
USER MANUAL
A3
ReadyClean

EN
FR
P03
P26
3
EN
CONTENTSCONTENTS
PRODUCT SAFETY ············································································ P04
TECHNICAL SPECIFICATIONS ··························································· P09
ABOUT YOUR ReadyClean A3 ROBOTIC MOP ································· P10
ABOUT YOUR DOCKING STATION ···················································· P11
GETTING TO KNOW YOUR ReadyClean A3 ····································· P12
TIPS BEFORE CLEANING ·································································· P13
GETTING STARTED ············································································ P14
DOWNLOADING THE APP ································································· P16
MAPPING YOUR HOME······································································· P17
START CLEANING ··············································································· P18
MAINTENANCE ··················································································· P21
TROUBLESHOOTING ·········································································· P24
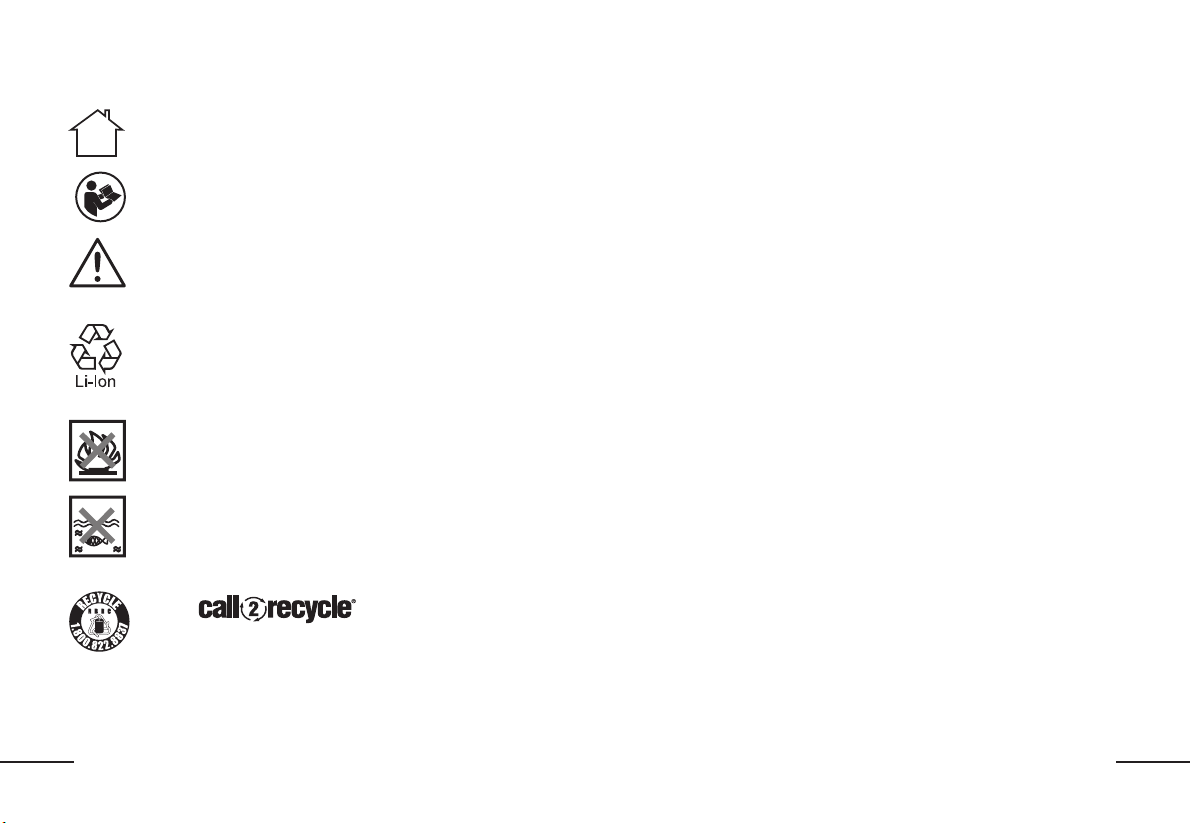
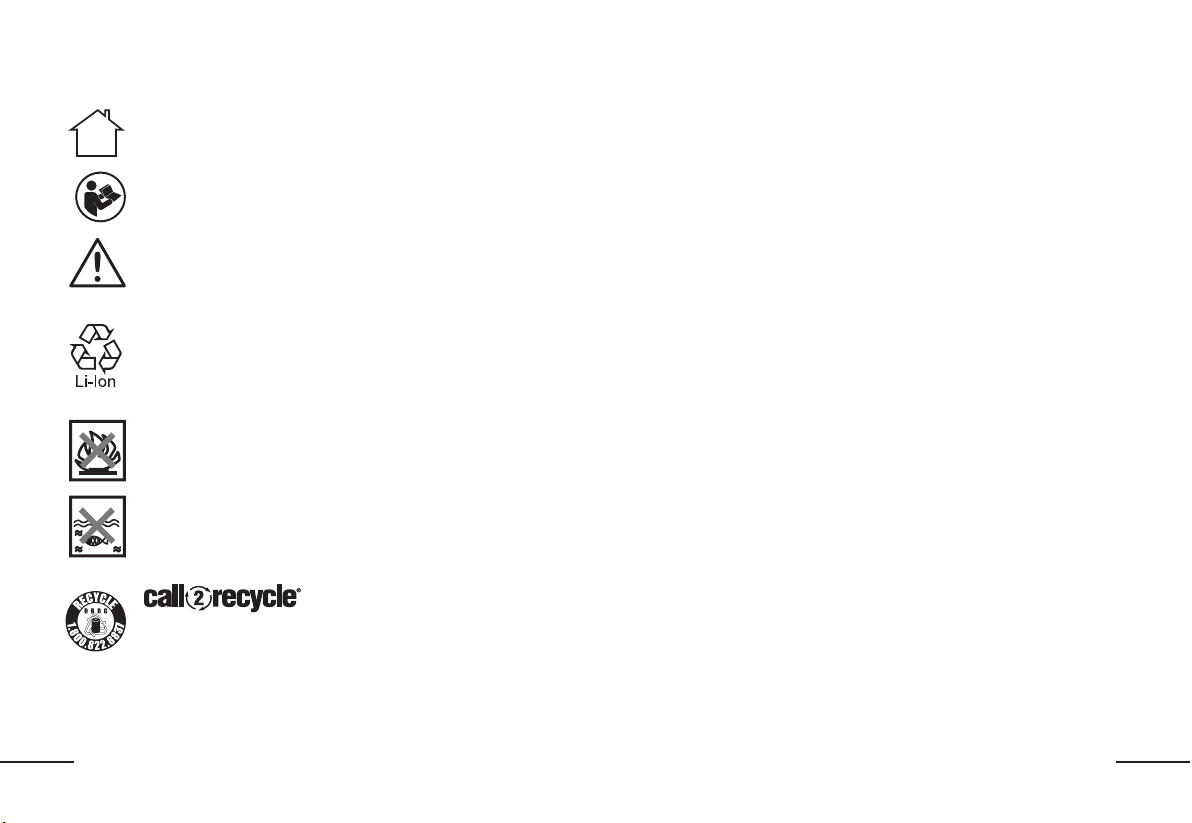
SYMBOLSSYMBOLS
For indoor use only
To reduce the risk of injury, user must read instruction
manual
Caution
Li-Ion battery, battery must be recycled
Do not burn
Batteries may enter water cycle if disposed improperly,
which can be hazardous for ecosystem. Do not dispose
of waste batteries as unsorted municipal waste.
For specific battery disposal instructions please
contact Call2Recycle at 1-800-822-8837 or visit www.
call2recycle.org.
4
EN
PRODUCT SAFETYPRODUCT SAFETY
WARNING: This product can expose you to chemicals including lead and
Di(2-ethylhexyl)phthalate (DEHP) which are known to the State of California to
cause cancer and birth defects or other reproductive harm. For more information go to
www.P65Warnings.ca.gov.
MOPPING CLEANER SAFETY WARNINGSMOPPING CLEANER SAFETY WARNINGS
IMPORTANT SAFETY IMPORTANT SAFETY
INSTRUCTIONS INSTRUCTIONS
When using an electrical appliance, basic precautions should always be
followed, including the following:
READ ALL INSTRUCTIONS READ ALL INSTRUCTIONS
BEFORE USING THIS BEFORE USING THIS
APPLIANCE APPLIANCE
Failure to follow the warnings and instructions may result in electric shock,
fire and/or serious injury.
WARNING WARNING – To reduce the risk of fire, electric shock, or
injury:
1. Unplug from outlet when not in use and before servicing.
2. To Reduce The Risk Of Electric Shock – Do not use outdoors or on
wet surfaces.
3. Do not allow to be used as a toy. Close attention is necessary when
used by or near children.
4. Use only as described in this manual. Use only manufacture’s
recommended attachments.
5. Do not use with damaged cord or plug. If appliance is not working
as it should, has been dropped, damaged, left outdoors, or
dropped into water, return it to a service center.
6. Do not pull or carry by cord, use cord as a handle, close a door
on cord, or pull cord around sharp edges or corners. Do not run
appliance over cord. Keep cord away from heated surfaces.
7. Do not unplug by pulling on cord. To unplug, grasp the adaptor, not
the cord.
8. Keep hair, loose clothing, fingers, and all parts of body away from
openings and moving parts.
9. Do not charge the unit outdoors.
10. Use only the charger supplied by the manufacturer to recharge.
11. Do not incinerate the appliance even if it is severely damaged. The
batteries can explode in a fire.
12. Do not put any object into openings. Do not use with any opening
blocked; keep free of dust, lint, hair, and anything that may reduce
air flow.
13. Do not handle charger, including charger plug, charger terminals
and appliance with wet hands.
14. Turn off all controls before unplugging.
15. Do not use to sweep flammable or combustible liquids, such as
gasoline, or use in areas where they may be present.
16. To Reduce the Risk of Fire, do not use a flammable or combustible
liquid to clean a floor
17. Do not unplug by pulling on cord. To unplug, grasp the charger, not
the cord.

5
EN
FOR ALL BATTERY – OPERATED FOR ALL BATTERY – OPERATED
APPLIANCES:APPLIANCES:
1. Prevent unintentional starting. Ensure the switch is in the off-position
before connecting to battery pack, picking up or carrying the appliance.
Carrying the appliance with your finger on the switch or energizing
appliance that have the switch on invites accidents.
2. Recharge only with the charger specified by the manufacturer .A charger
that is suitable for one type of battery pack may create a risk of fire when
used with another battery pack.
3. Use appliances only with specifically designated battery packs. Use of any
other battery packs may create a risk of injury and fire.
4. When battery pack is not in use, keep it away from other metal objects,
like paper clips, coins, keys, nails, screws or other small metal objects, that
can make a connection from one terminal to another. Shorting the battery
terminals together may cause burns or a fire.
5. Under abusive conditions, liquid may be ejected from the battery; avoid
contact. If contact accidentally occurs, flush with water. If liquid contacts
eyes, additionally seek medical help. Liquid ejected from the battery may
cause irritation or burns.
6. Do not use a battery pack or appliance that is damaged or modified.
Damaged or modified batteries may exhibit unpredictable behavior
resulting in fire, explosion or risk of injury.
7. Do not expose a battery pack or appliance to fire or excessive temperature.
Exposure to fire or temperature above 130°C may cause explosion.
8. Follow all charging instructions and do not charge the battery pack or
appliance outside of the temperature range specified in the instructions.
Charging improperly or at temperatures outside of the specified range may
damage the battery and increase the risk of fire.
9. Have servicing performed by a qualified repair person using only identical
replacement parts. This will ensure that the safety of the product is
maintained.
10. Do not modify or attempt to repair the appliance or the battery pack (as
applicable) except as indicated in the instructions for use and care.
SAFETY WARNINGS FOR BATTERY PACK SAFETY WARNINGS FOR BATTERY PACK
INSIDE THE TOOL INSIDE THE TOOL
a) Do not dismantle, open or shred battery pack.
b) Do not expose battery pack to heat or fire. Avoid storage in direct sunlight.
c) Do not short-circuit a battery pack. Do not store battery packs
haphazardly in a box or drawer where they may short-circuit each other or
be short-circuited by other metal objects. When battery pack is not in use,
keep it away from other metal objects, like paper clips, coins, keys, nails,
screws or other small metal objects, that can make a connection from one
terminal to another. Shorting the battery terminals together may cause
burns or fire.
d) Do not subject battery pack to mechanical shock.
e) In the event of battery leaking, do not allow the liquid to come in contact
with the skin or eyes. If contact has been made, wash the affected area
with copious amounts of water and seek medical advice.
f) Do not use any battery pack which is not designed for use with the
equipment.
g) Keep battery pack out of the reach of children.
h) Always purchase the battery pack recommended by the device
manufacturer for the equipment.
i) Keep battery pack clean and dry.
j) Wipe the charging terminals with a clean dry cloth if they become dirty.
k) Battery pack need to be charged before use. Always use the correct
charger and refer to the manufacturer’s instructions or equipment
manual for proper charging instructions.
l) Do not leave battery pack on prolonged charge when not in use.
m) After extended periods of storage, it may be necessary to charge
and discharge the battery pack several times to obtain maximum
performance.
n) Recharge only with the charger specified by BISSELL. Do not use any
charger other than that specifically provided for use with the equipment.
o) Retain the original product literature for future reference.
p) Use only the battery pack in the application for which it was intended.
q) Dispose of properly.

EN
r) Do not mix cells of different manufacture, capacity, size or type within a
device.
s) Keep the battery away from microwaves and high pressure.
SAVE THESE INSTRUCTIONSSAVE THESE INSTRUCTIONS
To satisfy FCC & IC RF exposure requirements, a separation distance
of 20cm (7.9in) or more should be maintained between the antenna of
this device and persons during device operation. To ensure compliance,
operations at closer than this distance is not recommended.
This device complies with Part 15 of the FCC Rules.
Operation is subject to the following two conditions:
(1) This device may not cause harmful interference, and
(2) This device must accept any interference received, including interference
that may cause undesired operation.
Warning: Changes or modifications to this unit not expressly approved
by the party responsible for compliance could void the user’s authority to
operate the equipment.
NOTE: This equipment has been tested and found to comply with the limits
for a Class B digital device, pursuant to Part 15 of the FCC Rules.
These limits are designed to provide reasonable protection against harmful
interference in a residential installation. This equipment generates, uses
and can radiate radio frequency energy and, if not installed and used in
accordance with the instructions, may cause harmful interference to radio
communications.
However, there is no guarantee that interference will not occur in a particular
installation. If this equipment does cause harmful interference to radio or
television reception, which can be determined by turning the equipment off
and on, the user is encouraged to try to correct the interference by one or
more of the following measures:
· Reorient or relocate the receiving antenna.
· Increase the separation between the equipment and receiver.
· Connect the equipment into an outlet on a circuit different from that to
which the receiver is connected.
· Consult the dealer or an experienced radio/TV technician for help.
This device contains licence-exempt transmitter(s)/receiver(s) that comply
with Innovation, Science and Economic Development Canada’s licence-
exempt RSS(s). Operation is subject to the following two conditions:
(1) This device may not cause interference.
(2) This device must accept any interference, including interference that may
cause undesired operation of the device.
Limited by local law regulations, version for North America does not have
region selection option.
SAFETY PRECAUTIONS WHEN USING THIS SAFETY PRECAUTIONS WHEN USING THIS
PRODUCTPRODUCT
CAUTION: Remain alert and follow the procedure below: Please read this CAUTION: Remain alert and follow the procedure below: Please read this
manual carefully before using the product and keep it properly. The robot is manual carefully before using the product and keep it properly. The robot is
not a toy. Supervise children and pets when the robot is cleaning DO NOT place not a toy. Supervise children and pets when the robot is cleaning DO NOT place
anything on top of the unit. Take care when walking in work areas to avoid anything on top of the unit. Take care when walking in work areas to avoid
stepping on or tripping over the unit as it moves on its own. DO NOT operate stepping on or tripping over the unit as it moves on its own. DO NOT operate
unit on floors with exposed electrical outlets. DO NOT immerse robot in water unit on floors with exposed electrical outlets. DO NOT immerse robot in water
or other liquids.or other liquids.
1. Problems that may arise when the mopping robot sweeps the floor should
be solved as soon as possible. Please clean up power cords and small
objects on the floor so they will not block the path when mopping. Fold the
fringe underneath the carpet, and keep hanging curtains and tablecloths
away from the floor.
2. In an environment that has stairs or drop-offs, please test the product
first to check if it can detect ledges. Consider blocking off stairs or edges
of drop-offs with a protective fence to prevent the product from falling. It
should be ensured that the protective device will not cause personal injury
such as by tripping.
3. Please use the product by following the instructions in the manual. Only

7
EN
use accessories recommended or sold by the manufacturer.
4. Ensure that the supply voltage matches the voltage rating shown on the
charging stand.
5. If the power cord is damaged, it must be replaced by the manufacturer, its
service agent or similarly qualified persons in order to avoid a hazard.
6. Please turn off the product before cleaning and maintaining the product.
7. Always pull the plug from the power socket before cleaning and
maintaining the product.
8. Before discarding the product, please remove it from
the charging stand, turn off the power switch, and
remove the battery.
9. If the product will not be used for a long time, please disconnect the
product from the power supply.
10. Before discarding the product, the product battery must be removed and
discarded in accordance with local laws and regulations.
11. The used battery must be discarded in accordance with local laws and
regulations.
12. This appliance is not intended for use by persons (including children) with
reduced physical, sensory or mental capabilities, or lack of experience
and knowledge, unless they have been given supervision or instruction
concerning use of the appliance by a person responsible for their safety.
13. Use the product only in an indoor home environment. Do not use the
product in outdoor, commercial, or industrial places.
14. Do not use the product with a damaged power cord or power socket. Do
not continue to use the product when the product cannot work properly
due to falling, damage, outdoor use or water ingress. The product should
be repaired by the manufacturer or its after-sales service in order to avoid
accidental injury.
15. Please use the product by following the instructions in the manual. Our
company is not responsible for any loss and damage caused by improper
use.
WARNINGWARNING
16. Only use the original charging stand provided by the manufacturer. Users
shall not replace the battery by themselves. If the battery is suspected
to be damaged, please contact the manufacturer, authorized dealer or
similarly qualified persons to replace it.
17. The product should not be used in an environment with open flames or
fragile objects.
18. The product should not be used in an overly hot (above 40
0
C) or overly cold
(below 0
0
C) environment.
19. Do not allow hair, clothes, fingers, or any other parts of human body to be
close to the opening and operating parts of the product.
20. The product should not be used on wet or watery ground.
21. The product should not mop any flammable materials such as gasoline
or toner powder for printers and photocopiers. The product should not be
used for cleaning areas with flammable materials.
22. The product should not vacuum any burning items, such as cigarettes,
matches, ashes and other items that may cause a fire.
23. Use the power cord carefully to avoid damage. It is forbidden to use the
power cord to drag or lift the product and its charging stand. It is forbidden
to use the power cord as a handle. It is forbidden to run the power cord
through a door gap. It is forbidden to pull the power cord around a sharp
corner or edge. Do not operate the product over a power cord. Keep the
power cord away from heat sources.
24. It is forbidden to use the damaged charging stand. If the charging stand is
damaged, it must be repaired or replaced by the manufacturer, authorized
dealer or similarly qualified persons in order to avoid a hazard.
25. It is prohibited to burn the product even if it is severely damaged. The
product battery may cause an explosion.

8
EN
INSTRUCTIONS FOR DISCARDING BATTERYINSTRUCTIONS FOR DISCARDING BATTERY
If you want to discard the battery contained in this machine, please do not discard it along with household garbage. Instead, hand it over to the nearest used battery
recycling station or after-sales service center for centralized disposal.
The following instructions are not for general users, but are to be used as the disposal instructions for the final battery disposer.
The chemical substances contained in the batteries of this machine will pollute the environment if handled improperly. Before discarding the robot, please be sure to
take out the battery from the robot body in advance. The battery should be handed over to a special battery collection point for centralized disposal.
Be careful! Leakage of the battery can cause human injury!
If the battery leaks, do not allow the leakage to come into contact with eyes or skin. In case of accidental contact, please thoroughly wash your hands and eyes with
clean water immediately. If you still feel uncomfortable, consult a doctor immediately.

9
EN
TECHNICAL SPECIFICATIONSTECHNICAL SPECIFICATIONS
ReadyClean A3
Dimension
264 x 263 x 95mm (10.4 x 10.4 x 3.7in)
Weight
3kg (6.6lbs)
Battery capacity
Li Battery 2600mAh
Rated voltage
14.4V
Rated power
8.4W
Docking Station
Dimension 320 x 300 x 256mm (12.6 x 11.8 x 10.1in)
Weight 3.5kg (7.7lbs)
Adaptor model AD-0121900060US
Adaptor input 100-240V~50-60Hz 0.5A
Rated input 19V
Rated output
19V
0.6A
Rated power 11.4W
* Actual product may vary due to the continuous product enhancement. Our company reserves the right to make improvement to the product at any time. For
household use only.
FOR BATTERY TOOLSFOR BATTERY TOOLS
The ambient temperature range for the use and storage of tool and battery is 0
℃
-45
℃
(32
℉
-113
℉
).
The recommended ambient temperature range for the charging system during charging is 4
℃
-40
℃
(39
℉
-104
℉
).
CUSTOMER SERVICECUSTOMER SERVICE
Any questions or concerns please visit support.BISSELL.com
10
EN
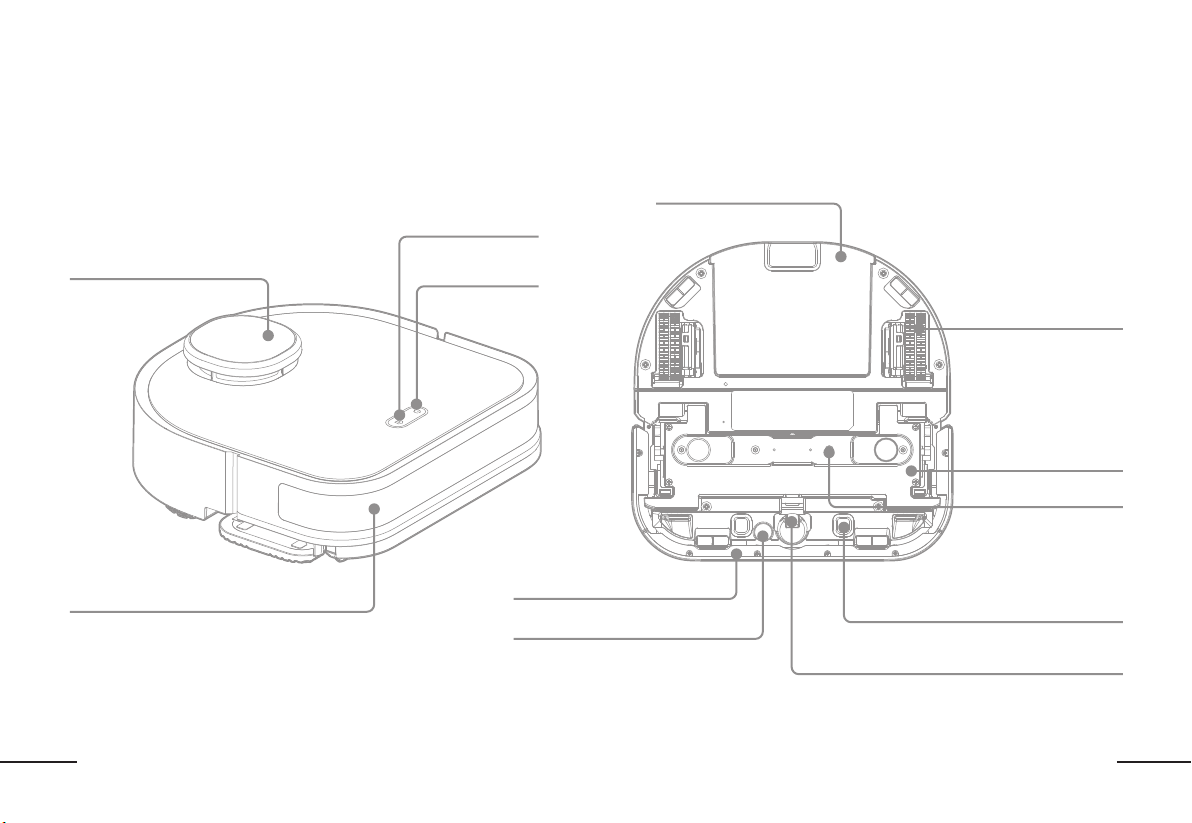
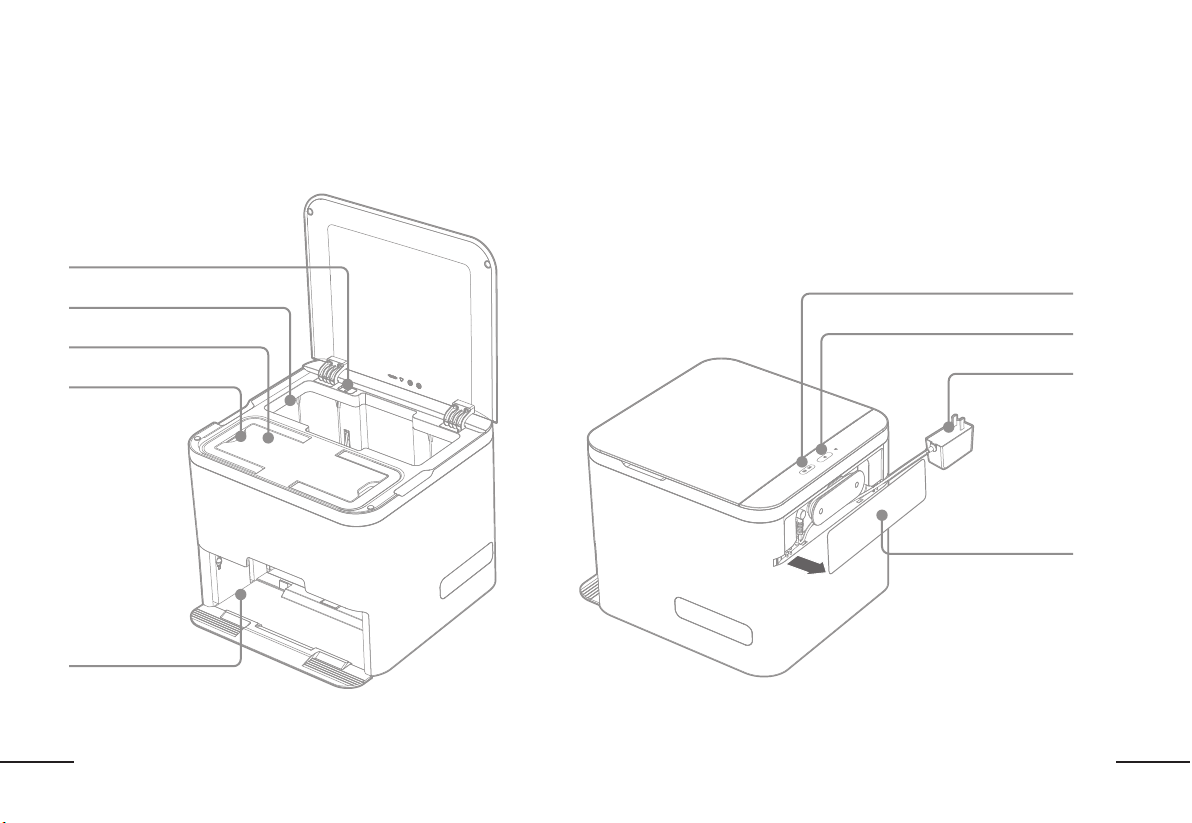
ABOUT YOUR ReadyClean A3 ROBOTIC MOPABOUT YOUR ReadyClean A3 ROBOTIC MOP
TOP VIEWTOP VIEW BOTTOM VIEWBOTTOM VIEW
LASER DISTANCE SENSOR (LDS)
POWER BUTTON
HOME BUTTON
CARPET DETECTION SENSOR
REMOVABLE WATER TANK
CHARGING SENSOR
CASTER WHEEL
DRIVE WHEELS
WATER OUTLET
BUMPER
BUMPER
MAGNETIC CLEANING
PAD BRACKET

11
EN
ABOUT YOUR DOCKING STATIONABOUT YOUR DOCKING STATION
FRONT VIEWFRONT VIEW BACK VIEWBACK VIEW
USED CLEANING PAD STORAGE
HANDLE
NEW CLEANING PAD STORAGE
CLEANING PAD
CHANGING AREA
COVER
POWER CORD
CHILD LOCK
CLEANING MODE SELECTION
START
12
EN
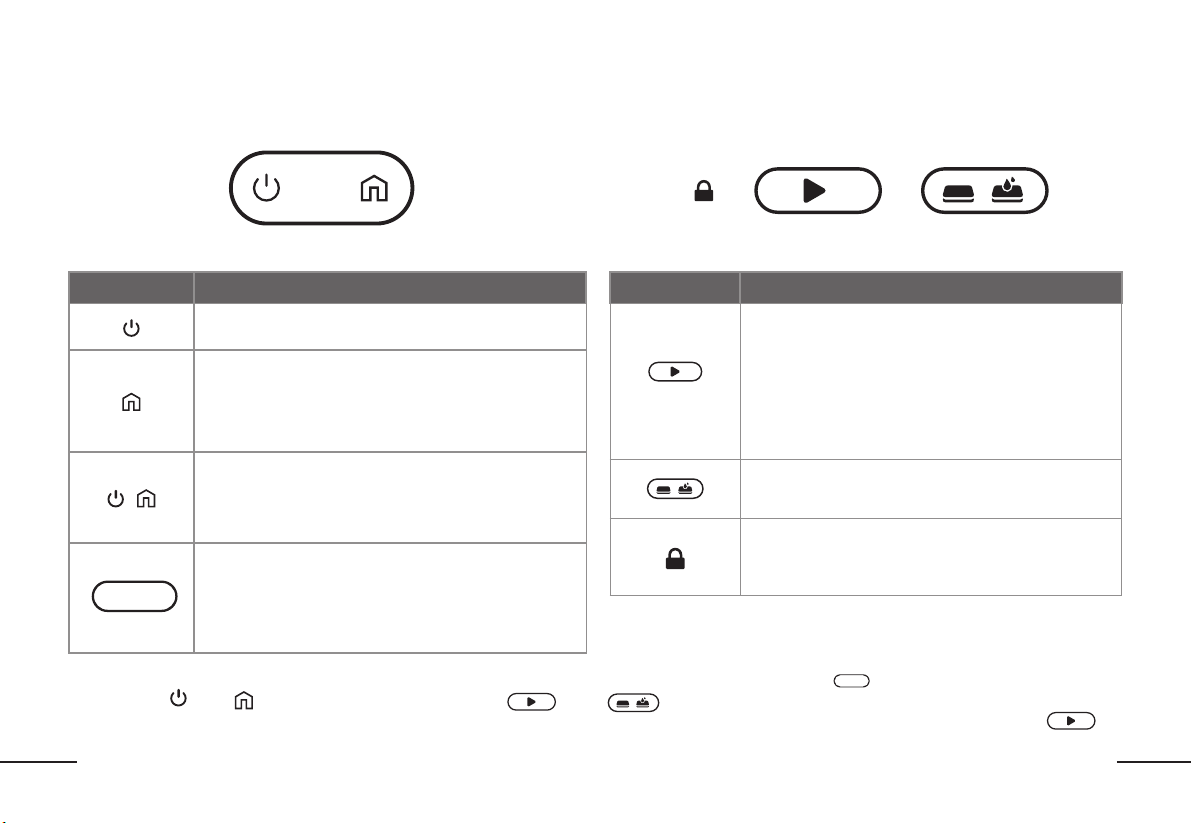
GETTING TO KNOW YOUR ReadyClean A3GETTING TO KNOW YOUR ReadyClean A3
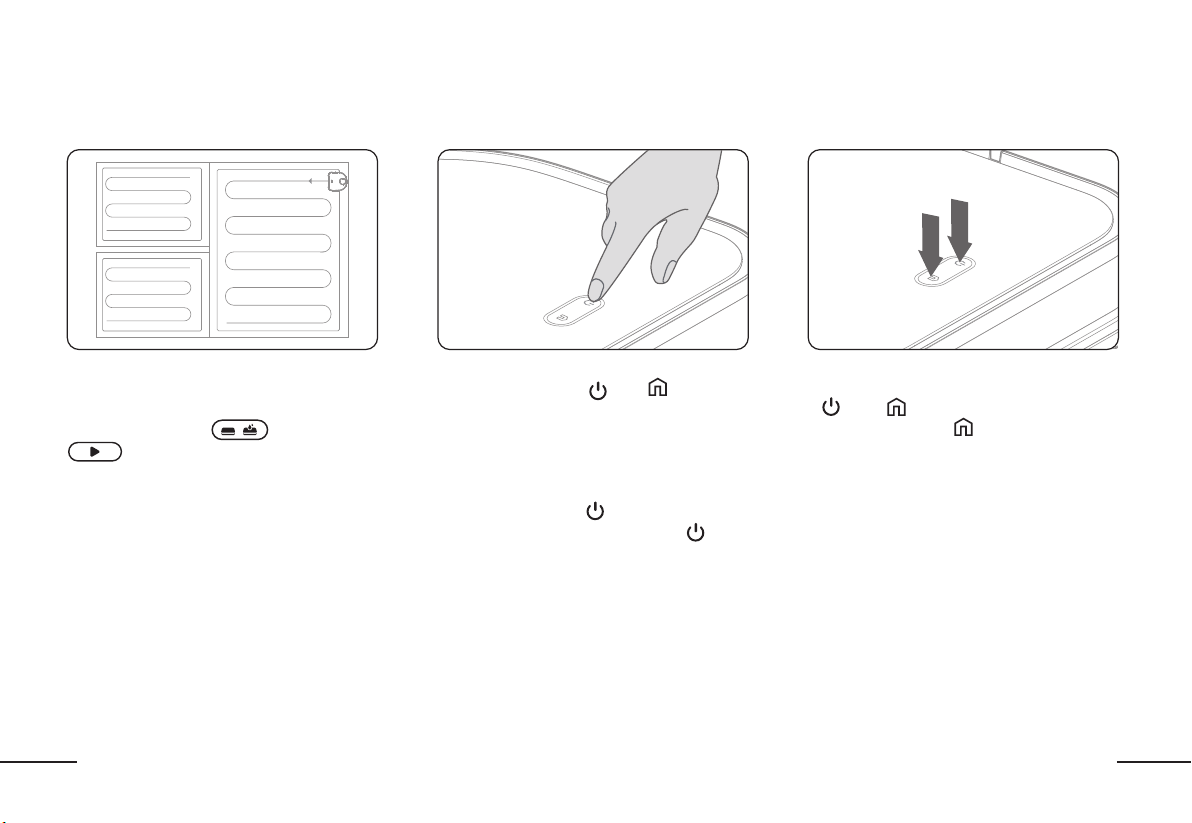
OPERATION PANEL FOR ReadyClean ROBOTIC MOP OPERATION PANEL FOR DOCKING STATION
CHILD LOCK START CLEANING MODE SELECTION
POWER BUTTON HOME BUTTON
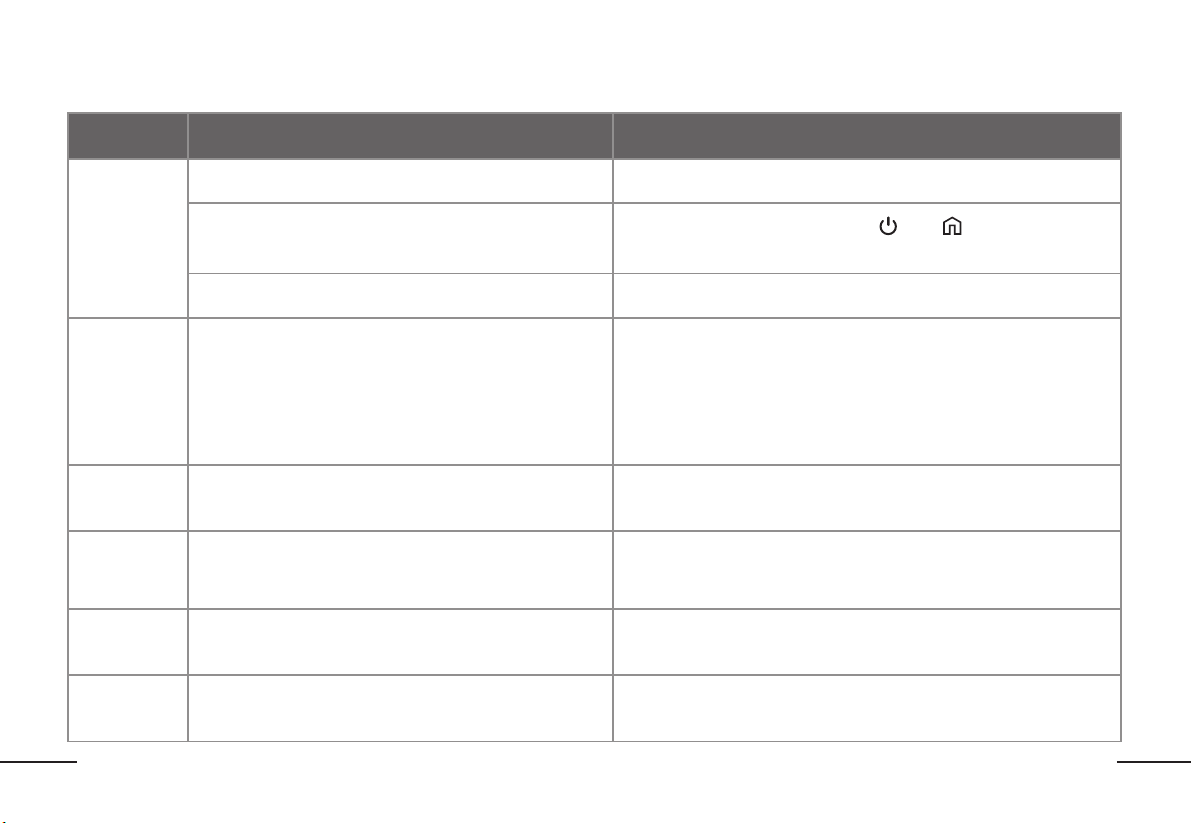
Button / Indicator Operation and function
Short press: the robot starts/pauses .
Long press for 3 seconds: turn on/off the robot.
Short press: Pause when the robot is cleaning.
Short press again: Send the robot home to recharge.
Long press for 3 seconds: Robot will start to spot clean.
(Note: Spot Clean is recommended for areas that have stains or
need extra cleaning attention.)
+
Short press: The robot will return home to replace the
cleaning pad.
Long press for 3 seconds: The robot enters pairing mode.
Long press for 8 seconds: Factory reset the robot.
Flashing White: Robot is charging or is in testing mode
Solid White: Robot is cleaning or in standby mode
Flashing Blue: Robot is in pairing mode
Flashing Red: Robot is experiencing an error
Solid Red: The battery is low (less than 15% battery remaining)
Button / Indicator Operation and function
When the robot is in the docking station:
Short Press: the robot will start cleaning.
Flashing White: the robot is home and charging
Solid White: the robot is home and fully charged
(NOTE: if the robot is not in the docking station, the buttons
on the docking station are not usable and will not light up.)
Short press: Switch between dry mopping mode,
wet mopping mode, and dry + wet mopping mode.
When the child lock is engaged, the buttons on the docking
station are locked and cannot be used. Unlock the child lock
in order to interact with the buttons on the docking station.
Energy-saving mode:Insert ReadyClean A3 into docking station and make sure that it is in charging mode("Energy-saving mode:Insert ReadyClean A3 into docking station and make sure that it is in charging mode(" " is in white flashing or white on)." is in white flashing or white on).
Then press “ Then press “ ”and “ ”and “ ” on ReadyClean A3 for 15s. When " ” on ReadyClean A3 for 15s. When " " and “ " and “ ”on docking station turn off, your ReadyClean A3 will enter into ”on docking station turn off, your ReadyClean A3 will enter into
Energy-saving mode. If you need quite Energy-saving mode. At first, pull out ReadyClean A3 from the docking station, then press and hold “Energy-saving mode. If you need quite Energy-saving mode. At first, pull out ReadyClean A3 from the docking station, then press and hold “
“for 3s to turn on the robot “for 3s to turn on the robot ..The mode is applied to DOE / UEC testing.The mode is applied to DOE / UEC testing.

13
EN
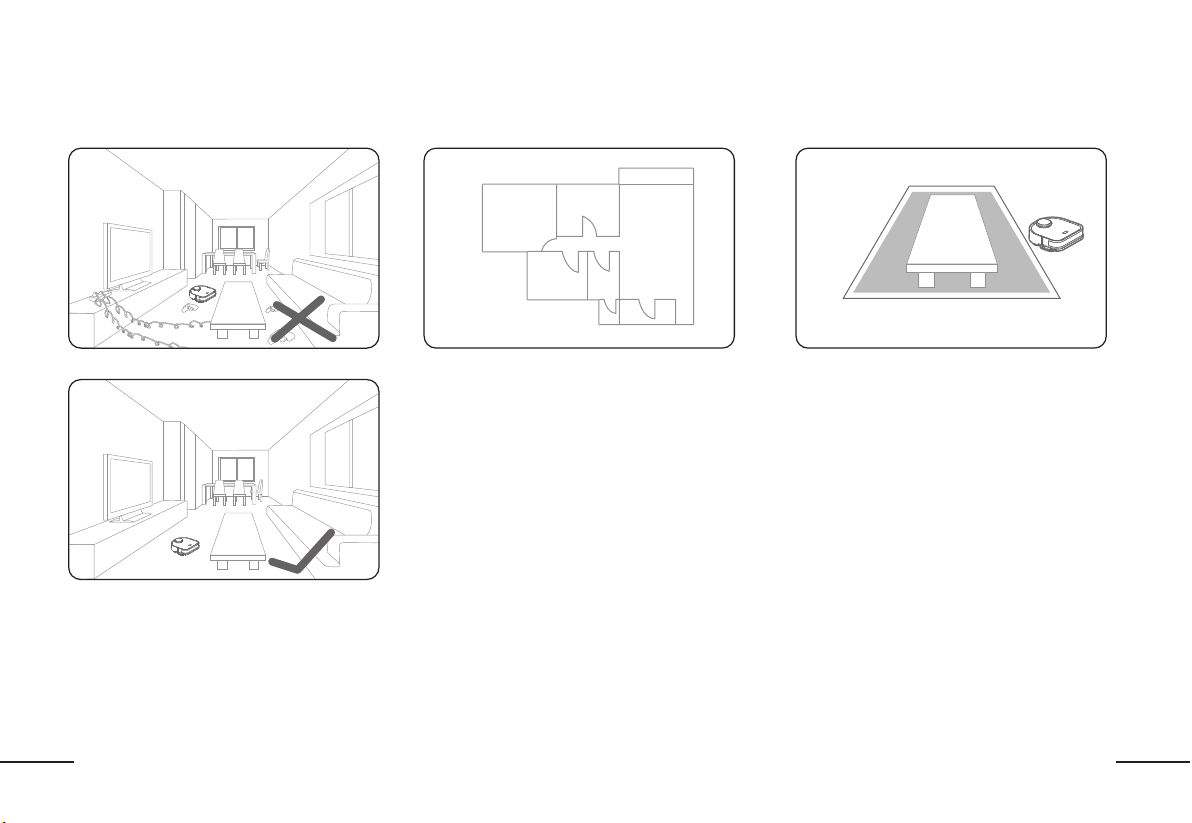
Open doors for an accurate floorplan mapOpen doors for an accurate floorplan map
In order to create the most accurate map of your
home, ensure the robot has access to all the
areas you would like it to clean. Open doors and
remove any barriers to allow the robot to explore
and map freely.
Create Virtual BoundariesCreate Virtual Boundaries
After mapping your floor plan, create virtual "no-go"
areas via the ReadyClean APP by BISSELL to limit
areas/rooms that you do not want the robot to clean
and ensure that the robot runs smoothly.
TIPS BEFORE CLEANINGTIPS BEFORE CLEANING
Organize the space to be cleanedOrganize the space to be cleaned
For optimal performance, pick up any toys, cords,
valuables, etc. that could hinder the robot mop
from cleaning.
(Note: Ensure that there is no object with a strong
reflective surface (ex: mirror) within 10cm/3.5
inches on the ground as it will confuse the robots
navigation lasers.)
14
EN
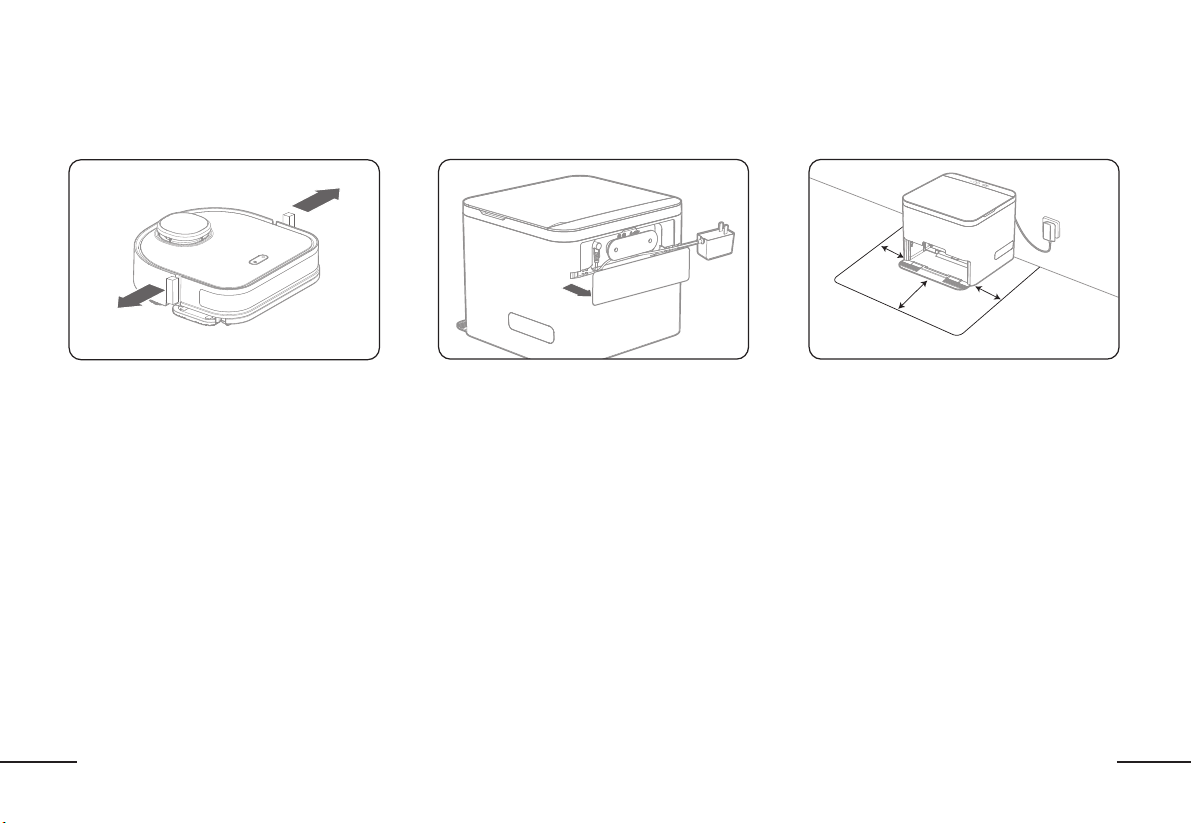
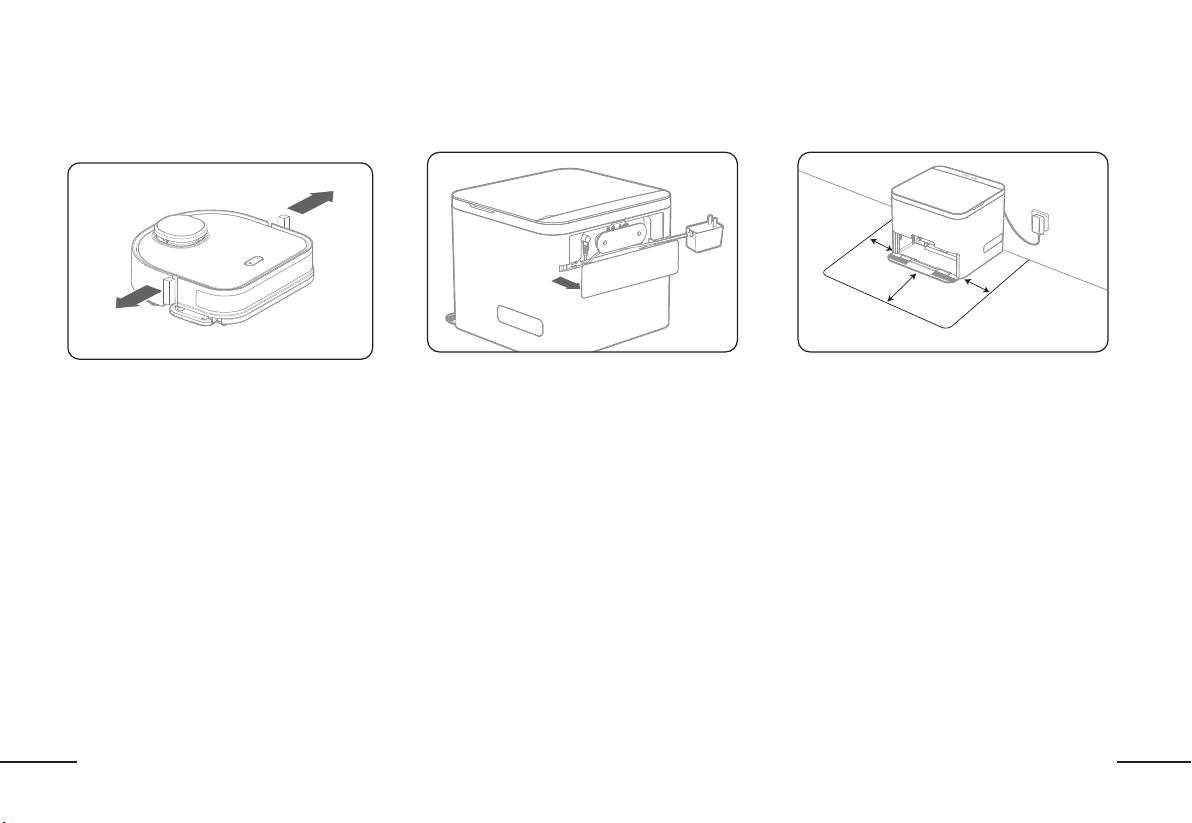
GETTING STARTEDGETTING STARTED
Remove all protective packaging materialsRemove all protective packaging materials
Remove all protective foam and labels from
the robot.
Place the docking stationPlace the docking station Docking station locationDocking station location
Remove the cover on the back of the docking
station to plug in the AC adapter to the docking
station and a wall outlet.
For best performance, place the docking
station against a wall leaving at least 2.3 ft
(70cm) on each side and at least 5ft (150cm)
in front.
1.5m(5’)
0.7m
(2.3’)
0.7m
(2.3’)
15
EN
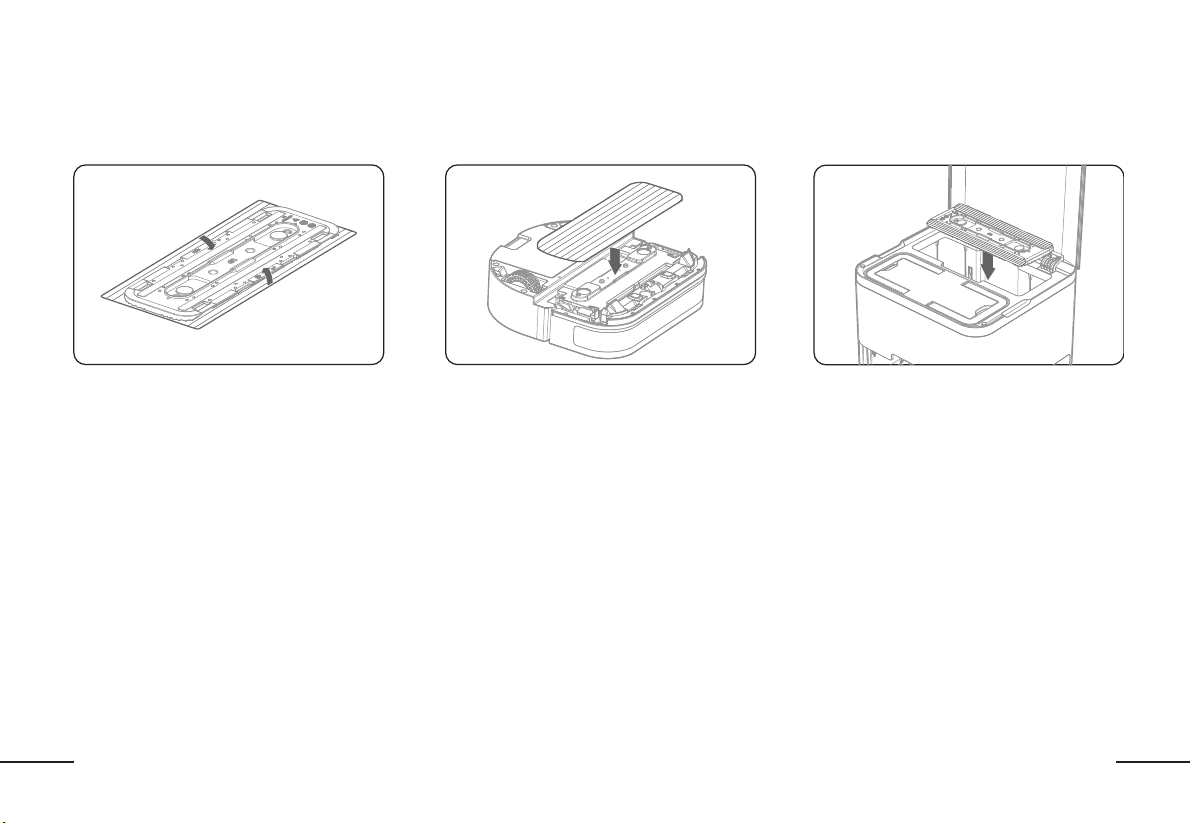
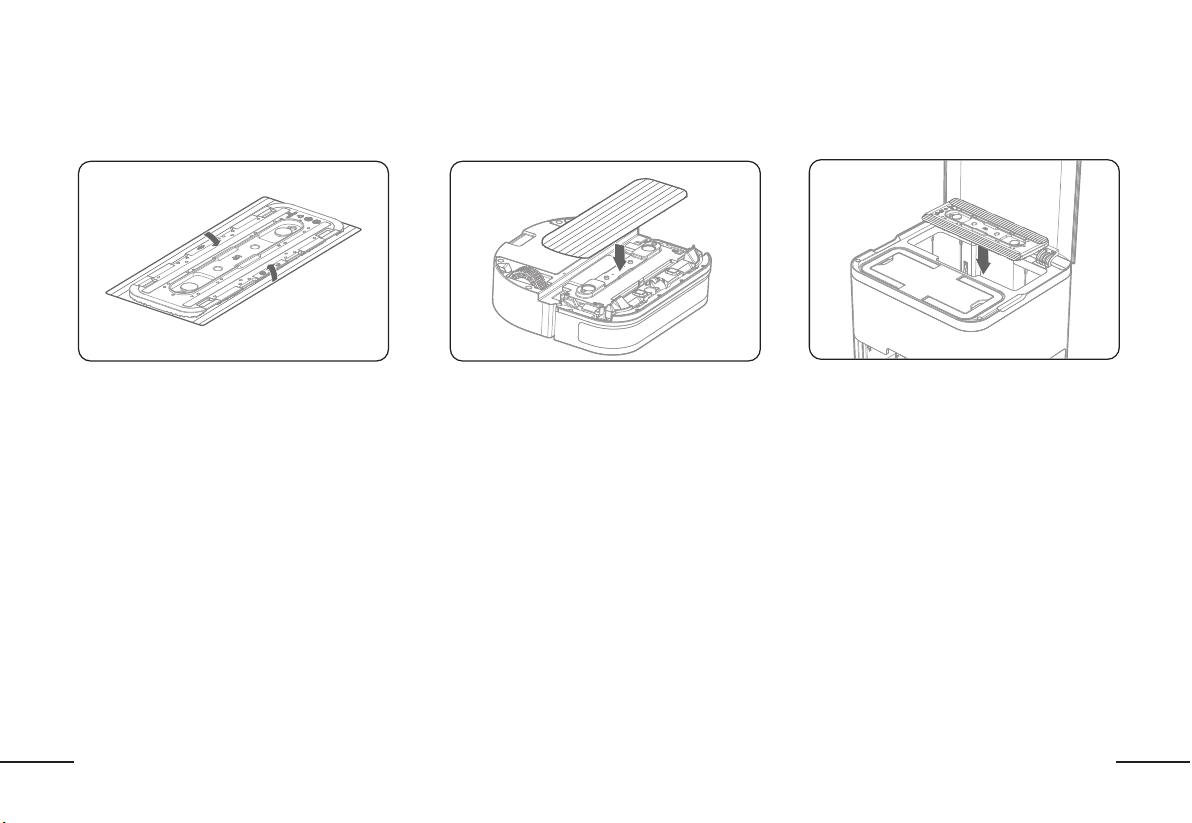
Wrap a new cleaning pad around the rubber mop
pad base, folding the pad firmly around the sides
of the base.
Assemble all mop pads in order to utilize the auto
change docking station.
Gently flip the robot over and align an assembled
cleaning pad onto the magnetic mop bracket.
Press firmly to ensure correct installation.
NOTE: It is a magnetic connection so you will
NOT hear or feel a firm "click". You will know it's
installed correctly if the pad does not fall off when
you flip the robot back over.
Assemble the cleaning padsAssemble the cleaning pads Install the cleaning padInstall the cleaning pad
Insert the cleaning padsInsert the cleaning pads
GETTING STARTEDGETTING STARTED
Open the lid of the docking station and place the
remaining assembled cleaning pads in the clean
pad storage box.

16
EN
GETTING STARTEDGETTING STARTED
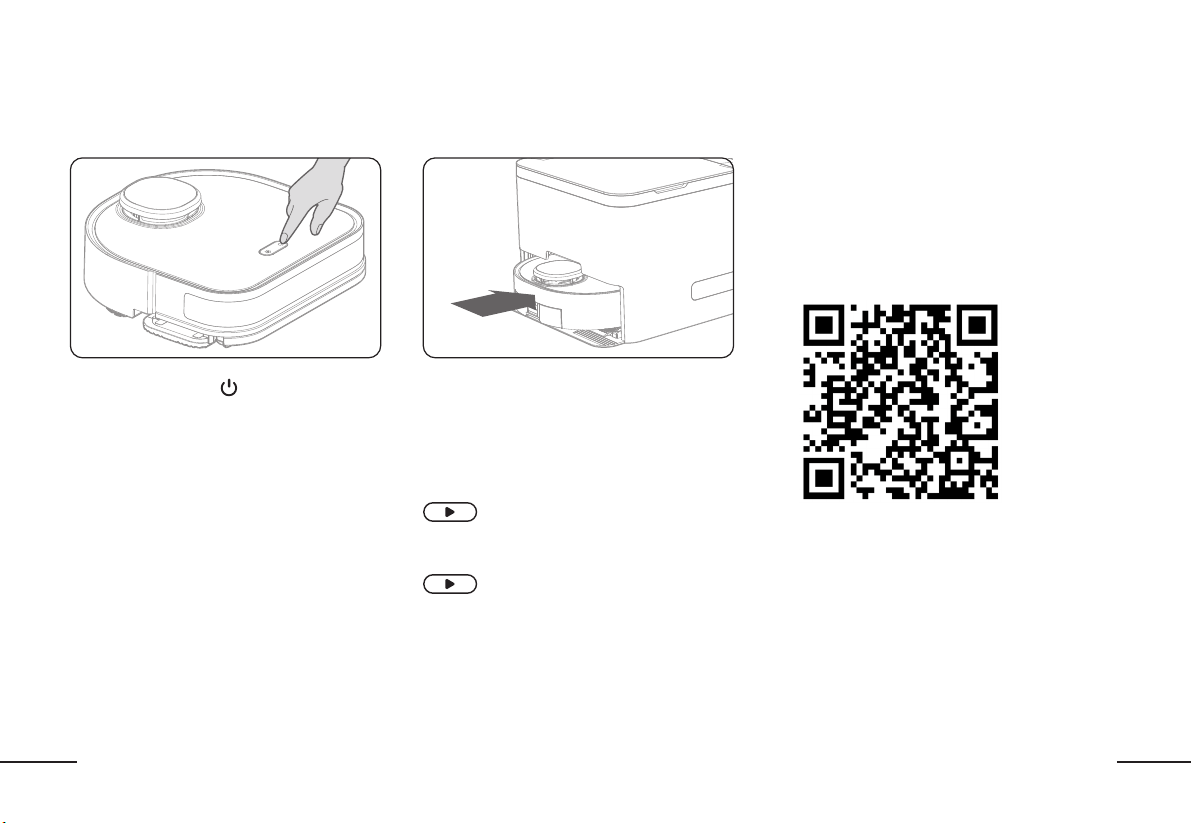
DOWNLOAD THE APPDOWNLOAD THE APP
Power on the ReadyClean A3
Long press “ ” for 3 seconds to turn on the robot.
You will hear startup music to indicate success.
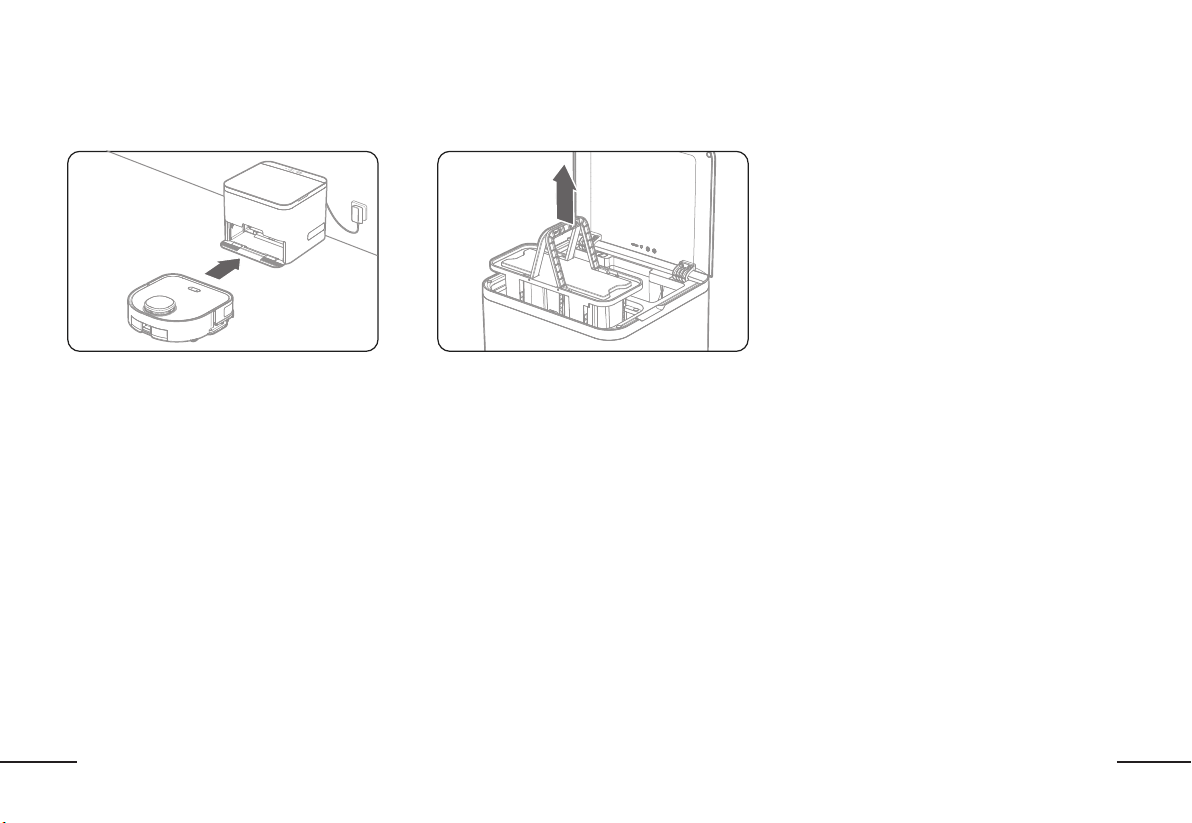
Charging
Manually push the robot into the docking station
to charge. Ensure you push the robot to the back
of the docking station to engage the charging
connectors.
Note: It is recommended you fully charge the
robot before first use.
Light on top of the docking station
flashes white while charging
Light on docking station is solid white
when charging is complete
For best experience, download the ReadyClean
APP by BISSELL to customize your cleaning, set a
schedule and access even more features.
Scan the QR code below or visit your mobile
application store to download the
"ReadyClean APP by BISSELL"

17
EN
MAPPING YOUR HOMEMAPPING YOUR HOME
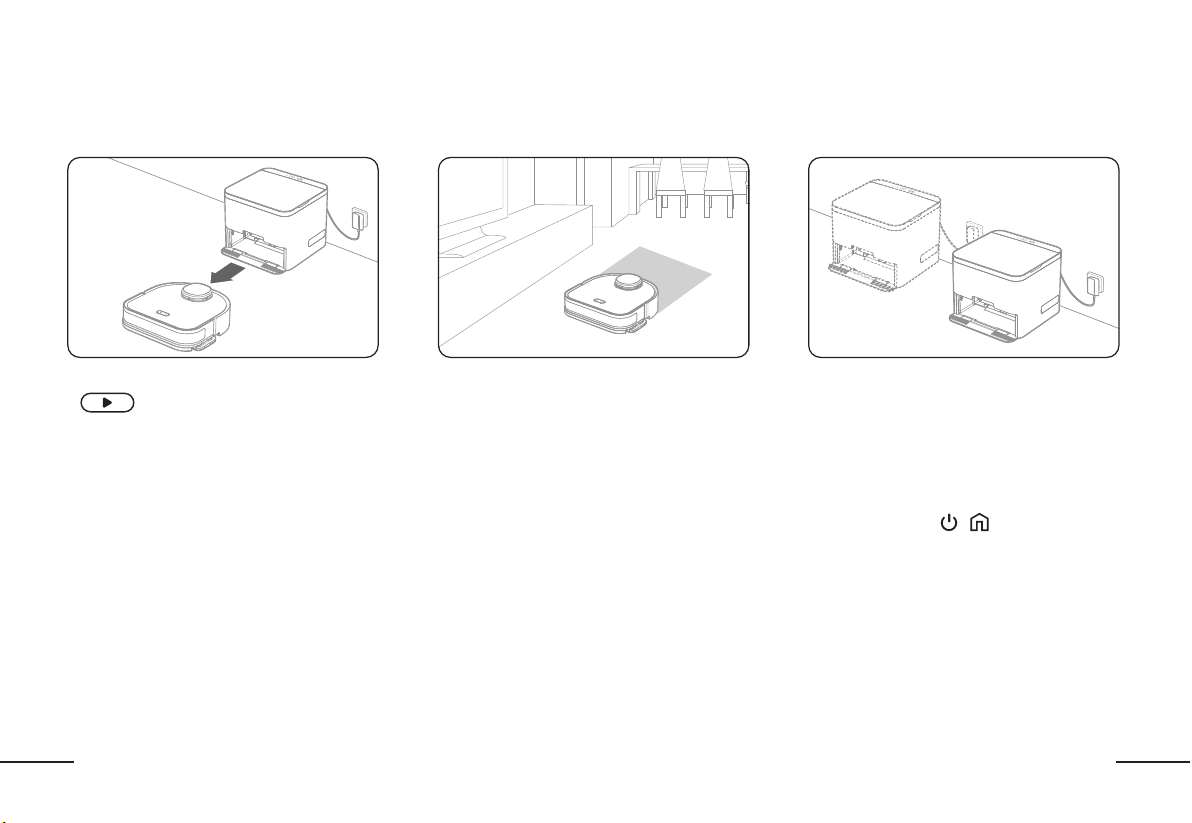
First Use: Creating the mapFirst Use: Creating the map
After the robot is fully charged, short press
" " on the docking station. The robot
will leave the docking station and begin
exploring your home and building a map of
your floor plan.
Note: The robot is NOT cleaning while building
the map. The cleaning pad will be lifted up as
it explores your home.
Tips while mappingTips while mapping
Do not follow or stand in the way of the robot as
it is mapping. This can cause missing spots or
errors in your floor plan map.
Open doors and remove obstacles to ensure
the most accurate and complete map.
The robot will continue to optimize and adjust
the map each time it goes out to clean.
Download the ReadyClean APP by BISSELL to see
your completed map and interact with your floor
plan (mark areas as off limits, set pad changing
by room or area cleaned, etc.)
Do not move the Docking StationDo not move the Docking Station
Do not move the docking station unless
necessary. Moving the docking station will
require you to remap your floor plan.
Remap as the following steps
1) Long press " + "for 8 seconds: Factory
reset the robot.
2) Follow the step"First Use: Creating the
map"to remap
18
EN
START CLEANINGSTART CLEANING
Start CleaningStart Cleaning
After the robot has mapped your floor plan,
it is ready to clean! After recharging from its
mapping journey, select the cleaning mode
" " and press " " on top of
the docking station or through the ReadyClean
APP by BISSELL.
The robot will begin cleaning around the
perimeter of the room before settling into a
methodical back and forth pattern.
NOTE: Download the ReadyClean APP by
BISSELL to actively see where the robot has
already cleaned on your map.
PausePause
To pause the robot, short press either the “ ” or
“
” button directly on the robot or through the
ReadyClean APP by BISSELL.
If the robot is paused for more than 10 minutes,
it will enter sleep mode. Short press the “ ”
button to wake up the robot. Short press the “ ”
button a second time to restart the cleaning task.
Return to the Docking StationReturn to the Docking Station
Return to the docking station
Pause the robot by pressing the “ ” or “
”
button. Press the “ ” button to send the
robot back to the docking station to charge.
Note: When you manually send your robot home
during mid-cleaning, it will not automatically
change the cleaning pad.
1
2
19
EN
START CLEANINGSTART CLEANING
Your ReadyClean A3 has 3 cleaning mode options: dry mopping, wet mopping or dry + wet mopping. The mode can be selected on top of the docking station
or through the
ReadyClean APP by BISSELL
. Note: Dry + Wet Mopping mode: the robot will dry mop first, when finished, it will go back and wet mop. If the battery
depletes before the job is completed, the robot will return to the docking station to charge and will resume cleaning where it left off when it is fully charged.
1. Add water and cleaning solution1. Add water and cleaning solution
A. Remove the water tank by pressing the release
button on the back of the tank and pulling out.
B. Remove the rubber stopper and fill the water
tank with water. If desired, add a cap full of the
provided cleaning solution to the water tank.
NOTE: Do not fill the water tank with cleaning
solution alone as it will clog the water outlets.
C. Firmly press the rubber stopper back into the
water tank.
D. Slide the water tank back into the robot.

20
EN
START CLEANINGSTART CLEANING
The Auto Change PadThe Auto Change Pad
By default, the robot will automatically change
the cleaning pad after cleaning (20 m
2
).
Customize when the pad is changed in the
ReadyClean APP by BISSELL by sq. ft. cleaned
OR by room.
When the robot returns to the docking station,
it will drive into the docking station to drop
the dirty pad. The dirty pad will be lifted into
the used pad container, while a clean pad will
be dropped. The robot will drive back into the
docking station to pick up the clean pad to
finish cleaning or to charge.
Empty the Used Cleaning Pads Frequently Empty the Used Cleaning Pads Frequently
Remember to dispose of the dirty cleaning
pads that are collected in the used container.
Lift the lid of the docking station to access the
used pad container. Use the handles to lift the
dirty cleaning pads out of the docking station.
Dispose of the dirty pads (do not throw away
the rubber pad bases).
NOTE: if the used wet pads are not emptied
frequently, mold and mildew could accumulate
in the docking station.

21
EN
MAINTENANCEMAINTENANCE
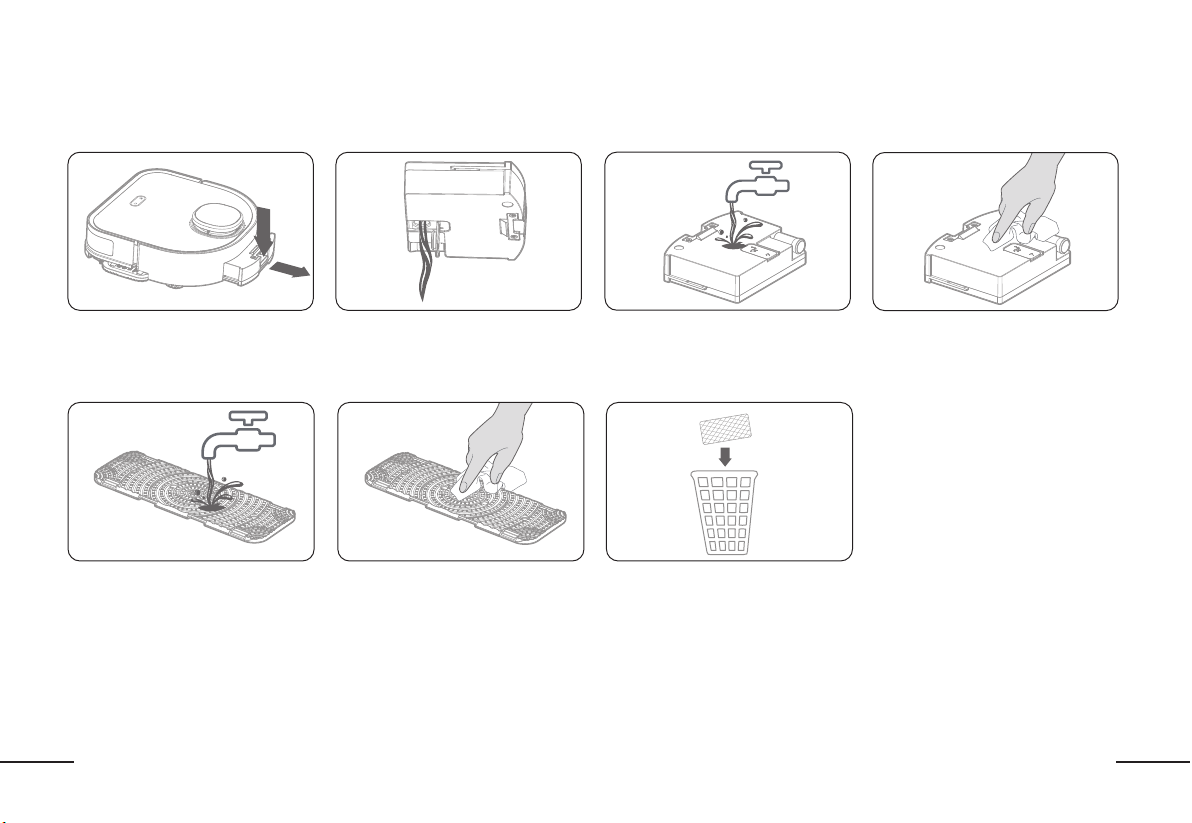
Clean the water tankClean the water tank
Remove the water tank by pressing the
release key
It is recommended that you rinse the
rubber base after disposing of the
dirty pad.
Empty the water tank
Dry the rubber base completely before
assembling clean pads
Flush the water tank
Dispose of the dirty disposable cleaning
pads ONLY. Do not throw away the
rubber base.
Wipe dry or air dry
Clean the rubber cleaning pad baseClean the rubber cleaning pad base
22
EN
MAINTENANCE: ROBOTIC MOPMAINTENANCE: ROBOTIC MOP
Bumper
Carpet Detection Sensor
Drive Wheels Cliff Sensors
Charging Sensors Caster Wheels
Laser Distance Sensor (LDS)
Magnetic Cleaning Pad Bracket
Use a dry, clean cloth to wipe all sensors and parts to keep the robot running at peak performance.
23
EN
MAINTENANCE: DOCKING STATIONMAINTENANCE: DOCKING STATION
Use a dry, clean cloth to clean the docking station. (NOTE: Use a dry cloth only. Do not use water to clean the docking station.)
Wipe the inside of the docking station Remove and dispose of all dirty
cleaning pads
Wipe the inside of the docking station
and charging sensors
24
EN
TROUBLESHOOTINGTROUBLESHOOTING
ErrorError Possible CausePossible Cause SolutionSolution
Cannot
Connect
To The
App
Mobile phone OS version is out of date Update your mobile phone under settings to the latest OS
The robot is not in pairing mode
Ensure the robot is on and then press “
” and “
“simultaneously
for 3 seconds until you hear voice confirmation
Cannot connect to Wi-Fi network Select your 2.4 GHz network only. The robot cannot connect to 5G
Failure to
Update
Firmware
Interrupted network connection or improper update
1. Keep the robot in the docking station and ensure the robot is connected
to the charging sensors.
2. During the update, do not remove the robot from the docking station
3. Keep your mobile device connected to your wi-fi network
4. Firmware updates can be found in the ReadyClean APP by BISSELL and
will take approximately 5-15 minutes to update
LiDAR Sensor
Error
The LiDAR sensor is blocked or stuck
Use a dry cloth to wipe the LiDAR sensor or remove any objects blocking
the sensor
Bumper Error
1. The bumper is stuck
2. The bumper is dirty
1. Inspect the bumper for any foreign objects. Ensure the bumper can
operate properly by being able to push it in and out
2. Wipe the bumper clean with a dry cloth
Cliff Sensor
Error
One or multiple cliff sensors are dirty or blocked Use a dry cloth to wipe clean all of the cliff sensors
Carpet
Detection
Sensor Error
The sensor is blocked or dirty
Use a dry cloth to wipe the sensor clean or remove any foreign objects
blocking the sensor
25
EN
ErrorError Possible CausePossible Cause SolutionSolution
Water Tank
Error
The water tank is not installed properly Please check the water tank to ensure that it is installed properly
Insufficient
Water. Please
Add Water
The water level is too low in the water tank Please refill the water tank and reinstall it into the robot
Drive Wheel
Error
One or multiple drive wheels is stuck or dirty
Inspect the drive wheels for any foreign objects and wipe clean
with a dry cloth
Charging Error
1. The docking station is not connected to the power supply
2. The docking station is dirty or blocked
1. Ensure that the Docking Station is properly connected to the
power supply
2. Use a dry cloth to wipe the docking station or remove any foreign
objects blocking the docking station
Docking Station
Error
The lifting mechanism of the docking station is stuck
1. Check for any objects that could be blocking the lifting mechanism
2. Unplug and then reconnect the power cord to reset the docking station
Please add
clean pads
There are no clean mop pads in the docking station
Add more clean mop pads to the clean pad storage box in the docking
station
Used Cleaning
Pad Storage
Error
The docking station is missing the used cleaning pad storage
box or it is installed incorrectly
Install the used mop pad storage box
Immobilized
Error
The robot is suspended off the ground or stuck Place the robot on level ground
TROUBLESHOOTINGTROUBLESHOOTING
For additional troubleshooting please visit support.BISSELL.com
A3
Manuel de l’utilisateur
ReadyClean
27
FR
CONTENUCONTENU
SÉCURITÉ DU PRODUIT..................................................................................................P27
SPÉCIFICATIONS TECHNIQUES...................................................................................P34
À PROPOS DE VOTRE SERPILLIÈRE ROBOTIQUE ReadyClean A3 .....................P35
À PROPOS DE VOTRE STATION D’ACCUEIL...............................................................P36
DÉCOUVRIR COTRE ReadyClean A3 ..........................................................................P37
CONSEILS AVANT DE NETTOYER ...............................................................................P38
COMMENCER ...................................................................................................................P39
TÉLÉCHARGER L’APPLICATION....................................................................................P41
FAIRE LE PLAN DE VOTRE MAISON............................................................................P42
COMMENCER À NETTOYER...........................................................................................P43
ENTRETIEN........................................................................................................................P46
RÉSOLUTION DE PROBLÈMES.....................................................................................P49
SYMBOLE SYMBOLE
Utilisation en intérieur uniquement
Pour réduire le risque de blessure, l’utilisateur doit lire le
mode d’emploi.
Attention
Batterie Li-Ion, la batterie doit être recyclée
Ne pas brûler
Les batteries pourraient être déversées dans les cours
d’eau si elles ne sont pas mises au rebut correctement,
ce qui pourrait causer un danger pour l’écosystème. Ne
jetez pas les piles dans les déchets municipaux non triés.
Pour des instructions spécifiques sur l’élimination de la
batterie, veuillez contacter Call2Recycle au 1-800-822-
8837 ou visiter www. call2recycle.org.

28
FR
SÉCURITÉ DU PRODUITSÉCURITÉ DU PRODUIT
AVERTISSEMENT : Ce produit peut vous exposer à des produits chimiques
incluant le plomb et le Di(2-éthylhexyle)phtalate (DEHP) connus dans l’État de la
Californie pour causer le cancer et des anomalies congénitales ou autres dommages à
l’appareil reproducteur. Pour de plus amples renseignements, consultez www.
P65Warnings.ca.gov.
AVERTISSEMENTS DE SÉCURITÉ SUR LES AVERTISSEMENTS DE SÉCURITÉ SUR LES
NETTOYANTS POUR LE PLANCHERNETTOYANTS POUR LE PLANCHER
INSTRUCTIONS DE SÉCURITÉ INSTRUCTIONS DE SÉCURITÉ
IMPORTANTES IMPORTANTES
Lorsque vous utilisez un appareil électronique, vous devriez toujours
prendre les précautions de base lorsque vous utilisez des appareils
électriques, incluant les suivantes :
LIRE TOUTES INSTRUCTIONS LIRE TOUTES INSTRUCTIONS
AVANT D’UTILISER CET AVANT D’UTILISER CET
APPAREILAPPAREIL
Ne pas suivre ces avertissements et instructions peut provoquer un risque
d’électrocution, d’un incendie et/ou de blessure grave.
AVERTISSEMENTAVERTISSEMENT – Pour réduire le risque
d’incendie, d’électrocution ou de blessure :
1. Ne laissez pas l’appareil sans surveillance lorsqu’il est branché.
Débranchez-le de la prise lorsque vous ne l’utilisez pas et avant
l’entretien.
2. Pour réduire le risque d’électrocution – ne pas utiliser à l’extérieur
ou sur une surface humide.
3. Ne pas utiliser comme un jouet. Une attention particulière est
nécessaire lorsqu’utilisé par ou à proximité d’enfants.
4. Utiliser seulement tel que décrit dans ce mode d’emploi. Utiliser
seulement les attachements recommandés du fabricant.
5. Ne pas utiliser avec une corde ou une prise endommagée. Si
l’appareil ne fonctionne pas comme il se doit, s’il est tombé, a
été endommagé, laissé à l’extérieur ou immergé dans l’eau, le
retourner à un centre de service.
6. Ne pas tirer ou porter par la corde, utiliser la corde comme
poignée, fermer une porte sur la corde ou tirer la corde le long
de rebords pointus ou de coins. Ne pas rouler un appareil sur la
corde. Garder la corde loin des surfaces chauffées.
7. Ne pas débrancher en tirant la corde. Pour débrancher, saisissez
l’adaptateur et non le cordon.
8. Garder les cheveux, les vêtements lâches, les doigts et toute
autre partie du corps loin des ouvertures et des pièces mobiles.
9. Ne pas charger l’appareil à l’extérieur.
10. Utiliser uniquement le chargeur fourni par le fabricant pour
recharger.
11. Ne pas incinérer l’appareil même s’il est gravement endommagé.
Les batteries peuvent exploser si elles sont exposées au feu.
12. Ne pas placer aucun objet dans les ouvertures. Ne pas utiliser si
une ouverture est bloquée; garder exempt de poussière, fibres,
cheveux et tout ce qui pourrait réduire le débit d’air.
13. Ne pas manipuler le chargeur, y compris la prise, les terminaux et
l’appareil avec des mains mouillées.

29
FR
14. Éteindre tous les contrôles avant de débrancher.
15. Ne pas utiliser sur des liquides inflammables et combustibles,
comme l’essence, ni dans des zones où ces liquides peuvent être
présents.
16. Pour réduire le risque d’incendie, ne pas utiliser un liquide
inflammable ou combustible pour nettoyer le plancher.
17. Ne débranchez pas en tirant sur le cordon. Pour débrancher,
saisissez le chargeur et non le cordon.
POUR TOUT APPAREIL À BATTERIE :POUR TOUT APPAREIL À BATTERIE :
1. Éviter de mettre en marche accidentellement. Assurer que l’interrupteur
est à la position éteint avant de connecter le bloc de batterie, ramasser
ou porter l’appareil. Porte l’appareil avec votre doigt sur l’interrupteur ou
ajouter du courant à un appareil avec l’interrupteur à la position allumé
attire les accidents.
2. Recharger seulement avec le chargeur spécifié par le fabricant. Un
chargeur qui est convenable pour un bloc de batterie pourrait engendrer
un risque d’incendie lorsqu’il est utilisé avec un autre bloc de batterie.
3. Utiliser les appareils seulement avec les blocs de batterie spécifiquement
désignés. L’utilisation de tout autre bloc de batterie peut engendrer un
risque de blessures et d’incendie.
4. Lorsque vous n’utilisez pas le bloc-pile, gardez-le à l’écart d’autres objets
en métal, tel que les trombones, les pièces de monnaie, les clés, les clous,
les vis ou autres petits objets en métal, qui peuvent établir une connexion
d’une borne à une autre. Court-circuiter les bornes de la pile ensemble
pourrait causer des brûlures ou un incendie.
5. Sous conditions abusives, un liquide peut être expulsé de la batterie; éviter
le contact avec ce liquide. Si le contact se produit accidentellement, rincer
avec de l’eau. Si le liquide entre en contact avec les yeux, consultez un
médecin aussi. Le liquide expulsé de la batterie peut causer une irritation
ou des brûlures.
6. Ne pas utiliser un bloc de batterie ou un appareil qui est endommagé
ou modifié. Les batteries endommagées ou modifiées peuvent être
imprévisibles et causer un incendie, une explosion ou présenter un risque
de blessure.
7. Ne pas exposer un bloc de batterie ou un appareil au feu ou à une
température excessive. L’exposition au feu ou à une température
supérieure à 130 °C peut causer une explosion.
8. Suivre toutes les instructions de chargement et ne pas charger le bloc de
batterie ou l’appareil à l’extérieur de la gamme de température spécifiée
dans les instructions. Charger incorrectement ou à une température à
l’extérieur de la gamme spécifiée pourrait endommager la batterie et
augmenter le risque d’incendie.
9. Faire effectuer l’entretien par une personne qualifiée pour la réparation qui
n’utilise que des pièces de remplacement identiques. Cela assurera que la
sûreté du produit est maintenue.
10. Ne pas modifier ou essayer de réparer l’appareil ou le bloc de batterie (tel
qu’applicable) sauf tel qu’indiquer dans les instructions pour l’utilisation et
l’entretien.
AVERTISSEMENTS DE SÉCURITÉ POUR LE AVERTISSEMENTS DE SÉCURITÉ POUR LE
BLOC DE BATTERIE DANS L’OUTILBLOC DE BATTERIE DANS L’OUTIL
a) Ne démontez pas, n’ouvrez pas ou ne détruisez pas le bloc-piles.
b) N’exposez pas le bloc-piles à de la chaleur ou une flamme. Évitez de le
ranger sous la lumière directe du soleil.
c) Ne court-circuitez pas le bloc-piles. Ne rangez pas le bloc-pile de façon
désordonnée dans une boîte ou un tiroir où ils pourraient causer des
courts-circuits ou il pourrait y avoir un court-circuit causé pas d’autres
objets en métal. Lorsque vous n’utilisez pas le bloc-pile, gardez-le à l’écart
d’autres objets en métal, tel que les trombones, les pièces de monnaie, les
clés, les clous, les vis ou autres petits objets en métal, qui peuvent établir
une connexion d’une borne à une autre. Court-circuiter les bornes de la
pile ensemble pourrait causer des brûlures ou un incendie.
d) Ne faites pas subir un choc mécanique au bloc-piles.
e) En cas d’une fuite de la pile, ne permettez pas au liquide d’entrer en
contact avec la peau ou les yeux. S’il y a contact, lavez la zone affectée

30
FR
avec beaucoup d’eau et consultez un médecin.
f) N’utilisez pas un bloc-pile qui n’est pas conçu à être utilisé avec
l’équipement.
g) Gardez le bloc-piles hors de la portée des enfants.
h) Achetez toujours le bloc-piles recommandé par le fabricant de l’appareil
pour l’équipement.
i) Gardez le bloc-piles propre et sec.
j) Essuyez les bornes des recharges avec un linge sec et propre s’ils sont
sales.
k) Le bloc de batterie doit être chargé avant l’utilisation. Utilisez toujours
le bon chargeur et consultez les instructions du fabricant ou le mode
d’emploi de l’équipement pour les bonnes instructions de charge.
l) Ne laissez pas le bloc-piles sur le chargeur lorsque vous ne l’utilisez pas.
m) Après une période prolongée de rangement, il pourrait être nécessaire
de charger et décharger le bloc-piles plusieurs fois pour obtenir une
performance maximale.
n) Rechargez seulement avec le chargeur spécifié par BISSELL. N’utilisez
pas un chargeur qui n’est pas qui n’est pas spécifiquement fourni pour
être utilisé avec l’équipement.
o) Conservez la paperasse originale du produit pour consultation ultérieure.
p) Utilisez le bloc-piles seulement aux fins prévues.
q) Jetez-le correctement.
r) Ne mélangez des cellules de fabrication, de capacité, de taille ou de type
différents dans un appareil.
s) N’exposez pas la batterie à des micro-ondes et de la haute pression.
CONSERVEZ CES CONSERVEZ CES
INSTRUCTIONSINSTRUCTIONS
Pour satisfaire aux exigences d’exposition RF de la FCC & IC, une distance
de séparation de 20cm (7.9in) ou plus doit être maintenue entre l’antenne de
cet appareil et les personnes pendant le fonctionnement de l’appareil. Pour
garantir la conformité, les opérations à une distance plus proche que celle
requise ne sont pas recommandées.
Cet appareil est conforme à la partie 15 des règles de la FCC.
Son fonctionnement est soumis aux deux conditions suivantes :
(1) Cet appareil ne peut pas causer d’interférences nuisibles, et
(2) Cet appareil doit accepter toute interférence reçue, y compris toute
interférence pouvant entraîner un fonctionnement indésirable.
Avertissement : Les changements ou modifications de cet appareil non
expressément approuvés par la partie responsable de la conformité
pourraient annuler l’autorisation de l’utilisateur à faire fonctionner
l’équipement.
REMARQUE : Cet équipement a été testé et jugé conforme aux limites pour
un appareil numérique de classe B, conformément à la partie 15 des règles
de la FCC.
Ces limites sont conçues pour fournir une protection raisonnable contre les
interférences nuisibles dans une installation résidentielle. Cet équipement
génère, utilise et peut émettre de l’énergie par radiofréquence et, s’il n’est
pas installé et utilisé conformément aux instructions, il peut causer des
interférences nuisibles aux communications radio.
Cependant, rien ne garantit que des interférences ne se produiront pas dans
une installation particulière. Si cet équipement cause des interférences
nuisibles à la réception radio ou télévision, ce qui peut être déterminé en
mettant l’équipement hors et sous tension, l’utilisateur devra essayer de
corriger l’interférence par une ou plusieurs des mesures suivantes :
· Réorienter ou déplacer l’antenne de réception.
· Éloigner l’équipement du récepteur.
· Brancher l’équipement à une prise sur un circuit différent de celui auquel le
récepteur est connecté.
· Consultez le revendeur ou un technicien radio/TV expérimenté pour
obtenir de l’aide.
Cet appareil contient un ou plusieurs émetteurs/récepteurs exemptés
de licence qui sont conformes aux CNR d’Innovation, Sciences et
Développement Économique Canada applicables aux appareils radio
exempts de licence. Son fonctionnement est soumis aux deux conditions
suivantes :
(1) Cet appareil ne peut pas causer d’interférences.
(2) Cet appareil doit accepter toute interférence, y compris les interférences

31
FR
pouvant causer un fonctionnement indésirable de l’appareil.
Limitée par les réglementations locales, la version pour l’Amérique du Nord
n’a pas d’option de sélection de région.
PRÉCAUTIONS DE SÉCURITÉ LORSQUE PRÉCAUTIONS DE SÉCURITÉ LORSQUE
VOUS UTILISEZ CE PRODUITVOUS UTILISEZ CE PRODUIT
ATTENTION : Soyez vigilant et suivez la procédure ci-dessous : Veuillez lire ATTENTION : Soyez vigilant et suivez la procédure ci-dessous : Veuillez lire
ce mode d’emploi attentivement avant d’utiliser le produit et le maintenir ce mode d’emploi attentivement avant d’utiliser le produit et le maintenir
correctement. Le robot n’est pas un jouet Supervisez les enfants et les animaux correctement. Le robot n’est pas un jouet Supervisez les enfants et les animaux
de compagnie lorsque le robot nettoie. NE RIEN placer sur l’unité. Prenez soin de compagnie lorsque le robot nettoie. NE RIEN placer sur l’unité. Prenez soin
de ne pas marcher sur les surfaces de travail pour éviter de marcher sur ou de ne pas marcher sur les surfaces de travail pour éviter de marcher sur ou
trébucher sur l’unité pendant qu’elle se déplace. NE PAS opérer l’unité sur des trébucher sur l’unité pendant qu’elle se déplace. NE PAS opérer l’unité sur des
planchers avec des prises de courant exposées. NE PAS submerger le robot planchers avec des prises de courant exposées. NE PAS submerger le robot
dans l’eau ou autre liquide.dans l’eau ou autre liquide.
1. Les problèmes qui pourraient survenir quand la serpillère robotique nettoie
le plancher devraient être résolus le plus tôt possible. Veuillez ramasser
les cordes d’alimentation et les petits objets du plancher afin qu’ils ne
bloquent pas le trajet du robot. Pliez la frange sous le tapis et gardez les
rideaux et les nappes de table hors du plancher.
2. Dans un environnement avec des escaliers ou des pentes, veuillez essayer
le produit en premier pour vérifier s’il peut détecter les rebords. Considérez
bloquer les escaliers et le rebord des pentes avec une clôture afin
d’éviter que le produit ne tombe. Il devrait être assuré que le dispositif de
protection ne causera pas de blessures, par exemple en trébuchant.
3. Veuillez utiliser le produit en suivant les instructions dans le mode
d’emploi. Utilisez uniquement les accessoires recommandés ou vendus
par le fabricant.
4. Assurez-vous que la tension d’alimentation correspond à la tension
nominale indiquée sur le socle de charge.
5. Si le cordon d’alimentation est endommagé, il doit être remplacé par le
fabricant, son agent de service ou une autre personne certifiée afin d’éviter
un danger.
6. Veuillez éteindre le produit avant de le nettoyer ou de l’entretenir.
7. Débranchez toujours de la prise avant de nettoyer et entretenir le produit.
8. Avant de jeter le produit, veuillez l’enlever du socle de charge, coupez
l’alimentation et enlevez la batterie.
9. Si le produit ne sera pas utilisé pour une longue période de temps, veuillez
déconnecter le produit de l’alimentation.
10. Avant de jeter le produit, la batterie du produit doit être enlevée et jetée
conformément aux lois et règlements locaux.
11. La batterie usagée doit être jetée conformément aux lois et règlements
locaux.
12. Cet appareil n’est pas destiné à être utilisé par des personnes (y compris
des enfants) ayant des capacités physiques, sensorielles ou mentales
réduites, ou manquant d’expérience et de connaissances, sauf si une
personne responsable de leur sécurité les supervise ou leur donne des
instructions concernant l’utilisation de l’appareil.
13. Utilisez le produit seulement dans un environnement domicile intérieur.
N’utilisez pas le produit à l’extérieur ou dans des endroits commerciaux ou
industriels.
14. N’utilisez pas le produit avec un cordon d’alimentation ou une prise
d’alimentation endommagés. Ne continuez pas d’utiliser le produit
s’il ne peut pas fonctionner correctement après être tombé, avoir été
endommagé, utilisé à l’extérieur ou été pénétré par l’eau. Le produit doit
être réparé par le fabricant ou le service d’après-vente afin d’éviter les
blessures accidentelles.
15. Veuillez utiliser le produit en suivant les instructions dans le mode
d’emploi. Notre entreprise n’est pas responsable pour aucune perte ou
dommage causé par la mauvaise utilisation.
AVERTISSEMENTAVERTISSEMENT
16. Utilisez seulement le socle de charge d’origine inclus du fabricant. Les
utilisateurs ne doivent pas remplacer la batterie d’eux-mêmes. Si vous
croyez que la batterie est endommagée, veuillez contacter le fabricant,
un concessionnaire autorisé ou une autre personne certifiée pour la
remplacer.
17. Le produit ne doit pas être utilisé dans un environnement avec des
flammes nues ou des objets fragiles.
18. Le produit ne doit pas être utilisé dans un environnement très chaud (plus

32
FR
de 40 °C) ou très froid (moins de 0 °C).
19. Ne laissez pas les cheveux, les habits, les doigts ou autre partie du corps être près de l’ouverture et les parties opérationnelles du produit.
20. Le produit ne doit être utilisé sur un plancher trempe ou mouillé.
21. Le produit ne doit pas être utilisé sur des matériaux inflammables tels que l’essence ou la poudre de toner pour les imprimantes et les photocopieurs. Le produit
ne doit pas être utilisé pour nettoyer des endroits avec des matériaux inflammables.
22. Le produit ne doit pas aspirer des articles brûlants, tels que les cigarettes, les allumettes, les cendres et autres articles qui pourraient causer un incendie.
23. Utilisez le cordon d’alimentation attentivement pour éviter les dommages. Il est interdit d’utiliser le cordon d’alimentation pour tirer ou soulever le produit et
son socle de charge. Il est interdit d’utiliser la corde d’alimentation comme poignée. Il est interdit de passer le cordon d’alimentation sous une porte. Il est
interdit de tirer le cordon d’alimentation le long d’un coin ou d’un rebord pointu. N’opérez pas le produit au-dessus d’un cordon d’alimentation. Gardez le cordon
d’alimentation loin des sources de chaleur.
24. Il est interdit d’utiliser un socle de charge endommagé. Si le socle de charge est endommagé, il doit être réparé ou remplacé par le fabricant, un concessionnaire
autorisé ou une autre personne certifiée afin d’éviter un danger
25. Il est interdit de brûler le produit même s’il est gravement endommagé. La batterie du produit peut causer une explosion.
INSTRUCTIONS POUR JETER LA BATTERIEINSTRUCTIONS POUR JETER LA BATTERIE
Si vous voulez jeter la batterie dans cette machine, ne la jetez pas dans les déchets ménagers. Au lieu, emportez-la station de recyclage de batteries usagées la plus
près ou un centre de service après-vente pour l’aliénation centralisée.
Les instructions suivantes ne sont pas pour les utilisateurs généraux, mais sont à être utilisées comme instructions d’aliénation pour l’éliminateur final de la batterie.
Les substances chimiques contenues dans les batteries de cette machine sont polluantes pour l’environnement si elles ne sont pas manipulées adéquatement.
Avant de jeter le robot, assurez-vous de retirer la batterie du robot en premier. La batterie doit être retournée à un point de collection à batterie spécialisé pour
l’aliénation centralisée.
Faites attention! Le liquide qui fuit de la batterie peut causer une blessure!
En cas d’une fuite de la batterie, ne permettez pas au liquide d’entrer en contact avec les yeux ou la peau. En cas de contact accidentel, veuillez bien laver vos mains
et yeux avec de l’eau propre immédiatement. Si vous vous sentez toujours inconfortable, consultez un médecin immédiatement.
33
FR
SPÉCIFICATIONS TECHNIQUESSPÉCIFICATIONS TECHNIQUES
ReadyClean A3
Dimensions
264 x 263 x 95 mm (10,4 x 10,4 x 3,7 po)
Poids
3kg (6.6lbs)
Capacité de la batterie
Batterie Li 2600mAh
Tension nominale
14.4V
Puissance nominale
8.4W
Station d’accueil
Dimensions 320 x 300 x 256 mm (12,6 x 11,8 x 10,1 po)
Poids 3.5kg (7.7lbs)
Modèle d'adaptateur AD-0121900060US
Entrée adaptateur 100-240V~50-60Hz 0.5A
Entrée nominale 19V
Sortie nominale
19V
0.6A
Puissance nominale 11.4W
* Produit actuel peut varier en raison des améliorations continues du produit. Notre entreprise se réserve le droit d’améliorer le produit n’importe quand.Pour
usage domestique uniquement.
POUR LES OUTILS DE LA BATTERIEPOUR LES OUTILS DE LA BATTERIE
La plage de température ambiante pour l’utilisation et le stockage de l’outil et de la batterie est 0
o
C à 45
o
C (32°F-113°F).
La plage de température ambiante recommandée pour le système de charge pendant la charge est de 4
o
C à 40
o
C (39°F-104°F).
SERVICE À LA CLIENTÈLESERVICE À LA CLIENTÈLE
Si vous avez des questions ou des préoccupations, veuillez consulter support.BISSELL.com

34
FR
À PROPOS DE VOTRE SERPILLÈRE ROBOTIQUE ReadyClean A3À PROPOS DE VOTRE SERPILLÈRE ROBOTIQUE ReadyClean A3
VUE DU HAUTVUE DU HAUT VUE DU BASVUE DU BAS
DÉTECTEUR DE DISTANCE LASER (LDS)
BOUTON D’ALIMENTATION
BOUTON D’ACCUEIL
DÉTECTEUR DE TAPIS
RÉSERVOIR D’EAU AMOVIBLE
CAPTEUR DE CHARGE
ROUE PIVOTANTE
ROUES MOTRICES
SORTIE D’EAU
AMORTISSEUR
BUMPER
NETTOYAGE À ÉMANT
SUPPORT À TAMPON
35
FR
À PROPOS DE VOTRE STATION D’ACCUEILÀ PROPOS DE VOTRE STATION D’ACCUEIL
VUE DE L’AVANTVUE DE L’AVANT VUE DE L’ARRIÈREVUE DE L’ARRIÈRE
RANGEMENT POUR TAMPON DE
NETTOYAGE
POIGNÉE
NOUVEAU RANGEMENT POUR
TAMPON DE NETTOYAGE
ZONE DE
CHANGEMENT
DE TAMPON DE
NETTOYAGE
HOUSSE
CORDON D’ALIMENTATION
VERROU POUR ENFANT
SÉLECTION DU MODE
DÉMARRER DE NETTOYAGE
36
FR
DÉCOUVRIR VOTRE ReadyClean A3DÉCOUVRIR VOTRE ReadyClean A3
PANNEAU DE COMMANDE POUR LA SERPILLÈRE ROBOTIQUE ReadyClean PANNEAUX D’OPÉRATION POUR LA STATION D’ACCUEIL
VERROU POUR
ENFANT
BOUTON D’ALIMENTATION BOUTON D’ACCUEIL
Bouton /
Indicateur
Opération et fonctionnement
Brève pression : le robot démarre/pause.
Longue pression pendant 3 secondes : éteindre/allumer le
robot
Brève pression : Mettre le robot en pause pendant qu’il nettoie.
Brève pression de nouveau : Envoyer le robot à l’accueil pour
recharger.
Longue pression pendant 3 secondes : Le robot commencera à
nettoyer l’endroit désigné.
(Remarque : Le nettoyage des endroits désignés est recommandé
pour les zones qui ont des taches ou qui nécessitent un peu plus
d’attention de nettoyage.)
+
Brève pression : Le robot retournera à l’accueil pour remplacer
le tampon de nettoyage.
Longue pression pendant 3 secondes : Le robot entre en
mode jumelage.
Longue pression pendant 8 secondes : Réinitialisation du
robot.
Blanc clignotant : Le robot se charge ou est en mode d’essai
Blanc solide : Le robot nettoie ou est en mode d’attente
Bleu Clignotant : Le robot est en mode jumelage
Rouge Clignotant : Le robot éprouve une erreur
Rouge solide : La batterie est faible (moins de 15 % de batterie
restant)
Bouton /
Indicateur
Opération et fonctionnement
Lorsque le robot est dans la station d’accueil :
Brève pression : le robot commencera à nettoyer.
Blanc clignotant : le robot est à l’accueil et se charge Blanc
solide : le robot est à l’accueil et complètement chargé
(REMARQUE : si le robot n’est pas à l’accueil, les boutons
sur la station d’accueil ne peuvent pas être utilisés et ne
s’allumeront pas.)
Brève pression : Changer entre les modes serpillère sèche,
serpillère mouillée et serpillère sèche+mouillée.
Quand le verrou pour enfant est activé, les boutons sur la
station d’accueil sont verrouillés et ne peuvent pas être
utilisés. Déverrouiller le verrou pour enfant afin de pouvoir
utiliser les boutons sur la station d’accueil.
DÉMARRER DE
NETTOYAGE
SÉLECTION DU MODE
Mode économie d'énergie:Insérez le ReadyClean A3 dans la station Mode économie d'énergie:Insérez le ReadyClean A3 dans la station
d'accueil et assurez-vous qu'il est en mode de charged'accueil et assurez-vous qu'il est en mode de charge(("" " est " est
en blanc clignotant ou en blanc sur en blanc clignotant ou en blanc sur )). Appuyez ensuite sur «. Appuyez ensuite sur « » et «» et «
» sur le ReadyClean A3 pendant 15s. Lorsque "» sur le ReadyClean A3 pendant 15s. Lorsque " " et " " et "
" sur la station d'accueil s'éteignent, votre ReadyClean A3 entrera en " sur la station d'accueil s'éteignent, votre ReadyClean A3 entrera en
mode d'économie d'énergie. Si vous avez besoin d'un mode d'économie mode d'économie d'énergie. Si vous avez besoin d'un mode d'économie
d'énergie assez. Dans un premier temps, retirez le ReadyClean A3 de la d'énergie assez. Dans un premier temps, retirez le ReadyClean A3 de la
station d'accueil, puis maintenez enfoncée la touche " station d'accueil, puis maintenez enfoncée la touche " " pendant 3 " pendant 3
secondes pour allumer le robot.Le mode est appliqué aux tests DOE / UEC.secondes pour allumer le robot.Le mode est appliqué aux tests DOE / UEC.
37
FR
Ouvrez les portes pour une carte exacte de votre Ouvrez les portes pour une carte exacte de votre
maisonmaison
Afin de créer la carte la plus exacte de votre
maison, assurez-vous que le robot puisse
accéder à toutes les zones que vous voulez
nettoyer. Ouvrez les portes et enlevez toute
barrière pour permettre au robot d’explorer et
tracer le plan sans obstructions.
Créez des limites virtuellesCréez des limites virtuelles
Après avoir tracé le plan de votre maison, créez des
zones « interdites » virtuelles avec l’application
ReadyClean de BISSELL pour limiter les zones/
pièces que vous ne voulez pas que le robot nettoie
et assurer le bon fonctionnement du robot.
CONSEILS AVANT DE NETTOYERCONSEILS AVANT DE NETTOYER
Organiser l’espace à être nettoyéOrganiser l’espace à être nettoyé
Pour une performance optimale, ramassez
tous jouets, cordons, objets de valeur, etc. qui
pourraient nuire au nettoyage de la serpillère
robot.
(Remarque : Assurez-vous qu’il n’y a pas d’objet
avec une surface réfléchissante (p. ex. : miroir) à
moins de 10 cm/3,5 po du plancher puisque cela
embrouillera les lasers de navigation du robot.)
38
FR
COMMENCERCOMMENCER
Enlevez tous les matériaux d’emballage de Enlevez tous les matériaux d’emballage de
protectionprotection
Enlevez toute la mousse protectrice et les
étiquettes du robot.
Placer la station d’accueilPlacer la station d’accueil
Emplacement de la station d’accueilEmplacement de la station d’accueil
Enlevez la housse de l’arrière de la station
d’accueil pour brancher l’adaptateur AC à la
station d’accueil et à la prise au mur
Pour la meilleure performance, placez la
station d’accueil contre un mur avec au moins
70 cm (2,3 pi) de chaque côté et au moins 150
cm (5 pi) en avant
1.5m(5’)
0.7m
(2.3’)
0.7m
(2.3’)
39
FR
Insérer les tampons de nettoyageInsérer les tampons de nettoyage
COMMENCERCOMMENCER
Ouvrez le couvercle de la station d’accueil et placez
le reste des tampons de nettoyage assemblés dans
la boîte de rangement des tampons de nettoyage.
Recouvrez la base à tampon en caoutchouc de
la serpillère d’un nouveau tampon de nettoyage,
pliant le tampon fermement autour des côtés de
la base.
Assemblez tous les tampons à serpillère afin
d’utiliser la fonction de changement automatique
de la station d’accueil.
Retournez doucement le robot et alignez un
tampon de nettoyage assemblé sur le support à
serpillère magnétique. Appuyez fermement pour
assurer une bonne installation.
REMARQUE : C’est une connexion magnétique
donc vous n’entendrez ou ne ressentirez pas un
« clic » ferme. Vous saurez que l’installation est
bonne si le tampon ne tombe pas lorsque vous
retournez le robot.
Assemblez les tampons de nettoyageAssemblez les tampons de nettoyage
Installer le tampon de nettoyageInstaller le tampon de nettoyage
40
FR
COMMENCERCOMMENCER
TÉLÉCHARGER TÉLÉCHARGER
L’APPLICATIONL’APPLICATION
Allumez la ReadyClean A3
Appuyez longuement « » pendant 3 seconds
pour allumer le robot.
Vous entendrez la musique de démarrage pour
indiquer que c’est réussi.
Recharge
Poussez le robot manuellement sur la station
d’accueil pour charger. Assurez-vous de pousser
le robot jusqu’à l’arrière de la station d’accueil pour
engager les connecteurs de chargement.
Remarque : Il est recommandé de complètement
charger le robot avant la première utilisation.
La lumière sur le haut de la station
d’accueil clignote blanc pendant que
le robot charge
La lumière sur la station d’accueil est
blanc solide quand la charge est
complète
Pour la meilleure expérience, téléchargez l’application
ReadyClean de BISSELL pour personnaliser le
nettoyage, établir un horaire et accéder à encore plus
de fonctions.
Scannez le code QR ci-dessous ou rendez-vous
au magasin d’application mobile pour télécharger
l’application « ReadyClean de BISSELL »
41
FR
FAIRE LE PLAN DE VOTRE MAISONFAIRE LE PLAN DE VOTRE MAISON
Première utilisation : Créer la cartePremière utilisation : Créer la carte
Une fois le robot chargé, appuyez brièvement
« » sur la station d’accueil. Le robot
quittera la station d’accueil et commencera à
explorer votre maison et en créer un plan.
Remarque : Le robot NE nettoie PAS pendant
la création du plan. Le tampon de nettoyage
sera soulevé pendant qu’il explore votre
maison.
Conseil pour la création du planConseil pour la création du plan
Ne suivez pas le robot et ne tenez-vous pas
dans son chemin. Cela peut causer des endroits
manquants ou des erreurs du plan.
Ouvrez les portes et enlevez les obstacles pour
assurer que le plan soit exact et complet.
Le robot continuera d’optimiser et ajuster le
plan chaque fois qu’il nettoie.
Téléchargez l’application ReadyClean de
BISSELL pour voire le plan complété et interagir
avec ce dernier (marquez les zones interdites,
établissez le changement du tampon par pièce
ou zone de nettoyage, etc.)
Ne pas déplacer la station d’accueilNe pas déplacer la station d’accueil
Ne déplacez pas la station d’accueil à moins
que ce soit nécessaire. Si vous déplacez la
station d’accueil, vous devrez refaire le plan de
votre maison.
Reconfigurer l’espace selon les étapes
suivantes
1) Longue pression « + » pendant 8
secondes : Réinitialisation du robot.
2) Suivez «Première utilisation : Créer la carte»
les étapes suivantes pour reconfigurer l’espace
42
FR
COMMENCER À NETTOYERCOMMENCER À NETTOYER
Commencer à nettoyer Commencer à nettoyer
Une fois le plan de votre maison complet, le
robot est prêt à nettoyer! Après avoir rechargé
de son trajet pour créer le plan, sélectionnez le
mode de nettoyage « » et appuyer «
» sur le haut de la station d’accueil ou
avec l’application ReadyClean de BISSELL.
Le robot commencera à nettoyer le long du
périmètre de la salle avant d’aller d’un côté à
l’autre.
REMARQUE : Téléchargez l’application
ReadyClean de BISSELL pour voir où le robot a
déjà nettoyé.
PausePause
Pour mettre le robot en pause, appuyez
brièvement le bouton « » ou « »
directement sur le robot ou dans l’application
ReadyClean de BISSELL.
Si le robot est en pause pendant plus de 10
minutes, il se mettra en mode veille. Appuyez
brièvement le bouton « » pour éveiller le
robot. Appuyez brièvement le bouton « » une
deuxième fois pour recommencer la tâche de
nettoyage.
RETOUR À LA STATION D’ACCUEILRETOUR À LA STATION D’ACCUEIL
Retour à la station d’accueil
Mettez le robot en pause en appuyant le bouton
« » ou « »
. Appuyez le bouton « » pour renvoyer le
robot à la station d’accueil pour charger.
Remarque : Quand vous retournez le robot à la
station d’accueil manuellement dans le milieu du
nettoyage, le tampon de nettoyage ne sera pas
automatiquement changé.
1
2

43
FR
COMMENCER À NETTOYERCOMMENCER À NETTOYER
Votre ReadyClean A3 a trois options de mode de nettoyage : serpillère sèche, serpillère humide ou serpillère sèche + humide. Le mode peut être sélectionné
sur le haut de la station d’accueil ou dans l’application ReadyClean de BISSELL. Remarque : Mode serpillère sèche + humide : le robot nettoiera en mode sec en
premier, une fois cela terminé, il retournera et nettoiera en mode humide. Si la batterie s’épuise avant que la tâche soit terminée, le robot retournera à la station
d’accueil pour charger et recommencera à nettoyer de ce point une fois la charge complète.
1. Ajouter de l’eau et de la solution nettoyante1. Ajouter de l’eau et de la solution nettoyante
A. Enlevez le réservoir d’eau en appuyant sur le
bouton de relâche à l’arrière du réservoir et en le
retirant.
B. Enlevez l’arrêt en caoutchouc et remplissez le
réservoir d’eau. Si voulu, ajoutez un bouchon de la
solution de nettoyage au réservoir d’eau.
REMARQUE : Ne remplissez pas le réservoir d’eau
de solution de nettoyage puisque cela bloquera
les sorties d’eau.
C. Poussez l’arrêt en caoutchouc de nouveau
dans le réservoir d’eau.
D. Replacez le réservoir d’eau dans le robot.
44
FR
COMMENCER À NETTOYERCOMMENCER À NETTOYER
Le changement de tampon automatiqueLe changement de tampon automatique
Par défaut, le robot changera automatiquement
le tampon de nettoyage après le nettoyage
(20 m
2
). Personnalisez quand le tampon est
changé dans l’application ReadyClean de
BISSELL par pi2 nettoyé ou par salle.
Lorsque le robot retourne à la station d’accueil,
il se rendra à la station d’accueil pour laisser
tomber le tampon salle. Le tampon sale sera
soulevé dans le contenant à tampons usagés,
pendant qu’un tampon propre descendra. Le
robot reculera dans la station d’accueil pour
ramasser le tampon de nettoyage pour finir le
nettoyage ou pour charger.
Vider les tampons de nettoyage souvent Vider les tampons de nettoyage souvent
N’oubliez pas de jeter les tampons de nettoyage
collectés dans le contenant de tampons
usagés. Soulevez le couvercle de la station
d’accueil pour accéder le contenant de tampons
usagés. Utilisez les poignées pour soulever les
tampons de nettoyage sales hors de la station
d’accueil. Jetez les tampons sales (ne pas jeter
les bases à tampon en caoutchouc).
REMARQUE : si les tampons humides ne
sont vidés souvent, des moisissures peuvent
s’accumuler dans la station d’accueil.
45
FR
ENTRETIENENTRETIEN
Nettoyer le réservoir d’eauNettoyer le réservoir d’eau
Retirez le réservoir d’eau en appuyant le
bouton de relâche
Il est recommandé que vous rincez la
base en caoutchouc après avoir jeté le
tampon sale.
Videz le réservoir d’eau
Séchez la base en caoutchouc
complètement avant d’assembler les
tampons de nettoyage
Rincez le réservoir d’eau
Jetez les tampons de nettoyage sales
SEULEMENT. Ne jetez pas la base en
caoutchouc.
Essuyez-le ou séchez à l’air
Nettoyer la base à tampon de nettoyage en caoutchoucNettoyer la base à tampon de nettoyage en caoutchouc

46
FR
ENTRETIEN : SERPILLIÈRE ROBOTIQUEENTRETIEN : SERPILLIÈRE ROBOTIQUE
Amortisseur
Détecteur de tapis
Roues motrices Détecteur de pente
Détecteur de charge Roues pivotantes
Détecteur de distance à laser (LDS)
Support de tampon de nettoyage
magnétique
Utilisez un chiffon sec et propre pour essuyer tous les détecteurs et pièces pour assurer que le robot continue de fonctionner de façon optimale.

47
FR
ENTRETIEN : STATION D’ACCUEILENTRETIEN : STATION D’ACCUEIL
Utilisez un chiffon sec et propre pour nettoyer la station d’accueil. (REMARQUE : Utiliser un chiffon sec seulement. Ne pas utiliser de l’eau pour nettoyer la station
d’accueil.)
Essuyez l’intérieur de la station d’accueil Enlevez et jetez tous les tampons de
nettoyage sales.
Essuyez l’intérieur de la station
d’accueil charge et les détecteurs de
charge
48
FR
DÉPANNAGEDÉPANNAGE
ErreurErreur Possible CausePossible Cause SolutionSolution
Impossible
de connecter
l’application
Version OS du téléphone mobile n’est pas à jour
Mettez à jour votre téléphone mobile dans les paramètres à l’OS le plus
récent
Le robot n’est pas en mode jumelage
Assurez-vous que le robot est allumé et appuyez «
» et « » en
même temps pendant 3 secondes jusqu’à ce que vous entendez la
confirmation vocale
Impossible de connecter au réseau Wi-Fi
Sélectionnez votre réseau 2.4 GFIz seulement. Le robot ne peut pas se
connecter à 5G
Failure to
Update
Firmware
Connexion réseau interrompue ou mise à jour incorrecte
1.Gardez le robot sur la station d’accueil et assurez-vous que le robot
est connecté aux capteurs de charge.
2.Pendant la mise à jour, n’enlevez pas le robot de la station d’accueil
3.Gardez votre appareil mobile connecté à votre réseau Wi-Fi
4.Les mises à jour firmware se trouvent sur l’application ReadyClean de
BISSELL et prendront environ 5 à 15 minutes à compléter.
Erreur du
détecteur LiDAR
Le détecteur LiDAR est bloqué ou pris.
Utilisez un chiffon sec pour essuyer le détecteur LiDAR ou enlevez tous
objets qui bloquent le détecteur
Erreur
d’amortisseur
1.L’amortisseur est pris
2.L’amortisseur est salle
1.Inspectez l’amortisseur pour tous objets étrangers. Assurez-vous que
l’amortisseur puisse bien fonctionner en l’enfonçant.
2.Essuyez l’amortisseur avec un linge sec pour le nettoyer
Erreur du
détecteur de pente
Un ou plusieurs de détecteur de pente sont salles ou bloqués Utilisez un linge sec pour essuyer tous les détecteurs de pente
Erreur du
détecteur de tapis
Le détecteur est bloqué ou salle.
Utilisez un chiffon sec pour essuyer le capteur ou enlevez tous objets
étrangers qui bloquent le détecteur
Réservoir d’eau
Erreur
Le réservoir d’eau n’est pas bien installé Veuillez vérifier le réservoir d’eau pour assurer qu’il est bien installé

49
FR
ErreurErreur Possible CausePossible Cause SolutionSolution
Pas assez d’eau.
Veuillez ajouter de
l’eau
Le niveau d’eau est trop bas dans le réservoir d’eau Veuillez remplir le réservoir d’eau et le réinstaller dans le robot
Erreur de roue
motrice
Une ou plusieurs des roues motrices sont prises ou salles
Inspectez les roues motrices pour tous objets étrangers et essuyez
avec un linge sec pour nettoyer.
Erreur de recharge
1.La station d’accueil n’est pas connectée à l’alimentation
2.La station d’accueil est salle ou bloquée
1.Assurez-vous que la station d’accueil est correctement connectée à
l’alimentation
2.Utilisez un chiffon sec pour essuyer la station d’accueil ou enlevez
tous objets étrangers qui bloquent la station d’accueil
Erreur de station
d’accueil
Le mécanisme de soulèvement de la station d’accueil est
bloqué
1.Vérifiez pour des objets qui pourraient bloquer le mécanisme de
soulèvement
2.Débranchez et reconnectez le cordon d’alimentation pour réinitialiser
la station d’accueil
Veuillez ajouter
les tampons de
nettoyage
Il n’y a pas de tampons de nettoyage propres dans la station
d’accueil
Ajoutez plus de tampons de nettoyage dans la boîte de rangement de
la station d’accueil
Erreur de
rangement de
tampons de
nettoyage usagés
La boîte de rangement de tampons de nettoyage usagés
manque de la station d’accueil ou elle est installée
incorrectement
Install the used mop pad storage box
Réservoir d’eau
Erreur
Le réservoir d’eau n’est pas bien installé Veuillez vérifier le réservoir d’eau pour assurer qu’il est bien installé
DÉPANNAGEDÉPANNAGE
Pour un dépannage supplémentaire, veuillez visiter support.BISSELL.com

Notes / RemarquesNotes / Remarques

Notes / RemarquesNotes / Remarques

1632021