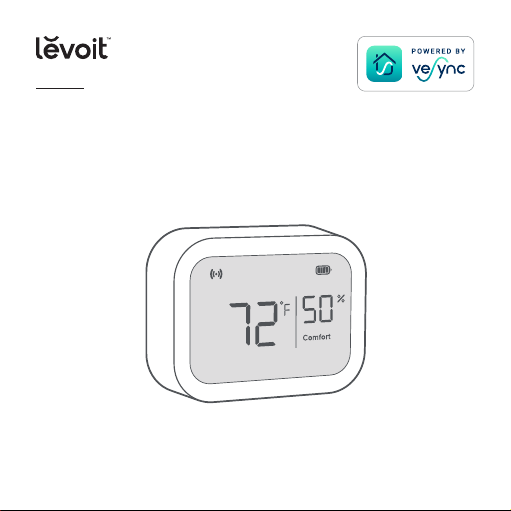
Aura™ Sensor
USER MANUAL
Questions or Concerns?
Please contact us Mon–Fri, 9:00 am–5:00 pm PST/PDT
at [email protected] or at (888) 726-8520.
Model: LTM-AS041S-WUS

2
Table of Contents
Package Contents
Specifications
Safety Information
Getting Started
Operation
VeSync App Setup
Connecting the sensor to the VeSync app
VeSync App Functions
Maintenance
Troubleshooting
Warranty Information
Customer Support
2
3
6
11
16
16
17
18
20
22
29
34
Package Contents
1 x Aura Sensor
1 x Wall Bracket
1 x Desktop Stand
2 x AAA Battery (Pre-Installed)
1 x User Manual
3
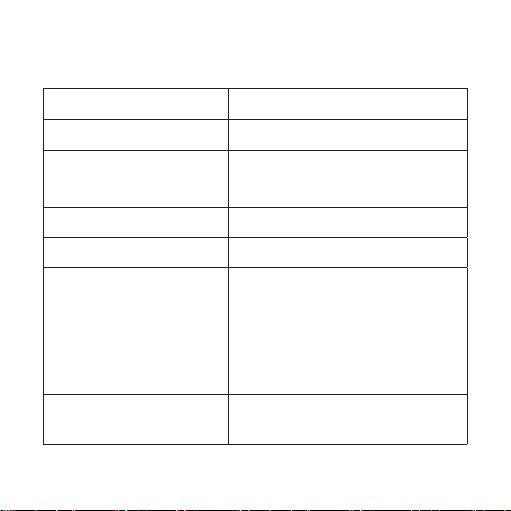
Specifications
Battery 2 x 1.5V AAA Batteries
Power Supply 3V⎓
Dimensions 2.40 x 1.84 x 0.86 in /
6.10 x 4.67 x 2.18 cm
Weight 0.15 lb / 0.07 kg
Connectivity Zigbee™ 3.0
Temperature
Display Range
32°–122°F / 0°–50°C
Temperature Display Accuracy:
±1°F during 32°–122°F
±0.5°C during 0°–50°C
Temperature
Increments
0.1°F / 0.1°C

4
SPECIFICATIONS (CONT.)
Relative Humidity
Display Range
1–99%
Humidity Display Accuracy:
±3% during 20–80% humidity
±5% during 0–99% humidity
Relative Humidity
Increments
1%
Max Connectivity
Distance
Indoor: 164 ft / 50 m
Outdoor: 492 ft / 150 m
Note: Outdoor distance is
measured in a straight line without
obstacles.
FCC ID (Inside Battery
Compartment)
2ARBY-AS041S

5
SPECIFICATIONS (CONT.)
Compatibility
• Levoit Aura™ Smart Thermostat
Note: To access additional smart functions, download the free
VeSync app (see page 16).

6
SAFETY INFORMATION
READ AND SAVE THESE
INSTRUCTIONS
Please read and follow all instructions and safety guidelines in this manual.
• Keep out of reach of children.
• Do not tamper with the sensor’s internal components.
• Do not dispose of any part of the sensor in a fire.
• Do not submerge or place the sensor in direct contact with water
or any other liquid.
• Not for commercial use. Household use only.
General Safety

7
• When installing or changing batteries, make sure to place the batteries
in the correct polarity.
• Using batteries that are not alkaline may shorten the operating time of
the sensor.
• Do not mix new and old batteries.
• Do not replace batteries while hands are wet or while the sensor is in
a wet environment.
• If the sensor is not in use for an extended period of time, remove the
batteries to conserve battery life and extend sensor lifetime.
Use & Care
SAFETY INFORMATION (CONT.)
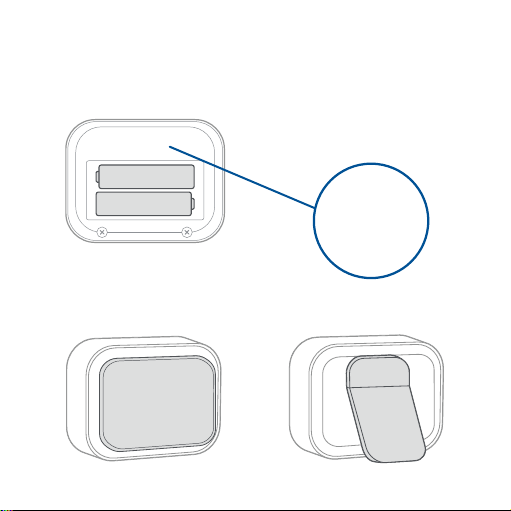
8
A. Battery Compartment B. FCC ID and 4-Digit
Code (Inside Battery
Compartment)
C. Wall Bracket D. Desktop Stand
Function Diagram
FCC ID:2ARBY-AS041S
4-Digit Code:XXXX
FCC ID:2ARBY-AS041S
4-Digit Code:XXXX
9
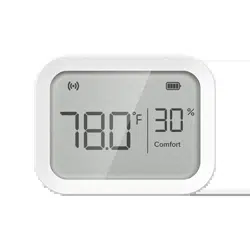
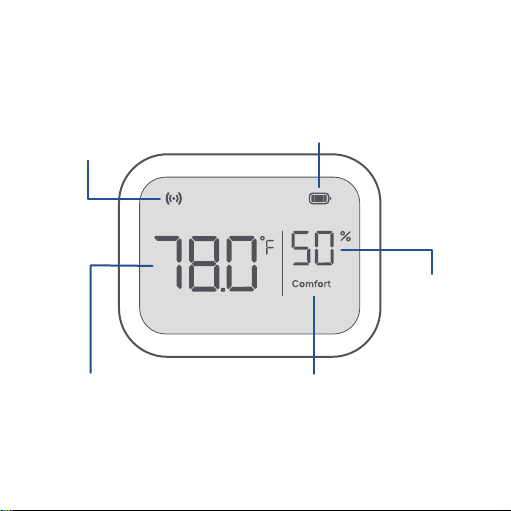
Connectivity
Signal
Battery Level
Temperature
Humidity
Percentage
Humidity
Comfort Level
Display Diagram
10
DISPLAY DIAGRAM (CONT.)
Connectivity Signal
Humidity Comfort Level
is displayed when the sensor is connected to the Aura Smart
Thermostat.
Displays Comfort, Low, or High depending on the humidity that’s
detected by the sensor.
Note: You must first connect the sensor to the VeSync app in
order to pair it with the smart thermostat (see Connecting the
sensor to the VeSync app, page 17).
Comfort The humidity is between 40% and 60%
Low The humidity is below 40%
High The humidity is above 60%

11
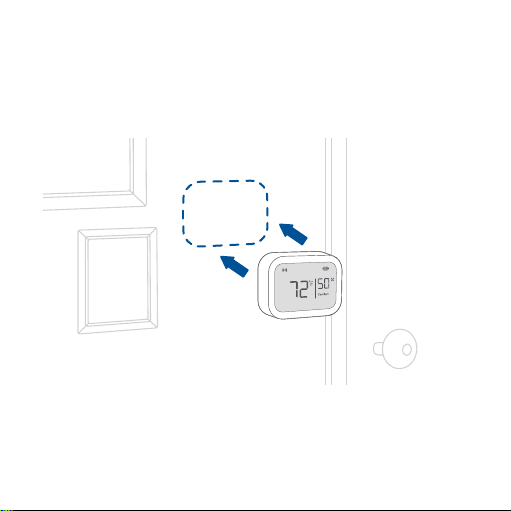
Installation
When using the sensor with the smart thermostat, make sure the
sensor is no more than 164 ft / 50 m away from the thermostat.
The Aura Sensor can be used by itself, or with the Aura Smart
Thermostat.
Note: To access smart features, the sensor must be connected to
the VeSync app and the smart thermostat.
Getting Started
12
GETTING STARTED (CONT.)
If there are obstructions between the sensor and smart thermostat
like dividing walls, dierent floor levels, and furniture, move the sensor
closer as these may aect the sensor’s connectivity.
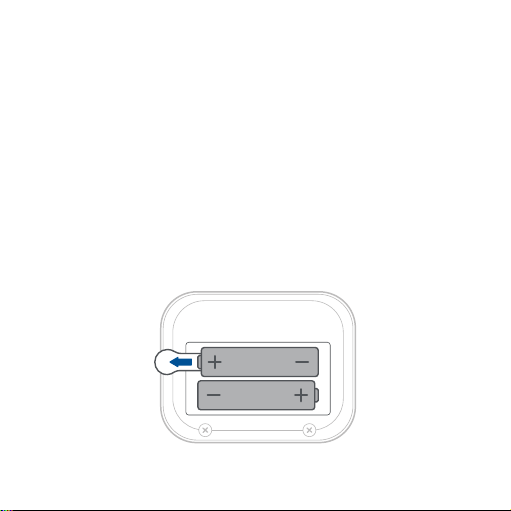
Note:
• Before first use, remove the battery pull tab from the sensor’s
battery compartment. [Figure 1.1]
• Take a picture or write down the 4-digit code in the battery
compartment of the sensor. This will be used later when
connecting multiple sensors to the VeSync app.
Figure 1.1
13
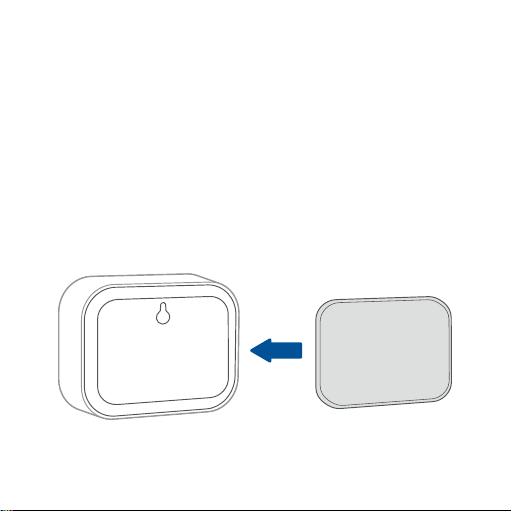
GETTING STARTED (CONT.)
1. Attach the wall bracket to the back of the sensor. [Figure 1.2]
2. Peel o the sticker cover on the wall side of the bracket.
Hanging the sensor on a wall
Note: The wall bracket is dicult to remove from the wall once
it is placed. Make sure the sensor is in range of the smart
thermostat before placing it on the wall.
Figure 1.2
14
GETTING STARTED (CONT.)
3. Place the sensor onto the wall and press firmly to make sure the
sensor is secured. [Figure 1.3]
Figure 1.3
Note: Do not press directly on the sensor’s display screen while
hanging it on to the wall.
15
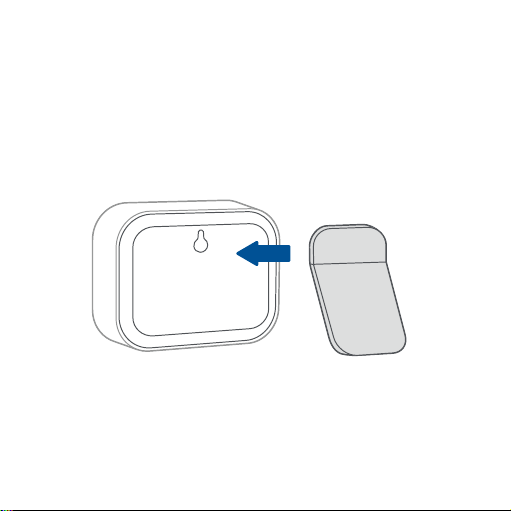
GETTING STARTED (CONT.)
1. Attach the desktop stand to the back of the sensor. [Figure 1.4]
2. Place your sensor on a flat surface like a shelf or desk.
Placing the sensor on a flat surface
Figure 1.4

16
1. To download the VeSync app,
scan the QR code or search
“VeSync” in the Apple App Store®
or Google Play Store.
2. Open the VeSync app. If you already have an account, tap Log In.
To create a new account, tap Sign Up.
VeSync App Setup
Operation
Note: The VeSync app is continually being improved and may
change over time. If there are any dierences, follow the in-app
instructions.
Note: For Android™ users, choose “Allow” to use VeSync.
Note: You must create your own VeSync account to use third-
party services and products. These will not work with a guest
account. With a VeSync account, you can also allow your family
and friends to control your sensor.

17
1. Tap the + icon on the VeSync app home screen.
2. Choose the Levoit Aura™ Sensor.
3. Remove and reinsert the batteries to put the sensor in pairing
mode.
4. If you only have one sensor, the sensor will automatically pair with
your smart thermostat.
Connecting the sensor to the VeSync app
Note: Make sure the battery tab is removed. Otherwise, the
sensor will not work and will not go into pairing mode.
Note: Sensors will automatically pair with all Levoit smart
thermostats associated with your VeSync account.
OPERATION (CONT.)
• If you are pairing multiple sensors at once, select the 4-digit
code that matches the sensor you are currently trying to pair.

18
VeSync App Functions
Remote Monitoring
• Monitor your home’s temperature and humidity conditions
from anywhere.
Instant App Alert
• Get notified about thermostat alerts directly to your
smartphone.
OPERATION (CONT.)
Note:
• You can change the sensor’s name and icon at any time by going to
the sensor’s screen in the VeSync app and tapping .
• The sensor must be paired with a Levoit smart thermostat in the
VeSync app in order to remotely monitor the sensor’s temperature
and humidity data.
5. Pick a room for your sensor.
6. Name your sensor (e.g., “living room sensor”).

19
Smart Scenes
• Prioritize comfort and air quality in your home using Smart
Scenes, which can control your Levoit thermostat, humidifier,
and sensor all at the same time.
Smart Routines
• Customize your sensor’s settings by selecting Smart Routines
for it to follow.
Temperature & Humidity Graphs
• View your sensor’s temperature and humidity history.
Changing the temperature unit
OPERATION (CONT.)
1. Open the VeSync app and tap the sensor’s settings icon.
2. Tap Change Unit and select the desired temperature unit.
3. Remove and reinstall the sensor’s batteries.
4. Wait for the sensor’s display to show the temperature unit has
changed.
20
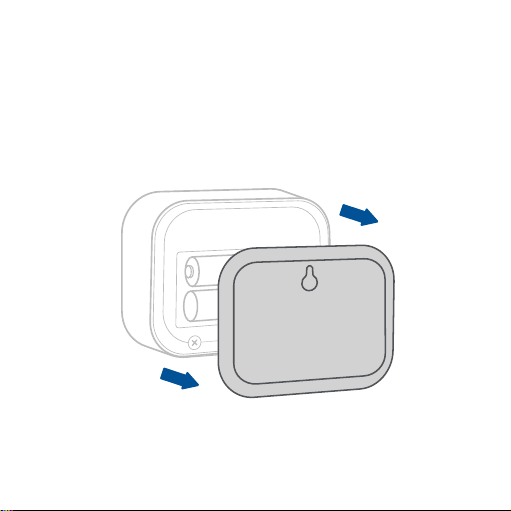
1. Flip the sensor over and open the battery compartment.
[Figure 2.1]
Maintenance
Replacing Batteries
Figure 2.1
21
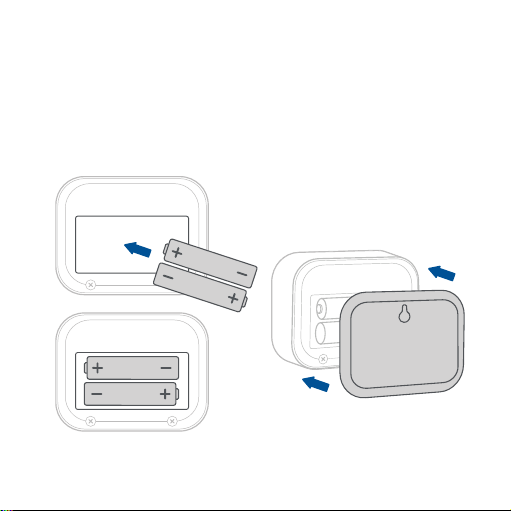
MAINTENANCE (CONT.)
2. Remove the old batteries and install new AAA batteries, making
sure they are inserted correctly. [Figure 2.2]
3. Replace the battery compartment lid by securely snapping the
cover back into place. [Figure 2.3]
Figure 2.2
Figure 2.3

22
Troubleshooting
Problem Possible Solution
The sensor display
does not turn on.
The battery tab in the battery
compartment may still be intact.
Open the battery compartment and
pull the battery tab out, reinsert
the batteries, and close the battery
compartment (see page 12).
The sensor’s batteries may be low.
Replace with 2 AAA batteries (see
page 20).
The sensor
does not show
temperature
and humidity
information.
Make sure the sensor is on and
batteries are installed with correct
polarity (see page 25).

23
TROUBLESHOOTING (CONT.)
Problem Possible Solution
The VeSync app
does not show
the sensor’s
temperature
and humidity
information.
Restart the pairing process by
removing the sensor’s batteries
and reinserting them. This will
automatically put the sensor in
pairing mode (see Connecting the
sensor to the VeSync app, page 17).
The sensor does
not connect to the
thermostat.
Make sure the thermostat and room
sensor are added to the same
VeSync account.
Make sure the thermostat and sensor
are no more than 164 ft / 50 m away
from each other (see Installation,
page 11).
24
TROUBLESHOOTING (CONT.)
Problem Possible Solution
The sensor does
not connect to the
thermostat.
The sensor's batteries may be low.
Replace with 2 AAA batteries
(see page 20).
If your problem is not listed, please contact Customer Support
(see page 34).
Why isn’t my sensor connecting to the VeSync app?
• Make sure your sensor and phone are within 30 ft of each
other.
• Reset the sensor by removing and reinserting the batteries,
then try connecting again (see page 20).
VeSync App Troubleshooting
25
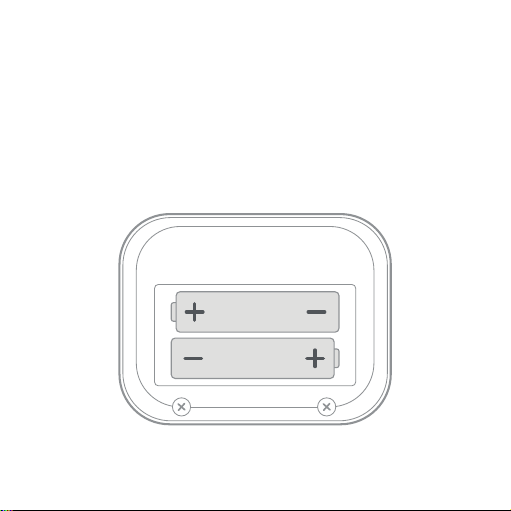
TROUBLESHOOTING (CONT.)
The sensor is oine.
• Make sure the sensor has batteries installed and the battery
polarity is correct. [Figure 3.1]
• Make sure your router is connected to the internet and your
smartphone’s network connection is working.
Figure 3.1

26
FEDERAL COMMUNICATION COMMISSION
INTERFERENCE STATEMENT PART 15
This device complies with Part 15 of the FCC Rules. Operation is
subject to the following two conditions:
(1) This device may not cause harmful interference, and
(2) This device must accept any interference received, including
interference that may cause undesired operation.
TROUBLESHOOTING (CONT.)
• Refresh the VeSync menu by swiping down on the screen.
• Delete your oine sensor from the VeSync app. Swipe left
(iOS®) or press and hold (Android™), then tap Delete. Restart
the sensor’s pairing process with the VeSync app.
Note: Power outages, internet outages, or changing Wi-Fi
routers may cause your sensor to go oine.
If your problem is not listed, please contact Customer Support
(see page 34).

27
NOTE: This equipment has been tested and found to comply with
the limits for a digital device, pursuant to the FCC Rules. These
limits are designed to provide reasonable protection against
harmful interference in a residential installation. This equipment
generates, uses and can radiate radio frequency energy and, if not
installed and used in accordance with the instructions, may cause
harmful interference to radio communications. However, there is no
guarantee that interference will not occur in a particular installation. If
this equipment does cause harmful interference to radio or television
reception, which can be determined by turning the equipment o and
on, the user is encouraged to try to correct the interference by one or
more of the following measures:
• Reorient or relocate the receiving antenna.
• Increase the separation between the equipment and
receiver.
• Connect the equipment into an outlet on a circuit dierent
from that to which the receiver is connected.
• Consult the dealer or an experienced radio/TV technician
for help.
FEDERAL COMMUNICATION COMMISSION
INTERFERENCE STATEMENT (CONT.)

28
FEDERAL COMMUNICATION COMMISSION
INTERFERENCE STATEMENT (CONT.)
FCC Caution: Any changes or modifications not expressly approved
by the party responsible for compliance could void the user’s authority
to operate this equipment.
FCC RADIATION EXPOSURE STATEMENT
FCC SDOC SUPPLIER'S DECLARATION OF
CONFORMITY
This equipment complies with FCC radiation exposure limits set forth
for an uncontrolled environment. End users must follow the specific
operating instructions for satisfying RF exposure compliance. To
maintain compliance with FCC RF exposure compliance requirements,
please follow operation instructions as documented in this manual.
This transmitter must not be co-located or operating in conjunction
with any other antenna or transmitter. This equipment should be
installed and operated with a minimum distance of 20 cm between
the radiator and your body. The availability of some specific channels
and/or operational frequency bands are country dependent and
are firmware programmed at the factory to match the intended
destination. The firmware setting is not accessible by the end user.
Arovast Corporation hereby declares that this equipment is in
compliance with the FCC. The declaration of conformity may be
consulted in the support section of our website, accessible from
www.levoit.com.
29
Warranty Information
Terms & Policy
Arovast Corporation (“Arovast”) warrants this product to the
original purchaser to be free from defects in material and
workmanship, under normal use and conditions, for a period of
2 years from the date of original purchase.
Arovast agrees, at our option during the warranty period,
to repair any defect in material or workmanship or furnish
an equal product in exchange without charge, subject to
verification of the defect or malfunction and proof of the date
of purchase.
Product Name Aura™ Sensor
Model LTM-AS041S-WUS
For your own reference, we strongly recommend
that you record your order ID and date of purchase.
Date of Purchase
Order ID

30
There is no other express warranty. This warranty does
not apply:
• If the product has been modified from its
original condition;
• If the product has not been used in accordance with
directions and instructions in the user manual;
• To damages or defects caused by accident, abuse,
misuse or improper or inadequate maintenance;
• To damages or defects caused by service or repair
of the product performed by an unauthorized
service provider or by anyone other than Arovast;
• To damages or defects occurring during commercial
use, rental use, or any use for which the product is
not intended;
• To damages or defects exceeding the cost of the
product.
WARRANTY INFORMATION (CONT.)

31
WARRANTY INFORMATION (CONT.)
Arovast will not be liable for indirect, incidental, or
consequential damages in connection with the use of the
product covered by this warranty.
This warranty extends only to the original consumer purchaser
of the product and is not transferable to any subsequent owner
of the product regardless of whether the product is transferred
during the specified term of the warranty.
This warranty does not extend to products purchased from
unauthorized sellers. Arovast’s warranty extends only to
products purchased from authorized sellers that are subject
to Arovast’s quality controls and have agreed to follow its
quality controls.
All implied warranties are limited to the period of this limited
warranty.

32
WARRANTY INFORMATION (CONT.)
This warranty gives you specific legal rights and you may
also have other rights which vary from state to state. Some
states do not allow the exclusion or limitation of incidental or
consequential damages, so the above limitation or exclusion
may not apply to you.
If you discover that your product is defective within the
specified warranty period, please contact Customer Support
via [email protected]. DO NOT dispose of your product
before contacting us. Once our Customer Support Team has
approved your request, please return the product with a copy
of the invoice and order ID.
Every Levoit product automatically includes a 2-year warranty.
To make the customer support process quick and easy, register
your product online at www.levoit.com/warranty.

33
WARRANTY INFORMATION (CONT.)
This warranty is made by:
Arovast Corporation
1202 N. Miller St., Suite A
Anaheim, CA 92806

34
Customer Support
If you have any questions or concerns about your
new product, please contact our helpful Customer
Support Team.
Arovast Corporation
1202 N. Miller St., Suite A
Anaheim, CA 92806
Support Hours
Mon–Fri, 9:00 am–5:00 pm PST/PDT
Email: [email protected]
Toll-Free: (888) 726-8520
*Please have your order invoice and order ID
ready before contacting Customer Support.

35
Attributions
Amazon, Alexa, and all related logos are trademarks of
Amazon.com, Inc. or its aliates.
App Store® is a trademark of Apple Inc.
Google, Android, and Google Play are trademarks of Google
LLC.
iOS is a registered trademark of Cisco Systems, Inc. and/or its
aliates in the United States and certain other countries.
Zigbee Alliance’s trademarks and logos, and all goodwill
associated therewith, are the exclusive property of the Zigbee
Alliance.

/LEVOITLIFESTYLE
/LEVOIT
/LEVOIT
/LEVOIT
LEVOIT.COM
MF041422RF-M1_0322LTM-AS041S-WUS