
ROBOT VACUUM CLEANER
INSTRUCTION
MANUAL
Please read the manual before use

CONTENTS
SAFETY INSTRUCTIONS 01
TECHNICAL DATA 08
IN THE BOX 09
Components in Package
Introduction to Parts of Robot Vacuum
GETTING STARTED 16
Start / Pause / Resume
SPOT Cleaning
Recharge
App Guide
MAINTENANCE AND COMMON
PROBLEMS 18
Dustbin / Water Tank / Filter (Clean
as needed)
Main Brush (Weekly cleaning is
recommended)
Side Brush (Weekly cleaning is
recommended)
Main Wheels (Weekly cleaning is
recommended)
Mop Assembly
Sensor and Charging Contacts (Weekly
cleaning is recommended)
Common Problems
PREPARATIONS BEFORE USE 11
Installation of Charging Base
Installation of Side Brush to Robot Vacuum
Power on & Charging
Wireless Network Connection
with obode App
Preparations of the Water Tank
Environmental Requirements
16
16
16
17
09
10
11
11
12
13
15
15
18
19
20
20
21
22
23

SAFETY INSTRUCTIONS
1
WARNING
IMPORTANT SAFETY INSTRUCTIONS
Turn o all controls before unplugging.
Do not use outdoors or on wet surfaces.
Do not allow to be used as a toy. Close attention is necessary when used by
or near children, pets or plants.
Use only as described in this manual. Use only manufacturer’s recommended
attachments.
Do not use with damaged cord or plug. If appliance or Docking Station is not
working as it should, has been dropped, damaged, left outdoors, or dropped
into water, return it to a service center.
Do not pull or carry by cord,use cord as a handle, close a door on cord, or
pull cord around sharp edges or corners. Do not run appliance over
cord.Keep cord away from heated surfaces.
Do not unplug by pulling on cord. To unplug, grasp the plug, not the cord.
Do not handle charger, including charger plug, and charger terminals with
wet hands.
Do not put any object into openings. Do not use with any opening blocked;
Keep the opening free of dust, lint, hair, and anything that may reduce air
flow.
Keep hair, loose clothing, fingers, and all parts of body away from openings
and moving parts.
Do not use to pick up flammable or combustible liquids, such as gasoline, or
use in areas where they may be present.
Do not pick up anything that is burning or smoking, such as cigarettes,
matches, or hot ashes.
1.
2.
3.
4.
5.
6.
7.
8.
9.
10.
11.
12.
To reduce the risk of fire,electric shock,or injury:
When using an electrical appliance, basic
precautions should always be followed, including the following:
READ ALL INSTRUCTIONS BEFORE USING (THIS APPLIANCE), Failure to
follow the warnings and instructions may result in electric shock, fire and/or
serious injury.

SAFETY INSTRUCTIONS
2
13.
14.
15.
16.
17.
18.
19.
20.
21.
22.
23.
Do not use without dust bin and/or filters in place.
Prevent unintentional starting. Ensure the switch is in the o-position
before connecting to battery pack, picking up or carrying the appliance.
Carrying the appliance with your finger on the switch or energizing appli-
ance that have the switch on invites accidents.
Recharge only with the charger specified by the manufacturer. A charger
that is suitable for one type of battery pack may create a risk of fire when
used with another battery pack.
Use appliances only with specifically designated battery packs. Use of any
other battery packs may create a risk of injury and fire.
When battery pack is not in use, keep it away from other metal objects, like
paper clips, coins, keys, nails, screws or other small metal objects, that can
make a connection from one terminal to another. Shorting the battery
terminals together may cause burns or a fire.
Under abusive conditions, liquid may be ejected from the battery; avoid
contact. If contact accidentally occurs, flush with water. If liquid contacts
eyes, seek medical help immediately.
Liquid ejected from the battery may cause irritation or burns.
Do not use a battery pack or appliance that is damaged or modified.
Damaged or modified batteries may exhibit unpredictable behavior
resulting in fire, explosion or risk of injury.
Do not expose a battery pack or appliance to fire or excessive tempera-
ture. Exposure to fire or temperature above 130°C may cause explosion.
Do not use and store in extremely hot or cold environments (It is recom-
mended to use in temperature -10°C-40°C and store in temperature
-20°C-40°C). Please charge the robot in temperature above 4°C and below
40°C.
Follow all charging instructions and do not charge the battery pack or
appliance outside of the temperature range specified in the instructions.
Charging improperly or at temperatures outside of the specified range may
damage the battery and increase the risk of fire.
Have servicing performed by a qualified repair person using only identical
replacementparts. This will ensure that the safety of the product is main-
tained.

SAFETY INSTRUCTIONS
3
24.
25.
26.
27.
28.
29.
30.
31.
32.
33.
34.
35.
36.
Do not modify or attempt to repair the appliance or the battery pack
except as indicated in the instructions for use and care.
Place the cords from other appliances out of the area to be cleaned.
Do not operate the vacuum in a room where an infant or child is sleeping.
Do not operate the vacuum in an area where there are lit candles or fragile
objects on the floor to be cleaned.
Do not operate the vacuum in a room that has lit candles on furniture that
the vacuum may accidentally hit or bump into.
Do not allow children to sit on the vacuum.
Do not use the vacuum on a wet surface.
Do not use the Docking Station if it is damaged.
Turn o the power switch before cleaning or maintaining the appliance.
The plug must be removed from the receptacle before cleaning or maintain
the Docking Station.
Remove the appliance from the docking station and turn o the power
switch to the appliance before removing the battery for disposal of the
appliance.
If the robot will not be used for a long time, fully charge the robot and
power OFF for storage and unplug the charger.
Use only with DC2113 docking station.
CAUTION:
RISK OF INJURY. BRUSH MAY START UNEXPECTEDLY.
REMOVE MAIN BRUSH BEFORE CLEANING OR SERVICING.

SAFETY INSTRUCTIONS
4
CAUTION:
"IMPORTANT SAFETY INSTRUCTIONS – SAVE THESE INSTRUCTIONS" and
"DANGER – TO REDUCE THE RISK OF FIRE OR ELECTRIC SHOCK, CARE-
FULLY FOLLOW THESE INSTRUCTIONS".
This appliance is not intended for use by persons (including children) with
reduced physical, sensory or mental capabilities, or lack of experience and
knowledge, unless they have been given supervision or instruction concern-
ing use of the appliance by a person responsible for their safety.
Children should be supervised to ensure that they do not play with the
appliance.
Cleaning and user maintenance shall not be made by children without
supervision.
If the supply cord is damaged, it must be replaced by a special cord or
assembly available from the manufacturer or its service agent.
Docking station is only applicable to the product A8.
Warning: The battery charger (Docking station) is not intended to charge
non-rechargeable batteries.
1.
2.
3.
4.
5.
6.
Please read the instruction sheet carefully before use
WARNING FOR BATTERY
1.
2.
3.
4.
5.
6.
7.
8.
9.
The product must be powered o before removing the battery.
Please note that do not disassemble the battery by yourself.
If you need to replace it, please contact the after-sales service center.
Please dispose of used battery according to local laws and regulations.
Do not dismantle, open or shred the battery.
Do not expose batteries to heat or fire. Avoid storage in direct sunlight.
Do not short-circuit a battery.
Do not store batteries haphazardly in a box or drawer where they may
short-circuit each other or be short-circuited by other metal objects.
Do not subject batteries to mechanical shock.
1.
2.
3.
4.
5.
6.
7.
8.
9.
10.
11.
12.
SAFETY INSTRUCTIONS
5
[symbol IEC 60417-5957
( 2004-12 )]
[symbol ISO 7000-0790
( 2004-01 )]
[symbol IEC 60417-5031
( 2002-10 )]
[symbol IEC 60417-5032
( 2002-10 )]
[symbol IEC 60417-5172
( 2003-02 )]
time-lag miniature fuse-link where X is the symbol for the
time/current characteristic as given in IEC 60127
for indoor use only
read operator's manual
direct current
alternating current
class II equipment
ON
OFF
In the event of a leaking, do not allow the liquid to come in contact with the
skin or eyes. If contact has been made, wash the aected area with copious
amounts of water and seek medical advice.
Do not use any charger other than that specifically provided for use with
the equipment.
Do not use any battery which is not designed for use with the equipment.
Do not mix dierent manufacture, capacity, size or type within a device.
Keep batteries out of the reach of children.
10.
11.
12.
13.
14.

SAFETY INSTRUCTIONS
6
SAVE THESE INSTRUCTIONS
Household use only
CLASS 1 LASER PRODUCT
INVISIBLE LASER RADIATION
1.
2.
The way this machine triggers entering energy saving mode: In
standby or charging state, press and hold the docking button or laser
radar for 20s, all the indicator lights will turn o, and the machine
enters energy saving mode;
Exit energy saving mode: In energy saving mode, press the power
button, the machine will restart after power on, and exit energy saving
mode.
This device complies with DHHS Radiation Rules, 21CFR Chapter 1, Subchapter J.
Seek medical advice immediately if the battery has been swallowed.
Keep batteries clean and dry.
Do not leave a battery on prolonged charge when not in use.
After extended periods of storage, it may be necessary to charge and
discharge the batteries several times to obtain maximum performance.
The batteries give their best performance when they are operated at
normal room temperature (20 °C ± 5 °C).
Retain the original product literature for future reference.
The battery may be irreversibly damaged if the battery is in low power for
a long time. It is recommended that the battery retain sucient power
before storage.
15.
16.
17.
18.
19.
20.
21.
To reduce the risk of electric shock, this appliance has a polarized plug (one
blade is wider than the other). This plug will fit in apolarized outlet only one
way. If the plug does not fit fully in the outlet, reverse the plug. If it still does
not fit, contact a qualified electrician to install the proper outlet. Do not change
the plug in any way.

SAFETY INSTRUCTIONS
7
CAUTION:
Please read the instruction sheet carefully before use
This device complies with Part 15 of the FCC Rules.Operation is subject to the
following two conditions:
-this device may not cause harmful interference.
-this device must accept any interference received, including interference that
may cause undesired operation.
-Changes or modifications not expressly approved by the party responsible for
compliance could void the user's authority to operate the equipment. This
equipment has been tested and found to comply with the limits for a Class B
digital device, pursuant to part 15 of the FCC Rules. These limits are designed
to provide reasonable protection against harmful interference in a residential
installation.
This equipment generates uses and can radiate radio frequency energy and, if
not installed and used in accordance with the instructions, may cause harmful
interference to radio communications.However, there is no guarantee that
interference will not occur in a particular installation.If this equipment does
cause harmful interference to radio or television reception, which can be
determined by turning the equipment o and on, the user is encouraged to try
to correct the interference by one or more of the following measures:
—Reorient or relocate the receiving antenna.
—Increase the separation between the equipment and receiver.
—Connect the equipment into an outlet on a circuit dierent from that to which
the receiver is connected.
—Consult the dealer or an experienced radio/TV technician for help.
MPE Reminding
To satisfy FCC RF exposure requirements,a separation distance of 20 cm or
more should be maintained between the antenna of this device and persons
during device operation.
To ensure compliance, operations at distance that closer than this is not
recommended.
FCC COMPLIANCE STATEMENT

Product Model: A8
Host Charging Voltage: 16.7V
Host Rated Voltage: 14.4V
Host Rated Power: 55W
Docking Station Model: DC2113
Docking Station Input: 100-240V~,50-60Hz,24W
Docking Station Output: 16.7V , 1A
Battery Model: BP14452C
Battery Rated Voltage: 14.4V
Battery Capacity: 5200mAh 74.88Wh
Charging Limit Voltage: 16.8V
1.
2.
3.
4.
5.
6.
7.
8.
9.
10.
11.
TECHNICAL DATA
8
Midea Robozone Technology Co.,Ltd
No.39 Caohu Avenue, Xiangcheng Economic
Development Zone, Suzhou, Jiangsu, China
Company: Midea America Corp.
Address: 300 Kimball DriveSuite 201, Parsippany, NJ, USA 07054
Note: You can also view the instructions on the app.
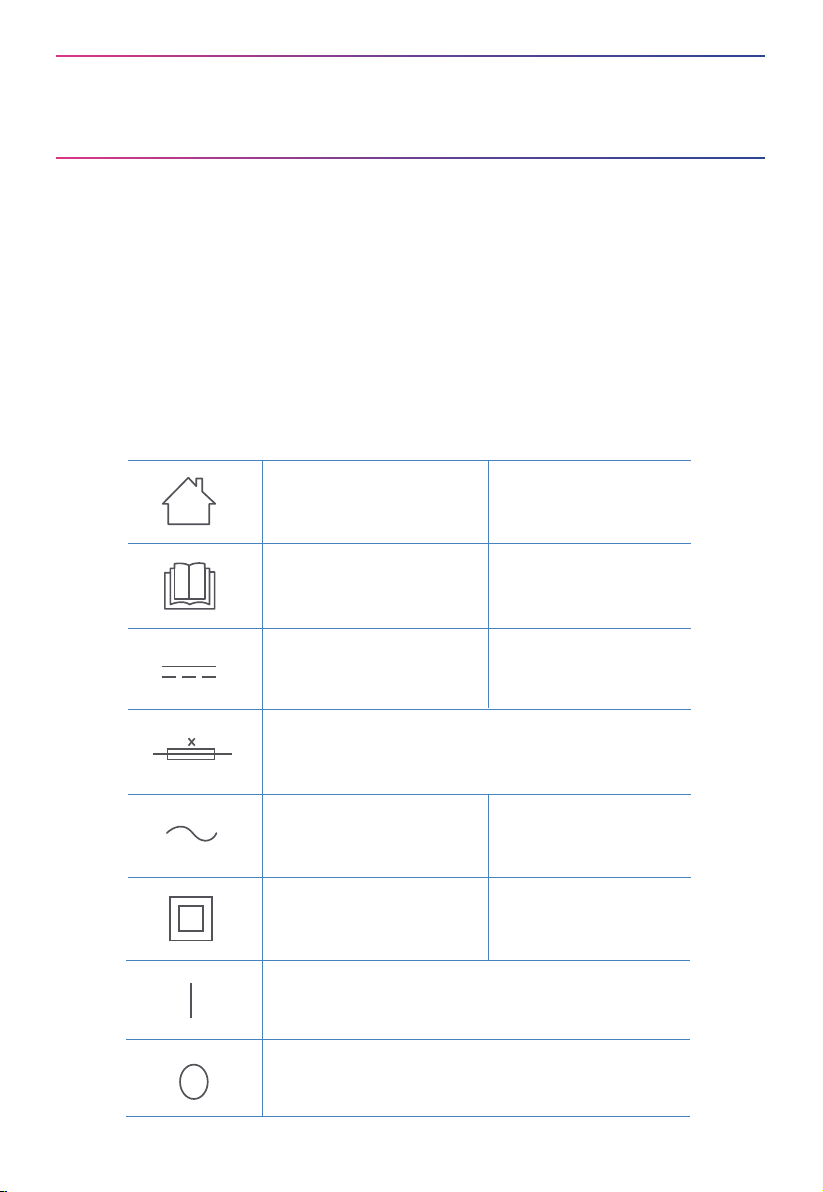
IN THE BOX
9
155mm
230mm
138mm
350mm
350mm
97mm
Components in Package
Robot Vacuum Charging Base
FilterSide Brush x4
Cleaning Brush
Instruction Manual
Mopping Cloth
IN THE BOX
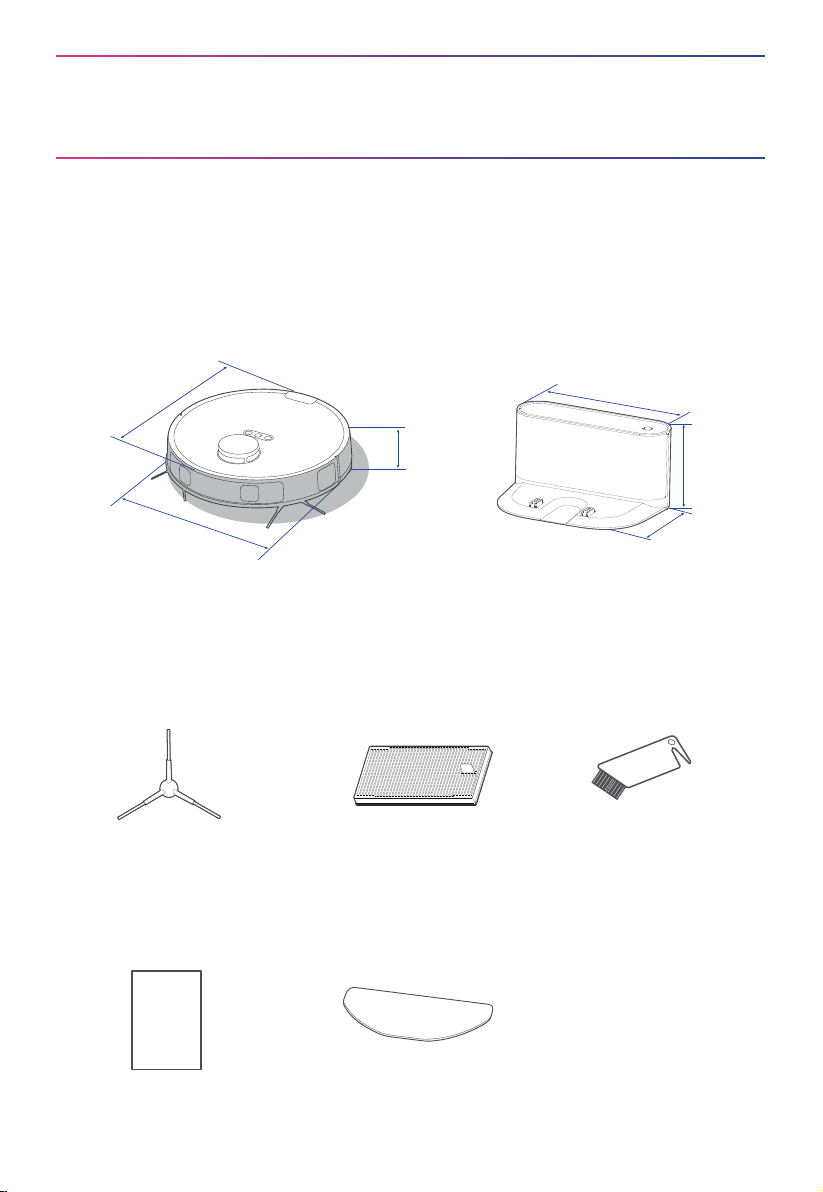
10
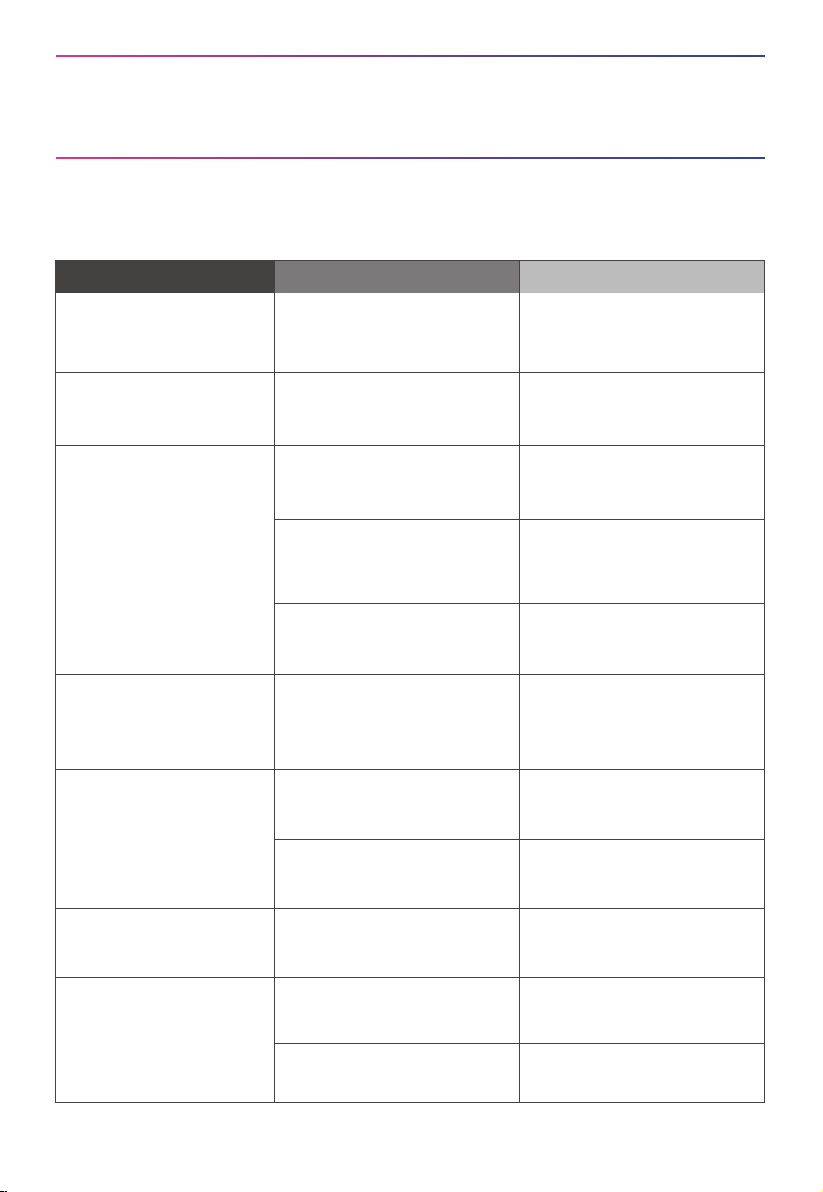
Main View
Introduction to Parts of Robot Vacuum
Bottom View
Carpet Detection
Sensor
Auto-lifting mop
Assembly
Power Button
Network / Spot
Cleaning Button
Bumper
LiDAR Sensor
Recharging Button
Dustbin /
Water Tank
Dustbin Release
Button
Cli Sensors
Omni-directional
Wheel
Side Brush
Main Wheel
Cover Plate of
Main Brush
Charging Contacts
Main Brush
Edge Sensor
Release Button of
Auto-lifting mop
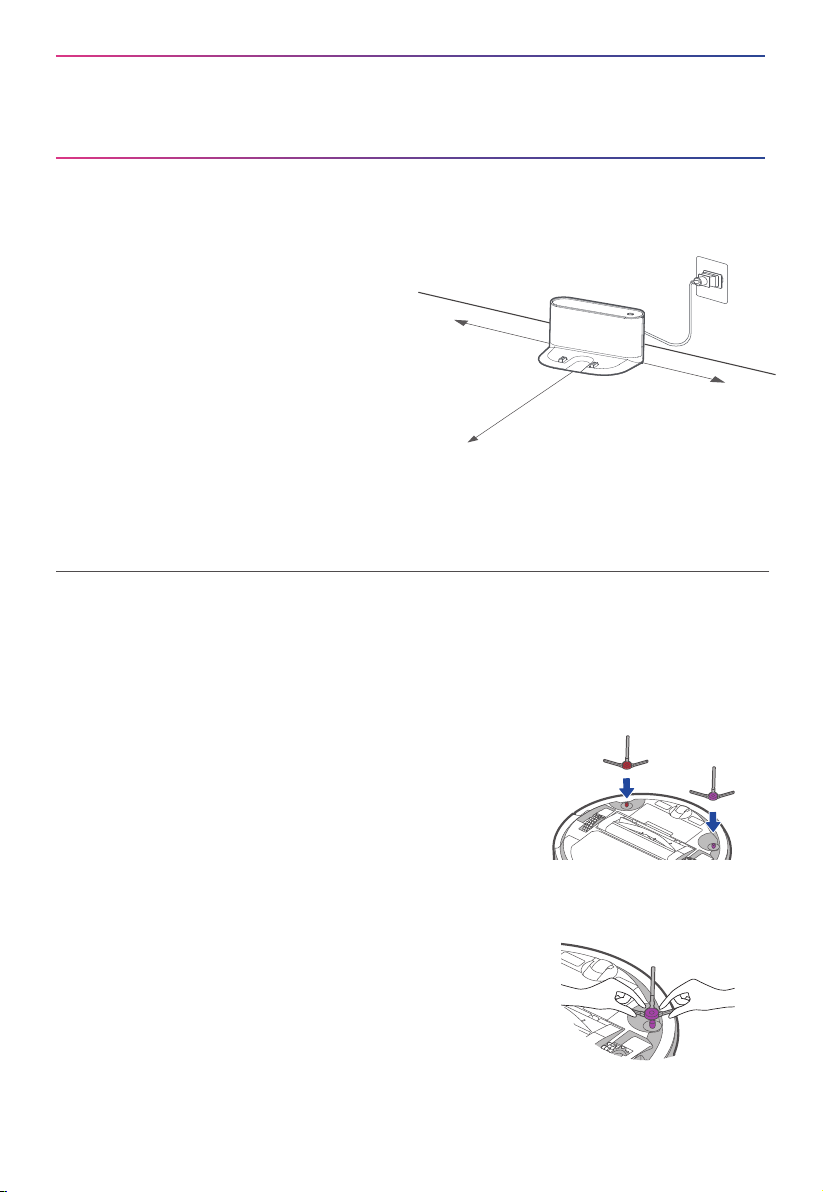
Installation of Charging Base
PREPARATIONS BEFORE USE
11
≥ 4.92 ft (1.5m)
≥ 1.64 ft (0.5m)
≥ 1.64 ft (0.5m)
Notes
1. Avoid placing the robot and the base under direct sunlight.
2. Do not cover the signal transmission area of charging base with stickers or other objects.
3. Be sure to keep the charging area dry.
Place the charging base flat against the wall
on a level surface.
If there is any charging base for other robot
vacuum cleaners in the room, please put it
away before use of our charging base to
avoid mismatching.
Place the charging base in an area covered
with wireless network signal to ensure stable
network connection of the robot and proper
function of the App.
Store the excess cords into the slot at the
back of the charging base to avoid aecting
the proper function of the robot vacuum.
1
2
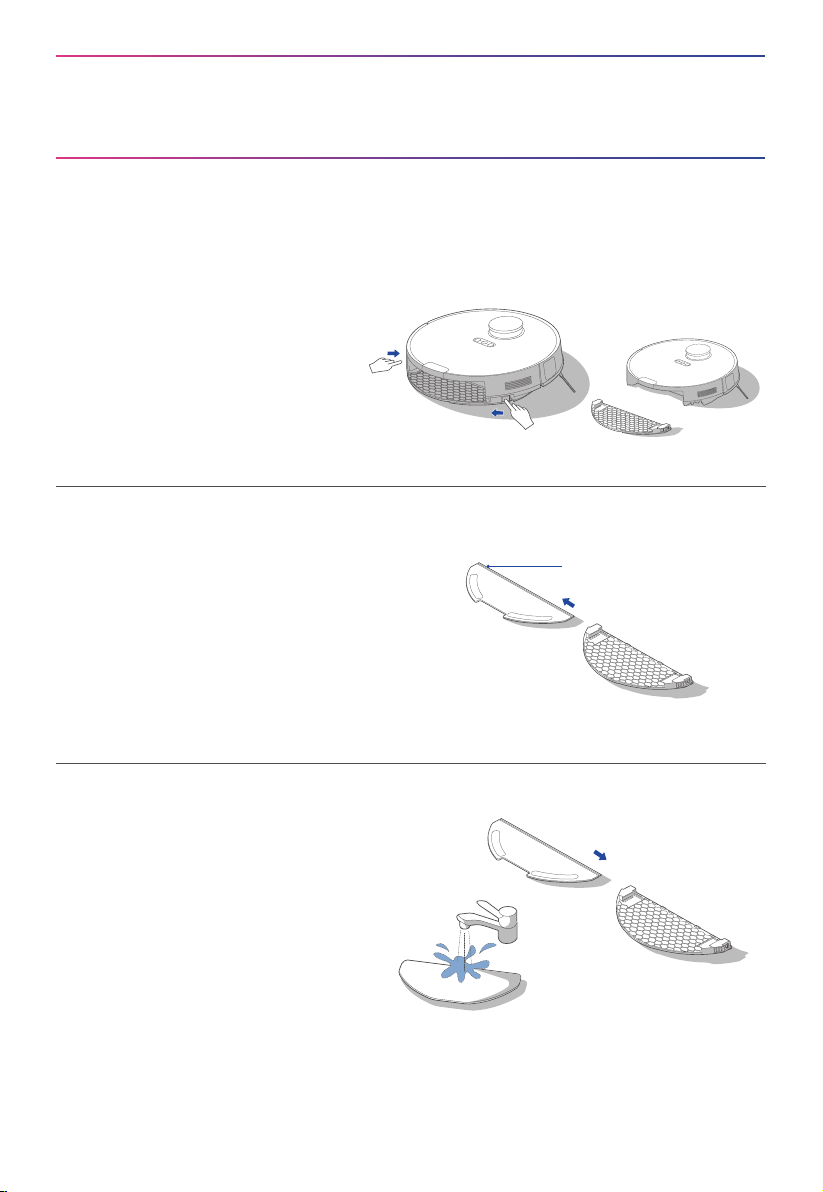
Installation of Side Brush to Robot Vacuum
Turn the main unit over. Attach the side brush to its
color-matched post and press down until they fit into
place.
1
To remove the side brush, grab the rubber-coated legs of
the side brush with both hands (be careful not to pull the
hair bundle vigorously) and pull it out.
2
PREPARATIONS BEFORE USE
12
Power on & Charging
Press and hold " " for 3 seconds to power on the
robot vacuum. After the power indicator turns on, put
the robot vacuum into the charging base for charging,
as shown. We recommend you charge the robot for
at least 6 hours before using it for the first time.
Notes
1. When the battery level is too low, the robot cannot be turned on. Please charge before using.
2. The robot will not be turned o when placed on the charging base. To turn the battery o, remove
the robot from the base, press and hold for 3s to shut it down. All indicators will be turned o.
3. To ensure that the robot is always ready for use, keep it in the charging state.
4. If you manually put the robot vacuum into the base, ensure that the charging contacts of both the
robot and the base are connected. When placed correctly, there should be some distance between
the robot’s bumper and the charging base.
5. For long-term storage, remove the robot from the base, turn it o and store it in a cool, dry place.
If the robot is not used for more than 3 months, allow it to get charged for at least 12 hours before
using. To preserve the battery lifespan, we suggest you fully charge the battery at least once every
six months.
o stable light o
1) Robot is in standby mode, or
2) Cleaning in progress, or
3) Robot is fully charged.
stable light stable light
battery level ≥ 20%, robot has
finished its mission and is going
to recharge
o
Status
stable light flash quickly
battery level < 20%, robot is
going to recharge
o
flash slowly o Robot is chargingo
flash quickly o
Error has occurred, see
"common problems"
o
Indicator Light
PREPARATIONS BEFORE USE
13
Wireless Network Connection with obode App
Ensure your phone is connected to the wireless network
that you wish to operate the robot with and Bluetooth is
turned on.
1
Add your robot vacuum to your App.
Press the " + " button shown in the App and select A8
from the available list of products.
3
Register and login
personal account
Add Equipment
Download App: Scan the QR code or search for “obode
Life” in the Apple or Google Play Store to download the
App.
Open the app and create your personal account. Follow
instructions on the screen.
2
Connect your robot to your wireless network.
After assembling and powering on the robot, press and
hold " " button for 3 seconds until a beep sound is
heard. The wireless network indicator light should start
flashing. Follow instructions on App for next steps.
4
flash slowly stable light o
Robot is waiting for network
configuration
stable light o
Robot is trying to connect to
network
flash quickly
Status
stable light o Spot cleaning is in progressstable light

PREPARATIONS BEFORE USE
14
Notes
If your home Wi-Fi name or password is changed, you will need to re-establish connection with your
robot.
1. App supports iOS 10.0 and above, Android 6.0 and above phone system versions, but pad device
is not accepted; generally the phone system version can be checked through the "Settings-About
Phone" on the phone.
2. This model does not support WEP encrypted router.
3. The robot supports 2.4GHz network exclusively. 5GHz frequency range is currently incompatible.
4. Wi-Fi is mandatory for network accessing configuration of the robot; once the network accessing
is configured successfully, the App may be operated in Wi-Fi/2G/3G/4G/5G network environment,
and the robot may be controlled remotely.
5. If your home's Wi-Fi password or router is changed, the robot vacuum cleaner will be displayed as
oine on the App: you only need to re-configure the network once again.
6. If others want to use the App to operate the same robot, they will need to be invited on App by
the family creator to join in (in the condition that the invitee has downloaded App and has
registered an account).
7. When the App changes, the old users may be asked to remove their device in the mobile App and
the new users will just need to configure directly their network by accessing in accordance with
network access instructions.
8. Reset Wi-Fi: If there is something wrong with the network connection, you can try to reset the
Wi-Fi by pressing and holding the network configuration button for 3 seconds. After that, the robot
will enter the pairing state, and you can re-try the connection.
15
PREPARATIONS BEFORE USE
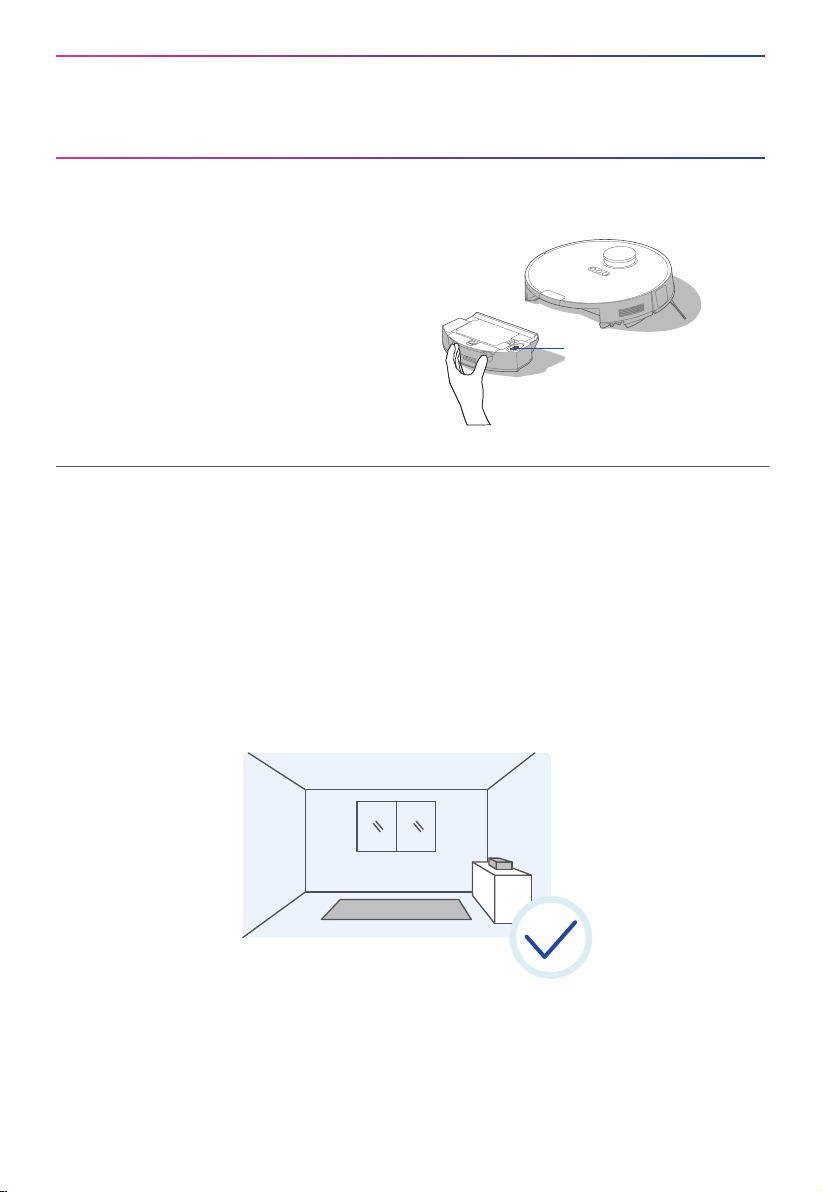
Environmental Requirements
Before using the robot, please make sure the area to be cleaned is free from items that may be
tangled/stuck with the robot (such as wires, hard objects, iron nails, glasses and other sharp
fragments), and items that may be dragged or knocked down by the robot (such as fragile,
precious and dangerous objects likely to fall) to avoid any possible personal injury or property
damage.
Preparations of the Water Tank
When using the mopping function, press the
dustbin release button to remove the
dustbin. Open the tank lid, fill the water tank
with cold water, and securely close the lid.
Place the dustbin back into the robot.
Water Inlet/Outlet
Notes
Do not add hot water or detergent into the tank to prevent clogging.
GETTING STARTED
16
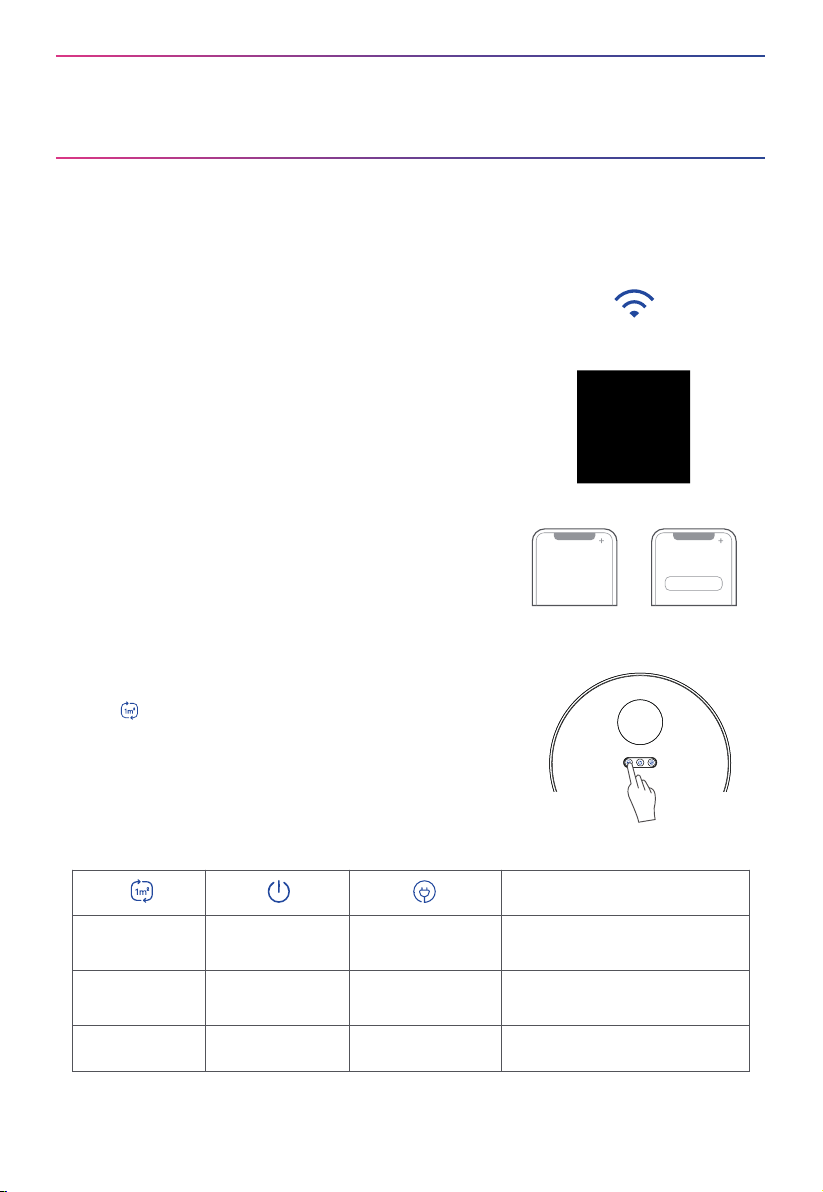
Start / Pause / Resume
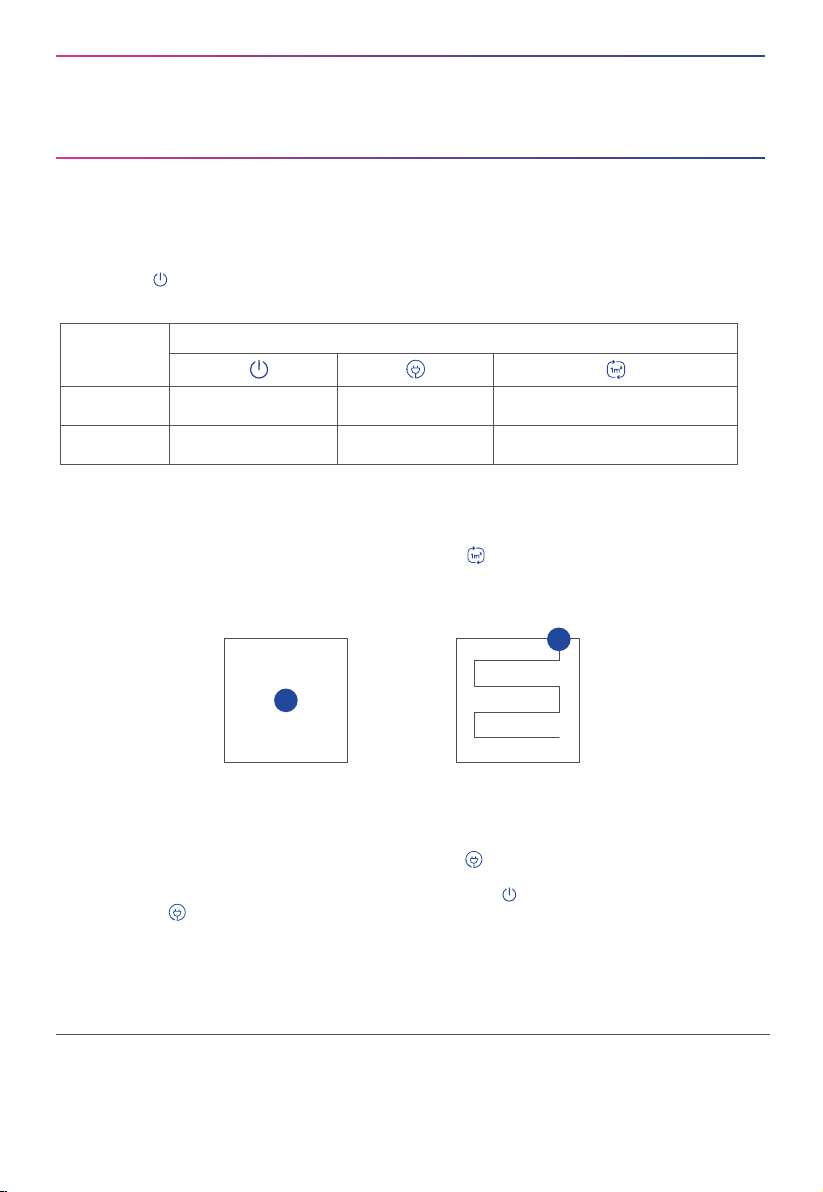
Briefly Press " " to start/pause/resume cleaning or use your App to control.
SPOT Cleaning
When the robot vacuum is in standby/pause mode, press " " to start spot cleaning. The robot
will begin to clean an area of one square meter centered on itself. After spot cleaning, the robot
will automatically return to the charging base to recharge.
Note that starting the spot cleaning mode will automatically stop the current cleaning cycle.
① When the robot vacuum is in standby mode, press " " and the robot vacuum will start
recharging.
② When the robot vacuum is in cleaning process, pressing " " can stop cleaning, and
then press " " can start recharging.
Under special circumstances (such as power depletion, robot vacuum jamming, etc.), the
robot vacuum may not be able to recharge automatically. Please manually place the robot
vacuum back to the charging base.
Recharge
1
2
1.0m 1.0m
1.0m 1.0m
Operation
Short Press
Start/resume/pause Return to the base Start spot cleaning
Shut down
/
Enter the Wi-Fi pairing state
Press and
hold for 3s
Button
Notes
1. The robot vacuum will enter sleep mode when it is in standby mode for more than 10 minutes. In
sleep mode, press any key to wake up the robot vacuum.
2. Do not immerse the robot in water. Doing so may damage the equipment, causing short-circuit
or current leakage.

GETTING STARTED
17
Press to exit the
current page
Settings
Map album
Battery level
Current status of the robot
Press to start cleaning
Set No-Go Zone
Whole house cleaning
Room cleaning
Cleaned area of the robot
Zone cleaning
Cleaned time of
the robot
Cleaning mode
Press to start recharging
Notes
The content of the App is subject to the upgraded version of the App. The interface is only for
reference, and will be updated continuously.
App Guide
MAINTENANCE AND COMMON
PROBLEMS
18
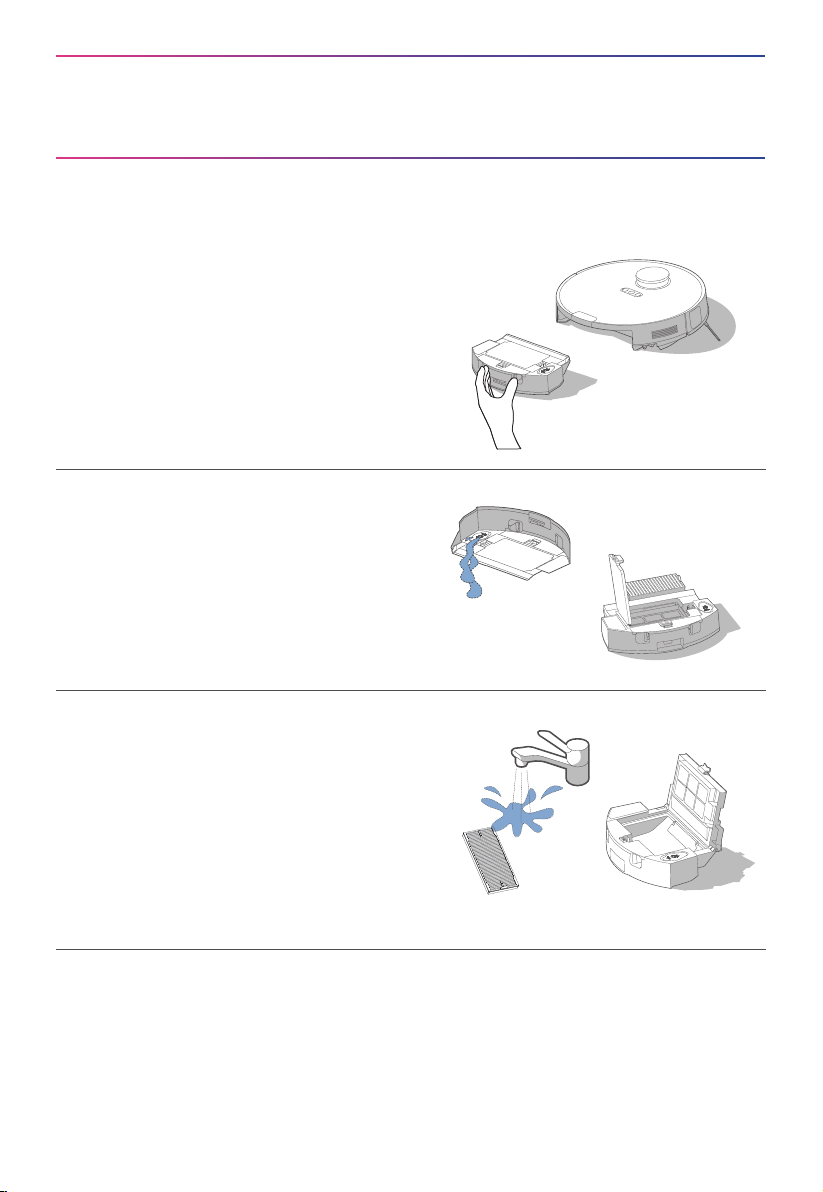
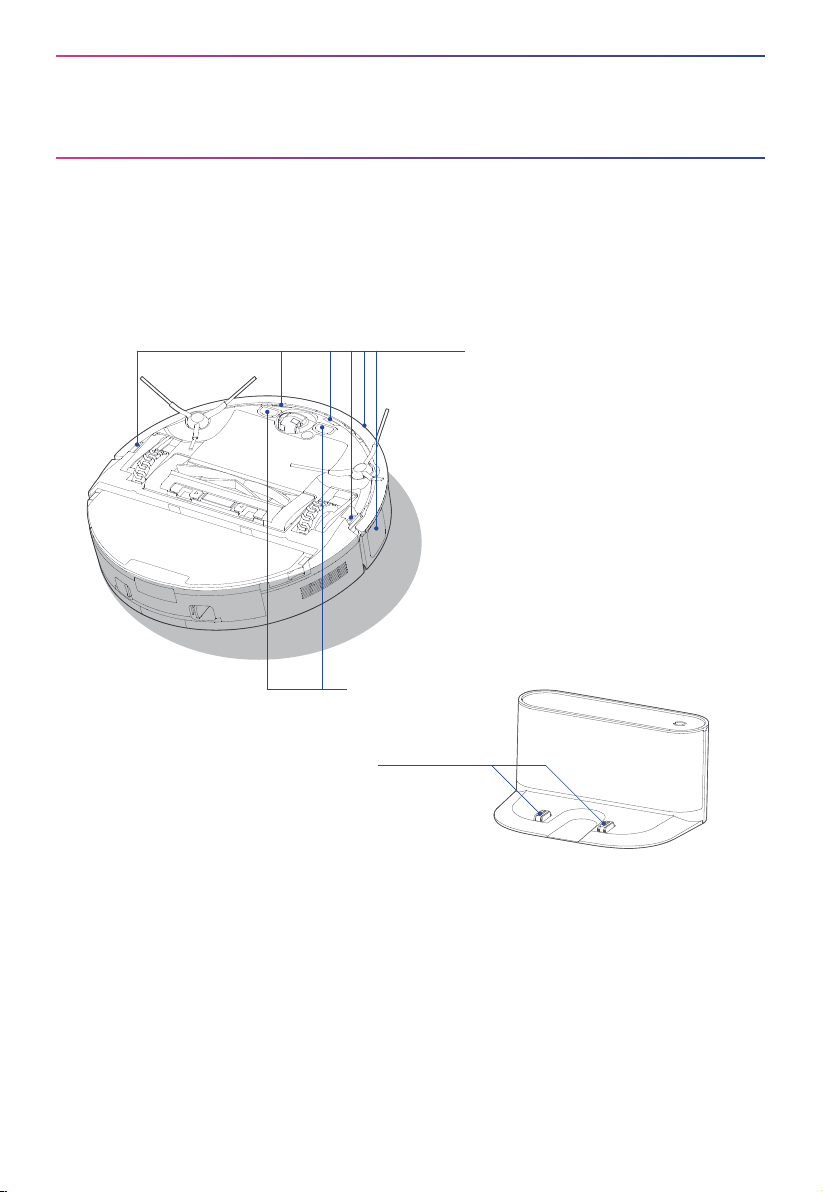
Dustbin / Water Tank / Filter(Clean as needed)
Remove debris by tapping the filter against
your garbage bin. You can clean the
dustbin, the filter and filter mesh with water,
but remember to dry them THOROUGHLY
before reinserting them into the robot (Do
not clean the filter elements with
detergents).
3
Open the lid of the water tank and clean
out the remaining water. Open the lid of
the dustbin and take out the filter.
2
Reinsert the dustbin into the robot. It is recommended to clean the filter elements every week
and replace them every 1-3 months.
4
1
Take out the dustbin:
Press the dustbin release button as shown
and take out the dustbin.
MAINTENANCE AND COMMON
PROBLEMS
19
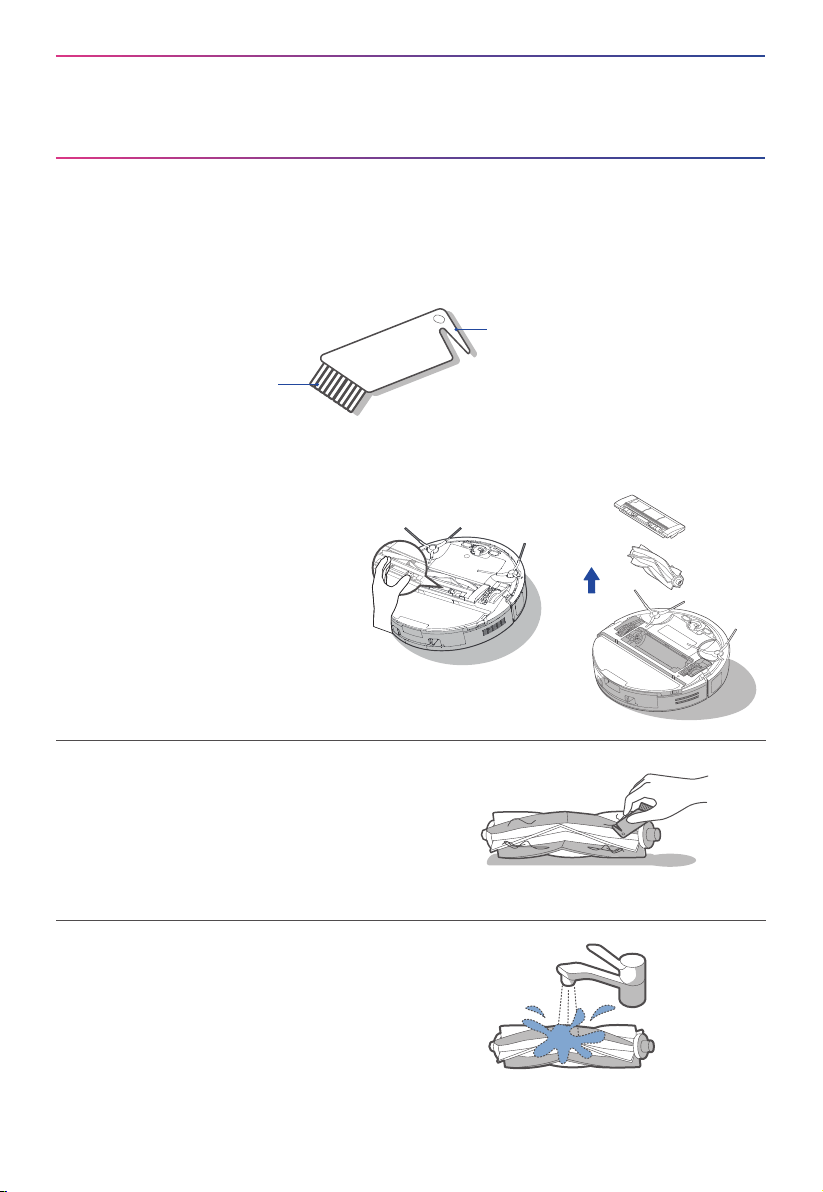
Clean the main brush and its cover plate
with the cleaning brush or a soft cloth.
2
Turn the main unit over. Put
your hand on the notch on the
upper part of the cover plate of
the main brush, press down to
release the cover plate of the
main brush and pull it out, and
lift the right side of the main
brush to take it out.
1
Wash the main brush with water and dry it.
3
Brush
Blade
How to use the cleaning brush:
① Cut the hair entangled on the main brush with the blade.
② Brush o the hair.
Main Brush (Weekly cleaning is recommended)
MAINTENANCE AND COMMON
PROBLEMS
20
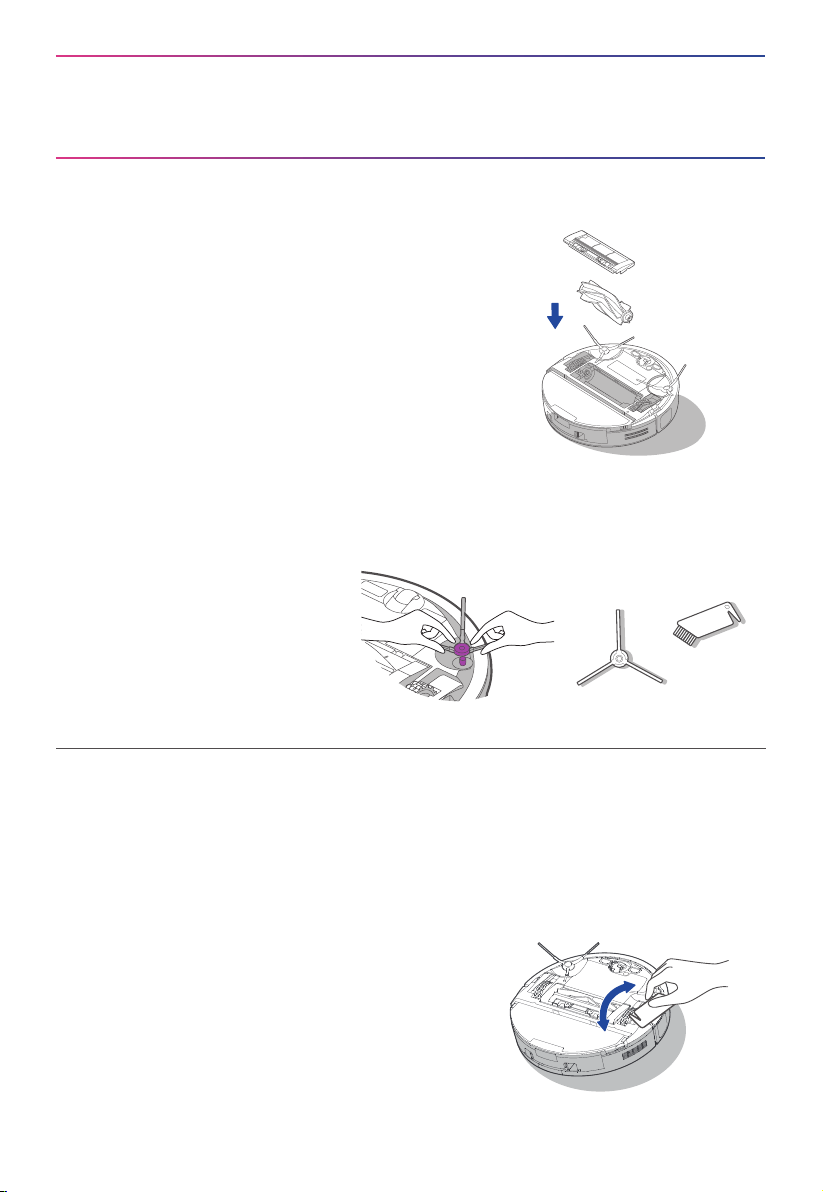
Pull out the side brush.
Remove dust on the side brush.
1
4
After cleaning, press the end cover back to the main
brush body.
Install the main brush body into the main unit
according to the direction shown in the figure. It is
recommended to clean the main brush every week
and replace them every 6 months.
Side Brush (Weekly cleaning is recommended)
Main Wheels (Weekly cleaning is recommended)
Rotate the main wheels back and forth to remove
debris or dust - remove and take out the hair or
debris with the cleaning brush or a soft cloth.
It is recommended to clean the side brush every week and replace them every 6 months.
2
MAINTENANCE AND COMMON
PROBLEMS
21
Remove the mopping cloth from the
mop holder.
2
Release the mop assembly and clean it.
1
3
Mop Assembly
Push/Pull Slot
Wash the mopping cloth with water
and dry it; then place the cleaned
mopping cloth back to the mop holder
and re-install the mop assembly to the
robot.
MAINTENANCE AND COMMON
PROBLEMS
Sensor and Charging Contacts (Weekly cleaning is recommended)
22
Gently wipe the charging contacts
with a dry soft cloth to ensure
normal charging.
Gently wipe the sensor with a
dry soft cloth to remove the
dust on the surface
MAINTENANCE AND COMMON
PROBLEMS
23
The robot vacuum
cannot be recharged
Faults
Possible Causes
The robot vacuum is not in
contact with the charging
contacts.
Place the robot vacuum 1m in
front of the charging base and
press the recharging button.
Actions
Common Problems
The robot vacuum
cannot return for
charging
The charging base is placed
improperly.
Place the charging base on a
level surface that is free of
obstacles.
The robot vacuum is
entangled/stuck by objects
(such as cords) on the floor.
Please put away the scattered
cords and objects on the floor.
The robot vacuum is
trapped
The side brush/main brush is
stuck so that the robot vacuum
cannot move normally.
Remove the objects that caused
the main/side brush to be stuck
and place the robot flat on the
floor and restart.
The robot vacuum is stuck by
obstacles.
Remove the obstacles and
proceed with cleaning, or set
No-go zones in App.
Cleaning process has
not been completed,
but the robot vacuum
returns for charging
The battery level of the robot
vacuum is running low.
Let the robot vacuum return for
recharging.
Fail to clean as
appointment
Scheduled appointment has
been cancelled.
Reset appointment.
The robot vacuum is in "Do Not
Disturb Mode".
Turn o "Do Not Disturb Mode"
or adjust the "do not disturb time
interval".
The robot vacuum
does not work
Left/right wheel is suspended.
Place the robot vacuum flat on
the floor and start the robot
vacuum.
The robot vacuum
moves backward
The protective cover of
navigation module is stuck.
Gently tap the protective cover
to remove dust.
There is obstacle ahead. Remove the obstacle ahead.
MAINTENANCE AND COMMON
PROBLEMS
24
The robot vacuum
moves backward
Faults
Possible Causes
The bumper is stuck.
Gently tap the front bumper to
remove dust.
Actions
There is dust accumulated on
the cli sensors.
Clean the dust accumulated on
the surface of cli sensors.
The robot vacuum has
no sound
· The sound is muted.
· The robot vacuum is in "Do
Not Disturb Mode".
· Turn up the volume.
· Turn o "Do Not Disturb Mode".
The App shows the
connection is
disconnected
· The phone is not connected
to the network normally.
· The router is not working
properly.
· The robot vacuum is not
turned on.
· The network is removed.
· Wi-Fi password or network
has been changed.
· Reconnect the phone network.
· Restart the router.
· Turn on the robot.
· Add new appliances in the App.
· Reset the network by pressing
and holding the
" " button for
3 seconds
· Add the device again following
the phone's instructions.
App operation response
delays
· Wi-Fi signal is weak.
· The network bandwidth is
insucient.
· Restart the router to reduce the
number of access users.
· Check the phone settings.
· Increase the network bandwidth.
For more details, please see the App push notifications for more exception handling.