
English
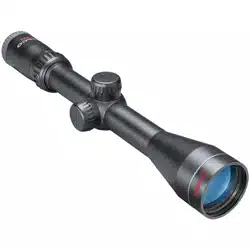
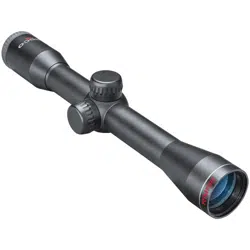
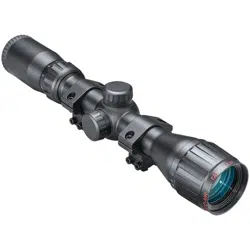
Elevation
Elévation
Elevacion
Objective Lens
Objectif
Objetivo
Windage
Dérivation
Deriva
Eyepiece
Oculaire
Ocular
Power Change Ring
Bague De Réglage De Grossissement
Anillo De Cambio De Potencia
Eyepiece Locking Ring
Anneau de blocage de l’oculaire
Anillo de cierre del ocular
Mount Clamp Screws
Vis de montage
Tornilos de sujecion de la montura
MOUNTING
BE SURE GUN IS NOT LOADED AND ACTION IS OPEN BEFORE PROCEEDING. USE SAFE GUN HANDLING PROCEDURES AT ALL TIMES.
1. Loosen Eyepiece Locking Ring and point scope toward a featureless, atly lit, bright area like a wall or open sky. CAUTION: VIEWING THE
SUN CAN CAUSE SERIOUS EYE INJURY. NEVER LOOK AT THE SUN WITH THIS SCOPE OR EVEN WITH THE NAKED EYE. Rotate eyepiece
left or right as needed until reticle appears sharp and clear to you. Retighten locking ring. You will not have to make this adjustment again.
2. Loosen mount clamp screws. Slide mount into dovetail grooves on receiver of your rie or air gun.
NOTE: Do not attempt to mount this scope on high powered sporting or military ries, as the eye relief is inadequate.
Serious eye damage can result if this scope is used on guns with recoil greater than that of .22 caliber ries and air guns.
3. Move scope forward of backward until eyepiece position is most comfortable for you when rie is held in shooting position. Tighten clamp
screws.
4. If reticle appears, tilted, loosen scope clamp screws and rotate scope until reticle is perpendicular to the bore. Retighten clamp screws.
ZEROING
If a boresighter is available follow the instructions provided with it, or use the method outlined below.
1. At an approved range or other safe area and using proper gun handling safety procedures, test re three rounds at a target.
NOTE: if your scope has a power change ring, test ring should be done at the highest power setting.
2. If bullets or pellets did not strike the point of aim, remove the windage and elevation caps and turn the dials in the direction needed to
bring your next shot group to your point of aim.
3. Repeat step #1.
ONE YEAR LIMITED WARRANTY
Your Tasco
®
riflescope is warranted to be free of defects in materials and workmanship for one year after the date of purchase. In the event of a defect under this
warranty, we will, at our option, repair or replace the product, provided that you return the product postage prepaid. This warranty does not cover damages
caused by misuse, improper handling, installation, or maintenance provided by someone other than a Tasco Authorized Service Department.
Any return made under this warranty must be accompanied by the items listed below:
1. A check/money order in the amount of $10.00 to cover the cost of postage and handling
2. Name and address for product return
3. An explanation of the defect
4. Proof of Date Purchased
Product should be well packed in a sturdy outside shipping carton, to prevent damage in transit, with return postage prepaid to the address listed below:
IN U.S.A. Send To: IN CANADA Send To:
Tasco Tasco
Attn.: Repairs Attn.: Repairs
9200 Cody 140 Great Gulf Drive, Unit B
Overland Park, Kansas 66214 Vaughan, Ontario L4K 5W1
For products purchased outside the United States please contact your local dealer for applicable warranty information.
©2014 B.O.P. Tasco, TM, ®, denote trademarks of B.O.P.
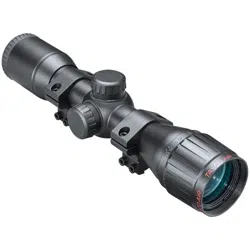
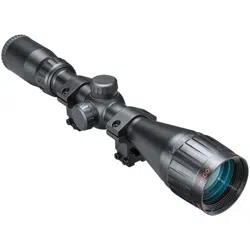
Parts Guide
RIFLESCOPE INSTRUCTION MANUAL
For .22 Caliber Ries and Air Guns
04-14
©2014 B.O.P.
(800) 423-3537 • www.tasco.com

INSTALLATION
VEILLEZ À CE QUE LE FUSIL NE SOIT PAS CHARGÉ ET QUE LE MÉCANISME SOIT OUVERT. IL FAUT TOUJOURS PRENDRE TOUTES LES
PRÉCAUTIONS NÉCESSAIRES DANS LE MANIEMENT DES ARMES À FEU.
1. Desserrez l’anneau de blocage de l’oculaire et pointez la lunette sur une surface lisse avec un bon éclairage uniforme, soit un mur ou le ciel, par
exemple. ATTENTION : L’OBSERVATION DU SOLEIL PEUT ENTRAÎNER DES LESIONS OCULAIRES IRREVERSIBLES. N’OBSERVEZ PAS LE SOLEIL AVEC
CET APPAREIL NI A L’OEIL NU. Tournez l’oculaire de gauche à droite jusqu’à ce que vous ayez une vision claire et nette du réticule. Serrez l’anneau de
blocage. Cet ajustement n’aura pas besoin d’etre répeté.
2. Desserrez les vis de montage. Insérez dans la glissière de xation de votre fusil.
REMARQUE : n’installez pas cet appareil sur des armes puissantes de type sportif ou militaire puisqu’il n’est pas adapté à cet usage.
L’emploi de cette lunette avec des armes dont le recul est supérieur à celui de fusils de calibre .22 ou à air comprimé peut causer d’importantes blessures aux
yeux.
3. Déplacez la lunette d’avant en arrière jusqu’à ce que l’oculaire soit confortable lorsque vous etes en position de tir. Serrez les vis.
4. Si le réticule semble incliné, dévissez les vis de serrage de la lunette et faites-le pivoter jusq’à ce que le réticule soit perpendiculaire au cylindre. Resserrez
les vis.
MISE À ZÉRO
UTILISEZ LE VISEUR D’ÂME (“BORE SIGHTER”) OU SUIVEZ LES INSTRUCTIONS SUIVANTES.
1. Dans un champ de tir ou tout autre endroit approprié, et conformément aux mesures de sécurité, eectuez trois séries de tirs sur une cible.
REMARQUE : Si le modèle utilisé comprend un zoom, le tir devra être eectué au réglage le plus élevé.
2. Si les balles n’atteignent pas le point visé, retirez les capuchons du réglage de l’élévation et de la dérivation et tournez les cadrans de manière à régler le
tir sur le point visé.
3. Répétez la première étape.
MONTAJE
ANTES DE PROCEDER AL MONTAJE, ASEGURESE QUE EL ARMA ESTE DESCARDADA Y LA ACCION DE DISPARO ABIERTA. SIEMPRE OBSERVE LOS
PROCEDIMIENTOS DE SEGURIDAD AL MANEJAR ARMAS DE FUEGO.
1. Aoje el Anillo de Cierre del Ocular y apunte la mira hacia un lugar plano, liso y bien iluminado, como una pared o el cielo abierto. PRECAUCION:
MIRAR AL SOL PUEDE CAUSAR DAÑO PERMANENTE A LOS OJOS. NUNCA MIRE AL SOL CON ESTA MIRA NI TAMPOCO A SIMPLE VISTA. Gire el
ocular a la izquierda o derecha según sea necesario hasta que usted pueda ver claramente y bien denida la reticula Vuelva a apretar el anillo de cierre.
Ya no será necesario que vuelva a hacer este ajuste.
2. Aoje los tornillos de sujeción de la montura. Deslice la montura en las ranuras de ensamble del recibidor de su rie o pistola de aire.
NOTA: No intente montar esta mira en ries deportivos o militares de alta potencia, ya que el descanso ocular es inadecuado.
El ojo puede sufrir graves daños si se utiliza esta mira en armas con una reculada mayor a las de ries o pistolas de aire calibre .22.
3. Mueva la mira hacia adelante o hacia atrás hasta que ésta quede en la posición más cómoda para usted cuando sostiene el rie en posición de tiro.
Apriete los tornillos de sujeción.
4. Si la reticula se ve ladeada, aoje los tornillos de sujeción y gire la mira hasta que la reticula esté perpendicular al ánima. Vuelva a apretar los tornillos de
sujeción.
AJUSTE A CERO
UTILICE EL CALIBRADOR DE PARALELISMO, EL CUAL VIENE CON SUS PROPIAS INSTRUCCIONES, O SIGA EL SIGUIENTE MÉTODO.
1. En un blanco de tiro autorizado u otra área segura, y utilizando los procedimientos de seguridad para el manejo de armas de fuego, haga tres rondas de
tiros de prueba hacia el blanco.
NOTA: Si usted tiene un modelo con magnicación, los tiros de prueba deben hacerse con la magnicación más alta posible.
2. Si las balas o balines no dieron en el blanco retire las tapas de los discos selectores de elevación y desviación lateral y girelos en la dirección que sea
necesaria para que su siguiente ronda se acerque más al blanco.
3. Repita el paso #1.
FrançaisEspañol
GARANTIE LIMITÉE de UN AN
Votre produit Tasco® est garanti exempt de défauts de matériaux et de fabrication pendant un an après la date d’achat. Au cas où un défaut apparaîtrait sous
cette garantie, nous nous réservons l’option de réparer ou de remplacer le produit, à condition de nous le renvoyer en port payé. La présente garantie ne couvre
pas les dommages causés par une utilisation, une manipulation, une installation incorrecte(s) ou un entretien incorrect ou fourni par quelqu’un d’autre qu’un
centre de réparation agréé par Tasco.
Tout retour effectué dans le cadre de la présente garantie doit être accompagné des articles indiqués ci-dessous :
1. Un chèque ou mandat d’une somme de 10,00 $ US pour couvrir les frais d’envoi et de manutention
2. Le nom et l’adresse pour le retour du produit
3. Une description du défaut constaté
4. La preuve de la date d’achat
Le produit doit être emballé soigneusement, dans un carton d’expédition solide, pour éviter qu’il ne soit endommagé durant le transport ; envoyez-le en port
payé, à l’adresse indiquée ci-dessous :
Aux États-Unis, envoyez à: Au CANADA, envoyez à:
Tasco Tasco
Attn.: Repairs Attn.: Repairs
9200 Cody 140 Great Gulf Drive, Unit B
Overland Park, Kansas 66214 Vaughan, Ontario L4K 5W1
Pour les produits achetés en dehors des États-Unis et du Canada, veuillez contacter votre distributeur local pour tous renseignements concernant
la garantie
©2014 B.O.P.
GARANTÍA LIMITADA de UNO AÑO
Su producto Tasco® está garantizado contra defectos de materiales y fabricación durante uno año después de la fecha de compra. En caso de defectos bajo esta
garantía, nosotros, a nuestra opción, repararemos o sustituiremos el producto siempre que lo devuelva con portes pagados. Esta garantía no cubre defectos
causados por el uso indebido, ni por un manejo, instalación o mantenimiento realizados por alguien que no sea un departamento de servicio autorizado de Tasco
Cualquier envío que se haga bajo esta garantía deberá ir acompañado por lo siguiente:
1. Un cheque/giro postal por la cantidad de 10 dólares para cubrir los gastos postales y de manejo
2. Nombre y dirección donde quiere que se le envíe el producto
3. Una explicación del defecto
4. Una prueba de la fecha de compra
El producto debe empaquetarse bien en una caja resistente para evitar que se dañe durante el transporte, con los portes prepagados a la direcciÛn que se
muestra a continuación:
En EE.UU. enviar a: En CANADÁ enviar a:
Tasco Tasco
Attn.: Repairs Attn.: Repairs
9200 Cody 140 Great Gulf Drive, Unit B
Overland Park, Kansas 66214 Vaughan, Ontario L4K 5W1
En el caso de productos comprados fuera de Estados Unidos o Canadá, póngase en contacto con su distribuidor local para que le den la información
pertinente sobre la garantía.
©2014 B.O.P.