Loading ...
Loading ...
Loading ...
Features
1. On/off switch
2. Lock-off button
3. Blade release button
4. Grass Shear blade (GSL35,
GSL75, GSN30, GSN35)
5. Shrub Trim blade (GSL35,
GSL75, GSN32, GSN35)
6. Blade cover (not shown)
Assembly
WARN ING:Avoidaccidentally switching thetoolon
during assembly,
Fitting and removing the
blade (fig. A, B, C)
The shear blade (4) has been
designed for trimming grass and
weeds. The trim blade (5) has been
designed for trimming hedges and
shrubs.
• To remove the blade cover (6).
Push and hold the blade release
button (3) in the direction of the
arrow (fig. A)
• Slide the blade cover (6)
backwards and lift it off (fig. A-l).
• While holding the blade onto the
pins (Fig. B), locate the blade cover
(6) and slide it forward (fig. C).
O
Note: No alignmentof bladewith drive
pinisrequiredandoperation ofthe blade !,_ -2_
coverrelease buttonisnot requiredwhen (_6
re-fittingthe bladecover. ........
Charging Procedure
The bafferyneedsto becharged before
firstuseandwhenever itfails toproduce
suffident power onjobs thatwere easily
done before.When chargingthe battery
forthe firsttime, or afterprolonged
storage,itwill onlyacceptan 80%
charge.Afterseveral charge and dischargecycles,the batterywillattainfull
capacity.The batterymaybecome warm while charging;thisis normal and
doesnot indicateaproblem.
/t,
WARNING: Do not charge the battery at ambient
temperatures below 36° F (2°C) or above 104°F (40°C).
Recommended charging temperature: Approximately 75°F (24°C).
• Note: Thecharger plugincorporateslock outs topreventthe use ofincorrect
chargers.The plugmust becorrectlyoriented when inserted.
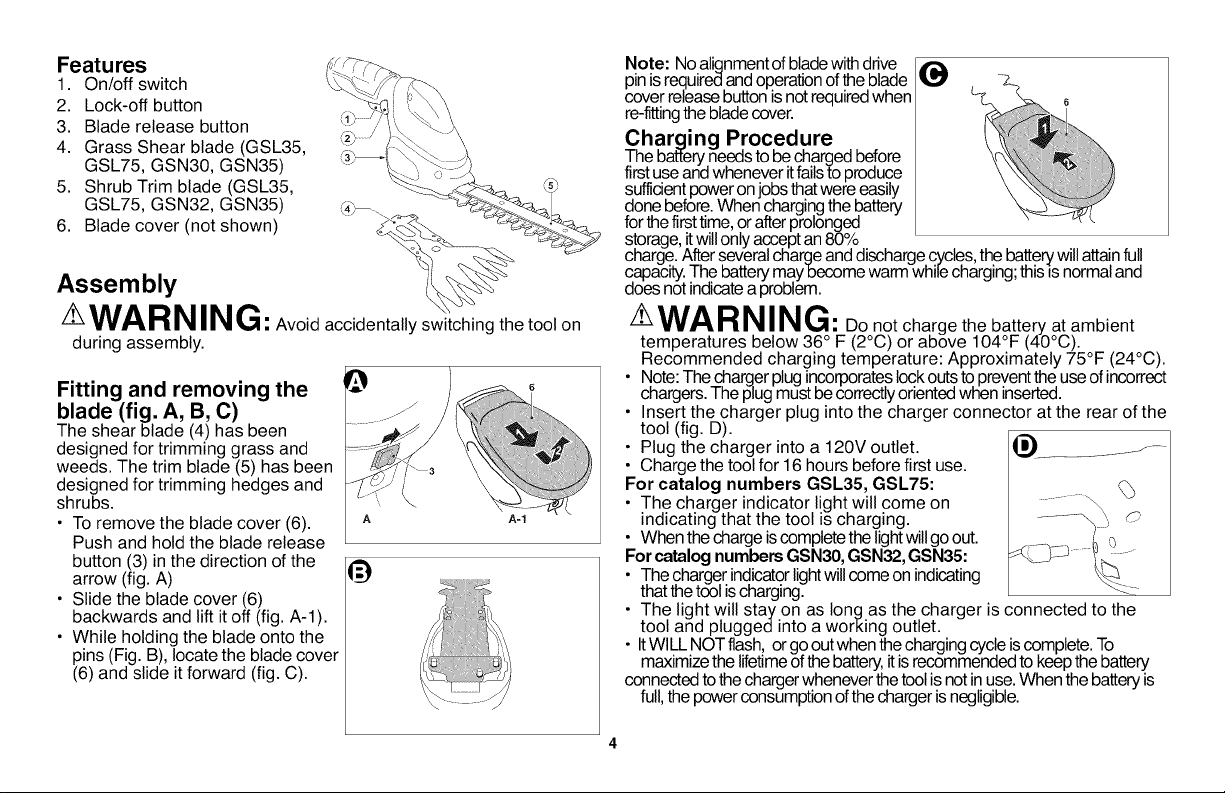
• Insert the charger plug into the charger connector at the rear of the
tool (fig. D).
• Plug the charger into a 120V outlet. __ ...........................f--
Charge the tool for 16 hours before first use.
For catalog numbers GSL35, GSL75:
The charger indicator light will come on
indicating that the tool is charging. -............"-,
When the chargeiscompletethe lightwillgo out.
For catalog numbers GSN30,GSN32, GSN35: _i_
The charger indicatorlightwill comeon indicating _
thatthe tool ischarging.
The light will stay on as long as the charger is connected to the
tool and pluggedinto a working outlet.
ItWILL NOTflash, or go outwhen the chargingcycle iscomplete.To
maximizethe lifetimeofthe battery,itis recommended to keepthe battery
connectedto the chargerwhenever the toolis not inuse. When thebatteryis
full,the power consumptionofthe charger isnegligible.
Loading ...
Loading ...
Loading ...