
Haier Overseas Electric Appliances Corp. Ltd
USER INSTRUCTIONS
OVENS
EN
02
● HWO60S14EPB4
● HWO60S14EPX4

General instructons
Product descrpton
Control panel
Oven cleanng and mantenance
Pyrolysis
Troubleshooting
3
10
12
14
21
23
24
Summary
Safety and warnings
EN 02
Installaton
27
SAFETY AND WARNINGS
Your oven has been carefully desgned to operate safely durng
normal cookng procedures. Please keep the followng safety
nstructons n mnd when you are usng t:
Electrcal Shock Hazard
Turn the oven off at the wall before replacng the oven
lamp or before carrying out any work or maintenance on it.
Falure to follow ths advce may result n electrcal shock or
death.
WARNING!
EN 03
Fre Hazard
Do not place alumnum fol, dshes, trays, water or ce on the
oven floor durng cookng, as dong so wll rreversbly
damage the enamel; lnng the oven wth alumnum fol or
single use protection available from stores may even cause
fre.
Never use your applance for warmng or heatng the room.
Persons could be burned or njured or a fre could start.
Storage n or on applance: flammable materals should not
be stored n an oven or near ts surface.
Falure to follow ths advce may result n overheatng,
burnng, and njury.
WARNING!
Cut Hazard
Take care durng nstallaton of the oven - some edges
are sharp.
Falure to use cauton could result n njury or cuts.
WARNING!
Hot Surface Hazard
Accessble parts may become hot when n use. To avod
burns and scalds, be careful not to touch any hot part and
keep chldren away.
Use oven mtts or other protecton when handlng hot
surfaces such as oven shelves or dshes.
Use care when openng the oven door. Let hot ar or steam
escape before removng or replacng food.
Do not touch heatng elements or nteror surfaces of the
oven. Heatng elements may be hot even though they are
dark n colour.
Interor surfaces of an oven become hot enough to cause
burns.
Durng and after use, do not touch, or let clothng or other
flammable materals contact heatng elements or nteror
surfaces of the oven untl they have had suffcent tme to
cool.
Other surfaces of the applance may become hot enough to
cause burns - among these surfaces are the oven vent, the
surface near the oven vent, and the oven door.
Falure to follow ths advce could result n burns and scalds.
WARNING!
EN 04

IMPORTANT SAFETY INSTRUCTIONS
To reduce the risk of fire, electrical shock, injury to persons or
damage when using the oven, follow the important safety
instructions listed below:
• Read all the instructions before using the oven. Use the oven
only for its intended purpose as described in these instructions.
• Proper installation: be sure your appliance is properly installed
and earthed by a qualified technician.
• Isolating switch: make sure this oven is connected to a circuit
which incorporates an isolating switch providing omnipolar
disconnection from the power supply the device must have
contact separation compliant to the requirements for
overvoltage category III, must bear the maximum connected
load and in must be in line with current legislation. The switch
must be incorporated in the fixed wiring in accordance to the
wiring rules.
The yellow-green earth cable should not be interrupted by the
device and must be easily accessible when the appliance is
installed.
• Household appliances are not intended to be played with by
children.
IF THE OVEN IS PROVIDED BY THE MANUFACTURER
WITHOUT PLUG THE APPLIANCE MUST NOT BE
CONNECTED TO THE POWER SOURCE USING PLUG OR
SOCKETS, BUT MUST BE DIRECTLY CONNECTED TO THE
SUPPLY MAINS.
• Do not leave children alone.
Children should not be left alone or unattended in the area where
the appliance is in use. They should never be allowed to sit or
stand on any part of the appliance.
• Children of less than 8 years old must be kept away from the
appliance unless continuously supervised. This appliance can be
SAFETY AND WARNINGS
EN 05

used by children aged from 8 years and above, and persons with
reduced physical, sensory or mental capabilities or lack of
experience and knowledge, if they have been given supervision
or instruction concerning the use of the appliance in a safe way
and they understand the hazards involved.
Cleaning and user maintenance shall not be done by children
without supervision.
• Do not place heavy objects on the oven door.
• Wear proper apparel. Do not wear loose fitting or hanging
garments when using the appliance. They could ignite or melt if
they touch an element or hot surface and you could be burned.
• User servicing: do not repair or replace any part of the appliance
unless specifically recommended in the manual. All other
servicing should be referred to a qualified technician.
• Do not use water on grease fires. Smother the fire or flame or
use a dry chemical or foam type extinguisher.
• Use only dry oven mitts or potholders.
Moist or damp potholders on hot surfaces could result in burns
from steam. Do not let potholders touch hot areas or heating
elements. Do not use a towel or a bulky cloth for a potholder. It
could catch fire.
• Do not heat unopened food containers. They can build up
pressure that may cause the container to burst and result in
injury.
• Safe food handling: leave food in the oven for as short a time as
possible before and after cooking. This is to avoid contamination
by organisms which may cause food poisoning. Take particular
care during warm weather.
• Always keep oven vents unobstructed.
• Do not operate your appliance by means of an external timer or
separate remote-control system.
• Caution: Hot air can blow from the vent at the top of the oven as
SAFETY AND WARNINGS
EN 06

part of the oven’s cooling system.
• Placement of oven shelves: always position shelves in the
desired location while the oven is cool (before preheating). If a
shelf must be removed while the oven is hot, do not let the oven
mitts or potholder contact hot heating elements in the oven or
the base of the oven.
• When you place the shelf inside, make sure that the stop is
directed upwards and in the back of the cavity. The shelf must be
inserted completely into the cavity.
• Do not clean the oven seal or use any oven-cleaning products
on it. It is essential for a good seal, which ensures that the oven
operates efficiently. Care should be taken not to rub, damage or
move it.
• Do not use oven cleaners, harsh/abrasive cleaning agents,
waxes, or polishes. No commercial oven cleaner, oven liner, or
protective coating of any kind should be used in or around any
part of the oven. Do not use harsh/abrasive cleaners, scourers or
sharp metal scrapers to clean the oven door glass since they
scratch the surface, which may result in the glass shattering.
• Clean only the parts listed in this manual.
• Do not use a steam cleaner to clean any part of the oven.
• Do not store things children might want above the oven.
Children could be burned or injured while climbing on the oven to
retrieve items.
• Do not install or operate the appliance if it is damaged or not
working properly. If you receive a damaged product, contact your
dealer or installer immediately.
• Use only bakeware approved for oven use. Follow the bakeware
manufacturer’s instructions.
• No additional operation/setting is required in order to operate
the appliance at the rated frequencies.
• lf the power cable is damaged, it should be substituted with a
EN 07

cable or special bundle available from the manufacturer or by
contacting the customer service department. The type of power
cable must be H05V2V2-F. This operation should be carried out
by a suitably qualified professional. The earth conductor (yellow-
green) must be approximately 10 mm longer than the other
conductors. For any repairs, refer only to the Customer Care
Department and request the use of original spare parts. Failure
to comply with the above can compromise the safety of the
appliance and invalidate the guarantee.
• The oven must be switched off before removing the removable
parts. After cleaning, reassemble them according the
instructions.
• WARNING: Never remove the oven door seal.
• When inserting the grid tray pay attention that the anti-slide
edge is positioned rearwards and upwards
• The appliance must not be installed behind a decorative door in
order to avoid overheating.
• The oven can be located high in a column or under a worktop.
Before fixing, you must ensure good ventilation in the oven
space to allow proper circulation of the fresh air required for
cooling and protecting the internal parts. Make the openings
specified on last page according to the type of fitting. Always fix
the oven to the furniture with screw provided with the appliance.
• excess spilled material must be removed before cleaning using
a self-clean cycle.
• Before starting a self-clean cycle, remove oven shelves and all
other cookware and/or utensils and accessories, and wipe up
large food spills or grease deposits,, using a damp sponge. Do
not use detergent.
• Do not place towels on the oven during the cleaning cycle
• Before starting a self-clean cycle, ensure you move any pet
birds to another, closed and well-ventilated room. Some pet
EN 08

birds are extremely sensitive to the fumes given off during a self-
clean cycle and may die if left in the same room as the oven
during such a cycle
• During a self-clean cycle, the oven reaches higher
temperatures than it does for cooking. Under such conditions,
the surfaces may get hotter than usual. Children therefore
should be kept at a safe distance.
• ln ovens with meat probe it is necessary, before making the
cleaning cycle, close the hole with the nut provided. Always close
the hole with the nut when the meat probe is not used.
• Only use the temperature probe recommended for this oven.
• If a hob has been fitted above the oven, never use the hob while
the self-clean cycle is working, this will prevent the hob from
overheating.
EN 09

General Instructons
We thank you for choosng one of our products. For the best results wth your oven, you should read ths
manual carefully and retan t for future reference. Before nstallng the oven, take note of the seral
number so that you can gve t to customer servce staff f any repars are requred. Havng removed the
oven from ts packagng, check that t has not been damaged durng transportaton. If you have doubts, do
not use the oven and refer to a qualfed techncan for advce. Keep all of the packagng materal (plastc
bags, polystyrene, nals) out of the reach of chldren. When the oven s swtched on for the frst tme,
strong smellng smoke can develop, whch s caused by the glue on the nsulaton panels surroundng the
oven heatng for the frst tme. This is absolutely normal and, if it occurs, you should wait for the smoke to
dissipate before putting food in the oven. The manufacturer accepts no responsibility in cases where the
instructions contained in this document are not observed.
NOTE: the oven functons, propertes and accessores cted n ths manual wll vary, dependng on the
model you have purchased.
Safety Indcatons
Only use the oven for ts ntended purpose, that s only for the cookng of foods; any other use, for example
as a heat source, s consdered mproper and therefore dangerous. The manufacturer cannot be held
responsble for any damage resultng from mproper, ncorrect or unreasonable usage.
The use of any electrcal applance mples the observance of some fundamental rules:
- do not pull on the power cable to dsconnect the oven from the socket;
- do not touch the applance wth wet or damp hands or feet;
- n general the use of adaptors, multple sockets and extenson cables s not recommended;
- n case of malfuncton and/or poor operaton, swtch off the applance and do not tamper wth t.
Electrcal Safety
ENSURE THAT AN ELECTRICIAN OR QUALIFIED TECHNICIAN MAKES THE ELECTRICAL
CONNECTIONS. The power supply to whch the oven s connected must conform wth the laws n force n
the country of nstallaton. The manufacturer accepts no responsblty for any damage caused by the
falure to observe these nstructons. The oven must be connected to an electrcal supply wth an earthed
wall outlet or a dsconnector wth multple poles, dependng on the laws n force n the country of
nstallaton. The electrcal supply should be protected wth sutable fuses and the cables used must have a
transverse secton that can ensure correct supply to the oven.
CONNECTION
The oven s suppled wth a power cable that should only be connected to an electrcal supply wth 220-
240 Vac power between the phases or between the phase and neutral. Before the oven s connected to
the electrcal supply, t s mportant to check:
- power voltage ndcated on the gauge;
- the settng of the dsconnector.
The groundng wre connected to the oven's earth termnal must be connected to the earth termnal of
the power supply. See detailed information at page 28.
WARNING
Before connectng the oven to the power supply, ask a qualfed electrcan to check the contnuty of the
power supply's earth termnal. The manufacturer accepts no responsblty for any accdents or other
problems caused by falure to connect the oven to the earth termnal or by an earth connecton that has
defectve contnuty.
NOTE: as the oven could requre mantenance work, t s advsable to keep another wall socket
avalable so that the oven can be connected to ths f t s removed from the space n whch t s
nstalled. The power cable must only be substtuted by techncal servce staff or by techncans wth
equvalent qualfcatons.
EN 10

Recommendatons
After each use of the oven, a mnmum of cleanng wll help keep the oven perfectly clean.
Do not lne the oven walls wth alumnum fol or sngle-use protecton avalable from stores. Alumnum fol
or any other protecton, n drect contact wth the hot enamel, rsks meltng and deteroratng the enamel
of the nsdes. In order to prevent excessve drtyng of your oven and the resultng strong smokey smells,
we recommend not usng the oven at very hgh temperature. It s better to extend the cookng tme and
lower the temperature a lttle. In addton to the accessores suppled wth the oven, we advse you only use
dshes and bakng moulds resstant to very hgh temperatures.
A low lght around the central man swtch could be present when the oven s off. Ths s a normal behavor.
It can be removed just turnng the plug upsde down or swappng the supply termnals.
Waste management and envronmental protecton
Requrements of EEC Drectve 93/68.
European drectve 2002/96/EC on Waste Electrcal and Electronc Equpment (WEEE) (for European
Unon countres only)
GB Ths applance s marked accordng to the European drectve 2002/96/EC on Waste Electrcal and
Electronc Equpment (WEEE). By ensurng ths product s dsposed of correctly, you wll help prevent
potental negatve consequences for the envronment and human health, whch could otherwse be
caused by napproprate waste handlng of ths product.
The symbol on the product, or on the documents accompanyng the product, ndcates that ths
applance may not be treated as household waste. Instead t shall be handed over to the applcable
collecton pont for the recyclng of electrcal and electronc equpment. Dsposal must be carred out n
accordance wth local envronmental regulatons for waste dsposal. For more detaled nformaton about
treatment, recovery and recyclng of ths product, please contact your local cty offce, your household
waste dsposal servce or the shop where you purchased the product.
Frst Use
PRELIMINARY CLEANING
Clean the oven before usng for the frst tme. Wpe over external surfaces wth a damp soft cloth.
Wash all accessores and wpe nsde the oven wth a soluton of hot water and washng up lqud. Set
the empty oven to the maxmum temperature and leave on for about 1 hour, ths wll remove any
lngerng smells of newness.
EN 11
Product Descrpton
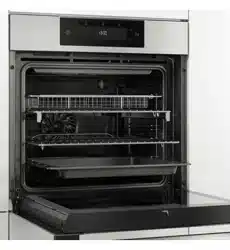
Overvew
Roasting dish
Accessories
Lateral wire grids
Holds baking trays and plates.
Wire Shelves
Located on both sides of the oven cavity, holds
wire shelves and dish.
1. Control Panel
2 Side racks
3. Wire Shelves (x2)
4. Roasting Dish
5. Air Fry Tray
6. Oven Door
7. Serial Number
For roasting and grilling. Can be placed on a lower
shelf to collect any food drips.
Used for air frying in conjunction with the air fry
function on your oven.
Air Fry Tray
6
7
EN 12
Telescopic guides
Two guide rails which facilitate the cooking status
check as they allow easily the extraction and
repositioning of trays and grids inside the oven
cavity.
Softclose
Hinges which ensure an automatic soft and smooth
movement during the closing phase of the oven
door.
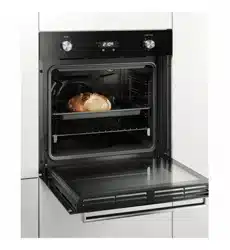
Turnspit
No pre-heating is required for rotisserie cooking.
Cooking with the door closed.
• Unscrew the hooks
• Insert the spit into the meat to be cooked
• Secure the meat with the hooks
• Tighten the screws
• Insert the spindle into the hole where the motor
is located.
• Remove the handle and use it at the end of
cooking to avoid burn when taking the food out of
the oven
EN 13
Control panel
Start
Pause
Functions Time Temperature
On/off
1 6
2 3 4
Navigation buttons
5
Please refer to next pages for detailed information on the display areas
Symbol Function Description
On/off
Functions
Time
Temperature
.
Navigation
Buttons
Start
Pause
1
2
3
4
5
6
Turning the oven on and off. The first time you turn on the oven, you
must set the time, using the navigations buttons (5) to select hours
and minutes and the Time button (3) to confirm.
Accessing manual functions (a) and food cooking categories (b),
Tailor bake (a2) and Gentle cooking function (a3), WiFi menu (e) and
cleaning options (which differ depending on model). To save a
favourite function and display it first when your oven is turned on, hold
down the (2) key for 5 seconds.
Accessing settings for cooking time (e), kitchen timer (f) and start
delay (g). Start delay and end of cooking can only be set after entering
cooking time. With the oven on standby, press Time (3) normally to
turn on the Minute Minder timer ; hold it down for 3 seconds to set the
time of day (i).
Accessing temperature setting (r), preheating (j) and fast preheating
(k) options. To activate/deactivate the screen lock (m) hold the (4) key
down for 5 seconds. During pyrolysis, the oven door will automatically
be locked and feedback will be displayed (d4). Automatic rapid heating
is available for a number of manual functions (p2).
Navigation buttons for setting functions and parameters.
Start/Pause of the cooking or confirm the functions.
EN 14
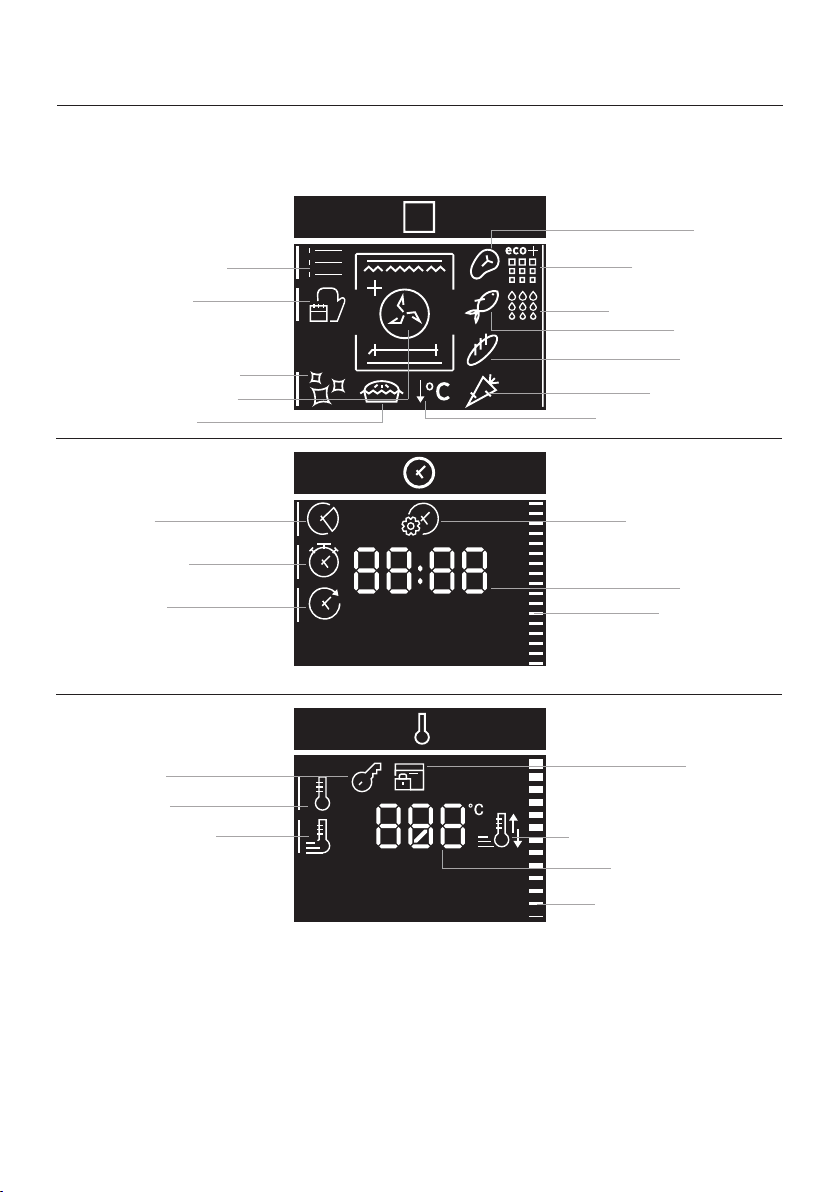
a. Manual functions
c. Cleaning functions
d1. Pyrolysis Eco
d2. Pyrolysis +
g. Set time of day
Door Lock
d. Duration
Time value
j. Preheat and cool down
feedback
e. Kitchen timer
b3. Baking
Time indicator
Temperature indicator
f. Delay start
b4. Vegetables
I. Fast preheating
h. Key Lock
b. Food cooking
categories
FUNCTIONS AREA
TIME AREA
TEMPERATURE AREA
a1. Function symbols
ı. Preheating
b2. Seafood
b1. Meat
Temperature value
a2. Master bake
a3. Low Temperature
Display
The display is divided into three areas, accessed by pressing the (2), (3) and (4) keys. The same keys
may be used to select the submenu (signalled by the indicator), using the navigation buttons to set
functions and parameters
EN 15
d3. Hydroeasyclean
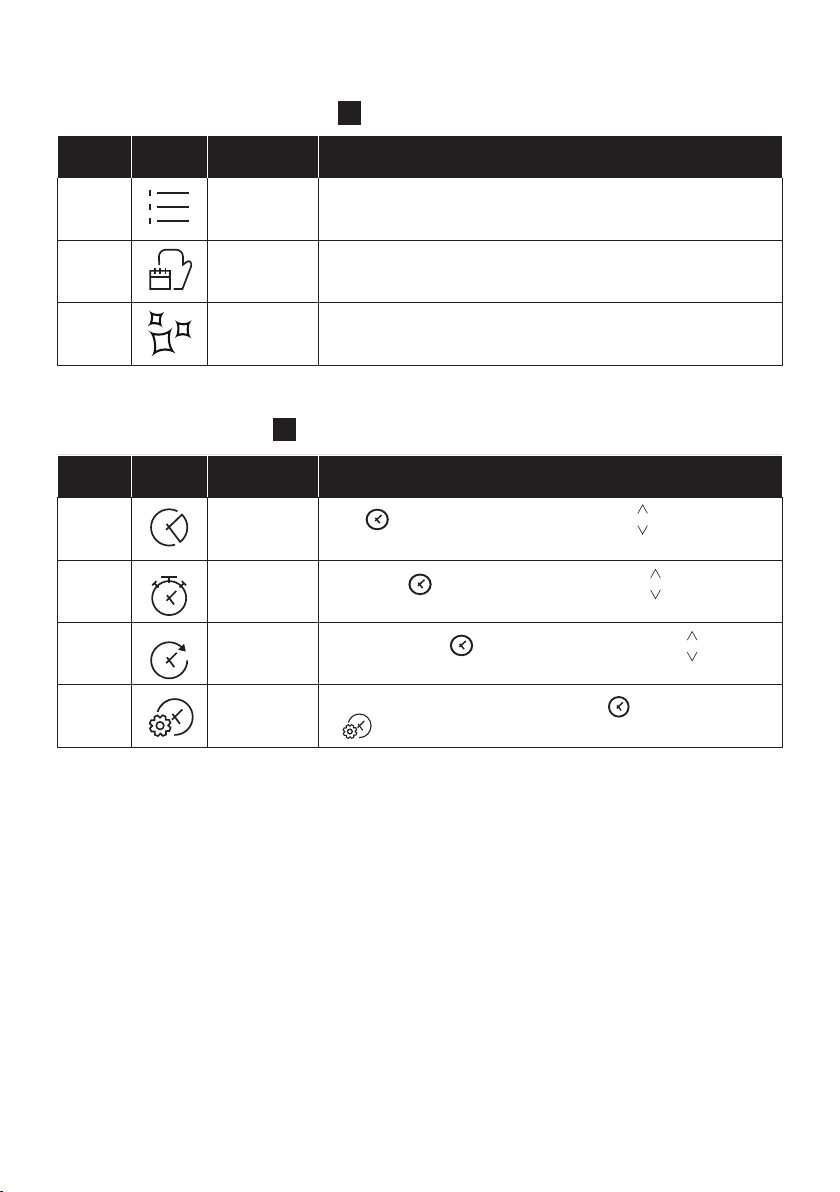
MAIN MENU – TIME AREA
3
Symbol Function Description
d
Duration
Press to set the cooking duration, use the keys to regulate
the time.
e
Kitchen
timer
Press twice to set the kitchen timer, use the keys to regulate
the time.
Delay
f
start
Press three times to set the delay start, use the keys to
regulate the time.
g
Set time of
day
With the oven on standby, press and hold down for 3 seconds
to .
Symbol Function Description
Manual
a
functions
This function allows to choose cooking functions, temperature
and duration.
Food
b
categories
In this menu you can access a 4 food cooking categories already
integrated on your oven.
c
Cleaning
functions
This function allows to choose a cleaning system available on your
oven.
The menus in overview
MAIN MENU – FUNCTIONS AREA
2
EN 16
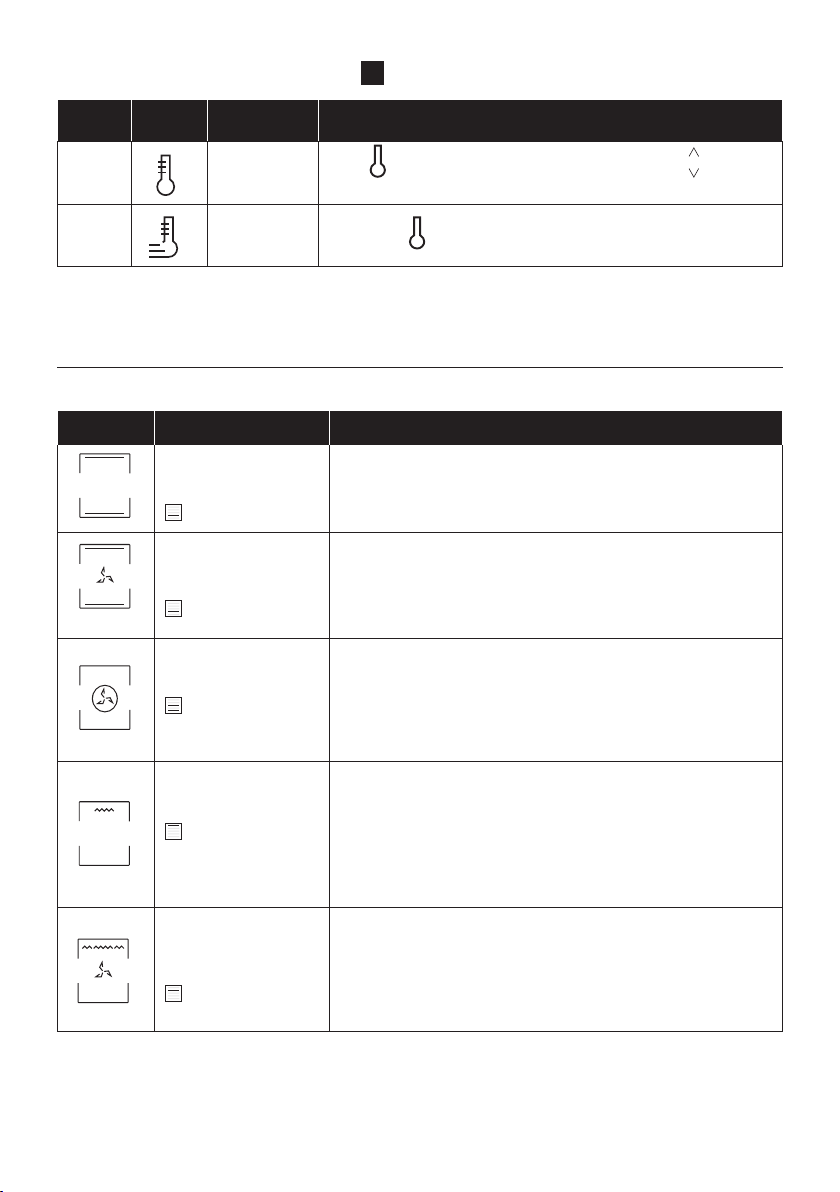
MAIN MENU – TEMPERATURE AREA
4
Symbol Function Description
ı
Preheating
Press to set the preheating temperature, use the keys to
regulate the value.
I
Fast
preheating
Press twice to set the fast temperature.
** Ideal temperature for suggested foods.
Symbol Description Suggestions
Bake
150-200°C **
2
nd
/3
rd
level
Fan Bake
180-200°C **
2
nd
/3
rd
level
Fan Forced
150-230°C **
3
rd
for single level
1
st
+3
rd
for double
level
Grill
L3 (power) **
th
5 level for thin
food
3
rd
th
/ 4 level for thick
food
Air Fry
200°C **
2
nd
/ 3
rd
/4
th
level
COOKING MODES
Manual functions (a1)
Both top and bottom heating elements are used. Preheat the oven for
about ten minutes. This function is ideal for all traditional roasting and baking;
for searing red meats, roast beef, leg of lamb, game, bread, foil wrapped food
and flaky pastry. Place the food and its dish on a shelf in mid position.
This function gives better heat distribution thanks to the combination of the
fan with top and bottom heating elements. Ideal for baking such as
bread,pizza and focaccia, ensuring a homogeneous cooking result due to
assisted heat distribution.
Uses the rear element in conjunction with fan and recommended for most
applications, including poultry, pastries, fish and vegetables. Heat
penetrates into the food more evenly and both the cooking and preheating
times are reduced. You can cook different foods at the same time one or
more positions. Allow about ten minutes extra when cooking foods at the
same time. The fan will pulse during operation.
Grill element is used; the power level can be adjusted and the oven should be
allowed to preheat for 5 minutes. White meats should be put at a distance
from the grill; the cooking time is longer, but the meat will cook without
drying out. Place food on the wire shelf with the roasting dish underneath to
catch any drips . Turn food 2/3 of the way through cooking if required. Use
the grill with door closed.
Grill element is used in conjuction with the fan to circulate hot air inside the
oven. Can be used in conjunction with the air fry tray to fry chips, hashbrowns
and chicken pieces without turning. Place the roasting tray beneath food to
collect any drips. Use the grill with door closed.
EN 17
Symbol Description Suggestions
Traditional Bake
160-180°C **
1
st
/2
nd
level
Fan Bake+
150-200°C
2
nd
/3
rd
level
Rotisserie + Grill
L5 power
Rotisserie + Fan Grill
200°C
Rotisserie + Bake
200-240°C
Maxi Grill
L3 (power) **
th th
4 / 5 level
Pastry Plus
170-210°C **
st nd
1 / 2 level
Only the bottom bake element is used. Suitable for crème caramel,
puddings and bain marie on one level.
The bottom heating element is used with the fan circulating the air inside the
oven. This method is ideal for fruit flans, tarts, quiches and pizza. It prevents
the top of food from drying.
Place the shelf in the bottom position.
Both upper elements are used; the oven should be allowed to preheat for 5
mins. Place food on the wire shelf with the roasting dish underneath to
collect any drips . Turn food 2/3 of the way through cooking if required. Use
the grill with door closed. Use L5 (power) without preheating when grilling
toasts.
For cakes and bread on a single level. Uses the upper and lower elements
initially. The fan, with the fan pulsing during the cookting process after the
oven has reached temperature.
Recommended for chicken breast, quails or fish fillets. The top grill element
is used with the turnspit roatating the food to be cooked. Place a baking tray
underneath the food at level 1 to collect drips and juices. Use the grill with
door closed.
Recommended for large items such as chicken or turkey. The top grill
element is used in conjunction with fan with the turnspit rotating the food to
be cooked. Place a baking tray underneath the food at level 1 to collect drips
and juices. Use the grill with door closed.
Recommended for beef or pork roasts. The top and bottom elements are
used with the turnspit roatating the food to be cooked. Place a baking tray
underneath the food at level 1 to collect drips and juices.
** Ideal temperature for suggested foods.
EN 18

SPECIAL FUNCTIONS
Symbol Description Suggestions
a2
Master bake
180-200°C **
2° level
a3
Low Temperature
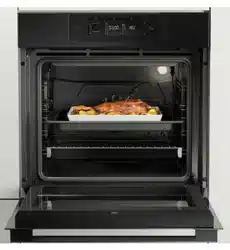
FOOD COOKING CATEGORIES
Symbol Description
Pre-
heat
Cooking
position
Heat Feel
tempera-
tures (°C)
Description
b1
Meat Y 2-3
58-62-65°C
for beef
For roasts and
cuts of beef,
veal and pork.
b2
Seafood Y 2-3
65°C For whole fish
and fillets.
b3
Baking Y 1-2
95° for bread
and pasta
baked
For breads,
lasagne and
pastries.
b4
Vegetables Y 3-4 70°C
For roasted
vegetables and
potatoes.
Perfect cooking results guaranteed thanks to the pre-set parameters by category. The default
values of time and temperature refer to quantities for 4 servings. Use the table below to set the
cooking time correctly.
The top heating element is used in conjunction with pulsing of the
fan to keep food soft inside and crunchy outside.
This function ensures the food remains tender and succulent with
minimal surface browing. A low temperature of 90°C is used in
conjunction with the upper and lower bake elements.
** Ideal temperature for suggested foods.
EN 19

ADDITIONAL FUNCTIONS
Sym-
bol
Description Suggestions
h
Key lock
Favourite
function
Food
Category
Serving size/grams (in bold,
default setting)
Cooking time (min)* *
after preheat
Meat 4/800; 6/1200; 8/1600 50; 52; 55
Fish 4/600; 6/900; 8/1200 36; 38; 40
Bakery 4/600; 6/900; 8/1000 42; 50; 56
Vegetables 4/800; 6/1200; 8/1600 57; 60; 65
This function enables to lock the screen in order to prevent any
unwanted use by minors. Press and hold down Temperature (4) for 5
seconds to activate the screen lock. Do the same to deactivate it.
To save a favourite function and display it first when your oven is turned
on, hold down the (2) key for 5 seconds.
** Ideal temperature for suggested foods.
Symbol Function Description
d1
d2
Pyrolitic Self
Clean Eco
CLEANING FUNCTIONS
Pyrolitic
Self Clean
For regular cleaning of the oven cavity. Will operate for 90 minutes,
during which the door will be locked.
For heavy cleaning of the oven cavity. Will operate for 120 minutes,
during which the door will be locked.
EN 20
d3
Hydroeasyclean For simple, efficient cleaning of the oven.
Oven cleanng and mantenance
General notes on cleanng
The lfecycle of the applance can be extended through regular cleanng. Wat for the oven to cool before
carryng out manual cleanng operatons. Never use abrasve detergents, steel wool or sharp objects for
cleanng, so as to not rreparably damage the enamelled parts. Use only water, soap or bleach-based
detergents (ammona).
GLASS PARTS
It s advsable to clean the glass wndow wth absorbent ktchen towel after every use of the oven. To
remove more obstnate stans, you can use a detergent-soaked sponge, well wrung out, and then rnse
wth water.
OVEN WINDOW SEAL
If drty, the seal can be cleaned wth a slghtly damp sponge.
ACCESSORIES
Clean accessores wth a wet, soapy sponge before rnsng and dryng them: avod usng abrasve
detergents.
ROASTING DISH
After usng the roasting dish, remove the pan from the oven. Pour the hot fat nto a contaner and wash the
roasting dish n hot water, usng a sponge and washng-up lqud.
If greasy resdues reman, mmerse the roasting dish n water and detergent. Alternatvely, you can wash
the roasting dish n the dshwasher or use a commercal oven detergent. Never put a drty roasting dish
back nto the oven.
Mantenance
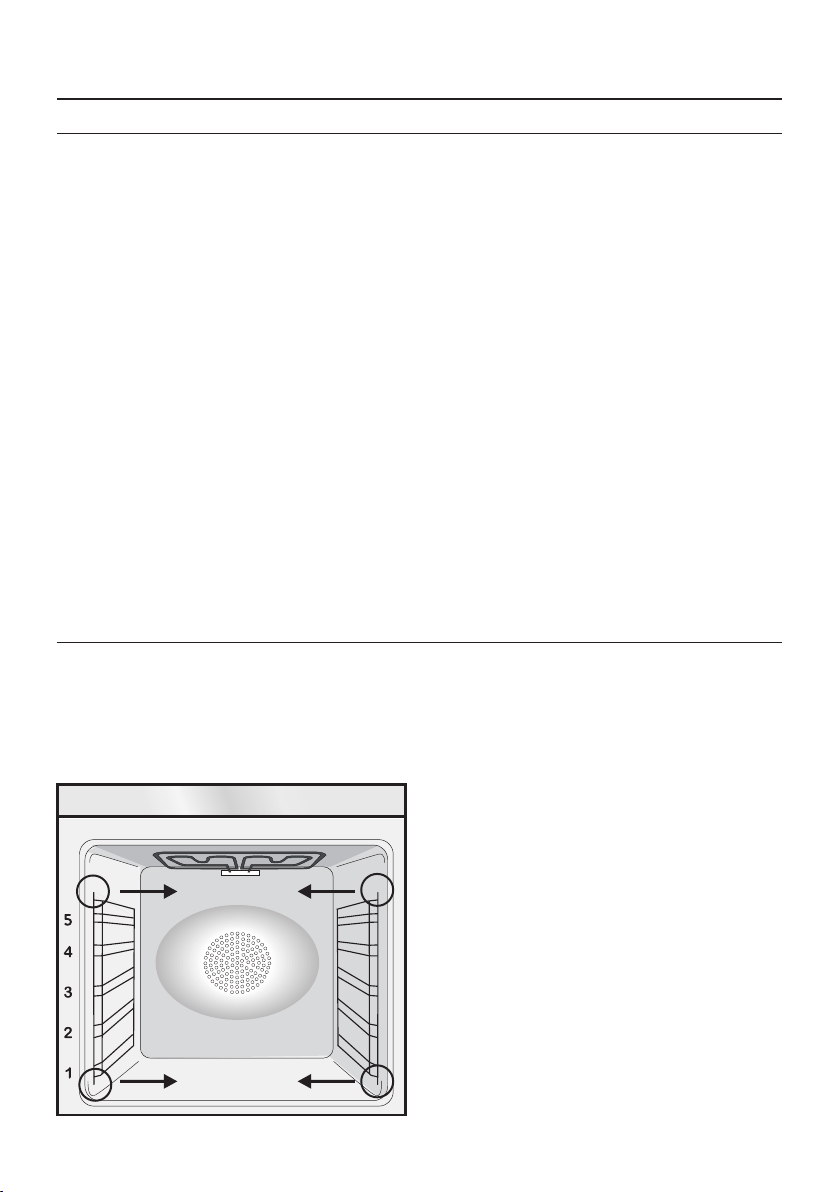
INSTRUCTION FOR REMOVAL AND CLEANING OF THE SIDE RACKS
1. Remove the wre racks by pullng them n the drecton of the arrows (see below)
2. To clean the wre racks ether put them n the dshwasher or use a wet sponge, ensurng that they
are dred afterwards.
3. After the cleanng process nstall the wre racks n reverse order.
CHANGING THE BULB
1. Disconnect the oven from the mains supply.
2. Undo the glass cover, unscrew the bulb and
replace it with a new bulb of the same type.
3. Once the defective bulb is replaced, replace
the glass cover.
This product contains one or more light sources
of energy efficiency class G (Lamp) /F (10 Led).
EN 21

REMOVAL AND CLEANING OF THE GLASS DOOR
1. Open the door 90° and pull the hinge fixing tabs toward the outside of the oven.
2. Put the door at a 45° angle, then pull the door forwards and upwards at the same time to release it.
Remove the oven door and place it on a cushioned surface (e.g. on top of a piece of fabric) with the handle
facing down.
3. Unscrew the two screws on the left and right and pull the upper door cover towards you to remove it.
4. Carefully remove the glass inside the oven, holding it firmly with two hands and placing it on a soft, flat
surface.
5.If there are glass panels in between, remove them and place them on a soft surface.
ATTENTION: the outer panel of glass is not removable
6. Clean the glass with a soft cloth using an appropriate cleaning product.
7. After cleaning, reassemble the parts in the opposite order to removal. On all glass panels, the "Low-E"
indication must be correctly legible and positioned on the left side of the door, near the left side hinge. This
ensures that the printed label on the first glass panel remains inside the door.
8. To attach, push the top cover forward and tighten the two screws on the left and right.
9. Holding the door at 45°, simultaneously insert the right and left male parts of the hinge into the holes of
the hinges released, until you hear them click in place. Bring the door to an angle of 90° and lock the fixing
tabs in place by pushing them towards the inside of the oven.
EN 22

Pyrolysis
The oven is equipped with a pyrolyser cleaning system,
which destroys food residues at high temperature. The
operation is carried out automatically by means of the
programmer. The resulting fumes are rendered "clean" by
passing over a Pyrolyser wich starts as soon as cooking
begins. As very high temperatures are required by the
Pyrolyser, the oven door is fitted with a safety lock. The
pyrolyser can be stopped at any time. The door cannot be
opened until the safety lock is displayed.
NOTE : If a hob has been fitted above the oven, never use
the gas burners or the electric hot-plates while the
Pyrolyser is working, this will prevent the hob from
overheating.
TWO PYROLYTIC CYCLE are pre-set:
Pyrolitic Self Clean Eco: Cleans a moderately stained
oven. Operates for a period of 90 minutes.
Pyrolitic Self Clean : Cleans a heavily stained oven.
Operates for a period of 120 minutes.
Never use commercially available cleaning products on a
Pyrolytic oven!
Tip : Carrying out Pyrolytic cleaning immediately after
cooking allows you to take advantage of residual heat,
thus saving energy.
Before executing a pyrolytic cycle:
•Remove all the accessories from the oven because they
are not able to tolerate the high temperatures used
during the pyrolytic cleaning cycle ; in particular
removing grids, side racks and the telescopic guides
(refer to the chapter REMOVING GRIDS AND SIDE
RACKS) .
•Remove any large spillages or stains as it would take too
long to destroy them. Also excessively large amounts of
grease could ignite when subject to the very high
temperatures of the Pyrolytic cycle.
•Close the oven door.
•Excess spillage must be removed before cleaning.
• Clean the oven door;
• Remove large or coarse food residues from the inside
of the oven using a damp sponge. Do not use
detergents;
• Remove all accessories and the sliding rack kit (where
present);
• Do not place tea towels.
Using the pyrolitic cycle:
1- Tap icon to select the cleaning functions (d) and, using
the navigation buttons, choose the preferred pyrolitic
cycle.
2- It is possible to defer the start time of the pyroclean
cycle by changing the END time via the programmer.
3- After few minutes, when the oven reaches a high
temperature, the door locks automatically. The pyroclean
cycle can be stopped at any time by pushing On/Off
button.
4- Once the pyroclean cycle is finished, the pyrolysis will
switch off automatically.
EN 23
Hydro Easy Clean
300 ml
The Hydro Easy Clean procedure uses steam to help remove remaining fat and food particles from the
oven.
1. Pour 300 ml of water into the Hydro Easy Clean container at the bottom of the oven.
2. Select the dedicated function (d1).
4. Allow the program to operate.
5. After the cycle, allow the oven to cool down.
6. When the appliance is cool, clean the inner surfaces of the oven with a cloth.
Warning: Make sure that the appliance is cool before you touch it.
Care must be taken with all hot surfaces as there is a risk of burns. Use distilled or drinkable water.
Waste management and environmental protection
Troubleshooting
Problem Possible cause Solution
The oven does not heat
up
The clock is not set Set the clock
The oven does not
heat up
A cooking function and temperature has
not been set
Ensure that the necessary settings
are correct
No reaction of the
touch user interface
Steam and condensation on the user in -
terface panel
Clean with a microfiber cloth the
user interface panel to remove the
condensation layer
This appliance is labelled in
accordance with European Di -
rective 2012/19/EU regarding
electric and electronic appli-
ances (WEEE). The WEEE con-
tain both polluting substances
(that can have a negative ef-
fect on the environment) and base elements
(that can be reused). It is important that the
WEEE undergo specific treatments to cor-
rectly remove and dispose of the pollutants
and recover all the materials. Individuals can
play an important role in ensuring that the
WEEE do not become an environmental prob-
lem; it is essential to follow a few basic rules:
- the WEEE should not be treated as domestic
waste;
- the WEEE should be taken to dedicated col-
lection areas managed by the town council or a
registered company.
In many countries, domestic collections may
be available for large WEEEs. When you buy a
new appliance, the old one can be returned to
the vendor who must accept it free of charge
as a one-off, as long as the appliance is of an
equivalent type and has the same functions as
the purchased appliance.
SAVING AND RESPECTING THE ENVIRON -
MENT
Where possible, avoid pre-heating the oven
and always try to fill it. Open the oven door as
infrequently as possible, because heat from
the cavity disperses every time it is opened.
For a significant energy saving, switch off the
oven between 5 and 10 minutes before the
planned end of the cooking time, and use the
residual heat that the oven continues to gen-
erate. Keep the seals clean and in order, to
avoid any heat dispersal outside of the cavity.
If you have an electric contract with an hour-
ly tariff, the “delayed cooking” programme
makes energy saving more simple, moving the
cooking process to start at the reduced tariff
time slot.
EN 24
25
26
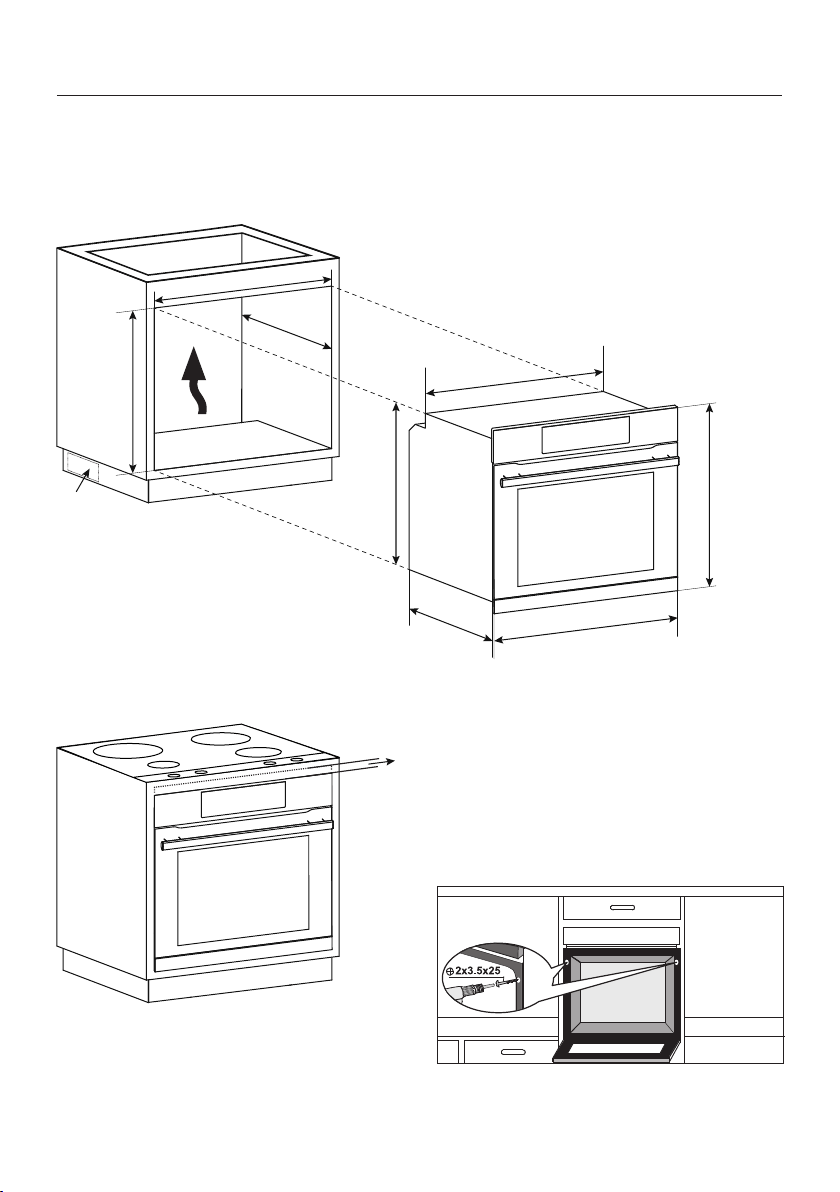
Installaton
Mounting Under Cooktop
The cabinetry should follow the dimensions shown. This allows for sufficient airflow behind the oven and
between the oven and cooktop for cooling. If the cabinetry base is fully sealed, an opening(s) should be
provided to allow cool air to enter.
560 mm
5
7
0 mm
600 mm
560 mm x 45 mm
595 mm
550 mm
548,5 mm
595 mm
577,5 mm
2
0
mm
Air Entry
Air Exit
5 mm gap
Note: be sure to consult the cooktop manufacturer’s installation guide to ensure adequate clearances.
27
* mandatory for all types of installations
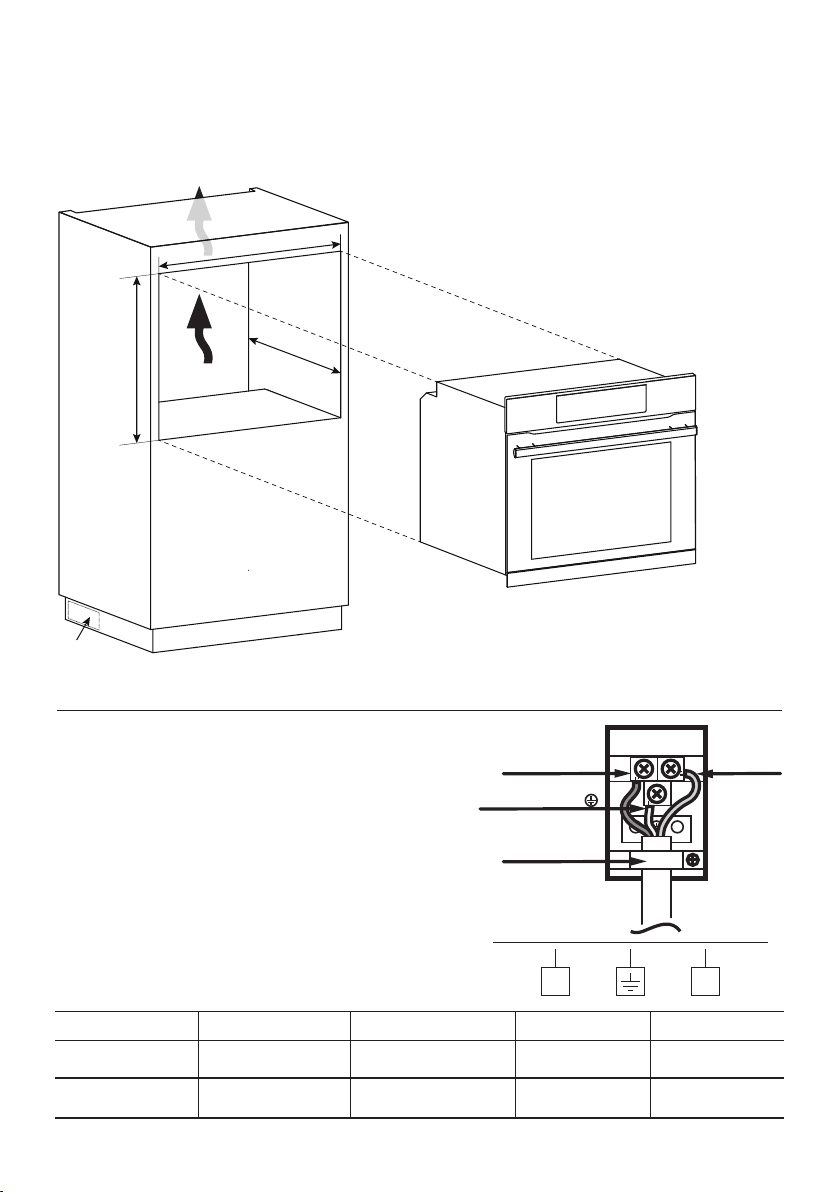
Standalone Installation
If the oven is mounted without cooktop, the cabinet depth and height can be reduced. An opening should
be provided at the top of the cabinetry to allow hot air to exit. If the bottom of the cabinetry is sealed,
opening(s) should be provided to allow cool air to enter.
560 mm
560 mm
595
mm
560 mm x 45 mm
460 mm x 45 mm
Air Entry
Air Exit
HWO60S14EPB4
HWO60S14EPX4
Model Max Power (W) Frequency (Hz) Voltage (V) Amps (A)
Electrical Connections
L N
Terminal
Live: Brown
Earth: Green/Yellow
Neutral: Blue
Cable clamp
L N
● The appliance may be connected to the mains supply
only by a competent person.
● The mains lead must not be clamped, bent, trapped, or
come into contact with hot parts of the appliance.
● This oven must be earthed.
● Before connecting the oven to the mains power supply,
check that:
- The domestic wiring system is suitable for the power
drawn by the oven (as specified on the rating plate)
- The voltage corresponds to the value given on the rating
plate.
2400 W
50 / 60 Hz
220 - 240 ~ 10 - 10.9
2400 W
50 / 60 Hz
220 - 240 ~ 10 - 10.9
28

EN The manufacturer will not be responsible for any inaccuracy resulting from printing or transcript errors
contained in this brochure. We reserve the right to carry out modifications to products as required, includ -
ing the interests of consumption, without prejudice to the characteristics relating tosafety or function.
70020665 ● 01.2023 ● Rev.A