ご使用の前に、この使用説明書をよくお読みの上、正しくお使いください。また、
カメラの説明書もご覧ください。
•
このレンズは、ニコン
Z マウントのミラーレスカメラ専用です。
安全上のご注意
あなたや他の人々への危害や財産への損害を未然に防止するため、ご使用の前に「安全上の
ご注意」をよくお読みの上、正しくお使いください。
この説明書をお読みになった後は、いつでも参照できるように保管してください。
A
警告
「死亡または重傷を負うおそれがある内容」です。
A
注意
「軽傷を負うことや財産の損害が発生するおそれがある内容」です。
お守りいただく内容を、以下の図記号で区分しています。
F
は、してはいけない内容です。
C
は、実行しなければならない内容です。
A
警告
E
分解
禁止
分解、修理または改造をしない
落下などによる破損で内部が露出したら、露出部に触らない
感電やけがの原因になります。
C
実行
熱くなる、煙が出る、こげ臭いなどの異常時は、直ちにカメラの電源を取り
外す
放置すると、発火、やけどの原因になります。
F
禁止
水でぬらさない
ぬれた手で触らない
感電や発火の原因になります。
F
禁止
引火、爆発のおそれのある場所では使わない
プロパンガス、ガソリン、可燃性スプレーなどの引火性ガスや粉塵の発生す
る場所で使うと、爆発や火災の原因になります。
F
禁止
レンズで直接太陽や強い光を見ない
失明や視力障碍の原因になります。
F
禁止
幼児の手の届くところに置かない
故障やけがの原因になります。
小さな付属品を誤って飲み込むと、身体に悪影響を及ぼします。飲み込んだ
ら、すぐに医師の診断を受けてください。
G
禁止
高温環境や低温環境では、直接触らない
やけどや低温やけど、凍傷の原因になることがあります。
A
注意
F
禁止
レンズを太陽や強い光源に向けたままにしない
集光して、内部部品の破損や発火の原因になることがあります。
逆光撮影では、太陽を画角から十分にずらしてください。
画角から太陽をわずかに外しても、発火の原因になります。
F
禁止
夏場の車内や直射日光の当たる所など高温環境に放置しない
故障や発火の原因になります。
F
禁止
三脚などにカメラやレンズを取り付けたまま移動しない
故障やけがの原因になります。
レンズの使い方
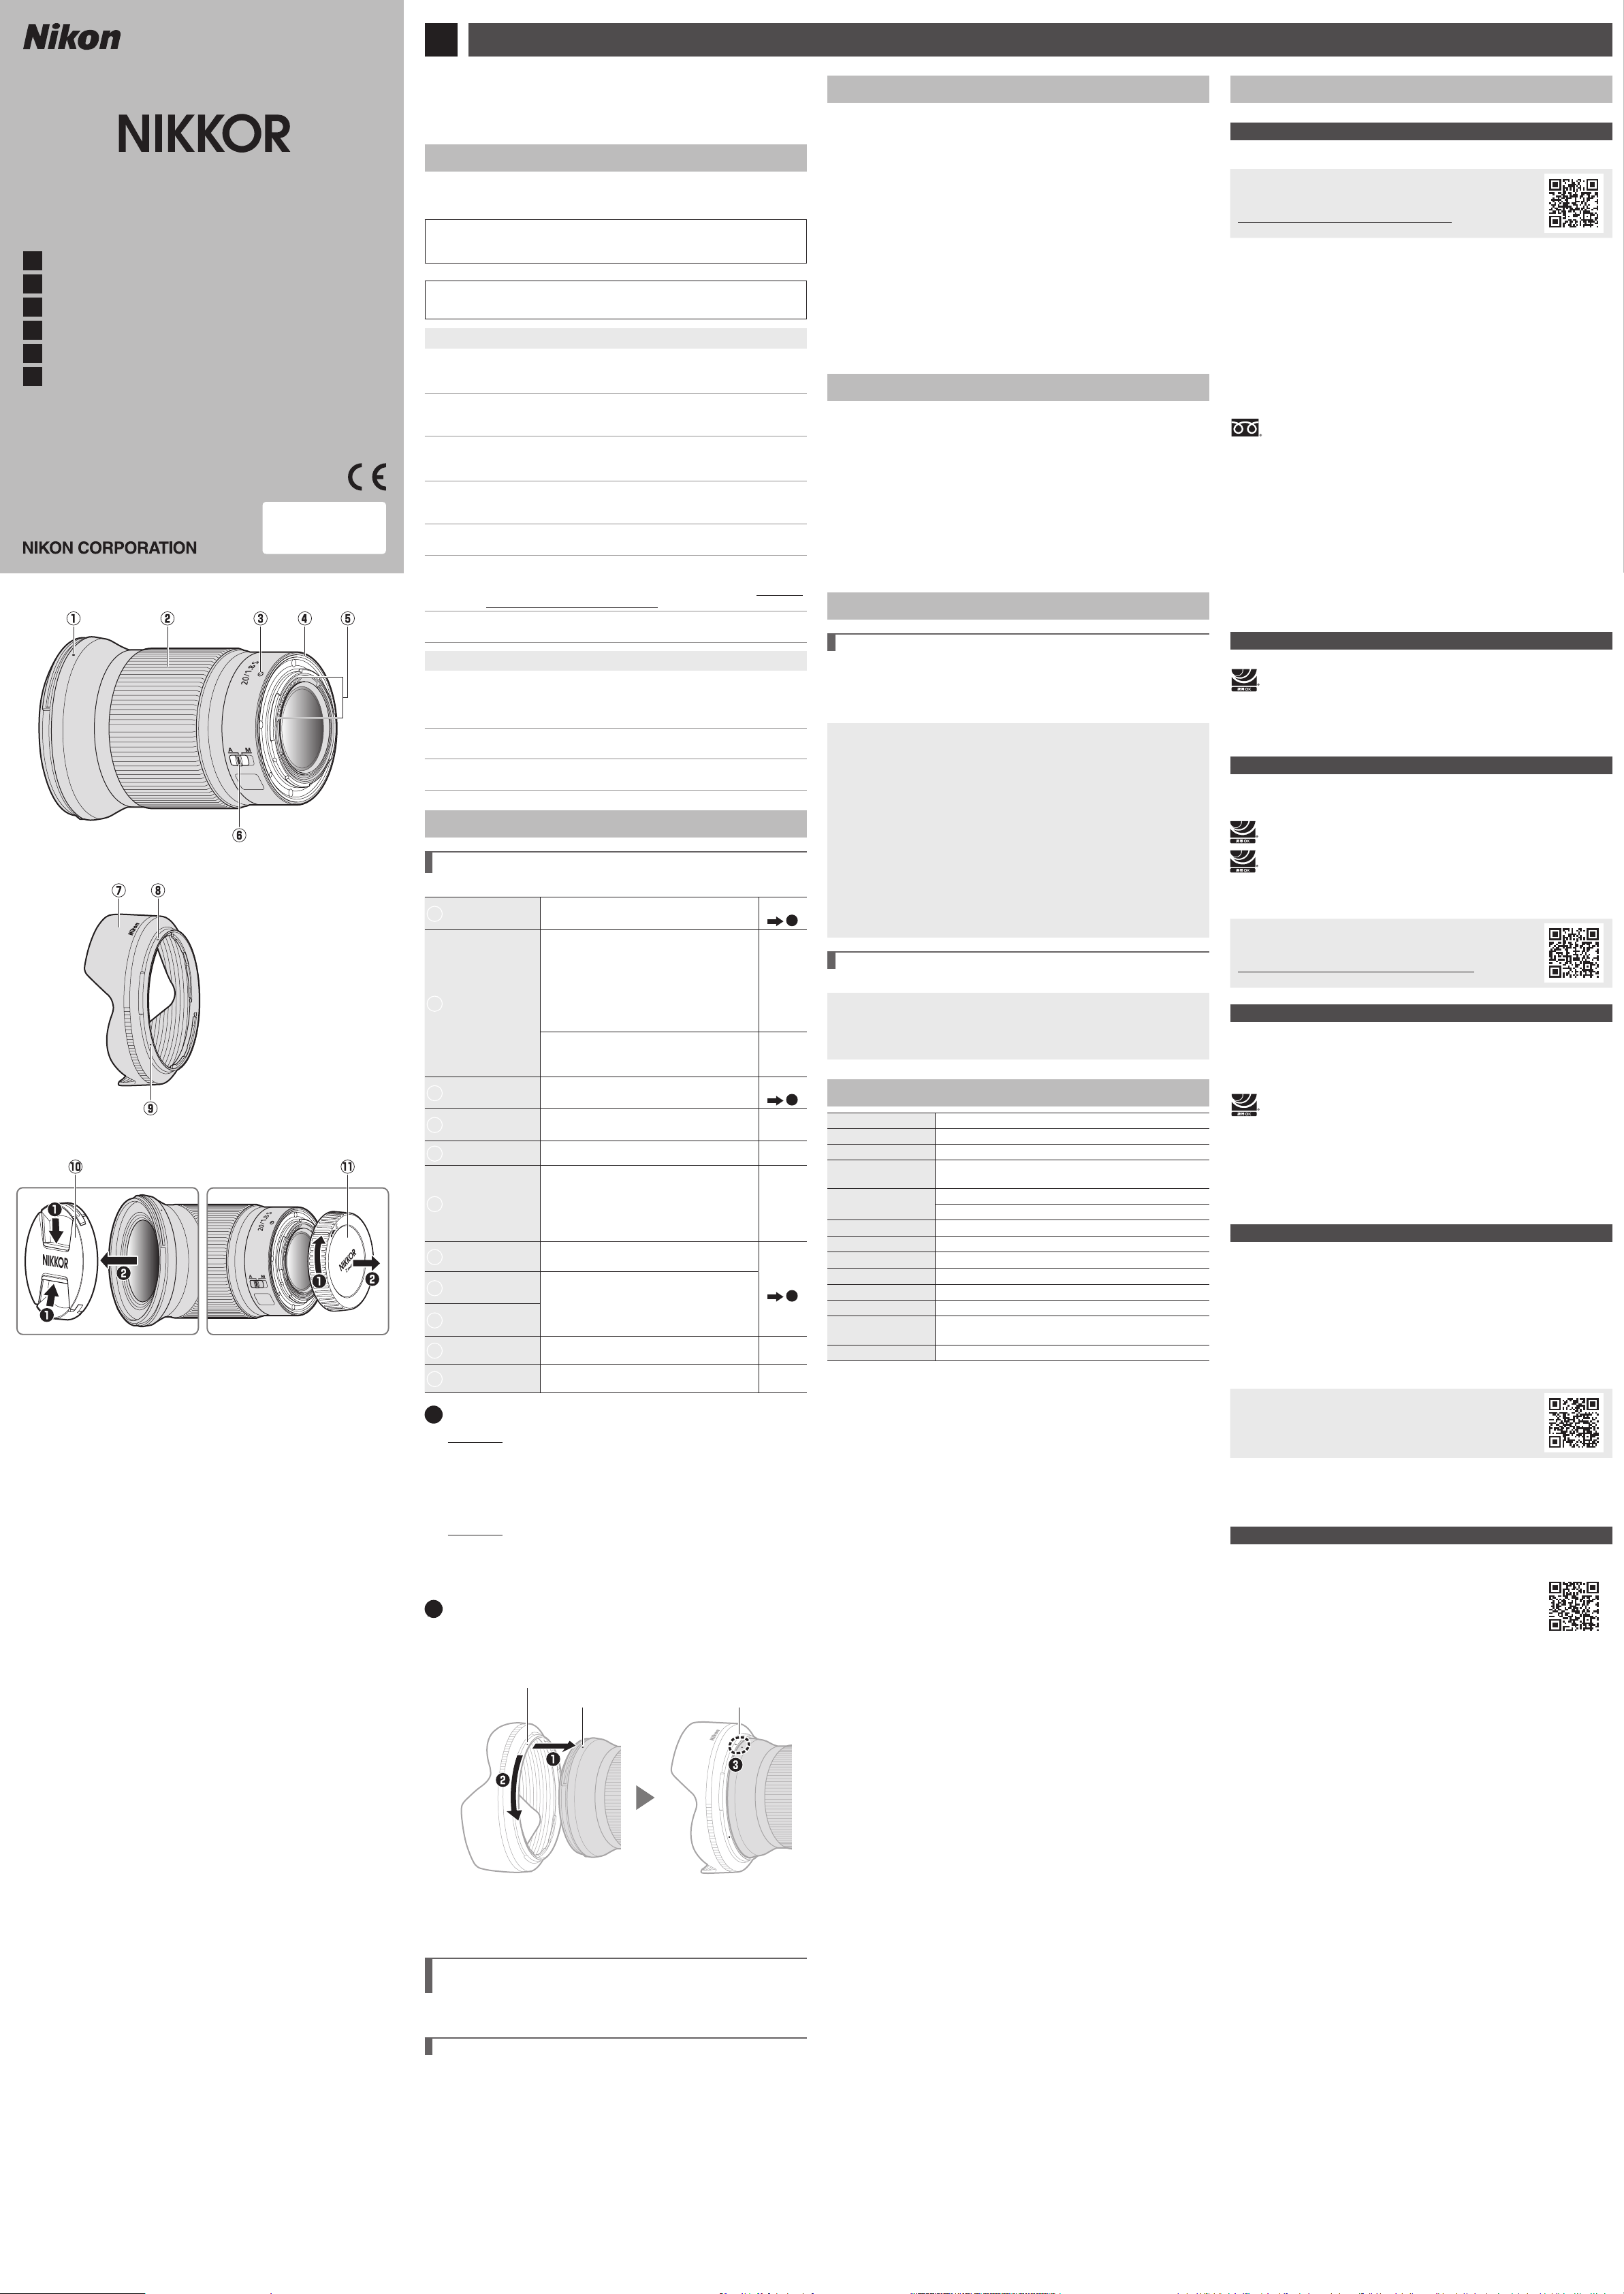
各部の名称と機能
左図で示されている各部の名称と機能は以下の通りです。
●
q
レンズフード着脱指
標
レンズにレンズフードを取り付けるときの指
標です。
詳しくは
B
●
w
コントロールリング
オートフォーカス時
このリングを回転させると、[フォーカス(
M/
A
)]や[絞り]などカメラで設定した機能を
使用できます。詳しくは、カメラの説明書に
記載されている[カスタムボタンの機能]ま
たは[カスタムボタンの機能(撮影)]の説明
をご覧ください。
—
マニュアルフォーカス時
このリングを回転させると手動でピント合わ
せができます。
—
●
e
レンズ着脱指標 カメラにレンズを取り付けるときの指標です。
詳しくは
A
●
r
レンズマウント
ゴムリング
— —
●
t
CPU
信号接点 カメラとレンズの間で情報を伝達します。 —
●
y
フォーカスモード
切り換えスイッチ
[
A
]を選ぶとオートフォーカスになり、[
M
]
を選ぶとマニュアルフォーカスになります。
•
カメラのフォーカスモードがマニュアルフォー
カスのときは、レンズで[
A
]を選んでいても
マニュアルフォーカスになります。
—
●
u
レンズフード
画像に悪影響を及ぼす光線をカットします。
レンズ面の保護にも役立ちます。
詳しくは
B
●
i
レンズフードセット
指標
レンズにレンズフードを取り付けるときの指
標です。
●
o
レンズフード取り付
け指標
●
!0
レンズキャップ
(
フロントキャップ
)
— —
●
!1
レンズキャップ
(リアキャップ)
— —
A
カメラへの取り付け方・取り外し方
取り付け方
z
カメラの電源を
OFF
にして、レンズのリアキャップとカメラのボ
ディーキャップを外す
x
カメラとレンズのレンズ着脱指標を合わせ、反時計回りにカチッ
と音がするまでレンズを回す
取り外し方
z
カメラの電源を
OFF
にする
x
レンズ取り外しボタンを押しながら、時計回りにレンズを回して
取り外す
B
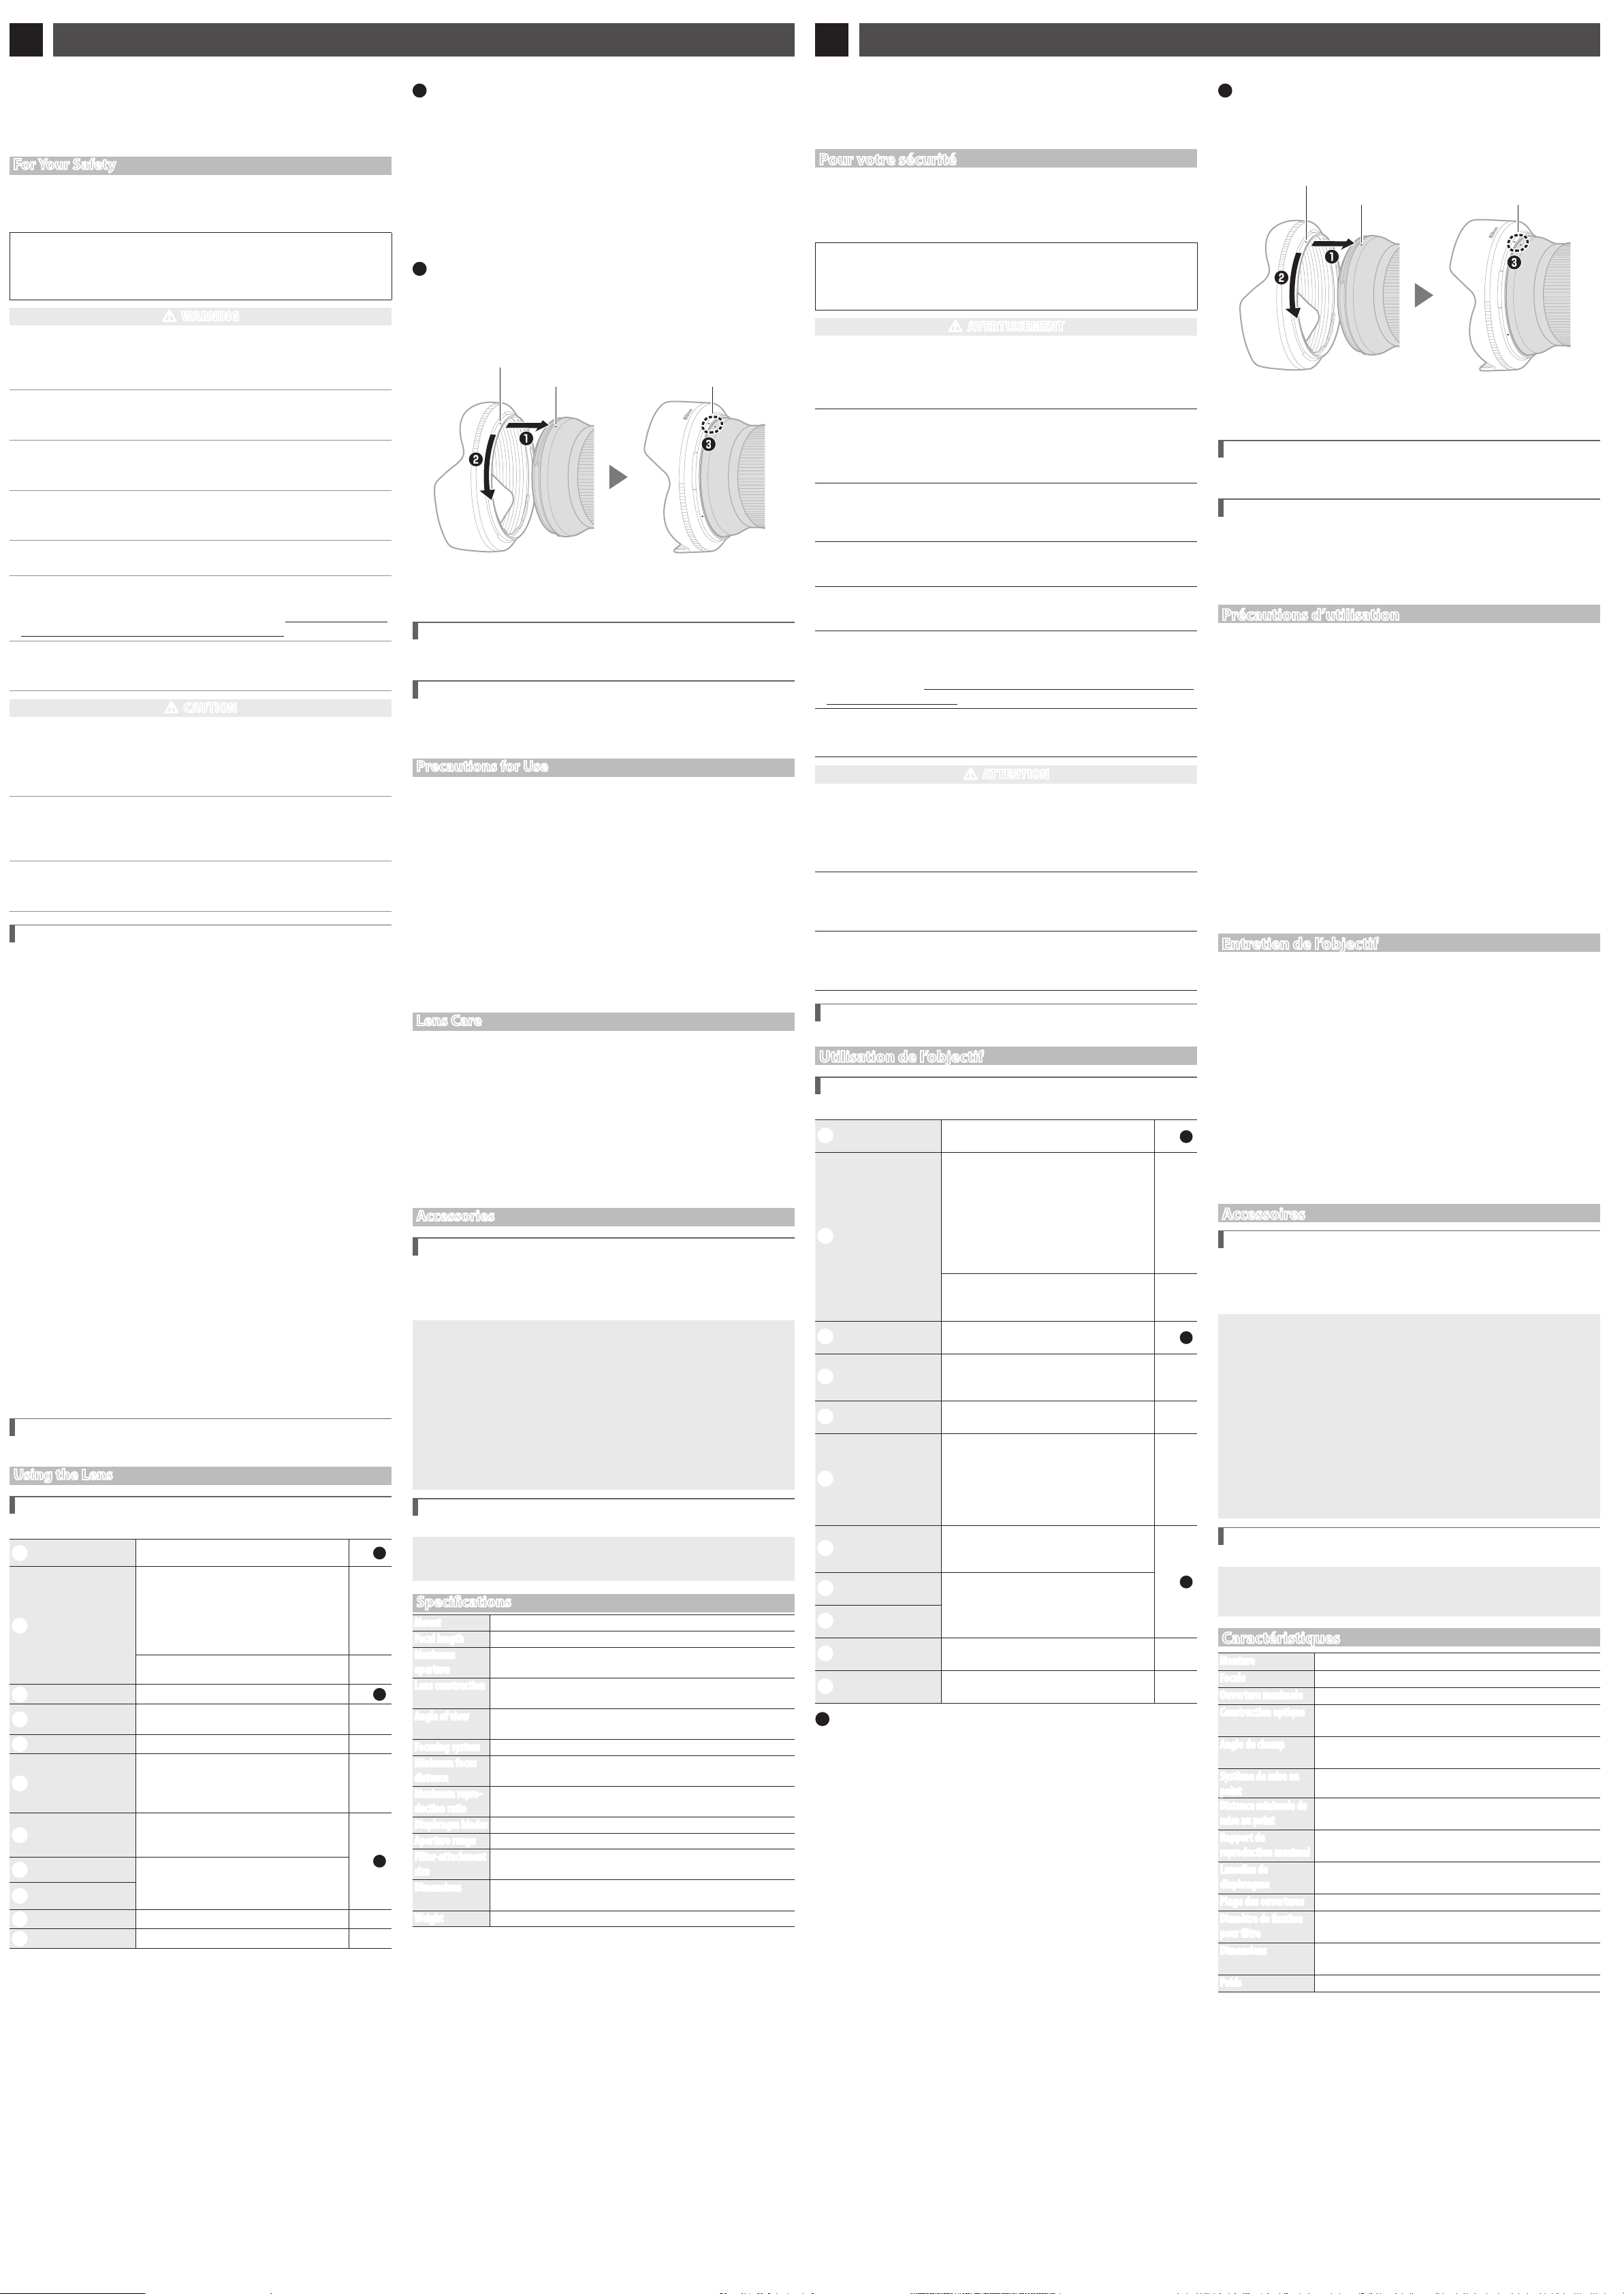
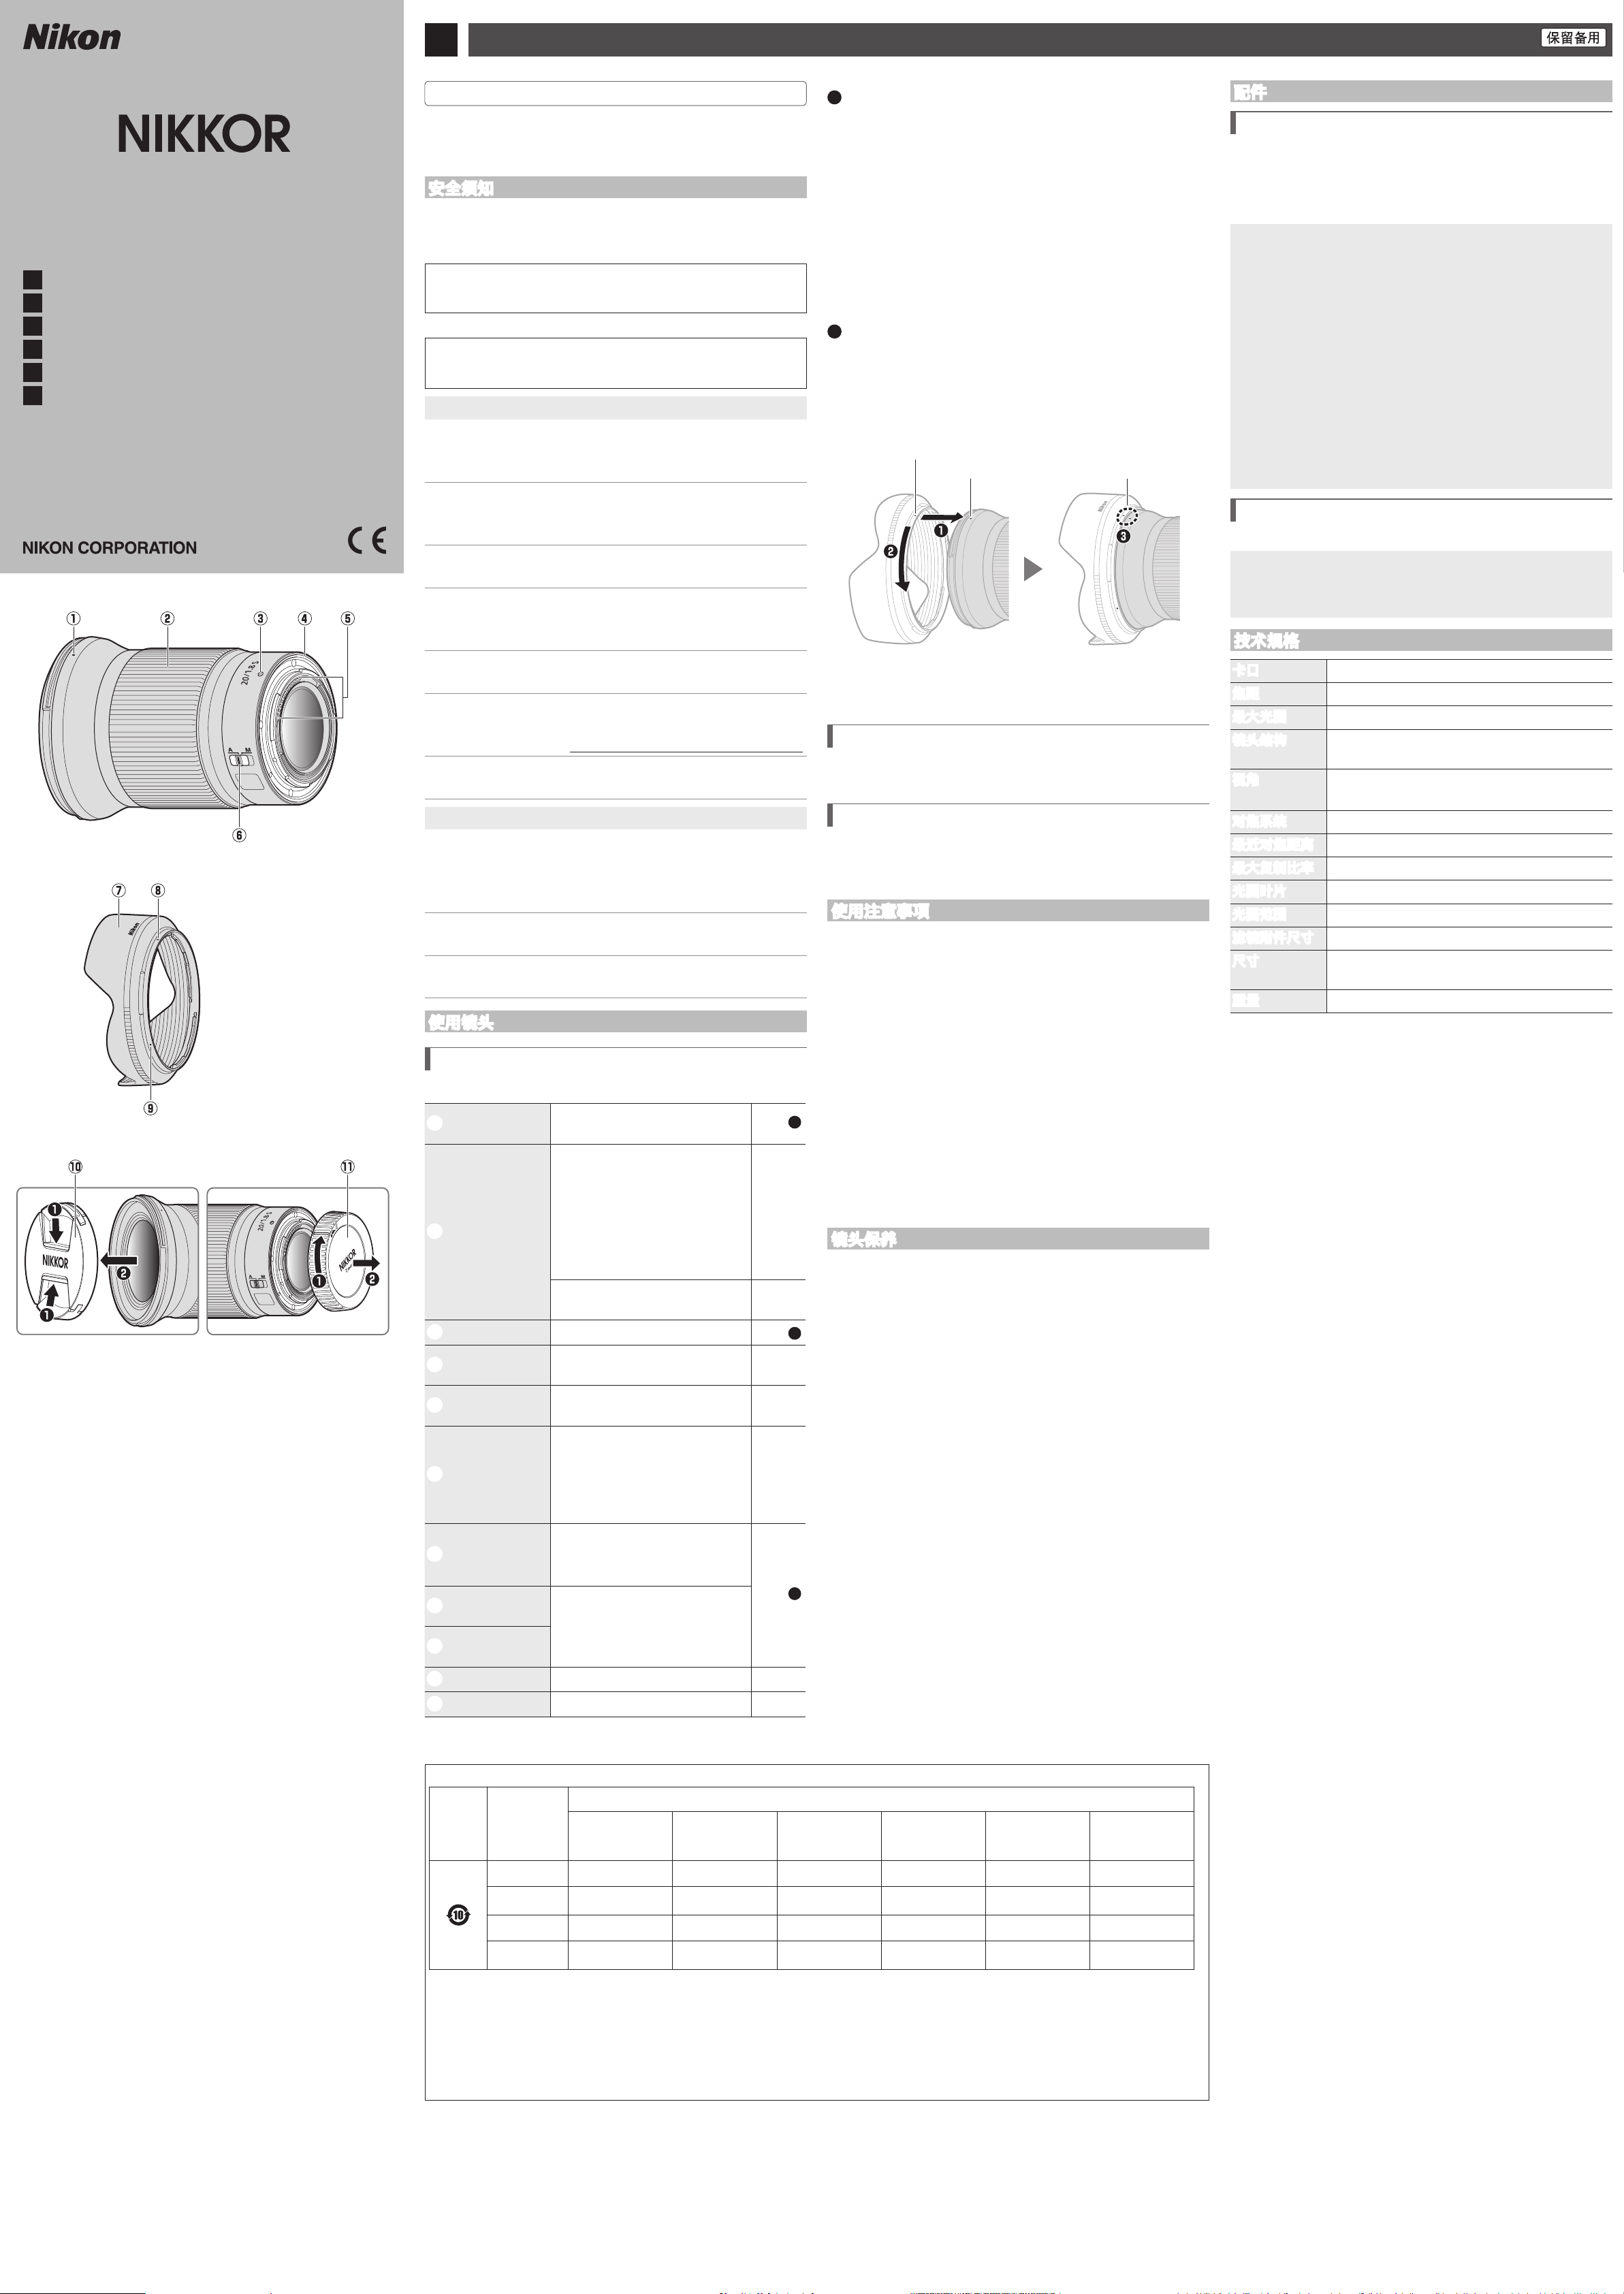
レンズフードの取り付け方・取り外し方
•
レンズフード着脱指標とレンズフード取り付け指標を合わせて(
q
)、レンズフー
ドを矢印(
w
)の方向に回転させ、レンズフード着脱指標とレンズフードセット
指標を合わせてください(
e
)。
レンズフード取り付け指標
レンズフード着脱指標 レンズフードセット指標
•
レンズフード先端を強くつかむと着脱が困難になります。着脱の際は、レンズフー
ド取り付け指標(●)付近を持って回転させてください。
•
取り外しは、取り付けと逆の手順で行ってください。
•
収納時はレンズフードを逆向きにしてレンズに取り付けられます。
内蔵フラッシュ搭載のカメラでフラッシュ撮影
するときのご注意
カメラの内蔵フラッシュを使用すると、フラッシュの光がレンズでさえぎられて、
画像の一部に影ができます。
カメラにレンズを取り付けたときのご注意
ピント合わせを行った後に、カメラの電源を OFF にして再び ON にするとピント位
置が変わることがあります。ピントをあらかじめ合わせておいて被写体を待つ置き
ピン撮影などでは、ピントを合わせてからシャッターをきるまでにカメラの電源を
OFF にしないことをおすすめします。
取り扱い上のご注意
•
レンズフードをレンズに装着した状態で、レンズフードだけを持たないでください。
•
CPU 信号接点は汚さないようにご注意ください。
•
レンズマウントゴムリングが破損した場合は、そのまま使用せず販売店またはニコン
サービス機関に修理を依頼してください。
•
レンズをカメラに装着していないときは、必ずレンズキャップを取り付けてください。
•
レンズを保管するときは、レンズ内部を保護するために太陽光のあたらない所に保管
してください。
•
レンズを水にぬらしたり、湿気の多い場所に置かないでください。部品がサビつくな
どして故障の原因になりますのでご注意ください。
•
火の近くなど、極端に温度が高くなるところに置かないでください。外観の一部に使
用している強化プラスチックが変形することがあります。
•
極端に温度差のある場所に急にレンズを持ち込むと、レンズ内外に水滴が生じ、故障
の原因となります。レンズをバッグやビニール袋などに入れて、周囲の温度になじま
せてからお使いください。
•
レンズを傷から守るために、持ち運ぶときはレンズケースに入れることをおすすめし
ます。
レンズのお手入れ
•
レンズ面を清掃する場合、通常はほこりを払う程度にしてください。
•
レンズ面に指紋など油分を含む汚れがついたときは、少量の無水アルコール(エタノー
ル)や市販のレンズクリーナーで湿らせた柔らかい清潔な木綿の布または市販のレン
ズクリーニングペーパーを使って、レンズの中心から外周へ渦巻き状に拭いてくださ
い。その場合、拭きムラや拭き残りがないように注意してください。
•
シンナーやベンジンなどの有機溶剤は絶対に使用しないでください。
•
レンズ表面の汚れや傷を防ぐには、別売のニュートラルカラー
NC フィルターなどの
使用をおすすめします。
•
レンズを長期間使用しないときは、カビやサビを防ぐために、高温多湿のところを避
けて風通しのよい場所に保管してください。また、直射日光のあたるところ、防虫剤
のあるところも避けてください。
アクセサリー
付属アクセサリー
•
レンズキャップLC-77B(フロントキャップ)
•
レンズキャップ
LF-N1(リアキャップ)
•
レンズフード
HB-95
•
レンズケースCL-C1
D
レンズケースのお取り扱いについて
•
レンズケースはレンズを傷から守ることを目的としており、落下や衝撃からレンズ
を保護する機能はありません。
•
レンズケースに撥水機能はありません。
•
レンズケースは材質の特性上、雨や水などで濡れた場合や摩擦によって、色落ち、
変色、色移り、伸縮することがあります。
•
ほこりは柔らかいブラシで払い落としてください。
•
表面に付着した汚れや水分は、乾いた柔らかい布で拭き取ってください。アルコール、
ベンジン、シンナーなどの溶剤は使わないでください。
•
直射日光があたる場所や、温度、湿度の高い場所に放置しないでください。
•
レンズ面や液晶画面などを拭くクリーニングクロスとしては使用できません。
•
レンズを収納して持ち運ぶ際、レンズが転がり出ないようご注意ください。
レンズケースの素材:ポリエステル
使用できるアクセサリー
77mm ネジ込み式フィルター
D
フィルターを使用する場合
•
フィルターは 1 枚で使用してください。
•
フィルターは、レンズフードを取り外してから装着してください。また、円偏光フィ
ルターの偏光効果の調節も、レンズフードを取り外した状態で行ってください。
仕様
マウント ニコン Z マウント
焦点距離
20mm
最大口径比 1:1.8
レンズ構成
11 群 14枚(ED レンズ 3 枚、非球面レンズ 3 枚、ナノク
リスタルコートあり)
画角
94°(撮像範囲FX)
70°(撮像範囲DX)
フォーカシング方式
IF(インターナルフォーカス)方式
最短撮影距離 撮像面から
0.2m
最大撮影倍率 0.19 倍
絞り羽根枚数
9 枚(円形絞り)
絞りの範囲
f/1.8—16
アタッチメントサイズ 77mm(P=0.75mm)
寸法
約
84.5mm(最大径)×108.5mm(レンズマウント基準
面からレンズ先端まで)
質量 約
505g
製品の外観・仕様・性能は予告なく変更することがありますので、ご了承ください。
Jp
使用説明書
En
User’s Manual
Before using this product, please read these instructions carefully. You will also need to
consult the camera manual.
• This lens is intended exclusively for use with mirrorless cameras featuring a Nikon Z
mount.
For Your Safety
To prevent damage to property or injury to yourself or to others, read “For Your Safety”
in its entirety before using this product.
Keep these safety instructions where all those who use this product will read them.
A WARNING: Failure to observe the precautions marked with this icon could
result in death or severe injury.
A CAUTION: Failure to observe the precautions marked with this icon could
result in injury or property damage.
A WARNING
• Donotdisassembleormodifythisproduct.
Donottouchinternalpartsthatbecomeexposedastheresultofafallor
otheraccident.
Failure to observe these precautions could result in electric shock or other injury.
• Shouldyounoticeanyabnormalitiessuchastheproductproducingsmoke,
heat,orunusualodors,immediatelydisconnectthecamerapowersource.
Continued operation could result in fire, burns or other injury.
• Keepdry.
Donothandlewithwethands.
Failure to observe these precautions could result in fire or electric shock.
• Donotusethisproductinthepresenceofammabledustorgassuchas
propane,gasolineoraerosols.
Failure to observe this precaution could result in explosion or fire.
• Donotdirectlyviewthesunorotherbrightlightsourcethroughthelens.
Failure to observe this precaution could result in visual impairment.
• Keepthisproductoutofreachofchildren.
Failure to observe this precaution could result in injury or product malfunction. In
addition, note that small parts constitute a choking hazard. Should a child swallow
any part of this product, seek immediate medical attention.
• Donothandlewithbarehandsinlocationsexposedtoextremelyhighor
lowtemperatures.
Failure to observe this precaution could result in burns or frostbite.
A CAUTION
• Donotleavethelenspointedatthesunorotherstronglightsources.
Light focused by the lens could cause fire or damage to product’s internal parts.
When shooting backlit subjects, keep the sun well out of the frame.
Sunlight focused into the camera when the sun is close to the frame could cause
fire.
• Do not leave the product where it will be exposed to extremely high
temperatures,foranextendedperiodsuchas inan enclosedautomobile
orindirectsunlight.
Failure to observe this precaution could result in fire or product malfunction.
• Do not transport cameras or lenses with tripods or similar accessories
attached.
Failure to observe this precaution could result in injury or product malfunction.
Notices for Customers in the U.S.A.
This device complies with part 15 of the FCC Rules. Operation is subject to the
following two conditions: (1) this device may not cause harmful interference, and (2)
this device must accept any interference received, including interference that may
cause undesired operation.
Federal Communications Commission (FCC) Radio Frequency Interference
Statement
This equipment has been tested and found to comply with the limits for a Class B
digital device, pursuant to Part 15 of the FCC rules. These limits are designed to provide
reasonable protection against harmful interference in a residential installation. This
equipment generates, uses, and can radiate radio frequency energy and, if not installed
and used in accordance with the instructions, may cause harmful interference to radio
communications. However, there is no guarantee that interference will not occur in a
particular installation. If this equipment does cause harmful interference to radio or
television reception, which can be determined by turning the equipment off and on,
the user is encouraged to try to correct the interference by one or more of the following
measures:
• Reorient or relocate the receiving antenna.
• Increase the separation between the equipment and receiver.
• Connect the equipment into an outlet on a circuit different from that to which the
receiver is connected.
• Consult the dealer or an experienced radio/television technician for help.
CAUTIONS
Modications
The FCC requires the user to be notified that any changes or modifications made to
this device that are not expressly approved by Nikon Corporation may void the user’s
authority to operate the equipment.
NikonInc.,1300WaltWhitmanRoad,
Melville,NewYork11747-3064,U.S.A.
Tel.:631-547-4200
Notice for Customers in Canada
CAN ICES-3 B / NMB-3 B
Using the Lens
Parts of the Lens: Names and Functions
Refer to the diagram on the left edge of this sheet.
q
Lens hood mounting
mark
Use when attaching the lens hood.
See
B
w
Control ring
Autofocus mode selected: In autofocus mode, ro-
tate the ring to adjust a setting such as Focus
(M/A) or Aperture assigned using the camera.
For more information, see the description of
Custom controls/Custom control assignment/Cus-
tom controls (shooting) in the camera manual.
—
Manual focus mode selected: Rotate the ring to
focus.
—
e
Lens mounting mark
Use when mounting the lens on the camera.
See
A
r
Rubber lens-mount
gasket
— —
t
CPU contacts
Used to transfer data to and from the camera. —
y
Focus-mode switch
Choose A for autofocus, M for manual focus.
Note that regardless of the setting chosen, fo-
cus must be adjusted manually when manual
focus mode is selected using camera controls.
—
u
Lens hood
Lens hoods block stray light that would other-
wise cause flare or ghosting. They also serve to
protect the lens.
See
B
i
Lens hood lock mark
Use when attaching the lens hood.
o
Lens hood alignment
mark
!0
Lens cap (front cap)
— —
!1
Lens cap (rear cap)
— —
A
Attachment and Removal
Attaching the Lens
z
Turn the camera off, remove the body cap, and detach the rear lens cap.
x
Position the lens on the camera body, keeping the mounting mark on the lens
aligned with the mounting mark on the camera body, and then rotate the lens
counterclockwise until it clicks into place.
Removing the Lens
z
Turn the camera off.
x
Press and hold the lens release button while turning the lens clockwise.
B
Attaching and Removing the Lens Hood
Align the lens hood mounting mark with the lens hood alignment mark (
q
)
and then rotate the hood (
w
) until the mounting mark is aligned with the lens
hood lock mark (
e
).
To remove the hood, reverse the above steps.
Lens hood alignment mark
Lens hood mounting mark Lens hood lock mark
When attaching or removing the hood, hold it near the lens hood alignment mark
(
●) and avoid gripping the front of the hood too tightly. The hood can be reversed
and mounted on the lens when not in use.
When Shooting Using Cameras with Built-in Flash
Shadows will be visible in images when using the camera’s built-in flash because the
light emitted from the flash may be obstructed by the lens.
When the Lens Is Attached
The focus position may change if you turn the camera off and then on again after fo-
cusing. If you have focused on a pre-selected location while waiting for your subject to
appear, we recommend that you do not turn the camera off until the picture is taken.
Precautions for Use
• Do not pick up or hold the lens or camera using only the lens hood.
• Keep the CPU contacts clean.
• Should the rubber lens-mount gasket be damaged, cease use immediately and take
the lens to a Nikon-authorized service center for repair.
• Replace the lens caps when the lens is not in use.
• To protect the interior of the lens, store it out of direct sunlight.
• Do not leave the lens in humid locations or in locations in which it may be exposed to
moisture. Rusting of the internal mechanism can cause irreparable damage.
• Do not leave the lens next to open flames or in other extremely hot locations. Ex-
treme heat could damage or warp exterior parts made from reinforced plastic.
• Rapid changes in temperature may cause damaging condensation inside and outside
the lens. Before taking the lens from a warm to a cold environment or vice versa, place
it in a bag or plastic case to slow the change in temperature.
• We recommend that you place the lens in its case to protect it from scratches during
transport.
Lens Care
• Removing dust is normally sufficient to clean the glass surfaces of the lens.
• Smudges, fingerprints, and other oily stains can be removed from the lens surface
using a soft, clean cotton cloth or lens cleaning tissue lightly dampened with a small
amount of ethanol or lens cleaner. Wipe gently from the center outwards in a circular
motion, taking care not to leave smears or touch the lens with your fingers.
• Never use organic solvents such as paint thinner or benzene to clean the lens.
• Neutral Color (NC) filters (available separately) and the like can be used to protect the
front lens element.
• If the lens will not be used for an extended period, store it in a cool, dry location to
prevent mold and rust. Do not store in direct sunlight or with naphtha or camphor
moth balls.
Accessories
Supplied Accessories
• LC-77B Lens Cap (front cap)
• LF-N1 Lens Cap (rear cap)
• HB-95 Lens Hood
• CL-C1 Lens Case
D
Using the Lens Case
• Thecaseisintendedtoprotectthelensfromscratches,notfromfallsorotherphysicalshocks.
• Thecaseisnotwaterresistant.
• Thematerialusedinthecasemayfade,bleed,stretch,shrink,orchangecolorwhenrubbedorwet.
• Removedustwithasoftbrush.
• Waterandstainscanberemovedfromthesurfacewithasoft,drycloth.Donotusealcohol,benzene,thinner,
orothervolatilechemicals.
• Donotstoreinlocationsexposedtodirectsunlightorhightemperaturesorhumidity.
• Donotusethecasetocleanthemonitororlenselements.
• Becarefulthatthelensdoesnotfallfromthecaseduringtransport.
Material:Polyester
Compatible Accessories
77 mm screw-on filters
D
Filters
• Useonlyonelteratatime.
• Removethelenshoodbeforeattachingltersorrotatingcircularpolarizinglters.
Specications
Mount Nikon Z mount
Focal length 20 mm
Maximum
aperture
f/1.8
Lens construction 14 elements in 11 groups (including3EDelements,3asphericalelements,and
elementswithNanoCrystalCoat)
Angle of view • FX format: 94°
• DX format: 70°
Focusing system Internal focusing system
Minimum focus
distance
0.2 m (0.66ft) from focal plane
Maximum repro-
duction ratio
0.19×
Diaphragm blades 9 (roundeddiaphragmopening)
Aperture range f/1.8 – 16
Filter-attachment
size
77 mm (P=0.75mm)
Dimensions Approx. 84.5 mm (3.4in.) maximum diameter × 108.5 mm (4.3in.)
(distancefromcameralensmountange)
Weight Approx. 505 g (1lb1.9oz)
Nikon reserves the right to change the appearance, specications, and performance of this
product at any time and without prior notice.
サービスとサポート
修理サービスのご案内
■
インターネットでのお申込み
ニコンイメージングジャパン修理センターで承ります。
下記のホームページからお申込みいただけます。
https://www.nikon-image.com/support/repair/
•
ニコン
ピックアップサービスで発送する場合
梱包資材のお届け・修理品のお引き取り、修理後のお届け・集金までをニコン指定の配送
業者(ヤマト運輸)が一括して代行するサービスです。全国一律の料金にて承ります(大
きさや重さには制限があり、取り扱いできない製品もあります)。
•
ご自身で発送する場合
インターネットでお申込みいただいた後、お客様ご自身で修理品を梱包し、修理センター
まで発送してください。
株式会社ニコンイメージングジャパン修理センター
〒
230-0052
横浜市鶴見区生麦
2-2-26
修理センターナビダイヤル
0570-02-8200
※
修理センターでは、宅配便、郵送をお受けします。ご来所の方の受付はしておりません。
■
お電話でのお申込み
お電話でのお申込みの場合は、ニコンピックアップサービスをご利用いただけます。
ニコン ピックアップサービス専用 フリーダイヤル(ヤマト運輸にて承ります)
0120-02-8155
営業時間:
9
:
00
~
18
:
00
(年末年始を除く毎日)
※
上記フリーダイヤルは、ニコン指定の配送業者(ヤマト運輸)にて承ります。修理内容に
関するお問い合わせにはお答えできません。修理内容に関するお問い合わせは修理センター
へお願いいたします。
■
サービスセンターでのお手続き
ニコンプラザのサービスセンター窓口でお見積り・受付をいたします。
D
修理品をお預けいただく場合のご注意
•
ボディーキャップやレンズキャップが付属している製品の場合は、製品保護のため、装着して
お預けください。
•
修理に必要と思われるもの以外の付属品は、ご自身で保管ください。
•
カメラなどの修理では、受付や修理の過程で撮影データをやむを得ず消去する場合があります。
大切なデータは必ずバックアップをお取りください。
修理に関するお問い合わせ先
株式会社ニコンイメージングジャパン修理センター
修理センター ナビダイヤル
0570-02-8200
営業時間:
9
:
30
~
18
:
00
(土曜日、日曜日、祝日、年末年始、夏期休業日など弊社定休日
を除く毎日)
•
ナビダイヤルをご利用いただけない場合は、ニコンカスタマーサポートセンター
(03)6702-0577
におかけください。
ニコンプラザについて
ニコンプラザは、ショールーム、サービスセンター、ギャラリーを統合したニコン映像製品
の総合情報拠点です。
※
ニコンプラザサービスセンターでは持ち込み修理の受け付けも行っています。
ニコンプラザショー ルーム ナビダイヤル
0570-02-8080
ニ
コンプラザサービスセンター ナビダイ
ヤル
0570-02-8060
•
音声ガイダンスにしたがってご利用ください。
•
ナビダイヤルをご利用いただけない場合は、ニコンカスタマーサポートセンター
(03)6702-0577
におかけください。
ニコンプラザの所在地、営業時間などについては、下記
URL
を
ご覧ください。
https://www.nikon-image.com/support/showroom/
製品の使い方に関するお問い合わせ先
■
インターネットでのお問い合わせ
https://www.nikon-image.com/support/contact/
■
お電話でのお問い合わせ
ニコン
カスタマーサポートセンター
ナビダイヤル
0570-02-8000
営業時間:
9
:
30
~
18
:
00
(年末年始、夏期休業日等を除く毎日)
•
ナビダイヤルをご利用いただけない場合は、ニコンカスタマーサポートセンター
(
03
)
6702-0577
におかけください。
•
フ ァ ク シ ミ リ は 、(
03
)
5977-7499
にお送りください。
お問い合わせ時のお願い
•
お わ か り に な る 範 囲 で 「 製 品 名 」、「 製 品 番 号 」、「 ご 購 入 日 」、 問 題 が 発 生 し た 場 合 は 「 手 順 」、「 現 象
(表示されたメッセージ)」、「発生頻度」などをご確認のうえ、お問い合わせください。
ニコンイメージング会員「製品登録」のご案内
ニコンでは製品を安全に、安心してご使用いただくため「製品登録」へのご協力をお願いしてお
ります。ご登録いただいた製品に関するファームアップ情報や重要なお知らせなどをメールでご
案内いたします。
■
製品登録方法
製品は、「ニコンイメージング会員」(無料)の「製品登録」ページからご登録いただけます。
ニコンイメージング会員登録および製品登録は以下ニコンホームページからお手続きください。
ニコンイメージング会員のご案内
https://www.nikon-image.com/enjoy/membership/about/
■
ニコンイメージング会員とは
登録製品に関するサポート情報・ニコン製品情報や、お得で便利な会員特
典
※
などフォトライフをよりお楽しみいただくための会員サービスです。
※
特典は登録製品ごとに異なります。
ご注意
•
ご登録にはメールアドレスとインターネットに接続できる環境が必要です。
•
登録製品の製品番号(製品本体および保証書に記載)が必要です。
•
特典の内容は、予告なく変更される場合があります。あらかじめご了承ください。
ニコンイメージングサポートページのご案内
https://www.nikon-image.com/support/
最新の製品テクニカル情報や、ソフトウェアのアップデート情報をご覧いただ
けます。
製品をより有効にご利用いただくために、定期的なアクセスをお
すすめします。
Fr
Manuel d’utilisation
Avant d’utiliser ce produit, veuillez lire ces instructions attentivement. Vous devrez
également consulter le manuel de l’appareil photo.
• Cet objectif est destiné exclusivement aux appareils photo hybrides dotés d’une
monture Nikon Z.
Pour votre sécurité
Afin d’éviter de provoquer des dommages matériels ou de vous blesser ou de blesser un
tiers, lisez intégralement «Pour votre sécurité» avant d’utiliser ce produit.
Conservez ces consignes de sécurité dans un endroit facilement accessible à tous
ceux qui pourraient se servir de ce produit.
A AVERTISSEMENT: le non-respect des consignes indiquées par cette icône peut
vous exposer à un danger de mort ou à de graves blessures.
A ATTENTION: le non-respect des consignes indiquées par cette icône peut vous
exposer à des blessures ou provoquer des dommages matériels.
A AVERTISSEMENT
• Nedémontezpasounemodiezpasceproduit.
Netouchezpaslescomposantsinternesquisontexposéssuiteàunechute
ouàunautreaccident.
Le non-respect de ces consignes peut provoquer un choc électrique ou d’autres
blessures.
• Sivousobservezdesanomaliesprovenantduproduitcommedelafumée,
delachaleurou desodeurs inhabituelles,débranchezimmédiatementla
sourced’alimentationdel’appareilphoto.
Continuer d’utiliser le matériel risque de provoquer un incendie, des brûlures ou
d’autres blessures.
• Gardezvotrematérielausec.
Nelemanipulezpasaveclesmainsmouillées.
Le non-respect de ces consignes de sécurité peut provoquer un incendie ou un
choc électrique.
• N’utilisezpasceproduitenprésencedepoussièresoudegazinammables
commedupropane,del’essenceoudesaérosols.
Le non-respect de cette consigne peut provoquer une explosion ou un incendie.
• N’observez pas directement le soleil ou toute autre source lumineuse
puissanteàtraversl’objectif.
Le non-respect de cette consigne peut provoquer des troubles visuels.
• Conservezceproduithorsdeportéedesenfants.
Le non-respect de cette consigne peut provoquer des blessures ou le
dysfonctionnement du produit. En outre, notez que les petites pièces présentent un
risque d’étouffement. Si jamais un enfant avalait une pièce de ce produit, consultez
immédiatement un médecin.
• Ne manipulez pas le matériel à mains nues dans des lieux exposés à des
températuresextrêmementbassesouélevées.
Le non-respect de cette consigne peut provoquer des brûlures ou des engelures.
A ATTENTION
• Nepointezpasl’objectifendirectiondusoleiloud’autressourcestrèslumineuses.
La lumière focalisée par l’objectif peut provoquer un incendie ou endommager
les composants internes du produit. Lorsque vous photographiez un sujet à
contre-jour, veillez à garder toujours le soleil à l’extérieur du cadre.
Lorsque le soleil se trouve près du cadre, sa lumière risque de se concentrer dans
l’appareil photo et de provoquer un incendie.
• Ne laissez pas le produit exposé à des températures excessivement chaudes
pendantunepériodeprolongée,commedansunevoitureferméeouenpleinsoleil.
Le non-respect de cette consigne peut provoquer un incendie ou le dysfonctionnement
du produit.
• Netransportezpas lesappareilsphotooules objectifssides trépieds ou
accessoiressimilairessontxés.
Le non-respect de cette consigne peut provoquer des blessures ou le dysfonctionnement
du produit.
Avis pour les clients au Canada
CAN ICES-3 B / NMB-3 B
Utilisation de l’objectif
Descriptif de l’objectif : noms et fonctions
Reportez-vous aux figures situées à gauche.
q
Repère de montage
du parasoleil
Référez-vous à ce repère lorsque vous fixez le
parasoleil.
Voir
B
w
Bague de contrôle
Mode autofocus sélectionné : en mode autofocus,
tournez cette bague pour modifier le réglage
d’une fonction sélectionnée avec l’appareil
photo, telle que Mise au point (M/A) ou Ouverture.
Pour en savoir plus, reportez-vous à la description
des fonctions Commandes personnalisées/
Dénition réglages perso./Commandes perso (prise
de vue) dans le manuel de l’appareil photo.
—
Mode de mise au point manuelle sélectionné :
tournez cette bague pour effectuer la mise au
point.
—
e
Repère de montage
de l’objectif
Référez-vous à ce repère lorsque vous fixez
l’objectif sur l’appareil photo.
Voir
A
r
Joint en caoutchouc
de la monture
d’objectif
— —
t
Contacts du
microprocesseur
Utilisés pour transférer les données depuis ou
vers l’appareil photo.
—
y
Commutateur du
mode de mise au
point
Choisissez A pour l’autofocus, M pour la mise au
point manuelle. Notez qu’indépendamment
du réglage choisi, vous devez modifier la mise
au point manuellement lorsque le mode de
mise au point manuelle est sélectionné à l’aide
des commandes de l’appareil photo.
—
u
Parasoleil
Le parasoleil bloque la lumière diffuse pouvant
provoquer de la lumière parasite ou une image
fantôme. Il permet aussi de protéger l’objectif.
Voir
B
i
Repère de verrouillage
du parasoleil
Référez-vous à ce repère lorsque vous fixez le
parasoleil.
o
Repère d’alignement
du parasoleil
!0
Bouchon d’objectif
(bouchon avant)
— —
!1
Bouchon d’objectif
(bouchon arrière)
— —
A
Fixation et retrait
Fixation de l’objectif
z
Mettez l’appareil photo hors tension, retirez le bouchon du boîtier et
détachez le bouchon arrière d’objectif.
x
Placez l’objectif sur le boîtier de l’appareil photo, en maintenant le
repère de montage de l’objectif aligné sur le repère de montage du
boîtier de l’appareil photo, puis faites pivoter l’objectif dans le sens
inverse des aiguilles d’une montre jusqu’au déclic.
Retrait de l’objectif
z
Mettez l’appareil photo hors tension.
x
Maintenez appuyée la commande de déverrouillage de l’objectif tout
en faisant pivoter ce dernier dans le sens des aiguilles d’une montre.
B
Fixation et retrait du parasoleil
Alignez le repère de montage du parasoleil sur le repère d’alignement du parasoleil
(
q
), puis tournez ce dernier (
w
) jusqu’à ce que le repère de montage s’aligne sur le
repère de verrouillage du parasoleil (
e
).
Pour retirer le parasoleil, eectuez les étapes ci-dessus dans le sens inverse.
Repère d’alignement du parasoleil
Repère de montage du parasoleil
Repère de verrouillage
du parasoleil
Lorsque vous fixez ou retirez le parasoleil, tenez-le à proximité du repère d’alignement
(
●
) et évitez de le saisir trop fermement à l’avant. Le parasoleil peut être retourné et
monté sur l’objectif lorsqu’il n’est pas utilisé.
Lors de prises de vue avec un appareil photo équipé d’un ash intégré
Lors de l’utilisation d’un flash intégré à l’appareil photo, l’objectif peut faire obstacle à la
lumière émise par le flash et générer une zone d’ombre visible sur les photos.
Lorsque l’objectif est xé
Le réglage de mise au point risque de changer si vous mettez l’appareil photo hors
tension puis à nouveau sous tension après avoir fait le point. Si vous avez fait le point
sur un emplacement sélectionné au préalable en attendant que votre sujet apparaisse,
nous vous recommandons de ne pas mettre l’appareil photo hors tension tant que
vous n’avez pas pris la photo.
Précautions d’utilisation
• Ne prenez pas ou ne tenez pas l’objectif ou l’appareil photo en saisissant uniquement
le parasoleil.
• Maintenez les contacts du microprocesseur propres.
• Si le joint en caoutchouc de la monture d’objectif est endommagé, cessez
immédiatement l’utilisation et confiez l’objectif à un centre Nikon agréé pour le faire
réparer.
• Remettez les bouchons d’objectif en place lorsque vous n’utilisez pas l’objectif.
• Pour protéger l’intérieur de l’objectif, rangez-le à l’abri du soleil.
• Ne laissez pas l’objectif dans des endroits humides ou dans des lieux où il risque d’être
exposé à l’humidité. La formation de rouille sur le mécanisme interne peut causer des
dégâts irréparables.
• Ne laissez pas l’objectif à proximité d’un feu ou dans d’autres endroits extrêmement
chauds. La chaleur extrême pourrait endommager ou déformer les pièces extérieures
composées de plastique renforcé.
• Les changements brusques de température peuvent être à l’origine d’une condensation
préjudiciable à l’intérieur et à l’extérieur de l’objectif. Avant de faire passer l’objectif d’un
environnement chaud à froid ou vice versa, rangez-le dans un sac ou dans une boîte en
plastique pour ralentir le changement de température.
• Nous vous recommandons de ranger l’objectif dans son étui afin de le protéger des
rayures lors du transport.
Entretien de l’objectif
• Normalement, enlever la poussière suffit pour nettoyer les surfaces en verre de
l’objectif.
• Les taches, les traces de doigts et autres traces de gras peuvent être éliminées de
la surface de l’objectif à l’aide d’un tissu propre et doux en coton ou d’un chiffon
optique légèrement imbibé d’une petite quantité d’éthanol ou de nettoyant pour
objectif. Essuyez délicatement avec un mouvement circulaire à partir du centre vers
l’extérieur, en prenant soin de ne pas laisser de traces, ni de toucher le verre avec les
doigts.
• N’utilisez jamais de solvants organiques comme un diluant à peinture ou du benzène
pour nettoyer l’objectif.
• Les filtres neutres (NC, disponibles séparément) et autres accessoires similaires
permettent de protéger la lentille avant.
• Si vous n’avez pas l’intention d’utiliser l’objectif pendant une période prolongée,
rangez-le dans un endroit frais et sec pour éviter la moisissure et la rouille. Ne le
rangez pas à la lumière directe du soleil ou avec des boules antimites de naphtaline
ou de camphre.
Accessoires
Accessoires fournis
• Bouchon d’objectif LC-77B (bouchon avant)
• Bouchon d’objectif LF-N1 (bouchon arrière)
• Pare-soleil HB-95
• Pochette pour objectif CL-C1
D
Utilisation de la pochette pour objectif
• Lapochetteestdestinéeàprotégerl’objectifdesrayuresetnondeschutesouautreschocsphysiques.
• Lapochetten’estpasrésistanteàl’eau.
• Lamatièreutiliséedanscettepochettepeutsedécolorer,déteindre,s’étirer,rétrécirouchangerdecouleuren
casdefrottementoud’humidité.
• Retirezlapoussièreavecunpinceaudoux.
• L’eauetlestachespeuventêtreretiréesdelasurfaceavecunchiondouxetsec.N’utilisezpasd’alcool,de
benzène,dediluantoud’autressubstanceschimiquesvolatiles.
• Nerangezpaslapochettedansdeslieuxexposésàlalumièredirectedusoleil,àdestempératuresélevées
ouàl’humidité.
• N’utilisezpaslapochettepournettoyerlemoniteurouleslentilles.
• Veillezàcequel’objectifnetombepasdelapochettelorsquevousletransportez.
Matière:polyester
Accessoires compatibles
Filtres à visser 77 mm
D
Filtres
• N’utilisezqu’unseulltreàlafois.
• Retirezleparasoleilavantdefixerunfiltreoudefairepivoterunfiltrepolarisantcirculaire.
Caractéristiques
Monture Monture Nikon Z
Focale 20 mm
Ouverture maximale f/1.8
Construction optique 14 lentilles en 11 groupes (dont3lentillesenverreED,3lentilles
asphériquesetdeslentillesbénéciantd’untraitementnanocristal)
Angle de champ • Format FX : 94°
• Format DX : 70°
Système de mise au
point
Système de mise au point interne
Distance minimale de
mise au point
0,2 m depuis le plan focal
Rapport de
reproduction maximal
0,19×
Lamelles de
diaphragme
9 (diaphragmecirculaire)
Plage des ouvertures f/1.8 – 16
Diamètre de xation
pour ltre
77 mm (P=0,75mm)
Dimensions Environ 84,5 mm de diamètre maximum × 108,5 mm
(distanceàpartirdupland’appuidelamontured’objectifdel’appareilphoto)
Poids Environ 505 g
Nikon se réserve le droit de modier à tout moment l’apparence, les caractéristiques et les
performances de ce produit sans avis préalable.
Jp
使用説明書
En
User’s Manual
Fr
Manuel d’utilisation
Sc
使用说明书
Es
Manual del usuario
Kr
사용설명서
NIKKOR Z 20mm f/1.8 S
Printed in Japan
CT9K01(64)
7MMA3164-01
r
ご使用の前に、この使用説明書をよくお読みの上、正しくお使いください。また、
カメラの説明書もご覧ください。
•
このレンズは、ニコン
Z マウントのミラーレスカメラ専用です。
安全上のご注意
あなたや他の人々への危害や財産への損害を未然に防止するため、ご使用の前に「安全上の
ご注意」をよくお読みの上、正しくお使いください。
この説明書をお読みになった後は、いつでも参照できるように保管してください。
A
警告
「死亡または重傷を負うおそれがある内容」です。
A
注意
「軽傷を負うことや財産の損害が発生するおそれがある内容」です。
お守りいただく内容を、以下の図記号で区分しています。
F
は、してはいけない内容です。
C
は、実行しなければならない内容です。
A
警告
E
分解
禁止
分解、修理または改造をしない
落下などによる破損で内部が露出したら、露出部に触らない
感電やけがの原因になります。
C
実行
熱くなる、煙が出る、こげ臭いなどの異常時は、直ちにカメラの電源を取り
外す
放置すると、発火、やけどの原因になります。
F
禁止
水でぬらさない
ぬれた手で触らない
感電や発火の原因になります。
F
禁止
引火、爆発のおそれのある場所では使わない
プロパンガス、ガソリン、可燃性スプレーなどの引火性ガスや粉塵の発生す
る場所で使うと、爆発や火災の原因になります。
F
禁止
レンズで直接太陽や強い光を見ない
失明や視力障碍の原因になります。
F
禁止
幼児の手の届くところに置かない
故障やけがの原因になります。
小さな付属品を誤って飲み込むと、身体に悪影響を及ぼします。飲み込んだ
ら、すぐに医師の診断を受けてください。
G
禁止
高温環境や低温環境では、直接触らない
やけどや低温やけど、凍傷の原因になることがあります。
A
注意
F
禁止
レンズを太陽や強い光源に向けたままにしない
集光して、内部部品の破損や発火の原因になることがあります。
逆光撮影では、太陽を画角から十分にずらしてください。
画角から太陽をわずかに外しても、発火の原因になります。
F
禁止
夏場の車内や直射日光の当たる所など高温環境に放置しない
故障や発火の原因になります。
F
禁止
三脚などにカメラやレンズを取り付けたまま移動しない
故障やけがの原因になります。
レンズの使い方
各部の名称と機能
左図で示されている各部の名称と機能は以下の通りです。
●
q
レンズフード着脱指
標
レンズにレンズフードを取り付けるときの指
標です。
詳しくは
B
●
w
コントロールリング
オートフォーカス時
このリングを回転させると、[フォーカス(
M/
A
)]や[絞り]などカメラで設定した機能を
使用できます。詳しくは、カメラの説明書に
記載されている[カスタムボタンの機能]ま
たは[カスタムボタンの機能(撮影)]の説明
をご覧ください。
—
マニュアルフォーカス時
このリングを回転させると手動でピント合わ
せができます。
—
●
e
レンズ着脱指標 カメラにレンズを取り付けるときの指標です。
詳しくは
A
●
r
レンズマウント
ゴムリング
— —
●
t
CPU
信号接点 カメラとレンズの間で情報を伝達します。 —
●
y
フォーカスモード
切り換えスイッチ
[
A
]を選ぶとオートフォーカスになり、[
M
]
を選ぶとマニュアルフォーカスになります。
•
カメラのフォーカスモードがマニュアルフォー
カスのときは、レンズで[
A
]を選んでいても
マニュアルフォーカスになります。
—
●
u
レンズフード
画像に悪影響を及ぼす光線をカットします。
レンズ面の保護にも役立ちます。
詳しくは
B
●
i
レンズフードセット
指標
レンズにレンズフードを取り付けるときの指
標です。
●
o
レンズフード取り付
け指標
●
!0
レンズキャップ
(
フロントキャップ
)
— —
●
!1
レンズキャップ
(リアキャップ)
— —
A
カメラへの取り付け方・取り外し方
取り付け方
z
カメラの電源を
OFF
にして、レンズのリアキャップとカメラのボ
ディーキャップを外す
x
カメラとレンズのレンズ着脱指標を合わせ、反時計回りにカチッ
と音がするまでレンズを回す
取り外し方
z
カメラの電源を
OFF
にする
x
レンズ取り外しボタンを押しながら、時計回りにレンズを回して
取り外す
B
レンズフードの取り付け方・取り外し方
•
レンズフード着脱指標とレンズフード取り付け指標を合わせて(
q
)、レンズフー
ドを矢印(
w
)の方向に回転させ、レンズフード着脱指標とレンズフードセット
指標を合わせてください(
e
)。
レンズフード取り付け指標
レンズフード着脱指標 レンズフードセット指標
•
レンズフード先端を強くつかむと着脱が困難になります。着脱の際は、レンズフー
ド取り付け指標(●)付近を持って回転させてください。
•
取り外しは、取り付けと逆の手順で行ってください。
•
収納時はレンズフードを逆向きにしてレンズに取り付けられます。
内蔵フラッシュ搭載のカメラでフラッシュ撮影
するときのご注意
カメラの内蔵フラッシュを使用すると、フラッシュの光がレンズでさえぎられて、
画像の一部に影ができます。
カメラにレンズを取り付けたときのご注意
ピント合わせを行った後に、カメラの電源を OFF にして再び ON にするとピント位
置が変わることがあります。ピントをあらかじめ合わせておいて被写体を待つ置き
ピン撮影などでは、ピントを合わせてからシャッターをきるまでにカメラの電源を
OFF にしないことをおすすめします。
取り扱い上のご注意
•
レンズフードをレンズに装着した状態で、レンズフードだけを持たないでください。
•
CPU 信号接点は汚さないようにご注意ください。
•
レンズマウントゴムリングが破損した場合は、そのまま使用せず販売店またはニコン
サービス機関に修理を依頼してください。
•
レンズをカメラに装着していないときは、必ずレンズキャップを取り付けてください。
•
レンズを保管するときは、レンズ内部を保護するために太陽光のあたらない所に保管
してください。
•
レンズを水にぬらしたり、湿気の多い場所に置かないでください。部品がサビつくな
どして故障の原因になりますのでご注意ください。
•
火の近くなど、極端に温度が高くなるところに置かないでください。外観の一部に使
用している強化プラスチックが変形することがあります。
•
極端に温度差のある場所に急にレンズを持ち込むと、レンズ内外に水滴が生じ、故障
の原因となります。レンズをバッグやビニール袋などに入れて、周囲の温度になじま
せてからお使いください。
•
レンズを傷から守るために、持ち運ぶときはレンズケースに入れることをおすすめし
ます。
レンズのお手入れ
•
レンズ面を清掃する場合、通常はほこりを払う程度にしてください。
•
レンズ面に指紋など油分を含む汚れがついたときは、少量の無水アルコール(エタノー
ル)や市販のレンズクリーナーで湿らせた柔らかい清潔な木綿の布または市販のレン
ズクリーニングペーパーを使って、レンズの中心から外周へ渦巻き状に拭いてくださ
い。その場合、拭きムラや拭き残りがないように注意してください。
•
シンナーやベンジンなどの有機溶剤は絶対に使用しないでください。
•
レンズ表面の汚れや傷を防ぐには、別売のニュートラルカラー
NC フィルターなどの
使用をおすすめします。
•
レンズを長期間使用しないときは、カビやサビを防ぐために、高温多湿のところを避
けて風通しのよい場所に保管してください。また、直射日光のあたるところ、防虫剤
のあるところも避けてください。
アクセサリー
付属アクセサリー
•
レンズキャップLC-77B(フロントキャップ)
•
レンズキャップ
LF-N1(リアキャップ)
•
レンズフード
HB-95
•
レンズケースCL-C1
D
レンズケースのお取り扱いについて
•
レンズケースはレンズを傷から守ることを目的としており、落下や衝撃からレンズ
を保護する機能はありません。
•
レンズケースに撥水機能はありません。
•
レンズケースは材質の特性上、雨や水などで濡れた場合や摩擦によって、色落ち、
変色、色移り、伸縮することがあります。
•
ほこりは柔らかいブラシで払い落としてください。
•
表面に付着した汚れや水分は、乾いた柔らかい布で拭き取ってください。アルコール、
ベンジン、シンナーなどの溶剤は使わないでください。
•
直射日光があたる場所や、温度、湿度の高い場所に放置しないでください。
•
レンズ面や液晶画面などを拭くクリーニングクロスとしては使用できません。
•
レンズを収納して持ち運ぶ際、レンズが転がり出ないようご注意ください。
レンズケースの素材:ポリエステル
使用できるアクセサリー
77mm ネジ込み式フィルター
D
フィルターを使用する場合
•
フィルターは 1 枚で使用してください。
•
フィルターは、レンズフードを取り外してから装着してください。また、円偏光フィ
ルターの偏光効果の調節も、レンズフードを取り外した状態で行ってください。
仕様
マウント ニコン Z マウント
焦点距離
20mm
最大口径比 1:1.8
レンズ構成
11 群 14枚(ED レンズ 3 枚、非球面レンズ 3 枚、ナノク
リスタルコートあり)
画角
94°(撮像範囲FX)
70°(撮像範囲DX)
フォーカシング方式
IF(インターナルフォーカス)方式
最短撮影距離 撮像面から
0.2m
最大撮影倍率 0.19 倍
絞り羽根枚数
9 枚(円形絞り)
絞りの範囲
f/1.8—16
アタッチメントサイズ 77mm(P=0.75mm)
寸法
約
84.5mm(最大径)×108.5mm(レンズマウント基準
面からレンズ先端まで)
質量 約
505g
製品の外観・仕様・性能は予告なく変更することがありますので、ご了承ください。
Jp
使用説明書
En
User’s Manual
Before using this product, please read these instructions carefully. You will also need to
consult the camera manual.
• This lens is intended exclusively for use with mirrorless cameras featuring a Nikon Z
mount.
For Your Safety
To prevent damage to property or injury to yourself or to others, read “For Your Safety”
in its entirety before using this product.
Keep these safety instructions where all those who use this product will read them.
A WARNING: Failure to observe the precautions marked with this icon could
result in death or severe injury.
A CAUTION: Failure to observe the precautions marked with this icon could
result in injury or property damage.
A WARNING
• Donotdisassembleormodifythisproduct.
Donottouchinternalpartsthatbecomeexposedastheresultofafallor
otheraccident.
Failure to observe these precautions could result in electric shock or other injury.
• Shouldyounoticeanyabnormalitiessuchastheproductproducingsmoke,
heat,orunusualodors,immediatelydisconnectthecamerapowersource.
Continued operation could result in fire, burns or other injury.
• Keepdry.
Donothandlewithwethands.
Failure to observe these precautions could result in fire or electric shock.
• Donotusethisproductinthepresenceofammabledustorgassuchas
propane,gasolineoraerosols.
Failure to observe this precaution could result in explosion or fire.
• Donotdirectlyviewthesunorotherbrightlightsourcethroughthelens.
Failure to observe this precaution could result in visual impairment.
• Keepthisproductoutofreachofchildren.
Failure to observe this precaution could result in injury or product malfunction. In
addition, note that small parts constitute a choking hazard. Should a child swallow
any part of this product, seek immediate medical attention.
• Donothandlewithbarehandsinlocationsexposedtoextremelyhighor
lowtemperatures.
Failure to observe this precaution could result in burns or frostbite.
A CAUTION
• Donotleavethelenspointedatthesunorotherstronglightsources.
Light focused by the lens could cause fire or damage to product’s internal parts.
When shooting backlit subjects, keep the sun well out of the frame.
Sunlight focused into the camera when the sun is close to the frame could cause
fire.
• Do not leave the product where it will be exposed to extremely high
temperatures,foranextendedperiodsuchas inan enclosedautomobile
orindirectsunlight.
Failure to observe this precaution could result in fire or product malfunction.
• Do not transport cameras or lenses with tripods or similar accessories
attached.
Failure to observe this precaution could result in injury or product malfunction.
Notices for Customers in the U.S.A.
This device complies with part 15 of the FCC Rules. Operation is subject to the
following two conditions: (1) this device may not cause harmful interference, and (2)
this device must accept any interference received, including interference that may
cause undesired operation.
Federal Communications Commission (FCC) Radio Frequency Interference
Statement
This equipment has been tested and found to comply with the limits for a Class B
digital device, pursuant to Part 15 of the FCC rules. These limits are designed to provide
reasonable protection against harmful interference in a residential installation. This
equipment generates, uses, and can radiate radio frequency energy and, if not installed
and used in accordance with the instructions, may cause harmful interference to radio
communications. However, there is no guarantee that interference will not occur in a
particular installation. If this equipment does cause harmful interference to radio or
television reception, which can be determined by turning the equipment off and on,
the user is encouraged to try to correct the interference by one or more of the following
measures:
• Reorient or relocate the receiving antenna.
• Increase the separation between the equipment and receiver.
• Connect the equipment into an outlet on a circuit different from that to which the
receiver is connected.
• Consult the dealer or an experienced radio/television technician for help.
CAUTIONS
Modications
The FCC requires the user to be notified that any changes or modifications made to
this device that are not expressly approved by Nikon Corporation may void the user’s
authority to operate the equipment.
NikonInc.,1300WaltWhitmanRoad,
Melville,NewYork11747-3064,U.S.A.
Tel.:631-547-4200
Notice for Customers in Canada
CAN ICES-3 B / NMB-3 B
Using the Lens
Parts of the Lens: Names and Functions
Refer to the diagram on the left edge of this sheet.
q
Lens hood mounting
mark
Use when attaching the lens hood.
See
B
w
Control ring
Autofocus mode selected: In autofocus mode, ro-
tate the ring to adjust a setting such as Focus
(M/A) or Aperture assigned using the camera.
For more information, see the description of
Custom controls/Custom control assignment/Cus-
tom controls (shooting) in the camera manual.
—
Manual focus mode selected: Rotate the ring to
focus.
—
e
Lens mounting mark
Use when mounting the lens on the camera.
See
A
r
Rubber lens-mount
gasket
— —
t
CPU contacts
Used to transfer data to and from the camera. —
y
Focus-mode switch
Choose A for autofocus, M for manual focus.
Note that regardless of the setting chosen, fo-
cus must be adjusted manually when manual
focus mode is selected using camera controls.
—
u
Lens hood
Lens hoods block stray light that would other-
wise cause flare or ghosting. They also serve to
protect the lens.
See
B
i
Lens hood lock mark
Use when attaching the lens hood.
o
Lens hood alignment
mark
!0
Lens cap (front cap)
— —
!1
Lens cap (rear cap)
— —
A
Attachment and Removal
Attaching the Lens
z
Turn the camera off, remove the body cap, and detach the rear lens cap.
x
Position the lens on the camera body, keeping the mounting mark on the lens
aligned with the mounting mark on the camera body, and then rotate the lens
counterclockwise until it clicks into place.
Removing the Lens
z
Turn the camera off.
x
Press and hold the lens release button while turning the lens clockwise.
B
Attaching and Removing the Lens Hood
Align the lens hood mounting mark with the lens hood alignment mark (
q
)
and then rotate the hood (
w
) until the mounting mark is aligned with the lens
hood lock mark (
e
).
To remove the hood, reverse the above steps.
Lens hood alignment mark
Lens hood mounting mark Lens hood lock mark
When attaching or removing the hood, hold it near the lens hood alignment mark
(
●) and avoid gripping the front of the hood too tightly. The hood can be reversed
and mounted on the lens when not in use.
When Shooting Using Cameras with Built-in Flash
Shadows will be visible in images when using the camera’s built-in flash because the
light emitted from the flash may be obstructed by the lens.
When the Lens Is Attached
The focus position may change if you turn the camera off and then on again after fo-
cusing. If you have focused on a pre-selected location while waiting for your subject to
appear, we recommend that you do not turn the camera off until the picture is taken.
Precautions for Use
• Do not pick up or hold the lens or camera using only the lens hood.
• Keep the CPU contacts clean.
• Should the rubber lens-mount gasket be damaged, cease use immediately and take
the lens to a Nikon-authorized service center for repair.
• Replace the lens caps when the lens is not in use.
• To protect the interior of the lens, store it out of direct sunlight.
• Do not leave the lens in humid locations or in locations in which it may be exposed to
moisture. Rusting of the internal mechanism can cause irreparable damage.
• Do not leave the lens next to open flames or in other extremely hot locations. Ex-
treme heat could damage or warp exterior parts made from reinforced plastic.
• Rapid changes in temperature may cause damaging condensation inside and outside
the lens. Before taking the lens from a warm to a cold environment or vice versa, place
it in a bag or plastic case to slow the change in temperature.
• We recommend that you place the lens in its case to protect it from scratches during
transport.
Lens Care
• Removing dust is normally sufficient to clean the glass surfaces of the lens.
• Smudges, fingerprints, and other oily stains can be removed from the lens surface
using a soft, clean cotton cloth or lens cleaning tissue lightly dampened with a small
amount of ethanol or lens cleaner. Wipe gently from the center outwards in a circular
motion, taking care not to leave smears or touch the lens with your fingers.
• Never use organic solvents such as paint thinner or benzene to clean the lens.
• Neutral Color (NC) filters (available separately) and the like can be used to protect the
front lens element.
• If the lens will not be used for an extended period, store it in a cool, dry location to
prevent mold and rust. Do not store in direct sunlight or with naphtha or camphor
moth balls.
Accessories
Supplied Accessories
• LC-77B Lens Cap (front cap)
• LF-N1 Lens Cap (rear cap)
• HB-95 Lens Hood
• CL-C1 Lens Case
D
Using the Lens Case
• Thecaseisintendedtoprotectthelensfromscratches,notfromfallsorotherphysicalshocks.
• Thecaseisnotwaterresistant.
• Thematerialusedinthecasemayfade,bleed,stretch,shrink,orchangecolorwhenrubbedorwet.
• Removedustwithasoftbrush.
• Waterandstainscanberemovedfromthesurfacewithasoft,drycloth.Donotusealcohol,benzene,thinner,
orothervolatilechemicals.
• Donotstoreinlocationsexposedtodirectsunlightorhightemperaturesorhumidity.
• Donotusethecasetocleanthemonitororlenselements.
• Becarefulthatthelensdoesnotfallfromthecaseduringtransport.
Material:Polyester
Compatible Accessories
77 mm screw-on filters
D
Filters
• Useonlyonelteratatime.
• Removethelenshoodbeforeattachingltersorrotatingcircularpolarizinglters.
Specications
Mount Nikon Z mount
Focal length 20 mm
Maximum
aperture
f/1.8
Lens construction 14 elements in 11 groups (including3EDelements,3asphericalelements,and
elementswithNanoCrystalCoat)
Angle of view • FX format: 94°
• DX format: 70°
Focusing system Internal focusing system
Minimum focus
distance
0.2 m (0.66ft) from focal plane
Maximum repro-
duction ratio
0.19×
Diaphragm blades 9 (roundeddiaphragmopening)
Aperture range f/1.8 – 16
Filter-attachment
size
77 mm (P=0.75mm)
Dimensions Approx. 84.5 mm (3.4in.) maximum diameter × 108.5 mm (4.3in.)
(distancefromcameralensmountange)
Weight Approx. 505 g (1lb1.9oz)
Nikon reserves the right to change the appearance, specications, and performance of this
product at any time and without prior notice.
サービスとサポート
修理サービスのご案内
■
インターネットでのお申込み
ニコンイメージングジャパン修理センターで承ります。
下記のホームページからお申込みいただけます。
https://www.nikon-image.com/support/repair/
•
ニコン
ピックアップサービスで発送する場合
梱包資材のお届け・修理品のお引き取り、修理後のお届け・集金までをニコン指定の配送
業者(ヤマト運輸)が一括して代行するサービスです。全国一律の料金にて承ります(大
きさや重さには制限があり、取り扱いできない製品もあります)。
•
ご自身で発送する場合
インターネットでお申込みいただいた後、お客様ご自身で修理品を梱包し、修理センター
まで発送してください。
株式会社ニコンイメージングジャパン修理センター
〒
230-0052
横浜市鶴見区生麦
2-2-26
修理センターナビダイヤル
0570-02-8200
※
修理センターでは、宅配便、郵送をお受けします。ご来所の方の受付はしておりません。
■
お電話でのお申込み
お電話でのお申込みの場合は、ニコンピックアップサービスをご利用いただけます。
ニコン ピックアップサービス専用 フリーダイヤル(ヤマト運輸にて承ります)
0120-02-8155
営業時間:
9
:
00
~
18
:
00
(年末年始を除く毎日)
※
上記フリーダイヤルは、ニコン指定の配送業者(ヤマト運輸)にて承ります。修理内容に
関するお問い合わせにはお答えできません。修理内容に関するお問い合わせは修理センター
へお願いいたします。
■
サービスセンターでのお手続き
ニコンプラザのサービスセンター窓口でお見積り・受付をいたします。
D
修理品をお預けいただく場合のご注意
•
ボディーキャップやレンズキャップが付属している製品の場合は、製品保護のため、装着して
お預けください。
•
修理に必要と思われるもの以外の付属品は、ご自身で保管ください。
•
カメラなどの修理では、受付や修理の過程で撮影データをやむを得ず消去する場合があります。
大切なデータは必ずバックアップをお取りください。
修理に関するお問い合わせ先
株式会社ニコンイメージングジャパン修理センター
修理センター ナビダイヤル
0570-02-8200
営業時間:
9
:
30
~
18
:
00
(土曜日、日曜日、祝日、年末年始、夏期休業日など弊社定休日
を除く毎日)
•
ナビダイヤルをご利用いただけない場合は、ニコンカスタマーサポートセンター
(03)6702-0577
におかけください。
ニコンプラザについて
ニコンプラザは、ショールーム、サービスセンター、ギャラリーを統合したニコン映像製品
の総合情報拠点です。
※
ニコンプラザサービスセンターでは持ち込み修理の受け付けも行っています。
ニコンプラザショー ルーム ナビダイヤル
0570-02-8080
ニ
コンプラザサービスセンター ナビダイ
ヤル
0570-02-8060
•
音声ガイダンスにしたがってご利用ください。
•
ナビダイヤルをご利用いただけない場合は、ニコンカスタマーサポートセンター
(03)6702-0577
におかけください。
ニコンプラザの所在地、営業時間などについては、下記
URL
を
ご覧ください。
https://www.nikon-image.com/support/showroom/
製品の使い方に関するお問い合わせ先
■
インターネットでのお問い合わせ
https://www.nikon-image.com/support/contact/
■
お電話でのお問い合わせ
ニコン
カスタマーサポートセンター
ナビダイヤル
0570-02-8000
営業時間:
9
:
30
~
18
:
00
(年末年始、夏期休業日等を除く毎日)
•
ナビダイヤルをご利用いただけない場合は、ニコンカスタマーサポートセンター
(
03
)
6702-0577
におかけください。
•
フ ァ ク シ ミ リ は 、(
03
)
5977-7499
にお送りください。
お問い合わせ時のお願い
•
お わ か り に な る 範 囲 で 「 製 品 名 」、「 製 品 番 号 」、「 ご 購 入 日 」、 問 題 が 発 生 し た 場 合 は 「 手 順 」、「 現 象
(表示されたメッセージ)」、「発生頻度」などをご確認のうえ、お問い合わせください。
ニコンイメージング会員「製品登録」のご案内
ニコンでは製品を安全に、安心してご使用いただくため「製品登録」へのご協力をお願いしてお
ります。ご登録いただいた製品に関するファームアップ情報や重要なお知らせなどをメールでご
案内いたします。
■
製品登録方法
製品は、「ニコンイメージング会員」(無料)の「製品登録」ページからご登録いただけます。
ニコンイメージング会員登録および製品登録は以下ニコンホームページからお手続きください。
ニコンイメージング会員のご案内
https://www.nikon-image.com/enjoy/membership/about/
■
ニコンイメージング会員とは
登録製品に関するサポート情報・ニコン製品情報や、お得で便利な会員特
典
※
などフォトライフをよりお楽しみいただくための会員サービスです。
※
特典は登録製品ごとに異なります。
ご注意
•
ご登録にはメールアドレスとインターネットに接続できる環境が必要です。
•
登録製品の製品番号(製品本体および保証書に記載)が必要です。
•
特典の内容は、予告なく変更される場合があります。あらかじめご了承ください。
ニコンイメージングサポートページのご案内
https://www.nikon-image.com/support/
最新の製品テクニカル情報や、ソフトウェアのアップデート情報をご覧いただ
けます。
製品をより有効にご利用いただくために、定期的なアクセスをお
すすめします。
Fr
Manuel d’utilisation
Avant d’utiliser ce produit, veuillez lire ces instructions attentivement. Vous devrez
également consulter le manuel de l’appareil photo.
• Cet objectif est destiné exclusivement aux appareils photo hybrides dotés d’une
monture Nikon Z.
Pour votre sécurité
Afin d’éviter de provoquer des dommages matériels ou de vous blesser ou de blesser un
tiers, lisez intégralement «Pour votre sécurité» avant d’utiliser ce produit.
Conservez ces consignes de sécurité dans un endroit facilement accessible à tous
ceux qui pourraient se servir de ce produit.
A AVERTISSEMENT: le non-respect des consignes indiquées par cette icône peut
vous exposer à un danger de mort ou à de graves blessures.
A ATTENTION: le non-respect des consignes indiquées par cette icône peut vous
exposer à des blessures ou provoquer des dommages matériels.
A AVERTISSEMENT
• Nedémontezpasounemodiezpasceproduit.
Netouchezpaslescomposantsinternesquisontexposéssuiteàunechute
ouàunautreaccident.
Le non-respect de ces consignes peut provoquer un choc électrique ou d’autres
blessures.
• Sivousobservezdesanomaliesprovenantduproduitcommedelafumée,
delachaleurou desodeurs inhabituelles,débranchezimmédiatementla
sourced’alimentationdel’appareilphoto.
Continuer d’utiliser le matériel risque de provoquer un incendie, des brûlures ou
d’autres blessures.
• Gardezvotrematérielausec.
Nelemanipulezpasaveclesmainsmouillées.
Le non-respect de ces consignes de sécurité peut provoquer un incendie ou un
choc électrique.
• N’utilisezpasceproduitenprésencedepoussièresoudegazinammables
commedupropane,del’essenceoudesaérosols.
Le non-respect de cette consigne peut provoquer une explosion ou un incendie.
• N’observez pas directement le soleil ou toute autre source lumineuse
puissanteàtraversl’objectif.
Le non-respect de cette consigne peut provoquer des troubles visuels.
• Conservezceproduithorsdeportéedesenfants.
Le non-respect de cette consigne peut provoquer des blessures ou le
dysfonctionnement du produit. En outre, notez que les petites pièces présentent un
risque d’étouffement. Si jamais un enfant avalait une pièce de ce produit, consultez
immédiatement un médecin.
• Ne manipulez pas le matériel à mains nues dans des lieux exposés à des
températuresextrêmementbassesouélevées.
Le non-respect de cette consigne peut provoquer des brûlures ou des engelures.
A ATTENTION
• Nepointezpasl’objectifendirectiondusoleiloud’autressourcestrèslumineuses.
La lumière focalisée par l’objectif peut provoquer un incendie ou endommager
les composants internes du produit. Lorsque vous photographiez un sujet à
contre-jour, veillez à garder toujours le soleil à l’extérieur du cadre.
Lorsque le soleil se trouve près du cadre, sa lumière risque de se concentrer dans
l’appareil photo et de provoquer un incendie.
• Ne laissez pas le produit exposé à des températures excessivement chaudes
pendantunepériodeprolongée,commedansunevoitureferméeouenpleinsoleil.
Le non-respect de cette consigne peut provoquer un incendie ou le dysfonctionnement
du produit.
• Netransportezpas lesappareilsphotooules objectifssides trépieds ou
accessoiressimilairessontxés.
Le non-respect de cette consigne peut provoquer des blessures ou le dysfonctionnement
du produit.
Avis pour les clients au Canada
CAN ICES-3 B / NMB-3 B
Utilisation de l’objectif
Descriptif de l’objectif : noms et fonctions
Reportez-vous aux figures situées à gauche.
q
Repère de montage
du parasoleil
Référez-vous à ce repère lorsque vous fixez le
parasoleil.
Voir
B
w
Bague de contrôle
Mode autofocus sélectionné : en mode autofocus,
tournez cette bague pour modifier le réglage
d’une fonction sélectionnée avec l’appareil
photo, telle que Mise au point (M/A) ou Ouverture.
Pour en savoir plus, reportez-vous à la description
des fonctions Commandes personnalisées/
Dénition réglages perso./Commandes perso (prise
de vue) dans le manuel de l’appareil photo.
—
Mode de mise au point manuelle sélectionné :
tournez cette bague pour effectuer la mise au
point.
—
e
Repère de montage
de l’objectif
Référez-vous à ce repère lorsque vous fixez
l’objectif sur l’appareil photo.
Voir
A
r
Joint en caoutchouc
de la monture
d’objectif
— —
t
Contacts du
microprocesseur
Utilisés pour transférer les données depuis ou
vers l’appareil photo.
—
y
Commutateur du
mode de mise au
point
Choisissez A pour l’autofocus, M pour la mise au
point manuelle. Notez qu’indépendamment
du réglage choisi, vous devez modifier la mise
au point manuellement lorsque le mode de
mise au point manuelle est sélectionné à l’aide
des commandes de l’appareil photo.
—
u
Parasoleil
Le parasoleil bloque la lumière diffuse pouvant
provoquer de la lumière parasite ou une image
fantôme. Il permet aussi de protéger l’objectif.
Voir
B
i
Repère de verrouillage
du parasoleil
Référez-vous à ce repère lorsque vous fixez le
parasoleil.
o
Repère d’alignement
du parasoleil
!0
Bouchon d’objectif
(bouchon avant)
— —
!1
Bouchon d’objectif
(bouchon arrière)
— —
A
Fixation et retrait
Fixation de l’objectif
z
Mettez l’appareil photo hors tension, retirez le bouchon du boîtier et
détachez le bouchon arrière d’objectif.
x
Placez l’objectif sur le boîtier de l’appareil photo, en maintenant le
repère de montage de l’objectif aligné sur le repère de montage du
boîtier de l’appareil photo, puis faites pivoter l’objectif dans le sens
inverse des aiguilles d’une montre jusqu’au déclic.
Retrait de l’objectif
z
Mettez l’appareil photo hors tension.
x
Maintenez appuyée la commande de déverrouillage de l’objectif tout
en faisant pivoter ce dernier dans le sens des aiguilles d’une montre.
B
Fixation et retrait du parasoleil
Alignez le repère de montage du parasoleil sur le repère d’alignement du parasoleil
(
q
), puis tournez ce dernier (
w
) jusqu’à ce que le repère de montage s’aligne sur le
repère de verrouillage du parasoleil (
e
).
Pour retirer le parasoleil, eectuez les étapes ci-dessus dans le sens inverse.
Repère d’alignement du parasoleil
Repère de montage du parasoleil
Repère de verrouillage
du parasoleil
Lorsque vous fixez ou retirez le parasoleil, tenez-le à proximité du repère d’alignement
(
●
) et évitez de le saisir trop fermement à l’avant. Le parasoleil peut être retourné et
monté sur l’objectif lorsqu’il n’est pas utilisé.
Lors de prises de vue avec un appareil photo équipé d’un ash intégré
Lors de l’utilisation d’un flash intégré à l’appareil photo, l’objectif peut faire obstacle à la
lumière émise par le flash et générer une zone d’ombre visible sur les photos.
Lorsque l’objectif est xé
Le réglage de mise au point risque de changer si vous mettez l’appareil photo hors
tension puis à nouveau sous tension après avoir fait le point. Si vous avez fait le point
sur un emplacement sélectionné au préalable en attendant que votre sujet apparaisse,
nous vous recommandons de ne pas mettre l’appareil photo hors tension tant que
vous n’avez pas pris la photo.
Précautions d’utilisation
• Ne prenez pas ou ne tenez pas l’objectif ou l’appareil photo en saisissant uniquement
le parasoleil.
• Maintenez les contacts du microprocesseur propres.
• Si le joint en caoutchouc de la monture d’objectif est endommagé, cessez
immédiatement l’utilisation et confiez l’objectif à un centre Nikon agréé pour le faire
réparer.
• Remettez les bouchons d’objectif en place lorsque vous n’utilisez pas l’objectif.
• Pour protéger l’intérieur de l’objectif, rangez-le à l’abri du soleil.
• Ne laissez pas l’objectif dans des endroits humides ou dans des lieux où il risque d’être
exposé à l’humidité. La formation de rouille sur le mécanisme interne peut causer des
dégâts irréparables.
• Ne laissez pas l’objectif à proximité d’un feu ou dans d’autres endroits extrêmement
chauds. La chaleur extrême pourrait endommager ou déformer les pièces extérieures
composées de plastique renforcé.
• Les changements brusques de température peuvent être à l’origine d’une condensation
préjudiciable à l’intérieur et à l’extérieur de l’objectif. Avant de faire passer l’objectif d’un
environnement chaud à froid ou vice versa, rangez-le dans un sac ou dans une boîte en
plastique pour ralentir le changement de température.
• Nous vous recommandons de ranger l’objectif dans son étui afin de le protéger des
rayures lors du transport.
Entretien de l’objectif
• Normalement, enlever la poussière suffit pour nettoyer les surfaces en verre de
l’objectif.
• Les taches, les traces de doigts et autres traces de gras peuvent être éliminées de
la surface de l’objectif à l’aide d’un tissu propre et doux en coton ou d’un chiffon
optique légèrement imbibé d’une petite quantité d’éthanol ou de nettoyant pour
objectif. Essuyez délicatement avec un mouvement circulaire à partir du centre vers
l’extérieur, en prenant soin de ne pas laisser de traces, ni de toucher le verre avec les
doigts.
• N’utilisez jamais de solvants organiques comme un diluant à peinture ou du benzène
pour nettoyer l’objectif.
• Les filtres neutres (NC, disponibles séparément) et autres accessoires similaires
permettent de protéger la lentille avant.
• Si vous n’avez pas l’intention d’utiliser l’objectif pendant une période prolongée,
rangez-le dans un endroit frais et sec pour éviter la moisissure et la rouille. Ne le
rangez pas à la lumière directe du soleil ou avec des boules antimites de naphtaline
ou de camphre.
Accessoires
Accessoires fournis
• Bouchon d’objectif LC-77B (bouchon avant)
• Bouchon d’objectif LF-N1 (bouchon arrière)
• Pare-soleil HB-95
• Pochette pour objectif CL-C1
D
Utilisation de la pochette pour objectif
• Lapochetteestdestinéeàprotégerl’objectifdesrayuresetnondeschutesouautreschocsphysiques.
• Lapochetten’estpasrésistanteàl’eau.
• Lamatièreutiliséedanscettepochettepeutsedécolorer,déteindre,s’étirer,rétrécirouchangerdecouleuren
casdefrottementoud’humidité.
• Retirezlapoussièreavecunpinceaudoux.
• L’eauetlestachespeuventêtreretiréesdelasurfaceavecunchiondouxetsec.N’utilisezpasd’alcool,de
benzène,dediluantoud’autressubstanceschimiquesvolatiles.
• Nerangezpaslapochettedansdeslieuxexposésàlalumièredirectedusoleil,àdestempératuresélevées
ouàl’humidité.
• N’utilisezpaslapochettepournettoyerlemoniteurouleslentilles.
• Veillezàcequel’objectifnetombepasdelapochettelorsquevousletransportez.
Matière:polyester
Accessoires compatibles
Filtres à visser 77 mm
D
Filtres
• N’utilisezqu’unseulltreàlafois.
• Retirezleparasoleilavantdefixerunfiltreoudefairepivoterunfiltrepolarisantcirculaire.
Caractéristiques
Monture Monture Nikon Z
Focale 20 mm
Ouverture maximale f/1.8
Construction optique 14 lentilles en 11 groupes (dont3lentillesenverreED,3lentilles
asphériquesetdeslentillesbénéciantd’untraitementnanocristal)
Angle de champ • Format FX : 94°
• Format DX : 70°
Système de mise au
point
Système de mise au point interne
Distance minimale de
mise au point
0,2 m depuis le plan focal
Rapport de
reproduction maximal
0,19×
Lamelles de
diaphragme
9 (diaphragmecirculaire)
Plage des ouvertures f/1.8 – 16
Diamètre de xation
pour ltre
77 mm (P=0,75mm)
Dimensions Environ 84,5 mm de diamètre maximum × 108,5 mm
(distanceàpartirdupland’appuidelamontured’objectifdel’appareilphoto)
Poids Environ 505 g
Nikon se réserve le droit de modier à tout moment l’apparence, les caractéristiques et les
performances de ce produit sans avis préalable.
Jp
使用説明書
En
User’s Manual
Fr
Manuel d’utilisation
Sc
使用说明书
Es
Manual del usuario
Kr
사용설명서
NIKKOR Z 20mm f/1.8 S
Printed in Japan
CT9K01(64)
7MMA3164-01
r
©
2020 Nikon Corporation
Es
Manual del usuario
Antes de utilizar este producto, lea atentamente estas instrucciones. También tendrá
que consultar el manual de la cámara.
• Este objetivo ha sido diseñado exclusivamente para su uso con cámaras mirrorless
con montura Z de Nikon.
Por su seguridad
Para evitar daños materiales, sufrir lesiones o lesionar a terceros, lea completamente
“Por su seguridad” antes de usar este producto.
Guarde estas instrucciones de seguridad en un lugar en el que todos los que usen el
producto puedan leerlas.
A ADVERTENCIA: No respetar las precauciones marcadas con este icono puede
causar lesiones graves o mortales.
A PRECAUCIÓN: No respetar las precauciones marcadas con este icono puede
causar lesiones o daños materiales.
A ADVERTENCIA
• Nodesmontenimodiqueesteproducto.
Notoquelaspiezasinternasquepuedanquedarexpuestascomoresultado
deunacaídauotroaccidente.
No respetar estas precauciones puede causar descargas eléctricas u otras lesiones.
• Si notaanomalías en elproducto,como por ejemplola emisión dehumo,calor u
oloresinusuales,desconecteinmediatamentelafuentedealimentacióndelacámara.
Continuar usando el producto podría causar incendios, quemaduras u otras lesiones.
• Mantenerseco.
Nomanipularconlasmanosmojadas.
No respetar estas precauciones puede causar incendios o descargas eléctricas.
• No useeste producto en presenciade polvoo gas inamable,como por
ejemplopropano,gasolinaoaerosoles.
No respetar esta precaución puede causar explosiones o incendios.
• No mire directamente al sol o a otra fuente de luz brillante a través del
objetivo.
No respetar esta precaución puede causar discapacidad visual.
• Mantengaesteproductoalejadodelosniños.
No respetar esta precaución puede causar lesiones o funcionamientos incorrectos
del producto. Además, tenga en cuenta que las piezas pequeñas pueden presentar
riesgos de asfixia. Si un niño ingiere cualquier pieza de este producto, solicite asistencia
médica inmediatamente.
• Nomanipularconlasmanosdescubiertasenzonasexpuestasatemperaturas
extremadamentealtasobajas.
No respetar esta precaución puede causar quemaduras o congelación.
A PRECAUCIÓN
• Nodejeelobjetivoapuntandohaciaelsolnihaciaotrasfuentesdeluzintensa.
La luz enfocada a través del objetivo puede causar incendios o dañar las piezas
internas del producto. Al disparar en condiciones de contraluz, mantenga el sol
alejado del encuadre.
La luz del sol enfocada en la cámara cuando el sol está cerca del encuadre puede
causar un incendio.
• No deje el producto en zonas expuestas a temperaturas extremadamente altas
durantelargosperíodos,comoporejemplo,enelinteriordeunvehículocerradoo
encontactodirectoconlaluzdelsol.
No respetar esta precaución puede causar incendios o funcionamientos incorrectos
del producto.
• Notransportecámarasuobjetivoscontrípodesoaccesoriossimilaresinstalados.
No respetar esta precaución puede causar lesiones o funcionamientos incorrectos del producto.
Avisos para los clientes de EE. UU.
Este dispositivo cumple con la parte 15 de las normas de la FCC. El funcionamiento
está sujeto a las dos condiciones siguientes: (1) este dispositivo no puede causar
interferencias perjudiciales, y (2) este dispositivo debe aceptar cualquier interferencia
recibida, incluidas las interferencias que pudieran generar un funcionamiento no
deseado.
Declaración sobre interferencias con radiofrecuencias de la Comisión
Federal de Comunicaciones (FCC)
Este equipo ha sido sometido a pruebas y se ha determinado que cumple con los
límites para un dispositivo digital clase B, de acuerdo con la sección 15 del Reglamento
de la FCC. Estos límites han sido establecidos para ofrecer una protección razonable
contra interferencias perjudiciales en un entorno residencial. Este equipo genera, utiliza
y puede irradiar energía de radiofrecuencia, y de no ser instalado y utilizado de acuerdo
con las instrucciones, puede producir interferencias perjudiciales en las comunicaciones
de radio. Sin embargo, no es posible garantizar que en una determinada instalación no
habrá interferencias. Si este equipo causa interferencias perjudiciales en la recepción
de radio o televisión, lo cual puede determinarse apagando y encendiendo el equipo,
se aconseja al usuario que intente corregir dichas interferencias tomando una o más
de las medidas siguientes:
• Cambie la orientación o la ubicación de la antena receptora.
• Aumente la separación entre el equipo y el receptor.
• Conecte el equipo a una toma de un circuito distinto a aquel al que el receptor esté
conectado.
• Consulte al proveedor o a un técnico de radio/televisión experimentado.
PRECAUCIONES
Modicaciones
La FCC exige que se le notifique al usuario que la realización de cambios o modificaciones
en este dispositivo no expresamente aprobados por Nikon Corporation puede invalidar
el derecho del usuario a utilizar el equipo.
NikonInc.,1300WaltWhitmanRoad,
Melville,NewYork11747-3064,U.S.A.
Tel.:631-547-4200
Aviso para los Clientes de Canadá
CAN ICES-3 B / NMB-3 B
Uso del objetivo
Partes del objetivo: Nombres y funciones
Consulte el diagrama mostrado en el margen izquierdo de esta página.
q
Marca de montaje del
parasol
Utilizar al instalar el parasol.
Consultar
B
w
Anillo de control
Modo autofoco seleccionado: En el modo
autofoco, gire el anillo para definir ajustes
como Enfoque (M/A) o Diafragmas asignados
utilizando la cámara. Para más información,
consulte la descripción de Controles
personalizados/Asignación control personalizado/
Controles pers. (disparo) en el manual de la
cámara.
—
Modo enfoque manual seleccionado: Gire el anillo
para enfocar.
—
e
Marca de montaje de
objetivo
Utilizar al montar el objetivo en la cámara.
Consultar
A
r
Junta de goma de
montaje del objetivo
— —
t
Contactos de CPU
Se utiliza para transferir datos a y desde la
cámara.
—
y
Interruptor de modo
de enfoque
Seleccione A para autofoco o M para
el enfoque manual. Tenga en cuenta
que, independientemente de la opción
seleccionada, el enfoque debe ajustarse
manualmente al seleccionar el modo de
enfoque manual usando los controles de la
cámara.
—
u
Parasol de objetivo
Los parasoles bloquean la luz directa que
de otro modo causaría destellos o efecto
fantasma. También sirven para proteger el
objetivo.
Consultar
B
i
Marca de bloqueo del
parasol
Utilizar al instalar el parasol.
o
Marca de alineación
del parasol
!0
Tapa del objetivo
(tapa delantera)
— —
!1
Tapa del objetivo
(tapa trasera)
— —
A
Instalación y desinstalación
Instalación del objetivo
z
Apague la cámara, retire la tapa del cuerpo y extraiga la tapa trasera del
objetivo.
x
Coloque el objetivo en el cuerpo de la cámara, manteniendo la
marca de montaje del objetivo alineada con la marca de montaje
del cuerpo de la cámara y, a continuación, gire el objetivo en sentido
antihorario hasta que haga clic en su lugar.
Desinstalación del objetivo
z
Apague la cámara.
x
Mantenga pulsado el botón de liberación del objetivo mientras gira el
objetivo en sentido horario.
B
Instalación y extracción del parasol
Alinee la marca de montaje del parasol del objetivo con la marca de alineación del
parasol (
q
) y, a continuación, gire el parasol (
w
) hasta que la marca de montaje
quede alineada con la marca de bloqueo del parasol del objetivo (
e
).
Para retirar el parasol, realice los pasos anteriores en orden inverso.
Marca de alineación del parasol
Marca de montaje del parasol
Marca de bloqueo
del parasol
Al montar o quitar el parasol, sujételo cerca de la marca de alineación del parasol (
●
)
y evite agarrar la parte delantera del parasol con demasiada fuerza. El parasol se puede
invertir y montar sobre el objetivo cuando no esté en uso.
Si se dispara empleando cámaras con ash incorporado
Si se utiliza el flash incorporado de la cámara, es posible que aparezcan sombras en las
imágenes porque la luz emitida por el flash puede quedar obstruida por el objetivo.
Cuando el objetivo está instalado
La posición del enfoque podría cambiar si apaga la cámara y luego vuelve a encenderla
después de enfocar. Si ha enfocado sobre una ubicación preseleccionada mientras
espera que su sujeto aparezca, se recomienda no apagar la cámara hasta capturar la
imagen.
Precauciones de uso
• No recoja ni sujete el objetivo o la cámara usando solamente el parasol.
• Mantenga los contactos de CPU limpios.
• Si se daña la junta de goma de montaje del objetivo, deje de usarlo inmediatamente
y lleve el objetivo al servicio técnico autorizado de Nikon para repararlo.
• Vuelva a colocar las tapas del objetivo cuando no lo esté utilizando.
• Para proteger el interior del objetivo, guárdelo fuera del alcance de la luz directa del sol.
• No deje el objetivo en lugares con mucha humedad o en aquellos lugares en los
que pueda estar expuesto a la humedad. La oxidación del mecanismo interno puede
ocasionar daños irreparables.
• No deje el objetivo junto a llamas o en un lugar extremadamente caliente. El calor
extremo podría dañar o deformar las piezas hechas de plástico reforzado.
• Los cambios rápidos de temperatura podrían provocar condensación dentro y fuera del
objetivo. Antes de transportar el objetivo de un ambiente frío a otro caliente o viceversa,
colóquelo en una bolsa o estuche de plástico para atenuar el cambio de temperatura.
• Se recomienda colocar el objetivo en su funda para protegerlo de arañazos durante el
transporte.
Cuidado del objetivo
• Retirar el polvo es, por norma general, suficiente para limpiar las superficies de cristal del objetivo.
• Las manchas, huellas dactilares y demás manchas grasientas pueden eliminarse de la
superficie del objetivo con un paño de algodón suave y limpio o con un pañuelo de
limpieza para objetivos humedecido ligeramente con una pequeña cantidad de etanol
o limpiador de objetivos. Limpie suavemente desde el centro hacia el exterior con
movimientos circulares, teniendo cuidado de no dejar manchas ni de tocar el objetivo
con los dedos.
• Nunca use solventes orgánicos como disolvente de pintura o benceno para limpiar
el objetivo.
• Los filtros de color neutro (NC) (disponibles por separado) y similares pueden usarse
para proteger el elemento del objetivo delantero.
• Si el objetivo no se va a usar durante un periodo prolongado de tiempo, guárdelo en
un lugar frío y seco para evitar la formación de moho y corrosión. No lo guarde a la luz
solar directa o con bolas antipolillas de alcanfor o de naftalina.
Accesorios
Accesorios suministrados
• Tapa del objetivo LC-77B (tapa delantera)
• Tapa del objetivo LF-N1 (tapa trasera)
• Parasol del objetivo HB-95
• Estuche para objetivo CL-C1
D
Uso del estuche para objetivo
• Elestucheestádiseñadoparaprotegerelobjetivocontraarañazos,nocontracaídasuotrosimpactosfísicos.
• Elestuchenoesresistentealagua.
• Elmaterialutilizadoenelestuchepuededesvanecerse,desteñir,estirar,encogerocambiardecoloralfrotarlo
omojarlo.
• Limpieelpolvoconuncepillosuave.
• Elaguaylasmanchaspuedenlimpiarsedelasupercieconunpañosuaveyseco.Noutilicealcohol,benceno,
diluyenteniningúnotroproductoquímicovolátil.
• Nologuardeenlugaresexpuestosalaluzdirectadelsoloaaltastemperaturasohumedad.
• Nouseelestucheparalimpiarlapantallaoloselementosdelobjetivo.
• Procurequeelobjetivonosecaigadelestucheduranteeltransporte.
Material:Poliéster
Accesorios compatibles
Filtros con rosca de 77 mm
D
Filtros
• Utiliceúnicamenteunltrocadavez.
• Retireelparasolantesdecolocarfiltrosodegirarlosfiltrospolarizadorescirculares.
Especicaciones
Montura Montura Z de Nikon
Distancia focal 20 mm
Diafragma máximo f/1.8
Construcción de
objetivo
14 elementos en 11 grupos(incluyendo3elementosED,3elementos
asféricosyelementosconrevestimientodenanocristal)
Ángulo de visión • Formato FX: 94°
• Formato DX: 70°
Sistema de enfoque
Sistema de enfoque interno
Distancia de enfoque
mínima
0,2 m (0,66pies) desde el plano focal
Relación de
reproducción máxima
0,19×
Cuchillas del diafragma 9 (aperturadediafragmaredondeada)
Alcance de diafragma f/1.8 – 16
Tamaño de accesorio
del ltro
77 mm (P=0,75mm)
Dimensiones Aprox. 84,5 mm (3,4plug.) de diámetro máximo × 108,5 mm
(4,3plug.) (distanciaapartirdelapletinademontajedelobjetivo)
Peso Aprox. 505 g (1lb1,9oz)
Nikon se reserva el derecho de cambiar el aspecto, las especicaciones y el rendimiento de
este producto en cualquier momento y sin previo aviso.
이 제품 을 사용하기 전에 본 지침을 주의해서 읽으십시오. 카메라 설명서도
참조해야 합니다.
• Nikon Z 마운트가 장착된 이 렌즈는 미러리스 카메라 전용입니다.
안전상의 주의
제품이 손상되거나 사용자나 타인이 상해를 입지 않도록 제품을 사용하기 전에 “안전상의
주의”에 나와 있는 모든 내용을 읽으십시오.
안전 지침은 모든 사용자가 읽을 수 있는 곳에 보관하십시오.
A 경고: 이 아이콘이 표시된 주의사항을 지키지 않을 경우 사망이나 심각한
상해를 입을 수 있습니다.
A 주의: 이 아이콘이 표시된 주의사항을 지키지 않을 경우 상해를 입거나
제품이 손상될 수 있습니다.
A 경고
• 이 제품을 분해하거나 개조하지 마십시오.
떨어뜨리거나 다른 사고로 인해 노출된 내부를 만지지 마십시오.
이 주의사항을 지키지 않으면 감전이나 다른 상해를 입을 수 있습니다.
• 제품에서 연기가 나거나 제품이 뜨겁거나 이상한 냄새가 나는 등 이상 징후가
발견되면 카메라 전원을 즉시 분리하십시오.
계속 사용할 경우 화재가 발생하거나 화상 또는 다른 상해를 입을 수 있습니다.
• 건조한 곳에 보관하십시오.
젖은 손으로 만지지 마십시오.
이 주의사항을 지키지 않으면 화재가 발생하거나 감전될 수 있습니다.
• 프로판, 가솔린, 에어로졸과 같은 가연성 가스 또는 분진이 있을 경우에는
제품을 사용하지 마십시오.
이 주의사항을 지키지 않으면 폭발이나 화재가 발생할 수 있습니다.
• 렌즈를 통해 태양이나 다른 밝은 광원을 직접 쳐다보지 마십시오.
이 주의사항을 지키지 않으면 시력이 손상될 수 있습니다.
• 어린이의 손이 닿지 않는 곳에 두십시오.
이 주의사항을 지키지 않으면 상해를 입거나 제품이 고장 날 수 있습니다.
또한 작은 부품을 잘못 삼키면 질식될 위험이 있습니다. 어린이가 부품을
삼켰을 경우 즉시 응급 처치를 해야 합니다.
• 극고온이나 극저온 장소에서는 맨손으로 만지지 마십시오.
이 주의사항을 지키지 않으면 화상이나 동상을 입을 수 있습니다.
A 주의
• 렌즈를 태양이나 다른 강한 광원을 향하게 두지 마십시오.
렌즈를 통해 초점에 모아진 빛으로 화재가 발생하거나 제품 내부가 손상될
수 있습니다. 역광을 받는 피사체를 촬영할 때는 태양을 프레임에서 충분히
멀리 떨어뜨려 두십시오.
태양이 프레임 가까이에 있을 경우 태양광이 카메라 내부에 초점을 형성해
화재가 발생할 수 있습니다.
• 밀폐된 자동차나 직사광선이 비치는 곳과 같이 온도가 매우 높은 장소에
장시간 제품을 노출하지 마십시오.
이 주의사항을 지키지 않으면 화재가 발생하거나 제품이 고장 날 수 있습니다.
• 삼각대 또는 유사한 액세서리가 설치된 상태에서 카메라 또는 렌즈를
이동하지 마십시오.
이 주의사항을 지키지 않으면 상해를 입거나 제품이 고장 날 수 있습니다.
렌즈 사용하기
렌즈의 부품: 이름 및 기능
이 시트의 왼쪽 가장자리에 있는 그림을 참조하십시오.
q
렌즈 후드 장착 마크 렌즈 후드를 부착할 때 사용합니다.
B
참조
w
조절 링
자동 초점 모드 선택: 자동 포커스 모드에서
링을 돌려서 카메라 를 사용하여 할당된
초 점(M/A) 또 는 조리개와 같은 설정을
조 정 합 니 다. 자 세 한 내 용 은 카 메 라
설명서에서 사 용자 제어 설정/사 용자 정의
제어 설정/사 용 자 제어 설정(촬 영)의 설명을
확인하십시오.
—
수동 초점 모드 선택: 링을 돌려서 초점을
맞춥니다.
—
e
렌즈 장착 마크 렌즈를 카메라에 장착할 때 사용합니다.
A
참조
r
렌즈 장착 고무
가스켓
— —
t
CPU 접촉부
카 메 라 와 데 이 터 를 주 고 받 는 데
사용됩니다.
—
y
초점 모드 스위치
자 동 초점일 경우에는
A
를, 수동 초점일
경우에는
M
을 선택합니다. 선택한 설정에
관계없이 카메라 컨트롤을 사용하여 수동
초점 모드를 선택했다면 초점을 수동으로
조정해야 합니다.
—
u
렌즈 후드
렌 즈 후 드 는 플 레 어나 고 스 트 현 상 을
초래할 우려가 있는 미광을 차단합니다.
렌즈를 보호하는 역할도 합니다.
B
참조
i
렌즈 후드 잠금 마크
렌즈 후드를 부착할 때 사용합니다.
o
렌즈 후드 정렬 마크
!0
렌즈 캡(전방 캡) — —
!1
렌즈 캡(후방 캡) — —
A
부착 및 제거
렌즈 장착
z
카메라의 전원을 끄고 바디 캡을 제거한 다음 렌즈 뒷 커버를 분리합니다.
x
렌즈의 장착 마크 와 카메라 본체의 장착 마크가 일치되도록 카메라
본체에서의 렌즈 위치를 조정합니다. 그런 다음 렌즈가 딸깍 소리를 내며
제자리에 들어갈 때까지 시계 반대 방향으로 돌려줍니다.
렌즈 제거
z
카메라 전원을 끕니다.
x
렌즈 릴리즈 버튼을 계속 누른 상태로 렌즈를 시계 방향으로 돌립니다.
B
렌즈 후드 부착 및 제거
렌즈 후드 장착 마크를 렌즈 후드 정렬 마크(
q
)와 맞춘 다음 장착 마크가
렌즈 후드 잠금 마크(
e
)에 일치할 때까지 후드(
w
)를 돌리십시오.
후드를 제거하려면 위의 단계를 역순으로 수행합니다.
렌즈 후드 정렬 마크
렌즈 후드 장착 마크 렌즈 후드 잠금 마크
후드를 연결하거나 분리할 때 렌즈 후드 정렬 마크(●) 근처를 잡고 후드
앞쪽을 너무 세게 잡지 마십시오. 사용하지 않을 경우 후드를 뒤집어서 렌즈에
장착할 수 있습니다.
플래시가 내장된 카메라를 사용해서 촬영할 때
카메라의 내장 플래시를 사용하면 플래시에서 나오는 빛이 렌즈로 인해 차단되어
화상에 그림자가 생길 수 있습니다.
렌즈가 부착된 경우
초점을 맞춘 후 카메라를 껐다가 다시 켜면 초점 위치가 변경될 수 있습니다.
피사체가 나타나기를 기다리면서 미리 선택한 위치에 초점을 맞춰뒀다면 화상을
촬영하기 전까지는 카메라를 끄지 않는 것이 좋습니다.
사용 시 주의사항
• 렌즈 후드로 렌즈 또는 카메라를 들어올리거나 잡지 마십시오.
• CPU 접촉부를 깨끗하게 유지하십시오.
• 렌즈 장착 고무 가스켓이 손상된 경우에는 즉시 사용을 중단하고 니콘 서비스
지정점에 렌즈 수리를 의뢰하여 주십시오.
• 렌즈를 사용하지 않는 경우 렌즈 캡을 교체하십시오.
• 렌즈 내부를 보호하려면 직사광선이 비치지 않는 곳에 보관합니다.
•
습한 장소나 수분에 노출될 수 있는 곳에 렌즈를 두지 마십시오. 내부에 녹이
슬면 수리가 불가능한 손상을 입을 수 있습니다.
• 렌즈를 불 옆이나 기타 매우 뜨거운 장소에 두지 마십시오. 강한 열로 인해 강화
플라스틱으로 만든 외장 부품이 손상되거나 변형될 수 있습니다.
• 급격한 온도 변화로 렌즈 내부와 외부를 손상하는 응결이 발생할 수 있습니다.
따뜻한 곳에서 추운 장소로 또는 그 반대로 렌즈를 옮기기 전에 가방이나
플라스틱 케이스에 넣어 온도 변화를 늦추십시오.
• 렌즈에 흠집이 생기지 않도록 렌즈를 케이스에 넣어 운반하는 것이 좋습니다.
렌즈 관리
• 일반적으로 렌즈의 유리면을 청소할 경우 먼지만 제거하면 됩니다.
• 소량의 에탄올이나 렌즈 클리너를 부드럽고 깨끗한 면직물 천이나 렌즈 페이퍼에
살짝 적신 후 렌즈 표면에 묻 은 얼룩, 지문 및 기타 유성 얼룩 을 지울 수
있습니다. 중앙에서 바깥쪽으로 원을 그리며 닦아줍니다. 이때 얼룩이 남거나
유리에 손가락이 닿지 않도록 주의합니다.
• 절대로 페인트 시너나 벤젠과 같은 유기용제를 사용하여 렌즈를 닦지 마십시오.
• 뉴트럴 컬러(NC) 필터(별매) 등을 사용하여 전면 렌즈를 보호합니다.
• 렌즈를 오랫동안 사용하지 않을 경우에는 곰팡이나 녹이 슬지 않도록 서늘하고
건조한 장소에 보관하십시오. 직사광선 아래나 나프타나 좀약과 함께 보관하지
마십시오.
액세서리
제공되는 액세서리
• 렌즈 캡 LC-77B(전방 캡)
• 렌즈 캡 LF-N1(후방 캡)
• 렌즈 후드 HB-95
• 소프트 렌즈 케이스 CL-C1
D
소프트 렌즈 케이스 사용
• 이 케이스는 렌즈에 흠집이 나지 않도록 보호하기 위한 것으로 떨어뜨리거나
다른 물리적인 충격으로부터 보호하기 위한 용도는 아닙니다.
• 이 케이스는 방수가 되지 않습니다.
• 케 이 스 에 사 용 된 재 료 는 문 지르 거나 젖 은 상 태일 때 색 이 바 래거나,
흘러내리거나, 늘어나거나, 수축되거나, 변색될 수 있습니다.
• 먼지는 부드러운 솔을 이용해 제거하십시오.
• 부드럽고 마른 천으로 표면에 묻은 물기나 얼룩을 닦아줍니다. 알코올, 벤젠,
시너 또는 기타 휘발성 화학 물질은 사용하지 마십시오.
• 직사광선이나 고온 다습한 장소에 보관하지 마십시오.
• 케이스를 사용하여 모니터 또는 렌즈 구성을 닦지 마십시오.
• 운반 중에 렌즈가 케이스에서 빠지지 않도록 주의하십시오.
소재: 폴리에스테르
호환 액세서리
77 mm 스크류식 필터
D
필터
• 필터는 한 번에 한 개씩만 사용하십시오.
• 필터를 부착하거나 원편광 필터를 돌리려면 먼저 렌즈 후드를 제거하십시오.
사양
마운트
Nikon Z 마운트
초점 거리 20 mm
최대 조리개 f/1.8
렌즈 구성 11군 14매(ED 렌즈 3매, 비구면 렌즈 3매 및 나노 크리스탈 코트
렌즈 포함)
화각 • FX 포맷: 94°
• DX 포맷: 70°
포커싱 시스템 IF 방식
최단 초점 거리 촬상면에서부터 0.2 m
최대 촬영 배율 0 .19×
조리개 날 9매(원형 조리개)
조리개 범위 f/1.8 ~ 16
필터 부착 크기
77 mm (P = 0.75 mm)
크기 최대 직경 약 84.5 mm×108.5 mm
(카메라 렌즈 장착면에서의 거리)
무게 약 505 g
Nikon은 언제든지 예고 없이 제품의 외관, 사양, 성능을 변경할 수 있습니다.
Kr
사용설명서
Sc
使用说明书
产品中有害物质的名称及含量
标志 部件名称
有害物质
铅
(Pb)
汞
(Hg)
镉
(Cd)
六价铬
(Cr (VI))
多溴联苯
(PBB)
多溴二苯醚
(PBDE)
外壳
机械元件
×
光学元件
电子元件
×
本表格依据
SJ/T
11364
的规定编制。
:
表示该有害物质在该部件所有均质材料中的含量均在
GB/T
26572
规定的限量要求以下。
×
:
表示该有害物质至少在该部件的某一均质材料中的含量超出
GB/T
26572
规定的限量要求。但是,以现有的技术条件要使照相
机相关产品完全不含有上述有害物质极为困难,并且上述产品都包含在《关于电气电子设备中特定有害物质使用限制指令
2011
/
65
/EU
》的豁免范围之内。
进口商 :
尼康映像仪器销售(中国)有限公司
(上海市蒙自路
757
号歌斐中心
12
楼
01
-
07
室
邮编 :
200023
)
尼康客户支持中心服务热线 :
400
-
820
-
1665
(周一至周日
9
:
00
–
18
:
00
,除夕下午休息)
尼康官方网站 :
http://www.nikon.com.cn/
在日本印刷
出版日期 :
2019
年
11
月
1
日
使用产品前请仔细阅读本使用说明书。
在使用本产品前,请仔细阅读本使用说明书。您还需要查阅照相
机说明书。
•
本镜头专供带有尼康
Z
卡口的微型单电相机使用。
安全须知
为预防对您或他人造成人身伤害或财产损失,请在使用前仔细阅
读“安全须知”,并以正确的方法使用。
请在阅读之后妥善保管本说明书,以便随时查阅。
A
警告
表示“有可能造成人员死亡或负重伤的内容”。
A
注意
表示“有可能造成人员负轻伤或财产损失的内容”。
本节使用以下图示和符号对必须遵守的内容作以分类。
F
表示不允许进行的行为
。
C
表示必须进行的行为
。
A
警告
E
禁止
拆解
切勿自行拆解、修理或改装。当产品由于跌落等原因
而破损使得内部外露时,切勿触碰外露部分。
否则将导致触电或受伤。
C
执行
当发现产品变热、冒烟或发出焦味等异常时,请立刻
切断照相机电源。
若 放任 不管, 将 导 致 起火或烫伤。
F
禁止
切勿使产品被水淋湿。切勿用湿手触碰产品。
否则将导致触电或起火。
F
禁止
切勿在有可能起火、爆炸的场所使用。
若在有丙烷气、汽油、可燃性喷雾剂等易燃性气体、
粉尘的场所使用产品,将导致爆炸或火灾。
F
禁止
切勿透过镜头直接观看太阳或其他强光。
否则将导致失明或视觉损伤。
F
禁止
切勿在婴幼儿伸手可及之处进行保管。
否则将导致故障或受伤。若误吞细小部件,将会对身
体造成伤害。万一意外吞入口中,请立即接受医生诊疗。
G
禁止
在高温环境或低温环境中,切勿直接接触产品。
否则将可能导致烫伤、低温烫伤或冻伤。
A
注意
F
禁止
切勿将镜头对着太阳或强光。
否则将有可能聚光,使内部零件破损或导致起火。进
行 背 光拍摄时, 请使 太阳充 分 偏离视角。
若仅使太阳稍微偏离视角,也可能导致起火。
F
禁止
切勿放置于夏天封闭的车内或直射阳光下等高温环境中。
否则将导致故障或起火。
F
禁止
切勿移动安装有照相机或镜头的三脚架。
否则将导致故障或受伤。
使用镜头
镜头部件:名称和功能
请参阅本页面左边的图表。
q
镜头遮光罩安装
标记
安装镜头遮光罩时使用。
参阅
B
w
控制环
选择了自动对焦模式时 :在自动
对焦模式中,旋转此环可调整使
用照相机所分配的设定(如,对
焦
(M/A)
或光圈)。有关详细信
息,请参阅照相机说明书中关于
自定义控制
/
自定义控制功能
/
自定义控制
(
拍摄
)
的说明。
—
选择了手动对焦模式时 :旋转此
环可进行对焦。
—
e
镜头安装标记 将镜头安装至照相机时使用。
参阅
A
r
镜头卡口橡胶垫
圈
— —
t
CPU
接点
用于将数据传送至照相机或从照
相机中传送数据。
—
y
对焦模式切换器
选择
A
可进行自动对焦,选择
M
则可进行手动对焦。请注意,无
论选择了何种设定,当使用照相
机控制选择了手动对焦模式时,
对焦都必须手动进行调整。
—
u
镜头遮光罩
镜头遮光罩可阻挡可能导致杂光
或鬼影的散射光线。它们还可用
于保护镜头。
参阅
B
i
镜头遮光罩锁定
标记
安装镜头遮光罩时使用。
o
镜头遮光罩对齐
标记
!0
镜头盖(前盖) — —
!1
镜头盖(后盖) — —
A
安装与取下
安装镜头
z
关闭照相机,取下机身盖,然后取下镜头后盖。
x
将镜头上的安装标记与照相机机身上的安装标记对齐,同
时将镜头置于照相机机身上,然后逆时针旋转镜头直至其
卡入正确位置发出咔嗒声。
取下镜头
z
关闭照相机。
x
按住镜头释放按钮并同时顺时针旋转镜头。
B
安装和取下镜头遮光罩
将镜头遮光罩安装标记与镜头遮光罩对齐标记(
q
)对齐,
然后旋转遮光罩(
w
)直至安装标记与镜头遮光罩锁定标记
(
e
)对齐。
若要取下遮光罩,请以相反顺序执行以上步骤。
镜头遮光罩对齐标记
镜头遮光罩安装标记
镜头遮光罩锁定标记
安装或取下遮光罩时,请在镜头遮光罩对齐标记(
●
)附近将
其握住,并避免将遮光罩的前部握得太紧。不使用时,可将
遮光罩反转并固定在镜头上。
使用带内置闪光灯的照相机拍摄时
使用照相机的内置闪光灯时,由于闪光灯发出的光可能会受到镜
头的遮挡,因此图像中将出现阴影。
安装镜头后
若您在对焦后关闭照相机并重新开启,对焦位置可能会发生改
变。若您在等待拍摄对象出现期间已对焦于预选位置,我们建议
您在照片拍摄前不要关闭照相机。
使用注意事项
•
拿起或持握镜头或照相机时,切勿仅持拿镜头遮光罩。
•
保持
CPU
接点清洁。
•
若镜头卡口橡胶垫圈损坏,请立即停止使用并将镜头送至尼康
售后服务中心或尼康特约维修店进行维修。
•
不使用镜头时,请装回镜头盖。
•
为保护镜头内部,请将其存放在没有阳光照射的地方。
•
切勿将镜头置于潮湿的地方或可能沾染湿气的场所。内部构造
生锈将导致无法挽回的损坏。
•
切勿将镜头靠近明火或置于其他过热的场所。过热可能会使强
化塑料表面部件受损或变形。
•
温度的突变可能导致镜头内外部结露以致损坏。将镜头从温暖
的环境带入寒冷的环境或从寒冷的环境带入温暖的环境之前,
请先将其置于包内或塑料盒中以缓和温度的变化。
•
运输产品时,请在包装箱内装入足够多的缓冲材料,以减少
(避
免)
由于冲击导致产品损坏。
镜头保养
•
一般情况下,清洁镜头的玻璃表面时去除灰尘即可。
•
您可使用一块干净的软棉布或镜头清洁纸稍微沾上少许乙醇或镜
头清洁剂来清除镜头表面的污点、指纹和其他油渍。请以圆周运
动方式从里向外轻轻擦拭,注意不要留下污渍,也不要用手指触
碰镜片。
•
切勿使用涂料稀释剂或苯等有机溶剂清洁镜头。
•
中性色彩(
NC
)滤镜(另购)等可用于保护前部镜片。
•
若您将在较长时间内不使用镜头,请将其存放在阴凉干燥的地
方以防止发霉和生锈。切不可存放在直射阳光下,也不可与石
脑油或樟脑丸一起存放。
配件
随附配件
•
镜头盖(前盖)
LC-
77
B
•
镜头盖(后盖)
LF-N
1
•
镜头遮光罩
HB-
95
•
镜头包布
CL-C
1
D
使用镜头包布
•
镜头包布旨在保护镜头免受刮伤,而不是保护其免受因跌落
或其他强烈碰撞所造成的影响。
•
镜头包布不防水。
•
镜头包布所采用的材质在被摩擦或弄湿时可能会褪色、掉色、
拉长、皱缩或变色。
•
请使用软刷去除灰尘。
•
表面附着的水和污渍可使用一块干的软布进行清除。切勿使
用酒精、苯、稀释剂或其他挥发性化学物质。
•
切勿将其存放在阳光直射、高温或高湿度的环境中。
•
切勿使用镜头包布清洁镜片和照相机显示屏。
•
在运输过程中,请注意不要让镜头从镜头包布中掉出。
材质 :聚酯纤维
兼容的配件
77
mm
旋入式滤镜
D
滤镜
•
一次仅可使用一个滤镜。
•
安装滤镜或旋转圆形偏振滤镜前,请先取下镜头遮光罩。
技术规格
卡口 尼康
Z
卡口
焦距
20
mm
最大光圈
f/
1
.
8
镜头结构
11
组
14
片(包括
3
枚低色散
ED
镜片、
3
枚非球
面镜片以及带纳米结晶涂层的镜片)
视角
•
FX
格式 :
94
°
•
DX
格式 :
70
°
对焦系统 内对焦系统
最近对焦距离 约
0
.
2
m
(至焦平面)
最大复制比率 约
0
.
19
倍
光圈叶片
9
片(圆形光圈孔)
光圈范围
f/
1
.
8
–
16
滤镜附件尺寸
77
mm
(
P=
0
.
75
mm
)
尺寸 约
84
.
5
mm
(最大直径)×
108
.
5
mm
(从照相
机镜头卡口边缘开始的距离)
重量 约
505
g
尼康公司保留可随时更改本产品的外观、技术规格和性能的权利。
NIKKOR Z 20mm f/1.8 S
Sc
使用说明书
Es
Manual del usuario
Kr
사용설명서
Jp
使用説明書
En
User’s Manual
Fr
Manuel d’utilisation
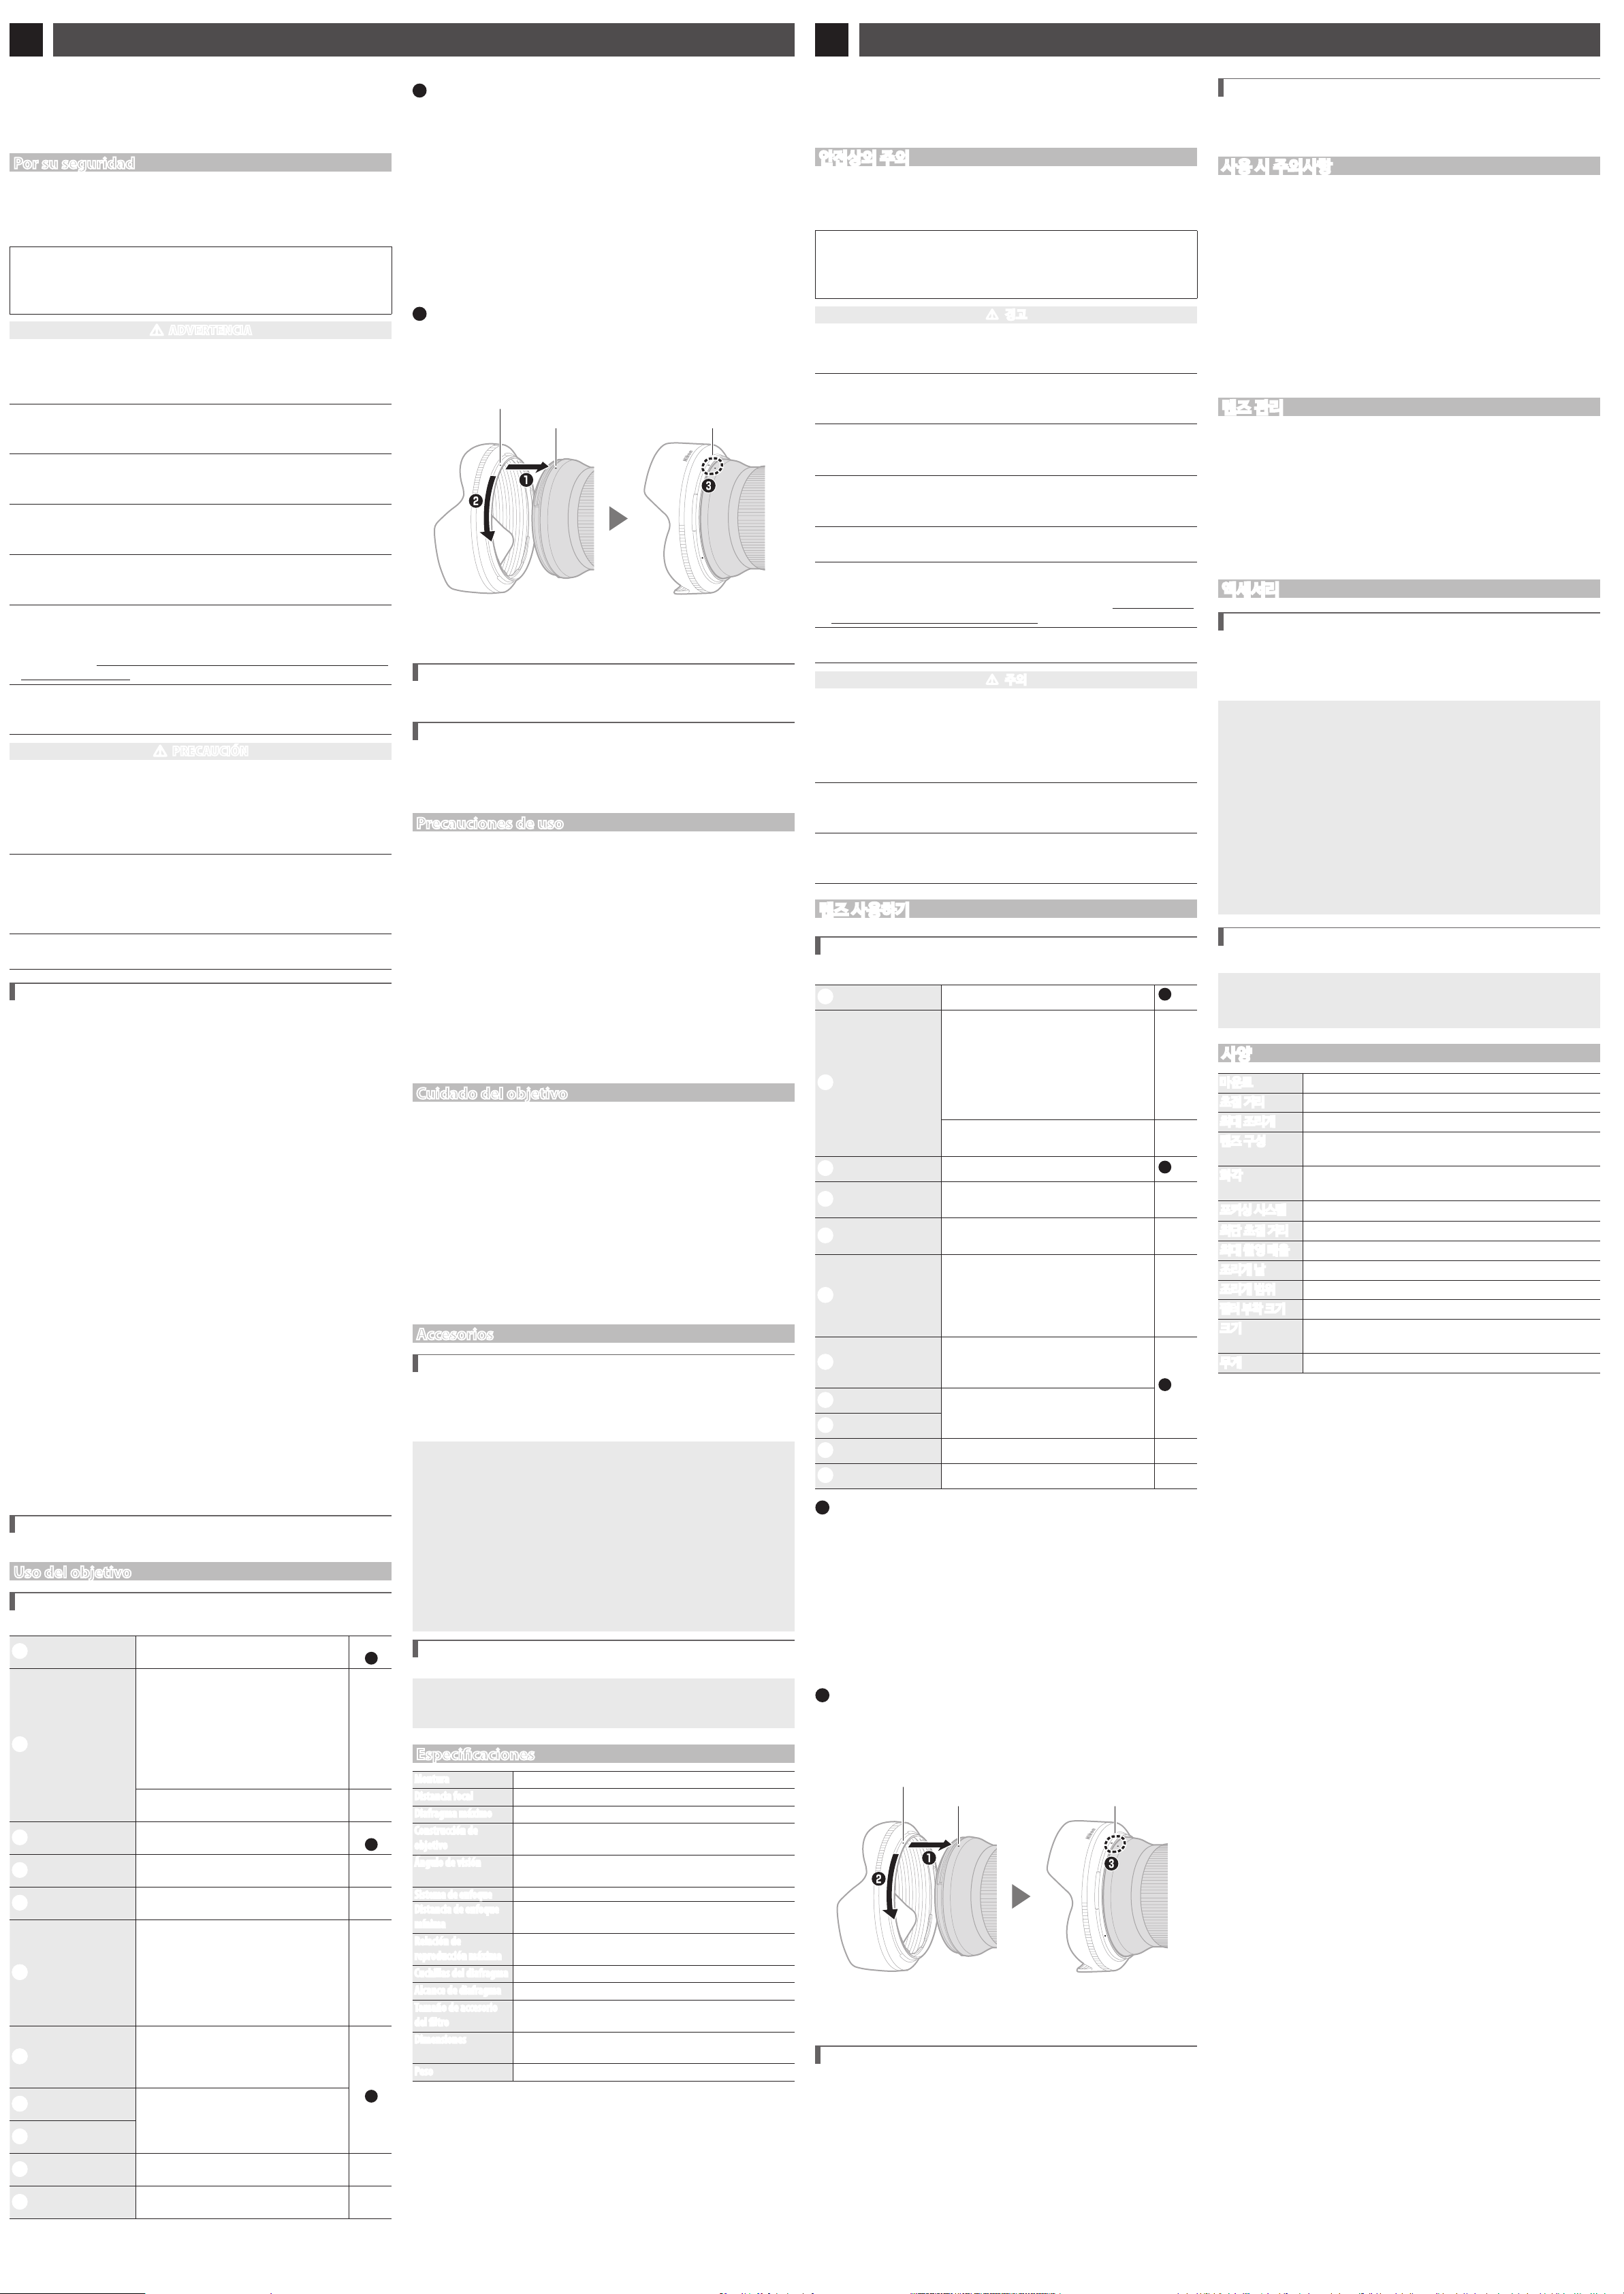