Loading ...
Loading ...
Loading ...
– 6
Figures to
Illustration
Both cable hooks can be folded out.
The lower cable hook can be rotated upwards to
enable quick cable removal.
Illustration
If the device is parked in the parking position, first
release the parking position.
In order to do this, hold the floor nozzle still with
your foot and tip the device backwards slightly.
Hold the button down and adjust the suction pipe to
the desired length.
Illustration
Note
The desired suction power can be set individually by
sliding the suction control.
Level 1 and 2: Low suction range
For vacuuming sensitive materials and light com-
ponents, such as upholstered furniture, rugs, cush-
ions, curtains, etc.
Level 3: Medium suction range
For daily vacuuming of lightly soiled surfaces and
for cleaning low-pile carpets.
Level 4: High suction range
For vacuuming durable floor coverings, hard floors,
high-pile carpets and heavily soiled surfaces.
Important notice! The device will shut down automati-
cally if there is risk of overheating. Turn the device off
and pull out the mains plug. Make sure, that the nozzle
and suction pipe are not clogged, and that the filter does
not need changing. After eliminating the fault, allow the
device to cool down for a at least 1 hour; then the device
will be ready for operation again.
Illustration
Illustration
Used to vacuum sensitive and smooth floors (par-
quet, marble, terracotta etc.).
Illustration
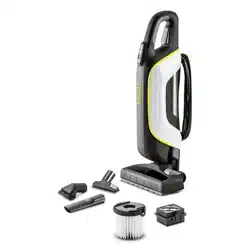
Upholstery nozzle: for cleaning upholstered furni-
ture, mattresses, laced curtains, etc.
Crevice nozzle: for edges, joints and heaters
Furniture brush: for gentle cleaning of furniture
and delicate objects, such as books, etc.
Illustration
Illustration
Roll-up the cable.
Engage the device (telescopic pipe is not extend-
ed) in parking position on the floor nozzle.
The device can also be stored in a horizontal posi-
tion, for example on a shelf on in a cupboard.
Note
Store the appliance in a dry room.
Recommendation: Empty main filter after every use.
For rest of procedure see:
Figure to
Note
When you unscrew it, the filter is automaticall
y
cleaned and the dirt is removed.
Recommendation: Remove long life filter at the latest
every 3 months, empty them and clean them if neces-
sary.
ATTENTION
The amount that can be vacuumed up can vary depend-
ing on the vacuuming material.
For fine dust, in particular, emptying may be necessary
earlier.
In order to ensure good filtration, replace long life filter
with new filter every 2 years.
For rest of procedure see:
Figure to
Notes
When you unscrew it, the filter is automaticall
y
cleaned and the dirt is removed.
Reinsert the long life filter in the filter box according
to the marking and screw it in completely until the
red safety rod is no longer visible.
ATTENTION
If the red safety rod is still visible, the filter box can-
not be inserted into the device.
The filter lock must therefore be screwed in all the
way.
On
ly
install dry long life filters in the device.
Recommendation: In order to ensure good filtration,
replace the exhaust filter once a year.
Illustration
Remove the exhaust filter cover upwards at an an-
gle along the edge of the device.
Press the exhaust filter together on both sides and
remove.
Attach a new exhaust filter and lock in place.
Place the exhaust filter cover on the edge of the ap-
pliance, push it downwards and lock in place.
Start up
Cable hooks
Adjusting the telescopic suction pipe
Setting the vacuum cleaning performance
Setting the switchable floor nozzle
Hard surfaces Carpets / carpeted
floors
Parquet nozzle
Using accessories
Finish operation
Transport, storage
Care and maintenance
Emptying the main filter
Emptying long life filter
Replacing exhaust filter
9EN
Loading ...
Loading ...
Loading ...