

CAFÉ
30”, 36” and 48”
ENGLISH/FRANÇAIS/ESPAÑOL
Write the model and serial numbers here:
Model # ___________________________
Serial # ___________________________
You’ll find them on a label located behind
the left burner knob or below the control
panel which is visible when the oven
door is opened.
OWNER’S MANUAL
RANGES
Professional Dual Fuel Gas
49-85244 10-17 GEA
SAFETY INFORMATION .......... 3
USING THE RANGE
Features of Your Range ................. 8
Cooktop Controls ....................... 9
Surface Cooking ........................10
Features of Your Oven ..................12
Oven Control ...........................13
Baking Tips ............................14
Oven Racks ............................15
Baking ................................16
Broiling ...............................17
Convection Baking or Roasting ...........19
Probe .................................21
Proofing .............................. 22
Self-Cleaning Oven .................... 23
Special Features ....................... 25
CARE AND CLEANING
Control Panel and Knobs ...............26
Oven Burners .........................26
Broiler Pan, Grid and Roasting Rack ......26
Oven Racks ........................... 27
Low Profile Oven Rack ................. 27
Lift-off Oven Door .....................28
Probe ................................28
Oven Light ............................29
Surfaces ..............................30
Dual-flame Stacked Burners ..............31
Spark Igniter and Electrodes ............ 32
Burner Grates .........................32
Grease Troughs ........................ 33
Griddle ............................... 33
Cutting Board ......................... 33
TROUBLESHOOTING TIPS .......34
WARRANTY ....................... 38
ACCESSORIES ....................39
CONSUMER SUPPORT ...........40
GE is a trademark of the General Electric Company. Manufactured under trademark license.

2 49-85244
THANK YOU FOR MAKING GE APPLIANCES A PART OF YOUR HOME.
Whether you grew up with GE Appliances, or this is your first, we’re happy to have you in the family.
We take pride in the craftsmanship, innovation and design that goes into every GE Appliances
product, and we think you will too. Among other things, registration of your appliance ensures that we
can deliver important product information and warranty details when you need them.
Register your GE appliance now online. Helpful websites and phone numbers are available in the
Consumer Support section of this Owner’s Manual. You may also mail in the pre-printed registration
card included in the packing material.
49-85244 3
READ AND SAVE THESE INSTRUCTIONS
IMPORTANT SAFETY INFORMATION
READ ALL INSTRUCTIONS BEFORE USING THE APPLIANCE
SAFETY INFORMATION
ANTI-TIP DEVICE
To reduce the risk of tipping the range,
the range must be secured by a properly
installed anti-tip bracket. See installation
instructions shipped with the bracket for
complete details before attempting to install.
For Professional All-Gas Ranges
To check if the bracket is installed and
engaged properly, look underneath the
range to see that the rear leveling leg is
engaged in the bracket. On some models,
the storage drawer or kick panel can be removed for easy inspection.
If visual inspection is not possible, slide the range forward, confirm
the anti-tip bracket is securely attached to the floor or wall, and slide
the range back so the rear leveling leg is under the anti-tip bracket.
If the range is pulled from the wall for any reason, always repeat
this procedure to verify the range is properly secured by the anti-tip
bracket.
Never completely remove the leveling legs or the range will not be
secured to the anti-tip device properly.
WARNING
If the information in this manual is not followed exactly, a fire or
explosion may result, causing property damage, personal injury or death.
- Do not store or use gasoline or other flammable vapors and liquids in the vicinity of
this or any other appliance.
- WHAT TO DO IF YOU SMELL GAS
Ŷ 'RQRWWU\WROLJKWDQ\DSSOLDQFH
Ŷ 'RQRWWRXFKDQ\HOHFWULFDOVZLWFKGRQRWXVHDQ\SKRQHLQ\RXUEXLOGLQJ
Ŷ,PPHGLDWHO\FDOO\RXUJDVVXSSOLHUIURPDQHLJKERU¶VSKRQH)ROORZWKHJDV
VXSSOLHU¶VLQVWUXFWLRQV
Ŷ ,I\RXFDQQRWUHDFK\RXUJDVVXSSOLHUFDOOWKHILUHGHSDUWPHQW
- Installation and service must be performed by a qualified installer, service agency or
the gas supplier.
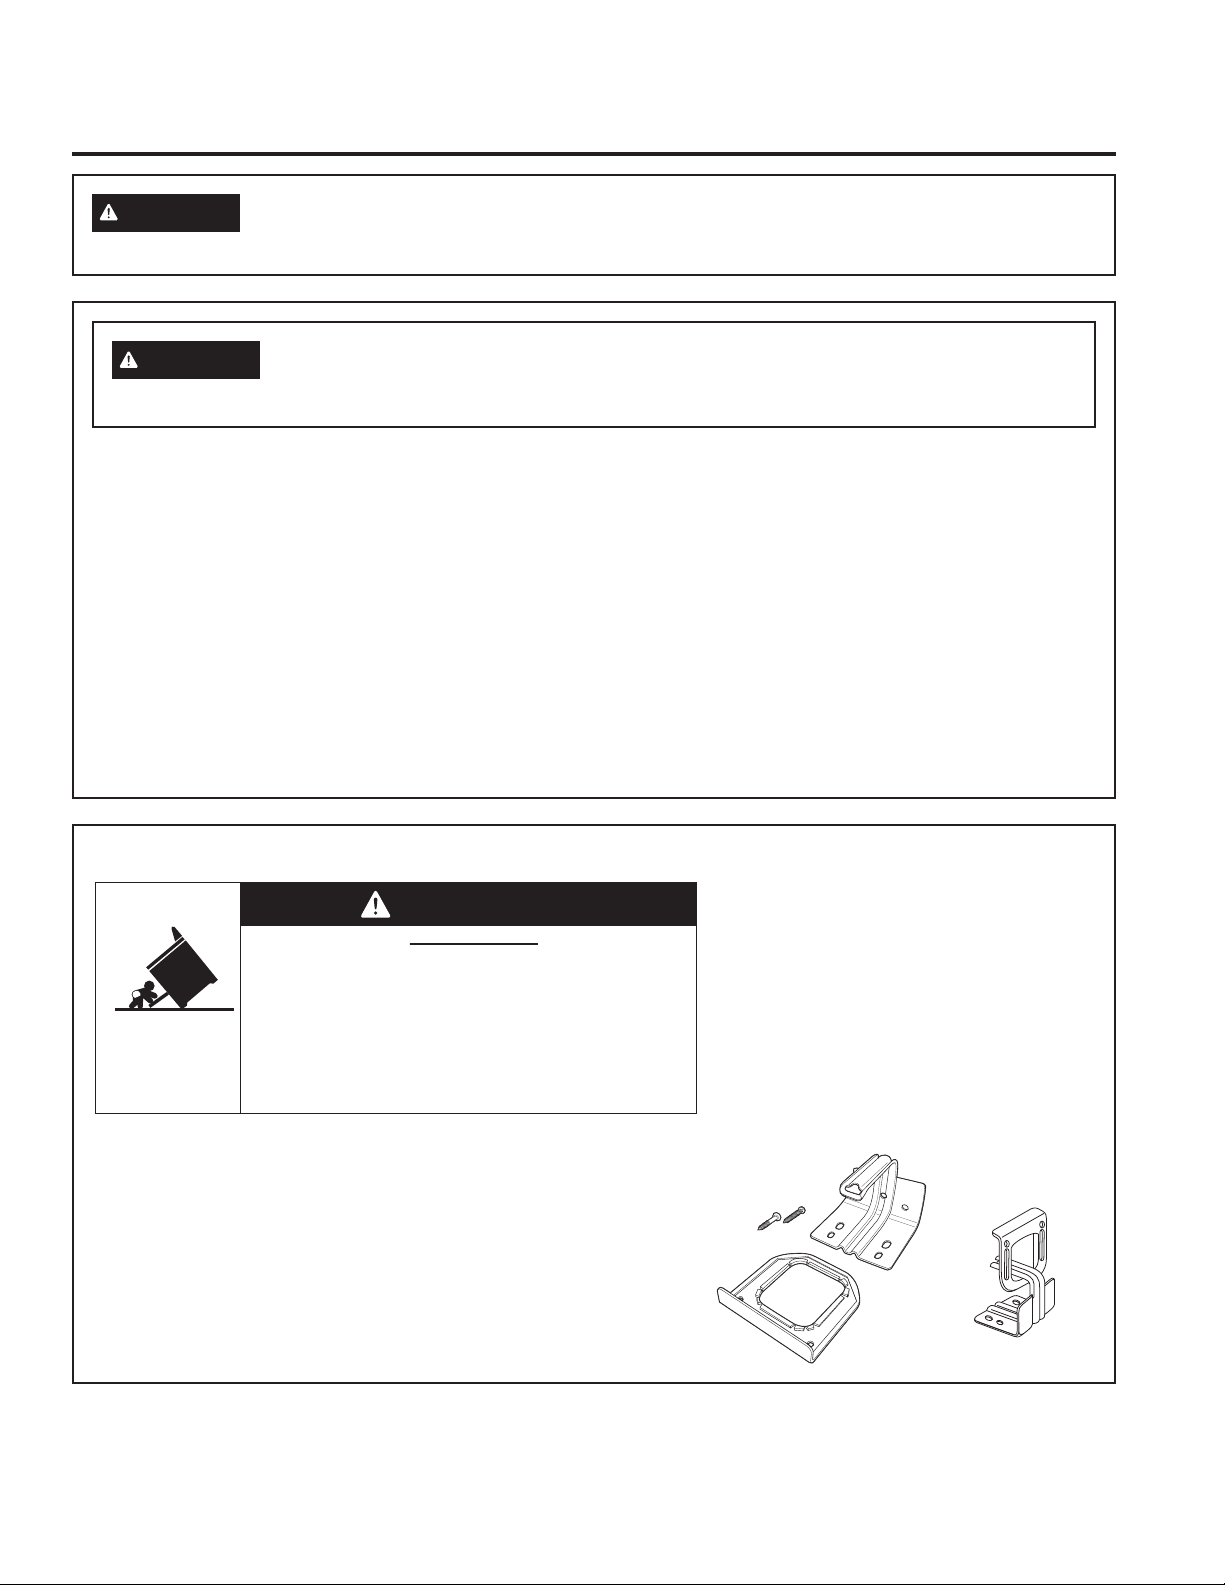
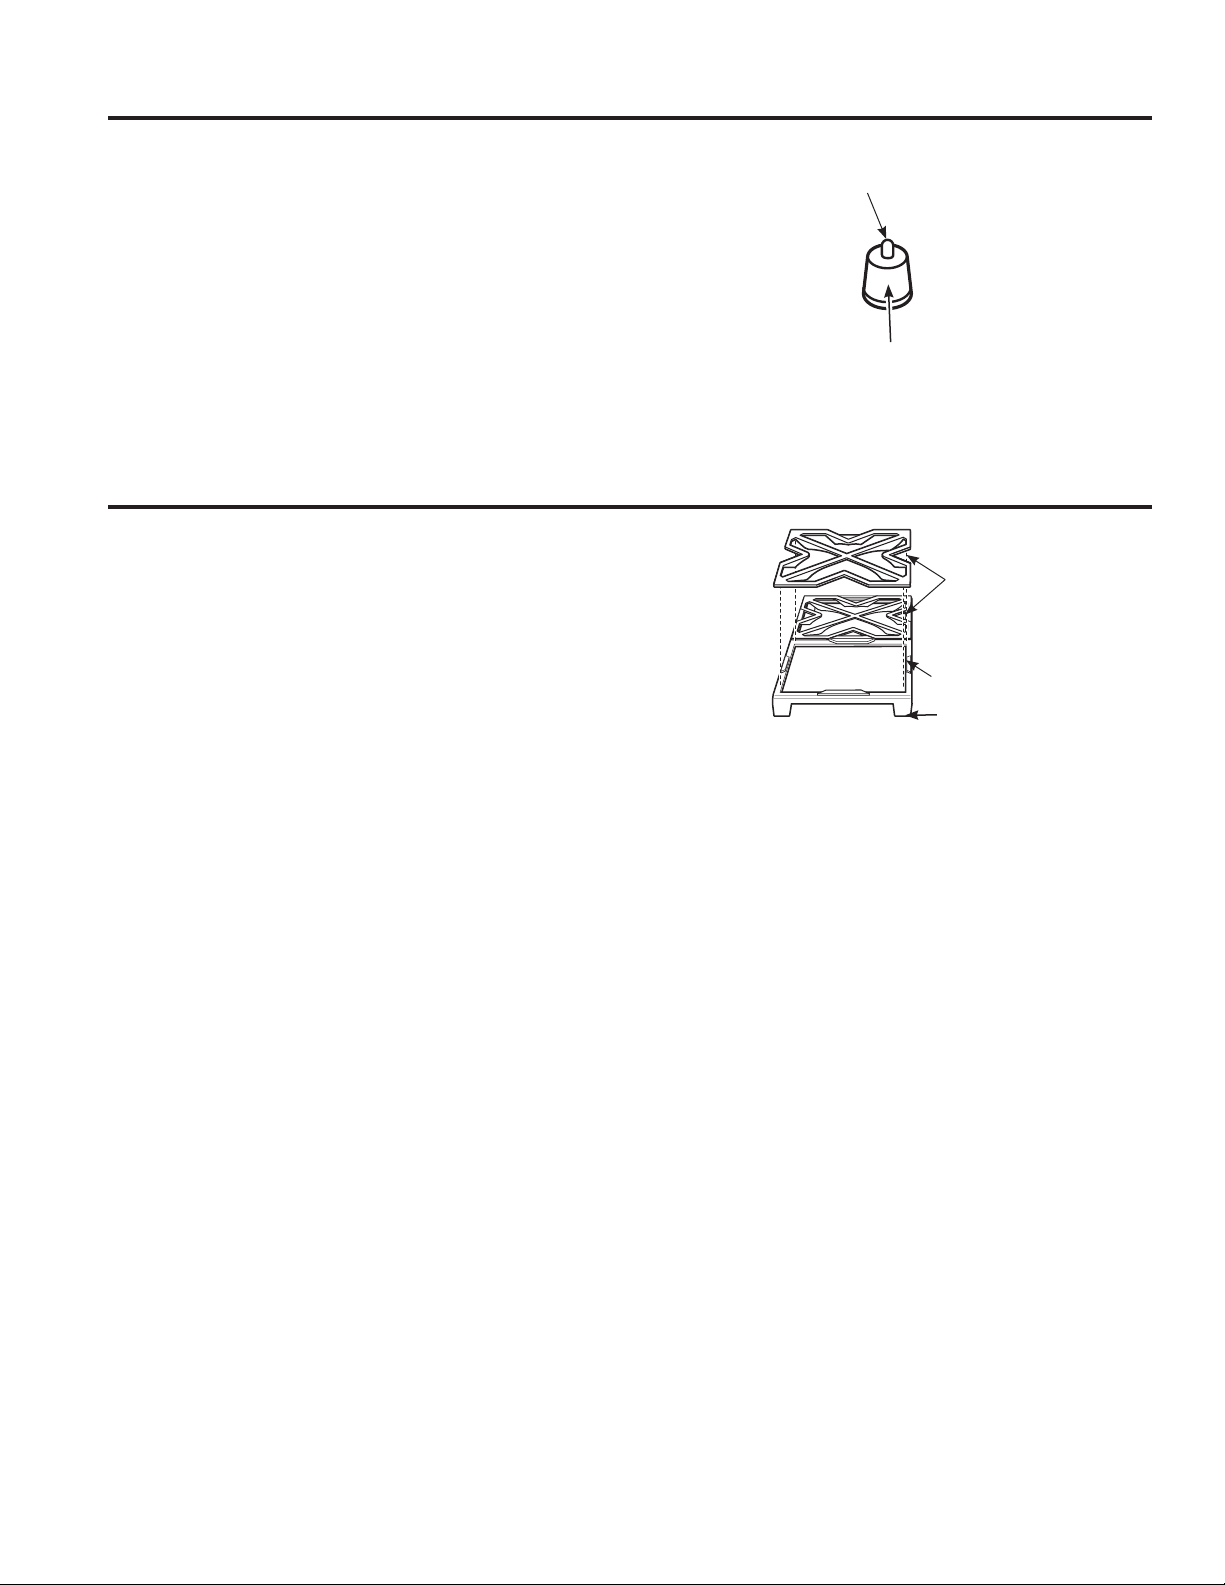
Anti-Tip Bracket
Kit Included
Rear View
• A child or adult can tip the range and be killed.
• Install the anti-tip bracket to the wall or floor.
• Engage the range to the anti-tip bracket by sliding the
range back such that the foot is engaged.
• Re-engage the anti-tip bracket if the range is moved.
• Failure to do so can result in death or serious burns
to children or adults.
Tip-Over Hazard
WARNING
WARNING
Read all safety instructions before using the product. Failure to follow these instructions may
result in fire, electrical shock, serious injury or death.
4 49-85244
SAFETY INFORMATION
READ AND SAVE THESE INSTRUCTIONS
IMPORTANT SAFETY INFORMATION
READ ALL INSTRUCTIONS BEFORE USING THE APPLIANCE
WARNING
GENERAL SAFETY INSTRUCTIONS
WARNING
NEVER use this appliance
as a space heater to heat or warm the room.
Doing so may result in carbon monoxide
poisoning and overheating of the oven.
Ŷ 8VHWKLVDSSOLDQFHIRULWVLQWHQGHGSXUSRVHDV
described in this owner’s manual.
Ŷ +DYH\RXUUDQJHLQVWDOOHGDQGSURSHUO\JURXQGHGE\
a qualified installer in accordance with the provided
installation instructions.
Ŷ $Q\DGMXVWPHQWDQGVHUYLFHVKRXOGEHSHUIRUPHG
only by a qualified gas range installer or service
technician. Do not attempt to repair or replace
any part of your range unless it is specifically
recommended in this manual.
Ŷ <RXUUDQJHLVVKLSSHGIURPWKHIDFWRU\VHWIRUXVH
with natural gas or propane (LP) gas. It can be
converted for use with either. If required, these
adjustments must be made by a qualified technician
in accordance with the installation instructions
and local codes. The agency performing this work
assumes responsibility for the conversion.
Ŷ +DYHWKHLQVWDOOHUVKRZ\RXWKHORFDWLRQRIWKH
range gas shut-off valve and how to turn it off if
necessary.
Ŷ %HIRUHSHUIRUPLQJDQ\VHUYLFHXQSOXJWKHUDQJH
or disconnect the power supply at the household
distribution panel by removing the fuse or switching
off the circuit breaker.
Ŷ %HVXUHDOOSDFNLQJPDWHULDOVDUHUHPRYHGIURPWKH
range before operating to prevent ignition of these
materials.
Ŷ 'XDO)XHO,IWKHKHDWLQJHOHPHQWLQWKHRYHQ
develops a glowing spot or shows other signs
of damage, do not use that area of the range. A
glowing spot indicates the element may fail and
present a potential burn, fire, or shock hazard. Turn
the heating element off immediately and have it
replaced by a qualified service technician.
Ŷ $YRLGVFUDWFKLQJRULPSDFWLQJJODVVGLVSOD\V'RLQJ
so may lead to glass breakage. Do not cook on a
product with broken glass. Shock, fire, or cuts may
occur.
Ŷ 'RQRWOHDYHFKLOGUHQDORQHRUXQDWWHQGHGLQDQ
area where an appliance is in use. They should
never be allowed to climb, sit or stand on any part
of the appliance.
Ŷ
CAUTION
Do not store items of interest
to children in cabinets above an oven - children
climbing on the oven to reach items could be
seriously injured.
Ŷ 1HYHUEORFNWKHYHQWVDLURSHQLQJVRIWKHUDQJH
They provide the air inlets and outlets that are
necessary for the range to operate properly with
correct combustion. Air openings are located at the
rear of the cooktop, at the top and bottom of the
oven door, and at the bottom of the range.
Ŷ 8VHRQO\GU\SRWKROGHUV²PRLVWRUGDPSSRW
holders on hot surfaces may result in burns from
steam. Do not let pot holders touch surface burners,
burner grate, or oven heating element. Do not use a
towel or other bulky cloth in place of pot holders.
Ŷ 'RQRWWRXFKWKHKHDWLQJHOHPHQWVRUWKHLQWHULRU
surface of the oven. These surfaces may be hot
enough to burn even though they are dark in color.
During and after use, do not touch, or let clothing
or other flammable materials contact any interior
area of the oven; allow sufficient time for cooling
first. Other surfaces of the appliance may become
hot enough to cause burns. Potentially hot surfaces
include the burners, grates, oven vent opening,
surfaces near the opening, crevices around the
oven door, metal trim parts above the door, any
backguard, or high shelf surface.
Ŷ 'RQRWKHDWXQRSHQHGIRRGFRQWDLQHUV3UHVVXUH
could build up and the container could burst,
causing an injury.
49-85244 5
READ AND SAVE THESE INSTRUCTIONS
IMPORTANT SAFETY INFORMATION
READ ALL INSTRUCTIONS BEFORE USING THE APPLIANCE
SAFETY INFORMATION
WARNING
GENERAL SAFETY INSTRUCTIONS (cont.)
Ŷ &RRNIRRGWKRURXJKO\WRKHOSSURWHFWDJDLQVW
foodborne illness. Minimum safe food temperature
recommendations can be found at
ZZZ,V,W'RQH<HWJRYDQGZZZIVLVXVGDJRY8VH
a food thermometer to take food temperatures and
check several locations.
Ŷ 'RQRWDOORZDQ\RQHWRFOLPEVWDQGRUKDQJRQWKH
oven door, drawer or cooktop. They could damage
the range or tip it over causing severe injury or death.
Ŷ .HHSWKHYHQWLODWRUKRRGDQGJUHDVHILOWHUVFOHDQ
to maintain good venting and to avoid grease fires.
Turn the ventilator OFF in case of a fire or when
intentionally "flaming" liquor or other spirits on the
cooktop. The blower if in operation, could spread
the flames.
WARNING
KEEP FLAMMABLE MATERIALS AWAY FROM THE RANGE
Failure to do so may result in fire or personal injury.
Ŷ 'RQRWVWRUHRUXVHIODPPDEOHPDWHULDOVLQDQRYHQ
or near the cooktop, including paper, plastic, pot
holders, linens, wall coverings, curtains, drapes and
gasoline or other flammable vapors and liquids.
Ŷ 1HYHUZHDUORRVHILWWLQJRUKDQJLQJJDUPHQWVZKLOH
using the appliance. These garments may ignite if
they contact hot surfaces causing severe burns.
Ŷ 'RQRWOHWFRRNLQJJUHDVHRURWKHUIODPPDEOH
materials accumulate in or near the range. Grease
in the oven or on the cooktop may ignite.
WARNING
IN THE EVENT OF A FIRE, TAKE THE FOLLOWING
STEPS TO PREVENT INJURY AND FIRE SPREADING
Ŷ 'RQRWXVHZDWHURQJUHDVHILUHV1HYHUSLFNXS
a flaming pan. Turn the controls off. Smother a
flaming pan on a surface unit by covering the pan
completely with a well-fitting lid, cookie sheet or flat
WUD\8VHDPXOWLSXUSRVHGU\FKHPLFDORUIRDPW\SH
fire extinguisher.
Ŷ ,IWKHUHLVDILUHLQWKHRYHQGXULQJEDNLQJVPRWKHU
the fire by closing the oven door and turning the
oven off or by using a multi-purpose dry chemical or
foam-type fire extinguisher.
Ŷ ,IWKHUHLVDILUHLQWKHRYHQGXULQJVHOIFOHDQWXUQ
the oven off and wait for the fire to go out. Do not
force the door open. Introduction of fresh air at self-
clean temperatures may lead to a burst of flame
from the oven. Failure to follow this instruction may
result in severe burns.
6 49-85244
WARNING
COOKTOP SAFETY INSTRUCTIONS
Ŷ 1HYHUOHDYHWKHVXUIDFHEXUQHUVXQDWWHQGHGDW
medium or high heat settings. Foods, especially oily
foods, may ignite resulting in fire that could spread
to surrounding cabinets.
Ŷ 1HYHUOHDYHRLOXQDWWHQGHGZKLOHIU\LQJ,IDOORZHG
to heat beyond its smoking point, oil may ignite
resulting in fire that may spread to surrounding
FDELQHWV8VHDGHHSIDWWKHUPRPHWHUZKHQHYHU
possible to monitor oil temperature.
Ŷ 7RDYRLGRLOVSLOORYHUDQGILUHXVHWKHPLQLPXP
amount of oil when using a shallow pan-frying
and avoid cooking frozen foods with excessive
amounts of ice.
Ŷ 8VHSURSHUSDQVL]HDQGDYRLGSDQVWKDWDUH
unstable or easily tipped. Select cookware that is
matched to the size of the burner. Burner flames
should be adjusted so that they do not extend
beyond the bottom of the pan. Excessive flame may
be hazardous.
Ŷ $OZD\VXVHWKH/,7(SRVLWLRQZKHQLJQLWLQJWKHWRS
burners and make sure the burners have ignited.
Ŷ :KHQXVLQJJODVVFHUDPLFFRRNZDUHPDNHVXUHLW
is suitable for cooktop service; others may break
because of sudden change in temperature.
Ŷ 7RPLQLPL]HWKHSRVVLELOLW\RIEXUQVLJQLWLRQRI
flammable materials and spillage, the handle of a
container should be turned toward the center of the
range without extending over nearby burners.
Ŷ 'RQRWXVHDZRNZLWKDURXQGPHWDOVXSSRUWULQJ
The ring may trap heat and block air to the burner
resulting in a carbon monoxide hazard.
Ŷ 'RQRWDWWHPSWWROLIWWKHFRRNWRS'RLQJVRPD\
damage the gas tubing to the surface burners
resulting in a gas leak and risk of fire.
Ŷ :KHQGLVDEOLQJ/RFN&RQWURORQVRPHPRGHOV
make sure the surface controls are set to the OFF
position. This will prevent unintended gas flow from
the burners.
Ŷ 'RQRWXVHDOXPLQXPIRLOWRFRYHUWKHJUDWHVRU
line any part of the cooktop. Doing so may result
in carbon monoxide poisoning, overheating of the
cooktop surfaces, or a potential fire hazard.
WARNING
OVEN SAFETY INSTRUCTIONS
WARNING
NEVER cover any slots,
holes, or passages in the oven bottom or
cover an entire rack with materials such as
aluminum foil or oven liners. Doing so blocks
air flow through the oven and may cause
carbon monoxide poisoning. Never place foil
or oven liners on the oven bottom. They can
trap heat causing risk of smoke or fire.
Ŷ 6WDQGDZD\IURPWKHUDQJHZKHQRSHQLQJWKHRYHQ
door. Hot air or steam which escapes can cause
EXUQVWRKDQGVIDFHDQGRUH\HV
Ŷ 1HYHUSODFHFRRNLQJXWHQVLOVSL]]DRUEDNLQJVWRQHV
or any type of foil or liner on the oven floor. These
items can trap heat or melt, resulting in damage to
the product and risk of shock, smoke or fire.
Ŷ 3ODFHRYHQUDFNVLQGHVLUHGORFDWLRQZKLOHRYHQLV
cool. If rack must be moved while oven is hot, be
careful to avoid touching hot surfaces.
Ŷ 'RQRWOHDYHLWHPVVXFKDVSDSHUFRRNLQJXWHQVLOV
or food in the oven when not in use. Items stored in
an oven can ignite.
Ŷ 'RQRWOHDYHLWHPVRQWKHFRRNWRSQHDUWKHRYHQ
vent. Items may overheat resulting in a risk of fire or
burns.
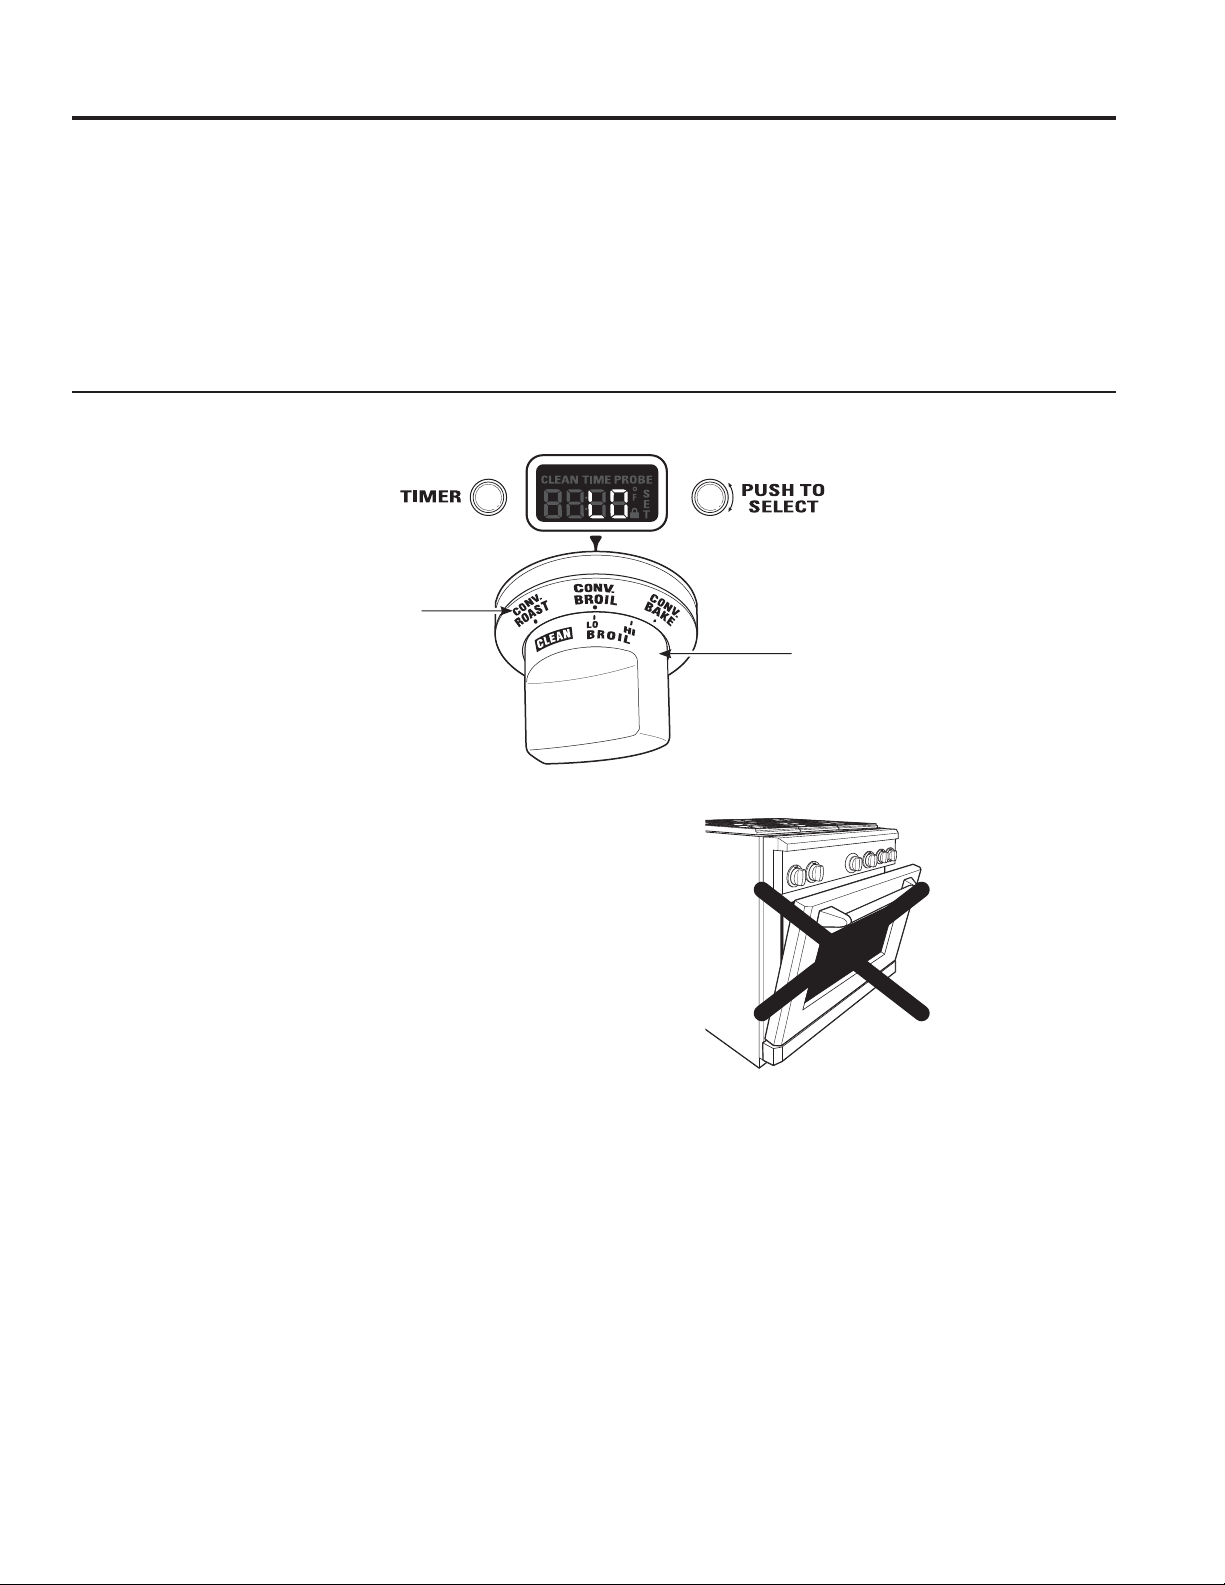
Ŷ 1HYHUEURLOZLWKGRRURSHQ2SHQGRRUEURLOLQJLV
not permitted due to overheating of control knobs.
SAFETY INFORMATION
READ AND SAVE THESE INSTRUCTIONS
IMPORTANT SAFETY INFORMATION
READ ALL INSTRUCTIONS BEFORE USING THE APPLIANCE
49-85244 7
WARNING
SELF-CLEANING OVEN SAFETY INSTRUCTIONS
The self-cleaning feature operates the oven at temperatures high enough to burn away food soils in the oven.
Follow these instructions for safe operation.
Ŷ 'RQRWWRXFKRYHQVXUIDFHVGXULQJVHOIFOHDQ
operation. Keep children away from the oven during
self-cleaning. Failure to follow these instructions
may cause burns.
Ŷ %HIRUHRSHUDWLQJWKHVHOIFOHDQF\FOHUHPRYHSDQV
shiny metal oven racks, and other utensils from the
oven. Only porcelain-coated oven racks may be left
in the oven.
Ŷ %HIRUHRSHUDWLQJWKHVHOIFOHDQF\FOHZLSHJUHDVH
and food soils from the oven. Excessive amount of
grease may ignite leading to smoke damage to your
home.
Ŷ ,IWKHVHOIFOHDQLQJPRGHPDOIXQFWLRQVWXUQWKH
oven off and disconnect the power supply. Have it
serviced by a qualified technician.
Ŷ 'RQRWXVHRYHQFOHDQHUV1RFRPPHUFLDORYHQ
cleaner or oven liner protective coating of any kind
should be used in or around any part of the oven.
Ŷ 'RQRWFOHDQWKHGRRUJDVNHW7KHGRRUJDVNHWLV
essential for a good seal. Care should be taken not
to rub, damage or move the gasket.
Ŷ IMPORTANT: The health of some birds is
extremely sensitive to the fumes given off during
the self-cleaning cycle of any range. Move birds to
another well-ventilated room.
STATE OF CALIFORNIA PROPOSITION 65 WARNINGS
WARNING
This product contains one or more chemicals known to the State of California to cause cancer,
and birth defects or other reproductive harm.
6HOIFOHDQHOHFWULFRYHQV6HOIFOHDQRYHQVFDQFDXVHORZOHYHOH[SRVXUHWRVRPHRIWKH3URSRVLWLRQ
substances, including carbon monoxide, during the cleaning cycle. Exposure to these substances can be
minimized by opening a window or using a ventilation fan or hood.
How to Remove Protective Shipping Film and Packaging Tape
Carefully grasp a corner of the protective shipping film
with your fingers and slowly peel it from the appliance
surface. Do not use any sharp items to remove the film.
Remove all of the film before using the appliance for the
first time.
To assure no damage is done to the finish of the
product, the safest way to remove the adhesive from
packaging tape on new appliances is an application of
a household liquid dishwashing detergent. Apply with a
soft cloth and allow to soak.
NOTE: The adhesive must be removed from all parts. It
cannot be removed if it is baked on.
READ AND SAVE THESE INSTRUCTIONS
IMPORTANT SAFETY INFORMATION
READ ALL INSTRUCTIONS BEFORE USING THE APPLIANCE
SAFETY INFORMATION
8 49-85244
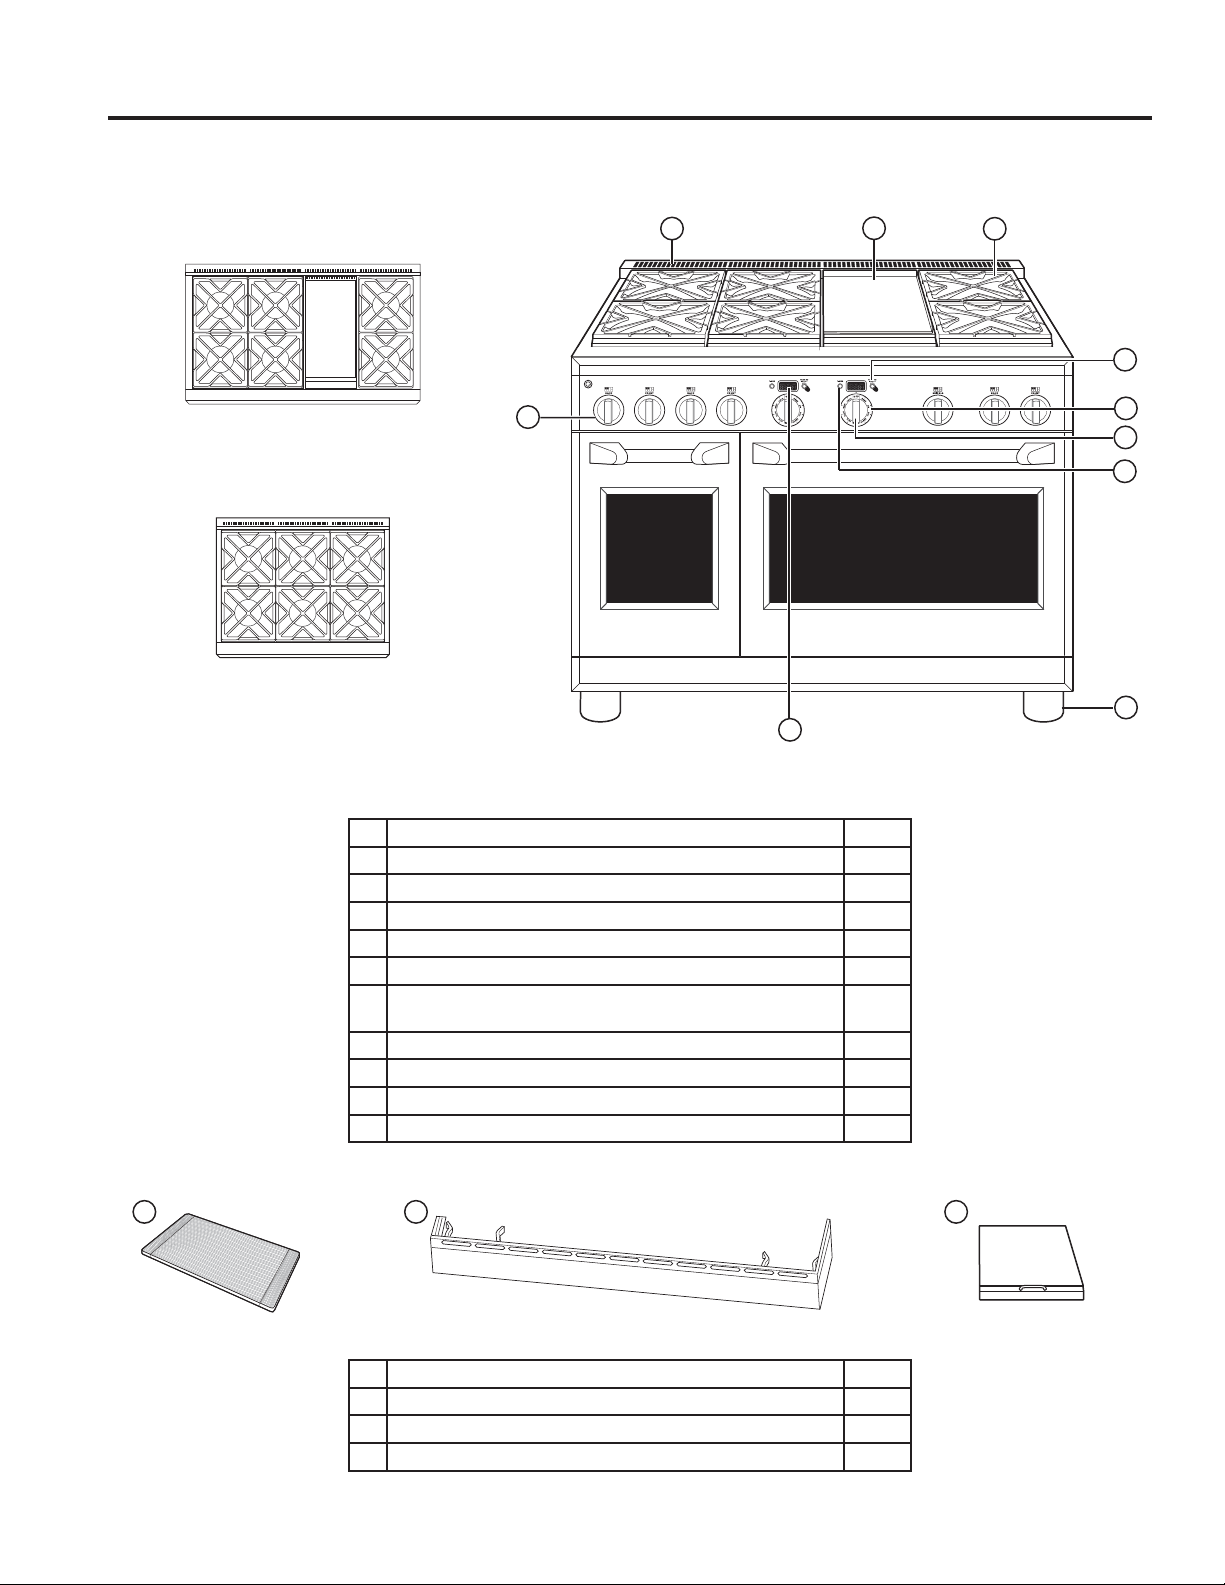
Design information
NOTE: Not all features are on all models. Appearance may vary.
Features of Your Range
USING THE RANGE: Features of Your Range
4
2
3
8
7
5
6
10
1
1
3
6 burners and griddle
6 gas burners
2
9
Double oven model shown includes a small oven.
Bamboo Cutting Board Griddle CoverToekick
Feature Index Page
1 Oven Vents 14
2 Griddle 11
3 Cooktop Burner Grates 32
4 Burner Control Knob 9, 26
5 Oven Display 13
6 Mini-Knob
(to select PROBE, TIMER or Special Features)
13, 26
7 Oven Mode Selector 13
8 Oven Temperature Knob 13
9 Kitchen Timer 13, 24
10 Leveling System (4) ²
Optional Accessories Page
1 Bamboo Cutting Board (on some models) 33
2 Toekick ²
3 Griddle Cover (on some models) ²
49-85244 9
USING THE RANGE: Cooktop Controls
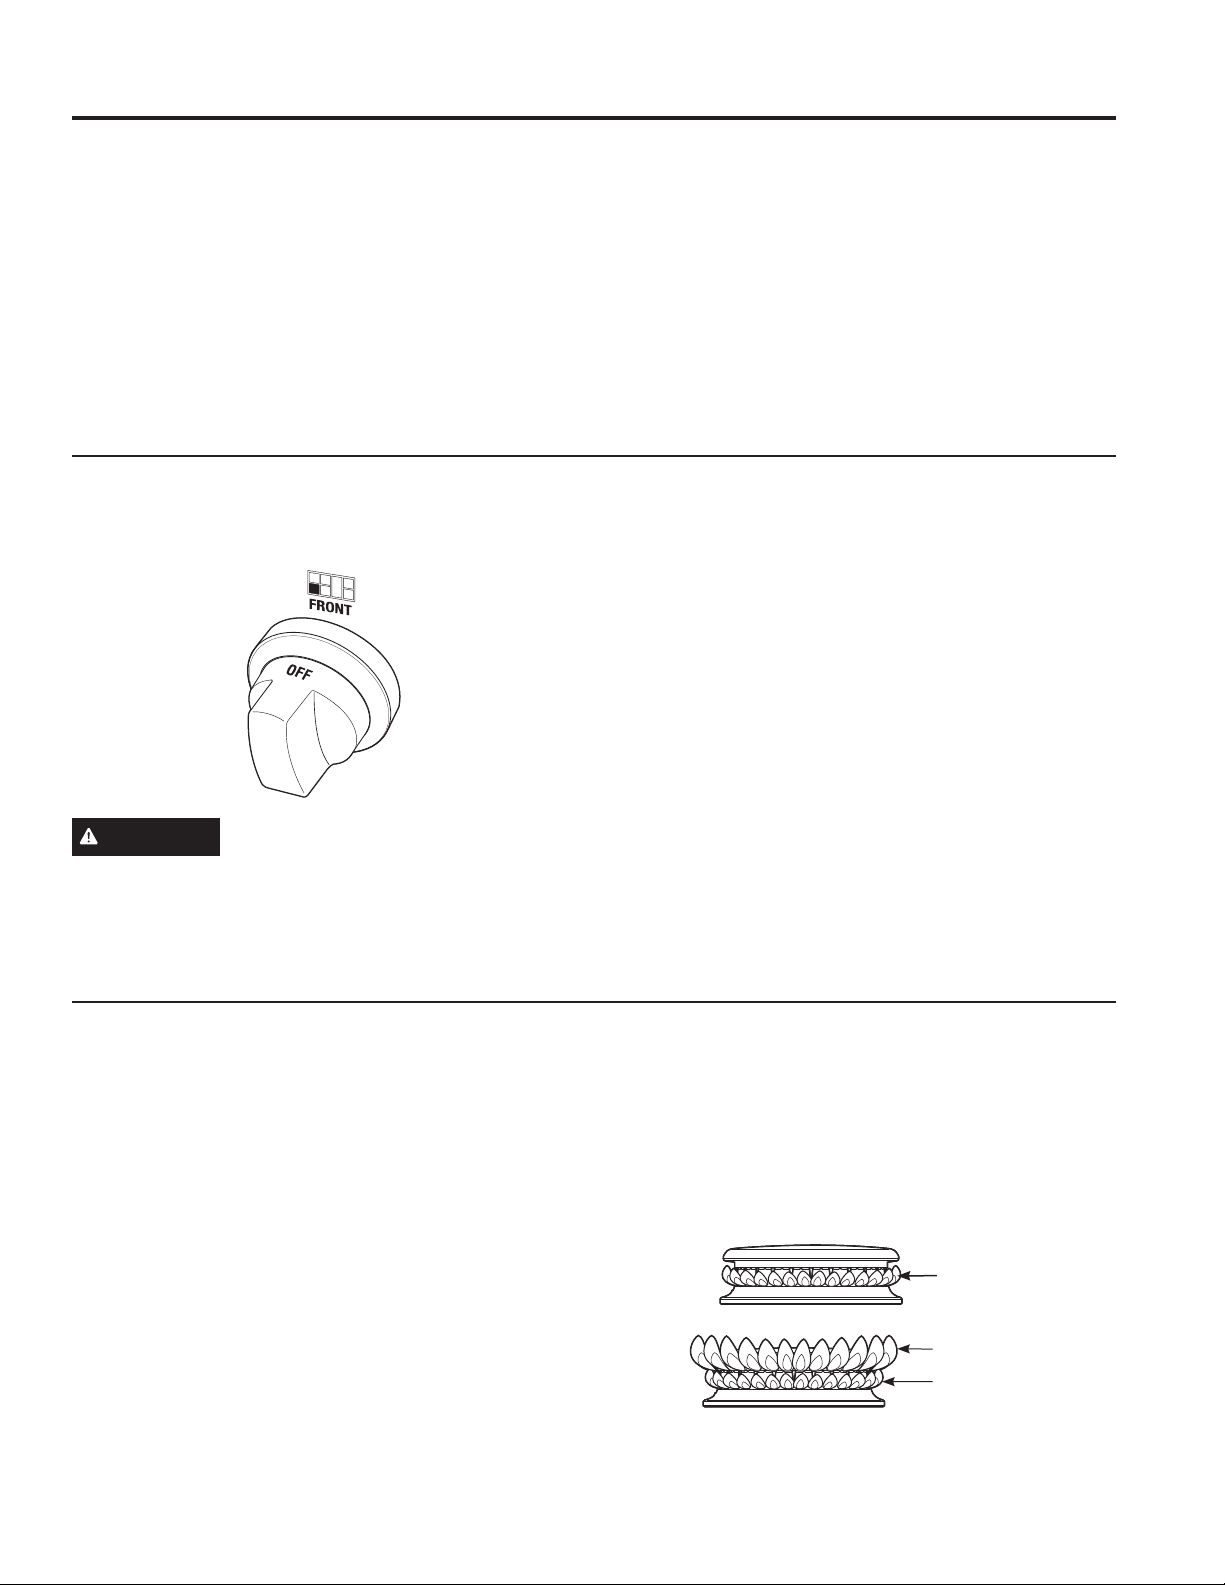
Cooktop Controls
Electronic Ignition and Automatic Reignition
The range is equipped with electronic ignition which
eliminates the need for a standing
pilot light.
The burners on this range will automatically relight if the
flame goes out.
All surface burner igniters will spark and make clicking
sounds when any burner is turned on. Do not touch any
of the burners when igniters are clicking.
Occasionally the burners may spark if excess wind or a
draft blows the flame away from the burner’s flame sensor.
In case of a power outage, you can light the surface
burners on your cooktop with a match. Hold a lighted
match to the burner, then turn the knob to the LOW
position. Use extreme caution when lighting burners
this way.
Do not attempt to light the griddle during a power outage.
The gas to these burners will automatically shut off
during a power outage.
Lower
Flame
8SSHU)ODPH
Lower Flame
To Light a Surface Burner
Push the control knob in and turn it counterclockwise to
the LITE position.
WARNING
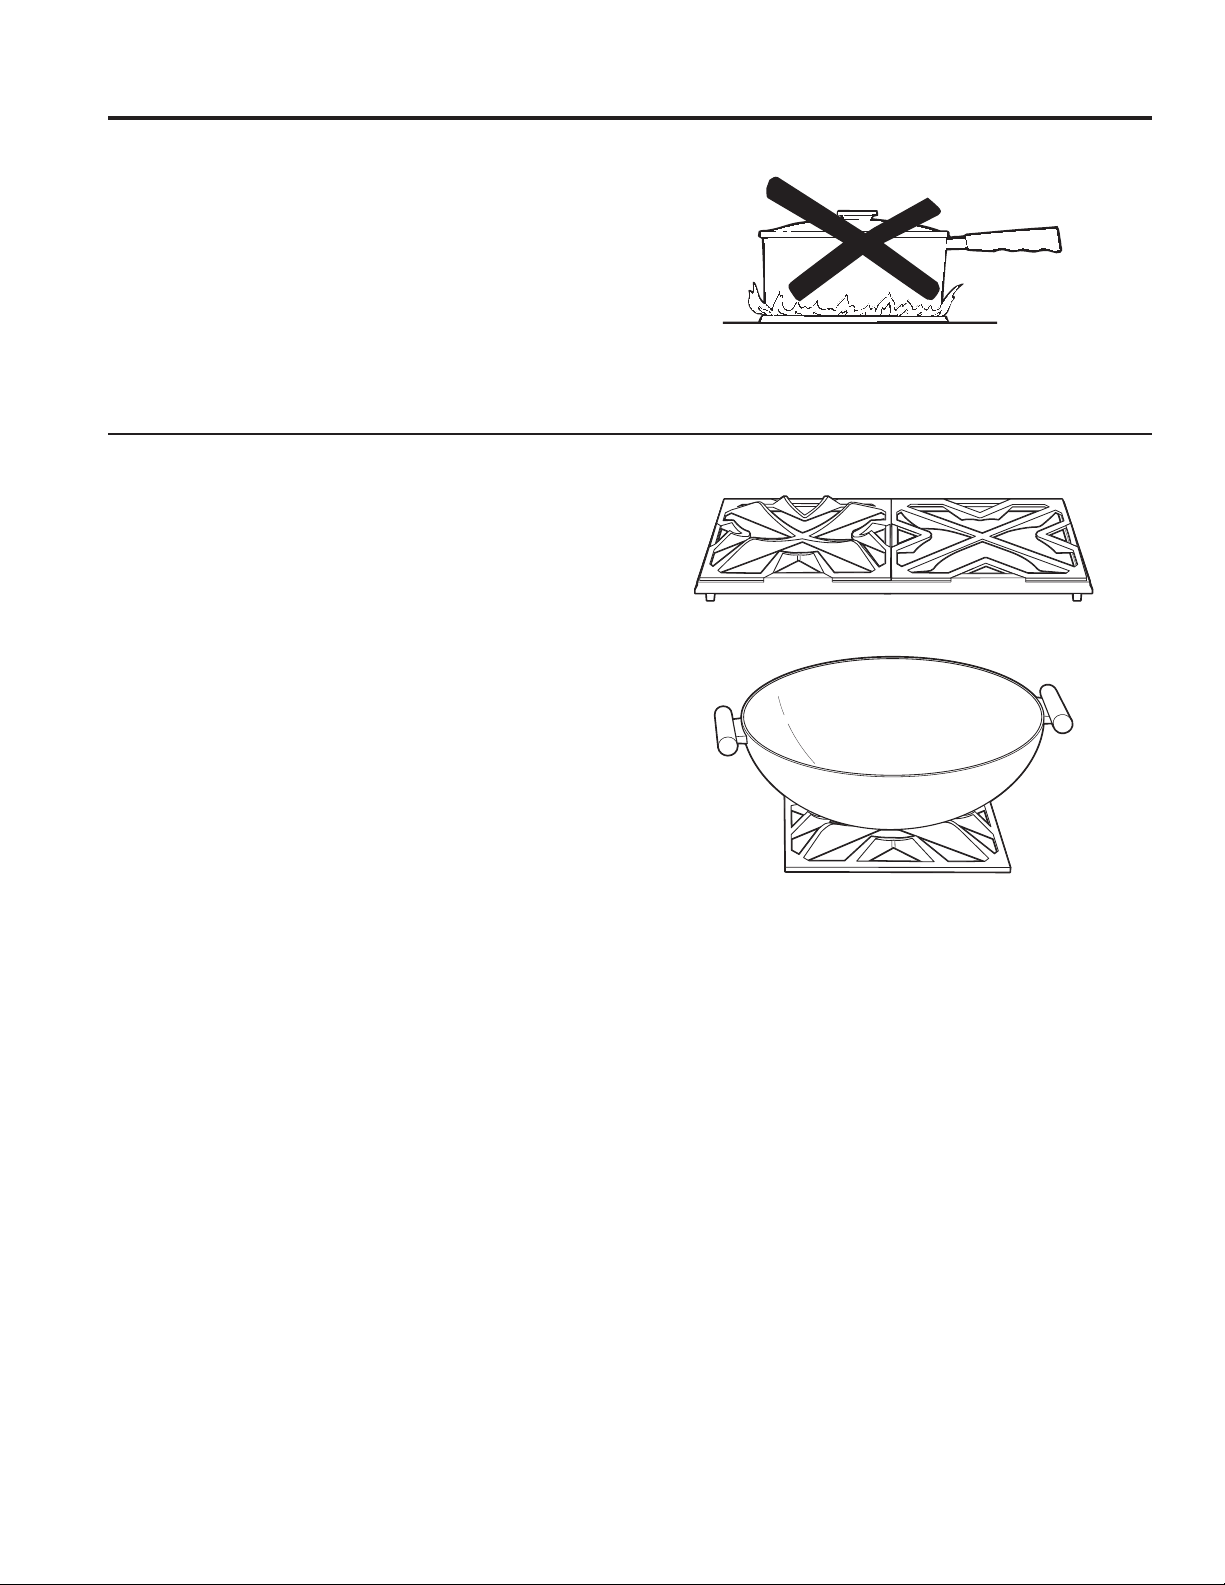
Burners should be operated only
when covered by cookware. Burner flames not
covered by cookware present a risk of fire or
clothing ignition. Never let flames extend beyond the
sides of the cookware. Failure to comply may result
in serious injury.
After the burner ignites, turn the knob to adjust the
flame size.
To turn a burner off, turn the knob clockwise, as far as
it will go, to the OFF position.
Ŷ Do not operate a burner for an extended period of time
without cookware on the grate. The finish on the grate
may chip without cookware to absorb the heat.
Dual-flame Stacked Burners
All surface burners on your range have two sets of flames
stacked one on top of the other; the dual-flame burners
have a lower (simmer) flame and a upper (main) flame.
When a burner is turned on, the lower flame will always
light and stay on.
Simmering:
The stacked burner design provides a wide range of
heat settings with which to simmer. Depending on the
type and quantity of food, and pan size, the flame can
be adjusted to suit your specific need. The lowest setting
uses only the lower flame and can maintain delicate
foods at a safe 140°F.
Cooking:
Settings from LO to X-HI will use both upper and lower
IODPHV8VHLO to HIIRUDOOSXUSRVHFRRNLQJ8VHHI or
X-HI (highest setting) with larger diameter cookware.
X-HI and HI are very high heat settings and are intended
to sear foods quickly and boil large quantities of water.
10 49-85244
How to Select Flame Size
Watch the flame, not the knob, as you increase or
reduce heat.
The flame size on a gas burner should match the
cookware you are using.
FOR SAFE HANDLING OF COOKWARE, NEVER
/(77+()/$0((;7(1'837+(6,'(62)7+(
COOKWARE. Any flame larger than the bottom of the
cookware will not result in faster heating and could be
hazardous.
For surface stability, 6” minimum diameter cookware is
UHFRPPHQGHG8VHODUJHUGLDPHWHUFRRNZDUHIRUKHDW
settings between HI and X-HI.
Surface Cooking
USING THE RANGE: Surface Cooking
Wok Cooking
The burner grates are uniquely designed to cook on
either side. The flat side accommodates flat bottom
cookware (stockpots, sauce pans, frying pans and flat
bottom woks), while the wok side is designed to hold a
wide variety of round bottom woks without the need for a
separate ring.
For easy access, a front burner location is
recommended for wok cooking.
The front center burner is recommended for wok cooking
RQEXUQHUƎDQGƎUDQJHV
Do not use a wok support ring. Placing the ring over the
burner or grate may cause the burner to work improperly,
resulting in carbon monoxide levels above allowable
standards. This could be hazardous to your health.
Wok Side Flat Side
49-85244 11
USING THE RANGE: Surface Cooking
Surface Cooking (Cont.)
Griddle Safety Precautions, Leveling (on some models)
WARNING
Fire Hazard
Ŷ 8VHFDUHZKHQFRRNLQJJUHDV\IRRGV6SLOOHGJUHDVHPD\UHVXOWLQILUH
Ŷ 1HYHUSODFHDQ\LWHPVRQWKHJULGGOHZKHQLWLVQRWLQXVH+HDWIURPVXUURXQGLQJEXUQHUVFDQKHDW
the griddle and may result in fire.
Ŷ 3ODFHDQGUHPRYHWKHJULGGOHRQO\ZKHQJULGGOHLVFRRODQGDOOVXUIDFHEXUQHUVDUHWXUQHG2))
Remove the metal cover and the cutting board before
turning the griddle on.
The griddle assembly should not be removed for
cleaning.
Once the unit is in position, the griddle can be leveled.
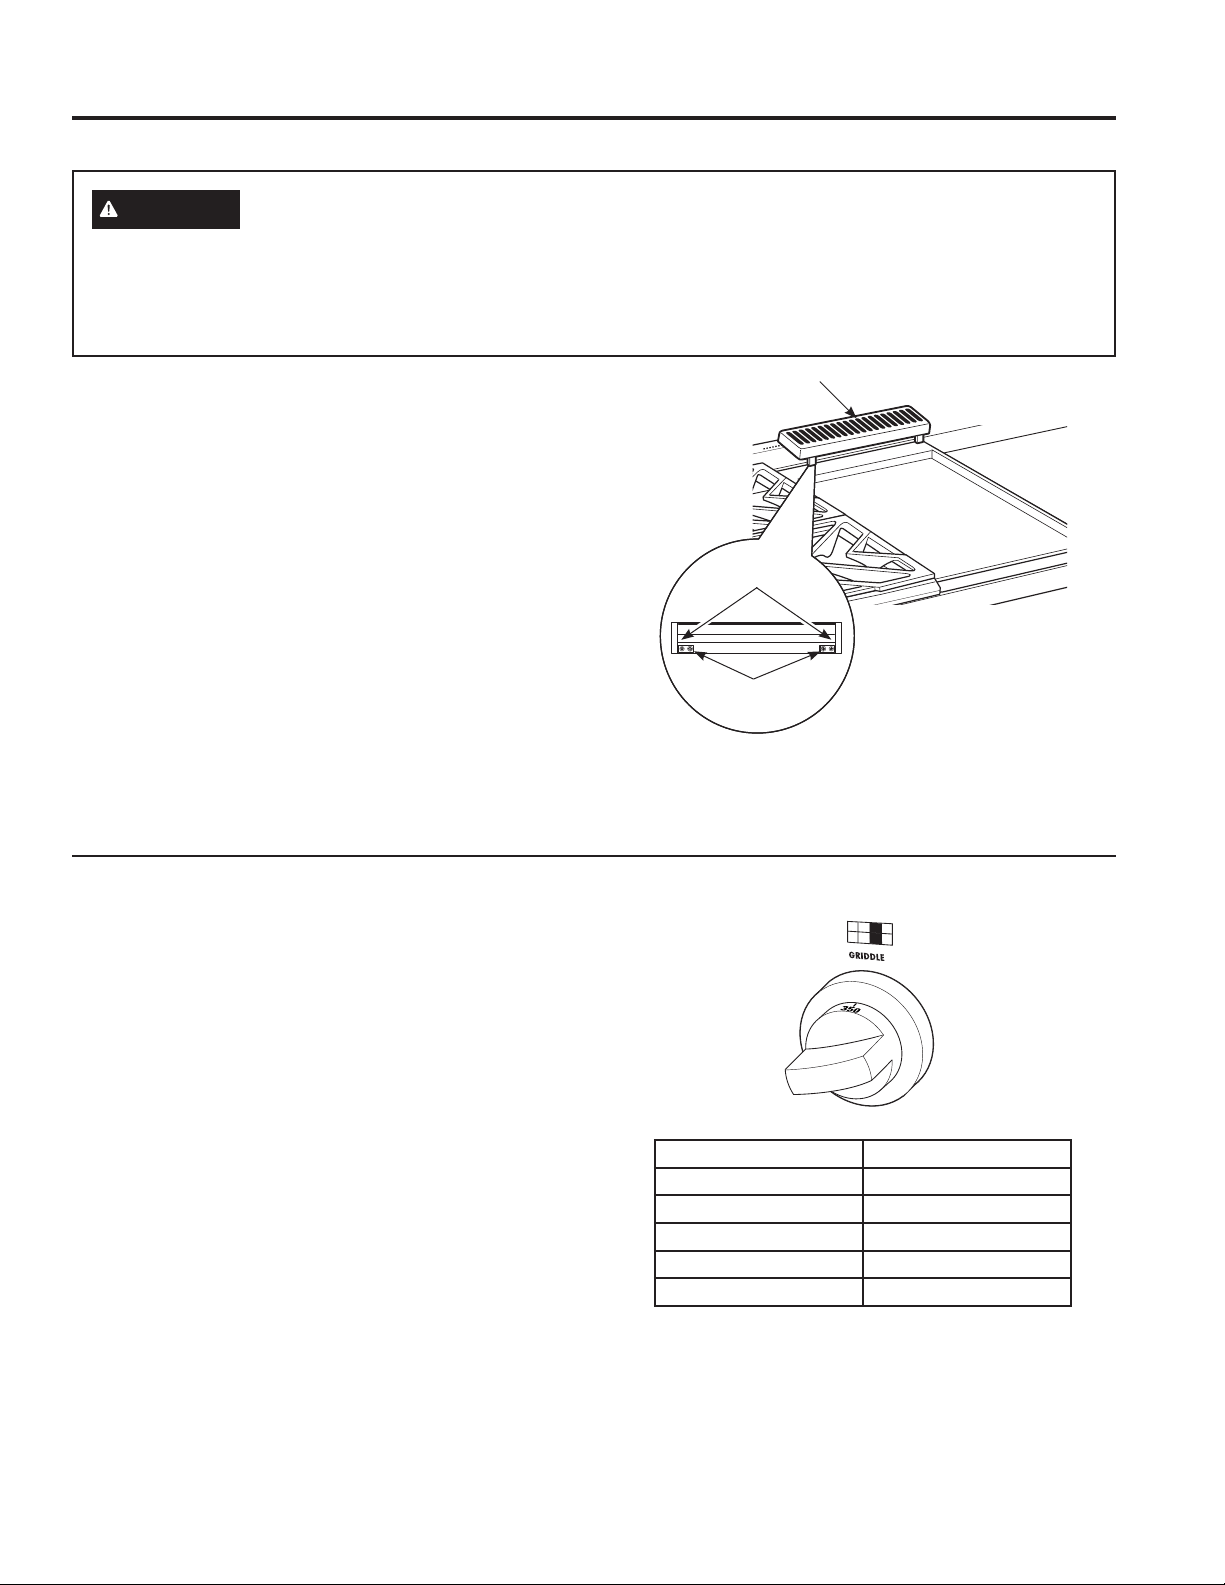
Remove the flue cover by lifting it straight up. Be careful
not to scratch the surrounding stainless steel surfaces
during removal of the flue cover.
The two inner screws are clamping screws for securing
the griddle in place. Loosen these two screws before
leveling. Do not remove these two screws.
The two outer screws are leveling screws. Do not
remove these two screws. They can be turned to level
the griddle or to provide a forward slope to help grease
and oils to drain away from the food being cooked. After
the first few uses, you will be able to judge the slope
best suited for the foods you are cooking and personal
preference.
After leveling the griddle, tighten the clamping screws to
secure griddle in place. +DQGWLJKWHQVFUHZVGRQRW
over-tighten.
Griddle flue cover
Clamping
screws
Leveling screws
Using the Griddle
Clean the griddle thoroughly with hot soapy water before
first use and after subsequent uses. The griddle surface
is made of durable, highly polished Type 304 stainless
steel backed by an aluminum plate for even heat
distribution. Apply a light coating of cooking oil to the
griddle surface to help prevent food from sticking.
To heat the griddle, push in and turn the control knob
to the desired temperature setting. The light on the
bezel will glow to indicate that the thermostat control is
working. The griddle is thermostatically controlled and
can be set to maintain any temperature from 200ºF
to 450ºF. Permit the griddle to preheat for 10 minutes
before placing food on it.
NOTE:8QOLNHWKHVXUIDFHEXUQHUVZKLFKXVHVSDUN
igniters, the griddle uses a Glo-Bar for ignition. Gas flows
to the griddle burner and ignition occurs approximately
45 seconds after the control knob is turned to a set
temperature.
Food Item Temperature Setting
Pancakes 375ºF
Hamburgers 400ºF
Bacon* 400ºF
Grilled Cheese 350ºF
Eggs 275ºF
*NOTE: Place bacon on a cold griddle. Do not preheat.

12 49-85244
1
2
Broiler Pan and Grid
Roasting Rack
12
11
Full Extension Oven Rack
Temperature Probe
10
4
1
9
7
8
5
6
3
2
Optional Accessories Page
1 Broiler Pan and Grid 19, 26
2 Roasting Rack 19, 26
Feature Index Page
1 Automatic Oven Door Latch ²
2 Broil Elements (2) 26
3 Halogen Oven Lights 29
4 Oven Rack Supports
²SRVLWLRQVLQODUJHRYHQ
²SRVLWLRQVLQVPDOORYHQ
16, 20
5 Bake Element (1) (under oven floor) 26
6 Oven Door Seal 30
7 Oven Frame Seal 30
8 Temperature Probe Outlet
²ULJKWVLGHLQODUJHRYHQ
²OHIWVLGHLQVPDOORYHQ
21
9 Convection Fan 19, 20
10 Oven Door 28, 30
11 Full Extension Oven Rack(s)
²LQODUJHRYHQ
²LQVPDOORYHQ
15, 16, 20, 27
12 Temperature Probe 21, 28
NOTE: On models equipped with 2 ovens, both ovens have same features.
Design information
NOTE: Not all features are on all models.
Features of Your Oven
USING THE RANGE: Features of Your Oven
49-85244 13
USING THE RANGE: Oven Control
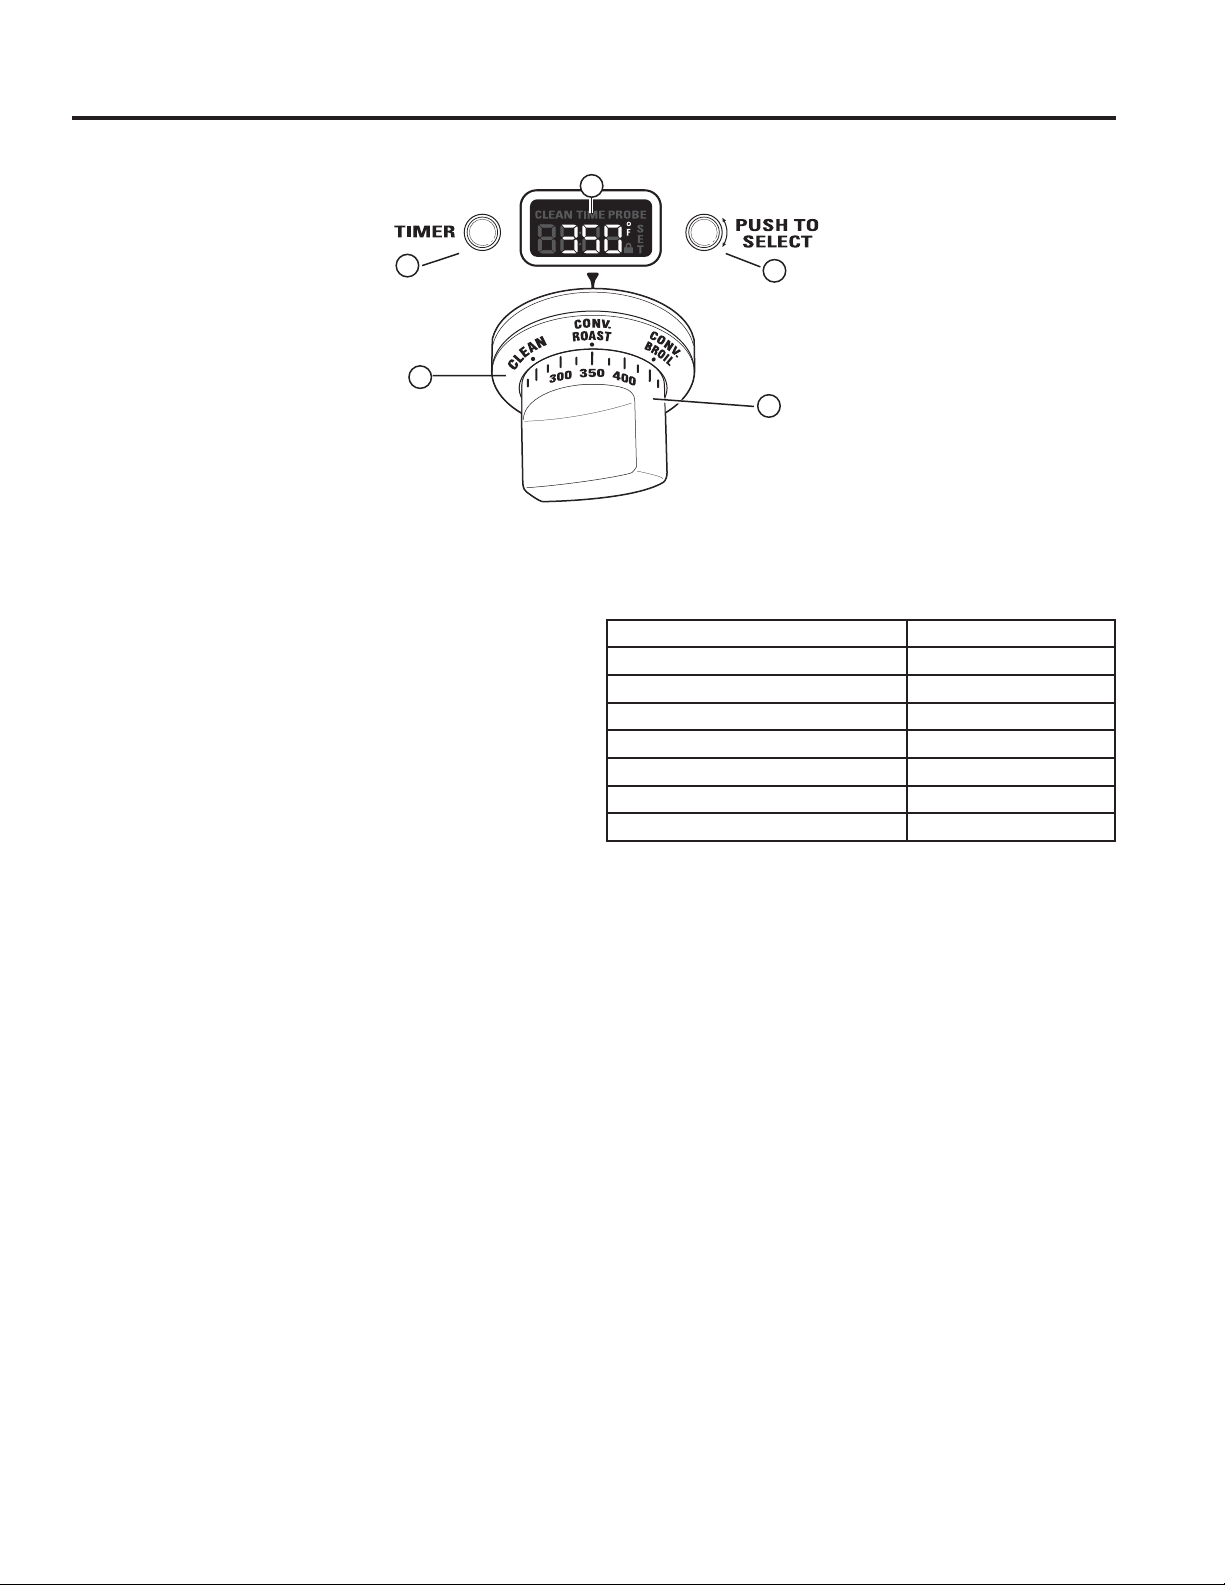
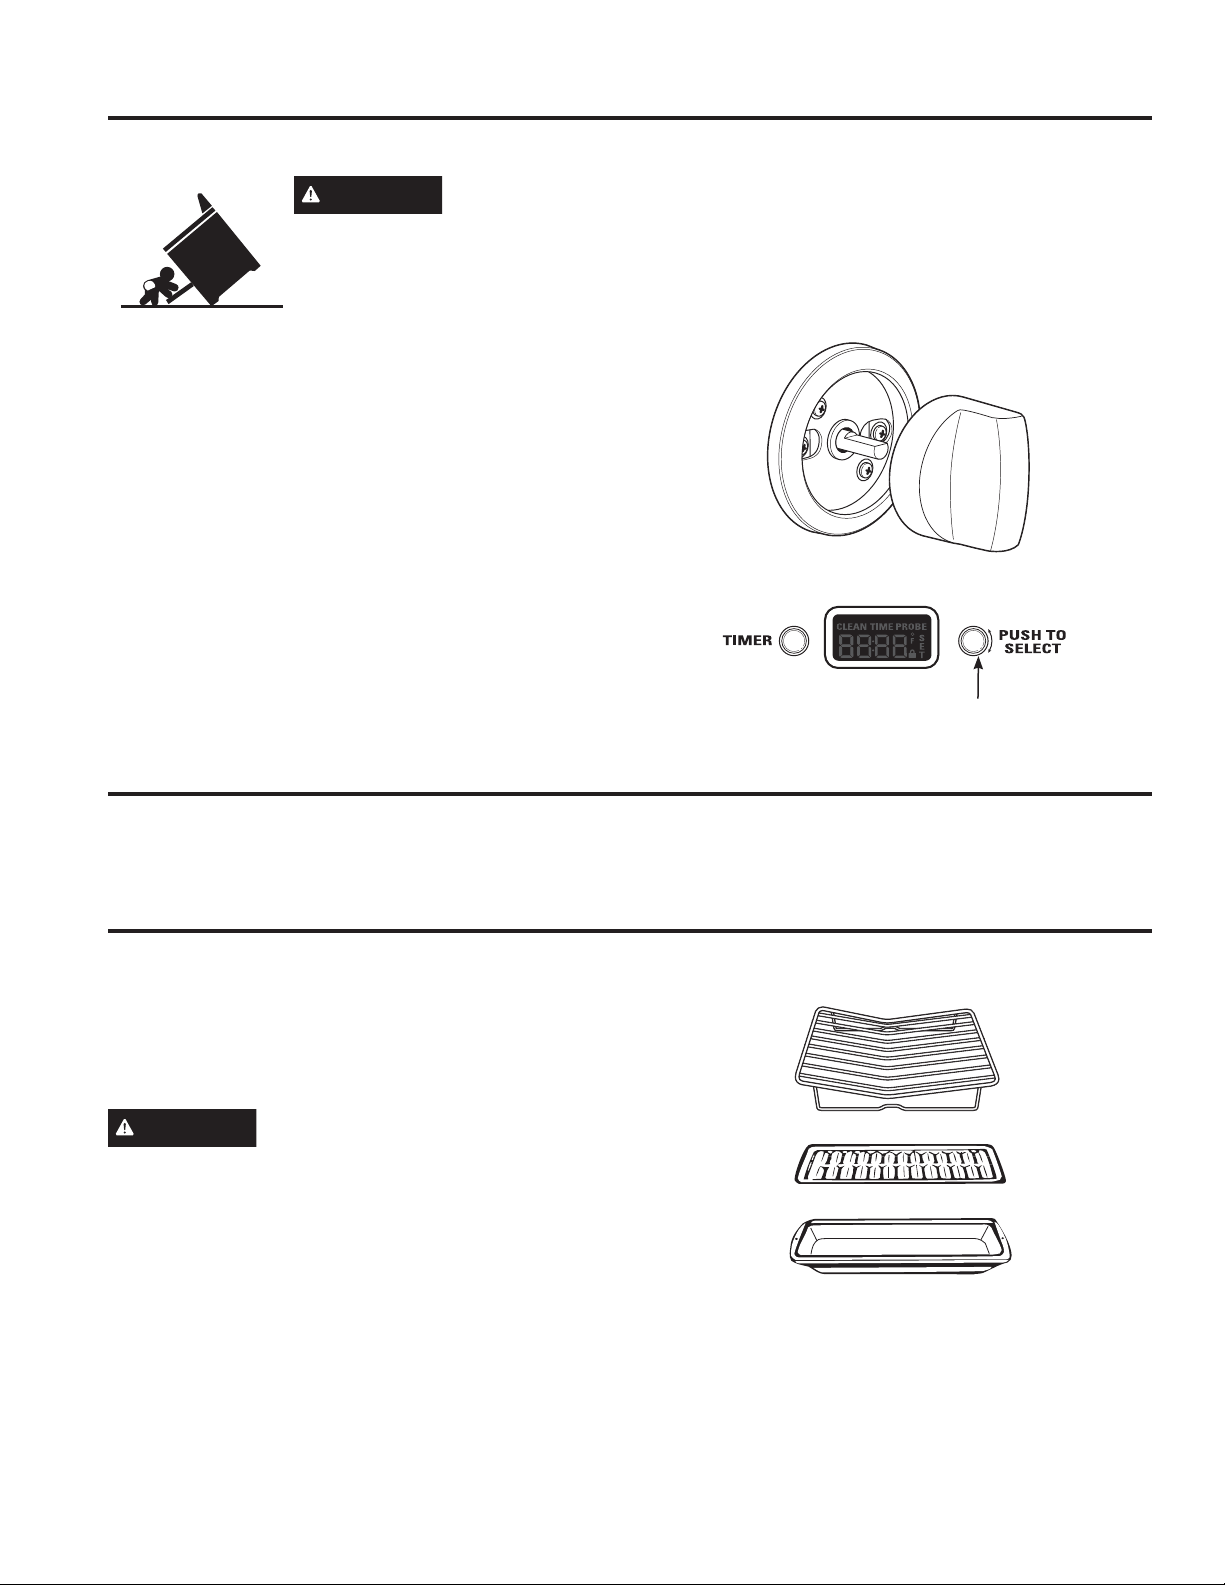
Oven Control
Features of Your Oven Control and Timer
1 Oven Mode Selector – 7XUQRXWHUULQJWRVHOHFW
PROOF – Maintains a warm environment useful for
rising yeast-leavened products.
BAKE – Select for traditional baking.
CONV BAKE –8VHIRUFRQYHFWLRQEDNLQJ
CONV ROAST –8VHIRUFRQYHFWLRQURDVWLQJ
BROIL – Select for broiling.
CLEAN – Select for the self-cleaning function. See
the Self-Cleaning Oven section.
2 Temperature Knob –7XUQWRVHOHFW
Temperatures from 175°F to 550°F.
LOW BROIL – A lower broiling temperature is
automatically set.
HIGH BROIL – A higher broiling temperature is
automatically set.
CLEAN – The self-clean temperature is automatically
set.
3 Mini-Knob – Turn to select and push to enter
PROBE or TIMER settings. Also to adjust CLEAN
cycle time.
4 Timer Button – Push to select the kitchen timer
function. The timer does not control oven operations.
5 Oven Display – Displays oven functions such as
oven and probe temperatures and kitchen timer.
The Oven Mode Selector (1) AND the Temperature
Knob (2) must be set together in one of the following
YDOLGSDLULQJV
To cancel a feature, turn either the Oven Mode
Selector or the Temperature knob to OFF.
To cancel PROOF, turn the Oven Mode Selector to OFF.
1
4
2
5
3
Oven Mode Selector Temperature Knob
BAKE 175º to 550°F
CONV BAKE 175º to 550°F
&219(&7,2152$67 175º to 550°F
&219(&7,21%52,/ HIGH or LOW BROIL
BROIL HIGH or LOW BROIL
CLEAN CLEAN
PROOF ²
14 49-85244
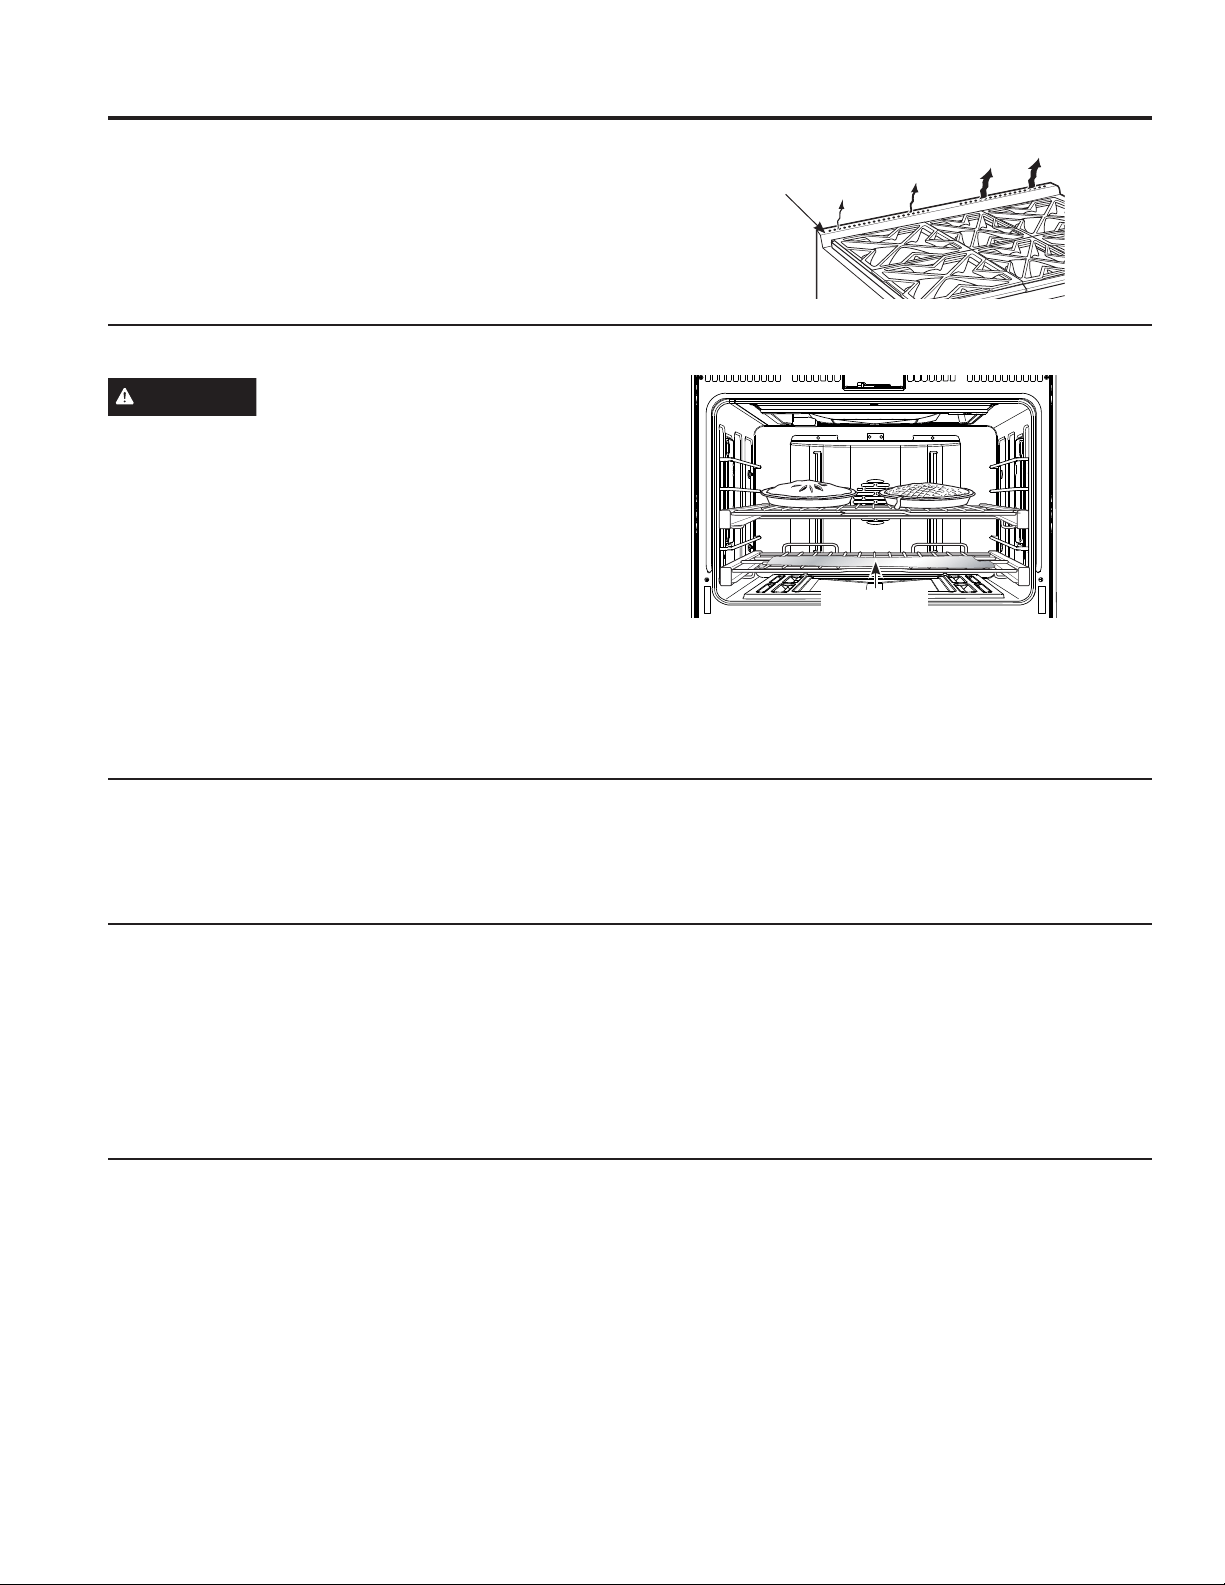
Do not block
rear vents
Baking Tips
USING THE RANGE: Baking Tips
Rear Oven Vents
An internal cooling fan operates during all oven modes.
The warm air from the oven is exhausted through vents
located at the rear of the cooktop.
Do not allow the airflow from the rear vents to be
obstructed by cookware or towels.
Aluminum Foil and Oven Liners
CAUTION
Do not use any type of foil or oven liner
to cover the oven bottom. These items can trap heat or
melt, resulting in damage to the product and risk of shock,
smoke or fire. Damage from improper use of these items
is not covered by the product warranty.
Foil may be used to catch spills by placing a sheet on
a lower rack, several inches below the food. Do not use
more foil than necessary and never entirely cover an
RYHQUDFNZLWKDOXPLQXPIRLO.HHSIRLODWOHDVW´
from oven walls to prevent poor heat circulation.
NOTE: “NO FOIL ON OVEN BOTTOM” note is
enameled on the bottom of the oven cavity and is
designed to withstand self-cleaning temperatures. Do not
attempt to peal or scrape off.
Baking Pans/Sheets
8VHWKHSURSHUEDNLQJSDQ7KHW\SHRIILQLVKRQWKHSDQHIIHFWVWKHDPRXQWRIEURZQLQJWKDWZLOORFFXU
Ŷ Dark, rough or dull pans absorb heat resulting in a
EURZQHUFULVSHUFUXVW8VHWKLVW\SHIRUSLHV
Ŷ Shiny, bright and smooth pans reflect heat, resulting in
a lighter, more delicate browning. Cakes and cookies
require this type of pan or sheet.
Ŷ Glass baking dishes also absorb heat. When baking in
glass baking dishes, the temperature may need to be
reduced by 25°F.
Preheating
Allow the oven to preheat before placing food in the
oven. Preheating is necessary for good results when
baking cakes, cookies, pastry and breads.
NOTE: Condensation or fogging on the inside of the
oven door glass is normal during the preheating of
the oven and will evaporate usually by the end of the
preheating cycle.
Pan Placement
For even cooking and proper browning, there must be enough room for air circulation in the oven. Baking results
will be better if baking pans are centered as much as possible rather than being placed to the front or to the back
of the oven.
Aluminum
foil to catch
spillovers
49-85244 15
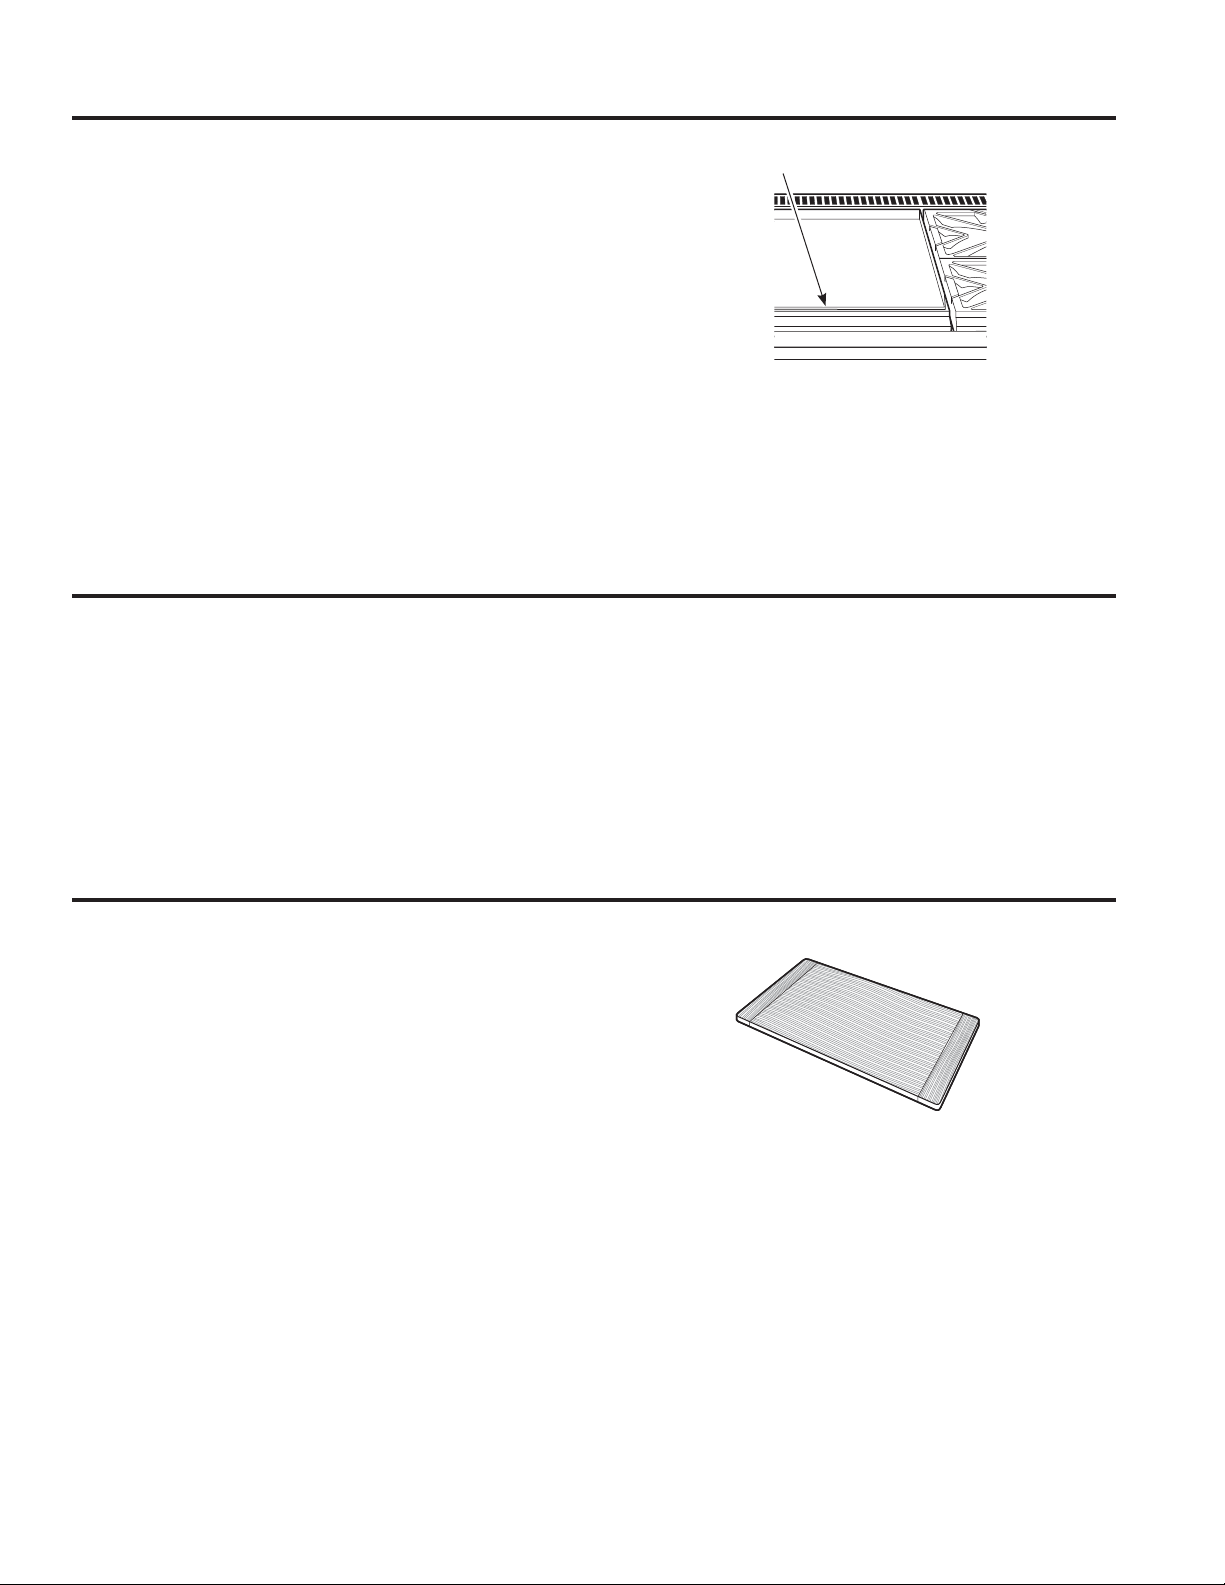
USING THE RANGE: Oven Racks
Oven Racks
Full Extension Oven Racks
CAUTION
To avoid possible burns, place the
racks in the correct position before turning on the oven.
The correct rack position depends on the kind of food
and the browning desired.
The racks have a frame that locks into the rack supports
on both sides. Once the frame is locked into place,
always pull the rack out, by its upper front rail, to its
full extension stop position, when placing or removing
cookware.
Remove and Replace Oven Racks
To remove a rack:
1. Make sure the rack is pushed all the way into the
oven.
2. Grasp the rack by both its upper front rail and its lower
front rail and lift straight up to unlock the front rack
locks from the rack supports.
3. Firmly holding onto both the upper and lower front rack
rails, pull the rack forward and remove it from the oven.
To replace a rack:
1. Place the rear rack locks over and onto the rack
supports (five rack positions are available including
the top position).
2. Slide the rack all the way in until the rear rack locks
are secure on the rear rack supports and press the
front rack locks onto the front rack supports.
3. Pull the rack all the way out to check that it is properly
engaged.
Lift to unlock front
rack locks from the
rack support
Lower
front
rail
8SSHU
front
rail
Front rack lock
Lower
front
rail
8SSHU
front
rail
Slide the rack all the way
in and push down to lock
the front rack locks onto
the front rack supports
Front
rack
lock
16 49-85244
Baking
USING THE RANGE: Baking
How to Set the Oven for Baking
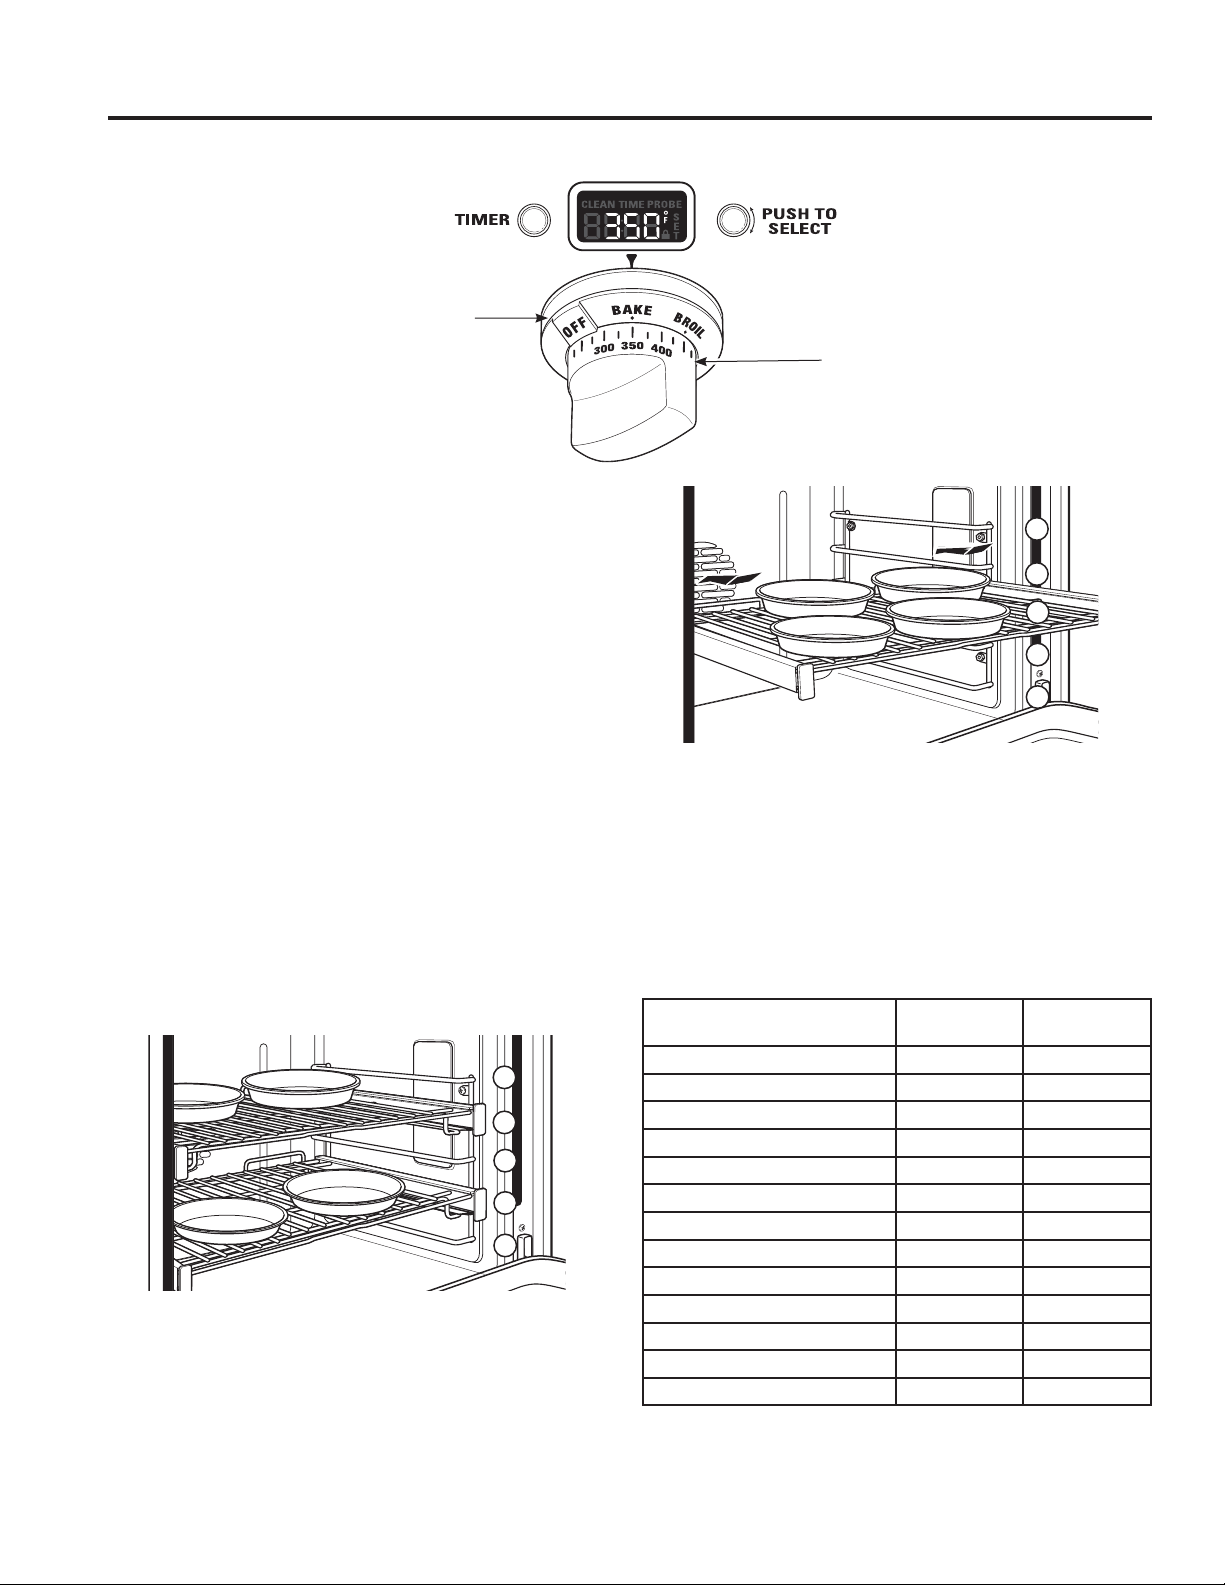
1. Turn the Oven Mode Selector to BAKE.
8VLQJWKH7HPSHUDWXUHNQREVHWWKHGHVLUHG
temperature, in 25°F increments, from 175°F to
550°F.
The oven will now begin to preheat. The temperature
display will begin at 100ºF and remain there until the
oven exceeds that temperature. From that point, the
display will show the actual temperature.
The interior lights will turn on and stay on until the
oven is turned off. The convection oven fan will turn
on temporarily during preheat. The control will beep
when the oven is preheated and food can now be
placed inside the oven.
3. Turn the Oven Mode Selector and the Temperature
knob to OFF when baking is finished.
NOTE: A cooling fan will turn on to cool internal parts.
This is normal, and the fan may continue to run even after
the oven is turned off.
8VHWKHWHPSHUDWXUHSUREHZKHQDSUHFLVHLQWHUQDO
WHPSHUDWXUHLVLPSRUWDQW6HH8VLQJWKHSUREH
When baking four cake layers at the same time, use
racks B and D. Stagger the pans so that one pan is not
directly above another.
Or, place four pans on one shelf using the center
SRVLWLRQ&3ODFHWKHSDQVVRHDFKKDVDWOHDVWƎDLU
space around it.
The oven has 5 rack positions. See the Full extension
oven racks section for how to use, remove and replace
the racks.
The double oven range has a small oven with 4 rack
positions. Rack position C is not in the small oven.
Oven Mode
Selector
(Outer)
Oven
Temperature
Knob (Inner)
Suggested shelf positions are intended as general guidelines. Experiment
with these positions for specific foods and personal preference.
Type of Food
Large Oven
Rack Position
Small Oven
Rack Position
Angel food cake A A
Biscuits or muffins C A or B
Cookies C B
Brownies B B
2 Layer cakes B B
4 Layer cakes C ²
Sheet cakes or 9 x 13 cakes B or C B
Quick breads C B
Bundt or pound cakes C B
Scratch Pies or pie shells B A
Frozen pies B or C ²
Casseroles B or C B
Pizza C B
C
D
B
A
E
C
D
B
A
E
49-85244 17
USING THE RANGE: Broiling
Broiling
Introduction to Broiling
7KHUHDUHGLIIHUHQWEURLOPRGHV%URLODQG&RQYHFWLRQ
Broil. Choose HI or LO setting in either mode.
Ŷ The HI setting can be used to seal in juices or provide
intense browning or charring when needed for foods
such as hamburgers, roasted vegetables, whole
peppers, eggplant, corn, assorted cut vegetables,
kabobs and very thin meats such as smoked pork
chops, London broil and chicken.
Ŷ The LO setting can be used for foods that need
adequate browning and also need to be thoroughly
cooked, like fish fillets, pork tenderloin and beef roast.
Convection Broil:
8VHVWKHFRQYHFWLRQIDQIRUDGGHGHYHQQHVV
How to Set the Oven for Broiling
1. Turn the Oven Mode Selector to BROIL or CONV
BROIL.
2. Turn the Oven Temperature Knob to LO BROIL or HI
BROIL. LO or HI will appear in the display.
NOTE: Always broil with the door closed. If the door is
left open, the display will scroll “CLOSE door” and the
elements will not turn on until the door is shut.
The oven interior lights will turn on and stay on until the
oven is turned off.
The convection fan will turn on when CONV BROIL is
selected.
3. When broiling is finished, turn the Oven Mode
Selector and the Temperature knob to OFF.
NOTE: A cooling fan will turn on to cool internal parts.
This is normal, and the fan may continue to run even after
the oven is turned off.
The broiler does not need to be preheated for most
broiling. However, foods that cook quickly, such as thin
strips of meat or fish may require a short preheating
period of approximately 5 minutes to allow the food to
brown. Turn the food only once during broiling.
NOTE: Broil will not work if the temperature probe is
plugged in. Never leave your probe inside the oven
during a broil cycle.
Oven Mode
Selector
(Outer)
Oven
Temperature
Knob
(Inner)
Open door broiling
is not permitted.

18 49-85244
Broiling (Cont.)
USING THE RANGE: Broiling
Broiling Guide
Due to the variety of of meats and cuts available, you
may select alternate rack positions based on personal
preferences of doneness and external searing. For
optimal searing, preheat oven for 5-10 minutes.
The size, weight, thickness, starting temperature and
your preference of doneness will affect broiling times.
This guide is based on meats at refrigerator temperature.
Aluminum Foil
You can use aluminum foil to line the broiler pan and
broiler grid. However, you must mold the foil tightly to the
grid and cut slits in it just like the grid.
C
D
B
E
NOTE: In general, higher rack positions yield darker external searing
and lower positions yield more doneness.
7KH86'HSDUWPHQWRI$JULFXOWXUHVD\V³5DUHEHHILVSRSXODUEXW\RXVKRXOGNQRZWKDWFRRNLQJLW
WRRQO\)PHDQVVRPHIRRGSRLVRQLQJRUJDQLVPVPD\VXUYLYH´6RXUFH6DIH)RRG%RRN<RXU
.LWFKHQ*XLGH86'$5HY-XQH
Food Rack Position Heat Setting Preheat
Broil
Ground Beef D HI ²
Chicken (Bone-in Breasts) B HI or LO ²
Bakery Products
Bread (toast)
D HI or LO ²
Convection Broiling
Fish
OEILOOHWVWRƎWKLFN
D LO 5 Minutes
Kabobs (5 skewers) D LO 5 Minutes
Sliced Vegetables D LO 5 Minutes
49-85244 19
USING THE RANGE: Convection Baking or Roasting
Convection Baking or Roasting
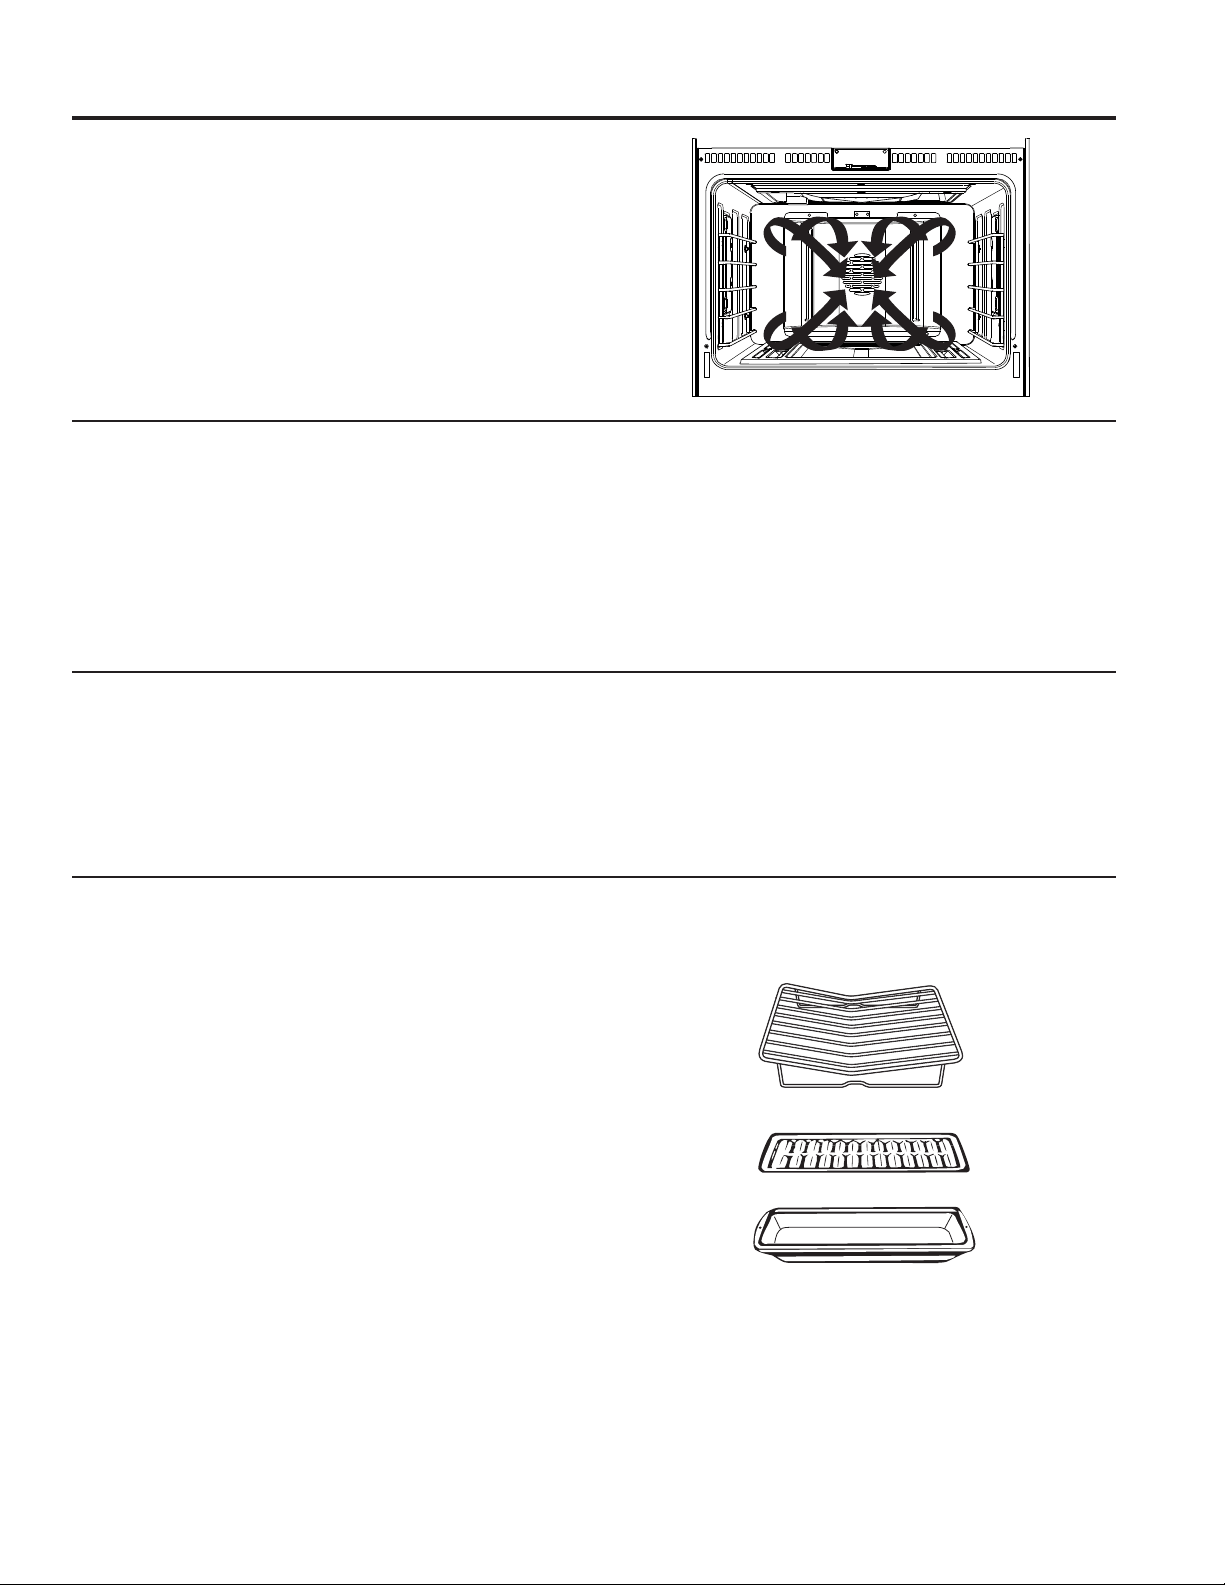
Introduction to Convection Cooking
The reverse-air convection system fan periodically
pauses, then changes direction to best distribute hot air
throughout the oven. As a result, foods are evenly cooked
DQGEURZQHG²RIWHQLQOHVVWLPHZLWKFRQYHFWLRQKHDW
NOTE: The convection fan shuts off when the oven door
is opened.
Cookware for Convection Cooking
Before using your convection oven, check to see if your
cookware leaves room for air circulation in the oven. If
you are baking with several pans, leave space between
them. Also, be sure the pans do not touch each other or
the walls of the oven.
Cookware used in standard BAKE will also work in
CONV BAKE. See Baking Tips section.
It is recommended that when baking cookies, the best
results are attained with a flat cookie sheet instead of a
pan with sides. For recipes like oven-baked chicken, use
a pan with low sides. Hot air cannot circulate well around
food in a pan with high sides.
Adapting Recipes
You can use your favorite recipes in the convection oven.
When convection baking, it may be necessary to reduce
the baking temperature by 25°F or to adjust the cooking
time. No temperature adjustment is necessary when
using CONV ROAST.
Some package instructions for frozen casseroles or
main dishes have been developed using commercial
convection ovens. For best results in this oven, preheat
the oven and use the temperature on the package.
Convection Roasting Tips
8VHWKHEURLOHUSDQJULGDQGWKHURDVWLQJUDFNIRUEHVW
UHVXOWV8VHRIWKHUDFNZLOOUHVXOWLQLPSURYHGEURZQLQJ
on the underside of meat or poultry.
1. Place the oven rack on a low rack position (A).
2. Place the grid on the broiler pan and put the roasting
rack over them.
3. Place meat on the roasting rack.
Optional Accessories
Grid
Broiler pan
Roasting Rack
20 49-85244
Convection Baking or Roasting (Cont.)
USING THE RANGE: Convection Baking or Roasting
How to Set the Oven for Convection Baking or Roasting
Convection Baking is ideal for evenly browned baked foods
cooked on single or multiple racks. Select Convection
Roast to roast large, tender cuts of meat uncovered.
When set on CONV BAKE or CONV ROAST, the rear
convection elements and the fan operate when the oven
is heating.
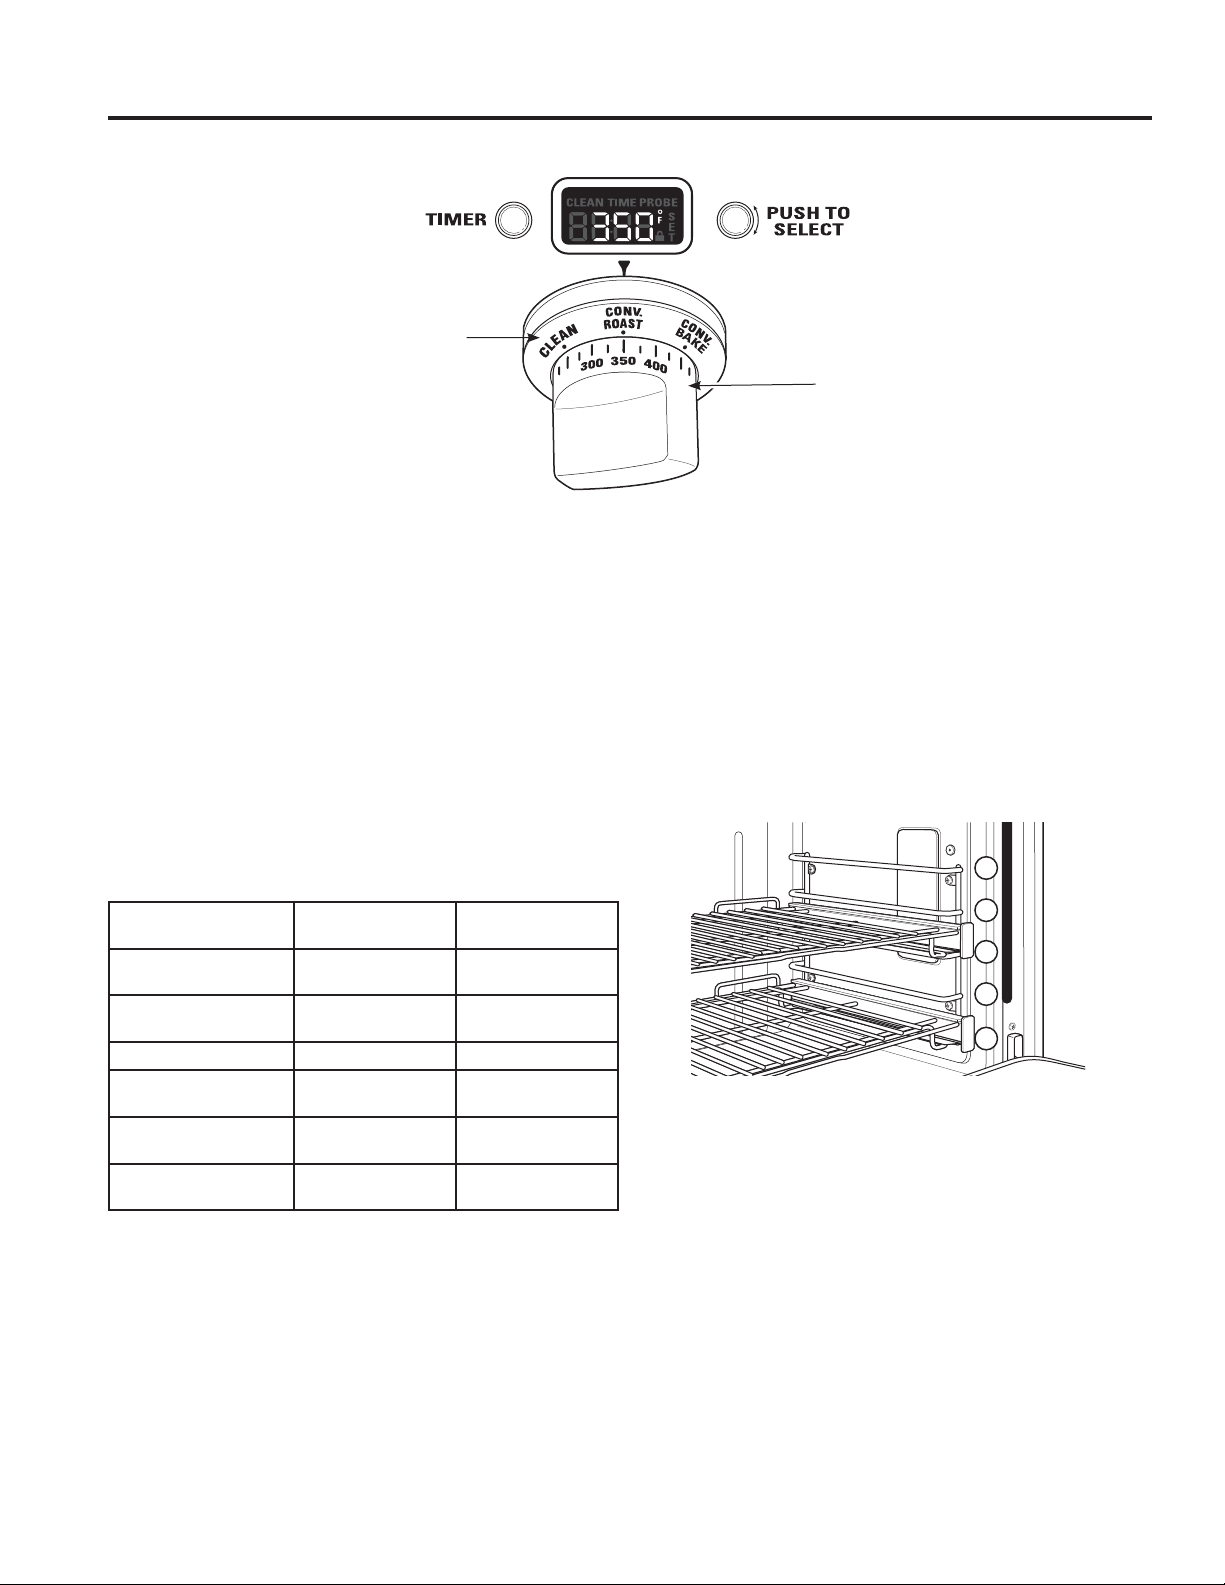
1. Turn the Oven Mode Selector to CONV BAKE or
CONV ROAST.
8VLQJWKH7HPSHUDWXUHNQREVHWWKHGHVLUHG
temperature, in 25°F increments, from 175°F to 550°F.
The oven will now begin to preheat. The temperature
display will begin at 100°F and remain there until the
oven exceeds that temperature. From that point, the
display will show the actual temperature.
The interior lights will turn on and stay on until the
oven is turned off. The convection oven fan will turn on
during preheat. The control will beep when the oven is
preheated and food can be placed inside the oven.
3. Turn the Oven Mode Selector and the Temperature
knob to OFF when convection cooking is finished.
NOTE: A cooling fan will turn on to cool internal parts.
This is normal, and the fan may continue to run even
after the oven is turned off.
8VHWKHWHPSHUDWXUHSUREHZKHQDSUHFLVHLQWHUQDO
WHPSHUDWXUHLVLPSRUWDQW6HH8VLQJWKHSUREH
The oven has 5 rack positions. See the Full extension
oven racks section for how to use, remove and replace
the racks.
The double-oven range has a small oven with 4 rack
positions. Rack position C is not in the small oven.
Oven Mode
Selector
(Outer)
Oven
Temperature
Knob (Inner)
Type of Food
Large Oven Rack
Position
Small Oven Rack
Position
Muffins and Cupcakes
(multiple racks)
B & D B & D
Cookies
(multiple racks) A, C & E B & D
Frozen Appetizer C ²]
Frozen Appetizer
(multiple racks) A, C & E ²
Roasting
(large cuts of meat) A B
Turkey or
Whole Chicken A B
Suggested shelf positions are intended as general guidelines. Experiment
with these positions for specific foods and personal preference.
C
D
B
A
E

49-85244 21
USING THE RANGE: Probe
Probe
How to Use the Probe with Bake, Convection Bake and Convection Roast
WARNING
Consuming undercooked food can result in foodborne illness. Use probe according to
the following instructions to ensure all portions of the food reach minimum safe cooking temperatures.
Recommendations for minimum safe food temperatures can be found at www.foodsafety.gov or
www.IsItDoneYet.gov.
CAUTION
8VHRYHQPLWWVZKHQLQVHUWLQJRU
removing the probe from the hot oven. Areas around the
probe inlet can be very hot.
For many foods, especially roasts and poultry, internal
food temperature is the best test for doneness. The
temperature probe takes the guesswork out of cooking
foods to the exact doneness you want.
The probe can be used with the BAKE, CONV BAKE
and CONV ROAST.
1. Push the tip of the probe into the thickest part of the
meat.
2. Place the rack in the desired rack position.
3. Set the oven controls. Turn the Oven Mode Selector
to CONV BAKE, CONV ROAST or BAKE. Turn the
Temperature Knob to desired oven temperature in
25°F increments, from 175°F to 550°F. Allow the oven
to preheat if necessary.
The oven and oven lights will turn on immediately and
stay on until the oven is turned off.
8VHRYHQPLWWVWRSODFHWKHIRRGLQWKHKRWRYHQ
Insert the plug into the outlet. Make sure it is pushed
all the way in. Close the oven door.
5. Turn the Mini-Knob to find the desired internal food
temperature. Push the Mini-Knob to select that
temperature.
The word PROBE and SET, will flash in the display
until a temperature is selected. If no temperature is
set, the probe will default to 100°F. If the oven was not
preheated, the display will show LO.
The internal food temperature can be set from a
minimum of 100°F and up to 200°F maximum.
When food reaches the set internal temperature, the
display will beep. To stop the reminder beep, turn the
Oven Mode Selector and the Temperature Knob to OFF.
8VHRYHQPLWWVWRUHPRYHWKHSUREHIURPWKHRYHQRXWOHW
To change the set internal temperature anytime in the
cooking process, push the Mini-Knob and turn to adjust
the temperature. Press the Mini-Knob to select.
Using the Probe
8VHRQO\WKHSUREHSURYLGHGZLWKWKHUDQJH
8VHWKHKDQGOHVRIWKHSUREHDQGSOXJZKHQLQVHUWLQJ
and removing them from the meat and oven outlet.
Ŷ To avoid damaging the probe, do not use tongs to pull
on the cable when removing it.
Ŷ To avoid breaking the probe, make sure food is
completely defrosted before inserting.
Ŷ To prevent possible burns, always wear an oven mitt
when removing the plug; internal oven surfaces may
be hot.
Ŷ Never leave the probe inside the oven during a broil or
self-cleaning cycle.
Ŷ Do not store the probe in the oven.
Probe
Outlet
Cable
Plug
Probe
Handles
The temperature probe has a skewer-like probe at
one end and a plug at the other end that goes into
the outlet in the oven.
22 49-85244
Probe (Cont.)
Proofing
USING THE RANGE:3UREH3URRILQJ
Proper placement of the probe
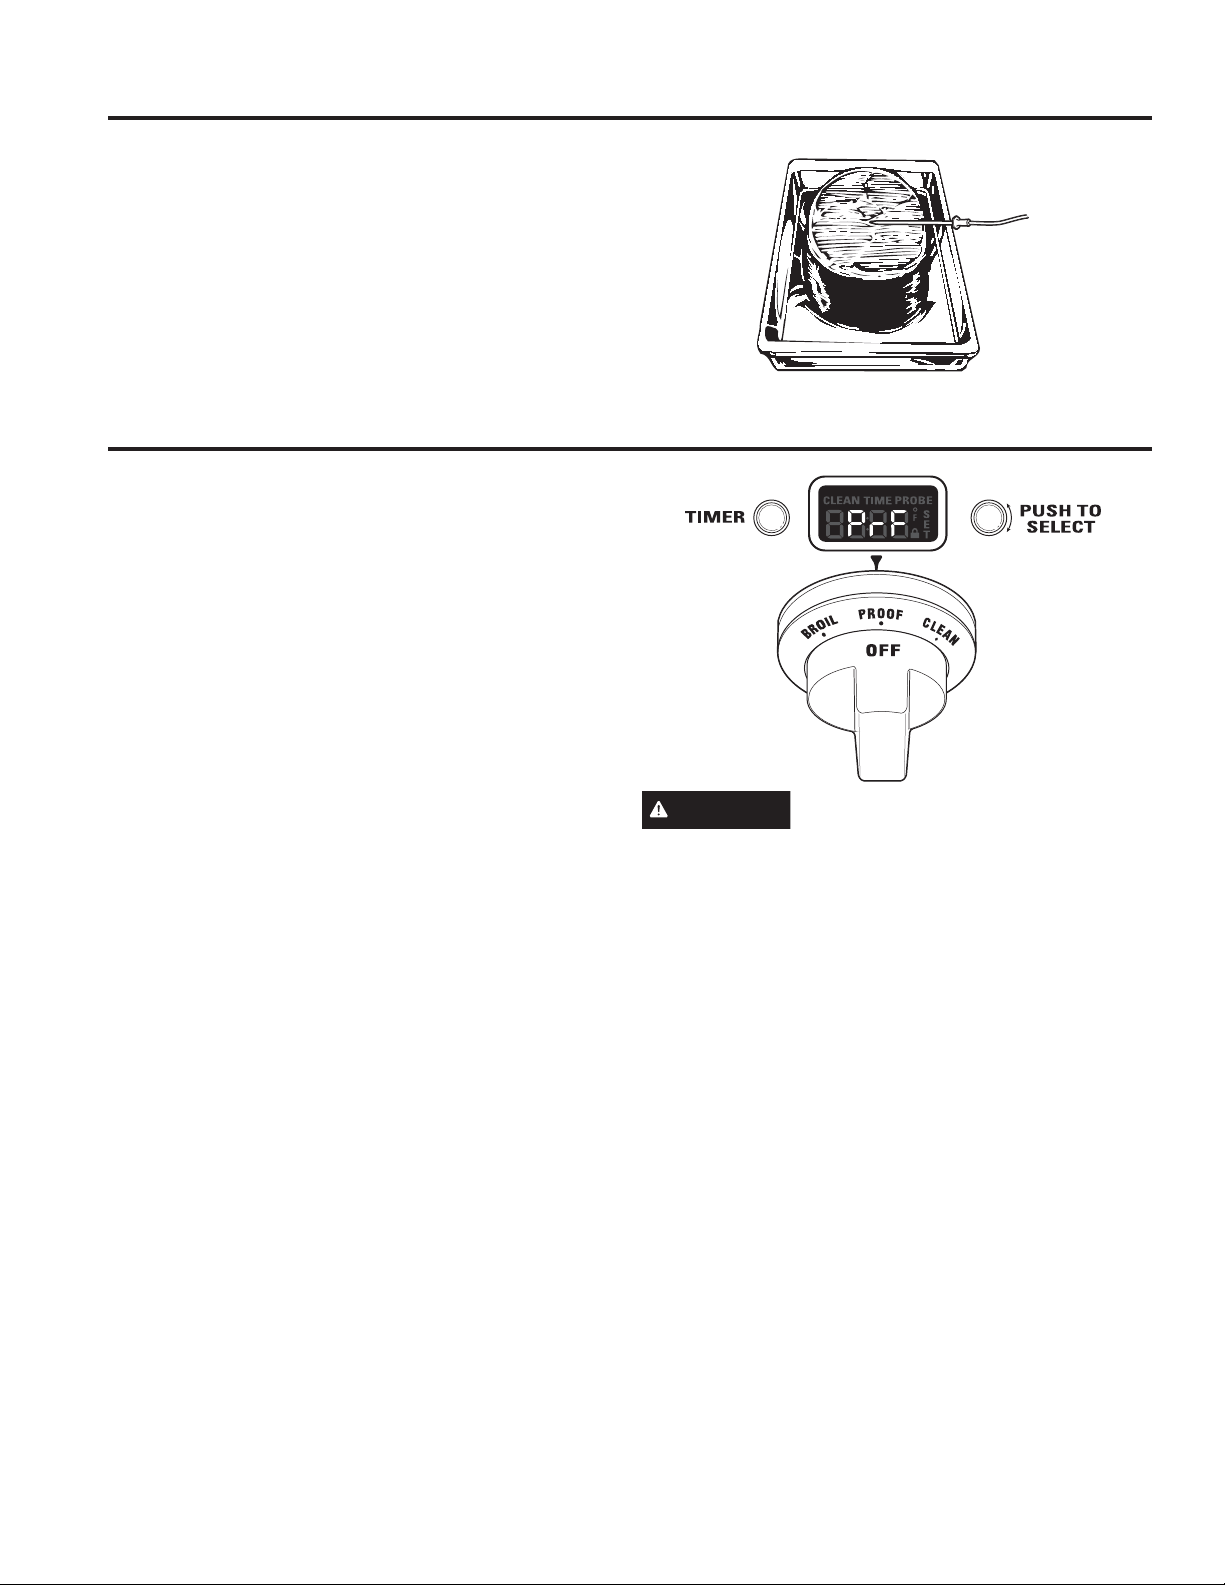
Ŷ Measure the distance to the center of a roast by laying
WKHWHPSHUDWXUHSUREHRQWRSRIWKHPHDW8VH\RXU
thumb and forefinger to mark where the edge of the
meat will come on the probe.
Ŷ Insert the probe up to the point marked with your
finger. The tip of the probe should be in the center of
the meat.
How to Set the Oven for Proofing
The proofing feature maintains a warm environment
which is useful for rising yeast-leavened dough.
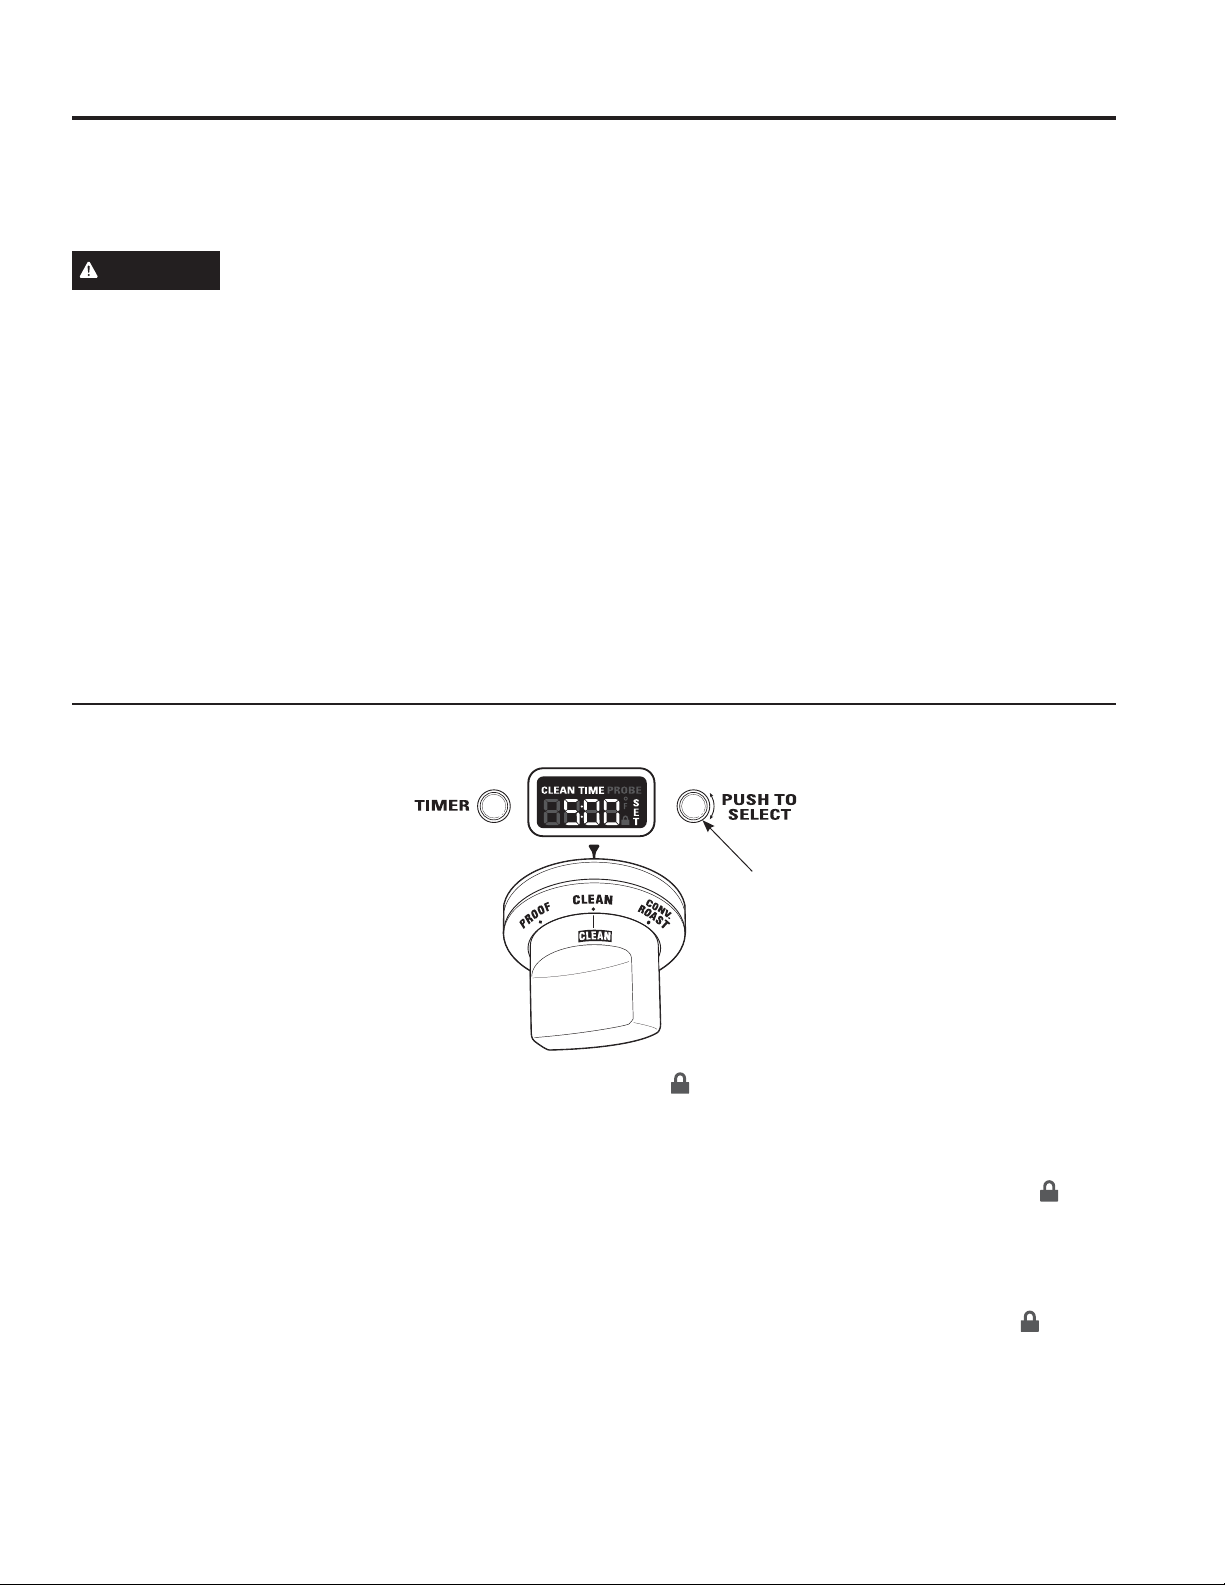
1. Turn the Oven Mode Selector to PROOF. The display
will show “PrF”. PROOF mode will not operate when
oven is above 125°F. The display will scroll “too hot”.
Allow the oven time to cool.
For best results, cover the dough with a cloth or with
greased plastic wrap.
8VHUDFNSRVLWLRQ%RU&LQWKHODUJHRYHQ8VHUDFN
position B in the small oven.
The proofing feature automatically provides the optimum
temperature for the proofing process; therefore the
Temperature knob does not affect the proof temperature.
The oven interior lights cycle on and off as necessary
to maintain optimum proof temperature until the Oven
Mode Selector has been turned to OFF.
Ŷ To avoid lowering the oven temperature and
lengthening proofing time, do not open the oven door
unnecessarily.
Ŷ Check bread products early to avoid over-proofing.
2. When proofing is finished, turn the Oven Mode
Selector to OFF.
CAUTION
Do not use the proofing mode for
warming food or keeping food hot. The proofing oven
temperature is not hot enough to hold foods at safe
temperatures.
49-85244 23
USING THE RANGE: Self-Cleaning Oven
Self-Cleaning Oven
Self-cleaning Safety Precautions
The self-clean oven feature is designed to make
cleaning the inside of the oven easy by using very high
temperatures to burn away food spills.
WARNING
Wipe up excess grease and other food
spills with a damp cloth. Excessive food soils can ignite
leading to smoke and heat damage.
Ŷ Do not clean the oven seals, damage can occur.
Ŷ Remove cookware, broiler pan, grid, probe and any
aluminum foil from the oven.
Ŷ Make sure the oven light lens and lens frame are in place.
Ŷ Do not use commercial oven cleaners, abrasives or
oven protectors in or near the self-cleaning oven.
Ŷ We recommend venting your kitchen with an open
ZLQGRZRUXVLQJDYHQWLODWLRQIDQKRRGGXULQJWKHVHOI
clean cycle.
Ŷ Clean soil from around the frame and from around the
oven door, outside the oven seals. These areas must
be cleaned by hand.
Ŷ The oven racks may be left in the oven during the self-
clean cycle.
IMPORTANT: The health of some birds is extremely
sensitive to the fumes given off during the self-
cleaning cycle of any oven. Move birds to another well-
ventilated room.
NOTE: Self-Clean will not work if the temperature probe
is plugged in or if the Sabbath mode is set.
On double oven models, you can set a clean cycle in
both ovens at the same time. The last oven set will
automatically delay its start until the end of the first
oven’s clean cycle.
On double oven models, you can bake in one oven and
self-clean in the other at the same time. However, you
cannot use the PROOF mode setting in one oven while
the other oven is self-cleaning.
How to Set the Oven for Cleaning
1. Turn off all surface burners. (The CLEAN cycle will not
start until all surface burners have been turned off.)
2. Turn the Oven Mode Selector to CLEAN.
3. Turn the Temperature knob to CLEAN.
The control automatically defaults to the
recommended clean cycle time of 5 hours. The clean
time may be adjusted to any time between 3 and 5
hours using the Mini-Knob. The display will show the
actual time remaining.
4. Push the Mini-Knob to start the CLEAN cycle.
If “CLOSE door” scrolls in the display, the self-clean
cycle has been selected but the door is not closed.
Close the oven door.
The symbol will flash as the oven door is locked. It
will not be possible to open the oven door during the
clean cycle.
5. After the clean cycle is complete and the oven has
cooled, “End” will show in the display and the
will turn off. Turn the Oven Mode Selector and the
Temperature knob to OFF.
To interrupt a clean cycle, turn the Oven Mode
Selector and the Temperature knob to OFF. When the
oven has cooled to a safe temperature, the symbol
will turn off indicating the door may be opened.
An interrupted clean cycle cannot be restarted until
after the oven is cool enough for the door to unlock.
Mini-Knob
Turn to adjust
Push to select
24 49-85244
After a Clean Cycle
You may notice some white ash in the oven. Wipe it up
with a damp cloth after the oven cools.
If white spots remain, remove them with warm sudsy
water and rinse thoroughly with a vinegar and water
mixture. These deposits are usually a salt residue that
cannot be removed by the clean cycle.
If the oven is not clean after one clean cycle, repeat the
cycle.
Timer
NOTE: The timer is independent of all the other functions
and does not control the oven.
To set the timer:
1. Push the TIMER button.
2. Turn the Mini-Knob to adjust any length of time up to
12 hours and push to select it.
On double oven models, each oven control has its own
timer function. Each timer can be set independently.
The control will beep with 1 minute remaining and the
display will show seconds until the timer counts down to
:KHQWKHWLPHUUHDFKHVWKHFRQWUROZLOOEHHS
3 times followed by one beep every 6 seconds until the
Mini-Knob is pushed.
To cancel the timer:
1. Push the TIMER button.
2. Turn the Mini-KnobWRDQGSXVKWRVHOHFW
To adjust the timer after start:
1. Push the TIMER button.
2. Turn the Mini-Knob to a new desired time and push
to select.
NOTE: The timer cannot be used while the oven is self-
cleaning. (On double oven models, the timer for the oven
that is not in the self-cleaning mode may be used.)
Self-Cleaning Oven (Cont.)
USING THE RANGE: Self-Cleaning Oven
Mini-Knob
Turn to adjust
Push to select
49-85244 25
Oven Thermostat Adjustment
You may find that your new oven cooks differently than
WKHRQHLWUHSODFHG8VH\RXUQHZRYHQIRUDIHZZHHNV
to become more familiar with it. If you still think your new
oven is too hot or too cold, you can adjust the thermostat
yourself.
On double oven models, use the large oven controls to
enter the mode and to select the adjustment.
To adjust the oven thermostat:
1. Push and hold the TIMER button and Mini-Knob at
the same time for 4 seconds until the display shows
“SF” (Special Features).
2. Turn the Mini-Knob counterclockwise until the display
scrolls “OFFSEt”. Push the Mini-Knob to select the
offset mode.
3. Turn the Mini-Knob to adjust the oven thermostat up
to 35°F hotter or (-) 35°F cooler in 1°F increments.
3A. On double oven models, you can adjust
the thermostat of the small oven by turning the
Mini-KnobDERYHWKHVPDOORYHQ8VHWKHODUJH
oven Mini-Knob to select that adjustment.
4. Push the Mini-Knob to select your choice and exit the
mode. If you do not wish to save changes, push the
TIMER button to exit at any time.
NOTE: This adjustment will only affect Bake, Convection
Bake and Convection Roast temperatures; it does
not affect broiling or self-cleaning temperatures. The
adjustment will be retained in memory after a power
failure.
Do not use thermometers, such as those found in
grocery stores, to check the temperature setting of your
oven. These thermometers may vary 20–40 degrees.
Sabbath Mode
To set the Sabbath mode:
7KH6DEEDWKPRGHLVGHVLJQHGIRUXVHRQWKH-HZLVK
6DEEDWKDQGRWKHU-HZLVKKROLGD\V
It can be used for baking only. It cannot be used for any
other cooking mode.
When the Sabbath feature is set, the oven light and
all audible beeps will be disabled. The feature will also
provide a random delay period, of approximately 30
seconds to 1 minute, before the oven will turn on once it
is set to BAKE.
1. Push and hold the TIMER button and Mini-Knob at
the same time for 4 seconds until the display shows
“SF” (Special Features).
2. Turn the Mini-Knob clockwise until the display scrolls
“SAbbAtH.” Push the Mini-Knob to select the Sabbath
mode.
3. Once “SAbbAtH” is selected, the display will scroll
“SAbbAtH ON”.
The Sabbath setting will control both ovens. The
symbol will appear in both oven display windows.
For double oven models, use the large oven control to
set the Sabbath feature for both ovens.
To Cancel the Sabbath Mode:
Repeat steps 1, 2 and 3. The display will scroll
“SAbbAtH OFF”.
The oven temperature may be adjusted at any time by
turning the temperature knob. There is a random delay
before the oven elements respond.
USING THE RANGE: Special Features
Special Features
Mini-Knob
Turn to adjust
Push to select
Mini-Knob
Turn to adjust
Push to select
Certified Sabbath Mode
26 49-85244
WARNING
If your range is removed for cleaning, servicing or any reason, be sure the
anti-tip device is reengaged properly when the range is replaced. Failure to
take this precaution could result in tipping of the range and can result in death
or serious burns to children or adults.
Be sure all controls are off and all surfaces are cool before cleaning any part of the range.
Clean up spatters with a damp cloth. Remove heavier
soil with warm, soapy water.
Do not use abrasives of any kind on the control panel or
knobs.
The control knobs may be removed for easier cleaning.
To remove a knob, pull it straight off the control panel.
Wash the knobs in hot soapy water, but do not soak.
NOTE: The Mini-Knob is not removable.
Control Panel and Knobs
CARE AND CLEANING:&RQWURO3DQHODQG.QREV2YHQ%XUQHUV%URLOHU3DQ*ULGDQG5RDVWLQJ5DFN
Mini-Knob
Do not attempt to clean the broil elements. Any soil will
burn off when the burner is heated.
The bake and convection elements are not exposed.
The broiler pan, grid and roasting rack are all dishwasher
safe. However, baked on foods may require washing
by hand with a commercial oven cleaner or abrasive
detergent.
Do not store a soiled broiler pan or grid anywhere in the
oven. Always properly dispose of excess grease.
CAUTION
Do not clean the broiler pan, grid or
roasting rack in a self-cleaning oven.
Optional Accessories
Oven Burners
Broiler Pan, Grid and Roasting Rack
Grid
Broiler pan
Roasting Rack
49-85244 27
CARE AND CLEANING: Oven Racks
Oven Racks
The racks may remain in the oven during the self-
cleaning cycle without being damaged.
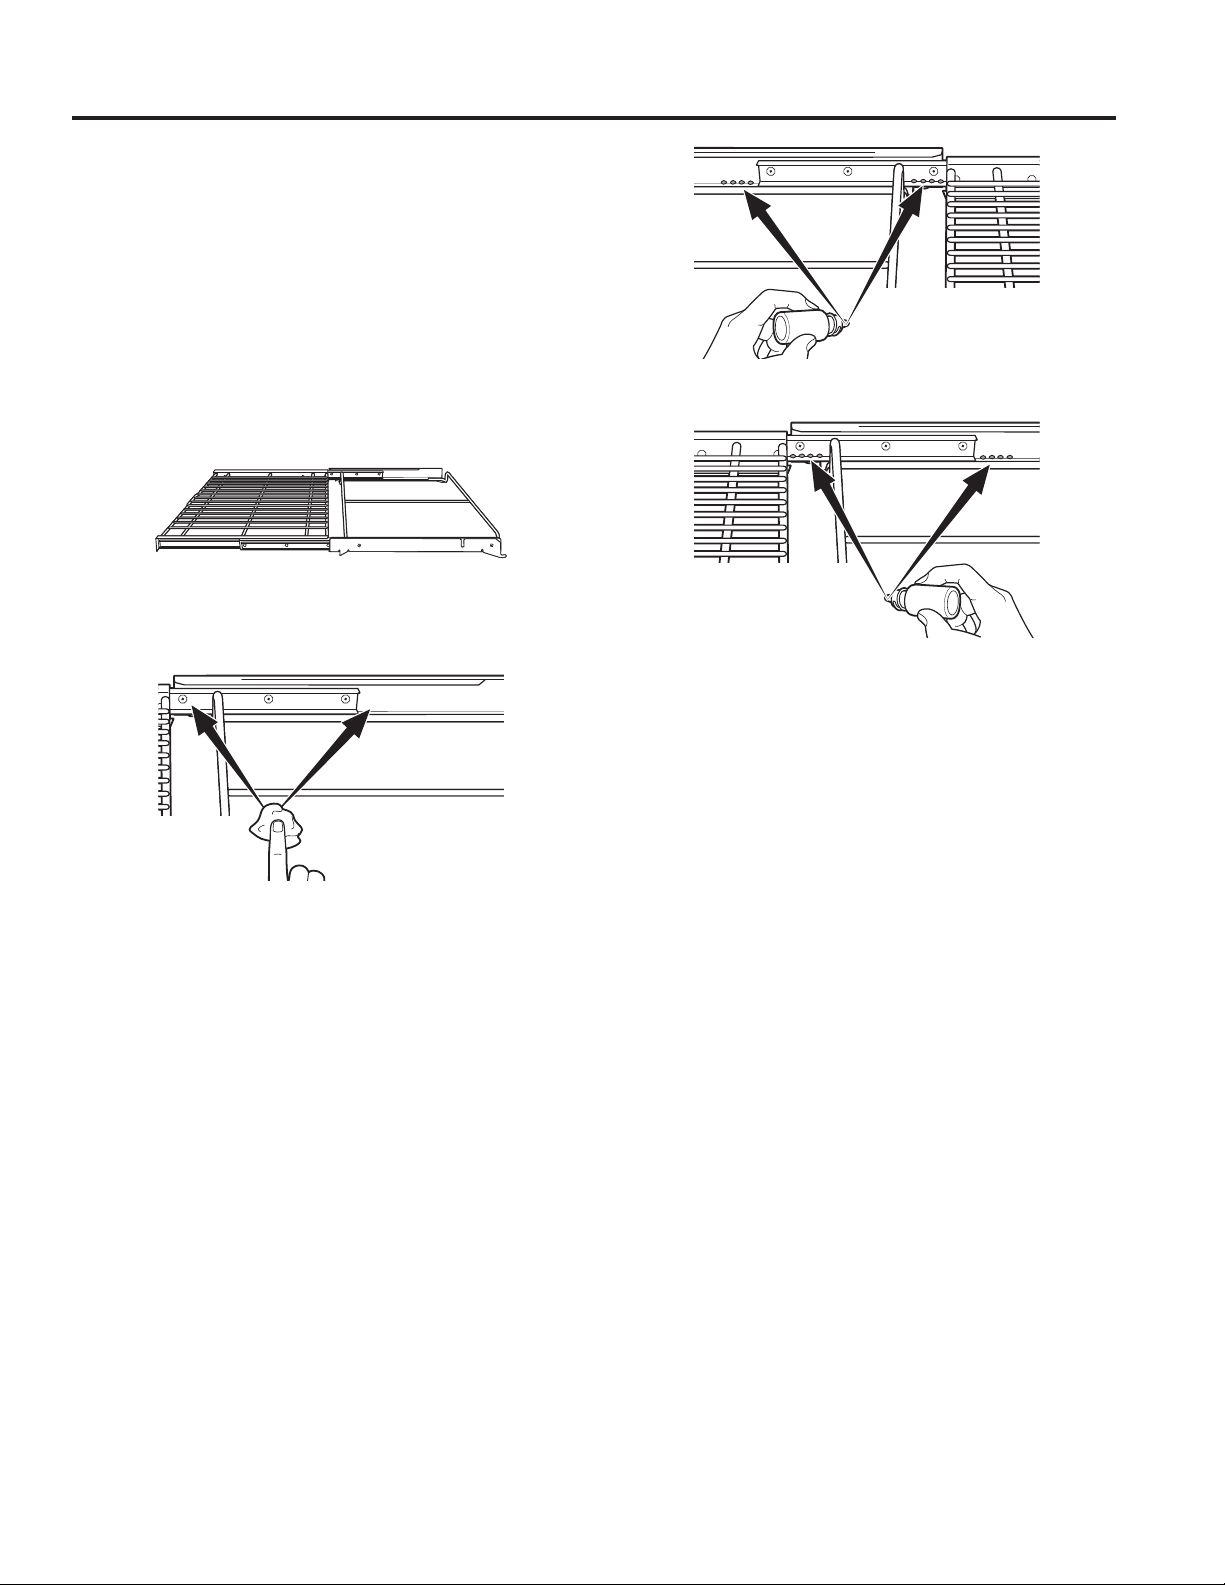
Periodically, after several self-clean cycles, the oven
racks may need to be lubricated using the Graphite
Lubrication shipped with your range. To order additional
Graphite Lubrication, call our National Parts Center at
800.626.2002 and reference WB02T10303.
1. Remove rack from the oven. See the Full extension
oven racks section.
2. Fully extend the rack on a table or countertop.
Newspaper may be placed underneath the rack for
easy cleanup.
3. If there is debris in the slide tracks, wipe it away using
a paper towel. NOTE: Any graphite lubricant wiped
away must be replaced.
4. Shake the graphite lubricant before opening it. Starting
with left slide mechanism of the rack, place four (4)
small drops of lubricant on the two (2) bottom tracks of
the slide close to the bearing carriers.
5. Repeat for the right slide mechanism of the rack.
6. Open and close the rack several times to distribute the
lubricant.
7. Replace the cap on the lubricant and shake it again.
Turn the rack over and repeat steps 3, 4, 5 and 6.
8. Close the rack, turn rack right-side-up and place in the
oven. See the Full extension oven racks section.
9. Repeat above steps for each rack.
NOTE: Do not use a cooking spray or other lubricant
sprays on the slides.
Rack right-
side-up
Right side
Left side
Rack right-side-up

28 49-85244
The door is very heavy. Be careful when removing and lifting the door.
Do not lift the door by the handle.
To remove the door:
1. Fully open the door.
2. Pull the hinge locks down toward the door frame, to
the unlocked position. A tool, such as a small flat-
blade screwdriver, may be required.
3. Firmly grasp both sides of the door at the top.
4. Close door to the door removal position,
(approximately 15 degrees from closed) and lift it up
and out until the hinge arm is clear of the slot.
To replace the door:
1. Firmly grasp both sides of the door at the top.
2. With the door at the same angle as the removal
position, seat the indentation of the hinge arm into the
bottom edge of the hinge slot. The notch in the hinge
arm must be fully seated into the bottom of the slot.
3. Fully open the door. If the door will not fully open, the
indentation is not seated correctly in the bottom edge
of the slot.
4. Push the hinge locks up against the front frame of the
oven cavity, to the locked position.
5. Close the oven door.
Allow the temperature probe to cool before cleaning.
The probe should be cleaned with soap and water by
hand.
Do not immerse the temperature probe in water.
Do not store the temperature probe in the oven.
Do not clean the temperature probe in the self-cleaning
oven.
Lift-off Oven Door
Probe
CARE AND CLEANING:/LIWRII2YHQ'RRU3UREH
Removal
position
Pull hinge locks down to unlock
Push hinge locks up to lock
Replacement
position
Hinge lock
Slot
Hinge arm
Indentation
Bottom
edge
of slot
Hinge
lock
Hinge
arm
49-85244 29
CARE AND CLEANING: Oven Lights
Oven Lights
WARNING
SHOCK OR BURN HAZARD: Before
replacing oven light bulb, disconnect the electrical power
to the range at the main fuse or circuit breaker panel.
Failure to do so may result in electric shock or burn.
CAUTION
BURN HAZARD: The glass cover and
bulb should be removed when cool. Touching hot glass
with bare hands or a damp cloth can cause burns.
Each oven is equipped with halogen light columns
located on the side walls of the oven. The lights come
on when the door is opened or when the oven is in a
cooking cycle.
Each light assembly consists of a removable light cover
with two locking clips and a light compartment with three
halogen bulbs.
Be sure to let the light cover and bulb cool completely.
For your safety, do not touch a hot bulb with bare hands
or a damp cloth.
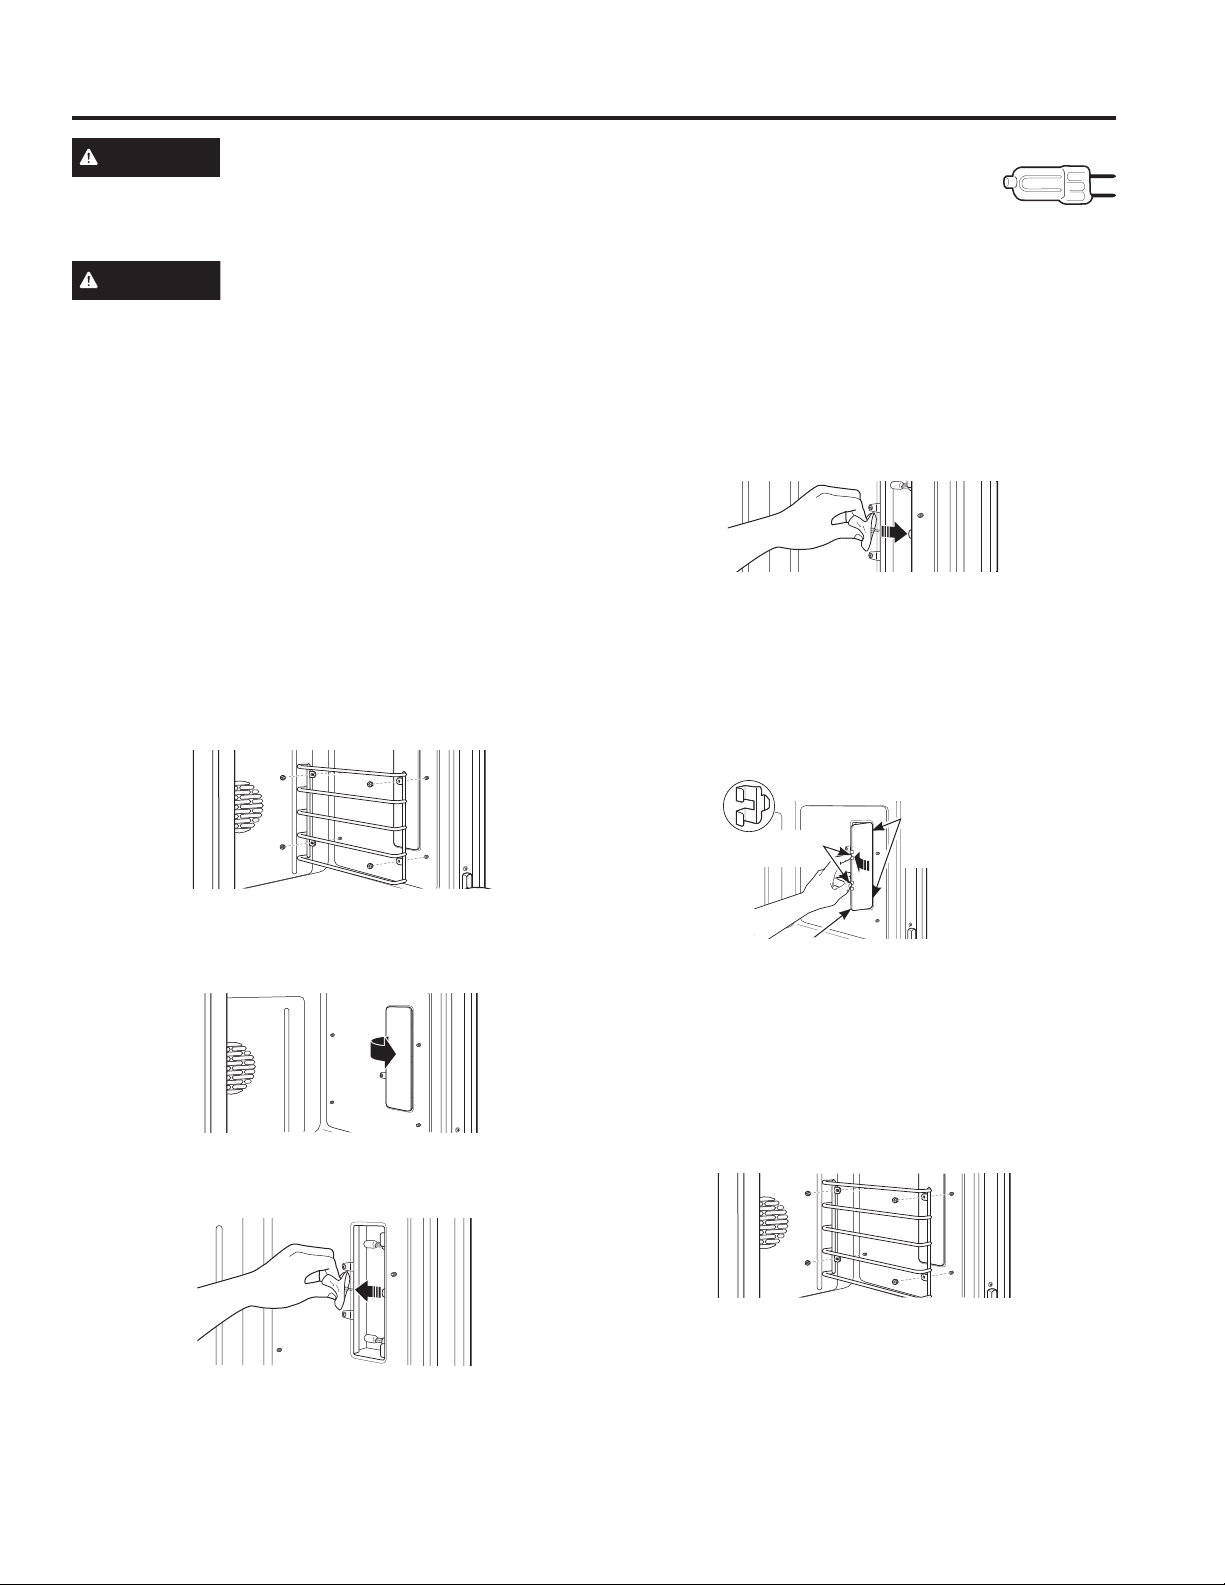
To remove:
1. Remove the racks from the oven. See the Full
extension oven racks section.
8VLQJDƎQXWGULYHUUHPRYHWKHIRXUQXWVKROGLQJ
the rack supports to the oven wall.
3. Remove the glass light cover by pulling its back edge
out and rolling it toward you. Do not remove any
screws.
8VLQJJORYHVRUDGU\FORWKUHPRYHWKHEXUQHGRXW
light bulb by pulling it straight out.
To replace:
8VHDQHZYROW+DORJHQEXOEZLWK*
pins, not to exceed 25 watts.
Replacement bulbs may be purchased by calling
800.626.2002. Order Part Number WB25T10064.
NOTE: Higher wattage bulbs will damage your oven.
8VLQJJORYHVRUDGU\FORWKUHPRYHWKHEXOEIURPLWV
packaging. Do not touch the bulb with bare fingers.
Oil from bare fingers may cause hot spots on the glass
surface and lead to premature failure of the bulb. If
you do touch the glass, clean it with alcohol prior to
installation.
1. Push the bulb straight into the receptacle all the way.
2. Replace the light cover, by placing its front edge under
the front two tabs in the light compartment. Roll the
back edge into place, making sure that it is firmly
seated.
NOTE: If the locking clips fell from the glass lens
cover, hold them on the cover, in the correct position,
while replacing the cover on the light compartment.
The light cover must be in place when using the
oven.
3. Reinstall the rack support. Be sure to orient the
support so that the top tabs for the nuts are closest to
the top of the oven. Lightly secure with the four nuts
removed earlier, but do not over-tighten or the enamel
could be chipped.
4. Replace the racks. See the Full extension oven racks
section.
5. Reconnect electrical power to the oven.
Press the light cover into place
Place front
edge of lens
cover under
front two tabs
Locking
clips

30 49-85244
Surfaces
CARE AND CLEANING: Surfaces
Oven Door
The oven frame and door, outside the oven seals,
should be cleaned by hand. Enameled surfaces should
be cleaned with hot soapy water. See Stainless Steel
Surfaces section for all Stainless Steel areas.
'RQRWUXERUFOHDQWKHGRRUVHDO²WKHILEHUJODVV
material of the seal has an extremely low resistance to
abrasion. An intact and well-fitting oven seal is essential
for energy-efficient operation and good baking results. If
the seal becomes worn, frayed, damaged or displaced it
must be replaced by a qualified technician.
Stainless Steel Surfaces
Do not use a steel-wool pad; it will permanently scratch
the surface.
To clean the stainless steel surface, use warm sudsy
water or a stainless steel cleaner. Always wipe the
surface in the direction of the grain. Follow the cleaner
instructions for cleaning the stainless steel surface.
To inquire about purchasing stainless steel appliance
cleaner, please call our toll-free number, 800.626.2002
or visit GEAppliances.com.
Oven bottom
The oven bottom has a porcelain enamel finish. To make
cleaning easier, protect the oven bottom from excessive
spillovers. A smaller sheet of foil or sheet tray may
be used to catch a spillover by placing it on the rack
below the rack you are cooking on. This is particularly
important when baking a fruit pie or other foods that
are highly acidic. Hot fruit fillings or other foods that are
highly acidic (such as tomatoes, sauerkraut and sauces
with vinegar or lemon juice) may cause pitting and
damage to the porcelain enamel surface and should be
wiped up immediately.
Never fully cover a rack with aluminum foil. This will
disturb the heat circulation and result in poor baking.
To clean up spillovers, use soap and water, an abrasive
cleaner or soap-filled scouring pad. Rinse well to remove
soap before self-cleaning.
49-85244 31
CARE AND CLEANING: Dual-flame Stacked Burners
Dual-flame Stacked Burners
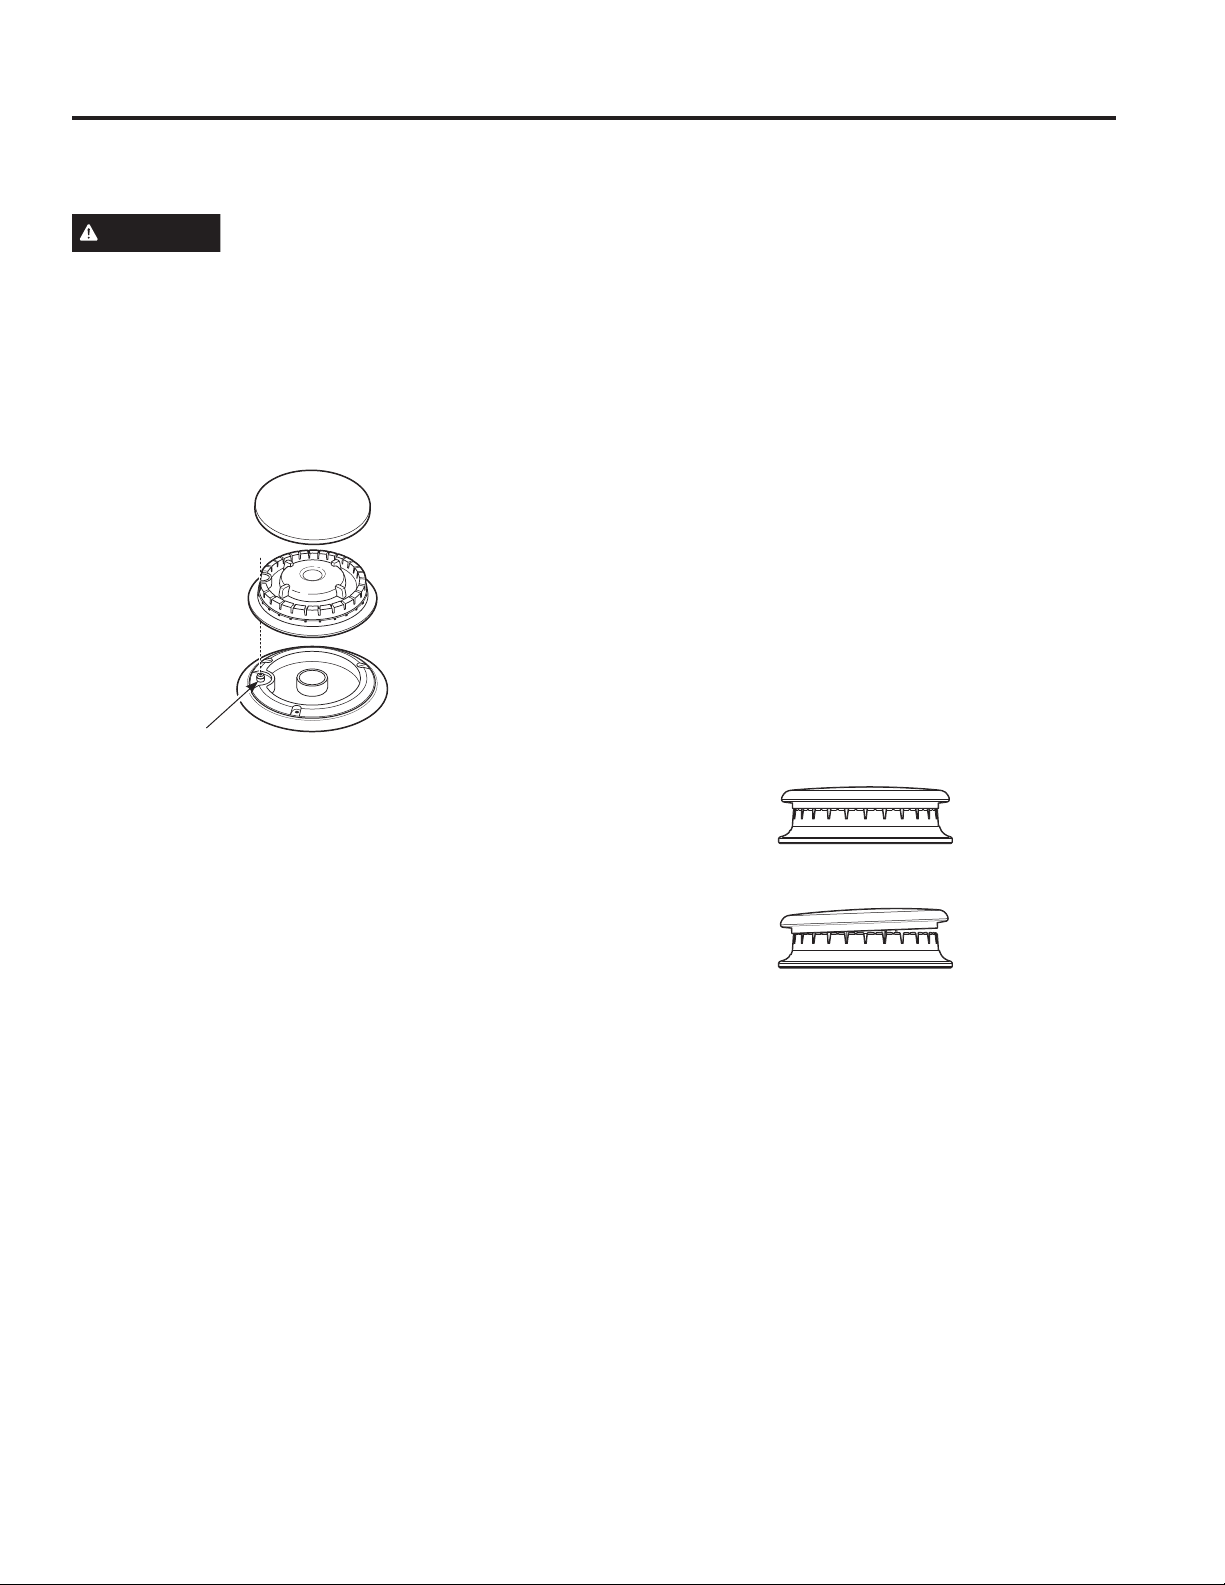
7KHEXUQHUFRQVLVWVRIWKUHHSDUWVWKHEXUQHUEDVH
burner head, and burner cap. The burner head and
burner cap can be lifted off, making them easy to clean.
CAUTION
'212723(5$7(7+(%851(5
:,7+287$//%851(53$576,13/$&(
Surface burners should be cleaned routinely, especially
after bad spillovers, which could clog the slots and holes
in the burner heads.
The electrode is located at the rear of each burner. Do
not attempt to disassemble or clean around any burner
while another burner is on. An electric shock may result.
To remove the burner parts:
1. Turn all controls OFF before removing any burner
parts.
2. When cool, you may lift off the burner grates, burner
caps and burner heads for easier cleaning. Do not
remove the burner bases.
NOTE: The ZGP304 model has 2 different size burners.
Be sure to replace the burners in the same location.
Cleaning
Lift off burner parts only when cool. Wash in hot, soapy
water. You may use a plastic scouring pad to remove
burned-on food particles.
To remove burned-on food, soak the burner heads in
a solution of mild liquid detergent and hot water for
20–30 minutes. For more stubborn stains, use a plastic
scouring pad or toothbrush.
If the spill goes inside the burner head assembly, wash it
under running water and shake to remove excess water.
After Cleaning
Before replacing the burner parts, shake out excess
water and then dry them thoroughly.
To replace the burner parts:
Make sure that the burner parts are replaced in the
correct location.
1. Replace the burner head on top of the burner base,
making sure that the hole in the burner head is
properly aligned with the electrode in the burner base.
A small gap between the base and head is normal.
2. Place the burner cap on top of the burner head. Make
sure that the burner cap is properly seated on the
burner head.
Burner
Head
Burner
Base
Electrode
Burner Cap
Burner cap not properly seated
Burner cap properly seated
32 49-85244
Spark Igniter and Electrodes
Burner Grates
CARE AND CLEANING:6SDUN,JQLWHUDQG(OHFWURGHV%XUQHU*UDWHV
The electrode of the electronic ignition system is
positioned at the rear of the burner base. When cleaning
the cooktop, be careful not to snag the igniter with your
cleaning cloth. Damage to the igniter could occur.
Be careful not to push in a control knob while cleaning. It
could cause the igniter to spark.
Make sure that the white ceramic igniters on the cooktop
are dry and clean. Clean the metal portion of the
electrode with a soft cloth or emery board.
Do not attempt to remove the electrode from the
cooktop.
The enameled cast-iron burner grates should be cleaned
regularly.
You must put the grates on the self-clean oven rack
during the self-clean cycle. DO NOT put the grate on
the oven floor during a self-clean cycle. DO NOT put the
frame inside the oven during a self-clean cycle. Only the
grate can withstand the heat of the self-clean cycle. The
frames may be cleaned by hand or in the dishwasher.
Wash them in hot soapy water, rinse, and dry thoroughly.
Although they are durable, the grates will gradually lose
their shine, regardless of the best care you can give
them. This is due to their continual exposure to high
temperatures.
Do not operate a burner for an extended period of time
without cookware on the grate. The finish on the grate
may chip without cookware to absorb the heat.
For stability, the frames have rubber pads on each
corner. During cleaning and use, be careful not to
damage or snag rubber pads.
Clean this metal part
with an emery board.
Do not clean this white
ceramic part with an
emery board.
Grates
Frame
Pads
49-85244 33
Grease troughs
CARE AND CLEANING:*UHDVH7URXJKV*ULGGOH&XWWLQJ%RDUG
Grease Troughs (on some models)
Griddle (on some models)
Cutting Board (on some models)
Grease from the griddle will drain into the enameled
cast-iron grease troughs at the front of the range. Once
the troughs have cooled, they may be lifted out for easier
cleaning.
To remove the cool grease trough from the griddle, slide
it toward the front and lift up.
Do not allow grease to accumulate in the grease
troughs as it can be a fire hazard. Clean the grease
troughs as soon as they are cool. The grease troughs
can be cleaned by hand with hot soapy water or in the
dishwasher. Wipe any spillage in the trough basin with a
soft cloth.
For stability, the troughs have rubber pads at the front.
Be careful not to damage the pads when removing for
cleaning.
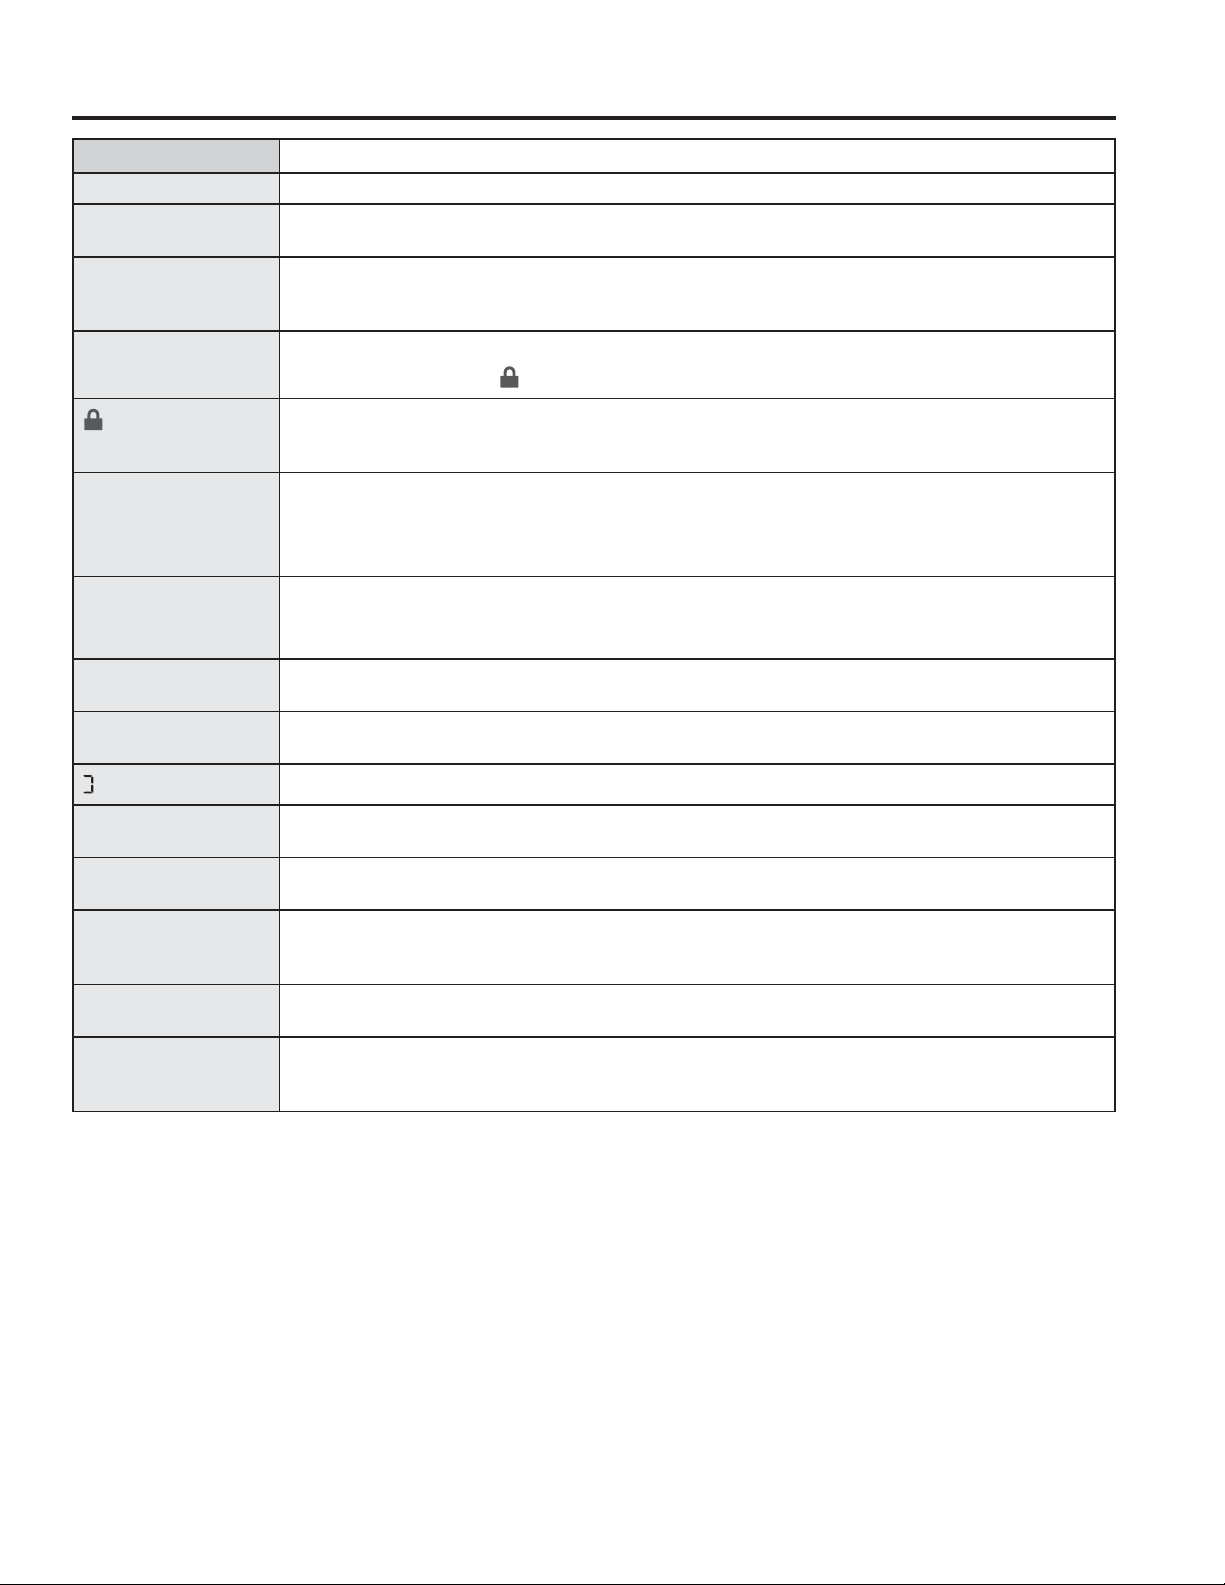
Thoroughly clean the griddle of grease and food particles,
using a square-edged metal spatula, while it is still hot.
Wipe the griddle with a dry, heavy, coarse cloth to
remove any remaining residue and food particles. If the
griddle is cleaned with anything other than a dry, heavy,
coarse cloth, it will need to be reseasoned.
Never flood the hot griddle with cold water. This could
cause the griddle to crack or warp.
NOTE: It is normal for the stainless steel griddle to
discolor to a yellow-brown color after use.
Wash the bamboo cutting board with warm water and a
mild soap. Occasionally, wipe it with mineral oil.
Do not clean the cutting board in the dishwasher.
Optional Accessories
34 49-85244
TROUBLESHOOTING TIPS
Troubleshooting tips ... Before you call for service
Save time and money! Review the charts on the following pages first and you may not need to call for service. If an
error occurs in the control operation, a fault code will flash in the display. Record the error code and call for service.
Problem Possible Cause
Oven Will Not Work A fuse in your home may be blown or the circuit breaker tripped.
The oven controls are not properly set.
The oven controls are set for cleaning. If necessary, allow the oven to cool; then open the door.
Make sure the Oven Mode Selector is set to BAKE and the Temperature knob is set to a temperature.
Oven Light(S) Do
Not Work
The light bulb is defective. Replace the bulb.
The oven is self-cleaning or the Sabbath feature is set. The oven lights do not come on during self-
cleaning or if the Sabbath feature is set.
The oven is set for Proof mode. The lights cycle on and off as necessary to maintain Proof temperature.
Food Does Not
Bake Or Roast
Properly
The oven controls are improperly set. See the Baking or Roasting section.
Oven not preheated for a long enough time; wait for the oven to signal preheat.
Incorrect cookware or cookware of improper size being used. See Baking Tips.
Racks in the wrong position. See the Baking or Roasting section.
8VHDIRLOWHQWWRVORZGRZQEURZQLQJGXULQJURDVWLQJ
Oven thermostat needs adjustment. See the Oven thermostat adjustment section.
Food Does Not
Broil Properly
This model is designed for closed door broiling only. Close the door. Always broil with the door closed.
The oven controls are not set at BROIL. See the Broiling section.
The probe is plugged into the outlet in the oven. Remove the probe from the oven.
Improper rack position being used.
&RRNZDUHLVQRWVXLWHGIRUEURLOLQJ8VHWKHEURLOLQJSDQDQGJULGWKDWFDPHZLWK\RXURYHQ
Aluminum foil used on the broiling pan and grid has not been fitted properly and slit as recommended.
Oven Will Not Self
Clean
The oven temperature is too high to set a self-clean operation.
Allow the oven to cool below the locking temperature and reset the controls.
The controls are not properly set. See the Self-Cleaning Oven section.
Cracking Or
Popping Sound
During Cleaning
This is normal. This is the sound of the metal heating and cooling during both the cooking and cleaning
functions.
Excessive Smoking
Occurs During
Cleaning
The oven is heavily soiled. Turn the Oven Mode Selector and the Temperature knobs to OFF. Open the
windows to rid the room of smoke. Wait until the locked door indicator light goes off. Wipe up excess
soil and reset the clean cycle.
Oven Not Clean
After A Clean Cycle
The oven was heavily soiled. Clean up heavy spillovers before starting the clean cycle. Heavily soiled
ovens may need to self-clean again.
Oven is connected to a 208V electrical supply. Set your cleaning time for 5 hours.
The oven controls are not properly set. See the Self-Cleaning Oven section.
Oven Racks Are
Difficult To Slide
The racks were cleaned in the self-clean cycle and now need periodic lubrication.
Do not spray with a cooking spray or other lubricant sprays. See Full extension oven racks in the Care
and Cleaning section.
49-85244 35
TROUBLESHOOTING TIPS
Troubleshooting tips ... Before you call for service
Problem Possible Cause
Timer Does Not Work The timer cannot be used while the oven is self-cleaning.
Oven Temperature
Too Hot Or Too Cold
Oven thermostat needs adjustment. See the Oven thermostat adjustment section.
Oven Door Will Not
Open After A Clean
Cycle
The oven is too hot. Allow the oven to cool below locking temperature.
“Close Door” Scrolls
In The Display
The self-clean cycle has been selected but the door is not closed.
Close the oven door. The
symbol will appear in the display
Is On When You
Want To Cook
The oven door is locked because the temperature inside the oven has not dropped below the
unlocking temperature. Turn the Oven Mode Selector and the Temperature knobs to OFF. Allow the
oven to cool.
F- And A Number
Flash In The Display
The oven has a function error code. Turn the Oven Mode Selector and the Temperature knobs to
OFF. Allow the oven to cool for one hour. Put the oven back into operation.
Disconnect all power to the oven for 30 seconds and then reconnect power. If the function error code
repeats, call for service.
Display Goes Blank The display is blank when the oven or timer is not in use.
A fuse in your home may be blown or the circuit breaker tripped. Replace the fuse or reset the circuit
breaker.
Unable To Get The
Display To Show “Sf”
The TIMER and the MINI-KNOB buttons must be pushed at the same time and held for 4 seconds.
“Probe” Appears In
The Display
This is reminding you to enter a probe temperature after plugging in the probe. Enter a probe
temperature
Shows In Display
The Sabbath mode has been selected.
Power Outage If the oven was in use during a power outage or surge, the oven must be reset. Turn the Temperature
knob and the Oven Mode Selector to OFF. Reset the controls to begin again.
Steam From The Vent When using the convection mode, it is normal to see steam coming out of the oven vent. As the
number of racks or amount of food being cooked increases, the amount of visible steam will increase.
Burning Or Oily Odor
Emitting From The
Vent
This is normal in a new oven and will disappear in time.
Strong Odor This is temporary. An odor from the insulation around the inside of the oven is normal for the first few
times the oven is used.
Fan Noise A cooling fan or a convection fan (depending on the function you are using) may turn on. This is
normal. The cooling fan will turn on to cool internal parts. It may run after the oven is turned off. The
convection fan may cycle on and off until the function is over or the door is opened.
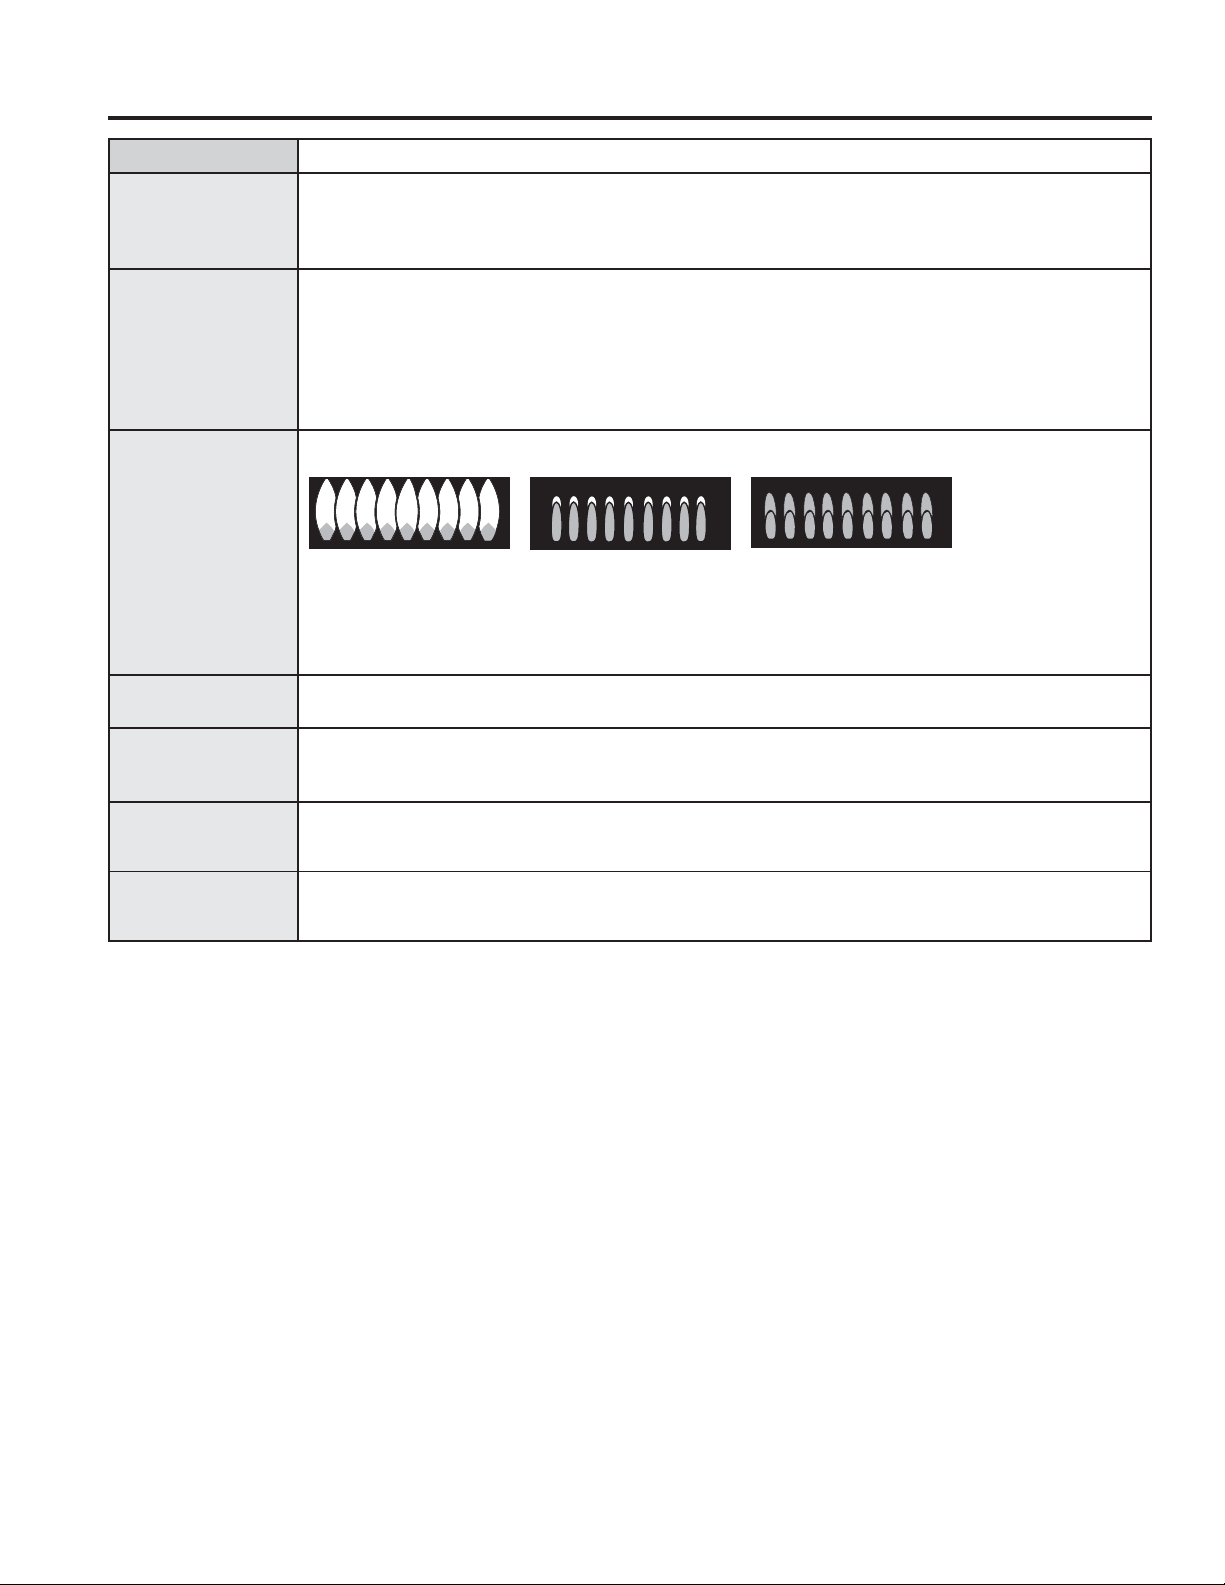
36 49-85244
Problem Possible Cause
Convection Fan Not
On All The Time
The convection fan (depending on the function you are using) may cycle on and off until the function
is over or the door is opened for optimized performance. This is normal. In addition, the convection
fan may cycle in the clockwise and counter clockwise direction until the function is over or the door is
opened.
Burners Do Not
Light Or Spark
Randomly
Electrical plug is not plugged into a live power outlet.
Gas supply not turned on.
Burner parts not replaced correctly.
Holes in the simmer rings or slits in the burner rings are clogged.
Clogged orifice, or wet burners or electrodes.
Cooktop Lockout feature is activated.
A fuse in your home may be blown or circuit breaker tripped.
Burners Have
Yellow Or Yellow-
Tipped Flames
Burner parts not replaced correctly.
A. Yellow flames: Call
for service.
B. Yellow tips on outer
cones: Normal for
propane (LP) gas.
C. Soft blue flames:
Normal for natural gas.
If burner flames look like (A), call for service. Normal burner flames should look like (B) or (C),
depending on the type of gas.
Burner Flames Very
Large Or Yellow
The range may be connected to the wrong fuel type. Contact the person who installed your range or
made the conversion
Burner Control
Knob Will Not Turn
When the knob is at the OFF position, it must be pushed in before it can be turned, and it can only be
turned in a counterclockwise direction. When the knob is at any other position, it can be turned in either
direction without being pushed inwards.
Condensation Or
Fogging On The
Inner Door Glass
Condensation or fogging on the inside of the oven door glass is normal during the preheating of the
oven and will evaporate usually by the end of the preheating cycle.
Burner Flames
contain Flickers of
Orange
Airborne dust; cool-mist humidifier; debris on or inside burner.
TROUBLESHOOTING TIPS
Troubleshooting tips ... Before you call for service

49-85244 37
Notes
38 49-85244
GEAppliances.com
All warranty service is provided by our Factory Service Centers, or an authorized Customer Care
®
technician. To schedule
service online, visit us at www.geappliances.com/service_and_support/, or call GE Appliances at 800.GE.CARES
(800.432.2737). Please have your serial number and your model number available when calling for service.
Servicing your appliance may require the use of the onboard data port for diagnostics. This gives a GE Appliances factory
service technician the ability to quickly diagnose any issues with your appliance and helps GE Appliances improve its
products by providing GE Appliances with information on your appliance. If you do not want your appliance data to be
sent to GE Appliances, please advise your technician not to submit the data to GE Appliances at the time of service.
What GE Appliances will not cover:
Ŷ Service trips to your home to teach you how to use
the product.
Ŷ 'LVFRORUDWLRQRIWKHJULGGOHSODWHRURYHQUDFNV
Ŷ &KLSSLQJRISRUFHODLQHQDPHOJUDWHVRURYHQUDFNV
Ŷ 5HSODFHPHQWRIKRXVHIXVHVRUUHVHWWLQJRIFLUFXLW
breakers.
Ŷ ,QFLGHQWDORUFRQVHTXHQWLDOGDPDJHFDXVHGE\
possible defects with this appliance.
Ŷ 'DPDJHDIWHUGHOLYHU\
Ŷ 'DPDJHWRWKHSURGXFWFDXVHGE\DFFLGHQWILUH
floods or acts of God.
Ŷ 3URGXFWGDPDJHRUIDLOXUHRIWKHSURGXFWLILWLV
abused, misused, used for other than the intended
purpose, or used commercially.
Ŷ ,PSURSHULQVWDOODWLRQGHOLYHU\RUPDLQWHQDQFH
If you have an installation problem, contact your
dealer or installer. You are responsible for providing
adequate electrical, gas, exhausting and other
connecting facilities as described in the Installation
Instructions provided with the product.
Ŷ 3URGXFWQRWDFFHVVLEOHWRSURYLGHUHTXLUHGVHUYLFH
EXCLUSION OF IMPLIED WARRANTIES
Your sole and exclusive remedy is product repair as provided in this Limited Warranty. Any implied warranties,
including the implied warranties of merchantability or fitness for a particular purpose, are limited to one year or
the shortest period allowed by law.
This warranty is extended to the original purchaser and any succeeding owner for products purchased for home use
ZLWKLQWKH86$,IWKHSURGXFWLVORFDWHGLQDQDUHDZKHUHVHUYLFHE\D*($SSOLDQFHV$XWKRUL]HG6HUYLFHULVQRWDYDLODEOH
you may be responsible for a trip charge or you may be required to bring the product to an Authorized GE Appliances
Service location for service. In Alaska, the warranty excludes the cost of shipping or service calls to your home.
Some states do not allow the exclusion or limitation of incidental or consequential damages. This warranty gives you
specific legal rights, and you may also have other rights which vary from state to state. To know what your legal rights
are, consult your local or state consumer affairs office or your state’s Attorney General.
Warrantor: GE Appliances, a Haier company
Warrantor in Canada: MC Commercial, Burlington, ON, L7R 5B6
Extended Warranties: Purchase a GE Appliances extended warranty and learn about special discounts that are
available while your warranty is still in effect. You can purchase it online anytime at
www.geappliances.com/service_and_support/shop-for-extended-service-plans.htm
or call 800.626.2224 during normal business hours. GE Appliances Service will still be there after your warranty expires.
For the period of GE Appliances will replace
One year
From the date of the
original purchase
Any part of the cooktop which fails due to a defect in materials or workmanship. During
this limited one-year warranty, GE Appliances will provide, free of charge, all labor and
in-home service to replace the defective part.
Staple your receipt here. Proof of the original purchase
date is needed to obtain service under the warranty.
WARRANTY
GE Appliances Gas Range Warranty

49-85244 39
ACCESSORIES
Looking For Something More?
GE Appliances offers a variety of accessories to
improve your cooking and maintenance experiences!
Refer to the Consumer Support page for phone numbers
and website information.
7KHIROORZLQJSURGXFWVDQGPRUHDUHDYDLODEOH
Accessories
Parts
Bamboo Cutting Board (on some models)
Toekick
Griddle Covers (on some models)
Full Extension Oven Rack(s)
Low Profile Oven Rack
Broiler Pan and Grid
Temperature Probe
Roasting Rack
6 Gas Burners
6 Gas Burner with Griddle

40 49-85244
Consumer Support
CONSUMER SUPPORT
GE Appliances Website
Have a question or need assistance with your appliance? Try the GE Appliances Website 24 hours a day, any day
of the year! You can also shop for more great GE Appliances products and take advantage of all our on-line support
VHUYLFHVGHVLJQHGIRU\RXUFRQYHQLHQFH,QWKH86GEAppliances.com ,Q&DQDGDGEAppliances.ca
Register Your Appliance
Register your new appliance on-line at your convenience! Timely product registration will allow for enhanced
communication and prompt service under the terms of your warranty, should the need arise. You may also mail in
the pre-printed registration card included in the packing material.
,QWKH86GEAppliances.com/register
,Q&DQDGDProdsupport.mabe.ca/crm/Products/ProductRegistration.aspx
Schedule Service
Expert GE Appliances repair service is only one step away from your door. Get on-line and schedule your service at
\RXUFRQYHQLHQFHDQ\GD\RIWKH\HDU,QWKH86GEAppliances.com/ge/service-and-support/service.htm
or call 800.432.2737 during normal business hours.
,Q&DQDGDGEAppliances.ca/en/support/service-request or call 800.561.3344
Extended Warranties
Purchase a GE Appliances extended warranty and learn about special discounts that are available while your
warranty is still in effect. You can purchase it on-line anytime. GE Appliances Services will still be there after your
ZDUUDQW\H[SLUHV,QWKH86GEAppliances.com/ge/service-and-support/shop-for-extended-service-plans.htm
or call 800.626.2224 during normal business hours.
,Q&DQDGDGEAppliances.ca/en/support/purchase-extended-warranty or call 800.290.9029
Remote Connectivity
For assistance with wireless network connectivity (for models with remote enable),
visit our website at GEAppliances.com/ge/connected-appliances/RUFDOOLQWKH86RQO\
Parts and Accessories
Individuals qualified to service their own appliances can have parts or accessories sent directly to their homes
(VISA, MasterCard and Discover cards are accepted). Order on-line today 24 hours every day.
,QWKH86GEApplianceparts.com or by phone at 877.959.8688 during normal business hours.
Instructions contained in this manual cover procedures to be performed by any user. Other servicing
generally should be referred to qualified service personnel. Caution must be exercised, since improper
servicing may cause unsafe operation.
Customers in Canada should consult the yellow pages for the nearest MC Commercial service center, visit our
website at GEAppliances.ca/en/products/parts-filters-accessories or call 800.661.1616.
Contact Us
If you are not satisfied with the service you receive from GE Appliances, contact us on our Website with all the
GHWDLOVLQFOXGLQJ\RXUSKRQHQXPEHURUZULWHWR
,QWKH86*HQHUDO0DQDJHU&XVWRPHU5HODWLRQV_*($SSOLDQFHV$SSOLDQFH3DUN_/RXLVYLOOH.<
GEAppliances.com/ge/service-and-support/contact.htm
,Q&DQDGD'LUHFWRU&RQVXPHU5HODWLRQV0&&RPPHUFLDO,QF_6XLWH)DFWRU\/DQH_0RQFWRQ1%(&0
GEAppliances.ca/en/contact-us
Printed in Mexico

Escriba el modelo y los números de serie
a continuación:
Modelo No: _______________________
Serial No: _________________________
Los encontrará en una etiqueta ubicada
detrás de la perilla del quemador izquierdo
o en la parte inferior de la estufa.
49-85244 10-17 GEA
GE es una marca registrada de General Electric Company. Fabricado bajo licencia de marca.
MANUAL DEL
PROPIETARIO
COCINAS
Cocinas Profesionales con Dos Tipos de Combustibles
INFORMACIÓN DE SEGURIDAD .....3
USO DE LA COCINA
Características de su Cocina ..................8
Controles de la Estufa ........................9
Cocción Sobre Superficie ....................10
Características de su Horno ..................12
Control del Horno. . . . . . . . . . . . . . . . . . . . . . . . . . . 13
Consejos de Horneado ......................14
Antes de Comenzar .........................15
Horneado ..................................16
Asado .....................................17
Horneado o Asado por Convección ...........19
Sonda .....................................21
Leudado ...................................22
Horno Auto-limpiante .......................23
Características Especiales ....................25
CUIDADO Y LIMPIEZA
Panel de Control y Perillas ...................26
Quemadores del Horno ......................26
Asadera, Rejilla y Parrilla de Rostizado ........26
Bandejas del Horno .........................27
Puerta del Horno Desmontable ...............28
Sonda .....................................28
Luces del Horno ............................29
Superficies .................................30
Quemadores Apilados de Llama Dual .........31
Encendedor por Chispa y Electrodos ..........32
Rejillas del Quemador .......................32
Canaletas Para Grasa ........................33
Plancha ....................................33
Tabla Para Cortar ...........................33
CONSEJOS PARA LA
SOLUCIÓN DE PROBLEMAS ........34
GARANTÍA .............................38
ACCESORIOS ..........................39
SOPORTE PARA
EL CONSUMIDOR .................... 40
CAFÉ
30”, 36” y 48”

2 49-85244
GRACIAS POR HACER QUE GE APPLIANCES SEA PARTE DE SU HOGAR.
Ya sea que haya crecido usando GE Appliances, o que ésta es su primera vez, nos complace
tenerlo en la familia.
Sentimos orgullo por el nivel de arte, innovación y diseño de cada uno de los electrodomésticos de
GE Appliances, y creemos que usted también. Entre otras cosas, el registro de su electrodoméstico
asegura que podamos entregarle información importante del producto y detalles de la garantía
cuando los necesite.
Registre su electrodoméstico GE ahora a través de Internet. Sitios Web y números telefónicos útiles
están disponibles en la sección de Soporte para el Consumidor de este Manual del Propietario.
También puede enviar una carta en la tarjeta de inscripción preimpresa que se incluye con
el material embalado.
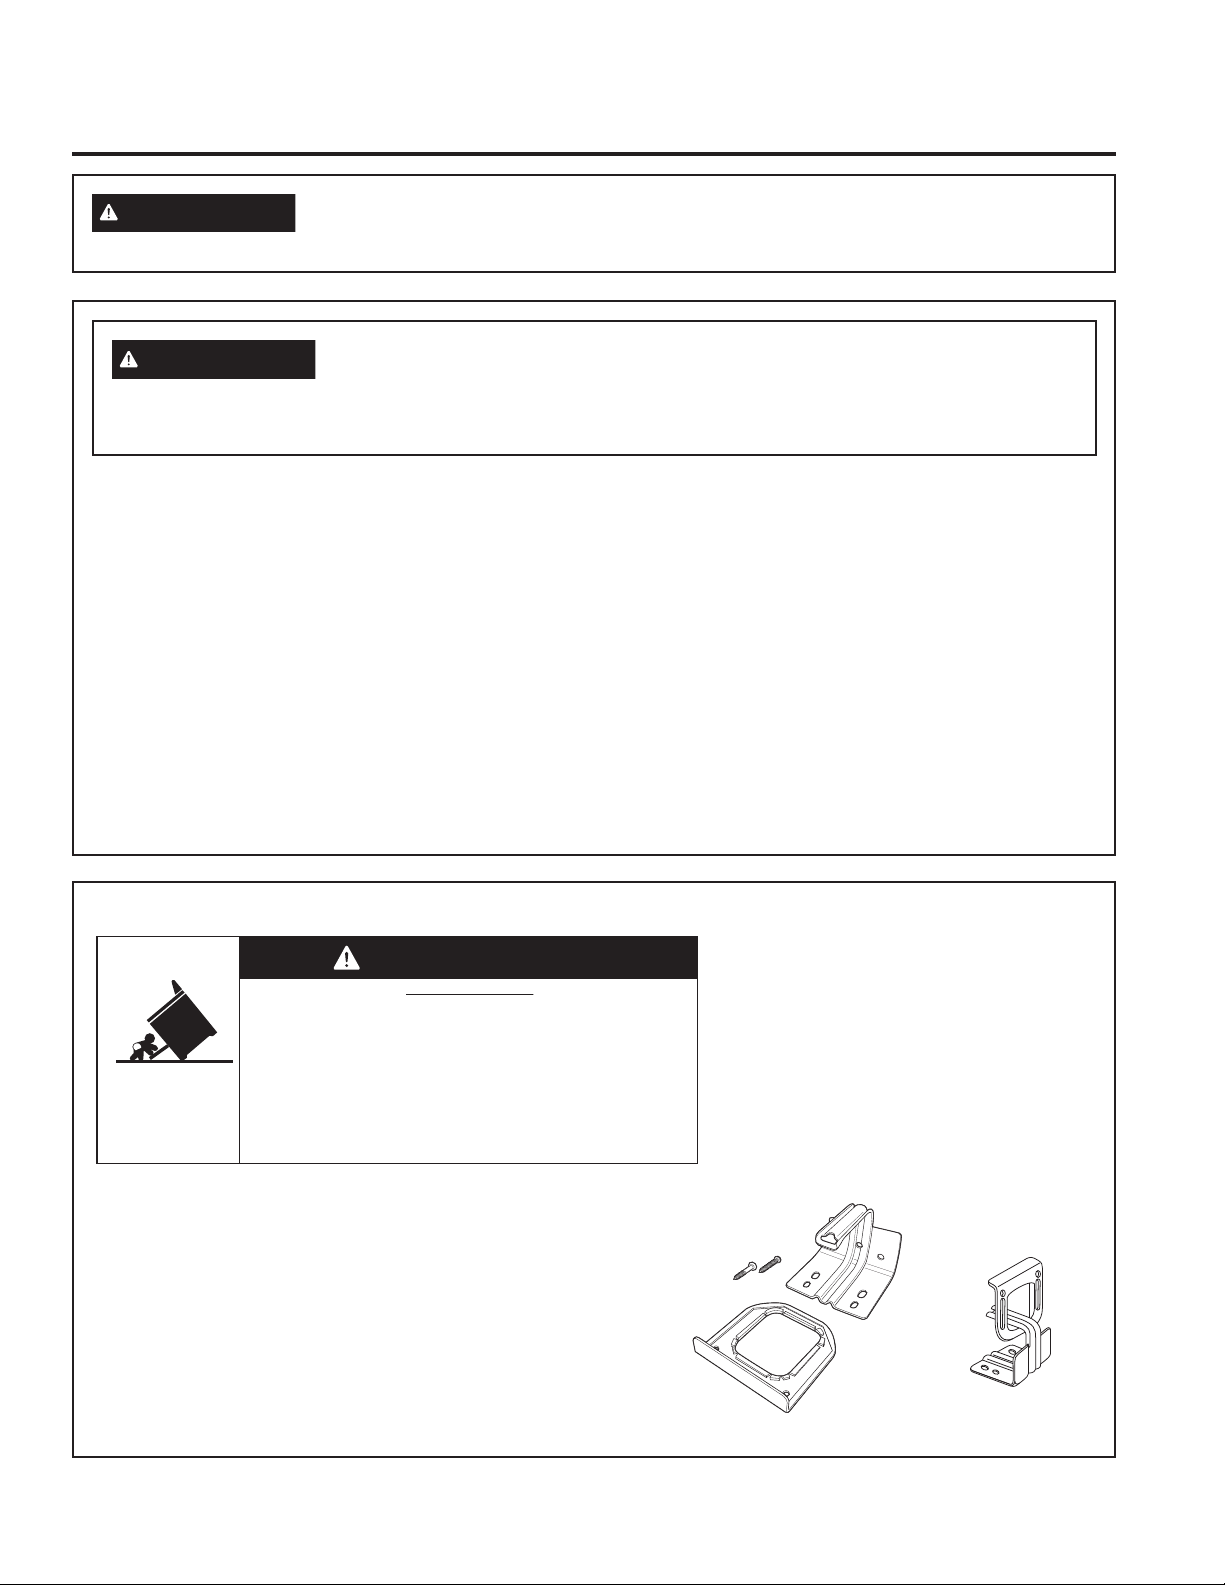
49-85244 3
LEA Y GUARDE ESTAS INSTRUCCIONES
INFORMACIÓN IMPORTANTE DE SEGURIDAD
LEA TODAS LAS INSTRUCCIONES ANTES DE USAR ESTE ELECTRODOMÉSTICO
INFORMACIÓN DE SEGURIDAD
ADVERTENCIA
Si la información de este manual no se sigue al pie de la letra,
puede ocasionarse un incendio o una explosión, generando daños a la propiedad,
lesiones personales o la muerte.
- No almacene o use gasolina u otros vapores o líquidos inflamables cerca de este o
cualquier otro aparato.
- QUÉ HACER SI HUELE GAS
Ŷ 1RWUDWHGHHQFHQGHUQLQJ~QDSDUDWR
Ŷ 1RWRTXHQLQJ~QLQWHUUXSWRUHOpFWULFRQRXWLOLFHQLQJ~QWHOpIRQRHQVXHGLILFLR
Ŷ,QPHGLDWDPHQWHOODPHDVXSURYHHGRUGHJDVGHVGHHOWHOpIRQRGHXQYHFLQR6LJD
las instrucciones del proveedor de gas.
Ŷ6LQRSXHGHFRPXQLFDUVHFRQHOSURYHHGRUGHJDVOODPHDOGHSDUWDPHQWRGH
bomberos.
/DLQVWDODFLyQ\VHUYLFLRWpFQLFRGHEHQUHDOL]DUORVXQLQVWDODGRUFDOLILFDGRXQD
agencia de servicio o el proveedor de gas.
DISPOSITIVO ANTI-VOLCADURAS
Para reducir el riesgo de volcar la cocina,
ésta debe sujetarse mediante un soporte anti-
volcaduras con una adecuada instalación. Ver
las instrucciones de instalación enviadas con el
soporte para obtener detalles completos antes
de iniciar la instalación.
Para Cocinas a Gas Profesionales
Para controlar si el soporte es instalado y
ajustado de forma apropiada, mire que debajo
de la cocina la pata niveladora trasera esté
ajustada al soporte. En algunos modelos, el
cajón de almacenamiento o el panel de protección se pueden retirar
para una fácil inspección. Si no es posible realizar una inspección visual,
deslice la cocina hacia adelante, confirme que el soporte anti-volcaduras
esté ajustado de forma segura al piso o la pared, y deslice la cocina
hacia atrás de modo que la pata niveladora trasera se encuentre debajo
del soporte anti-volcaduras.
Si la cocina es expulsada de la pared por alguna razón, siempre repita
este procedimiento a fin de verificar que esté asegurado de forma
correcta con un soporte anti volcaduras.
Nunca quite las patas de nivelación por completo ya que la cocina no
quedará bien sujeta al dispositivo anti-volcaduras.
• Un niño o adulto pueden volcar la cocina y morir.
• Instale el soporte anti-volcaduras sobre la pared o el piso.
•
Asegúrese la estufa al soporte anti-volcaduras deslizando
la unidad hacia atras de tal manera que la pata niveladora
sea enganchada.
• Vuelva a adherir el soporte anti-volcaduras si la estufa
se mueve de lugar.
• Si esto no se hace, se podrá producir la muerte o
quemaduras graves en niños o adultos.
Riesgo de Caída
ADVERTENCIA
Kit de soporte
anti-volcaduras incluido
Vista Trasera
ADVERTENCIA
Lea todas las instrucciones de seguridad antes de utilizar este producto. No seguir estas
instrucciones puede generar un incendio, una descarga eléctrica, lesiones corporales o la muerte.
4 49-85244
LEA Y GUARDE ESTAS INSTRUCCIONES
INFORMACIÓN IMPORTANTE DE SEGURIDAD
LEA TODAS LAS INSTRUCCIONES ANTES DE USAR ESTE ELECTRODOMÉSTICO
INFORMACIÓN DE SEGURIDAD
ADVERTENCIA
INSTRUCCIONES GENERALES DE SEGURIDAD
ADVERTENCIA
NUNCA use este
HOHFWURGRPpVWLFRSDUDFDOHQWDUHODPELHQWH
Como consecuencia de esto, se podrá producir
envenenamiento con monóxido de carbono y el
sobrecalentamiento del horno.
Ŷ 8VHHVWHHOHFWURGRPpVWLFRVyORSDUDVXSURSyVLWRRULJLQDO
como se describe en el manual del propietario.
Ŷ 6ROLFLWHTXHXQLQVWDODGRUFDOLILFDGRLQVWDOHVXFRFLQD\
que esté correctamente conectada a tierra, de acuerdo
con las instrucciones de instalación provistas.
Ŷ &XDOTXLHUDMXVWH\WUDEDMRGHVHUYLFLRWpFQLFRGHEHUi
ser realizado únicamente por instaladores calificados de
cocinas a gas o técnicos del servicio. No intente reparar o
reemplazar ninguna parte de la cocina, a menos que esto
se recomiende específicamente en este manual.
Ŷ 6XFRFLQDHVHQYLDGDGHVGHODIiEULFDFRQILJXUDGDSDUD
uso con gas natural o con gas propano (LP). Puede ser
convertida para uso con cualquiera de los dos. Si se
requieren, estos ajustes deben ser realizados por un
técnico calificado de acuerdo con las instrucciones de
instalación y códigos locales. La agencia que realiza este
trabajo asume la responsabilidad de la conversión.
Ŷ 6ROLFLWHTXHHOLQVWDODGRUOHPXHVWUHODXELFDFLyQGHOD
válvula de cierre de la cocina a gas y cómo apagarla en
caso de ser necesario.
Ŷ $QWHVGHUHDOL]DUFXDOTXLHUVHUYLFLRWpFQLFRGHVHQFKXIH
la cocina o desconecte el suministro de corriente desde
el panel de distribución del hogar, retirando el fusible o
desconectando el disyuntor.
Ŷ $VHJ~UHVHGHTXHWRGRVORVPDWHULDOHVGHHPEDODMHVHDQ
retirados de la cocina antes de su uso, a fin de evitar que
estos materiales se incendien.
Ŷ 'REOH$OLPHQWDFLyQ6LHOHOHPHQWRGHFDOHQWDPLHQWR
del horno desarrolla un punto brillante y muestra otras
VHxDOHVGHGDxRQRXVHGLFKDiUHDGHODFRFLQD8Q
punto brillante indica que el elemento puede fallar y
generar una posible quemadura, incendio o descarga
eléctrica. Apague el elemento de calentamiento de
inmediato y solicite a un técnico calificado del servicio
que reemplace el mismo.
Ŷ (YLWHUD\DURLPSDFWDUODVSDQWDOODVGHYLGULR+DFHU
esto podrá producir la rotura de vidrios. No cocine un
producto con un vidrio roto. Es posible que se produzcan
descargas, incendio o cortes.
Ŷ 1RGHMHDORVQLxRVVRORVRIXHUDGHVXUDGLRGHDWHQFLyQ
en el área donde el electrodoméstico se encuentre en
uso. Nunca se les deberá permitir trepar, sentarse o
pararse sobre ninguna parte del electrodoméstico.
Ŷ
PRECAUCIÓN
No coloque artículos de interés
para los niños sobre los gabinetes que están sobre un
horno – si los niños se trepan sobre el horno para llegar
a estos artículos podrían sufrir lesiones graves.
Ŷ 1XQFDEORTXHHODVYHQWLODFLRQHVDEHUWXUDVGHDLUHGHOD
cocina. Las mismas brindan las entradas y salidas de aire
que son necesarias para que la cocina opere de forma
correcta con la combustión adecuada. Las aberturas de
aire están ubicadas en la parte trasera de la cocina, en
la parte superior e inferior de la puerta del horno, y en la
parte inferior de la cocina.
Ŷ 8VHVyORVRVWHQHGRUHVGHROODVVHFRV±ORVVRVWHQHGRUHV
húmedos sobre superficies calientes pueden producir
quemaduras debido al vapor. No permita que los
sostenedores de ollas tengan contacto con los
quemadores superficiales, la parrilla de los quemadores,
o el elemento de calefacción del horno. No use una toalla
u otra tela voluminosa para reemplazar el mango de las
cacerolas.
Ŷ 1RWRTXHHOHOHPHQWRFDOHQWDGRUQLODVXSHUILFLHLQWHULRU
del horno. Es posible que estas superficies estén
demasiado calientes como para quemar, aunque su
FRORUVHDRVFXUR'XUDQWH\GHVSXpVGHOXVRQRWRTXH
ni permita que telas u otros materiales inflamables
toquen cualquier área interior del horno; espere a
que haya pasado un tiempo suficiente para que se
enfríen. Otras superficies del electrodoméstico se
podrán calentar lo suficiente como para ocasionar
lesiones. Las superficies potencialmente calientes
incluyen quemadores, rejillas, abertura de la ventilación
del horno, superficies cercanas a la abertura, grietas
alrededor de la puerta del horno, piezas con bordes
metálicos sobre la puerta, cualquier protección trasera,
o superficie de estante alto.
Ŷ 1RFDOLHQWHHQYDVHVGHFRPLGDTXHQRKD\DQVLGR
abiertos. Se podría acumular presión y el envase podría
explotar, ocasionando una lesión.
49-85244 5
LEA Y GUARDE ESTAS INSTRUCCIONES
INFORMACIÓN IMPORTANTE DE SEGURIDAD
LEA TODAS LAS INSTRUCCIONES ANTES DE USAR ESTE ELECTRODOMÉSTICO
INFORMACIÓN DE SEGURIDAD
ADVERTENCIA
INSTRUCCIONES GENERALES DE SEGURIDAD (cont.)
Ŷ &RFLQHODFRPLGDFRPSOHWDPHQWHSDUDHYLWDUTXHVH
produzcan enfermedades a partir de la comida. Puede
encontrar recomendaciones de seguridad mínima sobre
ODWHPSHUDWXUDGHODFRPLGDHQZZZ,V,W'RQH<HWJRY\
ZZZIVLVXVGDJRY8WLOLFHXQWHUPyPHWURSDUDWRPDUOD
temperatura de la comida y haga controles en diferentes
ubicaciones.
Ŷ 1RSHUPLWDTXHQDGLHVHWUHSHSDUHRFXHOJXHGHOD
puerta del horno, del cajón o la cocina. Se podrá dañar la
cocina o provocar su caída, ocasionando lesiones graves
o la muerte.
Ŷ 0DQWHQJDOLPSLDODFDPSDQDGHOYHQWLODGRU\ORVILOWURV
de grasa, a fin de mantener una buena ventilación y de
evitar incendios con grasa. Apague el ventilador en caso
de incendio o al “encender” intencionalmente licor u otras
bebidas alcohólicas de alta graduación en la superficie de
cocción. Si el extractor se encuentra en funcionamiento,
podrá esparcir las llamas.
ADVERTENCIA
MANTENGA LOS MATERIALES INFLAMABLES ALEJADOS DE LA COCINA
Si esto no se cumple, se podrán sufrir lesiones personales graves o incendios.
Ŷ 1RJXDUGHQLXVHPDWHULDOHVLQIODPDEOHVHQXQKRUQR
o cerca de la parte superior de la cocina, incluyendo
papel, plástico, sostenedores de ollas, trapos, cobertores
de pared, cortinas, paños y gasolina u otros vapores y
líquidos inflamables.
Ŷ 1XQFDXVHSUHQGDVKROJDGDVRTXHFXHOJXHQPLHQWUDV
usa el electrodoméstico. Evite acumular artículos
comúnmente usados en gabinetes sobre la cocina, y
tenga cuidado al extender la mano sobre la cocina.
La ropa que se encuentre cerca de los quemadores o
superficies calientes se podrá encender, ocasionando
quemaduras graves.
Ŷ 1RSHUPLWDTXHODJUDVDGHODFRFFLyQXRWURVPDWHULDOHV
inflamables se acumulen en o cerca de la cocina. La
grasa del horno o sobre la cocina se podrá incendiar.
ADVERTENCIA
EN CASO DE INCENDIO, SIGA LOS SIGUIENTES PASOS
PARA EVITAR LA PROPAGACIÓN DEL FUEGO
Ŷ 1RXVHDJXDVREUHHOIXHJRGHODJUDVD1XQFDWRPH
una olla que se esté incendiando. Apague los controles.
Extinga la olla que se esté incendiando sobre un
quemador superficial, cubriendo la olla completamente
con su tapa correspondiente, una hoja metálica de
galletas o una bandeja plana. Si es necesario, use un
químico seco multiuso o un extintor de chorro de espuma.
Ŷ 6LKD\XQLQFHQGLRHQHOKRUQRGXUDQWHHOKRUQHDGR
ahogue el fuego cerrando la puerta del horno y apagando
el mismo o usando un químico seco multipropósito o un
extintor de incendio con espuma.
Ŷ (QFDVRGHTXHKD\DIXHJRHQHOKRUQRGXUDQWHHOSHUtRGR
de auto limpieza, apague el horno y espere a que el fuego
se extinga. No fuerce la puerta para abrirla. La entrada de
aire fresco sobre las temperaturas de auto limpieza podrá
conducir a la producción de llamas en el horno.
6 49-85244
ADVERTENCIA
INSTRUCCIONES DE SEGURIDAD DE LA PARTE
SUPERIOR DE LA COCINA
Ŷ 1XQFDSLHUGDGHYLVWDORVTXHPDGRUHVFXDQGRVH
encuentren en las configuraciones de calor media o alta.
Las comidas, especialmente las que se preparan con
aceite, se pueden incendiar, lo cual puede ocasionar un
incendio que se propague a los gabinetes próximos.
Ŷ 1XQFDSLHUGDGHYLVWDHODFHLWHFXDQGRHVWpIULHQGR6L
se calienta más allá de su punto de cocción, el aceite
se puede quemar y provocar un incendio que se puede
SURSDJDUDORVJDELQHWHVSUy[LPRV8VHXQWHUPyPHWUR
para grasas profundas siempre que sea posible, a fin de
monitorear la temperatura del aceite.
Ŷ 3DUDHYLWDUGHUUDPHVHLQFHQGLRVXVHXQDFDQWLGDG
mínima de aceite al usar una sartén poco profunda y
evite la cocción de comidas congeladas con cantidades
excesivas de hielo.
Ŷ 8VHHOWDPDxRGHROODDGHFXDGRSDUDHYLWDUTXHVHDQ
inestables o que sufran caídas fácilmente. Seleccione
utensilios que coincidan con el tamaño del quemador.
Las llamas del quemador se deberán ajustar de modo
que no se extiendan más allá de la parte inferior de la
ROOD8QDFDQWLGDGH[FHVLYDGHOODPDSXHGHUHSUHVHQWDU
un riesgo.
Ŷ 6LHPSUHXVHODSRVLFLyQ/,7(DOHQFHQGHUORV
quemadores superiores y asegúrese de que estos se
hayan encendido.
Ŷ $OXVDUXWHQVLOLRVGHYLGULRFHUiPLFDDVHJ~UHVHGH
que sean adecuados para el servicio de cocina; otros
se podrán romper debido a un cambio repentino de
temperatura.
Ŷ $ILQGHPLQLPL]DUSRVLEOHVTXHPDGXUDVLQFHQGLRGH
materiales inflamables y derrames, la manija de un
envase deberá ser inclinada hacia el centro de la cocina
sin que se extienda sobre los quemadores cercanos.
Ŷ 1RXVHXQZRNFRQXQDQLOORFRQVRSRUWHGHPHWDO
redondo. El anillo podrá atrapar calor y bloquear el aire
hacia el quemador, produciendo el riesgo de emisión de
monóxido de carbono.
Ŷ 1RLQWHQWHHOHYDUODFRFLQD+DFHUHVWRSRGUtDGDxDU
la tubería de gas hasta los quemadores superficiales,
ocasionando una pérdida de gas y riesgo de incendio.
Ŷ $OLQKDELOLWDUHO%ORTXHRGHO&RQWUROGH*DVHQDOJXQRV
modelos), asegúrese de que los controles de superficie
se encuentren en la posición OFF (Apagado). Esto
evitará que haya un flujo de gas no intencional desde los
quemadores.
Ŷ 1RXVHSDSHOGHDOXPLQLRSDUDFXEULUUHMLOODVFXDOTXLHU
parte de la cocina. Si se hace esto se podrá
producir envenenamiento con monóxido de carbono,
sobrecalentamiento de las superficies de la cocina o un
posible riesgo de incendio.
ADVERTENCIA
INSTRUCCIONES DE SEGURIDAD
ADVERTENCIA
NUNCA cubra ninguna
ranura, agujeros o pasajes en el fondo del horno ni
cubra un estante entero con materiales tales como
papel de aluminio o cobertores de horno. Hacer esto
EORTXHDHOIOXMRGHDLUHDWUDYpVGHOKRUQR\SXHGH
ocasionar envenenamiento con monóxido de carbono.
Nunca coloque papel de aluminio o cobertores de
horno en el fondo del horno. Podrán atrapar el calor,
ocasionando riesgos de humo o incendio.
Ŷ 0DQWpQJDVHDOHMDGRGHODFRFLQDDODEULUODSXHUWDGHO
horno. El aire caliente o el vapor que sale puede causar
TXHPDGXUDVHQODVPDQRVURVWUR\XRMRV
Ŷ 1XQFDFRORTXHORVXWHQVLOLRVGHFRFLQDSLHGUDVSDUD
pizza u horneado o cualquier otro tipo de aluminio
o cobertor en la base del horno. Este ítems pueden
atrapar el calor o derretirse, ocasionando daños sobre el
producto y el riesgo de descargas, humo o incendios.
Ŷ &RORTXHORVHVWDQWHVGHOKRUQRHQODXELFDFLyQ
correspondiente mientras éste se encuentra frío. Si
es necesario retirar el estante mientras el horno se
encuentra caliente, evite tocar las superficies calientes.
Ŷ 1RGHMHSURGXFWRVWDOHVFRPRSDSHOXWHQVLOLRVGHFRFLQD
ni comida en el horno cuando no esté en uso. Los
artículos guardados en el horno se pueden incendiar.
Ŷ 1RGHMHQLQJ~QSURGXFWRVREUHODVXSHUILFLHGHFRFFLyQ
cerca de la ventilación del horno. Los artículos se pueden
sobrecalentar, y existe riesgo de incendio o quemaduras.
Ŷ 1XQFDDVHFRQODSXHUWDDELHUWD6HSURKtEHDVDUFRQ
la puerta abierta debido al sobrecalentamiento de las
perillas de control.
LEA Y GUARDE ESTAS INSTRUCCIONES
INFORMACIÓN IMPORTANTE DE SEGURIDAD
LEA TODAS LAS INSTRUCCIONES ANTES DE USAR ESTE ELECTRODOMÉSTICO
INFORMACIÓN DE SEGURIDAD
49-85244 7
ADVERTENCIA
INSTRUCCIONES DE SEGURIDAD DEL HORNO CON FUNCIÓN
DE AUTO LIMPIEZ
La función de auto limpieza usa el horno en temperaturas lo suficientemente altas como para consumir restos de comida
que haya dentro del mismo. Para un funcionamiento seguro, siga estas instrucciones.
Ŷ 1RWRTXHODVVXSHUILFLHVGHOKRUQRGXUDQWHHOFLFORGH
limpieza automática. Mantenga a los niños alejados del
horno durante la limpieza automática. Si no se siguen
estas instrucciones, se podrán producir quemaduras.
Ŷ $QWHVGHXWLOL]DUHOFLFORGHDXWROLPSLH]DUHWLUHODVROODV
estantes de metal brillante del horno y otros utensilios
que haya dentro del mismo. Sólo se pueden dejar dentro
del horno los estantes para horno con recubrimiento de
porcelana.
Ŷ $QWHVGHXWLOL]DUHOFLFORGHDXWROLPSLH]DOLPSLHODJUDVD
\UHVWRVGHFRPLGDTXHKD\DHQHOKRUQR8QDFDQWLGDG
excesiva de grasa se puede incendiar, lo cual puede
producir daños con humo en su hogar.
Ŷ 6LHOPRGRGHDXWROLPSLH]DIXQFLRQDGHIRUPDLQFRUUHFWD
apague el horno y desconecte el suministro de corriente.
Solicite el servicio de un técnico calificado.
Ŷ 1RXVHOLPSLDGRUHVSDUDKRUQR1RVHGHEHUiXVDU
limpiador para hornos comerciales ni revestimientos de
protección para hornos de ningún tipo en o alrededor de
cualquier parte del horno.
Ŷ 1ROLPSLHODMXQWDGHODSXHUWD/DMXQWDGHODSXHUWDHV
esencial para un buen sellado. Se debe tener cuidado de
no frotar, dañar ni mover la junta.
Ŷ IMPORTANTE: La salud de algunas aves es
extremadamente sensible a los humos emitidos durante
el ciclo de limpieza automática de cualquier cocina.
Coloque las aves en otra habitación bien ventilada.
ADVERTENCIA DE LA PROPOSICIÓN 65 DEL ESTADO DE CALIFORNIA
ADVERTENCIA
Este producto contiene uno o más químicos que el Estado de California entiende que producen
cáncer, y defectos en el nacimiento u otros daños reproductivos.
Los hornos con limpieza automática pueden ocasionar exposiciones de bajo nivel a algunas de las sustancias de la
Proposición 65, incluyendo monóxido de carbono, durante el ciclo de limpieza. La exposición a sustancias puede ser
minimizada abriendo una ventana o usando un extractor o campana.
Cómo Retirar la Película Protectora de Envío y la Cinta de Embalaje
Con cuidado tome un extremo de la película protectora
de envío con los dedos y lentamente retire la misma de la
superficie del electrodoméstico. No utilice ningún producto
filoso para retirar la película. Retire toda la película antes de
usar el electrodoméstico por primera vez.
Para asegurar que no haya daños sobre el acabado del
producto, la forma más segura de retirar el adhesivo de la cinta
de embalaje en electrodomésticos nuevos es aplicando un
detergente líquido hogareño para lavar platos. Aplique con una
tela suave y deje que se seque.
NOTA: El adhesivo deberá ser eliminado de todas las partes.
No se puede retirar si se hornea con éste dentro.
LEA Y GUARDE ESTAS INSTRUCCIONES
INFORMACIÓN IMPORTANTE DE SEGURIDAD
LEA TODAS LAS INSTRUCCIONES ANTES DE USAR ESTE ELECTRODOMÉSTICO
INFORMACIÓN DE SEGURIDAD

8 49-85244
Información de Diseño
NOTA: No todas las características se encuentran en todos los modelos. La apariencia puede cambiar.
Características de su Cocina
USO DE LA COCINA: Características de su Cocina
4
2
3
8
7
5
6
10
1
1
3
6 quemadores y plancha
6 quemadores a gas
2
9
El modelo de horno doble ilustrado incluye un horno pequeño.
Tabla para cortar
de bambú
Tapa de la PlanchaPlaca de protección
Índice de Características Página
1 Ventilaciones del horno 14
2 Plancha 11
3 Rejillas de los quemadores de la estufa 32
4 Perilla de Control del Quemador 9, 26
5 Pantalla del horno 13
6 Mini perilla
SDUDVHOHFFLRQDU352%(VRQGD7,0(5WHPSRUL]DGRUR
Special Features (características especiales)
13, 26
7 Selector de modo horno 13
8 Perilla de temperatura del horno 13
9 Temporizador de cocina 13, 24
10 Sistema nivelador (4) —
Accesorios Opcionales Página
1 Tabla para cortar de bambú (en algunos modelos) 33
2 Placa de protección —
3 Tapa de la Plancha (en algunos modelos) —
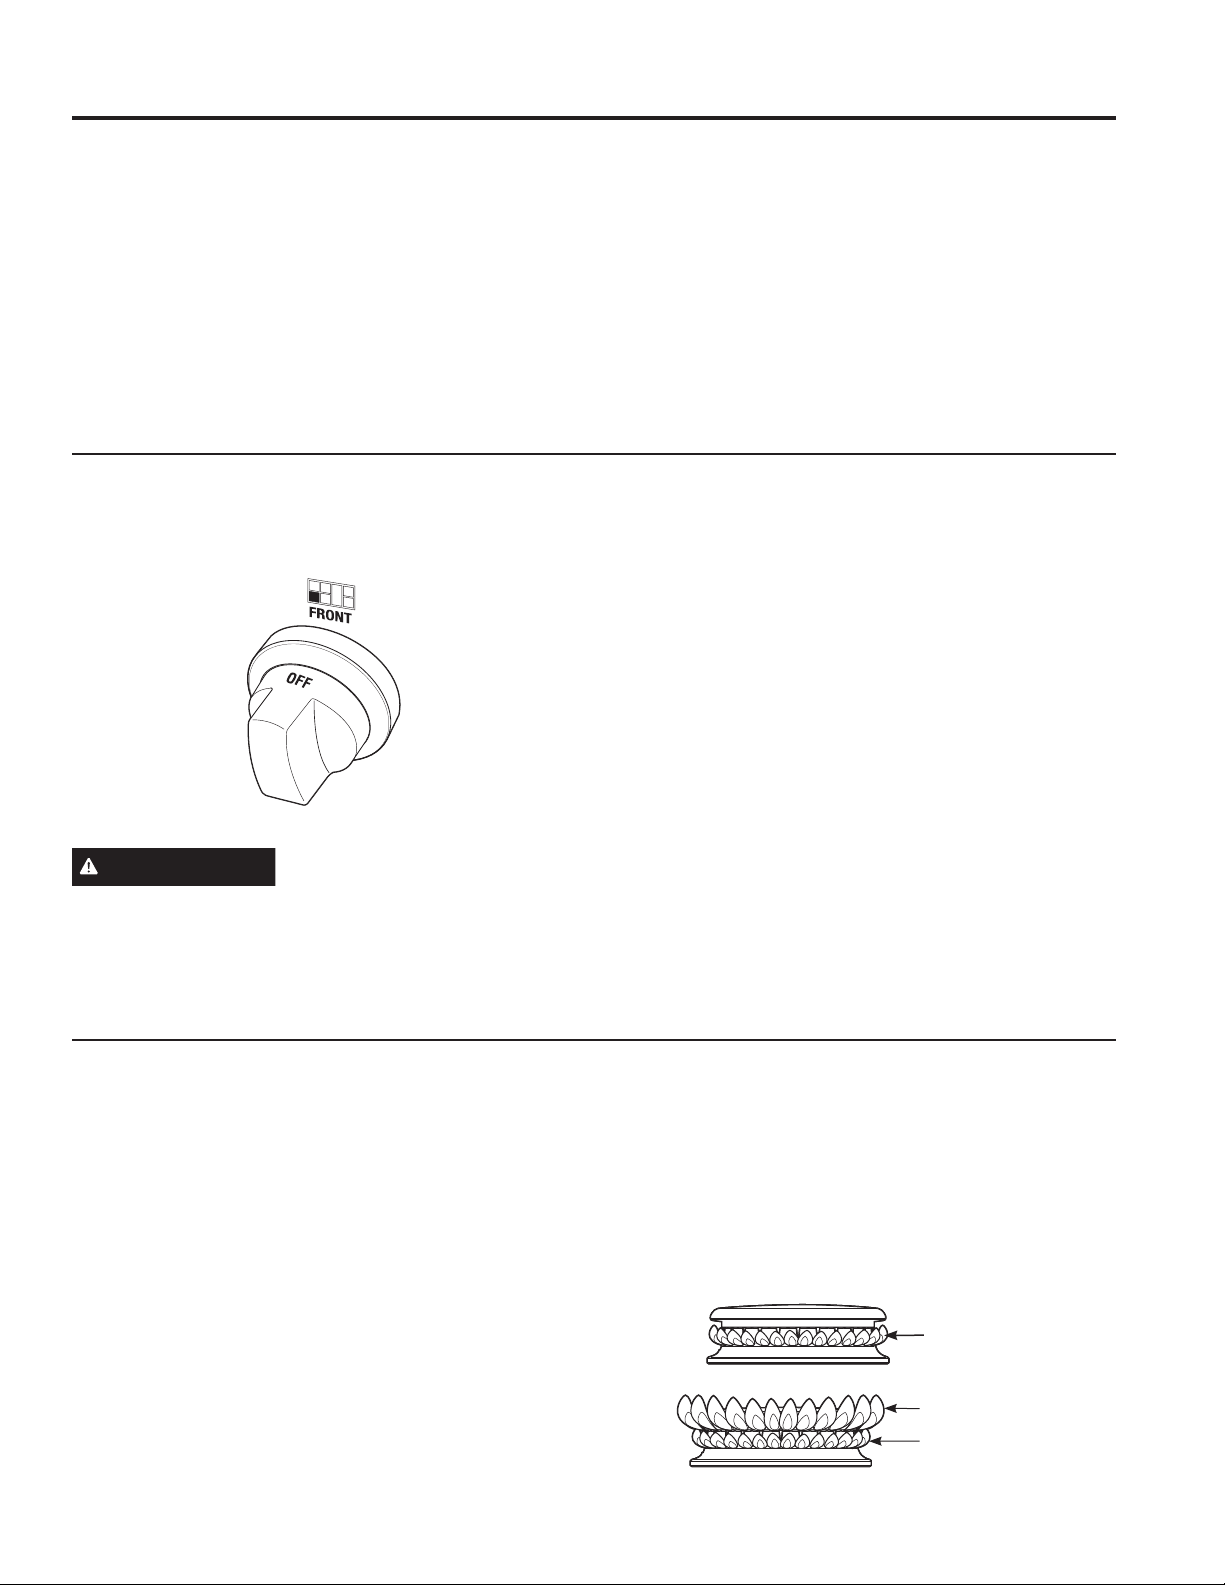
49-85244 9
Llama inferior
Llama superior
Llama inferior
USO DE LA COCINA: Controles de la Estufa
Controles de la Estufa
Encendido Electrónico y Reencendido Automático
La cocina se encuentra equipada con un encendido electrónico
que elimina la necesidad de una luz piloto fija.
Los quemadores de esta cocina vuelven a encenderse
automáticamente si la llamas e apaga.
Todos los encendedores de quemadores de superficie
chispearán y harán chasquidos cuando cualquier quemador
se enciende. No toque ningún quemador cuando los
encendedores se encuentran chasqueando.
Ocasionalmente los quemadores pueden chasquear si un
viento o corriente fuertes alejan la llama del sensor de llama
del quemador.
Si ocurriera un corte de energía, usted puede encender los
quemadores de superficie con un cerillo. Sostenga un cerillo
encendido cerca d el quemador, luego gire la perilla a la
posición LOW (baja). Tenga mucho cuidado al encender los
quemadores de esta manera.
No intente iluminar la plancha durante un corte de
corriente. El gas que alimenta estos quemadores se cerrará
automáticamente durante un corte de energía.
Cómo Encender un Quemador de Superficie
Presione la perilla de control hacia adentro y gírela en sentido
contrario a las agujas del reloj a la posición LITE (encender).
ADVERTENCIA
Los quemadores sólo deben ser
XVDGRVFXDQGRHVWpQFXELHUWRVSRUORVXWHQVLOLRV/DV
OODPDVGHORVTXHPDGRUHVTXHQRHVWpQFXELHUWDVSRUHO
utensilio presentan un riesgo de incendio o incendio de
telas. Nunca permita que las llamas se extiendan más allá
de los costados del utensilio. Si esto no se cumple, se
podrán producir lesiones graves.
'HVSXpVGHTXHVHHQFLHQGDHOTXHPDGRU gire la perilla
para ajustar el tamaño de la llama.
Para apagar el quemador, gire la perilla en sentido de las
agujas del reloj, hasta el máximo, a la posición OFF.
Ŷ No haga funcionar el quemador durante un período
prolongado sin recipientes de cocción sobre la rejilla. El
acabado de la rejilla puede saltarse sin un recipiente que
absorba el calor.
Quemadores Apilados de Llama Dual
Todos los quemadores de superficie de su cocina cuentan
con dos equipos de llamas apilados uno encima del otro; los
quemadores de llama dual tienen una llama inferior (fuego
lento) y una llama superior (principal).
Cuando se enciende un quemador, la llama inferior siempre se
encenderá y quedará prendida.
Fuego lento:
El diseño de quemadores apilados ofrece una amplia gama
de configuraciones de calor para poder cocinar a fuego lento.
'HSHQGLHQGRGHOWLSR\FDQWLGDGGHDOLPHQWRV\GHOWDPDxR
del recipiente, la llama puede ajustarse a sus necesidades
específicas. La configuración más baja utiliza sólo la llama más
baja y puede mantener alimentos delicados a una temperatura
segura de 140°F.
Cocción:
Las configuraciones desde LO (baja) a X-HI (extra alta)
XWLOL]DQODVOODPDVDOWDV\EDMDV8WLOLFHGHLO (baja) a HI (alta)
SDUDFRFFLyQJHQHUDO8WLOLFHHI (alta) o X-HI (extra alta) para
recipientes de un diámetro mayor
X-HI (extra alta) y HI (alta) son configuraciones muy altas y se
utilizan para dorar alimentos rápidamente y para hervir grandes
cantidades de agua.
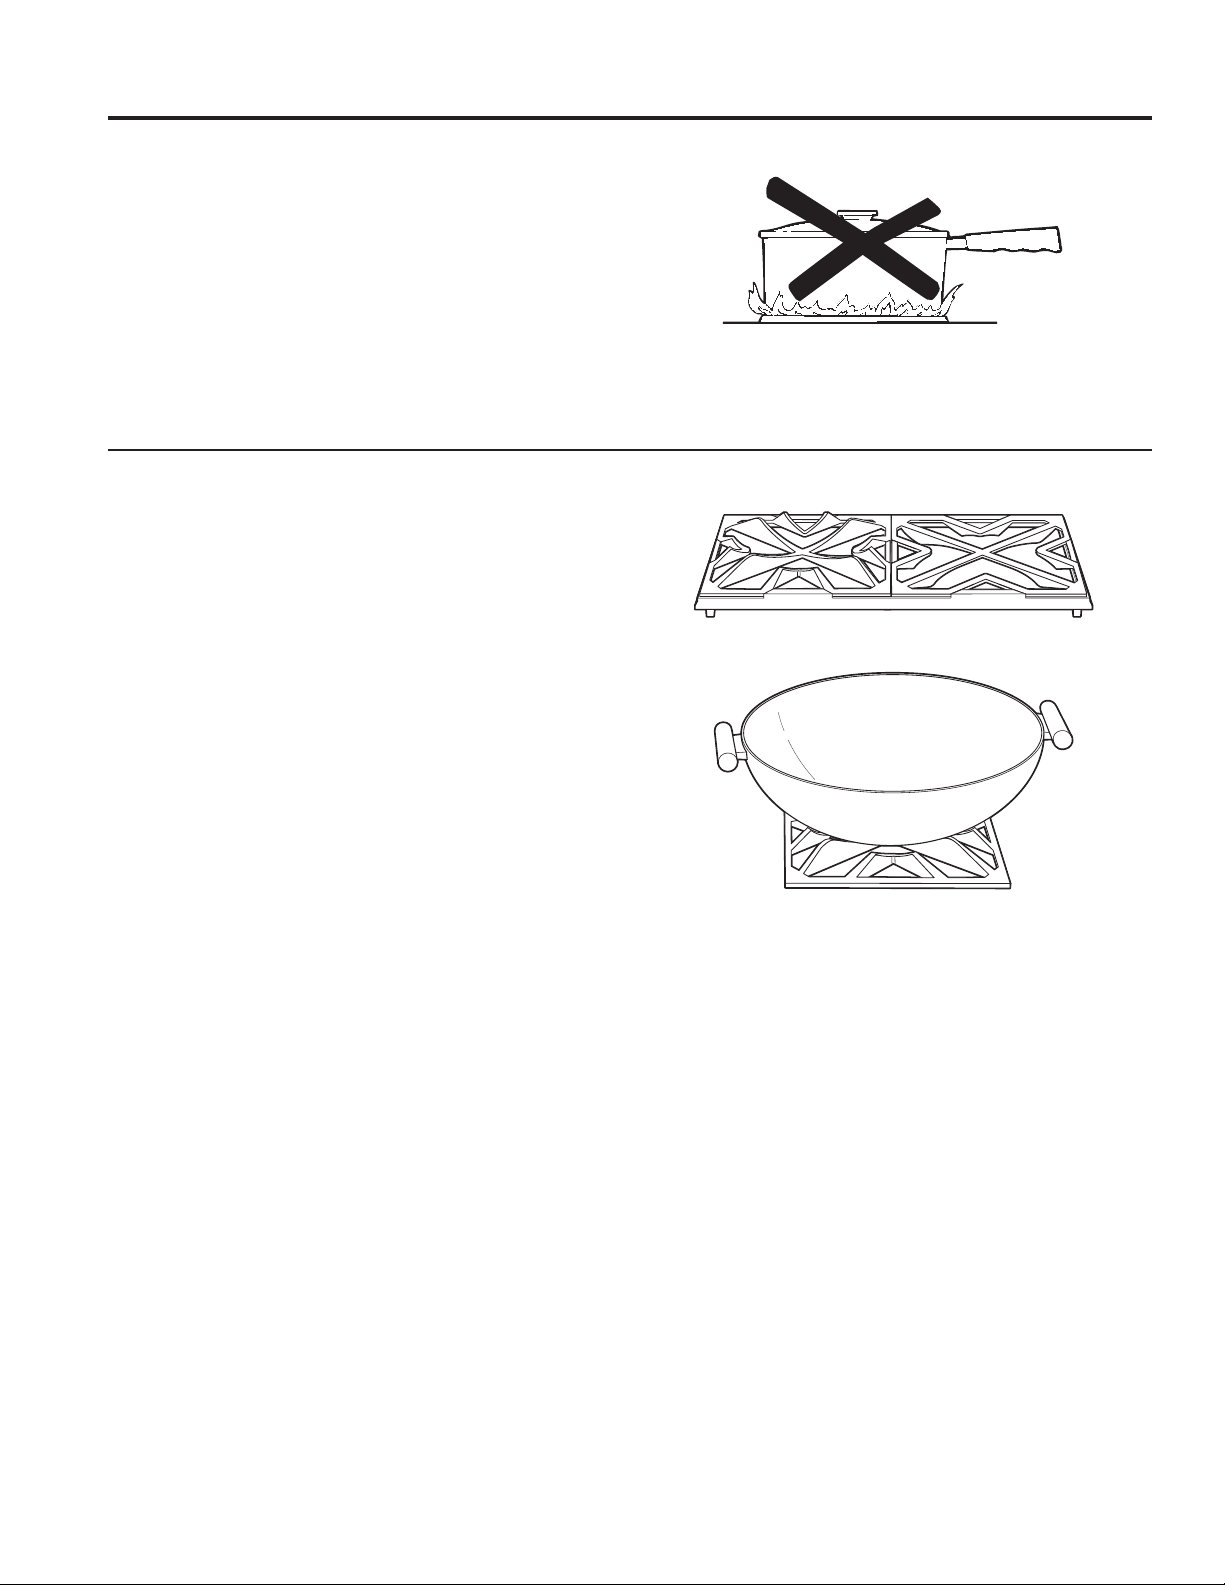
10 49-85244
Cómo Elegir el Tamaño de la Llama
Mire la llama, no la perilla, mientras reduzca o incremente el
calor.
El tamaño de la llama del quemador a gas debe ajustarse al
recipiente que esté usando.
3$5$810$1(-26(*852'(/265(&,3,(17(6'(
&2&&,Ï1181&$'(-(48(/$6//$0$66((;7,(1'$1
0È6$//È'(/26/$'26'(/265(&,3,(17(68WLOL]DU
llamas de un tamaño mayor a la base de los recipientes no los
calentará más rápido y podría resultar peligroso.
Para lograr estabilidad de la superficie, se recomienda un
UHFLSLHQWHGHFRFFLyQGHXQGLiPHWURPtQLPRGH´8WLOLFH
recipientes de una diámetro mayor en configuraciones de calor
entre HI (alta) y X-HI (extra alta).
Cocción en Wok
Las rejillas de los quemadores cuentan con un diseño único
para poder cocinar en ambos lados. El lado plano se utiliza
con recipientes de base plana (ollas grandes, cacerolas,
VDUWHQHV\ZRNVGHEDVHSODQDPLHQWUDVTXHHOODGRGHOZRN
VHHQFXHQWUDGLVHxDGRSDUDVRVWHQHUXQDYDULHGDGGHZRNVGH
base redonda sin la necesidad de un anillo separado.
Para un acceso sencillo, se recomienda el uso de un
quemador frontal para la cocción con wok.
Se recomienda el quemador frontal central para la cocción con
ZRNHQFRFLQDVGHTXHPDGRUHVGH´\´
1RXVHXQDQLOORGHVRSRUWHSDUDZRN&RORFDUHODQLOORVREUH
el quemador o parrilla podrá hacer que el quemador funcione
de forma inadecuada, produciendo niveles de monóxido de
carbono que superan los estándares permitidos. Esto puede
ser peligroso para su salud.
/DGRSDUDZRN Lado plano
Cocción Sobre Superficie
USO DE LA COCINA: Cocción Sobre Superficie
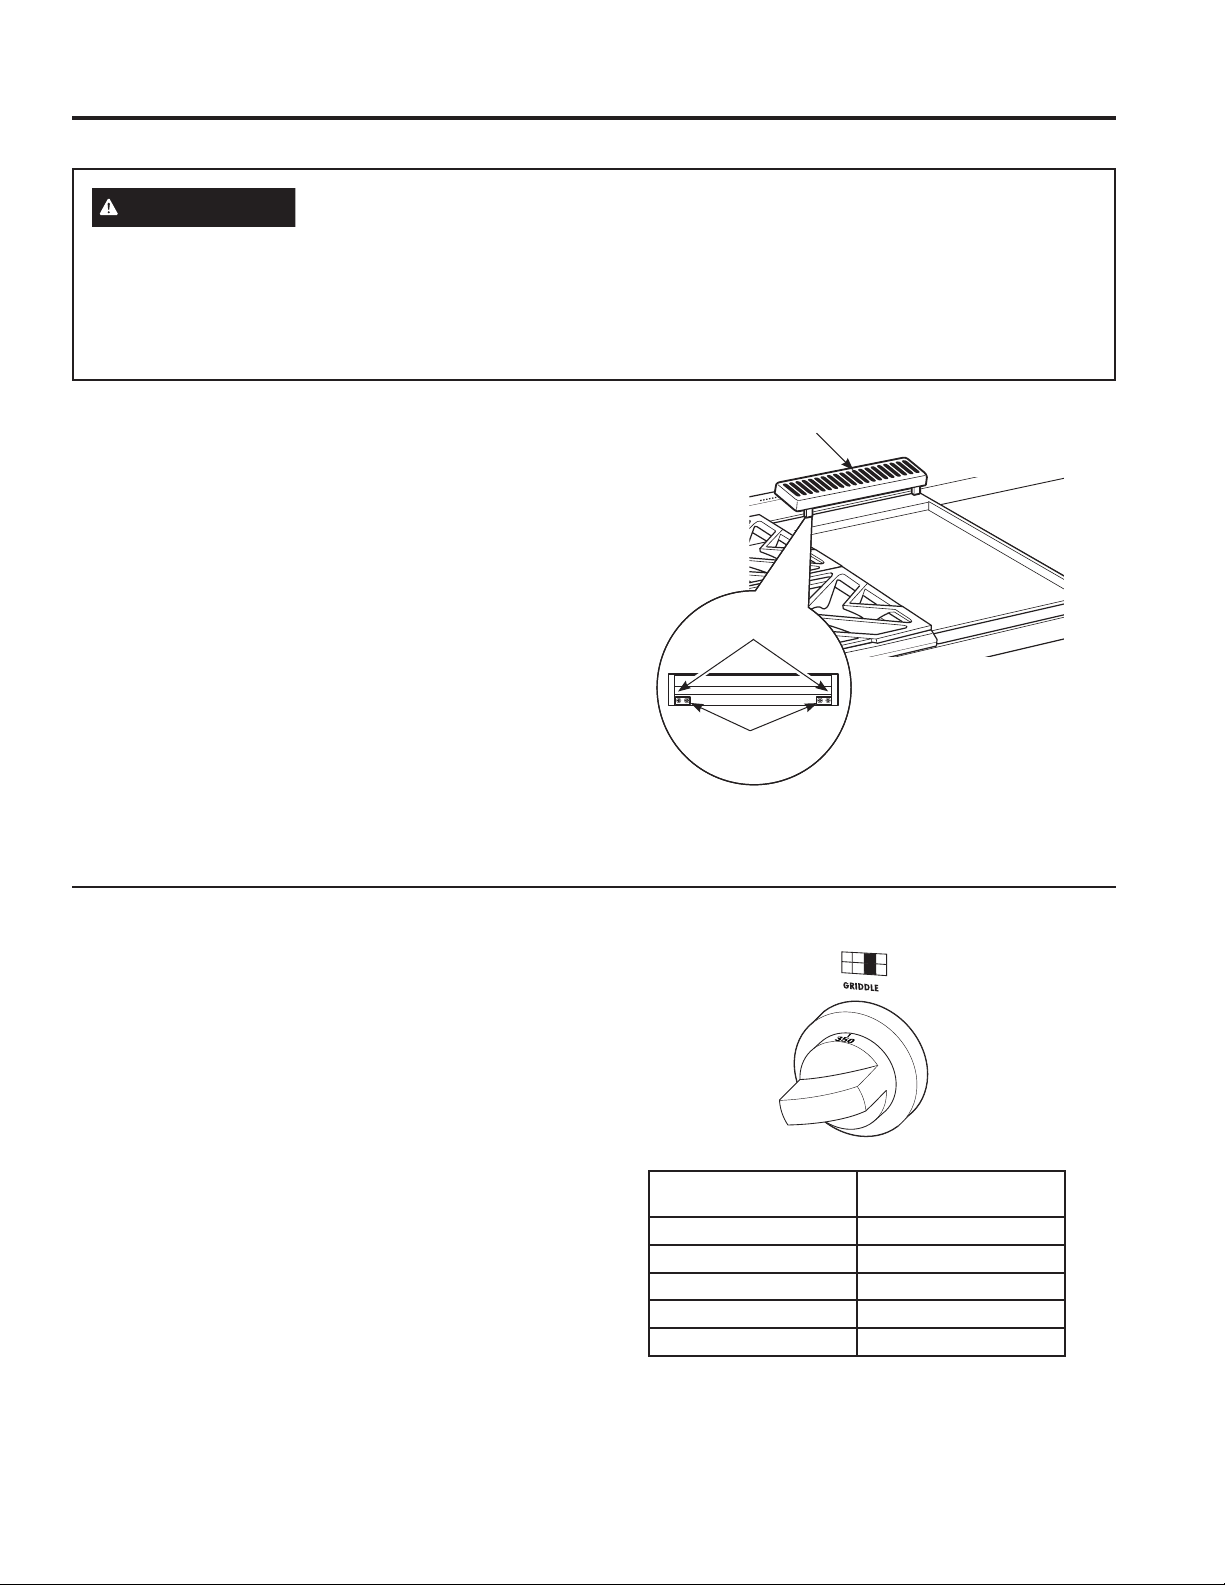
49-85244 11
Cocción Sobre Superficie (Cont.)
USO DE LA COCINA: Cocción Sobre Superficie
Cómo Usar la Plancha
Limpie la plancha completamente con agua caliente y jabón
antes del primer uso y luego de usos subsiguientes. La
superficie de la plancha es de acero inoxidable Tipo 304
altamente pulido y duradero, reforzado con una placa de
aluminio para una distribución pareja del calor. Aplique una
capa fina de aceite de cocina sobre la superficie de la plancha,
a fin de evitar que la comida se pegue.
Para calendar la plancha, presione y gire la perilla de control
hasta la configuración de temperatura deseada. La luz del
engaste brillará para indicar que el control del termostato se
encuentra en funcionamiento. La plancha es controlada por
termostato y puede ser configurada para mantener cualquier
temperatura entre 200ºF y 450ºF. Espere hasta que la plancha
se precaliente durante 10 minutos antes de colocar comida en
la misma.
NOTA: A diferencia de los quemadores de la superficie, los
cuales usan encendido a chispa, la plancha usa un encendido
SRULQFDQGHVFHQFLD*OR%DU(OJDVIOX\HKDVWDHOTXHPDGRU
de la plancha y el encendido se produce aproximadamente 45
segundos después de que la perilla de control es girada hasta
la temperatura configurada.
Alimento
Configuración de
temperatura
Panqueques 375ºF
+DPEXUJXHVDV 400ºF
Tocino* 400ºF
Queso asado 350ºF
+XHYRV 275ºF
* NOTA: Coloque el tocino sobre una plancha fría. No la
precaliente.
Precauciones de seguridad y nivelación de la plancha (en algunos modelos)
ADVERTENCIA
Riesgo de Incendio
Ŷ 7HQJDFXLGDGRDOFRFLQDUFRPLGDVFRQJUDVD/DJUDVDHVSDUFLGDSXHGHSURYRFDUXQLQFHQGLR
Ŷ 1XQFDFRORTXHQLJXDUGHXQDUWtFXORHQODSODQFKDLQFOXVRFXDQGRQRHVWpHQXVR(OFDORUGHORVGHPiV
quemadores puede calentar la plancha y provocar un incendio.
Ŷ &RORTXH\UHWLUHODSODQFKDVyORFXDQGRWRGDVODVSDUULOODV\ODSODQFKDHVWpQIUtDV\WRGDVODVXQLGDGHV
VXSHUILFLDOHVHVWpQHQ2))$SDJDGR
Quite la tapa de metal y la tabla para cortar antes de encender
la plancha.
La ensambladura de la plancha no debe quitarse para la
OLPSLH]D
8QDYH]TXHODXQLGDGVHHQFXHQWUDHQVXSRVLFLyQODSODQFKD
puede nivelarse. Quite la tapa de ventilación levantándola
hacia arriba. Asegúrese de no rayar las superficies de acero
inoxidable cercanas mientras quita la tapa de ventilación.
Los dos tornillos internos son tornillos de apriete para asegurar
la plancha en su lugar. Afloje los dos tornillos antes de nivelar.
No quite estos dos tornillos.
Los dos tornillos exteriores son tornillos de nivelación. No
quite estos dos tornillos. Pueden girarse para nivelar la
plancha o para brindar una inclinación hacia adelante para que
las grasas y aceites se escurran de los alimentos que se están
FRFLQDQGR'HVSXpVGHORVSULPHURVXVRVXVWHGSRGUiMX]JDU
la inclinación que mejor se ajuste a los alimentos que está
cocinando y a su preferencia personal.
'HVSXpVGHQLYHODUODSODQFKDDMXVWHORVWRUQLOORVGHDSULHWH
para asegurar la plancha en su lugar. Ajuste los tornillos a
PDQRQRDMXVWHGHPiV
Tapa de
ventilación de la
plancha
Tornillos
de apriete
Tornillos
de nivelación
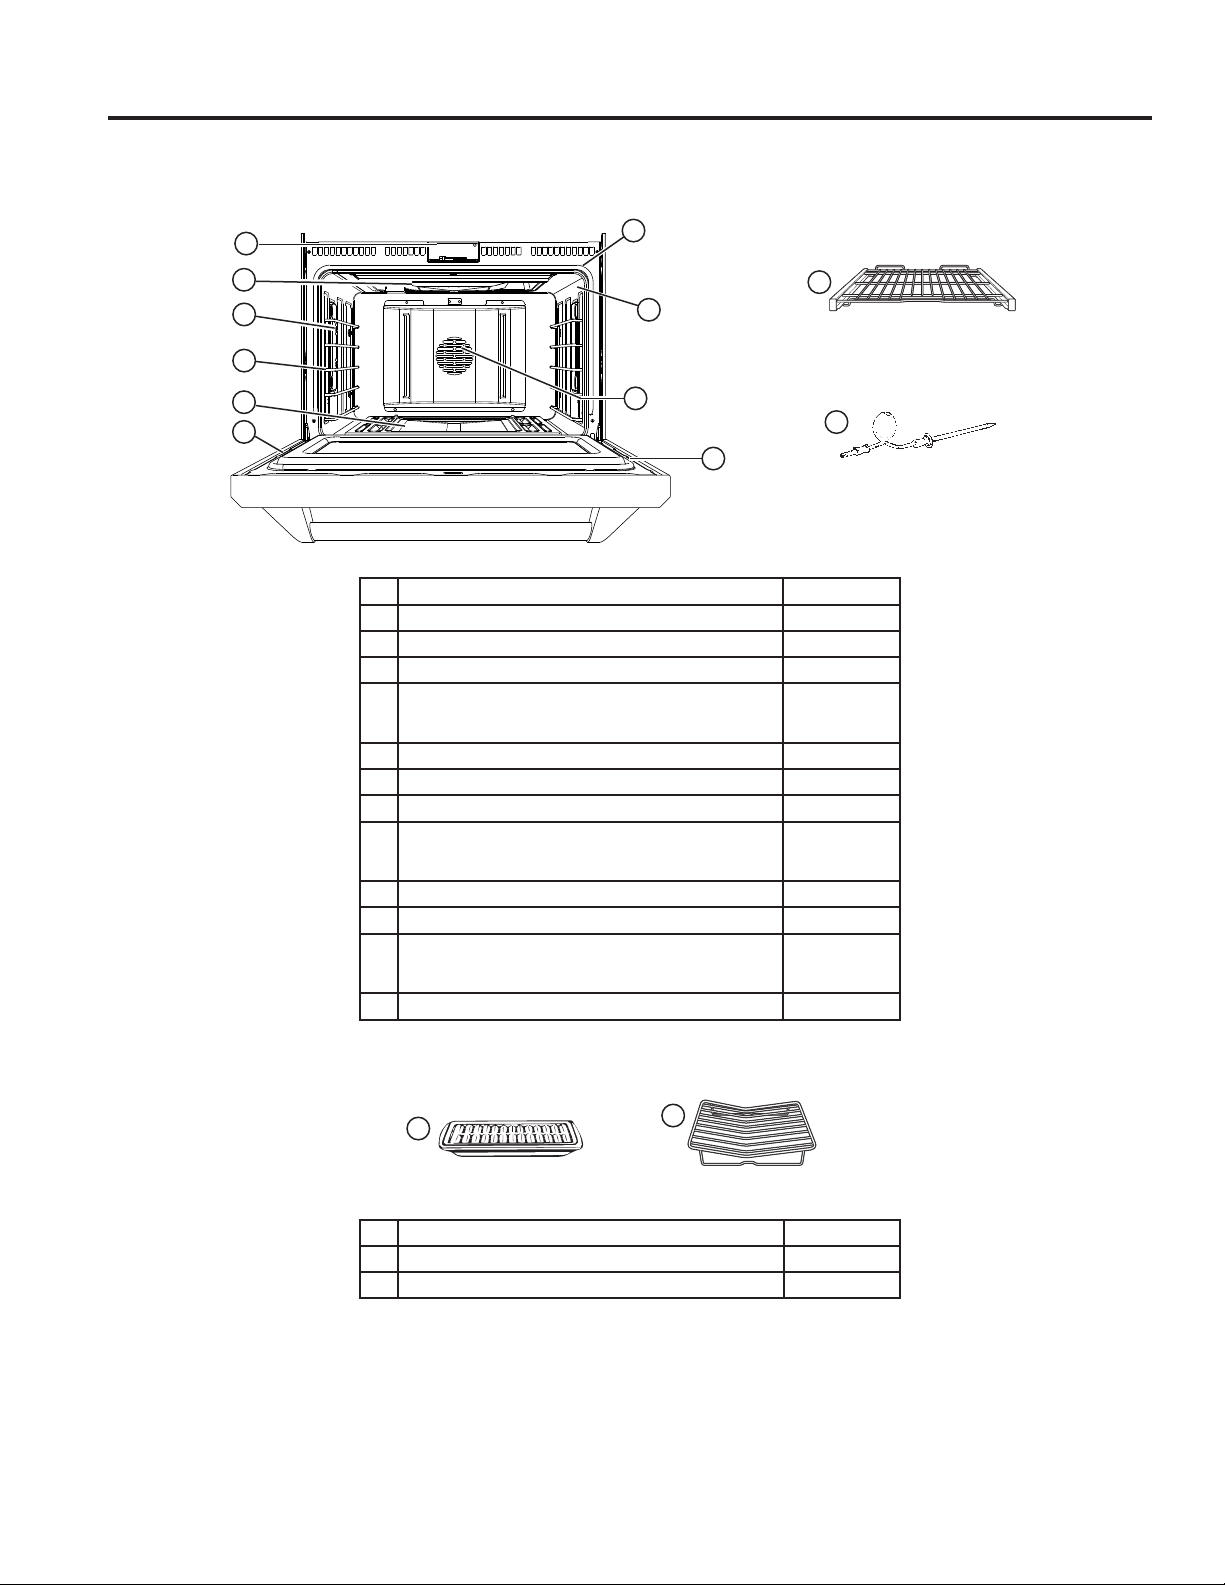
12 49-85244
Accesorios Opcionales Página
1 Asadera y rejilla de la asadera 19, 26
2 %DQGHMDGHURVWL]DGR 19, 26
Características de su Horno
USO DE LA COCINA:&DUDFWHUtVWLFDVGHVX+RUQR
Información de Diseño
NOTA: No todas las características se encuentran en todos los modelos.
1
2
Asadera y rejilla
de la asadera
%DQGHMDGHURVWL]DGR
Índice de Características Página
1 Traba automática de la puerta del horno —
2 Elementos para Asar (2) 26
3 Luces halógenas del horno 29
4 Soportes de la bandeja del horno
— 5 posiciones en un horno grande
— 4 posiciones en un horno pequeño
16, 20
5 (OHPHQWRSDUD+RUQHDUGHEDMRGHOSLVRGHOKRUQR 26
6 -XQWDGHODSXHUWDGHOKRUQR 30
7 -XQWDGHODUPD]yQGHOKRUQR 30
8 Salida de la sonda de temperatura
— lado derecho en un horno grande
— lado izquierdo en un horno pequeño
21
9 Ventilador de Convección 19, 20
10 Puerta del horno 28, 30
11 %DQGHMDVGHOKRUQRGHH[WHQVLyQWRWDO
— 1 en un horno grande
— 2 en un horno pequeño
15, 16, 20, 27
12 Sonda de temperatura 21, 28
NOTA: Los modelos con horno pequeño tienen las mismas características de un
horno grande.
12
11
%DQGHMDGHOKRUQR
de extensión total
Sonda de temperatura
10
4
1
9
7
8
5
6
3
2
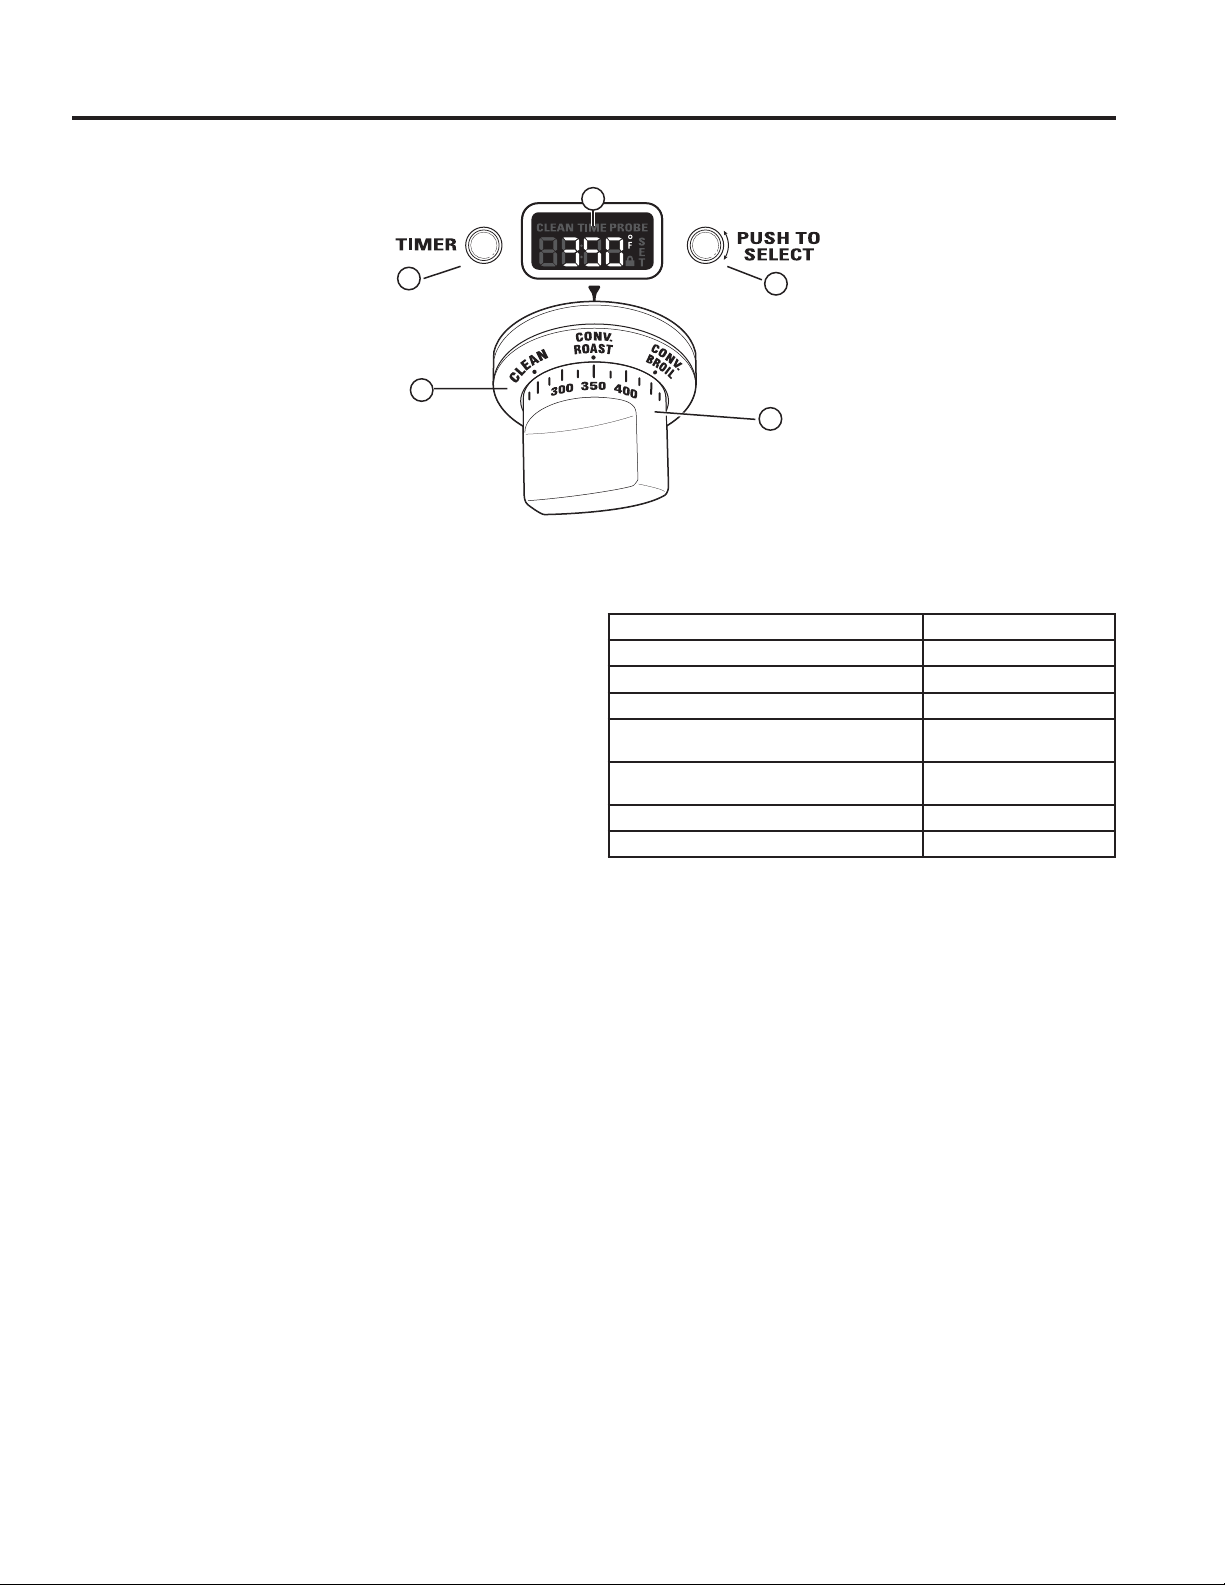
49-85244 13
&DUDFWHUtVWLFDVGHO&RQWUROGHO+RUQR\GHO7HPSRUL]DGRU
1 Selector de modo del horno – Gire el anillo
H[WHULRUSDUDHOHJLU
PROOF (leudado) – Mantiene un medio tibio útil para
leudar productos con levadura.
BAKE (horneado) – Seleccione para horneado tradicional.
CONV BAKE (horneado por convección) –8WLOLFHSDUD
horneado por convección.
&21952$67URVWL]DGRSRUFRQYHFFLyQ±8WLOLFHSDUD
rostizar por convección.
BROIL (asado) – Seleccione para asar.
&/($1OLPSLH]D±Seleccione para la función de auto-
OLPSLH]D9HUODVHFFLyQ+RUQRDXWROLPSLDQWH
2 Perilla de temperatura –*LUHSDUDVHOHFFLRQDU
Temperaturas de 175°F a 550°F.
LOW BROIL (asado baja) – Se configura automáticamente
una temperatura de asado menor.
HIGH BROIL (asado alta) – Se configura automáticamente
una temperatura de asado mayor.
&/($1OLPSLH]D± Se configura automáticamente la
temperatura de auto-limpieza.
3 Mini-perilla – Gírela para seleccionar y presione para
LQJUHVDUODVFRQILJXUDFLRQHV352%(VRQGDR7,0(5
(temporizador). También para ajustar el tiempo del ciclo
CLEAN (limpieza).
%RWyQGHOWHPSRUL]DGRU – Presione para elegir
la función del temporizador de cocina. El temporizador no
controla las operaciones del horno.
5 Pantalla del horno – Muestra las funciones del
horno tales como las temperaturas del horno y de la sonda
y el temporizador de cocina.
El selector de modo del horno (1) Y la perilla de temperatura
(2) deben configurarse juntos en uno de los siguientes pares
YiOLGRV
Para cancelar una característica, gire la perilla de selector
de modo del horno o la perilla de temperatura a OFF.
Para cancelar PROOF (leudado), gire el selector de modo del
horno a OFF.
Control del Horno
USO DE LA COCINA:&RQWUROGHO+RUQR
1
4
2
5
3
Selector de modo del horno Perilla de temperatura
%$.(KRUQHDGR 175º to 550°F
&219%$.(KRUQHDGRSRUFRQYHFFLyQ 175º to 550°F
&219(&7,2152$67FRQYHFFLyQURVWL]DGR 175º to 550°F
&219(&7,21%52,/FRQYHFFLyQDVDGR +,*+DOWDR
/2:%52,/DVDGREDMD
%52,/DVDGR +,*+DOWDR
/2:%52,/DVDGREDMD
CLEAN (limpieza) CLEAN (limpieza)
PROOF (leudado) —
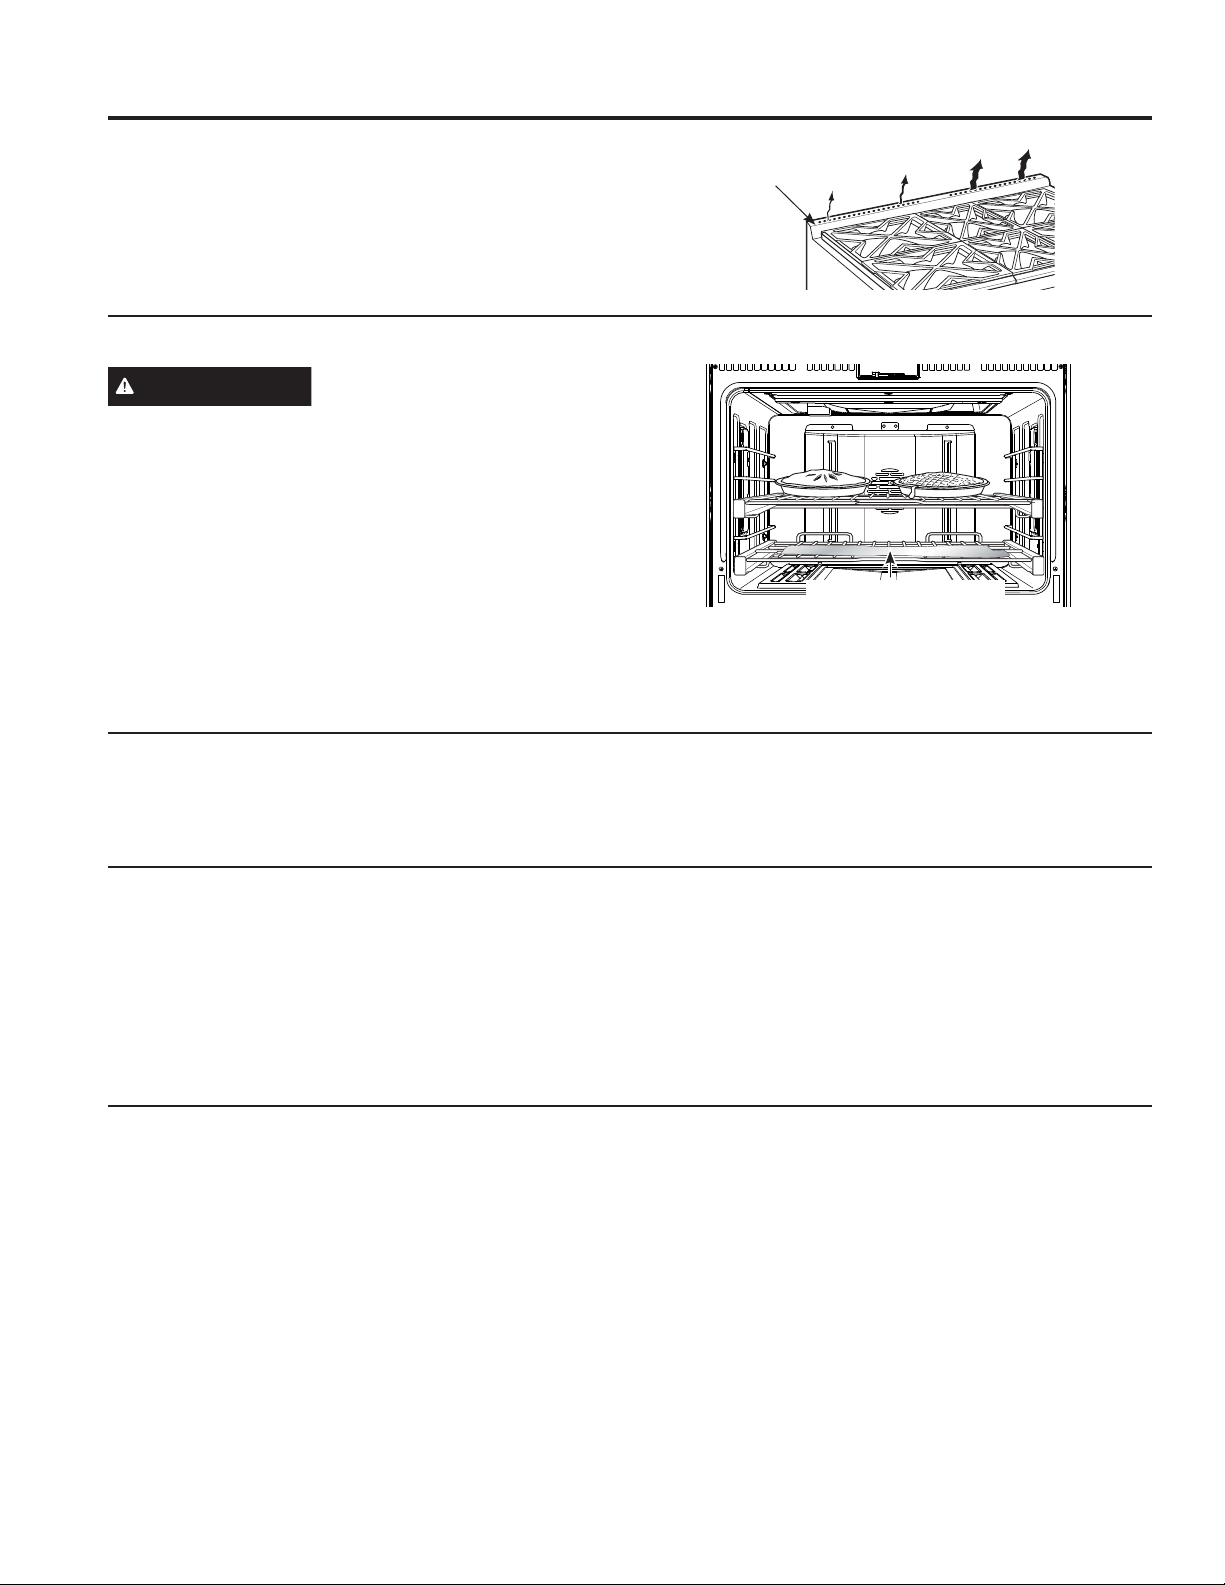
14 49-85244
Ventilaciones Traseras del Horno
'XUDQWHWRGRVORVPRGRVGHOKRUQRIXQFLRQDXQYHQWLODGRU
interno de enfriamiento. El aire caliente del horno se libera a
través de ventilaciones ubicadas en la parte trasera de la estufa.
No permita que el flujo de aire proveniente de las ventilaciones
traseras quede obstruido por recipientes de cocción o toallas.
Papel de Aluminio y Cobertores del Horno
PRECAUCIÓN
No use ningún tipo de aluminio o
cobertor de horno para cubrir el fondo del horno. Estos ítems
pueden atrapar el calor o derretirse, ocasionando daños sobre
el producto y el riesgo de descargas, humo o incendios. Los
daños por uso inadecuado de estos ítems no están cubiertos
por la garantía del producto.
Se podrá usar aluminio para evitar derrames, colocando una
hoja sobre un estante inferior varias pulgadas debajo de la
comida. No use más aluminio que el necesario y nunca cubra
totalmente el estante de un horno con papel de aluminio.
0DQWHQJDHODOXPLQLRDSRUORPHQRV´GHODVSDUHGHVGHO
horno, para evitar una circulación deficiente del calor.
NOTA: La nota que indica que no se coloque papel aluminio
en el fondo del horno está esmaltada en la base de la cavidad
del horno y está diseñada para resistir temperaturas de auto-
limpieza. No intente quitarla o rasparla.
Moldes/Bandejas de Horneado
8WLOLFHHOPROGHGHKRUQHDGRDGHFXDGR(OWLSRGHDFDEDGRGHOPROGHDIHFWDHOGRUDGRGHODSUHSDUDFLyQ
Ŷ Los moldes oscuros, ásperos o sin brillo absorben el calor,
ORTXHFUHDXQDFRUWH]DPiVGRUDGD\FUXMLHQWH8WLOLFHHVWD
clase para tartas.
Ŷ Los moldes brillantes, claros y lisos reflejan el calor, lo
que crea una dorado más claro y delicado. Los pasteles y
galletas requieren esta clase de molde o bandeja.
Ŷ Los recipientes de vidrio para hornear también absorben el
calor. Cuando hornee en recipientes de vidrio, puede tener
que reducir la temperatura en 25°F.
Precalentamiento
Permita que el horno se precaliente antes de colocar alimentos
en el horno. El precalentamiento es necesario para obtener
buenos resultados cuando hornee pasteles, galletas, pastelitos
y panes.
NOTA: La condensación o neblina al interior del vidrio de la
puerta del horno es normal durante el pre-calentamiento del
horno y por lo general se evaporará hacia el final del ciclo de
pre-calentamiento.
Ubicación de Moldes
Para una cocción uniforme y un dorado adecuado, tiene que haber suficiente espacio para la circulación de aire en el horno. Los
resultados del horneado serán mejores si los moldes de horneado se hallan lo más cerca posible del centro del horno, en lugar
de en el frente o en la parte trasera.
Consejos de Horneado
USO DE LA COCINA:&RQVHMRVGH+RUQHDGR
No bloquee las
ventilaciones traseras
Papel de aluminio para
retener derrames
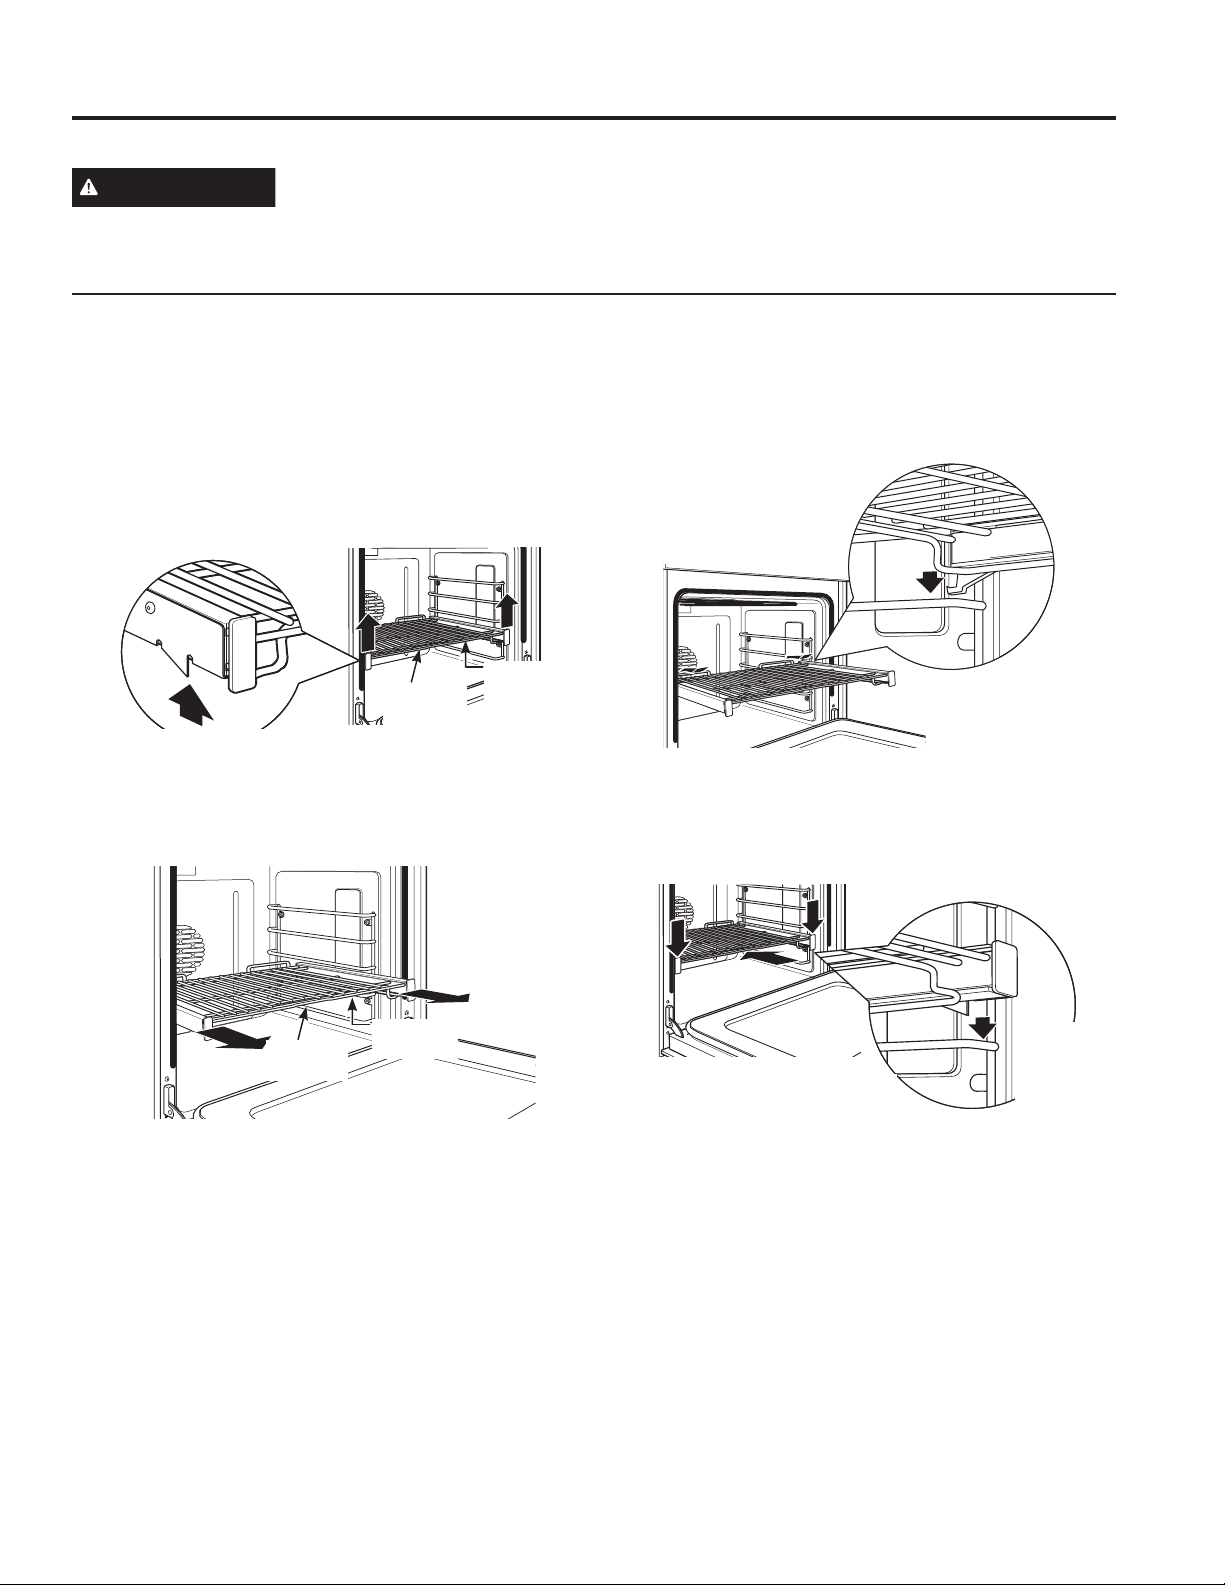
49-85244 15
Bandejas del Horno de Extensión Total
PRECAUCIÓN
Para evitar posibles quemaduras,
coloque las bandejas en la posición correcta antes de
encender el horno. La posición correcta de la bandeja depende
de la clase de alimento y del nivel de dorado deseado.
Las bandejas cuentan con un armazón que bloquea los
VRSRUWHVVREUHDPERVODGRV8QDYH]TXHHODUPD]yQVH
encuentra bloqueado en su lugar, siempre tire de la bandeja
hacia fuera, de su riel frontal superior, hasta su posición de
extensión total, cuando coloque o quite recipientes de cocción.
Cómo Colocar y Quitar Bandejas del Horno
Para quitar una bandeja:
1. Asegúrese de empujar la bandeja hasta el fondo del horno.
2. Tome la bandeja desde el riel frontal superior y su riel frontal
inferior y levántela hacia arriba para desbloquear las trabas
de los soportes de la parrilla.
3. Sosteniendo firmemente los rieles de las bandejas frontales
superior e inferior, tire de la parrilla hacia adelante y quítela
del horno.
3DUDUHHPSOD]DUXQDEDQGHMD
1. Coloque las trabas traseras de la bandeja sobre y dentro de
los soportes de la parrilla (hay cinco posiciones de parrilla
incluyendo la posición superior).
'HVOLFHODEDQGHMDKDFLDHOIRQGRKDVWDTXHODVWUDEDV
traseras de la parrilla se encuentren en los soportes de la
parrilla y presione las trabas frontales de la parrilla dentro de
los soportes frontales de la parrilla.
3. Tire la bandeja hacia afuera por completo para verificar que
se halle bien enganchada.
$QWHVGH&RPHQ]DU
USO DE LA COCINA: Antes de Comenzar
Levante para desbloquear las
trabas de la bandeja frontal
del soporte de la parrilla
Riel
frontal
inferior
Riel frontal
superior
Traba frontal de la bandeja
Riel frontal
inferior
Riel frontal
superior
'HVOLFHODEDQGHMDKDVWDHOIRQGR
y presione hacia abajo para
bloquear las trabas frontales
dentro de los soportes frontales
Traba
frontal
de la
bandeja
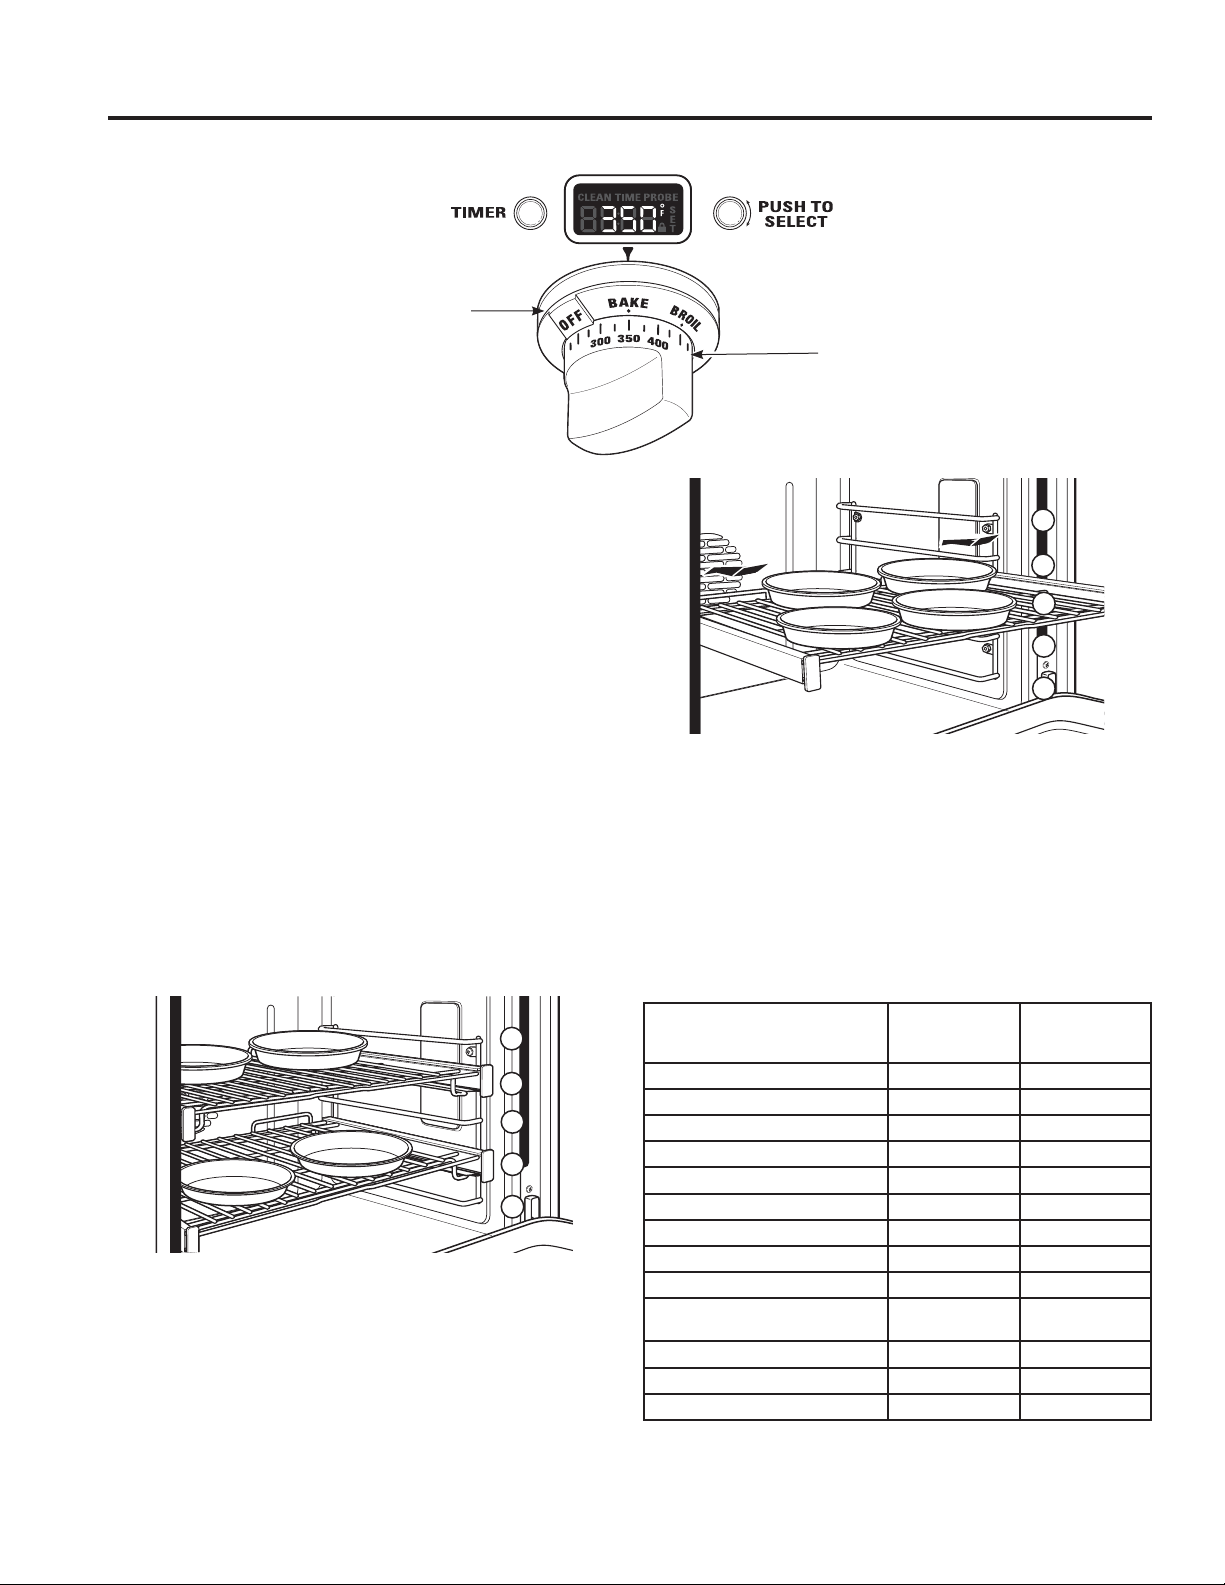
16 49-85244
Cómo Configurar el Horno Para Hornear
1. Gire el selector del modo del horno a BAKE (hornear).
8WLOL]DQGRODSHULOODGHWHPSHUDWXUDFRQILJXUHOD
temperatura deseada, incrementando la temperatura en
unidades de 25°F, de 175°F a 550°F.
El horno comenzará a precalentarse. La pantalla de
temperatura comenzará en 100ºF y seguirá allí hasta que
HOKRUQRVXSHUHGLFKDWHPSHUDWXUD'HVGHHVHSXQWROD
pantalla mostrará la temperatura actual.
Las luces internas se encenderán y continuarán encendidas
hasta que se apague el horno. El ventilador del horno
por convección se encenderá temporalmente durante
el precalentamiento. El control emitirá un pitido cuando
el horno ya haya precalentado y los alimentos pueden
colocarse dentro del horno.
3. Cuando el horneado haya finalizado, gire el selector de modo
del horno y la perilla de temperatura a OFF (apagado).
NOTA: Se encenderá un ventilador de refrigeración para enfriar
las piezas internas. Esto es normal, y el ventilador puede
continuar funcionando aún después de apagado el horno.
8WLOLFHODVRQGDGHWHPSHUDWXUDFXDQGRUHVXOWHLPSRUWDQWHXQD
temperatura interna precisa. Ver Cómo usar la sonda.
Al hornear cuatro capas de torta al mismo tiempo, use los
HVWDQWHV%\'(VFDORQHODVFDFHURODVGHPRGRTXHQRTXHGH
una directamente sobre la otra.
O coloque cuatro cacerolas en una repisa usando la posición
central C. Coloque las cacerolas de modo que cada una posea
XQHVSDFLRGHDLUHGHSRUORPHQRV´DOUHGHGRUGHOD
misma.
El horno tiene 5 posiciones de bandejas. Ver la sección
%DQGHMDVGHOKRUQRGHH[WHQVLyQWRWDOSDUDFRQVXOWDUFyPR
usar, quitar y reemplazar las bandejas.
La cocina de horno doble cuenta con un horno pequeño con 4
posiciones de bandejas. La posición de bandeja C no existe en
el horno pequeño.
Horneado
USO DE LA COCINA:+RUQHDGR
Selector de modo
del horno (exterior)
Perilla de temperatura
del horno (interior)
Las posiciones de estantes sugeridas deben utilizarse como una guía general.
Experimente con estas posiciones mediante alimentos específicos y
preferencia personal.
Tipo de alimento
Horno grande
Posición de las
bandejas
Horno pequeño
Posición de las
bandejas
Pastel “Angel food” A A
Galletas o muffins C $R%
%L]FRFKRV C %
%URZQLHV % %
Pasteles de 2 capas %%
Pasteles de 4 capas C —
Pasteles simples o de 9 x 13 %R& %
Panes rápidos C %
3DVWHOHV%XQGWRGHOLEUD C %
Pasteles caseros o bases de masa
para pasteles % A
Pasteles congelados %R& —
Estofados %R& %
Pizza C %
C
'
%
A
E
C
'
%
A
E
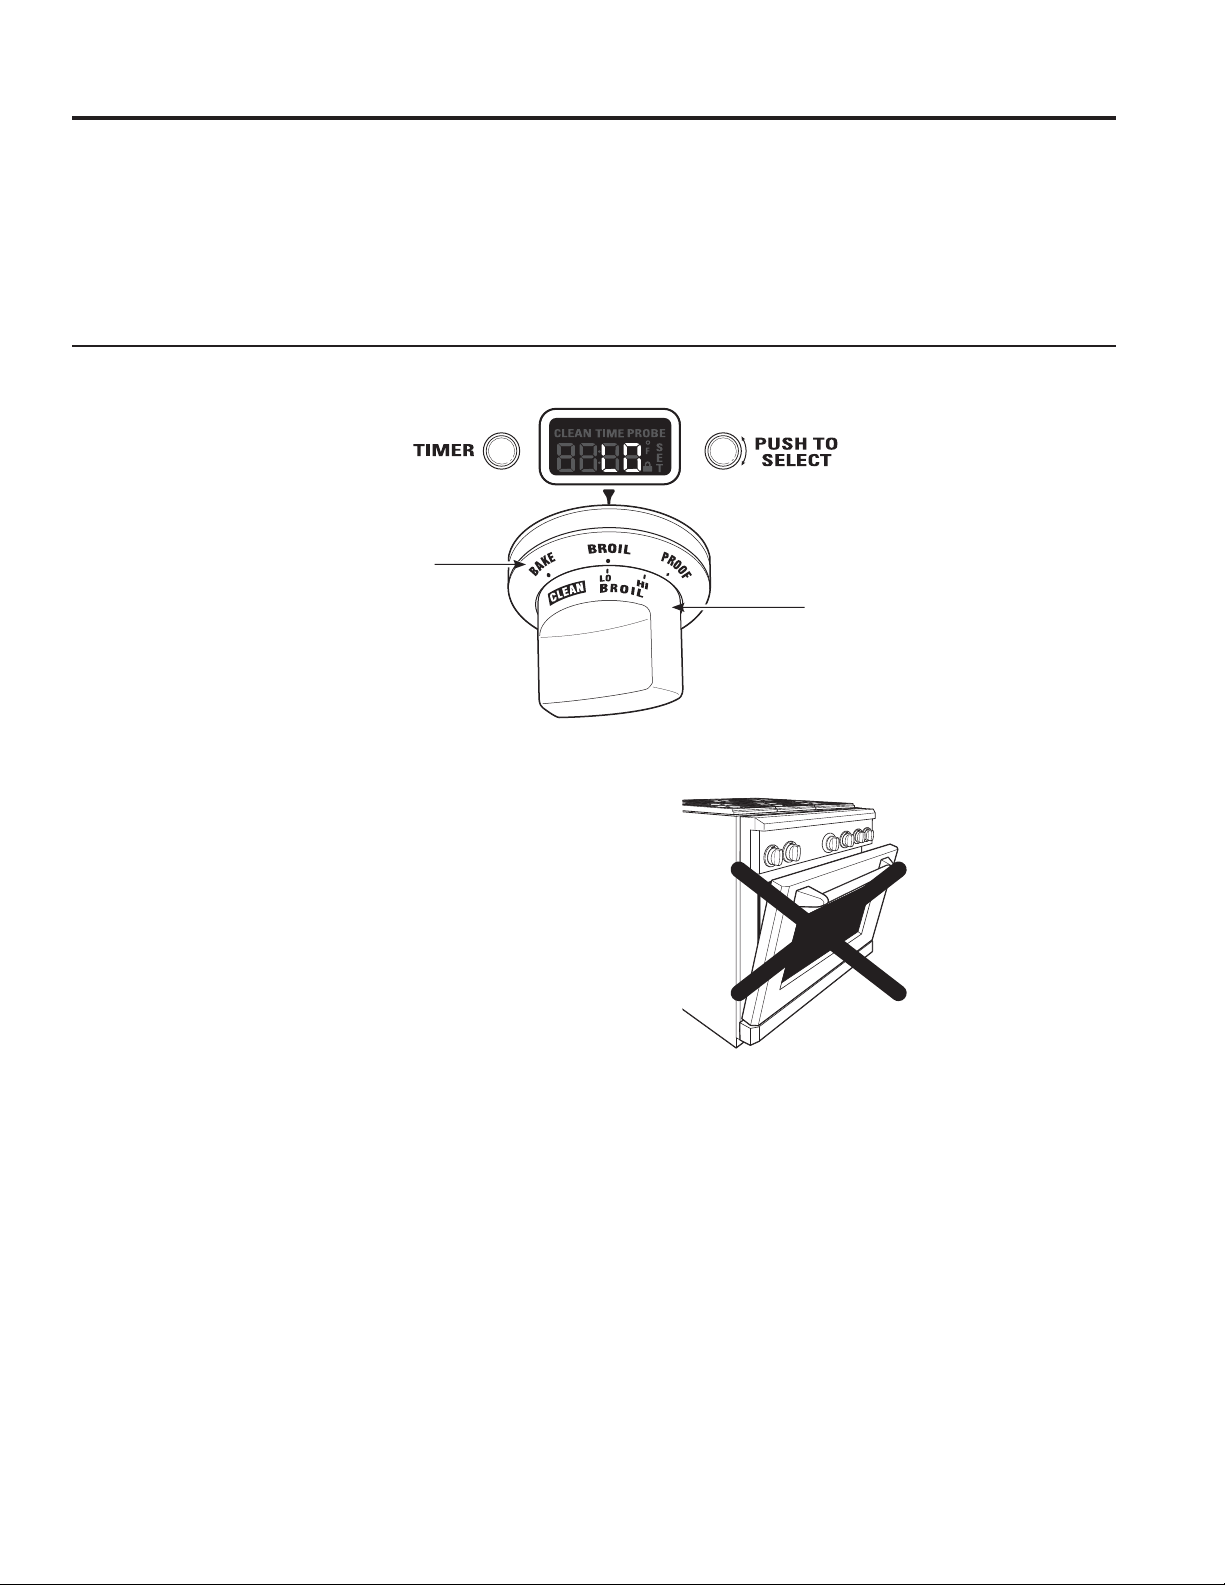
49-85244 17
Introducción al Asado
Existen 2 modos diferentes para asar. Elija la configuración HI (alta) o LO (baja).
Ŷ La configuración HI (alta) puede utilizarse para sellar los
jugos o dorar intensamente o carbonizar, cuando sea
necesario, alimentos tales como hamburguesas, vegetales
rostizados, pimientos enteros, berenjenas, maíz, variedad
GHYHJHWDOHVFRUWDGRVNDEREV\FDUQHVPX\ILQDVFRPR
chuletas de cerdo ahumadas, “London broil” y pollo.
Ŷ La configuración LO (baja) puede utilizarse para alimentos
que necesitan un dorado adecuado y también deben
cocinarse por completo, como filetes de pescado, lomo de
cerdo y asado de carne vacuna.
Cómo Configurar el Horno Para Asar
1. Gire el selector de modo del horno a BROIL (asado).
2. Gire la perilla de temperatura del horno a LO BROIL (asado
baja) o HI BROIL (asado alta). Aparecerán en la pantalla
LO (baja) o HI (alta).
NOTA: Siempre ase con la puerta cerrada. Si la puerta se
deja abierta, en la pantalla aparecerá “CLOSE door” (cerrar la
puerta) y los elementos no se encenderán hasta que se cierre
la puerta.
Las luces internas del horno se encenderán y continuarán
encendidas hasta que se apague el horno.
3. Cuando haya terminado de asar, gire el selector de modo
del horno y la perilla de temperatura a OFF.
NOTA: Se encenderá un ventilador de refrigeración para enfriar
las piezas internas. Esto es normal, y el ventilador puede
continuar funcionando aún después de apagado el horno.
NOTA: El asado no funcionará si la sonda de temperatura se
encuentra enchufada. Nunca deje la sonda dentro del horno
durante un ciclo de asado.
Asado
USO DE LA COCINA: Asado
Selector de modo
del horno (exterior)
Perilla de
temperatura
del horno
(interior)
No está permitido
asar con la puerta
abierta
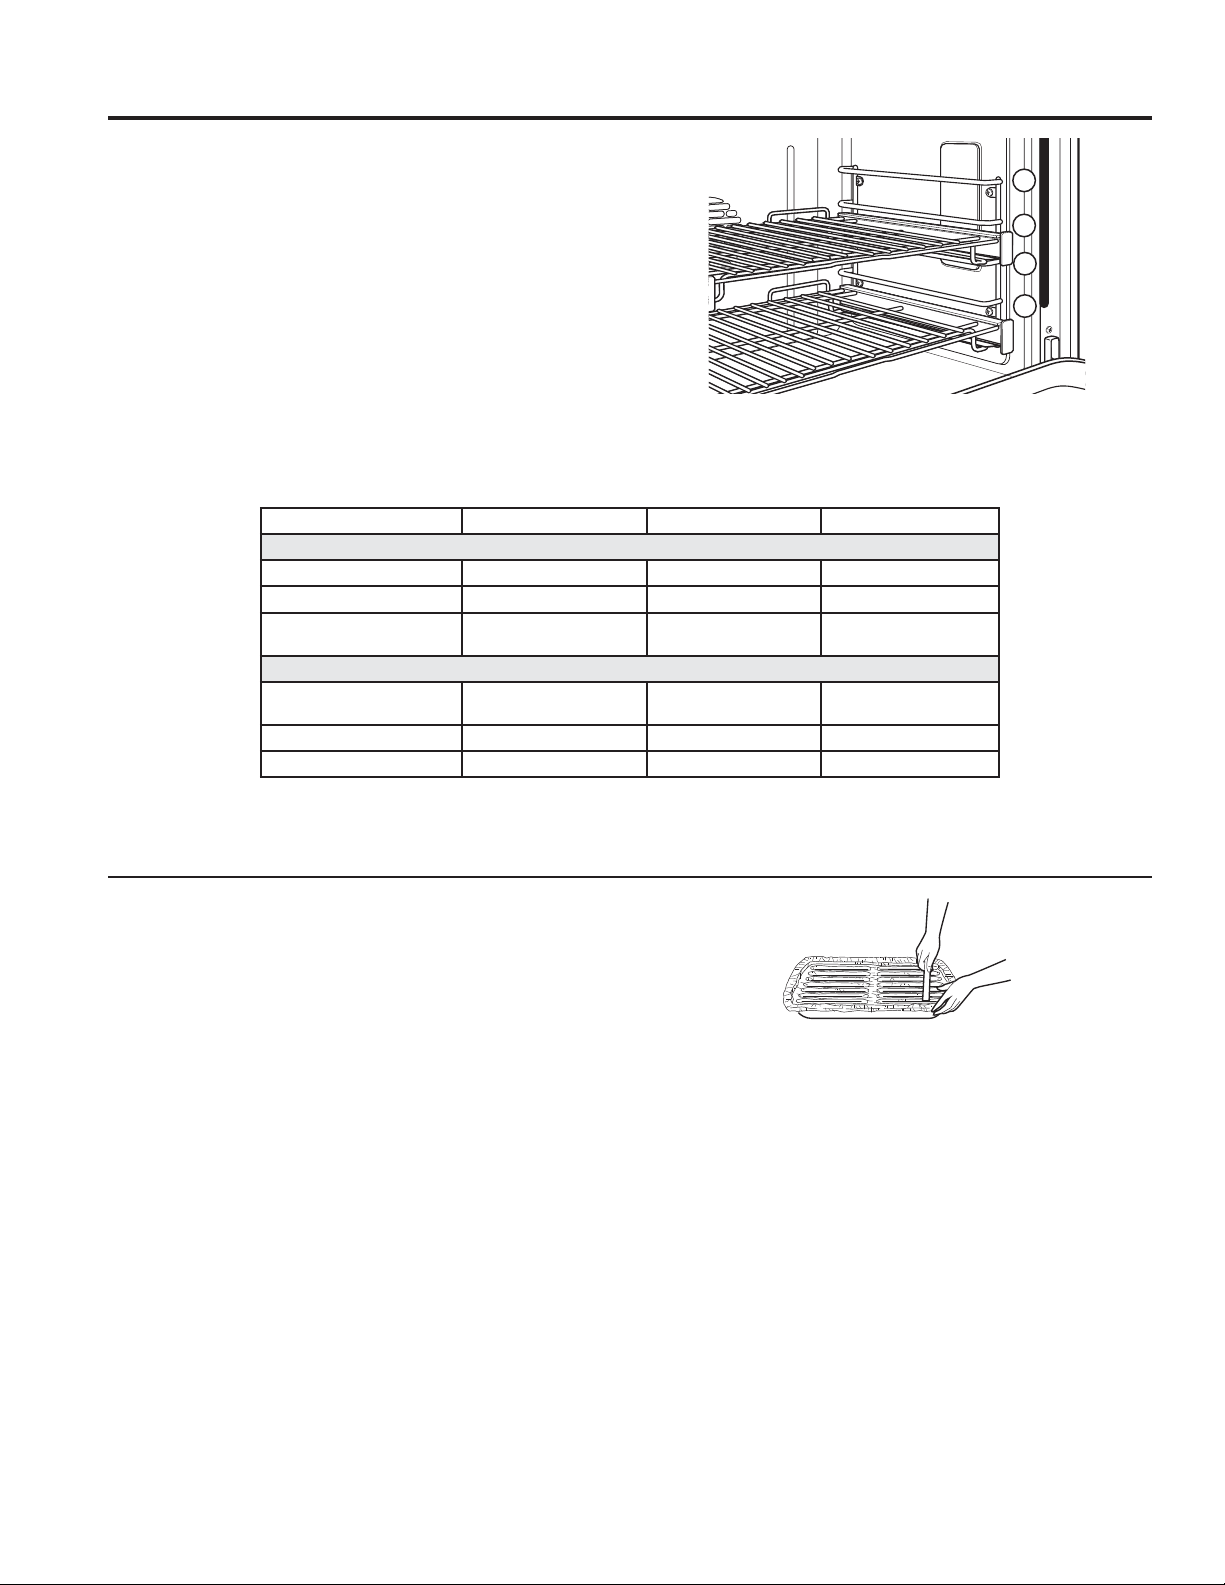
18 49-85244
Guía de Asado
Las posiciones de estantes sugeridas deben utilizarse como
una guía general. Experimente con estas posiciones con
alimentos específicos y preferencia personal.
El tamaño, peso, grosor, temperatura inicial y el punto de
cocción preferido afectarán los tiempos de asado. Esta guía
está basada en carnes con temperatura de refrigerador.
Papel de Aluminio
8VWHGSXHGHXVDUSDSHOGHDOXPLQLRSDUDFXEULUODDVDGHUD\OD
rejilla. Sin embargo, debe ajustarse bien el papel de aluminio a
la rejilla, y efectuarse cortes siguiendo la forma de la misma.
C
'
%
E
NOTA: En general, las posiciones más altas de la bandeja dan como
resultado un sellamiento externo de los alimentos mientras que las
posiciones más bajas dan como resultado en un nivel de cocción
más completo.
Asado (Cont.)
USO DE LA COCINA: Asado
(O0LQLVWHULRGH$JULFXOWXUDGHORV((88DILUPDTXH³ODFDUQHYDFXQDMXJRVDHVPX\SRSXODUSHURGHEHVDEHUVHTXH
DOFRFLQDUODDVyOR)DOJXQRVRUJDQLVPRVTXHSURYRFDQLQWR[LFDFLyQSXHGHQVREUHYLYLU´)XHQWH6DIH)RRG%RRN
<RXU.LWFKHQ*XLGH86'$5HY-XQLR
Alimento Posición de las bandejas Configuración de calor Precalentamiento
Asado
Carne picada ' +,DOWD —
Pollo (Pechugas con hueso) % +,DOWDR/2EDMD —
Productos de Panadería
Pan (tostado)
' +,DOWDR/2EDMD —
Asado Por Convección
Pescado Filetes
GHOLEUDDƎDQFKR
' LO (baja) 5 Minutos
Kabobs (5 pinchos) ' LO (baja) 5 Minutos
Vegetales en rodajas ' LO (baja) 5 Minutos

49-85244 19
Introducción a la Cocción por Convección
El ventilador con sistema de convección por aire inverso de se
pausa periódicamente, luego cambia de dirección a fin de generar
una mejor distribución de aire caliente a través del horno. Como
resultado, los alimentos se cocinan y doran en forma pareja, a
menudo en menos tiempo que con el calor normal.
NOTA: El ventilador por convección se apaga cuando se abre
la puerta de horno.
Recipientes Para la Cocción por Convección
Antes de utilizar el horno por convección, verifique que sus
elementos de cocción dejen espacio para la circulación de aire
en el horno. Si va a hornear con varios recipientes, deje un
espacio entre ellos. Además, asegúrese de que los recipientes
no se toquen entre sí o toquen las paredes del horno.
/RVUHFLSLHQWHVGHFRFFLyQXWLOL]DGRVHQ%$.(KRUQHDGR
FRP~QWDPELpQSXHGHQXVDUVHHQ&219%$.(KRUQHDGRSRU
convección). Ver la sección Consejos de horneado.
Al hornear galletas, los mejores resultados se logran con una
bandeja para galletas plana en lugar de una bandeja con
lados. Para recetas como pollo al horno, utilice una bandeja
con lados bajos. El aire caliente no puede circular bien
alrededor de los alimentos en una bandeja con lados altos.
Cómo Adaptar Recetas
8VWHGSXHGHXWLOL]DUVXVUHFHWDVIDYRULWDVHQHOKRUQRSRU
convección.
Cuando hornee por convección, puede resultar necesario
reducir la temperatura de horneado en 25°F o ajustar el tiempo
de cocción. No hace falta ajustar la temperatura cuando se usa
CONV ROAST (rostizado por convección).
Algunas instrucciones en paquetes de estofados congelados o
platos principales han sido desarrollados utilizando hornos por
convección comerciales. Para mejores resultados, precaliente
el horno y utilice la temperatura para horneado común indicada
en el paquete.
&RQVHMRVGH5RVWL]DGRSRU&RQYHFFLyQ
8WLOLFHODDVDGHUDODUHMLOOD\ODSDUULOODGHURVWL]DGRSDUD
mejores resultados. Mediante el uso de la parrilla, la parte
inferior de la carne vacuna o de ave se dorará mejor.
1. Coloque la bandeja del horno en una posición baja (A).
2. Coloque la rejilla sobre la asadera y deposite la parrilla de
rostizado por encima.
3. Coloque la carne sobre la parrilla de rostizado.
Accesorios Opcionales
Rejilla
Asadera
Parrilla de rostizado
Horneado o Asado por Convección
USO DE LA COCINA:+RUQHDGRR$VDGRSRU&RQYHFFLyQ
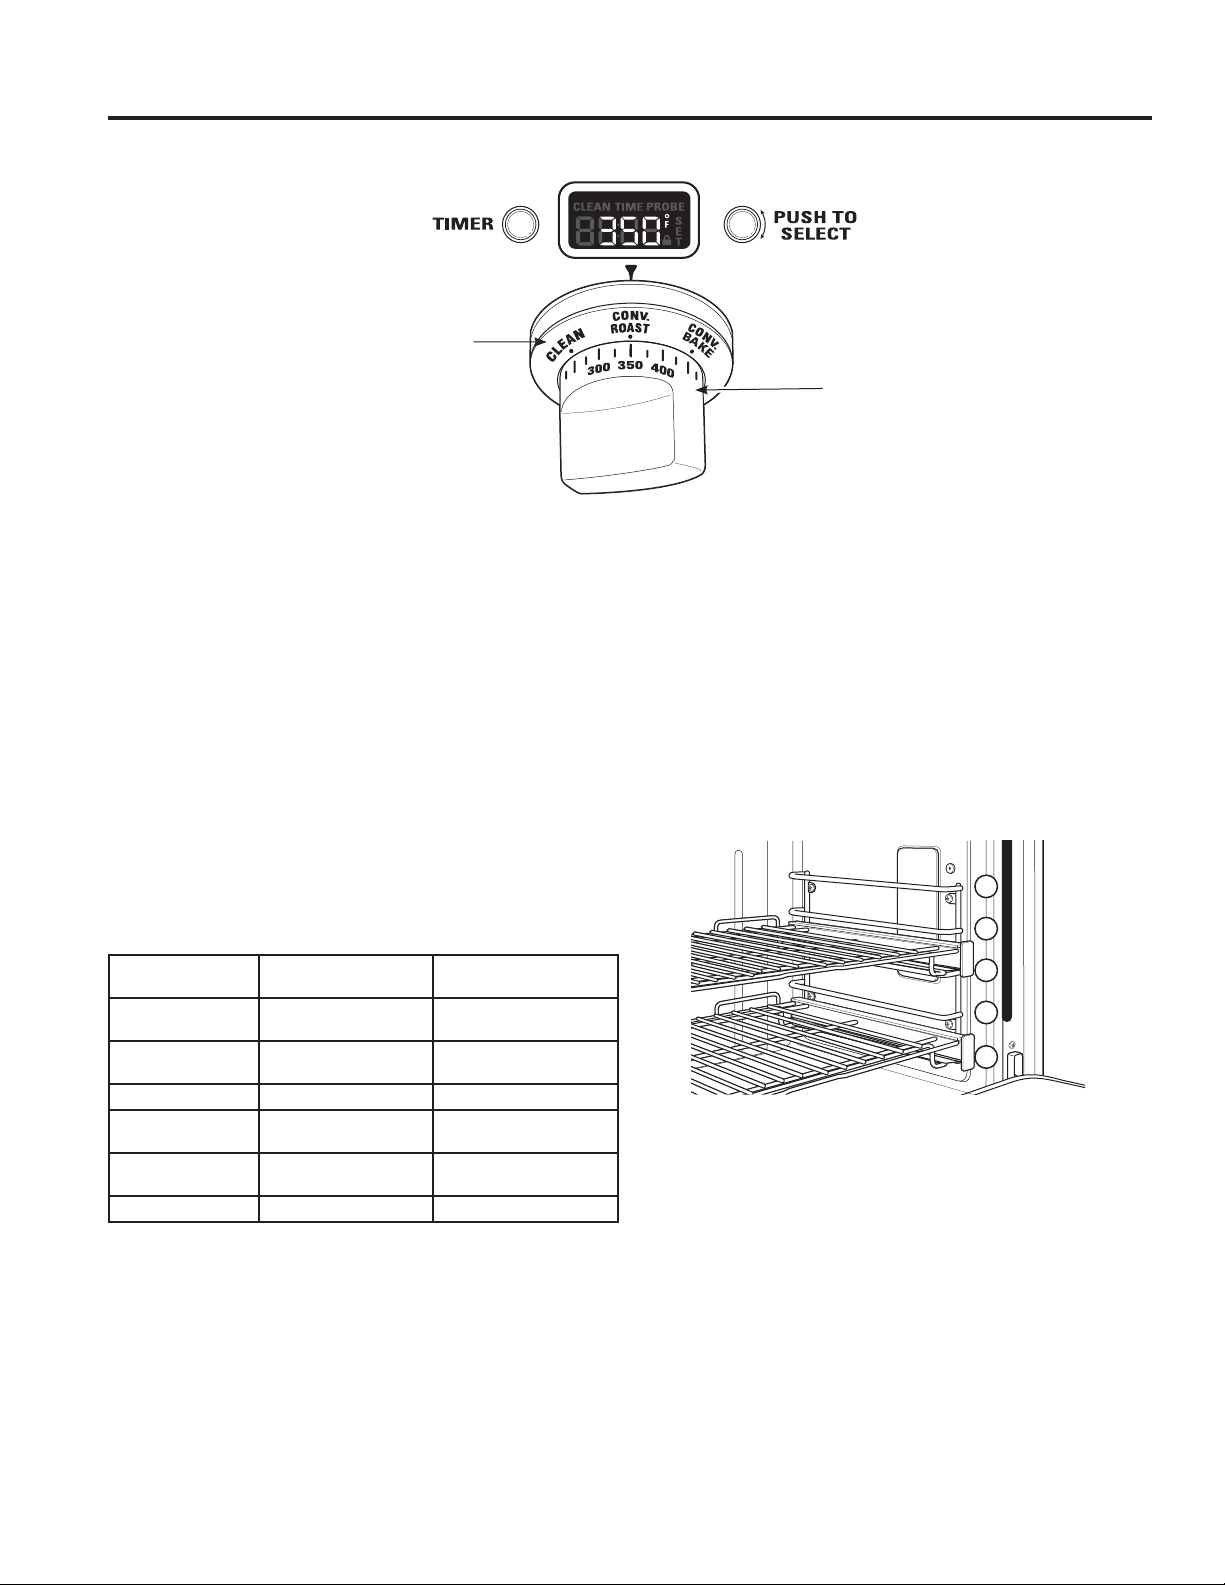
20 49-85244
&yPR&RQILJXUDUHO+RUQR3DUD+RUQHDGRR5RVWL]DGRSRU&RQYHFFLyQ
El horneado por convección es ideal para lograr alimentos con
un dorado parejo cocinados en bandejas únicas o múltiples.
Seleccione rostizado por convección para cocinar cortes de
carne grandes y tiernos sin cubrir.
Cuando se configuran en CONV BAKE (horneado por
convección) o &21952$67URVWL]DGRSRUFRQYHFFLyQ,
los elementos por convección traseros y el ventilador funcionan
cuando el horno se encuentra calentando.
1. Gire el selector de modo del horno a CONV BAKE
(horneado por convección) o &21952$67URVWL]DGR
por convección).
8WLOL]DQGRODSHULOODGHWHPSHUDWXUDFRQILJXUHODWHPSHUDWXUD
deseada, incrementando la temperatura en unidades de
25°F, de 175°F a 550°F.
El horno comenzará a precalentarse. La pantalla de
temperatura comenzará en 100ºF y seguirá allí hasta que
HOKRUQRVXSHUHGLFKDWHPSHUDWXUD'HVGHHVHSXQWROD
pantalla mostrará la temperatura actual.
Las luces internas se encenderán y continuarán encendidas
hasta que se apague el horno. El ventilador del horno por
convección se encenderá durante el precalentamiento. El
control emitirá un pitido cuando el horno ya haya precalentado
y los alimentos pueden colocarse dentro del horno.
3. Cuando la cocción por convección haya finalizado, gire el
selector de modo del horno y la perilla de temperatura a
OFF (apagado).
NOTA: Se encenderá un ventilador de refrigeración para enfriar
las piezas internas. Esto es normal, y el ventilador puede
continuar funcionando aún después de apagado el horno.
8WLOLFHODVRQGDGHWHPSHUDWXUDFXDQGRUHVXOWHLPSRUWDQWHXQD
temperatura interna precisa. Ver Cómo usar la sonda.
El horno tiene 5 posiciones de bandejas. Ver la sección
%DQGHMDVGHOKRUQRGHH[WHQVLyQWRWDOSDUDFRQVXOWDUFyPR
usar, quitar y reemplazar las bandejas.
La cocina de horno doble cuenta con un horno pequeño con 4
posiciones de bandejas. La posición de bandeja C no existe en
el horno pequeño.
Las posiciones de estantes sugeridas deben utilizarse como una guía
general. Experimente con estas posiciones para alimentos específicos
y preferencia personal.
C
'
%
A
E
Horneado o Asado por Convección (Cont.)
USO DE LA COCINA:+RUQHDGRR$VDGRSRU&RQYHFFLyQ
Selector de modo
del horno (exterior))
Perilla de temperatura
del horno (interior)
Tipo de alimento
Horno grande Posición
de las bandejas
Horno pequeño Posición
de las bandejas
Muffins y magdalenas
(bandejas múltiples)
%' %'
Galletas
(bandejas múltiples) $&( %'
Aperitivo congelado C —
Aperitivo congelado
(bandejas múltiples) $&( —
Rostizado (cortes de
carne grandes) A %
Pavo o pollo entero A %
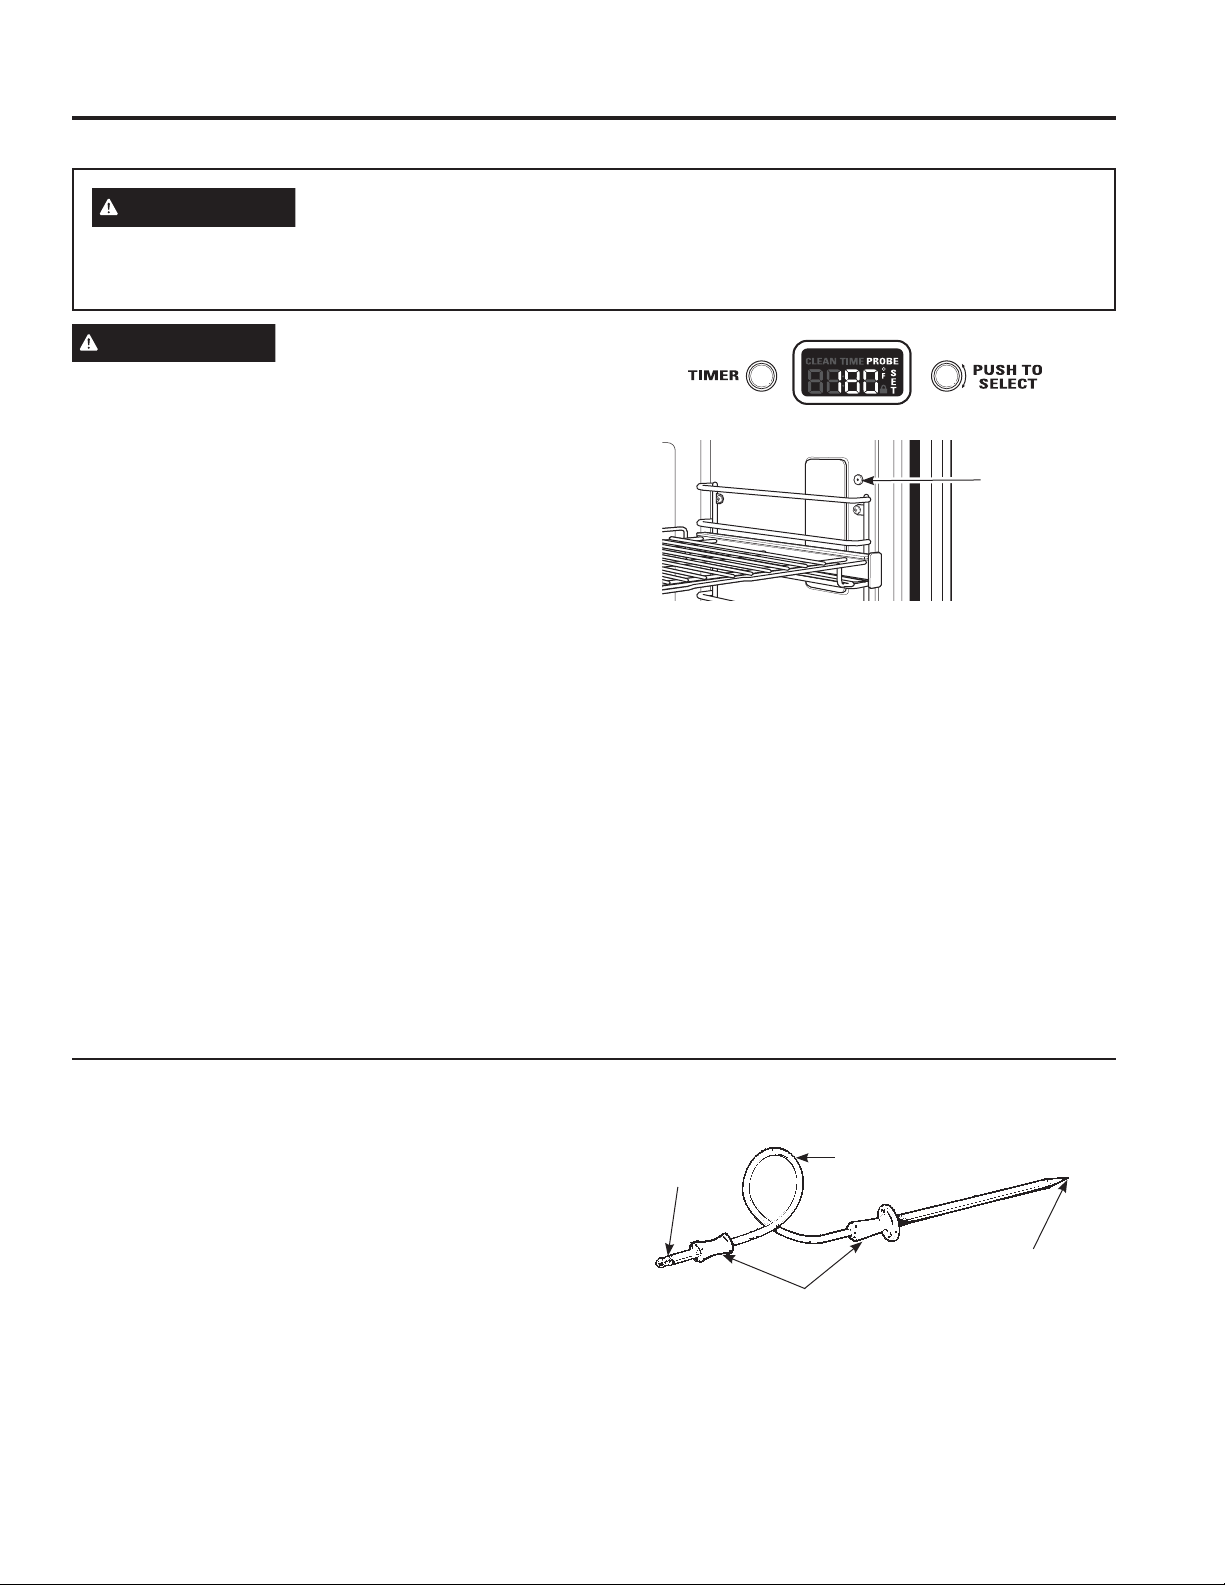
49-85244 21
&yPRXVDUOD6RQGDFRQ+RUQHDGR+RUQHDGRSRU&RQYHFFLyQ\5RVWL]DGRSRU&RQYHFFLyQ
ADVERTENCIA
El consumo de comida semicruda puede hacer que se contraigan enfermedades producidas
por la comida. Use la sonda de acuerdo con las siguientes instrucciones, a fin de asegurar que todas las partes
de la comida alcancen temperaturas de cocción mínimamente seguras. Puede encontrar recomendaciones de
temperaturas de cocción mínimamente seguras en www.foodsafety.gov o en www.IsItDoneYet.gov.
PRECAUCIÓN
8WLOLFHDJDUUDGHUDVFXDQGR
introduzca o quite la sonda del horno caliente. Las áreas que
rodean la entrada de la sonda pueden estar muy calientes.
En muchos alimentos, especialmente asados y carnes de ave,
la temperatura interna de los alimentos es la mejor prueba
para verificar el grado de cocción. Mediante la sonda de
temperatura se evita tener que adivinar el estado de cocción y
se logra el punto de cocción exacto.
/DVRQGDSXHGHXVDUVHFRQ%$.(KRUQHDGR&219%$.(
(horneado por convección) y CONV ROAST (rostizado por
convección).
1. Introduzca la punta de la sonda dentro de la parte más
gruesa de la carne.
2. Coloque la bandeja en la posición deseada.
3. Configure los controles del horno. Gire el selector de modo
del horno a CONV BAKE (horneado por convección),
&21952$67URVWL]DGRSRUFRQYHFFLyQ o BAKE
(horneado). Gire la perilla de temperatura a la temperatura
de horno deseada, incrementando la temperatura en
XQLGDGHVGH)GH)D)'HMHTXHHOKRUQR
se precaliente si fuese necesario. El horno y las luces
del horno se encenderán inmediatamente y continuarán
encendidas hasta que se apague el horno.
8WLOLFHDJDUUDGHUDVSDUDFRORFDUODFRPLGDHQHOKRUQR
caliente. Introduzca el enchufe en la salida. Verifique que
esté introducida hasta el fondo. Cierre la puerta del horno.
5. Gire la mini-perilla para encontrar la temperatura interna
deseada de los alimentos. Presione la mini-perilla para
seleccionar dicha temperatura.
/DVSDODEUDV352%(VRQGD\6(7FRQILJXUDUGHVWHOODUiQHQ
la pantalla hasta que se seleccione una temperatura. Si no se
configura una temperatura, la sonda utilizará una temperatura
predeterminada de 100°F. Si el horno no se precalentó, la
pantalla mostrará LO (baja).
La temperatura interna de los alimentos puede configurarse
desde un mínimo de 100°F hasta un máximo de 200°F.
Cuando los alimentos alcanzan la temperatura interna
configurada, la pantalla emitirá un pitido. Para detener el pitido,
gire el selector de modo del horno y la perilla de temperatura
D2))8VHDJDUUDGHUDVSDUDTXLWDUODVRQGDGHODVDOLGDGHO
horno.
Para cambiar la temperatura interna configurada en cualquier
momento del proceso de cocción, presione la mini-perilla y
gírela para ajustar la temperatura. Presione la mini-perilla para
seleccionar.
Cómo Usar la Sonda
8WLOLFHVyORODVRQGDD]XOSURYLVWDFRQODFRFLQD
8WLOLFHODVPDQLMDVGHODVRQGD\HOHQFKXIHFXDQGRORV
introduzca y quite de la carne y de la salida del horno.
Ŷ Para no dañar la sonda, no utilice pinzas para tirar del cable
cuando lo quite.
Ŷ Para no romper la sonda, verifique que los alimentos estén
totalmente descongelados antes de introducirla.
Ŷ Para evitar posibles quemaduras, siempre use una
agarradera cuando quite el enchufe; las superficies internas
del horno pueden estar calientes.
Ŷ Nunca deja la sonda dentro del horno durante un ciclo de
asado o de auto-limpieza.
Ŷ No almacene la sonda en el horno.
Salida
de la sonda
Cable
Enchufe
Sonda
Manijas
La sonda de temperatura cuenta con una sonda similar a
un pincho en un extremo y un enchufe en el otro extremo
que se introduce en la salida del horno.
Sonda
USO DE LA COCINA: Sonda
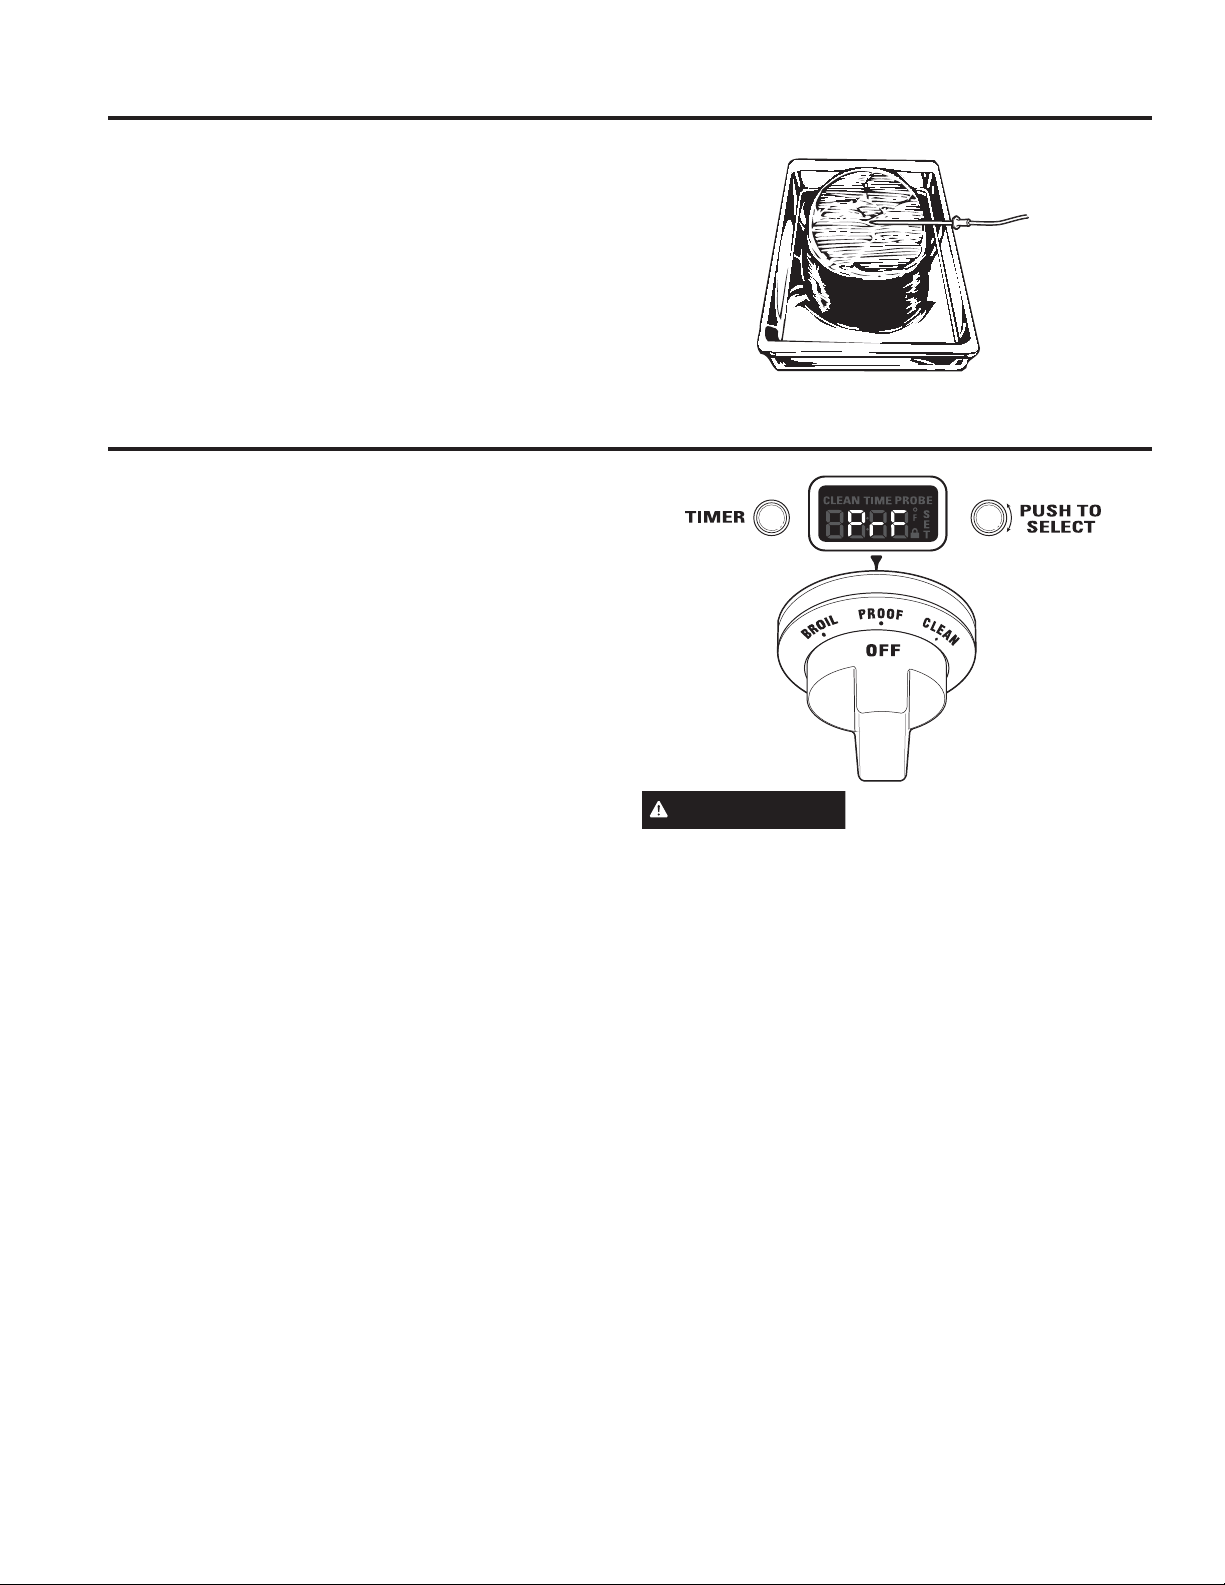
22 49-85244
Colocación Adecuada de la Sonda
Ŷ Mida la distancia hasta el centro del trozo de carne colocando
ODVRQGDGHWHPSHUDWXUDVREUHODFDUQH8WLOLFHVXSXOJDUR
dedo índice para marcar dónde quedará el extremo de la
carne en la sonda.
Ŷ Introduzca la sonda hasta el punto marcado con su dedo. La
punta de la sonda debe hallarse en el centro de la carne.
Cómo Configurar el Horno Para Leudar
La característica de leudado mantiene un medio tibio que
resulta útil para leudar masas con levadura.
1. Gire el selector de modo del horno a PROOF (leudado). En
la pantalla podrá verse “PrF”. El modo PROOF no funciona
cuando el horno se encuentra por encima de los 125°F. La
SDQWDOODLQGLFDUi³WRRKRW´GHPDVLDGRFDOLHQWH'HMHHQIULDU
el horno.
Para mejores resultados, cubra la masa con un paño o con un
envoltorio plástico engrasado.
8WLOLFHODSRVLFLyQGHEDQGHMD%R&GHOKRUQRJUDQGH8WLOLFHOD
SRVLFLyQGHEDQGHMD%HQHOKRUQRSHTXHxR
La característica de leudado brinda automáticamente la
temperatura óptima para el proceso de leudado; por lo tanto, la
perilla de temperatura no afecta la temperatura de leudado.
Las luces internas del horno se encienden y apagan según sea
necesario para mantener una temperatura de leudado óptima
hasta que el selector de modo del horno se haya apagado
(OFF).
Ŷ Para evitar bajar la temperatura del horno y prolongar
el tiempo de leudado, no abra la puerta del horno
innecesariamente.
Ŷ Verifique que los panes no leuden de más.
2. Cuando el leudado haya finalizado, gire el selector de modo
del horno a OFF.
PRECAUCIÓN
No utilice el modo de leudado
para calentar alimentos o para mantenerlos calientes. La
temperatura de leudado del horno no es lo suficientemente
caliente para conservar alimentos a temperaturas seguras.
Sonda (Cont.)
USO DE LA COCINA:6RQGD/HXGDGR
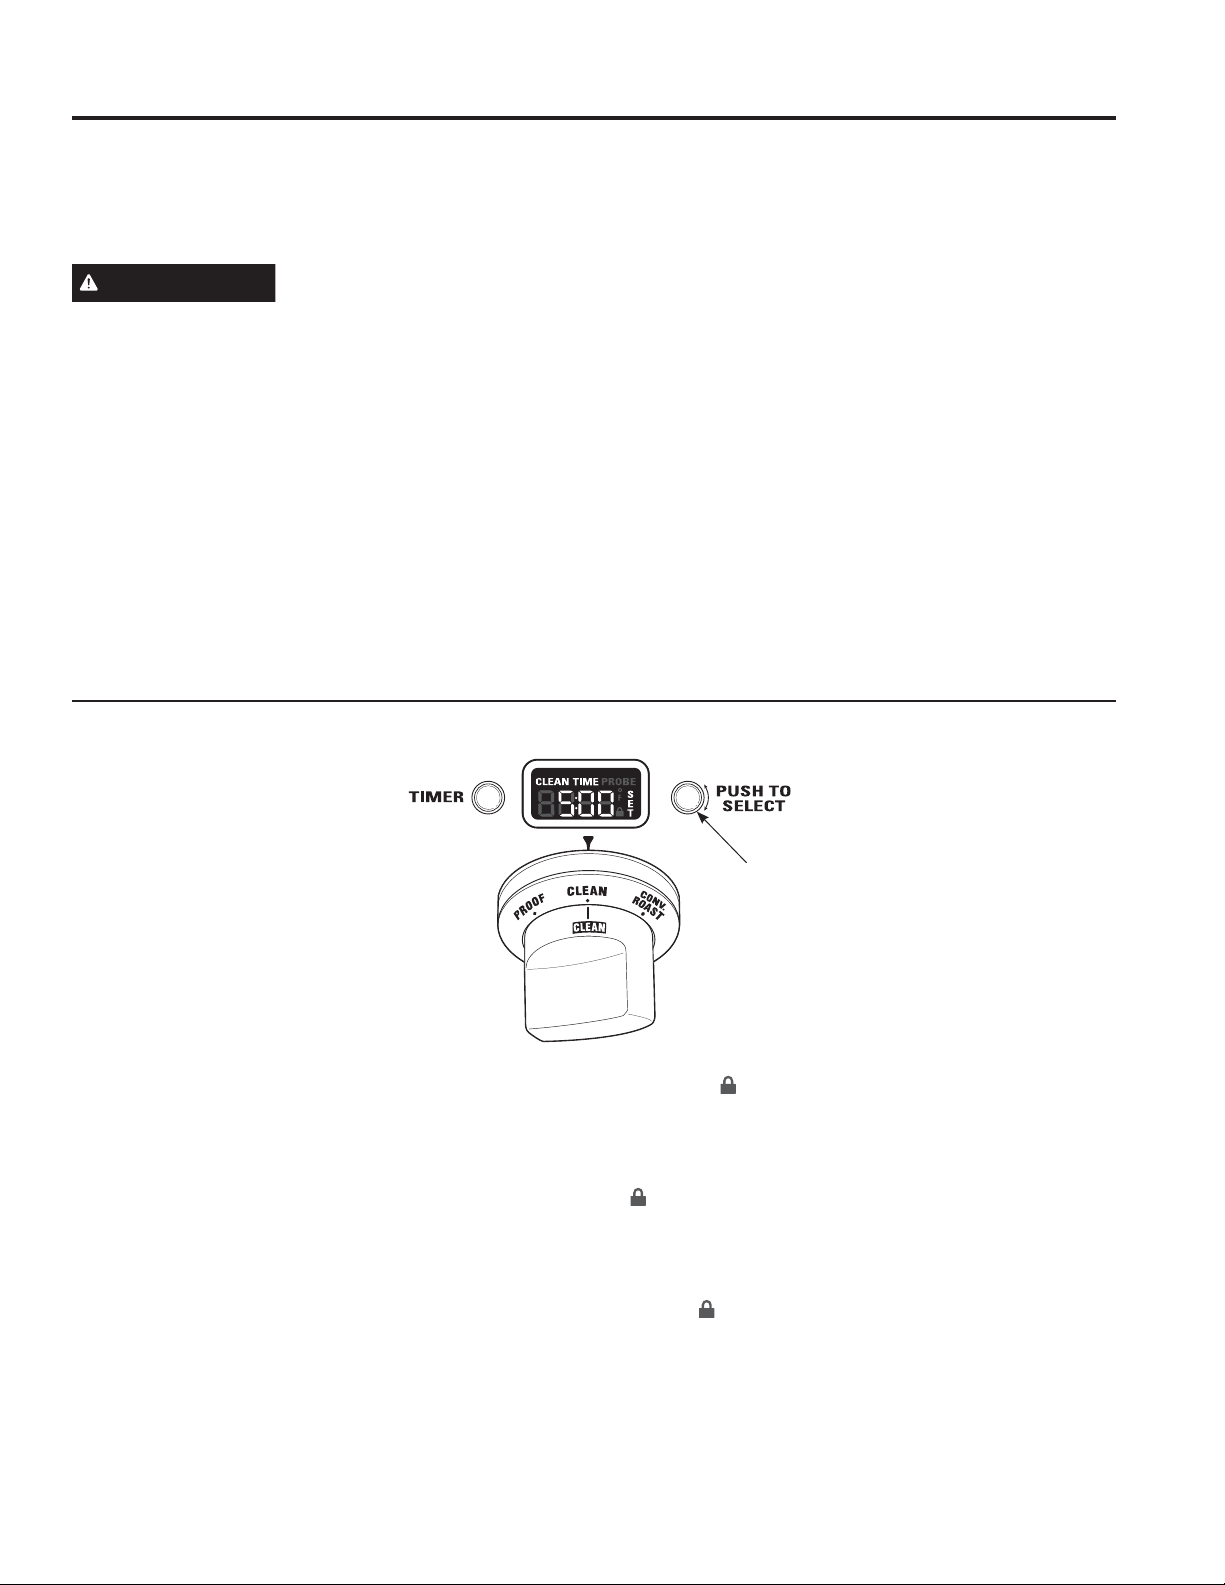
49-85244 23
3UHFDXFLRQHVGH6HJXULGDGGHOD$XWROLPSLH]D
La característica de auto-limpieza del horno se encuentra
diseñada para facilitar la limpieza de la parte interna del horno
utilizando temperaturas muy elevadas para quemar y eliminar
derrames de alimentos.
ADVERTENCIA
Limpie la grasa excesiva y otros
derrames de alimentos con un paño húmedo. La suciedad
excesiva de alimentos puede prenderse fuego, lo que provoca
humo y daños por calor.
Ŷ No limpie las juntas del horno porque pueden provocarse
daños.
Ŷ Quite los elementos de cocción, asadera, rejilla, sonda y
cualquier trozo de papel de aluminio del horno.
Ŷ Verifique que la lente de la luz del horno y el marco de la
lente se encuentren en su lugar.
Ŷ No utilice limpiadores de horno comerciales, abrasivos o
protectores de horno en o cerca de un horno auto-limpiante.
Ŷ Recomendamos ventilar su cocina con una ventana abierta
RXWLOL]DQGRXQYHQWLODGRUFDPSDQDGXUDQWHHOFLFORGHDXWR
limpieza.
Ŷ Limpie la suciedad ubicada alrededor del armazón o
alrededor de la puerta del horno, en la parte exterior de las
juntas del horno. Estas áreas deben limpiarse a mano.
Ŷ Las bandejas del horno pueden dejarse en el horno durante
el ciclo de auto-limpieza.
IMPORTANTE: Las emanaciones producidas durante el
ciclo de auto-limpieza de cualquier horno afectan la salud de
algunas aves de manera notoria. Procure llevar a sus aves a
otra habitación bien ventilada.
NOTA: El modo de auto-limpieza no funciona si la sonda de
temperatura se encuentra enchufada o si se halla configurado
el modo Sabbat.
En los modelos de horno doble, puede configurarse el ciclo de
limpieza en ambos hornos al mismo tiempo. El último horno
en configurarse automáticamente retardará su inicio hasta la
finalización del ciclo de limpieza del primer horno.
En los modelos de horno doble, se puede hornear en un horno
y efectuar la auto-limpieza en el otro al mismo tiempo.
Sin embargo, no puede usarse la configuración de modo
PROOF (leudado) en un horno mientras el otro se halla
realizando la auto-limpieza.
&yPR&RQILJXUDUHO+RUQR3DUDOD/LPSLH]D
1. Apague todos los quemadores de la superficie. (El ciclo de
OLPSLH]D no empieza hasta que todos los quemadores de la
superficie se hayan apagado).
2. Gire el selector de modo del horno a &/($1OLPSLH]D.
3. Gire la perilla de temperatura a la posición CLEAN
OLPSLH]D.
El control automáticamente utiliza el tiempo predeterminado
de ciclo de limpieza recomendado de 5 horas. El ciclo
de limpieza puede ajustarse a cualquier tiempo entre 3 y
5 horas utilizando la mini-perilla. La pantalla mostrará el
tiempo restante.
4. Presione la mini-perilla para iniciar el ciclo CLEAN
OLPSLH]D.
Si en la pantalla aparece “CLOSE door” (cerrar la puerta),
se ha seleccionado el ciclo de auto-limpieza pero no se ha
cerrado la puerta. Cierre la puerta del horno.
El símbolo
destellará hasta que se bloquee la puerta del
horno. No podrá abrirse la puerta del horno durante el ciclo
de limpieza.
'HVSXpVGHTXHHOFLFORGHOLPSLH]DKD\DILQDOL]DGR\HO
horno se haya enfriado, aparecerá “End” en la pantalla y el
se apagará. Gire el selector de modo del horno y la
perilla de temperatura a OFF (apagado).
Para interrumpir el ciclo de limpieza, gire el selector de
modo del horno y la perilla de temperatura a OFF. Cuando
la temperatura del horno haya bajado a un nivel seguro, el
símbolo se apagará indicando que puede abrirse la
puerta.
8QFLFORGHOLPSLH]DTXHVHLQWHUUXPSHQRSXHGHUHLQLFLDUVH
hasta que el horno se enfríe lo suficiente para que la puerta
se destrabe.
Horno Auto-limpiante
USO DE LA COCINA:+RUQR$XWROLPSLDQWH
Mini-perilla
Gire para ajustar
Presione para
seleccionar
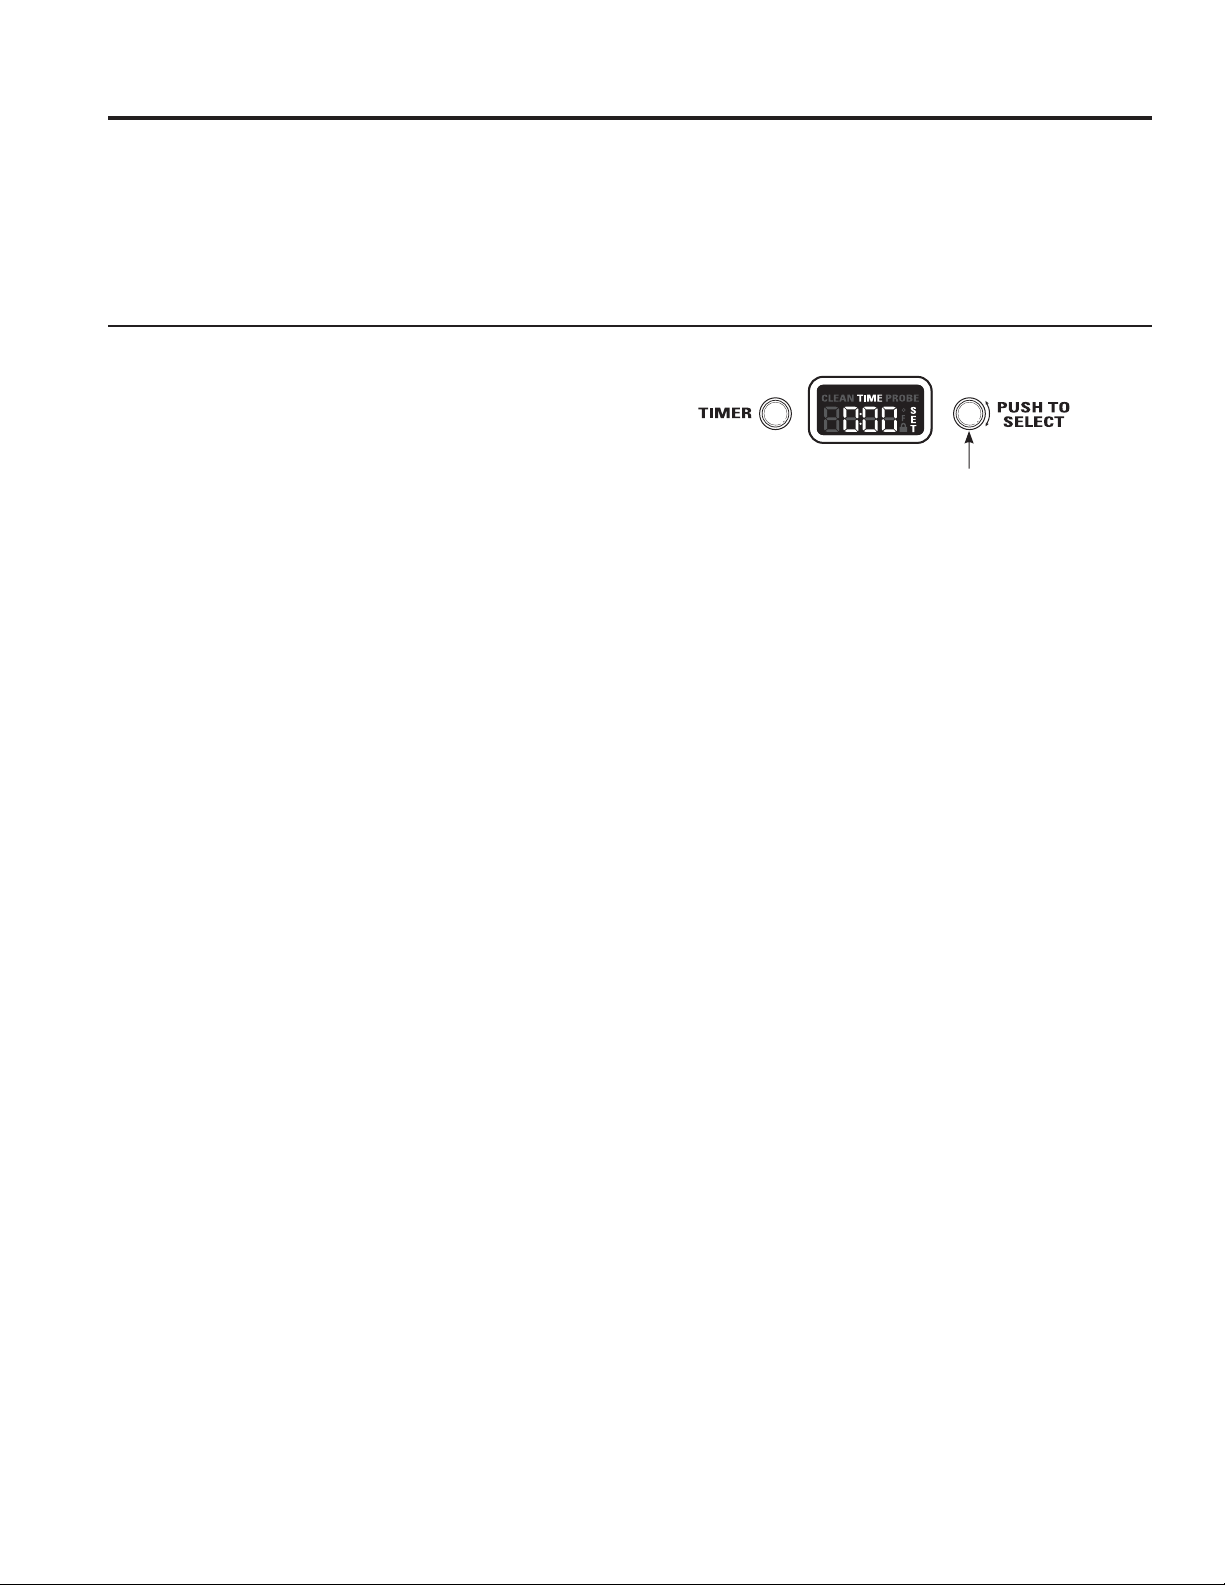
24 49-85244
'HVSXpVGHXQFLFORGHOLPSLH]D
Pueden quedar cenizas blancas en el horno. Límpielas con un
paño húmedo después de que se enfríe el horno.
Si quedan unas manchas blancas, quítelas con agua jabonosa
tibia y enjuague bien con una mezcla de vinagre y agua. En
general, estos depósitos son restos de sal que no pueden
eliminarse durante el ciclo de limpieza.
Si el horno no queda limpio después de un ciclo de limpieza,
repítalo.
7HPSRUL]DGRU
NOTA: El temporizador es independiente de todas las otras
funciones y no controla el horno.
3DUDFRQILJXUDUHOWHPSRUL]DGRU
1. Presione el botón 7,0(5WHPSRUL]DGRU.
2. Gire la mini-perilla para ajustar cualquier período de tiempo
de hasta 12 horas y presiónela para seleccionarlo.
En los modelos de horno doble, cada control del horno cuenta
con su propia función de temporizador. Cada temporizador
puede configurarse en forma independiente.
El control emitirá un pitido cuando quede 1 minuto de tiempo
restante y la pantalla mostrará los segundos hasta que el
WHPSRUL]DGRUKDJDODFXHQWDUHJUHVLYDKDVWD&XDQGR
HOWHPSRUL]DGRUDOFDQFHHOFRQWUROHPLWLUiSLWLGRV
seguidos de 1 pitido cada 6 segundos hasta que se presione
la mini-perilla.
3DUDFDQFHODUHOWHPSRUL]DGRU
1. Presione el botón 7,0(5WHPSRUL]DGRU.
2. Gire la mini-perillaD\SUHVLRQHSDUDVHOHFFLRQDU
3DUDDMXVWDUHOWHPSRUL]DGRUGHVSXpVGHOLQLFLR
1. Presione el botón 7,0(5WHPSRUL]DGRU.
2. Gire la mini-perilla hasta alcanzar un nuevo tiempo
deseado y presione para seleccionar.
NOTA: El temporizador no puede utilizarse mientras el horno
está efectuando la auto-limpieza. (En los modelos de horno
doble, puede utilizarse el temporizador del horno que no se
encuentra en el modo de auto-limpieza).
Horno Auto-limpiante (Cont.)
USO DE LA COCINA:+RUQR$XWROLPSLDQWH
Mini-perilla
Gire para ajustar
Presione para seleccionar
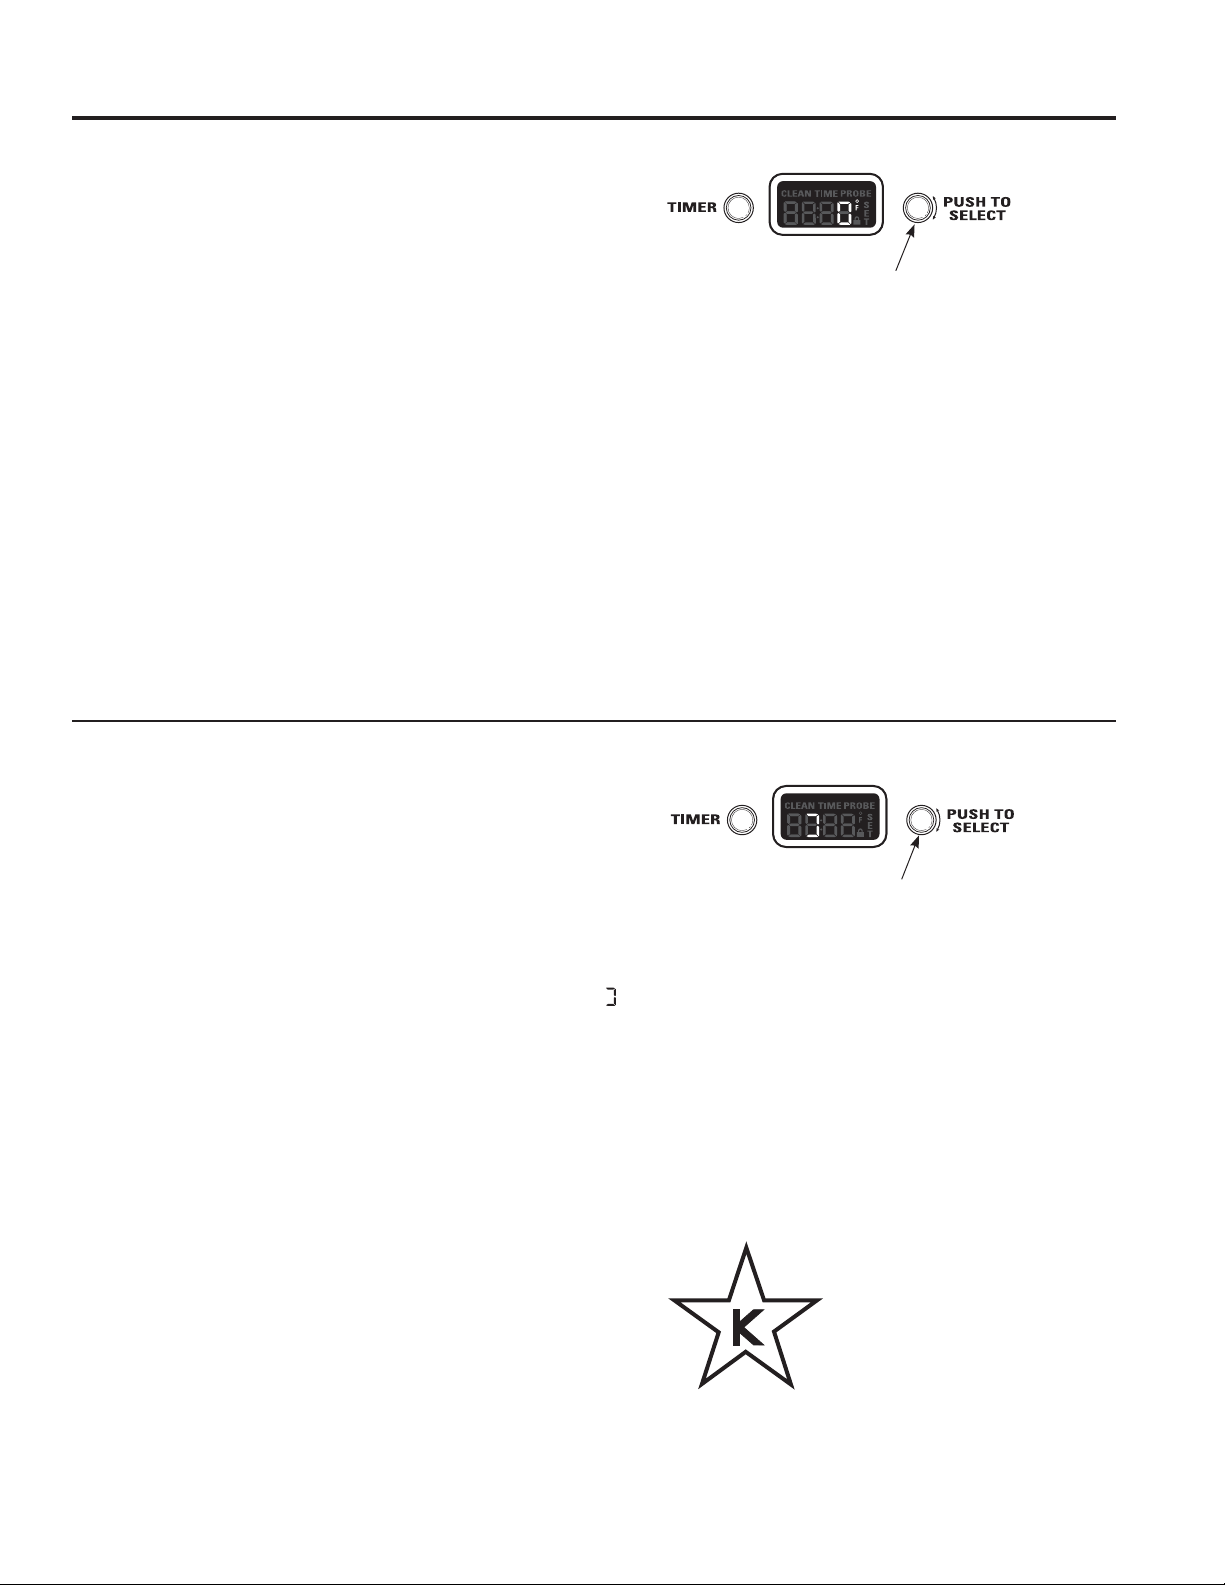
49-85244 25
Modo Sabbat certificado
Ajuste del termostato del horno
Es posible que su nuevo horno cocine de manera diferente
DODTXHXVWHGVHHQFXHQWUDDFRVWXPEUDGR8WLOtFHORGXUDQWH
algunas semanas para familiarizarse con sus funciones. Si
luego de este período considera que la temperatura del horno
es demasiado baja o demasiado alta, usted puede regular el
termostato.
En los modelos de horno doble, utilice los controles del horno
grande para ingresar el modo y para seleccionar el ajuste.
Para ajustar el termostato del horno:
1. Presione y sostenga el botón 7,0(5WHPSRUL]DGRU
y la mini-perilla al mismo tiempo durante 4 segundos
hasta que en la pantalla aparezca “SF” (Special Features,
características especiales).
2. Gire la mini-perilla en sentido contrario a las agujas
del reloj hasta que en la pantalla aparezca “OFFSEt”
(desplazamiento). Presione la mini-perilla para seleccionar
el modo desplazamiento.
3. Gire la mini-perilla para ajustar el termostato del horno
hasta 35°F más o 35°F menos, incrementándose en
unidades de 1°F.
3A. En modelos de horno doble, el termostato del horno
pequeño puede ajustarse girando la mini-perilla
XELFDGDVREUHHOKRUQRSHTXHxR8WLOLFHODmini-perilla
del horno grande para seleccionar dicho ajuste.
4. Presione la mini-perilla para seleccionar su elección y
para salir de dicho modo. Si no desea guardar los cambios,
presione el botón TIMER (temporizador) para salir en
cualquier momento.
NOTA: Este ajuste sólo afecta las temperaturas de horneado,
horneado por convección y rostizado por convección; no
afecta las temperaturas de asado o de auto-limpieza. El ajuste
se conservará en la memoria aún después de un corte de
energía.
No utilice termómetros, como los que se venden en las
tiendas, para verificar la configuración de temperatura del
horno. Esos termómetros pueden variar entre 20-40 grados.
Modo Sabbat
Para configurar el modo Sabbat:
El modo Sabbat se encuentra diseñado para utilizar en el
Sabbat judío y en otras festividades judías.
Sólo puede ser utilizado para hornear. No puede utilizarse para
otros modos de cocción.
Cuando se configura la característica de Sabbat, se
desactivan la luz del horno y todos los pitidos audibles. La
característica también ofrece un período de retardo aleatorio,
de aproximadamente 30 segundos a 1 minuto, antes de
que el horno se encienda una vez que se ha configurado en
%$.(KRUQHDU
1. Presione y sostenga el botón TIMER (temporizador) y la
mini-perilla al mismo tiempo durante 4 segundos hasta
que en la pantalla aparezca “SF” (Special Features,
características especiales).
2. Gire la mini-perilla en sentido de las agujas del reloj hasta
TXHHQODSDQWDOODDSDUH]FD³6$EE$W+´6DEEDW3UHVLRQH
la mini-perilla para seleccionar el modo Sabbat.
8QDYH]TXHVHKD\DVHOHFFLRQDGR³6$EE$W+´ODSDQWDOOD
PRVWUDUi³6$EE$W+21´6DEEDWHQFHQGLGR
La configuración de Sabbat controla ambos hornos. El símbolo
aparecerá en las dos ventanas de visualización de los hornos.
Para modelos de horno doble, utilice el control del horno grande
para configurar la característica Sabbat en ambos hornos.
Para cancelar el modo Sabbat:
5HSLWDORVSDVRV\3RGUiYHUVH³6$EE$W+2))´6DEEDW
apagado) en la pantalla.
La temperatura del horno puede ajustarse en cualquier
momento girando la perilla de temperatura. Antes de que
respondan los elementos del horno existe un retardo aleatorio.
Características Especiales
USO DE LA COCINA: Características Especiales
Mini-perilla
Gire para ajustar
Presione para seleccionar
Mini-perilla
Gire para ajustar
Presione para seleccionar
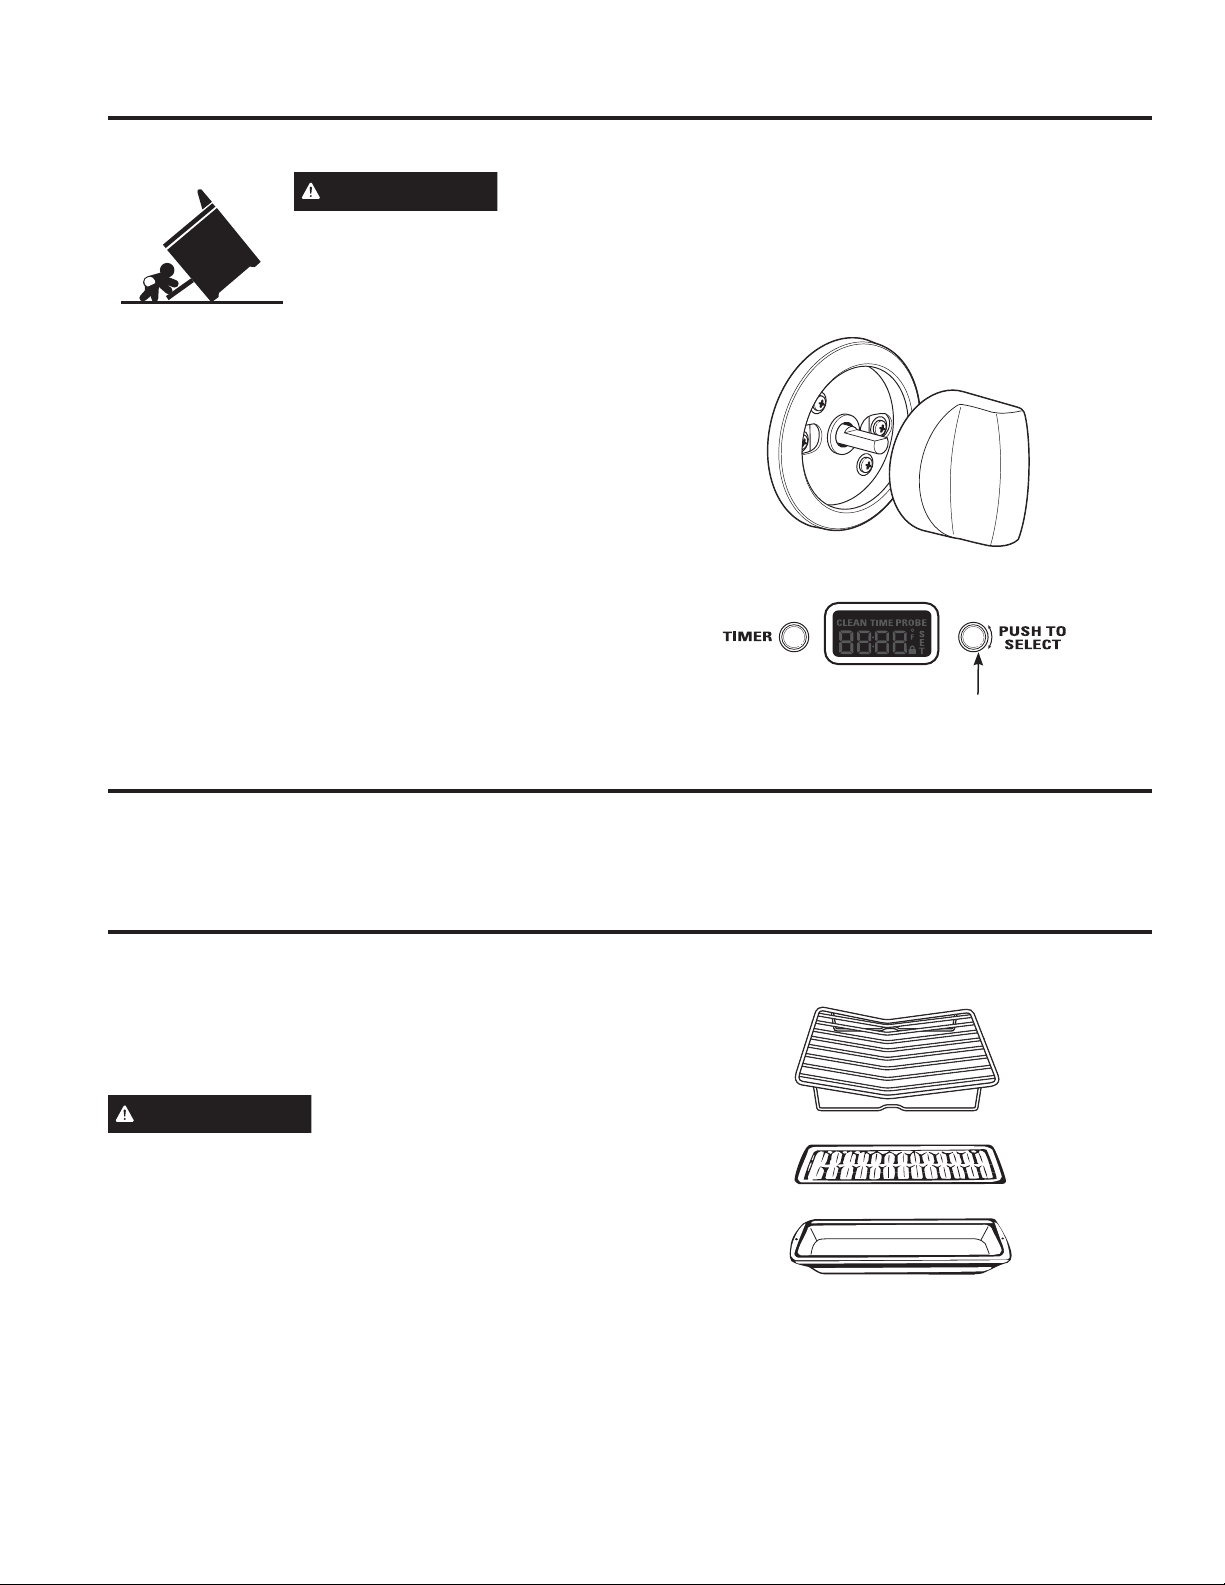
26 49-85244
ADVERTENCIA
Si se quita la cocina para efectuar una limpieza, reparaciones o cualquier
otra razón, verifique que el dispositivo anti-volcaduras se coloque de
manera adecuada cuando vuelva a instalarse la cocina. Si no toma esta
precaución, la cocina puede volcarse y provocar lesiones.
Asegúrese de que todos los controles estén apagados y que las superficies estén frías antes de limpiar cualquier parte de la cocina.
Limpie los derrames con un paño húmedo. Quite suciedades
más rebeldes con agua tibia jabonosa.
No utilice abrasivos de ninguna clase sobre el panel de control
y las perillas.
Para una limpieza más sencilla, las perillas de control pueden
quitarse. Para quitar una perilla, tire de la misma directamente
del panel de control. Lave las perillas en agua caliente
jabonosa, pero no las deje sumergidas.
NOTA: La mini-perilla no puede quitarse.
0LQL%RXWRQ
No intente limpiar los elementos para asar. Cualquier suciedad
se quemará cuando el quemador se caliente.
Los elementos para hornear y de convección no están expuestos.
La asadera, rejilla y parrilla de rostizado son todas aptas para
lavaplatos. Sin embargo, los elementos pegados durante el
horneado pueden necesitar limpieza a mano con un limpiador
de horno comercial o un detergente abrasivo.
No guarde una asadera o rejillas sucias dentro del horno.
Siempre elimine los restos de grasa.
PRECAUCIÓN
No limpie la asadera, la rejilla o la
parrilla de rostizado en el horno auto-limpiante.
Accesorios Opcionales
Quemadores del Horno
$VDGHUD5HMLOOD\3DUULOODGH5RVWL]DGR
Rejilla
Asadera
Parrilla de rostizado
Panel de Control y Perillas
CUIDADO Y LIMPIEZA:3DQHOGH&RQWURO\3HULOODV4XHPDGRUHVGHO+RUQR$VDGHUD5HMLOOD\3DUULOODGH5RVWL]DGR
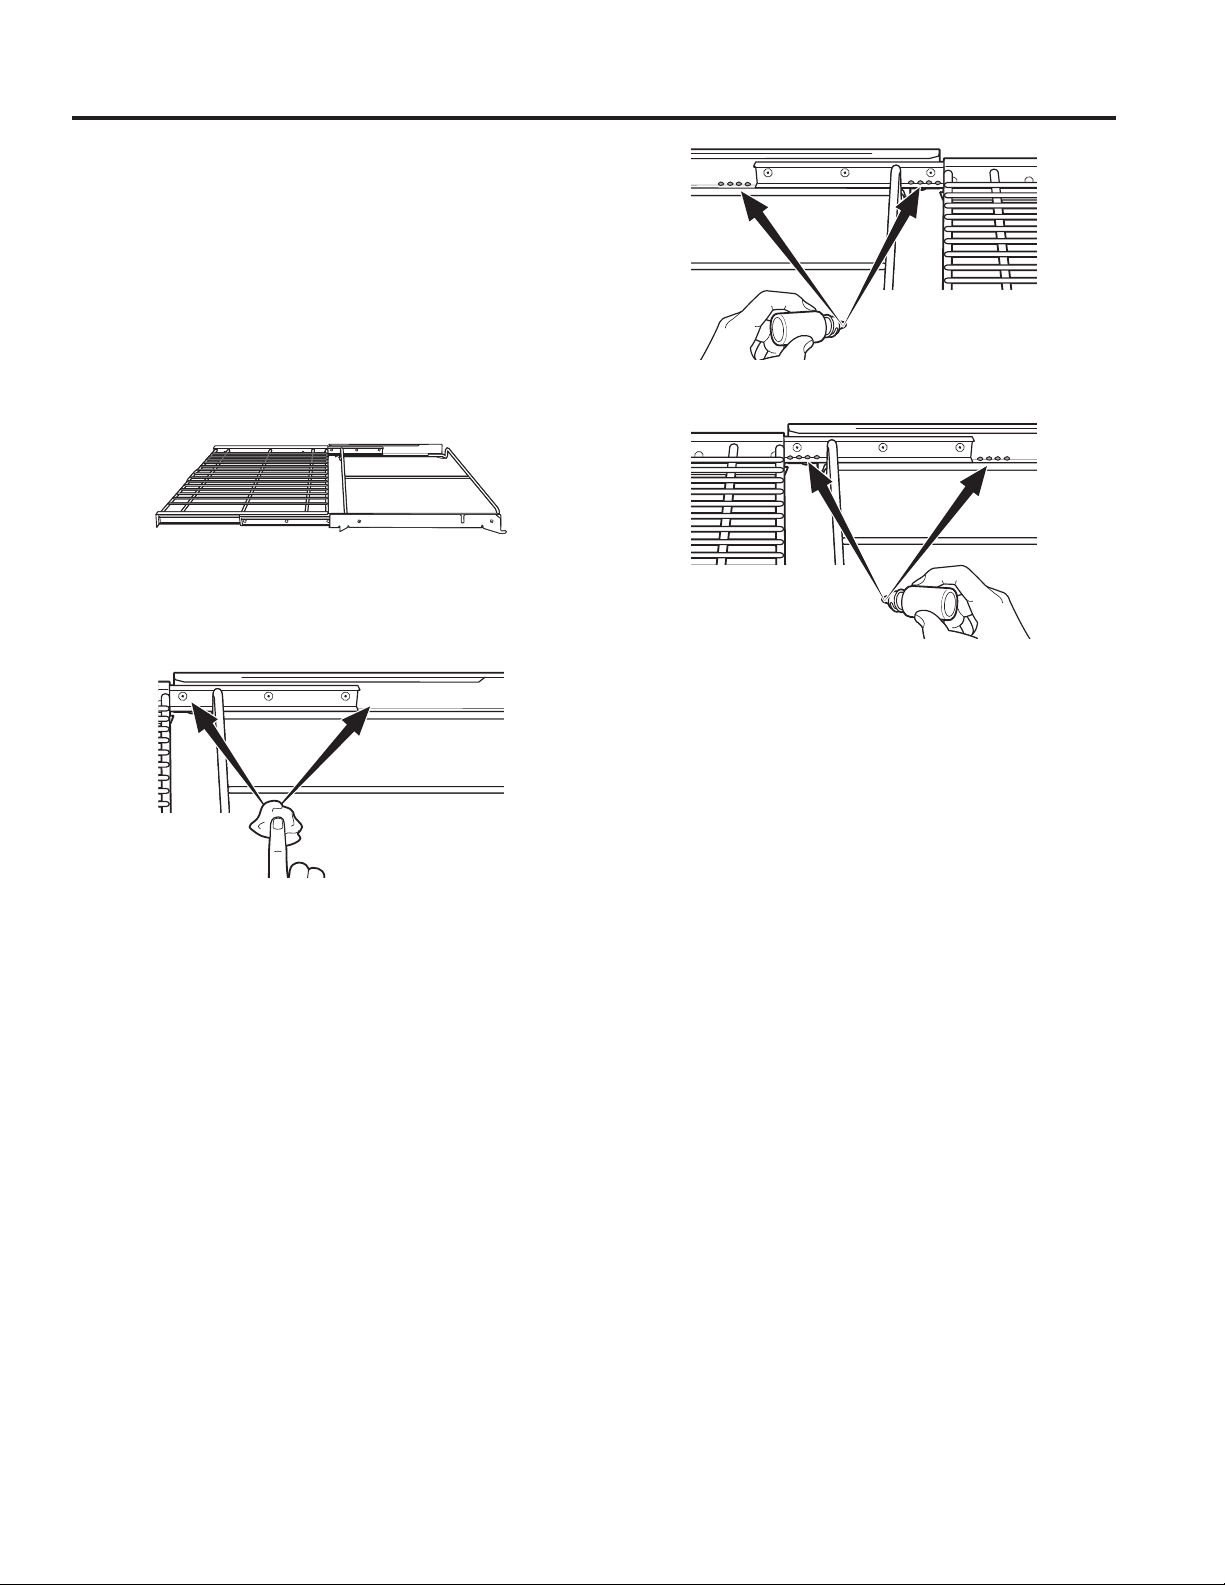
49-85244 27
Bandejas del Horno
CUIDADO Y LIMPIEZA:%DQGHMDVGHO+RUQR
Las bandejas pueden permanecer en el horno durante el ciclo
de auto-limpieza sin sufrir daños.
Periódicamente, después de varios ciclos de auto-limpieza,
las bandejas del horno pueden necesitar el uso del lubricante
de grafito enviado con su cocina. Para solicitar lubricante de
grafito adicional, llame a nuestro centro nacional de repuestos
DOFRQODUHIHUHQFLD:%7
4XLWHODEDQGHMDGHOKRUQR9HUODVHFFLyQ%DQGHMDVGHO
horno de extensión total.
2. Extienda por completo la bandeja sobre una mesa o
mostrador de encimera. Puede colocarse papel de diario
debajo de la bandeja para una limpieza sencilla.
3. Si hay residuos en las guías de deslizamiento, límpielas con
una toalla de papel. NOTA: Todo el lubricante de grafito
que se haya eliminado durante la limpieza debe volver a
colocarse.
4. Agite el lubricante de grafito antes de abrirlo. Comenzando
con el mecanismo de deslizamiento izquierdo de la guía,
coloque cuatro (4) gotas de lubricante sobre las dos (2)
guías traseras cercanas a los cojinetes de apoyo.
5. Repita en el mecanismo del lado derecho de la guía.
6. Abra y cierre la guía varias veces para distribuir el
lubricante.
5HHPSODFHODWDSDGHOOXEULFDQWH\DJtWHODQXHYDPHQWH'p
vuelta la bandeja y repita los pasos 3, 4, 5 y 6.
8. Cierre la bandeja, gire la bandeja dejando el lado derecho
hacia arriba y colóquela en el horno. Ver la sección
%DQGHMDVGHOKRUQRGHH[WHQVLyQWRWDO
9. Repita los pasos anteriores para cada bandeja.
NOTA: No utilice un pulverizador de cocción u otros
pulverizadores lubricantes sobre los deslizadores.
Guía lado
derecho arriba
Lado derecho
Lado izquierdo
Guía lado
derecho arriba
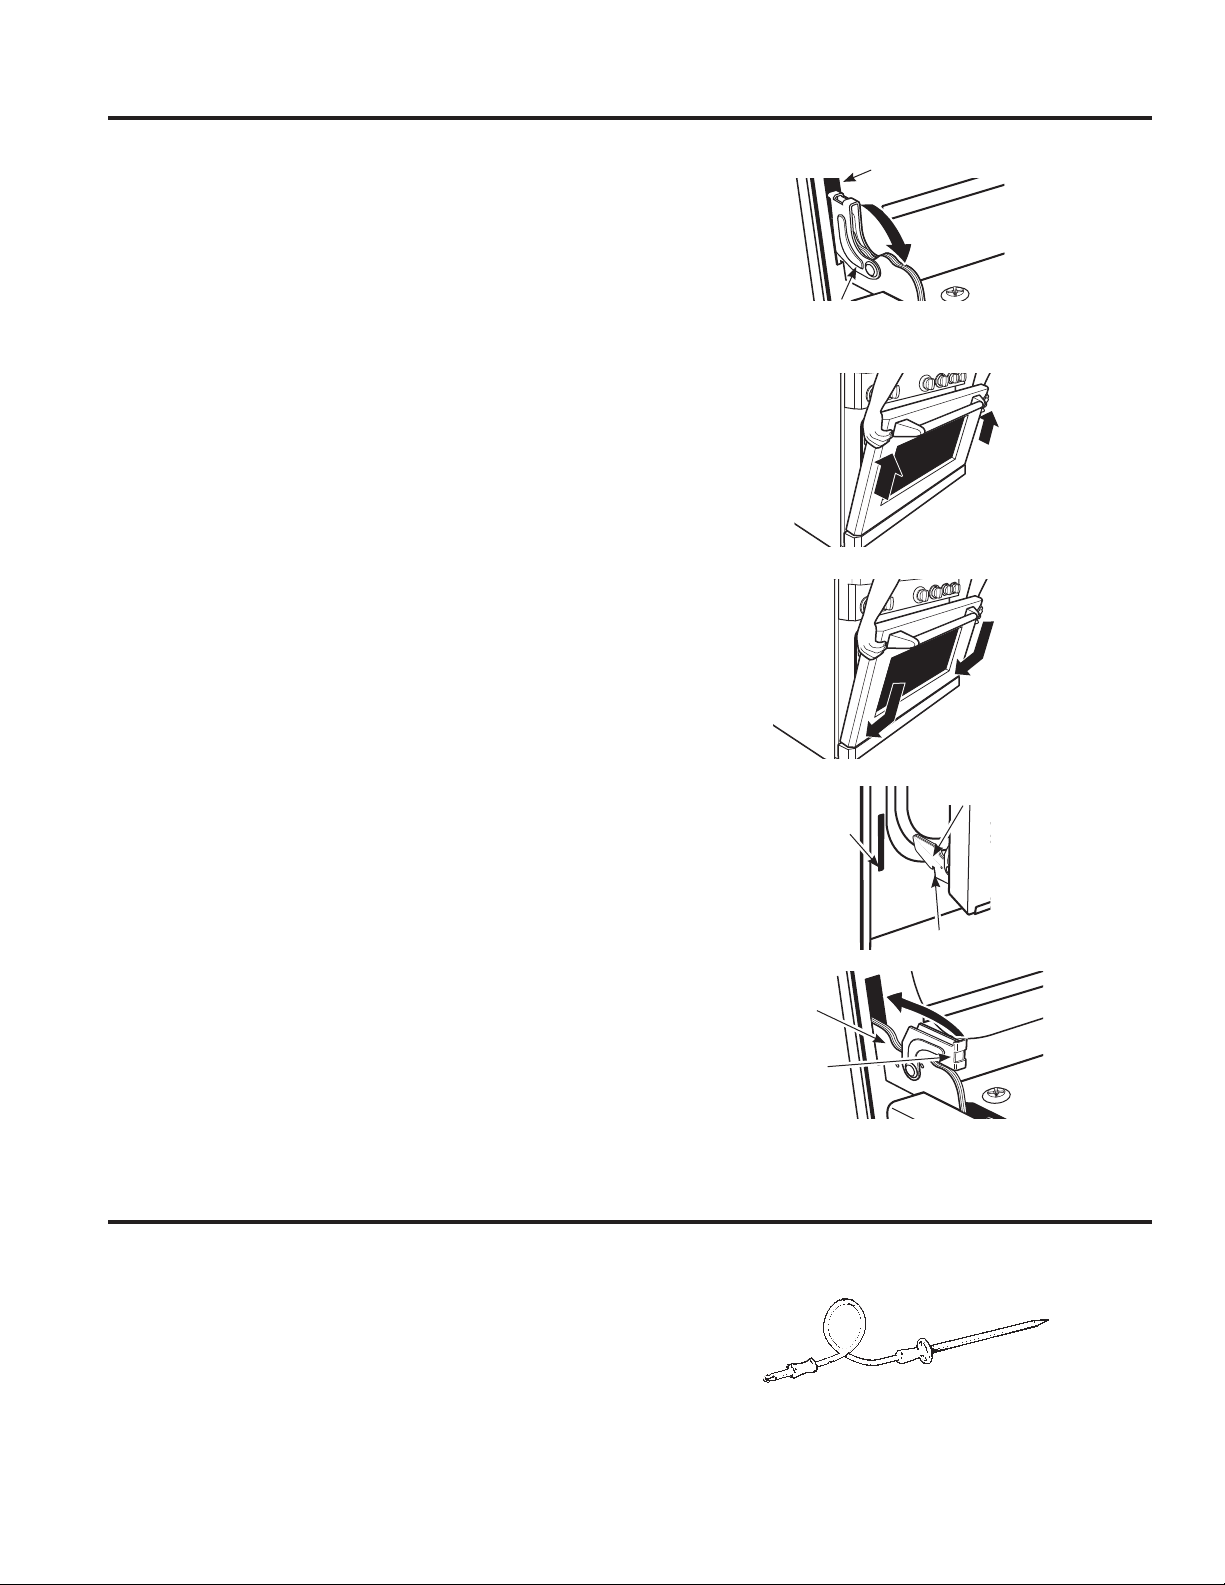
28 49-85244
Posición de
remoción
Tire las trabas de la bisagra hacia abajo para destrabar
Presione las trabas de la bisagra hacia arriba para trabar
Posición de
reemplazo
Traba de la bisagra
Ranura
%UD]RGHODELVDJUD
Muesca
Extremo inferior
de la ranura
Traba de la
bisagra
%UD]RGH
la bisagra
La puerta es muy pesada. Tenga cuidado al quitar y levantar la puerta.
No levante la puerta de la manija.
Para quitar la puerta:
1. Abra la puerta por completo.
2. Presione las trabas de la bisagra hacia abajo en dirección
del armazón de la puerta hasta destrabarlas. Puede
necesitarse una herramienta, como un destornillador plano.
3. Tome con firmeza ambos lados de la puerta de la parte
superior.
4. Cierre la puerta hasta su posición de remoción
(aproximadamente 15 grados desde la posición cerrada)
y levántela hacia arriba y afuera hasta que el brazo de la
bisagra quede liberado de la ranura.
3DUDUHHPSOD]DUODSXHUWD
1. Tome con firmeza ambos lados de la puerta de la parte
superior.
2. Con la puerta en el mismo ángulo de la posición de
remoción, introduzca la muesca del brazo de la bisagra
dentro del extremo inferior de la ranura de la bisagra. La
ranura del brazo de la bisagra debe estar bien colocada en
la parte inferior de la ranura.
3. Abra la puerta por completo. Si la puerta no se abre por
completo, la muesca no está bien colocada en el extremo
inferior de la ranura.
4. Presione las trabas de la bisagra hacia arriba contra el
armazón frontal de la cavidad del horno, hasta alcanzar la
posición de trabado.
5. Cierre la puerta del horno.
Permita que la sonda de temperatura se enfríe antes de
limpiarla.
La sonda debe limpiarse a mano con agua y jabón.
No sumerja la sonda de temperatura en agua.
No almacene la sonda de temperatura en el horno.
No limpie la sonda de temperatura en el horno auto-limpiante.
Sonda
Puerta del Horno Desmontable
CUIDADO Y LIMPIEZA:3XHUWDGHO+RUQR'HVPRQWDEOH6RQGD

49-85244 29
ADVERTENCIA
PELIGRO DE DESCARGA
ELÉCTRICA O QUEMADURAS: Antes de reemplazar la
bombilla del horno, desconecte la alimentación de energía al
horno desde el panel principal de fusibles o del interruptor de
circuitos. No hacerlo puede provocar una descarga eléctrica o
una quemadura.
PRECAUCIÓN
RIESGO DE INCENDIO: La tapa de
vidrio y la lámpara de luz se deberán retirar cuando estén frías.
Tocar el vidrio caliente sin protección en las manos o con un
trapo húmedo puede ocasionar quemaduras.
Los hornos están equipados con columnas de luces halógenas
ubicadas en la paredes laterales del horno. Las luces se
encienden cuando se abre la puerta o cuando el horno se
encuentra en un ciclo de cocción.
Cada ensambladura de luz está compuesta por una tapa
de luz desmontable con dos ganchos de trabado y un
compartimento de luz con tres focos halógenos.
Verifique que la tapa de la lámpara y el foco se hayan enfriado
por completo. Para mayor seguridad, no toque el foco con las
manos desnudas o con un trapo húmedo.
Para quitar:
4XLWHODVEDQGHMDVGHOKRUQR9HUODVHFFLyQ%DQGHMDVGHO
horno de extensión total.
8WLOL]DQGRXQDOODYHGHWXHUFDVGH´TXLWHODVFXDWUR
tuercas que sostienen los soportes de la bandeja a la pared
del horno.
3. Quite la tapa de luz de vidrio tirando su extremo trasero
hacia afuera y acercándolo hacia usted. No quite ningún
tornillo.
8WLOL]DQGRJXDQWHVRXQWUDSRVHFRUHWLUHHOIRFRGHOX]
quemado tirando en línea recta hacia fuera.
3DUDUHHPSOD]DU
8WLOLFHXQIRFRKDOyJHQRQXHYRGHYROWLRV
con clavijas G8, que no supere los 25 vatios.
Pueden adquirirse focos de repuesto llamando al
6ROLFLWHHOQ~PHURGHSLH]D:%7
NOTA: El uso de focos de un vataje mayor puede dañar su
horno.
Retire el foco de su envoltorio utilizando guantes o un trapo
seco. No toque el foco con las manos desnudas. El aceite de
las manos desnudas puede provocar puntos calientes en la
superficie de vidrio y causar una falla prematura del foco. Si
toca el vidrio, límpielo con alcohol antes de la instalación.
1. Empuje por completo el foco en línea recta dentro del
receptáculo.
2. Reemplace la tapa de la luz, colocando el extremo frontal
bajo las dos lengüetas frontales del compartimento de luz.
Coloque el extremo trasero en su lugar, verificando que esté
bien firme.
NOTA: Si los ganchos de trabado se cayeron de la tapa de
la lente de vidrio, sosténgalos sobre la tapa, en la posición
correcta, mientras reemplaza la tapa del compartimento de
la luz.
/DWDSDGHODOX]GHEHHVWDUHQVXOXJDUFXDQGRXWLOLFHHO
horno.
3. Reinstale el soporte de la bandeja. Asegúrese de orientar
el soporte de modo que las lengüetas superiores para las
tuercas se encuentren lo más cerca posible de la parte
superior del horno. Asegure suavemente con las cuatro
tuercas quitadas con anterioridad, pero no ajuste de más
porque el esmalte puede saltarse.
5HHPSODFHODVEDQGHMDV9HUODVHFFLyQ%DQGHMDVGHOKRUQR
de extensión total.
5. Reconecte la energía eléctrica al horno.
Luces del Horno
CUIDADO Y LIMPIEZA:/XFHVGHO+RUQR
Presione la tapa de la luz en su lugar
Coloque el extremo
frontal de la tapa de
la lente bajo las dos
lengüetas frontales
Ganchos de
trabado

30 49-85244
Para Limpiar la Puerta
El armazón y la puerta del horno, fuera de las juntas del horno,
deben limpiarse a mano. Las superficies esmaltadas deben
limpiarse con agua caliente jabonosa. Ver la sección Superficies
de acero inoxidable para todas las áreas de acero inoxidable.
No frote o limpie la junta de la puerta, dado que el material
de fibra de vidrio de la junta tiene un resistencia muy baja
DODDEUDVLyQ8QDMXQWDGHOKRUQRLQWDFWD\ELHQDMXVWDGD
resulta esencial para una operación con buen rendimiento
de la energía y buenos resultados de horneado. Si la junta
se desgasta, rompe o daña o cambia de lugar, un técnico
calificado debe cambiarla de inmediato.
Superficies de Acero Inoxidable
No utilice almohadillas de acero ya que rayan la superficie en
forma permanente.
Para limpiar la superficie de acero inoxidable, utilice agua tibia
jabonosa o un limpiador de acero inoxidable. Siempre limpie
la superficie en dirección de la veta. Siga las instrucciones del
producto para limpiar la superficie de acero inoxidable.
Para consultar sobre la compra de limpiadores de acero
inoxidable, llame en forma gratuita al 800.626.2002 o visite
GEAppliances.com.
Base del Horno
La base del horno tiene un acabado de esmalte de porcelana.
Para hacer la limpieza más fácil, proteja la base del horno de
GHUUDPHVH[FHVLYRV8QDOiPLQDGHDOXPLQLRPiVSHTXHxDR
una lata se puede usar para recoger los derrames colocándola
en la bandeja debajo de la bandeja en la cual usted está
cocinando. Esto es particularmente importante al hornear un
pastel de frutas u otros alimentos que son altamente ácidos.
Los rellenos de fruta caliente u otros alimentos que tienen alto
QLYHOGHiFLGRFRPRORVWRPDWHVHOVDXHUNUDXW\ODVVDOVDV
con vinagre o jugo de limón) pueden causar que el esmalte de
la porcelana se pele y se dañe, por lo que se debe limpiar de
inmediato.
Nunca cubra completamente una bandeja con papel aluminio.
Esto impedirá la circulación del calor y resultará en un
horneado deficiente.
Para limpiar los derrames use agua y jabón, un limpiador
abrasivo o esponjilla de restregar con jabón. Enjuague bien
para eliminar el jabón antes de hacer la auto-limpieza.
Superficies
CUIDADO Y LIMPIEZA: Superficies

49-85244 31
(OTXHPDGRUFRQVWDGHWUHVSDUWHV/DEDVHGHOTXHPDGRUHO
cabezal del quemador y la tapa del quemador. El cabezal y la
tapa del quemador pueden quitarse a fin de facilitar la limpieza.
PRECAUCIÓN
1287,/,&((/48(0$'256,1
72'$6/$63,(=$6(168/8*$5
Los quemadores de superficie debe limpiarse regularmente, en
especial después de sufrir derrames, lo que podría obstruir las
ranuras y orificios de los cabezales de los quemadores.
El electrodo se encuentra en la parte trasera de cada
quemador. No intente desarmar o limpiar un quemador
mientras otro se encuentre encendido. Puede provocarse una
descarga eléctrica.
3DUDTXLWDUODVSLH]DVGHOTXHPDGRU
1. Gire todos los controles a OFF (apagado) antes de quitar
piezas de los quemadores.
2. Cuando se enfríen, usted puede levantar las rejillas,
las tapas y los cabezales del quemador para efectuar
una limpieza más sencilla. No quite las bases de los
quemadores.
NOTA:(OPRGHOR=*3FXHQWDFRQWDPDxRVGLIHUHQWHVGH
quemadores. Asegúrese de reemplazar los quemadores en la
misma ubicación.
/LPSLH]D
Quite todas las piezas del quemador sólo cuando estén
frías. Lávelas en agua caliente jabonosa. Puede utilizarse
una almohadilla plástica para quitar las partículas de comida
quemada y pegada.
Para remover alimentos quemados y pegados, deje en
remojo los cabezales de los quemadores en una solución
de detergente líquido suave y agua caliente durante 20-30
minutos. Para manchas más rebeldes, utilice una almohadilla
plástica o un cepillo de dientes.
Si el derrame ingresa a la ensambladura del cabezal del
quemador, lávela bajo agua corriente y agítela para remover el
exceso de agua.
'HVSXpVGHODOLPSLH]D
'HVSXpVGHUHHPSOD]DUODVSLH]DVGHOTXHPDGRUDJtWHODVSDUD
quitar el exceso de agua y luego séquelas bien.
3DUDUHHPSOD]DUODVSLH]DVGHOTXHPDGRU
Asegúrese de que las piezas de los quemadores se coloquen
en los lugares correctos.
1. Reemplace el cabezal del quemador sobre la base del
quemador, verificando que el orificio del cabezal se
HQFXHQWUHELHQDOLQHDGRFRQHOHOHFWURGRGHODEDVH8Q
espacio pequeño entre la base y el cabezal resulta normal.
2. Coloque la tapa del quemador sobre el cabezal del
quemador. Verifique que la tapa del quemador esté bien
colocada sobre el cabezal del quemador.
Quemadores Apilados de Llama Dual
CUIDADO Y LIMPIEZA:4XHPDGRUHV$SLODGRVGH/ODPD'XDO
Cabezal del
quemador
%DVHGHO
quemador
Electrodo
Tapa del
quemador
Tapa del quemador mal colocada
Tapa del quemador bien colocada
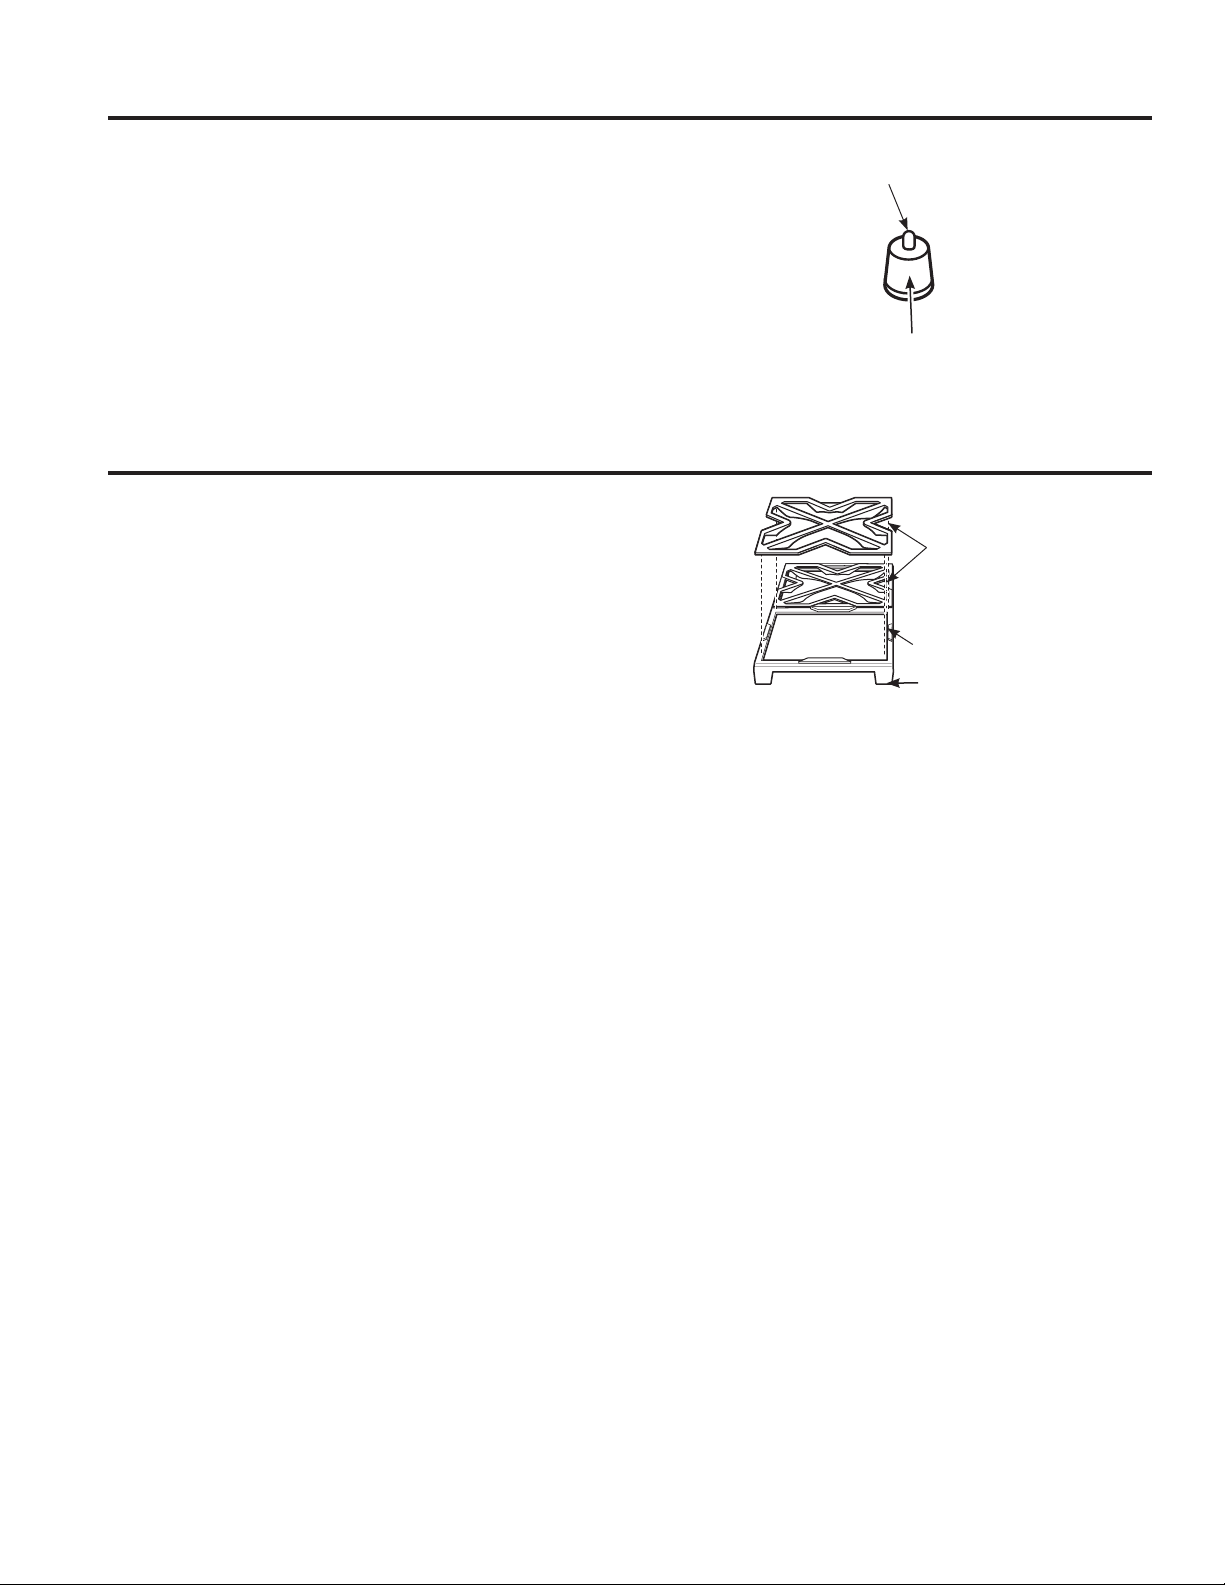
32 49-85244
Rejillas del Quemador
El electrodo del sistema de encendido electrónico se encuentra
ubicado en la parte trasera de la base del quemador. Cuando
limpie la estufa, tenga cuidado de no enganchar el encendedor
con el paño de limpieza. El encendedor podría dañarse.
Tenga cuidado de no empujar la perilla de control hacia
adentro mientras realiza la limpieza. Podría provocar el
accionamiento del encendedor por chispa.
Asegúrese de que los encendedores de cerámica blancos
ubicados sobre la estufa estén secos y limpios. Limpie la
porción de metal del electrodo con un paño suave o una lija.
No trate que quitar el electrodo de la estufa.
Las rejillas del quemador de hierro fundido esmaltado deben
limpiarse regularmente.
Las rejillas pueden limpiarse dentro del horno durante el ciclo
de auto-limpieza, o en el lavaplatos. Los armazones deben
limpiarse a mano o en el lavaplatos.
Lávelos en agua caliente jabonosa, enjuague y seque bien.
A pesar de ser resistentes, las rejillas gradualmente irán
perdiendo el brillo, aunque les brinde el mayor cuidado. Esto
se debe a su exposición continua a altas temperaturas.
No haga funcionar el quemador durante un período prolongado
sin recipientes de cocción sobre la rejilla. El acabado de la
rejilla puede saltarse sin un recipiente que absorba el calor.
Para estabilidad, los armazones cuentan con almohadillas de
JRPDHQFDGDHVTXLQD'XUDQWHODOLPSLH]D\HOXVRWHQJD
cuidado de no dañar o enganchar las almohadillas de goma.
Encendedor por Chispa y Electrodos
CUIDADO Y LIMPIEZA:(QFHQGHGRUSRU&KLVSD\(OHFWURGRV5HMLOODVGHO4XHPDGRU
Limpie esta parte de
metal con una lija.
No limpie esta parte
de cerámica blanca
con una lija.
Rejillas
Armazón
Almohadillas
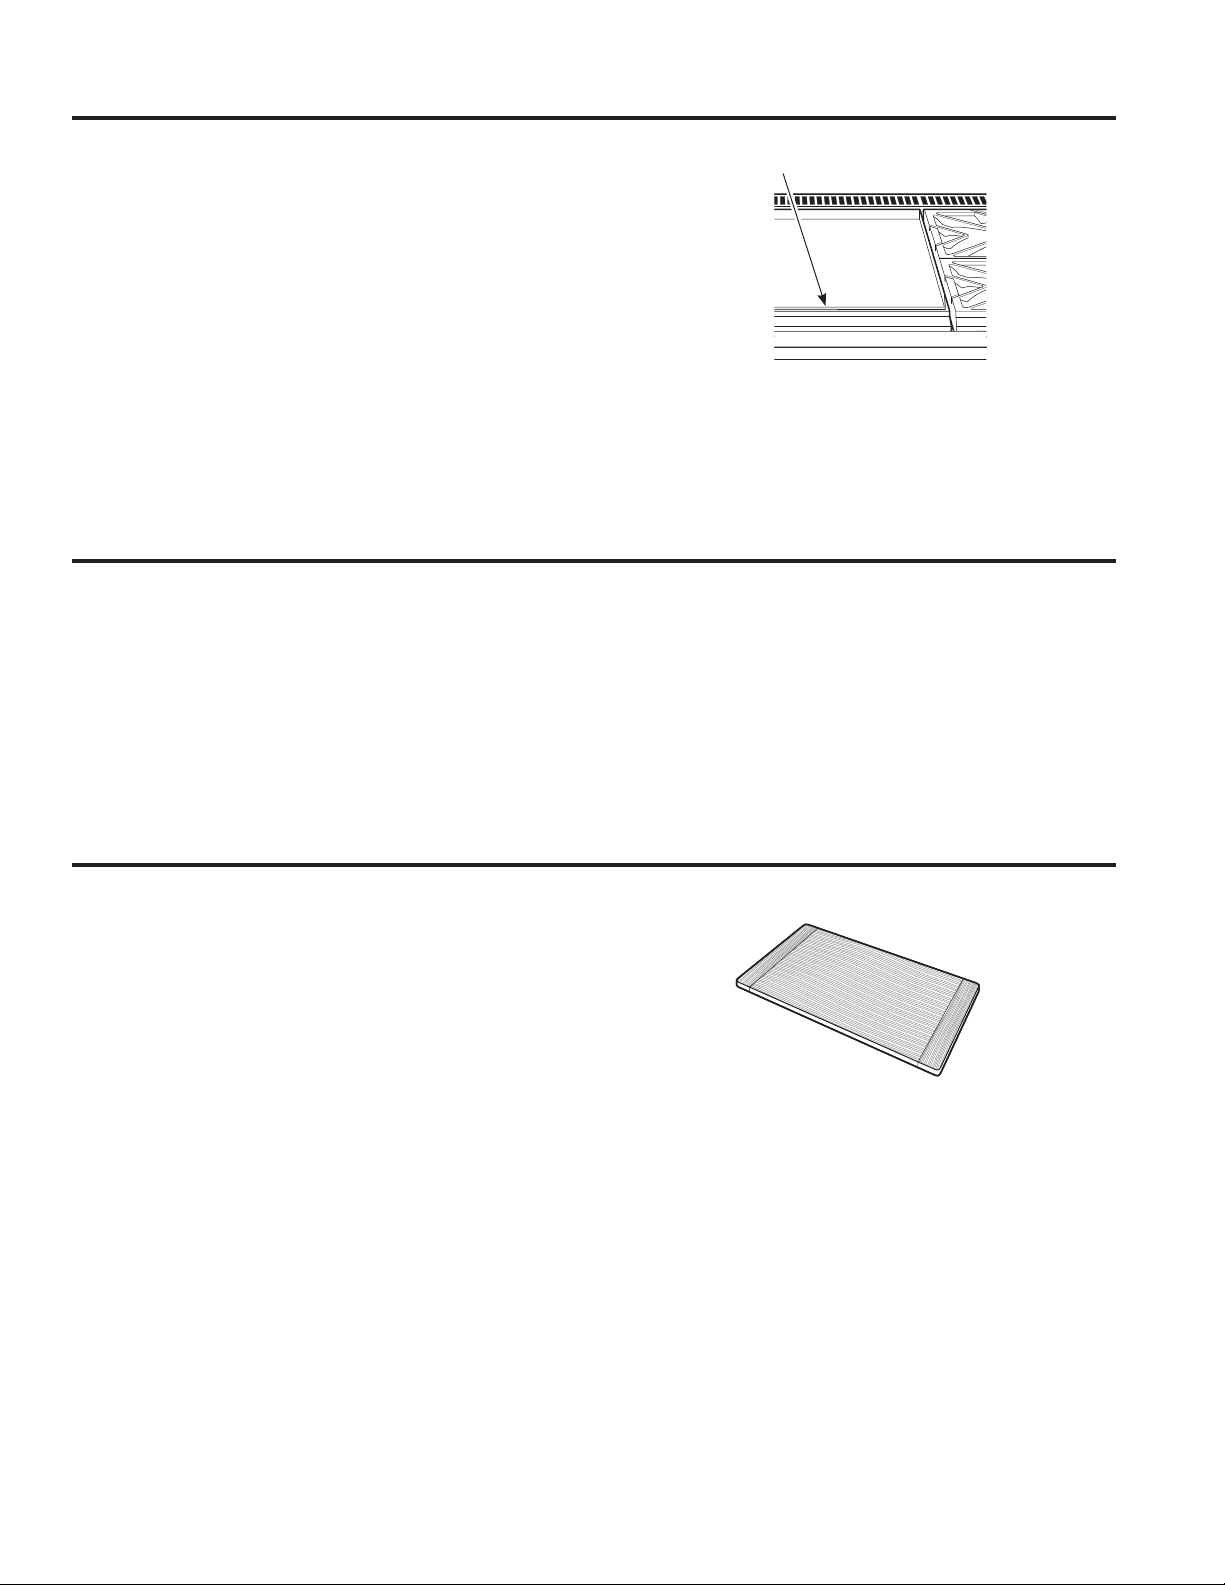
49-85244 33
Plancha (en algunos modelos)
Tabla Para Cortar (en algunos modelos)
La grasa de la plancha será drenada a la canaleta para grasa
GHKLHUURIXQGLGRXELFDGDHQHOIUHQWHGHODFRFLQD8QDYH]
que las canaletas se hayan enfriado, pueden quitarse para
efectuar una limpieza más cómoda.
Para quitar la canaleta para grasa fría de la plancha, deslícela
hacia el frente y levántela.
No permita la acumulación de grasa en las canaletas porque
pueden generar un peligro de incendio. Limpie las canaletas
para grasa tan pronto como se enfríen. Las canaletas para
grasa pueden limpiarse a mano con agua caliente jabonosa
o en el lavaplatos. Limpie cualquier derrame del tazón de la
canaleta con un paño suave.
Para lograr estabilidad, las canaletas cuentan con almohadillas
de goma en la parte frontal. Tenga cuidado de no dañar las
almohadillas cuando las quite para la limpieza.
Quite bien la grasa y las partículas de comida de la plancha
utilizando una espátula de metal de lados rectos, mientras
todavía esté caliente.
Limpie la plancha con un paño seco, resistente y grueso para
eliminar los residuos restantes y partículas de alimentos. Si la
plancha se limpia con otro elemento que no sea un paño seco,
resistente y grueso, ésta tendrá que volver a curarse.
Nunca llene la plancha caliente con agua fría. Esto podría
quebrar o torcer la plancha.
NOTA: Es normal que la plancha en acero inoxidable se ponga
de color amarillo-café después del uso.
Limpie la tabla para cortar de bambú con agua tibia y jabón
VXDYH'HYH]HQFXDQGROtPSLHODFRQDFHLWHPLQHUDO
No lave la tabla para cortar en el lavaplatos.
Accesorios Opcionales
Canaletas Para Grasa (en algunos modelos)
CUIDADO Y LIMPIEZA:&DQDOHWDV3DUD*UDVD3ODQFKD7DEOD3DUD&RUWDU
Canaletas para grasa
34 49-85244
CONSEJOS PARA LA SOLUCIÓN DE PROBLEMAS
¡Ahorre tiempo y dinero! Primero revise los cuadros que aparecen en las siguientes páginas y es posible que no necesite solicitar
reparaciones. Si se produce un error en el funcionamiento del control, un código de falla titilará en la pantalla. Registre el código
de error y llame al servicio técnico.
Consejos para la Solución de Problemas... Antes de solicitar el servicio técnico
Problema Causa Posible
El Horno No Funciona El fusible puede haberse quemado o el interruptor de circuitos puede haber saltado.
Los controles del horno no están bien configurados.
Los controles del horno están configurados para limpieza. Si fuera necesario, deje enfriar el horno; luego abra la
puerta.
9HULILTXHTXHHOVHOHFWRUGHPRGRGHOKRUQRHVWpFRQILJXUDGRHQ%$.(KRUQHDU\TXHODSHULOODGHWHPSHUDWXUD
esté configurada en una temperatura.
Las Luces Del Horno
No Funcionan
El foco de luz no funciona. Cambie el foco.
El horno se encuentra en el modo de auto-limpieza o la característica Sabbat se halla configurada. Las luces del
horno no se encienden durante la auto-limpieza o si la característica Sabbat se encuentra configurada.
El horno está configurado en el modo Proof (leudado). Las luces se encienden y apagan según sea necesario para
mantener la temperatura de leudado.
Los Alimentos No
Or Se Hornean O
5RVWL]DQ'H0DQHUD
Adecuada
/RVFRQWUROHVGHOKRUQRQRHVWiQELHQFRQILJXUDGRV9HUODVHFFLyQ+RUQHDGRR5RVWL]DGR
El horno no se precalentó el tiempo suficiente; espere a que el horno dé la señal de precalentamiento.
Se están utilizando recipientes de cocción incorrectos o de tamaño inapropiado. Ver los Consejos de horneado.
/DVEDQGHMDVQRHVWiQHQODSRVLFLyQFRUUHFWD9HUODVHFFLyQ+RUQHDGRR5RVWL]DGR
8WLOLFHSDSHOGHDOXPLQLRSDUDUHWDUGDUHOGRUDGRGXUDQWHHOURVWL]DGR
El termostato del horno debe ajustarse. Ver la sección Ajuste del termostato del horno.
Los Alimentos No
Se Asan De Manera
Adecuada
Este modelo está diseñado sólo para asado con la puerta cerrada Cierre la puerta. Siempre ase con la puerta
cerrada.
/RVFRQWUROHVGHOKRUQRHVWiQFRQILJXUDGRVHQ%52,/DVDU9HUODVHFFLyQ$VDGR
a sonda está enchufada dentro de la salida del horno. Quite la sonda del horno.
Se está usando una posición de bandeja inadecuada.
/RVUHFLSLHQWHVQRVRQDGHFXDGRVSDUDDVDU8VHODEDQGHMDSDUDDVDU\UHMLOODTXHYLQLHURQFRQVXFRFLQD
El papel metálico usado en la asadera y la rejilla no se ha colocado de manera correcta y no se han realizado los
cortes recomendados.
(O+RUQR1R5HDOL]D
/D$XWR/LPSLH]D
/DWHPSHUDWXUDGHOKRUQRHVWiPX\HOHYDGDSDUDFRQILJXUDUODIXQFLyQGHDXWROLPSLH]D'HMHTXHHOKRUQRVHHQIUtH
por debajo de la temperatura de bloqueo y reconfigure los controles.
/RVFRQWUROHVQRHVWiQELHQFRQILJXUDGRV9HUODVHFFLyQ+RUQRDXWROLPSLDQWH
Ruidos De Crujidos O
Chasquidos Durante
/D/LPSLH]D
Esto es normal. Es el sonido del metal calentándose y enfriándose durante las funciones de cocción y limpieza.
Humo Excesivo
'XUDQWH/D/LPSLH]D
El horno está muy sucio. Gire el selector de modo del horno y las perillas de temperatura a OFF (apagado). Abra
las ventanas para que salga el humo Espere hasta que se apague la luz indicadora de bloqueo de la puerta. Limpie
el exceso de suciedad y reconfigure el ciclo de limpieza.
El Horno No Queda
/LPSLR'HVSXpV8Q
&LFOR'H/LPSLH]D
El horno estaba muy sucio. Limpie los derrames más rebeldes antes de iniciar el ciclo de limpieza. Los hornos muy
sucios pueden necesitar un nuevo ciclo de auto-limpieza.
El horno se encuentra conectado a un suministro eléctrico de 208V. Configure el tiempo de limpieza a 5 horas.
/RVFRQWUROHVGHOKRUQRQRHVWiQELHQFRQILJXUDGRV9HUODVHFFLyQ+RUQRDXWROLPSLDQWH
5HVXOWD'LItFLO'HVOL]DU
Las Bandejas Del
Horno
Las bandejas se limpiaron en el ciclo de auto-limpieza y ahora necesitan lubricación periódica. No rocíe con
SXOYHUL]DGRUSDUDFRFLQDUXRWURVOXEULFDQWHVHQVSUD\9HU%DQGHMDVGHOKRUQRGHH[WHQVLyQWRWDOHQODVHFFLyQ
Cuidado y Limpieza.
49-85244 35
CONSEJOS PARA LA SOLUCIÓN DE PROBLEMAS
Consejos para la Solución de Problemas... Antes de solicitar el servicio técnico
Problema Causa Posible
(O7HPSRUL]DGRU1R
Funciona
El temporizador no puede utilizarse mientras el horno está efectuando la auto-limpieza.
La Temperatura Del
Horno Es Muy Elevada
O Muy Baja
El termostato del horno debe ajustarse. Ver la sección Ajuste del termostato del horno.
La Puerta Del Horno
1R6H$EUH'HVSXpV
De Un Ciclo De
/LPSLH]D
(OKRUQRHVWiPX\FDOLHQWH'HMHTXHHOKRUQRVHHQIUtHSRUGHEDMRGHODWHPSHUDWXUDGHEORTXHR
En La Pantalla
Aparece “Close Door”
(Cerrar Puerta)
Se ha seleccionado el ciclo de auto-limpieza pero la puerta no está cerrada. Cierre la puerta del horno. El símbolo
aparecerá en la pantalla.
Aparece Activado
Cuando Usted Desea
Cocinar
La puerta del horno está bloqueada porque la temperatura dentro del horno no ha descendido por debajo de la
WHPSHUDWXUDGHEORTXHR*LUHHOVHOHFWRUGHPRGRGHOKRUQR\ODVSHULOODVGHWHPSHUDWXUDD2))DSDJDGR'HMH
enfriar el horno.
)<8Q1~PHUR
Destellan En La
Pantalla
El horno tiene un código de error de función. Gire el selector de modo del horno y las perillas de temperatura a OFF
(apagado). Permita que el horno se enfríe durante una hora. Vuelva a encender el horno.
'HVFRQHFWHODHQHUJtDKDFLDHOKRUQRSRUVHJXQGRV\OXHJRYXHOYDDFRQHFWDUODHQHUJtD6LHOFyGLJRGHHUURU
de función se repite, llame al servicio técnico.
La Pantalla Queda En
Blanco
La pantalla queda en blanco cuando el horno o el temporizador no se encuentran en uso.
8QIXVLEOHSXHGHKDEHUVHTXHPDGRRHOLQWHUUXSWRUGHFLUFXLWRVSXHGHKDEHUVDOWDGR&DPELHHOIXVLEOHR
reconfigure el interruptor de circuito.
La Pantalla No
Muestra “Sf”
Los botones 7,0(5WHPSRUL]DGRU y MINI-KNOB (mini-perilla) deben presionarse al mismo tiempo y sostenerse
durante 4 segundos.
Aparece “Probe”
(Sonda) En La Pantalla
Esto le recuerda de ingresar una temperatura de sonda después de enchufarla. Ingrese una temperatura de sonda.
Aparece En La
Pantalla
Se ha seleccionado el modo Sabbat.
Corte De Energía Si el horno se encontraba en uso durante un corte de energía o subida de tensión, el horno debe reconfigurarse.
Gire la perilla de temperatura y el selector de modo del horno a OFF (apagado). Reconfigure los controles para
comenzar de nuevo.
Sale Vapor De La
Ventilación
Cuando se utiliza el modo por convección, es normal ver vapor saliendo de la ventilación del horno. A medida que
el número de bandejas o la cantidad de alimentos a cocinar se incrementa, la cantidad de vapor visible se elevará
Sale Olor A Quemado
O A Aceite Desde La
Ventilación
Esto es normal en un horno nuevo y desaparece con el tiempo.
Olor Penetrante Esto es temporal. Las primeras veces que se utiliza el horno es normal sentir un olor proveniente del aislante que
recubre la parte interna del horno.
Se Oye Un Ventilador 8QYHQWLODGRUGHHQIULDPLHQWRRXQYHQWLODGRUSRUFRQYHFFLyQVHJ~QODIXQFLyQTXHVHHVWpXWLOL]DQGRSXHGH
encenderse. Esto es normal. Se encenderá un ventilador de refrigeración para enfriar las piezas internas. Puede
funcionar aún después de que el horno se haya apagado. El ventilador por convección puede encenderse y
apagarse hasta que termine la función o se abra la puerta.
36 49-85244
Problema Causa Posible
El Ventilador De
Convección No Está
Encendido En Todo
Momento
El ventilador de convección (dependiendo de la función que esté usando) puede tener un ciclo de encendido y apagado
hasta que la función termine y la puerta se abra para un mejor desempeño. Esto es normal. Además, el ventilador de
convección puede realizar un ciclo en el sentido del reloj y en sentido contrario hasta que la función termine y la puerta
se abra.
Los Quemadores
No Se Enciende O
Chispean En Forma
Aleatoria
El enchufe eléctrico no se encuentra enchufado a un tomacorriente cargado.
El gas no está encendido.
Las piezas de los quemadores no se volvieron a colocar correctamente.
Los orificios de los anillos de fuego lento o las ranuras de los anillos del quemador se encuentran obstruidos.
Orificio obstruido o quemadores o electrodos húmedos.
/DIXQFLyQ&RRNWRS/RFNRXW%ORTXHRGHOD6XSHUILFLHGH&RFFLyQHVWiDFWLYDGD
Es posible que haya un fusible quemado en su hogar o que se haya desactivado el disyuntor.
Las Llamas De Los
Quemadores Son
Amarillas O Tienen
Puntas Amarillas
Las piezas de los quemadores no se volvieron a colocar correctamente.
A. Llamas amarillas: Llame al
servicio técnico.
B. Puntas amarillas en los
conos externos: Normal
para gas propano (LP).
&/ODPDVGHD]XOFODUR
Normal para gas natural.
Si las llamas del quemador se parecen a (A), llame al servicio técnico. Las llamas normales de los quemadores
GHEHQVHUFRPR%R&GHSHQGLHQGRGHOWLSRGHJDV
Las Llamas De Los
Quemadores Son Muy
Grandes O Amarillas
La cocina puede estar conectada a un tipo de combustible incorrecto. Comuníquese con la persona que instaló su
cocina o que realizó la conversión.
La Perilla De Control
Del Quemador No Gira
Cuando la perilla se encuentra en la posición OFF, debe presionarse hacia adentro antes de que pueda girarse,
y sólo puede girarse en sentido contrario a las agujas del reloj. Cuando la perilla se encuentra en cualquier otra
posición, ésta puede girarse en cualquier dirección sin presionarse hacia adentro.
Condensación O
Neblina En El Vidrio
Interior De La Puerta
La condensación o neblina en el interior del vidrio de la puerta del horno es normal durante el precalentamiento del
horno y por lo general se evaporará antes del final del ciclo de precalentamiento.
Las Llamas del
Quemador poseen
Parpadeos de Color
Anaranjado
Polvo en el aire, humidificador de vapor frío, desechos en o dentro del quemador.
CONSEJOS PARA LA SOLUCIÓN DE PROBLEMAS
Consejos para la Solución de Problemas... Antes de solicitar el servicio técnico

49-85244 37
Notas
38 49-85244
Abroche su recibo aquí. Para acceder al servicio técnico de acuerdo con
la garantía deberá contar con la prueba de la fecha original de compra.
GEAppliances.com
Todo el servicio de garantía es provisto por nuestros Centros de Servicio de Fabricación, o un técnico autorizado de Customer Care®.
Para programar una visita del servicio técnico a través de Internet, visítenos en www.geappliances.com/service_and_support/, o
llame a GE Appliances al 800.GE.CARES. Cuando llame para solicitar el servicio, tenga los números de serie y modelo disponibles.
Para realizar el servicio técnico de su electrodoméstico, se podrá requerir el uso de datos del puerto de abordaje para su diagnóstico.
Esto da al técnico del servicio de fábrica de GE Appliances la habilidad de diagnosticar de forma rápida cualquier problema con
su electrodoméstico, y de ayudar a GE Appliances a mejorar sus productos al brindarle a GE Appliances la información sobre su
electrodoméstico. Si no desea que los datos de su electrodoméstico sean enviados a GE Appliances, solicitamos que le indique a su
técnico no entregar los datos a GE Appliances en el momento del servicio.
4XpQRFXEULUi*($SSOLDQFHV
Ŷ 9LVLWDVDVXKRJDUSDUDHQVHxDUOHDXVDUHOSURGXFWR
Ŷ 'HFRORUDFLyQGHODSODFDGHODSODQFKDRGHODVEDQGHMDV
del horno.
Ŷ 6DOWDGRGHODVUHMLOODVGHHVPDOWHGHSRUFHODQDRGHODV
bandejas del horno.
Ŷ 5HHPSOD]RGHIXVLEOHVGRPpVWLFRVRODUHFRQILJXUDFLyQGHORV
interruptores de circuito.
Ŷ 'DxRVLQFLGHQWDOHVRUHVXOWDQWHVSURYRFDGRVSRUSRVLEOHV
defectos de este aparato.
Ŷ 'DxRVSURYRFDGRVGHVSXpVGHODHQWUHJD
Ŷ 'DxRVDOSURGXFWRSURYRFDGRVSRUDFFLGHQWHVLQFHQGLRV
inundaciones o fuerza mayor.
Ŷ )DOODVGHOSURGXFWRVLVHXWLOL]DSDUDXQREMHWLYRGLIHUHQWHGHO
previsto o si se usa en forma comercial.
Ŷ ,QVWDODFLyQHQWUHJDRPDQWHQLPLHQWRLQDGHFXDGRV
Si tiene un problema con la instalación, comuníquese con su
YHQGHGRURLQVWDODGRU8VWHGHVUHVSRQVDEOHGHVXPLQLVWUDU
adecuadas instalaciones eléctricas, de gas, de salida y
otras conexiones como se describe en las Instrucciones de
Instalación incluidas con el producto.
Ŷ 3URGXFWRQRDFFHVLEOHSDUDSUHVWDUHOVHUYLFLRWpFQLFR
solicitado.
GARANTÍA
Garantía de la Cocina a Gas de GE Appliances
EXCLUSIÓN DE GARANTÍAS IMPLÍCITAS
Su única y exclusiva alternativa es la reparación del producto, como se indica en la Garantía Limitada. Las
garantías implícitas, incluyendo garantías implícitas de comerciabilidad o conveniencia sobre un propósito
particular, se limitan a un año o al período más corto permitido por la ley.
Esta garantía se extiende al comprador original y a cualquier dueño subsiguiente de productos comprados para
XVRKRJDUHxRGHQWURGH((886LHOSURGXFWRHVWiHQXQiUHDGRQGHQRVHHQFXHQWUDGLVSRQLEOHXQ3URYHHGRU
Autorizado del Servicio Técnico de GE Appliances, usted será responsable por el costo de un viaje o se podrá
requerir que traiga el producto a una ubicación del Servicio Técnico de GE Appliances autorizado para recibir el
VHUYLFLR(Q$ODVNDODJDUDQWtDH[FOX\HHOFRVWRGHHQYtRROODPDGDVGHOVHUYLFLRDVXKRJDU$OJXQRVHVWDGRV
no permiten la exclusión o limitación de daños fortuitos o consecuentes. Esta garantía le da derechos legales
específicos y es posible que tenga otros derechos legales que varían entre un estado y otro. Para conocer cuáles son
sus derechos legales, consulte a la oficina de asuntos del consumidor local o estatal o al Fiscal de su estado.
Garante: GE Appliances, a Haier company
Garante en Canadá: MC Commercial, Burlington, ON, L7R 5B6
Garantías Extendidas: Adquiera una garantía extendida de GE Appliances y conozca los descuentos especiales que
están disponibles mientras su garantía aún está vigente. Puede acceder a la misma a través de Internet en cualquier
momento en
www.geappliances.com/service_and_support/shop-for-extended-service-plans.htm
o llamando al 800.626.2224 durante el horario comercial. Los Servicios para los GE Appliances aún estarán
disponibles cuando su garantía caduque.
Por el Período de *($SSOLDQFHVUHHPSOD]DUi
Un Año
'HVGHODIHFKDGHOD
compra original
Cualquier parteGHODHVWXIDTXHIDOOHGHELGRDXQGHIHFWRHQORVPDWHULDOHVRODIDEULFDFLyQ'XUDQWH
esta garantía limitada de un año, GE Appliances también proveerá, sin costo, todo el trabajo y el
servicio en el hogar para reemplazar la parte que presente defectos.

49-85244 39
ACCESORIOS
¿Busca Algo Más?
¡GE Appliances ofrece una variedad de accesorios para
mejorar sus experiencias de cocción y mantenimiento!
Para acceder a números telefónicos e información de sitios
Web, consulte la página de Soporte para el Consumidor.
(VWRV\RWURVSURGXFWRVHVWiQGLVSRQLEOHV
Accesorios
3LH]DV
Tabla para cortar de bambú (en algunos modelos)
Placa de protección
Tapa de la Plancha (en algunos modelos)
%DQGHMDVGHOKRUQRGHH[WHQVLyQWRWDO
%DQGHMDGHOKRUQRGHEDMRSHUILO
Asadera y rejilla de la asadera
Sonda de temperatura
%DQGHMDGHURVWL]DGR
6 Quemadores a Gas
6 Quemadores a Gas con Plancha

40 49-85244
Soporte para el Consumidor
SOPORTE PARA EL CONSUMIDOR
Sitio Web de GE Appliances
¢'HVHDUHDOL]DUXQDFRQVXOWDRQHFHVLWDD\XGDFRQVXHOHFWURGRPpVWLFR"£,QWHQWHDWUDYpVGHO6LWLR:HEGH*($SSOLDQFHVODV
KRUDVGHOGtDFXDOTXLHUGtDGHODxR8VWHGWDPELpQSXHGHFRPSUDUPiVHOHFWURGRPpVWLFRVPDUDYLOORVRVGH*($SSOLDQFHV\
aprovechar todos nuestros servicios de soporte a través de Internet, diseñados para su conveniencia.
(Q((88GEAppliances.com (Q&DQDGi GEAppliances.ca
5HJLVWUHVX(OHFWURGRPpVWLFR
£5HJLVWUHVXHOHFWURGRPpVWLFRQXHYRDWUDYpVGH,QWHUQHWVHJ~QVXFRQYHQLHQFLD8QUHJLVWURSXQWXDOGHVXSURGXFWRSHUPLWLUi
una mejor comunicación y un servicio más puntual de acuerdo con los términos de su garantía, en caso de surgir la necesidad.
También puede enviar una carta en la tarjeta de inscripción preimpresa que se incluye con el material embalado.
(Q((88GEAppliances.com/register
(Q&DQDGi Prodsupport.mabe.ca/crm/Products/ProductRegistration.aspx
Servicio Programado
El servicio de reparación de expertos de GE Appliances está a sólo un paso de su puerta. Conéctese a través de Internet y programe
VXVHUYLFLRDVXFRQYHQLHQFLDFXDOTXLHUGtDGHODxR(Q((88GEAppliances.com/ge/service-and-support/service.htm
o comuníquese al 800.432.2737 durante el horario de atención comercial.
(Q&DQDGi
GEAppliances.ca/en/support/service-request o llame al 800.561.3344
Garantías Extendidas
Adquiera una garantía extendida de GE Appliances y conozca los descuentos especiales que están disponibles mientras su
garantía aún está vigente. La puede adquirir en cualquier momento a través de Internet. Los servicios de GE Appliances aún
estarán allí cuando su garantía caduque.
(Q((88GEAppliances.com/ge/service-and-support/shop-for-extended-service-plans.htm
o comuníquese al 800.626.2224 durante el horario de atención comercial.
(Q&DQDGiGEAppliances.ca/en/support/purchase-extended-warranty
o llame al
800.290.9029
Conectividad Remota
Para solicitar asistencia para la conectividad de red inalámbrica (para modelos con acceso remoto),
visite nuestro sitio web en GEAppliances.com/ge/connected-appliances/RFRPXQtTXHVHDOHQ((88~QLFDPHQWH
3LH]DV\$FFHVRULRV
Aquellos individuos calificados para realizar el servicio técnico de sus propios electrodomésticos podrán solicitar el envío de
SLH]DVRDFFHVRULRVGLUHFWDPHQWHDVXVKRJDUHVVHDFHSWDQODVWDUMHWDV9,6$0DVWHU&DUG\'LVFRYHU2UGHQHKR\DWUDYpVGH
,QWHUQHWGXUDQWHODVKRUDVWRGRVORVGtDV(Q((88GEApplianceparts.com o de forma telefónica al 877.959.8688 durante
el horario de atención comercial.
/DVLQVWUXFFLRQHVTXHILJXUDQHQHVWHPDQXDOFXEUHQORVSURFHGLPLHQWRVTXHVHUiQUHDOL]DGRVSRUFXDOTXLHUXVXDULR
2WURVVHUYLFLRVWpFQLFRVJHQHUDOPHQWHGHEHQVHUGHULYDGRVDSHUVRQDOFDOLILFDGRGHOVHUYLFLR6HGHEHUiWHQHUFXLGDGR
ya que una reparación indebida podrá hacer que el funcionamiento no sea seguro.
Los clientes de Canadá deberán consultar en las páginas amarillas el centro de servicios de MC Commercial más cercano; visite
nuestro sitio web en GEAppliances.ca/en/products/parts-filters-accessories o comuníquese al 800.661.1616.
Contáctenos
Si no se encuentra satisfecho con el servicio que recibió de GE Appliances, comuníquese con nosotros a través de nuestro sitio
:HEFRQWRGRVORVGHWDOOHVLQFOX\HQGRVXQ~PHURWHOHIyQLFRRHVFULEDD
(Q((88*HQHUDO0DQDJHU&XVWRPHU5HODWLRQV_*($SSOLDQFHV$SSOLDQFH3DUN_/RXLVYLOOH.<
GEAppliances.com/ge/service-and-support/contact.htm
(Q&DQDGi'LUHFWRU&RQVXPHU5HODWLRQV0&&RPPHUFLDO,QF_6XLWH)DFWRU\/DQH_0RQFWRQ1%(&0
GEAppliances.ca/en/contact-us
Impreso en México

