
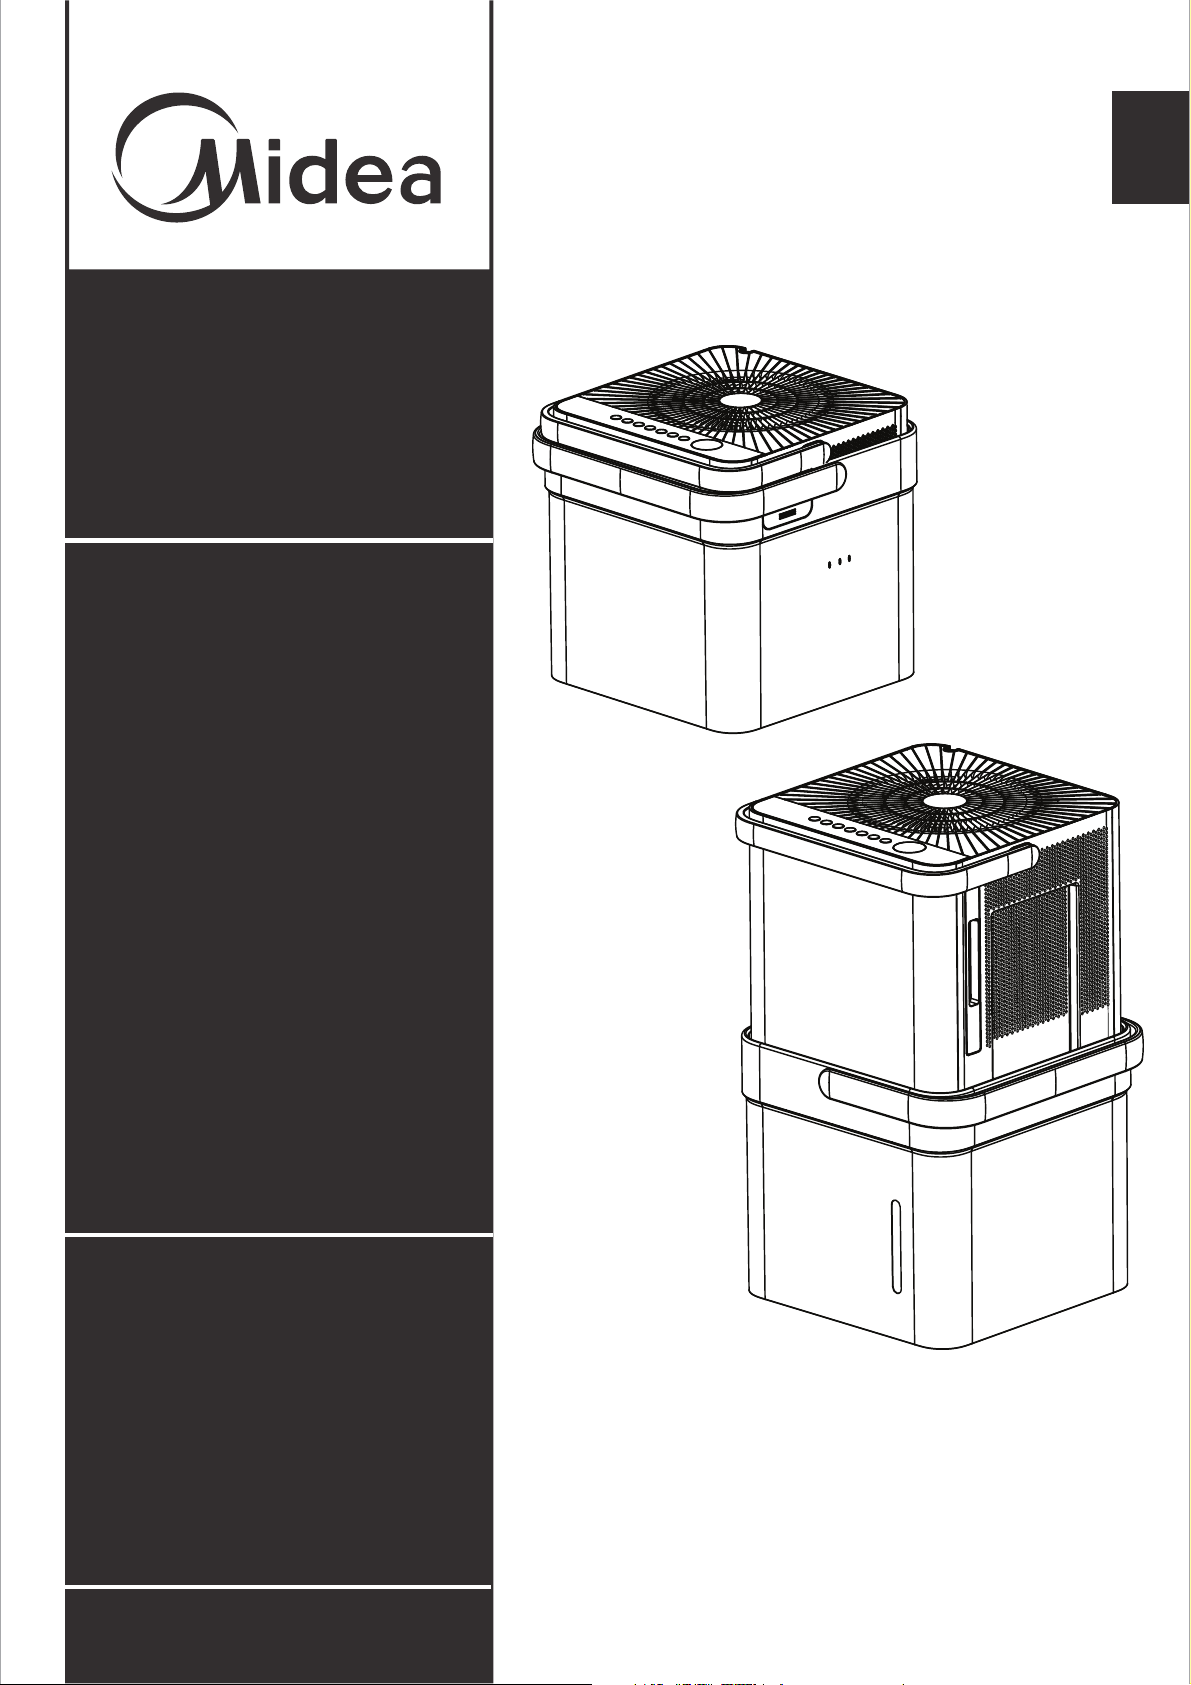
Dehumidifier
version A - 12 - 2020
www.midea.com
USER MANUAL
EN
Warning notices: Before using
this product, please read this
manual carefully and keep it
for future reference.
The design and specifications
are subject to change without
prior notice for product
improvement.
POWER SOURCE 115V,60Hz

Safety Precautions 1
Preparation 3
Operating Instructions 5
Care and Maintenance 11
Table of Contents
Troubleshooting Tips 12
App Instructions 13
Safety
Precautions
Safety
5HDG6DIHW\3UHFDXWLRQV%HIRUH2SHUDWLRQDQG,QVWDOODWLRQ
7RSUHYHQWGHDWKRULQMXU\WRWKHXVHURURWKHUSHRSOHDQGSURSHUW\GDPDJHWKH
IROORZLQJLQVWUXFWLRQVPXVWEHIROORZHG,QFRUUHFWRSHUDWLRQGXHWRLJQRULQJRI
LQVWUXFWLRQVPD\FDXVHGHDWKKDUPRUGDPDJH
WARNING
x
x
x
x
x
x
x
x
x
x
x
x
x
x
x
x
x
x
x
x
x
x
x
x
x
x
Safety Precautions
fe
Page 1
WARNING CAUTION
This symbol indicates the possibility of
property damage or serious consequences.
'RQRWH[FHHGWKHUDWLQJRIWKHSRZHURXWOHWRUFRQQHFWLRQGHYLFH
'RQRWRSHUDWHRUVWRSWKHXQLWE\VZLWFKLQJRQRURIIWKHSRZHU
'RQRWGDPDJHRUXVHDQXQVSHFLILHGSRZHUFRUG
'RQRWPRGLI\SRZHUFRUGOHQJWKRUVKDUHWKHRXWOHWZLWKRWKHUDSSOLDQFHV
'RQRWLQVHUWRUSXOORXWSOXJZLWKZHWKDQGV
'RQRWLQVWDOOWKHDSSOLDQFHLQDORFDWLRQWKDWPD\EHH[SRVHGWRFRPEXVWLEOHJDV
'RQRWSODFHWKHXQLWQHDUDKHDWVRXUFH
'LVFRQQHFWWKHSRZHULIVWUDQJHVRXQGVVPHOORUVPRNHFRPHVIURPLW
<RXVKRXOGQHYHUWU\WRWDNHDSDUWRUUHSDLUWKHXQLWE\\RXUVHOI
%HIRUHFOHDQLQJWXUQRIIWKHSRZHUDQGXQSOXJWKHXQLW
'RQRWXVHWKHPDFKLQHQHDUIODPPDEOHJDVRUFRPEXVWLEOHVVXFKDVJDVROLQHEHQ]HQH
WKLQQHUHWF
'RQRWGULQNRUXVHWKHZDWHUGUDLQHGIURPWKHXQLW
'RQRWWDNHWKHZDWHUEXFNHWRXWGXULQJRSHUDWLRQ
'RQRWXVHWKHXQLWLQVPDOOVSDFHV
'RQRWSXWLQSODFHVZKHUHZDWHUPD\VSODVKRQWRWKHXQLW
3ODFHWKHXQLWRQDOHYHOVWXUG\VHFWLRQRIWKHIORRU
'RQRWFRYHUWKHLQWDNHRUH[KDXVWRSHQLQJVZLWKFORWKVRUWRZHOV
&DUHVKRXOGEHWDNHQZKHQXVLQJWKHXQLWLQDURRPZLWKWKHIROORZLQJSHUVRQVLQIDQWV
FKLOGUHQHOGHUO\SHRSOHDQGSHRSOHQRWVHQVWLYHWRKXPLGLW\
'RQRWXVHLQDUHDVZKHUHFKHPLFDOVDUHKDQGOHG
1HYHULQVHUW\RXUILQJHURURWKHUIRUHLJQREMHFWVLQWRJULOOVRURSHQLQJV7DNHVSHFLDOFDUHWR
ZDUQFKLOGUHQRIWKHVHGDQJHUV
'RQRWSODFHKHDY\REMHFWRQWKHSRZHUFRUGDQGWDNHFDUHVRWKDWWKHFRUGLVQRWFRPSUHVVHG
'RQRWFOLPEXSRQRUVLWRQWKHXQLW
$OZD\VLQVHUWWKHILOWHUVVHFXUHO\&OHDQILOWHURQFHHYHU\WZRZHHNV
,IZDWHUHQWHUVWKHXQLWWXUQWKHXQLWRIIDQGGLVFRQQHFWWKHSRZHUFRQWDFWDTXDOLILHGVHUYLFH
WHFKQLFLDQ
'RQRWSODFHIORZHUYDVHVRURWKHUZDWHUFRQWDLQHURQWRSRIWKHXQLW
'RQRWXVHH[WHQVLRQFRUGV
This symbol indicates the possibility of
personnel injury or loss of life.

Safety
Precautions
Page 2
CAUTION
Preparation
Page 3
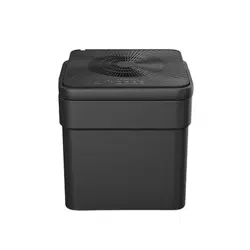
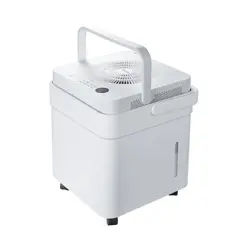
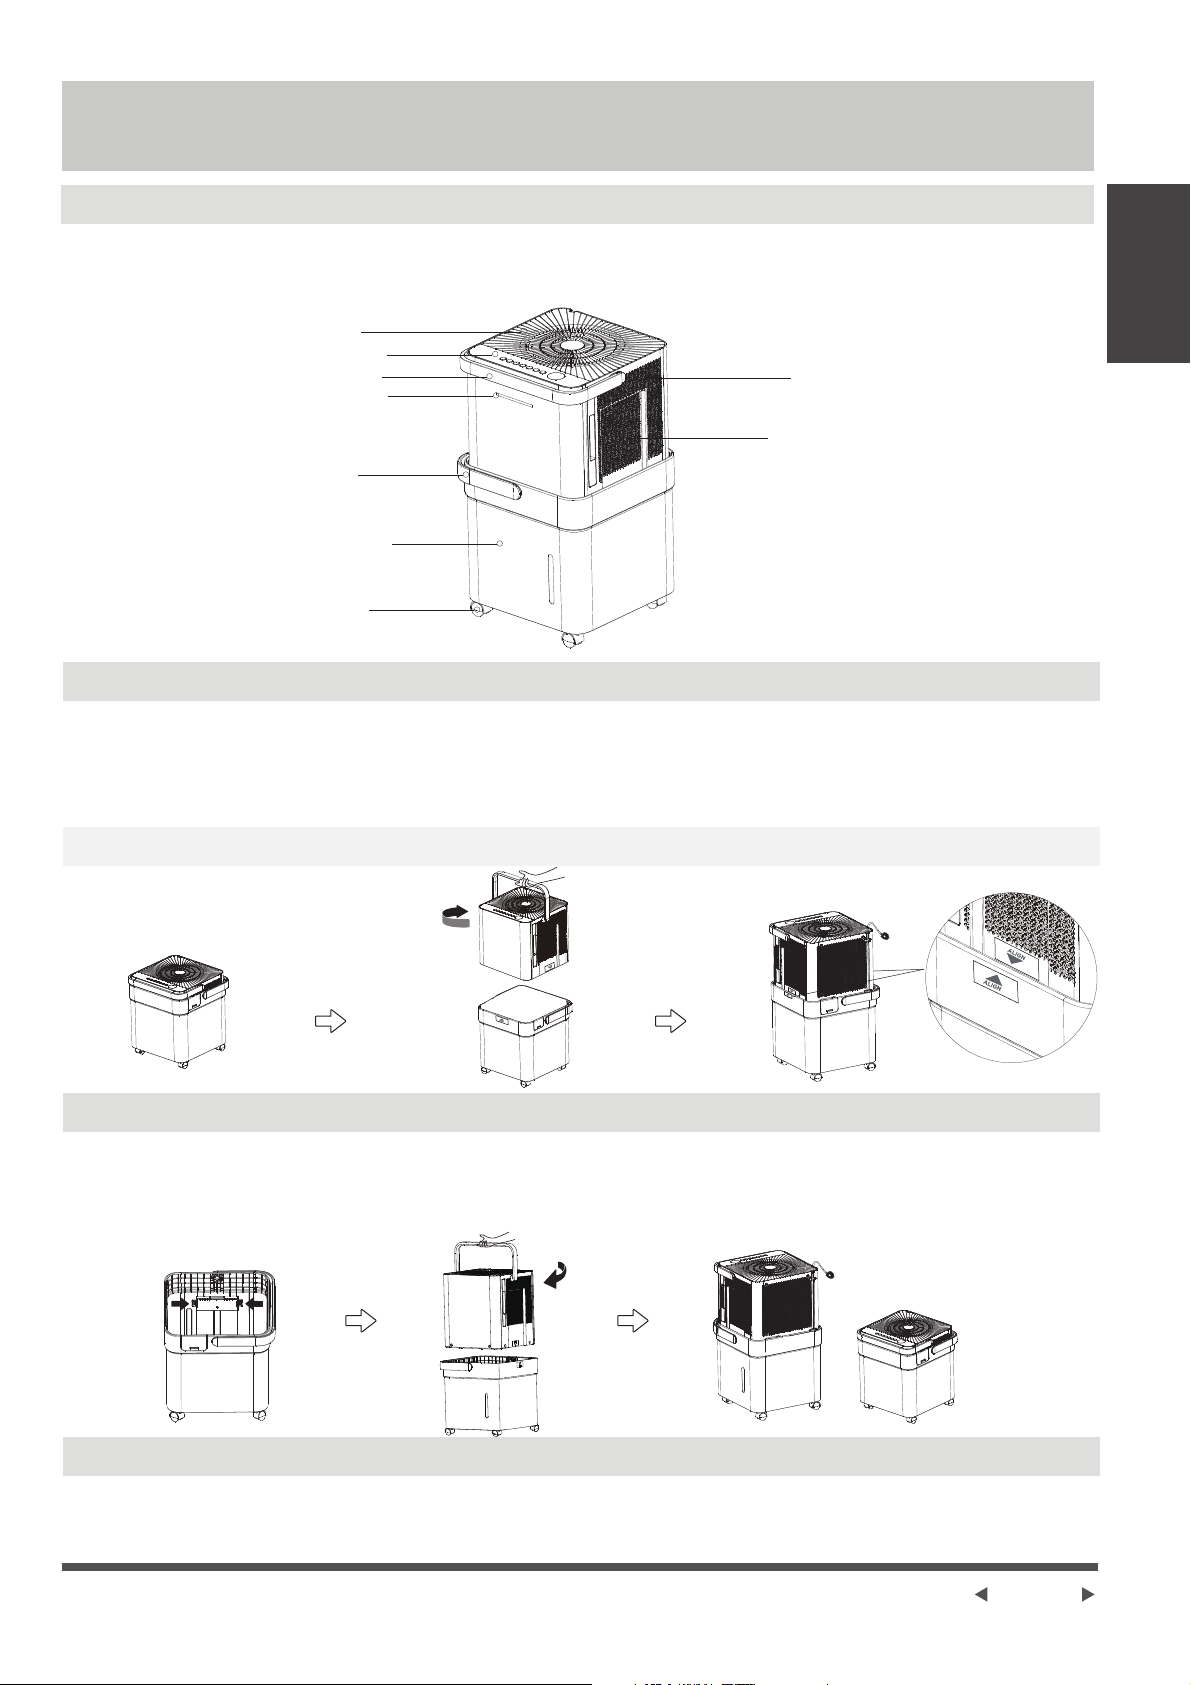
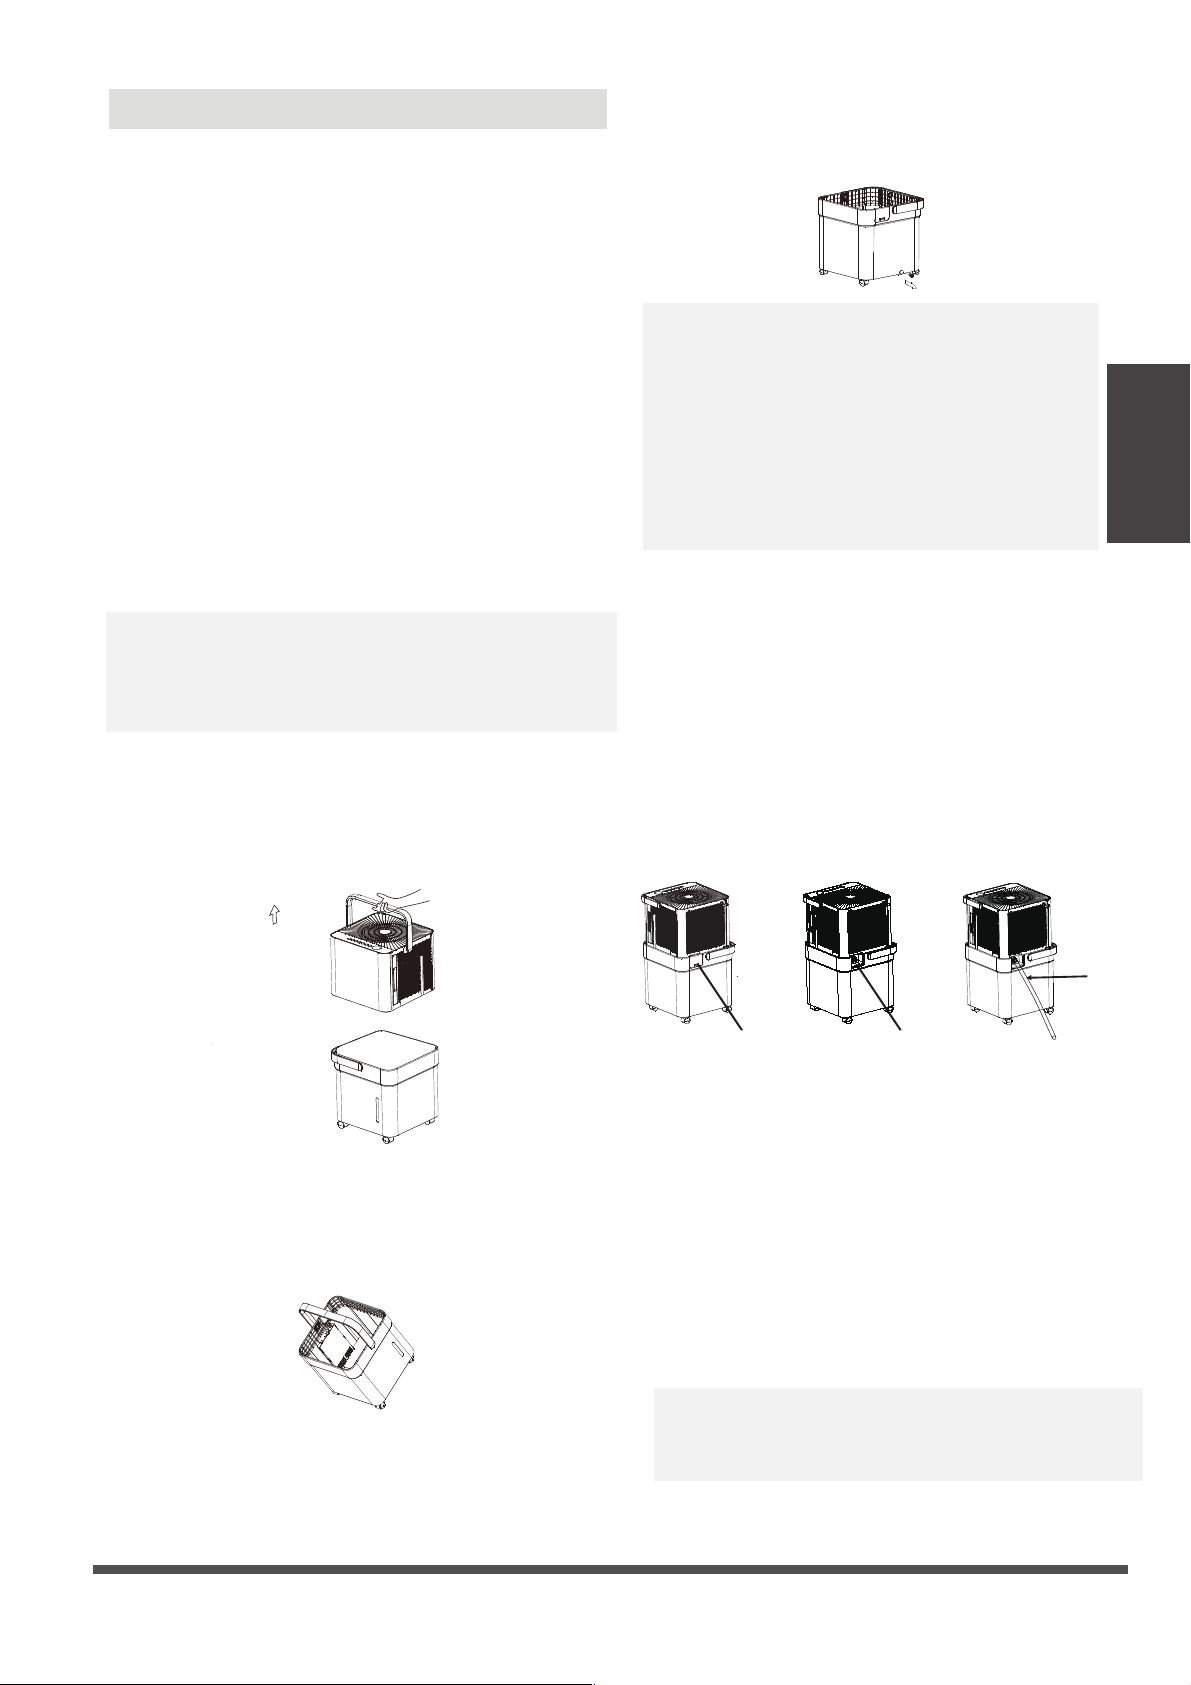
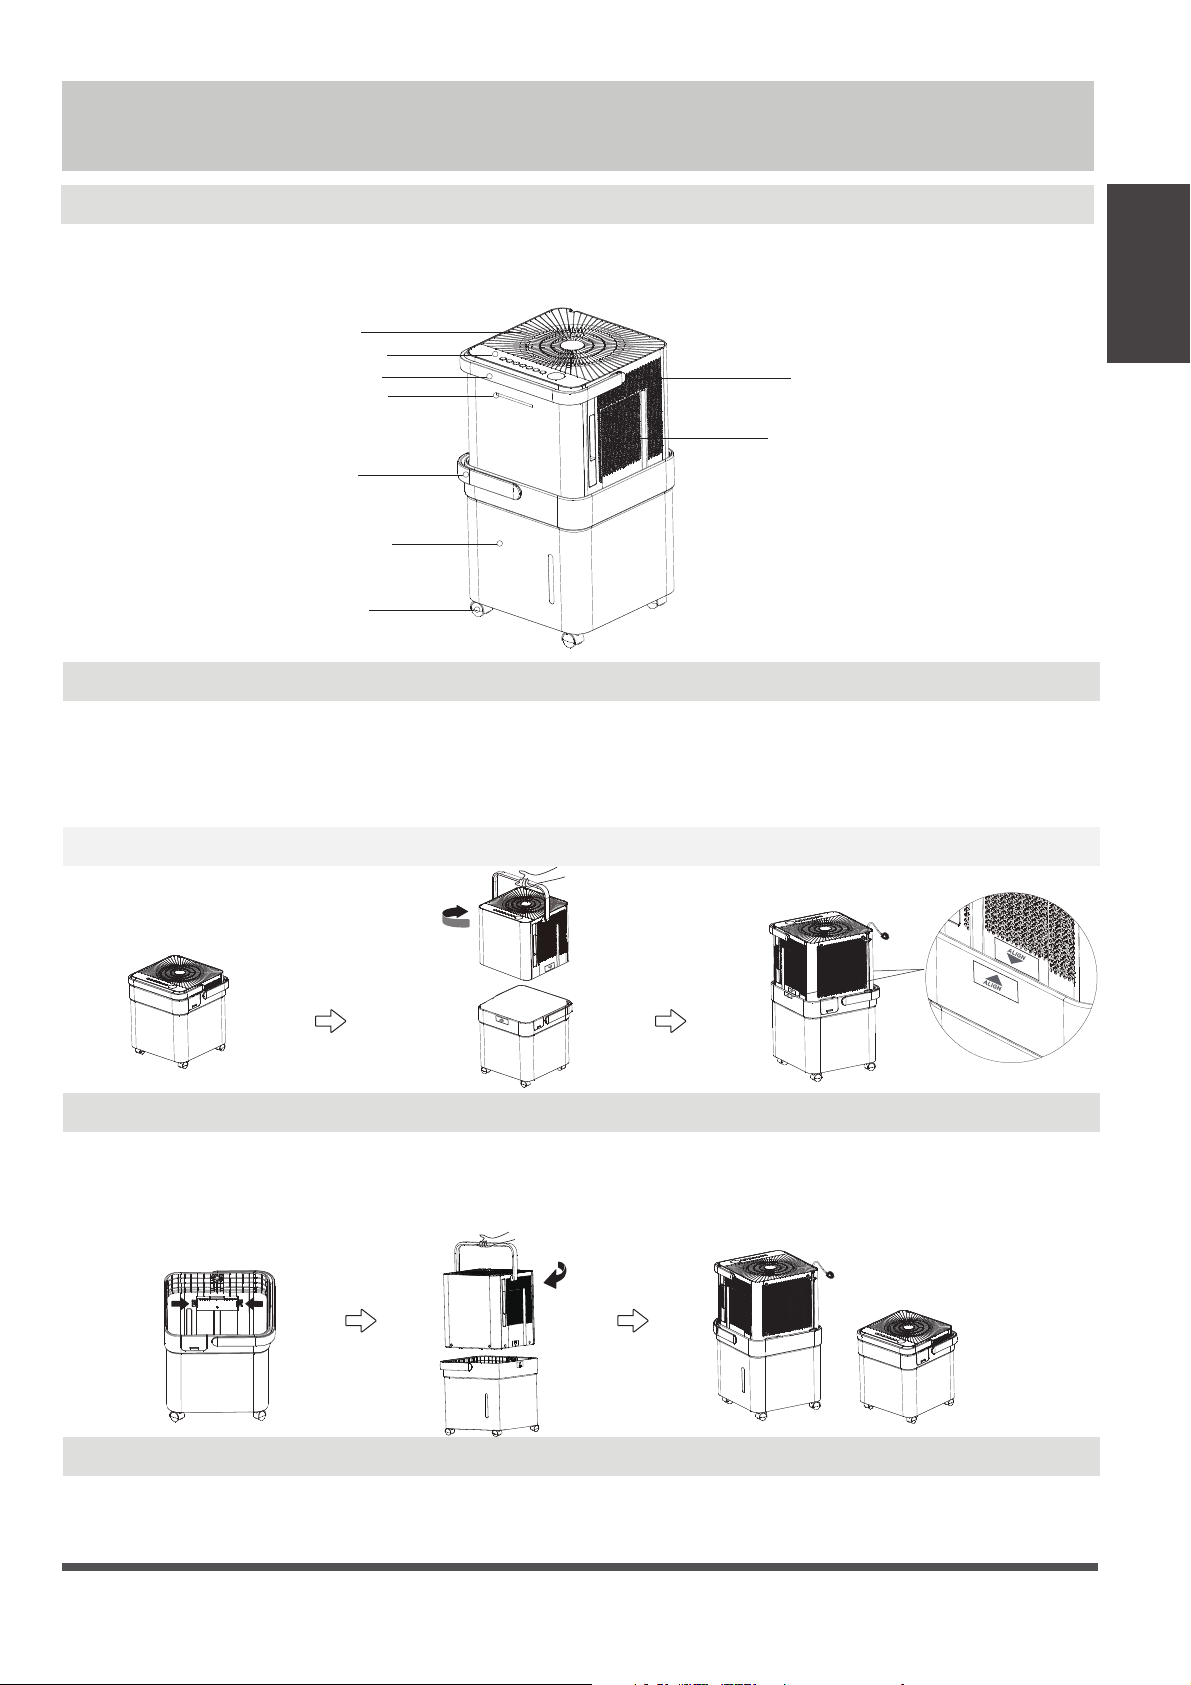
Identification of parts
Storage Instructions
Installation Instructions
NOTE:All the illustrations in the manual are for explanation purpose only. Your machine may be slightly
different. The actual shape shall prevail. The unit can be controlled by the unit control panel .
Preparation
control panel
caster(some units)
handle
air outlet grille
handle
water bucket
air filter (behind the grill)
air intake grille
.2.1
1. Take out the dehumidifier from the package.
2. Hold the handle and lift the dehumidifier up, pull out the power code, and rotate 90° counterclockwise.
3. Place the dehumidifier into the water bucket gently according to the ALIGN label until it clicks in place. Do never
install it rudely.
NOTE: During the operation, it is normal if you press the top cover and the dehumidifier shakes slightly.
3.
1. Press in the convex piece in the water bucket.
2. Lift the dehumidifier body handle, rotate 90° clockwise.
3. install the power cord into the in-line slot, put the dehumidifier into the package to store.
.3.2.1
Caster installation and disassembly instructions (some units)
Installation:
1.Attach the caster to the bottom of the unit.
2.Use a block to fix it as shown in the picture.
quick glance light
(some units)

When first using the dehumidifier, operate the unit
continuously 24 hours. Make sure the plastic cover on
the continuous drain hose outlet install stightly
properly so there are no leaks.
This unit is designed to operate with a working
environment between 5 C/41 F and 32 C/90 F,
and between 30%(RH) and 80%(RH).
If the unit has been switched off and needs to be
switched on again quickly , allow approximately three
minutes for the correct operation to resume.
Do not connect the dehumidifier to a multiple socket
outlet, which is also being used for other electrical
applications only. This dehumidifer should not be used
for commercial or industrial applications.
Place the dehumidifier on a smooth, level floor strong
enough to support the unit with a full bucket of water.
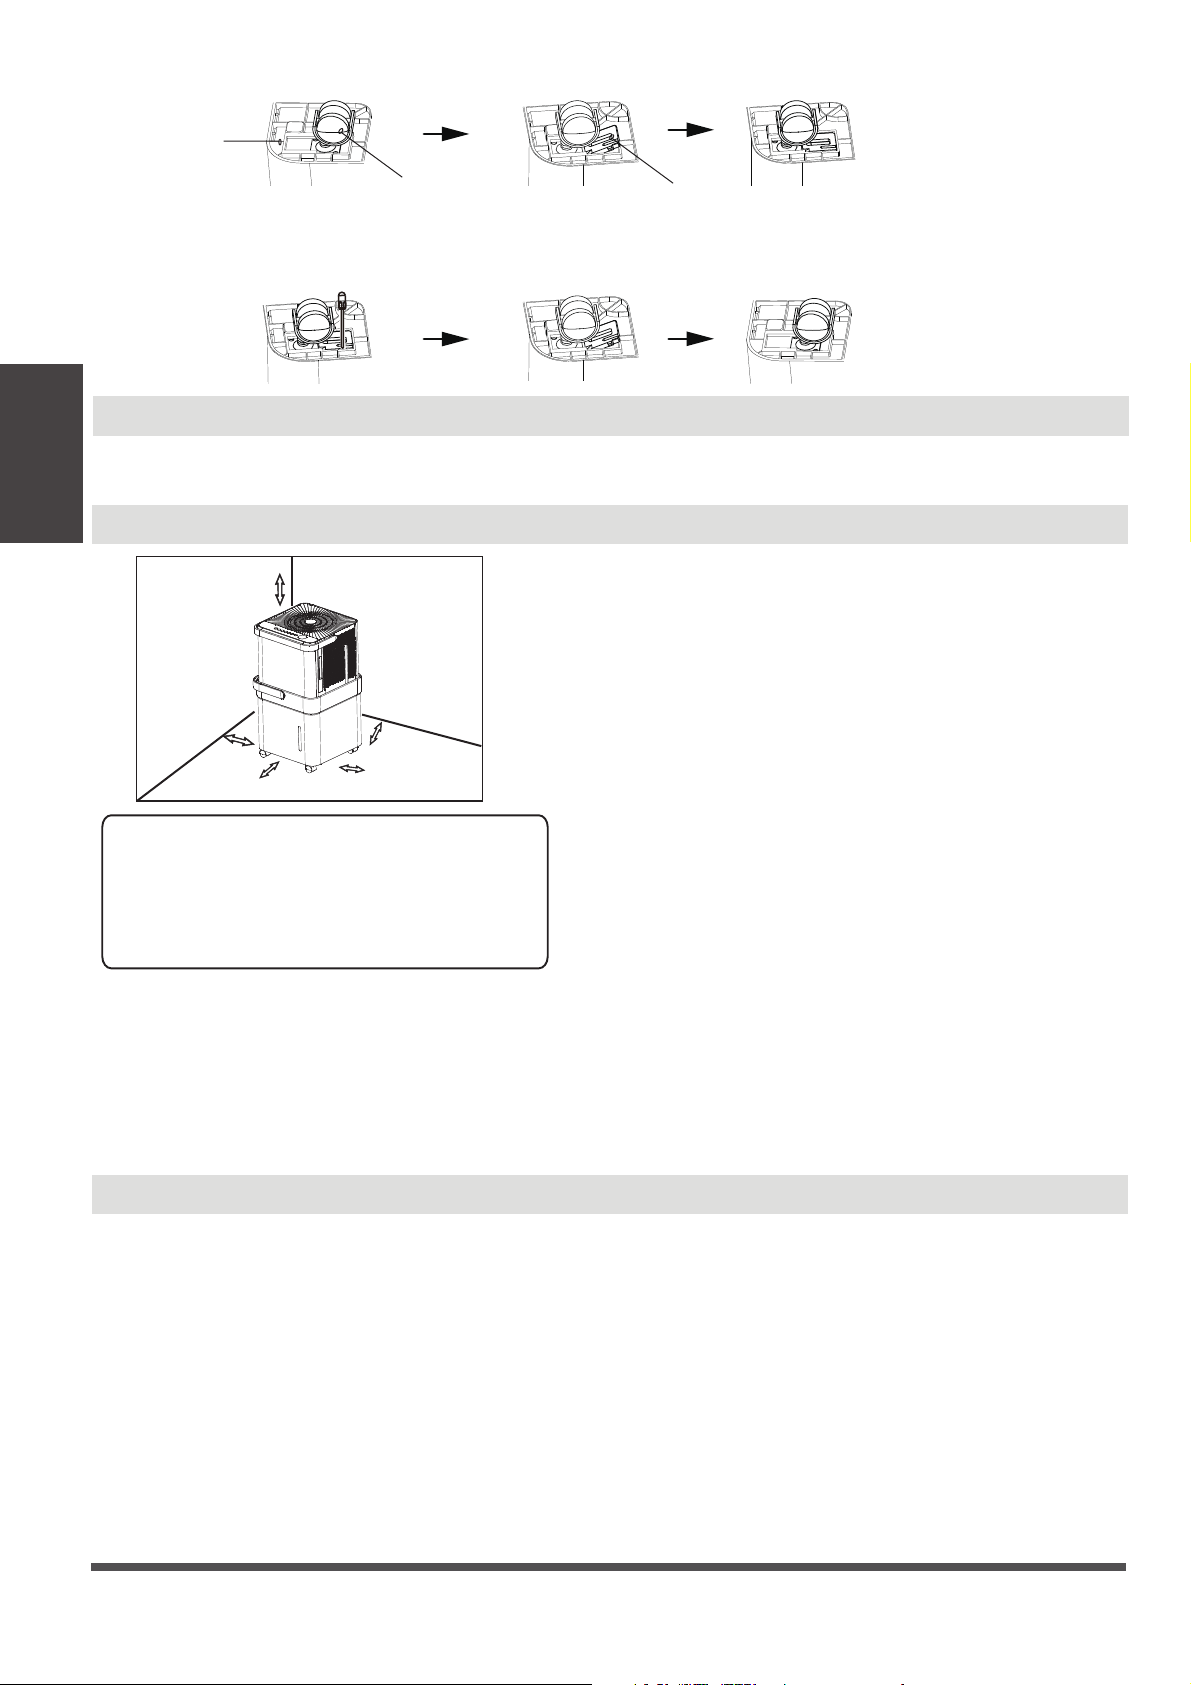
Allow at least 20cm of air space on all sides of the unit
for good air circulation (at least 40cm of air space on
air outlet).
Place the unit in an area where the temperature will
not fall below 5 C (41 F). The coils can become covered
with frost at temperatures below 5 C (41 F), which may
reduce performance.
Place the unit away from the clothes dryer, heater or
radiator.
Use the unit to prevent moisture damage anywhere
books or valuables are stored.
Use the dehumidifier in a basement to help prevent
moisture damage.
The dehumidifier must be operated in an enclosed
area to be most effective.
Close all doors, windows and other outside openings
to the room.
A dehumidifier operating in a basement will have little
or no effect in drying an adjacent enclosed storage
area, such as a closet, unless there is adequate
circulation of air in and out of the area.
Do not use outdoors.
This dehumidifer is intended for indoor residential
Casters (At four points on the bottom of unit)
Casters can move freely.
Do not force casters to move over carpet, nor
move the unit with water in the bucket.
(The unit may tip over and spill water.)
Page 4
Positioning the unit
When using the unit
•
•
•
•
•
•
•
•
•
•
•
•
•
•
•
Design Notice
In order to ensure the optimal performance of our products, the design specifications of the unit are
subject to change without prior notice.
20cm or more
40cm or more
20cm or more
20cm or more
40cm or more
appliances.
Select a suitable location, making sure you have easy
access to an electrical outlet.
Plug the unit into a electrical socket-outlet with earth
connection.
Make sure the Water bucket is correctly fitted
otherwise the unit will not operate properly.
•
•
•
NOTE:When the water in the bucket reaches to a certain
level,please be careful to move the machine to avoid it
falling down.
Operating
Instructions
•
Disassembly:
1.To remove the caster , use a screwdriver to prop up the block, then take it down.
2.Then remove the caster.
blockcaster
bottom of unit
Page 5
Operating Instructions
Control Panel Features
NOTE: The following control panels
are for explanation purpose only. The control panel of the unit you
purchased may be slightly different according to the models. Your machine may not contain some indicators or
buttons. The actual shape shall prevail.
Operating
Instructions
Press to turn the dehumidifier on and off.
Note: When the compressor startups or stops running,
the unit may make a loud voice, it is normal.
Power button
When you push the button to change operation
modes, the unit will make a beep sound to indicate
that it is changing modes.
Mode button
Press to select the desired operation mode from
Continuous dehumidifying,Dryer/Max (model dependent),
Smart dehumidifying (on some models) and Setting
dehumidifying.
noitcnuFrotacidnInoitcnuFrotacidnI
Bucketless Mode
Wireless light
Filter clean light
Pump light (for pump model only)
In Setting dehumidifying mode,
on some models
the set
indicator light
illuminates.
On some models, the unit
without setting dehumidifying indicator light. When
Bucketless mode (on some models)
The dehumidifier can be used without bucket. When
the unit is on, the LED DISPLAY shows”Eb”. Press and
hold FILL LEVEL button and UP button for 3 seconds in 3
minutes to shield “Eb” malfunction, and the bucketless
mode indicator light illuminates. Press and hold FILL LEVEL
button and UP button to exit Bucketless mode, the
bucketless mode indicator light turns dark.
Note: In Continuous dehumidifying, Dryer and Smart
dehumidifying modes, the humidity setting can‘t be
adjusted.
the Continuous, DRY, Smart indicator lights
turn dark,
the unit is at the setting dehumidifying mode.
Note: In Bucketless mode, the unit should operate with
a hose to drain away water.
In Bucketless mode, the bucket capacity can’t be selected
and the unit can’t turn on PUMP feature.
Low
Bas
High
Haut
Low
Bas
High
Haut
+

Page 6
Operating
Instructions
UP( )/DOWN( ) buttons
· Humidity Set Control buttons
In Setting dehumidifying mode, The humidity level can be
set within a range of 35%RH(Relative Humidity) to 85%RH
(Relative Humidity) in 5% increments. Press and hold the
button the humidity drop continuously.Press and
hold the button the humidity rise continuously.
Fan button
Control the fan speed. Press to select fan speed
in three steps-low, med and high (On some models
The fan speed just can be selected in two steps-low
and high). The fan speed indicator light illuminates
under different fan speed settings.
Press and hold the Fan button for 3 seconds to
eliminate filter reminder, when the filter light flickers
(On some models)
.
FILL LEVEL button
Control the bucket capacity.Press to select bucket
capacity in four steps-1, 2, 3 and 4. When turn on
pump function, the pump indicator light illuminates
and the bucket capacity will be at 4 step.
· Press to initiate the Auto start or Auto stop feature,
in conjuction with the and buttons. When the
unit is on, press the Timer button to activate the Auto
stop feature. When the unit is off, press this button
to activate the Auto start feature.
· Press or hold the and button to change the
Auto time by 0.5 hour increments, up to 10 hours,
then at 1 hour increments up to 24 hours.
· The control will count down the time remaining until
start.
· The selected time will register in 5 seconds and the
system will automatically revert back to display the
previous humidity setting.
· Turning the unit ON or OFF at any time or adjusting
the timer setting to 0.0 will cancel the Auto start or
Auto stop feature.
· When LED display window displays the code of P2,
the Auto start or Auto stop feature will also be
cancelled.
Timer button
Display
Shows the set % humidity level from 35% to 85% or
auto start/stop time (0~24) while setting, then shows the
actual (±5% accuracy) room % humidity level in a range
of 30% RH (Relative Humidity) to 90%RH (Relative
Humidity).
Error Codes:
EH60-Room temperature r sensor error--Unplug the unit
and plug it back in. If error repeats, call for service;
EH61-Tube Temperature sensor of the evaporator error--
Unplug the unit and plug it back in. If error repeats,
call for service;
EH0b-Display board and master control board
communication error.Unplug the unit and plug it
back in. If error repeats, call for service;
Wireless button (On some models)
Press and hold on the POWER button for 3 seconds to
initiate the Wireless connection mode. The LED DISPLAY
shows’AP’ to indicate you can set Wireless connection.
If connection (router) is successful within 8 minutes,
the unit will exit Wireless connection mode automatically
and the Wireless indicator illuminates and the unit
enters the previous function. If connection is failure
within 8 minutes, the unit exits the Wireless connection
mode automatically.
Note: The unit operates for 250 hours, then enter
filter clean reminder.
PUMP feature (On some models)
Press and hold on the Up/Down buttons 2 second to
initiate PUMP feature
.
Press and hold on the Up/Down
buttons 2 seconds again to stop PUMP feature.
Turn on the PUMP feature, the bucket capacity cannot
be selected and the bucket capacity is at 4 step.
Note: When the PUMP feature is , it works
when the water is full at 4 step.
+

e
Page 7
f
Other features
Auto Defrost
When frost builds up on the evaporator coils, the
compressor will cycle off and the fan will continue to
run until the frost disappears.
Note: When Auto defrosting operation, the unit may
make a voice of refrigerant flowing, it is normal.
Auto Shut Off
The dehumidifier shuts off when the bucket is full.
For some models, the fan motor will continue to run
for 30 seconds.
Wait 3 minutes before resuming operation
After the unit has stopped, it can not be restart
operation in the first 3 minutes.This is to protect the
unit. Operation will automatically start after 3 minutes.
Operating
Instructions
Operating
Instructions
dehumidification, please first
dehydrate the wet clothes.
3. Make sure to direct airflow
at the wet clothes.
4. For thick and heavy wet
clothes may not get the best
effective dehumidification.
Dryer mode (On some models)
The unit can make the MAX dehumidification function
when it is under Dryer mode. The fan speed can’t be
adjusted.
Note:
1. The Dryer/MAX (model dependent) mode must
be operated in a close room,do not open the door
and window.
2. To make the best effective
30~50cm
Wet clothes
30~50cm
Airflow
Allow 30~50cm
of distance on the
top and right side
of the unit to the
wet clothes.
Auto-Restart
If the unit breaks off unexpectedly due to the power
cut, it will restart with the previous function setting
automatically when the power resumes.
Continuous dehumidifying mode
At continuous dehumidifying mode, the unit dehumidify
continuously and cannot select humidity. Press mode
button to exit continuous dehumidifying mode.
Smart dehumidifying mode (On some models)
At smart dehumidifying mode, the unit will
automatically control room humidity in a comfortable
range 45%~55% according to the room temperature.
The humidity setting function will be invalid.
Note: When one of the above malfunctions occurs,
turn off the unit, and check for any obstructions.
Restart the unit, if the malfunction is still present, turn
off the unit and unplug the power cord. Contact the
manufacturer or its service agents or a similar qualified
person for service.
Protection Code:
P2-Bucket is full -- Empty the bucket and replace it in
the right position.
Eb-Bucket malfunction--Replace the bucket in the right
position, the malfunction clear.
Setting dehumidifying mode
At setting dehumidifying mode, the unit can be adjusted in a
range 35%~85%, and the humidity setting can be adjusted
(increase/decreasing) in 5%. Press MODE button to exit
setting dehumidifying mode.
Quick glance light (On some models)
When the humidity is more than 70%, the quick
glance light will emit red light.
When the humidity range is at 45% to 70%, the
quick glance light will emit yellow light.
When the humidity is lower than 45%, the quick
glance light will emit green light.
The light can be activated or deactivated by pressing
and holding the Fan button and UP button
simultaneously for 2 seconds.
MAX mode (On some models)
The unit can make the MAX dehumidification function
when it is under MAX mode. The fan speed is fixed at
high fan speed.
Operating
Instructions
e
Page 8
f
¥
X
table
Note:
1. Please make sure the unit is placed on a flat, horizontal
table to prevent toppling and sliding.The tilt angle needs
to be less than 1 degree.
2. Please make sure the tube is properly connected to the
drain before entering the bucketless mode.
4. On the Bucketless mode, don’t touch the switch or the
unit will exit Bucketless mode.
switch
5. Don’t move the unit when it is working. Turn off the
power and remove the plug before moving the unit.
3.The overall height of the tube should be lower than the
drain to avoid water backflow and ensure smooth discharge.
¥
X
X
10cm or more
NOTE: At the Bucketless mode, the hight of table is
more than 10cm.
Place the end of the hose into the drain area or the
container to catch the water.
Bucketless mode (on some models)
The dehumidifier can be used without bucket when
the unit is under Bucketless mode.
The unit will not reminds the water to be full after
entering the bucketless mode, therefore, it is suggested
that:
1. Check whether the tube is properly connected;
2. Link the other end of the tube to a place with
unlimited capacity, such as a sink or a basin;
3. Do not place the other end of the tube in a
container with limited capacity, otherwise the
water may overflow to the floor.
Exit the bucketless mode:
1. Press FILL LEVEL and up to exit
2. Turn off the power
NOTE: It may cause an unexpected exit from the
bucketless mode when the tank float touches the
micro switch (at the bottom of the unit). So please
check whether the bottom of the unit is clear under
the bucketless mode.
tilt angle
Operating
Instructions
Operating
Instructions
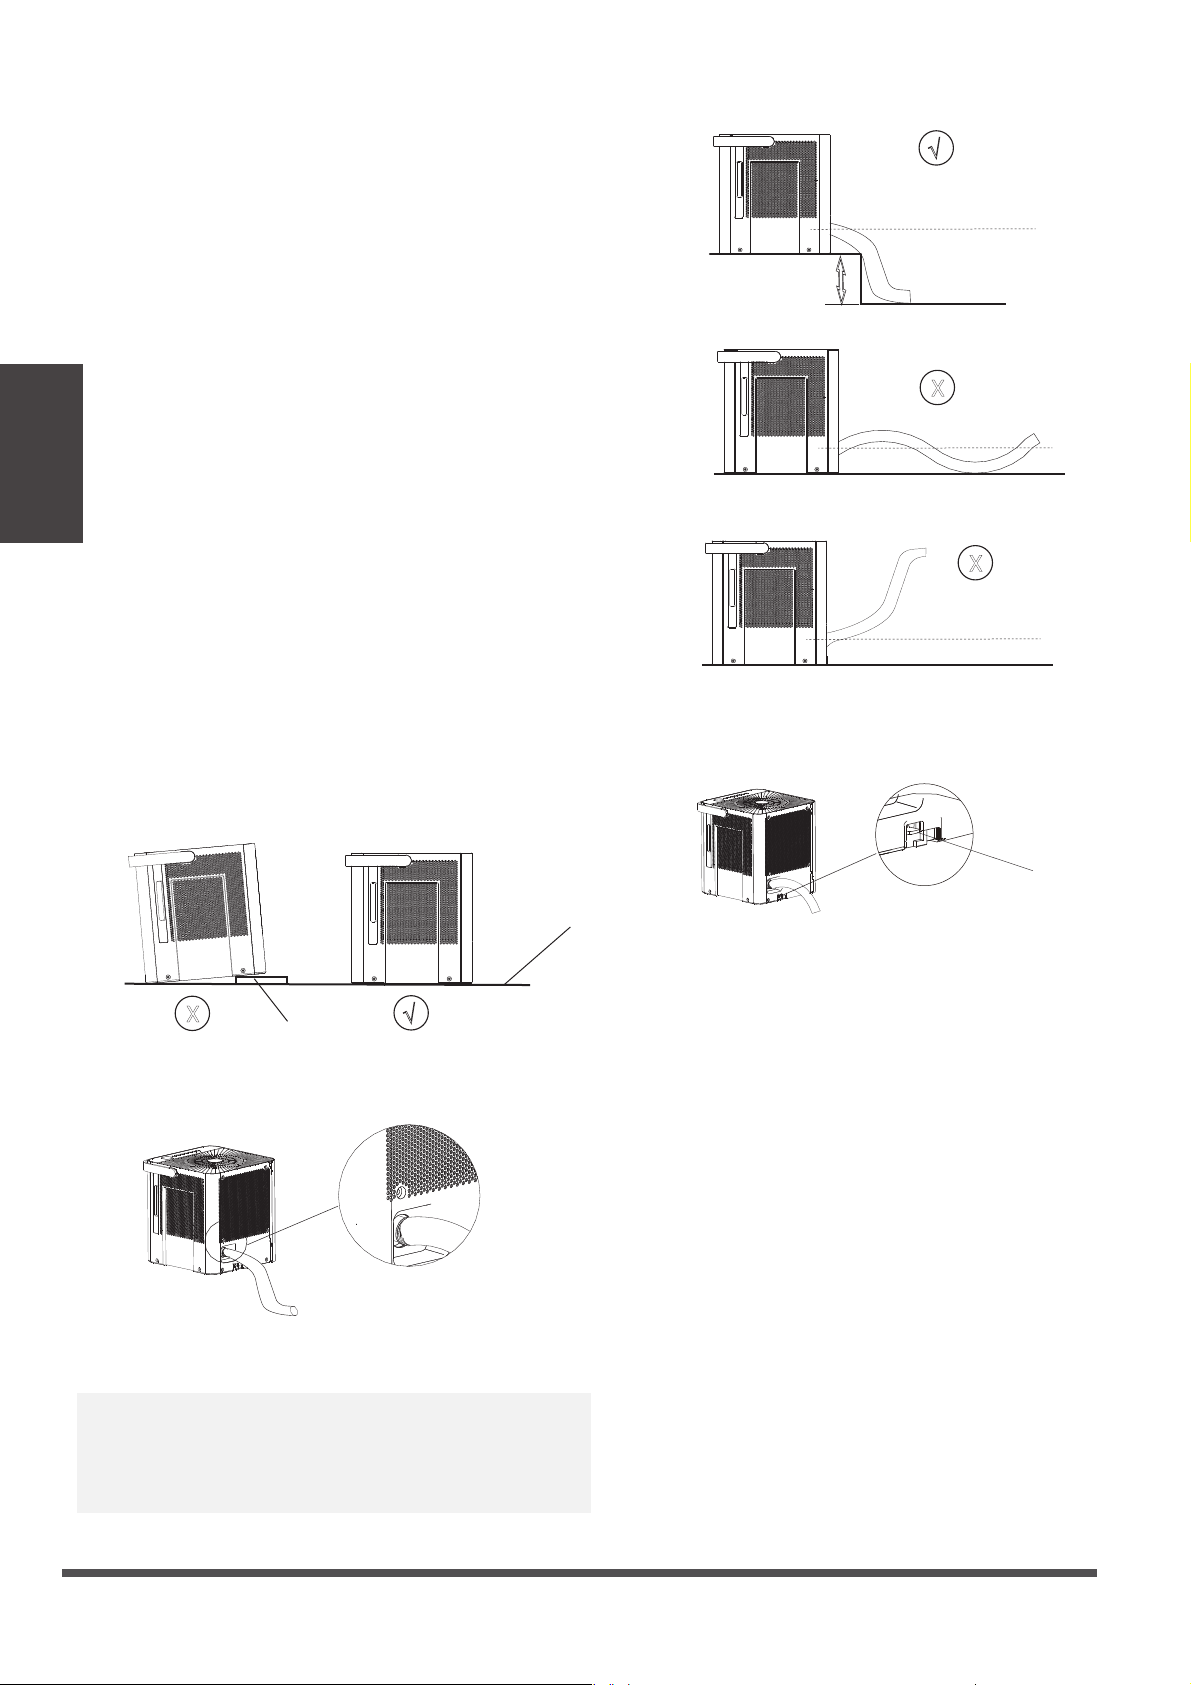
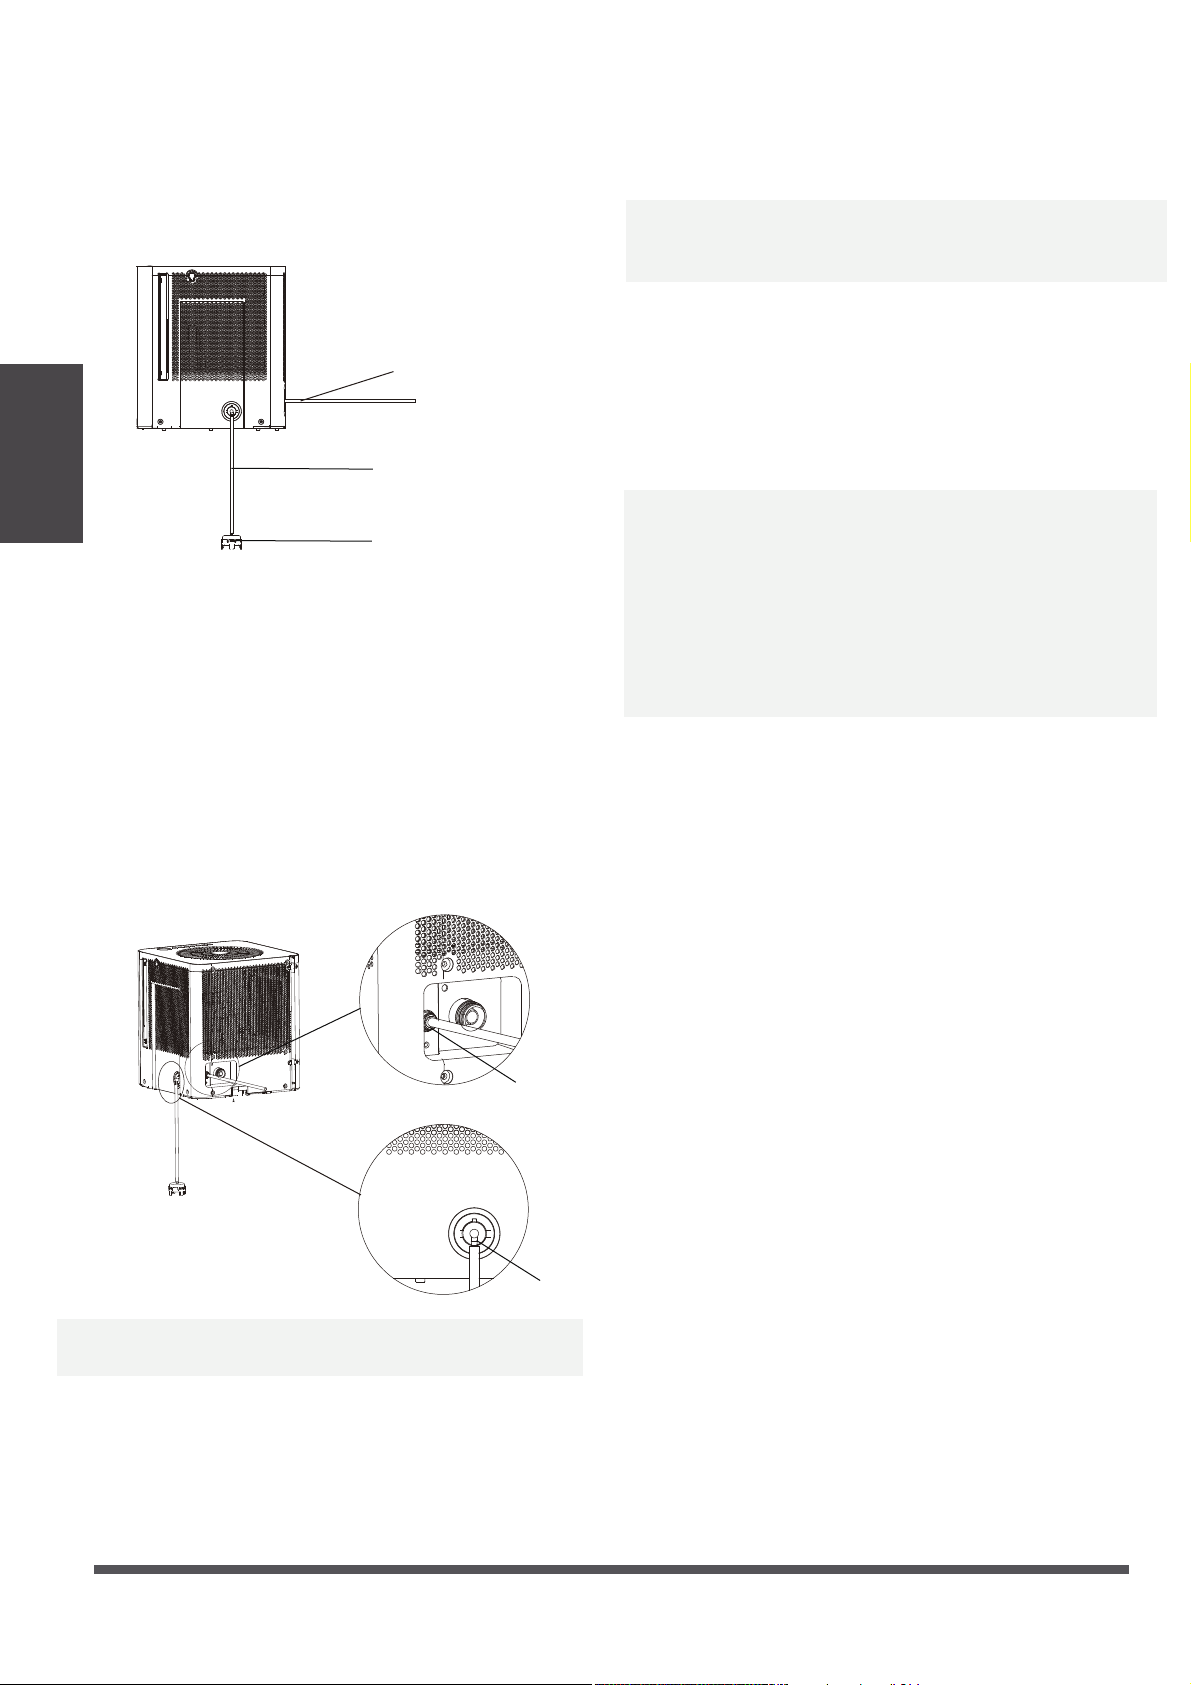
· Water can be automatically emptied into a floor
drain by attaching the unit with a water hose (not
included).
· Remove the cover located on the back of water
bucket, then remove the rubber plug. Attach a drain
hose and lead it to the floor drain or a suitable
drainage facility.
2. Continuous draining
Note: When the continuous drain feature is not
being used,remove the drain hose from the outlet
, reinstall the rubber plug and cover.
Note:
· When you remove the bucket, do not touch
any parts inside of the unit. Doing so may
damage the product.
· Be sure to insert the dehumidifier body gently
all the way into the bucket.
· When you remove the bucket, if there is some
water in the unit you must make the unit dry.
e
Page 9
f
Attach the
hose to the
drain hose
outlet.
Remove the rubber plug
Removing the collected water
There are two ways to remove collected water.
1. Use the bucket
1.
Lift the dehumidifier by the handle, separate the
it from the bucket and put it aside.
2. Two ways to pour the water out.
· When the unit is off,if the bucket is full, the unit will
beep 8 times (on some models) and the LED DISPLAY
shows “P2”.
· (For some models)When the unit is on,if the bucket is
full, the compressor turns off and the fan turns off after
30 seconds for drying the water of the condenser , then
the unit will beep 8 times and the LED DISPLAY shows
“P2”.
· Lift the dehumidifier body handle, separate the
dehumidifier body from the tank. Put the dehumidifier
body aside.
· Throw away the water from the water outlet and
replace the bucket.
Note:
· Lift the water bucket and throw away the water.
· Remove the rubber plug at the bottom of the bucket,
drain off the water.
· The machine will re-start when the bucket is restored in
its correct position.
Method A:
Lift the water bucket and throw away the water.
Method B:
Remove the rubber plug at the bottom of the
bucket to drain off the water.
· Make sure the hose is secure so there are no leaks.
· Direct the hose toward the drain area,making sure
that there are no kinks that will stop the warter
flowing.
· Place the end of the hose into the drain area and
make sure the end of the hose is level or downwards
to let the water flow smoothly. Do never let it up.
· Make sure the hose is lower than the drain hose
outlet.
· Select the desired humidity setting and fan speed
on the unit for continuous draining to start.
Remove the cover
Operating
Instructions
e
Page 10
f
· Water can be automatically emptied into a floor drain
or a suitable drainage facility by attaching the pump
drain outlet with a pump drain hose()od=1
/
4
,
supplied).
3. Pump draining (on some models)
· select the desired humidity setting and fan speed on
the unit for pump draining to start.
Note: The pump operation on light blinks at 1Hz when
the pump is operational failure. Please turn off the unit
and plug the power cord out. Check the following
things:
· Cleaning the filter of the pump hose.
· Check that the pump drain hose does not link or back.
· Empty the water of the bucket.
· Reinstall the pump hose if it drops and reinstall the
bucket properly. Turn on the unit. If the error repeats,
call for service.
Note: Do not use this operation when the outdoor
temperature is equal to or less than 0 C (32 F),
o
o
otherwise water is become ice that will cause the
water hose blocked up and the unit failure. Make
sure to empty the bucket once a week when using
the pump draining feature. When the pump draining
feature is not being used, remove the pump drain
hose from the outlet.
· Press the pump drain hose outlet in and take the
pump drain hose out from it. Take the pump hose
out from the unit.Make sure do not let the water in
the pump hose drip to the floor.
pump intake
pump outlet
pump drain hose
filter of pump hose
pump hose
· Install the pump hose into the pump hose intake of
the unit, and rotate it.
· Install the pump drain hose into the pump drain
hose outlet for depth of 15mm at least, then lead
the water hose to the floor drain or a suitable
drainage facility.
· Put the dehumidifier on the bucket again.
· Press and hold on the Up/Down buttons for 2 second
to initiate PUMP feature
. When the PUMP is activated,
the bucket capacity is at the 4th fill level and cannot
be selected. The PUMP works only if the bucket is full
of water at the 4th fill level.
Note: The pump may cause big noise when it starts to
work for 3~5 minutes. It is a normal phenomenon.
· Make sure the hose is secure so there are no leaks.
· Direct the hose toward the drain, making sure that
there are no kinks that will stop the water flowing.
· Place the end of the hose into the drain and make
sure the end of the hose is level or down to let the
water flow smoothly. Do never let it up.

e
Page 11
f
Care and
Maintenance
Clean the bucket
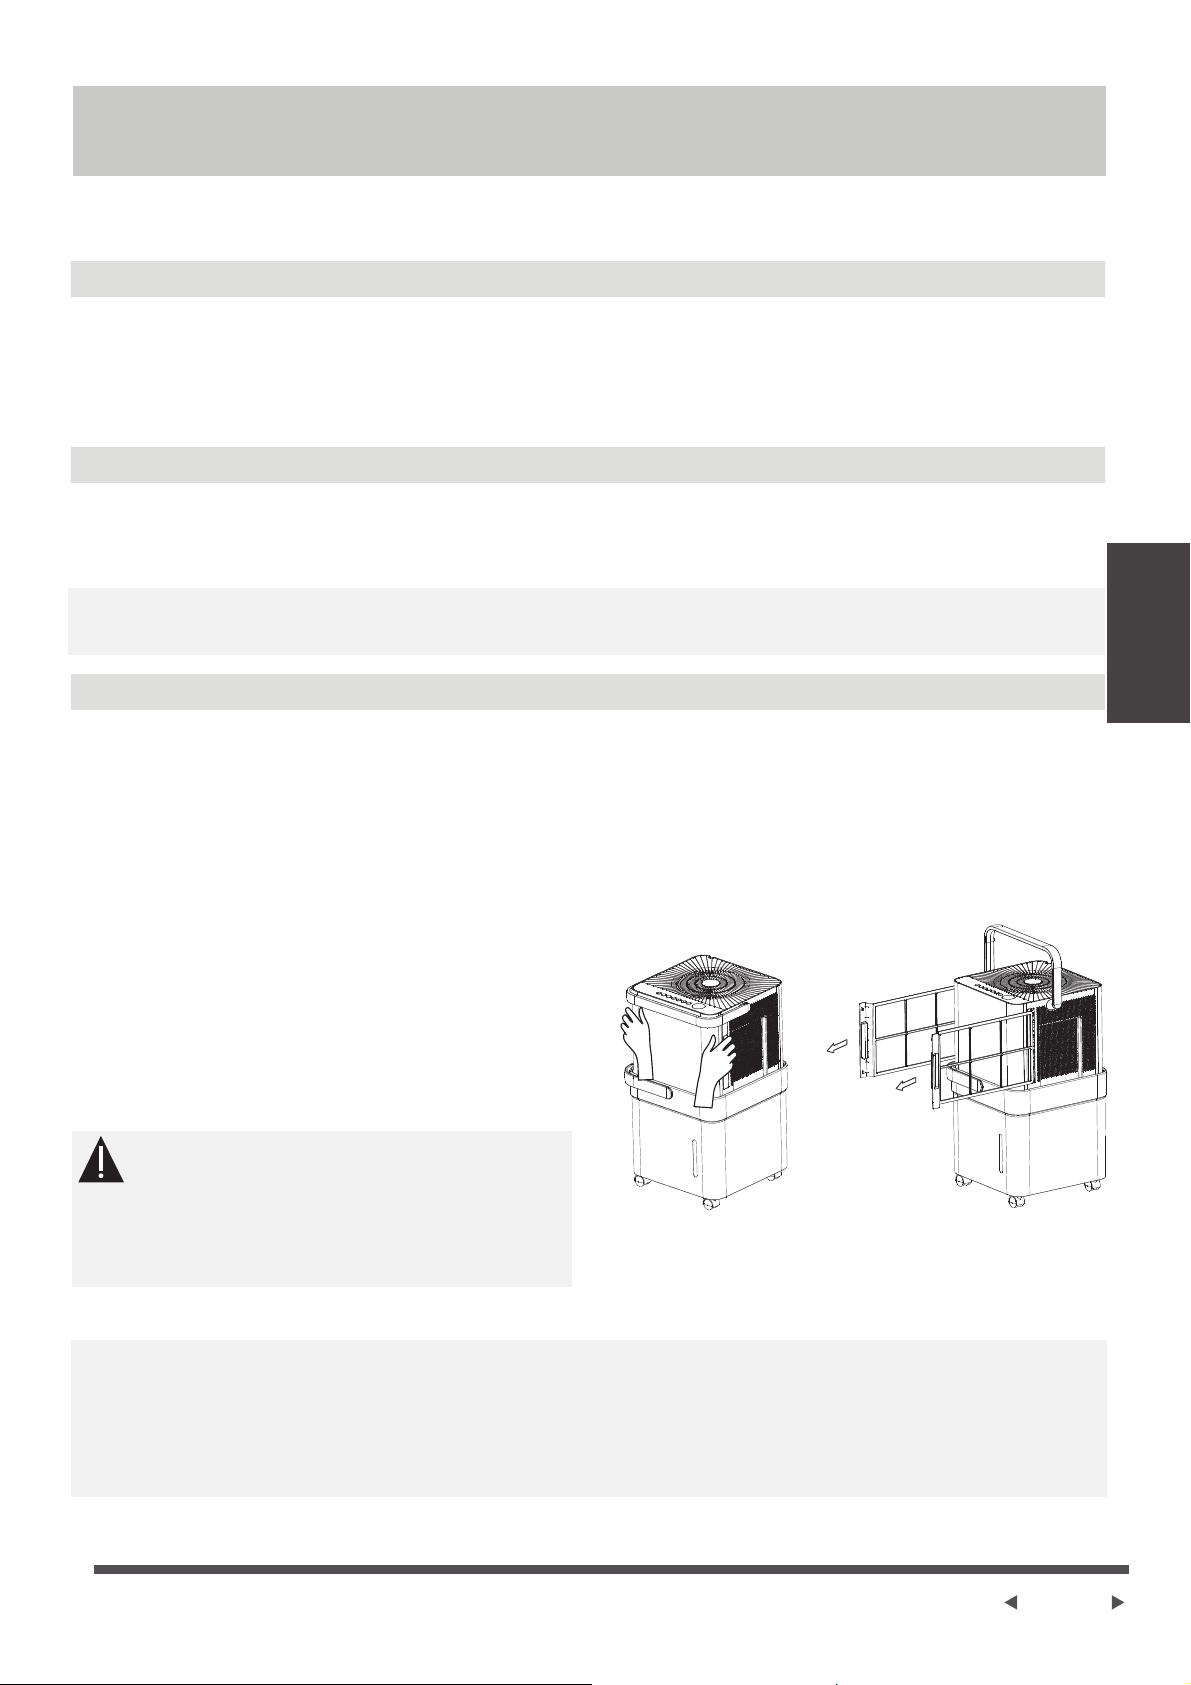
Clean the air filter
Clean the Grille and Case
Care and Maintenance
· Use water and a mild detergent. Do not use bleach or abrasives.
· Do not splash water directly onto the main unit. Doing so may cause an electrical shock, cause
the insulation to deteriorate, or cause the unit to rust.
· The air intake and outlet grilles get soiled easily, so use a vacuum attachment or brush to clean.
Care and cleaning of the dehumidifier
Turn the dehumidifier off and remove the plug from the wall outlet before cleaning.
Every few weeks, clean the bucket to prevent growth of mold, mildew and bacteria. Partially fill the
bucket with clean water and add a little mild detergent. Swish it around in the bucket, empty and
rinse.
Note: Do not use a dishwasher to clean the bucket. After clean, the bucket must be in place and
securely seated for the dehumidifier to operate.
The air filter behind the two flanks grille should be checked and cleaned at least every two weeks
or more often if necessary.
NOTE: DO NOT RINSE OR PUT THE FILTER IN AN AUTOMATIC DISHWASHER.
To remove:
· Grip the handle on the filter and pull it outward.
· Clean the filter with warm, soapy water. Rinse
and let the filter dry before replacing it. Do not
clean the filter in a dishwasher.
To attach:
· Insert the air filter back into the unit.
CAUTION
DO NOT operate the dehumidifier without a
filter because dirt and lint will clog it and
reduce performance.
Note:The cabinet and front may be dusted with an oil-free cloth or washed with a
cloth dampened in a solution of warm water and mildliquid dishwashing detergent.
Rinse thoroughly and wipe dry. Never use harsh cleansers, wax or polish on the
cabinet front. Be sure to wring excess water from the cloth before wiping around the
controls. Excess water in or around the controls may cause damage to the unit.

e
Page 12
f
When not using the unit for long time periods
· After turning off the unit, wait one day for water collecting before emptying the bucket.
· Clean the main unit, water bucket and air filter.
· Cover the unit with a plastic bag.
· Store the unit upright in a dry, well-ventilated place.
Troubleshooting Tips
Problem What to check
Troubleshooting
Tips
oo
Before calling for service, review the chart below first yourself.
Unit does not start
· Make sure the dehumidifier s plug is pushed completely into the outlet.
· Check the house fuse/circuit breaker box.
· Dehumidifier has reached its preset level or bucket is full.
· Water bucket is not in the proper position.
· The air filter is clogged.
· The unit is tilted instead of upright as it should be.
· The floor surface is not level.
· Hose to connector or hose connection may be loose.
· Intend to use the bucket to collect water, but the back drain plug is
removed.
· This is normal. The dehumidifier has Auto defrost feature.
· These are error codes and protection codes. See the CONTROL PADS
ON THE DEHUMIDIFIER section.
· Did not allow enough time to remove the moisture.
· Make sure there are no curtains, blinds or furniture blocking the front or
back of the dehumidifier.
· The humidity control may not be set low enough.
· Check that all doors, windows and other openings are securely closed.
· Room temperature is too low , below 5 C(41 F).
· There is a kerosene heater or something giving off water vapor in the
room.
Dehumidifier does not
dry the air as it should
The unit makes a loud
noise when operating
Frost appears on the coils
Water on floor
EH60, EH61,EH0b ,Eb or
P2 appear in the display
Page 13
We hereby declare that this Dehumidifier is in compliance with the essential
requirements and other relevant provisions of Directive 1999/5/EC.
1. Supports operating systems: iOS 7+ or Android 4+.
2. In the event of a OS update, there may be a delay between the update of the OS
and a related software update during which your OS may or may not be supported
until a new version is released. Your specific mobile phone or problems in your
network may prevent the system from working and Midea will not be responsible
for any problems that could be caused by incompatibility or network issues.
3. This Smart Dehumidifier only supports WPA-PSK/WPA2-PSK (recommended)
encryption.
4. To ensure proper scanning of the QR code, your smart phone must have at least a
5-megapixel camera.
5. Due to unstable network connectivity, requests may time out. If this happens, re-
run the network configuration.
6. Due to unstable network connectivity, commands may time out. If this happens,
the smartphone app and the actual product may display conflicting information.
The information displayed on the actual product is always the most accurate
available. Refresh the app to re-sync.
Model: US-OSK103 Dimensions: 41 x 24 x 5 (mm)
Standard: IEEE 802.11 b/g/n Operation Temperature: 0°C ~ 45°C / 32°F ~ 113°F.
Antenna Type: External
omnidirectional Antenna
Operation Humidity: 10% ~ 85%
Frequency: 2.4 GHz (wireless) Power Input: DC 5V/300 mA
Maximum Transmitted Power:
19.8 dBm Max
Midea will not be responsible for any problems that could be caused by
incompatibility or network issues, your wireless router and mobile phone.
NOTICE
Declaration of Conformity
Specification of Wireless Module
Precautions
App
Instructions
App Instructions
e
Page 14
f
Devices required to use the Smart Dehumidifi er:
1. Smart Phone with compatible iOS or Android system.
2. Wireless Router
3. Smart Dehumidifier
edoc RQ elppAedoc RQ diordnA
Scan to download app.
• You can also go to Google Play or App Store and search for Midea Air.
Download and Install the App
System Overview
NOTICE
All the images in this manual are for reference only, your product and app may look
slightly different. The actual product and app instructions have to be considered.
App
Instructions
e
Page 15
f
• Make sure your smartphone is connected to your wireless router and your wireless
router has a working 2.4GHz internet connection.
• It is recommended to activate your account immediately to be able to recover your
password by email.
NOTICE
• Make sure your smartphone is able to connect to the wireless network which will be used.
• Make sure also that the device is not connecting to other networks in range.
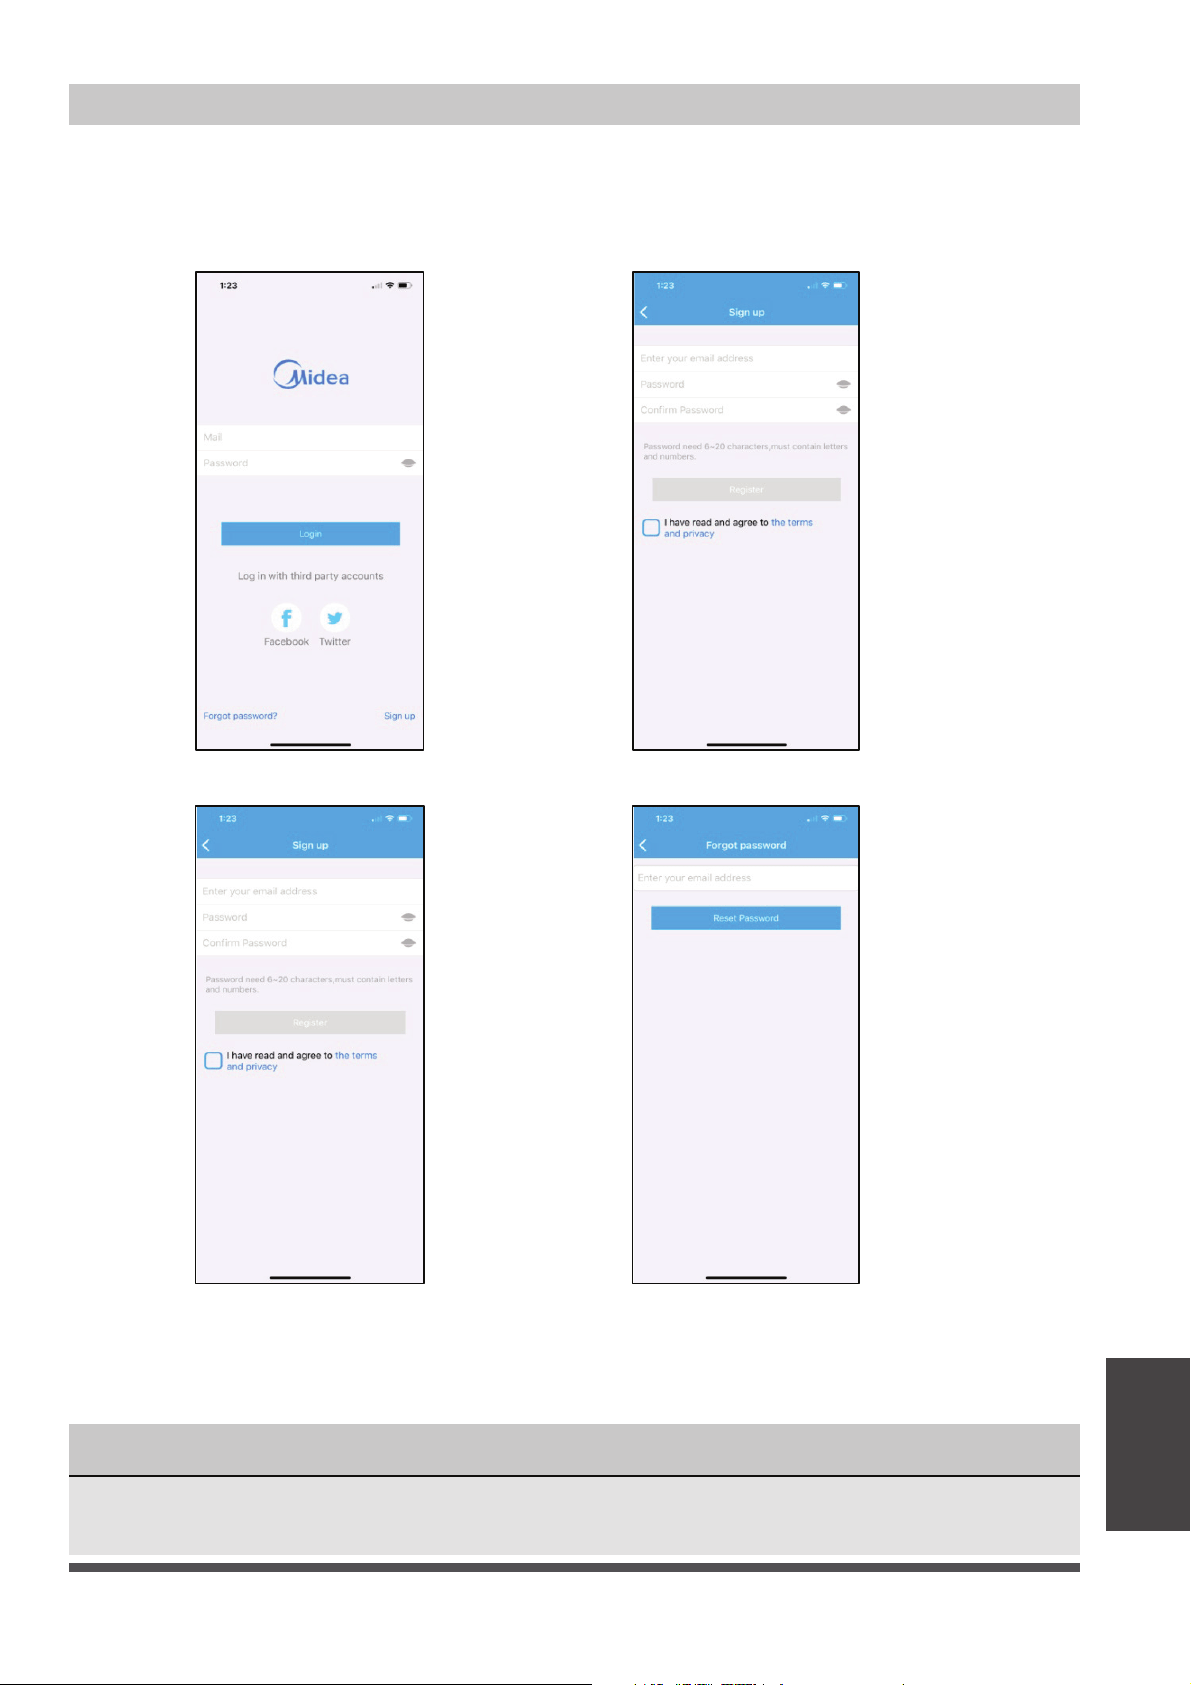
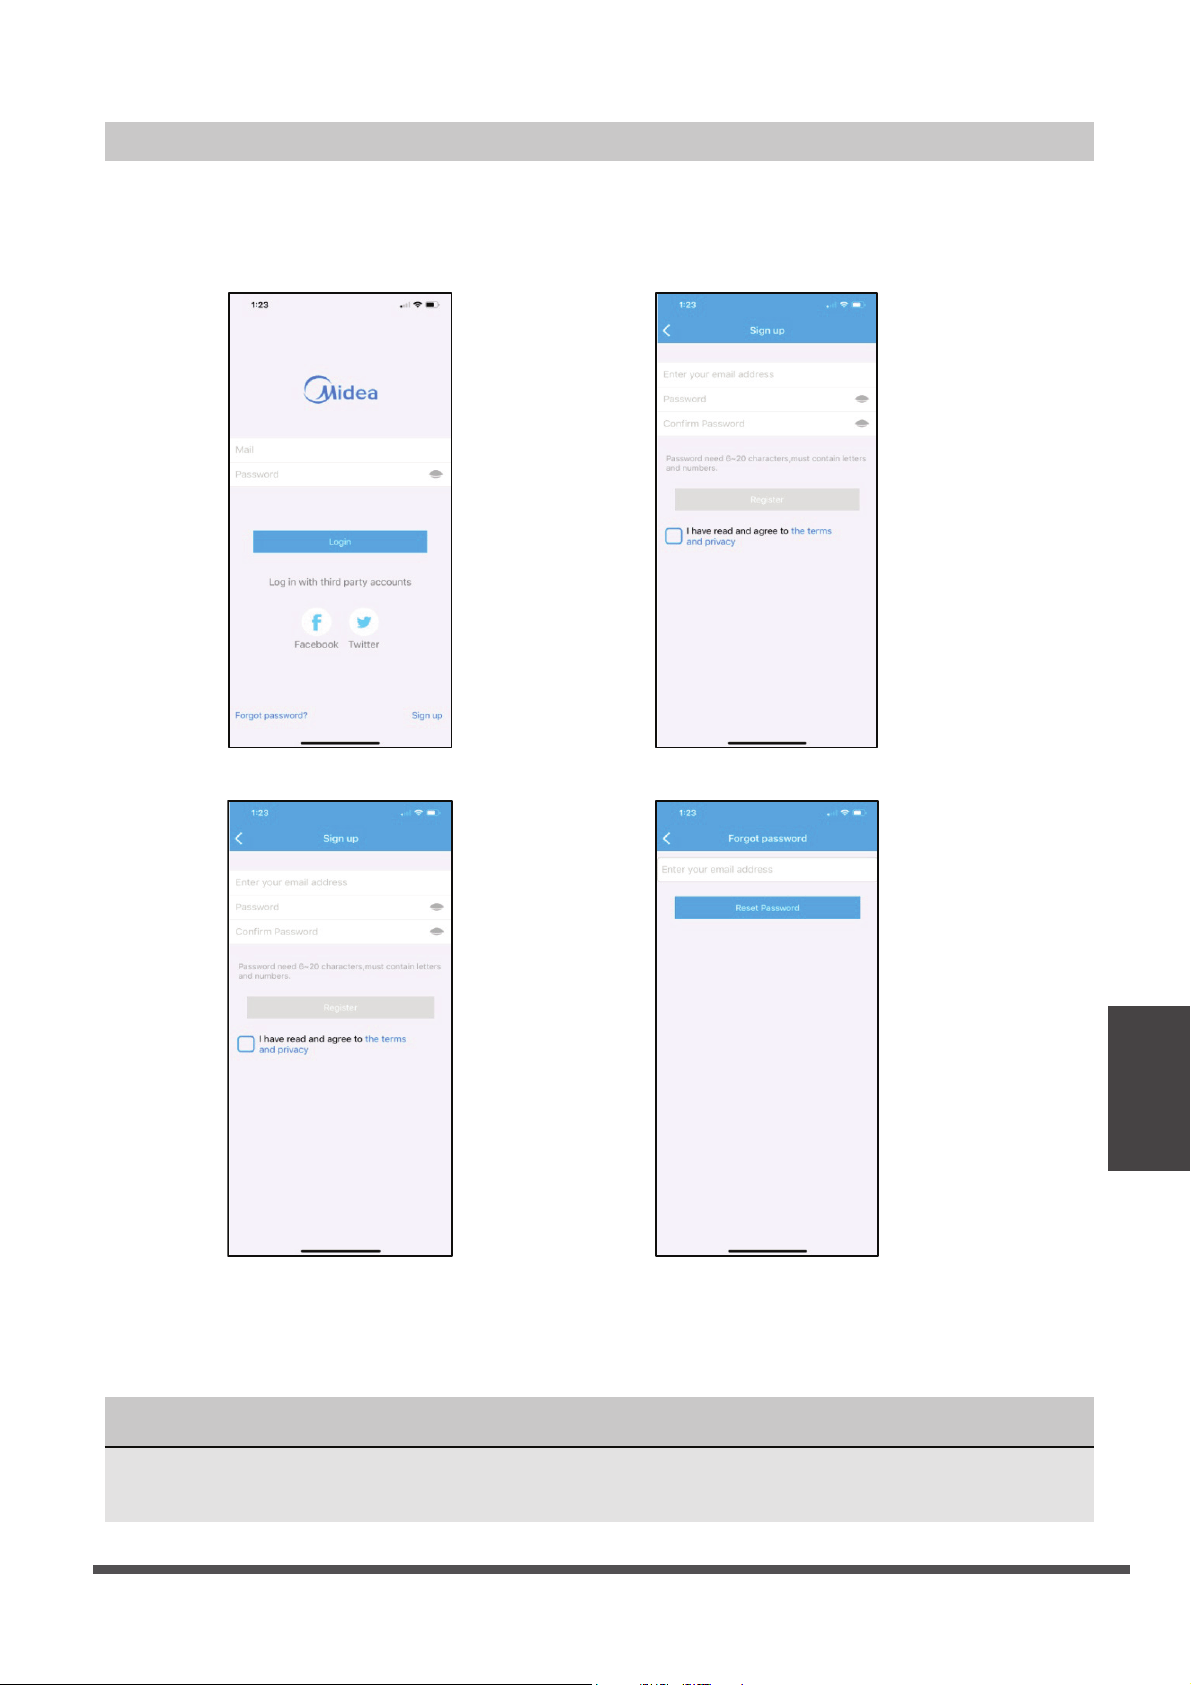
Create Your Account
1. Press “Sign Up”. 2. Enter your email address and password.
3. Press “Registration”. 4. If you forget your password, press
“Forgot password?” on the main
menu and enter your email address.
Then press “Reset Password”.
App
Instructions

e
Page 16
f
Additional App and Smart Home Functions
For additional instructions regarding the features of the app and Smart Home skill
capabilities, scan the QR code below.
App
Instructions

e
Page 17
f
Warranty
WARRANTY
These products have been made to quality standards and are guaranteed for domestic use
against manufacturing faults.
One (1) year full warranty from original purchase date and limited 2nd through 5th year
sealed system warranty if used for normal domestic purposes.
This warranty does not affect your statutory rights. In case of any malfunction of your
product (failure, missing part, etc.), please contact one of our service technicians at our toll-
free service line at 1-866-646-4332 from 8 AM to 6 PM EST, Monday to Friday, and 8 AM to 4
PM EST, Saturday. Midea reserves the right to repair or replace the defective product, at its
discretion.
Any warranty is invalid if the product has been overloaded or subject to neglect, improper
use or an attempted repair other than by an authorized agent. Heavy-duty or daily
professional/commercial usage are not guaranteed. Due to continuous product
improvement, we reserve the right to change product specifications without prior notice.
For instructions on how to properly drain Freon, please contact our customer service at
1-866-646-4332. Thank you.

Déshumidificateur
version A - 12 - 2020
www.midea.com
MANUAL D'UTILISATION
FR
Avis d’avertissement : Avant
d’utiliser ce produit, veuillez
lire ce manuel attentivement
et le garder pour référence
future.La conception et les
spécifications sont soumises
à des changements sans
préavis pour améliorer le
produit.
TENSION 115V,60Hz

Mesures de Sécurité 1
Préparation 3
Consignes de Fonctionnement 5
Entretien et Maintenance 11
Conseils de Dépannage 12
Instructions des Apps 13
Table des Matières

Mesures de
Sécurité
Safety
Veuillez lire attentivement les Mesures de Sécurité avant l’installation et l’utilisation
ATTENTION
Mesures de Sécurité
Page 1
ATTENTION AVERTISSEMENT
Ce symbole indique la probabilité de
blessure ou de décès de l’utilisateur.
Ce symbole indique la probabilité de dommages
matériels ou de conséquences graves.
Les instructions suivantes doivent être suivies scrupuleusement afin d’éviter les dommages matériels,
les blessures ou le décès de l’utilisateur ou des tiers. Une utilisation incorrecte du fait du non-respect
des consignes peut entraîner mort, blessures ou dommages.
-
tres appareils.
benzène ou dissolvant, etc.
soit pas comprimé.

fe
Mesures de
Sécurité
Page 2
AVERTISSEMENT
Préparation
e
Page 3
f
Identification des Pièces
Consignes de Stockage
Consignes d’Installation
Préparation
Panneau de Contrôle
Roulettes (certains modèles)
poignée
grille de sortie d’air
poignée
Bac d’eau
filtre à air (derrière la grille)
grille d’entrée d’air
1. 2.
REMARQUE : Pendant le fonctionnement, si vous pressez le cache supérieur et que l’appareil vibre légèrement,
ceci est une situation normale.
3.
1. 2. 3.
Installation et désinstallation des Roulettes (certains modèles)
Voyant lumineux
(certains modèles)
REMARQUE : Toutes les illustrations de ce manuel sont uniquement à but explicatif. Votre appareil peut
comporter quelques différences. La forme réelle prévaudra. L’appareil peut être commandé via le
panneau de contrôle.
1. Sortez le déshumidificateur de sa boîte.
2. Saisissez les poignées et soulevez le déshumidificateur, sortez le câble d’alimentation et faites une
rotation de 90° dans le sens inverse des aiguilles.
3. Placez le déshumidificateur dans le bac d’eau en douceur en respectant les consignes d’alignement
jusqu’au clic. Ne jamais forcez l’installation.
1. Enfoncez la pièce convexe dans le bac d’eau.
2. Soulevez le déshumidificateur par les poignées, faites une rotation de 90°.
3. Installez le câble d’alimentation dans l’emplacement, placez le déshumificateur dans la boîte pour
rangement.
Installation :
1. Fixez les roulettes au-dessous de l’appareil.
2. Utilisez un bloc pour les fixer comme indiqué sur la photo.
e
Page 4
f
Placez l’appareil
Pendant l’utilisation de l’appareil
Avis de Conception
20cm ou plus
40cm ou plus
20cm ou plus
20cm ou plus
40cm ou plus
Consignes de
Fonctionnement
BlocRoulette
Partie inférieure
de l’appareil
Désassemblage:
1. Pour retirer les roulettes, utilisez un tournevis pour soutenir le bloc, puis l’enlever.
2. Retirez ensuite la roulette.
Pour permettre des performances optimales de la part de nos produits, les caractéristiques en termes de
conception sont susceptibles de changer sans préavis.
Roulettes (au quatre coins du bas de l’appareil)
tapis, et ne déplacez pas l’appareil contenant
basculer et renverser l’eau qu’il contient)
sous-sol aura peu ou pas d’effet sur la déshumidifi-
cation d’un espace de stockage fermé adjacent, tel
d’air adéquate dans la pièce.
-
commercial ou industriel.
et assez solide pour supporter le poids de l’appareil
rempli d’eau.
de l’appareil pour une permettre une bonne circula-
tion d’air (au moins 40cm d’espace au niveau de la
sortie d’air).
bobines peuvent se couvrir de givre en cas de
réduire les performances.
sèche-linges et radiateurs.
des objets de valeur sont conservés.
clos pour être plus efficace.
-
faites fonctionner l’appareil pendant 24 heures de
suite. Assurez-vous que le cache en plastique qui
correctement pour éviter toutes fuites.
minutes pour que l’opération normale se déroule.
multiprise qui est également utilisé pour d’autres
appareils.
terre.
installé, sinon l’appareil ne fonctionnera pas
correctement.
certain niveau, veuillez faire attention lorsque vous
Low
Bas
High
Haut
Low
Bas
High
Haut
Page 5
Consignes de Fonctionnement
Fonctionnalités du Panneau de Contrôle
Consignes de
Fonctionnement
Bouton Mode
noitcnoFtnayoVnoitcnoFtnayoV
Mode sans bac d’eau
Voyant sans fil
Voyant Nettoyage de Filtre
Voyant Pompe (pour le modèle de pompe
seulement)
Remarque : Les panneaux de contrôle sont à titre indicatif uniquement. Le panneau de contrôle que
vous avez acheté peut être légèrement différent selon le modèle. Votre appareil peut ne pas contenir
certains voyants ou boutons. La forme réelle prévaudra.
Quand vous pressez le bouton pour changer de
mode, l’appareil émettra un bip pour indiquer le
changement de mode.
Bouton Allumage
Appuyez pour allumer/éteindre l’appareil.
Remarque : Lorsque le compresseur se met en
marche ou s’arrête, l’appareil peut faire un peu de
bruit, c’est un phénomène normal.
Pressez le bouton mode désiré, de Déshumidification
Continue, Déshydrateur/Max (dépend des modèles),
Déshumidification Intelligente (sur certains modèles) et
Paramètres de Déshumidification.
Dans le Mode Paramètres de Déshumidification, sur
certains modèles le voyant OK s’allume. Sur certains
modèles, l’appareil sans voyant de Paramètres de
Déshumidification. Lorsque que le voyant
Déshumidification Continue, Déshydrateur,
Déshumidification Intelligente s’éteint, l’appareil est
paramétré sur le Mode Déshumidification
Remarque : En mode Déshumidification Continue,
Déshydrateur, Déshumidification Intelligente, les
paramètres d’humidité ne peuvent pas être
modifiés.
Mode sans Bac d’eau (sur certains modèles)
Le déshumidificateur peut être utilisé sans bac
d’eau. Lorsque l’appareil est allumé, l’écran LED
indique « Eb ». Maintenez le pour bouton
NIVEAU DE REMPLISSAGE et le bouton HAUT
pendant 3 secondes en 3 minutes pour résoudre
la panne « Eb », et le voyant du Mode sans Bac
s’allume. Maintenez le bouton NIVEAU DE
REMPLISSAGE et le bouton Haut pour sortir du
Mode sans Bac, le voyant correspondant s’éteint.
Remarque : En Mode sans Bac d’eau, l'appareil
doit fonctionner avec un tuyau pour drainer l'eau.
En Mode sans Bac d’eau, la capacité du bac ne
peut pas être sélectionnée et l'appareil ne peut
pas activer la fonction POMPE.
+
Page 6
Bouton Sans Fil (sur certains modèles)
Bouton Minuterie
Ecran
Codes d’Erreurs:
Remarque : Lorsque la fonction POMPE est
activée, elle fonctionne lorsque le bac à eau est
plein et réglé sur 4.
Bouton Ventilateur
Boutons de Réglage de l’Humidité
Fonction POMPE (sur certains modèles)
Consignes de
Fonctionnement
Boutons HAUT ( )/BAS( )
En choisissant le mode Déshumidification, Le niveau
d’humidité peut être réglée entre 35% et 85% RH
(Humidité Relative) avec des augmentations de 5%.
Maintenez le bouton pour faire diminuer le niveau
d’humidité. Maintenez le bouton pour faire
augmenter le niveau d’humidité.
Contrôle la vitesse du ventilateur. Pressez pour
sélectionner la vitesse du ventilateur selon 3
paramètres-faible, moyen et fort. (Sur certains
modèles, la vitesse du ventilateur ne peut être réglée
qu’entre 2 paramètres-faible et fort.) Le voyant de
vitesse du ventilateur s’allume en fonction des
différents paramètres de vitesse du ventilateur.
Maintenez le bouton Ventilateur pendant 3 secondes
pour enlever le rappel du filtre, lorsque le voyant filtre
clignote (Sur certains modèles).
Remarque : L'appareil fonctionne pendant 250
heures, puis le rappel de nettoyage du filtre apparaît.
Bouton NIVEAU DE REMPLISSAGE
Contrôle la capacité du bac d’eau. Pressez pour
sélectionner la capacité du bac d’eau selon 4
paramètres-1, 2, 3 et 4. Lorsque vous activez la
fonction de pompe, le voyant de la pompe s'allume et
la capacité du bac d’eau sera sur 4.
automatique associé aux boutons et . Lorsque
l'appareil est allumé, appuyez sur le bouton
Minuterie pour activer la fonction d'arrêt
automatique. Lorsque l'appareil est éteint,
appuyez sur ce bouton pour activer la fonction de
démarrage automatique.
Maintenez le bouton et pour changer l’horaire
par plage de 30 minutes, jusqu’à 10 heures, puis
par plage de 1 heure jusqu’à 24 heures.
démarrage de l’appareil
secondes et le système reviendra
automatiquement pour afficher le réglage
d'humidité précédent.
régler la minuterie sur 0.0 annulera la fonction de
démarrage ou d’arrêt automatique.
de démarrage ou d’arrêt automatique sera
également annulé.
Maintenez les boutons Haut/Bas pendant 2
secondes pour lancer la fonction POMPE. Maintenez
à nouveau les boutons Haut/Bas pendant 2
secondes pour arrêter la fonction POMPE.
Allumez la fonction POMPE, la capacité du bac à
eau ne peut pas être sélectionnée et la capacité est
automatiquement réglée sur 4.
Maintenez le bouton POWER pendant 3 secondes
pour lancer le mode de connexion Sans Fil. L’écran
LED indique ‘AP’ pour indiquer que vous pouvez
lancer la connexion Sans Fil. Si la connexion (router)
est établie dans les 8 minutes, l’appareil quittera
automatiquement le mode de Connexion Sans Fil et
le voyant Sans Fil s’allume et l’appareil se
connectera à la fonction précédente. Si la connexion
échoue dans les 8 minutes, l’appareil quittera
automatiquement le mode de Connexion Sans Fil.
Indique le pourcentage d’humidité sélectionné de
35% à 85% ou l’heure automatique de
démarrage/d’arrêt (0~24) pendant le réglage,
indique ensuite le pourcentage d’humidité de la
pièce (±5% de précision) entre 30% et 90% RH
(Humidité Relative).
EH60-Erreur Capteur de Température ambiante --
Débranchez l'appareil et rebranchez-le. Si l'erreur
se répète, appelez le service après-vente;
EH61-Erreur Sonde de Température de
l’évaporateur -- Débranchez l'appareil et
rebranchez-le. Si l'erreur se répète, appelez le
service après-vente;
EH0b-Erreur de communication entre l’écran de
contrôle et la carte-mère principale. Débranchez
l'appareil et rebranchez-le. Si l'erreur se répète,
appelez le service après-vente;
·
·
·
·
·
·
+
e
Page 7
f
Autres caractéristiques
Dégivrage automatique
Arrêt automatique
Operating
Instructions
Remarque :
30~50cm
Linge mouillé
30~50cm
Flux d’air
Redémarrage automatique
Codes de protection :
Consignes de
Fonctionnement
P2 - Le bac d’eau est plein. - Videz le bac et
replacez-le dans la bonne position.
Eb - Dysfonctionnement du bac d’eau - Replacez
le bac dans la bonne position pour résoudre le
dysfonctionnement.
Lorsque le givre s'accumule sur les serpentins de
l'évaporateur, le compresseur s'arrête tandis que le
ventilateur continue de fonctionner jusqu'à ce que le
givre disparaisse.
Remarque : Lorsque le dégivrage automatique est
en cours, la machine peut émettre un bruit de liquide
réfrigérant, c'est normal.
Mode de déshumidification sur réglage
En mode de déshumidification sur réglage,
l’appareil peut être réglé dans une plage de
35% à 85% et la valeur de l'humidité peut être
ajustée (augmentée ou diminuée) de 5%.
Appuyez sur le bouton MODE pour quitter le
mode de déshumidification sur réglage.
Voyant lumineux (sur certains modèles)
Lorsque l'humidité est supérieure à 70%, le
voyant lumineux émet une lumière rouge.
Lorsque l'humidité est comprise entre 45% et
70%, le voyant lumineux émet une lumière
jaune.
Lorsque l'humidité est inférieure à 45%, le
voyant lumineux émet une lumière verte.
Le voyant peut être activé ou désactivé en
appuyant simultanément sur le bouton Fan et
le bouton UP pendant 2 secondes.
Mode MAX (sur certains modèles)
L’appareil peut activer la déshumidification
MAX lorsqu'il est en mode MAX. Le ventilateur
fonctionne à une vitesse élevée fixe.
Mode Séchage (sur certains modèles)
L’appareil peut activer la fonction de
déshumidification MAX lorsqu'il est en mode
Séchage. La vitesse du ventilateur ne peut
pas être réglée.
1. Le mode Séchage / MAX (selon le modèle)
doit être utilisé dans une pièce fermée.
N'ouvrez pas la porte ni les fenêtres.
2. Pour une déshumidification
plus efficace, veuillez
d'abord essorer le linge
mouillé.
3. Assurez-vous que le flux
d'air est orienté vers le
linge mouillé.
4. Pour du linge épais et
lourd, il se peut que la
déshumidification ne soit
pas optimale.
Le déshumidificateur s'arrête lorsque le bac d’eau est
plein. Pour certains modèles, le moteur du ventilateur
va continuer de fonctionner pendant 30 secondes.
Attendez 3 minutes avant de reprendre l’utilisation
Une fois que l'appareil s’est arrêté, il ne pourra pas
être redémarré dans les 3 minutes qui suivent. Cela a
pour but de protéger l'appareil. L’appareil reprendra
automatiquement l'opération après 3 minutes.
Si l’appareil s’est arrêté en raison d'une coupure de
courant, il redémarrera automatiquement sur le réglage
de fonction précédent, lorsque l'alimentation reprendra.
Mode de déshumidification continue
En mode de déshumidification continue, l’appareil
déshumidifie en continu et il n’est pas possible de
régler la valeur de l'humidité. Appuyez sur le bouton
Mode pour quitter le mode de déshumidification
continue.
Mode de déshumidification intelligent (sur certains
modèles)
En mode de déshumidification intelligent, l'appareil
contrôle automatiquement l'humidité de la pièce dans
une plage confortable comprise entre 45% à 55% en
fonction de la température ambiante. Le réglage de la
valeur de l'humidité sera désactivé.
Remarque : Lorsqu'un des dysfonctionnements
ci-dessus se produit, mettez l'appareil hors tension et
vérifiez s'il y a des obstacles. Redémarrez l'appareil, si
le dysfonctionnement est toujours présent, éteignez
l'appareil et débranchez la prise électrique. Contactez
le fabricant ou ses agents de services ou une personne
qualifiée similaire pour le service de support.
Laissez 30 à 50 cm
de distance entre le
linge mouillé et les
faces supérieure et
droite de l’appareil.

e
Page 8
f
X
Table
Remarque :
Interrupteur
X
X
10 cm ou plus
Angle d'inclinaison
Consignes de
Fonctionnement
Mode sans bac (sur certains modèles)
Le déshumidificateur peut être utilisé sans bac
d’eau lorsque qu'il est réglé en mode sans bac.
En mode sans bac, l’appareil n’indiquera pas bac
plein, par conséquent, il est recommandé de :
Remarque : Lorsque le flotteur du réservoir
touche le micro-interrupteur (en bas de l’appareil),
cela peut provoquer une sortie du mode sans
bac. Veuillez donc vérifier si le bas de l’appareil
est dégagé en mode sans bac.
1. Vérifier si le tuyau est correctement installé ;
2. Placer l'extrémité de sortie du tuyau à un
endroit qui ne risquera pas de déborder,
comme un évier ou un lavabo ;
3. Ne pas placer l’extrémité de sortie du tuyau
dans un récipient de capacité limitée, sinon
l'eau pourrait déborder sur le sol.
2. Veuillez vous assurer que le tuyau est
correctement relié au raccord de décharge avant
d'entrer en mode sans bac.
4. En mode sans bac, ne touchez pas l'interrupteur,
sinon l'appareil sortira du mode sans bac.
5. Ne déplacez pas l’appareil pendant qu’il
fonctionne. Éteignez l’appareil et enlevez la prise
électrique avant de déplacer l'appareil.
Pour quitter le mode sans bac :
3. L’ensemble du tuyau doit être plus bas que le
raccord de décharge pour éviter le refoulement de
l'eau et assurer une décharge fluide.
Remarque : En mode sans bac, la hauteur de la
table doit être supérieure à 10 cm.
Placez l'extrémité de sortie du tuyau dans un
endroit de vidange ou dans un récipient pour
récupérer l'eau.
Operating
Instructions
Remarque :
Page 9
Fixez le
tuyau à la
sortie de
vidange.
Retirez le bouchon
en caoutchouc
Extraire l’eau collectée
Il y a deux moyens d’extraire l'eau collectée.
Remarque :
Retirez le couvercle
Consignes de
Fonctionnement
1. Utilisez le bac d’eau.
secondes après afin de sécher l'eau du
séparez la partie principale et le réservoir. Mettez
la partie principale du déshumidificateur de côté.
Retirez le bouchon en caoutchouc au fond du
bac et vidangez l’eau.
est remis correctement en place.
l’eau.
Méthode B : Retirez le bouchon en caoutchouc
au fond du bac et vidangez l’eau.
car cela pourrait endommager le produit.
du déshumidificateur jusqu'au fond du bac
d’eau.
l'appareil.
un siphon de sol en reliant l’appareil à un tuyau
puis retirez le bouchon en caoutchouc. Fixez un
sol ou une décharge appropriée.
ait aucune fuite.
s’écouler.
niveau ou inclinée vers le bas pour permettre à
l'eau de bien s'écouler. Ne la laissez jamais
orientée vers le haut.
sortie de vidange de l’appareil.
ventilateur souhaités sur l’appareil pour démarrer la
vidange continue.
et le couvercle.
·
·
·
·
·
·
·
·
·
·
·
·
·
·
·
·
·
Consignes de
Fonctionnement
Page 10
L'eau peut être automatiquement évacuée dans un
siphon de sol ou une décharge appropriée en reliant
la sortie de vidange de la pompe à un tuyau de
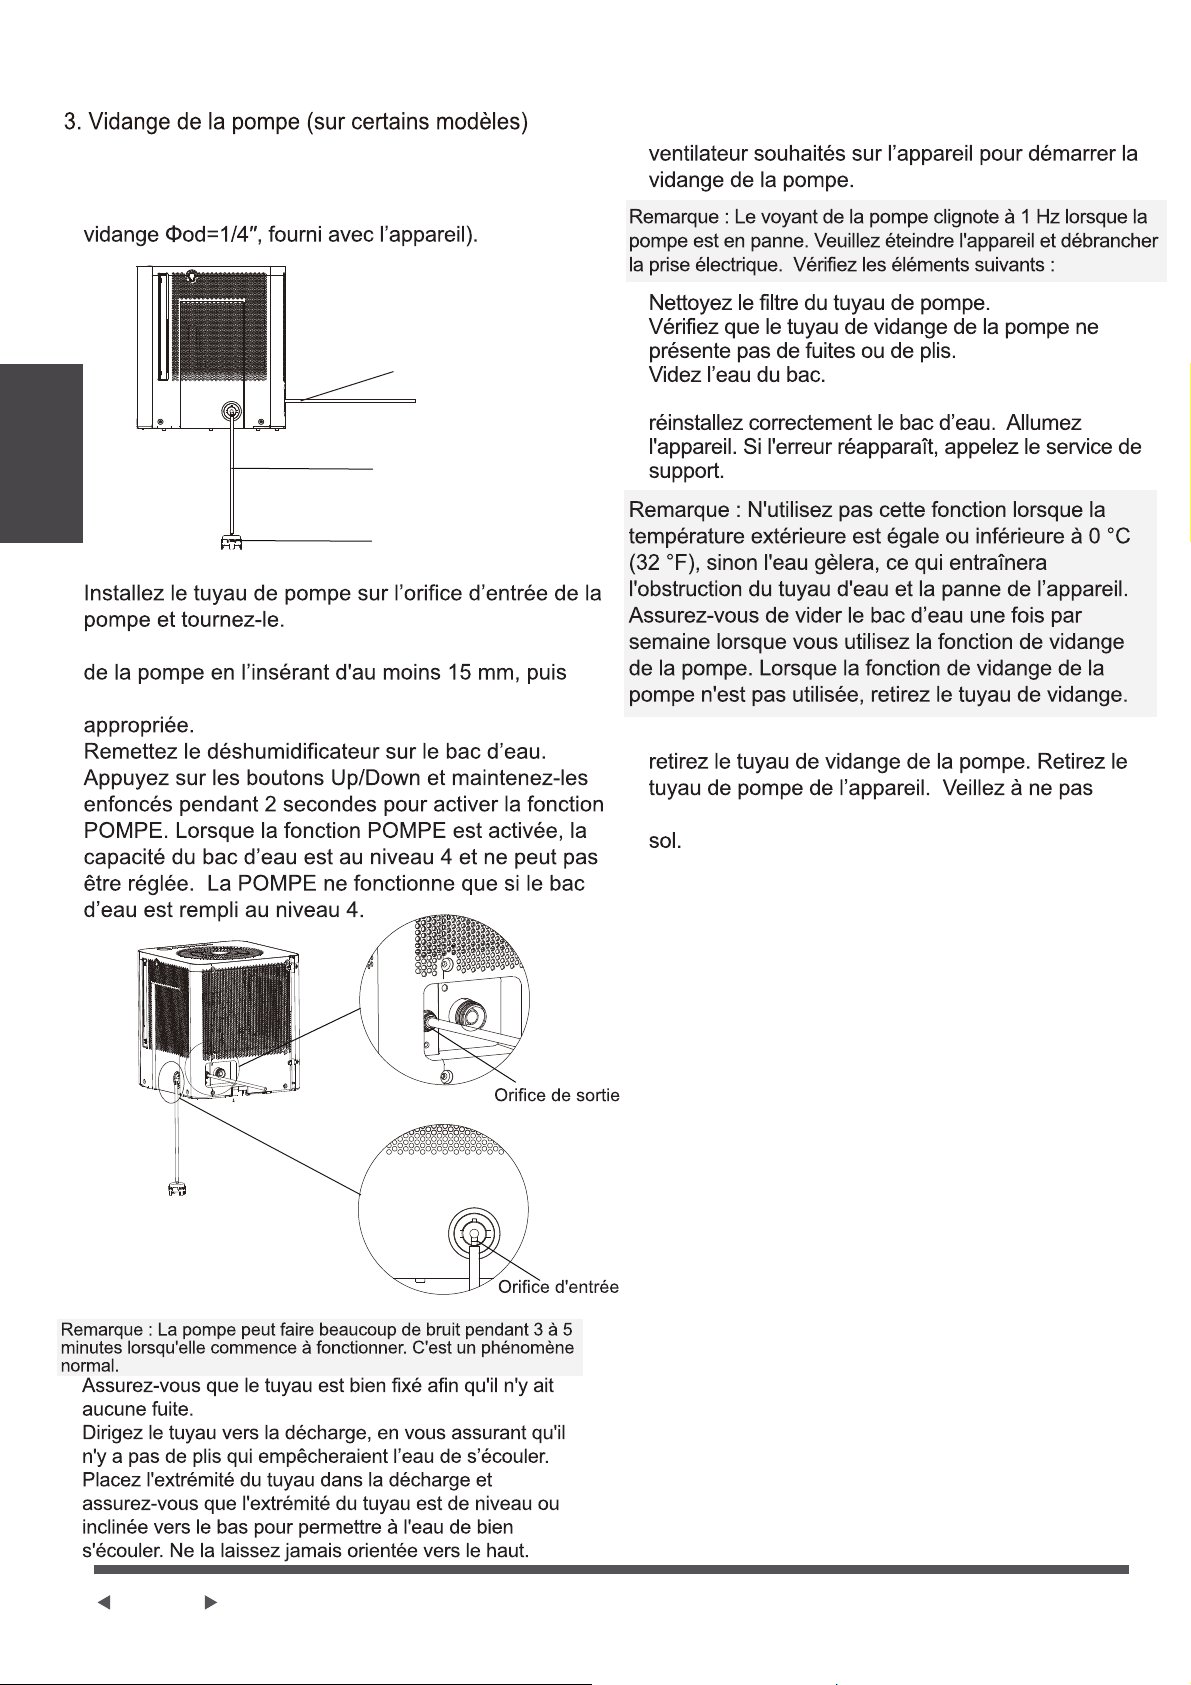
Tuyau de vidange
de la pompe
Tuyau de pompe
Filtre du tuyau de
pompe
de la pompe
de la pompe
Installez le tuyau de vidange sur la sortie de vidange
dirigez-le vers le siphon de sol ou une décharge
Sélectionnez le réglage d'humidité et la vitesse du
Réinstallez le tuyau de la pompe s'il est sorti et
Appuyez sur la sortie de vidange de la pompe et
laisser l'eau du tuyau de pompe s'égoutter sur le
·
·
·
·
·
·
·
·
·
·
·
·
·
·
Page 11
Entretien et
maintenance
Nettoyer le bac d’eau
Nettoyer le filtre à air
Clean the Grille and Case
Entretien et maintenance
Entretien et nettoyage du déshumidificateur
Éteignez le déshumidificateur et enlevez la prise électrique avant le nettoyage.
Pour réinstaller le filtre :
Réinsérez le filtre à air dans l'appareil.
AVERTISSEMENT
Utilisez de l'eau et un détergent doux. N'utilisez pas d'eau de javel ou d'abrasifs.
Ne pas projeter d'eau directement sur la partie principale de l’appareil. Cela pourrait provo-
quer un choc électrique, endommager l'isolation ou entraîner la rouille de l’appareil.
Les grilles d'entrée et de sortie d'air se salissent facilement, utilisez un dispositif d’aspiration
ou une brosse pour les nettoyer.
Attrapez la poignée du filtre et tirez-le vers
l'extérieur.
Nettoyez le filtre à l'eau tiède savonneuse.
Rincez et laissez sécher le filtre avant de le
réinstaller. Ne passez pas le filtre au
lave-vaisselle.
NE PAS faire fonctionner le déshumidificateur
sans filtre car les peluches et les poussières
le boucheront et réduiront ses performances.
Remarque : Le boîtier et le devant peuvent être dépoussiérés avec un chiffon non gras ou être
nettoyés avec un chiffon imbibé d'une solution d'eau tiède et de liquide vaisselle doux.
Rincez abondamment et essuyez. N'utilisez jamais de nettoyants agressifs, de cire ou de vernis
sur le devant du boîtier. Veillez à essorer le chiffon avant d'essuyer autour des boutons de com-
mande. Un excès d'eau dans ou autour des boutons de commande peut endommager l'appareil.
Nettoyez le bac d’eau toutes les quelques semaines, pour empêcher la prolifération de moisis-
sures et de bactéries. Remplissez partiellement le bac avec de l’eau propre et ajoutez un peu
de détergent doux. Tournez l’eau dans le bac, videz-le et rincez.
Remarque : Ne passez pas le bac d’eau au lave-vaisselle. Après le nettoyage, le bac d’eau doit
être remis en place et solidement installé pour que le déshumidificateur fonctionne.
Le filtre à air derrière la grille à deux vantaux doit être vérifié et nettoyé au moins toutes les deux
semaines ou plus souvent si nécessaire.
REMARQUE : NE PAS PASSER LE FILTRE À AIR AU LAVE-VAISSELLE.
Pour retirer le filtre :
·
·
·
·
·
·

Page 12
Conseils de dépannage
Conseils de
Dépannage
Après avoir éteint l'appareil, attendez un jour avant de vider le bac d’eau, afin de récupérer
toute l’eau.
Nettoyez la partie principale, le bac d’eau et le filtre à air.
Couvrez l'appareil avec un sac en plastique.
Gardez l'appareil en position verticale dans un endroit sec et bien ventilé.
• Assurez-vous que la fiche du déshumidificateur est entièrement enfoncée
dans la prise.
• Vérifiez la boîte à fusibles / disjoncteurs de la maison.
• Le déshumidificateur a atteint son niveau préréglé ou le bac d’eau est plein.
• Le bac d'eau n'est pas correctement installé.
• Le filtre à air est obstrué.
• L'appareil est incliné au lieu d'être droit comme il devrait l’être.
• La surface du sol n'est pas de niveau.
• C'est normal. Le déshumidificateur est doté d'une fonction de dégivrage
automatique.
• Le tuyau ou le raccord du tuyau est peut-être desserré.
• Le bac d’eau est censé récupérer l'eau, mais le bouchon de vidange arrière
est retiré.
Ce sont des codes d'erreur et des codes de protection. Voir la section
COMMANDES DE CONTRÔLE SUR LE DÉSHUMIDIFICATEUR.
• Il faudrait plus de temps pour éliminer l'humidité.
• Assurez-vous qu'aucun rideau, store ou meuble ne bloque l'avant ou l'arrière
du déshumidificateur.
• La valeur de l'humidité n'est peut-être pas réglée suffisamment basse.
• Vérifiez que toutes les portes, fenêtres et autres ouvertures sont bien fermées.
• La température ambiante est trop basse, inférieure à 5 °C (41 °F).
• Il y a un radiateur au kérosène ou autre objet qui dégage de la vapeur d'eau
dans la pièce.
Lorsque l'appareil ne sera pas utilisé pendant une longue période
Avant d'appeler le service de support, vérifiez d’abord vous-même les éléments du
tableau ci-dessous.
Problèmes
Ce qu'il faut vérifier
L’appareil ne démarre
pas.
Le déshumidificateur ne
sèche pas l'air comme il
le devrait.
L'appareil fait un bruit fort
lors de son
fonctionnement.
Du givre apparaît sur les
serpentins.
Il y a de l’eau sur le sol.
L’écran affiche EH60,
EH61, EH0b, Eb ou P2.
·
·
·
·
Instruction des Apps
Page 13
Dimensions: 41 x 24 x 5 (mm)
Puissance Transmise Maximale:
19.8 dBm Max
REMARQUE
Déclaration de Conformité
Caracteristiques du Module Sans Fil
Precautions
Nous déclarons par la présente que ce déshumidificateur est conforme aux exigences essentielles et
aux autres dispositions pertinentes de la directive 1999/5 / CE.
Modèle: US-OSK103
Norme: IEEE 802.11 b/g/n
Fréquence: 2.4 GHz (sans fil)
Type d’Antenne: Antenne omnidirec-
tionnelle externe
Température de Fonctionnement: 0°C ~ 45°C / 32°F ~ 113°F.
Humidité de fonctionnement: 10% ~ 85%
Alimentation Electrique: DC 5V/300 mA
1. Prend en charge les systèmes d'exploitation: iOS 7+ ou Android 4+.
2. Dans le cas d'une mise à jour du système d'exploitation, il peut y avoir un délai entre la mise à jour
du système d'exploitation et une mise à jour logicielle associée pendant lequel votre système
d'exploitation peut ou non être pris en charge jusqu'à ce qu'une nouvelle version soit publiée. Votre
téléphone mobile spécifique ou des problèmes dans votre réseau peuvent empêcher le système de
fonctionner et Midea ne sera pas responsable des problèmes qui pourraient être causés par une
incompatibilité ou des problèmes de réseau.
3. Ce Climatiseur Intelligent ne prend uniquement en charge le cryptage WPA-PSK / WPA2-PSK
(recommandé).
4. Pour garantir une lecture correcte du code QR, votre smartphone doit avoir au moins un appareil
photo de 5 mégapixels.
5. En raison d'une connectivité réseau instable, les demandes peuvent expirer. Si cela se produit,
relancer la configuration réseau.
6. En raison d'une connectivité réseau instable, les commandes peuvent expirer. Si cela se produit,
l'application pour smartphone et le produit réel peuvent afficher des informations contradictoires.
Les informations affichées sur le produit réel sont toujours les plus précises disponibles. Actualisez
l'application pour la resynchroniser.
Midea ne sera pas responsable des problèmes qui pourraient être causés par une incompatibilité
ou des problèmes de réseau, votre routeur sans fil et votre téléphone portable.
Instruction des Apps

Appareils requis pour utiliser le Déshumidificateur Intelligent:
1. Smartphone avec système iOS ou Android compatible.
2. Routeur sans fil
3. Déshumidificateur Intelligent
Scannez pour télécharger l’application mobile.
• Vous pouvez également aller sur Google Play ou App Store et rechercher Midea Air
QR Code pour Android QR Code pour Apple
Télécharger et Installer L'application
Présentation du Système
REMARQUE
e
Page 14
f
Toutes les images de ce manuel sont à titre indicatif uniquement, votre produit et votre application
peuvent être légèrement différents. Les instructions réelles du produit et de l'application doivent
être prises en compte.
INSTRUCTIONS POUR
LA TÉLÉCOMMANDE
ET L'APPLICATION
REMARQUE
Créez Votre Compte
6.1 Choisir “Sign Up”. 6.2 Saisissez votre adresse e-mail et votre mot de passe.
e
Page 15
f
• Assurez-vous que votre smartphone est connecté à votre routeur sans fil et que votre routeur sans
fil dispose d'une connexion Internet 2,4 GHz fonctionnelle,
• Il est recommandé d'activer votre compte immédiatement pour pouvoir récupérer votre mot de
passe par email,
6.3 Choisir “Registration”.
6.4 Si vous avez oublié votre mot de passe, Choisir
“Forgot password?” dans le menu principal et
entrez votre adresse e-mail. Choisir ensuite
“Reset Password”.
• Assurez-vous que votre smartphone soit capable de se connecter au réseau sans fil qui sera utilisé.
• Assurez-vous également que l'appareil ne se connecte pas à d'autres réseaux à portée.
INSTRUCTIONS POUR
LA TÉLÉCOMMANDE
ET L'APPLICATION

e
Page 16
f
Apps Supplémentaires et Fonctions D'accueil Intelligents
Pour obtenir des instructions supplémentaires concernant les caractéristiques de
l'application et des compétences de Smart Home, scanner le code QR ci-dessous.
App
Instructions

GARANTIE
GARANTIE
e
Page 17
f
Ces produits ont été fabriqués selon des normes de qualité et sont garantis pour un usage domestique
contre les défauts de fabrication.
Garantie complète d'un (1) an à compter de la date d'achat d'origine et garantie limitée du système scellé de
la 2e à la 5e année en cas d'utilisation à des fins domestiques normales.
Cette garantie n'affecte pas vos droits statutaires. En cas de dysfonctionnement de votre produit (panne,
pièce manquante, etc.), veuillez contacter l'un de nos techniciens de service à notre ligne de service sans
frais au 1-866-646-4332 de 8 h 00 à 18 h 00 HNE, du lundi au Vendredi et de 8 h 00 à 16 h 00 HNE le
samedi. Midea se réserve le droit de réparer ou de remplacer le produit défectueux, à sa discrétion.
Toute garantie est invalide si le produit a été surchargé ou soumis à une négligence, une mauvaise utilisa-
tion ou une tentative de réparation autre que par un agent autorisé. L'utilisation professionnelle / commer-
ciale intensive ou quotidienne n'est pas garantie. En raison de l'amélioration continue du produit, nous nous
réservons le droit de modifier les spécifications du produit sans préavis.
Garantie
Pour obtenir des instructions sur la façon de drainer correctement le fréon, veuillez contacter notre service
clientèle au 0-866-646-4332. Merci.

make yourself at homes