Loading ...
Loading ...
Loading ...
11ninjakitchen.com10
1-877-646-5288
COFFEE FRESHNESS TIMER
(NOT AVAILABLE ON ALL MODELS)
The coee freshness timer lets you know
how long your coee has been waiting for
you since the end of your previous brew�
At the end of every brew, the freshness
timer will activate (as indicated by the LED
next to the button when pressed), and it
will begin counting� To view the freshness
timer after a brew, press the Freshness
Timer Button once and the clock time will
change to show the amount of time that
has passed since the previous brew cycle
was completed� Press again at anytime to
display the clock time�
The freshness timer runs for 4 hours� After
4 hours is reached, the timer will stop,
the LED will turn o, and the display will
automatically switch back to the clock�
NOTE: The freshness timer can only be
activated and viewed after a brew cycle
has completed� The time and delay brew
cannot be set when the freshness timer
is displayed (indicated by the illuminated
LED to the right of the button)�
PREPARING & USING YOUR
NINJA® PROGRAMMABLE COFFEE MAKER – CONT.
PROGRAMMING DELAY BREW
1 Plug in the power cord.
2 After filling the water reservoir and
adding ground coee to the filter, be
sure the reservoir and brew basket are
securely in place. Place the empty carafe
under the brew basket.
3 Press DELAY. The clock will flash "12:00"
or the last time that was set. Use the
hour (H) and minute (M) buttons to set
the time you would like the Delay Brew
to begin. The AM or PM indicator will
illuminate on the right side of the display
as you are setting the time.
4 Select the brew style, and your selection
will illuminate. If brewing fewer than
4 cups, press 1-4 CUP.
5 Once you have set the time and brew
style, press DELAY or BREW to activate,
or wait 5 seconds for Delay Brew to lock
in. When activated, the unit will beep,
and DELAY will remain illuminated.
6 To cancel the program, press DELAY.
NOTE: The unit must remain on for the
Delay Brew function to work. DO NOT
unplug the unit after setting Delay Brew.
ADJUSTABLE WARMING PLATE
The warming plate will turn on once the
brew has started. By default, the warming
plate will remain on for 2 hours and will auto-
matically turn o after the time has elapsed.
To manually turn o the warming plate,
press the WARM button after the brew has
completed. You can turn the warming plate
back on by pressing WARM again. Wait until
the surface has cooled completely before
touching.
KEEP WARM TIME & TEMPERATURE
ADJUSTMENT
(TEMPERATURE ADJUSTMENT IS NOT
AVAILABLE ON ALL MODELS�)
You can adjust how long the warming plate
remain on (up to 4 hours) and/or set the
temperature to High, Medium, or Low.
By default, the warming plate is set to
remain on for 2 hours. To change the time/
temperature settings of the warming plate,
follow these instructions:
1 Press and hold the WARM button until
the clock flashes, displaying how long the
warming plate is currently set to stay on.
2 Quickly press the hour (H) or minute
(M) button to adjust the time up to
4 hours or decrease the time to 0 hours.
Press WARM to set the new time. Or
wait 5 seconds, and the unit will beep,
signifying the new time has been set.
3 To change the temperature, press the
hour (H) or minute (M) button, then
press WARM, or wait 5 seconds for the
temperature to lock in. To keep the
same temperature, press WARM, or
wait 5 seconds for the same temperature
to lock in.
NOTE: The unit will continue to brew
if additional water is added to the
reservoir. DO NOT add more water when
using the WARM function.
NOTE: If you set the warming time to 0
hours, it will skip the warming temperature
menu. When set to 0 hours, the warming
plate will not automatically activate during
or after a brew cycle, but you can still
manually turn it on by pressing WARM.
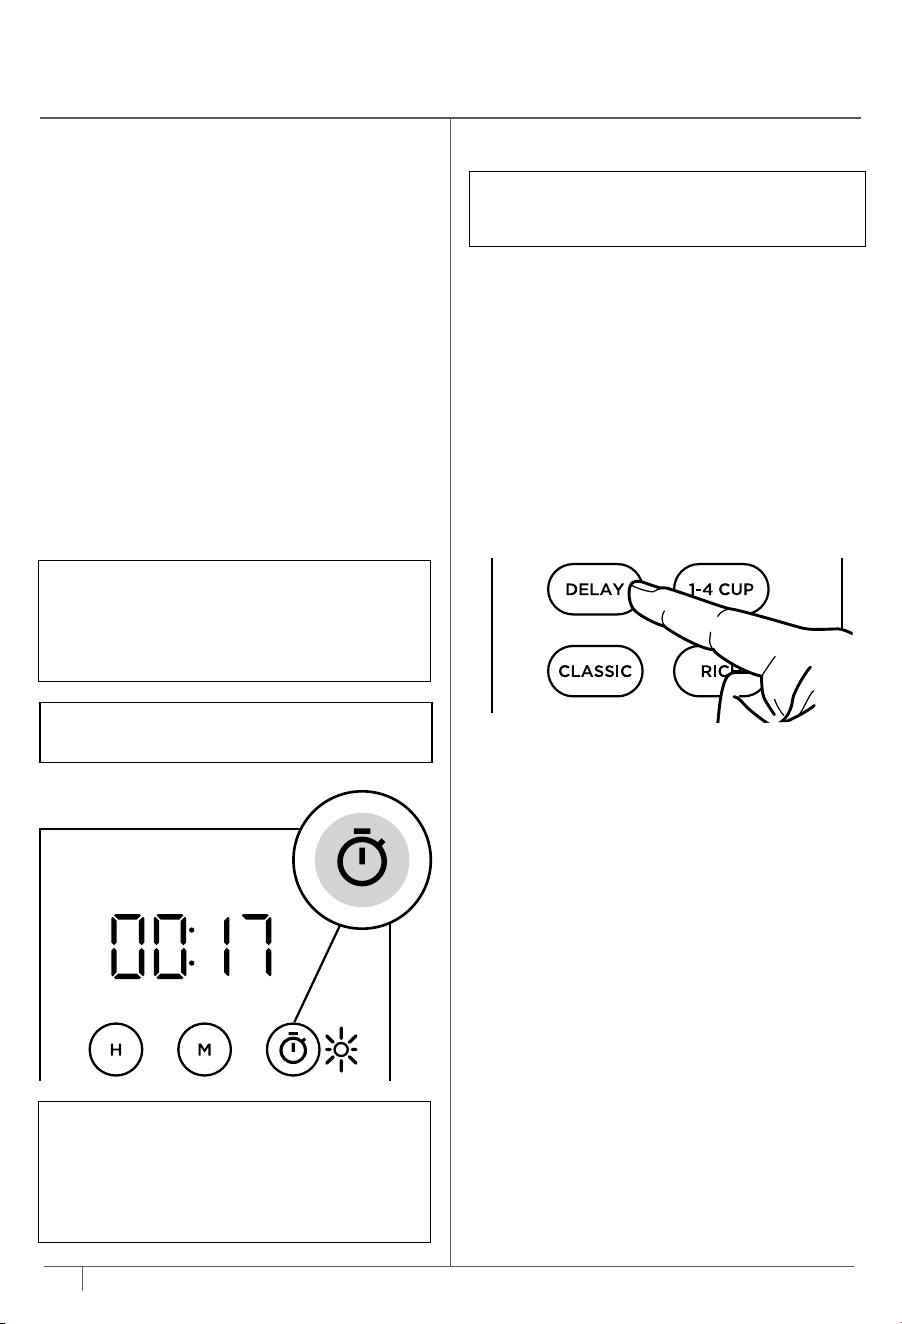
NOTE: If you press the freshness timer
button and the clock flashes “00:00”,
then either a brew has not been
completed or the timer has exceeded
the 4 hour maximum�
EXAMPLE: Image below shows that it
has been 17 minutes since last brew.
CLEANING AFTER A BREW
1 After the unit has cooled, remove the
brew basket and discard the grounds
and paper filter, if used. If using the
permanent filter, wash it thoroughly with
soap and warm water or place on the top
rack of the dishwasher.
2 Empty the water reservoir and
hand-wash or place in the dishwasher
with opening facing downwards.
We recommend thoroughly washing
the water reservoir weekly.
3 We recommend cleaning your carafe
with warm, soapy water and a soft brush,
or placing it on the top rack of your
dishwasher. DO NOT use a wire brush.
4 After the coee maker has cooled, wipe
down the main unit, showerhead, and
water reservoir shelf with a cloth and
warm water. DO NOT immerse the coee
maker in water.
TO CLEAN AND DESCALE YOUR
NINJA PROGRAMMABLE COFFEE MAKER
The clean function allows you to clean
your unit whenever you would like. As a
guideline, we recommend running a clean
cycle if it is taking significantly more time
to brew than normal.
1 Set the empty carafe beneath the
brew basket.
NOTE: For best results, we recommend
rinsing the reservoir after brewing.
NOTE: The glass carafe, brew-through lid,
permanent filter, water reservoir, water
reservoir lid, and scoop are dishwasher safe.
NOTE: Make sure the 1-4 CUP button is
not selected/illuminated before running a
clean cycle.
CARE & MAINTENANCE
Loading ...
Loading ...
Loading ...