
Loading ...
Loading ...
Loading ...
6English
ATTENTION
● Do not use scouring agents, glass or multi-purpose
cleaner for cleaning.
Transport
몇 CAUTION
● In order to prevent accidents or injuries, you must ob-
serve the weight of the device when transporting it.
Intended use
Only use the device in private households.
In accordance with the descriptions and the safety infor-
mation in these operating instructions, the device is in-
tended for use as a wet and dry vacuum cleaner.
Cold ashes may only be vacuumed with suitable acces-
sories.
Protect the device from rain and do not store it outdoors.
Note
The manufacturer accepts no liability for possible dam-
age caused by improper use or incorrect operation.
Environmental protection
The packing materials can be recycled. Please
dispose of packaging in accordance with the en-
vironmental regulations.
Electrical and electronic appliances contain valu-
able, recyclable materials and often components
such as batteries, rechargeable batteries or oil,
which - if handled or disposed of incorrectly - can
pose a potential threat to human health and the environ-
ment. However, these components are required for the
correct operation of the appliance. Appliances marked
by this symbol are not allowed to be disposed of togeth-
er with the household rubbish.
Notes on the content materials (REACH)
Current information on content materials can be found
at: www.kaercher.com/REACH
Accessories and spare parts
Only use original accessories and original spare parts.
They ensure that the appliance will run fault-free and
safely.
Information on accessories and spare parts can be
found at www.kaercher.com.
Scope of delivery
The scope of delivery for the appliance is shown on the
packaging. Check the contents for completeness when
unpacking. If any accessories are missing or in the
event of any shipping damage, please notify your deal-
er.
Warranty
The warranty conditions issued by our relevant sales
company apply in all countries. We shall remedy possi-
ble malfunctions on your appliance within the warranty
period free of cost, provided that a material or manufac-
turing defect is the cause. In a warranty case, please
contact your dealer (with the purchase receipt) or the
next authorised customer service site.
(See overleaf for the address)
Description of the device
Depending on the model selected, there are differences
in the equipment. The specific equipment is described
on the device packaging.
For the illustrations, refer to the graphics page.
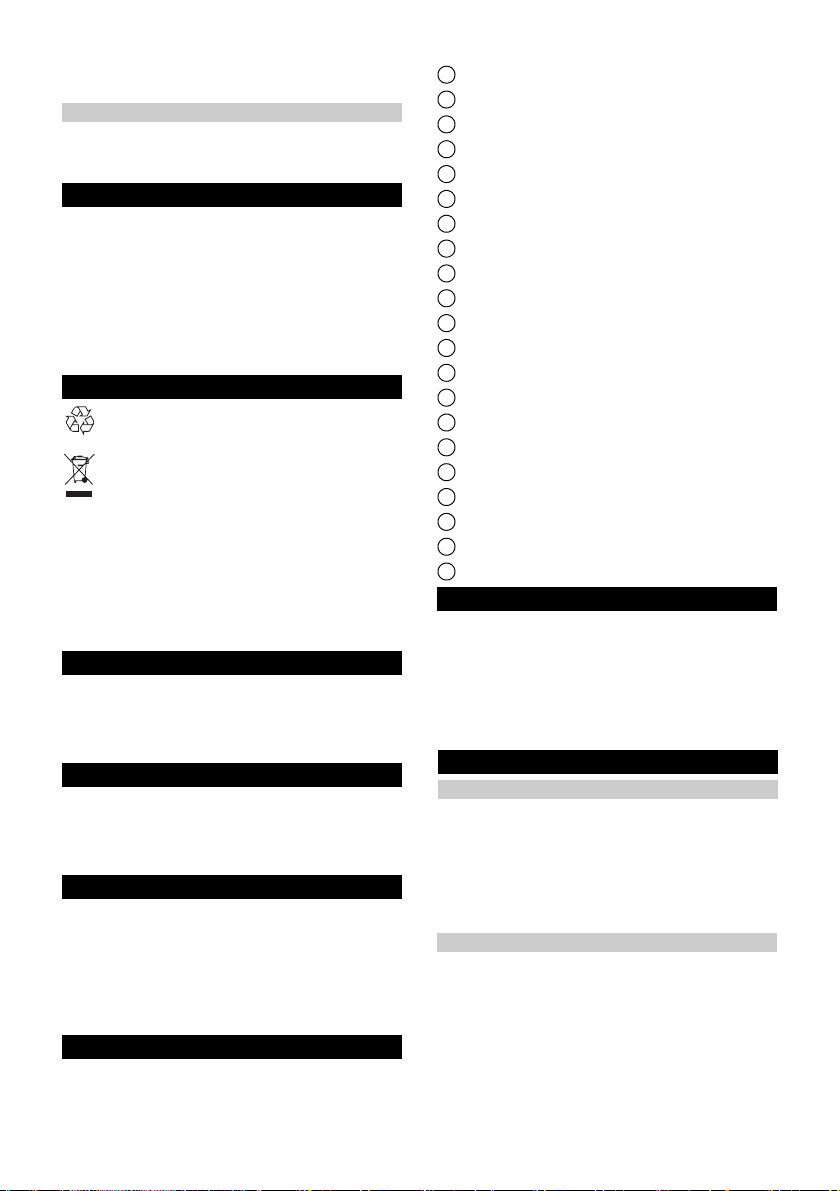
Illustration A
1 Suction hose connection
2 Rotary switch
3 Carrying handle
4 Parking position handle / accessory holder
5 Filter box with unlocking button
6 Cable hook
7 Hose storage (both sides)
8 Storage area
9 Container closure
10 Rating plate with technical data (e.g. container size)
11 Mains connection with mains plug
12 Parking position for floor nozzle
13 Accessory storage
14 Steering roller
15 Filter bag
16 Flat pleated filter
17 Removable handle
18 Suction hose with connection piece
19 Suction tubes 2 x 0.5 m
20 Crevice nozzle
21 Floor nozzle
Installing the steering rollers
1. Before initial startup, remove the contents from the
container and mount the steering rollers.
Illustration B
Illustration C
Illustration D
Note
For versions with stainless steel tubes, remove the pro-
tective cover before initial startup.
Accessory application
1. Connect the suction hose.
Illustration G
2. Connect the suction hose to the handle.
Illustration H
Note
For convenient vacuuming in confined spaces, the han-
dle can be removed, and the accessories plugged di-
rectly onto the suction hose.
To release the handle, the grey areas on both sides of
the handle must be pressed, and the handle pulled from
the hose.
Initial startup
Inserting the filter bag
1. Fully unfold the filter bag.
2. Attach the filter bag to the device connection and
press it on firmly.
Illustration E
3. Fit and lock the device head.
Illustration F
Note
We recommend using a filter bag to vacuum fine dust.
Loading ...
Loading ...