Loading ...
Loading ...
Loading ...
www.BISSELL.ca
5
1
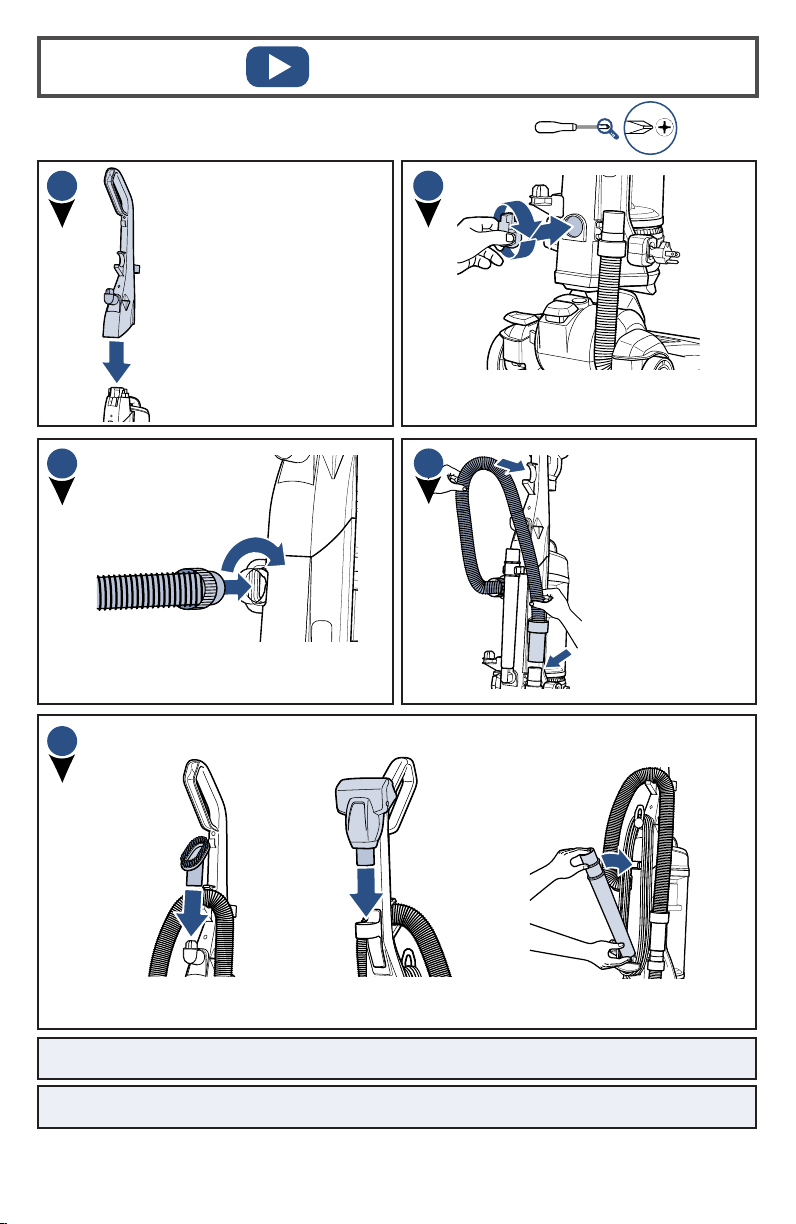
Place the upper handle onto
the base and push it down.
Then attach the handle with
the 2 screws taped to the
handle in a plastic bag.
Assembly
The only tool you will need to assemble your vacuum is a
Phillips screwdriver.
Insert the extension wand base and
turn it to the right to lock in place.
2
3
4
5
Insert the hose end into the back of the
vacuum and twist right to lock in place.
NOTE: The powerfoot will not suction properly unless the hose is fi rmly attached.
NOTE: Flexible Crevice Tool is not stored on board.
NOTE: Flexible Crevice Tool is not stored on board.
Wrap hose up and
around the hose
wrap on the handle.
Slide end of hose
into vacuum base.
Pet TurboEraser® ToolDusting Brush
Extension Wand
Now, put your accessory tools on the vacuum and you’re ready to go!
www.BISSELL.ca
5
1
Placez le manche supérieur
dans la base et poussez vers
le bas. Ensuite, fixez le manche
avec les 2vis qui se trouvent
dans le sac de plastique fixé
au manche avec du ruban.
Assemblage
Le seul outil dont vous aurez besoin pour assembler
votre aspirateur est un tournevis cruciforme.
Insérez la base de rallonge et tournez-là
vers la gauche pour la verrouiller en place.
2
3
4
5
Insérez l’extrémité du tuyau à l’arrière de
l’aspirateur et tournez-le vers la droite
pour le verrouiller.
REMARQUE: Le pied motorisé n'aspirera pas e cacement si le tuyau n’est pas fi xé
fermement.
Faites passer le tuyau
par le haut et autour
du porte-tuyau sur
le manche. Insérez
l'extrémité du tuyau
dans la base de
l'aspirateur.
Accessoire Pet TurboEraser®
Brosse à épousseter
Tube-rallonge
Placez vos accessoires sur l'aspirateur et vous voilà prêt!
REMARQUE: Le suceur plat fl exible ne se range pas sur l’appareil.
REMARQUE: Le suceur plat fl exible ne se range pas sur l’appareil.
Loading ...
Loading ...
Loading ...