
Use & Care Guide
Manual de Uso y Cuidado
Manuel d'entretien et d'utilisation
Model/Modelo/Modèle: DS1030
Stratus
TM
24V 2-in-1 Cordless
Stick Vac
Aspiradora Vertical Inalámbrica
Stratus
TM
2 en 1 de 24 V
Aspirateur Balai Sans Fil 2 en 1
24 V Stratus
TM
www.kenmorefloorcare.com
Vacuum Cleaner Help Line:
1-877-531-7321 (US) / 1-844-608-3081 (CA)
8:00am-5:00pm EST, M-F

- 2 -
Before Using Your New Vacuum Cleaner ........................................................................ 2
Packing List ..................................................................................................................... 2
Important Safety Instructions ........................................................................................3-4
Vacuum Cleaner Warranty .............................................................................................. 5
Parts and Features ........................................................................................................6-7
Assembly Instructions ................................................................................................. 8-10
Operating Instructions ...............................................................................................10-12
Vacuum Maintenance and Care ..................................................................................12-15
Troubleshooting .........................................................................................................16-17
Requesting Assistance Or Service .....................................................................Back Cover
TABLE OF CONTENTS
PACKING LIST
Your KENMORE CORDLESS VACUUM CLEANER is packaged with the following parts and
components assembled separately in the carton:
1 Handle
1 Main Body
1 Hand Vacuum Cleaner
1 Motorized Nozzle
1 Vacuum Support
1 Charger Base
1 Tool Attachment Holder
Read this Use & Care Guide. It will help you assemble and operate your new Kenmore
vacuum cleaner in the safest and most effective way.
For more information about vacuum cleaner care and operation, call the Vacuum Cleaner
Help Line at 1-877-531-7321 (US) / 1-844-608-3081 (CA). You will need the complete model
and serial numbers when requesting information.
Your vacuum cleaner’s model and serial numbers are located on the Model and Serial
Number Plate. Use the space below to record the model number and serial number of your
new Kenmore vacuum cleaner.
Model No.____________________________________________
Serial No. ____________________________________________
Date of Purchase ______________________________________
Keep this book and your sales check (receipt) in a safe place for future reference.
BEFORE USING YOUR NEW VACUUM CLEANER
1 Combination Tool
1 Dusting Brush
1 Crevice Tool
2 Filters (x1 Pre-installed)
1 Filter Basket (Pre-installed)
1 Charging Adapter
1 Manual

- 3 -
WARNING!
READ ALL INSTRUCTIONS IN THIS GUIDE BEFORE ASSEMBLING OR USING YOUR
VACUUM CLEANER. To reduce the risk of fire, electrical shock, injury to persons or damage
when using your vacuum cleaner, follow all safety precautions listed below.
IMPORTANT SAFETY INSTRUCTIONS
• Use your vacuum only as described in this
Use & Care Guide.
• Do not use or charge outdoors or on wet
surfaces.
• Do not allow to be used as a toy. Close
attention is necessary when used by or
near children, pets or plants.
• Use only manufacturer’s recommended
attachments. Do not use attachments
other than those supplied with this
vacuum.
• Do not handle charger, including charger
plug, and charger terminals with wet
hands.
• Do not put any object into openings. Do
not use with any opening blocked; keep
free of dust, lint, hair, and anything that
may reduce air flow.
• Keep hair, loose clothing, fingers, and all
parts of body away from openings and
moving parts.
• Use extra care when cleaning on stairs.
• Do not use to pick up flammable or
combustible liquids, such as gasoline, or
use in areas where they may be present.
• Switch off the appliance before
connecting the accessories.
• Do not pick up anything that is burning or
smoking, such as cigarettes, matches, or
hot ashes.
• Do not pick toxic solution such as chlorine
bleach, ammonia or drain cleaner.
• Do not use without dust cup and filter in
place.
• Do not charge the unit outdoors.
• Prevent unintentional starting. Ensure
the product does not operate before
connecting to hand vacuum, picking up
or carrying the appliance.
• Do not carry the appliance with your
finger on the switch.
• Do not attempt to charge the appliance
with the switch in the on position.
• Do not attempt to use this charging
adapter with any other product nor
attempt to charge this product with
another charging adapter.
• To recharge vacuum, use only
YLJXC-256050 charging adapter.
• Do not use an appliance that is damaged
or modified. Damaged or modified
appliance may exhibit unpredictable
behavior resulting in fire, explosion or risk
of injury.
• Do not immerse vacuum cleaner, or
charging adapter in water or other
liquids.
• Always turn the vacuum off before
connecting or disconnecting the
motorized nozzle.
• Store the cordless vacuum indoors. Put
the cordless vacuum away after use to
prevent accidents.
• Keep your work area well lit.
• Keep the vacuum moving over the carpet
surface at all times to avoid damaging
the carpet fibers.
• Do not vacuum up any liquids.
• Do not use in an enclosed space where
vapors are present from paint, paint
thinner, moth-proofing substances,
flammable dust or other explosive or

- 4 -
IMPORTANT SAFETY INSTRUCTIONS
SAVE THESE INSTRUCTIONS
Household use only.
toxic materials.
• Do not pick up hard or sharp objects such
as glass, nail, screws or coins that could
damage the vacuum cleaner.
• To avoid excessive heat and damage
to unit or batteries, do not operate the
vacuum while charging.
• Do not use extension cords or outlets with
inadequate current carrying capacity.
• Do not expose an appliance to fire or
excessive temperature. Exposure to fire
or temperature above 265°F (130°C) may
cause explosion.
• Leaks from battery cells can occur
under extreme usage or temperature
conditions. If the liquid gets on skin, wash
quickly with water. If liquid gets into the
eyes, flush them immediately with clean
water for a minimum of 10 minutes. Seek
medical attention.
• While there is no shock hazard from
electrical terminals located on the
vacuum, a burn could result from metal
objects being inserted into the terminal
areas. Vacuum cleaner terminals should
always be kept free of objects.
• Store charger indoors in a cool, dry
area, not exposed to weather to avoid
electrical shock and/or damage to the
vacuum cleaner.
• Changes or modifications to this unit
not expressly approved by the party
responsible for compliance could void the
user’s authority to operate the equipment.
• Charging improperly or at temperatures
outside of the specified range may
damage the battery and increase the risk
of fire.
• You are responsible for making sure
that your vacuum cleaner is not used
by anyone who is unable to operate it
properly.
• Have servicing performed by a qualified
repair person using only identical
replacement parts. This will ensure that
the safety of the product is maintained.
• Do not modify or attempt to repair
the appliance or the battery pack (as
applicable) except as indicated in the
instructions for use and care.
•
This appliance is designed for household
use only!
NOTICE
This device complies with part 15 of the
FCC Rules. Operation is subject to the
following two conditions.
1. This device may not cause harmful
interference.
2. This device must accept any interference
received, including interference that may
cause undesired operation.
Product Disposal
This product contains an internal Lithium-
ion battery pack formulated from
environmentally sensitive materials. This
product must be disposed of properly
with due care for the environment. Do
not dispose of product with household
garbage. Consult your local waste
authority for information regarding
available recycling or disposal options.

- 5 -
VACUUM CLEANER WARRANTY
LIMITED WARRANTY
FOR ONE YEAR from the date of sale this product is warranted against defects in
material or workmanship.
WITH PROOF OF SALE a defective product will be replaced free of charge.
The Kenmore brand is used under license. Direct all claims for warranty service to:
1-877-531-7321 (US) / 1-844-608-3081 (CA).
This warranty does not cover filters or belts, which are expendable parts that can wear
out from normal use within the warranty period.
This warranty is void if this product is ever used for other than private household purposes.
This warranty gives you specific legal rights, and you may also have other rights which
vary from state to state.
Cleva North America, Inc., Greenville SC 29607

- 6 -
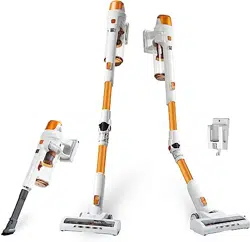
PARTS AND FEATURES
It is important to know your vacuum cleaners parts and features to assure its proper and
safe use. Review these before using your vacuum.
REPLACEMENT PARTS
To order a replacement
part, call
1-877-531-7321 (US) /
1-844-608-3081 (CA).
Item Part No.(US) Part No.(CA)
Filter 561050106 561050106
Filter Basket 561050115 561050115
Charging Adapter 561103108 561103108
Charger Base 561103105 561103105
Vacuum Support 561103106 561103106
Brush Roll 561050104 561050104
Combination Tool 561050113 561050113
Dusting Brush 561050111 561050111
Crevice Tool 561050112 561050112
Handle
Hand Vacuum
Main Body
EASYCUT
™
Button
Crevice
Tool
Hand Vacuum
Release Button
Hand Vacuum
Power Switch
Dust Cup
Release Button
Charger Base
Power/Speed Switch
Battery Charging
Indicator
Hose Release Tabs
Dusting Brush
Combination
Tool
LED Lights
Motorized
Nozzle
Tool Attachment
Holder
Charging
Adapter
Vacuum
Support
Dust Cup
(Filter inside)
Lock Button
- 7 -
PARTS AND FEATURES
Handle
Combination Tool
Dusting Brush
Charging Adapter
Hand Vacuum
Motorized Nozzle
Charger Base
Vacuum Support
Tool Attachment
Holder
Filter Basket
(Pre-installed)
Crevice Tool
Filter (x2)
(x1 Pre-installed)
Main Body
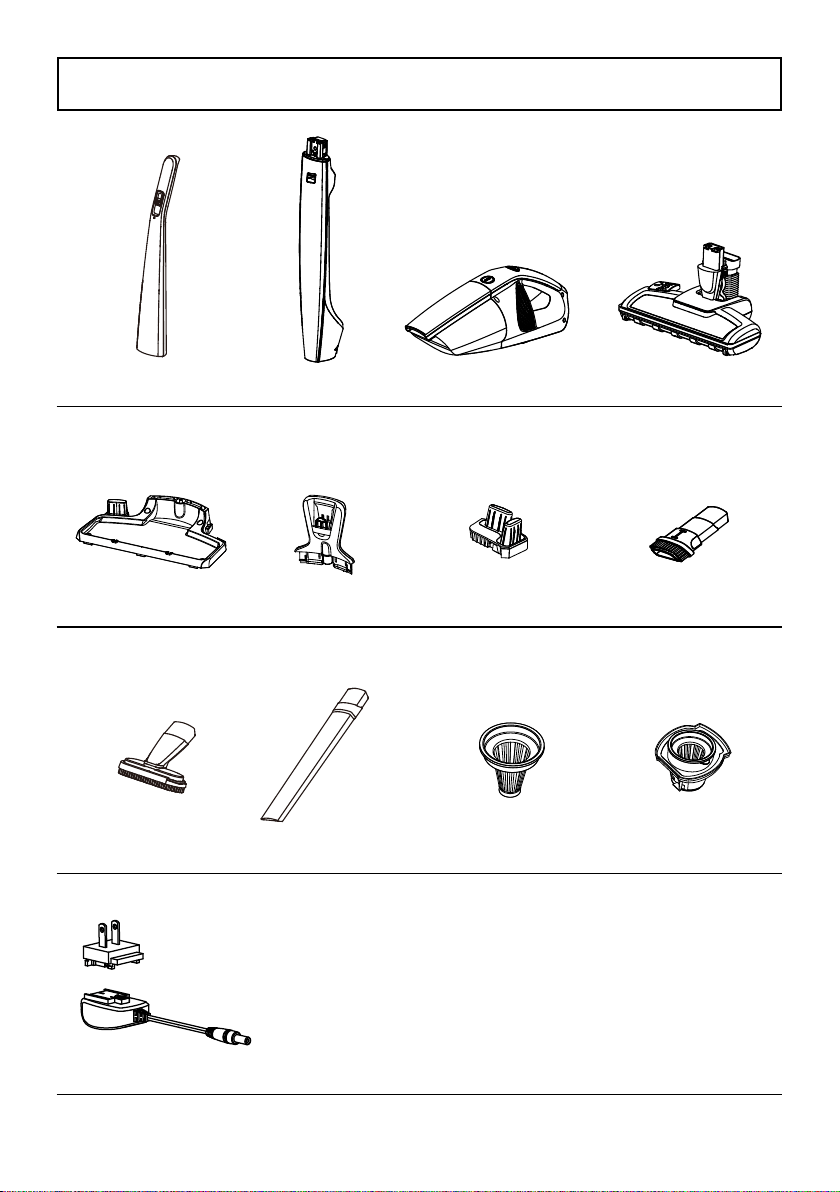
- 8 -
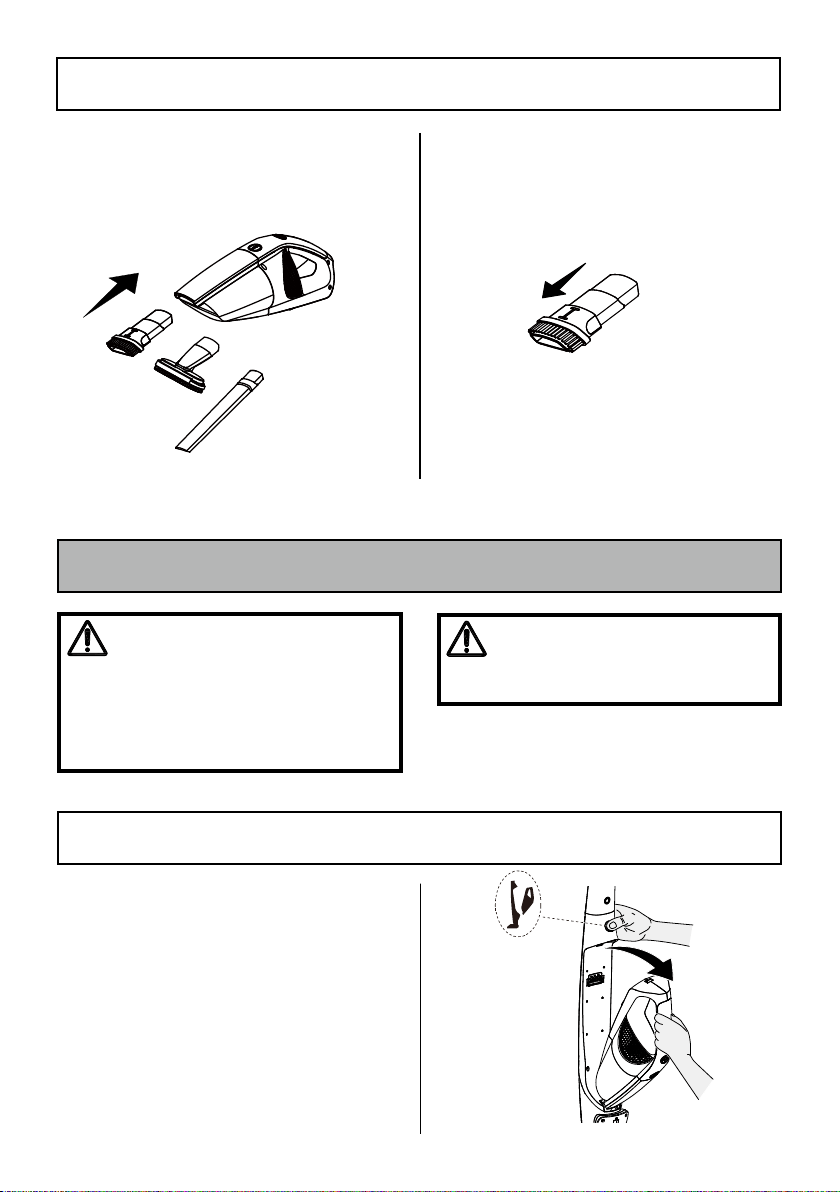
1. Fit the vacuum body into the motorized
nozzle and lock into place.
2. Insert the handle into the top of the main
body, as illustrated, and lock into place.
Before assembling the vacuum cleaner, check the PACKING LIST (Page 2). Use this list to
verify that you have received all the components of your new Kenmore Cordless 2-in-1
Stick Vacuum.
ASSEMBLY INSTRUCTIONS
3. Insert the hand
vacuum into the main
body as shown and
lock into place.
Ensure that the dust
cup is secured in
place.
4. Insert vacuum support and tool
attachment holder onto charger base and
click into place.
Click!
Click!
1
2
Click!

- 9 -
1. Insert the plug insert into the charging
adapter body. Align the support rails
located on the charging adapter body
with the guide rails on the plug insert.
Slide the plug insert fully towards the
charging adapter body to lock into
place until you hear a click.
NOTE:
To remove the plug, press the
release latch on the charging adapter
and slide the plug insert off the charging
adapter body.
2. Insert the charging adapter into the
charging port located on the bottom of
the charger base and secure the cord as
illustrated.
3. Insert the vacuum cleaner onto the
support rails of the charger base. Ensure all
connections are clean and free of dirt.
4. Make sure the vacuum cleaner is fully
charged before using for the first time.
The vacuum may take up to 5.5 hours to
charge completely if fully discharged.
5. Plug the charging adapter into a wall
outlet.
WARNING
Before charging make sure the unit is
turned OFF.
CHARGING
Plug Insert
Release
Latch

- 10 -
CHARGING
Battery Charging Indicator
NOTE:
The vacuum cleaner sits in the
charger base and is held into position while
charging by the support rails. Ensure you
place the vacuum cleaner downwards onto
the charger base and ensure the vacuum is
correctly docked. Make sure that there is
nothing obstructing the connections which
may prevent charging.
6. While the vacuum cleaner is being
charged, the battery charging indicator
will flash continuously until fully charged.
7. When the vacuum has reached full
charge (100%), the battery charging
indicator will turn off.
NOTE:
If the battery charging indicator
does not illuminate when charging, ensure
that:
• The vacuum cleaner is seated properly
onto the charger base.
• The charging plug is plugged into the
power supply properly.
• The electrical supply at the outlet is
powered on.
• The charging connector is fully inserted in
the charger base.
NOTE:
For improved battery
performance, always keep the vacuum
cleaner on the charging base while not in
use.
OPERATING INSTRUCTIONS
USING YOUR VACUUM CLEANER
Before vacuuming, check that the brush roll
is clear from any obstructions such as hair
or sharp objects to avoid scratching floors,
and that the dust cup is empty.
NOTE:
Use the low-speed setting for
cleaning of hard floors, and low pile rugs.
The high-speed setting should be used for
cleaning plush rugs and carpets or when
additional cleaning power is required.
CAUTION
Moving parts! To reduce the risk of personal injury, DO NOT
touch the brush roll when vacuum is on. Contacting the brush
roll while it is rotating can cut, bruise or cause other injuries.
Always turn off before servicing. Use caution when operating
near children or pets.
- 11 -
2. To turn on the hand vacuum, press the
power switch located on top of the
handle.
To turn off, press the power switch
located on top of the handle again.
NOTE:
When the hand vacuum is low
on battery power, the battery charging
indicator around the switch will flash.
The flashing will continue until the unit is
completely out of battery power.
To charge, turn off the vacuum; place the
hand vacuum into the main body and place
the whole unit onto the charger base.
NOTE:
When the vacuum cleaner is low
on battery power, the battery charging
indicator on the handle will flash. The
flashing will continue until the unit is placed
on the charging base or is completely out
of battery power.
USING YOUR VACUUM CLEANER
1. To start the vacuum cleaner, slide the
power/speed switch to the LOW speed
position.
2. To increase the speed and performance
of the vacuum cleaner, slide the power/
speed switch to the HIGH speed
position.
3. To stop the vacuum cleaner, place the
power/speed switch in the OFF position.
Power/Speed Switch
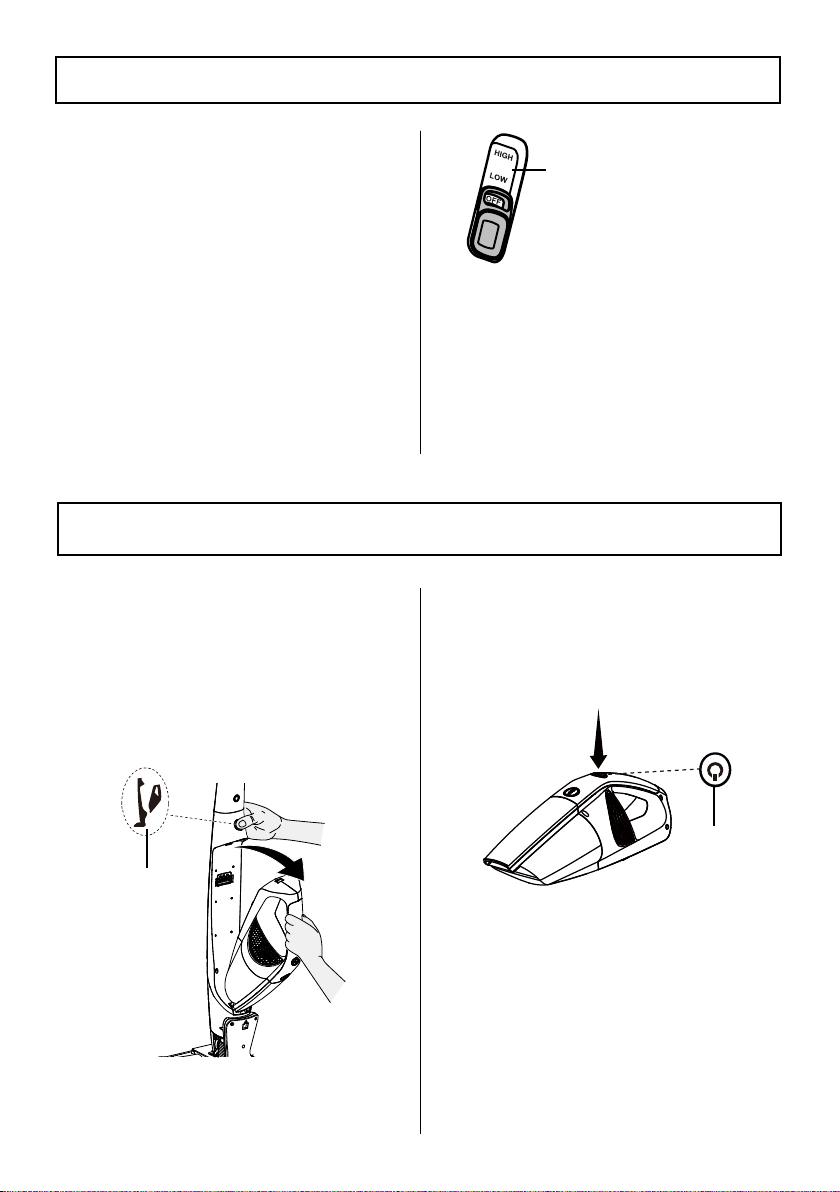
CLEANING WITH THE HAND VACUUM
Easily clean messes on furniture, upholstery,
stairs and other hard-to-reach areas with
the included combination tool.
1. To remove the hand vacuum cleaner,
press the hand vacuum release button
and detach it from the main body.
Hand Vacuum
Release Button
Power
Switch
- 12 -
4. The combination tool can be used as
a crevice tool or a dusting brush. To
transition from crevice tool to dusting
brush, slide the brush to the top. Ensure it
clicks into place to secure for operation.
5. To return the combination tool back to
the crevice function, slide the brush back
into the bottom position. Ensure it is
securely locked into place.
3. To clean areas that are difficult to reach,
use the accessories provided by inserting
the end of tool into the hand vacuum
suction port.
CLEANING WITH THE HAND VACUUM
VACUUM MAINTENANCE AND CARE
CAUTION
To reduce the risk of an electric shock,
remove the vacuum cleaner from the
charging base, and ensure the machine
is turned off before performing any
maintenance.
EMPTYING DUST CUP AND CLEANING FILTER
For best performance, empty dust cup
after every use. Never operate the vacuum
cleaner without dust cup and filter in
place.
Before emptying the dust cup, ensure the
vacuum is turned off.
1. Remove the hand vacuum from the main
body by pressing the hand vacuum
release button and detaching the
handheld unit from the main body.
WARNING
Do not operate the vacuum cleaner
without filters in place.
5. After repeated use, it may be necessary
to wash the filter basket and filter. First
brush loose debris from both basket and
filter, then hand wash basket and filter
in warm water. After washing, set aside
and allow to air dry for 24 hours.
IMPORTANT:
The filter basket and
filter must be completely dry before reuse.
6. Insert the clean, dry filter into the
basket and fit the basket into the dust
cup ensuring an air tight seal is formed
around the dust cup opening.
7. Reconnect the dust cup to the hand
vacuum. To do so, position the locking
tab on the handheld unit within the
locking grove located on the bottom of
the dust cup. Press the other end of the
dust cup into position until you hear a
‘click’.
EMPTYING DUST CUP AND CLEANING FILTER
2. Press the dust cup release button, lift the
released end first and pivot the dust cup
downwards to detach the unit from the
holding clip at the bottom of the unit.
And then separate the dust cup from the
hand vacuum body.
3. Remove the filter basket from the dust
cup. Empty the contents into a waste bin.
NOTE:
The key to maximum
performance is having a clean filter.
Cleaning the filter frequently will help
your vacuum cleaner operate at peak
efficiency. An extra filter is provided with
your vacuum cleaner to allow you to dry
one filter properly while using the other. To
purchase additional parts call 1-877-531-
7321 (US) / 1-844-608-3081 (CA).
4. Remove the filter from the filter
basket. With a soft, dry brush, clean
any accumulated debris from the side
screens of the filter and the filter basket.
1
2
- 13 -
WARNING
The motorized nozzle contains an
EASYCUT™ blade. It has an extremely
sharp edge inside. Do not touch the
blade when performing maintenance.
- 14 -
The motorized nozzle may accumulate
debris such as strings, hair and fibers. This
type of debris can wrap around the brush
and diminish its ability to clean effectively.
The EASYCUT™ blade in the motorized
nozzle will cut debris accumulation away
from the brush roll.
Recommended: After every use, clean the
brush roll with the EASYCUT™ system by
stepping on the button for 1-2 seconds
as illustrated while the vacuum cleaner is
operating. Repeat above step more than 5
times for better performance.
NOTE:
It is recommended to use the
EASYCUT™ system while the battery is
fully charged.
Brush Roll Manual Cleaning
1. Make sure the vacuum cleaner is turned
OFF. Remove the floor head from the
handle assembly and turn it over to
access the brush roll.
2. Unlock the brush roll tab using a flat
head screwdriver or similar tool.
3. Lift the brush roll out of the housing.
Clean off debris and anything wrapped
around the brush.
4. Place the brush roll into the housing
by aligning the end to the brush drive
side first, then inserting the other end
correctly into place. When installed
correctly, the brush roll will spin freely.
Lock the brush roll into place by securing
the locking tab back into position.
CLEANING THE MOTORIZED NOZZLE & BLOCKAGES
EASYCUT™ Button
2. Flex the connection hose to ensure you
can see straight through the other end. If
you can see any blockages in this area,
carefully remove them.
3. Reattach the motorized nozzle onto the
vacuum body.
NOTE:
Do not use scissors or other
sharp objects to remove a blockage from
the hose as these may damage the hose.
Brush Roll Reset
If the brush roll is blocked or overloaded,
the brush roll will stop turning and the LED
lights on the nozzle will flash ten times and
then turn off. The nozzle motor will turn off
while the unit motor stays on. Switch the
unit off and remove the obstruction to reset
the brush roll.
Hose Blockage Removal
1. To clean out the hose, press the hose
release tabs, as illustrated, and pull the
motorized nozzle away from the main
vacuum body.
1
1
2
2
- 15 -
CLEANING THE MOTORIZED NOZZLE & BLOCKAGES
WARNING
This product contains the EASYCUT™
blade. Do not touch the blade
when performing motorized brush
maintenance.
EASYCUT™ BLADE
- 16 -
Review the table for solutions to minor performance problems. Any service needed, other
than maintenance described in this Use & Care Guide, should be performed by a qualified
service dealer.
TROUBLESHOOTING
WARNING
Ensure the vacuum cleaner is turned off and removed from the charger base before
performing maintenance to it. Failure to do so could result in electrical shock or
personal injury.
PROBLEM
POSSIBLE CAUSE SOLUTION
Vacuum will not
power on.
Battery may be depleted. Charge the battery as instructed on page 9-10.
Wrong charger being used.
Be sure to use only the charger supplied with your
product.
Hand vacuum is not installed
properly.
Remove hand vacuum and reattach ensuring that
it is securely in place.
Charging connector is not fully
plugged into the charger base.
Be sure the charging connector is fully inserted in
the charger base.
Charging plug is not fully plugged
into outlet.
Be sure charging plug is fully plugged into outlet.
The vacuum cleaner is not seated
correctly onto the charger base.
Be sure the vacuum is seated properly onto the
charger base and there is nothing obstructing the
connections.
Battery indicator
does not illuminate
when charging the
battery.
Battery may be depleted. Charge the battery as instructed on page 9-10.
Charging adapter is not plugged
into outlet firmly.
Be sure the charging adapter is plugged in
properly to the outlet, and the charging connector
is plugged into the charging port of the hand
vacuum.
Debris accumulated on the metal
charge contacts on the hand
vacuum, main body and charging
adapter.
Be sure no debris is accumulated on the metal
charger contacts on the hand vacuum, main body
and charging adapter.
The electrical outlet is switched off.
Ensure that the outlet is supplying power to the
charger.
The plug is not installed correctly
in to the charging adapter body.
Reinstall the plug. Follow plug installation
instructions on page 9.
The vacuum cleaner is not seated
correctly onto the charger base.
Be sure the vacuum is seated properly onto the
charger base and there is nothing obstructing the
connections.
- 17 -
TROUBLESHOOTING
Brush roll in the
motorized nozzle is
not turning.
Brush roll is jammed.
Remove obstruction. Follow instructions on page
14.
Brush roll needs to be reset.
Turn the unit off and remove the obstruction, then
turn back on.
Brush roll is not installed properly.
Remove the brush roll and reinstall as instructed
on page 14.
Vacuum is not
picking up or
suction power is
weak.
Dust cup is full. Empty the dust cup.
Filter needs cleaning.
Follow filter cleaning instructions on page 12-13.
Filter needs to be replaced.
To purchase parts call 1-877-531-7321 (US) /
1-844-608-3081 (CA).
Battery may be depleted. Charge the battery as instructed on page 9-10.
Dust cup is not installed well.
Check the dust cup for correct installation and
ensure it is snapped firmly in place.
Dust escapes from
vacuum.
Filter is missing or installed
incorrectly.
Check the filter for correct installation. See page
12-13.
Filter is damaged and needs to be
replaced.
To purchase a replacement filter, call 1-877-531-
7321 (US) / 1-844-608-3081 (CA).
Dust cup is full or is installed
incorrectly.
Empty the dust cup container or position the dust
cup correctly and snap firmly into place.
Vacuum turns off
on its own.
Battery may be depleted. Charge the battery as instructed on page 9-10.
