Audio!Video Hard Drive Recordert
Seepages 23 and 59 for details.
For an overview of steps for setting np
and rising yonr new TV,see page 8.
Note:Todisplaya HighDefinitionpicture,theTVmustbe
receivinga HighDefinitionsignal (such asanover-the-air
HighDefinitionTVbroadcast,a HighDefinitiondigitalcable
program,or a HighDefinitiondigitalsatellitepmgram).For
details,pleasecontactyour"IVantennainstalleror your
cableor satellite provider.
Note:If the"IVispoweredoffandthenonagainquickly
whenthelampunitis hot,it maytakeseveralminutesfor
thepicturetoappearon-screen.Thisisa propertyofDLP
TVlamptechnoplogyandisnota signof malfunction.
Fordetails,see"IMPORTANTNOTICEABOUTNOTLAMP
RESTART"onpage8.
Thank you for purchasing this Toshiba TV. This manual will
help you use the many exciting features of your new TV.
Before operating the TV, please read this manual
completely, and keep it nearby for future reference.
Safety Precautions
WARNING: TO REDUCE THE R|SK OF F|RE OR ELECTRIC
SHOCK, DO NOT EXPOSE THiS APPL|ANCE TO RAiN OR
MOISTURE°
WARNING:TO REDUCETHE RiSK OF BLECTRmCBHOCK,
DO ROT REMOVE COVER (OR RACK).RO USER-
SERVICEABLEPARTSIRSmDE,REFERBERVmCmRGTO
QUALiFiEDSERVICEPERSONNEL(Thisdoesnotapplyto"Lamp
unitreplacementandcare"onpages103-105ofthismanuah)
The lightning flash with arrowhead symbol, within an
equilateral triangle, is intended to alert the user to the
presence of uninsulated "dangerous voltage" within the
product's enclosure that may be of sufficient magnitude
to constitute a risk of electric shock to persons.
The exclamation point within an equilateral triangle, is
intended to alert the user to the presence of important
operating and maintenance (]servicing) instructions in the
literature accompanying the appliance,
tamp before it has eoomedwill resuk in severe burns° ALLOW
THE LAMP TO COOL FOB AT LEAST ONE (I)HOUR BEFORE
REPLACINGIT.
The lamp in this product has a limited service life= The length of
sewice life varies depending on product use and user settings.
If you use the lamp beyond its service life:
• you may notice a reduction in the colors and/or brightness of the
picture, at which time you should replace the lamp unit; and
. the strength of the quartz glass in the lamp will be reduced
and the lampmay rupture. If the lamp ruptures, the TV will
not _operate until the lamp unit is replaced.
• Dispose of the used lamp unit by the approved method for
your area.
See "Lamp unit replacement and care"
en pages 103-105.
Note: The lamp unit contains mercury.
Disposal of mercury may be regulated due to
environmental considerations. For disposal or recycling
information, contact your local authorities ol the Electronic
industries Alliance {www.eiae.org}.
NOTE: NEVER C{)NNECT TH|S
TO A PERS@NAL COMPUTER (PC).
" THISTVIS NOTINTENDEDFORUSEWITHA PC=
HM95 R1 02-04 061505 2
N_[JCE OF POSSIBLETV STANDiNSTABILiTY
CAUTION: This temevision is for use onmywith
the Toshiba stand misted bemow. Use with other
carts ol stands is capable of lesuking in instability
causing possible injury.
Television Stand Model
46H M95 ST4665
52HM95 ST5265
62H M95 ST6265
NOTE TO CATV |NSTALLER$ JN THE Uo$oAo
This is a reminder to call the CATV system installer's attention to Article
820-40 of the U.S. NEe, which provides guidelines for proper grounding
and, in particular, specifies that the cable ground shall be connected to
the grounding system of the building, as close to ti_e point of cable entry
as practical For additional antenna grounding information, see items 27
and 28 on page 4.
Child Safety
Jt Makes A Differeace
Where Year TV Stands
Congratamatienson yourpurchase!
As yea enjoy your new TV, keep these safety tips in mind:
Theissue
Q If you are like most consumers,you havea TV in your home.Many homes,
in fact,have mole than one TV
© The home theater entertainmentexperienceisa growingtlend, and larger
TVsarepopular purchases;however,they are not alwayssupported on
the properTV stand&
© SometimesTVsareimproperlysecuredor inappropriately
situatedon dressers,bookcases,shelves,desks,audiospeakers,
chests,or carts.As a result,TVsnlay fall over,causing
unnecessaq/injury
Toshiba Cares!
© The consumerelectronicsindustryis committed to
making homeentertainment enjoyableand safe.
© TheConsumerElectronicsAssociationformed the
4omeEntertainmentSupportSafetyCommittee,comprised
of %/and consumerelectronicsfurnkure manufacturers,to
advocatechildren's safetyand educate consumersand their
[amiliesabout televisionsafety.
Tune mntoSafety
© One sizedoesNOTfit all! Useappropriatefurniture large enoughto
support the weight of your TV (and other electronic components).
© Useappropriateangle b{aces,straps,and anchorsto secure your furniture
to the wall (but neverscrew anythingdirectly into the %/)_
© Carefu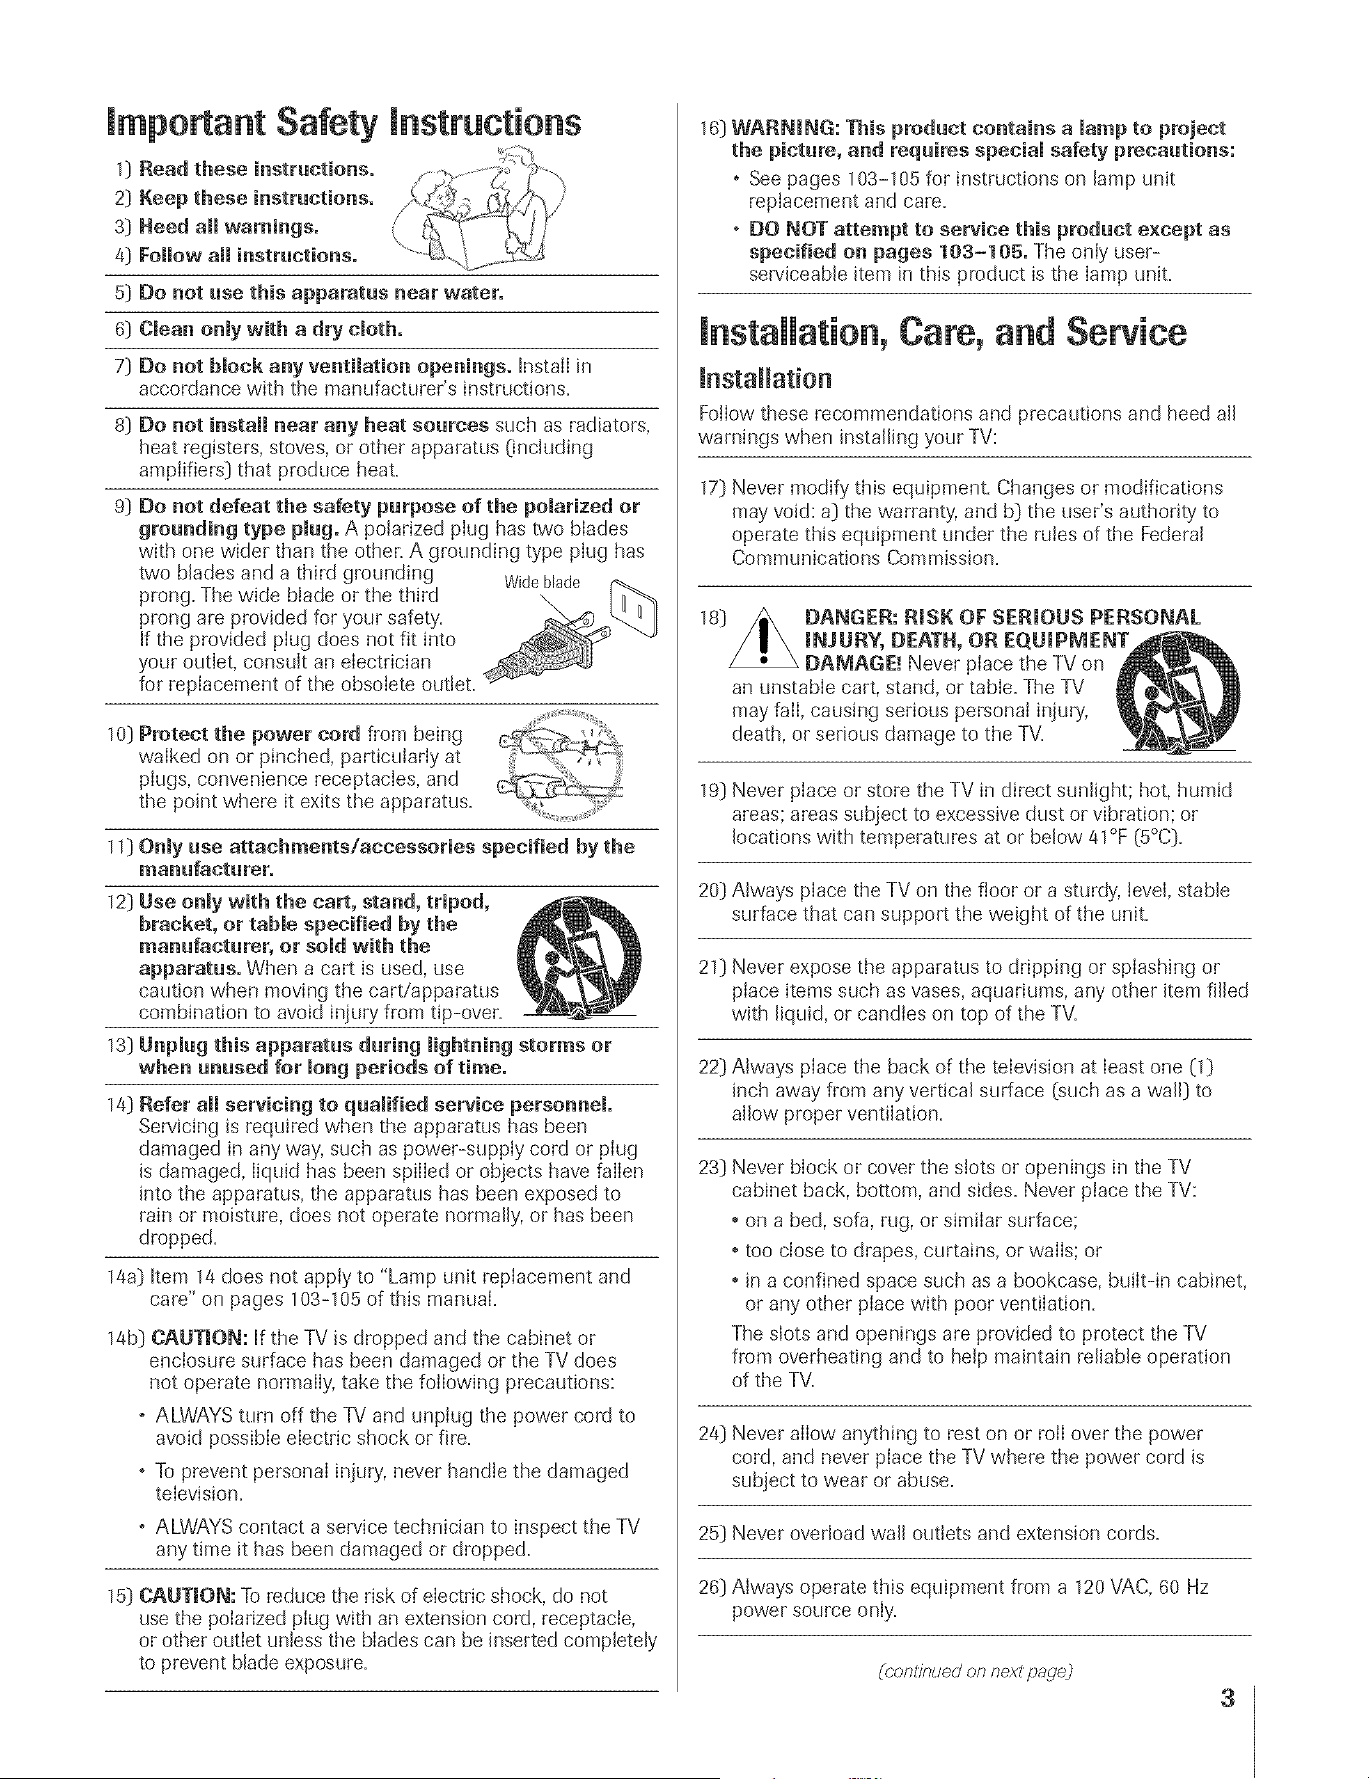
mmportant Safety mnstructions
0
2]
s]
4]
5]
6]
7]
Read these instructions.
Keep these instructions.
Need all warnings.
Follow all instructions.
Do not rise this apparatus near water.
Clean only with a dry cloth.
Do not block any ventilation openings. Install in
accordance with the manufacturer's instructions.
8) Do not install near any beat sources such as radiators,
heat registers, stoves, or other apparatus (including
amplifiers) that produce heat.
9] Do not defeat the safety purpose of the polarized or
grounding type plug. A polarized ping has two blades
with one wider than the other. A grounding type plug has
two blades and a third grounding Wideblade
prong. The wide blade or the third
prong are provided for your safety'.
If the provided plug does not fit into
your outlet, consult an electrician
for replacement of the obsolete outlet.
10] Protect the power cord from being
walked on or pinched, particularly at
pIugs, convenience receptacIes, and
the point where it exits the apparatus.
11] Only use attachments!accessories specified by the
manufacturer.
12] Use onmy with the cart, stand, tripod,
bracket, or tabme specified by the
manufacturer, or sold with the
apparatus. When a cart is used, use
caution when moving the cart/apparatus
combination to avoid injury from tip-over.
13] Unpmug this apparatus during lightning storms or
when unused for long periods of time.
14] Refer aH servicing to qualified service personnel.
Servicing is required when the apparatus has been
damaged in any way, such as power-supply cord or piug
is damaged, liquid has been spilled or objects have fallen
into the apparatus, the apparatus has been exposed to
rain or moisture, does not operate normally, or has been
dropped.
14a] Item 14 does not appIy to "Lamp unit repIacement and
care" on pages 103-105 of this manual.
14b] CAUTmON: If the TV is dropped and the cabinet or
enclosure surface has been damaged or the TV does
not operate normally, take the foilowing precautions:
o ALWAYS turn off the TV and unplug the power cord to
avoid possibIe electric shock or fire.
o To prevent personal injury, never handle the damaged
television.
o ALWAYS contact a service technician to inspect the TV
any time it has been damaged or dropped.
15] CAUTmON: To reduce the risk of electric shock, do not
use the poIarized plug with an extension cord, receptacle,
or other outlet unless the bIades can be inserted completely
to prevent blade exposure.
HM95 R1 002-04 061505 3
16] WARNING: This product contains a lamp to project
the picture, and requires special safety precautions:
o See pages 103-105 for instructions on lamp unK
replacement and care.
o DO NOT attempt to service this product except as
specified on pages 103-105, The only user-
serviceable item in this product is the lamp unit.
installation, Care, and Service
mnstallation
Follow these recommendations and precautions and heed all
warnings when installing your TV:
17] Never modify this equipment. Changes or modifications
may void: a) the warranty, and b] the user's authority to
operate this equipment under the rules of the Federal
Communications Commission.
DANGER: RISK OF SERmOUS PERSONAL
raNJURY, DEATH, OR EQUmPMENT
DAMAGE. _Never place the TV on
an unstable cart, stand, or table. The TV
may fail, causing serious personal injury,
death, or sedous damage to the TV.
19] Never place or store the TV in direct sunlight; hot, humid
areas; areas subject to excessive dust or vibration; or
locations with temperatures at or below 41°F (5°C].
20) Always place the TV on the floor or a sturdy, level, stable
surface that can support the weight of the unit.
21] Never expose the apparatus to dripping or splashing or
place items such as vases, aquariums, any other item filled
with liquid, or candies on top of the TV.
22] Always place the back of the television at least one (1]
inch away from any vertical surface (such as a wall) to
allow proper ventilation.
23] Never block or cover the slots or openings in the TV
cabinet back, bottom, and sides. Never place the TV:
• on a bed, sofa, rag, or similar surface;
• too close to drapes, curtains, or walls; or
• in a confined space such as a bookcase, built-in cabinet,
or any other place with poor ventilation.
The slots and openings are provided to protect the TV
from overheating and to help maintain reliable operation
of the TV.
24] Never allow anything to rest on or toil over the power
cord, and never place the TV where the power cord is
subject to wear or abuse.
25] Never overload wall outlets and extension cords.
26] Always operate this equipment from a 120 VAC, 60 Hz
power source only.
(conlinued on next pagej
3
÷
6/24/05, 7:45 PM
÷
F
_nstallation (hontinued fram previous page]
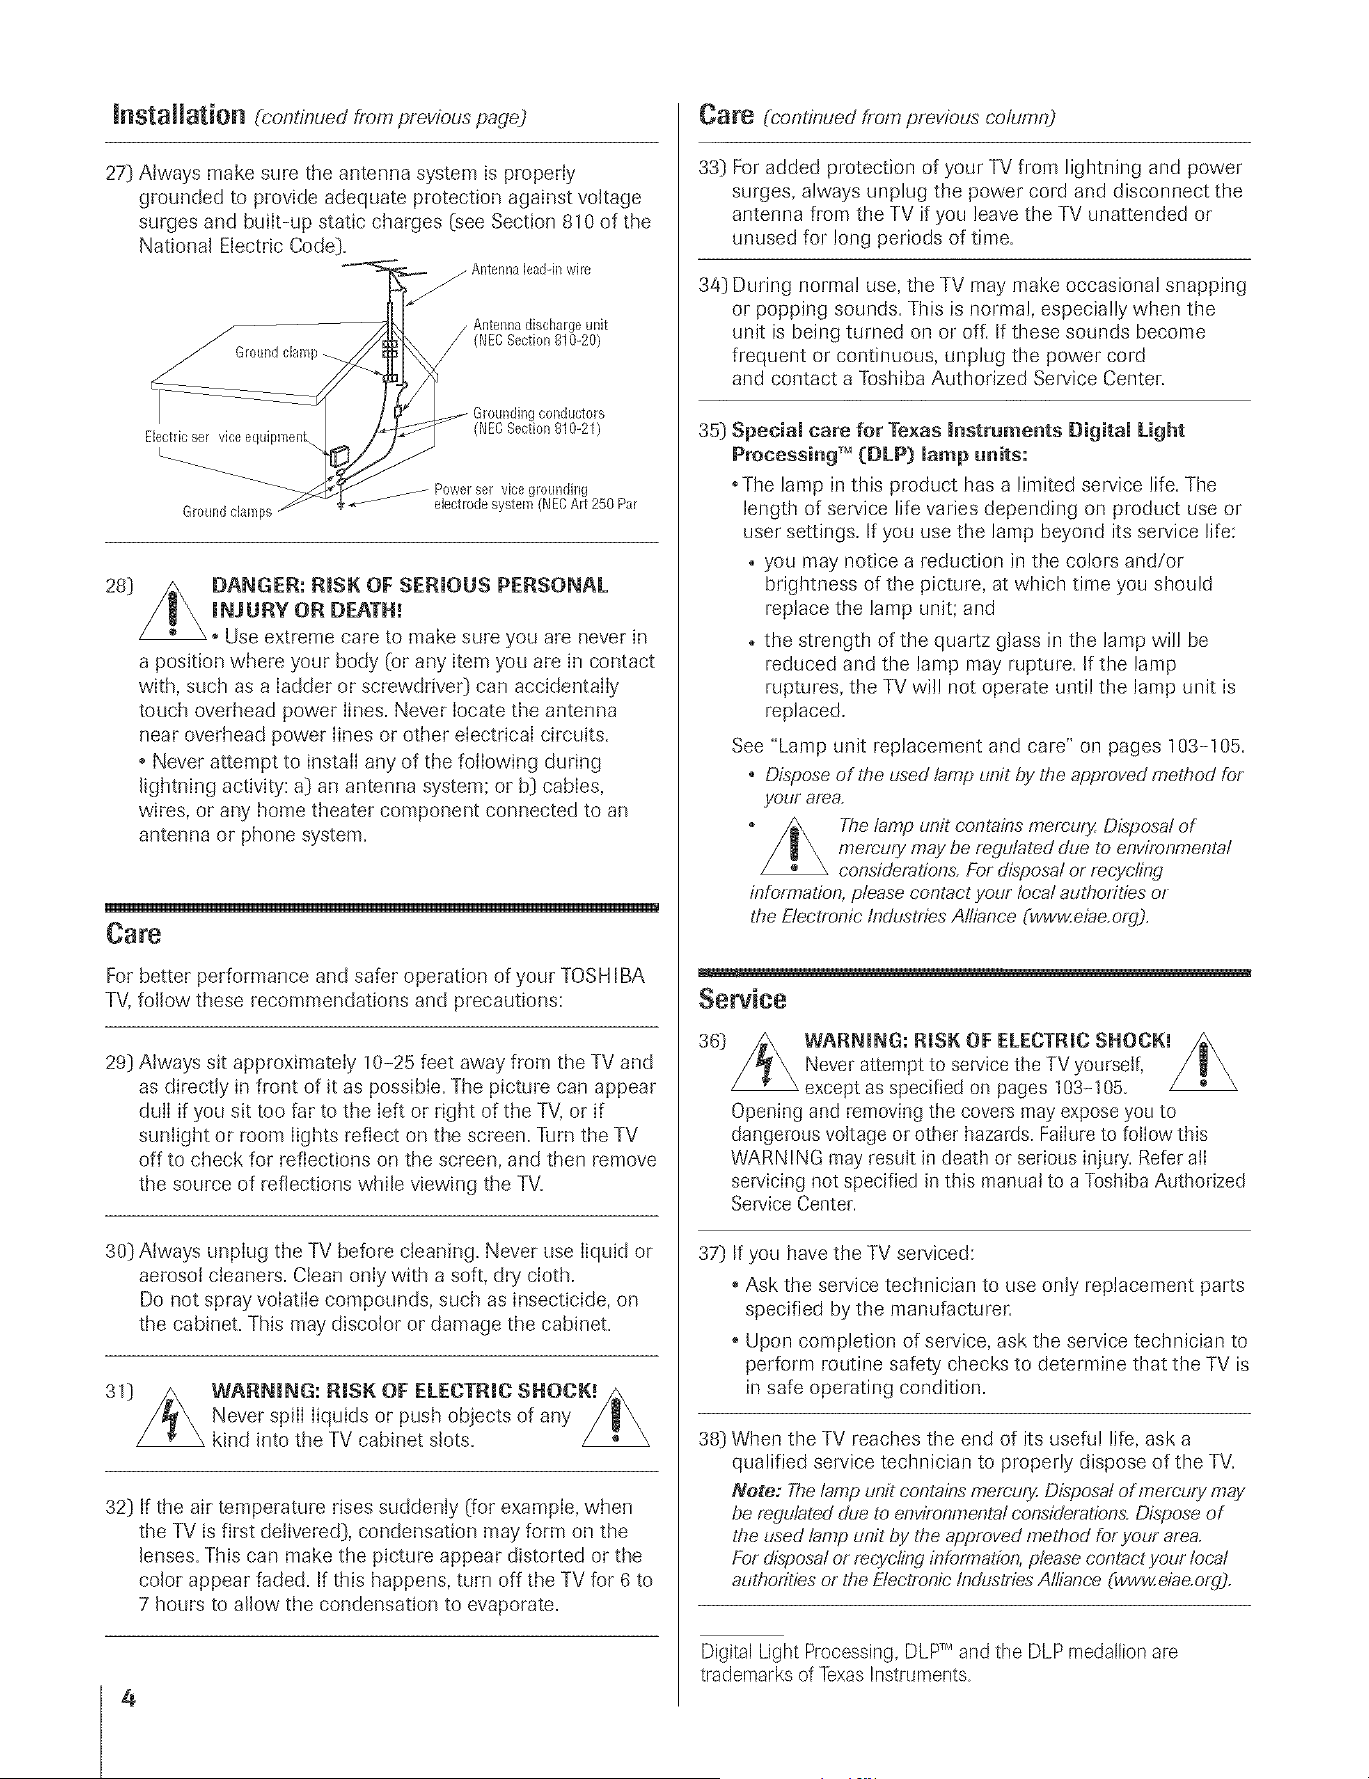
27] Always make sure the antenna system is properly
grounded to provide adequate protection against voltage
surges and buiIt-up static charges (see Section 810 of the
National Electric Code].
Ground clamp
Electricser vice equipmenL
Ground damps
collductors
(NECSection 810-21)
Power eel vice gronndh]g
• _ ebctrode system (NECArt 250 Par
28]
DANGER: RiSK OF SERmOUS PERSONAL
raNJURY OR DEATH!
Use extreme care to make sure you are never in
a position where your body (or any item you are in contact
with, such as a ladder or screwdrive0 can accidentally
touch overhead power lines. Never locate the antenna
near overhead power lines or other electrical circuits.
, Never attempt to install any of the following during
lightning activity: a] an antenna system; or b] cables,
wires, or any home theater component connected to an
antenna or phone system.
Care
For better performance and safer operation of your TOSHIBA
TV, follow these recommendations and precautions:
29] Always sit approximately 10-25 feet away from the TV and
as directly in front of it as possible. The picture can appear
dull if you sit too far to the left or right of the TV, or if
sunlight or room lights reflect on the screen. Turn the TV
off to check for reflections on the screen, and then remove
the source of reflections while viewing the TV=
30) Always unplug the TV before cleaning. Never use liquid or
aerosol cleaners. Clean only with a soft, dry' cloth.
Do not spray volatile compounds, such as insecticide, on
the cabinet. This may discolor or damage the cabinet.
39
WARNmNG: RmSK OF ELECTRIC SNOCK_
Never spill liquids or push objects of any
kind into the TV cabinet slots.
32] If the air temperature rises suddenly (for example, when
the TV is first delivered], condensation may form on the
lenses. This can make the picture appear distorted or the
color appear faded. If this happens, turn off the TV for 6 to
7 hours to allow the condensation to evaporate.
4
HM95 R1 02-04 061505 4
Care (continued from previous column)
33] For added protection of your TV fiom lightning and power
surges, always unplug the power cord and disconnect the
antenna from the TV if you leave the TV unattended or
unused for long periods of time.
34] During normal use, the TV may make occasional snapping
or popping sounds. This is normal, especially when the
unit is being turned on or of[ If these sounds become
frequent or continuous, unplug the power cord
and contact a Toshiba Authorized Sep/ice Center.
35] Special care for Texas Instruments Digitam Light
Processing TM (DLP) lamp uaits:
• The lamp in this product has a limited service life. The
length of serv'ice life varies depending on product use or
user settings. If you use the lamp beyond its service life:
o you may notice a reduction in the colors and/or
brightness of the picture, at which time you should
replace the lamp unit; and
o the strength of the quartz glass in the lamp will be
reduced and the lamp may rupture. If the lamp
ruptures, the TV will not operate until the lamp unit is
replaced.
See "Lamp unit replacement and care" on pages 103=! 05.
o Dispose of the used tamp unit by the approved n?ethod for
your area.
The lamp unit conta#?smemury. Disposal of
memury may be regulated dHe to environmental
consideration& For disposal or mcyebJg
information, please contact your local authorities or
the Electronic IndHstnesAlliance Cwww.ebe.org).
Service
36] WARNING: RISK OF ELECTRIC SHOCK!
Never attempt to service the TV yourself,
except as specified on pages 103-105.
Opening and removing the covers may expose you to
dangerous voltage or other hazards. Failure to follow this
WARN I NG may result in death or serious injmy. Refer all
servicing not specified in this manual to a Toshiba Authorized
Service Center.
37}
If you have the TV serviced:
, Ask the service technician to use only replacement parts
specified by the manufacturer.
Upon completion of service, ask the service technician to
perform routine safety checks to determine that the TV is
in safe operating condition.
38] When the TV reaches the end of its useful life, ask a
qualified serv'ice technician to properly dispose of the TV.
Note: The lamp unit contains memury. Disposal of memury mav
be regulated due to environmental considerations. Dispose of
the used lamp unit by the approved method for your area.
For disposal or recycling infbrmation, please contact your loca!
authorities or the Etectronie IndHstfies Alliance (wwweiae.org).
Digital Light Processing, DLPTM and the DLP medallion are
trademarks of Texas Ins[ruments
÷
6/24/05, 7:45 PM [
A ÷ [
3)
4)
The light source for this TV is a projection lamp unit with a
limited service life. When the lamp wears out, the picture may
become dark or black or the lamp may fail, at which time you
must replace the lamp unit. See "Lamp unit replacement and
care" on pages 103-105.
If you set the lamp mode to Low Powe!, each time you turn on
the TV, the lamp will start out in High Bright mode but will
switch to Low Power mode in approximately 1 minute. You will
notice a change in screen brightness when this happens. This is
normal and is not a sign of malfunction. (See page 75 for
details.)
Each time you turn on the TV, it may take several minutes for
the picture to obtain full brightness.
This TV's display is manufactured using an extremely high level
of precision technology; however, an occasional pixel (dot of
light) may show constantly on the screen. This is a structural
property of DLP TM(Digital Light Processing TM)technology in the
TV and is not a sign of malfunction. Such pixels are not visible
when the picture is viewed from a normal viewing distance (see
item 29 on page 4).
Depending on the media you are viewing, it is possible, although
unlikely, that a limited number of viewers may see a "rainbow
effect" on the screen, which can, in rare instances, result in eye
fatigue. This is a rare occurrence related to technology of this
type and is not a sign of TV malfunction.
6) Always sit approximately ! 0-25 feet away from the TV and as
directly in front of it as possible. The picture quality may be
affected by your viewing position and length of viewing time.
If you sit too closely to the TV for too long, you may suffer from
eye fatigue. See item 29 on page 4.
This TV contains several cooling fans to moderate the
internal temperature. You may be able to hear the fans
for several minutes after the TV is turned ofL This is a
functim_ of the Quick Restart TMfeature and is not a sign of TV
malfunction. You can set the Quick Restarf Mfeature to stop the
fans as soon as the TV is turned off. See "Setting the Quick
Restart TMfeature" on page 5!.
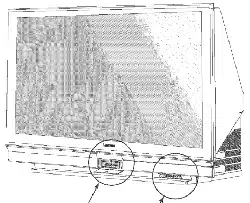
8) The green and red LED lights at the bottom center of the TV
front indicate your TV's current status. If either light flashes, see
"LED indications" on page 99 for details.
If you unplug the power cord, when you plug t!_e power cord in
again the message "Now Booting..." will display on-screen
until the picture appears, or the greert LED will blink until the
TV enters standby mode (plugged in but not powered on].
This is normal and is not a sign of malfunction.
10) When connecting an external A/V device, if you connect the
device's video output to the TV and the device's audio output
to a separate audio system, the picture and sound may not
synchronize completely.
11) When playirtg a video game on this TV, there may be a slight
delay between your command (e.g.,joystick, keyboard] and the
picture nmvement on the screen.
important Safety mnformation.............................................2-4
mmportant notes about your DLPT_projection TV ...............5
Chapter 1: Introduction ..........................................................7
Welcometo Toshiba...........................................................7
Featuresof your newTV .................................................... 7
Overview of steps for installing, settlng up_ and
using your new TV ...................................................... 8
Chapter 2: Connecting yoar TV ............................................9
TV front toud_pad and side panel controh
and COHIleCtiOHS ............................................................. 9
TV back pand connections ................................................ lO
Overview of cable types ...................................................... 11
About the connection illustrations ......................................12
Connecting a digital CabIeCARD '_'....................................12
Connecting a VCR and antenna or CaNe TV
(no Cable box) ............................................................... 13
Connecting a camcorder ..................................................... 13
Connecting a VCR and Cable box ..................................... 14
Connecting a VCR and satellite receiver .............................15
Connecting a DVD player with Swideo, a VCR,
and a Cable box .............................................................. 16
Connecting a DVD player with CoIorStream<_'
(component video) and a VCR ....................................... 17
Connecting two VCRs .......................................................18
Connecting an HDMI" or a DVI device to the
HDMI input .................................................................. 19
Connecting a digital audio system ......................................20
Connecting an analog audio system....................................20
Controlling infrared remote-controlled dexices
through the TV (IR pass-through) .................................. 21
Connecting IEEE 1394 video devices .................................. 22
Using analog<ompatible lEEE1394 devices ................... 22
Supported signals ........................................................... 22
Using TheaterNe( _'on-screen device control .................. 22
Connecting an AVHD or D-VHS recorder .................... 23
IEEE1394 device inkiaIization ....................................... 23
IEEE1394 device management ....................................... 24
G-LINK" connection ......................................................... 25
Chapter 3: Using the remote control .................................26
Learning about the remote control ..................................... 26
Installing the remote control batteries ................................. 28
Using the remote control MODE button to control
your other dexices ........................................................... 28
Remote Control fhnctiona[ key chart ................................. 29
Programming the remote control to operate
your other devices ........................................................... 31
Multi-brand remote control device codes............................ 33
Chapter 4: _lenu layout and navigation ...........................35
Main menu [ayout .............................................................. 35
Setup/Installation menu layout ........................................... 36
Navigating the menu system ............................................... 36
Chapter 5: TV Guide On Screen _ setup .............................37
Setting up the TV Guide On Screen®system.....................37
TV GuideOn Screen°'_Reminder .......................................40
Turning of)-the TV Guide On Screen<_
automatic disphy feature ................................................ 40
÷
HM95 R1 005-06 061505 5
÷
6/24/05, 7:48 PM
5
[
A ÷ L
Chapter 6: Setting up your TV .............................................41
Selecti_g the metal language ............................................... 4]
Configuring the antenna input sources ............................... 41
Programmil_g c]]armels into the TV's el]amid memory ....... 42
Programmh_g cham_elsautomatically .......................... 42
Manual[y adding aM de[eting cham_e[si_ the
channe[ memory ..................................................... 43
Progmmmh_g yore f_woritechalme[s .................................. 44
SettiJ_gup and using TheaterNet" oJ_screen
device control ................................................................. 45
Setti*_gup TheaterNet ................................................. 45
Using the TheaterNet control ico,s ............................. 46
TheaterNet IR device codes .................................. 47-49
Setti*_gthe AVHD device skip time .................................... 50
Setti*_gthe HDMI" audio mode ........................................ 50
Setti*_gthe time and date .................................................... 50
Viewi*_gthe CableCARD TM metro ...................................... 51
Setting the Quick Restart feature ........................................ 51
Viewii_gthe digital sig,al meter ......................................... 52
Viewing the system stares ................................................... 52
Chapter 7: Using the IV Guide On Screen
interactive program guide ............................................... 53
Setth_g up the TV Guide On Scree*_°°system ..................... 53
Navigati*_gthe T\/Guide On Screen<*system ..................... 54
TV Guide On Screen<_'remote control fimctions ......... 54
Video Window ........................................................... 55
Pand Metals ............................................................... 55
hffo Box...................................................................... 56
TV Guide On Screel¢_Icons ....................................... 56
TV Guide O, Screen;' Services .......................................... 57
LISTINGS screen ....................................................... 57
SEARCH screen .......................................................... 58
RECORDINGS screen ............................................... 60
SCHEDULE screen .................................................... 61
Record fbatures ........................................................... 61
Remind fbatures .......................................................... 63
SETUP scree*_............................................................. 65
Change system settings .......................................... 65
Change channel display ......................................... 65
Change def'au[t options .......................................... 66
Chapter g: Using the gV's features ..................................... 67
Selecth_gthe video input source to view ............................. 67
Labeling the video i*_putsources ......................................... 68
Tuning cham_e[s................................................................. 69
Using the chained browser .......................................... 69
Ttming yam: _vorite cham_els..................................... 71
Ttming to the next programmed charade[ .................... 71
Tailing to a specific cham_el (programmed or
tmprogrammed) ...................................................... 71
Switching between two chatmels usi*_g
Cha*me[Return ...................................................... 71
Switchi,g betwee*_two chatmels usi*_g
SurfLockTM ............................................................... 71
Selecth_gthe picture size ..................................................... 72
Natural picture size ..................................................... 72
TheaterWide I picture size.......................................... 73
TheaterWide 2 picture size.......................................... 73
TheaterWide 3 picture size.......................................... 73
Full picture size ........................................................... 7}
Scrolling the TheaterWide" picture .................................... 74
Using the auto aspect ratio feature ...................................... 74
Selectil_gthe cinema mode (480i sigHa[sonly) .................... 75
Selectil_gthe [amp mode .................................................... 75
Usi*_gthe POP f)atures ...................................................... 76
Using the POP double-window feature ....................... 76
Switchil_gthe speaker audio (main or POP) ................ 77
POP double-window aspect ratio ................................ 77
Using the FREEZE feature ................................................. 78
Using the _vorite channel scan feature ............................... 78
Adjusting the picture .......................................................... 79
Se[ecti*_gthe picture mode .......................................... 79
Adjusting the picture quality ....................................... 79
Using CableClea¢'_DNR (digital noise reduction) ...... 8{)
Selecting the color temperature ................................... 80
Using MPEG Noise Red uctio*_................................... 81
Using Dynamic Contrast ............................................ 81
Using the closed captio, mode ........................................... 82
Adva,ced closed captions ............................................ 82
Digital closed captiol_s ................................................ 83
Adjusting the audio ............................................................ 84
Mutil_g the sound ....................................................... 84
Using the digital audio selector ................................... 84
Se[ectil_gstereo/SAP broadcasts ................................... 84
Adjusting the audio quality ......................................... 85
Using the sub-bass system (SBS) ................................. 85
Using the StableSou,d °'_feature ................................... 85
Using the SRS W(FW'" surround sotmd f_ature .......... 86
Turning offthe built-in speakers ................................. 86
Se[ecti*_gthe optical audio output fbrmat ................... 86
Using the memory card JPEG picture viewer/MP3 audio
player ............................................................................. 87
Memory card specificatio,s ......................................... 87
Using the JPEG picture viewer .................................... 88
Using the MP3 audio player ....................................... 89
Memory card care and ha*idling.................................. 90
Setting the ON/OFF timer ................................................ 91
Setting the sleep timer ........................................................ 91
Displaying the charade[bam_er ........................................... 92
Understanding the auto power offfeature ........................... 92
Understanding the last mode memory feature .................... 92
Usii_gthe gray [eve[feature ................................................. 92
Chapter 9: Using the Locks menu ...................................... gg
Entering the PIN code ....................................................... 93
If you tam, at remember your PIN code ............................. 93
Changing your PIN code ................................................... 93
Blocking P_,_programs and moviesby rati*_g(V-Chip) ......... 94
Blocking cham_ds ............................................................... 95
Unlocking programs temporarily ........................................ 95
Lockil_gvideo il_puts .......................................................... 95
Using the GameTimer" ..................................................... 96
Usil_gthe front pand lock f)ature ....................................... 96
Chapter I0: Troubleshooting ................................................97
General [roubleshooth_g ..................................................... 97
LED indications ................................................................. 99
TV Guide On Scree*_°°FAOs .................................... 10(} 1(}2
Chapter 11: Appendix ......................................................... 103
Lamp trait rep[aceme*_t............................................ 103 1(}5
Specificatio*_s................................................................... 1(}6
Limited U*fitedStates g4_rranty ....................................... 107
Index .............................................................................. 110, 111
HM95 R1 0 5-06 061505 6
Copyright @ 2005 TOSHIBA CORPORATION A}I rights reserved
÷
6/24/05, 7:48 PM [
WNcometo Toshiba
Thank you fbr p_trchasing this Toshiba TM one of the most itmovative DLP TMprojection
TVs on the market. The goaI of this mmua[ is to guide you through setting up and
operating your TV as q_tickly as possible.
This maml_I applies to models 46HM95, 52HM95, and 62HM95. Befbre you start reading, check the model number on the
back of your TV.
h_structions in this tumuli ;ire b_sed on using the remote control You also cm use the controls on the TV f?ont touchpad if they
have the same n_me as those referred to on the remote control (MENU on the f}'ont touchpad functions as ENTER when a
metal is on-screen or when the TV (iuide On Screen<_>system is open.)
The side paneI and b_ck pand provide terminaIs fbr comlecting ()[her equipment to your TV. See page 9 fi)r front touchpad and
side pand &mils. See p/ge 10 fbr back parM details. See pages 12-25 fbr ir_structions on com_ecdng other devices to your TV.
Please read all safety and operating instructions in this manual carefully, and keep this manual for futt_e reference°
FeaturesofyournewTV
The fbHowing are just a J::ewof the many exciting J::eaturesof your new Toshiba widescreen, integrated HD DLP _''projection TV:
• hltegrated digRai tullhlg (8VSB ATSCand QAM) ehminates the need for a separate digital converter set-top box (in rnost cases).
• TV Guide On Semen _ no-fee interactive program guide (Chapters 5 and 7).
• DigRamCaMeCAND*Mslot for viewing encrypted digital Cable TV programs (page 12).
• DigRamrecording by cormecdng a D-VHS digitaI recording device or a Toshiba Symbio TMAndioiVideo Hard Drive Recorder to
one of the [EEE1394 jacks. You can record high defirfitkm and standard definition material from either tuner (page 23).
• Memory card slots [SD Memory Card, MukiMediaCard, MemoryStick, CompactFlash, xD-PicmreCard '_']_i_rviewing JPEG files
as a "slide show" (page 88) and }i_rplaying MP3 files (page 89).
° TheaterNet _Micons for on-screen control of external iR and iEEE1394 devices (page 45).
• Two mEEE1394ports for multi-device cormectiorl and control (page 22).
• Two HDMI {DV0 digital, high-defirfition mukimedia interf:aces(page 19).
• Two sets of eomorStream _ HD high-resolution component video inputs (pages 15 and 17).
• DembyDigRaP (page 2(1)and 8RS WOW'M(page 86) audio technt4ogies.
• DigRN Audio Out optical audio cormection (page 20).
• CaNeCmea¢ DNR digita[ picture noise reductkm (page 8(t).
• Doub[e-wir_dow POP (page 76) and rnuki-wir_dow Favorites (page 78) features.
Note:Afteryouset upthe IV Guide
OnScreen"system(Chapter5),
theprogramguide opens
automaticallybydefaultwhen
youturnon theTEYoucan turn off
the automaticprogramguide lpage
40) andinstead pressthe TVGUIDE
buttonon the remoteeontromto
manuallyopenthe programguide,
÷
In the UnitedStates.TV Guideandother relatedmarksareregisteredmarksof GemstarTV GuideInternatiol_al,Inc,and/or oneof its affiliates.%e TV GuideOnScreensystemis
manufaduredunderlicensefloraGemsTarTV Guideinternational,Inc and/or ol_eof its affiliates.The?_/GuideOn Screensystemis prelectedby oneor moreof thefollowing issued
UnitedStalespatents 6,498,895;6,418,556:6,331,877;6,239,794;6,154,203:5,940,073;4,908,713;4,751,578:4.706.121
UENSTAR-TV GUIDE _NTERNAT_ONAL INC.AND/OR ITSRELATED AFNUATES ARE NOT _N ANY WAY LIABLE FOR THE ACCURACY OR
AVA_LABKffY OF THE PROGRAN SCHEDULE _NFORNATION OR OTHER DATA _N THE TV GUIDE ON SCREEN SYSTEN AND CANNOT GUARANTEE
SERVICE AVAILABKITY IN YOUR AREA. IN NO EVENT SHALL GENSTAR-TV GUIDE INTERNATIONAL, INC.AND/OR ITSRELATED AEFIUATES BE
LIABLE FOR ANY DANAGES _N CONNECTION WiTH THE ACCURACY OR AVAILABIUTY OF THE PROGRAM SCHEDULE _NFOR_AT_ON OR OTHER
DATA _N THE TV GUIDE ON SCREENSYSTEN.
oThis productincorporatescopyrightprotectiontechnologythat is protectedbyUS. patentsa_d otherintellectualpropertyrights,Useofthis copyrightprotectiontechnologymustbe
authorizedbyMacrovisio_and is intended1orhomeandedgerlimitedpay perview usesonly,unlessotherwiseauthorizedby MacrovisionReverseengineeringordisassemNyis
prohibited
Copyright (ct,2005 TOSHIBA CORPORATION All rights reserved
7
HM95 R1 007-08 061505 7 .
6/24/O5, 8:46 PM
F
A ÷ L
Overview d steps for instaiiin9, settin 9 up, and usin 9 your new TV
Follow these steps to set up your TV and begin using its many exciting fbarares,
1 CarefuRy read the importact safety, h_staRatioc, care,
acd service icformatioc oc pages 2-5. Keep this
macuai for future referecce.
2 Observe the followic9 whec choosicg a locatioc for
the TV:
o Place the TV on the floor or on the optional TV stand listed in
the "Specifications" section (page 106).
NeTJC[OFPe$$JBL[TVSTAN#JNSTABWTY
DANGER:RiSK OFSERIOUS PERSONALiNJURY
OR DEATH!UsethisTYonlywith theTOSHIBA"IV
standlistedinthe "Specifications"section(page106).Usewithother
standsmayresultin instability,causingpossibleinjuryordeath.
3.
4.
o Piece the TV in a location where light does not reflect on the
screen.
° Place the TV far enough from walls and other objects to allow
proper ventilation. Inadequateventilation may cause
overheating which will damage the TV.THIS TYPE OF
DAMAGE IS NOT COVERED UNDER THE TOSHIBA
WARRANTY.
• Read "lrlstallatior_"or] pages 3 4.
o Read "important notes about your DLF MTV" on page 5.
Do cot plug h_acy power cords until AFTERyou have
connected all cables and devices to your TV.
BEFORE coccecth_g cables or devices to the TV, meal
the fucctiocs of the TV's connections and controls (pages 9
and 10)
5 Coccect your other emeetrocie device{s) to the TV
(pages 12 25).
6. Cocceet the G-UNK _ cable (either one of the enclosed iR
blaster cables} flora your VCR arld/or Cable box (if applicable) to
the G LINK® terminal so you can use the TV Guide On Screen_'
features (applies to VCRs and cable boxes or/ly}. See page 25.
7 Icstammthe batteries ic the remote coctrol (page 28)
8.
9.
10.
11
12
13.
14.
15.
16.
1z
18.
19.
20
See "Leamicg about the remote coctroi" (page 26) for
ac overview of the buttocs oc the remote coctrom.
Program the remote coctrol to operate your other
device(s} (pages 28 34).
AFTER coccectic9 all cables acd devices, plug ic the
power cords for your TV and other devices.
After you plug ic the TV power cord, the greec LED
(on the TVfl-ont touchpad, to the left of the POWERbutton)
will blick while the TV isbooting until the remote control is
usable When the green LED stops blinking, pless POWERto
turn on the TV.
See 'tED indications" on page 92
See "Mecu layout acd cavigatiec" for a quick overview
of cavigaticg the gv's mecu system (pages 35 36).
See Chapter 5 for deters oc setticg up the TV Guide
Oc Screec _ system (if available in your area).
See Chapter 7 for details oc usicg the TV Guide
Oc Sereec _ program guide (if avaihNe irl your area).
Program chacceJs icto the TV's chacceJ memory
(page 42).
Set up the TheaterNet TM oc-sereec device coctroJ
feature (if applicable to your parliculer home theater system
components) (page 45).
}:or details oc usicg the memory card JPEGpicture
viewer acd MP3 audio player, see page 87.
Eor details oc usicg the TWs features, see Chapter 8.
For hemp,refer to the Troubmeshooth_gGuide (Chapter
m).
Eor techcicaJ specificatiocs acd warracty icformatioc,
21. Ecjoy your cow TV_.
÷
mP_PORTANT NOTICE ABOUT "HOT LAMP RESTART"
When the TV has been powered on long enough for the lamp unit to get hot, it may take several minutes for the picture to appear on-screen
in the following situations:
* When the Qtlick Resta!-tTM feature is set to OFF and you trim the TV off and then on again wk!-fin a few minutes.
. If the TV is on when a short-term power failure, power surge, or other similar power faihlre occurs, such that the TV loses and regains
power within a few minutes.
This is a property of BLP TV [amp techcology acd is NOT a sigc of maifmmtioc.
If this occurs, the green LED on the TV front panel will blink (and the red LED will be lit solid) until the TV is finished restarting the lamp
and the normal picture appears. If BOTHgreen and red LEDs are blinking at a one-second rate, you will need to turn the TV off and then
on again to restart the lamp.
HM95 R1 0 7-08 061505 8
Copyright @ 2005 TOSHIBA CORPORATION A}I rights reserved
6/24/05, 8:48 PM [

Remote sensor
@
Front touchpad*
EXIT
GUIDE ®
Side panel
WDE0=3 IN_
Side of TV
VIDEO-3 iN Memory card
@ slots
@
*Gent/}/touch the printed keys on the touchpad.
**The MENU button on the TV front touchpad functions as the
ENTER button when a menu is onoscreen.
÷
(_) Remote sensor (behind the screen) -- Point the remote
contro_ toward @,isarea of @,eTV screen. See "Remote
control ef_bcfiverange" on page 27.
(g) TWV_DEO-- Repeatedly press to change the source you are
viewing (ANT 1, ANT 2, VIDEO 1, VIDEO 2, VIDEO 3,
HDMI 1, HDMI 2, ColorStream HD!, ColorStream
HD2).
(_) EXIT-- Press to dose an on-screen menu instandy.
® ARROWS A_'@ _ -- When a menu is on-screen, these
bu_ons fimction as up/down/lefdright menu navigation
buttons,
@ MENU {ENTER[}-- Press to access the menu system (see
page 35). When a menu is on-screen or the TV Guide
On Screen_)program guide is open, the MENU button on
the front touchpad f'uncdons as the ENTER button.
@ POWER -- Press to turn the TV on and of}_
Note: If lr_e B/stops responding to the coRt/o/s or_the remote
COftt/O/ or 7-V freot pant and you canrrot ttee off the TV, press
and hold the POWER button oa the TV /is/It paad h}r 5 or morn
secoods to fsset the 71/i
0 CHANNEL AV -- When no menu is on-screen, these
buttons change the channd (programmed channels only; see
page 42). When a *neml is on-screen, these buttons function
as up/down menu navigation buttons.
® VOLUME _ _ -- When no menu is on-screen, these
buttons adjust the vohm_e IeveLWhen a mere* is on-screen,
these buttons function as [ef}/right menu navigation
buggons_
@ GU_DE-- Press to access the TV Guide On Screerd')
program guide. (See page 53 fi._rdetails on using the
program guide.)
@ Green al_d Red LEDs
When the green LED lights solid (not Ninking), it indicates
that recording is in progress.
When the red LED lights solid (not blinking), it indicates
that the TV power cord is plugged in.
See "LED indications" on page 99 fi.)radditional
infi.}rmafion.
(_) VIDEO-3 -- The side paneI A/V connections are referred to
as "VIDEO 3" and include standard A/V connections plus
opdonaI SMdeo. (The VIDEO 1 and VIDEO 2 A/V
connections are on the TV's back panel; see page 10.
@ Memory card slots -- Insert a memory card into one of
the memory card slots to view JPEG files (such as photos) as
a "slide show" on your TV or listen to MP3 audio files (see
page 87).
Copyright ,3:}2005 TOSHIBA CORPORATION All rights reserved
9
HM95 R2 009-1t 061505 9
÷
6/27/05, 6:44 PM
r
A ÷ [
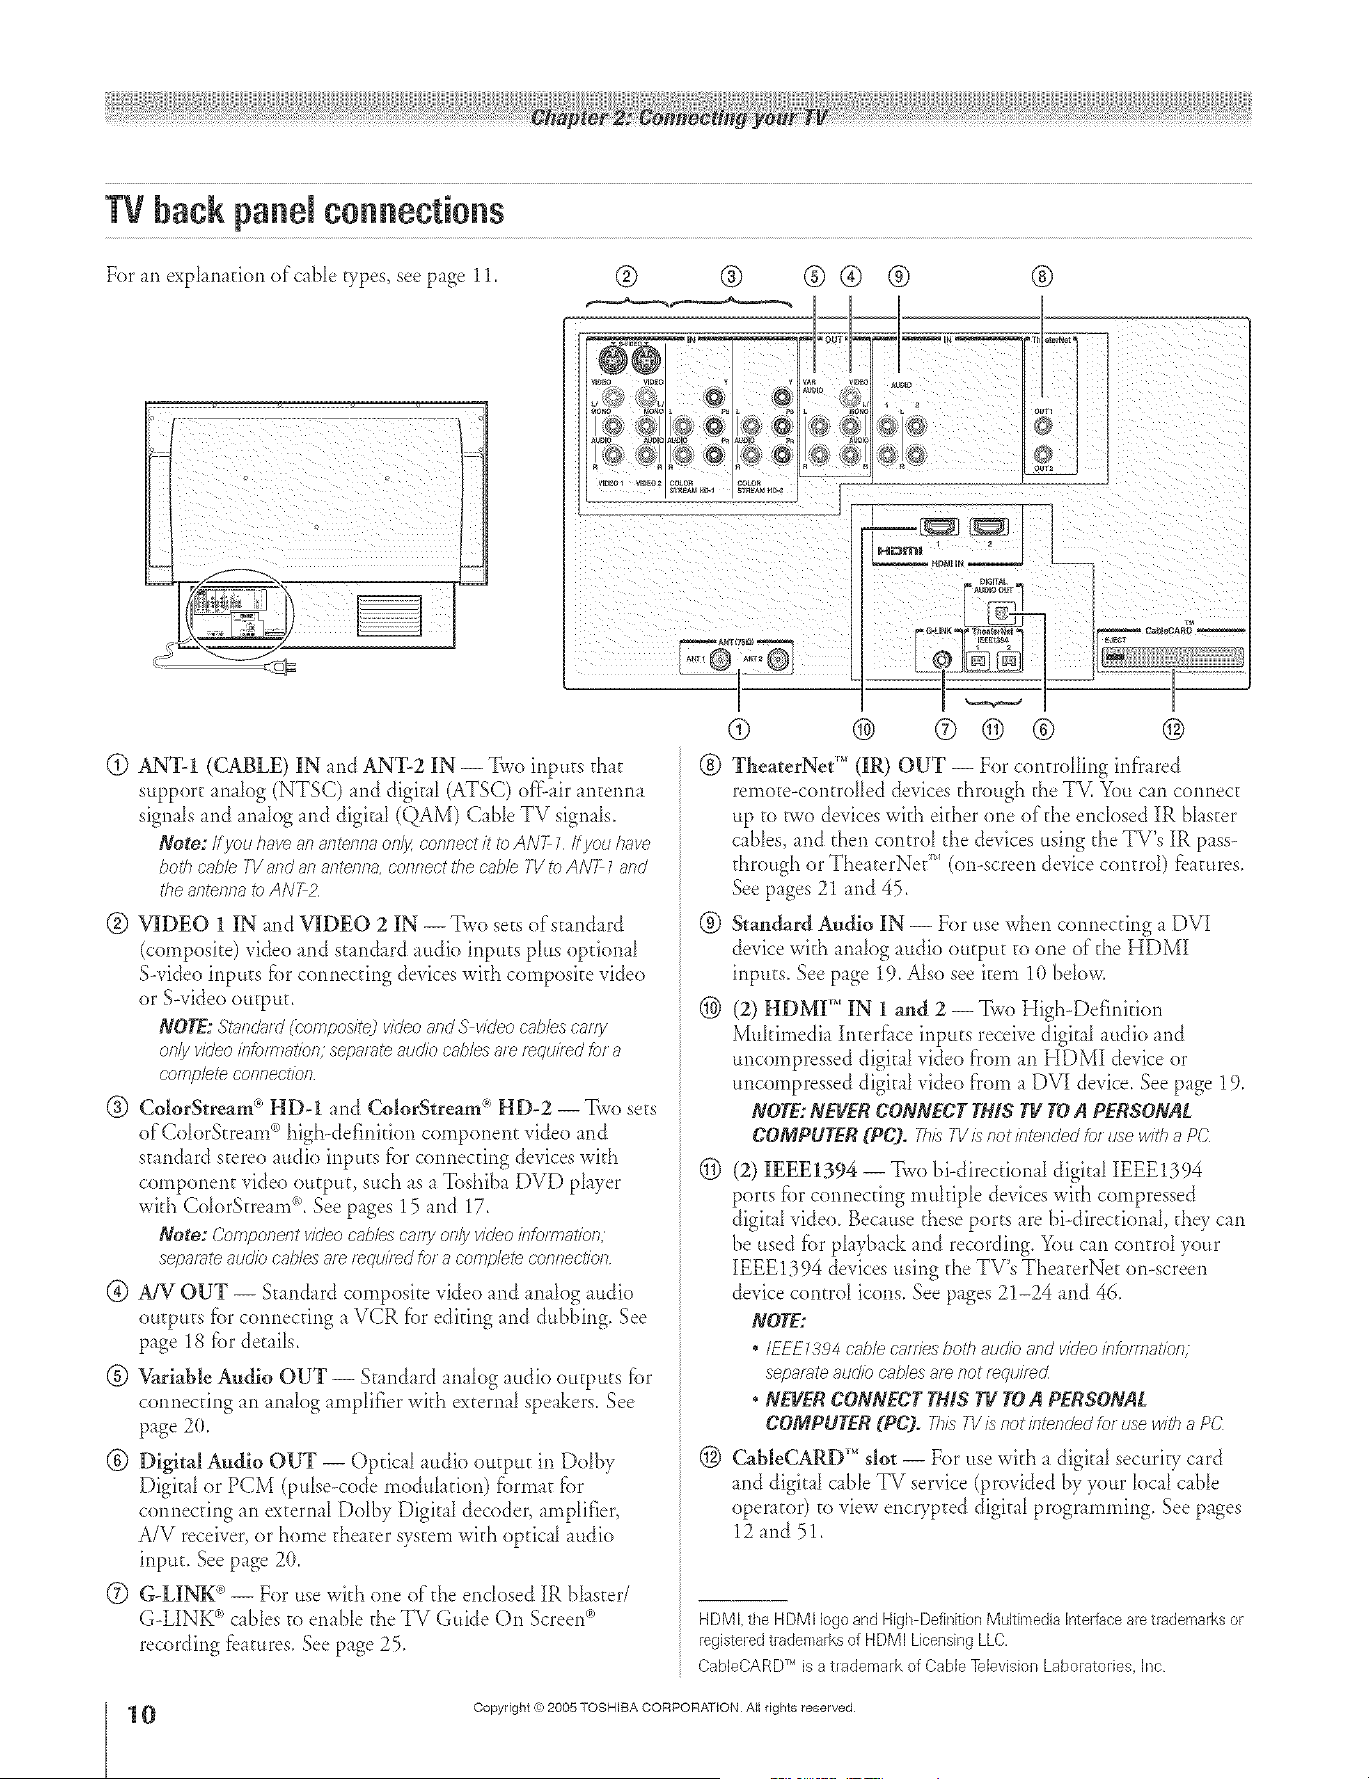
TVbackpanelconnections
For an expkm_tion of caNe types see page 11.
<_
@ AN%I (CABLE) IN and AN%2 IN -- Two inputs that
support anabg (NTSC) and digit d (ATSC) off:-airanterma
signals and anah)g and digital (QAM) CaNe TV signals.
Note: If you have an anterlna oe/_/ connect /i<ib ANT 1 It you /Tare
both cable I-1/af?d an antenna, co,elect i'he cabb I-1/to ANT 1 and
the 8fTteYffl8 to ANT Z
@ VIDEO 1 IN and VIDEO 2 IN --Two sets ofs_andard
(composite) video and standard audio inputs pIus optional
Swideo inputs fbr connecting devices with composite video
or S-video output.
NOTE:S't;_/lcl_(/(bompositedvideoandS v/(/eocablesc_,rfy
only video b_)m_atio/._; sepgn_te audio cg_b/esa_erequired _)f a
cofnfYete COl_neot/ol_
@ Co[[orStream ® HDd and Co[orStream (*HD-2 -- Two sets
of Cok)rStream °'_high-definition component video and
standard stere() audio inputs fbr connecting devices with
component vide() ou_puh such as a Toshiba DVD phyer
wkh ColorStream% See pages 15 and 17.
Note: Componef?t vicleo cable'_ cafg on& video informaticn,
separate audio cables am ,_qui/dd for a complete cofifTec//TJrt
@ AiV OUT -- Standard composite vide() and analog audio
outputs fbr connecting a VCR fiat editing and dubbing. See
page 18 fiar details.
@ V_riabte Audio OUT -- Stand _rdanalog audio outputs for
connecting an analog amplifier with external speakers. See
page 2(t.
® DigitM Audio OUT -- Optica[ attdio output in Do[by
Digital or PCM (pulse-code modulation) fbrmat fbr
connecting an external Dolby Digital decode*', amplifier,
A/V receiver, or home theater system widi optical attdio
input. See page 2(L
(Z) G-LIN-K®-- For use with one of the enclosed IR bhster/
G-LINK °')cables to enab[e the TV Guide On Screenc_
recording fbatures. See page 25.
® ® ®® ® ®
_'F £°'°
I
® ® ® © ® ®
@ TheaterNet'" (IR) OUT -- For controlling infrared
rerno_e-controHed devices through the TV. You can connect
up to two devices wkh either one of the encIosed IR bIaster
canes, and then control the devices using the TV's IR pass-
through or TheaterNe_" (on-screen device control) fbatures.
See pages 21 and 45.
@ Standard Audio IN -- For use when connecting a DVI
device with ana[og audio output to one of the HDMI
inputs. See page 19. A_sosee item 10 bdow.
® (2) HDMI'" IN 1 and 2 -- Two High-Definition
Muhimedia h_terfhce inputs receive digital audio and
uncompressed digital vide() from an HDMI device or
uncompressed digital vide() from a DVI device. See p_ge 19.
NOTE:NEVERCONNECTTHISTV TOA PERSONAL
COMPUTER(PC). Tb/sT1//snot/ntetlded_._._usewitha PC
(_) (2) IEEE1394 -- Two bi-direcfionaI digita_ IEEE1394
por_s fbr cennecdng muhip[e devices with compressed
digitaI video. Because these ports are hi-directional they can
be used fbr phyback and recording. You can control your
IEEE1394 devices using the TV's TheaterNet onoscreen
device control icons. See pages 21-24 and 46.
NOTE:
* IEE£_3_4c;_blec'a_T/esbothreJclicandvideo/r_torr_Tal<iof_;
sepat_te audiocnble'._amnot*_qui/_d
* NEVERCONNECTTHISTV TOA PERSONAL
COMPUTER(PC). 7hL_IV isnotisltefTcJecJfo_dsewitha PC;
® CabIeCARD'" slot -- For use wkh a digital securiV card
and digitaI cable TV service (provided by your local cane
operator) to view encrypted digital programming. See pages
12 and 5!.
HDM l. the HDMI logo and High DefinitionMultimedia Intedaeearetrademarksor
registeredt_ademarksof HDMI LicensingLLC.
Trl
CableCARD is a trademark of Cable Television Laboratories. Ine
0
HM95 R2 O 9-1t 061505 10
Copyright (e:2005 TOSHIBA CORPORATION All rights reserved
÷
6/27/05, 6:44 PM [

A ÷ L
1
NoraNEVERCONNECTTHINSTV m
T@ A P[R$@mAL COMPUT[R (PC),
THIS TV IS NOT INTENDED FOR USE WITH A PC.
Note: two dua_wandIR bh_ste/YGLIIVt__cablesare includedwithyau/ T1/All other f_qui/_d
c_bles,fine( providedwithyour other devices,cartbe purchasedat fT/a/Tye/ectlof?lcsaccessory
suppl/ef_
@ Coaxial (F-type) cable is used for corlrlectilig your arlterma, cable TV sere'ice, and/or
cane converter box to d_e ANT--1 and/or ANT--2 RF irlputs on your TV.
o Stau&rd AiV cables (composite video) usually come in sets of three, and are fbr use
wkh video devices v,&h starldard audio and stand _rd (composke) video output. These
cables (and the rdated irlputs on your TV) are vpicaHy color--coded accordirlg to use:
yellow fbr video, red fbr stereo right audio, and whke fbr stereo [e_? (or mono) audio.
o S-video cable is fbr use v,&h video devices wkh S-video output. Separate audio canes
are required fbr a complete cormecfioa.
Note: An S video c_bleprovidesbette_picturepe_¢omTs,nce i'/mn_ compositevideocable/f
you co/ulectan S videocable,be sum to dlscofuTectthe st_n&ffd (composite]videoc'_bleor
thepicture peffoflnance will be unaccept_bb
O Component video cables come in sets of three and are fbr use v&h vide() devices wkh
component video output. (CoIorStream (_)is Toshiba's brarld of comporlent video.)
These c _b[es are wpicalIy co'or-coded red, green, and blue. Separate audio cables are
required for a complete com_ecfion.
Note: Componentvl(/eoc'_b/esprovidebetterpletu/_ peffonnr:mcethana stJ_d;ffd(composite)
videoof S videocabb
HDMI cable is fi)r use wkh devices wkh HDMI (High-Definition Mukimedia
h_terfi_ce)output. HDMI cable delivers digkal audio and vide() in its native fbrmat.
This cane carries both video and audio ir_brmafior_; therefbre, separate audio c _b[esare
r_ot required fbr a complete HDMI device cormecfiom See p_ge 19 fbr f:_rther detai_s.
Note: HDM/c_bleprovides bethel plctu/_ peffaf_mnce thema st;oTranto'((;omposite) videoor
S vl(/eocable
IEEE1394 cable is _br use wkh video devices with compressed digital vide() output
that meet CEA specifications tier IEEE1394. This cable carries bod_ video and audio
infiarmafiom d_erefiare, no separate audio canes are required fiat a complete cotmecfion.
See pages 22-24.
Note:
• _ets>;nsm/ssionc_pe_bilityoflFFE_394c_bleusedwithtbisTVmustbeS400
1400Mbp'._m;_xinu_/Ti)
• IEEE_394cabbpmvidesbettetpicturepeffomlancel'hanasl?o_do_d(composite)
videoor S videocable
Dual-wand IR blaster/G-LINK <°,cable is f_)r use with vide() devices wkh IR (ird'rared)
remote control. Two of these rabies are included wkh your TV. Orle is fbr cormection
to the G-LINK <_)termirm[ (page 25) to enable TV Guide On Screen °_)recording features
(Chapters 5 and 7). The other can be used with the TV's IR pass-through feature (page
21) and TheaterNet _'_or>screen device control _eature (page 45).
Note: Thetwo/R bl_ste//G LINK_'_cablesh_c'l//ded_/ithyolo TVh_vespecificch;_r_lctef_stlcs(bat
;fflow_<hemIb WOl?propedy with tills 7-1/_IROUTand G LINK_ polls Never use other
aftermar_et _RMaster or G-UN_ cables w_th t#ds _ Othe/ rublesmay not fun(Joe
properlyand cn/_caused;_rnage7H!S TYPf OFDAMAGE ISNOT COVFREDBY Y(_UR
TOSHIBAWARRANTX
Optical audio cable is [i_rconnecting receivers wkh Dolby Digkal or PCM
(pulse<ode modu1_fion) optical radio input to the TV's DIGITAL AUDIO OUT
terminal See page 2(L
@
Coaxial (F=type) cable
@
Standard AN cables {red/wNte/yellow)
S=video cable
@
Cumpueeetvideo cables(re_/green/Nue
HDNI cable
[]
IEEE1394cable (&pin)
Duabwand IR Nusted_3-LN_ _ cable
{2 included)
©
Optical audio cable
Note: Although your TV includes bo/b HDM/
and/EEEZ394 c.onnectk)ns, it may not
operate wltb anotber device you have that
inc./udes such a c.,onnection. Fbr ex_)mple, Ibe
/EEE Z394 pelts are. not inl_nded to operate
w//b cufTent model Mini DV camco/def_, and
ff_e NDM/ input is not intended for
r:onnec/fon to a computeL Copyright
protection mquiremenls may also prohibit of
limit connectiv/l;/ See page Z9 for det_i/s
about the NDM/ inpuL See pages 22-24 for
tie.tails about the/EEE_394 pod&
÷
Copyright =):)2005 TOSHIBA CORPORATION All rights reserved
HM95 R2 009-1t 061505 11
6/27/05, 6:44 PM
11
S ÷ [
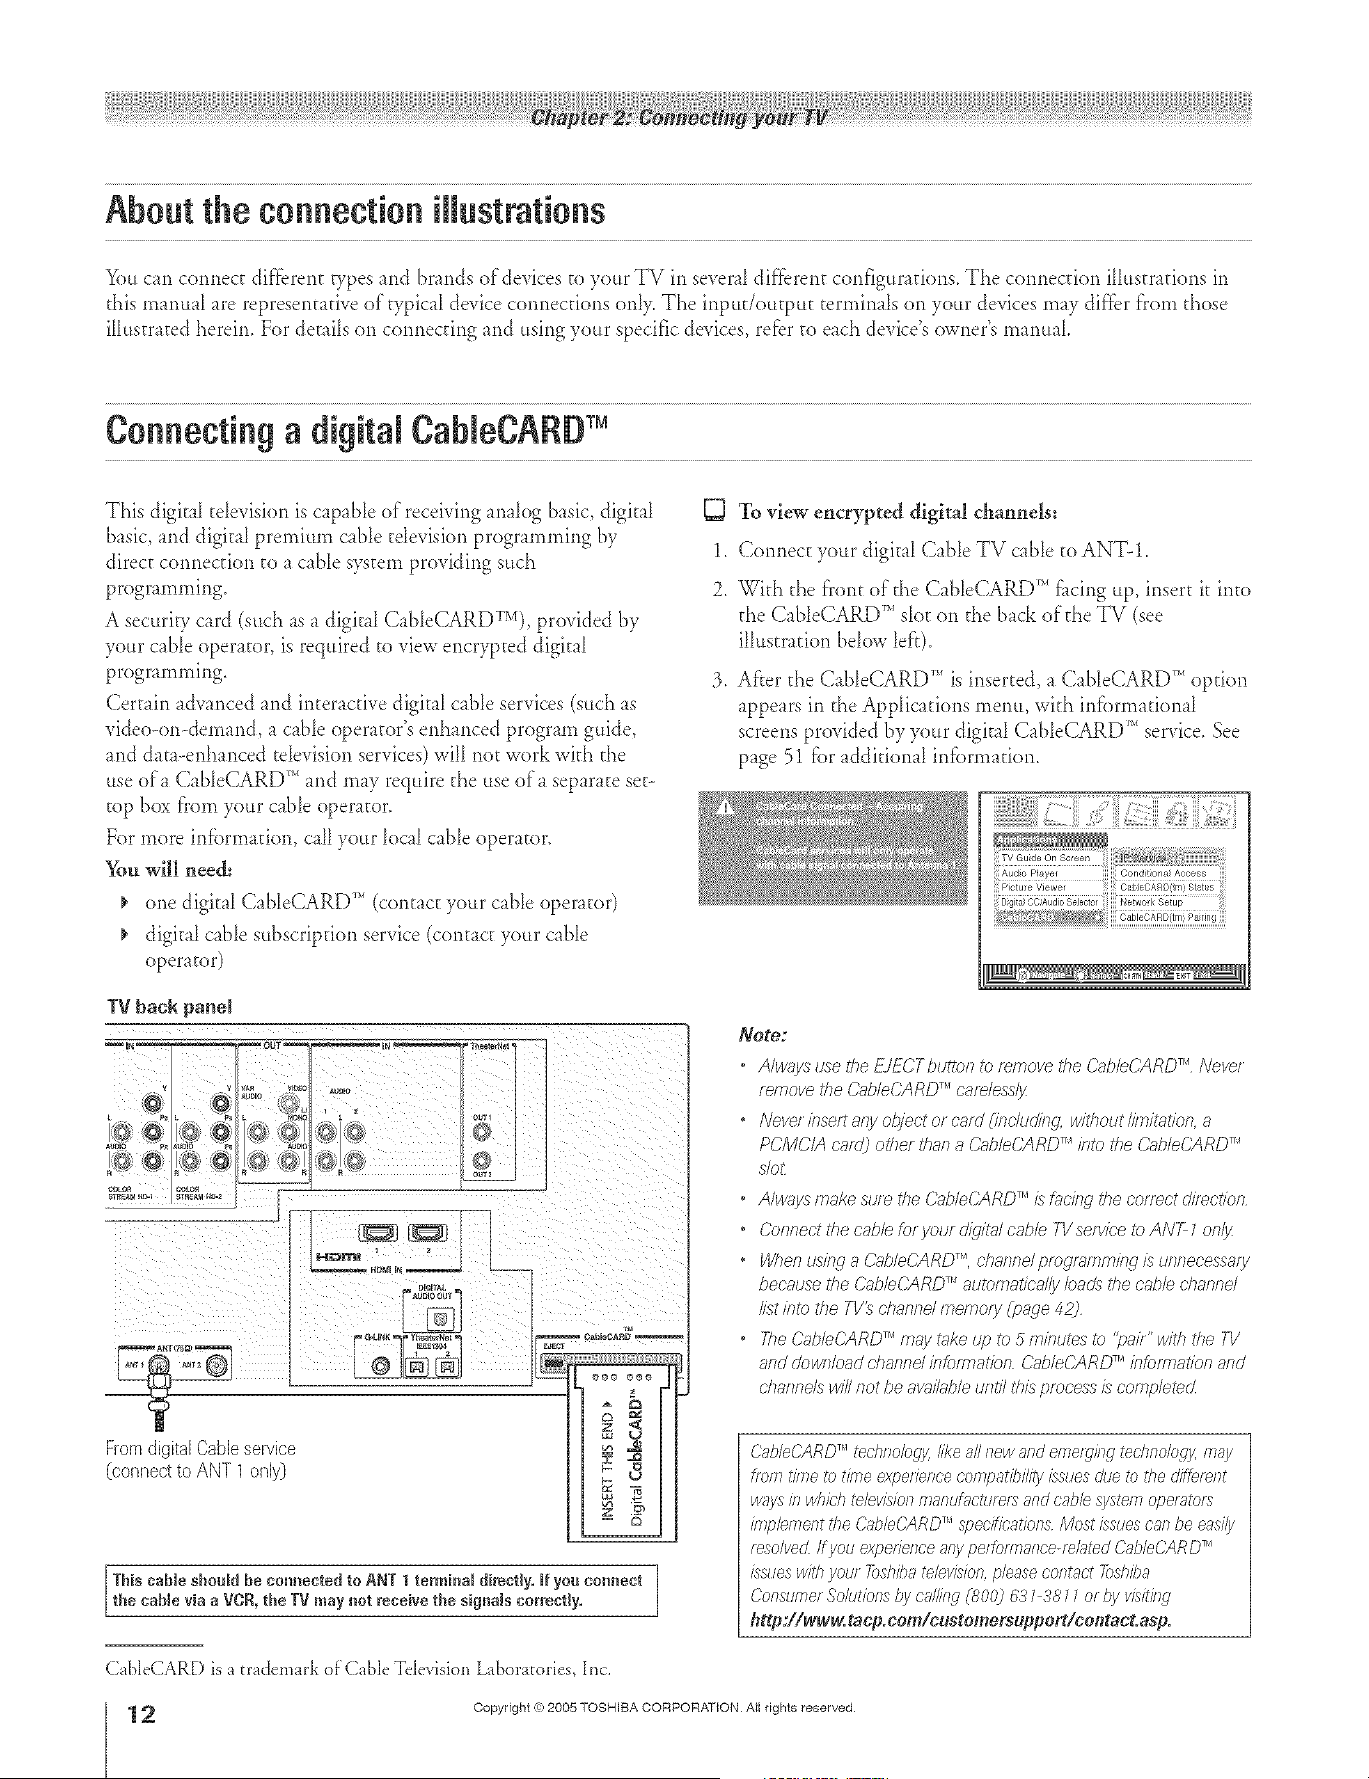
About the connection illustrations
You cm connect dif'fbrent vpes and br n_ds of&vices to your TV in several dif'fbrem configurations. The connection illustrations in
riffsmanuff are representative of OTicaI device connections only. The inpudoutput terminals on your devices may differ from d_ose
illustr _ted herein. For details on connecting md using your specific devices, refbr to e_ch device's owner's manual
Connecting a digital CaNeCARDTM
This digitaI tdevision is capable of receiving anabg basic, digital
basic, and digital premium c_ble tdevision programming by 1.
direct connection to a cane system providing such
programming. 2.
A securiw card (sud_ as a digit _ICableCARDTV), provided by
your cable operator, is required to view encrypted digkal
programming. 3.
Certain advanced and interactive digital cable services (such as
video-on-demand, a cane operator's enhanced program guide,
and dat _-enhanced television services) will notwork with the
use ofa CaNeCARD _'*and may require d_e use of a separate set-
top box from your cable operator.
For more information, call your local cable operator.
_m will need:
one digit fl CableCARD TM (contact your cable operator)
digkal cable subscription service (cont _ctyour cane
operator)
IV back panel
.... --r °°
<0 t@ g}
% o,I
g#PL_,
Ho_a IN _ --
Fromdigital CaNeservice
@onnectto ANT 1 only)
_- aa
E
This came shoo_d be commcted to ANT 1 terminal directly. If you connect
the cable via a VCR, the IV may not receive the signals correctly.
To view encrypted digital channels:
Connect your digkfl Cable TV cane to ANT-1.
_qth the front of the CableCARD _''fi_cingup, insert it into
the CabIeCARD _'*slot on the b_ck of die TV (see
ilhtstration below [el'r).
After the CableCARD TM is inserted, a CableCARD _'*option
appears in the Applications menu, with inff)rmational
screens provided by your digkaI CableCARD _'_service. See
p_ge 51 [}.)raddkional infi._nnadon.
Note:
• Always use the £1ECTbuttc/_ _) remove the CableCARD TM Never
femove the C>_bleCARDTM cafdessl_z
•Neve/ inseP,any of?loot o_ cmd (incltJdi_.,g.without bTiMtio& a
PCMC/A card) other than a C?_bleCARDTM into the C?_bleC/@DTM
sfo_
• Always make su/e tbe CableCARD TM /s faci/_g I'he correct direction
• Conned the cable k_ put did/h_l cable TV service to AN_ _ on/3z
• Whenus/ngaC_bleCARD TM, cbsr_i?dpfOgK;,fNfTJfW/SURRecess81_/
becnuse the C_IbbCARD TM autcmat/ca/ly bao_ the cabb channd
/L_tbtc the TV_ dTannd merrlo/y (page 42)
• The O_bleCARD TM m_,'yt_ke tap to 5 frlkltJtes i_) "pHk" with the 71/
attd dow/7/oad d}annd bkmnation d%b/eCiRD _'"/nfcm_ation and
dvanne/s will Rot be aK//able tJflt// this process/s cornp/eted
Cab/eCARDTM techno/%jy, like all new and emerging teclmo/ogy, may
_mm t/bTe to t/me expefTence cofrlf)atb//l_)! issues due to L/_er/fftefe/?t
A/ays if? A/hfch televl_5"lOl? flTafHHaotumf_' and cabb system of JelRtor_1
ffNpbfNelTt the C2_ObCARDTM ,sT_ecificatlonsMost issues can be easily
resolved ff you experTenceany pefgrrnalTce-mbted CabW_ARD TM
issues with your Toshba television,phase cootad Toshba
Corlsllelef SokJtbos by call/ca (800) &?_ 38 __ of by vl.gt/ng
http://_w.taep.eom/e_stemers_ppert/ee_tact.asp.
CableCARD is a trademark o['Cable Tdevision L_boratories, Inc.
12
HM95 R1 O 2-25 061505 12
Copyright (%2005 TOSHIBA CORPORATION Allrights reserved
÷
6/24/05, 9:12 PM [

A ÷ L
Connecting a VCRand antenna or CabJeTV {no CaNe box}
You will need:
¢ one signal splitter
d_ree coaxial canes
ewe sacs of standard A/V canes
• For bettel picture petfoerlane< ifyoulVE'R has S viUeo, use 817
S video cable (plus tile audio cnbles) iITste_d of tile seTncklrd
vicleo uffWe However dc Rot connect both _)/pesof vkleo c'nb/es
to VIDEO 7 (or VIDEO 2) at rite same time of the plctlee
pe/¢oiTnance will be unacceptg_b/e
• ffyOU have 8 mona V(_P,, coflf7eet L/MONO on tl7e71/tcyour
VCR_ 8ud/o out tel_,li/t81 us/rlg the WIT/teaud/o c;',hle oltl_
[_ To view the antenna or Cable signal:
Sdea the ANT 1 video input source on the TV2
To view the VCR:
Turn ON the VCR. Sdea d_e VIDEO 1 video input source
on the TV.*
To use the TV Guide On Screen <">recording features:
1. Camlea the G-LINK <"cable according co the ir_scrucdons
on page 25.
2. Make sure rhe VCR is cormeaed co the A/V OUT
terminals on the TV (see illuscrafion).
3. Sacd_eVCR co d_e appropriate lirle irlpuc (refbr co your
VCR owner's manual for details), and chert cure OFF the
VCR.
4. See Chapter 5 f_)rdetails on setting up the TV Guide
On Screer{'_system.
5. See Chapter 7 fbr details on using d_eTV Guide
On Screen_>system.
From Cable TV or antenna
splitter I_ /
OUT
0uv
Stereo VCR
Note: Tke VIDEO/AUDIO OUT relm/ha/s output sly/nail from Ule
ANT 1 ANT2, VIDEO L VIDEO 2, arid VIDEO 3 tefm/7?alswhelt i'he
appropr#lte input mode/s se/ectecL
The unauthorized racording, use, distribution, or revision of television
programs, videotapes, DVDs, and other materials is probibRed under the
Copyright Laws of tbe United States and other countries, and may subject
you to civil and criminal liability,
Connectinga eameorder
÷
* 1o select the video input socirce, press IN PUT on the remote control [see page 67).
1o program the PV remote control to operate other devices see Chapter 3.
VIDEO3 iep_t_ on TV right erie panel
Copyright =:}2005 TOSHIBA CORPORATION All rights reserved
HM95 R1 012-25 061505 13
6/24/05, 9:12 PM
13
[

A ÷ [
Connectinga VCRand CaNe box
You will need:
¢ one signal spikter
five coaxial cables
two sets of standard A/V canes
* Fbr bette/pietu/e peffom_Jancefrom your VCR If your VCR has
S videG connect an S video cabb (plus the auoJo c'able_2bstead
of the smnd;ffd video cable Do not connect an S video came and
a standa/d video cabb I_) VIDEO 1 (or VIDEO 2) at the same f/kne
or 17?epicture performance win be unaccept_bM
* ff/OU/rave a [T_OnO W_'f_ connect L/MONO on tire T1/to your
V(J_R'S 8gcl/o OUt telrtffn8/ us/r W the wlTM aucI/o c;ib/e on/j/:
* When you use 8 (-?;iblebox, you 17laynot be able to use tire remote
control iTJprogr_yn or access certakl features on the TIt
FromCableTV
D
To view basic Cable channels and use the TV-'s features:
Sdect the ANT 1 vide() input source on the TV.* Use d_e
TV controls (front pand or remote control) to change
channds and access the TV's fbamres.
g3
To view basic and premimn Cable channels:
Turn OFF the VCR. Sdect daeANT 2 video input source
on the T_* Tune d_e TV to channeI 3 or 4 (whichever
channeI the Cable box output is set to). Use the Cable box
controls to change channds.
g3 To view the VCR:
Turn ON the VCR, Select d_e VIDEO 1 video input source
on the TV.*
Note: A VIDEO 7connecbi)nwithan S Videocable(instead
of a s_V_no'gl/dvideo cable) will provideheifer picture
peffomranee(asmentionedin the fifatbu/leteditem at tire
_bpof thispage)
* lb select the videoinput source pressINPUTon the remotecontrol
(see page 67). 1o programthe ]_/remote contlol to operateother
devices,see Chapter3,
The unaatboriaed recording, use, distribution, or revision of television
programs, videotapes, BVDs, and other reateria_s is p:'obibited under the
Copyrigbt Laws of the United States and other countries, and may subject
you to civil and crireh_aJ Jiability,
Note: 7ke VIDEO/AUDIO OUT terTninalsoutput s_4na/_from the
ANT 7 ANT2, VIDEO L VIDE02, and VIDEO 3 te/mkra/s when the
appropriate input mode iS selected
To enable the TV Guide On Screen <')system to work
with your cable box and to use the TV Gtfide
On Screen _ recording features:
1. Connect the G-LINK _)cable according to d_einstructions
on page 25.
2. Make sure the VCR is connected to the A/V OUT
terminals on the TV (see ilIustradon).
3. Set the VCR to the appropriate Die inpu_ (refbr to your
VCR owner's manual fiar details), and d_en turn OFF the
VCR.
4. See Chapter 5 f_)rdetails on setting up the TV Guide
On Screen°'_system.
5. See Chapter 7 f_)rdetails on using the TV Guide
On Screen°'_system.
÷
HM95 R1 0 2-25 061505 14
Copyright @ 2005 TOSHIBA CORPORATION All rights reserved
6/24/05, 9:12 PM [
A ÷ L
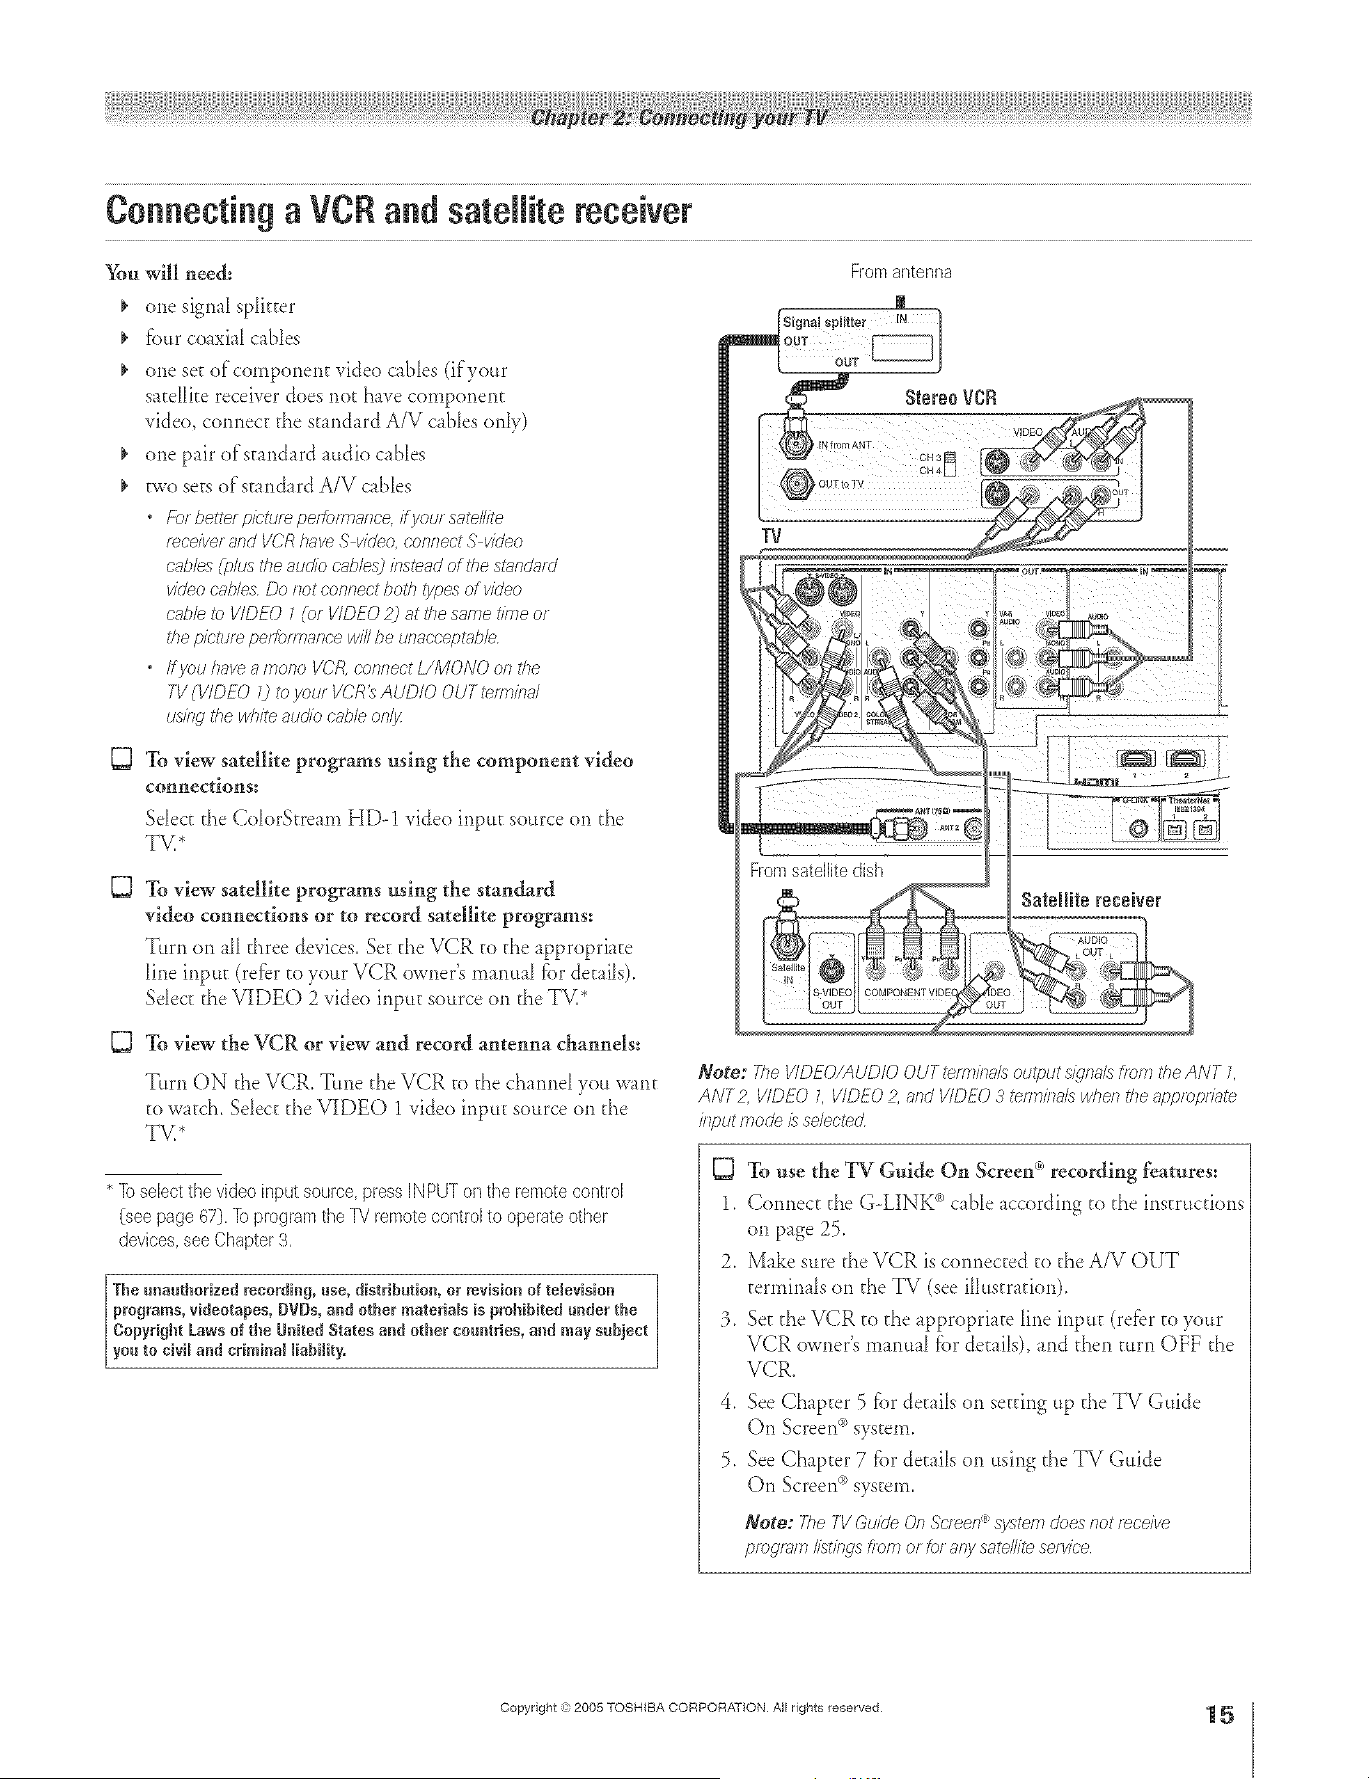
Connecting a VCRand satellite receiver
You will need:
one signal splitter
_' fbur coaxial canes
_' one se_ of component video cables (ifyour
saceHkereceiver does not have component
video, connect the stand _rdA/V canes only)
one pair of standard audio canes
Bvo seesof standard A/V cables
* Fbr hettel pie&_/e peiformarice, ifj/ole satellite
rece/wer£,ndVCRhaveS vkleo,oenr_ect.5"video
cables(plus theaudiocubles) bsteadofthestundord
videocat,losDoslotconnectbothtypes of video
cabbto VIDEO1(or VIDEO 2) atdiesametimeof
thepicture performal_ce willbe unaceeptabb
* ffyOtJ have a mona l/CJg, corifiect [//_dONO Oi_ ttie
TV (WDEO () to you/VCR_ AUDIO OUT terT:lbd
usingthewhiteaueibc>sbleon/s
To view satellite programs using the component video
connections:
Select the ColorStre m_ HD-1 video input source on d_e
TV/
{3
To view satellite programs nsing the standard
video connections or to record satellite programs:
Turn on all d_reedevices. Set the VCR co the appropriate
line input (refer to your VCR owner's manual for details).
Sdect the VIDEO 2 video input source on the TV.*
Satellite receiver
5}
To view the VCR or view and record antenna channels:
Turn ON d_eVCR. Tune d_e VCR co d_echmnd you wmt
to watch. Select the VIDEO 1 video input source on the
TV/
* 1o select the video input SOCHCe,press IN PUT on the remote control
(see page 67). 1o program the TV remote control to operate other
devices, see Chapter 3,
The unauthorized recording, use, distribution, or revision of television
programs, videotapes, DVOs,and other ruaterials is pmhibRed under the
Copyright Laws of the United States and other countries, and may subject
you to civil aad criminal liability,
Note: The I/IDEO/AUD/O OUT terw/itals output signals from the ANT L
ANT2, VIDEO L VIDEO 2, and VIDEO 3 _nT, ba/s wheR the appropr7?ffe
/77putmode is selected
To use the TV Gnide On Screen _'_recording features:
1. Connect the G-LINK _'cabD according to the instructions
on page 25.
2. Make sure the VCR is connected co the A/V OUT
cermina[s on the TV (see i[[ustradon).
3. Secd_eVCR to d_e appropriate Die inpu_ (refbr co your
VCR owner's manual for decal[s), and then turn OFF the
VCR.
4. See Chapter 5 _{)rde_ailson setting up the TV Guide
On Screen('_system.
5. See Chapter 7 f_)rde_ailson using the TV Guide
On Screen('_system.
Note: The7-VGuideOn.%'leon<_sy£emdoesr_otreceive
programlistings f/ornerror anysatellitese/vic'e
÷
HM95 R1 012-25 061505 15
Copyright =3:)2005 TOSHIBA CORPORATION All rights reserved
÷
6/24/05, 9:12 PM
15
[
A ÷ L
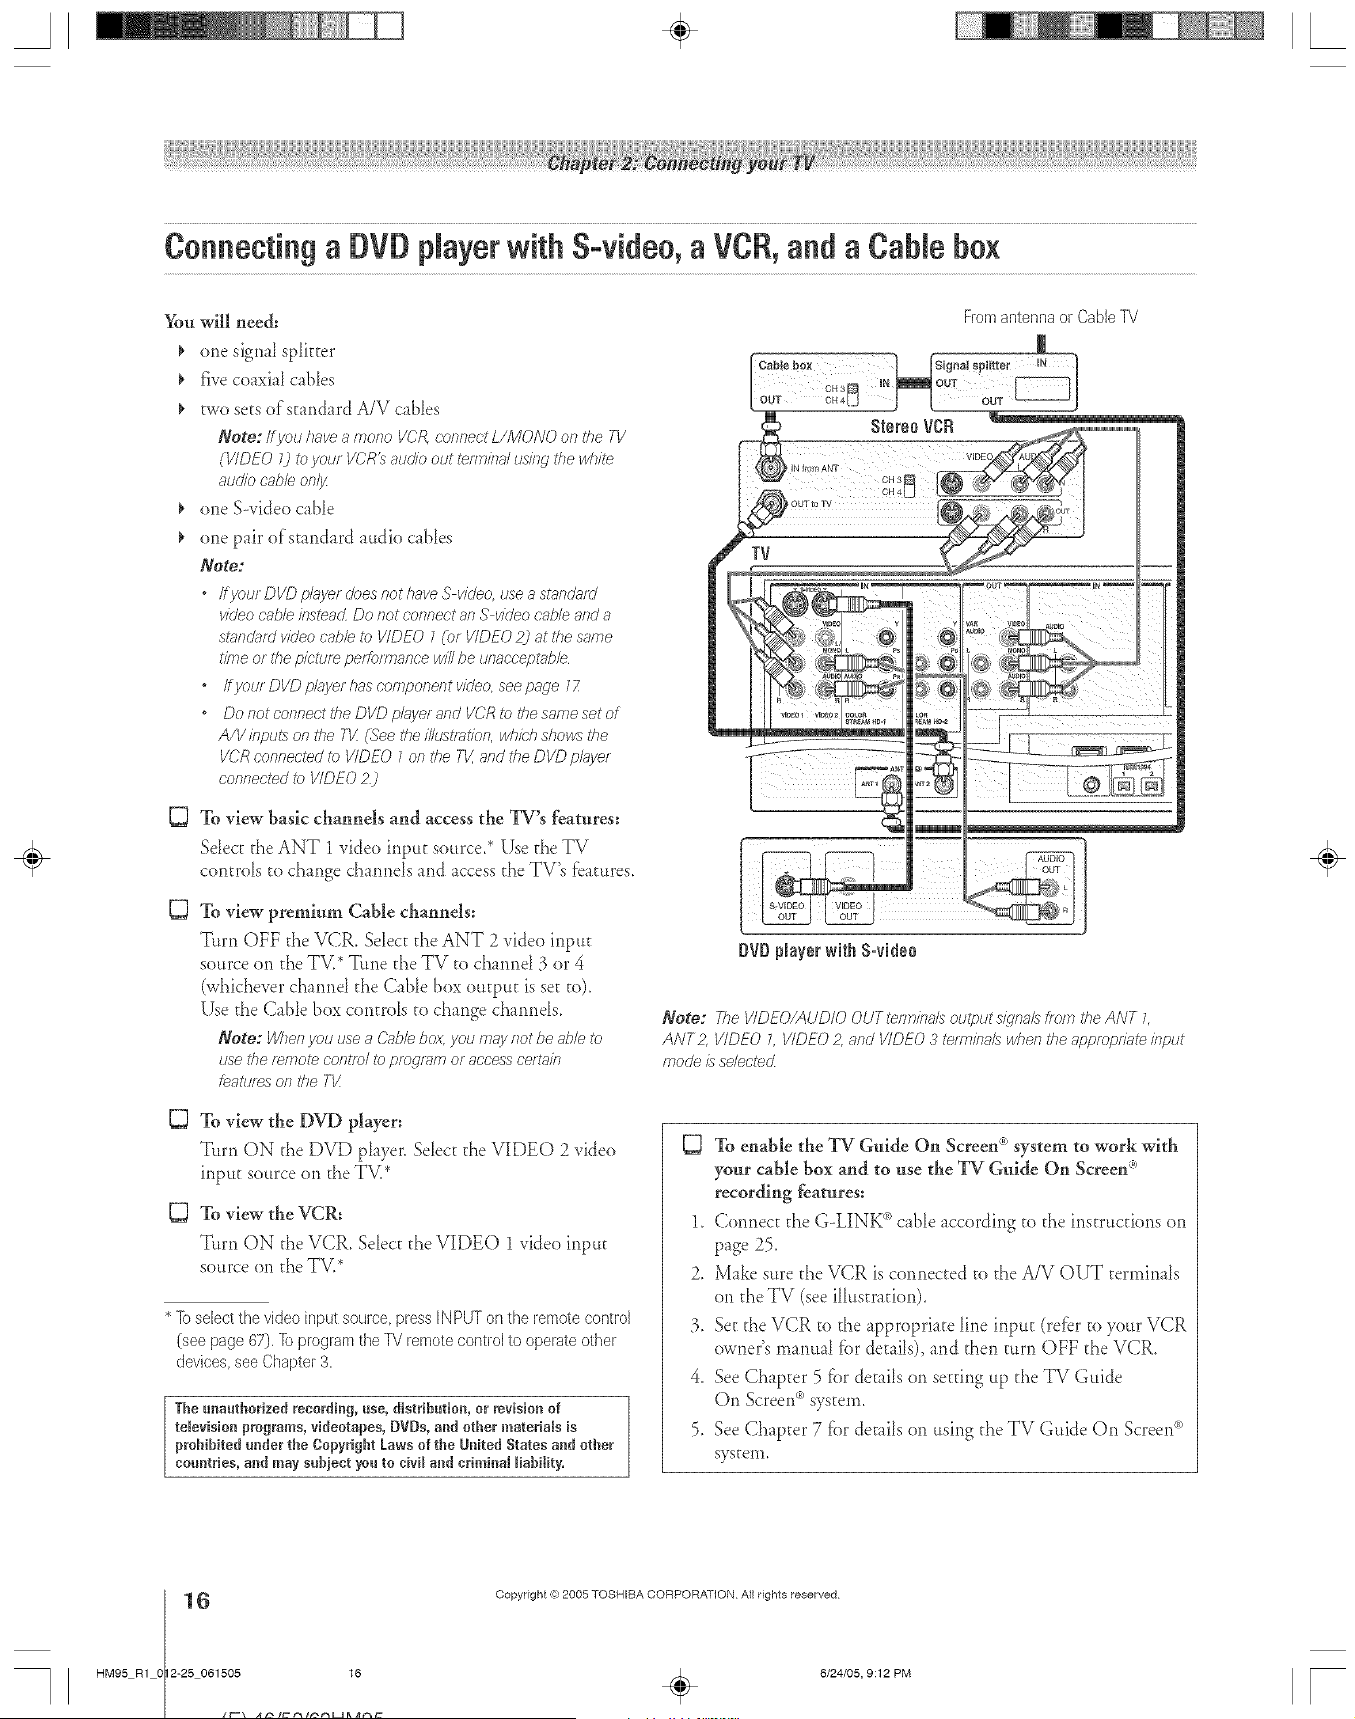
Connecting a DVD Nayer with S=video,a VCR,and a CaNe box
_m will need:
¢ one signal splitter
¢ five coaxial canes
I, two sets of standard A/V cables
Note: ffyou have a mono VCR connect L/MONO on tile TV
(VIDEO 7) to your VCR_ atJO)T)out teerlisTd tJsisTgtile wITM
audio cabb on/jz
I, one S--video c_ble
one pair of standard audio cables
Note:
* Ifyour DVD pl_vyerdoes not have S vkleo, use a standmd
video c_,b/e insteacL Do not connect an S video cable and a
standard video cabb to VIDEO 1 (or VIDEO 2) at the same
time or #re picture peffom_anoe will be unac'c'ept_bb
* I@ou/DI/Dpl_d/erhaseonlponentvideoseepage17
* Do not connect the DVD player and VCR to the same set of
A/V klput:_ on the 71/:(See the iNustsation,whM} shows the
VCR connected i?J VIDEO 7 on the 71/,a/ld the DVD plJyer
connected to VIDEO Z)
D
53
TO view basic channels and access the TV's features:
Sdect the ANT 1 video input source,* Use the TV
controls to chmge channels and _ccess the TV's f:eatures,
TO view premium Cable channels:
Turn OFF the VCR. SeIec_the ANT 2 video input
source on the TM* "[Ltnethe TV to chanrld 3 or 4
(whichever channd the Cable box output is set to).
Use the (-;able box controls to change channels.
Note: When gnu use a C2ai/e box you rs?_J/not be able to
use the f_mote COf?tfe/ [o prog/_)ffl or access ce/tain
featu/_s on the TI/
53 To view the DVD player:
Turn ON the DVD player. Select the VIDEO 2 video
input source on the TV.*
53 To view the VCR:
Turn ON the VCR. Sdect the VIDEO 1 video input
source on the TV.*
* lb select the video input source, press IN PUT on the remote control
(see page 67), ]b program the %/remote control to operate other
devices, see Chapter 3,
The unauthorized recording, use, distribution, er revision ef
television programs, videotapes, DVDs, aud ether materials is
prohibited under the Copyright Laws of the Uuited States and other
countries, and may sabieet you to civil and criminal liability.
Dr# Nayer with S-video
Note: The I/IDEO/AUD/O OUT _rm/?Tals output s/9"naLsfrom the ANT 1,
ANT2, VIDEO L VIDEO 2, and VIDEO 3 tenn/ha/s when the appropnT_teinput
mode is selected
53 To enable the TV Guide On Screen _'_system to work with
your cable box and to use the TV Guide On Screen _'°
recording features:
1. Connect the G-LINK _>cable according to the instructions on
page 25.
2. Make sure the VCR is connected to the A/V OUT terminals
on the TV (see illustration).
3. Set the VCR to the appropriate line input (refbr to your VCR
owner's manual fbr details), and then turn OFF the VCR.
4. See Chapter 5 fbr details on setting up the TV Guide
On Screen<_)system.
5. See Chapter 7 fbr details on using the TV Guide On Screen_)
system.
÷
6
HM95 R1 0 2-25 061505 16
Copyright ,{e;2005 TOSHIBA CORPORATION AiI rights reserved
6/24/05, 9:12 PM [

A ÷ L
Connectinga DVDplayerwith ColorStream(componentvideo)and a VCR
YourTV has ColorStream °'_(component video) inputs,
You will need:
one signal sp[kter
three coaxial c _b[es
two sets ofscmdard A/V cables
* For bettel piettlr_ peitoi777ar_ce,Fj/oto VCR has S video, use all
S video cabM (plus the audio c_,ble_3ins=end of the stneoklrcl
vic/eocab/e Nowevel; do not eonnect both /ypes of vk/eo c'nb/e to
VIDEO 1 (or VIDEO 2) at the same tnTle or the picture
pel?)f1778ecewill be L_flact;'ept:lbh
* ffyou have 8 mono VCR. eofyrlect L/MONO on the ',q/
(VIDEO 0 Ib your VCR_ audio out tert77bd using =bewbh'e
audio cable onlJz
one pfir of st mdard audio canes
one set of component video cables
° X)u can connect the comporyent video c,i_bles(plus audio
cables) tam _ite DVD playe/ to either set of CobrSe_r-1lyl
terreb_Js on the TV (HD 7 or HD 2) Tile Co/or_tf_Hm HD 1
arid HD 2 _rTn/na/s caslbe used with fOregress/ve(480p,
720p) and Inter/uced (480/i 1080/) scan systems A 7080i
Sl_77a/will provide the best picture performal_ce
o ffyourDI/Dp/isyerdoesnothavecomponeiltwUeo, seepage
16 ff your DVD pl_syelhas HDMI v/o'eo,see page 72
To view antenna or Cable channels:
Select the ANT 1 video input source on the TV2
To view the DVD player:
Turn ON the DVD player. Sdect the ColorS=ream HD-1
video input source on the TV,*
To view the VCR:
Turn ON the VCR. Select d_e VIDEO 1 video input
source on the TV.*
D
To record a TV program while watching a DVD:
Turn ON the VCR. Tune the VCR to fl_echanneI co
record. SeIect the Cok)rStream HD-1 video input source
on the TV* to view the DVD.
* lb select the video input source, press IN PUT on the remote control
(see page 67). ]b program the P4 remote control to operate other
devices, see Chapter 3.
The unautborised recording, use, distribution, or revision of television
programs, videotapes, DVDs, and other materials is probibRed under the
Copyright Laws of tbe UnRedStates and other countries, and may subject
you to civil and criminal liability.
From antenna or Cable
m
Signal splitter IN
orb player with component video
Note: The VIDEO/AUD/O OUT telm/bals output s/_lnalstfom the ANT L
ANT2 VIDEO D I/IDEO 2, and VIDEO 3 _rrn/bals wbefl the appropr77_
/bput fTlode /s selected
To use the TV Guide On Screen _')recording features=
1. Connect the G-LINK _"_cable according to the instructions
on page 25.
2. Make sure the VCR is connected co the A/V OUT
terminals on the TV (see ilh*stradon).
3. Se_d_eVCR to d_e appropriate line input (re_br to your
VCR owner's manual for de_ai[s),and then turn OFF the
VCR.
4. See Chapter 5 _)r de_ailson setting up the TV Guide
On Screen°'_system.
5. See Chapter 7 _)r de_ailson using the TV Guide
On Screen°'_system.
÷
HM95 R1 012-25 061505 17
Copyright =3:)2005 TOSHIBA CORPORATION All rights reserved
÷
6/24/05, 9:12 PM
17
[
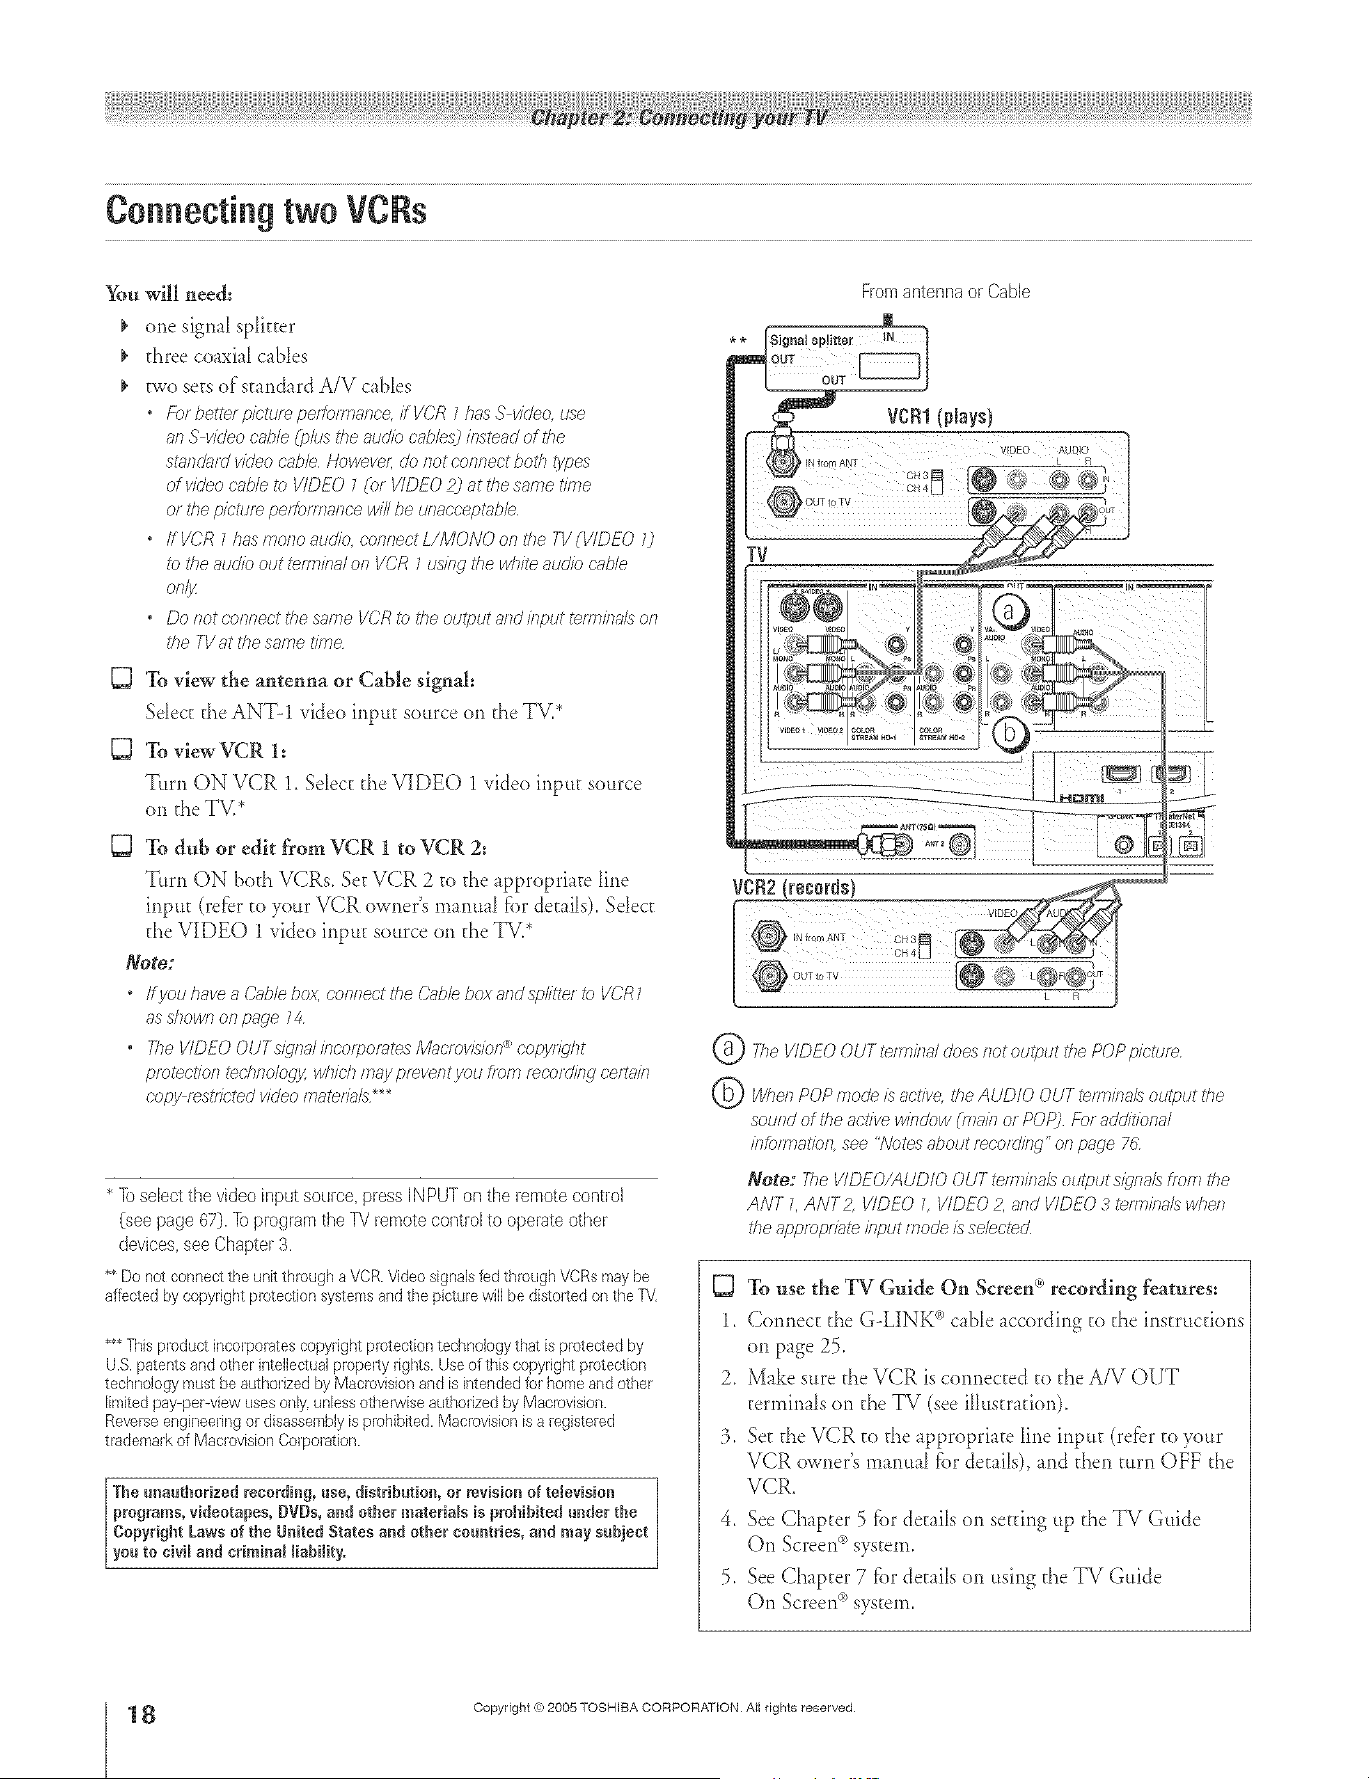
Connecting two VCRs
_m will nee&
one signa_ sphtter
three coaxia_ cabIes
two sets of standard A/V c _bIes
• Ebr he,tel picfum pe/M/mance, i/VCR 1has S video, use
an S video c'abM (pkJs the audio cables) instead of the
staf?da/d video cabb HoweveL do not connect both types
of video cubic to VIDEO 7 (or VIDEO _) at the same time
or the picture per¢ormanoe will be unacceptabb
• ff VG'R 7 has more audio, connect L/MONO on 17?eTV (WDEO 0
_b ttie audio out tennbal on VCR 7 usIr W the white atJdlTJcat)le
Of 7I_
• Do f_ot connect the same VCR to the output and irlput tef_r_/f?alsoFi
the TV at the same time
To view the antenna or Cable signal:
Sdect the ANT-1 video input source on the TV.*
To view VCR 1;
Turn ON VCR 1, SeIect d_e VIDEO 1 video input source
on the TV.*
D To dub or edit from VCR 1 to VCR 2:
Turn ON both VCR5_Set VCR 2 a_ the appropriate Line
input (refer to your VCR owner's manual fbr details)_Select
the VIDEO 1 video input source on the TV2
Note:
* IfyouhaveaC_lhlebox, conrTecttheCableboxandsplitte/tc VCR7
as dTown on page 74
o The VIDEO OUTs_gnd bcorpomtes/Vlglc/ov/k:ion _ copflT_'ht
pietectfofl techrTologjz wl7/c,/7may pmvent you from r_cordir W oerhlii 7
6,opy r_st/Jeted video materials _
* Ib select the video input source, press IN PUT on the remote controJ
(see page 67). Ib program the IV remote control to operate other
devices, see Chapter 3,
** Do not connect the unit through a VCR.Video signalsted th_relghVCRs may be
affected by copyright preteciion systemsandthe picture wfil be distelted on the TV
***This product h_corpeiatescopyright piotecfien technology that is protected by
U.S.patents and other intelleculalpropelty rights. Useef this copyright piotecfion
technology must be authorizedby Macrovisionand is intended for homeand ether
limitedpay perMew usesonly,unless otherwise authorized by Macmvision.
Reverseengineeringor disassemblyis prohibited. Macnwision is a _egiste_ed
tladen/ark ef MacrevisienCorporation.
The unauthorized recording, use, distribution, or revision of television
programs, videotapes, DVDs, arid other materiaWs is prohibited under the
Copyright Laws of the United States and other countries, and may subject
you to civil and criminal liability,
©
©
Fromantennaor Cable
VCRI(plays)
VIDEO AU610
TV
VCR2!federals)
The VIDEO OUT tefm/k_aldoes not output the POP picture
When POP mode is active, the AUDIO OUT terminaL_ output the
soured of tile active window (main or POP) For additional
/?lforh_latiof?see "Notes about mcor(l/llg" oil page 76
Note: The VIDEO/AUDIO OUT te1777/fTa/soutput Sl_rla/6 tf_)iTithe
ANT L ANT Z I/IDEO 7 VIDEO 2, and VIDEO 3 tenT_ba/s when
tile approp/fate klput moo'e is selected
TOuse the TV Guide On Screen <``'recording features:
1, Connect d_e GoLINK (")cane according to the instructions
on page 25,
2. Make sure the VCR is connected to the A/V OUT
tertninals on the TV (see illustration).
3, Set the VCR to the appropriate line input (refbr to your
VCR owner's manual fiat details), and then turn OFF the
VCR.
4. See Chapter 5 fiar details on setting up the TV Guide
On Screen°'_system.
5. See Chapter 7 f}ardetails on using d_eTV Guide
On Screen_>system.
÷
8
HM95 R1 0 2-25 061505 18
Copyright ,g;2005 TOSHIBA CORPORATION AiI rights reserved
6/24/05, 9:12 PM [
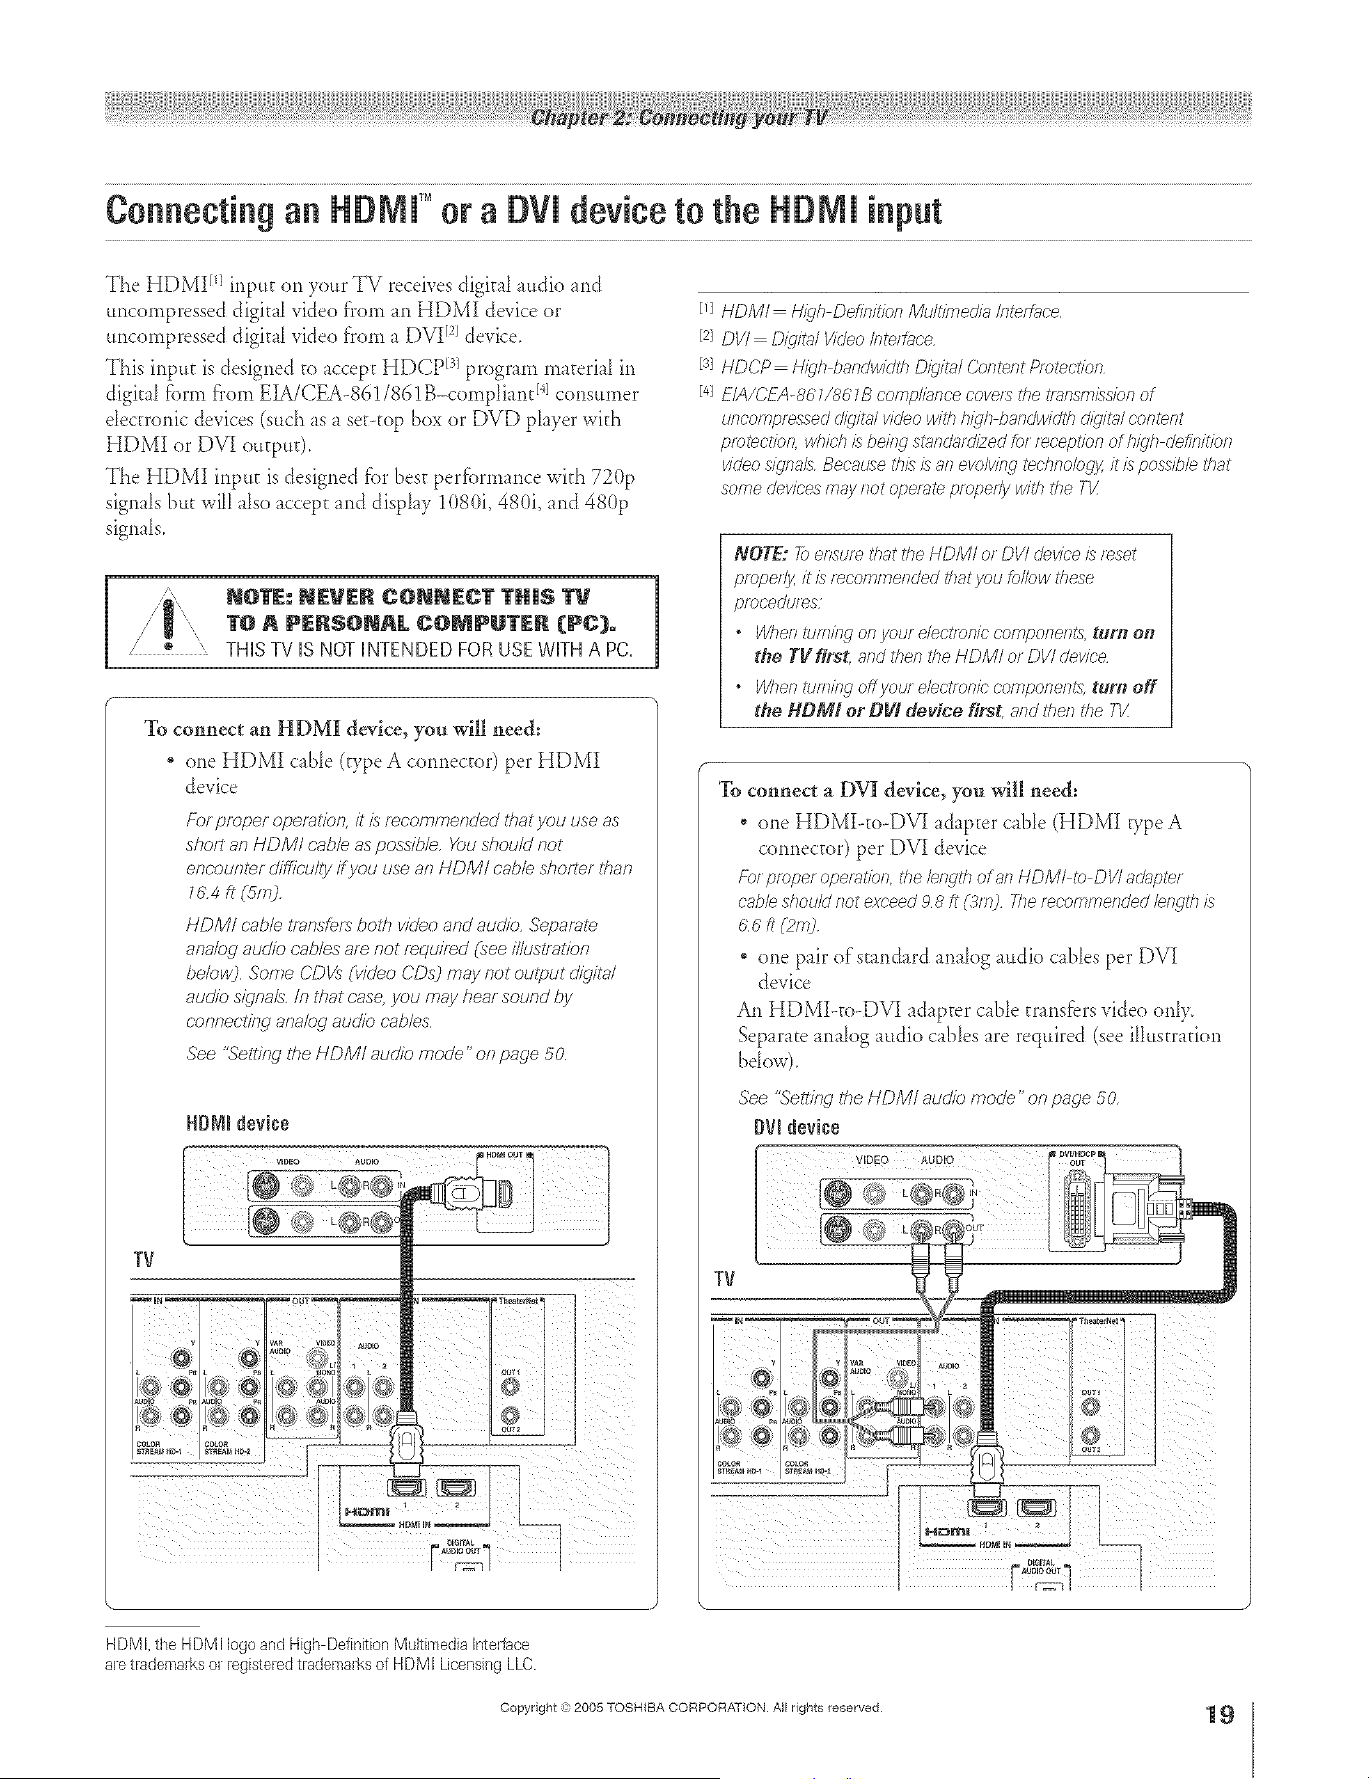
Connecting an HDMI" or a DVi device to the HDMI input
The HDMI [q input on your TV receives digkal audio and
uncornpressed digital video fforn an HDMI device or
uncompressed digkal video from a DVI [2]device.
This input is designed to accept HDCP I31program materiaI in
digkal fbrm from EL&/CEA-861/8(, 1B-compliant I4]consumer
electronic devices (such as a set-top box or DVD player with
HDMI or DVI output).
The HDMI input is designed fbr best perfbrmance with 720p
signals but will also accept and display 1080i, 480i, and 480p
signals.
N@ZE: NEVER C@NNECT THIS I"V
1"O A PERSONAL C@MPUTER (PC).
/ * " THISTV IS NOTINTENDEDFORUSEWITHA PC,
To connect an HDMI device, yon will need:
one HDMI c_ble (type A connector) per HDMI
device
For pmper operation, d is f_eommenu'ed ff_atyou use as
sho/t an HDMI r:ab/easpuss?b/e,YoushouMnot
encounter d/ffft-u/tyffyou use an HDMI cable,shorl_r than
Z&4 ft (5m2,
HDM/ c.ablelTansfersbulb video and audio, Separate
ana/od audio cabbs are not required (see il/ustra&_n
bebv,/] Some ('DVs (video CDs] may not output digital
audio signals,/n that case,you may hearsound by
c'onnectf/Wanalog audio c.abbs
See %'enitwthe HD/V/I audio mode" on page 50
lrv
[q HDMI Iq/9'h Definitkm Multimedia flltef_c'e
[2] DV/ D/.ditg#Vhleo /nte/hee
IS] HDCP H/}'h bandwhkh D/}'ita/ Content Pmtectkm
[4] E/A/CFA-86 W86 7B comp/ig_ncecove/s the t/ansm/ssiarl of
uncompressed c//git_# video with high bandwidth d/_,ita/oontent
protection, which/s behsq standardized for reception of h/_'h clefhdtk_n
video sYgnah Because tl,s /s 8f7 evolving tedys:sobgy it is possibh #sat
some devices may flat opel_m pmpedy with the TK
NOTE: 7b ensu/e that the HDM/ o_ DV/ a'ev/ce /s reset
pmpe/13zit/s recommended that you _dlow these
pmcedules
" Whell tum/Hg ol7 your ehotmfffc campofyefffs, tul'[_ o#t
the Tg first` and then the I-IDMI o_ DVI device
• When turning offyoor ehctmnk" co,mponerm, tuna off
the NDMl or DVI device first, and then the T1/
To connect a DVI device, yon will need:
one HDMI--to--DV[ adapter cane (HDMI vpe A
connector) per DV[ device
Fa_proper operation,thelength oral7 HDMI to DVIadapter
cableshouldnot exceed98 ft (b'm) 21erecommendedh/wth is
c;s _ _2m?
one pair of standard analog audio cables per DVI
device
An HDMLto-DV[ adapter cane transfers video on1>
Separate analog audio cables are required (see illusm_fion
bdow).
See "Sett/??gthe HDM/ au&b mode" on page 50.
DVI_eviee
÷
HD MI, the HDMI logoand High DefinitionMultimedia Interlace
are trademarksor tegisteredtrademarksof H DMI Licensing LLO.
Copyright ,3:)2005 TOSHIBA CORPORATION All rights reserved
HM95 R1 012-25 061505 19
÷
6/24/05, 9:12 PM
19
A ÷ L
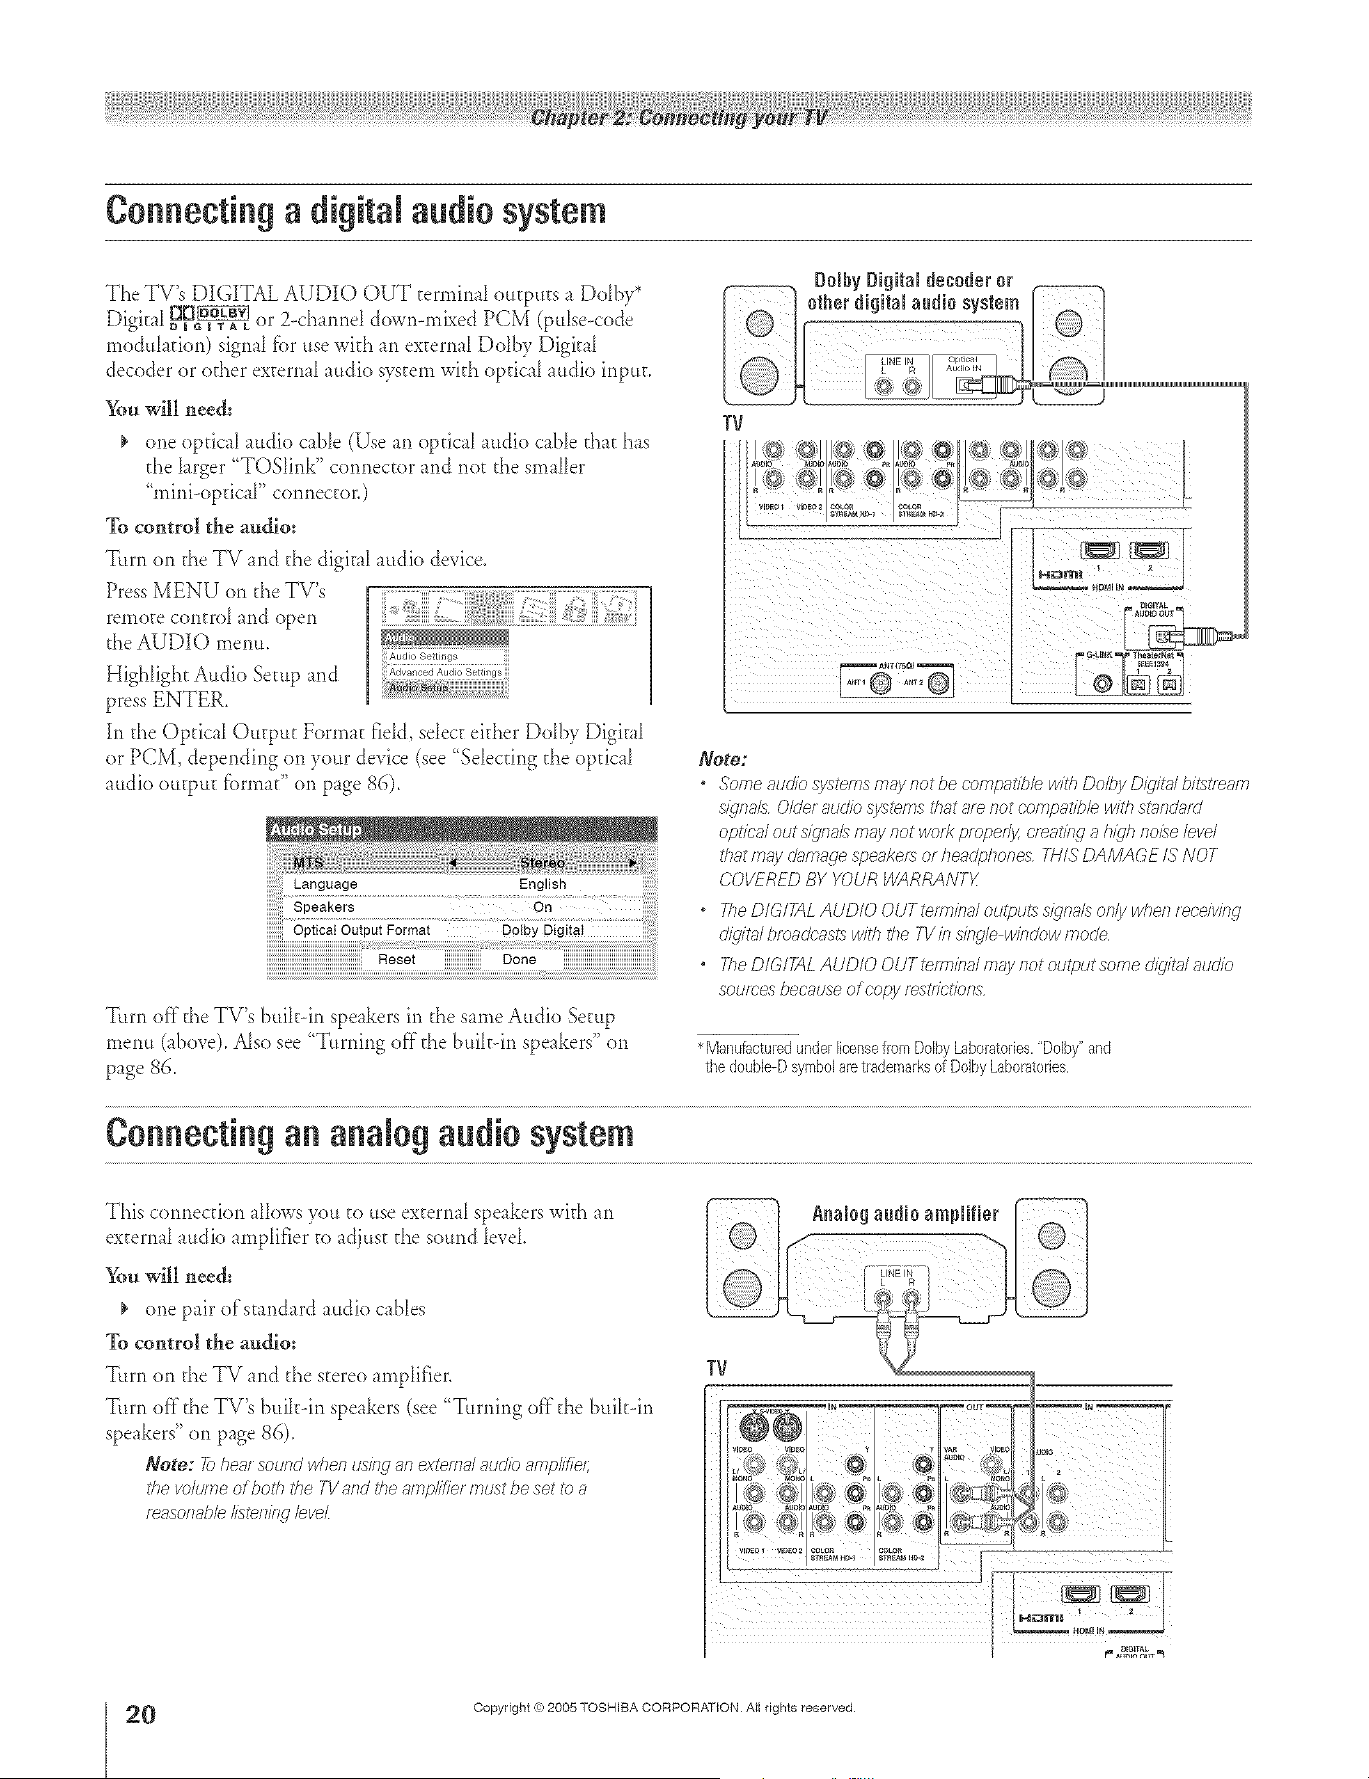
Connecting a digRal audio system
The TV's DIGITAL AUDIO OUT termir_aI eutputs a Dolby*
Digka[ _g_ or 2-cha*md dowr>mL_ed PCM (pulse-code
medulafion) signal fbr use with an excerna[Delby Digital
decoder or edger external audio system wkh optical audio input.
You will need:
one optical audio cane (Use an optical audio cane d_at has
the iarger "TOShr_k" cormector and not the smaller
"mini-opdcaF ce*mector.)
To control the audio:
Turn on d_eTV and the digkal audio device.
Press MENU on d_eTV's
remete contre[ and open
the AUDIO metal
Highlight Audio Setup and
press ENTER.
hl the Optical Output Format field, select either Dolby Digk_l
or PCM, deperlding en your device (see "Selecting the optical
audio output fbnnad' on page 86).
Turn off d_eTV's bulk--in speakers it1 the same Audio Setup
menu (_bove). Also see "T.rnir_g off the buikdr_ speakers" on
page 86.
DolhyDigital decoderor
o,,o,,,o,!o,o°,,!7,oo
TV
Note:
* SomeaucliosystemsmaynotbecompatiblewithDolbyD/_jt_#bi_5ti_am
S/qlia/5 0/Uer atJcJiosystems that are riot c-ompati/3b with SttffidJtffd
optic'a/out sly'sial5may not WOl?p/ oped_ c/_atis_c_a hi_jh rlolse level
that may C/gffTIRulesf?eaker_or Iiendphones 2;_I/SDAMAGE IS NOT
COVERED BY YOUR WARRANTg
* TheD/GlikLAUD/OOUTtemiba/outpu_5s/_,nalsor_/ywhenreceiving
cJ/4jlt_/bloaUc_:,si:5witl_ the 7-1/b sinSe wirscJowtootle
o The DIGITAL AUDIO OUT tefmba/niay slot output some d/gitgUatJcJio
sources because of c'opy rest/gt/bns
*Manufacturedunderlicensefrom DolbyLaboratories,"Dolby"and
the doubie-Dsymbolaretrademarksof DolbyLaboratories
Co eeti g a alog a dio system
This cermecdon alk_wsyou to use external speakers wkh an
external audio amplifier to adjust the sound level.
_*u will need:
one pair of standard a.dio cables
To control the audio:
Tun_ on the TV and the steree amplifier.
Turn off the TV's buihdn speakers (see "T.rning off the buikdn
speakers" on page 86).
Note: 7_heatsog/r?dwlienusiw_anexternalaudioamplif)e;;
thevolumeU boththeTVandtheamp/i_ief mustbesetI>_a
f_asoflabbIisteilifW bveL
TV
"] ql
_._ 4+ , _i,
÷
0
HM95 R1 O 2-25 061505 20
Copyright ,{e:2005 TOSHIBA CORPORATION Atl rights reserved
6/24/05, 9:12 PM [
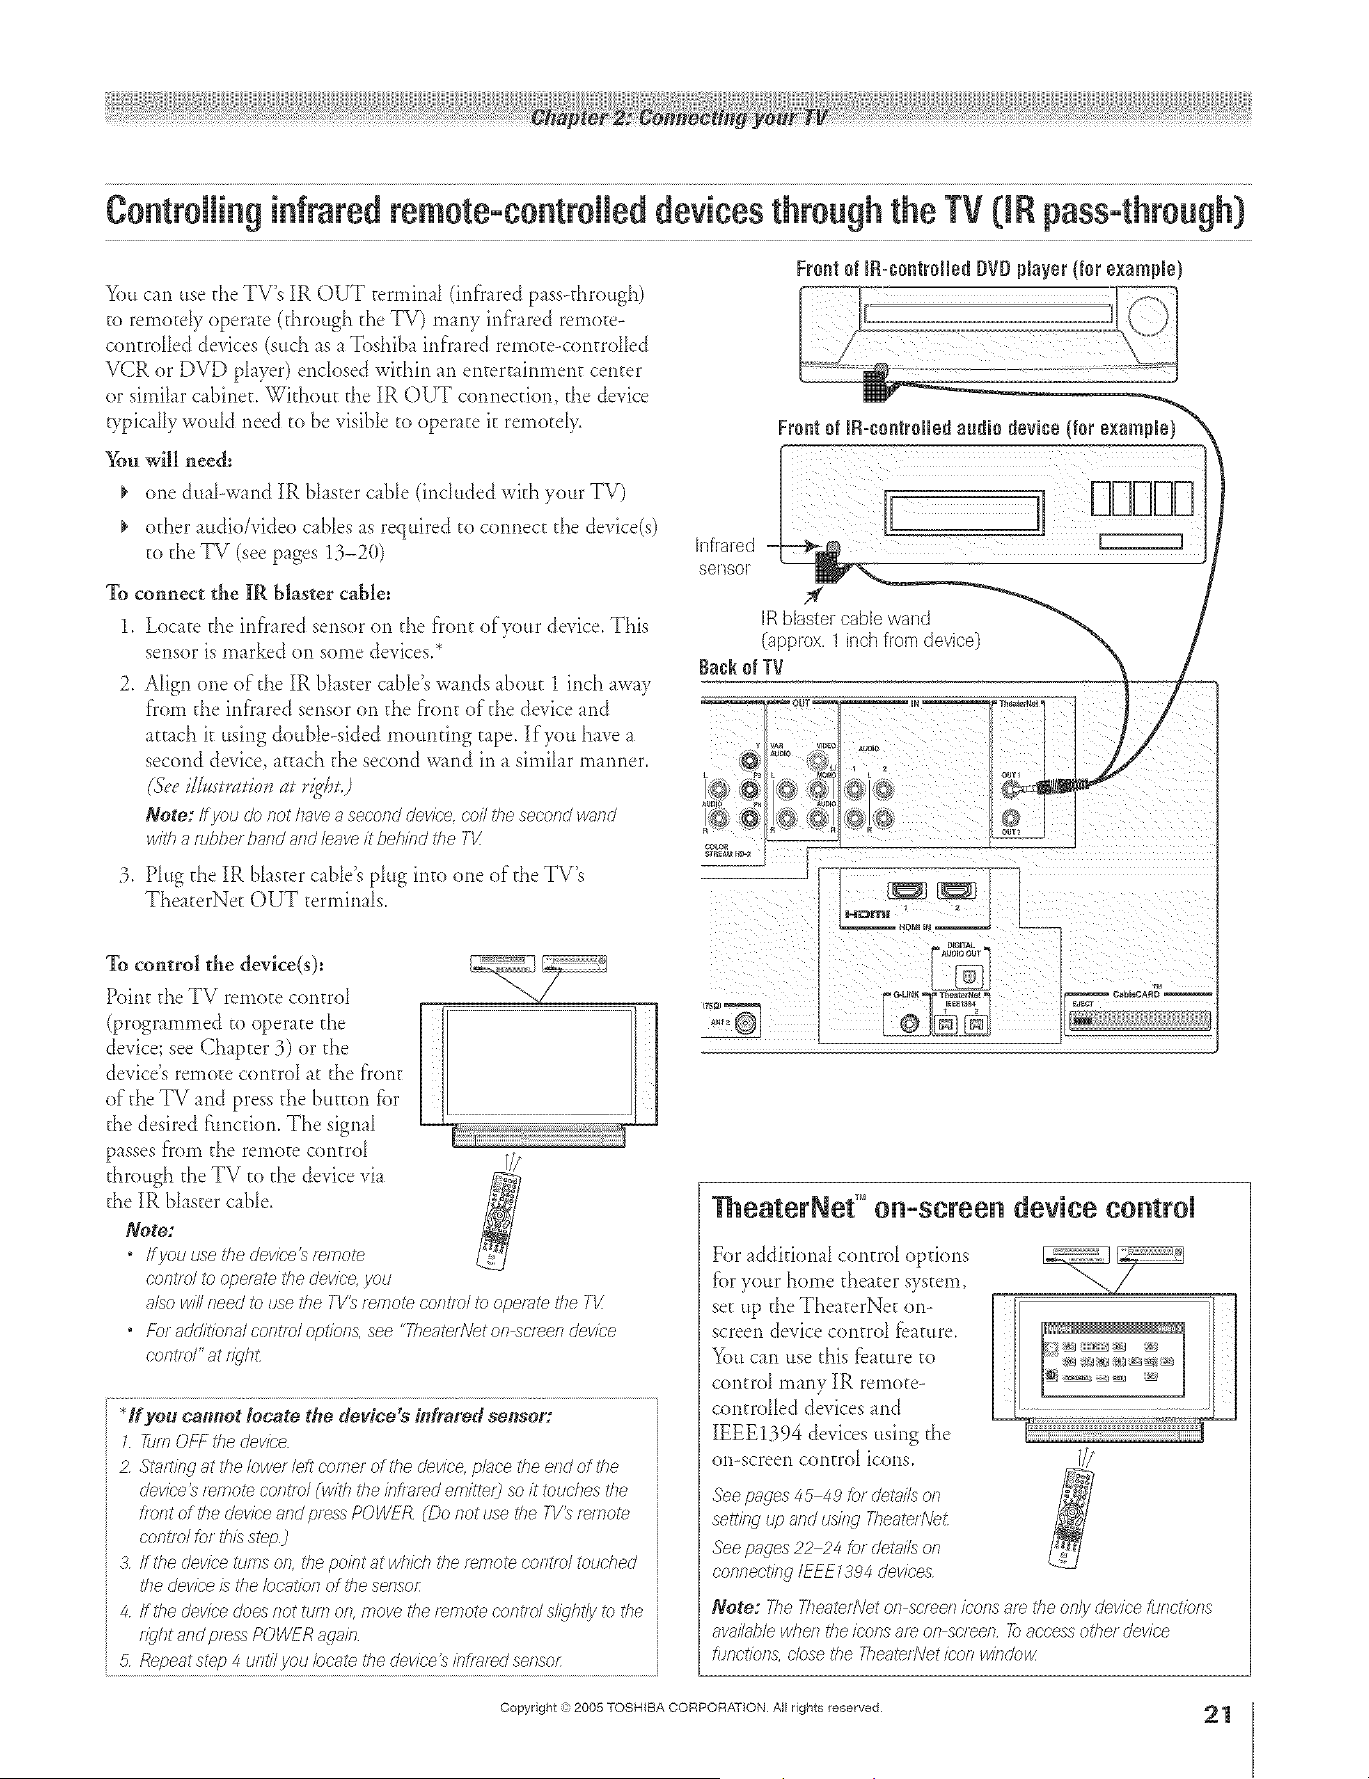
A ÷ L
ContrNling infraredremote-contrNleddevicesthrough the TV 0 Rpass-through}
%u can use t,heTV's IR OUT t,errnh_aI(infrared pass--t,hrough)
t,o rernotdy operat,e (t,hrough t,heTV) many inf}ared remote-
cont,rdled devices (sud_ as a Toshiba inf)'ared remot,e<ont,rdIed
VCR or DVD player) enclosed within an ent,ert,flnment, cent,or
or similar cabinet,, Wkhout t,heIR OUT connect,ion, t,hedevice
wpically would need t,obe visible t,ooperat,e it,remot,dy,
%u will need:
one dual-wand IR Nast,er cable (included wit,hyour TV)
od_er audio/video c_bles as required t,ocormect, t,he device(s)
t,od_eTV (see pages 13-20)
%
1.
2.
connect the IR blaster cable:
Locat,e t,heinfrared sensor on t,he front,of your device, This
sensor is m_rked on some devices,*
Align one of t,he IR blast,orcable's wands about, 1 inch aw_y
f}'omt,he inf'rared sensor on t,he f}'ont,of t,hedevice and
at,t,achit,using double-sided mount,ing t,ape, If you have a
second device, at,tach t,he second wand in a simihr manner,
(&.'eillum*uiouat rig@j
Note: If you & not lave a second devk;'e, con the second v>_/ld
with a fur)her band and leave h"behind the TX
3, Plug t,heIR bhst,er cable's plug int,o one of t,heTV's
Theat,erNet, OUT t,erminals,
To control the device(s):
Point, t,heTV remot,e cont,roI
(programmed t,o operat,et,he
device; see Chapter 3) or t,he
device's remote cent,roI at, t,hef}'ont,
of t,heTV and press t,he but,ton for
t,hedesired f:uncdon. The signal
passes [i'om t,heremoEecont,rd
t,hrough t,heTV t,ot,hedevice via
t,heIR blast,orcable.
Note:
If you use rhe device _ remote
c'ontld to ope/_ffe rite device, you
also will need to use tile TV_ remote contie/ re operate the T_
• Foradditional conrft,)/option& see "Theatee'Vet OfT_cl_en del//ce
c'ont/d" at fl_'h£
ff you camtot locate the device s #ffrared sensor:
1 fien OfT the device
2 St_ut/erj at the Iowe/left teeter of the device, ph£e the end of the
devk-e _ f_more coffffol _w/th the fnflFff_d em/tte/3 so it touches the
f/ofTt of the devk:e and p/ess POWER (Do riot use the T1/_ remore
control for th/:sstep)
3 ffthe devk;'e rums on, the pobt at which the twnote control touched
/77edevk;'e /s the bcat/on of the sensor
4 ffthe devk-e does not turn on, f77ovei'he r_i77otet,;ontldsl/ght/y ib the
light and press POWFR arab
5 Repeatstep 4 unti/i/ou locate the device} bflT_r_dsensor:
hlfrat,ed
sensor
Frontof IR-contr011odDVDNayor {forexample)
IRbBstet,cablewant,J
(approx.1inchfromdevice)
TheaterNef '°o -scree device control
For addMonaI cont,rol options
[_.}ryour home t,heat,ersyst,em,
set up t,heTheat,erNet, on-
screen device cont,rd fbamre,
You can use t,his_bamre t,o
cont,rol many IR remot,e-
cont,rdled devices and
IEEE1394 devices using t,he
on-screen cont,rol icons.
m
See pacms 45 49 for dehffLs on
settieg up and using Theate//Vet
See pacms?2 24 tot dehff/s on
connecting IEEE 7394 devices
Note: The T/TerfferNeton scleen /t,;ofTsare t/le O/l/ydevice furlct/orls
awl/lable when the icons 8f_ on so'leon _) access elher device
fur£tio/T& close the fhea_dVet icon windo_/
Copyright @ 2005 TOSHIBA CORPORATION All rights reserved
21
HM95 R1 012-25 061505 21
÷
6/24/05, 9:13 PM
÷
r
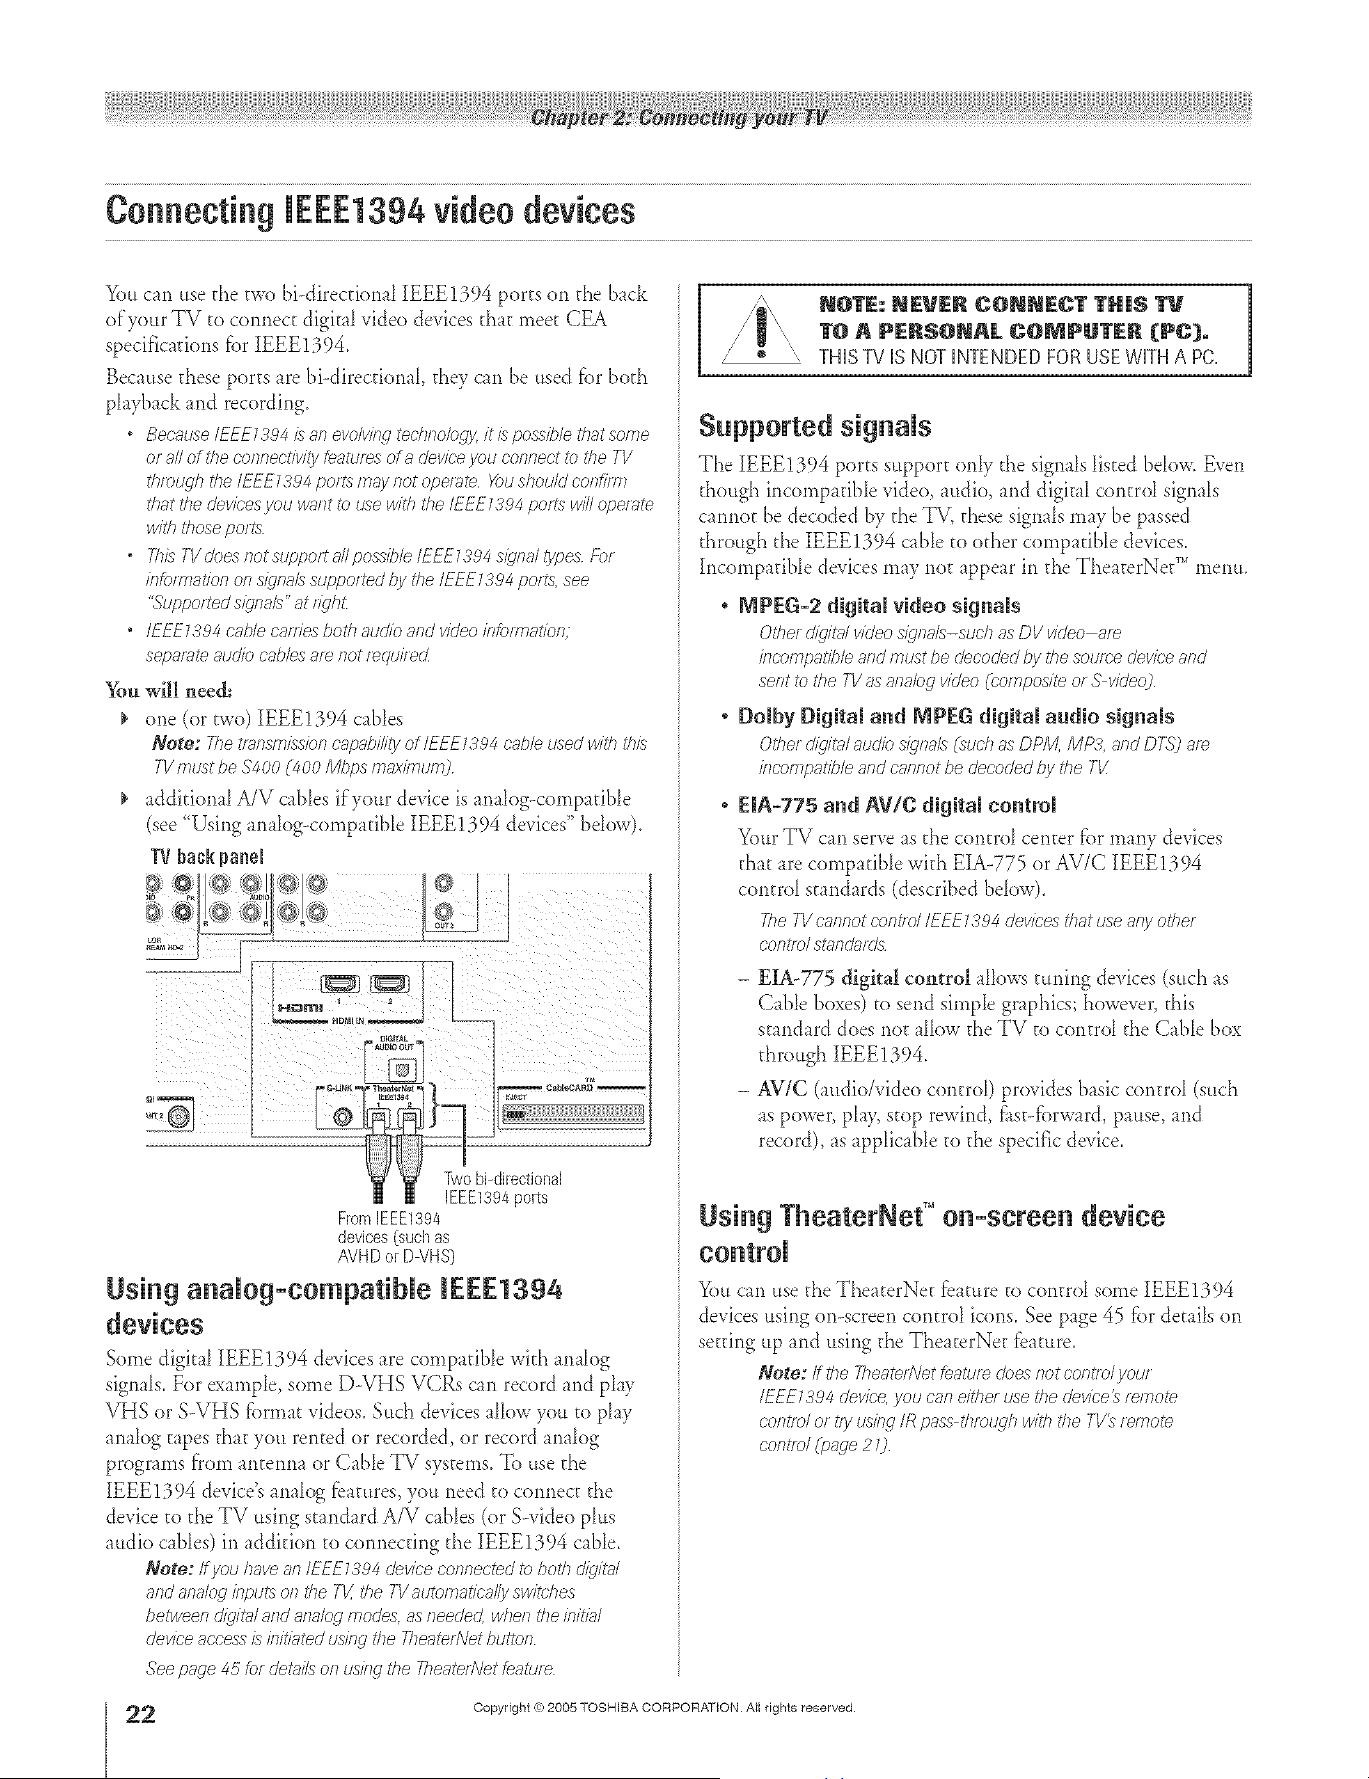
A ÷ L
Youcan .so the two bbdkecfionaI IEEE1394 ports on the back
of'your TV to connect digital video devicesrhar meet CEA
specificalions fbr [EEE1394.
Because these ports are hi-directional they can be used fbr both
playback and recording.
Because lEEF13_4/san evoMej _ecbnolugyit lspossibleti_atsoe_e
or aNof ibm cennectivity tea/uses of a devk:e you comlect ib the 7V
tbmqgb the/EEE7394 po/ts may not dlpemte Youshouk/ confi/el
that the devk;'esyou vmnt tu _se with _'heIEEE1394 peas Jvi/Iope/_/te
withIhoseports
" fl_/s TVdoes notsupporta//poss/ble/EEE1394 s/gvlal lypes Fu/
/ntumlatiun el., s/_'na_3suppo<ted by the IEEE1394 pot/s, see
"Suppo<ted sly'hal3" at t_c/hL
o IEEE7394 cable ca<Tiesboth audkl and video kTkWTaaflP/7;
separate atJd/(2cables a/e not mqui<ecZ
You will need:
one (or two) [EEE!394 cabbs
Note: 777etmnsmisskln capability ot lEF£TSO4 cable used with dam
7l/177tJSt be $400 (400 Mtlps FYla)fflTIte H_
addirional A/V cabbs if your device is analog-comparibb
(see <'Usinganalog-compadbb IEEE1394 devices" bdow).
TVbackpanel
},gtoQ:%<<Q
From[EEE1394
devices (such as
AVHD or DVHS)
Using anaUog-eempatibUe [EEE1394
devices
Some digkA {EEE1394 devices are compatible widi analog
signals. For example, some D-VHS VCRs can record and play
VHS or S-VHS fbrmat videos. Such devices allow you to play
analog t_pes that you rented or recorded, or record analog
progran)s from antenna or CabIe TV systems. To use the
{EEE1394 device's analog fbatures, you need co connect the
device to the TV using standard A/V cables (or S-video plus
audio canes) in addkion to connecting the IEEE1394 cane.
Note: If /ou have an IEFE1394 device connected _7>both dig/?al
and analog inputs o/7 the TV. the 7?'automatically switches
betwee/._d/q/ta/ and analog modes, as needed, when the bit<a/
device access/s initiated udng the TheaterNet btfitof7
See page 45 tot details Of? t.IS/f W _'heTheateAVet feature
2
HM95 R1 O 2-25 061505 22
Sapported sigaaIs
The IEEE1394 ports s,pport onIy the signals Iisted bdow. Even
though h)comp _dbIevideo, audio, and digit A control signals
cannot be decoded by the TV, these signals may be passed
through the IEEE1394 cable to other compatible devices.
h)compatible devices may no_ appear in the The _terNet" menu.
, MPEG-2 digital video signals
Other d/dtal vkleo s/qr_gJs-sudT as DV vkleo ale
/rlcdlfnpal'/b/e and must be decoded by the soume devk:e and
sent to the TV as a/labg video (compos/l'e or S video)
° Doiby Digital a_d _PFG digital audio signals
Other d/gUalau&b s/gv_als(suchasDPM, MP3, andD<g')a4_
/?lcompat/b/eandcannotbe decodedtly the Tk'
o EIA-775 a_d AV/C digital coatml
Your TV ca<)serve as the control center _br many devices
that are compatible wkh EIA-775 or AV/C [EEE1394
control standards (described below).
TileTVcannotcontrolIEEE1394devicesthatuseanyother
controlsmnda/ds
- EIA-775 digital control aIlows tuning devices (such as
Cable boxes) to send sin)pie graphics; however, this
stand _rd does no_ allow the TV to control the Cable box
through IEEE1394.
- AViC (audio/video control) provides basic control (such
as power, pIa> stop rewind, fl<st-fbrward,pause, and
record), as applicable to the spedfc device.
siag TheaterNet TM oa-screea device
_fi)u can use the TheaterNe_ fbature to control some IEEE1394
devices using on-screen control icons. See page 45 _br details ol)
setting up and using the The_terNet _bature,
Note: if gm 7heate<Netfeature doesf_otcontrolyour
/EEE1384device,you caneithe<usethe dev/ce_temote
cofitrol O[try udng IRpass tllmtLqhwithtile TV_remote
central (page 20
Copyright (%2005 TOSHIBA CORPORATION AI rights reserved
÷
6/24/05, 9:13 PM [
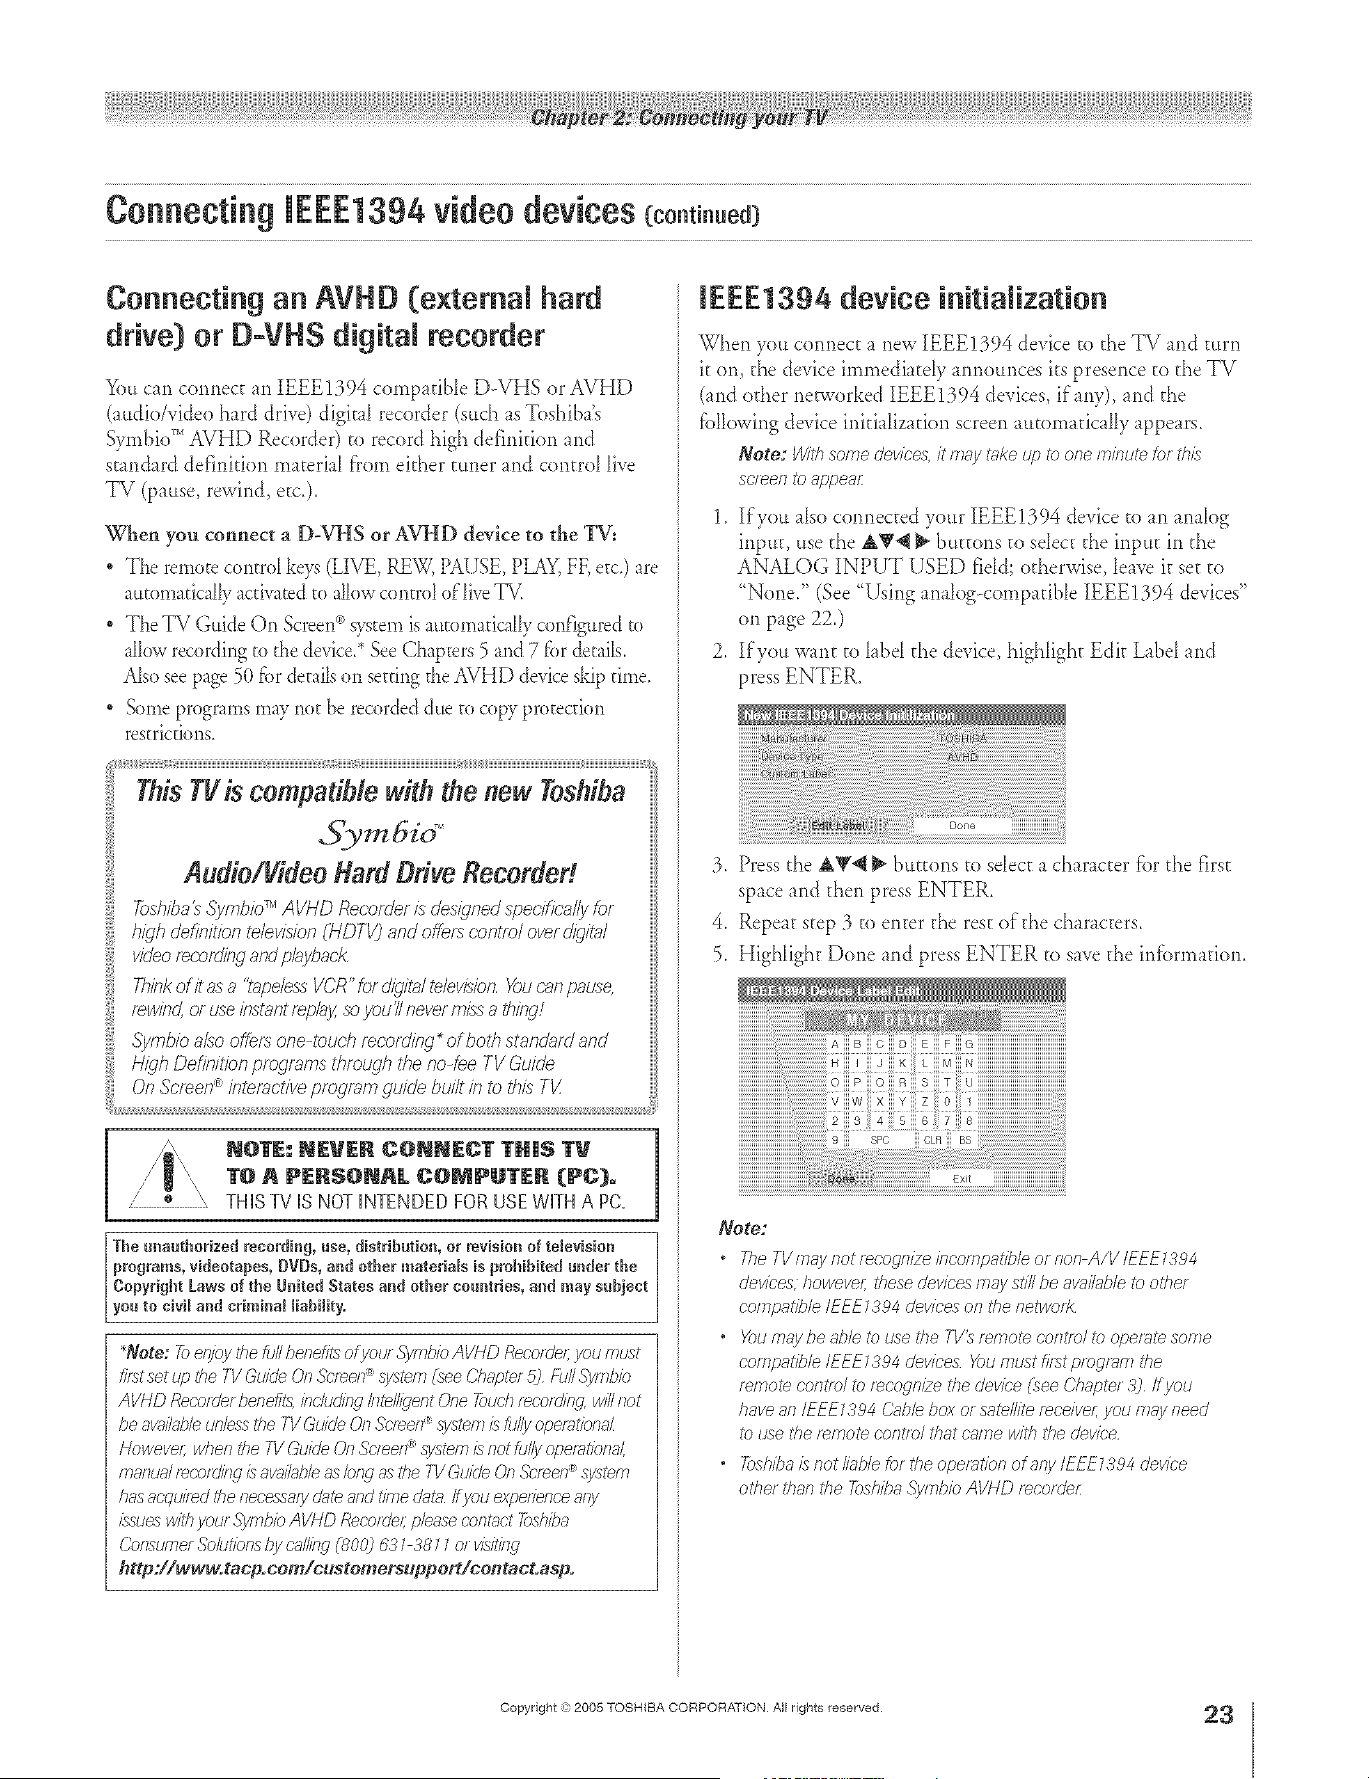
A ÷ L
Connecting an AVHD (extemN hard
drive) or B=VHS digitN recorder
_)u can cormec_ an IEEE1394 compatible D-VHS or AVHD
(audio/video hard drive) digk_1 recorder (such as Toshiba's
Symbio _''AVHD Recorder) to record high defirfifion and
s[andard definidorl ma[erial f'rom ekher [uner and con[rd live
TV (pause, rewind, etc.).
When you connect a D-VHS or AVHD device to the TV:
• The remote corltrd keys (LIVE, RE'W, PAUSE, PIM_Y,FF, etc.) are
automatically activated to aik_w control of'live T_.
• The TV Guide On gcreen _>s}_telll is automaddly configured to
allow recording to the device.* See ChapEers 5 and 7 for details.
Also see page 5(t for derails (m setting the AVHD device skip rime.
• Some programs may not be recorded due to copy protection
rearicckms,
high definitlbn tdevlsion (I-/DTV) and offef:_ centre/over @/?a/
i Think of) as a %,pe/ess VCR" fbr @%4 te/evidon, You r'_,npause,rewlhd, or use Ihstant f_pk!y, so _/ou'//never mixs a t/uktq!
:{ H,T¢,Oem,>n provrans throwh >e no-feeTV5uicle
N@TE: NEVER C@NNECT THIS
1"@R PERS@NAL g@NPU1"ER (PC}.
Z * \ THISTVISNOTINTENDEDFORUSEWKHAPC.
The unauthorized recordiug, use, distribution, or mvisio, of tdevision
programs, videotapes, BVDs, and other materiaWs is prohibited under the
Copyright Laws of the United States and other countries, and may subject
you to civil and criminaJ liability,
*Note: Tb e@gythe MI benefits of you/ Symbio AVHD Reco/de/; you must
_?_tset up the 71/Guide (?n._o'fee/;/_Systcn _ f :_ee Chap?_! ,15) f-tJ//.c_)/lT?/)io
AVHD RecorderbeneA;_ab('/,sJ(l'/f(4 IIl_NIJel?t One Touch F_COILt/f(,_ WiN I?ot
be a_/MJle ufgo3sthe TV Guide On Screen_ system is fully o/;)eiF)t/onr-lL
Howeve/; wheR the IV &aide (Jn .5'c/een_ system is Rot Mly opemObnal,
[F]FlflUk]I rod.or(lit W is av_J/a_)/e as bn(1 as tile TV Guide On Street?: system
has acqu/l_d be necessary dnte and time dat_ Ifyou expelience a/g
/_:suo_1w/l<hyour .S)ilTli)iOAVND Recc)tdeLpier,so COlll_d 2)slTit)8
Consume/Solot/ons t)y crg'ing (800) 5'3 _ 38 __ el v/sqt/fW
http:llww_otacp.com/c_stomers_pport/cootact.asp.
JEEE1394 device initialization
When you connect a new IEEE1394 device to the TV and turn
it on, the device immediatdy armour_ces its preser_ce to _heTV
(and edger networked [EEE1394 devices, if any), and the
fbllovvingdevice initialization screen automatic _llyappears.
Note: With some devices, it m,_y _ke up to one minute k)r this
so_e/_ to appeal
1. ][fyou aIso cormec_ed your IEEE1394 device to an anaIog
input, use d_e&_ _ bu_ons to seIec_ the inpu_ in d_e
ANALOG INPUT USED field; otherwise, lewe it set to
"None." (See "!..7singanalog-compatible [EEE1394 devices"
on page 22,)
2, ][fyou want to label the device, highligh_ Edit Label and
press ENTER.
3. Press d_e &'_@ _ buttons to sdect a character fiard_e first
space and d_en press ENTER,
4. Repeat step 3 to enter the rest oldie characters.
5. Highlight Done and press ENTER to save the irdbrmadon,
Biii C iii £/ Eiii Fiii G iiiiiiiiiiiiiiiiiiiiiiiiiiiiiiiiiiiiiiiiiiiiii
I iii Jiii K L iii M iii N HHHHHHHHHHHHHHHHHHHHHHH
Note:
* TheTVmayr_otrecognizeincompatib/eofnor_A/V/EEE_384
devices, howeve/; these devices may still be avni/g¢b/eto other
compatible/EEE_a94 devices on the netwod<
o X>umay be _d)leto use the TVD f_fr]ol_ coRt/o/to opetTite Soi?Te
oofz?patib/e/EEE _a94 devices X)u must fi_stptogf>?lTithe
f_fr]o_e cg)]l[lo/ to [_CO_R/ze the device _heeChapte/ 3) ff you
have all IEFE _a94 &_ble box or satellite f_ce/vel; you tT?aa/need
to dse the t>mote oontlo/ that crime with the devk'e
o _)shiba/s not Mb/e for the operation of any/EFE _394 device
othm than the _>shiba._yf77bbAVHD f_ootder
÷
HM95 R1 012-25 061505 23
Copyright ,3:)2005 TOSHIBA CORPORATION All rights reserved
÷
6/24/05, 9:13 PM
23
r
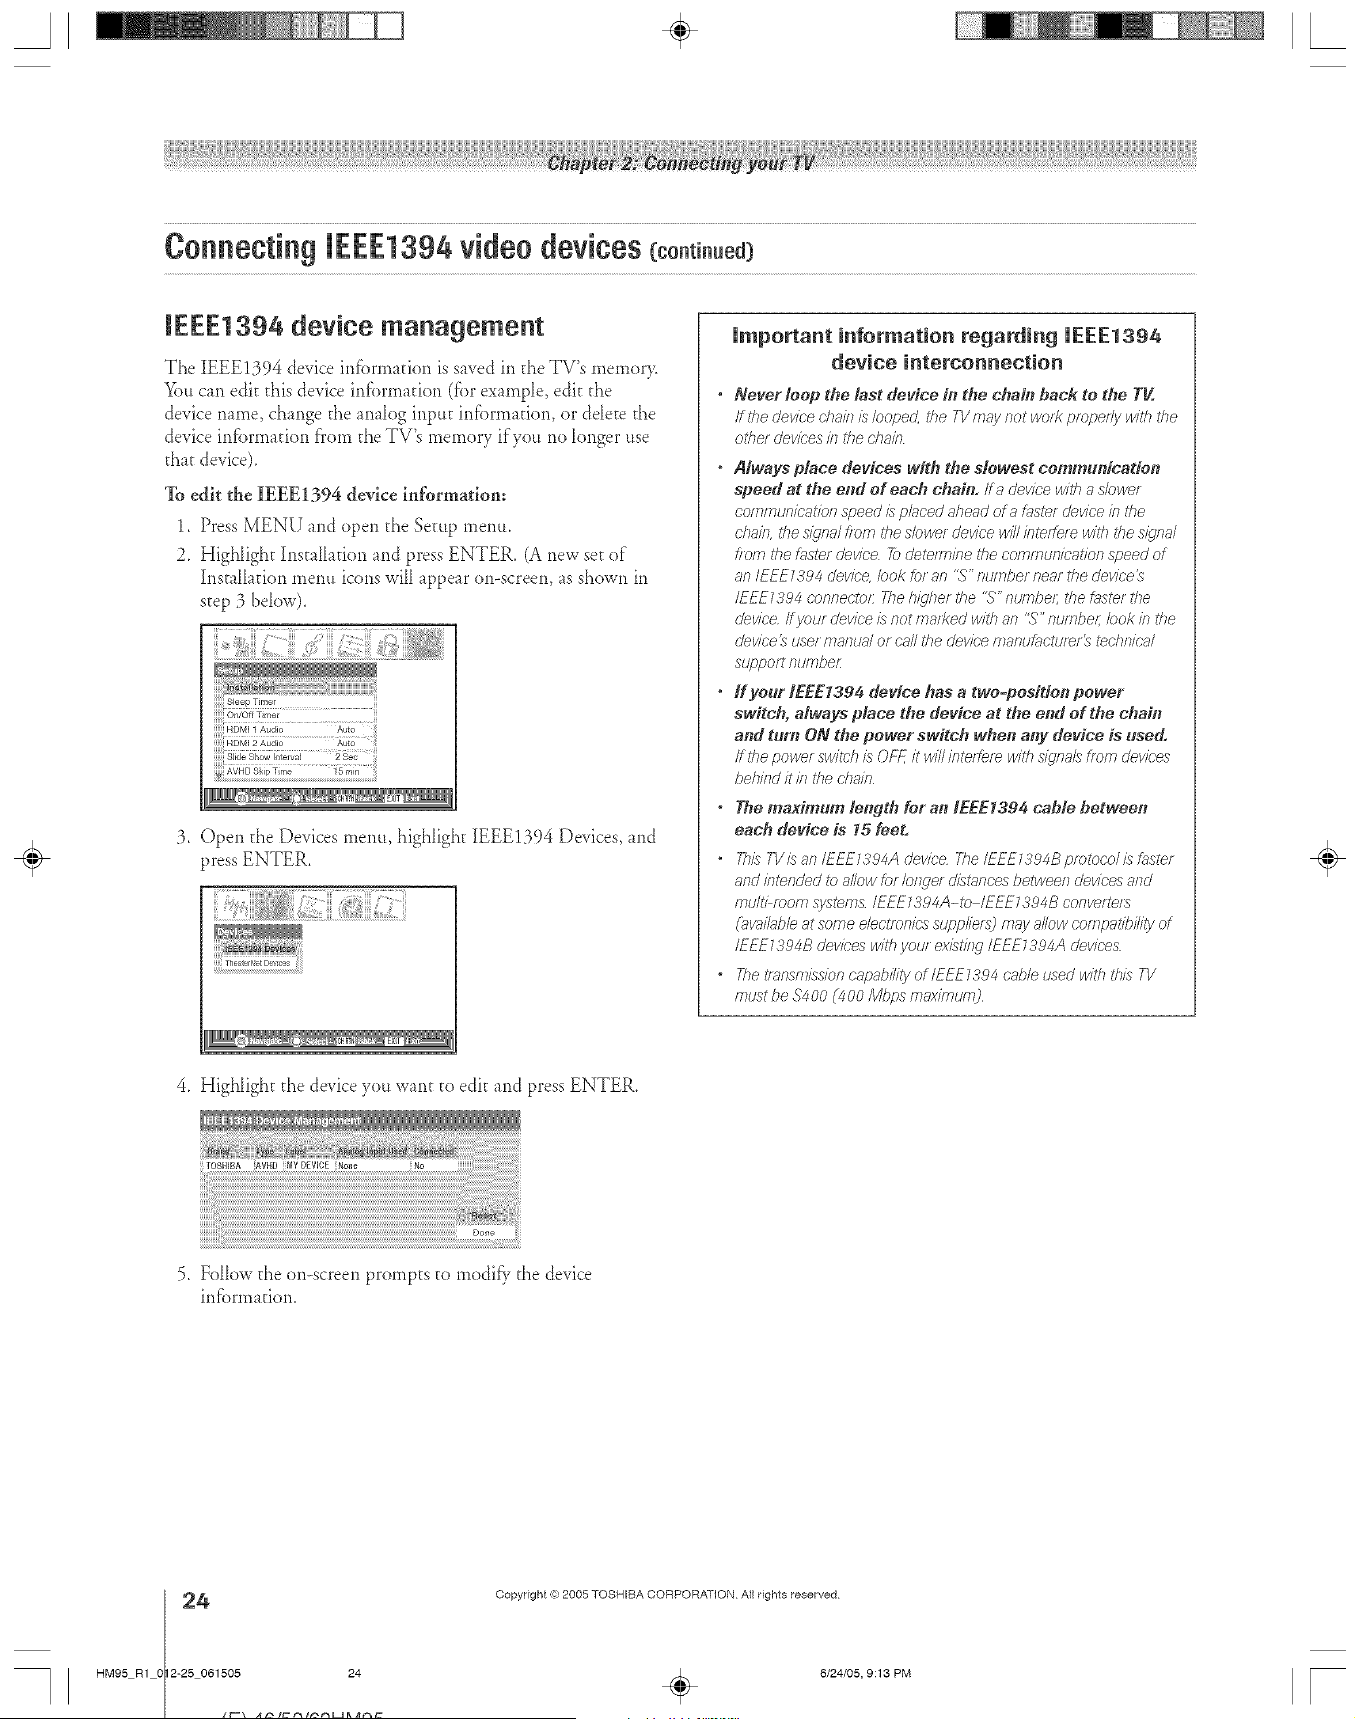
A ÷ L
IEEE1394 device management
The IEEE1394 device irdbrma[ion is saved in the TV's memor>
_)u can edi[ [his device irdbrmafiorl (fbr example, edi[ [he
device name, change [he arlalog input infbrmacion, or ddece [he
device irdbrmafion f'rom the TV's memory if you rio longer use
that device).
To edit the IEEE1394 device informatiom
1. Press MENU and open the Se[up mentt.
2_ HigNight InstaIladon and press ENTER. (A new set of
Installation merm icons will appear on-screen, as shown in
step 3 below).
:3. Open the Devices menu, highligh[ IEEE!394 Devices, md
press ENTER,
Thea_9retDeices
Important information regarding IEEE1394
device interconnection
• Never loop the last device in the chaff1 hack to the TV.
ff l'he Uevice chain i:_looped, the TV nlay not work pmpedy with the
otilel Uevices isl rITec'hain
" Always place devices with the slowest communication
speed at the end of each chain, ff a device with a s/cwe_
communication speed is pk_c'eciaheaci of ;_f_s_ef device in the
dlakl, the siqn;# from i'he slower cievice will inreffele will lY?es/_/nal
from #_eD_sterdevice 7k_dete/Tn/ne #_e OOh_lfTItoTioatiol?speed of
an I EEE139 4 device, bok tot an "S" nufFiber near the device 3
/FEE7394 connectcr 27e hi?her i'he "S" nu/<lbel; the taster the
cJevice ff yeur dJeviceis not ma_t<edwith an "S" number Icok b the
dev/ce ls user ffIalItJ_ll or call i'he device n7antJ[_ictu/_f _ tedflT/(-;a/
suppo/t nun7ber
• If your IEEE 1394 device has a two=positioo power
switch, Mways place the device at the end of the chain
and turn ON the power switch when any device is used°
If the powet sw#ch is OFF. it will inteffer_ with s/igna/3ffenl cievices
behind it kl the d}s,in
, ThemadmumlengthforanlEEE1394cahlehetween
each device is 15 feet.
• This TVis an IEEE1394A device 7he IEEE1394B protocol is _ster
and #Trended to allow for/of we/d/st_nc'es between devices and
multi morn system&/EEE7384A-to /EEE7394B convette/s
(;_?ilJble at SOfTIe electronic5 stJpplie152 /TTaJ/ allow COfTTi;;_ffiJility of
IFEE 7394B devices with yau/ ex/stiHg IEFE 7394A cievices
. The_/_ff_sn_issio/.,capabi/ityof/EEE7394cab/eusedwiththisT1/
must be $4 O0 (_O0 Mhps maximum]
4. HigNight the device yotl want to edit md press ENTER.
÷
TOSHIBA iAVHO iMYDEVIOE iNo_e
5. Follow the on-screen prompts to modi_' the device
irdbrm _fion.
4
HM95 R1 0 2-25 061505 24
Copyright ,{e:2005 TOSHIBA CORPORATION Atl rights reserved
6/24/05, 9:13 PM [

A ÷ L
* This connection is #ecessary for the Tg Guide On Screen _ system to work with your cable box to receive program listings and to
enable the Tg Guide On Screen _ recording features with your VCR.
* This connection is not necessary for AVND or D-VNS record#lg devices. See pages 23 and 50 for further details.
After you connect your devices to d_e TV, you will need to connect d_e G-LINK c_cable (ekher of the du_Fwand IR blaster cables
included wkh your TV) from your VCR and CaNe box (if appficaNe) a_ d_e G-LINK ® termina_ on d_e TV.
Note: TI/ @JJdeOR ,_ol_el?_ pfo_lFffYl CJ;)I?IISavailH/J/ethtTJtJc]h the/qN7 7aRd ANT2 antenna inputs and a/3o thre_4qhthe I/IDEO 1 inputs ff you
have a c';_hlebox connected _) VIDEO 7 TV Guide On Soiree ®ptog/_lTi d;ff_] is/lot a_ihds/e tlffetJgh ally other kT,ot£soft this T1! See i'he
cof?nectl()f?iRto/TTlatioll 0/?pages 73 25
The G--LINK°')connection is necessary to enable the fbllowing fbamres of your TV Guide On Screen®system:
" If you have a (;able box, yet* need to connect the G-LINK <_)c_ble from the (;able box to d',e G-LINK <_)terminal to receive ff,e
TV Guide On Screen<_)program listings for your Cable service.
" If you have a VCR, you need to connect d',e G-LINK °')cane from d',e VCR to d',e G-LINK ® terminal to use d',e TV Guide
On Screen<_)recording fb_mres.
To connect to the G-LINK ®terminah
1. Locate d_e infrared sensor on d_e front of your VCR or
Cd_Ie box. The sensor is marked on some devices.*
Frontef CaNebox
Align one of the GoLINK °')(IR bIaster) cane's wands about
1 inch away from the infrared sensor on the front of the
VCR and attach k using doubD-sided mounting tape.
If you have a Cable box, attach the other wand in a similar
mariner. (See i11ustrafion at right.)
Note: If you do not havea Cablebox coil the secondwand
/vl?ha robberband afTdleaveit behindthe T1/
Phtg the G-LINK °'_(IR blaster) cane's plug into d',e TV's
GoLINK <_terrain_b
Infrared I
sensor
G-LINK :_ (IR blaster) cable wand
(approx. 1 inch from device)
Backof TV
For details on setting up the TV Guide On Screen c°)system:
See Chapter 5.
...........7-I
For details on using the TV Guide On Screen _°_interactive ] [ // i_
guide:
program
See Chap_er 7, I©: _;0{Ig_ ;) /]g;) 12
......................................................... h0,<ll //o
*]f you cam_ot locate No device's infrared set_sor: _" .... I[_ j_ .... /_ !
_Jffl OFF l'he device _?_g_._,j
Z Starting at ihe lower leh"comm of the devk-e, pluoe the end of the
device_ temote 6"of}tld (_vith the i/lf/ated emitter) so it touches #_e
tlof_t of the cievice af?dpress POWER (Do t_ot use the T1/_ _emote
oont/d /or this sl_p )
3 ff the device rums on, the point at which the remote corltfe/_bud?ed
the cievice is the location of the seeso£
4 ffthe cievice does t_ot mm on, move the remote cof?/e)l sl@J}/ly/O/he
figJht aOd pres\_POWER armio
5 Reper;,tstep 4 unti/vou/mate the o'evice_ infrared senso£
÷
Copyright =):)2005 TOSHIBA CORPORATION All rights reserved
HM95 R1 012-25 061505 25
6/24/05, 9:13 PM
25
r
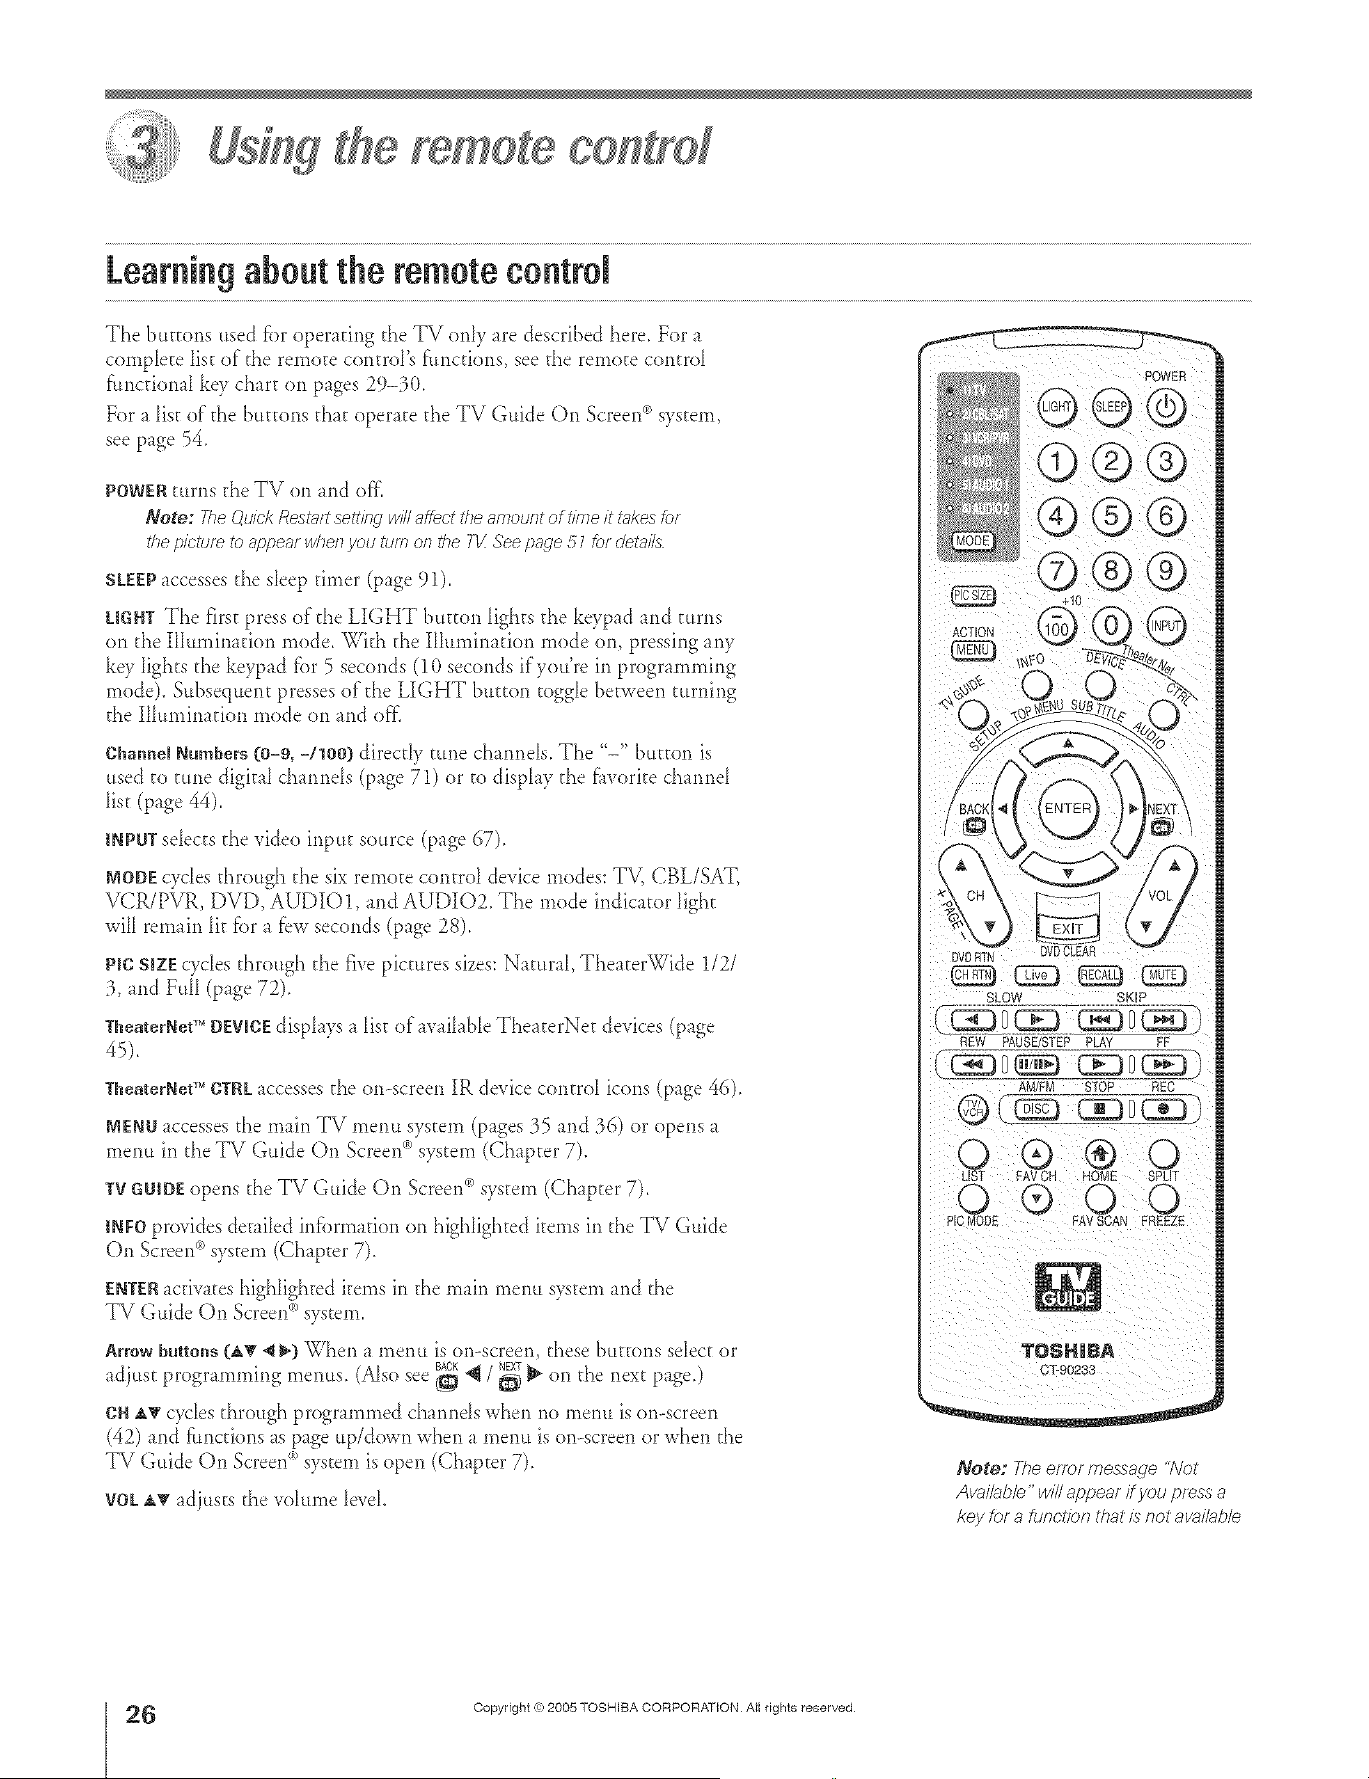
A ÷ [
yemete co#tyef
Learningabout the remotecontrol
The buttons used fi)r operating the TV only are described here. For a
cornplete Iist of" the remote controFs functions, see the remote control
fimcdonal k<v chart on pages 29-3(t.
For a list of d_e buttons dmt operate d_e TV Guide On Screen _ system,
see page 54.
POWER turns d_e TV on md off[
Note: Fhe Ou/ck Rest_fft seft/hg wdl affect the amount of tline /t _kes tcr
the picture to appeal wherl you turn ofl the I-1/See page 51 lot deta&
SLEEP _ccesses the s_eep diner (page 91).
LmNTThe first press of'the LIGHT button lights d_ekeypad and turns
on d_eIIIurninadon mode. Wkh d_e IHuminadon mode on, pressing any
key Iights the keypad fbr 5 seconds (10 seconds if you're in programming
mode). Subsequent presses of the LIGHT bu_ton toggle between turning
the Illumination mode on and ore
Channel Numbers (0-9, -/leO) direc@ rune ch nmels. The "-" button is
used to rune digkal ch nmds (page 71) or to displ V d_e fiworke chmnd
list (page 44).
INPUTsdects the video input source (page 67).
NODEcycles d_rough d_e six remote control device modes: TV, CBL/SAT,
VCR/PVR, DVD, AUDIO1, and AUDIOZ The mode indicator light
will rernfin lit fbr _ f_w seconds (page 28).
PlC SIZEcycles d_rough d_e five pictures sizes: Natural, TheaterWide 1/2/
:3,md FuN (p_ge 72).
TbeaterNetTM DEVICEdisphys _ list of wfllable The_terNet devices (page
45).
TheaterNetTM CTRLaccesses d_e on-screen IR device control icons (page 46).
MENUaccesses d_e main TV menu system (page_ :_5and :96) or opens
l'uenu in the TV Guide On Scree*¢>system (Chapter 7).
TVGUIOEopens d_e TV Guide On Screen_>system (Chapter 7).
INFOprovides detailed iiffbrmaflon on highlighted items in d_eTV Guide
On Screen°')system (Chapter 7).
ENTER_cfiv_teshighlighted items in the main menu system and the
TV Guide <'_
On Screen system.
Arrow buttons (d_v _ _) _qler_ a rnenu is or>screen, these buttons select or
adjust progr mm_ing menus. (Also see _ _ / _ _ on d_e next page.)
OH _' cycles d_rough programmed channels when no menu is or>screen
(42) and fhncdons mspage up/down when a menu is on--screenor when the
TV Guide On Screen<_)system is open (Chapter 7).
VOL_ _djusts d_evohtme level.
Note: The errer message "Not
Avai/_b/e" w/2 appear if you press a
key for a function that/s not avai/ab/e
÷
26
HM95 R1 O 6-34 061505 26
Copyright (%2005 TOSHIBA CORPORATION A_Irights reserved
6/24/05, 9:26 PM [

A ÷ L
Learningabout the remote control(co.t ..ed}
EXiTdoseson-screenmemtsand d_eTV Guide On Screen<_system,
CHRTNretttrllS to the hst viewed channel ([)age 71), or stops the pictatre viewer slide show
(page 88).
kb.*ere_urns viewing of d_e TV back to the live program, while continuing to record to d_e
Toshiba Symbio Cv AVHD recorder (pages 23 and 50).
RECAULdisphys TV setting infbrmadon on-screen (page 92).
MNTEreduces or turns off'd_e sound (page 84).
W/VCRselects TV mode to view one program while recording anod_er.
SKIP/SEARCH_Hqand b_ jump fbrward and bacbvard one day in the
TV Guide On Screen<_listings (Chapter 7).
LISTdisphys the Toshiba Symbio CMAVHD recorder play list (if available) (page 23).
FAVCN AT tunes to the next higher/lower fiworke channel (page 44).
HO[wE(_) accesses the home f'tmction of the channd browser fbature (page 69)
BACK NEXT
_ / _ _ While watching TV, d_ese buttons open the channel browser banner and ume to
d_e previous/next channel in d_e channd history (page 69). (Also see "Arrow bttttons" on
previous page.)
SPUTturns the POP feature on and off"(page 76) or locks/unlocks the TV Guide On Screen°'_
video window.
PlC MOBEsdects d_e picture mode (p_ge 79).
FAVSCAN_ccessesthe f_worke channe_ search f'tmcdon (page 78).
FR_:EZEaccesses the f'reezef:e_ture (page 78).
Remote control
effective range
Foroptimumperformar_ce,aimthe remote
controJdirectlyat theIV andmakesure
thereis no obstructionbetweer/the
remote controland the FV
Point remote controJ
toward remote sensor
oil front of TV.
16.4 ft (5m)
÷
HM95 R1 026-34 061505 27
Copyright ,3:)2005 TOSHIBA CORPORATION All rights reserved
÷
6/24/05, 9:26 PM
27
r
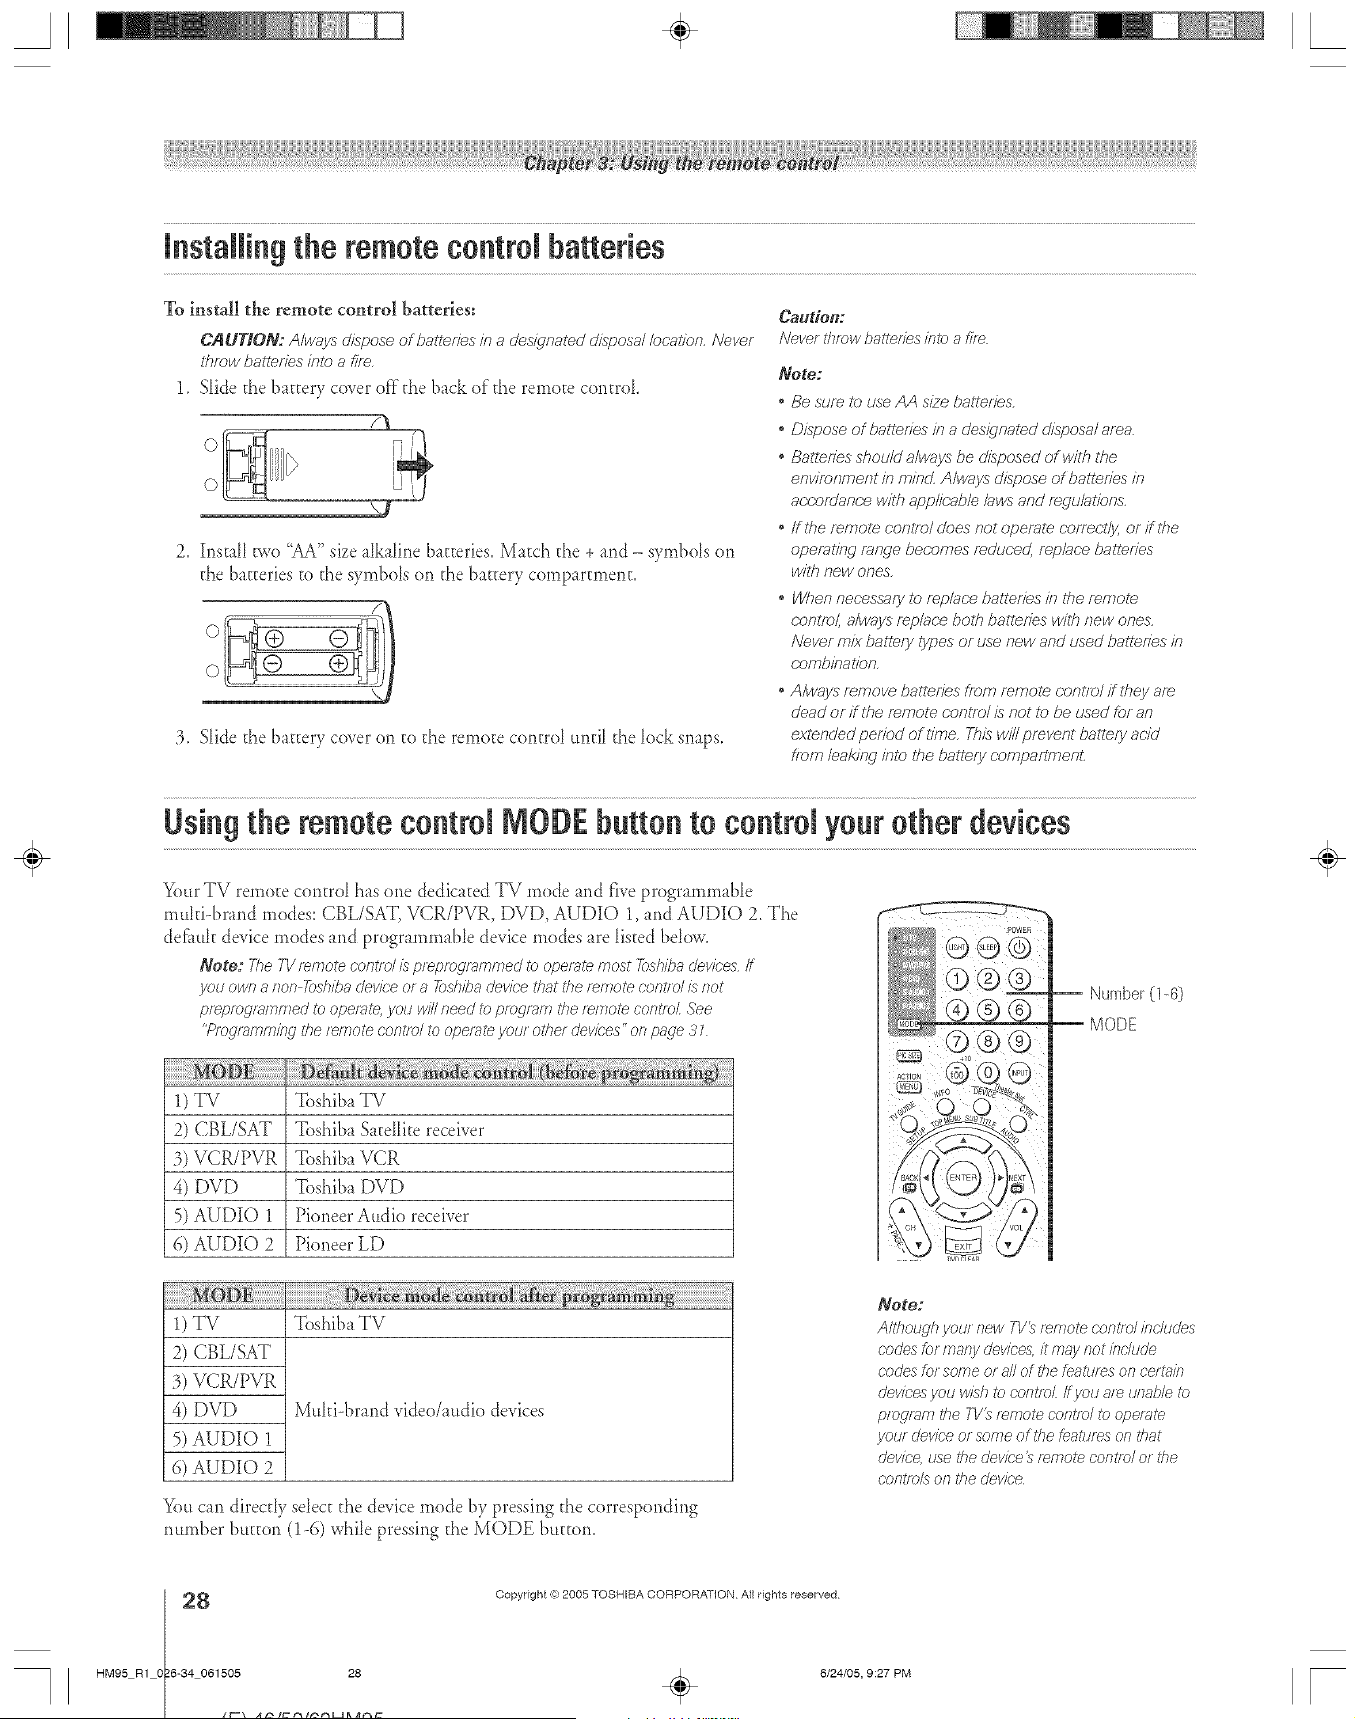
A ÷ [
instaRing the remote eontroJbatteries
To instal| the remote control batteries:
C_tLJTIO_: A/ways dispose of batt_f7es #7 a (Jes_dffpated disposal/ocatp_n. Never
tf_row batteries/n/o a fife,
1. Slide the battery cover of}"the b_ck of the remote control
2, Install two "AA" size _[kaline b_tteries, Match the + and - symbols on
the b_tteries to the symbols on the battery cornpartn_ent,
:3. Slide the battery cover on to the remote control until the lock snaps.
Caudert:
Never throw baYenes /?Jtca f/Te
Note:
, Be suf_ to _JseAA s/2e batteries,
, Dispose of ba/leffes in a des_qnal_d disposa/area
, Batteries shoiJ/d a/ways be disposed of with the
environment in min_Z Air,lays dispose of batteries m
a(;c;ofUanc;e w/tfl appl/c;ab/e /aws and f_gu/at/ons,
, ff the mnpole conl;,o/does not operate correc;t/y, or flUTe
operating range bec;omes f_dur;ed, f_p/sce batteries
w/l# new ones,
, When nec_essafyto f_p/ace battefPes in the remote
(;onl/o/, a/ways f_p/ac-e bog7 batteries with new ones,
Never mix ball_ly types or use new and _Jsedbatteries in
r;ofTT_JilTa17on,
. Always f_move battefTes ff_)n7f_÷nTotec'ons7olif ihey af_
dead or if the f_ngote c;ontlol D not to be used for an
extended pedod of I/?Tle,This w/// prevent battery acid
ifOrb leakif_g inl_ the battery (-ofnpaflr_penL
Using the remoteeontroJIVIODEbutton to eontroJyour other devices
Your TV remote control has one dedicated TV mode and five programmable
multi-brand modes: CBL/SAT, VCR/PVR, DVD, AUDIO 1, and AUDIO 2. The
def_ttlt device modes and programmable device modes are listed belov¢.
Note: 7710TV _e_notecont/ o/ is prepf_)_ra_nnped i_)operate most _shiba devices if
you own a non 7q_shibadevice o_a 7&siena dev/c'e that the _ernote c'nnt/d /;snot
pf_pmgi_;mrned to operate, yotJ win need i_ protean7 tl_e f_/770_econt/_)_See
"Pfog_p_mm/hgthe t_f770tecont/o/ to operate your otl_et dewbes" os_page ,9
1) TV
2) CBL/SAT
3) VCR/PVR
4) DVD
5) AUDIO 1
6) AUDIO 2
Toshiba IV
Toshiba S_te[[ite receiver
Toshiba VCR
Toshiba DVD
Pioneer Audio receiver
Pioneer LD
-- Number (1-6)
-- MODE
1) TV Woshib_TV
2) CBL/SAT
3) VCR/PVR
4) DVD Muhi-brand video/radio devices
5) AUDIO 1
6) AUDIO 2
Yott candirectly select the device mode by pressing the corresponding
number btt_ton (1-6) while pressing the MODE buttom
Note:
Altl_ough you/new T1/_ _mote _'om?olinckJdes
cndes fcr many devices, it may not/nchsde
cndes for some or all of tile featts/>s on re/fain
devices jlou wish tO cont/o/ ff JlOUar_ Llna/J/e tc
pfogian7 tile TV_ r_npote oon_/o/ to cJpe/_7_e
_CPtWdevic'e ot some of the Leatures on that
dev/c< use the dev/d'e_ remote control or the
c'nnt/o/s on 171edev/c'e
÷
8
HM95 R1 0 6-34 061505 28
Copyright re:2005 TOSHIBA CORPORATION All rights reserved
6/24/05, 9:27 PM [
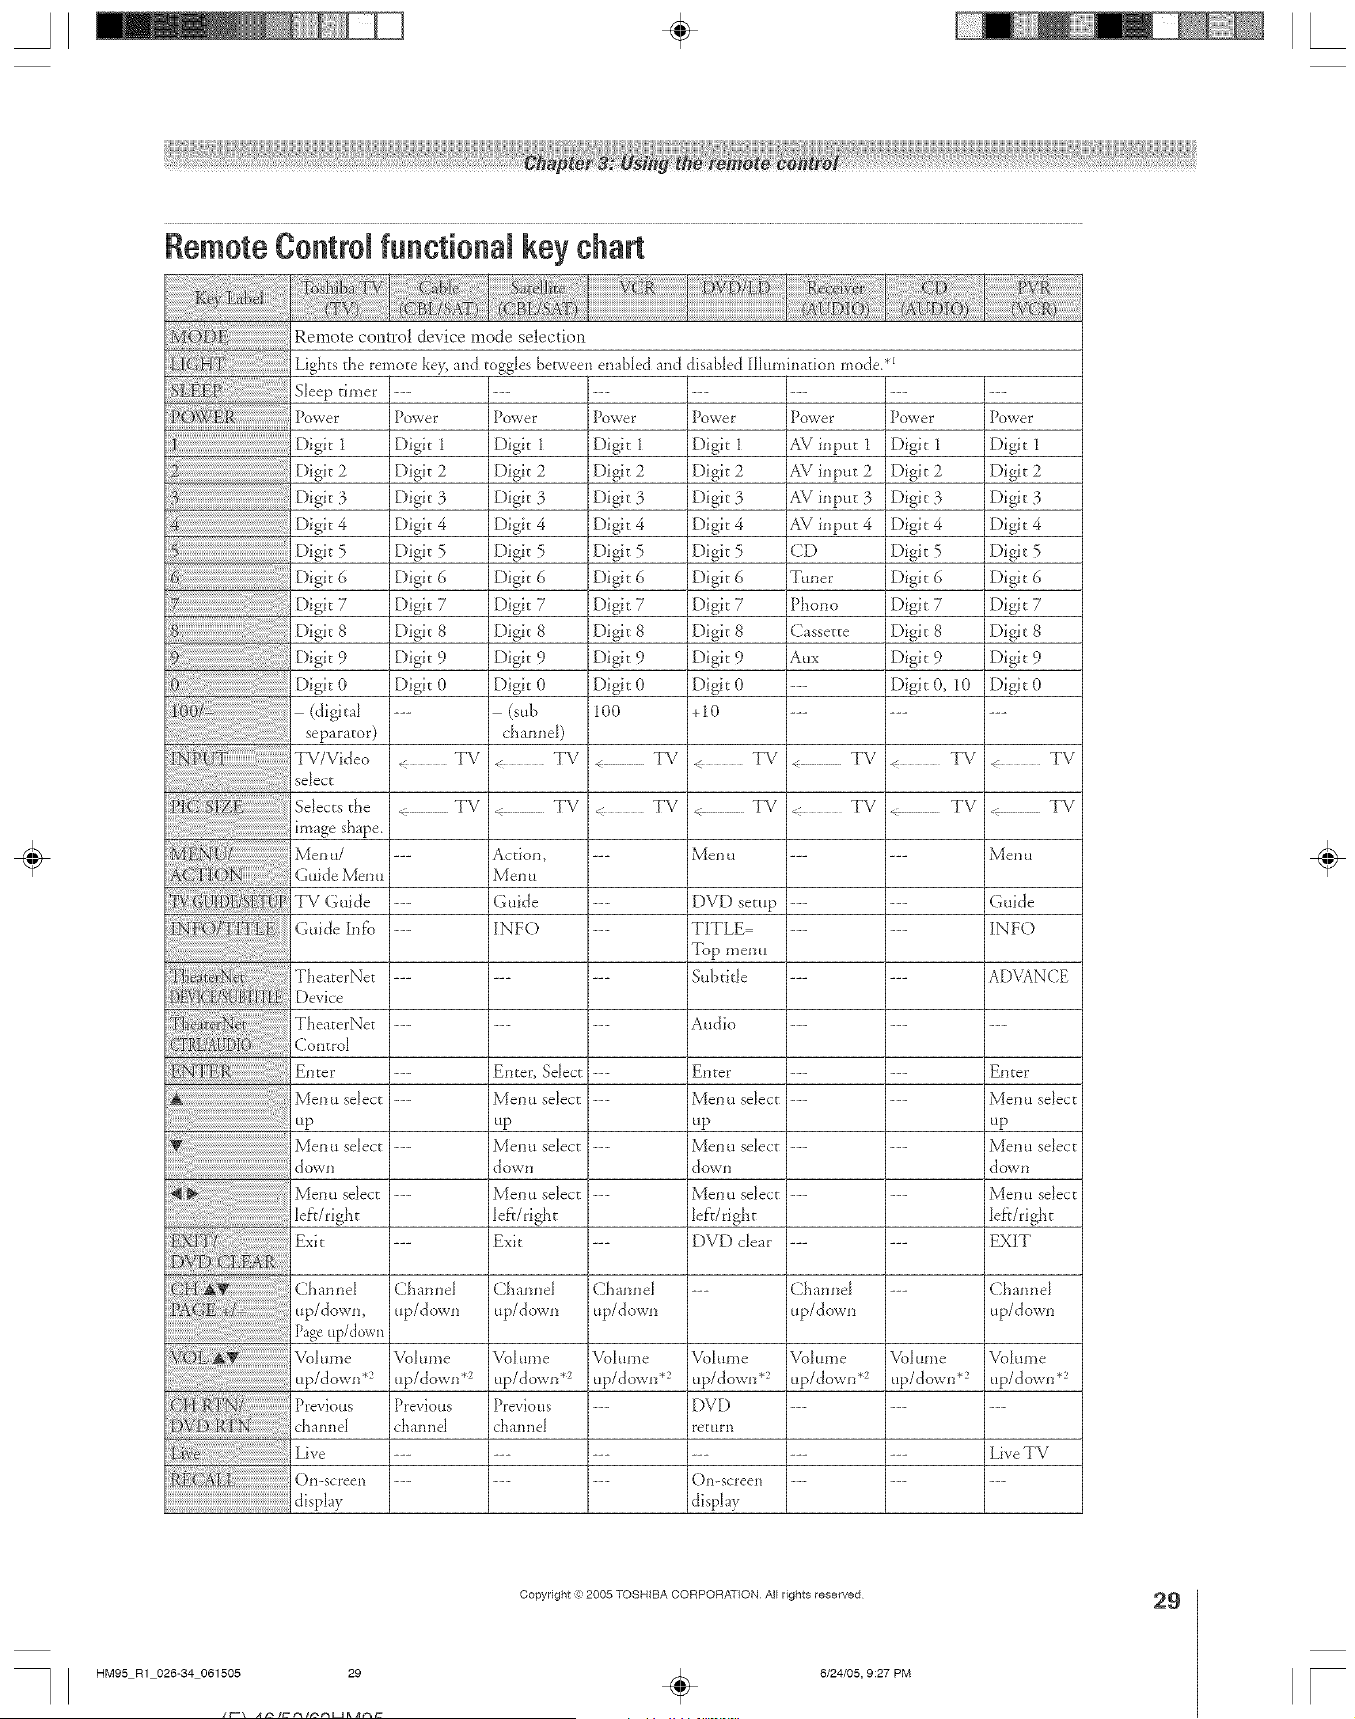
A ÷ [
Remote Control functionam key chart
Remote contro! device mode selection
Lights the remo_e ke?_and toggles [_erv,'eenenabled and
S eep t _e ..........
powP, jPowe Po,,e,: Po,,e Po,ve,
Digi_ 2
Digit 3
Digit 4
Digit 5
Digk 6
7
Digk 8
Digit 9
Digit 0
(digital
separator)
TV/Video
select
Selects t}'ie
image shape.
Men u/
Guide Mer!!
TV Guide
Guide h_k'o
TheaterNet
JDevice
TheaterNet
Control
Enter
Men u select
up
Men u select
do'vii
Men u select
lef}/right
Exit
ChanneI
up/down,
Page .p/dowl_
Volume
up/down*
Previous
channel
Live
On-screen
di@ay
Digit 2
Digit 3
Digit 4
Digk 5
Digk S
Digit 7
Digit 8
Digit 9
Digit 0
disal>led Hhmflnation mode/l
Power
Digit 1
Digit 2
Digit 3
Digit 4
Digit 5
Digit 6
Digit 7
Digit 8
Digit 9
Digit 0
+10
Power
Digit 1
Digit 2
Digit 3
Digit 4
Digk 5
Digit 6
Digit 7
Digit 8
Digit 9
Digit 0
< TV ,. TV < TV
,_ TV < TV TV
--- Men u Men u
--- DVD setup Guide
--- TITLE INFO
Top menu
--- Subthle ADVANCE
--- Audio ---
Digit 2 Digit 2
Digit 3 Digit 3
[)igk 4 [)igk 4
Digit 5 Digit 5
Digit 6 Digit 6
Digit 7 Digit 7
Digit 8 Digit 8
Digit 9 Digit 9
Digit 0 Digit 0
(sub 1O0
channel)
< TV TV
TV TV
Action, ---
MeI] 11
Guide ---
INFO ---
Enter, Select ---
Menu select ---
up
Menu select ---
down
Menu select ---
lef:r/right
Exit ---
Channel Channel
up/down up/down
VoI ume VoIume
up/down *_ up/down*
Previous --
channel
Channel
up/down
Enter
Men u select
up
Men u selec[
do'_VI]
Men u select
lef}/right
DVD clear
VoI {lille
up/down*2
DVD
re[Url]
On-screen
display
Power Power
AVinput 1 Digit 1
AVinpur 2 Digit2
AVinput 3 Digit 3
AVinput 4 Digit4
CD Digit 5
Tuner Digit 6
Phono Digit 7
Cassette Digit 8
Aux Digh 9
--- Digit 0, 10
TV TV
TV _ TV
Channel ---
up/down
Volume Volume
up/down *_ up/down*
Vol [II]]e
up/down .2
Previous
channel
EDter
Menu select
up
Menu select
dowI]
Menu select
leA/right
EXIT
Channel
up/do_n
VoI [II]]e
up/down *2
LiveTV
÷
HM95 R1 026-34 061505 29
Copyright :3:)2005 TOSHIBA CORPORATION All rights reserved
÷
6/24/05, 9:27 PM
29
F
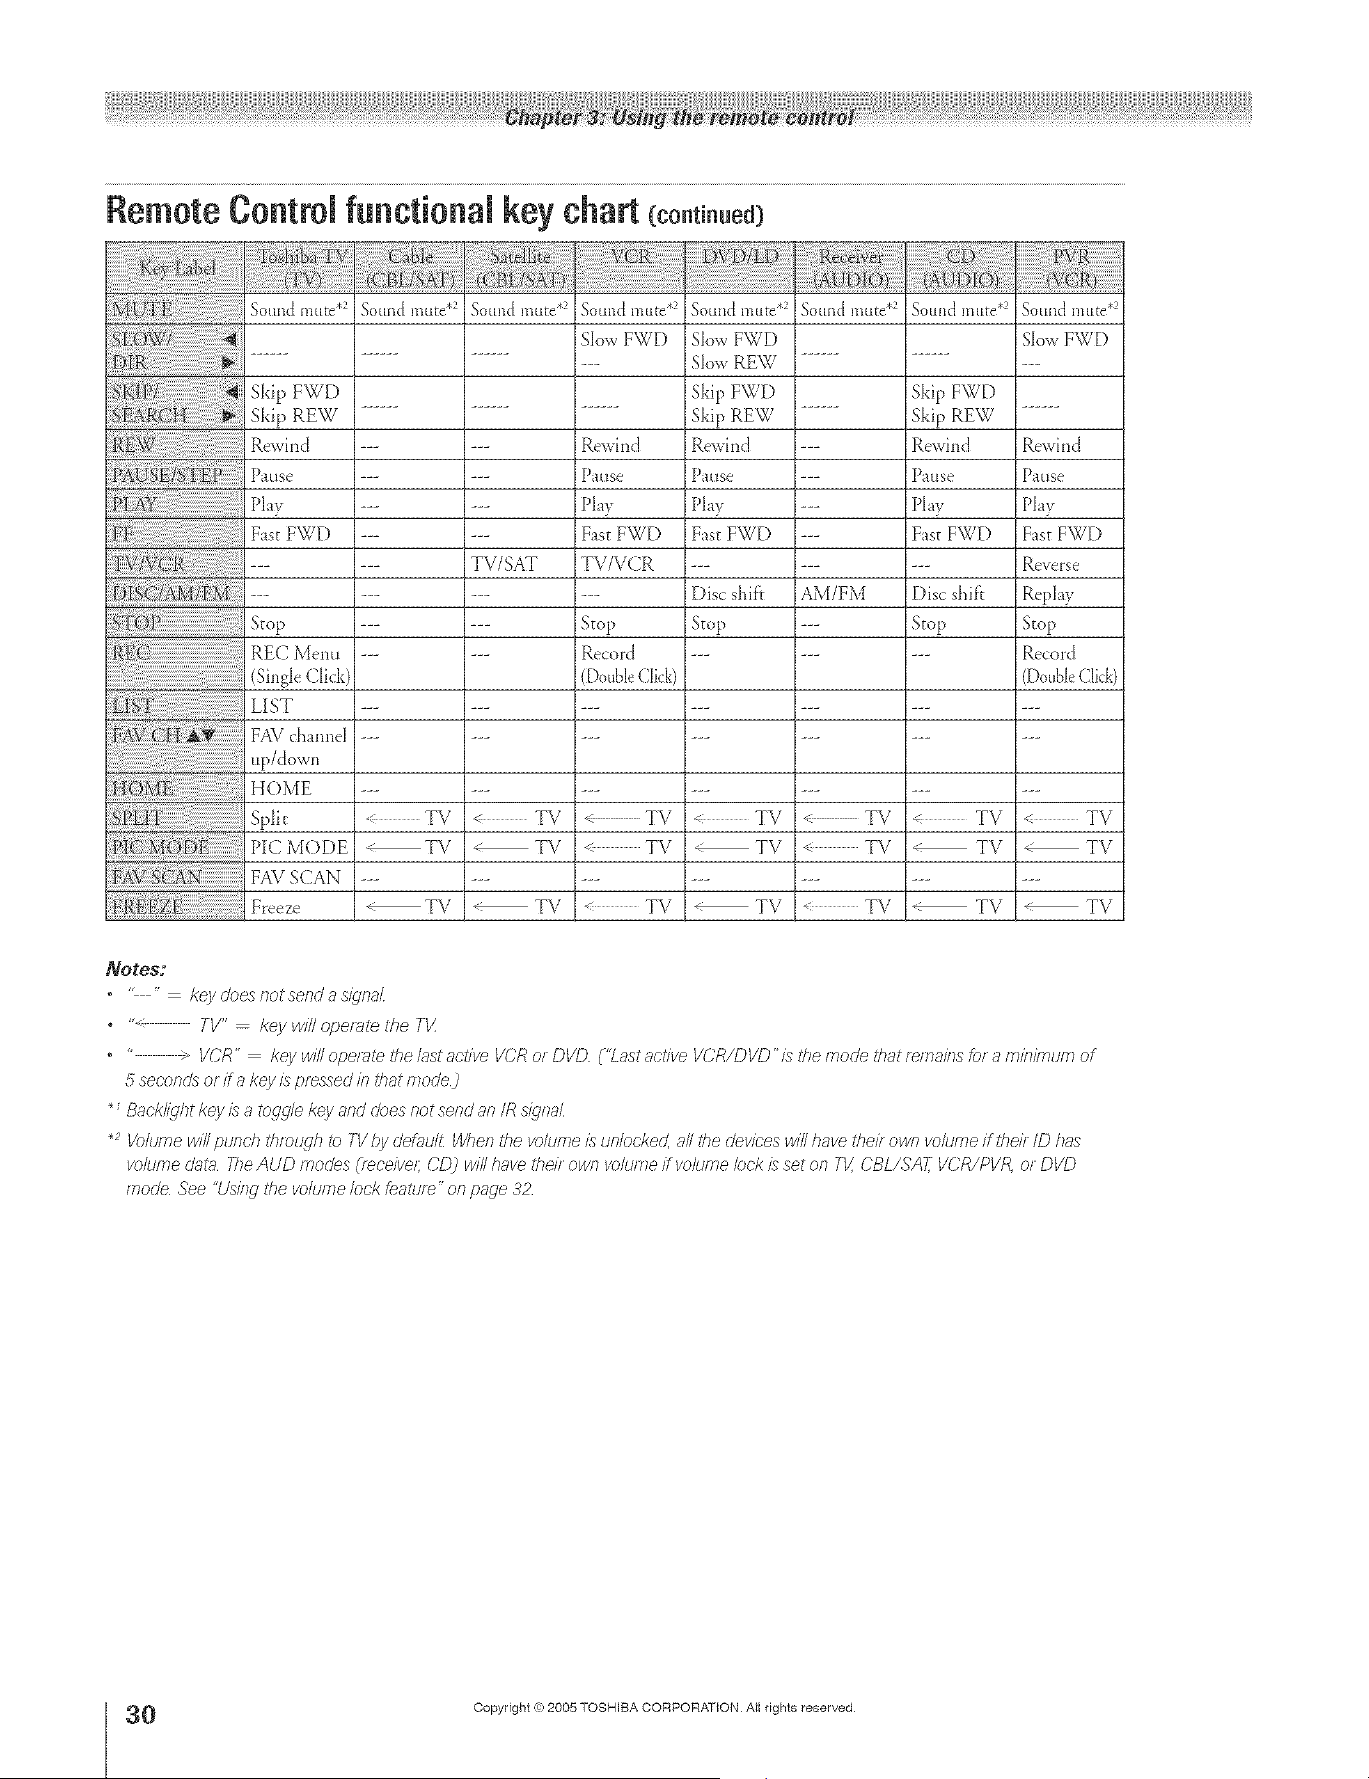
A ÷ [
Remote Controlfunctional key chart {co.t ..ed)
Sound mute* Sound n3ttte.2 Sottnd n3ttte.2 Sottlld mute .2
:()w!_ aowFWD
Skip FWD
Skip REW
Rewind
P tlise
Phy
Fast FWD
Stop
REC Menu
(Single Click)
LIST
FAV channel
up/down
HOME
Split
PIC M()DE
FAV SCAN
TVTSAT
Rewind
Prose
Play
F_sE FWD
TV/VCR
Stop
Record
Double Click)
Sotmd mute.2 Sound n3ttte.2 Sottnd n3ttte.2
SlowFWD
SlowREW
SkipFWD
SkipREW
Rewind
Prose
Phy
FastFWD
Disc shift
Stop
So LtI3/.t l]lttte .2
SlowF_;')[
Skip FWD
Skip REW
--- Rewind
--- PaL1se
--- Play
--- F_st FWD
AM/FM Disc shif'r
--- Stop
Rewind
Prose
Play
F_sEFWD
Reverse
Replay
Stop
Record
(Double Click)
TV
TV
" TV
< TV
" TV
TV
< TV
TV
TV
,_ TV
TV
TV
TV
< TV
TV
TV
TV
i_ TV
< TV
TV
TV
_otes:
.... key dces /lot send ;_s/_]r;a_
• "_ TV" -- key will opelale ttle TK
• " IiCR" keywll/oper_tefflebstact/ve VCRorDVD ("Lastact/ve VCR/DVD'isthemodethatfema/rlsfofam/rlimumof
5 seconds or ff a key is pressed b that mode)
_Back//dht key is a tog£11ekey aRd does not send an/R s/_'Ra/
_2 K?lume will pund} thmu£j? tc TI/ by clefuuF When the _olume /?_unlockec! all tile clev/ces will have their own volume ff the/l ID h;is
i/oluf_le data The AUD modes (/eceive/; CD) will have the//own volume/fw_kHne bck/i_ set on Th' CBL/SAT, IiCR/PVR, or DVD
rYloo'e ._ee "[Js/f W I<he vo/tJI77e/oc/(LeattJre" o11page 3Z
÷
0
HM95 R1 O 6-34 061505 30
Copyright (e:2005 TOSHIBA CORPORATION AiI rights reserved
6/24/05, 9:27 PM [
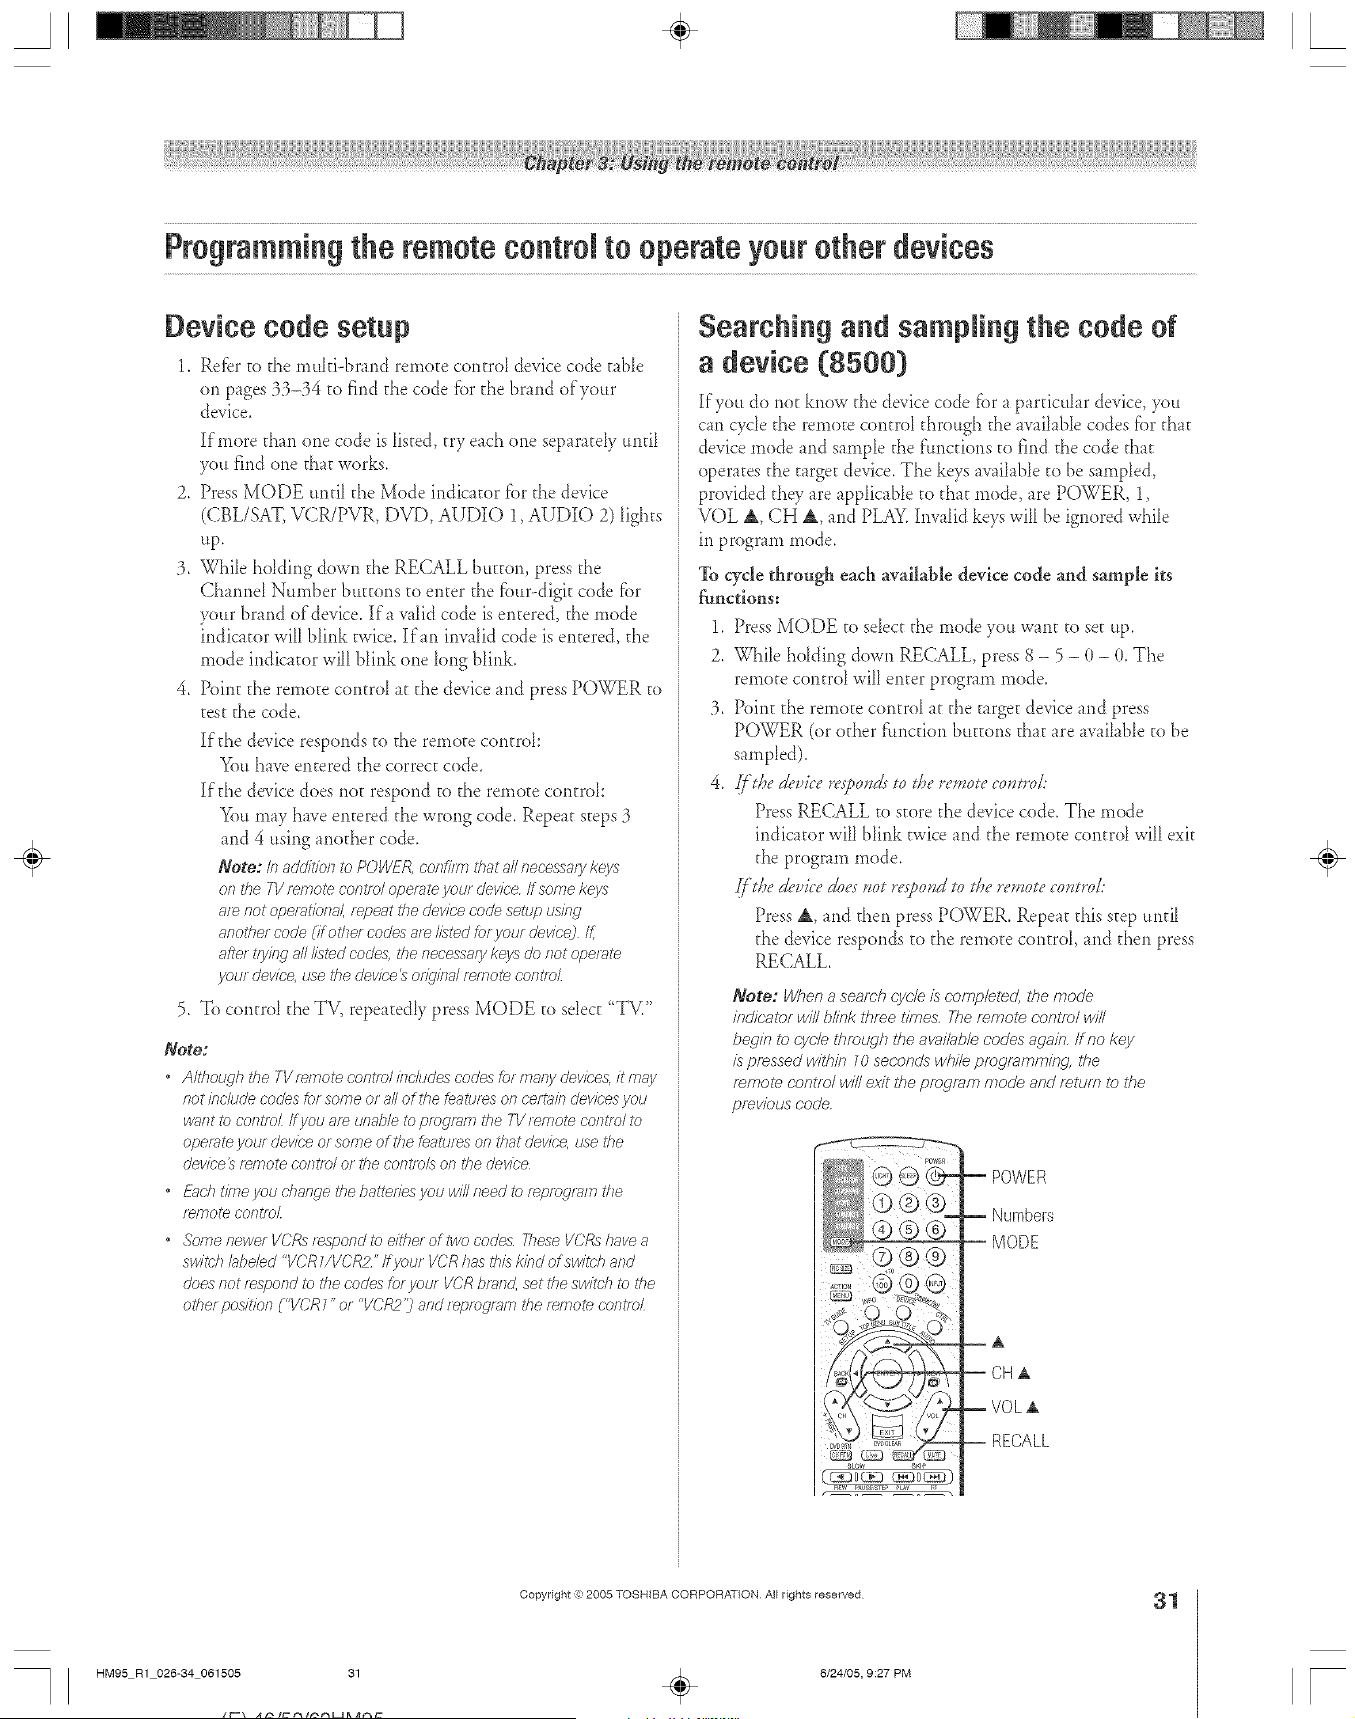
A ÷ L
Programmi.gthe remotecontrol to operateyourother devices
Device code setup
1. Refbr to the muki-brand remote contrd device cede ruble
on pages 33-34 to find the code fbr the brand of your
device.
If more than one code is listed, try each one separately until
yet* find one that works.
2, Press MODE until the Mode indicator fbr the device
(CBL/SAT, VCR/PVR, DVD, AUDIO 1, AUDIO 2) lights
up,
3, While holding down the RECALL button, press the
Channd Nm_ber buttons to enter the fbu>digit cede for
your brand of device. Ira valid code is entered, the mode
indicator will blink twice, If an invalid cede is entered, the
mode indicator will blink one long blink.
4, Point the remote contrd at the device and press P()WER to
test the code.
If the device responds to the remote contrd:
You have entered the correct code,
If the device does not respond to the remote contrd:
You may have entered the wrong code. Repeat steps 3
and 4 using another code.
Note: Inaddi_iente POWF/{oonfim7thatallneeessa/ykeys
ontim TVf_motecontroloperateyou/devk;'eIf some keys
8f_riotoperRt/oft8/, _epent thedevicecedesetup using
anothe/code(if othe/ codes atelisted[or yolo devk'e) /_
afte/tfyieg_#///stedcodes,thenecessarykeys donotoperm_
your dev/ce, use the dev/ee_ o@gld fwnote contm_
5, Te contrd the TV, repeatedly press MODE to sdect "TVi'
Note:
• Although the YWwnoa control i/lcludes codes for many devk'ea it may
not bc/ude codes tot softie of all of the features on cem_b o'evk;'esyou
wglfTttO COl'fff_)_If yOU am unable te program the 7-V/emote co/Fm/ te
operate your device or some of the features on that device, use the
device_ fwnote C'OfT_IO/ Ot the COY?trois OR #)e cJevice
• £_ch time you ehmTge the batteries you will need to f_,efT)gf_fy}the
f_mote COfTtf_)_
• Some newe/I/CRs t_spond to eithe/of_we codes These V(?Rshave a
switch bbe/ed "VCR1/VCR2" ff youf VCR h_;s&is kind of switch and
does not t_spond to the cedes for your I/CR bf_/ld, set the sw/tch _) the
other position ("VCR 7"or <'VCR2'j and [epfo_/_/7l i<hef_/Fio_eCOFF/DL
Searching and samp{ing the code of
a device (8500)
If you de not knew the device code fi)r a partical _rdevice, you
cm cycle the remote control through the wai[ab[e codes f()rthat
device mode and sample the f:tmctions te find the code that
operates the target device. The keys waihb[e to be sampled,
provided they are app[icalJe to that mode, are POWER, 1,
VOL A, CH A, and PLAY.Invalid keys will be ignored while
in progr m_ mode,
To cycle through each available device code and sample its
functions:
1.
2.
Press MODE to select the mode you wmt to set up.
While holding down RECALL, press 8 - 5 - 0 - 0. The
remote central will enter program mode.
Point the remote contrd at the target device and press
POWER (or other f'ttnctior_buttons that are avaihNe to be
sampled).
[['l/_ede'aloelvs}_ondsm daen',_ote co,rod:
Press RECALL te stere the device code. The mode
indicator will blink twice and the remote control will exit
the program mode,
{/'d_eg_,uicea'7_es,or re{k,ond so sl_ere,_osecostard:
Press A, and then press POWER, Repeat this step until
the device responds to the rerno_e contrd, and then press
RECALL
Note: When a seamh cyc/e is romp/creeL the mode
indicg_mr w/I/b/ink three times. The fvemo/e centre/will
begin/e cyc/e ff_mugh the avai/ob/e codes again./fno key
is pressed within _0 seconds whi/e pmgmmmi/?g, ire
remote centre/win e_vitff_epfegmm mode and return/e the
pmwbus code.
sloth S_l_
REW I'_USS_e_ rU,Y t
POWER
Numbers
MODE
A
CH±
VOL±
RECALL
÷
HM95 R1 026-34 061505 31
Copyright :3:)2005 TOSHIBA CORPORATION AJ[ rights reserved
÷
6/24/05, 9:27 PM
31
r
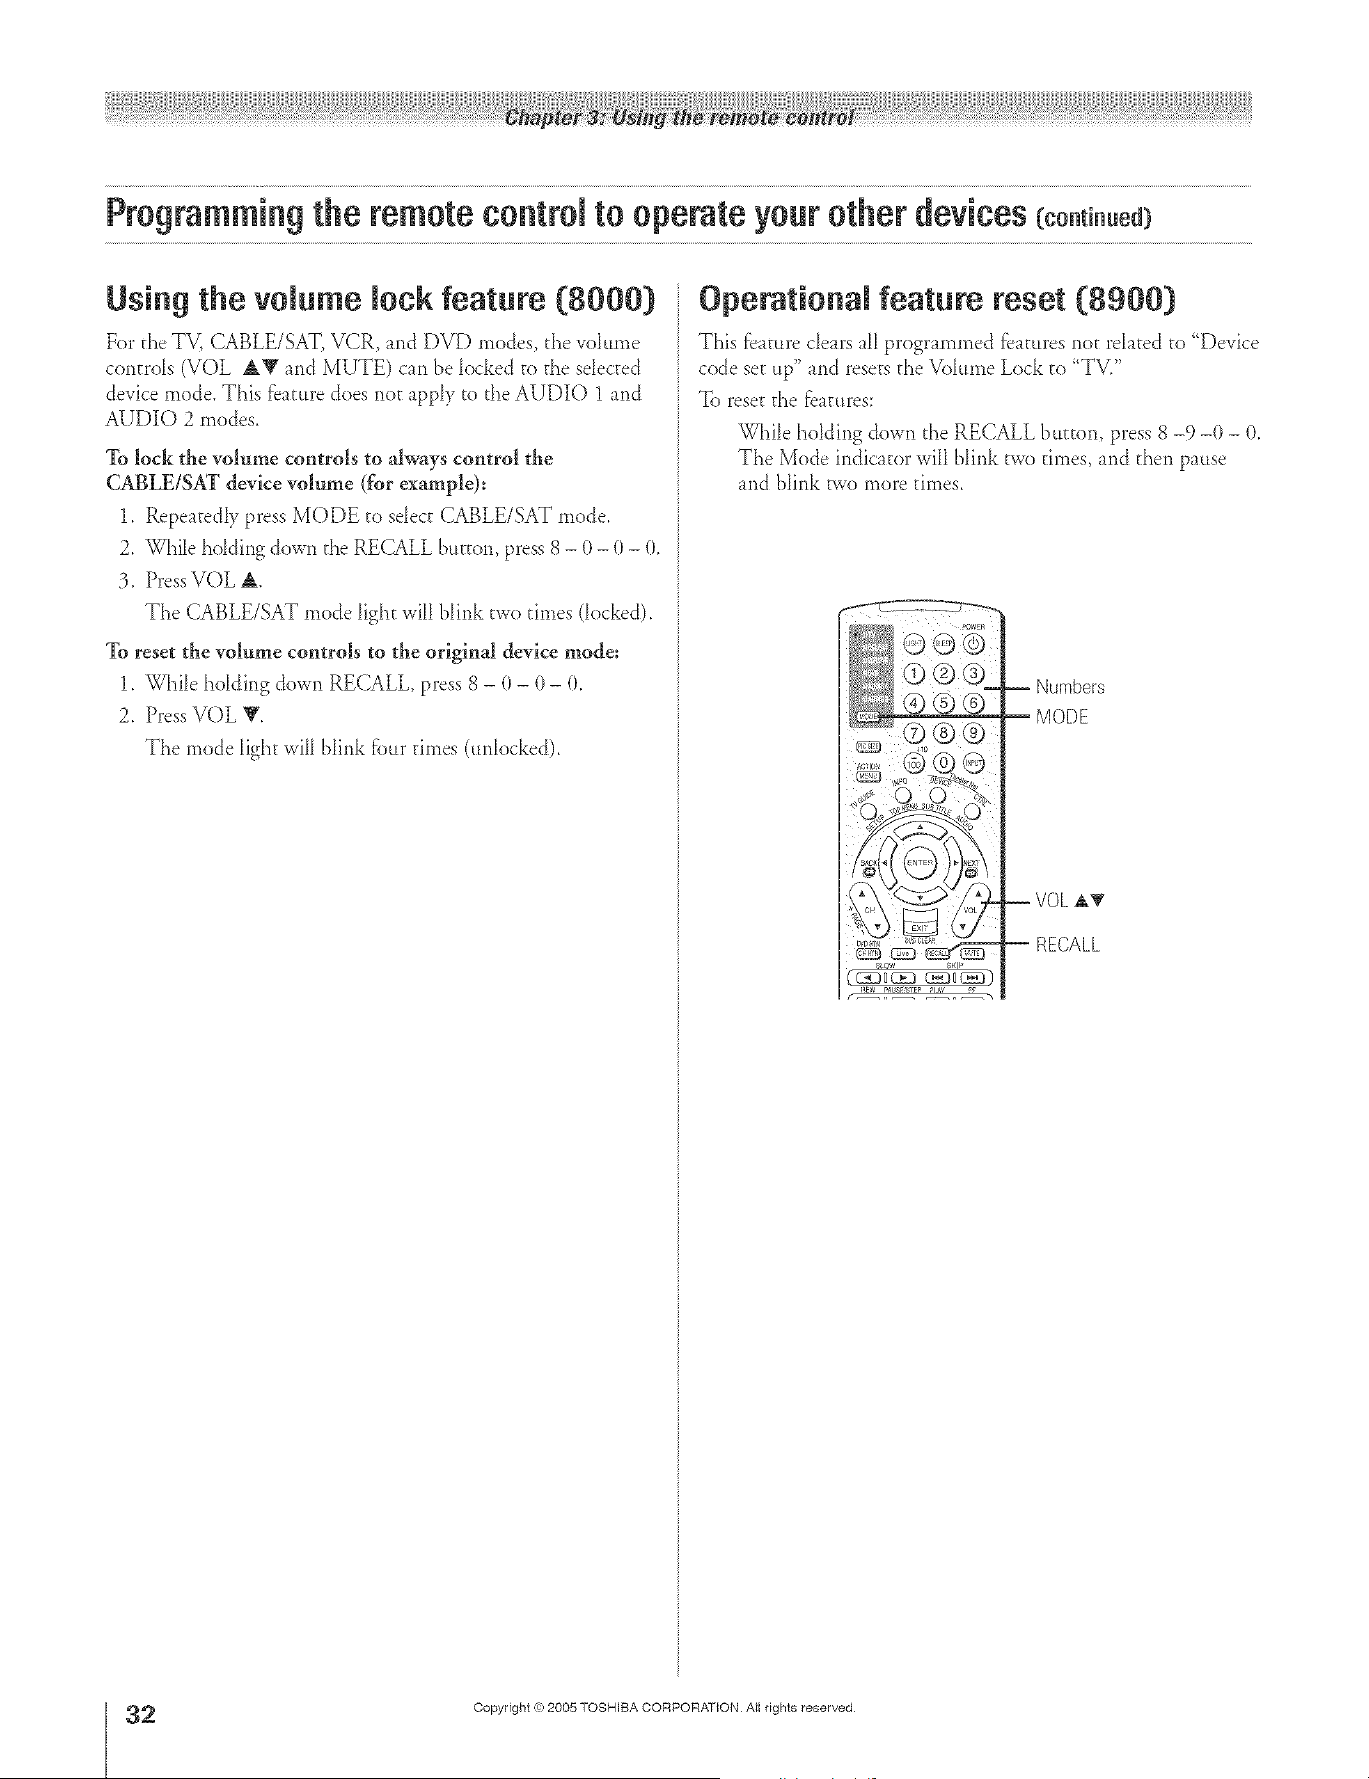
Programming the remote control to operate your other devices (co.t_.ued3
LIsing the volume mockfeature (8000)
For d_eTV, CABLE/SAT, VCR, and DVD modes, d_e volume
con_ro[s (VOL AV and MUTE) can be [ocked _o_he seIected
device mode. This fbatttre does not app[y to the AUD][O 1 and
AUDIO 2 modes.
To lock the volmne controls to always control the
CABLE/SAT device volume (for example):
1. Repeated[y press MODE to se[ect CABLE/SAT mode.
2. While ho[ding down the RECALL button, press 8 - 0 - 0 - 0.
3. PressVOL A
The CABLE/SAT mode hght will b[ink two times docked).
To reset the volume controls to the original device mode:
1. Whi[e ho[ding down RECALL, press 8 - 0 - 0 - 0.
2. Press VOL V.
The mode light wi[[ blink fbur times (tmlocked).
Operationamfeature reset (8900)
This fb_t_lredears a[[progr mmxed fb_mres not rdated to "Device
code set up" and resets the Vo[ttrne Lock to "TV)'
To reset the J;batttres:
While holding down the RECALL btttton, press 8 -9 -0 - (L
The Mode indic _tor wi[1blink two times, and d_en pause
md blink two more times.
÷
2
HM95 R1 O 6-34 061505 32
Copyright ,{e:2005 TOSHIBA CORPORATION Atl rights reserved
6/24/05, 9:27 PM [
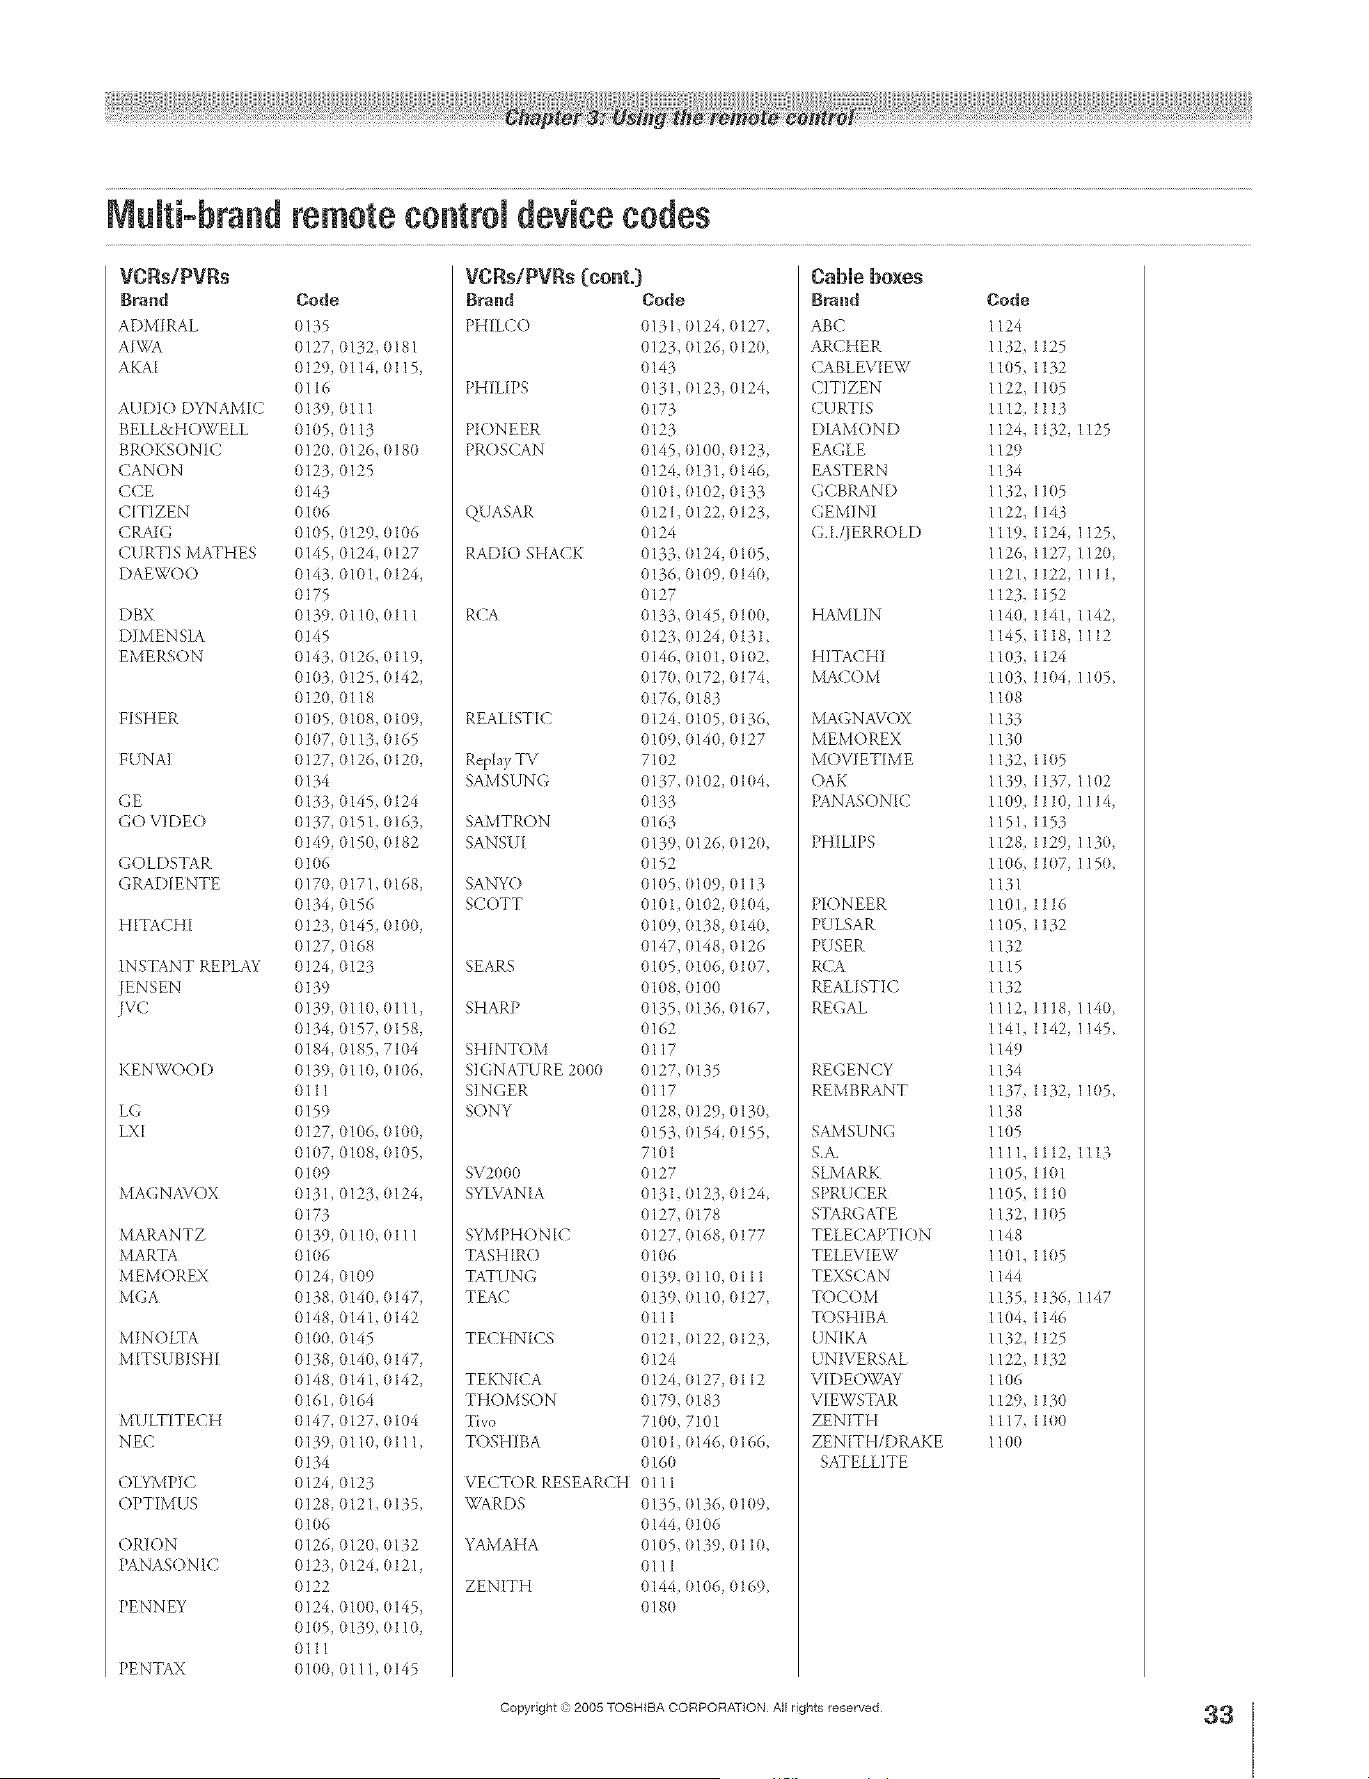
A ÷ L
VCRs/PVRs
B_nd Code
ADMIRAL 0135
AIWA (}127, 0132, 0181
AKA[ 0129, 0114, 0115,
0116
AUDIO DYNAM[C 0139, 0111
BELL&HOWELL (1105, 0113
BR()KSONIC 0120, O126, 0180
CANON (1123, 0125
CCE 0143
C[TIZEN 01 (>6
CRAIG 0105, 0129, 01(}6
CURTIS MATHES 0145, (}124, (}127
DAEWOO 0143,0101, 0124,
(}175
DBX 0139, 0110, 0111
DIMENSIA 0145
EMERSON 0143, 0126, 0119,
0103, (}125, (}142,
0120, 0118
FISHER 0105, 01(}8, 0109,
(}1(}7,0113, 0165
F UNA] 0 ]27, 0126, 0120,
0134
GE 0133, 0145, 0124
GO VIDE() 0137, 015L 0163,
(}149, 0150, 0182
(;OLDSTA R 0106
G RAD[ENTE 0170, 0171, 0168,
0134, 0156
H[TACHI 0123, 0145, 0100,
(}127, 0168
INSTANT REPLAY 0124, 0123
]ENSEN 0139
JVC 0 ]39, 0110, 0111,
(}134, (}157, {)158,
(}184, 0185, 71(}4
KEN WOOD 0139, 0110, 0106,
0111
L(; 0159
LX[ 0127, 0106, 0100,
0107, 01{118,(1105,
o109
MA( ;NAV( )X 0 ]31 0123, 0124,
0173
MARANTZ 0139, 0110, 0111
MARTA 0106
MEMOREX 012& 0109
M(;A 0 ]38, 0140, 0147,
0148, 0141, 0142
MINOLTA 0100, 0145
MITS UBISH[ 0138, 0140, 0 ]47,
0148, 0141, 0142,
016h 0164
MULTITECH 0147, 0127, 0104
NEC 0139, 0110,0111,
0134
OLYMPIC (}124, 0123
OPTIMUS 0128, 0121, 0135,
0106
ORION 0126, 0120, 0132
PAN ASONIC 0123, 0124, 0121,
0122
PENN EY 0 ]24, 0100, 0145,
0105, 0139, 0110,
0111
PENTAX 010(}, 0111, 0145
VCRs/PVRs (cont.)
BPand Bode
PHILCO 0131, 0124, 0127,
0123, 0126, 0120
0143
PHIL[PS 0131, 0123, 0124,
0173
PIONEER 0123
PROSCAN 0145, 0100, 0123,
0124, 0131, (}146,
0101,0102,0133
QUASAR 0121, 0122, 0123,
0124
RADIO SHACK 0133, 0124, 0105,
013& 0109, (}14(},
0127
RCA 0133, 0145, 0100,
0123, 0124, {)131,
0146, 0101,0102,
0170, 0172, {)1741
017& 0183
REAL[ST[C 0124, 0105, 0136,
0109, 0140, 0127
Rq)lay TV 7102
SAMSUN(; 0137, 0102, 01(}4,
0133
SAMTRON 0163
SANSU[ 0139, 0126, 0120,
0152
SANYO 0105, 0109, 0113
SCOTT 010 I, 0102, 0104,
0109, 0138, 0140,
0147, 0148, 0126
SEARS 01(15, 0106, 0107,
0108, 0100
SHARP 0135 0136, 0167,
0162
SHINTOM 0117
SIGNATURE 2000 0127, 0135
SINGER 0117
SONY 0128, (}129, 0130,
0153, {11154,(1155,
7101
SV2000 0127
SYLVAN[A 0131, {)123, (}124,
0127, 0178
SYMPHON [C 0127, 0168, 0177
TASH [RO O106
TATUNG 0139, 01 I(}, 0111
TEA<2 0139, 0110, 0127,
0lll
TECHNICS 0121, 0122, 0123,
0124
TEKN [CA 0124, 0127, 0112
THOMSON 0179, 0183
Tivo 7100, 7101
TOSHIBA 0 l01, 0146, 0166,
0160
VECTOR RESEARCH 0111
WARDS 0135, 0136, 0109,
0144, 0106
YAMAHA 0105, 0139, 0110,
0111
ZENITH 0144, 0106, 0169,
0180
CaNe boxes
Brand
ABC
ARCHER
CABLEVIEW
CITIZEN
CURTIS
DIAMOND
EAGLE
EASTERN
(',(;BRAND
GEMINI
G.L/IERROLD
HAMLIN
HITACHI
MACOM
MA<;NAVOX
MEMOREX
MOV]ETIME
OAK
PANASON[C
PHILIPS
PIONEER
PULSAR
PUSER
RCA
REALISTIC
REGAL
REGENCY
REMBRANT
SAMSUNG
S.A.
SLMARK
SPRUCER
STARGATE
TELECAPTIO N
TELEVIEW
TEXSCAN
TOCOM
TOSHIBA
UNIKA
UNIVERSAL
VIDE()WAY
V[EWSTAR
ZENITH
ZEN[TH/DRAKE
SATELLITE
Bode
1124
1132,1125
1105,1132
1122,1105
1112,1113
1124,1132,1125
1129
1134
1132, 11(}5
1122,1143
1119,1124,1125,
1126,1127,1120,
1121,1122,1111,
1123,1152
114(},1141,1142,
1145,1118,1112
1103,1124
1103, 11(}4, 1105,
108
133
130
132, 1105
1139,1137,1102
1109,1110,1114,
1151,1153
1128,1129,1130,
1106, 1107, 1150,
1131
11(}1, 1116
1105,1132
1132
1115
1132
1112,1118,1140,
1141,1142,1145,
1149
1134
1137, 1132, 1105,
1138
1105
111,1112,1113
1(}5, 1101
105,1110
132, 11(}5
148
101, 1105
144
1135,1136,1147
1104,1146
1132,1125
1122,1132
1106
1129,113(}
1117, 1100
1100
Copyright © 2005 TOSHIBA CORPORATION All rights reserved
33
HM95 R1 026-34 061505 33
÷
6/24/05, 9:27 PM
÷
F

A ÷ L
CD pmayera
Breed Bode
ADMIRAL 6126
AIWA 6133, 6135
CARVER 6129
DENON 6142_ 6151
EMERS()N 6139
FISHER 6 [05, 6106
GARRARD 6117
HARMAN/KARDON 6120, 6121, 6123,
6119
H ITACHI 6107
JENSEN 6134
JVC 6[40, 6141, 6145,
6148, 6151
KENWOOD 6100, 61(11, 6111,
6145
LXI 6136
MAGN AVOX 6129, 6132
MARANTZ 6129
MACINTOSH 6 [21
NAKAMICHI 6110
ONKYO 6114, 6115
OPTIMUS 6108, 6118, 6120,
6122
PANASO N I(2 6 [24, 6125) 6127,
6150
PHILI PS 6129, 613(> 6149
PIONEER 6 [(>8
QUASAR 6125, 6127, 6124
RCA 6147, 6137, 6138,
6131,6152
SANSIJI 6[ 1Q 6146, 6113
SANYO 6t05
S(OTT 6110, 6146
SHARP 6142_ 6143
SHERWOOD 6120
SONY 6128
SOUNDE-SIGH 6144
TEA( _' 6112, 6116, 6118
TECHNICS 6127, 6124, 6125
VICTOR 6[40, 6141, 6145
YAMAHA 6 [02_ 6103, 6104
Receivers
Brand Code
ADM] RAL 412(}
AIWA 4125, 4126, 4146
DENON 4134, 4135, 4136,
4143
FISHER 4104
(;ARRARD 4113
HARMAN KARDON 4115, 4123, 4145
JENSEN 4129
JVC 4132, 4133, 4140,
4144
KENWOOD 4100, 4108, 4141,
4142) 4147
MA(_NA\/OX 4127, 4128
MARANTZ 4124
MCNTOSH 4116
MITSUBISHI 4148
NAKAMICHI 410& 4117
ONKYO 41(19, 4114
OPTIMUS 4103_ 4127, 4131,
4130
PANASO N IC 4119, 4118, 4121
PHILIPS 4123
Receivers (cont.)
Brand Bode
PIONEER 4105 4107 41'3(}
QUASAR 4119, 4118, 4121
RCA 4103, 4105, 4127
4131,4130, 4149
SANSUI 4103, 4111,4139
SHARP 4134, 4137
SON Y 4 ]22
SOUNDE-SIGH 4138
TEAC 4112) 4113, 4111,
4110
TECHN ICS 412 l, 4118, 4119
VICTOR 4132 4133
YAMAHA 4101, 4102
Laser disks
Brand Bode
DENON 5114
HITACHI 5100
KEN WOOD 5102, 5103
MAG NAVOX 5101
MARANTZ 5114
MITSUBISHI 5114, 5118, 5119
NEC 5114
PANAS()NIC 5104, 5105, 5106,
5115
PHILIPS 5111
PRFNEER 5114
PROSCAN 5114
QUASAR 51(14, 5105, 5106,
5115
RCA 5114
SAMSUNG 5112
SANYO 5114, 5117
SHARP 5113 5116
SONY 5107, 5108, 51(>9,
51 lO
TEAC 5114
TOSH] BA 5114
YAMAHA 5101
DVD players
Brand Bode
AIWA 3123
APEX 3120
DEN ON 310(/_ 3117
FERGUSON 3101
HITACHI 3111
IVC 31 (}9
KEN WOOD 3115, 3129
KONKA 3119
MITSUBISHI 3105
NORDMEN DE 3101
ONKYO 3121
ORITRON 3124
PAN ASONIC 3100
PHILI PS 31 (}3, 3116
PIONEER 3102
RAITE 3113
RCA 310L 3106
SABA 3101
SAMPO 3114
SAMSUNG 3110
SHARP 31 (}8
S[LVAN[A 3132, 3118
SMC 3125
SONY 3104 3126, 3127,
3128
TECHNICS 3100
THOMSON 3101
T(YSHIBA 3103
WAVE 3122
YAMAHA 3100, 3130
ZENITH 31 (17)3112
VIALTA 3131
FUNAI 3132, 3118
Sateiiite receivers
Brand
DISH NETWORK
(E&ostar)
ECHOS77_R
EXPRESS VU
(;.E
G.L(GENERAL
INSTRUMENT)
GRADIENTE
HITACHI
HNS(Hughes)
MAGNAVOX
PANASONIC
PHIL/PS
PR/MESTAR
PROSCAN
RCA
SONY
STAR CHOICE
TOSHIBA
UNIDEN
Bode
2105,2115,2116,
2117
2105
21(15,2115
2106
2108
2114
2103,2111,2112
2103
2101_2102
2104
2101,21(12, 2118
2108
2106, 2109, 2110,
2113
2106,2109,2110,
2113
2107
2103,21(18
2100,2103,2119,
2120,2121,2122)
2123,2124,2125
2101,2102
34
HM95 R1 O 6-34 061505 34
Copyright @ 2005 TOSHIBA CORPORATION All rights reserved
÷
6/24/05, 9:27 PM [
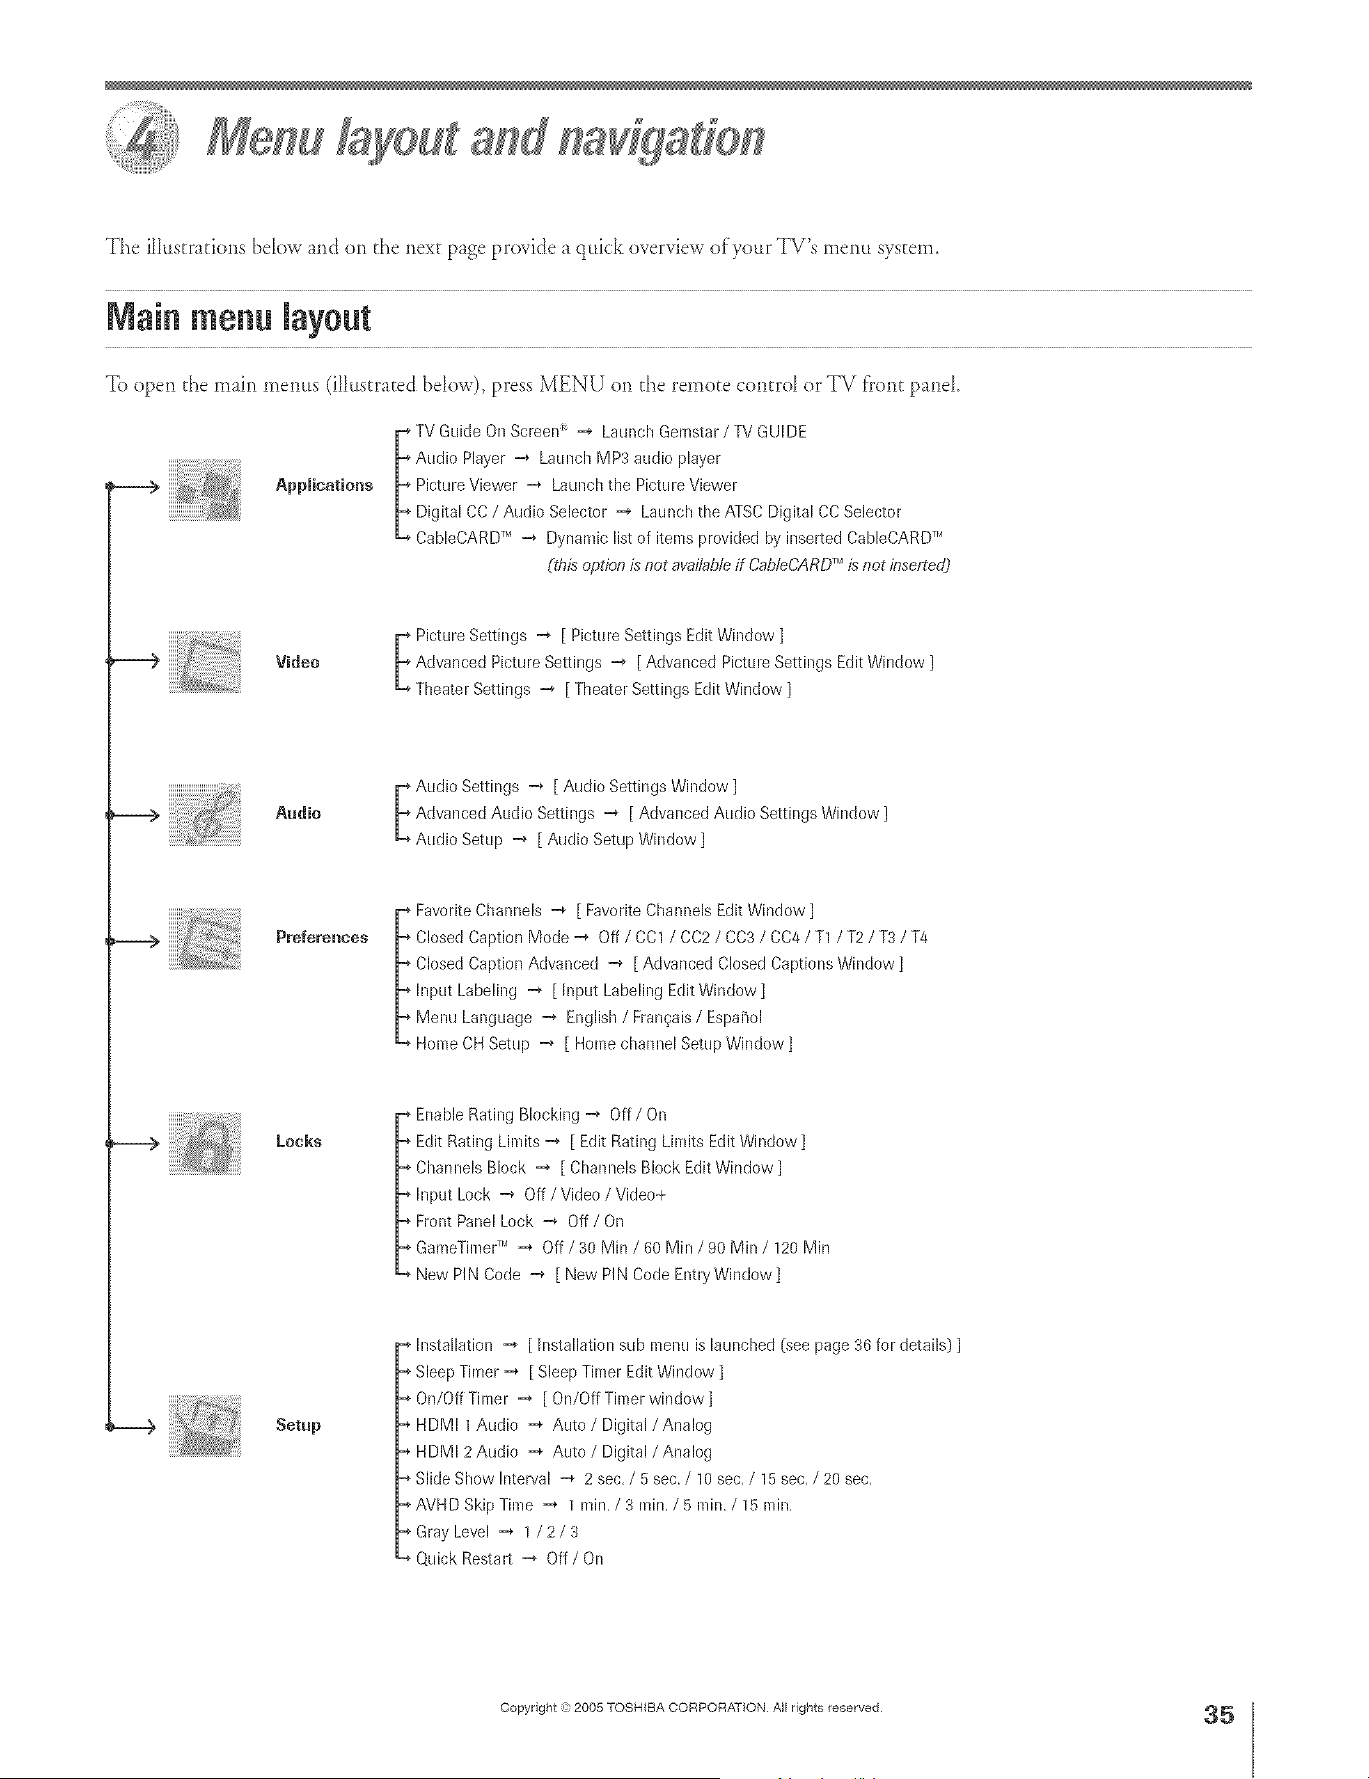
The iHl_strafionsbelow md on d_e next p_ge pro_ide a qldck o_erview ofyo_LrTV's metal system.
Nain menu lay0ut
To open _he main memts (iii_str _ed below), press MENU on d_e remote control or TV f?ont panel
[* TV Guide On Screen -_ Launch Gemstar / TV GUDE
[_ Audio Player -_ Latmch MP3 audio player
Applications [_ Picture Viewer -_ Launch the Picture Viewer
_ Digital CC / Audio Selector -_ LaLinchthe ATSC Digital CCSelector
L, CableCARDT,_-i, Dynamic list of items provided by inserted CableCARD;H
TM
(this option is not avai/ableff CableCARD is not ieserte@
iiiiiiiiii _i_eU
_ Picture Settings "_ [ Picture Settings Edit Window ]
Advanced Picture Settings -_ [ Advanced Picture Settings Edit Window ]
Theater Settings _ [ Theater Settings Edit Window ]
Audio
_ udio Settings -_ [ Audio Settings Window ]
Advanced Audio Settings -_ [ Advanced Audio Settings Window ]
Audio Setup _ [ Audio Setup Window ]
iiiii!i!t¸i;_,_,,_._.o_
Pre[erenees
Favorite Channels -_ [ Favorite Channels Edit Window ]
-,_Closed Caption Mode -_ Off / CC1 / CC2 / CC3 / CC4 / T1 / T2 / T3 / T4
Closed Caption Advanced _ [ Advanced Closed Captions Window ]
Input Labeling -_ [Input Labeling Edit Window]
-,_Menu Language _ English / Fran_;ais/ EspaiSol
Home CH Setup _ [ Home channel Setup Window]
Leeks
Enable Rating Blocking -_ OfT/On
-,_Edit Rating Limits _ [ Edit Rating Linfits Edit Window]
Channels Block _ [ Channels Block Edit Window ]
hlput Lock =4 Off / Video / Video+
-,_Front Panel Lock -i, Off / On
GameTinle¢'_ =* Off / 30 Min / 60 Min / 90 Min / 120 Min
New PIN Code -4 [ New PIN Code EntryWindow]
ii!i!i!ii!i
Setup
Installation _ [ Installation sub menu is launched (see page 36 for details) ]
Sleep Timer -_ [ Sleep Timer Edit Window ]
-,_On/Off Tinier -_ [ On/Off Timer window ]
_, HDMI 1 Audio -_ Auto / Digital/Analog
_, HDMI 2 Audio -_ Auto / Digital/Analog
Slide Show Interval =* 2 sec,/5 sec./10 sec,/15 sec, / 20 sec,
AVHD Skip Time -_ 1 rain, / 3 rain. / 5 rain. / 15 rain,
Gray Level -_ 1 /2/3
Quick Restalt _ Off / On
÷
HM95 R1 035-36 061505 35
Copyright ,3:)2005 TOSHIBA CORPORATION All rights reserved
÷
6/24/05, 9:34 PM
35
F
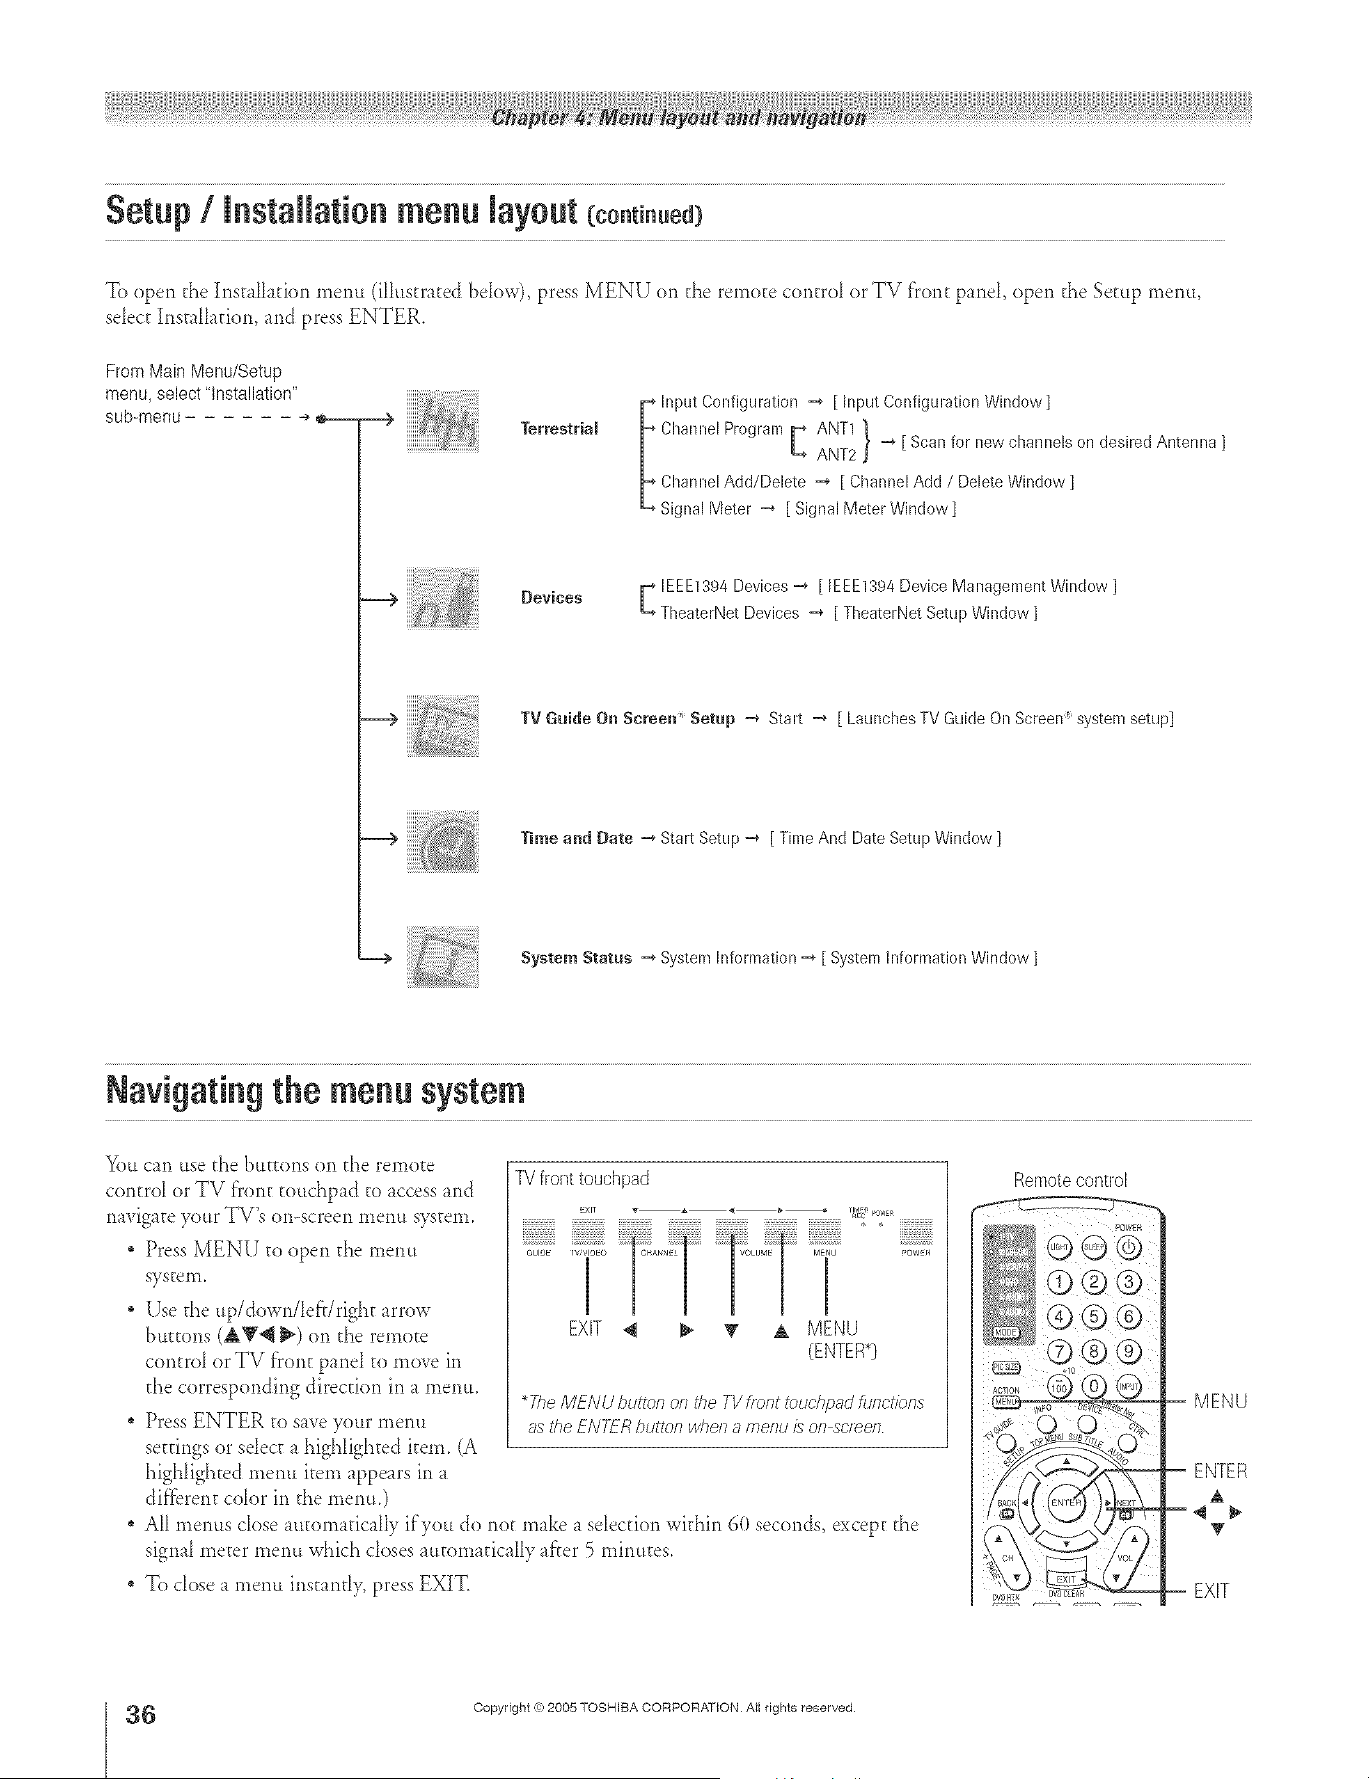
To open the hls[ @_fion menu (illustrated beIow), press MENU on the remote contrd or TV front panel open the Setup menu,
sdec[ InsmHf_fion,md press ENTER.
From Main Menu/Setup
menu, select "installation"
sub-menu ÷
TerrestriaJ
! lput Configuration =* [ hlput Configuration Window ]
Channel Program m-_ANT1
L ANT2 I "_ [ Scan for new channels on desired Antenna ]
Channel Add/Delete -_ [ Channel Add / Delete Window ]
Signal Meter =* [ Signal Meter Window ]
iiiiiiii ii_!;_;!i
Devices [ IEEE1394 Devices -_ [ IEEE1394 Device Managenlent Window ]
TlleaterNet Devices -_ [ TheaterNet Setup Window ]
TV Guide On Screen _ Setup =_ Start =_ [ Launches TV Guide On Screen :_system setup]
Time and Bate =* Start Setup -_ [ Time And Date Setup Window ]
÷
System Status =_ System Information -_ [ System Information Window ]
Navigating the menu system
Yott cfln ttse the bLtEEoils on the remote
contrd or TV front tou&p_d to _ccess md
navigate your TV's on-screen metal system.
Press MENU to open the menu
SysteiTl.
ETse the up/down/Ief_/righ[ arrow
buttons (AW_ _) on the remote
contrd or TV front paneI 1o move in
the corresponding direction in _ menu.
" Press ENTER to s_weyour menu
settings or select _ highlighted item. (A
higNighted menu item appears in
dif'f_rent cdor in the menu0
TV front touchpad
,own
EXIT _ _ "_ A MENU
(ENTER*)
*The MENU button o/_ the TV front touchpad _Jnct_bns
as the ENTFR butto/_ whe/_ a menu is on screen
AH menus cIose m[ornafica_ly if you do not make _ sdecfion within 60 seconds, except the
signa_ meter menu which doses mtorn_fic_Hy ff'rer 5 minutes,
To close _ l'tlenLLirlstarlt[_, press EXIT,
Remote control
-- MENU
-- ENTER
-- EXiT
6
HM95 R1 0 5-36 061505 36
Copyright ,(_:2005 TOSHIBA CORPORATION Atl rights reserved
6/24/05, 9:35 PM r
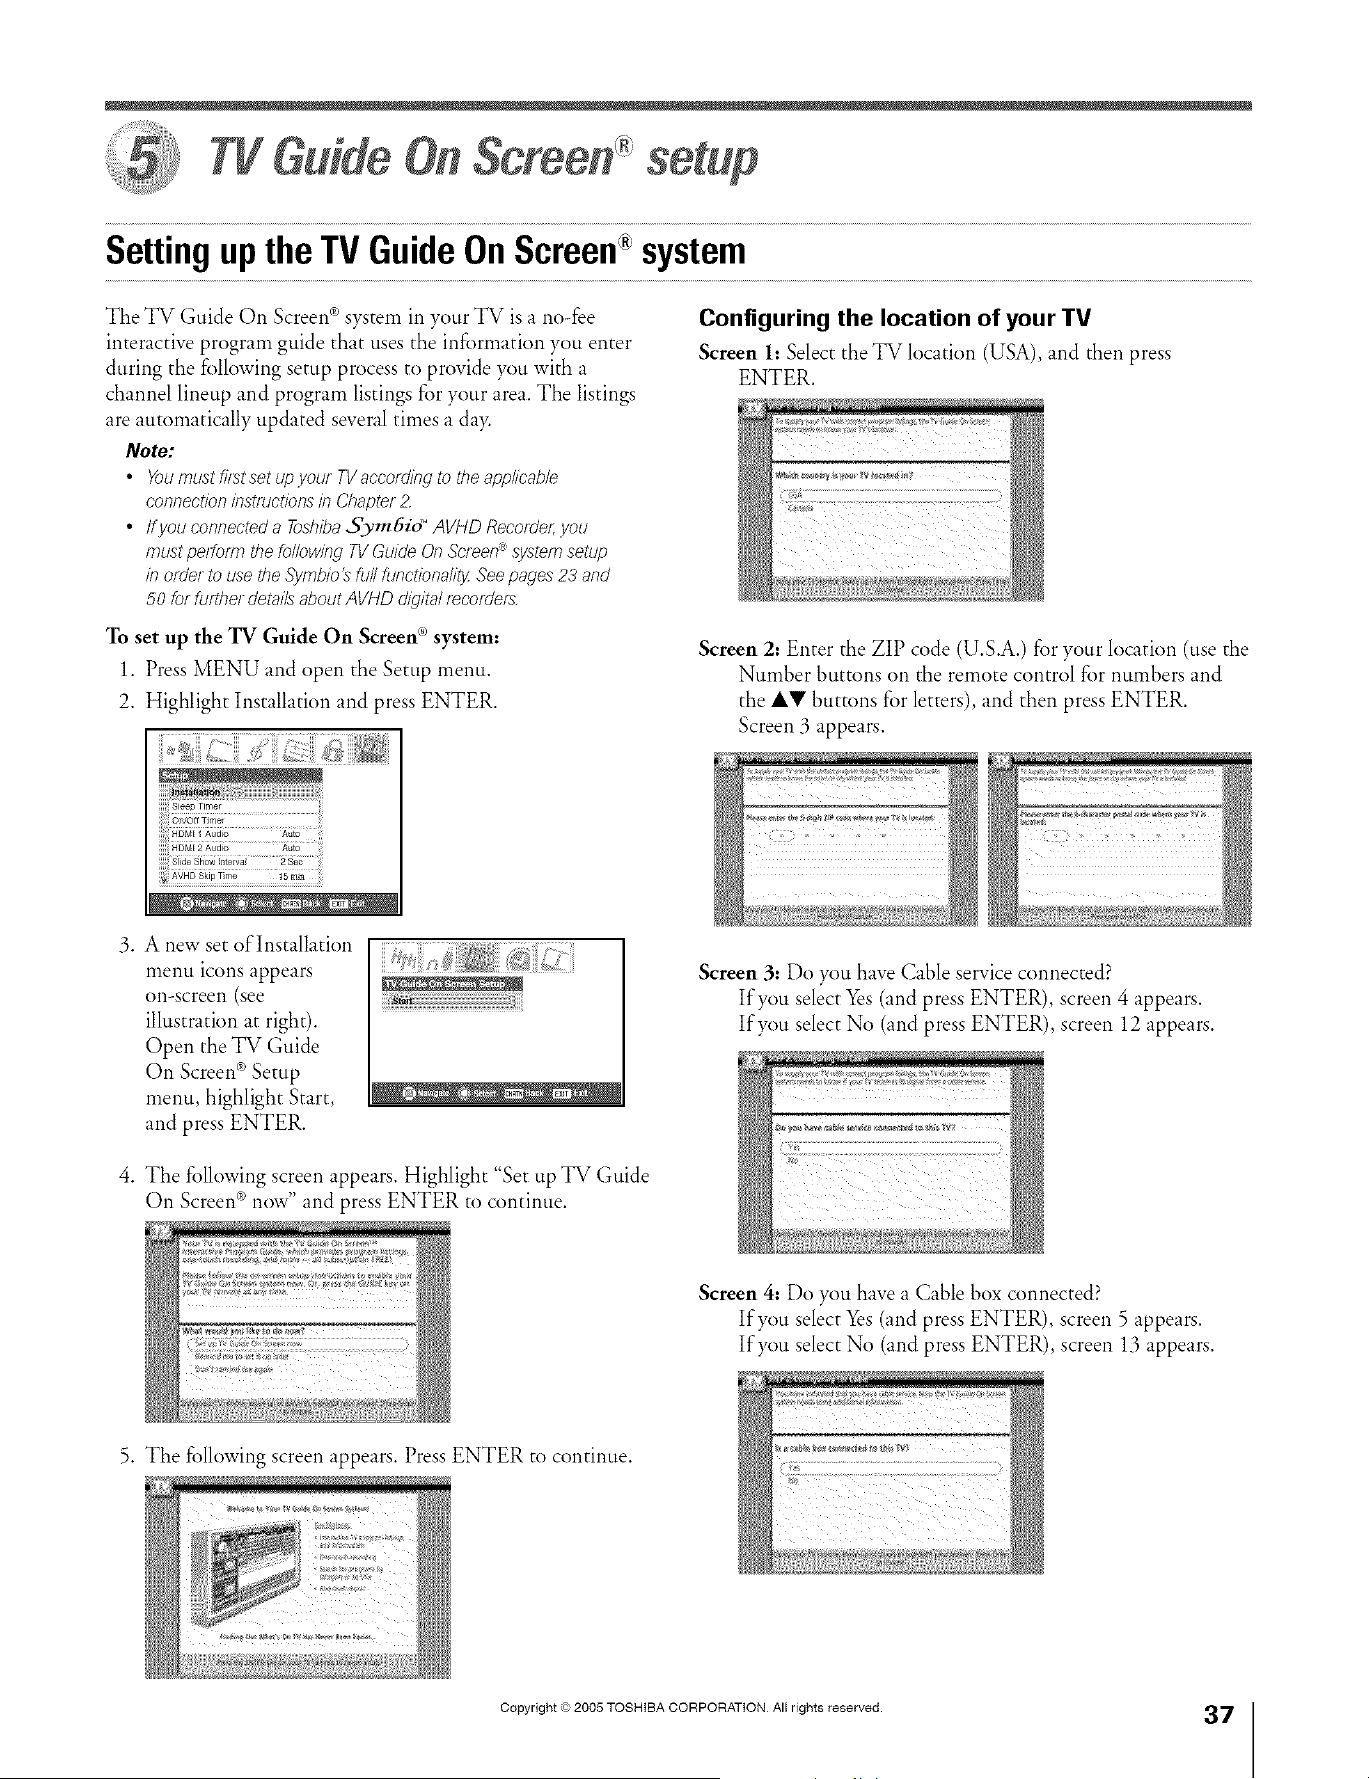
A ÷ L
TVGuide
Settingup the TV Guide On Screen®system
Ti_e TV Guide On Screen ® system in your TV is a no-fee
interactive program guide that uses the infi_rmation you enter
during the following setup process to provide you with a
channel lineup and program listings for your area. The listings
are automatically updated several times a day.
Note:
• Youmust fi/stset up your TVaccordingto the appkcab/e
connectioninstructionsin Chapter2.
• ffyou connecteda Toshiba.5_m6id °AVHD Recofde/;you
mustpeffo/m thefollowing TVGuideOn Screen_,systemsetup
in order to use the Symb/o_ full functiona/ilySeepages23 and
50 for fu/ther detailsabout AVHDdigitaltecorde/s
To set up the TV Guide On Screen (_system:
1. Press MENU and open the Setup menu.
2. Highlight Installation and press ENTER.
Configuring the location of your TV
Screen h Select the TV location (USA), and then press
ENTER.
Screen 2: Enter the ZIP code (U.S.A.) for your location (use the
Number buttons on the remote control for numbers and
the iV buttons for letters), and then press ENTER.
Screen 3 appears.
.
A new set of Installation
menu icons appears
on-screen (see
illustration at right).
Open the TV Guide
On Screen ®Setup
menu, highlight Start,
and press ENTER.
4. The following screen appears. Highlight "Set tip TV Guide
On Screen ®now" and press ENTER to continue.
Screen 3: Do you have Cable service connected?
If you select Yes(and press ENTER), screen 4 appears.
If you select No (and press ENTER), screen 12 appears.
÷
Screen 4: Do you have a Cable box connected?
If you select Yes (and press ENTER), screen 5 appears.
If you select No (and press ENTER), screen 13 appears.
5. The fi)llowing screen appears. Press ENTER to continue.
Copyright © 2005 TOSHIBA CORPORATION All rights reserved.
37
HM95 R1 037-40 061505 Black 37 . 6/24/05, 9:35 PM [
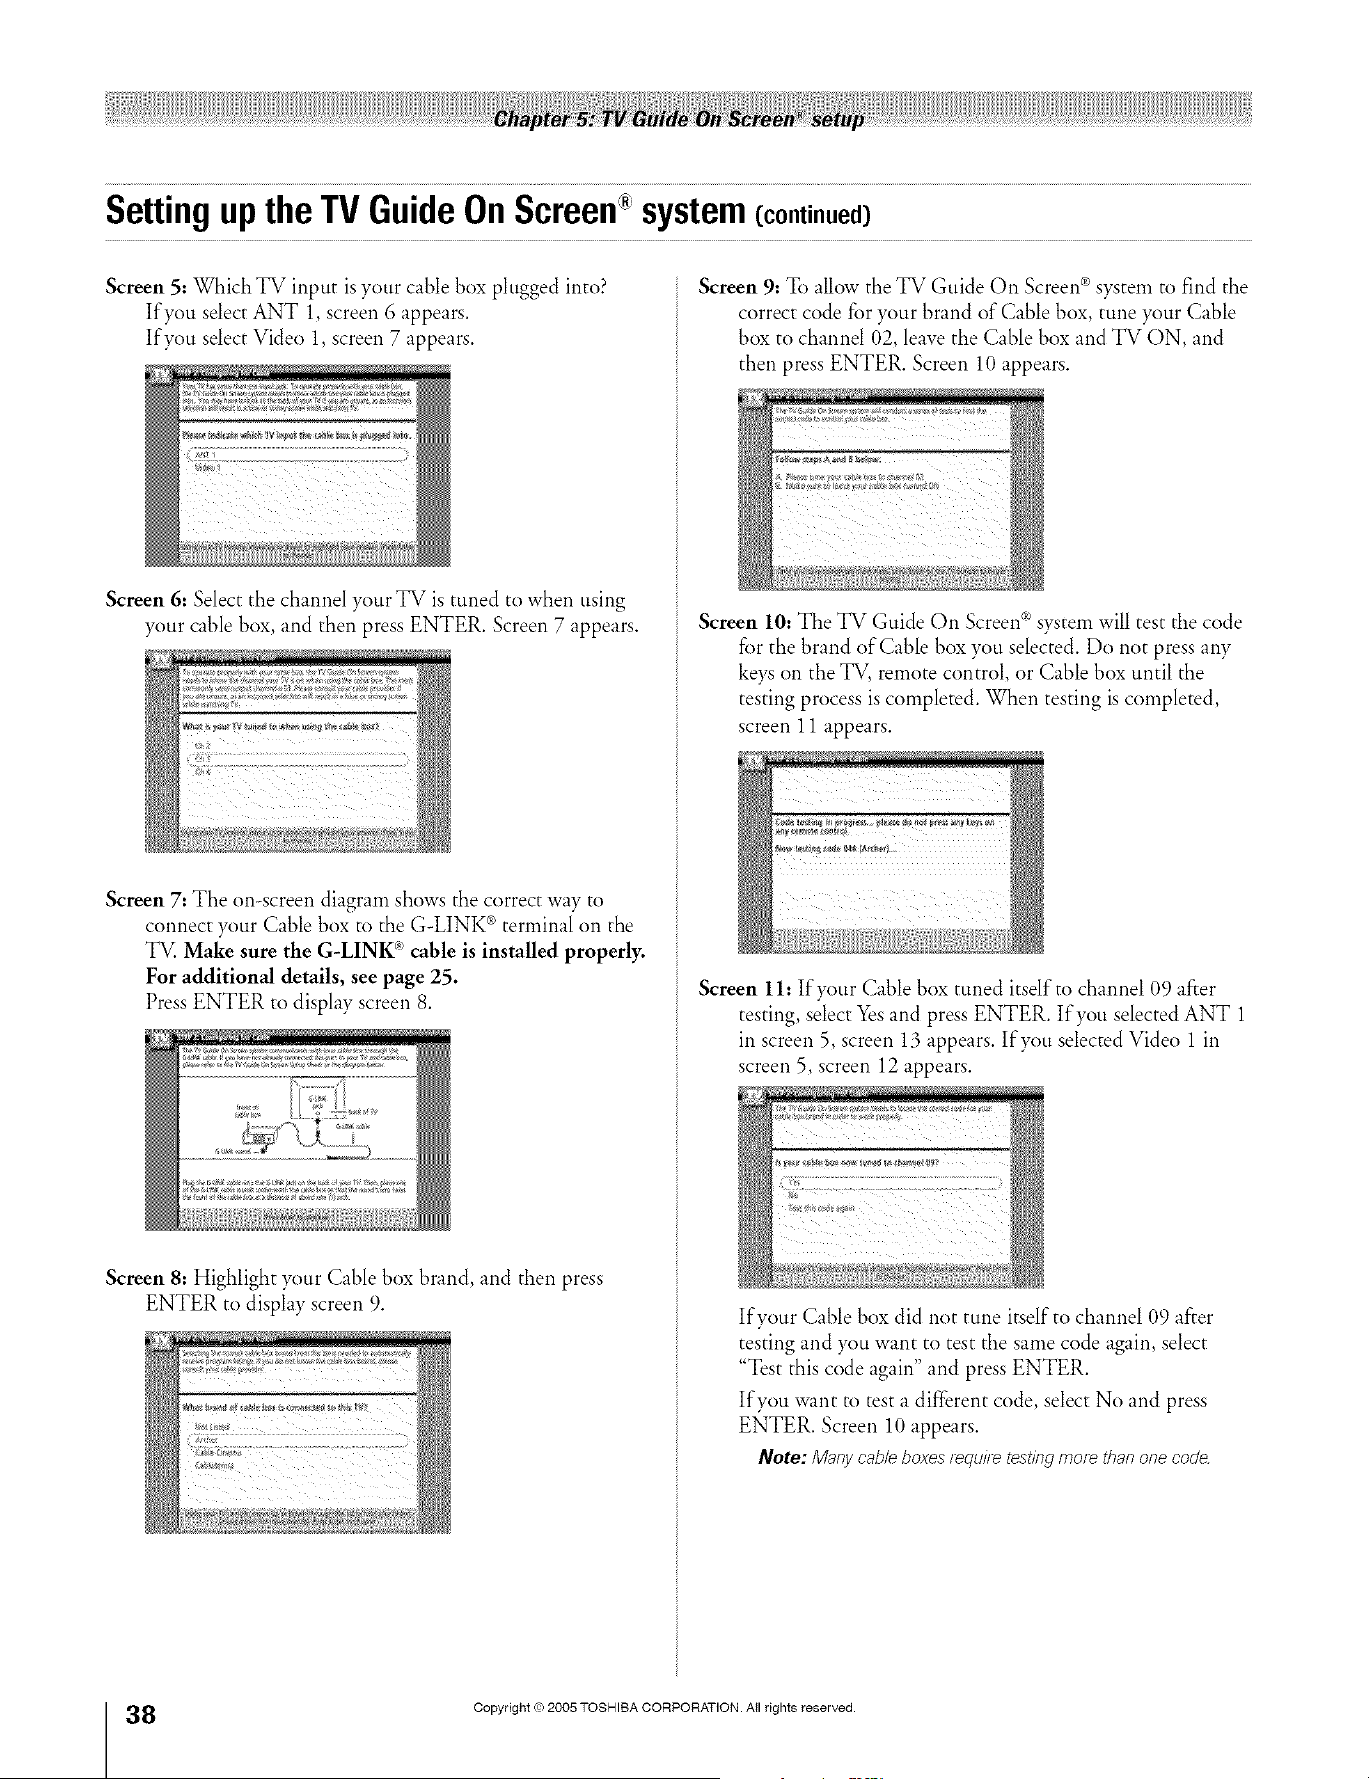
SettinguptheTVGuideOnScreen system(continued)
Screen 5: Which TV input is your cable box plugged into?
If you select ANT 1, screen 6 appears.
If you select Video 1, screen 7 appears.
Screen 6: Select the channel your TV is tuned to when using
your cable box, and then press ENTER. Screen 7 appears.
Screen 7: The on-screen diagram shows the correct way to
connect your Cable box to the G-LINK ®terminal on the
TV. Make sure the G-LINK _ cable is installed properly.
For additional details, see page 25.
Press ENTER to display screen 8.
Screen 8: Highlight your Cable box brand, and then press
ENTER to display screen 9.
Screen 9=To allow the TV Guide On Screen ®system to find the
correct code for your brand of Cable box, tune your Cable
box to channel 02, leave the Cable box and TV ON, and
then press ENTER. Screen 10 appears.
Screen lO: The TV Guide On ScreenCR)system will test the code
for the brand of Cable box you selected. Do not press any
keys on the TV, remote control, or Cable box until the
testing process is completed. When testing is completed,
screen 11 appears.
Screen 1h If your Cable box tuned itself to channel 09 after
testing, select Yesand press ENTER. If you selected ANT 1
in screen 5, screen 13 appears. If you selected Video 1 in
screen 5, screen 12 appears.
If your Cable box did not tune itself to channel 09 after
testing and you want to test the same code again, select
"Test this code again" and press ENTER.
If you want to test a different code, select No and press
ENTER. Screen 10 appears.
Note: Many cab/eboxes/equiretestingmorethanonecode.
÷
8
HM95 R1 0 7-40 061505
Black
38
Copyright © 2005 TOSHIBA CORPORATION. All rights reserved.
÷
6/24/05, 9:36 PM
F
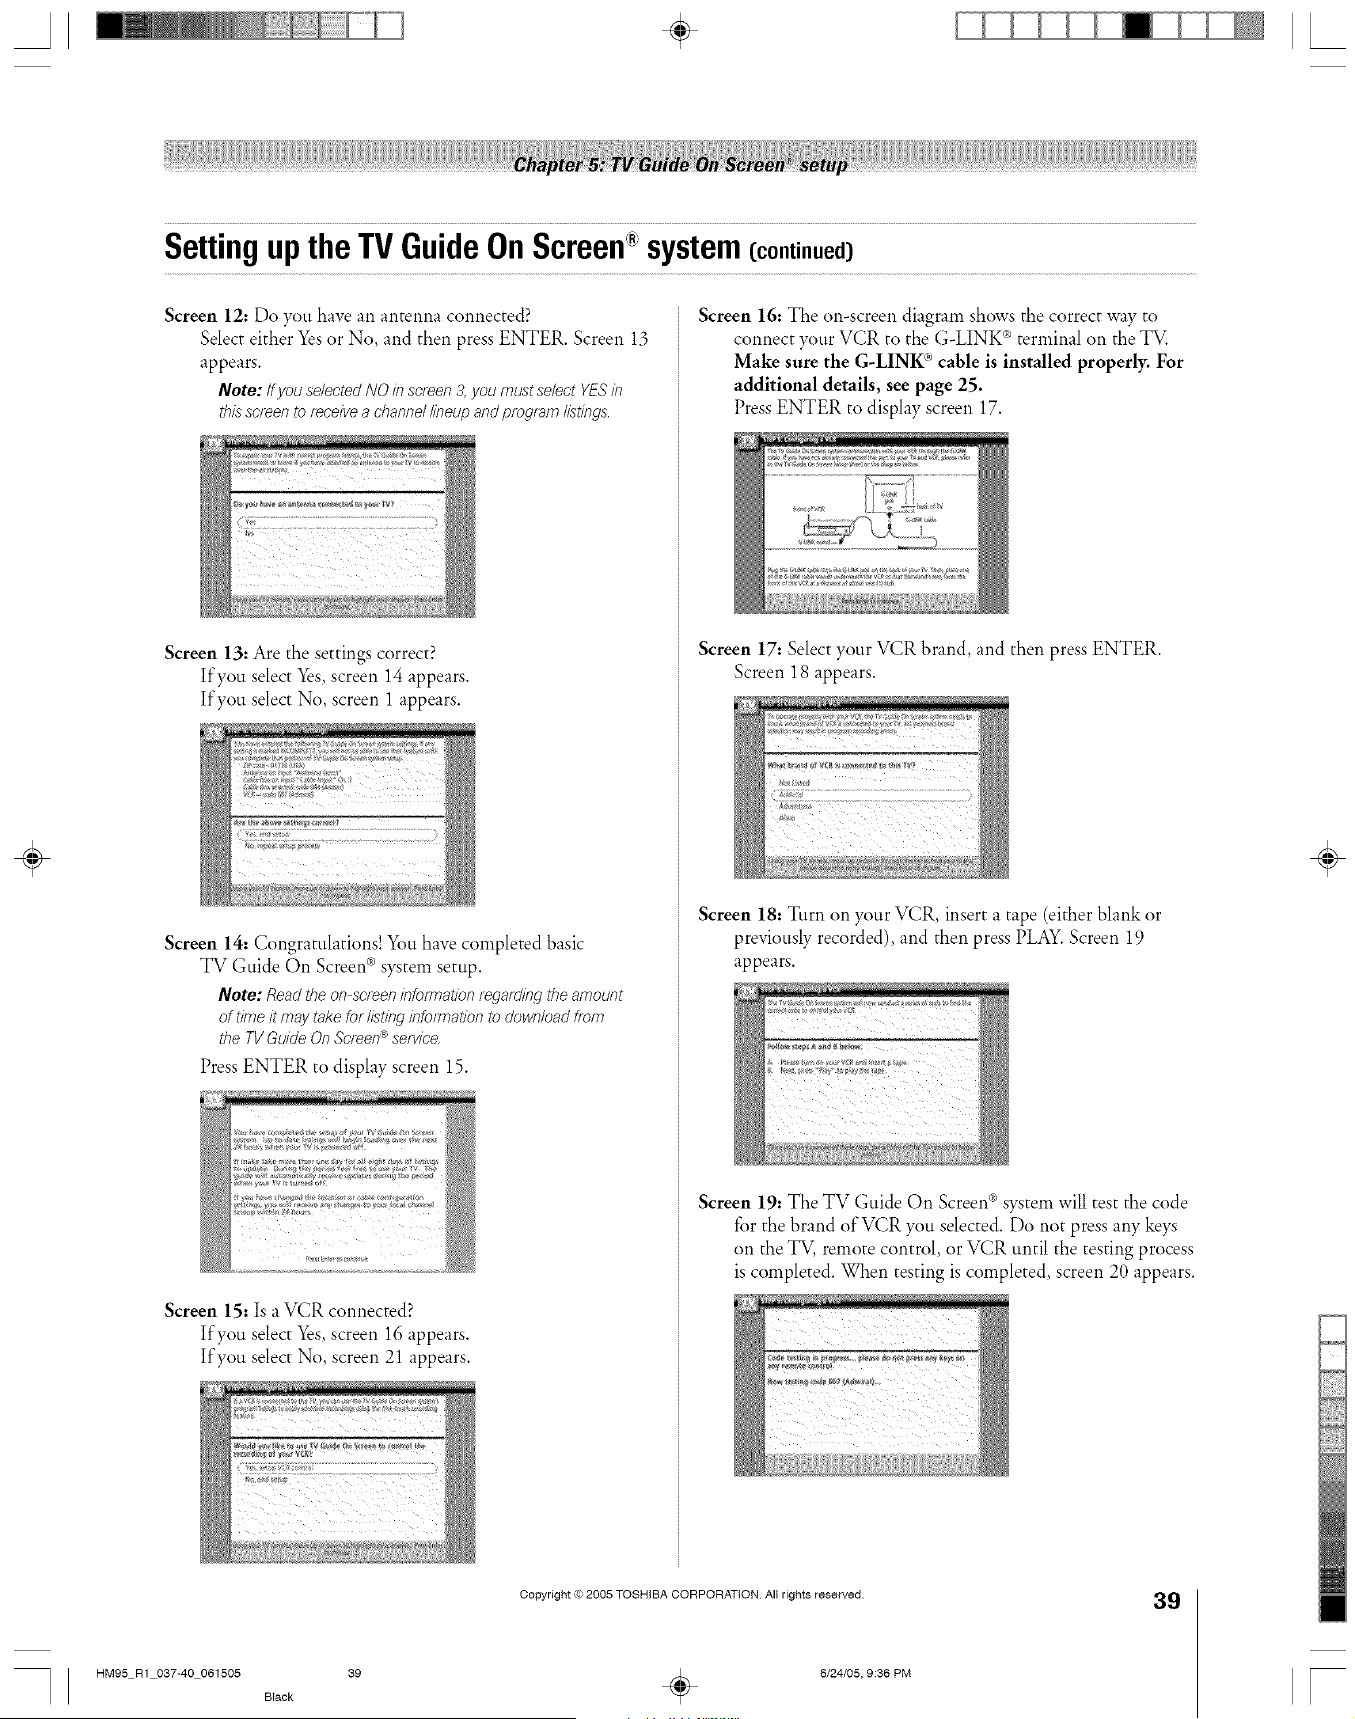
A ÷ L
SettinguptheTVGuideOnScreen system(continued)
Screen 12: Do you have an antenna connected?
Select either Yes or No, and then press ENTER. Screen 13
appears.
Note: tfyou selectedNO inscreen3,you mustse/ectYESin
th/L_screento _eceivea channdlineup andprogramlistings
Screen 13: Are the settings correct?
If you select Yes screen 14 appears.
If you select No screen 1 appears.
Screen 14: Congratulations! You have completed basic
TV Guide On Screen ® system setup.
Note: Readthe on screeninformation/ega_dingtheamount
of tiH7eit maytakefor listinginfo/mat/onto dowfT/oadfrofl7
the TVGuideOn Screen®setvice
Press ENTER to display screen 15.
Screen 15: Is a VCR connected?
If you select Yes screen 16 appears.
If you select No screen 21 appears.
Screen 16: The on-screen diagram shows the correct way to
connect your VCR to the G-LINK ®terminal on the TV.
Make sure the G-LINK ®cable is installed properly. For
additional details, see page 25.
Press ENTER to display screen 17.
Screen 17: Select your VCR brand, and then press ENTER.
Screen 18 appears.
Screen 18: Turn on your VCR insert a tape (either blank or
previously recorded), and then press PLAY. Screen 19
appears.
Screen 19: The TV Guide On Screen®system will test the code
for the brand of VCR you selected. Do not press any keys
on the TV, remote control, or VCR until the testing process
is completed. When testing is completed, screen 20 appears.
÷
Copyright © 2005 TOSHIBA CORPORATION All rights reserved.
39
HM95 R1 037-40 061505 Black 39 _ 6/24/05, 9:36 PM r
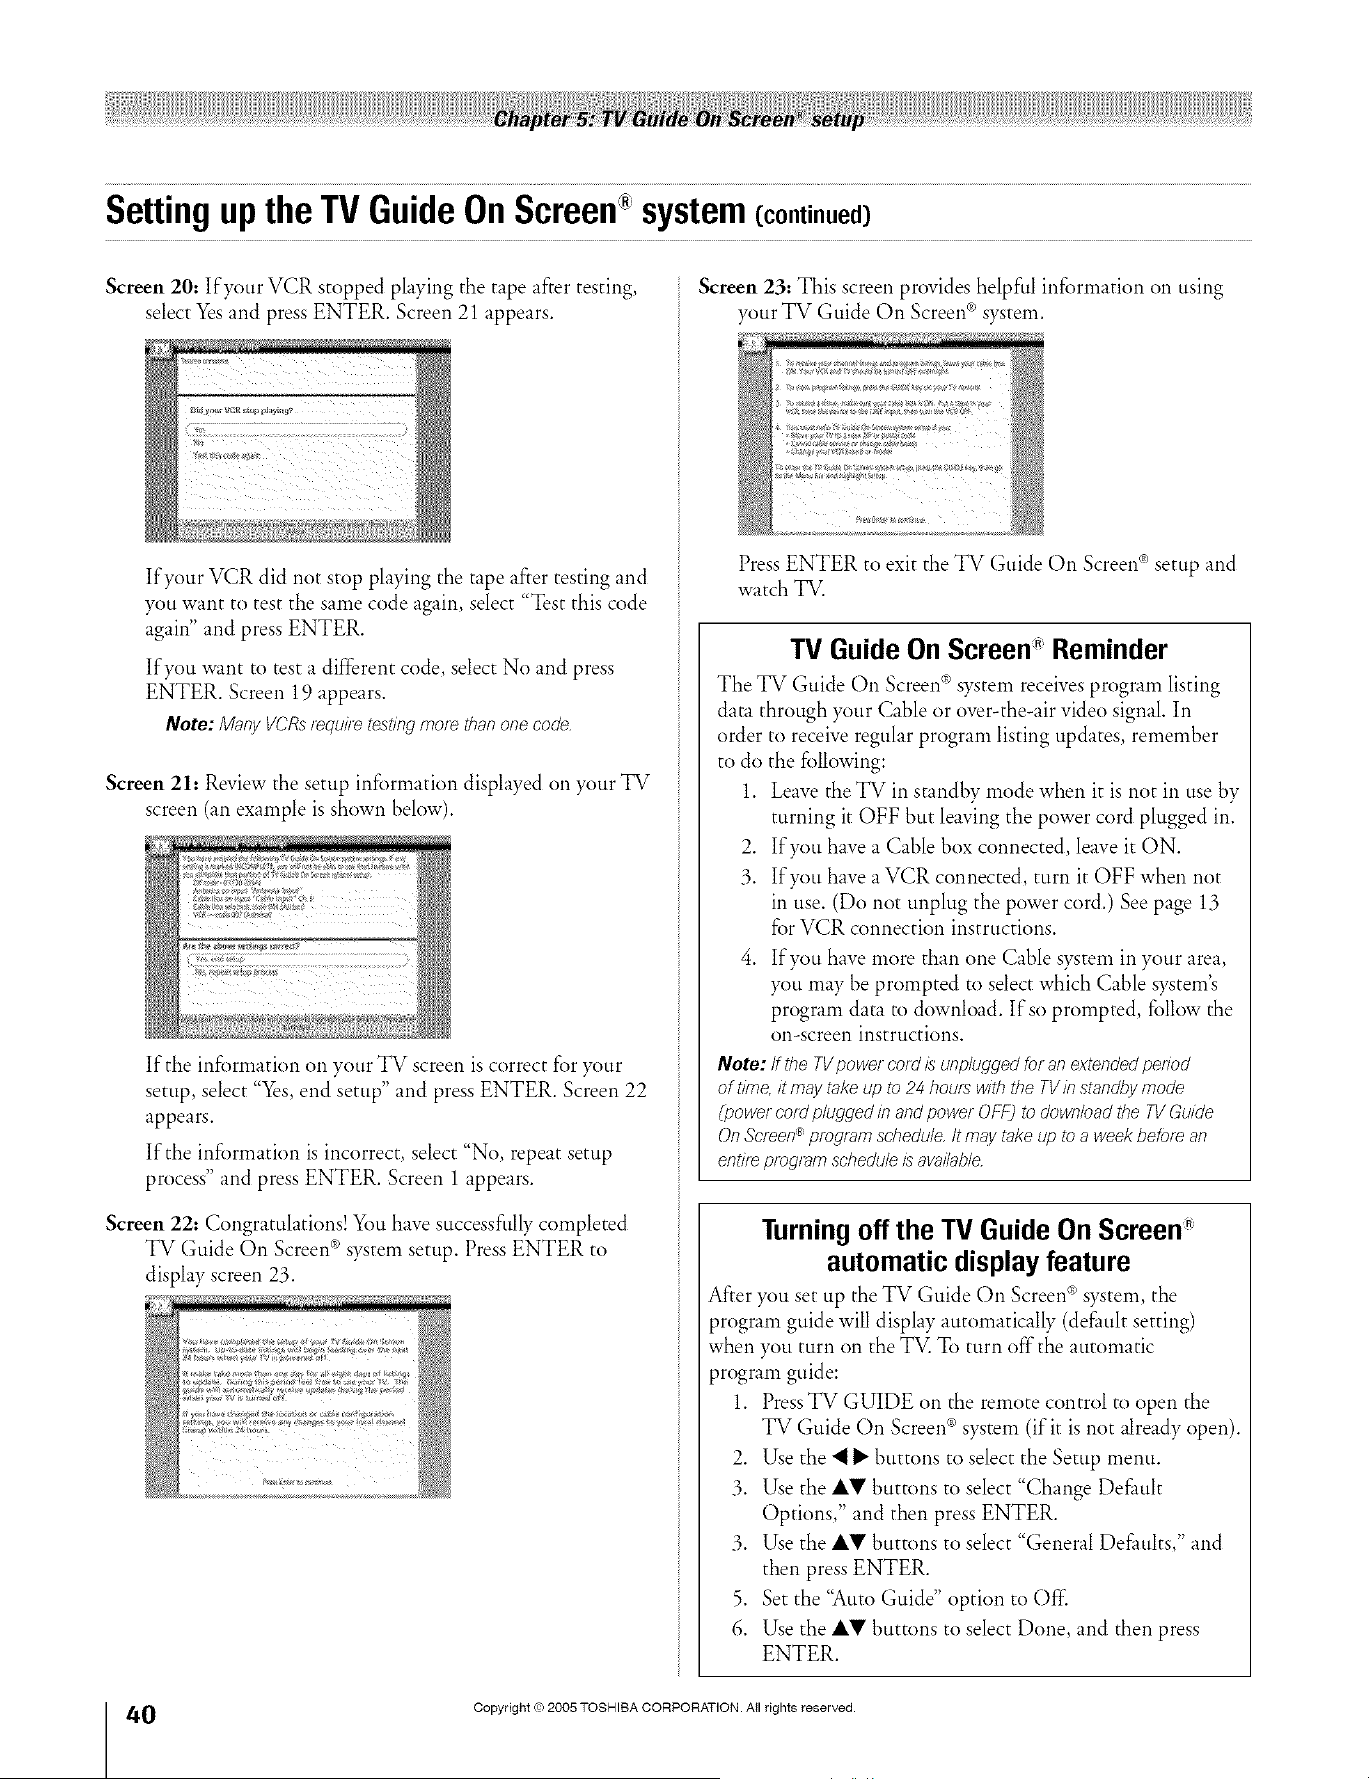
SettinguptheTVGuideOnScree# system(continued)
Screen 20: If your VCR stopped playing the tape after testing,
select Yesand press ENTER. Screen 21 appears.
If your VCR did not stop playing the tape after testing and
you want to test the same code again, select "Test this code
again" and press ENTER.
If you want to test a different code, select No and press
ENTER. Screen 19 appears.
Note: Many VCRsrequ/7_tesOngmore than onecode,
Screen 21: Review the setup information displayed on your TV
screen (an example is shown below).
If the information on your TV screen is correct for your
setup, select "Yes,end setup" and press ENTER. Screen 22
appears.
If the information is incorrect, select "No, repeat setup
process" and press ENTER. Screen 1 appears.
Screen 22: Congratulations! You have successfully completed
® r
TV Guide On Screen s)stem setup. Press ENTER to
display screen 23.
Screen 23."This screen provides helpful information on using
your TV Guide On Screen ®system.
Press ENTER to exit the TV Guide On Screen®setup and
watch TV.
TV Guide On Screen" Reminder
The TV Guide On Screen®system receives program listing
data through your Cable or over-the-air vide() signal. In
order to receive regular program listing updates, remember
to do the following:
1. Leave the TV in standby mode when it is not in use by
turning it OFF but leaving the power cord plugged in.
2. If you have a Cable box connected, leave it ON.
3. If you have a VCR connected, turn it OFF when not
in use. (Do not unplug the power cord.) See page 13
for VCR connection instructions.
4. If you have more than one Cable system in your area,
you may be prompted to select which Cable system's
program data to download. If so prompted, follow the
on-screen instructions.
Note: ff tbe TVpower cold is unplugged for an extended pedod
of time, it may take up to 24 hours with the TV in standby mode
(power cold plugged in and power OFF) to download the TV Guide
On Screen _ program schedule It may take up to a week befof_ an
entif_ program schedule is available.
Turning off the TV Guide On Screen
automatic display feature
After you set up the TV Guide On Screen ®system, the
program guide will display automatically (default setting)
when you turn on the TV. To turn off"the automatic
program guide:
1. PressTV GUIDE on the remote control to open the
TV Guide On Screen ®system (if it is not already open).
2. Use the "__" buttons to select the Setup menu.
3. Use the AV buttons to select "Change Default
Options," and then press ENTER.
3. Use the AV buttons to select "General Defaults," and
then press ENTER.
5. Set the "Auto Guide" option to Off:
6. Use the AV buttons to select Done, and then press
ENTER.
÷
0
HM95 R1 0 7-40 061505
Black
4O
Copyright © 2005 TOSHIBA CORPORATION. All rights reserved.
÷
6/24/05, 9:36 PM
[
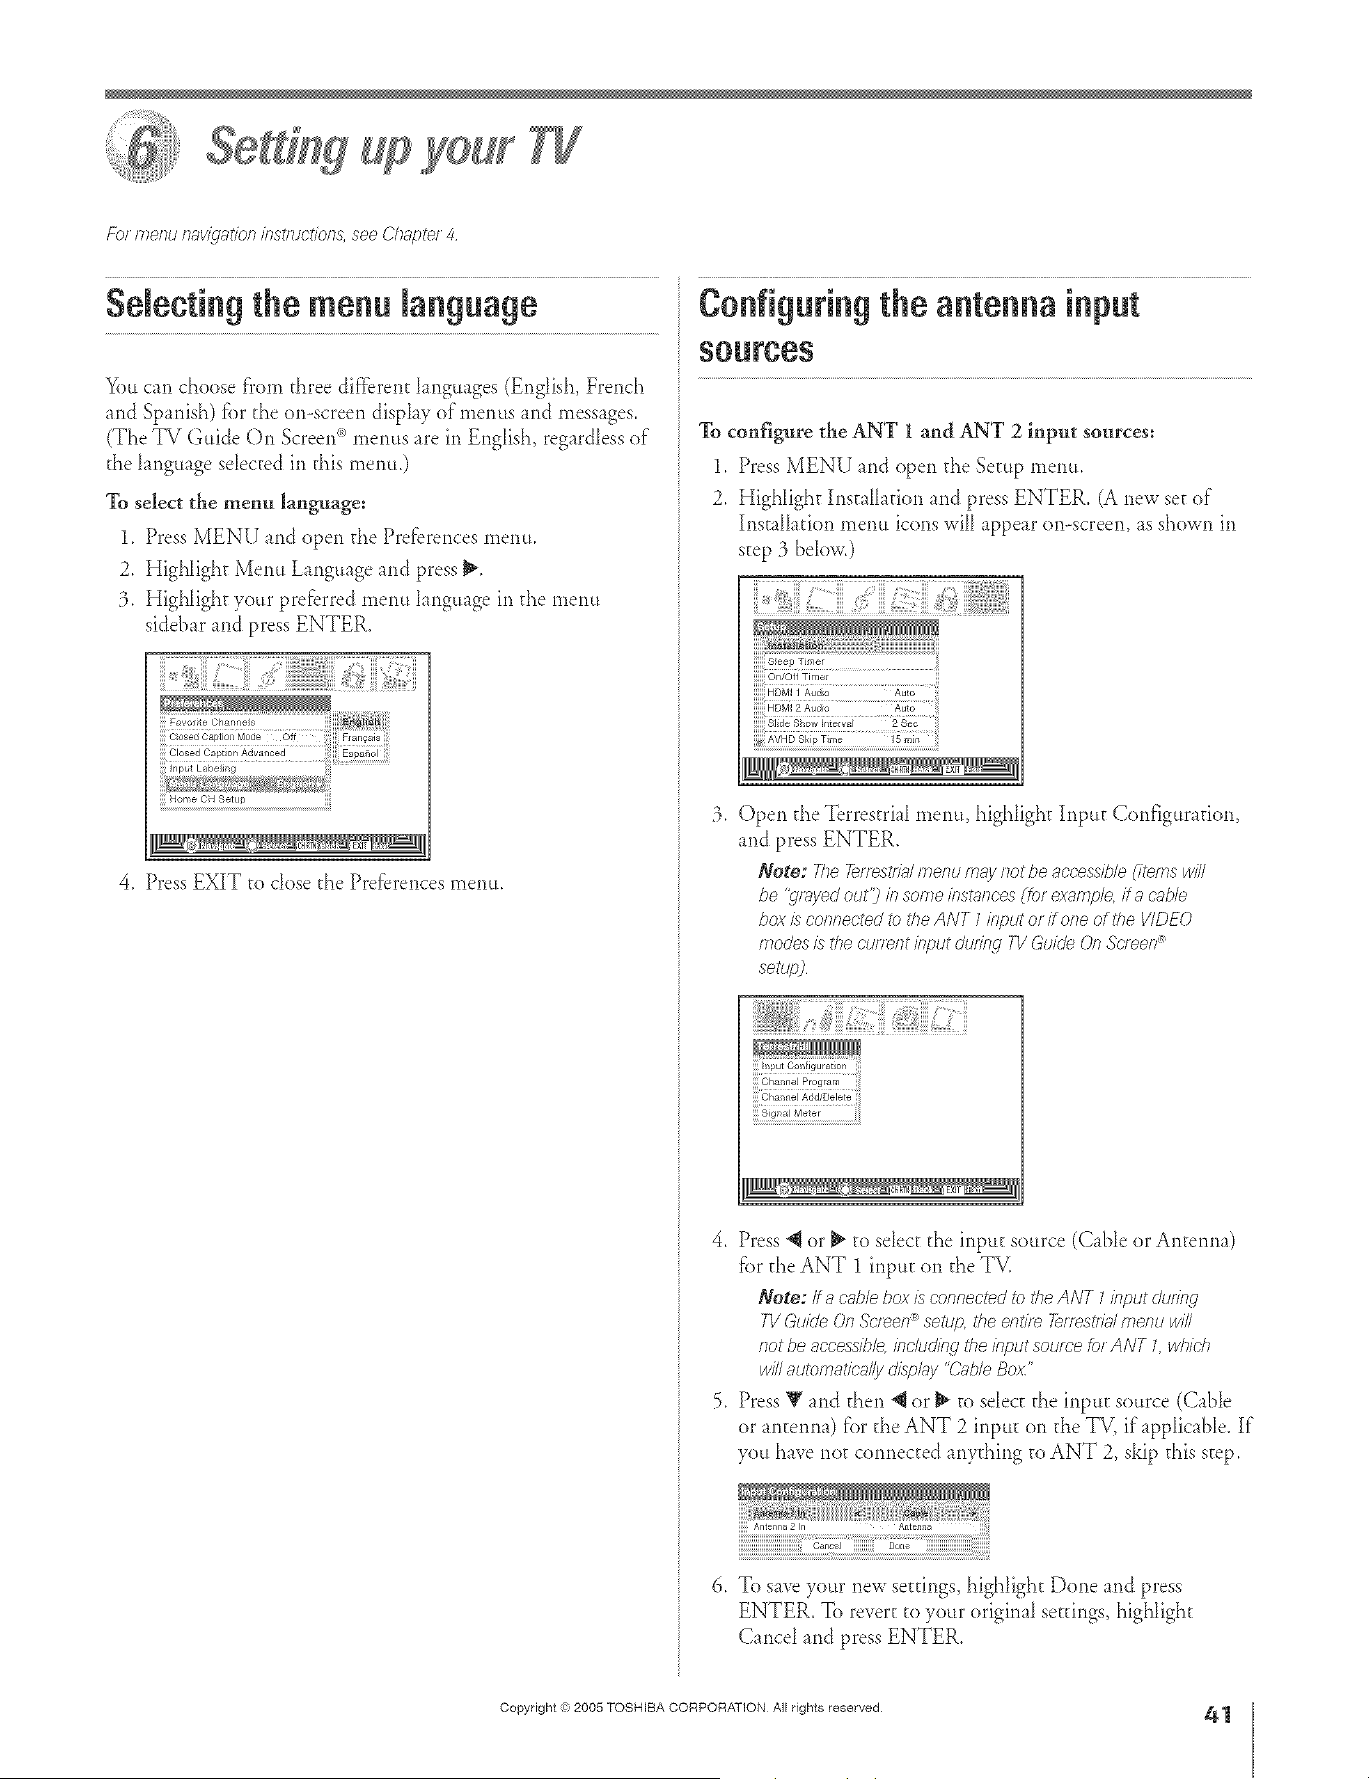
A ÷ L
year
Fb_ menu n_v@'_t/on /?Jst/uot/ons, see Chhv:)te_4
Selectingthe menu language
You can choose from three diffbrent Ianguages (English, Dench
and Spanish) fbr d_e on-screen display of n_erms and mess _ges.
(The TV Guide On Screen _)menus are in English, regardless of
the language sdected in d_is menu.)
To select the menu language:
1. Press MENU and open d_e Preferences menu.
2, Highlight Metal Language and press _,
3. HigNight your preferred menu hnguage in d_e menu
sidebar and press ENTER.
N] Cosed OaptioJ Mode Off F_ancais
Closed Capt on Advanced Espahol
Input LabeJJng .............
Home OH [_etJ l,
4. Press EXIT to close the Prefbrences menu.
Configuring the antenna input
% configure the ANT I and ANT 2 input sources:
1. Press MENU and open d_e Setup menu.
2. Highlight Installation and press ENTER. (A new se_of
InstalIadon menu icons will appear onoscreen, as shown in
step 3 below.)
3. Open the Terrestrial menu, highlight Input Configuration,
and press ENTER.
Note: The7&/fest/i;Jrnenum_ynot be acces_ff2/e(items will
be '_/wed out'})b somebst_/lc'es(£)r exampleff a (;oble
box is connectedtc i'heANT 1input of fiche ofl'he WDEO
modesis thecu/Tentklput during T1!GukJe(JnSc/een_
setup)
i{,ii}{{@}i@]i:_i:!i""}!!il]iiiili'}:{i:{<;iiiii'Tiiiiiii:iiii('L:<3!
Hi Channel Add/Delete _i_
u_
!!!Signa} Meter iiiii
4. Press @ or _ to sdec_ d_e input source (Cable or Antenna)
fbr the ANT 1 inpu_ on d_e TV.
Note; It _ c'./_lebox is connectec/to the ANT 7input &_ring
71/GuideOnSc/een®setup the enti/e 7elTeStf781F£e/?uwill
not be accessiblebc/udif_gthe inputsou/co _)tANT L whiUI
willautomaticallyd/splg_y"Cub/eBox"
5. PressY and then @ or _ m sdec_ the inpu_ source (CabIe
or ant:enna) J_'orthe ANT 2 inpu_ on the TV, ifappIicabIe. If
you have not connected anything to ANT 2, skip this step.
]]]]]Antenna 2 In Aatem_a
iiiiiiiiiiiiiiiiiiiiiiiiiiiiiiilil Canes1 iiiiiiiiii Do_e iiiiiiiiiiiiiiiiiiiiiiiiiiiiiiiiii
To swe your new se_@_gs,highlight Done and press
ENTER. To revert t() your original settings highlight
Cancd md press ENTER.
÷
HM95 R1 041-43 061505 41
Copyright (ct,2005 TOSHIBA CORPORATION All rights reserved
÷
6/24/05, 9:39 PM
41
F
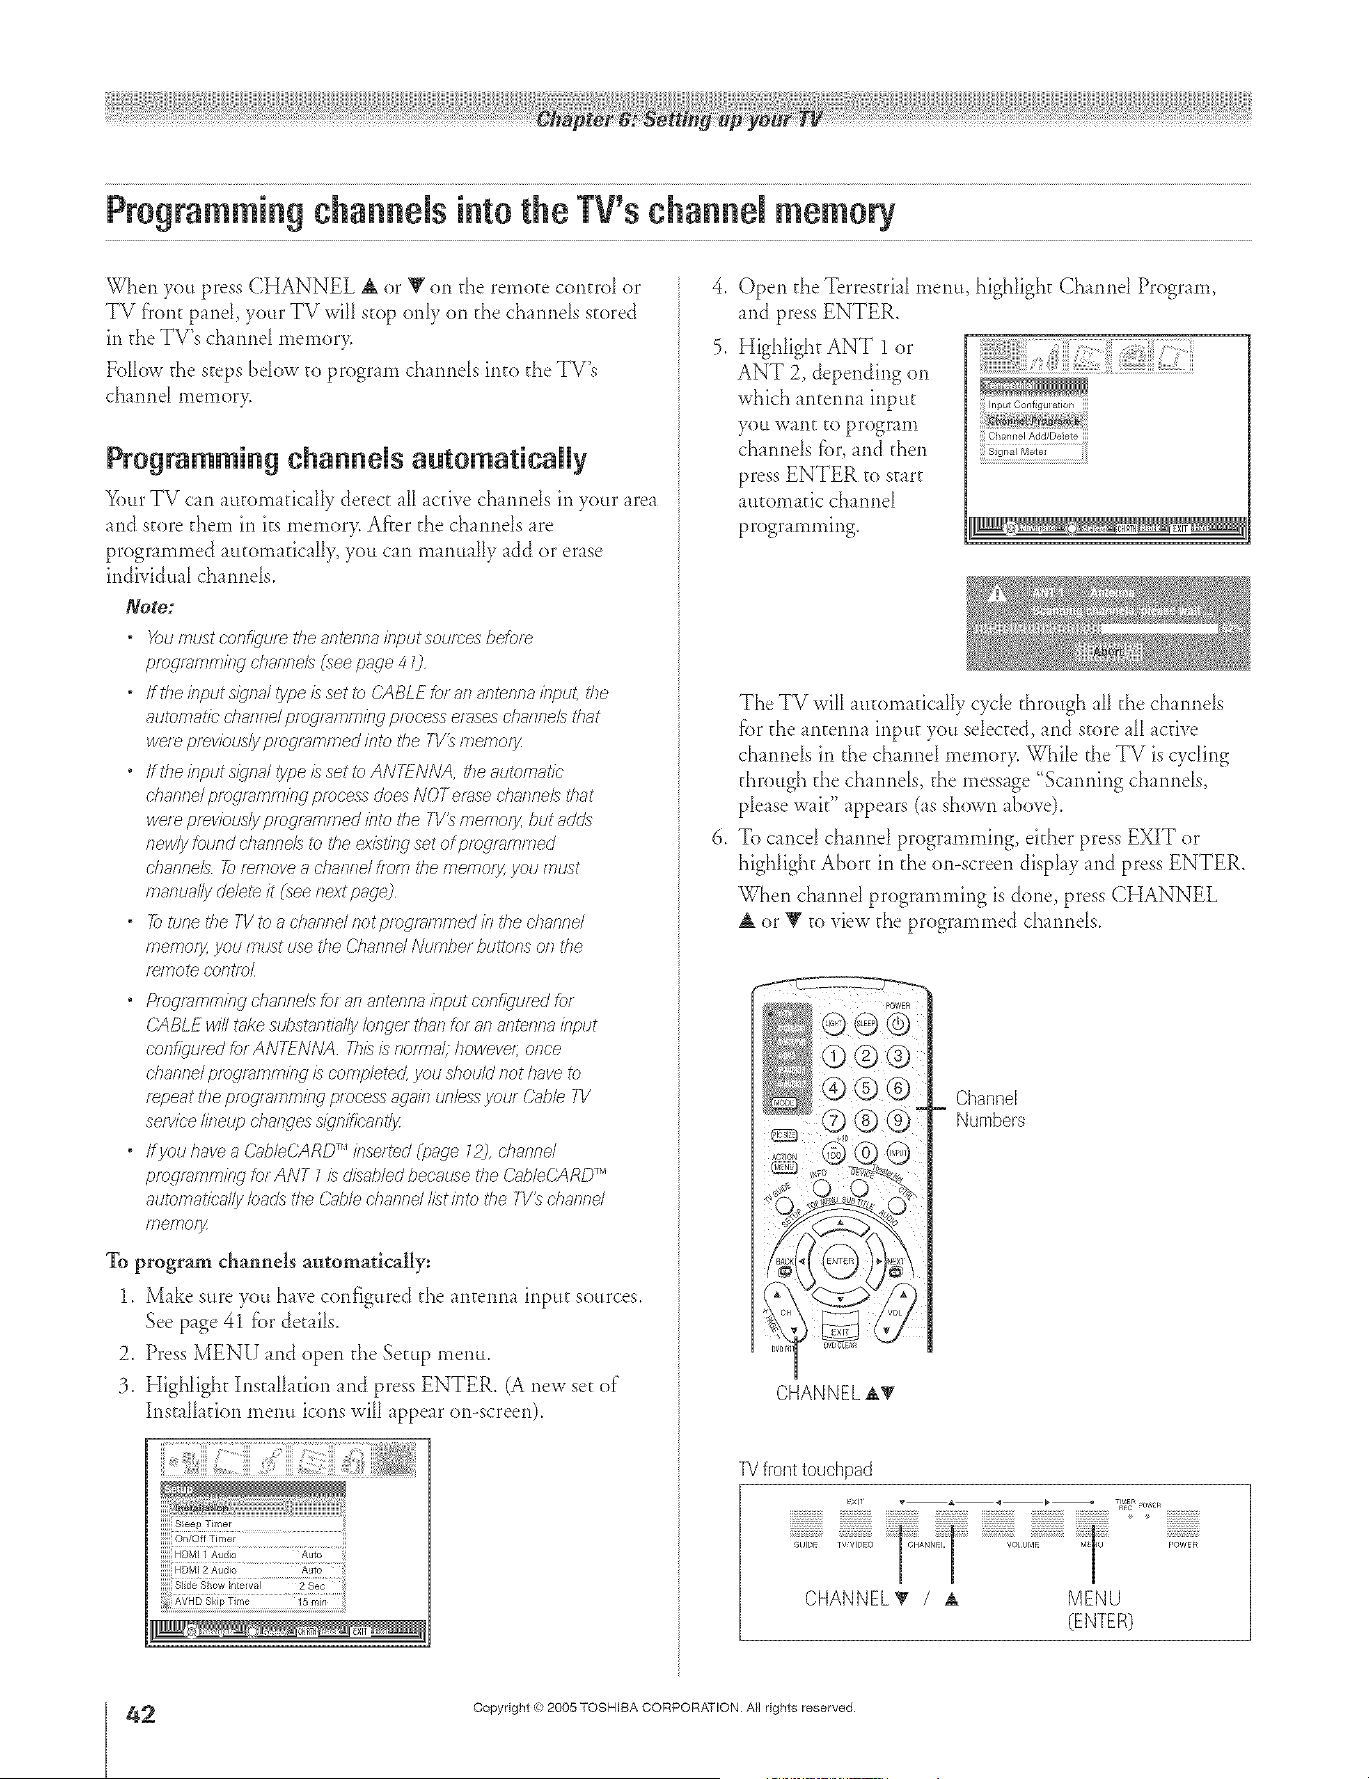
A ÷ L
ProgrammingchannNsinto the TV'sehannN memory
When you press CHANNEL A or Y on the remote central or
TV fTontpand, your TV will stop only on t}_echarmds stored
in the TV's chamM memor>
Follow t}_esteps brow to program charmds into the TV's
charred memor>
Programming channels antematieally
_)ur TV can automatically detect all active chatmds in your area
and store them in its memory. Afier the charmds are
programmed automatically, you can manually add or erase
individual charmds.
Note:
* X._umusteon_)'u/etheantennainputsoumesbefore
proc,_,mmingchanne/_)ee page4 O
* Iftheinputm)Tnal_ype£setto CASkEfofanantennak>ut, #>e
automaUcchannelpmg/wnm/enprocesserases channelsthat
wele previously pmg/_;mmed intoNo 7-1/_memos_
, ffthe fflput s@'na/O@e£ settoANTFNIVA, theautomatic
ehanfTe/pfogr7smm/rlUlpfoeess does NOT erase chasTrleL5that
woe pmvioudy pmgl/7smfTsedbto the TV_ meq Toiy,but adds
fTewlyfound dTannel5 Ib the ex£tisw set of pfog/71ml77ed
dTanl_el5 2_ remove a dTannd floln &e mernoi_ you fFitJst
manually c/e/e_ it (see next pageO
, 7btunetheTVtoadTanndnotpmgf_mmedkTthedTannd
mernolTf J/OU f£USt use the Channd /\JutY#)et buttofTs of 7 the
f_ly}ote COFItlDL
o Pmgfarnmbg ehaFffTelsfor as-santenna kTput con@umd br
CABLEwillt_lkestJi)st_ntia//j/ bfTgel tisaf7 for al_ 8fTtefTfT8 /R/)ut
eonfl_qumdfor ANTENIVA 2}£ i;_nomTM howeve/; once
ehanfTe/pfogra/77m/w1/s eornp/etecL you should Ilot have to
f>/}eat rite progl>}lTIIT#hgf2locess a_la/17unless your Cabb TV
seM//ee //sTetJp chalwes siqnif)b,nt/y
" ffyou have a Ce,bleCARD TM inse/ted @nge _2), channd
proc,_n_ming tot ANT 7 £ diM,bled because the C_hleCARD TM
automatk>'#ly #)adstheCabled}anndI£tintotheTV_chaslnd
fFleffTOf_Z
To program channels al.ltomatlcaHy:
1, Make sure you have couf]gured the antenria inp_tt so_trces.
See page 41 _ar details.
2. Press MENU and open the Setup menu.
3. Highlight Installation and press ENTER. (A new se_of
Installation me*m icons will appear on-screen).
,
5.
Open the Terrestrial memt, highlight ChanrM Program,
and press ENTER.
HigNight ANT 1 or
ANT 2, dependir_g on
which anterm_ input 'nptConf£{umt,or,
yOU Vv'_'_l"lt 10 prograI_ C_annel Add/De ere
charmds _;>r,and then _ _....
press ENTER to start
aurora _tic charred
progr mm_ing.
The TV ">,,,illautomatic _lly cycle through all the charmds
_ar the anterma input you seIected, and store alI active
chamMs in the chamM memor> While the TV is cycling
through the channels, the message "Scarming charmds,
ple _sewait" appears (_s shown above).
To cancel charred programming, either press EXIT or
highlight Abort in the on-screen display and press ENTER.
When charred programming is done, press CHANNEL
or T to view the programmed charmds,
I @®®
® ®®
00®®"
CHANNEL±_
Channel
Numbers
1_! front touchpad
CHANNEL_" / ± MENU
(ENTER)
÷
2
HM95 R1 0 1-43 061505 42
Copyright @ 2005 TOSHIBA CORPORATION All rights reserved
6/24/05, 9:40 PM r
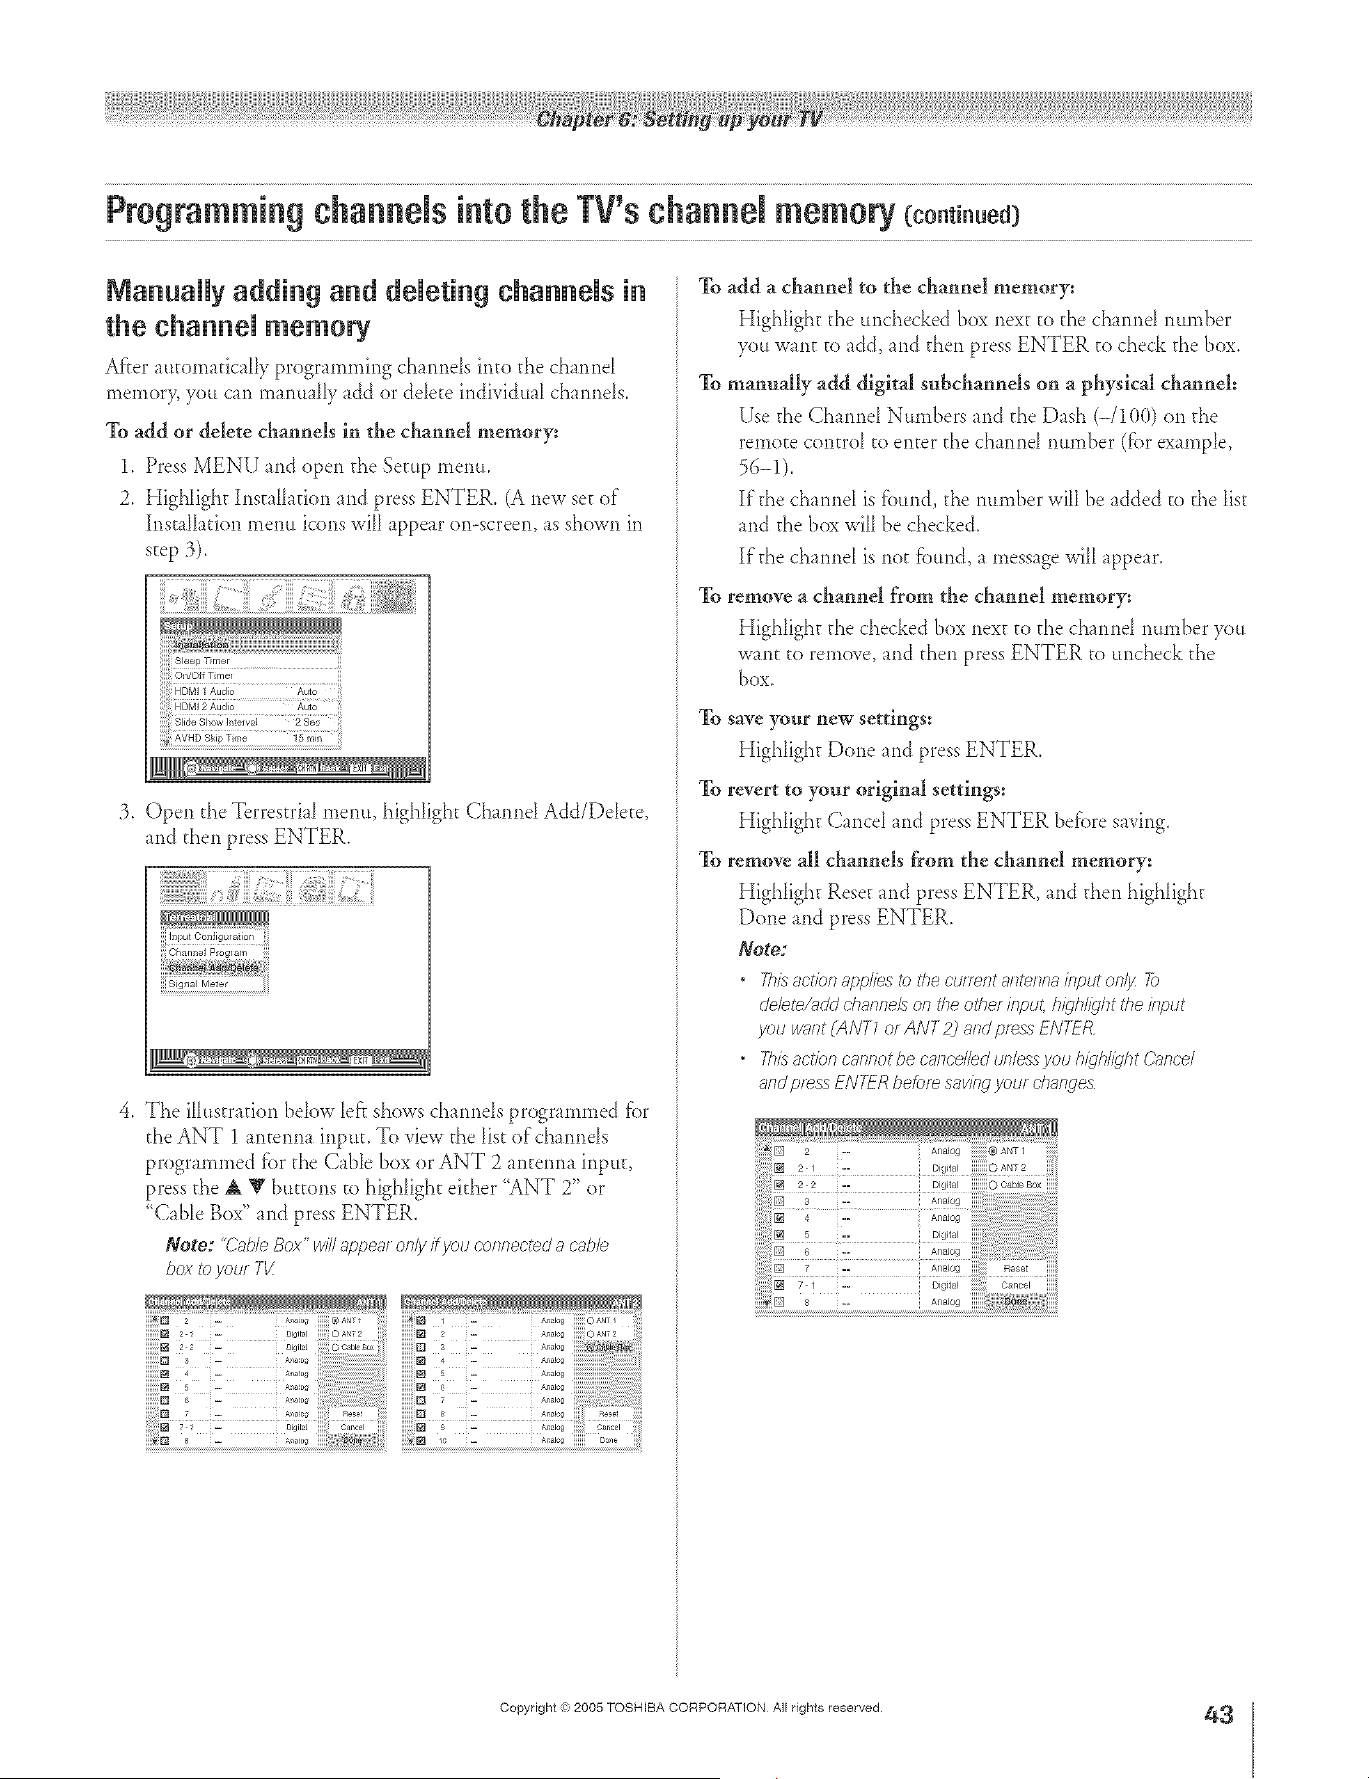
A ÷ L
ManuaRy adding and dNeting channNs in
the channeU memory
After mtorn_dcaHy programming channds into the channd
memory you can mmuflD add or ddete individua_ channds,
To add or delete channels in the channel memory:
1. Press MENU and open the Setup menu.
2. Highlight Instalhfion and press ENTER. (A new set of
hlst _IIation menu icons will appear on-screen, as shown in
step 3).
:3. Open the Terrestrifl menu, highlight Chmnd Add/Delete
and then press ENTER.
(:' ,4{
iiiChannel Program iii
!!!Sig_ml Motel iiiii
4. The illustration bdow left shows channds programmed fiat
the ANT 1 antenna input. To view the list of channds
programmed fiat the CaNe box or ANT 2 antenna input,
press the A V buttons to highlight either "ANT 2" or
"Cable Box" and press ENTER.
Note: "C_lb/eBox" wi/I ap/:)eat only it you cofTfTectedJa cable.
box I_)yore TI/
To add a channel to the channel memory:
Highlight the unchecked box next to the channd number
you want to add, and then press ENTER to che& the box.
To manually addt digital subchannels on a physical channel:
Use the Charmel Numbers and the Dash (-/100) on the
remote contrd to enter the channd number (f_arexample,
56-_).
If the channd is fbund, the number will be added to the list
and the b(= will be checked.
If the channd is not fiaund, a message will appear.
To remove a channel from the channel memory:
Highlight the checked box next to the channd number you
want to remove, and then press ENTER to uncheck the
box,
To save your new settlngs:
Highlight Done and press ENTER.
To revert to your original settings:
Hig[dight Cancd and press ENTER befbre saving.
To remove all channels from the channe! memory:
Highlight Reset and press ENTER, and dien highlight
Done and press ENTER.
Note:
" This 3crier?applies tc the c'terent a/lteslna/rip# on/jz 72)
dehte/; /dd chanrTeLs o1_ the el<her ifl/;)ut, hl_Thl_qiTt i<heh?/;)ut
you wnnt (ANT1 ot ANT 2) and pf_ss ENTER
* T/#sac#cncannotbecance//edun/eusyouhkjh//ghtC;_noe/
and p_ess ENT-_Rbefcre saving your d?afsges
÷
HM95 R1 041-43 061505 43
Copyright (ct,2005 TOSHIBA CORPORATION All rights reserved
÷
6/24/05, 9:40 PM
43
r
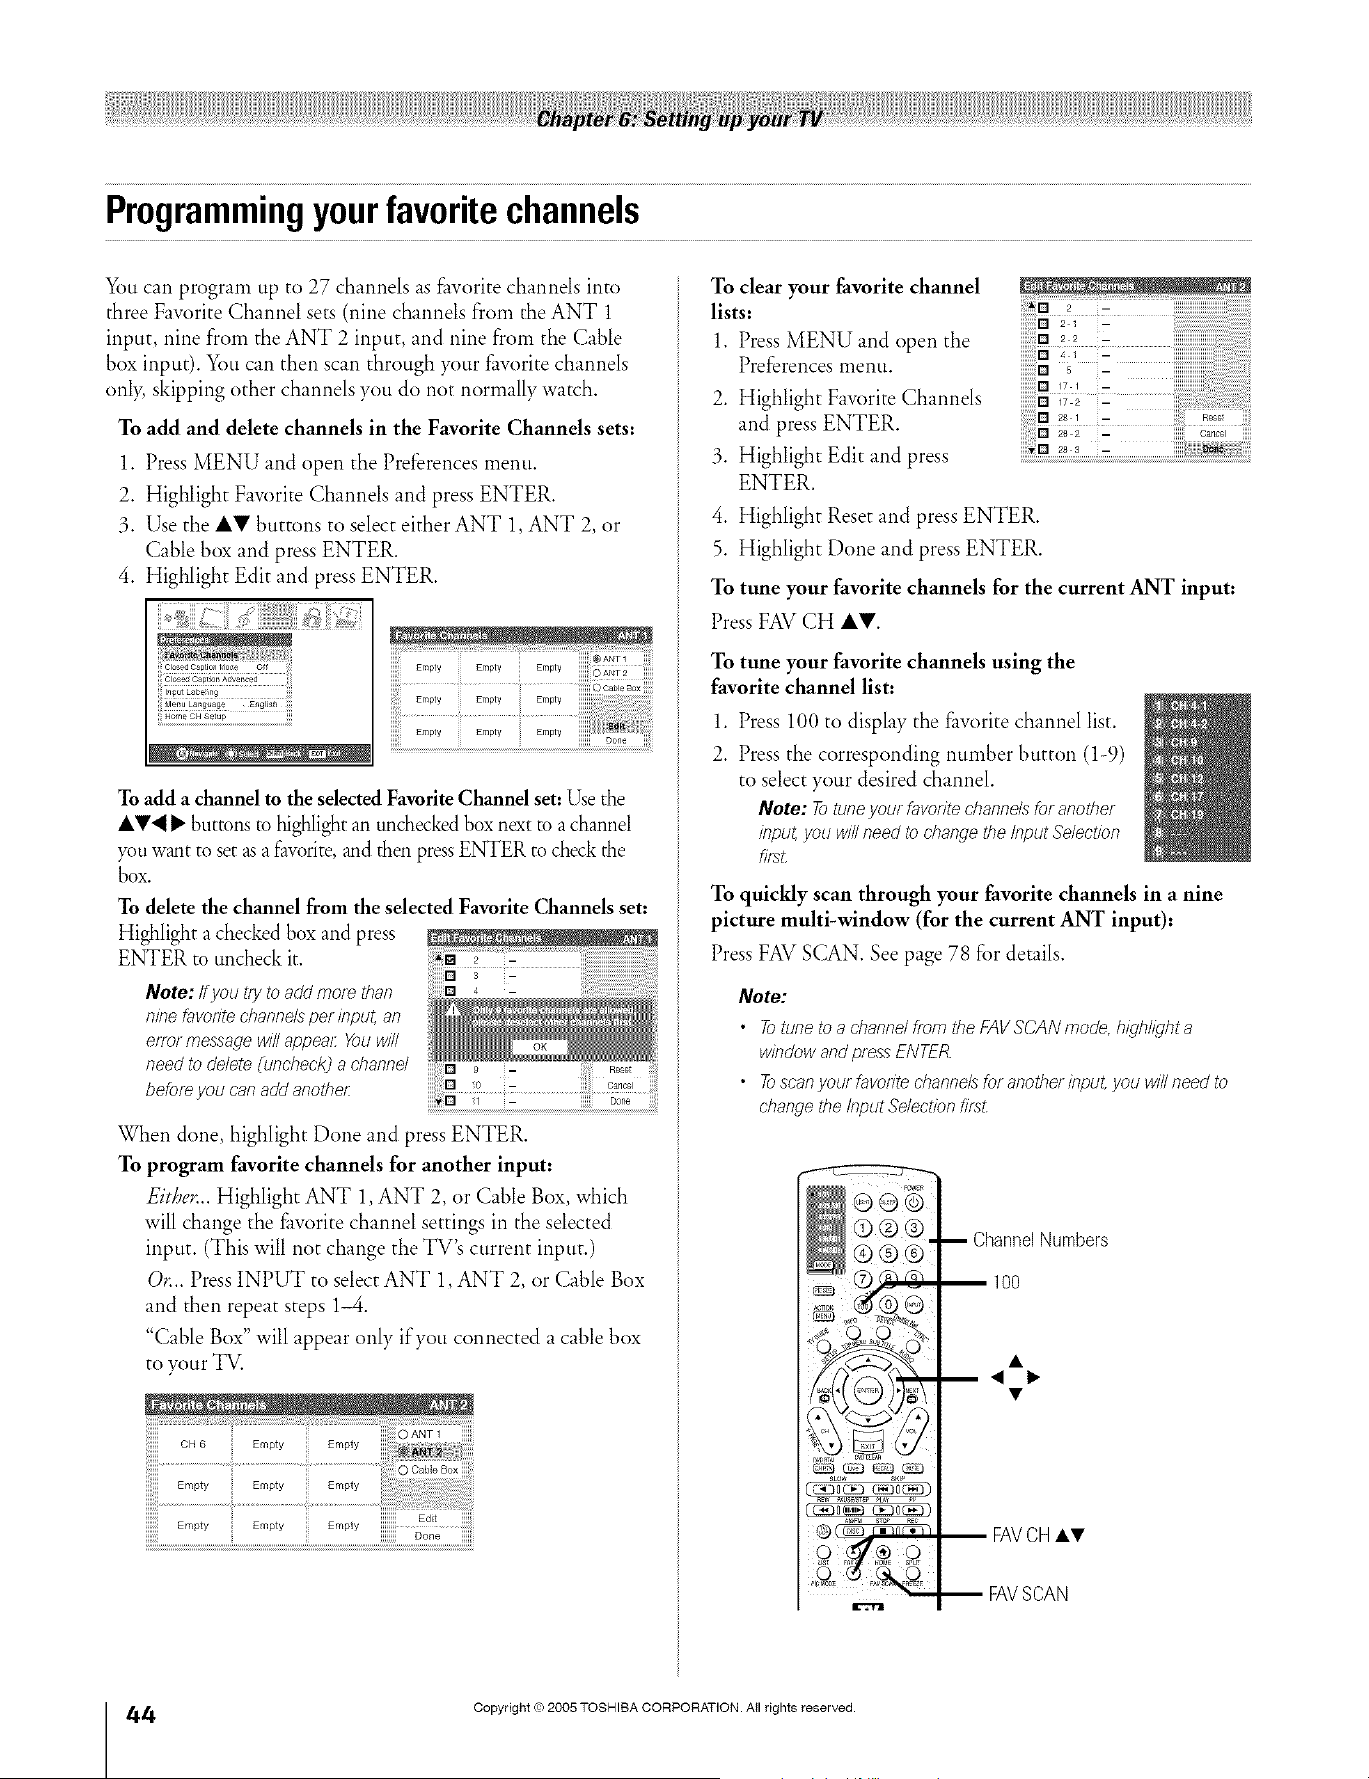
Programmingyourfavoritechannels
You can program up to 27 channels as £_vorite channels into
three Favorite Channel sets (nine channels from the ANT 1
input, nine from the ANT 2 input, and nine from the Cable
box input). You can then scan through your £_vorite channels
only, skipping other channels you do not normally watch.
To add and delete channels in the Favorite Channels sets:
1. Press MENU and open the Preferences menu.
2. Highlight Favorite Channels and press ENTER.
3. Use the lily buttons to select either ANT 1, ANT 2, or
Cable box and press ENTER.
4. Highlight Edit and press ENTER.
.................................
To add a channelto the selectedFavoriteChannel set:Use the
AV'_ I_ buttons to highlight an uncheckedbox next to a channel
you want to set asa raw)rite,and then pressENTER to checkthe
box.
To delete the channel from the selected Favorite Channels set:
Highlight a checked box and press
ENTERtouncheck,t 0 ::
Note: if you L(yto add more than [] 4 -
n#Tefavodte channels per input, an
enor message will appear You will
need to delete O/ncheck] a channd
before you can add another:
When done highlight Done and press ENTER.
To program favorite channels for another input:
Either.. Highlight ANT 1, ANT 2, or Cable Box, which
will change the £_vorite channel settings in the selected
input. (This will not change the TV's current input.)
O_.. Press INPUT to select ANT 1, ANT 2, or Cable Box
and then repeat steps 1-4.
"Cable Box" will appear only if you connected a cable box
to your TV.
Empty Empty Empty .....
iiiiii iiiiiiii Done iiiiiii
To clear your favorite channel
lists:
1. Press MENU and open the
Preferences menu.
2. Highlight Favorite Channels
and press ENTER.
3. Highlight Edit and press
ENTER.
;_iiii° 2 i2 iiiiiiiiiiiiiiiiiiiiiiiiiii!iiiiiiiiiiii!i
::o 2 2 ,
_
171 -
° i7& :
4. Highlight Reset and press ENTER.
5. Highlight Done and press ENTER.
To tune your favorite channels for the current ANT input:
Press FAVCH AV.
To tune your favorite channels using the
favorite channel list:
1. Press 100 to display the fhvorite channel list.
2. Press the corresponding number button (1-9)
to select your desired channel.
Note: Totuneyour favoriteehanne/sfor another
inpuLyou will need to changetheInput Selection
To quicMy scan through your favorite channels in a nine
picture multi-window (for the current ANT input):
Press FAV SCAN. See page 78 for details.
Note:
• To tune to a channel from the FAV SCAN mode, highlight a
window and press ENTER
• Toscan your favodte channels for another input, you will need to
change the Input Selection fi_:d.
_LOW SKI_
,'_o_ _o_)
ChannelNumbers
FAVCHA•
FAVSCAN
÷
4/4
HM95 R1 0 4-52 061505 44
Black
Copyright © 2005 TOSHIBA CORPORATION. All rights reserved.
6/24/05, 9:47 PM [
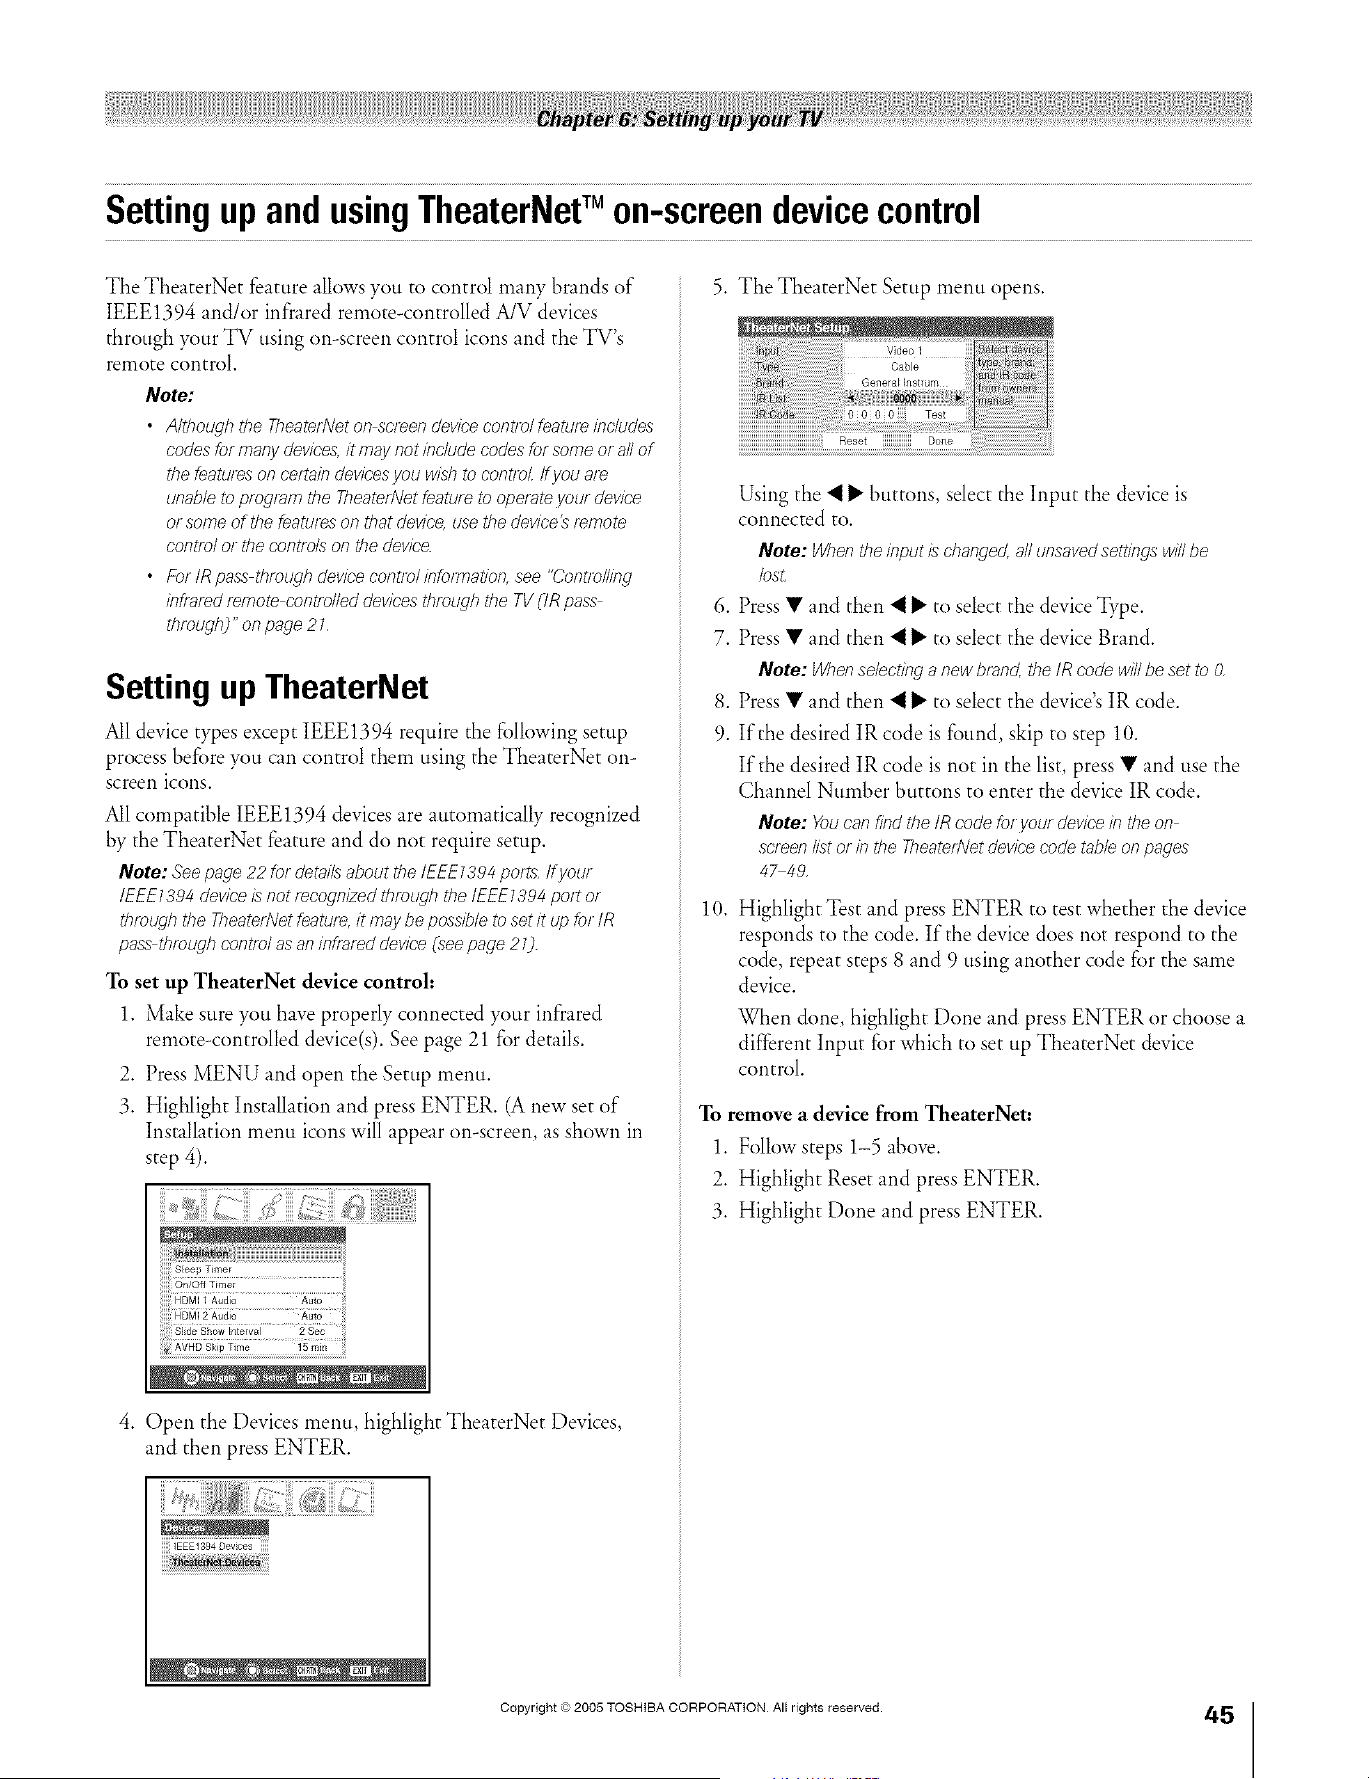
A ÷ L
SettingupandusingTheaterNetTM on-screendevicecontrol
The TheaterNet feature allows you to control many brands of
IEEE1394 and/or infrared remote-controlled A/V devices
through your TV using on-screen control icons and the TV's
remote control.
Note:
• A/tboughthe TheatedVeton screendevicecon_ro/featur_includes
codesformany devices,it maynotinclude codesfor someor allof
the teatureson certaindevicesyou wLsbto control ff you are
unableto program the TheatedVetfeatureto operateyour device
or someof the featureson that device,use thedevice_remote
control or thecontfL_lson the device.
• ForIR pass throughdevicecontrolinformation,see "(2ont/oll#Tg
infraredremote controlleddevicesthroughthe TV(IR pass
tbmugb2"on page 21
Setting up TheaterNet
All device types except IEEE1394 require the fi)llowing setup
process before you can control them using the TheaterNet on-
screen icons.
All compatible IEEE1394 devices are automatically recognized
by the TheaterNet feature and do not require setup.
Note: Seepage 22 for detailsaboutthe/EEE1394 penis ifyour
IEEE1394deviceis not fecogn/2edtbrougb the tEEEI394 pelt or
tbroL4gbthe TheaterNetfeatuf< it maybe possibleto set it up for tR
pass tbmugb controlas aninOafeddevice (,seepage 21].
To set up TheaterNet device control:
1. Make sure you have properly connected your infrared
remote-controlled device(s). See page 21 for details.
2. Press MENU and open the Setup menu.
3. Highlight Installation and press ENTER. (A new set of
Installation menu icons will appear on-screen, as shown in
step 4).
Sleep Timer
On/Off Timer
S]de Show Interval 2 Sec
_7_!_i !!m
4. Open the Devices menu, highlight TheaterNet Devices,
and then press ENTER.
IEEE1394 Devices
5. The TheaterNet Setup menu opens.
Using the "_ I1_buttons, select the Input the device is
connected to.
Note: Whentheinput is changed,all unsavedsettsngswillbe
/osL
6. Press • and then "_ I_ to select the device _,pe.
7. Press • and then "_ I_ to select the device Brand.
Note: Whenselectinga new bland, the IRcode will beset to &
8. Press • and then "_ I_ to select the device's IR code.
9. If the desired IR code is found, skip to step 10.
If the desired IR code is not in the list, press • and use the
Channel Number buttons to enter the device IR code.
Note: Youcan find the tRcode fo/ yourdevice#7theon
scr_ef7list orif7the TheatedVetdevicecode tableon pages
4_49,
10. Highlight Test and press ENTER to test whether the device
responds to the code. If the device does not respond to the
code, repeat steps 8 and 9 using another code for the same
device.
When done, highlight Done and press ENTER or choose a
different Input for which to set up TheaterNet device
control.
To remove a device from TheaterNet:
1. Follow steps 1-5 above.
2. Highlight Reset and press ENTER.
3. Highlight Done and press ENTER.
Copyright © 2005 TOSHIBA CORPORATION All rights reserved.
45
HM95 R1 044-52 061505 45
Black
/ i-- x, .4 r.__ /rz= t_ h.__ t_ [j i_, A/-_ rz
÷
6/24/05, 9:47 PM
÷
[
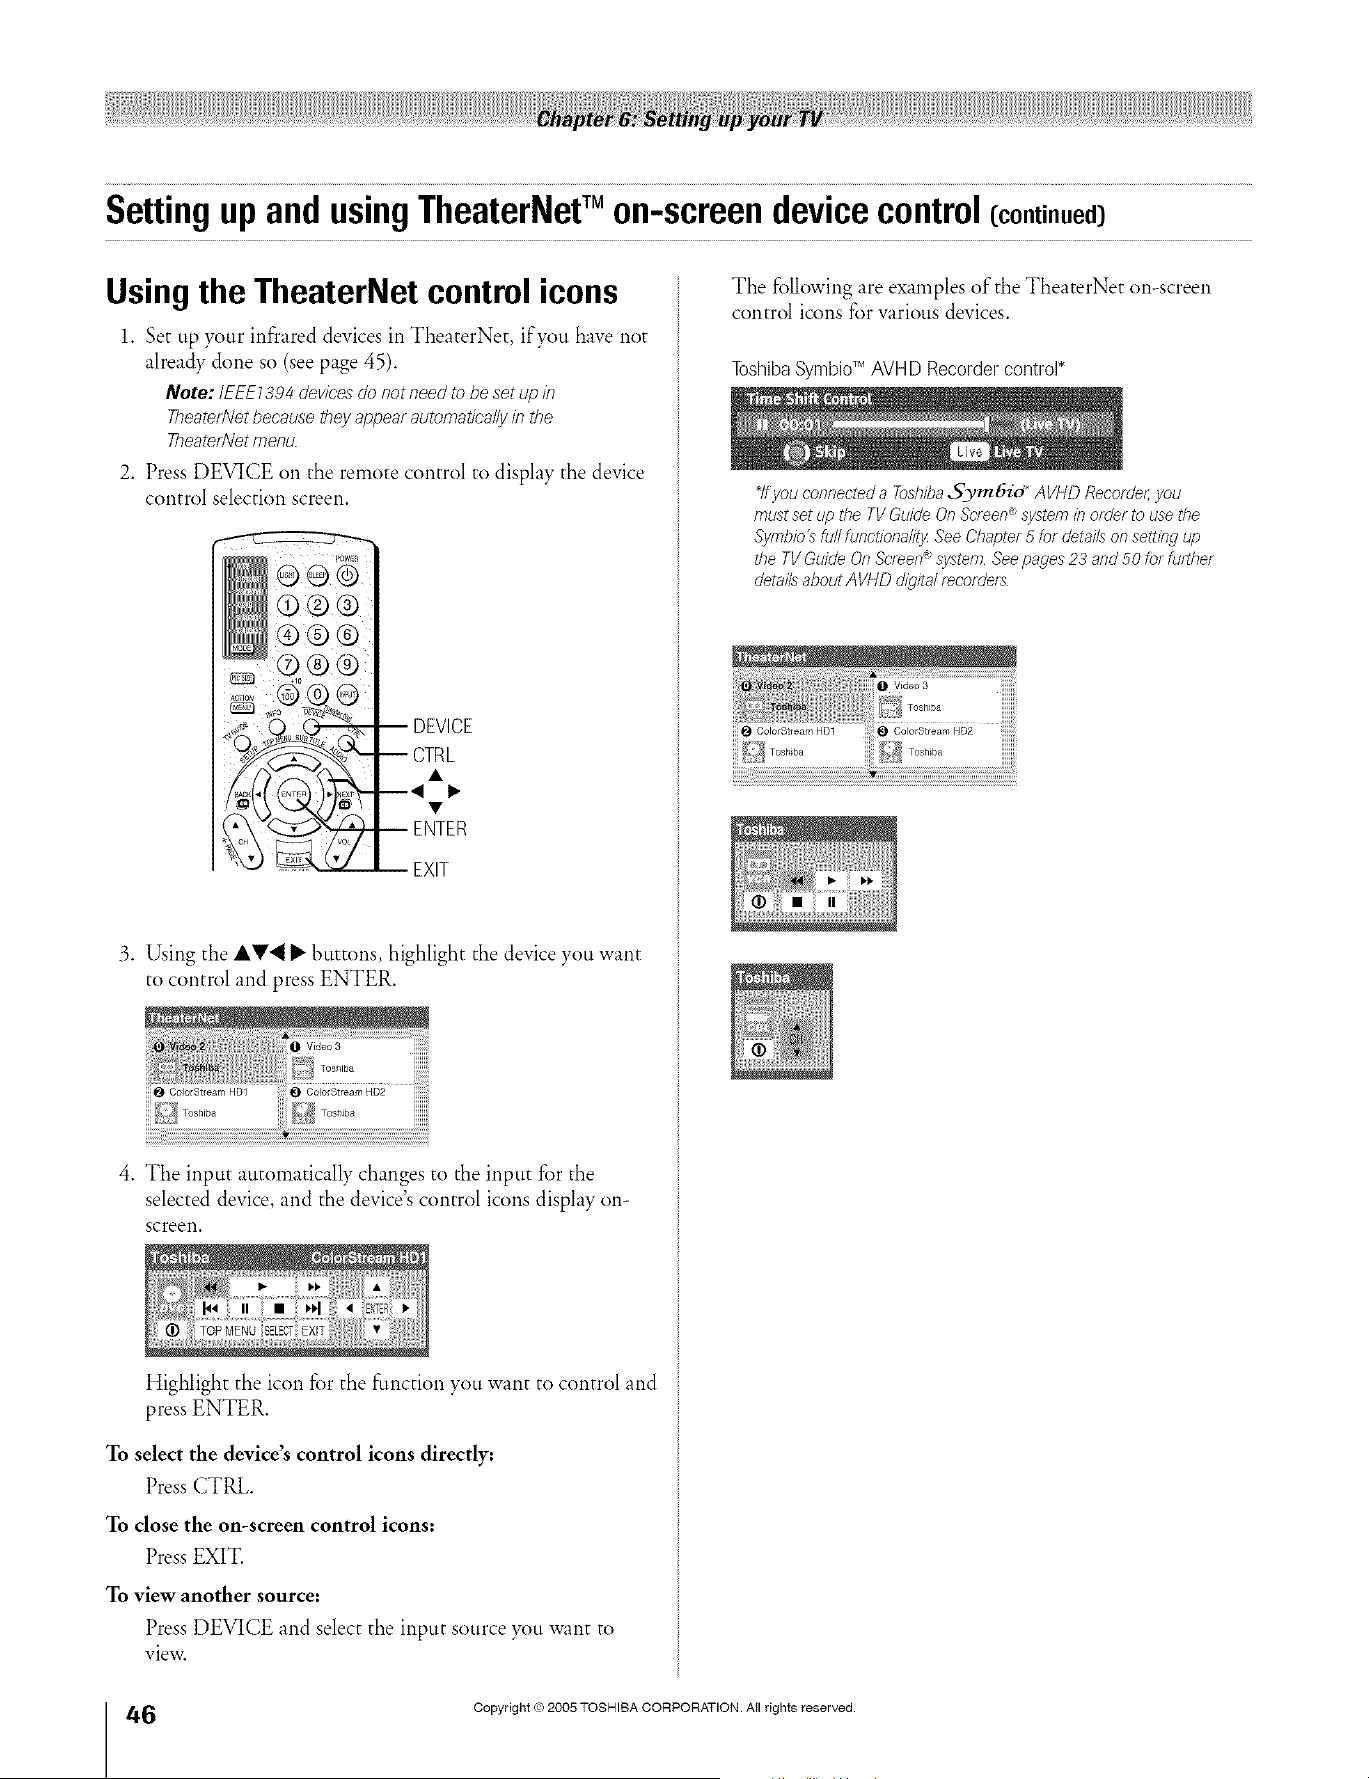
A ÷ L
SettingupandusingTheaterNefMon-screendevicecontrol(continued)
Using the TheaterNet control icons
1. Set up your infrared devices in TheaterNet, if you have not
already done so (see page 45).
Note:/EEE/394 devices do not need to be set up in
TheatetlVet because they appear automatically #7 the
TheatetlVet menu.
2. Press DEVICE on the remote control to display the device
control selection screen.
DEVICE
ENTER
EXIT
3. Using the AV'_ _" buttons, highlight the device you want
to control and press ENTER.
OolorStmam HD1
iiiiiiiii
4. The input automatically changes to the input for the
selected device, and the device's control icons display on-
screen.
Highlight the icon for the function you want to control and
press ENTER.
To select the device's control icons directly:
Press CTRL.
To close the on-screen control icons:
Press EXIT.
To view another source:
Press DEVICE and select the input source you want to
view.
The following are examples of the TheaterNet on-screen
control icons for warious devices.
ToshibaSymbioTM AVH D Recorder control*
_lfyou connected a ToslTiba.5_m&id _AVHD Recorde/;you
must set up the TV Guide OnScreen_ system in order to use the
Symb/o_ fal/ functiona/ity See Chapter 5 for details on setting up
tlTeTV Guide On Screen®system Seepages 23 and 50 for further
detailsabout AVHD d/igffalr_corders
I_ ColorStmam HD1
_ Tosh ba
÷
46
HM95 R1 0 4-52 061505 46
Black
/F"x, ACZ_H'Z_t'_/tZ_t'_UF, A,,'_I'Z_
Copyright © 2005 TOSHIBA CORPORATION. All rights reserved.
6/24/05, 9:47 PM r
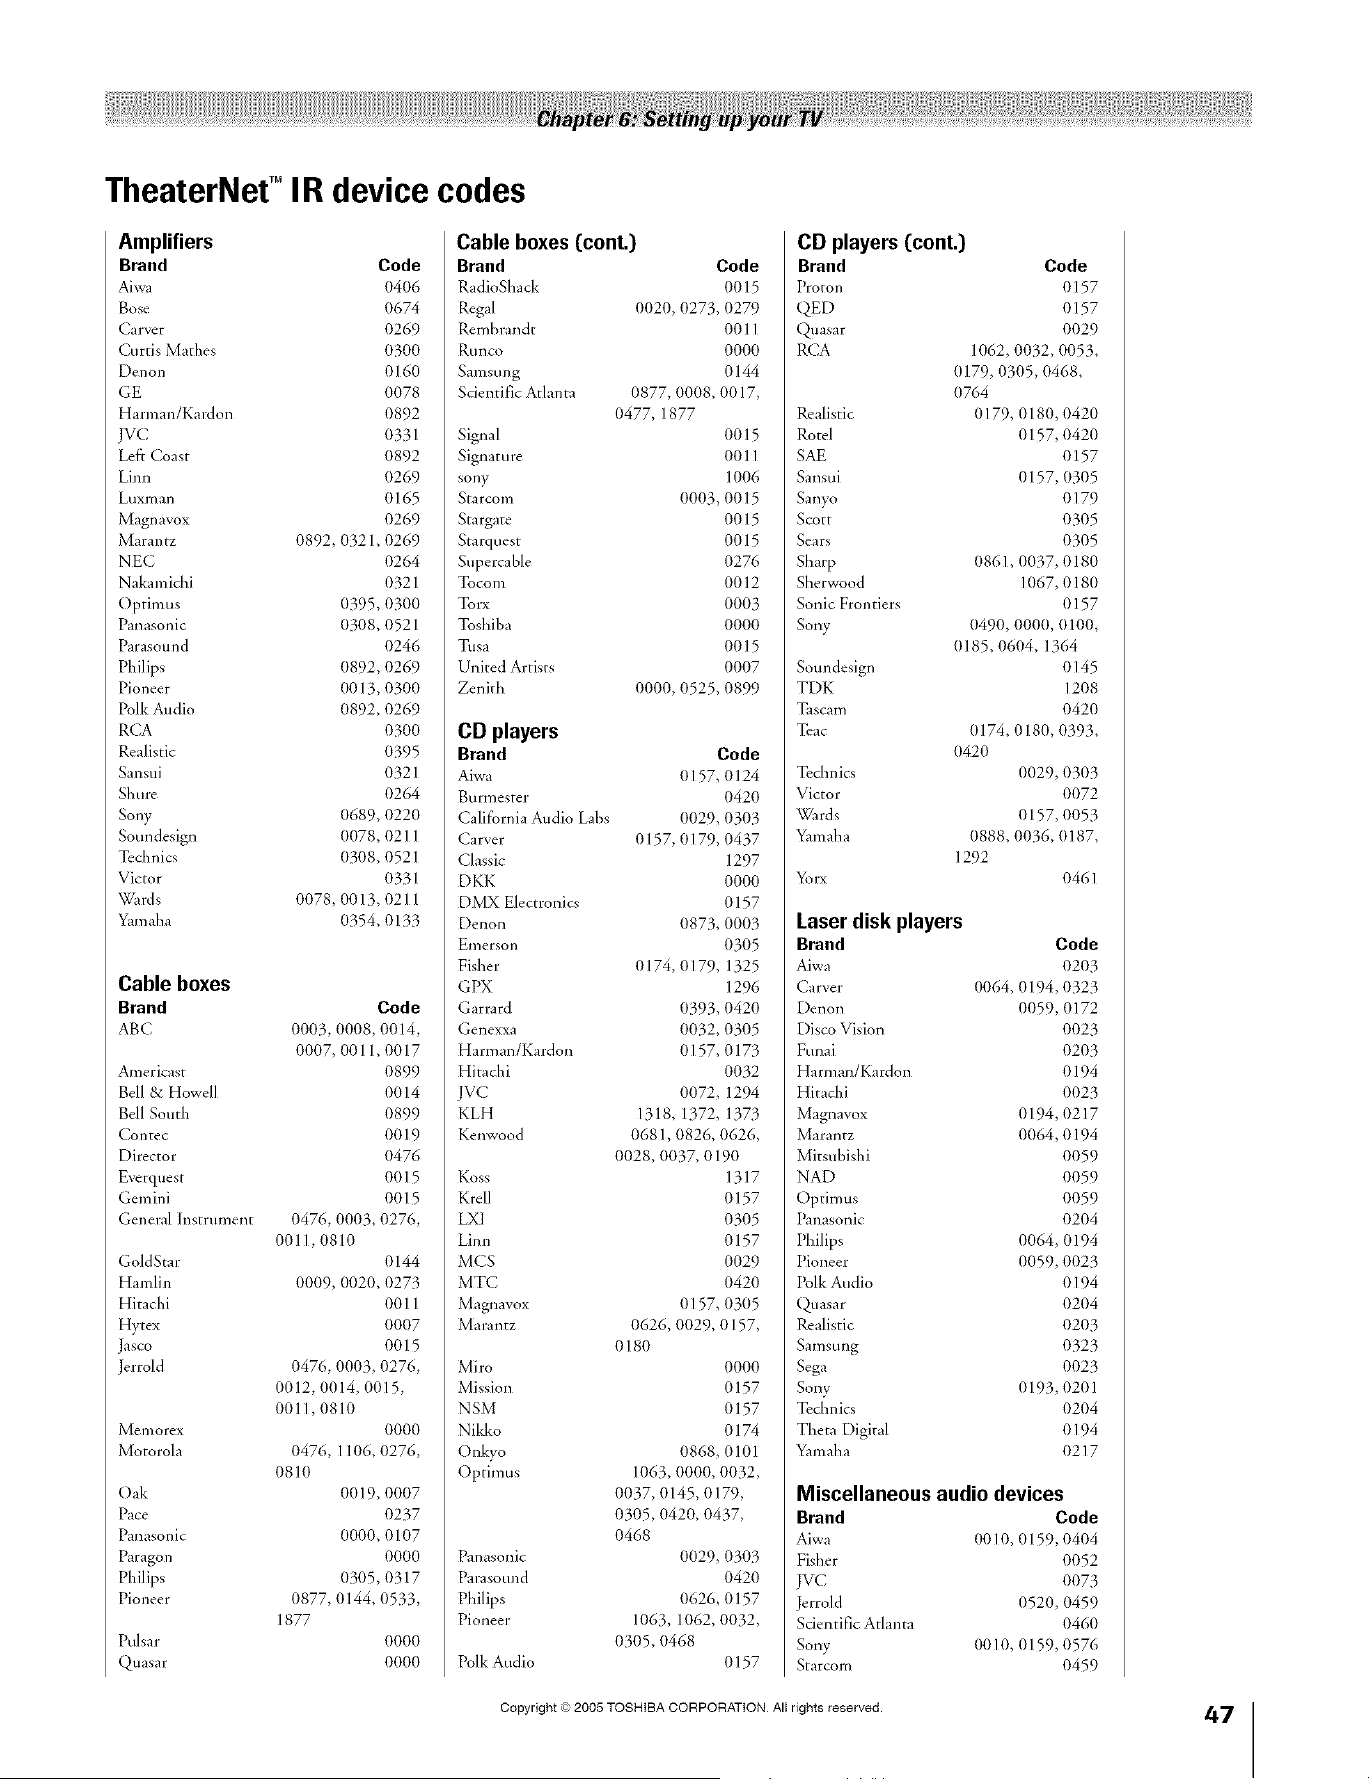
A ÷ L
TheaterNef ° IR device codes
Amplifiers
Brand Code
Aiwa 0406
Bose 0674
Carver 0269
Curtis Mathes 0300
Denon 0160
GE (}O78
Harman/Kardon 0892
JVC 0331
Left Coast (}892
Lim_ 0269
Luxman 0165
Magnavox 0269
Marantz 0892, 0321,0269
NEC 0264
Nakamicbi 032 I
Optimus 0395, 0300
Panasonic 0308, 052 I
Parasound 0246
Philips (}892, 0269
Pioneer 0013, 0300
Polk Andio 0892, 0269
RCA 0300
Realistic 0395
Sansui 0321
Shure 0264
Sony (}689, 0220
Soundesign (}078, 0211
Technics 0308, 0521
Victor (}33I
Wards 0078, 0013, 0211
Yamaha (}354, 0133
Cable boxes
Brand Code
ABC t-/(/(}3,(}(}1-/8,1-/1-/14,
0007, 001 I, 0017
Americast 0899
Bell & Howell 0014
Bell South 0899
Contec 0019
Director 0476
Everquest 0015
Gemini 0015
General Instrument 0476, 0003, 0276,
0011,0810
GoldStar 0144
Hamlin 00(}9, (}020, 0273
Hitachi 0011
Hytex (}007
Jasco 0015
Jerrold 0476, 0003, 0276,
0012, (}014, 0015,
00ll, 0810
Memorex 0000
Motorola 0476, 1106, 0276,
0810
Oak 0019, 0007
Pace 0237
Panasonic 0000, 0107
Paragon 0000
Philips 0305, 0317
Pio.eer 0877, 0144, 0533,
1877
Pulsar 0000
Quasar 0000
Cable boxes{cont.}
Brand Code
RadioShack 0015
Regal 0020, 0273, 0279
Rembrandt 001 I
Runco 0000
Samsung 0144
Scientific Atlanta 0877, 0008, 0017,
0477, 1877
Signal 0015
Signature 001 ]
sony 1006
Starcom 0003, 0015
Stargate 0015
Starquest 00 ] 5
Supercable 0276
Tocom 0012
Torx 0003
Toshiba 0000
Tusa 0015
United Artists 0007
Zenith 0000, 0525, 0899
CD players
Brand Code
Aiwa 0157,1-/124
Burmester 0420
Califbmia Audio Labs 0029, 0303
Carver 0157, 0179, 0437
Classic 1297
DKK 0000
DMX Electronics 0157
Denon 0873, 0003
Emerson 0305
Fisher 0174, 0179, 1325
GPX 1296
Garrard 0393, 0420
Genexxa 0032, 0305
Harman/Kardon 0157, 0173
Hita&i 0032
JVC 0072, 1294
KLH 1318, 1372, 1373
Kenwood 0681, 0826, 0626,
0028, (}(}37,0190
Koss 1317
Krell 0157
LXI O3O5
Linn 0157
MCS 0029
MTC 0420
Magnavox 0157, 0305
Marantz 0626, 0029, 0157,
0180
Miro 0000
Mission 0157
NSM 0157
Nikko 0174
Onkyo 0868, 0101
Optimus 1063, 0000, 0032,
0037, 0145, 0179,
0305, 0420, 0437,
0468
Panasonic 0029, 0303
Parasound 0420
Philips 0626, 0157
Pioneer 1063, 1062, 0032,
0305, 0468
Polk Audio 0157
CD players {cont.}
Brand Code
Proton 0157
QED 0157
Quasar 0029
RCA 1062, 0032, 0053,
0179, 0305, 0468,
0764
Realistic 0179, 0180, 0420
Rotel 0157, 0420
SAE 0157
Sansui 0157, 0305
Sanyo 0179
Scott 0305
Sears 0305
Sharp 0861,0037, 0180
Sherwood 1067, 0180
Sonic FroHtiers 0157
Sony 0490, 0000, 0100,
(}185, 0604, 1364
Soundesign 0145
TDK 1208
Tascam 0420
Teac 0174, 0180, 0393,
0420
To&nits 0029, 0303
Victor 0072
Wards 0157, 0053
Yamaha 0888, 0036, 0187,
1292
Yorx 0461
Laserdisk players
Brand Code
Aiwa 0203
Carver 0064, 0194, 0323
Denon 0059, 0172
Disco Vision 0023
Funai 0203
Harman/Kardon 0194
Hita&i 0023
Magnavox 0194, 0217
Marantz 0064, 0194
Mitsubishi 0059
NAD 0059
Optimus 0059
Panasonic 0204
PI,ilips 0064, 0194
Pioneer 0059, 0023
Polk Audio 0194
Quasar 0204
Realistic 0203
Samsung 0323
Sega 0023
Sony 0193,0201
Te&nics 0204
Tbeta Digital 0194
Yamaha 0217
Miscellaneous audio devices
Brand Code
Aiwa 0010, 0159, 0404
Fisher 0052
WC 0073
Jerrold 0520, 0459
Scientific Atlanta 0460
Sony 0010, 0159, 0576
Starcom 0459
Copyright © 2005 TOSHIBA CORPORATION All rights reserved.
HM95 R1 044-52 061505 47
Black
/ i'-- \ .4 _ irz_ t% i_ t% LI i_ A/% rz_
÷
6/24/05, 9:48 PM
47
÷
[
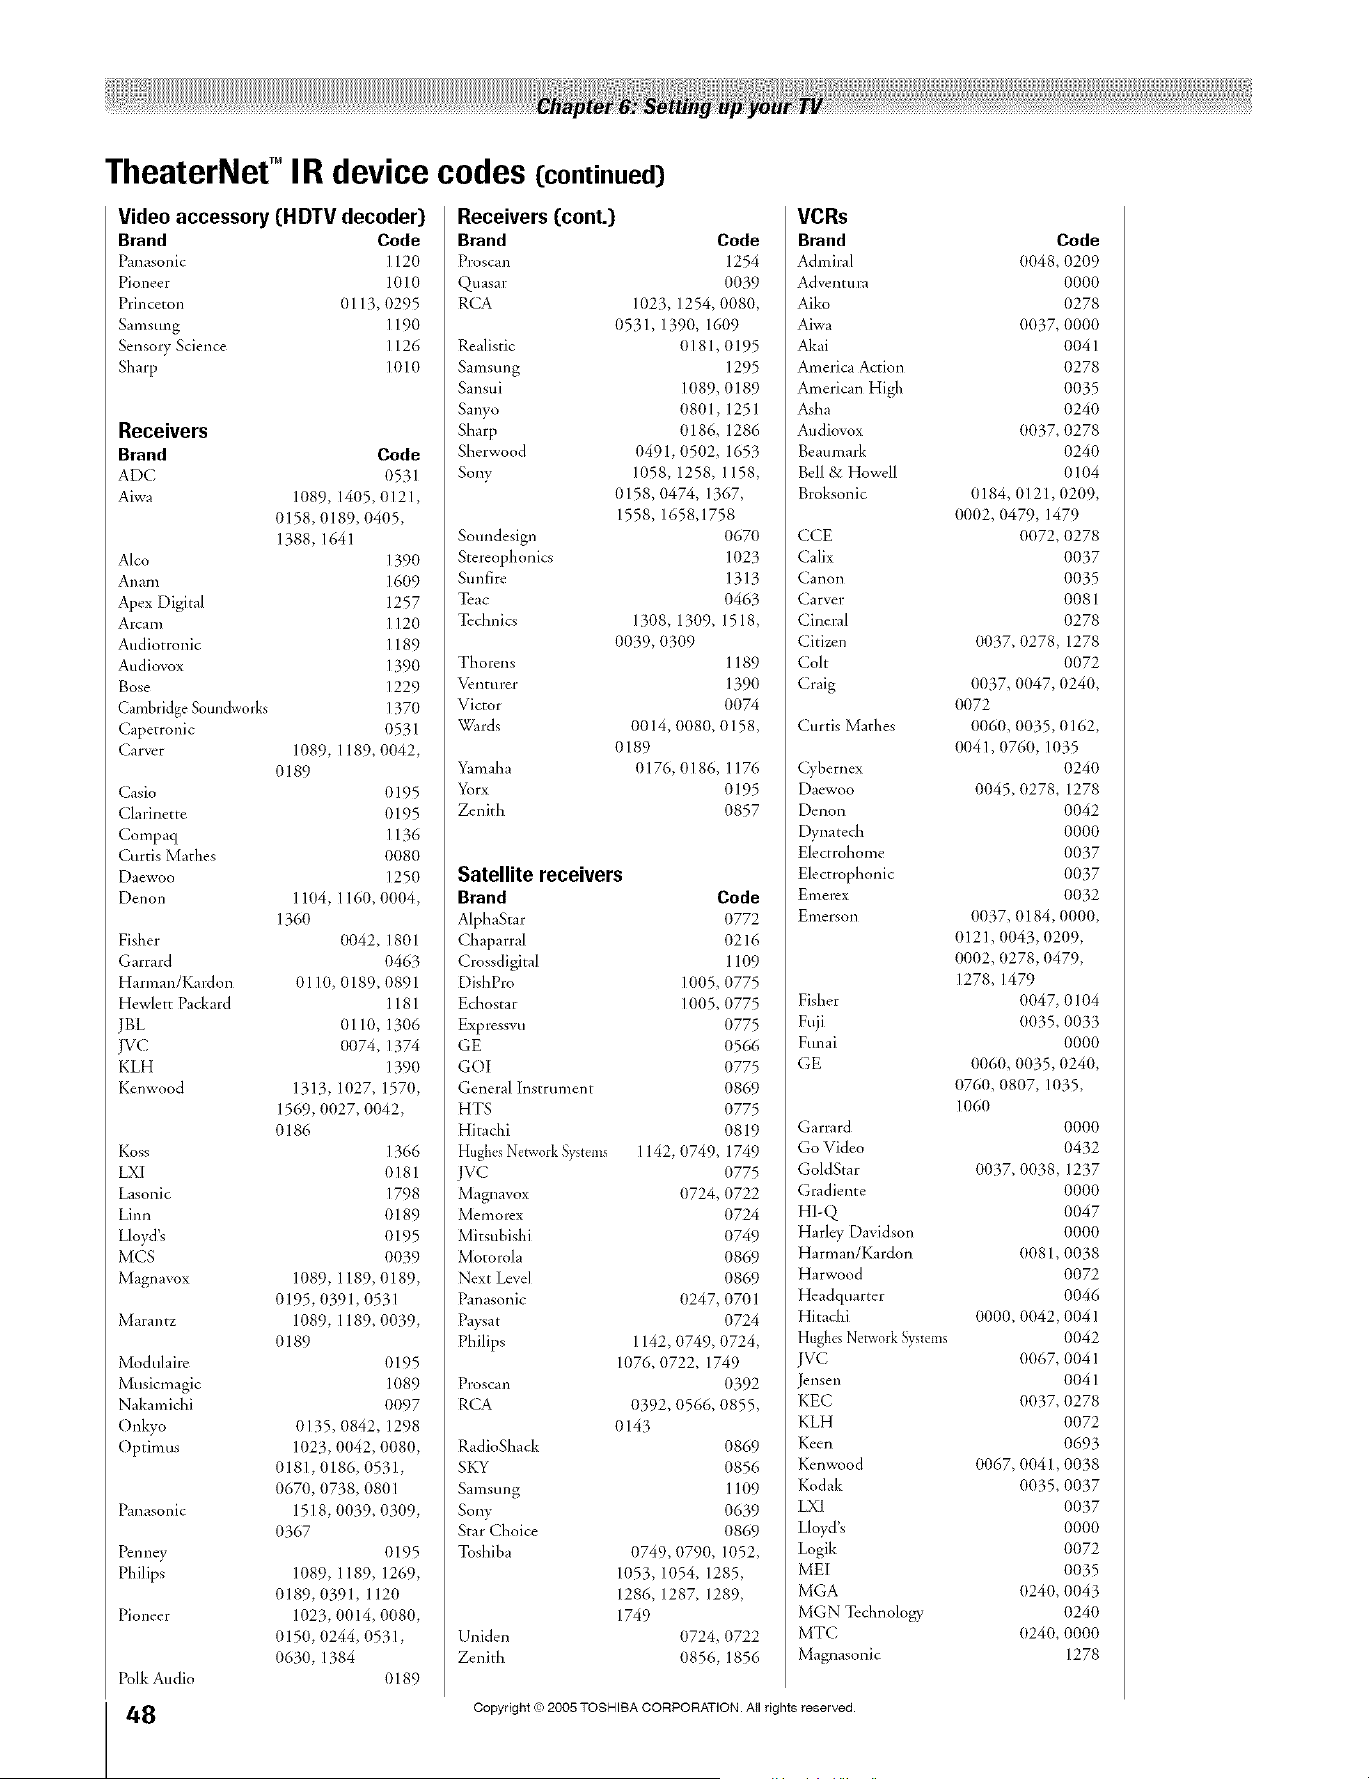
A ÷ L
TheaterNef ° IR device codes (continued)
Video accessory(HDTV decoder)
Brand Code
Panasonic I120
Pioneer 1010
Princeton 0113, 0295
Sal_lstlng ] ] 90
Sensory Science ]] 26
Sharp 1010
Receivers
Brand Code
ADC 0531
Aiwa 1089, 1405, 0121,
0158, 0189, 0405,
1388, 1641
Alto 1390
Anam 1609
Apex Digital 1257
Arcam I 120
Audiotronic I189
Audiovox 1390
Bose 1229
Cambridge Sotmdworks 137(1
Capetronic 0531
Carver 1089, I 189, 0042,
0189
Casio 0195
Clarinette 0195
Compaq 1136
Curtis Mathes 0(t80
Daewoo 1250
Denon 1104, 1160, 0(t04,
1360
Fisher (t042, 1801
Garrard 0463
Harman/Kardon 01 I(1, 0189, 0891
Hewlett Packard 1181
JBL 0110, 1306
JVC 0074, 1374
KLH 139O
Kenwood 1313, 1027, 1570,
1569, 0027, 0042,
0186
Koss 1366
LX[ 0181
Lasonic 1798
Lim_ 0189
Lloyd'_ 0195
MCS OO39
Magnavox 1089, 1189, 0189,
0195, (t391,0531
Marantz 1089, 1189, 0039,
0189
Modulaire 0195
Musicmagic 1(189
Nakamichi 0097
Onkyo 0135, 0842, 1298
Optimus 1023, 0042, 0080,
0181,0186, 0531,
0670, (t738, 0801
Panaso.ic 1518, (}039, 0309,
O367
Pcnney 0195
Philips 1089, 1189, 1269,
0189, 0391, 1120
Pio.eer 1023, 0014, 0080,
0150, 0244, 0531,
0630, 1384
0189
Polk Audio
HM95 R1 0 4-52 061505 45
Black
/_\ At_ IrZt'*II_t'*IU_ A,'%rZ
Receivers (cont.)
Brand Code
Proscan 1254
Quasar 0039
RCA 1023, 1254, 0080,
0531, 1390, 1609
Realistic (118I, 0195
Samsung 1295
Sansui ] (t89, 0189
Sanyo (t801, 1251
Sharp 0186, 1286
Sherwood 0491, (t502, 1653
Sony 1058, 1258, 1158,
0158, 0474, 1367,
1558, 1658,1758
Soundesign 0670
Stereophonics 1023
Sunfire 1313
Teac 0463
Technics 1308, 1309, 1518,
OO39, 0309
Thorens I 189
Venturer 1390
Victor 0074
Wards 0014, (t(t80, 0158,
0189
Yamaha 0176, 0186, 1176
Yorx 0195
Zenith 0857
Satellite receivers
Brand Code
AlphaStar 0772
Chaparral 0216
Crossdigital 1109
DishPro 1005, 0775
Echostar I (t05, 0775
Expressvu 0775
GE 0566
GOI 0775
General Instrument 0869
HTS O775
Hitachi 0819
HughesNetwork _',ystems I 142, 0749, 1749
JVC 0775
Magnavox (t724, 0722
Memomx 0724
Mitsubishi 0749
Motorola 0869
Next Level 0869
Panasonic (t247, 0701
Pay_at 0724
Philips 1142, 0749, 0724,
1076, 0722, 1749
Proscan 0392
RCA 0392, 0566, 0855,
0143
RadioShack 0869
SKY 0856
Samsung 1109
Sony 0639
Star Choice 0869
Toshiba 0749, 0790, 1052,
1053, 1054, 1285,
1286, 1287, 1289,
1749
Uniden (t724, 0722
Zenith (t856, 1856
VCRs
Brand
Admiral
Ad v_l]ttlra
Aiko
Aiwa
Akai
America Action
American High
Asha
Audiovox
Beaumark
Bell & Howell
Broksonic
CCE
Calix
Calloll
Carver
Cineral
Citizen
Colt
Craig
Curtis Mathes
Qbernex
Daewoo
Denon
Dynatech
Electrohome
Electrophonic
gmerex
gl_lerson
Fisher
Fuji
Funai
GE
Garrard
Go Video
GoldStar
Gradiente
HI-Q
Harley Davidson
Harman/Kardon
Harwood
Headquarter
Hitachi
HughesNetworkSystems
JVC
Jensen
KEC
KLH
Keen
Kenwood
Kodak
LXI
Lloyd's
Logik
MEI
MGA
MGN Te&nology
MTC
Magnasonic
Copyright © 2005 TOSHIBA CORPORATION. All rights reserved.
Code
(t048, 0209
0000
0278
0037,0000
0041
0278
OO35
0240
(t037, 0278
0240
0104
0184,0121,0209,
0002,0479,1479
0072,0278
0037
OO35
0081
0278
0037,0278,1278
0072
(t037, 0047, 0240,
(t072
(t060, (t035, 0162,
0041,0760,1035
0240
0045,0278,1278
0042
0000
0037
0037
0032
(t037,0184,0000,
(t121, 0043,0209,
(t002,0278,0479,
1278,1479
0047,0104
(t035, OO33
0000
(t060,(t035,0240,
(t760, 0807,1035,
1060
0000
0432
0037,0038,1237
0000
0047
0000
(t081,0038
0072
0046
0000,0042,0041
0042
0067,0041
0041
0037,0278
0072
O693
(t067, 0041,0038
0035,0037
0037
0000
0072
OO35
0240, OO43
0240
(t240, 0000
1278
÷
6/24/05, 9:48 PM [

TheaterNef ° IR device codes (continued)
VCRs (cont.)
Brand Code
Magnavox 1./1./35,0039, t-/(}81,
0000, (}149, 0563,
1781
Magnin 024(}
Marantz (}035. 0081
Marta 0(}37
Matsushita 0035, 0162, 0454
Memorex 0035, 0162, 0037,
0048, 0(}39, 0047,
0240, 0000, 0104,
0209, 0046. 0454,
0479, 1(}37, 1162,
1237, 1262
Minolta 0042
Mitsubishi 0067, 0043, 0807
Motorola 0035, 0048
Multite& 0000. 0072
NEC 0104, 0067. 004 I,
0038
Nikko 0037
Noblex 0240
Olympus 0035
Optimus 1062, 0162, 0037,
0048, (}104, 0432,
0454, 1048, 1162,
1262
Orion 0184, 0209, 0002,
0479, 1479
Panasonic 1062, 0035, 0162,
0225, 0454. 0616,
1035, 1162, 1262
Pcnney 0035, 0037, 0240,
0042, 0038. 1035,
1237
Pcntax 0042
Philco 0035, (}209. 0479
Philips 0035, 0081. 0618,
1081, 1181
Pilot 0037
Pioneer 0067
Polk Audio 0081
Profitronic 0240
Proscan 0060, 0760. 1060
Protec 0072
Pulsar 0039
Quarter 0046
Quartz 0046
Quasar 0035, 0162, 0454,
1035, 1162
RCA 0060, 0240, 0042,
0149, 0760, 0807,
1035, 1060
RadioShack 0000. 1037
Radix 0037
Randex 0037
Realistic 0035, 0037, 0048,
0047, 0000.0104,
0046
ReplayTV 0614.0616
Runco 0039
STS 0042
Samsung 0240, 0045
Sanky 0048. 0039
Sansui 0000, 0067, 0209,
0041,0479, 1479
Sanyo 0047, 0240.0104,
0046
VCRs(cont.)
Brand Code
Scott 1-/184,0045.1-/121,
0043
Sears 0035, 0037, 0047,
0000, (}042, 0104,
0046. 1237
Semp 0045
Sharp 0048. 0807. 0848
Shintom 0072
Shogun 0240
Singer 0072
Sonic Blue 0614, 0616
Sony 0035, 0032, 0000,
0033, 0636. 1032,
1232
Sylvania (}035, 0081. 0000,
0043. 1781
Symphonic 0000
TMK O24(}
Tatung 0041
Tcac 0000, 0041
To& nits 0035.0162
Tck.ika 0035, 0037, 0000
Thomas 0000
Tivo 0618, 0636
Toshiba 0045, 0043. 0845
Totevision 0037, 024(}
Unitech 0240
Vector 0045
Vector Research 0038
Video Co.ccpts 0045
Videomagic 0037
Videosonic 0240
Villain 0000
Wards 0060, 0035, 0048,
0047, 0081,0240,
0000, 0042, 0072,
0149, 0760
White Westinghouse 0209, 0072, 1278
XR-1000 0035. 0000. 0072
Yamaha 0038
Zenith 0039, 0000, 0209,
0033, 0479, 1479
DVD players
Brand Code
Aiwa 1-/641
Apex Digital 0672, 0717. 0755,
0794, (}796, 0797,
0830, 0856. 1100
Audiologic 0736
g & K 0655. 0662
Blue Parade 0571
Broksonic 0695
DVD2000 0521
Daewoo 0784
Denon 0490. 0634
Emersml 0591
Enterprise 0591
Fisher 0670
GE 0522, 0717
GPX 0699. 0769
Go Video 0715
Gradiente 065 I
Gr_enhill 0717
Harman/Kardon 0582, 0702
DVD players(cont.)
Brand Code
Hitachi 0573. 1-/664
Hitekcr 0672
JBL 0702
JVC 0558, 0623. 0867
KLH 0717
Kenwood 0490. 0534, 0682.
(}737
Konka 071 I. 0719, 0720,
072 l
Koss 0651
Lasonic 0798
Magnavox 0503. 0675
Malata 0782
Marantz 0539
Microsoft 0522
Mi.tek 0717
Mitsubishi 0521
Nesa 0717
Next Base 0826
Norcent 0872
Onkyo 0503. 0627
Oritron 0651
Panasonic 0490, 0632, 1362,
1462, 1490
Philips 0503, 0539, 0646,
0854
Pioneer 0525, 0571. 0632
Polk Audio 0539
Princeton 0674
Proscan 0522
RCA 0522. (1571,0717,
0822
Rotel 0623
Rowa 0823
Sampo 0698
Samsung 0573. 0820
Sansui 0695
Sanyo 0670
Sharp 0630
Sherwood 0633
Shinsonic 0533
Sony 0533, 0864, 1533
Sylvania 0675, 0821
To&nits 0490
To&wood 0692
Theta Digital 0571
Toshiba 0503, 0695. 1045
Tredex 0800
Urban Concepts 0503
XBox 0522
Copyright © 2005 TOSHIBA CORPORATION All rights reserved.
HM95 R1 044-52 061505 49
Black
ip'\ A*'__ /t__ I'_/t__I'_LA'fi AI%t__
÷
6/24/05, 9:48 PM
49
÷
[
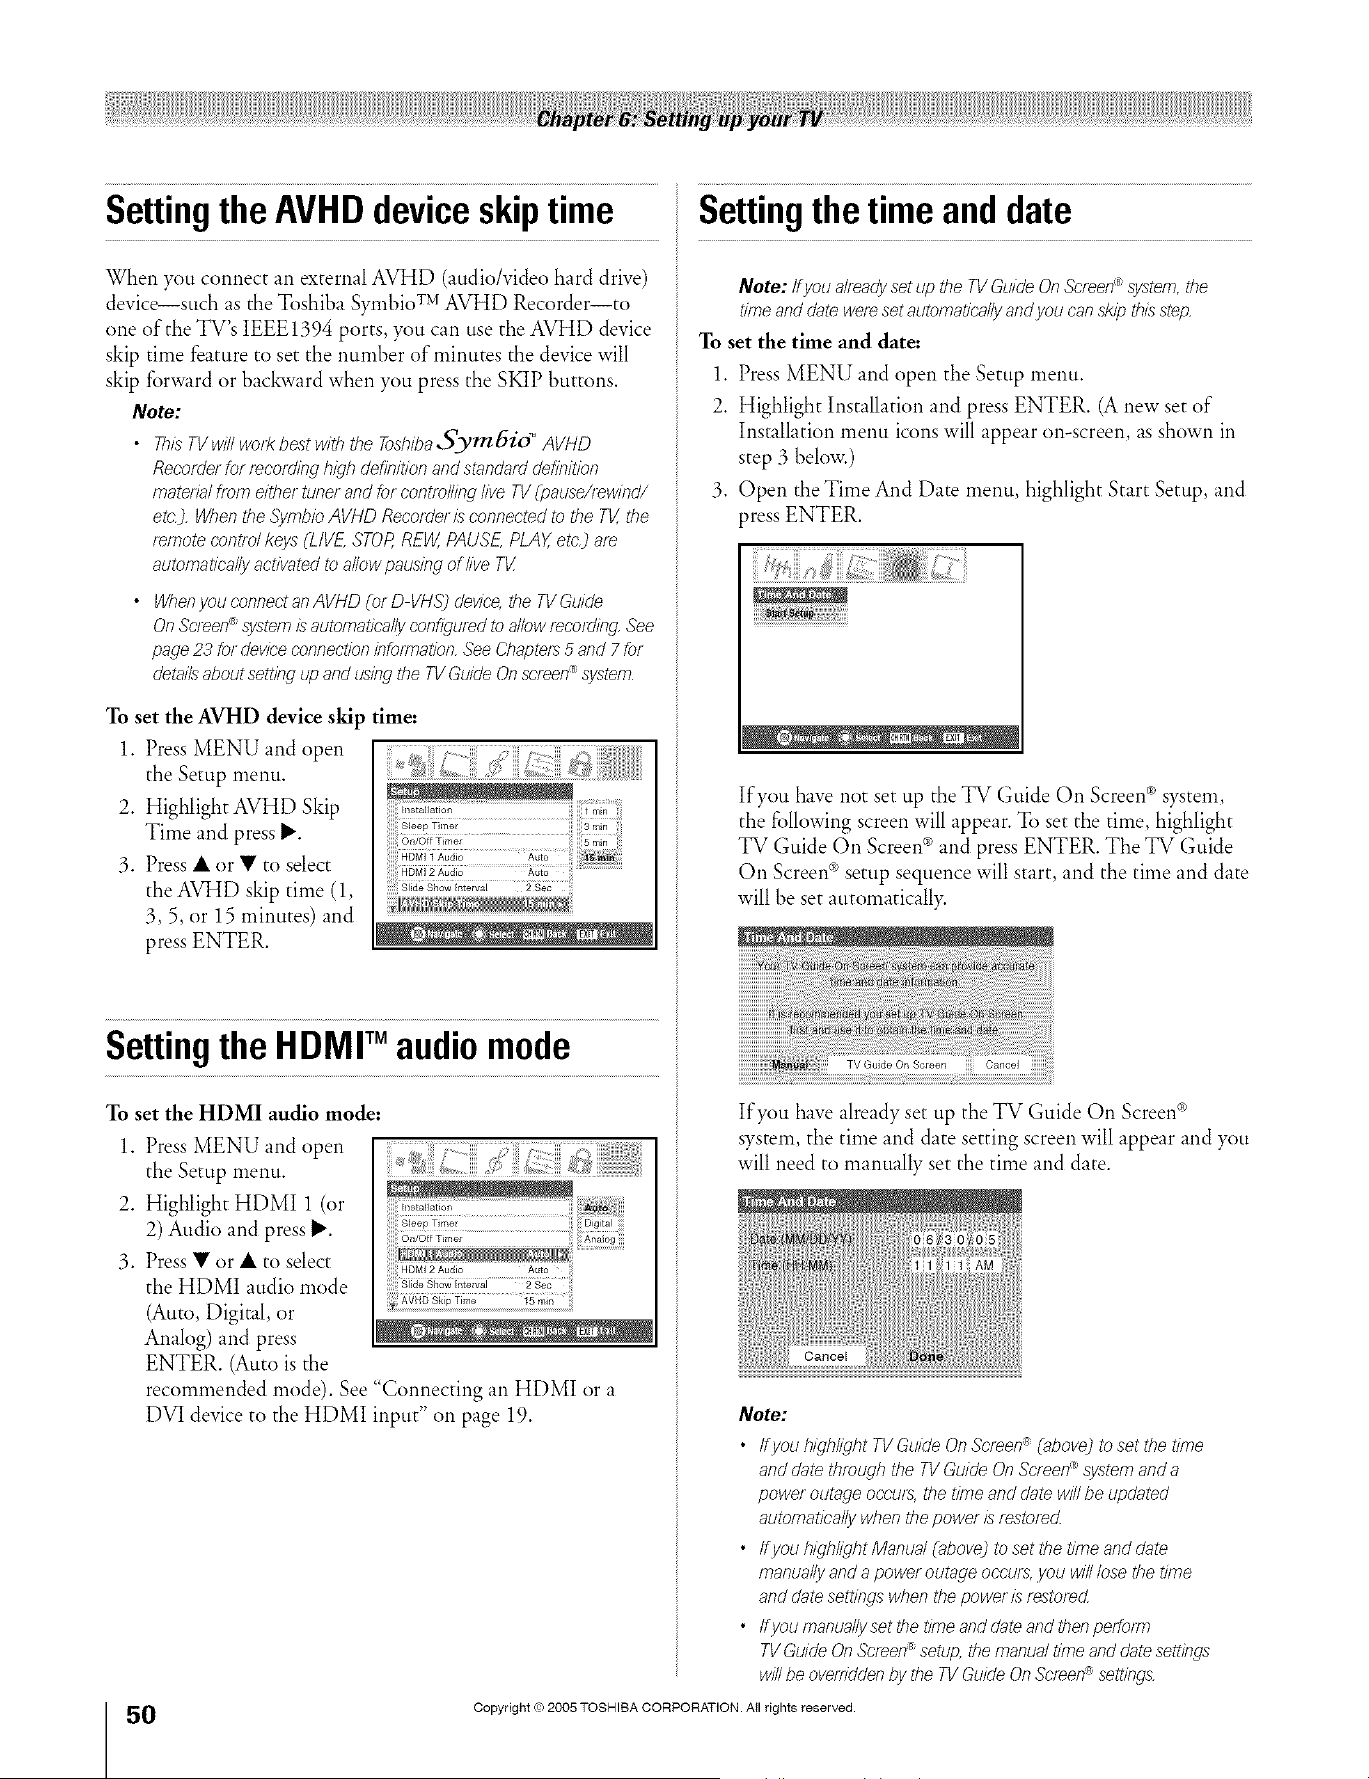
A ÷ L
Settingthe AVHD deviceskiptime
When you connect an external AVHD (audio/video hard drive)
device--such as the Toshiba Symbio TMAVHD Recorder--to
one of the TV's IEEE1394 ports, you can use the AVHD device
skip time feature to set the number of minutes the device will
skip forward or bac_vard when you press the SKIP buttons.
Note:
• ThXsTVwinwork bestwith the ToshibaSymbio" AVHD
Recorderfor recordinghigh definitionandstandarddefinition
mateffalfrom eithertunerand for controllinglive TV(pause/,ewind/
etc.J.Whenthe SymbloAVHD Recofde//_sconnectedto the TV,the
temote contfolkeys (LIVE,STOP,REW,PAUSE,PLAY,etc_ are
automaticallyactivatedto allowpausingof kve Tg
• WhenyouconnectanAVHD (olD VHS)device,the TVGuide
On Screen_,!ystem/;sautomatical!yconfiguredto allowrecordingSee
page23 for deviceconnectionlnfofTnation,See Chapters 5 and 7 for
detailsabout settingup andusingthe TVGuideOnscreen®system
To set the AVHD device skip time:
1. Press MENU and open
the Setup menu.
2. Highlight AVHD Skip
Time and press P".
3. Press • or • to select
the AVHD skip time (1,
3, 5, or 15 minutes) and
press ENTER.
Settingthe HDMI audiomode
To set the HDMI audio mode:
1. Press MENU and open
the Setup menu.
2. Highlight HDMI 1 (or
2) Audio and press P".
3. Press • or • to select
the HDMI audio mode
(Auto, Digital, or
Analog) and press
ENTER. (Auto is the
ilii Sleep Timer ii i Digital
HDMi 2 Audio Auto
Slide Show {nterval 2 Sec
recommended mode). See "Connecting an HDMI or a
DVI device to the HDMI input" on page 19.
0
HM95 R1 0 4-52 061505 50
Black
/l"x, A_ lrZ_ t_l_t_Uft A/._rZ_
Settingthetimeanddate
Note: lf you a/tea@set up the TVGuideOnScreen_,system,the
timeand datewereset automaticallyandyou can ,skipthisstep
To set the time and date:
1. Press MENU and open the Setup menu.
2. Highlight Installation and press ENTER. (A new set of
Installation menu icons will appear on-screen, as shown in
step 3 below.)
3. Open the Time And Date menu, highlight Start Setup, and
press ENTER.
If you have not set up the TV Guide On Screen® system,
the following screen will appear. To set the time, highlight
TV Guide On Screen®and press ENTER. The TV Guide
On Screen ®setup sequence will start, and the time and date
will be set automaticall>
If you have already set up the TV Guide On Screen®
system the time and date setting screen will appear and you
will need to manually set the time and date.
Note:
• If you iT/gh/igl_tTV Guide On Screen _ (abovej to ,setthe time
and date througl7 the TV Guide On Screen® ,system and a
power outage occu/s, the time and date will be updated
automatically when the power is f_sto/ed.
• ffyou highlight Manual (above) to set the tffne and date
manually and a power outage occurs, you will lose the tffne
and date settings when the power /_srestored
• tfyoumanuallysetthetimeanddateandthenpeffom7
TV Guide On Screen® setup, the manual time and date settings
will be overridden by the TV Guide On Screen _ settffTgs
Copyright (co2005 TOSHIBA CORPORATION. All rights reserved.
÷
6/24/05, 9:48 PM [
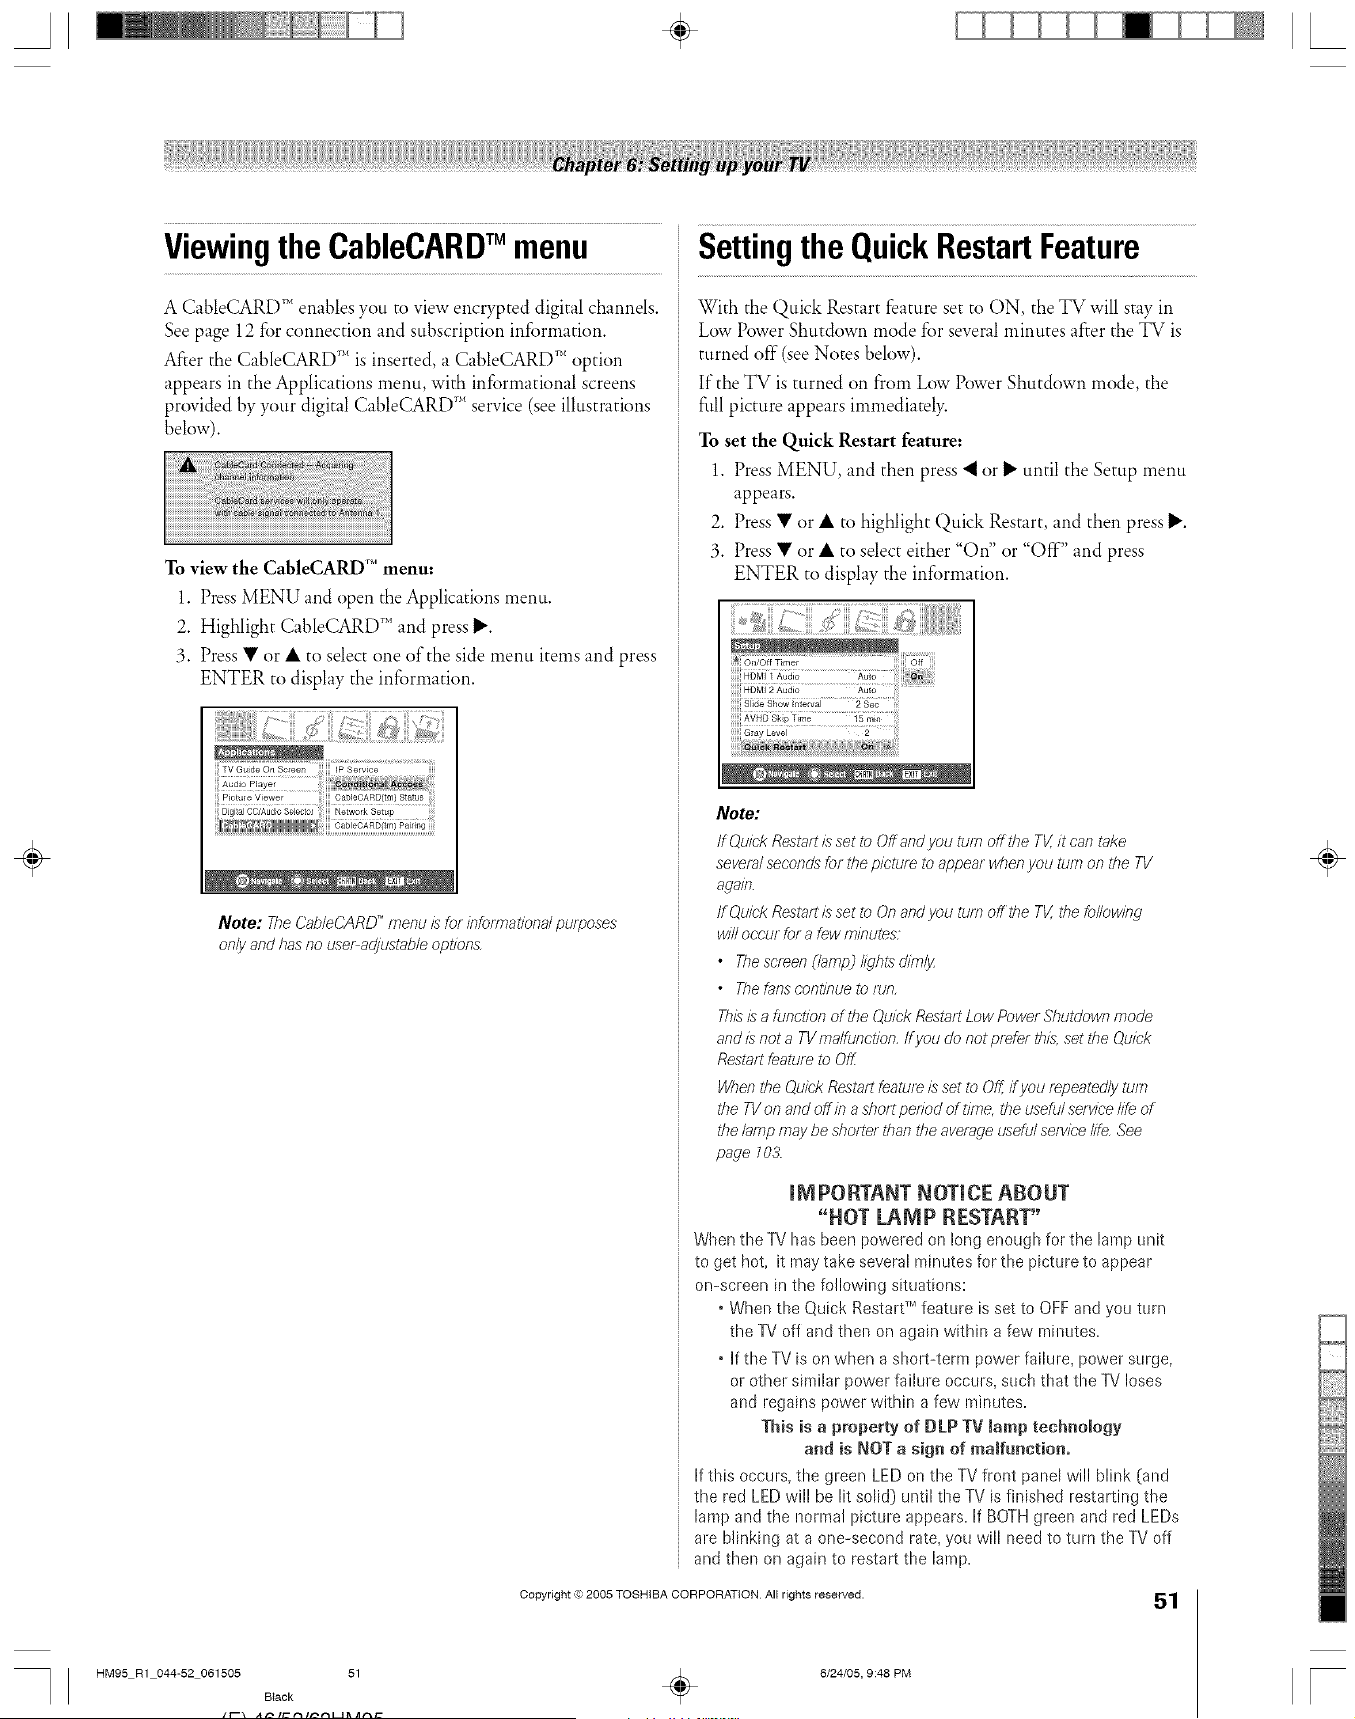
A ÷ L
ViewingtheCableCARDTM menu
A CableCARD T'_enables you to view encrypted digital channels.
See page 12 for connection and subscription information.
After the CableCARD '_'_is inserted, a CableCARD '_"option
appears in the Applications menu, with informational screens
provided by your digital CableCARD _'_service (see illustrations
below).
To view the CableCARD r" menu:
1. Press MENU and open the Applications menu.
2. Highlight CableCARD _"and press II,.
3. Press • or • to select one of the side menu items and press
ENTER to display the information.
TV Guide On Sc/een IP Service
A,d,oP,_yo,
;; Pict_J e Viewer CableCARD(tm) Status
Note: The CableCARD '_menu/s for #rfomrat/onal purposes
only and has no use/_adjustable options,
Settingthe QuickRestartFeature
With the Quick Restart feature set to ON, the TV will stay in
Low Power Shutdown mode for several minutes after the TV is
turned off (see Notes below).
If the TV is turned on from Low Power Shutdown mode, the
full picture appears immediately.
To set the Quick Restart feature:
1. Press MENU, and then press "_ or _" until the Setup menu
appears.
2. Press • or • to highlight Quick Restart, and then press lJ'.
3. Press • or • to select either "On" or "Off" and press
ENTER to display the information.
Note:
If Quick Restart/s set to Off and you turn off the TV,/t can take
several seconds for the picture to appear when you turn on the TV
again.
ff Quick Restart Lsset to On and you tuft7 off the TV, the following
will occur for 8 few minutes;
• The screen (/arnp_/ight,s dimly
• The fans continue to run,
Thisis a function of the Quick Restart Low Power Shutdown mode
and Lsnot a TV ma/function, If you do not prefer thLs,set the Quick
Restart feature to OfF
When the Quick Restart feature is set to Off, ff you repeatedly turn
the TV on and off in a short period of time, the useful service life of
the lamp may be sho/Ter than the average useful se/yice life See
page l O&
mM PORTANT NOTICE ABOUT
"HOT LAMP RESTART"
_/hen the TV has been poweled on long enough for the lamp onit
to get hot, it may take several minutes for the picture to appear
on=screen in the following situations:
• When the Quick Restart _Mfeature is set to OFF and you turn
the TV off and then on again within a few minutes.
• If the TV is on when a short=term power failure, power surge,
or other similar power failure occurs, such that the TV loses
and regains power within a few minutes.
This is a property of DLP TV lamp technology
and is ROT a sign of malfunction.
If this occurs, the green LED on the TV front panel will blink (and
the red LED will be lit solid) until the TV is finished restarting the
lamp and the normal picture appears. If BOTH green and red LEDs
are blinking at a one-second rate, you will need to turn the TV off
and then on again to restart the lamp.
Copyright © 2005 TOSHIBA CORPORATION All rights reserved.
51
HM95 R1 044-52 061505 51
B_ack
÷
6/24/05, 9:48 PM
÷
[
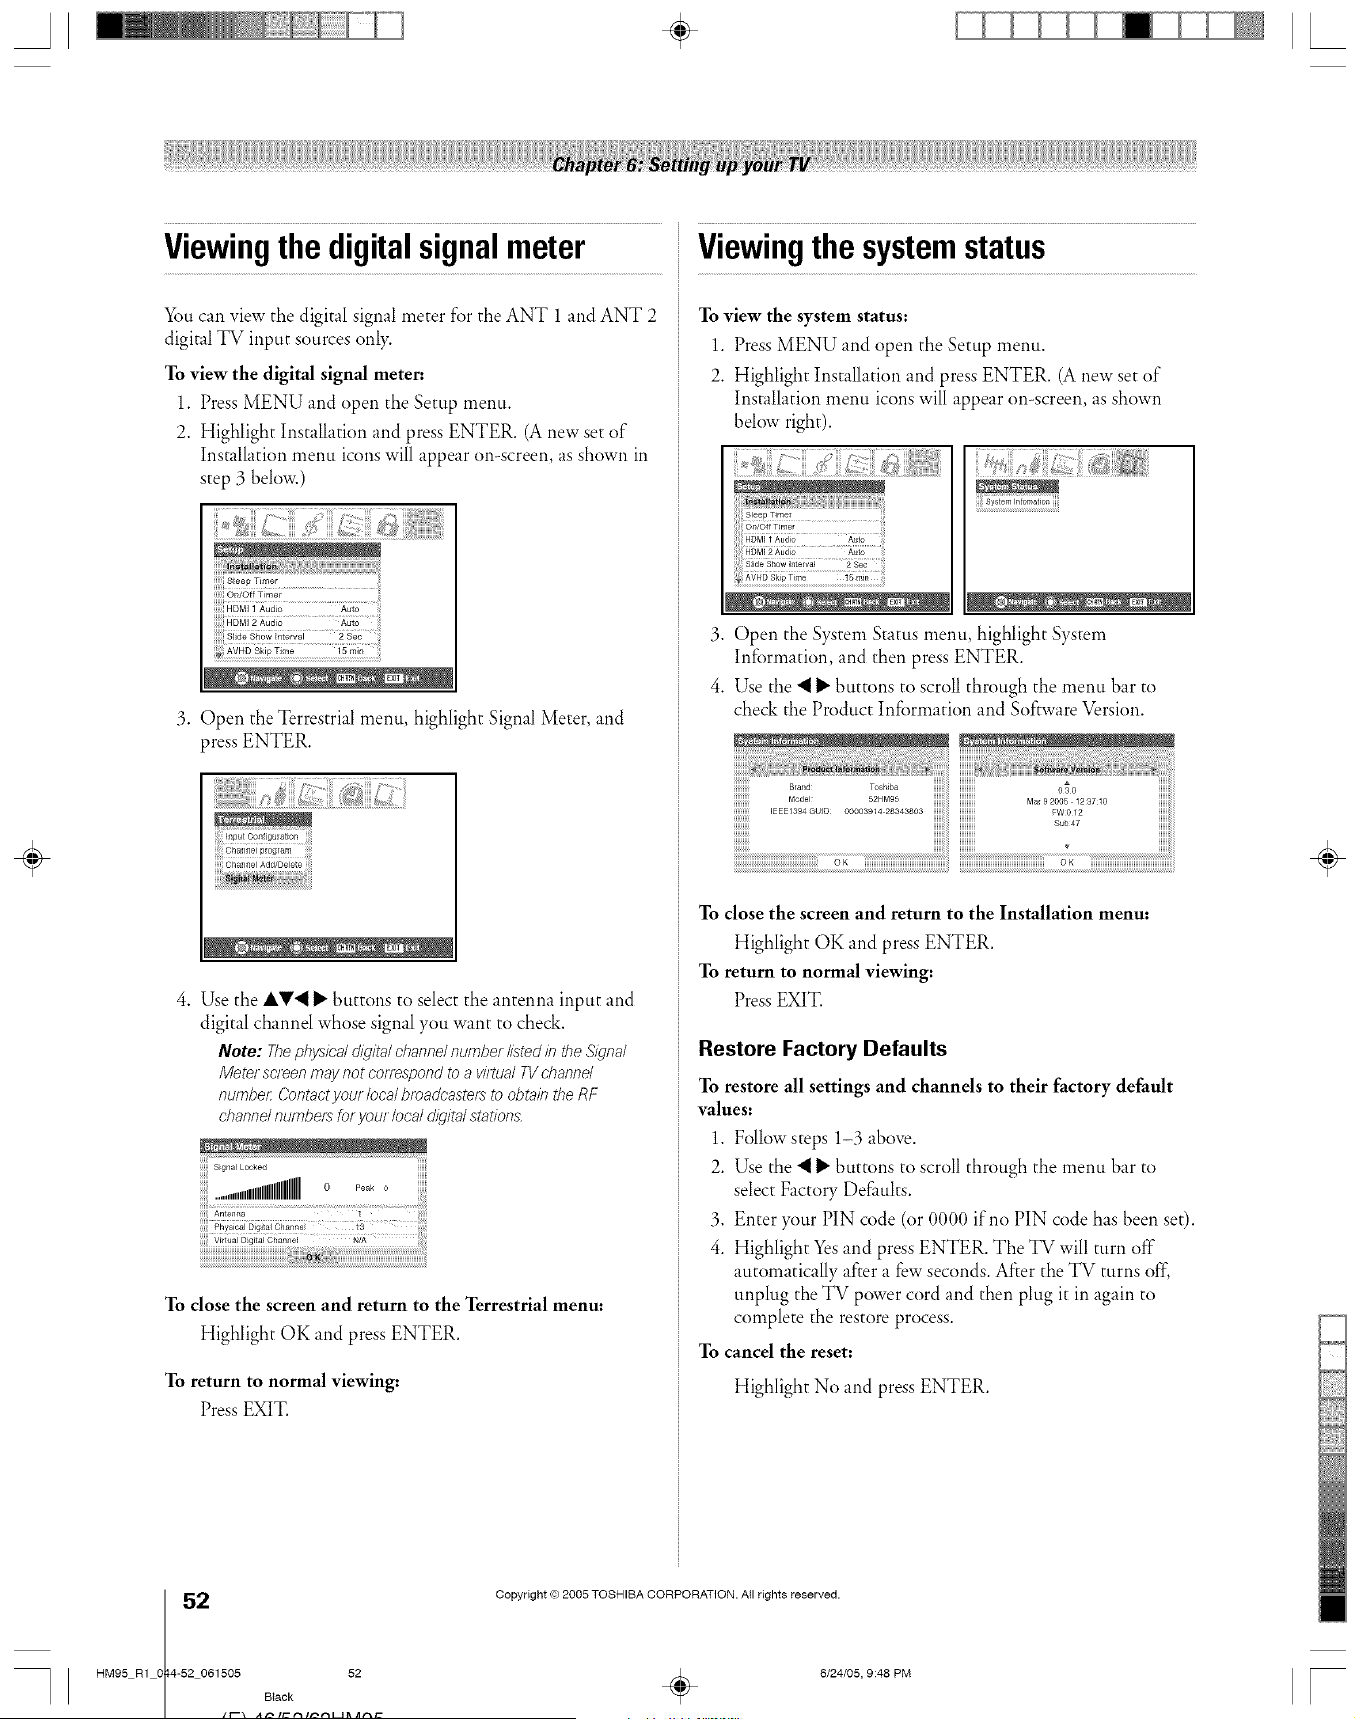
A ÷ L
Viewingthe digitalsignalmeter
_Smcan view the digital signal meter for the ANT 1 and ANT 2
digital TV input sources only.
To view the digital signal meter:
1. Press MENU and open the Setup menu.
2. Highlight Installation and press ENTER. (A new set of
Installation menu icons will appear on-screen, as shown in
step 3 below.)
!!!!!!S_eep Timer
...... iii
_i ©_iof f Timef
ilililililiHDMI 1 Audio Aute i_'_i
i Side Show {nterval 2 Sec [
3. ()pen the Terrestrial menu, highlight Signal Meter, and
press ENTER.
4. Use the IV'_ D"buttons to select the antenna input and
digital channel whose signal you want to check.
Note: Thephysic'a/digitalchannelnumber IL_tedin theSignal
Mete/ screenmaynot conespondto a virtualTVc'hannd
number:Contactyou/ /ocalbroadcaste_ to obtainthe RF
channd numbersforyou/local digital stations
To close the screen and return to the Terrestrial menu:
Highlight OK and pressENTER.
To return to normal viewing:
Press EXIT.
Viewingthe systemstatus
To view the system status:
1. Press MENU and open the Setup menu.
2. Highlight Installation and press ENTER. (A new set of
Installation menu icons will appear on-screen, as shown
below right).
iiiiii_ii...........................
3. Open the System Status menu, highlight System
Inforn_ation, and then press ENTER.
4. Use the "__"buttons to scroll through the menu bar to
check the Product Information and Software Version.
OK OK
To close the screen and return to the Installation menu:
Highlight OK and press ENTER.
To return to normal viewing:
Press EXIT.
Restore Factory Defaults
To restore all settings and channels to their factory default
values:
1. Follow steps 1-3 above.
2. Use the "__"buttons to scroll through the menu bar to
select Factory Delimits.
3. Enter your PIN code (or 0000 if no PIN code has been set).
4. Highlight Yes and press ENTER. The TV will turn oft
automatically after a few seconds. After the TV turns off,
unplug the TV power cord and then plug it in again to
complete the restore process.
To cancel the reset:
Highlight No and press ENTER.
÷
2
HM95 R1 0 4-52 061505 52
Black
it\ A_ lrZ_ t_l_t_Uft At_trZ_
Copyright © 2005 TOSHIBA CORPORATION. All rights reserved.
6/24/05, 9:48 PM r
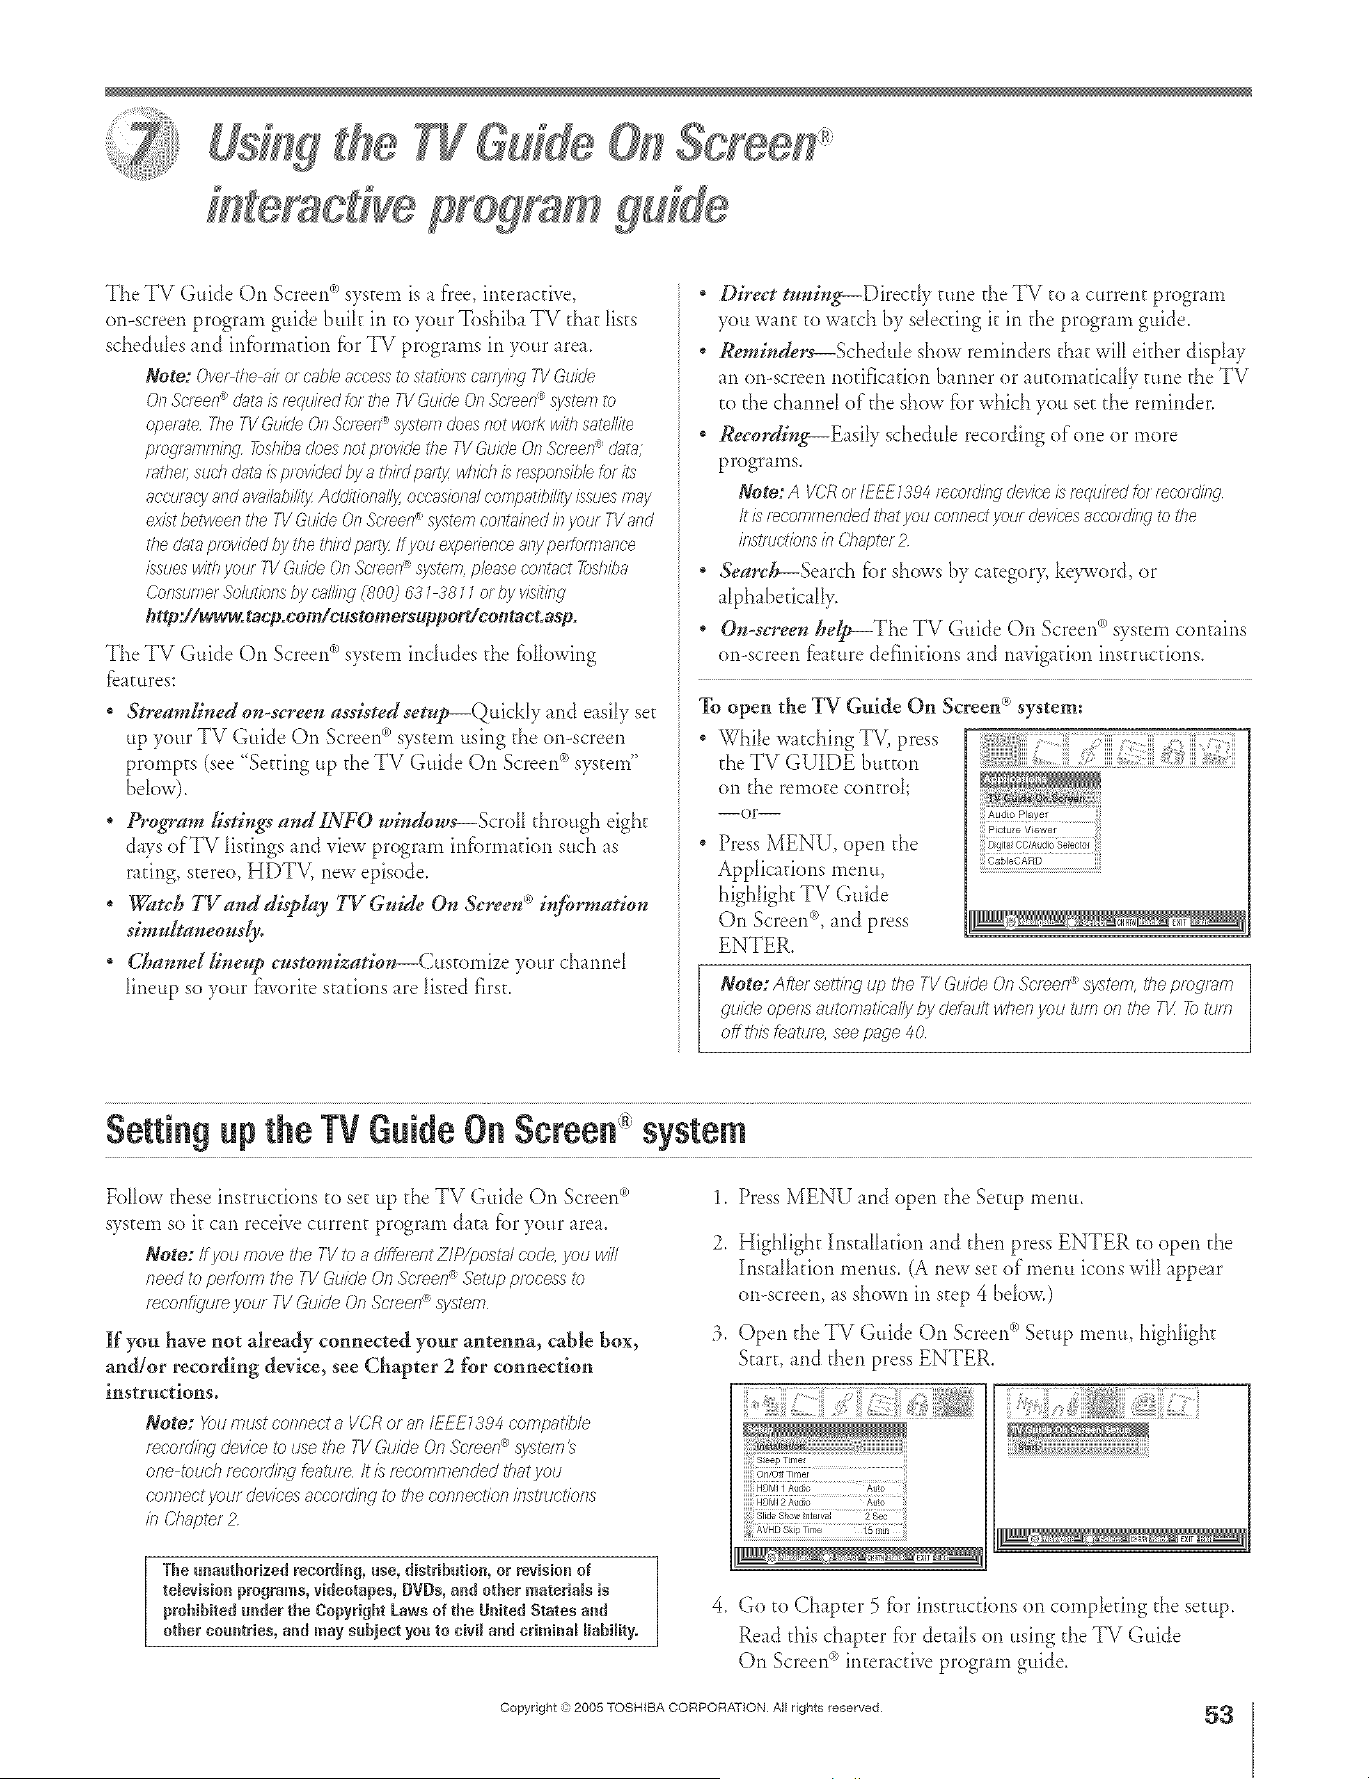
A ÷ L
eracd e program
The TV Guide On Screerd'>system is a flee, interactive,
on-screen prograrn guide bulk in to your Toshiba TV [hat fists
schedules and irdbrrnation fbr TV programs in your area.
Note: Ove_the Edlel cable access to st_io/_s c'afryliTg7V &lk/e
0/7 Screen_ dat_l is f_qui/_d tel the TV Gukle On Sc't_en_'._ysteelto
operate The TV GL/kleOn Sc'l_el?<_system does/lot weft<with satellite
pfogr_,mmir:g -/2)shbadoesnotpro[detheTVGuideOnS('merl_dnt_l,
fathel;such(lnt_isplovidedhyath#dpa_:tydTichisresporlsihbbrits
aco#acyandavai/ub/;/it3zAddkiona//y oeeasbnd compatibility issuesmay
existbetweenthe73/Gi/i(leOn&¥_er/ systemcorffukledinyol/fTVand
the(/_t_lprovidedbytilethi/dpartyIfyellexperience a/y pefgm?Emce
issueswithyo_ffTVGuide0/7Scleef7@system,phasecontact7bshba
C'olTsamef.9o/atiorlsby ea//illg (80@ g31 3811 or by visitillg
http://www.taep.eom/eustemersopport/coetoct.asp.
• , Q .
The TV Grade On Screen sys[ern includes [he fbllowing
fdatures:
Streamlined on-srreeu assisted setnp---QuickIy and easily set
up your TV Guide On Screer{_)sys[em using [he or>screen
prompts (see "Setting up the TV Guide On Screen_>sys[ern"
below),
. Program lisffngs audINFO windows--Sere11 through eight
days of TV [is[lugs and view program infbrmafion such as
rating, stereo, HDTV, new episode.
* Wamh TVand display I} r Guide Or*&teen'* D_}u*matio_t
simnItaueous&
Cha*anellineup eustomizatior*--Customize your channel
D_eup so your fiwori[e s[a[ions are listed first.
DDeet tuuing_Direc@ June the TV to a curren[ program
you want [o watch by selecting it in [he program guide.
Reminders--Schedule show reminders that will el[her display
an fro-screenno[ifica[ion harmer or automa[icaHy tune [he TV
to the channel of the show for which you set [he reminder.
. Recording--Easily schedtde recording of one or more
programs.
Note: A VC;Rof IEEF1394 fec'ofdir_gdevice is'teqaoed for leer>f&it
it i5'lecomme/?ded that you cot?rio[ yrJaf devices ac'eofdi/Wto the
illStrediolTsill Chapter 2
" Search--Search fiatshows by ca[egory, ke>_:ord, or
alphabetically,
On Screen system con[aresOu-sereeu help_The TV Guide ® '
or>screen fba[ure definkk)ns and rmvigatk)n instructk)rls.
To open the TV Guide On Screen C*system:
While watching TV, press
[he TV GUIDE bum)n
on the remote control
--or--
. Press MENU, open the
Applications metal,
highlight TV Guide
On Screen®, and press
ENTER.
j Audio Player
OableOARD
Note: After settl?lg up the TV Guide On Screen _ system the progtam
guide opeRs automat/belly by defg_u/twlTeil you gum of 7 the T1/ _9 i_tJm
Off tl}/s [eatut>, see page 40
÷
Setting the TV G ide 011Screen* system
Follow [hose ins[rucdons [o set up [he TV Guide On Screen<")
sys[ern so i[ cm receive curren[ program da[a fiatyour area.
Note: #you move the TV to a di#erent Z/P/postal code, you will
need to perform the TV Guic/e On Scf_en _ Setup process ib
f_COll_'tee Vr)te TV Guide On .Sef_efl® system
If you have not already connected your antenna, cable box,
and/or recording device, see Chapter 2 for connection
instructions.
Note: Youmustconnecta VCRo_anIEFEL;'94compatible
f_OOITI/f_' devk;'etousethe7-VGuideOnSo'feel7®system
onetoud__eco_ditW featureIrisrecommendedthat yau
oofTfTect your deviees aocotKJing to tile connection is?stmctiotls
in Chapter 2
The unauthorized recording, use, distribution, or revision of
television programs, videotapes, DVDs, and other materials is
prohibited under the Copyright Laws of the United States and
other countries, aud may sobjeot you to civil and criminal liability.
1. Press MENU and open the Setup memt,
2. Highlight InstaIIatior_ and [hen press ENTER [o open d_e
lust flla[ion ineruts, (a new set oflnerm icons will appear
on-screen, fs shown in step 4 bdow.)
:> Open d_e TV Guide On _ ®Screen So[up menu, highhgh[
Start, and [hen press ENTER.
__-_ _X_T
4. Go [o Chap[er 5 fbr instruc[ior_s on completing the so[up,
Read [his chfp[er fbr &tills on using the TV Guide
On Screen_>interac[ive progrfm guide.
Copyright ,):>2005 TOSHIBA CORPORATION All rights reserved
53
HM95 R2 053-56 062705 53 _ 6/27/05, 6:55 PM [
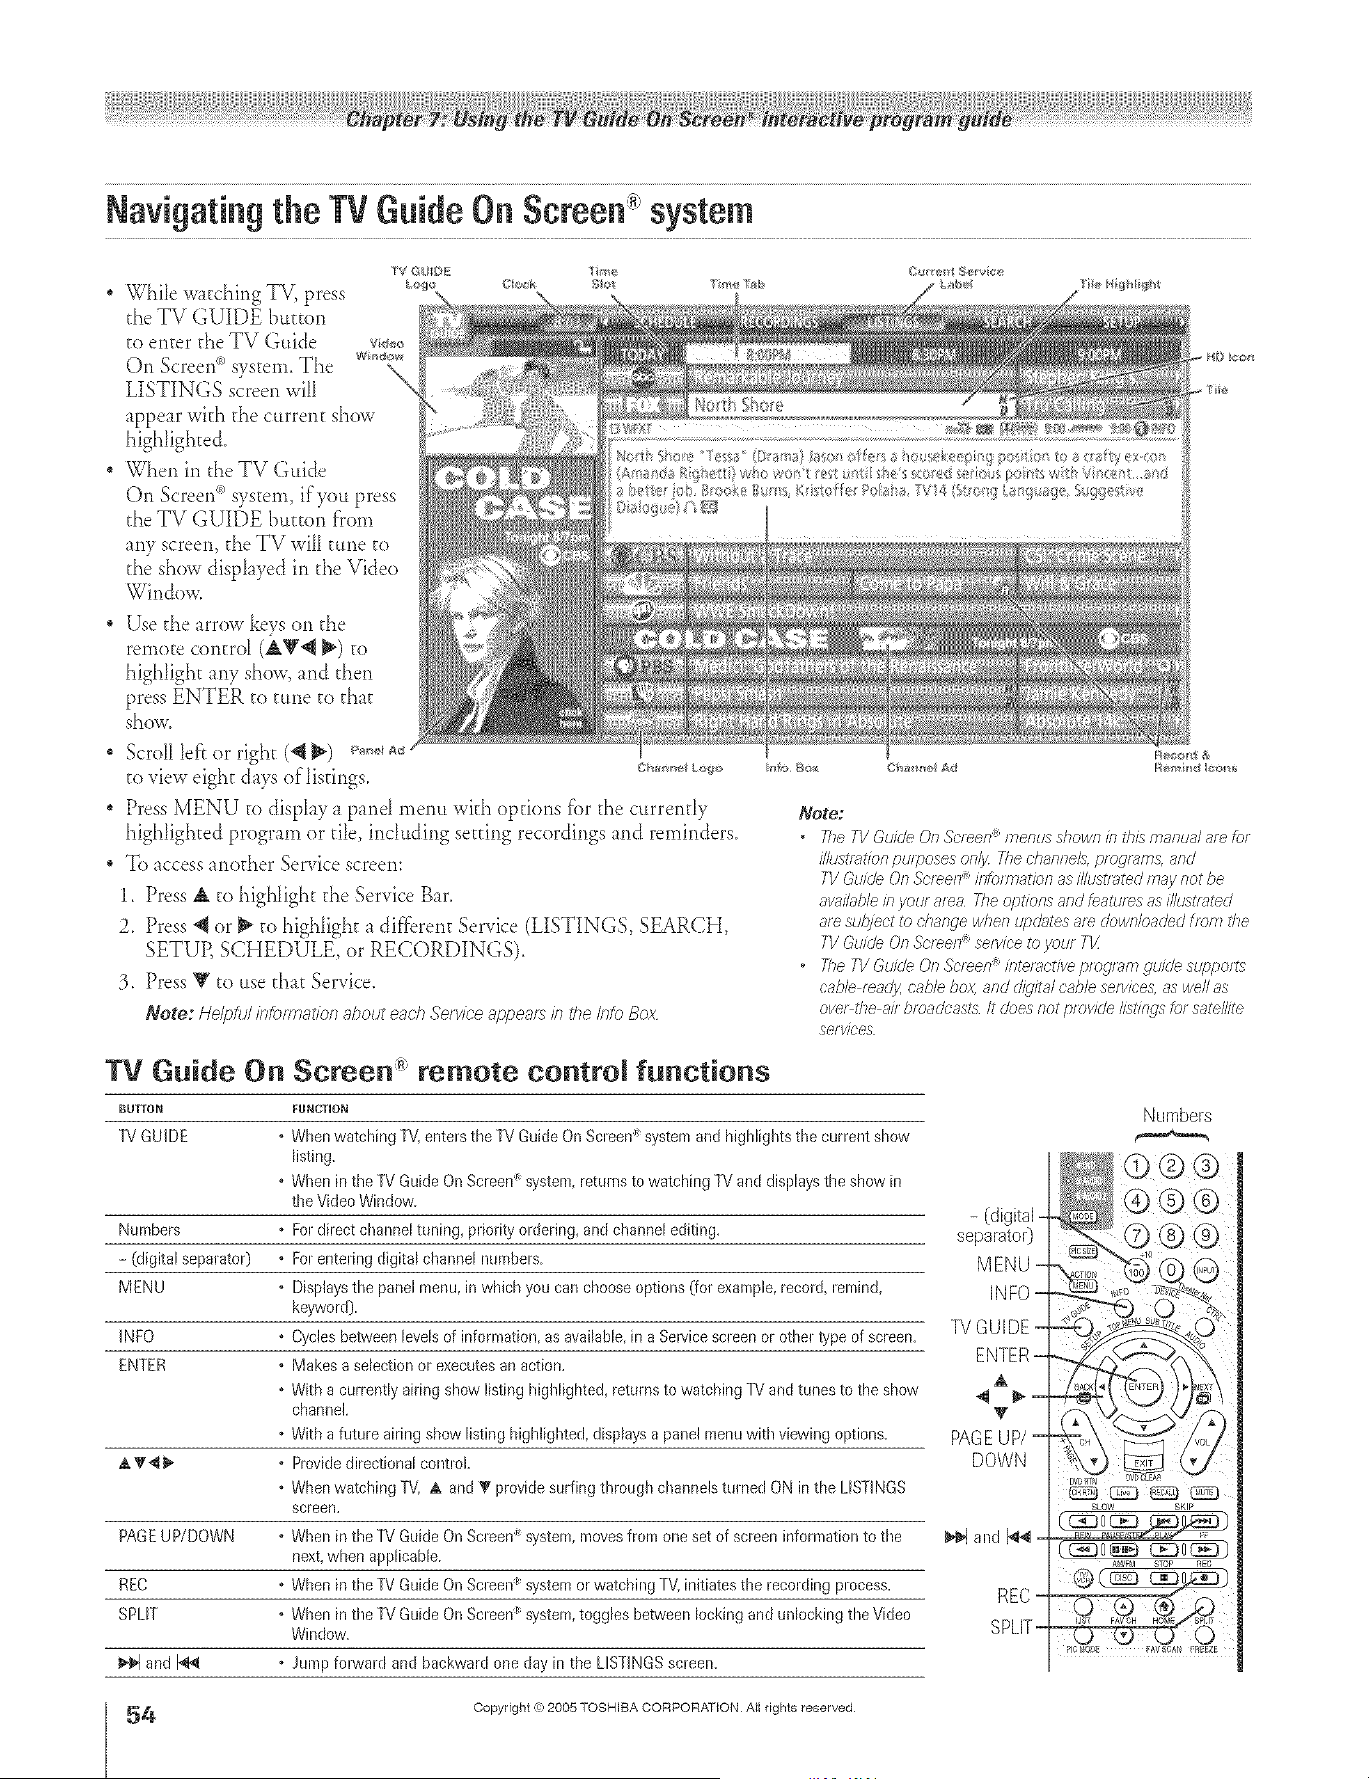
A ÷ L
* While watching TV, press
d_eTV GUIDE buEton
to enter d_e TV Guide v,_>,_,
On Screen<_system. The v_,_.
LISTINGS screen witl \\"
appear with the current show
highlighted_
" When in the TV Guide
On Screen<_system, if you press
d_eTV GUIDE button fi'om
any screen, the TV will tune to
d_eshow displayed in d_e Video
Window.
Use the arrow keys on the
remotecontrol (A_'_ _') to
highlight any show, and then
press ENTER to tune to that
shove.
* Scroll left or right (_ _) _,_,_.__v_
to view eight days oflis@_gs, cm,.,_,c_,o
" Press MENU to display a panel menu with options {_)rthe currently
highlighted program or tile, inchlding setting recordings and reminders_
. To access another Service screen:
1, Press a, to highlight d_eService Bar.
Z Press 4 or _ to highlight a different Service (LISTINGS, SEARCH,
SETUE SCHEDULE, or RECORDINGS).
:3, Press Y to use d_at Service.
Note: He/pfu/ /b_xTnat/on about each Service appeats /?_the/nto Box
Note:
o ff_e 7V 4ukle &_ Screen_ menus .shown/s th/5manual are &_
illust/>_t/onpu/pose5 only ff_e channele,pfo_f_lTi3, and
TV Guide On Sereen /rSofmat/orl as/Nus_mtedmay not be
avaik@le/syour area ff_e opt/on6 and featHf_5as///i/5tf;fled
ale subject to d_ange /vhen U/)d;_tesaf_ do/vrdoaded from the
TV Guk/e On SBreen sefwee to your TX
• 7he TV Guk/e On Screen®interactive Dfo{]f_fT?gU/(/e SU/)po_t6
cablB mad34cable box, and d/_j/ra/cable sefv/ee6,_s /veilas
Bye>the a// bmadt:ast._fi does not prow@ fist/rigs _J_satF£11te
sefylee5
TV Guide On Screen"" remote control functions
BUTTON FUNCTION
TV GUIDE • When watching TV, enteFsthe TV Guide OnScreen system and highlights the current show
listing.
.Wben in the TV Guide On Screen system,returns to watching TV and displaysthe show in
the Video Window.
- (digital
Numbers • Fordirect cbannel tuning, prioFityordering, and cbannel ecliting, separator)
- (digital sepaFator) • Forentering digital cbannel numbers. MENU -
MENU . Displaystbe panel menu, in which you can choose options (foFexample,record, remind, iNFO -
keyword).
INFO . Cycles betweenlevels of infoneation, asavailabb, in a Sewice screen or otbeFtype of screen. P_/G U IDE
ENTER • Makes a selectionor executesan action. ENTER
. With a currently airiHg show listing higb@hted, returns to watching TV andtunes to the show @ _ _
chanHel.
• With a future airing show listing highlighted, displays a panel menuwitb viewing options. PAGE UP/
at _'._ • Providedirectional controL DOWN
• When watcbing TV, at and• provklesurfing through cbamels tNFnedON in the LISTINGS
screen.
PAGEUP/DOWN . When in the TV Guide On Screen system,movesfrom one set of screen infeneationto tbe _€_ and _@ =
next when applicabb_
REC ° When in the TV Guide On Screen_ systeel or watching TV, initiates the recording process. REC -
SPLIT • When in tbe TV Guide On Screen_ systeel,toggles betweenbcking and unlocking the Video
Window. SPLIT-
and I'_ • Jurepforward and backward ene day in the LISTINGSscreen.
Numbers
SLOW SKIP
C_o_ rE308_ )
A_a'F_ STOP _C
!
i:
4
HM95 R2 0 3-56 062705
Copyright ,(_:2005 TOSHIBA CORPORATION All rights reserved
÷
54 _ 6/27/05, 6:55 PM [
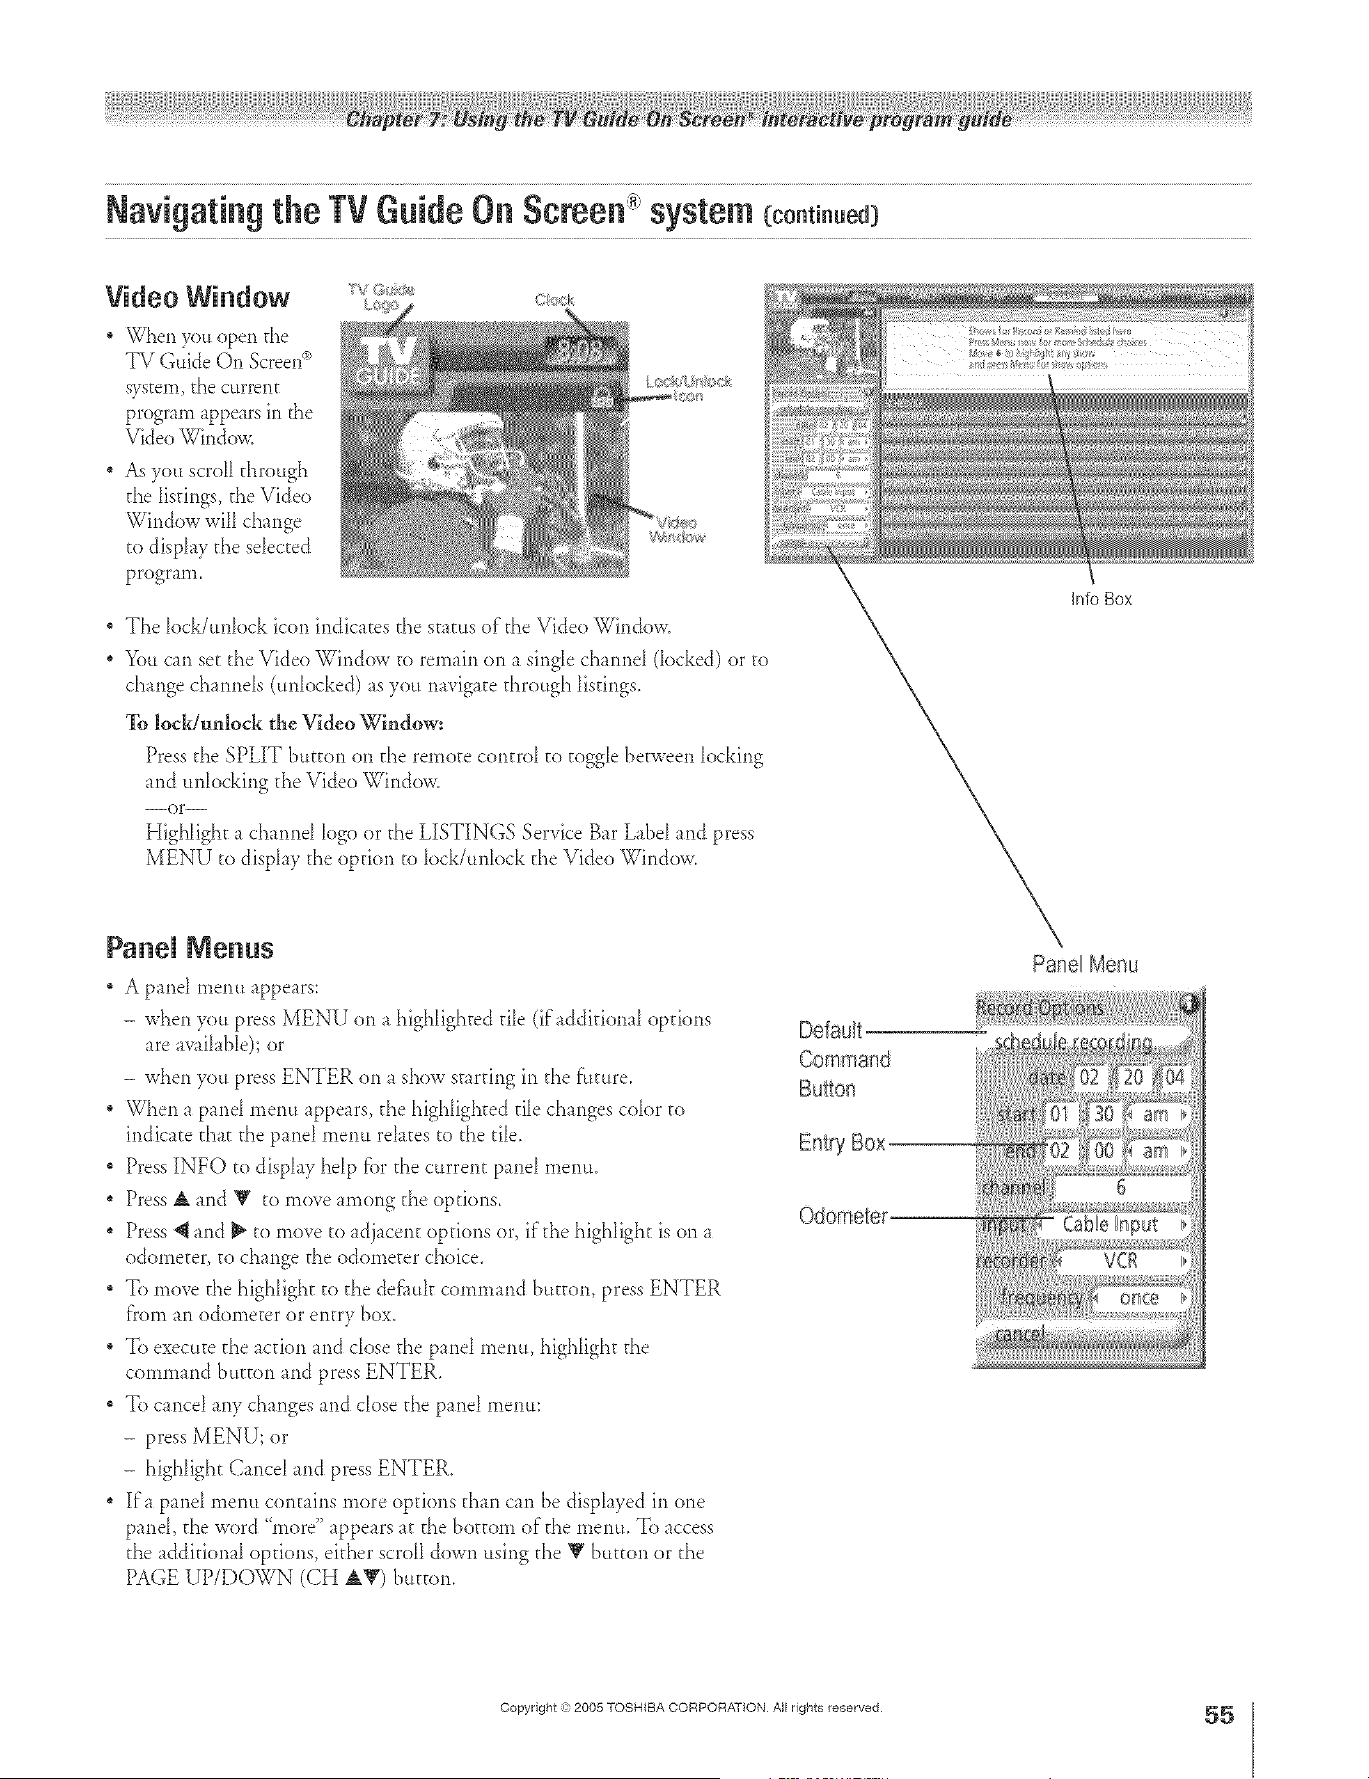
A ÷ L
Video Window ......
* _q_erl you open the
TV Guide On Screen _
system, the current
program appears in the
Video Window.
As you scroll through
the Iistings, the Video
Window wiIl change
to display the selected
program.
The lock/unlock icon indicates the staa*s of"the Video Window.
You can set d_eVideo Window to remain on a singIe channel docked) or to
change channels (unlocked) as you navigate through listings.
To lockiunbck the Video "Window:
Press the SPLIT btFton on the remote control to toggle beca_een locking
and unlo&ing d_eVideo Window_
--or--
Highlight a channd logo or the LISTINGS Service Bar Label and press
MENU to display the option to lock/unlock the Video Window.
Panel Nenus
A pand merm appears:
- when you press MENU on a highlighted die (ifaddkiona[ options
are available); or
- when you press ENTER on a show starring in the f'umre.
When a pand merm appears, the highlighted tile changes color to
indicate that the panel menu relates to the tile.
Press INFO to display help fbr the current panel rnentt_
, Press A and Y to move among the options.
, Press 4 and _ to move to adjacent options or, ifd_e highlight is on a
odometer, to change the odometer choice,
, To move d_e highlight to the def_mk command button, press ENTER
from an odometer or entry box,
* To execute d_e action and close the panel menu, highlight the
command button and press ENTER,
, To cancel any changes and close the panel menu:
- press MENU; or
- highlight Cancel and press ENTER,
If'a panel menu contains more options than can be displayed in one
panel, the word "more" appears at the bottom of"the menu. To access
d_eadditional options, ekher scroll down using the Y button or d_e
PAGE UP/DOWN (CH A_') button.
Default
Info Box
Pane[ Menu
÷
Copyright % 2005 TOSHIBA CORPORAT}ON All rights reserved
55
HM95 R2 053-56 062705 55 _ 6/27/05, 6:56 PM [
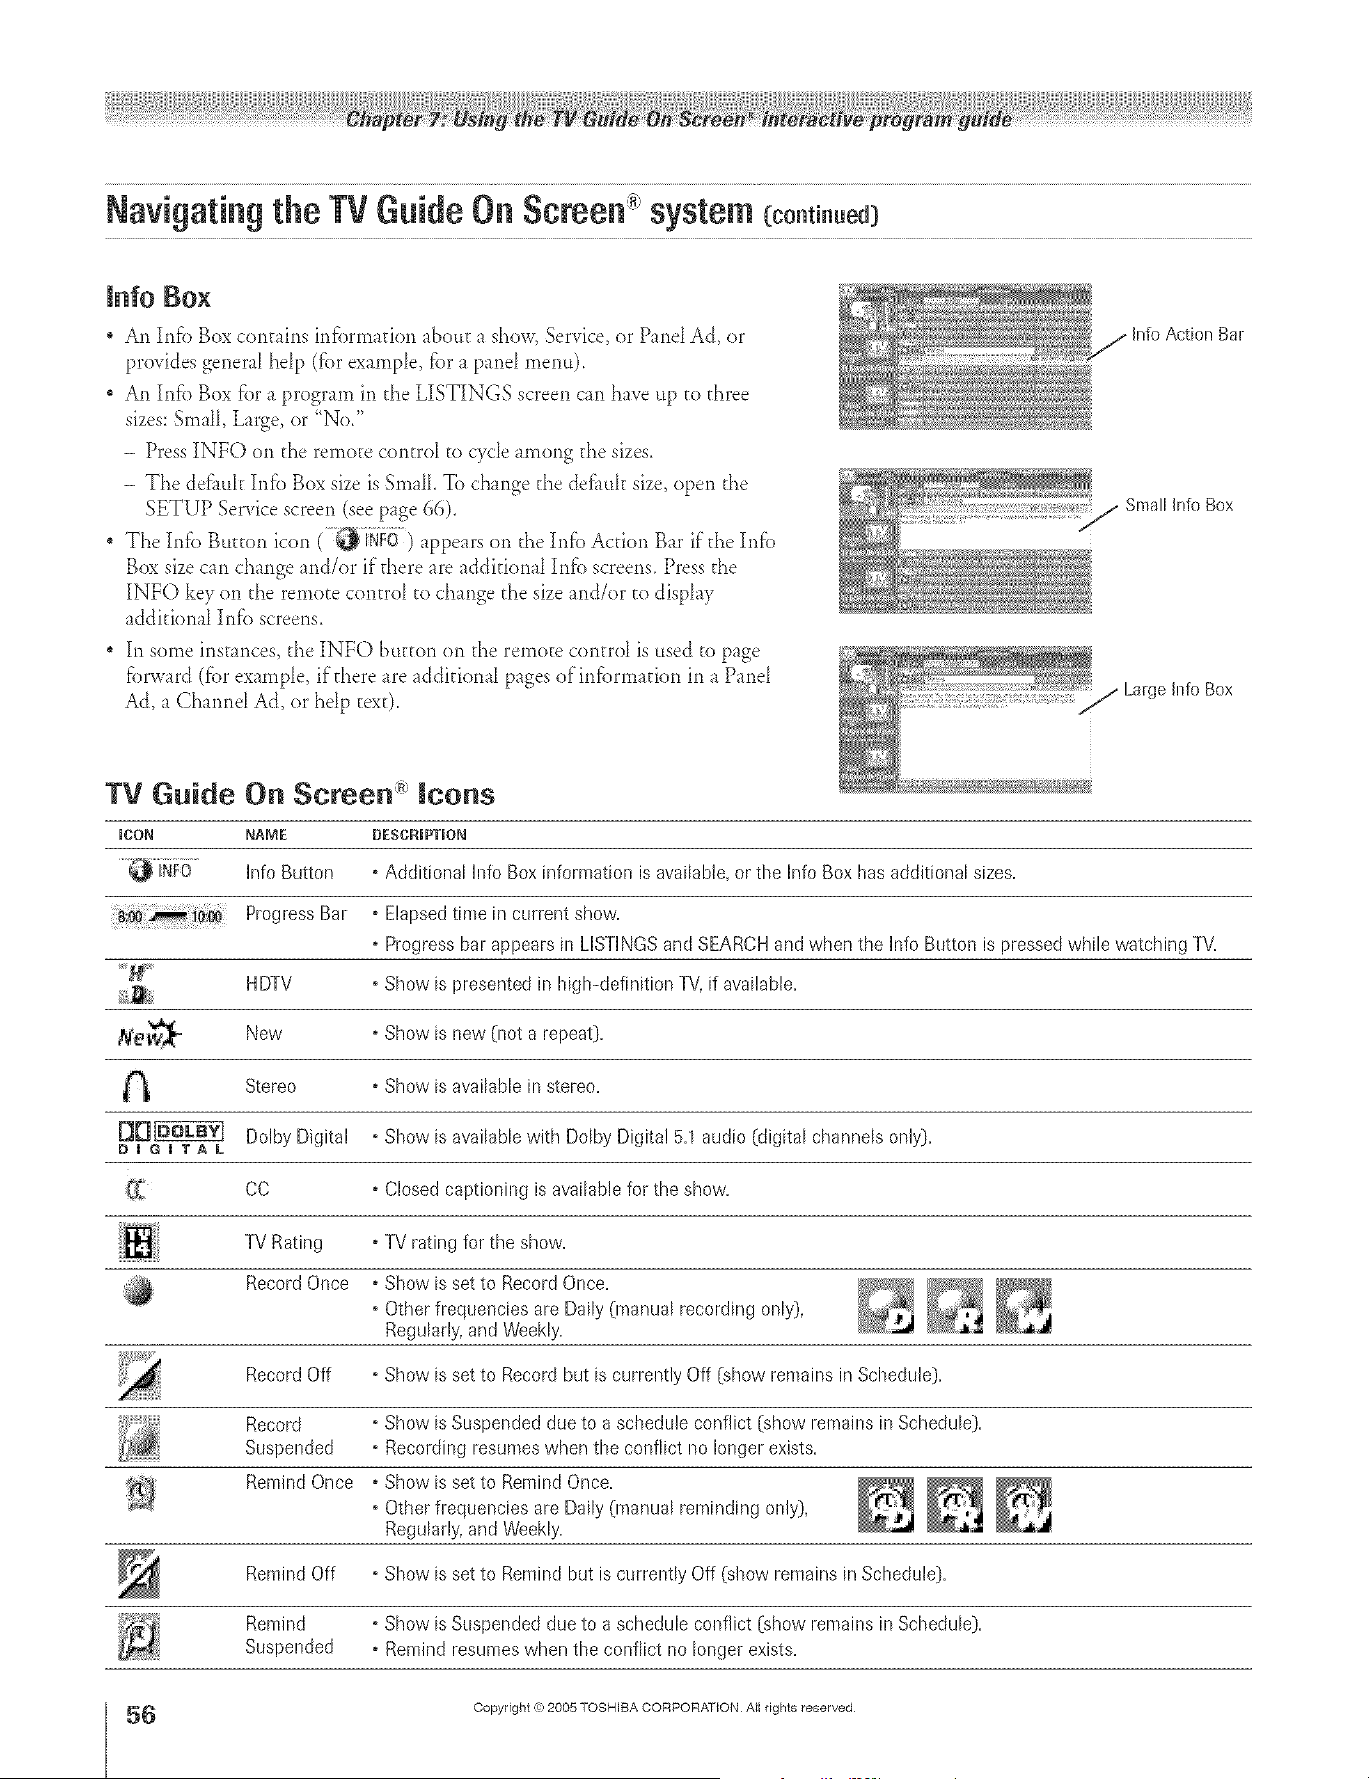
Navigating the TVGuide On Semen x:system {co.t .ued}
lnfo Box
An Dffb Box contains infi_rmafion about a show, Service, or Pand Ad, or
provides genera_ hdp (fbr exarnp_e, fbr a pand menu).
An [nf'o Box fbr a program in the LISTINGS screen can have up to three
sizes:Small, Large, or "No."
- Press INFO on d_erernote control to cycle among die sizes.
- The deflmk Infb Box size isSma[I. To change the def_mk size, open the
SETUP Service screen (see page (iS).
The Itfib Button icon ( _i}_FO ) appears on d_eIrffb Action Bar if the Irffb
Box size can change and/or if there are additional Int;} screens. Press d_e
][NFO key on the remote con_ro[ _ochange the size and/or ro display
additiona_ Info screens.
In some instances, d_e INFO/]utton on the remote cor_trol is used to page
fbrward (:_brexampD, ifd_ere tre tddifional pages ofirffbrrntfion in a Prod
Ad, a Charred Ad, or hdp rex0.
Bar
Small Info Box
//Large hffo Box
TV Guide On Screen Icons
ICON NAME DESCRIPTION
hfo Button o Additional h_foBox information is available, or the hfo Box has additional sizes.
Progress Bar ° Elapsed time in current show.
• Progress bar appears in LISTINGSand SEARCHand when the Info Button is pressed while watching TV.
....._* HDTV Show is presented in high-definition TV,if available.
_/0_ New Show is new (not a repeat).
Stereo Show is available in
stereo.
D mG mT A L Dolby Digital Show is available with Dolby Digital 5.1 audio (digital channels only).
CC Closed captioning is available for the show.
TV Rating TV rating for the show.
RecordOnoe oShowissettoRecordOnce. _ _ ,,_
• Other frequencies are Daily (manual recording only),
Regularly, and Weekly.
Record Off • Show is set to Record but is currently Off [show remains in Schedule).
Record • Show is Suspended due to a schedule conflict [show remains in Schedule).
Suspended • Recording resumes when the conflict no longer exists.
Remh_dOnce .ShowissettoRemindOnce. _ _ _
o Other frequencies are Daily (manual reminding only),
Regularly, and Weekly.
Remind Off . Show is set to Remind but is currently Off (show remains in Schedule).
Remind . Show is Suspended due to a schedule conflict [show remains in Schedule).
Suspended • Remind resumes when the conflict no longer exists.
÷
6
HM95 R2 0 3-56 062705 56
Copyright ,{_;2005 TOSHIBA CORPORATION AiI rights reserved
÷
6/27/05, 6:56 PM
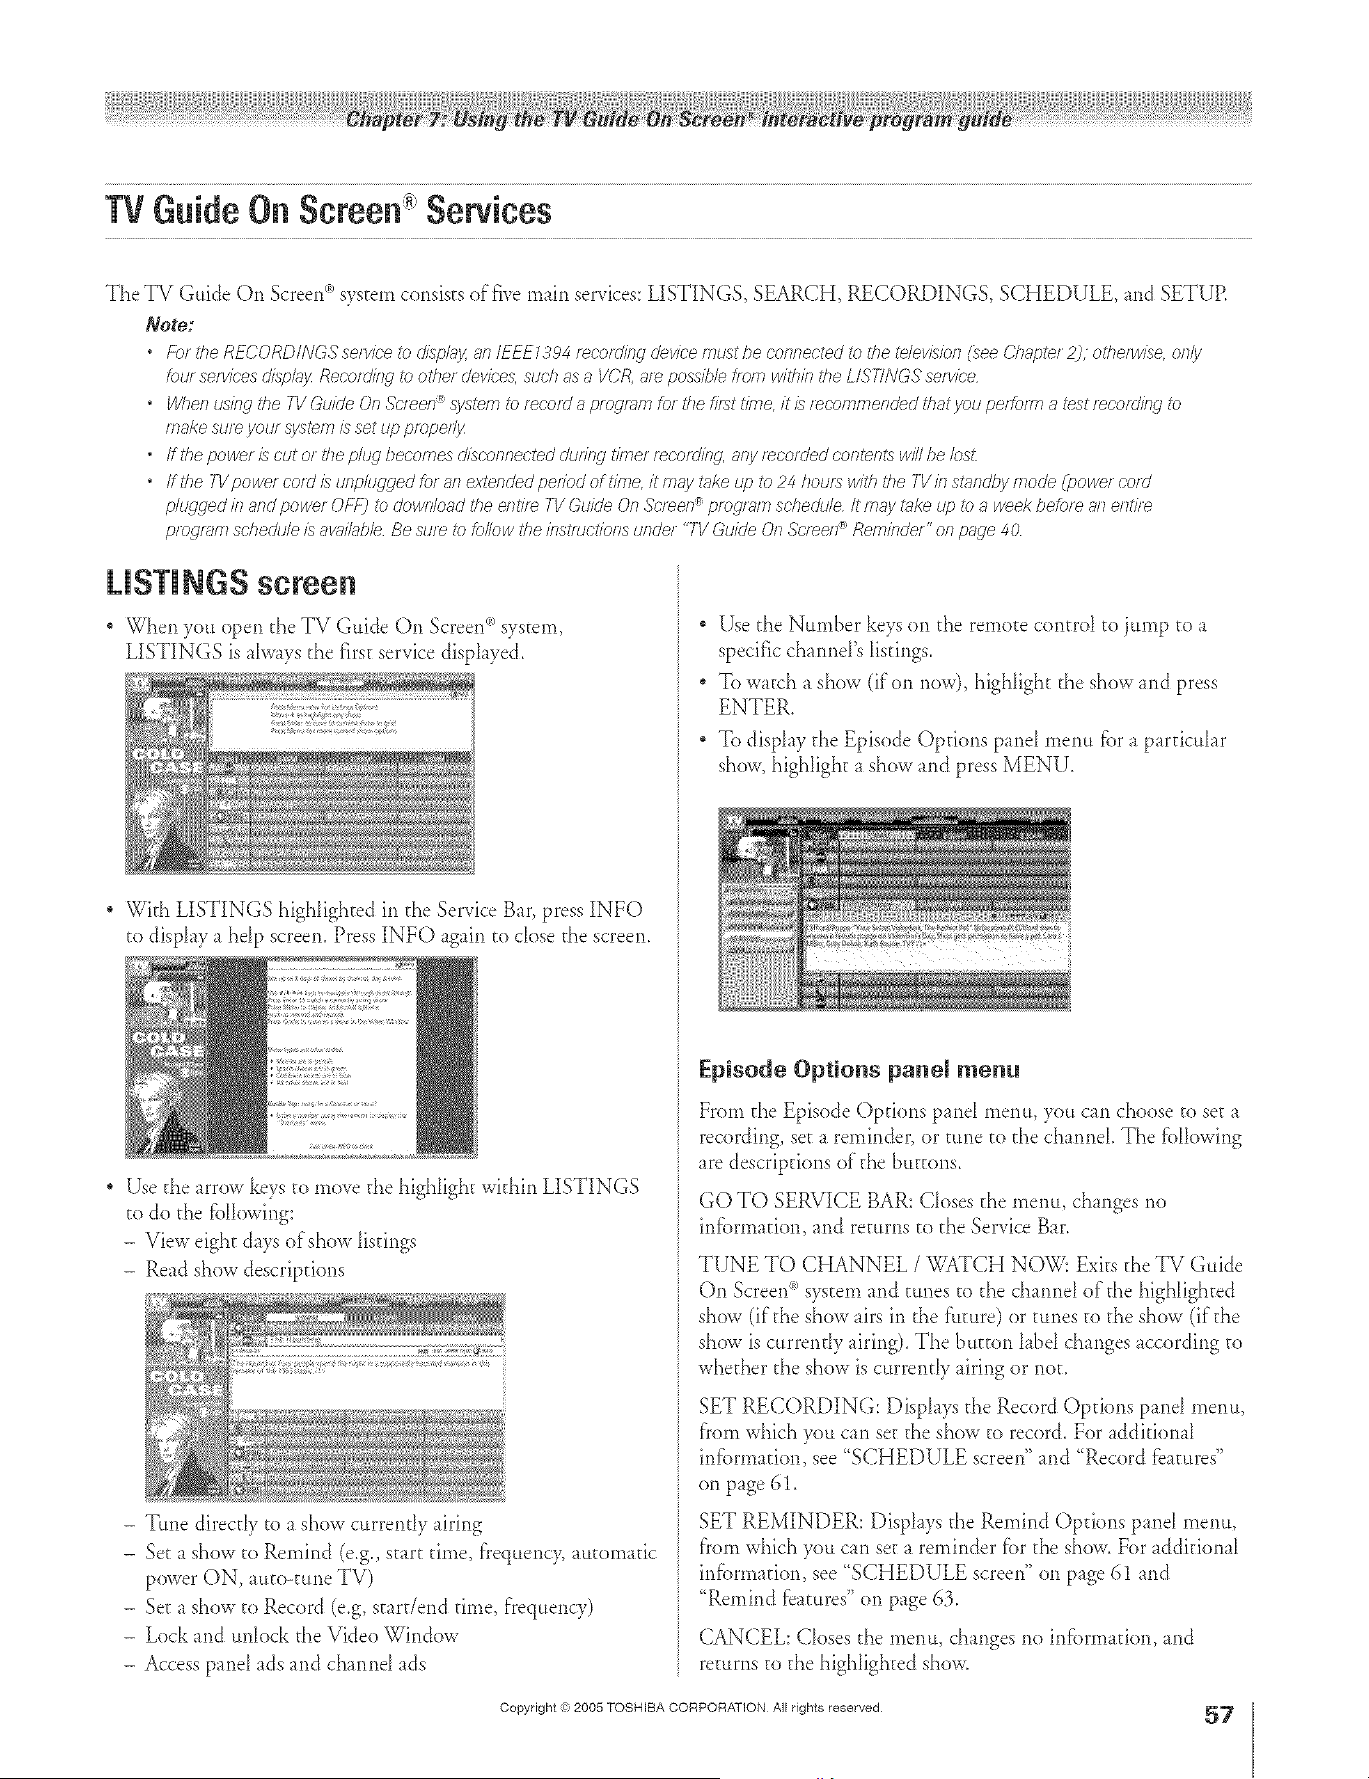
A ÷ L
The TV Guide On Screen '_'system consists of flve main services: LISTINGS, SEARCH, RECORDINGS, SCHEDULE, and SETUE
Note:
* Fbr the RFCORDINGS servk-e _) o'/iST#_y,an/EEE7394 reoording device must be connected to the _lev/sion (_ee Ch_tiYer 2), otherwise only
tou/ ser_fc'esdhph_jz Reoofdti_g to other dev/c_s, sud} as a IiCR, ate poss/b/e tiom witiTb the L/STINGS serv/ce
* When using the 71/Guide On .%'/een® ._wte/n _) record a program for tile first time, it/} recommended that you peffoflTI 8 test recoro'tii 9, tO
make sure you/system is set up prepell)_
* ffthepower/scutortiTepluclbecomesdisooslnecteddurin#thTlermcem'hlg arlyrecorcledc.orffentsw//Ibek)sl:
* fftiTe TVpowe/cord IS ul_plugged for 8n extended period of#me it may t_ke up to 24 hours w/tii tiTe TV hi standby f77oci_(powe/ COrd
phLqged h_and power OFF) to dowr#oad tim enti/e TV Guide On .c,_c'leel7_ prog12_177scheo'u/e /t Ir>ly rake up to a week before all e/ltire
prog/_m schedule/s aw#hbh Be sure to _)//ow tile bst/uct/ons tJRdel "TV Guide On Sc/ee/P Rembde/" on pr_ge 40
LISTINGS screen
" When you open the TV L;uide On Screen°'_system
LISTINGS is aIw_ys [[_efirst service displayed.
, _ Ith LL TINGS h*ghhghted m [}_eService B_r, press INFO
to display a hdp screen. Press INFO _gain to dose the screen.
, Use the arrow keys to move the highlight within LISTINGS
to do the fbIIowing:
- View eight days of show listings
- Read show descriptions
- Tune direcdy to a show currendy airing
- Set a show to Remind (e.g., start time, frequency, automatic
power ON, auto-tune TV)
- Set a show to Record (e.g, stardend fin>e,ffequenw)
- Lock and unlock the Vide<>Window
- Access panel ads and channd ads
" Use [t_eNumber keys on [t_eremote control to jump to a
specific channd's listings.
To w_tch a show (if on now), highlight the show and press
ENTER.
, To display the Episode Options pu>d menu fiarap_rticular
show, highlight _ show and press MENU.
Episode Options panel menu
Fron>the Episode Options pant menu, you can choose to set a
recording, se_ a reminder, or tune to the channd. The [bllowing
are descriptions of"the buttons.
GO TO SERVICE BAR: Closes the menu, chmges rio
infiarm_tion, md returns to the Service Bar.
TUNE TO CHANNEL / _9_TCH NOW: Exits the TV Guide
On Screen<_system and tunes to the channe[ of"the high[ighted
show (if the show airs in the f:t_[ure)or tunes to the show (if'the
show is currently airing). The button [abd changes according to
whether the show is currendy airing or not.
SET RECORDING: Displays the Record Options panel menu,
from which you can set the show to record. For additional
infi_rmatkm, see "SCHEDULE screen" and "Record _batures"
on p_ge 61.
SET REMINDER: Displays the Remind Options pant menu,
from which you can set a reminder fiarthe show. For additional
infbrmation, see "SCHEDULE screen" on p_ge 61 and
"Remind [batures" on page 63.
CANCEL: Closes the menu, changes rio in_brm_tion, md
returns to the high[igh[ed show.
Copyright (c?,2005 TOSHIBA CORPORATION All rights reserved
57
÷
HM95 R2 057-62 062705 57 _ 6/27/05, 6:56 PM [
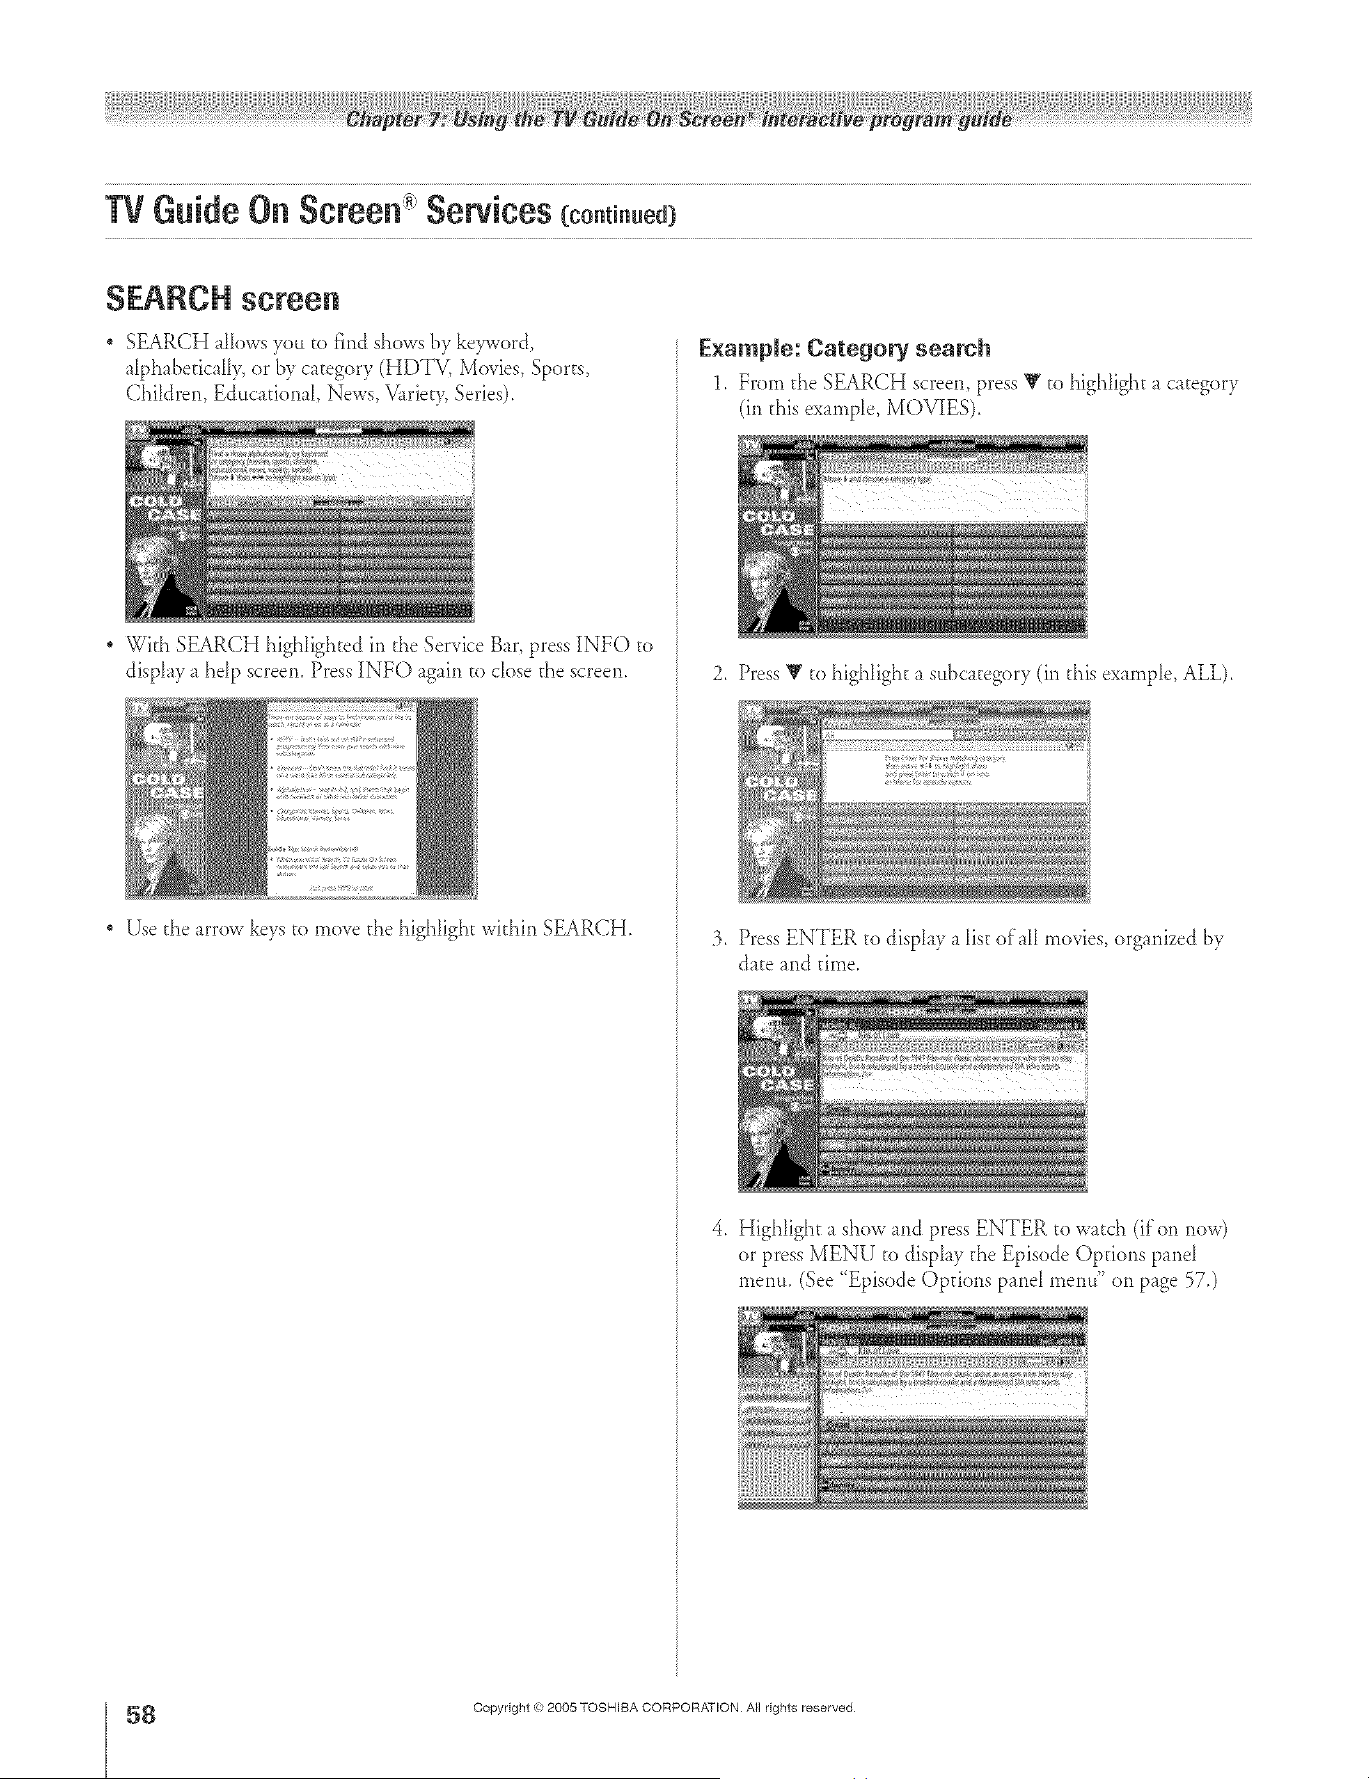
SEARCH screen
SEARCH _lIows you to find shows tw kew¢ord
_lphabefic_llv or by category (HDTV, Movies, Sports,
Children, E&tcafional, News, V2_riety,Series).
With SEARCH highlighted in the Service B_r, press INFO to
displ _y_ hdp screen. Press INFO again to close d_escreen.
Use d_e arrow keys to move the highlight within SEARCH.
E×ampie: Category search
1, From the SEARCH screen, press Y to highlight _ category
(in d_isexample, MOVIES).
2. Press V to highlight a sttbcategory (ir_d_is ex mlple, ALL),
3. Press ENTER to display a list of_H movies, organized [!?,
date md time,
4. Highlight _ show md press ENTER to watch (if on r_ov,,')
or press MENU to display d_e Episode Opdo*ls panel
menu. (See "Episode Options prod menu" oll p_ge 57.)
÷
8
HM95 R2 0 7-62 062705 58
Copyright @ 2005 TOSHIBA CORPORATION A}I rights reserved
÷
6/27/05, 6:56 PM
F
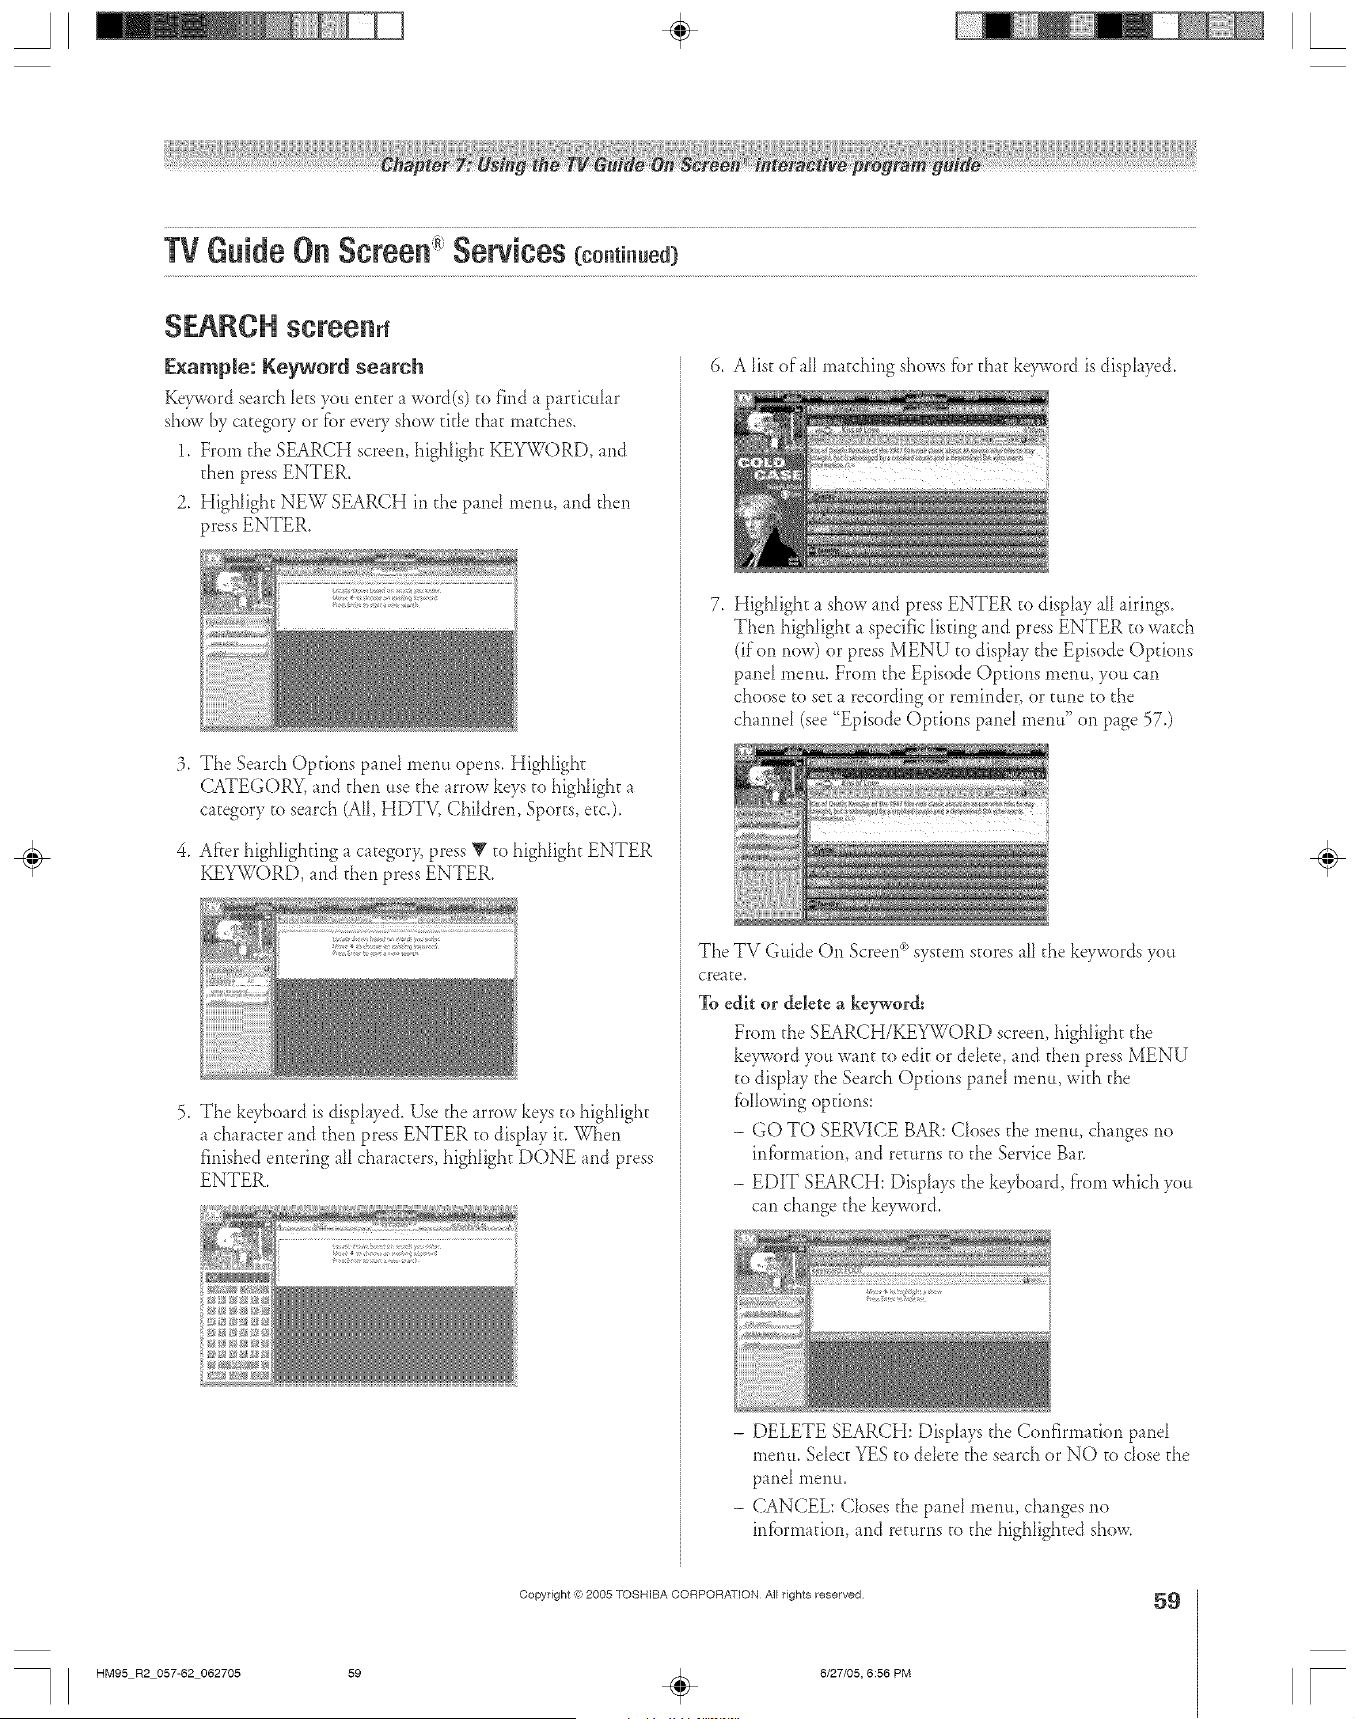
A ÷ [
SEARCH screenrf
E×ample: Reyword search
Keyword search lets you enter _ word(s) to find a pardcuhr
show by category or fiar every show title that matches.
1, Frorn the SEARCH screen, highlight KEY'WORD, and
then press ENTER.
2, Highlight NEW SEARCH in the pand menu, and then
press ENTER.
:3. The Search Options pand menu opens. Highlight
CATEGORY, md d_en use the arrow keys to highlight a
c_tegory to search (All, HDTV, Children, Sports, etc.).
4. After highlighting _ category, press V to highlight ENTER
KEYWORD, and then press ENTER.
5. The keyboard is disphyed. Use the arrow keys to highlight
a character and then press ENTER to disphy it. When
finished entering alI characters, highlight DONE and press
ENTER.
t ......
6. A list of all matching shows fbr d_at keyword is disphyed.
7. Highlight a show and press ENTER to display alI airings.
Then highlight a specific listing and press ENTER _owatch
(if'on now) or press MENU to disphy the Episode Options
panel menu. From the Episode Options menu, you can
choose to set a recording or remindeg or tune to the
channel (see "Episode Options panel menu" on page 57.)
The TV Guide On Screen_>system stores aHd_e keywords you
create.
To edit or delete a keyword:
From the SEARCH/KEYWORD screen, highlight the
ke_vord you want to edit or delete, and then press MENU
to display the Search Options pand menu, with the
fbllowing options:
- GO TO SERVICE BAR: Closes the menu, changes no
infbrmauon, and returns to the Service Bar.
- EDIT SEARCH: Displays the keyboard, from which you
can change the keyword.
- DELETE SEARCH: Displays the Confirmation panel
menu. Select YES to delete the search or NO to dose the
panel menu,
- CANCEL: Closes the pand menu, changes no
infbrn_adon, and returns to the highlighted show.
÷
Copyright <ct,2005 TOSHIBA CORPORATION All rights reserved
59
HM95 R2 057-62 062705 59 _ 6/27/05, 6:56 PM [
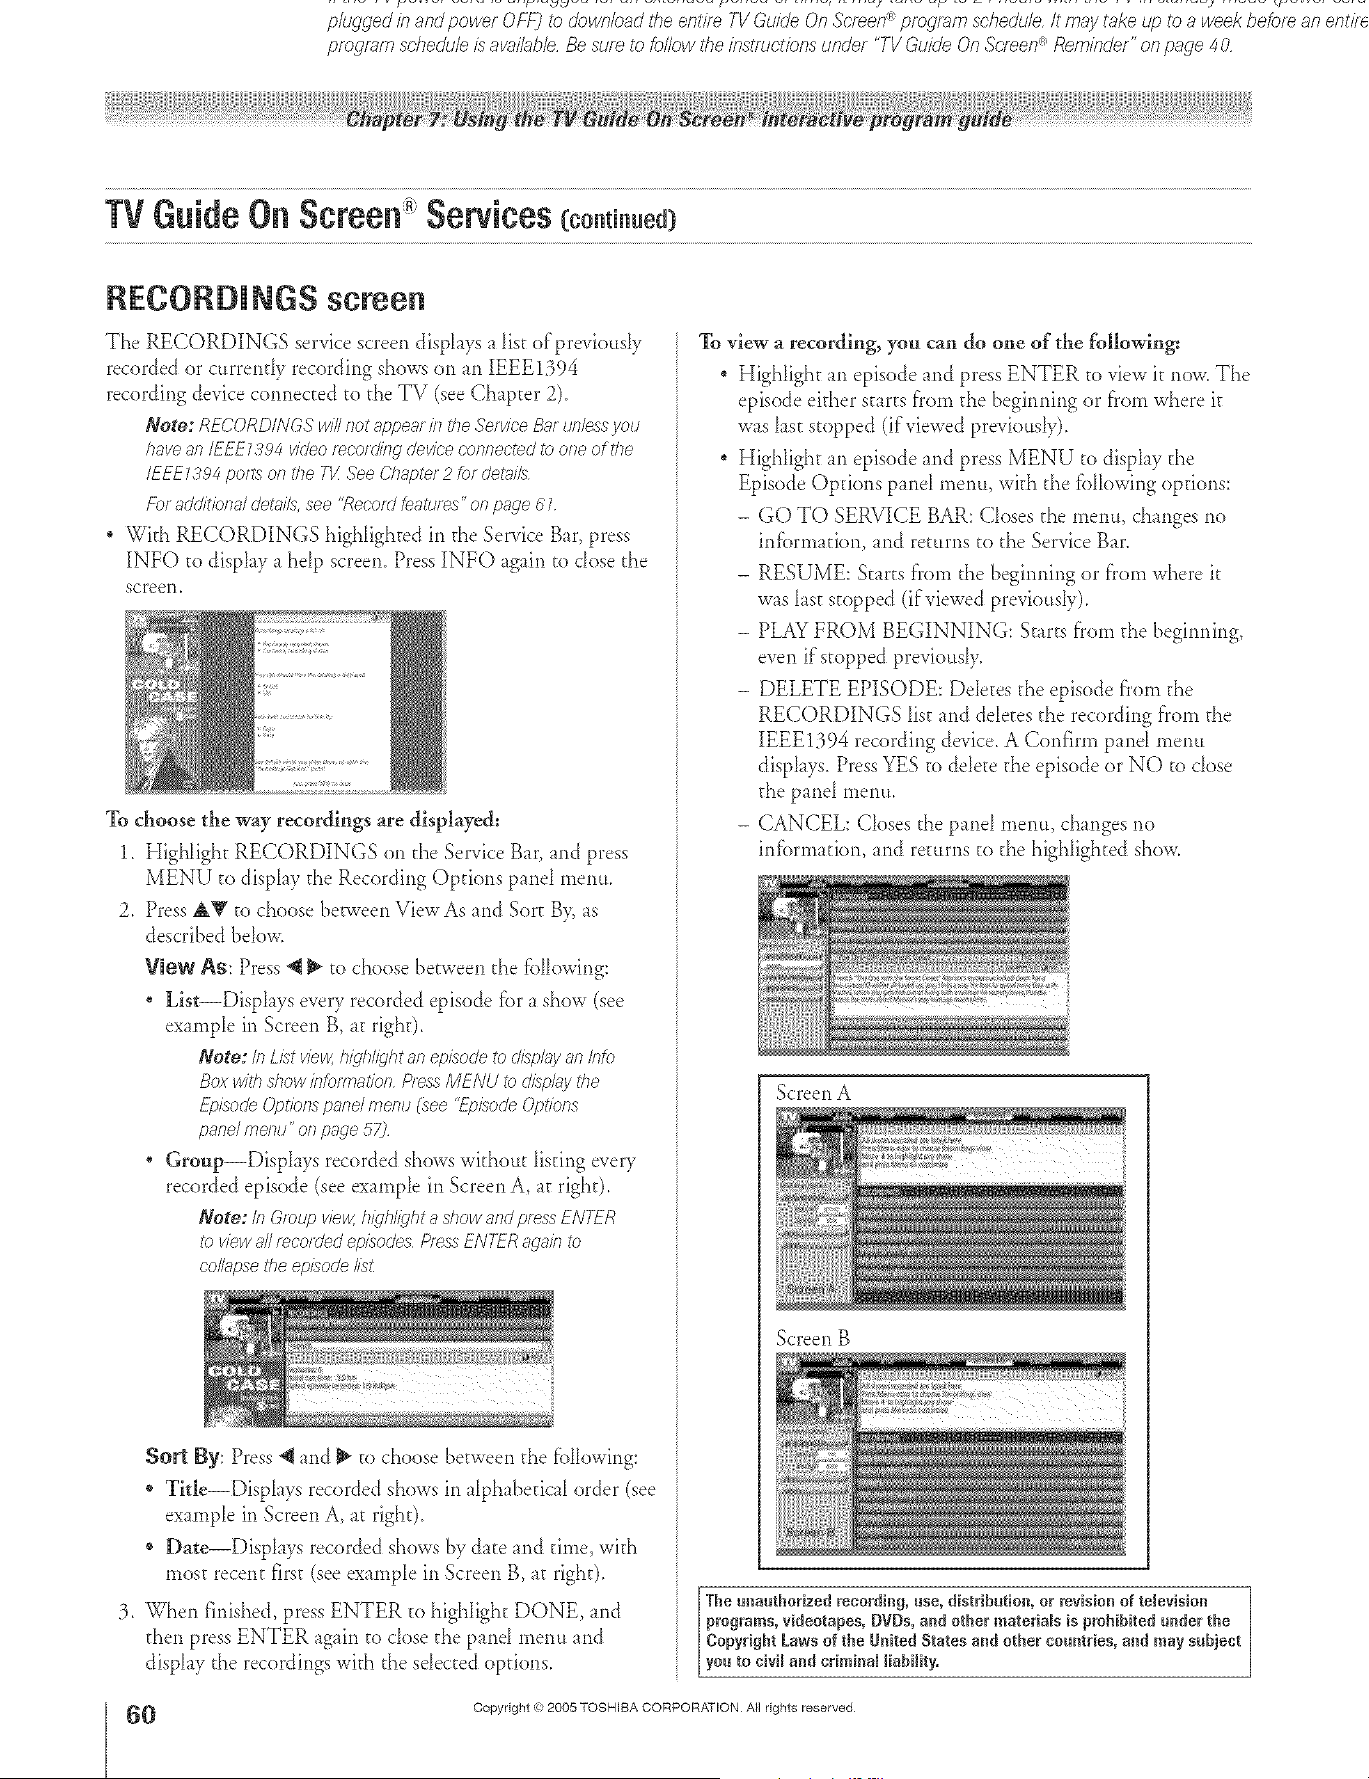
• vvtTenkesureyouf:_ystemL1setuppropenlF_us/nglr}e I v (_Ulde un ,bcfeen _ ,t_41_efT}_O fecofu a progfarT7 1of UTe flfS__U/Tie, itE/s fRcofTTfTTentledl_ffTa_ _les_rec°fdlilg
, if/he TVpowercord_ unpluggedforanextendedperiodof time,it maylakeup to24 hour:_wl_f_theTVIb standbymodeuJvw_ cur
pluggedinandpowerOFF)to downloadthe entireTVGuideOnScreen_programschedule,It maytakeqo to a weekbeforean ent/?e
programschedule_ avai/abb,Besureto followthe/ndTuct/bnsunder 'TVGuideOnScreen®Reminder"onpage 4O,
TVGuide Oil Screen Sewices (co.t ..ed)
RECORDINGS screen
The RECORDINGS service screen disph_ys a list of'previo_sly
recorded or currently recording shows on an IEEE1394
recording device connected to the TV (see Chapter 2).
Note: RECORDINGS will not _Tppearin the Service B_ff unle:_syou
have an/EEE7394 video mcomfng device connected _b one of the
IEEE Z394 putts of7the 71/See Chapter 2 for det_lil5
For additioT._a/det: 7ilh,see '<Record :eatu/ es" on pacTe61
, With RECORDINGS highlighted in tl_eService B_r, press
INFO to display a help screen. Press INFO again to dose the
screen.
To choose the way recordings are displayed:
1. Highlight RECORDINGS on the Service Bar, and press
MENU to display the Recording Options pand mentt.
2. Press AV to choose between ViewAs and Sort B> as
described below.
View As: Press @ _ to choose between the fbllowing:
List--Displays every recorded episode fbr a show (see
example in Screen B, at right).
Note: in kTstview,h_dh/kjhtanepTsodeto &s_g;,yan Into
Box withd?ow/nfo/rTlat/onPressMENU to o_pluv the
Ef)isoc/e Options pand merlu (see "L_eTsodeOptions
panelmenu" of7p_-Tge57)
Group--DispIays recorded shews withottt listing every
recorded episode (see example in Screen A, at right).
Note: In &cup vie_ hkjhl/}'ht ashow andpressENTER
I_ viewa///e/ordeal episode_ PressENTER_>gaklto
co/h_psethe ep/sode/is£
Sort By: Press @and _ to choose between the fbllowing:
* Title--Displays recorded shows in alphabetical order (see
example in Screen A, at right).
* Dae--Displays recorded shows by date and time, with
most recent first (see example in Screen B, at right).
3. When finished, press ENTER _o highIight DONE, md
then press ENTER again to dose the pand menu and
display the recordings with the selected options.
To view a recording, you can do one of the foHowing_
Highlight an episode and press ENTER to view it new. The
episode either star_s ['rom the begirming or ['rom where it
was last stopped (if viewed previously).
Highlight an episode and press MENU to display the
Episode Opdons panel metm, with the fbllewing options:
- GO TO SERVICE BAR: Closes the menu, changes no
infbrmation, and returns to the Service Bar.
- RESUME: Starts f}'om the begirming or f'rom where it
w_s last stopped (if viewed previously).
- PLAY FROM BEGINNING: Starts f'rom the begirming,
even if'stopped previously.
- DELETE EPISODE: Ddetes the episode fl'om the
RECORDINGS Iist and ddetes the recording fi'om the
IEEE1394 recording device. A Confirm pand menu
displays. Press YES to delete the episode or NO to close
the pmel menu.
- CANCEL: Cleses the panel menu, changes no
infbrmation, and re_urns to the highlighted show.
ScreenA
Screen B
The unauthorized recording, use, distribution, or revisio_ of television
programs, videotapes, OVOs, a_d other reateria_s is prohibited u_der the
Copyright Laws of the United States a_d other countries, and may subject
you to civi_ a_d crireina_ _iability.
O
HM95 R2 0 7-62 062705
Copyright @ 2005 TOSHIBA CORPORATION A}I rights reserved
÷
60 _ 6/27/05, 6:56 PM [
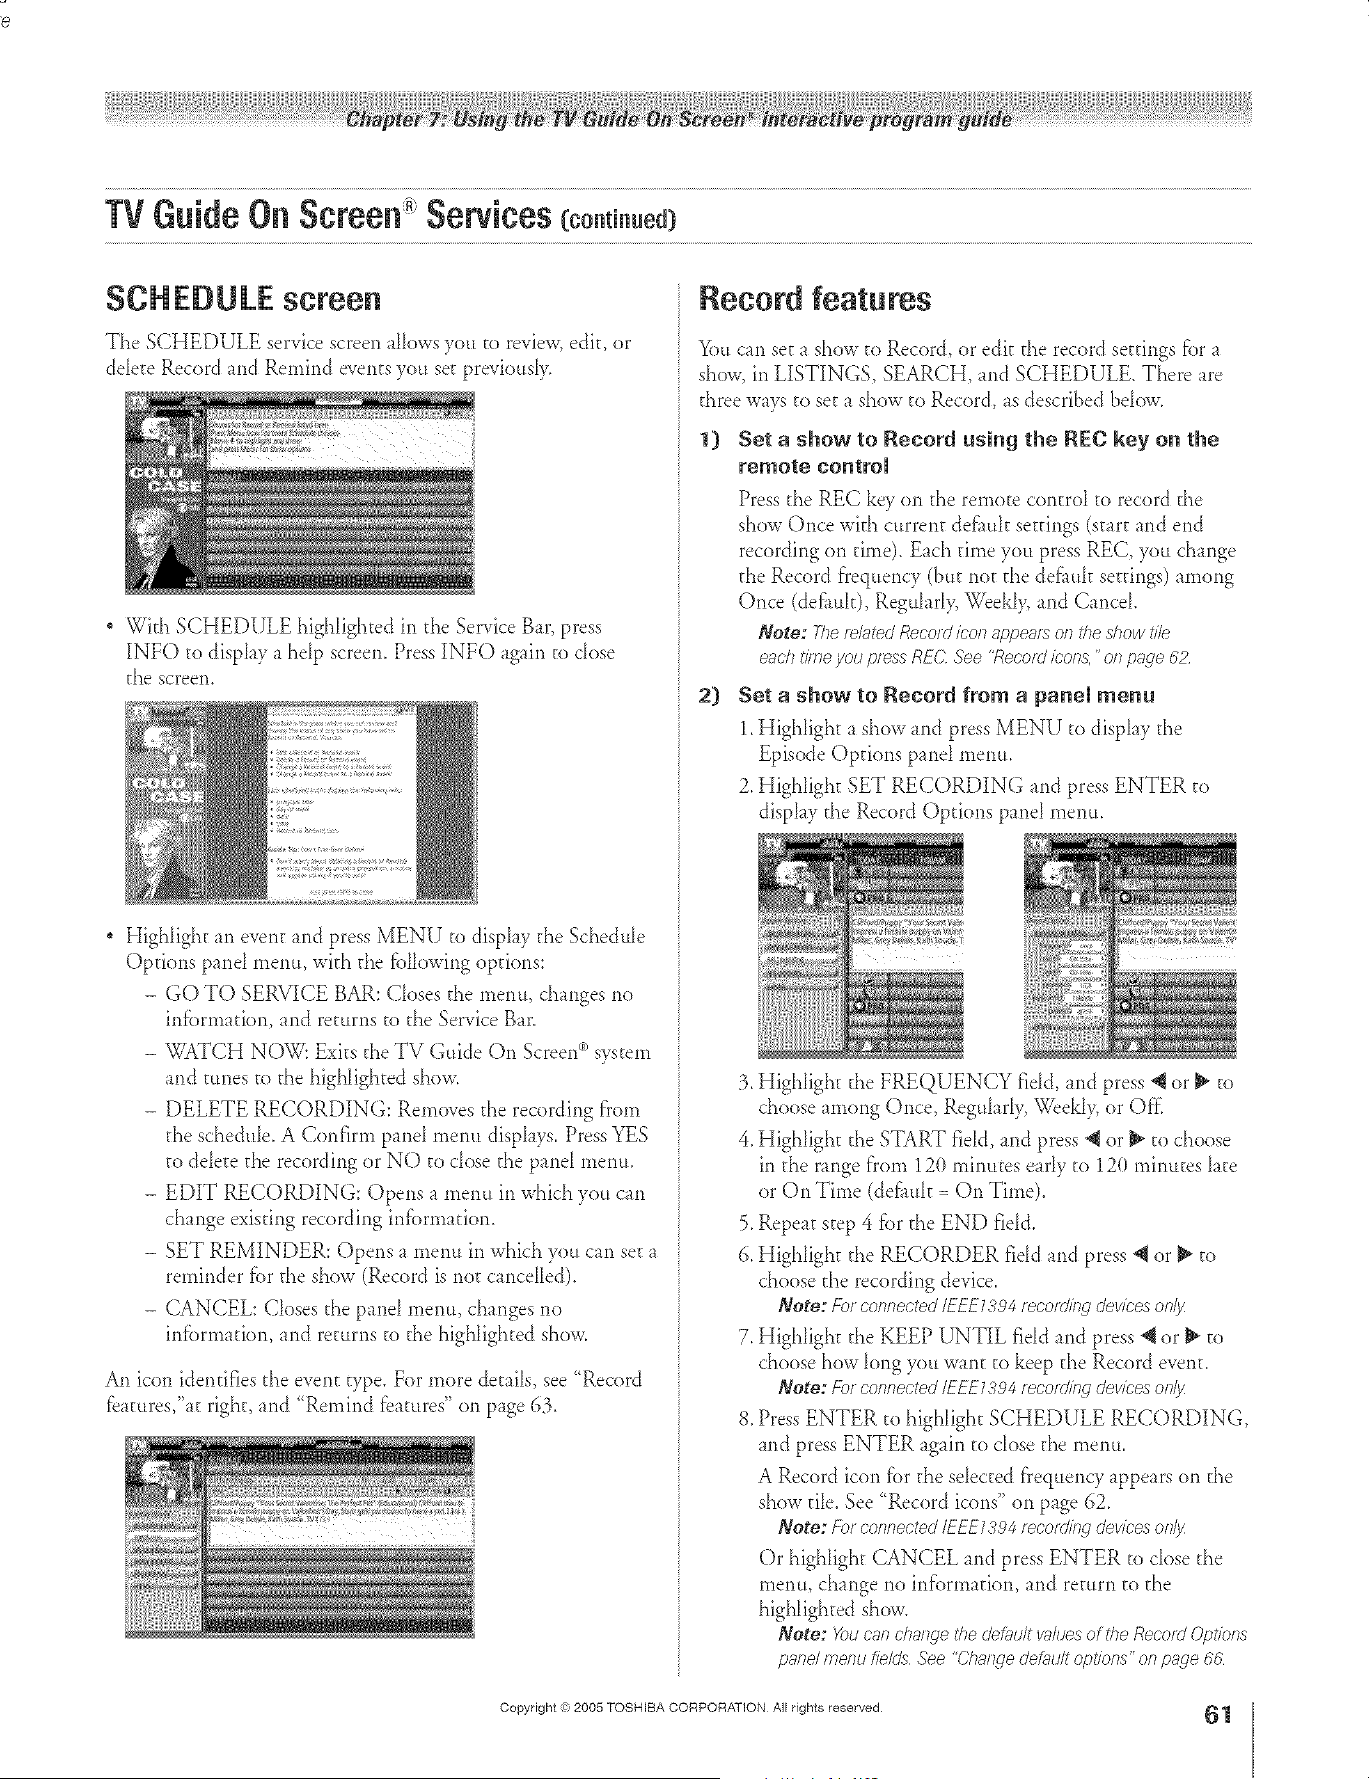
÷ L
re 8£ eIF/F_,
W Guide On Screen Sewiees (co.t ..ed)
SCH EDU LE screen
The SCHEDULE service screen allows you to review, edit, or
delete Record and Remind events you set previously.
* With SCHEDULE highlighted in the Service Bat', press
INFO to display a help screen. Press INFO again to dose
the screen.
* Highlight an event and press MENU to display the Schedule
Options panel menu, wkh the fiallowing options:
- GO TO SERVICE BAR: Ck>sesthe menu, changes no
inflammation,and returns to the Service Bar.
- TT%TCH NOW: Exits the TV Guide On Screen(")system
and tunes to the highlighted show.
- DELETE RECORDING: Removes the recording fTosn
the schedule. A Confirm panel menu displays. Press YES
to delete the recording or NO to close the panel menu.
- EDIT RECORDING: Opens a menu in which you can
change existing recording infiarmadon.
- SET REMINDER: Opens a menu in which you can set a
reminder tierthe show (Record is not cancdled).
- CANCEL: Ck>sesthe panel menu, changes no
infiarn_adon, and returns to the highlighted show.
An icon identifies the event type. For more details, see "Record
fbatures,"at right, and "Remind features" on page 63.
Record features
_)u can set a show to Record, or edit the record settings tier a
show, in LISTINGS, SEARCH, and SCHEDULE. There are
three ways to set a show to Record, as described bdow.
1} Set a show to Record using the REC key on the
remote control
Press the REC key on the remote control to record the
show Once with current def_mlt settings (start and end
recording on time). Each time you press REC, you change
the Record f}'equency (but not the def_uk settings) among
Once (defi_uk), Regulad> We&l> and Cancel
Note: Therefittedf@cordicon appearson the show file
eachtimeyou pressRE(;'See "Roe'oldicon&"of7 page #2
2} Set a show to Record from a panel menu
1. High{ight a show and press MENU to disp{ay the
Episode Options panel menu.
2. Highlight SET RECORDING and press ENTER to
display the Record Options pand menu.
3. Highhght the FREQUENCY rid& and press @ or _ to
choose among Once, Regularly, Weekly, or Of}_
4_Highlight the START fidd, and press @or _ to choose
in the range f}'om 12(}minutes early to 12(}minutes late
or On Time (de_mk = On Time).
5. Repeat step 4 tier the END field.
6. Highlight the RECORDER fidd and press @ or _ to
choose the recording device.
Note: Fo_ connected/EU:1394 recording devices oe/jz
7. Highhght the KEEP UNTIL fieId and press _ or _" to
choose how long you want to keep the Record event_
Note: For connected/EKE1384 reco_dind devices on{!z
8. Press ENTER to highlight SCHEDULE RECORDING,
and press ENTER again to close the menu.
A Record icon f_)rthe selected frequency appears on the
show die. See "Record icons" on page 62.
Note: f:or connected/_E1384 _ecording devices oe/Jz
Or highlight CANCEL and press ENTER to dose the
menu, change no information, and return to the
highlighted show.
Note; You can clT871geI<hedef;Tult b_aluesof the Record (Jptions
pand me/Tu fie/g6 <See"Cha77gedef_Tultoptions" on page 66
Copyright @ 2005 TOSHIBA CORPORATION All rights reserved
61
÷
HM95 R2 057-62 062705 61 _ 6/27/05, 6:57 PM [
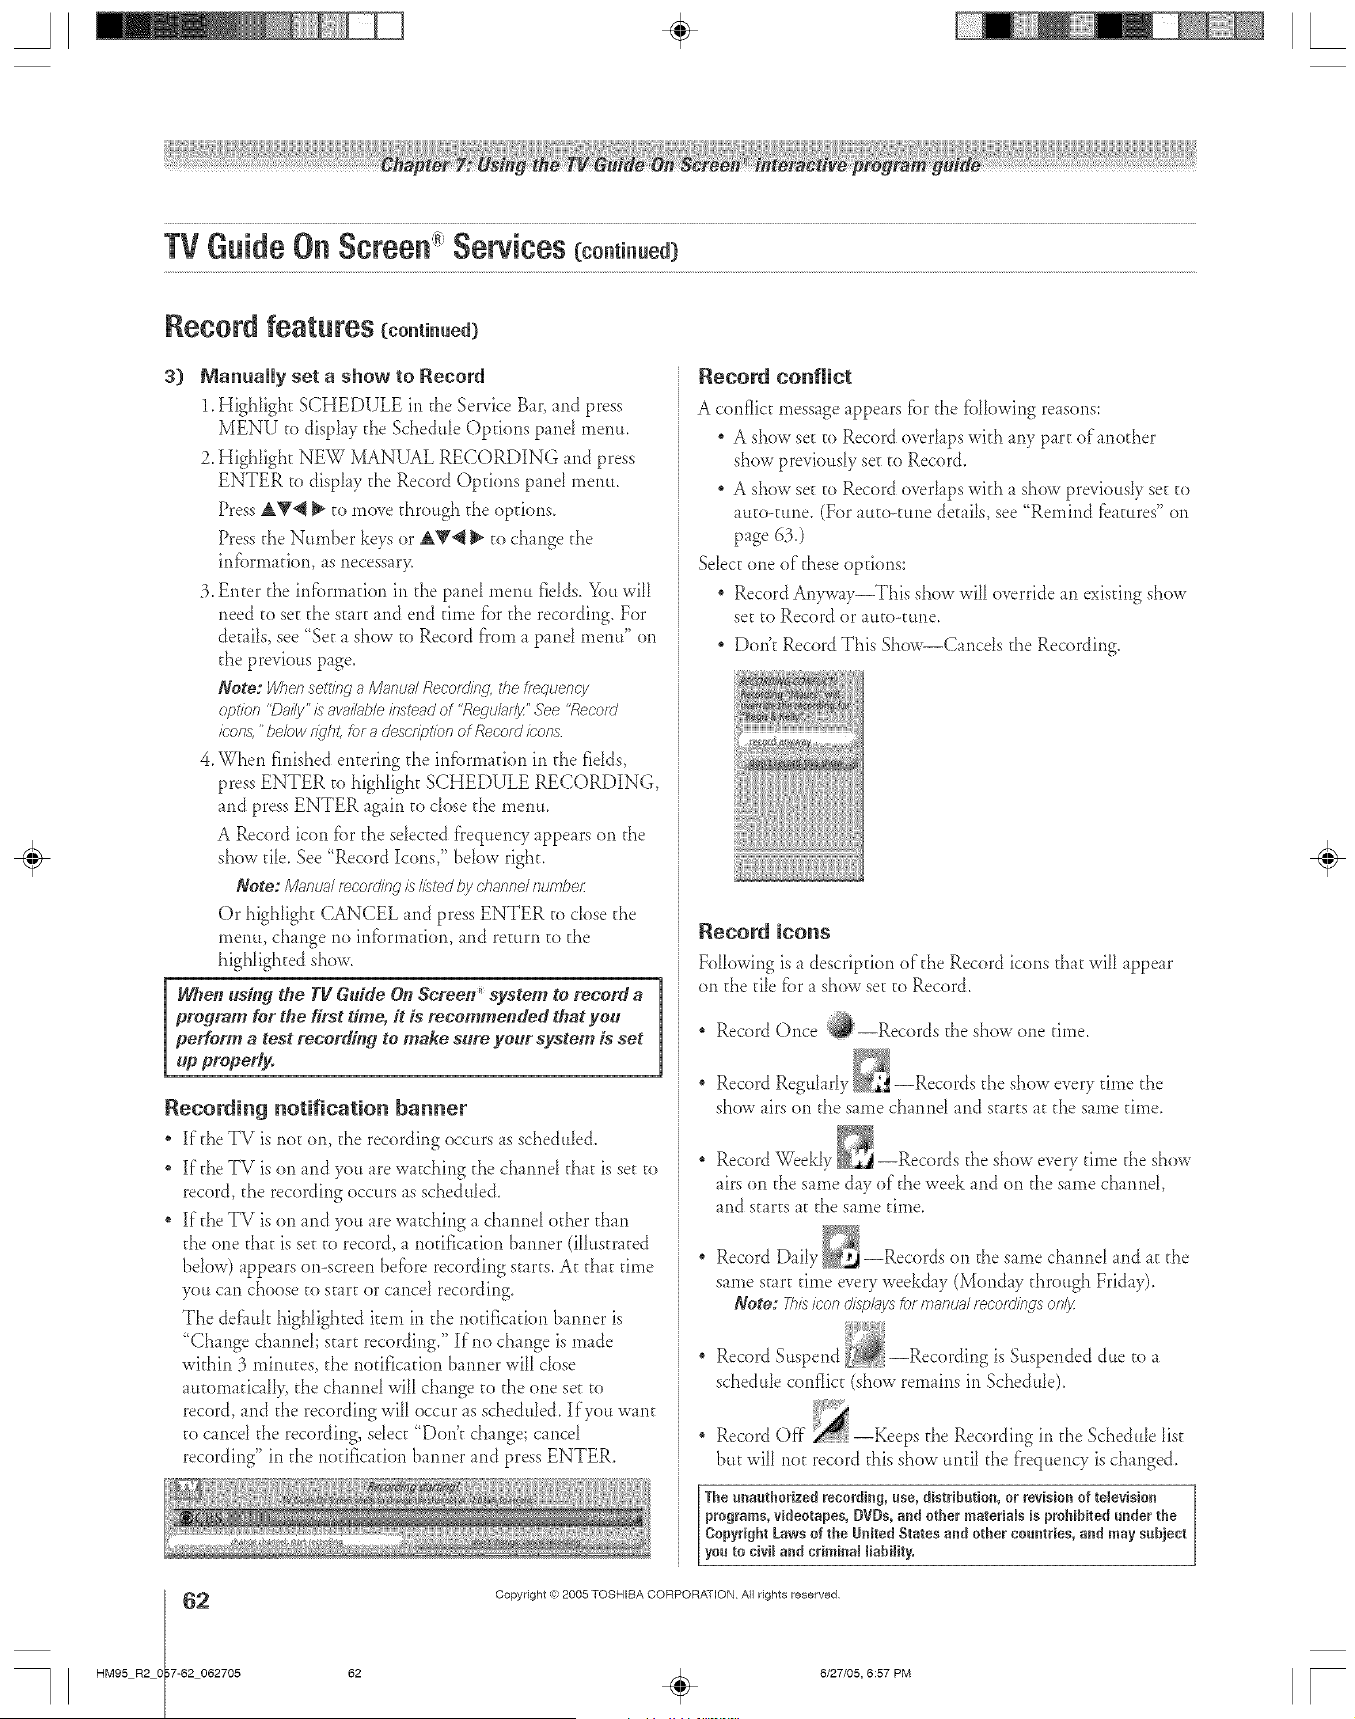
A ÷ L
Record features (ce.ti..ed)
3) Manually set a show to Record
1. Highlight SCHEDULE in d_e Service Bar, and press
MENU to display the Schedule Options pond menu.
Z Highlight NEW MANUAL RECORDING and press
ENTER to display the Record Options pond menu.
Press AT_ _ to move d_rough d_e opdons_
Press the Number keys or &V'_ _ to change d_e
infbrmafion, as necessar>
3. Enter d_e infbrmafion in d_e pand menu fdds. You will
need to set the start and end dine fbr d_erecording. For
details, see "Set a show to Record from a pond menu" on
the previous page.
Note: Whenset>g a ManugJ Reoo_dind. the f/equency
option "D_'ilT' /s avnilabMklsteadof "Requl;l@" See<'ReootU
icons,"below/iclh_,for8 descfl)tiog of Record/(;r)ltS
4. When fnished entering the infbrmation in the fdds,
press ENTER to highlight SCHEDULE RECORDING,
arid press ENTER again to close the menu.
A Record icon for the selected frequency appears on the
show tile. See "Record Icons," below right.
Note: M_nu_lfecorUing isILvtedby c'l_anne/ilumt_e/:
Or highlight (;ANCEL and press ENTER to cIose the
menu, change no information, and return co the
highlighted show.
Whet* us#gl the gg Guide On Screen _system to receM a
proyram for the first dine, it is recommended that you
perform a testrecord#St to make sure your system is set
up properly.
Recording notification banner
, If d_eTV is not on, the recording occurs as scheduled.
ill the TV is on and you are watching the channel that is set to
record, d_e recording occurs as scheduled.
ill the TV is on and you are watching a channel edger than
the one that is set to record, a notification banner (illustrated
bdow) appears on-screen heft)re recording starts. At d_at time
you can choose to start or cancel recording.
The defimk highlighted item in the notification banner is
"Change channd; start recording." If no change is made
within 3 minutes, the notification banner will dose
atttomatica[[> the channel will change to the one set to
record, and the recording will occur as scheduled. If you want
to cancd the recording, select "Don't change; cancel
recording" in the notification banner and press ENTER.
Record conflict
A conflict message appears fbr the fb[[owing reasons:
A show set to Record overlaps wkh any part ofanod_er
show previously set to Record.
* A show set to Record overlaps wkh a show previousIy set to
auto-rune. (For autoomne details, see "Remind t:eamres"on
page 63.)
Select one of these options:
* Record Anyway 'This show will override an existing show
set to Record or auto-tune,
" Doric Record This Show--Cancds the Recording.
Record icons
Following is a description oldie Record icons d_at will _ppear
on d_etile fbr _ show set to Record.
* Record Once :_--Records the show one time.
Record Regu[arIv --Records d_e show every rime d_e
show airs on d_e same channel and starts at d_e same rime.
Record _eek[y --Records the show every time the show
airs on the same day of the week and on d_e same channel
and starts at the same drne.
Record Daily _ --Records on the same charme[ md _t d_e
same start dine every weekday (Monday d_rough Friday).
Note: This icon displ;lys for m_eluol recorUinds onlJz
* Record Suspend _--Recording is Suspended due to
schedule conflict (show remains in Schedu[e)_
, Record Off _--Keeps d_e Recording in the Schedule list
but will not record this show until the frequency is changed.
The unauthorized recording, use, distribution, or revision et television
programs, videotapes, OrBs, and other materials is pmhihRed under the
Copyright Laws of the UnRed States and ether countries, and may subject
you to civil and criminal liability.
2
HM95 R2 0 7-62 062705
Copyright @ 2005 TOSHIBA CORPORATION All rights reserved
÷
62 . 6/27/05, 6:57 PM [
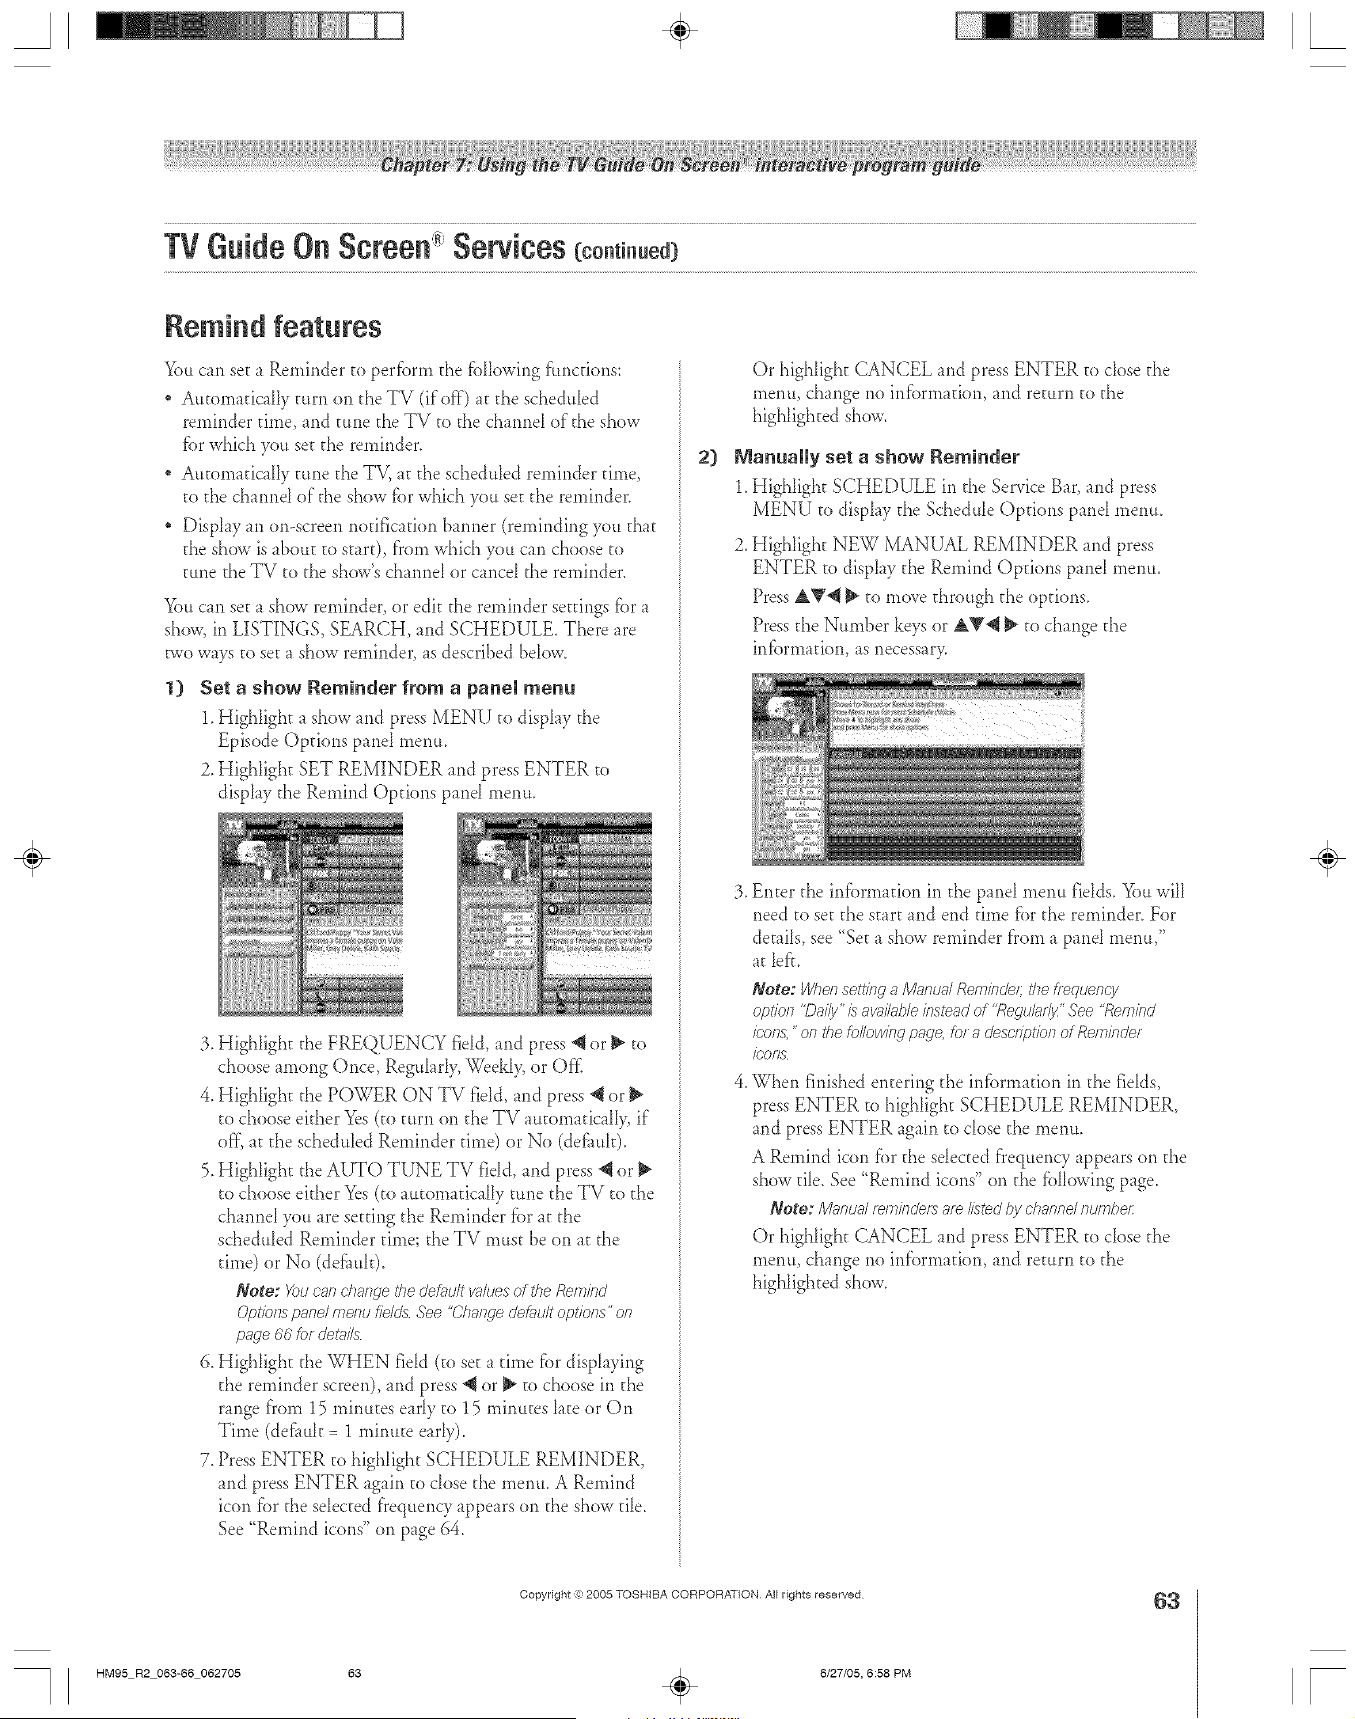
A ÷ L
Remind features
You can set a Reminder to perfbrm the f_)Ilowingfimcfions:
Automatically turn on theTV (if off) at the scheduled
reminder dine, and eune the TV to the channd of the show
fbr which you see the reminder,
Automatic 41ytune the TV, at the scheduled reminder time,
to the channel of the show fbr which you set the reminder.
Display an on-screen notification banner (reminding you that
the show is about to start), fi'om which you can choose to
tune the TV to the show's channel or cancel the reminder,
Yon cm set a show reminder, or edit the reminder settings fbr a
show, in LISTINGS, SEARCH, and SCHEDULE, There _re
two ways to see_ show reminder, _s described bdow_
1) Set a show Reminder from a panel menu
1, Highlight a show and press MENU to display the
Episode Options pand menu.
2. Highlight SET REMINDER and press ENTER to
display the Remind Options pand menu.
3. Highlight the FREQUENCY field, and press "_ or _ to
choose among Once, Regularly, Weekly, or OK
4, HighIighe the POWER ON TV field, and press "_ or
to choose either Yes(to turn on the TV automaticalI> if
of[ at the scheduled Reminder time) or No (defamE),
5, Highlighe the AUTO TUNE TV field, and press "_or
to choose either Yes (to automatically tune the TV to the
channeI you are seeting the Reminder fbr at the
scheduled Reminder time; the TV must be on at the
time) or No (dd_mh).
Note: X>/Joar change the c/e/gsult vnlues of rite Remind
C)pl'ionspanel menu fields See "Change c/e_lult oplVbns ' oil
p_sge66 for det_sils
6, Highlight the WHEN field (to set a time fbr displaying
the reminder screen), and press @ or _ to choose in the
range f'rom 15 minutes early to 15 minutes late or On
Time (def_ult = 1 minuee early).
7. Press ENTER to highlight SCHEDULE REMINDER,
and press ENTER again to close the menu. A Remind
icon _br the sdected frequency appears on the show tile.
See "Remind icons" on page 64,
2)
Or highlight CANCEL md press ENTER to dose the
menu, change no infbrm_don, md return to the
highlighted show.
Manually set a show Reminder
1. Highlight SCHEDULE in the Service B_r, and press
MENU to display the Schedule Options pand menu,
2. Highlight NEW MANUAL REMINDER and press
ENTER to display the Remind Options panel menu.
Press &V_ _ to move through the options.
Press the Number keys or AY@ _ to change the
infbrmation, as necessar>
3, Enter the inf_)rmadon in the panel menu fields. You will
need to see the start and end time fbr the reminder. For
dot dis, see "Set a show reminder f'rom a pand menu,"
at lef<
Note: When setting a IV/_nu_JReminde/: the fiequency
opt/bn "Dai/y"/s av_ilable instead of 'Regul_fff_" See "Rembd
icons, "on the following p_ge, fot 8 o'esc//f)t/Oll of Relnbder
/t/,'OFIS
4_When finished entering the infbm_ation in the fields,
press ENTER to highlighe SCHEDULE REMINDER,
and press ENTER again to close the menu.
A Remind icon fbr the selected f'requency appears on the
show tile, See "Remind icons" on the fblk_wingpage.
Note: M_ntJ;ff f_lT}/f'ld_fS 8f_ listed/by C/)81)De/ /Ttew_)e/:
Or highlighe CANCEL and pressENTER to dose the
menu, changeno information, and return to the
highlighted show.
÷
Copyright ,:} 2005 TOSHIBA CORPORATION AJl rights reserved
63
HM95 R2 063-66 062705 63 _ 6/27/05, 6:58 PM [
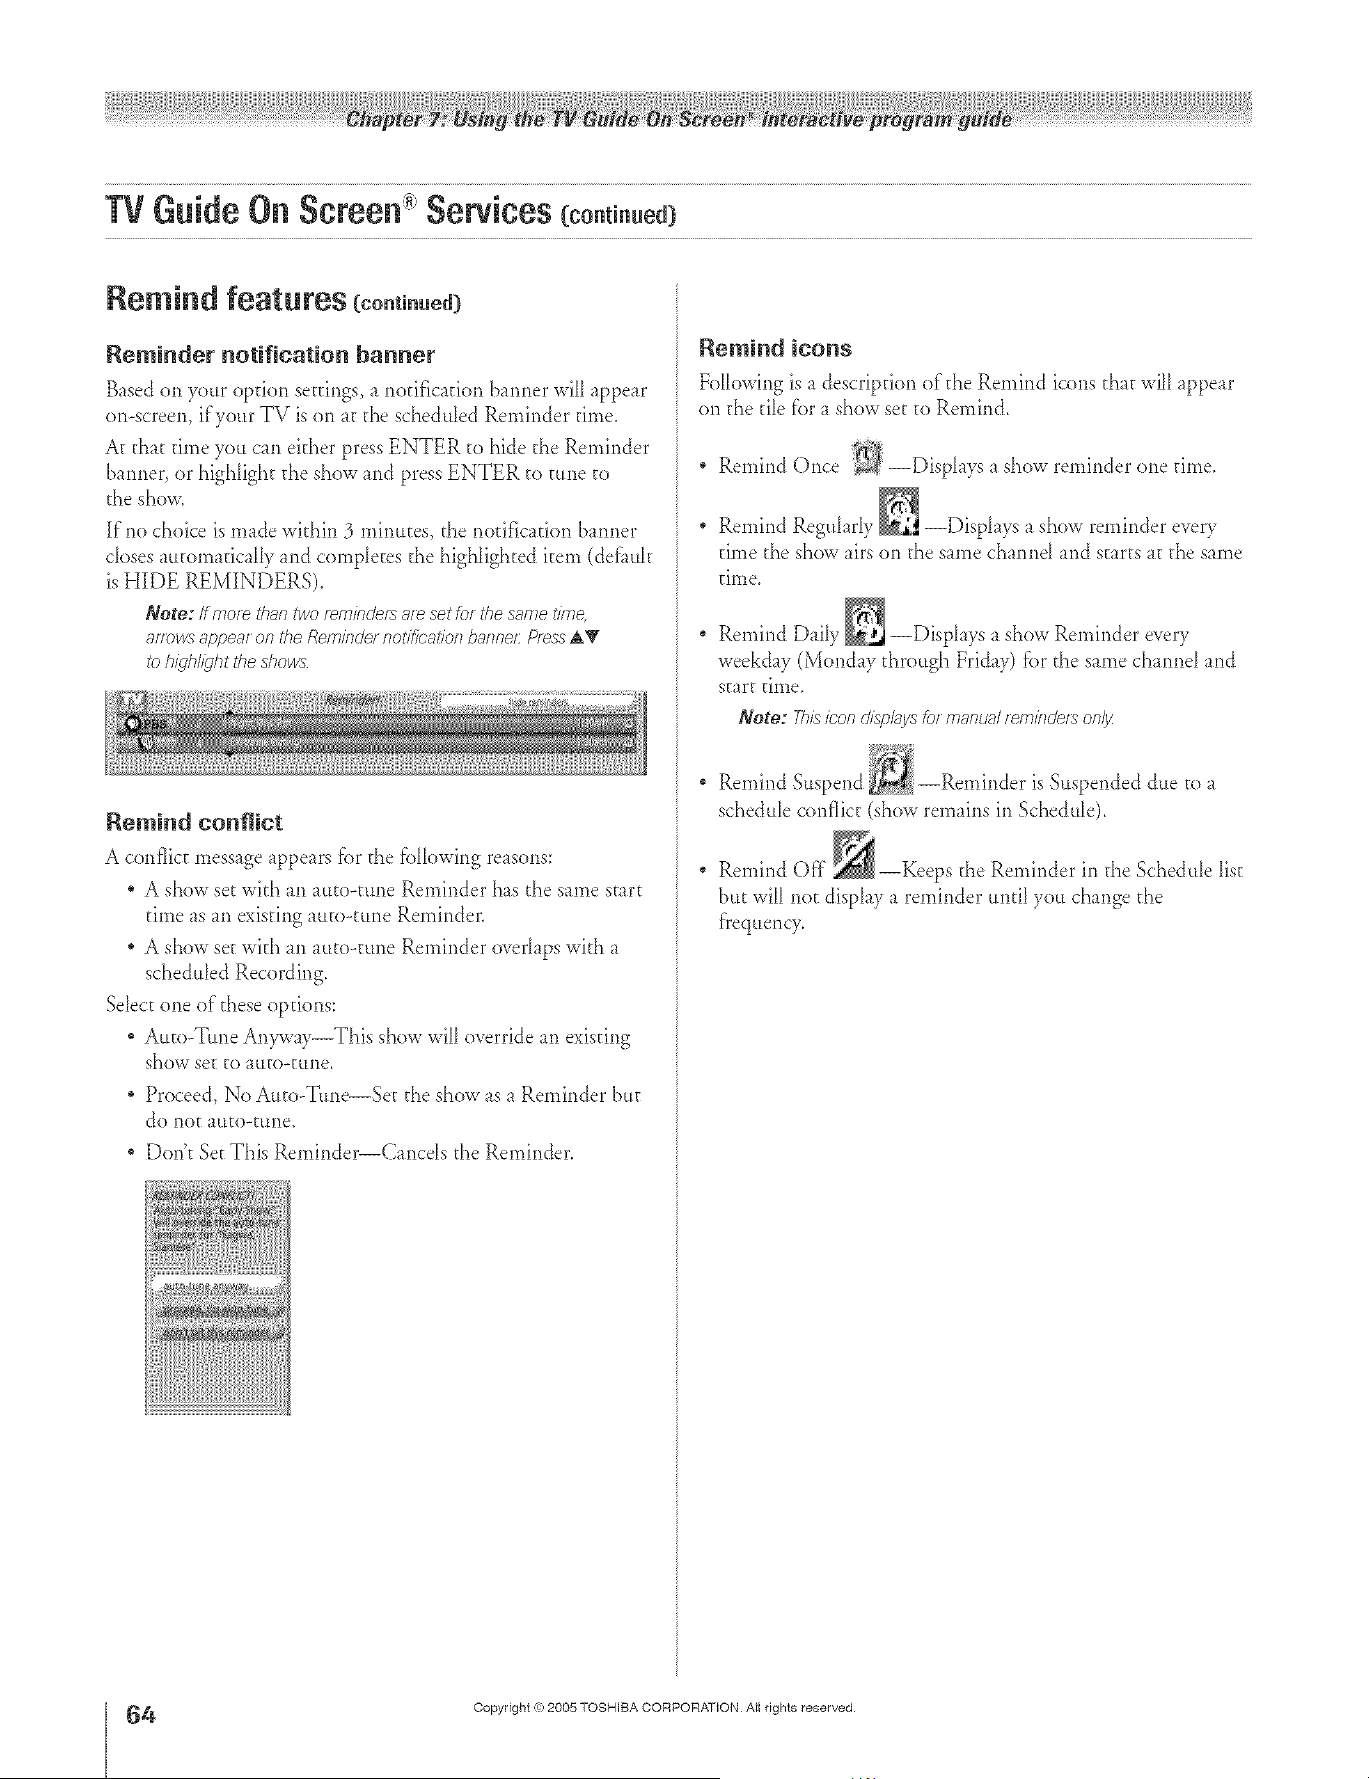
Retain d featu res (cont_nued_
Reminder notification banner
Based on your opdon seedngs, a rlofificafion banner will appear
or>screen, if your TV is on at the scheduled Reminder time.
At d_at time you can either press ENTER to hide the Reminder
banner, or highhght the show and press ENTER to rune to
the show.
If no choice is made within 3 mimttes, the notification barmer
closes aueomafically and completes the highlighted item (def_tule
is HIDE REMINDERS).
Note: Ifmore than_/o fe/nincle_ale getfo_the s2ffl_etl;,71<
sffTowsap/:)e_ffon No Remklde/ notification b21nne/:P/_s AV
to hi qhlight the d?o_s
Remind conflict
A conflict message appears fbr d_e fbHowing reasons:
* A show set with an auto-ume Reminder has the same start
time as an existing atteooume Reminder.
A show seewith an auto-rune Reminder overlaps with a
scheduled Recording.
Select one of these opdons:
Auto-Trine An_'ay_This show will override an existing
show see to auto-rune.
" Proceed, No AutooTtme--See the show as a Reminder but
do noe auto-rune.
" Dora SeeThis Remir_der--Cancds the Reminder.
Remind icons
Following is adescription oldie Remind icons tt_t will _ppear
on d_etile f'or_ show set to Remind.
Remind Once :_:--Displays ashow reminder one time.
Remind Regtdarly _ --Displays a show reminder every
time the show airs on the same channd and starts at the same
tilP.e
Remind Daily _ --Displays a show Reminder every
weekday (Mond _yd_rough Friday) fi._rthe same charred and
start time.
Note: This/con d/spl_tysf_.)fmanu_ff feol/?ldef_ on/3z
Remind Suspend --Reminder is Suspended due to
schedule conflict (show remains in Schedule).
Remind Off d_eReminder in d_e Schedule list
but will hoe display a reminder until you change d_e
[}'eqttency_
÷
64
HM95 R2 O 3-66 062705 64
Copyright (_;2005 TOSHIBA CORPORATION Atl rights reserved
÷
6/27/05, 6:58 PM
[

A ÷ [
SETU P screen
After you complete d_e inkiaI TV Guide On Screen_)setup (as
described in Chapter 5), you can char_ge d_e f_A[owingsettings:
_' Change system settings
Change channel display
_' Change def_mk options
Highlight a choice, press ENTER, and t}.}llowthe on-screen
insmtctions.
iiii
T' _ 'r '
_ M_ ETUP hghhghted in the Service Bm press INFO to
disphy a hdp screen. Press INFO again to dose the screen.
Change channel display
This option aIIows you to edit charmei irffbrmafion that appears
in LISTINGS, indudir_g the fbHowir_g:
Reorder d_e position the channds appear in LISTINGS.
Change the "tune charme[" number,
Note: The "tunechannel"is _hed_awJe/on whiehyou _ceive
astutionFo_example, twoviewersinthesame 7ip codemay
receivethesamestationonc/iffe/_fTtd?annd/lc_mbe/s.
depenclieg oil whethe/ they /TaveC)abbserviceor am t2_il)g8
cablebox
, Switch a channd m one oldie fbHowing settings:
- On (channd is always displayed in LISTINGS)
- Off (channel is never displayed in LISTINGS)
- Auto-Hide (channd is displayed in LISTINGS only
when program infbrmafion is available)
1. From the SETUP screen, highlight CHANGE CHANNEL
DISPLAY and press ENTER.
÷
Change system settings
This option _ppears only ff'reryou hwe completed the inki_! TV
Guide On Screen_*setup process (_8described in Chapter 5).
1. From d_e SETUP screen, highlight CHANGE SYSTEM
SETTINGS md press ENTER.
2. Highlight d_echannel row you want to edit and press
ENTER to display the Grid Options pand menu.
:3. To edit the options, press INFO md fbHow the on--screen
instructions.
2. Press ENTER again
to disphy the
Confirming Your
Settings screen.
3. Highlight one of the
options, press
ENTER, and fbllow
the on-screen
instructions.
Copyright ,):)2005 TOSHIBA CORPORATION All rights reserved
65
HM95 R2 063-66 062705 65 _ 6/27/05, 6:58 PM [
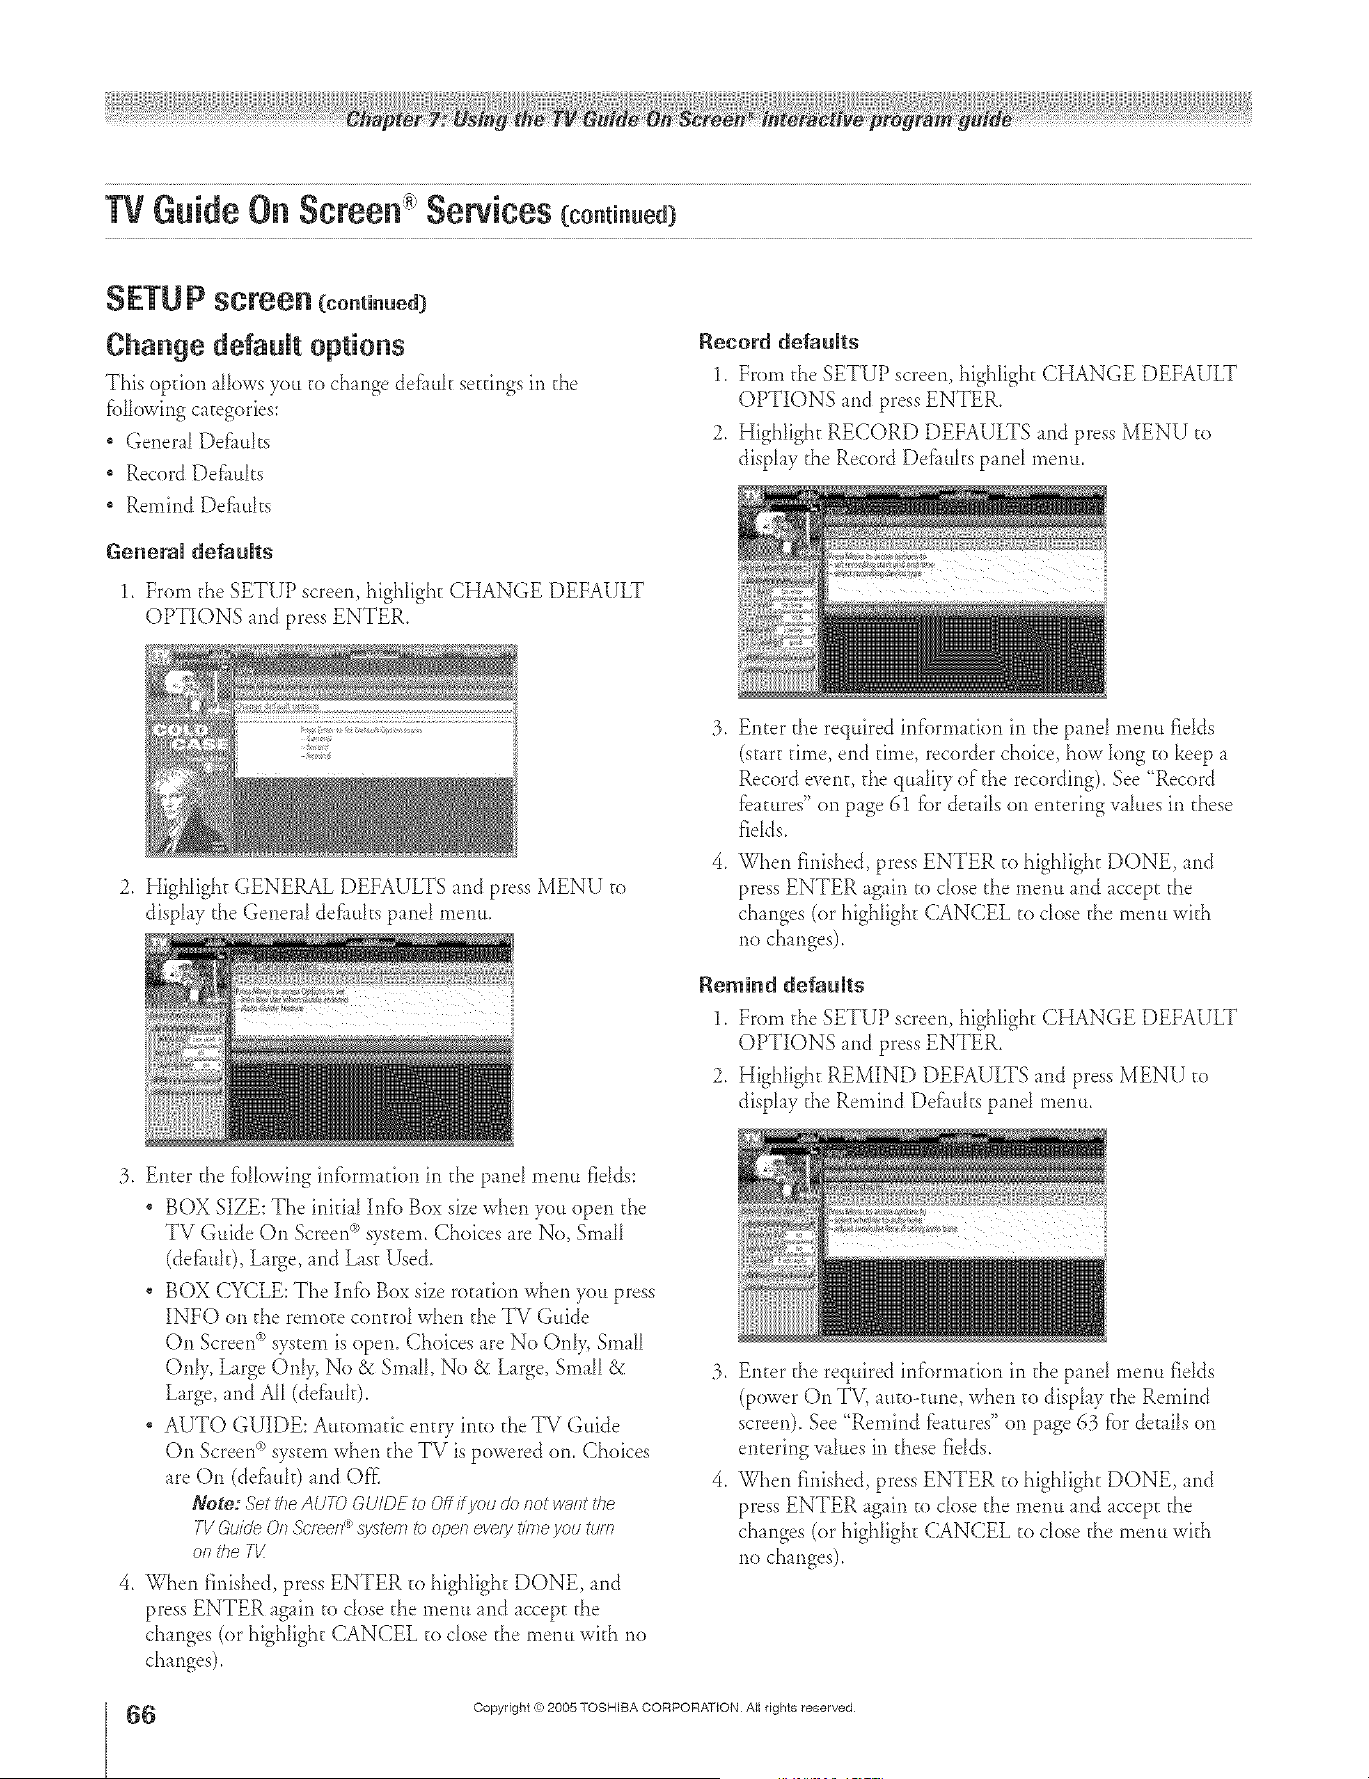
A ÷ [
SETU P screen[ ont n.e¢
Change default options
This option allows you _o change defimh setdngs in _he
fbHowing caEegories:
, General Defluks
" Record Defluhs
* Remind Def_mks
General defaults
1, From d_eSETUP screen,highlight CHANGE DEFAULT
OPTIONS and press ENTER.
Record defaults
1. From d_e SETUP screen, highlight CHANGE DEFAULT
OPTIONS and press ENTER.
2. Highlight RECORD DEFAULTS and press MENU to
display the Record Def_mksprod menu.
2. Highlight GENERAL DEFAULTS and press MENU to
disphy d_e Generfl defhuhs panel menu.
iiiii
Enter the required inf'ormadon in the pand menu fieIds
(s_art dine, end dine, recorder choice, how Iong to keep a
Record event, the qu _lkyof the recording). See "Record
fbamres" on page 61 f_._rdetails on entering vahles in d_ese
fields.
When finished, press ENTER _o highlight DONE, and
press ENTER again to close d_e menu and accept d_e
changes (or highlight CANCEL to dose the menu with
no changes).
Remind defaults
1. From d_e SETUP screen, highlight CHANGE DEFAULT
OPTIONS and press ENTER.
2. Highlight REMIND DEFAULTS and press MENU to
display the Remind Defimks panel rnenu.
÷
3. Enter d_e following infbrmadon in the pand rneml fidds:
* BOX SIZE: The inidaI Infb Box sizewhen you open d_e
TV Guide On Screen°_)system. Choices are No, Small
(defimk), Large, and Last Used.
BOX CYCLE: The Itfib Box size rotation when you press
INFO on the remo_e control when d_e TV Guide
On Screen °'_system is open. Choices arc No OnI> Small
Only, Large On1> No & Small, No & Large, Small &
Large, and All (defimh).
. AUTO GUIDE: Automatic entry into d_eTV Guide
On Screen _>system when d_eTV is powered on, Choices
are On (def_mh)and OK
Note: .SettheAUTDGU/DFtoOff ff you dof_otwr;,fFthe
TVGuideOn._cl_ef7_system tc openeve/?/t/177e_/OtJttJrfl
ontheTI/
4. When finished, press ENTER _o highlight DONE, and
press ENTER again to cIose the menu and accept the
changes (or highlight CANCEL to dose the menu with no
changes).
3, Enter the required information in the panel menu fidds
(power On TV, au_oomne, when to display d_e Remind
screen). See "Remind fbamres" on page 63 fbr &mils on
entering vahtes in d_ese fidds,
4. When finished, press ENTER _o highIight DONE, and
press ENTER again to dose d_e menu and accept the
changes (or highlight CANCEL to dose the menu with
no changes).
66
HM95 R2 O 3-86 062705
Copyright (_;2005 TOSHIBA CORPORATION All rights reserved
66 _ 6/27/05, 6:58 PM [
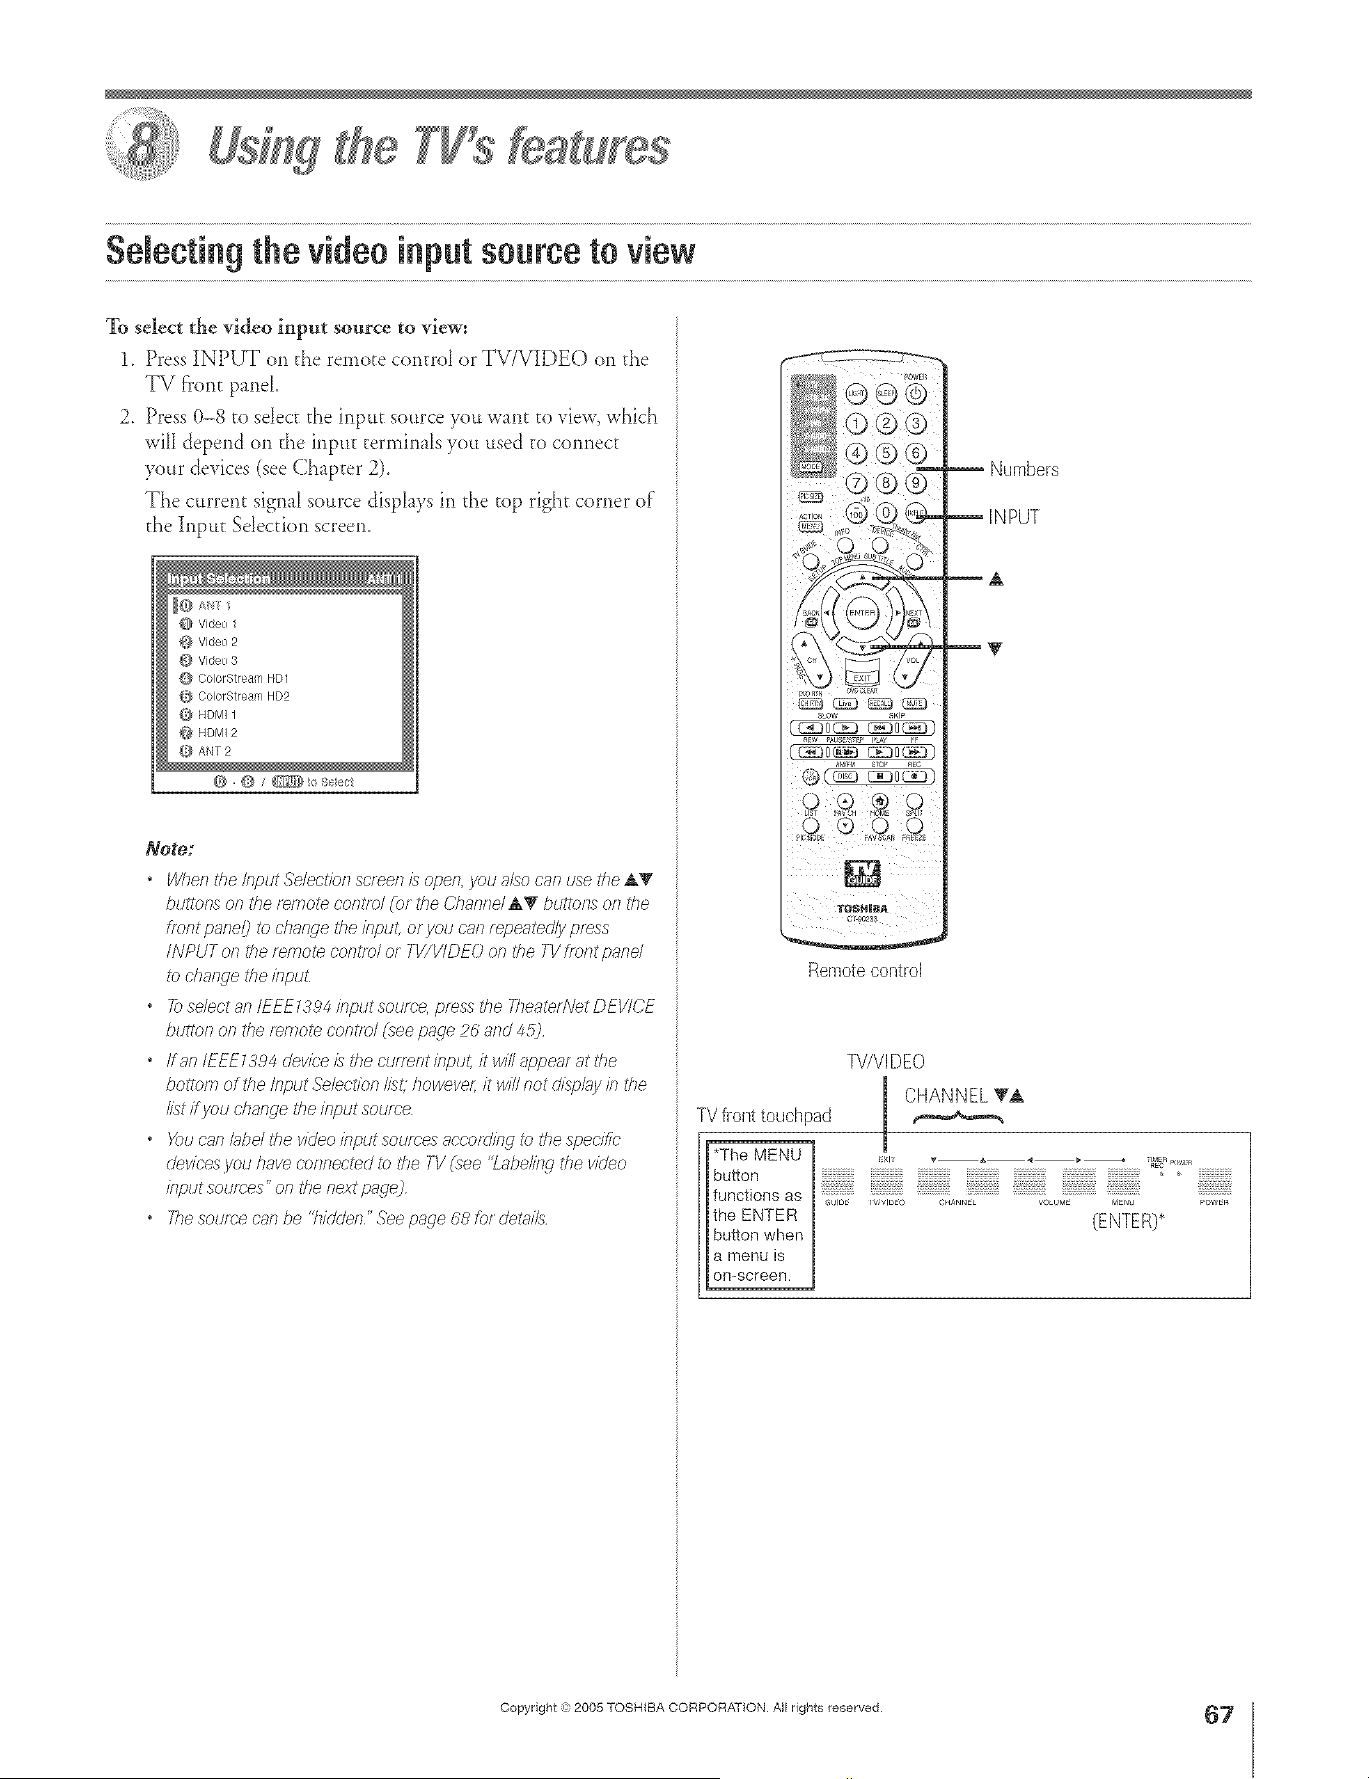
A ÷ L
SeJeclngthe videoinputsource to view
To select the video input source to view:
1. Press INPUT on the remote contrd or TV/VIDEO on d_e
TV front pand
2. Press 0-8 to seIect the input source you want to view, which
wil depend on the inpu_ terminals you used to connect
your devices (see Chapter 2).
The current signal source displays in the top right corner of
the h_put Sdecfion screen.
@ Video 2
@ Video 3
@ ColorStreaf- HD1
(_} ColorStream HD2
@ HDMI1
@ HDMI 2
ANT 2
Note:
* Wllen the input Selection screen £ open, yau also can use the AT/
btJFIOf]Son the fWT]ote con[e)/(01 the Channd AV buttons on tile
ffent panel_)to dsange the input, or you cnn repeatedly press
INPUT on the remote centre/or TV/VIDEO on the TV [font pand
_b@a/we ti_e/npuL
* _se/eotan/EEEZ394bputsoume, pmss#JeT/_eateAVetDEV/CE
button oll the remote centre/(see page p6 and 4:5)
o ffanlEEE1394cleviee/slT)ecu/mntklput, itwi//appeafatthe
bottofT_of the Input Selection I/M howeve( it w/// not (J/sp/uyb the
//st ff you change the input source
* XxJ can bbd the vk/eo input Soufg'es 8eoofzl/r]g to tile speci_b
dev/ees you have connected to the TV (see "Labebw the video
/?lput sotJK)es" on the next page)
o The sotJfu'e car be "hidden" See page 68 for dehff/s
SLOW SKI_
Auss_sz_ P,w
Numbers
Remotecontrol
W/VIDEO
CHANNELVA
TV fl-ont touchpad
j'The MENU _:x,= _ _, ,_ _ _ p .....
button '> _,_,_,_,_,_,_,
theENTERfuncti°nsas ,,s'!_s:i_i;s;s_if,.._:i;i!: ::_*_*_,,_'_:s_:s_lE=_._;!_ '_&_:,',:
I button when R)*
l a menu is
on-screen.
÷
HM95 R2 067-78 061505 67
Copyright ,t) 2005 TOSHIBA CORPORATION All rights reserved
÷
6/27/05, 4:32 PM
67
r
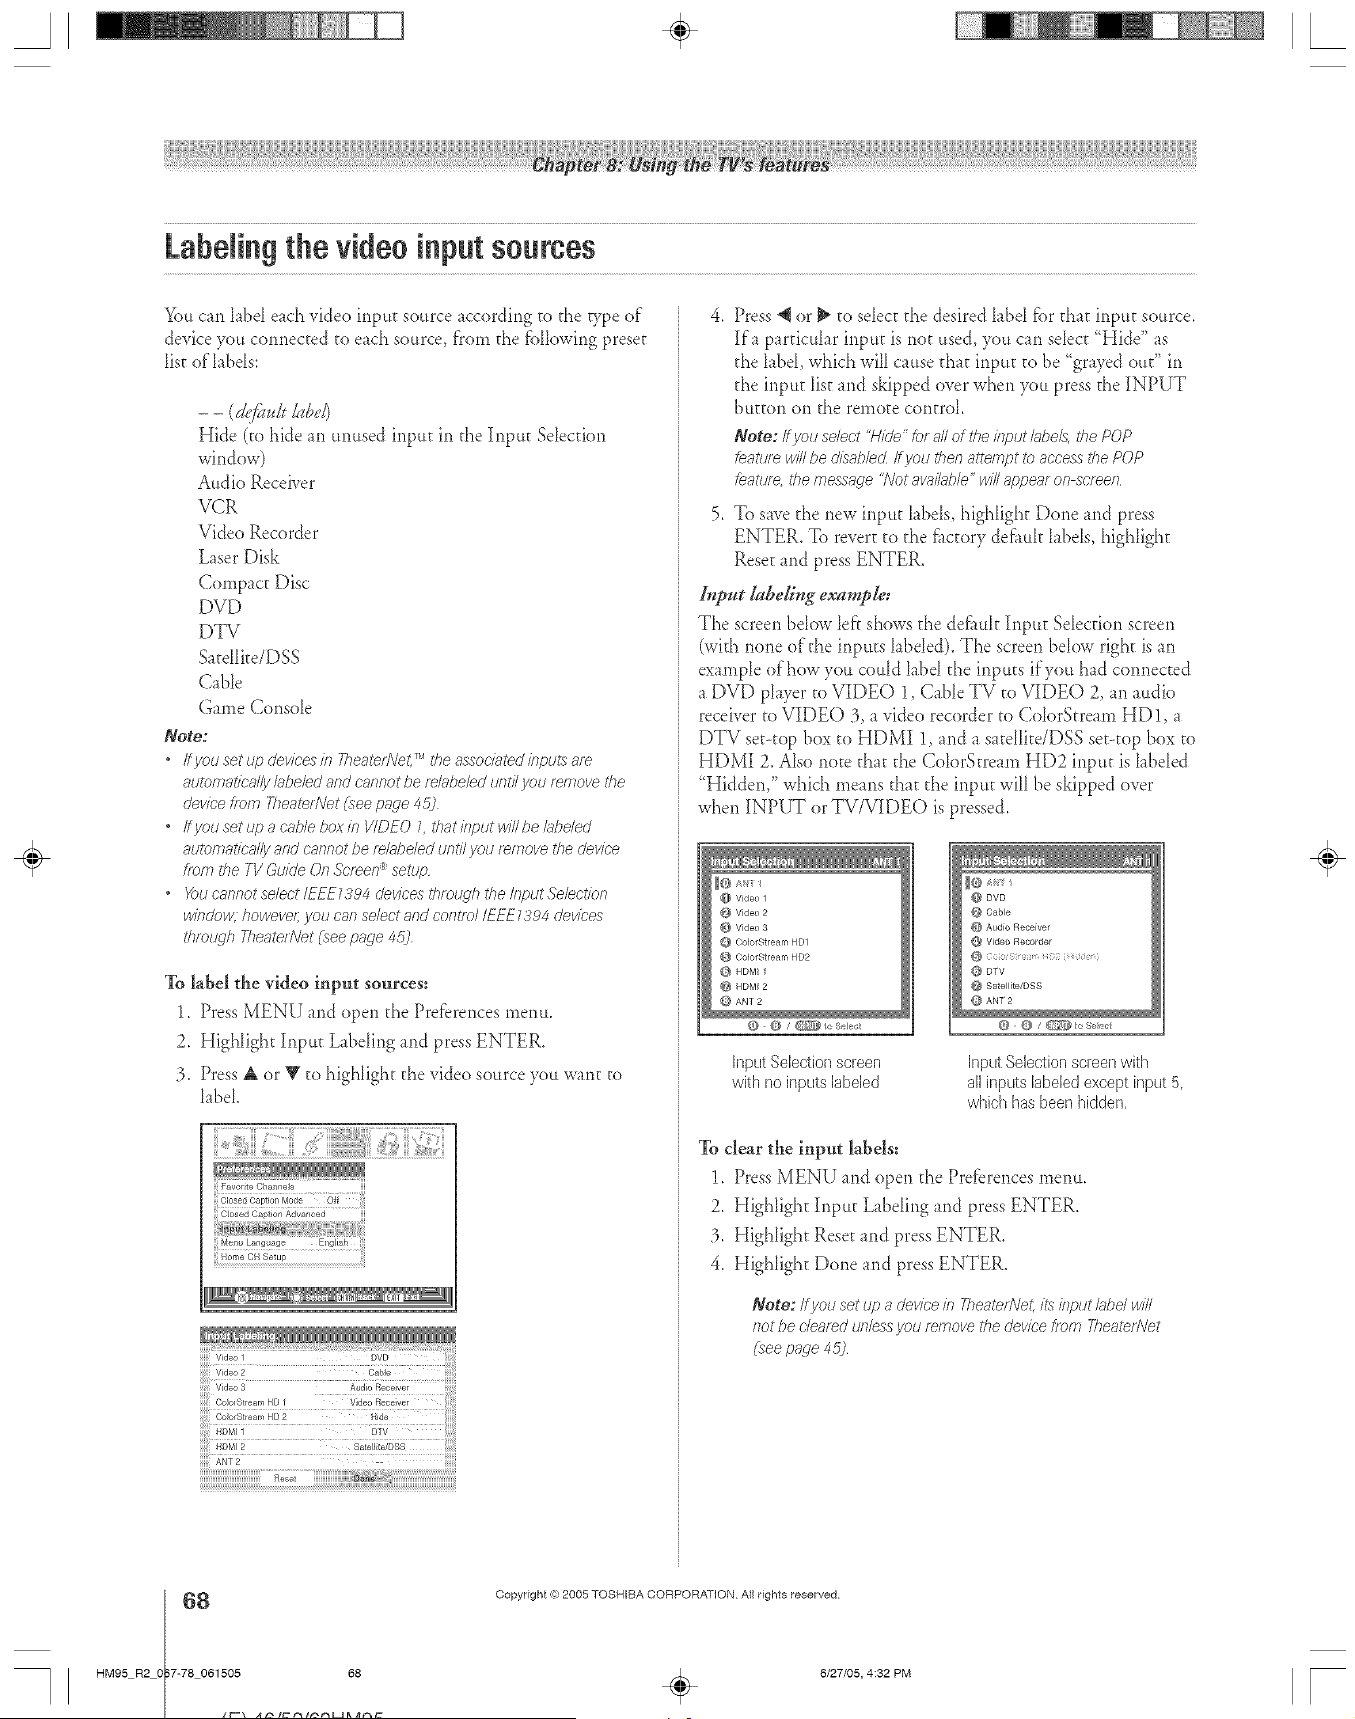
A ÷ L
Labelingthe videoinputsources
You can _abd each video input source accordhxg to fl_e D,pe of"
device you connected to each source, f'rom the f_aHow[ng preset
list o£ labds:
Hide (to hide an unused input in the Input Sdecfion
window)
Audio Receiver
VCR
Video Recorder
Laser Disk
Compact Disc
DVD
DTV
Satdlke/DSS
CaNe
Game Consde
Note:
• Ityeu set up devices in YheateeVet,TM the associated inpl£8 are
autonTatica//y bbebd and cannot be fdi_beled urlU/you remove the
device _tom TheaterNet [see page 4:5)
• ffyou set up a c'nMe box in V/DEO L that input winbe/abded
au/cmat/ca/ly and ca/lnot be rek_beled unt// you r_move the device
flora the TV Guide Of7Sc/_en _ setup
• _)td cannot select IEFE7394 e'evices through the Ii/put Sebction
winde_ howeve/; you oar select and coFlefe/IEEE 7394 devices
throtLqh 771eateUVet(see page 4:5j
To label the video input sources:
1.Press MENU and open dae Prefbrences mere*.
2. Highlight Input Labding and press ENTER.
3. Press A or Y to highlight the video source you want to
label.
Menu Language Eng ish
Home CH Setup
HDMI 2 sai_[iite;DsS
ANT2 --
Rese
Press *qor _ to sdect d_e desired label fbr that input source.
[fa particular input is not used, you can seIect "Hide" as
d_elabd, which will cause d_at input to be "grayed out" in
d_e input list and skipped over when you press the INPUT
button on the remote control
Note:/fyou select "H/P/e"fat all of the Input k_be/8,the POP
Leature w/2be disabled ff you then attempt to access the POP
Leature, the message 'Not avab_b/e ' w/2 appear on scree/7
5. To save d_enew input hbds, highlight Done md press
ENTER. To revert to the fi_ctorydefi_uk l_bds, highlight
Reset and press ENTER.
Input labeID_g example:
The screen bdow left shows d_edefi/uk Input Selection screen
(with none of'the inputs labded). The screen below right isan
example of how you could label the inputs if you had connected
a DVD player to VIDEO 1, Cable TV to VIDEO 2, an audio
receiver to VIDEO 3, a video recorder to CdorStream HD 1, a
DTV set-top box to HDMI 1, and a satdIite/DSS set-top box to
HDMI 2. Also note that the ColorStream HD2 input is labeled
"Hidden," which means that the input will be skipped over
when INPUT or TV/VIDEO is pressed.
@ Video 9
_} Video 3
ColorStream HD1
{,} ColorStream HD2
HDMI 1
@ HDM_2
ANT 2
@ DVD
@ Cable
d} Audio Receiver
@ Video Recorder
@ DTV
@ Satellite/DSS
_ANT2
Input SeJection screen
with no inputs ]abded
Input Selectionscreen with
a[] inputs labeledexcept input 5,
which has been hidden,
To clear the input labels:
1. Press MENU and open the Prefbrences menu.
2. Highlight Input Labding and press ENTER,
3. Highlight Reset and press ENTER,
4. Highlight Done and press ENTER,
Note: Ifyou set I#; a devicein 77_eateeVet,its ieputklbe/ win
lint be c'/ez,f_d unlessyou removethe dev/cetram 7hasten\let
(seepage 45]
÷
68
HM95 R2 O 7-78 061505 68
Copyright (e:2005 TOSHIBA CORPORATION AiI rights reserved
6/27/05, 4:32 PM [
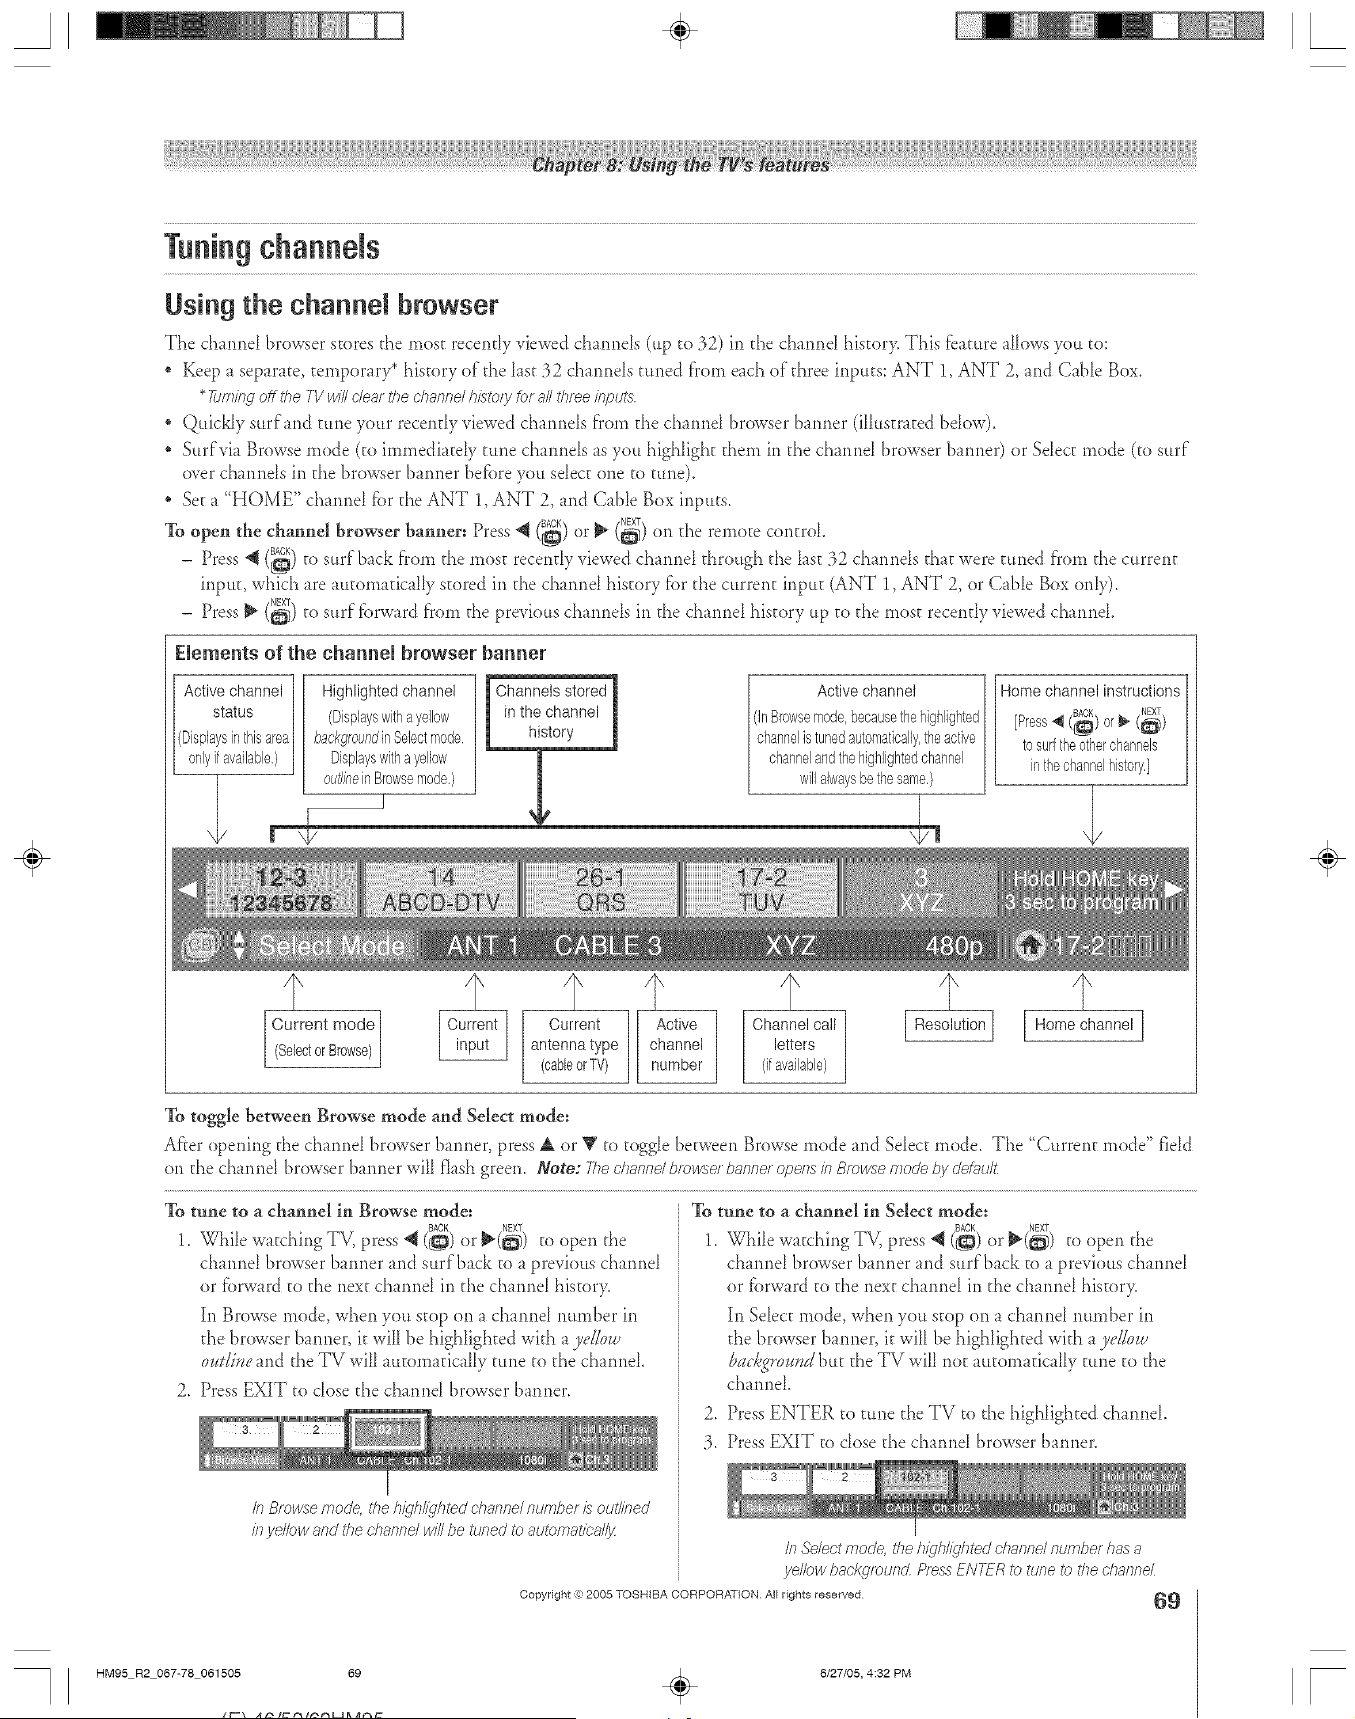
A ÷ L
Using the channel browser
The channd browser stores the most recently viewed channds (up to ,32)in the channd history, This f_ature allows you to:
, Keep a separate, temporary* history of the last 32 channds tuned forn each of'three inputs: ANT 1, ANT 2, and Cable Box,
* 7L,m#lg offthe TV wd/clear the channel h£tory &r a# three input_
: Quickly surf'and tune your recently viewed channds from the channd browser banner (ilhLstrated bdow),
Surf via Browse mode (to immediatdy tune channds as you highhght them in the channd browser banner) or Sdect mode (to surf
over channds in the browser banner befbre you sdect one to tune).
Set a "HOME" channd fbr the ANT 1, ANT 2, and CaNe Box inputs,
To open the channel browser banner: Press 4 (i_) Or _ (_._)NBXTon the remote control
Press BACK , _
- *_ (CO.)to surf back from the most recentD viewed chmnd through the la. t ._2chmnds that were tuned from the current
input, which are automatically stored in the channd history fbr the current input (ANT 1, ANT 2, or Cable Box only),
- Press _ (_) to surf fbrward foe the previous channds in the channd history up to the most recently viewed channd.
Elements of the channel browser banner
Activechannel
status
(Displaysinthisarea
onlyifavailable.)
Highlighted channel
(Displayswithayellow
backgroundinSelectmode
Displayswitha yellow
out/meinBrowsemode.)
I Channels stored
in the channel
history
Homechannelinstructions
BACK NEXT
[Press4 (_) or_ (_)
to surftheotherchannels
inthechannelhistory,]
Current mode
SeectorBrowse
Current
antenna type
(cableorTV)
f
Active
channel
number
Channel call
letters
(ifavailable)
Resolution [ Home channel ]
To toggle between Browse mode and Select mode:
Afer opening the chmnd browser banner, press A or V to toggle between Browse mode and Select mode, The "Current mode" fidd
on the chmnd browserbanner will flashgreen. Note: Thec/tannert;mwse_banne_operlsinBrowsenrodet_ydefg_u/t
To tune to a channel in Browse mode:
BACK
1, Whi[e watching TV, press @ (L@.)or _(_) to open the
channd browser banner and surf back to a previous channd
or fbrward to the new channd in the channd history,
In Browse mode, when you stop on a channd number in
the browser banner, it v¢iiibe highlighted with a ydkn.u
oudive and the TV will automatically tune to the channd.
2, Press EXIT to close the channd browser banner,
In Browse mode, the h/g/r//ghted channel numbet £ out#ned
#l ye#ow and the channel w/Vbe tuned to automat/ca//#
To tune to a channel in Select mode:
1. While watching TV, press @ (SACK)_or _(_) to open the
channd browser banner and surf back to a prevkms channd
or fbrward to the next channd in the channd histor>
In Select mode, when you stop <)*1a channd number in
the browser banner, it will be highlighted with a ye/low
backgromld but the TV will not automatically tune tO the
channd.
2. Press ENTER to tune the TV to the higNighted chnmd.
:3, Press EXIT to close the channel browser banner.
Copyright =})2005 TOSHIBA CORPORATION All rights reserved
In Se/ect mode, t/_eh/_/hhghted channel number has a
ye#ow background Press ENTER to tune to the charrnel
69
HM95 R2 067-78 061505 69
÷
6/27/05, 4:32 PM
÷
r
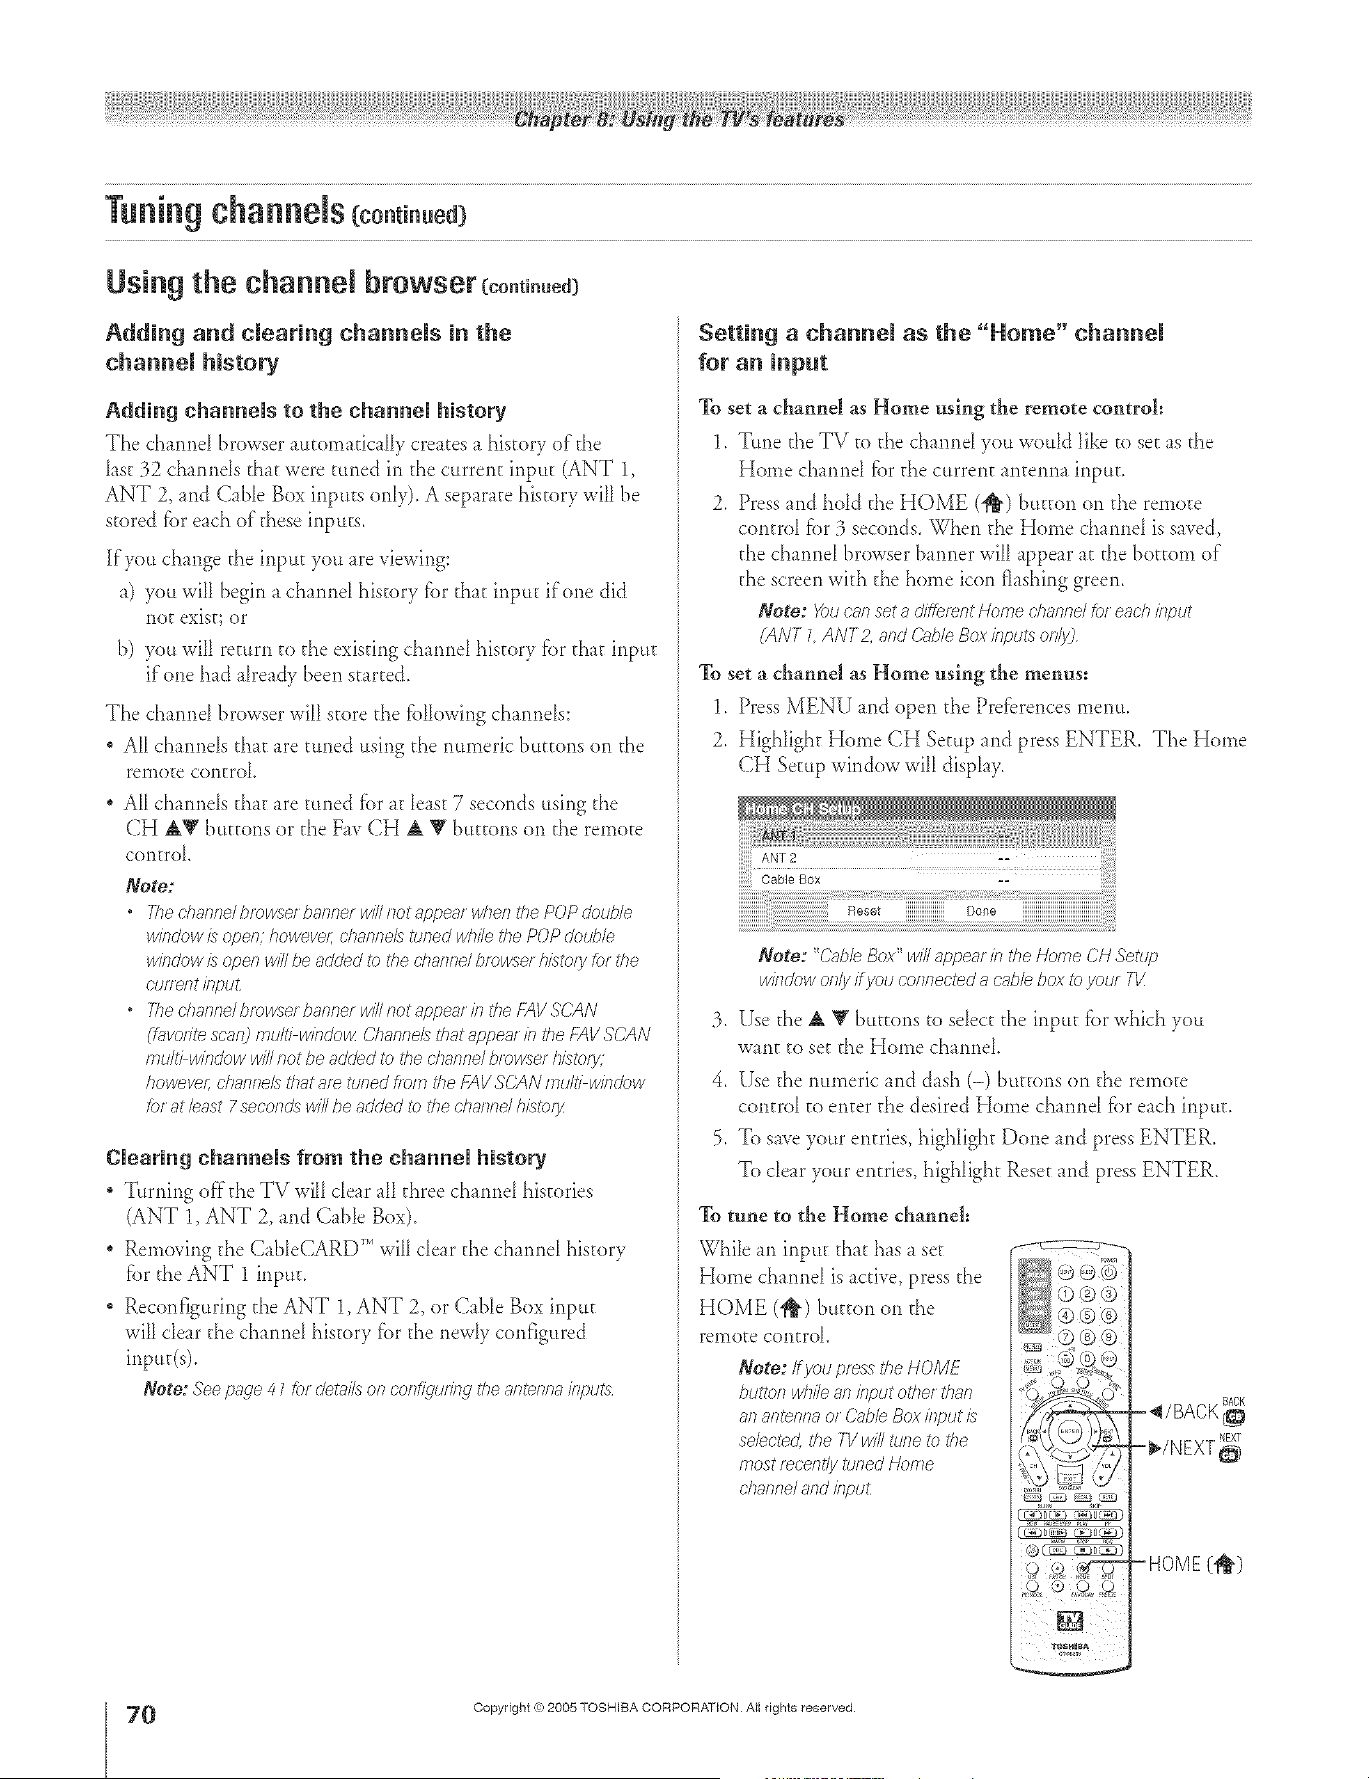
A ÷ L
Tuning channeJs (co.ti.ued)
Using the channel browser
Adding and clearing channels in the
channem history
Adding channels to the channel history
The charmeI browser atttomadcaIIy creates a history of the
hst 32 channds d_at were tuned in the c_Lrrentinput (ANT 1,
ANT 2, and Cable Box inputs only). A separate history will be
stored f_._reach of these inpttts.
If you change the input you are viewing:
a) you will begin a channel history fbr that input if one did
not exist; or
b) you will return to the existing channel history fbr d_at input
if one had already been started.
The channd browser will store d_e fblIowing channels:
All channels d_at are tuned using d_e numeric buttons on the
rernoge control
All channds that are tuned fbr at least 7 seconds using d_e
CH AV buttons or the Fay CH A T buttons on d_eremote
control
Note:
• Thechanndblowsefbaslne[willslotappe_[whe/_thePOPdoub/_
winclowis opmT;howeva; UTmRITQ/5 tuRm(J whil_ U)m /)Off ) CIoot)IQ
window/) open will l)e _scJo)dto No cIl_uIIlel l)fow__erhis:ely tot Ne
coe etIt iflpO£
, 777ed?aSlllelblow_erbannerwillnotrvppearisltl_ef-7_VSCAN
(L_vor/tescae) multi wiflo'o_z ()/lOflfle/5 that 8F)/_)es[b the FAV SCAN
multi WilK/OWwill not be ached to the dlanne/ browser his:ely:
howeve/; chaFffleZ5 Ulat am tuned f/om dle f:AVSO½N muIt/ wiflUow
_)f at bast 7 secoeds win be added to the channd his_?)f;z
Clearing channels from the channel history
Turning offthe TV wifl dear all three channd histories
(ANT 1, ANT 2, and Cable Box).
Removing the CableCARD TM will clear the channel history
fbr d_eANT 1 inptm
Reconfigudng the ANT 1, ANT 2, or CaNe Box input
will dear the channel history fbr the newly configured
inpuffs).
Note: See p#g_e4 1 for deed/s on co/l@uf27g the antenna if>u>
Setting a channel as the "Home" channel
for an input
To set a channel as Home using the remote control=
1. Tune the TV to the channd you would like to set as the
Home channd fbr the current antenna input.
2. Press and hold d_eHOME (_) bu_on on d_e remo_e
control _br3 seconds. When d_eHome channel is saved,
the channel browser banner will appear at the bottom of
the screen wkh the home icon flashing green.
Note: _)u csm sot a different Home channel for each input
(ANT L ANT2, and (2;hie Box inputs ofllyj
To set a channel as Home using the menus:
1, Press MENU and open d_e Pre_:erences menm
2. Highlight Home C]-I Setup and press ENTER. The Home
CH Setup window will disphy.
Note: "CableBox" wdlappear/?_the Home CNSetup
W/}ldowoflly ff yOO connecteda cobb box _ your 717:
3. Use the _ _ buttons to select the inpu_ _brwhich you
want m set the ]-Iome channel
4. Use the numeric and dash (-) buttons on the remo_e
control to enter the desired Home channd _breach input.
5. To save your entries, highlight Done and press ENTER.
To clear your entries, highlight Rese_and press ENTER.
To tune to the Home channel=
While an inpu_ that has a set
Home channel is active, press the
HOME (1_) button on the
remote control
Note: Ifyou/oess the HOME
btdYOfl i/bile an iHput other that7
8f7anl_nna ot (?rtbb Box i/iput is
se/ectect the TV win tune to the
most mcellt!y toned Home
dlmFffle/ and klptA
f_
-HOME(I_)
HM95 R2 O 7-78 061505 70
Copyright (e:2005 TOSHIBA CORPORATION Atl rights reserved
÷
6/27/05, 4:32 PM [

A ÷ [
Tuning channeJs (co.ti..ed)
Tuning your favorite channels
To tune to the charmds you progr mm_ed as Fworke Chnmels,
see page 44.
Tuning to the next programmed channel
To tune to the next programmed channel..
Press CHANNEL A or V on the remote control orTV fl'ont
panel.
Note:
, 77ffsfeature will slot wor7(unless jiol; prbgrrs_rschaisnels into tile
777 chaslnel memo/y (see page 42j
If yols are mcorUing a dsDqt;JUsannd, yc_uwill oisljl be ab/e ©
dsancseanalowdsarlne/swhih riserecordinwh inpmg/essIfyou
are [ecordisWan as._abgchannel, youwillonly beat>/eI_>dsaswe
cJ/_/Suldsaslne/s while rise recerdh.sgis b progless Thisis
because the 7V l'uner that h bring recorded (c/&'it;J of ana/edj
will be bcked on I'he chaslne/ i<hat is cuisent/y fecorTJing
]'uning to a specific channel
(programmed or unprogrammed)
Tuning analog channels:
Press the ChanneI Number buttons (0-9) on the rerno_e
control For example, co select channel 125, press 1, 2, 5.
Tuning dighal channels:
Press the Channel Number buttons (0-9) on the remote
control, fbllewed by the - (dash) button and then the sub-
channel number. For example, to select digital channd 125-1,
press 1, 2, 5, -, 1.
Note: Irad/?;>/&am?elssrsotprog;amme_eithefthro_Lcsh
theautomatic-channdscan(page42j of tl?echanndadd/
delete hJnction (pasge43J-you win have to tune the RF
dsanfsd using the O?aslnd Numbei and Dash bu_of7s on the
remote centrex
Switching between two channels using
Channel Return
The Channel Return fbature allows you to switch between two
channds wkhout entering an actual channd nmnber each time,
1. Sdec_ the first channel you want to view.
2. Selec_ a second channel using the Channd Number buttons
(and the dash (-) button if selecfing a digital channel).
3. Press CH RTN on the rem(xe control. The previous
channel will display. Each time you press CH RTN, the TV
will switch back and fbrth between the last two channels
that were selected.
Note:
* Ifyou pressCH RTNf/orl7g-7slonarstenn_sinput,the TVwill
feltJ/77_C/'helasFviewedANT inputand d_anssel
o ffyou are currentlyfecefd/n_' a piedI_sm,/<hssfeature willnot
be av;ff/Jbh
Switching between two channels using
The SuffLock_'_'fbature temporarily "memorizes" one channel in
the CH RTN bum>n, se you can return to that channeI quickIy
fSom any other channel by pressing CH RTN.
To memorlze a channel in the CH RTN button:
1. Sdect the channd you wet to progr m_ into the CH RTN
btttton,
2. Press and hold CH RTN fbr about 2 seconds until the
message "Channel Memorized" appears on the screem The
channel has been programmed into the CH RTN button.
3. You can then change channds repeatedI> and when you
press press CH RTN, the memorized channd will be
sdected.
The TV will return to the memorized channd one time onl>
Once you press CH RTN and then change channds again, the
CH RTN memory will be cleared and the button :'+ill fimction
as Channel Return, by swkcbing back and [brth between the last
two channds that were sdected.
i ...........
CHRTN
-- ChannelNumbers
- (dash}
-- CHANNEL ±T
Copyright ,:) 2005 TOSHIBA CORPORATION All rights reserved
71
HM95 R2 067-78 062705 71
÷
6/27/05, 8:06 PM
÷
[
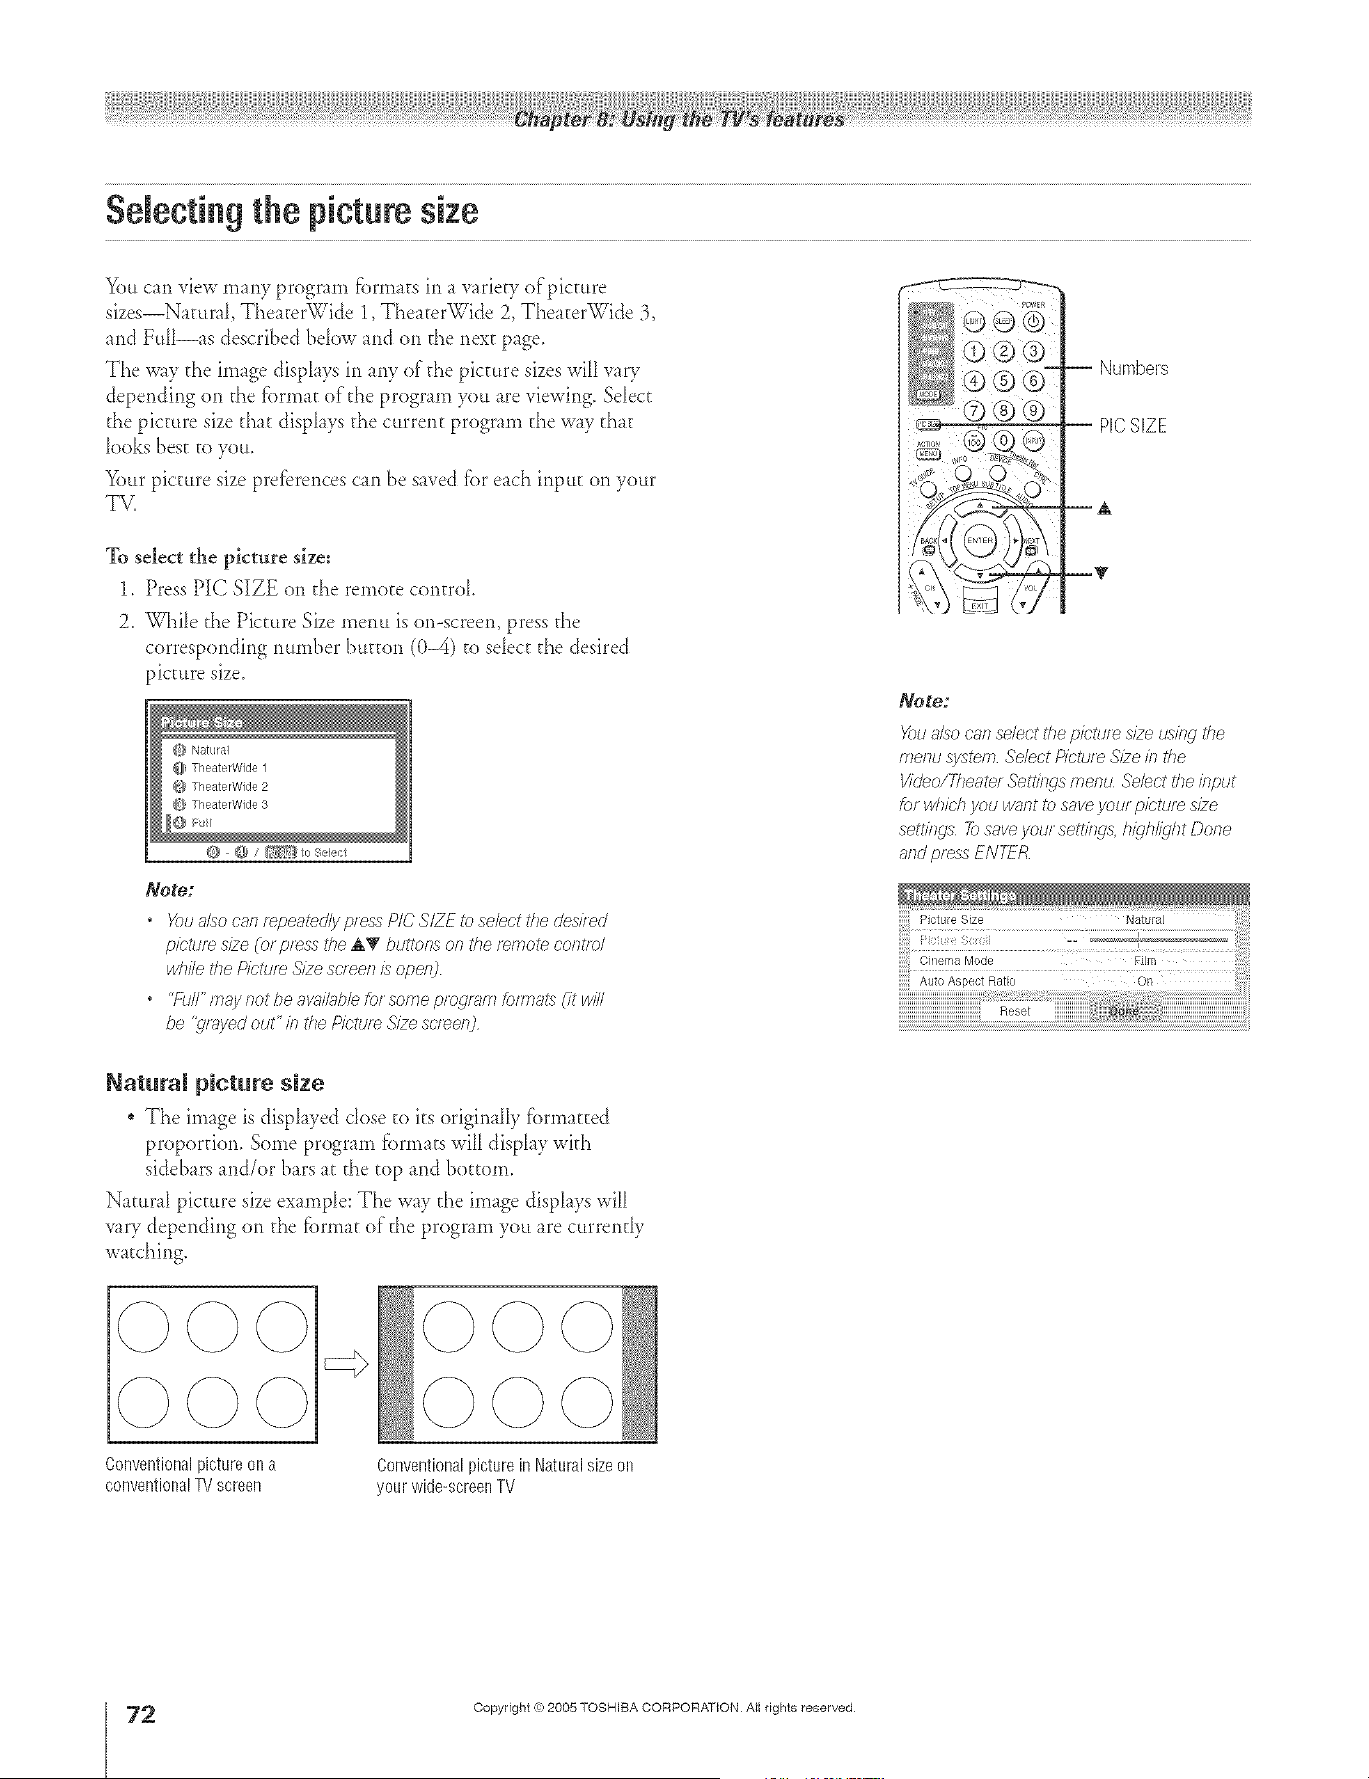
A ÷ L
Selecting the picture size
You can view many program fbrmats in a variety of picture
sizes--Natural, Theater%Vide 1, Theater\Vide 2,The _ter_qde 3,
and Full--as described bdow and on d_enext page.
The way d_e image dispIays in any of d_e picture sizes will vary
depending on the fbrmat of the program you are viewing. SeIect
the picture size d_at displays d_e current program the way d_at
looks best to you.
Your picture size prefbrences can be saved fbr each input on your
TV.
To select the picture size:
1. Press PIC SIZE on d_e remote cor_troL
2. While the Picture Size merm is or>screen, press the
corresporlding number button (0-4) ro sdect d_e desired
_?lcture size.
@ Natural
@ TheaterWide 1
@ TheaterWk]e 2
@ TheaterWk]e 3
Note:
Youalso can r_pea2d/y p/ess PlO SIZE iz)select the desi/ed
picture size (or pr_ss the A'g buigor_son the r_mote OOFItrc/
while the Picture ,STzescleef?IS opel_
• "FtJIl"maynotbeabcJl_bbforsorneprogiTirnforrnatsCitwill
be "q/_yed out" b tile Pir'ture S/ze sc'/_e/2
-- Numbers
-- PICSiZE
--A
--T
Note:
X)u _,lso can select the pic'tu/_ s_zeusing the
menu swtern Select P/ctu/e S/2e in tl_e
I/'kleoffl?eate/ Settings menu Select the input
k)r which you wnnt to save your picture s_2e
settings 7bsave your sett//W& h/gh@ht Done
arid press ENT-_R
BJaturaJ picture size
The image is displayed dose to ks originaIly fbrmatted
proportion. Some program _brmats will display wkh
sidebars and/or bars at the top and bottom.
Natural picture size example: The way the image displays will
vary depending on d_e fbrmat of d_e program you are currendy
watching.
÷
Conventionalpicture on a
conventionalTV screen
Conventionalpicturein Naturalsizeon
yourwide-screenTV
2
HM95 R2 O 7-78 061505 72
Copyright ,{e:2005 TOSHIBA CORPORATION AiI rights reserved
6/27/05, 4:32 PM r
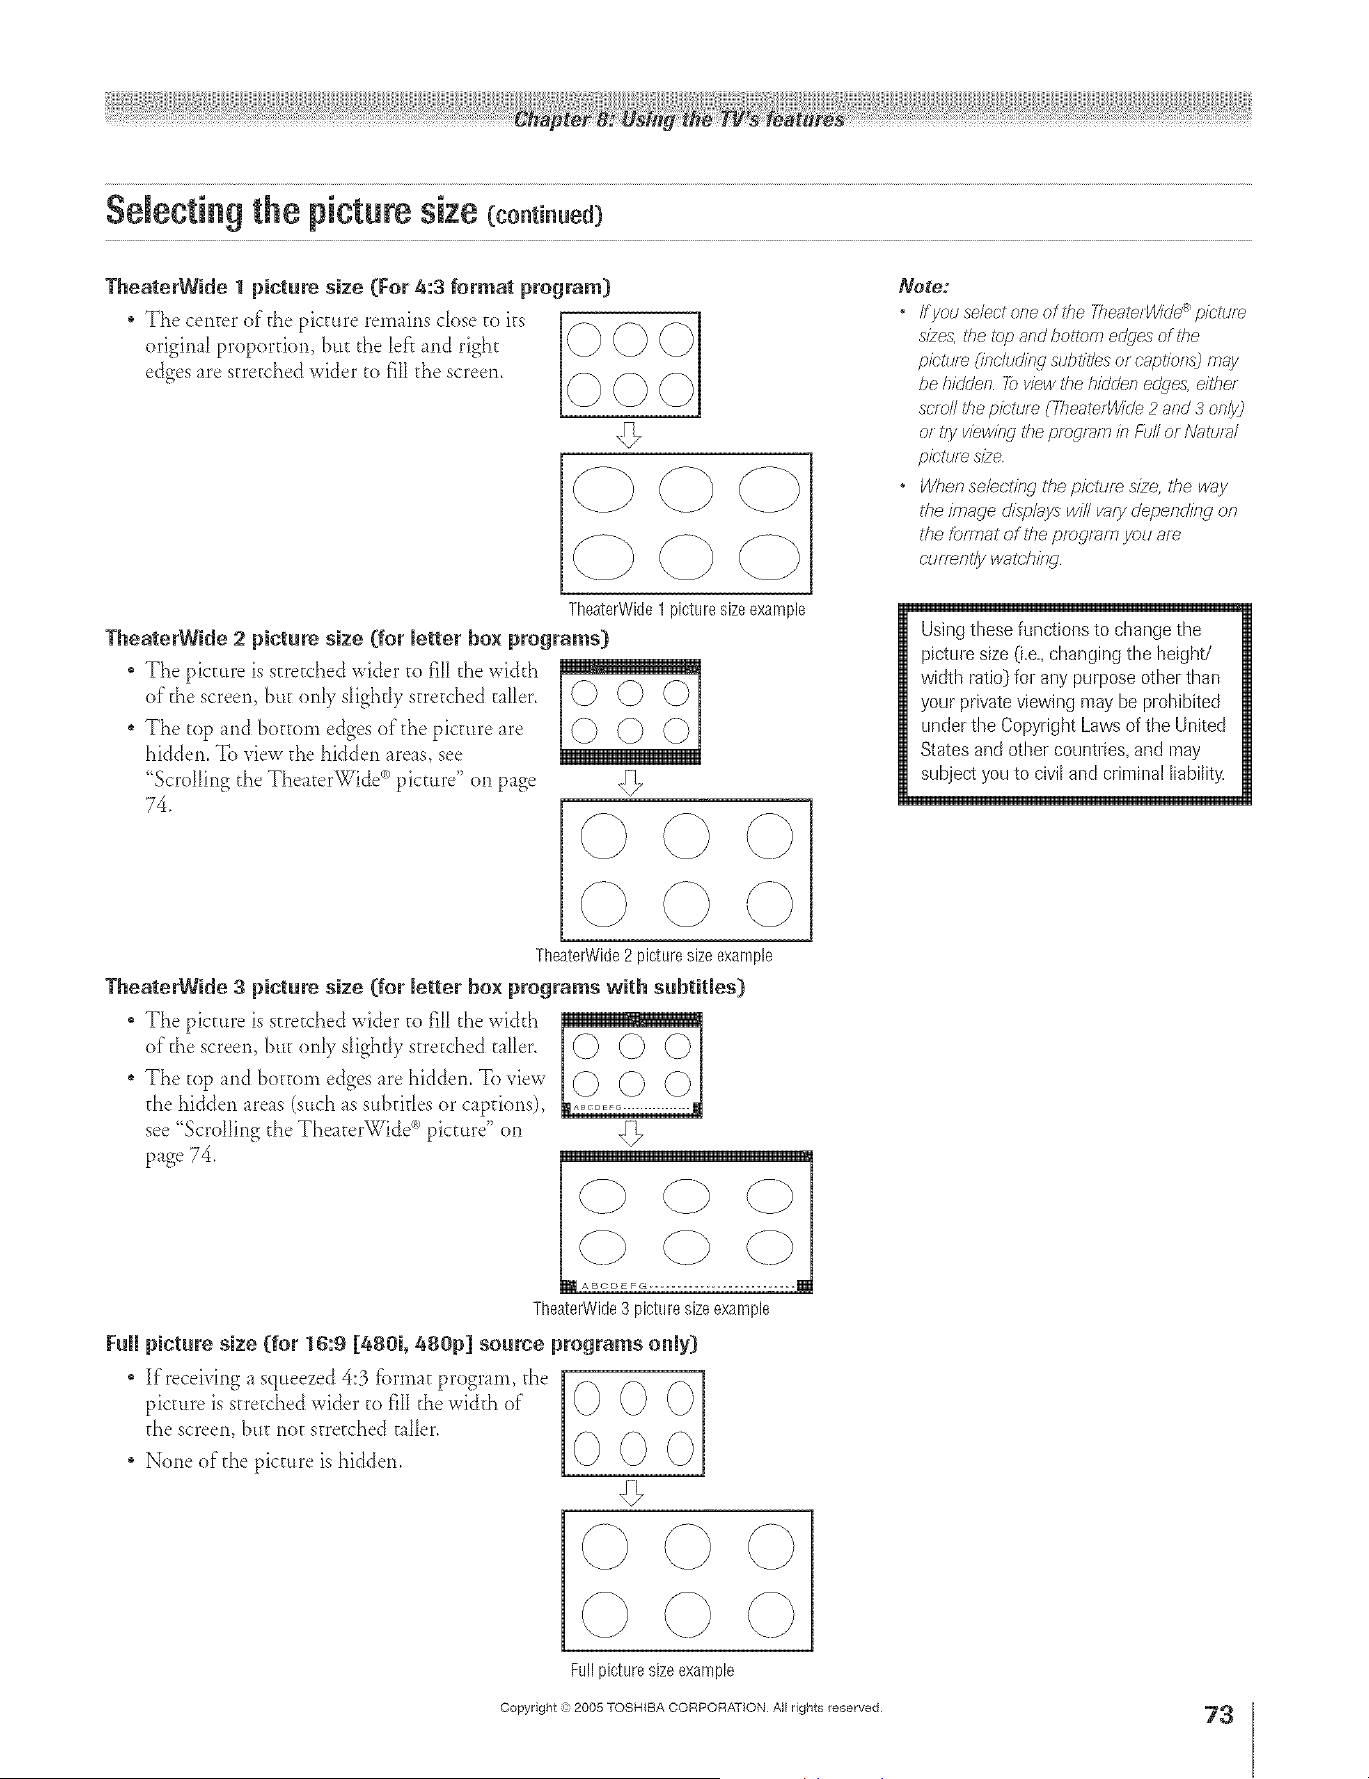
Selecting the picturesize (eo.ti..ed)
TheaterWide 1 picture size (For 4:3 format program}
original propordorl, but d_e left md right 0
edges are stretched wider to fill the screen, _-_
Note:
• IfyotlselectorleoftlTeYlTe;;qerWk/e_pictlzre
s/2es, the _bp and ho_tom eclges of the
pictur_ (/rlohJdinj sLit;titles or captions) may
be hiddell _ view the hizJdef?e@es, eithe/
scm// the picture CYheaterWk/e2 and 3 only}
or I?yviewing tile pfo cJl_ffTIb Fd// Of/_?fftJl_l/
pietum s/2e
o When sebcl/ng the p/r;ture s/2e,/he way
the image disp/ays will vary depenr///W on
t?le forTr}at of the program you am
r-UfTm_l/ywalt;hit W
TheaterWide1picturesizeexample
TheaterW[de 2 picture size (for letter box programs}
The picture is stretched wider to fiH d_ewi&h
of"the screen, but only s[igh@ stretched taller.
* The mp and bottom edges oldie picture are
bidden. To view the bidden areas, see
%crolling d_eTheaterWide _)picture" on page
74.
©©©
©©©
-O
Using these functions to change the
pictta-e size (Le,, changing the height/
width ratio_ for any purpose other than
your private viewing may be prohibited
under the Copyright Laws of the United
States and other countries, and may
subject you to civil and criminal liability,
TheaterWide2 picture sizeexample
TheaterWide 3 picture size (for letter box programs with subtitles}
" The picture is stretched wider to f]_Id_e wid d_
of'the screen but onD s[ighdv stretched t_Her,
* The top and bottom edges are bidden. Toview [(_] (_] _[
the bidden areas (such _s subddes or captions),
see "Scrolling the Theater_iide i picture on
page 74.
TheaterWide3 picture sizeexample
the screen, hut not stretched t_Her.
* None oldie picture is hidden.
Fuji picture size (for 1t6:9[_80i, 880p] source programs only)
Kreceiving _ squeezed4:3 lCbrmatprogram, d_e [
picture is stretched wider to fiII fl_ewicKh of" 0 0 0
l
000
q
÷
Fullpicture size example
Copyright ,:) 2005 TOSHIBA CORPORATION All rights reserved
HM95 R2 067-78 061505 73
6/27/05, 4:32 PM
73
[
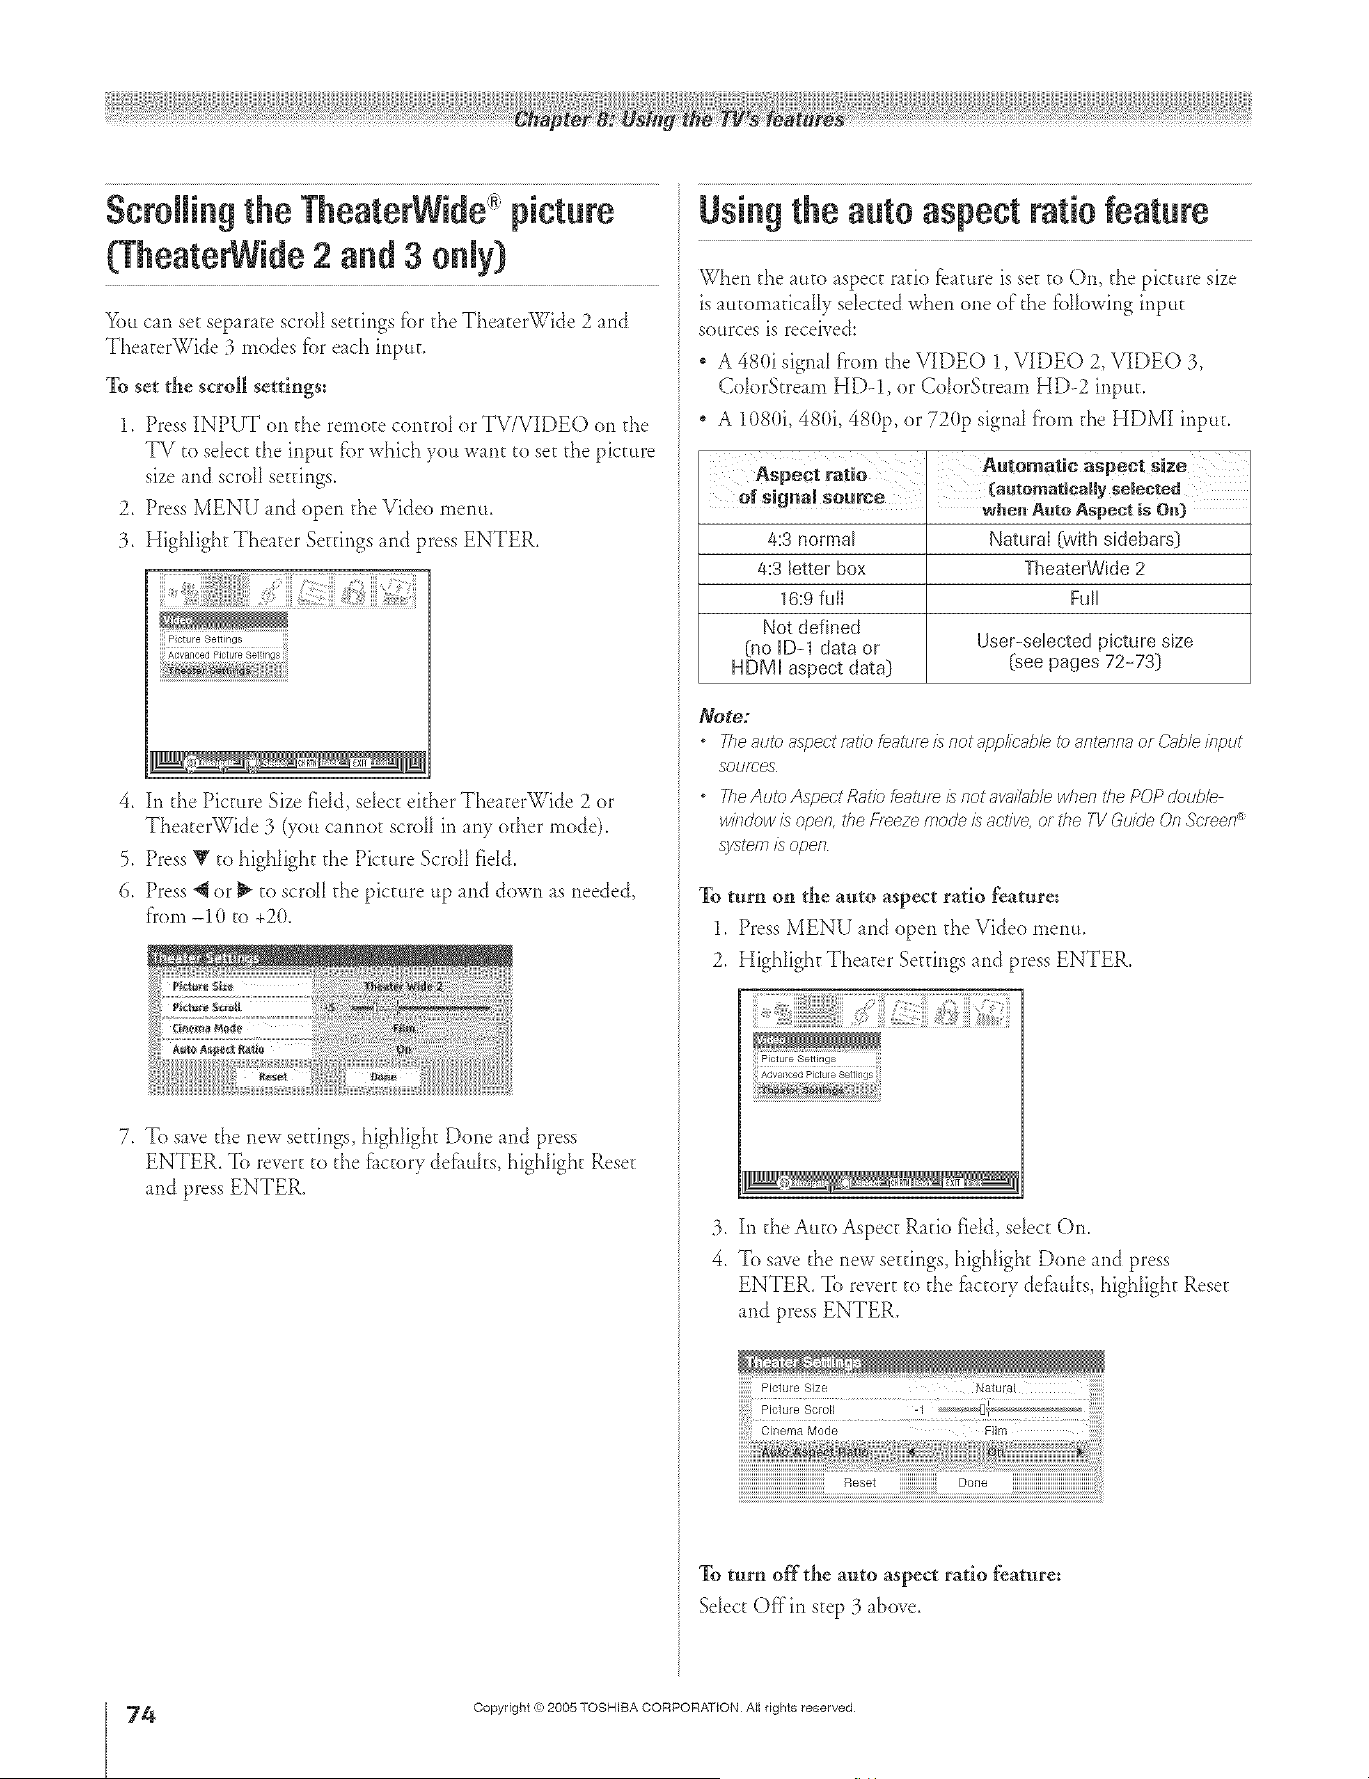
Scrolling the TheaterWide picture Using the auto aspectratio feature
(TheaterWide
2 and S
On,yj Whenthea.to,spectratiof_at_reisse_toOn,thepict.resize
is aatornaticaIIy sdected when one of"the fbllowing input
You can set separate scroll settings f(>rthe TheaterWide 2 and sources is received:
TheaterWide 3 modes fbr each input.
To set the scroll settings:
1. Press INPUT on the remote control or TV/VIDEO on the
TV to select the input fbr which you wmt to set the picture
size and scroll settings.
2. Press MENU and open the Video menu.
3. Highlight Theater Setdngs and press ENTER.
}}
ii! Advanced Picture Settings iii
4. In the Picture Size fidd, select either TheaterWide 2 or
TheaterWide 3 (you cmnot scroll in any od_er mode).
5. Press Y to highlight the Picture Scroll fidd.
6. Press @ or _ to scroll the picture up md down as needed,
f_(>m-10 to +20.
7, To save the new settings, highlight Done md press
ENTER. To revert to the f_ctor def_uks, highlight Reset
and press ENTER.
A 480i signal from the VIDEO 1, VIDEO 2, VIDEO :3,
ColorStream HD-1, or ColorStream HD-2 input.
, A 1(>80i,480i, 480p, or 720p signal f'rom the HDMI input.
Automatic aspect size
4:3 normal Natura{ {with sktebars}
4:3 letter box TlseateiWide 2
16:9 full Full
Not defined
(no ID-1 data or User-selected picture size
HDMI aspect data} (see pages 72-73}
Note:
7he auto aspect mt/e feature is not applicable to antenna or (-;aide #@ut
SOUrCes
21e Auto Aspect Ratio feature £ not awdatde when tile POP deubb
w//ldew is open, the f+_eze mode is active, or the TV GukJe Of7Sc/_e/l ¢
system/s open
To turn on the auto aspect ratio feature:
1, Press MENU md open the Video rnenLt,
2, Highlight Theater Settings and press ENTER,
3. Inthe Auto Aspect Ratio field, select On.
4. To save the new settings, highlight Done and press
ENTER. To revert to the fi_ctorydeflmks, highlight Reset
and press ENTER.
To turn offthe auto aspect ratio feature:
Select Offin step 3 above,
÷
4
HM95 R2 O 7-78 061505 74
Copyright <e:2005 TOSHIBA CORPORATION At{ rights reserved
6/27/05, 4:32 PM [
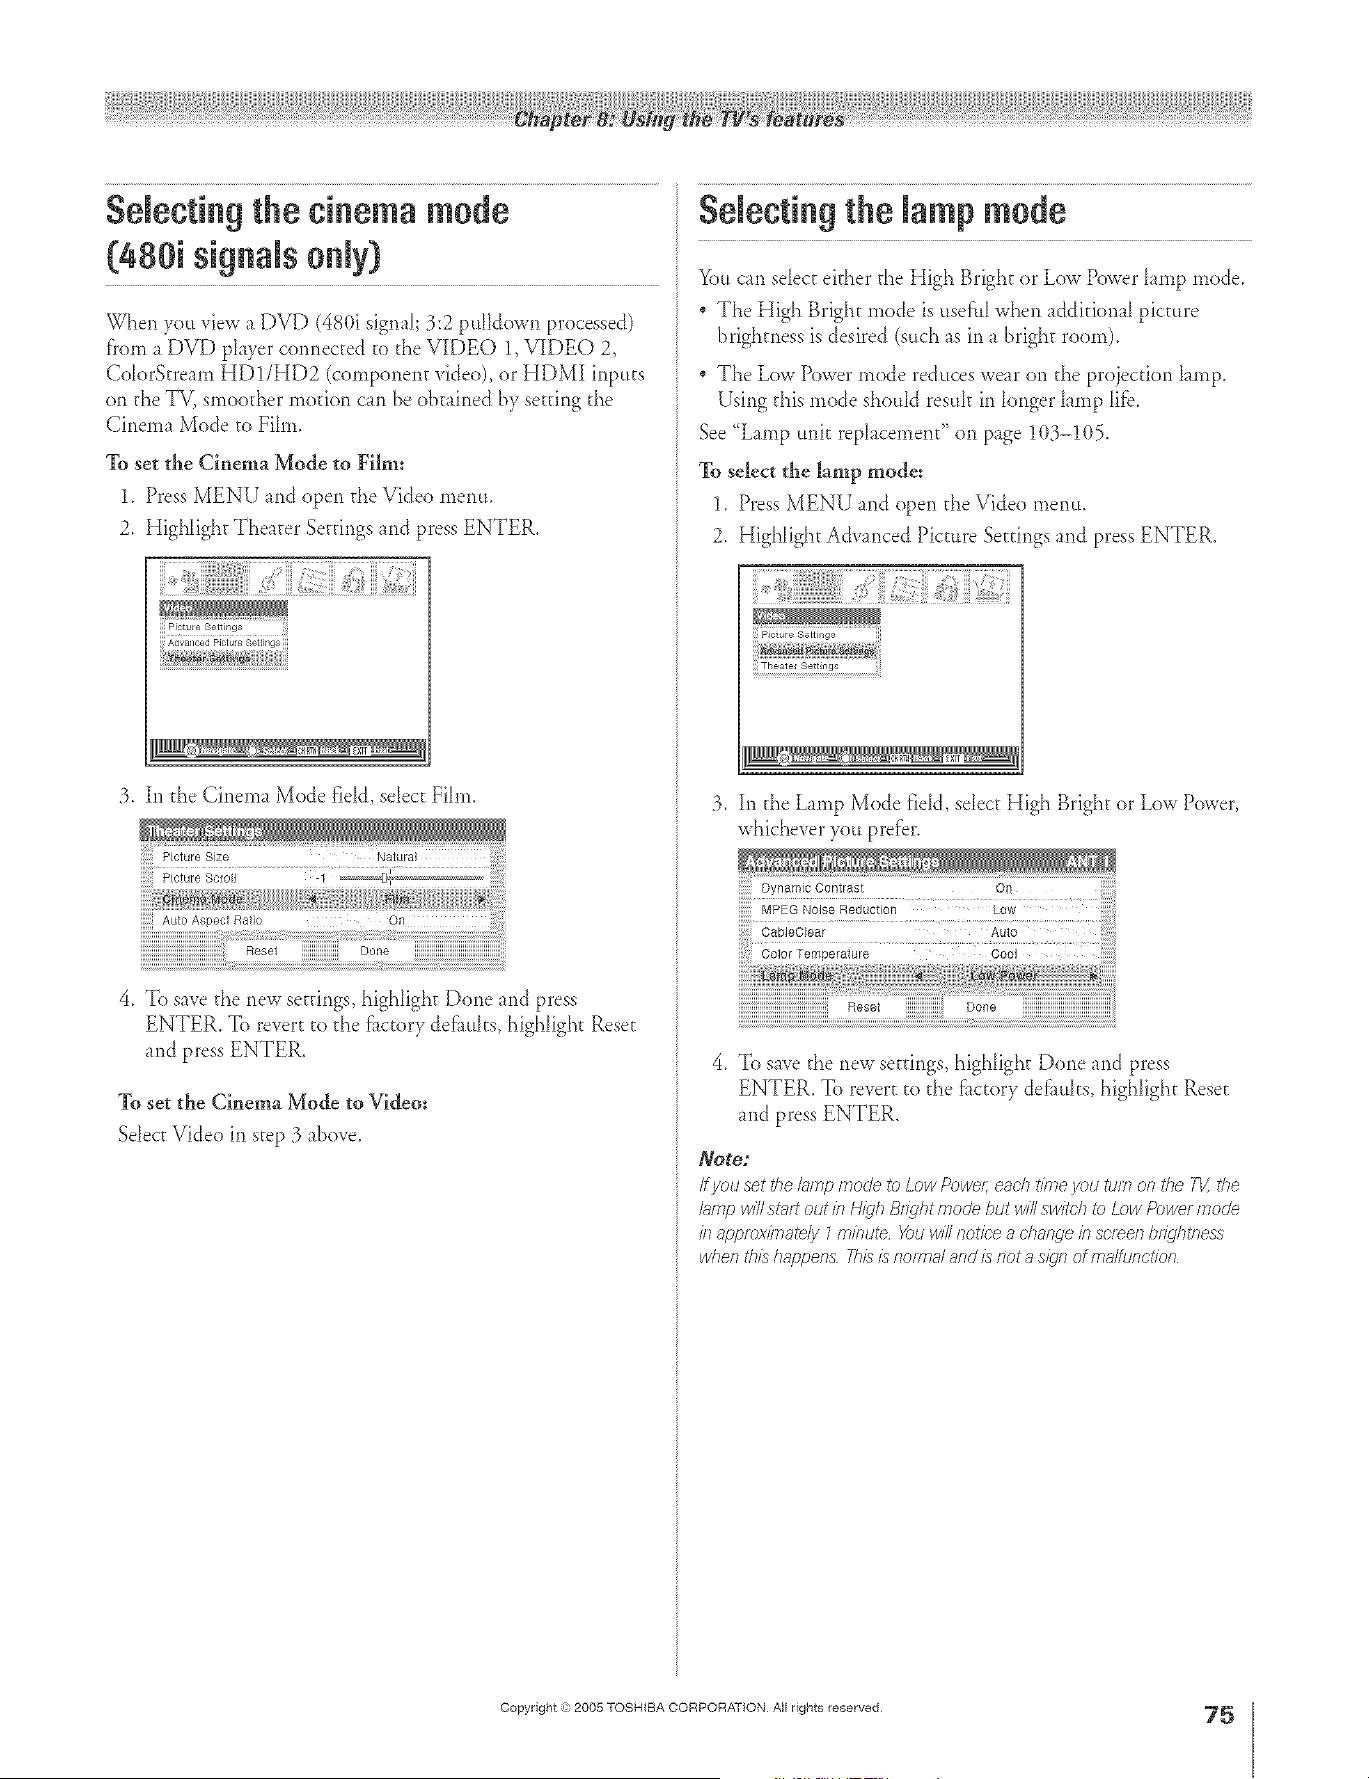
A ÷ [
Selectingthe cinema mode
(480i signals only)
When you view a DVD (480i signaI; 3:2 puHdown processed)
fforn a DVD player cormected to the VIDEO 1, VIDEO 2,
Co_orStream HD1/HD2 (component video), or HDMI inputs
on the TV, smoother motion can be obtained by setting the
Cinema Mode to Fib)).
To set the Cinema Mode to Film:
1. Press MENU and open the Vide() menu.
2. HigNight Theater Settings n)d press ENTER.
Advanced Picture Settings
:3. In the Cinema Mode fidd, sdect Fihn.
4. To save the new settings, highhght Done md press
ENTER. To revert to the fi_ctor def_ults, highlight Reset
md press ENTER.
To set the Cinema Mode to Video:
Sdect Video m step :3 a/rove.
Selectingthe lamp mode
You can sdect either the High Bright or Low Power hmp *))ode.
The High Bright mode is usef:tllwhen additional picture
brightness is desired (such as in a bright room).
The Low Power mode reduces wear on the projection hmp.
Using this mode should resuh in longer hmp lffb.
See "Lamp unit rephcement" on page 1(}3-!(}5.
To select the lamp mode:
1. Press MENU and open the Video menu.
2. High[ight Advanced Picture Settings and press ENTER.
:3. In the Lamp Mode fidd, sdect High Bright or Low Power,
whichever you prefer.
] Dynamic Contrast On
4. To save the new settings, highlight Done md press
ENTER. To revert to the fitctory def_ults, highlight Reset
md press ENTER.
Note:
/*you set the/;_/np mode to Low Pow< e_tch t/k,_eyou turn on #}e 11/,the
I_ffrlp wit still? out/n H/_lh B_Tghtmode but wit switch _ Low Power mode
/)l appmx/}T_ate/y7 /n/nute You wit notice a change/n screen br_qhtness
t/chef?th£ happens Th£ £ flo/Y,_ls/and £ not a s/gfl of ms/ttJ£ct/of7
÷
HM95 R2 067-78 061505 75
Copyright ,3:)2005 TOSHIBA CORPORATION All rights reserved
÷
6/27/05, 4:32 PM
75
[
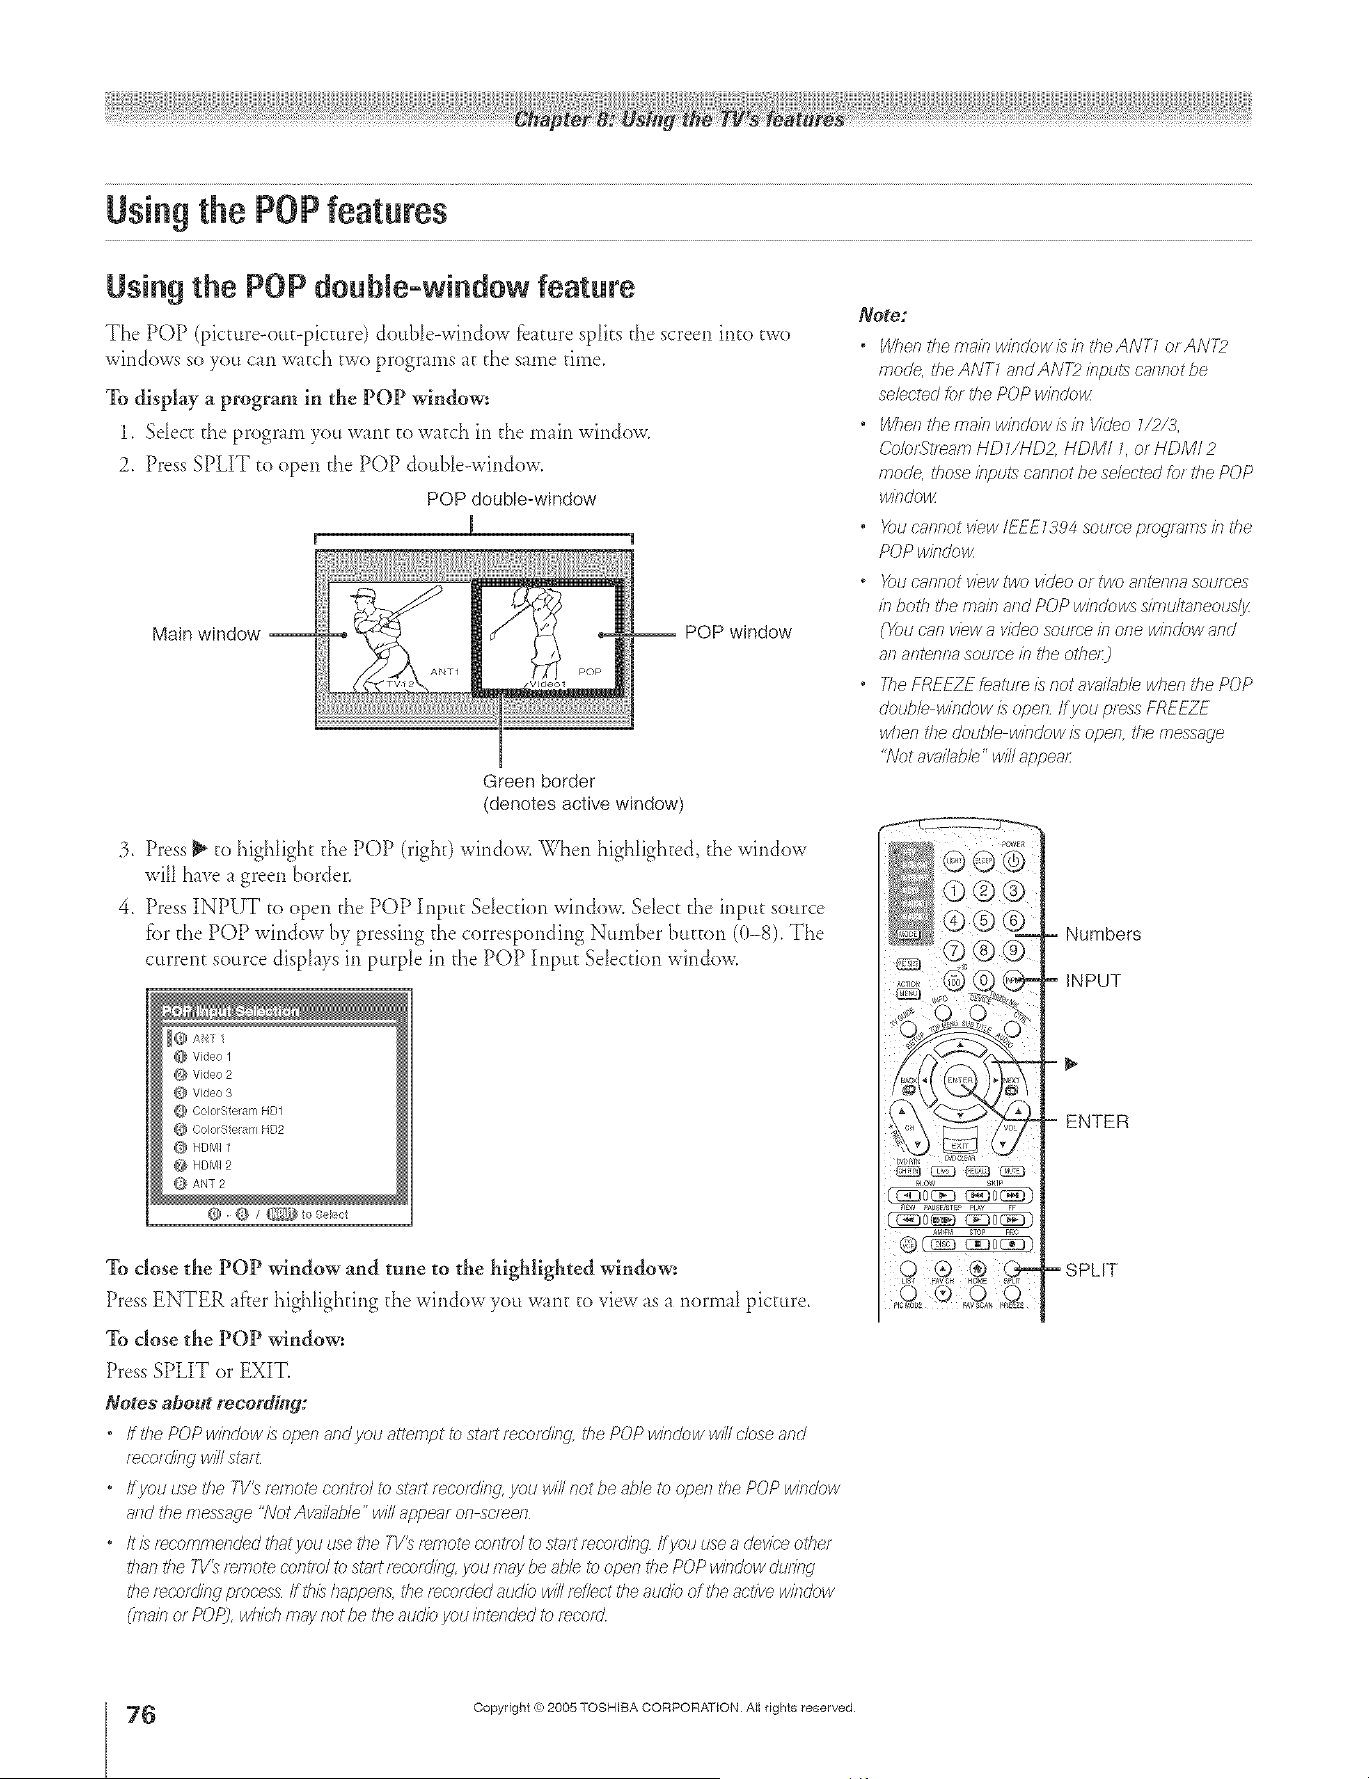
A ÷ L
Using the POPfeatures
Using the POP double=window feature
The POP (picture-out-picture) doul4e-wir_dow fbanlre spiks the screen into two
windows so you can watch two programs at d_e same time.
To display a program in the POP window:
1. Sdect the program you want to watch in the main window.
2. Press SPLIT to open d_e POP double-wir_dow.
POP double-window
1
Main window
POP window
Green border
(denotes active window)
3. Press _ to highlight the POP (right) window. When higNighted, the window
will have a green border.
4. Press INPUT to open d_e POP Input Sdection window. Sdect d_einput source
f;)r the POP window by pressirlg d_e corresponding Number button (0-8). The
current source displays in purple in the POP ][nput Selection window.
@ Vdeo 1
@ Vdeo 2
@ Vdeo 3
@ C.oorSte am HD1
_g OoorStelarr HD2
O HDMIt
@ HDMI 9
ANT 2
@ @ I _ to 8ele(',t
To dose the POP window and tune to the highlighted window:
Press ENTER af'rer hig}dighfir_gthe window yo, want to view as a r_ormal picture.
To close the POP window:
Press SPLIT or EXIT_
Notes about reeordincj:
• If the POP window is open and you aLte/npt to st{_tt recording the POP window will dose _-?l?d
r_cot dkbg will st;ll_
" ff_/OU use I_he 7V_ re/77088 control to sl??lf [eco[FJil?g _/otJ will not be s,ble to open the POP window
a/Td t/se messac/e "Not Ava/k_ble" will apperu on sc/_en
• It is rec'ommended thatyou use the 7-1/_remote cont/o/to stutt recording Ifyou use a device other
tban the 7-V_twrlote co/itm/ to s_>_/tfeco[Flin_', yOU/Tla}/be able to open the POP window dudng
the [ecord/l_Cj plocess ff this happen& d?e f_co[ded audio will reflect the audio of the active window
(mairl or P()P_, which may/'lot be the audio you bte/Tded to t_COf_]
Note:
" When tbernain windowisin tt/eA/\JT1 orAIVT2
mode, the ANT7 and AN72 ili_ptJ£8ca/7/_otbe
selected/o_ the POP w/ndo_
• Wbeo tbema/f/wlodowisk7 Video 1/2/3,
Co/orStleam HD Z/ND2, HDMI L or HDMI 2
mode, those klpul\s cannot be selected for the POP
windows
• Youcn/lnot view IEEE_394 source ptO!7l_/ITtSkl the
POP w/ndo>x
" X}u ca/Inot view i'wo video or two antenna soumes
ill both the main and POP windows sin/ult;i/leousf_z
(You can view a vkJeosource b ore window and
8/18f/te_7118source b/77e otbe/:_
• The FREFZF featu/e is not a_Jl_bb when the POP
double window is ope/I if you press FREEZ_
wl/en the double wi/ldow is ope& tile message
<5_/otav;/i/Jbb" will appear
Numbers
INPUT
ENTER
, SPLIT
÷
76
HM95 R2 0 7-78 061505 76
Copyright ,g:2005 TOSHIBA CORPORATION All rights reserved
6/27/05, 4:32 PM r
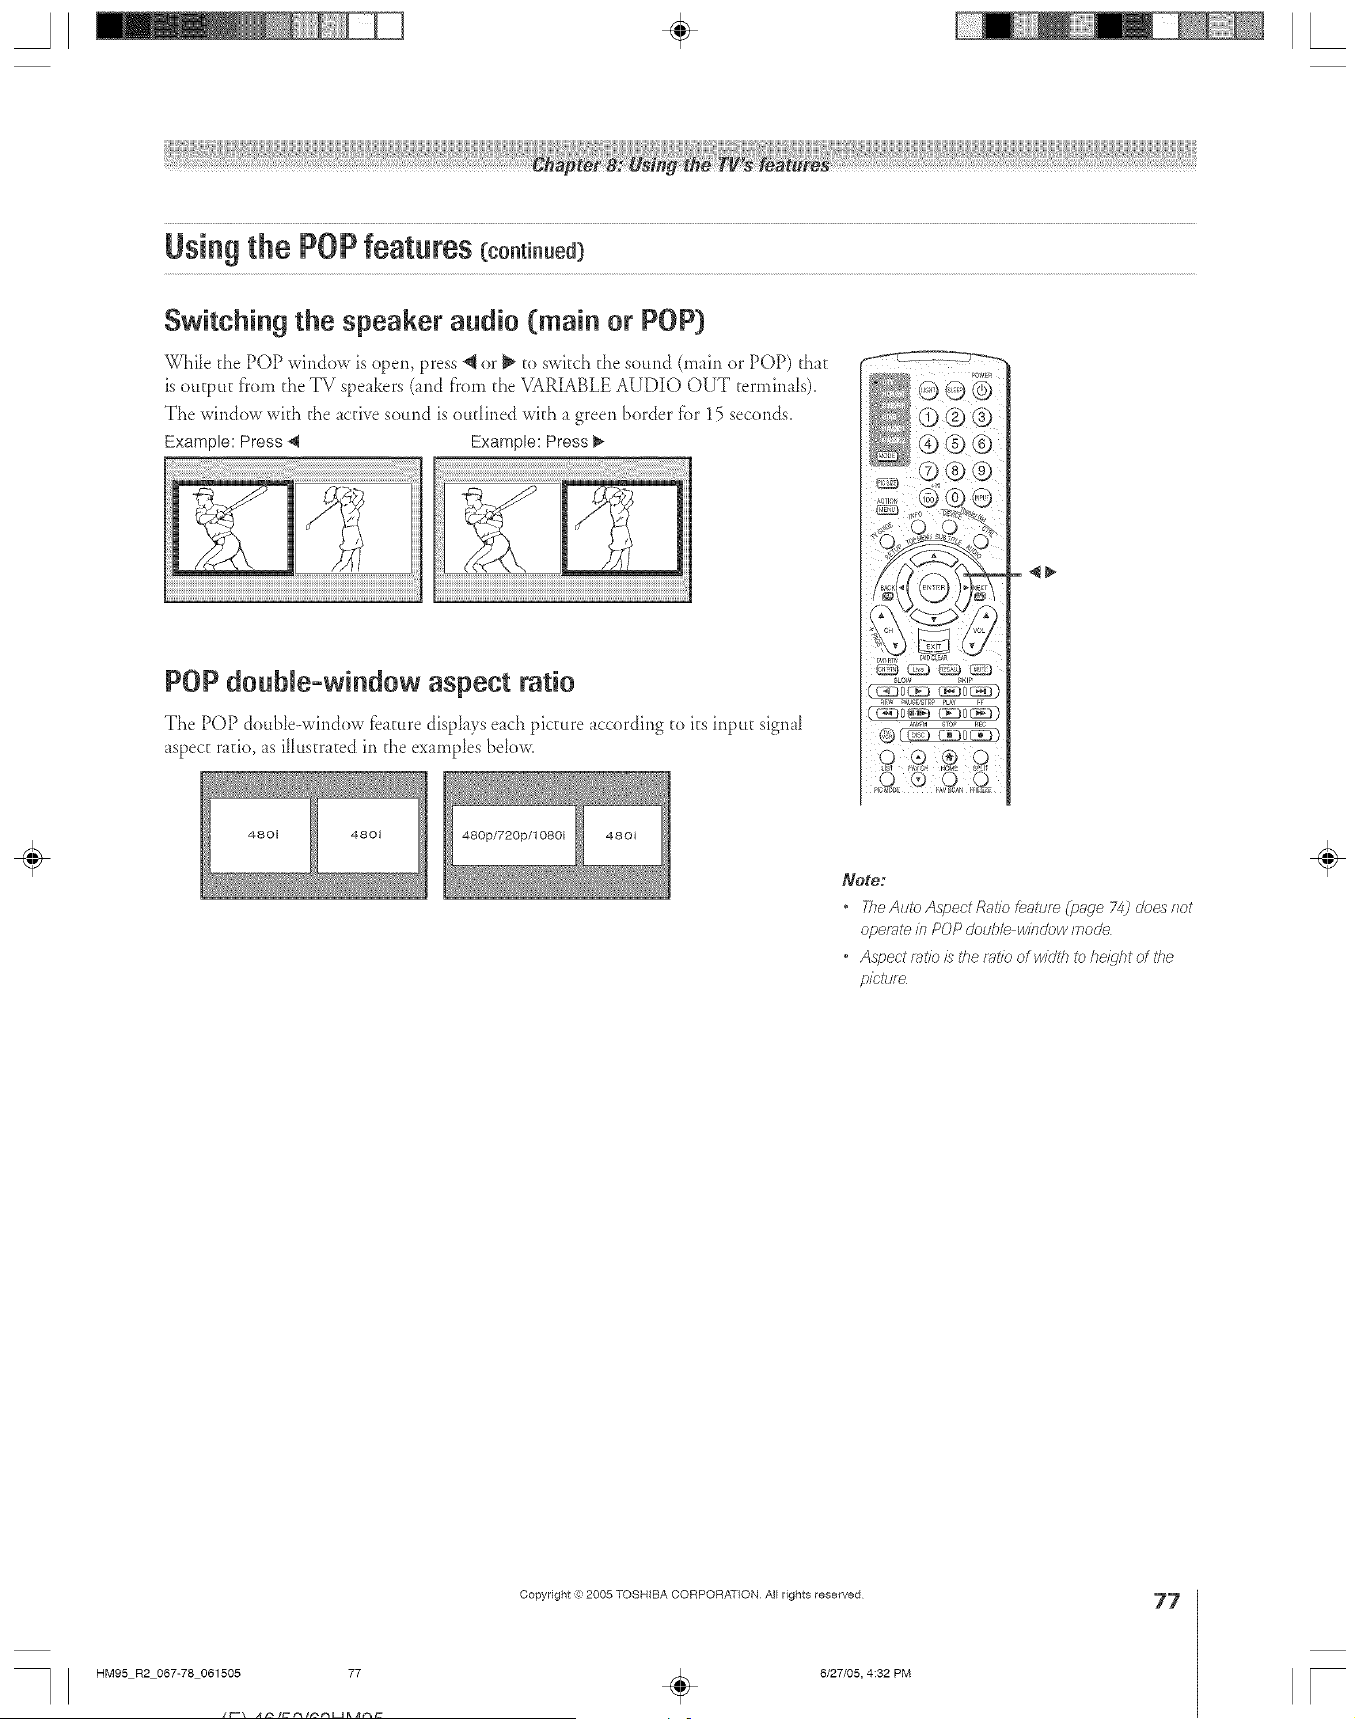
Using the POPfeatures (co.ti.ued}
Switching the speaker audio (main or POP}
WhiIe the POP window is open, press _ or _ to switch the so,rid (main or POP) d_at
is output f'rom @,eTV speakers (and f)'om @_eVARIABLE AUDIO OUT terminals).
The window wkh @,eactive sotmd is ottdined wkh a green border fiar 15 seconds.
Example: Press _ Example: Press _-
I
POP double=window aspect ratio
The POP double-wirldow fbmire displays each picture according to its input sign _1
_spect r_tio, _s iHttstrated in @,eexarc@es be[ow.
SLOW S_qP
£w _AU_E_STE pLUg FF
4_
480i 480i
Note:
• The Auto Aspect Ratio feature (page 74) does not
operate in POP double window mode
• Aspect ratio £ the f_tio of width to heiqht of the
pictt_
÷
Copyright @ 2005 TOSHIBA CORPORATION All rights reserved
HM95 R2 067-78 061505 77
6/27/05, 4:32 PM
77
r
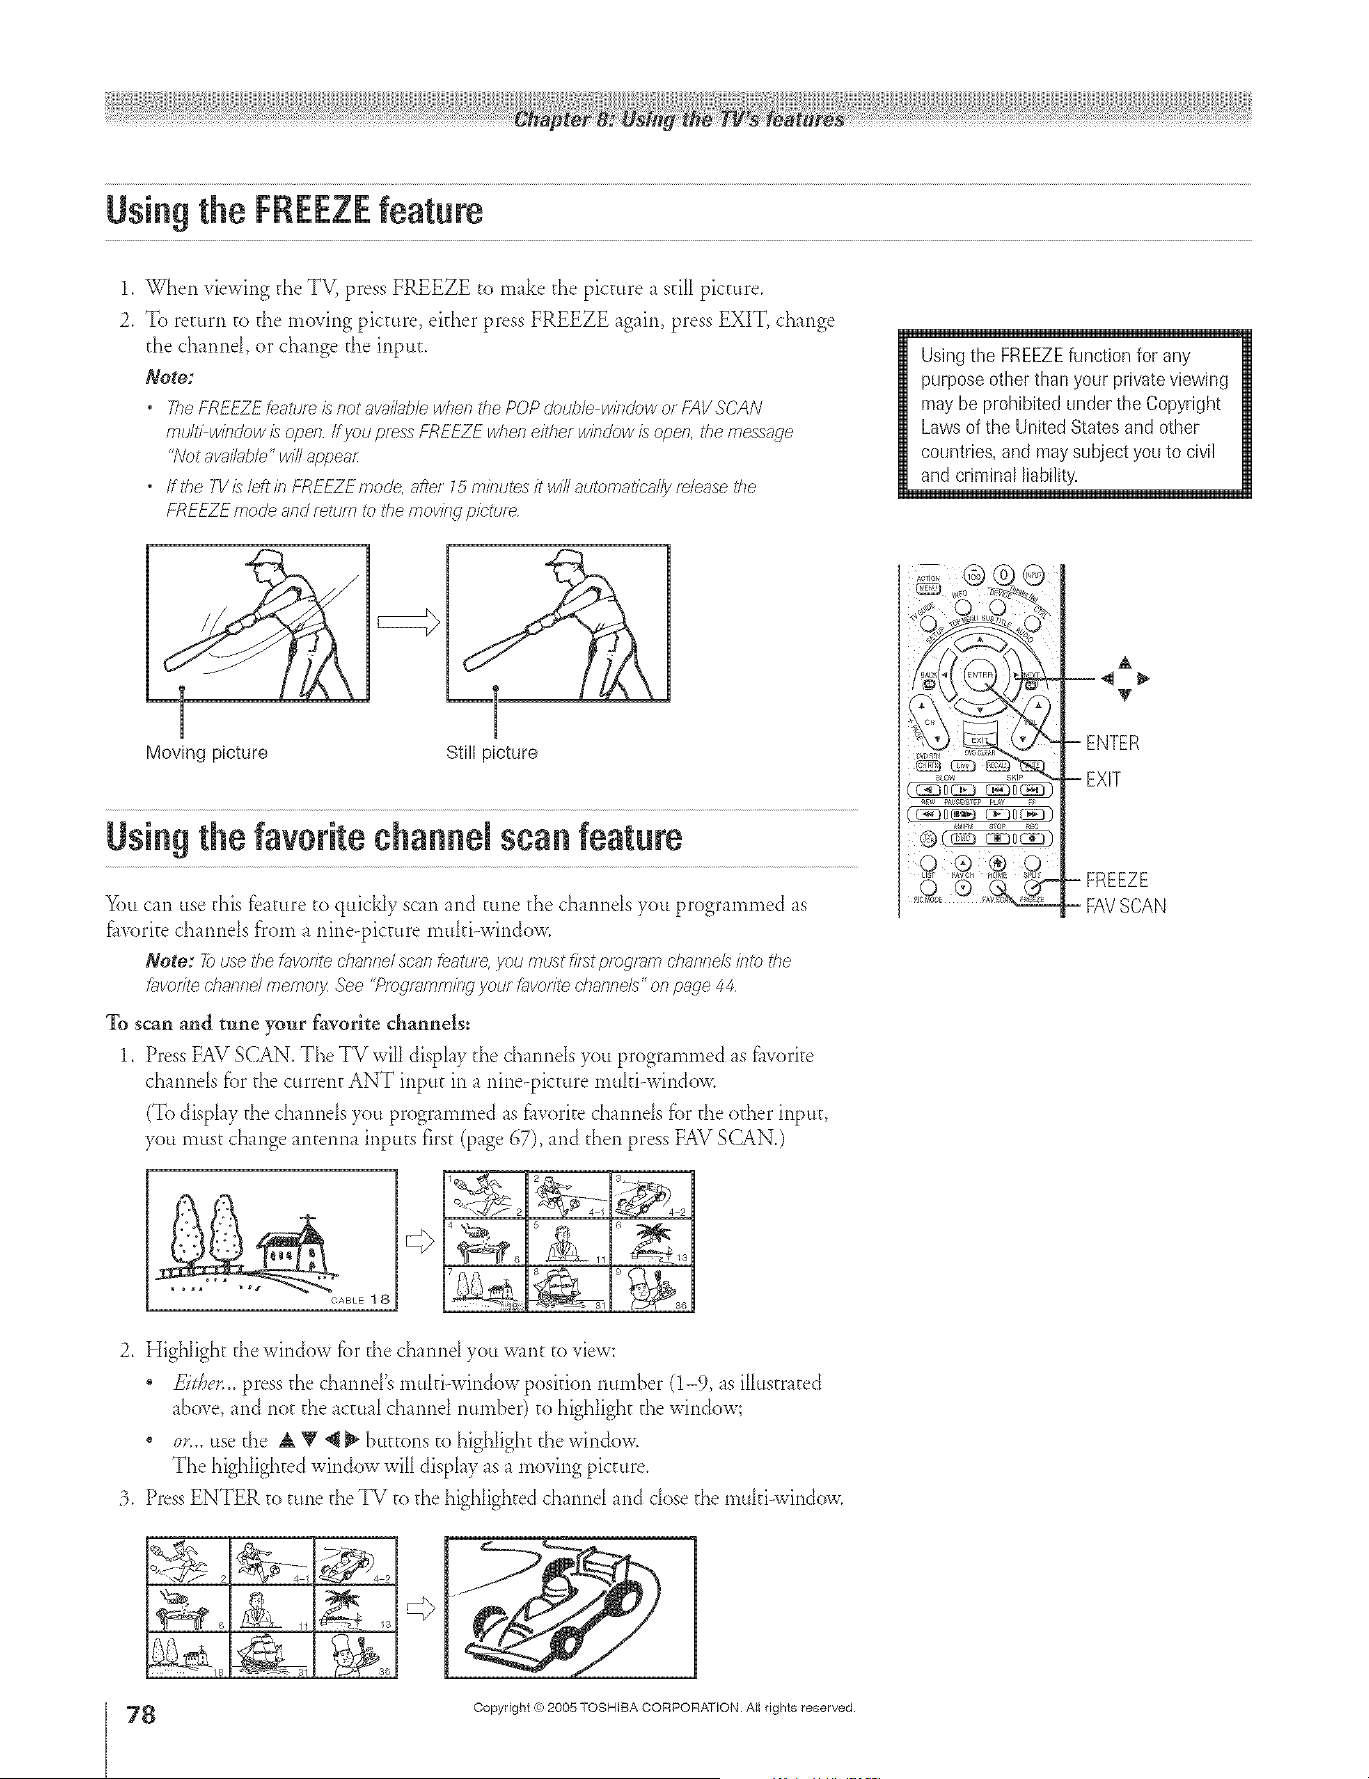
Usingthe FREEZEfeature
1. %then viewing the TV, press FREEZE to make the picture a still picture.
2. To return to d_e moving picture, either press FREEZE again, press EXIT, change
d_e channel or change d_e input.
Note:
° Tile FREEZELeatureis/totaw_ilublewhenthe POPdcuble windowo_FAVSCAN
multi windowisoperl ff yoI; pressFREEZEwheneither wifTdowis operl,the message
'7\7otavail;ff_/e' willappear
* ffthe TV/sleD*inFREEZEmode,afte/15 minutesit willautcmatiea//yrdease tile
FREEZEmode andreturn to the movifw pk'ture
Using the FREEZE function for any
purpose other than your private viewh_g
may be prohibited under the Copyright
Laws of the United States and other
countries, and may subject you to civil
and criminal liability.
Moving picture Still picture
Usingthe favorite channel scan feature
You can use this f?amre to quickly scan and rune the channels you prograrnmed as
f_worite channels from a r_ine--picture muhi-window.
Note: 72>use the hworfteclTaorTe/scar feature,you rrTtisl"fiist pregfb7lTiellarToeZsJfTtcNe
h_vorftechaFffTdmemo/_fl<_'ee"Piegl_mm/fTg yotJr[ilvotTtedTai?nels"onpage 44
To scan and tune your favorite channels:
1. Press FAV SCAN. The TV will display d_e channels you programmed as fhvorke
channels f;_r the current ANT input in a nine-picture muId-windov_;
(To disphy the channels you programmed as fhvorke channels for the od_er input>
you must change antenna inputs first (page GT), and then press FAV SCAN.)
CABLE 1 8 9 _86
2, HigNight the window fi>rthe channel you want to view:
, FJti_er,_pressthechannePsmuhi-windowposidonmm_ber(1-9, asiHustrated
above, and not d_eactual channel nurnber) to highlight d_ewindow;
, 0r,,, use the A V *__ buttons to higNight the window,
The highlighted window will disphy as a moving picalre
3, PressENTER to rune the TV to d_e highlighted channel and close d_e multi-window.
42
9&N 9
A
V
- ENTER
-EXIT
- FREEZE
- FAVSCAN
÷
8
HM95 R2 0 7-78 061505 78
Copyright (_:2005 TOSHIBA CORPORATION All rights reserved
6/27/05, 4:32 PM [
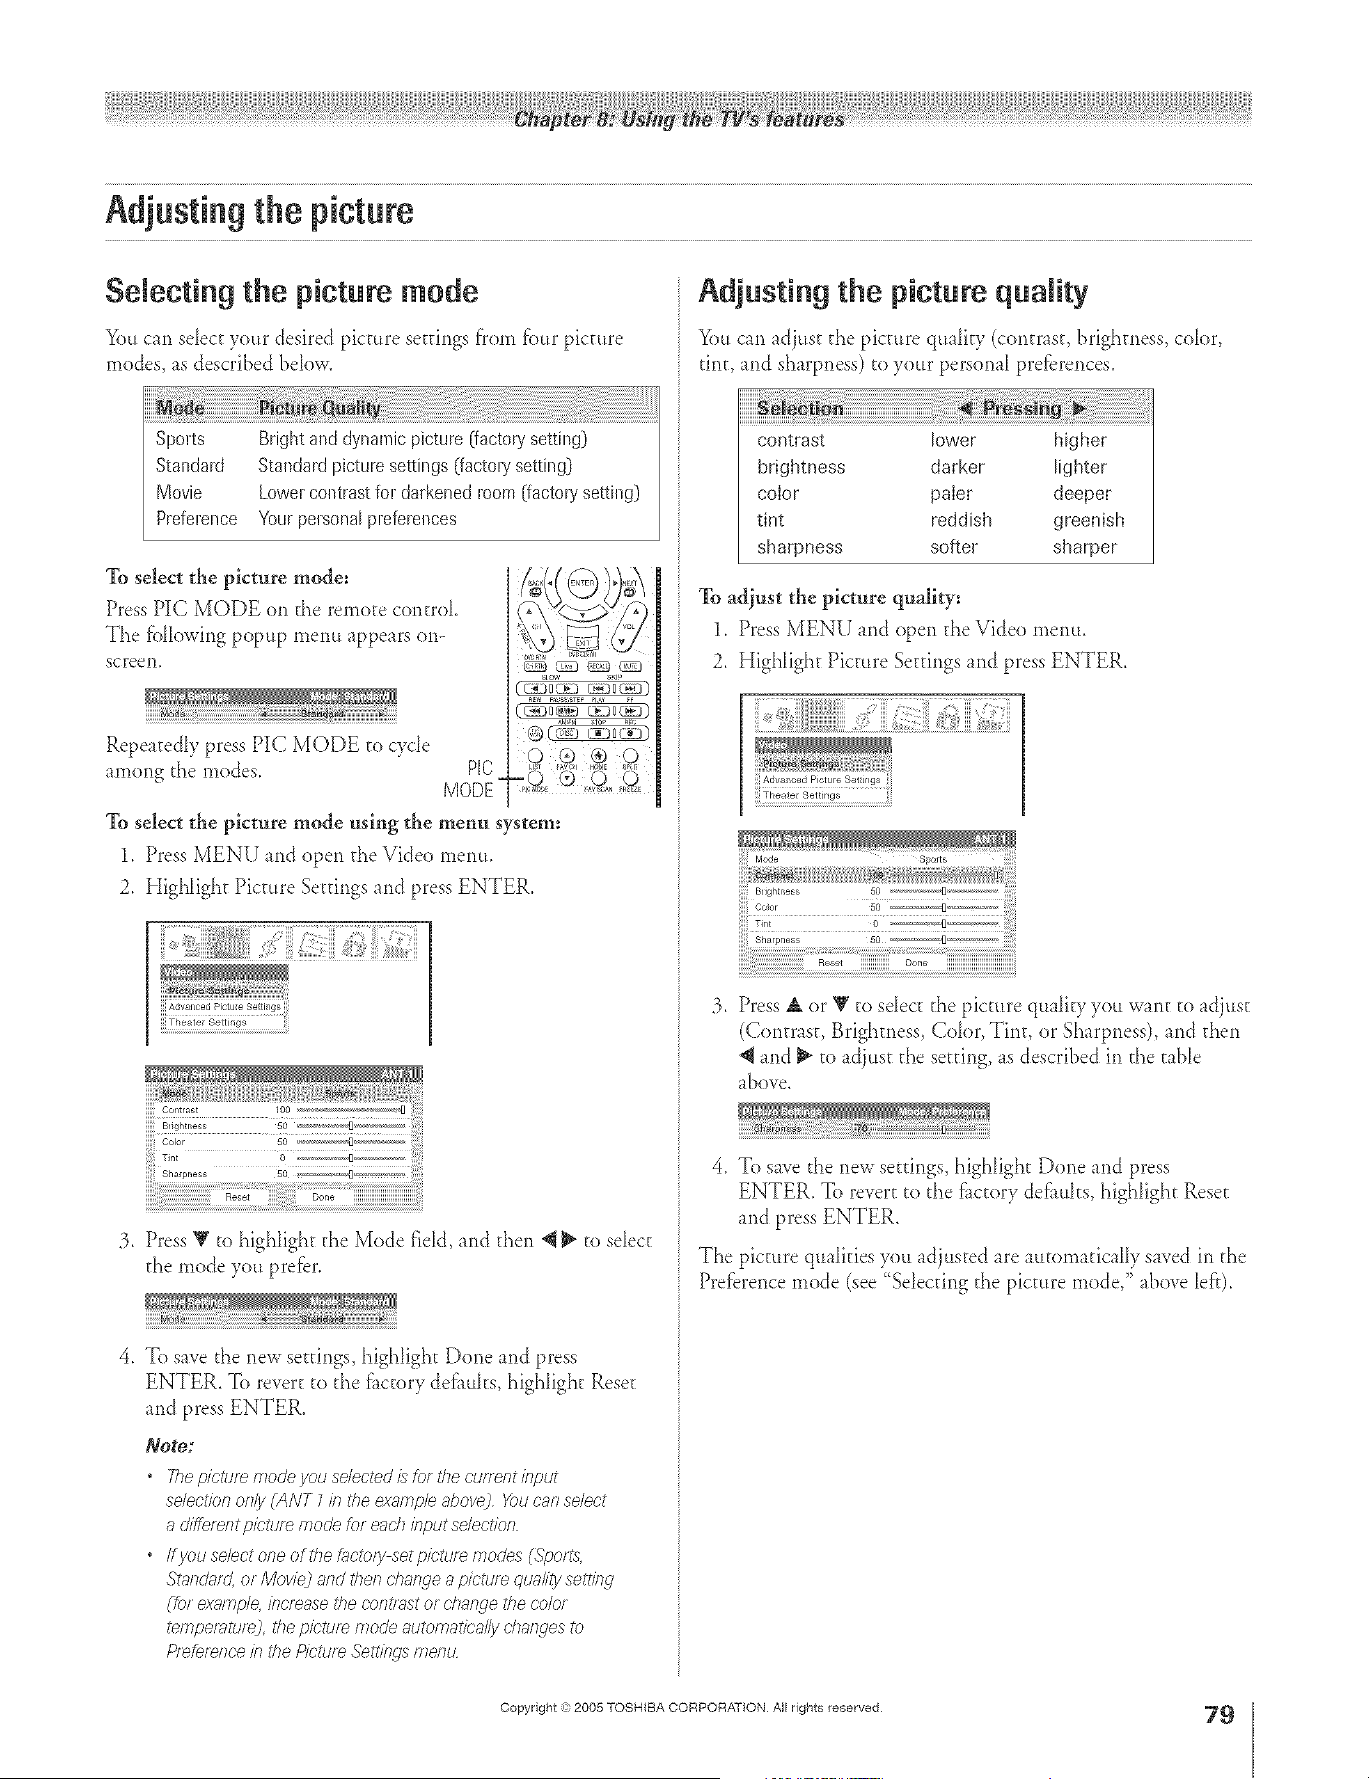
A ÷ [
Selecting the picture mode
You cart select your desired picture set@tgs from fk)arpicture
modes, as described below.
To select the picture mode:
Press PIC MODE on d_e remote contmL
The fbllowing popup menu tppears om
screen,
Repeatedly press PIC MODE to cycle
among the modes. P[C
MODE-
To select the picture mode using the menu system:
1. Press MENU md open d_e Video menu.
2. High[ight Picture Settings and press ENTER.
A6val ced Pictu e Settin
Theater Settings
iiiiiCo,/_rost
BI}ghtl ess
Coor
@larpness
:3, Press V to highlight d_e Mode field, and d_en 4 _ to select
d_emode you prefer.
4. To save the new settings, highlight Done and press
ENTER. To revert to d_e f_tctorydefhuhs, highlight Reset
and press ENTER.
Note:
• The p/crete mode you selected £ for #Tecunent input
select/on only (ANT 7 in i'he exnmple abovej X)u can select
a diffe/entpk}'ture mode lot ench if?put se/ecf/bn
• ffyouselectoneofthe£4cl?)/ysetpk2tlf_n_odes (Spotts,
St_/so'Hf_Zor Movie_ and tilers change a p/ctu/e qucdiOisetffng
(fo_ exnmp/e, /intense the cofVl_st or dTan_le the color
tempe/7_Lu_) #}e picture mode automatically d_afwes to
Pl_fefence b i'he Picture _geft/f/9's i?Tef?tz
Adjusting the picture quality
i You can adjustd_epictme quahty (contrtst, brighmess,cobr,
tint, md sharpness)to your personalprefbrences.
contrast lower higher
brightness darker lighter
color paler deeper
tint reddish greenish
sharpness softel sharper
To adjust the picture quality:
1. Press MENU and open the Video menu.
2, High[ight Picture Settings md press ENTER.
]] Advanced Picture Sett ngs
]] Thealel Settings
3, Press A or V to seIect the picture quahty you wmt to adjust
(Contras< Brighmess, Color, Tint, or Shtrpness), md d_en
4 md _ to tdjust d_eset@_g, ts described in the table
tbove
4. To save the new settings, highlight Done md press
ENTER. To revert to the f_ctory deflmhs, highlight Reset
and press ENTER.
The picture quaIifies you adjusted are atttomaficaIIy saved in d_e
Prefbrence rnode (see "Selecting the picture nmde," tbove 1el?).
÷
HM95 R2 079-86 061505 79
Copyright '3:)2005 TOSHIBA CORPORATION All rights reserved
÷
6/27/05, 5:11 PM
79
[
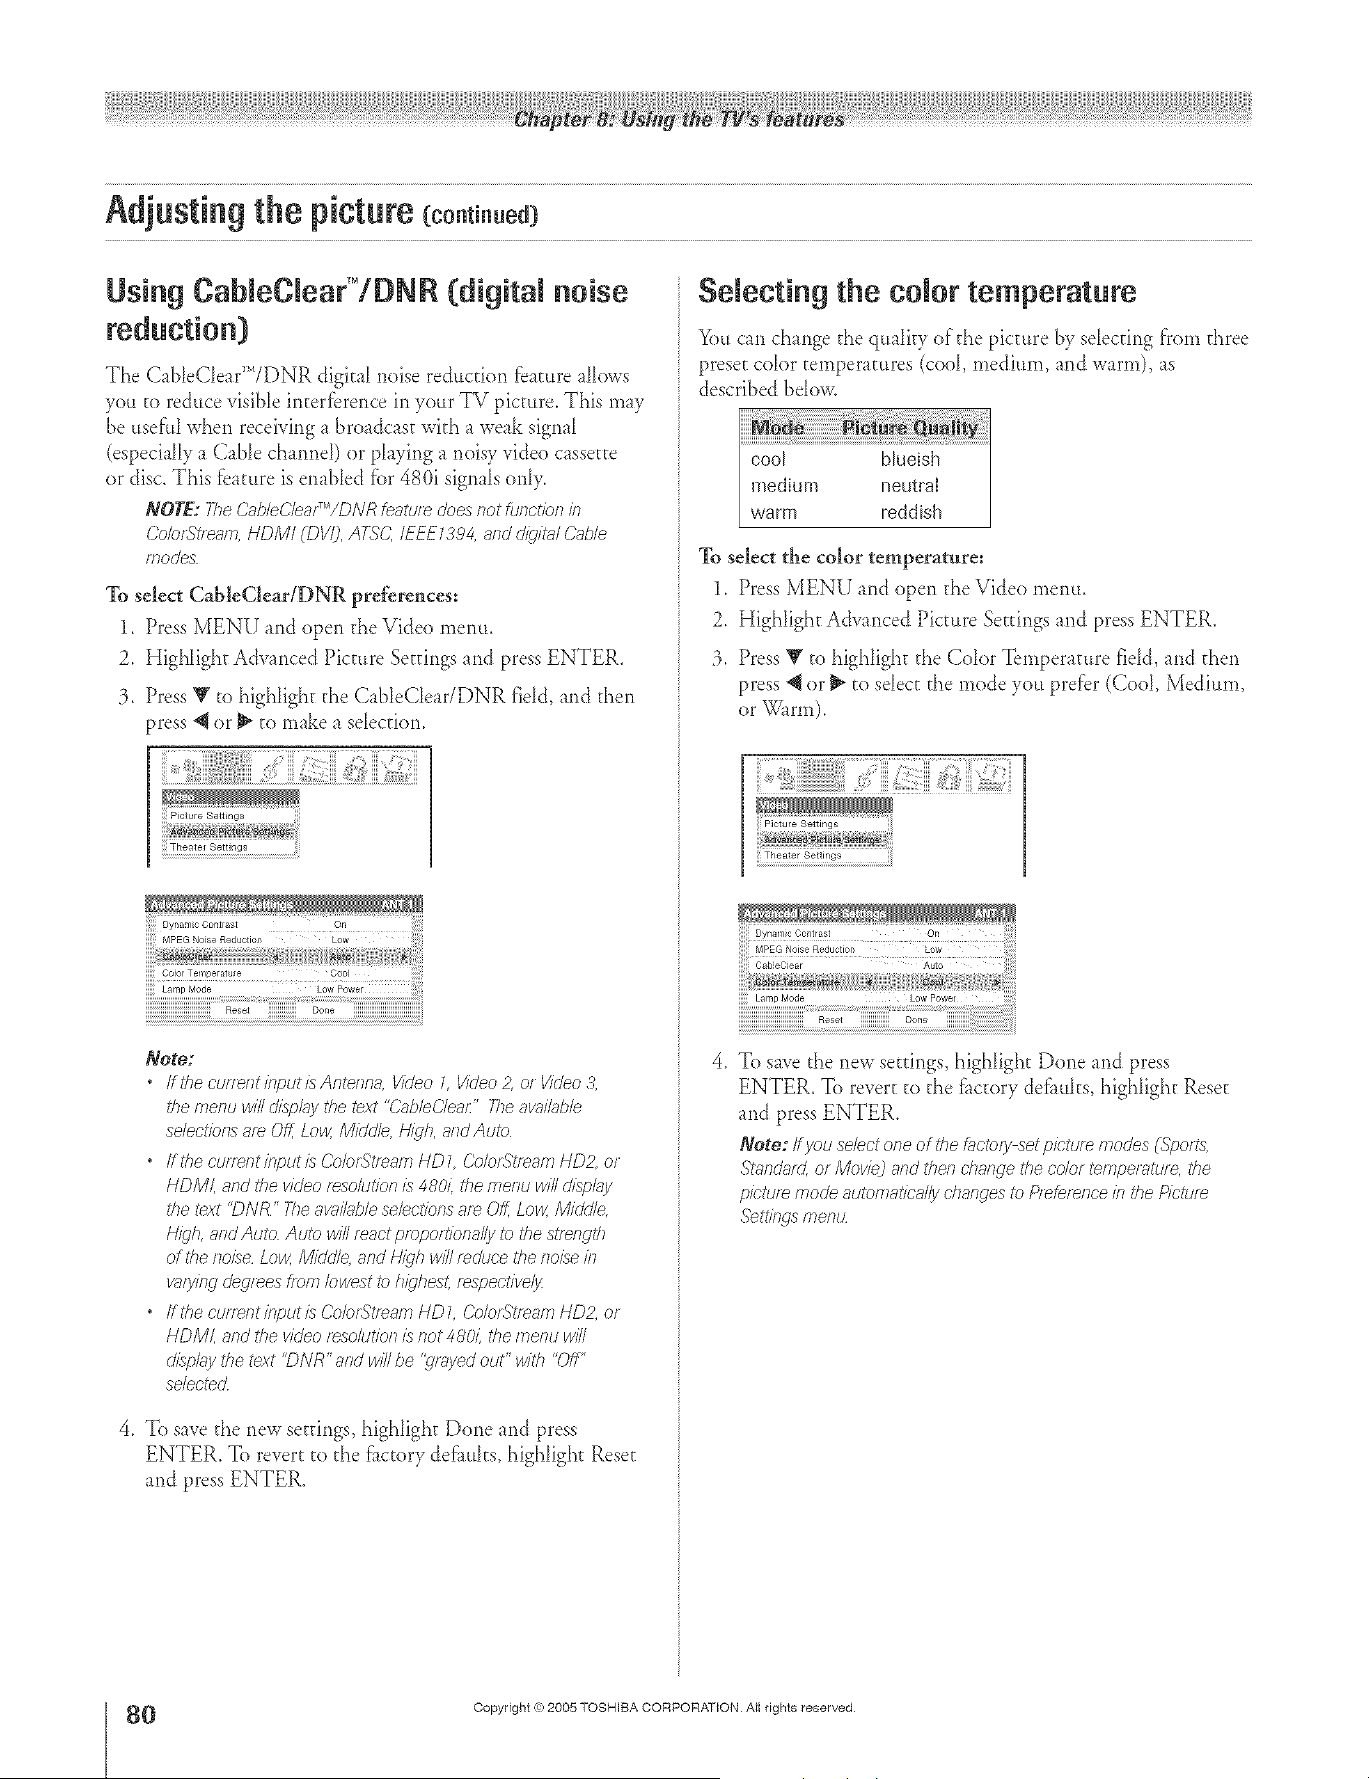
Using CabIeClearT°/DNR (digRN noise
reduction)
The Cab[eCDar"TDNR digital noise reduction fbature allows
you to reduce visiNe interfbrerlce in your TV picture. This may
be usefi11when receiving _ broadcast with a weak signal
(especially a Cable charred) or playing a noisy vide() cassette
or disc. This fbature is enabled fiar480i signals only.
NOTE:TheCP,t>IeCleafTr"/D/VRfeutuledoes/7otfu/lctienin
CebfSt/ e_lTi, HDMI(DVI], ATS'C, IEEE1394, and d/9'it_# Cob/e
fflodJew
To select CableCleariDNR preferences:
1. Press MENU and open the Vide() menu.
2. Highlight Advanced Picture Settings and press ENTER.
3. Press Y to highlight the CableC[ear/DNR fidd, and then
:)ress_ or _ to make a selection.
Reset iiiiiiiiiiiiiii Done i
Nogo:
• Iftl_ecurl_ntinputisAntenn_,Video1,Video2,o_Video3,
thenTenuwillclisplqy thetext"&_bhCle_£'Thea_iloble
se/ectiensa_eOff,Low,Mkld/e,Nigh,a/ldAute
" ffthe ctJrTeetinputis Ce©rStl_arl7 HD7 (2e/ot.q?feaq_ HDZ or
HDML and the video resolution L1480/: the/?Tel)U will displgly
the text "DNR ' The avni/_,,blesehctiens am Off, Low, Middle,
H/_'h, and Auto Auto will mact pmpo£iena//y te tile slgelTgth
of the/lo/}e Low, MickJI¢ and H/}'h will/educe tile tlo/se #l
_}sying deq/_es ffem lewest te highest, fespect/ve/)_
" if the cufTeetilTputis Co©r, gtl_-ih_l HDL Ce/o_St/_am HD2, or
HDML and the video f_so/tJtiel?iis/7or 48011the menu will
d/sD/;/y the text "DN R" and w/Y/be '>'f_yed out" with 'Off"
selected
4. To save the new settings, highhght Done md press
ENTER. To revert to the _i_ctorydelimits, highligh_ Reset
and press ENTER.
Se{ecting the co,or temperature
_>ucan change the q_mlity of the picture by selecting from three
preset color temperatures (cool, medium, and warm), as
described bdow.
cool bhmish
medium neutral
warm reddish
To select the color temperature:
1. Press MENU and open the Vide() menu.
2. Highlight Advanced Picture Settings and press ENTER.
3. Press _ to highlight the Color Temperature field, and then
press _ or _ to sdect the mode you prefer (Cool, Medium,
4. To save the new settings, highlight Done and press
ENTER. TOrevert to the [_c[ory delimits, highlight Reset
and press ENTER.
Note: If you select ore of the tg_c'te/yset pk'ture modes (Spo_ts
St_nd_d, o_ Movie) and then d?ange the crier tempermu/e, tl_e
pit;'ttJl_ mode 8u_ei778ticR//y d}arsges _) P;_fet_/loe ill the Pictt.q_
.qJetUf_4JsfF_el?t.L
÷
O
HM95 R2 0 9-86 061505 80
Copyright <e:2005 TOSHIBA CORPORATION Ai{ rights reserved
6/27/05, 5:11 PM [
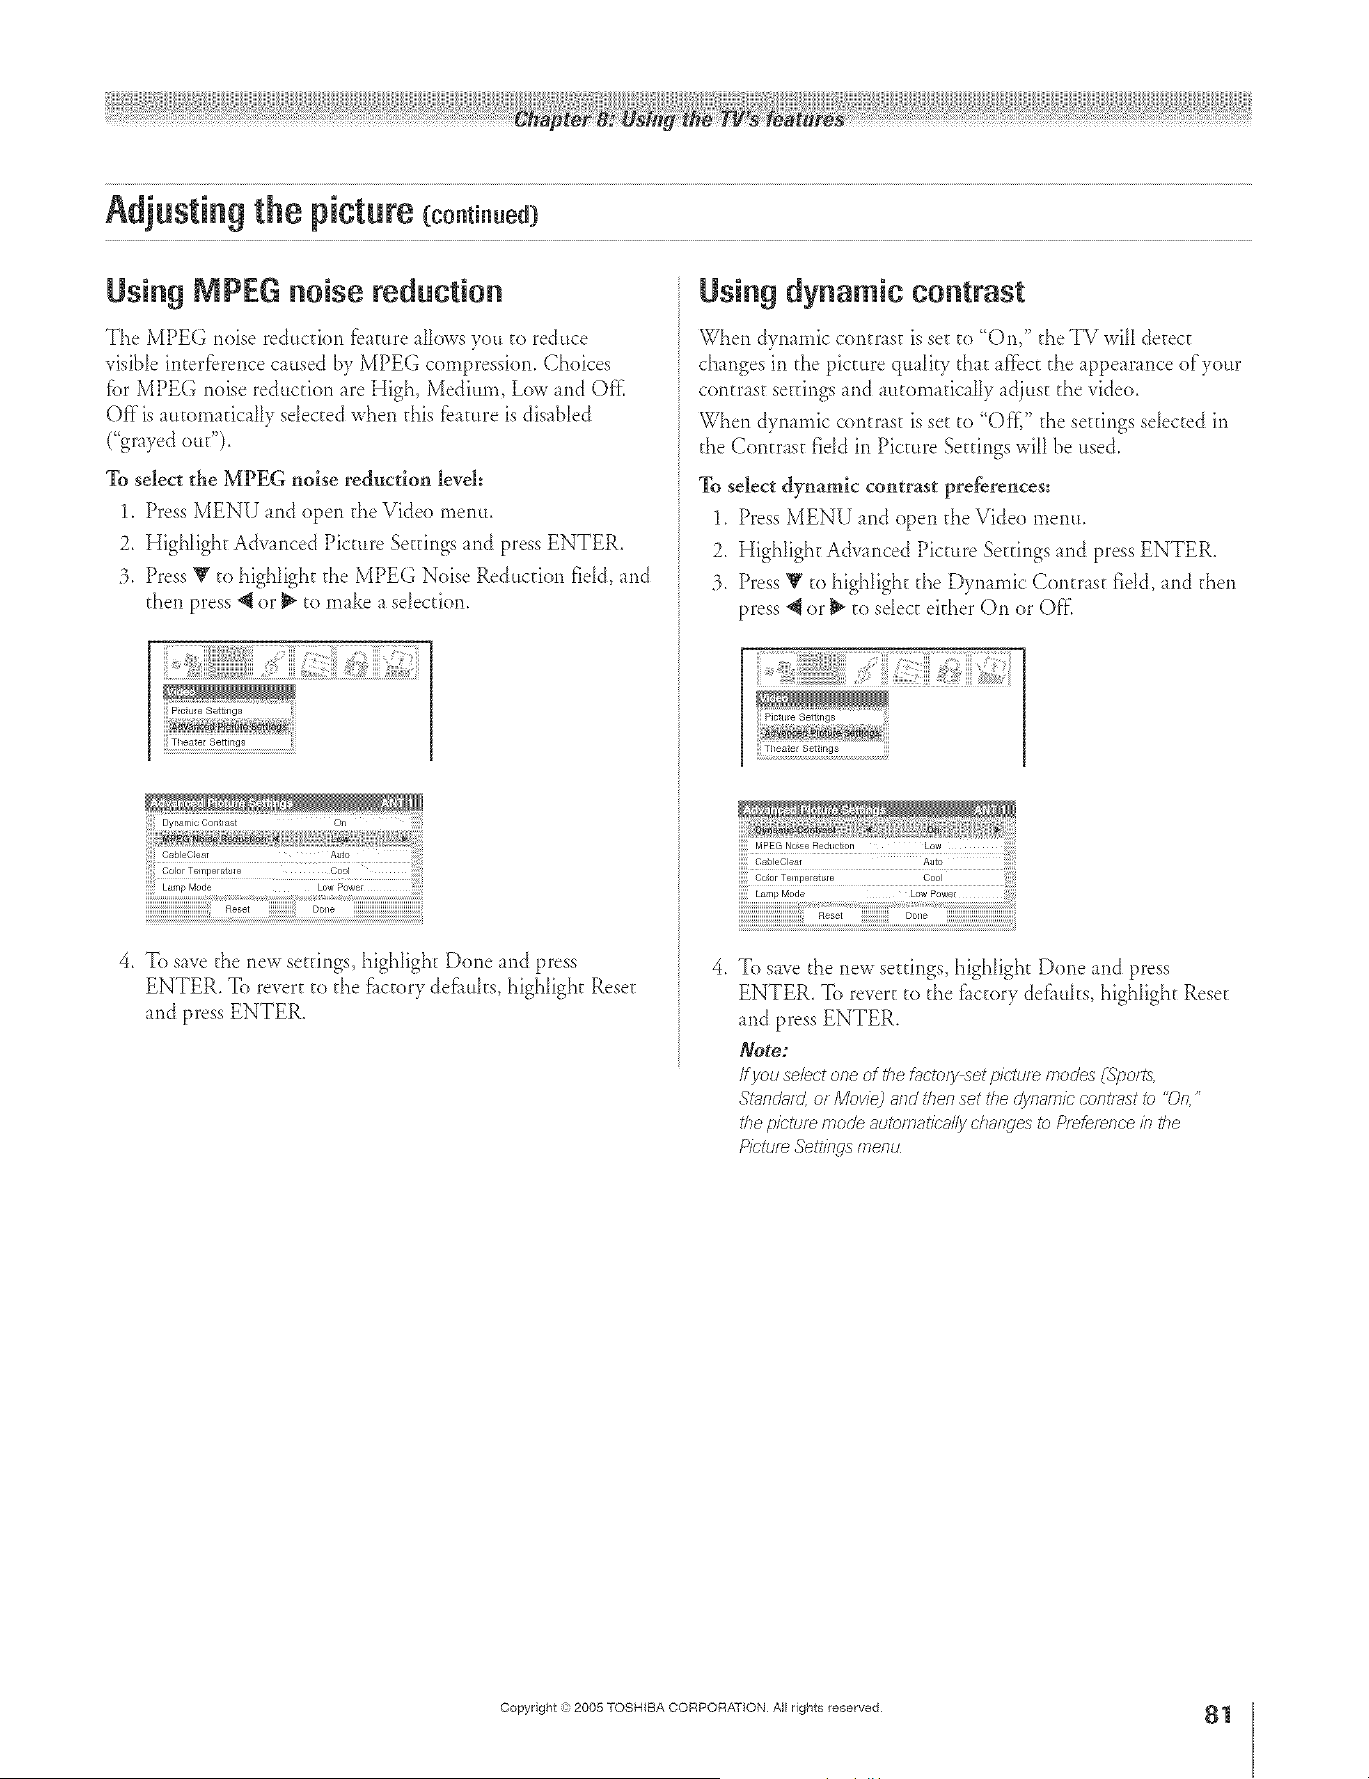
A ÷ L
Using IViPEGnoise reduction
The MPEG noise reduction fb_cure alh)wsyou co reduce
visible incerfbrence caused by MPEG compression. Choices
fbr MPEG noise reduction are High, Medium, Low and Offi
Off is automatically sdecced when this f_amre is disaNed
("grayed out").
To select the MPEG noise rednction level:
1. Press MENU and open d_eVide() menu.
2. HighIighc Advanced Picture Settings and press ENTER.
3. Press Y co highlight the MPEG Noise Reduction fidd, and
d_en press @or _" co make a sdecfion.
iii as i iiii
:i_i{ii_iii:iii;{ii{i!iiiii}i_ii!!!;i;iiii!i_!_;iiii{!!{_iliii_;!i
!!!Theate_ Settings iiii
4. To save d_enew settings, highhght Done and press
ENTER. To revere co the f_ccory deflmhs, highlight Reset
and press ENTER.
Using dynamic contrast
When dynamic contrast is set co "On," d_eTV will detect
changes in d_e picture quaIicy chat affbcc the appearance of your
contrast settings and automatically adjust d_evideo.
When dynamic contrast is sec co "Off;" the secdngs sdecced in
the Contrast field in Picture Settings will be used.
To select dynamic contrast preferences:
1. Press MENU and open the Video menu.
2. Highlight Advanced Picture Settings and press ENTER,
3. Press Y co highlight d_e Dynamic Contrast fidd, and then
press 4 or _ co select ekher On or Off'.
i7iii ii;;i i i7 7i iJiii ii iii ! {i!JJF;;;;ii; T7!iiii7 7;; ii i:;i!T:!i:¸
CO or Temper_tLir e Cool
Lamp Mode Low Power
R_et Do,_e
To save the new settings, highlight Done and press
ENTER. To revere co d_e f_ccory defhuhs, highlight Reset
and press ENTER.
Note:
Ifyou selectone of the &cto/y set pictuf_ moues (Spo£s,
.c,?lb'nclaf_Lof/1//ovie_and thenset the cJyrS-/h_#CcomT_stto "On"
thepicture mode automativ_#lydlanges to Pi_fefelTC'eb the
Pictl£_ Settklgsmenu
÷
HM95 R2 079-86 061505 81
Copyright =3:)2005 TOSHIBA CORPORATION All rights reserved
÷
6/27/05, 5:11 PM
81
[
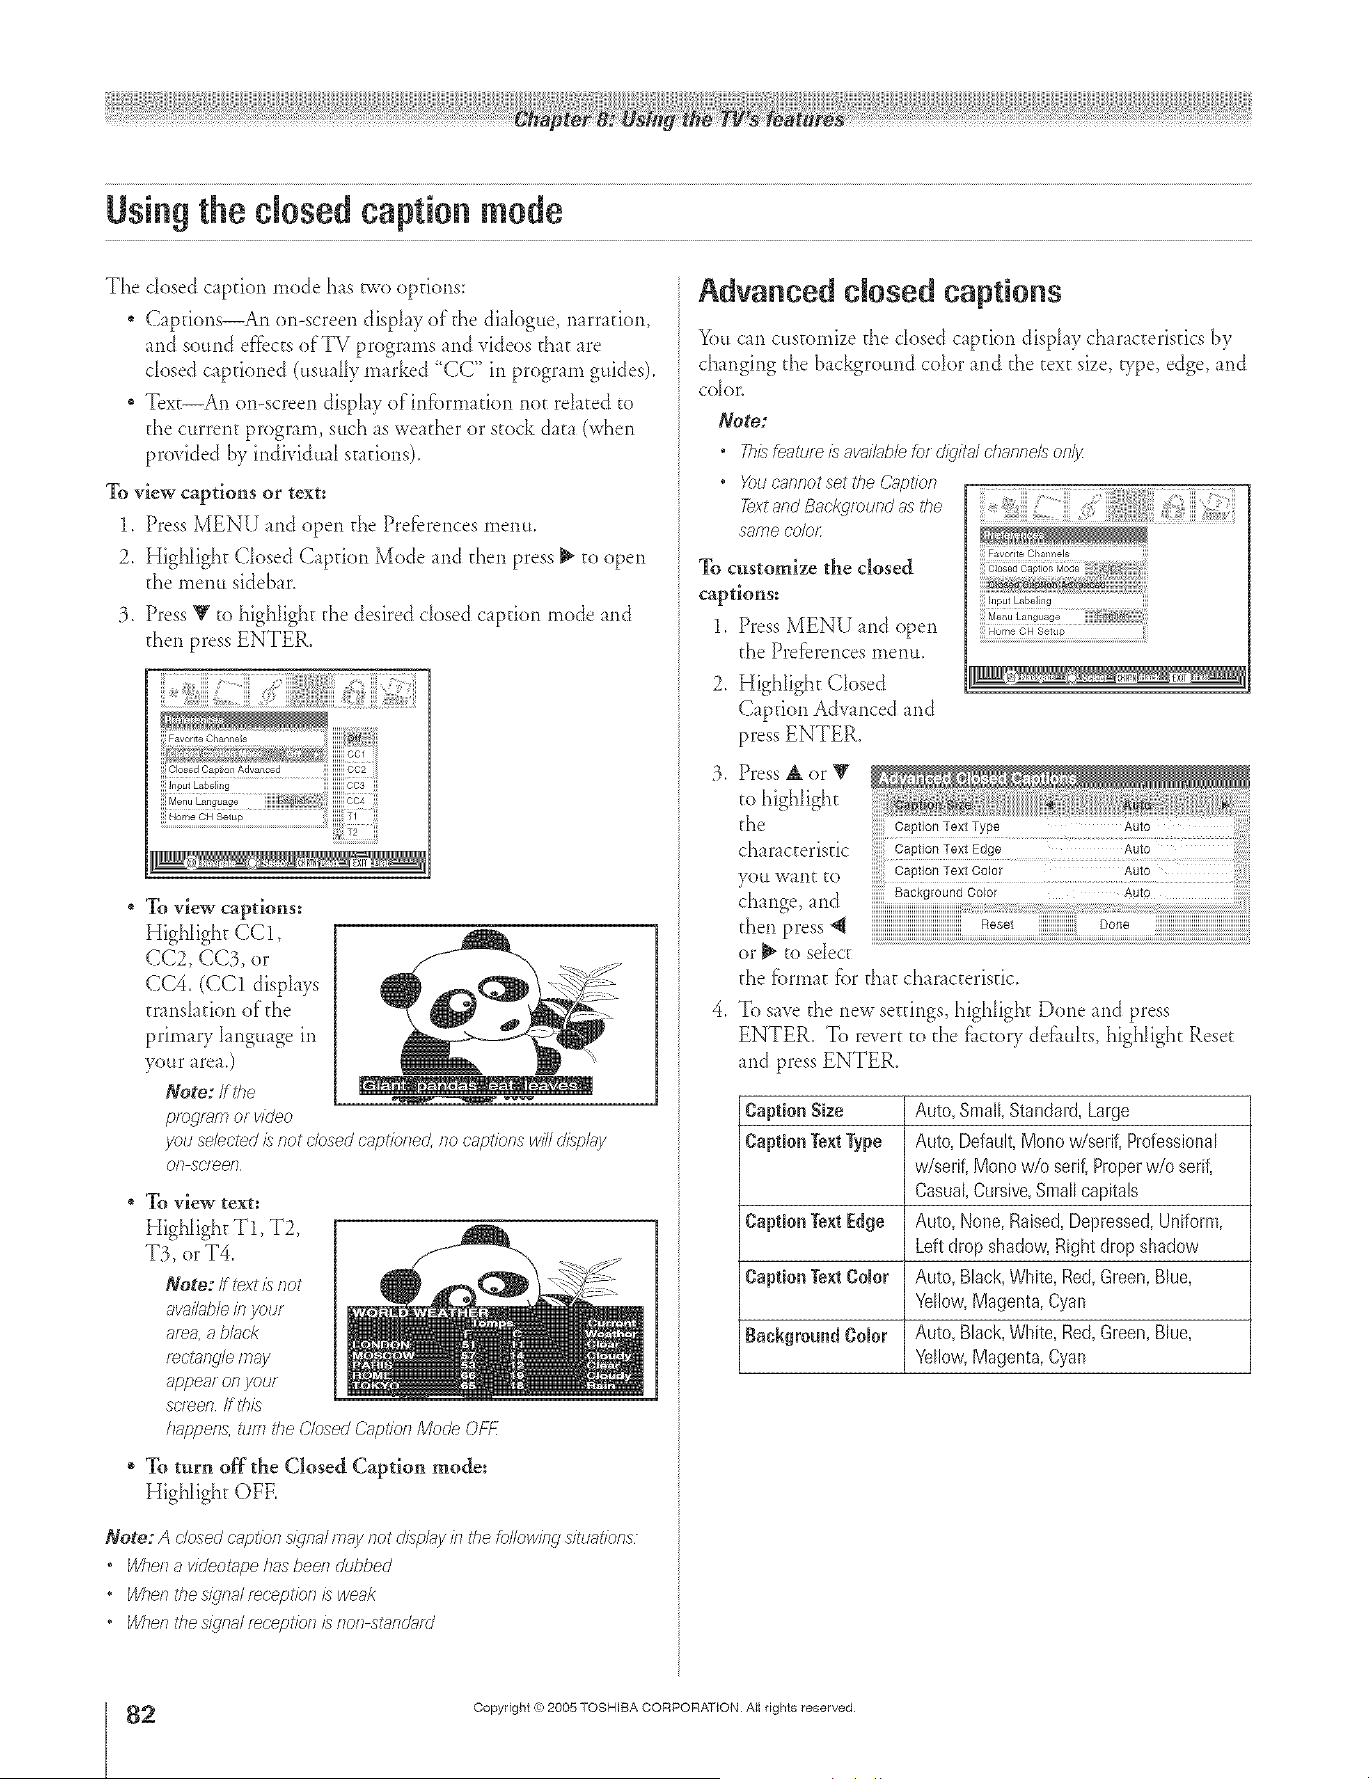
A ÷ L
Using the closed caption mode
The dosed caption rhode has Fwo options:
Capdons_An or>screen disphy of'the diaIogue, narration,
and sound ef'fbctsofTV prograrns and videos that are
dosed captioned (uamHy marked "CC" in program g_fides),
Tex_An on-screen disphy of infbrmation not rehted _o
the current program, such as wead_er or stock data (when
provided by individual stations).
To view captions or text:
1. Press MENU and open the Preferences menu.
2. Highlight Closed Caption Mode and then press _ to open
the inenu sidebar.
3, Press Y to highlight d_e desired dosed c_pdon mode and
d_en press ENTER.
To view captions:
Highlight CC1,
CC2, CC3, or
CC4. (CC1 disphys
transIadon of"d_e
primary Ianguage in
your area.)
Note: if the
pro C]I_]ITIor i/kleo
you selected/s not closed captioeed, ilo cnptkms will d/sAay
OR Scl_el7
To view text:
Highlight T1, T2,
T3, or T4.
Note: fftextis not
available in your
area, a bhck
r_olYfflgle inay
_,ppearonyour
su_ee /f thlls
hap, celTs, tuffl d?e Closed _)g)tk)f? Mode Of-_
o To turn off the Closed Caption mode:
Highlight OFF.
Note; A dosed cnptk>sls/qn_dmay not clio,elegyk_tile following situatkms
• W_e/1a videotape has been cL,bbed
• When the signal lecept/be is weak
• When the signal r_t._ptlbe is I?oe sttlr]d[ifo _
Advanced c osed captions
You can customize d_edosed c_pdon disphy ch m_cterisdcs by
chmging d_ebackground cobr and d_e text size, _,pe, edge, and
Color,
Note;
• T/,sfe_,_uleisavak_ble&r o'/_,italdyannelsoe/;z
• YetJcannotset the Caption
Lextand Bae_4round as the
SalTle color:
To customize the closed
captions:
1. Press MENU and open
the Preferences menu.
2. High[ight Closed
Capdon Advanced and
press ENTER,
((iFavorite Cl_annel8
MenuLanguage
!!!Home CH Setup iiii
3, Press A or V
to highlight
d_e
characteristic
4. To save d_enew se_dngs, high[igh_ Done and press
ENTER. To revert to d_e _hctoryde'links, highlight Reset
and press ENTER.
Caption Size Auto, Stoat[, Standard, Large
Caption Text Type Auto, Default, Mon0 w/serif, Professional
w/serif, Mono w/o serif, Proper w/o serif,
Casual, Cursive, Snm[[ capitals
Caption Text Edge Auto, None, Raised, Depressed, Uniform,
Left drop shadow, Right drop shadow
Caption Text Color Auto, Black, White, Red, Green, Blue,
Yellow, Magenta, Cyan
Background Color Auto, Black, White, Red, Green, Blue,
Yellow, Magenta, Cyan
÷
2
HM95 R2 0 9-86 061505 82
Copyright (%2005 TOSHIBA CORPORATION Allrights reserved
6/27/05, 5:11 PM [
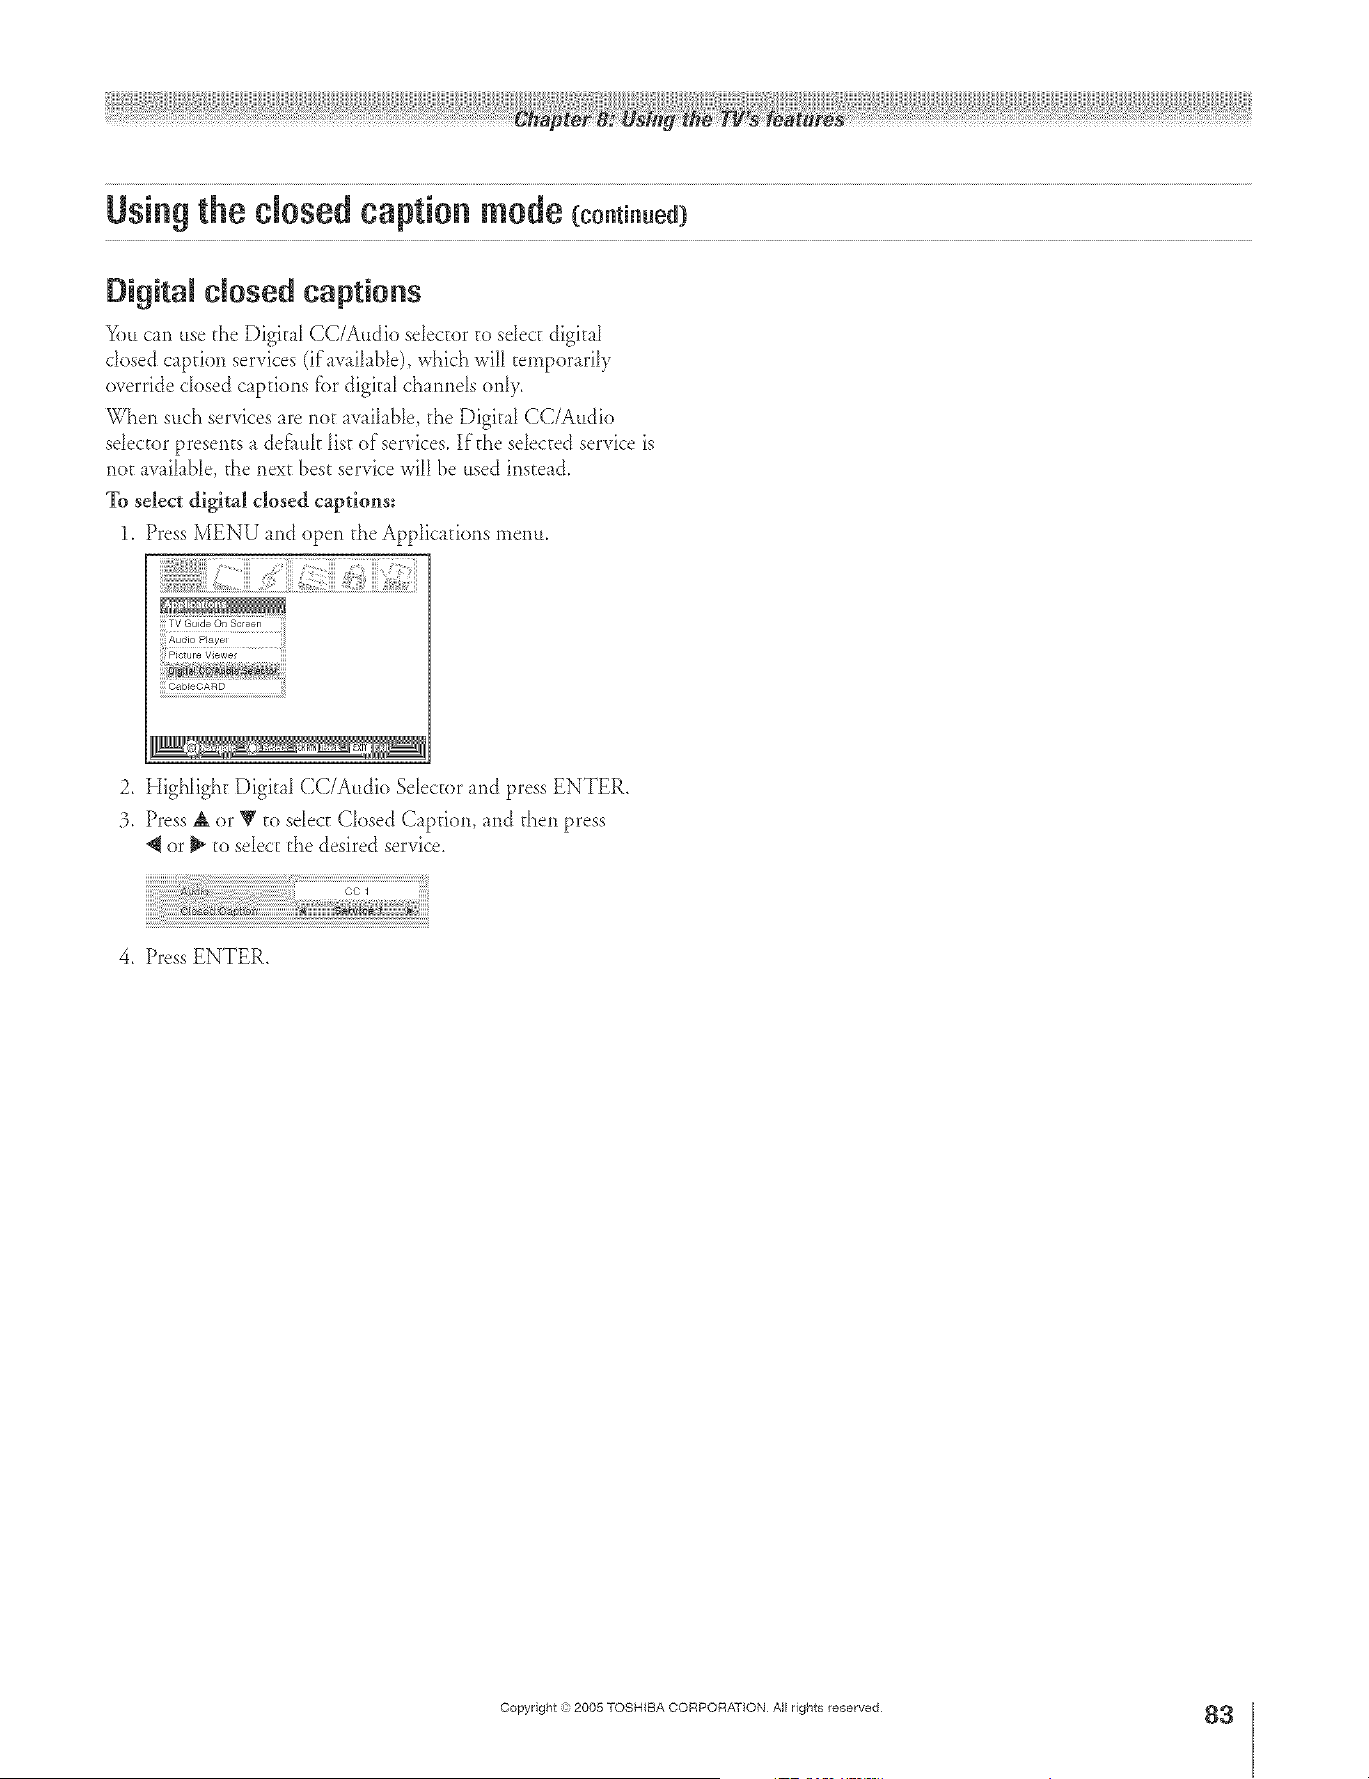
A ÷ L
Digital c_osed captions
You can use d_eDigkal CC/Audio sdector to seIeccdigital
dosed caption services (ifavaihble), which will temporarily
override dosed captions fbr digkfl charmds only,
When such services are not available, d_e Digital CC/Audio
sdector presents a defh_4t _ist of services. If the sdected service is
not avaihble, the next best service will be used instead.
To select digital closed captions:
1. Press MENU and open the Applications menu.
Cab eOARD
2. HigNight Digital CC/Audio Sdector and press ENTER.
3. Press A or V to seIeccClosed Caption, and then press
or _ to select d_edesired service.
4. Press ENTER.
÷
HM95 R2 079-86 061505 83
Copyright ,3:)2005 TOSHIBA CORPORATION All rights reserved
÷
6/27/05, 5:11 PM
83
[
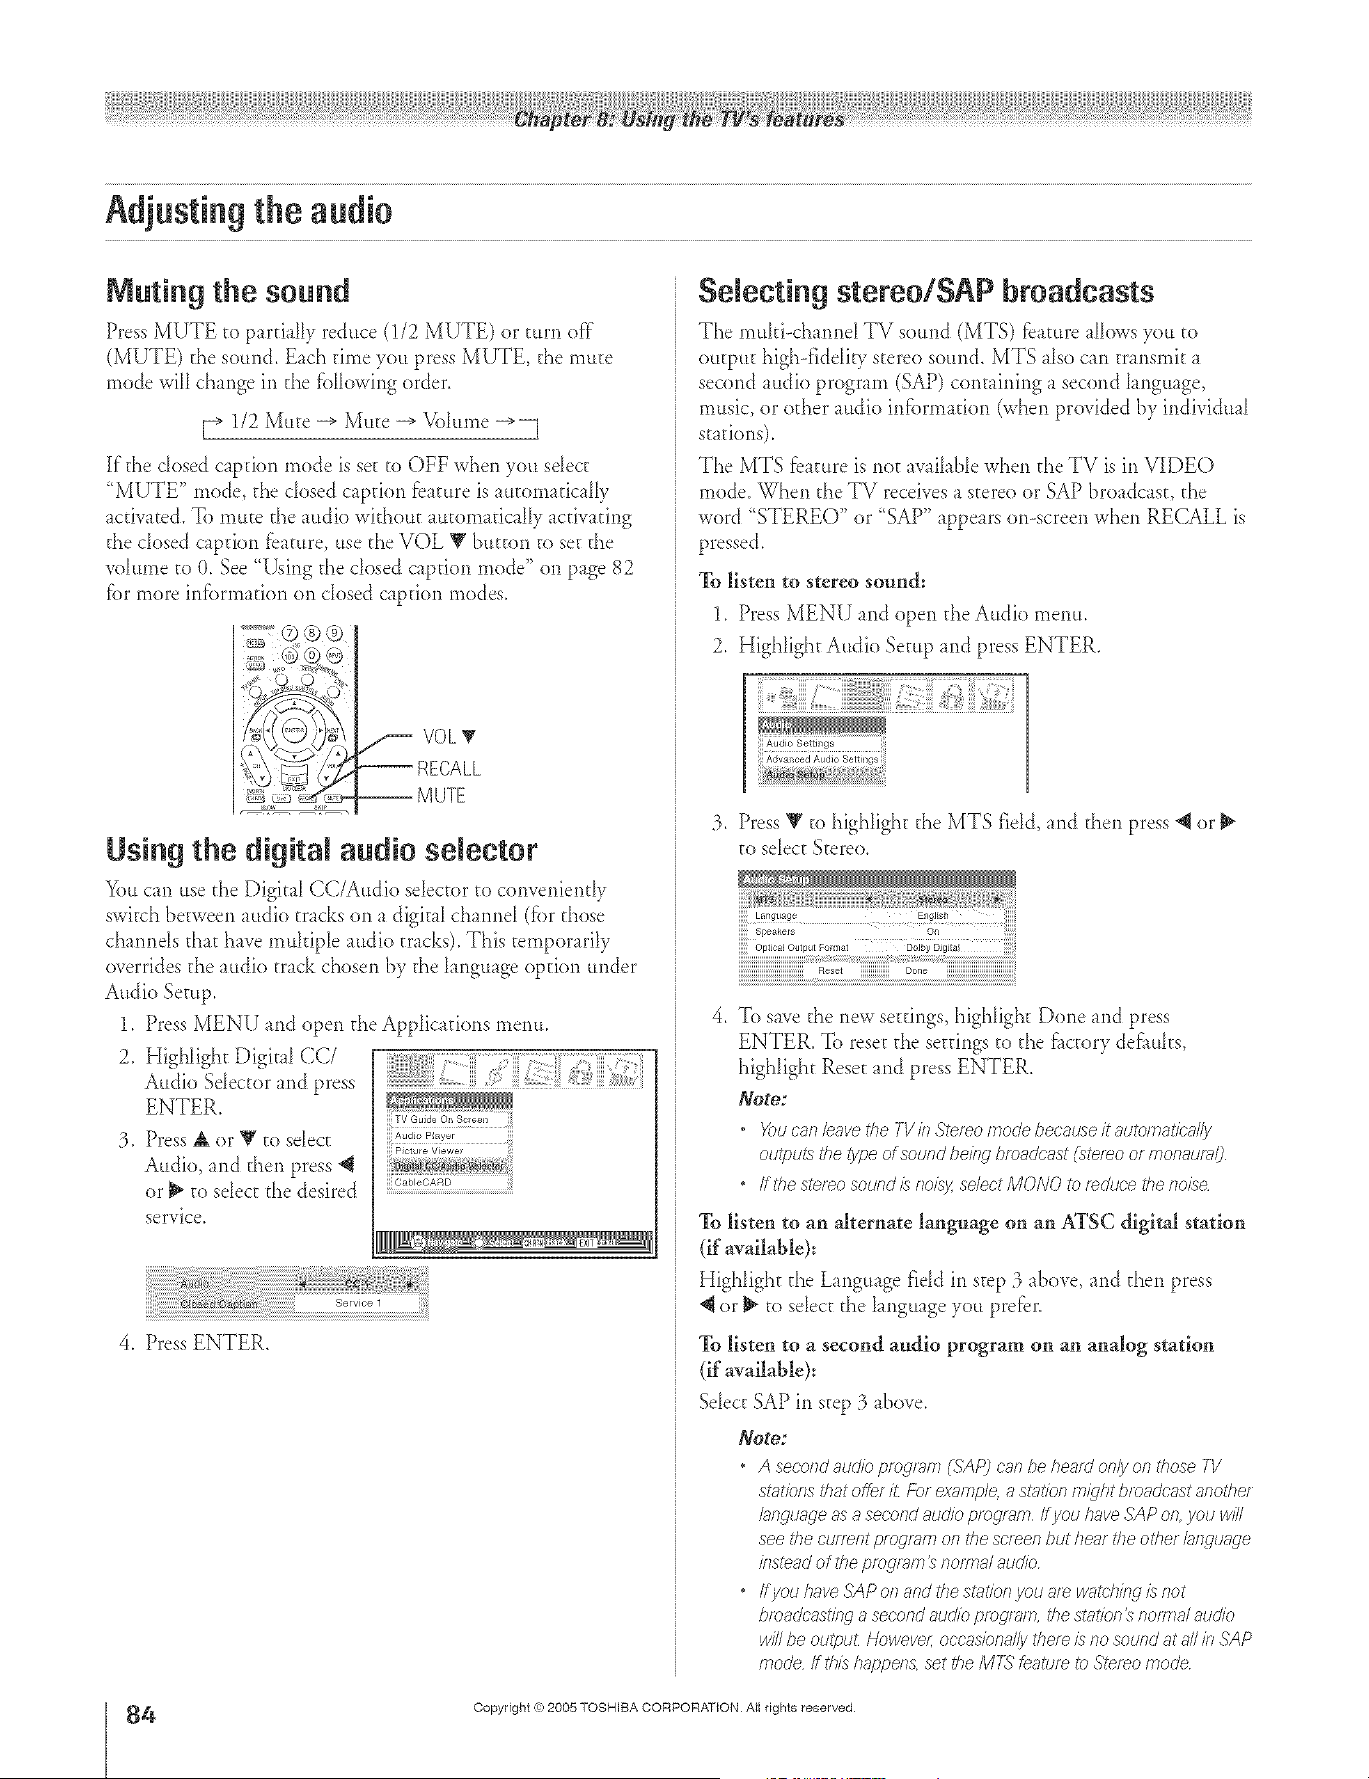
A ÷ L
Muting the sound
Press MUTE to partially reduce (1/2 MUTE) or turn of}"
(MUTE) the sound. Each time you press MUTE, the mute
mode will change in the fbllowing order.
[_ 1/2 Mute -_ Mute -_ Vohm_e -_
If the dosed caption mode is set to OFF when you sdect
"MUTE" mode, the dosed caption bature is automatically
activated. To mute the audio without autornafica[Iy activating
the dosed caption f_ature, use the VOL V button to set the
vdume to O, See "_Mng the dosed caption mode" on page 82
fbr more infbrmation on dosed caption modes.
-- M UTE
Using the digRaJ audio selector
You carl use the DigitaI CC/Audio seIector to conveniently
switch between audio tracks on a digit d cham)d (fbr those
charmds that have rnuhiple audio tracks). This temporarily
overrides the audio track chosen by the hnguage option under
Audio Setup.
1. Press MENU and open the Applications menu.
2. Highlight Digital CC/
Audio Selector and press
ENTER.
3, Press AorYto sdect
Audio, and then press @
or _ to select the desired
service.
CableCARD
4, Press ENTER.
Selecting stereo/SAP broadcasts
The muhi<hannd TV so,nd (MTS) ?bat,re alIows yo, to
output high-fiddiFy stere<)sound. MTS also carl transmit a
second audio program (SAP) containing a second hnguage,
music, or other audio infbnnation (when provided by individual
stations).
The MTS fbature is *lotavaihble when the TV is in VIDEO
mode. When the TV receives a stereo or SAP broadcast, the
word "STEREO" or "SAP" appears o>screen when RECALL is
pressed.
To listen to stereo sound:
1, Press MENU and open the Audio menu.
2, Highhght Audio Setup md press ENTER.
:3. Press V to highlight the MTS field, md then press @ or
to sdect Stereo.
OptJcal Output FoHnat DoJby DJgi a
Rose_ iiiiiiiiiiiiiii Done iiiiiiiiiiiiiiiiiiiiiiiiiiiiii_ _
4. To save the new settings, highlight Done and press
ENTER. To reset the settings to the _tctory de'hubs.
highlight Reset and press ENTER.
Note:
• Xx_ can lesve the TV in Stereo tootle boo'sure it sutomat/c_J/y
outputs the type of sound being bfoadc_st (ste/_o or monaum/_
• ff#_estereosoundisnoisy,selectMONOtof_c/tJo'ethe17o/se
To listen to an alternate language on an ATSC digital station
(if available):
Highlight the Language field in step 3 above, and then press
or _ to sdect the language you pre_er.
% listen to a second audio program on an analog station
(if available):
Select SAP in step 3 above.
Note:
• A secondauc//cpmg/_m(SAP) can behesffdonly on I'ho'_eTV
statk)nsthatoftef£ Forexample, a sl?)tionfTI/{lht broadcustanol'hef
hngunge as a secof?d audio ptogl_lr_ ff you ??ave SAP o17 you 14////
see #}e cufTefrt p?Ogl_i?7017tl_escreen but henr the other hl_guage
klstead of the pfog/em _ ??OIrTla/8Ud//C
• ffyou ??aveSAP of?and the stoat?onyou a[_ wg£.:lr/nglis not
bmaclcast/nrj a second audio pfogzr?lrl, the shffion _ notarial addio
xvi/Ibe outpu_ Howeve?; occasionally theze is no sound at a// in SAP
mode ff th/s /l_-?f)f?e/?&set the Mr-_ Leatum to Stereo mode
4
HM95 R2 O 9-86 061505 84
Copyright (© 2005 TOSHIBA CORPORATION AiI rights reserved
÷
6/27/05, 5:11 PM r
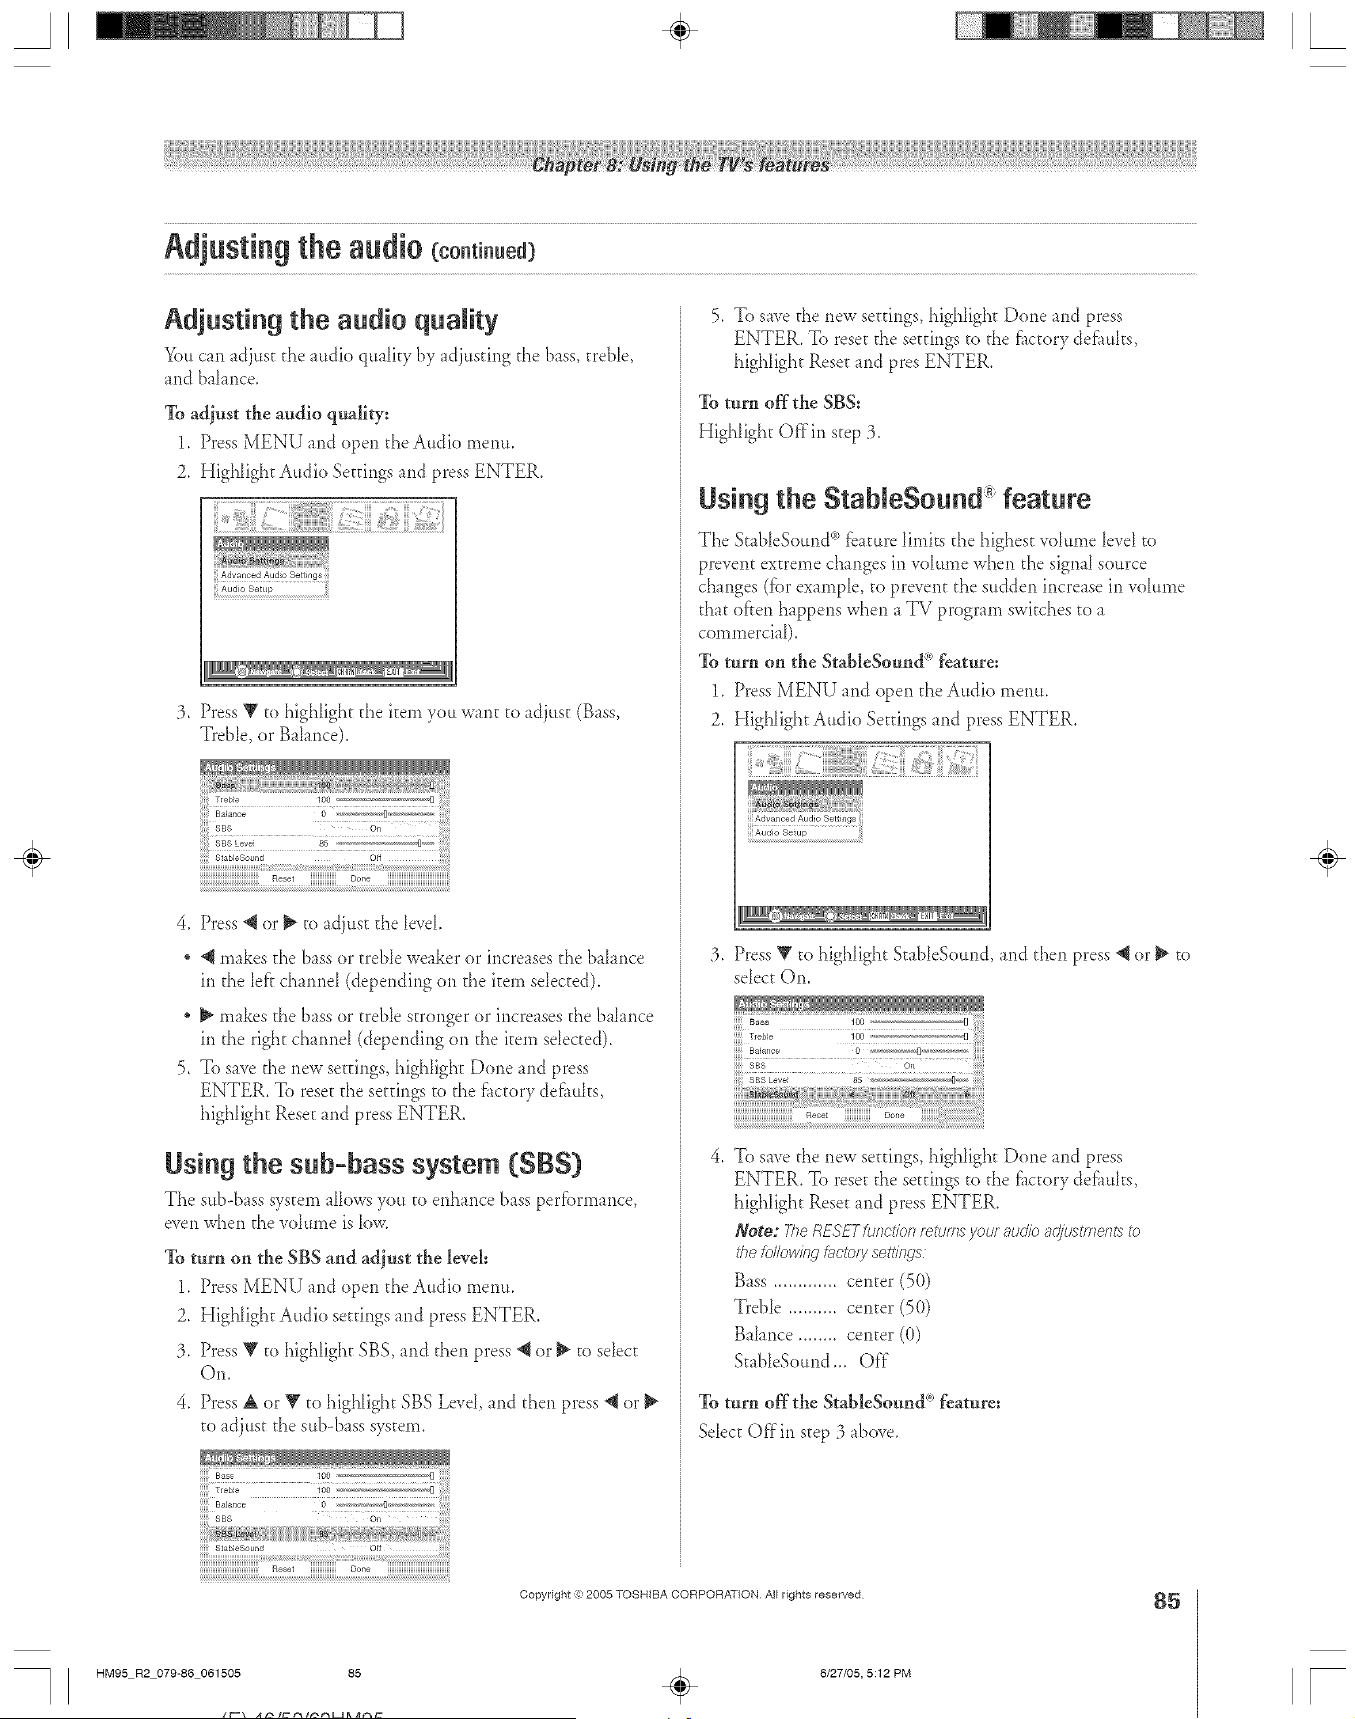
A ÷ L
Adjusting the audio quality
You can adjust d_e a,dio quahty by adj,sfing the bass, treNe,
and ba[ance.
To adjust the audio q_dity:
1. Press MENU and open d_eAudio menu.
2. IIigNight Audio Settings and press ENTER.
jj Advanced Audio Settings
j A_dio Setup
:3. Press Y to highlight d_e item you Wnlt to adjust (Btss,
Treble, or B thnce).
StableSound oif :_
iiiiiiiiiiiiiiiiiiiiiiiiiiiiiiiiii Reset iiiiiiiiiiiiiii Oone iiiiiiiiiiiiiiiiiiiiiiiiiiiiiiiiiiiii
,
Press @ or _ to tdjust d_e level
@ makes the bass or txebIe weaker or increases the balance
in the [el}chmnd (depending on the item selected).
_ makes the bass or treble stronger or increases the b _iance
in the right channd (depending on the item sdected).
5. To save the new settings, highlight Done and press
ENTER. To reset d_e settings to the fhctory defhuhs,
highlight Reset and press ENTER.
Using the sub=bass system (SBS)
The sub-btss system allows you to enhance bass performance,
even when the vdume is low.
To turn on the SBS and adjust the level:
1. Press MENU and open d_eAudio menu.
2. Highlight Audio settings and press ENTER.
3. Press V to highlight SBS, and then press _{or _ to select
Oil.
4. Press A or V to highlight SBS Level, and d_en press @or
to adjust the sub-bass system.
iiiiiiiiiiiiiiiiiiiiiiiiiiiiiiiiiiReset iiiiiiiiiiiiiii Oone iiiiiiiiiiiiiiiiiiiiiiiiiiiiiiiiiiiii
5. To save d_enew seatings, highIigh_ Done and press
ENTER. To rese_ d_esettings to the f_tctorydefhuhs,
highlight Rese_hid pros ENTER.
To turn offthe SBS:
Highlight Offin step :3.
Using the StableSo nd" feature
The StabIeSound °'__baturelimks the highest wlIume [evd to
prevent extreme changes in vdume when the signal source
changes (fbr example, to prevent the sudden increase in vdume
that often happens when a TV program switches to a
commercial).
To turn on the StableSound <'°feaure:
1. Press MENU and open the Audio menu.
2. HigNight Audio Settings and press ENTER,
:3. Press _ to highlight StabIeSound, and d_en press @ or _ to
sdect On.
To save the new se_tings, highIigh_ Done and press
ENTER. To rese_ d_e settings to the f_tctory defhuhs,
highlight Rese_ and press ENTER.
Note: TheRESFTfunctionforumsyour audio ac_:u_tmen_to
i'hefollowingf,_cto/ysettiirg___
Bass ............. center (5(})
Treble .......... center (50)
Bahnce ........ center (0)
StableSomld ... Off"
To turn off the StableSound ° feature:
Select Offin step 3 above.
Copyright ,:) 2005 TOSHIBA CORPORATION AJl rights reserved
85
HM95 R2 079-86 061505 85
÷
6/27/05, 5:12 PM
÷
r
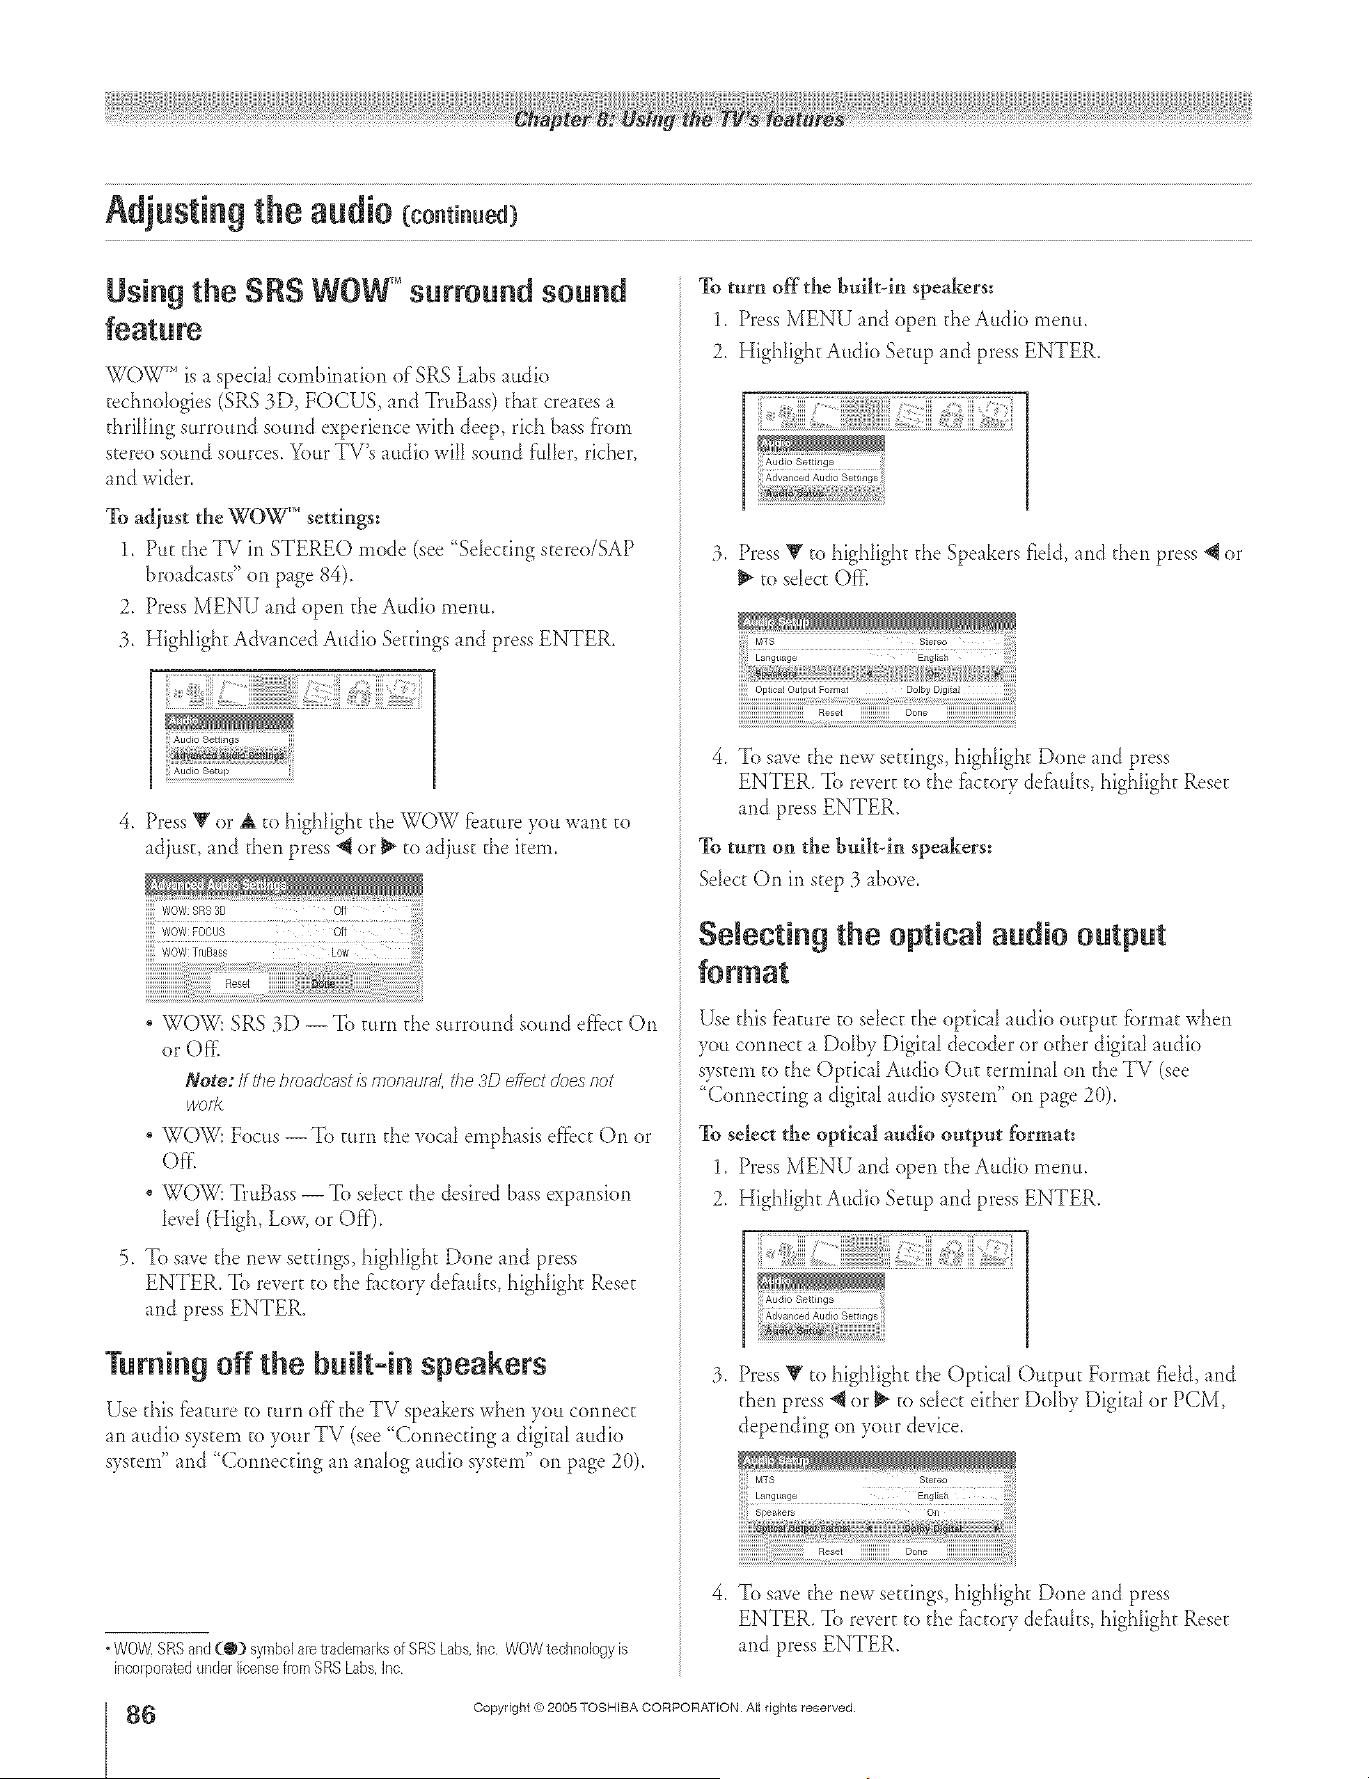
A ÷ L
Using the SRS WOWTM surround sound
WG_ r', is a speciaI combination of SRS Labs audio
techndogies (SRS 3D, FOCUS, and TruBass) t[_atcreates a
thrilling surround sound experience with deep, rich bass from
stereo sound sources. Your TV's audio will sound f'ttller, richer,
and wider.
To adjust the WO_"" settings:
1. Put the TV in STEREO mode (see "Sdecting stereo/SAP
broadcasts" on page 84).
2. Press MENU and open the Audio menu.
3. Highlight Advanced Audio Settings and press ENTER.
Audio Settings
jj!Audio Setup ii
4. Press V or A to highlight tt_eWOW fbature you want to
adjust, md then press @or _ to adjust the item.
WOVe'SRS8[} Oil
..... iii ii!i!!i!ii!i i
Wow FOCUS Oft
WOW TruBass Low
WOW: SRS 3D -- To turn the surround sound effbct On
or Off}
Note: If the/eoadci_stis mon_u/>i, the 3D effect does not
/volt<
, WOW: Focus --To turn the voca_emphasis effbct On or
Offi
WOW: TruBass -- To select the desired bass expansion
bvd (High, Low, or Off).
5. To save the new settings, highlight Done and press
ENTER. To revert to the fitctory def_udis, highlight Reset
and press ENTER.
Turning off the built=in speakers
Use this fb mire to turn of'[ the TV speakers when you connect
m _udio system to your TV (see "Connecting a digitfl radio
system" md "(}onnecfing an analog audio system" on page 2(}).
° WOW,SRSand(@) symbolaretrademarksof SRSLabs,Inc WOWtechnologyis
incorporatedunderlicensefrom SRSLabs,]nc
6
HM95 R2 O 9-86 061505 86
To turn offthe buikdn speakers:
1. Press MENU and open the Audio menu.
2. Highlight Audio Setup md press ENTER.
3. Press Y to highhght the Speakers fidd, and then press "_ or
to sdect Oft_
4. To save the new settings, highlight Done md press
ENTER. To revert to the f_ctory defl_uhs, highlight Reset
and press ENTER.
To turn on the built_in speakers:
Sdect On in step :3_bove.
Selecting the optical audio output
Use d_is fbature to sdect the optical audio outpu_ fbrmat when
you connect a Dolby Digital decoder or other digital audio
system to the Opdcfl Audio Ou_ terminal on the TV (see
"Connecting a digital audio system" on page 2(t).
To select the optlca[ audio output format:
1. Press MENU and open the Audio menu.
2. Highlight Audio Setup md press ENTER.
:3. Press _' to highlight the Optical Outpu_ Format rid& md
then press "_or _" to sdect either Ddby Digital or PCM,
depending on your device.
4. To save the new settings, highligh_ Done and press
ENTER. To revert to the f_ctory defi_uhs, highlight Rese_
and press ENTER.
Copyright ,(_:2005 TOSHIBA CORPORATION Atl rights reserved
÷
6/27/05, 5:12 PM r
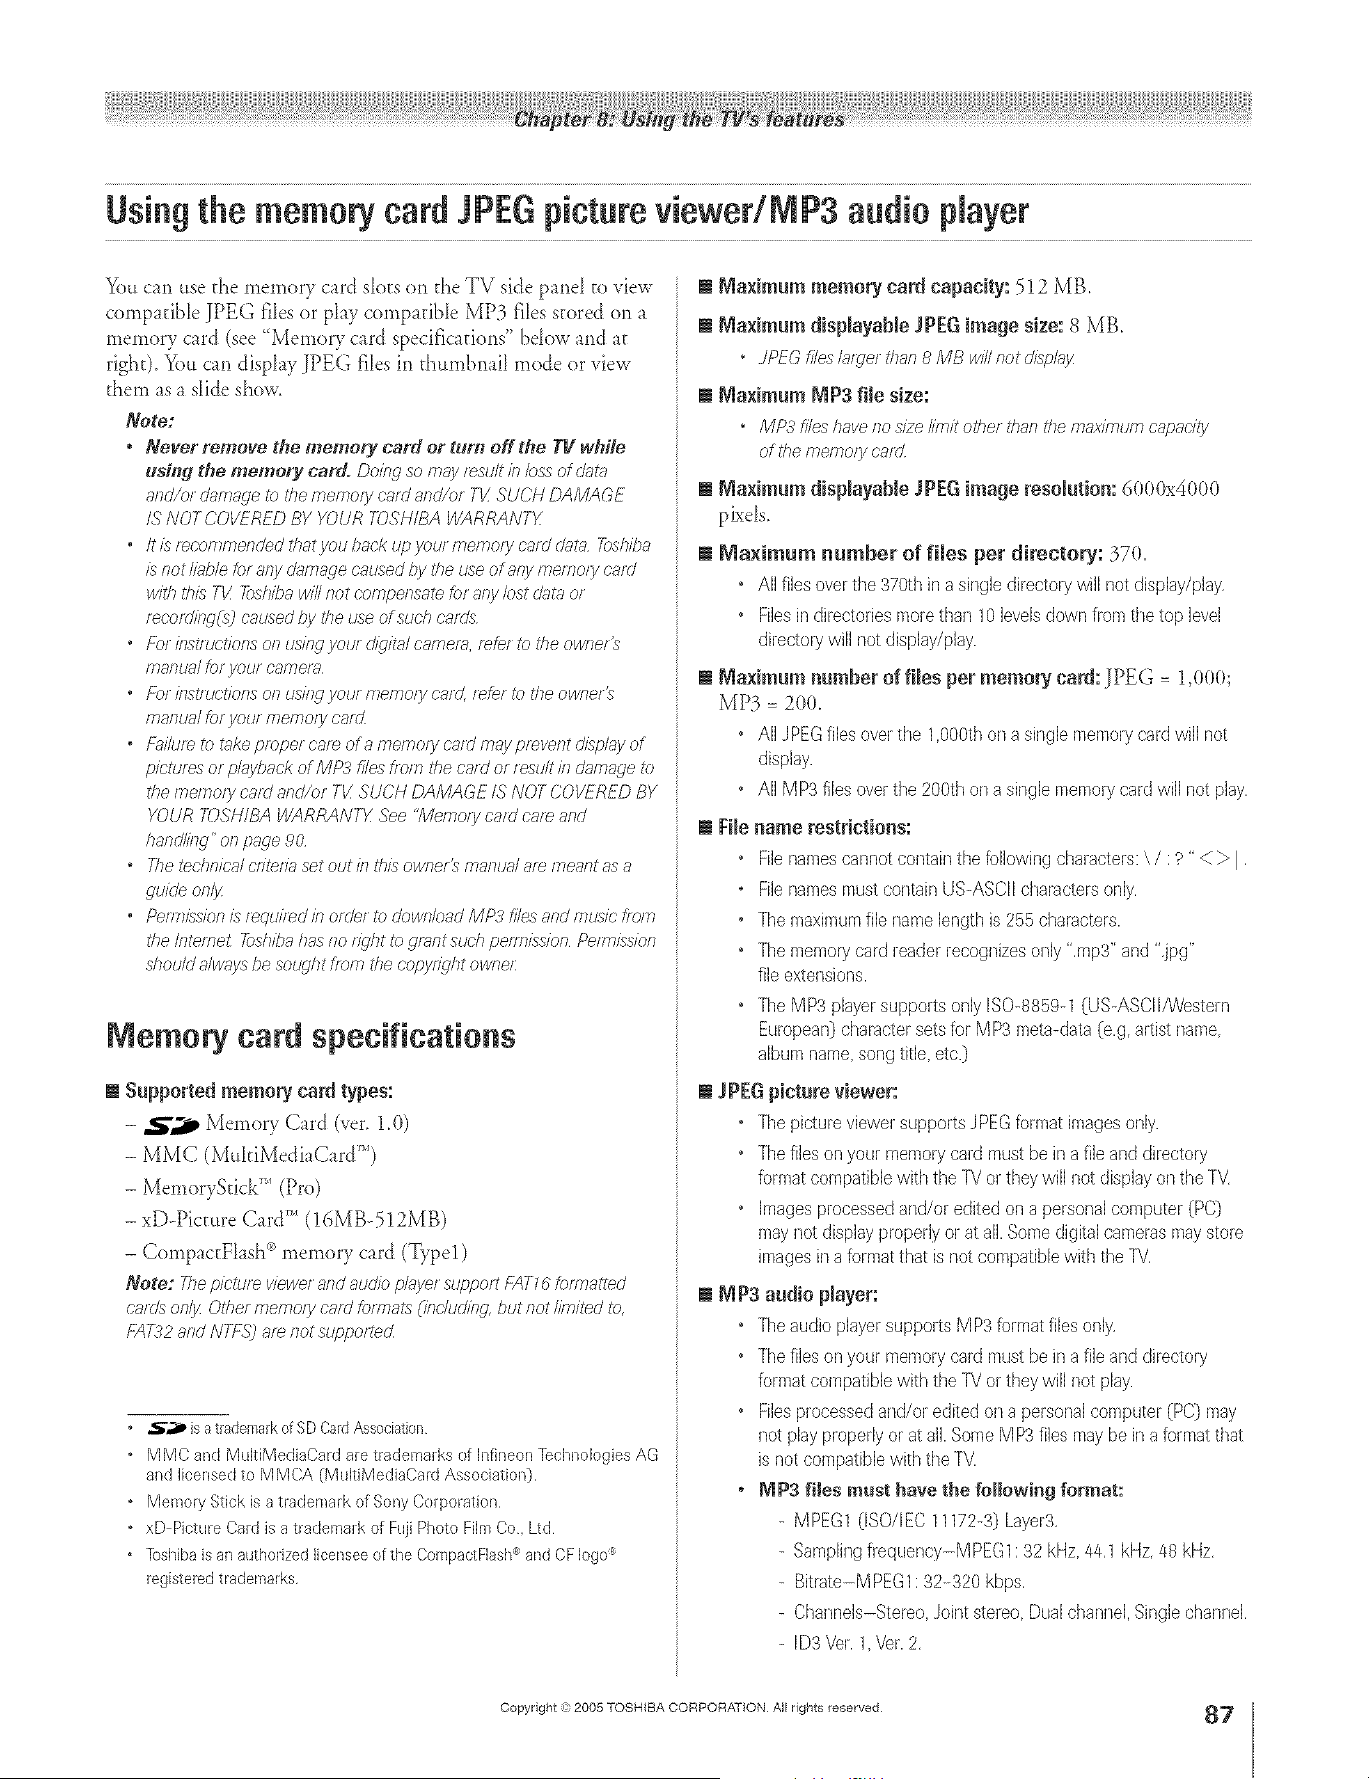
A ÷ L
Usiagthe meamq¢card JPEGpictureviewedNP3 audio player
You can use d_e memory card slots on the TV side pand co view
compmible JPEG files or play corapmib[e MP3 flies scored on a
memory card (see "Memory card speciflcmions" bdow and ac
right). You can display JPEG flies in thumbnail mode or view
them as a sine show.
Note:
• NeverremovethememorycardortuHtoffthe Tlfwh/#e
uafnd the memory card. Doirm so may r_sulr in loss of clut_
arlr//or damage i?)Ne memory carry and/or TI/ SUCH DAN/AGE
IS NOT COVFRED BY YOUR ;qOSNIBA WARRANTY
° It is mcomnreryded tbaryou back up your fTlemory card @/t_l 7-ost?iba
is ROt Iiuble tot arty dalylage caused by the use of aey memory crrid
wit/_ this TI/ 7_sb/ba w/// not compensate _r any lost eta or
mcoal/ng(s) caused by the use of sud} c'ard.'_
" fz_)r/flStrIJctiofYsO/rUslb_lyouro'f4/italcalrlerR, f_feftotheowiref's
manual hiyour canters
" For"/rlstluotiofys err usi/W your nremoiycnrd, t_f,er totheoweet_
marlurr/ for ycxe aremory card
. f->,ilum to tnke proper cat_ era fTlemoolycard may fJmveRt d£play of
pictures or ph_yback of MP3 files from the card at result in rk_mage to
tbe memory card and/or TI/ SUCN DAN/AGE IS NOT COVERED BY
YOUR T(JSNI£A WARRANTY .See"Memoly card c'af_ and
hand//bg" o/7 paqe 90
. The technical cr/teda set out in this owner's manu_d ar_ meant as a
guide onlJz
• Peiyrr/ssio£Lst_quir_d b oulern) rJoweload MP3 file_ and nrus??:from
tbe Inteme£ _)sh/ba has fro t7_'/7t S) grant s_-h pemyiss/on Pefm/ssior7
should d_x;yysbe sought from the copy/_qllt owner:
Memory card specifications
N Supported memory card types:
- _,_, Memory Card (vet. 1.0)
- MMC (MukiMediaCard'')
- MemorySfick" (Pro)
- xD--Picmre Card'' (16MB--512MB)
- CompaccFlash _>memory card (_,pel)
Note: 7he picture viewer and audio pk_ye_supper€/:;4T76 tormatted
crrals eel}4 Other eremoiy card hxmats (irlehJdirlg but not limited 179,
f-71X_72and NT;_gj ar_ riot sdpported
" 5"_ is a trademarkof SD CardAssociation
, MMCand MultiMediaCard are trademarks of h-ffineonTechnologiesAG
and Ncensed to MMCA (MultiMediaCard Associstior0
" MenJoly Stick is a tladernark of Sony Corporation
, xD Picture Card is a trademark of FujiPhoto Film Co. Ltd
* Tosl-fibai6 an authorized licensee of the CompaclFiash®and CF logo
registered trademarks,
m Naximum memory card capacity: 512 MB.
m Naximam displayahleJPEG image size: 8 MB.
" JPEGfilesIo_gertb_m8 MB will notd/ivph;y
N Naximum NPg filesize:
" MP3 fileshaverio sizelimit otherth6mthe r-r/6;_?r_umcapacity
of thememoo/ c'a_rJ
N Naximam displayaNe J PEG image resolution: 6000x4000
pL,:els.
m Ma×imum number of files per directory: 370.
• All flies overtile 370th in a single directorywill not display/play,
• Fliesin directoliesmorethai 10 levelsdown fromthe top level
diredory will clotdisplay/play.
m Na×imam uamber of files per memory card: JPEG = 1,000;
MP3 = 20(L
• All JPEGfiles overthe 1,000thon a single memorycardwill not
display.
• All MP3 filesoverthe 200th on a sir/gle memorycardwill not play.
11FiLename restrictions:
• Filenamescannot contain the followingcharacters:\ / :? "< > I
• Filenames mustcontain US-ASCIIcharaders only.
• Themaximumfile namelength is 255 characters.
• Thememorycard reader recognizesonly",rap3" and ",jpg"
fileextensions.
• The MP3 playersupports only IS0-8859-1 (US-ASCII/Westeln
European)charactersets for MP3 meta-data (e,g,artist name,
album name,songtitle, etc.)
11J PEG picture viewer:
• Thepielure viewer supportsJPEGformat imagesonly.
• Theflieson your memorycard must be in a file and directory
formatcompatiblewith the TVor they will not displayon the TV
• Imagesprocessedand/or edited on a personalcomputer(PC}
mayriot displayproperly or at all,Some digitalcamerasmaystore
imagesin a formatthat is not compatiblewith theTV,
m MP3 audio player:
• Theaudio playersupports MP3 formatflies only,
• Thefileson your memorycard must be ina file and directory
formatcompatibb with the l_! or theywill not play.
• Filesprocessedand/or edited on a personalcomputer (PC} may
not play prope@or at aN.SomeMP3 files maybe in a formatthat
is not compatiblewith the TV
• MP3 flies must have the following format:
- MPEG1(ISO/IEC 11172-3)Layer&
- SampNngfrequency-MPEGl: 32 kHz, 4/*.1kHz 48 kHz.
- Bitrate-MPEGl: 32-320 kbps.
- Channels-Stereo Joint stereo Dualchanc/el,Singlechannel.
-IDSVec. lVer. 2.
÷
HM95 R2 087@2 061505 87
Copyright ,):)2005 TOSHIBA CORPORATION All rights reserved
÷
6/27/05, 6:07 PM
87
r
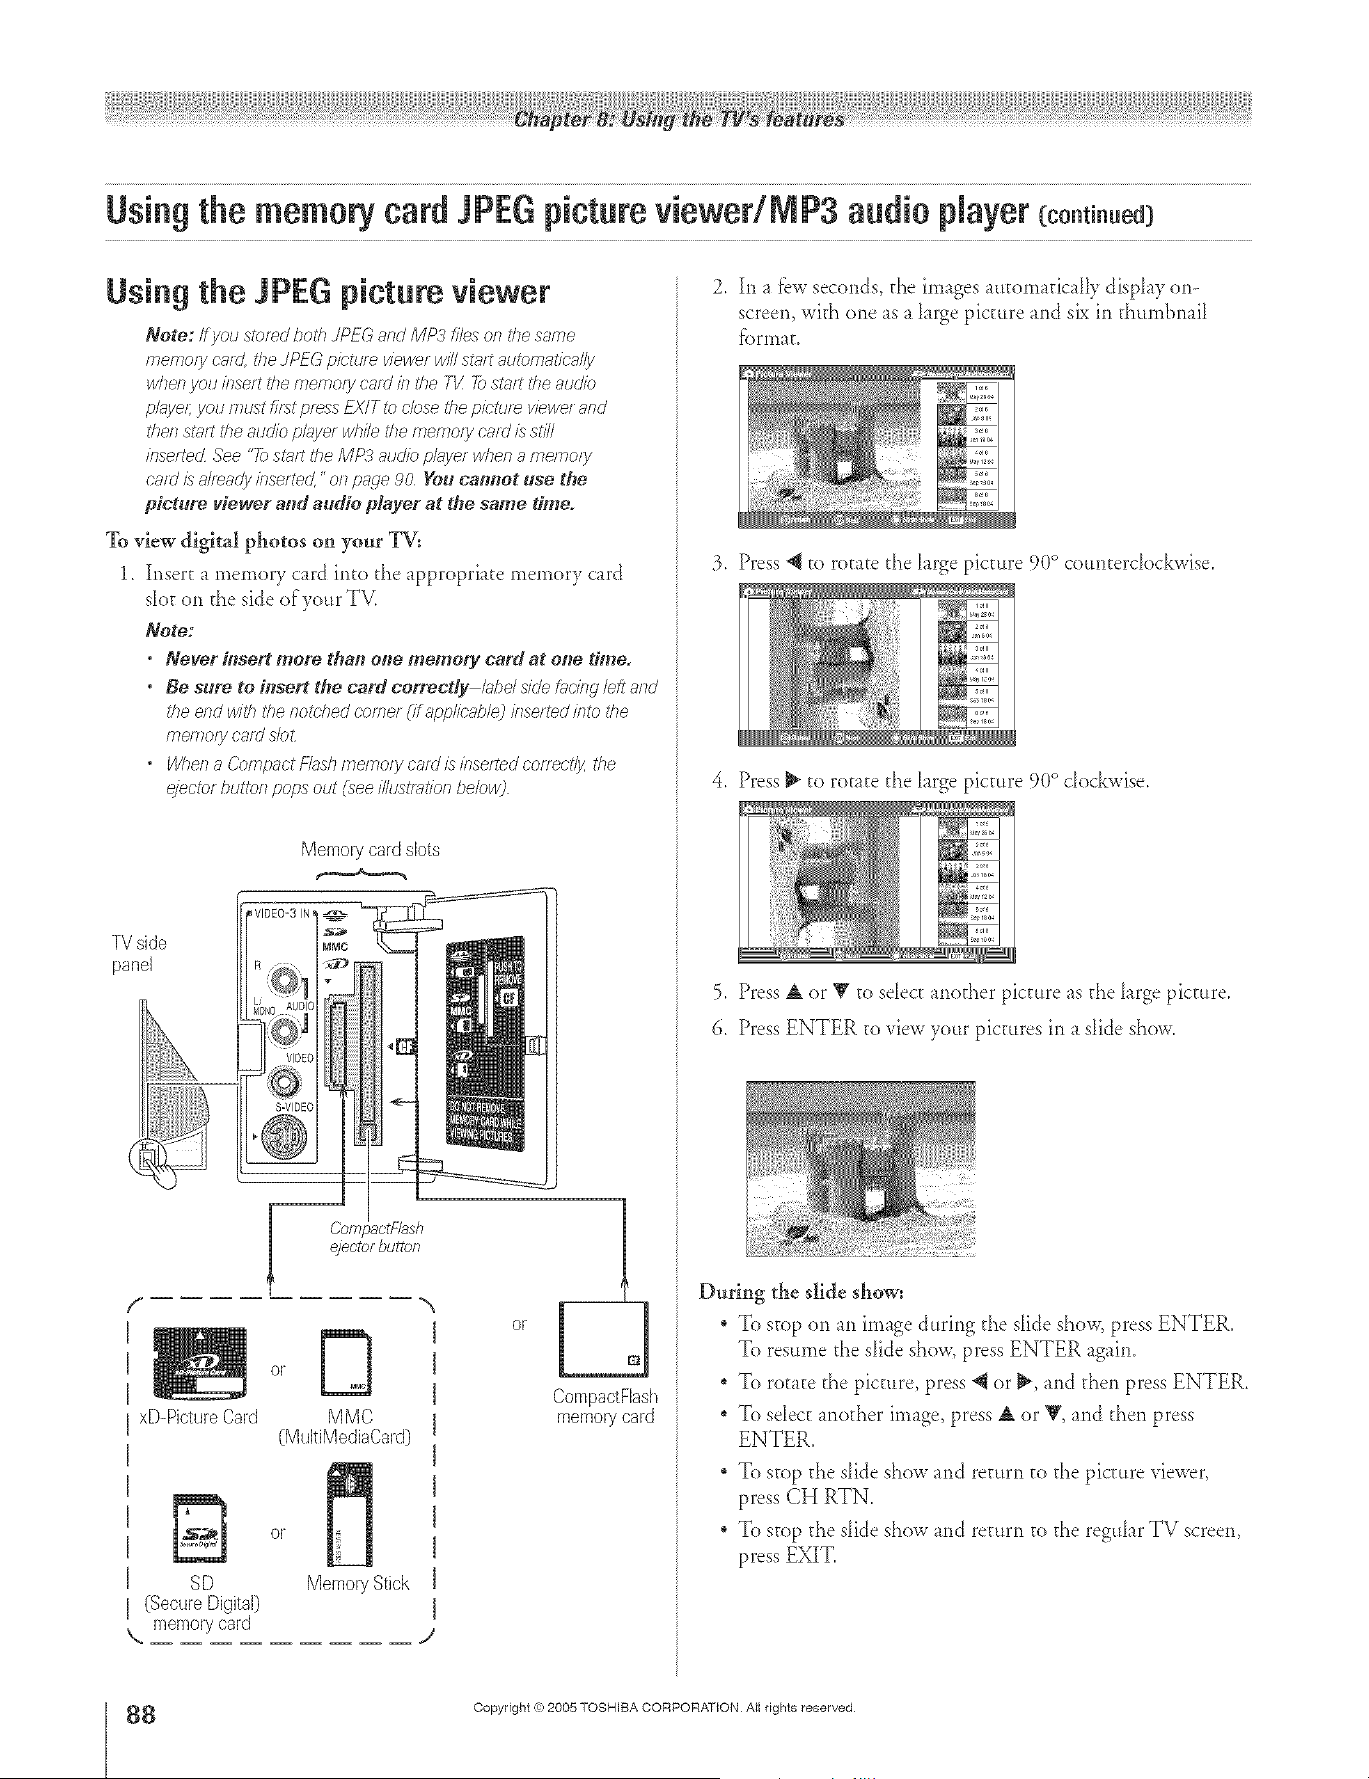
A ÷ L
Usiag the meamnj card JPEGpictureviewedNP3 audio Nayer coo.t ..ed
Using the JPEG picture viewer
Note; If you stcred both dPEG _nd MP.:/ fires on _hesame
rTlemo/y er_rd,the JPFG p/ctiJre v/eH/etwill statt autcmatica//y
when Vou /?.>se/tthe memory catd h_the TK 7bstqft t/?eaudio
pl;4yel; yOUf7?ustfh_t preSSEXIT to dose the p/etu[_ viewer and
then stall the audio player while he memory cn/d is stir/
/nsettedL See '7b stmt tile MP3 auo)b ph_yerwhen a/nemo/y
cmd is gdr_a@bsertedL "or1 p%le 90 _'gu cahoot use the
picture viewer and audio player at the same dmeo
To view digital photos on your TV:
1. Insert a memory card into the appropriate memory card
slot on the side of your TV.
Note:
• Never#tsertmorethaoo#ememorycardatouedmeo
• Be sure to insert the card correcdy IHt)e/sfde/Hchlg left _md
the end with the notched corner (ff applie;_hleJirlse/ted into the
memory card slo_
" WheR 8 Cofrlpoct f:h_sh fT?efy]ory cord is bsefted co[tact/y, the
_:eetcr /)uttofl pops out (see dlustf;lth)n bebw)
TV side
panel
Memorycardslots
_VlDE0-3IN I@
i MMC
8-VIDEC
f,
xD-PictureCard
SD
(Secure Digital)
K memory card
or
MMC
(MultiMediaCard)
or
Memo_7Stick
EJ
CompactFlash
memorycard
2. In _ fbwseconds, d_e images mtorn_dc flly disphy or>
screen, wkh one _s _ hrge picture and six in thumbnail
f_.)ri'_la [.
3, Press @ to rotate the large picture 90° counterclockwise.
4, Press _ to rotate the hrge picture 9(t° clockwise.
5. Press _ or _ to sdect another picture _s the hrge picture.
6. Press ENTER to view your pictures in a slide show.
During the slide show:
To stop on an image during d_e s[ide show, press ENTER.
To resume the slide show, press ENTER agaim
To rot _tethe picture, press @ or _, and d_en press ENTER.
, To sdect another image, press _ or _, and then press
ENTER.
, To stop the slide show and return to the picture viewer,
press CH RTN.
, To stop the slide show and return to the reguhr TV screen,
press EXIT.
÷
8
HM95 R2 0 7-92 061505 88
Copyright (e;2005 TOSHIBA CORPORATION Atl rights reserved
6/27/05, 6:07 PM r
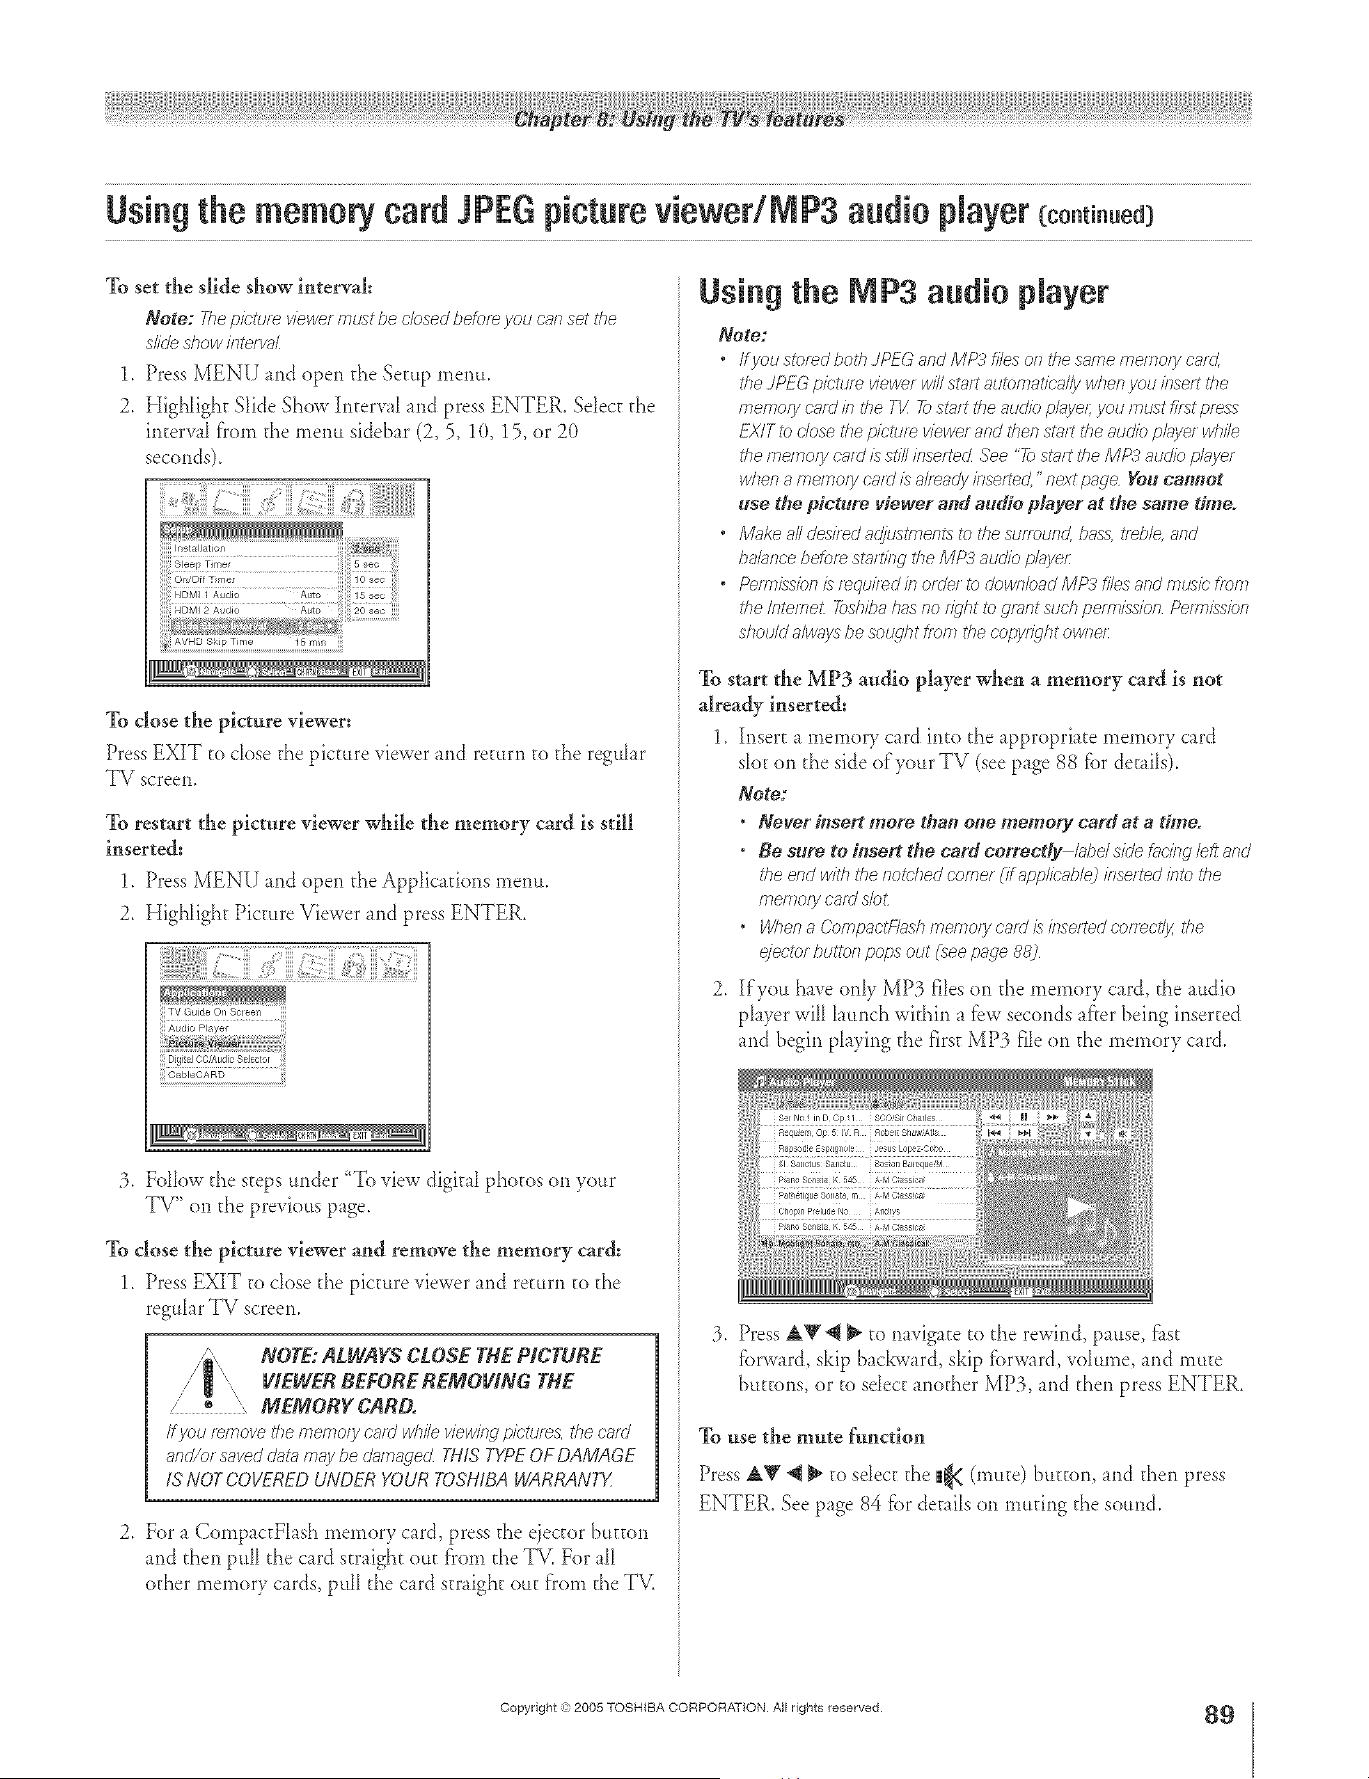
A ÷ L
Usiagthe memorycard JPEGpictureviewedMP3 audio playercoo.t ..ed
To set the slide show interval:
Note: Thepicture viewermu_tbe closedbetor_you can set the
slideshowintel_(71
1. Press MENIJ and open tt_e Setup menu.
2. Highlight Slide Show Interwl and press ENTER, Sdect tt_e
interval f'rom the menu sidebar (2, 5, 10, 15, or 20
seconds).
To close the picture viewer:
Press EXIT to close the picture viewer and return to t}_ereguhr
TV screen.
To restart the picture viewer while the memory card is still
inserted:
1. Press MENU md open tt_eApplications menu.
2, Highlight Picture Viewer md press ENTER,
11 DJrita] CC/kud o SeJector
:3. Fdbw the steps under "To view digit _1photos on your
TV" on the previous p_ge,
To close the picture viewer and remove the memory card:
1. Press EXIT to dose tI_epicture viewer and return to tI_e
regular TV screen.
NOTE: ALWAYS CLOSE THE PICTURE
VIEWER BEFORE REMOVING THE
/ _ MEMORY CARD.
Ifyou r_rnove_he/71eqrolycard while view//_gpictIJl_Zti}e card
and/or savedclat_maybe damagecLTHIS TYPEOFDAMAGE
IS NOT COVEREDUNDER YOUR TOSHIBAWARRANTX
2, For a CompactFIash memory c_rd press the ejector button
and d_en Ddl tt_e c_rd straight out fi'om the TV. For all
other memory cards pull the c_rd strflght out f'rom the TV.
Using the aP3 audio player
Note:
° If you stored both JPFG _nd MP3 files on the same memoly card.
the JPEG picture viewer will start au_bmatica//y when you itrse/t #_e
memory cnrd in the TI/ 7_ st_fftthe audio pl;_ye/;}/otJirllJst fllSt pr_}ss
FXIT _bclose _7?epicture viewer and dref7st;lit the audio pbye/ Jvhi/e
the rrle/rlo/y card/?_st/2/r_sertedZSee 'rb s_Vutthe MP3 8ud:b p/;_yer
when a memory card is already/nse/-teK "next paae You carmet
use the picture viewer and audio player at the same time.
° Moke all desired ac_iustolents to the surround, bass. t_ehle. _md
ba/glfrd'ebefor> starting the MP;-7audio p/grver
* Pemrl}sionlsr_qui/_dislorde/ibdowebadMP3filesandmusiefren7
the Internee 7bsi}ba has no ft,'hi to glent such pemffssion Pef_,l/}'_/orl
should alwgsysbe sotLqht tram the copyl_qht oweel:
To start the MP3 audio player when a memory card is not
already inserted:
1. Insert a memory card into the appropriate memory card
s[o_on the side of your TV (see page 88 fbr details).
Note:
* Never insert more tha_ one memory c_rd at a time.
o Be sure to h_sert the card eorrecdy /_be/side _;_cingleft and
#_e end with #_e/lotched comer (if applic_h/ej inse/ted into the
memoly card s/o£
* When a Compacl_7_r._hmemoir card is k_selted cov_ct/y, the
_:eotor btJttOfl pops out (see pnge 88)
2. {fyott have only MP3 files on the memory card, the audio
player will hmch within a few seconds after being inserted
and begin playing the first MP3 file <)*1the memory card.
:3. Press _r@ _ to navigate to the rewind, pause, ff_st
fbrward, skip backward, skip fbrward, vdume, and inure
buttons, or to sdect another MP3, and then press ENTER.
To use the mute function
Press A_ *q_ to select the |_4((mute) bu_ton, md then press
ENTER. See p_ge 84 fbr de_ails on mu_ing the sound.
÷
HM95 R2 087-92 061505 89
Copyright ,3:)2005 TOSHIBA CORPORATION AJl rights reserved
÷
6/27/05, 6:07 PM
89
r
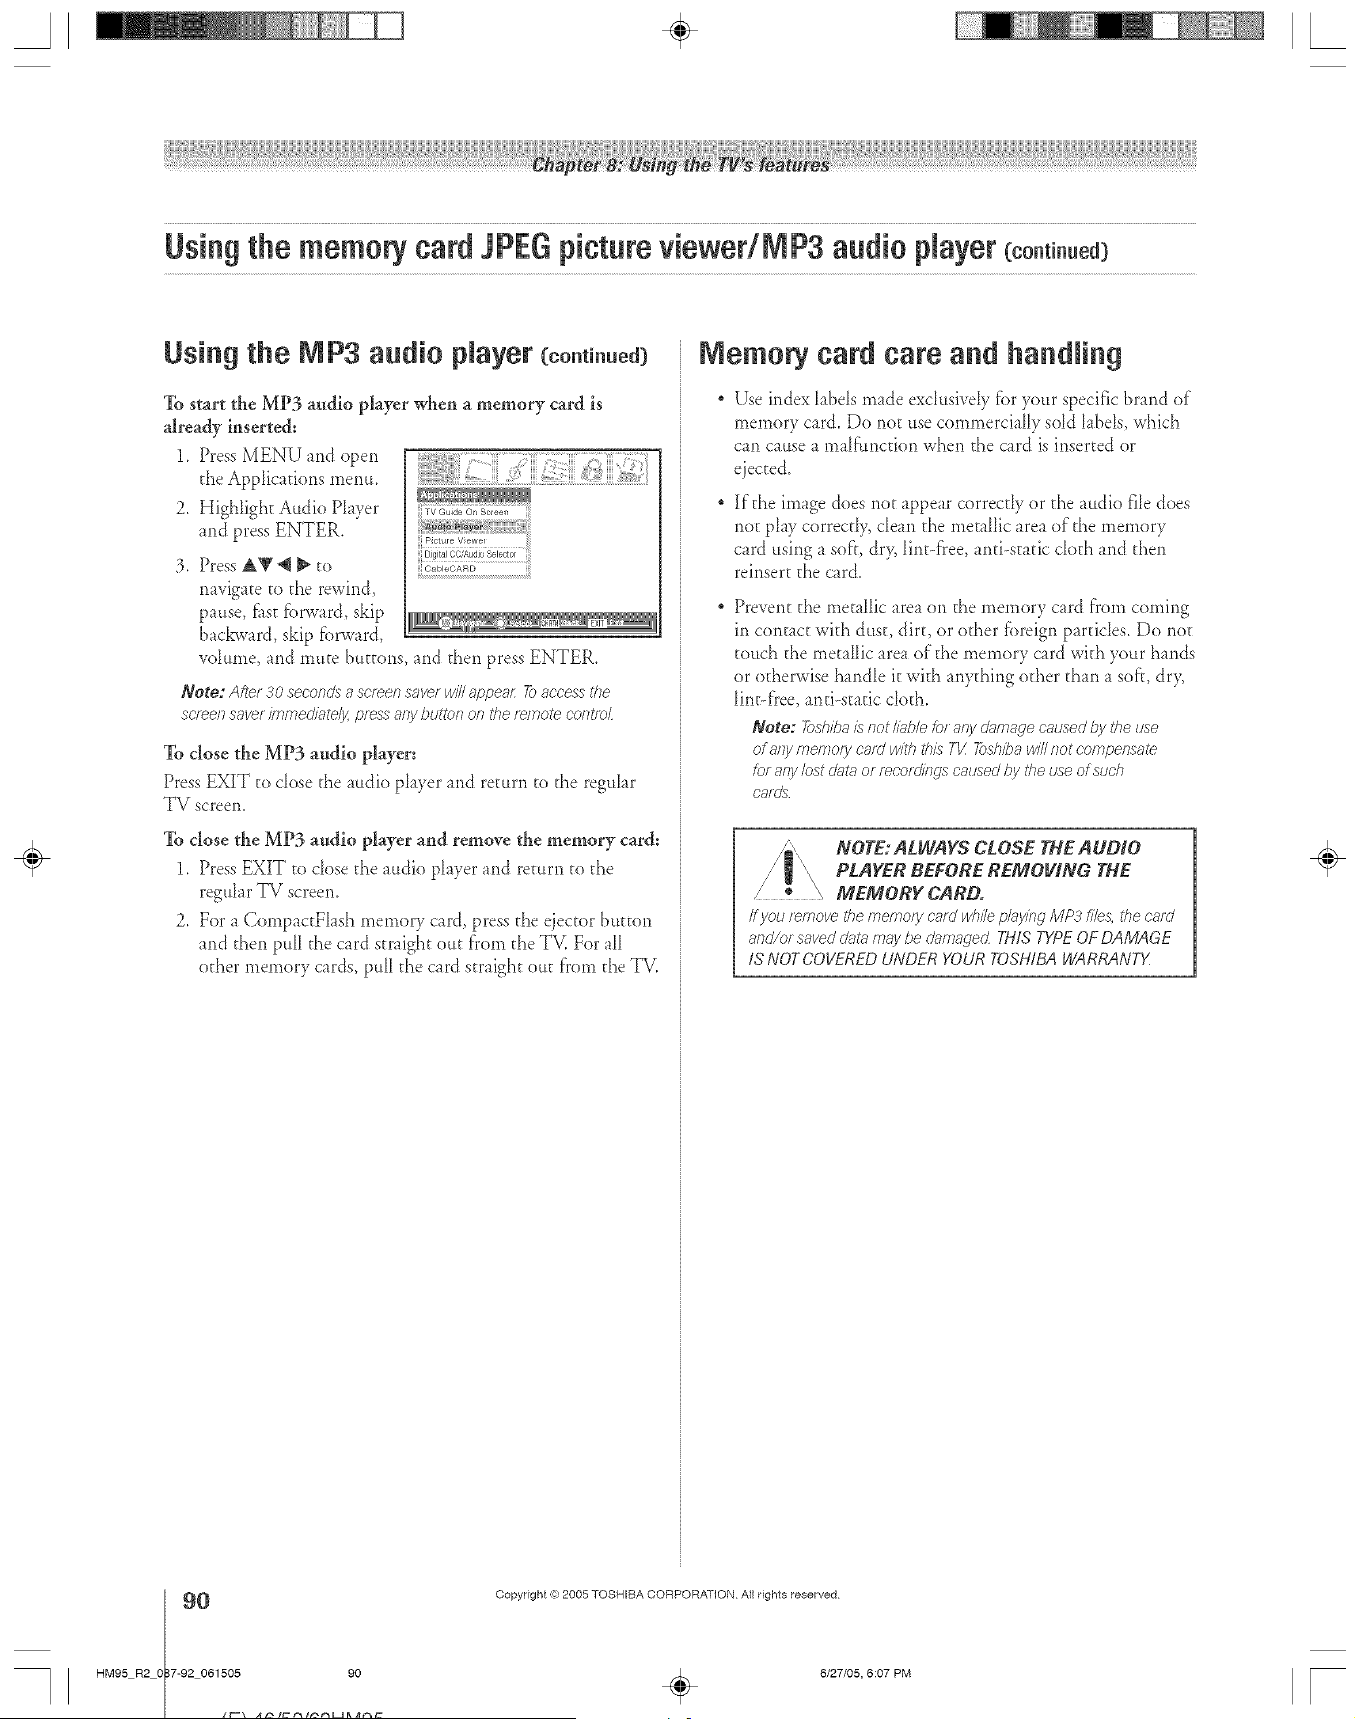
Usiag the memorycard JPEGpictureviewedNP3 audio Nayer coo.t ..ed
Using the NP3 audio player (co.ti.ued)
To start the MP3 audio player when a memory card is
already inserted:
1. Press MENU and open
the Applications menu.
2. Highlight Audio PIayer
and press ENTER.
Press A_' @ _ to
navigate to the rewind,
pause, f_st fbrward, skip
backward, skip f_)rward,
volume, arid mute buttons, arid then press ENTER.
CableCARD
Note: After 30 seconds a screen saver wiTIappear: 7b access the
screel7 saver 17nmedl?_te/y,press any btJttcr7 on the r>lrlote corFlo£
To close the MP3 audio player:
Press EXIT to dose the radio player arid remm to the regular
TV screen.
To close the MP3 audio player and remove the memory card:
1. Press EXIT to dose d_eaudio player arid return to d_e
regular TV screen.
2. For a CompactFlash memory card, press the ejector buEton
arid daen pall dae card straight out from the TV. For aIl
other memory cards, pull dae card straight out f'rom the TV.
Memory card care and handling
Use index [abds made exd:LsiveIy_br your specific brand of
memory card. Do riot use commercially sold [abds, which
can cause a ma[l'tmctiori when the card is inserted or
ejected.
If the image does riot appear correctly or d_e audio file does
not p_ay correctI> dean the metallic area of the memory
card using a soft, dr> lint-fi'ee, and-static cloth arid d_en
reinsert d_ecard.
Prevent the met _lIic area on d_e memory c_rd from coming
in contact wkh dust, dirt, or other fbreign pardcIes, Do *lot
touch the metaIIic area of the memory card with your hands
or od_erwise handle it with ariyd_ing od_er d_a*l a sol?, dr>
lint-f}'ee,anti-static cloth,
Note: fi>sMbais Ilot Iiublefor aW dgffnagecausedi_gtheuse
Of any tTle/7_Olycard withthis TV 7bd_bawill r_oteompeesate
for anyIcst di_tg_or mcord/rlgscausedhy theuse of sudv
cards
NOTE:ALWAYS CLOSE TNE AUDIO
PLAYER BEFORE REMOVING THE
/ ® _ MEMORYCARD.
Ifyou r_movethe memo/ycard whilepl_yingMP3 file& thecard
and/or saveddgff_,,maybe damagecLTHISTKPEOF DAMAGE
IS NOT COVEREDUNDER YOUR TOSHIBAWARtL4NTY
÷
O
HM95 R2 O 7-92 061505 90
Copyright ,{e:2005 TOSHIBA CORPORATION Atl rights reserved
6/27/05, 6:07 PM [
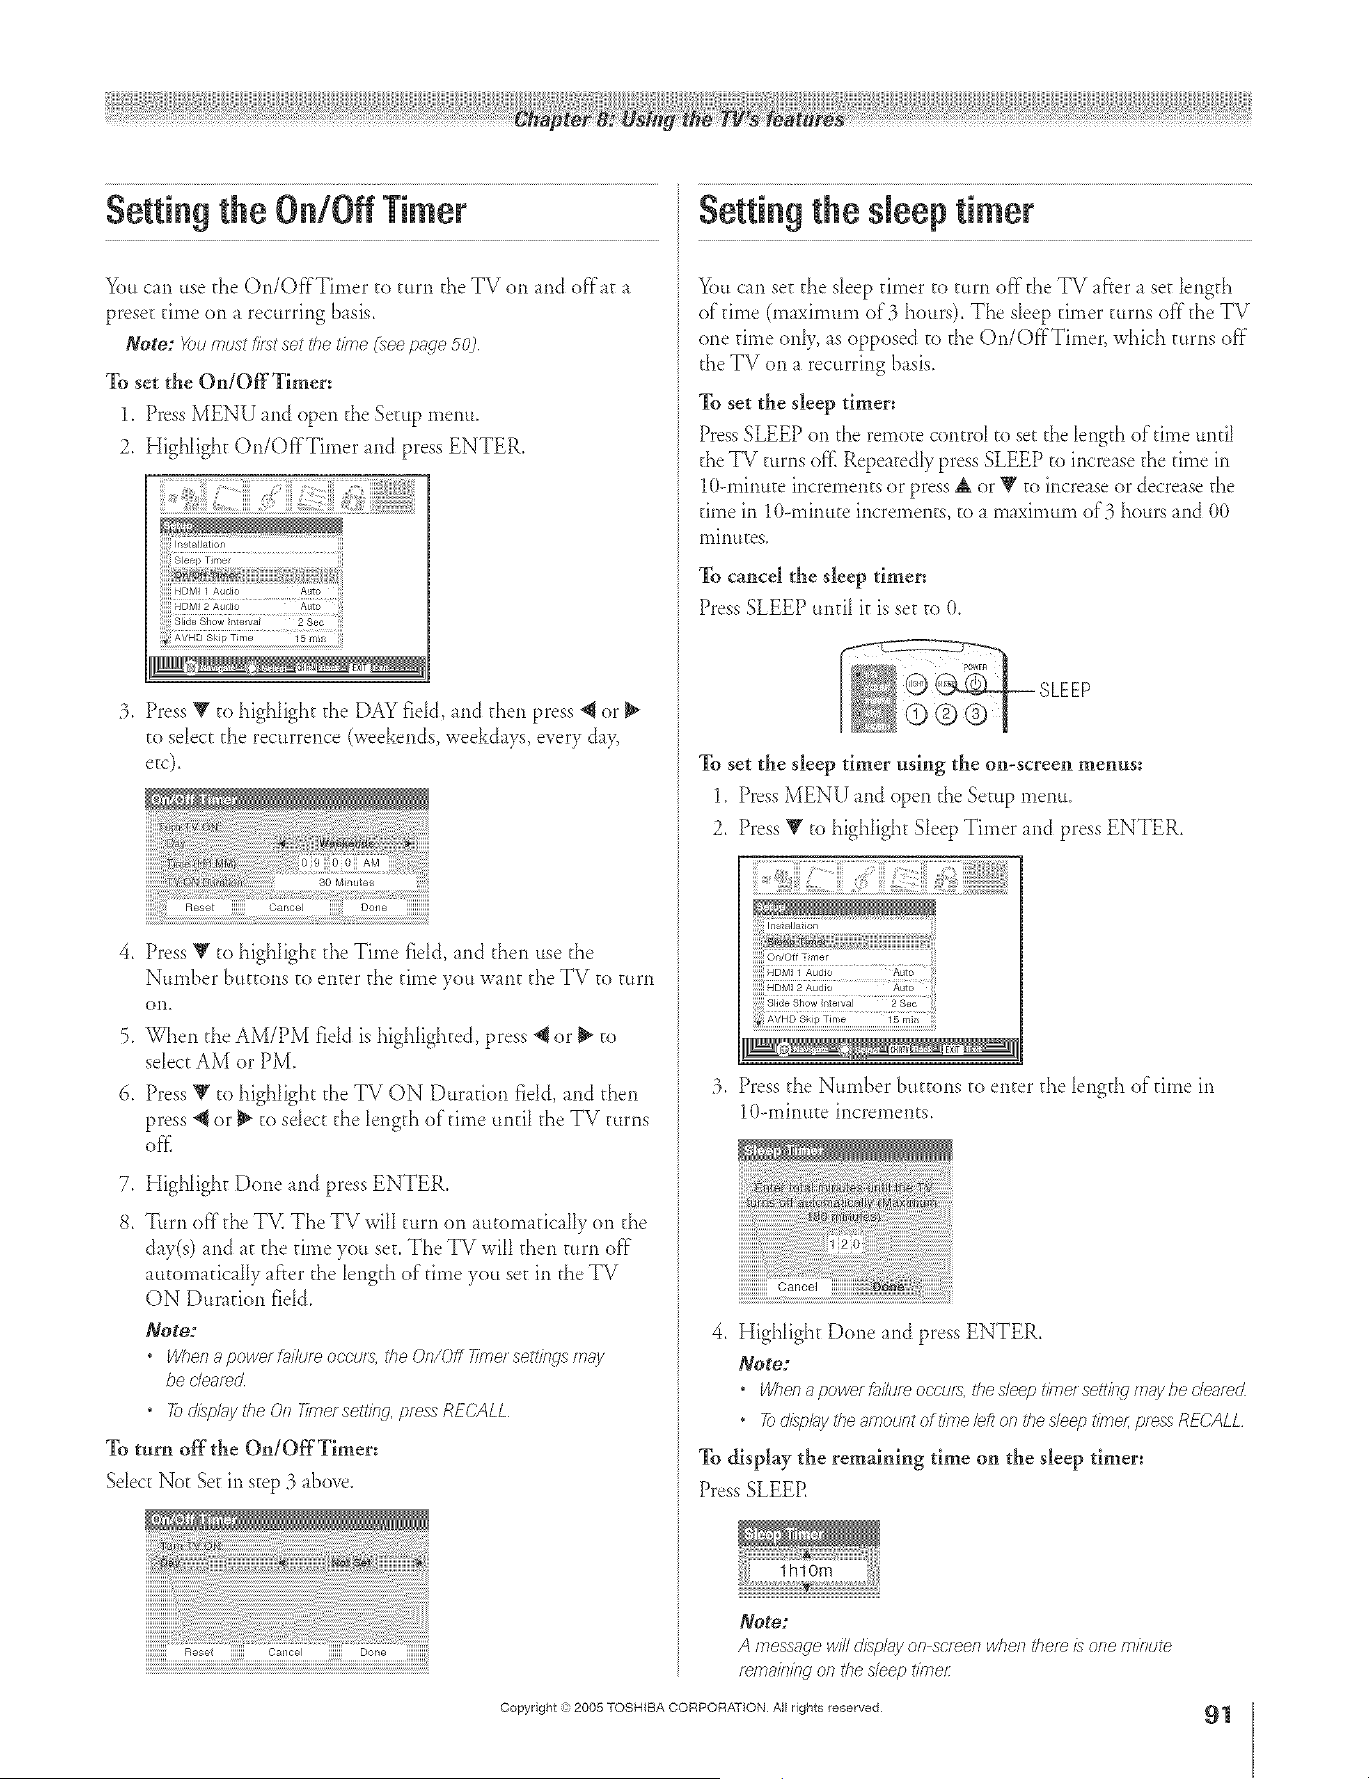
A ÷ [
Setting the On/Off Timer
You can use d_eOn/OffTimer to turn d_e TV on and offat a
preset time on a recurring basis.
Note: _)umustfirstsettl?e_?ne(see p@'e 502
To setthe On/Off Timer:
1. Press MENU and open the Setup menu.
2. Highlight On/Off'Timer and press ENTER.
:3. Press V to highlight the DAY fidd, md then press *_or
to select d_e recurrence (weekends, weekdays, every day
.
.
6.
Press V to highlight d_eTime field, and d_en use d_e
Number buttons to enter d_e @no you wmt the TV to mrn
on,
When d_e AM/PM field is highlighted, press _1or _ to
select AM or PM.
Press V to highlight the TV ON Duration fidd, and d_en
press _{ or _ to sdect the M_gth of @no until the IV turns
off..
7. Highlight Done and press ENTER.
8. Tttrn off d_eTV. The TV wilI turn on automatically on the
day(s) and at d_e @no you set. The TV wiIl then mrn off"
automatically af}er d_elength of"time you set in the TV
ON Duration field.
Note:
• When a powe/&/lure occ'u/_, the Oe/C)ff T/reel setti_lg_s/77;;y
be de;ned
, To display the On 77mersetting, press RECALL
To turn offthe On/OffTimer:
Sdect Not Set in step :3above.
Reset ©ancel Done
Setting the sJeeptimer
You can se_the sleep timer to mrn offthe TV afier a set length
of"time (maximum of 3 hours). The sleep @nor turns off the TV
one time only, as opposed to d_e On/Off'Timer, which turns off"
the TV on a recurring basis.
To set the sleep timer:
PressSLEEP o*1the remote controI to set the Iength of time untiI
the TV turns of'flRepeatedly press SLEEP to increase the time in
10-minute increments or press & or V to increase or decrease the
rune m 1()--minuteincrements, to a maximum of'3 hours and O0
lninuEes.
To cancel the sleep timer:
Press SLEEP until it is set to 0.
To set the sleep timer using the on-screen menus:
1. Press MENU and open the Setup menu.
2. Press V to highlight Sleep Timer and press ENTER.
:3. Press the Number buttons to enter the Iength of"@no in
10--minute increments.
4. Highlight Done and press ENTER,
Note:
• Whenapowe/D_i/u/eoccu/s,tlyesleeptiole/settlYsgmaybec/e_ec_
• 2_d£pl;6/theamountoft/Thebft on thesleept/?ne/;pie_ REC'ALL
To display the remaining time on the sleep timer:
Press SLEER
Note:
A message w/71&splay on scree/1 when thefe £ one minute
fema/?_/bgon the sleep t/kner
Copyright ,:) 2005 TOSHIBA CORPORAT}ON All rights reserved
91
HM95 R2 087-92 061505 91
÷
6/27/05, 6:08 PM
÷
[
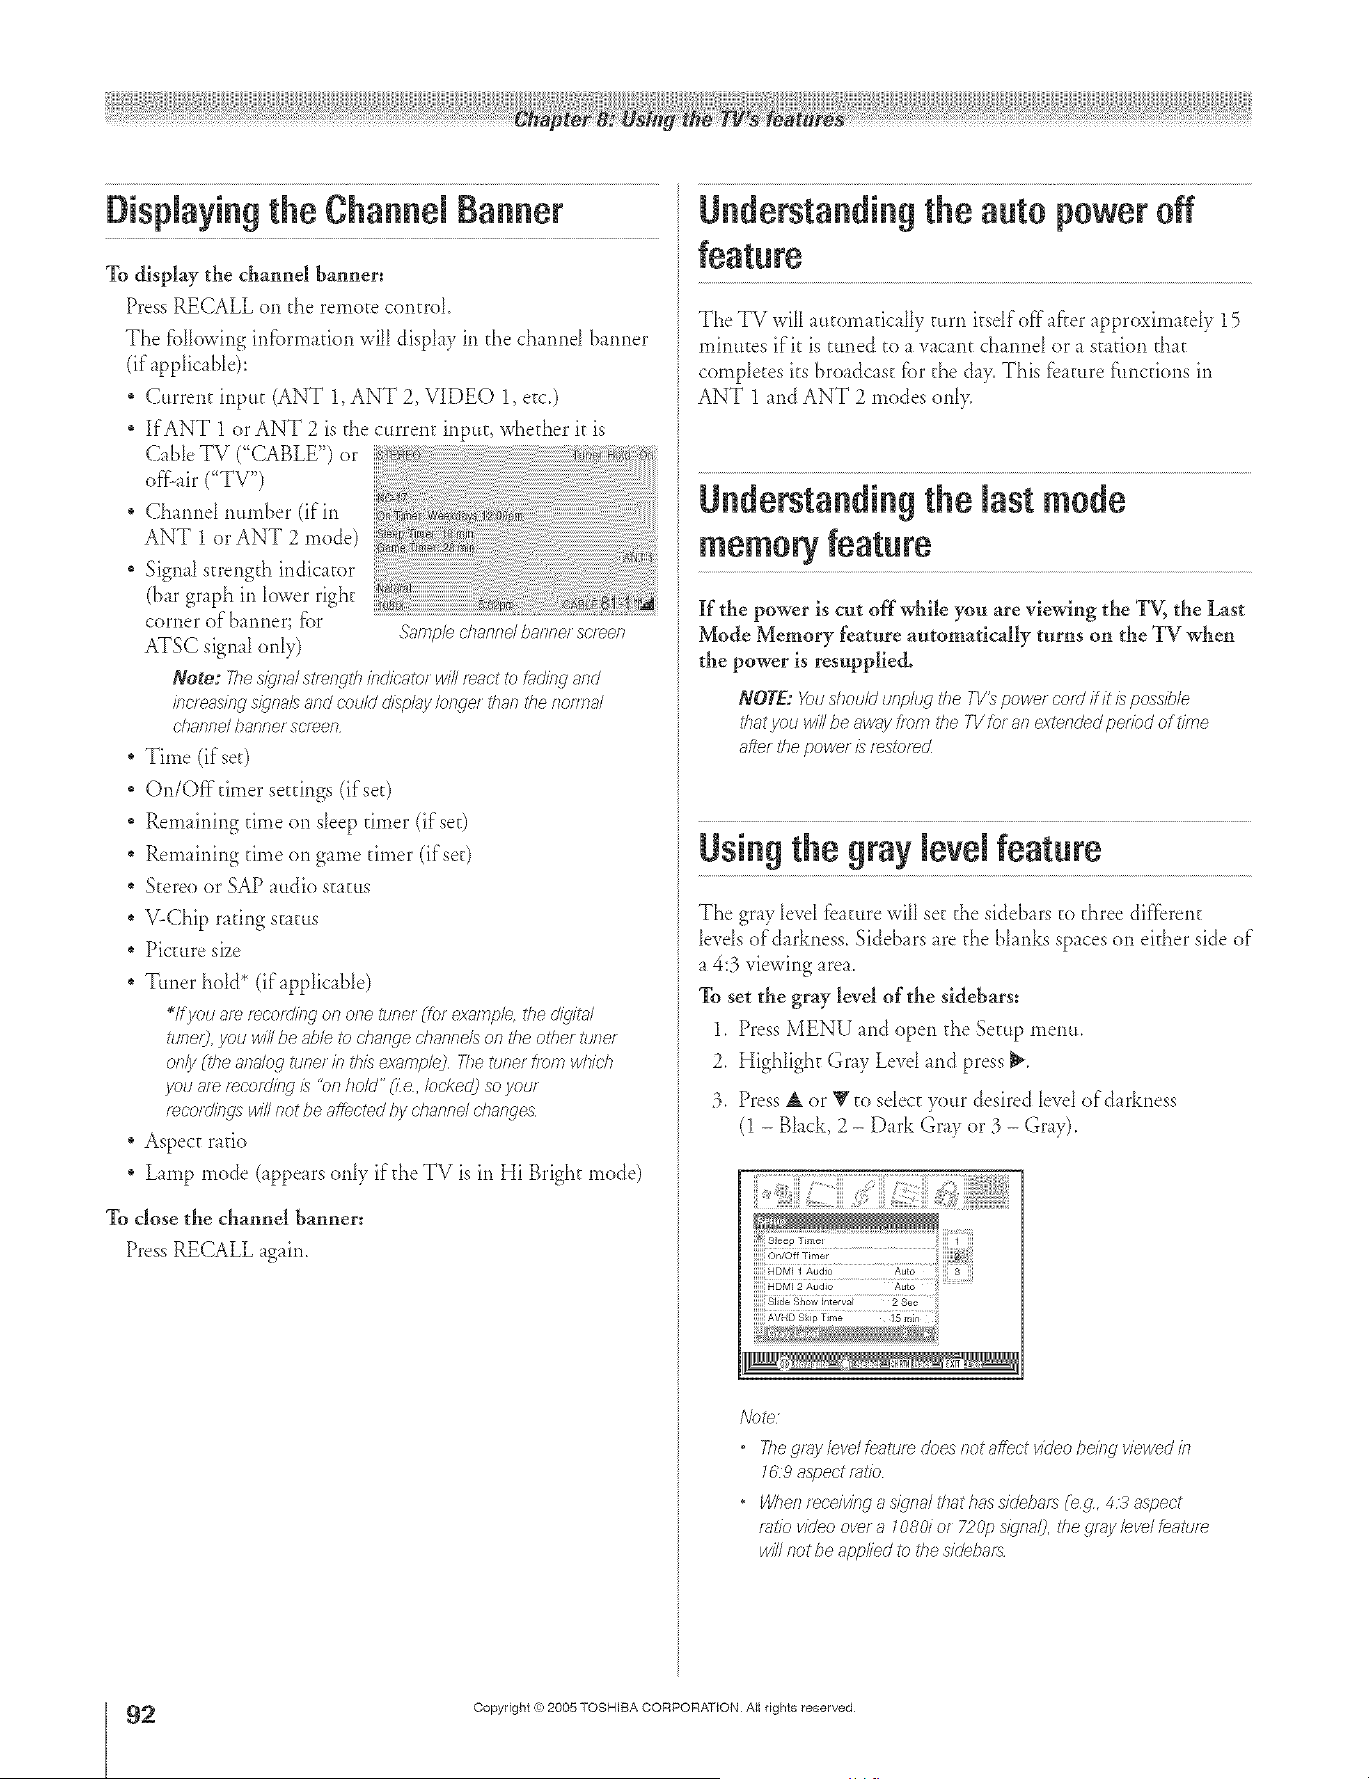
A ÷ L
Displaying the Channel Banner
TOdisplay the channel banner:
Press RECALL oi_ the remote corlm_[
The fbIIowirlg infbrmadon will display in the charred barmer
(if app[ic _Ne):
* Current input (ANT 1, ANT 2, VIDEO 1, etc.)
If ANT 1 or ANT 2 is the cturenr inDtt, wbedier it is
CaNe TV CCABLE") or
of_Lair("TV")
Charred number (if in
ANT 1 or ANT 2 mode)
Signal strengd_ indic _tor
(bar graph Jr1k_wer right
corner of harmer; fbr
ATSC signal o<dy)
Note2 7778 sJc]fTal St<el'l_ltl7 /nd/cglDt i/ill react to [ucJiR_ arid
bc< ec'Sil W S@Wal5 and could disT<luI/ Io]Tge/ than the ROnT]al
channd banner screen
" Time (ifse0
On/Offfimer settings (ifse0
* Remairfing time or1sleep timer (if set)
* Remairfing time on game timer (if s00
* Stere<)or SAP attdio scat<is
, V-Chip raring status
, Picmre size
* Ttmer hold* (ifapp[icaNe)
*If you am mco;ding on one tuner (for exa/rlple the cdqim/
tuner), you will be _d)leto chalwe channels on the other tufTe<
Of Till One afTaloff tuner b ibis examplej The tuner flora which
yOU af_ f_cofd/))g /) 'bf7 ham" _] e, locked) so your
r_cordierts win nor be affected l)y channd d?aeges
* Aspect ratio
Lamp mode (appears only if die TV is in Hi Bright mode)
To close the channel banner:
Press RECALL again.
Sacrlple channel banner screen
Understanding the auto power off
The TV will atttomaticaHy turn ksdf off a_?erapproximatdy 15
mirmtes if it is tuned to a vacant cba<melor a station that
completes its broadcast fbr the day. This fbmlre f:tmcdons in
ANT 1 and ANT 2 modes only.
Understanding the last mode
memory feature
If the power is cut off while you are viewing the TV, the Last
Mode Memory feature automatically turns on the TV when
the power is resupplie&
NOTE: Youshould unplug fl?e TV_ powet cotd flit is possible
that you H42be away flora the Yl/ for an extended per7bd of time
after the power is [_stof_d
Using the gray levelfeature
The gray level fbature will set the sidebars to d_ree different
lords of darkness. Sidebars are d_eblanks spaces on either side of
a 4:3 viewir_garea.
To set the gray level of the sidebars:
1. Press MENU at_dopen d_e Setup menu.
2. Highlight Gray Level and press _.
:3. Press A or Y to seIect yottr desired level old <rkness
(1 - Black, 2 - D_rk Gray or :3- Gr@,
Side Show h_terval 2 Sea
/do _e]
• The gay level feature does not affect video being viewed in
769 aspect _atio
• Whel_ tecdvirlg a s/?fTal fl?at has xidei)afs _eg, 4,5' aspect
rTitio video ovet a 108d of 720p Sl_'rla/j, the gray bye/feature
win no<be applied to the sidebafs
÷
2
HM95 R2 0 7-92 061505 92
Copyright ,{_;2005 TOSHIBA CORPORATION All rights reserved
6/27/05, 6:08 PM [
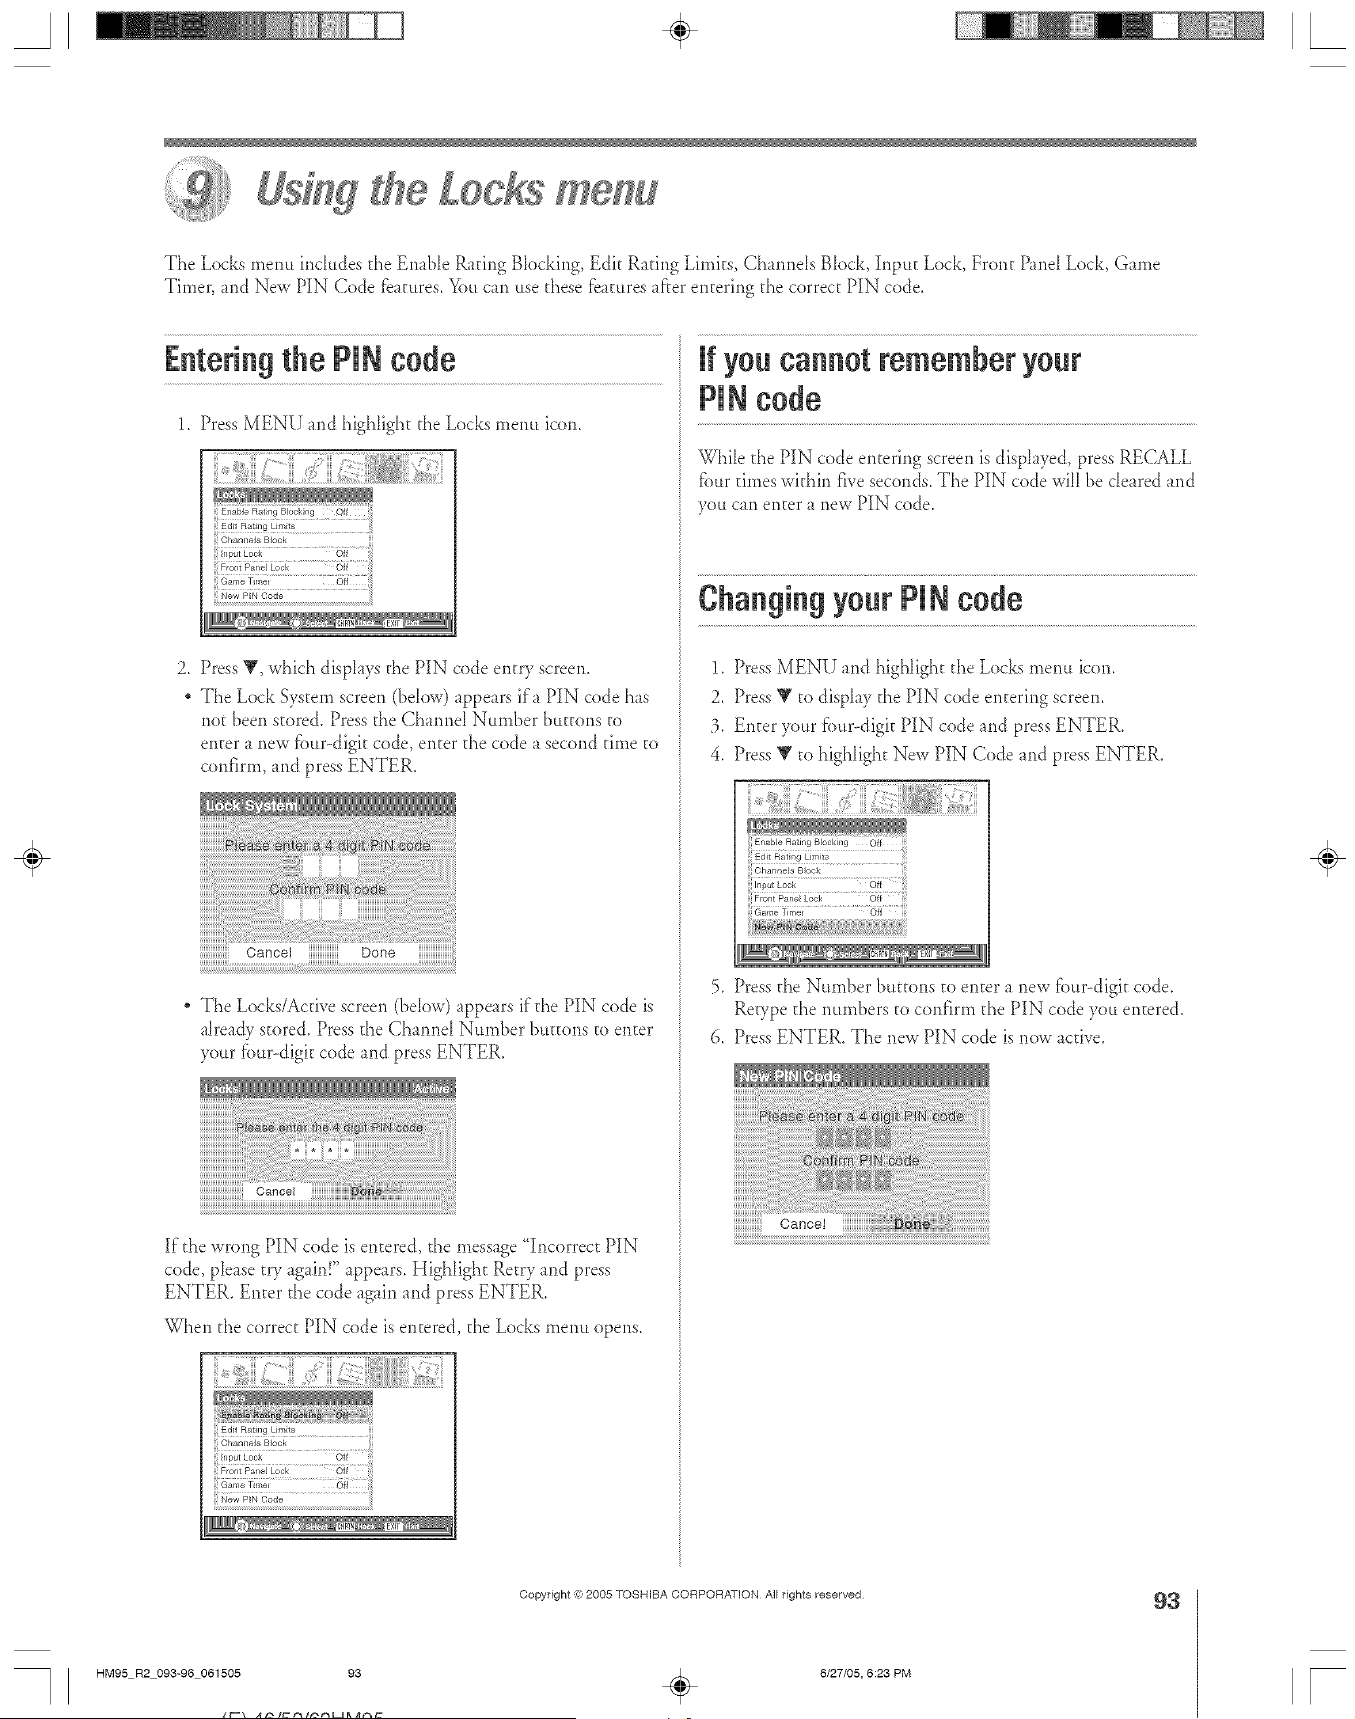
The Locks menu includes the EnaNe Rating Blocking, Edi[ Raring Limits, ChamMs Block, InpuE Lock, Front Prod Lock, Game
Timer, md New PIN Code f:eatures.You can use [hose f:eaturesd'_erentering [he correc[ PIN code.
Enteringthe PINcode
1. Press MENU md higNigh[ the Locks menu icon.
OhanlleJs BJock
Input Look Off
Font Pan8 Lock Oil
Gaffe TmeJ Off
New PIN Code
2, Press V, which displays d_e PIN code en[ry screen.
, The Lock Sys[em screen (bdow) appears ira PIN code has
no[ been s[ored. Press [he Channd Number buttons to
enter a new _bur-digi[ code, en[er [he code a second @no to
confirm, and press ENTER.
Cancel Done
" The Locks/Active screen (beIow) appears if d_e PIN code is
@eady stored. Press [he Channd Number bu[[ons to en[er
your f_._urodigitcode md press ENTER.
If [he wrong PIN code is entered, [he message "Incorrec[ PIN
z ' [>>
code, please Jr? _g_m. appetrs. Highlight Re[ry and press
ENTER. Enter [he code _gdn and press ENTER.
When [he correc[ PIN code is entered, the Locks menu opens.
Edit Rating LJm[ts
Input Lock
Front Pane Lock Off
iii Gama TimeJ Off iill
ii! New PIN Code iii
If yea caaaet remember your
PIN code
While d_e PIN code emoting screen is displayed press RECALL
fi.mr times within five seconds. The PIN code will be de,red and
you can en[er _ new PIN code.
Chaagiag year PIN cede
1. Press MENU and higNight [he Locks menu icon.
2. Press Y [o display the PIN code entering screen.
3. Enter your fi)u>digit PIN code and press ENTER.
4. Press V [o highIight New PIN Code and press ENTER.
5. Press the Number bu[tons to enter a new f_._ur-digitcode.
Retype the numbers to confirm [he PIN code you entered.
6. Press ENTER. The new PIN code is now active.
÷
HM95 R2 093-96 061505 93
Copyright @ 2005 TOSHIBA CORPORATION All rights reserved
÷
6/27/05, 6:23 PM
93
r
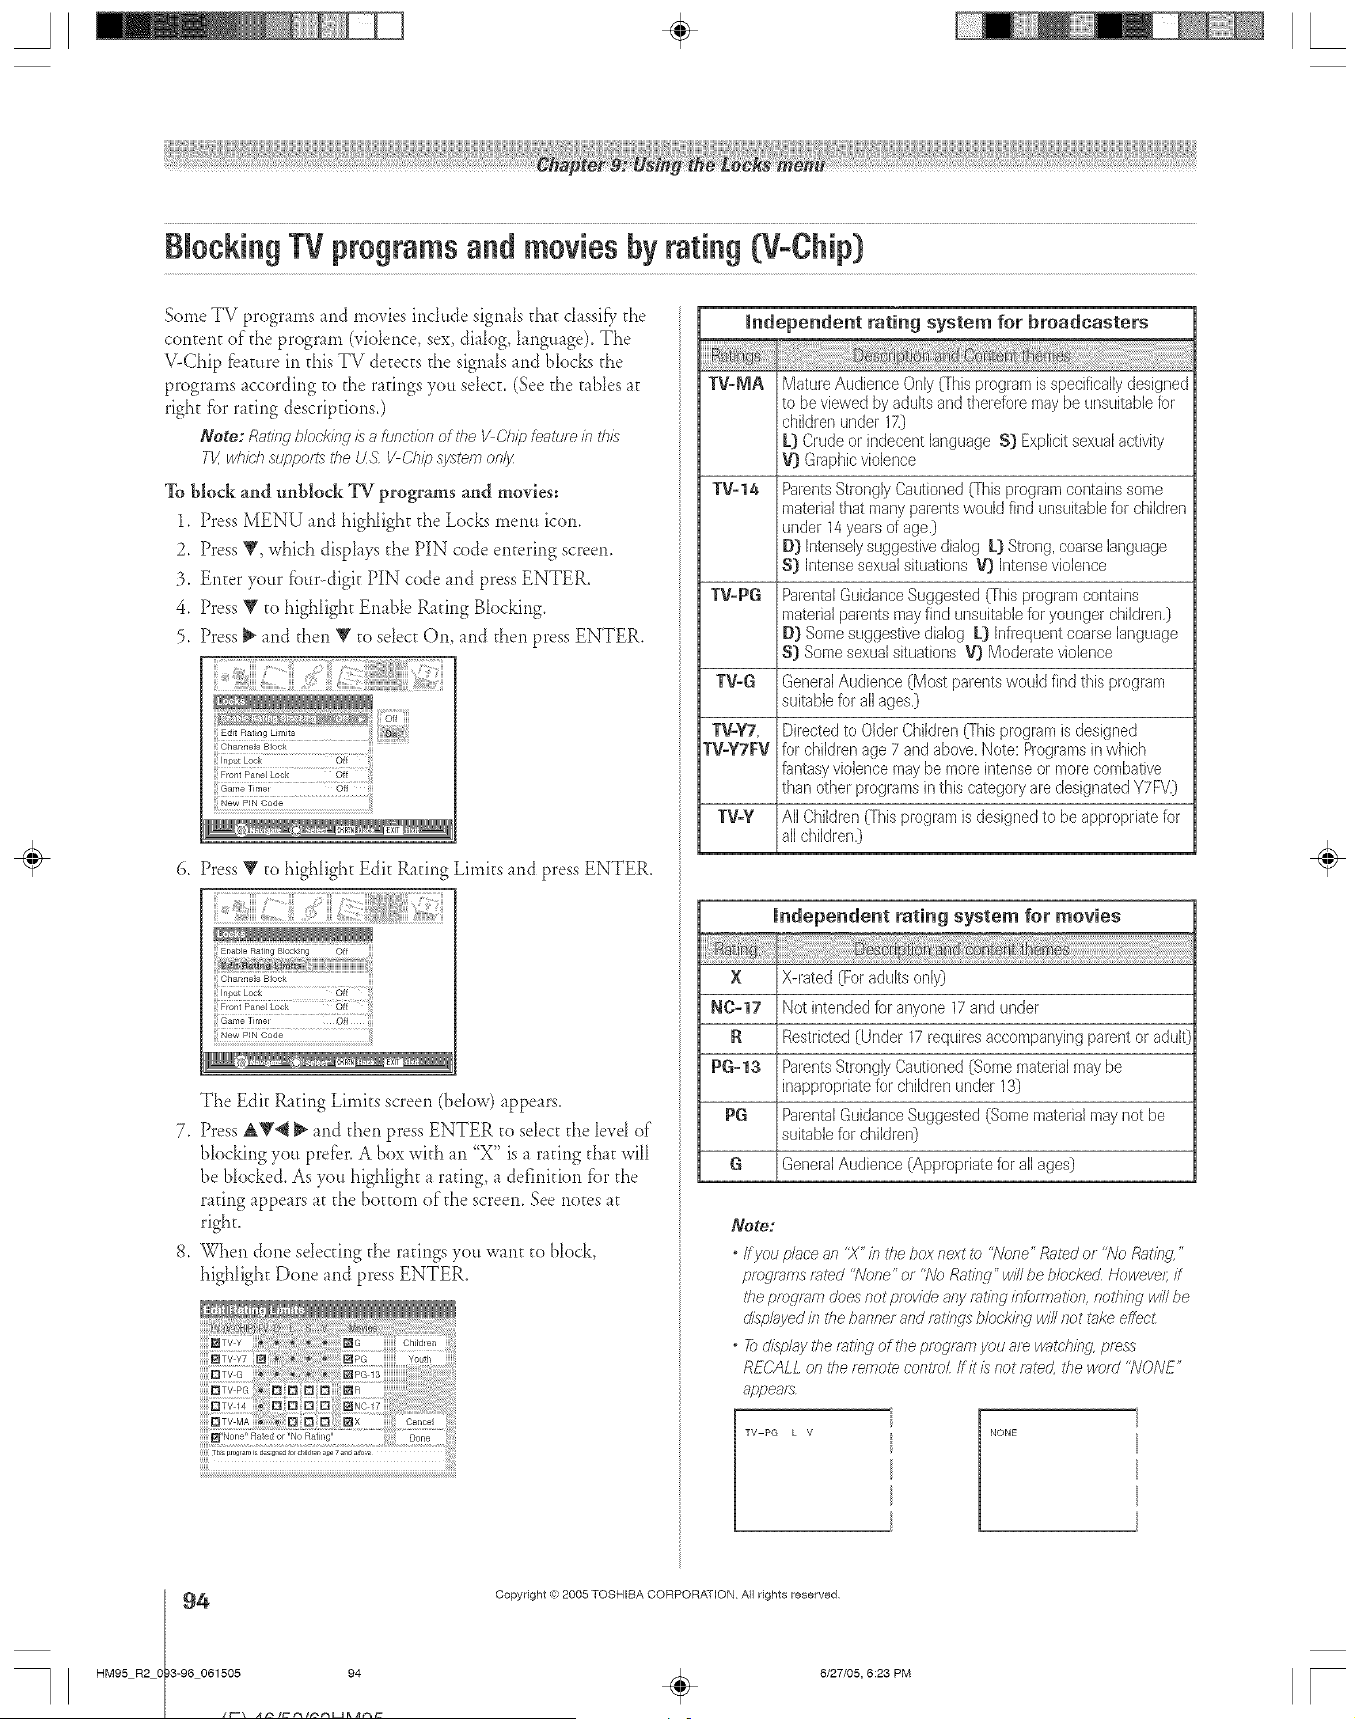
A ÷ L
BlockingTVprogramsand moviesbyrating (VoChip}
Some TV programs and movies include signals that classiC,the
content of the program (vidence, sex, dialog, language). The
V-Chip fbamre in this TV detects the signals and blocks d_e
programs according to the ratings you sdect. (See d_e tables at
right fbr raring descriptions.)
Note: Ratissc;bk>ck/nj is _1furleUol7 of the I/ Cl?ip fegffu/e in th£
Tk' which support6 ehetL9 Ii C:l?ipsystem only
To block and tmblock TV programs and movies:
1. Press MENU and highlight the Locks menu icon,
2. Press Y, which displays the PIN code entering screen.
3. Enter your fixlr--digk PIN code and press ENTER.
4. Press Y to highlight Enable Raring Blocking.
5. Press _ and then Y to sdect On, and then press ENTER.
)
5 7/_A
iii Channels Block
iii ........
iii Game Timel Off _
ii! New PIN Code iiii
Press T cohighlight Edit Raring Limits md press ENTER.
iii Front Pane[ kock off
ii! Game Time_ Of I ;;;
! New PIN Code i
The Edit Raring Limits screen (bdow) appears.
7. Press A_'4 _ and then press ENTER to select d_eIevd of
blocking you prefbr. A box wkh an "X" is a raring that will
be blocked. As you highlight a raring, a definkion for the
rating appears at the bottom of the screen. See notes at
right.
8. When done sdecdng the ratings you want to block,
highlight Done and press ENTER.
Independent rating system for broadcasters
TV-MA Mature Audience Only {[his program is specifically designed
to be viewed by adults and therefore may be unsuitable for
children under 17.)
k} Crude or indecent language S} Explicit sexual adivity
V} Graphic violet/re
TV-14 Parents Strongly Cautioned {(his program cor/tah/s some
material that many parents would find unsuitable for children
under 14 years of age.)
D} Intensely suggestive dialog L} Strong, coarse language
S} Inter/se sexual situations '{j Intense violence
TV=PG Parental Guidance Suggested (This program contair/s
material parents may find unsuitable for younger children,)
D} Some suggestive dialog k} Infrequent coarse language
S} Some sexual situations V} Moderate violence
TV-G General Audience (Most parents would find this program
suitable for all ages,)
TV=YT, Directed to Older Children {This program is designed
TV=YTFV for children age 7 arid above. Note: Programs in which
fantasy violence may be more intense or more combative
than othel programs in this category are designated YTFV.)
TV=Y All Children 0his program is designed to be appropriate for
all children.)
Independent rating system for movies
X X-rated (For adults only)
NO-17 Not intended for anyone 17 and under
R Restricted (Ur/der 17 requires accompanying parent or adul0
PG-13 Parents Strongly Cautioned (Some material may be
inappropriate for children under 13)
PG Parental Guidance Suggested (Some material may not be
suitable for children)
G General Audience (Appropriate for all ages)
Note:
* Ifyou place _n 'X'/n the Dox next _) ;_lone" Rated or "No Rat/bg,"
piogmms fFlted 7Vo£e" or "l\JoRatkJg" w/7/be blocked Howevel; ff
the program does not pmwcle any mtkTginforyrTat/ofLnotlT/bg w/7/be
d/sp/_j/ed /71tl_eba/lner and r_,t/bgsblock/71gwit not t_ke e_ect
* To display the r_lt/7_gof the program you are wc;tch/hg, press
RECALL on the re/77ote colltro/ ff /t /s not rated, the word WONE"
appears
TV PG L V NONE
÷
4
HM95 R2 0 3-96 061505 94
Copyright @ 2005 TOSHIBA CORPORATION All rights reserved
6/27/05, 6:23 PM r
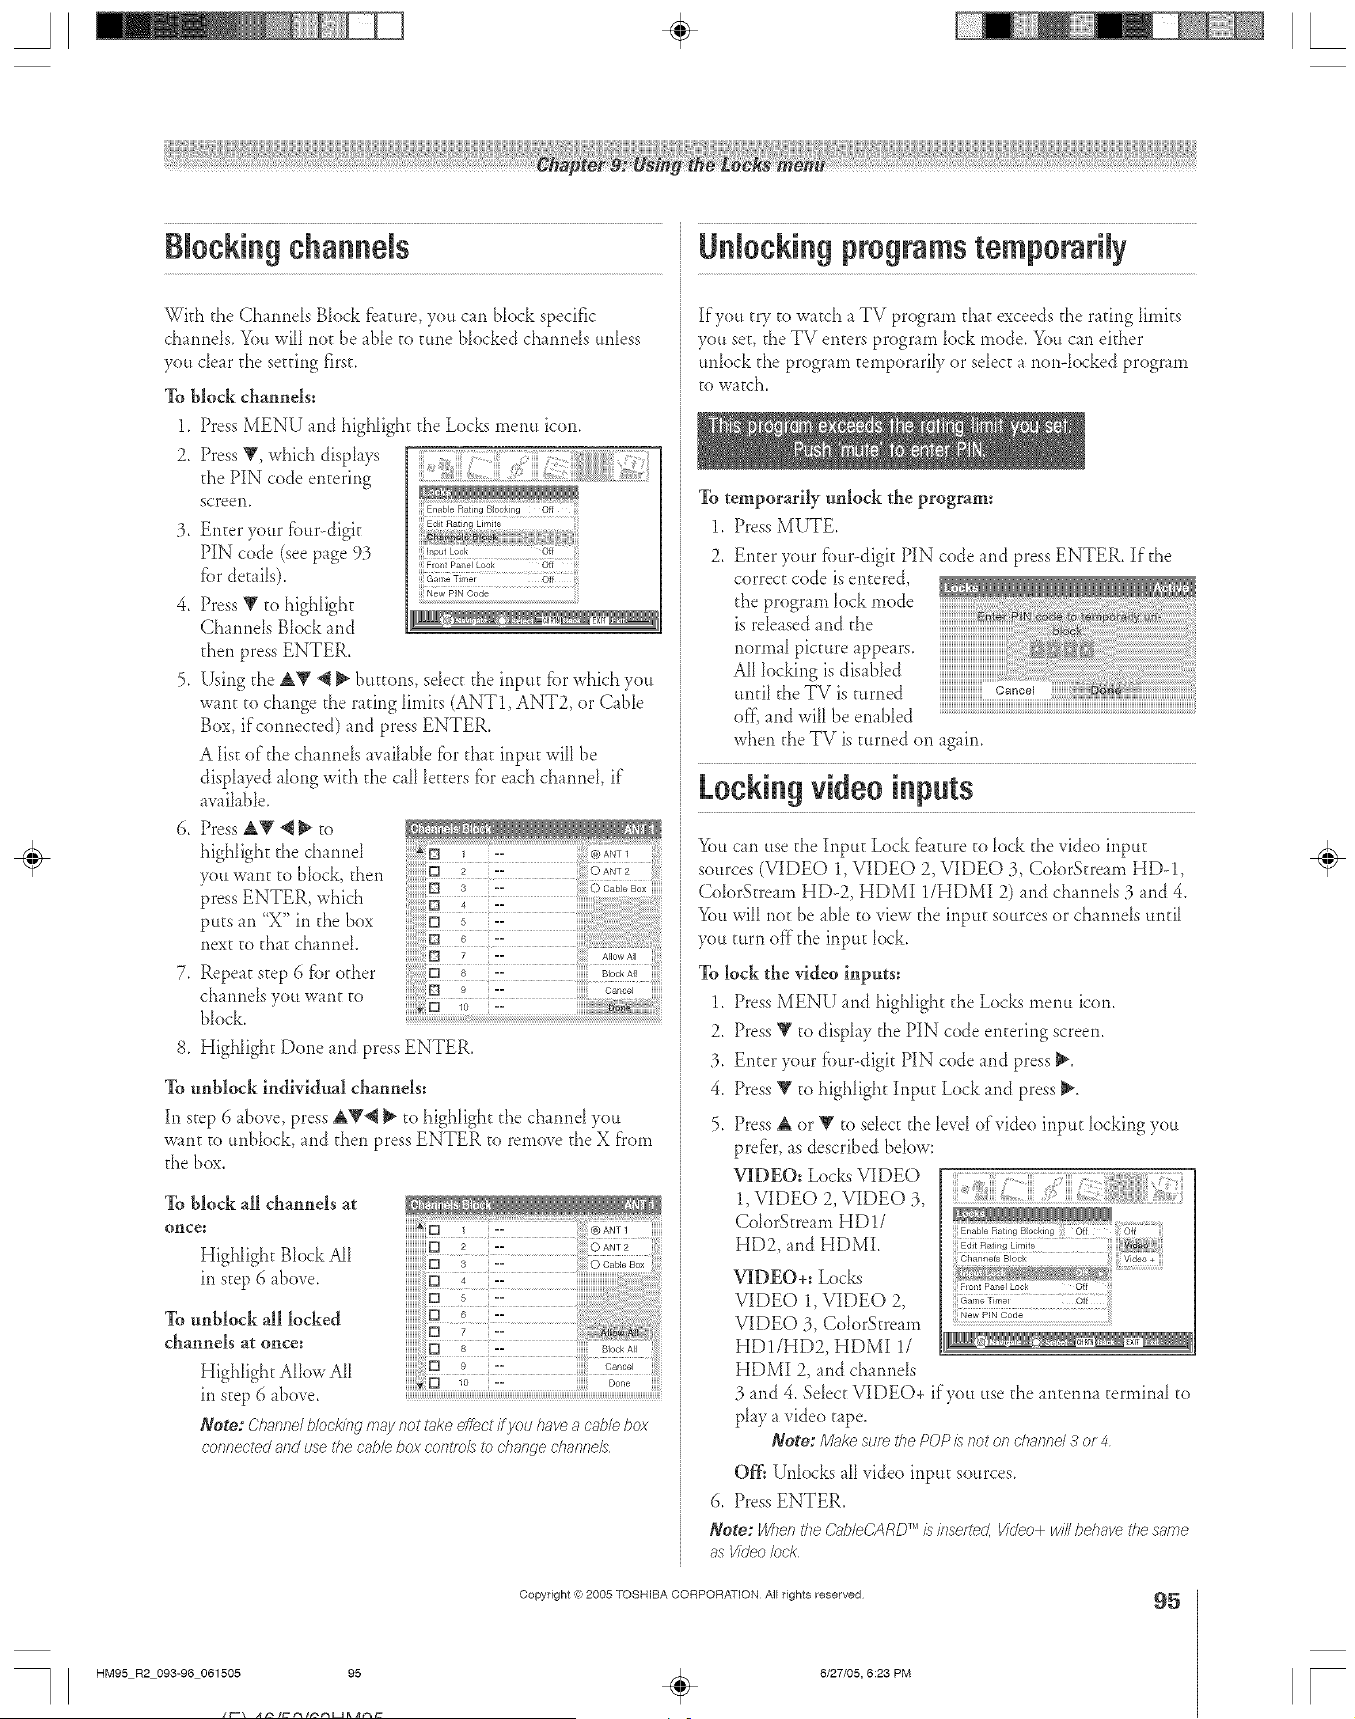
Blockingchannels
Wkb d_eChanneIs Block fb_mre you can b[ock specific
ch/nrle[s. You will not be _b[e to Rule blocked charmds unless
you de_r d_esetting first.
To block channels:
1.
2,
i),
,
,
6,
,
Press MENU and high[ight d_eLocks menu icon.
Press Y, whidn disp[ays
d_e PIN code entering
screem
Enter your fbur--digk
PIN code (see page 93 _,o,_Pane,o0_ O_
[br deHils). G_.,,o TJ..... Oil
Press V to highIight ...........
Channds Bbck md
d_en press ENTER.
Using d_e AV '_ _ buttons, so[oct the input l:}.)rwhich you
wmt to change d_erating limits (ANT1, ANT2, or C_ble
Box, if connected) md press ENTER.
a [ist of the cbarme[s avai[abD fbr that input will be
displayed _long with the call letters fbr each channd, if
avfi[ab[e.
Press AY 4 _ to
highlight d_e d]armd
you wmt to b[ock, then
press ENTER, which
puts an "X"in the box
next to that channel
Repeat step 6 fbr edger
channels you want to
b[ock
iiiiiiio_0_, iiiiii
8. High[ight Done and press ENTER.
To unblock individmd channels:
[n step 6 d)ove, press AV'_ _ to highlight d_echannel you
want to unb[ock, md d_en press ENTER to remove the X ffon_
the box.
To block all channels at
once:
Highlight Bbck All
in step 6 _bove.
To nnblock all locked
channels at once:
Highlight Allow All
in step 6 above.
Note: _'178rffTe/b/ocki/Ig/n_,ynottHkeeffectifycu l_avea cablebox
connected and use the cabb box colltfo/s to d?a/lge dlalff?e/s
UNocking programstemporarily
If you try to watch a TV program that exceeds the raring limits
you set, the TV enters program lock mode. You can either
unlock d_eprogram temporarily or select a non-locked program
tO W _tcb,
To temporarily tmlock the program:
1. Press MUTE.
2. Enter your fiat>digit PIN code and press ENTER. If the
correct code is entered,
d_eprogram lock mode
is released md d_e
normaI picutre appears.
A[[ locking is dis died
unfit the TV is turned
of< and will be enabDd
when dae TV is turned on agfin.
Lockingvideoinputs
You can use the Input Lock fbamre to [o& the video input
sources (VIDEO 1, VIDEO 2, VIDEO 3, ColorStream HD-1,
Co[orStream HD-2, HDMI 1/HDMI 2) and channds 3 and 4.
You wi[[ not be able to view the input sources or channds unfi[
you turn off"the input lock.
To lock the video inputs:
1. Press MENU and highlight the Locks menu icon.
2. Press Y to display the PIN code entering screen.
3. Enter your fbur-digk PIN code and press _.
4. Press T to high[ight Input Lock and press _.
Press A or _r to sdect the [evel of video input locking you
prefbr, as described below:
VIDEO: Locks VIDEO
1, VIDEO 2, VIDEO 3,
Co[orStream HD!/
Enable Ratng 8 oeking Off
HD2, and HDMI ..................
VIDEO+: Locks
Flonl Panel Lock Off
VIDEO 1, VIDEO 2, _a,,e_i,0ol......
VIDEO 3, CobrStream
HD1/HD2, HDMI 1/
HDMI 2, and charmeIs
3 and 4. Sdect VIDEO+ if you use the antenna terminal to
play a video tape.
Note:/V/_d<e sure the POP/s/lot on cl>_,/lnel3 or 4
Off= Unlocks tll video inpu_ sources.
6. Press ENTER.
Tr_
Note: When the (bbleCARD /s/bsefted, V/dee+ wd/ behoovethe same
as V/dee/ock
Copyright (ct,2005 TOSHIBA CORPORATION All rights reserved
95
HM95 R2 093-96 061505 95
÷
6/27/05, 6:23 PM
÷
[
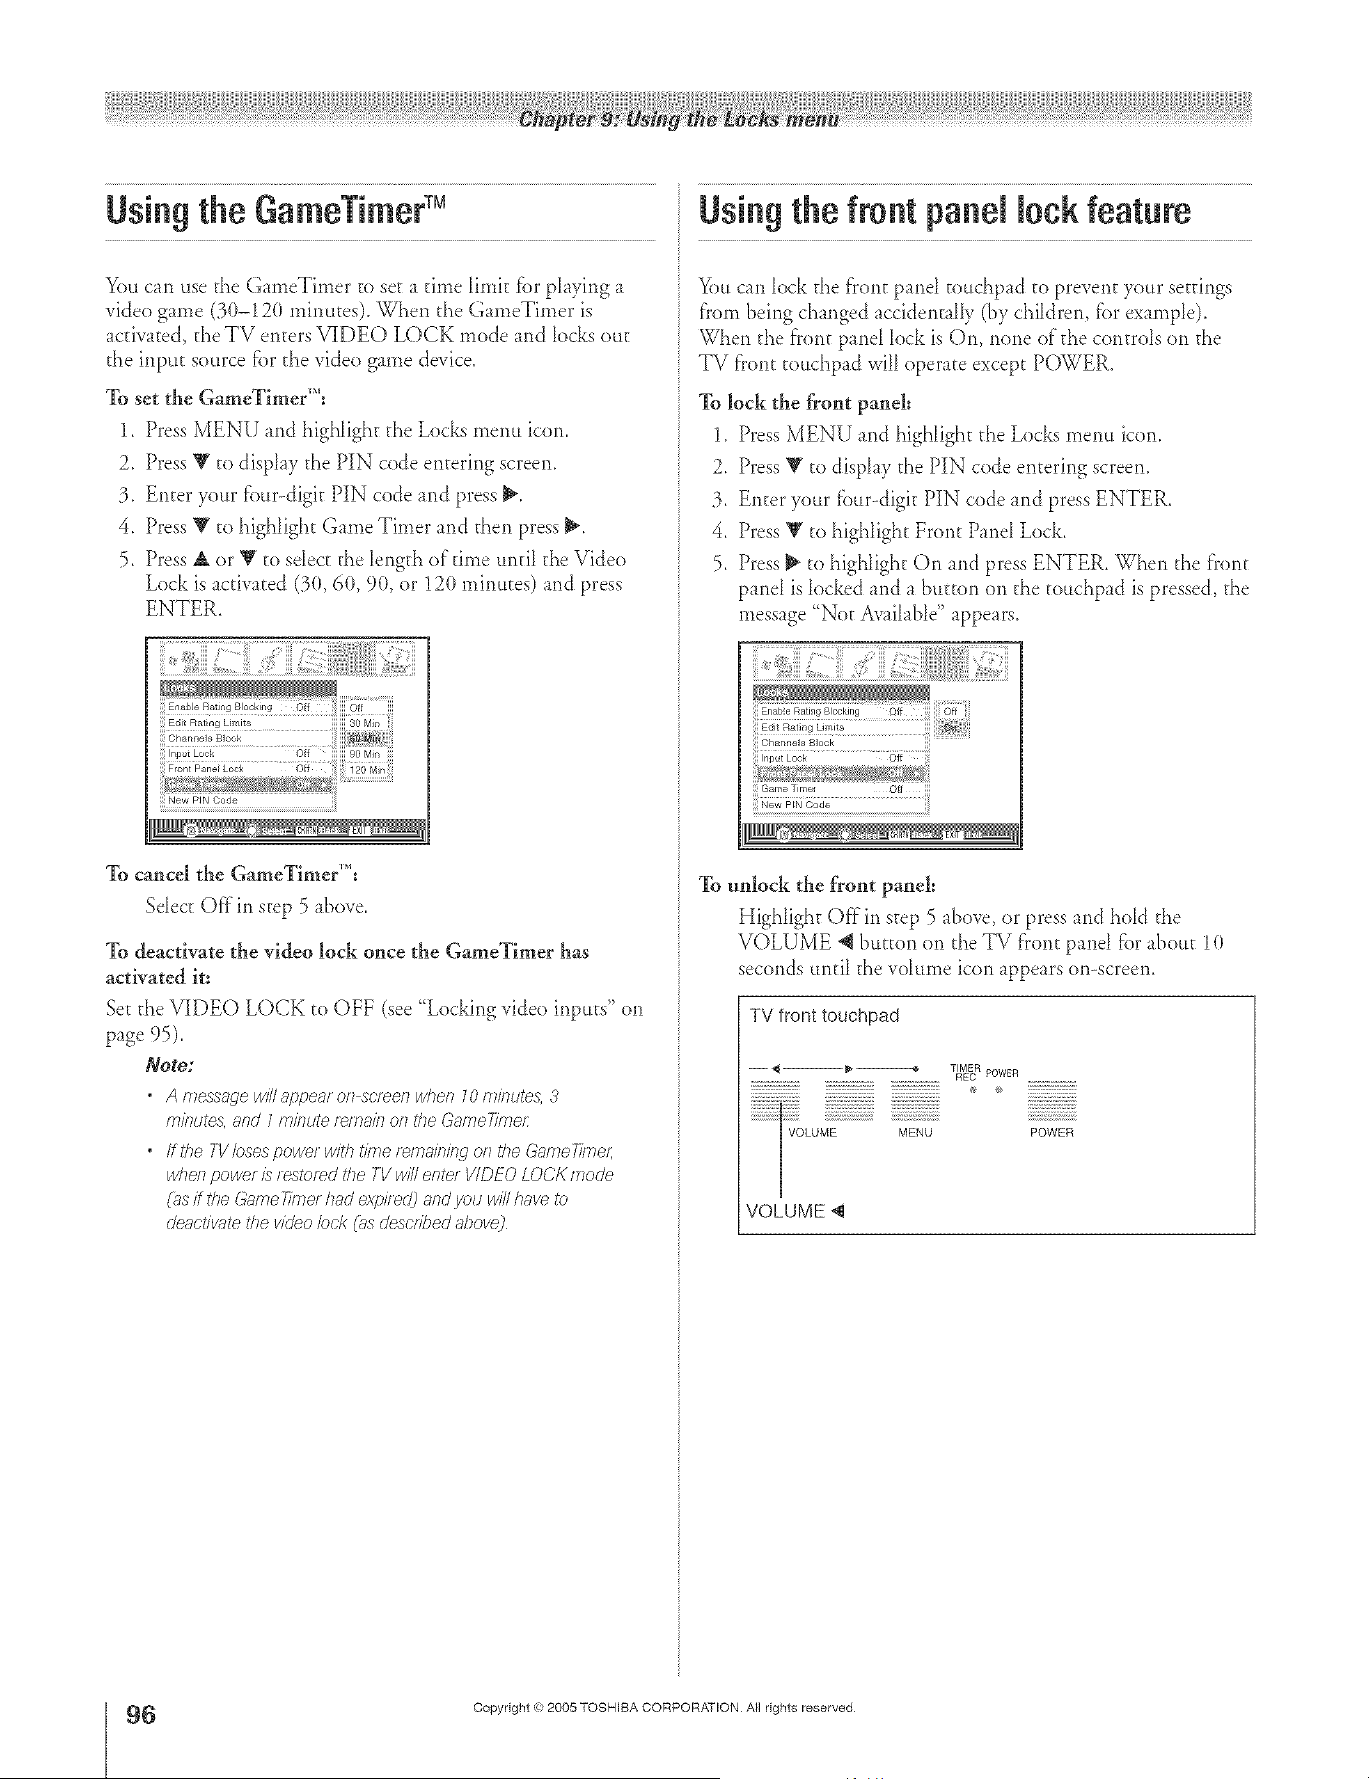
" TM
Using the GameT mer
You can use the GameTimer co set a @ne limk fbr playing a
video game (3(t-12(t minutes). Wheil d_e GameTimer is
activated, cheTV ei_tersVIDEO LOCK mode ai_d locks out
the input source for the video game device.
To set the GameTimer'":
1. Press MENU and highlight d_eLocks menu icon.
2. Press T co display the PIN code entering screen.
3. Enter your f'ou>digk PIN code and press _.
4. Press V co highlight Game Timer and then press _.
5. Press A or Y to select d_e length of time until the Video
Lock is activated (3(t, 6(t, 9(t, or 12(t minutes) and press
ENTER.
Inpt Lock Off ill 90 Min ill
iNYgZ?x_N@ /*_*_g Nil ..................
New PIN Code
To cancel the GameTimer'_':
Select Off in step 5 _bove.
To &actiw_te the video lock once the GameTimer has
activated it:
Set the VIDEO LOCK t(_ OFF (see "Locking video inputs" on
page 95).
Note:
* A mess;_ge wi//6@peru on screen when 10 minute:_, 3
minutes, and 1 minute f_lT]a/f7011tl)8 GameT/me/:
* ffthe 7-Vbses power with/J177e(&-F]R/II/FIC/Ofl the Garne77me/;
when power £ / estof_d the TV wi// ente/ VIDEO LOCK mode
(us ff ti_e (;'ume77me/had expi/ee2 and you will have Ib
de;ict/vr_te the video bc'k (_s described d)ove)
Using the front panel lock feature
_)u can lock the front pond couchp _d to prevent your settings
fl'om being changed accidencalIy (by children, fbr example).
When d_e front panel lock is On, none of the controls on d_e
TV fl'ont couchpad will operate except POWER.
To lock the front panel:
1. Press MENU and highlight d_eLocks menu icon.
2. Press T to display the PIN code entering screen.
3. Enter your fi)ur-digic PIN code and press ENTER.
4. Press T to highlight Front Panel Lock.
5. Press _ to highlight On and press ENTER. When the fl'ont
panel is locked and a button on d_etouchpad is pressed, d_e
message "Not Available" appears.
Game Timel Of I
New PIN Code
]k_unlock the front paneh
Highlight Offin step 5 above, or press and hold the
VOLUME _ button on d_eTV fT'oncpond for about 10
seconds until the volume icon appears on-screen.
TV front touchpad
-- _{ -- _ -----------_ TIMER
............................................................... DEC POWER ......................
i/ii????}i;:V_9 LUM !_i1_/?/?/7; 2;BBI/)_II_/Ui_ :7i£;_iff:}JBS?2POWER
/
VOLUME 4
÷
6
HM95 R2 0 3-96 061505 96
Copyright @ 2005 TOSHIBA CORPORATION All rights reserved
6/27/05, 6:23 PM [
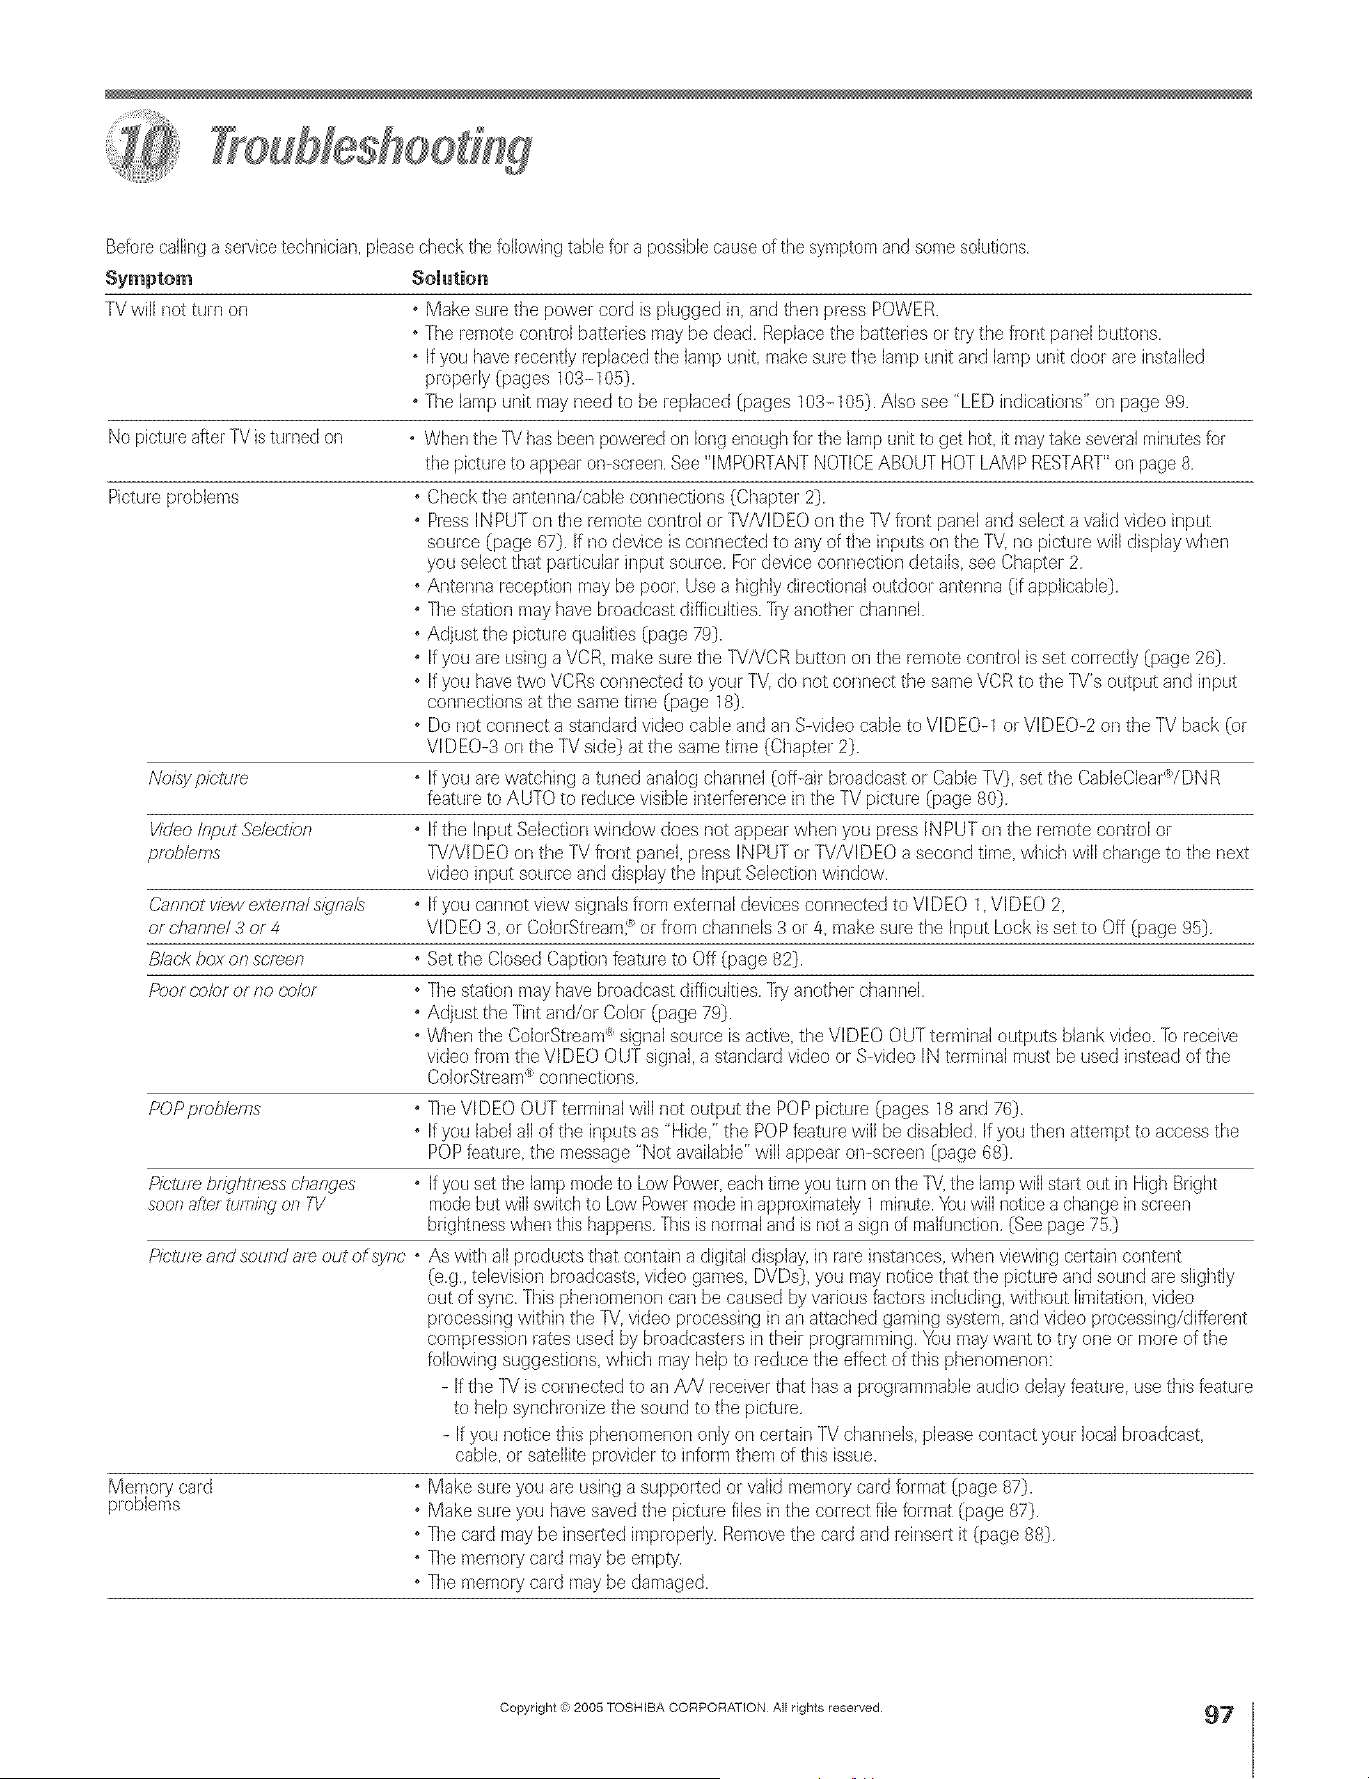
Beforecallinga sewice technician,pleasecheck the followingtablefor a possiblecauseof the symptomand some solutions,
Symptom Solution
TVwill no_turn or7 o Make sure tile power cord is plugged in and tiler] press POWER.
o The rernote control batteries may be dead. Replacethe batteries or try the fi-orltpanel buttons.
o If you have recently replaced the lan/p unit, make sure the lan/p Llnitand lamp unit door are installed
properly (pages 103-105).
o The lampunit may need to be replaced (pages 103-105). Also see "LED indications" oil page 99.
No pictureafter TVis turned on • When the TVhasbeer]poweJedon long enoughfor the lampunit to get hot it maytakeseveralminutesfor
the pictureto appear on-screen,See "IMPORTANTNOTICEABOUT HOT LAMP RESTART"on page 8,
Picture problems o Check the ar_tenna/cableconnections (Chapter 2}.
o PressINPUT on tile remote control or W/VIDEO on tile TVfront panel and select a w_lidvideo input
source (page 67). If no device is corlr/ected to any of tile inputs or/the TV, no picture will display wher/
you select tha_ parlicular input source For device cor]nectiorl details see Chapter 2
oAntenna reception may be poor. Use a highly dh-ectionaloutdoor antenna (if applicable)
o The station n/ay havebroadcast difficulties. Try another chanrlel.
oAdjust the picture qualities (page 79).
o If you are using a VCR, make sure tile 7sT/VCRbutton oil tile remote control is set correctly (page 26).
o If you havetwo VCRsconnecled to you/TV, do not conrlect the same VCR to tile TV's output arid ir/put
connectior/s at the same tin/e (page 18)
o Do not connect a standard video cable and an S-video cable to VIDEO-1 or VIDEO-2 on tile TV back (or
VIDEO-3 on the TV side) at ttle same tin/e (Chapter 2).
o If you are watching a tuned analog channel (off-air broadcast or CableTV}, set tile CableClear'_/DNR
feature to AUTO to reduce visible interference in the TV pidure (page 80)
o If tile Input Selection window does riot appear when you press INPUTon the remote control or
TV/VIDEO on the TV fi-ont panel, press INPUT or TV/VIDEO a second time, which will change to the next
video ir/put socirceand display the Input Selection wh]dow.
o If you cannot view signals from external devices connected to VIDEO 1 VIDEO 2,
VIDEO 3, or ColorStrearYCor from channels 3 or 4 make sure tile Input Lock is set to Off (page 95)
o Set the Closed Captior/feature to Off (page 82).
o The station may havebroadcast difficulties. Try another channel.
oAdjust the Tint and/o/Color (page 79}.
oWtTenthe ColorStream'_signal source is active,the VIDEO OUT terminal outputs blank video. Toreceive
video from the VIDEO OUT signal,a standard video or S-video IN terminal must be used instead of tile
ColorStrean/'_connections
Noisy pic/ure
Video Input Se/ectien
problems
Cannot view extema/ slgna/s
or channel 3 or 4
Black box on screen
Peof (;elof or no cdJler
POP problems
Picture br_qhtness changes
soot7 after tum/fw ors TV
Memory card
problems
o Tile VIDEO OUTterminal will not output tile POPpicture (pages 18 and 76)
o If you label all of tile inputs as "Hide" the POPfeature will be disabled. If you then attempt to access the
POPfeature the message "Not available"will appear on-screen (page 68}.
o Ifyou set the lampmodeto Low Power,eachtimeyou turn on the TV,the lampwill start out in High Bright
mode but will switchto Low Powermode inapproximately1 minute.Youwill notice a changein screen
blightnesswhen this happens,Thisis normaland is not a sign of malfunction,(Seepage 75,)
Picturs and souredare out ofsync o As with all products that contain a digital display,ir/rare instar/ces,when viewing certain cor/tent
(eg., television broadcasts,video gan/es DVDs}, you may notice that tile picture and sound are slightly
out of sync Tills phenomenon carl be caused by various factors including, without IimitaSon,video
processing withh/tile IV, video processing in an a_tactledgaming system, and video processing/different
compression rates used by broadcasters in theh-programmir/g. _u maywant to try one or n/ore of the
followh]g suggestions, which mayhelp to reduce the effect of tills phenomenon:
- If ttle TV is connected to ar/A/V receiverthat has a programn/able audio delay feature, use tills feature
to help synchronize ttle sound to the picture
If you notice tills phenomenon only on certain TV channels please contact your local broadcast
cable, or satellite provider to inform them of tills issue.
o Make sure you are using a supporled or valid memory card format (page 87).
o Make sure you havesaved the picture files in the correct file format (page 87).
o Tile card may be inserted improperly. Removetile card and reinsert it (page 88).
o Tile memory card maybe empty.
o The memory card may be damaged.
÷
Copyright (_1,2005 TOSHIBA CORPORATION All rights reserved
HM95 R2 097-102 061505 97
6/27/05, 8:14 PM
97
r
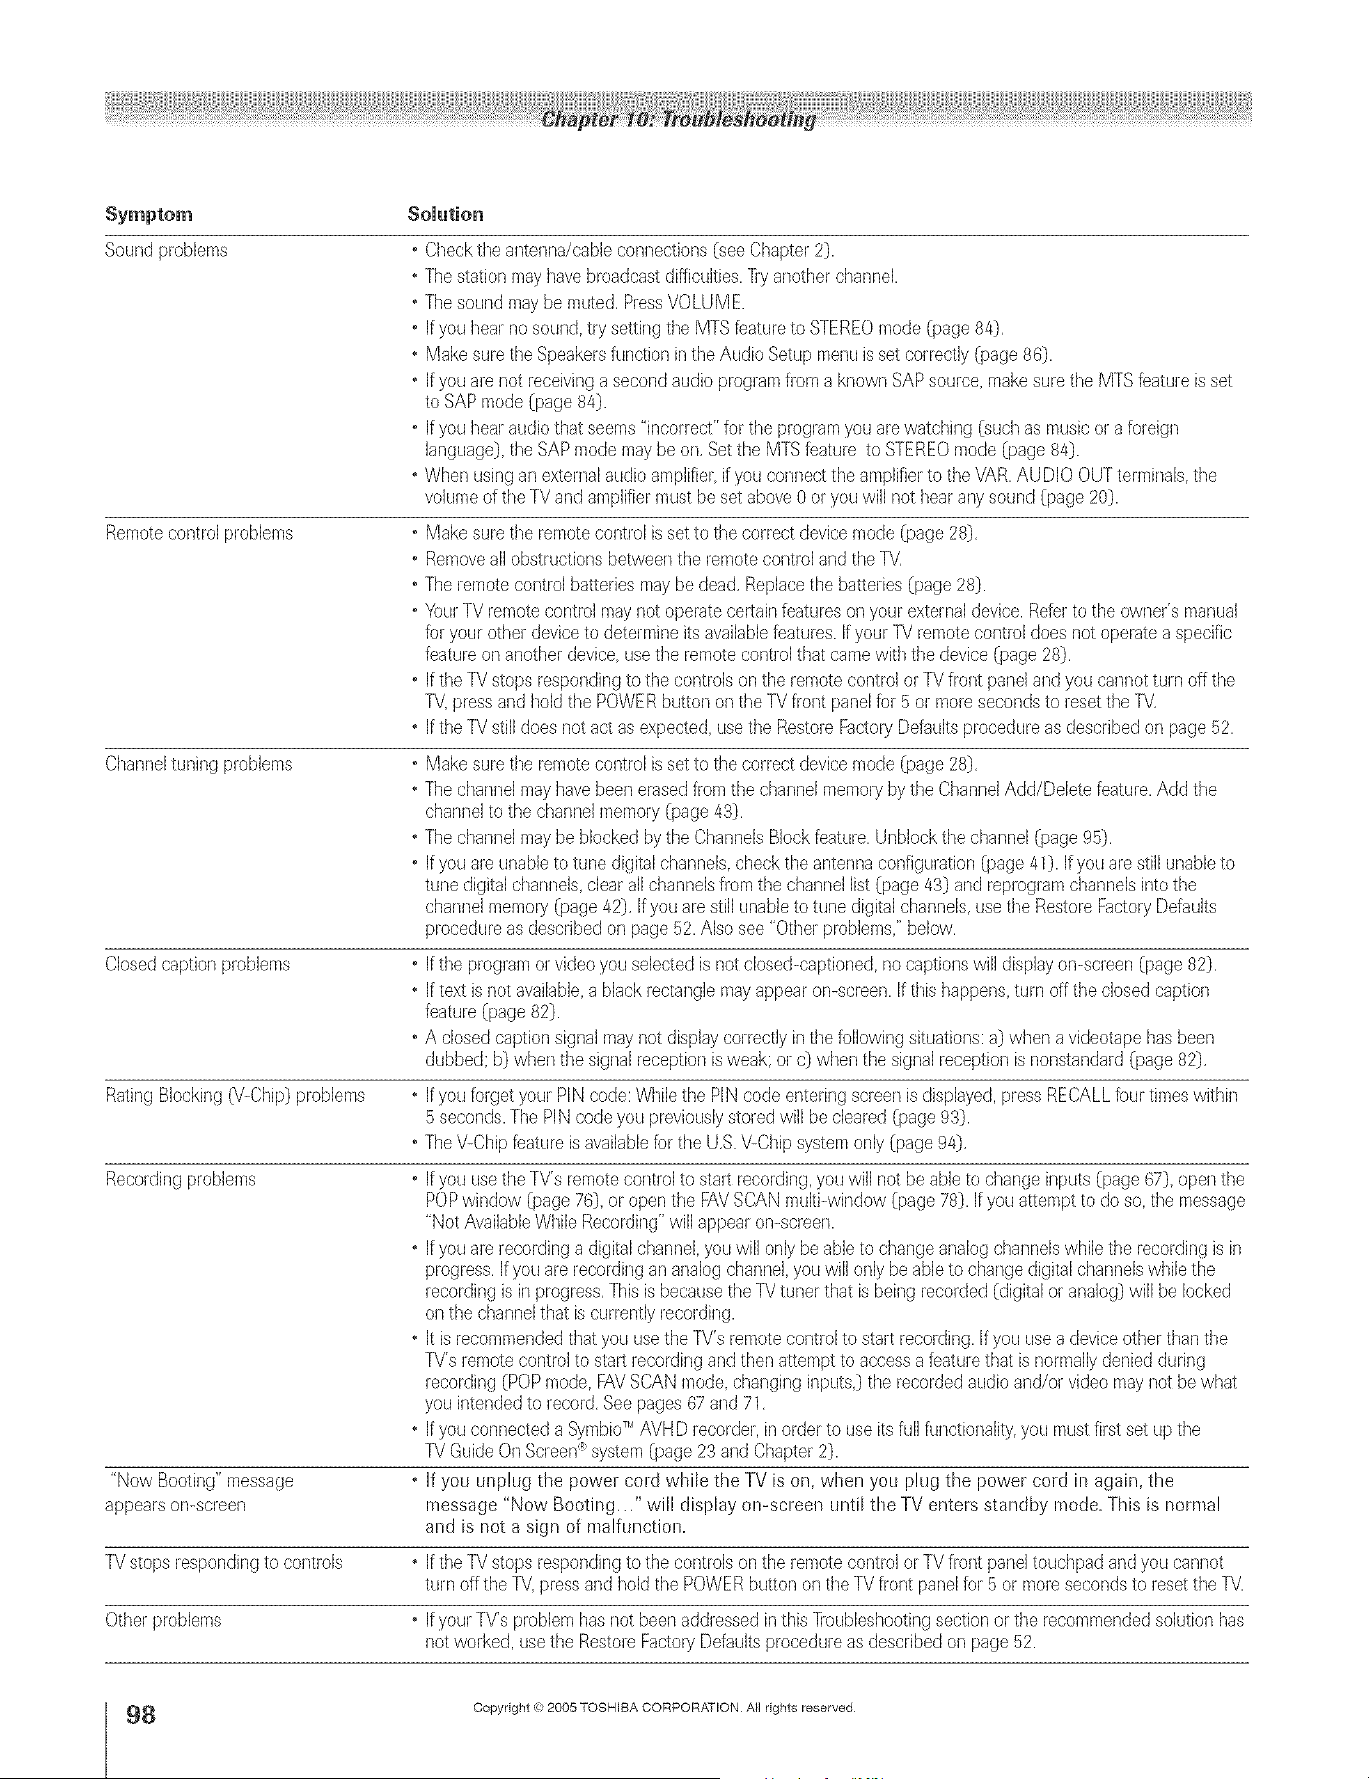
Symptom
Solution
Soundproblems Checkthe ar/tenna/cableconnections{see Chapter2}.
Thestation may havebroadcast difficulties,71-yanotherchanneE.
Thesound may be muted.PressVOLUM E.
if youhear nosound,try setting tile MTS featureto STEREOmode {page84}.
Make sure the Speakersfunction inthe Audio Setupmenu is set correctly{page 86}.
if youare not receivinga second audio programfrom a known SAPsource,makesure the MTSfeatureis set
to SAPmode {page84}.
• [fyou Ileal-audio that seems"incorrer;P'for the programyou arewatching {suchas musicor a foreign
language},tile SAPmode maybe on.Set the MTSfeature to STEREOmode {page 84}.
• When usingan externalaudio amplifier ifyou conned the amplifiel to the VAR.AUDIO OUTterminals,tile
volumeof tile TVand amplifier mustbe set above0 oryou will not hearar/y sound {page 20}.
Remote control problems • Make sure the remote control is setto tile correct device mode {page 28},
• Remove all obstructions between the remote control and the l)'
• The lemote control batteries may be dead. Replace the batteries {page 28}.
• Your TV remote control may riot operate certain features on your external device. Refer to the owner's manual
for your other device to determine its available features. If your TV remote control does not operate a specific
feature on another device use tile remote control that came with tile device {page 28},
• [f the TV stops responding to the controls on the remote control or TV front panel and you cannot ttHn off the
IV press and hold the POWER button on tile TV front panel fer 5 or more seconds to reset the IV.
• If the IV still does not act as expected use tile Restore Factory Defaults procedure as described on page 52.
Channel tuning problems • Make sure the remote control is set to the correct device mode {page 28},
• The channel may have been erased from the channel memory by the Channel Add/Delete feature, Add the
channel to the channel memory {page 431.
• The channel may be blocked by the Channeb BJock feature, UnbJock the channel {page 95},
• If you are unable to tune digital channels, check the antenna configuration {page 411. If you are still unable to
tune digital channels, clear all channels from the channel list {page 43} and reprogram channels into the
chanr/el memo0/{page 42}, If you are still unable to tune digital char/nels, use the Restore Fadory Defaults
procedure as described on page 52. Also see "Other problems,' below,
Closed caption problems • If tile program or video you selected is not closed-captioned, no captior/s will display on-screen {page 82}.
• If text is riot available, a black rectangle may appear on-screen, If this happens, turn off the closed caption
feature {page 82}.
• A closed caption signal may not display correctly in the following situations: a} when a videotape has been
dubbed; b} when the signal reception is weak: or c} when the signal reception is nonstandard {page 821,
RatingBlocking('\/-Chip}problems • If you forget your PlN code: Whilethe PlN code entering screenis displayed,press RECALLfour timeswithin
5 seconds.The PlN codeyou previouslystoredwill be cleared{page 93}.
• TheV-Chipfeatureis availablefor the U,S.V-Chipsystemonly {page 941,
Recordingproblems • If you usethe TV's remotecontrolto start recording,youwill not be ableto changeinputs {page 67}, open the
POPwindow {page76}, or open the FAVSCANmulti-window {page 78}. If you attempt to do so, tile message
"Not AvailableWhileRecording"will @pea on-screen.
• If you are recordinga digital channel,you will only be ableto changeanalog channelswhilethe recordingis in
progress,Ifyou are recordingan analogchannelyou will only beable to changedigital channelswhile the
recordingis inprogress,Thisis becausetile Fd tuner that is being recorded {digitalor analog} will be locked
on the channelthat is currently recording.
• It is recommendedthat you usethe TV's remotecontrol to start recording.Ifyou use a device otherthan tile
[V's lemote controlto star1recordingand then attemptto accessa feattHe that is normallydeniedduring
recording{POPmode,FAVSCAN mode, changing inputs,}the recordedaudio and/or video maynot bewhat
you intendedto record,Seepages 67 arid 71,
• If you connected a SymbioTM AVHD lecorder, inorder to use its full functionality,you mustfirst set up tile
7_/GuideOn Screen_system {page23 and Chapter2}.
• if you unplug the power cord while the TV is on, when you plug the power cord in again, the
message "Now Booting..." will display on-screen LInti[the TV enters standby mode. This is normal
and is not a sign of malfunction.
"Now Booting" message
appears on-screen
IV stops lesponding to controb • [f the l_/stops responding to the controls on the remote control or TV front pane] touehpad and you cannot
turn offthe l_/, press and hold tile POWER button or/the TV front panel for 5 or more seconds to reset tile TV,
Other problems • [f your TYs problem has not been addressed in this ]]oubleshooting section or tile recommended solution has
riot worked, use the Restore Fador7 Defaults procedure as described on page 52.
÷
8
HM95 R2 0 7-102 061505 98
Copyright @ 2005 TOSHIBA CORPORATION A}I rights reserved
6/27/05, 8:15 PM [

A ÷ [
The green and red LEDs on d_eTV f'ron_touchpad (to _heletr of"_hePOWER button) indicate _heTV's s_ams,as described bdow.
• Red ON (solid) and Green OFF = The TV power cord is plugged in.
• Green ON (solid) and Red OFF = A recording is in progress while _heTV is OFE
• Red ON (solid) and Green ON (solid) = A recording is in progress while the TV is ON.
• Green and/or Red biinking (see tabie bdow).
)Vote: If the F1/Ioses Arc power (e g, _tpower outgtge ooctJr_ o_ the power c'o_dts uf>/ugged),
when power ts testcmd, the gmerr LED wit/b/ink while the TV ts booting until the remote
COl?trot/S t.zsab/e This is/lo[Tyla/arid is Rot a s/qrl of frlaffurlct/_)Fi
GUIDE TV/VIDEO CHANNEL VOLUME MENU
TV front touchpad ........Red LED....................
Green LED
LED indication Condition Solution
1)Green blinks continuously The lampunit dooris noLseated TurnOFFthe TVand unplugthe power cord.Review'How to
at 3-second intervals, properly replacethe lampunit" on pages10/4-105to ensurethatthe lamp
Red blinks continuously door isinstalledsecurely If the problem persists,contacta Toshiba
at 0.5-secondintervals. AuthorizedServiceCenter.
2)Green Minks continuously The lampis noLworking properly. TheTV will aulomaticallytry to restartitselleight times (seeitem
at 0.5-secondintervals; #3).
Red is ON (solid).
3) Gree. and Red biiak The lampis noLworking properly Turnthe TV OFFandthen ON agakl.If the problempersists,
continuouslyat aRerthe eighth automaticrestart replacethe lampunit (seepages 103-105). Ifthe problemstill
1-secondintervals. (see item#2). exists,contact aToshibaAuthorizedServiceCenter
4)Green is OFF; An abnormaltemperature TurnOFFthe TV Checkto makesure all slo[sand openingsinthe
Red blinks at 0.2-second increasehas occurred. TV cabinetare no[ covered,blocked,or dusty TurnON the TV
intervals4 times (repea0. again.If the problempersisls,contacta ToshibaAuthorizedService
Center.
5)Green is OFF; Abnormaloperation TurnOFFthe TVand unphg the power cord. Plugthe power cord
Red blinks continuously (inchJdingcoolinglan stop), inagainand turn ON the TV If the problempersists,contacta
at 0.5-secondintervals. ToshibaAuthorizedServiceCenter.
6)Green is OFF; Abnormaloperationor BUS line. TurnOFFthe TVand unphg the power cord.Plugthe power cord
Red blinks continuously inagain andturn ON the TV Ifthe problempersists,contacta
at Fsecond intervals. ToshibaAuthorizedServiceCenter.
7)Green is OFF; The colorwheel hasstopped. TurnOFFthe TVand unphJgthe power cord. Plugthe power cord
Red blinks at 0.2-second inagainand turn ON the T\/If the problempersists,contact a
intervals3 times (repea0. ToshibaAuthorizedServiceCenter.
÷
Copyright (o 2005 TOSHIBA CORPORATION All rights reserved
HM95 R2 097-102 061505 99
5/27/05, 5:29 PM
99
[

A ÷ L
TVGuideOnScreen FAQs
The _Howing are ffequen@ asked questions about the TV Guide On Screen °°system. The answers represent the most _ikdy sohitions
to the problem.
AReryouset up the TVGuideOnSemen_system(Chapter 5},the
programguide opensautomaticalmyby defauRwhenyouturn on
the TV.Youcan turn offthe automaticprogramguide (see page40)
andinsteadpressthe TVGUmDEbuttononthe remotecontrol to
manuallyopentheTVGuideOnScreen_programguide.
SETUP
1. Q; What if I move and my ZIP code or postal code
changes?
A: Highlight Setup in the Ser_,,ice Bar Press V to highlight
Change System Se_tings (page 65), and then press ENTER.
Folh_w the on-screen prompts to enter new inf[_rmation
(see Chaptes 3 tot details), it can take up to 24 hours to
receive new data.
2. Q: What if I change my cable hook-up to antenna or vice
versa?
A: Highlight Setup in the Setwice Bar. Press Y to highlight
(hange System Settings (page 65), and then press ENTER,
Follow the on-screen prompts to enter new input
intormation and rescan channds for the new input (see
Chaptes 3 R_r details).
3. Q; What ifI change cable boxes?
A: Highlight Setup in the Service Bar Press V to high[ight
Change System Se_tings (page65), and then press ENTER.
Follow the on-screen prompts to enter new input
int_rmation and rescan channels for the new input (see
Chaptes 3 for details).
4. Q; I used m have a cable box, bnt now I get direct cable.
What do I do?
A: Highlight Setup in the Service Bar. Press V to highlight
(hange System Settings (page 65), and then press ENTER.
Fo_h_wthe on-screen prompts to enter new input
in_(_rmation and rescan channels R_r the new input (see
(hapter 3 for details),
5. Q: KI add a recorder or change my cable service, how do I
change my- Setup information?
A: Highlight Setup in the Setwice Bar. Press V to highlight
(hange System Settings (page 65), and then press ENTER.
Folh_w the on-screen prompts to enter new information
(see Chapter 3 _[_rdetails). It can take lip m 24 hours m
receive new data.
6. Q; Why does it take up to 24 hours for the TV Guide
On Screen _'_system m be ready for use?
A: The inidal setup process consists of finding the s_ations in
)xmr area that carU the TV Guide On Screen _*°system data
and tuning to those s_ations m receive the setup and
lisdngs data.
100
HM95 R2 017-102 061505 100
7. Q; I had a power outage. Do I need to go through initial
setup of the TV Guide On Screen ''_systeru again?
A: No. The information ]_ut entered is stored in the TV Guide
On Screen °°system me*nor>
Note: For (?;,'hiebox users,the TVfT_ustbe OFFand tile (2g_ble
box mustbe/eft ON fot the TVGuide OnSc/_en®systemto
f_c'e/ved?ailnd /ioe tJpirTfolmaf/_o
8. Q: How do I connect the G-LI[NK('_(IR blaster) cable to
the G-MNK _"_input on the TV?
A: See Chapter 2: Connecting your TV in this mauuak
You also can retcr to the TV Guide On Screen _')prompts
during VCR or Calde box setup.
9. Q: When will I be able to view my TV program listings and
use other '_ Gnide On Screen _'_system features?
A: You will be able to use inidal program _isdngs wkhin 24
hours ofinitia_ setup, It-may take up to one week to receive
the t'u_leight days of program _istings.
i0. Q: What should I do Kl cannot complete initial setup?
A: If yot_ are tmable to complete initial setup using the owner's
manual and the on-screen prompts, p_ease call _12_shiba_s
National Service Division at 1-800-631-3811.
11. Q; KI make a mistake during setup, how do I go back to
the prevlons step?
A: Comp[ete the remaining setup s_epa When "(onfirming
Your Settings" appears, select "No, repeat setup process/'
Fo_h_wthe on-screen prompts and input the correct
inf_rmation.
12. Q: What if the channel number is not visible on my-cable
box?
A: Your calde box may be det:auhing to a dock or time display
once the channel changes. Watch the box carefully when
tesdng the cable box brand code to see if the channel
changes to 09.
13. Q; Why won't my VCR turn on?
A: There are several possibilities:
a) An incorrect or "no VCR" code was eurered during the
TV Guide On Screen _°initial setup. Press the GUIDE
button on the remote control, and then press _ to
highlight SET[JR Press _ to highlight "Change system
settings," and then press ENTER. Follow the on-screen
prompts to select the correct V(R information.
b) Make sure the G-LINK °° (IR blaster) cable is connected
coffee@ (see page 25).
c) The V(R record times is on Turn oil" the times.
d) The wired remote V(R is incompati/de.
Copyright (0 2005 TOSHIBA CORPORATION All rights reserved
÷
6/27/05, 6:29 PM [
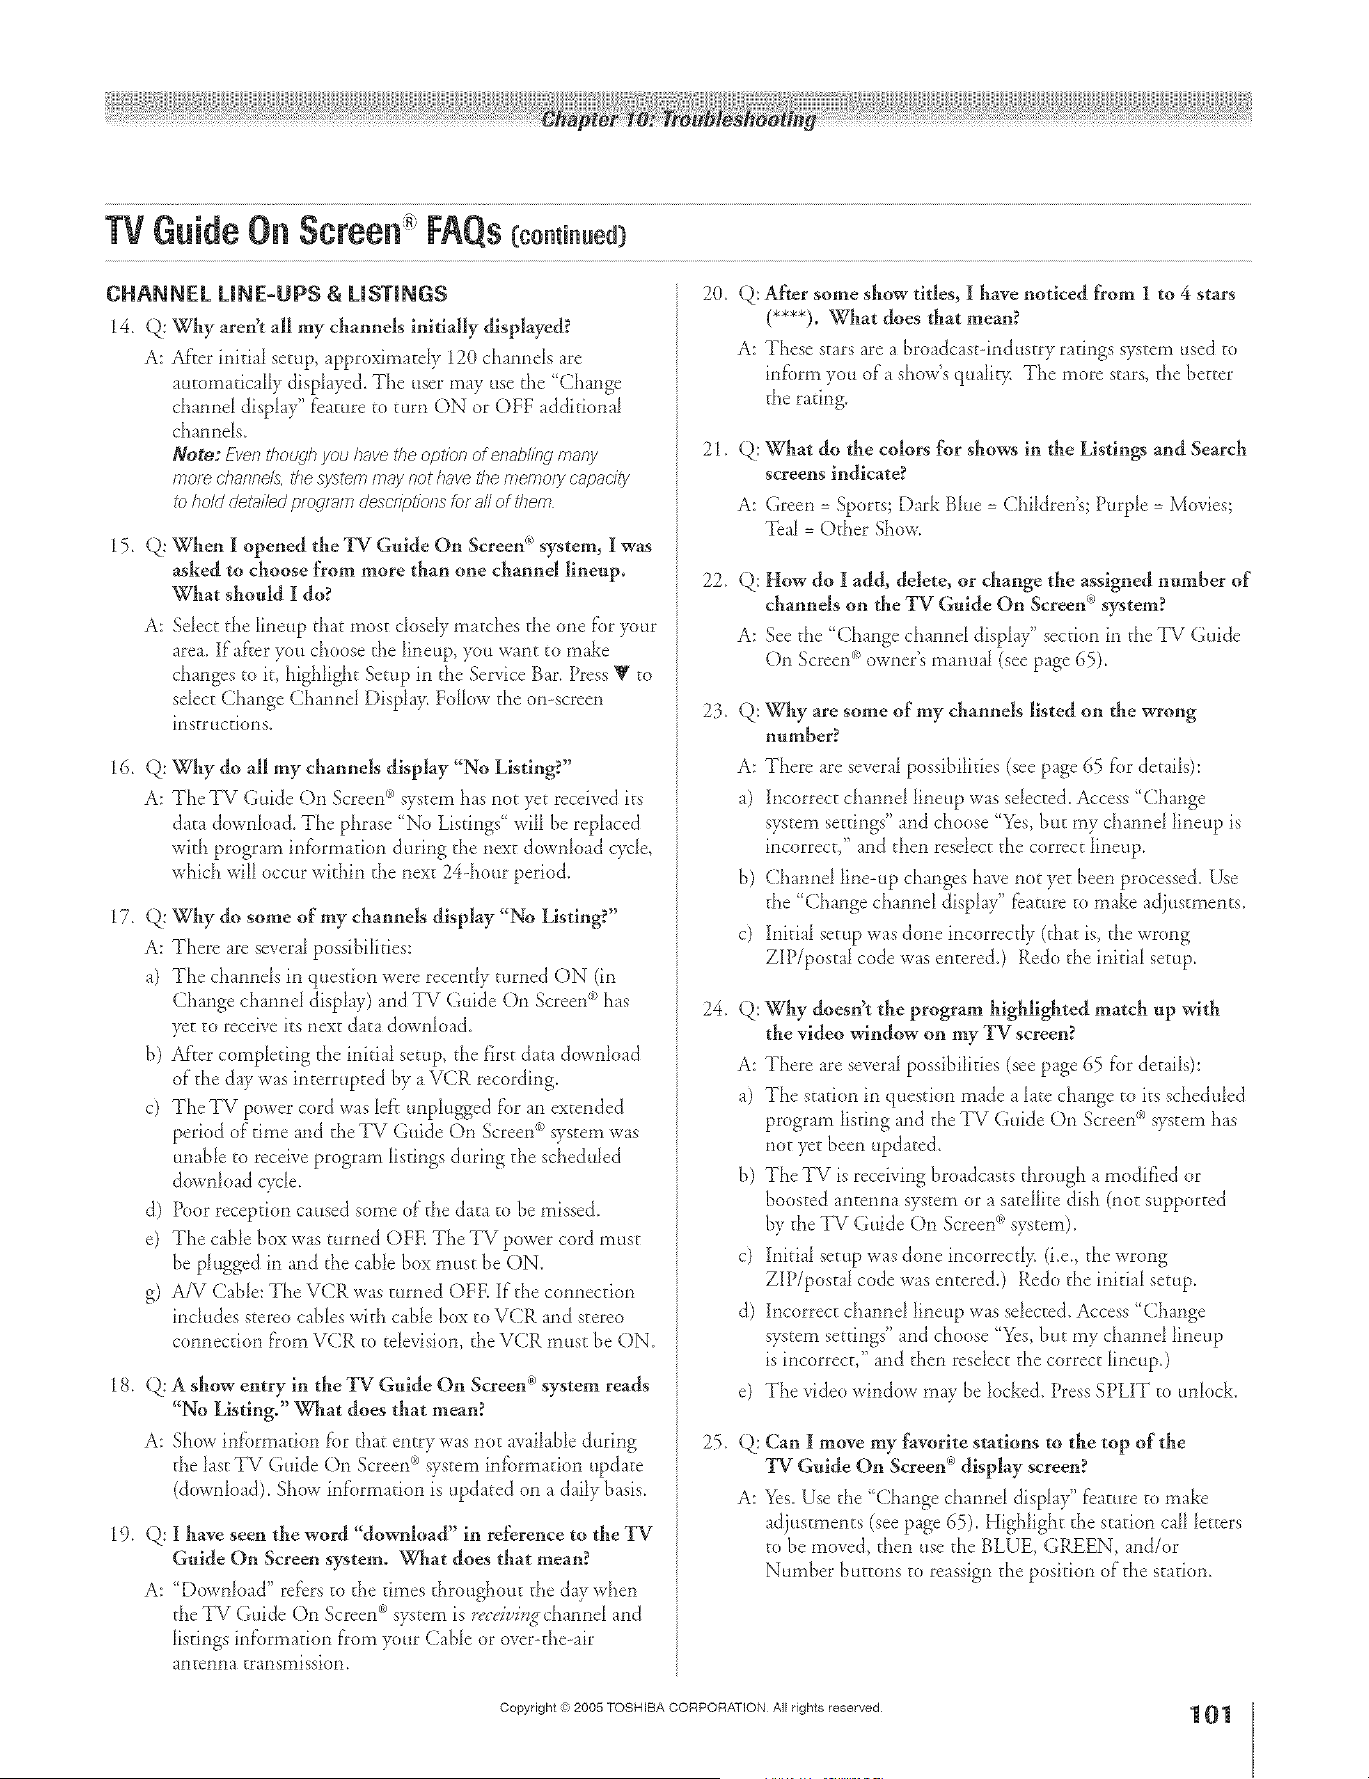
S ÷ L
CHANNEL UNE-UPS & USTmNGS
14. Q; Why aren't all my channels initially displayed?
A: At'_er inidal setup, approximatdy 120 channds are
automatically displayed. The aser may use the "Change
channd display" tcature to turn ON or OFF addkional
channds.
Note: Eventho£@ pu havetl}e option of en&ling ma®
mole channds,171esyste_nirl_y not/lave the memo<yc,ap_c,i@
to hold det_u/edprogram desc/iptionsfor 8Nof theM:l
15. Q When I opened the _[%rGuide On Screen _)system, I was
asked to choose from more than one channd lineup,
What should I do?
A: Select the lineup that most ck_sdy matches the one for your
area. If after you choose the lineup, you want to make
changes to k, highlight Setup in tile Service Bar. Press Y co
select Change Channel Displa> Follow the on-screen
instructions.
16. Q: Why do all my channels display "No Listing?"
A: The TV Gtfide On Screen u)system has not vet received its
data downh_ad. The phrase "No Listings" will be replaced
wkb program information during the next download cycle,
which will occur wkhin the next 24-hour period.
17. Q Why do some of my channels display "No Listing?"
A: There are several possibi[kies:
a) The channds in quesdon were recen@ turned ON (in
(hange channd display) and TV Guide On Screen u_has
yet to receive ks next data download.
b) After completing the initial setup, the first data download
of the day was interrupted by a VCR recording.
c) TheTV power cord was left unplu_ed for an extended
period of time and the TV Guide On Screen '<)system was
unalie to receive program lisdngs d uring the sched tied
download cycle.
d) D_or reception caused mine of the data co be missed.
e) The cable box was turned OFE The TV power cord must
be phlgged in and the cable box must be ON.
g) A/V (aMe: The V(R was turned OFE If the connection
includes stereo cables with cable box to V(R and stereo
connection t}om V(R to tdevision, the VdR must be ON.
18. Q A show entry in the "P¢-Gnlde On Screen _)system reads
"No Listing." What does that mean?
A: Show inR_rmation for that entry was not available during
the last TV Guide On Screen u_system inR_rmation update
(download). Show M'ormation is updated on a daily basis.
19. Q: I have seen the word "download" in reference to the _N
Guide On Screen system° What does that mean?
A: '<[)ownh_ad" re_crs to the times throughout the day when
the TV Guide On Screen °_system is J;a'rivingchannd and
listings information t}om yore Cable or over-the-air
antenna transmission,
20. Q: After some show titles, ][have noticed from 1 to 4 stars
(****). What does that glean?
A: These scars are a broadcasc-ind uscry ratings system used to
inform you era show's qualir,? The more stars, the better
the rating.
21. Q What do the colors for shows in the Listings and Search
screens indicate?
A: Green= Sports; Dark Nue = Children's; Purple = Movies;
Teal = Other Show.
22. Q: How do I add_ delete, or dange the assigned number of
channels on the TV Guide On Screen ('_system?
A: See the "Change channd display" section in theTV Guide
On Screen °°asvner's manual (see page 65).
23. Q: Why are some of my channels listed on the wrong
nnmber?
A: There are several possibilities (see page 65 R_r details):
a) Incorrect channd lineup was selected. Access '<Change
system settings" and choose '<Yes,but my channel lineup is
incorrect," and then resdect the correct lineup.
b) (hannel line-up changes {lave not yet been processed. Use
the '<Change channd display" feature to make adjustments.
c) Inkial setup was done incorrec@ (that is, the wrong
ZiP/postal code was entered.) Redo the inkial setup.
24. Q: Why doesn't the program highlighted match np with
the video window on my TV screen?
A: There are several possibilities (see page 65 for details):
a) The station in question made a late change to its scheduled
program listing and the TV Guide On Screen u_system has
not Secbeen updated.
b) TheTV is receiving broadcasts through a modified or
boosted antenna syaem or a satellke dish (noc supported
by the TV Guide On Screen °°system).
c) Inidal setup was done incorrec@ (i.e., the wrong
ZIP/postal code was entered.) Redo the initial setu D
d) incorrect channd lineup was selected. Access "6 hange
system seKings" and choose '<Yes,but my channd lineup
is incorrect," and then reselect the correct lineuD)
e) The video window may be h_cked. Press SPLIT to unh_ck.
25. Q (;an I move my faw-_rltestations m the top of the
'][_?Gnlde On Screen_"_display screen?
A: Yes.Use the '<(hange channel display" feature to make
adjusm_ents (seepage 65) Highlight the station call letters
to be moved, then use the BLUE, GREEN, and/or
Number buttons to reassign the position of the station.
Copyright @ 2005 TOSHIBA CORPORATION All rights reserved
101
HM95 R2 097-102 061505 101
÷
6/27/05, 6:29 PM
÷
r
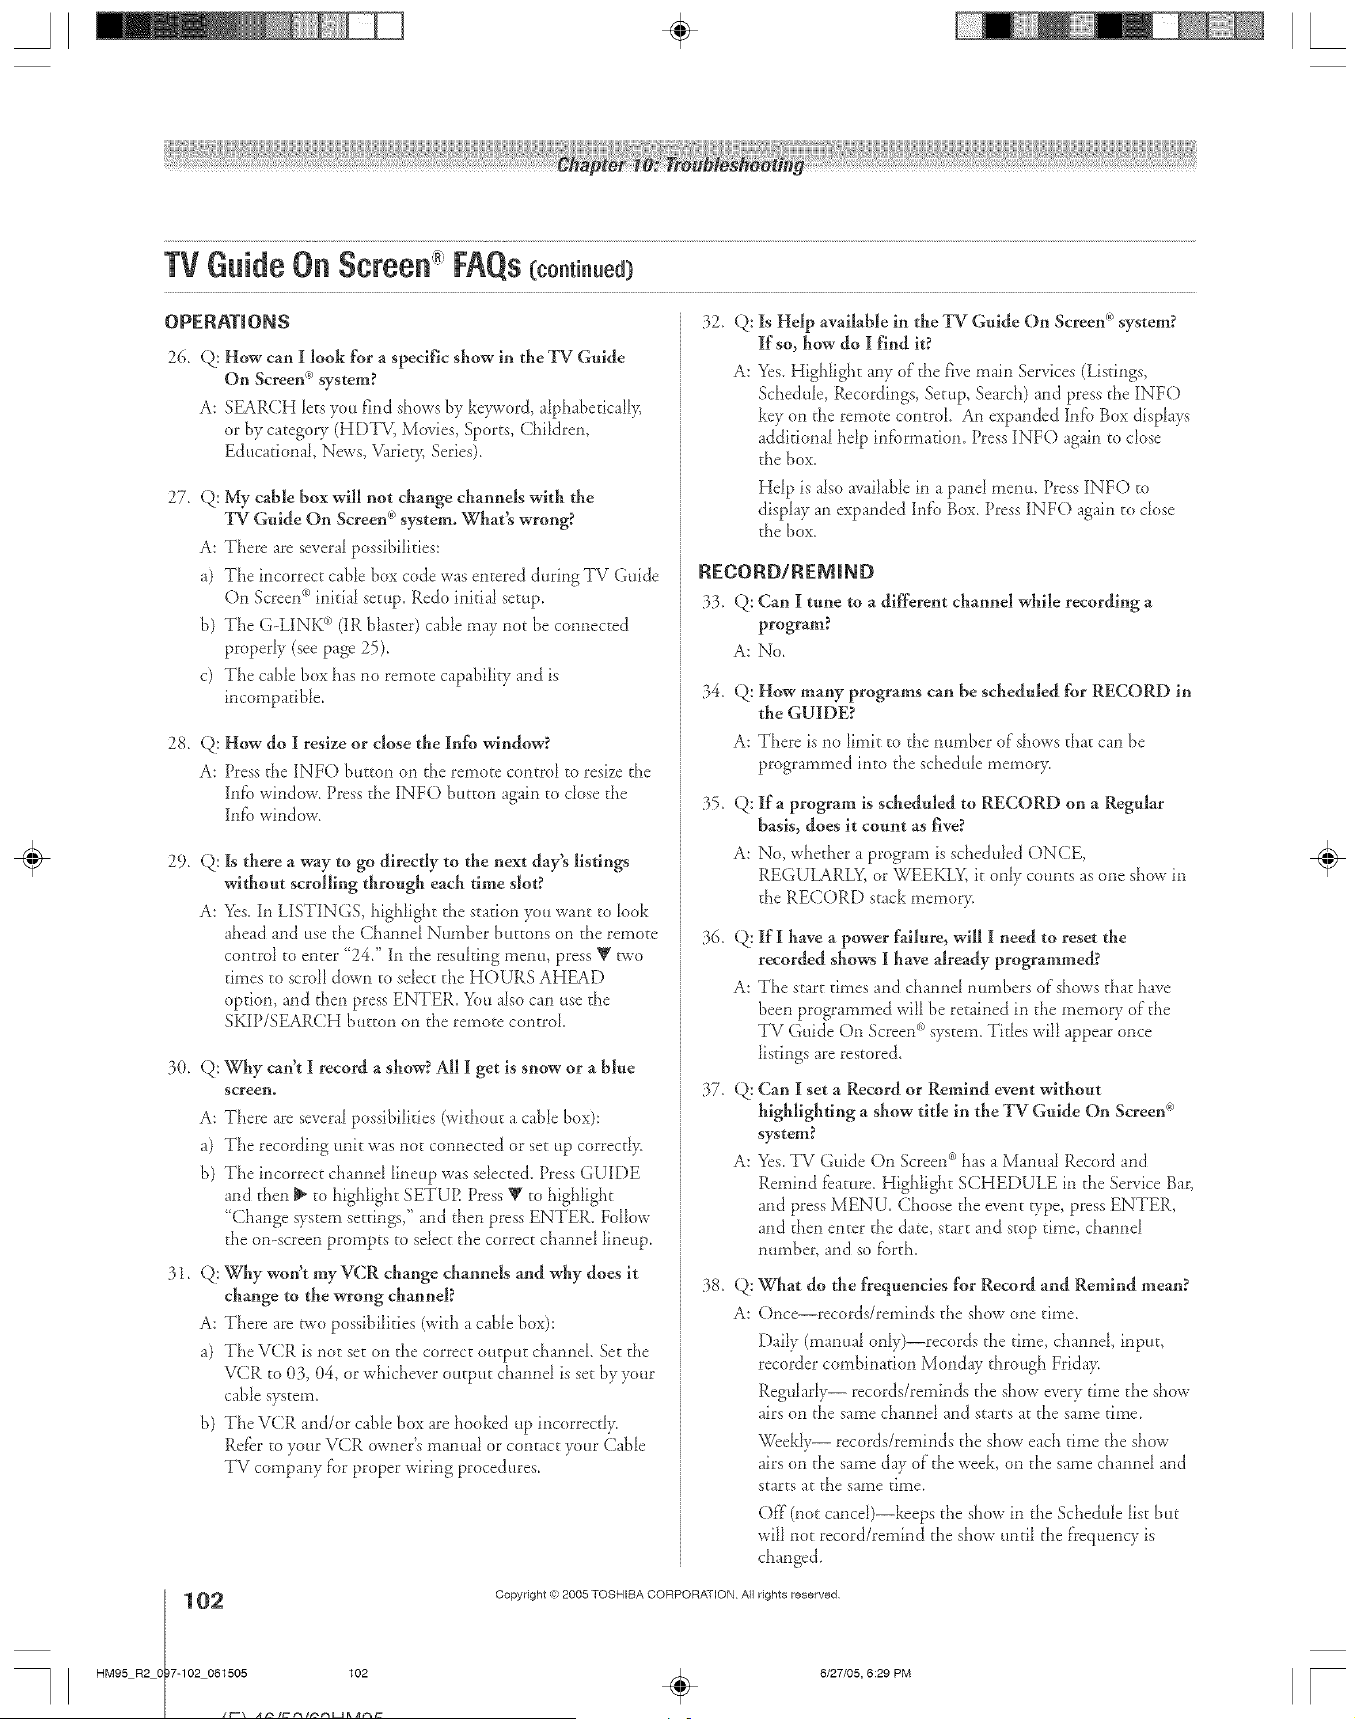
A ÷ L
OPERATmONS
26. Q How can I look [or a specific show in the TV Guide
On Screen _")system?
A: SEARCH lets you find shows by keyword, alphabetically,
or by catego U (HDTV, Movies, Sports, Chi]dren,
Educational, News, Varievy, Series).
2Z Q: My cable box will not change channels with the
'Pd Gnide On Screeff ")system° What_ wrong?
A: There are several possibilities:
a) The incorrect cable box code was entered during TV Guide
On Screen °°initial setup. Redo initial setup.
b) The G-LINK °')(IR b[aster) cable may not be connected
properly (see page 25).
c) The cable box has no remo_e capabilig and is
incompatible.
28. Q! How do I resize or close the Info window?
A: Pressthe INFO button on the remote contro_ to resize the
[n_ window. Press the [NFO button again to dose the
[nfb window.
2% Q: Is there a way to go dlrecdy to the next day_ listings
without scrolling through each time slot?
A: Yes In LISTINGS, higNight the station you want to look
ahead and use the Channel Number buttons on the remo_e
control to enter "24." In the resuking menu, press _' t_,eo
times to scroll down to sdect the HOURS AHEAD
option, and then press ENTER. You also can use the
SKIP/SEAR( H button on the remote control
30. Q: Why can't I record a show? All I get is snow or a blue
screen.
A: There are severaI possibilides (without a calde box):
a) The recording unk was not connected or set tip correcd>
b) The incorrect channel lineup was sdected. Press GUIDE
and then _ to highlight SETUR Press V to highlight
"Change system settings," and then press ENTER. Follow
the on-screen prompts to sdect the correct channel iineup.
31. Q! Why won't myVCR change channels and why does it
change to the wrong channel?
A: There are _,s'opossibilities (wkh a cabIe box):
a) The V(R is not set on the correct output channel Set the
V(R to 03, 04, or whichever output channel is se_by j¢otlr
calde system.
b) The VCR and/or calde box are hooked up incorrecd>
Refer to your VCR owner's manual or contact your (able
TV company for proper wiring proced tires.
32. Q: Is Help available in the _[YGMde On Screeff")system?
If so, how do I find it?
A: Yes. Highlight anyof the five main Services(Listings,
Schedule, Recordings, Setup, Search) and press the INFO
key on the remote control An expanded Int_ Box displays
additional hdp int_mnation. Press INFO again to dose
the box.
Hdp is also availaNe in a pand menu, Press INFO to
display an expanded lnt'o Box. Press INFO again to dose
the box.
RECORD/REMiND
33. Q: Can I tune m a different channel while recording a
program?
A: No.
34. Q: How many programs can be scheduled for RECORD in
the GUIDE?
A: There is no limk to the number of shows that can be
programmed into the schedulememory.
35. Q: Ira program is schedMed to RECORD on a Regular
basis, does it connt as five?
A: No, whether a program is scheduled ON(E,
REGULARLY,or WEEKLY,it only cotmts as one show in
the RE(ORD stack memory.
36. Q If I have a power failure, will I need to reset the
recorded shows I have already programmed?
A: The s_art times and channel numbers of shows that have
been programmed will be re_ained in the memo U of the
TV Guide On Semen °°system. Tides will appear once
[isdngs are restored,
37. Q (;an I set a Record or Remind event without
highlighting a show title in the TV Guide On Screen _"_
system?
A: Yes.TV Guide On Screen _'_has a Manual Record and
Remind feature. Highlight S(HEDULE in the Service Bar,
and press MENU Choose the event wpe, press ENTER,
and then enter the date, start and stop time, channel
nmY_ber,and so forth.
3& Q What do the frequencies for Record and Remind mean?
A: Once--recoMs/reminds the show one time.
Daily (manual only)--records the time, channel input,
recoMer combination Monday through Ftida>
Regtdarly-- records/reminds the show every time the show
airs on the same channe_ and s_arts at the same time.
Weekly-- records/reminds the show each time the show
airs on the same day of the week, on the same channel and
s_arts at the same time.
Off (not cancd)--keeps the show in the Schedtde _istbut
will not record/remind the show ulrtil the freqtlency is
changed.
102
HM95 R2 017-102 061505 102
Copyright @ 2005 TOSHIBA CORPORATION All rights reserved
÷
6/27/05, 6:29 PM [
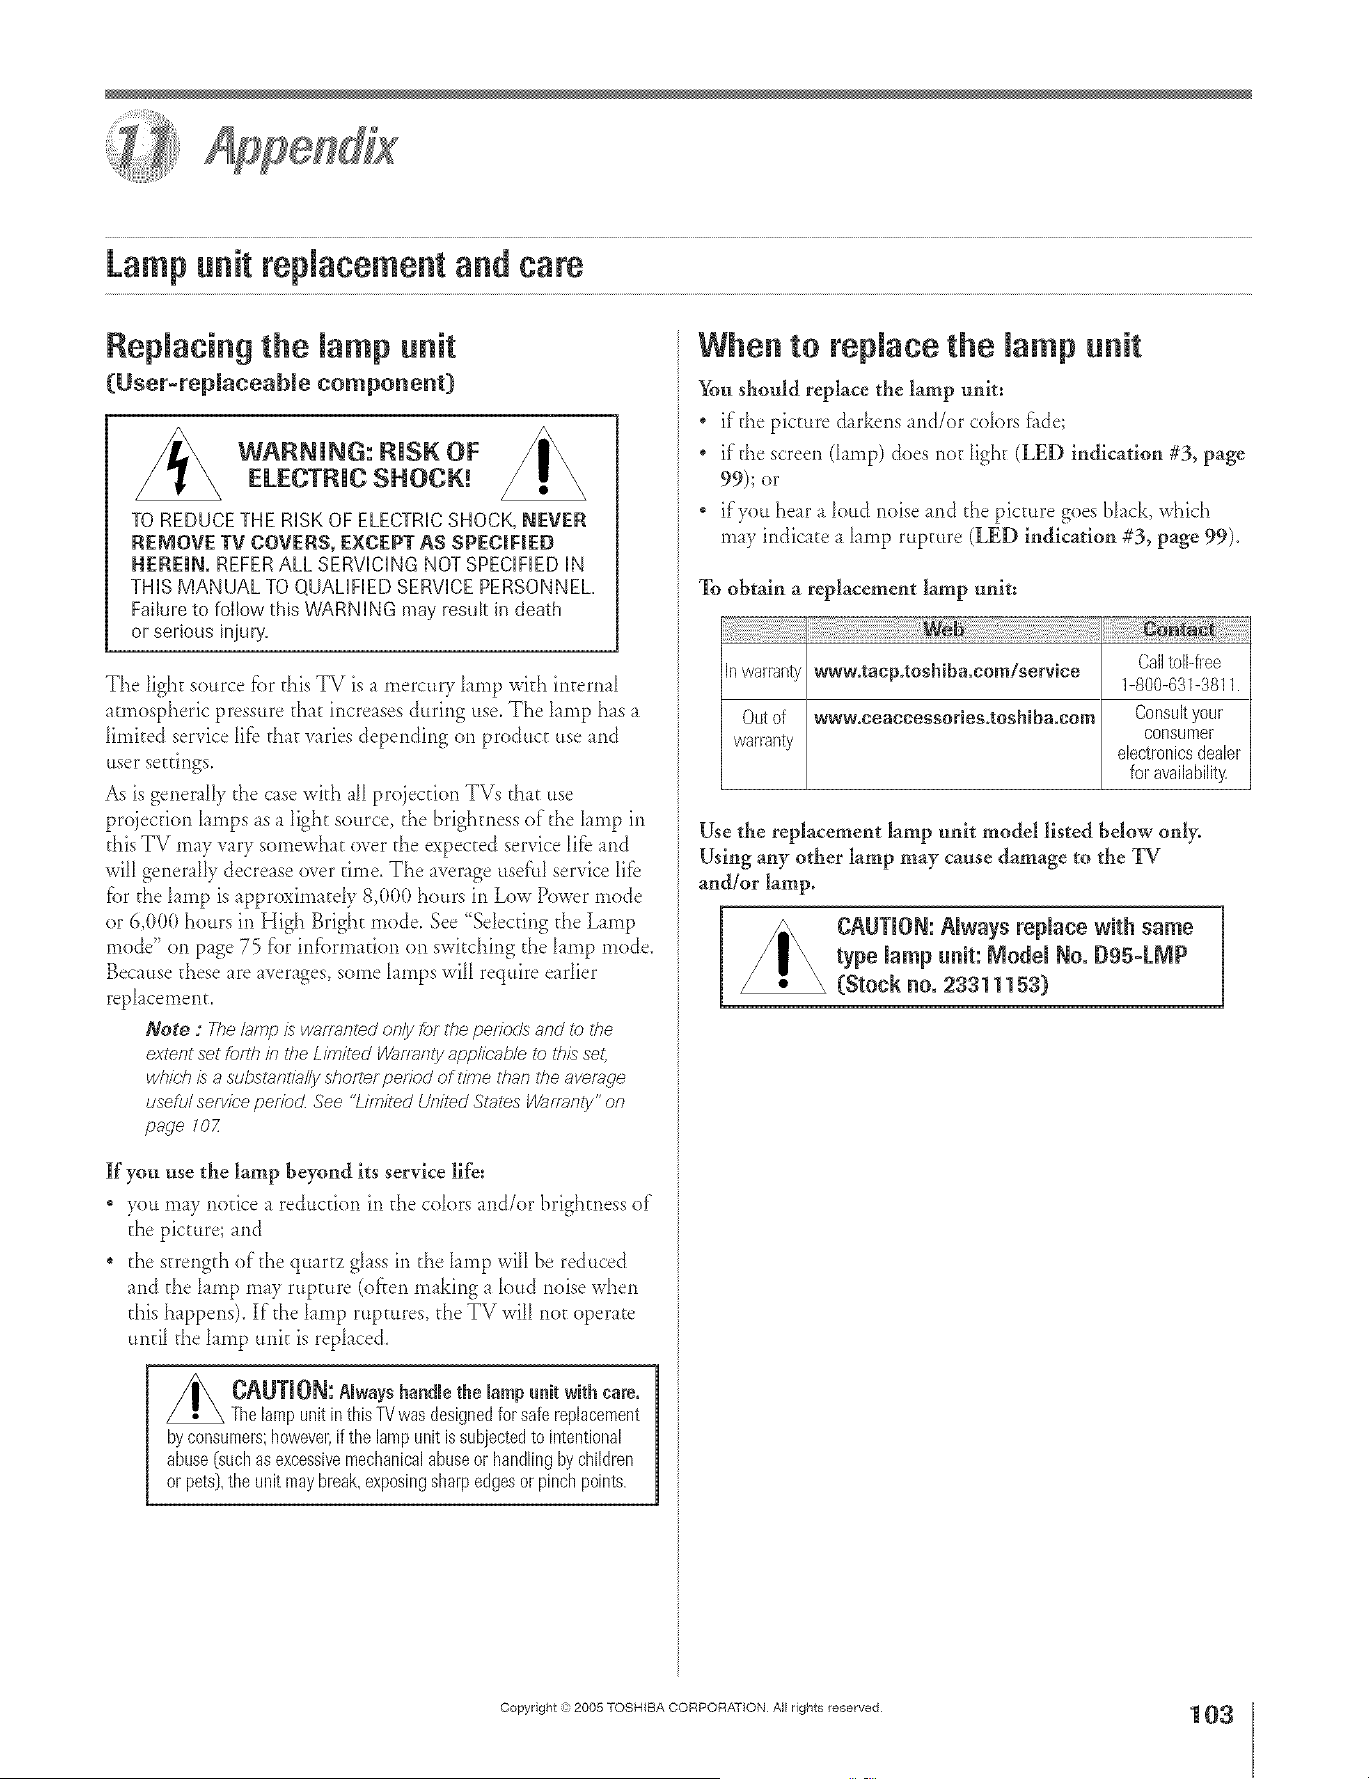
A ÷ L
Lampunit replacementand care
Replacing the lamp unit
(User-replaceable component)
_ WARNING: RiSK OFELECTRIC SHOCK. _
TO REDUCETHE RiSKOF ELECTRICSHOCK,NEVER
REMOVETV COVERS,EXCEPTAS SPECiNED
HEREmN.REFERALLSERViCiNGNOTSPECiFiEDiN
THiSMANUAL TOQUALiFiEDSERVICEPERSONNEL,
FaiffJre to foIIow this WARNING may lesuk h death
or serious injury=
The fight source _br this TV is a mercury hmp with inremal
atmospheric pressure that increases during use. The hmp has a
fimited service fife that varies depending on product use and
user settings.
As is generally the case with alI projection TVs that use
projection Iamps as a light source, the brightness of the hmp in
this TV may vary somewhat over the expected service Iife and
will generally decrease over time. The average useful service life
fbr the hmp is approximatdy 8,(t(t0 hours in Low Power mode
or 6,00(} hours in High Bright mode. See "Sdecting the Lamp
mode" on page 75 f'or infi_rmafion on switching the lamp mode.
Because these are werages, some lamps will require eadier
rephcement.
Note : >e /amp is warmn/ed on/yfer #re pe/mds and to the
extent set fofff7 in 2re Limited Wans,nty applicable to this set;
which is a subslanlia/lyshofter pefied of time than the average
usehd servicepealed See 'tffnited UnitedStal_s W,_rfanty"on
page 107
If you use the lamp beyond its service life:
you may notice a reduction in the colors and/or brightness of
the picture; and
the strength of the quartz g[ass in the hmp wiII be reduced
and the Iamp may rupture (()f'renmaking a[oud noise when
this happens). If the hmp ruptures, the TV will not operate
until the lamp unit is rephce&
(_A[JTmON: Always handle the lamp unR with care.
The lamp unit inthis TV was designed for safe replacement
by consumers; however, if the lamp unit issubjected to intentional
abuse (such asexcessive mechanical abuse or handling by children
or pets), the unit may break, exposing sharp edges or pinch points.
When to repmacethe mampunR
_m should replace the lamp unit:
if the picture d _rkens and/or colors fhde;
. if the screen (hmp) does not light (LED indication #3, page
99); or
if you hear a loud noise and the picture goes black, which
may indicate a hmp rupture (LED indication #3, page 99).
To obtain a replacement lamp unit:
In warranty www°tacp°toshibaocom/service
Out of www.ceaccessories.toshiba.eom
warranty
CallteIbfree
1-800-631-3811.
Consukyour
consumer
electronicsdealer
for availability.
Use the replacement lamp unit model listed below only.
Using any other lamp may cause damage to the TV
and/or lampo
CAUTION: Nways replace with same
type lamp unit: Model No, D95-LMP
(Stock no, 23311153}
÷
HM95 R2 103-109 061505 103
Copyright =:)2005 TOSHIBA CORPORATION AJl rights reserved
÷
6/27/05, 6:40 PM
103
r
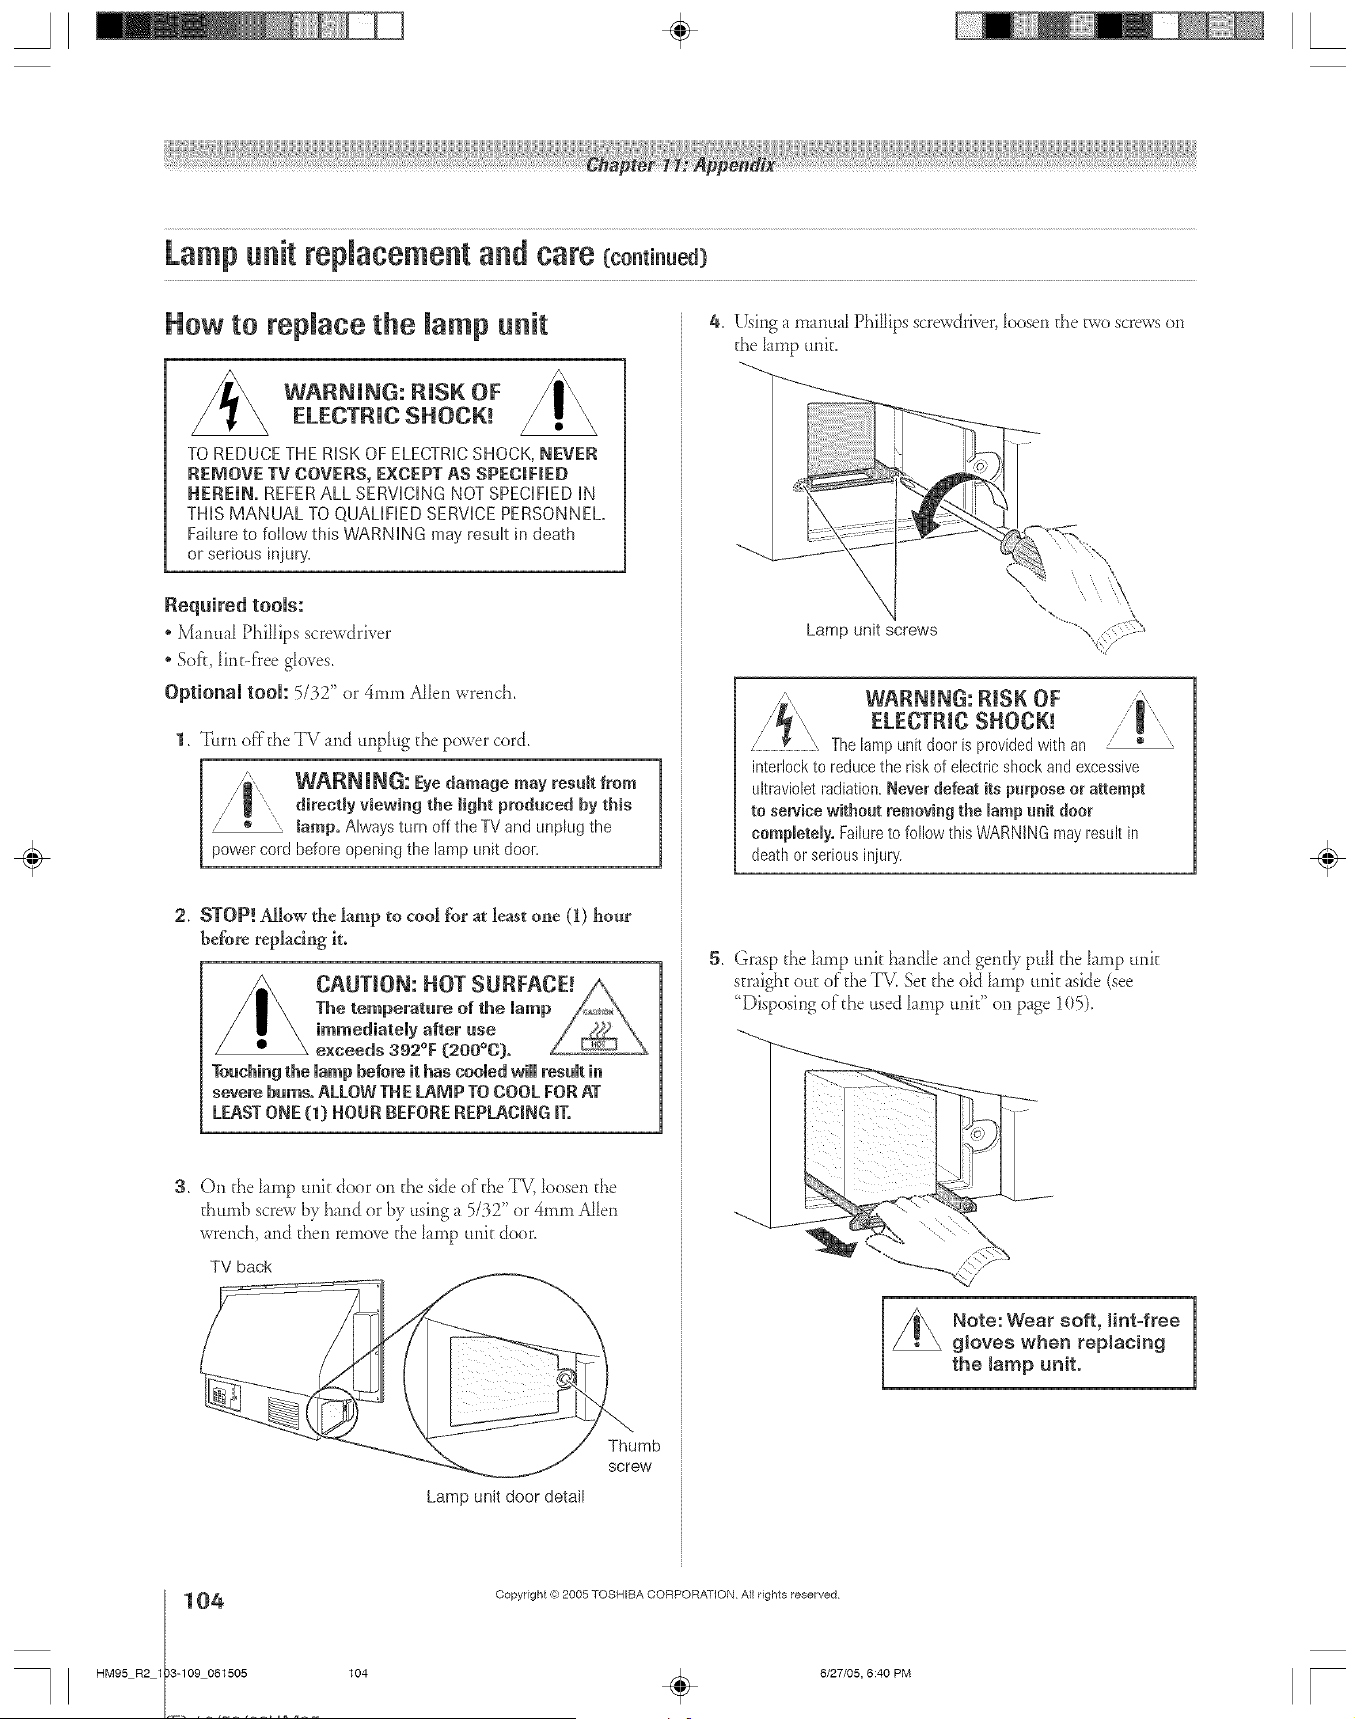
Lampunit replacement and care (co.t ..ed
How to repJace the Jamp unR
_ WARNING: RiSK OFELECTRIC SHOCR._
TO REDUCE THE RiSK OF ELECTRICSHOCK, NEVER
REMOVE TV COVERS, EXCEPT AS SPED|NED
HEREIN. REFERALL SERViCiNG NOT SPECiFiED iN
THiS MANUAL TO QUALiFiED SERVICE PERSONNEL,
FaiMre to follow this WARNING may resuk indeath
or serious injul%
Required tools:
" Manual Phillips screwdriver
" Sof_, Hnt-ffee gIoves,
Optionam teem: 5/32" or 4ram Al_enwrench,
1, Turn offthe TV and unphg t}_epower cord,
W&RNING: Eyedamage may resuR from
directly viewing the J]ght prodaeed by this
tamp, Always turn off the TV and unplug the
power cord befole opening the lamp und dooL
2. STOP! Allow the lamp to cool for a le_t one (I) hot_r
before replacing it.
Touching the lamp before it has cooled will result in
severe barns, ALLOW THE LAMP TO COOL FOR AT
LEAST ONE O) HOUR BEFORE REPLACING if,
3, O,1 the lamp unk door o,1_heside of_he TV, loosen the
_humb screw by hind or by using a 5/32" or 4me Allen
wrench, and then remove _helamp unk door
TV back
Thumb
SCreW
Lamp unit door detail
4, Using a manuaI Phillips screwdriver,_oosenthe two screwson
the Iamp unk.
Lamp unit screws
WARNING:RISK OF
The lamp unit door is provided with an /
interlock to reduce the risk of electric shock and excessive
ultraviolet radiation. Never defeat its purpose or attempt
to service without removing the mamp unR door
completely. Failure to follow this WARNING may result in
death or serious injury.
5, Grasp the lamp unk hmdIe and gen_Iypull the lamp unk
straigh_ottt of the _ Set the old Iamp unit aside (see
"Disposingoldie used lamp elk" on page 105),
Note: Wear soft, Hnt-free
gloves when replacing
the lamp unit.
÷
Copyright ,g:2005 TOSHIBA CORPORATION All rights reserved
6/27/05, 6:40 PM [

Lampunit replacement and care (co.t . ed
HOw tO repJace the Jamp unit (continued)
6, Carefully insert the new _amp unit straight into the TV unti_
it is hLlly seated
Note :
• Neversubj_ct_/_elHmpun/t_oexceaa/_d_ock
• Never toud7 tile I_smpi.Tit ¢flassor otlJerw/ke clef it di/_S
Doing so rrl_!yaffect the image quality and re&/oe the service/fie of
the bmp See '<Cleauingthe lump unit gbss" below
CLEANING THE LAMP UNIT GLASS
If you accklentailytouch the lamp unit glassor otherwise
get it dirty,wipe it with a lint-free ionscleaningcloth (such
as a clothfor cleaning camera lensesor eyeglasses).
CAUTION: NEvEe dean a hot lamp with
any type of flammable liquid or aemse_
cleaning agent. Many ordinary cIeaning agents
[such as glass deaners_ contain chemicals that m% ue
flammabfe at certain temperatures. It the tamp unit is not aN.wed
to cool for at least one [1) hour, such chemicals may ignite.
7. Using a rn mu_I Phiihps screwdriver, tighten the Fwo lamp
unit screws.
Note: Nand=tidhtell only. Do uot use an electivescrew&vet
--.
--...
Lamp unit screws
(use manual PHIlips screwdriver only) ':"
NOTE: Makesure the lampunit andscrews
are installedsecurely:otherwise,the TVmaynot
turn on andthe lamplife maybe shortened.
8. Re_tt _chthe Iamp unit door, rnaking sure to insert the hooks
on the Jeff side of the Jamp _fit door inside the opening in
the 'FV cabinet. _--
Insert the hooks inside
the TV cabinet opening.
Lamp unit door
9. Replace the thumb screwand hand-tighten.
10.
Lamp unit door
NOTE : Make sure
the lamp unit door is
installed seculely; otherwise,
the TV may not turn on.
Plug in the power cerd and turn on the TM After the initial
warrnup peried (which may take several seconds fi)r f:tflI
picture brighmess), the TV should operate norrnalI> If any of
the f;._llovdngconditions exist, turn off the TE unplug the
power cerd, and repeat steps 1-9 to ensure that the lamp unit
and lamp unit door are installed correcdy:
, No picture o D_rk picture "TV will not turn on
_[Ka_ier repeating steps 1-9, the problem still exists:
Call TACP Consurner Solutions at 1-8(}(}o631-38!1.
Disposing of the used lamp unit
, Place the used lamp unit ill the empE7 box from the new unit.
* Keep the larnp unit out of reach of children and pets.
z_ CAUTION: handle the unit with
Always lamp care.
The lamp unit in this TV was designed for safe replacement by
consumers; however, if the lamp unit is subjected to intentional or
accidental abuse (such as excessive mechanical abuse or handling by
children or pets), the unit may break, exposing sharp edges or pinch points.
* Dispose of the used larnp unit by the approved method fi.>r
your area.
NOTE : ThelampunitcontainsmercuryDisposalof mercurymay
be regulateddueto environmentalconsiderations.Fordisposalor
recyclinginformation,contactyourl,ca[ authoritiesor theElectronicIndustries
Alliance(v®vw.eiaaorg).
÷
HM95 R2 103-109 061505 105
Copyright =_)2005 TOSHIBA CORPORATION All rights reserved
÷
6/27/05, 6:40 PM
105
[
A ÷ L
NOTE:
This model complies with tile specifications listed below.
Desigrts and specifications are subject to chavtge without _totice°
, This model may not be compatible with features al_d/ar specificadans that may be added itl the h_ture.
Television System
NTSC standard
ATSC standard (SVSB)
Digital Cable (64 QAM 256 QAM; in-the-dear, unencrypted*)
*Eml_n_eUOTannel_can be weweUon thl? 7V
ushIJ a C_d_IeCARL?5r'See pg(.ie _2 Mr Uet_rils
Channel Coverage
VHF: 2 through 1_
UHF: 14 through 69
Cable TV: Mid band (A-8 through A-I, A through I)
Super band (J through VJ)
Hyper band (AA through ZZ, AAA, BBB)
Ultra band (65 through 94 100 through 1:15)
Power Source
120VAC 60Hz
Power Consumption
240 W (average)
38 W in standby mode (using a CabIeCARD'")
34 W in standby mode (without a CableCARD r'_
Audio Power
15W+I5W
Speaker Type
Main: Two 4-inch (10cm) round
Tweeter: Two 1-5/8-inch (4era) round
Video/Audlo Terminals
S-VIDEO INPUT:
Y : I V(p?), 75 ohm, negative sync.
C : (}.286 V(p-p) (burst signal), 75 ohm
VIDEO/AUDIO INPUT:
VIDEO: 1 V(p-p), 75 ohm, negative sync.
AUDIO: 150 mV(rms) (3{)% modulation equivtlent,
22 k ohm or greater)
ColorStream _'_(compouent video) HD INPUT:
Y : IV(p-p), 75 ohm
PR: 0.7 V(p-p), 75 ohm
PB: 0.7 V(p-p), 75 ohm
AUDIO: 150 mV(rms), 22 k ohm or greater
Suggested fbrmats: I080i, 480p, 480i, 720p
NOTE: 77?1siV(MegnotproviUeColorStleamHD OUTRtJE
** E EDID Enhanced Extended Display Identification
Video/Andlo Terminals (continued)
HDMI _"INPUT:
HDMI compliant (type A connector)
HDCP compliant
E-EDID** compliant
Suggested fbrmats: 1080i, 480p, 480i, 720p
HDMI Audio: 2-channel PCM; 32/44.1/48 kHz sampling
frequency; 16/20/24 bits per sample
NOTE: ThislVUoesglot f)/oviUe HDM!OUTPU7[
VIDEO/AUDIO OUTPUT (also fbr recording):
VIDEO: 1 V(p-p), 75 ohm, negative sync.
AUDIO: 150 mV(rms) (30% modulation equivJent,
2.2 k ohm or less)
VARIABLE AUDIO OUTPUT:
0.300 mV(rms) (30% modulation equivalent,
2.2 k ohm or less)
G-LINK _'mid IR OUTPUT:
3 V(p-p), 3.5 mm mono socket (IR blaster cables nlpplied)
IEEE1394 INPUT/OUTPUT:
IEEE1394 compliant 4-pin
DIGITAL AUDIO OUTPUT;
Optical type
Dimensions
46HM95: Width:
Height:
Depth:
52HM95: Width:
Height:
Depth:
62HM95: Width:
Height:
Depth:
53-1/8 inches (1349 ram)
31-13/16 inches (808 ram)
15-1/4 inches (387 ram)
58-3/8 inches (1483 ram)
35-1/16 inches (891 ran0
15-1/4 inches (387 ram)
67-1116 inches (1703 ram)
40-15/16 inches (1040 ram)
18-3/16 inches (462 ram)
_'elght
46HM95:78 lbs (35.38 kg)
52HM95:83 Ibs (37.65 kg)
62HM95:99 lbs (44.9(t kg)
Supplied Accessories
• Two dual wind IR blaster cables
• Remote control with pa'o size <AA' alkaline batteries
• Owner's Manual (this book)
Optional Stands
46HM95:ST4665
52HM95:ST5265
62HM95:ST6265
Copyright @ 2005 TOSHIBA CORPORATION All rights reserved
÷
6/27/05, 6:40 PM [
LimitedUnitedStates Warranty
for DLP_ Television Models
]oshiba America Consumer Produets, LLC ("TACP") makes the following
limited warranties to original consumers in the Urfited States
THESE LIMITED WARRANTIES EXTEND TO THE ORIGINAL
CONSUMER PURCHASER OR ANY PERSON RECEIVING THIS DLV"
TELEVISION AS A GIFT FROM THE ORIGINAL CONSUMER
PURCHASER AND TO NO OTHER PURCHASER OR TRANSFEREE.
DLPTMTELEVISIONS PURCHASED IN TH E U.S.A. AND USED ANYWHERE
OUTSIDE OF THE U.S.A., INCLUDING, WITHOUT LIMITATION, CANADA
AND MEXICO, ARE NOT COVERED BY THESE WARRANTIES.
DLPTF'TELEVISIONS PURCHASED ANYWHERE OUTSIDE OF THE U.S.A.,
INCLUDING, WITHOUT LIMITATION, CANADA AND MEXICO, AND USED
IN THE U.S.A., ARE NOT COVERED BY THESE WARRANTIES.
Limited One (1) Year Warranty on Parts and Labor
TACP warlants this DLPTr'l]elevision and its palts against defects in materials
or workmanship for a period of one (1) year after the date of original retail
purchase DURING THIS PERIOD, TACP WILL, AT TACP'S OPTION,
REPAIR OR REPLACE A DEFECTIVE PART WITH A NEW OR
REFURBISHED PART WITHOUT CHARGE TO YOU FOR PARTS OR
LABOR. During this period, TACPAuthorized Service Station personnel will
come to yoar home when warranty selvice is required De[)ending on the
type of repair required, the service will either be performed in your home or
the DLPT'I]elevision will be taken to a TACP Authorized Service Station for
repair and returr_edto your bottle at no cost to you
Limited One (1) Year Warranty on Lamp Unit
TACP warlants the original lamp unit contained in this D LPTr'lTelevision
against defects in materials or workmanship for a period of one (1) year after
the date of original retail purchase DURING THIS PERIOD, TACP WILL,
AT TACP'S OPTION, EXCHANGE A DEFECTIVE LAMP UNIT WITH A
NEW OR REFURBISHED LAMP UNIT WITHOUT CHARGE TO YOU.
LABOR CHARGES FOR LAMP UNIT REPLACEMENT ARE YOUR
RESPONSIBILITY AND ARE NOT COVERED UNDER THIS
WARRANTY. The lamp unit is a user replaceable component,
Rental Units
The warranty for DLPT'ITelevision rental urfits begins on the date of the first
rental or thinly (30} clays after the date of shipment to the rental firm,
whiehever comes fi_st
Limited Warranty for Commercial Units
TACPwarlants DLP_'1]elevisions, includir_g the lamp units contair_edtherein,
that are sold and used for commercial purposes as follows: all pa_ls are
warranted against defects in materials or workmanship for a period of ninety
(90) days after the date of original retail purchase DURING THIS PERIOD,
TACP WILL, ,AT TACP'S OPTION, REPAIR OR REPLACE A DEFECTIVE
PART WITH A NEW OR REFURBISHED PART WITHOUT CHARGE TO
YOU.
Owner's Manual and Pradant Registration
Read this owr/er's manual thoroughly before opelating this DLP_'1television
Complete and mail the enclosed product legistration card or register your
DLP_'1Television online at wwwotacp.toshibaocom/service as soon as
possible. By registerirlg your DLPT'ITelevision you will enable TACP to bling
you new products specifically designed to meet your needs and help us to
contaet you inthe urflikely event a safety notification is required tinder the
Consumer Product Safety Act, Failure to register your product does not
diminish your warlanty rights
Year Responsibffity
THE ABOVE WARRANTIES ARE SUBJECT TO THE FOLLOWING
CONDITIONS:
(1) You mast retain your original bill of sale or p_ovide other proof of
purchase
(2) All warranty servicing of this DLP_Hlebvision nalst be pelformed by an
Authorized TACP Serviee Station,
(3) ]be warlantie9 from TACPare effective only ifthis DLP H]_levision is
purehased and operated in the Continental USA or Puello Rico
(4} Labor service charges for set installation, setup, adjustment of eustomer
controls, and installation or repair of antenna systems are not covered
by this warranty Reception problems caused by inadequate antenna
systems, misaligned satellite dishes, cable television dbtribat[on. VCRs.
DVD players/recorders, personal computer level IEEE139a devices, and
any other connected signal source device are your responsibility
(5) Warrantbs extend only to defects in materiab or workmanship as Ihnited
above, and do not extend to any DLP_'1]_levision or parts that have
been lost or discarded by you ol to damage to the D LP_'1lelevision or
pa_ls caused by fires, misuse, accident. Acts of God (sueh as lightning
or fluctuations in electric powe0, improper installation, improper
maintenance, or use in violation of instructions furnished by TACP: use
ol malfunction thlough simultaneous use of this D LP_'1l_levision and
eonnected equipment: or to units that have been modified or bad the
serial number lemoved, altered, defaeed, or lendered illegible
How to Obtain Warranty Service
If, after following all of the operating hstaJct[ons in this nlar/ua]and reviewing
the section titled "Troubleshooth-_g,"you find that servbe is needed:
(1) [o find the nearest TACPAuthorized Servbe Station, visit TACP's
website at wwwotacp°tosbibaocom/service or contact TACP's
Consul/ler Sokltion Center toll free at 1 800 631 3811
(2) You must present your original bill of sale or other proof of purchase to
the TACP Authorized Servbe Station
For additional information, visit TACP's web site:
www.tacp.tosbiba.co_°
ALL WARRANTIES IMPLIED BY THE LAW OF ANY STATE OF THE
U.S.A., INCLUDING THE iMPLIED WARRANTIES OF
MERCHANTABILITY AND FITNESS FOR A PARTICULAR PURPOSE,
ARE EXPRESSLY LIMITED TO THE DURATION OF THE LIMITED
WARRANTIES SET FORTH ABOVE. WITH THE EXCEPTION OF ANY
WARRANTIES iMPLIED BY THE LAW OF ANY STATEOF THE U.S.A. AS
HEREBY LIMITED, THE FOREGOING WARRANTY iS EXCLUSIVE AND
IN LIEU OF ALL OTHER WARRANTIES, GUARANTEES, AGREEMENTS,
AND SIMILAR OBLIGATIONS OF TACP WITH RESPECT TO THE
REPAIR OR REPLACEMENT OF ANY PARTS. IN NO EVENT SHALL
TACP BE LIABLE FOR CONSEQUENTIAL OR INCIDENTAL DAMAGES
(INCLUDING, BUT NOT LIMITED TO, LOST PROFITS, BUSINESS
INTERRUPTION, OR MODIFICATION OR ERASURE OF RECORDED
DATA CAUSED BY USE, MISUSE OR iNABILITY TO USE THIS DLPTM
TELEVISION),
No person, agent, distributoL deabr, or company is authorized to change,
modity, or extend the terms of these warranties in any manner whatsoever
The time within which an action must be commenced to enforce any
obligation of TACP arising under the wananty or under any statute or Jawof
the United States or any state thereof is hereby B/lited to ninety (90) days
flora the date you discover, or sboukJ have discovered, the defect, This
]in/itationdoes not apply to implied walranties arising under the law of any
state of the U.SA
THIS WARRANTY GIVES YOU SPECIFIC LEGAL RIGHTS AND YOU
MAY ALSO HAVE OTHER RIGHTS WHICH MAY VARY FROM STATE
TO STATE IN THE U.S.A. SOME STATESOF THE U.S.A. DO NOT ALLOW
LIMITATIONS ON THE DURATION OF AN iMPLIED WARRANTY,
WHEN AN ACTION MAY BE BROUGHT, OR THE EXCLUSION OR
LIMITATION OF INCIDENTAL OR CONSEQUENTIAL DAMAGES.
THEREFORE THE ABOVE PROVISIONS MAY NOT APPLY TO YOU
UNDER SUCH CIRCUMSTANCES. 05
Copyright @ 2005 TOSHIBA CORPORATION All rights reserved
107
HM95 R2 103-109 061505 107
÷
6/27/05, 6:40 PM
÷
r
A copy of the GPL source code in this product may be obtained by
contacting Toshiba Consumer SohEtions at (800)83! -38! 1. There will be a
charge to cover the costs of providing the source code.
A copy of the LGPL source code in this product may be obtained by
contacting Toshiba Consumer Solutions at (800)83! -38! 1. There will be a
charge to cover the costs of providing the source code.
USB Protocol Copyright "c:2005 The NetBSD Foundation, Inc. All rights
reserved.
Redistribution and use in source and binary forms, with or without
modification, are permitted provided that the following conditions are
nlet:
1 Redistributions of source code must retain the above copyright notice.
this list of conditions and the following disclaimer
2 Redistributions in binary form must reproduce the above copyright notice,
this list of conditions and the following disclaimer in the docul/lentatior_
and/ol other ir/atelials provided with the distribution.
3 Neither the name of The NetBS D Foundation nor the names of its
contributors may be used to endorse or promote products derived from
this software without specified prior written permission
THIS SOFTWARE IS PROVIDED BY THE NETBSD FOUNDATION, INC.
AND CONTRIBUTORS "AS IS" AND ANY EXPRESS OR IMPLIED
WARRANTIES, INCLUDING, BUT NOT LIMITED TO, THE IMPLIED
WARRANTIES OF MERCHANTABILITY AND FITNESS FOR A
PARTICULAR PURPOSE ARE DISCLAIMED. IN NO EVENT SHALL THE
FOUNDATION OR CONTRIBUTORS BE LIABLE FOR ANY DIRECT,
INDIRECT, INCIDENTAL, SPECIAL, EXEMPLARY, OR CONSEQUENTIAL
DAMAGES (INCLUDING, BUT NOT LIMITED TO, PROCUREMENT OF
SUBSTITUTE GOODS OR SERVICES; LOSS OF USE, DATA, OR PROFITS;
OR BUSINESS INTERRUPTION) HOWEVER CAUSED AND ON ANY
THEORY OF LIABILITY, WHETHER IN CONTRACT, STRICT LIABILITY, OR
TORT (INCLUDING NEGLIGENCE OR OTHERWISE) ARISING IN ANY
WAY OUT OF THE USE OF THIS SOFTWARE, EVEN IF ADVISED OF THE
POSSIBILITY OF SUCH DAMAGE.
This product includes software developed by the OpenSSL Project for Elsein
the OI)enSSL ]oolkit (http://www.openssl.org}.
This product includes cryptographic software written by Eric Yaung
(eay@clyptsoft,com)
OpenSSL 097d Copyright © 1998 2000 the OpenSSL Roject. All Rights
reserved Redistribution and use in source and binaly forms, with or without
modification, ae permitted ixovided that the following conditions are met:
1 Redistributions of source code must retain the above copyright notice.
this list of conditions and the following disclaimer
2 Redistlibutions ill binary form must reproduce the above copyright notice,
this list of conditions and the following disclaimer in the documentation
and/o_ other materials provided with the distribution
3 All advertising materials mentioning features or use of this softwae illust
display the folk)wing acknowledgement: This product inckldes software
developed by the OpenSSL Project for use in the OpenSSL ]aolkit
(http ://openssl org).
4 The names "OpenSSL Toolkit" and "Open SSL Project" must not be used
to enclorse or promote products derived from this software without pnor
written permission For written permission, please contact openssl
cole{a.,operlssl org
5 Products derived from this softwae may not be called "OpenSSL" nor may
"Open SSL" appear in their names without prior written permission of the
OpenSSL Project.
6 Redistributions of any form whatsoever must ietain the following
acknowledgement: "This product incBdes soflwae developed by the
OpenSSL Project fur use inthe OpenSSL Toolkit (hltp://wwwopensslorg}"
THIS SOFTWARE IS PROVIDED BYTHE OpenSSL PROJECT"AS IS" AND
ANY EXPRESSEDOR IMPLIED WARRANTIES, INCLUDING, BUT NOT
LIMITED TO,THE IMPLIED WARRANTIES OF MERCHANTABILITY AND
FITNESS FORA PARTICULAR PURPOSEARE DISCLAIMED. IN NO EVENT
SHALL THE OpenSSL PROJECTOR CONTRIBUTORS BE LIABLE FOR ANY
DIRECT,INDIRECT, INCIDENTAL, SPECIAL, EXEMPLARY, OR
CONSEQUENTIAL DAMAGES (INCLUDING, BUT NOT LIMITED TO,
PROCUREMENT OF SUBSTITUTEGOODS ORSERVICES; LOSS OF USE,
DATA,OR PROFITS;OR BUSINESS INTERRUPTION) HOWEVER CAUSED
AND ON ANY THEORY OF LIABILITY, WHETHER IN CONTRACT,STRICT
LIABILITY, OR TORT(INCLUDING NEGLIGENCE OR OTHERWISE)
ARISING IN ANY WAY OUT OF THE USE OF THIS SOFTWARE, EVEN IF
ADVISED OF THE POSSIBILITY OFSUCH DAMAGE. This product includes
product includes software written by Tim Hudson (tjlt,_ctTptsoR.com).
This package is an SSL implementation written by Eric Young
Netscapes SSL This library is free for commercial and non-commercial use
so long as the following conditions are adhered to. The following conditions
apply to all code found in this distribution, be it the RC4, RSA, Ihash, DES,
etc., code; not just the SSL code. The SSL documentation inck_ded with this
distribution is covered by the same copyright 1eRBSexcept that the holder is
Copyright remains Eric Ybung's, and as such any Copyright notices in tile
code are not to be removed. If tills package is used in a product, Eric
Young should be given attribution as the author of the parts of the library
used. This can be in tile fornl of a textual message at program startup or in
documentation (online or textual) provided with the package.
Redistribution and use in source and binary forms, with or without
modification, are permitted provided that the following conditions are met:
1 Redistributions of source code must retain the copyright notice, this list of
conditions and the following disclaimer
2 Redistributions in binar7 foHl_ must reproduce the above copyright notice,
this list of conciitions and the following disclaimer in the documentation
and/or other materiab provided with the distribution
3 All advertising materials mentioning features or Elseof this software must
display the following acknowledgemer_t: "This product includes
cryptogrsphic software wril_en by Eric Young (eay{_-{)crTptsoft.com)i'The
word cryptographic' call be left out if the routines from the library being
used are not cryptographic related.
z_If you include any Windows sf)ecific code (or derivative thereo0 from the
apps directory (applbation code) you must include an acknowbdgement:
"This product inckldes software wlitten by Tim Hudson
0jh¢_cryptosoft.com}"
THIS SOFTWARE IS PROVIDED BY ERIC YOUNG "AS IS" AND ANY
EXPRESS OR IMPLIED WARRANTIES, INCLUDING, BUT NOT LIMITED
TO,THE IMPLIED WARRANTIES OF MERCHANTABILITY AND FITNESS
FOR A PARTICULAR PURPOSE ARE DISCLAIMED. IN NO EVENTSHALL
THE AUTHOR OR CONTRIBUTORS BE LIABLE FOR ANY DIRECT,
INDIRECT, INCIDENTAL, SPECIAL, EXEMPLARY, OR CONSEQUENTIAL
DAMAGES (INCLUDING, BUT NOT LIMITED TO, PROCUREMENT OF
SUBSTITUTEGOODS OR SERVICES; LOSS OF USE, DATA, OR PROFITS;
OR BUSINESS INTERRUPTION) HOWEVER CAUSED AND ON ANY
THEORY OF LIABILITY, WHETHER IN CONTRACT, STRICT LIABILITY, OR
TORT (INCLUDING NEGLIGENCE OR OTHERWISE) ARISING IN ANY
WAY OUT OF THE USE OF THIS SOFTWARE, EVEN IF ADVISED OF THE
POSSIBILITY OF SUCH DAMAGE. The license and distribution terms for
any publicly available version or derivative of this code cannot be changed,
i.e. this code cannot simply be copied and put under another distribution
license (including the GNU Public License).
÷
Copyright @ 2005 TOSHIBA CORPORATION All rights reserved
6/27/05, 6:40 PM [
÷
Copyright ,3:)2005 TOSHIBA CORPORATION AlE rights reserved
HM95 R2 103-109 061505 109 _ 6/27/05, 6:40 PM
109
A
Antenna cables .........................................................................11
Audio player ...............................................................................87
Audio quality adjustments ....................................................85
Audio system connection ......................................................20
Auto aspect .................................................................................74
Auto power off ...........................................................................92
AVH D .....................................................................................23, 50
B
Back of the TV ...........................................................................10
Blocking channels ....................................................................95
C
Cable box connection ......................................................14, 16
CabIeCARD T_'.............................................................................12
CabteCIear TM DNR ....................................................................80
Cables ...........................................................................................11
Camcorder connection ...........................................................13
CH AT buttons ..................................................................42, 71
CH RTN button ..........................................................................71
Channel Number buttons ..............................................42, 71
Channel programming:
Automatic programming ..................................................42
Manually adding and deleting .......................................43
Cinema mode .............................................................................75
Closed captions ........................................................................82
Color temperature ....................................................................80
CotorStream <_......................................................................10, 17
Connecting devices ..........................................................12-25
CompactFtash <_memory' cards .....................................87,88
Component video cables ......................................................11
Component video (ColorStream <_)..............................10, 17
D
Device connections ..........................................................12-25
Defaults, restore TV factory .................................................52
Digital Audio Out ......................................................................20
Digital signal meter .................................................................52
DNR (Digital Noise Reduction) ..........................................80
Dotby Digital ........................................................................20, 86
Double-window POP feature ...............................................76
DVD player connection ...................................................16, 17
D-VHS ....................................................................................23, 50
DVI connection ..........................................................................19
Dynamic Contrast .....................................................................81
EFGHJJ
EIA-775 .........................................................................................22
FAV SCAN button ..............................................................44, 78
Factory' defaults, restore TV ..........................................52, 79
Favorite channels ..............................................................44, 78
Features, TV ...................................................................................7
Focus .............................................................................................86
Front of the TV ..............................................................................9
Front panet lock ........................................................................96
Front panet touch pad .......................................................9, 36
GameTimer TM ..............................................................................96
G-LINK _ connection ...............................................................25
HDMP connection .................................................................19
IEEE1394 ......................................................................................22
INPUT button .............................................................................67
Input lock .....................................................................................95
Installation, care, and service ............................................3, 4
Installation, setup ........................................................................8
Integrated digital tuning ...........................................................7
IR blaster .....................................................................................21
J PEG .......................................................................................87-90
L
Labeiing video inputs .............................................................68
Lamp mode .................................................................................75
Lamp unit repIacement ..............................................103-105
Language selection .................................................................41
Last mode memory feature ..................................................92
LED indications ...............................................................8, 9, 99
Locking video inputs ...............................................................95
LOCKS menu ..............................................................................93
Channels, blocking .............................................................95
Enable rating blocking ......................................................94
GameTimeF" .........................................................................96
New PIN code ......................................................................93
Unlocking programs temporarily ..................................95
Video inputs, locking .........................................................95
÷
I 110
HM95 R2 lr0_1tl 061505 110
Copyright @ 2005 TOSHIBA CORPORATION AH rights reserved
6/27/05, 7:10 PM [
M
Memory cards .....................................................................87-90
Memory' Stick T" memory' cards .....................................87,88
Menu system .......................................................................35, 36
MMC memory' cards .........................................................87, 88
M P3 .........................................................................................87-90
MPEG-2 digital video signals ..............................................22
MPEG Noise Reduction .........................................................81
MTS feature ................................................................................84
MUTE button ..............................................................................84
OPQ
ON/OFF timer............................................................................91
Optical audio cable .................................................................11
Picture adjustments:
Color temperature ...............................................................80
Picture mode .........................................................................79
Picture quality .......................................................................79
Picture-out-picture (POP}:
FAV SCAN button ................................................................78
SPLIT button ..........................................................................76
Picture scroll ...............................................................................74
Picture size selection ..............................................................73
Picture viewer. ...........................................................................87
Problems with TV ...............................................................97,98
Quick Restart .............................................................................51
R
RECALL button .........................................................................84
Remote control:
Battery' installation ..............................................................28
Device code table ........................................................33, 34
Effective range ......................................................................27
Functional key chart ....................................................29, 30
Learning about the buttons ............................................26
Operational feature reset .................................................32
Programming ........................................................................3 ]
Searching and sampling the code ...............................31
Volume lock feature ...........................................................32
Restart, Quick ............................................................................51
Restore TV factory defaults ..................................................52
S
Safety, care, installation, and service .............................2-5
SAP sound ...................................................................................84
Satellite receiver connection ...............................................15
Sub-bass (SBS} .........................................................................85
Scrolling the TheaterWide _ picture ...................................74
SD (Secure DigitalT'0 memory cards ..........................87, 88
Service .............................................................................................4
Setup, TV ...............................................................................36, 4]
Setup, TV Guide On Screen :_system ................................37
Sleep timer ..................................................................................9]
Speakers ON/OFF ....................................................................86
Specifications ...........................................................................106
SRS 3D .........................................................................................86
SRS WOW ...................................................................................86
StabIeSound :_.............................................................................85
Stereo sound ..............................................................................84
S-video cables ...........................................................................11
Symbio T" AVH D recorder ...............................................23, 50
System status .............................................................................52
T
TheaterNet TMDEVICE and CONTROL buttons .............46
TheaterNet _Mcontrot ...............................................................2]
TheaterNeP' setup ..................................................................45
TheaterWide :_picture size ....................................................73
Time and date setting .............................................................50
Troubleshooting ..................................................................97,98
TruBass .........................................................................................86
TV Guide On Screen :_..................................................8, 37, 53
V
V-Chip bIocking (Locks menu} ....................................93-95
VCR connection .................................................................13-18
Video cables ...............................................................................11
Video input labels ....................................................................68
Video input lock ........................................................................95
W, X
Warranty .....................................................................................107
WOW, SRS ...................................................................................86
xD-Picture Card"' ...............................................................87,88
÷
HM95 R2 110-1tl 061505 111
Copyright _ct,2005 TOSHIBA CORPORATION All rights reserved
÷
6/27/05, 7:10 PM
111
F

÷
TOSH|BA ArVIER|CA CONSUMER PRODUCTSj L.L.C.
HEAD OmCE: 82 TOTOWA ROAD, WAYNE, NJ 07470, USA.
NATIONAL SERVICEDMSION:1420 B TOSHIBA DRIVE,LEBANON, TN 37087, USA
MANUFACTUREDBY
TOSidJBA AIVIERJCA CONSUIVIER PRODLICTS_ L,L,C,
CableClear, ColorStream, StabbSound, and TheaterWide are registered trademarks of Toshiba America Consumel_Products, LLC
GameTimer, SulfLock, Symbio. and TheaterNet are trademarks of Toshiba America Donsumer Plx)ducts,LLC
Digital Light Processing, DLPTM and the DLP medallior_are trademarks of Texas Instruments
PRINTEDIN USA
(05-06)[A-PDFO]
Copyright @ 2005 TOSHIBA CORPORATION All rights reserved
23566650A
HM95 R2 112 061505 112 _ 6/27/05,6:41 PM [