
使用説明書
(P.6–11)
User’s Manual (PP.12–19)
Benutzerhandbuch (S. 20–25)
Manuel d'utilisation (P. 26–31)
Manual del usuario (PP. 32–37)
Manuale d’uso (PP. 38–43)
(P. 44–59)
(P. 60–65)
Jp
En
De
Fr
Es
It
Sc
Tc
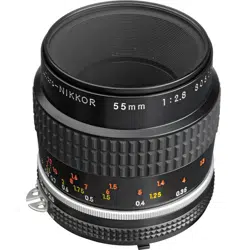
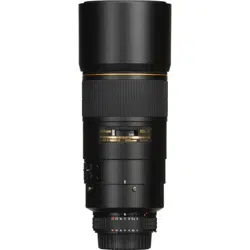
AF-S Nikkor
300mm f/4D
IF-ED
2
この表示を無視して、誤った取り扱いをすると、人が死亡または重傷を負
う可能性が想定される内容を示しています。
この表示を無視して、誤った取り扱いをすると、人が傷害を負う可能性が
想定される内容および物的損害の発生が想定される内容を示しています。
安全上のご注意
ご使用の前に「安全上のご注意」をよくお読みのうえ、正しくお使いください。
この「安全上のご注意」は製品を安全に正しく使用していただき、あなたや他の
人々への危害や財産への損害を未然に防止するために、重要な内容を記載しています。
お読みになった後は、お使いになる方がいつでも見られる所に必ず保管してくだ
さい。
表示について
表示と意味は次のようになっています。
注意
警告
警告
分解したり、修理や改造をしないこと
感電したり、異常動作をしてケガの原因となります。
落下などによって破損し、内部が露出したときは、露出
部に手を触れないこと
感電したり、破損部でケガをする原因となります。カメラの電池
を抜いて、販売店またはニコンサービス機関に修理を依頼してく
ださい。
接触禁止
すぐに
修理依頼を
分解禁止
お守りいただく内容の種類を、次の絵表示で区分し、説明しています。
絵表示の例
△記号は、注意(警告を含む)を促す内容を告げるものです。図の中や近くに具
体的な注意内容(左図の場合は感電注意)が描かれています。
記号は、禁止の行為(してはいけないこと)を告げるものです。図の中や近く
に具体的な禁止内容(左図の場合は分解禁止)が描かれています。
●記号は、行為を強制すること(必ずすること)を告げるものです。図の中や近
くに具体的な強制内容(左図の場合は電池を取り出す)が描かれています。
3
Tc
警告
熱くなる、煙が出る、こげ臭いなどの異常時は、速やか
にカメラの電池を取り出すこと
そのまま使用すると火災、やけどの原因となります。電池を取り
出す際、やけどに充分注意してください。電池を抜いて、販売店
またはニコンサービス機関に修理を依頼してください。
水につけたり、水をかけたり、雨にぬらしたりしないこと
発火したり感電の原因となります。
引火、爆発のおそれのある場所では使用しないこと
プロパンガス・ガソリンなど引火性ガスや粉塵の発生する場所で
使用すると、爆発や火災の原因となります。
レンズまたはカメラで直接太陽や強い光を見ないこと
失明や視力障害の原因となります。
注意
ぬれた手でさわらないこと
感電の原因になることがあります。
製品は幼児の手の届かないところに置くこと
ケガの原因になることがあります。
逆光撮影では、太陽を画角から充分にずらすこと
太陽光がカメラ内部で焦点を結び、火災の原因になることがあります。
画角から太陽をわずかに外しても火災の原因になることがあります。
使用しないときは、レンズにキャップをつけるか太陽光の
あたらない所に保管すること
太陽光が焦点を結び、火災の原因になることがあります。
三脚にカメラやレンズを取り付けたまま移動しないこと
転倒したりぶつけたりしてケガの原因になることがあります。
窓を閉め切った自動車の中や直射日光が当たる場所など、
異常に温度が高くなる場所に放置しないこと
内部の部品に悪い影響を与え、火災の原因となることがあります。
電池を取る
水かけ禁止
使用禁止
見ないこと
感電注意
移動注意
放置禁止
放置禁止
保管注意
使用注意
すぐに
修理依頼を
4
1
2
3
5
4

6
Jp
はじめに
このたびはニッコールレンズをお買い上げいただき、ありがとうございます。
このレンズは、高速で静かなAF(オートフォーカス)撮影を可能にするレン
ズ内超音波モーター(サイレント・ウェーブ・モーター)駆動方式を採用し
た高性能単焦点レンズです。
主な特長
●
F6、F5、F4シリーズ、F100、F90X/F90各シリーズ、F80シリー
ズ、F70D、ニコンU、プロネア600i、プロネアSカメラ、およびニコ
ンデジタル一眼レフカメラ(D4、D300Sなど)との組
み合わせでは、
AF撮影が可能なばかりでなく、AF撮影中にも瞬時にマニュ
アルフォーカス
モードに切り換えることのできる「マニュアル優先オートフォーカス」
機能、AF撮影時にAF作動を一定の撮影距離範囲に制限できるフォーカス
制限切り換えスイッチなど、数々の機能が威力を発揮します。
●
被写体までの距離情報をカメラ側に伝達する機能を備え、3D測光機能を
持ったカメラとの組み合わせ時により的確な露出制御を実現する3D-マ
ルチパターン測光・3D-マルチBL調光を可能とします。さらに、ニコンAF
[オートフォーカス(F3AF除く)]カメラとの組み合わせではフォーカス
エイドによるマニュアルフォーカス撮影(手動によるピント合わせ)が可
能です。
●
ニコン内焦方式を採用しているため、ピント合わせ時の保持バランスが良
いなど、操作性にも優れています。
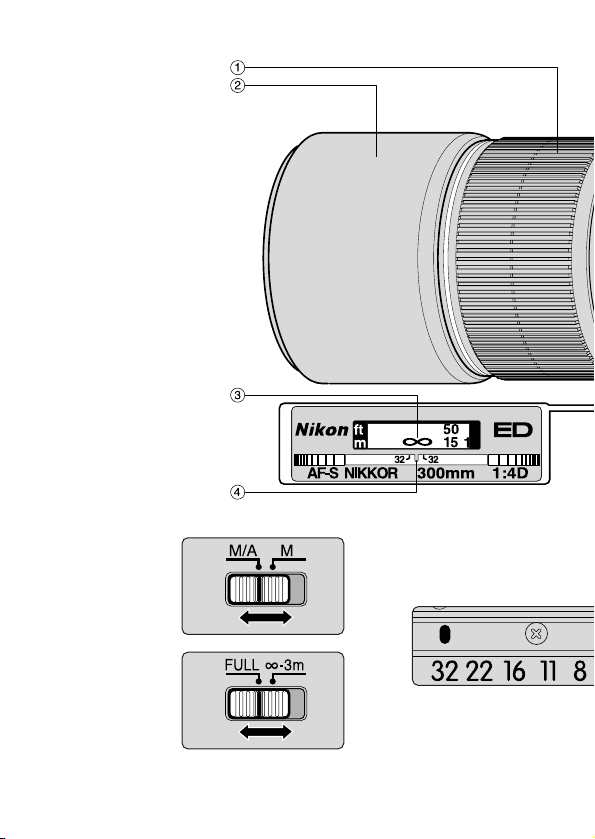
各部の名称
1フォーカスリング
2フード
3距離目盛
4距離目盛基準線
5フォーカス制限切り換えスイッチ
6フォーカスモード切り換えスイッチ
7三脚座取り付け指標
8絞り指標/着脱指標
9最小絞りロックレバー
!絞り目盛
"ファインダー内直読用絞り目盛
#CPU信号接点
$最小絞り信号ガイド(EE連動ガイド)
%開放F値連動ガイド
&露出計連動ガイド
(絞りリング
)三脚座止めネジ
~着脱式三脚座
7
Jp
注記
●
レンズのCPU信号接点は汚さないようにご注意ください。
●
CPU信号接点を破損しますので、オート接写リングPK-1、PK-11/11A、オ
ートリング BR-4またはK1リングはご使用になれません。その他のアクセサ
リーとカメラとの組み合わせ使用に際しては、必ず各製品の使用説明書も併せ
てご参照ください。
●
ニコンF3AF用DX-1ファインダーと組み合わせての使用はできません。
●
距離目盛は目安であり、被写体までの距離を保証するものではありません。
ピント合わせの方法
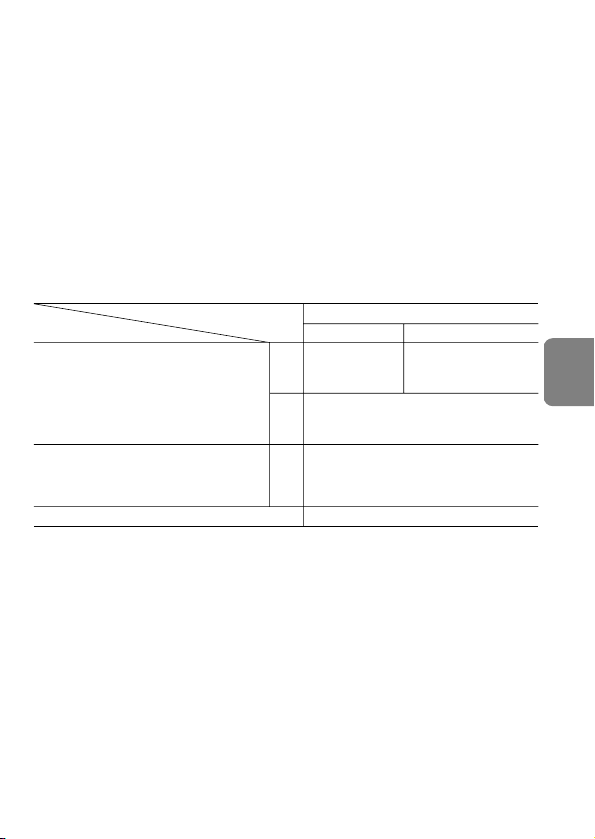
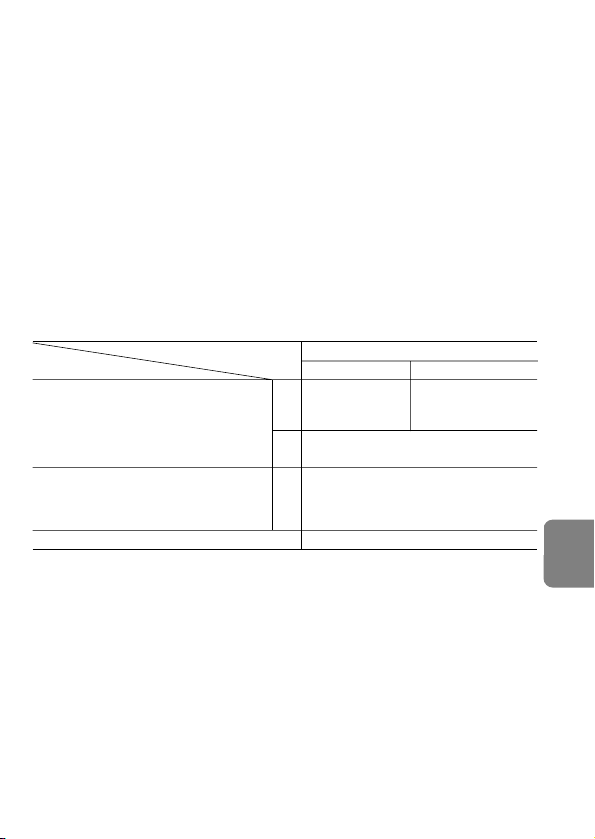
ご使用のカメラや撮影目的によって、下表のようなピント合わせが選択できます。
■M/A(マニュアル優先オートフォーカス)モードの使い方
フォーカスモード切り換えスイッチをM/Aにセットしますと、AF(オート
フォーカス)撮影時、シャッターボタンの半押しやAF作動ボタンを保持した
まま、フォーカスリングを手で回転させるとオートフォーカスがマニュアル
に切り換わり、マニュアルフォーカス撮影が行えます。半押しやAF作動ボ
タンから指をはなすと、マニュアルフォーカスモードは解除されます。(図1)
■フォーカス制限切り換えスイッチの使い方
(M/Aモード使用可能なカメラのみ)
AF(オートフォーカス)撮影時、撮影距離が常に3m以上に限られている場
合、この切り換えスイッチを∞-3mにセットすると、ピント合わせの時
間を短縮することができます。3m以内に被写体がある場合はFULLにセ
ットします。(図2)
フォーカスモード
(カメラ)
レンズの設定モード
カメラ
上記以外のAF(オートフォーカス)カメラ
(F3AF除く)
マニュアル優先
オートフォーカス
撮影
マニュアル
フォー カス 撮影
(フォーカスエイド可)
マニュアルフォーカス撮影のみ
(フォーカスエイド可)
マニュアルフォーカス撮影のみ
(フォーカスエイド可)
AF
AF
M
M
AF(
オートフォーカス
)以外のカメラ
マニュアルフォーカス撮影のみ
M/A M
※このレンズはF3AFカメラではご使用できません。
F6、F5、F4シリーズ、F100、
F90X/F90各シリーズ、F80シリーズ、
F70D、ニコンU、プロネア600i、
プロネアS、FXフォーマット/
DXフォーマットのニコンデジタル一眼レフ
カメラ

8
Jp
被写界深度
プレビュー(絞り込み)機構を持つカメラでは、撮影前に被写界深度を確認
することができます。
最小絞りロックレバー
プログラムオートやシャッター優先オートによる撮影時は、絞りリングを
最小絞りに固定しておくことができます。まずレンズの絞りリングを回し、
最小絞り(最も大きい数値)を絞り指標に合わせます。次に、最小絞りロッ
クレバーを絞りリングの方向にスライドし2つのオレンジ指標を合わせま
す。これで絞りリングは最小絞りでロックされます。ロックレバーを反対
方向にスライドするとロックは解除されます。(図3)
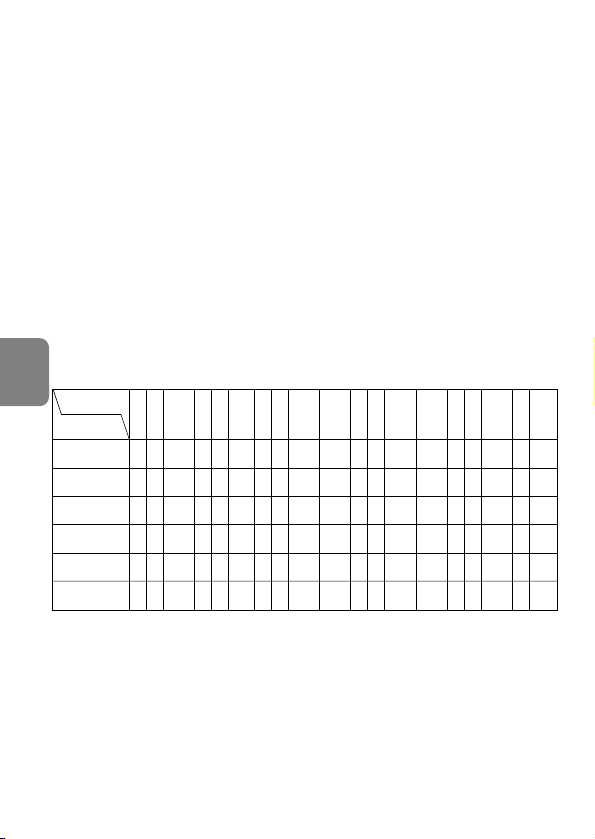
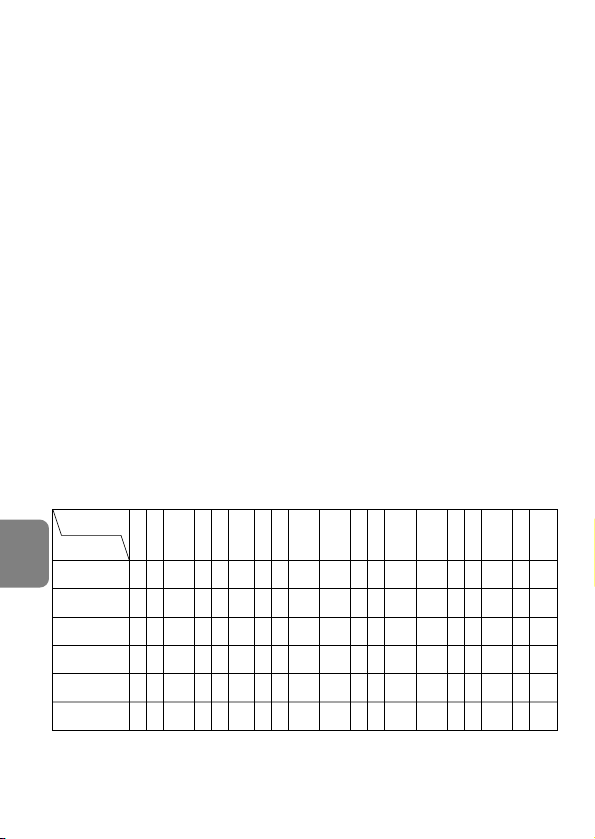
ファインダースクリーンとの組み合わせ
■構図の決定やピント合わせの目的には
◎ 好適です。
○ 視野の一部が多少見にくくなりますが、撮影結果に全く影響がありません。
― 各カメラに存在しないファインダースクリーンを指しています。
() 中央部重点測光時の補正値です。F6カメラの場合、測光値の補正は、カメラのカスタムメ
ニュー「b6:スクリーン補正」を「B or E以外」にセットして行います。B型およびE型
以外を使用する場合は、補正量が0でも、「B or E以外」にセットしてください。F5カメ
ラの場合は、カスタムセッティングNo.18の設定で測光値の補正を行います。F4シリー
ズカメラの場合は、ファインダースクリーン露出補正ダイヤルを回して補正を行います。
詳しくはカメラの使用説明書をご覧ください。
空欄 使用不適当です。ただし、Mスクリーンの場合、撮影倍率1/1倍以上の近接撮影に用い
られるため、この限りではありません。
注意:上記以外のカメラでB/B2/B3、E/E2/E3、K/K2/K3スクリーンの見え方は、そ
れぞれF4+DP-20のB、E、Kスクリーンの欄を参考にしてください。
スクリーン
カメラ
F5+DP-30
◎
◎ ―
◎
―
―
―
―
―
―
― ◎ ―
― ◎ ―
― ―
― ―
―
―
◎
(+0.5)
―
◎
(+0.5)
―
―
― ◎ ― ◎ ―
G4G3
G1
G2
H3
H4
H1
H2
BCDE
EC-B
EC-E
FJKLMP
R
S
T
U
F4+DP-20
F4+DA-20
F3
F5+DA-30
A
◎
◎
○
(+0.5)
○
(-1.0)
○
(-1.0)
○
(-1.0)
○
○
(+0.5)
○
○
○
(-1.5)
○
○
○
○
(+0.5)
○
(-1.0)
○
◎
◎
◎
◎
◎
―
―
―
―
◎
◎
◎
◎
◎
―
―
―
◎
◎
(+0.5)
◎
◎
◎
◎ ◎ ◎
◎
◎
(+0.5)
◎
◎
◎
◎
○ ○
――
F6 ◎ ― ― ――◎ ◎ ― ◎ ― ◎ ― ― ◎― ―

9
Jp
カメラ内蔵フラッシュ使用時のご注意
ニコンの全てのフラッシュ内蔵カメラは、画面のケラレなくお使いいただ
けます。
三脚座(図4)
カメラではなくレンズの三脚座に三脚を取り付けます。
1 三脚座止めネジを少し緩めます1。
2 レンズの三脚座取り付け指標を三脚座の に合わせ、レンズを差し込
みます2。
3 レンズを回転し、レンズの三脚座取り付け指標を三脚座の任意の位置指標
3(90°ごとに3ヵ所あります)に合わせ、三脚座止めネジを締めてロック
します。(
ロックしない場合、不用意にレンズが外れることがありますので、
ご注意ください
。)
使用される三脚によっては、カメラのグリップを握った状態でカメラを回転
させるとき、手が三脚にあたることがありますのでご注意ください。
フード
フードを引き出す際は、回しながら引き出すとクリックが滑らかに外れます。
またフードは、引き出したときにレンズ正面から見て反時計方向に止まるま
で回転させますと固定できます。なお、フードの取り外しはできません。フ
ードを使用しないときは、クリックがある位置まで戻して収納してください。
なお、フードの部分を持って、レンズを持ち上げないでください。クリック
が外れてレンズ部が自重で下がり、他のものにぶつかると、損傷する恐れが
あります。

10
Jp
レンズのお手入れと取り扱い上のご注意
●
レンズ面の清掃は、ホコリを拭う程度にしてください。指紋がついたと
きは、柔らかい清潔な木綿の布に無水アルコール(エタノール)を少量湿
らせ、レンズの中心から外周へ渦巻状に、拭きムラ、拭き残りのないよ
うに注意して拭いてください。
●
シンナーやベンジンなどの有機溶剤は絶対に使用しないでください。
●
レンズ表面の汚れや傷を防ぐために、NCフィルターを常用することをお
すすめします。また、レンズフードも役立ちます。
●
レンズをケースに入れるときは、必ず、レンズキャップを前後に取り付け
てください。
●
レンズを長期間使用しないときは、カビやサビを防ぐために、高温多湿
のところを避けて風通しのよい場所に保管してください。また、直射日
光のあたるところ、ナフタリンや樟脳のあるところも避けてください。
●
レンズを水に濡らすと、部品がサビつくなどして故障の原因となります
のでご注意ください。
●
ストーブの前など、高温になるところに置かないでください。極端に温
度が高くなると、外観の一部に使用している強化プラスチックが変形す
ることがあります。
●
レンズ後部(カメラへの取付側)から内部へのブロアーでの吹きつけは、
絶対に行わないでください。このレンズの絞り羽根は、カメラ側に露出
しているため、ブロアーの強い空気が直接当たると、レンズ内の絞り羽
根が破損するおそれがあります。また、異物等が入った場合にも、絞り
羽根やレンズを損傷することがありますので、カメラから取り外したら、
付属の裏ぶたを装着してください。
付属アクセサリー
77mmスプリング式レンズキャップ 裏ぶた
セミソフトケース CL-M2
別売アクセサリー
77mmネジ込み式フィルター
AF-Sテレコンバーター TC-14EⅡ、TC-17EⅡ※、TC-20EⅢ※
※オートフォーカスがF8対応のカメラに装着した場合を除き、オート
フォーカス不可

11
Jp
仕様
型式: ニコンFマウントCPU内蔵Dタイプ、AF-Sレンズ
焦点距離: 300mm
最大口径比: 1:4
レンズ構成: 6群10枚(EDガラス2枚)
画角: 8°10′・・・ 35mm判一眼レフカメラ
FXフォーマットのデジタル一眼レフカメラ
5°20′・・・
DXフォーマットのデジタル一眼レフカメラ
6°40′・・・ IX240カメラ
撮影距離情報: カメラへの撮影距離情報出力可能
ピント合わせ: IF(ニコン内焦)方式、超音波モーターによるオート
フォーカス、マニュアルフォーカス可能
撮影距離目盛: ∞〜1.45m、5ft(併記)
最短撮影距離: 撮像面から1.45m
絞り目盛: 4、5.6、8、11、16、22、32、
最小絞りでロック可能
(ファインダー内直読用目盛併記)
絞り方式: 自動絞り
測光方式: CPU連動方式のカメラでは開放測光
フォーカス制限
切換えスイッチ: Full(∞〜1.45m)と∞〜3mの2段切換え
三脚座: 360°回転三脚座(着脱可能)、90°三脚座取り付け
指標付き
アタッチメントサイズ
:77mm(P=0.75mm)
大きさ:
約90(最大径)×約222.5mm(長さ:バヨネットマウ
ント基準面からレンズ先端まで)、全長約230.5mm
質量: 約1440g(三脚座取り付け時)
約1300g(三脚座なし)
●
仕様、外観の一部を、改善のため予告なく変更することがあります。

12
Ch
Jp
De
Fr
Es
It
Ck
En
Introduction
Thank you for purchasing the AF-S Nikkor 300mm f/4D IF-ED. This is a high-
grade, internal focusing (IF) lens employing a Silent Wave Motor to drive the
focusing mechanism, thus the “S” designation. As a result, autofocusing is
smooth, silent, and almost instantaneous.
Major features
• Autofocusing possible with Nikon F6, F5, F4-Series, F100, F90X/N90s*,
F90-Series/N90*, F80-Series/N80-Series*, F70-Series/N70*,
F65-Series/N65-Series*, Pronea 600i/6i* and Pronea S cameras, and Nikon
digital SLR cameras, such as the D4 and D300S. Also provided: autofocusing
with manual override and autofocus range limiting via a focus limit switch.
• Manual focusing using focus assist as well as autofocusing possible with all
Nikon AF camera bodies, except the F3AF.
• For more accurate exposure control, subject distance information is
transmitted from the lens to the camera body, providing 3D Matrix Metering
and 3D Multi-Sensor Balanced Fill-Flash with appropriate Nikon cameras
and Speedlights.
* Sold exclusivley in the USA.
Nomenclature
1
Focus ring
2
Lens hood
3
Distance scale
4
Distance index line
5
Focus limit switch
6
Focus mode switch
7
Tripod collar alignment index
8
Aperture index/Mounting index
9
Minimum aperture lock lever
!
Aperture scale
"
Aperture-direct-readout scale
#
CPU contacts
$
Minimum aperture signal post
(EE servo coupling post)
%
Aperture indexing post
&
Meter coupling ridge
(
Aperture ring
)
Tripod collar lock screw
~
Detachable tripod collar

13
Ch
Jp
De
Fr
Es
It
Ck
En
Important!
•Be careful not to soil or damage the CPU contacts.
•Do not attach the following accessories to the lens, as they might damage the
lens CPU contacts: Auto Extension Ring PK-1, PK-11/11A, Auto Ring BR-4,
and K1 Ring.
Other accessories may not be suitable when this lens is used with certain
camera bodies. For details, refer to user’s manual for each product.
•This lens is not compatible when used with a Nikon F3AF camera with the AF
Finder DX-1 attached.
•The distance scale does not indicate the precise distance between the subject
and the camera. Values are approximate and should be used only as a general
guide.
Focusing
Set your camera’s focus mode selector according to this chart:
• Autofocus with manual override
Set the focus mode switch (Fig. 1) to M/A. Autofocus is provided, but you can
manually override the focus by operating the separate manual focus ring while
lightly depressing the shutter release button or the AF start (AF-ON) button on
the camera body of cameras so equipped. To cancel manual override, remove
your finger from the shutter release button or the AF start button.
Camera’s focus mode
Lens’ focus mode
Cameras
Nikon AF cameras (except for F3AF)
Autofocus with
manual priority
AF
AF
M
M
Other Nikon cameras (except for F3AF)
Manual focus
M/A M
* Sold exclusively in the USA.
Manual focus
(Electronic
rangefinder
can be used.)
Manual focus
(Electronic rangefinder
can be used.)
Manual focus
(Electronic rangefinder
can be used.)
F6, F5, F4-Series, F100, F90X/N90s*, F90-Series/
N90*, F80-Series/N80-Series*, F70-Series/N70*,
F65-Series/N65-Series*, Pronea 600i/6i*,
Pronea S, Nikon digital SLR (Nikon FX/DX format)
cameras

14
Ch
Jp
De
Fr
Es
It
Ck
En
Depth of Field
If your camera has a depth of field preview (stop-down) button or lever, depth of
field can be observed while looking through the camera viewfinder.
Minimum Aperture Lock (Fig. 3)
For programmed auto or shutter-priority auto exposure shooting, use the
minimum aperture lock lever to lock the lens aperture at f/32.
1 Set the lens to its minimum aperture (f/32) by aligning it with the aperture
index.
2 Slide the lock lever toward the aperture ring, so the two orange dots are
aligned.
To release the lock, slide the lever in the opposite direction.
Recommended Focusing Screens
Various interchangeable focusing screens are available for certain Nikon SLR
cameras to suit any picture-taking situation. The ones recommended for use
with this lens are:
Screen
Camera
F5+DP-30
◎
◎
―
◎
―
―
―
―
―
―
―
◎
―
―
◎
―
― ―
― ―
― ―
◎
(+0.5)
―
◎
(+0.5)
―
― ―
◎
―
◎
―
G4G3
G1
G2
H3
H4
H1
H2
BCDE
EC-B
EC-E
F
JKLMP
R
S
T
U
F4+DP-20
F4+DA-20
F3
F5+DA-30
A
◎
◎
○
(+0.5)
○
(-1.0)
○
(-1.0)
○
(-1.0)
○
○
(+0.5)
○
○
○
(-1.5)
○
○
○
○
(+0.5)
○
(-1.0)
○
◎
◎
◎
◎
◎
―
―
―
―
◎
◎
◎
◎
◎
―
―
―
◎
◎
(+0.5)
◎
◎
◎
◎ ◎◎
◎
◎
(+0.5)
◎
◎
◎
◎
○ ○
――
F6
◎
― ― ――
◎ ◎
―
◎
―
◎
― ―
◎
― ―
• To limit the range of autofocus (for M/A mode usable cameras
only)
Move the focus limit switch (Fig. 2) from FULL to ∞-3m to reduce autofocus
time. This is useful when shooting subjects farther away than 3m (9.8 ft). Set
the switch to FULL when your subjects are closer than 3m.

15
Ch
Jp
De
Fr
Es
It
Ck
En
◎ Excellent focusing
○ Acceptable focusing
Slight vignetting or moiré patterns appear in the viewfinder, but not on the
film.
― Not available.
( ) Indicates degree of exposure compensation needed (Center-Weighted metering
only). For F6 cameras, compensate by selecting “Other screen” in Custom
Setting “b6: Screen comp.” and setting the EV level to -2.0 to +2.0 in 0.5 EV
steps. When using screens other than type B or E, “Other screen” must be
selected even when the required compensation value is “0” (no compensation
required). For F5 cameras, compensate using Custom Setting #18 on the
camera body. For F4-Series cameras, compensate using the Exposure
Compensation Dial for the focusing screen.
See user’s manual of the camera body for more details.
Blank box means not applicable. Since type M screen can be used for both
macrophotography at a 1:1 magnification ratio and for photomicrography, it has
different applications than other screens.
When using the B/B2/B3, E/E2/E3, and K/K2/K3 focusing screens in cameras
other than those listed above, refer to the columns on the F4 + DP-20’s B, E and
K screens, respectively.
Taking Flash Pictures with Cameras having Built-in
flash
All Nikon cameras having built-in flash are usable and no vignetting occurs.
Using a Tripod (Fig. 4)
This lens is equipped with a detachable rotating tripod collar. When using a
tripod, attach it to the lens’ tripod collar instead of the camera. To attach the
tripod collar to the lens, follow these steps:
1 Loosen the tripod collar lock screw 1 slightly.
2 Insert the lens by aligning the tripod collar alignment index on the lens with
the mark on the tripod collar. 2
3 Turn the lens to an appropriate position index 3 (three indexes are provided
every 90°) on the tripod collar by aligning the tripod collar alignment index
on the lens, then tighten the screw. (If the screw is not tight, the lens
may accidentally come off the tripod collar.)

16
Ch
Jp
De
Fr
Es
It
Ck
En
Lens Care
•Clean the lens surface with a blower brush. To remove dirt and smudges, use a
soft, clean cotton cloth or lens tissue moistened with ethanol (alcohol) or lens
cleaner. Wipe in a circular motion from center to outer edge, taking care not to
leave traces or touch other parts.
•Never use thinner or benzene to clean the lens as this might damage the lens,
result in a fire, or cause health problems.
•To protect the front lens element, an NC filter is recommended at all times. A
lens hood also helps protect the front of the lens.
•When storing the lens in the lens case, attach both front and rear caps.
•When the lens will not be used for a long time, store it in a cool, dry place to
prevent mold. Also store the lens away from direct sunlight or chemicals such
as camphor or naphthalene.
•Do not get water on the lens or drop it in water as this will cause it to rust and
malfunction.
•Reinforced plastic is used for some parts of the lens. To avoid damage, never
leave the lens in an excessively hot place.
•Never use an air blower to clean the inside rear portion of the
lens. Because the diaphragm blades are exposed, they may be damaged by a
strong burst of air. Also be sure to attach the rear lens cap when the
lens is not in use to protect the lens and diaphragm blades from foreign
matter and fingerprints.
When holding your camera by its handgrip and rotating the camera in
its tripod collar, your hand may bump into the tripod, depending on the
tripod in use.
Lens Hood
Pull out the lens hood by rotating it slowly until the click-stop position is
released and the hood moves smoothly. Then, turn it counterclockwise (as
viewed from the front) to secure it in the extended position. Because the lens
hood is not detachable, slide it back to its click-stop position when not in use.
Never lift the lens by its hood. This may cause the lens to drop, due to its
own weight, and become damaged, if it hits something hard.

17
Ch
Jp
De
Fr
Es
It
Ck
En
Supplied Accessories
77mm snap-on front lens cap
Rear lens cap
Semi-soft case CL-M2
Optional Accessories
77mm screw-in filters
AF-S Teleconverters TC-14EII, TC-17EII*, TC-20EIII*
* Autofocus is available only with cameras that offer f/8 support.

18
Ch
Jp
De
Fr
Es
It
Ck
En
Specifications
Type of lens: D-type AF-S Nikkor lens having built-in CPU
and Nikon bayonet mount
Focal length: 300mm
Maximum aperture: f/4
Lens construction: 10 elements in 6 groups (2 ED elements)
Picture angle: 8°10´ with 35 mm (135) format Nikon film-SLR
cameras and Nikon FX format digital SLR
cameras
5°20´ with Nikon DX format digital SLR cameras
6°40´ with IX240 system cameras
Distance information: Output to camera body
Focusing: Nikon Internal Focusing (IF) system (utilizing an
internal Silent Wave Motor); manually via
separate focus ring
Shooting distance scale: Graduated in meters and feet from 1.45m (5 ft) to
infinity (∞)
Closest focusing distance: 1.45 m (4.8 ft) from focal plane
Aperture scale: f/4– f/32 on both standard and aperture-direct-
readout scales
Minimum aperture lock: Provided
Diaphragm: Fully automatic
Exposure measurement: Via full-aperture method with cameras with CPU
interface system
Focus limit switch: Provided; two ranges available: FULL (∞ –
1.45m [4.8 ft]) or ∞ – 3m (9.8 ft)
Tripod mounting: Detachable tripod mounting collar; rotatable
through 360°, indices every 90°
Attachment size: 77mm (P = 0.75mm)
Dimensions: Approx. 90mm dia. x 222.5mm (extension from
the camera’s lens mounting flange); overall
length is approx. 230.5mm
Weight: Approx. 1440g (50.8 oz.) with tripod collar;
approx. 1300g (45.9 oz.) for lens only
Specifications and designs are subject to change without any
notice or obligation on the part of the manufacturer.

19
Ch
Jp
De
Fr
Es
It
Ck
En

20
Ch
Jp
En
Fr
Es
It
Ck
De
Einführung
Wir danken Ihnen für das Vertrauen, das Sie Nikon mit dem Kauf des AF-S Nikkor
300 mm f/4D IF-ED entgegenbringen. Dieses hochwertige Objektiv mit
Innenfokussierung (IF) und Silent Wave Motor (S) bietet einen besonders schnellen
und nahezu geräuschlosen Autofukusbetrieb.
Die wichtigsten Merkmale
•Autofokusbetrieb mit den Nikon Kameras F6, F5, Serie F4, F100, F90X, Serie F90,
Serie F80, Serie F70, Serie F65, Pronea 600i, Pronea S und Nikon Digital-SLR-
Kameras wie etwa Nikon D4 und D300S. Ebenfalls möglich: Autofokusbetrieb mit
manueller Beeinflussung sowie Autofukusbereich-Begrenzung über
Schalterbetätigung.
•Manuelle Scharfeinstellung mit Einstellhilfe sowie Autofokusbetrieb mit allen
Autofokuskameras von Nikon, außer der F3AF.
•Für noch genauere Belichtungsregelung wird die Aufnahmedistanz vom Objektiv
zur Kamera übermittelt und es stehen 3D-Matrix-Messung sowie 3D-Multi-Sensor-
Aufhellblitzbetrieb (mit geeigneten Nikon Kameras und Speedlights) zur Verfügung.
Nomenklatur
1
Entfernungseinstellring
2
Gegenlichtblende
3
Entfernungsskala
4
Entfernungs Indexlinie
5
Fokussier-Begrenzungsschalter
6
Fokussierschalter
7
Positionierindizes des
Stativanschlusses
8
Blendenindex/Objektivindex
9
Verriegelung für kleinste Blende
!
Blendenskala
"
Skala für Blendendirekteinspiegelung
#
CPU-Kontakte
$
Signalstift für kleinste Blende
(Kupplungsstift für automatische
Blendensteuerung)
%
Anschlag für Blendenkupplung
&
Steuerkurve
(
Blendenring
)
Feststellschraube des
Stativanschlusses
~
Abnehmbarer Stativanschluß
21
Ch
Jp
En
Fr
Es
It
Ck
De
Achtung!
•Halten Sie die CPU-Kontakte peinlich sauber, und schützen Sie sie vor
Beschädigung!
•Folgendes Zubehör darf nicht an das Objektiv angesetzt werden, da es die CPU-
Kontakte beschädigen könnte: Automatik-Zwischenring PK-1, PK-11/PK-11A,
Automatikring BR-4 und Zwischenring K1. Anderes Zubehör kann bei Verwendung
des Objektivs mit gewissen Kameramodellen ungeeignet sein. Einzelheiten
entnehmen Sie bitte das jeweiligen Benutzerhandbuch.
•Das Objektiv ist nicht zur Verwendung mit der Nikon F3AF mit angesetztem
AF-Sucher DX-1 geeignet.
•Die Entfernungsskala zeigt nicht den genauen Abstand zwischen Motiv und Kamera
an. Die Werte sind Näherungswerte und können nur als Richtlinie dienen.
Fokussieren
Wählen Sie den Fokussiermodus der Kamera anhand der folgenden Tabelle:
• Autofokus-Modus mit manueller Einstellmöglichkeit
Stellen Sie den Fokussierschalter (Abb. 1) auf M/A. Bei dieser Einstellung ist der
Autofokus-Modus zwar aktiviert, kann aber jederzeit durch Drehen des separaten
Entfernungseinstellrings und gleichzeitiges Antippen des Auslösers oder der AF-
Starttaste (AF-ON) an Kameras, die über ein solches Bedienteil verfügen, deaktiviert
werden. Zur Aufhebung der manuellen Einstellmöglichkeit den Auslöser oder die
AF-Starttaste freigeben.
• Begrenzung des Autofokusbereichs (nur bei Kameras mit M/A-Modus)
Zur Reduzierung der Autofokuszeit ist der Fokussier-Begrenzungsschalter (Abb. 2)
von Wählbereich FULL auf ∞-3 m zu stellen. Dies ist nützlich zur Aufnahme von
Objekten in schneller Bewegung, die weiter als 3 m entfernt sind. Bei Objekten mit
Aufnahmeentfernungen unter 3 m stellen Sie den Schalter auf FULL.
Fokussiermodus der
Kamera
Fokussiermodus des Objektivs
Kameras
F6, F5, Serie F4, F100, F90X, Serie F90,
Serie F80, Serie F70, Serie F65,
Pronea 600i, Pronea S,
Nikon Digital-SLR-Kameras
(Nikon FX/DX-Format)
Nikon-AF-Kameras
(außer F3AF)
Autofokus-Modus
mit manueller
Einstellmöglichkeit
Manueller Fokus
(Elektronische
Einstellhilfe verfügbar.)
Manueller Fokus
(Elektronische
Einstellhilfe verfügbar.)
Manueller Fokus
(Elektronische
Einstellhilfe verfügbar.)
AF
AF
M
M
Andere Nikon-Kameras (außer F3AF)
Manuelles Fokussieren
M/A M

22
Ch
Jp
En
Fr
Es
It
Ck
De
Schärfentiefe
Verfügt die Kamera über eine Taste oder einen Hebel zur Schärfentiefe-Vorschau
(Abblendung), so läßt sich die Schärfentiefe im Kamerasucher verfolgen.
Verriegelung auf kleinster Blende (Abb. 3)
Für Programm- und Blendenautomatik muß der Blendenring auf kleinster Öffnung
(32) verriegelt werden.
1 Drehen Sie den Blendenring, bis die Blendenzahl 32 dem Blendenindex
gegenübersteht.
2 Schieben Sie den Riegel in Richtung auf den Blendenring, so daß die beiden
orangefarbenen Punkte aufeinander ausgerichtet sind.
Zur Entriegelung schieben Sie den Riegel in die entgegengesetzte Richtung.
Empfohlene Einstellscheiben
Für bestimmte Nikon-Kameras stehen verschiedene auswechselbare Einstellscheiben
zur Verfügung, um jeder Aufnahmesituation gerecht zu werden. Die zur Verwendung
mit diesem Objektiv empfohlenen sind nachstehend aufgelistet:
◎ Hervorragende Scharfeinstellung
○ Akzeptable Scharfeinstellung
Das Sucherbild vignettiert leicht. Die Aufnahme selbst bleibt hiervon unberührt.
― Nicht möglich
()Zeigt den Betrag zusätzlich erforderlicher Belichtungskorrektur (Nur mittenbetonte
Belichtungsmessung). Bei F6-Kameras korrigieren Sie durch Wahl von “Andere” in der
Individualfunktion “b6: Einstellscheibe” und Einstellen des LW-Werts im Bereich zwischen –2,0
und +2,0 in 0,5-LW-Schritten. Bei Gebrauch von anderen Scheiben als B oder E, ist “Andere”
auch dann zu wählen, wenn der erforderliche Korrekturwert “0” beträgt (keine Korrektur nötig). Zur
Einstellung des Korrekturwerts am F5 Kameragehäuse dient die Individualfunktion Nr. 18. Mit den
F4-Serien-Geräten durch den Belichtung-Kompensationsanzeiger für Visiermattscheiben
kompensieren.
Näheres hierzu finden Sie im Benutzerhandbuch des Kameragehäuses.
Einstellscheibe
Kamera
F5+DP-30
◎
◎ ―
◎
―
―
―
―
―
―
― ◎ ―
― ◎ ―
― ―
― ―
―
―
◎
(+0.5)
―
◎
(+0.5)
―
―
― ◎ ― ◎ ―
G4G3
G1
G2
H3
H4
H1
H2
BCDE
EC-B
EC-E
FJKLMP
R
S
T
U
F4+DP-20
F4+DA-20
F3
F5+DA-30
A
◎
◎
○
(+0.5)
○
(-1.0)
○
(-1.0)
○
(-1.0)
○
○
(+0.5)
○
○
○
(-1.5)
○
○
○
○
(+0.5)
○
(-1.0)
○
◎
◎
◎
◎
◎
―
―
―
―
◎
◎
◎
◎
◎
―
―
―
◎
◎
(+0.5)
◎
◎
◎
◎ ◎ ◎
◎
◎
(+0.5)
◎
◎
◎
◎
○ ○
――
F6 ◎ ― ― ――◎ ◎ ― ◎ ― ◎ ― ― ◎― ―

23
Ch
Jp
En
Fr
Es
It
Ck
De
Ein Leerfeld bedeutert: unbrauchbar. Da die Einstellscheibe M sowohl für Maktrofotografie bis zum
Abbildungsmaßstab 1:1 als auch Mikrofotografie eingesetzt werden kann, unterscheidet sich ihr
Anwendungsbereich von dem anderer Einstellscheiben.
Bei Verwendung der Scheiben B/B2/B3, E/E2/E3 bzw. K/K2/K3 in anderen als den obengenannten
Kameras gelten die Spalten für die Scheiben B, E bzw. K auf F4 + DP-20.
Blitzaufnahmen mit Kameras mit eingebautem Blitz
Alle Nikon-Kameras mit eingebautem Blitz sind geeignet, ohne daß Vignettierung
auftritt.
Stativverwendung (Abb. 4)
Das Objektiv verfügt über eine abnehmbare, drehbare Stativmanschette. Bei
Stativaufnahmen setzen Sie statt der Kamera diese Manschette auf das Stativ.
Verfahren Sie wie folgt:
1 Lockern Sie die Stativmanschetten-Sicherungsschraube 1.
2 Schieben Sie die Manschette auf das Objektiv, so daß der Manschettenindex des
Objektivs mit dem Index auf der Manschette ausgerichtet ist 2.
3 Drehen Sie das Objektiv auf einen geeigneten Positionsindex 3 (drei Indexe in
Abständen von 90° sind vorgesehen), indem Sie den Manschettenindex des
Objektivs entsprechend ausrichten. Ziehen Sie dann die Sicherungsschraube fest.
(Vorsicht. Wenn die Schraube nicht festgezogen wird, kann sich das
Objektiv von der Manschette lösen.)
Wenn Sie die Kamera am Handgriff halten und dabei in ihrem
Stativanschluß drehen, kann je nach verwendetem Stativ ihre Hand am
Stativ anschlagen.
Gegenlichtblende
Ziehen Sie die Gegenlichtblende heraus, indem Sie sie aus der Rastposition frei
drehen, so daß sie sich frei bewegen läßt. Drehen Sie sie dann im
Gegenuhrzeigersinn (von vorne betrachtet), um sie in herausgezogener Position zu
sichern. Da die Gegenlichtblende nicht abnehmbar ist, schieben Sie sie in ihre
Raststellung zurück, wenn sie nicht gebraucht wird. Heben Sie keinesfalls das
Objektiv an der Gegenlichtblende an. Andernfalls kann das Objektiv durch sein
eigenes Gewicht herunterfallen und beschädigt werden.

24
Ch
Jp
En
Fr
Es
It
Ck
De
Pflege des Objektivs
•Säubern Sie Glasflächen mit einem Blasepinsel. Staub und Flecken entfernen Sie
mit einem sauberen, weichen Baumwolltuch oder Optik-Reinigungspapier, das Sie
mit éthanol (Alkohol) oder Optik-Reinigungsflüssigkeit anfeuchten. Wischen Sie in
kreisförmigen Bewegungen von der Mitte nach außen, ohne daß Wischspuren
zurückbleiben.
•Verwenden Sie keinesfalls Verdünnung oder Benzin zur Reinigung, da dieses zu
Beschädigungen führen, Gesundheitsschäden verursachen oder ein Feuer auslösen
könnte.
•Zum Schutz der Frontlinse empfiehlt es sich, stets ein NC-Filter aufgesetzt zu
lassen. Die Gegenlichtblende wirkt als zusätzlicher Frontlinsenschutz.
•Bei Aufbewahrung des Objektivs in seinem Köcher sollten beide Objektivdeckel
aufgesetzt sein.
•Bei längerer Nichtbenutzung sollte das Objektiv an einem kühlen, trockenen Ort
aufbewahrt werden. Halten Sie das Objektiv von direkter Sonneneinstrahlung oder
Chemikalien wie Kampfer oder Naphthalin fern.
•Halten Sie das Objektiv von Wasser fern, das zur Korrosion und zu
Betriebsstörungen führen kann.
•Einige Teile des Objektivs bestehen aus verstärktem Kunststoff. Lassen Sie das
Objektiv deshalb nie an übermäßig heißen Orten zurück!
•Reinigen Sie den inneren hinteren Teil des Objektivs keinesfalls mit
Druckluft. Da die Membranlamellen freiliegen, können sie durch einen starken
Luftstoß beschädigt werden. Setzen Sie auch unbedingt den
Objektivrückdeckel auf, wenn das Objektiv nicht in Gebrauch ist, um
das Objektiv und die Membranlamellen vor Fremdkörpern und Fingerabdrücken zu
schützen.
Zubehör
Aufsteckbarer 77-mm-Frontobjektivdeckel
Objektivrückdeckel
Objektivbeutel CL-M2
Sonderzubehör
Weiter 77-mm-Einschraubfilter
AF-S Telekonverter TC-14EII, TC-17EII*, TC-20EIII*
* Der Autofokus ist nur mit Kameras verfügbar, die eine 1 : 8-Unterstützung anbieten.

25
Ch
Jp
En
Fr
Es
It
Ck
De
Technische Daten
Objektivtyp: AF-S-Nikkor mit D-Charakteristik eingebauter CPU und
Nikon-Bajonett
Brennweite: 300 mm
Maximale Blendenöffnung
:
f/4
Optischer Aufbau: 10 Linsen in 6 Gruppen (2 ED-Linsenelemente)
Bildwinkel: 8°10’ mit Nikon-Film-Spiegelreflexkameras im 35 mm-
Format (135) und Digital-Spiegelreflexkameras im
Nikon-FX-Format
5°20’ mit Digital-Spiegelreflexkameras im Nikon-DX-
Format
6°40’ mit IX240-Systemkameras
Entfernungsdaten: Ausgabe an die Kamera
Fokussiersystem: Innenfokussierung nach dem Nikon-IF-System (mittels
integriertem Silent Wave-Motor); manuell über
separaten Fokussierring
Entfernungsskala: Unterteilt in Meter und Fuß, und zwar von 1,45 m bis
unendlich (∞)
Naheinstellgrenze: 1,45 m von der Sensorebene gemessen
Blendenskala: f/4 – f/32, sowohl auf der Standardskala als auch der
Skala für Blendendirekteinspiegelung
Verriegelung für
kleinste Blende: Vorhanden
Blendenart: Vollautomatisch
Belichtungsmessung: Offenblendenmessung bei Kameras mit CPU-Interface-
System
Fokussier-Begrenzungsschalter:
Vorhanden; zwei Wählbereiche: FULL (∞ – 1,45m)
oder ∞ – 3m
Stativbefestigung: Abnehmbarer Stativanschluß, drehbar um 360° mit
Indizes in Abständen von 90°
Befestigungsgröße: 77 mm (P = 0,75mm)
Abmessungen: ca. 90 mm Durchm. x 222,5 mm (Länge bis Flansch);
Gesamtlänge ca. 230,5 mm
Gewicht: ca. 1440 g mit Stativanschluß, ca. 1300 g nur Objektiv
Änderungen von technischen Daten und Design durch den Hersteller
vorbehalten.

26
Ch
Jp
En
De
Es
It
Ck
Fr
Introduction
Merci d’avoir porté votre choix sur l’objectif AF-S Nikkor 300mm f/4D IF-ED. C’est
un objectif haute performance à mise au point interne (IF) utilisant un moteur à ondes
silencieux pour entraîner le mécanisme de mise au point, d’où la désignation “S”.
Cela permet une mise au point automatique régulière, silencieuse et presque
instantanée.
Principales caractéristiques
•Mise au point automatique possible avec les appareils Nikon F6, F5, série F4,
F100, F90X/N90*, série F90/N90*, série F80/série N80*, série F70/N70*, série
F65/série N65*, Pronea 600i/6i*, Pronea S et les reflex numériques, tels D4 et
D300S. Permet aussi la mise au point automatique avec priorité au manuel et la
limitation de la plage de mise au point automatique via un limiteur de mise au
point.
•La mise au point manuelle avec assistance à la mise au point, ainsi que la mise au
point automatique sont possibles avec tous les boîtiers Nikon AF, sauf le F3AF.
•Pour un contrôle d’exposition plus précis, la distance au sujet est transférée de
l’objectif au boîtier, permettant la mesure matricielle 3D et le dosage auto
flash/ambiance par multi-capteur 3D quand l’objectif est monté sur un appareil
Nikon et avec des flashes corrects.
* Vendu exclusivement aux Etats-Unis.
Nomenclature
1
Bague de mise au point
2
Parasoleil
3
Echelle des distances
4
Ligne de repère des distance
5
Commutateur limiteur de mise au point
6
Commutateur de mode de mise au point
7
Index d’alignement de collier du trépied
8
Index d’ouverture/index de montage
9
Levier de verrouillage d’ouverture
minimale
!
Echelle des ouvertures
"
Echelle de lecture directe de l’ouverture
#
Contacts CPU
$
Levier de signal d’ouverture minimale
(levier de servo couplage EE)
%
Douille d’indexation d’ouverture
&
Index de couplage du posemètre
(
Bague des ouvertures
)
Vis de verrouillage de collier du
trépied
~
Collier du trépied amovible
27
Ch
Jp
En
De
Es
It
Ck
Fr
Important!
•Veiller à ne pas salir ni endommager les contacts électroniques.
•Ne pas essayer de monter les accessoires suivants, car ils risquent d’abimer les
contacts : Bague d’auto-rallonge PK-1, PK-11/PK-11A, Bague auto BR-4 et Bague K1.
D’autres accessoires peuvent ne pas convenir lorsque l’objectif est utilisé avec
certains boîtiers. Se référer aux manuels d’utilisation.
•Cet objectif n’est pas compatible avec le appareil F3AF équipé du viseur DX-1.
•L’échelle de distance n’indique pas la distance précise entre le sujet et l’appareil
photo. Les valeurs sont approximatives et ne doivent être considérées que comme
une estimation générale.
Mise au point
Réglez le sélecteur de mise au point de l’appareil conformément à ce tableau:
• Autofocus avec priorité manuelle
Réglez le sélecteur de mode de mise au point (Fig. 1) à M/A. Cela permet la mise
au point automatique, mais il est possible d’utiliser la priorité manuelle en agissant
sur la bague de mise au point manuelle séparée en pressant légèrement le
déclencheur ou le bouton de démarrage AF (AF-ON) sur l’appareil, sur un appareil
qui en est pourvu. Pour annuler la priorité manuelle, relâchez le déclencheur ou le
bouton de démarrage AF.
• Pour limiter la plage autofocus
(seulement sur les appareils possédant le mode M/A)
Amenez l’interrupteur de fin de course de mise au point (Fig. 2) de FULL à ∞-3 m
pour réduire le temps requis pour l’autofocus. C’est pratique pour prendre des sujets
situés à plus de 3 m. Réglez l’interrupteur à FULL pour des sujets à moins de 3 m.
Mode de mise au point
de l'appareil
Mode de mise au point de l'objectif
Appareil
F6, F5, série F4, F100, F90X/N90s*,
série F90/N90*, série F80/série N80*,
série F70/N70*, série F65/série N65*,
Pronea 600i/6i*, Pronea S,
Reflex numériques Nikon (format Nikon
FX/DX)
Appareils Nikon AF
(sauf F3AF)
Autofocus avec
priorité manuel
Mise au point manuelle
(le télémètre électronique
peut être utilisé.)
Mise au point manuelle
(le télémètre électronique
peut être utilisé.)
Mise au point manuelle
(le télémètre électronique
peut être utilisé.)
AF
AF
M
M
Autres appareils Nikon (sauf F3AF)
Mise au point manuelle
M/A M
* Vendu exclusivement aux Etats-Unis.
28
Ch
Jp
En
De
Es
It
Ck
Fr
Profondeur de champ
Si votre appareil est pourvu d’un bouton ou levier de prévisionnage de la mise au
point (ouverture réelle), vous pourrez observer la profondeur de champ en regardant
dans le viseur.
Blocage d’ouverture minimale (Fig. 3)
En mode Programme ou Auto priorité vitesse, réglez puis verrouillez le diaphragme
sur l’ouverture minimale (f/32).
1 Réglez le diaphragme sur l’ouverture mini (f/32) en alignant sur le repère
d’ouverture.
2 Glissez le curseur de blocage vers la bague de diaphragme de sorte que les deux
points orange soient alignés.
Pour débloquer, glissez le curseur dans l’autre direction.
Ecrans de mise au point recommandés
Divers écrans de mise au point sont disponibles pour certains appareils Nikon SLR
qui s’adaptent à toutes les conditions de prise de vues. Les écrans recommandés
avec cet objectif sont listés ci-dessons.:
◎ Mise au point excellente
○ Mise au point passable
Un vignetage affecte l’image du verre. L’image sur la pellicule ne porte cependant aucune trace
de ceci.
― Non disponible
()Indique la compensation de l’exposition additionnelle requise (Mesure pondérée centrale
uniquement). Pour les appareils F6, corrigez en sélectionnant “Activ.: autre“ dans le réglage
personnalisé “b6: Plage visée” et en réglant le niveau IL de -2,0 à +2,0 par pas de 0,5 IL. Lorsque
vous utilisez des verres autres que ceux de type B ou E, il faut sélectionner “Activ.: autre” même
lorsque la valeur de correction est de “0“ (pas de correction nécessaire). Pour les appareils F5,
Verre
Appareil
F5+DP-30
◎
◎ ―
◎
―
―
―
―
―
―
― ◎ ―
― ◎ ―
― ―
― ―
―
―
◎
(+0.5)
―
◎
(+0.5)
―
―
― ◎ ― ◎ ―
G4G3
G1
G2
H3
H4
H1
H2
BCDE
EC-B
EC-E
FJKLMP
R
S
T
U
F4+DP-20
F4+DA-20
F3
F5+DA-30
A
◎
◎
○
(+0.5)
○
(-1.0)
○
(-1.0)
○
(-1.0)
○
○
(+0.5)
○
○
○
(-1.5)
○
○
○
○
(+0.5)
○
(-1.0)
○
◎
◎
◎
◎
◎
―
―
―
―
◎
◎
◎
◎
◎
―
―
―
◎
◎
(+0.5)
◎
◎
◎
◎ ◎ ◎
◎
◎
(+0.5)
◎
◎
◎
◎
○ ○
――
F6 ◎ ― ― ――◎ ◎ ― ◎ ― ◎ ― ― ◎― ―

29
Ch
Jp
En
De
Es
It
Ck
Fr
compenser en utilisant le réglage personnalisé n° 18 sur l’appareil. Pour les appareils de la série F4,
compenser en utilisant le cadran de compensation de l’exposition prévu pour les filtres de mise au
point.
Voyez le manuel d’utilisation de l’appareil photo pour plus de détails.
Un blanc indique aucune application. Du fait que le verre M peut être utilisé pour la macrophotographie
à un rapport d’agradissement 1:1 et pour la photomicrographie, il a des applications diffèrentes de
celles des autres verres.
Lors de l’utilisation de verres B/B2/B3, E/E2/E3 ou K/K2/K3 dans des appareils autres que ceux
indiqués ci-dessus, se reporter respectivement aux colonnes des verres B, E, K de F4 + DP-20.
Prise de vues au flash avec un appareil à flash intégré
Tous les appareils à flash intégré Nikon sont utilisables et il n’y a pas de vignettage.
Utilisation d’un trépied (Fig. 4)
Cet objectif est équipé d'un collier pour trépied rotatif amovible. A l'emploi d'un
trépied, fixez-le au collier pour trépied de l'objectif au lieu de l'appareil. Procédez
comme suit pour fixer le collier pour trépied à l'objectif:
1 Desserrez légèrement la vis de blocage du collier pour trépied 1.
2 Insérez l'objectif en alignant l'index d'alignement du collier pour trépied sur
l'objectif sur la marque sur le collier pour trépied 2.
3 Tournez l'objectif à l'index de position 3 correct (trois index sont prévus tous les
90˚) sur le collier pour trépied en alignant l'index d'alignement du collier pour
trépied sur l'objectif, puis serrez la vis. (Si la vis n'est pas serrée, l'objectif
peut se détacher accidentellement du collier pour trépied.)
En tenant l’appareil par sa poignée et en le tournant dans son collier de
trépied, votre main peut heurter le trépied, selon le trépied utilisé.
Parasoleil
Faites sortir le parasoleil et tournez-le lentement jusqu’à ce que la position de mise
en place avec déclic soit libérée et qu’il bouge légèrement. Puis, tournez-le dans le
sens anti-horaire (vu de l’avant) pour l’immobiliser en position sortie. Comme il n’est
pas amovible, glissez-le en arrière jusqu’au déclic de mise en place quand il n’est
pas utilisé. Ne soulevez jamais l’objectif en le tenant par le parasoleil. Il
pourrait tomber sous l’effet de son poids et s’endommager s’il heurte quelque chose.

30
Ch
Jp
En
De
Es
It
Ck
Fr
Soin de l’objectif
•Nettoyer la surface de l’objectif avec un pinceau soufflant. Pour enlever les
poussières ou les traces, utiliser de préférence un tissu de coton doux, ou un tissu
optique, légèrement humidifié avec de l’alcool éthylique (éthanol). Essuyer en
mouvement circulaire partant du centre.
•Ne jamais employer de solvant ou de benzènes qui pourrait endommager l’objectif,
prendre feu ou nuire à la santé.
•Il est recommandé d’utiliser un filtre NC en permanence, pour protéger la lentille
frontale. Un paresoleil assure également une bonne protection contre les chocs.
•Lors du rangement de l’objectif dans son étui, penser à remettre en place les
bouchons avant et arrière.
•En cas d’inutilisation pour une longue période, entreposer le matériel dans un
endroit frais, sec et aéré pour éviter les moisissures. Tenir le matériel éloigné des
sources de lumière, et des produits chimiques (camphre, naphtaline, etc.).
•Eviter les projections d’eau ainsi que l’immersion, qui peut provoquer la rouille et
des dommages irréparables.
•Divers matériaux de synthèse sont utilisés dans la fabrication. Pour éviter tout
problème, ne pas soumettre l’objectif à de fortes chaleurs.
•N’utilisez jamais de pinceau soufflant pour nettoyer l’arrière de
l’objectif. Les lames du diaphragme étant exposées, elles peuvent être
endommagées par un jet d’air fort. Attachez bien le bouchon arrière d’objectif
quand l’objectif n’est pas utilisé pour protéger l’objectif et les lames du
diaphragme contre les matières étrangères et les empreintes de doigts.
Accessoires fournis
Bouchon avant d’objectif diamètre 77 mm
Bouchon arrière
Étui semi-souple CL-M2
Accssoires en option
Autres filtres vissants 77 mm
AF-S Téléconvertisseurs TC-14EII, TC-17EII*, TC-20EIII*
* L’autofocus n’est disponible qu’avec les appareils photo prenant en charge
l’ouverture f/8.

31
Ch
Jp
En
De
Es
It
Ck
Fr
Caractéristiques
Type d’objectif: Nikkor AF-S de type D avec processeur et monture
baïonnette Nikon
Focale: 300 mm
Ouverture maximale: f/4
Construction optique : 10 éléments en 6 groupes (2 éléments ED)
Angle de champ: 8˚10’ avec les reflex argentique 24x36 Nikon et reflex
numériques Nikon au format FX
5°20’ avec les reflex numériques Nikon au format DX
6˚40’ avec les appareils photo IX240
Informations sur
la distance: À l’appareil
Mise au point: Système Internal Focusing (IF) Nikon (utilisant un
moteur à ondes silencieux interne); manuel par bague
de mise au point séparée
Echelle des distances
de prise de vue: Graduée en mètres et pieds de 1,45 m à l’infini (∞)
Distance minimale
de mise au point : 1,45 m à partir du plan focal
Echelle des ouvertures: f/4 – f/32 pour les échelles standard et de lecture directe
de l’ouverture
Verrouillage d’ouverture
minimale: Oui
Diaphragme: Entièrement automatique
Mesure de l’exposition: Via méthode pleine ouverture avec les appareils avec
système d’interface CPU
Commutateur limiteur
de mise au point: Fourni; deux plages disponibles: FULL
(∞ – 1,45m) ou
∞ – 3 m.
Montage sur trépied: Collier de montage sur trépied amovible; rotation à
360˚, index tous les 90˚
Taille des accessoires: 77 mm (P = 0,75 mm)
Dimensions: Env. 90 mm diam. x 222,5 mm (rallonge de la bride de
montage d’objectif de l’appareil); longuer hors-tout est
env. 230,5 mm
Poids: Env. 1440 g avec collier pour trépied; env. 1300 g
objectif seulement
Les caractéristiques et le dessin sont susceptibles d’être modifiés sans préavis
ni obligation de la part du constructeur.

32
Ch
Jp
En
De
Fr
It
Ck
Es
Introducción
Muchas gracias por su compra del AF-S Nikkor 300mm f/4D IF-ED. Es un objetivo
de enfoque interno (IF) de gran calidad que utiliza un motor Silent Wave para
accionar el mecanismo de enfoque, de ahí viene el “S”. En consecuencia, el enfoque
automático es suave, silencioso y prácticamente instantáneo.
Principales funciones
•El enfoque automático es posible con las cámara Nikon F6, F5, serie F4, F100,
F90X/N90s*, serie F90/N90*, serie F80/serie N80*, serie F70/N70*,
serie F65/serie N65*, Pronea 600i/6i*, Pronea S y las cámaras SLR digitales
Nikon, como las de D4 y D300S. También tiene un: enfoque automático con
cancelación manual y limitación de gama de enfoques automáticos a través del
interruptor límite de enfoque.
•Enfoque manual utilizando la asistencia de enfoque así como el enfoque automático
son posibles en todas las cámaras Nikon AF excepto la F3AF.
•Para un control de exposición más preciso, la información de distancia al objeto se
transmite del objetivo a la cámara para que pueda funcionar la medición de matriz
de 3 dimensiones y el flash de relleno balanceado multi-sensor de 3 dimensiones
con las cámara Nikon apropiadas y sus Speedlights.
* De venta exclusiva en los EE UU.
Nomenclatura
1
Anillo de enfoque
2
Visera
3
Escala de distancias
4
Línea indicadora de distancias
5
Interruptor de límite de enfoque
6
Interruptor de modo de enfoque
7
Indices para el alineamiento del collar
del trípode
8
Indice de aberturas/índice de monturas
9
Palanca de fijación de apertura mínima
!
Escala de apertura
"
Escala de lectura directa de apertura
#
Contactos CPU
$
Borne de señal de abertura mínima
(Borne de acoplador EE)
%
Poste de índice de apertura
&
Protuberancia de acoplamiento al
exposímetro
(
Anillo de aberturas
)
Tornillo de fijación del collar del
trípode
~
Collar del trípode desmontable

33
Ch
Jp
En
De
Fr
It
Ck
Es
¡Importante!
•Tener cuidado de no manchar o dañar los contactos de la CPU.
•No montar en el objetivo los siguientes accesorios, ya que podrían dañar los
contactos de la CPU: Anillo de Autoextensión PK-1, PK-11/PK-11A, Anillo Auto
BR-4 o Anillo K1.
Puede que otros accesorios no sean apropiados cuando se usa este objetivo con
determinados cuerpos de cámara. Para más detalles, ver el manual del usuario de
cada producto.
•Este objetivo no se puede usar con una cámara Nikon F3AF que lleve montado el
Visor AF DX-1.
•La escala de distancia no indica la distancia precisa entre el sujeto y la cámara. Los
valores son aproximados y deberían utilizarse exclusivamente como guía general.
Enfoque
Ajuste el selector de modo de enfoque de su cámara de acuerdo con este cuadro:
• Enfoque automático con prioridad manual
Ajuste el interruptor de modo de enfoque (Fig. 1) a M/A. Se dispone de un
enfoque automático pero puede dar prioridad al enfoque manual con el anillo de
enfoque manual mientras oprime ligeramente el obturador o el botón del inicio de
AF (AF-ON) en el cuerpo de la cámara si existe. Para cancelar la prioridad manual,
levante el dedo del obturador o del botón de inicio de AF.
• Para limitar la gama del enfoque automático (sólo para cámaras que
utilicen el modo M/A)
Mueva el interruptor de límite de enfoque (Fig. 2) de FULL a ∞-3 m para reducir el
tiempo de enfoque automático. Es útil para hacer tomas de sujetos que están a más
de 3 m. Mueva el interruptor a FULL cuando el sujeto está a menos de 3 m.
Modo de enfoque de la cámara
Modo de enfoque del objetivo
Cámaras
F6, F5, serie F4, F100, F90X/N90s*, serie F90/
N90*, serie F80/serie N80*, serie F70/N70*,
serie F65/serie N65*, Pronea 600i/6i*,
Pronea S, cámaras SLR digitales Nikon
(formato Nikon FX/DX)
Cámaras AF de Nikon
(excepto para F3AF)
Enfoque
automático con
prioridad manual
Enfoque manual
(puede utilizarse
un telémetro
electrónico.)
Enfoque manual (puede utilizarse un
telémetro electrónico.)
Enfoque manual (puede utilizarse un
telémetro electrónico.)
AF
AF
M
M
Otras cámaras Nikon (excepto F3AF)
Enfoque manual
M/A M
* De venta exclusiva en los EE UU.

34
Ch
Jp
En
De
Fr
It
Ck
Es
Profundidad de campo
Si su cámara tiene un botón o palanca de previsualización de profundidad de campo
(cierre de iris) puede observarse la profundidad de campo mientras mira por el visor
de la cámara.
Bloqueo de la apertura mínima (Fig. 3)
Para disparar con exposición automática programada o automática con prioridad al
obturador, utilizar la palanca de bloqueo de la apertura mínima para fijar la apertura
del objetivo en f/32.
1 Ajustar el objetivo a su apertura mínima (f/32) alineándolo con el índice de
apertura.
2 Deslice la palanca de fijación hacia el anillo de aperturas para que se alineen dos
puntos naranjas.
Para desbloquearlo, deslizar la palanca en la dirección opuesta.
Pantallas de enfoque recomendadas
Hay diferentes pantallas de enfoque intercambiables para algunas cámaras SLR de
Nikon apropiados para cualquier situación fotográfica. Las recomendadas para
utilizar con este objetivo son las que aparecen en la lista a continuación.
◎ Enfoque excelente
○ Enfoque aceptable
Ligero viñeteo afecta la imagen de la pantalla, pero la imagen de la película no es afectada
por esto.
― No existe
()
Indica la cantidad de compensación adicional necesaria (Solamente medición ponderada central). Para
cámaras F6, compense seleccionando “Otra pantalla” en el ajuste personal del usuario “b6: Compens
pantalla” y ajustando el nivel EV a -2,0 a +2,0 en pasos de 0,5 EV. Cuando se utilice una pantalla que no sea
Pantalla
Cámara
F5+DP-30
◎
◎ ―
◎
―
―
―
―
―
―
― ◎ ―
― ◎ ―
― ―
― ―
―
―
◎
(+0.5)
―
◎
(+0.5)
―
―
― ◎ ― ◎ ―
G4G3
G1
G2
H3
H4
H1
H2
BCDE
EC-B
EC-E
FJKLMP
R
S
T
U
F4+DP-20
F4+DA-20
F3
F5+DA-30
A
◎
◎
○
(+0.5)
○
(-1.0)
○
(-1.0)
○
(-1.0)
○
○
(+0.5)
○
○
○
(-1.5)
○
○
○
○
(+0.5)
○
(-1.0)
○
◎
◎
◎
◎
◎
―
―
―
―
◎
◎
◎
◎
◎
―
―
―
◎
◎
(+0.5)
◎
◎
◎
◎ ◎ ◎
◎
◎
(+0.5)
◎
◎
◎
◎
○ ○
――
F6 ◎ ― ― ――◎ ◎ ― ◎ ― ◎ ― ― ◎― ―

35
Ch
Jp
En
De
Fr
It
Ck
Es
de tipo B o E, debe seleccionarse “Otra pantalla” incluso cuando el valor de compensación requerido sea “0”
(no se requiere compensación). Para la cámara F5 compense usando el ajuste personal del usuario No. 18
en el cuerpo de la cámara. Para las cámaras de la serie F4, compense usando el dial de compensación de
exposición para las pantallas de enfoque.
Para más detalles, consulte el manual del usuario de la cámara.
Los blancos significan inaplicable. Como la pantalla de tipo M se usa para macrofotografía a una razón de
aumento de 1:1 asi como para microfotografía, su aplicación es distinta a la de las demás pantallas.
Cuando se utilicen las pantallas de enfoque B/B2/B3, E/E2/E3 y K/K2/K3 en cámaras distintas de las relacionadas
arriba, vea las columnas de las pantallas B, E y K, de F4 + DP-20 respectivamente.
Cuando se hacen fotografías con flash en cámara con flash
incorporado
Puede utilizar en todas las cámaras con flash incorporado de Nikon sin que se
produzca un viñetado.
Uso de un trípode (Fig. 4)
Este objetivo tiene un collar de trípode rotatorio desmontable. Cuando utilice un
trípode, instálelo en el colar del trípode de objetivo en lugar de la cámara. Para
instalar el collar de trípode en el objetivo, siga los pasos a continuación:
1 Afloje ligeramente el tornillo de fijación 1 del colar del trípode.
2 Inserte el objetivo alineando el índice de alineación de collar del trípode en el
objetivo con la marca en el collar del trípode 2.
3 Gire el objetivo a una posición índice 3 apropiada (hay tres índices cada 90°) en
el collar de trípode alineando el índice de alineación de collar del trípode en el
objetivo y apriete el tornillo. (Si el tornillo no está apretado, el objetivo
puede salirse accidentalmente del collar del trípode.)
Al sujetar la cámara por su empuñadura y girar la cámara en el collar del
trípode, su mano puede golpear contra el trípode, según el trípode que esté
utilizando.
Visera del objetivo
Saque la visera del objetivo girándola lentamente hasta que se suelte la posición del
seguro y la visera se mueva suavemente. Gírela ahora a la izquierda (vista desde
adelante) para asegurarla en la posición extendida. Como la visera del objetivo no
puede desmontarse, deslizar hacia atrás hasta su posición de tope cuando no lo
utiliza. No levantar el objetivo por su visera. Esto puede hacer que se caiga el
objetivo debido a su propio peso y dañarlo, si se golpea contra algo duro.

36
Ch
Jp
En
De
Fr
It
Ck
Es
Forma de cuidar el objetivo
•Limpiar la superficie del objetivo con un cepillo soplador. Para eliminar la
suciedad o las huellas, utilizar un trapo de algodón suave y limpio o papel especial
para objetivos humedecido en etanol (alcohol) o limpiador de objetivos. Limpiar
describiendo un movimiento circular del centro hacia fuera, teniendo cuidado de
no dejar restos ni tocar otras partes.
•No usar en ningún caso disolvente o benceno para limpiar el objetivo ya que podría
dañarlo, provocar un incendio o causar problemas sanitarios.
•Se recomienda utilizar en todo momento un filtro NC para proteger el elemento
frontal del objetivo. También un parasol contribuirá a proteger la parte frontal del
objetivo.
•Cuando se guarde el objetivo en su estuche, colocarle las dos tapas.
•Cuando no se vaya a utilizar el objetivo durante largo tiempo, guardarlo en un lugar
fresco y seco para evitar la formación de moho. Guardar el objetivo, además, lejos
de la luz solar directa o de productos químicos tales como alcanfor o naftalina.
•No mojar el objetivo ni dejarlo caer al agua, ya que se oxidaría y no funcionaría
bien.
•Algunas partes del objetivo son de plástico reforzado. Para evitar daños, no dejarlo
nunca en un lugar excesivamente caliente.
•No utilizar un soplador de aire para limpiar la parte trasera interior del
objetivo. Como las hojas del diafragma están expuestas, pueden dañarse al
recibir un fuerte soplo de aire. Además, instalar siempre la tapa trasera de
objetivo en el objetivo cuando no lo utilice, para proteger el objetivo y las
hojas del diafragma contra materias extrañas y huellas digitales.
Accesorios suministrados
Tapa frontal de presión a 77 mm
Tapa trasera de objetivo
Estuche semiblando CL-M2
Accesorios opcionales
Otros filtros con rosca de 77 mm
AF-S Teleconvertidores TC-14EII, TC-17EII*, TC-20EIII*
* Autofoco está disponible únicamente con cámaras que sean compatibles con f/8.

37
Ch
Jp
En
De
Fr
It
Ck
Es
Especificaciones
Tipo de objetivo: AF-S Nikkor tipo D con CPU incorporado y montura de
bayoneta Nikon
Distancia focal: 300 mm
Abertura máxima: f/4
Estructura del objetivo: 10 lentes en 6 grupos (2 lentes ED)
Angulo de imagen: 8°10’ para las cámaras SLR de película con formato de
35 mm (135) de Nikon y para las cámaras SLR digitales
con formato FX de Nikon
5°20’ para las cámaras SLR digitales con formato DX de
Nikon
6°40’ para las cámaras del sistema IX240
Información de distancia
: Salida al cuerpo de la cámara
Enfoque: Sistema de enfoque interno de Nikon (IF) (con un motor
Silent Wave interno); manual por anillo de enfoque
independiente
Escala de distancias
de la toma: Calibrado en metros y pies desde 1,45 m a infinito (∞)
Distancia de
enfoque mínima: 1,45 m a partir del plano focal
Escala de aberturas: f/4– f/32 en escalas normales y de lectura directa de
aberturas
Bloqueo de
abertura mínima: Instalado
Diafragma: Totalmente automático
Medición de exposición: Método de abertura total con cámaras con sistema de
interfase CPU
Conmutador de
límite de enfoque: Instalado; hay dos posiciones: FULL
(∞ – 1,45m) o ∞
– 3 m
Montura de trípode: Collar de montura de trípode desmontabel rotación
hasta 360°, índices cada 90°
Tamaño de accesorios: 77 mm (P = 0,75mm)
Dimensiones: Aprox. 90 mm de diám. x 222,5 mm (desde la pestaña
de montaje); aprox. 230,5 mm de longitud (total)
Peso: Aprox. 1440 g con el collar de trípode; aprox. 1300 g
sólo para el objetivo
Las especificaciones y los diseños están sujetos a cambio sin previo aviso ni
obligación por parte del fabricante.

38
Ch
Jp
En
De
Fr
Es
Ck
It
Introduzione
Grazie per aver acquistato l’obiettivo AF-S Nikkor 300mm f/4D IF-ED.
È un obiettivo ad alte prestazioni e messa a fuoco interna (IF) che si avvale di un
motore Silent Wave per azionare il meccanismo di messa a fuoco, e per questo il
nome del modello include una “S”. La messa a fuoco automatica pertanto risulta
particolarmente agevole, silenziosa e quasi istantanea.
Caratteristiche principali
•Messa a fuoco automatica poss
ibile con fotocamere Nikon F6, F5, serie F4,
F100, F90X, serie F90, serie F80, serie F70, serie F65, Pronea 600i, Pronea S
e le fotocamere reflex digitali Nikon, quali D4 e D300S. Altre funzioni: messa a
fuoco automatica con regolazione manuale e limitazione del campo di messa a
fuoco automatica tramite interruttore di limite di messa a fuoco.
•Messa a fuoco manuale mediante aiuto alla messa a fuoco e messa a fuoco
automatica possibile con tutte le macchine Nikon AF, eccetto il modello F3AF.
•Per un controllo più accurato dell’esposizione, le informazioni circa la distanza del
soggetto vengono trasmesse dall’obiettivo al corpo macchina fotografica sempre
che si tratti di macchine Nikon appropriate e Speedlights con Misurazione a
matrice 3D e 3D Multi-Sensor Balanced Fill-Flash.
Nomenclatura
1
Anello di messa a fuoco
2
Paraluce
3
Scala delle distanze
4
Contrassegno distanza
5
Interruttore di limite di messa a fuoco
6
Interruttore del modo di messa a fuoco
7
Indici di allineamento del collare del
treppiede
8
Indice delle aperture/Indice di
montaggio
9
Leva di blocco di apertura minima
!
Scala delle aperture
"
Scala di lettura diretta delle aperture
#
Contatti CPU
$
Attacco di segnale di apertura minima
(attacco per accoppiamento EE servo)
%
Perno per misurazione dell’apertura
&
Indice di accoppiamento
dell’esposimetro
(
Anello di apertura
)
Vite di fissaggio del collare del
treppied
~
Collare del treppiede staccabile
39
Ch
Jp
En
De
Fr
Es
Ck
It
Importante!
•Fate attenzione a non sporcare o danneggiare i contatti CPU.
•Gli accessori elencati non vanno montati su questo obiettivo, in quanto potrebbero
danneggiarne i contatti CPU: Anello di Prolunga Automatico PK-1, PK-11/PK-11A,
Anello Auto BR-4, Anello K1.
Altri accessori, nell’impiego con determinati corpi camera, possono risultare
inadatti. Per maggiori dettagli, consultate i relativi manuali d’uso.
•Quest’ottica non è utilizzabile abbinata alla fotocamera Nikon F3AF con il mirino
autofocus DX-1 montato.
•La scala distanze non indica la distanza precisa tra il soggetto e la fotocamera. I
valori sono approssimativi e servono solo a titolo di riferimento generale.
Messa a fuoco
Posizionare il selettore del modo di messa a fuoco della fotocamera in conformità
alla seguente tabella:
• Messa a fuoco automatica con esclusione per il funzionamento
in manuale
Posizionare l’interruttore del modo di messa a fuoco (Fig. 1) su M/A. Cosí la
messa a fuoco automatica funziona, ma è possibile escludere manualmente la
messa a fuoco agendo sull’anello di messa a fuoco manuale separato mentre si
preme leggermente il pulsante di rilascio dell’otturatore o il pulsante di avvio AF
(AF-ON) sul corpo della fotocamera negli apparecchi che ne sono provvisti. Per
annullare l’esclusione manuale, togliere il dito dal pulsante di rilascio
dell’otturatore o dal pulsante di avvio AF.
Modo di messa a fuoco
della fotocamera
Modo di messa a fuoco dell'obiettivo
Fotocamere
F6, F5, serie F4, F100, F90X, serie F90,
serie F80, serie F70, serie F65, Pronea 600i,
Pronea S, fotocamere reflex digitali Nikon
(formato FX/DX)
Fotocamere Nikon AF
(tranne F3AF)
Messa a fuoco
automatica con
precedenza manuale
Messa a fuoco manuale
(è possibile utilizzare
un telemetro elettronico.)
Messa a fuoco manuale
(è possibile utilizzare un telemetro elettronico.)
Messa a fuoco manuale
(è possibile utilizzare un telemetro elettronico.)
AF
AF
M
M
Altre fotocamere Nikon (tranne F3AF)
Messa a fuoco manuale
M/A M
40
Ch
Jp
En
De
Fr
Es
Ck
It
• Come limitare la gamma della messa a fuoco automatica (solo per
fotocamere utilizzabili in modo M/A)
Spostare l’interruttore di fine corsa della messa a fuoco (Fig. 2) da FULL a ∞-3 m
per ridurre il tempo di messa a fuoco automatica. Questa funzione è utile quando si
riprendono soggetti situati a una distanza maggiore di 3 m. Posizionare
l’interruttore su FULL quando il soggetto si trova a una distanza inferiore ai 3 m.
Profondità di campo
Se la vostra fotocamera è dotata di un pulsante o di una leva per l’anteprima della
profondità di campo (Stop-Down), è possibile osservare la profondità di campo
guardando nel mirino della fotocamera.
Blocco al diaframma minimo (Fig. 3)
Per la ripresa nei modi di esposizione automatica Programmata o a Priorità dei
tempi, fate uso della leva di blocco al diaframma minimo, per mantenere prefissato il
valore f/32.
1 Regolate il diaframma al valore minimo, f/32, allineandolo all’indice delle aperture.
2 Spingete la leva di blocco verso l’anello di apertura cosicché i due puntini
arancioni risultino allineati.
Per liberare la leva, spingetela nella direzione opposta.
Schermi di messa a fuoco consigliati
Per alcune fotocamere SLR Nikon sono disponibili vari schermi di messa a fuoco
intercambiabili adatti a ogni situazione di ripresa. Gli schermi consigliati per l’uso
con questo obiettivo sono elencati sotto.
Schermo
Fotocamera
F5+DP-30
◎
◎ ―
◎
―
―
―
―
―
―
― ◎ ―
― ◎ ―
― ―
― ―
―
―
◎
(+0.5)
―
◎
(+0.5)
―
―
― ◎ ― ◎ ―
G4G3
G1
G2
H3
H4
H1
H2
BCDE
EC-B
EC-E
FJKLMP
R
S
T
U
F4+DP-20
F4+DA-20
F3
F5+DA-30
A
◎
◎
○
(+0.5)
○
(-1.0)
○
(-1.0)
○
(-1.0)
○
○
(+0.5)
○
○
○
(-1.5)
○
○
○
○
(+0.5)
○
(-1.0)
○
◎
◎
◎
◎
◎
―
―
―
―
◎
◎
◎
◎
◎
―
―
―
◎
◎
(+0.5)
◎
◎
◎
◎ ◎ ◎
◎
◎
(+0.5)
◎
◎
◎
◎
○ ○
――
F6 ◎ ― ― ――◎ ◎ ― ◎ ― ◎ ― ― ◎― ―

41
Ch
Jp
En
De
Fr
Es
Ck
It
◎ Messa a fuoco eccellente
○ Messa a fuoco accettabile
L’immagine sullo schermo presenta una riduzione di luminosità o tracce di fenomeno del moiré.
Questo però non lascia tracce sulla pellicola.
― Non disponibile.
()Indica il valore della compensazione di esposizione aggiuntiva richiesto (Solamente misurazione
a preferenza centrale). Con le fotocamere F6, compensare selezionando “Otra pantalla”
nell’impostazione personalizzata “b6: Compens pantalla”, quindi impostando il livello EV tra -2.0
e +2.0 ad intervalli di 0,5 EV. Quando si utilizzano schermate diverse da B o E, è necessario
selezionare “Otra pantalla” anche quando il valore di compensazione richiesto è pari a “0”
(nessuna compensazione necessaria). Per la fotocamera F5, compensare utilizzando
l’impostazione personalizzata 18 sul corpo della fotocamera. Per gli apparecchi della serie F4,
compensare utilizzando il quadrante di compensazione dell’esposizione previsto per i filtri di
messa a fuoco.
Per ulteriori dettagli, fare riferimento al manuale d’uso della fotocamera.
Il quadrato vuoto non è applicabile. Come lo schermo del tipo M può essere utilizzato per macrofotografia con
rapporto di ingrandimento 1:1 e fotomicrografia, esso presenta differenti applicazioni che agli altri schermi.
Impiegando gli schermi B/B2/B3, E/E2/E3 ed K/K2/K3 con fotocamere diverse da quelle elencate sopra, fare
riferimento alle colonne riguardanti gli schermi B, E e K di F4 + DP-20, rispettivamente.
Quando si scattano fotografie con il flash utilizzando
fotocamere con flash incorporato
Tutte le fotocamere con flash incorporato della Nikon possono essere utilizzate senza
l’occorrenza di vignettature.
Per usare un cavalletto (Fig. 4)
Questo obiettivo è dotato di un collare per cavalletto staccabile. Quando si usa il
cavalletto, attaccarlo al collare per cavalletto dell'obiettivo invece che della macchina
fotografica. Per attaccare all'obiettivo il collare per cavalletto, seguire i passi della
procedura seguente.
1 Allentare la vite di blocco del collare per cavalletto 1.
2 Inserire l'obiettivo allineando l'indice di allineamento del collare per cavalletto
presente sull'obiettivo con il segno presente sul collare per cavalletto 2.
3 Ruotare l'obiettivo su un indice di posizione appropriata 3 (ci sono tre indici
ogni 90°) sul collare per cavalletto allineando l'indice di allineamento collare per
cavalletto sull'obiettivo, dopo di che serrare la vite. (Se la vite non viene
stretta bene, l'obiettivo potrebbe, accidentalmente, staccarsi dal
collare per cavalletto.)
Quando la fotocamera viene afferrata per la parte di presa e la si fa ruotare
attorno al collare del treppiede, a seconda del treppiede utilizzato la mano
potrebbe urtare il treppiede.

42
Ch
Jp
En
De
Fr
Es
Ck
It
Paraluce
Estrarre il paraluce ruotandolo lentamente fino a che la posizione di arresto con
scatto è sganciata e il paraluce si muove liberamente. A questo punto, ruotarlo in
senso antiorario (guardandolo dal davanti) per fissarlo nella posizione estesa.
Siccome il paraluce non può essere distaccato, quando non va usato, farlo scorrere
all’indietro fino a che si arresta con uno scatto. Non sollevare mai l’obiettivo
afferrandolo per il paraluce. Questo perché l’obiettivo è pesante e potrebbe
cadere e danneggiarsi, soprattutto cadendo su qualcosa di duro.
Cura e manutenzione dell’obiettivo
•Pulite la superficie delle lenti con un pennello a pompetta. Per rimuovere impronte
e macchie, fate uso di un fazzoletto di cotone, soffice e pulito, o di una cartina
ottica leggermente imbevuti con alcool o con l’apposito liquido “lens cleaner”.
Strofinate delicatamente con movimento circolare dal centro verso l’esterno,
facendo attenzione a non lasciare tracce o toccare altre parti.
•Per la pulizia non utilizzate mai solventi o benzina, che potrebbero danneggiare
l’obiettivo, causare incendi o problemi di intossicazione.
•Per la protezione della lente frontale è buona norma tenere sempre montato un filtro
NC. Anche il paraluce contribuisce validamente a proteggere la parte anteriore
dell’obiettivo.
•Prima di porre l’obiettivo nell’astuccio o in borsa, montate entrambi i coperchi
protettivi.
•Se rimane a lungo inutilizzato, riponetelo in un ambiente fresco e ventilato per
prevenire la formazione di muffe. Tenetelo inoltre lontano dal sole o da agenti
chimici come canfora o naftalina.
•Non bagnatelo e fate attenzione che non cada in acqua. La formazione di ruggine
potrebbe danneggiarlo in modo irreparabile.
•Alcune parti della montatura sono realizzate in materiale plastico rinforzato. Per
evitare danni non lasciate mai l’obiettivo in un luogo eccessivamente caldo.
•Non pulire la parte posteriore interna dell’obiettivo con un soffio
d’aria. Le lame del diaframma sono esposte e potrebbero essere danneggiate da
un forte soffio d’aria. Inoltre, applicare il tappo posteriore quando non si
usa l’obiettivo per proteggere, tanto l’obiettivo che le lame del diaframma da
corpi estranei e impronte digitali.
Accessori in dotazione
Tappo anteriore da 77 mm dia. Tappo posteriore
Custodia semi-rigida CL-M2

43
Ch
Jp
En
De
Fr
Es
Ck
It
Accessori opzionali
Altri filtri a vite da 77 mm
AF-S Teleconvertitori TC-14EII, TC-17EII*, TC-20EIII*
* L’autofocus è disponibile solo per le fotocamere che supportano f/8.
Caratteristiche tecniche
Tipo di obiettivo: Obiettivo AF-S Nikkor tipo D con CPU incorporata e
attacco a baionetta Nikon
Lunghezza focale: 300 mm
Apertura massima: f/4
Costruzione obiettivo: 10 elementi in 6 gruppi (2 elementi ED)
Angolo di campo:
8°10’ con fotocamere Reflex a pellicola Nikon formato
35 mm (135) e fotocamere Reflex digitali Nikon formato FX;
5°20’ con fotocamere Reflex digitali Nikon formato DX;
6°40’ con fotocamere sistema IX240
Dati distanze: Uscita verso il corpo fotocamera
Messa a fuoco: Sistema di messa a fuoco interna (IF) Nikon (utilizza un
motore interno Silent Wave); manuale mediante anello
di messa a fuoco separato
Scala delle distanze
di ripresa: Graduata in metri e piedi da 1,45 m all’infinito (∞)
Distanza minima
per la messa fuoco: 1,45 m dal piano focale
Scala delle aperture: f/4 – f/32 sia sulla scala standard che sulla scala di
lettura diretta delle aperture
Blocco apertura minima: Inseribile
Diaframma: Completamente automatico
Misurazione
dell’esposizione: Con metodo ad apertura massima per le fotocamere con
sistema di interfaccia CPU
Interruttore di limite
di messa a fuoco: In dotazione; due gamme disponibili: FULL
(∞ –
1,45m) oppure ∞ – 3 m
Montaggio su treppiede: Collare di montaggio su treppiede staccabile; girevole
su 360°, indici ogni 90°
Misura dell’accessorio: 77 mm (P = 0,75mm)
Dimensioni: ca. 90 mm diam. x 222,5 mm (estensione della flangia);
lunghezza totale ca. 230,5mm
Peso: Circa 1440 g con il collare del treppiede; circa 1300 g il
solo obiettivo
Le specifiche e i disegni sono soggetti a modifica senza preavviso o obblighi da
parte del produttore.
Sc
44
安全须知
请在使用前仔细阅读“安全须知”,并以正确的方法使用。
本“安全须知”中记载了重要的内容,可使您能够安全、
正确地使用产品,并预防对您或他人造成人身伤害或财产
损失。请在阅读之后妥善保管,以便本产品的所有使用者
可以随时查阅。
有关指示
本节中标注的指示和含义如下。
警告
表示若不遵守该项指示或操作不当,则有可
能造成人员死亡或负重伤的内容。
注意
表示若不遵守该项指示或操作不当,则有可
能造成人员伤害、以及有可能造成物品损害
的内容。
本节使用以下图示和符号对必须遵守的内容作分类和说
明。
图示和符号的实例
△
符号表示唤起注意(包括警告)的内容。
在图示中或图示附近标有具体的注意内容(左图之例
为当心触电)。
符号表示禁止(不允许进行的)的行为。
在图示中或图示附近标有具体的禁止内容(左图之例
为禁止拆解)。
●
符号表示强制执行(必需进行)的行为。
在图示中或图示附近标有具体的强制执行内容(左图
之例为取出电池)。
∎䞷ℶ❐ⓜ庆Ⅳ兕梔床㦻∎䞷広㢝ᇭ
保留备用
45
警 告
禁止拆解
切勿自行拆解、修理或改装。
否则将会造成触电、发生故障并导致受伤。
禁止触碰
立即委托修理
当产品由于跌落而破损使得内部外露
时,切勿用手触碰外露部分。
否则将会造成触电、或由于破损部分而导致
受伤。
取出照相机电池,并委托经销商或尼康授权
的维修服务中心进行修理。
取出电池
立即委托修理
当发现产品变热、冒烟或发出焦味等异
常时,请立刻取出照相机电池。
若在此情况下继续使用,将会导致火灾或灼
伤。
取出电池时,请小心勿被烫伤。
取出电池,并委托经销商或尼康授权的维修服
务中心进行修理。
禁止接触水
切勿浸入水中或接触到水,或被雨水淋
湿。
否则将会导致起火或触电。
禁止使用
切勿在有可能起火、爆炸的场所使用。
在有丙烷气、汽油等易燃性气体、粉尘的场
所使用产品,将会导致爆炸或火灾。
禁止观看
切勿用镜头或照相机直接观看太阳或强
光。
否则将会导致失明或视觉损伤。
Sc
Sc
46
注 意
当心触电
切勿用湿手触碰。
否则将有可能导致触电。
禁止放置
切勿在婴幼儿伸手可及之处保管产品。
否则将有可能导致受伤。
小心使用
进行背光拍摄时,务必使太阳充分偏离画
角。
阳光会在照相机内部聚焦,并有可能导致火
灾。
太阳偏离画角的距离微小时,也有可能会导
致火灾。
妥善保存
不使用时请盖上镜头盖,或保存在没有阳光
照射处。
阳光会聚焦,并有可能导致火灾。
小心移动
进行移动时,切勿将照相机或镜头安装在三
脚架上。
摔倒、碰撞时将有可能导致受伤。
禁止放置
切勿放置于封闭的车辆中、直射阳光下或
其它异常高温之处。
否则将对内部零件造成不良影响,并导致火
灾。

Sc
47
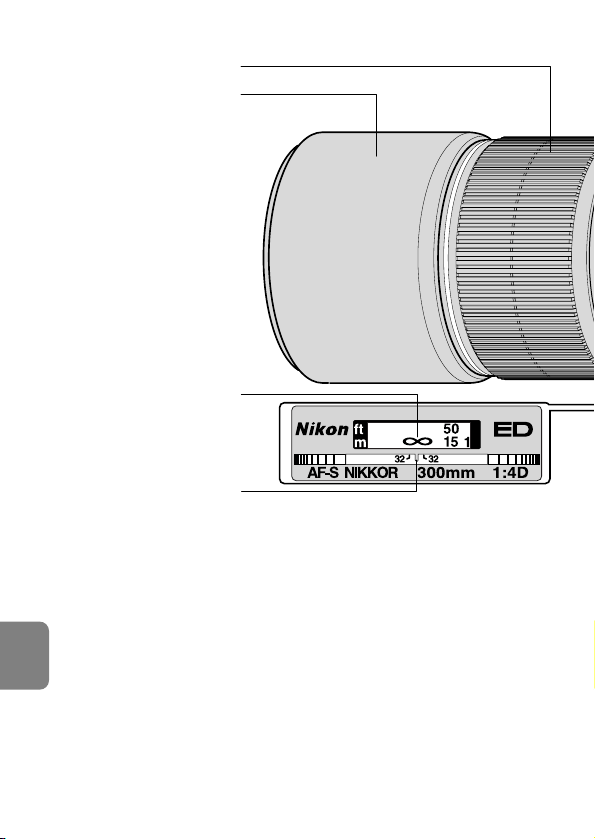
Sc
48
1
2
3
4
名稱
q對焦環
w鏡頭遮光罩
e距離刻度
r距離標線
t對焦限制開關
y對焦模式切換器
u三腳架固定座校準標誌
i光圈標誌/安裝標誌
o最小光圈鎖定桿
!0光圈刻度
!1光圈直接讀取刻度
!2 CPU接點
!3最小光圈確認位(EE伺服
耦合位)
!4光圈指示位
!5測光表耦合脊
!6光圈環
!7三腳架固定座環鎖定螺絲
!8三腳架固定座
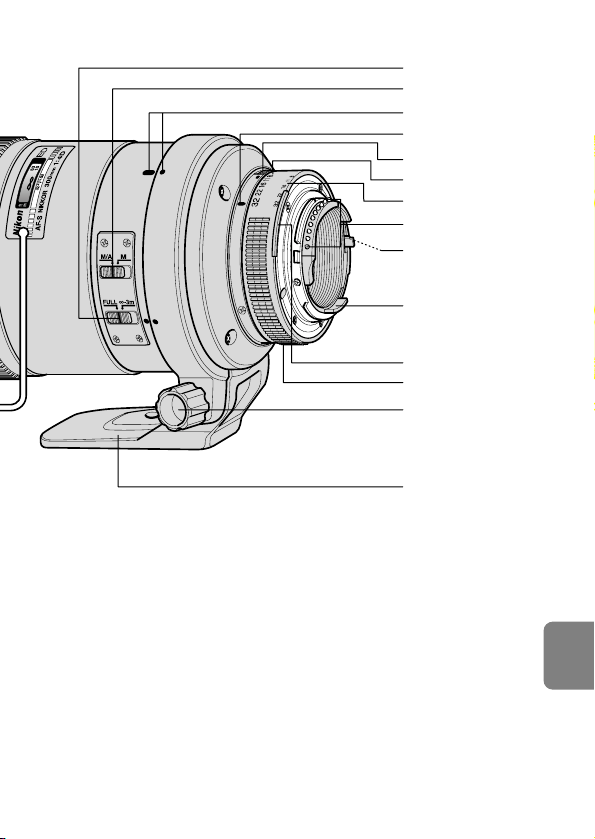
Sc
49
5
6
7
8
9
!
"
#
$
%
&
(
)
~

簡介
謝謝您購買AF-S尼克爾300mm f/4D IF-ED鏡頭-這是一個
高性能的內部對焦(IF)鏡頭﹐採用寧靜波動馬達驅動對
焦機構﹐以英文“寧靜”的第一字母S為標誌-自動對焦
過程流暢﹑安靜﹐幾乎一瞬間就能完成-
主要特色
●用於F6﹑F5﹑F4系列﹑F100﹑F90X/N90s*﹑
F90系列/N90*﹑F80系列/N80系列*﹑F70系列/N70*﹑
F65系列/N65系列*﹑Pronea 600i/6i*﹑Pronea S照相機及尼
康數碼單鏡反光照相機﹐包括D4和D300S上都能進行自
動對焦-同時也能以手動優先的自動對焦及通過對焦限
制開關限制自動對焦範圍-
●除了F3AF之外﹐配用於所有尼康AF照相機機身﹐都能
進行自動對焦及利用對焦助理作手動對焦-
●鏡頭會將拍攝對象距離信息傳送至機身﹐作更精確的曝
光控制﹐配合適當的照相機和閃光燈﹐提供3D矩陣測光
及3D多傳感器均衡式閃燈補光-
* 只在美國銷售-
注意事項
●注意不要弄臟或損壞CPU接點-
●不要將下列附件與本鏡頭連接﹐以免損壞CPU接點﹐自動
延伸環PK-1﹑PK-11/11A﹑自動環BR-4和K1環-
當本鏡頭安裝在某些照相機上時﹐也不宜使用附件﹐有關
細節﹐請參閱各廠家的使用說明書-
●本鏡頭不宜與裝有DX-1 AF取景器的尼康F3AF照相機一起
使用-
●距離刻度並不表示拍攝對象和照相機之間的精確距離-
數值是近似值﹐只能作為一般參考-
Sc
50
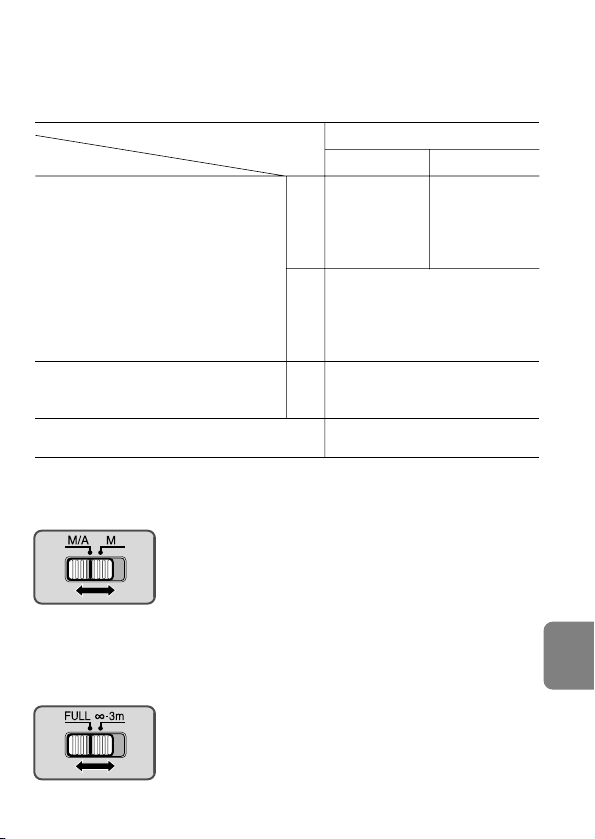
Sc
51
對焦
按下表設定照相機對焦模式:
■手動優先的自動對焦
將對焦模式切換器設定在M/A時﹐仍有自動
對焦﹐但可通過操作獨立的手控對焦環﹐來
手控補償對焦﹐此時﹐應輕壓快門釋放按鈕
或照相機上備有的AF起始鈕(AF-ON)-放
鬆按在快門釋放按鈕或AF起始鈕上的手指﹐
即可解除手動優先的自動對焦-
■限制自動對焦範圍(僅適用於M/A模式照相機)
旋轉對焦限制開關﹑從FULL至∞-3m再回
復至自動對焦-該功能足以對應遠於3m的拍
攝對象-拍攝對象近於3m時﹐可將開關移至
FULL-
照相機對焦模式
鏡頭對焦模式
照相機
手動優先的
自動對焦
手動對焦
(可使用電子
測距儀-)
手動對焦
(可使用電子測距儀-)
AF
M
M/A M
尼康AF照相機 (除了F3AF外)
手動對焦
(可使用電子測距儀-)
AF
M
其他尼康照相機(除了F3AF外) 手動對焦
*僅在美國出了售-
F6﹑F5﹑F4系列﹑F100﹑
F90X/N90s*﹑F90系列/N90*﹑
F80系列/N80系列*﹑
F70系列/N70*﹑
F65系列/N65系列*﹑
Pronea 600i/6i*﹑Pronea S﹑
尼康數碼單鏡反光(尼康
FX/DX格式)照相機
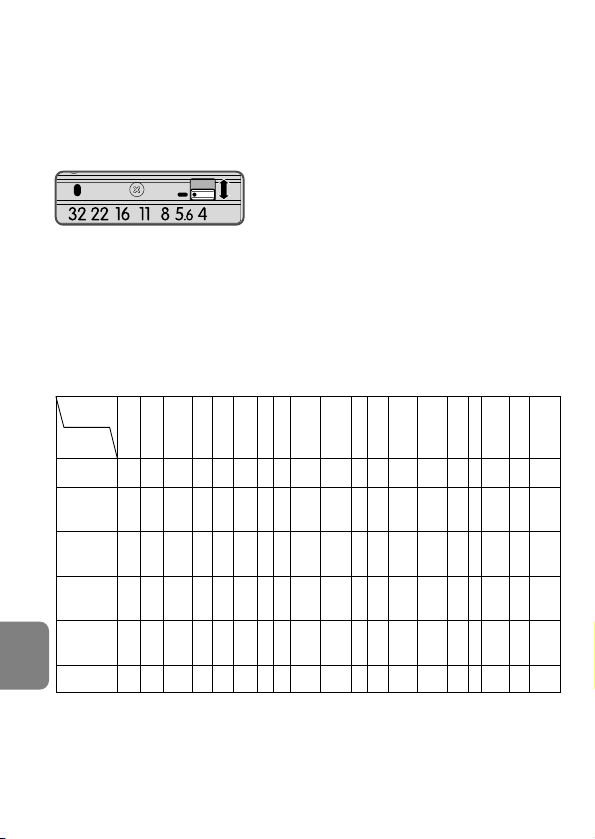
請使用對焦屏
各種對焦屏可通用於尼康單鏡反光照相機的任何相應的攝影場景-下
面所列可用於本鏡頭:
◎:最佳對焦
○:可能對焦
取景器內有輕微漸暈或莫爾條紋圖形﹐但膠片上不會有-
-:不可用-
對焦屏
照相機
F6
F5+DP-30
― ― ―――
◎
―
―
―
―
―
―
― ―
― ―
― ―
― ―
― ―
◎
(+0.5)
―
◎
(+0.5)
―
― ―
◎
―
◎
―
G4G3
G1
G2
H3
H4
H1
H2
BCDE
EC-B
EC-E
FJKLMP
R
S
T
U
F4+DP-20
F4+DA-20
F3
F5+DA-30
A
◎
◎
○
(-1.0)
○
(-1.0)
○
(-1.0)
○
○
○
○
(-1.5)
○
― ―
○
○
(+0.5)
○
(-1.0)
○
◎
◎
◎
◎
◎
―
―
―
―
―
―
◎
◎
(+0.5)
◎
◎◎ ◎◎
◎ ◎
◎
◎
◎
◎
○ ○
◎
― ―― ― ― ―
○
(+0.5)
○
(+0.5)
○◎
◎
◎
◎
◎
◎
◎
◎
◎
◎
◎
◎
◎
―
◎
◎
(+0.5)
Sc
52
景深
如您的照相機上有景深預灠按鈕﹐則可通過照相機取景器
來觀察景深-
最小光圈鎖定
要作程序自動或快門先決自動曝光
拍攝時﹐請用最小光圈鎖定桿將鏡
頭的光圈鎖定在f/32的位置上-
1. 將鏡頭對準光圈指示﹐並設定於最小光圈(f/32)-
2. 將鎖定桿滑向光圈環﹐使兩個橙色點對齊-
如要釋放鎖定時﹐請將鎖定桿推往相反的方向-
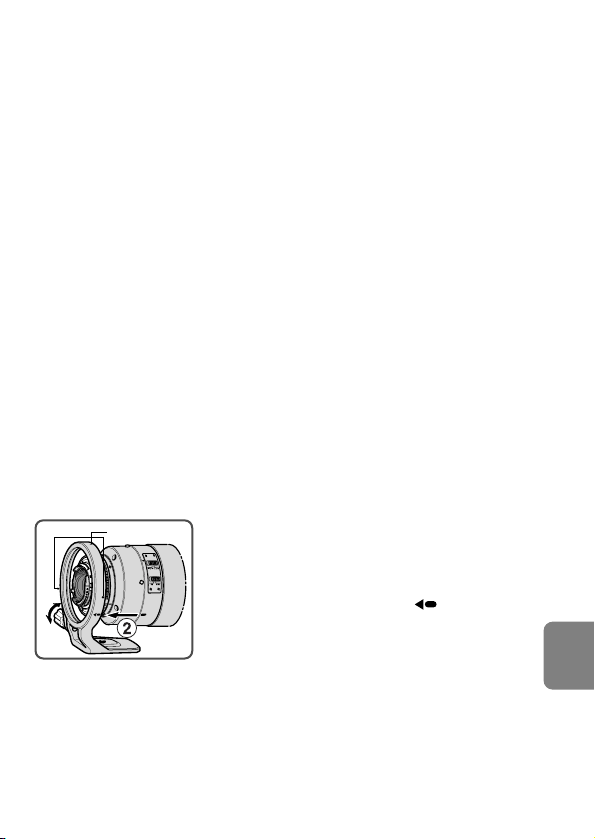
Sc
53
1 略微擰鬆三腳架固定座環鎖定螺絲
1-
2 將鏡頭上的三腳架固定座校準標誌對
正三腳架固定座2上的 標誌而插入
鏡頭-
3 使鏡頭上的三腳架固定座校準標誌對
正﹐將鏡頭轉至三腳架接頭上適當的
位置標誌3(每90°有三個指標)﹐然後擰緊螺絲- (螺絲
如果不擰緊﹐鏡頭隨時都可能從三腳架固定座上脫落-)
用手抓住照相機的把手將照相機旋入三腳架固定座時﹐你
的手可能會碰到三腳架﹐情況隨所用的三腳架而異-
3
1
( ):顯示曝光補償值(僅在中央重點測光時)- F6照相機
通過選擇自定義設定“b6:對焦屏補償”中的“其他對
焦屏”作補償﹐並且將曝光補償標准設定在+/-2.0 EV﹐
1/2 EV步長-當使用了B型和E型之外的對焦屏﹐“其他
對焦屏”務必要選中﹐即使必需的補償值為0(沒有補
償需要)- F5照相機請用機身上的“自定義設定#18”
作補償-F4系列照相機請用對焦屏的“曝光補償刻度”
作補償- 詳情請參閱照相机机身使用說明書-
空白意為不宜使用-因為M型對焦屏可同時用1:1放大倍
率進行宏觀拍攝和微縮拍攝﹐因此﹐不在此限-
使用B/B2/B3﹑E/E2/E3和K/K2/K3對焦屏時﹐可分別參照
F4+DP-20表B﹑E和K型對焦屏-
使用內置閃光燈照相機拍攝閃光照片時
所有尼康照相機都可用﹐而且不會出現漸暈-
使用三腳架
此鏡頭配備一個可裝拆的旋轉三腳架固定座-使用三腳架
時﹐應該將三腳架裝到此鏡頭的三腳架固定座上﹐而不是
裝在照相機機身上-想將三腳架固定座裝到鏡頭上時可按
下列步驟進行:

Sc
54
鏡頭遮光罩
慢慢擰轉鏡頭遮光罩至脫離其卡嗒定位點而可以自由活動時將它
拉出-然後反時針向轉(從前方所見)使它緊固在伸長位置- 由
於此遮光罩是不能拆下的﹐所以在不用的時候應該將它推回原來
的卡嗒定位點-絕不可抓住遮光罩來提起鏡頭- 因為這樣做很容
易因鏡頭本身的重量使鏡頭脫落﹐一撞擊硬物鏡頭就會損壞-
鏡頭的維護保養
●使用吹氣球刷清掃鏡頭表面-如想清除鏡頭上的污垢時﹐請
用柔軟乾淨的棉布或鏡頭清潔紙沾點酒精或鏡頭清潔液擦
拭-在擦拭鏡頭時﹐請繞圓圈自中心向周圍擦拭﹐注意不
要在鏡片上留下痕跡或碰撞外部的部件-
●切勿使用稀釋劑或苯溶液去清潔鏡頭﹐因有可能損傷鏡頭﹐
或造成火災﹐或損害健康-
●為了保護前鏡片﹐最好經常裝上NC濾鏡片-鏡頭遮光罩也有
助於保護鏡頭的前鏡片-
●當把鏡頭保存在鏡盒中時﹐請蓋好前蓋和后蓋-
●當鏡頭準備長時間不用時﹐一定要保存在涼爽乾燥的地方以
防生黴-而且﹐不可放在陽光直接照射或放有化學藥品樟腦
或衛生丸等的地方-
●注意不要濺水於鏡頭上或落到水中﹐因為將會生鏽而發生故
障-
●鏡頭的一部分部件採用了強化塑料-不要把鏡頭放置在高溫的
地方﹐以免損壞-
●不可用吹風刷來清理鏡頭後方內部﹐因為那裡有曝露裝設的
簾幕葉片﹐容易被強烈的氣流吹壞-鏡頭在不用時也必須裝
上後鏡蓋防止外來雜物及指紋沾污鏡頭及簾幕葉片-
●運輸產品時﹐請在包裝箱內裝入足夠多的緩沖材料﹐以減
少(避免)由于沖擊導致產品損坏-

Sc
55
附件
77mm按扣式鏡頭前蓋 鏡頭后蓋 半軟套CL-M2
選購附件
77mm旋入式濾鏡
AF-S望遠倍率鏡TC-14EII﹑TC-17EII*﹑TC-20EIII*
* 自動對焦僅適用于支持f/8 的照相機
-
規格
鏡頭類型: D型AF-S尼克爾鏡頭,帶內置CPU和尼康鏡
頭卡口
焦距:300mm
最大光圈: f/4
鏡頭構造: 6個組群中有10個元件(2ED元件)
畫角:使用35mm(135)格式的尼康膠卷單鏡反
光照相機和尼康FX格式數碼單鏡反光照相
機時為8°10′﹔
使用尼康DX格式數碼單鏡反光照相機時為
5°20′﹔
使用IX 240系統照相機時為6°40′
距離信息: 輸出到照相機
對焦:尼康內部對焦(IF)系列(使用內置寧靜
波動馬達)
手動則採用獨立對焦環
拍攝距離刻度:以米為單位從1.45m至無窮遠(∞)
最近對焦距離﹕1.45m(至焦平面)
光圈範圍: f/4∼f/32﹐標準型和光圈直接讀取刻度
最小光圈鎖定:配備
光圈:全自動
曝光測量: 配合帶CPU接點系統的照相機﹐採用全光圈
方式

Sc
56
對焦限制開關:配備-適用兩種範圍:FULL(∞∼1.45m )
或∞∼3m
安裝三腳架: 三腳架固定座﹐可旋轉360°﹐指數都為90°
安裝:77mm(P=0.75mm)
尺寸:直徑約90mm﹐鏡頭長222.5mm(自照相機鏡
頭卡口邊緣算起);總長度約為230.5mm
重量:約1440g﹐帶三腳架固定座
約1300g﹐僅鏡頭
產品設計與規格如有更改﹐恕不另行通知-

Sc
57
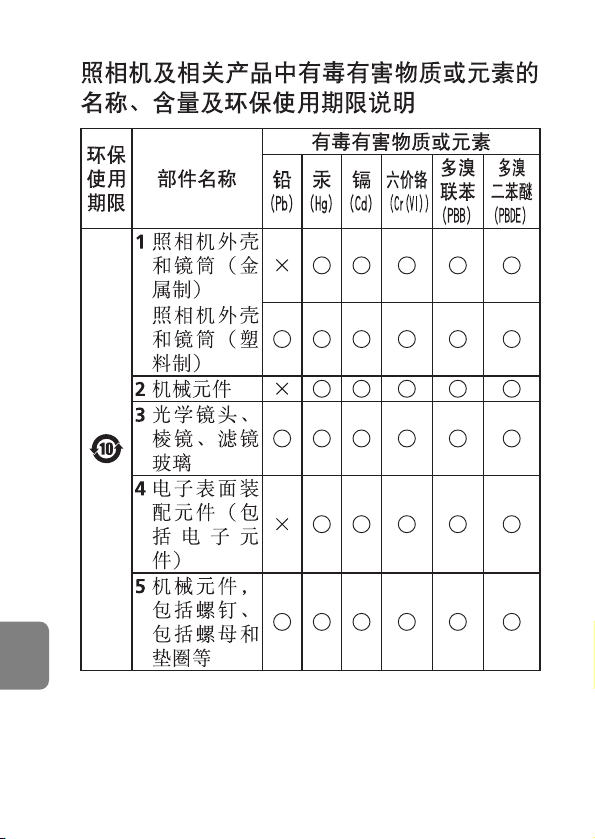
Sc
58

Sc
59
进口商: 尼康映像仪器销售(中国)有限公司
(上海市茂名南路205号瑞金大厦22楼,
200020)
尼康客户支持中心服务热线: 400-820-1665(周一至周
日9:00–18:00)
http://www.nikon.com.cn/
在日本印刷
出版日期: 2014年8月1日
注:
有毒有害物质或元素标识说明
○ 表示该有毒有害物质或元素在该部件所有均质材
料中的含量均在SJ/T11363-2006标准规定的限量
要求以下。
× 表示该有毒有害物质或元素至少在该部件的某一
均质材料中的含量超出SJ/T11363-2006标准规定
的限量要求。但是,以现有的技术条件要使照相
机相关产品完全不含有上述有毒有害物质极为困
难,并且上述产品都包含在《关于电气电子设备
中特定有害物质使用限制指令2011/65/EU》的豁
免范围之内。
环保使用期限
此标志的数字是基于中华人民共和国电子信息产品
污染控制管理办法及相关标准,表示该产品 的环保
使用期限的年数。请遵守产品的安全及使用注意事
项,并在产品使用后根据各地的法律、 规定以适当
的方法回收再利用或废弃处理本产品。

Tc
60
前言
謝謝您購買AF-S尼克爾300mm f/4D IF-ED鏡頭。這是一個高性能的內部對焦
(IF)鏡頭,採用寧靜波動馬達驅動對焦機構,以英文“寧靜”的第一字母S
為標誌。自動對焦過程流暢、安靜,幾乎一瞬間就能完成。
主要特色
●用於F6、F5、F4系列、F100、F90X/N90s*、F90系列/N90*、F80系列/N80系列*、
F70系列/N70*、F65系列/N65系列*、Pronea 600i/6i*、Pronea S相機及尼康數
碼
單鏡反光
相機,包括D4和D300S上都能進行自動對焦。同時也能以手動強
制取代自動對焦及通過焦距限制開關限制自動對焦範圍。
●除了F3AF之外,配用於所有尼康AF相機機身,都能進行自動對焦及利用對
焦助理作手動對焦。
●鏡頭會將主體距離的信息傳送至機身,作更精確的曝光控制,配合適當的
相機和閃光燈,提供3D矩陣測光及3D多傳感器均衡式閃燈補光。
* 只在美國銷售。
注意事項
●注意不要弄臟或損壞CPU觸點。
●不要將下列附件與本鏡頭連接,以免損壞CPU觸點,自動伸縮的PK-1、PK-11/
11A、自動環BR-4和K1環。
當本鏡頭安裝在某些相機上時,也不宜使用附件,有關細節,請參閱各廠家
的使用說明書。
●本鏡頭不宜與裝有DX-1 AF取景窗的尼康F3AF相機一起使用。
●距離尺並不表示主體和相機之間的精確距離。數值是近似值,只能作為一般
參考。
名稱
q 對焦環
w 鏡頭罩
e 距離刻度
r 距離標線
t 聚焦限位開關
y 對焦模式開關
u 三腳架軛具校準標誌
i 光圈標誌/安裝標誌
o 最小光圈鎖定桿
!0 光圈刻度
!1 光圈直接讀取刻度
!2 CPU觸點
!3 最小光圈確認位(EE伺服耦合位)
!4 光圈指示位
!5 測光表耦合脊
!6 光圈環
!7 三腳架軛具螺釘
!8 三腳架裝卸軛具

Tc
61
對焦
按下表設定相機對焦模式:
■自動對焦和手控補償
將對焦模式開關設定在M/A(圖1)時,仍有自動對焦,但可通過操作獨立的手
控對焦環,來手控補償對焦,此時,應輕壓快門釋放鈕或相機上備有的AF起始
鈕(AF-ON)。放鬆按在快門釋放鈕或AF起始鈕上的手指,即可解除手控補償。
■限制自動對焦範圍(僅適用於M/A模式相機)
旋轉對焦限位開關(見圖2)、從FULL至∞-3m再回復至自動對焦。該功能足以
對應遠於3m(9.8ft)的拍攝主體。拍攝主體近於3m時,可將開關移至FULL。
景深
如您的相機上有景深預檢(定格)鈕桿,則可通過相機取景窗來觀察景深。
最小光圈鎖定(圖3)
要作程序自動或快門先決自動曝光攝影時,請用最小光圈鎖定桿將鏡頭的光圈
鎖定在f/32的位置上。
1. 將鏡頭對準光圈指示,並設定於最小光圈(f/32)。
2. 將鎖定桿滑向光圈環,使兩個橙色點對齊。
如要釋放鎖定時,請將鎖定桿推往相反的方向。
相機聚焦模式
鏡頭聚焦模式
相機
F6、F5、F4系列、F100、 F90X/N90s*、
F90系列/N90* 、F80系列/N80系列*、
F70系列/N70*、F65系列/N65系列*、
Pronea 600i/6i*、Pronea S、尼康數碼單鏡
反光(尼康FX / DX格式)相機
自動對焦和
手控先決
手動對焦
(可使用電子
測距儀。)
手動對焦
(可使用電子測距儀。)
AF
M
M/A M
尼康AF相機 (F3AF除外)
手動對焦
(可使用電子測距儀。)
AF
M
其他尼康相機 (F3AF除外) 手動對焦
*僅在美國出了售。

Tc
62
請使用聚焦屏
各種聚焦屏可通用於尼康SLR相機的任何相應的攝影場景。下面所列可用於本鏡頭:
◎: 最佳聚焦
○: 可能對焦
取景窗內有輕微暈映或波紋圖形,但膠片上不會有。
-: 是指相機上不帶取景器屏。
( ):顯示光圈補償值(僅在偏重中央測光時)。F6相機通過選擇自選設定“b6:屏幕補償”中的
“其他屏幕”作補償,並且將曝光補償標准設定在+/-2.0 EV,1/2 EV級。當使用了B型和E型
之外的屏幕,“其他屏幕”務必要選中﹐即使必需的補償值為0(沒有補償需要)。F5相機請用
機身上的“自選設定#18”作補償。F4系列相機請用聚焦屏的“曝光補償刻度”作補償。 詳情
請參閱相机机身使用說明書。
空白意為不宜使用。因為M型聚焦屏可同時用1:1放大倍率進行宏觀攝影和微縮攝影,因此,不
在此限。
使用B/B2/B3、E/E2/E3和K/K2/K3聚焦屏時,可分別參照F4+DP-20表B、E和K型對焦屏。
使用內藏閃燈相機拍攝閃光照片時
所有尼康相機都可用,而且不會出現暈映。
使用三腳架(圖4)
此鏡頭配備一個可裝拆的旋轉式腳架接頭。使用腳架時,應該將腳架裝到此
鏡頭的腳架接頭上,而不是裝在相機機身上。想將腳架接頭裝到鏡頭上時可
按下列步驟進行:
1 略微擰鬆腳架接頭鎖緊螺絲1。
2 將鏡頭上的腳架接頭對準指標對正腳架接頭2上的 標誌而插入鏡頭。
3 使鏡頭上的腳架接頭對準指標對正,將鏡頭轉至腳架接頭上適當的位置指
標3(每90°有三個指標),然後擰緊螺絲。(螺絲如果不擰緊,鏡頭隨時
都可能從腳架接頭上脫落。)
用手抓住相機的把手將相機旋入腳架安裝套環時,你的手可能會碰到腳
架,情況隨所用的腳架而異。
聚焦屏
相機
F6
F5+DP-30
◎
― ― ―――
◎
―
―
―
―
―
―
― ◎ ―
― ◎ ―
― ―
― ―
―
―
◎
(+0.5)
―
◎
(+0.5)
―
―
― ◎ ― ◎ ―
G4G3
G1
G2
H3
H4
H1
H2
BCDE
EC-B
EC-E
FJKLMP
R
S
T
U
F4+DP-20
F4+DA-20
F3
F5+DA-30
A
◎
◎
○
(-1.0)
○
(-1.0)
○
(-1.0)
○
○
○
○
(-1.5)
○
―
○
○
(+0.5)
○
(-1.0)
○
◎
◎
◎
◎
◎
―
―
―
◎
◎
◎
◎
◎
―
―
―
◎
◎
(+0.5)
◎
◎
◎
◎ ◎ ◎
◎
◎
◎
◎
◎
◎
○ ○
◎ ―
―― ◎ ― ― ―
○
(+0.5)
○
(+0.5)
○◎ ―
―
◎
◎
◎
◎
(+0.5)

Tc
63
鏡頭遮光罩
慢慢擰轉鏡頭遮光罩至脫離其卡嗒定位點而可以自由活動時將它拉出。然後反
時針向轉(從前方所見)使它緊固在伸長位置。由於此遮光罩是不能拆下的,
所以在不用的時候應該將它推回原來的卡嗒定位點。絕不可抓住遮光罩來提起
鏡頭。因為這樣做很容易因鏡頭本身的重量使鏡頭脫落,一撞擊硬物鏡頭就會
損壞。
鏡頭的維護保養
●使用吹風刷清掃鏡頭表面。如想清除鏡頭上的污垢時,請用柔軟乾淨的棉
布或鏡頭清潔紙沾點酒精或鏡頭清潔液擦拭。在擦拭鏡頭時,請繞圓圈
自中心向周圍擦拭,注意不要在鏡片上留下痕跡或碰撞外部的部件。
●切勿使用稀釋劑或苯溶液去清潔鏡頭,因有可能損傷鏡頭,或造成火災,
或損害健康。
●為了保護前鏡片,最好經常裝上NC濾光鏡片。鏡頭的遮光罩也有助於保護
鏡頭的前鏡片。
●當把鏡頭保存在鏡盒中時,請蓋好前蓋和後蓋。
●當鏡頭準備長時間不用時,一定要保存在涼爽乾燥的地方以防生黴。而
且,不可放在陽光直接照射或放有化學藥品樟腦或衛生丸等的地方。
●注意不要濺水於鏡頭上或落到水中,因為將會生鏽而發生故障。
●鏡頭的一部分部件採用了強化塑料。不要把鏡頭放置在高溫的地方,以免
損壞。
●不可用吹風刷來清理鏡頭後方內部,因為那裡有曝露裝設的簾幕葉片,容易被
強烈的氣流吹壞。鏡頭在不用時也必須裝上後鏡蓋防止外來雜物及指紋沾污
鏡頭及簾幕葉片。

Tc
64
附件
77mm按扣式前鏡蓋鏡蓋後鏡蓋鏡蓋半軟套CL-M2
選購附件
77mm旋入式濾色鏡
AF-S望遠倍率鏡TC-14EII、TC-17EII*、TC-20EIII*
* 自動對焦僅適用於支援f/8 的相機。
規格
鏡頭類型: D型AF-S尼克爾鏡頭,具有內置CPU(中央處理器)和尼康
卡口座
焦距: 300mm
最大光圈: f/4
鏡頭構造: 6個組群中有10個元件(2ED元件)
畫角:
使用35mm(135)格式的尼康菲林單鏡反光相機和尼康FX格式數
碼單鏡反光相機時為8°10′;
使用尼康DX格式數碼單鏡反光相機時為
5°20′
;
使用IX 240系統相機時為
6°40′
距離信息: 輸入機身
對焦: 尼康內部對焦(IF)系列(使用內裝靜噪波導馬達)
手控則用獨立對焦環
拍攝距離刻度: 刻度自1.45m至無限遠(∞)
最近對焦距離: 1.45m(至焦平面)
光圈範圍: f/4∼f/32,標準型和光圈直接讀取刻度
最小光圈鎖定: 配備
光圈: 全自動
曝光測量:
連接CPU的系列相機,採用全光圈方式
聚焦限位開關: 配備。適用兩種範圍:FULL(∞∼1.45m )或∞∼3m
安裝三腳架: 三腳架裝卸軛具,可旋轉360°,指數都為90°
安裝: 77mm(P=0.75mm)
尺寸: 直徑約90mm,鏡頭長222.5mm(自相機鏡頭安裝盤算起);
總長度約為230.5mm
重量: 約1440g,帶三腳架
約1300g,僅鏡頭
產品設計與規格如有更改,恕不另行通知。

Tc
65

Ch
Jp
En
De
Fr
Es
It
Ck
66
■被写界深度表
■
Depth of field
撮影距離
Focused distance
Eingestellte Entfernung
Distance de mise au point
Distancia de enfoque
Distanza messa a fuoco
Profundidad de campo
Profondità di campo
被写界深度
Depth of field
Schärfentiefe
Profondeur de champ
撮影倍率
Reproduction ratio
Abbildungsmaßstab
Rapport de reproduction
Relación de reproducción
Rapporto di riproduzione
(m)
■
Profundidad de campo
■
Profondità di campo
■
Schärfentiefentabelle
■
Profondeur de champ
■
■
∞
1/∞
15
1/49.8
10
1/32.7
7
1/22.5
5
1/15.7
4
1/12.3
3
1/8.9
2.5
1/7.2
2
1/5.5
1.7
1/4.5
f/4
649.31–
∞
14.67–
15.34
9.86–
10.15
6.93–
7.07
4.97–
5.04
3.98–
4.02
2.99–
3.01
2.49–
2.51
2.00–
2.00
1.70–
1.70
1.45–
1.45
f/8
324.95–
∞
14.36–
15.71
9.71–
10.30
6.86–
7.14
4.93–
5.07
3.96–
4.04
2.98–
3.02
2.48–
2.52
1.99–
2.01
1.69–
1.71
1.45–
1.45
f/11
236.49–
∞
14.13–
15.99
9.61–
10.42
6.81–
7.20
4.91–
5.10
3.94–
4.06
2.97–
3.03
2.48–
2.52
1.99–
2.01
1.69–
1.71
1.44–
1.46
f/22
118.54–
∞
13.36–
17.12
9.25–
10.89
6.63–
7.41
4.82–
5.20
3.88–
4.12
2.94–
3.07
2.46–
2.54
1.97–
2.03
1.68–
1.72
1.44–
1.46
f/32
81.68–
∞
12.73–
18.31
8.95–
11.35
6.48–
7.62
4.74–
5.30
3.83–
4.18
2.91–
3.10
2.44–
2.57
1.96–
2.04
1.67–
1.73
1.43–
1.47
f/5.6
463.96–
∞
14.54–
15.49
9.80–
10.21
6.90–
7.10
4.95–
5.05
3.97–
4.03
2.98–
3.02
2.49–
2.51
1.99–
2.01
1.70–
1.70
1.45–
1.45
f/16
162.77–
∞
13.77–
16.48
9.45–
10.63
6.73–
7.30
4.86–
5.14
3.91–
4.09
2.95–
3.05
2.47–
2.53
1.98–
2.02
1.69–
1.71
1.44–
1.46
1.45
1/3.7

Ch
Jp
En
De
Fr
Es
It
Ck
67
Focused
distance
Depth of field
Reproduction
ratio
f/4 f/5.6 f/8 f/11 f/16 f/22 f/32
(ft)
5'0"–
5'0"
6'0"–
6'0"
5'0"–
5'0"
5'0"–
5'0"
5'11"–
6'1"
4'11"–
5'1"
4'11"–
5'1"
2130'–
∞
10'0"–
10'0"
8'0"–
8'0"
7'0"–
7'0"
6'0"–
6'0"
1522'–
∞
9'11"–
10'1"
8'0"–
8'0"
7'0"–
7'0"
5'0"–
5'0"
1066'–
∞
9'11"–
10'1"
7'11"–
8'1"
7'0"–
7'0"
6'0"–
6'0"
776'–
∞
9'11"–
10'1"
7'11"–
8'1"
6'11"–
7'1"
6'0"–
6'0"
534'–
∞
9'10"–
10'2"
7'11"–
8'1"
6'11"–
7'1"
5'0"–
5'0"
389'–
∞
9'9"–
10'3"
7'10"–
8'2"
6'11"–
7'1"
5'11"–
6'1"
268'–
∞
9'8"–
10'4"
7'10"–
8'2"
6'10"–
7'2"
5'11"–
6'1"
11'11"–
12'1"
14'10"–
15'2"
11'11"–
12'1"
11'10"–
12'2"
14'8"–
15'5"
11'8"–
12'4"
11'7"–
12'6"
48'11"–
51'2"
29'7"–
30'5"
19'10"–
20'2"
14'11"–
15'1"
48'6"–
51'8"
29'5"–
30'7"
19'9"–
20'3"
11'11"–
12'1"
47'10"–
52'5"
29'3"–
30'10"
19'8"–
20'4"
14'10"–
15'2"
47'1"–
53'4"
28'11"–
31'2"
19'6"–
20'6"
14'9"–
15'3"
45'10'–
55'0"
28'6"–
31'8"
19'4"–
20'9"
11'9"–
12'3"
44'6"–
57'3"
27'11"–
32'5"
19'1"–
21'0"
14'6"–
15'7"
42'4"–
61'3"
27'1"–
33'8"
18'9"–
21'6"
14'3"–
15'10"
∞
50
30
20
15
12
10
8
7
6
5
1/∞
1/50.6
1/29.8
1/19.5
1/14.3
1/11.2
1/9.1
1/7.0
1/6.0
1/4.9
1/3.9
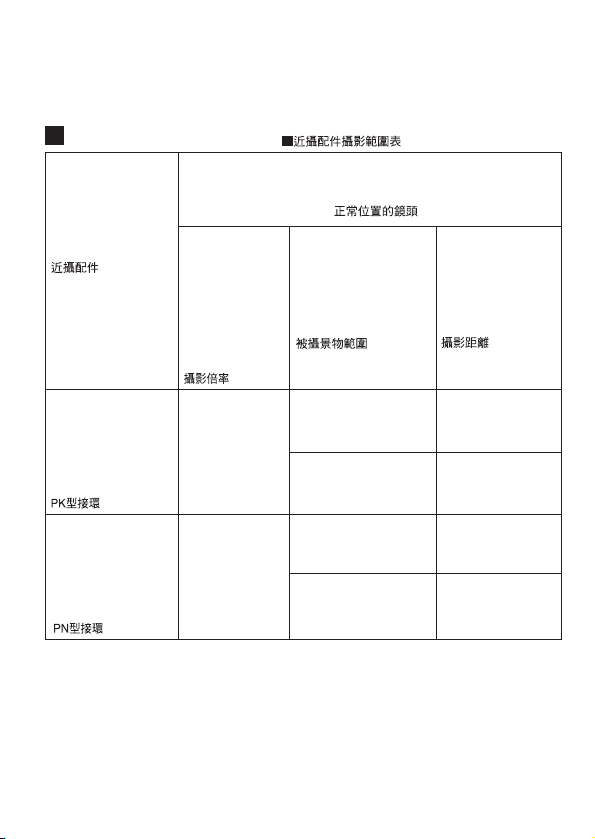
Ch
Jp
En
De
Fr
Es
It
Ck
68
使用器具
Close-up attachment
Nahaufnahmezubehör
Accessoires macro
Accesorio de acercamiento
Dispositivi Close-Up
Objetivo en la posicion normal
Obiettivo alla posizione normale
レンズ正方向
Lens in normal position
Objektive in Normalstellung
Objectif en position normale
撮影倍率
Reproduction ratio
Abbildungsmaßstab
Rapport de
reproduction
Relación de
reproducción
Rapporto di
riproduzione
PNリング
PN-series Rings
Zwischenringsatz PN
Bagues PN
Anillo de la Serie PN
Anello serie PN
PKリング
PK-series Rings
Zwischenring PK
Bagues PK
Anillo de la Serie PK
Anello serie PK
1/21.0–1/1.8
■接写表 ■Photographic Range With Close-Up Attachments
■Fotografische Bereiche mit dem Nahaufnahme-Zubehör
■Rapports obtenus en proxiphotographie et photomacrographie
■Rangos fotográficos con accesorios de aceramiento ■Fotografia con dispositivi per riprese Close-Up
被写界面積
Subject field
Aufnahmefeld
Champ couvert
Campo abarcado
Campo del soggetto
撮影距離
Focused distance
Eingestellte Entfernung
Distance de mise au point
Distancia de enfoque
Distanza messa a fuoco
678–10850.4×75.6–4.3×6.5
1/5.6–1/1.8
229–10813.4×20.2–4.2×6.3
19.8×29.8–1.7×2.5
(cm)
(inch)
5.3×7.9–1.7×2.5
266.9–42.6
90.2–42.4
(cm)
(inch)
(cm)
(inch)
(cm)
(inch)
■
近摄配件拍摄范围表
近摄配件
PN型接环
正常位置的镜头
拍摄倍率
拍摄对象范围
对焦距离
PK型接环
Ch
Jp
En
De
Fr
Es
It
Ck
69
PKリングのはじめの数値は、PK-12リング1個使用のとき、あとの数値は、PK-11A〜PK-13リング、PK-11〜
PK-13リングまたはPK-1〜PK-3リングを連結したときのものです。ただし、PK-11/11AリングおよびPK-1リ
ングは、このレンズに直接取り付けることはできませんので、ご注意ください。
The first values are for the PK-12 ring used alone and the other ones for
the PK-11A–PK-13, PK-11–PK-13, or PK-1–PK-3 rings together. However
the PK-11/11A and PK-1 rings cannot be attached directly to the lens.
Die ersten Werte gelten für den Zwischenring PK-12, wenn dieser allein benutzt wird. Die anderen Werte gelten für die
Kombinationen PK-11A–PK-13, PK-11–PK-13 oder PK-1–PK-3. Die Zwischenringe PK-11/11A und PK-1 lassen sich nicht
direkt am Objektiv anbringen!
Les premières valeurs sont pour la bague PK-12 utilisée seule et les autres pour les bagues PK-11A–PK-13, PK-11–PK13
ou PK-1–PK-3 utilisées ensemble. Toutefois, les bagues PK-11/11A et PK-1 ne peuvent être directement fixées à l’objectif.
Los primeros valores son para el caso en que se utilice el anillo PK-12 solo y los otros valores para el caso en que se
utilicen los anillos PK-11A–PK-13, PK-11–PK-13, o PK-1–PK-3 juntos. Sin embargo, no es posible montar los anillos
PK-11/11A y PK-1 en el objetivo en forma directa.
I primi valori sono per l’anello PK-12 usato da solo mentre i seguenti sono per gli anelli PK-11A–PK-13, PK-11–PK-13, o
PK-1–PK-3 usati assieme. Si tenga comunque presente che gli anelli PK-11/11A e PK-1 non possono essere agganciati
direttamente.
第一个数字是PK-12环单独使用时的值,其余为PK-11A-PK-13,
PK-11-PK-13或PK-1-PK-3一起使用时的值。不过,PK-11/11A
及PK-1环不能直接加装到镜头上。

Ch
Jp
En
De
Fr
Es
It
Ck
70

Ch
Jp
En
De
Fr
Es
It
Ck
71

NIKON CORPORATION
Printed in Japan
TT4H18 (80)
8MNJA333-18 ▲ G13
No reproduction in any form of this manual, in whole or in
part (except for brief quotation in critical articles or
reviews), may be made without written authorization
from NIKON CORPORATION.
使用説明書の内容が破損などによって判読できなくなったときは、ニコンサービス機関にて新
しい使用説明書をお求めください(有料)。