

EnglishFrançaisEspañol
English
Français
Español


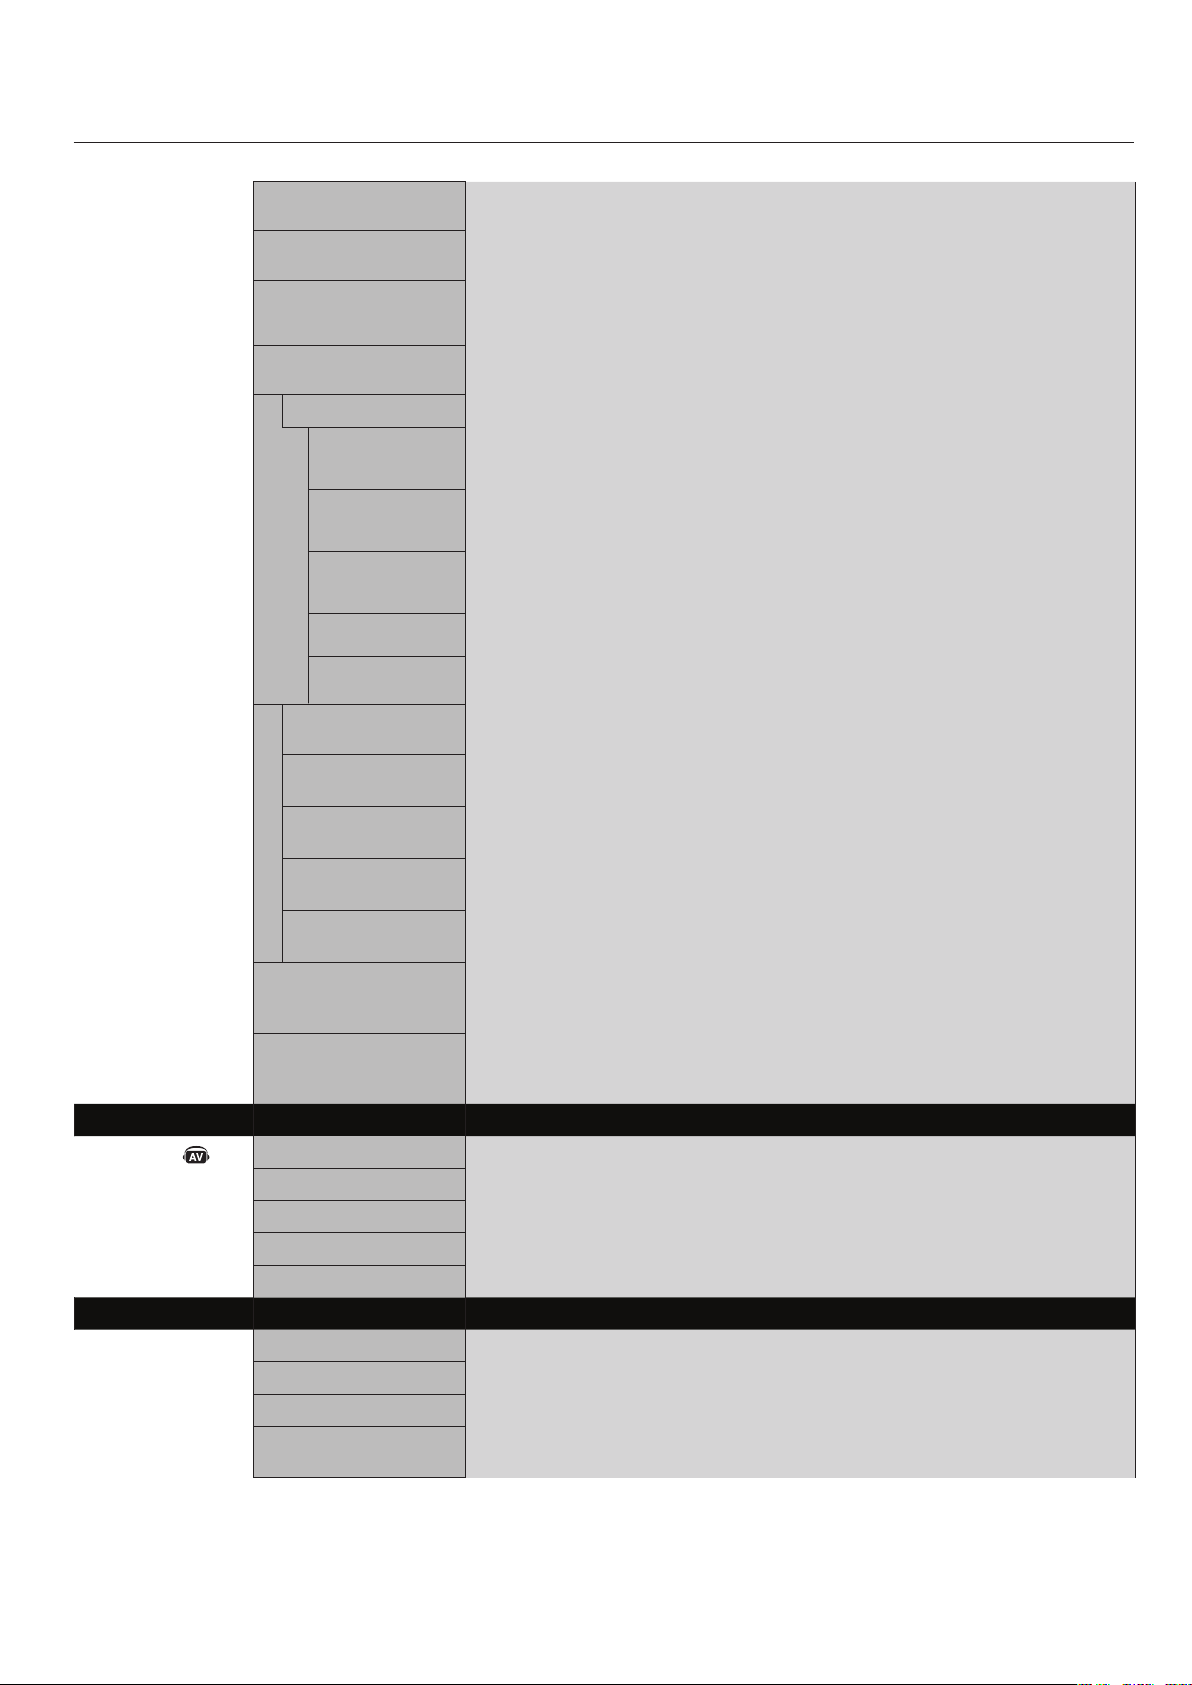
Important Information .......................................................................................................................... English-2
Safety Precautions and Maintenance .................................................................................................. English-3
Recommended Use ...................................................................................................................................English-4
Package Contents ....................................................................................................................................English-5
Installation
Mounting .................................................................................................................................... English-6
Attaching Mounting Accessories .......................................................................................... English-7
Stand Removal ........................................................................................................................... English-8
Ventilation Requirements, Prevent Tipping .......................................................................English-9
Part Names and Functions
Control Panel ............................................................................................................................. English-10
Terminal Panel ........................................................................................................................... English-11
Remote Control ......................................................................................................................... English-12
Remote Control Operating Range ......................................................................................... English-14
Remote Control ID Function .................................................................................................. English-15
Setup ........................................................................................................................................................... English-16
Connections
Connecting the LCD Monitor to a PC .................................................................................... English-18
Connecting to a Macintosh Computer ................................................................................. English-19
Connecting to a Computer with a Digital Output ............................................................. English-20
Connecting a DVD Player with component out .................................................................. English-21
Connecting a DVD Player with HDMI out ............................................................................. English 22
Connecting to a Stereo Amplifier ......................................................................................... English 23
Basic Operation
Power On and Off Modes ..........................................................................................................English-24
Power Indicator ........................................................................................................................ English-25
Power Management Function ................................................................................................ English-25
Picture Size ...............................................................................................................................English-25
Picture Mode ............................................................................................................................. English-25
Information OSD ....................................................................................................................... English-25
OSD (On-Screen-Display) Controls ......................................................................................................... English-26
Picture ........................................................................................................................................ English-27
Adjust .......................................................................................................................................... English-27
Audio ........................................................................................................................................... English-28
Schedule ..................................................................................................................................... English-28
PIP (Picture-in-Picture) .......................................................................................................... English-29
OSD ............................................................................................................................................... English-29
Multi Display .............................................................................................................................. English-30
Display Protection .................................................................................................................... English-30
Advanced Option ....................................................................................................................... English-31
TV Tuner ...................................................................................................................................... English-32
Digital Tuner Operation .......................................................................................................... English- 33
NOTE ............................................................................................................................................ English-34
Using the LCD with RS-232C ................................................................................................................... English-35
Features ..................................................................................................................................................... English-40
Troubleshooting .......................................................................................................................................English-41
References ................................................................................................................................................. English-42
Specifications ........................................................................................................................................... English-43
Pin Assignment ......................................................................................................................................... English-45
Limited Warranty ..................................................................................................................................... English-46
Manufacturer’s Recycling and Energy Information ......................................................................... English-47

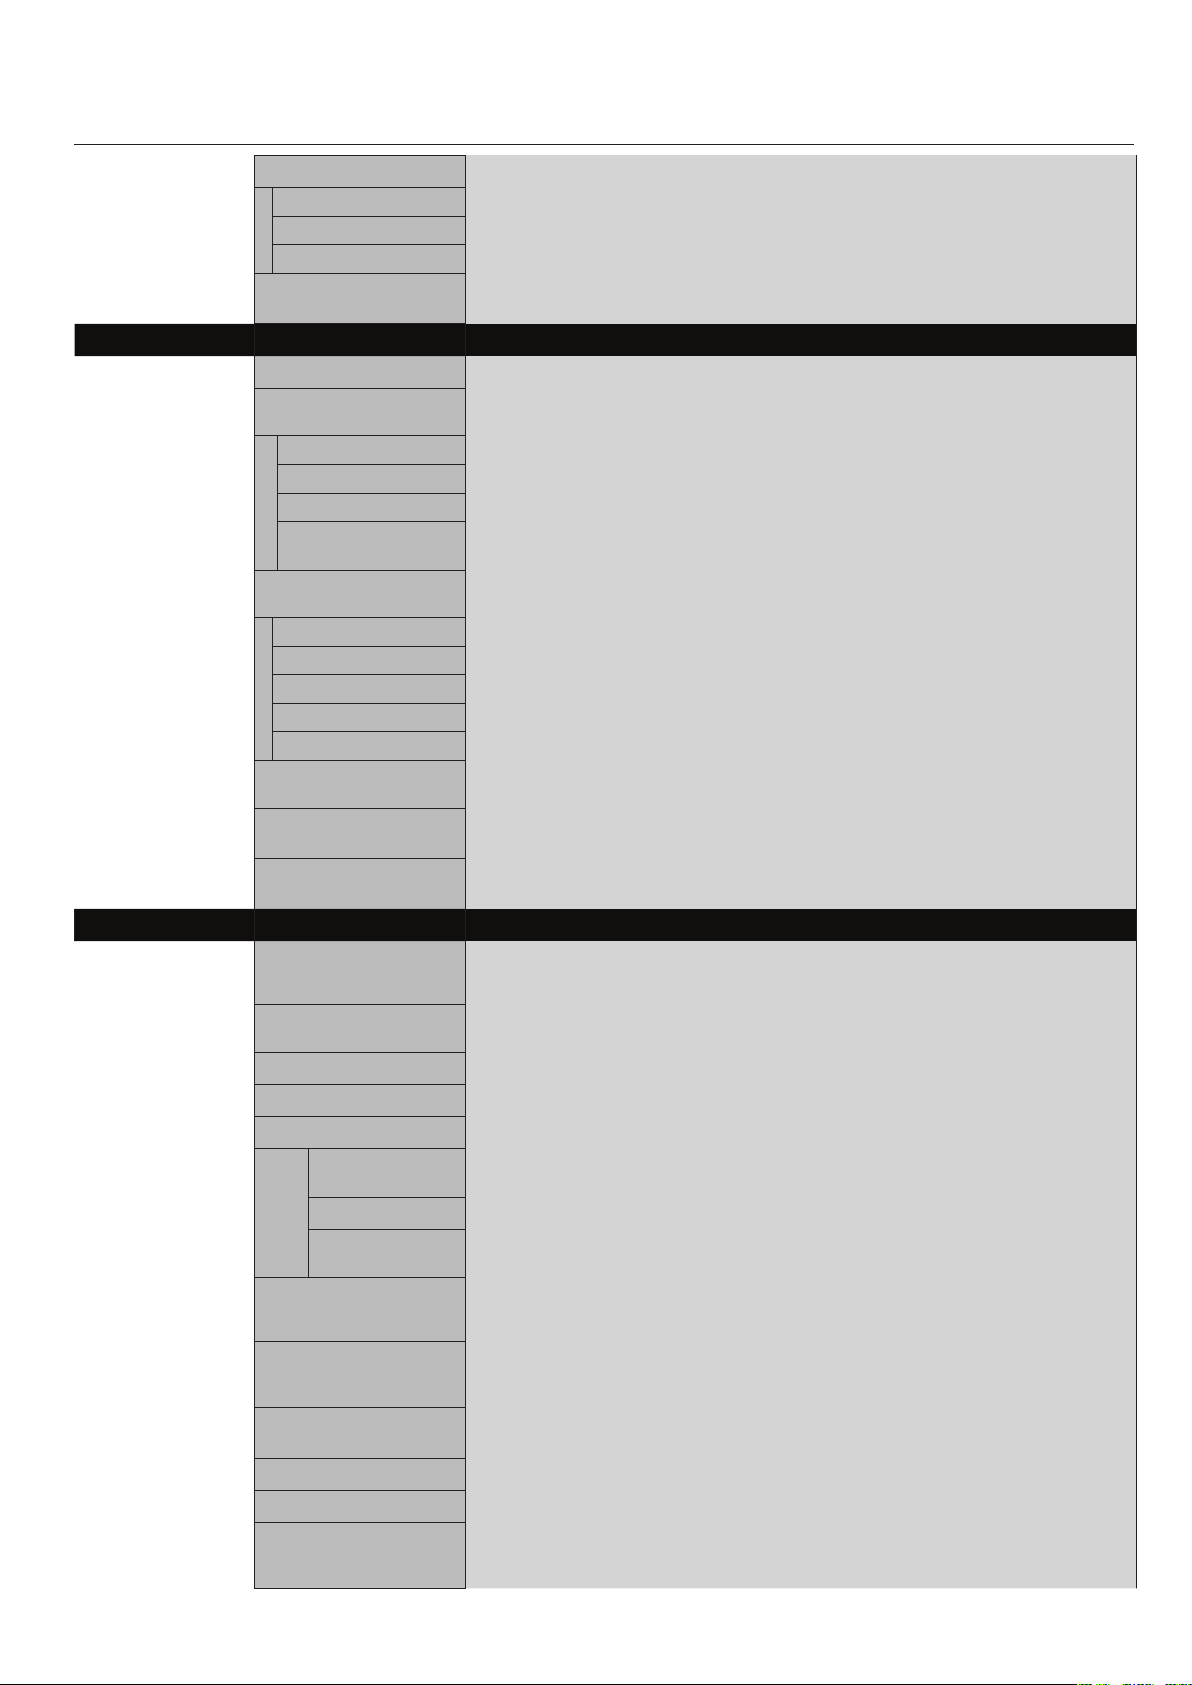
Informations importantes ......................................................................................................................Français-2
Consignes de sécurité et d’entretien ...................................................................................................Français-3
Utilisation recommandée ....................................................................................................................... Français-4
Contenu de la boîte .................................................................................................................................Français-5
Installation
Montage .....................................................................................................................................Français-6
Fixation des accessoires de montage ...................................................................................Français-7
Retrait du support ...................................................................................................................Français-8
Exigences de ventilation, Couvercle de l’interrupteur d’alimentation principal,
Éviter le renversement ...........................................................................................................Français-9
Nom des pièces et fonctions
Panneau de commande ..........................................................................................................Français-10
Panneau de borne .................................................................................................................... Français-11
Télécommande .........................................................................................................................Français-12
Plage de fonctionnement pour la télécommande ............................................................Français-14
ID Télécommande fonctionne ...............................................................................................Français-15
Configuration ...........................................................................................................................................Français-16
Branchements
Brancher le moniteur ACL au PC ..........................................................................................Français-18
Brancher à un ordinateur Macintosh
®
...............................................................................Français-19
Brancher à un ordinateur avec sortie numérique ..........................................................Français-20
Branchement d’un lecteur DVD via la sortie de composant ..........................................Français-21
Branchement d’un lecteur DVD via la sortie HDMI .........................................................Français-22
Branchement à un amplificateur stéréophonique .......................................................... Français-23
Fonctionnement de base
Modes SOUS et HORS tension ...............................................................................................Français-24
Voyant d’alimentation ...........................................................................................................Français-25
Gestion de la consommation ................................................................................................Français-25
Taille de l’image ......................................................................................................................Français-25
Mode image ..............................................................................................................................Français-25
Information OSD .....................................................................................................................Français-25
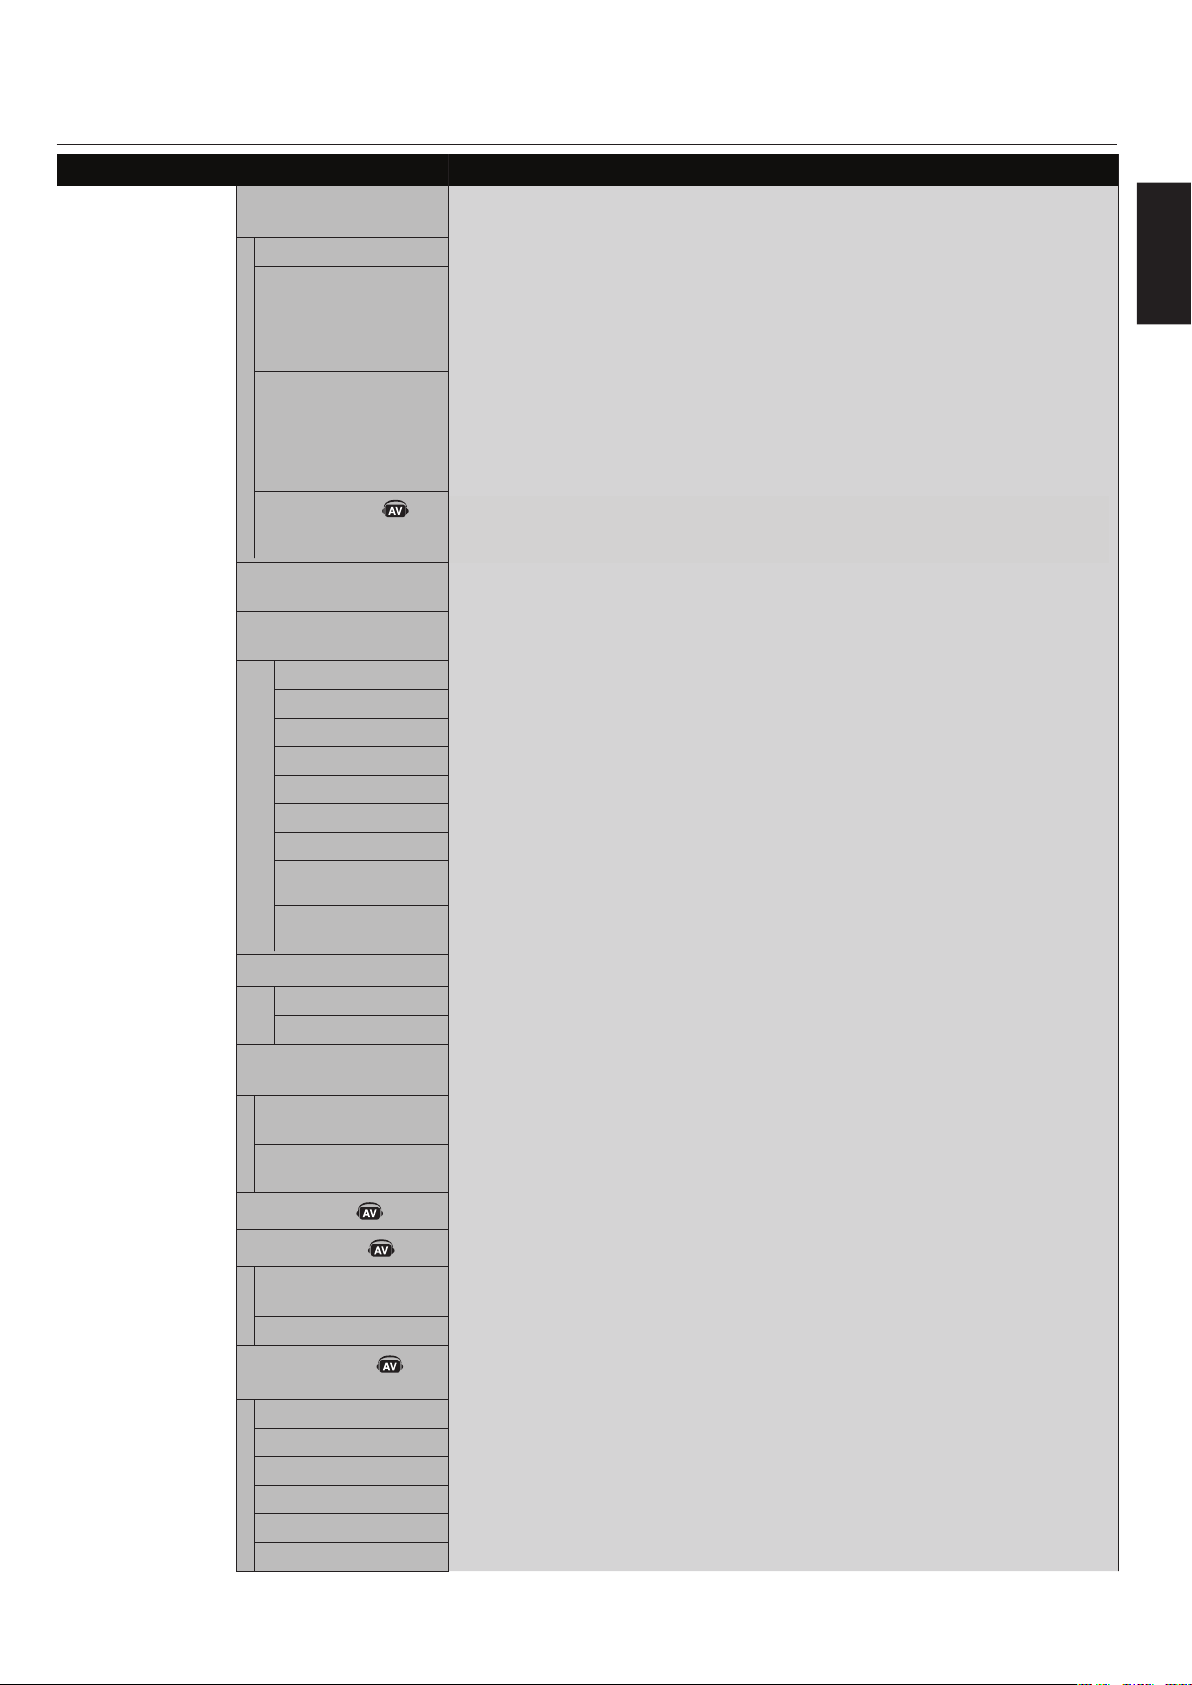
Commandes OSD (gestionnaire à l’écran) ..........................................................................................Français-26
Image .........................................................................................................................................Français-27
Régler .........................................................................................................................................Français-27
Audio .........................................................................................................................................Français-28
Calendrier ................................................................................................................................Français-29
Image Dans Image (PIP) .........................................................................................................Français-29
OSD .............................................................................................................................................Français-29
Affichages Multiples ...............................................................................................................Français-30
Protection Affichage ..............................................................................................................Français-30
Option Avancée ........................................................................................................................Français-31
Syntoniseur TV ........................................................................................................................Français-32
Opération de syntonisation numérique ............................................................................Français-34
Remarques ............................................................................................................................... Français-35
Utiliser l’ACL avec RS-232C ...................................................................................................................Français-36
Fonctions ..................................................................................................................................................Français-41
Dépannage ...............................................................................................................................................Français-42
Références ...............................................................................................................................................Français-43
Caractéristiques ....................................................................................................................................Français-44
Affectation des broches .......................................................................................................................Français-46
Garantie limitée .....................................................................................................................................Français-47
Informations du fabricant relatives au recylage et aux économies d’énergie ........................Français-48

Información importante ........................................................................................................................ Español-2
Precauciones de seguridad y mantenimiento ................................................................................... Español-3
Uso recomendado ..................................................................................................................................... Español-4
Contenidos del paquete .......................................................................................................................... Español-5
Instalación
Montaje ....................................................................................................................................... Español-6
Conexión de accesorios de montaje ..................................................................................... Español-7
Remoción del soporte ............................................................................................................. Español-8
Requisitos de ventilación, Tapa del interruptor de corriente principal,
Prevención de caídas ...............................................................................................................Español-9
Nombres y funciones de las piezas
Panel de control ........................................................................................................................ Español-10
Panel de terminal ..................................................................................................................... Español-11
Control remoto ......................................................................................................................... Español-12
Rango operativo del control remoto .................................................................................... Español-14
Función Identificación de control remoto .......................................................................... Español-15
Configuración ............................................................................................................................................ Español-16
Conexiones
Conexión del monitor LCD a la PC .........................................................................................Español-18
Conexión a una computadora Macintosh ............................................................................ Español-19
Conexión a una computadora con salida digital ................................................................ Español-20
Conexión de un reproductor de DVD con un componente externo ............................... Español-21
Conexión de un reproductor de DVD con HDMI externo .................................................. Español-22
Conexión a un amplificador de estéreo ............................................................................... Español-23
Funcionamiento básico
Modos ENCENDIDO y APAGADO ............................................................................................... Español-24
Indicador de corriente ........................................................................................................... Español-25
Administración de la energía ................................................................................................. Español-25
Tamaño de la imagen ...............................................................................................................Español-25
Modo de imagen ........................................................................................................................ Español-25
Información OSD ....................................................................................................................... Español-25
Controles OSD (Administrador de pantalla) ........................................................................................ Español-26
Imagen ........................................................................................................................................ Español-27
Adjuste ........................................................................................................................................ Español-27
Audio ........................................................................................................................................... Español-28
Programa .................................................................................................................................... Español-28
PIP (Picture-in-Picture) .......................................................................................................... Español-29
OSD ............................................................................................................................................... Español-29
Multipantalla ............................................................................................................................. Español-30
Protección Pantalla ................................................................................................................. Español-30
Opción Avanzada ....................................................................................................................... Español-31
Sintonizador de TV ................................................................................................................... Español-32
Funcionamiento del sintonizador digital ............................................................................ Español-33
Notas ........................................................................................................................................... Español-34
Uso del LCD con RS-232C ........................................................................................................................ Español-35
Características ......................................................................................................................................... Español-40
Solución de problemas ............................................................................................................................ Español-41
Referencias ................................................................................................................................................ Español-42
Especificaciones ....................................................................................................................................... Español-38
Asignación de clavijas .............................................................................................................................Español-45
Garantía limitada ..................................................................................................................................... Español-46
Información del fabricante sobre reciclado y energía .................................................................... Español-47
English-2
2.Thisequipmenthasbeentestedandfoundto
complywiththelimitsforaClassBdigitaldevice,
pursuanttopart15oftheFCCRules.These
limitsaredesignedtoprovidereasonableprotec-
tionagainstharmfulinterferenceinaresidential
installation.Thisequipmentgenerates,uses,and
canradiateradiofrequencyenergy,and,ifnot
installedandusedinaccordancewiththeinstruc-
tions,maycauseharmfulinterferencetoradio
communications.However,thereisnoguarantee
thatinterferencewillnotoccurinaparticular
installation.Ifthisequipmentdoescauseharm-
fulinterferencetoradioortelevisionreception,
whichcanbedeterminedbyturningtheequip-
mentoffandon,theuserisencouragedtotry
tocorrecttheinterferencebyoneormoreofthe
followingmeasures:
Reorientorrelocatethereceivingantenna.
Increasethedistancebetweentheequipmentand
receiver.
Connecttheequipmentintoanoutletonacircuit
differentfromthattowhichthereceiveris
connected.
Consultyourdealeroranexperiencedradio/TV
technicianforhelp.
Ifnecessary,theusershouldcontactthedealeroran
experiencedradio/televisiontechnicianforaddi-
tionalsuggestions.Theusermayfindthefollowing
booklet,preparedbytheFederalCommunications
Commission,helpful:“HowtoIdentifyandResolve
Radio-TVInterferenceProblems.”Thisbookletis
availablefromtheU.S.GovernmentPrintingOffice,
Washington,D.C.,20402,StockNo.004-000-00345-4.
•
•
•
•
WARNING
TOPREVENTFIREORSHOCKHAZARDS,DONOTEX-
POSETHISUNITTORAINORMOISTURE.DONOTUSE
THISUNIT’SPOLARIZEDPLUGWITHANEXTENSION
CORDRECEPTACLEOROTHEROUTLETSUNLESSTHE
PRONGSCANBEFULLYINSERTED.
REFRAINFROMOPENINGTHECABINETASTHEREARE
HIGHVOLTAGECOMPONENTSINSIDE.REFERSERVIC-
INGTOQUALIFIEDSERVICEPERSONNEL.
CAUTION
CAUTION:TOREDUCETHERISKOFELECTRICSHOCK,
MAKESUREPOWERCORDISUNPLUGGED
FROMWALLSOCKET.TOFULLYDISENGAGE
THEPOWERTOTHEUNIT,PLEASEDISCON-
NECTTHEPOWERCORDFROMTHEAC
OUTLET.DONOTREMOVECOVER(ORBACK).
NOUSERSERVICEABLEPARTSINSIDE.REFER
SERVICINGTOQUALIFIEDSERVICEPERSON-
NEL.
Thissymbolwarnsuserthatuninsulatedvoltage
withintheunitmayhavesufficientmagnitudeto
causeelectricshock.Therefore,itisdangerousto
makeanykindofcontactwithanypartinsidethis
unit.
Thissymbolalertstheuserthatimportantlitera-
tureconcerningtheoperationandmaintenanceof
thisunithasbeenincluded.Therefore,itshouldbe
readcarefullyinordertoavoidanyproblems.
CanadianDepartmentof
CommunicationsComplianceStatement
DOC:ThisClassBdigitalapparatusmeetsallrequirements
oftheCanadianInterference-CausingEquipmentRegula-
tions.
C-UL:BearstheC-ULMarkandisincompliancewithCana-
dianSafetyRegulationsaccordingtoCAN/CSAC22.2
No.60950-1.
FCCInformation
1.UsetheattachedspecifiedcableswiththeL406T6,or
L466T7colormonitorsoasnottointerferewithradioand
televisionreception.
(1)Pleaseusethesuppliedpowercordorequivalentto
ensureFCCcompliance.
(2)Pleaseusethesuppliedshieldedvideosignalcable,
MiniD-SUB15-pintoMiniD-SUB15-pin.
DeclarationoftheManufacturer
Weherebycertifythatthecolormonitor
L406T6orL466T7isincompliancewith
CouncilDirective2006/95/EEC:
–EN60950-1
CouncilDirective2004/108/EEC:
—EN55022
—EN61000-3-2
—EN61000-3-3
—EN55024
andmarkedwith
NECDisplaySolutionsLtd.
4-13-23,Shibaura,
Minato-Ku
Tokyo108-0023,Japan

English
English-3
SafetyPrecautions
andMaintenance
FOROPTIMUMPERFORMANCE,PLEASENOTE
THEFOLLOWINGWHENSETTINGUPAND
USINGTHEMONITOR:
DONOTOPENTHEMONITOR.Therearenouser-
serviceablepartsinsideandopeningorremoving
coversmayexposeyoutodangerousshockhazards
orotherrisks.Referallservicingtoqualifiedservice
personnel.
Donotspillanyliquidsintothecabinetoruseyour
monitornearwater.
Donotinsertobjectsofanykindintothecabinetslots,
astheymaytouchdangerousvoltagepoints,whichcan
beharmfulorfatalormaycauseelectricshock,fireor
equipmentfailure.
Donotplaceanyheavyobjectsonthepowercord.
Damagetothecordmaycauseshockorfire.
Donotplacethisproductonaslopingorunstablecart,
standortable,asthemonitormayfall,causingserious
damagetothemonitor.
WhenoperatingtheMultiSyncmonitorwithitsAC
125-240Vpowersupply,useapowersupplycordthat
matchesthepowersupplyvoltageoftheACpower
outletbeingused.Thepowersupplycordyouusemust
havebeenapprovedbyandcomplywiththesafety
standardsofyourcountry.(TypeH05VV-F3G1mm²
shouldbeusedinEurope)
IntheUK,useaBS-approvedpowercordwithmolded
plughavingablack(13A)fuseinstalledforusewith
thismonitor.Ifapowercordisnotsuppliedwiththis
monitor,pleasecontactyoursupplier.
Donotplaceanyobjectsontothemonitoranddonot
usethemonitoroutdoors.
Thelampsinthisproductcontainmercury.Please
disposeaccordingtostate,localorfederallaw.
Donotbend,crimporotherwisedamagethepower
cord.
Donotusemonitorinhightemperature,humid,
dusty,oroilyareas.
Donotcoverventonmonitor.
Ifmonitororglassisbroken,donotcomeincontact
withtheliquidcrystal.
Handlebrokenglasswithcare.
Allowadequateventilationaroundthemonitorsothat
heatcanproperlydissipate.Donotblockventilated
openingsorplacethemonitorneararadiatororother
heatsources.Donotputanythingontopofmonitor.
Thepowercableconnectoristheprimarymeansof
detachingthesystemfromthepowersupply.The
monitorshouldbeinstalledclosetoapoweroutlet
thatiseasilyaccessible.
•
•
•
•
•
•
•
•
•
•
•
•
•
•
•
•
Handlewithcarewhentransporting.Savepackaging
fortransporting.
Donotholdthedisplaybythebezelwhenmovingor
shiftingthedisplay.
KeeptheventholesonthebackoftheLCDcleanof
dirtanddust.Itisrecommendedtowipeventholes
withasoftclothaminimumofonceperyear.
Ifusingthecoolingfancontinuously,itis
recommendedtowipeventholesaminimumofoncea
month.
CAUTION
Immediatelyunplugyourmonitorfromthewalloutletand
referservicingtoqualifiedservicepersonnelunderthefol-
lowingconditions:
Whenthepowersupplycordorplugisdamaged.
Ifliquidhasbeenspilledon,orobjectshavefalleninto
themonitor.
Ifthemonitorhasbeenexposedtorainorwater.
Ifthemonitorhasbeendroppedorthecabinet
damaged.
Ifthemonitordoesnotoperatenormallybyfollowing
operatinginstructions.
•
•
•
•
•
•
•
•
•

English-4
CAUTION
CORRECTPLACEMENTANDADJUSTMENTOFTHE
MONITORCANREDUCEEYE,SHOULDERAND
NECKFATIGUE.CHECKTHEFOLLOWINGWHEN
POSITIONINGTHEMONITOR:
Foroptimumperformance,allow20minutesforwarm-
up.
Restyoureyesperiodicallybyfocusingonanobjectat
least5feetaway.Blinkoften.
Positionthemonitorata90˚angletowindowsandother
lightsourcestominimizeglareandreflections.
CleantheLCDmonitorsurfacewithalint-free,
nonabrasivecloth.Avoidusinganycleaningsolutionor
glasscleaner.
Adjustthemonitor’sbrightnessandcontrastcontrolsto
enhancereadability.
Avoiddisplayingfixedpatternsonthemonitorforlong
periodsoftimetoavoidimagepersistence(afterimage
effects).
Getregulareyecheckups.
Ergonomics
Torealizethemaximumergonomicbenefits,werecommend
thefollowing:
UsethepresetSizeandPositioncontrolswithstandard
signals.
UsethepresetColorSetting.
Usenon-interlacedsignals.
Donotuseprimarycolorblueonadarkbackground,as
itisdifficulttoseeandmayproduceeyefatiguedueto
insufficientcontrast.
Formoredetailedinformationonsettingupahealthywork
environment,refertothefollowingdocument:
AmericanNationalStandardforHumanFactors
EngineeringofVisualDisplayTerminalWorkstations
ANSI-HFSStandardNo.100-1988
Publishedby:
TheHumanFactorsandErgonomicsSociety
P.O.Box1369,SantaMonica,California90406.
•
•
•
•
•
•
•
•
•
•
•
CleaningtheLCDPanel
Whentheliquidcrystalpanelbecomesdustyordirty,
wipegentlywithsoftcloth.
DonotrubtheLCDpanelwithcoarsematerial.
DonotapplypressuretotheLCDsurface.
DonotuseOAcleaner.OAcleanerwillcause
deteriorationordiscolortheLCDsurface.
CleaningtheCabinet
Unplugthepowersupply
Gentlywipethecabinetwithasoftcloth
Tocleanthecabinet,dampentheclothwithaneutral
detergentandwater,wipethecabinetandfollowwitha
drycloth.
NOTE:
Thesurfaceofthecabinetiscomposedofmany
typesofplastic.DONOTcleanwithbenzenethinner,
alkalinedetergent,alcoholicsystemdetergent,glasscleaner,
wax,polishcleaner,soappowder,orinsecticide.Rubber
orvinylshouldnotbeincontactwiththecabinetforan
extendedperioroftime.Thesetypesoffluidsandmaterials
cancausethepainttodeteriorate,crackorpeel.
•
•
•
•
•
•
•
English
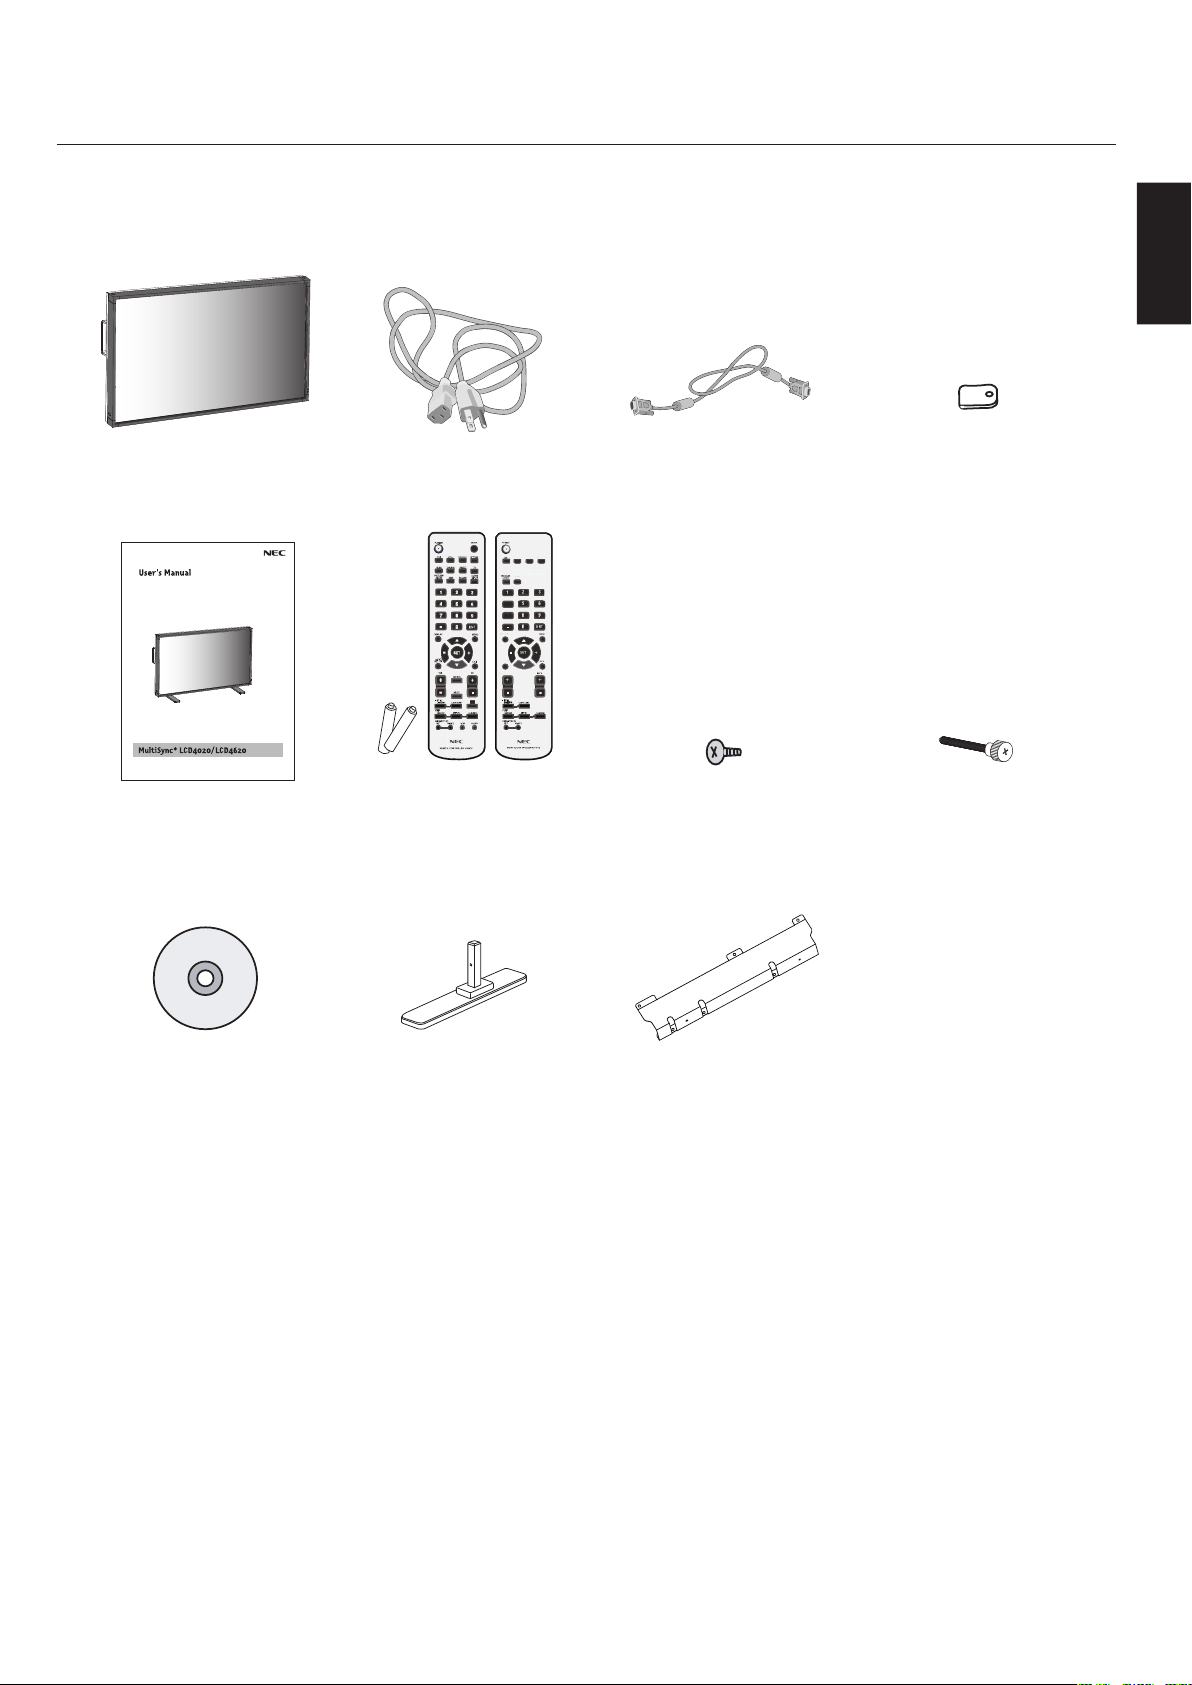
English-5
LCDMonitorPowerCord
VideoSignalCable
(MiniD-SUB15pintoMiniD-
SUB15pin)
Clampx3
VGA RGB/HV OPTION
DISPLAY
AUTO
SET UP
TRANSPARENCY
SIZE
1
4
7
+
VGA
RGB/HV
OPTION
DISPLA
Y
A
A
A
U
T
O
S
E
T
UP
TRAN
S
PAREN
CY
SIZ
E
VGA
RGB/HV
OPTION
1
4
7
+
P
User’sManual
WirelessRemoteControl
andAABatteries
(Theproductyoupurchasedhas
oneoftheseremotecontrols)
Screw(M4x10)x9Thumbscrewforstandx2
CD-ROMStandx2Cablecover

English-6
Mounting
DONOTmountthemonitoryourself.Please
askdealer.Forproperinstallationitisstrongly
recommendedtouseatrained,qualifiedtechnician.
Pleaseinspectthelocationwheretheunitisto
bemounted.Notallwallsorceilingsarecapable
ofsupportingtheweightoftheunit.Product
warrantydoesnotcoverdamagecausedbyimproper
installation,remodeling,ornaturaldisasters.Failure
tocomplywiththeserecommendationscouldresultin
voidingthewarranty.
DONOTblockventilatedopeningswithmounting
accessoriesorotheraccessories.
ForNECQualifiedPersonnel:
Toinsuresafeinstallation,usetwoormorebracketsto
mounttheunit.Mounttheunittoatleasttwopointson
theinstallationlocation.
Pleasenotethefollowingwhenmounting
onwallorceiling.
Whenusingmountingaccessories
otherthanthosethatareNEC
approved,theymustcomplywith
theVESA-compatible(FDMlv1)
mountingmethod.
NECstronglyrecommendsusing
sizeM6screws(10mm+thickness
ofbracketinlength).Ifusing
screwslongerthan10mm,checkthedepthofthehole.
(RecommendedFastenForce:470-635N
·cm)NEC
recommendsmountinginterfacesthatcomplywith
UL1678standardinNorthAmerica.
Priortomounting,inspecttheinstallationlocationto
insurethatitisstrongenoughtosupporttheweightof
theunitsothattheunitwillbesafefromharm.
Refertotheinstructionsincludedwiththemounting
equipmentfordetailedinformation.
Mountinglocation
Theceilingandwallmustbestrongenoughtosupportthe
monitorandmountingaccessories.
DONOTinstallinlocationswhereadoororgatecan
hittheunit.
DONOTinstallinareaswheretheunitwillbe
•
•
•
•
•
•
•
subjectedtostrongvibrationsanddust.
DONOTinstallnearwherethemainpowersupply
entersthebuilding.
Donotinstallinwherepeoplecaneasilygraband
hangontotheunitorthemountingapparatus.
Whenmountinginarecessedarea,asinawall,leaveat
least4inches(10cm)ofspacebetweenthemonitorand
thewallforproperventilation.
Allowadequateventilationorprovideairconditioning
aroundthemonitor,sothatheatcanproperlydissipate
awayfromtheunitandmountingapparatus.
MountingonCeiling
Ensurethattheceilingissturdyenoughtosupportthe
weightoftheunitandthemountingapparatusover
time,againstearthquakes,unexpectedvibrations,and
otherexternalforces.
Besuretheunitismountedtoasolidstructure
withintheceiling,suchasasupportbeam.Securethe
monitorusingbolts,springlockwashers,washerand
nut.
DONOTmounttoareasthathavenosupporting
internalstructure.DONOTusewoodscrewsor
anchorscrewsformounting.DONOTmounttheunit
totrimortohangingfixtures.
Maintenance
Periodicallycheckforloosescrews,gaps,distortions,
orotherproblemsthatmayoccurwiththemounting
apparatus.Ifaproblemisdetected,pleasereferto
qualifiedpersonnelforservice.
Regularlycheckthemountinglocationforsignsof
damageorweaknessthatmayoccurovertime.
Orientation
Whenusingthedisplayintheportraitposition,the
monitorshouldberotatedclockwisesothattheleftside
ismovedtothetopandtheLEDindicatorlightisonthe
bottom.Thiswillallowforproperventilationandwillex-
tendthelifetimeofthemonitor.Improperventilationmay
shortenthelifetimeofthemonitor.
•
•
•
•
•
•
•
•
Unit
Mounting
Bracket
Thickness of
Bracket
Screw
10mm
Screw length should equal depth of
hole (10mm) + the thickness of
mounting bracket.
Thisdevicecannotbeusedorinstalledwithoutthe
TabletopStandorothermountingaccessoryforsupport.
Forproperinstallationitisstronglyrecommendedto
useatrained,NECauthorizedserviceperson.Failure
tofollowNECstandardmountingprocedurescould
resultindamagetotheequipmentorinjurytotheuser
orinstaller.Productwarrantydoesnotcoverdamage
causedbyimproperinstallation.Failuretofollowthese
recommendationscouldresultinvoidingthewarranty.
Forfurthermountinginformationseepage6.
Forstandinstallationseepage8~9.
LEDIndicator
English
English-7
- continued
AttachingMountingAccessories
ThedisplayisdesignedforusewiththeVESAmounting
system.
1)AttachMountingAccessories
Mountingaccessoriescanbeattachedwhilethe
monitorisontheTabletopStandintheupright
position(Figure1).Becarefultoavoidtipping
monitorwhenattachingaccessories.Afteraccessories
areattached,standcanberemoved.
Mountingaccessoriescanbeattachedwiththe
monitorinthefacedownposition.Toavoiddamaging
thescreenface,placetheprotectivesheetonthe
tableunderneaththeLCD(Figure2).Theprotective
sheetwaswrappedaroundtheLCDintheoriginal
packaging.Makesurethereisnothingonthetable
thatcandamagethemonitor.
WhenusingmountingaccessoriesotherthanNEC
compliantandapproved,theymustcomplywiththe
VESA-compatiblemountingmethod.NECstrongly
recommendsusingscrewsM6sizeand10mmin
length.Ifusingscrewslongerthan10mm,checkthe
depthofthehole.(RecommendedFastenForce:470-
635N•cm)
NECrecommendsusingmountinginterfacethat
complywithUL1678standardinNorthAmerica.
Figure1
Figure2
VESAMountingInterface
TabletopStand
ProtectiveSheet
Table
TabletopStand
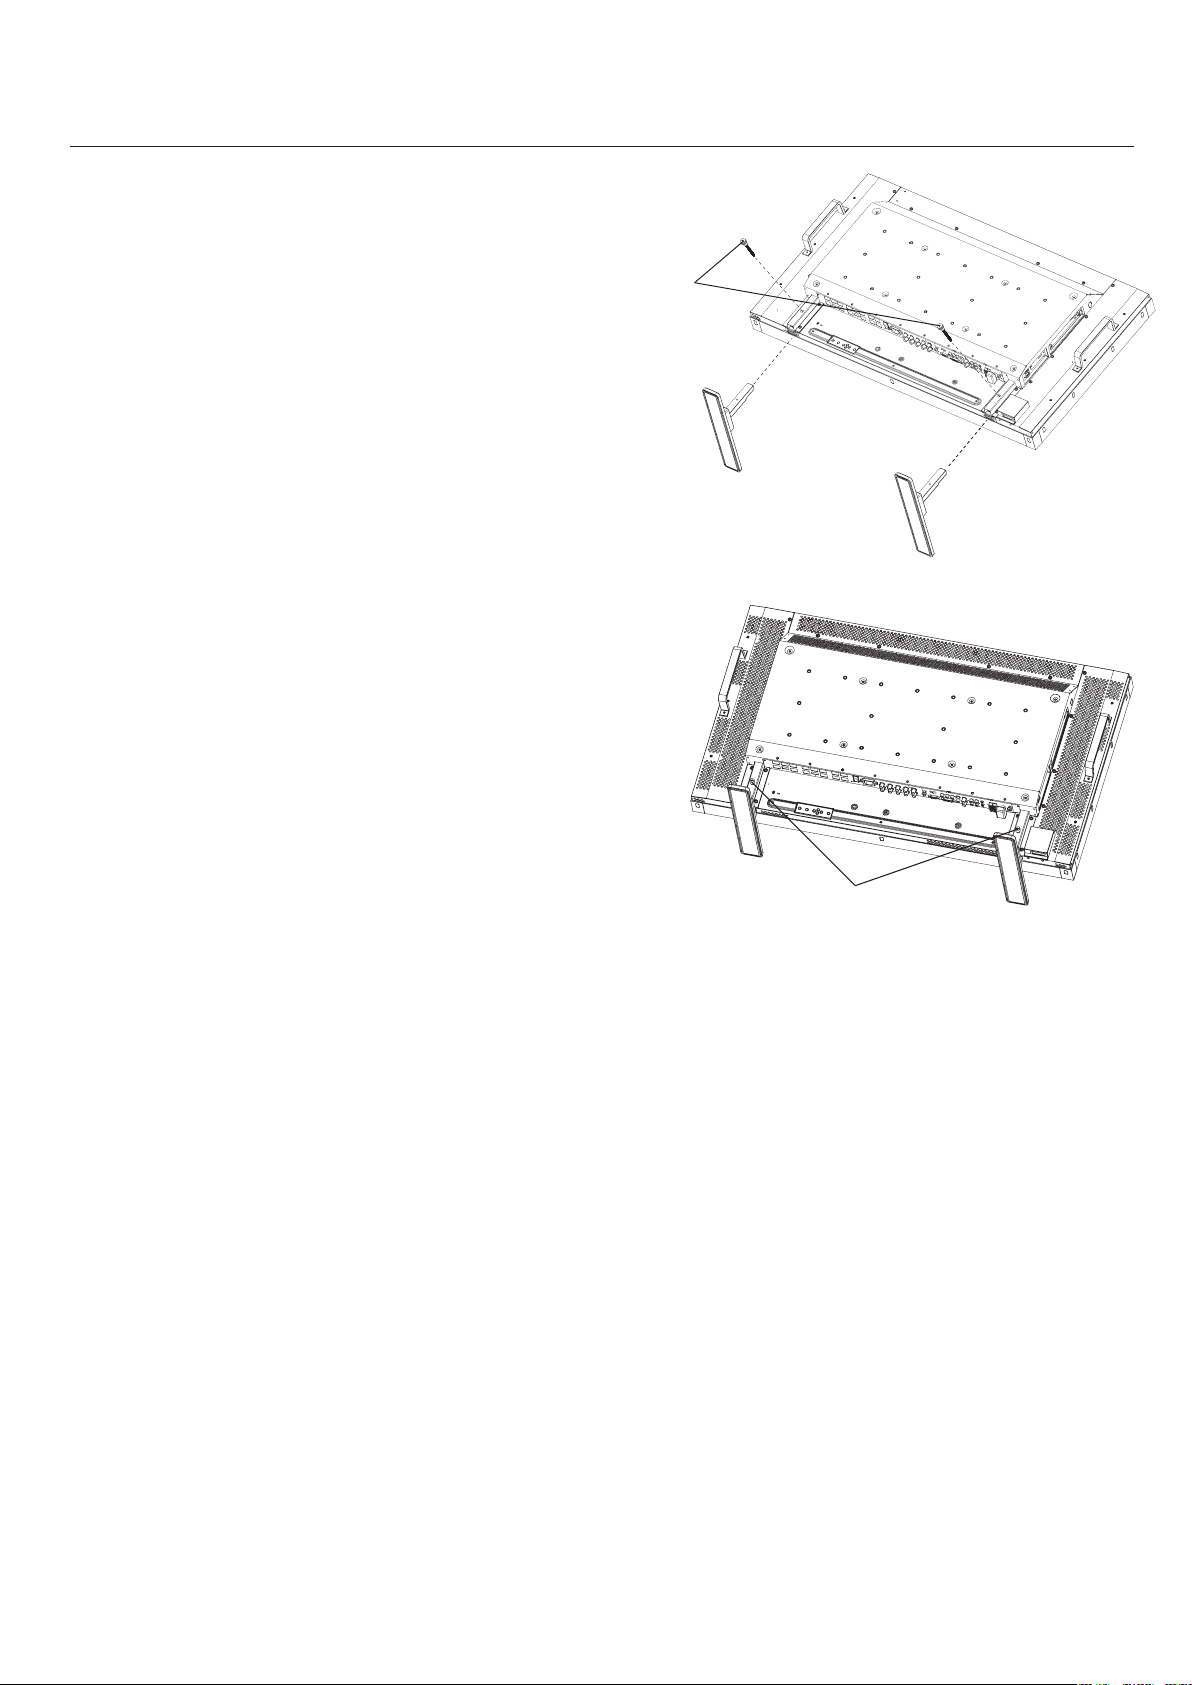
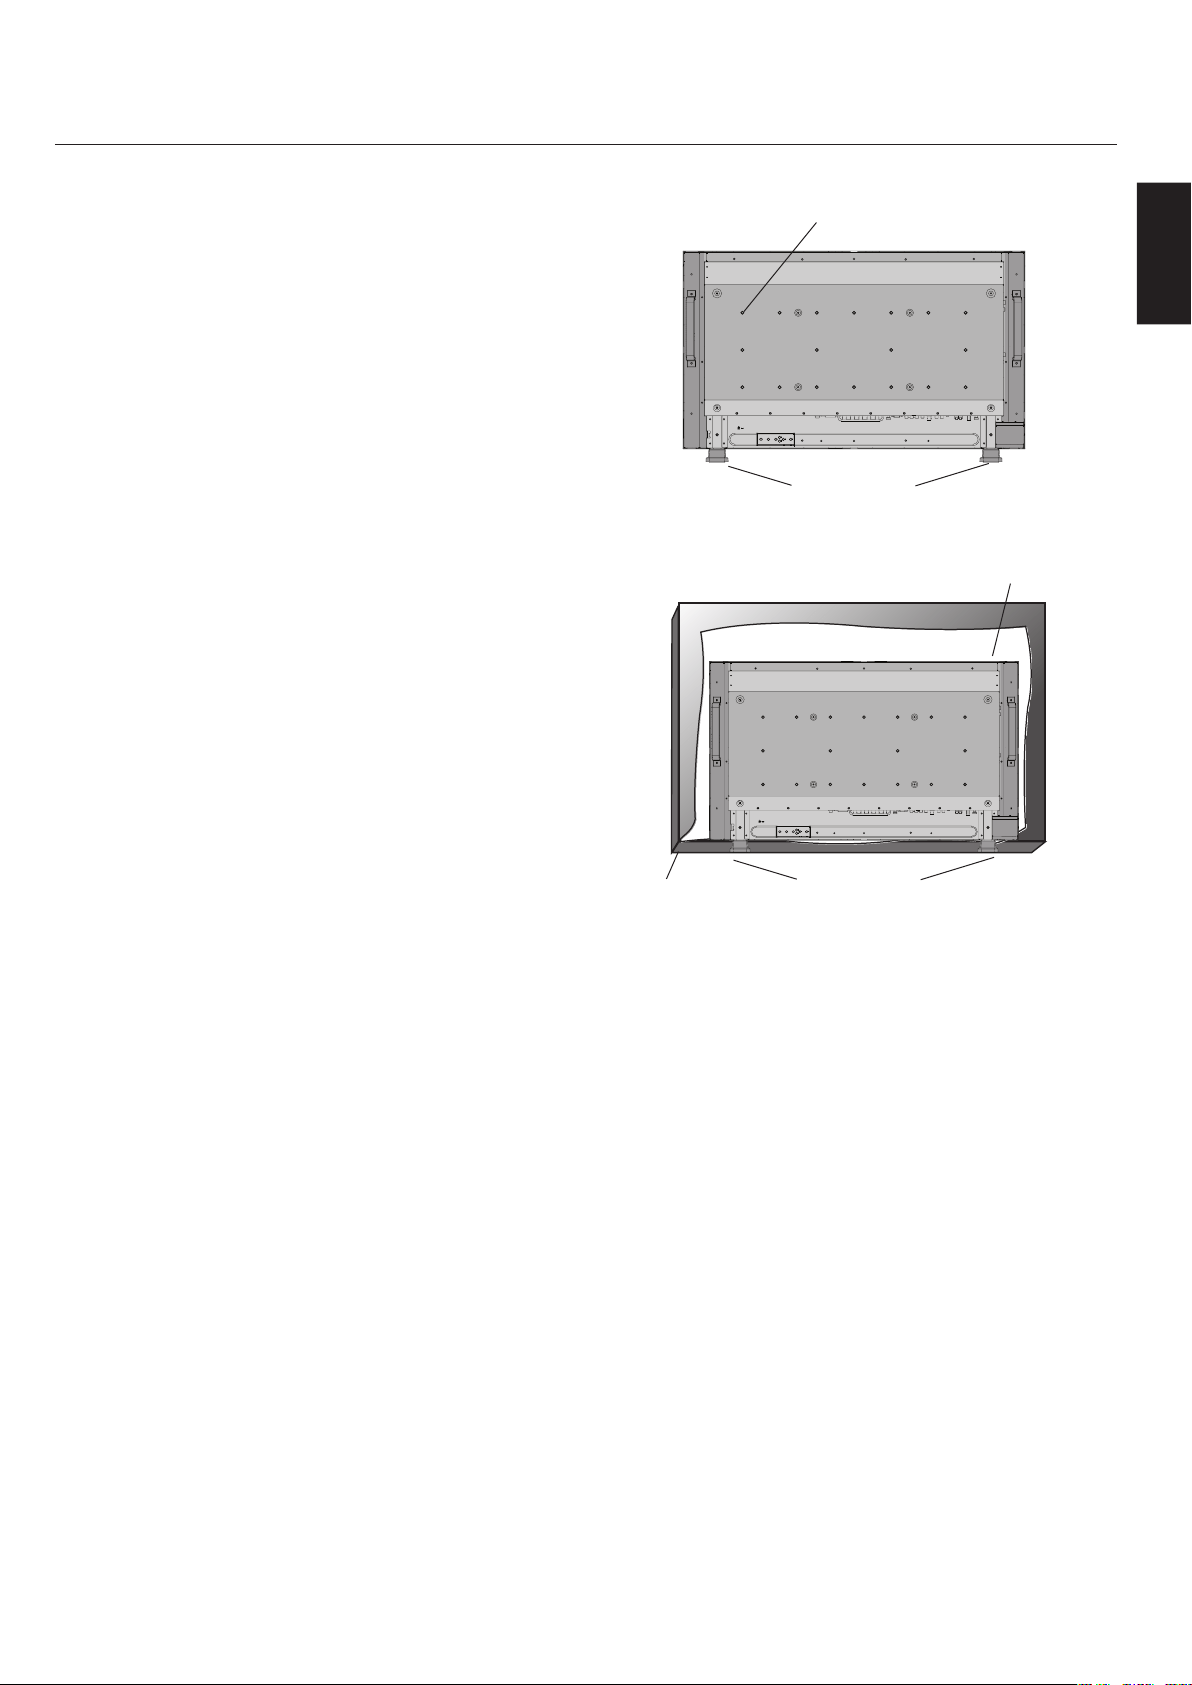
English-8
2)Installingandremovingstand
CAUTION
Installingandremovingthestandmustbedonebytwo
ormorepeople.
Howtoinstallstand
1.Pleaseturnmonitoroff.
2.Placestandontomonitorwiththelongendsofthe
feetinfrontofthemonitor.
3.Afterinsertingstandinguideblock,fasten
thumbscrewsonbothsidesofthemonitor.
Howtoremovethestand
1.Spreadtheprotectivesheetonaflatsurface,such
asadesk.
2.Placemonitorontheprotectivesheet.
3.Removethumbscrewswithascrewdriverorwith
yourfingersandplacetheminasafeplacefor
reuse.
- continued
Thumbscrews
Thumbscrews
NOTE:Placestandontomonitorso
thatthelongendofthefeetareinthe
front.
English
English-9
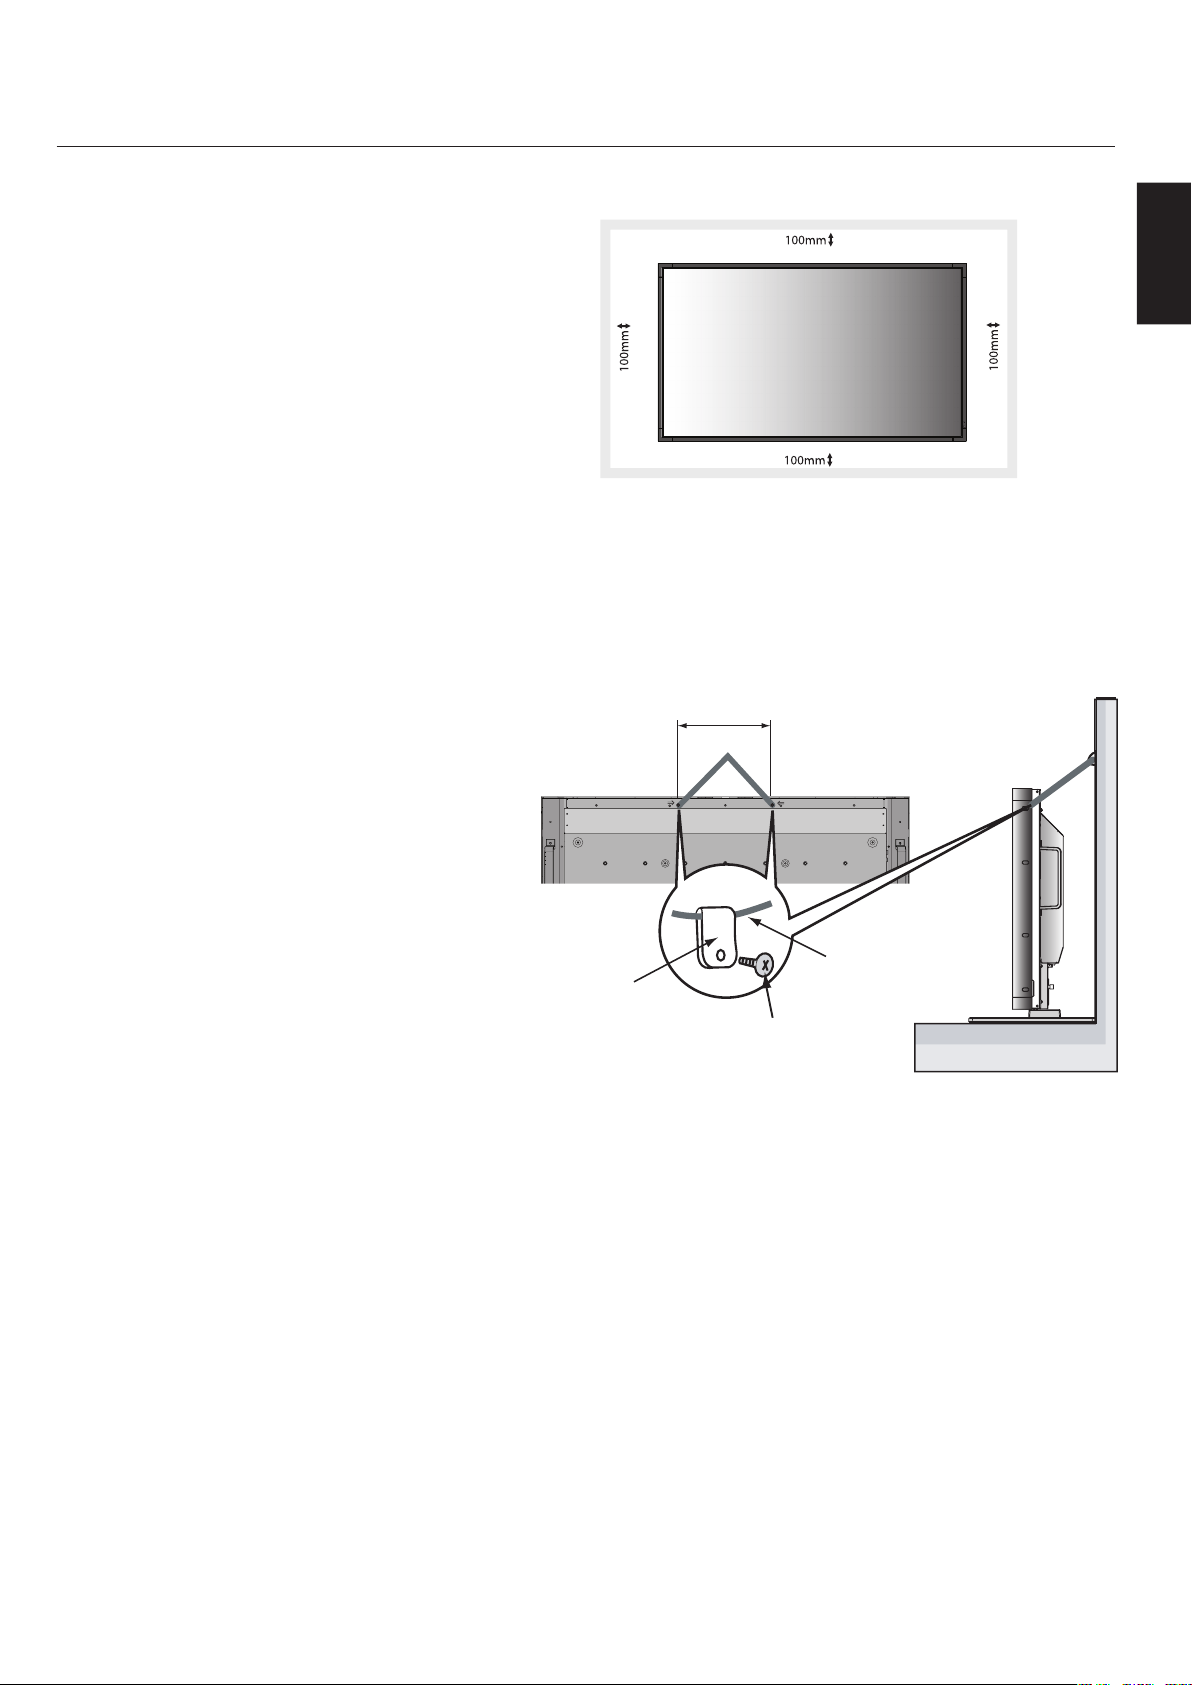
3)VentilationRequirements
Whenmountinginanenclosureorinarecessed
area,leavespacebetweensurroundingthemonitor
andsurroundingobjectstoallowheattodisperse,as
showninFigure5.
4)PreventTipping
WhenusingthedisplaywiththeTabletopStand
fastentheLCDtoawallusingacordorchainthatcan
supporttheweightofthemonitor(LCD4020approx.
31.1kg;LCD4620approx.37.9kg)inordertoprevent
themonitorfromfalling.Fastenthecordorchain
tothemonitorusingtheprovidedclampandscrew
(Figure6).
BeforeattachingtheLCDmonitortothewall,make
surethatthewallcansupporttheweightofthe
monitor.
Besuretoremovethecordorchainfromthewall
beforemovingtheLCD.
Figure5
- continued
LCD4020:278mm
LCD4620:210mm
Figure6
Clamp
Screw
CordorChain
ScrewHoles
English-10
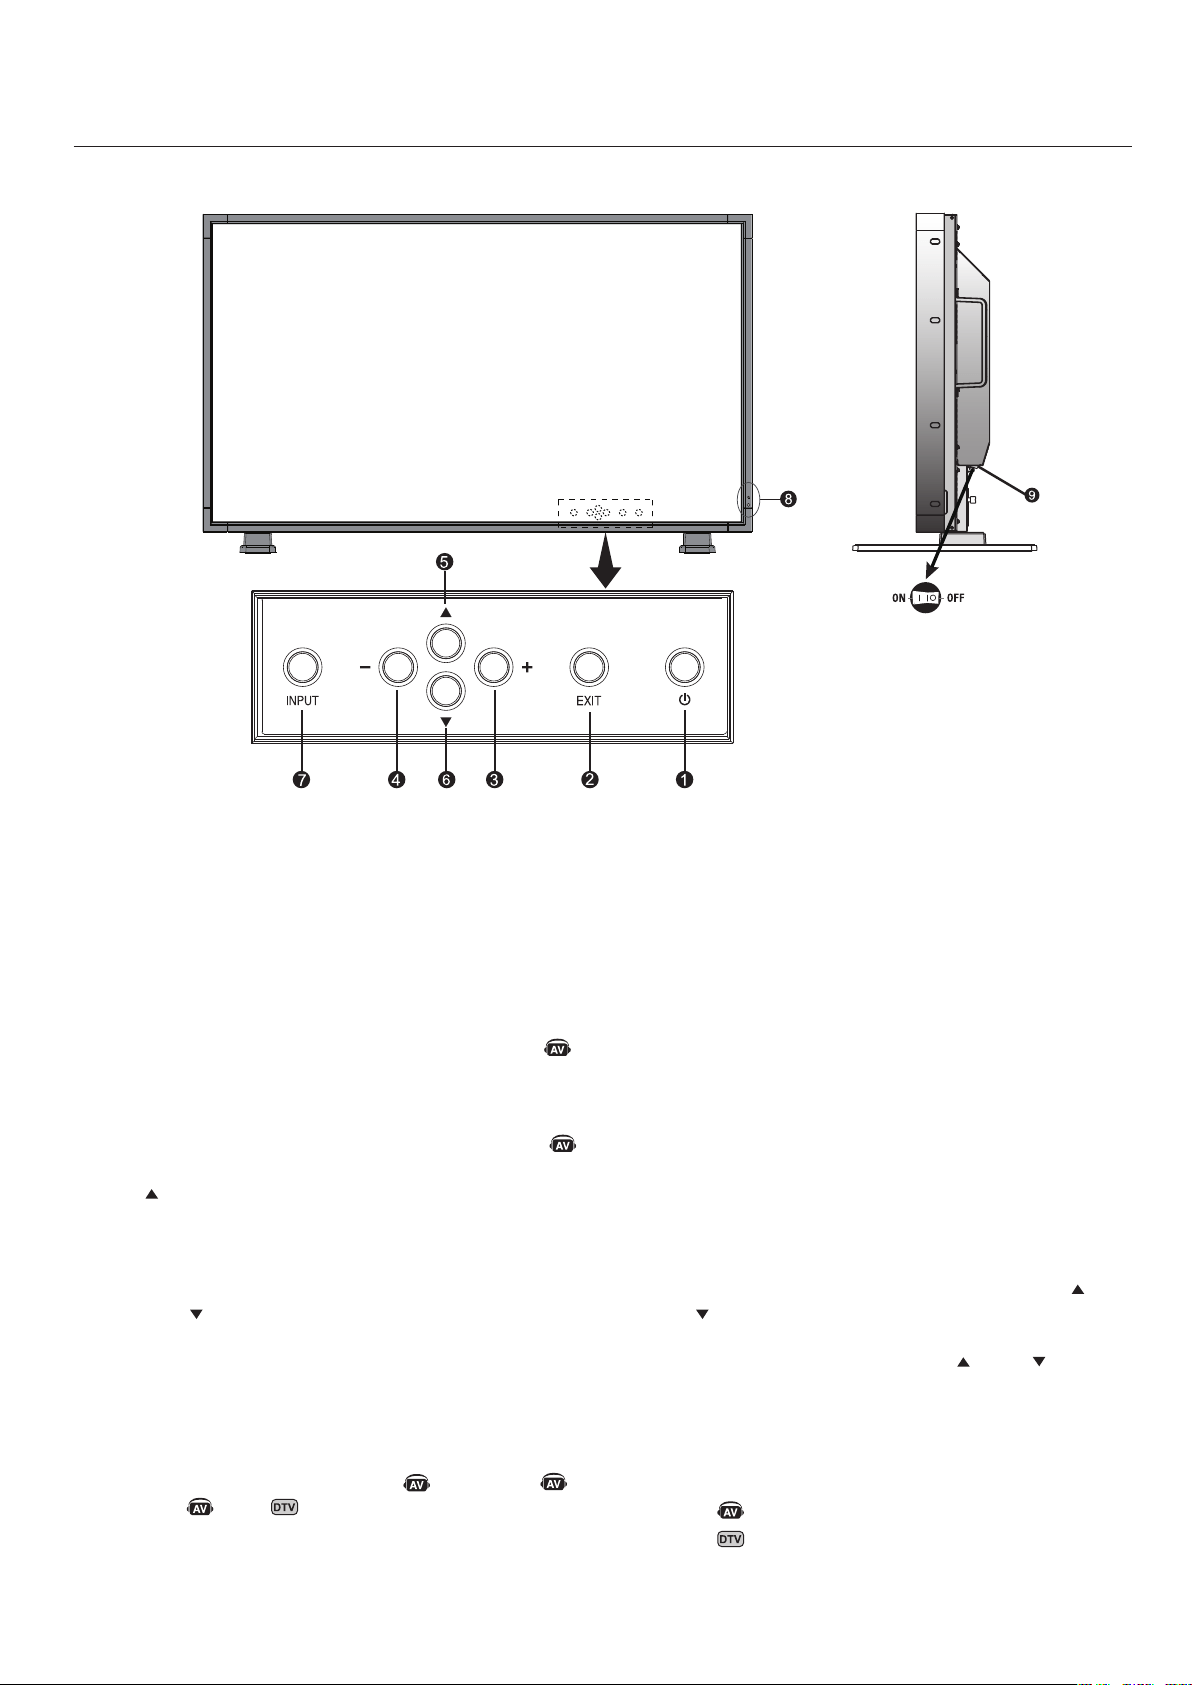
1)POWER
Switchesthepoweron/off.(Seepage24)
2)EXIT
ActivatestheOSDmenuwhentheOSDmenuisoff.
Exitsfromthecurrentmenubeingdisplayedtothe
previousmenuwithintheOSD.
3)PLUS(+)
IncreasesthesettingadjustmentwithinOSDmenu.
IncreasestheaudiooutputlevelwhentheOSDisoff.
4)MINUS(-)
DecreasesthesettingadjustmentwithinOSDmenu.
DecreasestheaudiooutputlevelwhentheOSDisoff.
5)UP()
ActivatestheOSDmenuwhentheOSDmenuisoff.
Movesthehighlightedareauptoselectwhichsettingtobe
adjustwithinOSDmenu.
6)DOWN()
ActivatestheOSDmenuwhentheOSDmenuisoff.
Movesthehighlightedareadowntoselectwhichsetting
tobeadjustwithinOSDmenu.
7)INPUT
Selectswhichsignalconnectedtothedisplayisshown.
([DVI],[VGA],[RGB/HV],[HDMI],[DVD/HD],
[VIDEO],[TV])
ActsasSETbuttonwithintheOSDmenu.
8)RemotecontrolsensorandPowerindicator
Receivesthesignalwhenusingthewirelessremotecontrol.
(Seepage14)
GlowsgreenwhentheLCDmonitorisinactivemode*.Glows
redwhentheLCDisinPOWEROFF(ECOstandby)mode.
GlowsamberwhentheLCDisinPOWEROFF(standby)
mode.BlinksamberwhenthemonitorisinPowerSave
Mode.GreenandamberblinkalternatelywhileinPower
Standbywiththe“SCHEDULESETTINGS”functionenabled.
Whenacomponentfailureisdetectedwithinthemonitor,the
indicatorwillblinkred.
"*If"OFF"isselectedinPOWERINDICATOR(Seepage30),
theLEDwillnotlightwhentheLCDmonitorisactivemode".
9)MainPowerSwitch
SeesawSwitchtoturnthethemainpoweron/off.
ControlKeyLockMode
ThisfunctioncompletelylocksoutaccesstoallControl
Keyfunctions.
ToenabletheControlKeyLockMode,pressboth“”
and“”simultaneouslyandholddownforthree(3)
seconds.
Togobacktousermode,pressboth“”and“”
simultaneouslyandholddownforthree(3)seconds.
DenotesAVunitfunction.AllAVfunctionsareenabledwiththeAV
unitisinstalled.NotallmodelshavetheAVunitinstalled.
DenotesDigitalTunerfunction.AllDTVandAVfunctionsare
enabledwhentheDTVunitisinstalled.Notallmodelswillhave
thedigitaltunerinstalled.
English
English-11
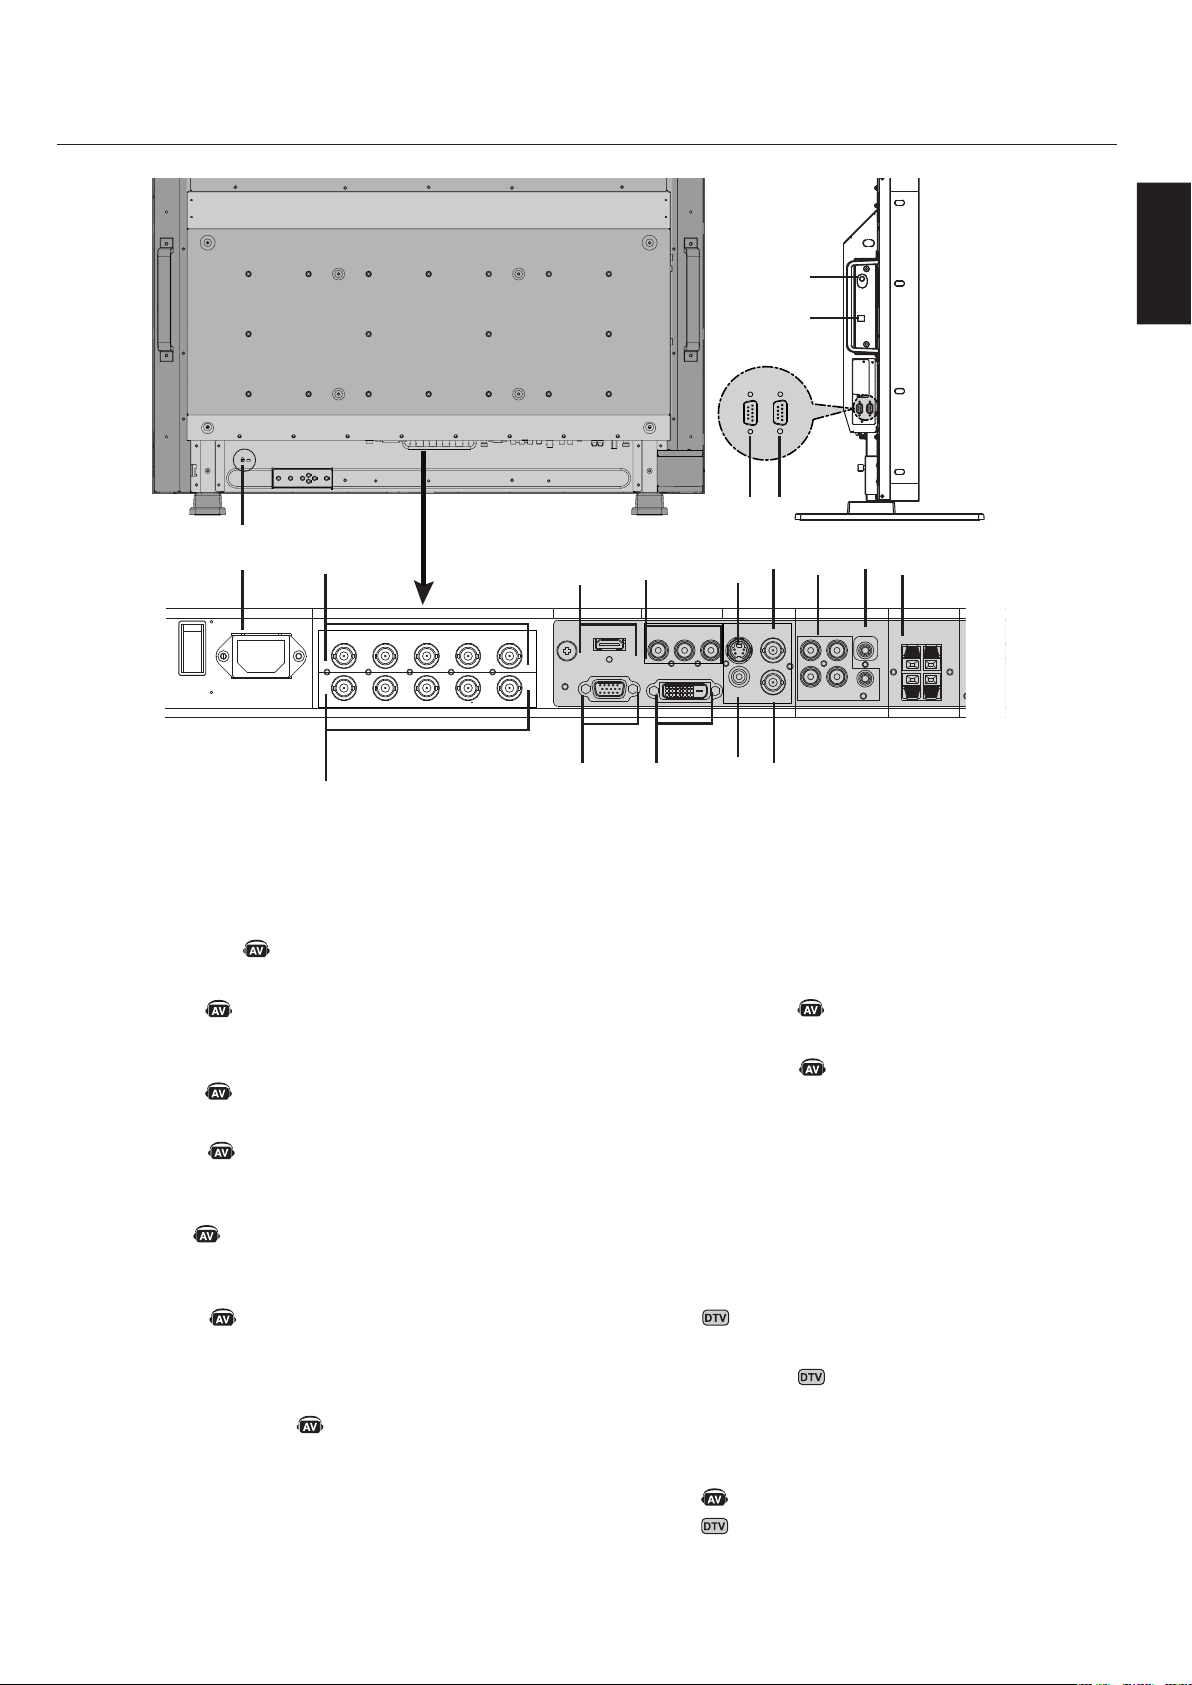
- continued
1)ACIN
Connectswiththesuppliedpowercord.
2)RGB/HVOUT[R,G,B,H,V](BNC)
OutputsthesignalfromtheRGB/HVINconnectortoan
inputonaseparatedevice.
3)HDMIconnector
ToinputdigitalHDMIsignals.
4)DVD/HDIN
ConnectingequipmentsuchasaDVDplayer,HDTV
device,orSet-Top-Box.
5)S-VIDEOIN
InputS-video.
6)VIDEOOUT
OutputthecompositevideosignalfromtheVIDEOIN
connection.
7)AUDIOIN
Inputtheaudiosignalfromexternalequipmentsuchas
acomputer,VCRorDVDplayer.
8)AUDIOOUT
OutputtheaudiosignalfromtheAUDIOIN1,2,
3,HDMI,andTVjacktoanexternaldevice(stereo
receiver,amplifier,etc,).
9)SPEAKERTERMINALS
OutputtheaudiosignalfromAUDIO1,2,3,HDMI,and
TVtoexternalspeakersjack.
NOTE:SpeakerTerminalis15W+15W(8ohm).
10)RGB/HVIN[R,G,B,H,V](BNC)
InputRGB/HVsignalsorsignalsfromotherRGB
equipment.ASync-on-Greensignalcanbeconnectedto
theGconnector.
11)VGA(MiniD-SUB15)
Analogcomputerinput.
12)DVI-D
InputdigitalRGBsignalsfromacomputerorHDTV
devicehavingadigitalRGBoutput.
13)VIDEOIN(RCA)
Compositevideoinput.
14)VIDEOIN(BNC)
Compositevideoinput.
15)EXTERNALCONTROL(D-Sub9pin)
ConnectRS-232Cinputtoexternalequipmentsuchasa
PCinordertocontrolRS-232Cfunctions.
16)EXTERNALCONTROL(D-Sub9pin)
ConnectRS-232Coutput.
ToconnecttomultipleMultiSyncmonitors
viadaisyRS-232CChain.
17)RFIN
TVsignalinput.
18)S/PDIFOUTPUT
Opticaldigitalaudioout.
19)KensingtonLock
Forsecurityandtheftprevention.
DenotesAVunitfunction.AllAVfunctionsareenabledwiththeAV
unitisinstalled.NotallmodelshavetheAVunitinstalled.
DenotesDigitalTunerfunction.AllDTVandAVfunctionsare
enabledwhentheDTVunitisinstalled.Notallmodelswillhave
thedigitaltunerinstalled.
15
16
INOUT
AC IN RGB/HV OUT
PC IN
VIDEO
DVD/HD IN
AUDIO SPEAKER
RGB/HV IN
VGA(D-SUB)
DVI(DVI-D)
HDMI
Y Cb/Pb Cr/Pr
S-VIDEO IN
OUT
AUDIO OUT
R L
-
-
-
AUDIO1 INAUDIO2 INAUDIO3 IN
R R
L L
IN
IN
R G B H V
R G B H V
1
19
5
7
6
13
14
9
8
2
10
3
11
12
4
17
18
English-12
- continued
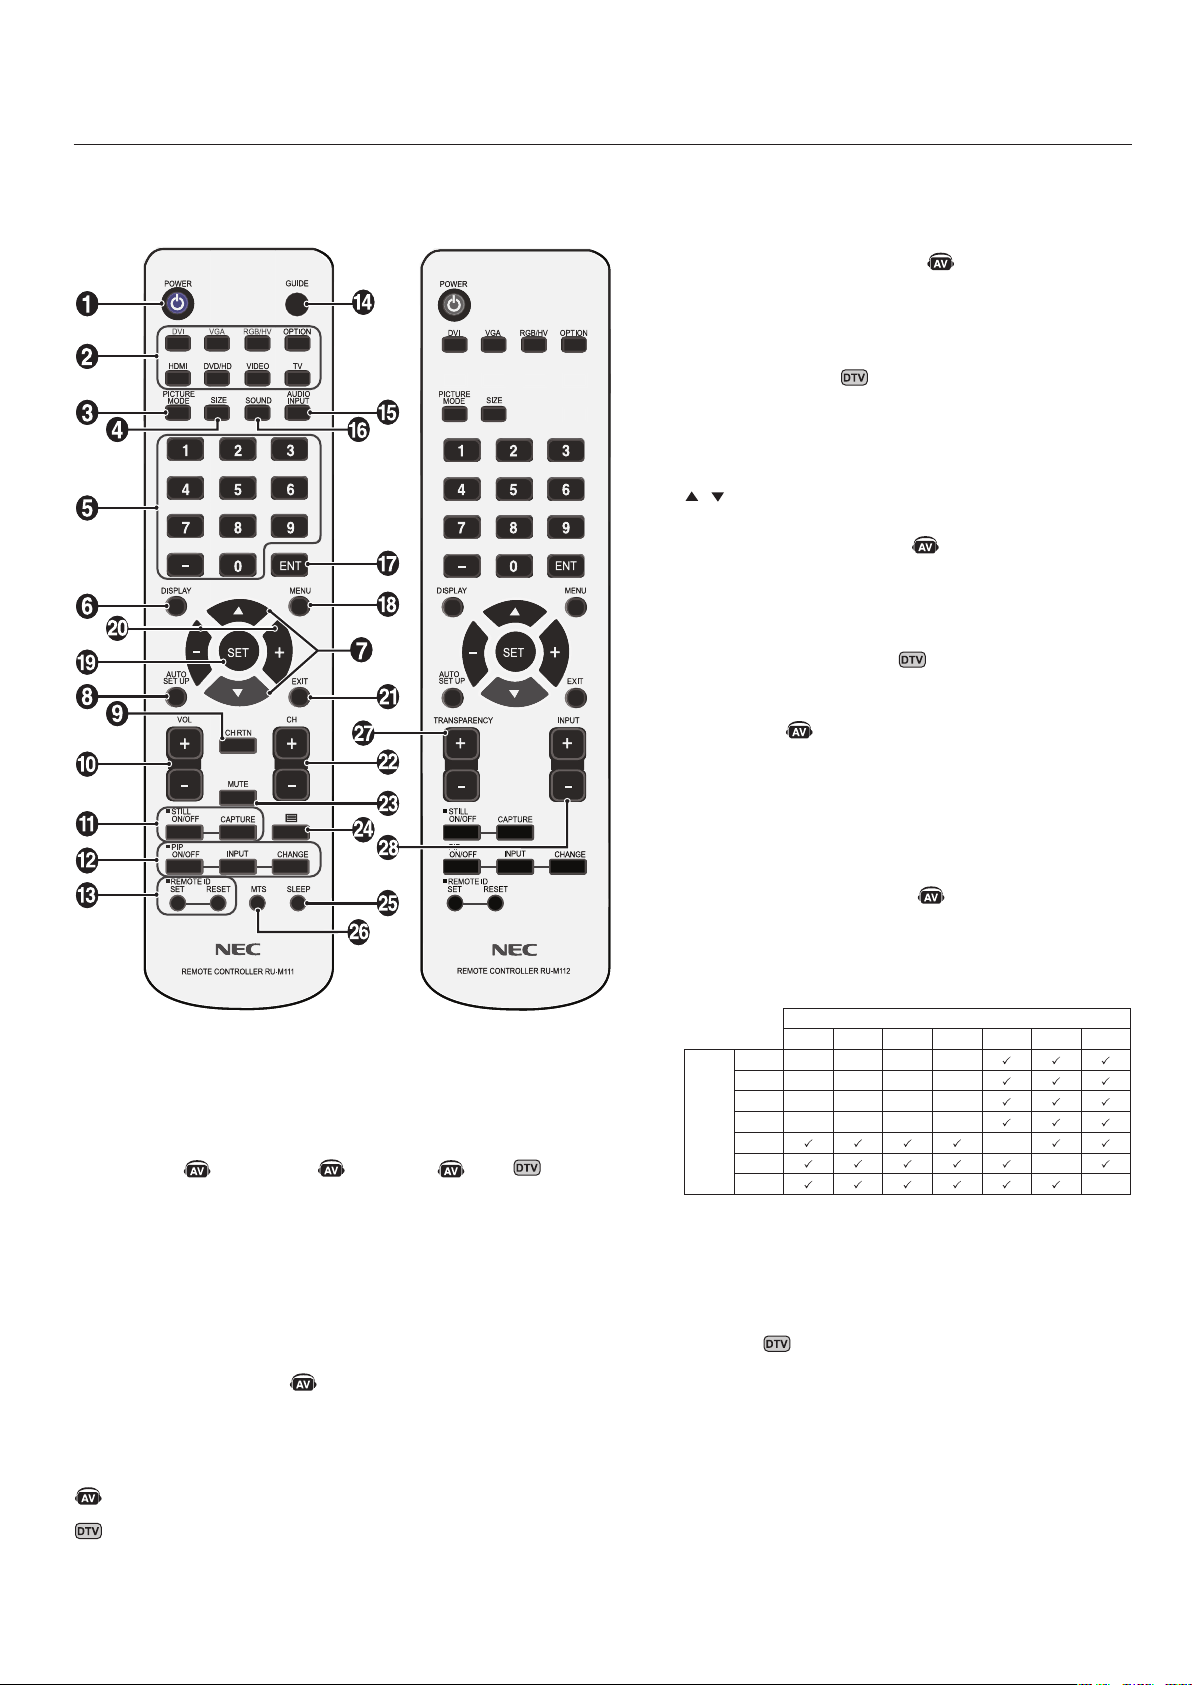
1)POWER
Switchesthepoweron/off.
2)INPUT
Selectswhichinputsignal([DVI],[VGA],[RGB/HV],
[HDMI],[DVD/HD],[VIDEO],[TV],
[OPTION])tobedisplayed.
3)PICTUREMODE
Selectspicturemode,[HIGHBRIGHT],[STANDARD],
[sRGB],[CINEMA].Seepage25.
HIGHBRIGHT:formovingimages
STANDARD:forimages
sRGB:fortextbasedimages
CINEMA:formovies
4)SIZE
Selectsaspectratioofthedisplayedimage.
[FULL],[NORMAL],[WIDE],and[ZOOM].
Seepage25.
5)KEYPAD
Setandchangepasswords.SetREMOTEID.
SelectTVchannel.
6)DISPLAY
Turnon/offtheInformationOSD.Seepage25.
7)
Movehighlightedareaupordown.
MovesthePIPsub-picture.
8)AUTOSETUP
EntersAUTOSETUPmenu.
9)CHANNELRETURN
Returntopreviouschannel.
10)VOLUME
IncreasesorDecreasessoundlevel.
11)STILL
ON/OFF:Activates/deactivatesstillpicturemode.
CAPTURE:Capturesstillpicture.
12)PICTUREinPICTURE
ON/OFF:TurnsPIPonoroff.
INPUT:ChangestheinputsignalofPIP.
CHANGE:Swapsinnerpicturewithouterpicture.
SubPicture
DVIVGARGB/HVHDMIDVD/HDVIDEOTV
Main
Picture
DVI----
VGA----
RGB/HV----
HDMI----
DVD/HD-
VIDEO-
TV-
13)REMOTEID
ActivatesREMOTEIDfunction.Seepage15.
14)GUIDE
Enteronscreenprogramguide.
DenotesAVunitfunction.AllAVfunctionsareenabledwiththeAV
unitisinstalled.NotallmodelshavetheAVunitinstalled.
DenotesDigitalTunerfunction.AllDTVandAVfunctionsare
enabledwhentheDTVunitisinstalled.Notallmodelswillhave
thedigitaltunerinstalled.

English
English-13
15)AUDIOINPUT
SelecttheAudiosource.
NOTE:Itispossibletoplayaudiofromasourcethatis
differentfromthevideosource.Whensettingparental
controlsforvideo,beawarethatthiscontentisnot
filtered.
16)SOUND
Artificialsurroundsound.
17)ENTER
Gotochannelselected.
18)MENU
TurnsON/OFFmenumode.
19)SET
Makesselection.
20)-,+
Increasesordecreasesadjustment.
MovesthePIPsub-picture.
21)EXIT
Goestopreviousmenu.
22)Channel
Goupordownchannelselections.
23)MUTE
Mutesaudiooutput.
24)
Activatesclosedcaptioning.
25)SLEEP
Sleeptimer.
26)MTS
Multi-tracksound.
27)TRANSPARENCYbutton*
DeterminesthelevelofOSDtransparency.
28)INPUTbutton*
Cyclesthroughavailableinputs.
*:Theproductyoupurchasedmaynothavethisfeature.
Changingthechannel
BothAnalogandDigitalchannelsareavailableusingthis
tuner.InadditiontotheCH+andCH-buttonschannels
canbechangedinthefollowingmethod.
TuningAnalogChannels
Inputthedesiredchannelnumberusingthekeypad,then
press[SET]or[ENT]toimmediatelytunetothenew
channel.Ifthenumberisinputand[SET]or[ENT]isnot
pushed,afterafewsecondsthechannelwillbechanged.
Forexampletotunetochannel5,press[5]thenpress
[SET]or[ENT].
TuningDigitalChannels
Totuneintoadigitalsub-channelenterthenumberofthe
mainchannel,thenadashfollowedbythenumberofthe
sub-channel.Forexampletotunetodigitalchannel5-1,
press[5]then[–]then[1].Press[SET]or[ENT]totune.
- continued
DenotesAVunitfunction.AllAVfunctionsareenabledwiththeAV
unitisinstalled.NotallmodelshavetheAVunitinstalled.
DenotesDigitalTunerfunction.AllDTVandAVfunctionsare
enabledwhentheDTVunitisinstalled.Notallmodelswillhave
thedigitaltunerinstalled.
English-14
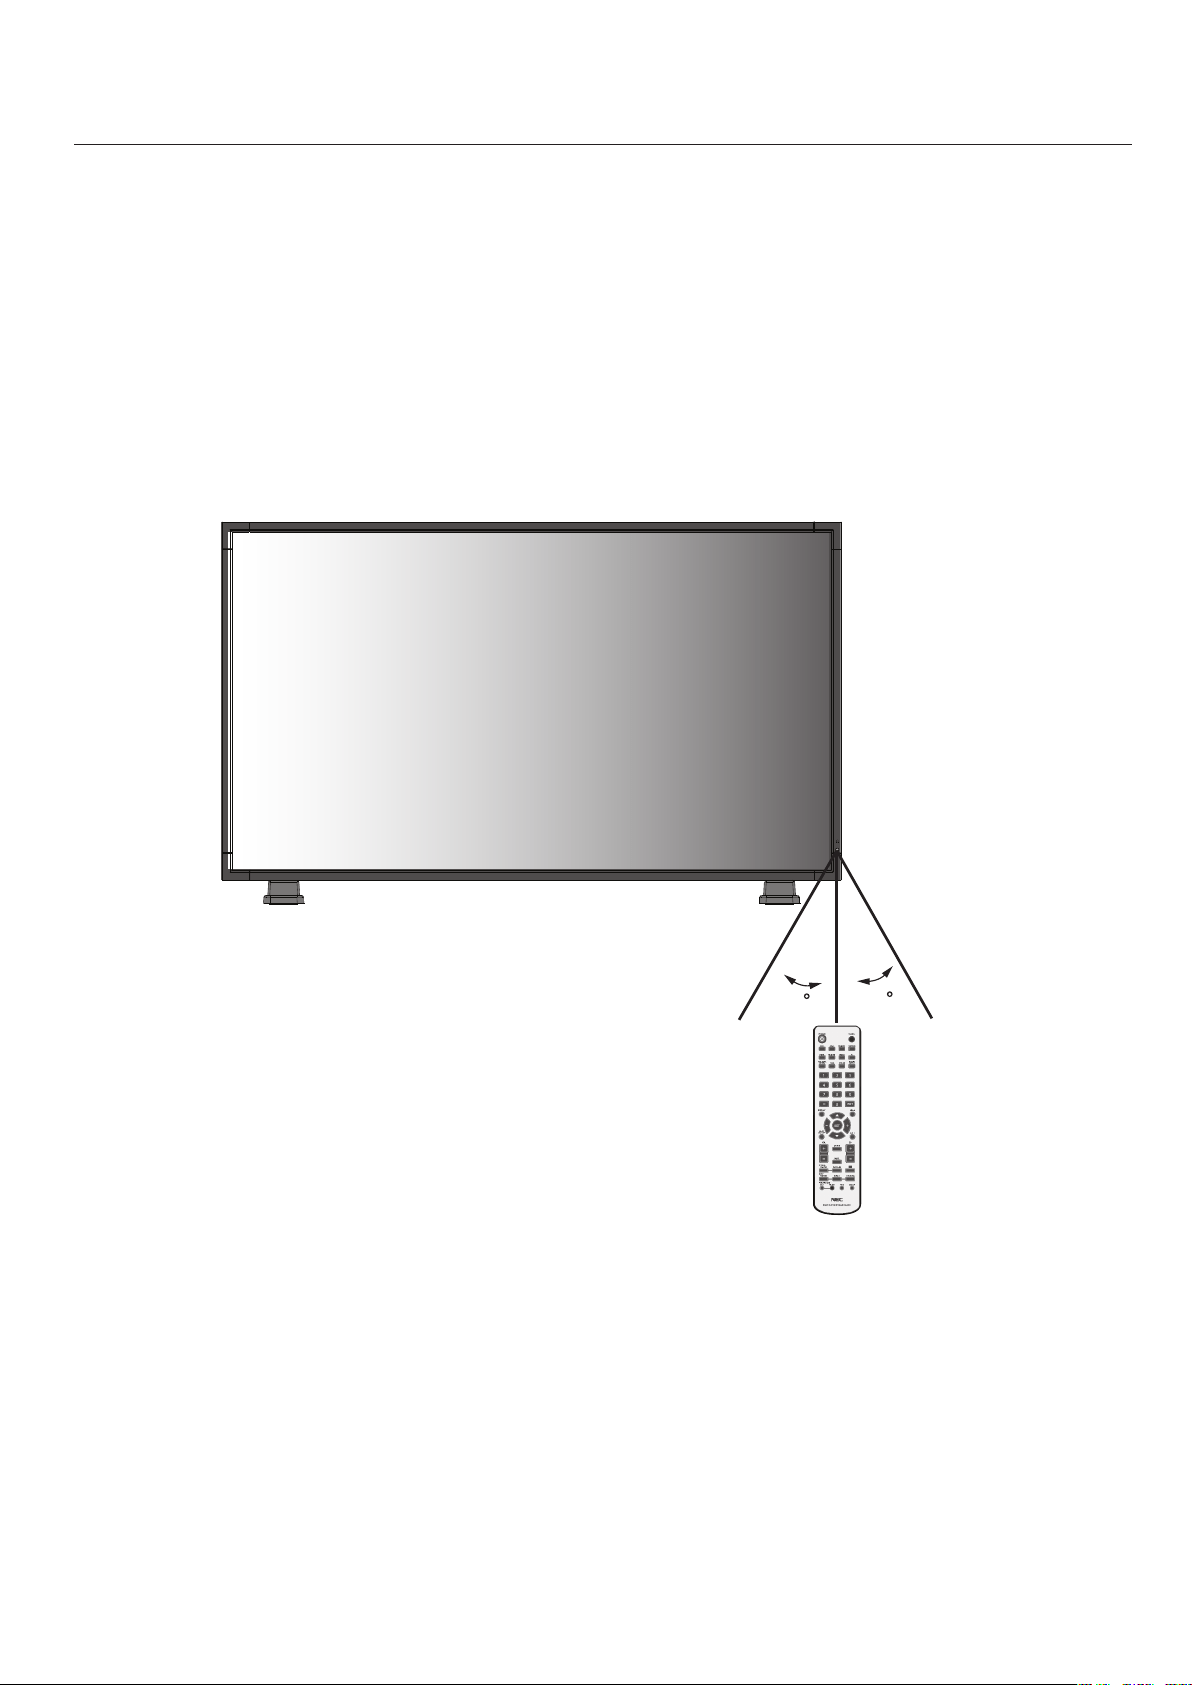
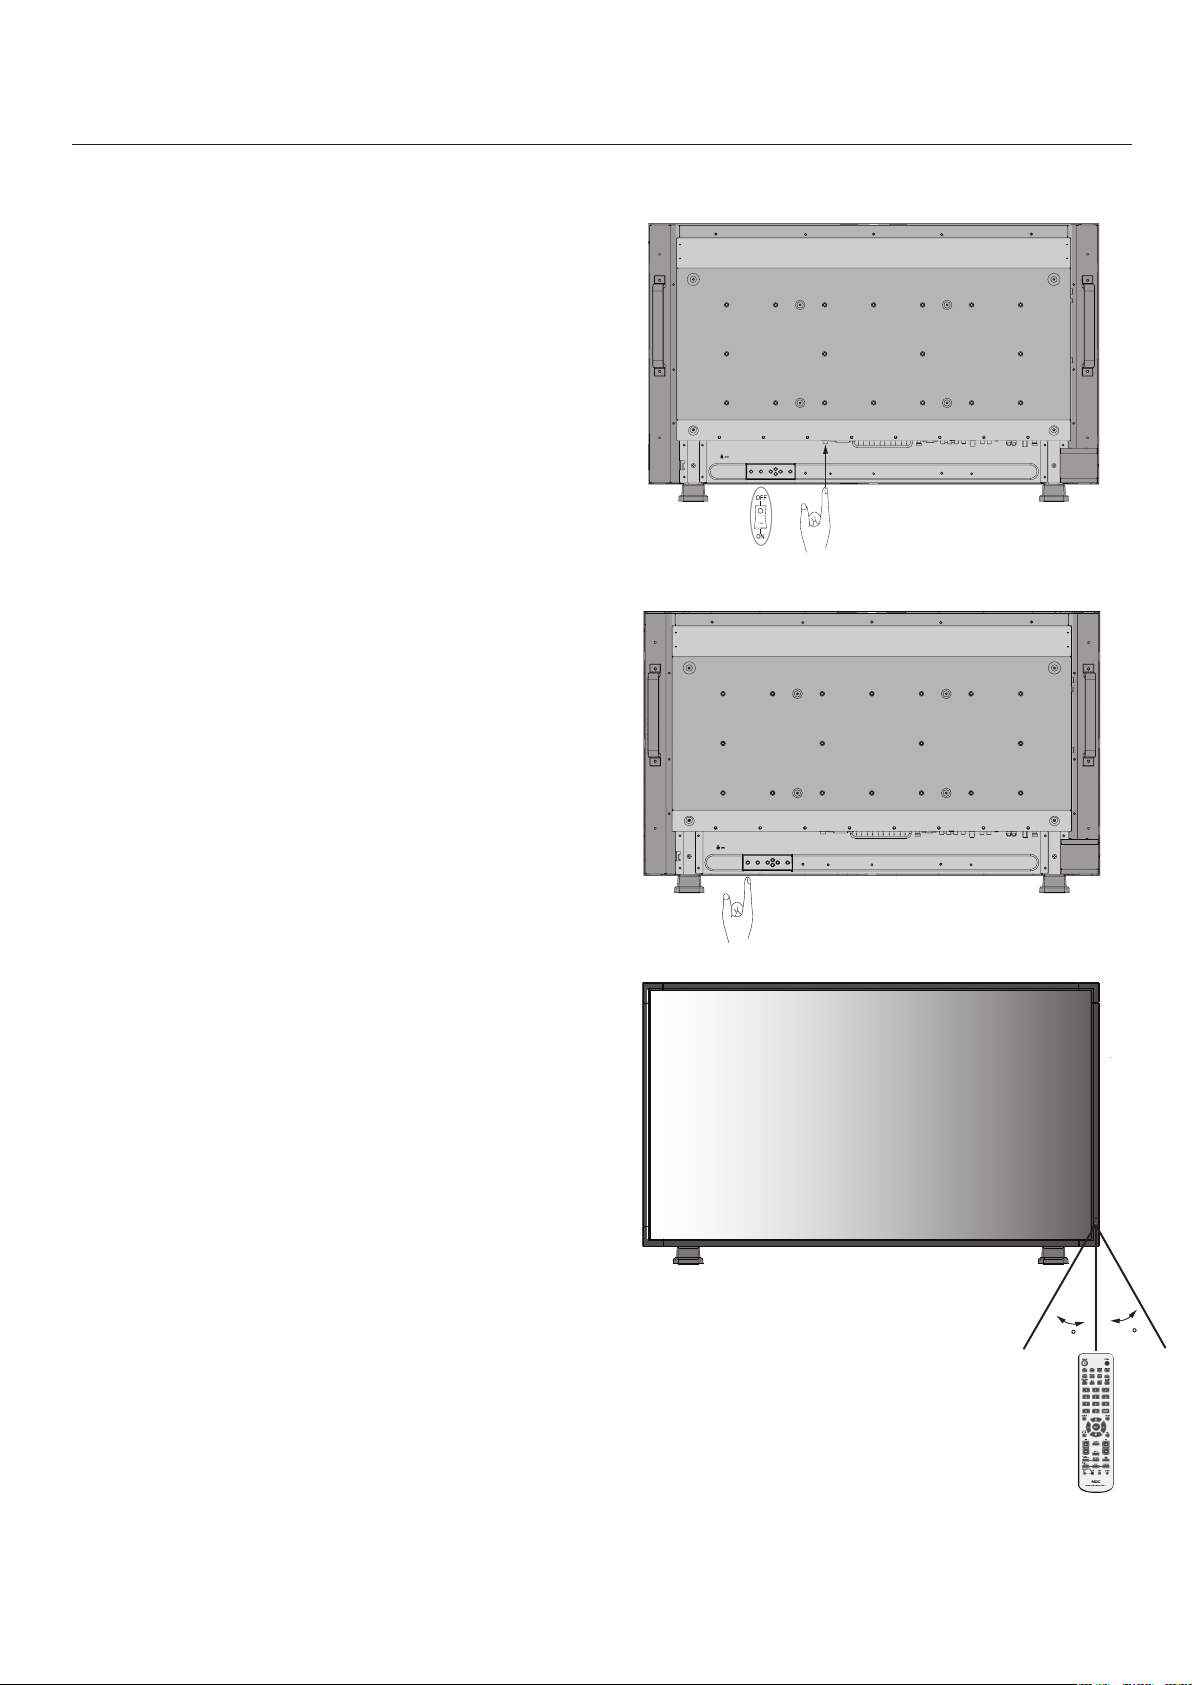
OperatingRangefortheRemoteControl
Pointthetopoftheremotecontroltowardthemonitor’s
remotesensorwhilepressingbuttons.Theremote
controlcanbeusedfromthefrontofthemonitorata
maximumdistanceof7m/23ft.fromthefrontofthe
LCDmonitor’sremotecontrolsensor.Themaximum
horizontalandverticalangleforuseoftheremoteis30
degreeswithinadistanceof3.5m/10ft.
CAUTION
Theremotecontrolsystemmaynotfunctionwhen
directsunlightorstrongilluminationstrikestheremote
controlsensoroftheLCDmonitor,orwhenthereisan
objectinthepathofthesensor.
HandlingtheRemoteControl
Donotopentheremotecontrolotherthanto
installbatteries.
Donotallowwaterorotherliquidtosplashontothe
remotecontrol.Iftheremotecontrolgetswet,wipeit
dryimmediately.
Avoidexposuretoheatandsteam.
- continued

English
English-15
REMOTECONTROLID
Theremotecontrolincludedwiththedisplaycanbeused
tocontrolupto26individualMultiSyncmonitorsus-
ingwhatiscalledtheREMOTECONTROLIDmode.The
REMOTECONTROLIDmodeworksinconjunctionwith
theMonitorID,allowingcontrolofupto26individual
MultiSyncmonitors.Forexample:iftherearemanymoni-
torsbeingusedinthesamearea,aremotecontrolinnor-
malmodewouldsendsignalstoeverymonitoratthesame
timeFigure1.UsingtheremoteinREMOTECONTROL
IDmodewillonlyoperateonespecificmonitorwithinthe
groupFigure2.
TOSETREMOTECONTROLID:
WhileholdingdowntheREMOTEIDSETbuttononthe
remotecontrol,usetheKEYPADtoinputtheMonitor
ID(1-26)ofthedisplaytobecontrolledviaremote.The
remotecanthenbeusedtooperatethemonitorhavingthat
specificMonitorIDnumber.
When0isselectedorwhentheremotecontrolisinnormal
mode,allmonitorswillbeoperated.
TOUSEREMOTECONTROLIDMODE
IDMode-ToenterIDModepresstheREMOTEIDSET
buttonandholddownfor2seconds.
NormalMode-ToreturntoNormalModepressthe
REMOTEIDRESETbuttonandholddownfor2seconds.
Inorderforthisfeaturetoworkproperly,thedisplaymust
beassignedaMonitorIDnumber.TheMonitorIDnumber
canbeassignedundertheMULTIDISPLAYmenuinthe
OSD(Seepage30).
YoumonitorIDinthecenterofdisplaywhenyourremote
controlisIDmode.-
MonitorID:1MonitorID:2MonitorID:3
Remotedoes
notwork
Remotedoes
notwork
Remoteworks
Figure2
Remotesetupto
useRemoteID:3
MonitorID:1MonitorID:2MonitorID:3
RemoteworksRemoteworksRemoteworks
Figure1
RemoteinNormal
modeortheREMOTE
IDissetto0
- continued

English-16
Pleaseseeinstallationonpage6of
thismanualandfollowallinstallation
instructions.
1)Determinetheinstallationlocation.
CAUTION:InstallingyourLCDdisplaymustbe
donebyaqualifiedtechnician.Contactyourdealer
formoreinformation.
CAUTION:MOVINGORINSTALLINGTHELCD
MONITORMUSTBEDONEBYTWOORMORE
PEOPLE.Failuretofollowthiscautionmayresultin
injuryiftheLCDmonitorfalls.
CAUTION:Donotmountoroperatethedisplay
upsidedown,faceup,orfacedown.
CAUTION:ThisLCDhasatemperaturesensorand
coolingfan.IftheLCDbecomestoohot,thecooling
fanwillturnonautomatically.IftheLCDbecomes
overheatedwhilethecoolingfanisrunning,the
“Caution”menuwillappear.Ifthe“Caution”menu
appears,discontinueuseandallowtheunittocool.
Usingthecoolingfanwillreducethelikelihood
ofearlycircuitfailureandmayhelpreduceimage
degradationand"imagepersistance".
IftheLCDisusedinanenclosedareaoriftheLCD
paneliscoveredwithaprotectivescreen,pleasecheck
theinsidetemperatureofthemonitorbyusingthe
“HEATSTATUS”controlintheOSD(seepage30).If
thetemperatureishigherthanthenormaloperating
temperature,pleaseturnthecoolingfantoONwithin
theFANCONTROLmenuwithintheOSD
(seepage30).
IMPORTANT
Laytheprotectivesheet,whichwaswrappedaround
theLCDmonitorwhenitwaspackaged,beneaththe
LCDmonitorsoasnottoscratchthepanel.
2)Installtheremotecontrolbatteries.
Theremotecontrolispoweredbytwo1.5VAA
batteries.Toinstallorreplacebatteries:
A.Pressandslidetoopenthecover.
B.Alignthebatteriesaccordingtothe(+)
and(–)indicationsinsidethecase.
C.Replacethecover.
CAUTION:Incorrectusageofbatteriescanresult
inleaksorbursting.NECrecommendsthefollowing
batteryuse:
Place“AA”sizebatteriesmatchingthe(+)and(-)signs
oneachbatterytothe(+)and(-)signsofthebattery
compartment.
Donotmixbatterybrands.
Donotcombinenewandoldbatteries.Thiscan
shortenbatterylifeorcauseliquidleakageofbatteries.
Removedeadbatteriesimmediatelytopreventbattery
acidfromleakingintothebatterycompartment.
Donottouchexposedbatteryacid,itmayinjureskin.
NOTE:IfyoudonotintendtousetheRemoteControlfor
alongperiodoftime,removethebatteries.
•
•
•
•
•
English
English-17
3)Connectexternalequipment.
Toprotecttheexternalequipment,turnoffthemain
powerbeforemakingconnections.
Refertoyourequipmentusermanualforfurther
information.
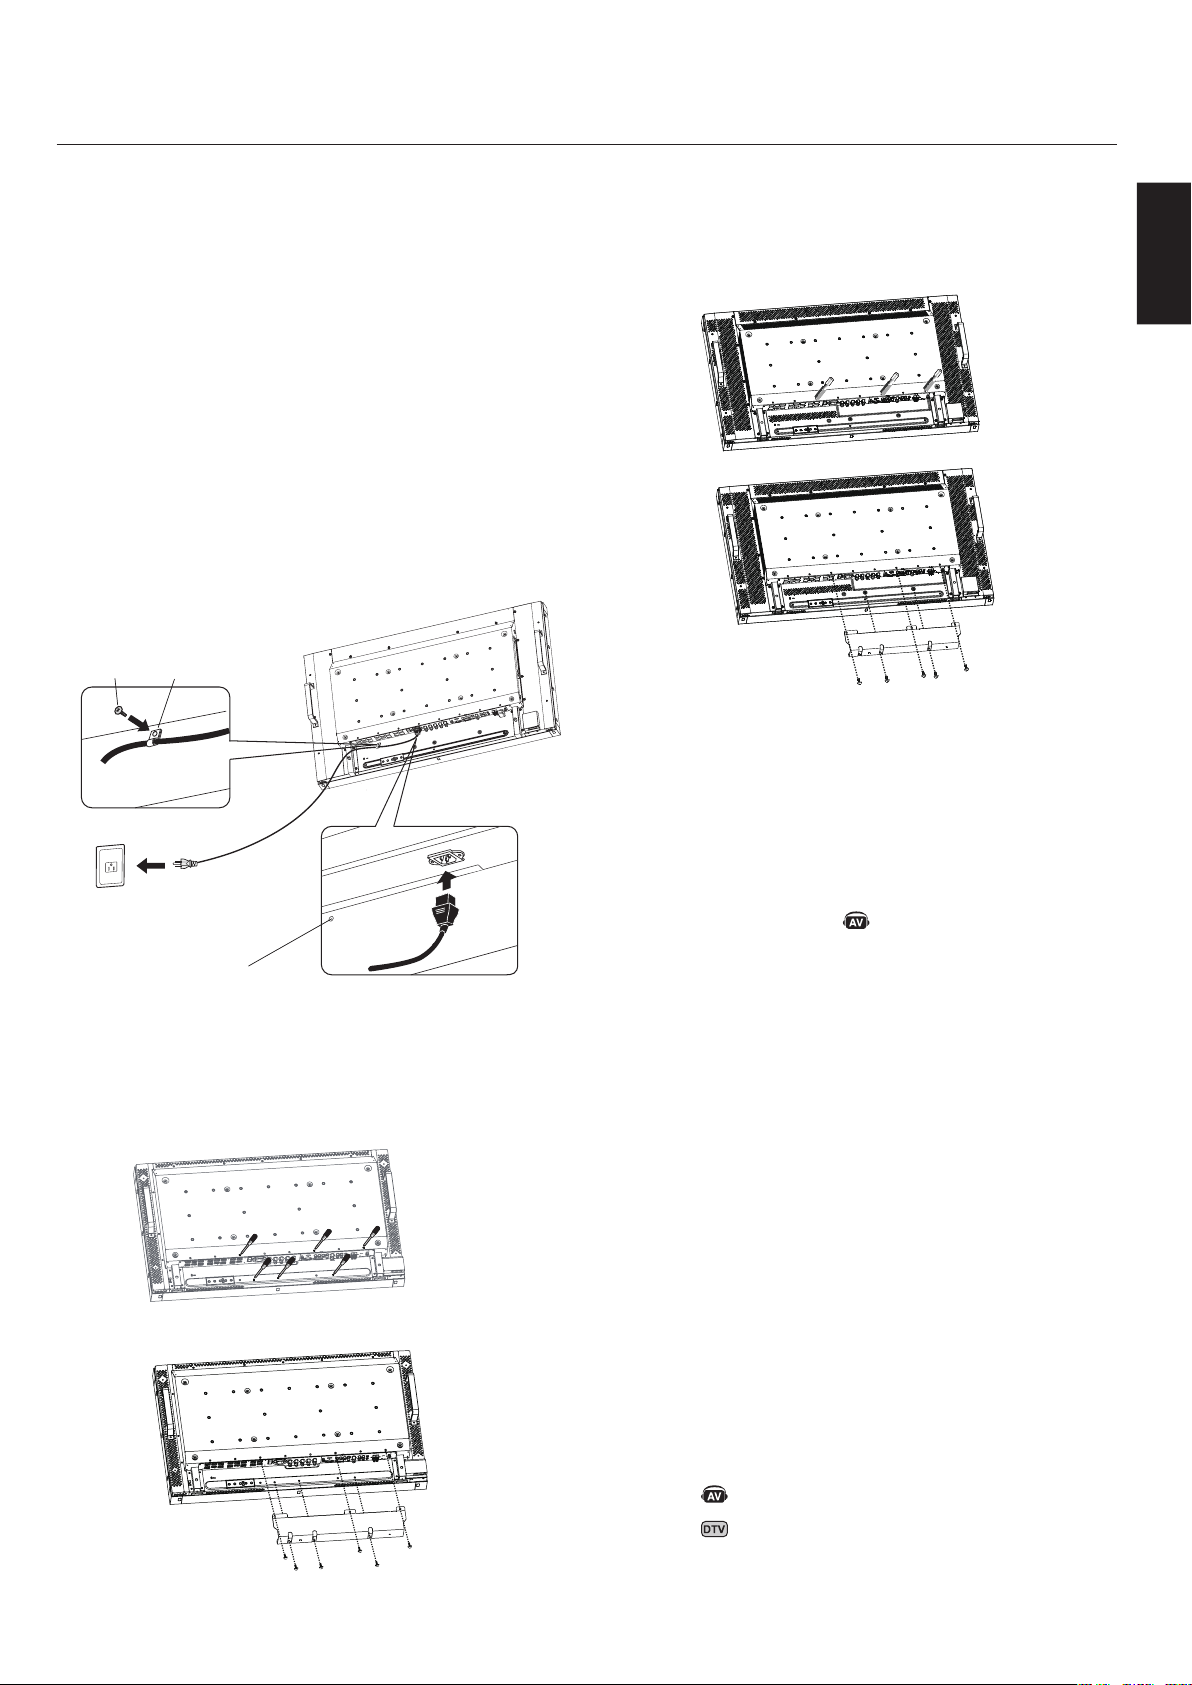
4)Connectthesuppliedpowercord.
Theequipmentshouldbeinstalledclosetoaneasily
accessiblepoweroutlet.
PleaseattachedpowercordtheLCDmonitorby
attachingthescrewandclamp.
Fullyinserttheprongsintothepoweroutletsocket.A
looseconnectionmaycauseimagedegradation.
NOTE:IfyouusethismonitoratAC220-240V,
pleasereferto“SafetyPrecautionsandMaintenance
&RecommendedUse”sectionsofthismanualfor
properselectionofACpowercord.
5)Attachthecablecover
ForLCD4020
Removethesixscrews.
Use6oftheM4x10screws(included)toattachthe
cablecover.
•
•
•
•
•
•
•
ForLCD4620
Removethe3screws.
Use5oftheM4x10screws(included)toattachthe
cablecover.
6)Switchonthepowerofalltheattached
externalequipment.
Whenconnectedwithacomputer,switchonthe
powerofthecomputerfirst.
7)Operatetheattachedexternalequipment.
Displaythesignalfromthedesiredinputsource.
8)Adjustthesound
Makevolumeadjustmentsasrequired.
9)Adjustthescreen(Seepage27).
Makeadjustmentsofthescreendisplaypositionwhen
necessary.
10)Adjusttheimage(Seepage27).
Makeadjustmentssuchasbrightnessorcontrast
whenrequired.
11)RecommendedAdjustments
Toreducetheriskofthe“imagepersistence”,please
adjustthefollowingitemsbasedontheapplication
beingused:
“DATE&TIME”and“SCHEDULESETTINGS”
(Seepages28and29)
“SCREENSAVER”,and“SIDEBORDERCOLOR”
(Seepage30)
Itisrecommendedthatthe“FANCONTROL”
setting(seepage30)beturnedtoONalso.
•
•
- continued
DenotesAVunitfunction.AllAVfunctionsareenabledwiththeAV
unitisinstalled.NotallmodelshavetheAVunitinstalled.
DenotesDigitalTunerfunction.AllDTVandAVfunctionsare
enabledwhentheDTVunitisinstalled.Notallmodelswillhave
thedigitaltunerinstalled.
Screw
Clamp
ScrewholeforClamp
English-18
AC IN RGB/HV OUT
PC IN
VIDEO
DVD/HD IN
AUDIO SPEAKER
RGB/HV IN
VGA(D-SUB)
DVI(DVI-D)
HDMI
Y
Cb/Pb Cr/Pr
S-VIDEO IN
OUT
AUDIO OUT
R L
-
-
-
AUDIO1 INAUDIO2 INAUDIO3 IN
R R
L L
IN
IN
R G B H V
R G B H V
BeforeconnectingexternalequipmenttoLCD:
Firstturnoffthepowertoalloftheequipmentassociated
withtheLCDaswellasthatoftheequipmenttobecon-
nected.
Forquestionsregardingexternalequipmentpleasereferto
theuser’smanualsuppliedwiththatequipment.
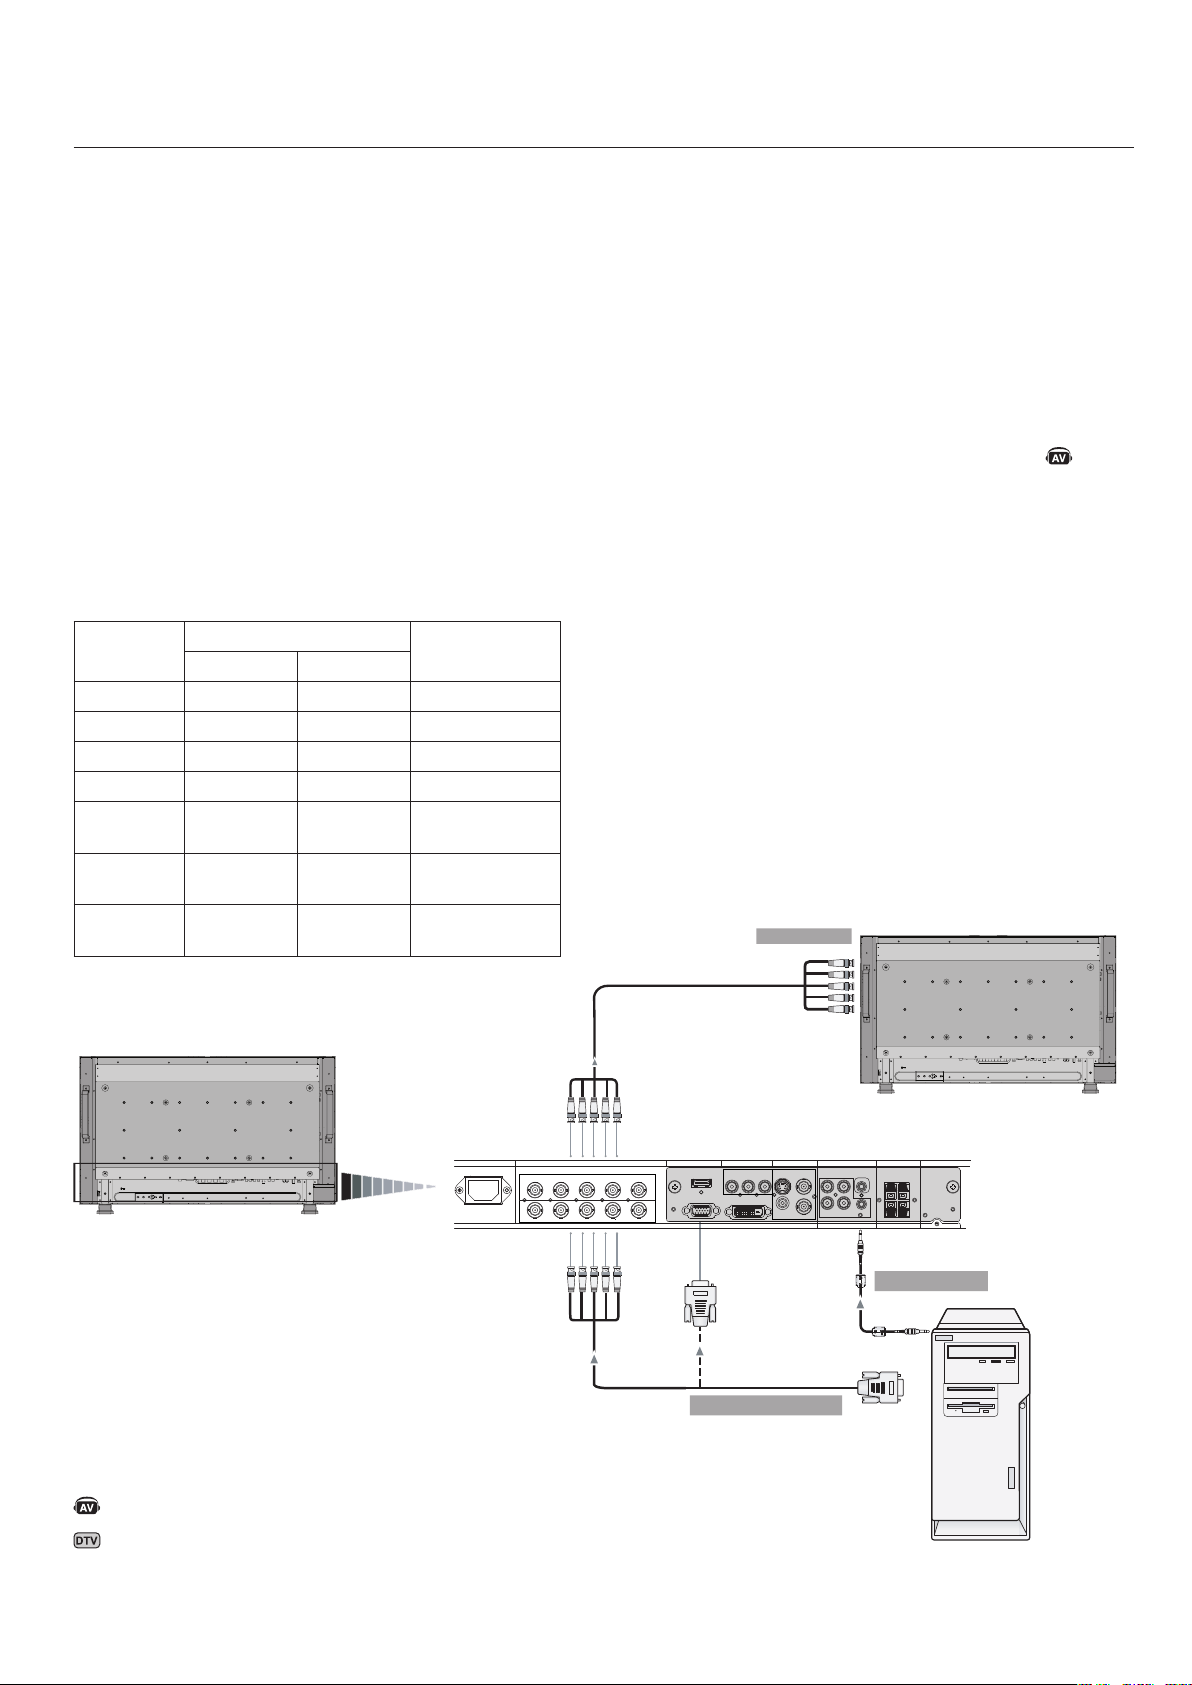
ConnectingtheLCDMonitortoaPC
ConnectingyourcomputertoyourLCDmonitorwillen-
ableyoutodisplayyourcomputer’sscreenimage.
Somevideocardshavingapixelclockover162MHzmay
notdisplayimagescorrectly.
TheLCDmonitorwillautomaticallyadjusttoapreset
timingtodisplaytheproperimage.
<FactoryPresetSignalTiming>
Resolution
Scanningfrequency
RemarksHorizontalVertical
640x48031.5kHz60Hz
800x60037.9kHz60Hz
1024x76848.4kHz60Hz
1280x76848.0kHz60Hz
1360x76848.0kHz60Hz
Recommended
resolution
1280x102464.0kHz60Hz
Compressed
image
1600x120075.0kHz60Hz
Compressed
image
ToconnecttotheVGAconnector(miniD-sub15pin)on
theLCDmonitor,usetheprovidedRGBsignalcable(mini
D-sub15pintominiD-sub15pin).
ToconnecttotheRGB/HVconnector(BNC)ontheLCD
monitor,useaminiD-sub15pintoBNCx5signalcable
(notincluded).SelectRGB/HVfromtheINPUTbutton.
WhenconnectingtoasecondLCDmonitor,usetheRGB/
HVOUTconnector(BNC)(BNCINPUTonly).
TheAUDIOIN1,2,3canbeusedtochoosetheaudio
source.Toselect,usetheAUDIOINPUTbutton.
LCDMonitor
(secondmonitor)
LCDMonitor
ToRGB/HVInput
FromAudioOutput
MiniD-sub15pin
PCorIBM
compatible
BNCx5
BNCx5
BNCx5
DenotesAVunitfunction.AllAVfunctionsareenabledwiththeAV
unitisinstalled.NotallmodelshavetheAVunitinstalled.
DenotesDigitalTunerfunction.AllDTVandAVfunctionsare
enabledwhentheDTVunitisinstalled.Notallmodelswillhave
thedigitaltunerinstalled.
FromAnalogRGBOutput
(BNCInputonly)
English
English-19
AC IN RGB/HV OUT
PC IN
VIDEO
DVD/HD IN
AUDIO SPEAKER
RGB/HV IN
VGA(D-SUB)
DVI(DVI-D)
HDMI
Y Cb/Pb Cr/Pr
S-VIDEO IN
OUT
AUDIO OUT
R L
-
-
-
AUDIO1 INAUDIO2 INAUDIO3 IN
R R
L L
IN
IN
R G B H V
R G B H V
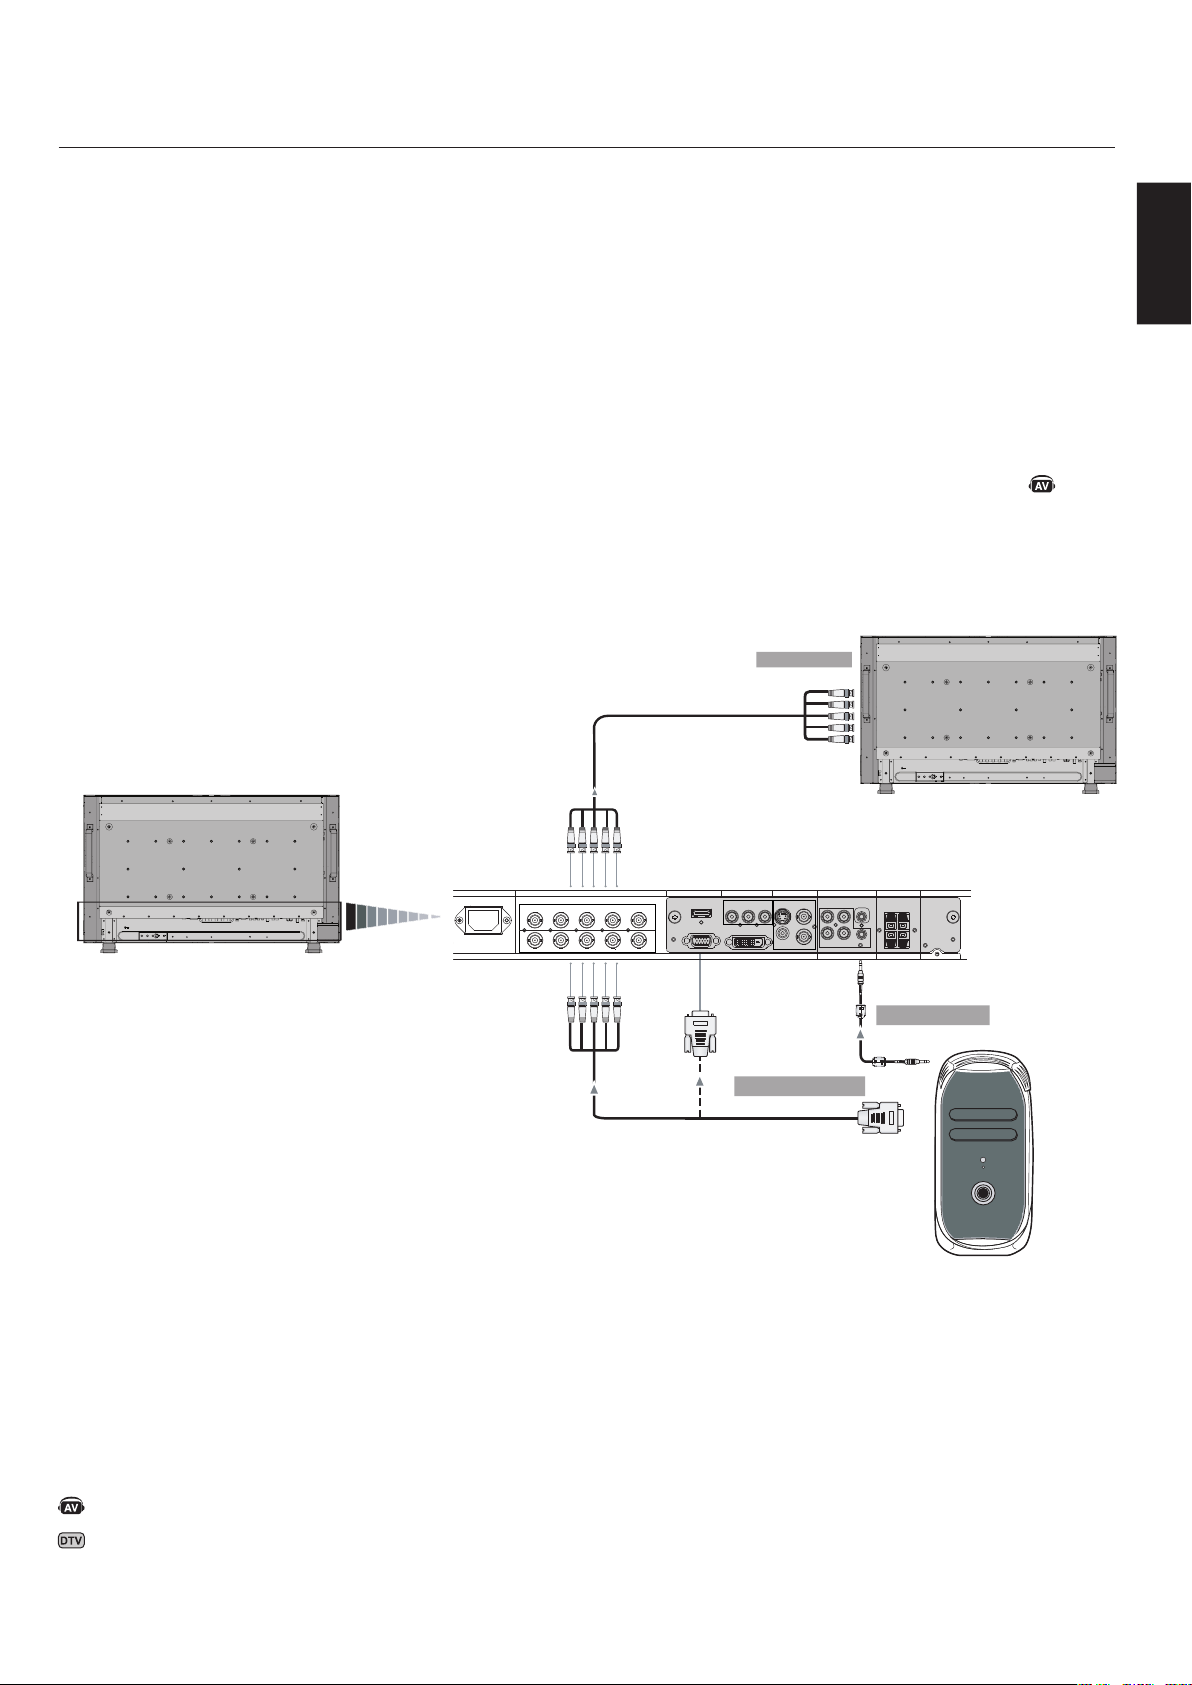
ConnectingtoaMacintosh®Computer
ConnectingyourMacintoshcomputertoyourLCD
monitorwillenableyoutodisplayyourcomputer’sscreen
image.Somevideocardsordriversmaynotdisplayimages
correctly.
ToconnecttotheVGAconnector(miniD-sub15pin)on
theLCDmonitor,usetheRGBsignalcable(miniD-sub15
pintominiD-sub15pin)includedwiththedisplay.
NOTE:ForolderMacintoshcomputers,useMacintosh
cableadaptertoconnecttoyourMacintosh’svideoport.To
obtaintheMacintoshcableadaptercallNECDisplaySolu-
tionsofAmerica,Inc.at(800)632-4662
ToconnecttotheRGB/HVconnector(BNC)ontheLCD
monitor,useaminiD-sub15pintoBNCx5signalcable
(notincluded)(BNCINPUTonly).
IfyouwillbeconnectingtheLCDmonitortoaMacintosh
PowerBook,set“Mirroring”tooff.
RefertoyourMacintosh’sowner’smanualformoreinfor-
mationaboutyourcomputer’svideooutputrequirements
andanyspecialidentificationorconfiguringthatmaybe
required.
TheAUDIOIN1,2,3canbeusedtochoosetheaudio
source.Toselect,usetheAUDIOINPUTbutton.
- continued
LCDMonitor
(secondmonitor)
MiniD-sub15pin
Macintosh
BNCx5
BNCx5BNCx5
LCDMonitor
ToRGB/HVInput
FromAnalogRGBOutput
MiniD-sub15pin
FromAudioOutput
DenotesAVunitfunction.AllAVfunctionsareenabledwiththeAV
unitisinstalled.NotallmodelshavetheAVunitinstalled.
DenotesDigitalTunerfunction.AllDTVandAVfunctionsare
enabledwhentheDTVunitisinstalled.Notallmodelswillhave
thedigitaltunerinstalled.
(BNCInputonly)
English-20
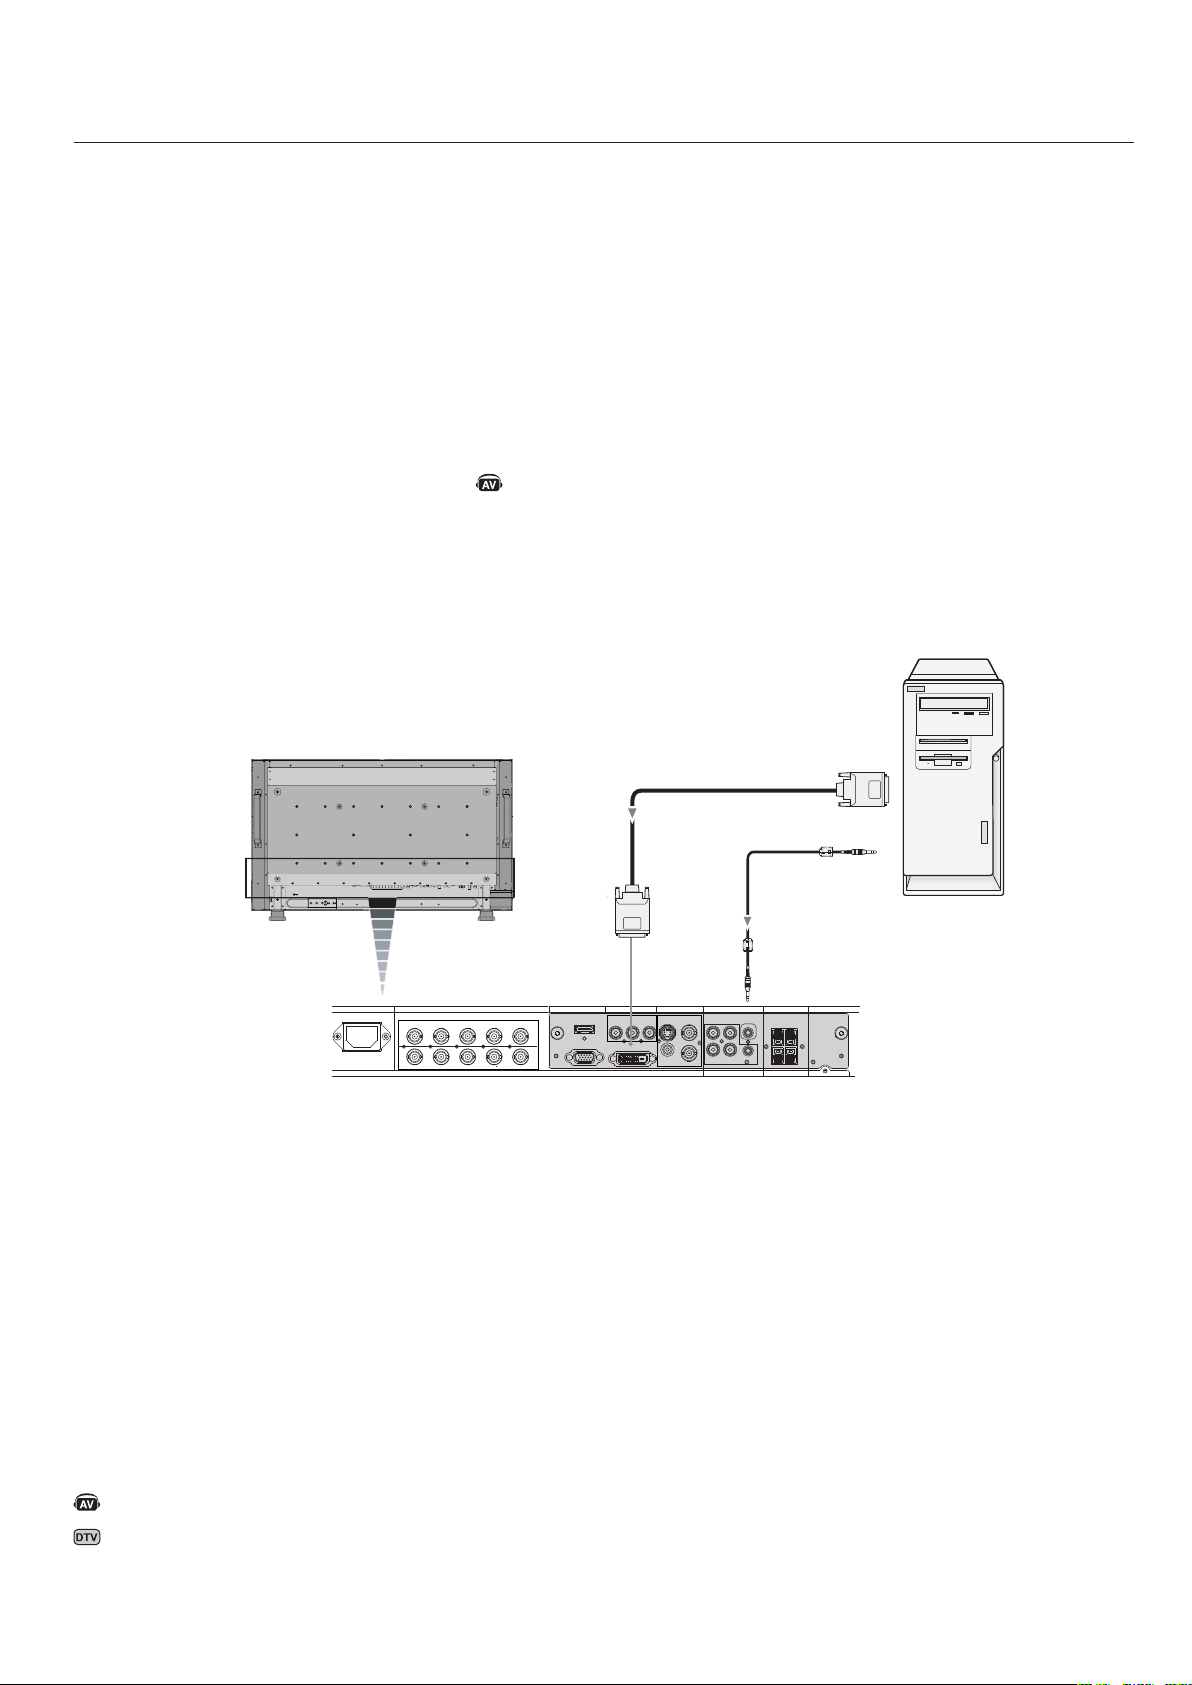
ConnectingtoaComputerwithDigitalOutput
Connectionscanbemadewithdevicesequippedwitha
digitalinterfacethatcomplieswiththeDVI(DigitalVisual
Interface)standard.
DVIconnectoralsoacceptsaDVI-Dcable.
InputTMDSsignalsconformingtoDVIstandards.
Tomaintaindisplayquality,useacablerecommended
byDVIstandards.
TheAUDIOIN1,2,3canbeusedtochoosetheaudio
source.Toselect,usetheAUDIOINPUTbutton.
•
•
•
- continued
AC IN RGB/HV OUT
PC IN
VIDEO
DVD/HD IN
AUDIO SPEAKER
RGB/HV IN
VGA(D-SUB)
DVI(DVI-D)
HDMI
Y
Cb/Pb Cr/Pr
S-VIDEO IN
OUT
AUDIO OUT
R L
-
-
-
AUDIO1 INAUDIO2 INAUDIO3 IN
R R
L L
IN
IN
R G B H V
R G B H V
LCDMonitor
Equipmentwithadigitalinterfacesuchas
aPCwithRGBoutput(TMDS)
FromDVIoutput
DVI-Dconnector
DenotesAVunitfunction.AllAVfunctionsareenabledwiththeAV
unitisinstalled.NotallmodelshavetheAVunitinstalled.
DenotesDigitalTunerfunction.AllDTVandAVfunctionsare
enabledwhentheDTVunitisinstalled.Notallmodelswillhave
thedigitaltunerinstalled.
English
English-21
LCDMonitor
RCA
RCA
RCA
DVI-DConnector
ToDVIOutput
FromDVDCompononent
VideoOutput
LeftAudio
RightAudio
ConnectingaDVDPlayerwithcomponentout
ConnectingyourDVDplayertoyourLCDmonitorwillen-
ableyoutodisplayDVDvideo.
RefertoyourDVDplayeruser’smanualformore
information.
ConnecttheLCDMonitortoaDVDPlayer
ToconnecttheDVD/HDINconnector(RCA)ontheLCD
monitor,useaseparatelyavailableRCAconnectorcable.
SomeDVDplayersmayhavedifferentconnectorssuchas
aDVI-Dconnector.
Select[DVI-HD]modefromthe“DVIMODE”menu
whenyouconnectaDVI-Dconnector.ForDVIMode
selection,see“DVIMODE”onpage31.
TheAUDIOIN1,2,and3(bothRCA)canbeusedfor
audioinput.Forconnection,select[IN1,IN2]or[IN3]
fromtheAUDIOINPUTbutton.
•
•
•
•
- continued
DenotesAVunitfunction.AllAVfunctionsareenabledwiththeAV
unitisinstalled.NotallmodelshavetheAVunitinstalled.
DenotesDigitalTunerfunction.AllDTVandAVfunctionsare
enabledwhentheDTVunitisinstalled.Notallmodelswillhave
thedigitaltunerinstalled.
English-22
- continued
RGB/HV OUT
RGB/HV IN
VGA (D-SUB) DVI (DVI-D)
RGB/HV OUT
RGB/HV IN
VGA (D-SUB) DVI (DVI-D)
LCDMonitor
RCA
FromHDMIOutput
ToDVDComponent
videooutput
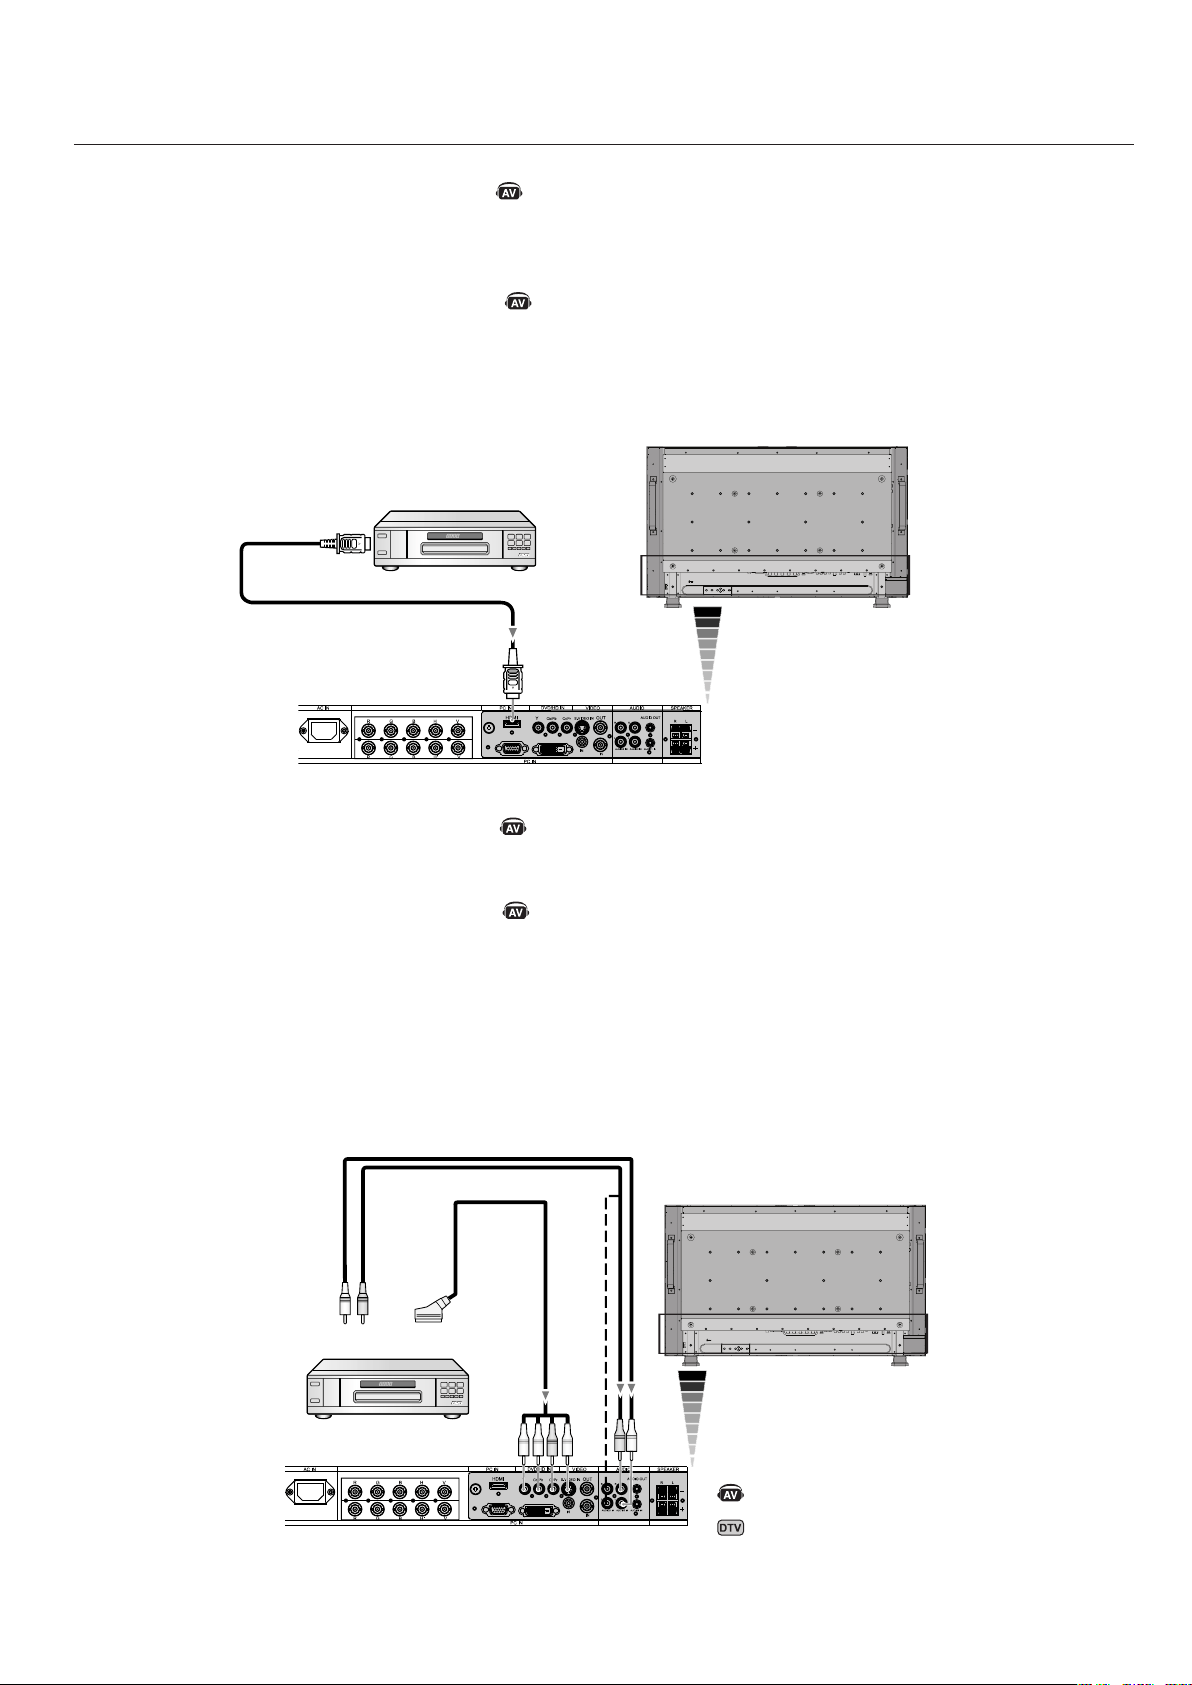
ConnectingaDVDPlayerwithHDMIout
ConnectingyourDVDplayertoyourLCDmonitorwillenableyoutodisplayDVDvideo.
RefertoyourDVDplayeruser’smanualformoreinformation.
ConnecttheLCDMonitortoaDVDPlayer
PleaseuseanHDMIcablethathastheHDMIlogo.
Itmaytakeafewsecondstoshowthesignal.
WedonotsupportPC-DVIsignals.
•
•
•
LCDMonitor
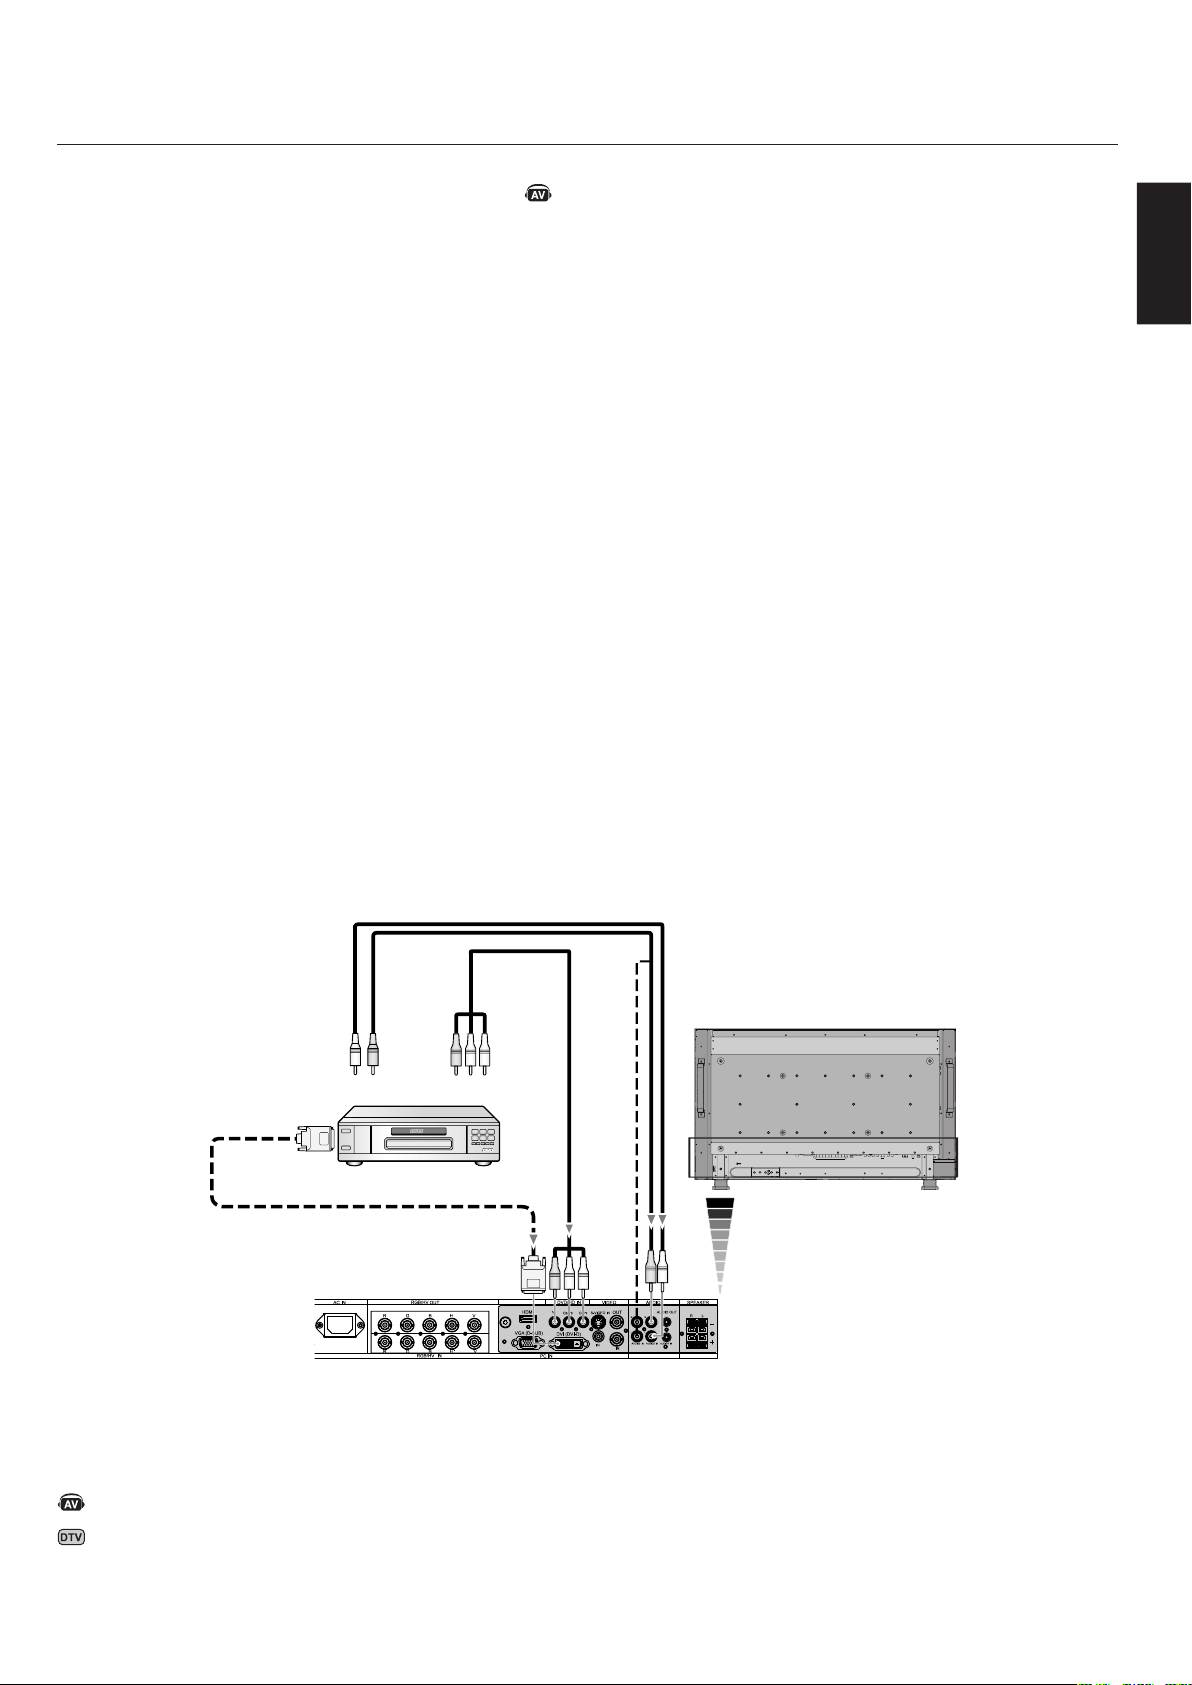
ConnectingaDVDPlayerwithSCARTout
ConnectingyourDVDplayertoyourLCDmonitorwillenableyoutodisplaySCART.
ConnecttheLCDMonitortoaDVDPlayer
ToconnecttheDVD/HDINconnector(RCA)ontheLCDmonitorandconnectthevideo(sync)andtheVideoInconnector
(RCA),useaseparatelyavailableRCAconnectorcable.
SomeDVDplayersmayhavedifferentconnectorssuchasDVI-Dconnector.
Select[ON]modefromthe“SCARTMODE”menuwhenyouuseaSCARTconnector.Modeselection,see“SCART”on
page31.
TheAUDIOIN2and3(bothRCA)canbeusedforaudioinput.Forconnection,select[IN2]or[IN3]fromtheAUDIO
INPUTbutton.
•
•
•
•
HDMIConnector
RCA
LeftAudio
RightAudio
SCART
DenotesAVunitfunction.AllAVfunctionsareenabledwiththeAV
unitisinstalled.NotallmodelshavetheAVunitinstalled.
DenotesDigitalTunerfunction.AllDTVandAVfunctionsare
enabledwhentheDTVunitisinstalled.Notallmodelswillhave
thedigitaltunerinstalled.
English
English-23
- continued
RGB/HV OUT
RGB/HV IN
VGA (D-SUB) DVI (DVI-D)
LCDMonitor
RCA
External
Speakers
VCRorLaserdiscplayer
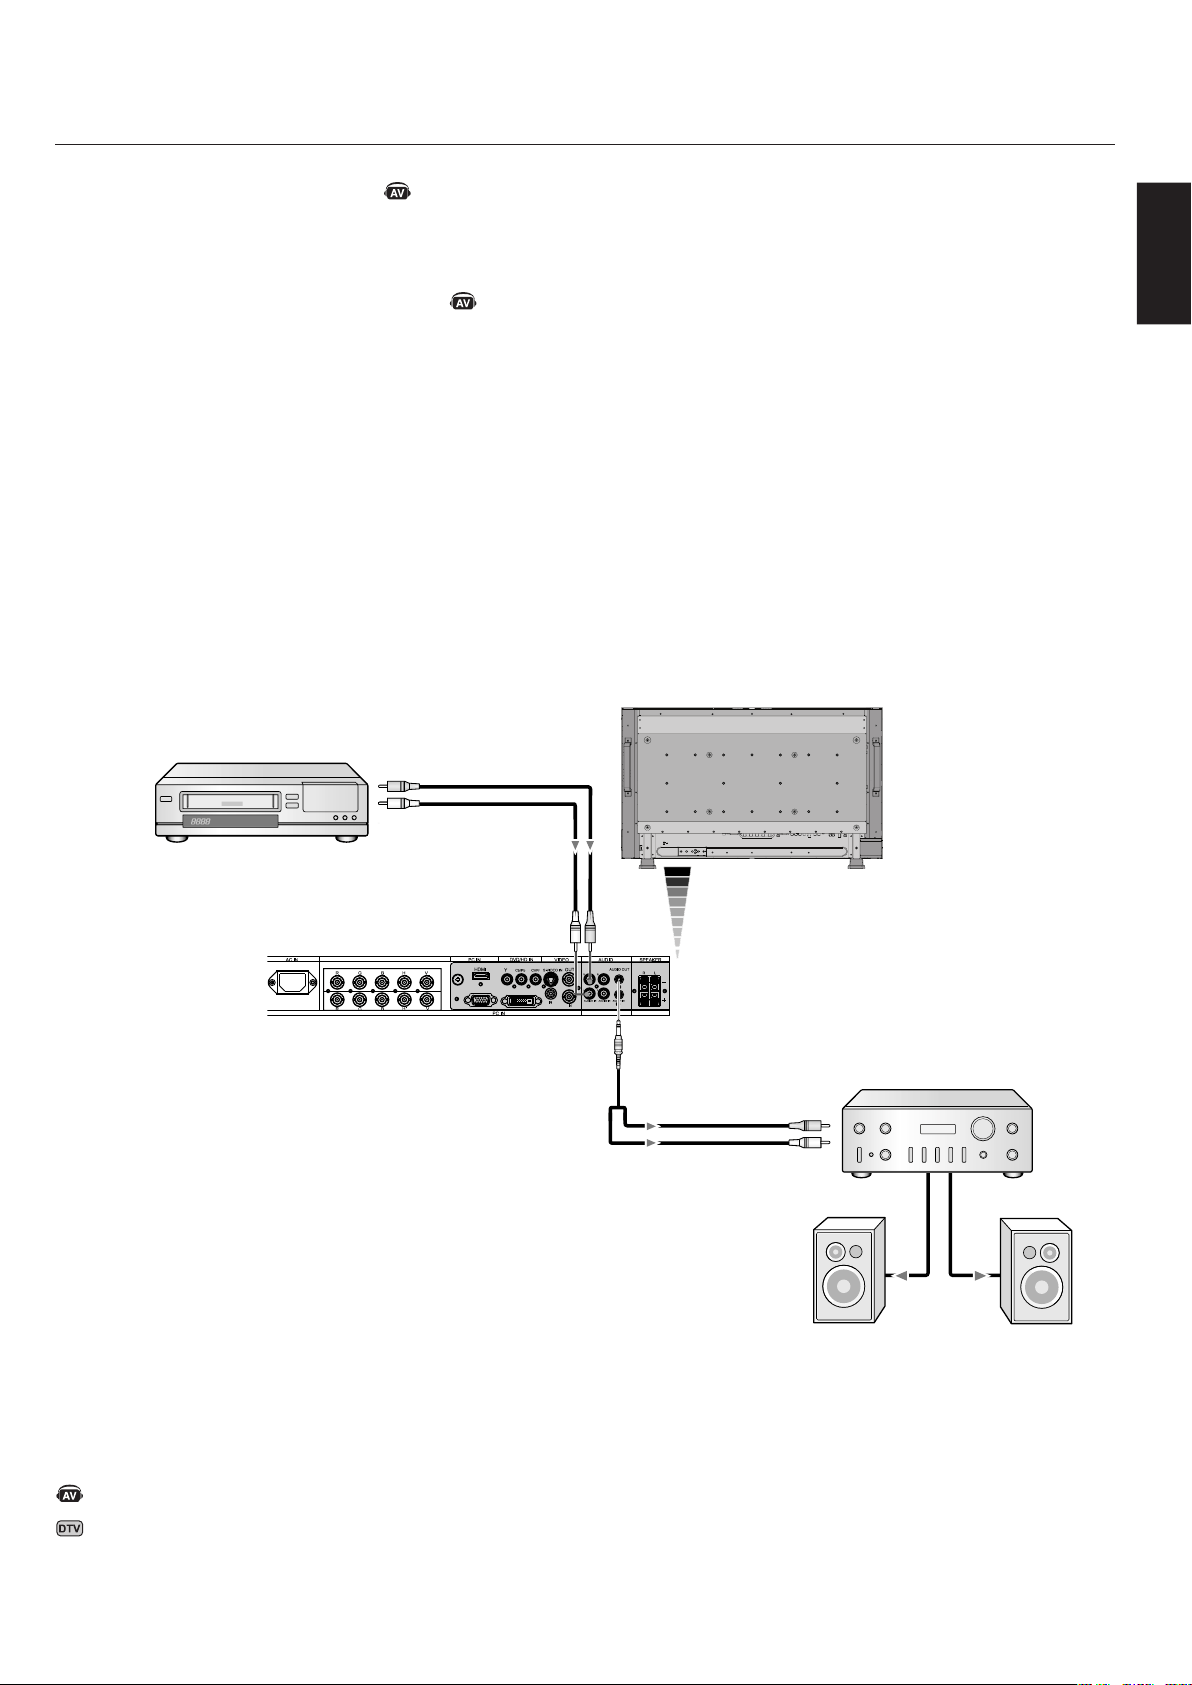
ConnectingtoaStereoAmplifier
YoucanconnectyourstereoamplifiertoyourLCDmonitor.Refertoyouramplifierowner’s
manualformoreinformation.
ConnecttheLCDMonitortoaStereoAmplifier
TurnontheLCDmonitorandtheamplifieronlyafterallconnectionshavebeenmade.
UseastereoMiniRCAcabletoconnecttheAUDIOOUTconnector(astereoMiniJack)
ontheLCDmonitorandtheaudioinputontheamplifier.
Donotreversetheaudioleftandrightjacks.
TheAUDIOINisusedforaudioinput.
TheAUDIOOUTjackoutputssoundfromtheselectedAudioinput.
•
•
•
•
•
ToAudioRight
Amplifier
ToAudioLeft
ToAudioRight
ToAudioLeft
DenotesAVunitfunction.AllAVfunctionsareenabledwiththeAV
unitisinstalled.NotallmodelshavetheAVunitinstalled.
DenotesDigitalTunerfunction.AllDTVandAVfunctionsare
enabledwhentheDTVunitisinstalled.Notallmodelswillhave
thedigitaltunerinstalled.
English-24
- Power ON and OFF Modes
TheLCDmonitorpowerindicatorwillturngreenwhile
poweredonandwillturnredoramberwhilepoweredoff.
NOTE:TheMainPowerSwitchmustbeintheON
positioninordertopowerupthemonitorusingthe
remotecontrolorthePowerButtononthefrontofthe
LCD.
PowerButton
MainPowerSwitch
English
English-25
POWER
DVI VGA RGB/HV OPTION
HDMI
PICTURE
MODE
DISPLAY
AUTO
SET UP
VOL
STILL
PIP
REMOTEID
ON/OFF
SET RESET
REMOTE CONTROLLER RU-M111
MTS SLEEP
INPUT
CHANGE
ON/OFF
CAPTURE
MUTE
CH
CHRTN
EXIT
MENU
AUDIO
INPUT
DVD/HD
SIZE
SOUND
VIDEO
TV
GUIDE
ENT
SET
+
+ +
PowerIndicator
ModeStatusIndicatorLight
PowerONGreen*2
PowerOFF(ECOSTANDBY)*
Powerconsumptionunder1W
Red
PowerOFF(STANDBY)
Powerconsumptionunder5W
Amber
PowerSaveAmberBlinking
PowerStandbywhen
“SCHEDULESETTINGS”
enabled
GreenandAmber
blinkalternately
Diagnosis(Detectingfailure)RedBlinking
(SeeTroubleShootingpage
41)
*WheninEcoStandbyModeRS-232Ccontrolsdonotfunction.
*2If"OFF"isselectedinPOWERINDICATOR(Seepage30),the
LEDwillnotlightwhentheLCDmonitorisactivemode.
PowerManagement
TheLCDmonitorfollowstheVESAapprovedDPMPower
Managementfunction.
Thepowermanagementfunctionisanenergysavingfunc-
tionthatautomaticallyreducesthepowerconsumptionof
thedisplaywhenthekeyboardorthemousehasnotbeen
usedforafixedperiodoftime.
Thepowermanagementfeatureonyournewdisplayhas
beensettothe“ON”mode.Thisallowsyourdisplaytoen-
teraPowerSavingModewhennosignalisdetected.This
couldpotentiallyincreasethelifetimeofthedisplaywhile
powerconsumptionisdecreased.
STANDBYmodeisusedwhenthedisplayisconnected
toanRS-232CcableorwhenusingtheINPUTDETECT
function.
ECOSTANDBYuseslesspower,buttheRS-232Cand
INPUTDETECTfunctionsarenotavailable.
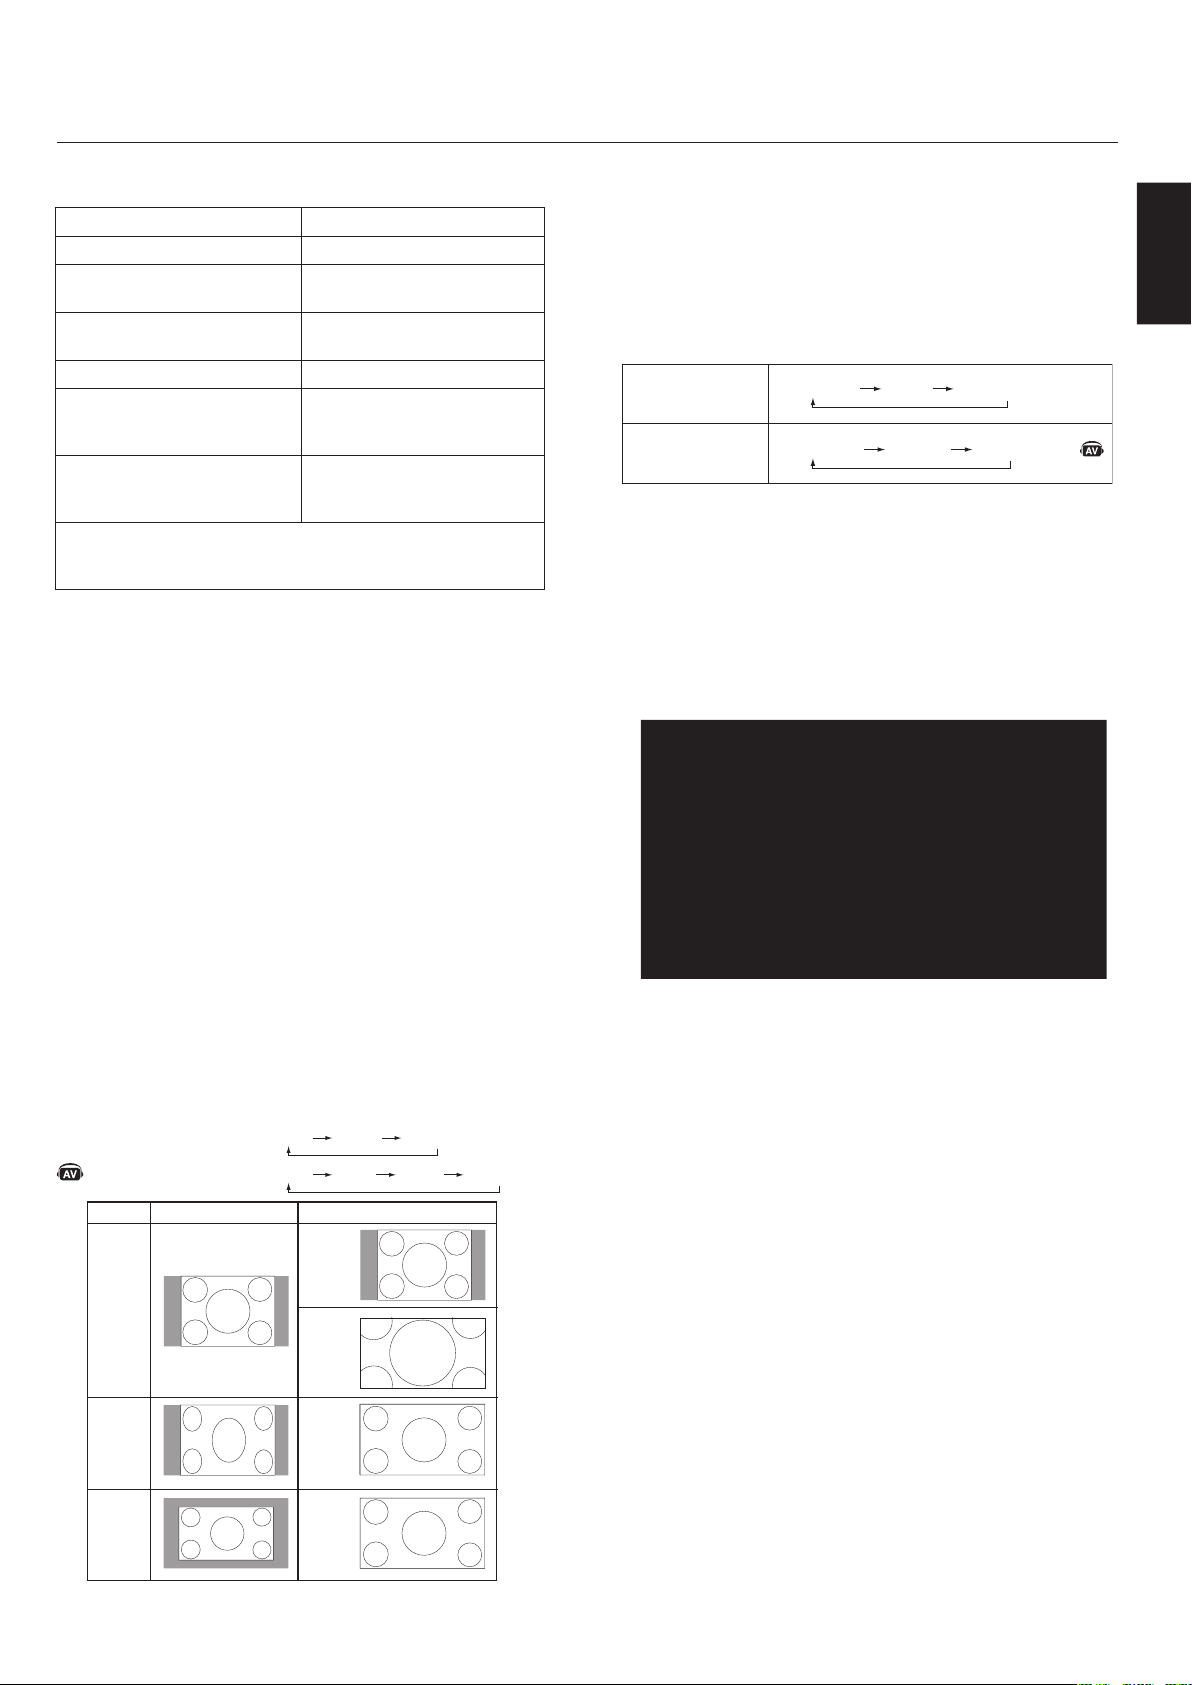
PictureSize
Thesizeofthepicturecanbechangeddependingonthe
aspectratio(4:3,16:9,etc.)oftheinputsignal.
PictureMode
ChoosethePictureModethatismostsuitableforthetype
ofcontentthatisshown.
Standard:forimages
sRGB:fortextbasedapplications.
Highbright:formovingimages
Cinema:formovies
STANDARDsRGBHIGHBRIGHT
STANDARDCINEMAHIGHBRIGHT
DVI,VGA,
RGB/HV,OPTION
HDMI,DVD/HD,
VIDEO,TV
InformationOSD
TheInformationOSDprovidesinformationsuchas:Mon-
itorID,InputSource,PictureSize,etc.PresstheDISPLAY
buttonontheremotetobringuptheInformationOSD.
Seepage35fordetailedexplanation.
- continued
Monitor ID:1
Target ID:5
DVI
AUDIO: IN1
SIZE:FULL
1024 X 768
48KHz/60Hz
SignalType
4:3
NORMALSIZERECOMMENDEDSIZE
NORMAL
ZOOM
(DYNAMIC)
FULL
WIDE
Squeeze
Letterbox
DVI,VGA,RGBH/V,OPTIONFULLZOOMNORMAL
FULLWIDEZOOMNORMAL
HDMI,DVD/HD,VIDEO,TV
English-26
ADAPTIVE CONTRASTADAPTIVE CONTRAST
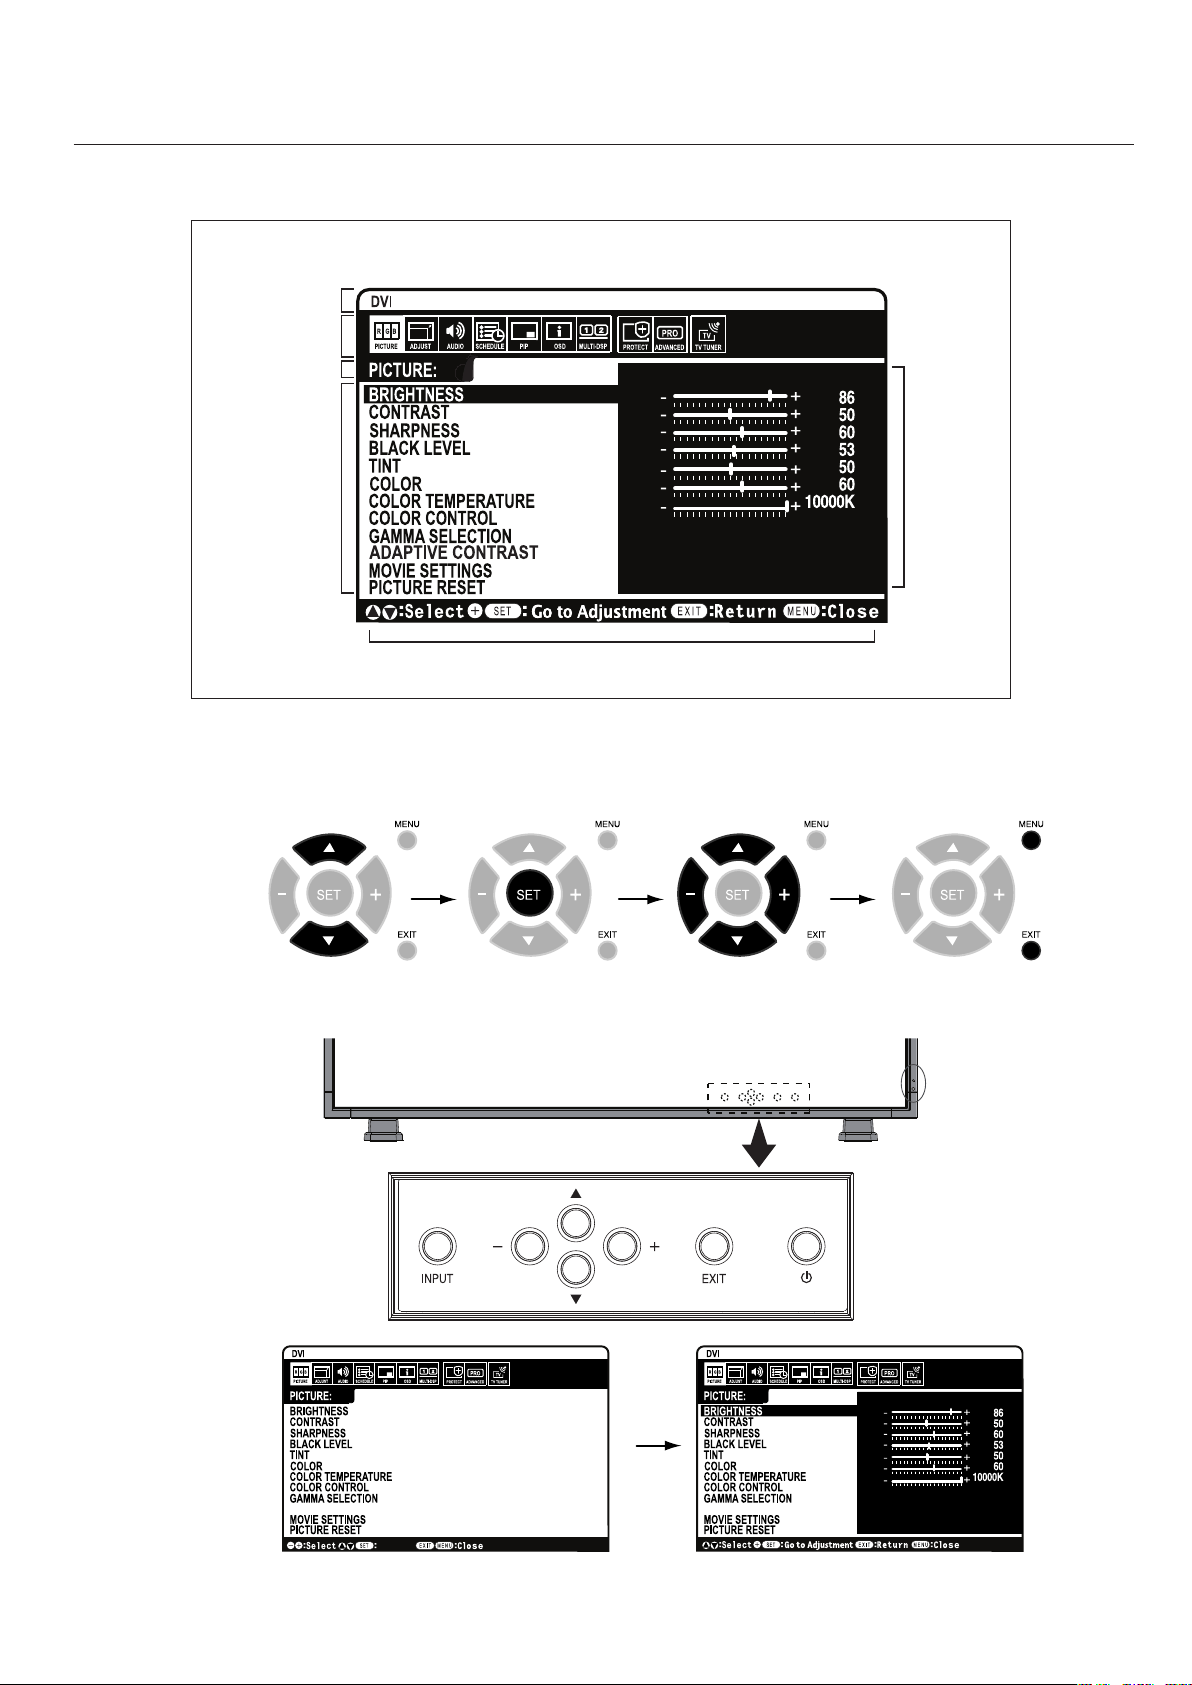
InputSource
MainMenuItems
SubMenu
MainMenuIcons
KeyGuide
Adjustment
Settings
PressUPorDOWN
buttontoselect
sub-menu.
Press
SET.
PressUP,DOWN,PLUS,
orMINUStoselectthe
functionorsettingtobe
adjusted.
PressMENUor
EXIT.
PressUPorDOWN
buttontoselect.
PressINPUTbutton
todecide.
PressUP,DOWN,
PLUS,orMINUSto
select.
Press
EXIT.
Remote
Control
Control
Panel
OSD
Screen
English
English-27
OSDSetting
PICTUREBRIGHTNESSAdjuststheoverallimageandbackgroundbrightness.Press+or-toadjust.
CONTRASTAdjuststheimagebrightnessinrelationshiptothebackground.Press+or-toadjust.
Note:ThesRGBpicturemodeisstandardandcannotbechanged.
SHARPNESSAdjuststhecrispnessoftheimage.Press+or-toadjust.
BLACKLEVELAdjuststheimagebrightnessinrelationshiptothebackground.Press+or-toadjust.
Note:ThesRGBpicturemodeisstandardandcannotbechanged.
TINT
HDMI,DVD/HD,VIDEO,TV
inputonly
Adjuststhetintofthescreen.Press+or-toadjust.
COLOR
HDMI,DVD/HD,VIDEO,TV
inputonly
Adjuststhecolordepthofthescreen.Press+or-toadjust.
COLORTEMPERATUREAdjuststhecolortemperatureoftheentirescreen.Alowcolortemperaturewillmake
thescreenreddish.Ahighcolortemperaturewillmakethescreenbluish.
Note:ThesRGBpicturemodeissettoapredefined6500Kstandard
andconnotbechanged.
COLORCONTROL
DVI,VGA,RGB/HV,HDMI
inputonly
AdjuststhelevelsoftheRed,Yellow,Green,Cyan,Blue,MagentaandSaturation.
Note:ThesRGBpicturemodeisstandardandcannotbechanged.
GAMMASELECTIONSelectadisplaygammaforbestpicturequality.
Note:ThesRGBpicturemodeisstandardandcannotbechanged.
NATIVE
2.2
2.4
SGAMMA
DICOMSIM.
PROGRAMMABLE
GammacorrectionishandledbytheLCDpanel.
TypicaldisplaygammaforusewithaPC.
Goodforvideo(TV,DVD,etc.).
Specialgammaforcertaintypesofmovies.Raisesthedarkpartsandlowersthelight
partsoftheimage.(S-Curve)
DICOMGSDFcurvesimulatedforLCDtype.
AprogrammablegammacurvecanbeloadedusingNECsoftware.
ADAPTIVECONTRAST
HDMI,DVD/HD,VIDEO,TV
inputonly
Setsthelevelofadjusmentfordynamiccontrast.
OFF
MID
HIGH
MOVIESETTINGS
NOISEREDUCTION
VIDEO,TVinputonly
FILMMODE
HDMI,DVD/HD,VIDEO,TV
inputonly
Adjuststheamountofnoisereduction.Press+or-toadjust.
SelectsFilmmode.
PICTURERESETResetsthefollowingsettingswithinthePICTUREmenubacktofactorysetting:
BRIGHTNESS,CONTRAST,SHARPNESS,BLACKLEVEL,TINT,COLORTEMPERATURE,
COLORCONTROL,GAMMASELECTION,ADAPTIVECONTRAST,MOVIESETTINGS.
ADJUSTAUTOSETUP
VGAandRGB/HVinputonly
Automaticallyadjustsscreensize,Hposition,Vposition,Clock,ClockPhase,White
Level,andBlackLevel.
AUTOADJUST
VGAandRGB/HVinputonly
HPosition,VPositionandClockPhaseareadjustedautomaticallyuponpoweron.
HPOSITIONControlsthehorizontalpositionoftheimagewithintheDisplayareaoftheLCD.
Press+tomoveright.Press-tomoveleft.
VPOSITIONControlstheverticalpositionoftheimagewithintheDisplayareaoftheLCD.
Press+tomoveup.Press-tomovedown.
CLOCK
VGAandRGB/HVinputonly
Press+toexpandthewidthoftheimageontherightofthescreen.
Press-tonarrowthewidthoftheimageontheleft.
ADAPTIVE CONTRASTADAPTIVE CONTRAST
- continued
English-28
- continued
CLOCKPHASE
VGA,RGB/HV,DVD/HDinputonly
Adjuststhevisual“noise”ontheimage.
HRESOLUTION
DVI,VGA,RGB/HVinputonly
Adjuststhehorizontalsizeoftheimage.
VRESOLUTION
DVI,VGA,RGB/HV
inputonly
Adjuststheverticalsizeoftheimage.
ZOOMMODE
AllinputexceptforTV
Selecttheaspectratioofthescreenimage.
BASEZOOM
Choosethezoommethod.
16:9
HDMI,DVD/HD,
VIDEOInputonly
14:9
HDMI,DVD/HD,
VIDEOInputonly
DYNAMIC
HDMI,DVD/HD,
VIDEOInputonly
OFF
CUSTOM
SameaspectratioastheLCDpanel.
14:9
Expandsa4:3picturetofillthescreeninanon-linear(non-proportionate)mannerand
someoftheimagewillbelostduetoexpansion.DYNAMICisthesameasFULLsize
imagewhenHDTV1080isignalisinput.
Selecting“OFF”willdisplaytheimageina1by1pixelformat.(Iftheinputresolutionis
higherthana1360x768resolution,theimagewillbescaleddowntofitthescreen.
Displaysanimageaslargeaspossiblewithoutchangingtheaspectratioorcuttingoff
partoftheimage.
ZOOM
16:9,14:9,CUSTOMonly
HZOOM
16:9,14:9,CUSTOMonly
VZOOM
16:9,14:9,CUSTOMonly
HPOS
16:9,14:9,CUSTOMonly
VPOS
16:9,14:9,CUSTOMonly
Maintainstheaspectratiowhilezooming.
Amountofhorizontalzoom.CanbeadjustedforeachBASEZOOMsetting.
Amountofverticalzoom.CanbeadjustedforeachBASEZOOMsetting.
Horizontalposition.CanbeadjustedforeachBASEZOOMsetting.
Verticalposition.CanbeadjustedforeachBASEZOOMsetting.
INPUTRESOLUTION
VGAandRGB/HVinputonly
Ifthereisaproblemwithsignaldetection,thisfunctionforcesthemonitortodisplaythe
signalatthedesiredresolution.
Ifnoproblemisdetected,theonlyavailableoptionwillbe“AUTO”.
ADJUSTRESETResetsthefollowingsettingswithintheADJUSTmenubacktofactorysetting:
AUTOADJUST,HPOSITION,VPOSITION,CLOCK,CLOCKPHASE,HRESOLUTION,V
RESOLUTION,ZOOMMODE,INPUTRESOLUTION.
AUDIO
BALANCE
TREBLE
BASS
PIPAUDIOSelectssourceofPIPaudio.
AUDIORESETResets“AUDIO”optionsbacktofactorysettings.
SCHEDULEOFFTIMERSetsthemonitortopoweroffafteralengthoftimebetween1and24hours.
SCHEDULESETTINGCreatesaworkingscheduleforthemonitortouse.Seepage34forinstructions.
SCHEDULELISTListofschedules.
DATE&TIMESetsthedate,time,anddaylightsavingregion.Date&timemustbesetinorderforthe
“SCHEDULE”functiontooperate.

English
English-29
- continued
YEAR
MONTH
DAY
TIME
DAYLIGHTSAVING
SCHEDULERESETResetsthefollowingsettingswithintheSCHEDULEmenubacktofactorysetting:
OFFTIMER,SCHEDULESETTINGS.
PIP
KEEPPIPMODE
Allowsthemonitortoremainin“PIP”modeafterpoweringoff.WhenPowerisreturned,
PIPappearswithouthavingtoentertheOSD.
PIPMODEPicture-in-Picture
OFF
PIP
POP
SIDEBYSIDE(ASPECT)
SIDEBYSIDE(FULL)
PIPSIZESelectsthesizeofthesub-pictureusedinPicture-in-Picture(PIP)mode.
SMALL
MIDDLE
LARGE
PIPPOSITIONDetermineswherethePIPappearsonthescreen.
PIPRESETResetsthefollowingsettingswithinthePIPmenubacktofactorysetting:
KEEPPIPMODE,PIPMODE,PIPSIZE,PIPPOSITION.
OSDLANGUAGESelectthelanguageusedbytheOSD.
ENGLISH
DEUTSCH
FRANÇAIS
ITALIANO
ESPAÑOL
SVENSKA
OSDTURNOFFTurnsofftheOSDafteraperiodofinactivity.Thepresetchoicesare10-240seconds.
OSDPOSITIONDeterminesthelocationwheretheOSDappearsonthescreen.
UP
DOWN
LEFT
RIGHT
INFORMATIONOSDSelectswhethertheinformationOSDisdisplayedornot.TheinformationOSDwillbe
displayedwhentheinputsignalorsourcechanges.TheinformationOSDwillalsogive
awarningwhenthereisno-signalorthesignalisout-ofrange.
Anintervalbetween3to10secondsfortheInformationOSDtoappearisavailable.
MONITORINFORMATIONMonitorInformation.
English-30
- continued
OSDTRANSPARENCYSetthetransparencyleveloftheOSD.
OFF
TYPE1
TYPE2
OSDRESETResetsthefollowingsettingswithintheOSDmenubacktofactorysetting:
OSDTURNOFF,OSDPOSITION,INFORMATIONOSD,andOSDTRANSPARENCY.
MULTIDISPLAYMONITORID
SetsthemonitorIDnumberfrom1-26.
IRCONTROL
Selectsthemodeofthemonitorforusewiththeinfra-redremotecontrolwhenusing
theRS-232Cdaisychain.
NORMAL
PRIMARY
SECONDARY
LOCK
Themonitorwillbecontrollednormallybywirelessremotecontroller.
Choose“PRIMARY”forthefirstmonitorwithinanR-S232Cdaisychain.
Choose“SECONDARY”forallsubsequentmonitorswithinanRS-232Cdaisychain.
Preventsthemonitorfrombeingcontrolledbywirelessremotecontroller.Toreturnto
normaloperation,pressthe“DISPLAY”buttonontheremotecontrollerfor5seconds.
TILEMATRIX
Allowsoneimagetobeexpandedanddisplayedovermultiplescreens(upto25)
throughadistributionamplifier.
HMONITORS
VMONITORS
POSITION
TILECOMP
ENABLE
Numberofmonitorsarrangedhorizontally.
Numberofmonitorsarrangedvertically.
Selectwhichsectionofthetiledimagetobedisplayedonthemonitor.
TurnstheTILECOMPfeatureon.
EnablesTileMatrix.
POWERONDELAY
Adjuststhedelaytimebetweenbeingin“standby”modeandentering“poweron”mode.
“POWERONDELAY”canbesetbetween0and50seconds.
POWERINDICATOR
TurnsonorofftheLEDlocatedonthefrontofthemonitor.If"OFF"isselected,theLEDwill
notlightwhentheLCDmonitorisactivemode.
MULTIDISPLAYRESET
ResetsthefollowingsettingswithintheMULTIDISPLAYmenubacktofactorysetting:
MONITORID,IRCONTROL,TILEMATRIX,POWERONDELAY.
DISPLAY
PROTECTION
POWERSAVE
AllinputsexceptforTV
Setshowlongthemonitorwaitstogointopowersavemodeafteralostsignal.
NOTE:WhenconnectingDVI,videocardmightnotstopsendingdigitalevenifimagehasdis-
appeared.Inthiscasethemonitordoesnotgottopowermanagementmode.
STANDBYMODE
Lowerspowerconsumption.
Note:RS-232CFunctionislostwheninEcoStandbymode.
HEATSTATUS
DisplaysstatusoftheCOOLINGFAN,BRIGHTNESSandTEMPERATURE.
FANCONTROL
Coolingfanreducesthetemperatureofthedisplay.
SCREENSAVER
UsetheSCREENSAVERfunctiontoreducetheriskofImagePersistence.
GAMMA
BRIGHTNESS
MOTION
Thegammacurvebecomesnarrow,reducingcontrastandcuttingdowntheriskof
imageretention.
Thebrightnessisdecreasedwhen“ON”isselected.
Thescreenimageisslightlyexpandedandmovesin4directions(UP,DOWN,RIGHT,
LEFT)atuserdeterminedintervals.
SIDEBORDERCOLOR
Adjuststhecolorofthesideborderswhena4:3imageisdisplayed.
Press+button,thebarwillbecomelighter.
Press-button,thebarwillbecomedarker.
AUTOBRIGHTNESS
DVI,VGA,RGB/HV
inputonly
Adjuststhebrightnesslevelaccordingtotheinputsignal.
CHANGESECURITY
PASSWORD
Allowsthesecuritypasswordtobechanged.Factorypresetpasswordis0000.
SECURITYLOCK
Locksthesecuritypassword.
DDC/CI
ENABLE/DISEABLE:turnonoroffthetwowaycommunicationandcontrolofthemonitor.
DISPLAY
PROTECTIONRESET
ResetsthefollowingsettingswithinthePicturemenubacktofactorysetting:
POWERSAVE,STANDBYMODE,FANCONTROL,SCREENSAVER,SIDEBORDERCOLOR,
AUTOBRIGHTNESS.
English
English-31
- continued
ADVANCEDOPTIONINPUTDETECT
AllinputsexceptforTV
Selectsthemethodofinputdetectionthemonitoruseswhenmorethantwoinput
devicesareconnected.
NONE
FIRSTDETECT
LASTDETECT
VIDEODETECT
TheMonitorwillnotsearchtheothervideoinputports.
Whenthecurrentvideoinputsignalisnotpresent,thenthemonitorsearchesfora
videosignalfromtheothervideoinputport.Ifthevideosignalispresentintheother
port,thenthemonitorswitchesthevideosourceinputporttothenewfoundvideo
sourceautomatically.Themonitorwillnotlookforothervideosignalswhilethecurrent
videosourceispresent.
Whenthemonitorisdisplayingasignalfromthecurrentsourceandanewsecondary
sourceissuppliedtothemonitor,themonitorwillautomaticallyswitchto
thenewvideosource.Whencurrentvideoinputsignalisnotpresent,themonitor
searchesforavideosignalfromtheothervideoinputport.Ifthevideosignalispresent
intheotherport,thenthemonitorswitchesthevideosourceinputporttothe
newfoundvideosourceautomatically.
DVD/HDorVIDEOinputswillhavepriorityoverDVI,VGA,andRGB/HV.WhenDVD/HD
orVIDEOinputsignalispresentthemonitorwillchangeandkeeptotheDVD/HDor
VIDEOinput.
LONGCABLEON/OFF
VGAandRGB/HVinputonly
Compensatesforimagedegradationcausedfromusingalongcable.
LONGCABLEMANUAL
VGAandRGB/HVinputonly
Manuallycompensatesforimagedegradationcausedfromusingalongcable.
REDDELAY
GREENDELAY
BLUEDELAY
REDSHARPNESS
GREENSHARPNESS
BLUESHARPNESS
SOGPEAK.
VIDEOEQ.
RGB/HVinputonly
SYNCTERMINATE
RGB/HVinputonly
Adjuststhephaseoftheredsignal.
Adjuststhephaseofthegreensignal.
Adjuststhephaseofthebluesignal.
AdjuststheperformancedegradationoftheREDsignal.
AdjuststheperformancedegradationoftheGREENsignal.
AdjuststheperformancedegradationoftheBLUEsignal.
AdjuststheshapeofSynconGreensignal.
Optimizetheshape(Tailing)ofRED,GREENandBLUEsignals.
Selectstheterminateresistanceformatchingthecableimpedance.
DVIMODEChoosetheDVImodebasedontheinputdeviceconnectedviaDVIconnector.
DVI-PC
DVI-HD
WhenaPCorsimilarequipmentisconnected.
WhenaDVDplayerisconnected.
SCANCONVERSION
AllinputsexceptforRGB,RGB/HV
SelectstheIP(InterlacetoProgressive)conversionfunction.
Note:ForDVIinput"DVI-HD"needstobeenabledintheDVImodemenu.
PROGRESSIVE
INTERLACE
Convertsinterlacedsignalstoprogressive.
Thisisthedefaultsetting.
DisablesIPconversion.Thissettingisbestsuitedformotionpictures,butincreases
theriskofimageretention.
SCARTMODE
InputmodefordevicesusingSCARTconnectors.
S-VIDEOMODE
SelectstheS-Videoinputportfunction.
PRIORITY
SEPARATE
WhenanS-VideocableisconnectedtotheS-Videoinput,itwillhavepriorityover
thecompositeinputport.
TheS-VideoportandCompositeportcanbeselectedasindependentinputports.
COLORSYSTEM
VIDEOinputonly
TheselectedColorSystemdependsonthevideoformatoftheinputsignal.
AUTO
NTSC
PAL
SECAM
4.43NTSC
PAL-60
AutomaticallychoosesColorSystemsettingbasedoninputsignal.
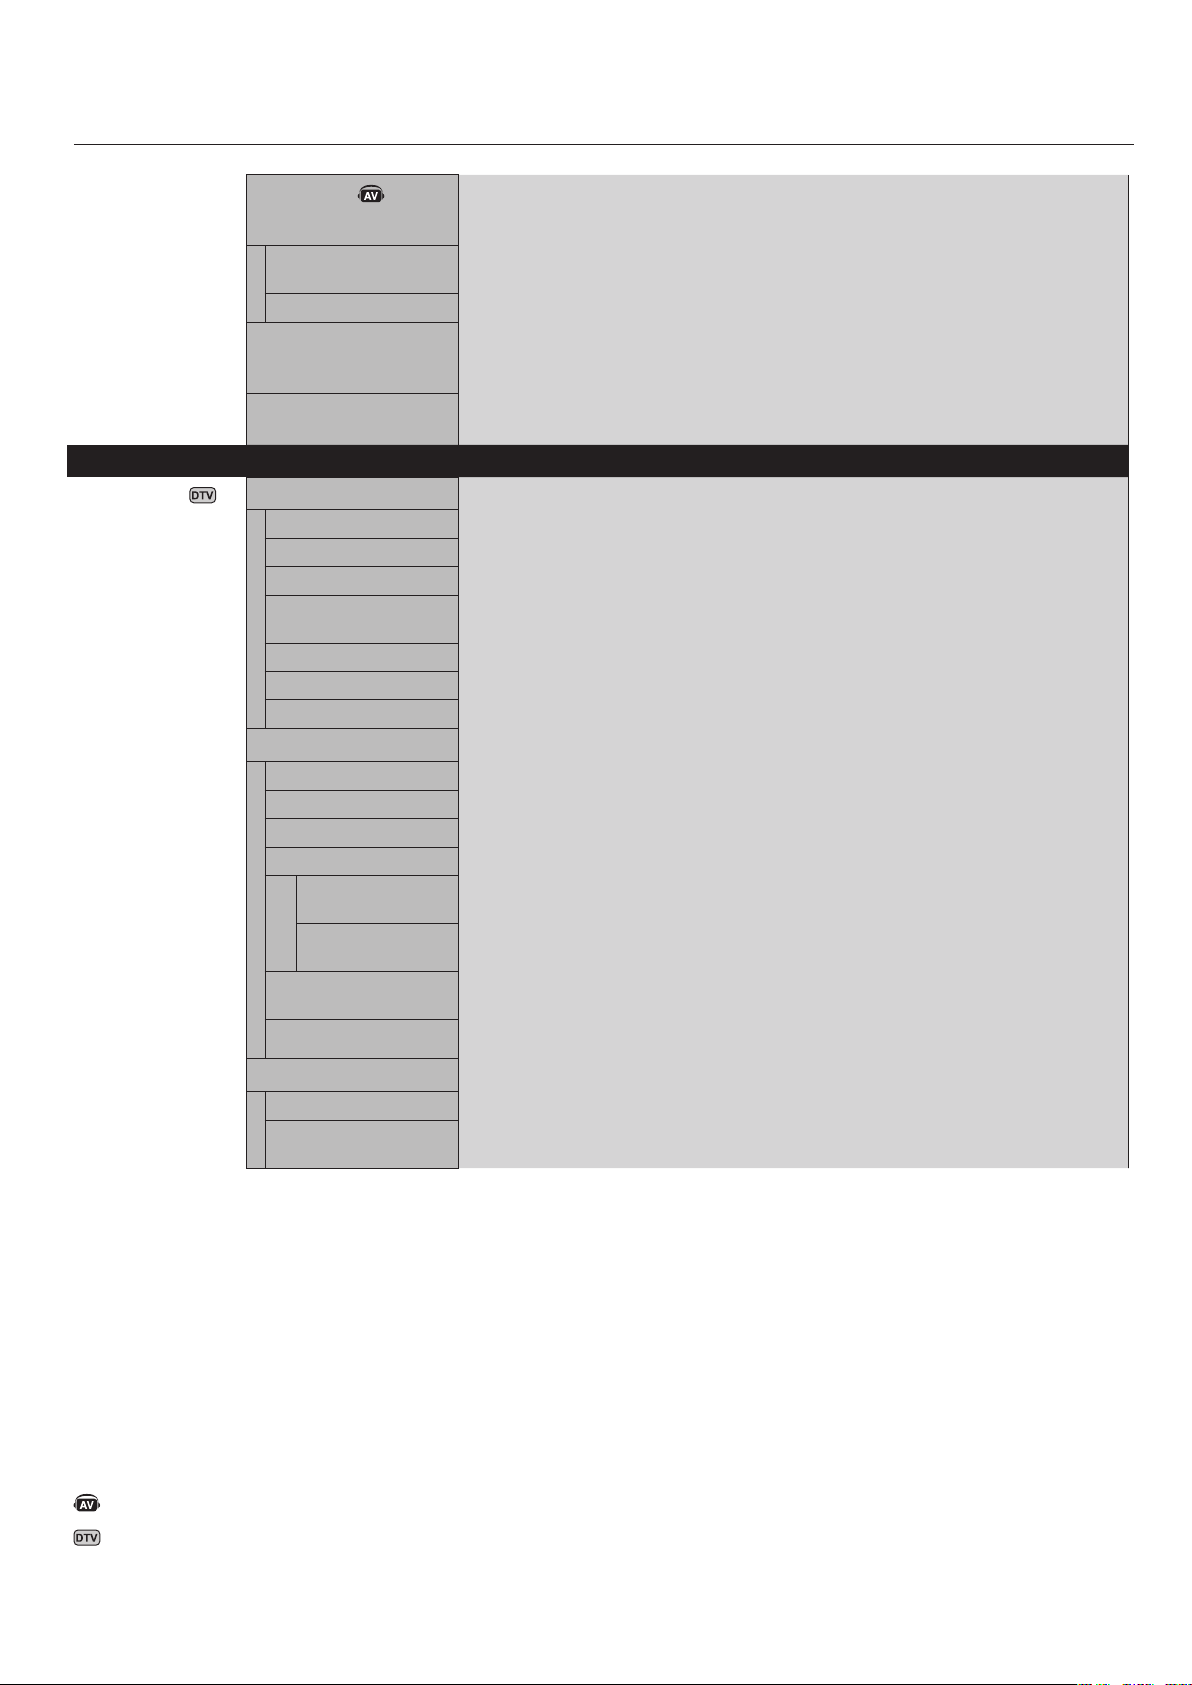
English-32
- continued
SCANMODE
HDMI,DVD/HD,VIDEO,TV
inputonly
Somevideoformatsmayrequirescanconversioninordertobestdisplaytheimage.
OVERSCAN
UNDERSCAN
Imagesizeislargerthanwhatcanbedisplayed.Theimageedgewillappearcropped.
Approximately95%oftheimagewillbeshownonthescreen
Imagesizestayswithinthedisplayarea.Thewholeimageisdisplayedonthescreen.
ADVANCEDOPTION
RESET
ResetsthefollowingsettingswithintheADVANCEDOPTIONmenubacktofactoryset-
ting:INPUTDETECT,LONGCABLEON/OFF,LONGCABLEMANUAL,DVIMODE,SCAN
CONVERSION,S-VIDEOMODE,SCANMODE.
FACTORYRESETResetsOSDoptionsbacktofactorysettingsEXCEPTFOR:CHANGESECURITYPASS-
WORDandSECURITYPASSWORD.
TVTUNER
Notallmodelshave
theDigitalTuner
installed.
TUNER
TUNINGBAND
CHECKDTVSIGNAL
CHANNELSEARCH
ADDONCHANNEL
SEARCH
FINETUNING
CHANNELEDIT
CHANNELLABELS
ChooseAIRorCableasTVsource.
ShowsthestatusoftheDigitalTVsignal.
SearchesforTVchannelsandstorestheminmemory.
SearchesforTVchannelsandstorestheminmemorywithouterasingpreviously
storedchannels.
Performsfineadjustmentstoanalogchannels.
Addorremovechannelsstoredinmemory.
Addalabeltothechannel.
CONFIGURATION
MENULANGUAGE
TIMEZONE
PASSWORDSET
PARENTALCONTROL
PARENTAL
CONTROLMENU
ADVANCED
RATING
CLOSEDCAPTION
OPTIONS
RESOLUTION
SettheParentalControlPassword.Factorydefaultpasswordis0000.
Parentscanchoosetoblocktypesofprogrammingbasedonratingandcontent.
Downloadablerating,dependingonbroadcast.PressSETtochangesetting.
NOTE:ClosedcaptioningsettingscannotbeadjustedfortheVIDEO/S-VIDEOinputs.
AUTOisistheonlyoptionavailablefortheseinputs.
Setthedisplayedimagetothedesiredresolution.
AUDIO
AUDIOLANGUAGE
DIGITALAUDIO
OUTPUT
Choosethelanguageofaudiooutput.
Selectthedigitalaudiooutputsource.ChooseDolbyD/PCM/OFF.
DenotesAVunitfunction.AllAVfunctionsareenabledwiththeAV
unitisinstalled.NotallmodelshavetheAVunitinstalled.
DenotesDigitalTunerfunction.AllDTVandAVfunctionsare
enabledwhentheDTVunitisinstalled.Notallmodelswillhave
thedigitaltunerinstalled.
English
English-33
InitialTVSetup
BeforewatchingTVforthefirsttimeitisnecessaryto
programthechannels.
1.AttachthecableorantennatothecoaxialRFConnector
onthebackofthemonitor.
NOTE:Cabledistributionsystemshouldbegrounded
(earthed)inaccordancewithANSI/NFPA70,theNational
ElectricCode(NEC),inparticularsection820.93,
GroundingofOuterConductiveShieldofaCoaxialCable.
2.EntertheOSDandgototheTUNER.
3.IntheTUNINGBANDmenuselectwhichtuning
method(Air,Cable,CableHRC,CableIRC)willbeused.
4.EntertheCHANNELSEARCHmenu.PressSETto
automaticallyscanandstorechannelstomemory.
Thechannelsearchwillstorebothanaloganddigital
channels.
NOTE:Analogchannelsareindicatedwitha-0following
thechannelnumber.Digitalchannelsareindicatedwith
a-followedbyanumber.Forexample,channel2-0is
analogandchannel2-1isdigital.Analogchannelsmay
alsohaveseparatedigitalsubchannelsassociatedwith
them.Forexamplechannel3-0wouldbeanalogfollowed
bychannel3-1,3-2,etc.
5.Oncechannelsareinmemory,usetheCHANNELEDIT
menutoaddorremovechannelsandtheCHANNEL
LABELmenutocreateuniquenamesforchannels,if
desired.
ParentalControlsTV,VIDEOinputonly.
Parentscanblockcertaintypesofprogrammingbasedon
theratingandthecontent.
Toblockprogramming:
1.EnterthePARENTALCONTROLmenu,foundunderthe
CONFIGsubmenuwithintheTUNEROSD.
2.Enterthepassword.Defaultpasswordis0000.This
passwordcanbechangedinthePASSWORDSETmenu.
3.Highlightthesquarenexttothetypeofprogramming
youwishtoblockandpressSETontheremote.
NOTE:Blockingonetypeofprogrammingwill
automaticallyblockallhigherratedprogrammingalso.
However,itispossibletounlockthisprogrammingwhile
keepingthedesiredprogrammingblocked.
TVParentalGuideRatingsChart
OFFNoLimitation.
TV-YAllchildren.Thethemesandelementsinthisprogramarespecificallydesignedforaveryyoung
audience,includingchildrenfromages2-6.
TV-Y7Directedtoolderchildren.Themesandelementsinthisprogrammayincludemildphysicalorcomic
violenceormayfrightenchildrenundertheageof7.
TV-GGeneralaudience.Itcontainslittleornoviolence,nostronglanguage,andlittleornosuggestive
dialogueorsituations.
TV-PGParentalguidancesuggested.Theprogrammaycontaininfrequentcoarselanguage,limitedviolence,
somesuggestivesexualdialogueandsituations.
TV-14Parentsstronglycautioned.Thisprogramcontainssomematerialthatmanyparentswouldfind
unsuitableforchildrenunder14yearsofage.Thisprogrammaycontainintenseviolence(V),intense
sexualsituations(S),strongcoarselanguage(L),orintenselysuggestivedialogue(D).
TV-MAMatureaudiencesonly.Thisprogrammaycontainmaturethemes,indecentlanguage,graphicviolence
andexplicitsexualcontent.
VideoParentalGuideRatingsChart
OFFNoLimitation
GGeneralaudiences.Allagesarepermittedtowatch.
PGParentalguidancesuggested.Somematerialmaynotbesuitableforchildren.
PG-13Parentsstronglycautioned.Somematerialmaybeinappropriateforchildrenunder13.
RRestricted.Under17requiresanaccompanyingparentoradultguardian.
NC-17Nooneunder17permittedtowatch.
XAdultsonly.
NOTE:NotallmodelscomewiththeDigitalTunerinstalled.
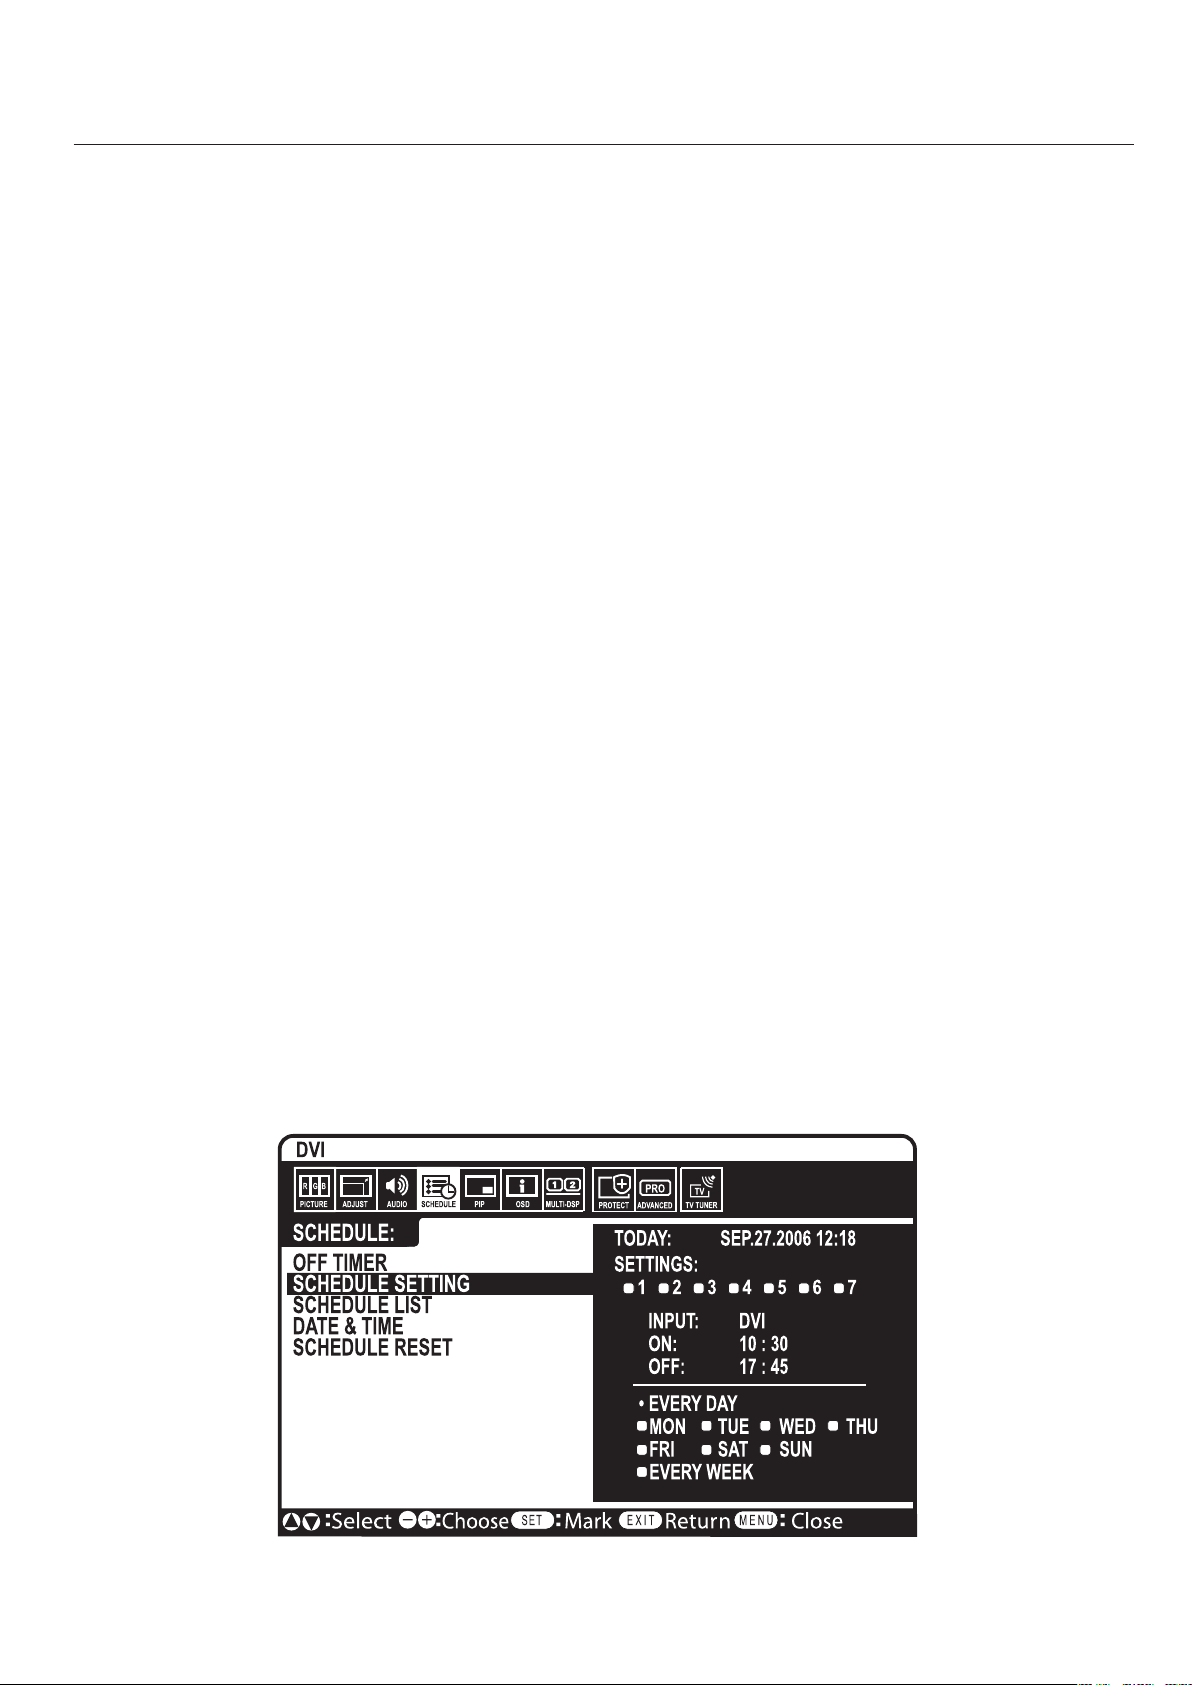
English-34
NOTE1:CREATINGASCHEDULE
Theschedulefunctionallowsthedisplaytobesettopower
onandoffatdifferenttimes.Uptosevendifferentsched-
ulescanbeprogrammed.
Toprogramtheschedule:
1.EntertheSCHEDULEmenu.
HighlightSCHEDULESETTINGusingtheupand
downbuttons.PresstheSETorthe+buttontoenterthe
Settingsmenu.Highlightthedesiredschedulenumber
andpressset.Theboxnexttothenumberwillturn
yellow.Theschedulecannowbeprogrammed.
2.UsetheupanddownarrowstohighlightINPUT.
Usethe+and-buttonstochoosetheinputsource.
3.AftertheINPUTsourceisselected,usethedownbutton
tohighlightthehourssettingintheONtimeslot.Use
the+and-buttonstosetthehour.Usetheupanddown
buttonstohighlighttheminutessetting.Usethe+and
-buttonstosettheminutes.SettheOFFtimeinthesame
manner.
4.Usethedownbuttontoselectadayonwhichthe
schedulewillbeenabled.Pushthesetbuttontoenable.If
thescheduleistoberaneveryday,usethechooseEVERY
DAYandpresstheSETbuttonThecirclenexttoEVERY
DAYwillturnyellow.Ifaweeklyscheduleisdesired,
choosethedaysoftheweekusingtheupanddown
buttonsandpressingSETtoselect.Thenhighlightthe
EVERYWEEKoptionandpressSET.
5.Afterascheduleisprogrammedtheremainingschedules
canthenbeset.PressCLOSEtoleavetheOSDorpress
EXITtogobacktothepreviousmenu.
NOTE:Ifschedulesareoverlappingthentheschedule
withthehighestnumberwillhavepriorityoverthe
schedulewiththelowestnumber.ForexampleSchedule
#7willhavepriorityoverSchedule#1.
NOTE2:IMAGEPERSISTENCE
PleasebeawarethatLCDTechnologymayexperiencea
phenomenonknownasImagePersistence.ImagePersis-
tenceoccurswhenaresidualor“ghost”imageofaprevious
imageremainsvisibleonthescreen.UnlikeCRTmonitors,
LCDmonitors’imagepersistenceisnotusuallypermanent,
butconstantimagesbeingdisplayedforalongperiodof
timeshouldbeavoidedsincetheremaybea“semi-perma-
nent”effect.
Toalleviateimagepersistence,turnoffthemonitorforas
longasthepreviousimagewasdisplayed.Forexample,if
animagewasonthemonitorforonehourandaresidual
imageremains,themonitorshouldbeturnedoffforone
hourtoerasetheimage.
Aswithallpersonaldisplaydevices,NECDISPLAYSOLU-
TIONSrecommendsdisplayingmovingimagesandusing
amovingscreensaveratregularintervalswheneverthe
screenisidleorturningoffthemonitorwhennotinuse.
Pleasesetthe“SCREENSAVER”,“DATE&TIME”and
“SCHEDULESETTINGS”functionstofurtherreducethe
riskofImagepersistence.

English
English-35
ThisLCDmonitorcanbecontrolledviapersonalcomputer
orwirelessremotecontrolusinganRS-232Cconnection.
MONITORIDandIRCONTROL
UsingonePCoroneinfra-redwirelesscontroller,upto26
individualLCD4020/LCD4620monitorscanbecontrolled
throughadaisychainviaRS-232Cconnection.
1.ConnectPCandLCD4020/LCD4620.
ConnectaPC’sRS-232Ccontroloutputtothe
LCD4020/LCD4620’sRS-232Cinput.Youcanthen
connecttheRS-232CoutputfromtheLCD4020/
LCD4620toanotherLCD4020/LCD4620’sRS-232C
input.Upto26monitorscanbeconnectedusingRS-
232C.
2.SetMonitorIDandIRControlmode.
Forproperoperation,theMonitorIDshouldbe
setintheOSDmenuofeachmonitorthatisinthe
chain.TheMonitorIDcanbesetunderthe“MULTI
DISPLAY”menuintheOSD.TheMonitorIDnumber
canbesetwithinarangefrom1to26.Notwo
monitorsshouldsharethesameMonitorIDnumber.
Itisrecommendedtonumbereachmonitorinadaisy
chainsequentiallyfrom1.Thefirstmonitorinthe
daisychainisdesignatedastheprimarymonitor.
Subsequentmonitorswiththechainaresecondary
monitors.
Inthe“MULTIDISPLAY”menuonthefirstmonitor
intheRS-232Cdaisychainsetthe“IRCONTROL”to
“PRIMARY”.
Setthe“IRCONTROL”to“SECONDARY”onallother
monitors.
3.Pressthe“DISPLAY”buttonontheremote
controlwhileaimingatthe“PRIMARY”
monitor.
TheInformationOSDwillbeshownattopleftsideof
thescreen.
MONITORID:DisplaystheIDnumberofthe
currentmonitorwithinthedaisychain.
TARGETID:DisplaystheIDnumberofthemonitor
thattobecontrolledviadaisychainfromthecurrent
monitor.
Pressthe“+”or“-”buttonstochangethe“Target
ID”toshowtheIDnumberofthemonitortobe
controlled.Tocontrolallofthedaisychained
monitorssimultaneously,select“ALL”asthe“Target
ID.”
NOTE:IfthemonitorisinECOStandbymode,RS-
232Cfunctionalityisstopped.
4.Usethewirelessremotecontrollertocontrol
the“SECONDARY”monitorwhileaimingat
the“PRIMARY”monitor.
The“MENUOSD”willappearontheselectedtarget
monitor.
NOTE:Ifthe“IDNo.”modeselectOSDisshowing,
pressthe“DISPLAY”buttonontheremotecontrol
whilepointingatthe“PRIMARY”monitortoclear
thisOSD.
HINT:Ifyoulostcontrolduetotheincorrectsetting
of“IRCONTROL”,pressingthe“DISPLAY”button
ontheremotecontrolfor5ormoresecondswillreset
the“IRCONTROL”menuto“NORMAL”function.
Monitor ID:1
Target ID:5
DVI
AUDIO: IN1
SIZE:FULL
1024 X 768
48KHz/60Hz
Input Source
Picture Size
Input Signal Information
ID number assigned to current monitor *1
ID number assigned monitor to be
controlled via RS-232C *2
*1:"IRcontrol"shouldbeset"Primary"or"Secondary".
*2:"IRcontrol"shouldbeset"Primary".
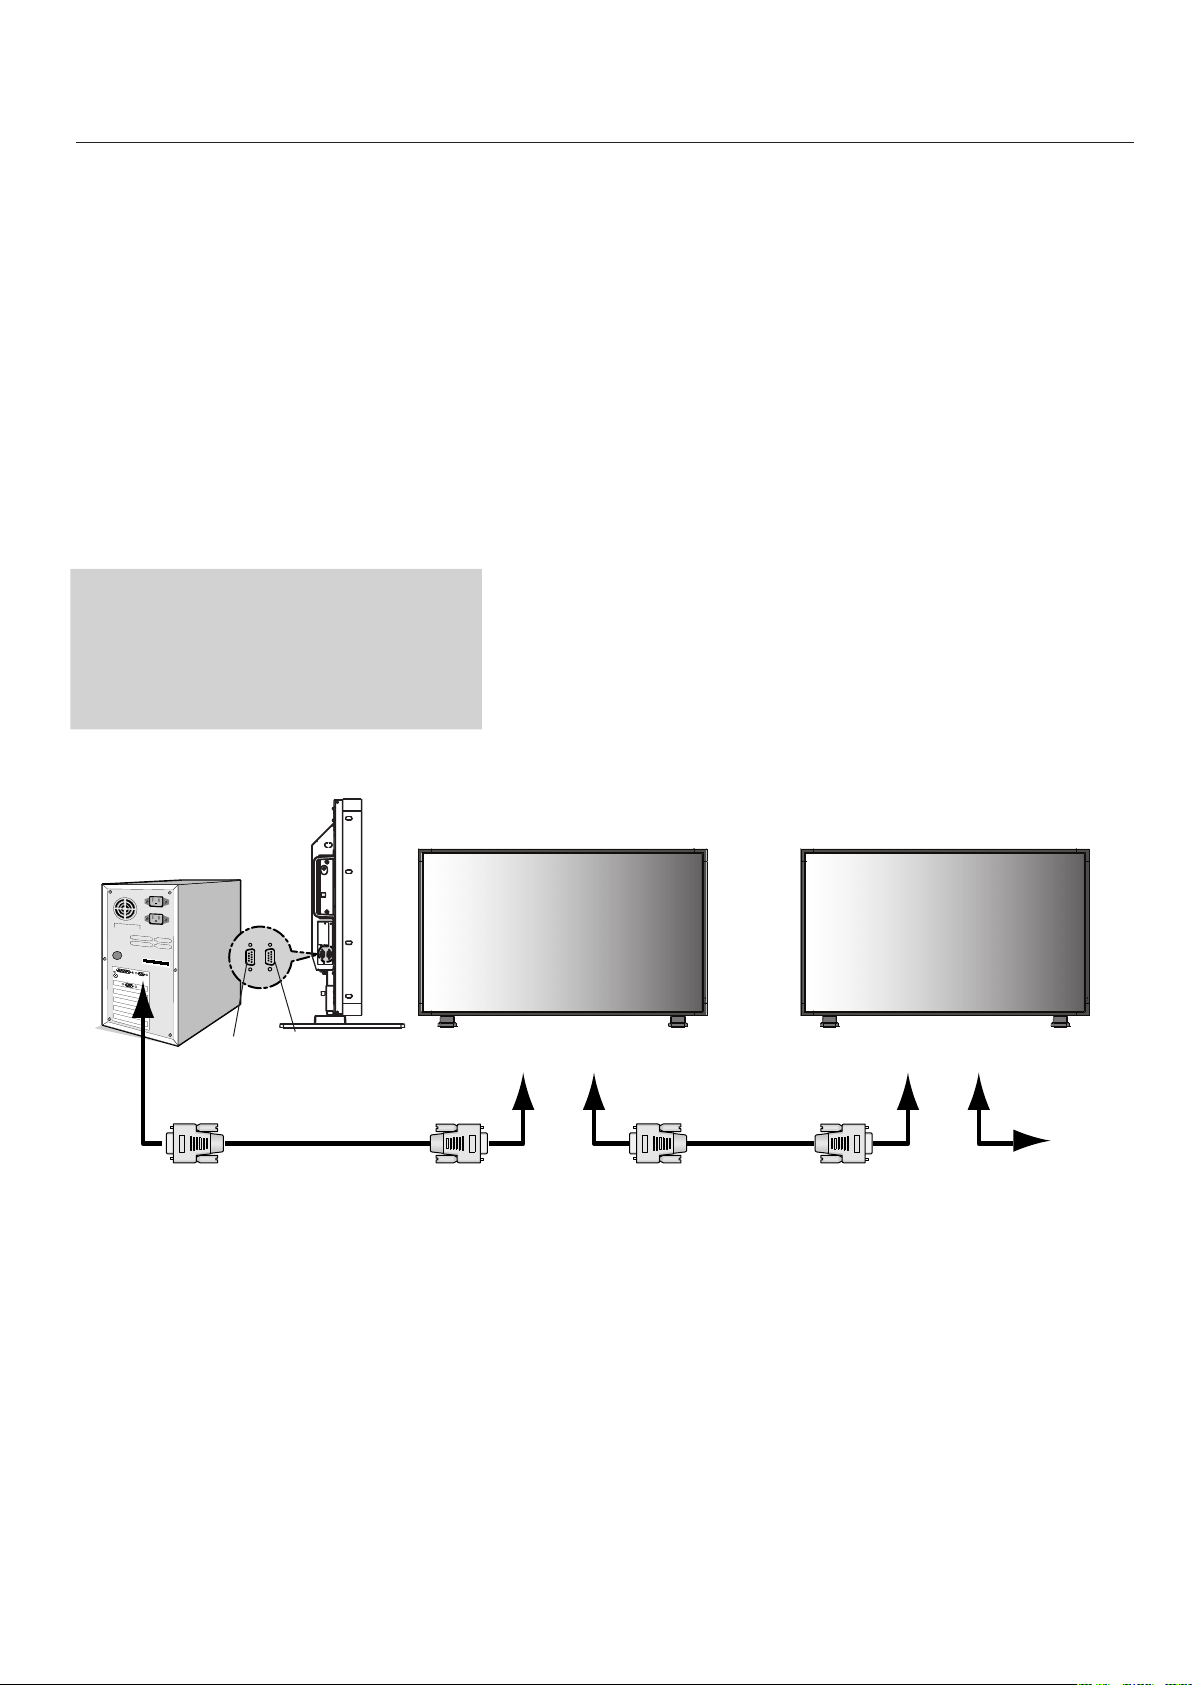
English-36
ThisLCDmonitorusesRXD,TXDand
GNDlinesforRS-232Ccontrol.
Thereversetypecable(nullmodemcable)
shouldbeusedforRS-232Ccontrol.
Functionsthatcanbecontrolled
viaRS-232Care:
PoweringONorOFF
Switchinginputsignals
NOTE:IfyourPC(IBMorIBMcompatible)isequipped
onlywitha25-pinserialportconnector,a25-pinserial
portadapterisrequired.Contactyourdealerfordetails.
NOTE:Inordertofunction,theRS-232COUTterminal
canonlybeconnectedtoanothermonitorofthesame
model.Donotconnecttoothertypesofequipment.
•
•
- continued
PC
(Out)
RS-232CCable
RS-232CCable
RS-232C(IN)RS-232C(OUT)RS-232C(IN)RS-232C(OUT)
MultiSync
MultiSync
MultiSync
IN
OUT
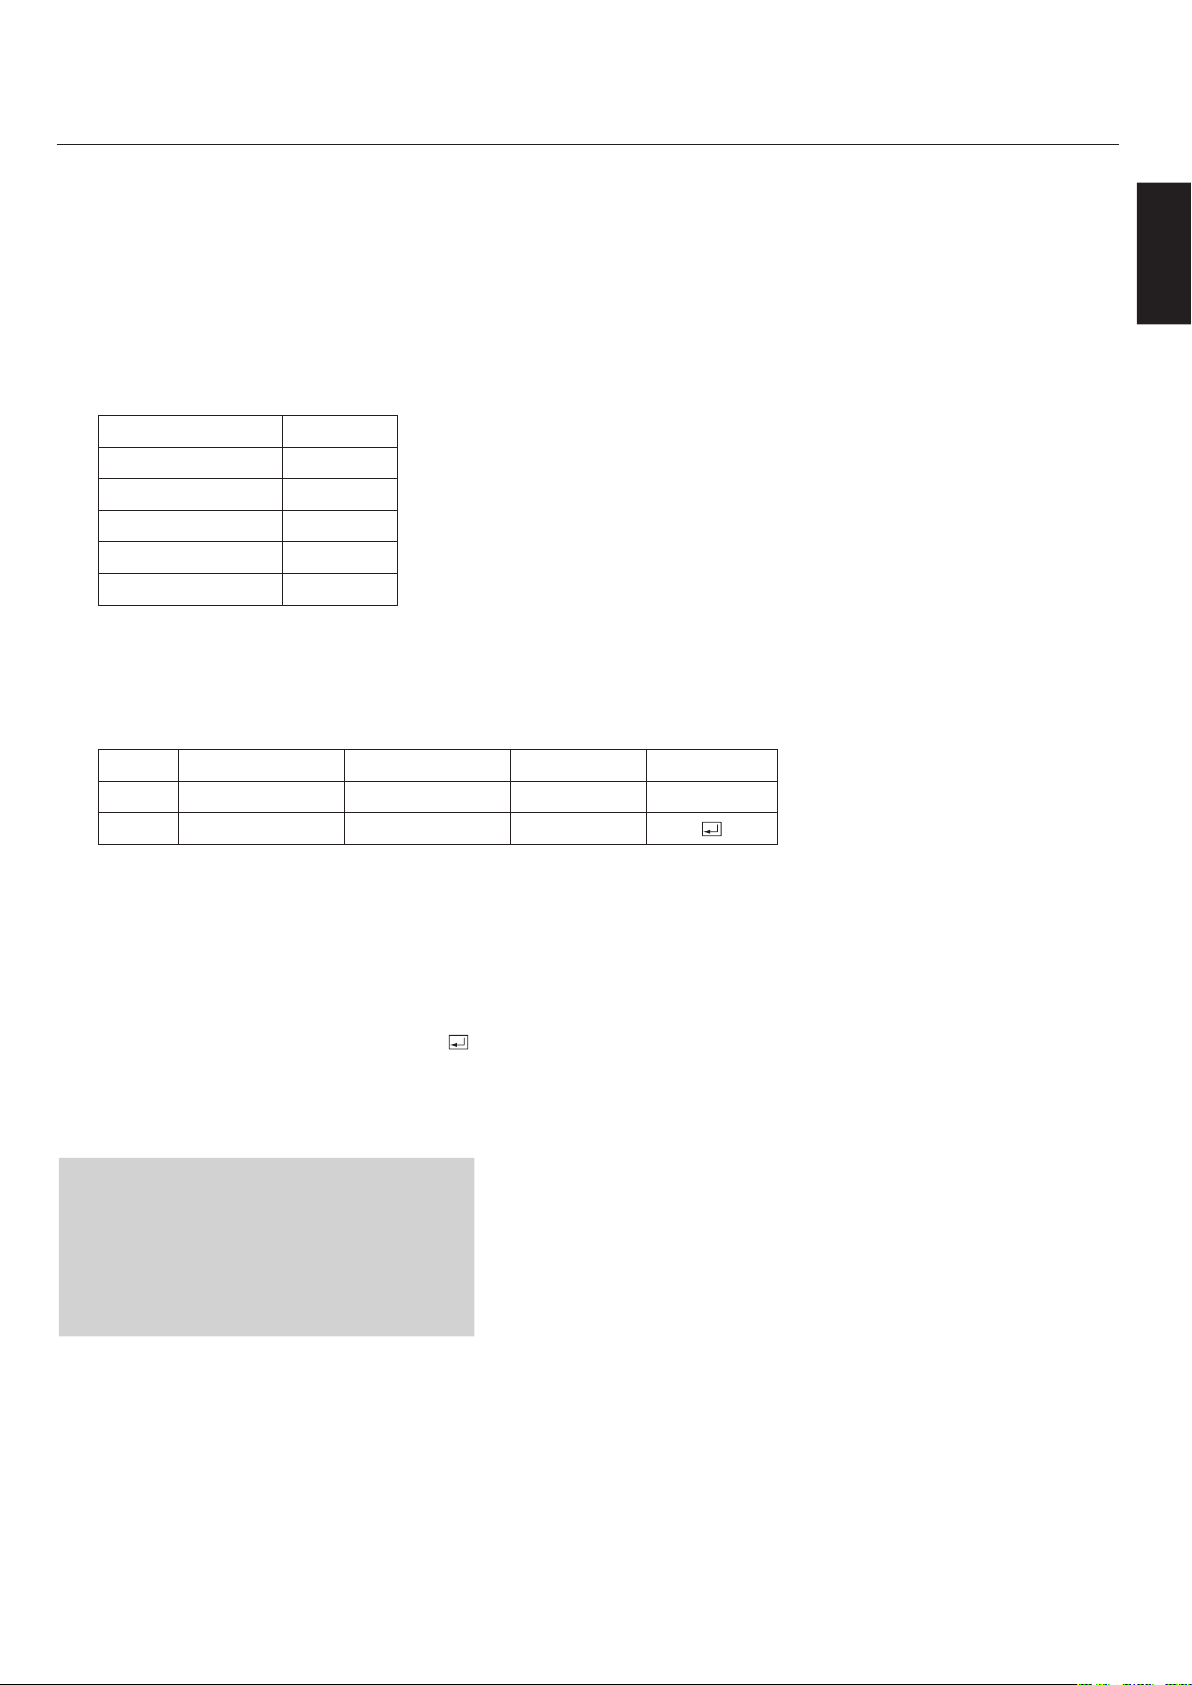
English
English-37
- continued
ThefollowingcontrolsequenceisusedforasingleMultiSyncdisplay.
Whenusingthefollowingcontrolcommands,allofthedaisy-chainedmonitorscan
becontrolledatthesametimefromtheprimarymonitor.However,replyandstatus
commandswillonlypertaintotheprimarymonitor,andnottothesecondarymoni-
tors.
1)Interface
PROTOCOLRS-232C
BAUDRATE9600[bps]
DATALENGTH8[bits]
PARITYBITNONE
STOPBIT1[bit]
FLOWCONTROLNONE
2)Controlcommanddiagram
Thecommandisstructuredbytheaddresscode,functioncode,datacodeand
endcode.Thelengthofthecommandisdifferentforeachfunction.
AddressCodeFunctionCodeDataCodeEndCode
HEX30h30hFunctionData0Dh
ASCII'0''0'FunctionData
[Addresscode]30h30h(InASCIIcode,'0''0')fixed.
[Functioncode]Acodeofeachfixedcontrolmove.
[Datacode]Acodeofeachfixedcontroldata(number)and
notalwaysindicated.
[Endcode]0Dh(InASCIIcode,'
')fixed.
TocontrolmultipleMultiSyncmonitorsthatare
daisy-chainedtogetherpleaseusetheextended
controlcommand.Instructionsfortheex-
tendedcontrolcommandcanbefoundonthe
CDincludedwiththedisplay.Thefileiscalled
“External_control.pdf”.
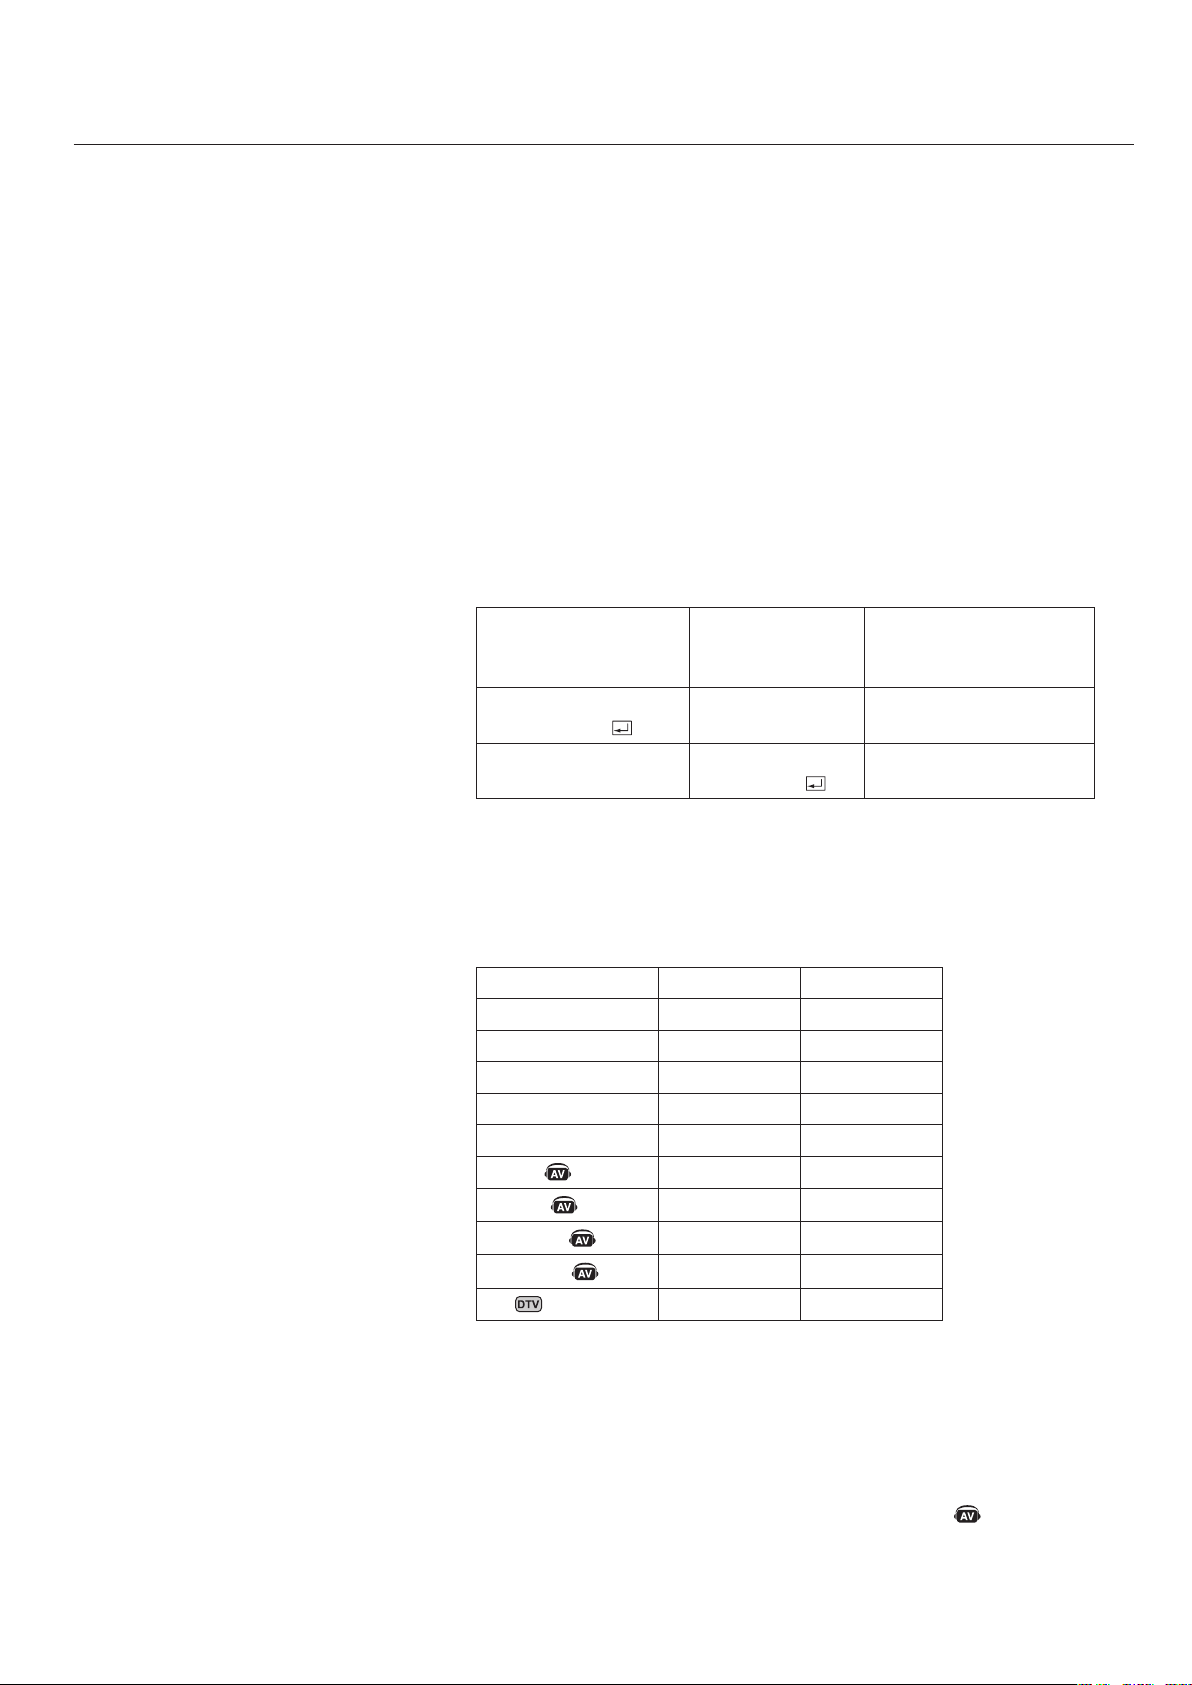
English-38
- continued
3)Controlsequence
1)ThecommandfromacomputertotheLCDmonitorwilltake400ms.
2)TheLCDmonitorwillsendareturncommand400ms*afterithasreceived
anencode.Ifthecommandisnotreceivedcorrectly,
theLCDmonitorwillnotsendthereturncommand.
3)Thepersonalcomputerchecksthecommandandconfirmsifthe
commandwhichhasbeensenthasbeenexecutedornot.
4)ThisLCDmonitorsendsvariouscodesotherthanthereturncode.When
sendingacontrolsequenceviaRS-232C,othercodesfrompersonal
computerswillbeignored.
*Thesendingtimeofthereturncommandmaybedelayeddependingonthe
monitor’scurrentactivity(changingoftheinputsignal,etc.).
[Example]TurnthepowerON.(''isforASCIIcode)
Sendingcommands
fromthePCetc.
Statuscode
fromLCDmoni-
tor
Meaning
3030210D
'0''0''!''
'
Commandfor
POWERON
3030210D
'0''0''!''
'
Commandreceived
(Commandechoback)
4)Operationcommands
OperationcommandsexecutethebasicoperationsettingofthisLCD
monitor.
Itmaynotoperatewhenchangingthesignal:
OperationASCIIHEX
POWERON!21h
POWEROFF"22h
DVI_r15Fh72h31h
VGA_r25Fh72h32h
RGB/HV_r35Fh72h33h
HDMI_h15Fh68h31h
VIDEO
_v15Fh76h31h
DVD/HD
_v25Fh76h32h
S-VIDEO
_v35Fh76h33h
TV
_t25Fh74h32h
POWEROFFcommandshouldnotbeusedlessthan1minuteafterthepoweris
turnedon.
POWERONcommandshouldnotbeusedlessthan1minuteafterthepoweris
turnedoff.
S-VIDEOisenabledbyhavinganS-VIDEOcableconnectedwiththe"S-
VIDEO"signalpresentandselecting"PRIORITYMODE".
•
•
•
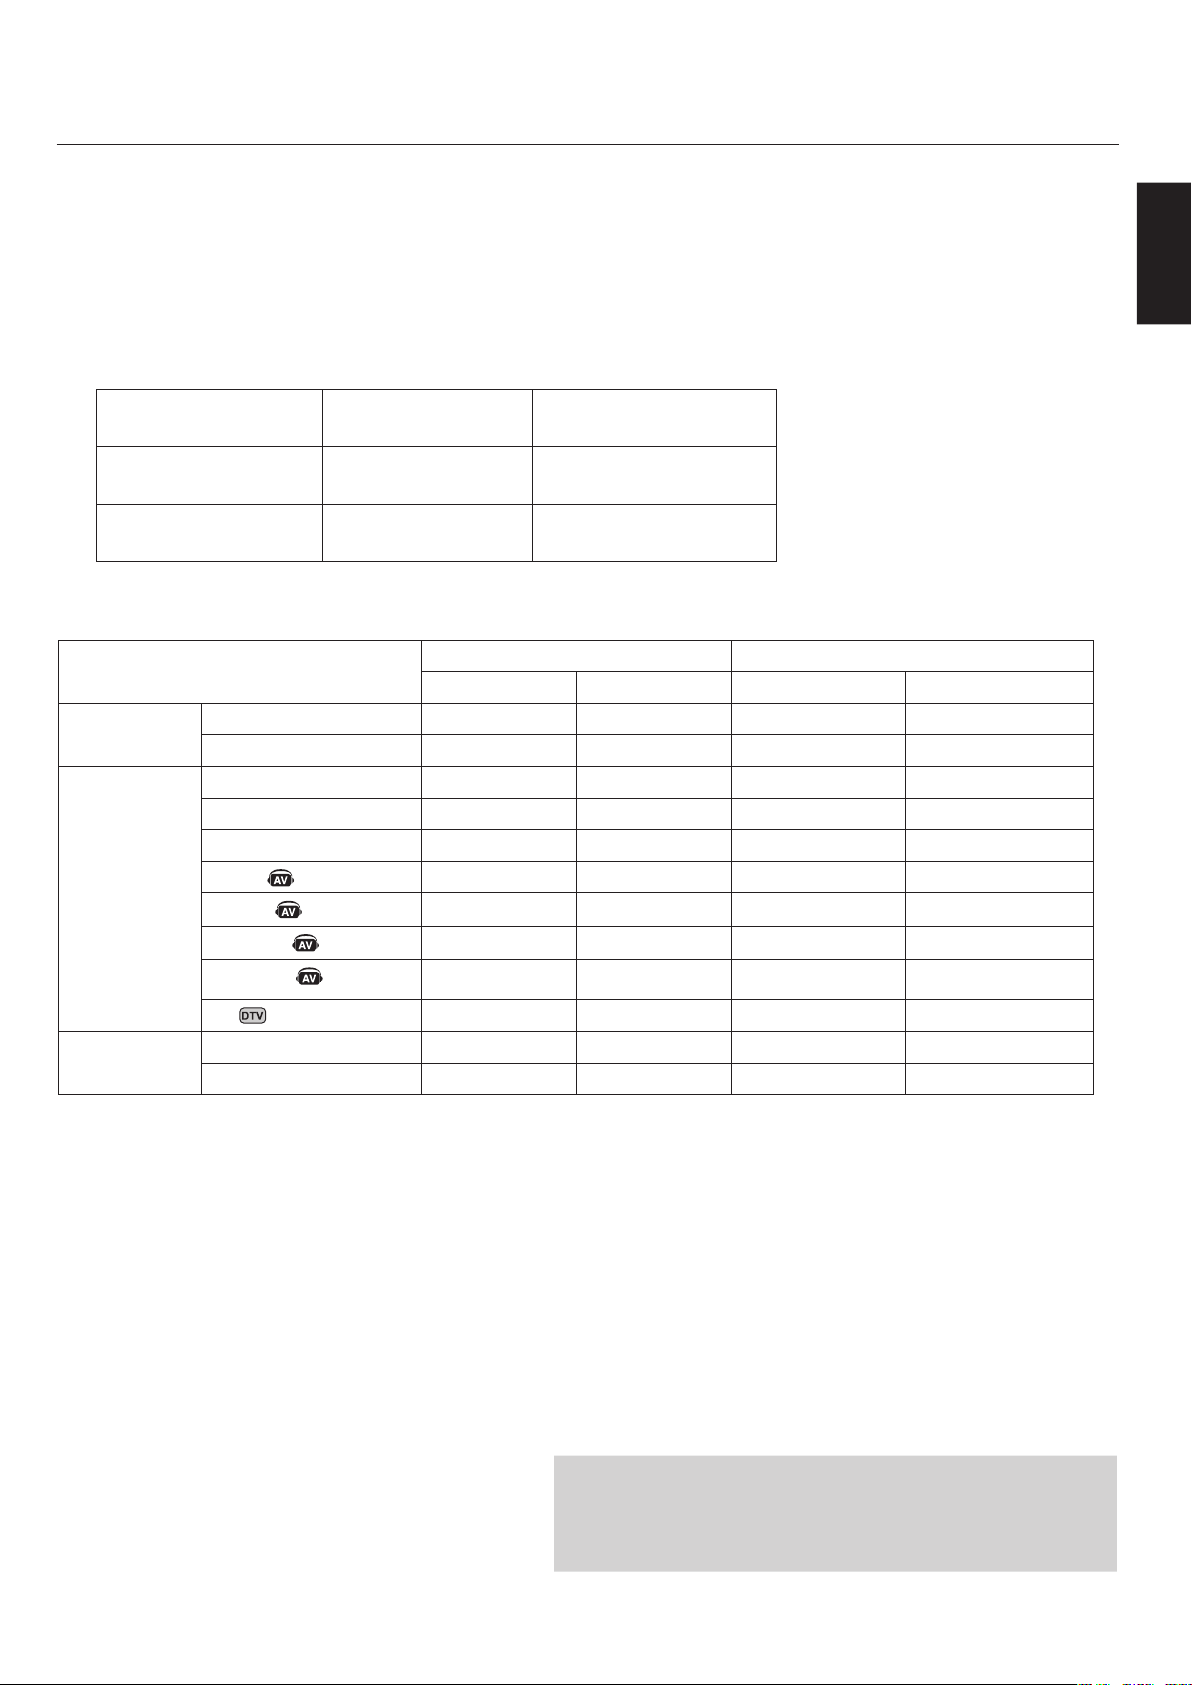
English
English-39
5)Readcommand
HostcomputersendsthecommandwithoutData-codetomonitor.
Afterreceivingthiscommand,themonitorreturnsthecommandwithData-
codeofcurrentstatustohostcomputer.
<ex>WhentheHostcomputerchecksthePowerstatusofmonitor,thestatusof
monitorispowered-on.
Commandfrom
computer
Commandfrom
Monitor
Detailofcommand
303076500D
‘0’’0’’v’’P’[enter]
Askaboutthepower
statusofmonitor.
30307650310D
‘0’’0’’v’’P’’1’[enter]
Monitorispowered-on.
StructureoftheRead-command
ASCIIHEX
FunctionData(Receive)FunctionData(Receive)
POWER
ONvP1765031
OFF(standby)vP0765030
Input
DVI(DVI-D)vIr176497231
VGA(D-sub)vIr276497232
RGB/HV(BNC)vIr376497233
HDMIvIh176496831
VIDEO
vIv176497631
DVD/HD
vIv276497632
S-VIDEO
vIv376497633
TV
vIt276497432
PictureMode
HIGHBRIGHTvMp1764D7031
StandardvMp2764D7032
NOTE:Forcompleteinformationpleaseseefile
“External_Control.pdf”ontheCD-ROM.
- continued
RS-232Ccontrolwillnotfunctionifthedisplayisin“ECO
STANDBY”mode.Ifmonitorsaredaisy-chained,andonedisplay
isin“ECOSTANDBYmode,thencontroloftheentiredaisy-chain
willbelost.Seepage30formoreinformationonSTANDBYmode.

English-40
40"or46"diagonalscreensize:Addsanewdimensiontoinformationdisplaytechnology.
1366x768resolution:Allowsforcrisptextandpreciseimages.
XtraView®technology:Allowsforwide-angleviewing.
DDC/CIcapabilities:Allowcontrolcommandstobesentdirectlytothemonitorthrougha
standardPCoroveranexistingnetworkbyasystemadministrator.
CableComp™:Automaticlongcablecompensationpreventsimagequalitydegradationcausedby
longcablelengths.
User-friendly,efficientdesign:FeaturesthecurrentlyproposedVESA-standardmountingandan
overalllightweightconstructionforeasytransportandinstallation.
Lowpowerconsumptionandreducedheatemission:Leadtoalowertotalcostofownership.
OnScreenDisplay(OSD):Putsyouincompletecontrolofdisplaysettings.
NEC’squalityandreliability:Providepeaceofmindwitha3-yearwarranty(includingbacklight)
and24/7customerserviceandtechnicalsupport.
ReducedFootprint:Providestheidealsolutionforenvironmentsrequiringsuperiorimagequality
butwithsizeandweightreductions.Themonitor’ssmallfootprintandlowweightallowittobe
movedortransportedeasilyfromonelocationtoanother.
AccuColor®ControlSystem:AlongwithsRGBallowsyoutochangebetweenthecolorsettingson
yourdisplaytomatchyourpersonalpreference.
OmniColor™ControlSystem:AlongwithsRGBcolor-matchinguses6-axiscolordatatoensure
true-to-lifecolorreproductionforstillimagesandreal-timevideos.
PlugandPlay:TheMicrosoft®solutionwiththeWindows
®
operatingsystemfacilitatessetupand
installationbyallowing
themonitortosenditscapabilities(suchasscreensizeandresolutions
supported)
directlytoyourcomputer,automaticallyoptimizingdisplayperformance.
IntelligentPowerManager(IPM®)System:Providesinnovativepower-savingmethods,saving
two-thirdsofyourmonitorenergycosts.
MultipleFrequencyTechnology:Automaticallyadjustsmonitortothedisplaycard’sscanning
frequency,thusdisplayingtheresolutionrequired.
FullScan®Capability:Allowsyoutousetheentirescreenareainmostresolutions,significantly
expandingimagesize.
VESA®StandardMountingInterface:AllowsuserstoconnecttheirLCDmonitortoanyVESA
standardthirdpartymountingarmorbracket.Allowsforthemonitortobemountedonawallor
anarmusinganythirdpartycompliantdevice.NECrecommendsusingmountinginterfacethat
complywithUL1678standardinNorthAmerica.
DVI-D:Thedigital-onlysubsetofDVIcreatedbytheDigitalDisplayWorkingGroup(DDWG)for
digitalconnectionsbetweencomputersanddisplays.Asadigital-onlyconnector,analogsupport
isnotprovidedoffaDVI-Dconnector.AsaDVI-baseddigitalonlyconnection,onlyasimple
adapterisnecessaryforcompatibilitybetweenDVI-DandotherDVI-baseddigitalconnectors
suchasDFPandP&D.
TILEMATRIXwithTILECOMP:Allowsmultiplescreenstodisplayoneimagetiledoverseveral
stackedmonitorswhilecompensatingwithinthedisplayedimageformonitorbezelwidth.
ZOOM:Expandstheimagehorizontallyandverticallydirection.
RS-232Cdaisychain:YoucancontrolmultiplemonitorsbyPCorwirelessremotecontrol.
Self-diagnosis:Ifaninternalerrorshouldoccur,afailurestatewillbeindicatedbyablinkingred
lightonthefrontofthemonitor.

English
English-41
Nopicture
Thesignalcableshouldbeproperlyconnectedtothedisplay
card/computer.
Thedisplaycardshouldbeproperlyseatedinitsslot.
FrontPowerSwitchandcomputerpowerswitchshouldbein
theONposition.
Checktomakesurethatasupportedmodehasbeenselected
onthedisplaycardorsystembeingused.(Pleaseconsult
displaycardorsystemmanualtochangegraphicsmode.)
Checkthemonitorandyourdisplaycardwithrespectto
compatibilityandrecommendedsettings.
Checkthesignalcableconnectorforbentorpushed-inpins.
PowerButtondoesnotrespond
UnplugthepowercordofthemonitorfromtheACoutletto
turnoffandresetthemonitor.
Imagepersistence
PleasebeawarethatLCDTechnologymayexperiencea
phenomenaknownasImagePersistence.ImagePersistence
occurswhenaresidualor“ghost”imageofapreviousimage
remainsvisibleonthescreen.UnlikeCRTmonitors,LCD
monitors’imagepersistenceisnotpermanent,butconstant
imagesbeingdisplayedforalongperiodoftimeshould
beavoided.Toalleviateimagepersistence,turnoffthe
monitorforaslongasthepreviousimagewasdisplayed.For
example,ifanimagewasonthemonitorforonehourand
aresidualimageremains,themonitorshouldbeturnedoff
foronehourtoerasetheimage.
NOTE:Aswithallpersonaldisplaydevices,NECDisplay
SolutionsofAmerica,Inc.recommendsdisplayingmoving
imagesandusingamovingscreensaveratregularintervals
wheneverthescreenisidleorturningoffthemonitorwhen
notinuse.
Imageisunstable,unfocusedor
swimmingisapparent
SignalcableshouldbeproperlyattachedtotheLCD
monitor,computer,orotherinputdevice.
UsetheOSDscreencontrolstofocusandadjustdisplayby
increasingordecreasingtheclockphasetotal.Whenthe
displaymodeischanged,theOSDImageAdjustsettings
mayneedtobereadjusted.
Checkthemonitorandyourdisplaycardwithrespectto
compatibilityandrecommendedsignaltimings.
Ifyourtextisgarbled,changethevideomodetonon-
interlacedanduse60Hzrefreshrate.
Imageofcomponentsignalisgreenish
ChecktoseeiftheDVD/HDinputconnectorisselected.
LEDonmonitorisnotlit
(nogreenorredcolorcanbeseen)
MainPowerSwitchshouldbeintheONpositionandpower
cordshouldbeconnected.
Makecertainthecomputerisnotinapower-savingmode
(touchthekeyboardormouse).
•
•
•
•
•
•
•
•
•
•
•
•
•
•
•
RedLEDonmonitorisblinking
Acertainfailuremighthaveoccurred,pleasecontactyour
nearestauthorizedNECDISPLAYSOLUTIONSservice
facility.
Displayimageisnotsizedproperly
UsetheOSDscreencontrolstoincreaseordecreasethe
clocktotal.
Checktomakesurethatasupportedmodehasbeenselected
onthedisplaycardorsystembeingused.(Pleaseconsult
displaycardorsystemmanualtochangegraphicsmode.)
Selectedresolutionisnotdisplayedproperly
UseOSDinformationtoenterInformationmenuand
confirmthattheappropriateresolutionhasbeenselected.If
not,selectappropriateresolution.
“SCHEDULESETTINGS”/"OFFTIMER”functions
notworkingproperly
The“SCHEDULESETTINGS”functionwillbedisabled
whenthe“OFFTIMER”isset.
Ifthe“OFFTIMER”functionisenabledandthepower
totheLCDmonitoristurnedofforifthepowersupplyis
interruptedunexpectedly,thentheOFFTIMERwillbe
reset.
NoSound
Checktoseeifspeakercableisproperlyconnected.
Checktoseeifmuteisactivated.
Checktoseeifvolumeissetatminimum.
NOTE:Itispossibletoplayaudiofromasourcethatis
differentfromthevideosource.Whensettingparental
controlsforvideo,beawarethatthiscontentisnotfiltered.
RS-232Cdoesnotwork
Makesurethemonitorisnotin“EcoStandby”mode.(seepage
30)
RemoteControldoesnotwork
Makesurethebatteriesareinsertedproperly.
Testthebatteriesforstrength/life.
Makesuretopointtheremotedirectlyatthesensoronthe
monitor.
CheckiftheremoteisinRemoteIDmode.
Theremotecontrolmaynotfunctionwhenindirect
sunlightorwhenthereisstrongilluminationontheremote
sensorofthemonitor.
SnowyPicture,PoorSoundinTV
Checkantenna/cableconnection.Usenewcableifnecessary.
InterferenceinTV
Checkcomponentsforshielding.Movethemawayfromthe
monitorifnecessary.
•
•
•
•
•
•
•
•
•
•
•
•
•
•
•
•
•

English-42
NECMonitorCustomerService&Support
CustomerServiceandTechnicalSupport:(800)632-4662
Fax:(800)695-3044
PartsandAccessories/MacintoshCableAdapter:(800)632-4662
WarrantyInformation:www.necdisplay.com
OnlineTechnicalSupport:www.necdisplay.com
SalesandProductInformation
SalesInformationLine:(888)632-6487
CanadianCustomers:(866)771-0266,Ext#:4037
GovernmentSales:(800)284-6320
GovernmentSalesemail:gov@necdisplay.com
ElectronicChannels
WorldWideWeb:www.necdisplay.com
ProductRegistration:www.necdisplay.com
EuropeanOperations:www.nec-display-solutions.com
DriversandDownloads:www.necdisplay.com
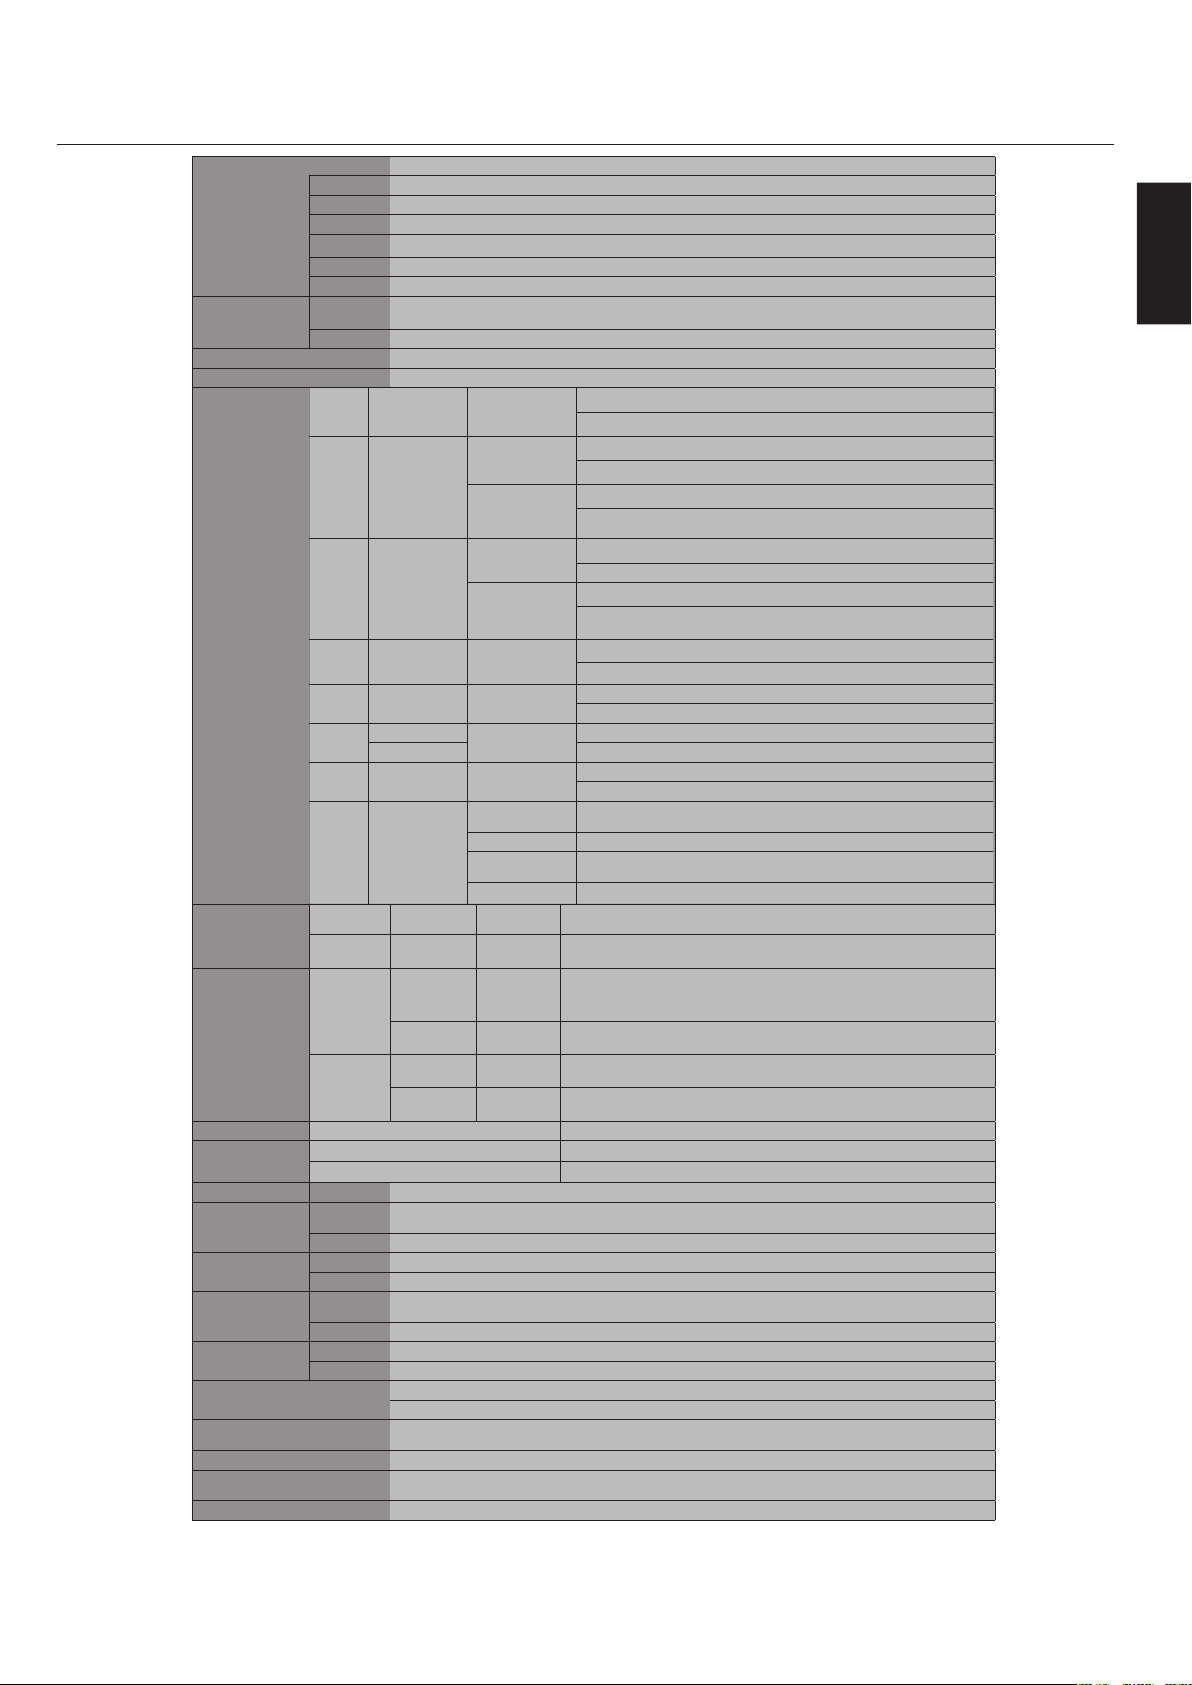
English
English-43
LCDModule(40"/101.6cmdiagonal)
PixelPitch0.648mm
Resolution1366x768pixels
ColorOver16millioncolors(dependingonvideocardused)
Brightness700cd/m²(Maximum),500cd/m²(Typ)
ContrastRatio2000:1(typ)
ViewingAngleUp89/Down89/Left89/Right89(typ)@CR>10
FrequencyHorizontalANALOG:15.625/15.734kHz,31.5kHz-91.1kHz
DIGITAL:31.5kHz-91.1kHz
Vertical50Hzto85Hz
PixelClock25.2MHz-162.0MHz
ViewableSize885.168x497.664mm
InputSignal
DVIDVI-D24PinDIGITALRGB
DVI(HDCP)
VGA60,SVGA60,XGA60,WXGA60,SXGA60,UXGA60*,1920X1080*(60Hz)
VGAMiniD-sub15Pin
AnalogRGB
0.7Vp-p/75ohm
VGA60,SVGA60,XGA60,WXGA60,SXGA60,UXGA60*,1920X1080*(60Hz)
Sync
Separate:TTLlevel(Pos./Neg.)
CompositesynconGreenVideo:
0.3Vp-pNeg.
RGB/HVBNC(R,G,B,H,V)
AnalogRGB
0.7Vp-p/75ohm
VGA60,SVGA60,XGA60,WXGA60,SXGA60,UXGA60*,1920X1080*(60Hz)
Sync
Separate:TTLlevel(Pos./Neg.)
CompositesynconGreenVideo:
0.3Vp-pNeg.
HDMIHDMIType-ADigitalRGB
HDMI
1080p*,1080i*,720p@50Hz/60Hz,576p@50Hz,480p@60Hz
DVD/HD
RCA(Y,Cb/Pb,
Cr/Pr)
Component
Y:1.0Vp-p/75ohm,Cb/Cr(Pb/Pr):0.7Vp-p/75ohm
HDTV/DVD:1080p*,1080i*,720p@50Hz/60Hz,576p@50Hz,480p@60Hz,576i@50Hz,480i@60Hz
VIDEO
BNC
Composite
1.0Vp-p/75ohm
RCANTSC/PAL/SECAM/4.43NTSC/PAL60
S-VIDEOMiniDIN4pinS-VIDEO
Y:1.0Vp-p/75ohmC:0.286Vp-p/75ohm
NTSC/PAL/SECAM/4.43NTSC/PAL60
TV
75ohm
F-terminal
Analog
Terrestrialbroadcast
NTSC:VHF(2-13ch),UHF(14-69ch)
AnalogCableCATV1-135ch
Digital
Terrestrialbroadcast
ATSC(8VSB):2-69ch
DigitalCable64/256QAM:1-135ch
OutputSignalRGB/HVBNC(R,G,B,H,V)AnalogRGB0.7Vp-pwith75ohmterminated
SeparateHVsync:TTLlevel(Pos./Neg.)
VIDEOBNCCOMPOSITE1.0Vp-pwith75ohmterminated
AudioAUDIOInputRCA(L/R)x2
STEREO
MiniJack
AnalogAudioStereoL/R0.5Vrms
HDMIType-ADIGITALAudioPCM32,44.1,48KHz(16bit)
AUDIOOutputSTEREO
MiniJack
AnalogAudioStereoL/R0.5Vrms
OpticalS/PDIF
connector
DigitalAudioS/PDIFOpticalDigitalaudiooutput(PCM/DolbyDigital)**
SpeakerOutputExternalSpeakerJack15W+15W(8ohm)
ControlRS-232C:IND-sub9Pin
RS-232C:OUTD-sub9Pin(daisychain)
PowerSupply3.0-1.2A@100-240VAC,50/60Hz
Operational
Environment
Temperature5to40˚C/4˚Fto140˚F(Defaultbrightness)
5~20˚C/4˚Fto68˚F(Maximumbrightness)
Humidity20%to80%
Storage
Environment
Temperature-20˚Cto60˚C/-4˚Fto140˚F
Humidity10%to90%(withoutcondensation)/below60%over40˚C
DimensionsNet919.7(W)x567.7(H)x330(D)mm(withStand)
919.7(W)x532.2(H)x140(D)mm(withoutStand)
Gross1147(W)x761(H)x312(D)mm
WeightNet31.1kg/68.6lbs.
Gross38.9kg/85.8lbs.
VESAcompatiblearm
mountinginterface
3x200mmx200mm(8Holes)
2x200mmx200mm(6Holes)
CompliedRegulatory
andGuidelines
UL60950-1/CSAC22.2No.60950-1/TUV-GS/EN60950-1
FCC-B/DOC-B/EN55022-A/EN55024/EN61000-3-2/EN61000-3-3/CE
PowerManagementVESADPM
Plug&PlayVESADDC2B
DDC/CI
AccessoriesUser’smanual,PowerCord,VideoSignalCable,RemoteControl,AABatteryx2,Clampx3,Screwx11,CD-ROM,Standx2,Cablecover.
*CompressedImage
**AudioOutputforDigitalTerrestrialbroadcast
ManufacturedunderlicensefromDolbyLaboratories."Dolby"andthedouble-DsymbolaretrademarksofDolbyLaboratories.
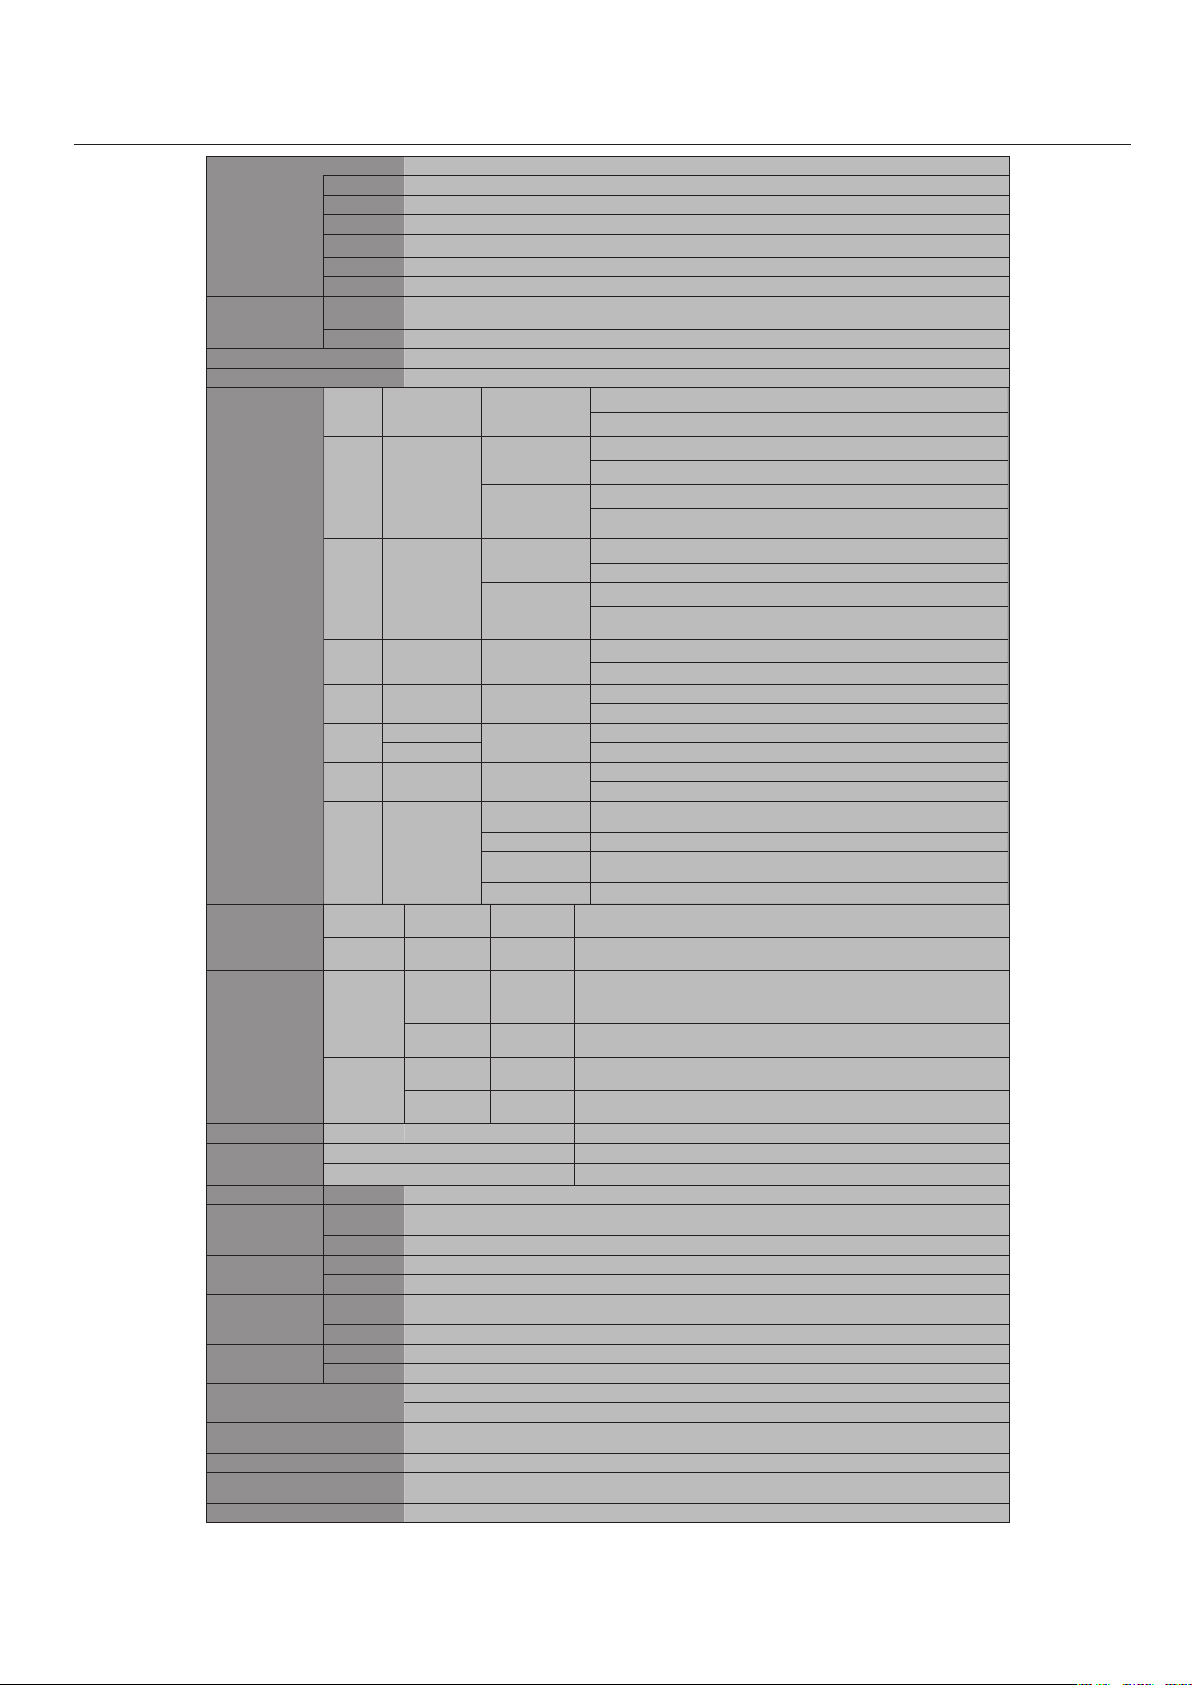
English-44
LCDModule(46"/116.8cmdiagonal)
PixelPitch0.7455mm
Resolution1366x768pixels
ColorOver16millioncolors(dependingonvideocardused)
Brightness650cd/m²(Maximum),500cd/m²(Typ)
ContrastRatio2000:1(typ)
ViewingAngleUp89/Down89/Left89/Right89(typ)@CR>10
FrequencyHorizontalANALOG:15.625/15.734kHz,31.5kHz-91.1kHz
DIGITAL:31.5kHz-91.1kHz
Vertical50Hzto85Hz
PixelClock25.2MHz-162.0MHz
ViewableSize1018.353x572.544mm
InputSignal
DVIDVI-D24PinDIGITALRGB
DVI(HDCP)
VGA60,SVGA60,XGA60,WXGA60,SXGA60,UXGA60*,1920X1080*(60Hz)
VGAMiniD-sub15Pin
AnalogRGB
0.7Vp-p/75ohm
VGA60,SVGA60,XGA60,WXGA60,SXGA60,UXGA60*,1920X1080*(60Hz)
Sync
Separate:TTLlevel(Pos./Neg.)
CompositesynconGreenVideo:
0.3Vp-pNeg.
RGB/HVBNC(R,G,B,H,V)
AnalogRGB
0.7Vp-p/75ohm
VGA60,SVGA60,XGA60,WXGA60,SXGA60,UXGA60*,1920X1080*(60Hz)
Sync
Separate:TTLlevel(Pos./Neg.)
CompositesynconGreenVideo:
0.3Vp-pNeg.
HDMIHDMIType-ADigitalRGB
HDMI
1080p*,1080i*,720p@50Hz/60Hz,576p@50Hz,480p@60Hz
DVD/HD
RCA(Y,Cb/Pb,
Cr/Pr)
Component
Y:1.0Vp-p/75ohm,Cb/Cr(Pb/Pr):0.7Vp-p/75ohm
HDTV/DVD:1080p*,1080i*,720p@50Hz/60Hz,576p@50Hz,480p@60Hz,576i@50Hz,480i@60Hz
VIDEO
BNC
Composite
1.0Vp-p/75ohm
RCANTSC/PAL/SECAM/4.43NTSC/PAL60
S-VIDEOMiniDIN4pinS-VIDEO
Y:1.0Vp-p/75ohmC:0.286Vp-p/75ohm
NTSC/PAL/SECAM/4.43NTSC/PAL60
TV
75ohm
F-terminal
Analog
Terrestrialbroadcast
NTSC:VHF(2-13ch),UHF(14-69ch)
AnalogCableCATV1-135ch
Digital
Terrestrialbroadcast
ATSC(8VSB):2-69ch
DigitalCable64/256QAM:1-135ch
OutputSignalRGB/HVBNC(R,G,B,H,V)AnalogRGB0.7Vp-pwith75ohmterminated
SeparateHVsync:TTLlevel(Pos./Neg.)
VIDEOBNCCOMPOSITE1.0Vp-pwith75ohmterminated
Audio
AUDIOInputRCA(L/R)x2
STEREO
MiniJack
AnalogAudioStereoL/R0.5Vrms
HDMIType-ADIGITALAudioPCM32,44.1,48KHz(16bit)
AUDIOOutputSTEREO
MiniJack
AnalogAudioStereoL/R0.5Vrms
OpticalS/PDIF
connector
DigitalAudioS/PDIFOpticalDigitalaudiooutput(PCM/DolbyDigital)**
SpeakerOutput
ExternalSpeakerJack15W+15W(8ohm)
ControlRS-232C:IND-sub9Pin
RS-232C:OUTD-sub9Pin(daisychain)
PowerSupply3.4-1.35A@100-240VAC,50/60Hz
Operational
Environment
Temperature5to40˚C/4˚Fto140˚F(Defaultbrightness)
5~20˚C/4˚Fto68˚F(Maximumbrightness)
Humidity20%to80%
Storage
Environment
Temperature-20˚Cto60˚C/-4˚Fto140˚F
Humidity10%to90%(withoutcondensation)/below60%over40˚C
DimensionsNet1055.4(W)x644.1(H)x351(D)mm(withStand)
1055.4(W)x608.6(H)x140(D)mm(withoutStand)
Gross1278(W)x837(H)x312(D)mm
WeightNet37.9kg/83.6lbs.
Gross47.1kg/103.8lbs.
VESAcompatiblearm
mountinginterface
3x200mmx200mm(8Holes)
2x200mmx200mm(6Holes)
CompliedRegulatory
andGuidelines
UL60950-1/CSAC22.2No.60950-1/TUV-GS/EN60950-1
FCC-B/DOC-B/EN55022-A/EN55024/EN61000-3-2/EN61000-3-3/CE
PowerManagementVESADPM
Plug&PlayVESADDC2B
DDC/CI
AccessoriesUser’smanual,PowerCord,VideoSignalCable,RemoteControl,AABatteryx2,Clampx3,Screwx11,CD-ROM,Standx2,Cablecover
*CompressedImage
**AudioOutputforDigitalTerrestrialbroadcast
ManufacturedunderlicensefromDolbyLaboratories."Dolby"andthedouble-DsymbolaretrademarksofDolbyLaboratories.
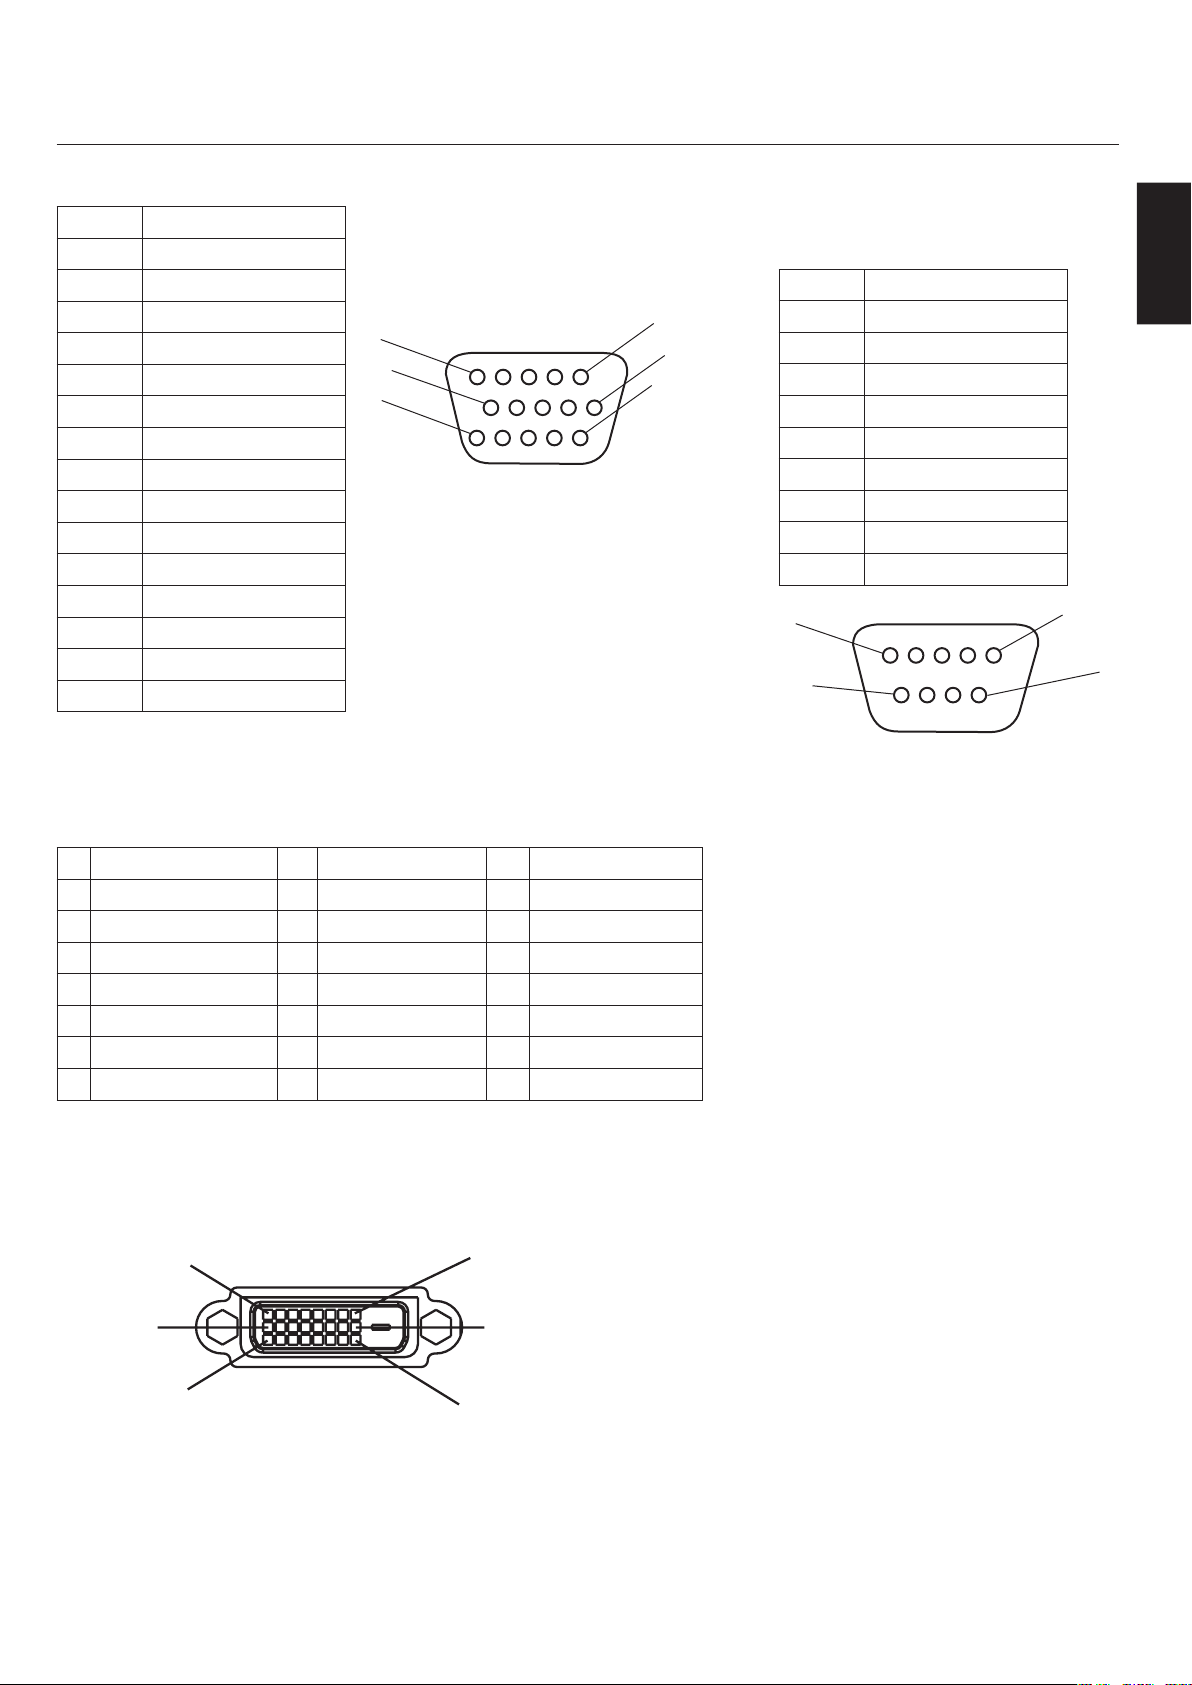
English
English-45
1)AnalogRGBInput(MiniD-SUB15P)VGA
PinNo.Name
1 VideoSignalRed
2 VideoSignalGreen
3 VideoSignalBlue
4 GND
5 DDC-GND
6 Red-GND
7 Green-GND
8 Blue-GND
9 +5V(DDC)
10 SYNC-GND
11 GND
12 DDC-SDA
13 H-SYNC
14 V-SYNC
15 DDC-SCL
2)DigitalRGBInput(DVI-D)DVI
1 TX2-9 TX1-17 TX0-
2 TX2+10 TX1+18 TX0+
3 Shield(TX2/TX4)11 Shield(TX1/TX3)19 Shield(TXP/TX5)
4 NC12 NC20 NC
5 NC13 NC21 NC
6 DDC-SerialClock14 +5power22 Shield(TXC)
7 DDC-SerialData15 Ground(+5V)23 TXC+
8 NC16 HotPlugDetect24 TXC-
1
6
11
15
10
5
1
9
17
8
16
24
3)RS-232CInput
(D-SUB9P)
PinNo.Name
1 Connectedto7&8
2 RXD
3 TXD
4 Connectedto6
5 GND
6 Connectedto4
7 Connectedto1&8
8 Connectedto1&7
9 NC
5
9
6
1
D-SUB9P
DVI-D
MiniD-SUB15P

English-46
NECDisplaySolutionsofAmerica,Inc.(hereinafter“NECDISPLAYSOLUTIONS”)warrantsthis
Producttobefreefromdefectsinmaterialandworkmanshipand,subjecttotheconditionsset
forthbelow,agreestorepairorreplace(atNECDISPLAYSOLUTIONS’soleoption)anypartofthe
enclosedunitwhichprovesdefectiveforaperiodofthree(3)yearsfromthedateoffirstconsumer
purchase.Sparepartsarewarrantedforninety(90)days.Replacementpartsorunitmaybenewor
refurbishedandwillmeetspecificationsoftheoriginalpartsorunit.
Thiswarrantygivesyouspecificlegalrightsandyoumayalsohaveotherrights,whichvaryfrom
statetostate.ThiswarrantyislimitedtotheoriginalpurchaseroftheProductandisnottransferable.
ThiswarrantycoversonlyNECDISPLAYSOLUTIONS-suppliedcomponents.Servicerequiredasa
resultofthirdpartycomponentsisnotcoveredunderthiswarranty.Inordertobecoveredunderthis
warranty,theProductmusthavebeenpurchasedintheU.S.A.orCanadabytheoriginalpurchaser.
ThiswarrantyonlycoversProductdistributionintheU.S.A.orCanadabyNECDISPLAYSOLU-
TIONSNowarrantyserviceisprovidedoutsideoftheU.S.A.orCanada.ProofofPurchasewillbe
requiredbyNECDISPLAYSOLUTIONStosubstantiatedateofpurchase.Suchproofofpurchase
mustbeanoriginalbillofsaleorreceiptcontainingnameandaddressofseller,purchaser,andthe
serialnumberoftheproduct.
ItshallbeyourobligationandexpensetohavetheProductshipped,freightprepaid,ordeliveredto
theauthorizedresellerfromwhomitwaspurchasedorotherfacilityauthorizedbyNECDISPLAY
SOLUTIONStorendertheservicesprovidedhereunderineithertheoriginalpackageorasimilar
packageaffordinganequaldegreeofprotection.AllProductsreturnedtoNECDISPLAYSOLU-
TIONSforserviceMUSThavepriorapproval,whichmaybeobtainedbycalling1-800-632-4662.The
Productshallnothavebeenpreviouslyaltered,repaired,orservicedbyanyoneotherthanaservice
facilityauthorizedbyNECDISPLAYSOLUTIONStorendersuchservice,theserialnumberofthe
productshallnothavebeenalteredorremoved.InordertobecoveredbythiswarrantytheProduct
shallnothavebeensubjectedtodisplayingoffixedimagesforlongperiodsoftimeresultinginimage
persistence(afterimageeffects),accident,misuseorabuseoroperatedcontrarytotheinstructions
containedintheUser’sManual.Anysuchconditionswillvoidthiswarranty.
NECDISPLAYSOLUTIONSSHALLNOTBELIABLEFORDIRECT,INDIRECT,INCIDENTAL,
CONSEQUENTIAL,OROTHERTYPESOFDAMAGESRESULTINGFROMTHEUSEOFANY
NECDISPLAYSOLUTIONSPRODUCTOTHERTHANTHELIABILITYSTATEDABOVE.THESE
WARRANTIESAREINLIEUOFALLOTHERWARRANTIESEXPRESSORIMPLIED,INCLUDING,
BUTNOTLIMITEDTO,THEIMPLIEDWARRANTIESOFMERCHANTABILITYORFITNESS
FORAPARTICULARPURPOSE.SOMESTATESDONOTALLOWTHEEXCLUSIONOFIMPLIED
WARRANTIESORTHELIMITATIONOREXCLUSIONOFLIABILITYFORINCIDENTALOR
CONSEQUENTIALDAMAGESSOTHEABOVEEXCLUSIONSORLIMITATIONSMAYNOTAP-
PLYTOYOU.
ThisProductiswarrantedinaccordancewiththetermsofthislimitedwarranty.Consumersare
cautionedthatProductperformanceisaffectedbysystemconfiguration,software,theapplication,
customerdata,andoperatorcontrolofthesystem,amongotherfactors.WhileNECDISPLAY
SOLUTIONSProductsareconsideredtobecompatiblewithmanysystems,specificfunctional
implementationbythecustomersoftheProductmayvary.Therefore,suitabilityofaProductfor
aspecificpurposeorapplicationmustbedeterminedbyconsumerandisnotwarrantedbyNEC
DISPLAYSOLUTIONS.
ForthenameofyournearestauthorizedNECDisplaySolutionsofAmerica,Inc.servicefacility,
contactNECDisplaySolutionsofAmerica,Inc.at1-800-632-4662.

English
English-47
NECDISPLAYSOLUTIONSisstronglycommittedtoenvironmentalprotectionand
seesrecyclingasoneofthecompany’stopprioritiesintryingtominimizetheburden
placedontheenvironment.Weareengagedindevelopingenvironmentally-friendly
products,andalwaysstrivetohelpdefineandcomplywiththelatestindependent
standardsfromagenciessuchasISO(InternationalOrganizationforStandardization)
andTCO(SwedishTradesUnion).
DisposingofoldNECproduct
Theaimofrecyclingistogainenvironmentalbenefitsbymeansofreusing,upgrading,
reconditioning,orreclaimingoldmaterial.Dedicatedrecyclingsitesensurethat
environmentallyharmfulcomponentsareproperlyhandledandsecurelydisposed.
Toensurethebestrecyclingofourproducts,NECDISPLAYSOLUTIONSoffersa
varietyofrecyclingproceduresandgivesadviceonhowtohandletheproduct,inan
environmentallysensitiveway,onceithasreachedtheendofitslife.
Allrequiredinformationconcerningthedisposaloftheproductandcountry-specific
informationcanbefoundonourfollowingwebsites:
USA:http://www.necdisplay.com
Europe:http://www.nec-display-solutions.com/greencompany/
Japan:http://www.nec-display.com
Energysaving
Thismonitorfeaturesanadvancedenergysavingcapability.WhenaVESADisplay
PowerManagementSignaling(DPMS)Standardsignalissenttothemonitor,the
EnergySavingmodeisactivated.ThemonitorentersasingleEnergySavingmode.
LCD4020
ModePowerconsumptionLEDcolor
NormalOperation300WGreen
EnergySavingModeLessthan5WAmber
OffMode(ECOstandby)Lessthan1WRed
LCD4620
ModePowerconsumptionLEDcolor
NormalOperation340WGreen
EnergySavingModeLessthan5WAmber
OffMode(ECOstandby)Lessthan1WRed
WEEEMark(EuropeanDirective2002/96/EC)
WithintheEuropeanUnion
EU-widelegislation,asimplementedineachMemberState,requiresthatwasteelectricalandelectronicproducts
carryingthemark(left)mustbedisposedofseparatelyfromnormalhouseholdwaste.Thisincludesmonitors
andelectricalaccessories,suchassignalcablesorpowercords.WhenyouneedtodisposeofyourNECdisplay
products,pleasefollowtheguidanceofyourlocalauthority,orasktheshopwhereyoupurchasedtheproduct,
orifapplicable,followanyagreementsmadebetweenyourselfandNEC.Themarkonelectricalandelectronic
productsonlyappliestothecurrentEuropeanUnionMemberStates.
ThemarkonelectricalandelectronicproductsonlyappliestothecurrentEuropeanUnionMemberStates.
OutsidetheEuropeanUnion
IfyouwishtodisposeofusedelectricalandelectronicproductsoutsidetheEuropeanUnion,pleasecontactyour
localauthoritysoastocomplywiththecorrectdisposalmethod.

PROPRIETARYNOTICEANDLIABILITYDISCLAIMER
Theinformationdisclosedinthisdocument,includingalldesignsandrelatedmaterials,
isthevaluablepropertyofNECDisplaySolutionsofAmerica,Inc.and/oritslicensors,as
appropriate,reserveallpatent,copyrightandotherproprietaryrightstothisdocument,
includingalldesign,manufacturing,reproduction,useandsalesrightsthereto,excepttothe
extentsaidrightsareexpresslygrantedtoothers.
TheNECDisplaySolutionsofAmerica,Inc.product(s)discussedinthisdocumentare
warrantedinaccordancewiththetermsoftheLimitedWarrantyStatementaccompanying
eachproduct.However,actualperformanceofeachsuchproductisdependentuponfactors
suchassystemconfiguration,customerdataandoperatorcontrol.Sinceimplementationby
customersofeachproductmayvary,thesuitabilityofspecificproductconfigurationsand
applicationsmustbedeterminedbythecustomerandisnotwarrantedbyNECDisplaySolu-
tionsofAmerica,Inc.
Toallowfordesignandspecificationimprovements,theinformationinthisdocumentis
subjecttochangeatanytimewithoutnotice.
ReproductionofthisdocumentorportionsthereofwithoutpriorapprovalofNECDisplay
SolutionsofAmerica,Inc.isprohibited.
DECLARATIONOFCONFORMITY
ThisdevicecomplieswithPart15ofFCCRules.Operationissubjecttothefollowingtwo
conditions.(1)Thisdevicemaynotcauseharmfulinterference,and(2)thisdevicemustac-
ceptanyinterferencereceived,includinginterferencethatmaycauseundesiredoperation.
U.S.ResponsibleParty:NECDisplaySolutionsofAmerica,Inc.
Address:500ParkBlvd.Suite1100
Itasca,IL60143
Tel.No.:(630)467-3000
TypeofProduct:ComputerMonitor
EquipmentClassification:ClassBPeripheral
Model:MultiSyncLCD4020(L406T6)
MultiSyncLCD4620(L466T7)
Weherebydeclarethattheequipmentspecifiedabove
conformstothetechnicalstandardsasspecifiedintheFCCRules.
WindowsisaregisteredtrademarkofMicrosoftCorporation.NECisaregisteredtrademark
ofNECCorporation.Allotherbrandsandproductnamesaretrademarksorregistered
trademarksoftheirrespectiveowners.
LCD4020-AV,LCD4020-AVT,LCD4620-AV,LCD4620-AVTonly
HDMI,theHDMIlogoandHigh-DefinitionMultimediaInterfacearetrademarksorregis-
teredtrademarksofHDMILicensingLLC.
PartNo1E50XXXX
PrintedInChina