SAFETY GUIDES:
=
Check with your local public works department for plumbing codes. You must follow
t
heir guidelines as you install the whole home water filtration system.
=
Do not use this system on water that is microbiologically unsafe or of unknown
q
uality without adequate disinfection before or after the system.
= This system is only for use on COLD water (100°F / 38°C max.). Do not install on
a hot water supply.
= Do not install this system where it will be exposed to outdoor weather or direct sun.
=
Do not install or store this system where it will be exposed to temperatures below
f
reezing. Water freezing in the system will damage it.
=
The maximum operating water pressure of this system is 100 pounds per square
i
nch. If your home water supply pressure exceeds 80 psi, install a pressure
r
educing valve before installing the whole home water filtration system.
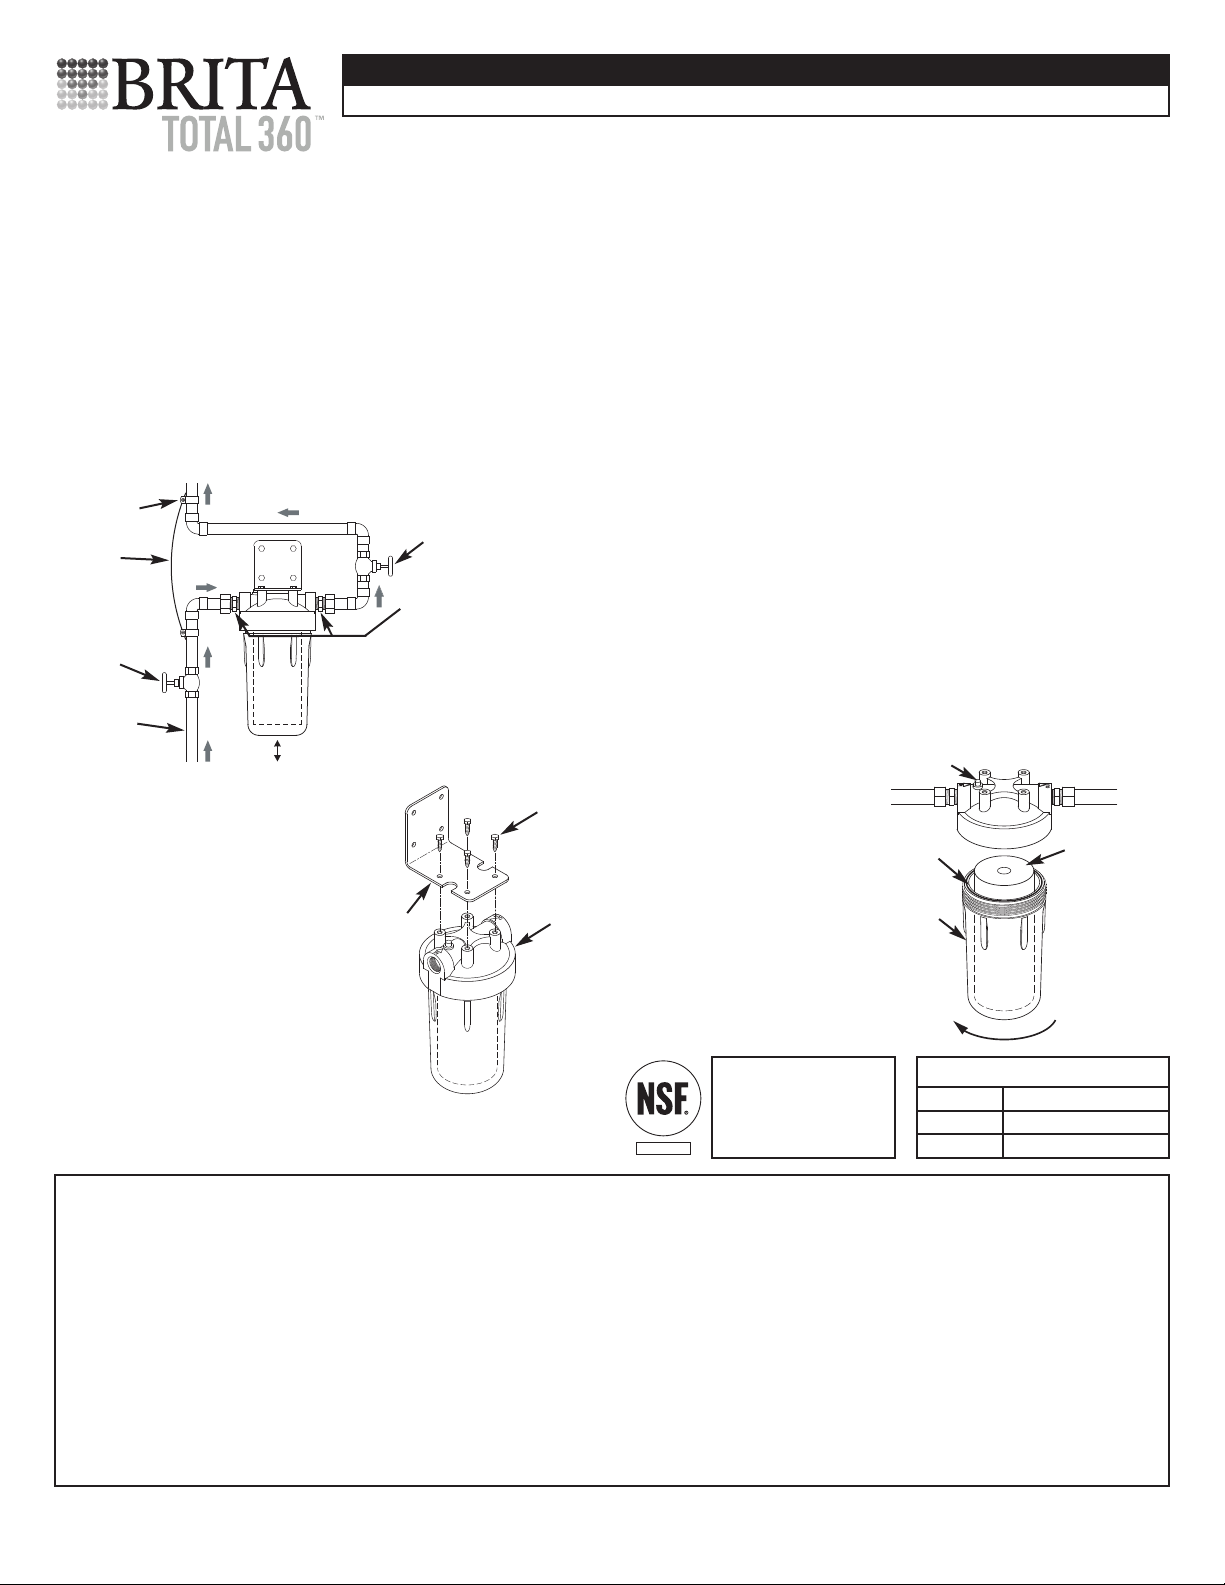
INSTALLATION LOCATION:
T
o filter water to a faucet, install the filtration system on the COLD supply water pipe
t
o that faucet (See Figure 1).
NOTE: A mounting bracket and screws are included to support the filtration system
(See Figure 2).
7
. Fully open a cold water faucet downstream of the filtration system, then slowly turn
t
he water supply back on and check for leaks.
8. Turn off the cold water faucet when the water flow becomes smooth.
GROUNDING INFORMATION:
T
he house cold water pipe is often used to ground electrical outlets in the home.
G
rounding protects you from electrical shock. Installing the filtration system may have
b
roken this ground. To restore, buy and install a #4 copper wire across the filtration
s
ystem, tightly clamped at both ends, as shown in Figure 1.
FILTER CARTRIDGE INSTALLATION OR REPLACEMENT:
Utilizes BRW4C, BRW4P, BRW4F and other standard 4-1/2” x 10” filter cartridges.
NOTE: A special wrench is included for removing the sump.
C
AUTION: Never remove the sump with water pressure in the filtration system.
1. Close the water supply shutoff valve to the filtration system (See Figure 1). To
r
elieve pressure in the filtration system, press the vent valve on top of the filter head
(
See Figure 3) or open a cold water house faucet downstream of the filtration system.
2. Turn the sump to the left to remove from the head (See Figure 3). Be careful, as
the sump is full of water. Do not lose the large o-ring seal.
3
. Be sure the inside of the sump is clean. Thoroughly wash with warm, soapy water
a
nd rinse.
4. Remove the wrapper from the new filter cartridge and insert the filter cartridge into
the sump. Some cartridges fit either way, while others fit only one way. Observe
markings on the cartridge, or on the wrapper.
5
. Lightly lubricate the o-ring seal, in the sump, with silicone grease (available at your
l
ocal hardware store). Be sure it is fully seated in the groove.
6. Hold the sump up to the filter head, aligning the center hole in the cartridge with the
p
rotrusion on the bottom of the head.
N
OTE: If the sump will not tighten up to the head, you may have the cartridge in
u
pside down or not centered in the sump. Take the cartridge out and check for
correct orientation.
7
. Being careful not to cross-thread, turn the sump to the right onto the filter head and
tighten securely. Do not overtighten.
8
. Partially open a house faucet downstream of the filtration system. Then, slowly open
the water supply shutoff valve (See Figure 1) and allow the filtration system to fill with
water. While it is filling, press the vent valve to release air in the filtration system.
9. Close the faucet. Then, check for leaks between the sump and the head.
NOTE: If a leak is occurring, turn off the water supply and depressurize the filtration
system. Then, remove the sump and check the o-ring for cuts, flat spots, etc.,
ONE YEAR LIMITED WARRANTY ON WHOLE HOME WATER FILTRATION SYSTEM (except filter cartridges)
Warrantor: Water Channel Partners, 1890 Woodlane Drive, Woodbury, MN 55125
Warrantor guarantees, to the original owner, that the Whole Home Water Filtration System, when installed and maintained in accordance with the instructions, will be free from defects in materials and work-
manship for a period of one year from date of installation. If, within the first year, a part proves, after inspection, to be defective, Warrantor will, at its sole option, either replace or repair the part without
charge except installation charges. Labor to maintain the equipment is not part of the warranty. Filter cartridges, which are expendable, are not covered by the warranty.
TO OBTAIN WARRANTY PARTS, SIMPLY CALL 1-800-218-6172 for assistance. This warranty applies only while this product is in use in the United States.
General Provisions
The above warranties are effective provided the Whole Home Water Filtration System is operated at water pressures not exceeding 100 psi, and at water temperatures not exceeding 100°F; provided further
that the Whole Home Water Filtration System is not subject to abuse, misuse, alteration, neglect, freezing, accident or negligence; and provided further that the Whole Home Water Filtration System is not
damaged as the result of any unusual force of nature such as, but not limited to, flood, hurricane, tornado or earthquake.
Warrantor is excused if failure to perform its warranty obligations is the result of strikes, government regulation, materials shortages, or other circumstances beyond its control.
THERE ARE NO WARRANTIES ON THE WHOLE HOME WATER FILTRATION SYSTEM BEYOND THOSE SPECIFICALLY DESCRIBED ABOVE. ALL IMPLIED WARRANTIES, INCLUDING ANY
IMPLIED WARRANTY OF MERCHANTABILITY OR OF FITNESS FOR A PARTICULAR PURPOSE, ARE DISCLAIMED TO THE EXTENT THEY MIGHT EXTEND BEYOND THE ABOVE PERIODS.
THE SOLE OBLIGATION OF WARRANTOR UNDER THESE WARRANTIES IS TO REPLACE OR REPAIR THE COMPONENT OR PART WHICH PROVES TO BE DEFECTIVE WITHIN THE SPECIFIED
TIME PERIOD, AND WARRANTOR IS NOT LIABLE FOR CONSEQUENTIAL OR INCIDENTAL DAMAGES. NO WARRANTOR DEALER, AGENT, REPRESENTATIVE, OR OTHER PERSON IS
AUTHORIZED TO EXTEND OR EXPAND THE WARRANTIES EXPRESSLY DESCRIBED ABOVE.
Some states do not allow limitations on how long an implied warranty lasts or exclusions or limitations of incidental or consequential damage, so the limitations and exclusions in this warranty may not apply
to you. This warranty gives you specific legal rights, and you may have other rights which vary from state to state. This warranty applies to consumer-owned installations only.
INSTALLATION STEPS:
1. Obtain two 1” male NPT adaptors
(not included) of an appropriate size
and type to adapt to the existing cold
water supply pipe.
2. Shut off the water supply to the main
pipe and open a high and low faucet
in the system to drain the pipe.
3. Cut out a section of the COLD water
supply pipe several inches long, as
needed to install the filtration system as
shown in Figure 1.
4. Apply 4 wraps of teflon tape to the
threads of the 1” male NPT adaptors
(not included) and carefully turn them
into the filtration system’s inlet and out-
let ports.
5. With the IN side of the filtration system
toward the incoming water, make
connections, as shown in Figure 1.
When tightening compression nuts,
be sure to use a second wrench to hold
the 1” NPT fitting while turning the nut.
Fig. 2
and sealing surfaces for
foreign material. Clean
the o-ring and lubricate
with silicone grease.
Carefully press into the
groove in the sump.
10. If using a Taste and Odor
Cartridge: A taste and odor
cartridge contains activated
carbon, a black powder. After
the new cartridge is installed,
open the faucet downstream
of the filtration system and
allow carbon particles to
purge from the cartridge.
Close the faucet when you no
longer see “fines” (discolor -
ation) in the filtered water, or
approximately 2 - 3 minutes.
7379654 (Rev. B 5/26/20)
Questions? Call toll free 1-800-218-6172 or visit www.ecopurehome.com/brita
BRWHFS Whole Home Water Filtration System (filter cartridges not included)
INSTALLATION INSTRUCTIONS
Cold Water
Pipe
S
hutoff
V
alve
G
round
W
ire
Clamp (2)
1
” NPT
Adaptor (2)
NOTE: Be sure to allow a minimum
of 2” under the filtration system
for removing the sump
(to change the cartridge)
Optional
Shutoff Valve
IN
OUT
Fig. 1
Screws
(4)
Head
Mounting
Bracket
Vent Valve
Filter
Cartridge
O-Ring
Seal
Sump
Turn to
the left to
remove
Fig. 3
REPLACEMENT PARTS
Part No. Description
BROR009 O-Ring
BRUSW09 Sump Removal Wrench
BRWHFS is
Tested and certified by
NSF International against
NSF/ANSI Standard 42 for
materials and structural
integrity requirements.
COMPONENT
6. Before turning the water back on, install the filter cartridge (not included),
as shown in “FILTER CARTRIDGE INSTALLATION OR REPLACEMENT”.