14’’ Corded Grass Trimmer GT1454
Read all safety rules and instructions carefully before operating this tool.
601 Regent Park Court Greenville, SC 29607, SC 29650 1-866-384-8432
Lea detenidamente todas las normas de seguridad e instrucciones antes de utilizar esta herramienta.
601 Regent Park Court Greenville, SC 29607, SC 29650 1-866-384-8432
Bordeadora Eléctrica de Césped de 14 pu
MNL_GT1454_V1
EN p. 2
ES p. 22
OPERATOR’S MANUAL / MANUAL DEL OPERADOR

Contents
2
Product Specifications
2
General Safety Rules
3-5
Electrical Information 6-7
Know Your Grass Trimmer 8
Assembly 9-12
Operation 13-14
Maintenance 15-16
Troubleshooting
17
Warranty
18
Exploded View
19
Parts List
20
Notes
21
2
CONTENTS
PRODUCT SPECIFICATIONS
14” GRASS TRIMMER
Type Corded
Voltage
120 V~60Hz
Amp
5.5 A
Speed 8000 RPM
Line Size 0.065" (1.6mm)
Cutting Swath 14” (355mm)
Net Weight
5.78 lbs (2.6 kg)

3
GENERAL SAFETY RULES
WARNING
READ ALL INSTRUCTIONS AND SAVE THESE INSTRUCTIONS.
When using the grass trimmer the safety rules must be followed. For your
own safety and bystanders please read these instructions before operating the
grass trimmer. Do not use the grass trimmer without reading the instruction sheet.
Please keep the instructions safe for later use.
• This grass trimmer is designed for cutting grass, soft vegetation, and for edging.
• The device is not allowed to be used in public gardens, parks, sports centers or at roadsides as
well as in agriculture and forestry.
• This grass trimmer is not allowed to be used for cutting or chopping, otherwise, there is a risk of
injury. For example:
- Hedges, shrubs and bushes,
- Flowers,
- In terms of composting.
• Never allow children or people unfamiliar with these instructions to use the trimmer.
• If the supply cord is damaged, it must be replaced by the manufacturer, its service agent or
similarly qualified persons in order to avoid a hazard.
• Do not wear loose clothing or jewelry. They can be caught in moving parts. Use of gloves and
substantial footwear is recommended when working outdoors. Wear protective hair covering to
contain long hair.
• Stop using the grass trimmer while people, especially children, or pets are nearby.
• Only use the grass trimmer in daylight or good artificial light.
• Ground Fault Circuit Interrupter (GFCI) protection should be provided on the circuit(s) or outlet(s)
to be used for the gardening appliance. Receptacles are available having built-in GFCI
protection and may be used for this measure of safety.
• Before using the grass trimmer and after any impact, check for signs of wear or damage and
repair as necessary.
• Never operate the grass trimmer with damaged guards or without the guards in place.
• Keep hands and feet away from the cutting means at all times and especially when switching on
the motor.
• To reduce the risk of electric shock, use only with an extension cord intended for outdoor use,
such as an extension cord of cord type SW-A, SOW-A, STW-A, STOW-A, SJW-A, SJOW-A,
SJTW-A or SJTOW-A.

4
GENERAL SAFETY RULES
• Keep proper footing and balance at all times.
• Take care against injury from any device fitted for trimming the filament line length. After extending
new cutter line always return the grass trimmer to its normal operating position before switching on.
• Never fit metal cutting elements.
• Never use replacement parts or accessories not provided or recommended by the manufacturer.
• Disconnect the grass trimmer from the outlet before checking, cleaning or working on the grass
trimmer and when it is not in use.
• Only use identical replacement parts when servicing a tool with double insulation. Servicing should
be performed by a qualified technician.
• Always ensure that ventilation openings are kept clear of debris.
• Avoid unintentional starting. Do not carry plugged-in appliance with finger on switch.
• Do not abuse the cord. Never carry appliance by the cord or yank it to disconnect from outlet.
Keep the cord from heat, oil, and sharp edges.
• It will do the job better and with less likelihood of a risk of injury at the rate for which it was designed.
ADDITIONAL SAFETY INSTRUCTIONS FOR YOUR GRASS TRIMMER
• Do not expose to moisture.
• Use only on AC outlets supply voltage shown on the product rating label.
• Avoid operating your trimmer in wet grass, where feasible.
• Do not use in rain.
• On slopes, be extra careful of your footing and wear nonslip footwear.
• Do not walk backwards when trimming, you could trip.
• Always walk when operating the trimmer, never run.
• Switch the trimmer off before going over surfaces other than grass.
• Never pick up or carry a trimmer by the cord.
• Do not lean over the trimmer guard as objects may be throw by the cutting line.
• Keep all nuts, bolts and screws tight to be sure the trimmer is in safe working condition.
• To avoid the risk of injury keep fingers and hands clear of the line cutter on the leading edge of
the guard.
• After use, disconnect the machine from the outlet and check for damage
• When not in use, tools should be stored indoors in a dry and high, or locked-up place – out of
reach of children.

• Corded powered trimmers should only be repaired by an authorized technician.
• Use only manufacturer’s recommended replacement parts and accessories.
• The preparation for use, operation and maintenance of the appliance:
- Keep cutting edge sharp and clean for best performance and to reduce the risk of injury.
Follow instructions for lubricating and changing accessories. Inspect appliance cord periodically,
and if damaged, have it repaired by an authorized service facility. Inspect extension cords
periodically and replace if damaged. Keep handles dry, clean, and free from oil and grease.
- Read the instructions carefully.
- Be familiar with the controls and proper use of the equipment.
- Before use check the supply and extension cord for signs of damage or aging.
- If the cord becomes damaged during use, disconnect the cord from the power supply
immediately.
- Do not use the trimmer if the cords are damaged or worn.
WARNING
5
GENERAL SAFETY RULES
- Cutting elements continue to rotate after the motor is switched off;
- Keep extension cords away from cutting elements.
WARNING
WARNING
6
ELECTRICAL INFORMATION
DOUBLE INSULATED
This grass trimmer has a plug. The grass trimmer is double insulated to provide a double
thickness of insulation between you and the tool’s electrical system. All exposed metal parts are
isolated from the internal metal motor components with protective insulation.
TO AVOID ELECTRICAL HAZARDS, FIRE HAZARDS, OR DAMAGE TO THE
TOOL, USE PROPER CIRCUIT PROTECTION. YOUR GRASS TRIMMER IS
WIRED AT THE FACTORY FOR 120V OPERATION. CONNECT TO A 120 V,
15 A CIRCUIT, AND USE A 15 A TIME-DELAYED FUSE OR CIRCUIT
BREAKER. TO AVOID SHOCK OR FIRE, IF THE EXTENSION CORD IS
WORN, CUT OR DAMAGED IN ANY WAY, REPLACE IT IMMEDIATELY.
USE ONLY IDENTICAL REPLACEMENT PARTS WHEN SERVICING THE
GRASS TRIMMER, TO AVOID INJURY.
WARNING
DOUBLE INSULATION DOES NOT TAKE THE PLACE OF NORMAL SAFETY
PRECAUTIONS WHEN OPERATING THIS GRASS TRIMMER.
CAUTION
ALWAYS MAKE SURE THAT YOUR OUTLET IS PROPERLY GROUNDED.
IF UNCERTAIN, HAVE IT CHECKED BY A CERTIFIED ELECTRICIAN.
WARNING
THIS GRASS TRIMMER IS FOR OUTDOOR USE ONLY. DO NOT EXPOSE
TO RAIN OR USE IN DAMP LOCATIONS.
7
ELECTRICAL INFORMATION
Make sure your extension cord is properly wired and in good electrical condition. Always replace a
damaged extension cord or have it repaired by a qualified person before use. Keep extension cords
away from sharp objects, excessive heat and damp or wet areas.
Use a separate electrical circuit for your tools. This circuit should comprise a wire of at least 12
gauge and should be protected with a 15 A time-delayed fuse. Before connecting the motor to the
power line, make sure the switch is in the OFF position and the electric current is identical to that
stamped on the motor nameplate. Running at a lower voltage will damage the motor.
GUIDELINES FOR USING EXTENSION CORDS
USE THE PROPER EXTENSION CORD. Make sure your extension cord is in good condition.
When using an extension cord, be sure to use one heavy enough to carry the current your product
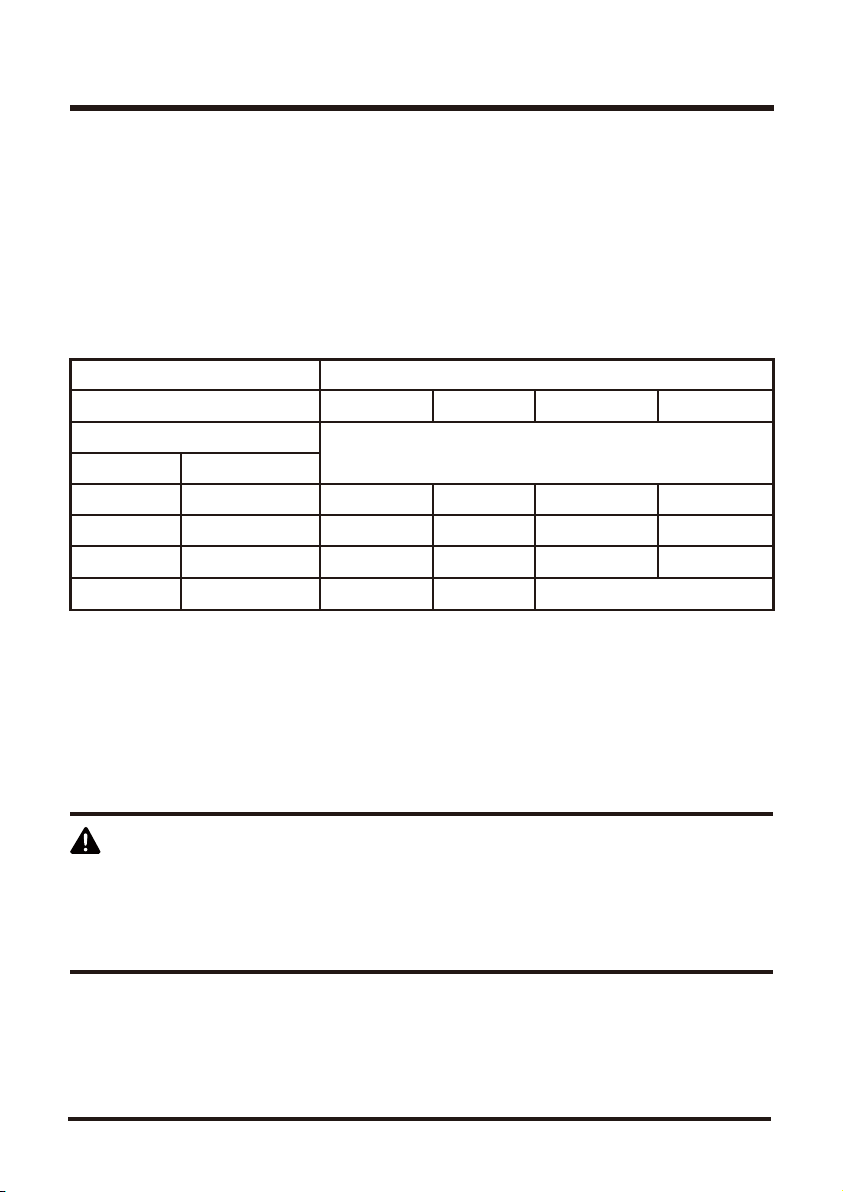
will draw. An undersized cord will cause overheating. The table below shows the correct size to use
depending on cord length and nameplate ampere rating. If in doubt, use the next heavier gauge.
The smaller the gauge number, the heavier the cord.
Minimum Gauge for Extension Cords (AWG)
(Using 120 V only)
Ampere Rating
AWG
120V
More Than
0
6
10
12
Not More Than
6
10
12
16
25ft (7.62m)
18
18
16
14
50ft (15.24m)
16
16
16
12
100ft (30.48m)
16
14
14
Not Recommended
150ft (45.72m)
14
12
12
Total Length of Cord in Feet (meters)
WARNING
SAVE THESE INSTRUCTIONS.
ALTHOUGH THIS GRASS TRIMMER IS DOUBLE INSULATED, THE EXTENSION
CORD AND RECEPTACLE MUST STILL BE GROUNDED WHILE IN USE TO
PROTECT THE OPERATOR FROM ELECTRICAL SHOCK.
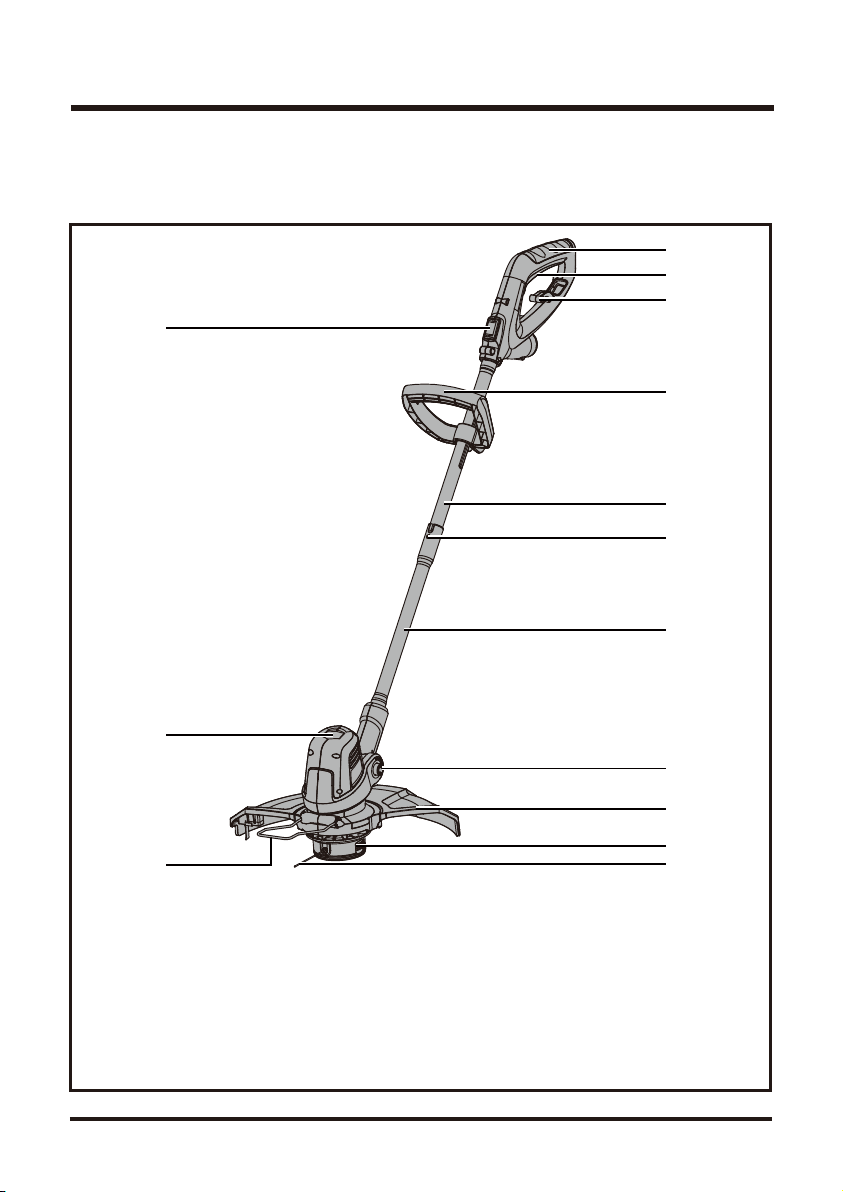
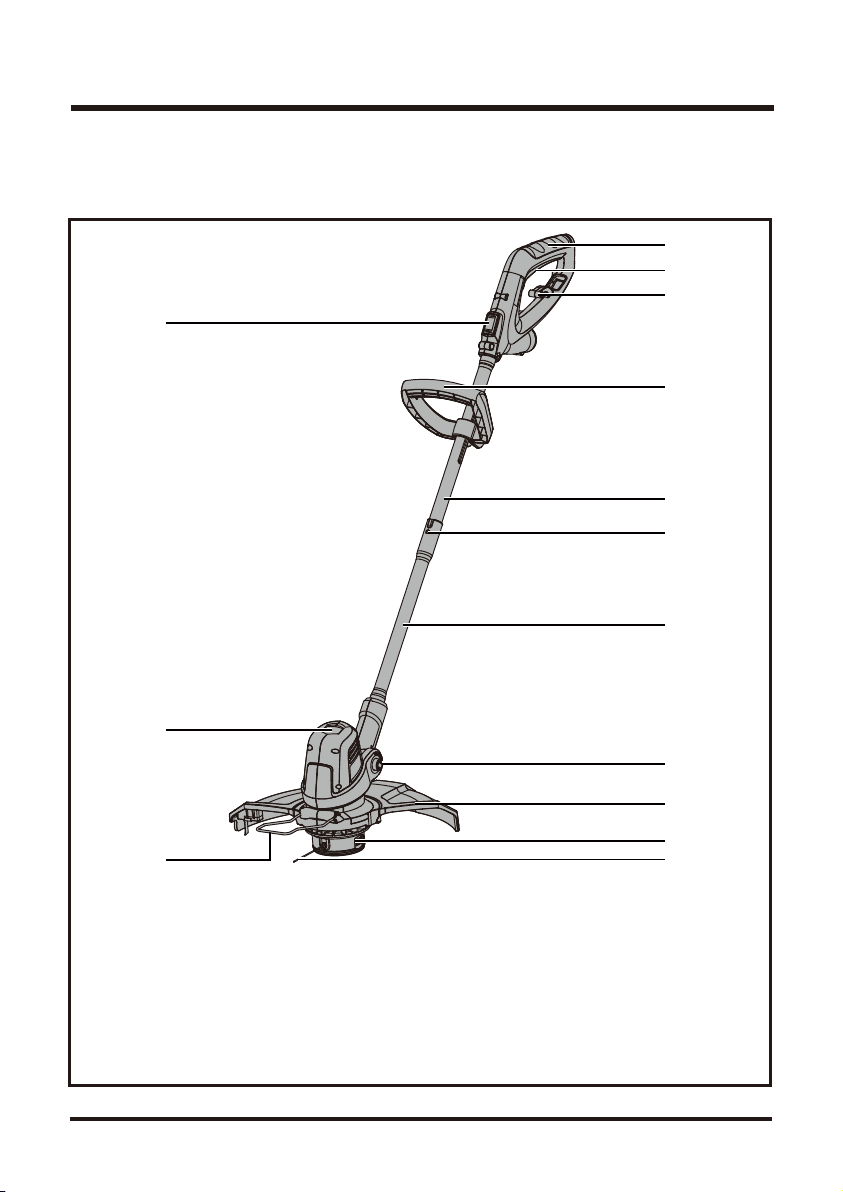
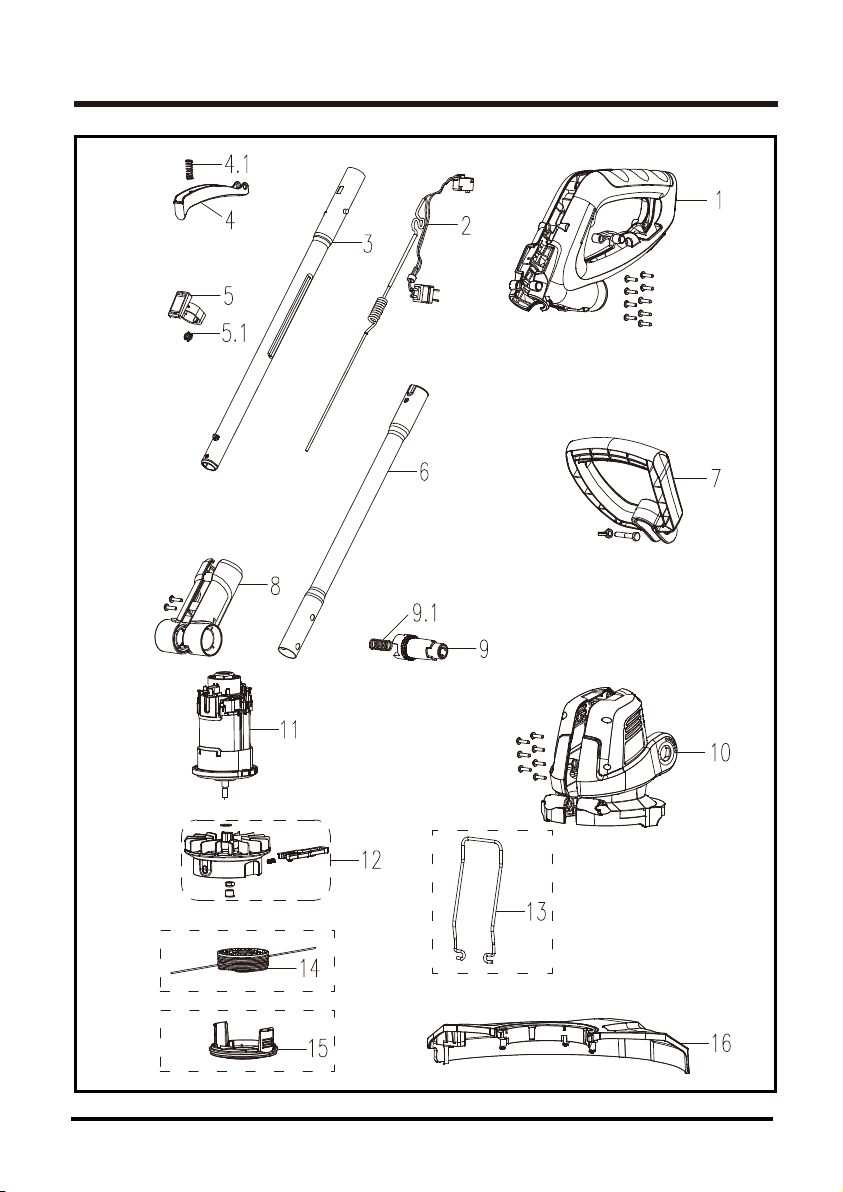
KNOW YOUR GRASS TRIMMER
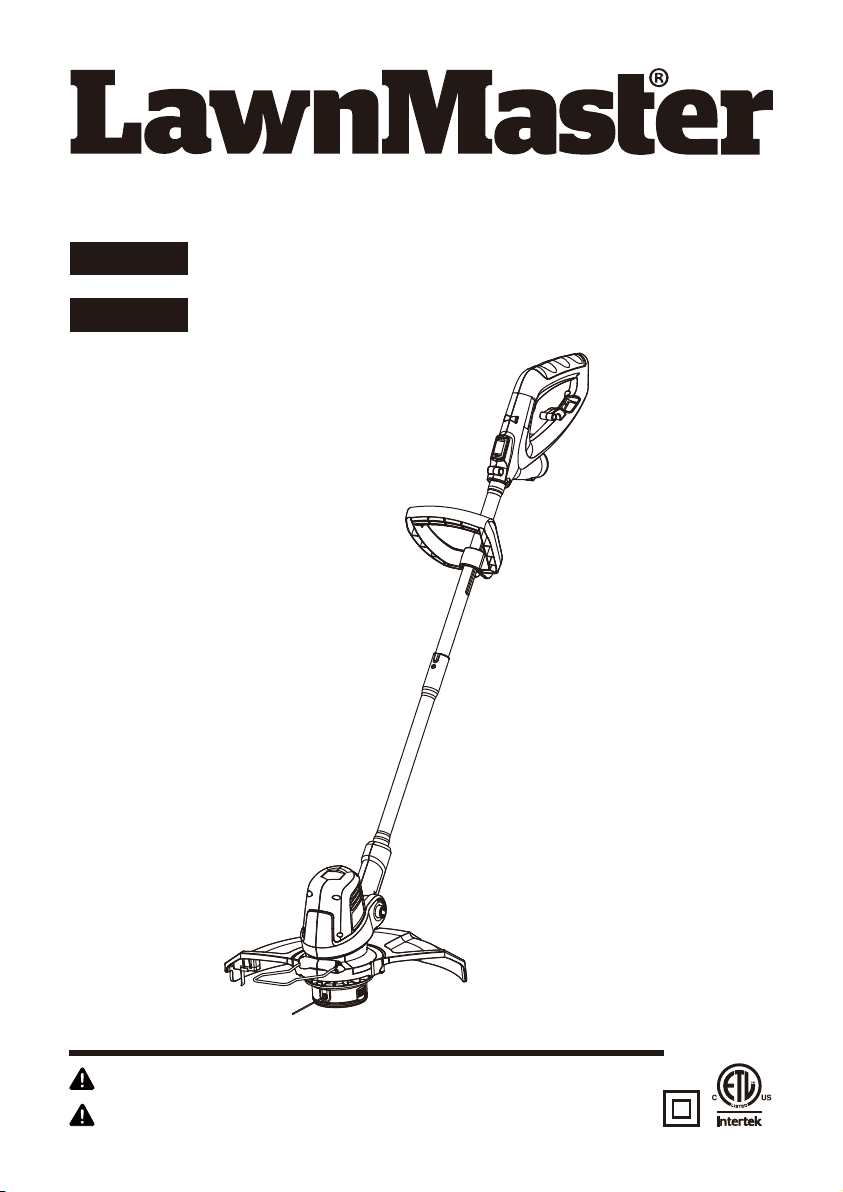
Components
1. Upper Handle
2. ON / OFF Switch
3. Cord Retainer Hook
4. Assist Handle
5. Upper Shaft
6. Connection Point Locking Pin
7. Lower Shaft
8. Pivoting Head Button
9. Debris Guard
10. Trimmer Head W / Line Spool
11. Trimming Line
12. Flower Guard
13. Motor Housing
14. Rotational Lock Button
The safe use of this product requires an understanding of the information on the product and in this
Operator’s Manual as well as a knowledge of the project you are attempting. Before use of this
product, familiarize yourself with all operating features and safety rules.
8
12
3
2
1
5
6
4
7
8
9
10
11
14
13

This product requires assembly.
• Carefully remove the product and any accessories from the box. Make sure that all items listed in
the packing list are included.
• Inspect the product carefully to make sure no breakage or damage occurred during shipping.
• Do not discard the packing material until you have carefully inspected and satisfactorily operated
the product.
• If any parts are damaged or missing, please call the service center.
9
ASSEMBLY
PACKING LIST
(1) Lower Shaft (with trimmer head and line spool installed)
(1) Upper Shaft
(1) Assist Handle
(1) Bolt
(1) Wing Nut
(1) Debris Guard
(1) Flower Guard
(1) Operator's Manual
WARNING
WARNING
10
ASSEMBLY
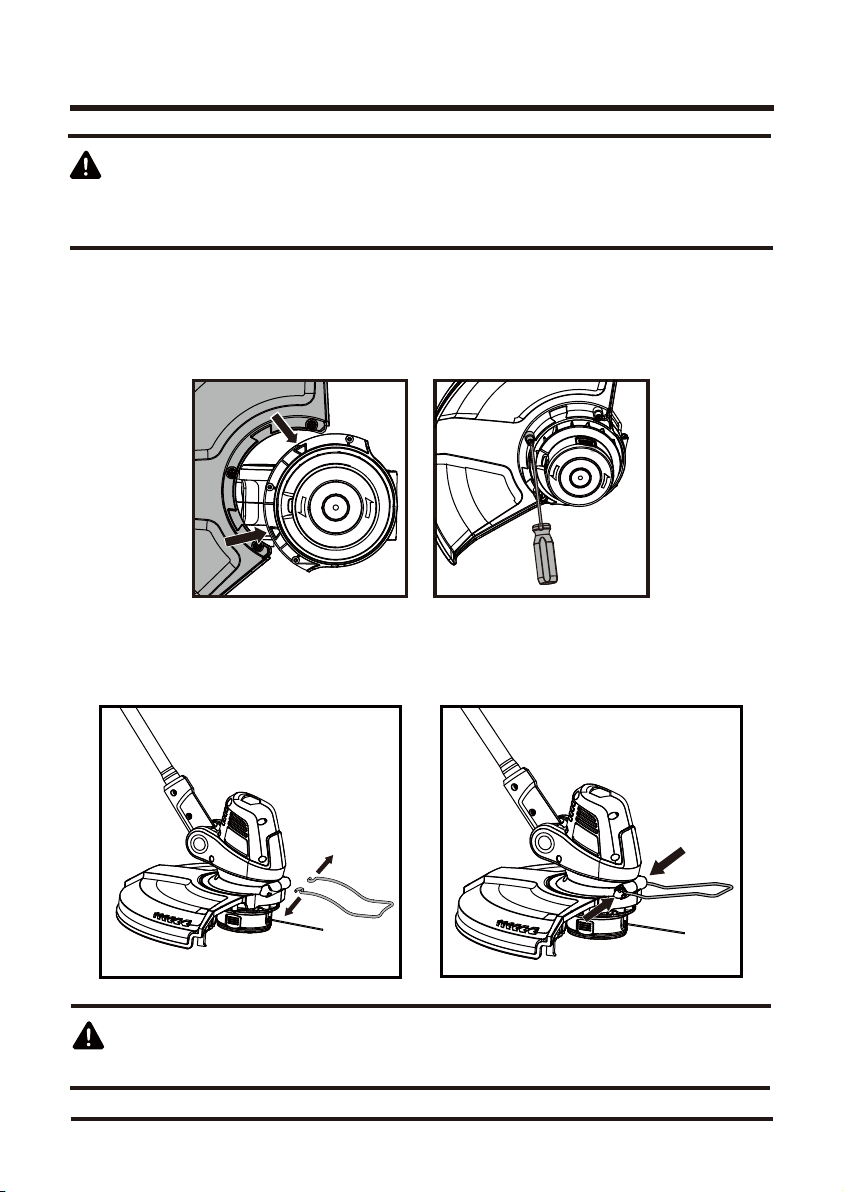
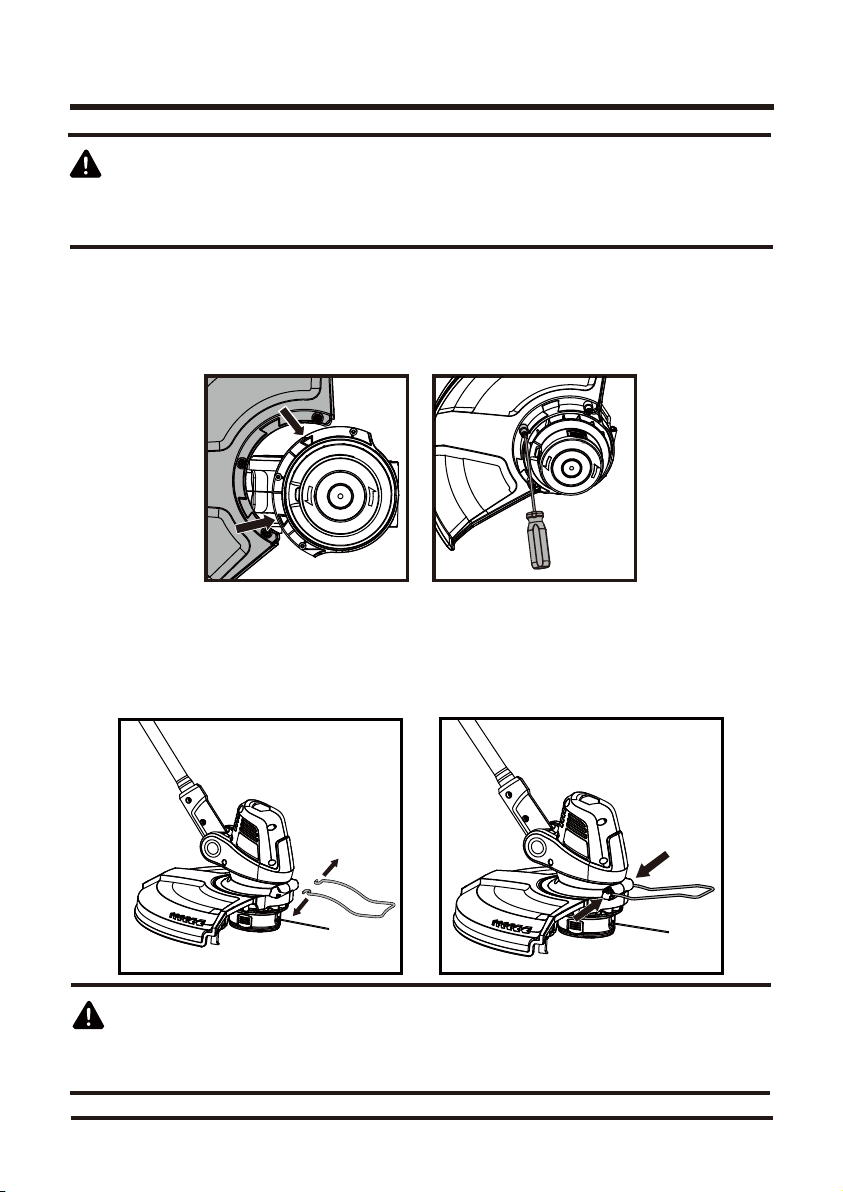
FITTING THE GUARD
1. Fit the debris guard into the slots on the trimmer housing and align the screw holes in the debris
guard with those in the trimmer head. Place the guard in position (Fig. 1).
2. Secure the guard with the screws using a phillips screwdriver (Fig. 2).
FITTING THE FLOWER GUARD
1. Pull the flower guard wide enough to extend wide enough to fit over the motor housing (Fig. 3).
2. Insert both ends of the steel bar into the recessed cavities on the motor housing (Fig. 4).
Before assembly, make sure that the grass trimmer is switched off and
unplugged.
Never use the grass trimmer unless the guard is properly fitted.
Fig. 1
Fig. 3 Fig. 4
Fig. 2
11
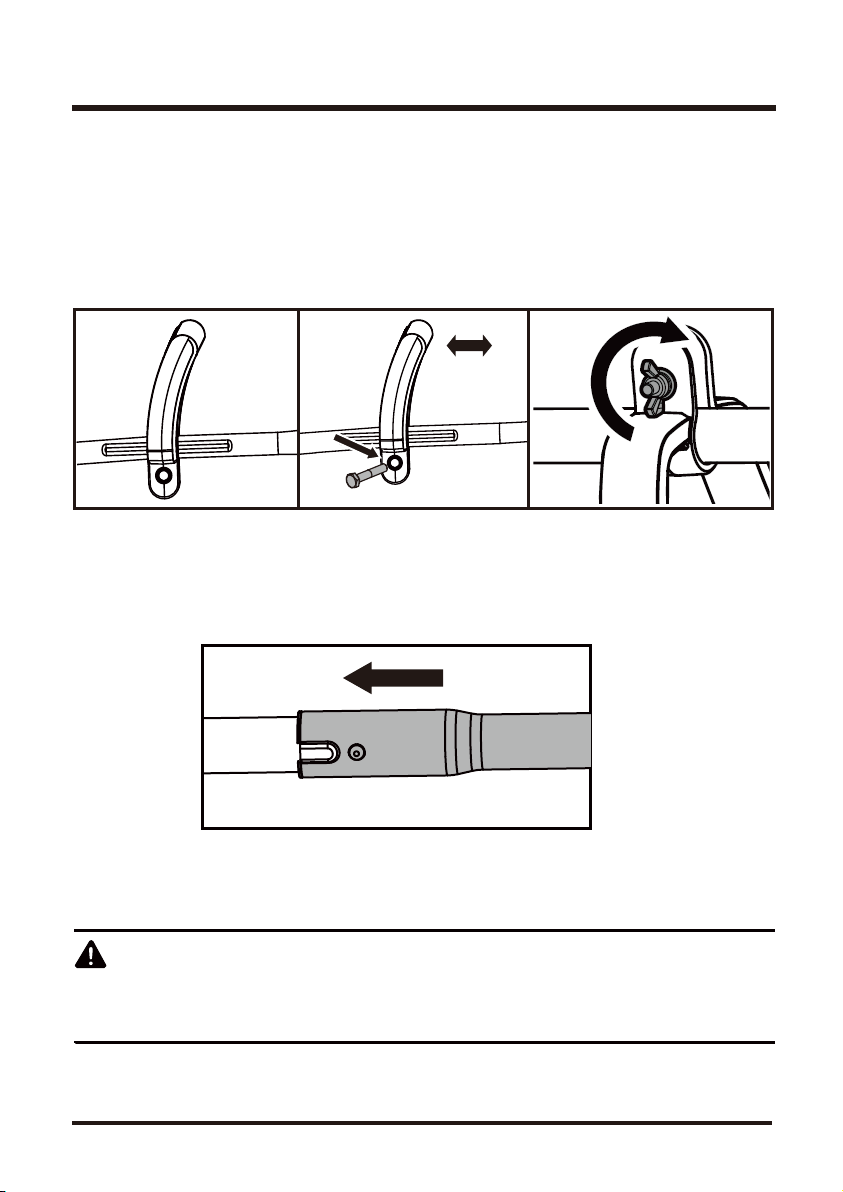
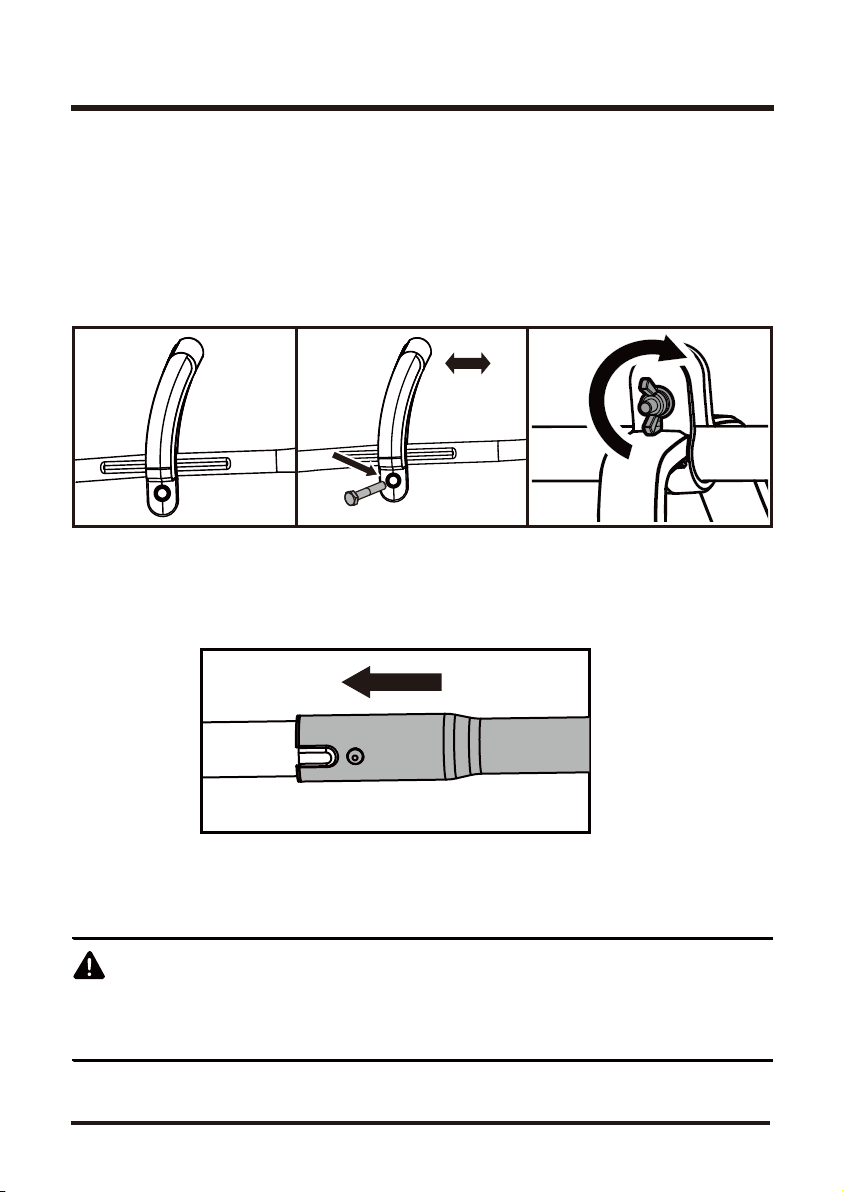
FITTING THE ASSIST HANDLE
Loosen and remove the wing nut and bolt from the assist handle.
1. Place the assist handle on the upper shaft. Adjust the handle to mount on the index channel as
shown (Fig. 5).
2. Along the index channel, slide the assist handle to the most comfortable position (Fig. 6).
3. Insert the bolt in the hole on the assist handle and tighten the wing nut securely (Fig. 7).
ASSEMBLY
Fig. 5 Fig. 6 Fig. 7
JOINING THE UPPER SHAFT TO THE LOWER SHAFT
1. Align the upper shaft with the lower shaft.
2. Insert upper shaft into the lower shaft and locking pin button into place (Fig. 8).
Never adjust the upper handle while the power head is running. Failure to
stop the motor may cause serious personal injury.
NOTE:
If the button does not release completely in the positioning hole, the shafts are not locked
into place. Slightly rotate from side to side until the button is locked into place.
WARNING
Fig. 8
12
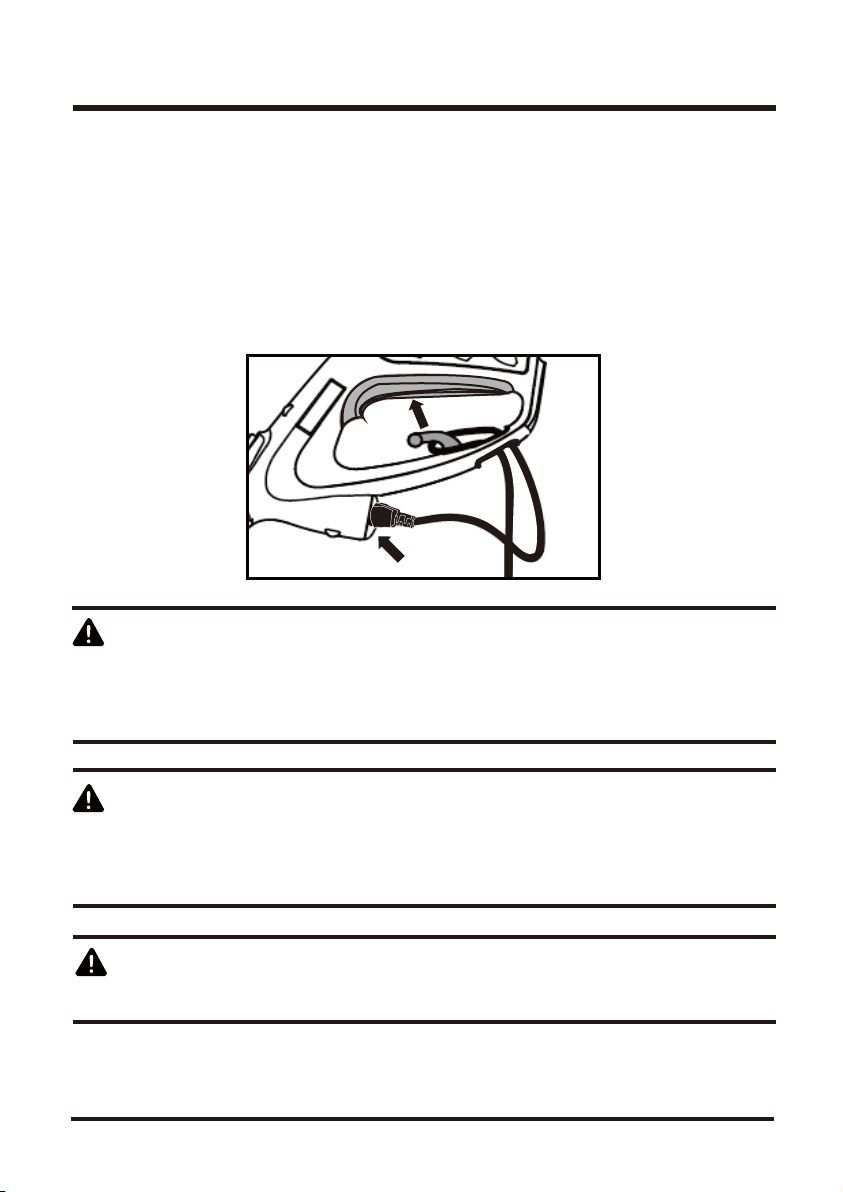
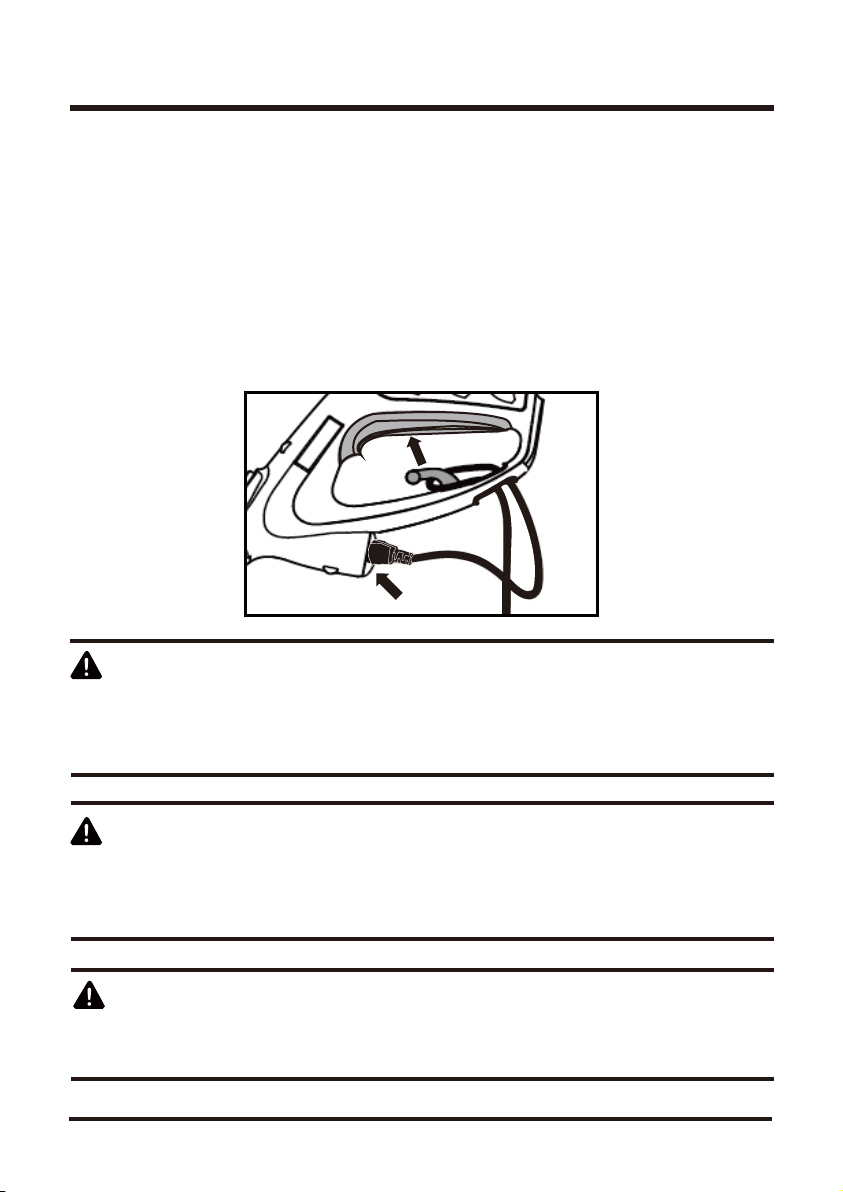
PREPARING THE TRIMMER FOR USE
NOTE: Use only approved outdoor extension cords.
1. Attach the outlet end of an extension cord to the plug on the rear of the grass trimmer.
2. Route the extension cord through the slot located on the rear of the grass trimmer housing and
place underneath the cord retainer.
3. To start the grass trimmer, press the on/off switch.
4. To stop the grass trimmer, release the on/off switch (Fig. 9).
ASSEMBLY
WARNING
If any parts are damaged or missing, do not operate this product until the
parts are replaced. Failure to heed this warning could result in serious
personal injury.
WARNING
Do not connect to power supply until assembly is complete.
Failure to comply could result in accidental starting and possible serious
personal injury.
WARNING
Never attempt to lock the on/off switch in the ON position.
Fig.9
OPERATION
HINT FOR OPTIMUM USE
In order to achieve optimum cutting results, only cut dry grass.
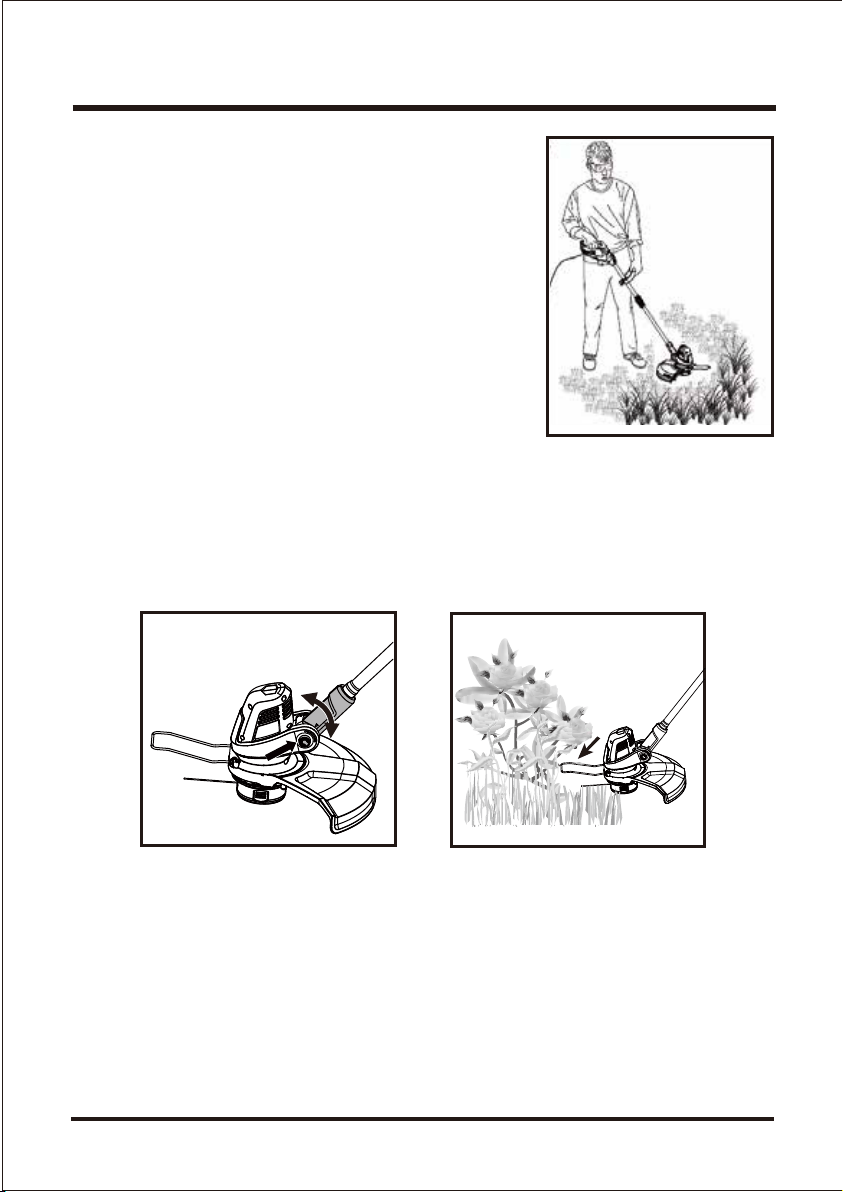
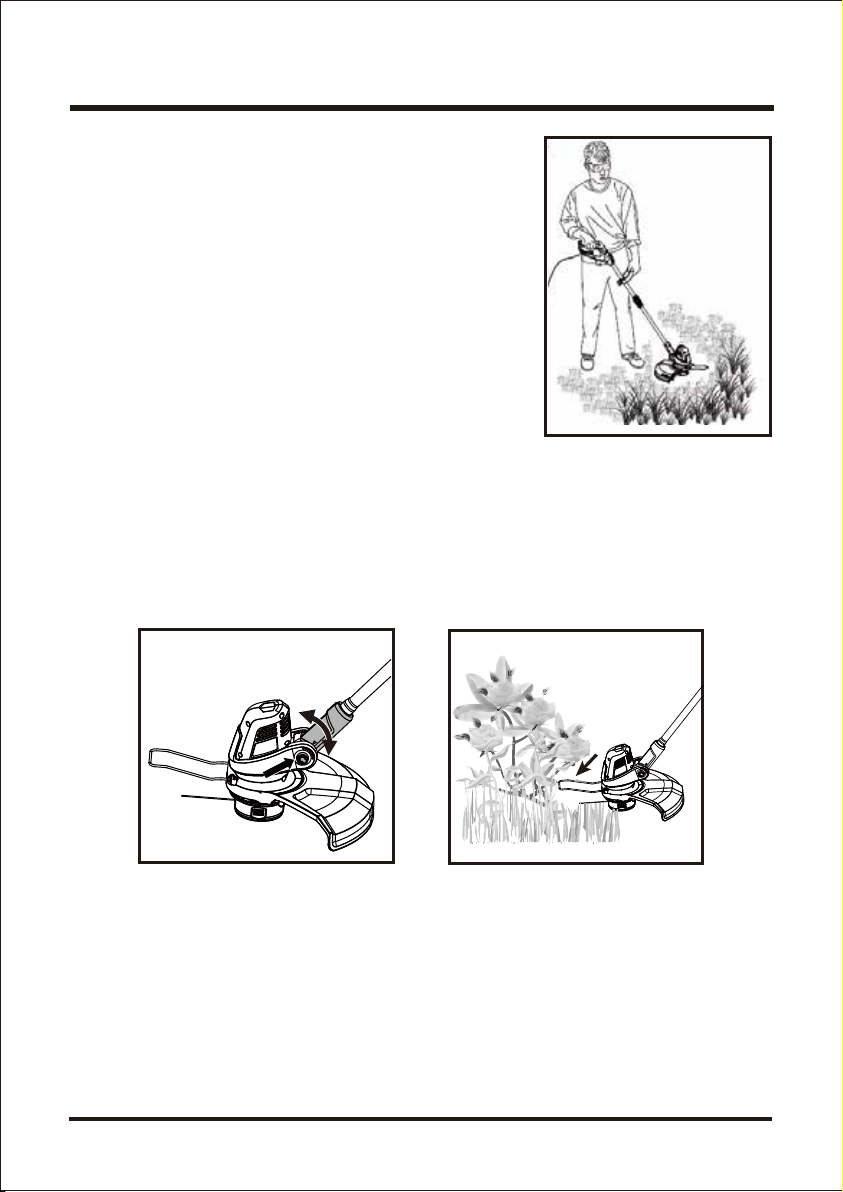
TRIMMING
1. Hold the grass trimmer. Gently swing the trimmer from side
to side (Fig. 10).
2. When cutting long grass, work in stages from top to bottom
in small sections. This will prevent the grass being cut from
wrapping around the shaft and spool head.
3. If the grass trimmer starts running slowly, reduce the load.
ADJUSTING HEAD ANGLE
NOTE: This trimmer is equipped with a 7-position pivoting head. The head can be adjusted so it is
easy to access to areas such as under bushes and garden furniture.
1. Depress the pivoting head button and adjust the shaft to the desired angle (Fig. 11).
2. Release the button.
USING THE FLOWER GUARD
If necessary the flower guard can be swung down until it engages. Use the flower guard as shown
to cut around delicate plants or flowers (Fig. 12).
Fig. 12Fig. 11
13
Fig. 10
14
OPERATION
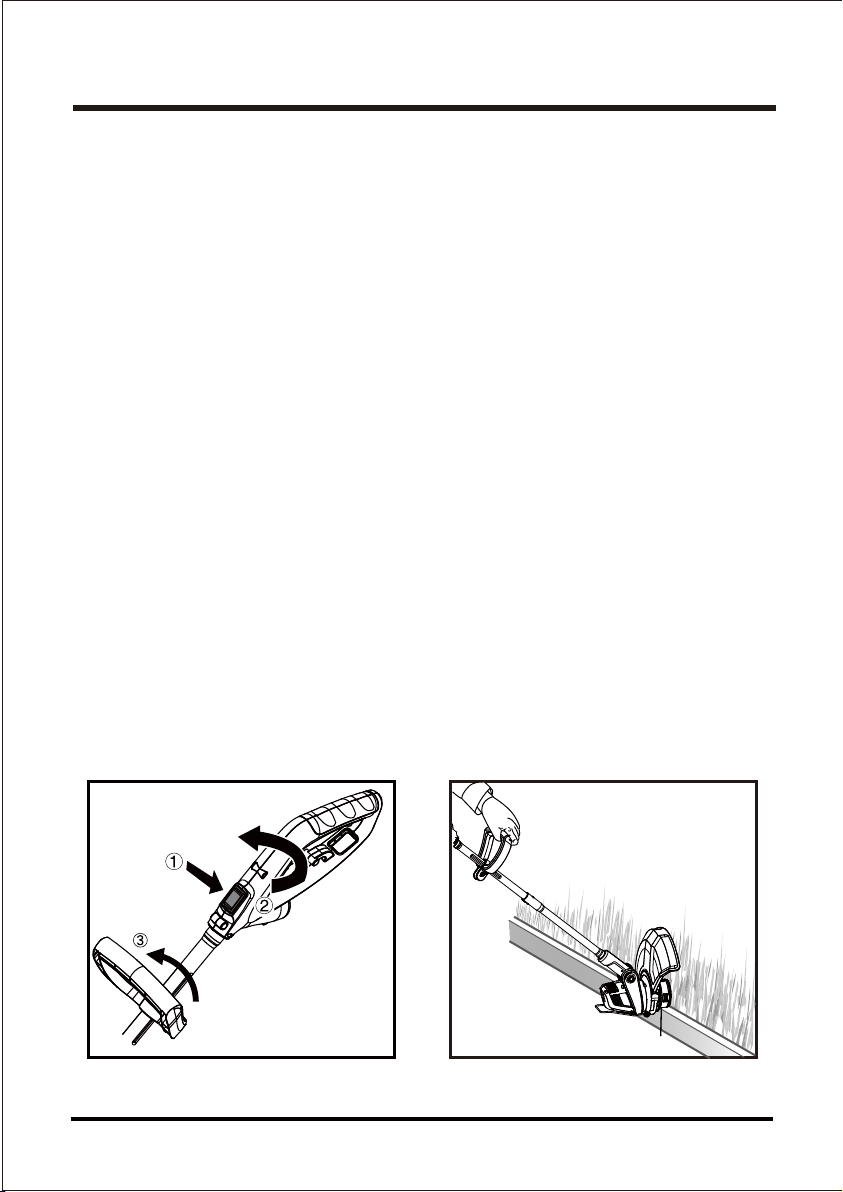
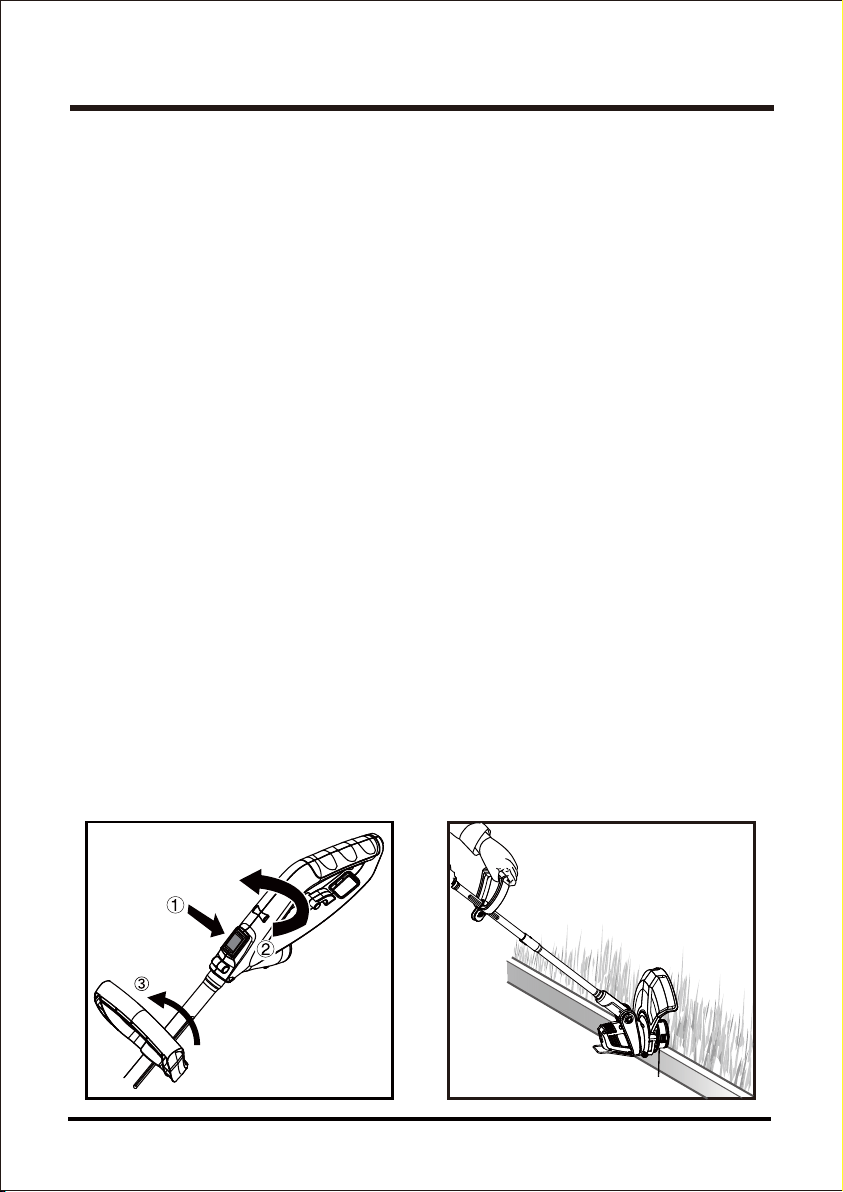
EDGING
NOTE:
The best method of edging is performed with the upper handle and assist handle rotated 180°.
1. Unplug the grass trimmer.
2. Press the rotational lock button and rotate the upper handle clockwise (Fig. 13).
3. Release button when the upper handle has been rotated 180° to the edging position.
4. Rotate assist handle 180° and snap onto index channel (Fig. 13).
5. Hold the trimmer with both hands for edging sidewalks and walkways (Fig. 14).
NOTE: The head also can be adjusted to the desired angle for edging.
Fig.14Fig.13
ADVANCING LINE
NOTE: The trimmer is equipped with an auto-feed head.
Do not bump the head or try to advance the line. This will damage the
trimmer and void the warranty.
1. With the trimmer running, release the on/off switch.
2. Wait two seconds, and press the on/off switch.
NOTE: The auto feed function works during the starting and stopping of the
trimmer. The line will extend approximately 3/16” with each stop and start of
the on/off switch WHILE NOT TRIMMING until the line reaches the length of
the grass deflector blade.
3. It may take up to 10 complete starts and stops to advance the line.
NOTE: After each use, clean the trimmer head with a damp cloth to remove
dirt and grime.
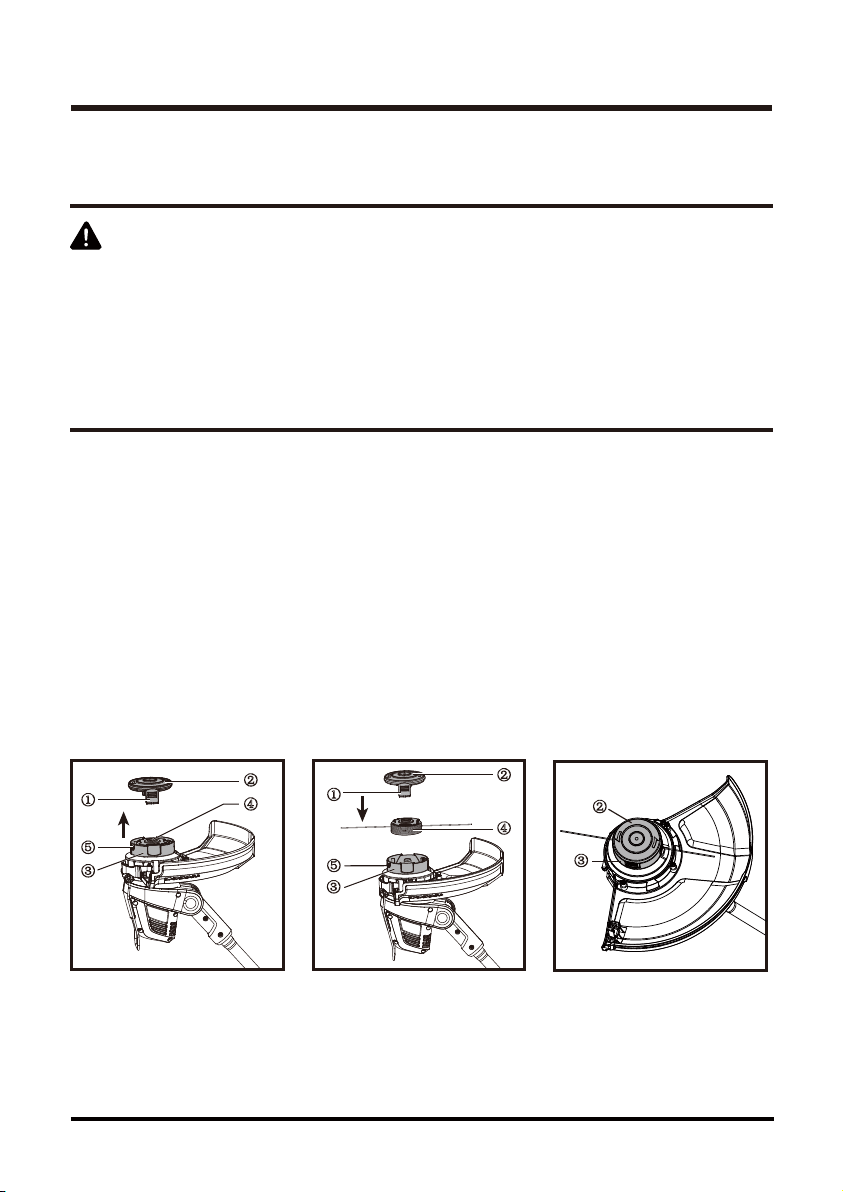
Fig. 15 Fig. 16
Your grass trimmer has been designed to operate over a long period of time with minimum
maintenance.
Continuous satisfactory operation depends upon proper tool care and regular cleaning.
MAINTENANCE
FITTING A NEW SPOOL
1. Unplug the grass trimmer.
2. Remove the empty spool (Fig. 15).
3. Press the tabs ① and remove the spool cover ② from the cutting head ③. Remove the empty
spool ④ from the cutting head.
4. Replace with a new spool (Fig. 16).
5. Release both cutting lines from the parking slot and guide the lines into both eyelets ⑤.
The lines should protrude approximately 4” from the eyelets ⑤.
6. Put the new spool ④ into the cutting head ③. Rotate the spool slightly until it is seated.
7. Snap the spool cover ② on the cutting head ③ and ensure it is in place (Fig. 17).
Fig. 17
WARNING
Before performing any maintenance, switch off and unplug the tool.
Regularly clean the ventilation slot in your grass trimmer using a soft
brush or dry cloth.
Regularly clean the cutting line and spool using a soft brush or dry cloth.
Regularly remove grass and dirt from the underside of the guard using a
blunt scraper.
15
②
③
①
②
⑤
④
④
⑤
①
②
③
③
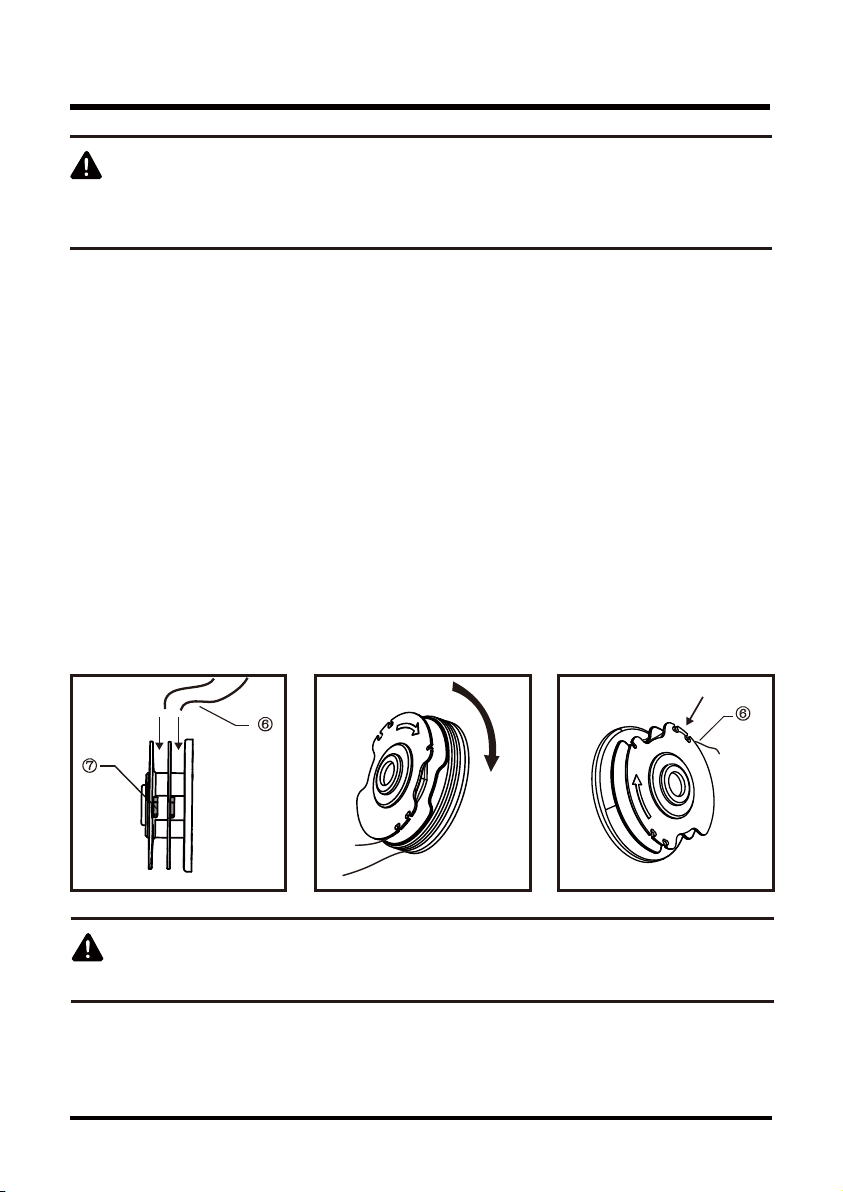
Fig. 18 Fig. 19 Fig. 20
WINDING NEW LINE ONTO A SPOOL
1. You may wind new cutting lines onto an empty spool.
2. Replacement packs of cutting line are available from dealer.
3. Remove the empty spool from the grass trimmer as described above.
4. Remove any remaining cutting line from the spool.
5. Prepare 2 cutting lines ⑥ with the same length for winding. There are 4 eyelets ⑦ in the spool,
2 eyelets ⑦ in the upper section and 2 eyelets ⑦ in the lower section (Fig. 18).
6. First feed 4” of cutting lines ⑥ into the two eyelets ⑦. Two eyelets ⑦ should be in the different
sections of spool.
7. Wind the cutting lines ⑥ onto the spool in the direction of the arrow showed on spool. Make sure
to wind the lines on neatly and in layers. Do not crisscross (Fig. 19).
8. After winding, fix the end of lines ⑥ in the parking slot of the spool (Fig. 20).
9. If you want to use, operate as described above to fix the spool on the grass trimmer. Do not
forget to release the cutting lines ⑥ from the parking slot.
MAINTENANCE
16
If the cutting lines protrude beyond the trimming blade, cut them off so that they
just reach the blade.
WARNING
Only use the appropriate type of cutting line (0.065” round monofilament).
WARNING
⑦
⑥
⑥

17
If your grass trimmer does not appear to operate properly, follow the instructions below.
If this does not solve the problem, please contact your local repair agent.
TROUBLESHOOTING
Before proceeding, switch off the tool and unplug.
WARNING
PROBLEM POSSIBLE CAUSE SOLUTION
The trimmer
does not start.
The trimmer
runs slowly.
Unsatisfactory
result.
Automatic line
feed does not
work.
The power cord is not properly
connected to power source.
Defective on/off switch.
The spool housing is blocked.
The cutting line protrudes too
long.
The cutting line is worn or
damaged.
Insufficient cutting line.
The spool is jammed.
Replace the spool.
Repair by a qualified personal.
Check that the power cord is properly
connected and that there is power going to
trimmer.
Check that the spool housing can rotate
freely. Carefully clean it if necessary.
Check that the cutting line does not
protrude more than 4” from the spool
housing. If it does, cut it off so that it just
reaches the line trimming blade.
Keep the tabs depressed and remove the
spool cover from the housing. Pull the
cutting line until it protrudes 4” from the
housing. If insufficient cutting line is left on
the spool, install a new spool of cutting line
as instructed in FITTING A NEW SPOOL
section.
Carefully clean the spool cover and
housing.
Remove the spool and check if the lever
can move freely.
Remove the spool and unwind the cutting
line, then wind it on neatly again as
instructed WINDING NEW LINE ONTO A
SPOOL section. Replace the spool as
instructed.

18
WARRANTY
We take pride in producing a high quality, durable product. This Lawnmaster
®
product carries a
limited two (2) year warranty against defects in workmanship and materials from date of purchase
under normal household use. If product is to be used for commercial, industrial or rental use, a 30
day limited warranty will apply. Warranty does not apply to defects due to direct or indirect abuse,
negligence, misuse, accidents, repairs, or alterations and lack of maintenance. Please keep your
receipt/packing list as proof of purchase. This warranty gives you specific legal rights, and you
may have other rights, which vary from state to state. For product service call Customer Service at
1-866-384-8432.
Items not covered by warranty:
1. Any part that has become inoperative due to misuse, commercial use, abuse, neglect, accident,
improper maintenance, or alteration;
2. The unit, if it has not been operated and/or maintained in accordance with the Operator's
Manual;
3. Normal wear, except as noted below;
4. Routine maintenance items such as lubricants, blade sharpening;
5. Normal deterioration of the exterior finish due to use or exposure.
Transportation Charges: Transportation charges for the movement of any power equipment unit or
attachment are the responsibility of the purchaser. It is the purchaser’s responsibility to pay
transportation charges for any part submitted for replacement under this warranty unless such
return is requested in writing by LawnMaster
®
.
SAVE YOUR RECEIPTS. THIS WARRANTY IS VOID WITHOUT THEM.
19
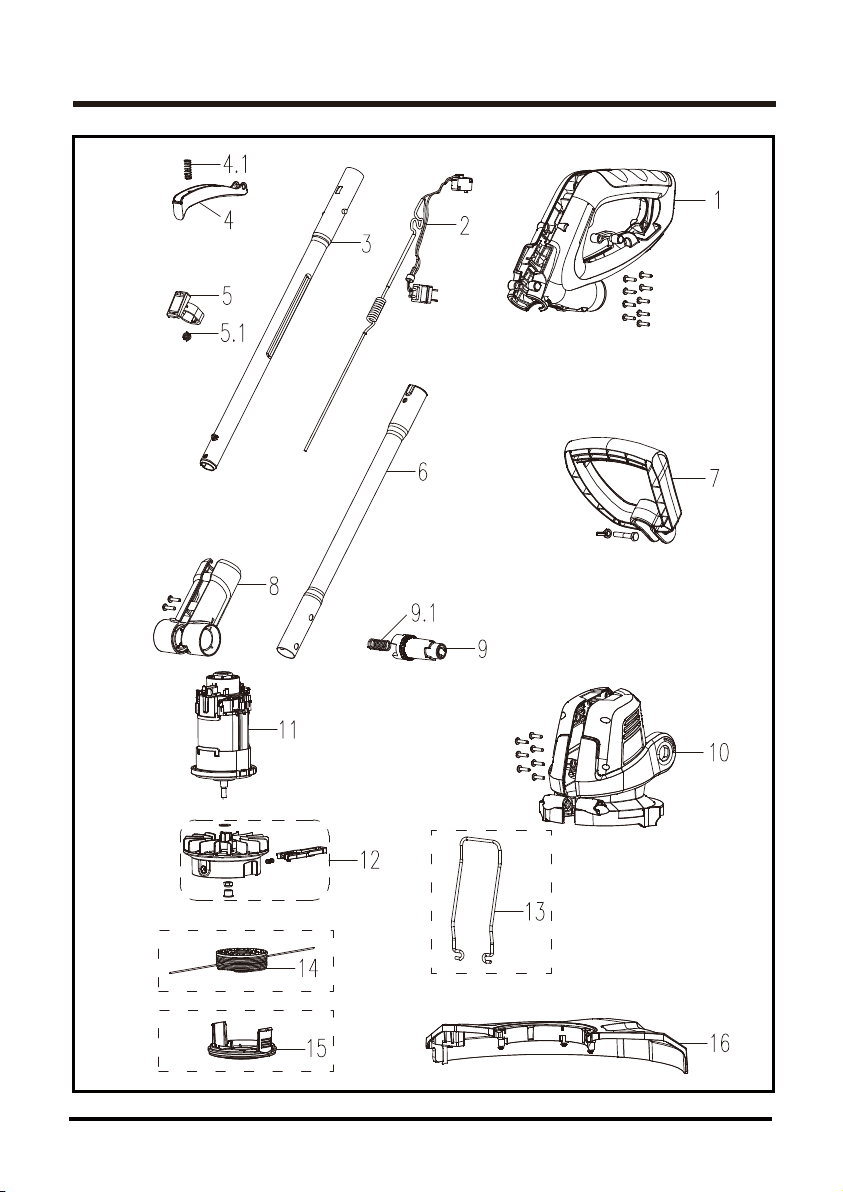
EXPLODED VIEW

ITEM NO. PART NO. DESCRIPTION
PARTS LIST
QTY
1
2
3
4
4.1
5
5.1
6
7
8
9
9.1
10
11
12
13
14
15
16
1
1
1
1
1
1
1
1
1
1
1
1
1
1
1
1
1
1
1
121065101
121065102
121063102
121020110
221001117
121030110
121002106
121064103
121064101
121065107
221004107
121002110
121065103
121065108
121065104
121058103
121025107
121065105
121065106
* Parts highlighted in gray are available for after sales purchase.
Handle assembly
Power cord
connection assembly
Switch trigger assembly
Compression spring
Extension Wand Unit
Compression spring
connection assembly
Assistant handle assembly
Rotary handle assembly
Shaft lock button
Compression spring
Motor housing assembly
Motor assembly
Cutting head assembly
Flower guard
Spool assembly
Spool cover
Protector guard assembly
20

NOTES
21

Contenido
Especificaciones del producto
Reglas generales de seguridad
Información eléctrica
Conozca su bordeadora
Ensamblaje
Funcionamiento
Mantenimiento
Resolución de problemas
Garantía
Vista en detalle
Lista de piezas
Notas
22
CONTENIDO
ESPECIFICACIONES DEL PRODUCTO
Bordeadora Eléctrica de Césped de 14 pu
Sección Página
Tipo Alámbrica
Voltaje
120 V~60 Hz
Amp
5,5 A
Velocidad 8000 RPM
Tamaño del hilo 0,065 pulgadas (1,6 mm)
Marca de corte 14 pulgadas (355 mm)
Peso Neto 5,78 lbs (2,6 kg)
22
22
23-25
26-27
28
29-32
33-34
35-36
37
38
39
40
41

23
REGLAS GENERALES DE SEGURIDAD
ADVERTENCIA
LEA TODAS LAS INSTRUCCIONES Y GUÁRDELAS PARA CONSULTAS
FUTURAS. Al usar la bordeadora, debe seguir las reglas de seguridad
relacionadas.
Por su seguridad y la de las personas cercanas, lea estas instrucciones antes de usar la
bordeadora. No utilice la bordeadora sin antes leer las instrucciones. Guarde las instrucciones
para usarlas a futuro.
• Esta bordeadora está diseñada para cortar césped, vegetación suave y para recortar orillas.
• Este producto no se debe usar en jardines públicos, parques, centros de deportes o caminos,
ni tampoco en actividades agrícolas ni forestales.
• Esta bordeadora no se debe usar para cortar o picar, ya que estas actividades general riesgo
de lesiones. Ejemplo:
- Setos, arbustos, árboles pequeños,
- flores,
- en casos de compostaje.
• Jamás permita que niños o personas que no conozcan estas instrucciones utilicen la bordeado-
ra.
• Si el cable de alimentación está dañado, debe ser reemplazado por el fabricante, por su agente
de servicio o por una persona similarmente calificada para así evitar peligros.
• No se ponga prendas anchas o joyas. Pueden quedar atrapadas en las piezas móviles. Se
recomienda el uso de guantes y calzado resistentes al trabajar en exteriores. Utilice protección
de contención para el cabello largo.
• Deje de usar la bordeadora cuando haya personas, especialmente niños, cerca.
• Utilice la bordeadora solo durante el día o bajo una buena iluminación artificial.
• Debe haber protección del interruptor de circuito por pérdida a tierra (GFCI) en el(los)
circuito(s) o toma(s) de corriente que usará el dispositivo de jardín. Hay disponible receptácu-
los con protección GFCI integrada, los cuales se pueden utilizar para esta medida de seguri-
dad.
• Antes de usar la bordeadora y después de cualquier impacto, revise que no haya señales de
desgaste o daños y repare según sea necesario.
• Jamás utilice la bordeadora si las protecciones están dañadas o no están puestas.
• Mantenga sus manos y pies alejados del sistema de corte en todo momento y especialmente al
encender el motor.
• Para reducir el riesgo de descarga eléctrica, use solo cables de extensión para exteriores,

24
REGLAS GENERALES DE SEGURIDAD
como aquellos tipo SW-A, SOW-A, STW-A, STOW-A, SJW-A, SJOW-A, SJTW-A o SJTOW-A.
• Mantenga los pies en tierra firme y el equilibrio en todo momento.
• Tenga cuidado de no lesionarse con los dispositivos equipados para recortar el largo del
filamento. Tras extender el nuevo hilo de corte, devuelva siempre la bordeadora a su posición
de uso normal antes de encenderla.
• Jamás coloque elementos de corte hechos de metal.
• Jamás utilice piezas de repuesto o accesorios que no hayan sido suministrados o recomenda-
dos por el fabricante.
• Desconecte la bordeadora de la alimentación antes de revisarla, limpiarla, trabajar con ella y
cuando no esté en uso.
• A la hora de hacer cualquier tarea de mantenimiento a una herramienta con doble aislante,
utilice siempre piezas de repuesto idénticas. Las reparaciones se deben realizar mediante un
técnico calificado.
• Asegúrese de que las aberturas de ventilación estén libres de sedimentos.
• Evite un encendido accidental. No transporte la herramienta con su dedo sobre el interruptor.
• No abuse del cable. Jamás transporte la herramienta desde el cable ni lo tire para desconectar-
lo de la toma de corriente. Evite que el cable entre en contacto con calor, aceite y bordes
afilados.
• Esto facilitará el trabajo y tendrá menos posibilidades de sufrir lesiones a la velocidad para la
que fue diseñada.
INSTRUCCIONES DE SEGURIDAD ADICIONALES PARA SU BORDEADORA
• No exponer a la humedad.
• Use únicamente el voltaje de alimentación de la toma de CA mostrado en la etiqueta de
clasificación del producto.
• Evite usar su bordeadora en césped mojado, cuando sea posible.
• No la use en la lluvia.
• En pendientes, preste atención adicional a sus pies y use calzado antideslizante.
• No camine hacia atrás al cortar el césped, ya que podría tropezarse.
• Siempre camine al usar la recortadora, nunca corra.
• Apague la bordeadora antes de pasar sobre superficies que no sean césped.
• Jamás levante o transporte una bordeadora tomándola desde el cable de alimentación.
• No se recargue sobre la guarda de la bordeadora puesto que ya que el hilo de corte podría
lanzar objetos.

25
REGLAS GENERALES DE SEGURIDAD
ADVERTENCIA
- Los elementos cortantes siguen girando después de que el motor se detiene;
- Mantenga los cables de extensión lejos de los elementos de corte.
• Mantenga todos los pernos, tuercas y tornillos apretados, para asegurarse de que la bordeado-
ra está en condiciones operativas seguras.
• Para evitar el riesgo de lesiones, mantenga sus dedos y manos alejados del hilo de corte en el
borde de la protección.
• Después del uso, desconecte la máquina de la toma y compruebe el daño.
• Cuando estén en uso, las herramientas deberán ser guardadas en interior en una ubicación
seca y alta o bajo llave, fuera del alcance de los niños.
• Las bordeadoras eléctricas deben repararse únicamente mediante un técnico autorizado.
• Utilice solo las piezas y accesorios de repuesto recomendadas por el fabricante.
• Preparación para el uso, operación y mantenimiento del aparato:
- Mantenga el borde de corte afilado y limpio para garantizar su máximo desempeño y reducir
el riesgo de lesiones. Siga las instrucciones de lubricación y cambio de accesorios. Inspecci-
one el cable del aparato periódicamente y, si está dañado, haga que un centro de servicio
autorizado lo repare. Inspeccione los cable de extensión periódicamente y reemplácelos si
están dañados. Mantenga las manijas secas, limpias y libres de aceite y grasa.
- Lea las instrucciones detenidamente.
- Familiarícese con los controles y uso correcto del equipo.
- Antes de usar, revise el suministro de alimentación y el cable en búsqueda de daños o
desgaste.
- Si se daña el cable durante el uso, desconéctelo de la alimentación inmediatamente.
- No utilice la bordeadora, si los cables están dañaos o desgastados.
ADVERTENCIA
ADVERTENCIA
26
INFORMACIÓN ELÉCTRICA
DOBLE AISLACIÓN
Esta bordeadora de césped cuenta con un enchufe. La bordeadora tiene doble aislante para
proporcionar un doble grosor en la aislación entre usted y el sistema eléctrico de la herramienta.
Todas las piezas metálicas expuestas están aisladas de los componentes internos metálicos del
motor mediante una aislación protectora.
A FIN DE EVITAR PELIGROS ELÉCTRICOS, INCENDIOS O DAÑOS EN LA
HERRAMIENTA, UTILICE LA PROTECCIÓN ADECUADA PARA EL
CIRCUITO. SU BORDEADORA FUE CABLEADA EN LA FÁBRICA PARA
FUNCIONAR CON CORRIENTE DE 120 V. CONÉCTELA A UN CIRCUITO
DE 120 V, 15 A, Y USE UN DISYUNTOR O FUSIBLE AUTOMÁTICO CON
RETARDO TEMPORAL. PARA EVITAR EL RIESGO DE INCENDIOS, EN
CASO DE ESTAR DESGASTADO EL CABLE EXTENSOR, CORTADO O
DAÑADO DE MANERA ALGUNA, REEMPLÁCELO INMEDIATAMENTE.
SOLO USE PIEZAS DE REPUESTO IDÉNTICAS CUANDO LE DE
MANTENIMIENTO A LA BORDEADORA, A FIN DE EVITAR LESIONES.
ADVERTENCIA
LA DOBLE AISLACIÓN NO REEMPLAZA LAS PRECAUCIONES DE SEGURIDAD
NORMALES AL USAR ESTA BORDEADORA.
PRECAUCIÓN
ASEGÚRESE SIEMPRE DE QUE SU TOMA DE CORRIENTE ESTÉ BIEN
CONECTADA A TIERRA. SI NO ESTÁ SEGURO, HAGA QUE UN
ELECTRICISTA CERTIFICADO LA REVISE.
ADVERTENCIA
ESTA BORDEADORA ES SOLO PARA USO EN EXTERIORES. NO
EXPONER A LA LLUVIA NI USAR EN LUGARES HÚMEDOS.

INFORMACIÓN ELÉCTRICA
27
Asegúrese de que su cable de extensión esté en buenas condiciones eléctricas. Reemplace
siempre un cable de extensión dañado o haga que lo repare una persona calificada antes de usarlo.
Mantenga los cables de extensión lejos de objetos filosos, calor excesivo y zonas mojadas o
húmedas.
Utilice un circuito eléctrico separado para sus herramientas. Este circuito debe tener un cable de al
menos calibre 12 y estar protegido con un fusible con retardo de tiempo 15 A. Antes de conectar el
motor a la alimentación eléctrica, asegúrese de que el interruptor esté en la posición de apagado
(OFF) y que la corriente sea igual a la estampada en la placa del motor. El uso de un voltaje menor
dañará el motor.
PAUTAS PARA UTILIZAR CABLES DE EXTENSIÓN
USE EL EXTENSOR ADECUADO. Asegúrese de que su cable extensor esté en buenas condiciones.
Al utilizar un cable extensor, asegúrese de utilizar uno lo suficientemente potente como para llevar la
corriente necesaria que el producto necesita. Un cable de menor tamaño del adecuado provocará
sobrecalentamiento. La tabla que aparece a continuación muestra el tamaño correcto dependiendo
del largo del cable y clasificación del amperaje. En caso de duda, utilice el siguiente que tenga más
capacidad. Cuanto menor sea el calibre, más fuerte será el cable.
ADVERTENCIA
GUARDE ESTAS INSTRUCCIONES.
A PESAR DE QUE ESTA BORDEADORA DE CÉSPED TIENE DOBLE
AISLAMIENTO, EL CABLE DE EXTENSIÓN Y EL RECEPTÁCULO DEBEN
ESTAR CONECTADOS A TIERRA MIENTRAS SE USA PARA PROTEGER
AL OPERADOR DE UNA DESCARGA ELÉCTRICA.
Calibre mínimo para extensores (AWG)
(Solo use 120 V)
Amperaje AWG
120V
Más de
0
6
10
12
No más de
6
10
12
16
18
18
16
14
16
16
16
12
16
14
14
14
12
12
7,62 m
(25 pies)
15,24 m
(50 pies)
30,48 m
(100 pies)
45,72 m
(150 pies)
Largo total del cable en pies (metros)
No recomendado
CONOZCA SU BORDEADORA
El uso seguro de este producto requiere un entendimiento de la información del producto así como
del Manual del operador como parte del conocimiento del proyecto que lleva al cabo. Antes de
usar este producto, familiarícese con todas las funciones operativas y reglas de segurid.
28
Componentes
1. Manija superior
2. Interruptor de Encendido/Apagado
3. Gancho de retén del cable
4. Manija de apoyo
5. Eje superior
6. Pasador de bloqueo del punto de conexión
7. Eje inferior
8. Botón de la cabeza pivotante
9. Protector contra escombros
10. Cabezal de la bordeadora con
carrete del hilo de corte
11. Hilo de corte
12. Protector para flores
13. Carcasa del motor
14. Botón de bloqueo de giro
12
3
2
1
5
6
4
7
8
9
10
11
14
13

Este producto requiere armado.
• Con cuidado, extraiga el producto y sus accesorios de la caja. Asegúrese de que todos los
elementos mencionados en la lista de componentes del empaque estén incluidos.
• Inspeccione el producto cuidadosamente para asegurarse de que no se haya roto o dañado
durante el transporte.
• No bote el material del empaque hasta que haya inspeccionado completamente y utilizado
satisfactoriamente el producto.
• Si alguna pieza está dañada o faltante, llame al centro de servicio.
29
ENSAMBLAJE
LISTA DE PIEZAS
(1) Eje inferior (con el cabezal de corte y el carrete del hilo de corte instalados)
(1) Eje superior
(1) Manija de asistencia
(1) Tornillo
(1) Tuerca de mariposa
(1) Guarda de desechos
(1) Guarda de flores
(1) Manual del usuario
ENSAMBLAJE
ADVERTENCIA
ADVERTENCIA
30
CÓMO INSTALAR EL PROTECTOR
1. Coloque el guarda desechos en las ranuras de la caja de la recortadora y alinee los orificios
de los tornillos del protector de residuos con los de la cabeza de la bordeadora. Coloque la
guarda en su posición (Fig. 1).
2. Asegure la protección con los tornillos usando un destornillador cabeza phillips (Fig. 2).
COLOCACIÓN DE EL PROTECTOR DE FLORES
1. Tire de el protector para flores lo suficientemente ancho para que se extienda lo suficiente para
que se ajuste sobre la carcasa del motor (Fig. 3).
2. Inserte ambos extremos de la barra de acero en las cavidades empotradas en la carcasa del
motor (Fig. 4).
Antes de armar, asegúrese de que la bordeadora esté apagada y
desenchufada.
Jamás utilice la bordeadora a menos que la protección esté instalada
correctamente.
Fig. 1
Fig. 3 Fig. 4
Fig. 2
31
COLOCACIÓN DE LA MANIJA DE ASISTENCIA
Afloje y retire la tuerca de mariposa y el perno de la manija de asistencia.
1. Coloque la manija de asistencia en el eje superior. Ajuste la manija para montar en el canal de
índice como se muestra (Fig. 5).
2. A lo largo del canal de índice, deslice la manija de asistencia a la posición más cómoda (Fig. 6).
3. Inserte el tornillo en el orificio de la manija de asistencia y apriete firmemente la tuerca de
mariposa (Fig. 7).
ENSAMBLAJE
Fig. 5 Fig. 6 Fig. 7
UNIR EL EJE SUPERIOR AL EJE INFERIOR
1. Alinee el eje superior con el eje inferior.
2. Inserte el eje superior en el eje inferior y el botón del pasador de bloqueo en su lugar (Fig. 8).
Jamás ajuste la manija superior mientras el cabezal motriz está andando.
No detener el motor podría provocar lesiones personales graves.
NOTA:
Si el botón no se suelta del todo en el orificio de posición, los ejes no están fijados en su
lugar. Gire lentamente de lado a lado hasta que el botón calce en su lugar.
ADVERTENCIA
Fig. 8
32
CÓMO PREPARAR LA BORDEADORA PARA EL USO
NOTA: Utilice solo cables de extensión aprobados para uso en exteriores.
1. Inserte el extremo de salida de un cable de extensión en el enchufe de la parte posterior de la
bordeadora.
2. Enrute el cable de extensión a través de la ranura ubicada en la parte posterior de la carcasa de
la bordeadora y colóquelo debajo del retén del cable.
3. Para que funcione la bordeadora de césped, presione el interruptor de encendido/apagado
(on/off).
4. Para detener el funcionamiento de la bordeadora de césped, deje de presionar el interruptor de
encendido/apagado (on/off) (Fig. 9).
ADVERTENCIA
Si alguna pieza está dañada o falta, no utilice este producto hasta
reemplazarla. No hacer caso a esta advertencia podría causar lesiones
severas.
ADVERTENCIA
No conectar a la alimentación hasta que el armado esté completo.
El no cumplir con esto podría causar un funcionamiento inicial erróneo y
posibles lesiones severas.
ADVERTENCIA
Jamás intente bloquear el interruptor de encendido/apagado en la
posición de encendido (ON).
ENSAMBLAJE
Fig.9
FUNCIONAMIENTO
SUGERENCIA PARA UN USO ÓPTIMO
Para alcanzar óptimos resultados de corte, corte solo césped
seco.
CORTE
1. Sujete la bordeadora de césped. Gire suavemente la
bordeadora de lado a lado (Fig. 10).
2. Cuando corte pasto largo, trabaje en etapas de arriba a abajo
en secciones pequeñas. Esto evitará que el pasto que se está
cortando se enrolle alrededor del eje y el cabezal del carrete.
3. Si la bordeadora se enciende con lentitud, reduzca la carga.
AJUSTE DEL ANGULO DEL CABEZAL
NOTA: Esta bordeadora está equipada con un cabezal pivotante de 7 posiciones. El cabezal se
puede ajustar para que sea fácil acceder a áreas como debajo de arbustos y muebles de jardín.
1. Presione el botón del cabezal giratorio y ajuste el eje al ángulo deseado (Fig. 11).
2. Deje de presionar el botón.
CÓMO USAR EL PROTECTOR PARA FLORES
De ser necesario, el protector para flores se puede deslizar hacia abajo hasta quedar fijo. Use el
protector para flores como se muestra para cortar alrededor de plantas o flores delicadas (Fig. 12).
Fig. 12Fig. 11
33
Fig. 10
34
FUNCIONAMIENTO
CORTE DE BORDES
NOTA:
El mejor método para cortar bordes se realiza con el mango superior y el mango de asistencia
girados a 180°.
1. Desenchufe la bordeadora.
2. Presione el botón de bloqueo de rotación y gire la palanca superior hacia la derecha (Fig. 13).
3. Suelte el botón cuando la manija superior haya girado 180° a la posición del borde.
4. Gire la manija de asistencia 180° y encaje en el canal de índice (Fig. 13).
5. Sostenga la bordeadora con ambas manos para bordear aceras y pasillos (Fig. 14).
NOTA: El cabezal también se puede ajustar al ángulo deseado para los bordes.
AVANCE DEL HILO DE CORTE
NOTA: La bordeadora posee un cabezal con alimentación automática.
No golpee el cabezal ni intente hacer avanzar el hilo de corte. Esto dañará
la bordeadora y anulará la garantía.
1. Con la bordeadora en funcionamiento, suelte el interruptor de encendio/apagado (on/off).
2. Espere dos segundos, y presione el interruptor de encendio/apagado (on/off).
NOTA: La función de alimentación automática funciona durante el arranque
y parada de la bordeadora. El hilo de corte se extenderá aproximadamente
3/16 de pulgada cada vez en cada parada y arranque del interruptor de
encendio/apagado (on/off) MIENTRAS NO RECORTA hasta que el hilo de
corte alcance la longitud de la cuchilla deflectora de pasto.
3. Puede tomar hasta 10 arranques y paradas completas para que el hilo de corte avance.
NOTA: Después de cada uso, limpie la bordeadora con un paño mojado para
remover la tierra y suciedad.
Fig.14Fig.13
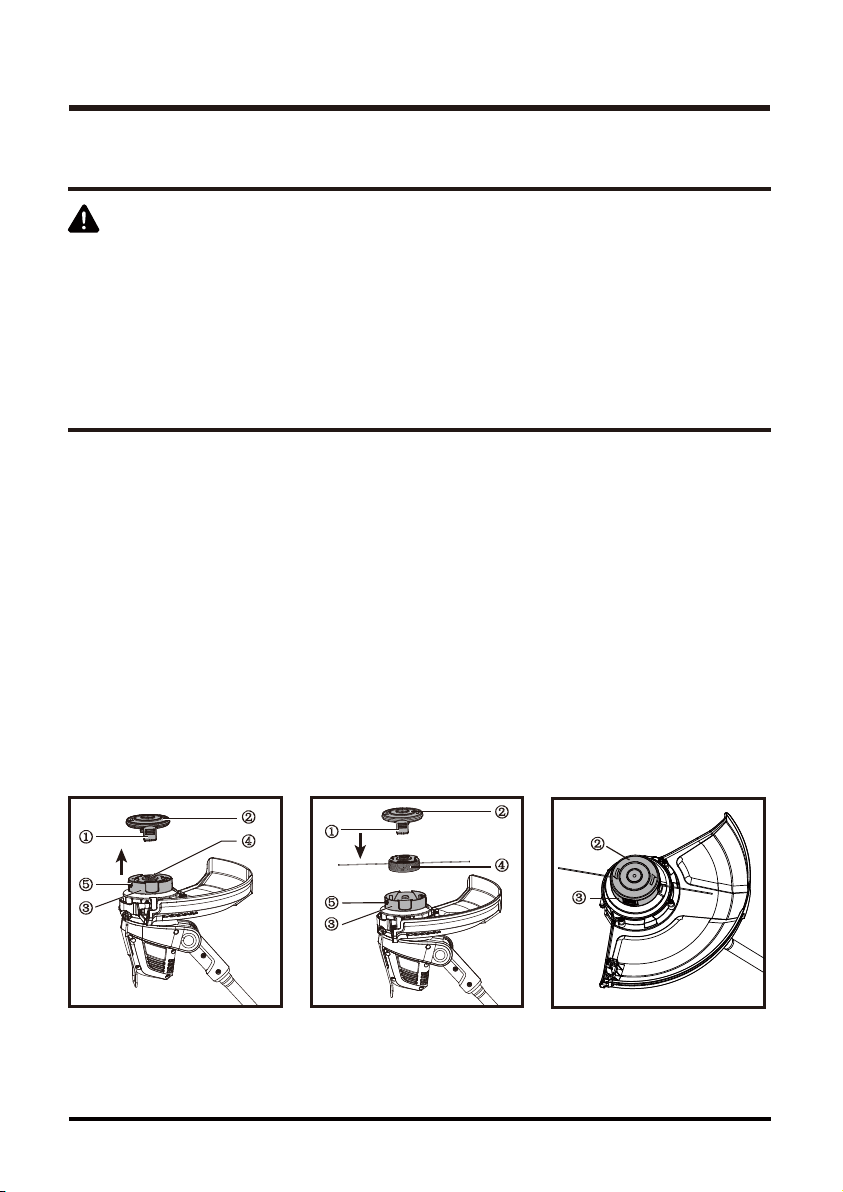
Fig. 15 Fig. 16
El cabezal también se puede ajustar al ángulo deseado para los bordes con un mantenimiento
mínimo. Una operación continua satisfactoria depende de un cuidado adecuado de la herramienta
y de una limpieza regular.
MANTENIMIENTO
COLOCAR UN NUEVO CARRETE
1. Desenchufe la bordeadora.
2. Retire el carrete vacío (Fig. 15).
3. Presione las pestañas ① y extraiga la tapa del carrete ② del cabezal de corte ③. Saque el
carrete vacío ④ del cabezal de corte.
4. Reemplace la pieza con un carrete nuevo (Fig. 16).
5. Suelte ambos hilos de corte de la ranura de estacionamiento y guíe los hilos de corte en ambos
ojales ⑤. Los hilos de corte deben sobresalir aproximadamente 4 pulgadas de los ojales ⑤.
6. Coloque el carrete nuevo ④ en el cabezal de corte ③. Gire el carrete levemente hasta que
quede asentado.
7. Presione la cubierta del carrete ② sobre el cabezal de corte ③ y asegúrese de que entre en su
lugar a presión (Fig. 17).
Fig. 17
ADVERTENCIA
Antes de realizar mantenimiento, apague y desenchufe la herramienta.
Limpie regularmente la ranura de ventilación de su bordeadora, utilizando
un cepillo suave o un paño seco.
Limpie regularmente el hilo de corte y carrete, utilizando un cepillo suave
o paño seco.
Regularmente quite el pasto y la suciedad de la parte inferior de la
protección con un raspador romo.
35
②
③
①
②
⑤
④
④
⑤
①
②
③
③

MANTENIMIENTO
ENROLLAR UN HILO DE CORTE NUEVO EN UN CARRETE
1. Puede enrollar un hilo de corte nuevo en un carrete vacío.
2. Hay paquetes de reemplazo de los hilos de corte disponibles con el distribuidor.
3. Quite el carrete vacío de la bordeadora como se indica anteriormente.
4. Extraiga cualquier hilo de corte remanente del carrete.
5. Prepare 2 hilos de corte ⑥ con el mismo largo para enrollarlos. Hay 4 ojales ⑦ en el carrete, 2
ojales ⑦ en la parte superior y 2 ojales ⑦ la parte inferior (Fig. 18).
6. Primero pase 4 pulgadas de hilo de corte ⑥ hacia los dos ojales ⑦. Los dos ojales ⑦ deben
estar en distintas secciones del carrete.
7. Enrolle los hilos de corte ⑥ en el carrete en la dirección que indican las flechas del carrete.
Asegúrese de enrollar el hilo de manera pareja y en capas. No los cruce (Fig. 19).
8. Después de enrollar, fije el extremo de los hilos ⑥ en la ranura de estacionamiento del carrete
(Fig. 20).
9. Siga las indicaciones antes mencionadas para fijar el carrete a la bordeadora. No olvide liberar
los hilos de corte ⑥ de la ranura de estacionamiento.
36
Si los hilos de corte se asoman más allá de la hoja de corte, córtelos para que
lleguen justo hasta la hoja.
ADVERTENCIA
Utilice únicamente el tipo de hilo de corte adecuado (monofilamento redondo
de 0,065 pulgadas).
ADVERTENCIA
Fig. 18 Fig. 19 Fig. 20
⑦
⑥
⑥

37
Si su bordeadora de pasto no parece funcionar apropiadamente, siga las instrucciones de
abajo.
Si esto no resuelve el problema, póngase en contacto con su agente de reparaciones local.
RESOLUCIÓN DE PROBLEMAS
Antes de seguir, apague la herramienta y desconéctela.
ADVERTENCIA
PROBLEMA POSIBLE CAUSA SOLUCIÓN
La bordeado-
ra no arranca.
La bordeado-
ra corre
lentamente.
Resultado no
satisfactorio.
La
alimentación
automática de
hilo no
funciona.
El cable de alimentación no
está conectado correctamente
a la fuente de alimentación.
El interruptor de encendido/a-
pagado está defectuoso.
La carcasa del carrete está
bloqueada.
El hilo de corte sobresale
demasiado por tiempo.
El hilo de corte está
desgastada o dañada.
No hay hilo de corte
suficiente.
El carrete está atorado.
Reemplace el carrete.
Reparación por personal cualificado.
Verifique que el cable esté correctamente
conectado y que entre energía a la
orilladora.
Revise que la carcasa del carrete pueda
girar libremente. Límpiela cuidadosamente
de ser necesario.
Revise que el hilo de corte no sobresalga
más de 10 cm desde la carcasa del
carrete. Si lo hace, córtelo para que
alcance el aspa del cortador de hilo.
Mantenga las lengüetas presionadas y
extraiga la cubierta del carrete desde la
carcasa. Tire el hilo de corte hasta que
sobresalga 10 cm desde la carcasa. Si no
queda suficiente hilo de corte en el
carrete, instale un nuevo carrete de hilo de
corte como se indica en la sección
COLOCAR UN CARRETE NUEVO.
Limpie cuidadosamente la cubierta del
carrete y carcasa.
Extraiga el carrete y revise que la palanca
pueda moverse libremente.
Retire el carrete y desenrolle el hilo de
corte, luego enróllelo cuidadosamente de
nuevo como se indica en la sección
ENROLLAR HILO DE CORTE NUEVO A
UN CARRETE. Reemplace el carrete
como se indica.

38
GARANTÍA
Nos sentimos orgullosos de ofrecer a usted un producto de alta calidad y durabilidad. Este
producto de Lawnmaster® tiene una garantía limitada de dos (2) años contra defectos de mano de
obra y materiales a partir de la fecha de compra en uso doméstico normal. Si el producto se
llegase a utilizar de manera comercial, industrial o para su alquiler, se aplicará una garantía
limitada de 30 días. La garantía no se aplica a defectos debidos a abuso directo o indirecto,
negligencia, mal uso, accidentes, reparaciones, o alteraciones y falta de mantenimiento. Mantenga
su recibo/lista de empaque como prueba de su compra. Esta garantía le entrega derechos legales
específicos que pueden variar según su estado (podría tener otros derechos adicionales). Para
obtener ayuda, llame al servicio de atención al cliente al 1-866-384-8432.
Artículos no cubiertos por la garantía:
1. cualquier parte que no funcione por culpa de uso indebido, uso comercial, abuso, negligencia,
accidentes, mantenimiento inadecuado o alteración;
2. la unidad, si no ha sido operada y/o mantenida de acuerdo con el Manual del operador;
3. el desgaste normal, a excepción de lo que se señala a continuación;
4. elementos de mantenimiento de rutina, tales como lubricantes y filo de las cuchillas;
5. el deterioro normal del acabado exterior debido al uso o exposición.
Cargos de transporte: Los cargos por transporte para cualquier unidad o aditamento son respons-
abilidad del comprador. Es responsabilidad del comprador pagar los cargos de transporte de
cualquier pieza enviada para reemplazo bajo esta garantía, a menos que dicha devolución sea
solicitada por escrito por LawnMaster®.
CONSERVE LOS COMPROBANTES DE COMPRA. ESTA GARANTÍA QUEDA ANULADA SIN
ELLOS.
39
VISTA EN DETALLE

N° DE ARTÍCULO N° DE PIEZA DESCRIPCIÓN
LISTA DE PIEZAS
CANT.
1
2
3
4
4.1
5
5.1
6
7
8
9
9.1
10
11
12
13
14
15
16
1
1
1
1
1
1
1
1
1
1
1
1
1
1
1
1
1
1
1
121065101
121065102
121063102
121020110
221001117
121030110
121002106
121064103
121064101
121065107
221004107
121002110
121065103
121065108
121065104
121058103
121025107
121065105
121065106
* Las piezas resaltadas en gris se pueden adquirir como compra posventa.
Conjunto de piezas de la manija
Cable de alimentación
Conjunto de piezas de conexión
Conjunto de piezas del gatillo interruptor
Resorte de compresión
Unidad de la varilla de extensión
Resorte de compresión
Conjunto de piezas de conexión
Conjunto de piezas de la manija de ayuda
Conjunto del mango giratorio
Botón de bloqueo del eje
Resorte de compresión
Conjunto de piezas de la carcasa del motor
Conjunto de piezas del motor
Conjunto de piezas del cabezal de corte
Protector para flores
Conjunto de piezas del carrete
Cubierta del carrete
Conjunto de guardas de protección
40

NOTAS
41