INSTRUCTION MANUAL
Model #22159 -DS
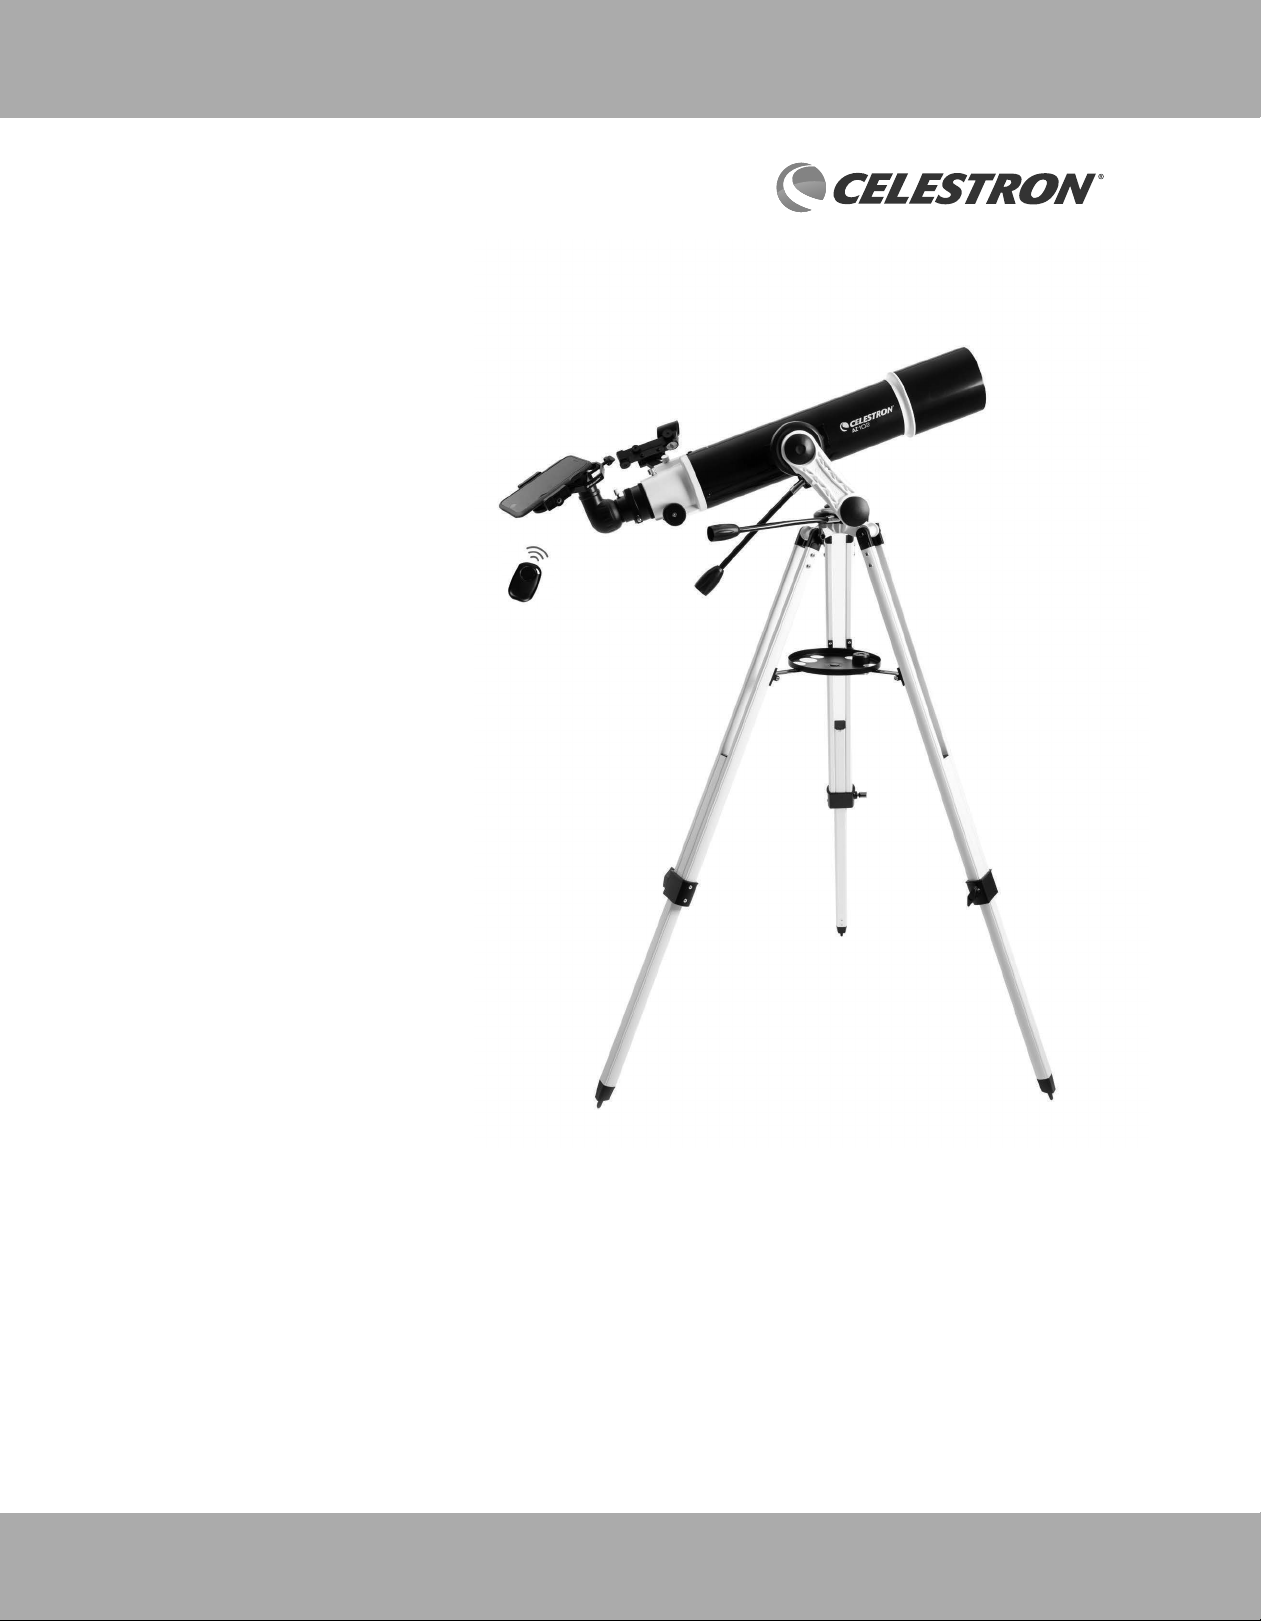
CELESTRON AZ 10 2
TELESCOPE
2
SOLAR WARNING
• Never look directly at the Sun with the naked eye or with a telescope unless you have the proper solar fi lter.
Permanent and irreversible eye damage may result.
• Never use your telescope to project an image of the Sun onto any surface. Internal heat build-up can damage the
telescope and any accessories attached to it.
• Never use an eyepiece solar fi lter or a Herschel wedge. Internal heat build-up inside the telescope can cause these
devices to crack or break, allowing unfi ltered sunlight to pass through to the eye.
• Do not leave the telescope unsupervised, especially when children or adults unfamiliar with the correct operating
procedures of your telescope are present.
We recommend saving your telescope box so it can be used to store the telescope when it is not in use. Unpack the
box carefully as some parts are small. Use the parts list below to verify that all parts and accessories are present.
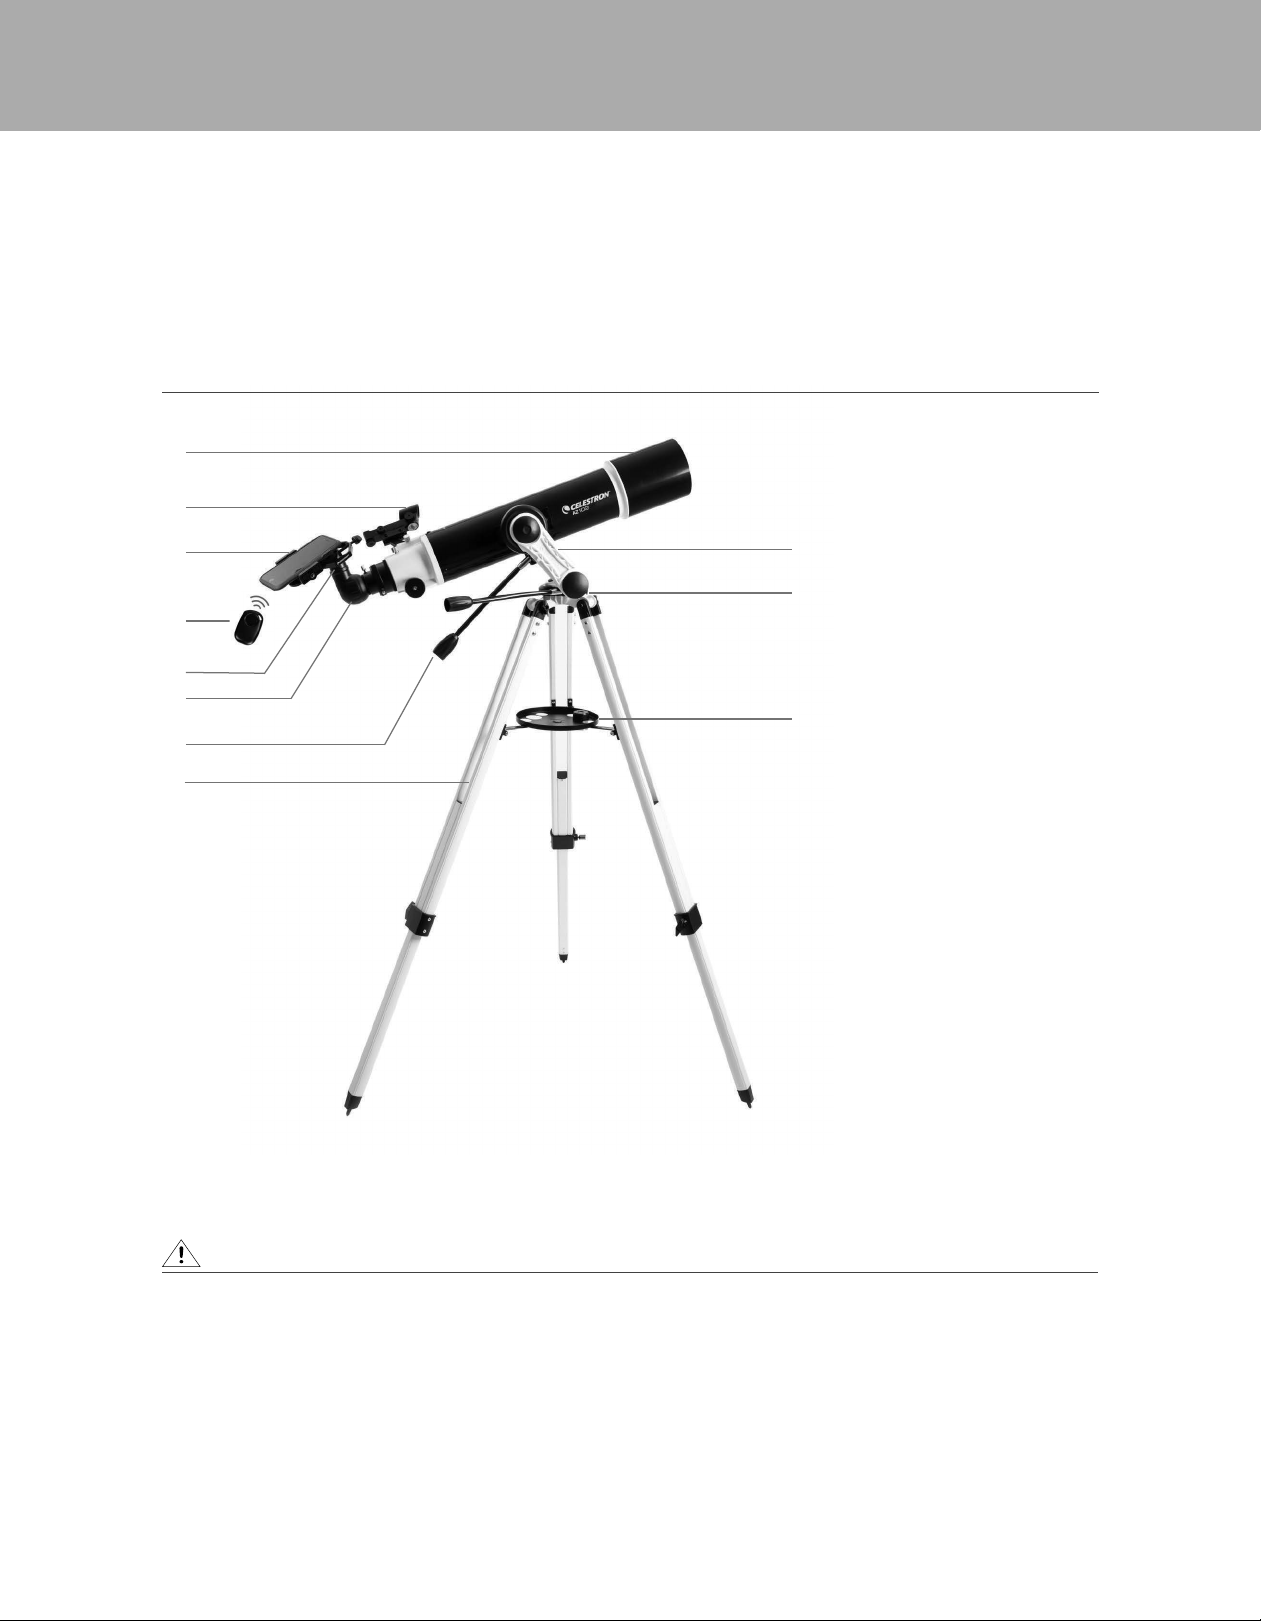
WHAT’S IN THE BOX
1. Telescope Tube
2. StarPointer Finderscope
3. Smartphone Adapter
(Smartphone not included)
4. Bluetooth Remote Shutter
Trigger
5. Eyepiece
6. Erect Image Diagonal
7. Slow Motion Knobs
8. Tripod
9. Omni AZ Mount
10. Hex-key Wrench
(Inside mount)
11. Accesory Tray
3
10
2
9
11
1
5
6
7
8
NOTE: Smartphone not included.
PARTS LIST
4
3
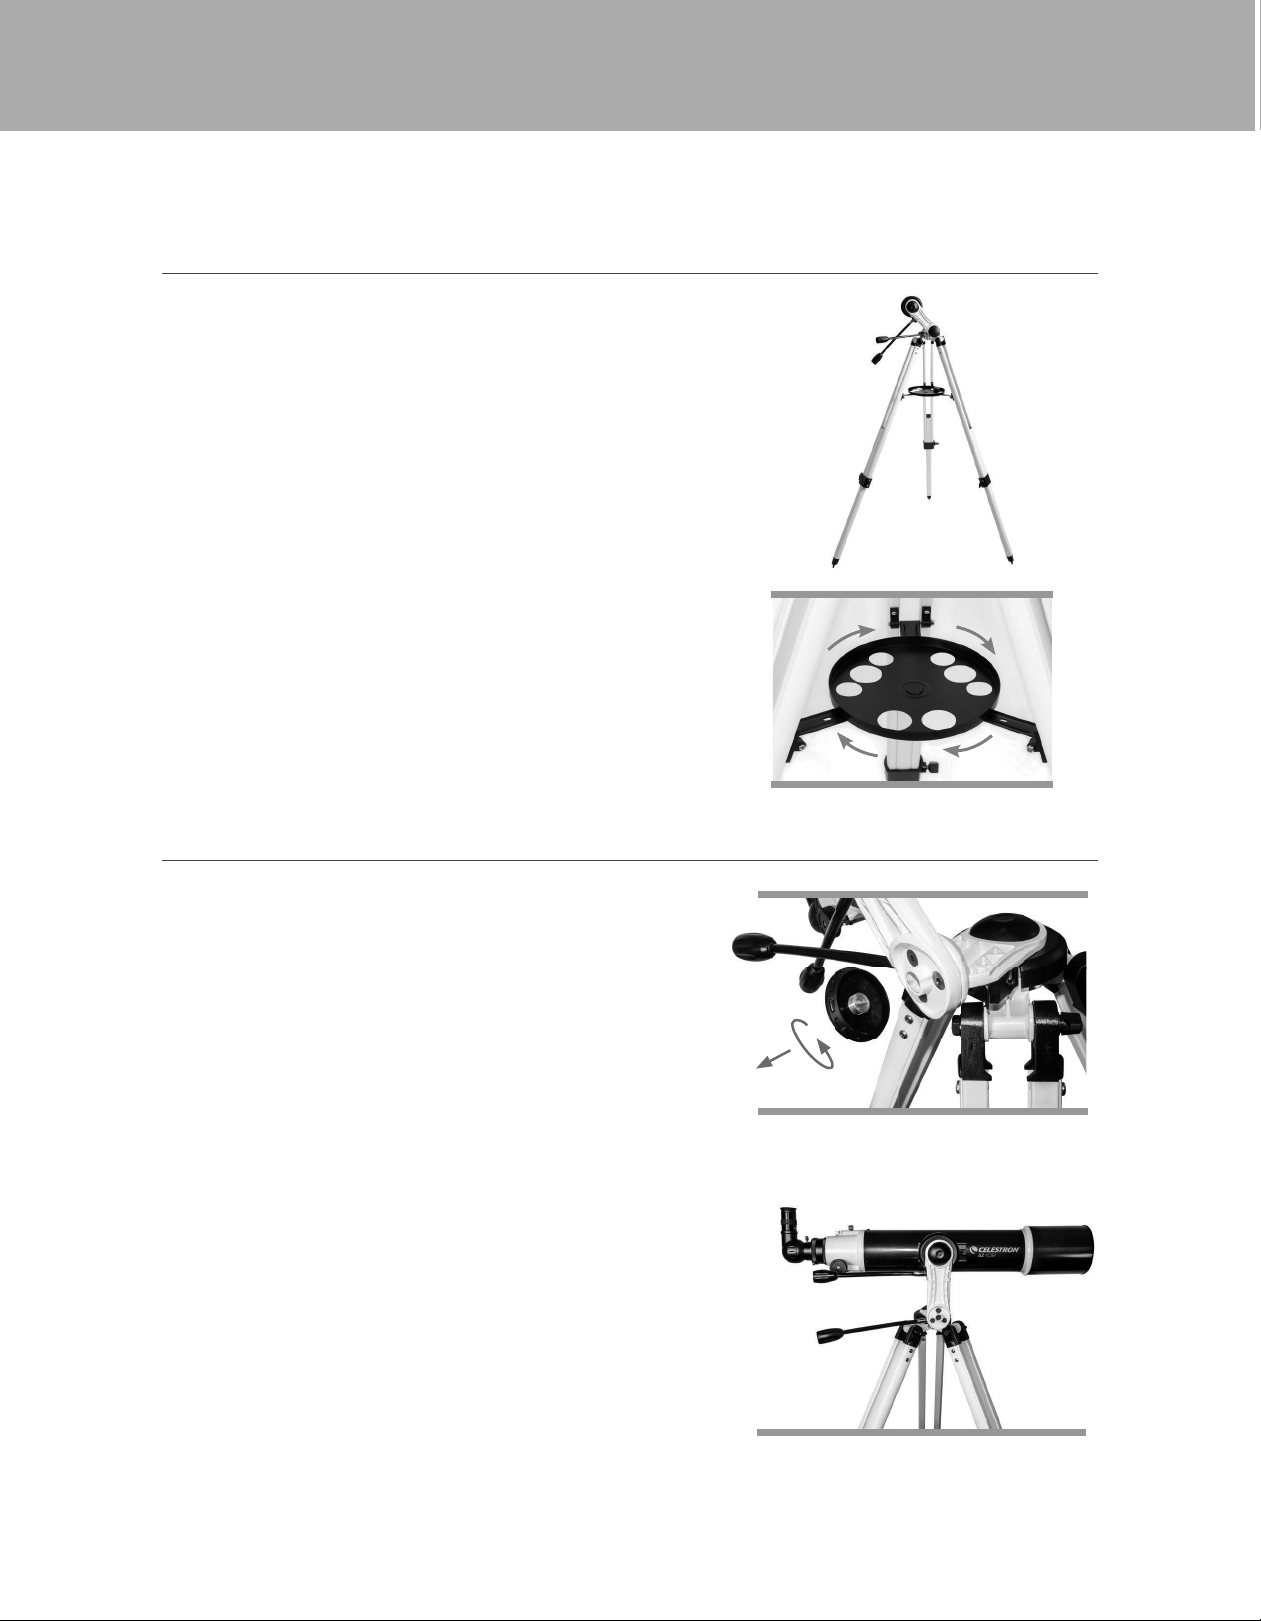
The AZ mount and tripod come fully assembled, so setting
it up is easy.
1. Remove the tripod and mount from the box.
2. Loosen the hand knobs at the bottom of each leg and
extend the inner section of the leg to the desired length.
Tighten the knobs to secure the legs, being careful not
to over tighten.
3. Stand the tripod upright and pull the tripod legs apart
until the center brace snaps into place.
4. Place the accessory tray on top of the center brace and
line up the threaded post on the bottom of the tray with
the hole in the top of the center leg brace. Rotate the
tray clockwise unitl it is secure.
5. Make sure the leg hinge bolts are secure by snugging
down the black thumbnuts at the top of each leg.
Depending on your specifi c use of the telescope, you may
wish to change the angle of the mount arm to give you
additional range of motion. The mount comes set up for
the astronomical use; it can move upward but is limited
in its downward motion. If you are using the mount for
terrestrial observation from an elevated location (cliff top,
balcony, etc.) and you want to point the scope well below
the horizon, you will need to change the angle of the mount
arm to accommodate this.
To make this adjustment:
1. Unthread the round cover on the bottom of the vertical
arm of the mount.
2. Using a 4mm hex-key wrench (user supplied), remove the
three screws under the cover.
3. Rotate the mount arm so that it is pointed straight up and
thread the three screws back in.
4. Tighten the screws and replace the round cover.
ASSEMBLING YOUR TELESCOPE
ADJUSTING THE ANGLE OF THE MOUNT ARM
THE MOUNT
4
THE SLOW MOTION KNOBS
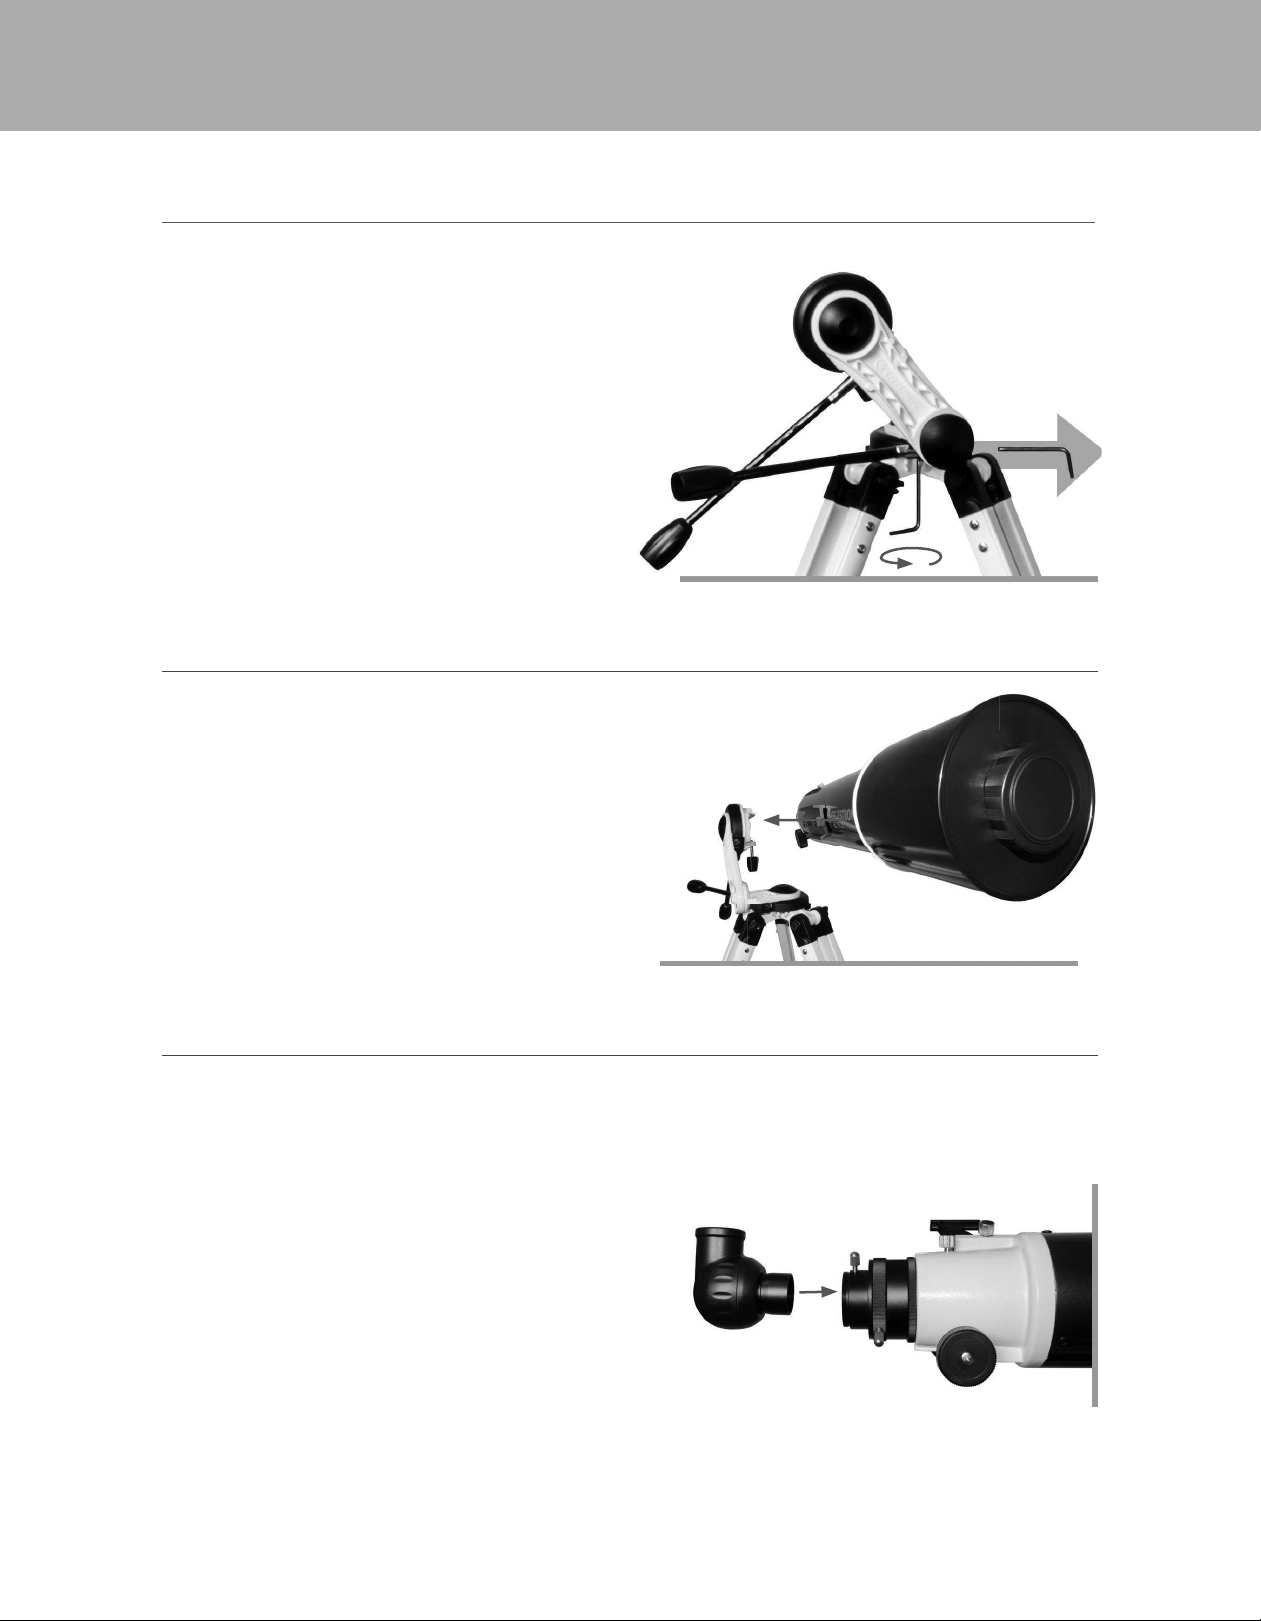
To attach the slow motion knobs to your mount:
1. Locate the supplied hex key hidden inside the slot in the
front of your mount.
2. Place the slow motion control knob over the D-shaped
gear shaft and push inward to make sure it is fully seated.
3. Use the hex key to tighten the setscrews onto the
gear shaft.
4. Return the hex key to its storage position in the front of
the mount.
To attach the telescope tube to your tripod and mount:
1. Locate the dovetail bar mounted on the side of the
telescope tube.
2. Holding the telescope tube next to the mount, slide the
dovetail bar into the clamp at the top of the mount.
3. Tighten the hand knob on the bottom of the clamp to
secure the telescope in place.
The star diagonal attaches to the back of a refracting
telescope and contains a small prism that refl ects light at a
90° angle, providing a more comfortable viewing position.
Because a star diagonal gives you a 100% correctly
oriented image, you can easily use the telescope for
daytime terrestrial observing.
To insert the diagonal:
1. Remove the caps from both sides of the diagonal.
2. Loosen the setscrews on the back of the focuser and
pull out the small dust cap.
3. Insert the smaller tube on the diagonal into the back of
the focuser and secure it by tightening the setscrews.
You can rotate the diagonal to any position by loosening
the setscrews.
THE STAR DIAGONAL
Locate the supplied hex key hidden inside the slot in the
Place the slow motion control knob over the D-shaped
gear shaft and push inward to make sure it is fully seated.
Use the hex key to tighten the setscrews onto the
Return the hex key to its storage position in the front of
THE TELESCOPE TUBE
5
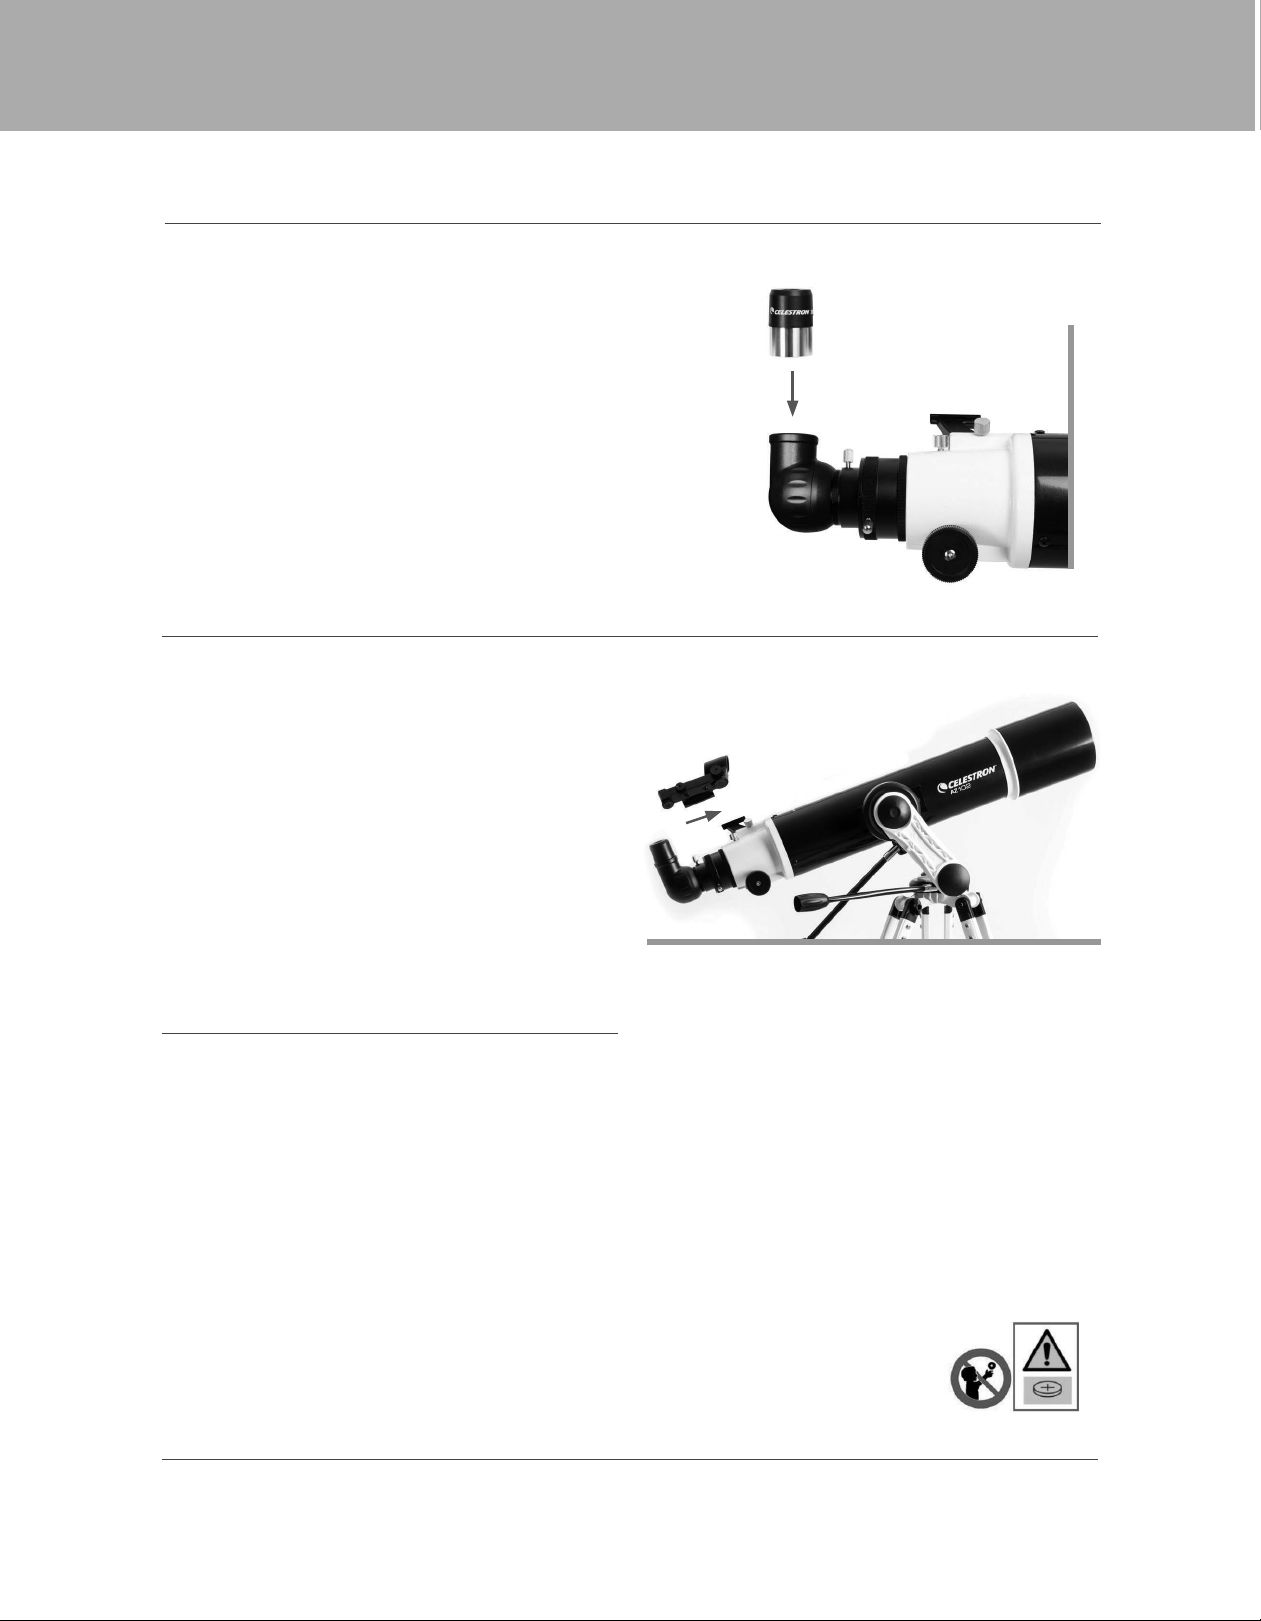
Your telescope comes with a 10mm and 20mm Kellner
eyepieces. Additional eyepieces can be purchased to
increase or decrease the magnifi cation to your desired level.
1. Loosen the set screws on the open end of the star
diagonal.
2. Insert the silver barrel of the 20mm eyepiece into the
star diagonal.
3. Tighten the setscrews to secure the eyepiece
4. To see the sharpest image possible, focus by looking
through the eyepiece and slowly turning the focusing
knobs until the image comes into sharp focus.
Your telescope comes with a StarPointer fi nderscope
that you will use as a sighting tool when aiming the telescope
at a target. Your StarPointer fi nderscope is shipped with a
clear plastic tab inserted between the battery and the contact
to prevent the battery from accidentally being discharged in
shipment. Pull this tab out before using your fi nderscope.
To install the fi nderscope:
1. Slide the fi nderscope bracket into the dovetail slot on
the telescope tube near the focuser. The large window
on the fi nder should be facing the front of the telescope.
2. Secure the bracket by tightening the setscrew on the
dovetail slot.
BATTERY ACCESS INSTRUCTIONS
THE EYEPIECE
THE STARPOINTER FINDERSCOPE
The StarPointer fi nderscope is powered by a long life 3V lithium battery (#CR2032) located directly under the
StarPointer’s front end.
To access the battery compartment, turn the StarPointer upside down. Using a Phillips head screwdriver, loosen the
screw and lift up the battery cover. When replacing the battery, make sure to install the new battery with its positive
terminal (+) facing outward. If the telescope will not be in use for a long period of time, it is recommended to remove the
battery from the StarPointer.
WARNING: KEEP BATTERIES OUT OF REACH OF CHILDREN.
• Examine devices and make sure the battery compartment is correctly secured, e.g. that the screw or other mechanical
fastener is tightened.
• Do not use if compartment is not secure.
• Dispose of used button batteries immediately and safely. Flat batteries can still be dangerous.
• Tell others about the risk associated with button batteries and how to keep their children safe.
MOVING THE TELESCOPE
The AZ mount has slip clutches in both axes. To make large movements with the telescope, simply hold the optical tube and
push it in the desired direction. To make fi ne adjustments or to track celestial objects, turn both slow motion knobs.

6
ALIGNING THE STARPOINTER FINDERSCOPE
The StarPointer fi nderscope helps you aim your telescope by looking through its round glass window and covering your target
with the red recticle projected in the window.
The fi rst time you assemble your telescope, you’ll need to align the fi nderscope with the main optics of the telescope. Although
this step can be done at night, it is signifi cantly easier during the day. Once you have completed the fi nderscope alignment, you
should not have to repeat this step unless the fi nderscope is bumped or dropped.
1. Take the telescope outside during the day. Using your naked eye, fi nd an easily recognizable object, such as a streetlight, car
license plate, or tall tree. The object should be as far away as possible, but at least a quarter mile away.
2. Remove the main dust cover from the telescope and make sure your 20mm eyepiece is installed.
3. Move the telescope left and right or up and down so that it is roughly pointing toward the object you chose in step 1.
4. Look through the telescope’s eyepiece and manually move the telescope until the object you chose lies in the center of the
view. If the image is blurry, gently turn the focus knobs until it comes into sharp focus.
5. Once the object is centered in your 20mm eyepiece, turn on the fi nderscope by turning the power/brightness switch knob
on the fi nderscope as far as it will go.
6. With your head positioned about a foot behind the fi nder, look through the round window and locate the red dot. It will
probably be close to, but not on top of, the object you see when you are looking through the 20mm eyepiece.
7. Without moving the telescope, use the two adjustment knobs on the side and underneath the fi nderscope. One controls the
left-right motion of the red dot, while the other controls the up-down motion. Adjust both until the red dot appears over the
same object you are observing in the 20mm eyepiece.
Now choose some other distant targets to practice aiming your telescope. Look through the StarPointer fi nderscope window
and place the red dot on the target you are trying to view and verify that it is the 20mm eyepiece of the scope.
With your fi nderscope aligned, your telescope is fully assembled and you are ready to observe!
NOTE: Be sure to turn off the StarPointer fi nderscope when not in use to conserve battery power.
YOUR FIRST ASTRONOMICAL OBSERVING SESSION
THE MOON
Now you are ready to take your telescope out at night and do some real observing!
Let’s start with the Moon. The Moon takes about one month go through a complete phase cycle, from New Moon to Full Moon
and back again. Try observing it at different points during this cycle.
While you can observe the Moon any time it is visible in the night sky, the best time to view it is from two days after a New
Moon up to a few days before a Full Moon. During this period, you will be able to see the most detail in craters and lunar
mountain ranges. Consult a calendar to fi nd out when the next New Moon will be.
1. With a clear view of the Moon, set up your telescope with the 20mm eyepiece.
2. Turn on the fi nderscope and look through it to fi nd the red reticle.
3. Move the telescope until you can see the Moon through the fi nderscope’s window and the reticle is centered on the Moon.
4. Look through the 20mm eyepiece. Gently turn the focus knobs to adjust the sharpness of the image.
CONGRATULATIONS! YOU HAVE NOW OBSERVED YOUR FIRST CELESTIAL OBJECT!
To get a closer view of the Moon, replace the 20mm eyepiece with the 10mm eyepiece. It will give you more magnifi cation,
making the Moon appear much larger. You may need to adjust the focus knobs when you change eyepieces to ensure you are
getting the sharpest image.
You can view many other celestial objects, such as planets, star clusters and nebulae using this same basic technique.
7
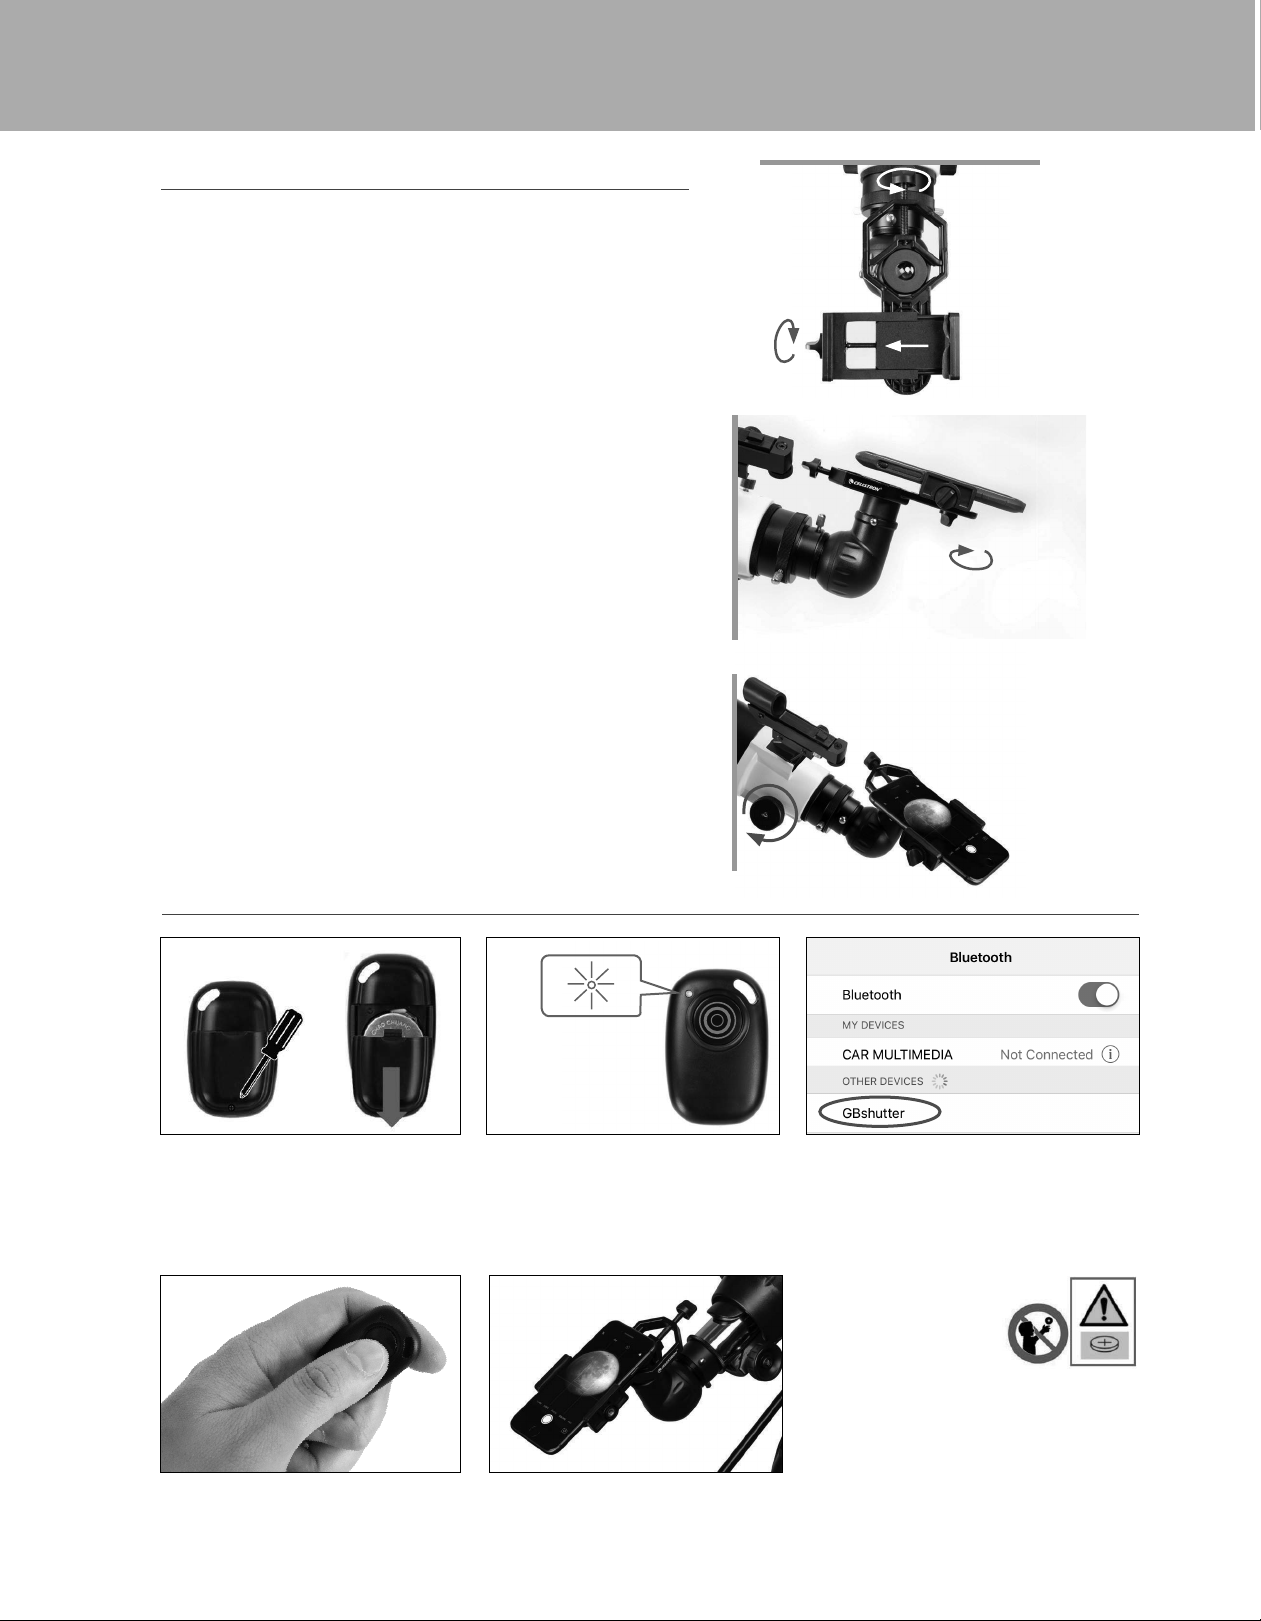
1. Open the eyepiece clamp and place it around the body of
the eyepiece. Tighten the clamp unit it is secure.
2. Use the phone clamp knob to open the phone holder
until your phone fi ts inside. Tighten it to secure your
phone in place.
3. Turn on the phone and open your camera app. Make sure
the fl ash is turned off.
4. Loosen the knob on the bottom of the adapter that secures
the phone clamp to the eyepiece clamp. Slide the phone
clamp up and down and rotate it left and right until your
camera is looking down through the eyepiece of the
telescope. Tighten the knob on the bottom of the adapter
to secure it in place.
5. Use the telescopes focuser to adjust focus of your camera.
Snap the image using your app.
INSTALLING THE SMARTPHONE ADAPTER
USING THE BLUETOOTH REMOTE
Press and hold the button on the remote for 5 seconds.
A blue light will turn on and, after a few seconds, start
to blink. The remote is now in pairing mode.
Using the Bluetooth settings on your phone, pair the device
called “GBshutter.”
Open your camera app. Press the button on the remote
to trigger the shutter on your phone.
If your camera is in video mode, you can press the button
once to start recording and again to stop the recording.
4
5
To replace the battery, use a small Phillips-head
screwdriver to loosen the battery cover screw and slide
the cover downward. Install a fresh CR2032 battery
with the positive (+) side facing upward. Reposition
the battery cover and secure it in place by tightening the
battery cover screw.
1
2
3
WARNING: KEEP BATTERIES OUT
OF REACH OF CHILDREN.
Examine the device and make sure
the battery compartment is correctly
secured, e.g. that the screw or other
mechanical fastener is tightened.
• Do not use if compartment is not secure.
• Dispose of used button batteries immediately and safely.
Flat batteries can still be dangerous.
• Tell others about the risk associated with button batteries and how
to keep their children safe.

© 2022 Celestron • All rights reserved
celestron.com/pages/technical-support
2835 Columbia Street • Torrance, CA 90503 U.S.A.
CELESTRON TWO YEAR LIMITED WARRANTY
A. Celestron warrants your product to be free from defects in materials and workmanship for two years. Celestron will repair or replace such product or part
thereof which, upon inspection by Celestron, is found to be defective in materials or workmanship. As a condition to the obligation of Celestron to repair
or replace such product, the product must be returned to Celestron together with proof-of-purchase satisfactory to Celestron.
B. The Proper Return Authorization Number must be obtained from Celestron in advance of return. Please submit your request to Celestron’s online technical
support center at https://www.celestron.com/pages/technical-support to receive the number to be displayed on the outside of your shipping container.
All returns must be accompanied by a written statement setting forth the name, address, and daytime telephone number of the owner, together with a brief
description of any claimed defects. Parts or product for which replacement is made shall become the property of Celestron.
The customer shall be responsible for all costs of transportation and insurance, both to and from the factory of Celestron, and shall be required to prepay
such costs.
Celestron shall use reasonable efforts to repair or replace any product covered by this warranty within thirty days of receipt. In the event repair or replacement
shall require more than thirty days, Celestron shall notify the customer accordingly. Celestron reserves the right to replace any product which has been
discontinued from its product line with a new product of comparable value and function.
This warranty shall be void and of no force of effect in the event a covered product has been modified in design or function, or subjected to abuse, misuse,
mishandling or unauthorized repair. Further, product malfunction or deterioration due to normal wear is not covered by this warranty.
CELESTRON DISCLAIMS ANY WARRANTIES, EXPRESSED OR IMPLIED, WHETHER OF MERCHANTABILITY OR FITNESS FOR A PARTICULAR USE, EXCEPT AS EXPRESSLY SET FORTH HEREIN. THE SOLE OBLIGATION OF CELESTRON
UNDER THIS LIMITED WARRANTY SHALL BE TO REPAIR OR REPLACE THE COVERED PRODUCT, IN ACCORDANCE WITH THE TERMS SET FORTH HEREIN. CELESTRON EXPRESSLY DISCLAIMS ANY LOST PROFITS, GENERAL,
SPECIAL, INDIRECT OR CONSEQUENTIAL DAMAGES WHICH MAY RESULT FROM BREACH OF ANY WARRANTY, OR ARISING OUT OF THE USE OR INABILITY TO USE ANY CELESTRON PRODUCT. ANY WARRANTIES WHICH ARE
IMPLIED AND WHICH CANNOT BE DISCLAIMED SHALL BE LIMITED IN DURATION TO A TERM OF TWO YEARS FROM THE DATE OF ORIGINAL RETAIL PURCHASE.
Some states do not allow the exclusion or limitation of incidental or consequential damages or limitation on how long an implied warranty lasts, so the above
limitations and exclusions may not apply to you.
This warranty gives you specific legal rights, and you may also have other rights which vary from state to state. Celestron reserves the right to modify or
discontinue, without prior notice to you, any model or style product. If warranty problems arise, or if you need assistance in using your product, please visit
Celestron’s online technical support center at https://www.celestron.com/pages/technical-support.
NOTE: This warranty is valid to U.S.A. and Canadian customers who have purchased this product from an authorized Celestron dealer in the U.S.A. or Canada. Warranty outside the U.S.A. and Canada is valid only to customers who
purchased from a Celestron’s International Distributor or Authorized Celestron Dealer in the specific country. Please contact them for any warranty service.
INSTRUCTIONS
• Risk of explosion if battery is replaced by an incorrect type.
• The included battery is not rechargeable.
• Please use the battery in its original purpose to avoid causing the battery to short circuit. When the conductive material is connected directly to the battery positive and negative will cause a short circuit.
• Do not use a damaged battery.
• Keeping the battery in an extremely cold or very hot location can result in shortened battery life.
• When replacing the battery, please refer to the instruction manual and pay attention to the positive and negative direction of battery.
• Do not put the battery in the fire. Dispose of the battery according to local regulations.
AUSTRALIAN CONSUMER LAW - WARRANTY
Our goods come with guarantees that cannot be excluded under the Australian Consumer Law. You are entitled to a replacement or refund for a major failure and for compensation for any other reasonably foreseeable loss or damage.
You are also entitled to have the goods repaired or replaced if the goods fail to be of acceptable quality and the failure does not amount to a major failure.
FCC IDENTIFIER: 2A2FG-93974
This device complies with Part 15 of the FCC Rules. Operation is subject to the following two conditions: (1) This device may not cause harmful interference, and (2) this device must accept any interference received, including
interference that may cause undesired operation.
CAUTION: Changes or modifications not expressly approved by the party responsible for compliance could void the user’s authority to operate the equipment.
NOTE: This equipment has been tested and found to comply with the limits for a Class B digital device, pursuant to part 15 of the FCC Rules. These limits are designed to provide reasonable protection against harmful interference
in a residential installation.
This equipment generates, uses and can radiate radio frequency energy and, if not installed and used in accordance with the instructions, may cause harmful interference to radio communications. However, there is no guarantee
that interference will not occur in a particular installation.
If this equipment does cause harmful interference to radio or television reception, which can be determined by turning the equipment off and on, the user is encouraged to try to correct the interference by one or more of the
following measures:
• Reorient or relocate the receiving antenna.
• Increase the separation between the equipment and receiver.
• Connect the equipment into an outlet on a circuit different from that to which the receiver is connected.
• Consult the dealer or an experienced radio/TV technician for help.
Product design and specifications are subject to change without prior notification. This product is designed and intended for use by those 14 years of age and older.
22159-DS
05-22