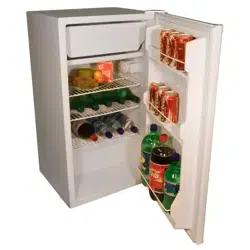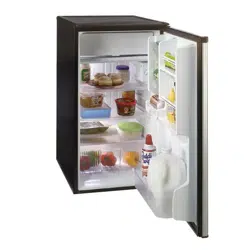
Compact Refrigerator
Model 60912
9,5 cu. ft. Capacity
Read This Manual!
It willtellyou howtooperate and care for yourrefrigerator.
it also offers tipson how to gelthe best and lowest cost
performance.
If you prefer installingyour own parts, usethe parts listto
findthe part number. Do not usethe illustrationnumber.
In the space belowrecord the modeland serialnumber of
your refrigerator. Each is printedon the modelnumber
platelocated inthe upper comer of the refrigeratorback.
Use these numbers when calling for service.
Model No. Serial No.
Installation
Remove all pacld,-_jmaterial and tape from unit,Inspect
unitthoroughly.Notify Sears immediately if unithasany
damaged or missingparts.
Install uniton a strong level floor or counter. Avoidany di-
rect sunlight,heat source or moisture.
Let aircirculatefreely around the refrigerator. Keep the
back of the unitat least 4 inches away from the wall. Pro-
vide at least 1 inchof space between the top ofthe unit
and any surface above it.
_ AUTION: If you turn off the cold control, allow
at least three minutes before restarting to avoid
blowing fuses or tripping your circuit breaker.
Electrical Requirements
120 Volts, 60 Hz (60 cycles AC), 15 amps
Electrical Grounding
Your refrigeratorcomes with a three-prong plugand must
be insertedinto a three-prong, groundedwall outlet.Do not
use an extension cord.
Full One Year Warranty on Refrigerator
For one year fromthe date of purchase, whenthis refrig-
eratoris operated and maintained in accordance with the
owner's instructionsthat come with if, Sears willrepair it,
free of charge, if defective in material or workmanship.
FulIFive Year Warranty on
Sealed Refrigeration System
For five years fromthe date of purchase, when this refrig-
eratoris operated and maintained in accordance with the
owner's instructionsthat come with it, Sears willrepair the
sealed system (consistingof refrigerant,connecting tubing
and compressor motor), free of charge, if defective in me-
terfal or workm_.
The above warranty coverage app&_ only to refdgerato_
whichare used forthe storage of food for private house-
hold purposes.
Wmmnty service Is available by contacting the nearest
Sears Service Center in the United States.
Thiswarrantyappliesonlywhilethisproductisin useinthe
UnitedStates.Thiswarrantygivesyouspecificrightsand
youmay alsohaveotherrightswhichvaryIromstateto
state.
Sears, Roebuck end Co., Dept. 817WA,
Hoffman Estates, IL 60179
_ ARNING: Unless the above grounding
method is followed, you are not protected
against severe or lethal shock in the event of
a short circuit in refrigerator wiring or electrical
components.
Things to Remember
1. When resetting your refrigerator to a new temperature,
allow 24 hours for it to reach the new setting.
2. The motor will start and stop often. It must do so in
order to maintain the temperature you select.
3. Keep your refrigerator level.
4. Unplug the refrigerator before doing anything with the
electrical system.
Sears, Roebuck and Co., Hoffman Estates, IL 60179
Sears, RoJ_ck and Co., U.S.A.
Printedin Mexico PINtNo. 302(154
(3/19/02)
Use and Care Information
on Eros/day Ca_ and Use
1. To €ontrol the temll_rWtum:
Ft_, sel the Cold Conlrol on "3."Wait 24 hoursfor the
enflre cabln_ to cod, Then a_ust the confrofif
necessary, S_ting the Cold Co_rol to MIN isthe
WmTne_ selUng; MAX is the cot:lest.The MAX seffing
may reduce the temperature to belowfreezing, but it
will notcoolthe refrigeratortaster.
The fresh food sect_ should be as cold as possible
withoutfreezingvegetables or milk. Ad'lustas
necessary.
2. Defrost:
Defrost when 114 inchof frostforms. Set the tempera-
ture controld'_l to OFF for defrosting. Remove food.
Do not touchthe freezing plate with your bare hands,
Do no{use electricdefrost devices or hair dryersto
meltthe frost, They may damage the plastic parts.
When defrosting iscompleted, wipe the freezing plate
dry and reset the control dial. Returnfood to
refrigerator.
3, For all cleaning:
Mix 2 tablespoons baking soda with I quart warm
water or use a mild soap. Do not use strong cleaners,
scouringpowder or pads. For persistent odors,contact
Sears Service Center for odor removal products. Do
notput the drip tray in the dishwasher. Vacuurn the
condensertubing on the back ofthe refrigeratorwhen
dusty.
Energy Saving Tips
1. Close the door as soon as you can after opening it
to remove food. Make sure the door isfully shutafter
each use so that cold air doesn't escape from the
refrigeratorcavity.
2. Keep the condenser coils clean. The motormust
work harder when the coils are dusty. Clean the coils at
least once every 3 months. They are located on the
back of the unit.
3. AdJu=t,the Cold Control. Try a warmer setting. Your
refrigeratormay be colder than necessary. Use the
conditionof milkto check refrigeratorlemperature. As
long as milk keeps without spoilingyour refrigeratoris
cold enough.
4. Do Not place ho_foodsin the refrigerator.
S. Do Not allow more than 1/4 inchoffrost to buildup in
the freezer corrq:)artment.
'6.
Redu¢e the number end leng(h of the Ilmee 1F)uopen
the door, Your coolingsystem won't have to run u
often.
7. Keep your refdgendor level, so that the doorseals
tightly. When the door is closed, the door gaskets
should touch the relfigerator all the way around. If not,
makeyourreldgeratorlevelby useofthe adjustable
leglocatedunderthe unit.
8. Keep your refrigerator my from stoves or (dher
heat sources. A cool and dry place aflowa your
refrigerator _ooperate more efficiently.
Before Calling for Service
Check the plug and fuse.
Test the outlet with a lamp.
Be sure the control is notset to OFF,
Read thiS_rtanual, especially the items under Use and
Care Information. You may f'mdthe answer toyour
questions.
If you do not find the answer to your questions inthis
manual, findthe unitmodel number (on upper back of
refrigerator) and contact your nearest Sears Service
Center.
When requesting service or ordering parts,
always provide the followinginformation:
Product Name Part Name
Model Number Part Number
_ ANGER: ELECTRICAL SHOCK HAZARD
Disconnect power before servicing.
t
H_nel Cap
I _ S_ ___0 r
Le9 _ \ L._,,_L-_Hrxe
Scr m,e
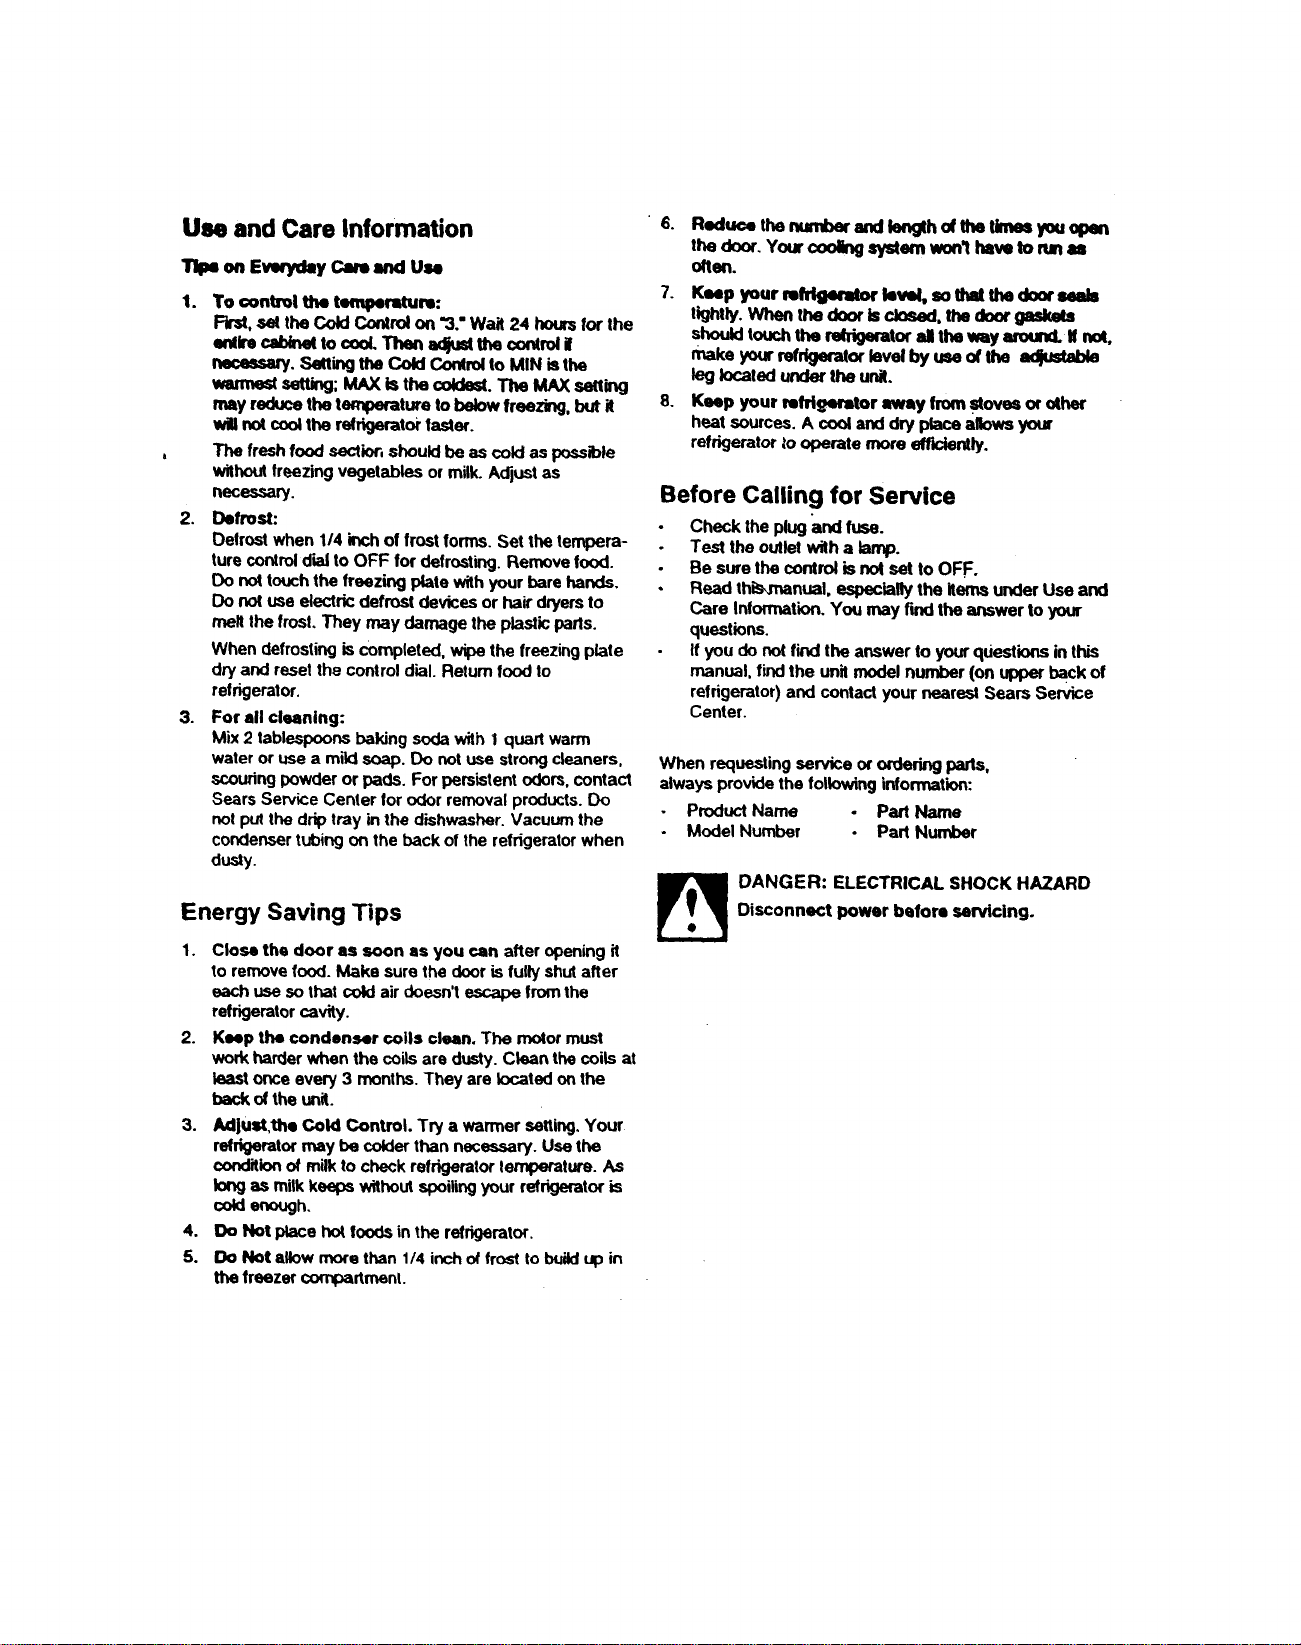
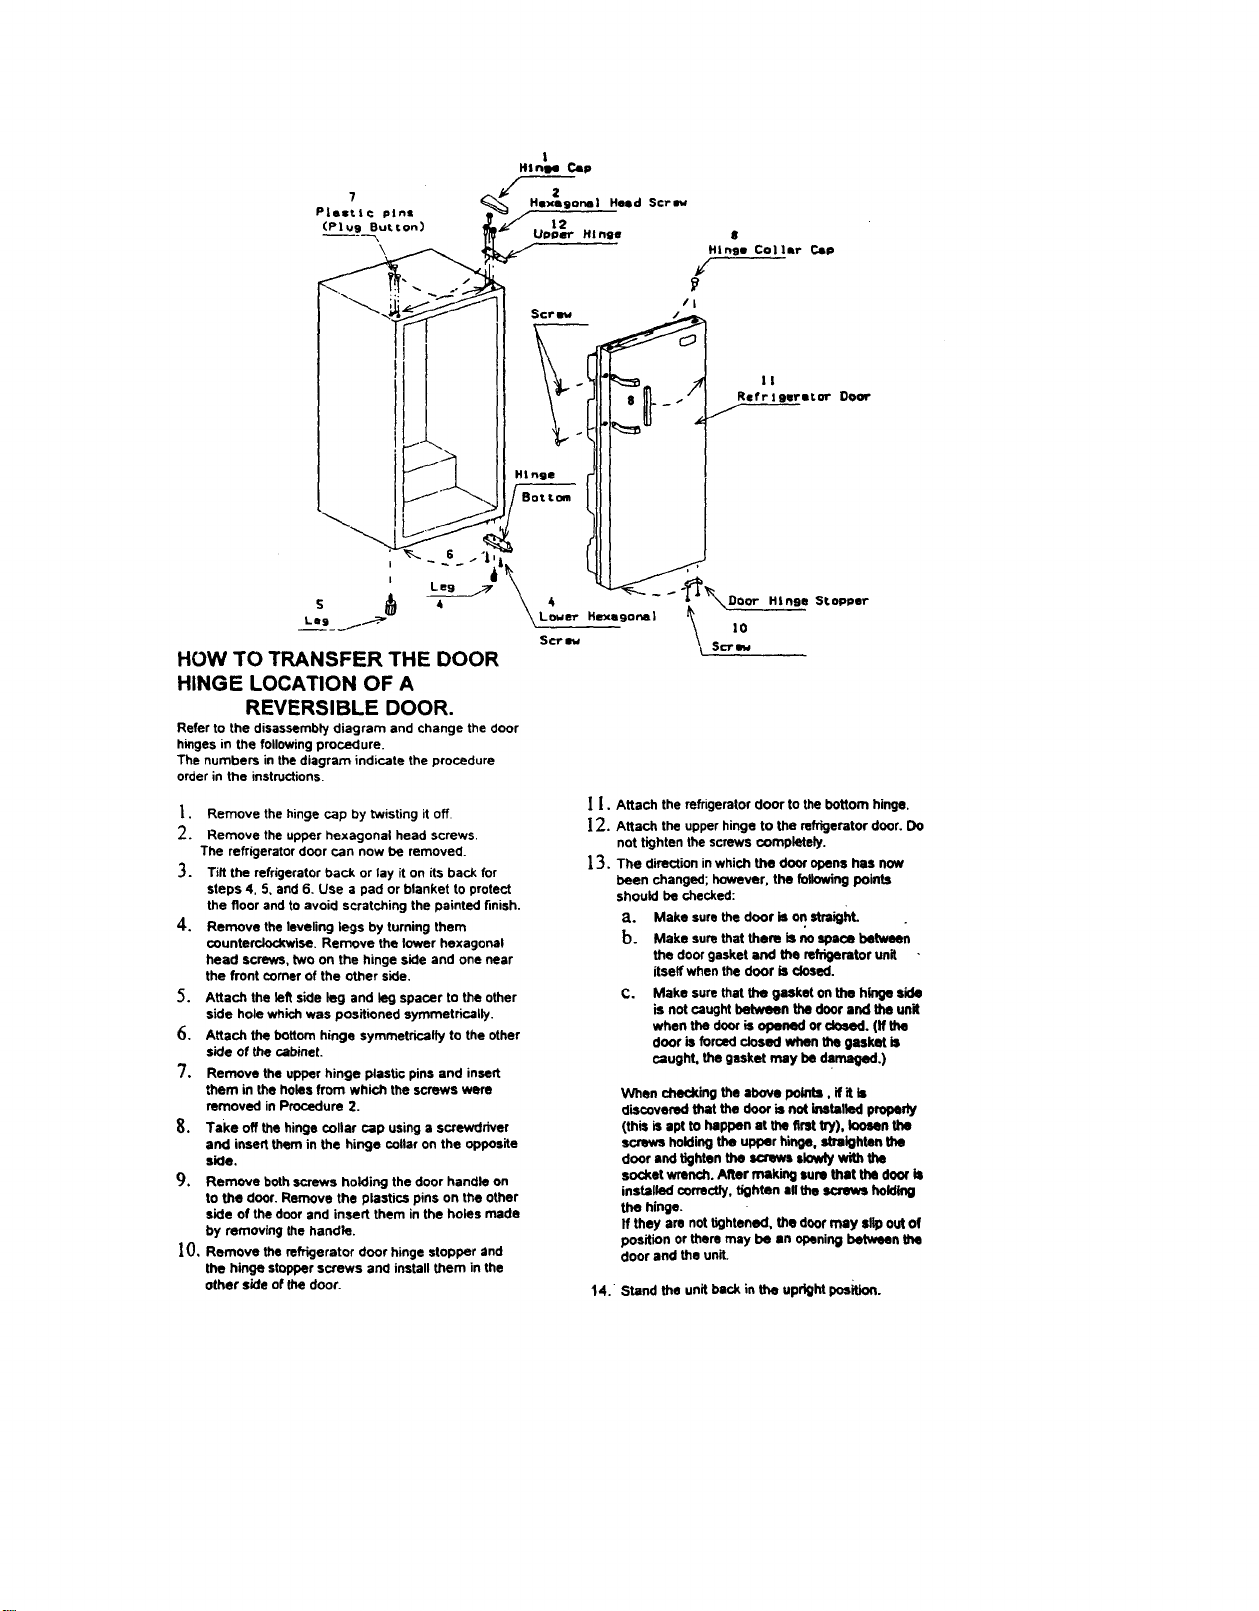
HOW TO TRANSFER THE DOOR
HINGE LOCATION OF A
REVERSIBLE DOOR.
Refer to the disassembly diagram and change the door
hinges in the following procedure.
The numbers in the diagram indicate the procedure
order in the instructions.
HI nee Stopper
|. Remove the hinge cap by twisting it off
2. Remove the upper hexagonal head screws
The refrigerator door can now be removed_
3. Tilt the refrkJerator back or lay it on its back for
steps 4, 5, and 6. Use a pad or blanket to protect
the floor and to avoid scratching the painted finish.
4. Remove the leveling legs by turning them
counterclockwise. Remove the lower hexagonal
head screws, two on the hinge side and one near
the front comer of the other side.
5. Attach the left side leg and leg spacer to the other
side hole which was positioned symmetrically.
6. Attach the bottom hinge symmetrically to the other
side of the cabinet.
7. Remove the upper hinge plastic pins and insert
them in the holes from which the screws were
removed in Procedure 2.
8. Take off the hinge ooliar cap using a screwdriver
and insert them in the hinge collar on the opposite
side.
9. Remove bothscrews holding the door handle on
to the door. Remove the plastics pins on the other
side of the door and insert them in the holes made
by removing the handle.
|0, Remove the refrigerator door hinge stopper and
the hinge stopper screws and install them in the
other side of the door.
I1.
12.
13.
Attach the refrigerator door to the bottom hinge.
Attach the upper hinge to the refrigerator door. Do
not tighten the screws completely.
The direction in which the door opens has now
been changed; however, the following points
should be checked:
3.. Make sure the door is on straight.
b. Make sure that there is no space between
the door gasket and the refrigerator unit
itself when the door is closed.
C. Make sure that the gasket on the hinge side
is not caught between the door and the unit
when the door is opened or dosed. (if the
door is forced closed when the gasket is
caught, the gasket may be damaged. )
When checking the above points, if it is
discovered that the door is not installed properly
(this isapt tO happen at the first try), k_)sen the
screws holding the upper hinge, straighten the
door and tighten the screws slowly with the
socket wrench. After making sure that the door is
installed correctly, tighten all the screws holding
the hinge.
If they are not tightened, the door may sllp out of
position or there may be an opening between the
door and the unit.
14. Stand the unit back in the updgM position.

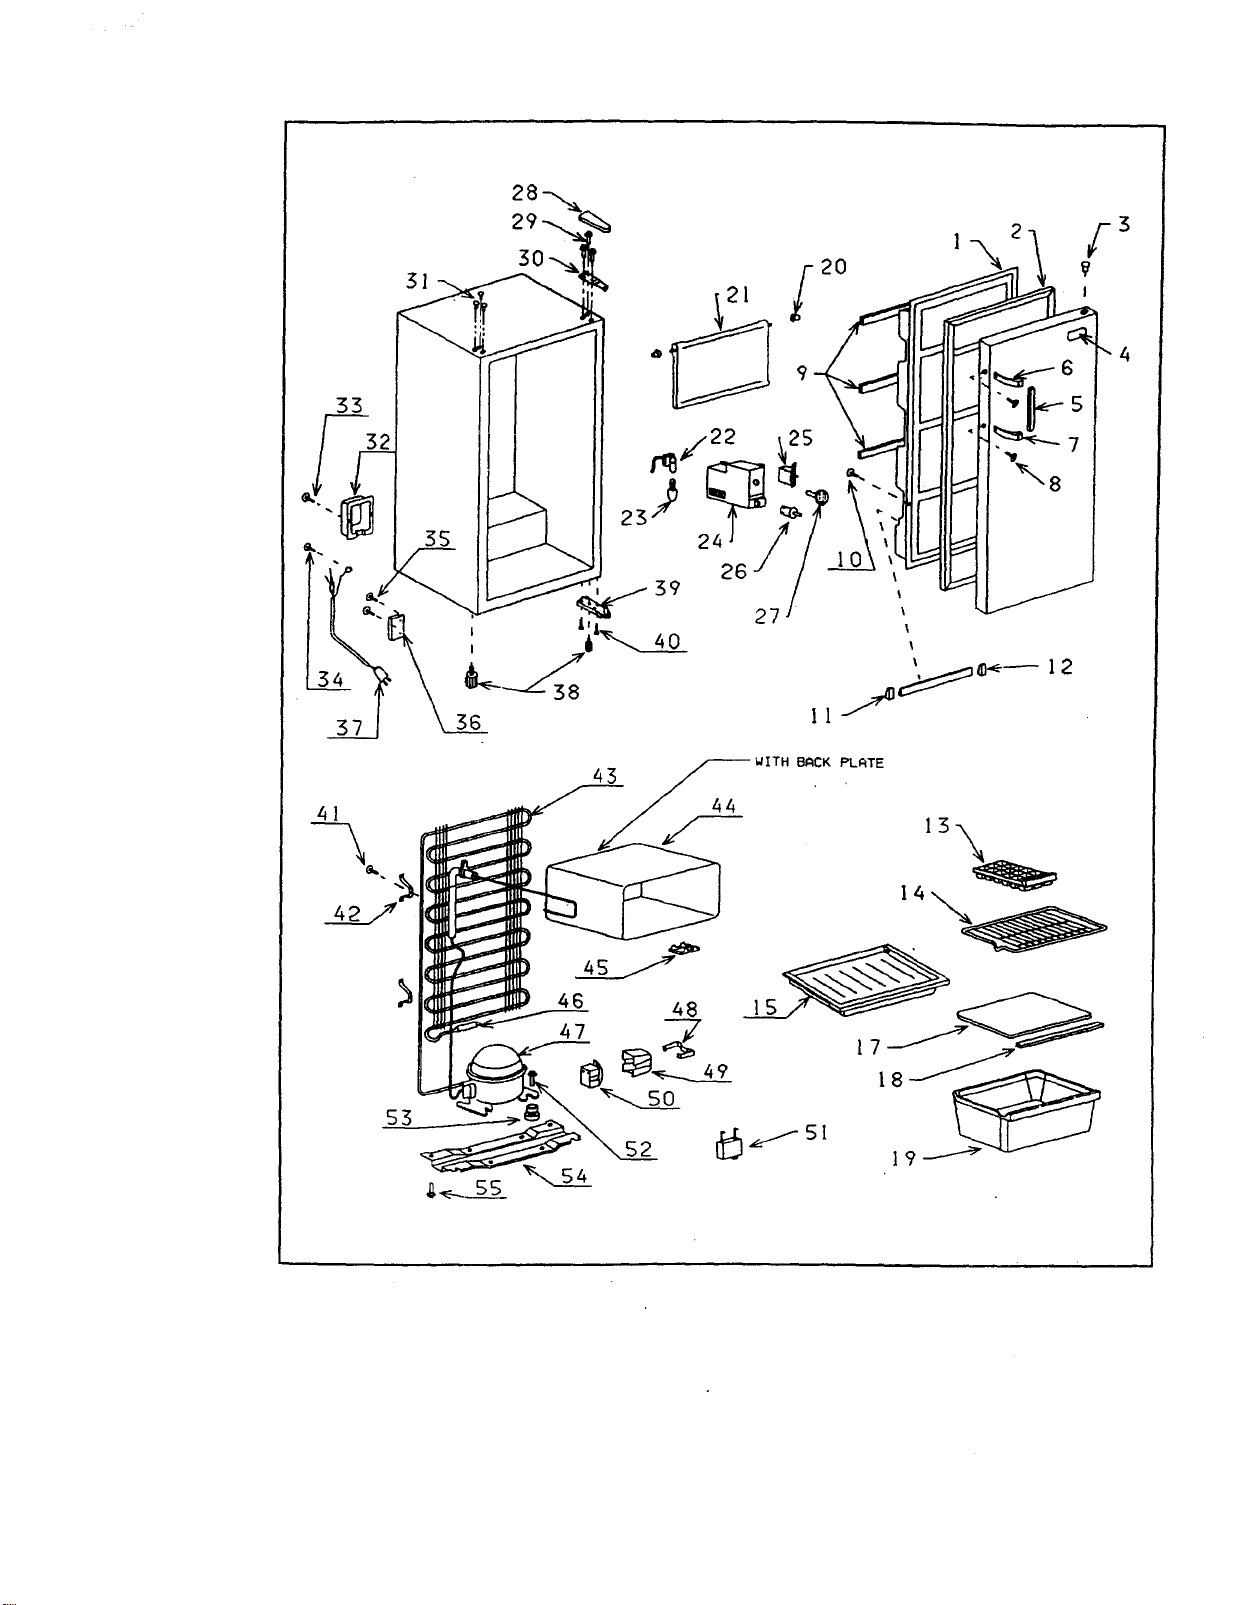
Parts List
Model: 564.60912100
CAUTION: Use Kenmore parts number on all orders, not the illustrationnumber.
Illus. No. Part No. Description Illus. No. Part No. Description
1 301811 DoorLiner 29 302009
2 302653 GasketAssembly 30 301718
3 302388 GrommetCap 31 302372
4 302340 Mascot 32 301730
5 302338 Handle 33 300308
6 ' 300063 CapHandleA 34 301991
7 300064 CapHandleB 35 300308
8 302647 ScrewforHandle 36 301817
9 302307 DoortrimShelf 37 301744
10 300308 Screw 38 300885
11 301847 DoorShelfBushingRight 39 302426
12 301846 DoorShelfBushingLeft 40 300456
13 302486 IceCubeTray 41 302317
14 302644 Shelf 42 300502
15 302657 DripTray 43 302646
17 302643 GlassShelf 44 302659
18 302671 Trimforglassshelf 45 300255
19 301795 Crisper 46 302304
20 302309 EvaporatorDoorGrommet 47 302648
21 302645 EvaporatorDoor 48 302202
22 302199 Socketforlamp 49 302201
23 301021 Lamp 50 302650
24 302191 PanelThermo 51 302649
25 301581 Thermostat 52 300413
26 302192 Switch 53 302427
27 302175 ThermoKnob
28 300033 HingeCover 54 302651
55 301868
56 301809
Screws
HingeTop
PlugButtons
CaseWireSplicer
Screw
Screw,#026MachineScrew
Screw
Clamp
PowerCord
Legs
BottomHinge
Screw
Screw
CondenserBracket
Condenser
Evaporator
ThermoBulbClamp
Drier
Compressor
ClipRelayCover
RelayCover
PTCThermistor
RunningCapacitor
CompressorMountingBolts
CompressorMounting
Grommets
CompressorBasePlate
Screw
FoamDoor
Part No. Description
302654 Owner'sManual/PartslisU
AuxiliaryManual
302655 Technicalsheet
33
57
41
42
SS
28
4G
47
44
For in-home major brand repair service:
Call 24 hours a day, 7 days a week
1-800-4-MY-HOME" (1-800-469-4663)
Para pedir servicio de reparacibn a domicilio - 1-800-676-5811
In Canada for all your service and parts needs call
- 1-800-665-4455
Au Canada pour tout le service ou les pi_ces
For the repair or replacement parts you need:
Call 6 am - 11 pm CST, 7 days a week
PartsDirect
1-800-366-P ART (1-800-366-7278)
Para ordenar piezas con entrega a domicilio - 1-800-659-7084
For the location of a Sears Parts and Repair Center in your area:
Call 24 hours a day, 7 days a week
1-800-488-1222
For information on purchasing a Sears Maintenance Agreement
or to inquire about an existing Agreement:
Call 9 am - 5 pro, Monday - SaturdaY
1-800-827-6655
r •
8WAR8
HomeCentral"
|