Loading ...
Loading ...
Loading ...
17
If the Saw Becomes Pinched or Trapped
1. Wait for the blade to stop, wait ve minutes for the saw to
cool, remove the battery, and wear gloves to protect your
hands from the chain teeth.
2. If you can reach the limb from the ground, lift the limb
while holding the saw. This should release the “pinch” and
free the saw.
3. If the saw is still trapped, call a professional for
assistance.
Maintenance + Care
mWARNING! Always remove the battery before
performing any adjustments, maintenance, or repairs to your
cordless pole chain saw.
• Use protective gloves when handling the bar and chain.
• Keep the bar encased in its sheath, except when working
directly on the bar or the chain.
• Never dispose of oils or other polluting materials in
unauthorized places.
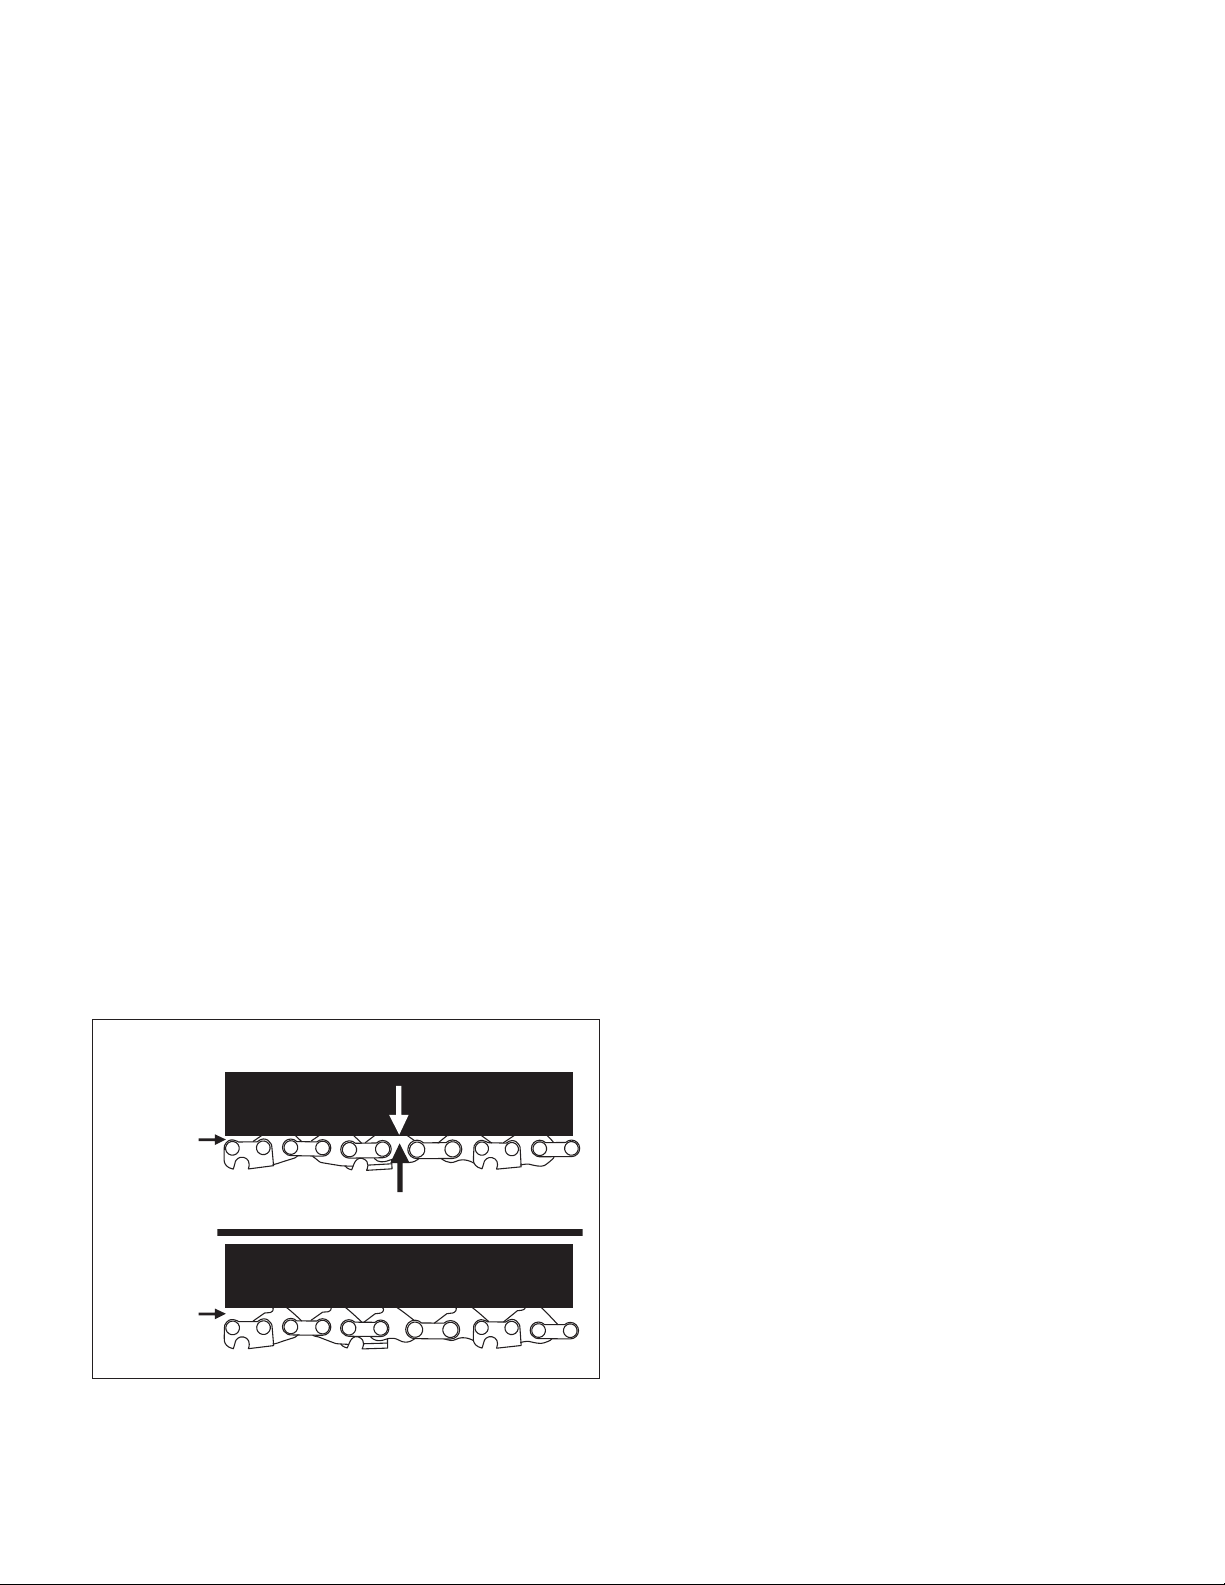
Chain Tension
Check the chain tension before using the saw when the chain
is cold. The correct tension of a cold chain is when there is no
slack on the underside of the guide bar; the chain is snug, but
you can rotate it by hand without binding.
During normal saw operation, the temperature of the chain will
increase. The drive links of a correctly tensioned warm chain
will hang approximately 0.050 in. (1.25 mm) out of the bar
groove. Be aware that a chain tensioned while warm, may be
too tight upon cooling. Check the “cold tension” before next
use. The chain must be re-tensioned whenever the ats on the
drive links hang out of the bar groove (Fig. 29).
NOTE: A new chain tends to stretch. Check the chain tension
frequently and re-tension as needed.
Nuts and Screws
Periodically check that all the nuts and screws are tightened
securely. Check that the telescoping lock and assembly lock
are intact and in proper working order.
Chain Sharpening
mWARNING! To ensure that the saw works safely and
eciently, it is essential that the cutting components are
well-sharpened. It is highly recommended to replace the
chain once it loses its ability to cut cleanly and safely.
It is possible, however, to sharpen the existing chain if the
sharpening is carefully performed. Any work on the chain
and bar requires specic experience and special tools. For
safety purposes, we recommend you contact an authorized
Snow Joe
®
+ Sun Joe
®
dealer or call the Snow Joe
®
+
Sun Joe
®
customer service center at 1-866-SNOWJOE
(1-866-766-9563).
Sharpening is necessary when:
• The sawdust looks like dust;
• Cutting becomes more dicult;
• The cut is not straight;
• Vibrations increase.
An authorized service center will sharpen the chain using the
right tools to ensure minimum removal of material and even
sharpness on all the cutting edges.
If you sharpen the chain yourself, use special round-section
les with the right diameter depending on the type of chain
(see “Chain Maintenance Table”). You need a certain amount
of skill and experience to avoid damaging the cutting edges.
Sharpen the chain as follows (Fig. 30):
• Secure the bar rmly, with the chain mounted, in a
suitable vise.
• Tighten the chain if it is loose.
• Mount the le in the guide and then insert it in the tooth at
a constant angle from the cutting edge.
• Sharpen in a forward motion a few times and repeat this
on all the cutting edges facing the same way (right or left).
• To move the chain forward, use a screwdriver.
• Turn the bar over in the vise and repeat on all the other
cutting edges.
• Check that the depth limiter tooth does not stick out
farther than the inspection tool and le any projecting
parts with a at le, rounding o the edges (Fig. 29).
• After sharpening, remove all traces of ling and dust
and lubricate the chain in an oil bath. Replace the chain
whenever:
– The length of the cutting edges decreases to 5 mm
or less;
– There is too much play between the links and the rivets.
Properly Adjusted Warm Chain
Approximately 0.050 in. (1.25 mm)
Flats are
visible here
Flats are not
visible here
Chain Needs Tensioning
Fig. 29
Loading ...
Loading ...
Loading ...