Electric Wall Oven
Model: EB-67ERC-8BC54T
Dalxo User Manual
Please read the instruction carefully before usage. If you have any problems,
please do not hesitate to contact our service team: support@dalxo.com

Table of Contents
Introduction..........................................................................................................................1
Important Safety Tips..........................................................................................................3
Parts List...............................................................................................................................6
Installation Electric Wall Oven...........................................................................................7
Using the Electric Wall Oven.............................................................................................12
Cleaning & Maintenance....................................................................................................17
Troubleshooting...................................................................................................................19
Warranty..............................................................................................................................20

1
Electric Wall Oven
Model: EB-67ERC-8BC54T
Introduction
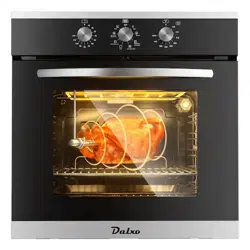
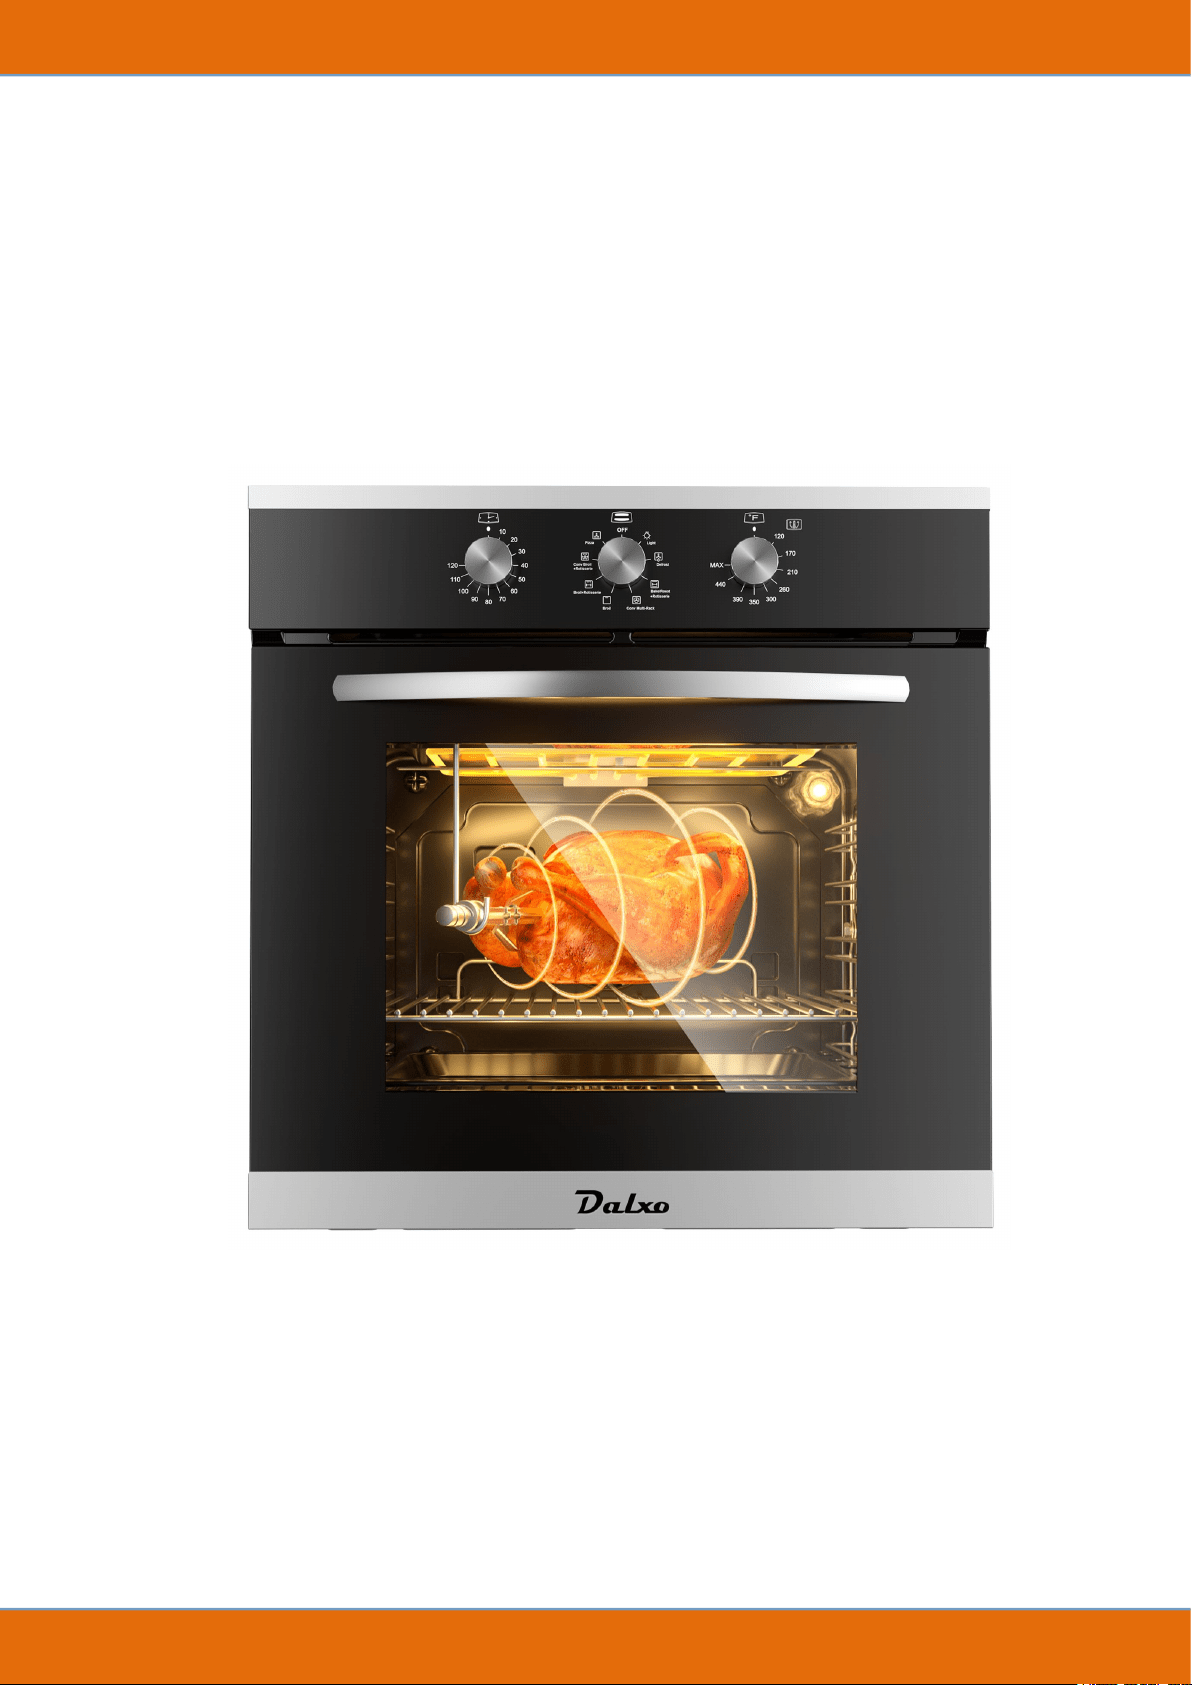
Congratulations on Your Purchase of the Dalxo’s Single Wall Oven
24” electric ovens are made with stainless steel finishes and triple-layer tempered glass
doors. The large capacity of 2.6 cubic feet meet your needs for cooking multiple foods
simultaneously. 8 practical functions are provided. In convection mode, it cooks evenly
and heats up faster than normal ovens. Use our rotating forks to help you 360° roast a
golden crispy turkey, practical and efficient on Thanksgiving. Plus, there are
over-temperature protectors to ensure your safety and a 60-minute timer reminds you
to turn it off when the time comes to prevent the food from scorching.
Hope that you will enjoy the use of Dalxo's oven for many years to come. Perfect for
kitchens, islands and mobile homes. Moreover, if you have an apartment to rent, our
stylish built-in ovens complement the kitchen perfectly to attract more tenants.
We take great pride in providing you with the highest quality products and superior
service and support.
Parameter Specifications
Dimensions
Cut Out
Voltage/
Frequency
Material
Capacity
Rated
Power
Max
Temp
Timer
23.4’’L*23.4”
W’’*21.5’’H
22.05’’L*23.19
W’’*21.65’’H
220V/60Hz
Stainless Steel
finish+Tempered
Gass door
2.6 cu. ft
2700-
3220W
440℉
60 Mins
User Manual
2
The single-phase alternating current of the oven is 220-240V 50Hz. In any event, you should
always check the nameplate specifications affixed to the machine before installing the
equipment.
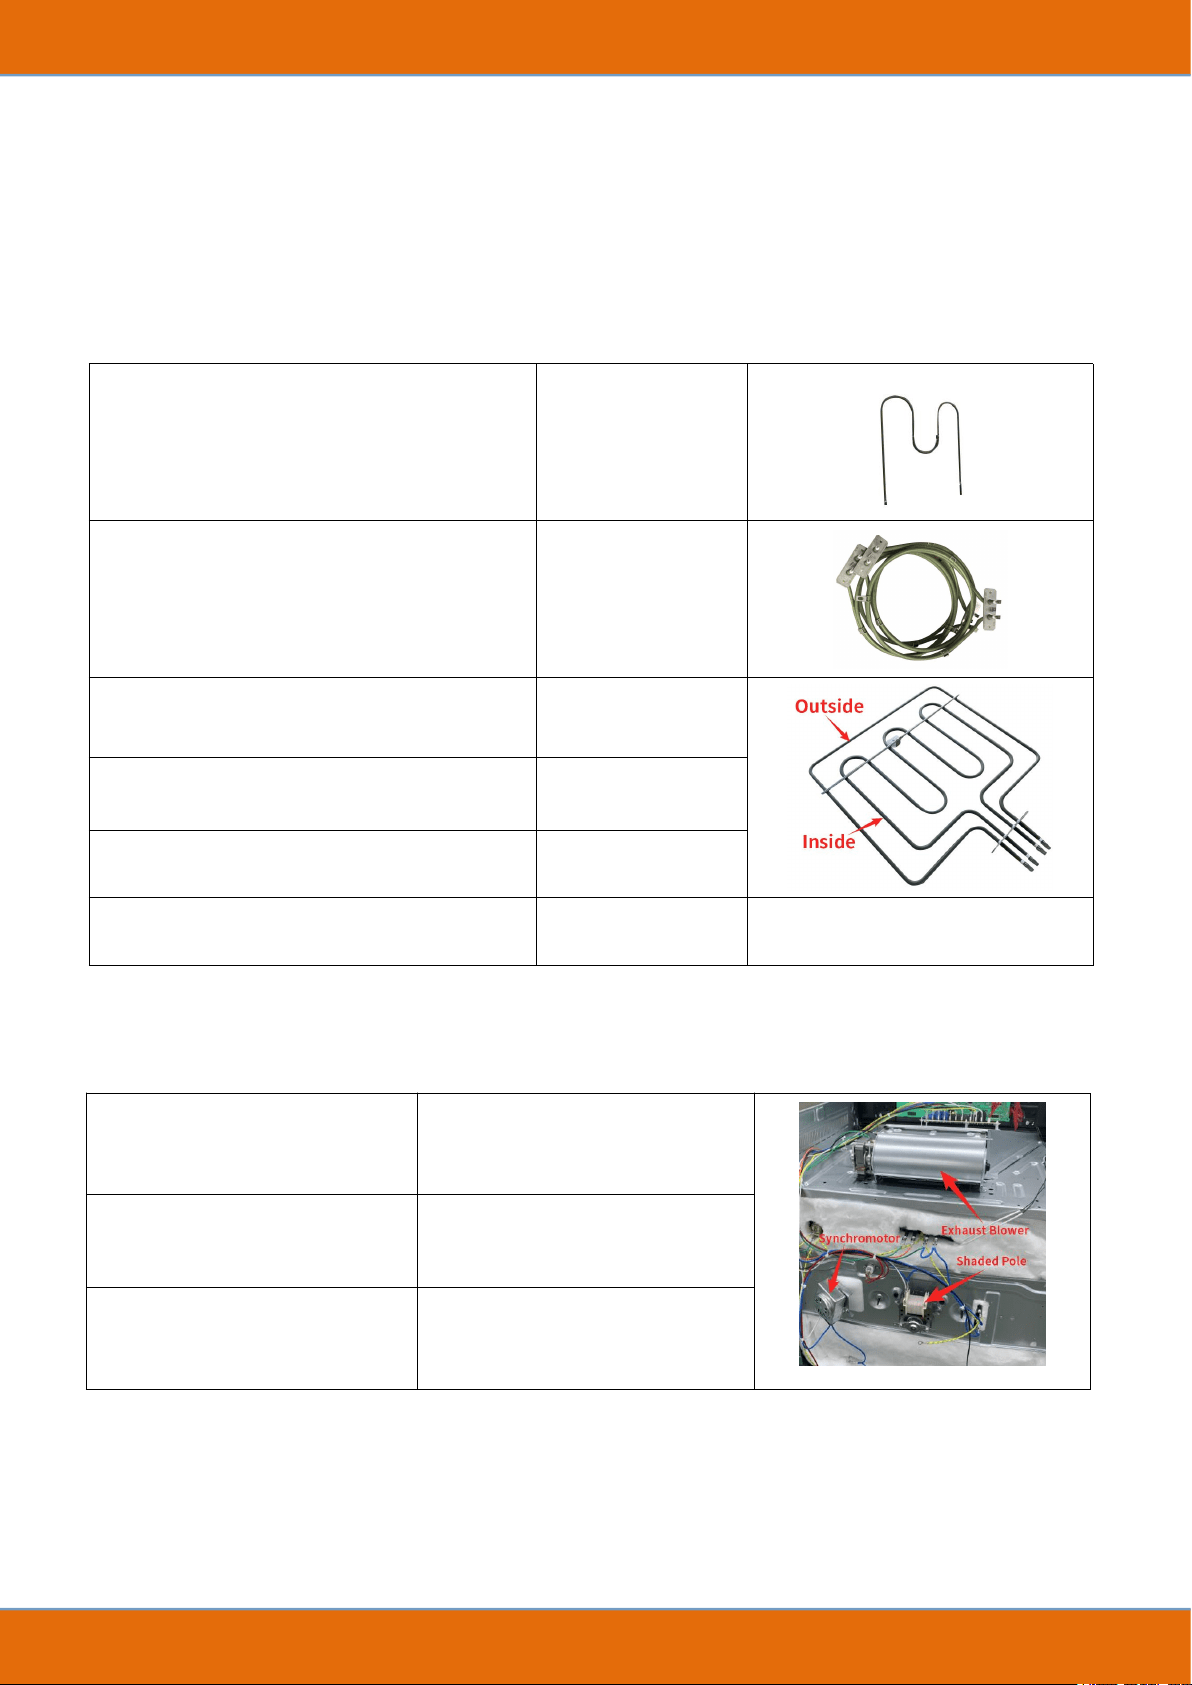
Power of the Heating Tube & Light
Lower Heating El.
1200W
Circle Heating El.
2100W
Total Upper Heating El.
1000W+1900W
Upper Inside Heating El.
1900W
Upper Outside Heating El.
1000W
Oven Light
15W
/
Power of the Heating Motor
Synchromotor
4W
Shaded Pole
25W
Exhaust Blower
15W

3
Important Safety Tips
Please read and understand the following safety tips prior to using your product.
Recommend asking a professional electrician to install the single wall oven.
The oven heats up when it is running. For your child's safety, do not approach the
glass door.
Be careful not to leave packing materials within the reach of children as a safety hazard, such as
plastic sheeting, expanded polystyrene.
Important: Do not use the oven door handle as a moving tool, e.g to remove it from its
packaging.
When the oven is turned on for the first time, acrid smoke may appear. This is due to the
heating of the adhesive used on the insulation boards around the oven. It is normal phenomenon.
If this happens, just be patient and wait until the smoke is gone before placing the food in the
oven. Never roast or bake on the oven base.
Good Habits of Safety Awareness
This device is designed for non-professional home use, and its functions
should not be changed at will.
The electrical system of this equipment can only be used safely if it is
properly connected to a standard grounding.
The manufacturer is not responsible for any damage caused by incorrect
installation or unreasonable use of the equipment.
4
A qualified person must be contacted in the following cases:
The following items are potentially dangerous and appropriate measures must be taken to
keep children and the disabled out of the reach:
Controls and general appliances;
Package, such as bags, polystyrene, nails, etc;
Electrical appliances when they are no longer in use, especially potentially hazardous
parts.
Warning: Accessible parts become hot during use. To avoid burns and scalds,
keep children away.The product will become hot in use, attention should be
taken to avoid touching the heating elements in the oven.
Avoid the Following Situations:
The wet body comes into contact with the appliance.
Using the appliance when barefoot.
Pull the appliance or power cord to unplug it from the power outlet.
Block ventilation or cooling slots.
Allow power supply cords of small appliances to contact with the hot parts of the unit.
Exposing the appliance to atmospheric agents , like rain or sun.
Use the oven as storage.
Use flammable liquids near the appliance.
Using adaptors, multiple sockets or extension cords;
Attempt to install or repair equipment without the assistance of qualified personnel.
Important: Do not use harsh abrasive cleaners or sharp metal scrapers to
clean glass door, as they will scratch the surface to shatter.

5
A qualified person must be contacted in the following cases:
Install according to the instructions;
When in doubt about operating the equipment;
When the power socket is not compatible with the electrical plug, the power socket
needs to be replaced, when it is not compatible with the electrical plug.
Service Center authorized by the manufacturer must be contacted in the following:
If there is doubt about the integrity of the device after it has been removed from the
packaging;
If the power cord is damaged or needs to be replaced;
If the equipment occurs to malfunctions or unnormal function, you need to ask for original
spare parts.
It is a good idea to do the following:
Only use the appliance to cook food instead other;
Check the condition of the appliance after it has been unpacked;
Before cleaning or performing maintenance, if the device is not working properly, unplug it
from the power source;
Unplug the appliance and turn off the gas cock when the appliance is not in use for a long
time;
Remove the cookware from the oven using the cooking pull handle or gloves;
Always grasp the oven door in the centre because the ends may be hot due to the escape of
hot air;
Make sure the control knob is at the "o" setting when the device is not in use;
Unplug the appliance when you decide not to use it any longer.
6
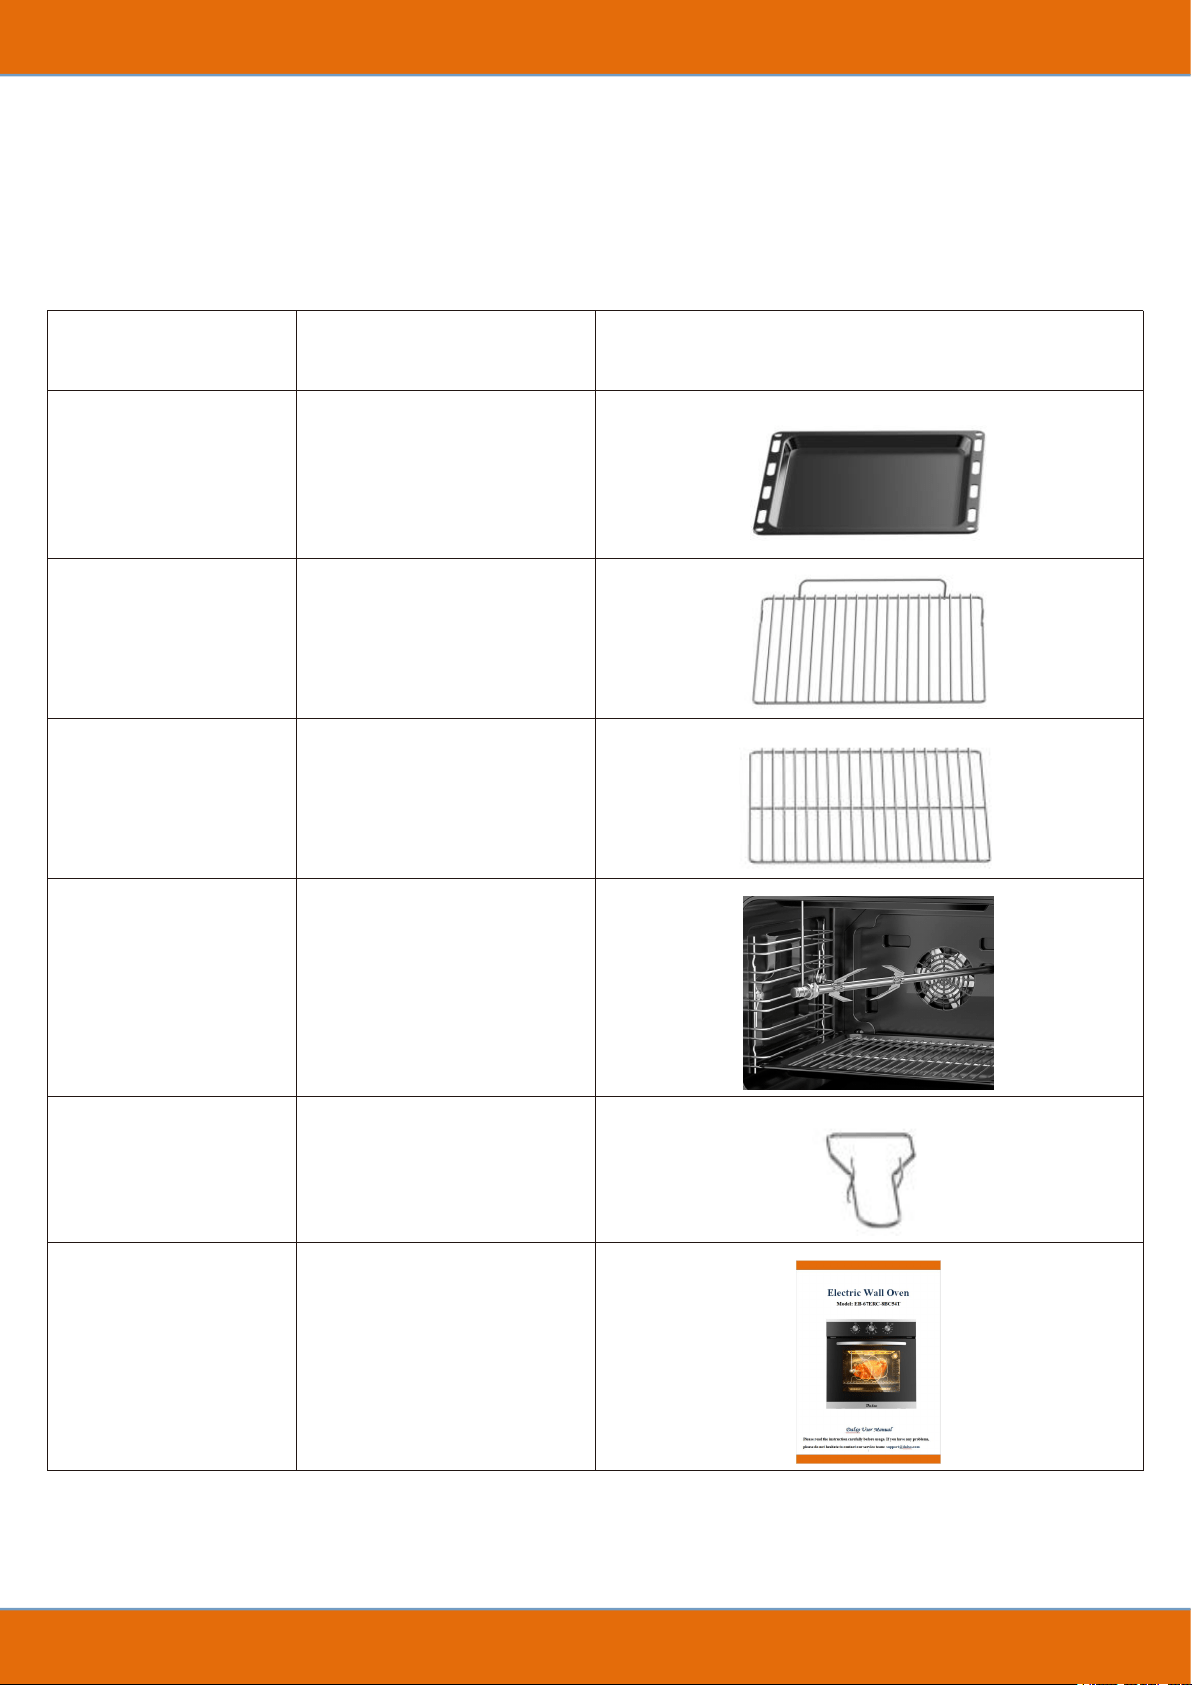
Parts List
Parts
Number
Diagram
Tray
1pcs
Large Grill
1pcs
Small Grill
1pcs
Rotisserie Fork
1pcs
Pull Handle
1pcs
Manual
1pcs

7
Installation Electric Wall Oven
IMPORTANT: Unplug your oven before performing installation or maintenance.
Installation should be carried out by qualified personnel according to the instructions. The
manufacturer is not responsible for any damage to persons, animals or objects caused by
incorrect installation.
Opening Dimensions (General tolerance)
Width: 22.05 +/- 0.05”
Height: 23.19 +0-0.09”
NOTE: If the oven is to be paired with a stovetop, you must follow the instructions in the booklet
provided with the other appliance. For efficient air circulation, the oven should be installed
according to the dimensions (Fig. 1).
8
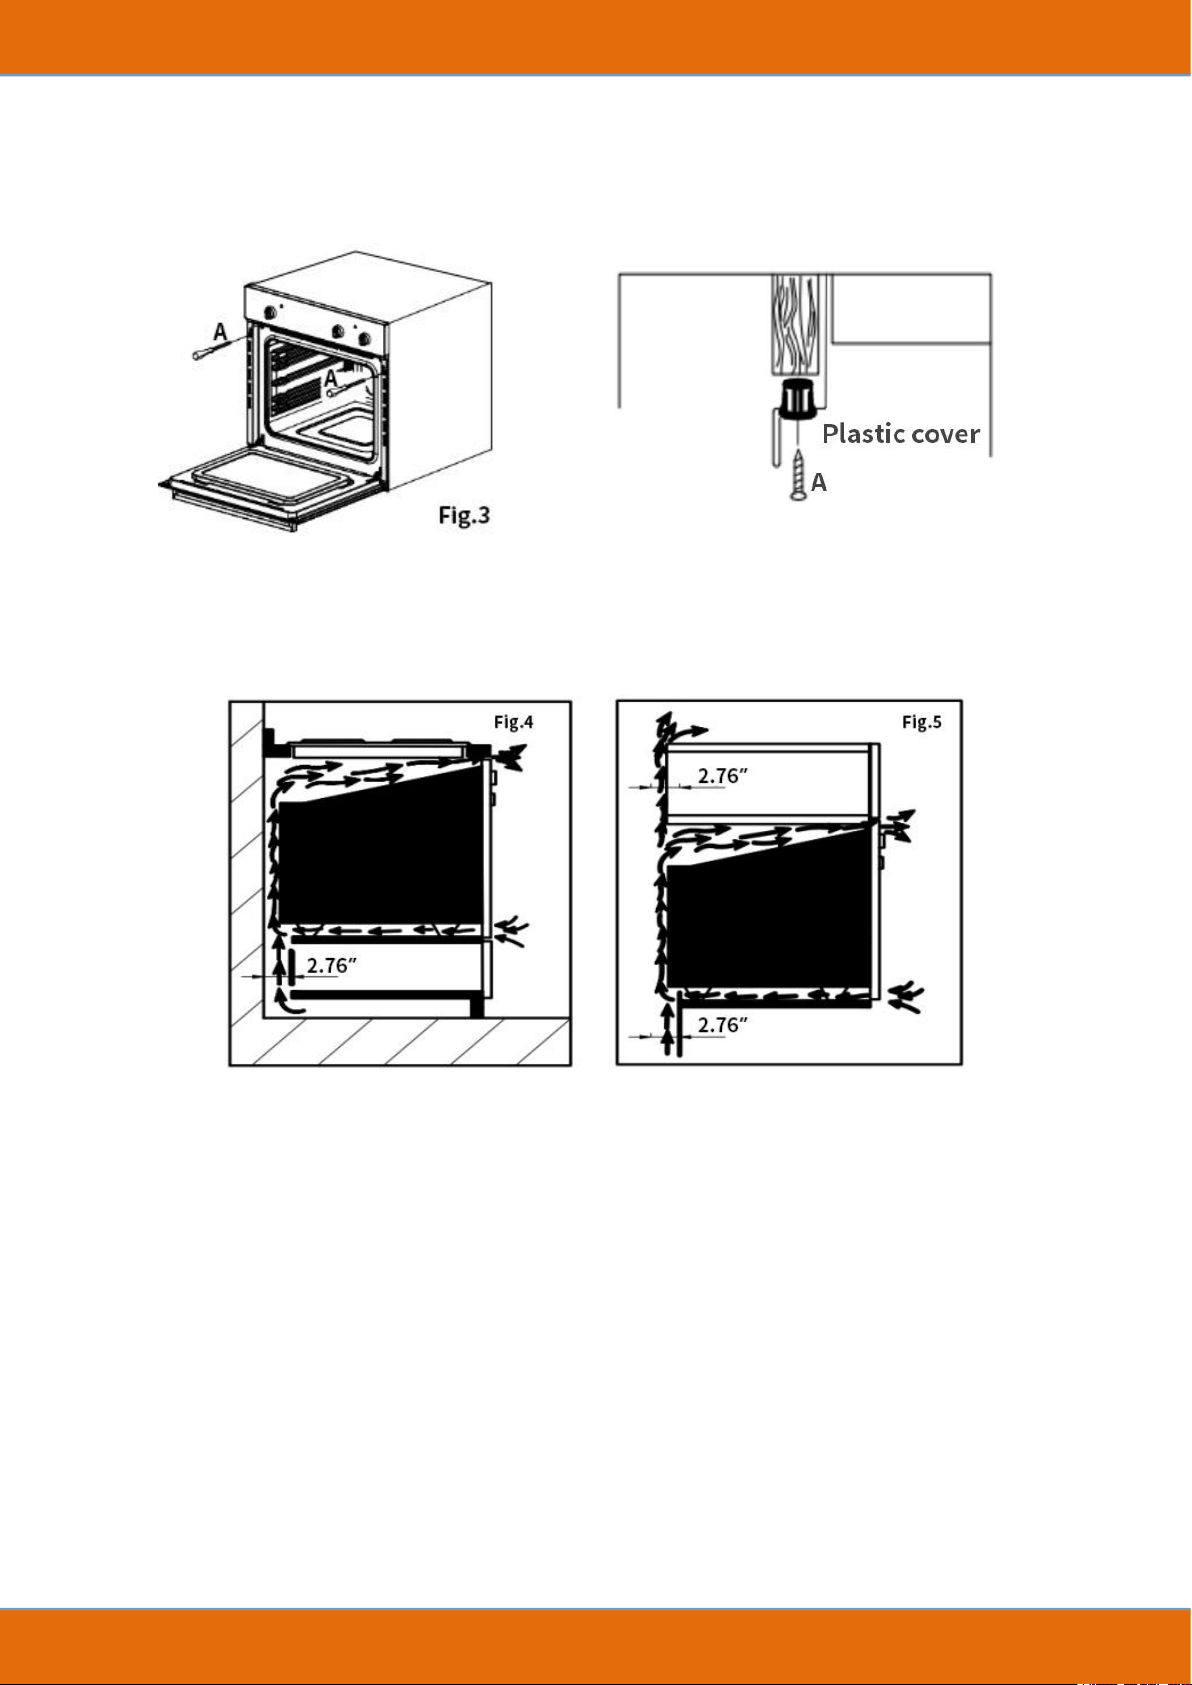
There are 2 holes in the door frame to mount the oven to other surroundings (under the bench or
above other machines) by screwing and inserting the plastic cover (Fig. 3).
The rear panel of the machine must be removed to allow free circulation of air. There should be
at least 2.76” (70 mm) of clearance behind the panel where the oven is installed (Fig.4-5).
For a built-in oven to work properly, the cabinets must be the correct type.
The panels of adjacent furniture should be heat resistant. Especially when they are wood
veneers, the adhesive should withstand 250°F (120°C), or it will deform or fall off.
For your safety, do not touch electrical components once the device is installed.
All protective parts provided cannot be fixed in a non-removable way.
Ensure that the appliance is switched off before replacing the lamp to avoid the
possibility of electric shock.
9
Connection to the Mains Supply
Devices must be connected according to current rules. It is recommended to be wired by a
professional electrician.
Check that the rated power of power and outlet match the max wattage indicated on the
nameplate.
The correct connection is to insert the plug into a socket with a third contact point to the
ground.
If the device has a power cord installed but no plug, wire it as follows:
The “yellow/green” grounded wire, which must be connected to the terminal should be
0.39" (10mm) longer than others.
The “blue” neutral line has to be connected to the terminal marked with letter “N”.
The “Black, Brown or Red” live wires have to be connected to terminal “L”.
Mains connection can also be made by fitting a double pole switch with a min gap between
the contacts of 0.12 inches ( 3mm ), proportionate to the load.
The yellow/green earth wire should not be controlled by the switch.
Once the appliance is in place, the plug or two-pole switch for the mains connection should
be handy.
IMPORTANT
The power cord should be placed 120°F (50°C) below the ambient temperature.
Safety can only be ensured if it is properly connected to a valid grounded power source in
accordance with electrical safety regulations.
The manufacturer is not responsible for any damage to persons or objects due to lack of a
ground connection.
This equipment must be grounded.
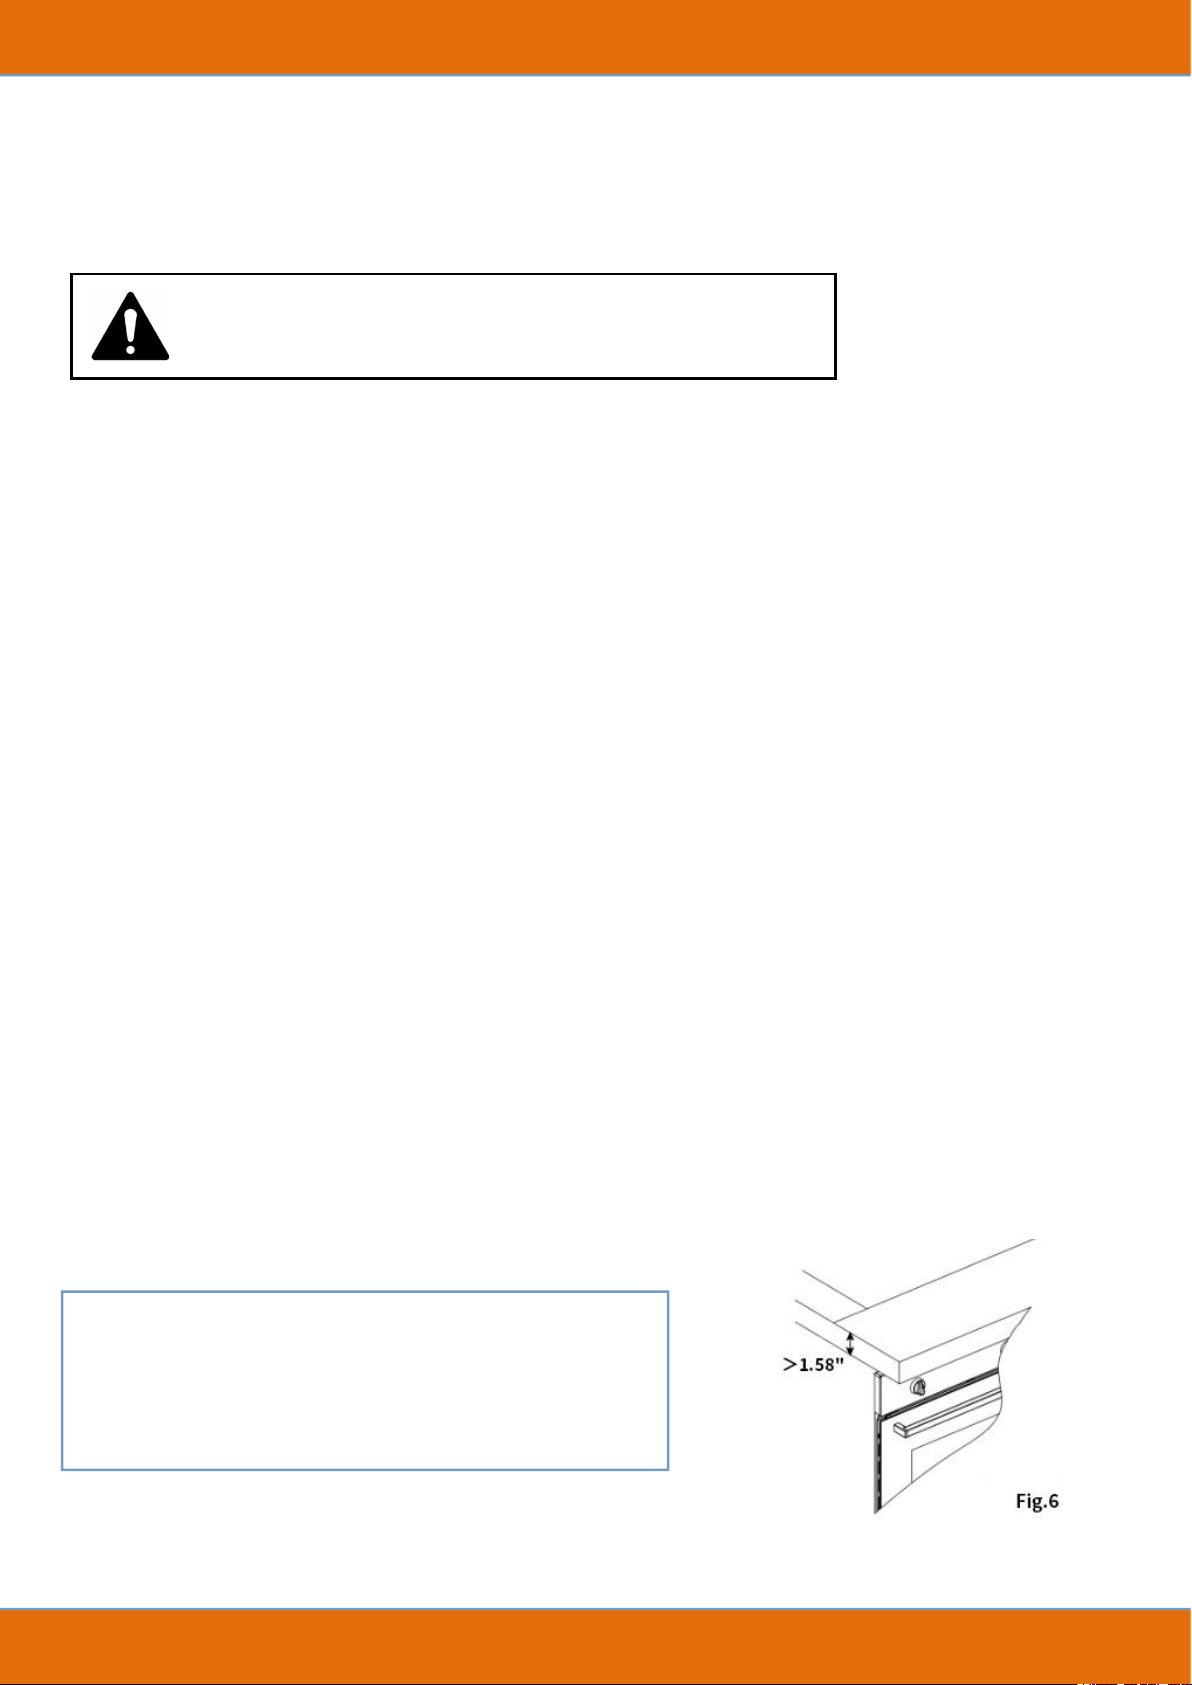
If a gas stove needs to be installed above the wall
oven, the distance between them should be >
1.58”.
10
Removable Glass Door
The oven door is made of 3 layers of glass, the top and bottom of each layer are flow-through.
When the oven is running, air circulates through the door to keep the outer pane cool. If
condensation is working between the glass panes, the door can be removed to clean between
them.
Follow the instructions above to remove the door and place it on a protective surface (such as a
tablecloth) to prevent it from being scratched.
The door handle should line up with the edge of the table. Make sure the glass lies flat to avoid
breakage of glass in cleaning.
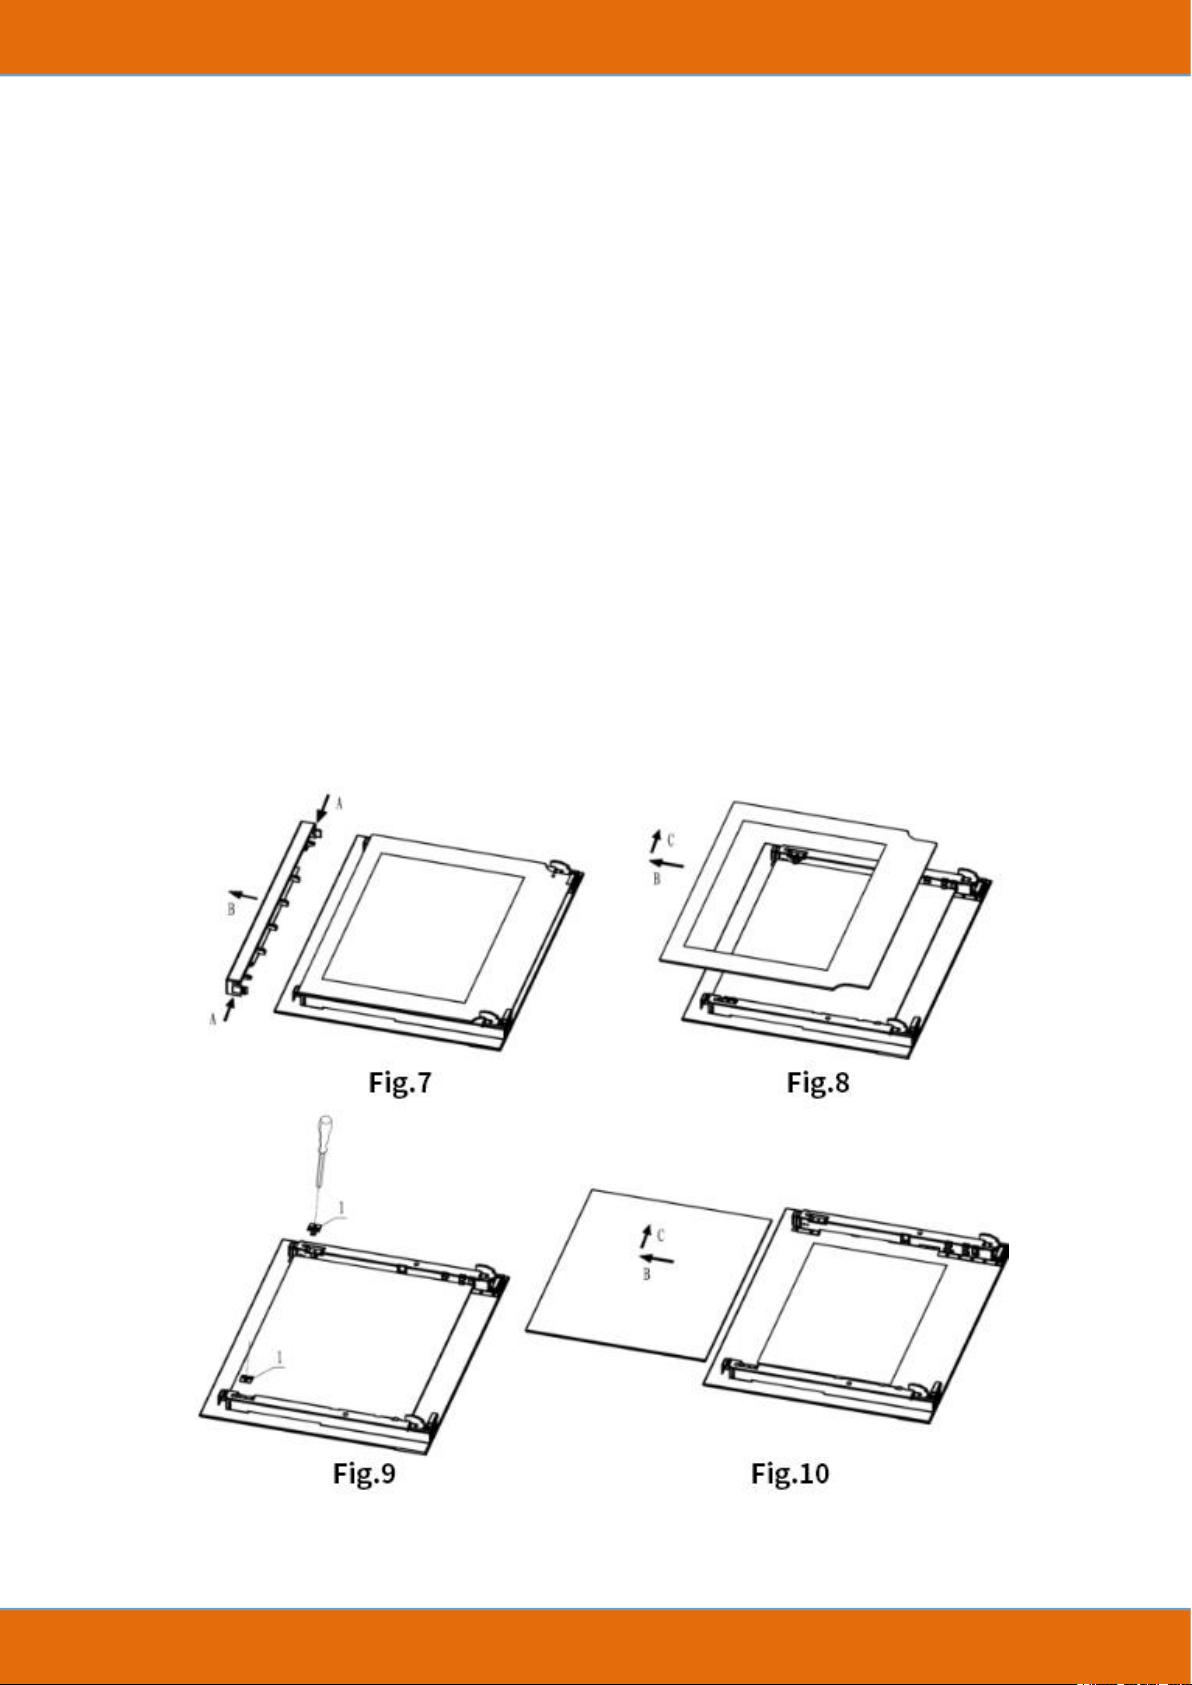
1.Press the button on left and right side of door, then take out top rail. (Fig.7)
2
.
Take out inner glass slowly (Fig.8)
3
.
Loose clips. (Fig.9)
4
.
Take out middle glass. (Fig.10)
Clean glass and other parts with a damp microfiber cloth, a clean sponge, or a hot water
solution containing a small amount of detergent, then dry with a soft cloth.
11
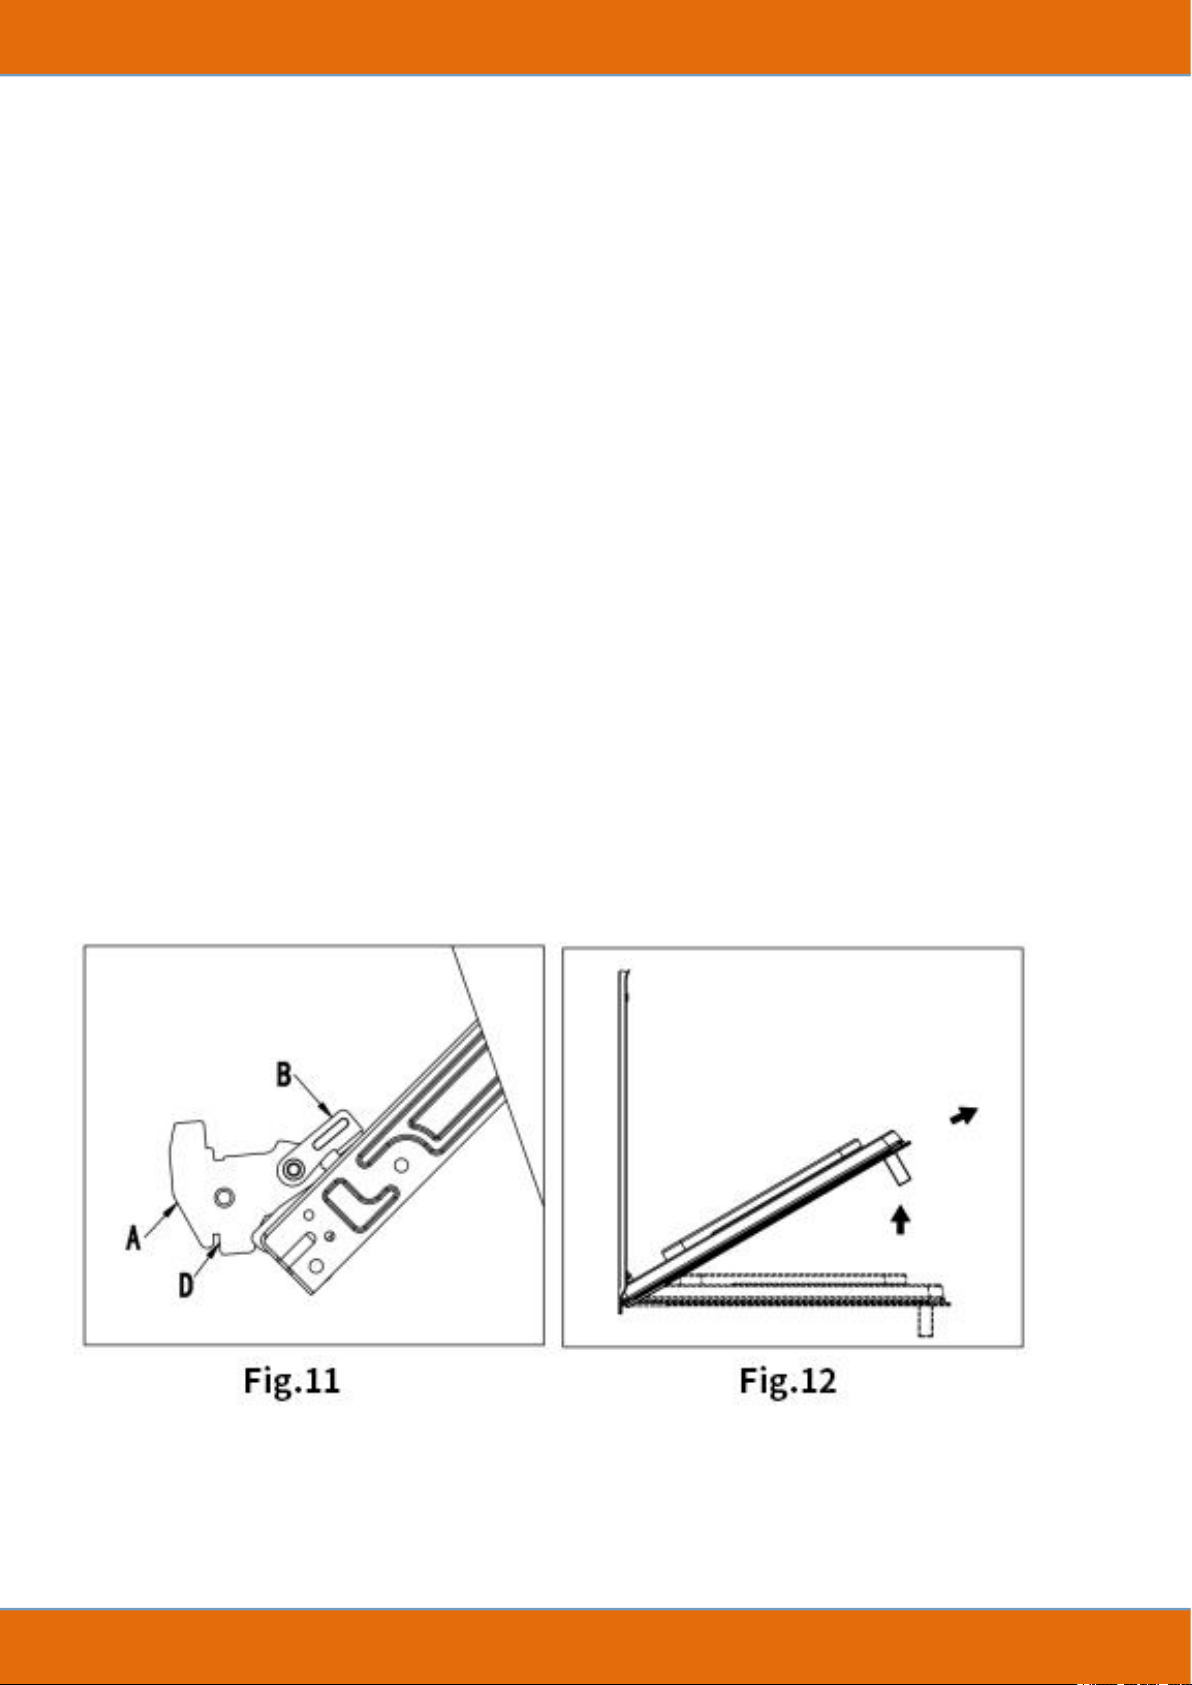
Disassemble/Assemble the Oven Door
To make it easier to clean the inside oven, the oven door can be removed by proceeding as
follows:
Open the door completely and lift the 2 levers “B” (Fig.11);
Shut the door slightly, you can lift it out by pulling out the hooks “A” to reassemble the
door. (Fig.12)
Door in a vertical position, insert the two hooks “A” into the slots;
Ensure that seat “D” is hooked perfectly onto the edge of the slot (Move the oven door
backwards and forward slightly);
Keep the oven door open fully, unhook the 2 levers “B” downwards and then shut the
door again.
12
Using the Electric Wall Oven
Panel contain time, function and temperature knobs
Note: All functions will not be activated until the temperature is selected using the knob.
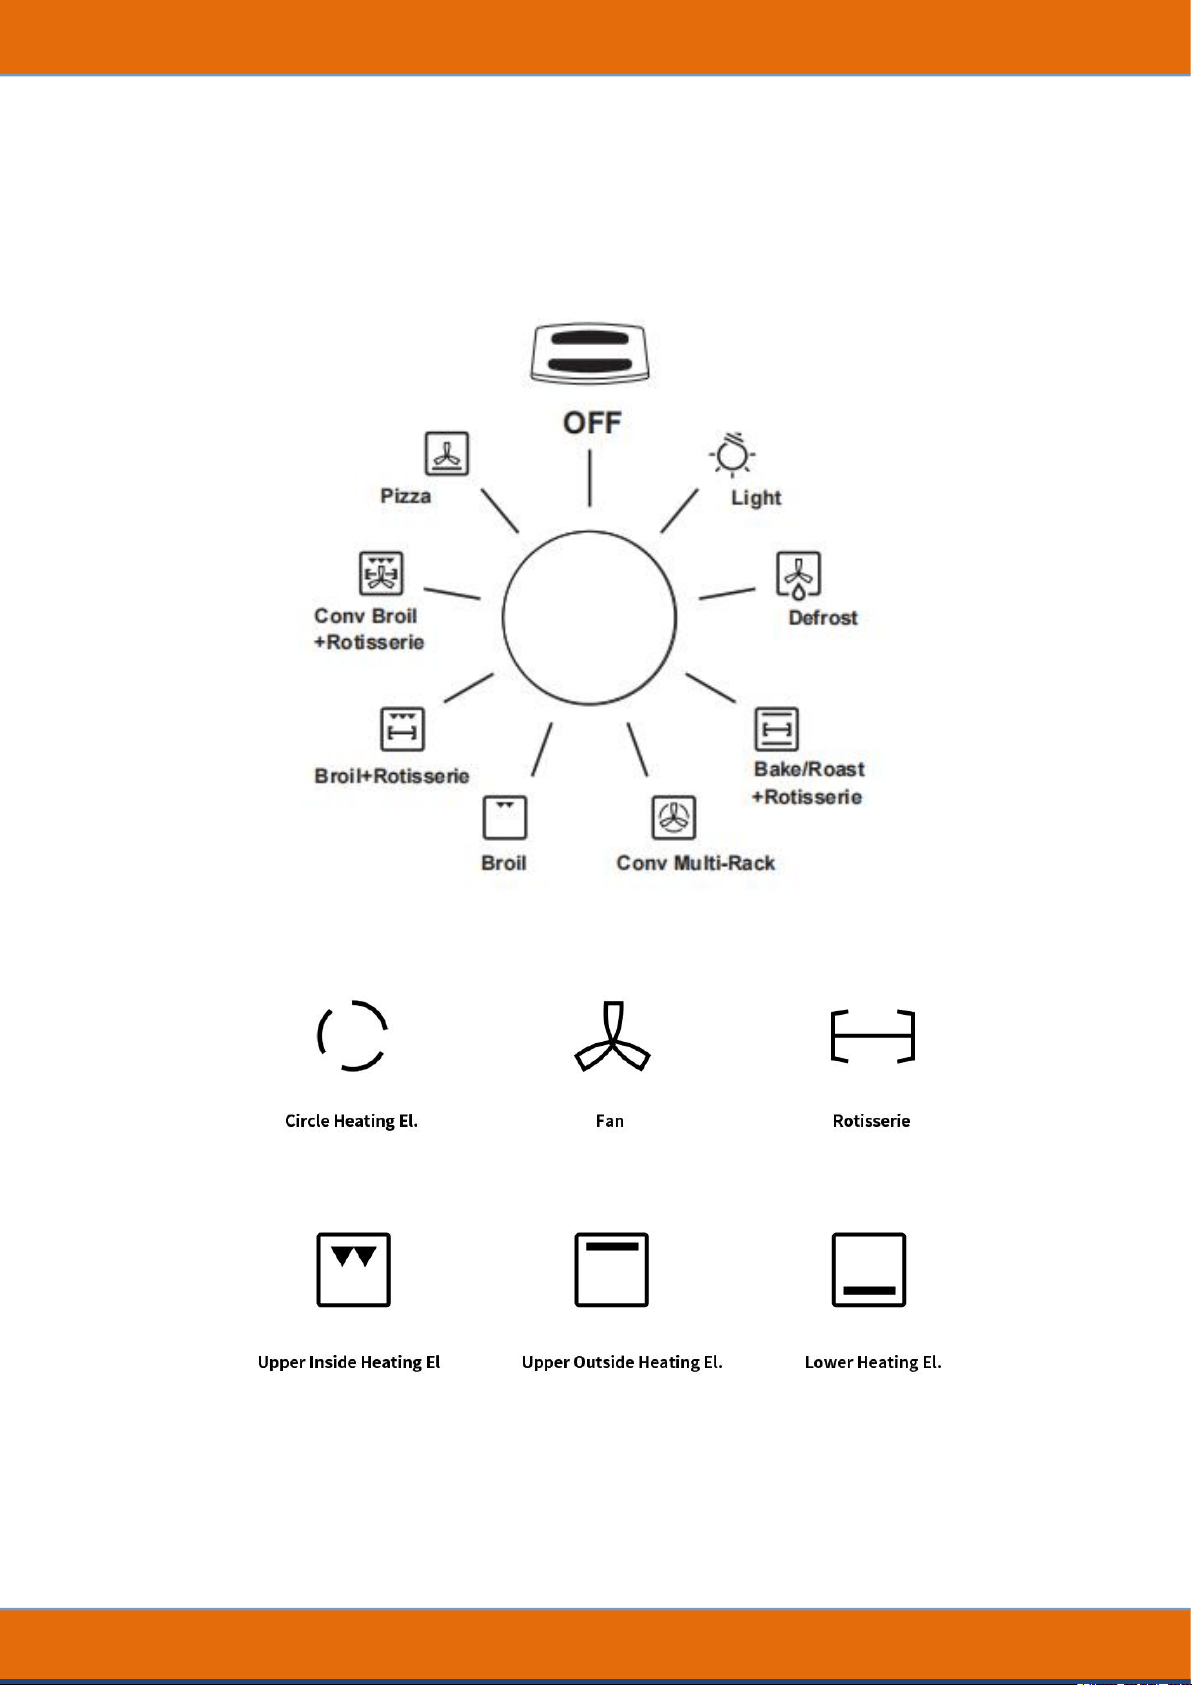
Recognition the Icon
Note: the inverted triangle represents the inside heating tube in the top.
13
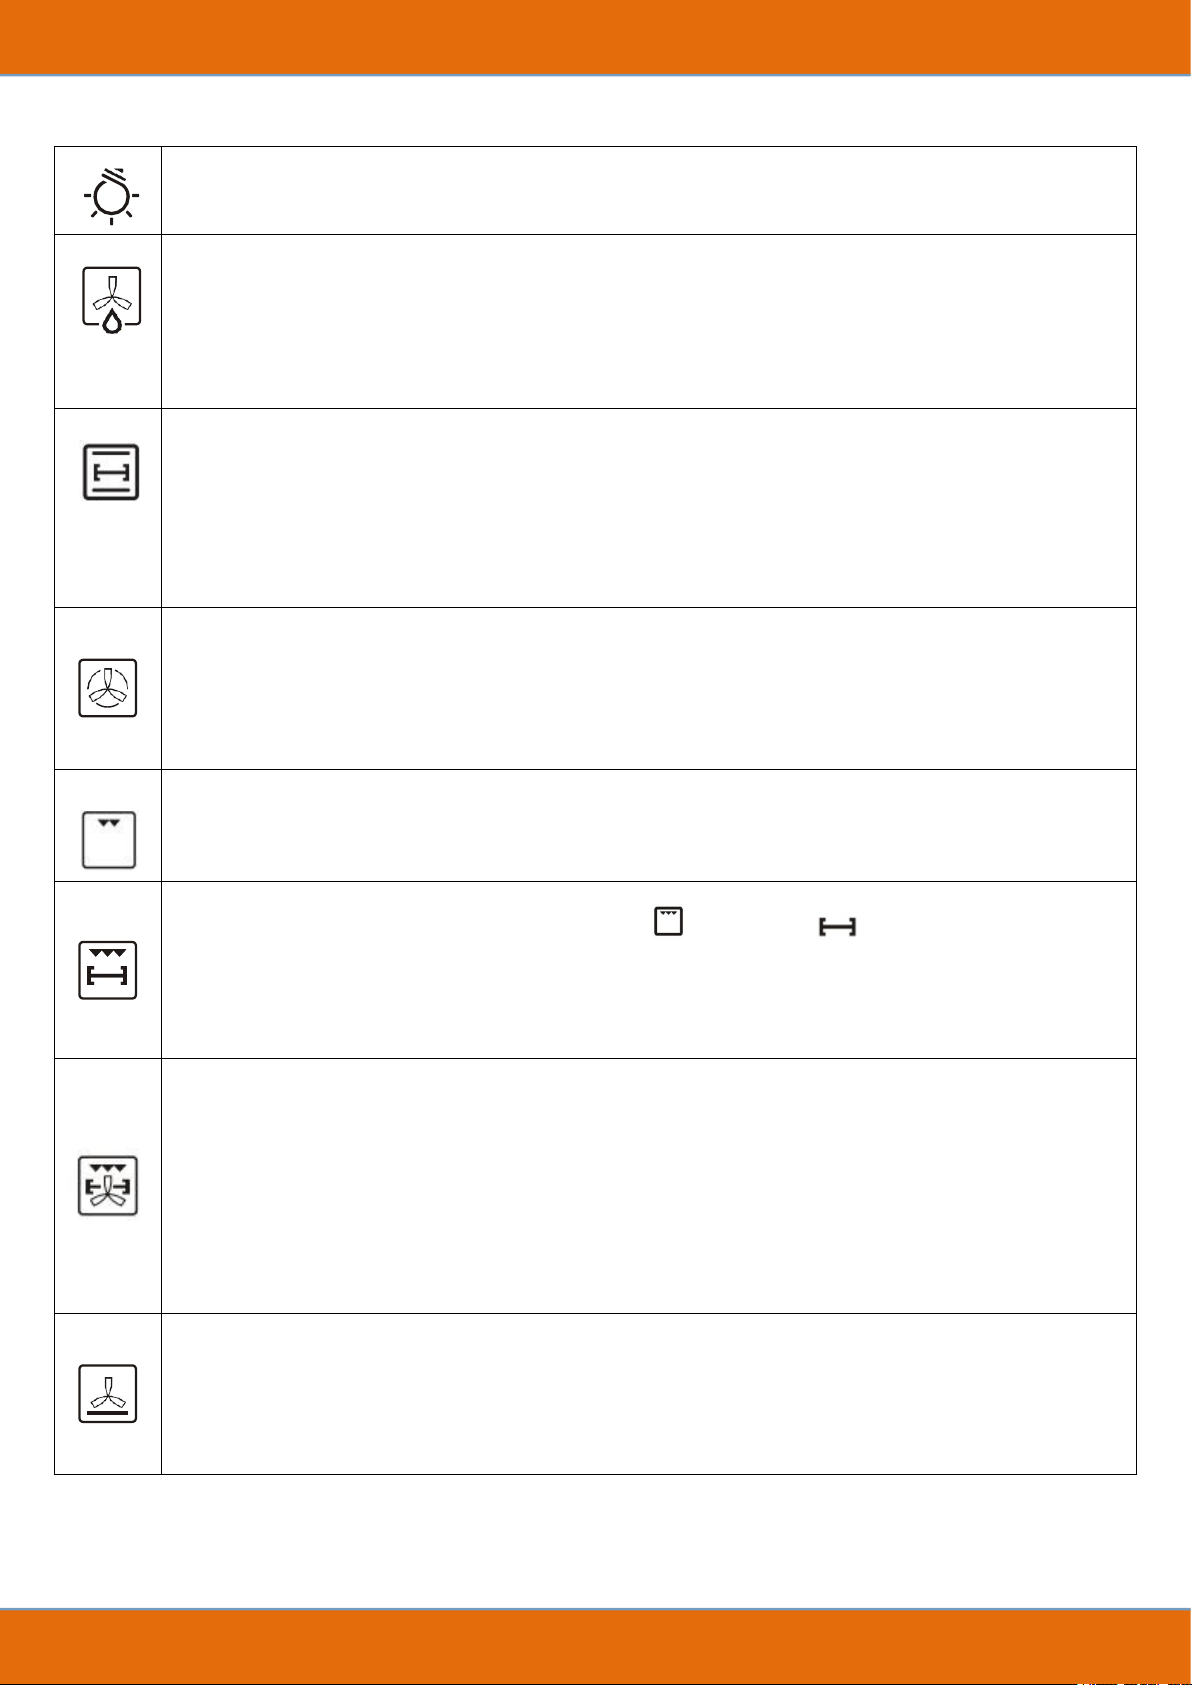
Light
A light inside the Oven.
Defrost with Fan
Rapid defrosting is helped by switching on the fan provided which ensures uniform distribution of
low-temperature air inside the oven. Frozen convenience foods such as fish sticks, chicken nuggets
and french fries.
Bake/Roast+Rotisserie
Bake: Cooks with dry, heated air; Perfect for Variety of foods, such as cakes, cookies,
pastries, quick bread, quiche and casseroles.
Roast:Use more intense heat from the upper element and more browning of the exterior; Suit for
meats, poultry, less tender cuts of meats and roasting vegetables
Convection Multi-Rack
Circulates heat uniformly using a fan and heating element in the back.This mode is well suited for
cooking individual serving-sized foods such as cookies,biscuits,cream puffs, cupcakes, dinner
rolls, and muffins. It is also good for cooking on multiple racks (2 or 3) at the same time.
Broil
Use intense heat radiated from the upper element. Tender cuts of meat (1" or less), poultry,
browning bread and casseroles.
Broil+Rotisserie (Upper inside heating element or Rotisserie ).
With rotisserie in the broil function, you can 360° roast the chicken. Always broil with the door
closed. The benefits of broiling include Fast and efficient cooking; Cooking without the addition of
fats or liquids.
Convection Broil+Rotisserie
Convection broil is similar to broil. It combines intense heat from the upper element with heat
circulated by a convection fan. This mode is well suited for cooking thick, tender cuts of meat,
poultry and fish. It is not recommended for browning breads, casseroles and other foods. Always
use convection broil with the door closed. In addition to the benefits of standard broiling,
convection broiling is faster.
Pizza Function
Similar to Bake, but the air is circulated from a fan at the back of the oven that cycles on and off.
All types of pizza- fresh, frozen, prebaked crust and ready-to-bake.
14
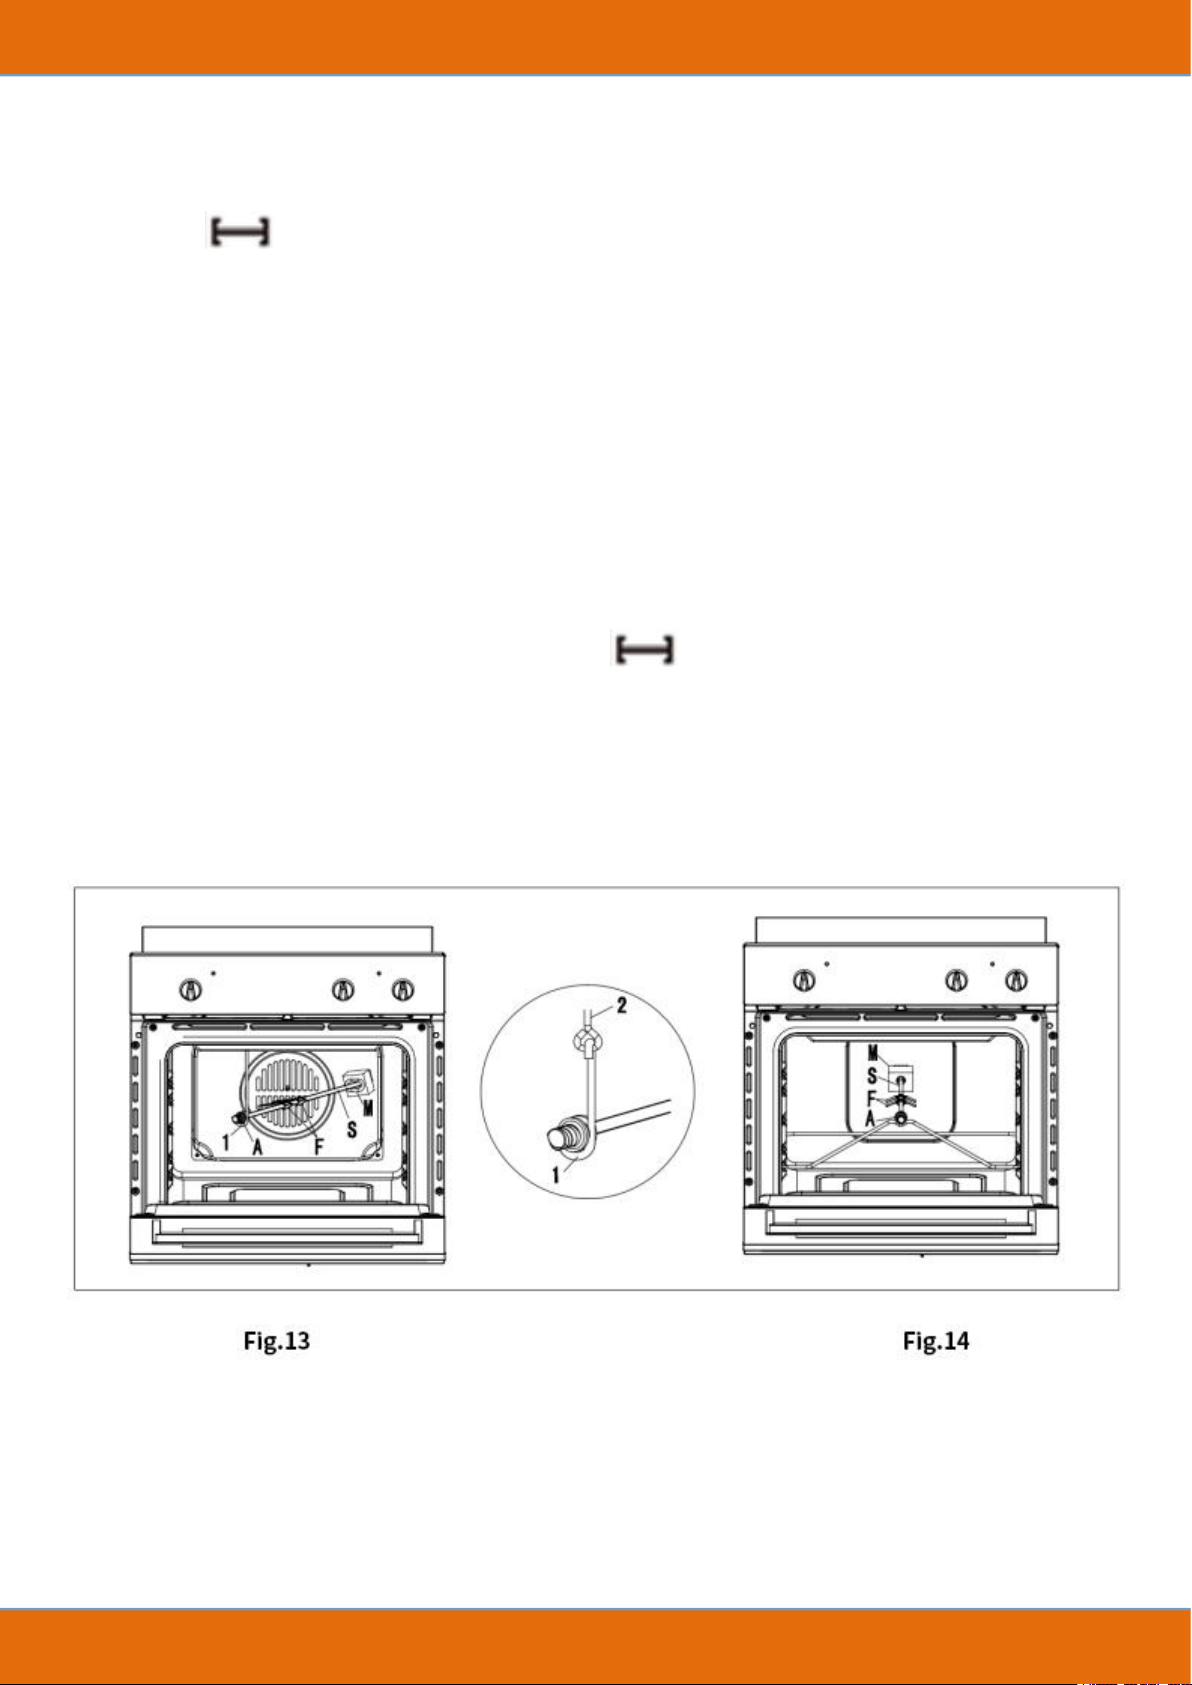
Use the Rotisserie
In the icon " " of the function panel, the rotisserie can be used in combination with the
rack. After fitting the food on to the spit “S”, block it with the two forks “F”. then proceed as
follows:
The common oven installation method is as shown below, but this product is suitable for
Fig.13; And Fig.14 is just for extra reference.
Fit the end of the spit into the motor “M” at the back of the oven (Fig. 13).
Fit the support into the circular groove in the spit.
Unscrew and remove handle “A”.
Number “2” hooks the oven, “1” in the circle, as shown in the middle picture.
Place the oven tray with a little water on the lowest shelf of the oven.
Turn the knob to position to rotisserie icon .
Partially close the oven door.
When the cooking time is up, screw the handle on the spit and remove everything from
the oven. If necessary, use an oven glove to avoid any burn.
15
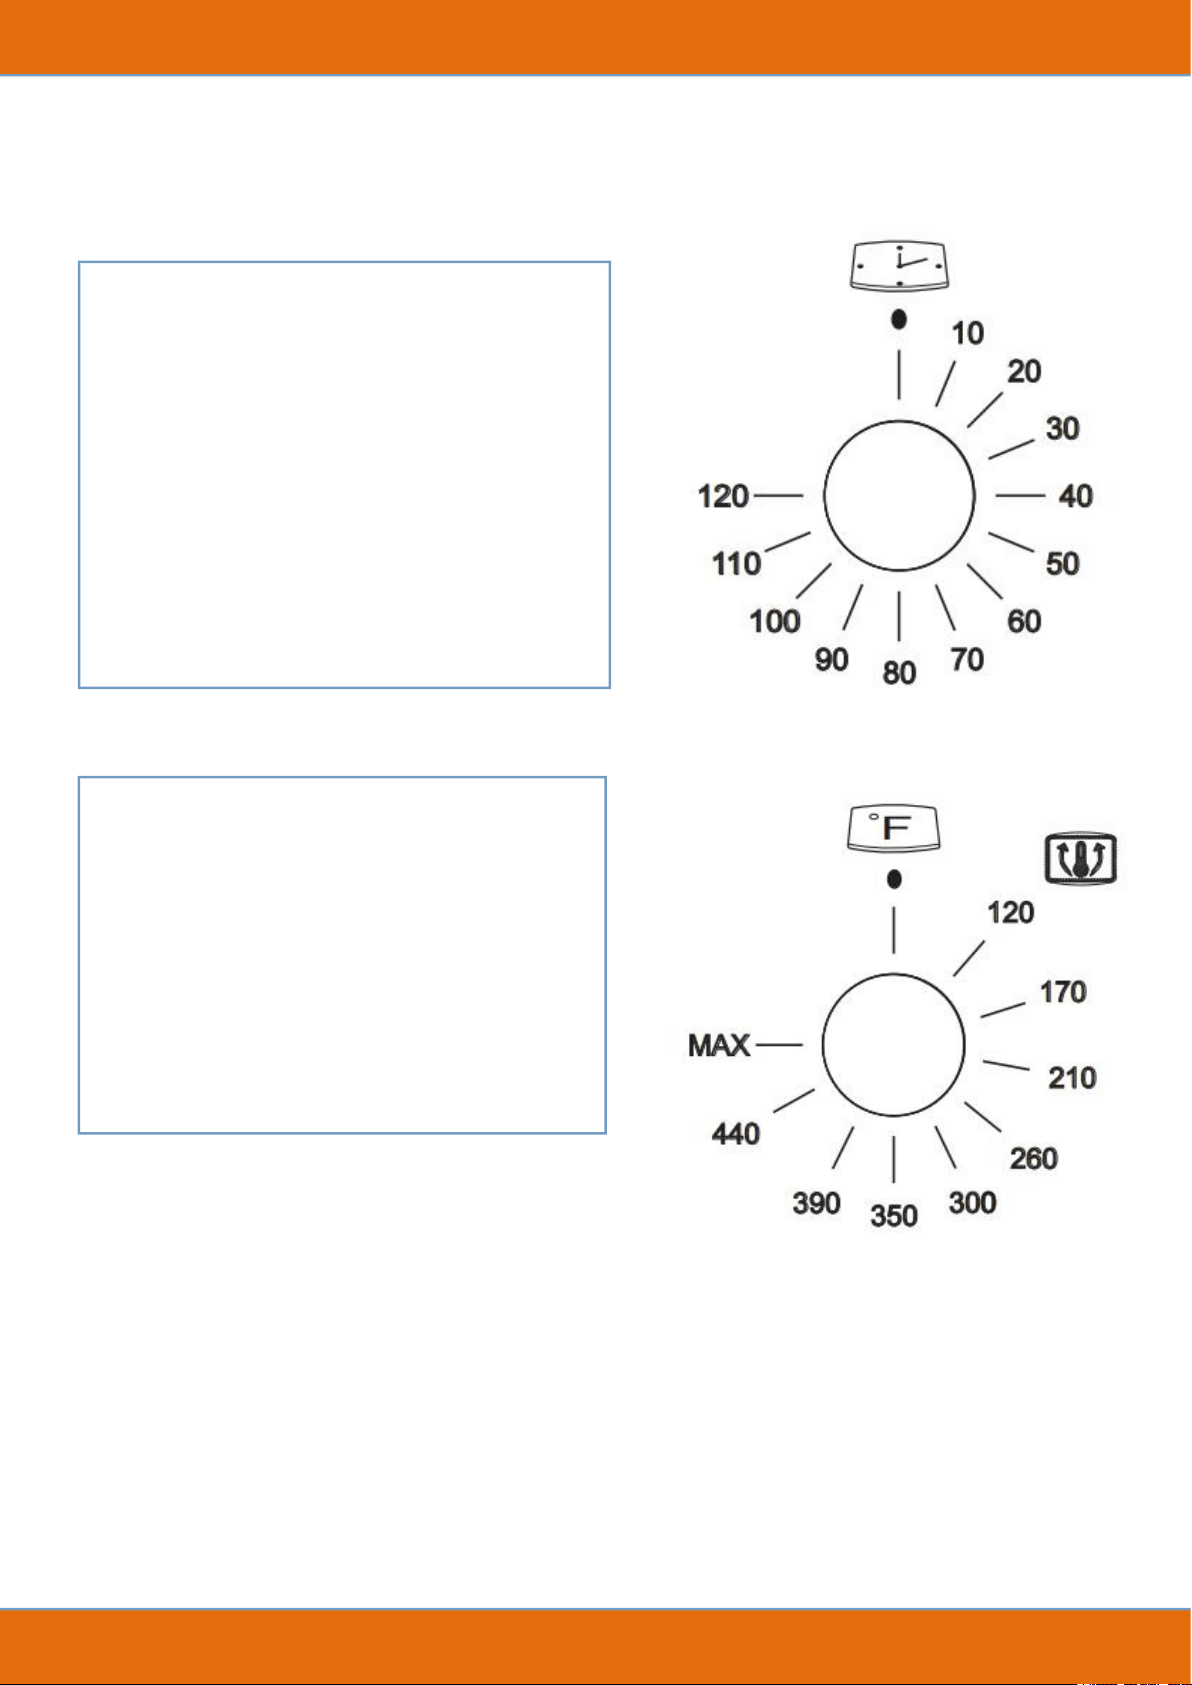
Timer & Temperature
Indicator Light
The indicator light located above the control panel will turn on and off when the heating
element is inserted or removed.
When the oven is running at a constant temperature, the neon light stays on until the
preset temperature is reached; when it goes out, it means it has been reached.
When the oven cools, the thermostat determines the re-insertion of the heating elements
Turn the knob clockwise to set the desired
cooking time.
The adjustable range of time is 0-120
minutes. It is recommended to be at least >5
min; there will be a sound signal and stop
running when the time you set is reached.
The temperature range is 0-440 ° F or
more. Note that the temperature difference
around ±59℉(15°C).
16
with consequent re-lighting of the indicator lights.
In the model, the internal oven light is always on in any running function and is considered an
operational warning light.
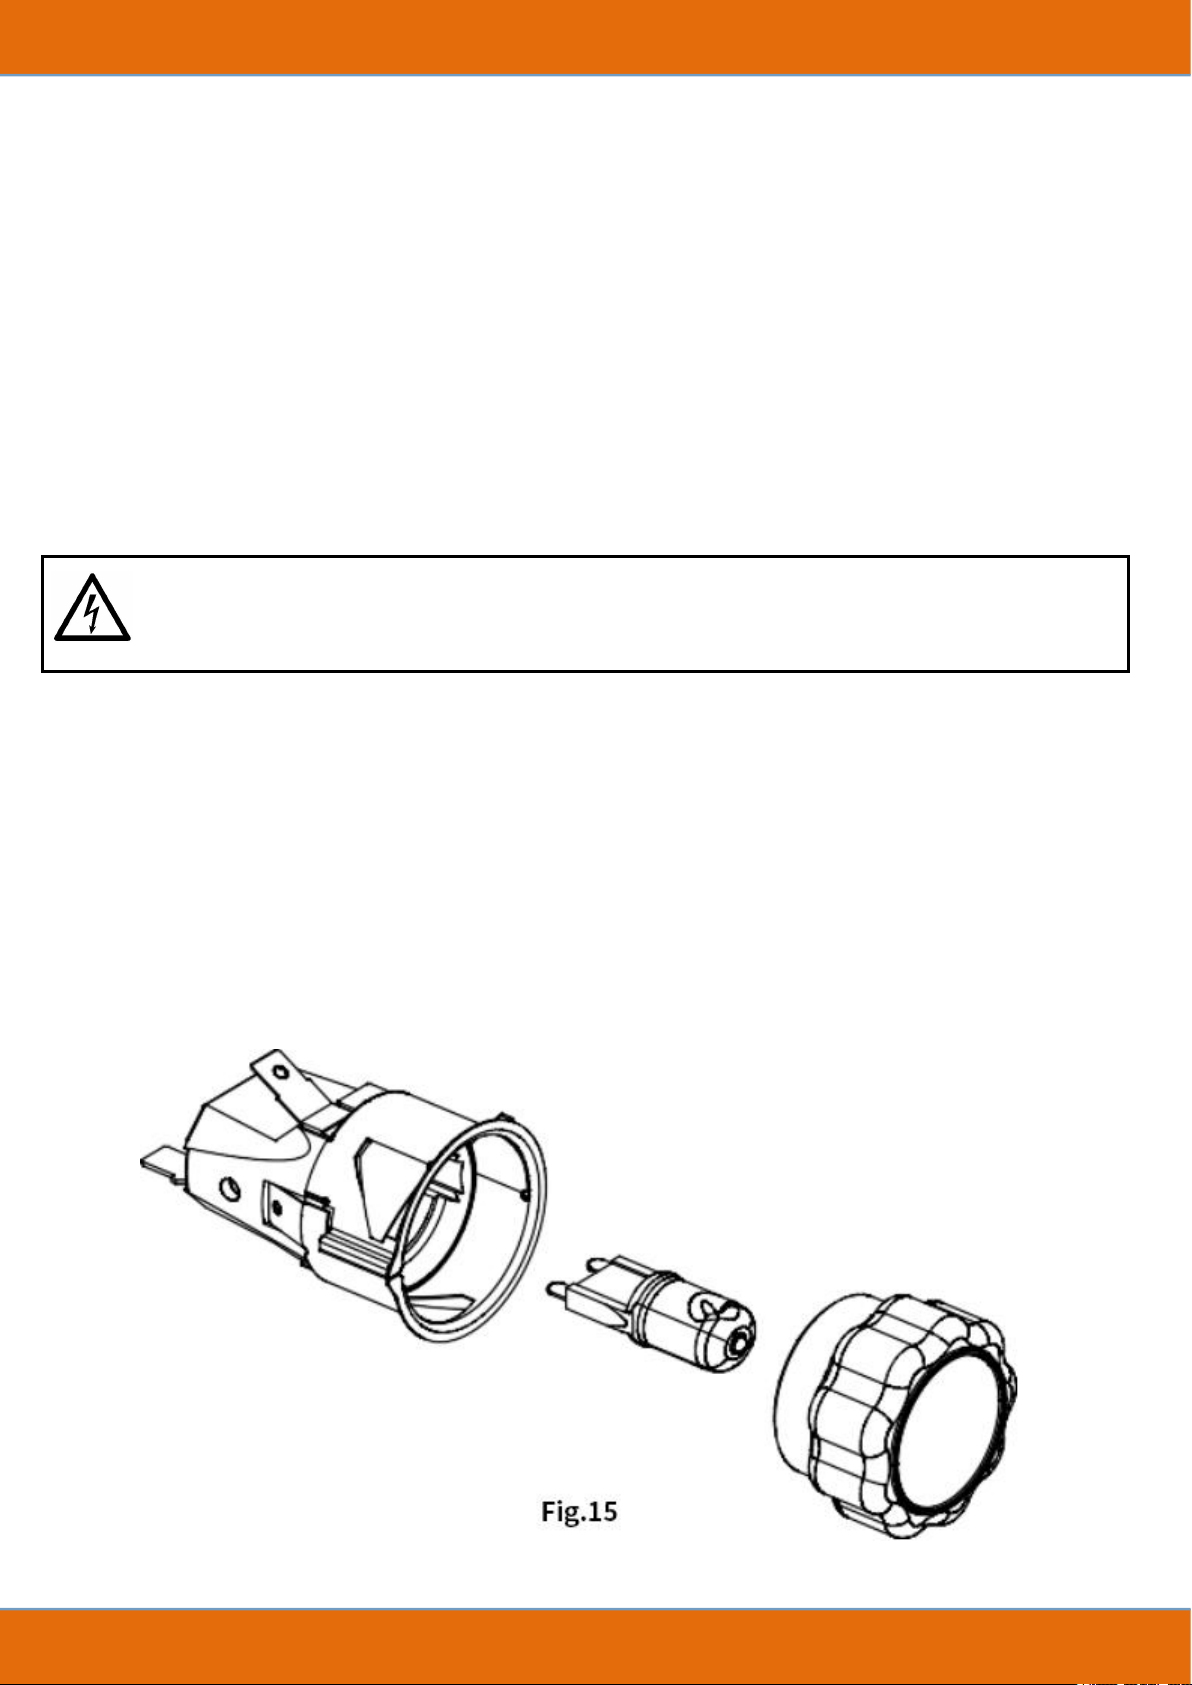
Replace the Light (Fig.15)
Unplug your oven;
Unscrew the glass cover attached to the lamp holder;
Unscrew the lamp and replace it with high-temperature one, around 572℉ (300℃ ).
Remount the glass cover and reconnect the appliance to the power supply.
Warning: Do not operate the device with a damaged power cord or plug, return the unit to the
nearest authorized service center for inspection and repair.
Lamp Specification:
- Voltage: AC 220V-240V
- Wattage:25W
- Socket:G9
WARNING: Ensure that the appliance is unplugged before replacing the lamp to
avoid the possibility of electric shock.

17
Cleaning & Maintenance
IMPORTANT: This appliance is only for household use, don’t use it outdoors!
Important: Unplug your oven before cleaning or maintenance.
To extend the life of your oven, it must be cleaned regularly as follows:
Do not use steam equipment to clean the appliance.
To protect against the risk of electrical shock, do not immerse the unit, cord or plug in
liquid or sprinkle water to clean the appliance.
Don’t clean the appliance when it is still hot. The inside and external surface of the oven
should preferably be cleaned with damp cloth when it is cooled down.
If you use your oven for an extended period of time, condensation may form. Dry it by
using a soft cloth.
There are rubber seals around the oven opening to ensure it works perfectly. The
condition of this seal needs to be checked regularly. Avoid using abrasive products for
cleaning. If damaged, please contact the nearest after-sales service center. We recommend
you avoid using the oven until it has been repaired.
Never put aluminum foil on the bottom of the oven, as heat buildup can interfere with
cooking and even damage the enamel.
Clear the glass door with a damp cloth and dry it with a soft cloth.
Do not use harsh abrasive cleaners or sharp metal scrapers to clean the glass door since
they may scratch the surface and shatter them.

18
This product must not be disposed of with household waste. Disposal of electrical and
electronic equipment must be carried out in a place authorized for recycling.
Collecting and recycling waste saves natural resources and ensures that products are disposed
of in an environmentally friendly and healthy way.
IMPORTANT
If you decide to no longer use the oven, you should unplug and disconnect
the power cord so that it cannot be used. Abandoned appliances can be a
safety risk because children often play with them.

19
Troubleshooting
Before calling service team for support, please check the following troubleshooting tips:
Cause
Reason
Solution
The upper crust is dark
but the lower part too
pale
Not enough heat from
the bottom.
Use the natural convection position;
Use deeper cake tins;
Lower the temp;
Put the cake on a lower rack.
The lower part is dark
but the upper crust too
pale
Excessive heat from
the bottom..
Use the natural convection position;
Use lower side tins;
Lower the temp;
Put the cake on a higher rack.
Too cooked on the
outside but not enough
on the inside.
Temperature is too
high.
Lower the temp and increase the
cooking time.
The outside is too dry
in the right color.
Temperature is too low.
Increase the temp and lower the cooking
time.

20
Warranty
This warranty applies to products sold by Dalxo in the U.S. It expressly applies to a single
product only.
Dalxo products are warranted for one year after purchase against defects in material and
workmanship. Please save your receipt as proof of purchase is required to make a warranty
claim. During this period, we will provide repairs, refunds or replacements at our discretion.
Warranty is not transferable by resale, including through third-party unauthorized retailers, and
is only granted to the original consumer purchaser when purchased from an authorized retailer.
In the case of a new home purchase, the warranty period will start from the date of ownership.
This warranty does not cover and excludes damage or defects caused by:
Consumer misuse
Abuse
Neglect includes not cleaning and regular maintenance as described in manual
Commercial use
Subject the product to any voltage outside the specified range
Loss of parts
The affixing of any attachments not provided with the product
Accident
Use in a manner not intended and outlined in the manual.
Any subsequent damages caused by the above listed exclusions will not be covered and any
claims determined to meet the above exclusions will be denied. All liability is limited to the
purchase price and does not include any:
Retail offered extended warranties
Tax
Other charges (including postage to send required materials)
Incidental and/or consequential damages associated with the product in question.

21
Every implied warranty, including any statutory warranty of merchantability or fitness for a
particular purpose is disclaimed except to the extent prohibited by law, in which case such
warranty is limited to the duration of this written warranty. This warranty gives you specific
legal rights. You may have other legal rights that vary depending on where you live. Some
states do not allow limitations on implied warranties or special, incidental, or consequential
damaged, so the above limitations may not apply to you.
For faster service, please provide the model number, serial number, and receipt ready for the
operator to assist you.