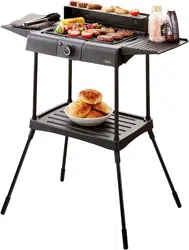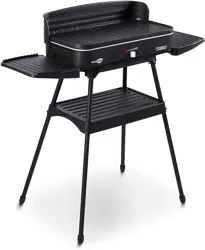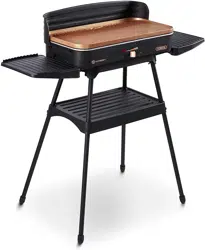
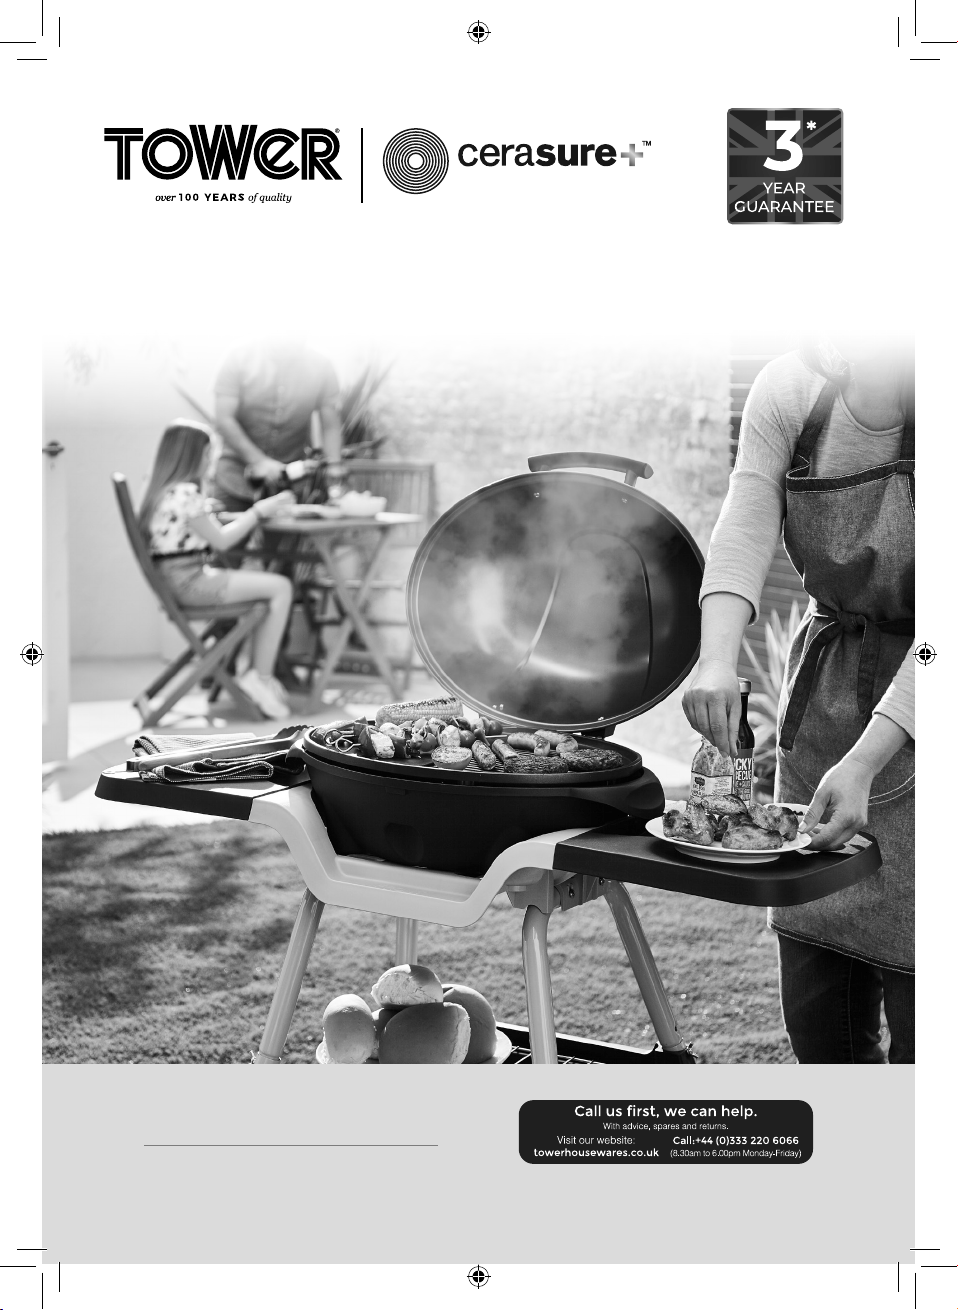
T14039BLK
INDOOR/OUTDOOR
XL ELECTRIC BBQ GRILL & GRIDDLE
WITH STAND AND FIXED SIDE SHELVES
SAFETY AND INSTRUCTION MANUAL
PLEASE READ CAREFULLY
*Subject to registering your Extended Guarantee online at
www.towerhousewares.co.uk.
Non-stick coated cooking
2
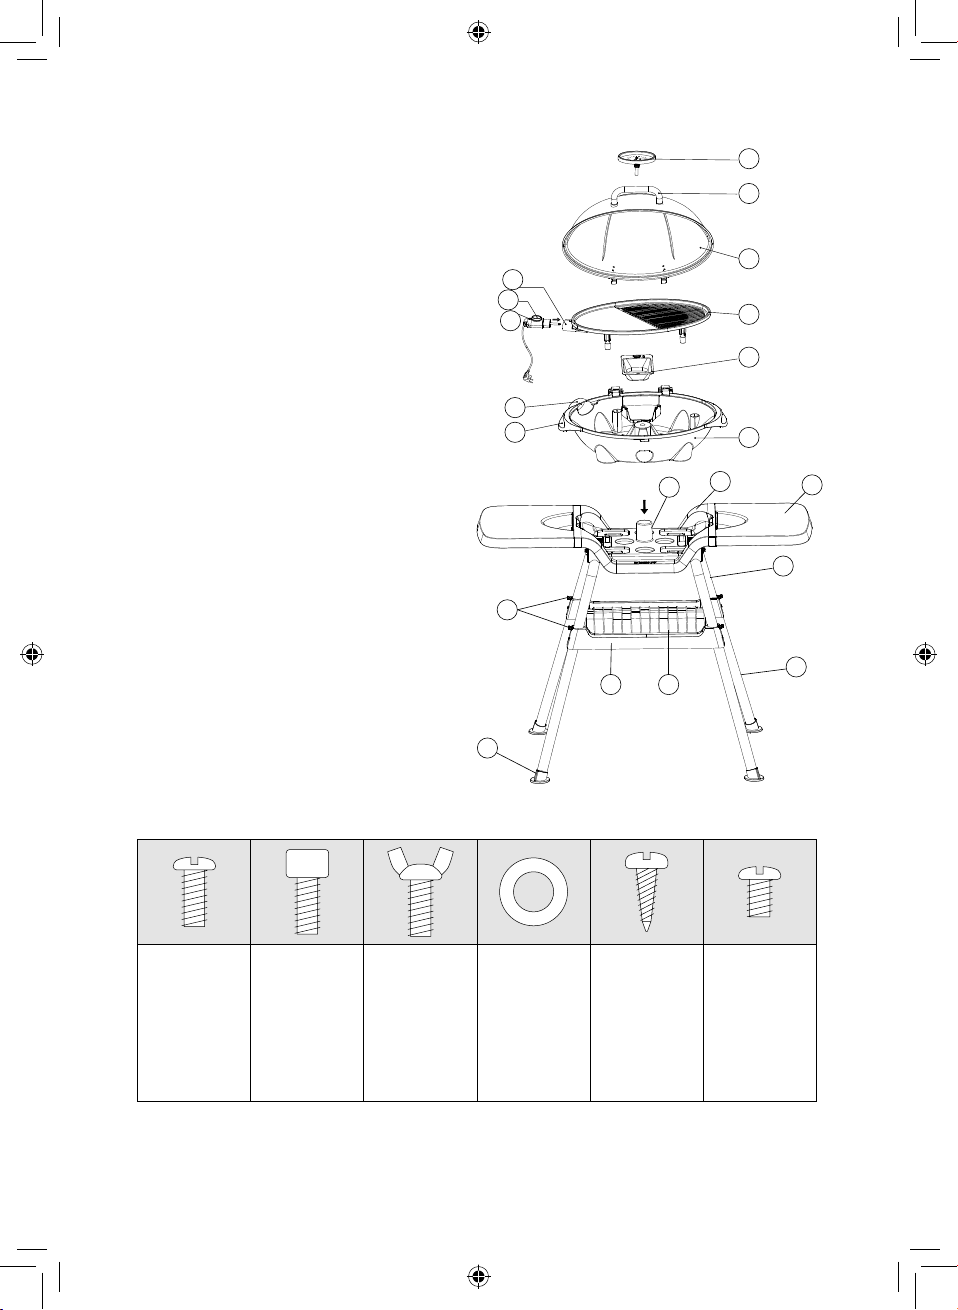
This box contains:
Instruction Manual
1. Thermometer and screw nut N
2. Handle of cover
3. Cover
4. Grill Plate
5. Grease pan
6. Base of appliance
7. Stand tube
8. Centre base
9. Side table
10. U-shaped tube
11. Straight tube
12. Rack
13. Plastic rack holder
14. Feet pads
15. C butterfly screw + D washer
16. Handle of base
17. Opening for appliance socket
18. Removable temperature controller
19. Temperature control dial
20. Appliance socket
Specifications:
Screws list:
(A)
Screw
(x 4)
(B)
Screw
(x 4)
(C)
Butterfly
Screw
(x 8)
(D)
Washer
(x 8)
(E)
Screw
(x 4)
(F)
Screw
(x 2)
This screw
is used to
tighten the
handle on
the lid
1
2
3
4
5
6
7
8
9
10
11
12 13
14
15
16
17
18
19
20
3
Description: Indoor/Outdoor XL Electric BBQ Grill & Griddle
with Stand And Fixed Side Shelves
Model: T14039BLK
Rated Voltage: 220-240V
Frequency: 50/60Hz
Power Consumption: 2000-2400W
Documentation
We declare that this product conforms to the following product legislation in accordance with
the following directive(s):
2014/30/EU Electromagnetic Compatibility (EMC)
2014/35/EU Low Voltage Directive (LVD)
1935/2004/EC Materials & Articles in Contact With Food (LFGB section 30 & 31)
2015/863/EU Restriction of Hazardous Substances Directive.
(including amendment (EU) 2015/863).
2009/125/EC Eco-design of Energy related Products (ErP)
RK Wholesale LTD Quality Assurance, United Kingdom.
Technical Data:
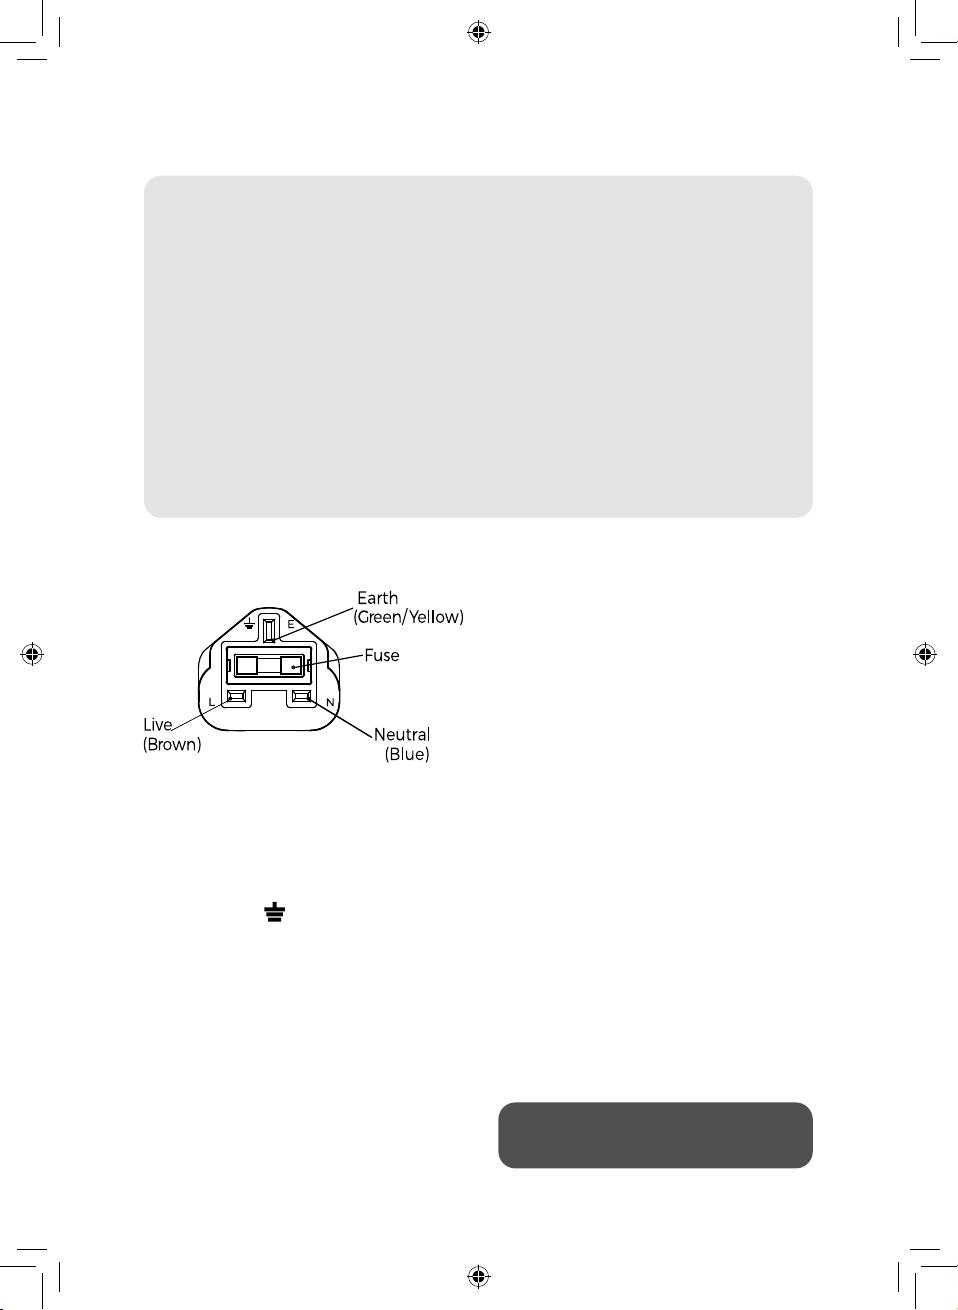
Wiring Safety for UK Use Only
IMPORTANT
As the colours in the mains lead of this
appliance may not correspond with the
coloured markings identifying the terminals in
your plug, please proceed as follows:
The wires in the mains lead are labelled in
accordance with the following code:
Blue neutral [N] Brown live [L] Green/
Yellow [EARTH]
Plug Fitting Details (Where Applicable).
The wire labelled blue is the neutral and must
be connected to the terminal marked [N].
The wire labelled brown is the live wire and
must be connected to the terminal marked [L].
The wire labelled green/yellow must be
connected to the terminal marked with the
letter [E].
On no account must either the brown or
the blue wire be connected to the [EARTH]
terminal.
Always ensure that the cord grip is fastened
correctly.
The plug must be fitted with a fuse of the same
rating already fitted and conforming to BS 1362
and be ASTA approved.
If in doubt consult a qualified electrician who
will be pleased to do this for you.
Non-Rewireable Mains Plug.
If your appliance is supplied with a non-
rewireable plug fitted to the mains lead and
should the fuse need replacing, you must use an
ASTA approved one (conforming to BS 1362 of
the same rating).
If in doubt, consult a qualified electrician who
will be pleased to do this for you.
If you need to remove the plug - disconnect it
from the mains - then cut it off of the mains
lead and immediately dispose of it in a safe
manner. Never attempt to reuse the plug or
insert it into a socket outlet as there is a danger
of an electric shock.
WARNING:
This appliance MUST be earthed!
4
DISPOSAL OF THE UNIT
Appliances bearing the symbol shown here may not be disposed of in domestic rubbish.
You are required to dispose of old electrical and electronic appliances like this separately.
Please visit www.recycle-more.co.uk or www.recyclenow.co.uk for access to information about the
recycling of electrical items.
Please visit www.weeeireland.ie for access to information about the recycling of
electrical items purchased in Ireland.
The WEEE directive, introduced in August 2006, states that all electrical items must be
recycled, rather than taken to landfill.
Please arrange to take this appliance to your local Civic Amenity site for recycling,
once it has reached the end of its life.
• Check that the voltage
of the main circuit
corresponds with the
rating of the appliance
before operating.
• If the supply cord or
appliance is damaged,
stop using the appliance
immediately and
seek advice from the
manufacturer, its service
agent or a similarly
qualified person.
• WARNING! DO NOT let
the cord hang over the
edge of a table or counter,
serious burns may result
from the BBQ being
pulled over.
• DO NOT carry the
appliance by the power
cord.
• CAUTION! The BBQ can
ONLY be used with an
extension cord if it is
the ONLY APPLIANCE
that is plugged into the
extension, and if it is
used in conjunction with
a circuit breaker or an
extension cord that has a
circuit breaker built-in.
• DO NOT pull the plug out
by the cord as this may
damage the plug and/or
the cable.
• Switch off at the wall
socket then remove the
plug from the socket
when not in use or before
cleaning.
• Switch off and unplug
before fitting or removing
tools/attachments, after
use and before cleaning.
• Close supervision is
necessary when any
appliance is used by or
near children.
Please read these notes carefully
BEFORE using your
Tower appliance
Important Safety Information:

5
• Children should not play
with the appliance.
• This appliance can be
used by children aged
from 8 years and above
and persons with reduced
physical, sensory or
mental capabilities or
lack of experience and
knowledge if they have
been given supervision
or instruction concerning
use of the appliance in a
safe way and understand
the hazards involved.
• Cleaning and user
maintenance should
not be undertaken
by children without
supervision.
• Take care when any
appliance is used near
pets.
• DO NOT use this product
for anything other than its
intended use.
• This appliance is for
household use only.
• This appliance includes a
heating function.
• Please ensure that the
appliance is used on a
stable, level, and heat
resistant surface.
• DO NOT immerse cords,
plugs or any part of the
appliance in water or any
other liquid.
• DO NOT place the BBQ
on or near combustible
materials such as a
tablecloth or curtain.
• DO NOT place the BBQ
against a wall or against
other appliances. Leave at
least 10cm free space on
the back and sides and
10cm free space above
the appliance.
• Allow the BBQ to cool
down for approx 60
minutes before you
handle or clean it.
• Remove burnt remnants.
• Any baking trays or oven
dishes used on the BBQ
will become hot. Always
use oven gloves when
handling or removing
anything from the BBQ.
• WARNING! This appliance
operates at high
temperatures, which may
cause burns. DO NOT
touch the hot surfaces
of the appliance (pan, air
outlet, etc.)
• DO NOT move the
appliance when it is full of
hot food.
• DO NOT immerse the
appliance in water.
• In the unlikely event the
appliance develops a fault,
stop using it immediately
and seek advice from the
Customer Support Team:
+44 (0) 333 220 6066
6
Before First Use:
Read all instructions and safety information carefully before first use. Please retain this information
for future reference.
1. Remove the parts from the packaging and lay out on an even surface.
2. Assemble as per the assembly instructions using a flat head screwdriver.
3. Wash the grill plate, grease pan and cover thoroughly. The grill plate and the grease pan are
both dishwasher safe.
IMPORTANT: Dry all the different parts thoroughly. This applies especially to the appliance socket
Never immerse the temperature controller in water.
4. Your appliance is now ready for normal use.
5. Dispose of the packaging in a responsible manner.
Assembly:
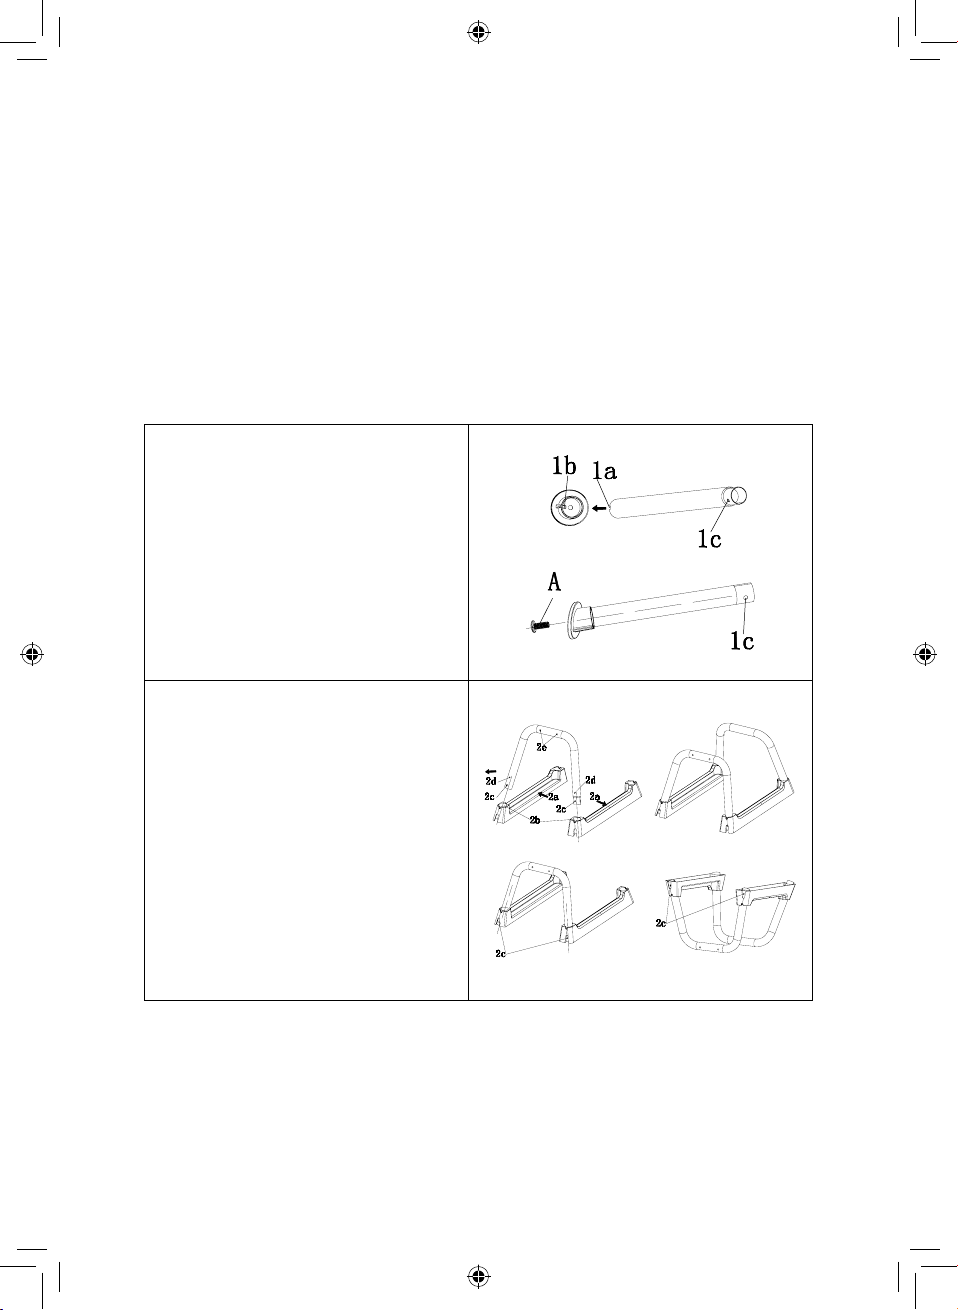
Install the plastic pad (14)
Take a straight tube (11) one of the feet pads
(14). Align the position of the notch (1a) of the
straight tube (11) with the stopper (1b) of the
foot (14) to prevent it from turning
Then tighten with the screw ‘A’ from the
bottom of the foot (14)
Install the other three sets in this same way.
(Note: There are two straight tubes (11) with
shrink tubes (1c) at the other end, and the
other two straight tubes (11) with no shrink
tubes (1c), they should be placed separately).
Place the two plastic rack holders (13) on a
flat surface (The inner sides (2a) face to face).
Take a U-shaped tube (10) and position with
the screw holes “2c”, “2d”, and “2e” facing
outward. Insert into holes (2b) of two brackets.
Then insert another U-shaped tube (10) into
the bracket holes on the other side.
(Hint: Take the U-shaped tube (10) and make
sure the side with the screw holes is facing
outward.)
Set up two U-shaped tubes (10) and turn over.
Make sure that the screw holes (2c) at the
bottom of the U-shaped tubes (10) from the
mouth of the tubes expose the gap in the
plastic bracket (13) to facilitate subsequent
installation and screws position.

7
Insert the straight tube (11) with shrinkage
side into the hole of the U-shaped tube (10)
without shrinkage side.
Align the screw holes (1c) and (2c), tighten the
holes with screw (B).
Then insert the straight tube(11)without
shrinkage side into the hole of the U-shaped
tube (10) with shrinkage side.
Align the screw holes (1c) and (2c), tighten the
holes with screw (B).
According to this method, install the four
straight tubes (11) on the U-shaped tube (10).
After installing the straight tube (11), turn the
frame back over so it is now standing upright.
Press the plastic rack holder (13) down so
that the notch limit semicircular arc (j0) on
the plastic rack holder (13) is firmly pressed
against the round head (B0) of the screw B,
exposing the screw hole (2d) on the U-shaped
tube (10)
Take a Butterfly screw (C) and insert it into
the washer (D) to align the screw holes (2d)
and tighten. Tighten the other three parts in
the same way.
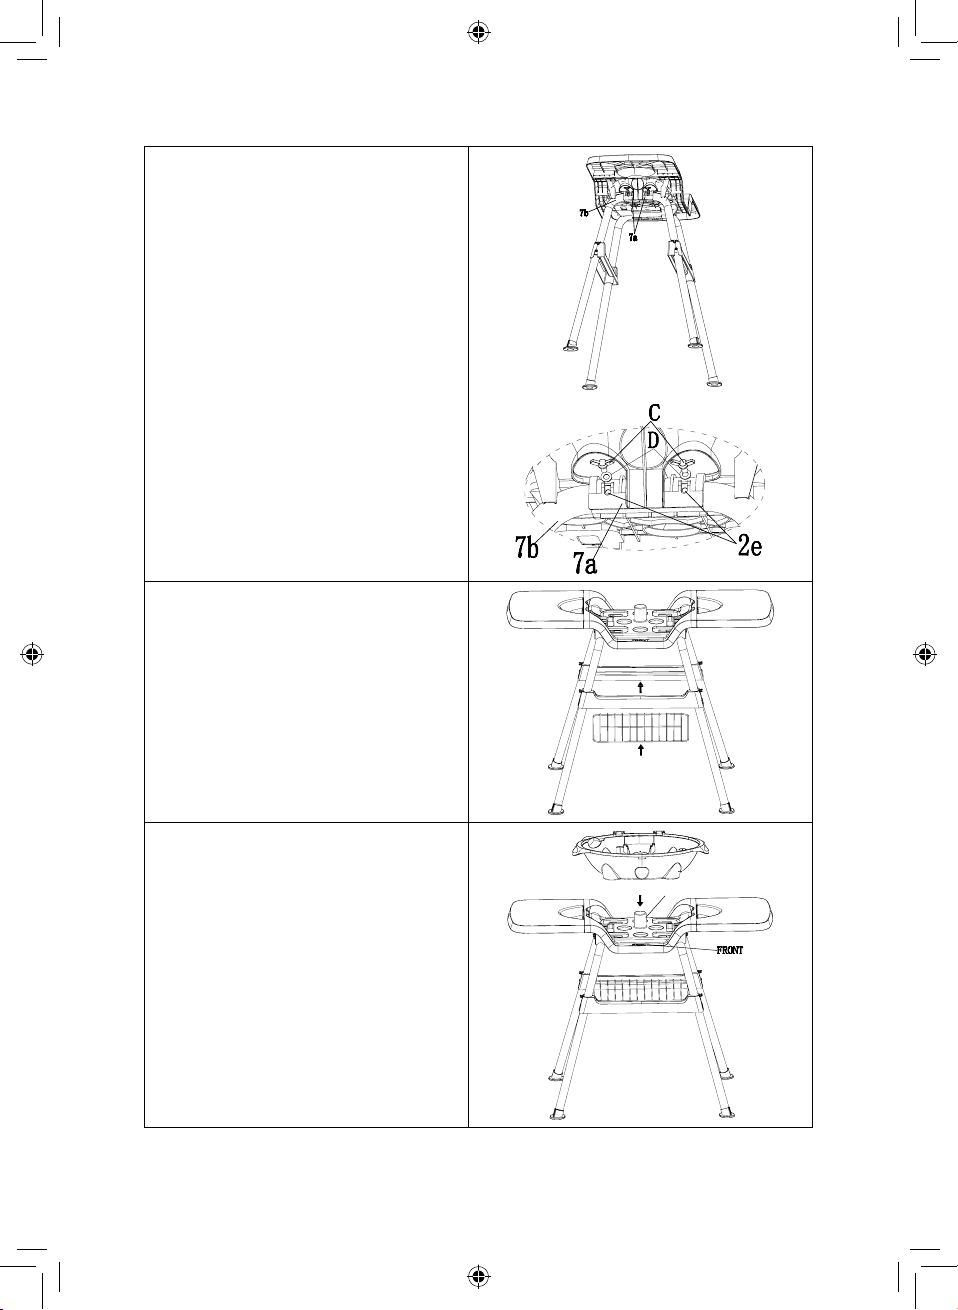
Turn over the Side table (9) and the centre
base (8); place them on a flat surface.
Matching hole (5b1) of the centre base (8)
align hole (5a1) of the Side table (9).
Matching hole (5b2) of the centre base (8)
align hole (5a2) of the Side table (9).
Then press down firmly.
(You can use a rubber hammer to lightly
hammer home.)
Use screw (E) to align the screw holes and
tighten.
Install the side table (9) on the other side in
the same way.
8
Place the semicircular groove (7a) at one end
of the centre base (8) on the arc surface (7b)
corresponding of the U-shaped tube (10).
Align the two screw holes (2e).
Then take a Butterfly screw (C) and insert it
into the washer (D) to align and tighten the
two screw holes (2e).
Place the rack (12) on the corresponding
plane inside the plastic rack holder (13).
The full frame is assembled.
Make sure the side with the word ‘FRONT’ on
the frame centre base (8) is facing you, Match
the hole of the bowl-shaped base (6) and
locate the stand tube (7) in the centre base
hole (8)
7
9
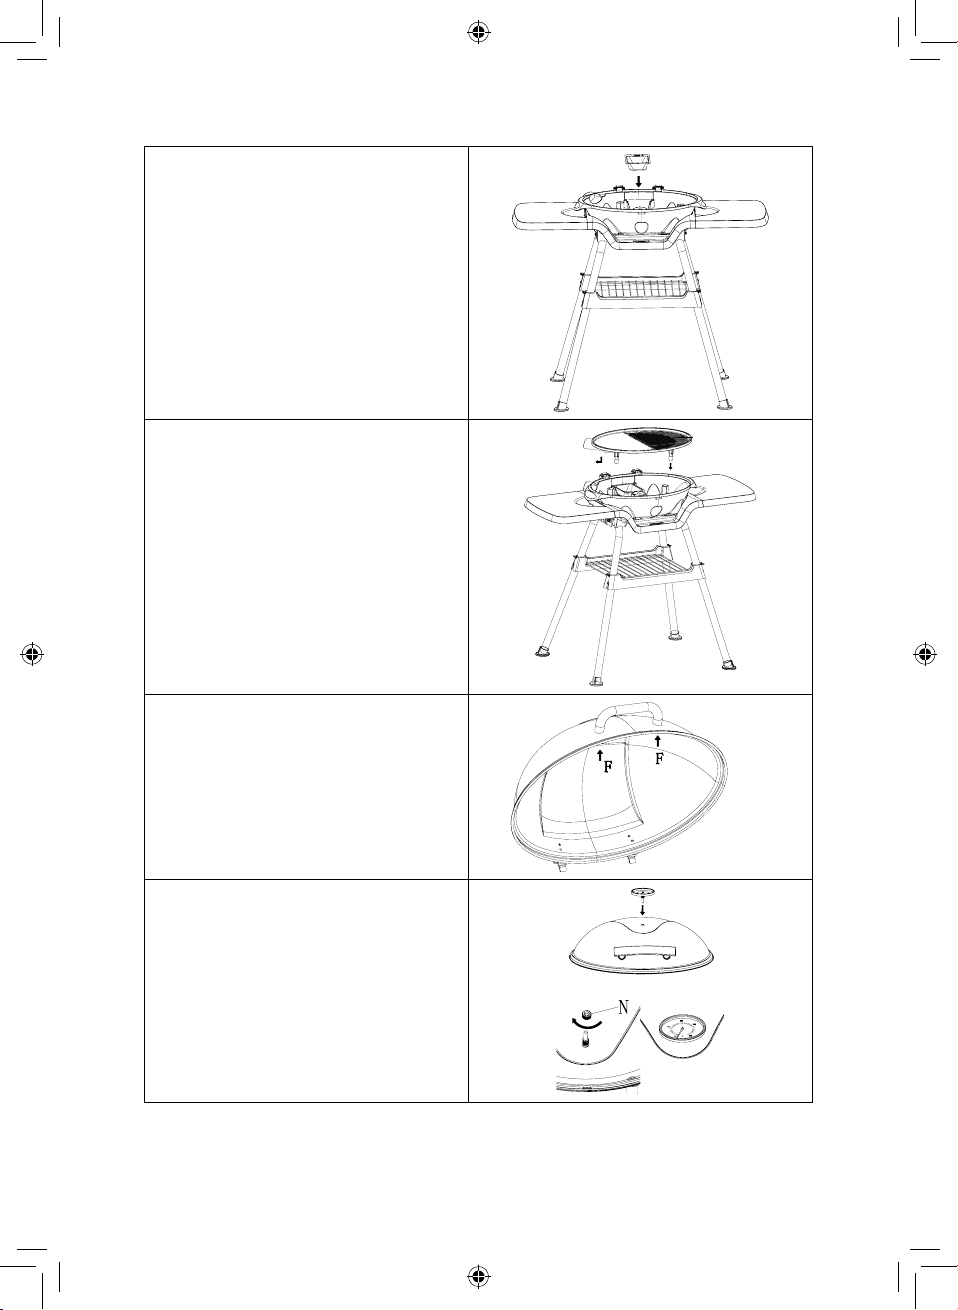
Insert the grease pan (5) into the holder on
the back of the base (6).
To securely secure the grease pan, align the
hole in the grease pan with the positioning
protrusion located in the centre of the base.
The grease pan can be removed and washed.
Make sure that the grease pan is replaced
after cleaning.
Note: The capacity of the grease pan is 0.3
litres. Pour out the fat as soon as the pan is
full. The surface of the grease pan becomes
very hot. Use heat-resistant gloves if you have
to remove the pan.
Place the grill plate (4) on the base of
appliance (6).
Insert the appliance socket (20) on the
backside of the grill plate (4) into the opening
intended for it (17), then set the grill plate
horizontally on the appliance base.
Align the handle (2) with the two mounting
holes on the cover (3) and tighten with screw
(F)
Insert the thermometer (1) into the hole of the
cover (3) and tighten with screw nut (N) from
the cover inside.
10
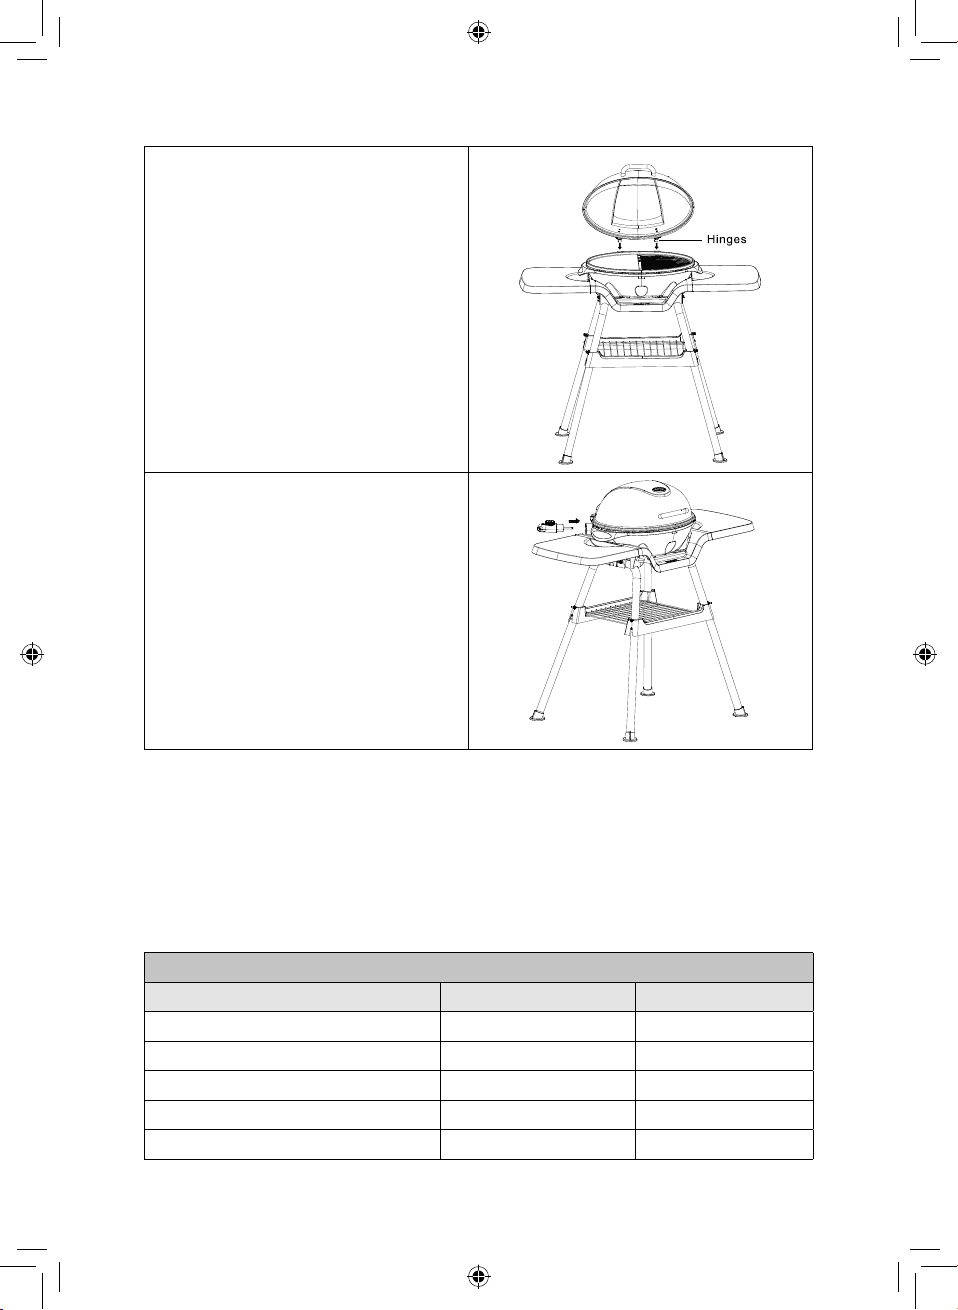
Install the Cover (3) into the Base (6)
Hold the cover by the handle and slide the
hinges into the holes of the base.
To remove the cover, open the cover at a 45º
angle and release the hinges from the holes.
The cover must be open at a 45º angle for it to
be removed.
Insert the pin of the removable temperature
controller (18) into the appliance socket (17).
You can now plug the plug into the socket.
WARNING! Do not pull on the cable to
remove the temperature controller.
WARNING! Lay the power cord so that no one
will trip over it and remember to remove the
plug after use.
Using Your Appliance
1. Connect the appliance to the mains electricity supply.
2. Set the temperature controller (19) to the required temperature level
Note: It usually takes about 3 minutes to heat up.
3. The temperature indicator lamp will go out as soon as the required temperature has been
reached.
4. Place your food to be grilled on the grill plate (4)
SETTINGS TABLE:
Food to be grilled Temperature setting Cooking time (min.)
Steak/beef 5 20-25
Lamb 5 20-25
Chicken drumsticks 5 30-35
Chicken wings 5 20-25
Chops 5 25-30
11
Food to be grilled Temperature setting Cooking time (min.)
Fillet of pork 4-5 9-10
Whole fish 5 15
Kebabs 3-4 10-12
Various sausages 3-4 12-15
Tips for grilling:
• Your meat will be tender if you marinade it overnight before cooking (the marinade is always
made of oil (to moisten), vinegar (to tenderize) and a mixture of seasonings).
• Always use tongs or some form of scoop to turn the grilled food (using a fork to turn the food
will dry it out and damage the non-stick coating).
• Only turn meat and fish once during grilling. You do not need to turn it more than once too
much turning will dry food out.
• Never cook meat for too long.
• Rub the grill plate with a piece of kitchen paper soaked in oil from time to time.
Troubleshooting:
Problem Possible cause Solution
The BBQ Grill does not
heat up.
The BBQ Grill is not connected to the
power supply.
Insert the mains plug in a socket
with earthing contact.
The BBQ Grill switches
off on its own.
The selected temperature setting has
been reached. The thermostat will
automatically switch off.
The thermostat will automatically
switch back on once the selected
temperature setting is under-run.
Slide the thermostat control to a
higher temperature setting.
Cleaning & Care:
• Disconnect the appliance from the mains electricity supply.
• Allow the grill to cool completely.
• Remove the detachable temperature controller (18) from the appliance socket.
• Wash the grill plate (4) and grease pan (5) with hot water and detergent. (They are dishwasher
safe).
Note: Do not use steel wool pads or abrasives.
• Wipe the base of the appliance (6) with a damp cloth. Fat splashes can be removed with a mild
cleaning agent.
Note: The grill plate has a non-stick coating. Do not scratch this coating during either the grilling or
the cleaning stages.
Tip: Use a washing-up brush with plastic bristles to clean the grill plate.
Protect the appliance from dust and dirt if it is not to be used for a prolonged length of time (wrap it
in a plastic bag). Store it in a dry place.
0420.V1
thank you!
We hope you enjoy your appliance for many years.
This product is guaranteed for 12 months from the date of original purchase.
If any defect arises due to faulty materials of workmanship, the faulty products must be returned to the place
of purchase.
Refund or replacement is at the discretion of the retailer.
The Following Conditions Apply:
The product must be returned to the retailer with proof of purchase or a receipt.
The product must be installed and used in accordance with the instructions contained in
this instruction guide.
It must be used only for domestic purposes.
It does not cover wear and tear, damage, misuse or consumable parts.
Tower has limited liability for incidental or consequential loss or damage.
This guarantee is valid in the UK and Eire only.
The standard one year guarantee is only extended to the maximum available for each particular
product upon registration of the product within 28 days of purchase. If you do not register the product
with us within the 28 day period, your product is guaranteed for 1 year only.
To validate your extended warranty, please visit
www.towerhousewares.co.uk and register with us online.
Please note that length of extended warranty offered is dependent on product type and that each qualifying
product needs to be registered individually in order to extend its warranty past the standard 1 year.
Extended warranty is only valid with proof of purchase or receipt.
Your warranty becomes void should you decide to use non Tower spare parts.
Spare parts can be purchased from www.towerhousewares.co.uk
Should you have a problem with your appliance, or need any spare parts,
please call our Customer Support Team on:
+44 (0) 333 220 6066
Non-stick coated cooking