
Ingers011Rand Owner's Manual
Installation, Operation and Maintenance Instructions
for Standard Two-Stage Lubricated Air Compressors
(Electric Motor and Gasoline Engine Models Up to 30 Horsepower)
IMPORTANT INFORMATION! READ AND FOLLOW THESE INSTRUCTIONS. RETAIN FOR REFERENCE.
_.'f.'!=1_/b'd
DEFINITIONS
A__ WILL cause DEATH, SEVERE INJURY or substantial
property damage.
/k WARNING CAN cause DEATH, SEVERE INJURY or substantial
property damage.
/_ CAUTION WILL or CAN cause MINOR INJURY or property
damage.
GENERAL SAFETY PRECAUTIONS
A__'_ INTAKE AIR. Can contain carbon monoxide or other
contaminants. Will cause serious injury or death.
Ingersoll-Rand air compressors are not designed,
intended or approved for breathing air. Compressed
air should not be used for breathing air applications
unless treated in accordance with all applicable
codes and regulations.
/_ WARNING HAZARDOUS VOLTAGE. Can cause serious injury
or death. Disconnect power and bleed pressure
from the tank before servicing. Lockout/Tagout
machine. Compressor must be connected to
properly grounded circuit. See grounding
instructions in manual. Do not operate compressor
in wet conditions. Store indoors.
/k CAUTION
MOVING PARTS. Can cause serious injury. Do not
operate with guards removed. Machine may start
automatically. Disconnect power before servicing.
LockoutJTagout machine.
HOT SURFACES. Can cause serious injury. Do not
touch. Allow to cool before servicing. Do not touch
hot compressor or tubing.
HIGH PRESSURE AIR. Bypassing, modifying or
removing safety/relief valves can cause serious
injury or death. Do not bypass, modify or remove
safety/relief valves. Do not direct air stream at body.
Rusted tanks can cause explosion and severe injury
or death. Drain tank daily or after each use. Drain
valve located at bottom of tank.
RISK OF BURSTING. Use only suitable air handling
parts acceptable for pressure of not less than the
maximum allowable working pressure of the
machine.
[€-]:1_1:1dL,ImlII_I_o -v];_.111Ko]_I
INTRODUCTION
This manual provides safe and reliable instructions for the
installation, operation and maintenance of your Ingersoll-Rand air
compressor. Carefully read this manual before attempting to
operate or perform any maintenance. If you are uncertain about any
of the instructions or procedures provided in this manual, contact
Ingersoll-Rand. We recommend you retain this manual, and all
publications provided with your air compressor, in a location which
is accessible to all personnel who operate and service your
compressed air equipment.
APPLICATION
IngersolI-Rand's standard two-stage lubricated air compressors are
single-acting, air-cooled machines. Typical compressors are
furnished as compact, self-contained, air receiver tank mounted
units that are automatically regulated and driven by an electric
motor or gasoline engine. An air-cooled aftercooler, low oil level
shutdown switch and automatic drain valve are among the optional
accessories that can be furnished. Bare compressor pumps and
baseplate-mounted units are also available.
These compressors may be used for a variety of compressed air
application up to 250 PSIG (17.5 kg/cm2). Application of these
compressors as either a primary or supplementary source of air is
virtually unlimited in industrial plants, service stations and auto
repair shops. Supplementary service includes such uses as
furnishing air at pressure not carried in regular shop lines, air at
isolated locations, and standby service for air when larger
compressors are shut down.
TWO-STAGE OPERATION
Two-stage compressors consist of one or two first-stage cylinders
with the same bore size and one second-stage cylinder with a
smaller bore size.
Typical Two-Stage, Two
Cylinder Unit
Typical Two-Stage, Three
Cylinder Unit
The basic principle of operation is as follows: On the suction stroke
of the first-stage piston(s), air at atmospheric pressure enters the
cylinders through the inlet filter(s) and then the inlet valves located
in the head. On the compression stroke of the first-stage piston(s),
the air is compressed to an intermediate pressure and discharged
through the discharge valves(s) into common manifold(s). From the
manifold(s) the air passes through the intercooler tubes, where the
heat of first-stage compression is removed. On the suction stroke of
the second-stage piston this cooled air enters the second-stage
cylinder through the inlet valve. The compression stroke of the
second-stage piston compresses the air to the final discharge
pressure and forces it out through the discharge valve into the
receiver tank or system. If cooling of the discharge air is required,
© Ingersoll-Rand Company
Printed in U.S.A.
Form SCD-838A
August 2001

anair-cooledaftercoolershouldbeinstalledbetweenthe
compressordischargeandthereceivertankorsystem.
Formaintainingthereceivertankorsystemairpressurewithin
predeterminedlimits, the compressor may be operated with
automatic start & stop control or constant speed control regulation.
The type of regulation used depends upon the application.
ADDITIONAL REFERENCES
Unless otherwise stated, dimensions, weights and measurements
are provided in standard U.S. measure followed in parentheses by
the metric conversion. Any torque values given are stated in inch or
foot pounds followed by the Newton-meter equivalent in
parentheses. Electrical characteristics are given in
voltage-phase-hertz.
I;3_[o]_lh_lull_:_1_ll_E."]_l_[o]ulKo_l
Ensure adequate lifting equipment is available for unloading and
moving the unit to the installation site.
NOTE Lifting equipment must be properly rated for the
weight of the unit.
,_,CAUTION Lift the unit by the shipping skid only. Do not use
the motor lifting eye to lift the entire unit. The motor
lifting eye is for removing the motor from the unit
only.
z_ CAUTION! Do not work on or walk under the unit while it is
suspended.
Use suitable lifting equipment (i.e. forklift) to lift and transport the
unit to the installation site. Ensure the lifting equipment, straps,
etc. are capable of supporting the weight of the unit.
iiii
Before signing the delivery receipt, inspect for damage and missing
parts. If damage or missing parts are apparent, make the
appropriate notation on the delivery receipt, then sign the receipt.
Immediately contact the carrier for an inspection.
All material must be held in the receiving location for the carrier's
inspection.
Delivery receipts that have been signed without a notation of
damage or missing parts are considered to be delivered "clear."
Subsequent claims are then considered to be concealed damage
claims. Settle damage claims directly with the transportation
company.
If you discover damage after receiving the unit (concealed damage),
the carrier must be notified within 15 days of receipt and an
inspection must be requested by telephone with confirmation in
writing. On concealed damage claims, the burden of establishing
that the unit was damaged in transit reverts back to the claimant.
Read the unit nameplate to verify it is the model ordered, and read
the motor nameplate to verify it is compatible with your electrical
conditions. Make sure electrical enclosures and components are
appropriate for the installation environment,
SELECTING A LOCATION
ELECTRIC MOTOR UNITS. For most electric motor units, select a
relatively clean and dry well-lighted indoor area with plenty of space
for proper ventilation, cooling air flow and accessibility. Provide
1,000 cubic feet of fresh air per 5 horsepower. Locate the unit at
least 15 inches (38 cm) from walls, and make sure the main power
supply is clearly identified and accessible.
Unless the electrical components of the unit are specially protected
for outdoor use, do not install an electric motor unit outdoors or in
an area that will expose the electrical components to rain, snow or
sources of appreciable moisture.
z_ WARNING
WARNING FOR UNITS EQUIPPED
WITH ELECTRIC DRAIN VALVE
The electric drain valve incorporates arcing or
sparking parts, such as snap switches, receptacles
and the like that tend to produce arcs or sparks
and, therefore, when located in a garage, the
compressor should be in a room or enclosure
provided for the purpose, or the electric drain
valve should be 18 inches (457 mm) or more above
the floor.
GASOLINE ENGINE UNITS. For gasoline engine units, keep the
engine at least 3 feet (1 m) away from building walls and other
equipment. Install the unit in a location with plenty of space for
proper ventilation, cooling air flow and accessibility. Do not install or
operate a gasoline engine unit in a confined area.
AMBIENT TEMPERATURE CONSIDERATIONS. Ideal operating
temperatures are between 32°F and 100°F (0°C and 37.8°C). If
temperatures consistently drop below 32°F (0°C), install the
compressor in a heated area. If this is not possible, you must
protect safety/relief valves and drain valves from freezing. If
temperatures are consistently below 40°F (4.4°C), consider
installing an external crankcase heater kit, especially if the
compressor has difficulty starting.
z_ CAUTION Never operate the compressor in temperatures
below -15°F (-26.1°C) or above 125°F (51.0°C).
HUMID AREAS. In frequently humid areas, moisture may form in
the pump and produce sludge in the lubricant, causing running parts
to wear out prematurely. Excessive moisture is especially likely to
occur if the unit is located in an unheated area that is subject to
large temperature changes.
Two signs of excessive humidity are external condensation on the
pump when it cools down and a "milky" appearance in petroleum
lubricant.
You may be able to prevent moisture from forming in the pump by
increasing ventilation, operating for longer intervals or installing an
external crankcase heater kit.
NOISE CONSIDERATIONS. Consult local officials for information
regarding acceptable noise levels in your area. To reduce excessive
noise, use vibration isolator pads (except on Models 2000 and
2000P) or intake silencers, relocate the unit or construct total
enclosures or baffle walls.
MOUNTING
A WARNING Remove the unit from the skid before mounting.
ELECTRIC MOTOR UNITS. Bolt the unit to a firm, level foundation
(such as a concrete floor). Do not bolt uneven feet tightly to the
foundation, as this will cause excessive stress on the receiver tank.
Use metal shims under the "short" feet if necessary. DO NOT USE
VIBRATION ISOLATOR PADS ON MODELS 2000 AND 2000P.

Typical Permanent Mounting (Customer Supplied Hardware)
Flat Washer I
X ..f_..._3t8" Lag Screw
Isolator \ _...fq
11\ \
Shim beneath Floor line
isolator washer, if
necessary Lag screw anchor
for concrete
GASOLINE ENGINE UNITS. Bolt the unit to a firm, level
foundation. Do not bolt uneven feet tightly to the foundation, as this
will cause excessive stress on the receiver tank. Use metal shims
under the "short" feet if necessary. Gasoline engine units mounted
on truck beds must be fastened securely without applying excessive
stress on the receiver tank. We recommend installing a vibration
isolator kit with gasoline engine models.
INSTALLING REMOTE AIR INLET PIPING
/_ CAUTION Do not operate the unit without air inlet filtration.
If the air around the unit is relatively free of dirt, install the air inlet
filter at the inlet connection at the pump. If the air is dirty, pipe the
filter to a source of clean air. Use PVC plastic tubes for remote inlet
piping. Do not use black pipe or galvanized pipe, as these promote
sweating and rust. Consider installing an in-line type filter for ease
of cleaning and replacement. Make the line as short and direct as
possible and as large, or larger, than the diameter of the inlet
connection on the pump. Do not install piping with a diameter lower
than that of the pump intake.
Increase the pipe diameter one size for every 10 feet (3 m) of length
or every 90 ° bend. Make sure the piping is adequately braced.
If you pipe the filter outdoors, cover it with a hood to prevent the
entrance of rain or snow.
Heavy duty filter elements and filtration equipment are available for
fine airborne dust, such as cement and rock dust.
Typical Remote Air Inlet Piping.
ELBOW__
Direct to compressor SUPPORT-- [_
a_rIienta_a(ifdifsta._ce I I
/ P,PE--II
122 .mLL
F"T'NG/
BUSHINGS /
DRAIN VALVE
m
HOOD
AIR INLET
FILTER
-- OUTSIDE
WALL
INSTALLING
/k WARNING
A CAUTION!
DISCHARGE PIPING
Do not use plastic pipe, soldered copper fittings,
rubber hose, or lead-tin soldered joints anywhere in
the compressed air system.
If you will be using synthetic compressor lubricant,
all downstream piping material and system
components must be compatible. Refer to the
following material compatibility list. If there are
incompatible materials present in your system, or if
there are materials not included in the list, contact
Ingersoll-Rand for recommendations.
SYNTHETIC COMPRESSOR LUBRICANT
MATERIAL COMPATIBILITY LIST
SUITABLE
Viton®, Teflon®, Epoxy (Glass Filled), Oil Resistant Alkyd, Fluorosilicone,
Fluorocarbon, Polysulfide, 2-Component Urethane, Nylon, Delrin®,
Celcon®, High Nitrile Rubber (Buna N. NBR more than 36% Acrylonitrile),
Polyurethane, Polyethylene, Epichlorohydrin, Polyacrylate, Melamine,
Polypropylene, Baked Phenolics, Epoxy, Modified Alkyds
(® indicates trademark of DuPont Corporation)
NOT RECOMMENDED
Neoprene, Natural Rubber, SBR Rubber, Acrylic Paint, Lacquer, Varnish,
Polystyrene, PVC, ABS, Polycarbonate, Cellulose Acetate, Low Nitrile
Rubber (Buna N. NBR less than 36% Acrylonitrile), EPDM, Ethylene Vinyl
Acetate, Latex, EPR, Acrylics, Phenoxy, Polysulfones, Styrene Acrylonitrile
(San), Butyl
NOTE All compressed air systems generate condensate
which accumulates in any drain point (e.g. tanks,
filters, drip legs, aftercoolers, dryers). This
condensate contains lubricating oil and/or
substances which may be regulated and must be
disposed of in accordance with local, state, and
federal laws and regulations.
GENERAL REQUIREMENTS. The piping, fittings, air receiver tank,
etc. must be certified safe for at least the maximum working
pressure of the unit. Use hard-welded or threaded steel or copper
pipes and cast iron fittings that are certified safe for the unit's
discharge pressure and temperature. DO NOT USE PVC PLASTIC
IN THE COMPRESSED AIR DISCHARGE LINE. Use pipe thread
sealant on all threads, and make up joints tightly to prevent air
leaks.
CONDENSATE DISCHARGE PIPING. If installing a condensate
discharge line, the piping must be at least one size larger than the
connection, as short and direct as possible, secured tightly and
routed to a suitable drain point or waste container. Condensate
must be disposed of in accordance with local, state, and federal
laws and regulations.
A WARNING If an aftercooler, check valve, block valve, or any
other restriction is added to the compressor
discharge, install a properly-sized ASME approved
safety/relief valve between the compressor
discharge and the restriction.
INSTALLING
UNITS)
A WARNING
ELECTRICAL WIRING (ELECTRIC MOTOR
Electrical installation and service should be
performed by a qualified electrician who is familiar
with all applicable local, state and federal laws and
regulations.
GENERAL. The motor rating, as shown on the motor nameplate,
and the power supply must have compatible voltage, phase and
hertz characteristics.
WIRE SIZE. The electrical wiring between the power supply and
electric motor varies according to motor horsepower and other
factors. Install adequately sized power leads to protect against

excessivevoltagedropduringstart-up.RefertotheNational
ElectricCode(NEC)forinformationonselectingtheproperwire
sizeandsecuringelectricalconnections.Ifyouconnectadditional
electricalequipmenttothesamecircuit,considerthetotalelectrical
loadwhenselectingtheproperwiresize.DONOTUSE
UNDERSIZEWIRE.
Ifwiresizeinformationisnotavailable,thewiresizesshowninthe
followingwireselectionchartcanbeusedasasafeguide,ifthe
distancedoesnotexceed50feet(15.3m).Forlongerdistances,
consultandelectricalcontractororthelocalelectriccompanyfor
recommendations.
MOTOR SINGLE THREE
HP PHASE PHASE
115V 230V 200V 230V 460V 575V
12 14 14 14 14 14
10 14 14 14 14 14
8 14 14 14 14 14
8 12 14 14 14 14
1
1.5
2
3
5
7.5
10
15
20
25
30
MAGNETIC STARTER. If the motor installed on your unit has a
motor reset button, it does not require a magnetic starter. If the
motor does not have this button and the unit does not have a
factory-installed starter, install a magnetic starter with thermal
overload protection. Follow the manufacturer's instructions for
installation. Ingersoll-Rand cannot accept responsibility for
damages arising from failure to provide adequate motor protection.
FUSES. Refer to the NEC to determine the proper fuse or circuit
breaker rating required. When selecting fuses, remember the
momentary starting current of an electric motor is greater than its
full load current. Time-delay or "slow-blow" fuses are recommended.
PRESSURE SWITCH. On units without a factory-installed pressure
switch, wire a pressure switch in accordance with the appropriate
wiring schematic in the DIAGRAMS section of this manual. Mount
the pressure switch in accordance with the manufacturer's
recommendations. The connecting line to the receiver tank must be
as short and direct as possible, and certified safe for at least the
maximum working pressure of the unit.
CONNECTING A BATTERY (GASOLINE ENGINE UNITS) __
NOTE If you will be making connections to a remote
battery, the engine on the compressor unit must be
equipped with an alternator.
BATTERY. A 12 volt battery with a minimum current rating of 250
CCA (cold cranking amps) and minimum ampere-hour rating of 24
Ah should be sufficient for cranking most electric start engines.
BATTERY CABLES. Refer to the following table for size and length
recommendations.
Cable Maximum
Size (CA) Length
6 5' (1.5 m.)
4 7'-2.5" (2.1 m,)
2 12' (3.6 m.)
CONNECTION PROCEDURES:
1. Connect the battery positive (+) cable (A) to the starter solenoid
terminal (B).
B
/
"4 "A
2. Connect the battery negative (-) cable (C) to the bolt shown in the
following illustration. Secure the wire in place by screwing a
suitably-sized nut onto the bolt and down onto the terminal.
Kohler Honda
Kawasaki Ingersoll-Rand
3. Connect the battery positive (+) cable (A) to the battery positive (+)
terminal.
4. Connect the battery negative (-) cable to the battery negative (-)
terminal.
5. Coat the terminals and cable ends with corrosion-preventive grease.
A WARNING Remove the cable from the negative (-) side of the
battery before servicing.
Refer to the engine manufacturer's instructions for more
information.
FUEL PUMP INSTALLATION (GASOLINE ENGINE UNITS) _
Some engines use an optional fuel pump to supply gasoline to the
engine directly from a vehicle's onboard fuel system. Install the fuel
pump within 12 inches (30 cm) of the bottom surface of the vehicle's
fuel tank. Protect the pump from contamination by installing a fuel
isolation valve and an inline filter between the pump fuel system.
COMPRESSOR LUBRICATION
/k CAUTION Do not operate without lubricant or with inadequate
lubricant. Ingersoll-Rand is not responsible for
compressor failure caused by inadequate
lubrication.
SYNTHETIC COMPRESSOR LUBRICANT. Ingersoll-Rand
recommends All Season T30 Select synthetic lubricant from
start-up. See the WARRANTY section for extended warranty
information.
ALTERNATE LUBRICANTS. You may use XL-300 or a comparable
petroleum-based lubricant that is premium quality, does not contain
detergents, contains only anti-rust, anti-oxidation, and anti-foam
agents as additives, has a flashpoint of 440°F (227°C) or higher,
and has an auto-ignition point of 650°F (343°C) or higher,

Seethepetroleumlubricantviscositytablebelow.Thetableis
intendedasageneralguideonly.Heavydutyoperatingconditions
requireheavierviscosities.Referspecificoperatingconditionsto
Ingersoll-Randforrecommendations.
TemperatureAround
Compressor
oF oC
<40 < 4.4
40-80 4.4-26.7
80-125" 26.7-51.0"
Viscosity @ 100°F
(37.8°C)
SUS I Centistokes
150 32
500 110
750 165
Viscosity Grade
ISO I SAE
32 10
100 30
150 40
* = For Models 2000 and 2000P, use Ingersoll-Rand
XL-740HT Compressor Oil in temperatures above 100°F
(37.7°0).
If you use a petroleum-based compressor lubricant at start-up and
decide to convert to All Season T30 Select later on, the pump must
be decarbonized and flushed before conversion. Contact
Ingersoll-Rand for more information.
FILLING PROCEDURES:
1. Unscrew and remove the oil fill plug.
2. Fill the crankcase with lubricant.
3. Replace the oil fill plug HAND TIGHT ONLY.
/_ CAUTION Do not remove the oil fill plug while the compressor
is running,
Refer to the following table for crankcase capacity.
Model Crankcase Capacity
2340 28 oz.(827 ml.)
2475 41 oz.(1212 ml.)
2545 73 oz.(2158 ml.)
7100 80 oz.(2365 ml.)
15T, 2000,2000P 144 oz.(4258 ml.)
Use one of the following methods illustrated to determine when the
crankcase is full,
A
E F
A = FULL level at bottom thread of oil fill opening on units without
sight glass or dipstick.
B = ADD level below bottom thread of oil fill opening on units
without sight glass or dipstick.
C = FULL level on units with sight glass.
D = ADD level on units with sight glass.
E = ADD level on units with dipstick.
F = FULL level on units with dipstick.
LOW OIL LEVEL SWITCH
A float activated low oil level switch may be installed to protect your
unit against damage due to insufficient compressor oil level. Low oil
level in the compressor crankcase causes the switch contacts to
open, thus shutting the unit down until the proper oil level has been
restored.
Proper protection against low oil level depends on proper
adjustment of the low oil level switch. During the initial run, stop the
unit and drain one quart of oil from the compressor crankcase into a
suitable clean container. Listen for the switch to click or check the
switch with a continuity tester.
The float sometimes gets cocked or stuck during shipping. If the
float is cocked or stuck, open the disconnect switch, drain the
remaining oil, remove the crankcase cover and then free the float.
Reassemble and then reuse the same oil.
NOTE
If the float is cocked in the low position, the unit
cannot start.
INTERMITTENT DUTY FORMULA
Units operating above 200 PSIG are to be operated according to the
"Intermittent Duty Formula."
INTERMITTENT DUTY FORMULA
Pump-up time should not ordinarily exceed thirty (30)
minutes or be less than ten (10) minutes. Shutdown
periods between cycles of operation should be at least
equal to the pump-up time. Note: When the compressor
is regulated by constant speed control, the shutdown
period is the time the compressor is operating
unloaded.
A pump-up time limit with the following cool-down period is
recommended to protect the valves and heads against stabilized
high operating temperatures, which could rapidly build up carbon in
these areas.
All inquiries for high-pressure compressor application where the
"use" cycle differs from the "Intermittent Duty Formula" should be
referred to Ingersoll-Rand.
START-UP (ELECTRIC MOTOR DRIVEN MODELS) __
1, Close the service valve.

2.
3.
Release any remaining tank pressure by slowly opening the manual
drain valve.
Close the manual drain valve and apply power to the compressor. If
the pressure switch is equipped with an "ON/AUTO-OFF" lever, flip
the switch to the "ON/AUTO" position. If the unit is equipped with a
control panel "ON/OFF" switch, move the switch to the "ON"
position.
Typical Pressure Switch Lever (if Equipped)
ON/AUTO OFF
4. Slowly open the service valve.
Typical Service Valve (A = Open, B = Closed)
A_.
Z_CAUTION
NOTE
Unusual noise or vibration indicates a problem. Do
not continue to operate until you identify and
correct the source of the problem.
Ensure the direction of rotation is correct per the
arrow on the motor. If the rotation is incorrect on
three-phase units, interchange any two of the three
leads.
START-UP (GASOLINE ENGINE UNITS)
z_ WARNING Do not operate gasoline engine units in an enclosed
area.
1. Release any remaining tank pressure by slowly opening the manual
drain valve.
2. Turn on the engine gasoline supply.
3. Put the choke in the "on" position.
4. Close the service valve and put the unloader lever in the "unload"
(A) position for Kawasaki and Honda engine driven models, or the
"load" (B) position for Kohler engine driven models.
5. Start the engine, release the choke, and allow the engine to warm
up for two to three minutes.
6. Return the unloader lever to the "load" (B) position on Kawasaki and
Honda engine driven models.
Typical Unloader (A = Unload, B = Load)
NOTE
NOTE
Turn the gasoline supply off when the compressor
is not being used.
Some gasoline engine driven compressors require
5-8 break-in hours of operation before reaching full
capacity and speed.
COMPRESSOR CONTROLS
AUTOMATIC START & STOP CONTROL. This type of control
applies to electric motor driven models under 10 horsepower.
NOTE Automatic Start & Stop Control is intended for use
when the motor will start no more than 6 times per
hour.
When the receiver tank pressure reaches the factory pre-set
maximum pressure (usually 175 PSIG), the pressure switch stops
the unit. When the receiver tank pressure drops below the factory
pre-set minimum (usually 135 PSIG), the pressure switch resets
and restarts the unit.
CONSTANT SPEED CONTROL. This type of control applies to
gasoline engine units.
When the receiver tank pressure reaches the factory pre-set
maximum pressure (usually 175 PSIG), the unloader slows down
the engine and the unit stops pumping. When the receiver tank
pressure drops to the factory pre-set minimum (usually 145 PSIG),
the unloader resets, the engine returns to full speed, and the unit
resumes pumping.
DUAL CONTROL. This type of control applies to electric motor
units over 10 horsepower. Select either automatic start and stop
control or constant speed control by adjusting the knob on the
auxiliary valve. For automatic start and stop control, turn the knob
on the auxiliary valve fully clockwise to disable the auxiliary valve.
The pressure switch will then start and stop the unit.
NOTE For dual control models, automatic start and stop is
preferred.
Auxiliary Valve.
KNOB"__
CLOCKWISE
COUNTERCLOCKWISE
Select constant speed control if the unit restarts in less than 10
minute intervals or runs more than 40 minutes per hour. Turn the
knob fully counterclockwise to run the unit continually. When the
receiver tank pressure reaches 170 PSlG, the unit runs but does not
pump.
NOTE The auxiliary valve is factory pre-set at 5 PSIG lower
than the factory pressure switch setting,
A CAUTION Running unloaded for more than 20 minutes per
hour or more than 15 minutes continually with the
use of constant speed control will cause oil
pumping and should be avoided,
PRESSURE SWITCH ADJUSTMENT
z_ WARNING High voltage is present at the pressure switch
contacts when the power supply is connected.
Disconnect, lock and tag main power supply before
making adjustments.
A CAUTION Do not adjust the pressure switch to exceed the
maximum discharge pressure of the unit.
NOTE Adjust the pressure switch only if adjustments are
absolutely necessary.
CUT-IN & CUT-OUT. The cut-out (compressor shut-down) is the
pressure at which the switch contacts open, and the cut-in
(compressor restart) is the pressure at which the switch contacts
close. See COMPRESSOR CONTROLS.
ADJUSTMENT CONTROLS. All pressure switches have a range
adjustment control (A). Some pressure switches also have a
differential adjustment (B) control. On switches without a differential

adjustmentcontrol,thespanbetweencut-inandcut-outpressure
levelsswitchesisfactorysetfor40_+4PSIGandcannotbe
adjusted.
NOTE Some pressure switches are equipped with an
on-off lever used to open and close the electrical
contacts inside the switch. THIS LEVER IS NOT A
DIFFERENTIAL ADJUSTMENT CONTROL. The
pressure switches with the on-off lever do not have
a differential adjustment control.
ADJUSTMENT PROCEDURES (SWITCHES WITHOUT
DIFFERENTIAL ADJUSTMENT CONTROL):
1. Remove the pressure switch cover.
2. Adjust the range by turning the range adjustment screw clockwise
(in) to increase the cut-out point or counter-clockwise (out) to
decrease the cut-out point.
NOTE: One full turn changes the setting approximately 2
PSIG.
3. Replace cover, reconnect power supply and start the compressor.
4. Note the pressure gauge reading at which the compressor cuts out.
5. Repeat adjustment procedure if necessary.
Pressure Switch Range Adjustment.
The oil pump is equipped with an adjustable pressure regulator
which may be reset if conditions warrant. Refer to the following
illustration and instructions:
1. Use an adjustable wrench to remove the knurled cover for the valve
on the right side of the oil pump housing (A).
2. Loosen the retaining nut (B) with a 7/16" wrench such that the
threaded rod (C) is free to rotate.
3. Using a 1/8" hex key, adjust the threaded rod to the desired setting.
Turning the rod clockwise increases the oil pressure setting, and
turning the rod counterclockwise decreases the oil pressure.
4. When the oil pressure is set, tighten the retaining nut and replace
the knurled cover.
ADJUSTMENT PROCEDURES (SWITCHES WITH DIFFERENTIAL
ADJUSTMENT CONTROL):
1. Remove the pressure switch cover.
2. Set the cut-in pressure with the range adjustment nut. Turn the nut
clockwise (in) to increase the pressure or counter-clockwise (out) to
decrease the pressure.
NOTE: One full turn changes the setting approximately 2
PSIG.
3. Set the cut-out pressure with the differential adjustment. Turn the
differential adjustment nut clockwise (in) to increase the pressure or
counter-clockwise (out) to decrease the pressure.
NOTE: One full turn changes the setting approximately 2
PSIG.
4. Replace the cover, reconnect the power supply and start the unit.
5. Note the pressure gauge reading at which the unit cuts out.
6. Repeat the adjustment procedure if necessary.
The minimum possible differential is approximately 20% of cutout
pressure. It is advisable to have as wide a differential as possible to
avoid frequent starting and stopping of the unit. Note the pressure
gauge reading at which the unit cuts-out and re-establish this point
if necessary.
Note the interaction between the range and differential adjustments,
i.e., if the cut-out is increased, the differential will also increase, or
if the differential is narrowed, the cut-out will be reduced, etc. These
factors must be considered when adjusting the switch and
compensated for accordingly.
OIL PRESSURE ADJUSTMENT (MODEL 2000P)
For pressure lubricated compressors, the oil pressure should be
checked upon start-up by observing the oil pressure gauge. The
acceptable operating range is 15-40 psig. It is normal for the oil
pressure to vary slightly with oil temperature. Compressors
equipped with an optional low oil pressure shutdown system will
automatically shut down if the oil pressure drops below 10 psig.
STARTING UNLOADING SYSTEM
The starting unloading feature exists on certain models. The
purpose of the system is to relieve cylinder pressure when the unit
stops, permitting it to start against a light load. A light load
increases the life of the driver and belts and also reduces the
possibility of tripping the overload relay. The system operates in the
following manner:
The centrifugal unloader is attached to the end of the crankshaft as
shown in the following illustrations.
When the unit starts, centrifugal force acts upon the unloader
weights and they swing outward. This permits the plunger and thrust
pin to move inward and the pilot valve to close. The escape path to
atmosphere for the cylinder pressure is now closed and the
compressor pumps air in a normal manner.
When the unit stops, the weights retract, permitting the thrust pin
spring to move the plunger and thrust pin outward. The thrust pin
opens the pilot valve and the trapped air pressure escapes from the
cylinder and intercooler through a passage in the frame end cover,
through the unloader tube and to atmosphere through the inlet
filter/silencer,

Position of weight and thrust pin when unit is operating.
TUBE CONNECTION
TO ATMOSPHERE
t
!
Position of weight and thrust pin when unit is stopped.
TUBE CONNECTION
TO ATMOSPHERE
STARTING UNLOADING SYSTEM (PRESSURE
LUBRICATED MODELS)
Pressure lubricated compressors use a hydraulic unloader system
to provide Ioadless starting. This system has the added feature of
providing emergency unloading should oil pressure be lost during
compressor operation.
The hydraulic unloader circuit bypasses the auxiliary valve (H) to
direct control air to the head unloaders when oil pressure is lost.
This circuit is controlled by the hydraulic unloader valve (E), a
normally open valve that closes on rising oil pressure. During
compressor operation, the oil pressure holds the hydraulic unloader
valve closed. Head unloader actuation is controlled by the auxiliary
valve.
When oil pressure is lost, either due to compressor shutdown or to
a lubrication problem during compressor operation, the hydraulic
unloader opens, actuating the head unloaders (F). This action will
either vent the shut down compressor in preparation for the next
start-up or release compression load to minimize damage if oil
pressure is lost while the compressor is running.
/
D
\
F
A = Oil Pump
B = Oil Filter
C = Oil Pressure Gauge
D = Oil Pressure Switch
E = Hydraulic Unloader Valve
F = Head Unloaders
G = Shuttle Valve
H = Auxiliary Valve
PILOT VALVE ADJUSTMENT
If the pilot valve tube line is excessively hot, it is a good indication
that the pilot valve is leaking and adjustment is required.
To adjust the pilot valve, proceed as follows:
1. Stop the unit and disconnect and tag the electrical supply main
switch to prevent accidental start-up.
2. Remove the pilot valve tube and the tube fittings.
3. Remove the pilot valve body and all existing shims.
4. Screw the pilot valve body back into the frame end cover (without
any shims) until contact with the thrust pin is felt. Advance the pilot
valve body 1/4 to 1/2 turn more.
If contact with the thrust pin cannot be felt, the following steps may
be necessary to locate the contact point:
1. Insert a small instrument (punch, rod, nail, etc.) into the end of the
pilot valve untilit contacts the valve stem.
2. While still inserted in the pilot valve, make a mark on the instrument
even with the outside edge of the pilot valve body.
3. Keeping the instrument pressed lightlyagainst the valve stem, screw
the pilot valve body into the frame end cover. When the mark on the
instrument starts moving out away from the edge of the pilot valve
body, contact has been made with the thrust pin.
4. Advance the pilot valve body 1/4 to 1/2 turn more and proceed with
step five.
5. Measure the gap between the pilot valve body and the frame end
cover.
6. Remove the pilot valve body and add enough shims to fill the gap
measured in step five.
7. Screw the pilot valve body back into the frame end cover until the
body is tight on the shims.
8. Reconnect the pilot valve tube and tube fittings.
BREATHER/UNLOADER BY-PASS
The breather/unloader by-pass tube lines eliminates air pressure
build-up in the compressor frame by providing a passage for the air
to escape through the inlet unloader (if opened) or (if closed)
through the check valve, therefore, by-passing the inlet unloader
and escaping to atmosphere through the inlet filter/silencer.

OILCONSUMPTIONCHECK
A rule of thumb in determining a "passing grade" for oil consumption
is to consider consumption at or above 50 horsepower-hours per
ounce to be acceptable.
The formula is as follows:
Horsepower X Hours of Operation = Horsepower Hours
Ounces of Oil Used per Ounce
To apply this formula, consider the size of the machine. In the
following example, a 5 horsepower compressor uses 2 ounces of oil
every 20 hours of operation.
5 Horsepower X 20 Hours of = 50 Horsepower
Operation Hours per Ounce
2 Ounces of Oil Used
The compressor in the example passes the oil consumption test.
NOTE New or rebuilt compressor pumps will discharge
higher than normal amounts of oil until the piston
rings are seated (approximately 100 operating
hours).
A WARNING
NOTE
NOTE
NOTE
NOTE
NOTE
Before performing maintenance, release air
pressure from the system and disconnect, lock and
tag the main power supply or disconnect the wire
from the engine spark plug.
All compressed air systems contain maintenance
parts (e.g. lubricating oil, filters, separators) which
are periodically replaced. These used parts may be,
or may contain, substances that are regulated and
must be disposed of in accordance with local, state,
and federal laws and regulations.
Take note of the positions and locations of parts
during disassembly to make reassembly easier. The
assembly sequences and parts illustrated may differ
for your particular unit.
Any service operations not explained in this manual
should be performed by an authorized service
representative.
Reference the engine owner's manual for engine
care information.
The following maintenance schedule has been
developed for typical applications. Maintenance
intervals should be shortened in harsher
environments.
Daily or Before
Each
Operation
Weekly
Monthly
3/500 *
6/1000 *
12/2000 *
MAINTENANCE SCHEDULE
• Check for oil leaks.
• Check lubricant level. Fill as needed.
• Drain receiver tank condensate (if automatic
draining device is not provided). Open manual
drain valve and collect and dispose of
condensate accordingly.
• Check for unusual noise and vibration.
• Ensure beltguards and covers are securely in
place.
• Ensure engine (if supplied) is filled with fuel
and lubricant according to the manufacturer's
recommendations.
• Ensure area around compressor is free from
rags, tools, debris, and flammable or
explosive materials.
• Check system oil pressure on pressure
lubricated models while compressor is hot.
• Observe operation of safety/relief valves while
the compressor is running. Replace
safety/relief valves that do not operate freely.
• Inspect air filter element(s). Clean if
necessary.
• Inspect for air leaks. Squirt soapy water
around joints during compressor operation
and watch for bubbles.
• Check tightness of screws and bolts. Tighten
as needed.
• Inspect drive belts. Adjust if necessary.
• Clean exterior.
• Change petroleum lubricant while crankcase
is warm.
• Drain compressor oil and clean oil sight glass
• Replace oil filter and change lubricant (if
necessary) on pressure lubricated models.
• Install maintenance pak
--or-
• Change synthetic lubricant while crankcase is
warm.
• Replace filter element.
* indicates months/operating hours, whichever occurs first.
FILTER INSPECTION & CLEANING
1. Unscrew and remove the wing nut (A) securing the filter housing (B)
to its base (C).
2. Remove the filter housing and withdraw the old filter element (D).
Clean the element with a jet of air or vacuum.
3. Replace the filter element and housing, securing it in place with the
wing nut previously removed.
/
A
OIL CHANGE
1. Remove the oil drain plug (A) and allow the lubricant to drain into a
suitable container.
2. Replace the oil drain plug.
3. Follow the filling procedures in OPERATION section,

10
BELT ADJUSTMENT
CHECKING BELT TENSION. Check belt tension should be
occasionally, especially if looseness is suspected. New belts must
also be properly tensioned upon installation.
TENSIONING BELTS. Belt tensioning can be achieved by
loosening the motor or engine anchor screws, pushing the motor or
engine away from the pump, and retightening the motor or engine
anchor screws. Some units are equipped with a belt tensioning bolt
that, when turned, pulls the motor or engine away from the pump.
Otherwise, the motor can be easily moved by placing a prying tool
beneath it. A commercially available spreader or other belt
tensioning device can also be helpful.
BELT TENSION f_J_
i3oL..r _ /i'l!
Follow the procedures outlined below to correctly set and measure
belt tension on electric motor and gas engine models including
2340, 2475, and 2545 (with "A" belt type only). Refer to the
following illustration for a visual representation.
.............................It) _LT 8PAN ..............................
I)EFLECTIO!I _ .._/__"
O-RINGS . i ) DIRECTION OF 1
'. I/ FORCE APPLIED \
P# gT'gX,
(READ DOWN)
DEFLECTION
DISTANCE SCALE
(READ UP)
\
J
/
....... i /
1. Lay a straight edge across the top outer surface of the belt drive
from pulley to sheave.
2. At the center of the span, perpendicular to the belt, apply pressure
to the outer surface of the belt with a tension gauge. Force the belt
to the deflection indicated in the BELT TENSION TABLE in the
DIAGRAMS & TABLES section. Compare the reading on the tension
gauge to the table.
Follow the procedures outlined below to correctly set and measure
tension on 7.5 through 30 horsepower models 2545, 7100, 15T and
2000 with "B" and "C" belt types.
1. Measure the span length (t) of the drive.
2. Determine the amount of deflection (in inches) required to measure
deflection force (in pounds) by multiplying the span length (t) by
1/64. For example, a 32" span length multiplied by 1/64 equals 1/2"
of deflection required to measure deflection force.
3. Lay a straight edge across the top outer surface of the belt drive
from pulley to sheave.
4. At the center of the span, perpendicular to the belt, apply pressure
to the outer surface of the belt with a tension gauge. Force the belt
to the predetermined deflection calculated in step 2. Compare the
reading on the tension gauge to the BELT TENSION TABLE in the
DIAGRAMS & TABLES section.
Ensure the pulley and sheave are properly aligned and the motor
anchor screws are adequately retightened prior to restarting the
compressor.
A CAUTION Improper pulleylsheave alignment and belt tension
can result in motor overload, excessive vibration,
and premature belt and/or bearing failure.
To prevent these problems from occurring, ensure the pulley and
sheave are aligned and belt tension is satisfactory after installing
new belts or tensioning existing belts.
TANK INSPECTION
The life of an air receiver tank is dependent upon several factors
including, but not limited to, operating conditions, ambient
environments, and the level of maintenance. The exact effect of
these factors on tank life is difficult to predict; therefore,
Ingersoll-Rand recommends that you schedule a certified tank
inspection within the first five years of compressor service. To
arrange a tank inspection, contact Ingersoll-Rand.
If the tank has not been inspected within the first 10 years of
compressor service, the receiver must be taken out of service until
it has passed inspection. Tanks that fail to meet requirements must
be replaced.
A WARNING Failure to replace a rusted air receiver tank could
result in air receiver tank rupture or explosion,
which could cause substantial property damage,
severe personal injury, or death. Never modify or
repair tank. Obtain replacement from service center.

11
_o_] _[oIo_€_
PROBLEM
Abnormal piston, ring or cylinder wear
Air delivery drops off
Automatic drain valve leaks or does not drain automatically
Auxiliary valve chatters or leaks around stem
Broken intercooler or aftercooler tubes
Compressor does not come up to speed
Compressor is slow to come up to speed
Compressor runs excessively hot
Compressor will not unload cycle
Compressor will not unload when stopped
Excessive noise during operation
Excessive starting and stopping
Knocks or rattles
Lights flicker or dim when running
Moisture in crankcase or "milky" appearance in petroleum lubricant or
rusting in cylinders
Motor overload trips or draws excessive current
Oil in discharge air (oil pumping)
Oil leaking from shaft seal
Safety/relief valve "pops"
High interstage pressure
Low interstage pressure
Engine cranks slowly or will not start
Motor will not start
Engine will not start
Oil Leaks
Low Oil Pressure
Excessive oil pressure fluctuations (> 5 psi)
CHECK POINT
4, 8, 9, 19, 28, 35
1,6, 15, 16, 18, 19, 29
16
23, 24
36
2,6,12,15,21
26, 27, 33, 34
3, 14, 15, 22
23, 24, 26
26, 33
2, 6, 15, 16, 21, 27, 32
5, 11, 16, 32, 40
2, 15, 17, 19, 20, 21
12, 13
9,10
5, 6, 12, 13, 14, 15, 16, 19, 20, 21, 34
4, 7, 9, 18, 19, 25, 35
25
1,5, 29, 30
3O
31
6, 14, 37, 38
12
39
41
42, 43, 44, 46
42, 43, 44, 45, 46

12
CHECK
POINT
1
2
3
4
5
6
7
8
9
10
11
12
13
14
15
16
17
18
19
2O
21
22
23
24
25
26
27
28
29
30
31
32
33
34
35
36
37
38
39
40
41
42
43
44
45
46
POSSIBLE CAUSE
Clogged or dirty inlet and/or discharge line filter.
Loose beltwheel or motor pulley, excessive end play in motor
shaft or loose drive belts.
Inadequate ventilation around beltwheel.
Lubricant viscosity too low.
Air leaks in air discharge piping.
Lubricant viscosity too high.
Lubricant level too high.
Lubricant level too low.
Detergent type lubricant being used.
Extremely light duty cycles.
Compressor located in damp or humid location.
Pressure switch differential too narrow.
Improper line voltage.
Wiring or electric service panel too small.
Poor contact on motor terminals or starter connections.
Improper starter overload heaters.
Poor power regulation (unbalanced line).
Drive belts too tight or misaligned.
Compressor valves leaky, broken, carbonized or loose.
Automatic drain valve clogged, leaking or defective.
Carbon build-up on top of piston(s).
Piston rings damaged or worn (broken, rough or scratched).
Excessive end gap or side clearance.
Piston rings not seated, are stuck in grooves or end gaps not
staggered.
Cylinder(s) or piston(s) scratched, worn or scored.
Connecting rod, piston pin or crankpin bearings worn or scored.
Loose bearing spacer on crankshaft.
Defective ball bearings on crankshaft or motor shaft.
Wrong beltwheel direction of rotation.
Leaking, broken or worn inlet unloader parts.
Auxiliary valve dirty or seats worn.
Crankshaft seal worn or crankshaft scored.
Leaking or maladjusted centrifugal pilot valve.
Leaking check valve or check valve seat blown out.
Extremely dusty atmosphere.
Defective safety/relief valve.
High pressure inlet valve leaking.
Low pressure discharge valve leaking.
Automatic start and stop mode is not suitable for air demand.
Pressure switch unloader leaks or does not work.
Ambient temperature too low.
Worn cylinder finish.
Beltwheel out of balance, tubes not braced or secured, wrong
pulley speed.
Engine not grounded properly.
Gasoline exceeds storage time or contains water.
No fuel in tank.
Fuel valve closed.
Low oil pressure.
Excessive condensate in receiver tank.
Loose fittings/elbows/connectors
Maladjusted or defective oil pressure regulator valve
Maladjusted or defective hydraulic unloader valve
Defective oil pressure gauge
Oil foaming in crankcase
Debris or other obstruction blocking oil flow
POSSIBLE SOLUTION
Clean or replace.
Check beltwheel, motor pulley, crankshaft, drive belt tension and
alignment. Repair or replace as required.
Relocate compressor for better air flow.
Drain existing lubricant and refill with proper lubricant.
Check tubing and connections. Tighten joints or replace as
required.
Drain existing lubricant and refill with proper lubricant.
Drain excess lubricant.
Add lubricant to crankcase to proper level.
Drain existing lubricant and refill with proper lubricant.
Run compressor for longer duty cycles.
Relocate compressor or install crankcase heater kit.
Adjust pressure switch to increase differential, if differential
adjustment is provided. Install pressure switch with differential
adjustment feature if differential adjustment is desired.
Check line voltage and upgrade lines as required. Contact
electrician.
Intall properly sized wire or service box. Contact electrician.
Ensure good contact on motor terminals or starter connections.
Install proper starter overload heaters. Contact electrician.
Contact power company.
Adjust belts to proper tension and alignment.
Inspect valves. Clean or replace as required. Install Valve/Gasket
Step Saver Kit..
Inspect valve and clean, repair or replace as required.
Clean piston(s). Repair or replace as required.
Install Ring/Gasket Step Saver Kit.
Adjust piston rings.
Repair or replace as required.
Inspect all. Repair or replace as required. Install
Bearing/Connecting Rod Step Saver Kit.
Inspect bearings and replace if required. Install
Bearing/Connecting Rod Step Saver Kit.
Check motor wiring for proper connections. Reverse two leads on
three-phase motors.
Inspect parts and replace as required.
Inspect parts. Clean, adjust or replace as required.
Replace seal. Install shaft sleeve if required. Install
Bearing/Connecting Rod Step Saver Kit.
Replace pilot valve o-ring. Adjust pilot valve.
Replace check valve.
Install remote air inlet piping and route to source of cleaner air.
Install more effective filtration.
Replace.
Inspect, clean or repair as required.
Inspect, clean or repair as required.
Adjust auxiliary valve for constant speed operation.
Realign stem or replace.
Install crankcase heater kit. Convert to All Season T30 Select
lubricant. Relocate compressor to warmer environment.
Deglaze cylinder with 180 grit flex-hone.
Check vibration level, change pulley or beltwheel if required,
tighten tube clamps.
Ground battery to engine as recommended.
Replace gas, add fuel stabilizer.
See manufacturer's instructions for refueling.
Open fuel valve.
See manufacturer's instructions.
Drain receiver tank with manual drain valve or install automatic
drain valve.
Re-torque fittings per specified torque requirements
Adjust valve to proper setting
Replace regulator valve
Replace hydraulic unloader valve assembly
Replace gauge
Drain existing lubricant, thoroughly clean crankcase, replace
lubricant
inspect/clean all oil passages

13
FASTENER
High Pressure Head Bolts
Low Pressure Head Bolts
Cylinder Flange Bolts
Frame Cover Bolts
Shaft Cover Bolts
Crankpin Cap Screws
Unloader Cover Screws
High Pressure Inlet Valve Screws
Low Pressure Inlet Valve Screws
High Pressure Outlet Valve Screws
Low Pressure Outlet Valve Screws
Beltwheel Bolt
High Pressure Head Center Bolts
Low Pressure Head Center Bolts
Unloader Guide Mounting Screw
Low Oil Level Switch Baffle Screw
Head Center Acorn Nuts
Pilot Valve
Unloader Body Assembly
Bearing/Unloader Housing Bolts
Valve Plate Studs
TORQUE TABLE
NOTE
2340 2475 2545 7100 2000 & 2000P
75 75 75 75 120
75 75 75 75 120
30 50 50 50 50
17 17 17 20 20
17 17 17 20 50
5.5 11 11 12-15 --
-- -- 11 11 --
11-15 LB-IN 11-15 LB-IN 11-15 LB-IN 5.5 36 LB-IN
11-15 LB-IN 25-30 LB-IN 25-30 LB-IN 5.5 36 LB-IN
11-15 LB-IN 11-15 LB-IN 11-15 LB-IN 26 36 LB-IN
25-30 LB-IN 25-30 LB-IN 25-30 LB-IN 26 36 LB-IN
33 60 60 113 80
-- -- 10 -- --
-- -- 14-16 -- --
.... 25
.... 5
.... 7
.... 25
.... 25
.... 25
.... 7
Tighten all fasteners evenly using a cross pattern in
two stages.
BELT TENSION TABLE
MODEL DEFLECTION (IN.)
2340 (14" Span) 0.25
2340 (19" Span) 0.29
2475 (14" Span) 0.25
2475 (19" Span) 0.29
2475F/X11GH 0.34
2475F/X9/11GK 0.25
2475N5 (14.5" Span, Cogged 0.23
belt)
2545 (A Groove) 0.29
TENSION (LB.) BELT
TYPE
4.9 - 7.1
B
4.9 - 7.1
4.9 - 7.1
C
4.9 - 7.1
5.5 - 8.0
5V
11.25 - 13.0
4.5 - 6.5
4.9 - 7,1
HORSEPOWER
7.5
10-15
20
25-30
25-30
TENSION AT 1/64" DEFLECTION PER
INCH OF SPAN
7.0 - 10.0
8.0 - 12.0
12.0 - 18.0
14.0 - 21.0

14
ELECTRICAL WIRING DIAGRAMS
Single Phase Wiring
fO SUPPI Y
_ L2"
u
SEE NOTE
M O[ -A TI
IF------_YZ_/
E>_I,
*MOTOR
1
OFF ON * * o OL /
PS LOLS *qATS F_ .
0 C------<]q'-8------o_ _-_-x_-----_ M F------+_ _
SS 7 _ 8 _ 9 ¼_ 6 "-/ 5 "4
A
C
EDV
T
L
FU
HATS
LOLS
M
OL
PS
SS
To supply
Wiring for optional electric drain valve
Electric drain valve
Supply Line Terminal
Load Terminal
Control Circuit Fuse
High Air Temperature Switch (#)
Low Oil Level Switch (#)
Motor Starter Coil
Motor Starter Overload
Pressure Switch
Selector Switch (#)
Alternate wiring for converting 3 phase starter to 1
phase application
(#) = if provided
Three Phase Wiring
@
,l
M OL-A TI
M OL_C T3
PS LOLS *HATS _ O,LI
1
©
*EDV
To Power Su
Starter
NOTE
On units requiring a starter, connect line power to the starter, do not connect
line power to the pressure switch.
• Connect ground wire to ground lug
• L3 used for 3-phase motors & starters only

15
Typical Baseplate Unit
ENCLOSED BELTGUARD
A R
FLOW
AIR COOLED AFTERCOOLER
(OPTIONAL)
-AIR INLET FILTER
INTERCOOLER
SAFETY/RELIEFOUTLET VALVE_
AIR INLET FILTER
_L (OUTDOOR OPTION)
LOW OIL LEVEL
AIR COOLED SWITCH OIL DRAIN
AFTERCOOLER (OPTIONAL)
CONNECTION MOUNTING HOLE. <
Typical Horizontal Simplex Unit
AIRCOOLED AFTERCOOLER
(OPTIONAL)
AIR --
FLOW
SAFETY/RELIEF VALVE
_ MOUNTED MOTOR
STARTER (OPTIONAL) OIL FILL
LOW OIL LEVEL
SWITCH
OIL DRAIN
DISCHARGE
SAFETY/RELIEF VALVE
AIR INLET
FILTERS CONSTANT SPEED
--PRESSURE SWITCH,
GAUGE, RECEIVER
SAFETY/RELIEF VALVE
AND AUXILIARY VALVE
ENCLOSED
BELTGUARD
INSPECTION
OPENINGS
(BOTHS,DES),
/
MANUAL DRAIN VALVE
(LOCATION WHEN SUPPLIED
WITH AUTO DRAIN VALVE)
AUTO CONDENSATE
DRAIN VALVE 1/8"
NPT DRAIN PORT
(OPTIONAL)
AIR RECEIVER TANK /
MOUNTING HOLES Z
DRAIN VALVE
(LOCATION WHEN NOT SUPPLIED
WITH AUTO DRAIN VALVE)
AIR OUTLET
SERVICE VALVE

16
Typical Vertical Simplex Unit
t
Z'qEZEIIFE :Z I 13 _,1_
)4
FFE,Z RE :3 :SE
I
I ii :31
: F T FI IFF
L E
--IR :31 E
kts_
F TI,,I
2
IR _LI=4
4
I [_:F(Fl.Fr:
_RIII LE
Typical Gasoline Engine Unit
GASOLINE ENGINE
ENGINE AIR CLEANER
ENGINE EXHAUST \
MUFFLER
(REAR)
ENGINE OIL
DIPSTICK
ENGINE OIL
DRAIN
PRESSURE GAUGE,
DISCHARGE & RECEIVER SAFETY/RELIEF VALVE,
DISCHARGE UNLOADER
INTERSTAOE
SAFETY/RELIEF VALVE
AIR INLET
r OIL FILL PLUG
OIL DRAIN PLUG
ENCLOSED
AIR
FLOW
AIR OUTLET
AIR RECEIVER
TANK_
MOUNT
MOUNTING HOLES j (4 REQUIRED)
MANUAL CONDENSATE
DRAIN VALVE

17
WARRANTY
Ingersoll-Rand Company warrants that the Equipment manufactured by it and delivered hereunder shall be free of defects in material and
workmanship for a period of twelve (12) months from the date of placing the Equipment in operation or eighteen (18) months from the date
of shipment, whichever shall occur first. The foregoing warranty period shall apply to all Equipment, except for the following: (A)
Compressors that are operated solely on All Season T30 Select sunthetic compressor lubricant will have their bare compressor warranted
for the earlier of twenty-four (24) months from the date of initial operation or thirty (30) months from the date of shipment. (B) Replacement
parts will be warranted for six (6) months from the date of shipment. Should any failure to conform to this Warranty be reported in writing
to the Company within said period, the Company shall, at its option, correct such nonconformity by suitable repair to such Equipment, or
furnish a replacement part F.O.B. point of shipment, provided the purchaser has installed, maintained and operated such equipment in
accordance with good industry practices and has complied with specific recommendations of the Company. Accessories or equipment
furnished by the Company, but manufactured by others, shall carry whatever warranty the manufacturer conveyed to Ingersoll-Rand
Company and which can be passed on to the Purchaser. The Company shall not be liable for any repairs, replacements, or adjustments to
the Equipment or any costs of labor performed by the Purchaser without the Company's prior written approval.
The Company makes no performance warranty unless specifically stated within its proposal and the effects of corrosion, erosion and
normal wear and tear are specifically excluded from the Company's Warranty. In the event performance warranties are expressly included,
the Company's obligation shall be to correct in the manner and for the period of time provided above.
THE COMPANY MAKES NO OTHER WARRANTY OF REPRESENTATION OF ANY KIND WHATSOEVER, EXPRESSED OR IMPLIED,
EXCEPT THAT OF TITLE, AND ALL IMPLIED WARRANTIES OF MERCHANTABILITY AND FITNESS FOR A PARTICULAR PURPOSE,
ARE HEREBY DISCLAIMED.
Correction by the Company of nonconformities, whether patent or latent, in the manner and for the period of time provided above, shall
constitute fulfillment of all liabilities of the Company and its Distributors for such nonconformities with respect to or arising out of such
Equipment.
LIMITATION OF LIABILITY
THE REMEDIES OF THE PURCHASER SET FORTH HEREIN ARE EXCLUSIVE, AND THE TOTAL LIABILITY OF THE COMPANY, ITS
DISTRIBUTORS AND SUPPLIERS WITH RESPECT TO CONTRACT OR THE EQUIPMENT AND SERVICES FURNISHED, IN
CONNECTION WITH THE PERFORMANCE OR BREACH THEREOF, OR FROM THE MANUFACTURE, SALE, DELIVERY,
INSTALLATION, REPAIR OR TECHNICAL DIRECTION COVERED BY OR FURNISHED UNDER CONTRACT, WHETHER BASED ON
CONTRACT, WARRANTY, NEGLIGENCE, INDEMNITY, STRICT LIABILITY OR OTHERWISE SHALL NOT EXCEED THE PURCHASE
PRICE OF THE UNIT OF EQUIPMENT UPON WHICH SUCH LIABILITY IS BASED.
THE COMPANY, ITS DISTRIBUTORS AND ITS SUPPLIERS SHALL IN NO EVENT BE LIABLE TO THE PURCHASER, ANY
SUCCESSORS IN INTEREST OR ANY BENEFICIARY OR ASSIGNEE OF THE CONTRACT FOR ANY CONSEQUENTIAL, INCIDENTAL,
INDIRECT, SPECIAL OR PUNITIVE DAMAGES ARISING OUT OF THIS CONTRACT OR ANY BREACH THEREOF, OR ANY DEFECT IN,
OR FAILURE OF, OR MALFUNCTION OF THE EQUIPMENT, WHETHER OR NOT BASED UPON LOSS OF USE, LOSS PROFITS OR
REVENUE, INTEREST, LOST GOODWILL, WORK STOPPAGE, IMPAIRMENT OF OTHER GOODS, LOSS BY REASON OF SHUTDOWN
OR NON-OPERATION, INCREASED EXPENSES OF OPERATION, COST OF PURCHASE OF REPLACEMENT POWER, OR CLAIMS OF
PURCHASER OR CUSTOMERS OF PURCHASER FOR SERVICE INTERRUPTION WHETHER OR NOT SUCH LOSS OR DAMAGE IS
BASED ON CONTRACT, WARRANTY, NEGLIGENCE, INDEMNITY, STRICT LIABILITY OR OTHERWISE.
Questions? Parts? Service?
1-800 AIR SERV
Visit our website:
www. a ir. ing e rso II-ra n d .com

)lngers011Rand Manual del usuario
Instrucciones de instalacibn, operacibn y mantenimiento
para compresores de aire est ndar lubricados en dos etapas
(Modelos con motor el ctrico y motor a gasolina de hasta 30 caballos de fuerza)
ilNFORMACION IMPORTANTE! LEA Y SIGA ESTAS INSTRUCCIONES. GUARDELAS COMO REFERENCIA.
_o)_T. oKo)_[,._][e']_i_i_ll_,_][,.',]_.[_
DEFINICIONES
,__ CAUSARA la MUERTE, LESIONES GRAVES o graves
dafios a la propiedad.
A ADVERTENClA PUEDE causar LA MUERTE, LESIONES GRAVES o
graves dahos a la propiedad.
A PRECAUCl0N CAUSARA O PUEDE CAUSAR LESIONES MENORES
o dahos a la propiedad.
PRECAUCIONES GENERALES DE SEGURIDAD
,_ _ AIRE DE ADMISION. Puede contener monbxido de
carbono u otros contaminantes. Causar_ lesiones
graves o la muerte. Los compresores de aire
Ingersoll-Rand no est_n disehados, destinados o
aprobados para respirar aire. No se debe usar el aire
comprimido para aplicaciones de aire respirable, a
menos que se trate de acuerdo con todas las
normas y reglamentos aplicables.
A ADVERTENCIA VOLTAJE PELIGROSO. Puede causar lesiones
graves o la muerte. Desconecte la energia y purgue
la presibn del tanque antes de hacer mantenimiento.
Bloquee/etiquete la m_quina. El compresor se debe
conectar a un circuito debidamente conectado a
tierra. Vea las instrucciones de conexibn a tierra en
el manual. No opere el compresor en condiciones
h_medas. Almacene en interiores.
PARTES MOVILES. Pueden causar lesiones graves.
No opere la m&quina si se ha retirado el protector.
La m_quina puede empezar a funcionar
autom_ticamente. Desconecte la energia ante de
hacer mantenimiento. Bloquee/etiquete la m_quina.
SUPERFICIES CALIENTES. Pueden causar lesiones
graves. No tocar. Deje enfriar antes de hacer
mantenimiento. No toque el compresor o la tuberia
caliente.
AIRE DE ALTA PRESION. La derivacibn,
modificacibn o retiro de las v_lvulas de
seguridad/alivio puede causar lesiones graves o la
muerte. No derive, modifique o retire las v_lvulas de
seguridad/desahogo. No apunte el flujo de aire a las
personas. Los tanques oxidados pueden causar una
explosibn y lesiones graves o la muerte. Vacie el
tanques diariamente o despu_s cada uso. V&lvula de
drenaje ubicada al rondo del tanque.
A PRECAUCION RIESGO DE EXPLOSION. Utilice solamente piezas
de manipulacibn de aire adecuadas que sean
aceptables para presiones no inferiores a la presibn
m_xima de trabajo admisible de la m_quina.
INTRODUCCION
Este manual ofrece instrucciones seguras y confiables para la
instalaci6n, operaci6n y mantenimiento de su compresor de aire
Ingersoll-Rand. Lea atentamente este manual antes de tratar de
operarlo o hacer cualquier mantenimiento. Si no est_ seguro acerca de
alguna de las instrucciones o procedimientos que aparecen en este
manual, comuniquese con Ingersoll-Rand. Le recomendamos que
guarde este manual y todas las publicaciones que vienen con su
compresor de aire en un lugar accesible a todo el personal que opera y
da servicio a su equipo compresor de aire.
APLICACION
Los compresores de aire estandar lubricados de dos etapas
Ingersoll-Rand son mAquinas de simple efecto enfriadas por aire. Los
compresores tfpicos se entregan como unidades compactas,
aut6nomas, montadas en el tanque receptor, que se regulan e impulsan
automAticamente por un motor el6ctrico o motor a gasolina. Entre los
accesorios opcionales que se pueden proveer se encuentra un
posenfriador enfriado por aire, un interruptor de apagado por bajo nivel
de aceite y una valvula de drenaje automatico. Tambien se dispone de
bombas de compresi6n sin accesorios y unidades montadas en placa
base.
Estos compresores se pueden usar para diversas aplicaciones de aire
comprimido de hasta 250 PSIG (17,5 kg/cm2). La aplicaci6n de estos
compresores como fuente primaria o complementaria de aire es
prActicamente ilimitada en plantas industriales, estaciones de servicio y
talleres de auto reparaci6n. El servicio complementario incluye usos
como la provisi6n de aire a una presi6n que usualmente no se ofrece en
las lineas regulares de los talleres, aire en lugares aislados y servicio
de reserva de aire cuando se desconectan compresores mas grandes..
OPERACION EN DOS ETAPAS
Los compresores de dos etapas constan de uno o dos cilindros de
primera etapa con el mismo tamafio de diametro interior y un cilindro de
segunda etapa con un tamafio de diametro interior mas pequefio.
Unidad tipica de dos etapas
y dos cilindros
Unidad tipica de dos etapas
y tres cilindros
El principio basico de operaci6n es el siguiente: En el recorrido de
succi6n del o de los pistones de primera etapa, el aire a presi6n
atmosferica entra a los cilindros a traves del o de los filtros de admisi6n
y luego alas v_lvulas de admisi6n ubicadas en la culata. En el recorrido
de compresi6n del o de los pistones de primera etapa, el aire se
comprime a una presi6n intermedia y se descarga a traves de la o las
© Ingersoll-Rand Company
Printed in U.S.A.
Form SCD-838A
agosto de 2001

vMvulas de descarga hacia el o los mt31tiples comunes. Desde el o los
mt_ltiples, el aire pasa a trav6s de los tubos del interenfriador, donde se
elimina el calor de la compresion de primera etapa. En el recorrido de
succion del piston de segunda etapa, este aire enfriado entra al cilindro
de segunda etapa a traves de la vMvula de admision. El recorrido de
compresion del piston de segunda etapa comprime el aire hasta la
presion de descarga final y Io hace salir por la vMvula de descarga
hacia el tanque o sistema receptor. Si se debe enfriar el aire de
descarga, se debe instalar un posenfriador enfriado por aire entre la
descarga del compresor y el tanque o sistema receptor.
Para mantener la presi6n de aire del tanque o del sistema receptor
dentro de Ifmites predeterminados, se puede operar el compresor con
un control automatico de partida y parada o regulacion de control de
velocidad constante. El tipo de regulacion que se use depende de la
aplicacion.
OTRAS REFERENCIAS
A menos que se indique otra cosa, las dimensiones, pesos y medidas
se dan en medidas estandares de los EE.UU., seguidas entre
parentesis por la conversion al sistema metrico. Los valores de torsion
dados se indican en pulgadas o pies libras, seguidos por el equivalente
en Newton-metros entre par_ntesis. Las caracteristicas el_ctricas se
dan en voltaje-fase-hertzios.
Asegt)rese de disponer de equipos de levantamiento adecuados para
descargar y trasladar su compresor al sitio de instalacion.
NOTA El equipo de levantamiento debe estar calibrado
adecuadamente para el peso de la unidad.
z_ PRECAUClON Levante la unidad s61o pot los patines de embarque.
No use el orificio de izamiento del motor para
levantar toda la unidad. El orificio de izamiento del
motor estA destinado exclusivamente para sacar el
motor desde la unidad.
Z_ iPRECAUCION! No trabaje ni transite bajo la unidad mientras se
encuentra suspendida,
Use un equipo de levantamiento adecuado (por ej., horquilla
elevadora) para izar y transportar la unidad hasta el sitio de
instalaci6n. Aseg_rese de que el equipo de levantamiento, correas,
etc., sean capaces de soportar el peso de la unidad..
Antes de firmar el recibo de entrega, asegt_rese de que no falten piezas
ni hayan piezas dafiadas. Si hay evidencia de dafios o de que faltan
piezas, haga la anotaci6n respectiva en el recibo de entrega y luego
firmelo. Comuniquese inmediatamente con el transportista para que
realice una inspeccion.
Todo el material se debe mantener en el lugar de recepcion para la
inspeccion del transportista.
Los recibos de entrega firmados que no tienen anotaci6n de dafios o
piezas faltantes se consideran como prueba de una entrega "sin
problemas". Cualquier reclamo posterior se considerarA como demanda
pordafiosocultos. Liquidecualquierdemandapordafiosconla
empresa de transporte.
Si descubre algen dafio despues de recibir la unidad (dafio oculto),
debe notificar al transportista dentro de un plazo de 15 dias despues
del recibo y solicitar por telefono una inspecci6n, con una confirmaci6n
por escrito. En las demandas por dafios ocultos, la responsabilidad de
establecer que la unidad se daft6 durante el transporte recae en la
persona que hace el reclamo.
Lea la placa de identificaci6n del compresor para verificar que
corresponde al modelo solicitado y lea la placa del motor para verificar
que es compatible con sus condiciones electricas. Asegt)rese de que
las cajas y componentes electricos sean los adecuados para el entorno
de instalacion.
SELECCION DE UNA UBICACION
UNIDADES CON MOTOR EUeCTRICO. Para la mayoria de las
unidades con motor el6ctrico, seleccione un Area interior relativamente
limpia y bien iluminada, con suficiente espacio para permitir una
adecuada ventilaci6n, flujo de aire de enfriamiento y accesibilidad. Deje
1.000 pies ct_bicos de aire fresco por cada 5 caballos de fuerza. Ubique
la unidad a una distancia de por Io menos 15 pulgadas (38 cm) de las
paredes y asegt3rese de que la alimentaci6n principal estA claramente
identificada y sea accesible.
A menos que los componentes electricos de la unidad esten
especialmente protegidos para su uso en exteriores, no instale una
unidad con motor el6ctrico a la intemperie ni en un Area en que los
componentes el6ctricos queden expuestos a la Iluvia, nieve o fuentes
de humedad apreciables.
ADVERTENClA PARA UNIDADES DOTADAS
DE LA V.&.LVULA DE DRENAJE ELECTRICO
/k ADVERTENCIA La vAIvula de drenaje eldctrico posee piezas que
forman arcos o producen chispas, tales como
interruptores de resorte, receptAculos y otros
similares, que tienden a producir arcos o chispas.
Por Io tanto, cuando se ubican en un garaje, el
compresor debe estar en una habitacibn o recinto
destinado a ese propbsito, o la vAIvula de drenaje
el6ctrico debe estar a 18 pulgadas (457 mm) o mAs
por encima del piso.
UNIDADESCON MOTORAGASOLINA. Paralas unidadescon motor
a gasolina, mantenga el motor a una distancia minima de 3 pies (1 m)
de las paredes y otros equipos. Instale la unidad en un lugar con
suficiente espacio para permitir una adecuada ventilacion, flujo de aire
de enfriamiento y accesibilidad. No instale ni opere una unidad con
motor a gasolina en un Area cerrada.
CONSIDERAClONES SOBRE LA TEMPERATURA AMBIENTE.
Las temperaturas de operacion ideales fluctean entre los 32°F y los
100°F (0°C y 37,8°C). Si las temperaturas bajan sistematicamente a
menos de 32°F (0°C), ubique el compresor dentro de un Area
calefaccionada. Si esto no es posible, se deben proteger las vMvulas de
desahogo/seguridad y de drenaje contra el congelamiento. Si las
temperaturas se mantienen de manera sistemAtica a menos de 40°F
(4,4°C), considere la instalaci6n de un juego de calefactores de carter
externos, especialmente si el compresor tiene dificultades para partir.
/k PRECAUCII_N Nunca haga funcionar el compresor a temperaturas
inferiores a -15°F (-26,1°C) o superiores a 125°F
(51,0°C).
AREAS HUMEDAS. En Areas frecuentemente h5medas, se puede
acumular humedad en la bombay producir sedimentos en el lubricante.
Esto causarA el desgaste prematuro de las piezas m6viles. Es muy
probable que se produzca un exceso de humedad si la unidad estA
ubicada en un Area sin calefacci6n sujeta a grandes cambios de
temperatura.
Dos signos de exceso de humedad son la condensacion externa en la
bomba cuando esta se enfria y un aspecto "lechoso" del lubricante de
petroleo.
Es posible que Ud. pueda evitar la acumulaci6n de humedad en la
bomba aumentando la ventilaci6n, operando la mAquina durante
perfodos mAs prolongados o instalando un juego de calefactores del
carter externos.

CONSIDERACIONES SOBRE EL RUIDO. Consulte alas
autoridades locales sobre los niveles aceptables de ruido en su &rea.
Para reducir el exceso de ruido, use silenciadores en la admision o
almohadillas aislantes de la vibracion (excepto en los Modelos 2000 y
2000P), ubique la unidad en otro lugar o construya recintos totalmente
cerrados o paredes acesticas.
MONTAJE
/_ ADVERTENClA Antes del montaje, retire la unidad de los patines.
UNIDADES CON MOTOR ELf:CTRICO. Emperne la unidad a una
base nivelada y firme (como un piso de concreto). No apriete
excesivamente las patas desniveladas a la base, ya que esto causar_
una excesiva tensi6n sobre el tanque receptor. Si es necesario, use
cutlas de metal bajo las patas m_s cortas. NO USE ALMOHADILLAS
AISLANTES DE LA VIBRACION EN LOS MODELOS 2000 Y
2000P.
Montaje permanente tipico (ferreteria suministrada por el cliente)
Ar andei8 plana
ArandeJa de L_._
aislamiento
aislamiento, si
es necesado Anclaie de tira%ndo
papa concreto
UNIDADES CON MOTOR A GASOLINA. Emperne la unidad a una
base nivelada y firme. No apriete excesivamente las patas desniveladas
a la base, ya que esto causar_ una excesiva tensi6n sobre el tanque
receptor. Si es necesario, use cutlas de metal bajo las patas m_s
cortas. Las unidades con motor a gasolina montadas sobre plataformas
de cami6n se deben fijar firmemente sin aplicar una tensi6n excesiva
sobre el tanque receptor. Recomendamos instalar un juego aislador de
vibraciones en los modelos de motor a gasolina.
INSTALACION DE LA TUBERiA DE ADMISION
REMOTA DE AIRE
N PRECAUCl0N No haga funcionar la unidad sin un filtro de entrada
de aire.
Si el aire alrededor de la unidad est& relativamente libre de polvo,
instale el filtro de entrada de aire en la conexi6n de toma de la bomba.
Si el aire est_ sucio, conecte el filtro a una fuente de aire limpio. Use
tubos pl&sticos de PVC para la tubefia de admisi6n remota. No use
tubos negros ni tubos galvanizados, ya que ellos fomentan la
condensacion y la oxidacion. Considere la instalacion de un filtro de tipo
en linea para facilitar la limpieza y el reemplazo. Haga la linea Io mas
corta y directa posible y con el diametro mas grande posible o al menos
superior al diametro de la conexion de toma en la bomba. No instale
tuberias con un diametro inferior al de la toma de la bomba.
Aumente el di_metro de la tuberia en un tamafio por cada 10 pies (3 m)
de Iongitud o cada 90 ° de curvatura. Compruebe que la tuberia est&
adecuadamente acodada.
Si conecta el filtro hacia el exterior, cebralo con un sombrerete para
evitar la entrada de Iluvia o nieve.
Se dispone de equipos de filtraci6n y elementos de filtro de uso
intensivo para el polvo fino presente en el aire, como el polvo de roca y
cemento.
Tipica tuberia de admisi6n remota de aire.
CODO __
iifferior/!6a ples) TbBO --
MANGUE NION EN TE
BUJES /
VALOR DE OREN,aJE
-- _IERTA
------. PARED F_XTER[OR
INSTALACION DE TUBERIA DE DESCARGA
/k WARNING No use tuberia pldstica, accesorios de cobre
soldados, manguera de caucho o uniones soldadas
con plomo-estafio en ninguna parte del sistema de
aire comprimido.
/k iPRECAUCION! Si usa el lubricante sintdtico para compresores, todo
el material de la tuberia descendente y los
componentes del sistema deben ser compatibles.
Consulte la lista de compatibilidad de materiales que
se indica a continuacibn. Si hay materiales
incompatibles en su sistema o si hay materiales que
no aparecen en la lista, comuniquese con
Ingersoll-Rand para obtener recomendaciones..
LUBRICANTE SINTETICO PARA COMPRESORES
LISTA DE COMPATIBILIDAD DE MATERIALES
ADECUADOS
Viton®, Teflon®, epoxia (relleno con vidrio), alkido resistente al aceite,
fluorosilicona, fluorocarbono, polisulfuro, uretano de dos componentes,
nil6n, Delrin®, Celcon®, goma con alto contenido de nitrilo (Buna N. NBR
con m&s de un 36% de acrilonitrilo), poliuretano, polietileno, epiclorhidrina,
poliacrilato, melamina, polipropileno, fen61icos secados, epoxias, alkidos
modificados
(® indica una marca registrada de DuPont Corporation)
NO RECOMENDADOS
Neopren, goma natural, goma SBR, pintura acrilica, laca, barniz,
poliestireno, PVC, ABS, policarbonatos, acetato de celulosa, goma con
bad contenido de nitrilo (BUNA N. NBR con menos de un 36% de
acrilonitrilo), EPDM, acetato de vinilo etileno, I&tex, EPR, acrflicos, fenoxi,
polisulfones, acrilonitrilo estireno (San), butilo
NOTA Todos los sistemas de aire comprimido producen
liquido condensado que se acumula en todos los
puntos de drenaje (por ejemplo, tanques, filtros, tubos
de goteo, posenfriadores, secadores, etc.). Este liquido
condensado contiene aceite lubricante y/o otras
materias que pueden estar sujetos a regulaciones y se
deben desechar en conformidad con las leyes y
normativas locales, federales y estatales.
REQUISITOS GENERALES. Las tuberias, accesorios, tanque
receptor, etc., deben ser de seguridad certificada para al menos la
presi6n de trabajo de la unidad. Use tuberias y accesorios de cobre o
hierro fundido de acero roscado o soldadura dura que tengan seguridad
certificada para la presi6n y temperatura de descarga del compresor..
NO USE PLASTICO PVC EN LA LINEA DE DESCARGA DE AIRE
COMPRIMIDO. Use sellante de roscas en todas las roscas y junte
hermeticamente las uniones para evitar fugas de aire.
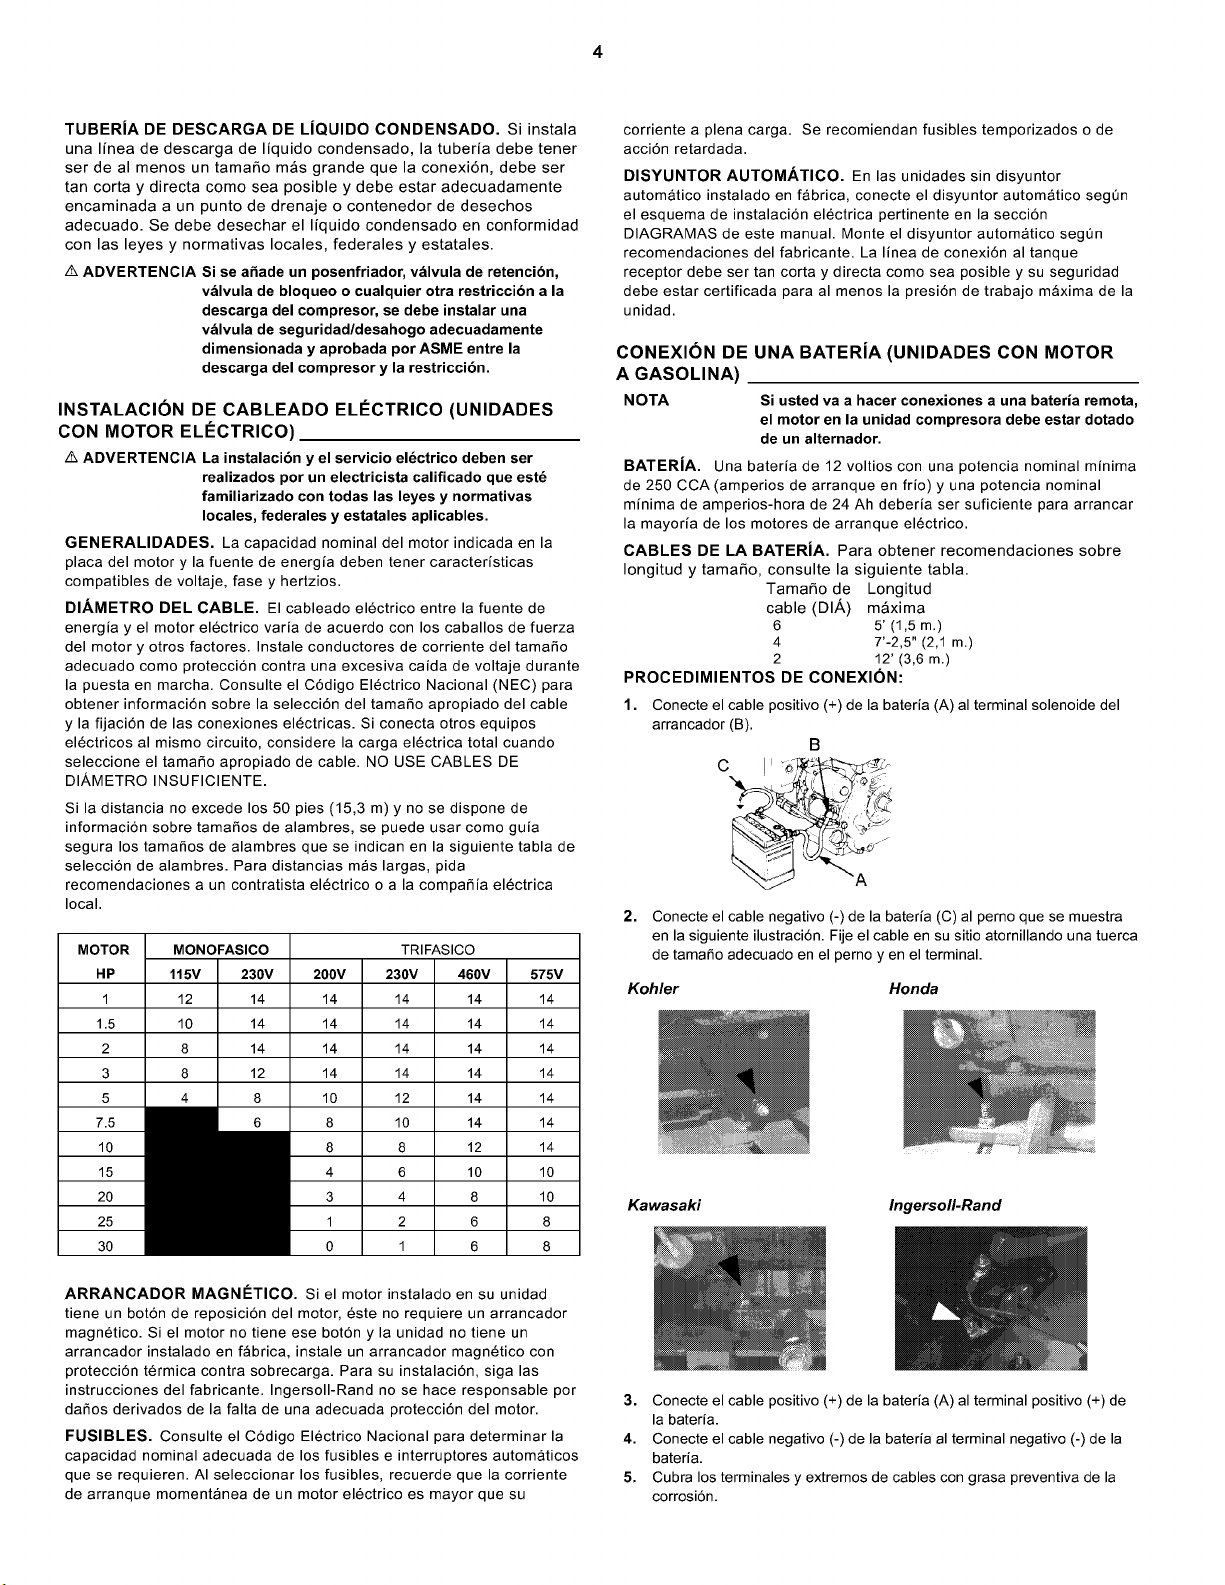
TUBERiA DE DESCARGA DE L[QUIDO CONDENSADO. Si instala
una Ifnea de descarga de liquido condensado, la tuberia debe tener
ser de al menos un tamafio mAs grande que la conexi6n, debe ser
tan corta y directa como sea posible y debe estar adecuadamente
encaminada a un punto de drenaje o contenedor de desechos
adecuado. Se debe desechar el Ifquido condensado en conformidad
con las leyes y normativas locales, federales y estatales.
/k ADVERTENCIA Si se ahade un posenfriador, vAIvula de retencibn,
vAIvula de bloqueo o cualquier otra restriccibn a la
descarga del compresor, se debe instalar una
vAIvula de seguridad/desahogo adecuadamente
dimensionada y aprobada por ASME entre la
descarga del compresor y la restriccibn.
INSTALACION DE CABLEADO ELECTRICO (UNIDADES
CON MOTOR ELI_CTRICO)
A ADVERTENClA La instalacibn y el servicio el6ctrico deben ser
realizados por un electricista calificado que est6
familiarizado con todas las leyes y normativas
locales, federales y estatales aplicables.
GENERALIDADES. La capacidad nominal del motor indicada en la
placa del motor y la fuente de energfa deben tener caracterfsticas
compatibles de voltaje, fase y hertzios.
DIAMETRO BEL CABLE. El cableado electrico entre la fuente de
energia y el motor electrico varia de acuerdo con los caballos de fuerza
del motor y otros factores. Instale conductores de corriente del tamafio
adecuado como proteccion contra una excesiva caida de voltaje durante
la puesta en marcha. Consulte el C6digo Electrico Nacional (NEC) para
obtener informaci6n sobre la selecci6n del tamafio apropiado del cable
y la fijaci6n de las conexiones electricas. Si conecta otros equipos
electricos al mismo circuito, considere la carga el6ctrica total cuando
seleccione el tamafio apropiado de cable. NO USE CABLES DE
DIAMETRO INSUFICIENTE.
Si la distancia no excede los 50 pies (15,3 m) y no se dispone de
informacion sobre tamafios de alambres, se puede usar como guia
segura los tamafios de alambres que se indican en la siguiente tabla de
seleccion de alambres. Para distancias mas largas, pida
recomendaciones a un contratista electrico o a la compafiia el6ctrica
local.
MOTOR
HP
1
1.5
2
3
5
7.5
10
15
20
25
30
MONOFASICO TRIFASICO
115V 230V 2O0V 230V 460V 575V
12 14 14 14 14 14
10 14 14 14 14 14
8 14 14 14 14 14
8 12 14 14 14 14
ARRANCADOR MAGN#TICO. Si el motor instalado en su unidad
tiene un boton de reposicion del motor, este no requiere un arrancador
magnetico. Si el motor no tiene ese boton y la unidad no tiene un
arrancador instalado en fAbrica, instale un arrancador magnetico con
protecci6n termica contra sobrecarga. Para su instalaci6n, siga las
instrucciones del fabricante. Ingersoll-Rand no se hace responsable por
dafios derivados de la falta de una adecuada protecci6n del motor.
FUSIBLES. Consulte el Codigo Electrico Nacional para determinar la
capacidad nominal adecuada de los fusibles e interruptores automaticos
que se requJeren. AI seleccionar los fusibles, recuerde que la corriente
de arranque momentanea de un motor electrico es mayor que su
corriente a plena carga. Se recomiendan fusibles temporizados o de
acci6n retardada.
DISYUNTOR AUTOMATICO. En las unidades sin disyuntor
automatico instalado en fabrica, conecte el disyuntor automatico segQn
el esquema de instalacion electrica pertinente en la seccion
DIAGRAMAS de este manual. Monte el disyuntor automatico seg0n
recomendaciones del fabricante. La linea de conexi6n al tanque
receptor debe ser tan corta y directa como sea posible y su seguridad
debe estar certificada para al menos la presi6n de trabajo maxima de la
unidad.
CONEXION DE UNA BATERJA (UNIDADES CON MOTOR
A GASOLINA)
NOTA Si usted va a hacer conexiones a una bateria remota,
el motor en la unidad compresora debe estar dotado
de un alternador.
BATERiA. Una bateria de 12 voltios con una potencia nominal minima
de 250 CCA (amperios de arranque en frio) y una potencia nominal
minima de amperios-hora de 24 Ah deberia ser suficiente para arrancar
la mayorfa de los motores de arranque el6ctrico.
CABLES DE LA BATERiA. Para obtener recomendaciones sobre
Iongitud y tamafio, consulte la siguiente tabla.
Tamafio de Longitud
cable (DIA) maxima
6 5' (1,5 m.)
4 7'-2,5" (2,1 m.)
2 12' (3,6 m.)
PROCEDIMIENTOS DE CONEXI(_N:
1.
Conecte el cable positivo (+) de la bateria (A) al terminal solenoide del
arrancador (B).
B
c I' _-'_J_.'b__ ,
2. Conecte el cable negativo (-) de la baterfa (C) al perno que se muestra
en la siguiente ilustraci6n. Fije el cable en su sitio atornillando una tuerca
de tamafio adecuado en el perno y en el terminal.
Kohler Honda
Kawasaki Ingersoll-Rand
3. Conecte el cable positivo (+) de la bateria (A) al terminal positivo (+) de
la bateria.
4. Conecte el cable negativo (-) de la bateria al terminal negatJvo (-) de la
bateria.
5, Cubra los terminales y extremos de cables con grasa preventJva de la
corrosion.

AADVERTENCIA Antes de hacer mantenimiento, retire el cable del
lado negativo (-) de la bateria.
Para m_s informaci6n, consulte las instrucciones del fabricante del
motor.
INSTALAClON DE LA BOMBA DE COMBUSTIBLE
(UNIDADES CON MOTOR A GASOLINA)
Algunos motores usan una bomba de combustible opcional para
suministrar directamente gasolina al motor desde el sistema de
combustible a bordo de un vehfculo. Instale la bomba de combustible
dentro de una distancia de 12 pulgadas (30 cm) de la superficie inferior
del tanque de combustible del vehiculo. Proteja la bomba de la
contaminaci6n instalando una valvula de aislamiento de combustible y
un filtro en linea entre el sistema de combustible de la bomba.
LUBRICACION DEL COMPRESOR
A PRECAUCl6N No haga funcionar el compresor sin lubricante o con
un lubricante inadecuado. Ingersoll-Rand no se hace
responsable en caso de fallas del compresor
causadas por una lubricacibn inadecuada.
LUBRICANTE SINTf:TICO PARA COMPRESORES. Ingersoll-Rand
recomienda el lubricante sintetico All Season T30 Select desde la
puesta en marcha. Consulte la secci6n GARANT[A para obtener
informaci6n respecto a la garantia ampliada.
OTROS LUBRICANTES. Puede usar XL-300 o un lubricante basado
en petr61eo comparable que sea de primera calidad, que no contenga
detergentes, que contenga s61o agentes anticorrosivos, antioxidantes y
antiespumantes como aditivos, con un punto de inflamaci6n de 440°F
(227°C) o superior y una temperatura de ignici6n de 650°F (343°C) o
superior.
Consulte la tabla de viscosidad de lubricantes de petr61eo a
continuaci6n. La tabla pretende servir s61o como guia general. Las
condiciones de operaci6n de uso intensivo requieren una mayor
viscosidad. Consulte a Ingersoll-Rand para obtener recomendaciones
sobre sus condiciones de operaci6n especificas.
Temperatura
alrededor del
compresor
°F [ °C
<40 < 4,4
40-80 4,4-26,7
80-125" 26,7-51,0"
Viscosidad a 100°F Grado de
(37,8°C) viscosidad
SUS I Centistokes ISO I SAE
150 32 32 10
500 110 100 30
750 165 150 40
* = Para los Modelos 2000 y 2000P, use Ingersoll-Rand
XL-740HT Compressor Oil para temperaturas mbs de 100°F
(37,7°C).
Si usted usa un lubricante en base a petr61eo para compresores durante
la puesta en marcha y posteriormente decide cambiar a All Season T30
Select, se debe descarbonizar y lavar la bomba antes de la conversi6n.
Comuniquese con Ingersoll-Rand para m_s informaci6n.
PROCEDIMIENTOS DE LLENADO:
[o_o][',i_
1. Destornille y saque el tap6n de Ilenado de aceite (A).
2. Llene el carter con lubricante.
3. Vuelva a poner el tap6n del aceite y APRIETE UNICAMENTE A MANO,
A PRECAUCl0N No retire el tapbn de Ilenado de aceite mientras el
compresor est_ funcionando.
Modelo Capacidad de c_rter
2340 28 oz.(827 ml.)
2475 41 oz.(1212 ml.)
2545 73 oz.(2158 ml.)
7100 80 oz.(2365 ml.)
15T, 2000,2000P 144 oz.(4258 ml.)
Use uno de los siguientes metodos ilustrados para determinar cuando el
carter esta Ileno.
E F
A = Nivel FULL (lleno) en la rosca inferior del orificio de Ilenado de
aceite en las unidades sin visor o sin indicador del nivel de aceite.
B = Nivel ADD (agregar) debajo de la rosca inferior del orificio de
Ilenado de aceite en las unidades sin visor o sin indicador del nivel de
aceite.
C = Nivel FULL en las unidades con visor.
D = Nivel ADD en las unidades con visor.
E = Nivel ADD en las unidades con indicador del nivel de aceite.
F = Nivel FULL en las unidades con indicador del nivel de aceite.
INTERRUPTOR DE BAJO NIVEL DE ACEITE
Se puede instalar un interruptor de bajo nivel de aceite activado por
flotaci6n, para proteger la unidad contra dafios debido a un nivel
insuficiente de aceite del compresor. Un nivel bajo de aceite en el carter
del compresor hace que los contactos del interruptor se abran,
apagando la unidad hasta que se haya restaurado el nivel apropiado de
aceite.
La protecci6n apropiada contra in bajo nivel de aceite depende del
ajuste apropiado del interruptor de bajo nivel de aceite. Durante la
marcha inicial, detenga la unidad y vacie un cuarto del aceite desde el
c_rter del compresor en un recipiente limpio adecuado. Escuche c6mo
el interruptor hace clic o revise el interruptor con un probador de
continuidad.
A veces el flotador se activa o atasca durante el traslado. Si el flotador
esta activado o atascado, abra el interruptor de desconexi6n, vacie el
aceite restante, retire la cubierta del carter y luego libere el flotador.
Rearme y vuelva a usar el mismo aceite.
NOTA Si el flotador est_ activo en la posici6n baja, la
unidad no podr_ arrancar.
FORMULA DE USO INTERMITENTE
Los modelos que operan a mas de 200 PSIG se deben operar segen la
"F6rmula de uso intermitente".
FORMULA DE USO INTERMITENTE
El tiempo de bombeo normalmente no debe ser superior a
treinta (30) minutos ni inferior a diez (10) minutos. Los
periodos de apagado entre ciclos de operacion deben ser por
Io menos iguales al tiempo de bombeo. NOTA Cuando el
compresor se regula por medio de un control de velocidad
constante, el periodo de apagado es el tiempo que el
compresor opera sin carga.
Con respecto a la capacidad del carter, consulte la siguiente tabla,

Serecomiendaunlimitedetiempodebombeoconelsiguienteperfodo
deenfriamientoparaprotegerlasvMvulasylasculatascontraaltas
temperaturasestablesdeoperaci6n,quepuedenacumularrapidamente
carb6nenestasAreas.
Todaslasconsultassobrelaaplicaci6ndelcompresoraaltapresi6n
dondeelciclode"uso"difieradela"F6rmuladeusointermitente"se
debenreferiraIngersoll-Rand.
ARRANQUE (MODELOS DE MOTOR DE ACCIONAMIENTO
ELECTRICO)
1. Cierre la vAIvula de servicio.
2. Deje escapar la presi6n que quede en el tanque, abriendo lentamente la
vAIvula de drenaje manual.
3. Cierre la vAIvula de drenaje manual y aplique corriente al compresor. Si
el disyuntor automatico posee una palanca "ON/AUTO-OFF", Ileve el
interruptor a la posici6n "ON/AUTO". Si la unidad posee un interruptor
"ON/OFF" en el panel de control, Ileve el interruptor a la posici6n "ON".
Tipica palanca del disyuntor autom_tico (si Io hay)
ENCEN DIDO!AUTOM_TICO APAGADO
4. Abra lentamente la vAIvula de servicio.
Tipica vi_lvula de sencicio (A = abierta, B =cerrada)
A PRECAUCION
NOTA
Cualquier ruido o vibracibn poco comunes indican
que hay un problema. No contint_e con la operacibn
hasta despu_s de identificar y solucionar la causa
del problema.
Compruebe que el sentido de rotacibn es correcto
segQn la flecha del motor. Si la rotacibn es
incorrecta en las unidades trifAsicas, intercambie
dos de los tres conductores.
ARRANQUE (UNIDADES CON MOTOR A GASOLINA)__
A ADVERTENClA No opere las unidades con motor a gasolina en un
Area cerrada.
1. Deje escapar la presi6n que quede en el tanque, abriendo lentamente la
vAIvula de drenaje manual.
2. Active el abastecimiento de gasolina del motor.
3. Ponga el estrangulador en la posici6n "on".
4. Cierre la vAIvula de servicio y ponga la palanca del descargador en la
posici6n de "descarga" (A) para los modelos con motores Kawasaki y
Honda y Ingersoll-Rand, o en la posici6n "carga" (B) para los modelos
con motor Kohler.
5. Arranque el motor, suelte el estrangulador y deje que el motor se
caliente durante dos a tres minutos.
6. Devuelva la palanca del descargador a la posici6n "carga" (B) en los
modelos con motores Kawasaki y Honda y Ingersoll-Rand.
Tipico descargador (A = descarga, B = carga)
NOTA
Corte el suministro de gasolina cuando no estd
usando el compresor.
NOTA
Algunos compresores impulsados por motores a
gasolina requieren 5-8 horas de operacibn de rodaje
antes de alcanzar su plena capacidad y velocidad.
CONTROLES DEL COMPRESOR
CONTROL AUTOMATICO DE ARRANQUE Y PARADA. Este tipo
de control se aplica a los modelos accionados por motor electrico de
menos de 10 caballos de fuerza.
NOTA El control automAtico de arranque y parada estA
destinado al uso de motores que no arrancan mAs
de 6 veces por hora.
Cuando la presi6n del tanque receptor alcanza la presi6n maxima
preestablecida en fabrica (comt)nmente 175 PSIG), el disyuntor
automatico detiene la unidad. Cuando la presi6n del tanque receptor
baja a menos del minimo preestablecido en la fabrica, el disyuntor
automatico se repone en cero y rearranca la unidad.
CONTROL DE VELOCIDAD CONSTANTE. Este tipo de control se
aplica alas unidades con motor a gasolina.
Cuando la presi6n del tanque receptor alcanza la presi6n maxima
preestablecida en fabrica (comt)nmente 175 PSIG), el descargador
disminuye la velocidad del motor y la unidad deja de bombear. Cuando
la presi6n del tanque receptor baja a menos del minimo preestablecido
en la fabrica (comt)nmente 145 PSIG), el descargador se restablece, el
motor vuelve a velocidad plena y la unidad reinicia el bombeo.
CONTROL DOBLE. Este tipo de control se aplica a las unidades con
motor electrico de mAs de 10 caballos de fuerza. Seleccione ya sea
control automAtico de arranque y parada o control de velocidad
constante ajustando la perilla de la vMvula auxiliar. Para el control
automatico de arranque y parada, gire la perilla de la valvula auxiliar
totalmente a la derecha para desactivar la valvula auxiliar. Entonces, el
disyuntor automatico arrancara y detendra la unidad.
NOTA Para los modelos de control doble, se prefiere el
arranque y parada autom_ticos.
V_lvula auxiliar
PEI_ILLA J_
HACIA LA DERECHA
HACIA LA IZQUIERDA
CONTROLES DE AJUSTE. Todos los disyuntores automaticos tienen un
control de ajuste de gama (A). Algunos disyuntores automaticos tambien
tienen un control de ajuste diferencial (B). En los disyuntores sin control de
ajuste diferencial, el tramo entre los interruptores de niveles de presi6n de
conexi6n y desconexi6n se establece en fabrica a 40 _+4 PSIG y no se
puede ajustar.
NOTA Algunos disyuntores autom_ticos est_n equipados con
una palanca de encendido y apagado que se usa para
abrir y cerrar los contactos eldctricos dentro del
interruptor. ESTA PALANCA NO ES UN CONTROL DE
AJUSTE DIFERENCIAL. Los disyuntores automaticos
con palanca de encendido y apagado no tienen un
control de ajuste diferencial.
PROCEDIMIENTOS DE AJUSTE (DISYUNTORES SIN CONTROL DE
AJUSTE DIFERENCIAL):
1. Retire la cubierta del disyuntor autom_tico.
2. Ajuste la escala girando el tornillo de ajuste de escala a la derecha (hacia
adentro) para aumentar el punto de desconexi6n o a la izquierda (hacia
afuera) para reducir el punto de desconexi6n.
NOTA Un giro completo cambia el ajuste aproximadamente en
2 PSIG
3. Vuelva a colocar la cubierta, reconecte la fuente de alimentaci6n y arranque
el compresor.

4. Fijeseenlalecturadelman6metroalaquesedesconectaelcompresor.
5. Siesnecesario,repitaelprocedimientodeajuste.
Ajuste del range del disyuntor neum_tico.
PROCEDIMIENTOS DE AJUSTE (DISYUNTORES CON CONTROL
DE AJUSTE DIFERENClAL):
1. Retire la cubierta del disyuntor automatico.
2. Ajuste la presi6n de conexi6n con la tuerca de ajuste de escala. Gire la tuerca
a la derecha (hacia adentro) para aumentar la presi6n o a la izquierda (hacia
afuera) para reducir la presi6n.
NOTA Un giro completo cambia el ajuste en aproximadamente
2 PSIG.
3. Ajuste la presidn de desconexi6n con el ajuste diferencial. Gire la tuerca de
ajuste diferencial a la derecha (hacia adentro) para aumentar la presi6n o a la
izquierda (hacia afuera) para reducir la presi6n.
NOTA Un giro completo cambia el ajuste en aproximadamente
2 PSIG.
4. Vuelva a colocar la cubierta, reconecte la fuente de alimentaci6n y arranque
la unidad.
5. Fijese en la lectura del mandmetro a la que se desconecta la unidad.
6. Si es necesario, repita el procedimiento de ajuste.
El diferencial minimo posible es de aproximadamente un 20% de la presi6n
de desconexi6n. Es aconsejable tener un diferencial Io mas amplio posible
para evitar frecuentes arranques y detenciones de la unidad. Fijese en la
lectura del man6metro a la que se desconecta la unidad y restablezca este
punto si es necesario.
Observe la interacci6n entre los ajustes de escala y diferencial, esto es, si
se aumenta la desconexidn, el diferencial tambi6n aumentarA, o si se
estrecha el diferencial, se reducira la desconexi6n, etc. Estos factores se
deben tener en cuenta cuando se ajusta el interrupter y se deben hacer las
correspondientes compensaciones.
AJUSTE DE LA PRESlON DEL ACEITE (MODELO 2000P)__
Para compresores lubricados a presi6n, se debe revisar la presi6n del
aceite al momento del arranque, observando el indicador de presi6n de
aceite. El rango de operaci6n aceptable es de 15-40 psig. Es normal
que la presi6n de aceite varie ligeramente con la temperatura del
aceite. Los compresores dotados de un sistema de apagado opcional
por baja presi6n de aceite se apagan autom_ticamente si la presi6n del
aceite desciende por debajo de los 10 psig.
La bomba de aceite posee un regulador ajustable de presi6n que se
puede restablecer si las condiciones asi Io exigen. Consulte la siguiente
ilustracion e instrucciones:
1. Use una Ilave inglesa graduable para retirar la cubierta estriada de la
v&lvula del lado derecho de la caja de la bomba de aceite (A).
2. Afloje la tuerca de retenci6n (B) con un Ilave de torsi6n de 7/16" de
modo que la varilla roscada (C) pueda girar libremente.
3. Usando una Ilave hexagonal de 1/8", ajuste la varilla roscada segt_n
desee. AI girar la varilla hacia la derecha aumentar& el ajuste de presi6n
de aceite; al girarla hacia la izquierda, disminuir_ la presi6n de aceite.
4, Cuando haya ajustado la presion de aceite, apriete la tuerca de
retencion y vuelva a colocar la cubierta estriada,
SISTEMA DE DESCARGA EN EL ARRANQUE
En determinados modelos existe la funci6n de descarga en el arranque. El
prop6sito de este sistema es aliviar la presidn de los cilindros cuando la
unidad se detiene, permitiendo que arranque con una carga ligera. Una
carga ligera aumenta la vida del controlador y las correas y ademas reduce
la posibilidad de que se gatille el rel6 de sobrecarga. El sistema opera de la
siguiente manera:
El descargador centrifuge se conecta junto al extremo del cig_efial, como se
muestra en las siguientes ilustraciones.
Cuando la unidad arranca, la fuerza centrifuga act_a sobre las pesas del
descargador y 6stas giran hacia afuera. Esto permite que el pasador de
empuje y el piston se muevan hacia adentro y que la vAIvula piloto se cierre.
La trayectoria de escape a la atm6sfera para la presi6n del cilindro ahora
esta cerrada y el compresor bombea aire de una manera normal•
Cuando la unidad se detiene, las pesas se retraen, permitiendo que el
resorte del pasador de empuje mueva hacia afuera el piston y el pasador de
empuje. El pasador de empuje abre la valvula piloto y la presi6n del aire
atrapado escapa del cilindro e del interenfriador a traves de un pasaje en la
cubierta del extremo del armaz6n, a trav6s del tubo del descargador y a la
atm6sfera a traves del silenciador/filtro de entrada.
Posicion de la pesa y pasador cuando la unidad est# en funcionamiento.
/
Posici6n de la pesa y pasador de empuje cuando se detiene la unidad.
// CleUENAL _" "_:" "x\\ ":
• , / ' - \
F_ESOR'rE net CU_AS[_ RELLENO
DE _'V" PUJE ESPACIO
ARRANQUE DEL SISTEMA DE DESCARGA (MODELOS DE
LUBRICADO A PRESION)
Los compresores lubricados a presi6n usan un sistema hidraulico de
descarga para proporcionar un arranque sin carga. Adem_s, este
sistema ofrece una descarga de emergencia si se pierde la presi6n del
aceite durante la operaci6n del compresor.
Cuando se pierde la presi6n del aceite, el circuito del descargador
hidr_ulico deja fuera de circuito la v&lvula auxiliar (H), para dirigir el aire
de control a los descargadores del cabezal. Este circuito esta controlado
por la valvula del descargador hidraulico (E), una valvula normalmente
abierta que se cierra cuando sube la presi6n del aceite. Durante la
operaci6n del compresor, la presi6n del aceite mantiene cerrada la
valvula del descargador hidraulico. La acci6n del descargador del
cabezal esta controlada por la valvula auxfliar,

Cuandosepierdelapresi6ndelaceite,yaseadebidoalapagadodel
cornpresoroaunproblemadelubricaciondurantelaoperaciondel
cornpresor,eldescargadorhidraulicoseabre,accionandolos
descargadoresdelcabezal(F).Estaacci6noventilaelcompresorde
apagadoenpreparaci6nparaelsiguientearranqueoliberalacargade
cornpresi6nparaminirnizarlosdafiossisepierdepresiondeaceite
mientraselcornpresorestafuncionando.
D F
C \
" iiiiiii t
/
A = Bomba de aceite
B = Filtro de aceite
C = Manometro de aceite
D = Presostato de aceite
E = Vdlvula de descarga hidr_ulica
F = Descarcagores de cabeza
G = V_lvula de doble efecto
H = Vdlvula auxiliar
I= Receptor
AJUSTE DE LA VALVULA PILOTO
Si la linea del tube de la v_lvula piloto est_ excesivamente caliente, es
una buena indicaci6n de que la valvula piloto tiene fugas y requiere un
ajuste.
Para ajustar la v_lvula piloto, proceda como se indica a continuaci6n:
1. Detenga la unidad y desconecte y etiquete el surninistro electrico
principal para evitar un arranque accidental.
2. Retire el tubo de la v&lvula piloto y los accesorios del tube.
3. Retire el cuerpo de la valvula piloto y todos los suplernentos de ajuste
existentes.
4. Vuelva a atornillar el cuerpo de la valvula piloto en la cubierta del
extremo de la armaz6n (sin suplementos de ajuste), hasta que sienta el
contacto con el pasador de ernpuje. Avance el cuerpo de la valvula piloto
en 1/4 a 1/2 vuelta mas.
Si no siente el contacto con el pasador de empuje, pueden ser
necesarios los siguientes pasos para Iocalizar el punto de contacto:
1. Inserte un instrumento pequefio (punzon, varilla, clavo, etc.) en el
extremo de la v&lvula piloto hasta que toque el v&stago de v&lvula.
2. Mientras a_n est_ insertado en la v&lvula piloto, haga una marca en el
instrurnento a nivel con el borde externo del cuerpo de la valvula piloto.
3. Manteniendo el instrumento ligeramente oprimido contra el v_stago de la
valvula, atornille el cuerpo de la valvula piloto en la cubierta del extreme
de la armaz6n. Cuando la marca en el instrumento comience a salir del
borde del cuerpo de la valvula piloto, habra hecho contacto con el
pasador de ernpuje.
4. Avance el cuerpo de la v_lvula piloto 1/4 a 1/2 vuelta m&s y contin6e con
el paso cinco.
5. Mida el espacio entre el cuerpo de la v_lvula piloto y la cubierta del
extrerno de la armazon.
6. Retire el cuerpo de la v&lvula piloto y agregue suficientes suplementos
de ajuste para Ilenar el espacio medido en el paso cinco.
7. Vuelva a atornillar el cuerpo de la valvula piloto en la cubierta del
extremo de la armaz6n, hasta que el cuerpo quede apretado sobre los
suplernentos de ajuste.
8. Vuelva a conectar el tube de la v&lvula piloto y los accesorios del tube.
hV_!'_,__IIII=1_IhV_II=1_IIlie]
DESVIO DEL RESPIRADERO/DESCARGADOR
Las lineas de los tubes de desvio del respiradero/descargador eliminan
la acurnulaci6n de presi6n de aire en la armaz6n del compresor,
proporcionando un conducto para que escape el aire a trav_s del
descargador de admisi6n (si est& abierto) o (si est& cerrado) a trav_s de
la valvula de retenci6n, pasando por alto de esta rnanera el
descargador de admisi6n y escapando a la atmosfera a traves del filtro
de entrada/silenciador.
COMPROBACIC)N DEL CONSUMO DE ACEITE
Una regla empirica para determinar un "grade de aprobado" para el
consume de aceite es considerar come aceptable un consume de 50
caballos de fuerza-horas o rnas per onza.
La f6rmula es la siguiente:
Caballos de fuerza X Horas de = Horas de caballos de
operaci6n fuerza por onza
Onzas de aceite utilizadas
Para aplicar esta f6rmula, considere el tamafio de la m&quina. En el
ejemplo siguiente, un compresor de 5 caballos de fuerza usa 2 onzas
de aceite cada 20 horas de operaci6n.
5 caballos de fuerza X 20 horas de = 50 horas de caballos
operaci6n de fuerza por onza
2 onzas de aceite
utilizadas
El compresor del ejernplo pasa la prueba de consurno de aceite.
NOTA Las bombas de compresor nuevas o
reacondicionadas descargar_n cantidades de aceite
m_s altas que Io normal hasta que se asienten los
anillos del pistbn (aproximadamente 100 horas de
operacibn).
A ADVERTENCIA Antes de realizar el mantenimiento, suelte la presibn
de aire del sistema y desconecte, bloquee y etiquete
el suministro de alimentacibn principal o desconecte
el cable de la bujia del motor.
NOTA Todos los sistemas de aire comprimido
contienen componentes sujetos a mantenimiento
(por ejemplo, aceite lubricante, filtros,
separadores) que se deben reemplazar
peribdicamente. Estos componentes usados
pueden o no contener substancias sujetas a
regulaci6n y se deben desechar en conformidad
con las leyes y normativas locales, federales y
estatales.
NOTA
NOTA
NOTA
NOTA
Tome nota de las posiciones y ubicaciones de las
piezas durante el desmontaje para facilitar el
reensamblaje. Las secuencias del montaje y las
piezas ilustradas pueden diferir para su unidad
particular.
Cualquier operacibn de servicio que no se incluya
en esta seccibn debe ser ejecutada por un
representante autorizado.
Para obtener informacibn sobre cuidado del motor,
consulte el manual del propietario del motor.
El siguiente calendario de mantenimiento rige en
aplicaciones normales. Es necesario acortar los
intervalos de mantenimiento en ambientes m_s
extremos.

Diariamente o
antes de cada
operaci6n
Semanalmente
Mensualmente
3/500 *
6/1000 *
12/2000 *
CALENDARIO DE MANTENIMIENTO
• Verifique que hay escapes de aceite.
• Revise el nivel del lubricante. Rellene seg6n sea
necesario.
• Vacie el condensado del tanque receptor (si no
hay un dispositivo de drenaje automatico). Abra
la valvula de drenaje manual, recoja y disponga
del liquido condensado segen corresponda.
• Verifique si hay vibraciones y ruidos inusuales.
• Aseg6rese de que las guardabandas y las
cubiertas esten bien sujetas en su lugar.
• Compruebe que el motor (si Io hay) este Ileno de
combustible y lubricante segen las
recomendaciones del fabricante.
• Compruebe que el _lrea alrededor del compresor
est6 libre de trapos, herramientas, escombros y
materiales inflamables o explosives.
• En los modelos lubricados a presi6n, revise la
presi6n de aceite del sistema cuando el
compresor este caliente.
• Observe la operaci6n de las v&lvulas de
seguridad/desahogo mientras el compresor est&
funcionando. Reemplace las valvulas de
seguridad/desahogo que no funcionen
libremente.
• Inspeccione el o los elementos de filtro de aire.
Limpie si es necesaria.
• Verifique si hay fugas de aire. Ponga agua
jabonosa alrededor de las juntas mientras el
compresor esta funcionando y observe si se
producen burbujas.
• Revise el apriete de los tornillos y pernos.
Vuelva a apretar si es necesario.
• Revise las correas de transmisi6n. Ajuste si es
necesario.
• Limpie el exterior.
• Cambie el lubricante de petr61eo mientras el
c_rter este tibio.
• Vacie el aceite del compresor y limpie el visor
del aceite
• En los modelos lubricados a presi6n, reemplace
el depurador de aceite y cambie el lubricante (si
es necesario).
• Instale el paquete de mantenimiento
--o--
• Cambie el lubricante sintetico mientras el c_lrter
este tibio.
• Reemplace el elemento de filtro.
* indica meses/horas de operaci6n, Io que ocurra primero.
INSPECCION Y LIMPIEZA DEL FILTRO
1. Destornille y saque la tuerca mariposa (A) que fija la caja del filtro
(B) a su base (C).
2. Saque la caja del filtro y retire el elemento de filtro antiguo (D).
Limpie el elemento con un chorro de aire o un aspirador.
3. Reinstale el elemento de filtro y la caja apretando la tuerca
mariposa.
/
A
CAMBIO DE ACEITE
1. Saque el tap6n de drenaje de aceite (A) y deje que el lubricante se vacie
en un contenedor adecuado.
2. Vuelva a poner el tap6n de drenaje de aceite.
3. Siga los procedimientos de Ilenado de la secci6n OPERACION.
AJUSTE DE LA CORREA
COMPROBAClON DE LATENSION DE LA CORREA. Compruebe
ocasionalmente la tensi6n de la correa, especialmente si sospecha
aflojamiento. Las correas nuevas tambien se deben tensar
adecuadamente en el momento de su instalaci6n.
TENSADO DE CORREAS. Se puede Iograr el tensado de la correa
aflojando los tornillos de anclaje del motor, alejando el motor de la
bomba y volviendo a apretar los tornillos de anclaje del motor. Algunas
unidades estAn provistas de un perno de tensado de correa que,
cuando se gira, aleja el motor de la bomba. Si no Io tienen, el motor se
puede mover f_cilmente colocando bajo 51 una herramienta a modo de
palanca. Tambi6n puede ser t_til un separador disponible en el comercio
u otro aparato para tensar correas.
PERNO DE TENSION
DE CORREA
PERNOS DE ANCLAJE
Siga los procedimientos que se indican m_ls abajo para ajustar y medir
correctamente la tensi6n de la correa en los modelos con motor
el6ctrico y motor a gasolina come el 2340, 2475 y 2545 (s61o con el tipo
de correa "A"). Para una representaci6n visual, consulte la siguiente
ilustraci6n.
, ..............j _ _I _ -_--[-._--------------------w,_o_ co r__ {_)_?
\, , /
ESC _LA OE DIST,_,NCI_
1. Apoye un borde recto en la superficie exterior superior de la transmisi6n
de la correa, desde la polea a la roldana,

10
AI centro del tramo, en forma perpendicular a la correa, aplique presi6n
a la superficie exterior de la correa con un medidor de tensi6n. Fuerce la
correa a la flexi6n indicada en la TABLA DE TENSI6N DE CORREA en
la secci6n DIAGRAMAS Y TABLAS. Compare la lectura del medidor de
tensi6n con la tabla.
Siga los procedimientos descritos m_s abajo para ajustar y medir
correctamente la tensi6n en los modelos de 7,5 a 30 caballos de fuerza
2545, 7100, 15T y 2000 con tipos de correa "B" y "C".
1. Mida la Iongitud del tramo (t) de la transmisi6n.
2. Determine la cantidad de flexi6n (en pulgadas) que se requiere para
medir la fuerza de flexi6n (en libras) multiplicando la Iongitud del tramo
(t) por 1/64. Por ejemplo, una Iongitud de tramo de 32" multiplicada por
1/64 equivale a 1/2" de flexi6n necesaria para medir la fuerza de la
flexi6n.
3. Apoye un borde recto en la superficie exterior superior de la transmisi6n
de la correa, desde la polea a la roldana.
4. AI centro del tramo, en forma perpendicular a la correa, aplique presi6n
a la superficie exterior de la correa con un medidor de tensi6n. Fuerce la
correa a la flexi6n predeterminada que se calcul6 en el paso 2. Compare
la lectura del indicador de tensi6n con la TABLA DE TENSION DE
CORREA en la secci6n DIAGRAMAS Y TABLAS.
Antes de volver a poner en marcha el compresor, compruebe que la
polea y la roldana est6n adecuadamente alineadas y que los tornillos de
anclaje del motor se vuelvan a apretar adecuadamente.
/k PRECAUCION Una alineacibn de la polea y la roldana y tensibn de
la correa inadecuadas pueden generar una
sobrecarga del motor, un exceso de vibracibn y la
falla prematura de la correa y/o el rodamiento.
Para evitar estos problemas, compruebe que la polea y la roldana esten
alineadas y que la tensi6n de la correa sea satisfactoria despues de
instalar correas nuevas o de tensar correas existentes.
INSPECCION DEL TANQUE RECEPTOR
La vida etil de un tanque receptor de aire depende de varios factores,
incluyendo, entre otras cosas, condiciones operativas, ambientales y
nivel de mantenimiento. El efecto preciso de estos factores sobre la
vida 6til del tanque es dificil de predecir; por Io tanto, Ingersoll-Rand le
recomienda programar una inspecci6n certificada del tanque durante los
primeros cinco afios de uso del compresor. Para concertar una
inspecci6n de tanque, comuniquese con Ingersoll-Rand.
Si el tanque no se ha inspeccionado dentro de los primeros 10 afios de
uso del compresor, el receptor se debe dejar fuera de servicio hasta
quehayapasadolainspecci6n. Los tanques que no cumplen con los
requisitos deben ser reemplazados.
/k ADVERTENCIA Si no se reemplaza un tanque receptor de aire
oxidado, el resultado puede ser la ruptura o
explosibn de dicho tanque, Io que podria provocar
importantes dafios a la propiedad y graves lesiones
a las personas o incluso la muerte. Nunca modifique
ni repare el tanque. Consiga su reemplazo en el
centro de servicio t6cnico.

11
PROBLEMA
Desgaste anormal del cilindro, anillo o piston
La entrega de aire disminuye
La vMvula de drenaje autom&tica presenta filtraciones o no drena
autom&ticamente
La vMvula auxiliar tintinea o tiene filtraciones alrededor del v&stago
Tubos rotos en el interenfriador o posenfriador
El compresor no Ilega a la velocidad deseada
El compresor tarda en Ilegar a la velocidad deseada
El compresor se calienta demasiado durante el funcionamiento
El compresor no ejecuta el ciclo de descarga
El compresor no descarga cuando se detiene
Ruido excesivo durante la operacion
Demasiadas partidas y paradas
Golpea o tintinea
Las luces destellean o se aten6an durante la operaci6n
Humedad en el c&rter o apariencia "lechosa" en el lubricante de
petr61eo o herrumbre en los cilindros
La sobrecarga del motor produce una desconexi6n o un consumo
excesivo de corriente
Aceite en la descarga de aire (bombeo de aceite)
Escape de aceite del reten del eje
La vMvula de seguridad/descarga "salta"
Alta presi6n entre etapas
Baja presi6n entre etapas
La maquina chirrfa o no arranca
El motor no arranca
La m&quina no arranca
Escapes de aceite
Presi6n baja de aceite
Fluctuaciones excesivas de la presi6n de aceite (> 5 psi)
PUNTO DE COMPROBACION
4, 8, 9, 19, 28, 35
1,6, 15, 16, 18, 19, 29
16
23, 24
36
2,6,12,15,21
26, 27, 33, 34
3, 14, 15, 22
23, 24, 26
26, 33
2, 6, 15, 16, 21, 27, 32
5, 11, 16, 32, 40
2, 15, 17, 19, 20, 21
12, 13
9,10
5, 6, 12, 13, 14, 15, 16, 19, 20, 21, 34
4,7,9,18,19,25,35
25
1,5,29,30
30
31
6,14,37,38
12
39
41
42,43,44,46
42,43,44,45,46

PUNTO
COMP.
1
2
3
4
5
6
7
8
9
10
12
13
14
15
16
17
18
19
2O
21
22
23
24
25
26
27
28
29
30
31
32
33
34
35
36
37
38
39
40
41
42
43
44
45
46
12
POSIBLE CAUSA
Entrada y/o filtro del tubo de descarga sucios o atascados.
Rueda de banda o polea del motor sueltas, juego excesivo en el eje del motor o
bandas de transmisi6n sueltas.
Ventilaci6n inadecuada alrededor de la rueda de banda.
Lubricante poco viscoso.
Filtraciones de aire en la tuberia de descarga de aire.
Lubricante demasiado viscose.
Exceso de lubricante.
Muy poco lubricante.
Se esta usando lubricante tipo detergente.
Ciclos de operacion extremadamente cortes.
Compresor ubicado en un area h0meda o mojada.
Diferencial del interruptor de presi6n demasiado estrecho.
Voltaje de linea incorrecto.
Panel de servicio el6ctrico o cableado demasiado pequeffo.
Contacto deficiente en los terminales del motor o conexiones del arrancador.
Calefactores incorrectos de sobrecarga del arrancador.
Deficiente regulacion de la potencia (linea desequilibrada).
Bandas de transmision muy apretadas o mal alineadas.
Compressor valves leaky, broken, carbonized or loose.
VAIvulas del compresor rotas, carbonizadas, sueltas o con filtraciones.
Acumulaci6n de carbono sobre el o los pistones.
Anillos del pist6n daffados o gastados (rotos, Asperos o con araffazos). Excesivo
espacio final o separaci6n lateral.
Los anillos del piston no estan asentados, estAn pegados a las ranuras o los
espacios finales no estan escalonados.
Cilindros o pistones con araffazos, gastados o cortados.
Rodamientos de la varilla de union, pasador del piston o del cig0effal gastados o
cortados. Espaciador de rodamientos suelto en el cig0effal.
Rodamientos de bolas defectuosos en el cig0effal o eje del motor..
Sentido err6neo de rotaci6n de la rueda de banda.
Filtraciones, roturas o desgaste en las piezas del descargador de toma.
VAIvula auxiliar sucia o asientos gastados.
Reten del cigbeffal gastado o cigL]effal cortado.
Valvula piloto centrifuga desajustada o con filtraciones.
Valvula de retencion con filtraciones o asiento de la valvula fundido.
Atmosfera extremadamente polvorienta.
Valvula de seguridad/descarga defectuosa.
Filtraciones en la vAIvula de admisi6n de alta presi6n.
Filtraciones en la vAIvula de descarga de baja presi6n.
El modo autom_tico de parada y arranque no es adecuado para la demanda de aire.
El descargador del interruptor de presi6n tiene filtraciones o no funciona.
Temperatura ambiente demasiado baja.
Capa superficial del cilindro desgastada.
Rueda de banda desequilibrada, tubos sin acodar o fijar, velocidad de polea
inadecuada.
La maquina no tiene una conexion a tierra adecuada.
La gasolina ha sido almacenada por demasiado tiempo o contiene agua.
No hay combustible en el tanque.
VAIvula de combustible cerrada.
Baja presi6n de aceite.
Condensaci6n excesiva en tanque receptor.
Accesorios/codos/conectores sueltos
VAIvula del regulador de presi6n de aceite desajustada o defectuosa
Valvula del descargador hidraulico desajustada o defectuosa
Indicador de presion de aceite defectuoso
Espuma de aceite en el carter
Residuos u otras obstrucciones bloqueando el flujo de aceite
POSIBLE SOLUCION
Limpie o reemplace.
Revise la tensi6n y alineaci6n de la rueda de banda, polea del motor, cigL]effal y
banda de transmisi6n. Repare o reemplace seg0n sea necesario.
Ubique el compresor en una posici6n con mejor ventilaci6n.
Vacfe el lubricante existente y vuelva a Ilenar con uno adecuado.
Revise la tuberia y las conexiones. Apriete las uniones o reempl_celas seg0n sea
necesario.
Vacie el lubricante existente y vuelva a Ilenar con uno adecuado.
Vacie el exceso de lubricante.
Agregue lubricante al carter hasta el nivel adecuado.
Vacie el lubricante y vuelva a Ilenar con uno adecuado.
Opere el compresor con ciclos de operacion mas largos.
Cambie de lugar el compresor o instale un juego de calefactores de carter.
Si cuenta con ajuste de diferencial, ajuste el interruptor de presi6n para aumentar el
diferencial. Si desea ajuste de diferencial, instale un interruptor de presi6n con
funci6n de ajuste de diferencial.
Revise el voltaje de Ifnea y mejore las Ifneas seg0n necesario. Comunfquese con un
electricista.
Instale una caja de servicio o cableado de tamaffo correcto. Comuniquese con un
electricista.
Asegure un buen contacto de los terminales del motor o conexiones del arrancador.
Instale calefactores correctos de sobrecarga del arrancador. Comuniquese con un
electricista.
Comuniquese con la compaSia electrica.
Ajuste las bandas a la tension y alineacion adecuadas.
Inspeccione las vAIvulas. Limpie o reempl_celas seg0n sea necesario. Instale el
juego ahorrapasos de v_lvulas/empaquetaduras.
Inspeccione la v_lvula y limpie, repare o reemplace seg0n sea necesario.
Limpie el o los pistones. Repare o reemplace seg0n sea necesario.
Instale el juego ahorrapasos de anillos/empaquetaduras.
Ajuste los anillos del piston.
Repare o reemplace seg0n sea necesario.
Inspeccione todo. Repare o reemplace seg0n sea necesario. Instale el juego
ahorrapasos de rodamientos/biela de conexion.
Inspeccione los rodamientos y reemplace si es necesario. Instale el juego
ahorrapasos de rodamientos/biela de conexi6n.
Revise si las conexiones de cableado del motor son adecuadas. Invierta dos
conductores en los motores trif_sicos.
Inspeccione las piezas y reemplace seg0n sea necesario.
Inspeccione las piezas. Limpie, ajuste o reemplace seg0n sea necesario.
Reemplace el reten. Si es necesario, instale un manguito de eje. Instale el juego
ahorrapasos de rodamientos/biela de conexion.
Reemplace la junta torica de la valvula piloto. Ajuste la valvula piloto.
Reemplace la valvula de retencion.
Instale una tuberia de admision remora de aire y guiela a una fuente de aire mas
limpio. Instale un filtro mas eficaz.
Reemplace.
Inspeccione, limpie o repare seg0n sea necesario.
Inspeccione, limpie o repare seg0n sea necesario.
Ajuste la vAIvula auxiliar para una operaci6n de velocidad constante.
Realinee el vAstago o reemplace.
Instale un juego de calentadores del c_rter. Cambie el lubricante a All Season T30
Select. Lleve el compresor a un entorno de mayor temperatura.
Limpie el cilindro con flex-hone de 180 granulos.
Revise el nivel de vibracion, cambie la polea o rueda de banda si es necesario,
apriete las abrazaderas del tubo.
Haga la conexion a tierra de la bateria a la maquina como se recomienda.
Reemplace la gasolina, agregue estabilizador de combustible.
Vea las instrucciones del fabricante para el reaprovisionamiento de combustible.
Abra la vAIvula de combustible.
Vea las instrucciones del fabricante.
Vacfe el tanque de receptor con la v_lvula de drenaje manual o instale una vAIvula de
drenaje autom_tica.
Aplique una torsi6n adecuada a los accesorios
Ajuste la vAIvula seg0n sea apropiado
Reemplace la valvula del regulador
Reemplace el conjunto de valvula del descargador hidraulico
Reemplace el indicador
Vacie el lubricante, limpie completamente la caja del cigiJeffal, reemplace el
lubricante
Inspeccione/limpie todos los conductos del aceite

13
TABLA DE TORSIONES DE LOS FIJADORES
2340
Pernos prisioneros de alta presi6n 75
Pernos prisioneros de baja presi6n 75
Pernos de reberde del cilindre 30
Pernos de cubierta de la armaz6n 17
Pernos de cubierta del eje 17
Tornilles de cabeza del pasador de cigL)efial 5,5
Tornillos de cabeza del descargador
Tornillos de la vAIvula de admisi6n de alta 11-15 LB-PULG
presi6n
Tornillos de la vAIvula de admisi6n de baja 11-15 LB-PULG
presi6n
Tornillos de la vAIvula de salida de alta presi6n 11-15 LB-PULG
Tornillos de la valvula de salida de baja presi6n 25-30 LB-IPULG
Perno de la rueda de la banda 33
Pernos de centre de la culata de alta presi6n
Pernos de centre de la culata de baja presi6n
Tornillo de montaje guia del descargador
Tornillo deflector del interrupter de bajo nivel de
aceite
Tuercas ciegas de centre de la culata
Valvula piloto
Conjunto de cuerpo del descargador
Pernos de la caja del descargador/rodamiento
Husillos de la placa de valvula
2475 2545 7100 2000 Y 2000P
75 75 75 120
75 75 75 120
50 50 50 50
17 17 20 20
17 17 20 50
11 11 12-15 --
-- 11 11 --
11-15 LB-PULG 11-15 LB-PULG 5,5 36 LB-PULG
25-30 LB-PULG 25-30 LB-IPULG 5,5
11-15 LB-PULG 11-15 LB-PULG 26
25-30 LB-PULG 25-30 LB-IPULG 26
60 60 113
-- 10 --
-- 14-16 --
NOTA
Apriete de manera uniforme todos los fijadores usando un patrbn en cruz en dos etapas.
36 LB-PULG
36 LB-PULG
36 LB-PULG
8O
25
5
7
25
25
25
7
TABLA DE TENSIONES DE CORREA
MODELO DEFLEXION TENSION (LB.)
(PULG.)
2340 (Intervalo Nominal 14" ) 0,25 4,9 - 7,1
2340 (Intervalo Nominal 19" ) 0,29 4,9 - 7,1
2475 (Intervalo Nominal 14" ) 0,25 4,9 - 7,1
2475 (Intervalo Nominal 19" ) 0,29 4,9 - 7,1
2475F/X11GH 0,34 5,5 - 8,0
2475F/X9/11GK 0,25 11,25 - 13,0
2475N5 (tramo de 14,5", correa 0,23 4,5 - 6,5
dentada)
2545 (ranura A ) 0,29 4,9 - 7,1
TIPO DE
CORREA
B
C
5V
CABALLOS DE FUERZA TENSION A UNA DEFLEXION DE 1/64"
POE PULGADA DE TRAMO
7,5 7,0-10,0
10-15 8,0-12,0
20 12,0-18,0
25-30 14,0- 21,0
25-30

14
DIAGRAMAS DE CABLEADO ELECTRICO
Cableado monofasico
u
SEE NOTE
M O[ -A TI
IF----_YL,_/
[>_1,
*MOTOR
1
OFF ON * * o OL /
PS LOLS *qATS F_ .
0 C------<)q'-8------o_ _-_-x_-----_ M F------+_ _
SS 7 _ 8 _ 9 ¼_ 6 "-/ 5 "4
A
C
EDV
T
L
FU
HATS
LOLS
M
OL
PS
SS
AI suministro
Cableado para la v&lvula de drenaje el6ctrico
opcional
Valvula de drenaje electrico
Terminal de linea de suministro
Terminal de carga
Fusible del circuito de control
Interruptor de alta temperatura del aire (#)
Interruptor de bajo nivel de aceite (#)
Bobina del arrancador del motor
Sobrecarga del arrancador del motor
Disyuntor automatico
Conmutador selector (#)
Cableado alternativo para convertir un arrancador
trifasico a una aplicacion monofasica
(#) = si Io hay
Cableado trif&sico
@
,l
M OL-A TI
I_--'b_
M OL_C T3
t F--O_
_1,
PS LOLS '_HATS _ O,LI
1
©
*EDV
To Power Su
Starter
NOTA
En las unidades que requieren un arrancador, conecte la linea de alimentacibn
al arrancador. No conecte la linea de alimentacibn al interruptor de presibn.
• Conecte el cable de conexion a tierra al terminal de tierra
• L3 se usa para los motores y arrancadores trif,Csicos Qnicamente

15
Tipica unidad de placa base
ENCLOSED BELTGUARD
A R
FLOW
AIR COOLED AFTERCOOLER
(OPTIONAL)
-AIR INLET FILTER
INTERCOOLER
SAFETY/RELIEFOUTLET VALVE_
AIR INLET FILTER
_L (OUTDOOR OPTION)
LOW OIL LEVEL
AIR COOLED SWITCH OIL DRAIN
AFTERCOOLER (OPTIONAL)
CONNECTION MOUNTING HOLE. <
Tipica unidad simplex horizontal
AIRCOOLED AFTERCOOLER
(OPTIONAL)
AIR --
FLOW
SAFETY/RELIEF VALVE
_ MOUNTED MOTOR
STARTER (OPTIONAL) OIL FILL
LOW OIL LEVEL
SWITCH
OIL DRAIN
DISCHARGE
SAFETY/RELIEF VALVE
AIR INLET
FILTERS CONSTANT SPEED
--PRESSURE SWITCH,
GAUGE, RECEIVER
SAFETY/RELIEF VALVE
AND AUXILIARY VALVE
ENCLOSED
BELTGUARD
INSPECTION
OPENINGS
(BOTHS,DES),
/
MANUAL DRAIN VALVE
(LOCATION WHEN SUPPLIED
WITH AUTO DRAIN VALVE)
AUTO CONDENSATE
DRAIN VALVE 1/8"
NPT DRAIN PORT
(OPTIONAL)
AIR RECEIVER TANK /
MOUNTING HOLES Z
DRAIN VALVE
(LOCATION WHEN NOT SUPPLIED
WITH AUTO DRAIN VALVE)
AIR OUTLET
SERVICE VALVE

16
Tipica unidad simplex vertical
t
Z'qEZEIIFE :Z I 13 _,1_
)4
FFE,Z RE :3 :SE
I
I ii :31
: F T FI IFF
L E
--IR :31 E
kts_
F TI,,I
2
IR _LI=4
4
I [_:F(Fl.Fr:
_RIII LE
Tipica unidad con motor a gasolina
GASOLINE ENGINE
ENGINE AIR CLEANER
ENGINE EXHAUST \
MUFFLER
(REAR)
ENGINE OIL
DIPSTICK
ENGINE OIL
DRAIN
PRESSURE GAUGE,
DISCHARGE & RECEIVER SAFETY/RELIEF VALVE,
DISCHARGE UNLOADER
INTERSTAOE
SAFETY/RELIEF VALVE
AIR INLET
r OIL FILL PLUG
OIL DRAIN PLUG
ENCLOSED
AIR
FLOW
AIR OUTLET
AIR RECEIVER
TANK_
MOUNT
MOUNTING HOLES j (4 REQUIRED)
MANUAL CONDENSATE
DRAIN VALVE

17
GARANTiA
Ingersoll-Rand Company garantiza que los equipos que fabrica y distribuye conforme a este documento estar&n libres de defectos tanto
en sus materiales como en su fabricaci6n, durante un periodo de doce (12) meses desde la fecha en que los Equipos se ponen en
operaci6n o de dieciocho (18) meses desde el momento del embarque, Io que suceda primero. Este periodo de garantia se aplicar& a
todos los Equipos, salvo los siguientes: (A) Los compresores que funcionen exclusivamente con el lubricante sintetico All Season T30
Select para compresores, tendran una garantia por el compresor, sin accesorios, de veinticuatro (24) meses desde la fecha de inicio de
las operaciones o de treinta (30) meses desde la fecha de embarque, Io que ocurra primero. (B) Los repuestos tendran una garantia de
seis (6) meses desde la fecha de embarque Si dentro de dicho periodo se informa por escrito a la Compar_ia de algQn tipo de
incumplimiento de las condiciones de esta Garantia, la Compar_ia a su discrecion corregira dicho incumplimiento reparando el Equipo en
forma apropiada o proporcionara un reemplazo F.O.B. en el punto de embarque, siempre y cuando el comprador haya instalado,
mantenido y operado dicho Equipo en conformidad con pr&cticas industriales correctas y haya cumplido con las recomendaciones
especificas de la Compar_ia. Los accesorios o equipos provistos por la Compafiia pero fabricados por otros mantendr_n todas las
garantia traspasadas a Ingersoll-Rand Company por su fabricante y que puedan ser transferidas al Comprador. La Compafiia no se har&
responsable de reparaciones, reemplazos o ajustes a los Equipos o de ningQn tipo de costo por mano de obra en que incurra el
Comprador que no cuenten con la previa autorizaci6n por escrito de la Compar_ia.
La Compafiia no otorga ning_n tipo de garant[a de buena ejecuci6n, a menos que se estipule especfficamente dentro de sus propuestas, y esta Garantia
excluye especificamente los efectos de la corrosi6n, erosi6n y el desgaste normal. En aquellos casos donde expresamente se incluyan garant[as de buena
ejecuci6n, la obligaci6n de la Compafi[a sera efectuar correcciones en la manera y durante el plazo estipulado mas arriba.
LA COMPANiA NO HACE NINGUN OTRO TIPO DE DECLARACION, EXPRESA O IMPLiCITA, SALVO AQUELLA DE PROPIEDAD Y POR ESTE MEDIO SE
DECLINAN TODAS LAS GARANTiAS IMPLiCITAS DE COMERCIABILIDAD Y APTITUD PARA UN FIN EN PARTICULAR.
La correcci6n de los incumplimientos de la Compafiia, sean patentes o latentes, en la forma y durante el plazo estipulado mas arriba, debera constituir el
cumplimiento de todas las responsabilidades de la CompaSia y sus Distribuidores, para aquellos incumplimientos respecto a o que surjan de dichos
Equipos.
LIMITACION DE RESPONSABILIDADES
LOS RECURSOS DEL COMPRADOR ESTIPULADOS EN ESTE DOCUMENTO SON EXCLUSIVOS Y LA RESPONSABILIDAD TOTAL DE LA COMPAI_IiA,
SUS DISTRIBUIDORES Y PROVEEDORES, CON RESPECTO AL CONTRATO O EQUIPOS Y SERVICIOS PROVISTOS, EN RELACION CON LA
EJECUCION O SU FALTADE CUMPLIMIENTO O QUE SURJAN DE LA FABRICACION, VENTA, ENTREGA, INSTALACION, REPARACION O DIRECCION
TC:CNICACUBIERTA O PROVISTA BAJO UN CONTRATO, YA SEA QUE SE BASEN EN UN CONTRATO, GARANTiA, NEGLIGENCIA, INDEMNIDAD,
RESPONSABILIDAD LIMITADA U OTRO, NO PODRAN EXCEDER EL PRECIO DE COMPRA DE LA UNIDAD O EQUIPO EN LOS CUALES SE BASA DICHA
RESPONSABILIDAD.
LA COMPANiA, SUS DISTRIBUIDORES Y SUS PROVEEDORES NO SERAN RESPONSABLES BAJO CIRCUNSTANCIA ALGUNA ANTE
EL COMPRADOR, CUALQUIER SUCESOR O BENEFICIARIO O CESIONARIO DEL CONTRATO, POR NINGON DANO INDIRECTO,
INCIDENTAL, ESPECIAL O PUNITORIO QUE SURJA DE ESTE CONTRATO O DE CUALQUIER INCUMPLIMIENTO DE I_L, O DE
CUALQUIER DEFECTO, FALLA O MAL FUNCIONAMIENTO DEL EQUIPO, YA SEA QUE SE BASE DICHO DANO O NO EN LA FALTA DE
USO, LA PI_RDIDA DE INGRESOS O UTILIDADES, INTERESES, PI_RDIDA DE BUENA REPUTACION, CESE DE TAREAS, DANO
SOBRE OTROS BIENES, Pg:RDIDAS PRODUCTO DEL CIERRE O LA FALTA DE FUNCIONAMIENTO, AUMENTO EN LOS COSTOS DE
OPERACION, COSTO DE LA COMPRA DE ENERGiA DE REEMPLAZO O DEMANDAS DE LOS COMPRADORES O CLIENTES DEL
COMPRADOR POR LA INTERRUPCION DEL SERVICIO, SE ORIGINE O NO DICHA PC:RDIDA O DANO EN EL CONTRATO, GARANTIA,
NEGLIGENCIA, INDEMNIZACION, RESPONSABILIDAD ABSOLUTA U OTRO.
&Preguntas? Piezas? &Servicio?
1-800 AIR SERV
Visite nuestro sitio web:
www.air.ingersoll-rand.com
