


en
Ú7DEOHRIFRQWHQWV
>HQ@,QVWUXFWLRQPDQXDO
,PSRUWDQWVDIHW\LQIRUPDWLRQ
&DXVHVRIGDPDJH
,QVWDOODWLRQDQGFRQQHFWLRQ
<RXUQHZRYHQ
&RQWUROSDQHO
)XQFWLRQVHOHFWRU
7HPSHUDWXUHVHOHFWRU
7LPHU
$FFHVVRULHV
%HIRUHXVLQJWKHRYHQIRUWKHILUVWWLPH
+HDWLQJXSWKHRYHQ
&OHDQLQJWKHDFFHVVRULHV
6HWWLQJWKHRYHQ
+HDWLQJIXQFWLRQDQGWHPSHUDWXUH
&RRNLQJWLPH
.LWFKHQWLPHU
6HWWLQJWKHNLWFKHQWLPHU
:KHQWKHWLPHRQWKHNLWFKHQWLPHUKDVHODSVHG
6ZLWFKLQJRIIWKHNLWFKHQWLPHU
&DUHDQGFOHDQLQJ
&OHDQLQJSURGXFWV
7URXEOHVKRRWLQJ
0DOIXQFWLRQWDEOH
5HSODFLQJWKHRYHQOLJKWEXOE
$IWHUVDOHVVHUYLFH
(QXPEHUDQG)'QXPEHU
(QHUJ\DQGHQYLURQPHQWWLSV
6DYLQJHQHUJ\
(QYLURQPHQWDOO\IULHQGO\GLVSRVDO
7HVWHGIRU\RXLQRXUFRRNLQJVWXGLR
&DNHVDQGSDVWULHV
*UDWLQVWRDVW
7LSVIRUEDNLQJFDNHVDQGVWUXGHOFRUUHFWO\
3UHSUHSDUHGSURGXFWV
6SHFLDOGLVKHV
$FU\ODPLGHLQIRRGVWXIIV
3URGXNWLQIR
$GGLWLRQDOLQIRUPDWLRQRQSURGXFWVDFFHVVRULHV
UHSODFHPHQWSDUWVDQGVHUYLFHVFDQEHIRXQGDW
ZZZERVFKKRPHFRPDQGLQWKHRQOLQHVKRS
ZZZERVFKHVKRSFRP

en
,PSRUWDQWVDIHW\LQIRUPDWLRQ
5HDGWKHVHLQVWUXFWLRQVFDUHIXOO\2QO\WKHQZLOO
\RXEHDEOHWRRSHUDWH\RXUDSSOLDQFHVDIHO\
DQGFRUUHFWO\5HWDLQWKHLQVWUXFWLRQPDQXDOIRU
IXWXUHXVHRUIRUVXEVHTXHQWRZQHUV
&KHFNWKHDSSOLDQFHIRUGDPDJHDIWHU
XQSDFNLQJLW'RQRWFRQQHFWWKHDSSOLDQFHLILW
KDVEHHQGDPDJHGLQWUDQVSRUW
2QO\DOLFHQVHGSURIHVVLRQDOPD\FRQQHFW
DSSOLDQFHVZLWKRXWSOXJV'DPDJHFDXVHGE\
LQFRUUHFWFRQQHFWLRQLVQRWFRYHUHGXQGHU
ZDUUDQW\
7KLVDSSOLDQFHLVLQWHQGHGIRUGRPHVWLFXVH
RQO\7KHDSSOLDQFHPXVWRQO\EHXVHGIRUWKH
SUHSDUDWLRQRIIRRGDQGGULQN7KHDSSOLDQFH
PXVWEHVXSHUYLVHGGXULQJRSHUDWLRQ2QO\XVH
WKLVDSSOLDQFHLQGRRUV
7KLVDSSOLDQFHLVLQWHQGHGIRUXVHXSWRD
PD[LPXPKHLJKWRI PHWUHVDERYHVHD
OHYHO
7KLV DSSOLDQFH LV QRW LQWHQGHG IRU RSHUDWLRQ ZLWK
DQH[WHUQDOFORFNWLPHURUDUHPRWHFRQWURO
7KLV DSSOLDQFH PD\ EH XVHG E\ FKLOGUHQ RYHU WKH
DJH RI \HDUV ROG DQG E\ SHUVRQV ZLWK UHGXFHG
SK\VLFDOVHQVRU\RUPHQWDOFDSDELOLWLHVRUE\
SHUVRQV ZLWK D ODFN RI H[SHULHQFH RU NQRZOHGJH
LIWKH\DUHVXSHUYLVHGRUDUHLQVWUXFWHGE\D
SHUVRQUHVSRQVLEOHIRUWKHLUVDIHW\KRZWRXVH
WKHDSSOLDQFHVDIHO\DQGKDYHXQGHUVWRRGWKH
DVVRFLDWHGKD]DUGV
&KLOGUHQPXVWQRWSOD\ZLWKRQRUDURXQGWKH
DSSOLDQFH&KLOGUHQPXVWQRWFOHDQWKH
DSSOLDQFHRUFDUU\RXWJHQHUDOPDLQWHQDQFH
XQOHVVWKH\DUHDWOHDVW \HDUVROGDQGDUH
EHLQJVXSHUYLVHG
.HHSFKLOGUHQEHORZWKHDJHRI \HDUVROGDWD
VDIHGLVWDQFHIURPWKHDSSOLDQFHDQGSRZHU
FDEOH
::DUQLQJ² 5LVNRIILUH
■ &RPEXVWLEOHLWHPVVWRUHGLQWKHFRRNLQJ
FRPSDUWPHQWPD\FDWFKILUH1HYHUVWRUH
FRPEXVWLEOHLWHPVLQWKHFRRNLQJ
FRPSDUWPHQW 1HYHU RSHQ WKH DSSOLDQFH GRRU
LIWKHUHLVVPRNHLQVLGH6ZLWFKRIIWKH
DSSOLDQFHDQGXQSOXJLWIURPWKHPDLQVRU
VZLWFKRIIWKHFLUFXLWEUHDNHULQWKHIXVHER[
5LVNRIILUH
■ 7KHDSSOLDQFHEHFRPHVYHU\KRW1HYHUXVH
WKHWRSRIWKHDSSOLDQFHDVDZRUNWRSRU
VWRUDJHDUHD
5LVNRIILUH
■ $ GUDXJKW LV FUHDWHG ZKHQ WKH DSSOLDQFH GRRU
LV RSHQHG *UHDVHSURRI SDSHU PD\ FRPH LQWR
FRQWDFWZLWKWKHKHDWLQJHOHPHQWDQGFDWFK
ILUH'RQRWSODFHJUHDVHSURRISDSHUORRVHO\
RYHUDFFHVVRULHVGXULQJSUHKHDWLQJ$OZD\V
ZHLJKWGRZQWKHJUHDVHSURRISDSHUZLWKD
GLVKRUDEDNLQJWLQ2QO\FRYHUWKHVXUIDFH
UHTXLUHGZLWKJUHDVHSURRISDSHU
*UHDVHSURRISDSHUPXVWQRWSURWUXGHRYHU
WKHDFFHVVRULHV
5LVNRIILUH
■ 7KHDSSOLDQFHEHFRPHVYHU\KRW0DNHVXUH
WKDW\RXFRPSO\ZLWKWKHILJXUHVLQGLFDWHGLQ
WKHVHFWLRQHQWLWOHG ,QVWDOOLQJDQGFRQQHFWLQJ
IRUWKHPLQLPXPFOHDUDQFHDERYHWKH
DSSOLDQFH
■ 'RQRWLQVWDOOWKHDSSOLDQFHEHKLQGD
GHFRUDWLYHGRRURUWKHGRRURIDNLWFKHQXQLW
■ 7KH DSSOLDQFH PXVW QRW EH LQVWDOOHG LQ D ILWWHG
NLWFKHQXQLW
7KHUHLVDULVNRIRYHUKHDWLQJ
::DUQLQJ² 5LVNRIHOHFWULFVKRFN
■ ,QFRUUHFW UHSDLUV DUH GDQJHURXV 5HSDLUV PD\
RQO\EHFDUULHGRXWDQGGDPDJHGSRZHU
FDEOHVUHSODFHGE\RQHRIRXUWUDLQHGDIWHU
VDOHVWHFKQLFLDQV,IWKHDSSOLDQFHLV
GHIHFWLYHXQSOXJWKHDSSOLDQFHIURPWKH
PDLQVRUVZLWFKRIIWKHFLUFXLWEUHDNHULQWKH
IXVHER[&RQWDFWWKHDIWHUVDOHVVHUYLFH
5LVNRIHOHFWULFVKRFNDQGVHULRXVLQMXU\
■ 7KHFDEOHLQVXODWLRQRQHOHFWULFDODSSOLDQFHV
PD\PHOWZKHQWRXFKLQJKRWSDUWVRIWKH
DSSOLDQFH1HYHUEULQJHOHFWULFDODSSOLDQFH
FDEOHVLQWRFRQWDFWZLWKKRWSDUWVRIWKH
DSSOLDQFH
5LVNRIHOHFWULFVKRFN
■ 'RQRWXVHDQ\KLJKSUHVVXUHFOHDQHUVRU
VWHDPFOHDQHUVZKLFKFDQUHVXOWLQDQ
HOHFWULFVKRFN
5LVNRIHOHFWULFVKRFN
■ 3HQHWUDWLQJPRLVWXUHPD\FDXVHHOHFWULF
VKRFN 1HYHU VXEMHFW WKH DSSOLDQFH WR LQWHQVH
KHDWRUKXPLGLW\2QO\XVHWKLVDSSOLDQFH
LQGRRUV
5LVNRIHOHFWULFVKRFN
■ $GHIHFWLYHDSSOLDQFHPD\FDXVHHOHFWULF
VKRFN 1HYHU VZLWFK RQ D GHIHFWLYH DSSOLDQFH
8QSOXJWKHDSSOLDQFHIURPWKHPDLQVRU
VZLWFKRIIWKHFLUFXLWEUHDNHULQWKHIXVHER[
&RQWDFWWKHDIWHUVDOHVVHUYLFH

HQ
::DUQLQJ² 5LVNRIEXUQV
■ 7KHDSSOLDQFHEHFRPHVYHU\KRW1HYHU
WRXFKWKHLQWHULRUVXUIDFHVRIWKHFRRNLQJ
FRPSDUWPHQWRUWKHKHDWLQJHOHPHQWV
$OZD\VDOORZWKHDSSOLDQFHWRFRROGRZQ
.HHSFKLOGUHQDWDVDIHGLVWDQFH
5LVNRIEXUQV
■ ;7KHDFFHVVLEOHVXUIDFHVRIWKHDSSOLDQFH
JHWYHU\KRW1HYHUWRXFKWKHKRWVXUIDFHV
.HHSFKLOGUHQDZD\
5LVNRIVHULRXVEXUQV
■ $FFHVVRULHV DQG RYHQZDUH EHFRPH YHU\ KRW
$OZD\VXVHRYHQJORYHVWRUHPRYH
DFFHVVRULHVRURYHQZDUHIURPWKHFRRNLQJ
FRPSDUWPHQW
5LVNRIEXUQV
■ $OFRKROLFYDSRXUVPD\FDWFKILUHLQWKHKRW
FRRNLQJFRPSDUWPHQW1HYHUSUHSDUHIRRG
FRQWDLQLQJODUJHTXDQWLWLHVRIGULQNVZLWKD
KLJKDOFRKROFRQWHQW2QO\XVHVPDOO
TXDQWLWLHVRIGULQNVZLWKDKLJKDOFRKRO
FRQWHQW2SHQWKHDSSOLDQFHGRRUZLWKFDUH
::DUQLQJ² 5LVNRIVFDOGLQJ
■ :KHQ\RXRSHQWKHDSSOLDQFHGRRUKRW
VWHDP PD\ HVFDSH 2SHQ WKH DSSOLDQFH GRRU
ZLWKFDUH.HHSFKLOGUHQDWDVDIHGLVWDQFH
5LVNRIVFDOGLQJ
■ :DWHULQDKRWFRRNLQJFRPSDUWPHQWPD\
FUHDWHKRWVWHDP1HYHUSRXUZDWHULQWRWKH
FRRNLQJFRPSDUWPHQWZKHQWKHFRRNLQJ
FRPSDUWPHQWLVKRW
::DUQLQJ² 5LVNRILQMXU\
6FUDWFKHGJODVVLQWKHDSSOLDQFHGRRUPD\
GHYHORSLQWRDFUDFN'RQRWXVHDJODVV
VFUDSHUVKDUSRUDEUDVLYHFOHDQLQJDLGVRU
GHWHUJHQWV
&DXVHVRIGDPDJH
&DXWLRQ
■ $FFHVVRULHVIRLOJUHDVHSURRISDSHURU
RYHQZDUHRQWKHFRRNLQJFRPSDUWPHQWIORRU
GRQRWSODFHDFFHVVRULHVRQWKHFRRNLQJ
FRPSDUWPHQWIORRU'RQRWFRYHUWKHFRRNLQJ
FRPSDUWPHQWIORRUZLWKDQ\VRUWRIIRLORU
JUHDVHSURRISDSHU'RQRWSODFHRYHQZDUH
RQWKHFRRNLQJFRPSDUWPHQWIORRULID
WHPSHUDWXUH RI RYHU & KDV EHHQ VHW 7KLV
ZLOOFDXVHKHDWWRDFFXPXODWH7KHEDNLQJ
DQGURDVWLQJWLPHVZLOOQRORQJHUEHFRUUHFW
DQGWKHHQDPHOZLOOEHGDPDJHG
■ :DWHULQDKRWFRRNLQJFRPSDUWPHQWGRQRW
SRXUZDWHULQWRWKHFRRNLQJFRPSDUWPHQW
ZKHQLWLVKRW7KLVZLOOFDXVHVWHDP7KH
WHPSHUDWXUHFKDQJHFDQFDXVHGDPDJHWR
WKHHQDPHO
■ 0RLVWIRRGGRQRWVWRUHPRLVWIRRGLQWKH
FRRNLQJFRPSDUWPHQWZKHQLWLVFORVHGIRU
SURORQJHGSHULRGV7KLVZLOOGDPDJHWKH
HQDPHO
■ )UXLW MXLFH ZKHQ EDNLQJ SDUWLFXODUO\ MXLF\ IUXLW
SLHVGRQRWSDFNWKHEDNLQJWUD\WRR
JHQHURXVO\)UXLWMXLFHGULSSLQJIURPWKH
EDNLQJWUD\OHDYHVVWDLQVWKDWFDQQRWEH
UHPRYHG,ISRVVLEOHXVHWKHGHHSHU
XQLYHUVDOSDQ
■ &RROLQJZLWKWKHDSSOLDQFHGRRURSHQRQO\
DOORZWKHFRRNLQJFRPSDUWPHQWWRFRROZKHQ
LW LV FORVHG (YHQ LI WKH DSSOLDQFH GRRU LV RQO\
RSHQDOLWWOHIURQWSDQHOVRIDGMDFHQWXQLWV
FRXOGEHGDPDJHGRYHUWLPH
■ +HDYLO\VRLOHGRYHQVHDOLIWKHRYHQVHDOLV
KHDYLO\VRLOHGWKHRYHQGRRUZLOOQRORQJHU
FORVHSURSHUO\ZKHQWKHRYHQLVLQRSHUDWLRQ
7KHIURQWVRIDGMDFHQWXQLWVFRXOGEH
GDPDJHG$OZD\VNHHSWKHRYHQVHDOFOHDQ
■ 2YHQ GRRU DV D EHDULQJ VXUIDFH GR QRW VWDQG
RUSODFHREMHFWVRQWKHRYHQGRRUZKHQLWLV
RSHQ'RQRWKDQJREMHFWVRQWKHRYHQGRRU
■ &DUU\LQJWKHDSSOLDQFHGRQRWFDUU\RUKROG
WKHDSSOLDQFHE\WKHGRRUKDQGOH7KHGRRU
KDQGOHFDQQRWVXSSRUWWKHZHLJKWRIWKH
DSSOLDQFHDQGFRXOGEUHDN
en
,QVWDOODWLRQDQGFRQQHFWLRQ
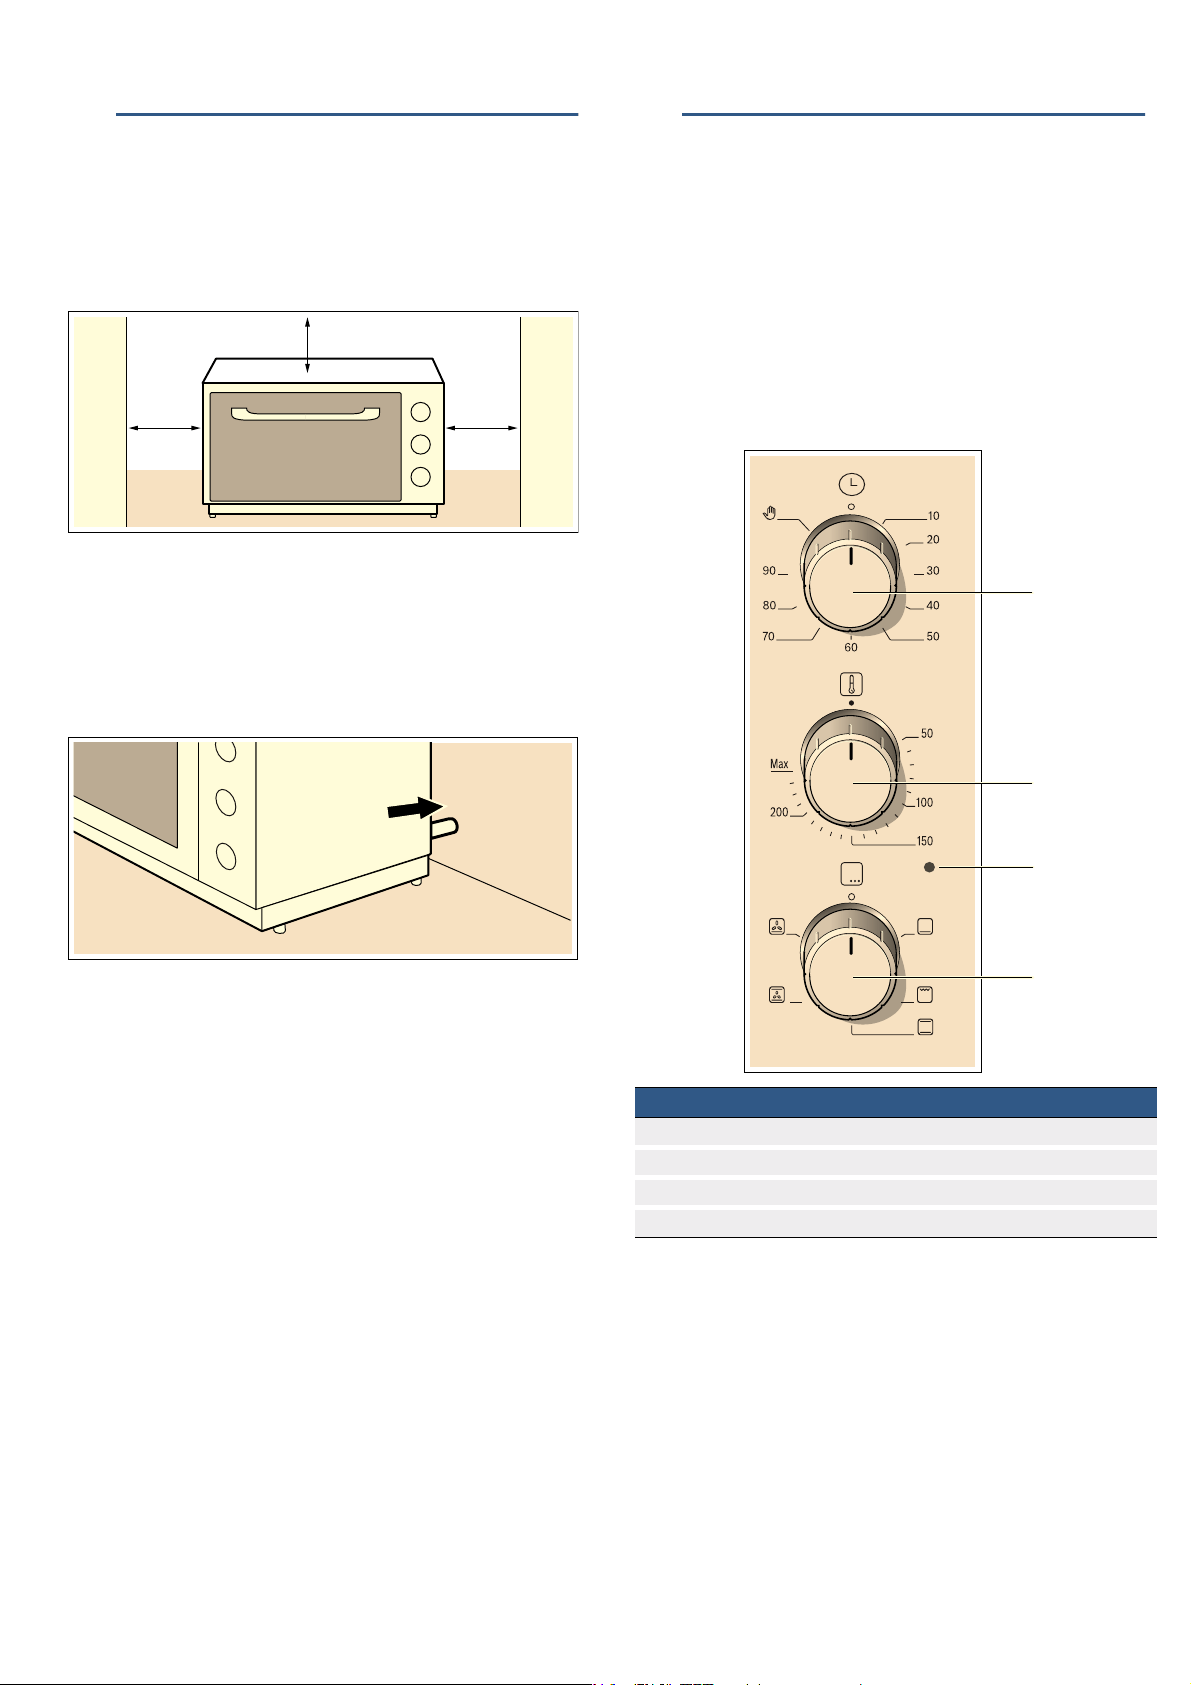
3ODFHWKHWDEOHWRSDSSOLDQFHRQDVROLGOHYHOVXUIDFHDW
OHDVWFPDERYHWKHIORRU7KHYHQWLODWLRQVORWVDWWKH
EDFNWRSDQGVLGHVPXVWEHXQREVWUXFWHGDWDOOWLPHV
7KH PLQLPXP FOHDUDQFHV VSHFLILHG LQ WKH LOOXVWUDWLRQ PXVW
EHPDLQWDLQHG
::DUQLQJ² 5LVNRIILUH
7KH YHQWLODWLRQ GXFW RQ WKH UHDU RI WKH DSSOLDQFH JHWV YHU\
KRW)ODPPDEOHZDOOFRYHULQJVIDEULFZDOOSDSHUHWF
PD\ FDWFK ILUH 7KH ZDOO PDWHULDO PXVW EH KHDWUHVLVWDQW WR
DWOHDVW&
6SDFHUVPXVWEHXVHGWRPDLQWDLQDFOHDUDQFHEHWZHHQ
WKHDSSOLDQFHDQGWKHZDOO
7KH DSSOLDQFH FRUUHVSRQGV WR SURWHFWLRQ FODVV , DQG PXVW
RQO\EHRSHUDWHGZLWKDSURWHFWLYHHDUWKFRQQHFWLRQ
)RUHOHFWULFDOVDIHW\UHDVRQVWKLVDSSOLDQFHPXVWRQO\EH
FRQQHFWHGZLWKDQHDUWKHGFRQQHFWLRQ,IWKHSURWHFWLYH
HDUWKFRQQHFWLRQGRHVQRWFRPSO\ZLWKUHJXODWLRQV
SURWHFWLRQDJDLQVWHOHFWULFDOKD]DUGVLVQRWJXDUDQWHHG
7KHIXVHUDWLQJPXVWEHDWOHDVW$$Q+:)W\SH
FDEOHRUHTXLYDOHQWPXVWEHXVHGIRUFRQQHFWLQJWKH
DSSOLDQFH7KHPDLQVYROWDJHPXVWFRUUHVSRQGWRWKH
YROWDJHVSHFLILHGRQWKHUDWLQJSODWH
2QO\DSURIHVVLRQDOPD\FRQQHFWWKHVRFNHWDQGUHSODFH
WKHFRQQHFWLRQFDEOH7KHPDLQVSOXJPXVWEHDFFHVVLEOH
DWDOOWLPHV
'RQRWXVHSRZHUVWULSVRUH[WHQVLRQOHDGV2YHUORDGLQJ
FDXVHVDULVNRIILUH
,I D IDXOW FXUUHQW IXVH ER[ LV WR EH XVHG RQO\ XVH RQH ZLWK
WKHV\PERO z
2QO\WKLVV\PEROJXDUDQWHHVWKDWWKHIXVHER[FRPSOLHV
ZLWKFXUUHQWUHJXODWLRQV
<RXUQHZRYHQ
+HUH\RXZLOOOHDUQDERXW\RXUQHZRYHQ7KHFRQWURO
SDQHO DQG WKH LQGLYLGXDO RSHUDWLQJ FRQWUROV DUH H[SODLQHG
<RX ZLOO ILQG LQIRUPDWLRQ RQ WKH FRRNLQJ FRPSDUWPHQW DQG
WKHDFFHVVRULHV
&RQWUROSDQHO
%HORZLVDJHQHUDORYHUYLHZRIWKHFRQWUROSDQHO7KHVH
LQVWUXFWLRQVDSSO\WRDQXPEHURIGLIIHUHQWPRGHOV7KHUH
PD\EHVRPHGLIIHUHQFHVGHSHQGLQJRQWKHDSSOLDQFH
PLQ
FP
PLQ
FP
PLQFP
'HVFULSWLRQ
7LPHU
7HPSHUDWXUHVHOHFWRU
7HPSHUDWXUHLQGLFDWRUOLJKW
)XQFWLRQVHOHFWRU
HQ
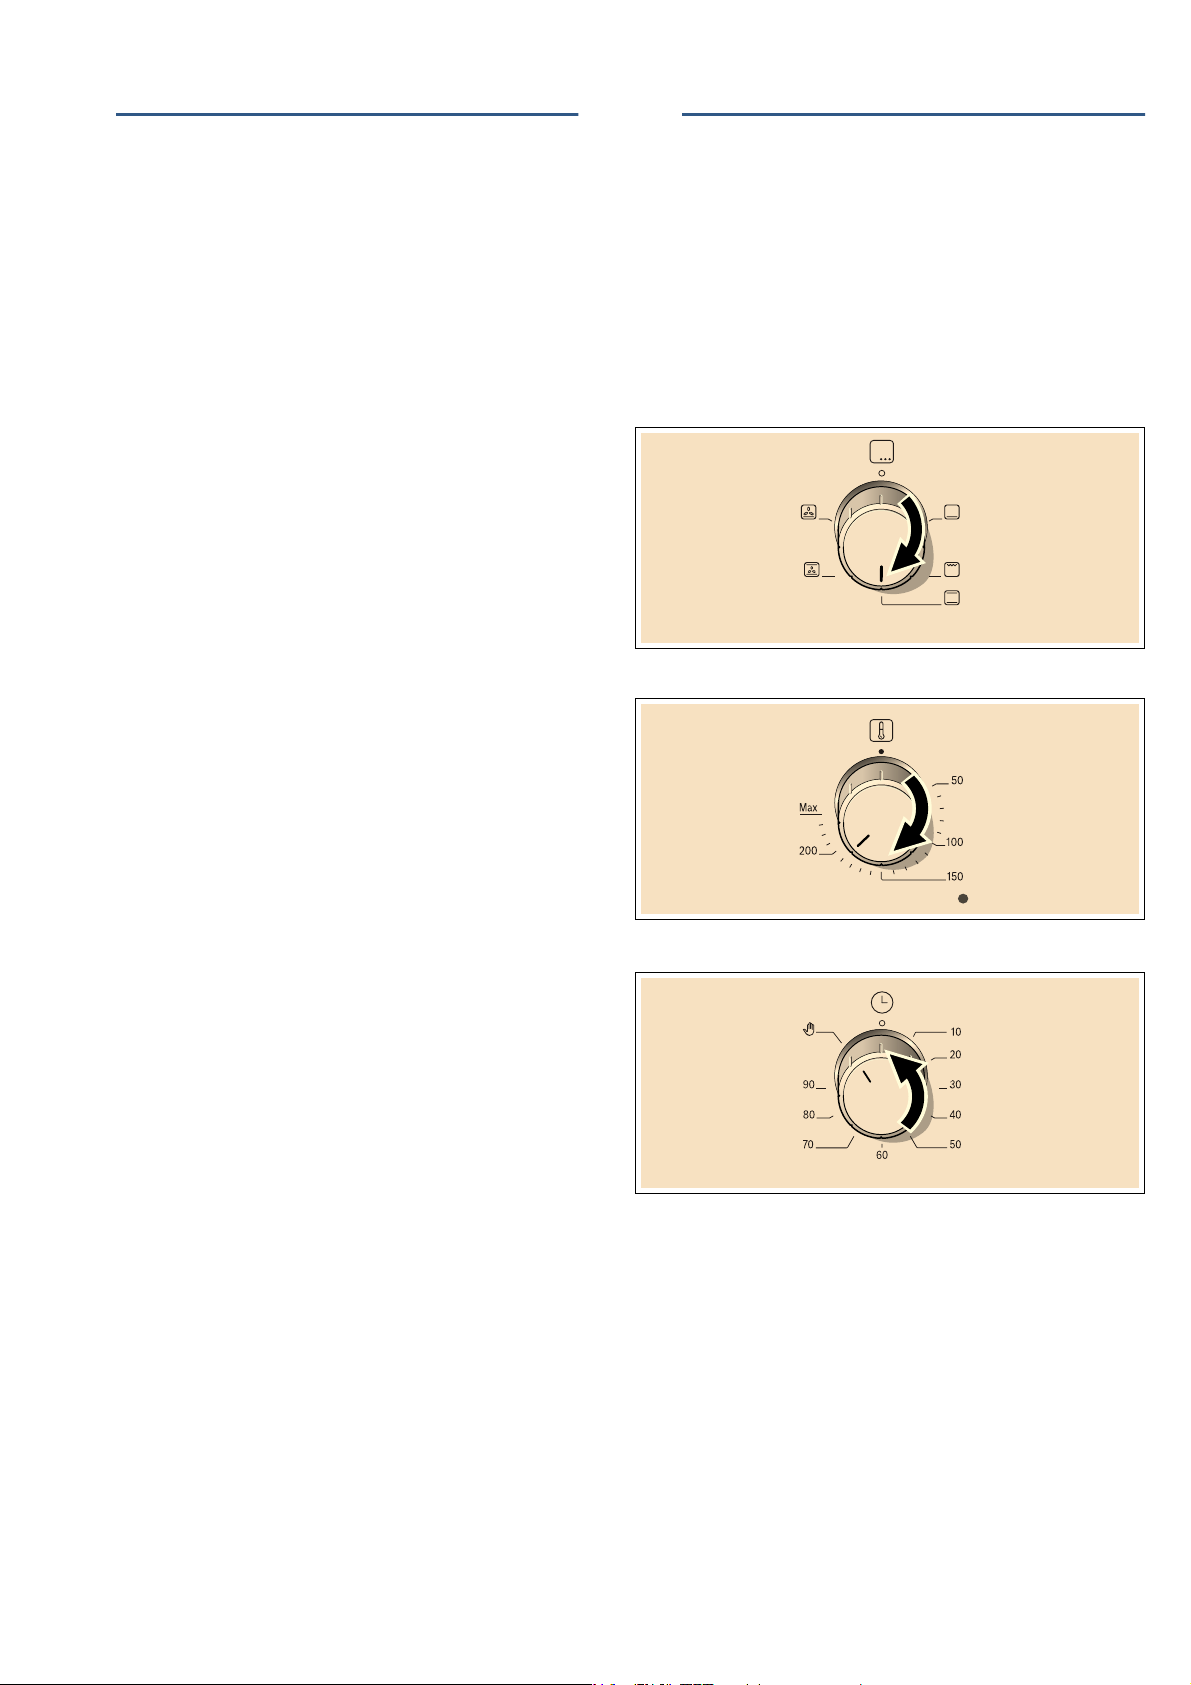
)XQFWLRQVHOHFWRU
8VHWKHIXQFWLRQVHOHFWRUWRVHWWKHKHDWLQJIXQFWLRQ\RX
UHTXLUHIRUWKHRYHQ<RXFDQWXUQWKHIXQFWLRQVHOHFWRU
FORFNZLVHDQGDQWLFORFNZLVH
7KHOLJKWLQWKHRYHQFRPHVRQZKHQ\RXDGMXVWWKH
IXQFWLRQVHOHFWRU
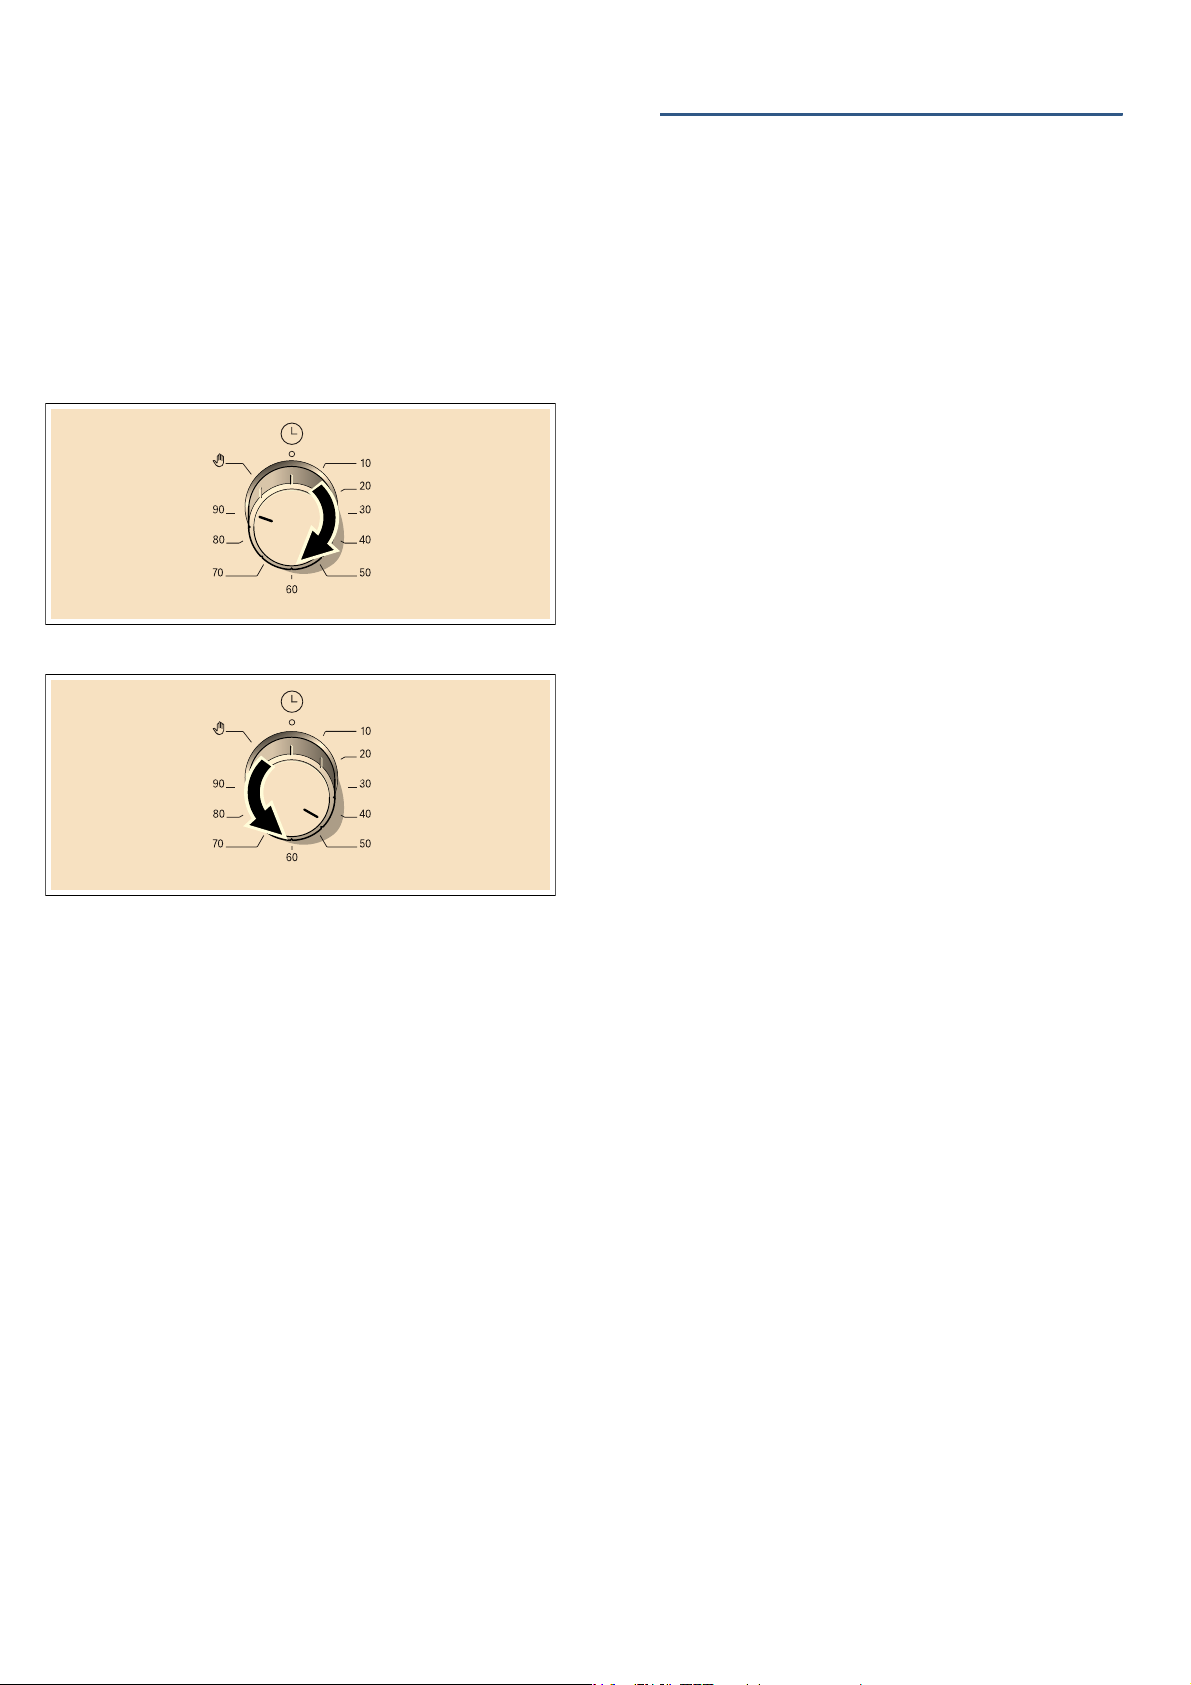
7HPSHUDWXUHVHOHFWRU
8VHWKHWHPSHUDWXUHVHOHFWRUWRVHWWKHWHPSHUDWXUHRU
JULOOVHWWLQJ
7KH WHPSHUDWXUH LQGLFDWRU OLJKW ZLOO EH OLW ZKHQ WKH RYHQ LV
KHDWLQJ7KHOLJKWJRHVRXWGXULQJSDXVHVLQWKHKHDWLQJ
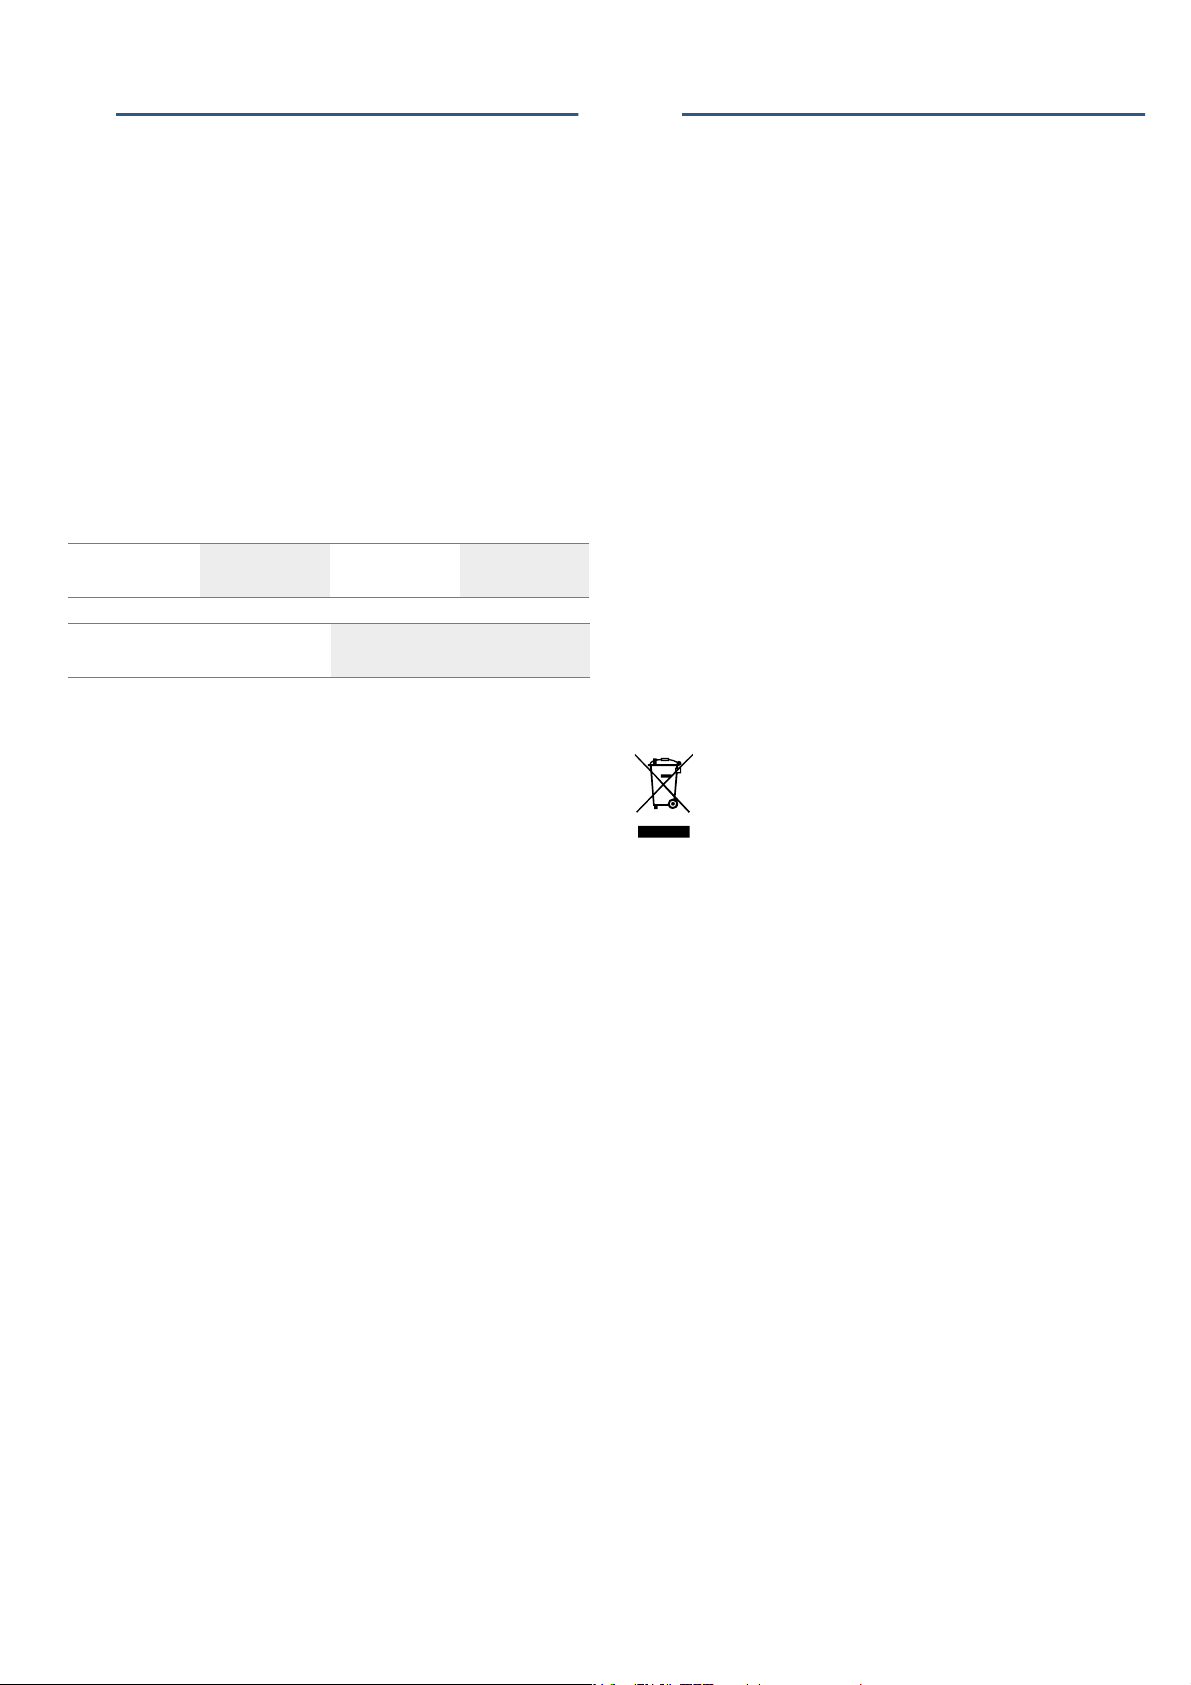
7LPHU
<RXFDQXVHWKHWLPHUWRVHWDFRRNLQJWLPHRIXSWR
PLQXWHVDIWHUZKLFKWKHRYHQZLOODXWRPDWLFDOO\VZLWFK
RII
7KHVHOHFWRUFDQEHWXUQHGXSWR'RQRWWU\WRWXUQLW
DQ\IXUWKHU
,IWKHRYHQKDVEHHQVZLWFKHGRQWKHIXQFWLRQLQGLFDWRU
OLJKWZLOOEHOLW
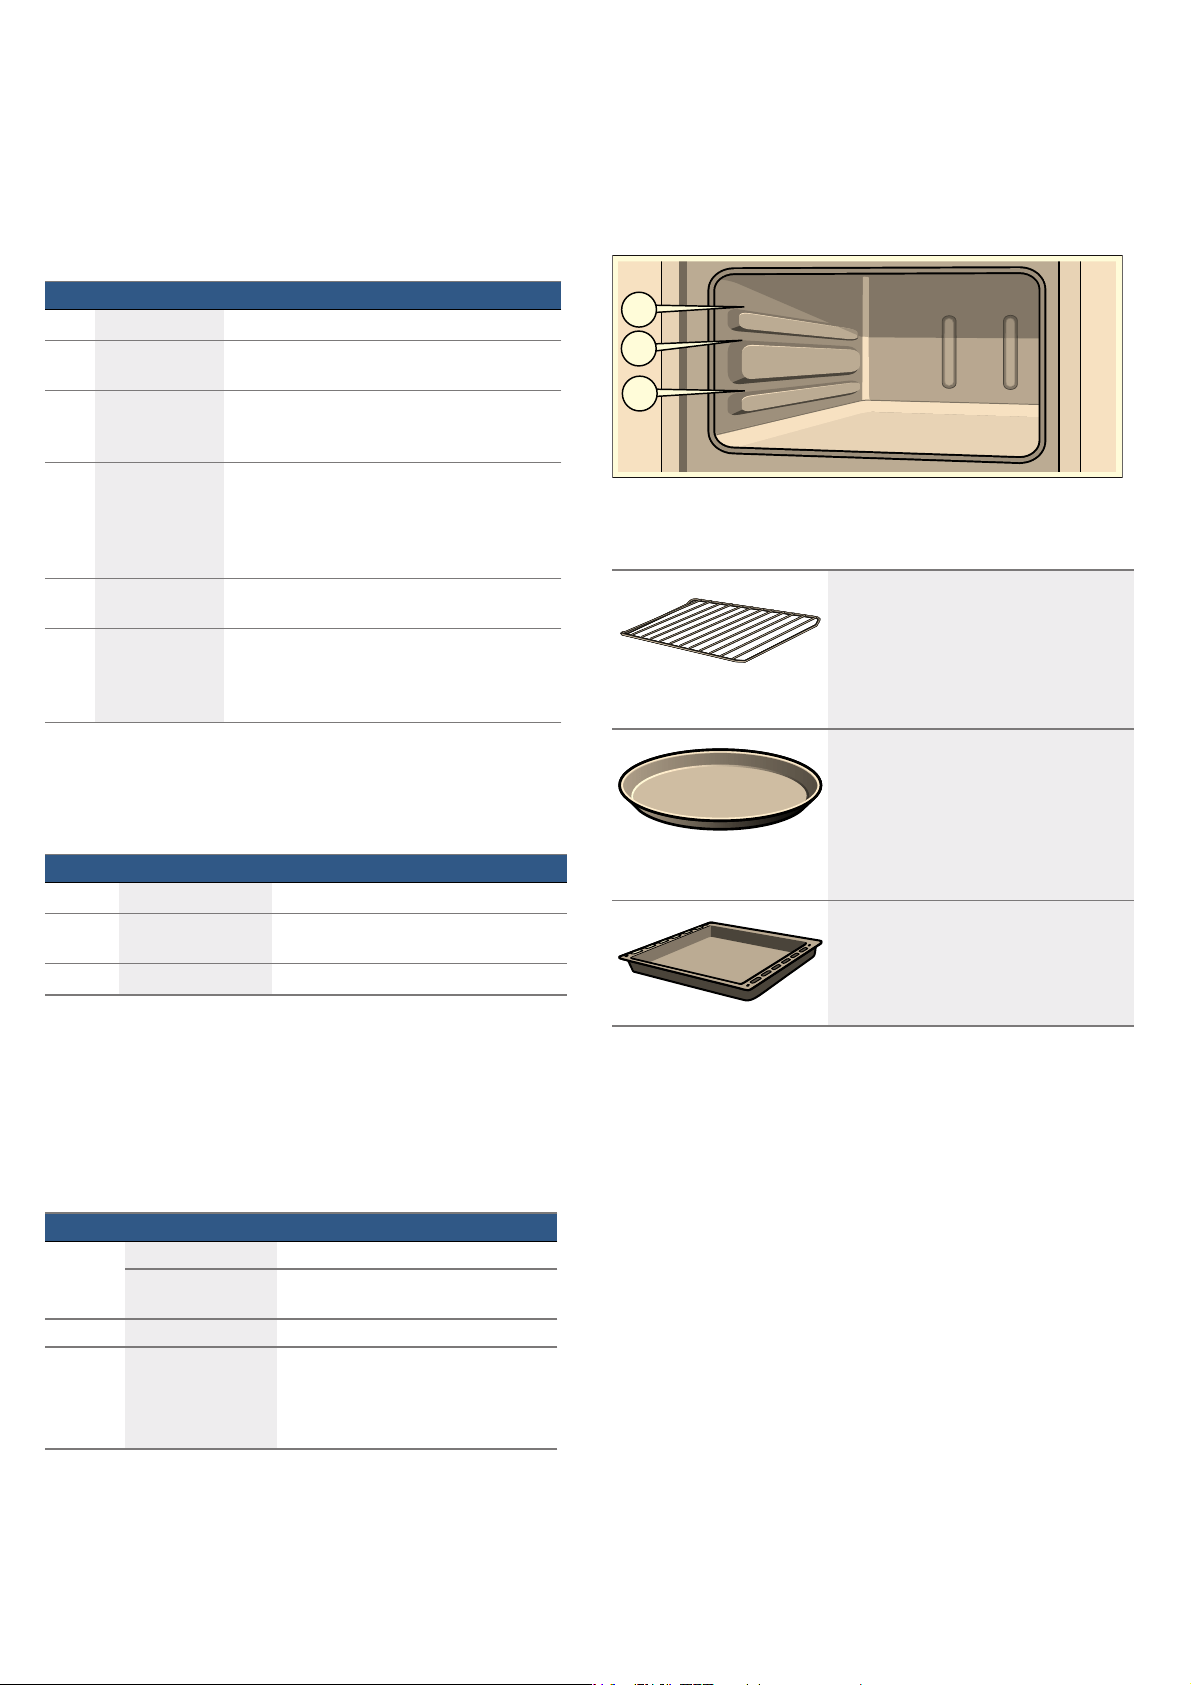
$FFHVVRULHV
7KHDFFHVVRULHVFDQEHLQVHUWHGLQWRWKHRYHQDW
GLIIHUHQWSRVLWLRQV
:KHQJULOOLQJDVLQJOHWKLFNSLHFHRIIRRGVOLGHWKHZLUH
UDFNLQDWOHYHO RWKHUZLVHWKHIRRGPD\WRXFKWKHJULOO
7KHDFFHVVRULHVPD\EHFRPHGHIRUPHGZKHQWKH\
EHFRPHKRW$VVRRQDVWKH\KDYHFRROHGGRZQWKH
GHIRUPDWLRQGLVDSSHDUVZLWKQRHIIHFWRQWKHIXQFWLRQ
2YHQGRRU$GGLWLRQDOVDIHW\SUHFDXWLRQV
'XULQJORQJFRRNLQJWLPHVWKHRYHQGRRUPD\EHFRPH
YHU\KRW
,I\RXKDYHVPDOOFKLOGUHQH[WUDVXSHUYLVLRQLVUHTXLUHG
GXULQJRYHQRSHUDWLRQ
,QDGGLWLRQWKHUHLVDSURWHFWLYHGHYLFHSURWHFWLYHJULG
ZKLFK SUHYHQWV GLUHFW FRQWDFW ZLWK WKH RYHQ GRRU <RX FDQ
SXUFKDVHWKLVRSWLRQDODFFHVVRU\IURPWKH
DIWHUVDOHVVHUYLFH
6HWWLQJ 8VH
Û 2IISRVLWLRQ 7KHRYHQLVVZLWFKHGRII
$
%RWWRP KHDWLQJ )RUILQDOEDNLQJDQGEURZQLQJ+HDWLV
HPLWWHGIURPEHORZ
(
)XOOVXUIDFH
JULOO
<RX FDQ JULOO VWHDNV VDXVDJHV EUHDG DQG
SLHFHVRIILVK7KHZKROHDUHDEHORZWKH
JULOOHOHPHQWEHFRPHVKRW
%
7RSERWWRP
KHDWLQJ
%DNLQJDQGURDVWLQJDUHSRVVLEOHRQDVLQ
JOH OHYHO RQO\ )RU FDNHV DQG SL]]DV LQ WLQV
RU RQ D EDNLQJ WUD\ DQG DOVR IRU OHDQ MRLQWV
RI PHDW VXFK DV EHHI YHDO DQG JDPH +HDW
LVHPLWWHGHYHQO\IURPWKHWRSDQGERWWRP
N
+RWDLU )RUFDNHVZLWKRXWWRSSLQJVRUILOOLQJVLQ
WLQVSXIISDVWU\DQGMRLQWV
6
3L]]DVHWWLQJ )RUWKHTXLFNFRRNLQJRIIUR]HQSURGXFWV
ZLWKRXWSUHKHDWLQJHJSL]]DFKLSVRU
VWUXGHO7KHIDQGLVWULEXWHVWKHKHDWIURP
WKHERWWRPKHDWLQJHOHPHQW
6HWWLQJ 0HDQLQJ
Ú 2IISRVLWLRQ 7KHRYHQLVQRWKHDWLQJXS
7HPSHUDWXUH
UDQJH
7KH WHPSHUDWXUH LQ WKH FRRNLQJ FRP
SDUWPHQWLQ&
0D[ *ULOOVHWWLQJ 7KHSRZHUVHWWLQJIRUWKHJULOO
(
6HWWLQJ 0HDQLQJ
Û 2IISRVLWLRQ 7KHRYHQLVVZLWFKHGRII
(QGRIWKHVHW
FRRNLQJWLPH
$QDXGLEOHVLJQDOZLOOVRXQGRQFH
WKHVHWFRRNLQJWLPHKDVHODSVHG
&RRNLQJWLPH &RRNLQJWLPHLQPLQXWHV
> 0DQXDORSHUDWLRQ 7KHRYHQLVVZLWFKHGRQ
7KHRYHQEHJLQVWRKHDWXSDV
VRRQDVDWHPSHUDWXUHLVVHW
7KHWLPHULVVZLWFKHGRII
:LUHUDFN
)RURYHQZDUHFDNHWLQVURDVWV
JULOOHGLWHPVDQGIUR]HQPHDOV
5RXQGHQDPHOEDNLQJWUD\
)RUPRLVWFDNHVSDVWULHVIUR]HQ
PHDOVDQGODUJHPHDWGLVKHV
$OZD\VXVHZLWKWKHZLUHUDFN
7RHQVXUHWKDWWKHIRRGFRRNVHYHQO\
WKURXJKRXWSODFHWKHEDNLQJWUD\LQ
WKHFHQWUHRIWKHZLUHUDFN
(QDPHOOHGEDNLQJWUD\
)RUPRLVWFDNHVSDVWULHVIUR]HQ
PHDOVDQGODUJHPHDWGLVKHV
en
%HIRUH XVLQJ WKH RYHQ IRU WKH
ILUVWWLPH
,QWKLVVHFWLRQ\RXFDQILQGRXWZKDW\RXPXVWGREHIRUH
XVLQJ\RXURYHQWRSUHSDUHIRRGIRUWKHILUVWWLPH)LUVW
UHDGWKHVHFWLRQRQ 6DIHW\LQIRUPDWLRQ
+HDWLQJXSWKHRYHQ
7RUHPRYHWKHQHZFRRNHUVPHOOKHDWXSWKHRYHQZKHQ
LWLVHPSW\DQGFORVHG$QKRXURI7RSERWWRPKHDWLQJDW
& LV LGHDO (QVXUH WKDW QR SDFNDJLQJ UHPQDQWV KDYH
EHHQOHIWLQWKHFRRNLQJFRPSDUWPHQW
8VHWKHIXQFWLRQVHOHFWRUWRVHW7RSERWWRPKHDWLQJ
8VH WKH WHPSHUDWXUH VHOHFWRU WR VHW WKH WHPSHUDWXUH WR
&
6HWWKHWLPHUWRPLQXWHV
$IWHUDQKRXUWKHRYHQVZLWFKHVRII
&OHDQLQJWKHDFFHVVRULHV
%HIRUH\RXXVHWKHDFFHVVRULHVIRUWKHILUVWWLPHFOHDQ
WKHPWKRURXJKO\ZLWKKRWVRDS\ZDWHUDQGDVRIWGLVK
FORWK
6HWWLQJWKHRYHQ
7KHUHDUHYDULRXVZD\VLQZKLFK\RXFDQVHW\RXURYHQ
+HUHZHZLOOH[SODLQKRZ\RXFDQVHOHFWWKHGHVLUHGW\SH
RIKHDWLQJDQGWHPSHUDWXUHRUJULOOVHWWLQJ
+HDWLQJIXQFWLRQDQGWHPSHUDWXUH
([DPSOHLQWKHLOOXVWUDWLRQ7RSERWWRPKHDWLQJDW &
%
8VHWKHIXQFWLRQVHOHFWRUWRVHWWKHKHDWLQJIXQFWLRQ
8VHWKHWHPSHUDWXUHVHOHFWRUWRVHWWKHWHPSHUDWXUH
6ZLWFKRQWKHRYHQXVLQJWKHWLPHU >
7KHRYHQZLOOEHJLQWRKHDWXS
6ZLWFKLQJRIIWKHRYHQ
7XUQWKHWLPHUWRWKH2IISRVLWLRQ Û
&KDQJLQJWKHVHWWLQJV
7KHW\SHRIKHDWLQJDQGWHPSHUDWXUHFDQEHFKDQJHGDW
DQ\WLPHZLWKWKHLUUHVSHFWLYHVHOHFWRU
HQ
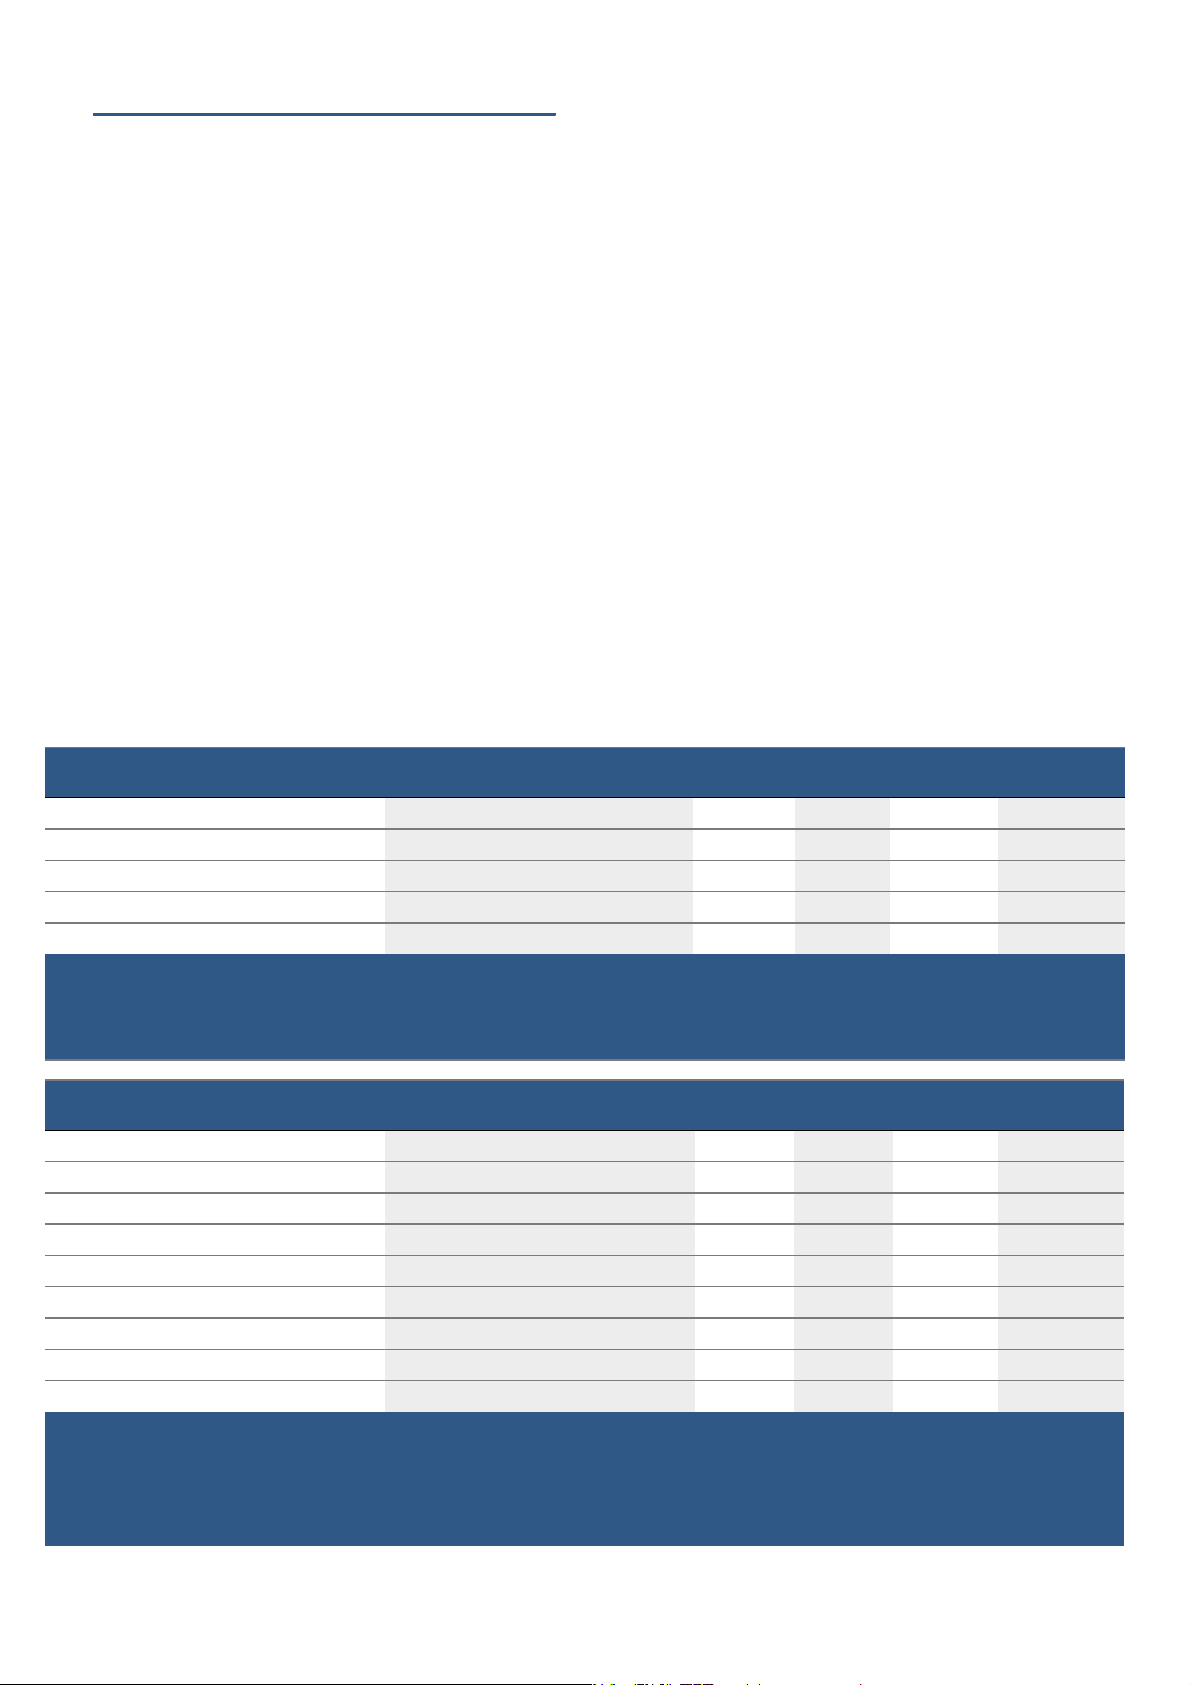
&RRNLQJWLPH
<RX FDQ VHW WKH FRRNLQJ WLPH IRU \RXU GLVK XVLQJ WKH WLPHU
:KHQ WKH FRRNLQJ WLPH KDV HODSVHG WKH RYHQ VZLWFKHV RII
DXWRPDWLFDOO\7KLVPHDQVWKDW\RXGRQRWKDYHWRVWRS
ZKDW\RXDUHGRLQJWRVZLWFKRIIWKHRYHQDQGSUHYHQWV
WKHIRRGIURPDFFLGHQWDOO\EHLQJFRRNHGIRUWRRORQJ
([DPSOHLQWKHLOOXVWUDWLRQ&RRNLQJWLPHRIPLQXWHV
8VHWKHIXQFWLRQVHOHFWRUWRVHWWKHKHDWLQJIXQFWLRQ
8VHWKHWHPSHUDWXUHVHOHFWRUWRVHWWKHWHPSHUDWXUH
7XUQWKHWLPHUFORFNZLVHDVIDUDVLWZLOOJRGRQRWWU\
WRWXUQLWDQ\IXUWKHU
7KHQWXUQLWEDFNWRWKHUHTXLUHGFRRNLQJWLPH
7KHRYHQZLOOQRZEHJLQKHDWLQJ
:KHQWKHWLPHKDVHODSVHG
$QDXGLEOHVLJQDOZLOOVRXQG7KHRYHQZLOOVWRS
KHDWLQJ7KHWLPHUZLOOUHPDLQLQWKH2IISRVLWLRQ Û7XUQ
WKHWHPSHUDWXUHVHOHFWRUWRWKH ûSRVLWLRQ
&KDQJLQJWKHFRRNLQJWLPH
7XUQWKHWLPHUFORFNZLVHWRWKHVWRSDQGWKHQEDFNWRWKH
QHZFRRNLQJWLPH
&DQFHOOLQJWKHFRRNLQJWLPH
7XUQWKHWLPHUWRWKH2IISRVLWLRQ Û
.LWFKHQWLPHU
:KHQWKHRYHQLVVZLWFKHGRIIWKHWLPHUIXQFWLRQFDQEH
XVHGDVDNLWFKHQWLPHU<RXFDQVHWDWLPHRIXSWR
PLQXWHV
6HWWLQJWKHNLWFKHQWLPHU
7XUQWKHWLPHUFORFNZLVHDVIDUDVLWZLOOJR
7KHQWXUQLWEDFNWRWKHUHTXLUHGFRRNLQJWLPH
7KHFRRNLQJWLPHZLOOQRZVWDUWWRHODSVH
7KH FRRNLQJ WLPH FDQ EH FKDQJHG DW DQ\ WLPH 7R GR WKLV
WXUQWKHVHOHFWRUFORFNZLVHDVIDUDVLWZLOOJRDQGWKHQ
EDFNWRWKHQHZFRRNLQJWLPH
:KHQWKHWLPHRQWKHNLWFKHQWLPHUKDV
HODSVHG
$Q DXGLEOH VLJQDO ZLOO VRXQG DQG WKH WLPHU ZLOO EH VHW WR WKH
2IISRVLWLRQ
6ZLWFKLQJRIIWKHNLWFKHQWLPHU
7XUQWKHWLPHUWRWKH2IISRVLWLRQ

en
&DUHDQGFOHDQLQJ
:LWK JRRG FDUH DQG FOHDQLQJ \RXU RYHQ ZLOO UHPDLQ FOHDQ
DQG IXOO\IXQFWLRQLQJ IRU D ORQJ WLPH WR FRPH +HUH ZH ZLOO
H[SODLQKRZWRPDLQWDLQDQGFOHDQ\RXURYHQFRUUHFWO\
::DUQLQJ² 5LVNRIEXUQV
7KH DSSOLDQFH EHFRPHV YHU\ KRW 1HYHU WRXFK WKH LQWHULRU
VXUIDFHVRIWKHFRRNLQJFRPSDUWPHQWRUWKHKHDWLQJ
HOHPHQWV $OZD\V DOORZ WKH DSSOLDQFH WR FRRO GRZQ .HHS
FKLOGUHQDWDVDIHGLVWDQFH
::DUQLQJ² 5LVNRIHOHFWULFVKRFN
'R QRW XVH DQ\ KLJKSUHVVXUH FOHDQHUV RU VWHDP FOHDQHUV
ZKLFKFDQUHVXOWLQDQHOHFWULFVKRFN
::DUQLQJ² 5LVNRILQMXU\
6FUDWFKHG JODVV LQ WKH DSSOLDQFH GRRU PD\ GHYHORS LQWR D
FUDFN'RQRWXVHDJODVVVFUDSHUVKDUSRUDEUDVLYH
FOHDQLQJDLGVRUGHWHUJHQWV
::DUQLQJ² 5LVNRIHOHFWULFVKRFN
3HQHWUDWLQJPRLVWXUHPD\FDXVHHOHFWULFVKRFN%HIRUH
FOHDQLQJ DQG PDLQWHQDQFH SOHDVH XQSOXJ WKH PDLQV SOXJ
RUVZLWFKRIIWKHFLUFXLWEUHDNHULQWKHIXVHER['RQRW
LPPHUVHWKHDSSOLDQFHLQZDWHURURWKHUOLTXLGZKHQ
FOHDQLQJ
1RWHV
■ 6OLJKWGLIIHUHQFHVLQWKHFRORXUVRQWKHIURQWRIWKH
RYHQ DUH FDXVHG E\ WKH XVH RI GLIIHUHQW PDWHULDOV VXFK
DVJODVVSODVWLFDQGPHWDO
■ 6KDGRZVRQWKHGRRUSDQHOZKLFKORRNOLNHVWUHDNV
DUHFDXVHGE\UHIOHFWLRQVPDGHE\WKHRYHQOLJKW
■ (QDPHOLVEDNHGRQDWYHU\KLJKWHPSHUDWXUHV7KLV
FDQ FDXVH VRPH VOLJKW FRORXU YDULDWLRQV 7KLV LV QRUPDO
DQGGRHVQRWDIIHFWWKHLUIXQFWLRQ7KHHGJHVRIWKLQ
WUD\VFDQQRWEHFRPSOHWHO\HQDPHOOHG$VDUHVXOW
WKHVH HGJHV FDQ EH URXJK 7KLV ZLOO QRW LPSDLU WKH DQWL
FRUURVLRQSURWHFWLRQ
&OHDQLQJSURGXFWV
7R HQVXUH WKDW WKH GLIIHUHQW VXUIDFHV DUH QRW GDPDJHG E\
XVLQJWKHZURQJFOHDQLQJSURGXFWIROORZWKHLQVWUXFWLRQV
LQWKHWDEOH'RQRWXVHDQ\RIWKHIROORZLQJ
■ +DUVKRUDEUDVLYHFOHDQLQJDJHQWV
■ &OHDQLQJSURGXFWVZLWKDKLJKDOFRKROFRQWHQW
■ +DUGVFRXULQJSDGVRUFOHDQLQJVSRQJHV
■ 3UHVVXUHZDVKHUVRUVWHDPFOHDQHUV
:DVKQHZVSRQJHFORWKVWKRURXJKO\EHIRUHXVH
$UHD &OHDQLQJSURGXFWV
2YHQIURQW +RWVRDS\ZDWHU
&OHDQZLWKDGLVKFORWKDQGGU\ZLWKDVRIW
FORWK'RQRWXVHJODVVFOHDQHURUDJODVV
VFUDSHU
'RRUSDQHOV *ODVVFOHDQHU
&OHDQZLWKDVRIWFORWK'RQRWXVHDJODVV
VFUDSHU'RQRWXVHDJJUHVVLYHFOHDQLQJ
SURGXFWVRUVKDUSPHWDOREMHFWVIRUFOHDQ
LQJ7KHVHPD\VFUDWFKDQGGDPDJHWKH
VXUIDFHRIWKHJODVVSDQHO
.QREV :LSHZLWKZDUPVRDS\ZDWHUDQGDFORWK
'U\ZLWKDVRIWFORWK
&RRNLQJFRPSDUW
PHQW
+RWVRDS\ZDWHURUDYLQHJDUVROXWLRQ
&OHDQZLWKDGLVKFORWK
7KHSURWHFWLYHSDQHORQWKHORZHUKHDWLQJ
HOHPHQWFDQEHUHPRYHG7RGRWKLVILUVW
UHIHUWRWKHLQVWDOODWLRQPDQXDO
:DUPVRDS\ZDWHURUDYLQHJDUVROXWLRQ,I
WKH RYHQ LV YHU\ GLUW\ XVH RYHQ FOHDQHU EXW
RQO\ZKHQWKHRYHQLVFROG
*ODVVFRYHUIRUWKH
RYHQOLJKW
:LSHZLWKZDUPVRDS\ZDWHUDQGDFORWK
'U\ZLWKDVRIWFORWK
6HDO
'RQRWUHPRYH
+RWVRDS\ZDWHU
&OHDQZLWKDGLVKFORWK'RQRWVFRXU
$FFHVVRULHV +RWVRDS\ZDWHU
6RDNDQGFOHDQZLWKDGLVKFORWKRUEUXVK

HQ
7URXEOHVKRRWLQJ
0DOIXQFWLRQV RIWHQ KDYH VLPSOH H[SODQDWLRQV 5HIHU WR WKH
WDEOHEHIRUHFDOOLQJWKHDIWHUVDOHVVHUYLFHDV\RXPD\EH
DEOHWRUHPHG\WKHIDXOW\RXUVHOI
::DUQLQJ² 5LVNRIHOHFWULFVKRFN
,QFRUUHFWUHSDLUVDUHGDQJHURXV5HSDLUVPD\RQO\EH
FDUULHGRXWE\RQHRIRXUWUDLQHGDIWHUVDOHVHQJLQHHUV,I
WKH DSSOLDQFH LV IDXOW\ XQSOXJ WKH PDLQV SOXJ RU VZLWFK RII
WKHIXVHLQWKHIXVHER[&RQWDFWWKHDIWHUVDOHVVHUYLFH
0DOIXQFWLRQWDEOH
,I D GLVK GRHV QRW WXUQ RXW DV ZHOO DV \RX KDG KRSHG UHIHU
WR WKH VHFWLRQ 7HVWHG IRU \RX LQ RXU FRRNLQJ VWXGLR ZKHUH
\RXZLOOILQGSOHQW\RIFRRNLQJWLSVDQGWULFNV
5HSODFLQJWKHRYHQOLJKWEXOE
::DUQLQJ² 5LVNRIHOHFWULFVKRFN
:KHQUHSODFLQJWKHFRRNLQJFRPSDUWPHQWEXOEWKHEXOE
VRFNHW FRQWDFWV DUH OLYH %HIRUH UHSODFLQJ WKH EXOE XQSOXJ
WKHDSSOLDQFHIURPWKHPDLQVRUVZLWFKRIIWKHFLUFXLW
EUHDNHULQWKHIXVHER[
,IWKHEXOELQWKHRYHQOLJKWIDLOVLWPXVWEHUHSODFHG
5HSODFHPHQWKHDWUHVLVWDQWEXOEVFDQEHREWDLQHGIURP
WKHDIWHUVDOHVVHUYLFH3OHDVHVXSSO\\RXUDSSOLDQFHV
( QXPEHUDQG)'QXPEHU
6ZLWFKRIIWKHFLUFXLWEUHDNHURUXQSOXJWKHPDLQVSOXJ
2SHQWKHDSSOLDQFHGRRU
3ODFHDWHDWRZHOLQWKHFROGFRRNLQJFRPSDUWPHQWWR
SUHYHQWGDPDJH
8QVFUHZWKHJODVVFRYHUDQGWXUQWKHIDXOW\RYHQOLJKW
EXOEDQWLFORFNZLVHWRUHPRYHLWIURPLQVLGHWKH
FRRNLQJFRPSDUWPHQW
5HSODFHWKHRYHQOLJKWEXOEZLWKDEXOEZLWKWKH
IROORZLQJVSHFLILFDWLRQV
9ROWDJH9
3RZHU:
&DS (
7HPSHUDWXUHUHVLVWDQFH &
6FUHZWKHJODVVFRYHUIRUWKHRYHQOLJKWEXOEEDFNRQ
5HPRYHWKHWHDWRZHODQGVZLWFKWKHFLUFXLWEUHDNHU
EDFNRQRUSOXJWKHPDLQVSOXJEDFNLQ
7XUQ WKH IXQFWLRQ VHOHFWRU WR DQ\ KHDWLQJ IXQFWLRQ WR FKHFN
WKDWWKHRYHQOLJKWLQJZRUNVFRUUHFWO\
3UREOHP 3RVVLEOHFDXVH 5HPHG\LQIRUPDWLRQ
7KHRYHQGRHV
QRWZRUN
7KHSOXJLVQRW
SOXJJHGLQ
3OXJLQWKHSOXJ
3RZHUFXW &KHFNZKHWKHUWKHNLWFKHQ
OLJKWRURWKHUNLWFKHQDSSOL
DQFHVDUHZRUNLQJ
7KHRYHQGRHV
QRWKHDWXS
'XVWKDVFRO
OHFWHGRQWKH
FRQWDFWV
7XUQWKHFRQWURONQREVEDFN
DQGIRUWKVHYHUDOWLPHV
en
$IWHUVDOHVVHUYLFH
,IWKHDSSOLDQFHQHHGVUHSDLULQJRXUDIWHUVDOHVVHUYLFH
ZLOOEHKDSS\WRKHOS2XUDIWHUVDOHVFHQWUHFDQSURYLGH
\RXZLWKWKHWHOHSKRQHQXPEHURI\RXUQHDUHVWVHUYLFH
SRLQW
(QXPEHUDQG)'QXPEHU
:KHQFRQWDFWLQJXVE\WHOHSKRQHSOHDVHTXRWHWKH
SURGXFWQXPEHU(QRDQGSURGXFWLRQQXPEHU)'QR
VRWKDWZHFDQDVVLVW\RXPRUHHIIHFWLYHO\7KHUDWLQJ
SODWHEHDULQJWKHVHQXPEHUVFDQEHIRXQGDWWKHEDFNRI
WKHRYHQ7RVDYHWLPH\RXFDQPDNHDQRWHRIWKH
QXPEHUVIRU\RXUDSSOLDQFHDQGWKHWHOHSKRQHQXPEHURI
WKHDIWHUVDOHVVHUYLFHLQWKHVSDFHEHORZLQFDVH\RX
QHHGWKHP
3OHDVHQRWHWKDWDYLVLWIURPDQDIWHUVDOHVVHUYLFH
HQJLQHHULVQRWIUHHRIFKDUJHLQWKHHYHQWWKDWWKH
DSSOLDQFHKDVEHHQPLVXVHGHYHQGXULQJWKHZDUUDQW\
SHULRG
3OHDVHILQGWKHFRQWDFWGDWDRIDOOFRXQWULHVLQWKH
HQFORVHGFXVWRPHUVHUYLFHOLVW
7RERRNDQHQJLQHHUYLVLWDQGSURGXFWDGYLFH
5HO\ RQ WKH SURIHVVLRQDOLVP RI WKH PDQXIDFWXUHU <RX FDQ
WKHUHIRUHEHVXUHWKDWWKHUHSDLULVFDUULHGRXWE\WUDLQHG
VHUYLFH WHFKQLFLDQV ZKR FDUU\ RULJLQDO VSDUH SDUWV IRU \RXU
DSSOLDQFHV
(QHUJ\DQGHQYLURQPHQWWLSV
+HUH\RXFDQILQGWLSVRQKRZWRVDYHHQHUJ\ZKHQ
EDNLQJ DQG URDVWLQJ DQG KRZ WR GLVSRVH RI \RXU DSSOLDQFH
SURSHUO\
6DYLQJHQHUJ\
■ 2QO\SUHKHDWWKHRYHQLIWKLVLVVSHFLILHGLQWKHUHFLSH
RULQWKHRSHUDWLQJLQVWUXFWLRQWDEOHV
■ 8VHGDUNEODFNODFTXHUHGRUHQDPHOOHGEDNLQJWLQV
7KH\DEVRUEWKHKHDWSDUWLFXODUO\ZHOO
■ 2SHQWKHRYHQGRRUDVLQIUHTXHQWO\DVSRVVLEOHZKLOH
\RXDUHFRRNLQJEDNLQJRUURDVWLQJ
■ ,W LV EHVW WR EDNH VHYHUDO FDNHV RQH DIWHU WKH RWKHU 7KH
RYHQ LV VWLOO ZDUP 7KLV UHGXFHV WKH EDNLQJ WLPH IRU WKH
VHFRQGFDNH<RXFDQDOVRSODFHWZRORDIWLQVQH[WWR
HDFKRWKHU
■ )RUORQJHUFRRNLQJWLPHV\RXFDQVZLWFKWKHRYHQRII
PLQXWHV EHIRUH WKH HQG RI WKH FRRNLQJ WLPH DQG XVH
WKHUHVLGXDOKHDWWRILQLVKFRRNLQJ
(QYLURQPHQWDOO\IULHQGO\GLVSRVDO
'LVSRVHRISDFNDJLQJLQDQHQYLURQPHQWDOO\IULHQGO\
PDQQHU
(QR )'QR
$IWHUVDOHVVHUYLFH O
*%
&DOOVFKDUJHGDWORFDORUPRELOHUDWH
,(
SHUPLQXWHDWSHDN2IISHDN
SHUPLQXWH
7KLVDSSOLDQFHLVODEHOOHGLQDFFRUGDQFHZLWK
(XURSHDQ 'LUHFWLYH (8 FRQFHUQLQJ XVHG
HOHFWULFDODQGHOHFWURQLFDSSOLDQFHVZDVWH
HOHFWULFDO DQG HOHFWURQLF HTXLSPHQW :((( 7KH
JXLGHOLQH GHWHUPLQHV WKH IUDPHZRUN IRU WKH UHWXUQ
DQGUHF\FOLQJRIXVHGDSSOLDQFHVDVDSSOLFDEOH
WKURXJKRXWWKH(8
This product contains light sourc
es from energy efficiency class G.
HQ
7HVWHG IRU \RX LQ RXU FRRNLQJ
VWXGLR
+HUH\RXFDQILQGDVHOHFWLRQRIGLVKHVDQGWKHLGHDO
VHWWLQJVIRUWKHP:HZLOOVKRZ\RXZKLFKKHDWLQJ
IXQFWLRQ DQG WHPSHUDWXUH DUH EHVW VXLWHG WR \RXU GLVK<RX
ZLOOEHSURYLGHGZLWKLQIRUPDWLRQRQVXLWDEOHFRRNLQJ
DFFHVVRULHVDQGWKHSRVLWLRQDWZKLFKWKH\VKRXOGEH
SODFHG LQ WKH RYHQ 7KHUH ZLOO DOVR EH WLSV DERXW RYHQZDUH
DQGSUHSDUDWLRQPHWKRGV
1RWHV
■ 7KHYDOXHVLQWKHWDEOHDOZD\VDSSO\WRIRRGSODFHGLQ
WKHFRRNLQJFRPSDUWPHQWZKHQLWLVFROGDQGHPSW\
2QO\SUHKHDWWKHDSSOLDQFHLIWKHWDEOHVSHFLILHVWKDW
\RXVKRXOGGRVR/LQHWKHDFFHVVRULHVZLWK
JUHDVHSURRISDSHUEHIRUHSUHKHDWLQJWKHDSSOLDQFH
■ 7KHWLPHVVSHFLILHGLQWKHWDEOHVDUHLQWHQGHGDVD
JXLGHRQO\7KHVHYDOXHVGHSHQGRQWKHTXDOLW\DQG
FRPSRVLWLRQRIWKHIRRG
■ 8VHWKHDFFHVVRULHVSURYLGHG
5HPRYHDQ\XQQHFHVVDU\DFFHVVRULHVDQGRYHQZDUH
IURPWKHFRRNLQJFRPSDUWPHQW
■ $OZD\VXVHDQRYHQFORWKRURYHQJORYHVZKHQWDNLQJ
KRWDFFHVVRULHVRURYHQZDUHRXWRIWKHFRRNLQJ
FRPSDUWPHQW
&DNHVDQGSDVWULHV
%DNLQJWLQV
,WLVEHVWWRXVHGDUNFRORXUHGPHWDOEDNLQJWLQV
%DNLQJWLPHVDUHLQFUHDVHGZKHQOLJKWFRORXUHGEDNLQJ
WLQVPDGHRIWKLQPHWDORUJODVVGLVKHVDUHXVHGDQG
FDNHVGRQRWEURZQVRHYHQO\
,I \RX ZLVK WR XVH VLOLFRQH EDNLQJ WLQV XVH WKH LQIRUPDWLRQ
DQGUHFLSHVSURYLGHGE\WKHPDQXIDFWXUHUDVDJXLGH
6LOLFRQHEDNLQJWLQVDUHRIWHQVPDOOHUWKDQQRUPDOWLQV
7KHDPRXQWRIPL[WXUHDQGUHFLSHLQVWUXFWLRQVPD\GLIIHU
7DEOHV
7KHWDEOHVVKRZWKHLGHDOW\SHRIKHDWLQJIRUWKHYDULRXV
FDNHVDQGSDVWULHV7KHWHPSHUDWXUHDQGEDNLQJWLPH
GHSHQGRQWKHDPRXQWDQGFRPSRVLWLRQRIWKHPL[WXUH
7KLVLVZK\WHPSHUDWXUHUDQJHVDUHJLYHQLQWKHWDEOHV
<RXVKRXOGWU\WKHORZHUWHPSHUDWXUHILUVWVLQFHDORZHU
WHPSHUDWXUHUHVXOWVLQPRUHHYHQEURZQLQJ<RXFDQ
LQFUHDVHWKHWHPSHUDWXUHQH[WWLPHLIQHFHVVDU\
,I \RX SUHKHDW WKH RYHQ WKH EDNLQJ WLPH LV VKRUWHQHG E\
WRPLQXWHV
$GGLWLRQDOLQIRUPDWLRQFDQEHIRXQGLQWKH %DNLQJWLSV
VHFWLRQIROORZLQJWKHWDEOHV
&DNHVLQWLQV $FFHVVRULHV 6KHOISRVL
WLRQ
+HDWLQJ
IXQFWLRQ
7HPSHUD
WXUHLQ&
&RRNLQJWLPH
LQPLQXWHV
5LQJFDNH 5RXQG%XQGWSDQ
%
6SRQJHFDNH 6SULQJIRUPFDNHWLQFPGLDPHWHU
%
)UXLWIODQ 6SULQJIRUPFDNHWLQFPGLDPHWHU
%
%URZQLHV 6TXDUHJODVVGLVK
%
4XLFKHIODQ 5RXQGQRQVWLFNWLQ FPGLDPHWHU
%
,QVHUWWKHZLUHUDFNZLWKWKHFXUYHGOLSSRLQWLQJGRZQZDUGV
,QVHUWWKHZLUHUDFNZLWKWKHFXUYHGOLSSRLQWLQJXSZDUGV
8VH KHDWUHVLVWDQW JODVV RYHQZDUH RQO\ 1HYHU VHW KRW JODVV RYHQZDUH GRZQ RQ D FROG RU ZHW VXUIDFH DIWHU WDNLQJ LW RXW RI WKH RYHQ 7KLV
PD\FDXVHWKHJODVVRYHQZDUHWRFUDFN
%DNHGLWHPVRQDEDNLQJWUD\ $FFHVVRULHV 6KHOISR
VLWLRQ
+HDWLQJ
IXQFWLRQ
7HPSHUD
WXUHLQ&
&RRNLQJ WLPH
LQPLQXWHV
0XIILQVSUHKHDW (QDPHOEDNLQJWUD\
N
7UD\EDNHV 5RXQGHQDPHOEDNLQJWUD\ZLUHUDFN
N
%LVFXLWV (QDPHOEDNLQJWUD\
%
9LHQQHVHZKLUOV (QDPHOEDNLQJWUD\
N
+RWZDWHUVSRQJHFDNH 5RXQGHQDPHOEDNLQJWUD\ZLUHUDFN
N
6SRQJHPL[WXUHIRU6ZLVVUROOSUHKHDW (QDPHOEDNLQJWUD\
%
6LPLWVHVDPHHQFUXVWHGEUHDGULQJV (QDPHOEDNLQJWUD\
N
%DNHGLWHPVPDGHZLWKSXIISDVWU\ (QDPHOEDNLQJWUD\
%
3LHVDQGWDUWVZLWK\XINDEUHDGFDVHV 5RXQGHQDPHOEDNLQJWUD\ZLUHUDFN
N
,QVHUWWKHZLUHUDFNZLWKWKHFXUYHGOLSSRLQWLQJGRZQZDUGV
,QVHUWWKHZLUHUDFNZLWKWKHFXUYHGOLSSRLQWLQJXSZDUGV
8VH KHDWUHVLVWDQW JODVV RYHQZDUH RQO\ 1HYHU VHW KRW JODVV RYHQZDUH GRZQ RQ D FROG RU ZHW VXUIDFH DIWHU WDNLQJ LW RXW RI WKH RYHQ 7KLV
PD\FDXVHWKHJODVVRYHQZDUHWRFUDFN
3UHKHDWWKHRYHQEHIRUHFRRNLQJ2QFHWKHWHPSHUDWXUHLQGLFDWRUOLJKWJRHVRXW\RXNQRZWKDWWKHRYHQKDVILQLVKHGSUHKHDWLQJ

en
*UDWLQVWRDVW
,I \RX DUH JULOOLQJ GLUHFWO\ RQ WKH ZLUH UDFN \RX VKRXOG DOVR
LQVHUWWKHHQDPHOEDNLQJWUD\DWSRVLWLRQ7KLVZLOONHHS
WKHRYHQLWVHOIFOHDQ
$OZD\VSODFHRYHQZDUHRQWKHZLUHUDFN
5RVHQNXFKHQ%DYDULDQ\HDVWOHDYHQHG
FDNH
5RXQGHQDPHOEDNLQJWUD\ZLUHUDFN
N
3DVWULHVPDGHIURP\HDVWGRXJK 5RXQGHQDPHOEDNLQJWUD\ZLUHUDFN
N
3L]]D (QDPHOEDNLQJWUD\
N
3UHKHDWLQJEUHDGZLWK JIORXU 5RXQGHQDPHOEDNLQJWUD\ZLUHUDFN
%
%DNHGLWHPVRQDEDNLQJWUD\ $FFHVVRULHV 6KHOISR
VLWLRQ
+HDWLQJ
IXQFWLRQ
7HPSHUD
WXUHLQ&
&RRNLQJ WLPH
LQPLQXWHV
,QVHUWWKHZLUHUDFNZLWKWKHFXUYHGOLSSRLQWLQJGRZQZDUGV
,QVHUWWKHZLUHUDFNZLWKWKHFXUYHGOLSSRLQWLQJXSZDUGV
8VH KHDWUHVLVWDQW JODVV RYHQZDUH RQO\ 1HYHU VHW KRW JODVV RYHQZDUH GRZQ RQ D FROG RU ZHW VXUIDFH DIWHU WDNLQJ LW RXW RI WKH RYHQ 7KLV
PD\FDXVHWKHJODVVRYHQZDUHWRFUDFN
3UHKHDWWKHRYHQEHIRUHFRRNLQJ2QFHWKHWHPSHUDWXUHLQGLFDWRUOLJKWJRHVRXW\RXNQRZWKDWWKHRYHQKDVILQLVKHGSUHKHDWLQJ
'LVK $FFHVVRULHVDQGRYHQ
ZDUH
3RVLWLRQ +HDWLQJ
IXQFWLRQ
7HPSHUDWXUH
LQ &
&RRNLQJ WLPH LQ
PLQXWHV
3DVWD
0DFDURQLEDNH 6TXDUHJODVVGLVK
%
*UDWLQ
3RWDWRJUDWLQPDGHIURPUDZLQJUHGLHQWV
PD[FPGHHS
6TXDUHJODVVGLVK
N
7RDVW
7RDVWZLWKWRSSLQJ VOLFHV :LUHUDFN
(
,QVHUWWKHZLUHUDFNZLWKWKHFXUYHGOLSSRLQWLQJGRZQZDUGV
,QVHUWWKHZLUHUDFNZLWKWKHFXUYHGOLSSRLQWLQJXSZDUGV
8VH KHDWUHVLVWDQW JODVV RYHQZDUH RQO\ 1HYHU VHW KRW JODVV RYHQZDUH GRZQ RQ D FROG RU ZHW VXUIDFH DIWHU WDNLQJ LW RXW RI WKH RYHQ 7KLV
PD\FDXVHWKHJODVVRYHQZDUHWRFUDFN
**** Preheat the appliance for 10 minutes.

HQ
7LSVIRUEDNLQJFDNHVDQGVWUXGHOFRUUHFWO\
%HIRUH\RXVWDUW 2QO\SUHKHDWWKHDSSOLDQFHLIWKHUHFLSHVSHFLILHVWKDW\RXVKRXOGGRVR,I\RXGRSUHKHDW
VHOHFWDWHPSHUDWXUHWKDWLVORZHUWKDQWKHEDNLQJWHPSHUDWXUHVSHFLILHGLQWKHFRRNLQJWDEOH
$SDUW IURP WKH EDNLQJ WUD\ RU ZLUH UDFN UHTXLUHG IRU EDNLQJ WKHUH VKRXOG EH QR RWKHU REMHFWV LQ
WKH RYHQ ,I \RX DUH XVLQJ D VPDOO WLQ RU WUD\ IRU EDNLQJ SODFH WKLV ULJKW LQ WKH FHQWUH RI WKH ZLUH
UDFN
7KH LQJUHGLHQWV XVHG KDYH DQ HIIHFW RQ WKH
FRRNLQJWLPH
$OOWKHLQJUHGLHQWVXVHGIRUFDNHVDQGVWUXGHOEDNHVPXVWEHIUHVKDQGDWURRPWHPSHUDWXUH
)ORXUPXVWEHRIWKHTXDOLW\UHTXLUHGIRUEDNLQJFDNHVDQGVWUXGHOEDNHVDQGPXVWEHVLHYHG
8VH EDNLQJ SRZGHU DQG \HDVW DFFRUGLQJ WR WKH LQVWUXFWLRQV DQG TXDQWLW\ LQGLFDWLRQV RI WKH PDQ
XIDFWXUHU
7KLQJVWRUHPHPEHUZKHQEDNLQJDVWUX
GHOEDNH
7KHWDEOHVSHFLILHVNJRI\XINDGRXJKIRUSUHSDULQJDVWUXGHOEDNH,I\RXXVHPRUHRUOHVV
GRXJKWKDQVSHFLILHGLQWKHUHFLSHRULI\RXXVHDVWUXGHOGRXJKWKDW\RXKDYHUROOHGRXW\RXU
VHOI WKH WKLFNQHVV RI WKH EDNHVWUXGHO ZLOO YDU\ ZKLFK ZLOO FKDQJH WKH UHTXLUHG FRRNLQJ WHPSHU
DWXUHDQGWLPH7KH\XINDGRXJKVKHHWVPXVWEHOD\HUHGHYHQO\RQWKHEDNLQJVKHHWDQG
EUXVKHG ZLWK D PL[WXUH RI PLON RLO HJJ DQG \RJKXUW 3RXU WKH UHVW RI WKH HJJPLON PL[WXUH RYHU
WKHEDNH7KHGRXJKVKHHWVPXVWEHOD\HUHGWRDQHYHQKHLJKWDQGWKHHJJPLONPL[WXUHPXVW
EHHYHQO\GLVWULEXWHGVRWKDWWKHEDNHFRRNVDQGEURZQVHYHQO\
&DNHVDQGEDNHVVWUXGHOEURZQYHU\
TXLFNO\EXWDUHQRWFRRNHGWKURXJK
1RWDOOIRRGVEURZQDWWKHVDPHUDWH:KHQ\RXEUXVKIRRGZLWKHJJPLONRURLOWKH\EURZQ
PRUH TXLFNO\ ,I WKH EDNH EURZQV WRR TXLFNO\ QH[W WLPH VOLGH WKH EDNLQJ WUD\ LQ DW D ORZHU OHYHO
UHGXFH WKH WHPSHUDWXUH DQG LQFUHDVH WKH EDNLQJ WLPH 2WKHUZLVH WKH EDNH PD\ QRW EH FRRNHG
WKURXJKRQWKHLQVLGHHYHQLIDSSHDUVWREHRQWKHRXWVLGH
3UHSDULQJ\HDVWGRXJK 7KH PLON RU ZDWHU PXVW EH OXNHZDUP LQ RUGHU IRU WKH GRXJK WR ULVH 7KH GRXJK VKRXOG KDYH WKH
FRQVLVWHQF\ RI DQ HDUOREH $ KDUG GRXJK ZLOO QRW ULVH $OORZ WKH GRXJK WR SURYH LQ D ZDUP SODFH
IRU DERXW PLQXWHV 'R QRW OHDYH WR SURYH IRU WRR ORQJ RWKHUZLVH WKH GRXJK ZLOO EHFRPH VRXU
2QFH\RXKDYHPDGHWKHGRXJKLQWRWKHUHTXLUHGVKDSHOHDYHLWWRSURYHIRUDIXUWKHUPLQ
XWHV DQG WKHQ SODFH LW LQ D FROG RYHQ :KHQ LW LV FRRNHG WDNH WKH GRXJK RXW RI WKH RYHQ FRYHU
LWZLWKDGDPSWHDWRZHODQGOHDYHLWWRFRRO7KLVZLOOJLYHLWDVRIWFUXVW
<RXZLVKWREDNHDFFRUGLQJWR\RXURZQ
UHFLSH
8VHVLPLODULWHPVLQWKHEDNLQJWDEOHVDVDJXLGH
<RXFDQFKHFNZKHWKHUDFDNHLVFRRNHG
RUQRW
$SSUR[LPDWHO\ PLQXWHVEHIRUHWKHHQGRIWKHFRRNLQJWLPHLQVHUWDWKLQFRFNWDLOVWLFNLQWR
WKHGHHSHVWSRLQWRIWKHFDNH,IWKHFRFNWDLOVWLFNFRPHVRXWFOHDQWKHFDNHLVUHDG\
7KHFDNHFROODSVHV 8VHOHVVIOXLGQH[WWLPHRUVHWWKHRYHQWHPSHUDWXUH GHJUHHVORZHU2EVHUYHWKHPL[LQJ
WLPHVVSHFLILHGLQWKHUHFLSH'RQRWRSHQWKHRYHQGRRUXQWLODWOHDVWPLQXWHVEHIRUHWKH
HQGRIWKHFRRNLQJWLPH
7KHFDNHKDVULVHQLQWKHPLGGOHEXWKDV
VXQNDURXQGWKHHGJH
'R QRW JUHDVH WKH HGJH RI WKH FDNH WLQ $IWHU EDNLQJ ORRVHQ WKH FDNH IURP WKH WLQ FDUHIXOO\ ZLWK
DNQLIH
7KHFDNHEURZQVWRRPXFKRQWRS 1H[W WLPH SODFH WKH FDNH ORZHU LQ WKH RYHQ DQG EDNH DW D ORZHU WHPSHUDWXUH IRU VOLJKWO\ ORQJHU
7KHFDNHLVWRRGU\ 0DNH WLQ\ KROHV LQ WKH ILQLVKHG FDNH XVLQJ D FRFNWDLO VWLFN 7KHQ GUL]]OH IUXLW MXLFH RYHU LW 1H[W
WLPHVHOHFWDWHPSHUDWXUH GHJUHHVKLJKHUDQGUHGXFHWKHEDNLQJWLPH
7KHFDNHORRNVJRRGEXWLVVRJJ\RQWKH
LQVLGH
8VHOHVVIOXLGQH[WWLPHDQGEDNHIRUVOLJKWO\ORQJHUDWDORZHUWHPSHUDWXUH
7KHSLHFHVRIGRXJKDUHVWLFNLQJWRJHWKHU
ZKHQWKH\HDVWUROOVDUHEDNHG
7KHUHPXVWEHDGLVWDQFHRIDERXW FPEHWZHHQWKHEUHDGUROOV7KLVJLYHVHQRXJKVSDFHIRU
WKHEUHDGUROOVWRH[SDQGDQGEDNHHYHQO\RQDOOVLGHV
&RQGHQVDWLRQIRUPVZKHQ\RXEDNHPRLVW
FDNHV
6WHDPFDQIRUPGXULQJEDNLQJZKLFKHVFDSHVYLDWKHGRRU7KHVWHDPPD\VHWWOHDQGIRUP
ZDWHU GURSOHWV RQ WKH FRQWURO SDQHO RU RQ WKH IURQWV RI DGMDFHQW XQLWV 7KLV LV D QDWXUDO SURFHVV

en
3UHSUHSDUHGSURGXFWV
2EVHUYHWKHLQVWUXFWLRQVRQWKHSDFNDJLQJ
,I\RXOLQHWKHDFFHVVRULHVZLWKJUHDVHSURRISDSHUPDNH
VXUHWKDWWKHSDSHULVVXLWDEOHIRUWKHVHWHPSHUDWXUHV
0DNHVXUHWKHSDSHULVDVXLWDEOHVL]HIRUWKHGLVKWREH
FRRNHG
7KHFRRNLQJUHVXOWJUHDWO\GHSHQGVRQWKHTXDOLW\RIWKH
IRRG 3UHEURZQLQJ DQG LUUHJXODULWLHV FDQ VRPHWLPHV HYHQ
EHIRXQGRQWKHUDZSURGXFW
6SHFLDOGLVKHV
$WORZWHPSHUDWXUHV\RXFDQHYHQPDNHKRPHPDGH
\RJKXUW
)LUVWUHPRYHWKHDFFHVVRULHVIURPWKHFRRNLQJ
FRPSDUWPHQW
0DNLQJ\RJKXUW
%ULQJ O RI PLON IDW WR WKH ERLO WKHQ DOORZ LW WR
FRROWR &
6WLULQ JFKLOOHG\RJKXUW
3RXULQWRFXSVRUVPDOOMDUVDQGFRYHUZLWKFOLQJILOP
3ODFHWKHFXSVRUMDUVRQWKHZLUHUDFN
$FU\ODPLGHLQIRRGVWXIIV
$FU\ODPLGHLVPDLQO\SURGXFHGLQJUDLQDQGSRWDWR
SURGXFWVSUHSDUHGDWKLJKWHPSHUDWXUHVVXFK DVSRWDWR
FULVSV FKLSV WRDVW EUHDG UROOV EUHDG RU ILQH EDNHG JRRGV
ELVFXLWVJLQJHUEUHDGVSLFHGELVFXLW
'LVK $FFHVVRULHV 3RVLWLRQ +HDWLQJ
IXQFWLRQ
7HPSHUDWXUH
LQ &
&RRNLQJ WLPH LQ
PLQXWHV
&KLSV (QDPHOEDNLQJWUD\
%
3L]]D (QDPHOEDNLQJWUD\
N
'LVK 2YHQZDUH 6KHOISRVLWLRQ +HDWLQJ
IXQFWLRQ
7HPSHUDWXUH 'XUDWLRQ
<RJKXUW &XSVRUMDUV
2QWKHZLUHUDFN
%
& KRXUV
,QVHUWWKHZLUHUDFNZLWKWKHFXUYHGOLSSRLQWLQJGRZQZDUGV
7LSVIRUNHHSLQJDFU\ODPLGHWRDPLQLPXPZKHQSUHSDULQJIRRG
*HQHUDO
■
.HHSFRRNLQJWLPHVWRDPLQLPXP
■
&RRNPHDOVXQWLOWKH\DUHJROGHQEURZQEXWQRWWRRGDUN
■
/DUJHWKLFNSLHFHVRIIRRGFRQWDLQOHVVDFU\ODPLGH
%DNLQJ :LWKWRSERWWRPKHDWLQJPD[ &
%LVFXLWV :LWKWRSERWWRPKHDWLQJPD[ &
(JJRUHJJ\RONUHGXFHVWKHSURGXFWLRQRIDFU\ODPLGH
2YHQFKLSV 6SUHDGRXWDVLQJOHOD\HUHYHQO\RQWKHEDNLQJWUD\

6

6

6

5IBOLZPVGPSCVZJOHB
#PTDI)PNF"QQMJBODF
5HJLVWHU\RXUQHZGHYLFHRQ0\%RVFKQRZDQGSURILWGLUHFWO\IURP
t&YQFSUUJQTUSJDLTGPSZPVSBQQMJBODF
t8BSSBOUZFYUFOTJPOPQUJPOT
t%JTDPVOUTGPSBDDFTTPSJFTTQBSFQBSUT
t%JHJUBMNBOVBMBOEBMMBQQMJBODFEBUBBUIBOE
t&BTZBDDFTTUP#PTDI)PNF"QQMJBODFT4FSWJDF
)UHHDQGHDV\UHJLVWUDWLRQ²DOVRRQPRELOHSKRQHV
XXXCPTDIIPNFDPNXFMDPNF
-PPLJOHGPSIFMQ
:PV}MMGJOEJUIFSF
([SHUWDGYLFHIRU\RXU%RVFKKRPHDSSOLDQFHVQHHGKHOSZLWKSUREOHPV
RUDUHSDLUIURP%RVFKH[SHUWV
)LQGRXWHYHU\WKLQJDERXWWKHPDQ\ZD\V%RVFKFDQVXSSRUW\RX
XXXCPTDIIPNFDPNTFSWJDF
$POUBDUEBUBPGBMMDPVOUSJFTBSFMJTUFEJOUIFBUUBDIFETFSWJDFEJSFDUPSZ
BSH)BVTHFSÉUF(NC)
&DUO:HU\6WUDH
0QFKHQ, *ERMANY
XXXCPTDIIPNFDPN
A Bosch Company
*9001402605*
9001402605
020802 06