Loading ...
Loading ...
Loading ...
21
FINAL PREPARATION
1
. Some stainless steel parts may have a plastic protective wrap which must be peeled off. The interior of the ice
m
achine should be washed thoroughly with hot, soapy water, rinsed and wiped dry to remove film residue and any
installation dust or debris before being used. Solutions stronger than soap and water are rarely needed.
2. All stainless steel parts should be wiped with hot soapy water. If buildup occurs, do not use steel wool, abrasive
cloths, cleaners, or powders. If it is necessary to scrape stainless steel to remove encrusted materials, soak with hot,
wet cloths to loosen the material, then use a wood or nylon scraper. Do not use a metal knife, spatula, or any other
metal tool to scrape stainless steel; scratches are almost impossible to remove.
SERVICE INFORMATION
If service is required, call your dealer or authorized service agency. The name of the authorized service agency can be
obtained from the dealer or distributor in your area.
Have the following information readily available.
• Model number
• Serial number
• Date purchased
• Name of dealer from whom purchased
Clearly describe the problem that you are having. If you are unable to obtain the name of an authorized service agency,
or if you continue to have service problems, contact Viking Range Corporation at 1-888-VIKING1 (845-4641), or write to:
VIKING RANGE CORPORATION
PREFERRED SERVICE
1803 Hwy 82W
Greenwood, Mississippi 38930 USA
Record the information indicated below. You will need it if service is ever required. The model and serial number for
your ice machine are located on the front of the unit at the base of the door frame.
Model Number Serial Number
Date of Purchase Date Installed
Dealer’s Name
Address
If service requires installation of parts, use only authorized parts to insure protection under the warranty.
KEEP THIS MANUAL FOR FUTURE REFERENCE.
20
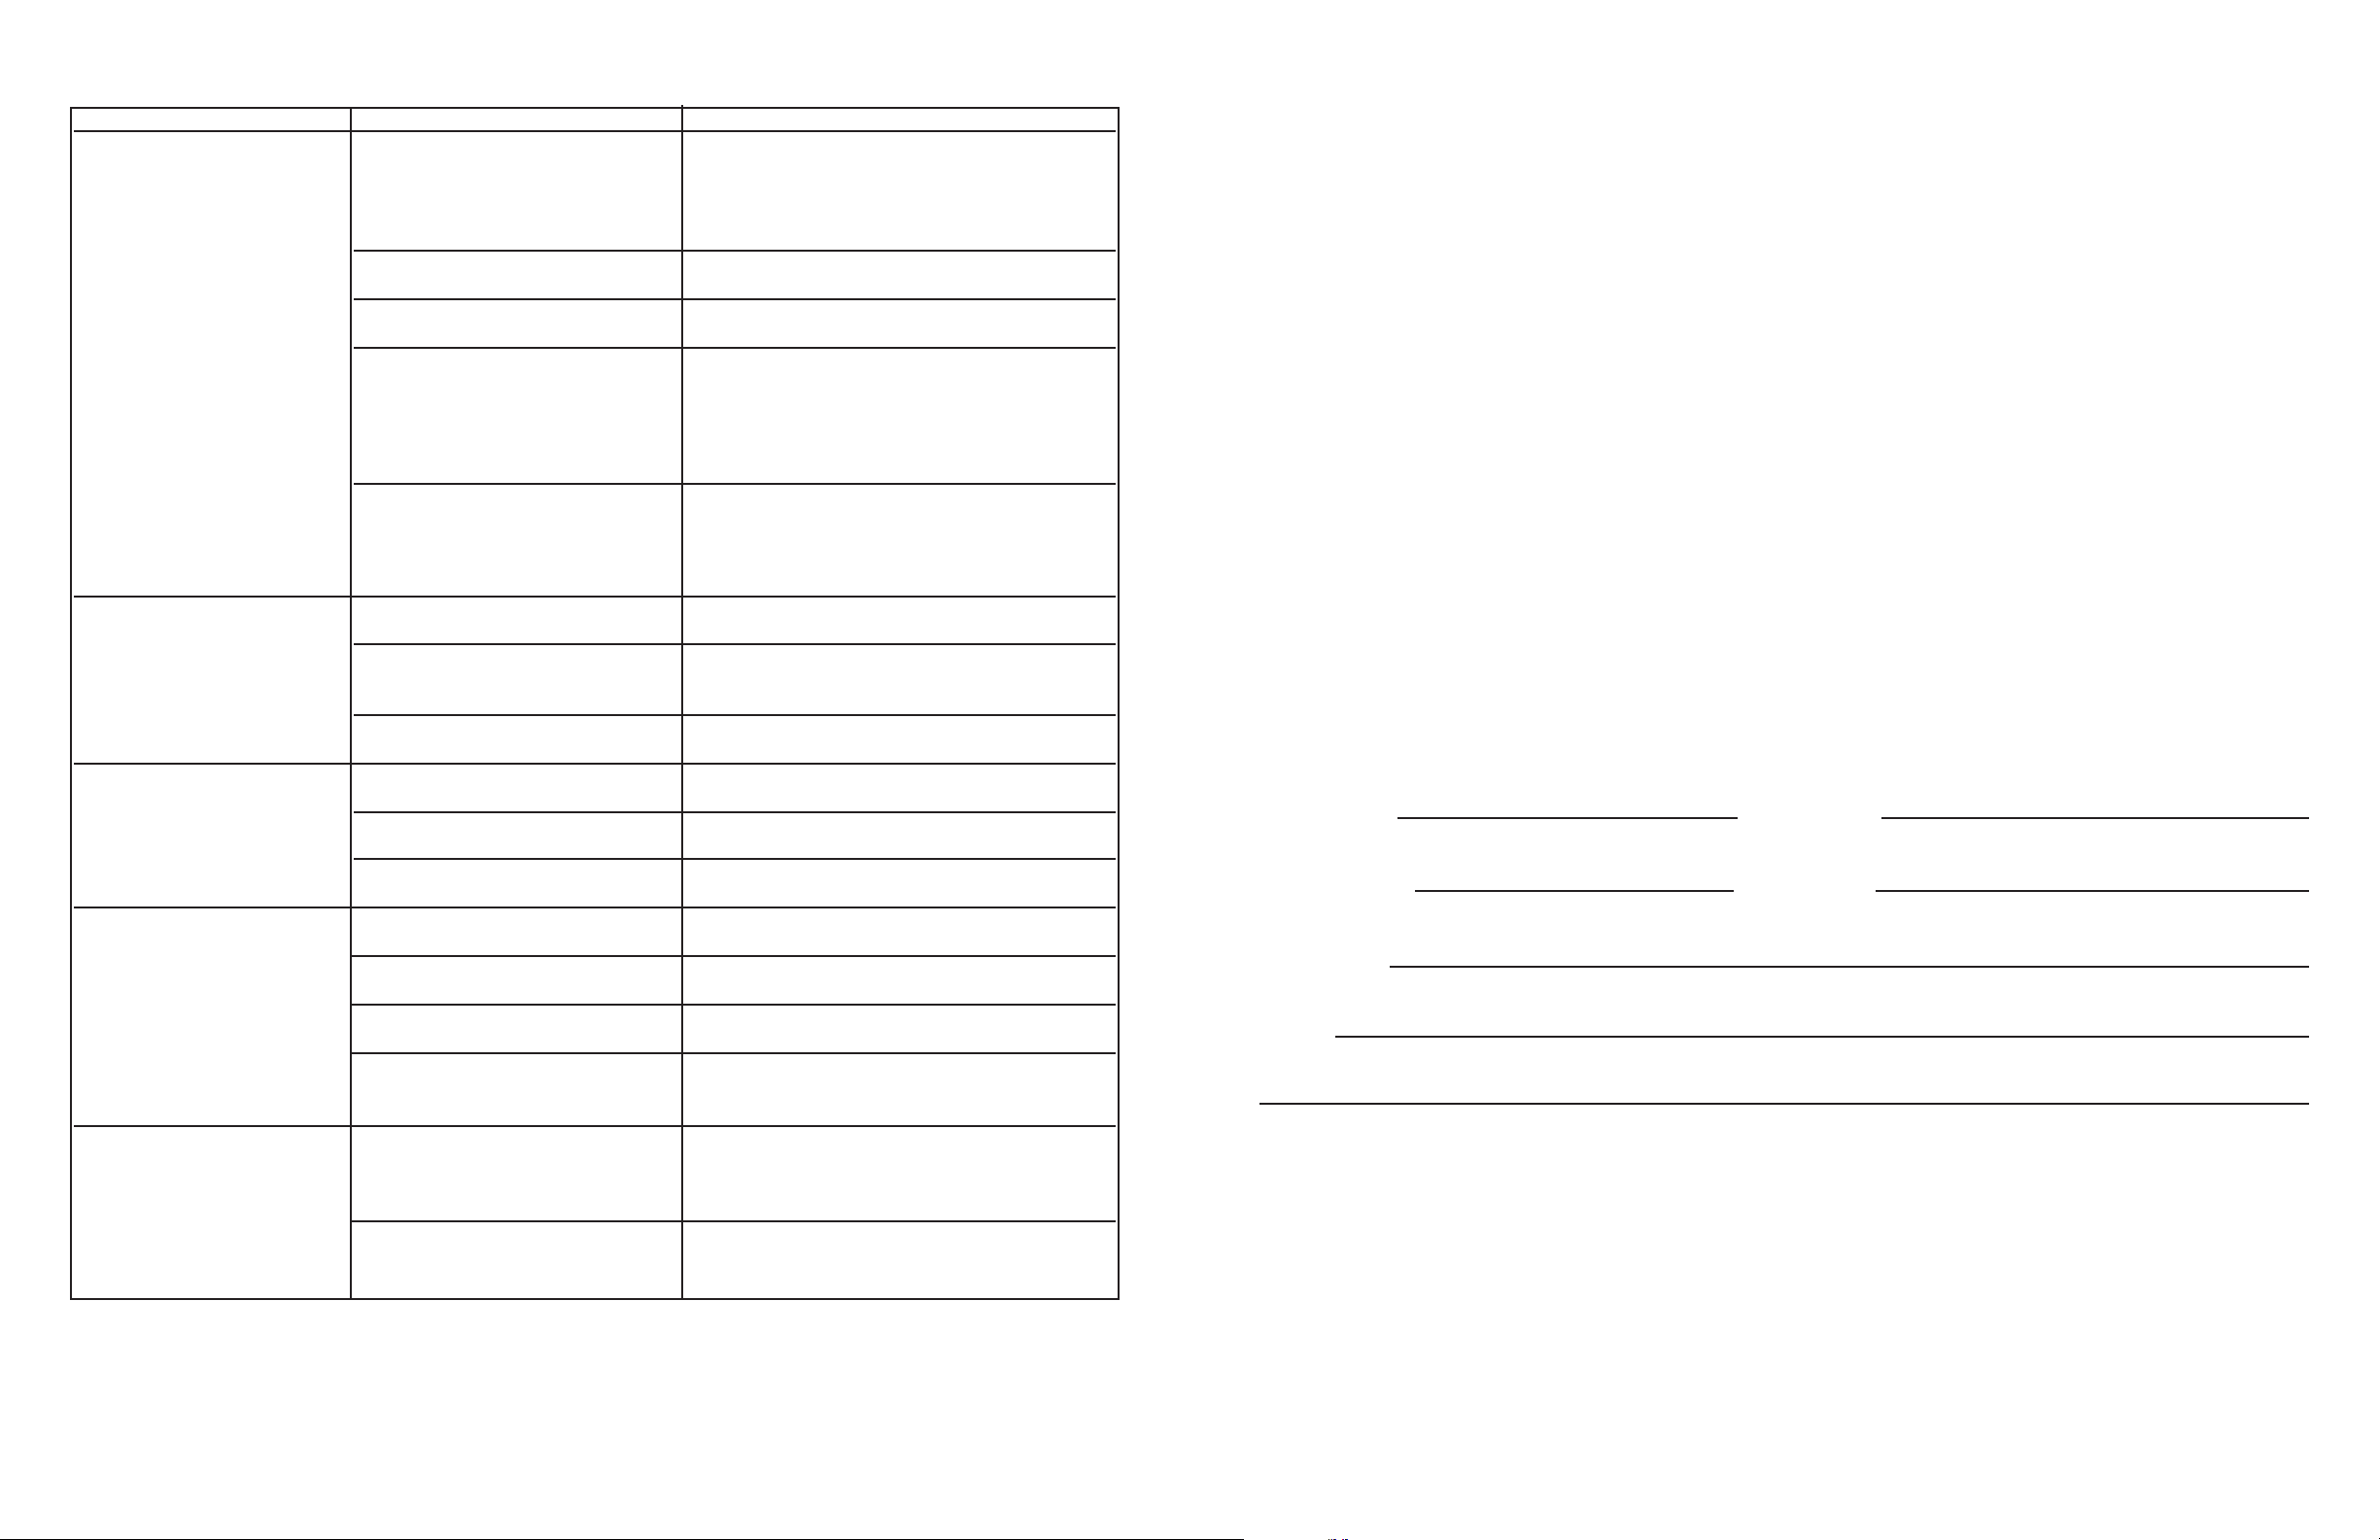
TROUBLESHOOTING GUIDE
P
ROBLEM POSSIBLE CAUSE CORRECTION
Low ice production. Unit Low water level in reservoir.
Make sure that the reservoir drain plug is
is running, has run over a 48 installed properly. Check the water line to
hour period, and there is the unit to make sure there are no restrictions
l
ittle ice in bin.
or kinks in the line. Check all filters to make sure
they are not restricted or plugged.
Distributor tube is restricted. See “Cleaning the Ice Machine System” section for
cleaning the unit for proper operation.
Build-up of deposits on evaporator See “Cleaning the Ice Machine System”
plate. section for cleaning the unit for proper operation.
Inadequate drain system. Restriction in drain lines will cause ice in the bin to
melt to a thinner cube. If using a gravity drain, make
certain there are no kinks or restrictions in the drain
lines. If using a drain pump, check the inlet screen,
discharge line, and vent line for any build-up or
restrictions.
Condenser fan air flow is restricted Make certain the grill in the front of the unit is free
and open for proper air circulation. Check and clean
the condenser coil by removing the grill in the front
of the unit. Clean the condenser with a vacuum and
brush attachment.
Grid cutter is not cutting The selector switch is not in the Set the rocker switch on the grill of the ice
ice slab. “ON” position. machine to the “ON” position.
The grid cutter is not plugged into Remove the escutcheon panel and plug the
receptacle. grid cutter into the receptacle on the side of the
liner.
It has not had time to cut It can take up to 35 minutes to cut through a
through the slab. harvested ice slab. This is normal operation.
Ice level is too low. The ice machine is not level Use a level to check the unit from side to side and
front to rear.
Room temperature is too cold. Move the unit to an area where temperature is
above 55°F.
The selector switch is not in the Set the rocker switch on the grill of the ice
“ON” position. machine to the “ON” position.
Ice level is too high. The ice machine is not level Use a level to check the unit from side to side and
front to rear.
Room temperature is too warm. Move the unit to an area where temperature is
below 90°F.
Ice deflector is not in place or Check to see that the ice deflector is in place
secured properly. and secured below the grid cutter.
Bin level sensing tube needs Adjust the bin level sensing tube by simply
adjusting. pressing directly down on the tube 5 inches from
the front of the tube to get a desired bin level.
Water keeps backing up Inadequate drain system. Restriction or improperly installed drain lines
into ice bin (gravity drain). will cause water to back up into the ice bin. Make
certain there are no kinks or restrictions in the drain
lines. If necessary, consult a qualified plumber.
Foreign material in ice bin drain Foreign material is restricting or blocking the ice bin
drain located at the right rear corner of the ice bin.
The drain will need to be cleared
.
Loading ...