PI D ir 7_[e_] e[e]tauuun _v_ [o]_
..............-Owner's
Instructions
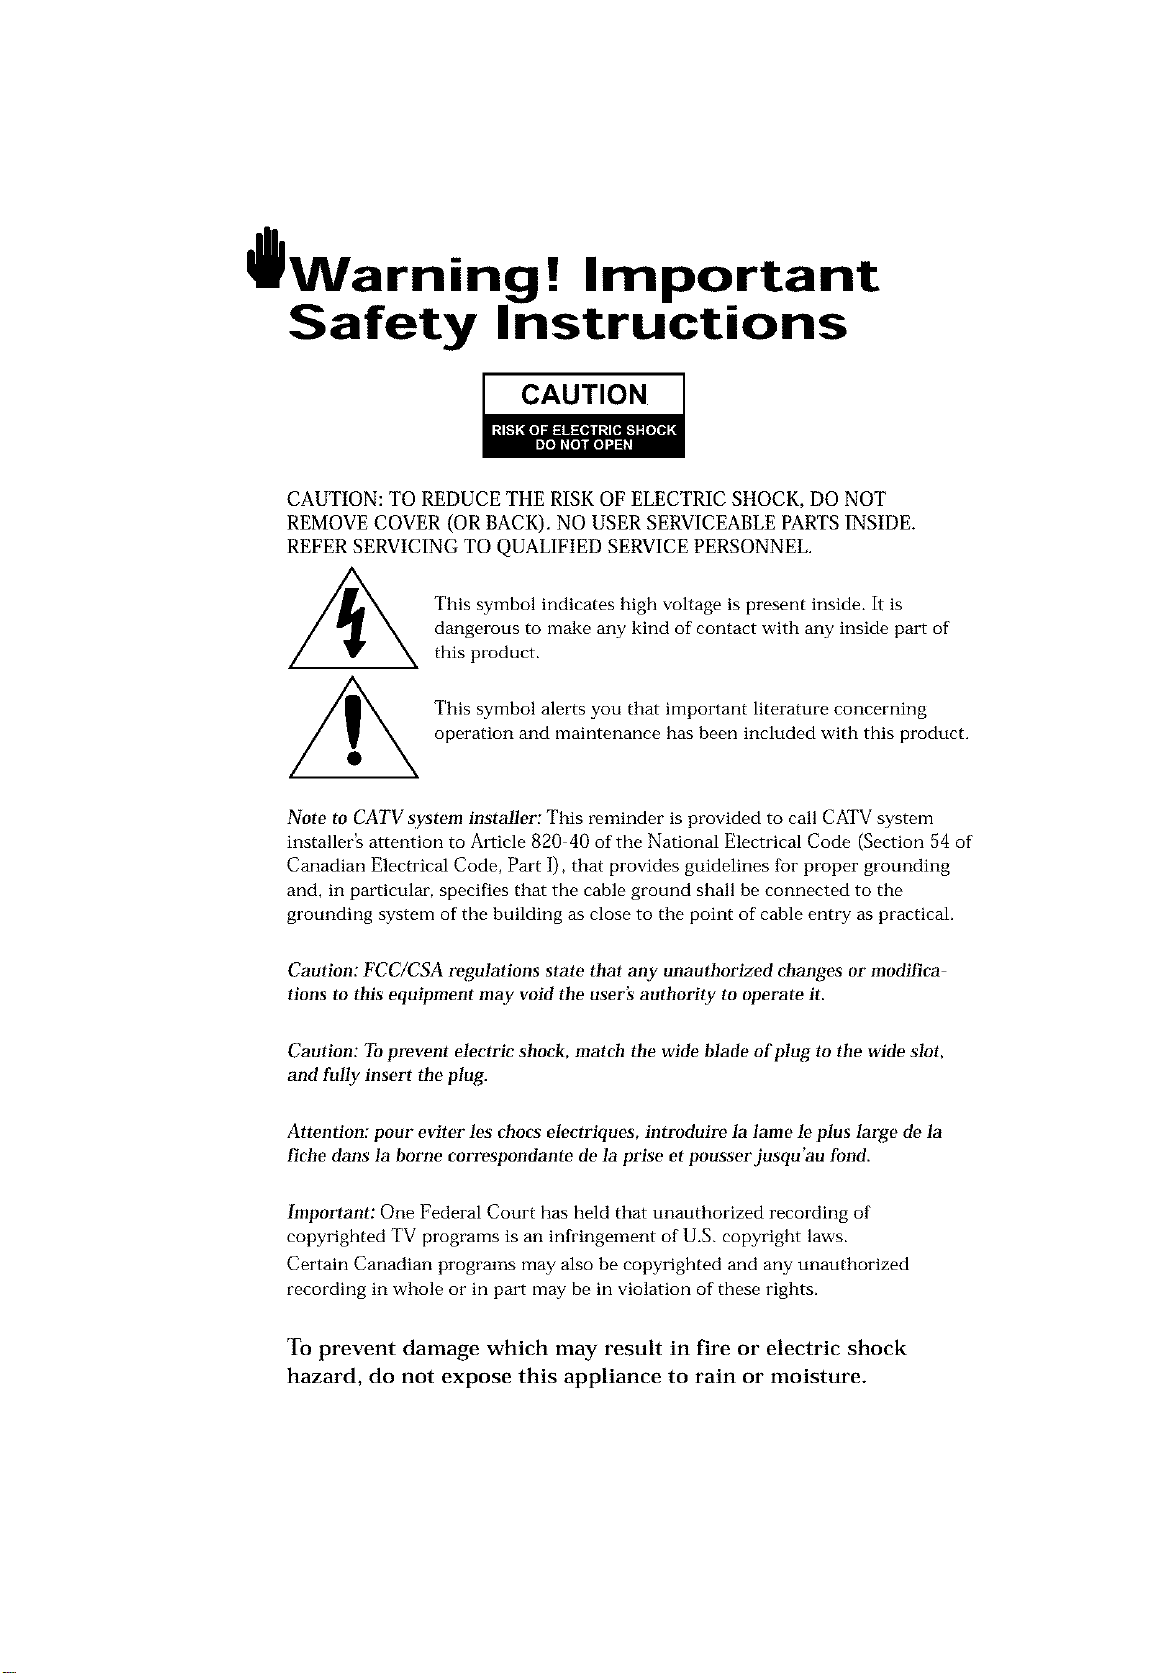
l Warninq ! Important
Safety Instructions
CAUTION
CAUTION: TO REDUCE THE RISK OF ELECTRIC SHOCK, DO NOT
REMOVE COVER (OR BACK). NO USER SERVICEABLE PARTS INSIDE.
REFER SERVICING TO QUALIFIED SERVICE PERSONNEL.
This symbol indicates high voltage is present inside, It is
dangerous to make any kind of contact with any inside part of
this product.
This symbol alerts you that important literature concerning
operation and maintenance has been included with this producL
Note to CATV system installer: This reminder is provided to call CATV system
installer's attention to Article 820 40 of the National Electrical Code (Section 54 of
Canadian Electrical Code, Part I), that provides guidelines for proper grounding
and, in particular, specifies that the cable ground shall be connected to the
grounding system of the building as close to the point of cable entry as practical.
Caution: FCC/CSA regulations state that any unauthorized ehanges or modillca
tlons to this equipment may void the user's authority to operate it.
Caution: To prevent etectric shoek, match the wide Made of plug to the wide slot,
and fully insert the plug.
Attention: pour eviter les chocs electriques, introduire la lame le ptus large de la
fiche dans la borne correspondante de la prise et pousserjusqu'au fond.
Important: One Federal Court has held that unauthorized recording of
copyrighted TV programs is an infringement of U.S. copyright laws.
Certain Canadian programs may also be copyrighted and any unauthorized
recording in whole or in part may be in violation of these rights.
To prevent damage which may result in fire or electric shock
hazard, do not expose this appliance to rain or moisture.
Thank You for Choosing Samsung
Thank you for choosing Samsung! Your new Samsung TV represents the latest in television
technology, We designed it with easy to use on screen menus and closed captioning capabili
ties, makhlg it one of the best products in its class. We are proud to offbr you a product that
will provide convenient, dependable service and enjoyment fur years to come.
Important Safety Information
Always be careful when using your TV receiver. '1"oreduce the risk of fire, electrical shock,
and other injuries, keep these safety precautions in mind when installing, using, and
maintaining your machine.
• Read all safety and operating instructions before operating your T_
• Keep the safety and operating instructions for future ieference.
• Heed all warnings on the TV i-eceiver and in the operating instructions.
• Follow all operating and use instructions.
• Unplug the TV receiver from the wall outlet befure cleaning. Use a damp cloth; do not use
liquid or aerosol cleaners.
• Never add any attachments and/or equipment without approval of the manufacturer. Such
additions can inci-ease the risk of fire, electric shock, or other personal injury,
• Do not use the TV receiver where contact with or immersion in water is a possibility, such as
near bath tubs, sinks, washing machines, swimming pools, etc.
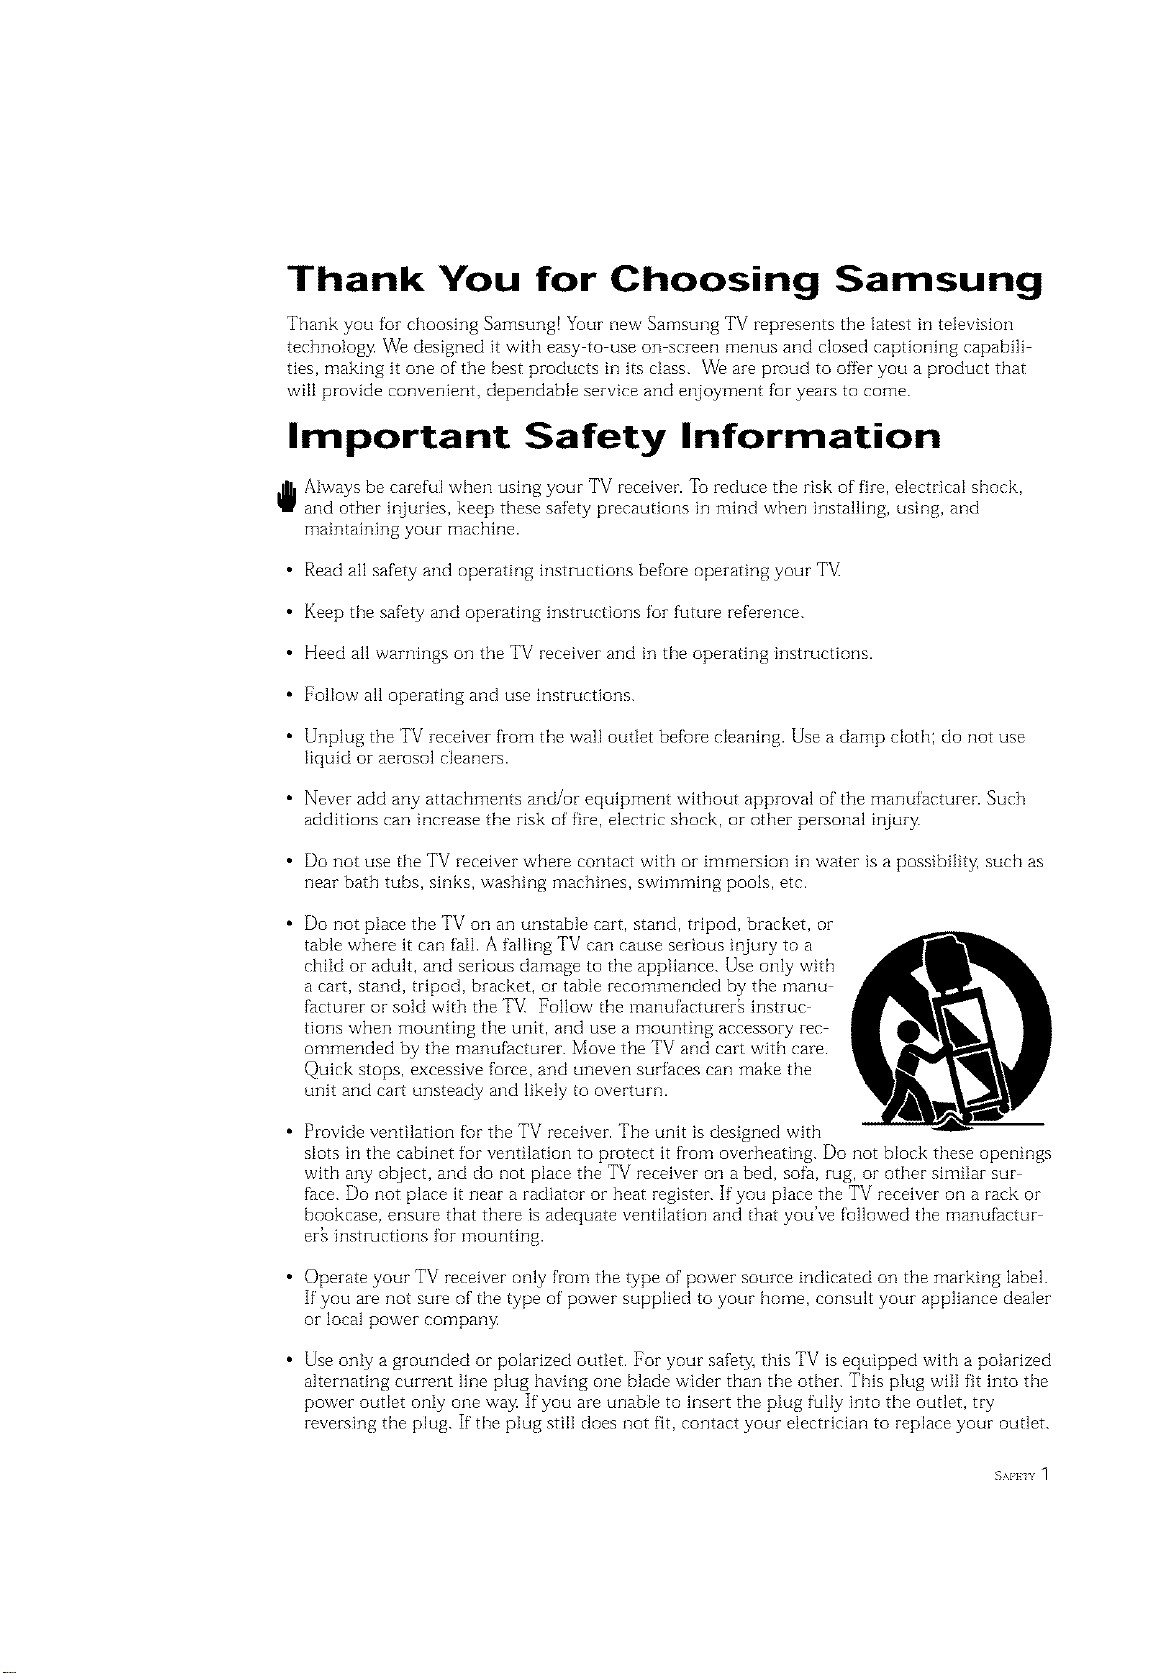
• Do not place the TV on an unstable cart, stand, tripod, bracket, or
table where it can fail. A falling TV can cause serious injury to a
child or adult, and serious damage to the appliance. Use only with
a cart, stand, tripod, bracket, or table recommended by the manu
facturer or sold with the TV_ Follow the manufacturer[ instruc
tions when mounting the unit, and use a mounting accessory rec
ommended by the manufacturer. Move the TV and cart with care.
Quick stops, excessive force, and uneven surfaces can make the
unit and cart unsteady and likely to overturn.
• Provide ventilation fur the TV receiver. The unitis designed with
slots in the cabinet for ventilation to pi-otect it from overheating. Do not block these openings
with any object, and do not place the TV receiver on a bed, sofa, rug, or other similar sur
face. Do not place it near a radiator or beat i-egister. If you place the TV receiver on a rack or
bookcase, ensure that there is adequate ventilation and that you've followed the manufactur
er_ instructions fur mounting.
• Operate your TV receiver only from the type of power source indicated on the marking label.
If you are not sure of the type of power supplied to your home, consult your appliance dealer
orlocal power company
• Use only a grounded or polarized outlet. For your safety, this TV is equipped with a polarized
alternating current line plug having one blade wider than the other. This plug will fit into the
power outlet only one way If you are unable to insert the plug fully into the outlet, try
reversing the plug. If the plug still does not fit, contact your electrician to replace your outlet.
SAFFIY 1
• Protect the power cord. Power supply cords should be routed so that they won't be walked
on or pinched by objects placed on or against them. Pay particular attention to cords at
plugs, convenience receptacles, and the point where they exit from the unit.
• Unplug the TV from the wall outlet and disconnect the antenna or cable system during a
lightning storm or when left unattended and unused fur long periods of thne. This will pre
vent damage to the unit due to lightning and power line surges.
Avoid overhead power lines. An outside antenna system should not be placed in the vicinity
of overhead power lines or other electric light or power circuits or where it can fail into such
power lines or circuits. When installing an outside antenna system, be extremely careflnl to
keep from touching the power lines or circuits. Contact with such lines can be fatal.
• Do not overload the wall outlet or extension cords. Overloading can result in fire or electric
shock.
• Do not insert anything through the openings in the unit, where they can touch dangerous
voltage points or damage parts. Never spill liquid of any kind on the TV[
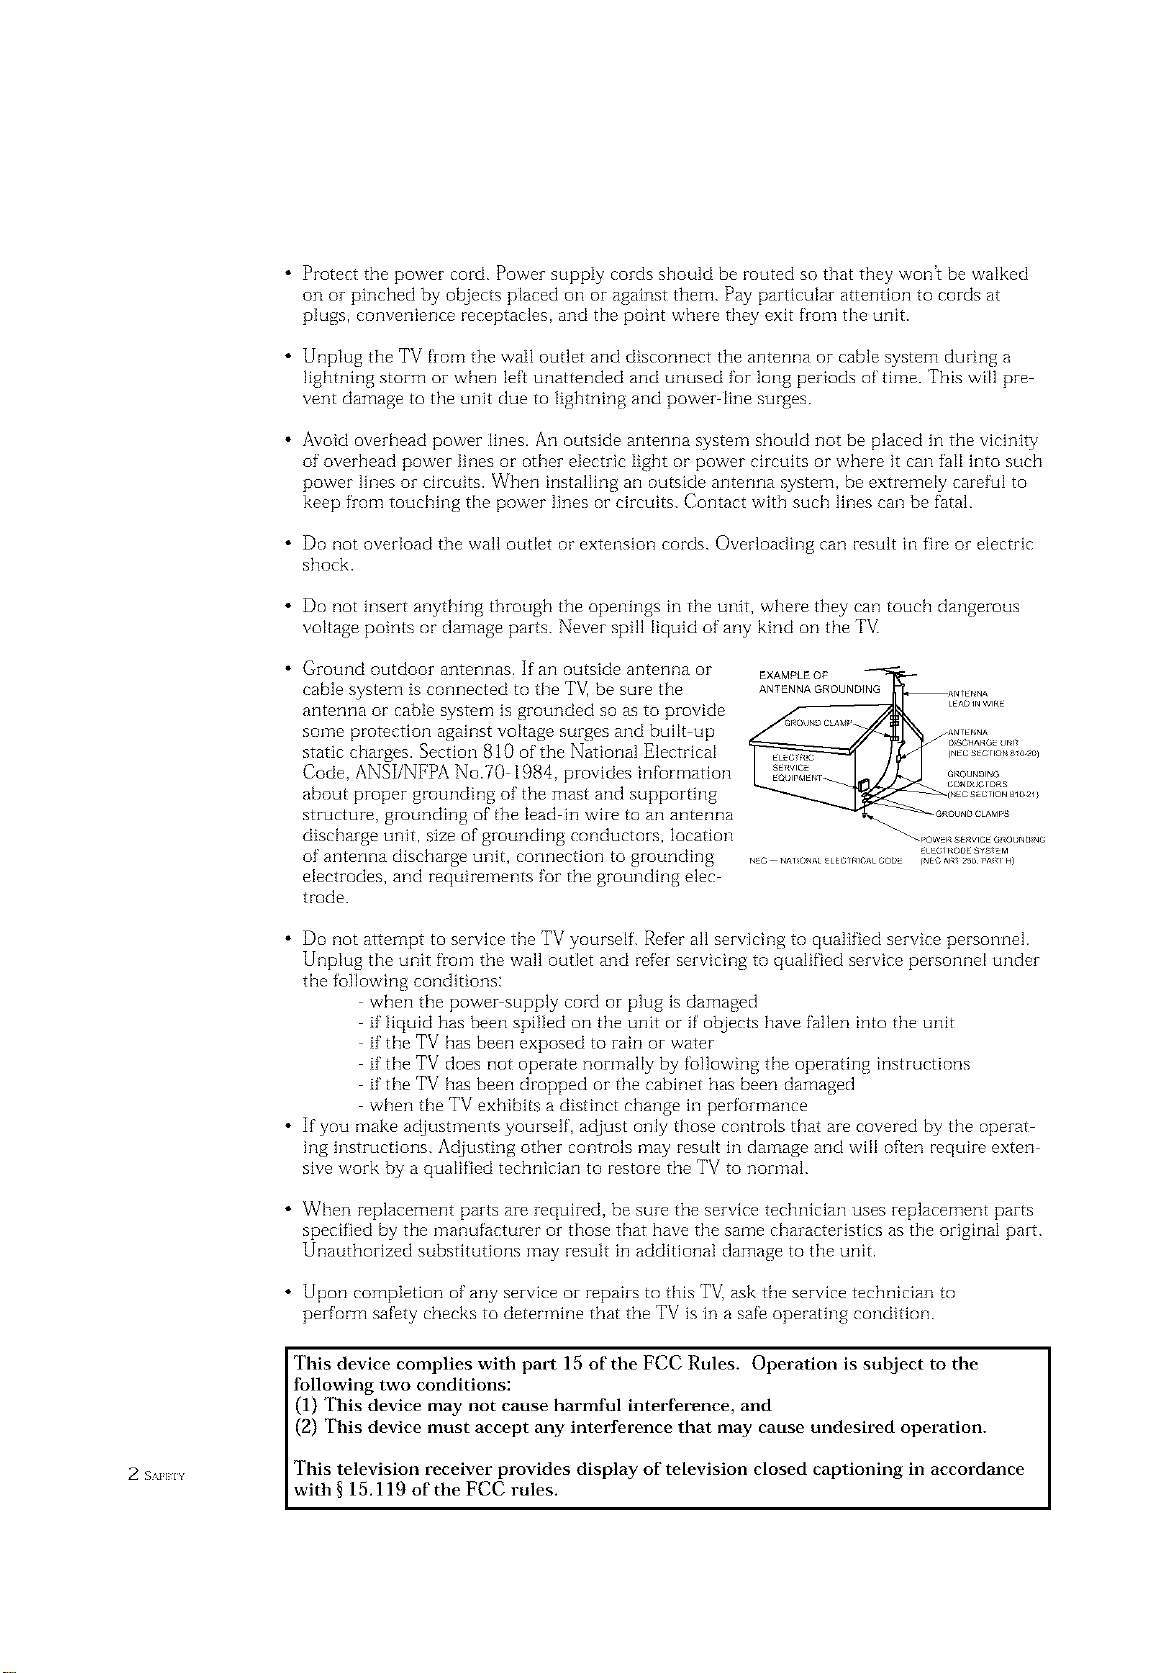
Ground outdoor antennas. If an outside antenna or
cable system is connected to the TV, be sure the
antenna or cable system is grounded so as to provide
some protection against voltage surges and built up
static charges. Section 810 of the National Electrical
Code, ANSI/NFPA No.70 1984, provides information
about proper grounding of the mast and supporting
structure, grounding of the lead in wire to an antenna
discharge unit, size of grounding conductors, location
of antenna discharge unit, connection to grounding
electrodes, and requirements for the grounding elec
trode.
EXAMPLEOF
ANTENNA GROUNDING
• Do not attempt to service the TV yourself. Refer all servicing to qualified service personnel.
Unplug the unit from the wall outlet and refer servicing to qualified service personnel under
the following conditions:
when the power supply cord or plug is damaged
if"liquid has been spilled on the unit or if' objects have fallen into the unit
if"the TV has been exposed to rain or water
if the TV does not operate normally by following the operating instructions
if the TV has been dropped or the cabinet has been damaged
when the TV exhibits a distinct change in performance
• If you make adjustments yourself, adjust only those controls that are covered by the operat
ing hlstructions. Adjusting other controls may result in damage and wfl[ often require exten
sive work by a qualified technician to restore the TV to normal.
• When replacement parts are required, be sure the service technician uses replacement parts
specified by the manufacturer or those that have the same characteristics as the original part.
Unauthorized substitutions may result in additional damage to the unit.
• Upon completion of any service or repairs to this TV] ask the service technician to
perform safety checks to determine that the TV is in a safe operating condition.
This device complies with part 15 of the FCC Rules. Operation is subject to the
following two conditions:
(1) This device may not cause harmful interference, and
(2) This device must accept any interference that may cause undesired operation.
2 s_Hn This television receiver provides display of television closed captioning in accordance
with § 15.119 of the FCC rules.
1) Read these hlstructions.
Keep these instructions.
Heed all warnings.
4) Follow aI[ hlstruetions.
Do not use this apparatus near water.
Clean only with dry cloth.
[_ OUBLE INSULATED When servidng
use only identical replacement parts.
Do not block any ventilation openings, Install hi accordance with the manufacturerh
instructions.
Do not insta[] near any heat sources such as radiators, heat registers, or other apparatus
(including amplifiers) that produce heat.
9) Do not defeat the safety purpose of the polarized or grounding type plug. A polarized
plug has two blades with one wider than the other. A grounding type plug has two blades
and a third grounding prong. The wide blade or the third prong are provided for your
safety. If the provided plug does not fit into your outlet, consult an electrician for replace
ment of the obsolete outlet.
10) Protect the power cord from being from being walked on or pinched particularly at plugs,
convenience receptacles, and the point where they exit from the apparatus.
11) Only use attachments/accessories specified by the manufacturer.
12) Use only with cart, stand, tripod, bracket, or table specified by the manufacturer, or sold
with the apparatus. When a used, caution when moving the cart/apparatus combination to
avoid injury from tip over.
13) Unplug this apparatus. When a cart is used, use caution when moving the cart/apparatus
combination to avoid injury from tip over.
14) Refer all servicing to qualified service personnel. Servicing is required when the apparatus
has been damaged in any way, such as power supply cord or plug is damaged, liquid has
been spilled or objects have fallen into the apparatus, the apparatus has been exposed to
rain or moisture, does not operate normally, or has been dropped.
EAFKIY 3
CONTENTS ]
Chapter 1: Your New TV ............... 1.1
List of Features .......................................... 1.1
List of Parts ............................................ 1.1
Familiarizing Yourself with Your New TV ...................... 1.2
Front Pand Buttons ............................... 1.2
Side Panel Jacks .................................. 1.3
Rear Panel Jacks .................................. 1.4
Remote Control .................................. 1.5
Chapter 2: Installation ................ 2.1
Connecting VHF and UHP' Antennas ......................... 2.1
Antennas with 300 ohm Flat ]bvin Leads ............... 2.1
Antennas with 75 ohm Round Leads .................. 2.2
Separate VHF and UHF Antennas .................... 2.2
Connecting Cable TV ..................................... 2.2
Cable without a Cable Box .......................... 2.2
Connecting to a Cable Box that Descrambles All Channels 2.3
Corlnectirlg to a Cable Box that
Descrambles Some Channels ........................ 2.3
Connecting a VCR ....................................... 2.5
Connecting an S VHS VCR ......................... 2.6
Connecting a DVD Player ................................. 2.7
Connecting a Digital TV Set-%p Box ......................... 2.7
Connecting a Camcorder .................................. 2.8
Installing Batteries in the Remote Control ..................... 2.9
Chapter 3: Operation .................. 3.1
"lhrnhlg the TV On and Off ................................ 3.1
Plug & Play Feature ...................................... 3.1
Viewing the Menus and On Screen Displays ................... 3.3
Viewing the Menus ............................... 3.3
Viewing the Display ............................... 3.3
Selecting a Menu Language ................................ 3.4
Memorizing the Channels ................................. 3.5
Selecting the Video Signa[ source ..................... .'{.5
Storing Channels in Memory (Automatic Method) ........ 3.6
Adding and Erasing Channels (Manual Method) ......... 3.7
Changing Channels ...................................... 3.7
Using the Channel Buttons ......................... 3.7
Directly Accessing Channels ........................ 3.7
Using the Pre CH Button to select the Previous Channel . .'{.7
Ac]justing the Volume ..................................... 3.8
Using Mute ..................................... 3.8
Setting the Clock ........................................ 3.9
Customizing the Picture .................................. 3 10
Using Automatic Picture Settings ........................... 3 1i
Customizing the Sound .................................. 3 12
Using Automatic Sound Settings ........................... 3 13
Viewing a VCR or Camcorder Tape ......................... 3 14
1 (ION] EN] S
CONTENTS
Chapter 4: Special Features ............ 4.1
Fine llming Channels .................................... 41
t,NA (LowNoise Amplifier) ................................ 42
Setting the Blue Screen Mode ............................... 43
Changing the Screen Size .................................. 44
Freezing the Picture ...................................... 44
Special Sound Options .................................... 4,5
Choosing a Multi Cf]alqlqe}Sound (MTS) Sourldtrack ..... 45
Auto Vulume .................................... 46
Virtual Dolby .................................... 47
Adjusting the Headphone Sound ..................... 48
Selecting the Headphone Sound ..................... 49
Setting the On/Off Timer ................................. 4. l0
Setting the Sleep Timer .................................. 4.11
Viewing Closed Captions ................................. 4.12
Viewing Picture in Picture ................................ 4.13
Activating Picture in Picture ....................... 4.13
Selecting a Signal Source (External A/V) for PIP ......... 4.14
Swapping the Contents of the PiP image and Main image 4.15
Changing the PIP Chalqnel ......................... 4.15
Changing the Location of the PIP Window ............ 4.15
Changing the Size of the PIP Window ................ 4.15
Using the VChip ....................................... 4.16
Setting Up Your Personal ID Number (PIN) ............ 4.16
How to Enable/Disable the VChip ................. 4.17
How to Set up Restrictions Using the "TV guidelines" . . 4.17
How to Set up Restrictions using the MPAA Ratings:
G. PG, PG 13, R, NC 17, X ........................ 4.18
How to Reset the TV after the VChip
Blocks a Charmel ("Emergency Escape") .............. 4.19
Chapter 5: PC Display ................. 5.1
Using Yc_urTV as a Computer (PC) Display .................... 51
How to Connect Your PC to the TV ................... 51
How to Set up Yuur PC Software (Windows only) ........ 52
Adjusting the Screen Quality ........................ 53
Changing the Screen Position ....................... 54
Changing the ScreenColor Standard .................. 55
Acliusting the Screen Color Settings ................... 5B
Chapter 6: Troubleshooting ............ 6.1
Identifying Problems ..................................... (} 1
Appendix ........................... A.1
Display Modes .......................................... A 1
Installing VESA compliant mounting devices ................... A2
Attaching a Wall or Arm mounting device ..................... A3
Retractable Stand ........................................ A4
Using the Anti Theft Kensington Lock ........................ A4
Pin Assignments ........................................ A5
Cleaning and Maintaining Yuur TV .......................... A5
Using YcourTV ir_Another Country .......................... A5
Specifications ........................................... A6
Your New TV
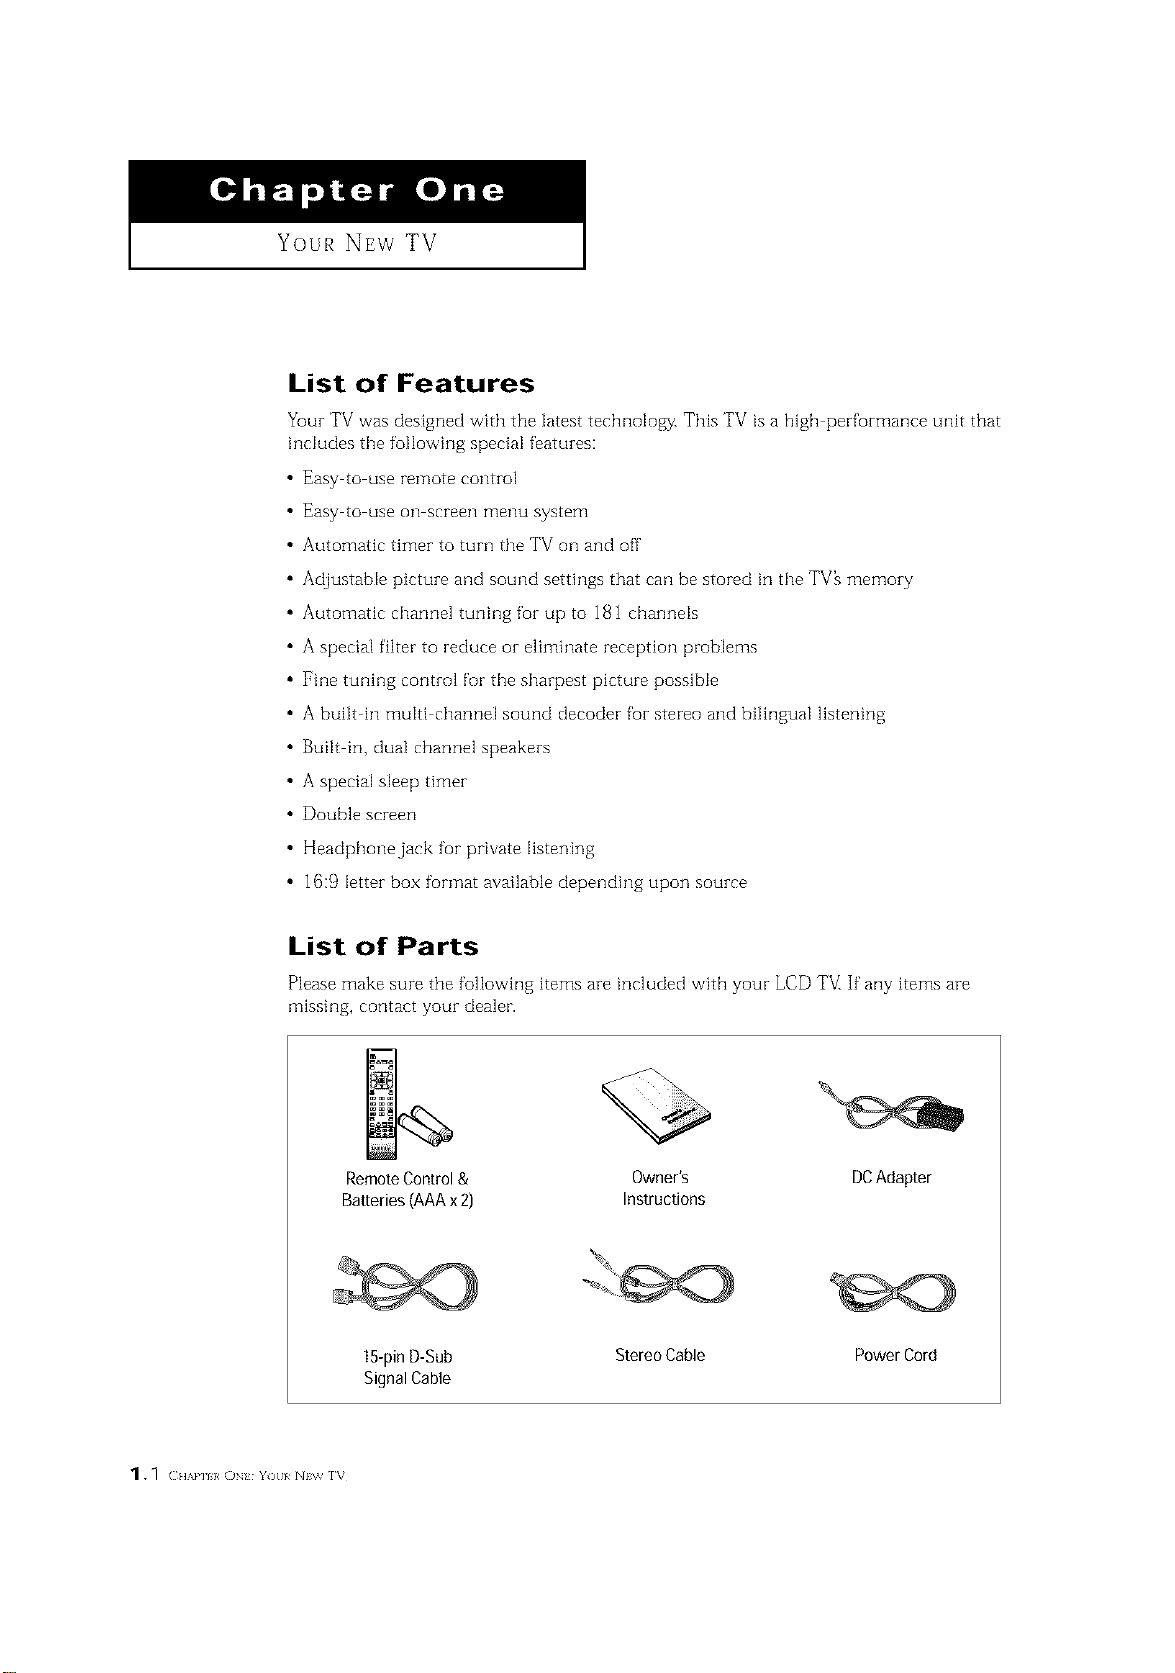
List of Features
_ur TV was designedwith the latesttechnology. This TV is a high per_rmance unit that
includes the following special features:
• Easy to use remote control
Easy to use on screen menu system
Automatic timer to turn the TV on and off
Adjustable picture and sound settings that can be stored in the TV_ memory
Automatic channel tuning for up to 181 channels
A special filter to reduce or eliminate reception problems
Fine tuning control for the sharpest picture possible
A built in multi channel sound decoder for stereo and bilingual listening
Built in, dual channel speakers
A special sleep timer
Double screen
Headphone jack fur private listening
16:9 letter box furmat available depending upon source
List of Parts
Please make sure the following items are included with your LCD TVIIf"any items are
missing, contact your dealer.
RemoteControl& Owner's DCAdapter
Batteries(AAAx2) Instructions
15-pinD-Sub StereoCable PowerCord
SignalCable
1. _ ( HAm I, ON Y)[I/ N\v rv
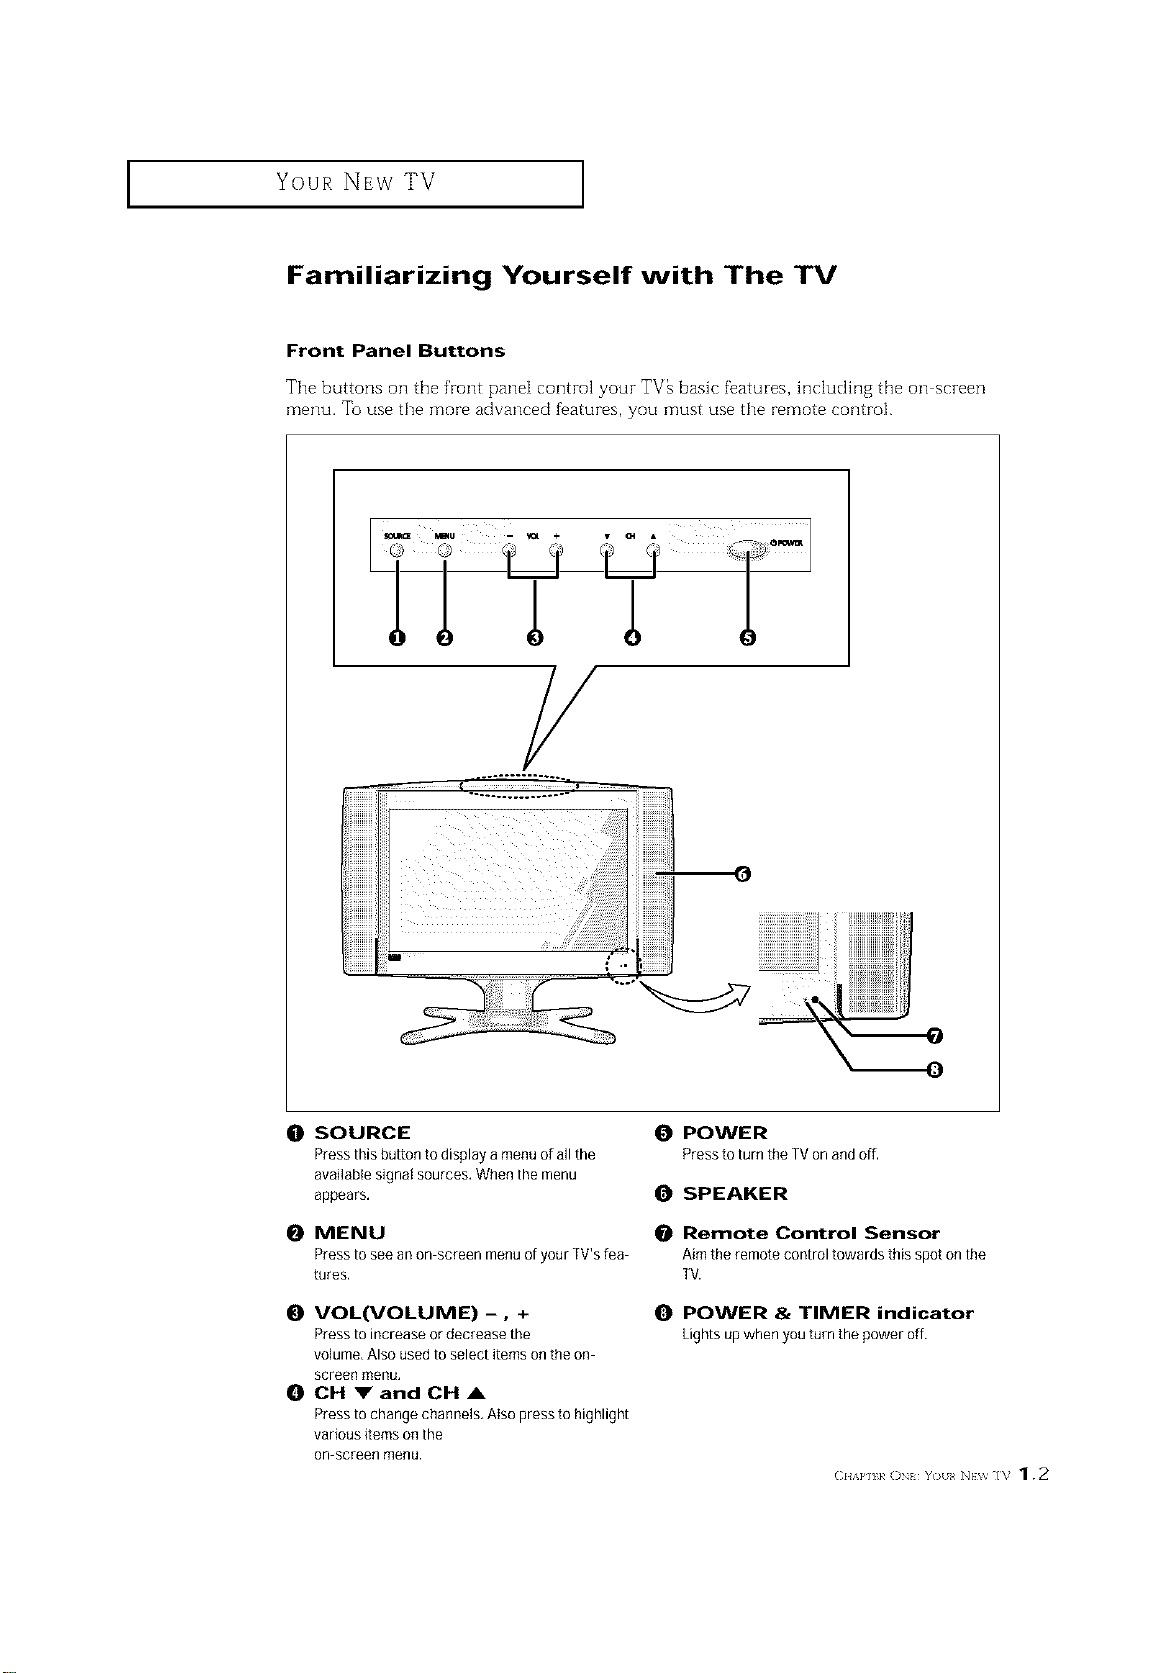
I Your NEw TV
Familiarizing Yourself with The TV
Front Panel Buttons
The buttons on the front pane[ control your TV_ basic f_atures, hldudhlg the on screen
menu. To use the more advanced f_atures, you must use the remote control.
LTT
/
(0 SOURCE
Pressthisbuttontodisplayamenu ofallthe
available signal sources. When the menu
appears,
0 MENU
Press to see an on screen menu of your ]V's lea
tures,
O VOL(VOLUME) -0 +
Press to increase or decrease the
volume, Also used to select items on the on
screen menu,
0 CH VandCHA
Press to change channels. Also press to highlight
various items on the
on screen menu.
0 POWER
Press to turn the TVon andoff,
O SPEAKER
Remote Control Sensor
Aim the remote control towards this spot on the
TV.
O POWER & TIMER indicator
Lightsupwhenyouturnthepoweroff.
(2HAP] k ON YO/[< NEV_ ]V 1.2
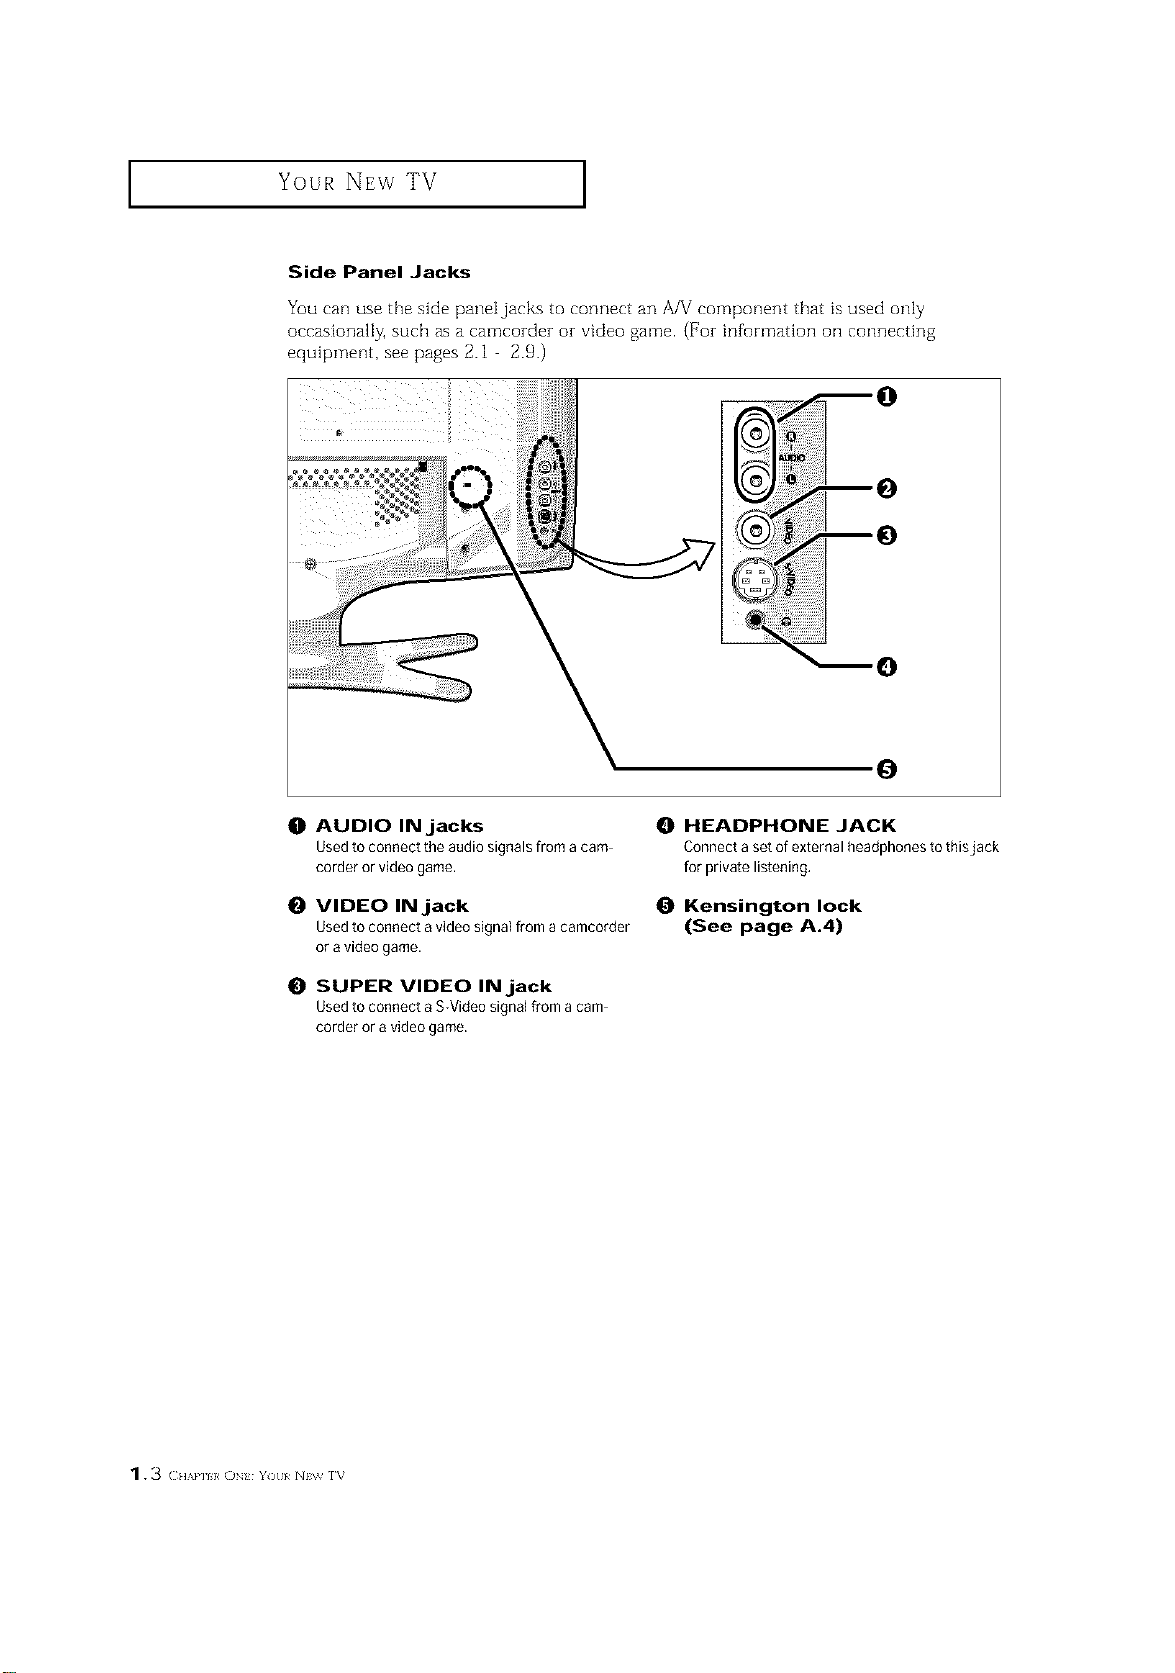
Your NEw TV ]
Side Panel Jacks
You can use the side panei jacks to connect an A/V component that is used only
occasionally, such as a camcozdez or video game. (For information oil connecting
equipment, see pages 2.1 2.9.)
0
0
O AUDIO INjacks
Used to connect the audio signals from a cam
corder or video game.
O VIDEO INjack
Used to connect avideo signal [rom a camcorder
or a video game.
0 SUPER VIDEO INjack
Used to connect a S-Video signal from a cam
corder or a video game.
HEADPHONE JACK
Connect a set of external headphones to thisjack
for private listening.
Kensington lock
(See page A.4)
1.3 CH',.P] }, ON Y)tl/ N\_ rv

Your NEw TV ]
Rear Panel Jacks
Use the rear panel jacks to connect an A/V component that _viHbe connected
conth]uously, such asa VCR or a DVD player.
For more infurmation on connecting equipment, see pages 2.1 2.9.
(]1 POWER OUTPUT
CONNECTOR
0 POWER INPUT CONNECTOR
O COMPONENT I(DVD)
Connects component video/audio from a DVD
player,
O COMPONENT 2(DTV)
Connects component video/audio from a Set/fop
Box.
O PC AUDIO INPUT
Connect these to the audio outputjacks on your
PC.
0 PC VIDEO INPUT
ConnecttothevideooutputportonyourPC.
O TV ANTENNA
Connectto anantennaorto acableTVsystem.
(2HAP] 1, ()N YOII< NEV_ ]V 1.4
Your NEw TV I
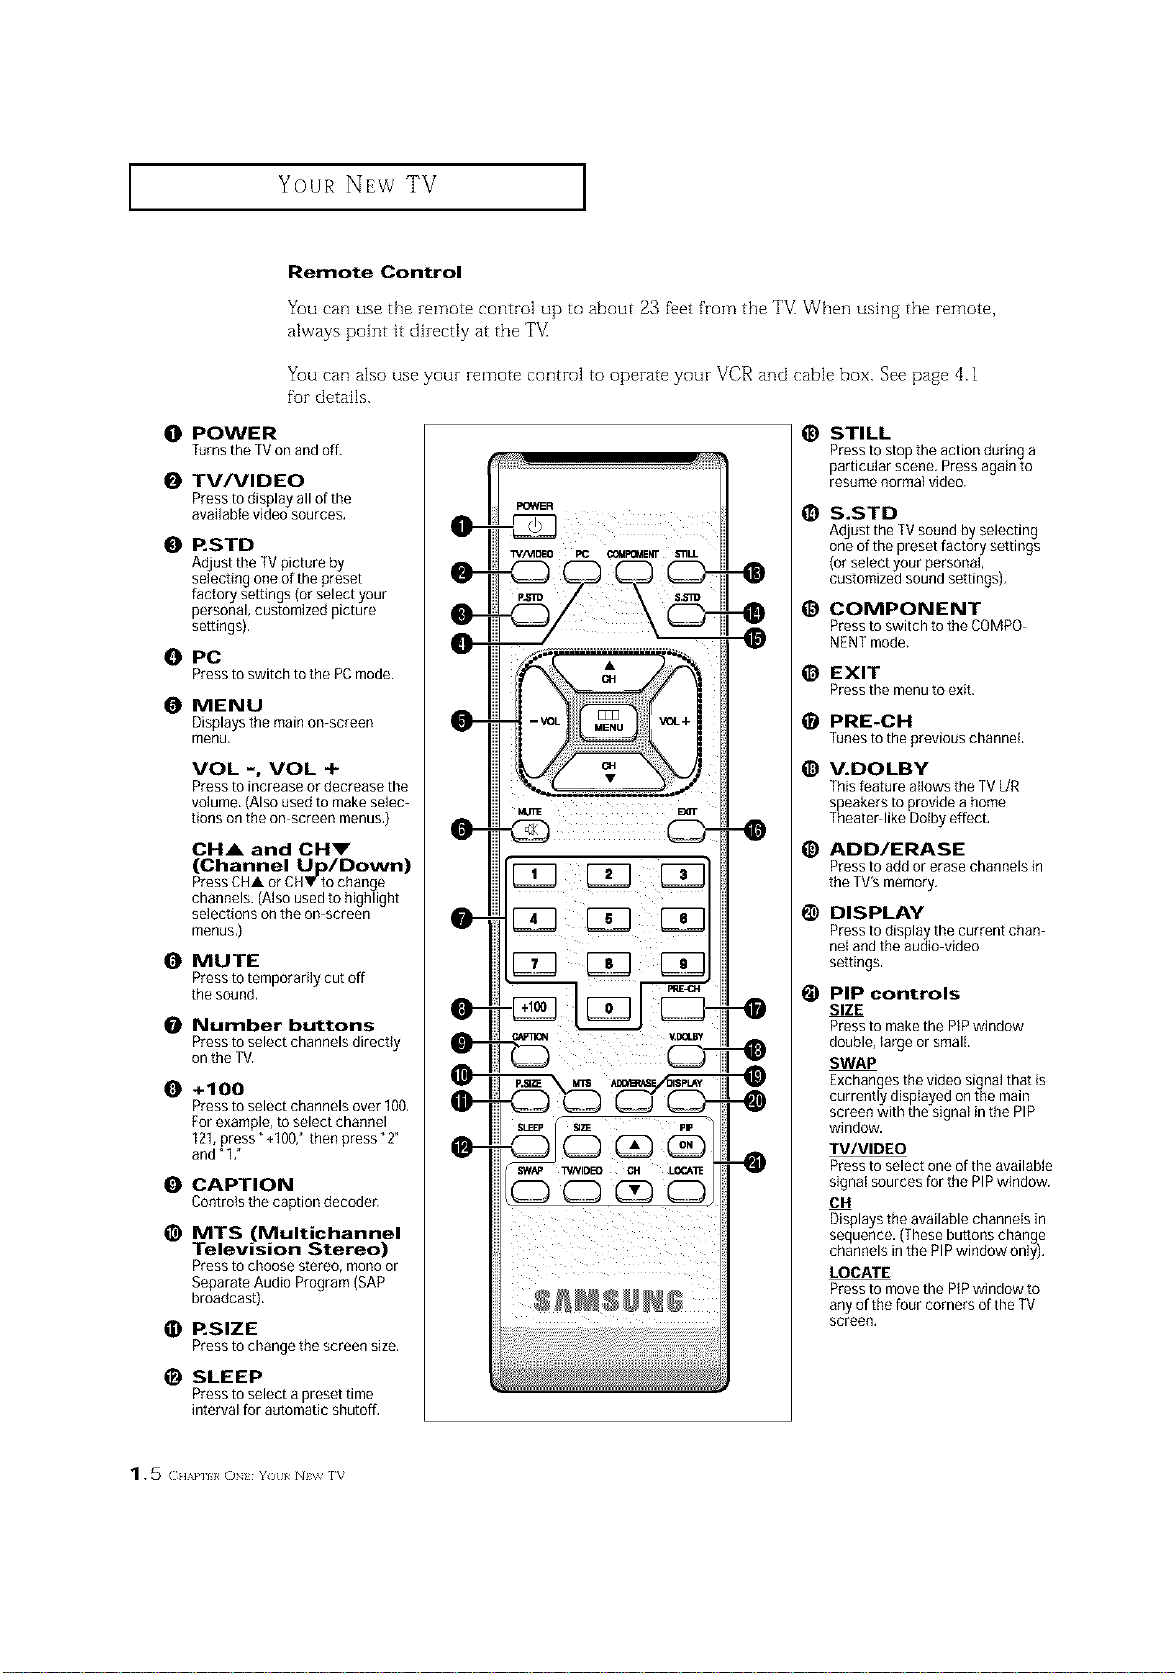
Remote Control
You can use the remote control up to about 23 fi_et from the "FV_When ushlg the remote,
always point it direcdy at the TV
You can also use your remote control to operate your VCR and cable box. See page 4.1
for details.
O POWER
TurnstheTVonandoff.
O TV/VIDEO
Pressto display all of the
available video sources.
0 RSTD
A_usttheTV picture by
selecting one ofthe preset
Nctoq se_ings(orselectyour
personal, cus_mized picture
sewings).
O PC
Presstoswitchtothe PCmode.
O MENU
Displays the main on screen
menu,
VOL -, VOL +
Press to increase or decrease the
volume,(Alsoused to make selec
lions on the on-screen menus,)
CH& and OHm"
(Channel Up/Down)
Press CHA or CHV to change
channeJs.(Also used to highlight
selections on the on screen
menus,)
O MUTE
Press totemporarily cut off
the sound.
0 Number buttons
Pressto select channels directly
on the TV.
O +100
Press to select channels over 100.
For example, to select channel
121,press" +1007 then press "2"
and"1 ,"
O CAPTION
Controls the caption decoder,
_) MTS (Multichannel
Television Stereo)
Pressto choose stereo, mono or
Separate Audio Program (SAP
broadcast).
O RSlZE
Presstochangethescreensize,
_) SLEEP
Press to select a preset time
interval for automatic shutoff,
_) STILL
Press to stop the action during a
particular scene, Pressagain 1o
resume normal video.
1_ S.STD
Adjustthe TVsound by selectillg
one of the preset factory settings
(or select yourpersonal,
customized sound settings),
@ COMPONENT
Press to switch to the COMPO-
NENT mode.
_) EXIT
Press the menu to exit.
_) PRE-CH
Tunes to the previous channel,
_) V.DOLBY
This feature allows the TVL/R
speakers to provide a home
Theater like Dotby effect.
_) ADD/ERASE
Press to add or erase channels in
the TV'smemory.
1_ DISPLAY
Pressto display the current chan
nel and the audio-video
settings.
@ PIP controls
SIZE
Pressto make the PiPwindow
double, large or small,
SWAP
Exchanges the video signal that is
currently displayed onthe main
screen with the signal in the PIP
window.
TV/VIDEO
Pressto select one of the available
signatsources for the PIPwindow.
014
Displays the available channels in
sequence. (Thesebuttons change
channels inthe PiP window only),
LOCATE
Pressto move the PIPwindow to
any of the four corners of the TV
screen.
1. 5 () tzkl'/I}/ ()N Y) I/ NIW f_
INSTALLATION
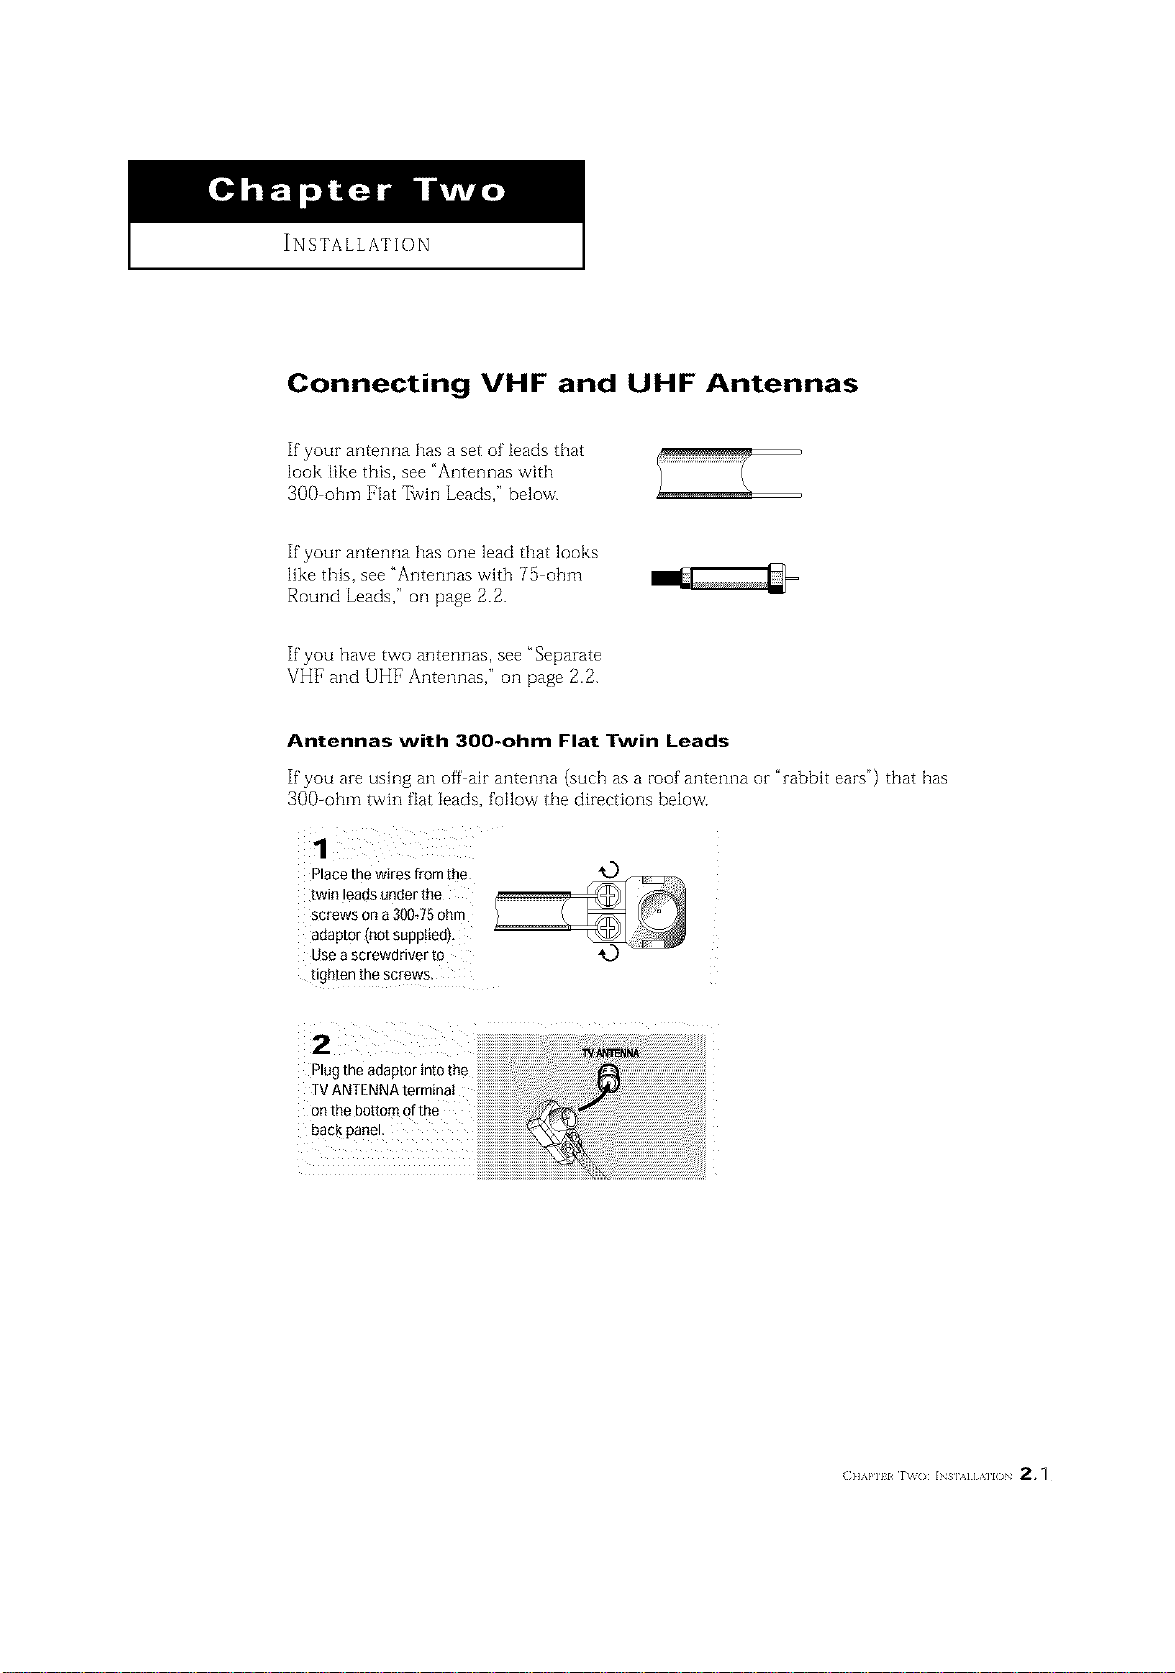
Connecting VHF and UHF Antennas
If your antenna has a set of leads that
look like this, see "Antennas with
3OO ohm Flat 7_vin Leads," below.
If your antenna has one lead that looks
like this, see "Antennas with 75 ohm
Round Leads," oil page 2.2.
If you have two antennas, see "Separate
VHF and UHF Antennas," oil page 2.2.
Antennas with 300-ohm Flat Twin Leads
If"you are using an off air antenna (such as a roof antenna or "rabbit ears") that has
300-ohm twin fiat leads, follow the directions below'.
1
Place the wires from the
[wm eaas under the
screws ona 300J5 ohm
adaptor Inot suppltedl,
use a screwdriver to
ugeten me screws
2
Plugtheadaptorintothe
TVANTENNAterminat
onthebottomofthe
backpanel
INSTALLATION ]
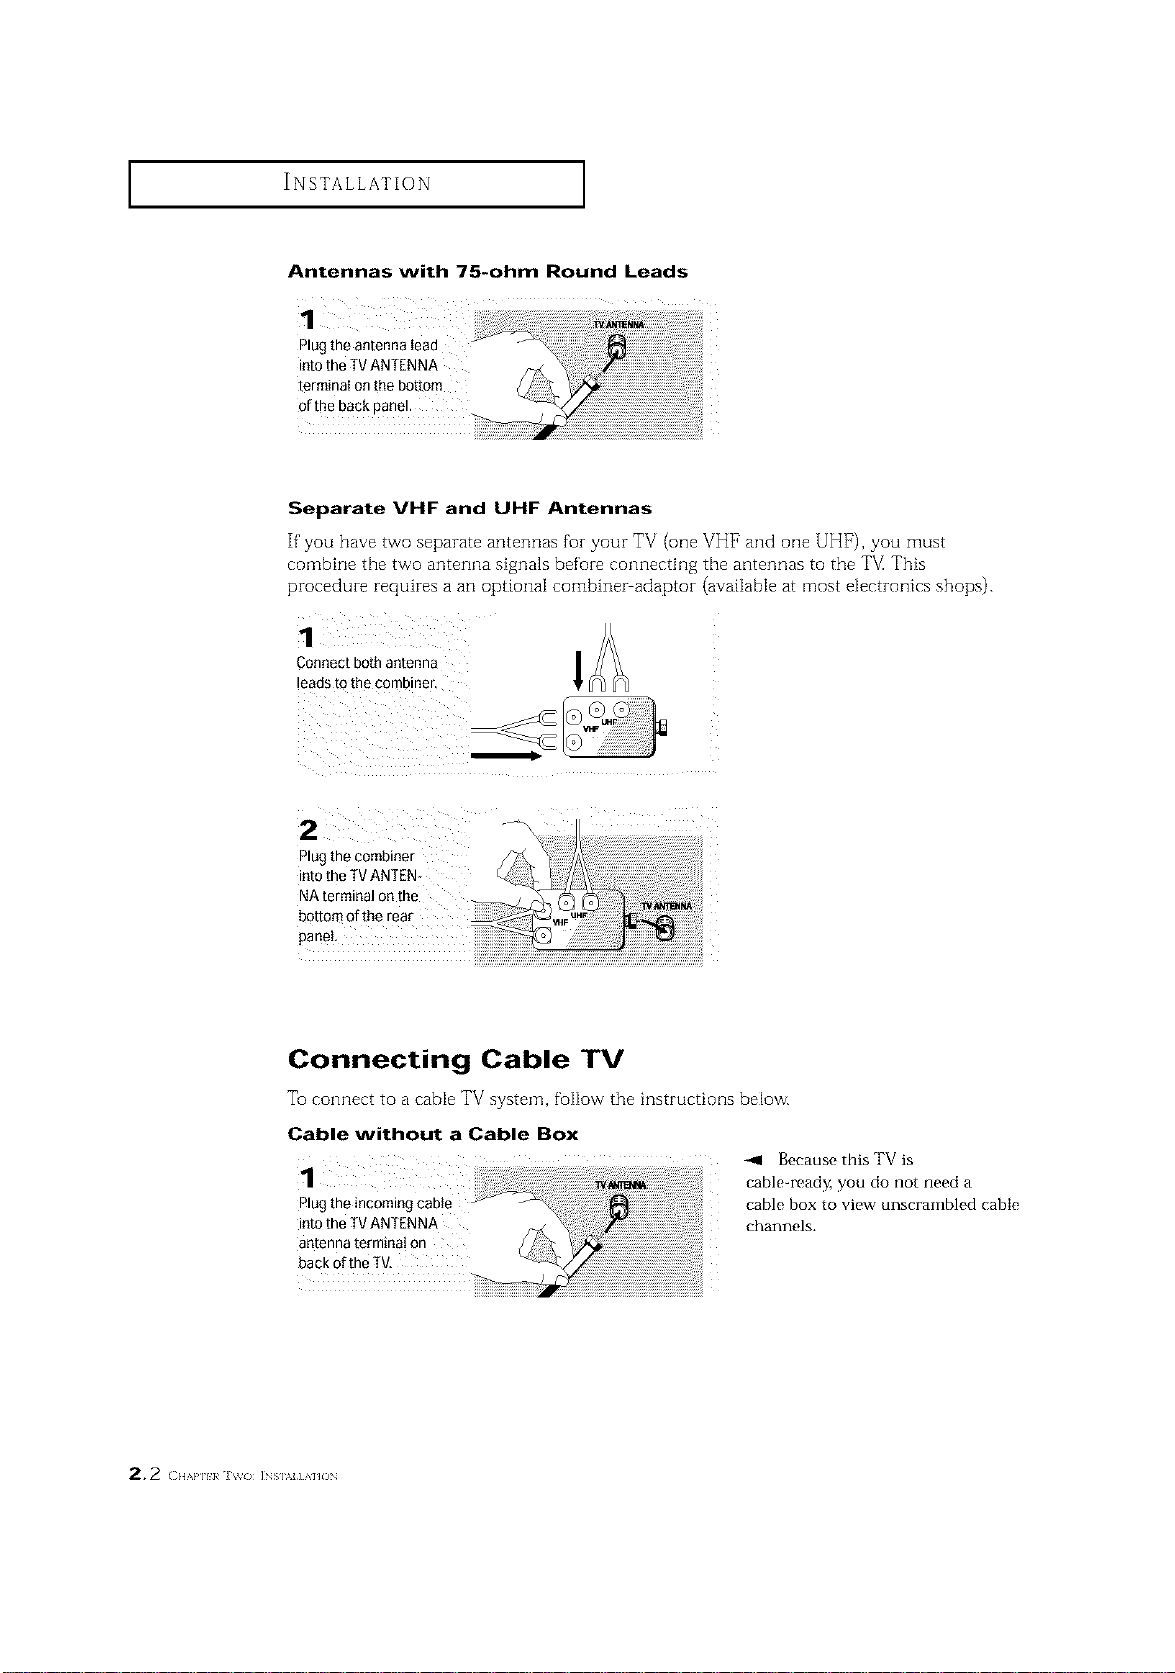
Antennas with 75-ohm Round Leads
1
Plug the antenna tead
into theTV ANTENNA
terminal onthe bottom
of the back panel.
Separate VHF and UHF Antennas
If' you have two separate antennas for your TV (one VH1_and one UHF), you must
combine the tVMOanterula signa]s before connecting the antennas to the TV This
procedure requires a an optional combiner adaptor (avaiiab[e at most electronics shops).
Connect both antenna
leads to the combiner,
z -4
Plug the combiner
into theTV ANTEN-
NA terminal on the
botton"
panel
Connecting Cable TV
To connect to a cable TV system, follow the instructioi]s below.
Cable without a Cable Box
1
Plug the incoming cable
into the TV ANTENNA
antenna terminal on
back ofthe TV,
-411 Because this TV is
table-read Z you do not need a
cable box to view unscrambled cable
channels.
2.2 ( H,,,m]_}a i_s],_=] A]JO_
INSTALLATION ]
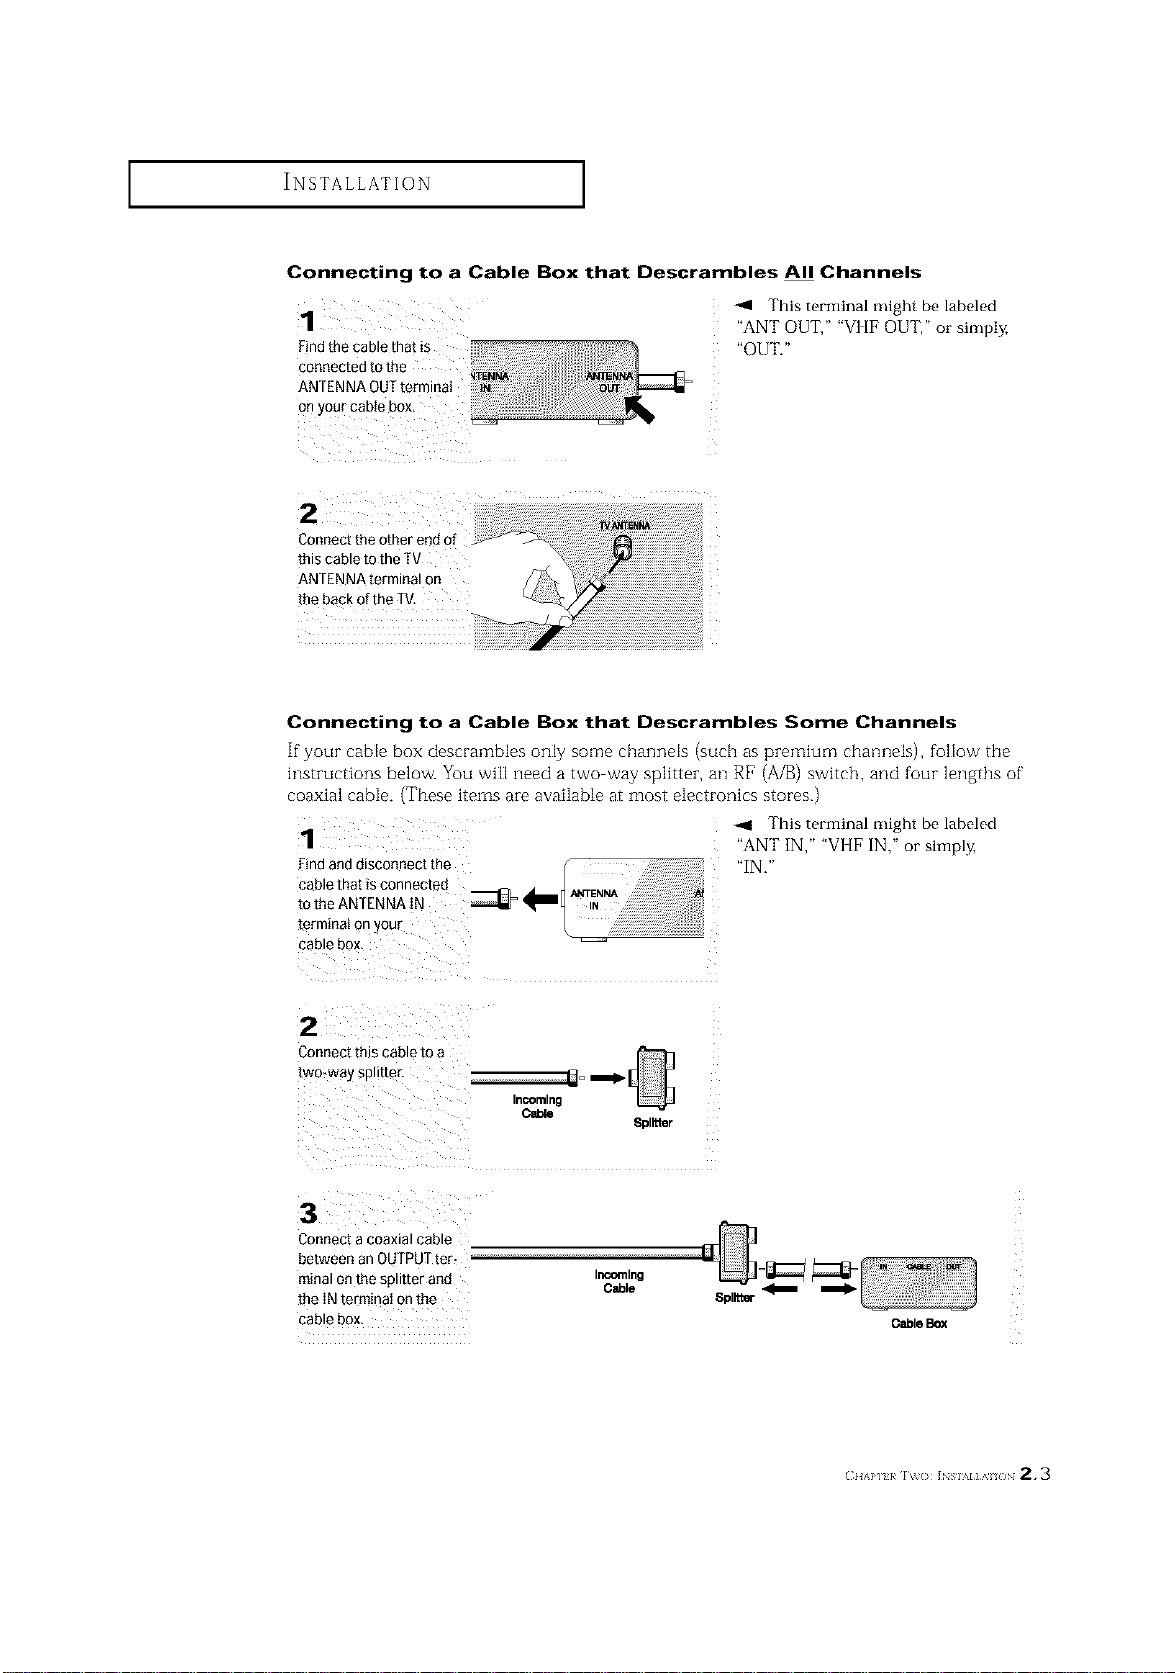
Connecting to a Cable Box that Descrambles All Channels
1
Findthecablethatis
cooneotedtothe ) _
ANTflNNAOUTtermmat
onyourcab ebox
This terminal might be labeled
"ANT OUT," "VI[F OUT," or simply,
"OUT."
2 :
Connecttheotherendof
thiscableto theTV
ANTENNAterminalon
thebackoftheTV,
Connecting to a Cable Box that Descrambles Some Channels
If"your cable box descrambles only some charmeis (such as premium channels), follow the
instructions below. You will need a two way splitter, an RF (A/B) switch, and four lengths of"
coaxial cable. (These items are available at most electronics stores.)
1
[erminai on your
cable box.
-ql This terminal might be labeled
"ANT IN," "VI[F IN," or simply,
"IN,"
2
Connec[ IRIS cable m a
[wo_waysp.[[e£
InCOming
8pl_ter
3
Connect a coaxial cable
between an OUFPUTter_ --
minal onthe splitter and Ir_emlng
Cable
[he IN term_na_on me
cable box.
Spllt_
O_le Box
(_IIAP] }/ IV(} ]NSIM]AI /IN 2.3
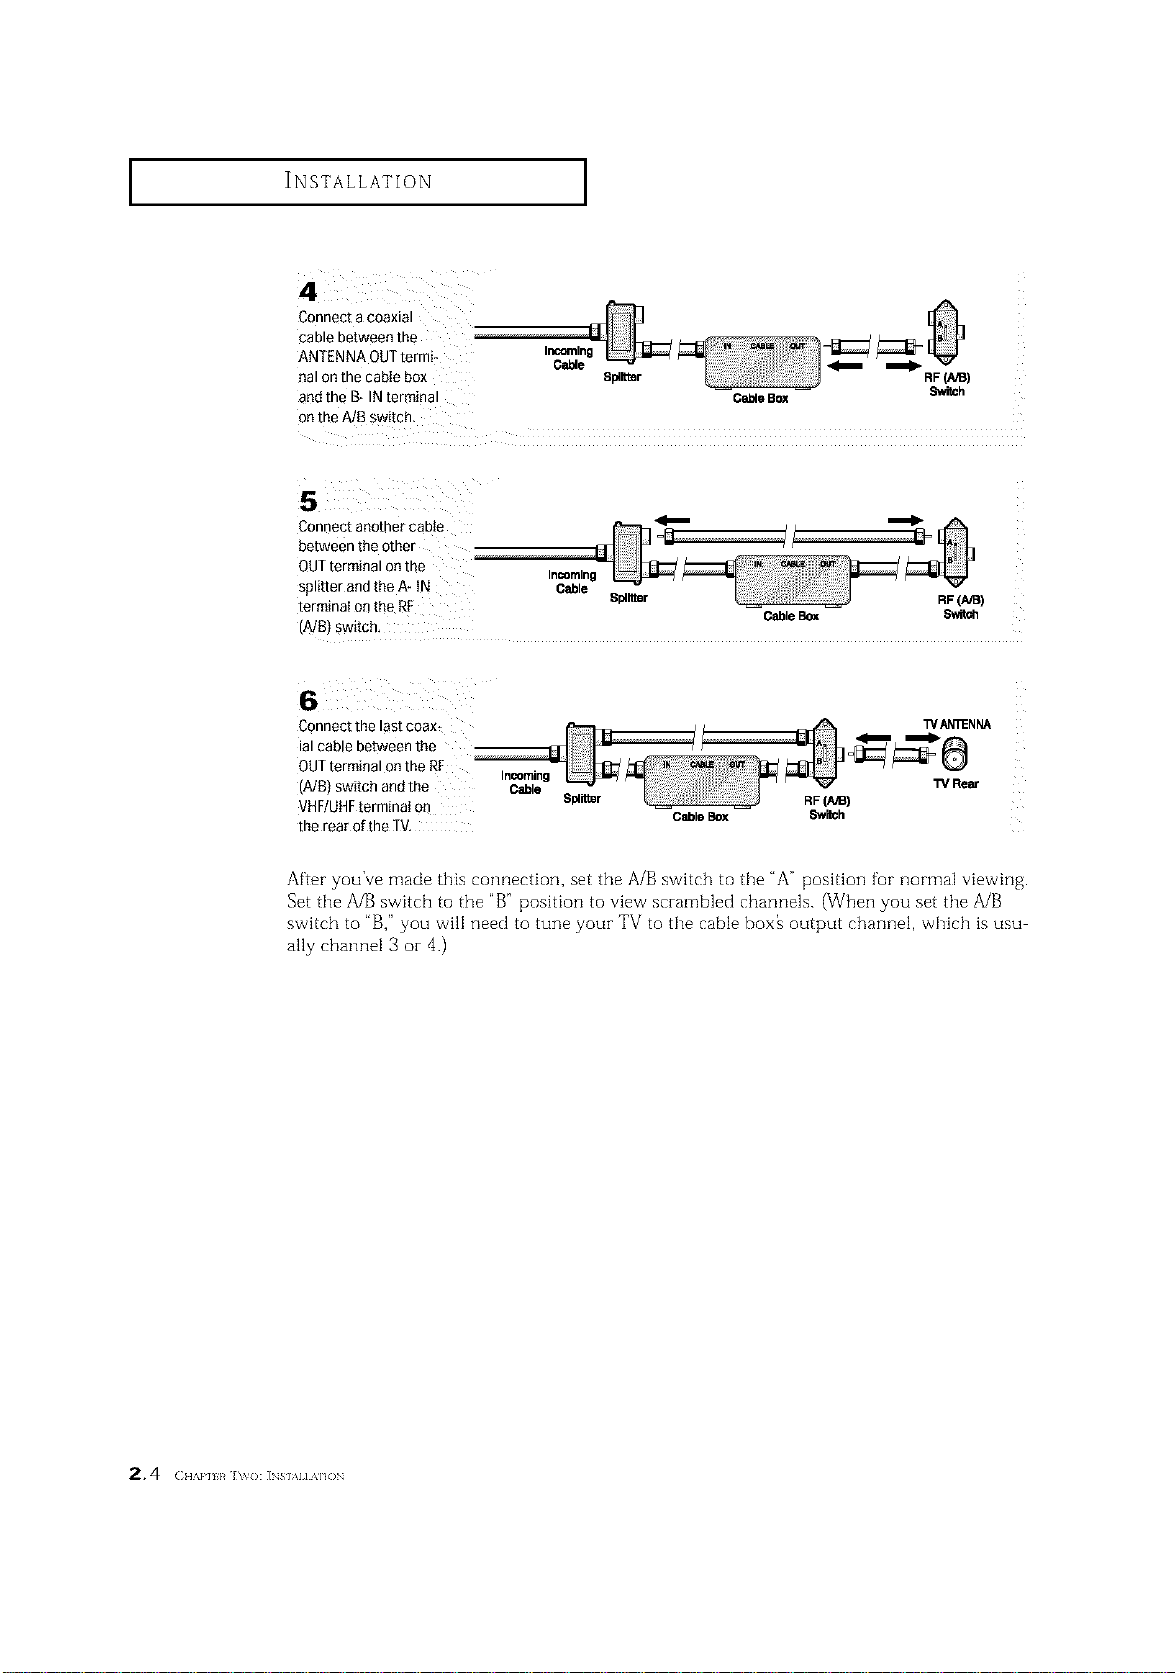
INSTALLATION ]
Connect a coaxial
cable between the
ANTENNA QUTtermi- Incoming
Cable _
eal on the cabIe box Splitter RF(A,_)
and the B- IN terminal O_e Box Switch
onthe A/B switch.
Connect another cable _ _
between the other
QUTterminal on the
Incoming
splitter andthe A- tN Cable
terminaI onthe RF Spllrmr RF(AIB)
CableBox $wit_
(A/B) Switch,
Connect the last coax_ WAN'_NNA
ial cable between the
OUTterminal on the RF
Incoming
(A/B) switch and the Cable W Rear
VHF/UHFterminal on Splil_r RF(AiB)
CableBox 8witch
the rear of the TV,
After you've made this connection, set the A/B switch to the "A" position fur normal viewing.
Set tile A/B switch to the "B" position to view scrambled channels. (When you set tile A/B
switch to "B," you will need to tune your TV to tile cable box_ output channel, which is usu
ally channel 3 oi- 4.)
2, 4 (:,,.,,,,,,,,_],_{):INs,,,,,A,.).
INSTALLATION ]
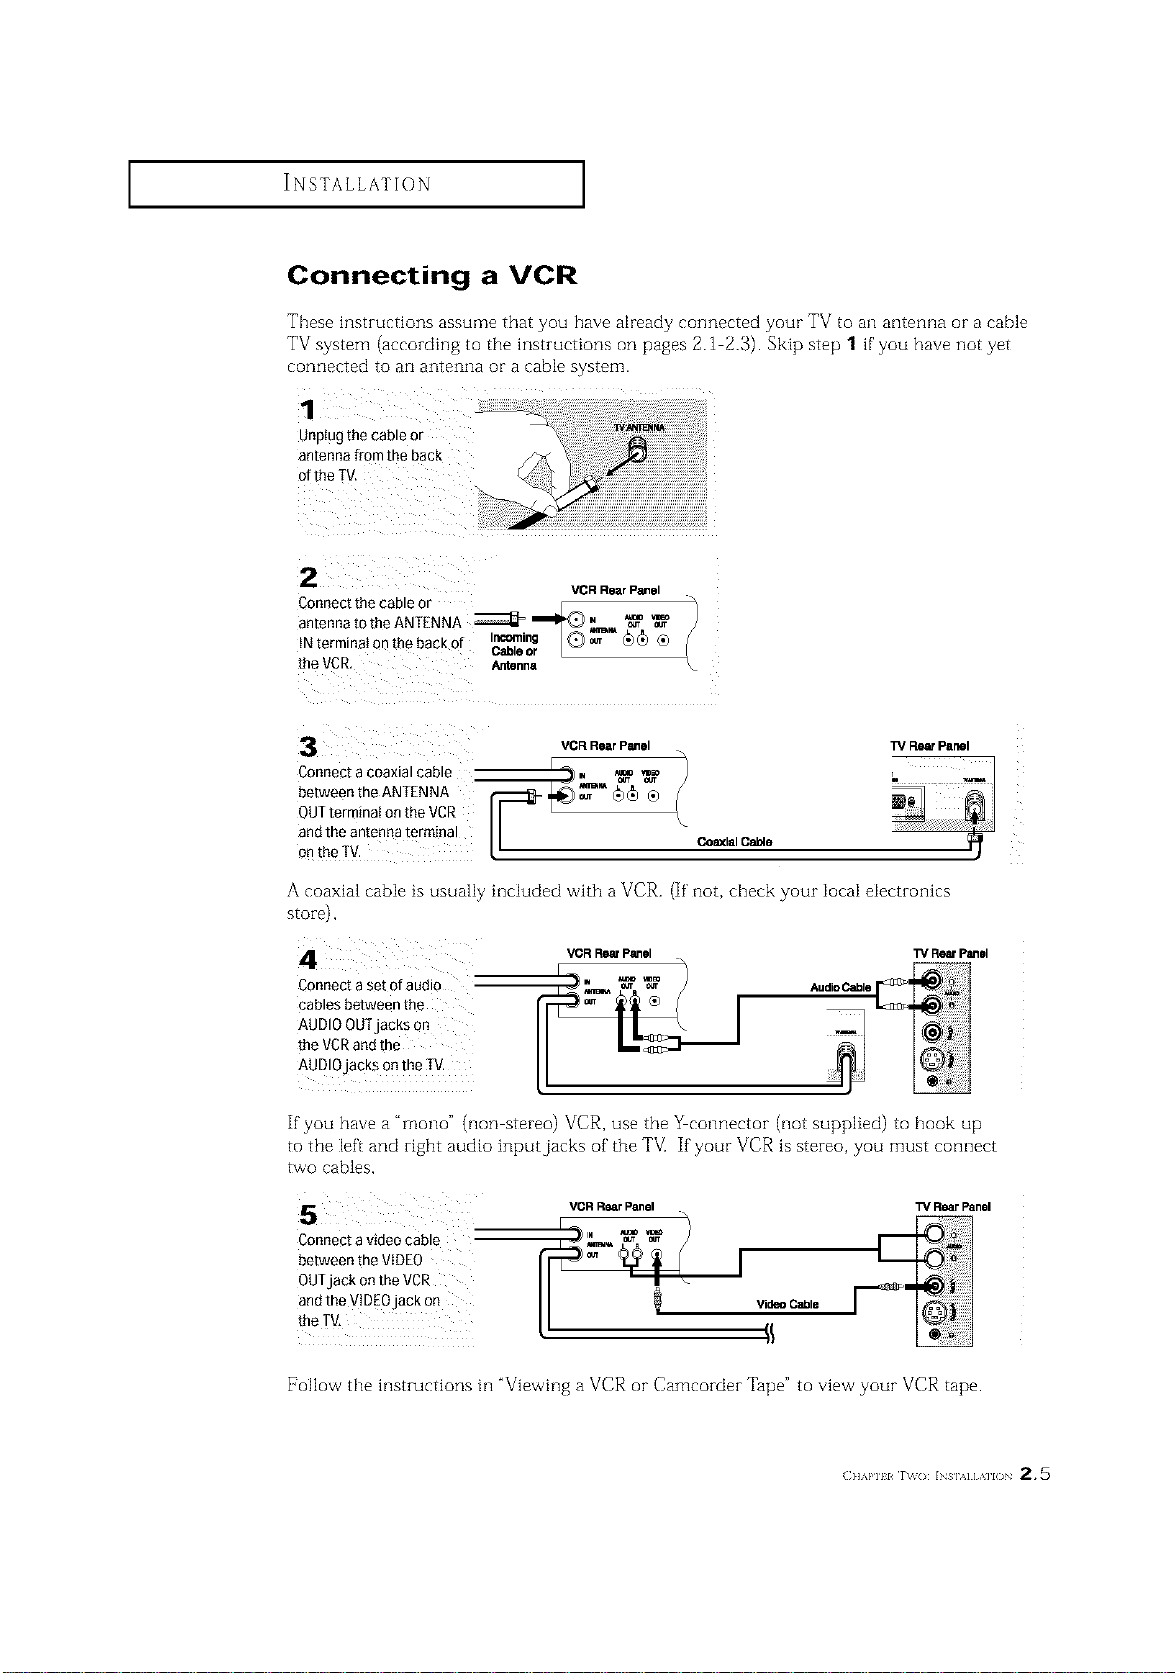
Connecting a VCR
These instructions assume that you have already connected your TV to an antenna or a cable
TV system (according to the instructions on pages 2.1 2.3). Skip step 1 if'you have not yet
connected to an antenna or a cable system.
1
Unplugthecableor
antennafromtheback
ofthe TV.
2
VGR Rear Panel
Connect the cable or _[ _. _/
antennatotheANTENNA ZZZZ_=_,_ _
{Nterrninatanthebackof ICr_le'_ [Q)_ _)_ ®
[heVCR. Antenna
3
Connect a coaxial cable
between the ANTENNA
OUTterminal on the VCR
ana Tneantenna termina
onthe IV.
VCR Rear Panel
_lal Cable
TV Rear Panel
i !'!#',!ii!i! ! , !i,,iiii!iiiii,ii! iii i!i iii illii
A coaxial cabIe is usually inciuded with a VCR.
stoTe),
_RR_P_el
If' not, check your IocaI eiectmnlcs
1_/ReefPanel
Connect a set ofaudio
cables between the
AUDIOOUTjacks On
the VCRand the
AUDIOjacks onthe IV.
_1
If you have a "mono" (non stereo) VCR, use the _eonnector (not supplied) to hook up
to the [eft and right audio inputjacks of the TV[ If your VCR is stereo, you must connect
tVVOcables,
Connect a video cable
between the VIDEO
OUTjack onthe VCR
andthe WDEOjack on
the TV,
VOR R_lr Panel
Video Cabie
TV RearPanel
[7ollow the instructions in "Viewing a VCR or Camcorder Tape" to view your VCR tape.
(]]'kl'll l r\_o: INs],_] [ ,\]l() 2 * 5
INSTALLATION I
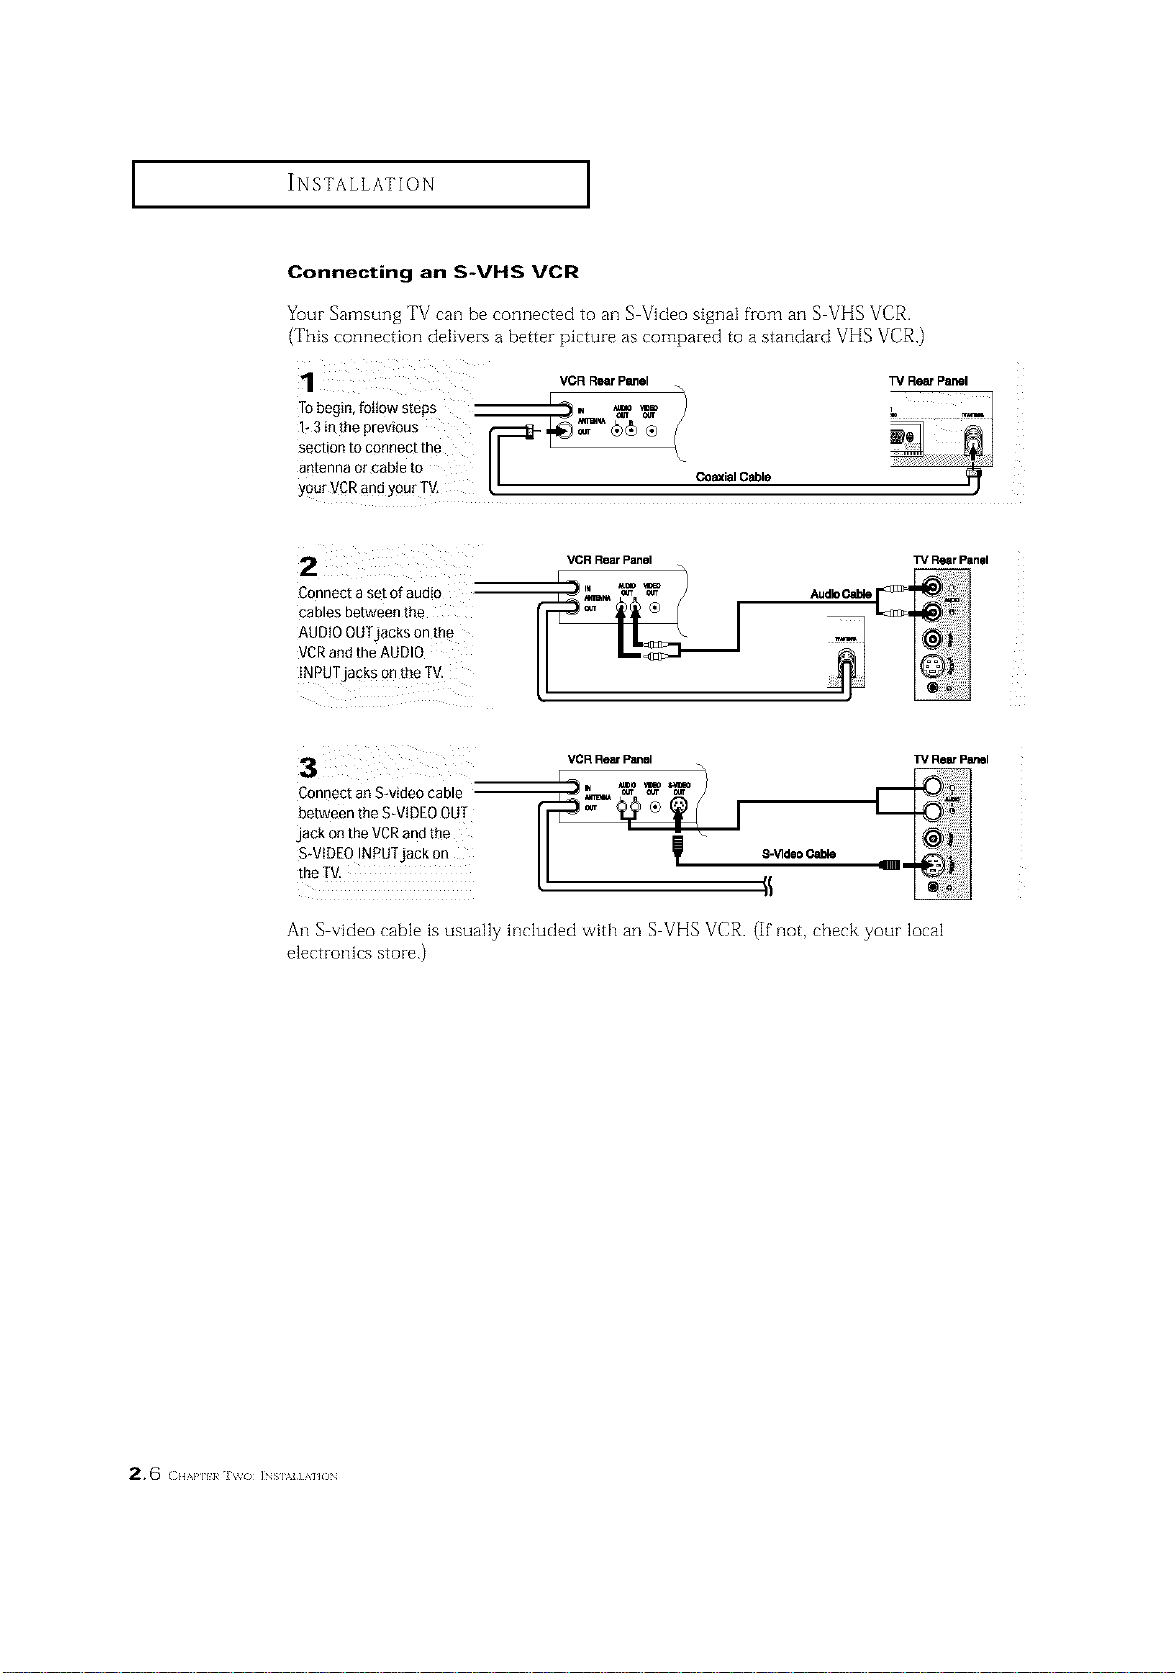
Connecting an S-VHS VCR
Your Samsung TV can be connected to an S-Video signal fronl an S VHS VCR.
(This connection delivers a better picture as compared to a standard VHS VCR.)
: VCR_ Panel TVRe_ panel
R
Tobegin,fottows'teps _m., *_ _ h _ _
g;t 7o17::it,e
antenna or cable to I I co_ial Cable I)
yourVCR and yourTV. 12
2
Connect a set of audio
cables ee[ween the
AUDIOOUTjacks on me
VCRano [ne AUDIO
INPUTjacks onme IV
V(_R RlSarPanel
TVRearPan01
3
2onnec[ an Swmeo came
aetween the S-VIDEOOUT
jack Onthe VCRandthe
S-VIDEOINPU]jac_ o_
me IV.
VCR Rein P_sl
8-Vide0Cable
TV I_ panel
An S-video -able is usually htcluded with an S VHS VCR. (If not, check your local
electrott[cs store.)
2,6 ( ],,,,},][:!}_ J \tv<) ]NS],M] A']JON
INSTALLATION ]
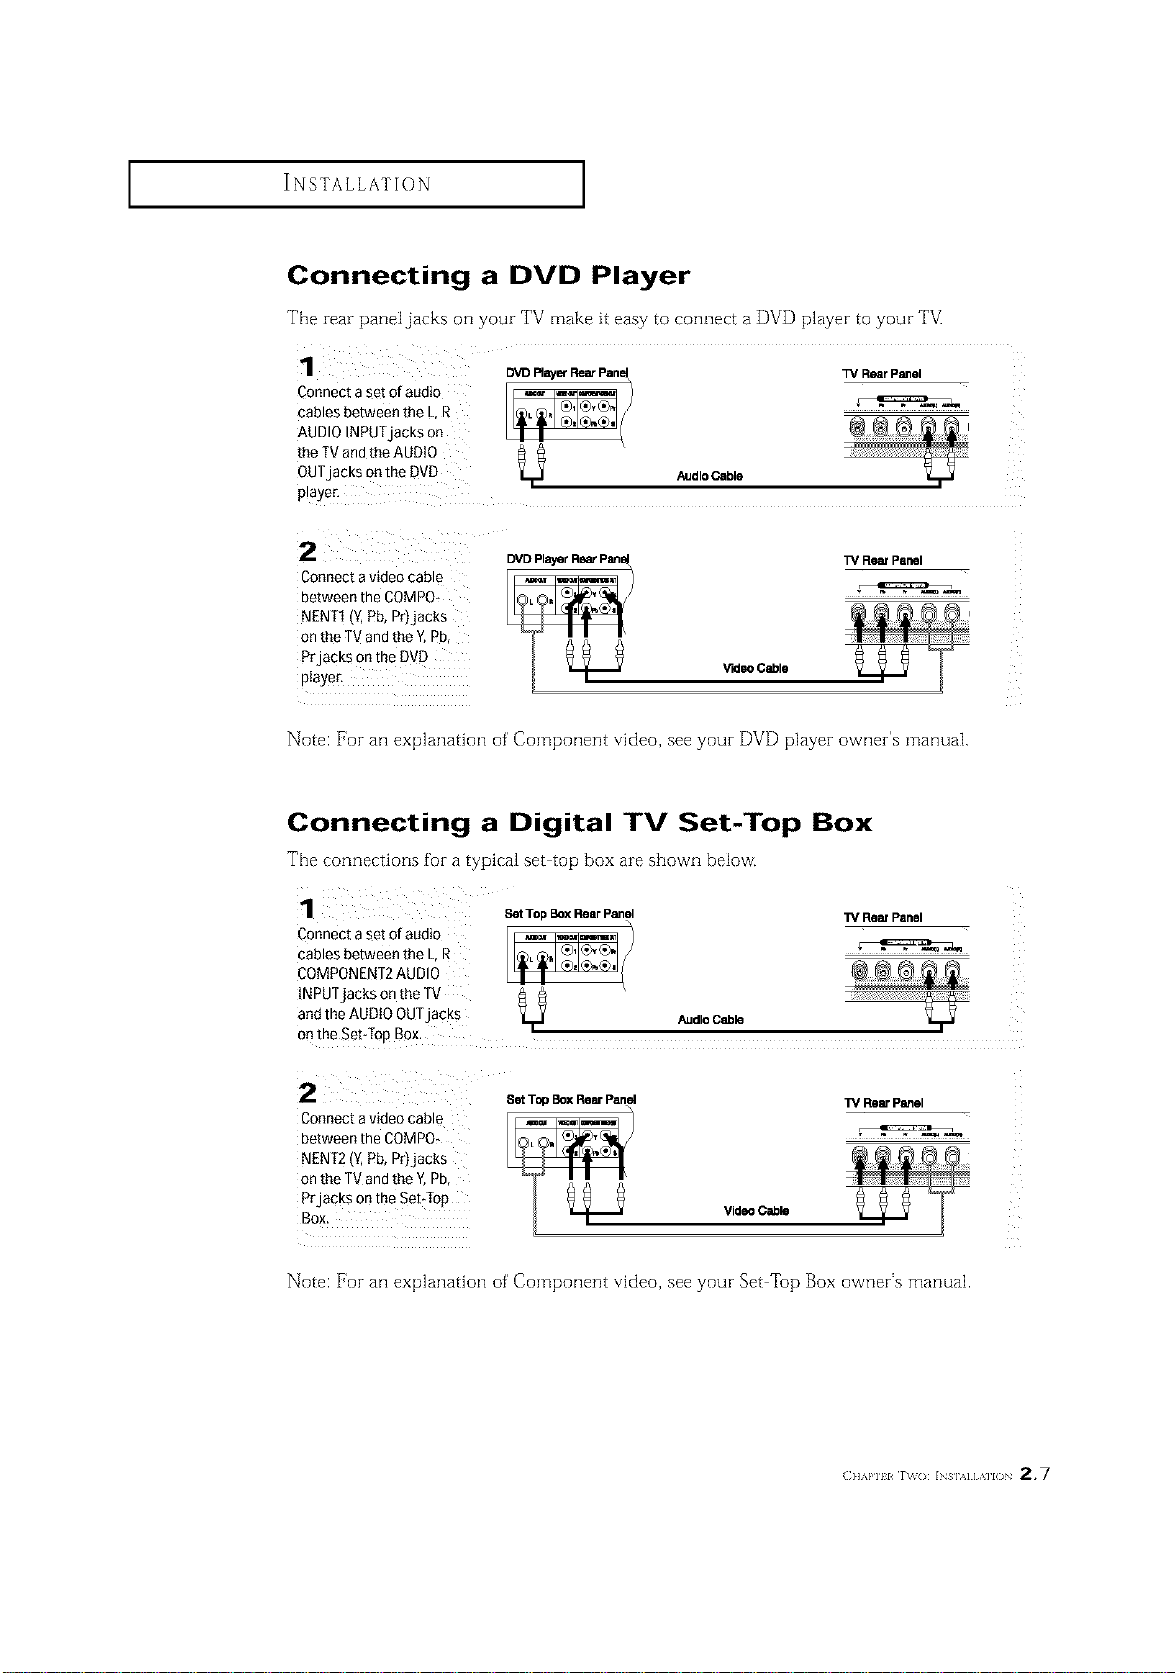
Connecting a DVD Player
The rear paneljacks on your TV make it easy to connect a DVD player to your TV.
Connect a set of audio
cables between the L.R
AUDIO INPUTjacKs on
the TV andthe AUDIO
OUT acksonthe DVD
3_aye£
DVD Ray_ RearPane_ _/Rear Panel
AudloOable
2
Connect avideo cable
between the COMPO+
NENT1 'Z Pb, Pr_jac_s
on the TVand the _ Pb
PrjacKs onme DVC
pla_.er.
TV Rear Panel
VideoCable
Note: For an explanation of' Component video, see your DVD player owner's manual.
Connecting a Digital TV Set-Top Box
The connections for a typical set top box are shown below.
1_ ReinPanel
Connect a set of audio
cables between the L,R
COMPONENT2AUDIO
INPUTjacks onthe TV
and the AUDIO OUTjacks AudleCable
onthe Set:lop Box.
SetTop BoxRear Panel
2 SetTopBOXRearPanel
Connect avideo cable
between the COMPO,
NENT2 (Y,Pb, Pr)jacks
on the TVand the Y,Pb,
Prjacks onthe SebTop
TM RearPanel
Video Cable
Note: For an explanation of' Component video, see your Set Top Box owner's manual.
(}]]'kl'll l r\_o: INs],,][,\]l() 2.7

INSTALLATION ]
Connecting a Camcorder
The side panel jacks o1-1your TV make it easy to connect a carncorder to your TM
They allow you to vievvrthe camcorder tapes without using a VCR. (Also see "Viewil]g a
VCR or Camcorder Tape" on page 3.17)
1
LocatetheA/Voutput _Jl_
jacks onthecamcorder, _...J.4_ _"__'_'_'>_ _ _ Ceencorder
Theyareusuallyfoundon _S_=J'_,O_P.t Jeal_
t2,2o?rr.hacko",o
Connect an audio cabIe O.rr_o_ler
Output Jecks
between the AUDt0 _A_
0UTPUTjack on the
cameorder and the
AUDIO terminals onthe
side of the TV,
W Side Panel
Inp=JtJacks
3 ¸
Connecta videocable
betweenthe VIDEO
OUTPUTjack onthe
cameorderandthe
VIDEOterminalonthe
sideoftheTV,
_rder
W Side Panel
InputJ_ks
Tile audio video cables shown here are usually included w'ith a Camcorder. (If' not, check
your local electronics store.) If your camcorder is stereo, you need to connect a set of"two
cables.
2.8 c,,,,,,,,,,,,J,_o INS],NHAHON
INSTALLATION ]
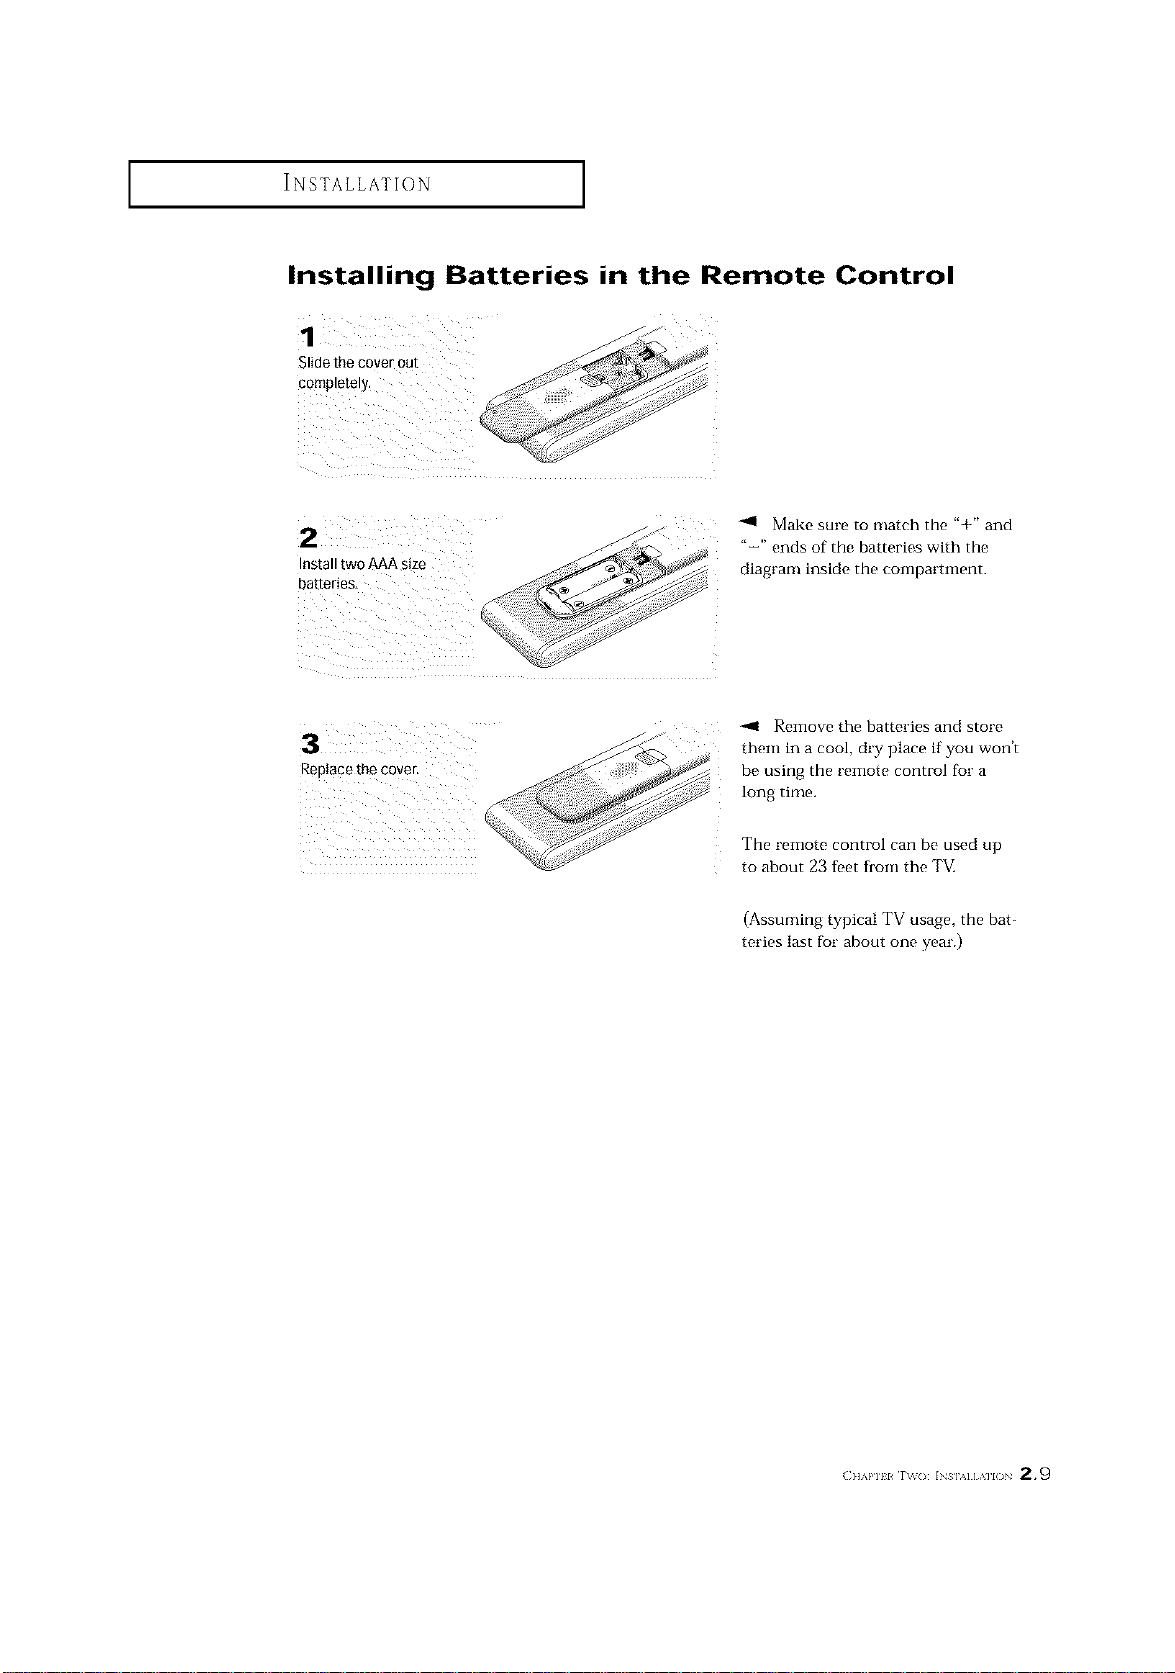
Installing Batteries in the Remote Control
Install tw0 AAA size
batteries_
Make sure to match the "+" and
"-" ends of the batteries with the
diagram inside the compartment.
Replace the cover.
-.11 Remove the batteries and store
them in a cool, dry place if you won't
be using the remote control for a
long time.
The remote control can be used up
to about 23 feet from the TM
(Assuming typical TV usage, the bat-
teries last for about one year.)
(]]_,l'll l r\_(): INs],_][,\]l() 2.9
OPERATION
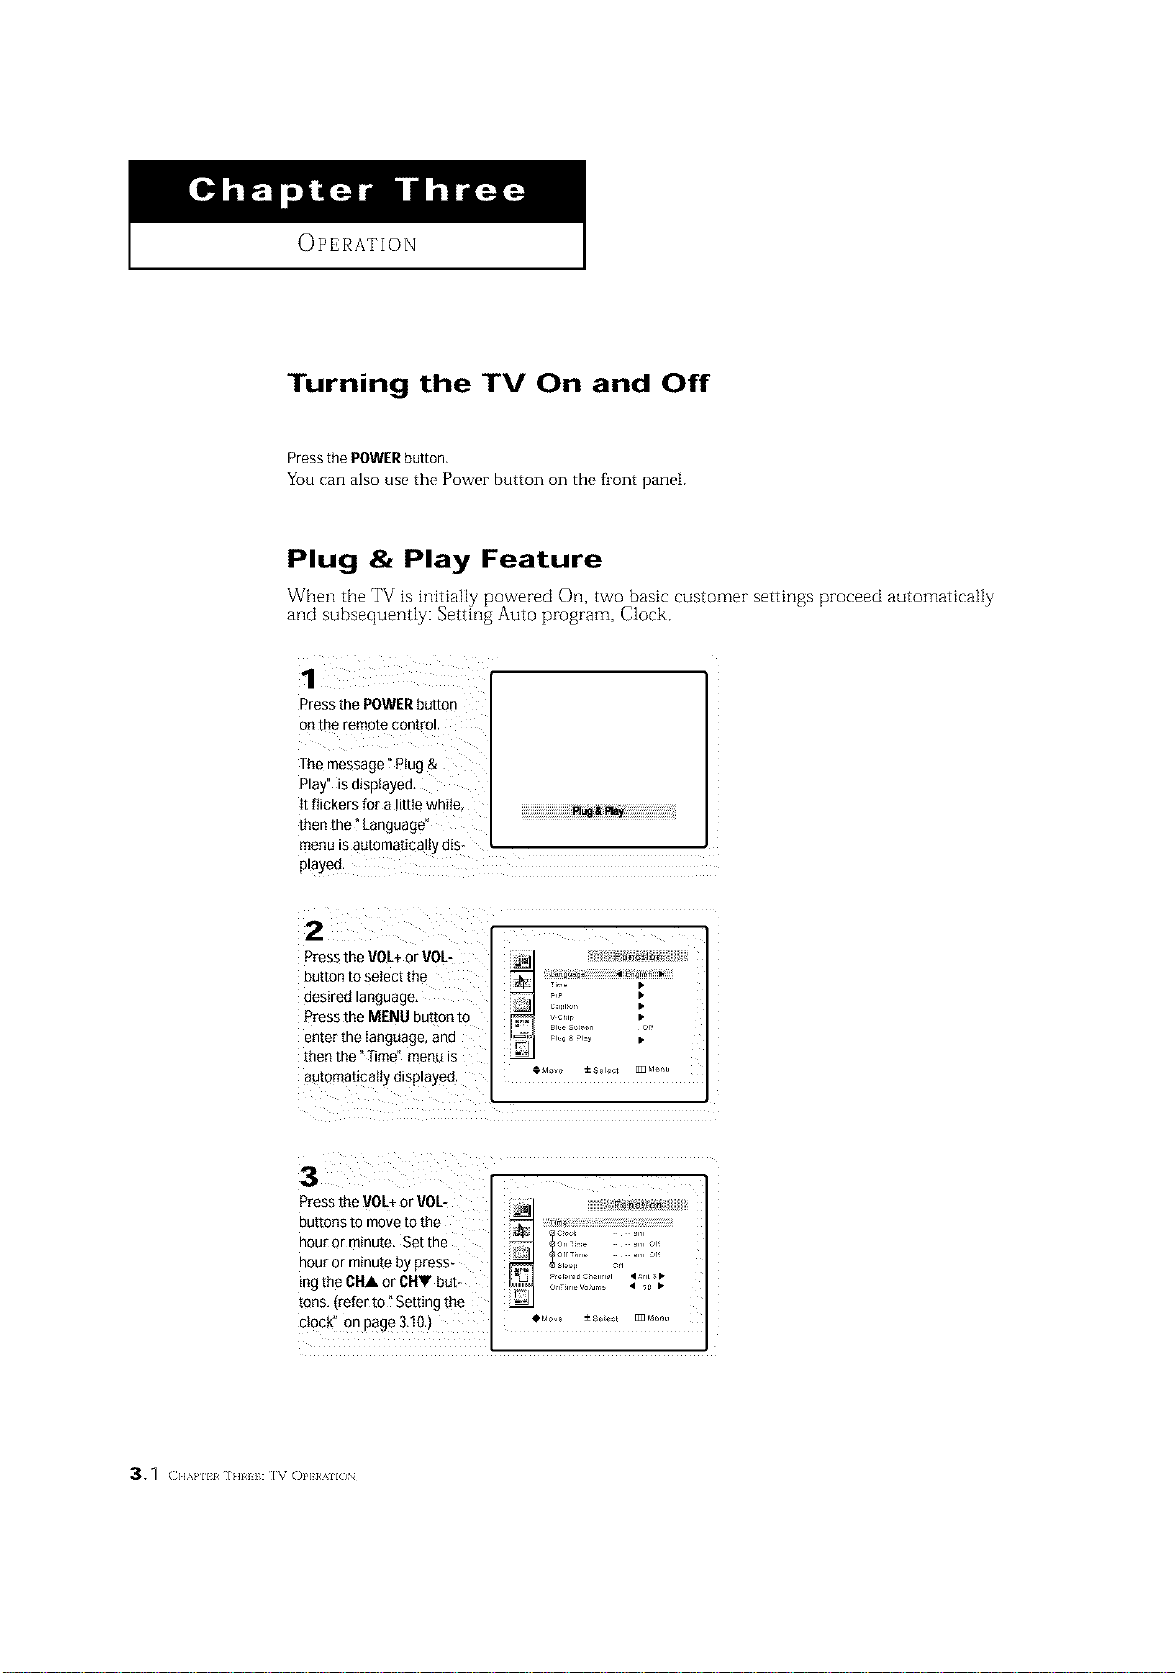
Turning the TV On and Off
Press the POWERbutton,
You can also use the Power button on the fl'ont panel.
Plug & Play Feature
W'hen the TV is initially powered On, two basic customer settings proceed automatkally
and subsequently: Setting Auto program, Clock.
Pressthe POWERbutton
onthe remote control.
The message" Plug &
Play" is displayed,
Itflickers for a little while,
then the _Language"
menu is automatically dis-
played,
2
Press the VOL+or V0L [i_ll
button tOselect the
Zo ;
desired language, t:ll ........ •
Press the MENU button to _ _1_ i[; _[
enter the language, and _ _,_,,,_,_, •
then the "Time" met
agtomaticatty displayed. _Mo_ ±s_,o¢, D,_,,
Press the VOL+or VOL- __ I
outtonstomo otothe
hour or minute. Set the ' _,o ;::o,
hour or minute by press- .........._,,, o_
ing the CHA or CHV but- OnTII.VOjd _............... _rlts_ _
tons (refer to "Setting the
clock" on page 3,lO.) , _,_ ±so_t _M....
3._ ( ]]kPll 1 ] HI I I : IV ()PI;R411(/N
OPERATION ]
4
Press the VOL+or VOL-
button to select the
desired video signaI
Source,
Press the MENU button [o
enter the vlaeo s gnu
Sourcff Blfl [r_en [Re
Ant Inpu[ cnec_ _s
automatica _yo_sp_ayeo
LNA
5
Make sure that the
antenna is connected to
the [V. Pressthe VOL+or
VOL-buttonto activate
"Auto Prog/am or
press the MENU button to
ski& Irefer to "Au[o
prograF on page 3.6.)
6
The message°E_oy your
wa[ching,"i_ elsplayeo.
7 i
If youwant to reset this lea-
lUre
- Press the MENU button
(2 PresstheOHVbuttor to
ntgnttgnt the Function
-enu aRflpress the
VOL+DU[tOr
31Press the CHV button [o
select Plug & Playan{]
Dressthe VOL+button.
VChr •
The message _Plug &
Ray' is displayee
(;.,_, _ r]]_]]: I% OI,}}/;_ /_N 3.2
OPERATION ]
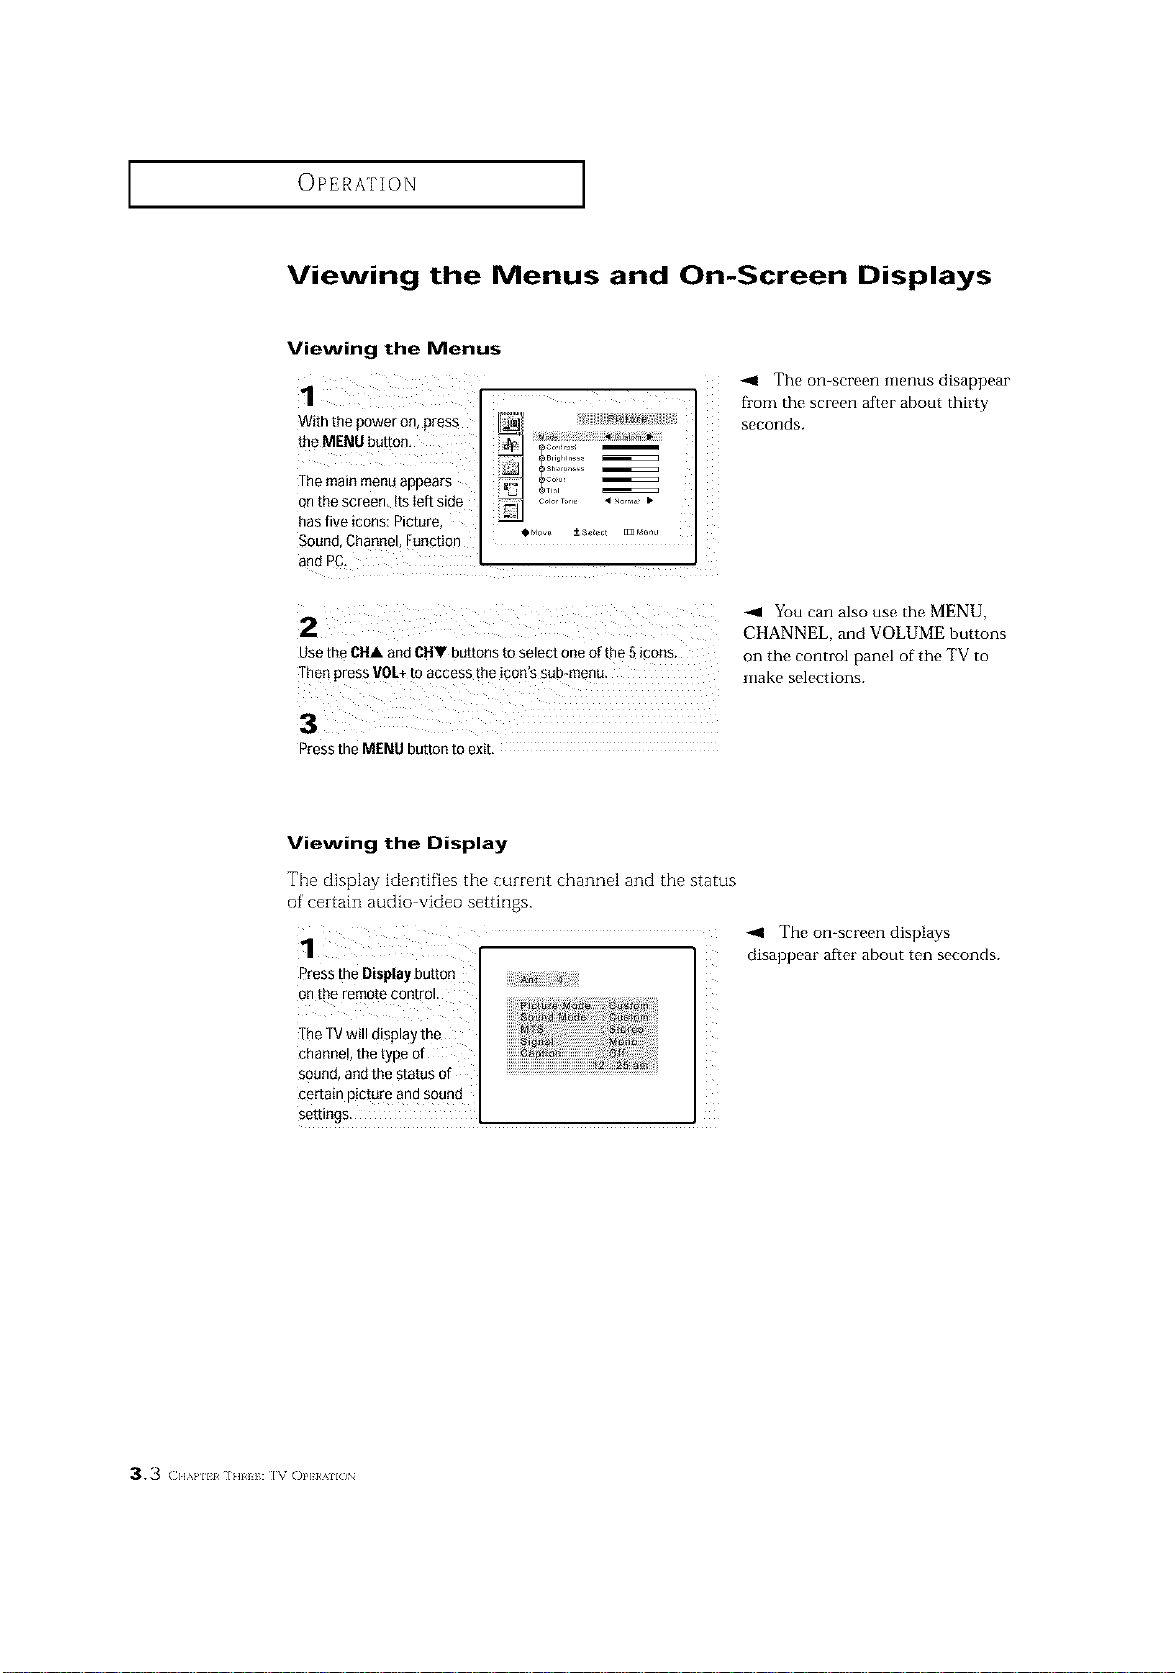
Viewing the Menus and On-Screen Displays
Viewing the Menus
1
With the Dower on press
the MENU button,
The main menu armear_
onme screen ItsIeft side
has five icons: Picture,
Sound. Channel Function
and _C,
OMS __S
The on-screen menus disappear
fl'om the screen after about thirty
seconds.
2
use the CUA and GUY buttons to select one of the 5 cons
fhe_ press VOL+to access the icon's sub-menu
3
Press the MENU button to exit,
You can also use the MENU,
CHANNEL, and VOLUME buttons
on the control panel of the TV to
make selections.
Viewing the Display
The display identifies the current channel and the status
of certain audio video settings.
Press the Displaybutton
onthe remote control.
The TVwill display the
channel, the type of
sound, andthe status of
certain picture and sound
settings.
-,9 The on-screen displays
disappear after about ten seconds.
3.3 (]l_}'lll ]HI I: IV ()I']}/411()N
OPERATION ]
Selecting a Menu Language
1
Press the MENU button to HI ;1",,,: _ r_
display the menu_ _..... Ti,., •
Press the CHV button to _1 _1_ ....
select _Function" then _::;_;_.'_ _"
press the VO[ ÷ button.
2/
Press the CHV button to
selePt Languagel
HI
pl,,_ a Fi.y •
...........
_Dgpl _ Choisir [m _d_nLi
Press the VOL+button to select the appropriate Ianguage:
English, Spanish, or French,
4
Press the MENU button to exit.
OPERATION ]
Memorizing the Channels
Your TV can memorize and store all of the available channels for both "off air" (antenna)
and cable channets. After the available channels are memorized, use the CH • and
CH • buttons to scan through the channels. This eliminates the need to change channels
by entering the channel digits. There are three steps for memorizing channels: selecting a
broadcast source, memorizing the channels (automatic) and adding and deleting channels
(manual).
Selecting the Video Signal-source
Before your television can begin i;qemorizing the available channels, you must specify the
type of signal source that is connected to the TV (i.e., an antenna or a cable system).
1
Press the MENU button 1o
dis[_Iaytqe menu.
Press the CU• button to
select "Channel _ men
oress the VOL+ button,
:vv ,_o • TV •
O_do_e --+SeJOCl _ _eJ,u
Repeatedly press the ] _ ]
rot+b.tte,tocycte I I
throughthese choices: I _ _ ....... :_=,,_ I
ANT (antenna, STD,HRC _-_ ........ ' T_ _
or IRC(allcableIV).
Note: STD, HRC and IRC identify/various types of cable TV
systems. Contact your local cable company to identif_y the type
of cable system that exists in your particular area.
At this point the signal source has been selected. Proceed to
"Storing Channels in Memory" (next page).
35 (]l_}'lll ]HI I: IV ()I']}/411()N
OPERATION ]
Storing Channels in Memory (Automatic Method)
1'
First,select the correct
signal source (ANT,STD,
tlRC, IRe). see Steps !-4
on previous page.
irl Tune • O0 •
_A or
TV Video • TV •
Press the MENU button, oM_,_ ±so_t _ Moo,,
Press the CHV button to
select" Channel", then
press the VOL+ button:
Press the CH• button to _ .............
Select the _AutOpro_
gram:. LA T " _(,,[ '
_MOvO --+St_J_61 El] _de_g
-,4 The TV automatically cycles
through all of the available channels
Pressthe VOL+ button
The TVwilt begin
memorizing all of the
available channels
and stores them in memory. This
takes about one to two minutes.
Press VOL+ at any time to interrupt
the illenlorization process and return
to the CHANNEL menu.
After all the available channels are stored, the Auto program
menu reappears, Press the MENU button to exit.
OPERATION ]
Adding and Erasing Channels (Manual Method)
Use the number buttons to directly se!ept the channel that will beadded Or eEased,
Press the ABD/EP.ASEbutton,
Repeatedly pressing this button wiII alternate between "Added" and" Erased,"
You can view any channel (including an erased channel) by using the number
buttons on the £eiilote control
Changing Channels
Using the Channel Buttons
PresstheCH• orCHV buttonstochangechannels.
When you press the CH • or CH • buttons, the TV changes channels in
sequence. You will see all the channels that the TV has memorized. (The TV
must have memorized at least three channels.) You will not see channels that
were either erased or not inemorized.
Directly Accessing Channels
Use the number buttons to quickly tune to any channel.
Press the number buttons to godirectly to a channel
For example, to select channel 27,press "2,"then _7: The TMwill change channela
when you Pressthe second namber.
When you use the number buttons, you can directly select channels that were
either erased or not flleiilorized.
To select a channel over 100, press the +100 button. (For channel 122, press
"+100," then "2," then "2.")
To change to single-digit channels (0 9) faster, press "0" before the
single digit. (For channel "4," press "0," then "4.")
Using the Pre-CH Button to select the Previous Channel
Press the PRE-CHbutton,
The TVwill switch to the last channel viewed.
To quickly switch between two channels that are far apart, tune to one channel,
then use the number button to select the second channel. Then, use the PRE-CH
button to quicMy alternate between thenL
37 (]l_k}'lll ]HI I: IV ()I']}/411()N
OPERATION ]
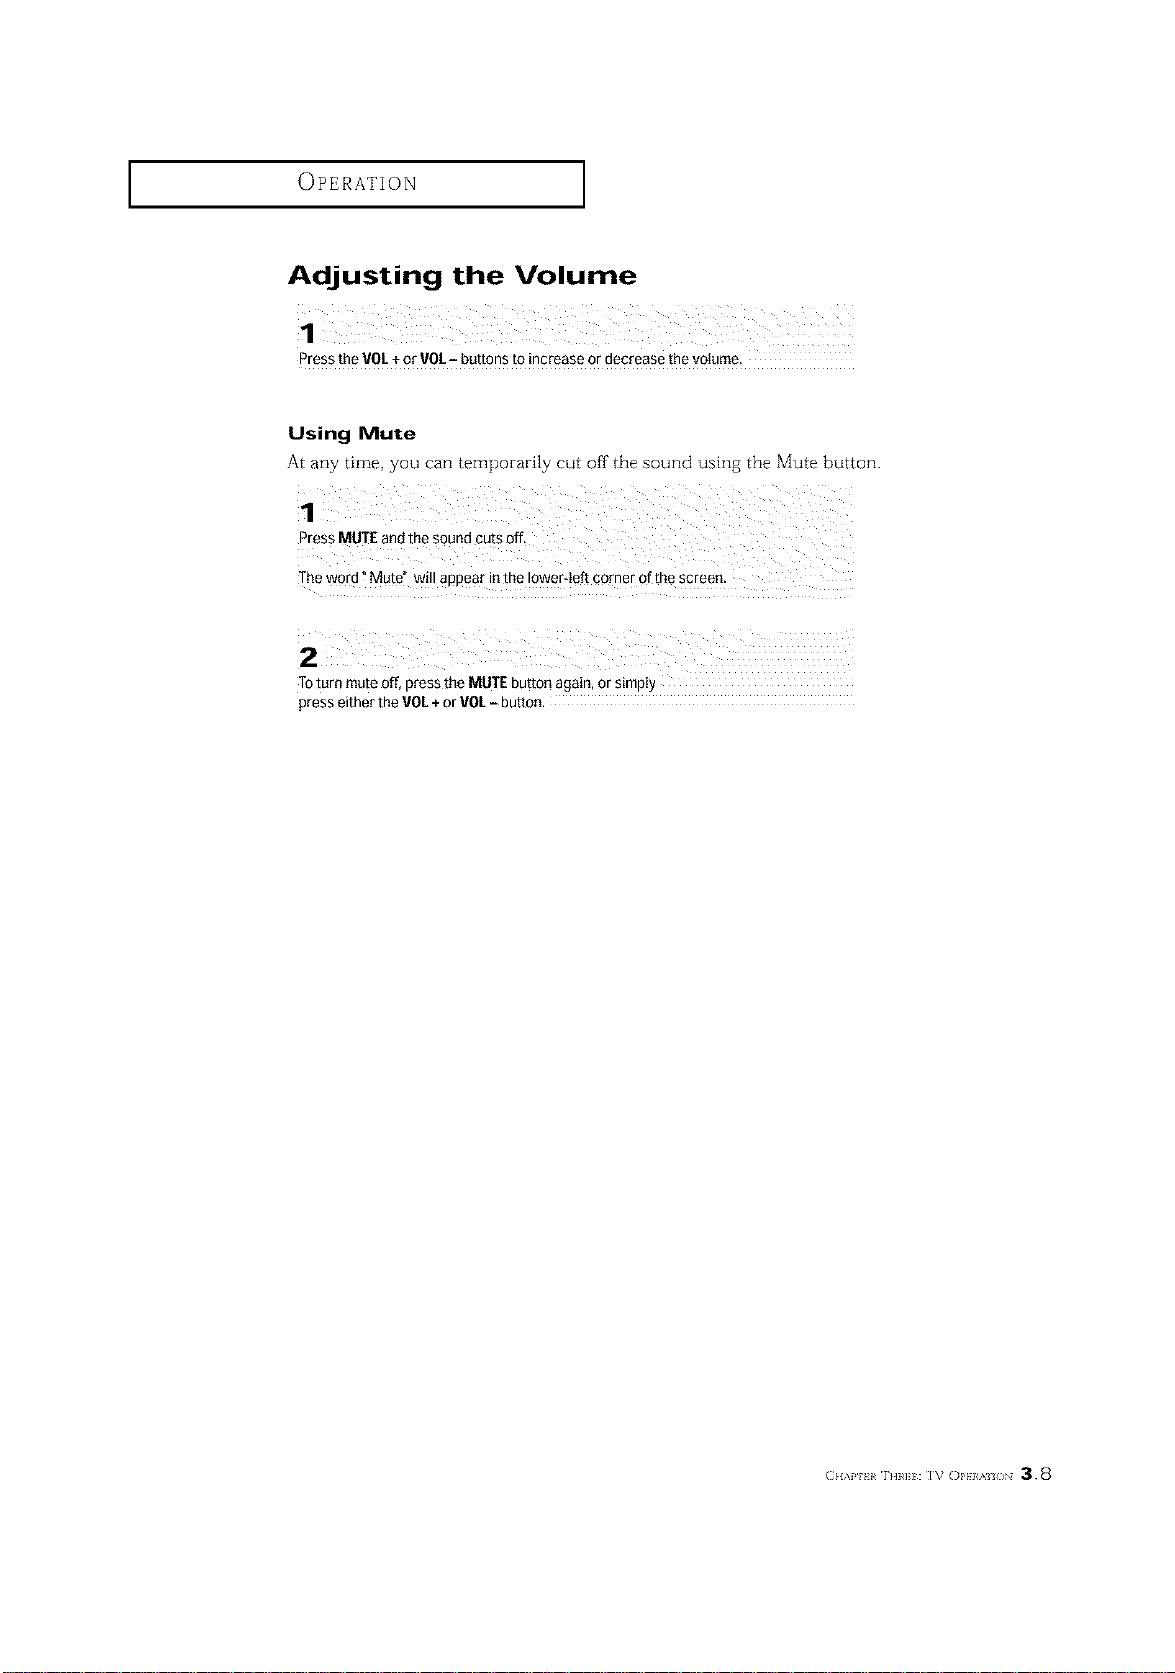
Adjusting the Volume
Press the VO/+ or VOL- buttons to increase or decrease the volume.
Using Mute
At any time, you can temporarily cut off the sound using the Mute button.
Theword Mute" willaPpearinthe ower'eftgnrnerofthescreen.
x
TOturn mute off, press the MUTEbutton again, or simpIy
press either the VUL+or VOL- button.
r._H: i_ ol,}}/;_ /_N 3.8
OPERATION ]
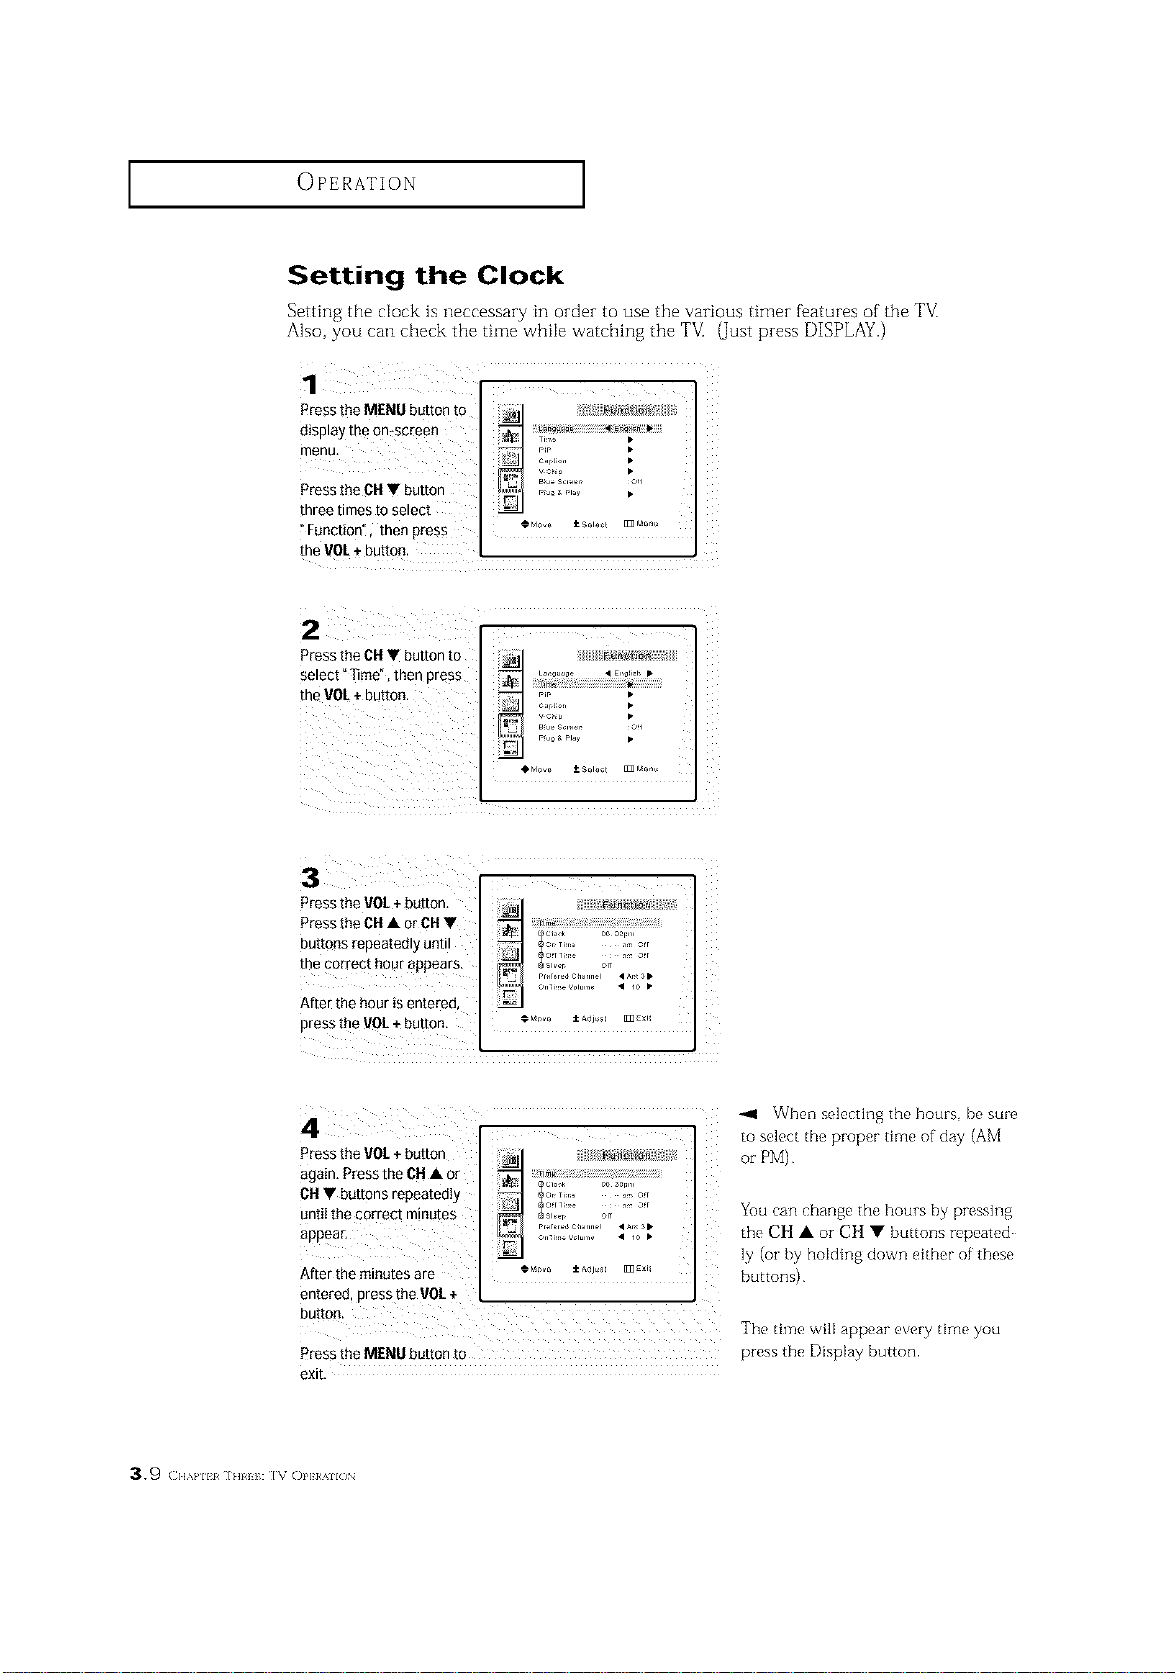
Setting the Clock
Setting the clock is neccessary in order to use the various timer fbatures of the TVI
Also, you can check the time while watching the TVI (_Justpress DISPLAY.)
"Function", thenpress cM_ ±s0,0_t _M0o_
the VOL+ button,
• i i
Pressthe rot + button,
Pressthe Ctl • or Ctl V
buttons repeatedly until
the perrept hour appears.
After the hour is entered,
press tl_evOL + button
_1 When selecting the hours, be sure
4 to select the proper time of day (AM
Pressthe gOt + button :_ or PM)
appearCttagain Press the Clt • oruntiIVthebuttonscorrectrepeatedlyminutes ___: ............ ...................._r'__i[;_Sle [ 0" _2 _'[[
o._i,,, wlu.,. • io •
After the minutes are €M_,,o ±Adj,_ _E_i_
entered press the VOI +
The time will appear every time you
Press the MENUbutton to press the Display button.
exit.
You can change the hours by pressing
the CH • or CH • buttons repeated
ly (or by holding down either of these
buttons)
3.9 (:]]&PIll ]HIII: IV ()I']}/AII()N
OPERATION ]
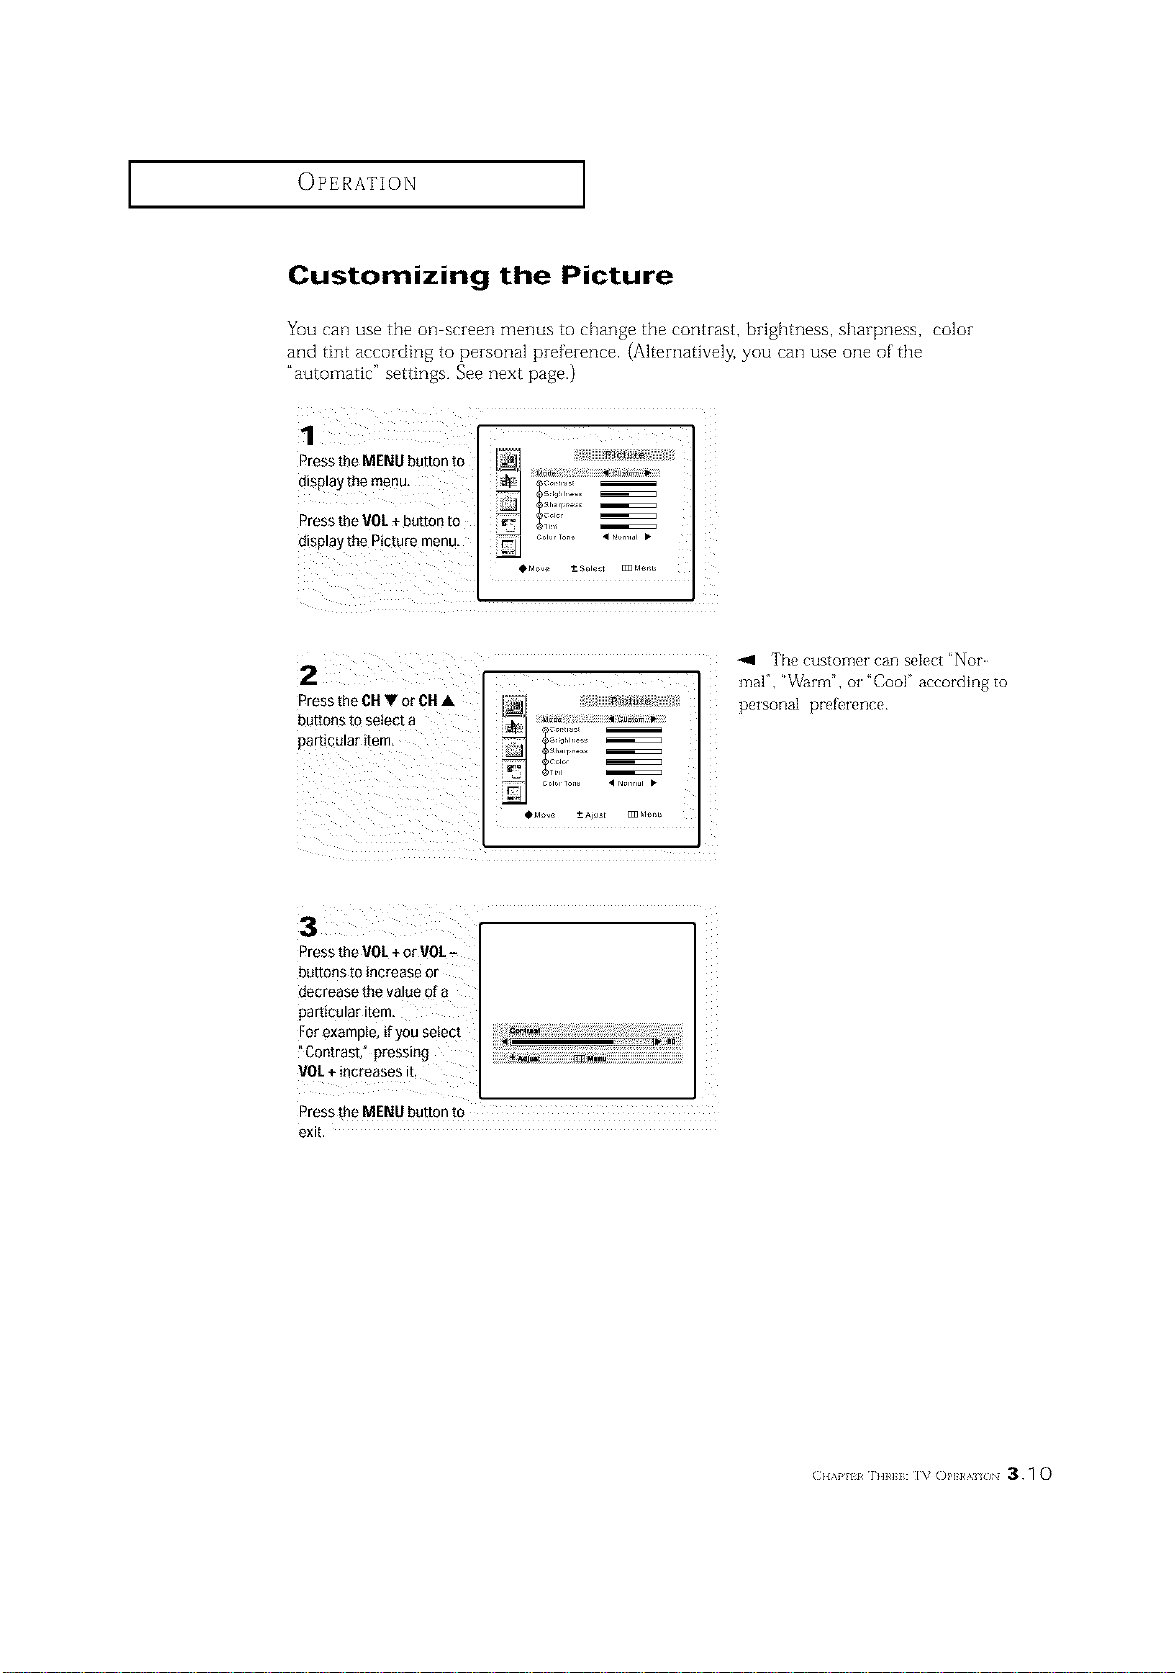
Customizing the Picture
You can use the on screen menus to change the contrast, brightness, sharpness, color
and tint according to personal preference. (Alternatively, you can use one of' the
"automatic" settings. See next page.)
1 iZ ¸¸¸
Press tbe MENU button to
display the menu,
Press the VO[ +button to r,_
display the picture menu.
OM_e t-- Select _ Mer_u
-,111 The customer can select "Nor
2 t,ec., oc.• i
Press r _ : pe_sonalmal"'" _3rrn",preferenceOr"Coop according to
buttons t0 setect a _1
particular item, _ _............
_ _= Colo _
"-io ......
Press the VOE+or VOL.
buttons to increase or
decrease the value of a
,articular item,
For example, ifyou select
Nii_i
"Contrast," pressing ,
VOI.+increases it.
Press the MENU button to
exit.
OPERATION ]
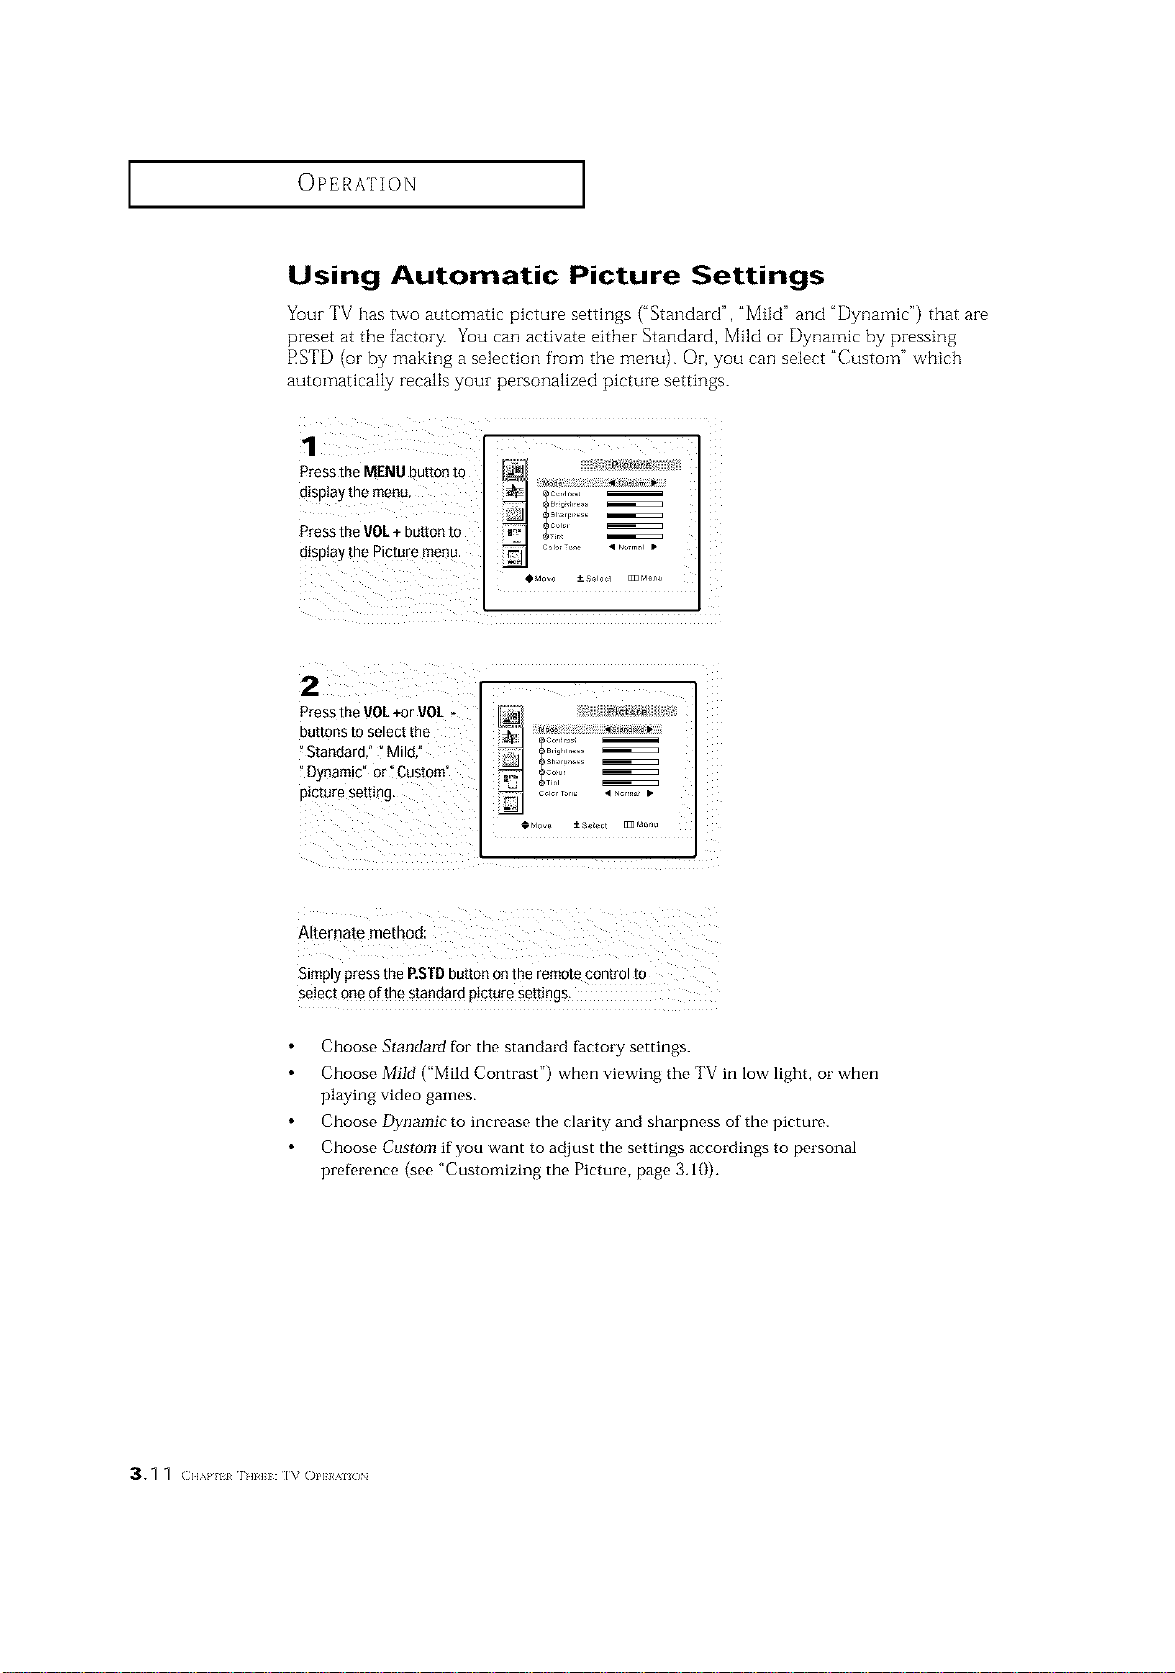
Using Automatic Picture Settings
Yuur TV has two automatic picture settings ("Standard", _MiM" and "Dynamic") that are
preset at the factory. You can activate either Standard, Mild or Dynamic by pressing
RSTD (or by making a selection from the menu). Or, you can select "Custoln" vvhich
automatically recalls your personalized picture settings.
Pressthe MENUbuttontO _
?
PresstheVOL+buttonto =n, _'"
display ° ...... • ........ •
•..... +_.............
2
Press the VUL +or VOL -
buttons LOselect the
"Standard," ? Mild,"
"Dynamic" or _Custom"
picture setting.
iii ................. ii
Alternate method:
Simplypressthe P.STDbuttononthe remotecontrolto
selectoneofthestandardpicturesettings,
Choose Standard for the standard factory settings.
Choose Miid ("Mild Contrast") when viewing the TV in low light, or when
playing video games.
Choose Dynamic to increase the clarity and sharpness of the picture.
Choose Custom if you want to at{just the settings accordings to personal
preDrence (see "Customizing the Picture, page 3.10).
3.1 1 (;u_}, lzl T'_zH: IV OZ'He_Z<_N

OPERATION ]
Customizing the Sound
The sound settings can be adjusted to suit your personal preference. (Alternatively, you
can use one of the "automatic" settings. See next page.)
Press the MENU button to _ [i::[is _ [[
display the menu, _ .............
Vir [ual Dolby Of[
Pressthe CHY button to _°'_° °"
_= VTS S.L h,_ rla, _r
VTS • to,, •
select" Sound", then _ ..=_,_.... •
press the VOL+button, _ _ur,_.,., ,_o,
_Mo,e ± se_ec_ _dem,
2. ;i
Press the CHV button to #_11 ;_i ,_:::
select" Equalizer", then _ _'_ud_........ ,I_11 _"
press the rot+ button. _'_ <_,';_o_i! _',',
_Move --+Stde¢[ E]3 Men,J
3
Press the VOL- or VOL+ _11
buttons to select a partic:
Press the CHV or CH •
buttons to increase or
decrease the value of a
Press the MENU button to
exit.
I% Ol,I;}/'_ /_ 3.1 2
OPERATION ]
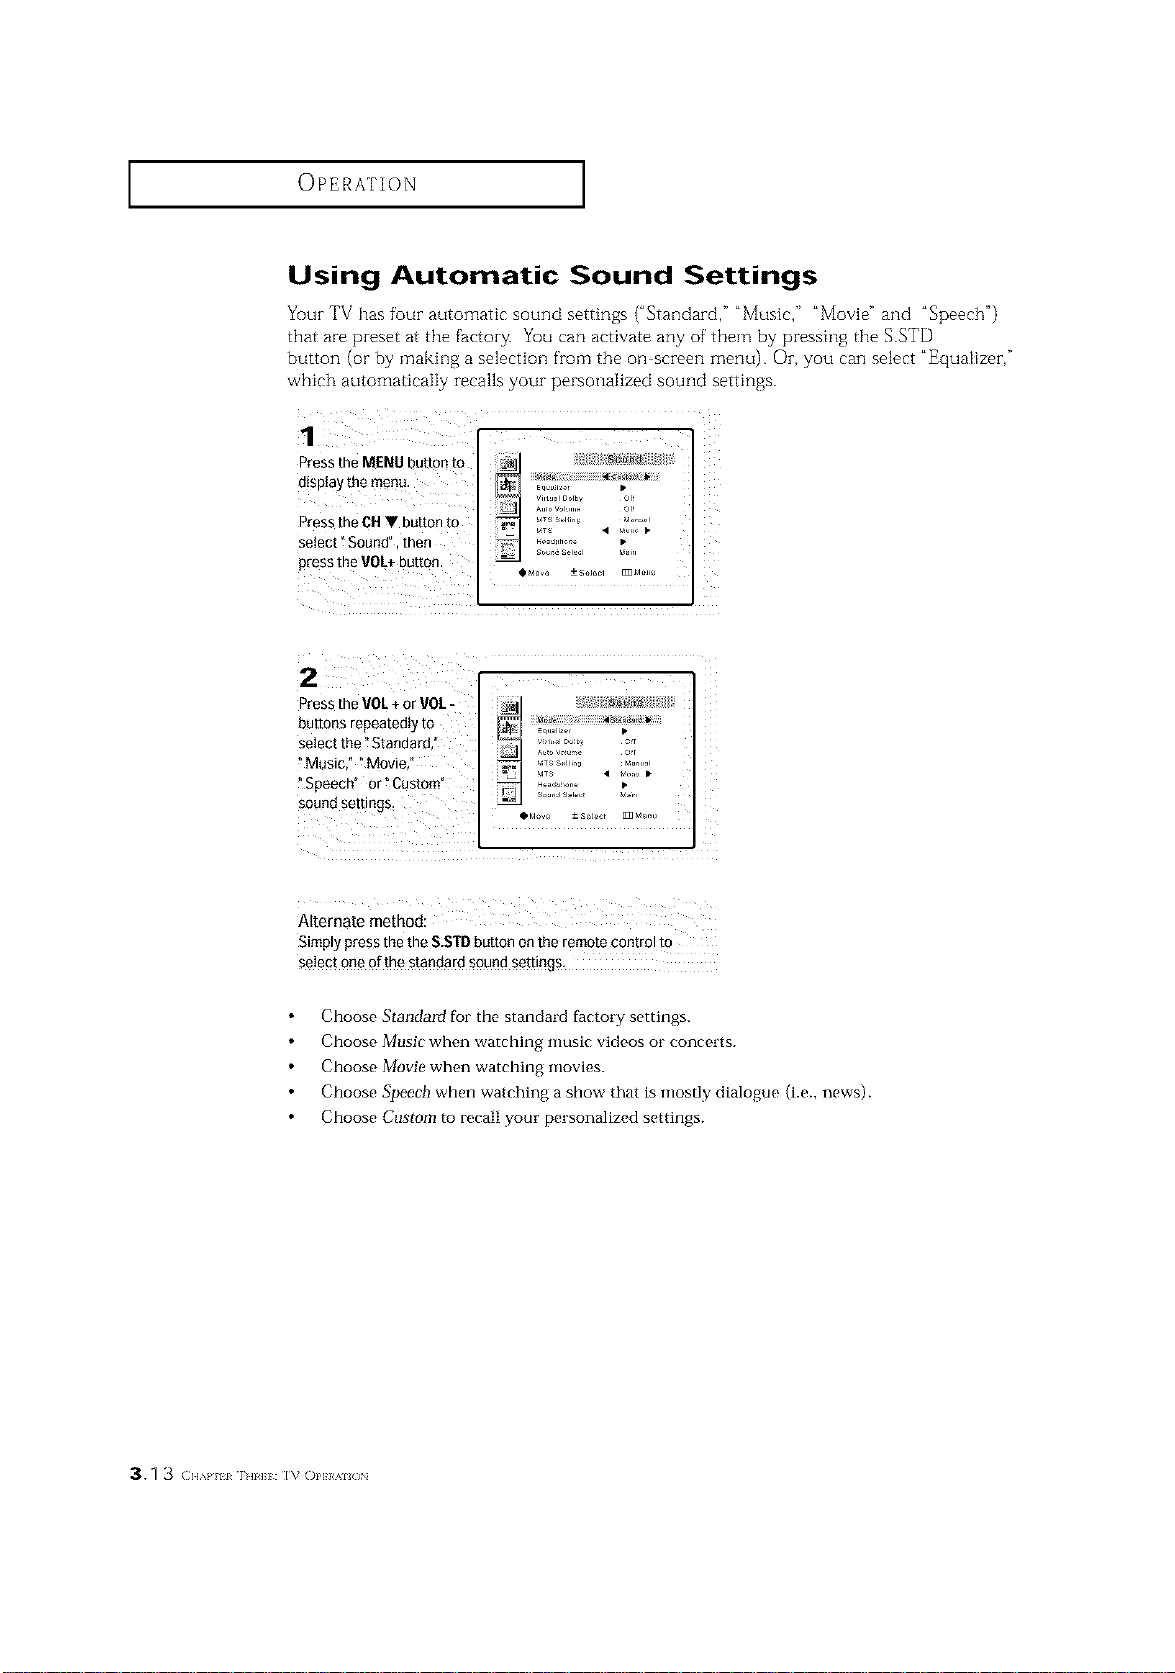
Using Automatic Sound Settings
Yuur TV has four automatic sound settings ("Standard," "Music," "Movie" and "Speech")
that are preset at the factory. Yuu can activate any of them by pressing the S.STD
button (or by making a selection from the oil screen menu). Or, you can select "Equalizer,"
which automatically recalls your personalized sound settings.
PresstheMENUbuttonto _ :] _ #,,_i[[
displayselectPressthe"theSound",cHmOnu'Vthenbuttonto _ '£ [:it_l I_0_ __J_'h;l_GI_TS.................EqEaiz+)r _ _r_rig"_rr;....
press the VOL÷button.
• ..... *..............
i 7
I
Press the VOL+ orrot -
buttons repeatedly to
select the "Standard,"
Music," _Movie,"
?Speech" or _Custom"
sound settings_
eq,,,,2, •
A_o vo_,, or
VTS • _,,,,o •
so,_,a Sl v_,,,
Alternate method:
Simply press the the S.STDbutton onthe remote control to
5elect one of the sDndard sound settings,
Choose StandaM for the standard factory settings.
Choose Music when watching music videos or concerts.
Choose Movie when watching movies.
Choose Speech when watching a show that is mostly dialogue (i.e., news).
Choose Custom to recall your personalized settings.
OPERATION ]
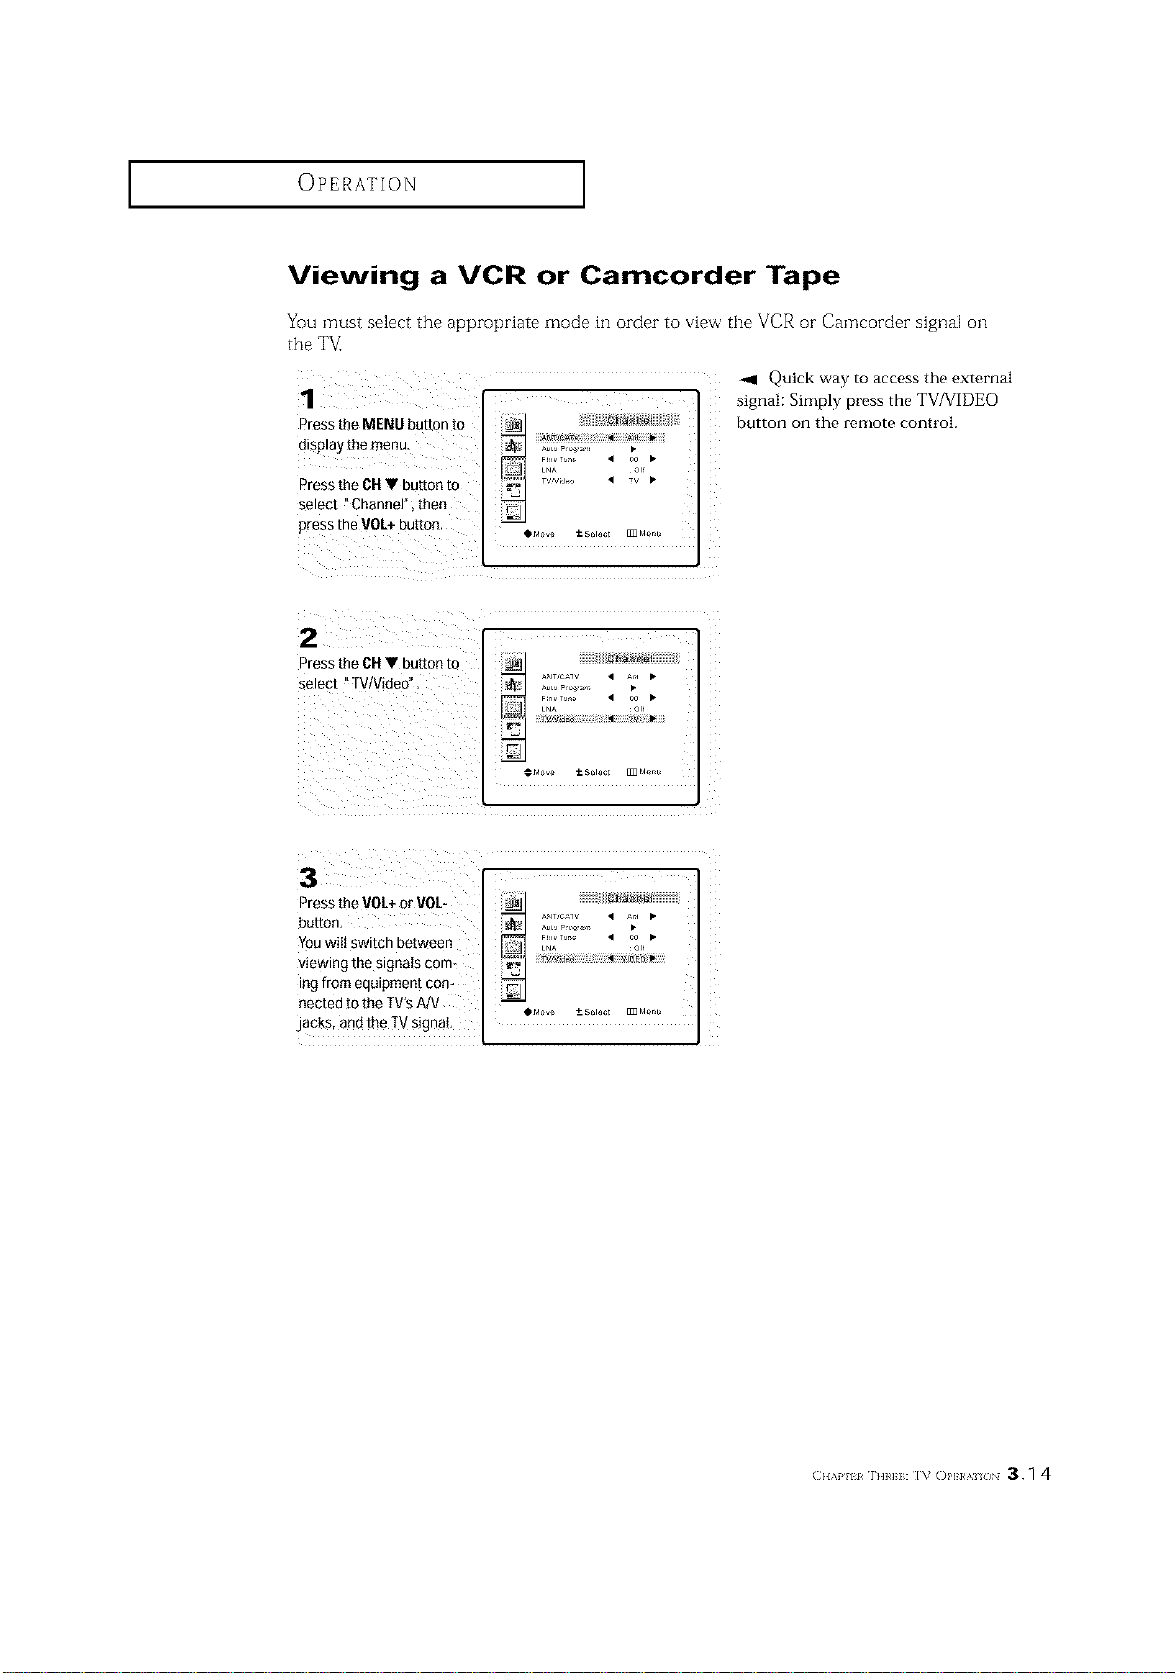
Viewing a VCR or Camcorder Tape
You must select the appropriate mode in order to view the VCR or Camcorder signal on
the TV_
1
Press tie MENU button m
display me menu.
Press the CU• button to
select "Channel", then
Dressthe VOL+button,
Quick way to access the external
signal: Simply press the TV/VIDEO
button on the remote control.
2
Press the gu • button to
select "W/Video".
LN_ O"
Press the VOL+or VOL-
button,
Youwill switch between
viewing the signals com-
ing from equipment con-
nected to the TV'sMV
m,,
@ld_v_ +-- S_lact [I_ MCr:U
jacks, and the TVsignal,
(;.,v,H r._H: I% Ol,I}/'_ /_ 3._ 4
SPECIAL FEATURES
Fine Tuning Channels
Use fine tuning to manually a¢]just a particular channel for optimal reception.
1
Selectthe appropriate
cna_ne
2
Press the MENU put[on m
display themenu,
Press the CH• button
twice to select °Channel
men Dress the VOL + bL[-
[OF
L_
i_ _ •
3
Press the CU• button to
select" Fine Tune
AN" rA, • _ •
_ rut° Fro_,_ •
LN_
4
Press the I/OL +and 1/01.-
ButtonsTOac ust the fine
tuning
I
AN. rA, • _ •
rut° Fro_,_ •
LN_
5
to store the fine tuning
semn£ in the TV'smemo-
ry, press the CB• button.
[A heart icon will appear
to reset the fine tuning io
00. press the CH • But
ton,
rut° Fro_,_ •
LN_
Press the MENU button to
exit.
<1 After you ad.just the fine tuning,
the "heart icon" will appear when
you press Display while watching
this channel.
41 (11,\1'1 _ lt_Hl SI'ICIAI _}AIUIiS
SPECIAL FEATURES ]
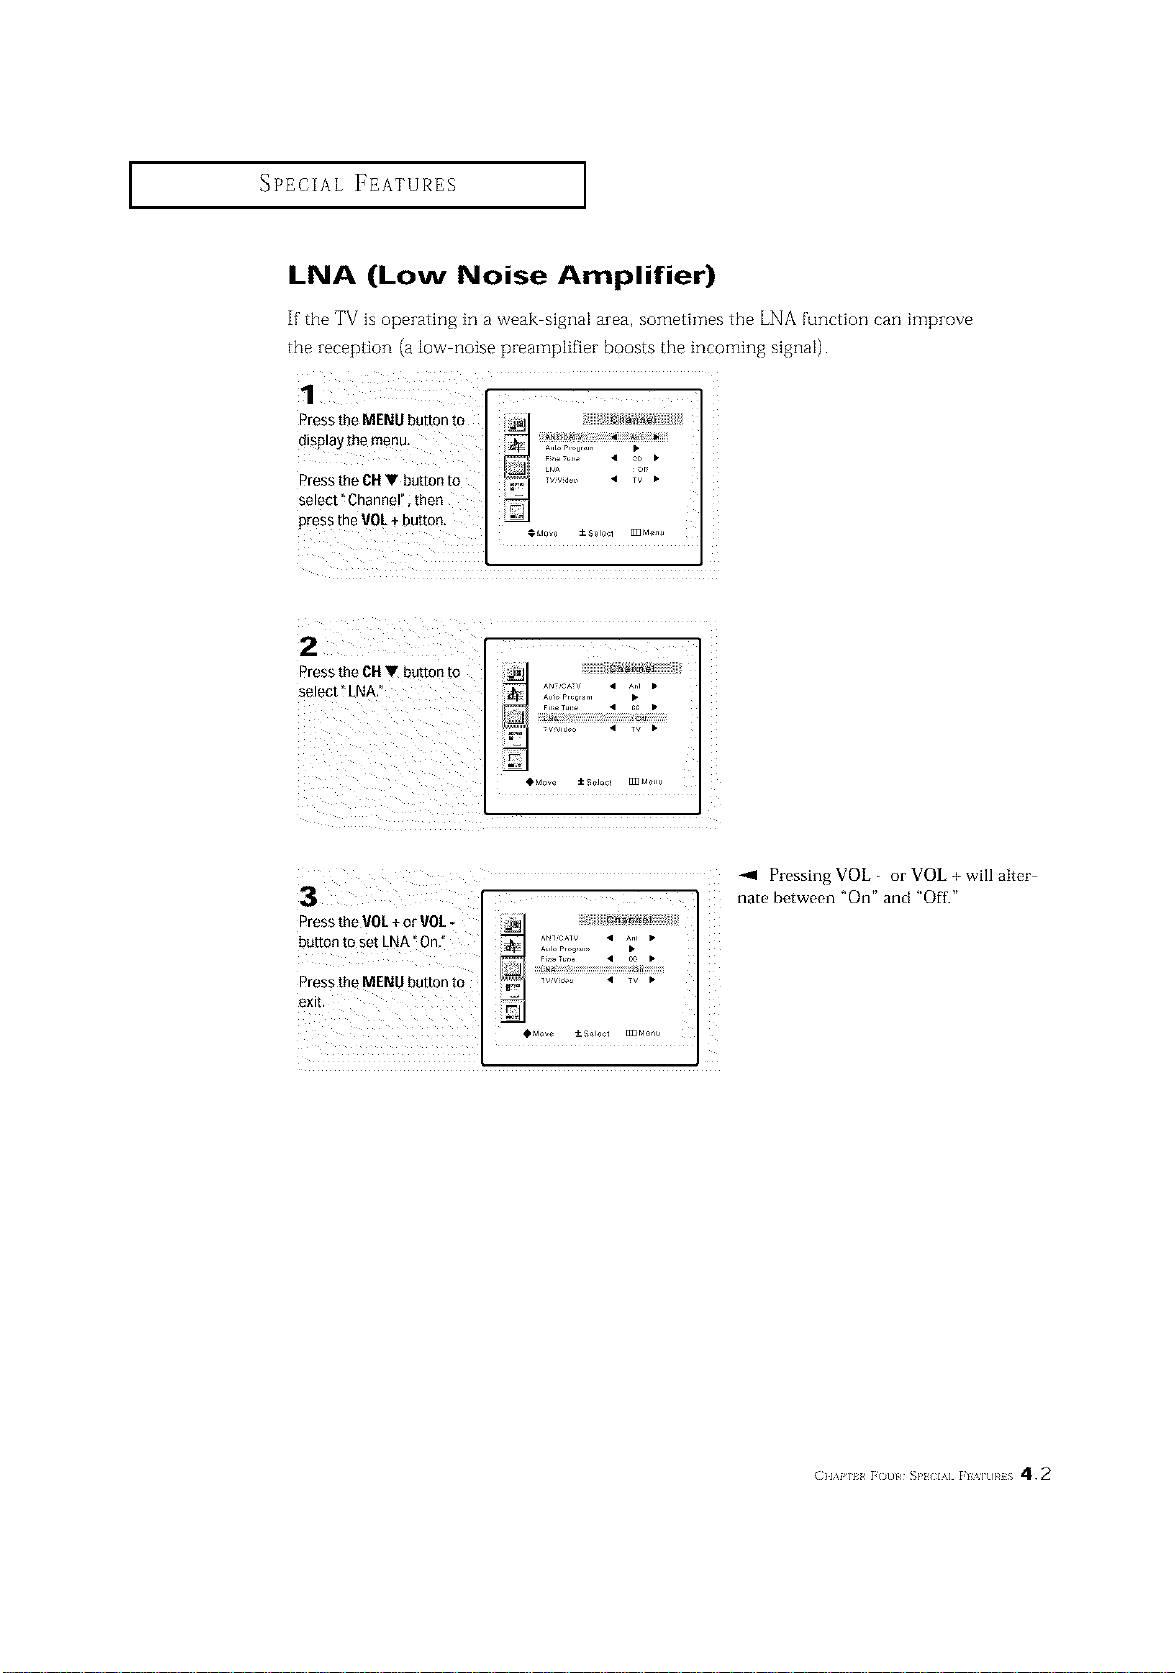
LNA (Low Noise Amplifier)
If'the TV is operating in a weak signal area, sometimes the LNA [unction can improve
the reception (a low noise preamplifier boosts the incoming signal).
Press the MENU button to
display the menu_ .............. •
LNA or
PresstheCHVbuttonto ........ • TV•
select" Channe" ;then
Pressthe VOL÷ button.
_dove ±8_1e¢1 _Men_
O&do_e ± SeJocl _Menu
Pressing VOL - or VOL + will alter-
nate between "On" and "Off."
Press the VO[ ÷or VOL.
_t, Jcmv • A,. •
button to set LNA" On," _ _,,,o_,o_.... •
PresstheMENUbuttonto _n. i;_;;;; • _
exit.
+
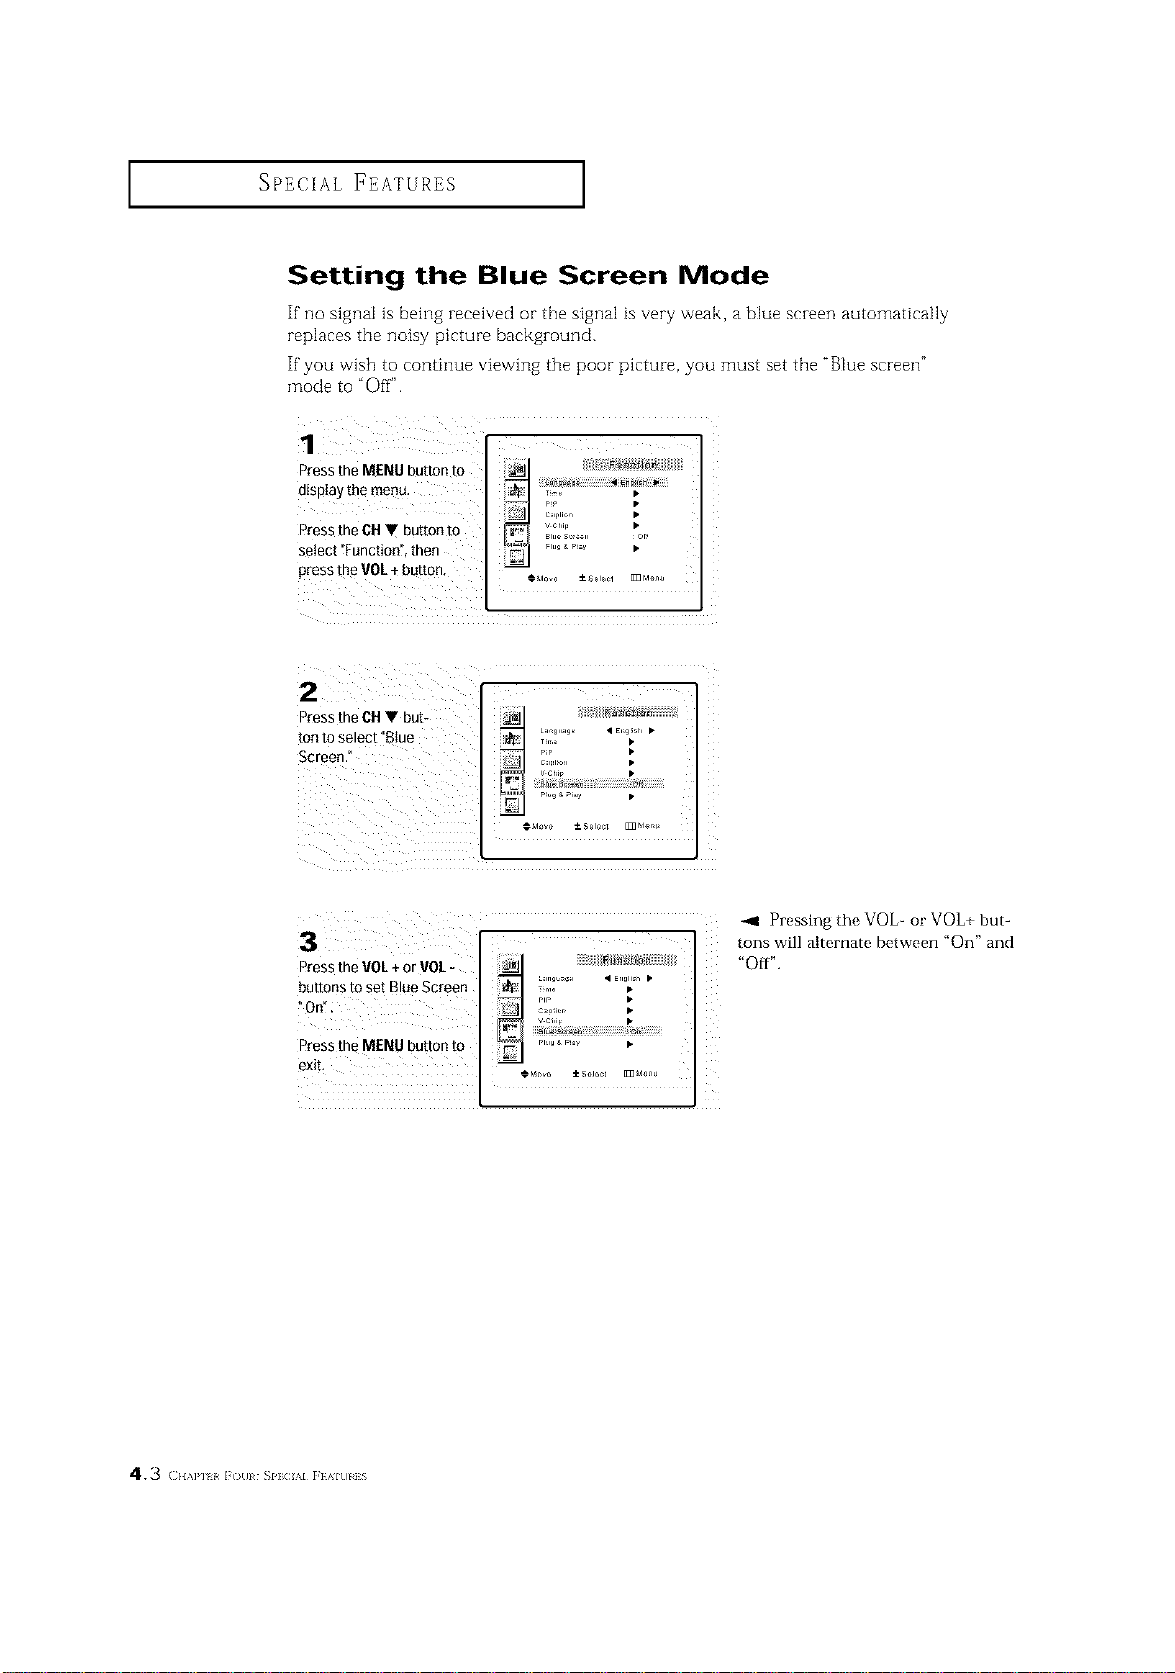
SPECIAL FEATURES ]
Setting the Blue Screen Mode
If"no signal is being received or the signal is very weak, a blue screen automatically
replaces the noisy picture background.
If"you wish to continue viewing the poor picture, you must set the "Blue screen"
mode to "Oil _'.
Press the MENU button to _Jl < _<_]__ [[]}
display themenu,
mP •
J] ,_,,oo •
Press the CH V button to _ _1_ Ills ..... %[
select "Function" then _ _'"_" _ •
Ptess_hgVOL ÷ buROn' €..... ±_.....m ......
2
Press the CH• but-
tonto select "Blue
Screen."
VCh_p •
i i iiiiiiiiiiii iiii
Press the VOL+ or VOL-
buttOnSOnTitosetBlueScreen __,_! ,_iii'_'_II_, • ........ •
Press the MENU button to ......... •
-,4 Pressing the VOL- or VOL+ but-
tons will alternate between "On" and
"Off".
4.3 (H,,H{,i()(ll SI']CL%IFEAIUI]S
SPECIAL FEATURES ]
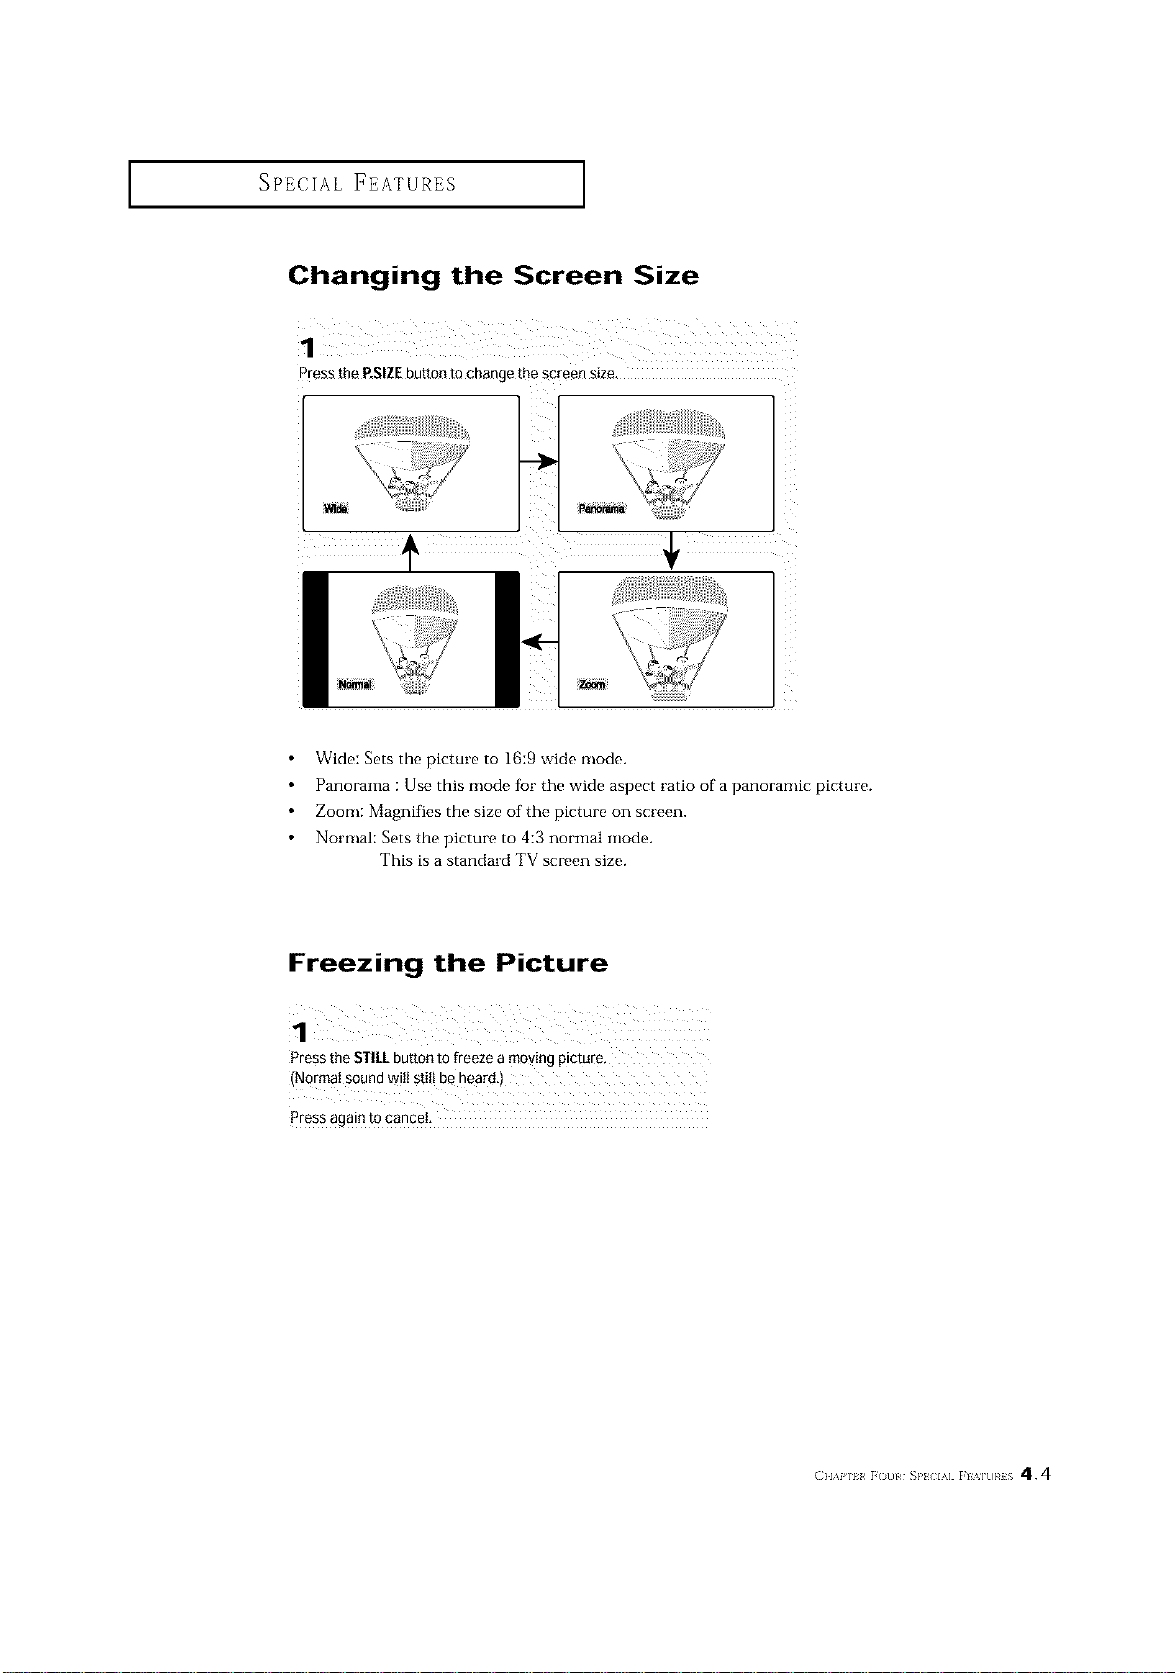
Changing the Screen Size
1
Press the P.SIZEbutton to change me screen s_ze
t
I N_a
Wide: Sets the picture to 16:9 wide mode.
Panorama : Use this mode fbr the wide aspect ratio of a panoramic picture.
Zoom: Magnifies the size of the picture on screen.
Normal: Sets the picture to 4:3 normal mode.
This is a standard TV screen size.
Freezing the Picture
1
Pressthe STILLbutton to freeze a moving picture,
press again to cance!:
(}l,\P 1_ r()[}l _}'_ IA] r[%][}}¢iS 4.4
SPECIAL FEATURES ]
Special Sound Options
Choosing a Multi-Channel Sound (MTS) Soundtrack
Depending on the particular program being broadcast, you can listen to stereo, mono, or
a Separate Audio Program. (SAP audio is usually a ft;reign language translation. Some
times SAP has unrelated information like news or weather.)
1
Press the MENU button to
disptay the menu. [L_ E_,,,,_, •
Press the CHV button to i_= ......................
r._TS • 'lo,,o •
Pressthe VOL÷ button cM_ ±s0,0_t _M0o_
Press the CHV button
three times to select
! MTS",
I_% _o,I • olo. •
Eqtl_liz r •
vim,,i DI_V or
_ ,,Im,o, •
3 I
Press the 1/01.÷button
repeatedly to select I_ _'°_° • ou,_o,,•
"Mono" ! SAR° or _1 _;;,_';o.... _,
"Stereo." _ ...........
Press the MENU button to _ _°:'"_ '_
-_1 The text at the bottom of the
menu tells you if the incoming
audio is stereo, SAP, or mono.
Choose Stereo for channels that are broadcasting in stereo.
Choose Mono for channels that are broadcasting in mono, or if you are
having difficulty receiving a stereo signal.
Choose SAP to listen to the Separate Audio Program, which is usually a
foreign language translation.
You can also change the MTS setting by pressing the "MTS" button on the remote
control. (When you change channels, MTS is set to "Stereo" automatically.
To listen in SAP' or Mono,' change the MTS setting.)
4.5 ( }l,\l'l I i ()(11 SIqCIAI _}Alkll]S
SPECIAL FEATURES ]
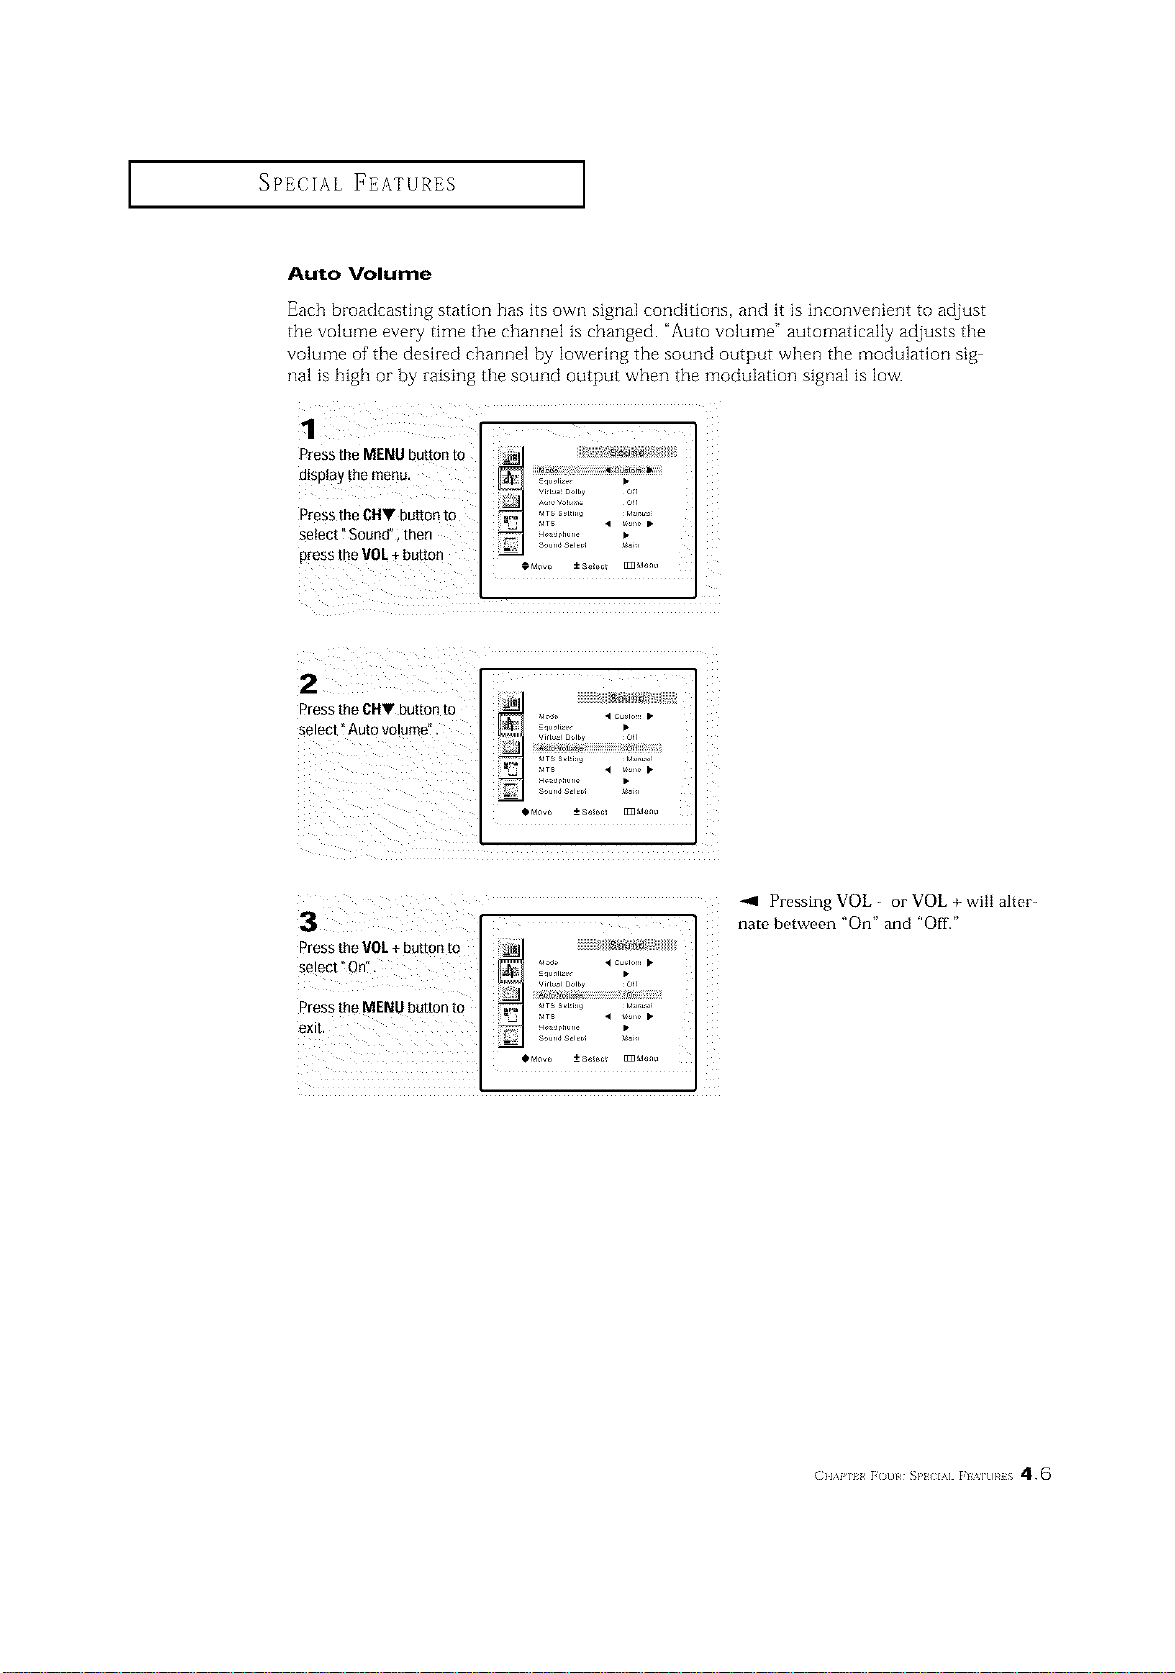
Auto Volume
Each broadeasthlg station has its own signal eondRions, and it is inconvenient to adjust
the volume every time the channel is changed. "Auto volume" automatically adjusts the
volume of the desired channel by lowering the sound output when the modulation sig
hal is high or by raising the sound output when the modulation signal is low.
Pressthe MENU button to
display [he menu, _ SqUaliz
Press the CHV button to '£i [ _'°D_JI'by _i[[
,_ VTS S,Hn_ tla, _r
Setect i Sound";then __£"2_',, L,
Pressthe V°L + butt°n * ..... ±s..... _ ......
2 Li L¸F
Press the CHV button to
select" Auto vo!ume".
i
vir[_ DQIby 01[
s°ur'_ S_l_ _,
I_Move ± 8a_e¢l []]] Manu
Press the V0/+ button to
...... vm_l Domy oJr
Press the MENU button to _._. _T__..i,,_ ._,_
VTS • _o,, •
-_ Pressing VOL - or VOL + will alter-
nate between "On" and "Off."
(}l,\p iI }(3ill SP} IA] }I%]tlRiS 4.6
SPECIAL FEATURES ]
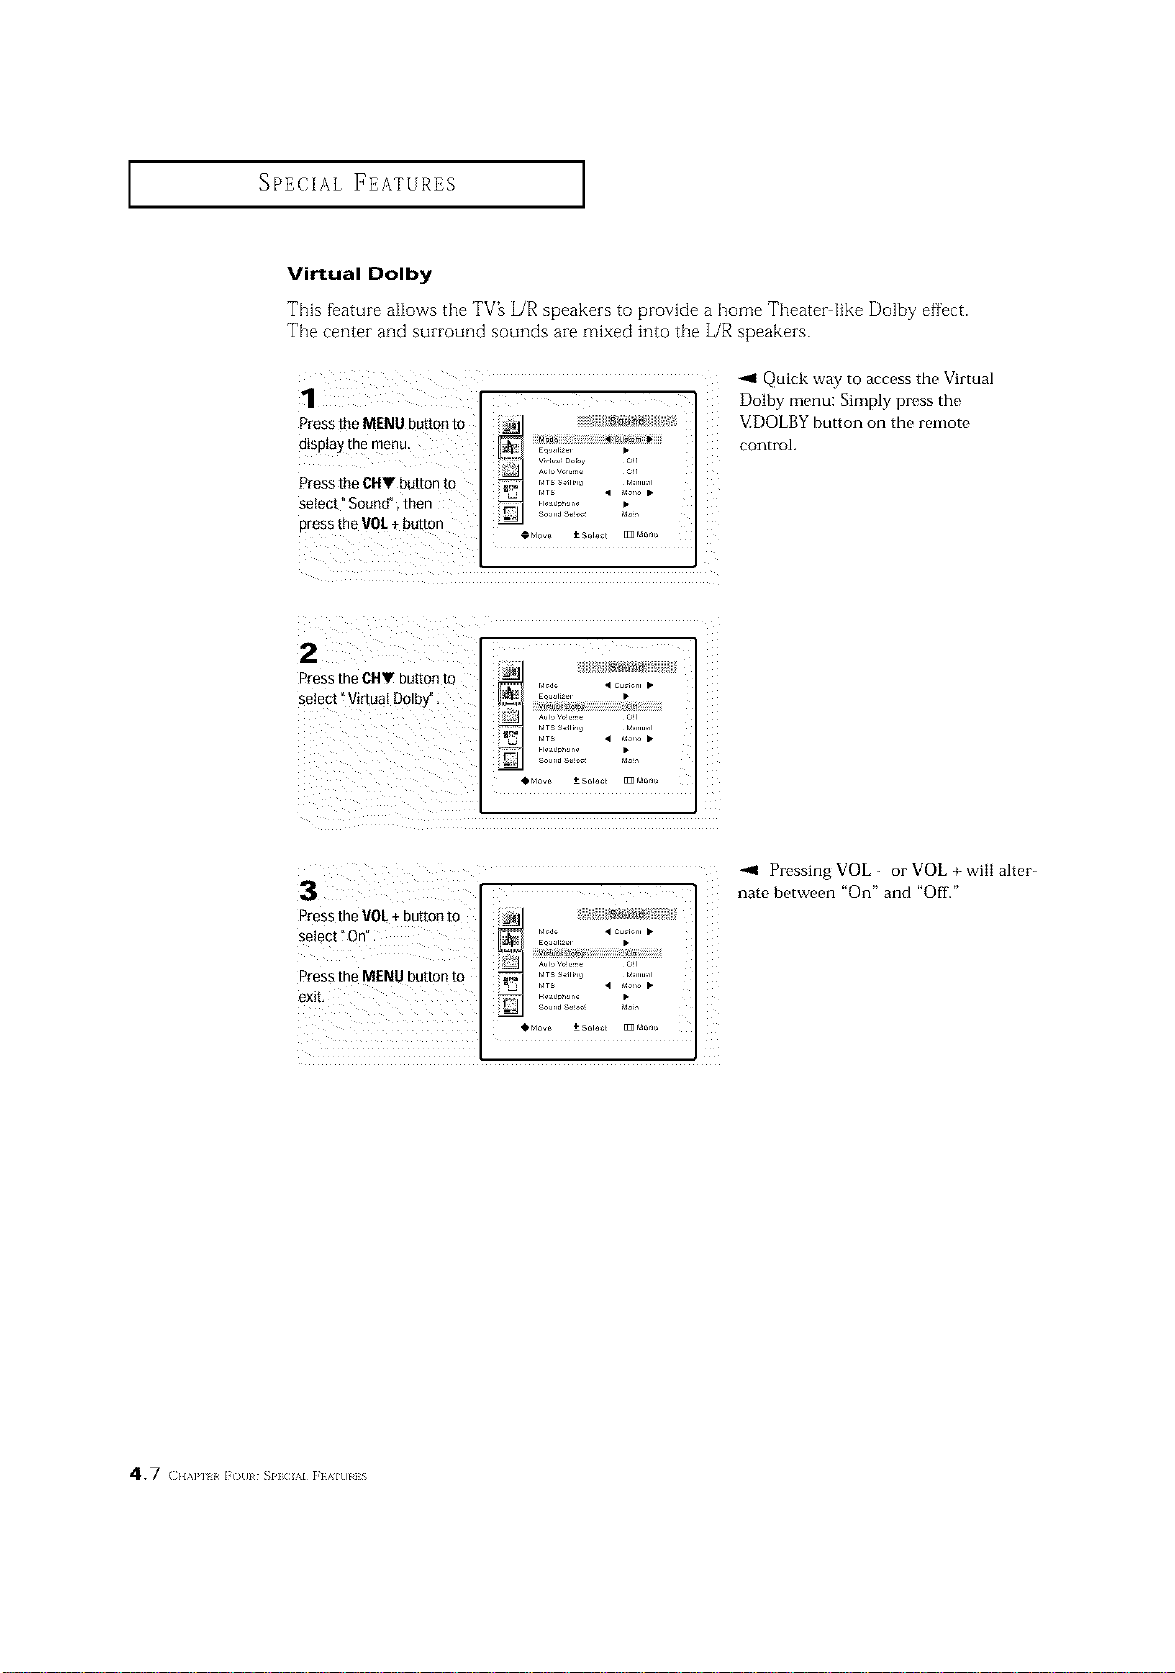
Virtual Dolby
This feature allows the TV_ L/R speakers to provide a home Theater like Dolby effect.
The center and surround sounds are mixed into the L/R speakers.
1
Press the MENU buuon m
o{sp{ay [Be meRLI
Press the CUV bmmr to
select" Sound'. then
Dress the VOt+ Du[mn
EO 12_ •
F ,_,o,o, •
Z
-,11Quick way to access the Virtual
Dolby menu: Simply press the
9:DOLBY button on the remote
control.
I
Press the CUr butto_ ro
select "VirtuaI Dolb,/
,0° i:i{_.....
• b.,o I*
, ,_,o,o,
OM_ t-Soa EI
Press the VOL+ button to _1 _i
Press the MENU button to _ [[:_ { _ ....... ' Mt_;:r_tlI;
exit, ...........
Pressing VOL- or VOL+ will alter-
nate between "On" and "Off."
47 {H,,H, It)HI SI']CIAIF}AIUI]S
I SPECIAL FEATURES I
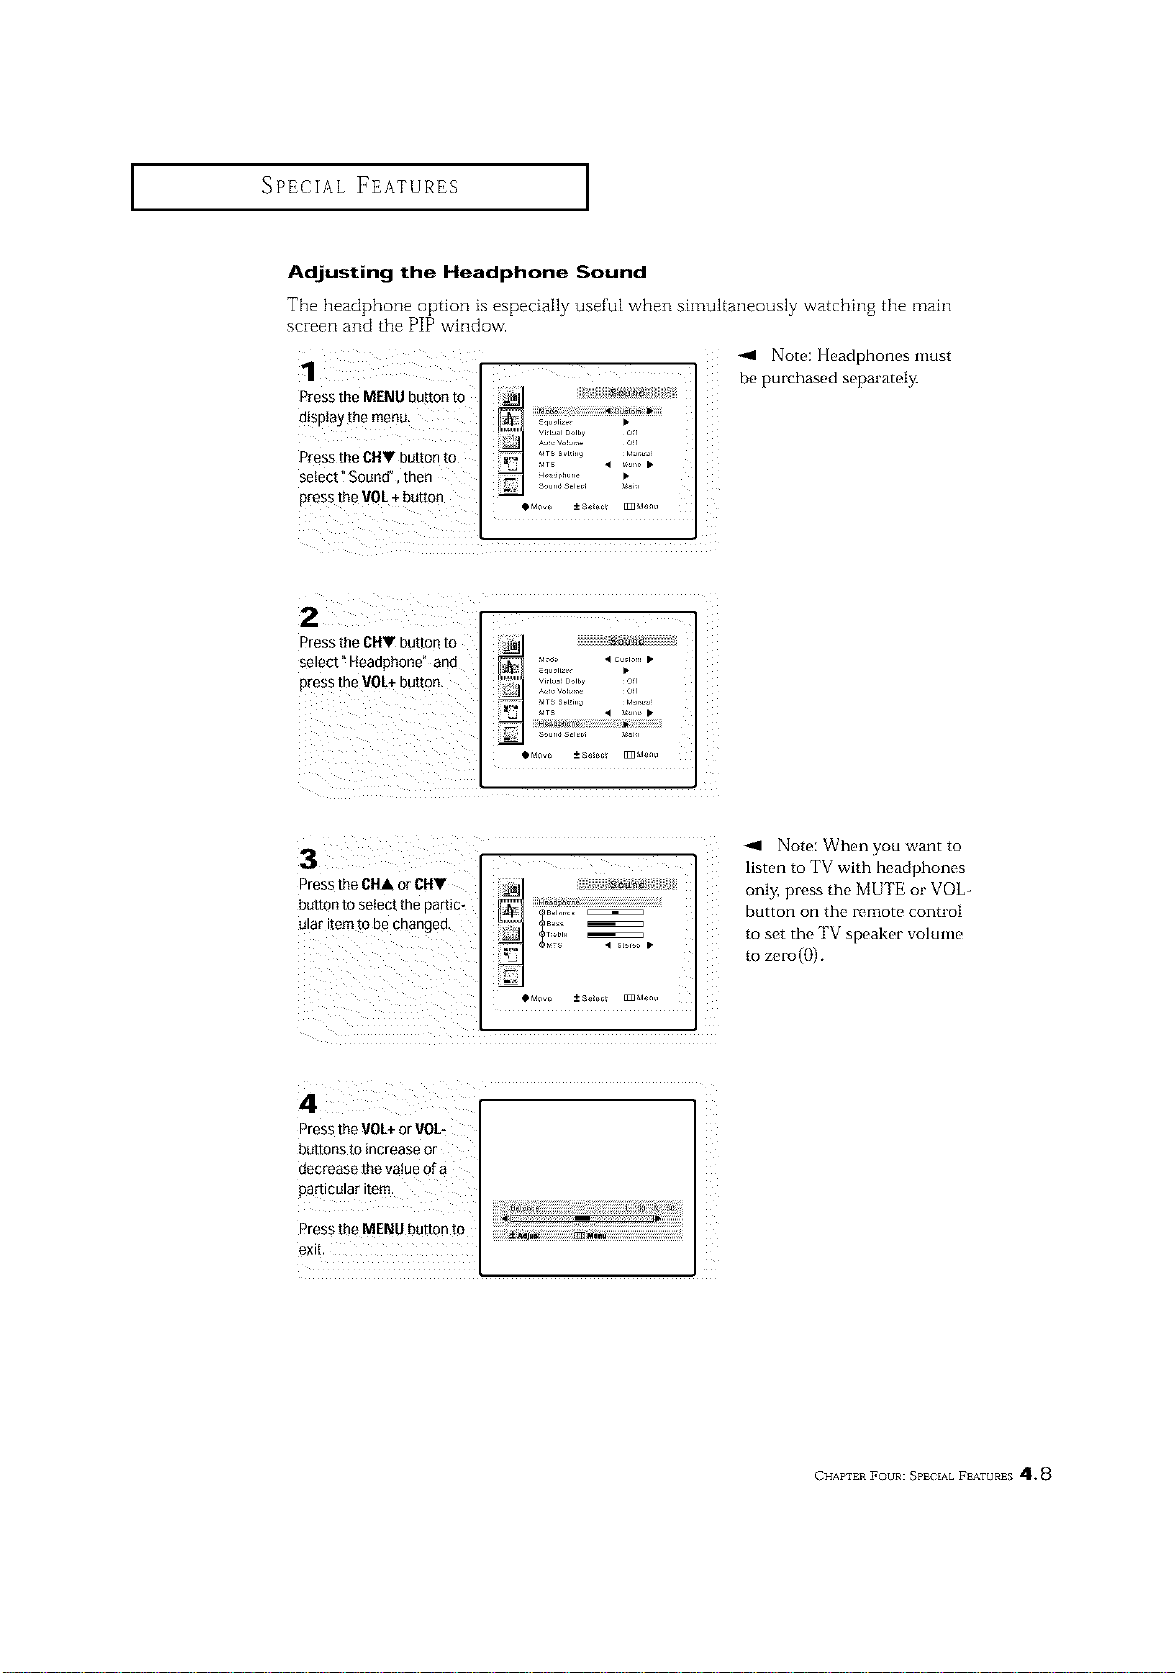
AdJusting the Headphone Sound
The headphone option is especially useful when simultaneously watching the main
screen and the PIP window.
1
Pressthe MENU button to
d!splay the menu_
Pressthe CHT button to
select ?Sound", then
Pressthe VOL+ button
e,l,,_liz_, •
Vi_tu_lDolby o_r
-,11 Note: l[eadphones must
be purchased separately,
2
Pressthe 6HV button to
select" Headphone" and
press tbe VOL+button.
vo_ • c_ io,,, •
_qu_liz •
Vir [u_l Dolby Off
_Movo _ aoI6_l [m Mortal
-_ Note: When you want to
listen to TV with headphones
only, press the MUTE or VOL-
button on the remote control
to set the TV speaker volume
to zero(()).
4
Pressthe VOL+or VOL-
buttons to increase or
decrease the value of a
particular item.
Press the MENU button to
exit.
CHAPTER FOUR: SPECXAL FEATURES 4"* 8
SPECIAL FEATURES ]
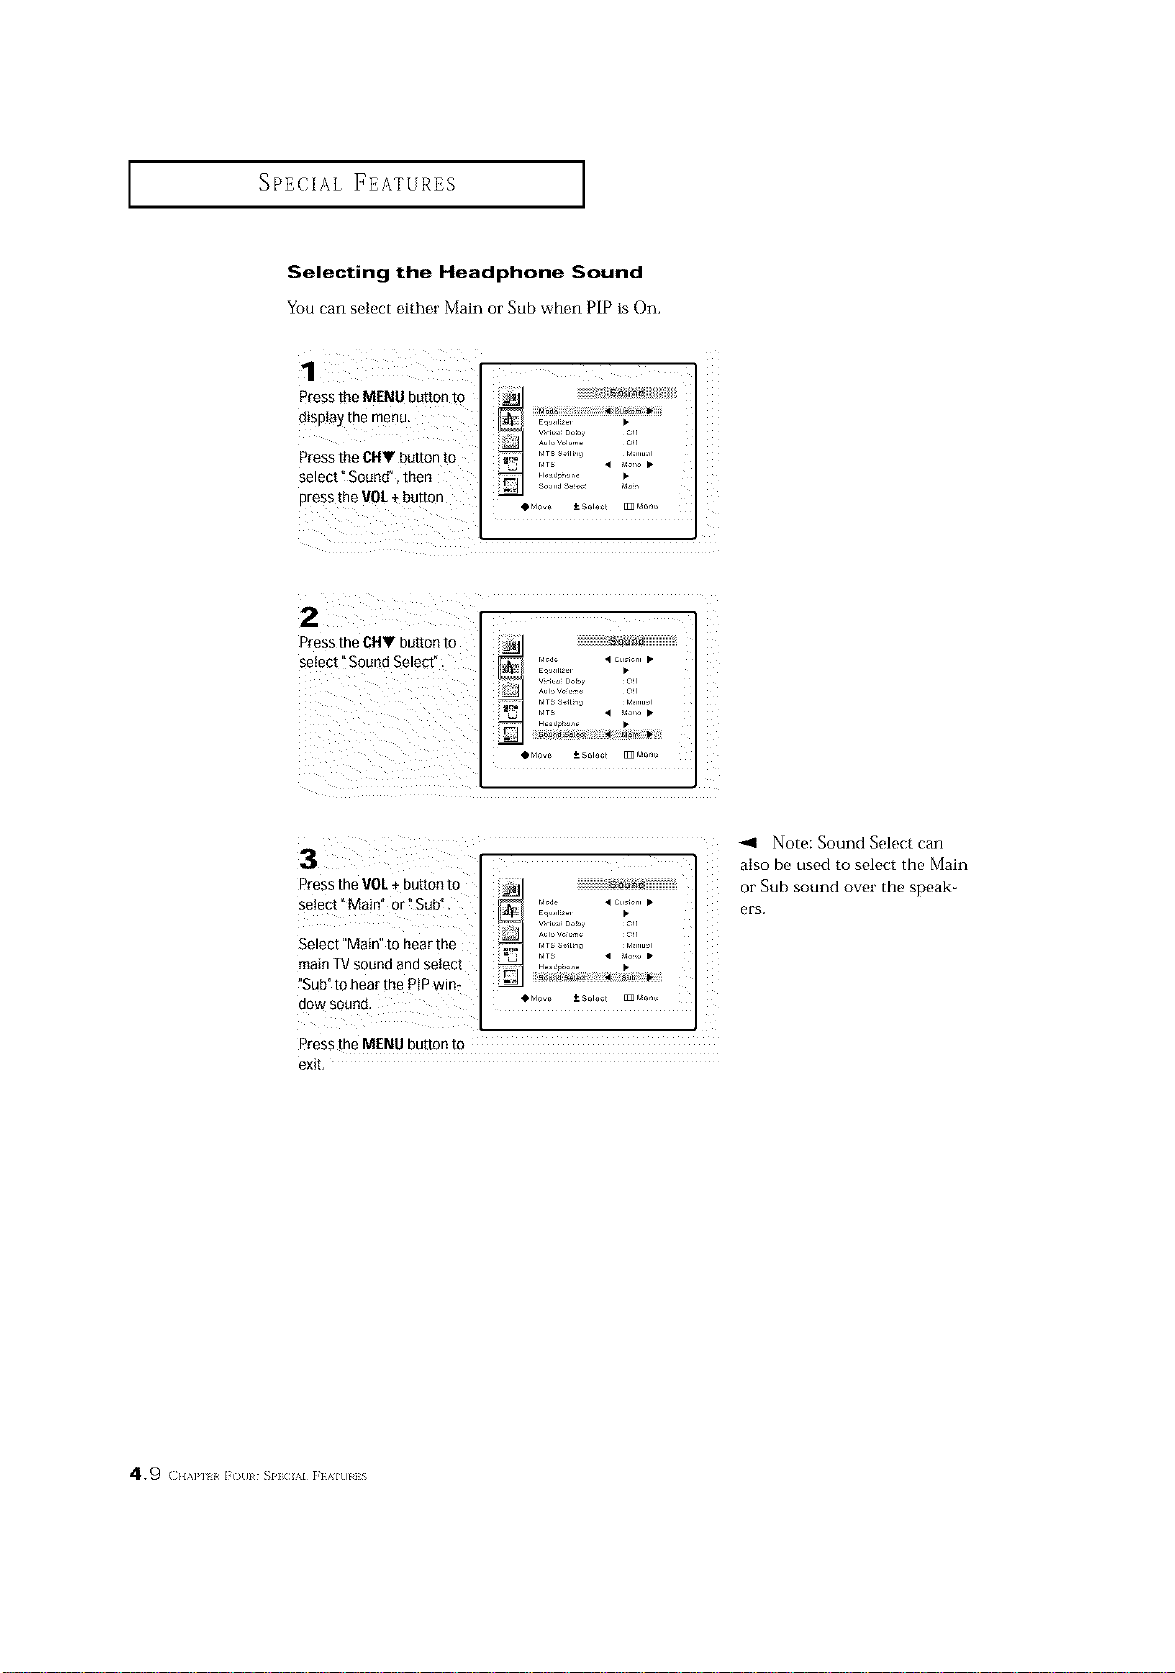
Selecting the Headphone Sound
You can select either Main or Sub when PIP is On.
Press the MENU button to _ _is _1
diSplaythe menu _I ........ •
Press the CItY button to _ln_ ,.,TS__,i,,_ ,_,r,,,,,
press the VOL+ button oM_ ±so,o_t _Moo_
2
Press the CItV button to
select Sound Select ". _ '_'_ • °";'°" •
....................
OMO_e *- Selast ff_ Meau
3
Press the VOL+ button to
select "Main _ or ?Sub".
Select "Main" to hear the
main TVsound and select
fSub"to hear the P!Pwire
dow sound
_ iiiiiiiiiiiiiiiiiifiii_i__@/iiiiiiiiiiiiiiiii_5
Em'_'"2_' • i
MTS • MO, O •
Press the MENU button to
exit,
_1 Note: Sound Select can
also be used to select the Main
or Sub sound over the speak_
ers.
49 C.,,H, l(_[ll SI'I;CIAI FIAIUIiS
SPECIAL FEATURES ]
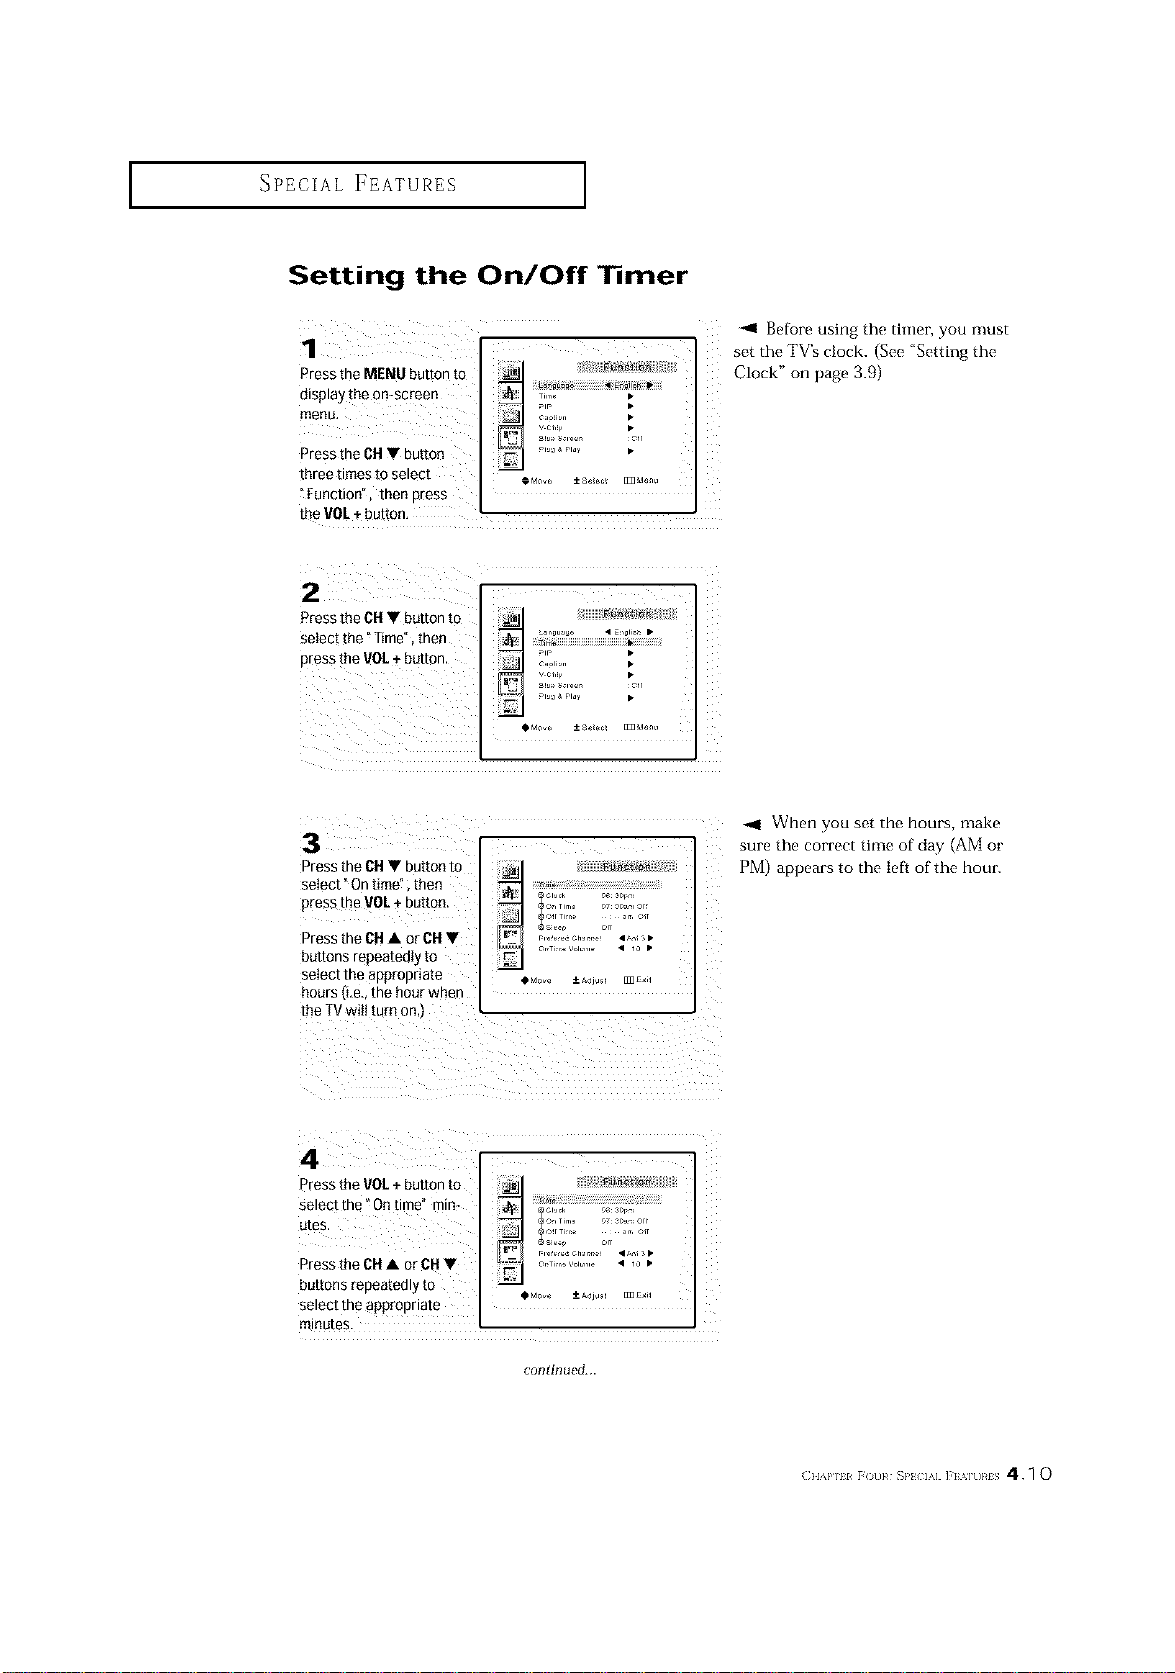
Setting the On/Off Timer
¸1¸¸¸¸¸¸
Press the MENU button to _ ;_"';_F f_
!i
display the on-screen _ Ti .... •
_lp •
menu. _ C IO i_rl
Press the CHV button ........... •
threetimestoselect ,_..o ±so_ _oo. :
?[unction", thee press ]
the VOL+ button.
-ql Before using the timer you must
set the TV's clock. (See "Setting the
Clock" on page 3.{))
2¸¸¸¸¸¸ _
Press the CH. button tO J_l
selectt.e"r,me",then
•..... _+...........
t
3
Cressthe CH• buttonto
select" On time", men
oress the VOL+ butto_.
Press the CH• or CH•
buttons repeatedly to
select me aDeroBriate
hours ILe., me hour wnen
the TVwill turn on.t
rlo_ k 06 _or,-=
_r
r•m•_VoL • lo •
O_dO_ Z_OUS _£Xl
When you set the hours, make
sure the correct time of day (AM or
PM) appears to the ief_ of the hour.
4
°-ess the VOL+ button to
se_ecttne Ontime" min_
utes.
_ress the CH • or CH •
buttons repea[eoly [o
select me appropriate
"nltlutes.
re, o_ _or..
continued...
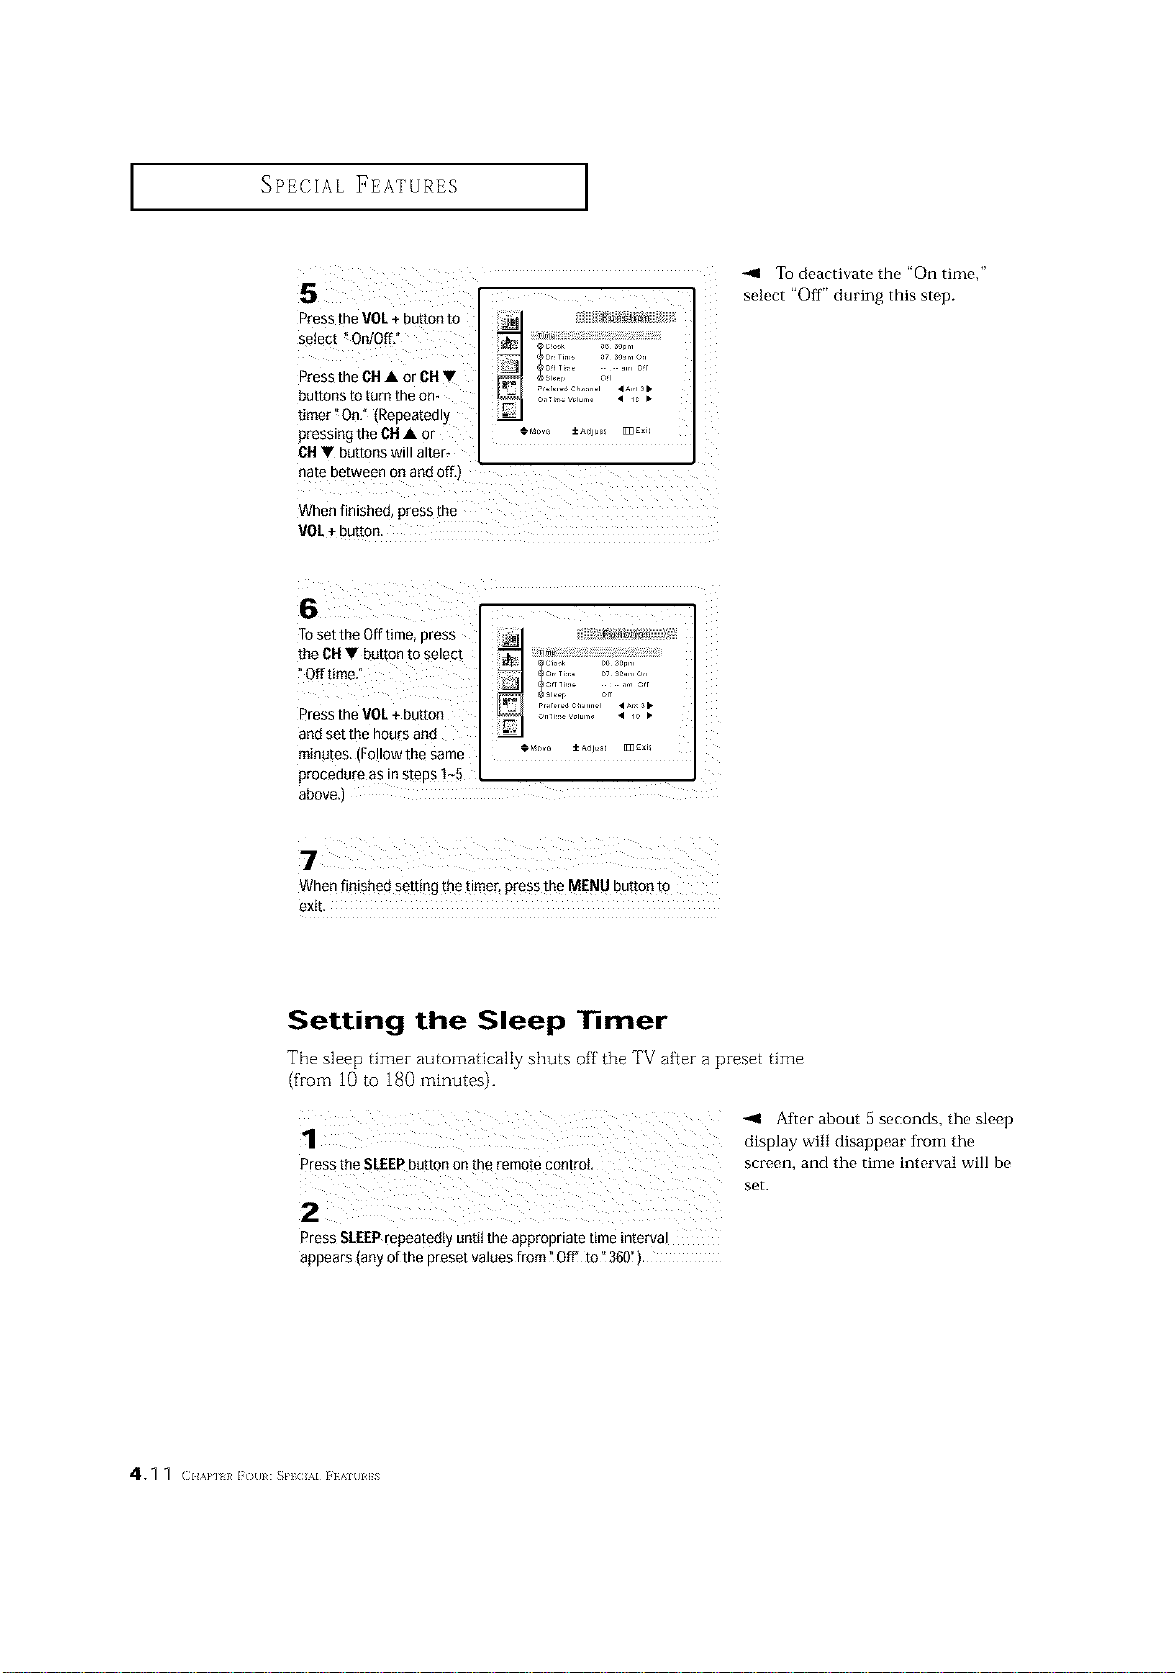
I SPECIAL FEATURES I
CHT buttons will alter,
hate between onand off,)
When finished, press the
VOL+buR0n:
-41 To deactivate the "On time,"
select "Off" during this step.
Toset the Off time, press
the CFIV button to select
"Offtime"
Press the VOL÷button
and set the hours and
minutes, (Followthe same
procedure as in steps 1-5
:ir Ti[i _ 07 30 iiyi O[i
CN0v_ ± Adju_ _I]gxi_
above,)
When finished sett!ng thetimer, press the MENU button tO
exit.
Setting the Sleep ] mer
The sleep timer automatically shuts off tile TV after a preset time
(from i0to 180minutes).
-41 After about a seconds, the sleep
display will disappear from the
press the SLEEPbutton on the remote control screen, and the time interval will be
set.
Press SLEEPrepeatedly until the appropriate time interval
appears (anyof the preset values from _O_ to_360").
4.q q <{,,,,,{,,i /){ll: _PICAI i }{AI{II]S
SPECIAL FEATURES ]
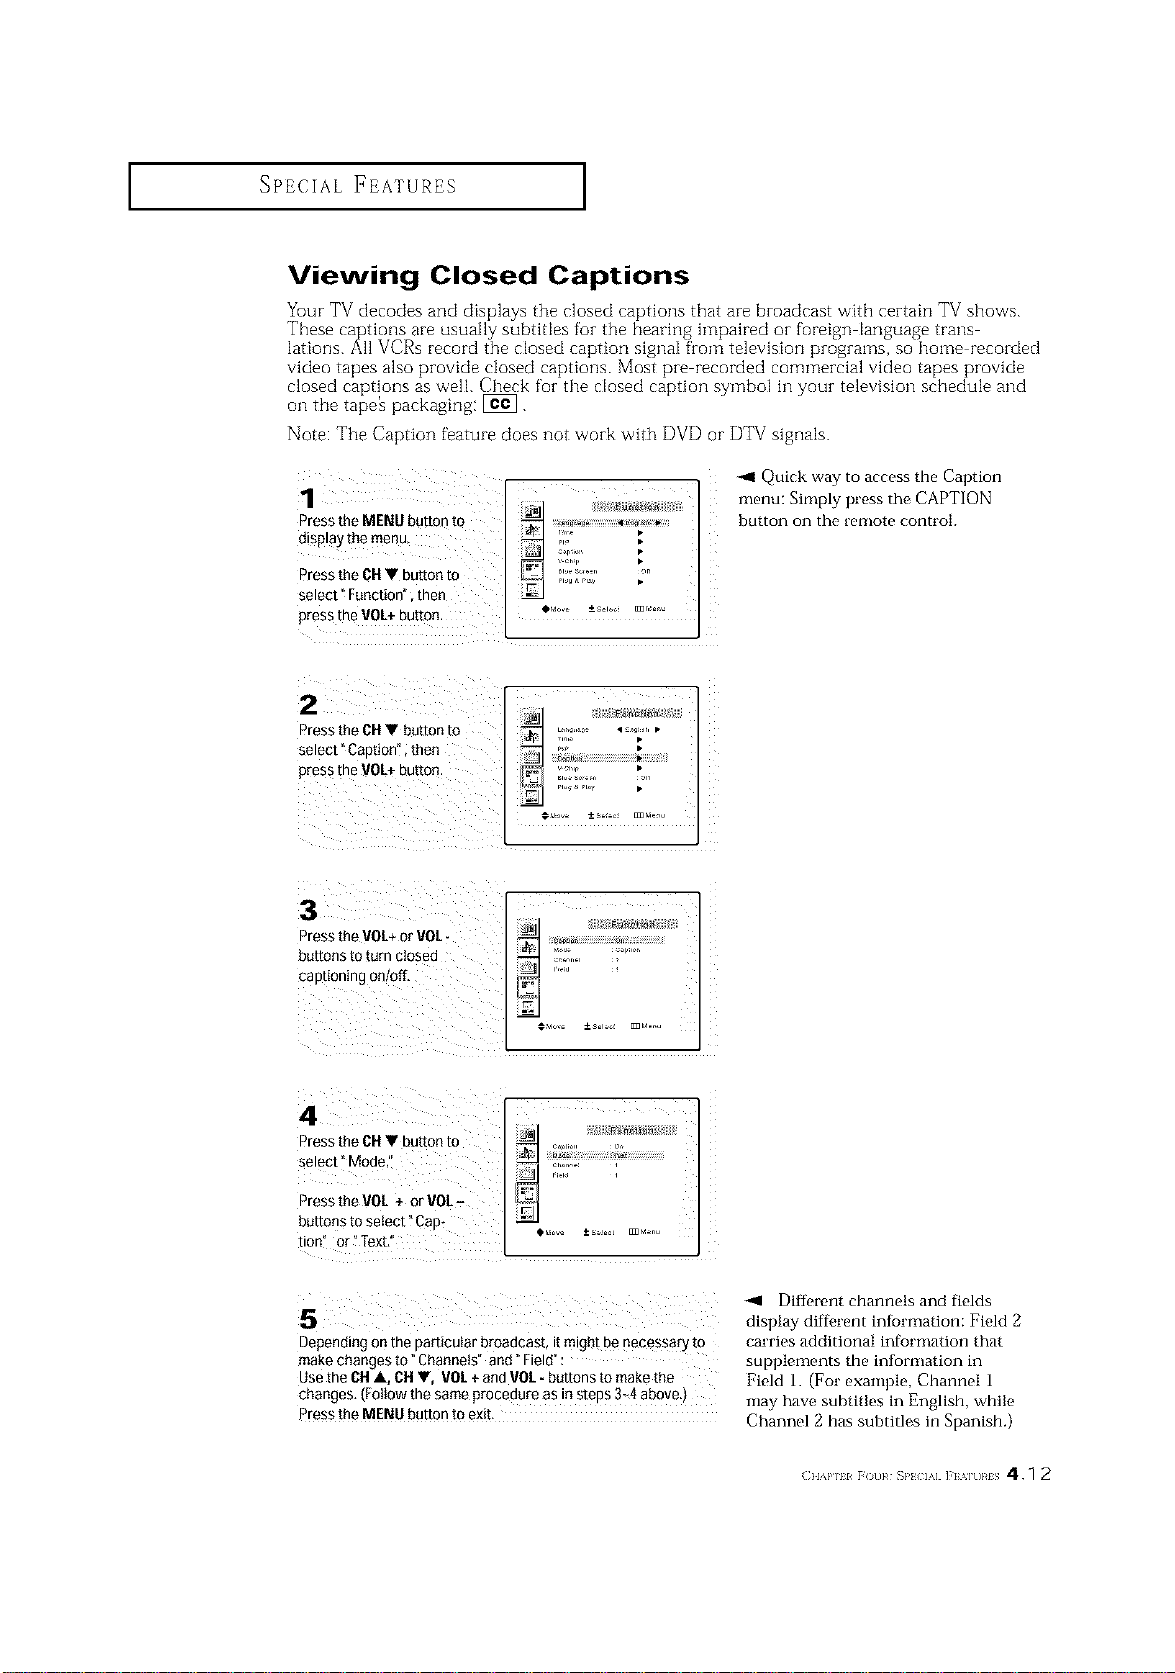
Viewing Closed Captions
Yuur TV decodes and displays the closed captions that are broadcast with certain TV shows.
These captions are usually subtitles for the bearing h]lpaired oi- foreign language trails
lations. All VCRs record the closed caption signal from television programs, so home recorded
video tapes also provide closed captions. Most pre recorded commercial video tapes provide
closed captions as well. Check for the closed caption symbol hi your television schedule and
oil the tape_ packaging: [_.
Note: The Caption feature does not work with DVD or DTV signals.
Press the MENU button to
display the menu
Press the OH• button to
select" Function" then
press the VOL+button, ._o,o ±_, _,_,_
-.,11Quick way to access the Caption
menu: Simply press the CAPTION
button on the remote control.
2
Press the DH • bd[rort [o
select _ Caouon . [net"
Dress the VOL+ DU[[O_
3
Press the VOI+ or VOI.-
auttons to turn ctosea
captioning onloff.
tion" or?Text/'
-<1 Different channels and fields
display diffh.rent intbrmation: Field 2
Depending on the particular broadcast, it might benecessary to carries additional information that
make changes to _Channels" and" Field": supplements the information in
Use the OHA, 011•, VOI + andVOI - buttons to makethe Field i. (For example, Channel i
changes. (Follow the same procedure as in steps 3_4 above,)
may have subtitles in English, while
Press the MENU button to exib Channel 2 has subtitles in Spanish.)
( }lAP 11 [ ot]}¢ S}'_ IA] ]'E'_]t]}¢I S 4.1 2
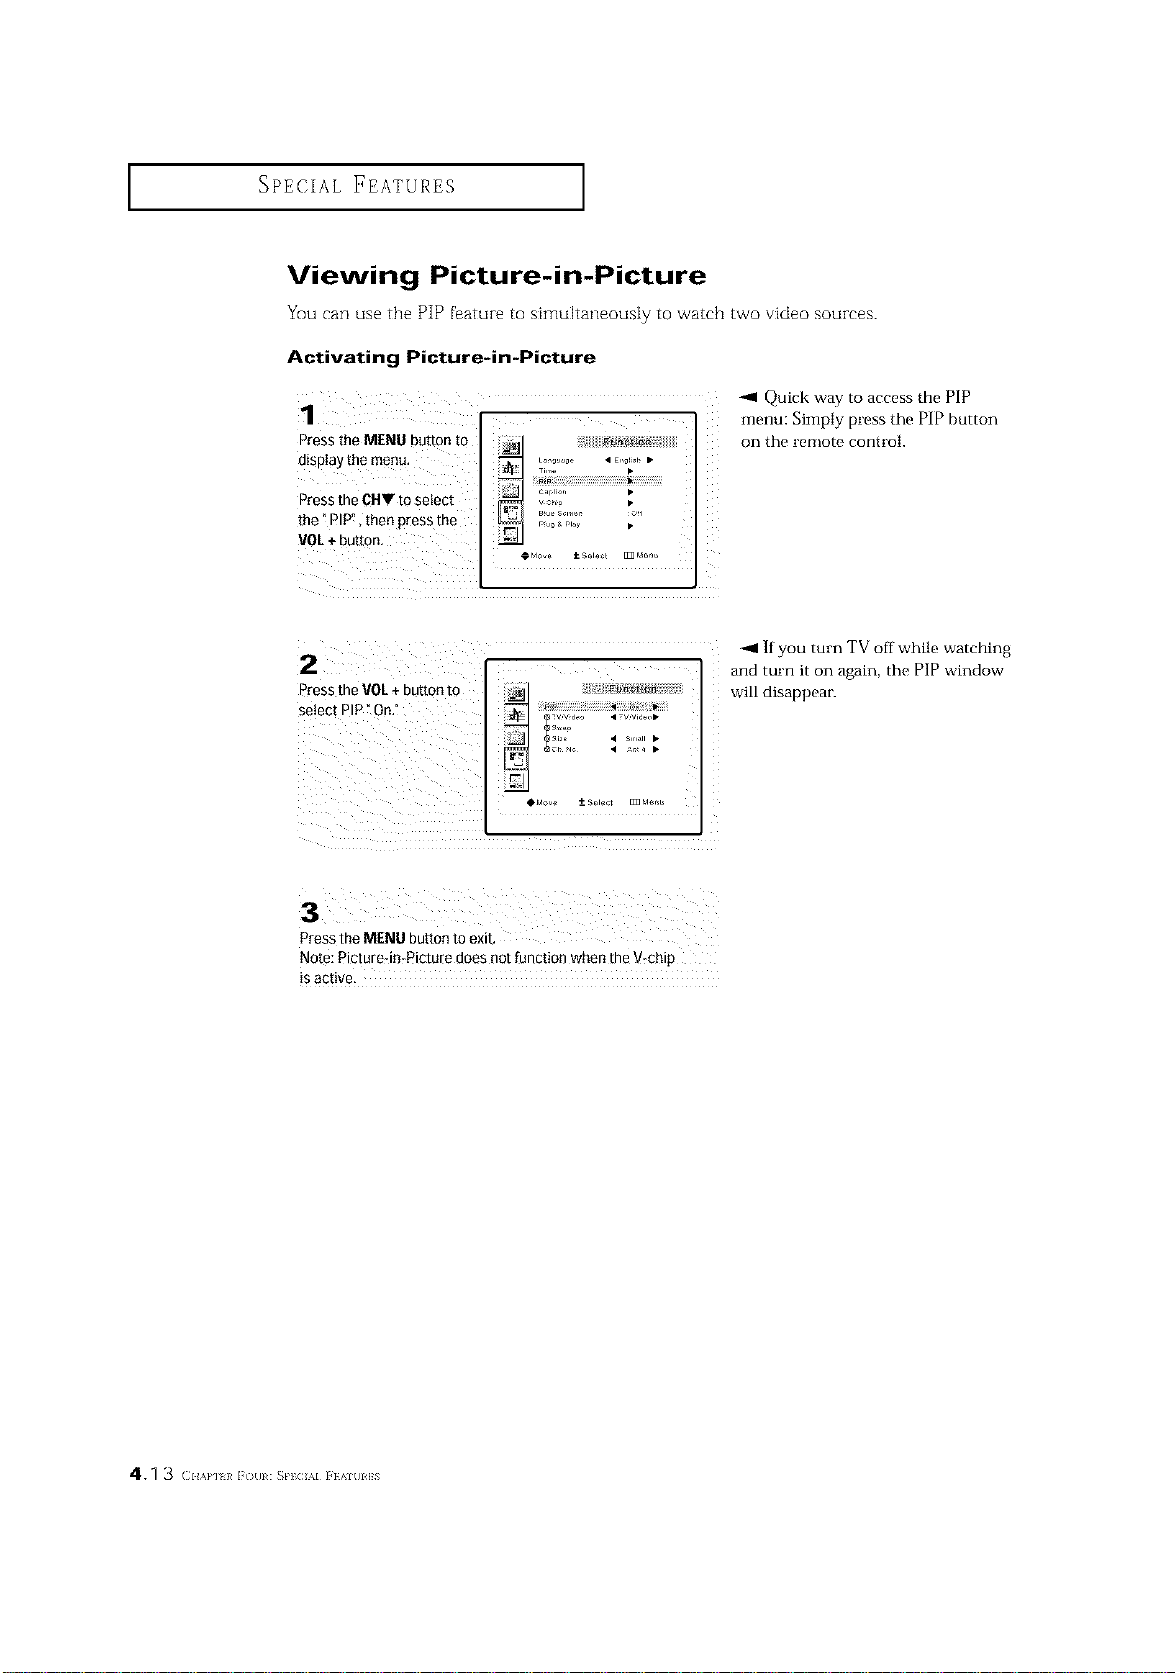
SPECIAL FEATURES ]
Viewing Picture-in-Picture
You can use the PIP feature to simultaneously to watch two video sources.
Activating Picture-in-Picture
Press the MENU button to _ _o_,,., • E_:, •
display the menu' ......
Press the CHT to select _2g %,,
the" PW', then press the ......... •
90L ÷button,
-_1 Quick way to access the PIP
menu: Simply press the PIP button
on the remote control.
-.11If you turn TV off while watching
and turn it on again, the PIP window
will disappear.
Note: Picture4nrPictu{e does not _unction whenthe V:chip
isactive,
4.1 3 (:1_,,,.,_i (/Ill : _PIC AI i }AIIII]S
SPECIAL FEATURES ]
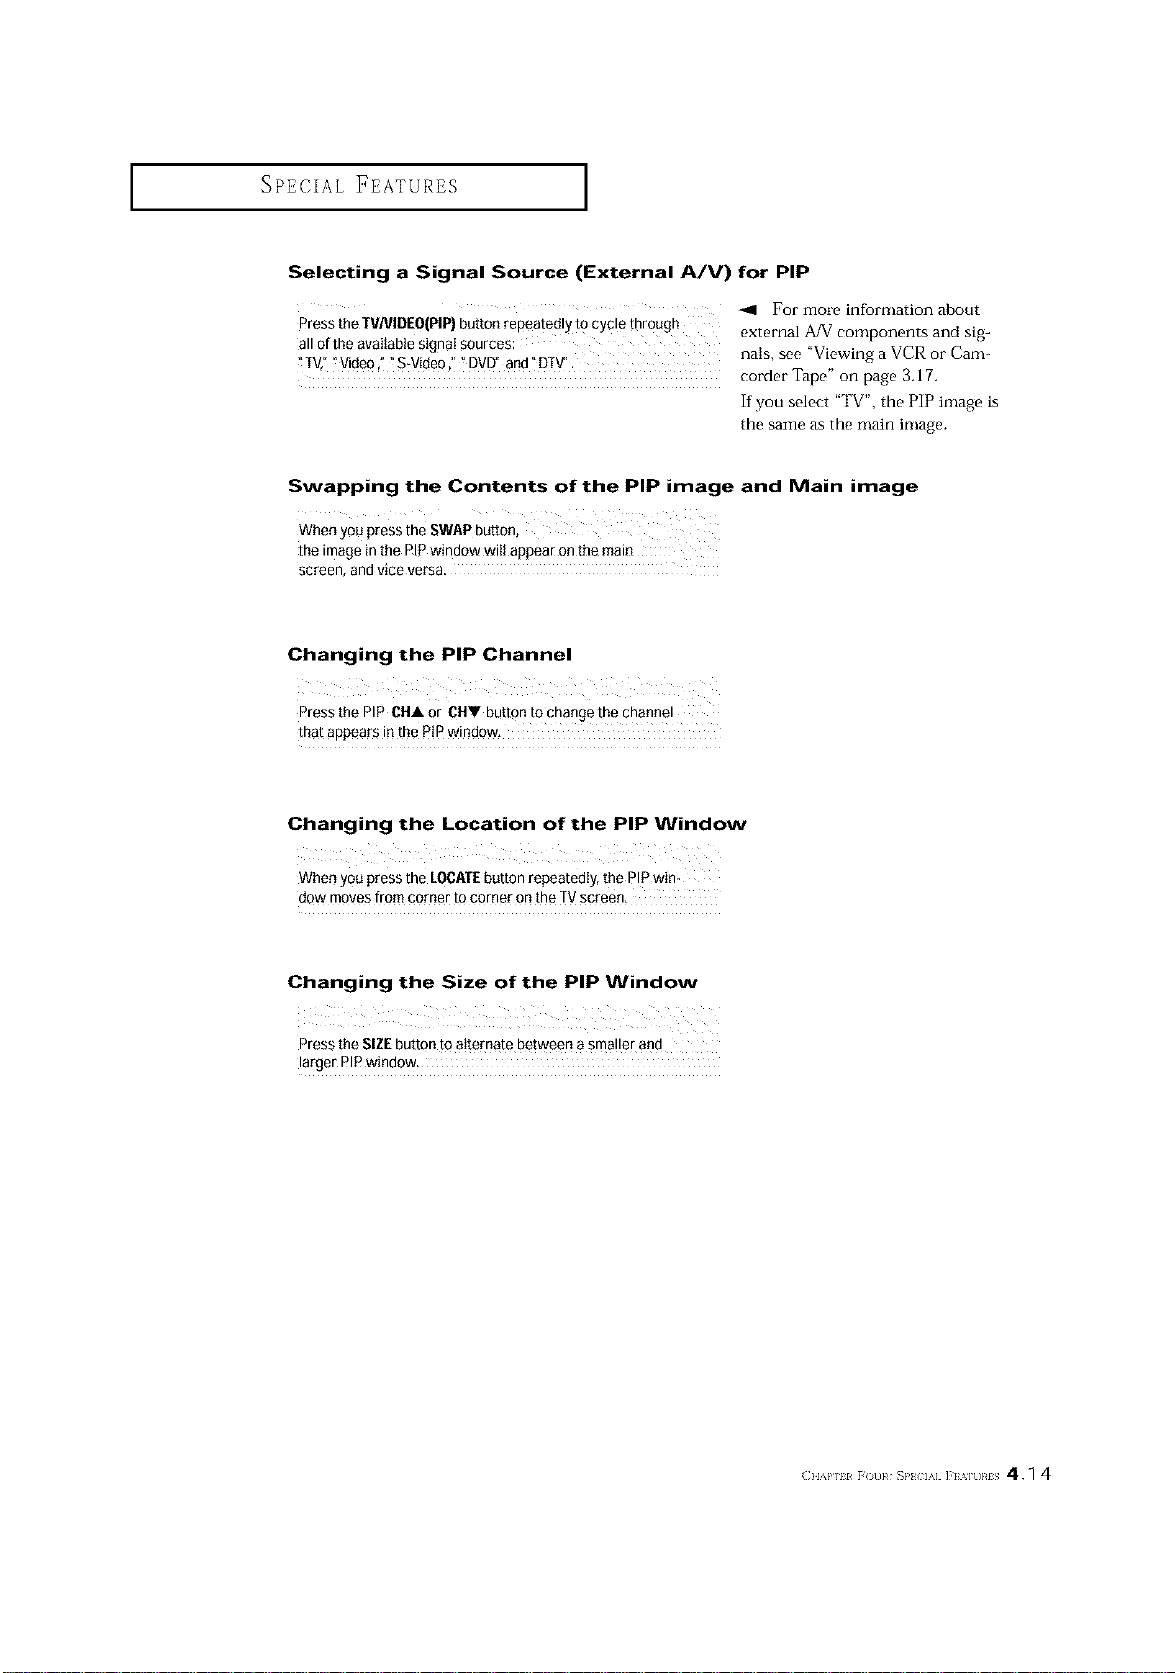
Selecting a Signal Source (External A/V) for PIP
For more information about
Press the TVNIDE0(PIP) button repeatedly tg cycle through external A/V components and sig-
all of the available signaI sources: nals, see "Viewing a VCR or Cam-
TV,"_Video ," "S-Video," " DVE7'and"DIV'. corder Tape" on page 3.17.
If you select "TV', the PIP image is
the same as the main image.
Swapping the Contents of the PiP image and Main image
When you press the SWAPbutton,
the image in the PiP window wilt appear on the main
screen, and vice versa.
Changing the PiP Channel
Press the PiP CHA or CHV button to change the channel
that appears in the PtP window,
Changing the Location of the PIP Window
When you press the LOCATEbutton repeatedly, the PIPwin:
dow moves from comer to corner onthe TVscreen,
Changing the Size of the PiP Window
Press the SiZE button to alternate between a smaller and
larger PIP window.
( }lAP 11 F()u}¢ _P} IA] ]'E%]U}¢IS 4.1 4
SPECIAL FEATURES ]
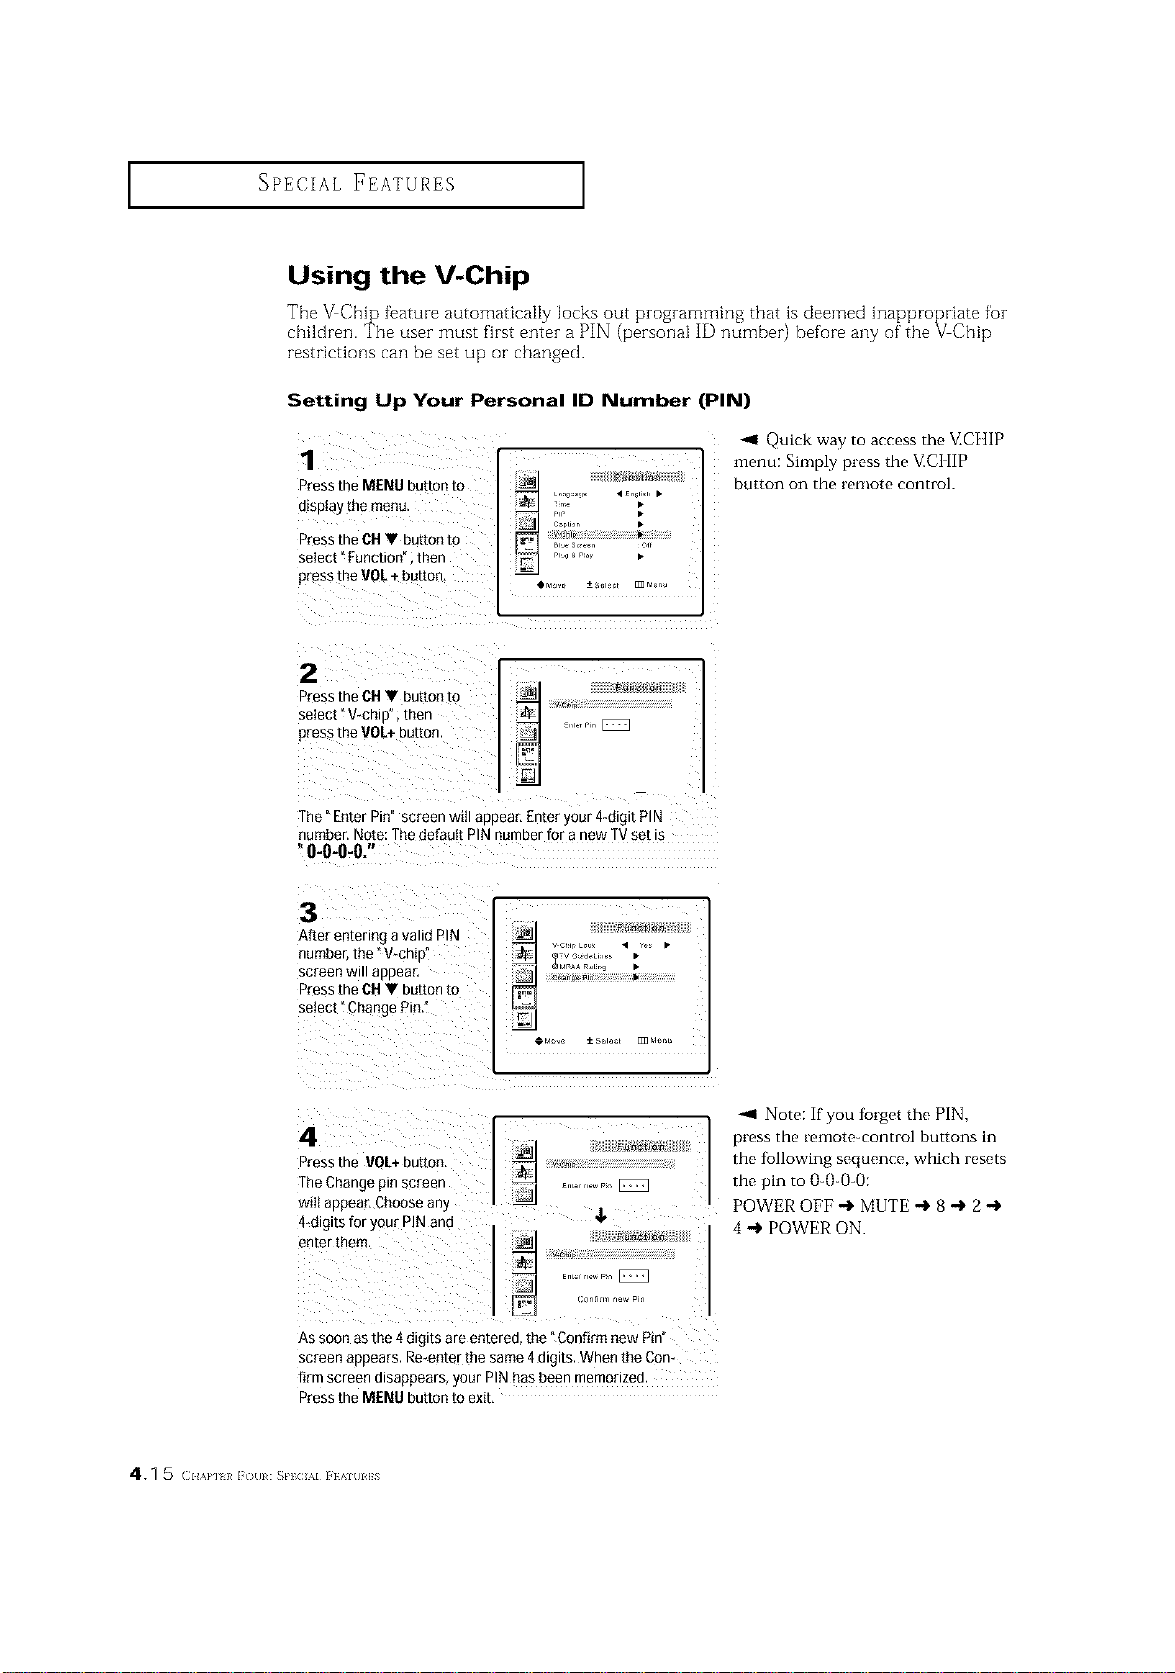
Using the V-Chip
The _Chip feature automaticaRy locks out programming that is deemed inappropriate for
children. The user must first enter a PIN (personal ID number) before any of' the VChip
restrictions can be set up or changed.
Setting Up Your Personal ID Number (PIN)
1
Press tie MENU button to
otap=aythe menu.
Press the CU• button to
select" Function" then
press the VOL+ button,
r,r •
_1 Quick way to access the V.CHIP
menu: Simply press the V.C] tIP
button on the remote control.
2
Press the CU• button to
seIect" V-chin ,men
press the VOL+buEon
The"EnterPin"screenwill appear,Enteryour4-digitPIN
number.Note:ThedefaultPINnumberfor a newTVsetb
"0-0-0-0."
3
After en[enng a valid PIN
number the "V_chio"
screen Will aDDear,
Press the Cld• button to
seiec[ ]hange Pin,"
Eun_c_l_
M_A n_t,,g •
4
Press the VOL+button
The Changepin screer
wiIl auoear Choose any
4-digits for your PINand
eater them
Fur_otJ o_
As soon as the 4 digits are entered the "Conhrm new Pin
screen appears. Re_enter the same 4 digit. When the Con-
[irm screen olsappears, your PIN has been memorized
Press the MENU button to exit.
Note: if you tb_get the PIN,
press the remote-control buttons in
the tollowing sequence, which resets
the pin to 0-()-0-0:
POWER OFF -I, MUTE -,1, 8 -I, 2 -,1,
4 _ POWER ON.
4.1 5 c.,,H ,_i {/[11 : _PIC AI i }AIUI]S
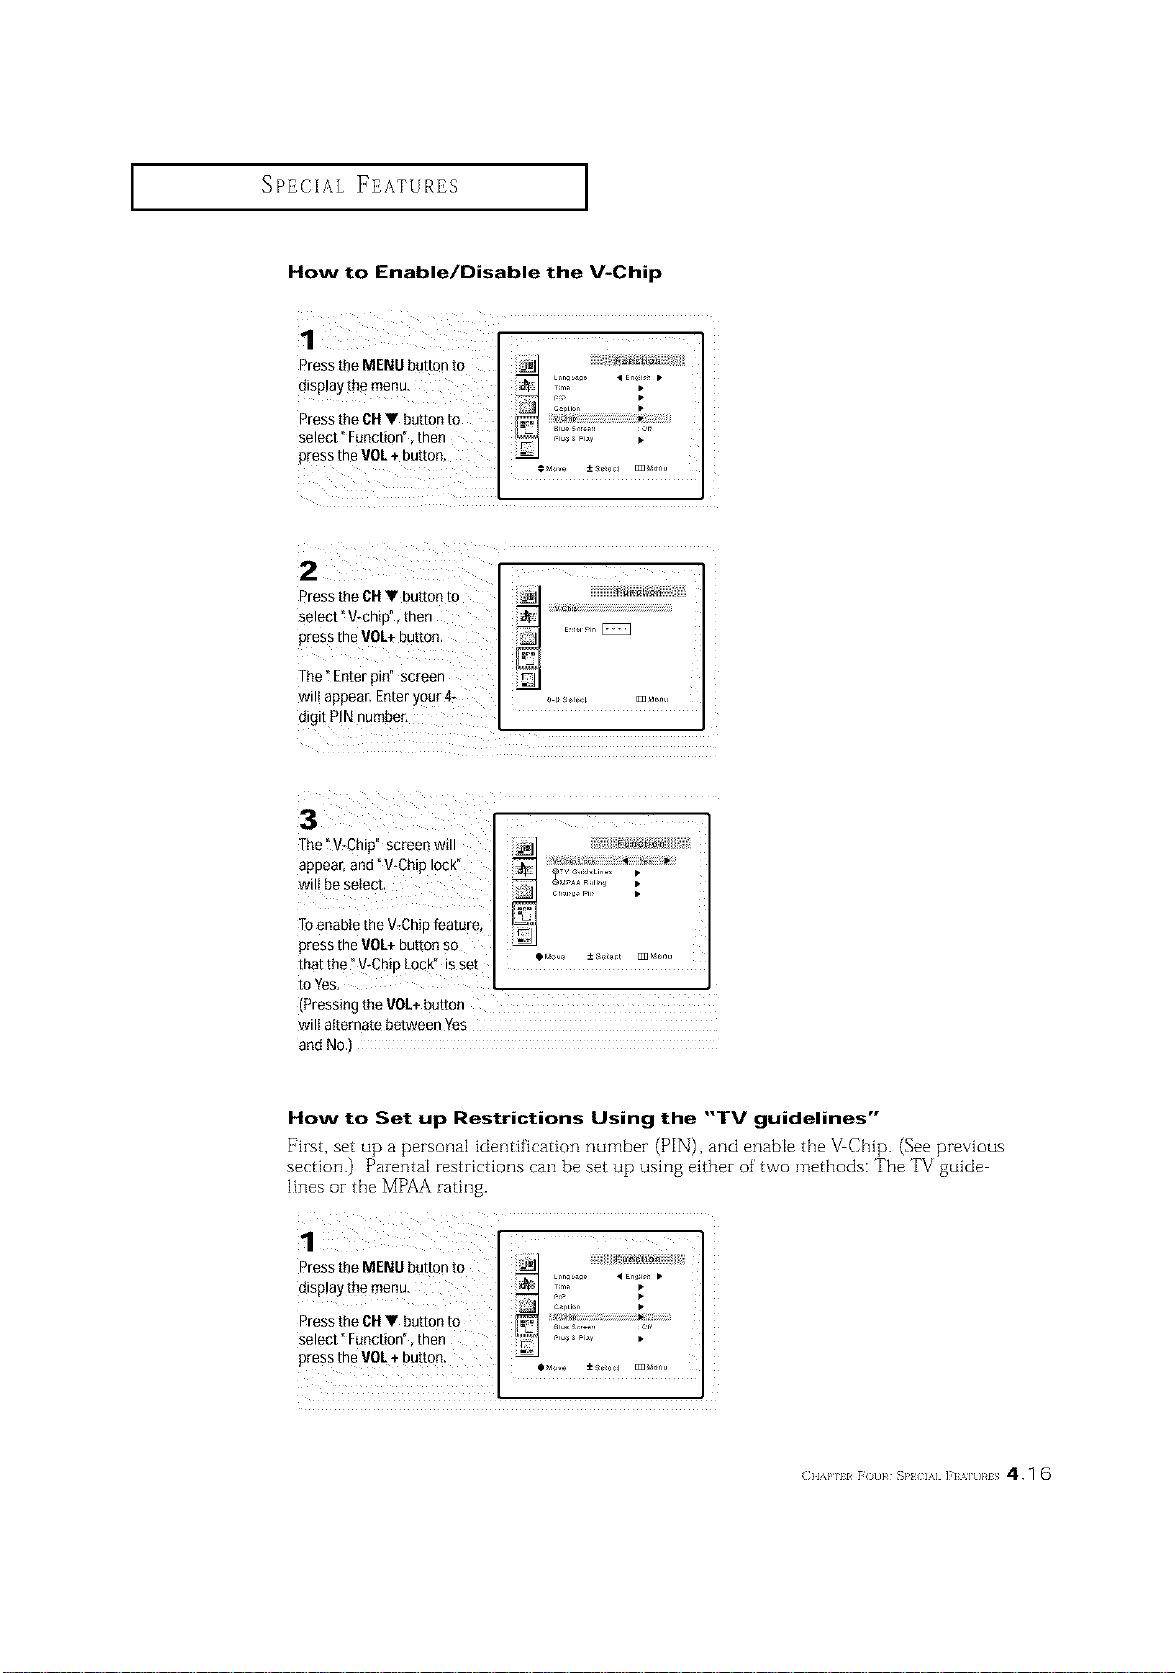
SPECIAL FEATURES I
How to Enable/Disable the V-Chip
Press the MENU button to
disPlaytbemenu
Pressthe CHV button to
select" Function", then
p_essthe VOL+ button,
....._ L_n b_g • En i_ •
ii ii i _ "
1 p
2 Z
Press the CHV button to
select" V-chip", then ....................................................................................
press the VOL÷button. .........[_
The" Enterpin" screen
wil!appear. Enter your 4_ __s_,_L _ ......
digit PINnumber,
The "V_Chip" screen will _1
appear,and "V-Chip lock"
Toenable the V_Chipfeature, _"1
press the VOL+button so _oMo,_ ±so_ _Moo,,
that the" V-Chip Lock" is set
to Yes,
(Pressing the VOL+button
wilt alternate between Yes
and NO.)
How to Set up Restrictions Using the "TV guidelines"
First, set up a personal identification number (PIN), and enable the V Chip. (See previous
section.) Parental restrictions can be set up using either of two methods: The TV guide
lines or the MPAA rating.
( }lAP 11 [( t}}_ _}'} if] ]'] %]t}}_IS 4.1 6
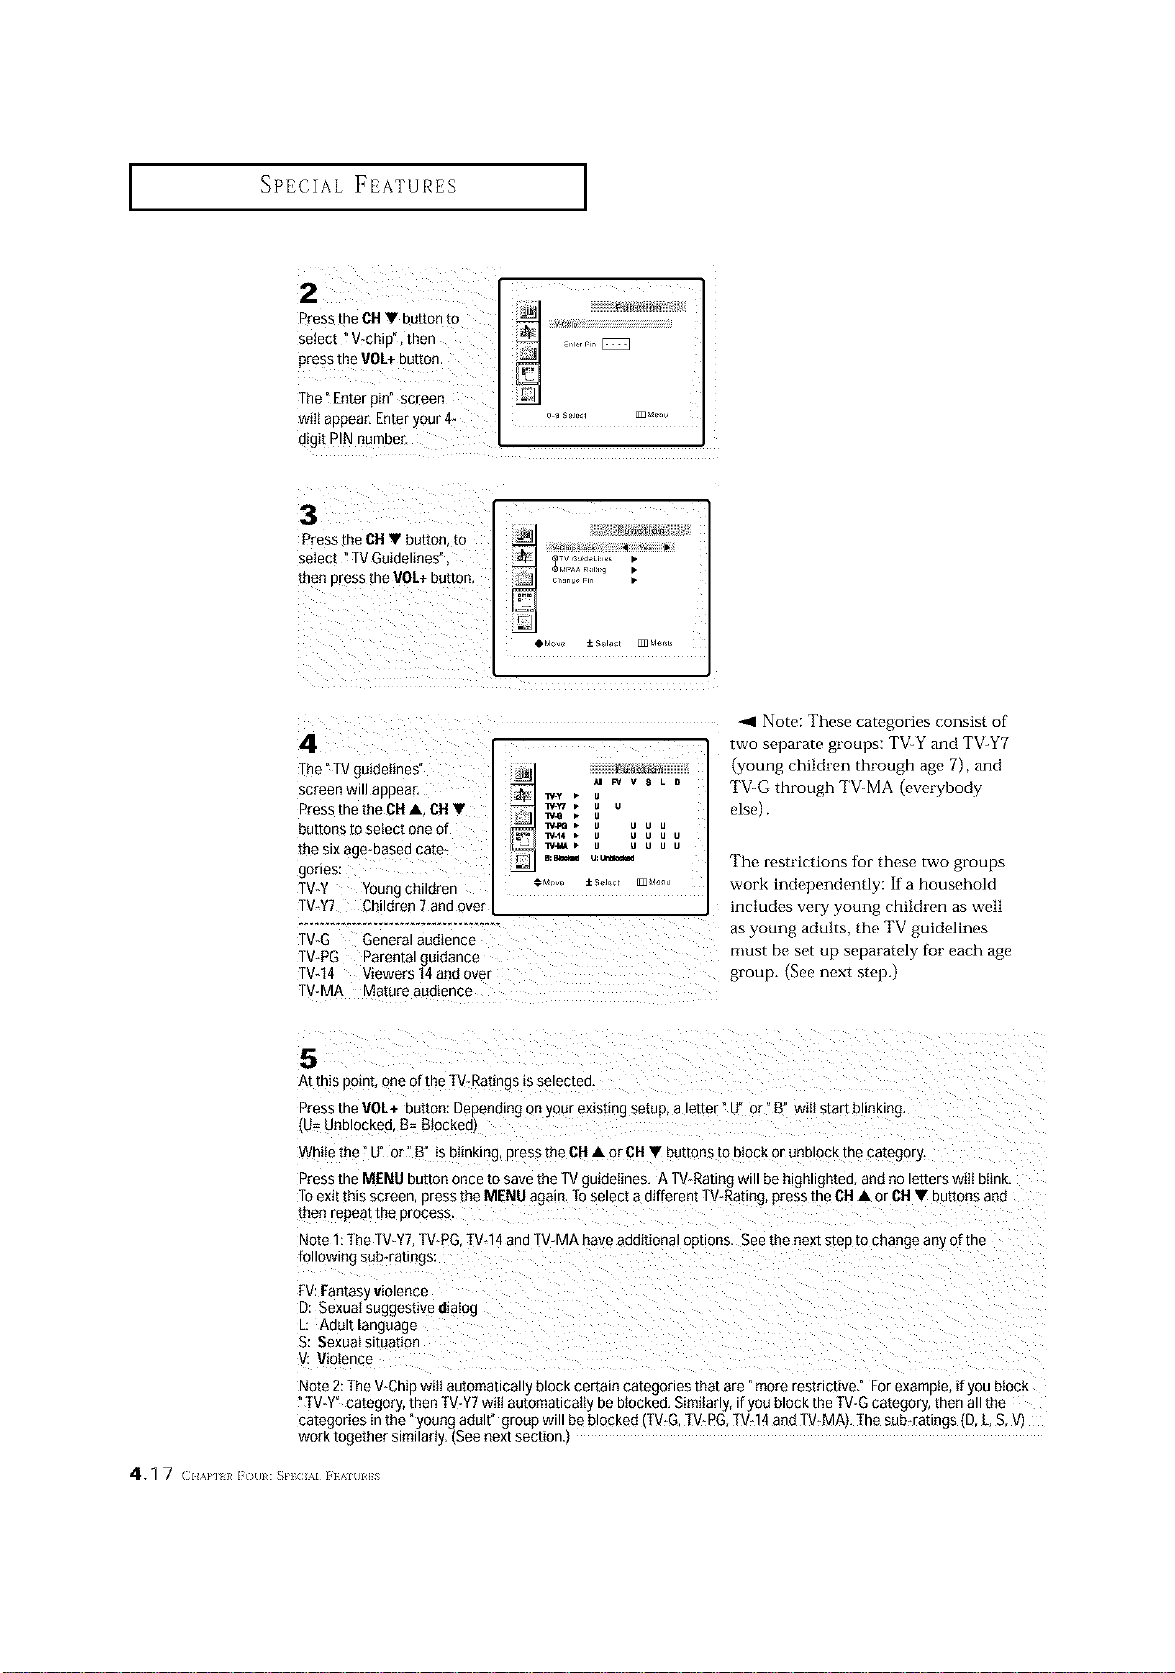
SPECIAL FEATURES ]
2
Press me CN • button m
select "V-oh D men
press the VOk+ DUttOn
The "Enter pin" screen
wili aeoear, Enteryour 4_
oNit PIN number.
..... [ZSZ3
3
Press theCN • butter [o
select "TV Guidelines"
LhenDressthe VOL+button
4
The"T guteetmes
screen Will appeal
Press the the(}N • CN •
DU[[OnSto select one of
the six age_Daseaca[e_
gorles:
TV-Y _oungchddrer
TV-¥7 Children 7 and eve{
TV-G General audience
TV-PG Parental gutaance
TV-14 Viewers 14andover
TV-MA Mature audience
_ v 8
1y-¥ •
• lv.w _ u
_• u u
_.t4 • u u
OM_ _ s_Jec E_dam
D
U
U
-_1 Note: These categories consist of
two separate groups: TV_Y and TV-Y7
tyoung children througn age 7) and
"['V_G through TV_MA evervbodv
elseL
The restrictions tur these two groups
work independently: If a household
includes very young children as well
as young adults, the TV guidelines
must De set up separatel) tar each age
group. See next step,
5
At this oom[. oneof the TV-Ratings _ssetectea
Press the VOL+ button: Depending onyour exist{ngsetup, a letter - U or °B" will start bl _ rig.
J= Unblocked. B=Blockedl
WN_e[Re u or _" i5 DilnKIng,p_essthe OH• or 61-1• buttons to D_OC_or UnDIOCKme category.
Press the MENU button once to savethe TVguidelines. A TV-Rating will be highlighteo, and no letters wiII bItnK.
Toexit mrs screen Dress the MENU again [o select a different TWRating press tn_ CN • or (}N• buttons and
[hen reoeat me process.
Note 1:The TV_YT.TV-PG.TV-14and TV-MA have additional opt ors. See the next steo to change an) of the
following sub-ratings:
FV:Fantas, violence
D: Sexual suggestive dialog
L: Adultlar ]uage
S: Sexualsituauon
. Violence
Note 2:The V-Chic wttt automanca • block certain categories that are "more restrictive." For example, if you aloc_
" IV-Y category, men TV-Y7wilI automatlcattx beblocked. Similar._, ifyou block the TV-G catego_, men anme
categories in the young aoutt group will be blocked -V-G. TV-PG.TVd4 and TV_MAj. Ihe sub-ratings tD L.S.V)
work together similarly. ISee next section•
4. q 7 (_IIA}*] I/ i (1[11 : _PIC /kl i }AI[IIIS

SPECIAL FEATURES I
6
How to set the FV D. L S andVsub-raung_
First.h gnttgnt one of these TV-Ratings:TV-Y7.TV-PG. [V*14 or TV-M._ (SeeStep 4,on previous page]
Next while the TV-Rating s setectea, repeateety press the VOL+button. ] his will cycte m/ougn me avail-
aDtesun-raunas IFV.LS. 3 or V)
A bi_nktngletter PU" or" B" wt{{ Dea_splayedfor each sub-rating. While the" U"or" B" is blinking, p/ess
the ON• or ONV buttons to change the sub-rating
Press MENU 3nce to save the TVguidelines. ATV-Rating will beselected annno teRerswrit 3link. Toexit
[nts screen Dressthe MENU button again. TOselect a different TV*Rating,press m_ CH• or CH• buttons
an{] mer repeat [re process,
Note: The V-ohio wilt automaticaii3 BLOCKcertain categories that are" More restrictive". Forexample, if you
block" L" suo-raur g in TV-PG,then the" L" sub-ratings in TV-14aneTV-MA will automaticatty ee blocked
7
Press the MENU button three times to clear all the screens fOr oroceed to the next section, ant] set u[
additiona{ restrictions based onthe MPAA codesl,
How to Set up Restrictions using the MPAA Ratings: G, PG, PG-
13, R, NC-17, X
The MPAA rating system uses the Motion Picture Association of America (MPAA) system, and
its main application is ibr movies. (Eventually: movie videocassettes will be encoded with
MPAA ratings.) When the VChip lock is on, the TV wi]l automatically block any pro
grams that are coded with objectionable ratings (either MPAA or TV Ratings).
Press the MENU button to
disp!ay the menu,
Press the CUV button to
select" Function" ;then
Pressthe V0L _ button.
Pip
capiio •
Pug & _lay •
Press the CHV button to
select" V-chip", then
press the VOL+button,
The" Enterpin" screen
will appear. Enter y0ur 47
digit PINnumber.
( }IAPTII [(31]}# _}'_ IA] ]'] %]U}#IS 4.1 8
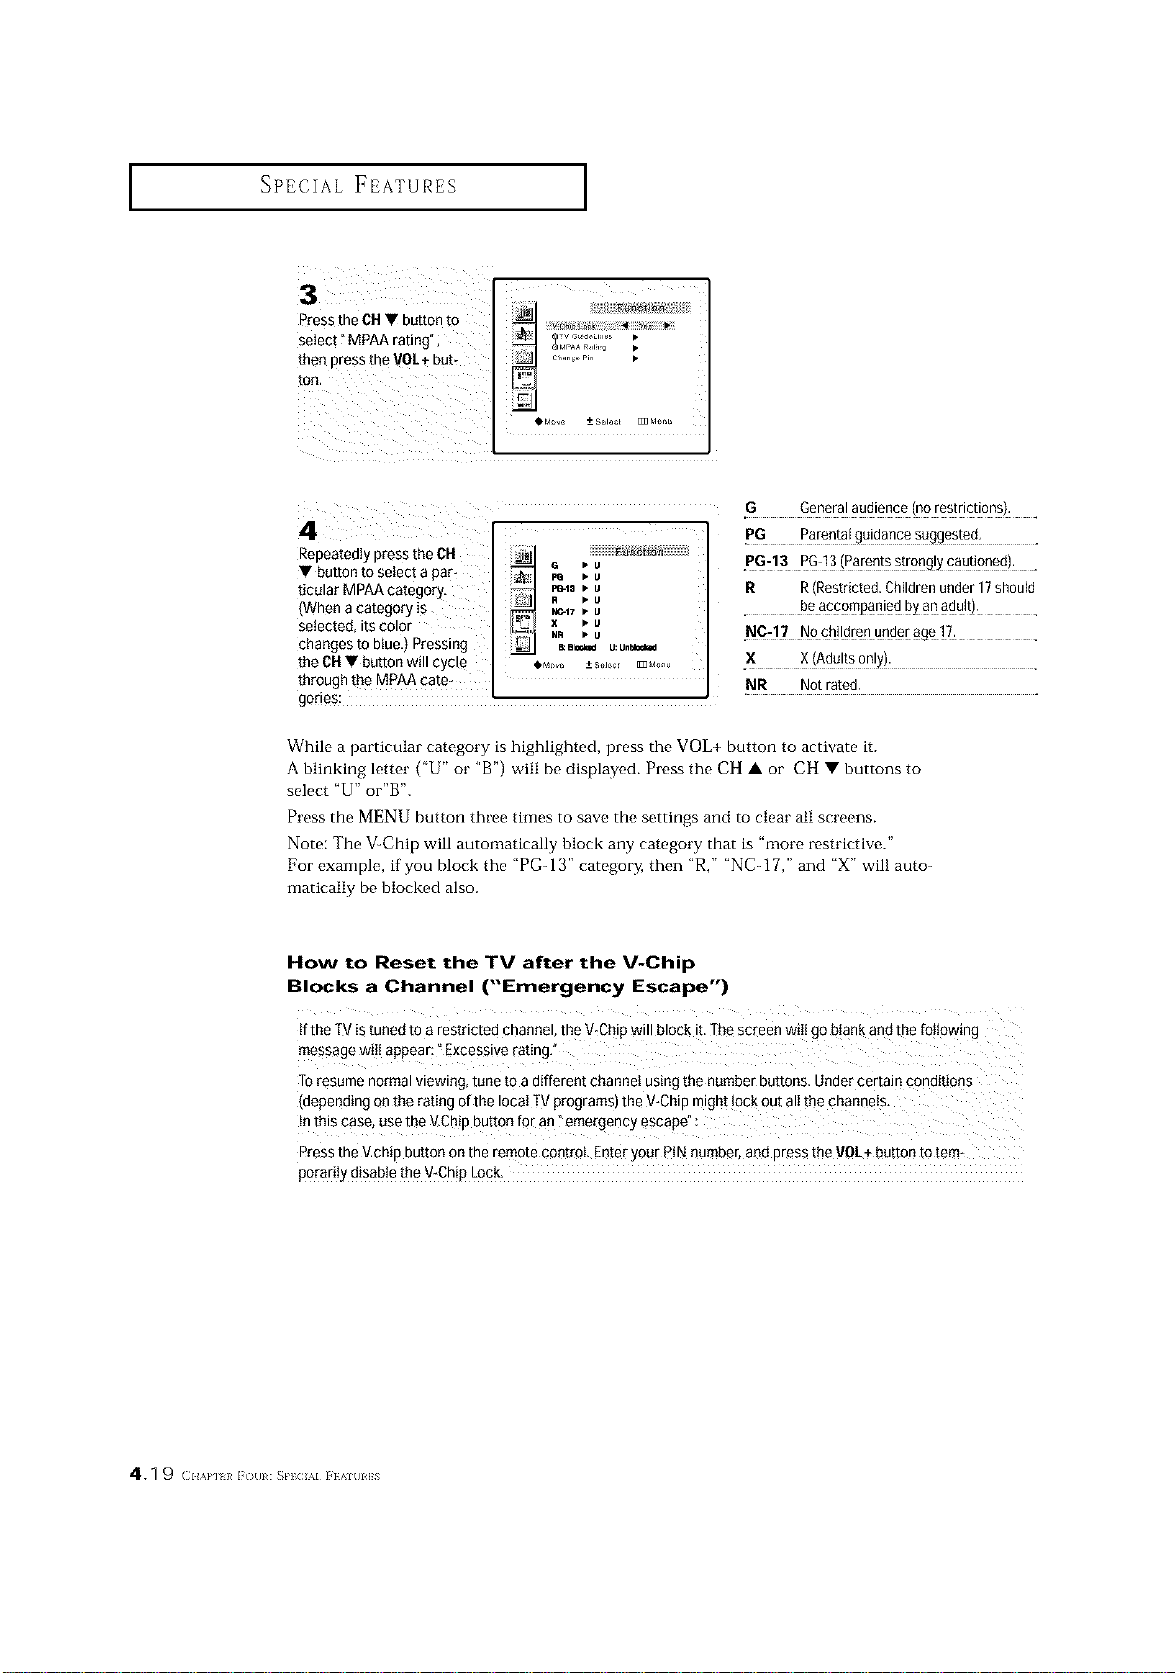
SPECIAL FEATURES ]
¸!3¸¸¸¸¸¸¸¸¸¸¸ :
Press the CH• button to
then press [he VO]
tOn,
Repeatedly press the CH _l
• butt0ntoseiectapar_ _ _a _uu
F_-I3 • U
tieular MPAA categ0ry. . • u
When a category is _ _17 • u
setected, itscolor _ x • u
changesto btue,) Pressing ._., •u u:u._
the CH• button will cycl_ ,M_,_o _+s_J_ _do_,_
through the MPAA eate-
.G Generalaudience (norestrictions). .
p6 Pare_ta!9_!da_ce>_99ested: .
.P9:13 PG:]3!Paren!ss!rong!_caut!oned): ,
R R(Restricted,Childrenunder17should
• beapcompa_iedbya_a_u!t): .
.X X(Adultsonly)•
NR Not rated.
gories: " "
While a particular category is highlighted, press the VOL+ button to activate it.
A blinking letter ("U" or "B') will be displayed. Press the CH • or CH • buttons to
select "U" or'B".
Press the MENU button three times to save the settings and to clear all screens.
Note: The V-Chip will automatically block any category that is "more restrictive."
For example, if you block the "PG- 13" categor_ then "R," "N C _17," and "X" will auto-
maticaliy be blocked also.
How to Reset the TV after the V-Chip
Blocks a Channel ("Emergency Escape")
tf the [V is tuned TOa restncteo cnannel the V-Cb,owill block it. The screen wilI goblank and the following
message wiii appear: _Excessive rating,
Toresume normal viewing, tune to a different channel using the number buttons. Under certain cona_uons
[depending onthe rating 3fthe Iocat TVprograms) the V-Chip might lock out all the channels,
Inth_scase. use the V.Chk button for an _emergency escape
Press the V.chiDBUttOnOnthe remote control Enterjour PiN number,and DresstheMOL+ button to tern*
porariI_ disable the V_ChioLock.
4.1 9 c.,,H }_i {/(11 : _Pl(;/kl i }AI(II]S
PC DISPLAY
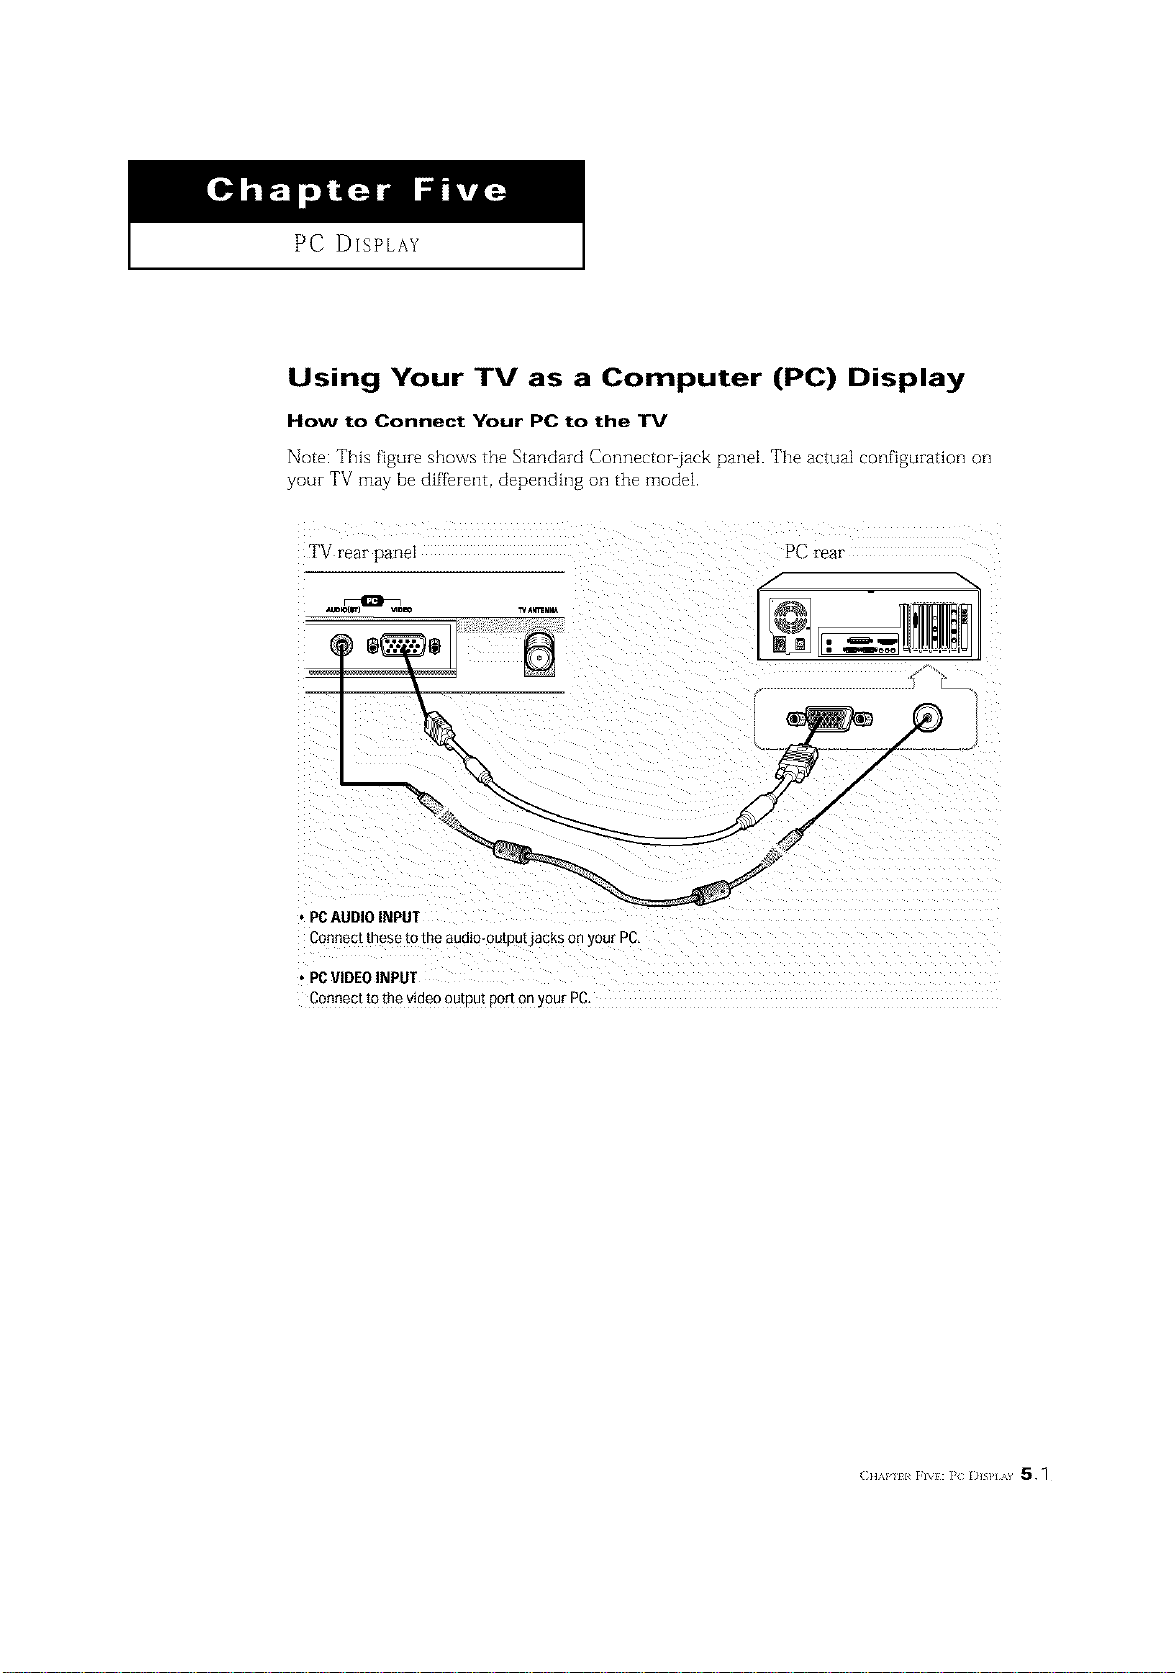
Using Your TV as a Computer (PC) Display
How to Connect Your PC to the TV
Note: This figure Si_O_rSthe Standard Connector jack panel. The actual configuration on
your TV may be different, depending on the model.
TV rear pane]
PC rear
• PCAUDIO INPUT
Connect these to the audio-outDu[JaCKSonyour PC,
• PCVIDEOINPUT
Connect to the video ou[pu[ porLonyour PC,
(]_AP I<FIW:PC I)]S] _¥ 5.1
PC DISPLAY ]
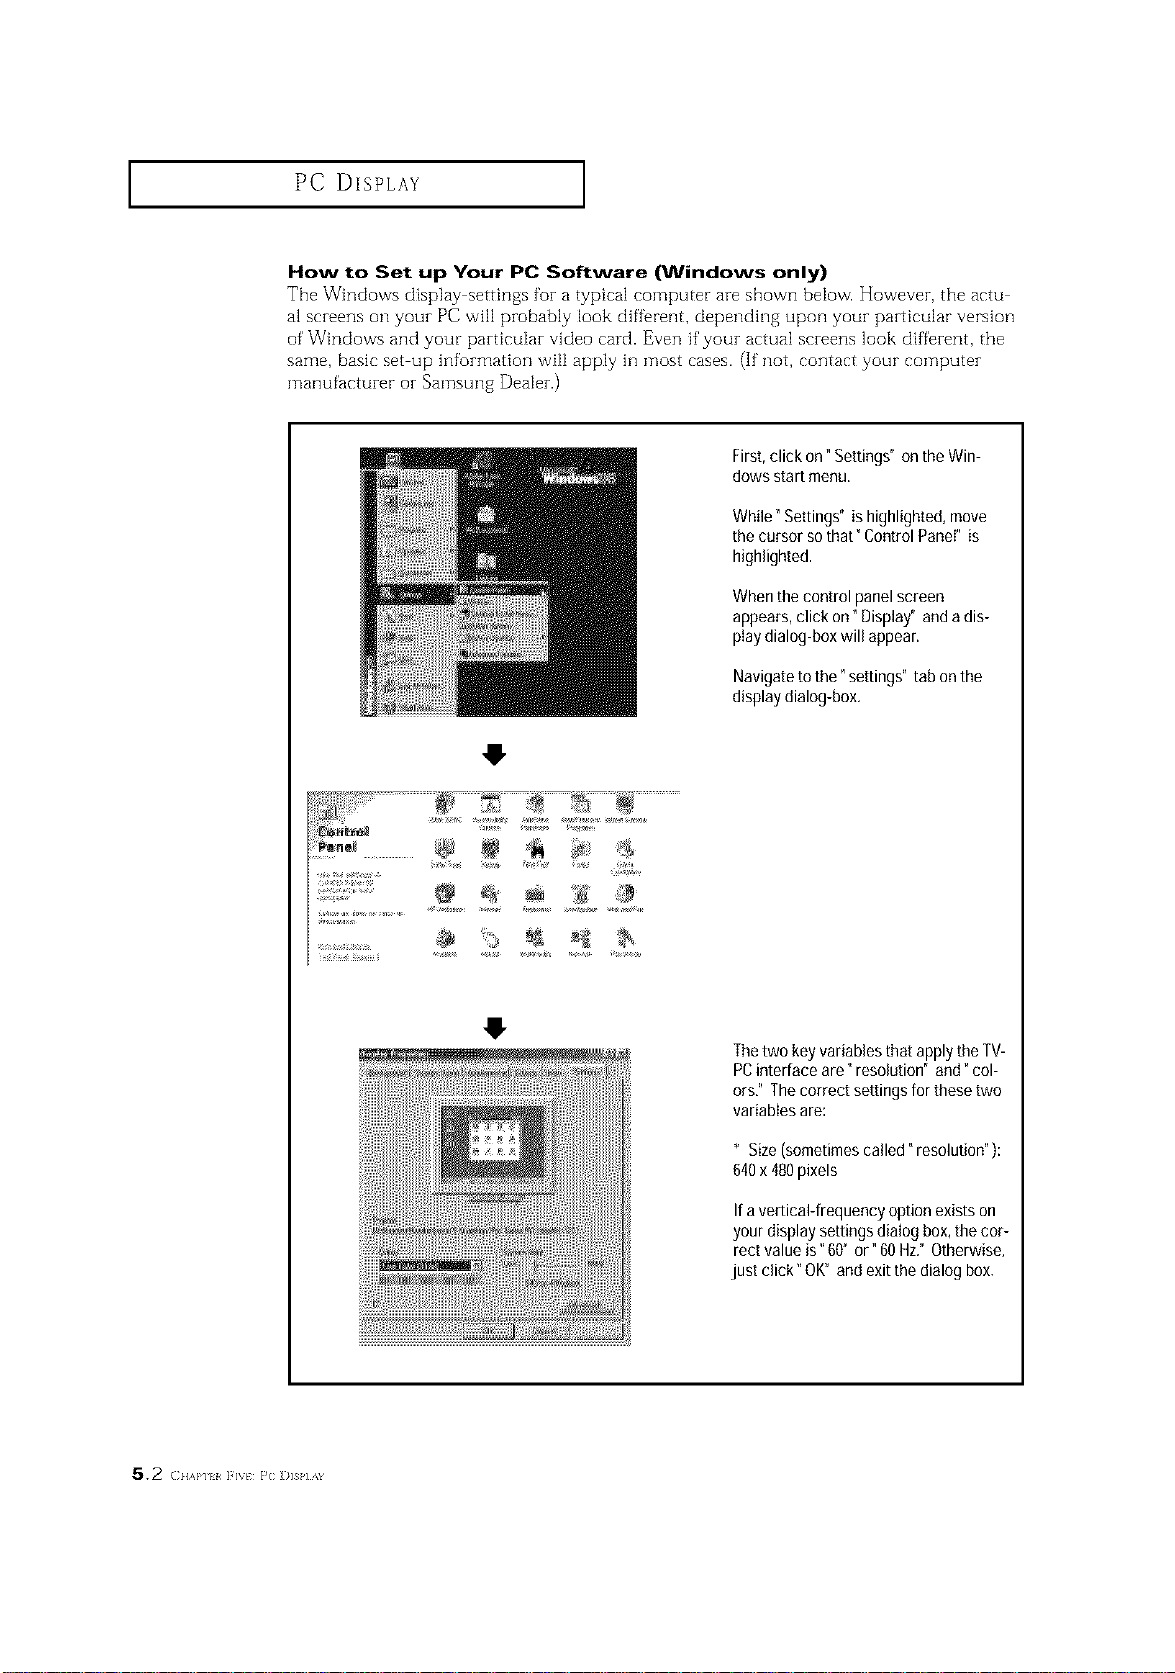
How to Set up Your PC Software (Windows only)
The Windows display settings for a typical computer are shown below• However, the actu
al screens on your PC will probably look diffk-ent, depending upon your particular version
of Windows and your particular video card. Even if your actual screens look different, the
same, basic set up information will apply hi most cases. (If not, contact your computer
manufacturer or Samsung Dealer.)
First, click on" Settings" on the Win-
dows start menu,
While °Settings" ishighlighted,move
the cursor sothat _ControlPanel"is
highlighted.
Whenthe control panelscreen
appears,click on" Display" andadis-
playdialog-boxwill appear.
Navigatetothe" settings" tab onthe
displaydialog-box.
Thetwo key variablesthatapplythe TV-
PCinterface are" resolution" and" col-
ors," Thecorrect settingsforthesetwo
variables are:
* Size(sometimescalled resolution )
640x480pixels
If a vertical-frequency option exists on
your display settings dialog box, the cor-
rect value is" 60" or" 60 Hz." Otherwise,
just click" OK" and exit the dialog box.
5.2 ( llA}q I i '_t } C ])]SI,] 1_
PC DISPLAY ]
Adjusting the Screen Quality
The purpose of picture quality adjustment is to remove or reduce picture noise. If the
noise is not removed by fine tuning aIone, then do the frequency adjustments to tile
utmost and fine tune again. After the noise has been reduced, re adjust the picture so
that it is a11gned on the center of screen
Press the PC button oi2 the zemote controI to seieet the PC mode
Press the MENU button to ;{ii i { '::
dispIay the menu. _ i;;
. H Po_ilo,,
V Pesiiiel
Press the OHV button to =o= °'°' *_' •
select" PC°, then press _ .......... •
the VOL÷button.
,M_,ve +--S_lect [II]Mr*r:u
2
Press theCHVbuttonto _ ;{E i { ';;
select _Coarse" or t Fine"
Z
Press the VOL+ or VOL- I _' I
button t° adjust the L __ J
screen quality, vertical <Ad'usti the Coarse>
ij n9
stripes appear or the pic
Luremay be blurry,
4[_ZE_E3_ 1_
<Adjustingthe Fine>
When you are satisfied with the settings, press the MENU but-
ton repeatedly to return to normat viewing,
C]]_P ii FI\}:]{ D]SIIxY 5.3
PC DISPLAY ]
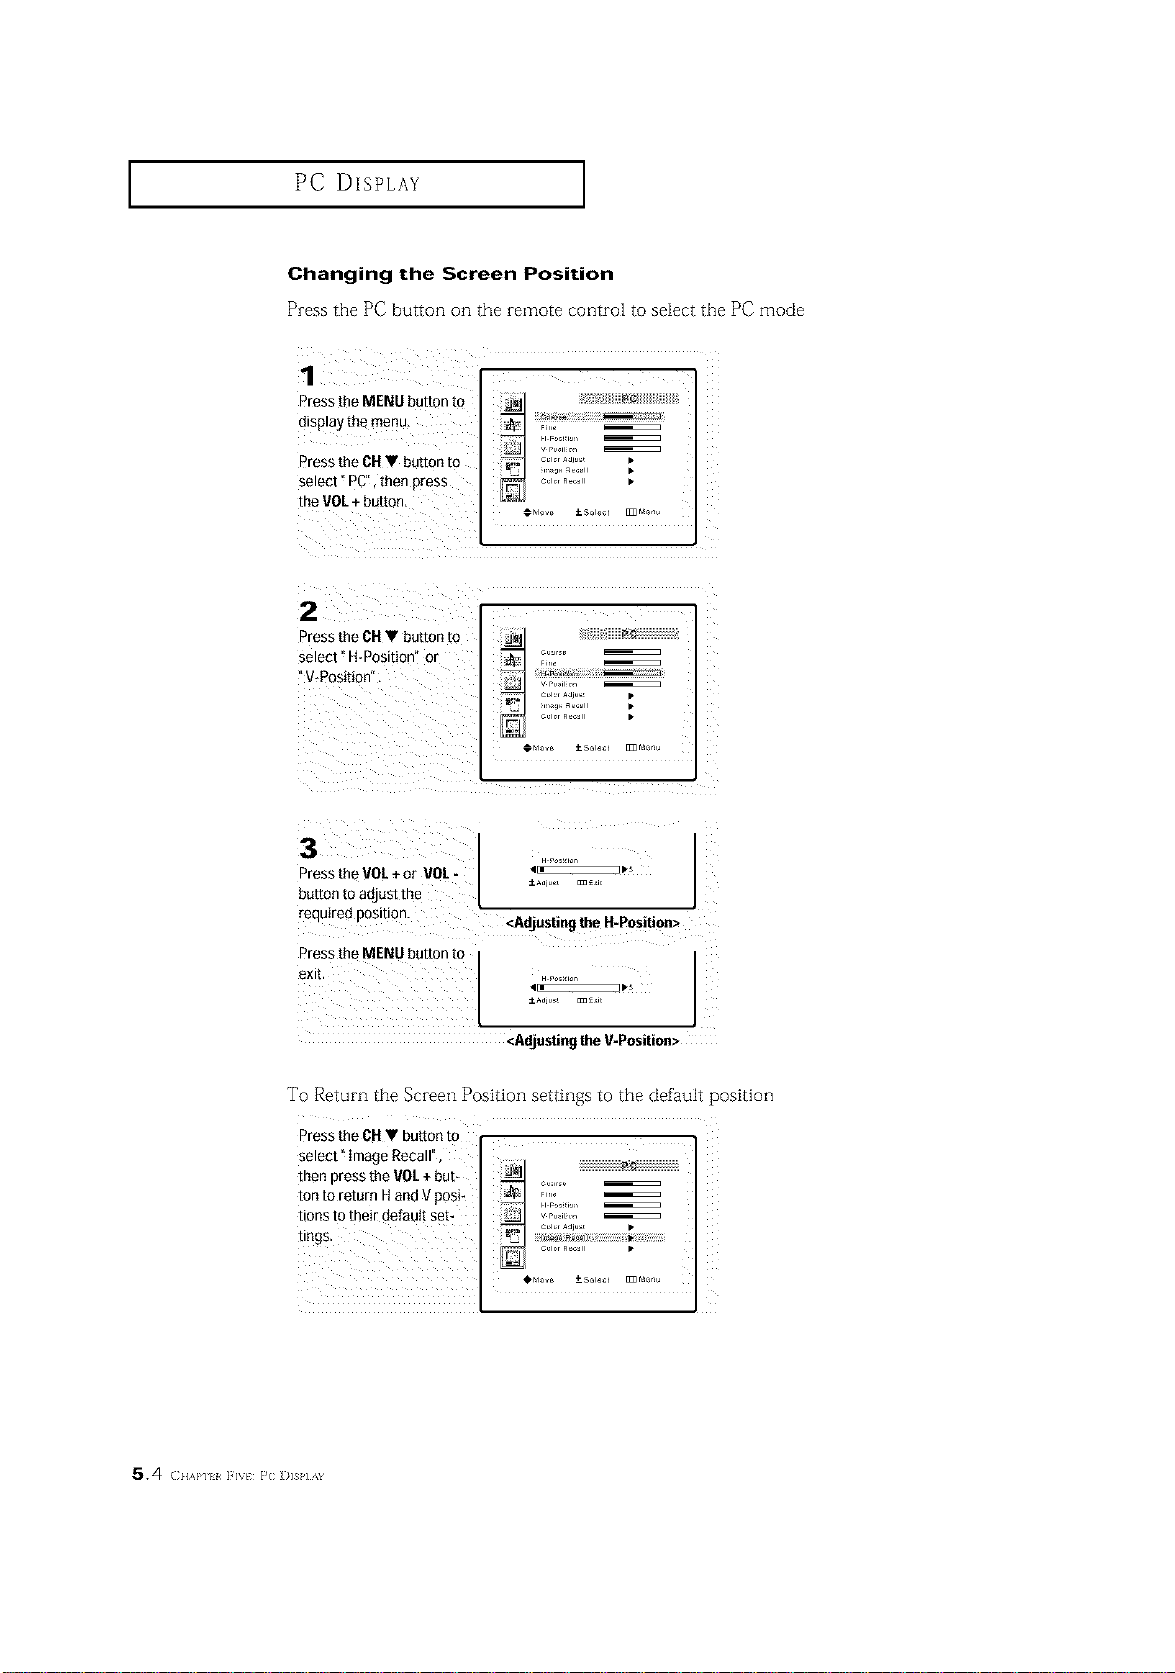
Changing the Screen Position
Press the PC button on the remote control to select the PC mode
1
Press me MENU button to
d_splay[ne menu
Press the CH• bu[ron [o
select" PC". then Dress
the VOL+button,
Fir.
r, ,, R.,, •
2
Press the CH• button to
select" H-Position or
"V-Posittor
r_., AJr • •
3
Press the VOL + or VOL -
DLt[[OR[0 30JUSlKne
reeuirea DOSI[IOn.
Press the MENU button m
eXl[
.p05,ror
4=_
<Adjusting the H-Position>
._os,,or
<Adjusting the V-Position>
To Return the Screen Position settings to the default position
PresstheCH• buttonto
5.4 ( I{_K}'] I 1 _t } C ])]SP] _h
PC DISPLAY ]
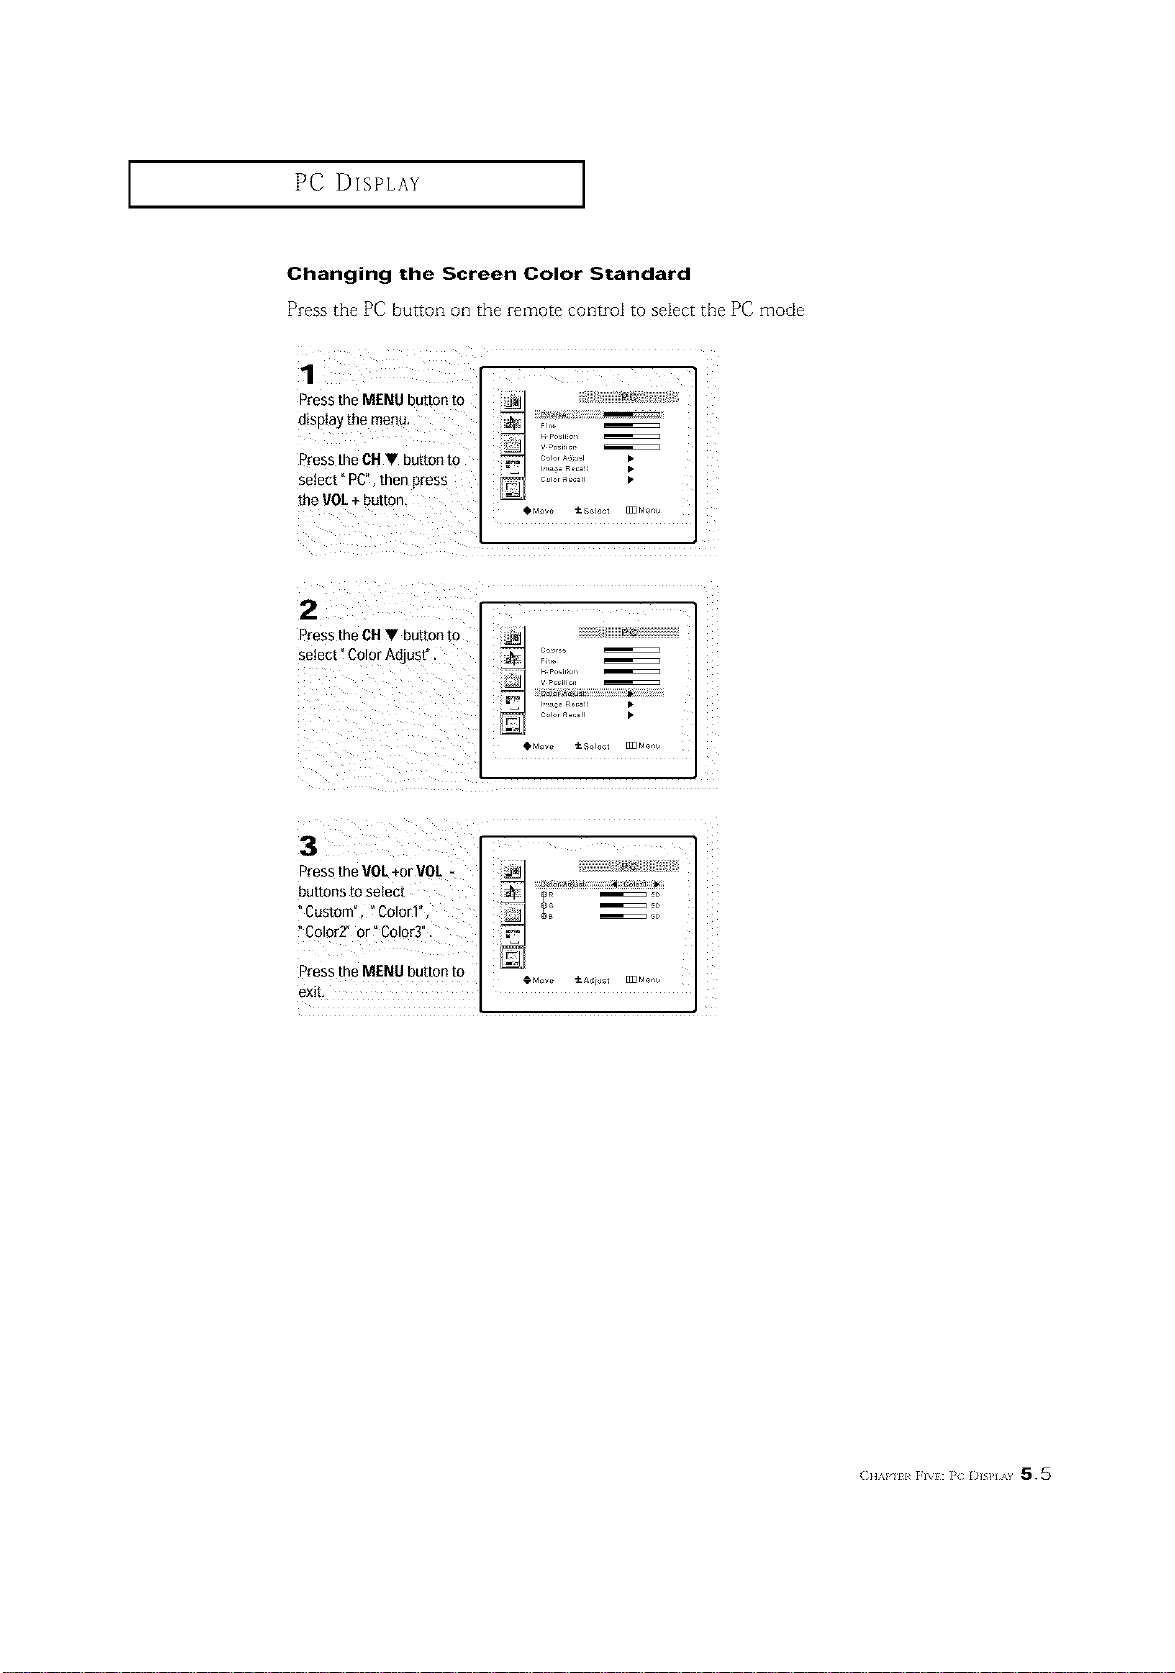
Changing the Screen Color Standard
Press the PC button on the remote controi to seiect the PC mode
1
Press the MENU button m
disDIaythe menu,
Press LheCH• button to
select"PC men press
LheVOL+buKon.
.0, _e
_ F:_
_pL_ c,
2
2
Press the CH• button to
setect ColorAdjust".
F_
.,,o_ R_, : •
3
Press the VOL+orVOL -
buttons to seled
Custolr _Color1'
"Color2" or" Color3
Press the MENU button to
exit
(2]]_P ii Fix}:]; l)]slIx¥ 5.5
PC DISPLAY ]
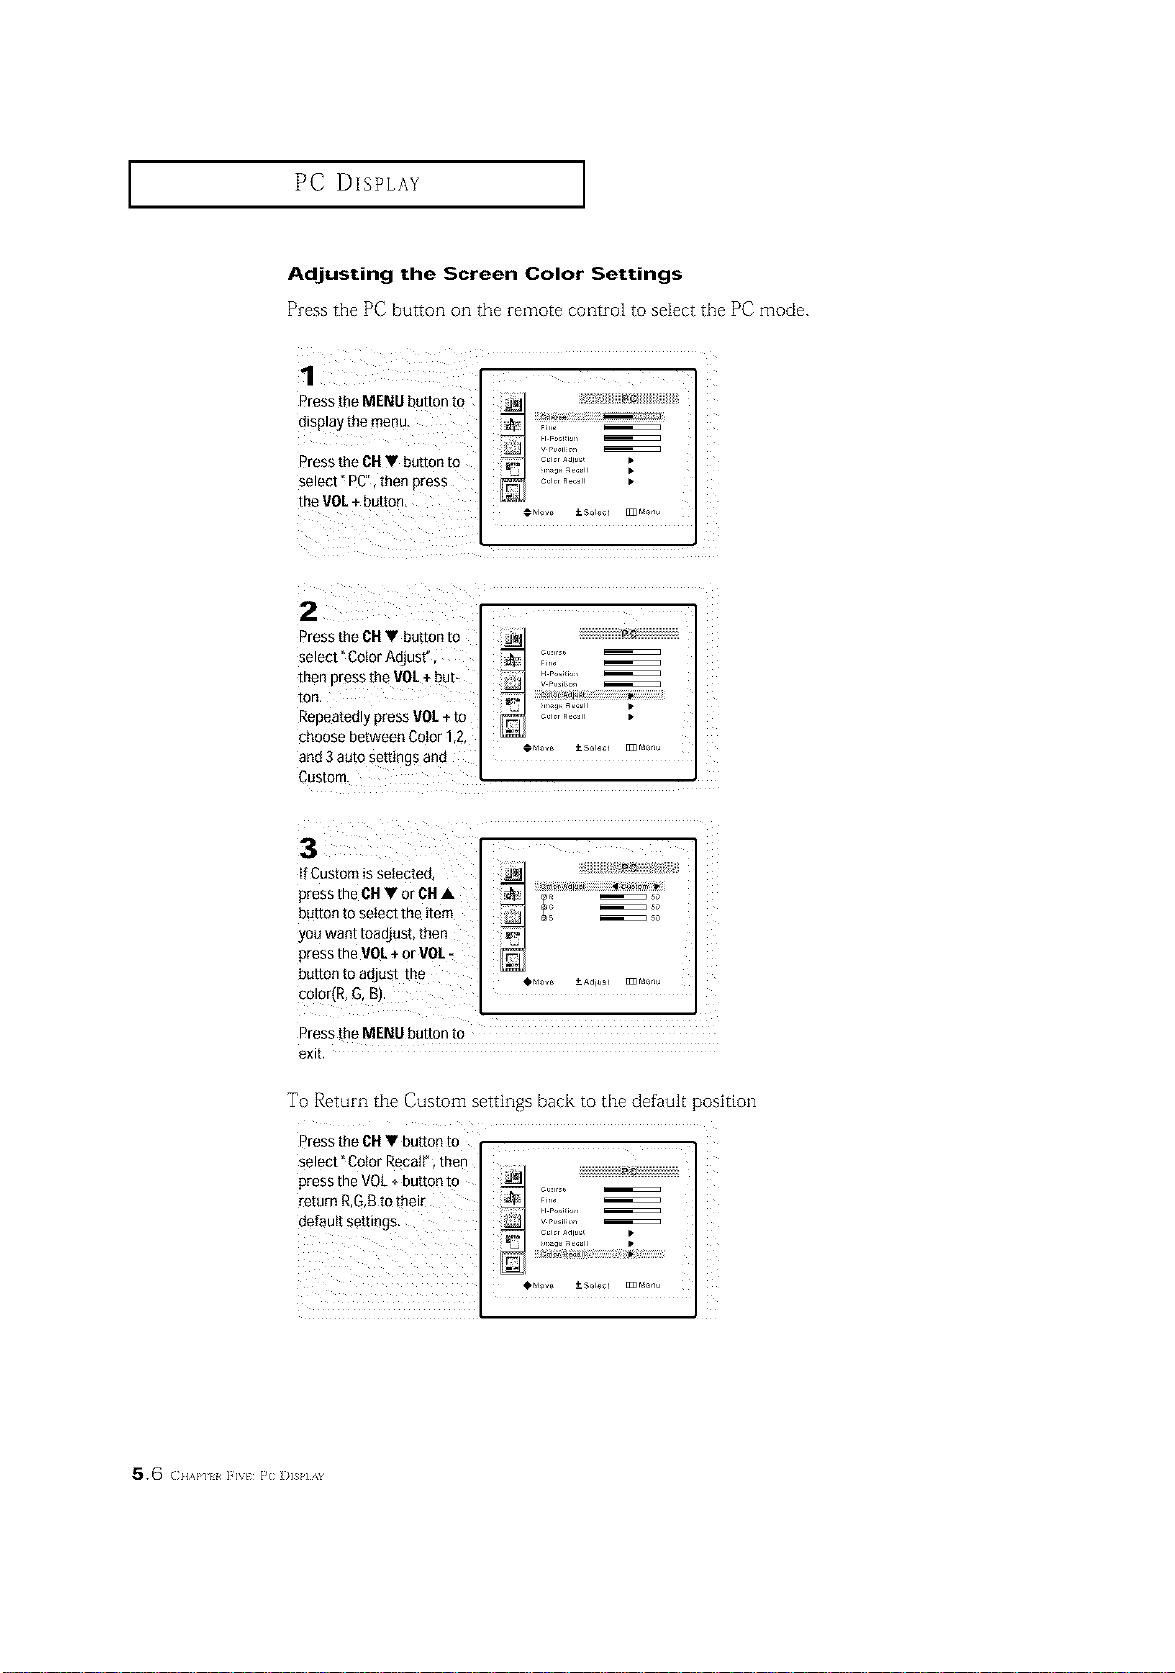
Adjusting the Screen Color Settings
Press the PC button on the remote control to select the PC mode.
1
Press the MENU button to
dBplay me men_.
B-ess the CU • button [o
select"PC men Dress
the VOL + button,
r, ,, R.,, •
2
Dress the 6U • button to
select "Color Adjust
men Dressthe V01`+ but-
[or
Repeatedly press 1/01.+to
choose between Color" 2,
and 3auto setungs and
Custom.
R_C
.°_,'22
_ bloke _so4 ]_ Monu
3
If Custom is selected
Dressthe CU • or CU•
DUtton [O Setect trip Item
yOU waft[ [o_(]j u SL [Rerl
press the VOL÷ or V01.-
button to adJust me
colorfR, G, B'
PG
Press [he MENU button to
8Xl[
To Return the Custom settings back to the default position
Press the CB• button to
select" Cotor Recatt*,then
press the V0L + button to _ o
return RGB to their _ ......
defautt settings, _ _C: i'l"ic:_ I
_ w Culm Adju_ •
*t't:t _-Ylttt=_1?°
5.6 ( IIA}*I I } C ])]SI,] !&
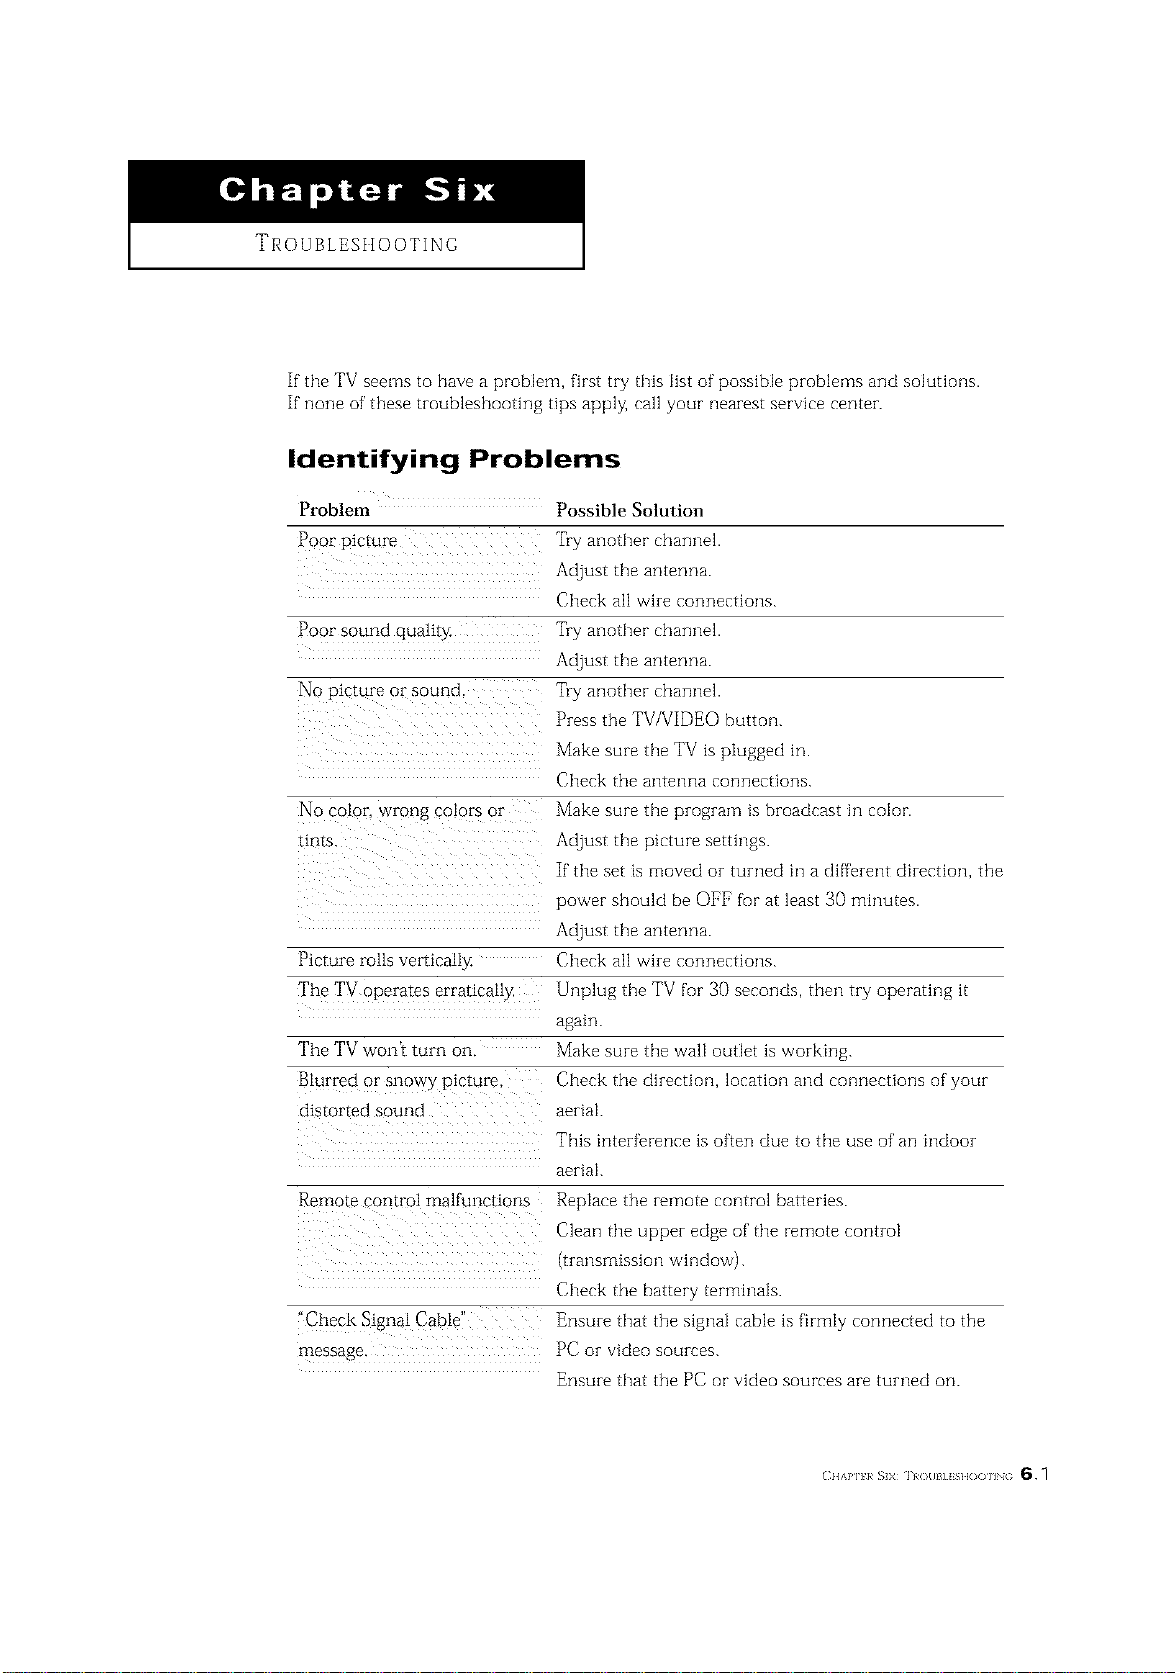
TROUBLESttOOTING
If the TV seems to have a problem, first try this list of possible problems and solutions.
If none of' these troubleshooting tips apply, call your nearest service center.
Identifying Problems
Problem Possible Solulion
Poor picture Try anotber channel.
Adjust tbe antenna.
Cbeck all wire connections.
Poor sound qualir!z Try anotber channel.
Adjust tbe antenna.
No picture or sound Try anotber channel.
Press the TV/VIDEO button.
Make sure tbe TV is plugged in.
Cbeck the antenna connections.
No color, wrong colors or Make sure tbe program is broadcast in color.
Hnrs. Adjust tbe picture settings.
If"tbe set is moved or turned in a different direction, the
power should be OFF for at least 30 minutes.
Adjust tbe antenna.
Picture rolls veitically Cbeck all wire connections.
The TV operates erraticall> Unplug tbe TV for 30 seconds, then try operating it
again.
The TV won't turn on. Make sure tbe wall outlet is working.
Blurred or snowy picture, Check the direction, location and connections of' your
distorted sound aerial.
This interference is often due to the use of an indoor
aerial.
Remote control malfunctions Replace the remote control batteries.
Clean tbe upper edge of tbe remote control
(transrnission vVilldoW).
Cbeck the battery terminals.
"Check Signal Cable" Ensure tbat the signal cable is firmly connected to the
message. PC or video sources.
Ensure tbat the PC or video sources are turned on.
(_1 {APII R SiX [ }/(){ll/I ]SI I()()llN( 6.1
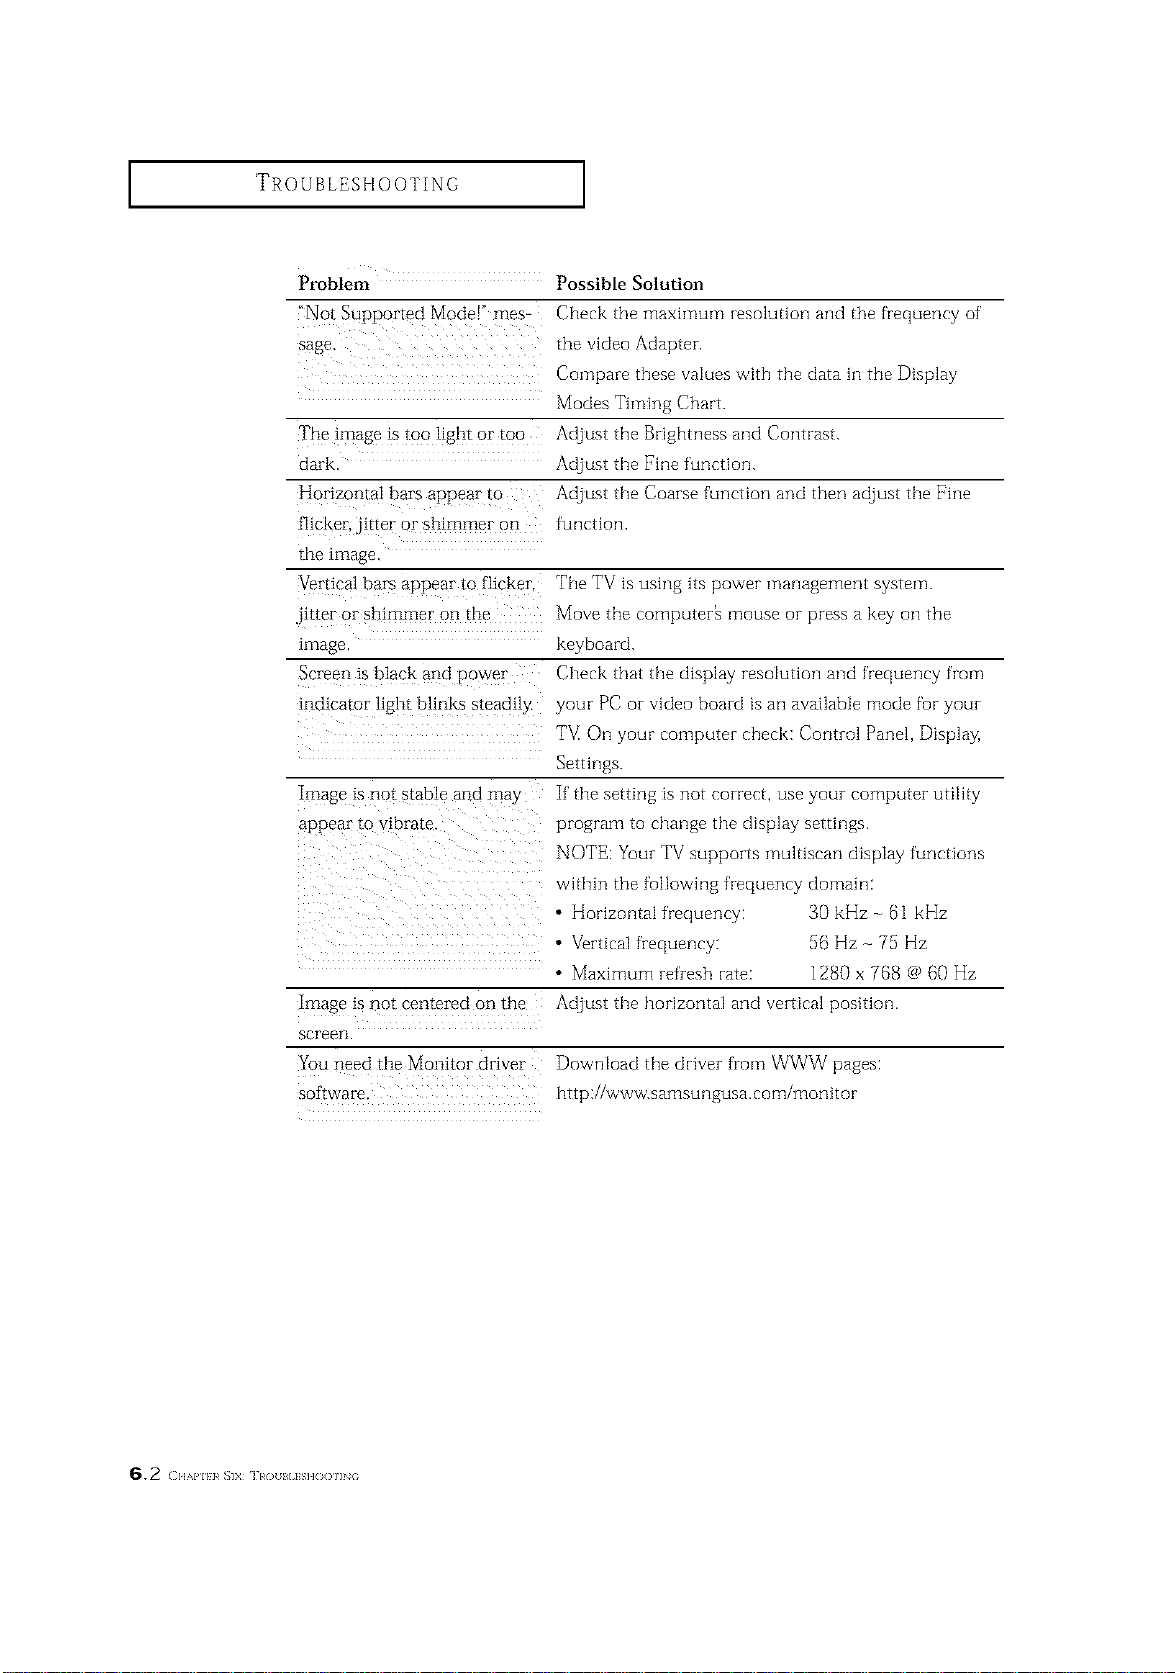
TROUBLESHOOTING ]
Problem Possible Solution
"Not Supported Mode!" rues- Check the maximum resolution and the frequency of'
sage. the video Adapter.
Compare these values with the data in the Display
Modes Timing Chart.
The image is too light or too Adjust the Brighmess and Contrast.
dark. Adjust the Fine function.
Horizontal bars appear to Adjust the Coarse function and then adjust the Fine
flicker, Jitter or shimmer on function.
the Linage.
Vertical bars appear to flicke* The TV is using its power management system.
iitter or shimmer on the Move the computer_ mouse or press a key on the
Lmage keyboard.
Screen is black and power Check that the display resolution and frequency from
indicator ligllt blinks steadil,z your PC or video board is an available mode for your
T'_ OH your computer check: Control Panel, Display,
Settings.
If the setting ts not correct, use your computer utility
program to change the display settings.
NOTE: Your TV supports multiscan display functions
within the folMwing frequency domain:
• Horizontal frequency: 30 kHz - (31kHz
• Vbrtical frequency: 56 Hz ~ 75 Hz
• Maximum iefresh rate: 1280 x 7158c_ 60 Hz
Adjust the horizontal and vertical position.
image is not stable and may
appear to vibrate.
Image is not centered on the
screen
You need the Monitor driver
SoIrwar8.
Download the driver from WWW pages:
http://www.samsungusa.com/monit or
_.2 (]b%l,l}}_ _]X ]t_O }{/]SII()<911N
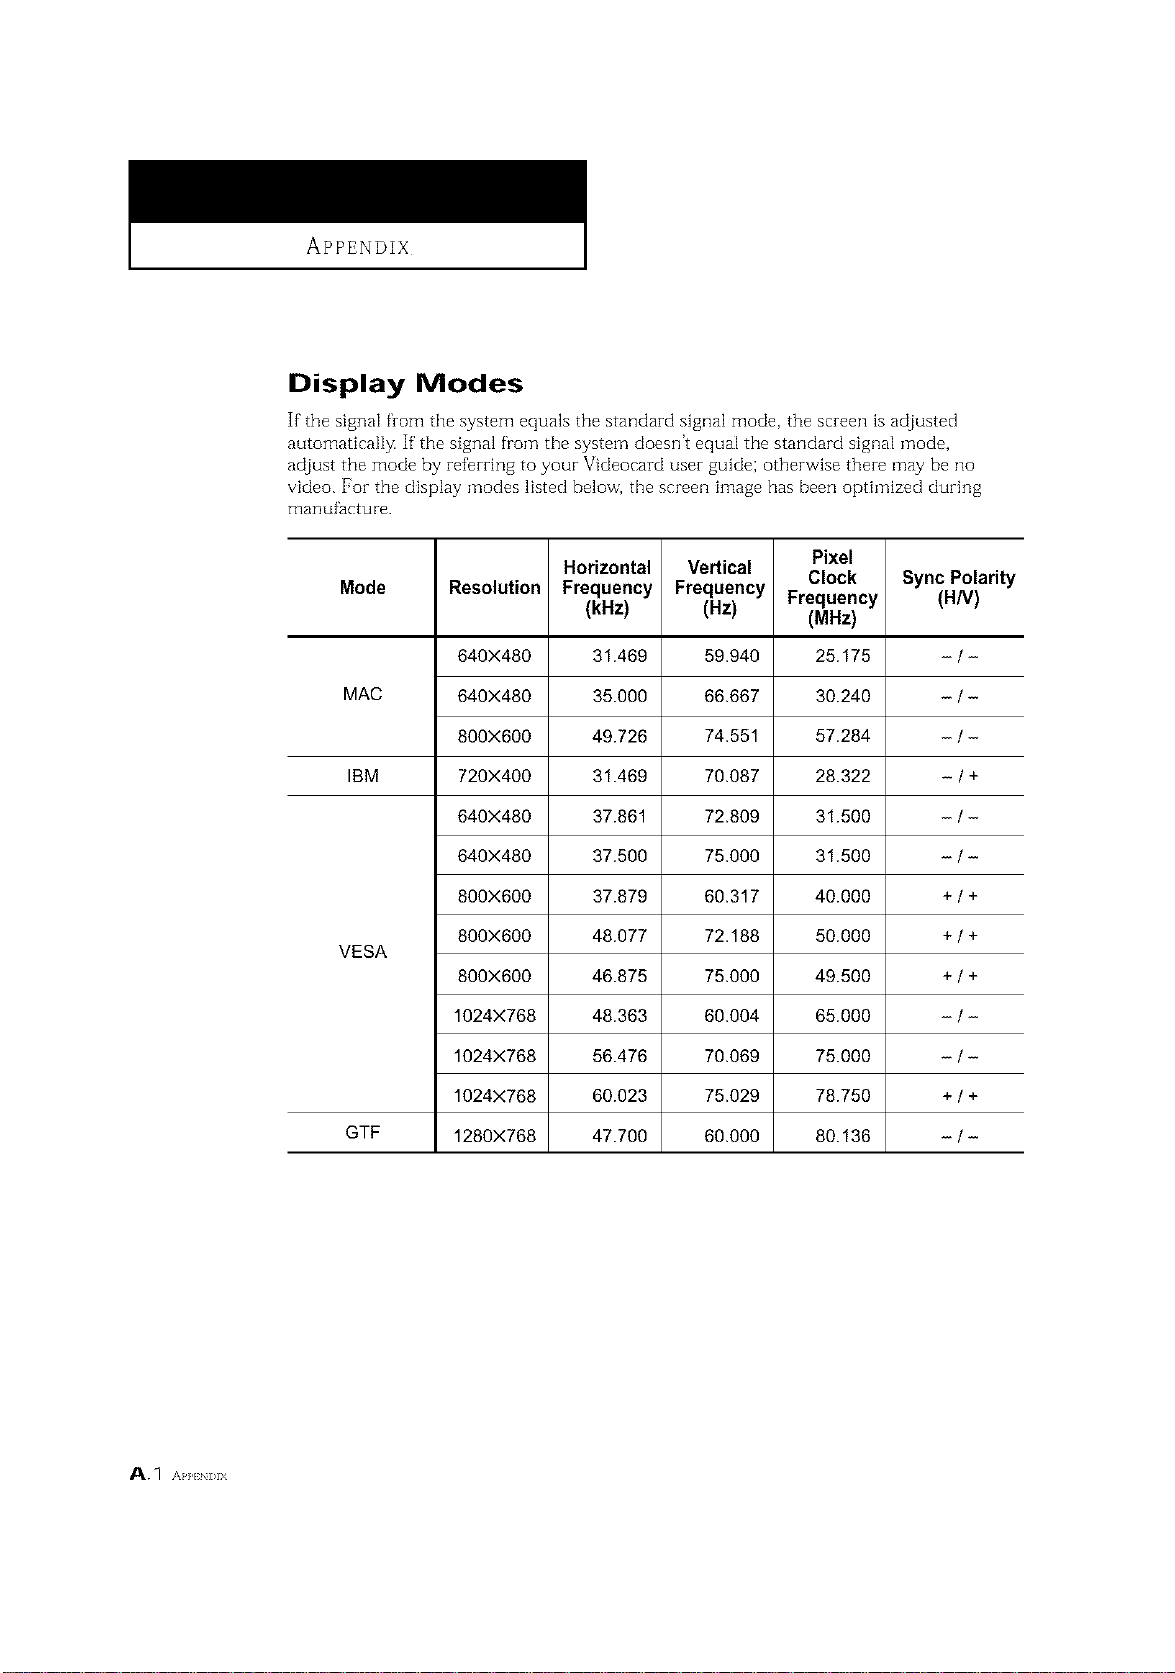
APPENDIX
Display Modes
If the signal from the system equals the standard signal mode, the screen is adjusted
automatical[]< If the signal from the system doesn't equal the standard signal mode,
adjust the mode by referring to your Videocard user guide; otherwise there may be no
video. For the display modes listed below, the screen image has been optimized during
Fffanufacture.
Pixel
Horizontal Vertical Clock Sync Polarity
Mode Resolution Frequency Frequency Frequency (H/V)
(kHz) (Hz) (MHz)
640X480 31.469 59.940 25.175 - / -
MAC 640X480 35.000 66.667 30.240 - / -
800X6OO 49.726 74.551 57.284 - / -
IBM 720X400 31.469 70.087 28.322 - I +
640X480 37.861 72.809 31.500 - I -
640X480 37.500 75.000 31.500 - I -
800X600 37.879 60.317 40.000 + I +
800X600 48.077 72.188 50.000 + I +
VESA
800X600 46.875 75.000 49.500 + I +
1024X768 48.363 60.004 65.000 - I -
1024X768 56.476 70.069 75.000 - I -
1024X768 60.023 75.029 78.750 + I +
GTF 1280X768 47.700 60.000 80.136 - I -
A. 1 AP],EN]>IX
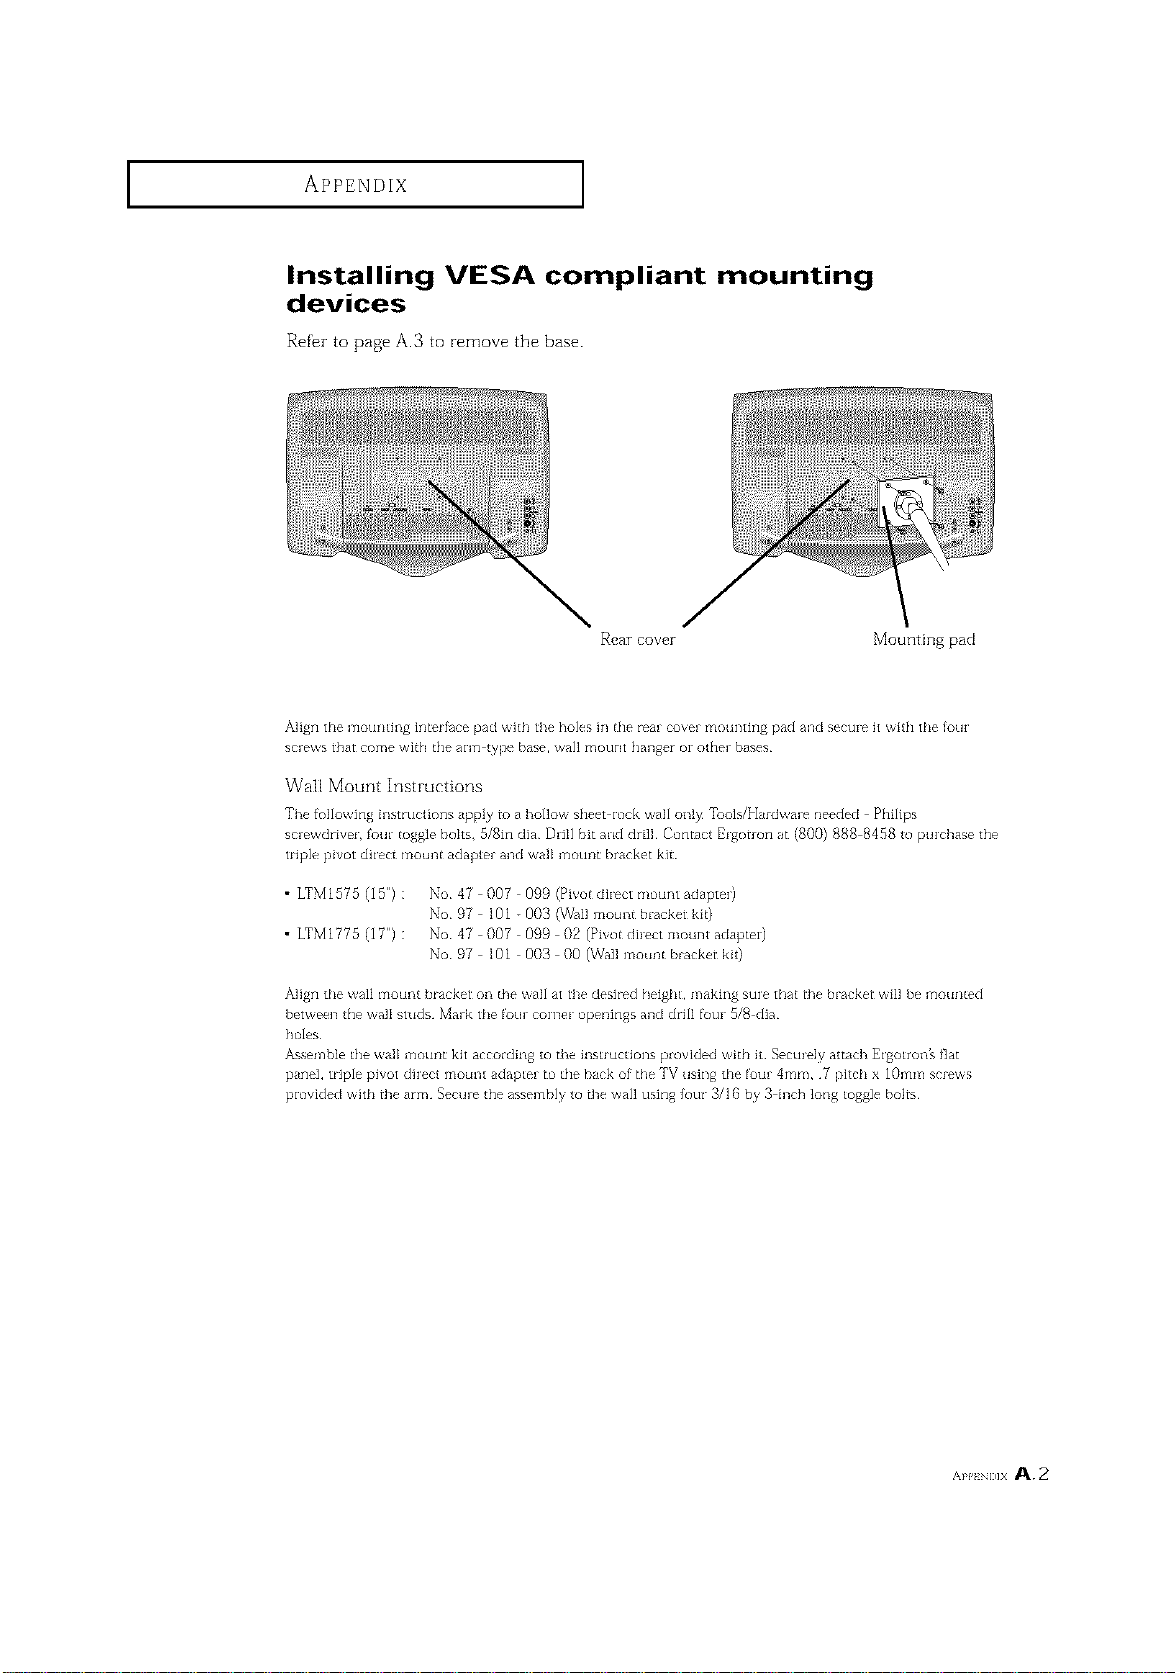
APPENDIX
Installing VESA compliant mounting
devices
Refer to page A.3 to remove the base.
Rear cover Mounting pad
Align the mourldng irlterfhce pad with the holes in the rear cover mounting pad and sectn_ it with the Iotn
screws that come wit]q the algl type base, wai] motlYK hanger oi¸other bases¸
Wail Mount Instructions
The fsllowing irlstruclions ,@ply to a hollow sheet iock wall only Tools/H_fdwme needed Philips
screwdriver, four toggle bolts, 5/8in dia Drill bit and drill Cont,_ct E_gotron at (800) 888 8458 to puicbase the
triple pivot diiect mount adapte_ and wail mount bracket kit
• LTMI575 (15") :
• LTMI775 (IT') :
No 47 007 099 (Pivot di_ct mount adapte0
No 97 lOl - 003 (Wall mount blacker kit)
No 47 007 099 02 (Pivot dff_ct mount adaptei)
No 97 1Ol 003 O0 (Wall mount blacker kit)
Align the wa]l mourl[ bracket oa []_e wail at the desired I'_eight, making suie that tbe blacker wi]] be mounEed
between Ihe wax studs. Mark the _ur corner openings and drill ff_tn¸ 5/8 dia.
holes
Assemble Ihe wail _'nourlt kit according to ti_e instructions provided wilh it Sectn_]y at_ch Ei_olroi_'s fiat
pane], triple pivot diiect mounl adapler to the back of tile TV using the four 4ram, .7 pitch x 10ram scl_ws
provided with tbe arm. Secure the assembly ro tbe wail using _tn" 3/16 by 3 inch long _oggle boi_
AP9 _]x A.2
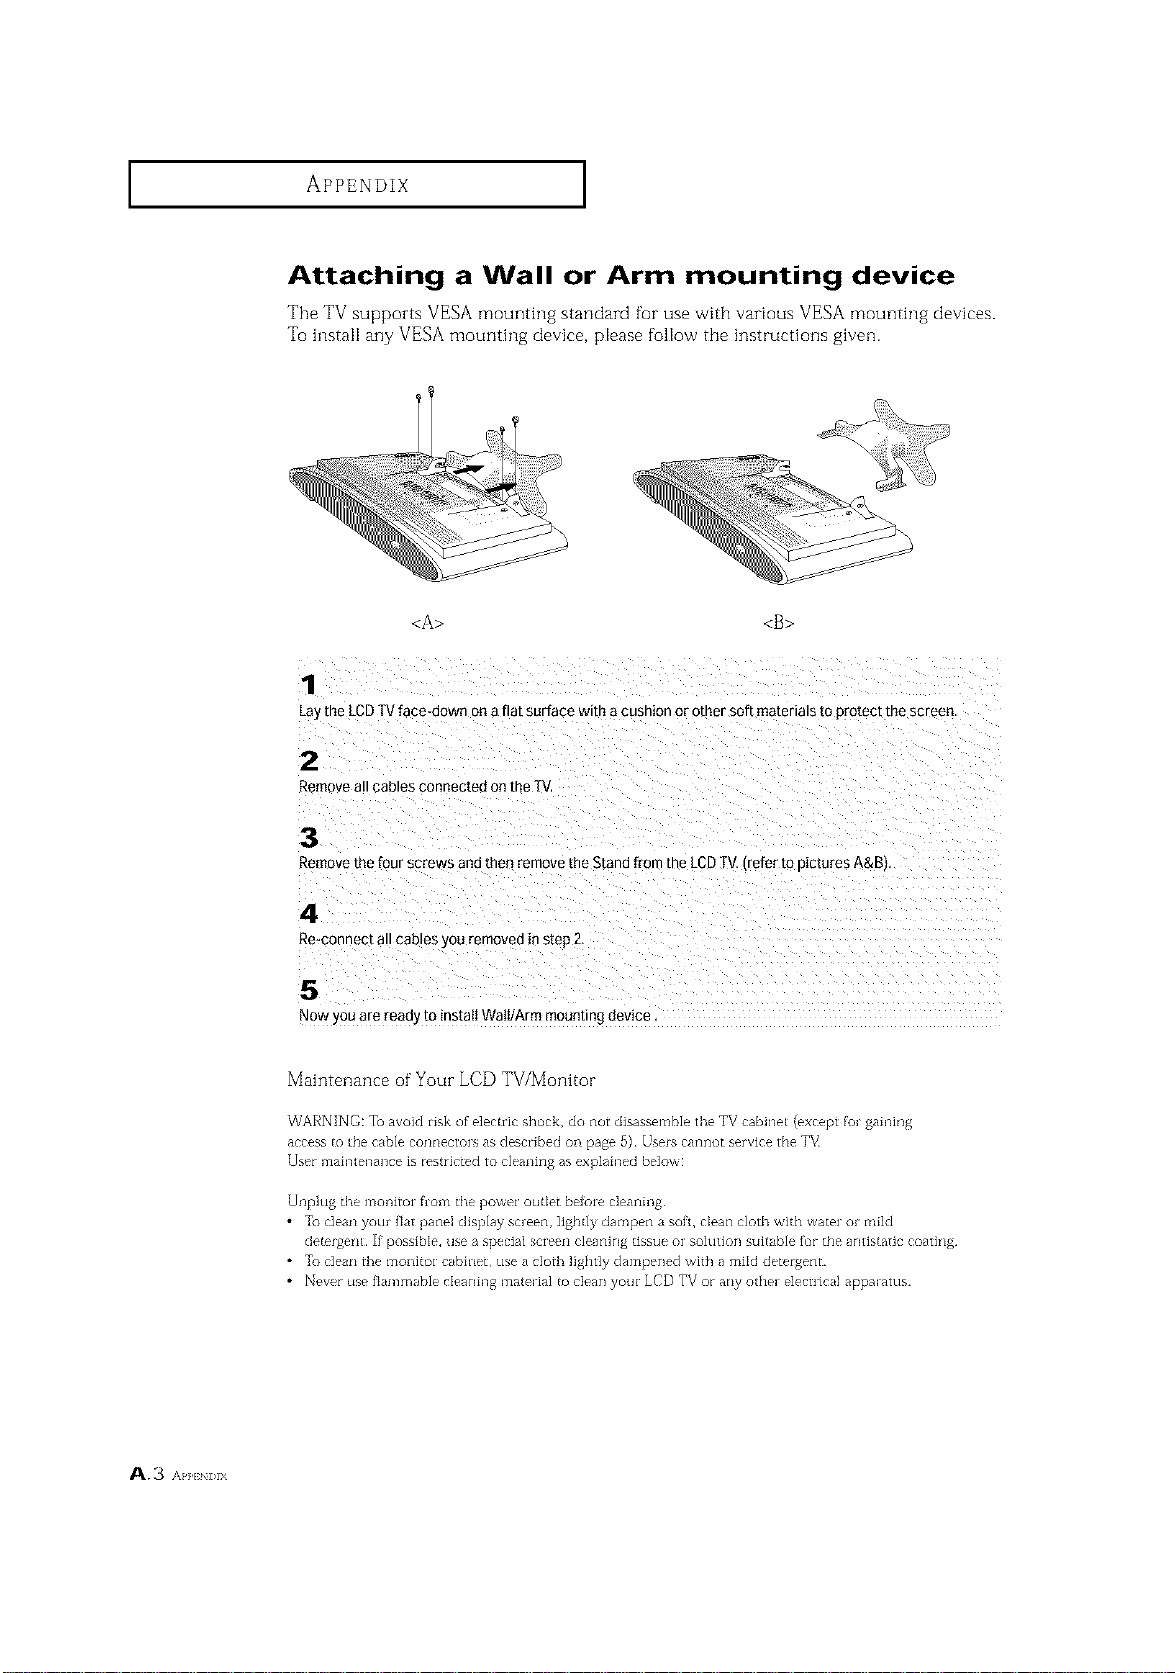
APPENDIX ]
Attaching a Wall or Arm mounting device
'File TV supports VESA mounting standard for use with various VESA mounthlg devkes.
To install any VESA mounting device, please follow the instructions given.
<A> <B>
1
Lay the LCD IV face-down on a ftt surface with a cushion or o[ner soft materials to {_ro[ect me screen
2
Remove all Cables connected On the T\
3
Remove the four screws and the_ remove the Stand from the LCD IV refer to [}ictures A&E
4
Re-connect all caoles you removee n sled 2,
5
NOW you are ready to instaII WaiI/Arm mounting £1evice
Maintenance of Your LCD TV/Monitor
WARNING: To avoid risk of elec_iic shock, do not disassemble the TV cabine_ (except fo_ gab-ring
r_ l
access _o [he cable coi_i_ectoIs 3s described oi_ page D) • Users c3ilflot service the T_
User iTlain[en313ce is restricted to cleai_bl_ as explainer] be]ow:
Unplug tl'_e moldtoI from the poweI ouQet beloIe c]eanirlg
• _ dean your _at pane] display screen, ]ighdy darr_pen a sofL clean cloth with water or mild
c]e_rgerl_ If possible, use a special screen c]eaning tissue or so]ution suitable _r the antistatic coatalg.
• _ dean Lhe moi_itor cabirleL use a cloLh lightly dampened with a mild detergent.
• Never use flammable cIeaning material _o cIean your LCD TV or any other e]ecuical apparatus.
A.3 AP],END_X
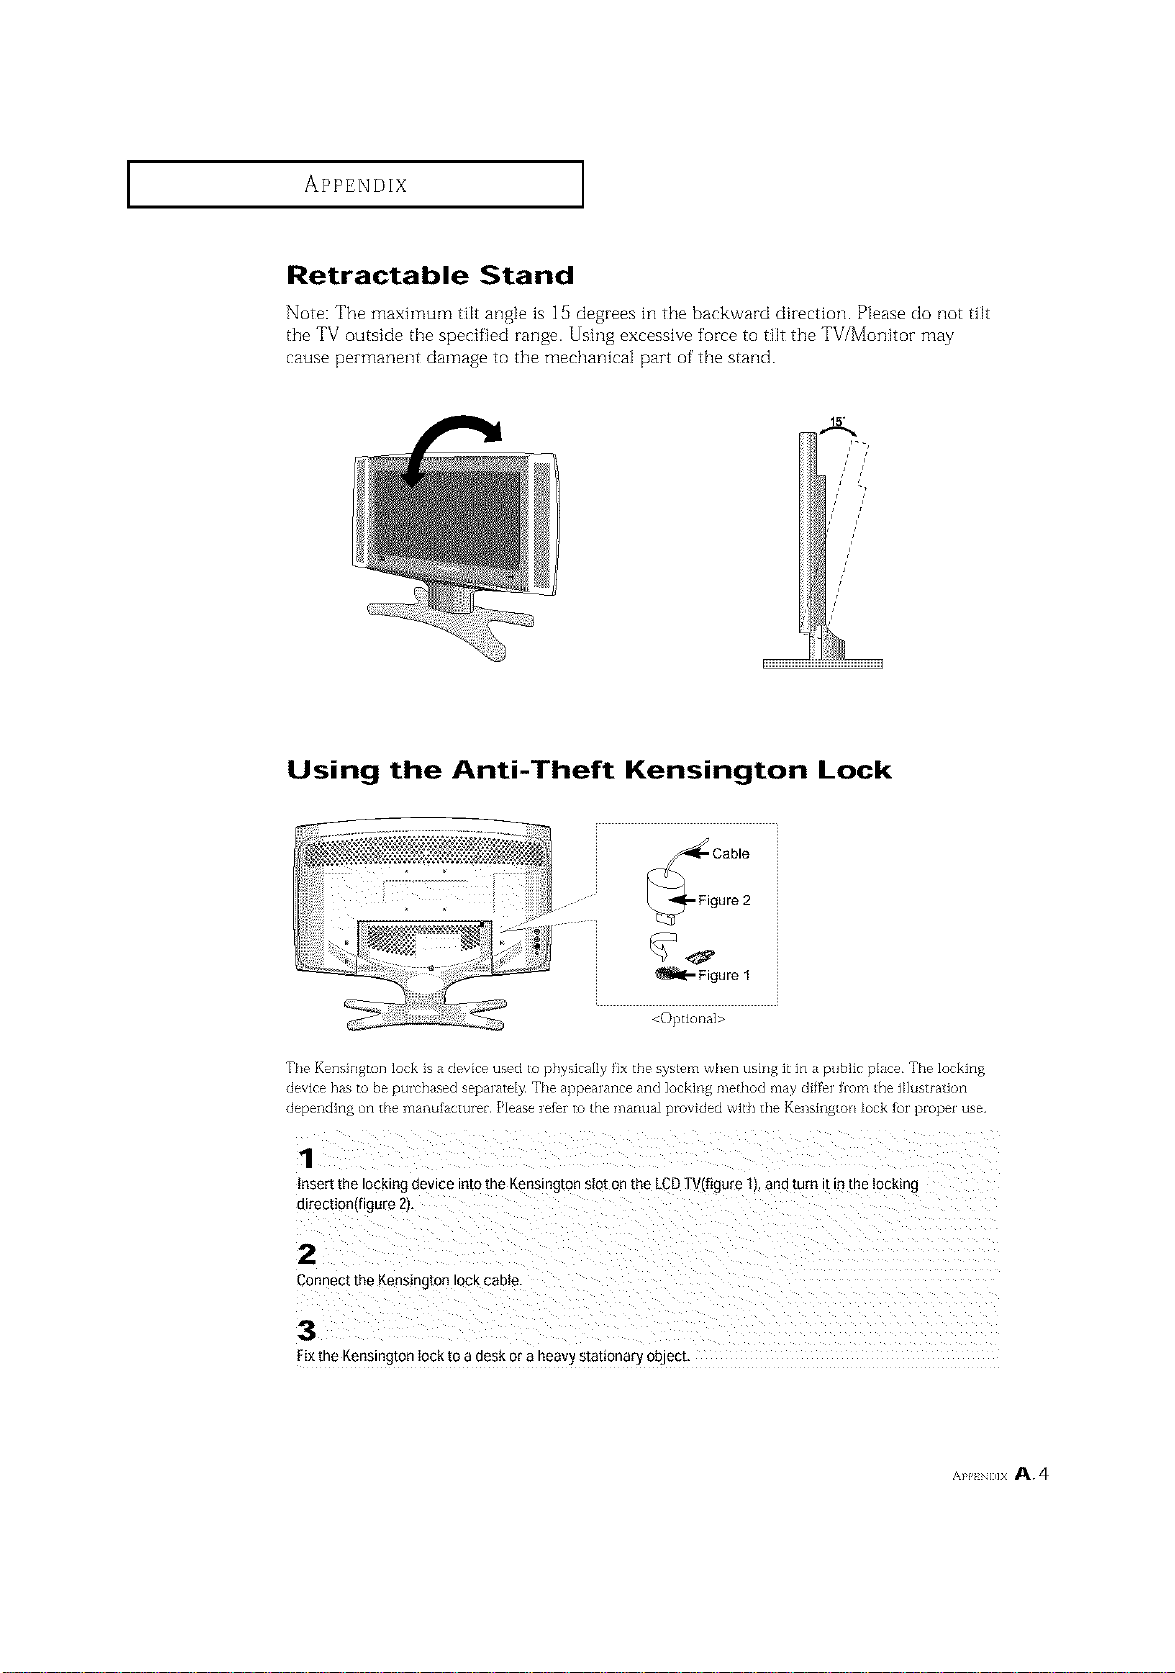
APPENDIX
Retractable Stand
Note: The maximum tilt angle is ]5 degrees in the backward direction. Please do not tilt
the TV outside the specified range• Using excessive force to tilt the TV/Monitor may
cause permanent damage to the mechanical part of the stand.
Using the Anti-Theft Kensington Lock
_Fi Cablegure 2
Figure 1
<Optiorla]>
The Kensington lock is a device used _o physically fix the system when usirlg it in a public place The locking
device has to be purchased separately¸ The appearance and locking me_hod may differ llom [he diustration
<tependin[_ on the ]llanutacturel _ lease refer to the mai1ua_ provided with the Kensh]g[on lock for plopel ¸use.
1
nser_ the locking oevme into me Kenmngton stot on the LCD I/(f_gure 1t, and turn _tm the locking
]lrec[ion(figure 2),
2
3onnect the Kensington lock cable.
3
Fix the Kensington lock to a desk or a heavy stauonary ooJecL
AppI!NI_]X A. 4
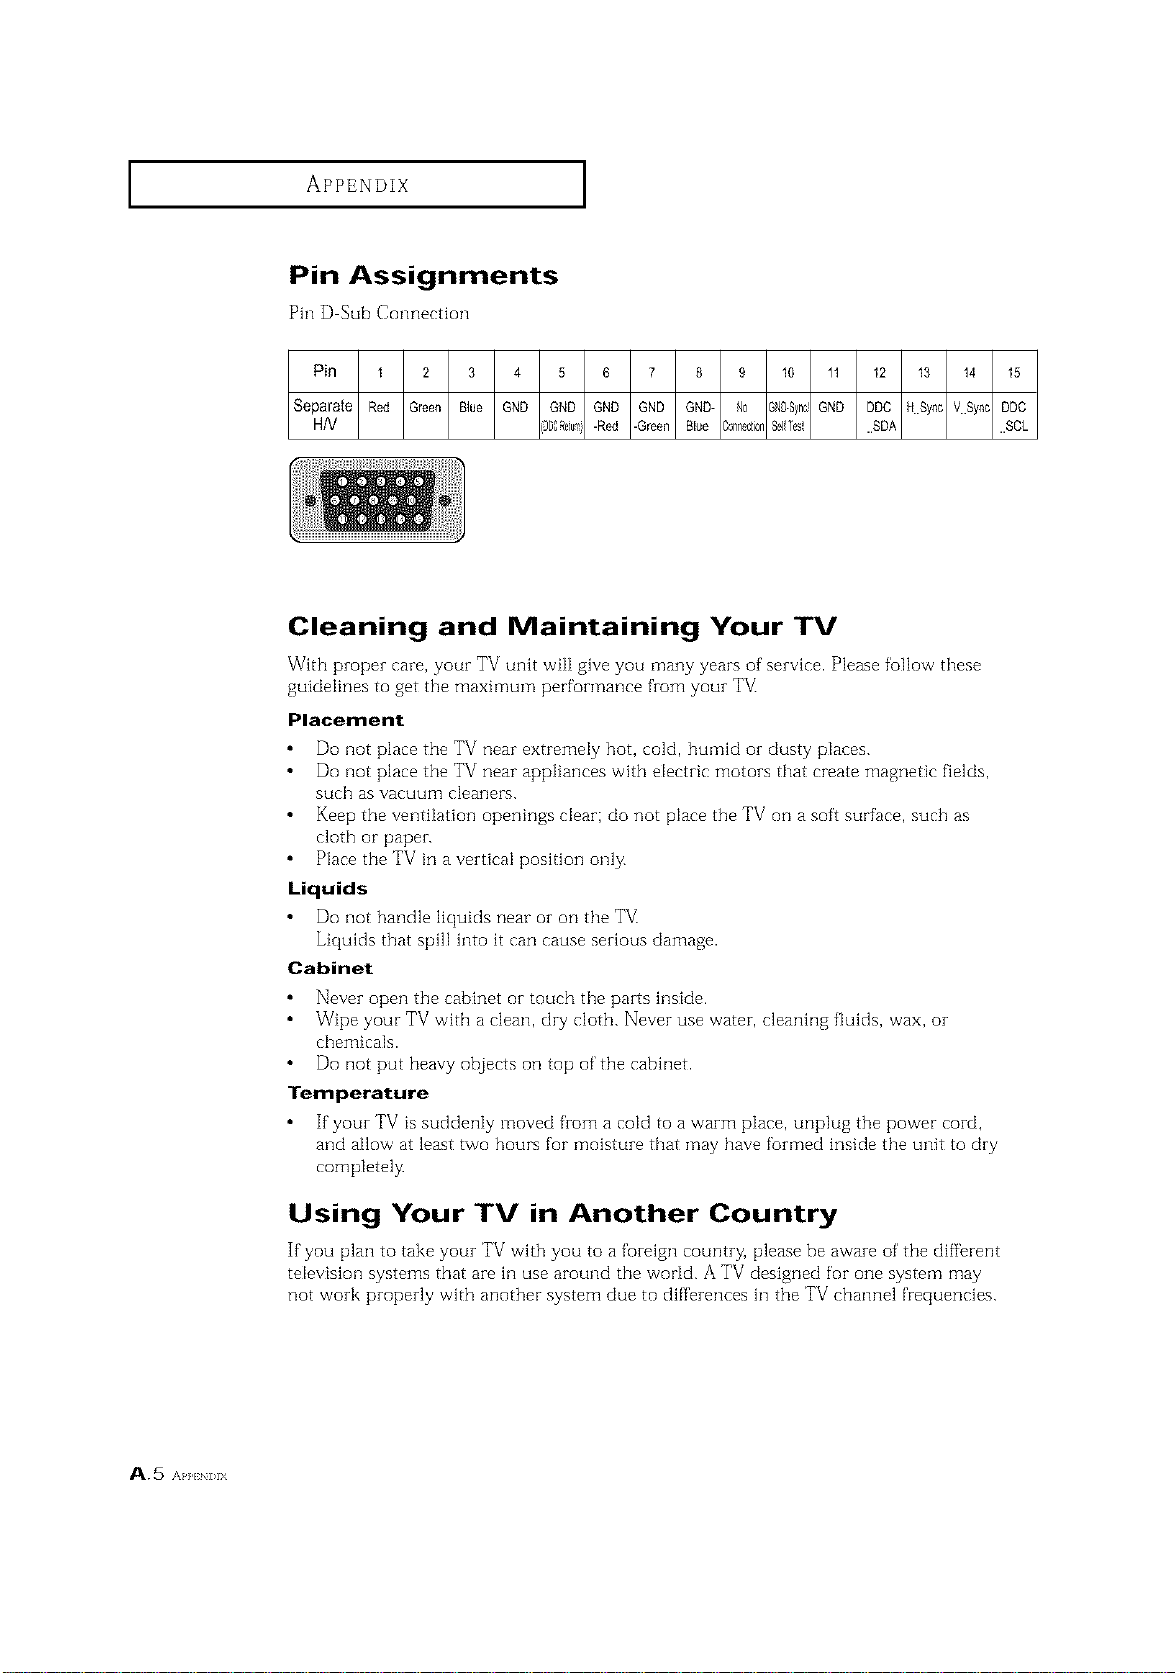
APPENDIX ]
Pin Assignments
Pin D Sub Connection
Pin 1 2 3 4 5 6 7 8 £ 10 11 12 13 14 15
Separate Red Green Blue GND GND GND GND GND- No _ND-SyncGND DDC HSync VSync DDC
H/V r0DC£eu_- -Red -Green BItJe ;onnec_ionSe]lTes{ ....SPA ....SCL
Cleaning and Maintaining Your TV
With proper care, your TV unit will give you many years of"service. Please follow these
guidelines to get the maximum performance from your TV_
Placement
Do not place the TV near extremely hot, cold, humid oi- dusty places.
Do not place the TV near appliances with electric motors that create magnetic fields,
such as vacuum] cleaners.
Keep the ventilation openings clear; do not place the TV on a soft suff'ace, such as
cloth or paper.
Place the TV in a vertical position only.
Liquids
Do not handle liquids near or on the T_/_
Liquids that spill into it can cause serious damage.
Cabinet
Never open the cabinet or touch the parts hlside.
Wipe your TV with a clean, dry cloth. Never use water, cleaning fluids, wax, or
chemicals.
Do not put heavy objects on top of the cabinet.
Temperature
If your TV is suddenly moved from a cold to a warm place, unplug the power cord,
and allow at least two hours for mdsture that may have formed inside the unit to dry
completelz
Using Your TV in Another Country
If you plan to take your TV with you to a foreign country, please be aware of the diffbrent
television systems that are in use around the world. A TV designed for one system may
not work properly with another system due to differences in the TV channel frequencies.
A.5 APPEN] >IX
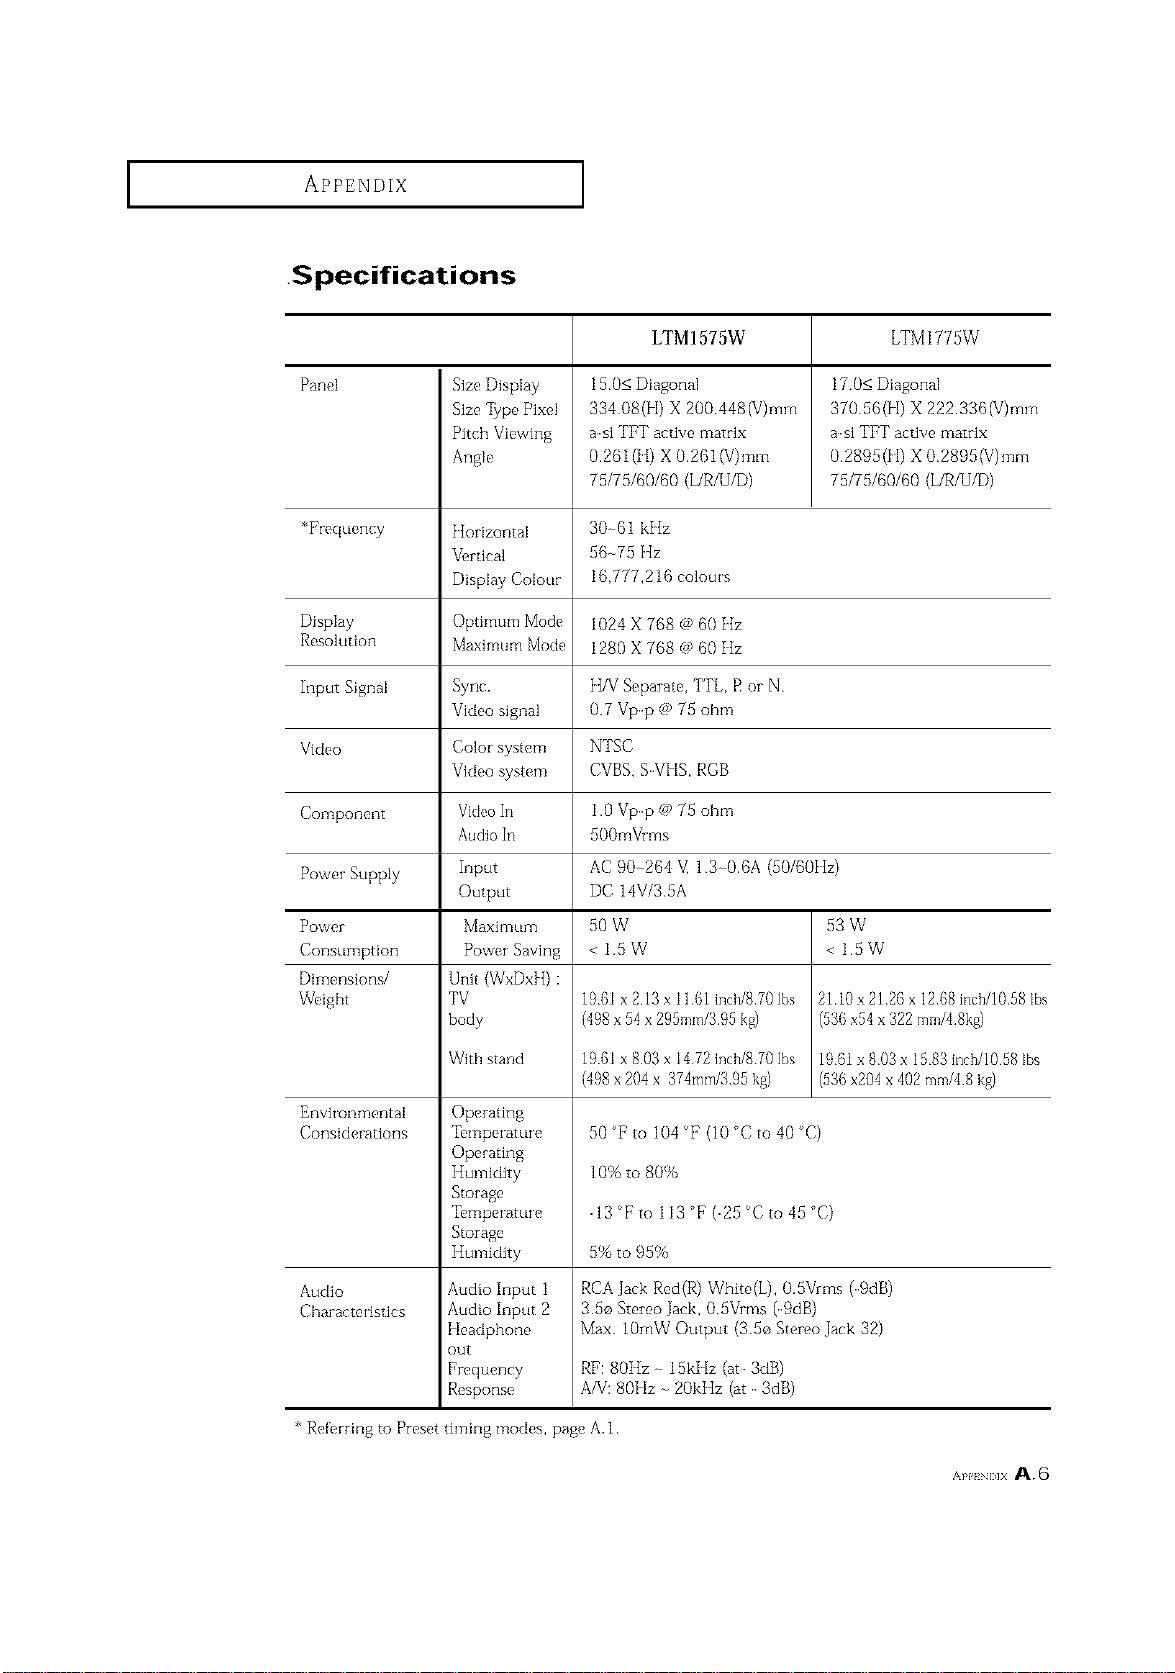
APPENDIX
.Specifications
LTM1575W LTM1775W
Panel Size DispIay 150< Diagonal 17.0< Diagonal
Size]9pe Pixel 334 08(H) X 200.448(V)mrn 370 56(H) X 222.336(V)mrn
asJ TI?T active matrix asJ TI?T active matrix
Angle 0.261(H) X 0.261 IV)ram 0.2895(H) X 0.2895IV)ram
75/75/60/60 (L/R/U/D) 75/75/60/60 (L/R/U/D)
*Frequency Horizontal 30-61 kIIz
%rtical 56-75 }_Iz
Display Colour 16,777,216 colouIs
Display 1024 X 768 @ 60 Hz
Resolution Maximum Mode 1280 X 768 @ 60 Iiz
Input Signal Sync.
Video signal 0.7 Vpp @ 75 ohm
Video Color system NTSC
Video system CVBS, SVHS, ROB
Component VideoIn 1.0 Vpp @ 75 ohm
Audio In 500mVims
Power Supply Input AC 90264 V,1 30.6A (50/60IIz)
Output DC 14V/3 5A
Power Maximum 50 W 53 W
Consumption Power Saving < 1.5 W < 1.5 W
Dimensions/ Unit (WxDxH) :
Weight TV 1961x213xllBlinch/8701bs 2110x2126x1268inch/10581bs
body
With stand 196ix 803x i472inch/8701bs 1961x 803x 1583 inch/10581bs
498 x204 x 374mm/395 kg) (936x204 x 402mm/48 kg)
Environmental
Considerations
Audio
Characteristics
Operating
Temperature
Operating
Storage
Temperature
Storage
tIumidJty
Audio Input 1
Audio Input 2
Headphone
out
Frequency
Response
50 Fro104 F(lO'Cto40 C)
10% to 80%
13 Fto113'F(25 Cto45'C)
5% to 95%
RCA Jack Red(R) Whitc,(L), 0.5Vrms (9dB)
35o SteIeo Jack, 0.5Vrms (9dB)
Max lOmW Output (350 Stereo Jack 32)
RF: 8011z 15kHz (at 3dB)
A/V: 80Hz 20kIIz (at 3dB)
* ReDrring to Preset timing modes, page A.1
APP ,Ix A.6

S_sung El_-t_ _edca inc.
105 Cha|lenser Road, Rtdge_e_dPaL'k,N.J. 07660
SERVICE DIVISION'.
TEL" 1-800-SAMSUNG (1-800-726-786_}
BN68-_248E.-00(ENG')