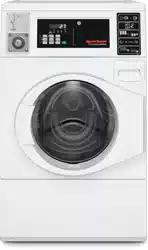
Installation/Operation
Frontload Washers
Metered Commercial
FLW1543C_SVG
Original Instructions
Keep These Instructions for Future Reference.
CAUTION: Read the instructions before using the machine.
(If this machine changes ownership, this manual must accompany machine.)
www.alliancelaundry.com
Part No. 807871ENR3
February 2024

WARNING
Failure to install, maintain, and/or operate this ma-
chine according to the manufacturer's instructions
may result in conditions which can produce bodily
injury and/or property damage.
W030
WARNING
For your safety and to reduce the risk of fire or an
explosion, do not store or use gasoline or other
flammable vapors and liquids in the vicinity of this or
any other appliance.
W022
WARNING
Models with electronic control:
• INGESTION HAZARD: This product contains a
non-replaceable button cell or coin battery.
• Battery Type: CR-2450/VAN, CR-2354/VCN,
CR2032
• Nominal voltage: 3V
• DEATH or serious injury can occur if ingested.
• A swallowed button cell or coin battery can cause
Internal Chemical Burns in as little as 2 hours.
• KEEP new and used batteries OUT OF REACH of
CHILDREN.
• Seek immediate medical attention if a battery is
suspected to be swallowed or inserted inside any
part of the body.
W1076
NOTE: The WARNING and IMPORTANT instructions ap-
pearing in this manual are not meant to cover all possi-
ble conditions and situations that may occur. It must
be understood that common sense, caution, and care-
fulness are factors which cannot be built into these
washers. These factors MUST BE supplied by the per-
son(s) installing, maintaining, or operating the unit.
Always contact the distributor, service agent, or the manufacturer
about any problems or conditions you do not understand.
Read all instructions before using unit.
This product uses FreeRTOS V7.2.0 (www.freertos.org).
Regulatory Statements
PRODUCT COMPLIANCE
Users of this product are cautioned not to make modifications or
changes that are not approved by Alliance Laundry Systems,
LLC. Doing so may void the compliance of this product with ap-
plicable laws and regulatory requirements and may result in the
loss of the user’s authority to operate the equipment.
UNITED STATES
This device complies with Part 15 of the FCC Rules. Operation is
subject to the following two conditions; (1) This device may not
cause harmful interference, and (2) this device must accept any
interference received, including interference that may cause un-
desired operation.
This equipment has been tested and found to comply with the
limits for a Class B digital device, pursuant to Part 15 of the FCC
Rules. These limits are designed to provide reasonable protection
against harmful interference in a residential installation. This
equipment generates uses and can radiate radio frequency energy
and, if not installed and used in accordance with the instructions,
may cause harmful interference to radio communications. How-
ever, there is no guarantee that interference will not occur in a
particular installation. If this equipment does cause harmful inter-
ference to radio or television reception, which can be determined
by turning the equipment off and on, the user is encouraged to try
to correct the interference by one or more of the following meas-
ures:
• Reorient or relocate the radio or television receiving antenna.
• Increase the separation between the computer equipment or
receiver.
• Connect the equipment into an outlet on a circuit different
from that to which the radio or television receiver is connec-
ted.
• Consult the dealer or experienced radio television technician
for help.
©
Copyright, Alliance Laundry Systems LLC -
DO NOT COPY or TRANSMIT
3 Part No. 807871ENR3

CAUTION
To comply with the limits of the Class B device, pur-
suant to Part 15 of the FCC Rules, this device is to
comply with Class B limits. All peripherals must be
shielded and grounded. Operation with non-certified
peripherals or non-shielded cables is likely to result
in interference and reception of the device.
W1004
Radiation Exposure Statement : This equipment complies with
FCC radiation exposure limits set forth for an uncontrolled envi-
ronment. The radio installed in this equipment and is intended to
operate with minimum distance 20cm between the radiator and
your body.
Limited Channels Fixed For Use In USA : IEEE 802.11b or
802.11g or 802.11n(HT20) operation of this product in the U.S. is
firmware-limited to Channel 1 through 11.
CANADA - CAN ICES-3(B)/NMB-3(B)
This device contains license-exempt transmitter(s)/receiver(s)
that comply with Innovation, Science and Economic Develop-
ment Canada’s license-exempt RSS(s) standards. Operation is
subject to the following two conditions:
• This device may not cause interference.
• This device must accept any interference, including interfer-
ence that may cause undesired operation of the device.
Radiation Exposure Statement: This equipment complies with
Innovation, Science and Economic Development Canada’s radia-
tion exposure limits set forth for in RSS-102. The radio installed
in this equipment is installed and is intended to operate with min-
imum distance 20cm between the radiator and your body.
EUROPE
Products bearing the CE mark comply with the following EU di-
rectives:
• EMC Directive 2014/30/EU
• Machinery Directive 2006/42/EC
• Gas Appliance Directive 2016/426/EU
• RoHS Directive 2011/65/EU and its amendment directives;
Commission Delegated Directive 2015/863 to restrict four
phthalates
If the product has telecommunications functionality, it also com-
plies with the requirements of the following EU directive:
• Radio Equipment Directive 2014/53/EU
Compliance with these Directives implies conformity to harmon-
ized European standards that are noted in the EU Declaration of
Conformity which is available upon request.
Alliance Laundry Systems products comply with the requirement
of Article 12 as it can be operated in at least one Member State as
examined and the product is compliant with Article 11 as it has
no restrictions on putting into service in all EU member states.
This device contains a 2.4GHz transceiver, intended for indoor
use only in all EU member states, EFTA states, and Switzerland.
Attention has been given to allowed operational frequencies. For
detailed information concerning installations in France, the user
should contact the national spectrum authority in France (http://
www.arcep.fr/ )
Be aware that outdoor installations require special attention and
will only be handled by trained and qualified installation person-
nel. No one from the general-public is permitted to install wire-
less products outdoors when external antennas, power and
grounding must be installed for use.
AUSTRALIA/NEW ZEALAND
The radio in this equipment complies with and is certified to the
Australian and New Zealand regulatory requirements.
BRAZIL ANATEL
This device is not entitled to protection against harmful interfer-
ence and may not interfere with duly authorized systems.
CHINA SRRC
The radio device has recieved certification of conformance in ac-
cordance with the People's Republic of China State Radio Regu-
lation Committee (SRRC) certification scheme. Integrations of
this radio into a final product does not require additional radio
certification provided installation instructions are followed. No
changes are authorized to the radio or the antenna of the ap-
proved device.
JAPAN
This product is equipped with a certified wireless device pursuant
to Article 2-1-19 of the Certification Ordinance. No changes are
authorized to the radio or the antenna of the approved device.
MEXICO IFETEL
“The operation of this equipment is subject to the following two
conditions: (1) it is possible that this equipment or device does
not cause harmful interference and (2) this equipment or device
must accept any interference, including that which may cause its
unwanted operation.”
SOUTH KOREA (KC)
The radio device has received certification of conformance in ac-
cordance with the Radio Waves Act. Integration of this radio into
a final product does not require additional radio certification pro-
vided installation instructions are followed. No changes are au-
thorized to the radio or the antenna of the approved device.
TAIWAN
©
Copyright, Alliance Laundry Systems LLC -
DO NOT COPY or TRANSMIT
4 Part No. 807871ENR3

The information in this section applies to products bearing the
Taiwan National Communications Commission mark:
This telecom equipment has complied with NCC regulations.
According to “Administrative Regulations of Low Power Radio
Waves Radiated Devices:
Article 12 The low-power radio-frequency devices must not be
altered by changing the frequency, enhancing emission power,
adding external antenna, and modification of original design
characteristic as well as function.
Article 14 The operation of the low-power radio-frequency devi-
ces is subject to the conditions that no harmful interference is
caused. The user must stop operating the device immediately
should harmful interference is caused and shall not resume until
the condition causing the harmful interference has been correc-
ted.
Moreover, the interference must be accepted that may be caused
by the operation of an authorized communications, or ISM equip-
ment. (1) Precautions (marked in the product manual and on out-
er packaging)
THAILAND
The information in this section applies to products approved by
the Thailand National Communications Commission:
These telecommunication and device are compliance with the re-
quirements of National Broadcasting and Telecommunication
Commission.
©
Copyright, Alliance Laundry Systems LLC -
DO NOT COPY or TRANSMIT
5 Part No. 807871ENR3
Safety Information
Explanation of Safety Instruction
Messages
Precautionary statements (“DANGER,” “WARNING,” and
“CAUTION”), followed by specific instructions, are found in this
manual and on machine decals. These precautions are intended
for the personal safety of the operator, user, servicer, and those
maintaining the machine.
DANGER
Indicates an imminently hazardous situation that, if
not avoided, will cause severe personal injury or
death.
WARNING
Indicates a hazardous situation that, if not avoided,
could cause severe personal injury or death.
CAUTION
Indicates a hazardous situation that, if not avoided,
may cause minor or moderate personal injury or
property damage.
Additional precautionary statements (“IMPORTANT” and
“NOTE”) are followed by specific instructions.
IMPORTANT: The word “IMPORTANT” is used to in-
form the reader of specific procedures where minor
machine damage will occur if the procedure is not fol-
lowed.
NOTE: The word “NOTE” is used to communicate in-
stallation, operation, maintenance or servicing informa-
tion that is important but not hazard related.
Important Safety Instructions
Save These Instructions
WARNING
To reduce the risk of fire, electric shock, serious in-
jury or death to persons when using your washer,
follow these basic precautions:
W023
• Read all instructions before using the washer.
• Install the washer according to the INSTALLATION IN-
STRUCTIONS. Refer to the EARTH/GROUND INSTRUC-
TIONS in the INSTALLATION manual for the proper earth/
ground connection of the washer. All connections for water,
drain, electrical power and earth/ground must comply with lo-
cal codes and be made by licensed personnel when required.
Do not do it yourself.
• Do not install or store the washer where it will be exposed to
water and/or weather.
• Do not wash articles that have been previously cleaned in,
washed in, soaked in, or spotted with gasoline, dry-cleaning
solvents, or other flammable or explosive substances as they
give off vapors that could ignite or explode.
• Do not add the following substances or textiles containing
traces of the following substances to the wash water: gasoline,
kerosene, waxes, cooking oils, vegetable oils, machine oils,
dry-cleaning solvents, flammable chemicals, thinners or other
flammable or explosive substances. These substances give off
vapors that could ignite, explode or cause the fabric to catch
on fire by itself.
• Under certain conditions, hydrogen gas may be produced in a
hot water system that has not been used for two weeks or
more. HYDROGEN GAS IS EXPLOSIVE. If the hot water
system has not been used for such a period, before using a
washing machine or combination washer-dryer, turn on all hot
water faucets and let the water flow from each for several mi-
nutes. This will release any accumulated hydrogen gas. THE
GAS IS FLAMMABLE, DO NOT SMOKE OR USE AN
OPEN FLAME DURING THIS TIME.
• To reduce the risk of an electric shock or fire, DO NOT use an
extension cord or an adapter to connect the washer to the elec-
trical power source.
• Do not allow children to play on or in the washer. Close su-
pervision of children is necessary when the washer is used
near children. This appliance is not intended for use by per-
sons (including children) with reduced physical, sensory or
mental capabilities, or lack of experience and knowledge, un-
less they have been given supervision or instruction concern-
ing the use of the appliance by a person responsible for their
safety. This is a safety rule for all appliances.
• Cleaning and user maintenance shall not be made by children
without supervision.
Safety Information
©
Copyright, Alliance Laundry Systems LLC -
DO NOT COPY or TRANSMIT
6 Part No. 807871ENR3

• Children less than three years should be kept away unless
continuously supervised.
• Models with electronic control: Remove and immediately re-
cycle or dispose of used controls according to local regula-
tions and keep away from children. Do NOT dispose of con-
trols in the trash or incinerate. Do not attempt to remove the
batteries. Even used batteries may cause severe injury or
death. Call a local poison control center for treatment infor-
mation. Non-rechargeable batteries are not to be recharged.
Do not force discharge, recharge, disassemble, heat above
158⁰F [70⁰C] or incinerate. Doing so may result in injury due
to venting, leakage or explosion resulting in chemical burns.
• Never operate the washer with any guards, panels and/or parts
removed or broken. DO NOT tamper with the controls or by-
pass any safety devices.
• DO NOT operate individual units if they have been separated
from a stack unit.
• Use your washer only for its intended purpose, washing
clothes. Always follow the fabric care instructions supplied
by the garment manufacturer.
• Always read and follow manufacturer’s instructions on pack-
ages of laundry and cleaning aids. To reduce the risk of poi-
soning or chemical burns, keep them out of the reach of chil-
dren at all times (preferably in a locked cabinet). Heed all
warnings or precautions.
• Do not use fabric softeners or products to eliminate static un-
less recommended by the manufacturer of the fabric softener
or product.
• Loading door MUST BE CLOSED any time the washer is to
fill, tumble or spin. DO NOT bypass the loading door switch
by permitting the washer to operate with the loading door
open.
• Be sure water connections have a shut-off valve and that fill
hose connections are tight. CLOSE the shut-off valves at the
end of each wash day.
• Keep your washer in good condition. Bumping or dropping
the washer can damage safety features. If this occurs, have
your washer checked by a qualified service person.
• Do not repair or replace any part of the washer, or attempt any
servicing unless specifically recommended in the user-mainte-
nance instructions or in published user-repair instructions that
you understand and have the skills to carry out. ALWAYS dis-
connect the washer from electrical supply before attempting
any service.
• Disconnect the power cord by grasping the plug, not the cord.
If the supply cord is damaged, it must be replaced by the man-
ufacturer, its service agent or similarly qualified persons in or-
der to avoid a hazard.
• Before the washer is removed from service or discarded, re-
move the lid or door to the washing compartment.
• Failure to install, maintain, and/or operate this washer accord-
ing to the manufacturer’s instructions may result in conditions
which can produce bodily injury and/or property damage.
NOTE: The WARNING and IMPORTANT SAFETY IN-
STRUCTIONS appearing in this manual are not meant
to cover all possible conditions and situations that may
occur. Observe and be aware of other labels and pre-
cautions that are located on the machine. They are in-
tended to provide instruction for safe use of the ma-
chine. Common sense, caution and care must be exer-
cised when installing, maintaining, or operating the
washer.
Always contact your dealer, distributor, service agent or the man-
ufacturer about any problems or conditions you do not under-
stand.
Safety Information
©
Copyright, Alliance Laundry Systems LLC -
DO NOT COPY or TRANSMIT
7 Part No. 807871ENR3

Table of Contents
Safety Information................................................................................. 6
Explanation of Safety Instruction Messages...................................................... 6
Important Safety Instructions........................................................................... 6
Dimensions and Specifications.............................................................. 10
Installation............................................................................................11
Before You Start........................................................................................... 11
Tools........................................................................................................ 11
Order of Installation Steps.......................................................................... 11
Position Unit Near Installation Area................................................................11
Remove Shipping Materials........................................................................... 11
Connect Fill Hoses........................................................................................12
Water Supply Requirements....................................................................... 12
Connecting Hoses......................................................................................13
Risers.......................................................................................................13
Connect Drain Hose to Drain Receptacle.........................................................14
Standpipe Installation................................................................................ 14
Position and Level the Washer........................................................................15
Wipe Out Inside of Wash Drum......................................................................15
Plug In the Washer........................................................................................ 16
Electrical Requirements............................................................................. 16
Earth/Ground Instructions.......................................................................... 16
Connect Laundry IQ to Gateway (Select Models)............................................ 17
Check Installation......................................................................................... 17
Vending....................................................................................................... 17
Meter Case............................................................................................... 17
Models Prepped for Card Reader ............................................................... 17
Operation............................................................................................. 19
Operation Instructions................................................................................... 19
Load Laundry........................................................................................... 19
Close Loading Door...................................................................................19
Add Laundry Supplies............................................................................... 19
Set Cycle.................................................................................................. 20
Set Wash Temperature............................................................................... 20
Set Wash Level......................................................................................... 20
Insert Coins or Card...................................................................................20
Start Washer..............................................................................................21
Indicator Lights.........................................................................................21
Maintenance......................................................................................... 22
©
Copyright 2024, Alliance Laundry Systems LLC
All rights reserved. No part of the contents of this book may be reproduced or transmitted in any form or by any means without the expressed
written consent of the publisher.
©
Copyright, Alliance Laundry Systems LLC -
DO NOT COPY or TRANSMIT
8 Part No. 807871ENR3

User-Maintenance Instructions....................................................................... 22
Lubrication............................................................................................... 22
Cold Weather Care.................................................................................... 22
Care of Your Washer..................................................................................22
Cleaning Glass Sealing Area...................................................................... 22
Replacing Hoses........................................................................................22
Filter Screens............................................................................................ 22
Extended Non-Use.................................................................................... 22
Laundry IQ (Select Models)....................................................................... 22
Cleaning Foreign Object Trap.....................................................................22
Reinstallation of Shipping Materials............................................................23
Troubleshooting....................................................................................24
Contact Information............................................................................. 26
Installer Checklist.................................................................................27
©
Copyright, Alliance Laundry Systems LLC -
DO NOT COPY or TRANSMIT
9 Part No. 807871ENR3

Dimensions and Specifications
L
K
J
I
H
G
F
E
D
C
B
A
FLW2345N_SVG
Figure 1
A 22.06 in. [560 mm]
B - Electronic Control 38.19 in. [970 mm]
B - Coin Slide Operated 40.19 in. [1021 mm]
C - Standard Capacity Meter Case 43 in. [1092 mm]
C - High Capacity Meter Case 43.875 in. [1114 mm]
D 32 in. [813 mm]
E 36 in. [914 mm]
F * 14.6 in. [371 mm]
G 26.875 in. [683 mm]
H 2.04 in. [52 mm]
I 27.73 in. [704 mm]
J (with door closed) 1.59 in. [40 mm]
K 13.1 in. [333 mm]
L 24 in. [610 mm]
* For ADA compliance turn legs out from base 0.5 inches.
Dimensions and Specifications
©
Copyright, Alliance Laundry Systems LLC -
DO NOT COPY or TRANSMIT
10 Part No. 807871ENR3

Installation
Before You Start
Tools
For most installations, the basic tools needed are:
9
/
1
6
"
FLW2376N_SVG
5
6
7
8
4
3
2
1
1. Safety Glasses
2. Wood Block
3. Wrench
4. Screwdriver
5. Pliers
6. Socket Wrench
7. Gloves
8. Level
Figure 2
NOTE: An 8 in. [20.32 cm] coin drawer is required for
coin operated models.
NOTE: If the washer is delivered on a cold day (below
freezing), or is stored in an unheated room or area dur-
ing the cold months, do not attempt to operate it until
the washer has had a chance to warm up.
NOTE: Install dryer before washer. This allows room for
attaching exhaust duct.
NOTE: Some moisture in the wash drum is normal. Wa-
ter is used during testing at the manufacturer.
NOTE: This appliance is suitable for use in countries
having a warm, damp climate.
Order of Installation Steps
The proper order of steps must be followed to ensure correct in-
stallation. Refer to the list below when installing your unit.
1. Position washer near the installation area.
2. Remove the shipping materials.
3. Connect the fill hoses.
4. Connect the drain hose to the drain receptacle.
5. Position and level the washer.
6. Wipe out inside of the washer.
7. Plug in the washer.
8. Connect Laundry IQ
TM
to gateway (select models).
9. Check installation.
Position Unit Near Installation Area
Move unit so that it is within 4 feet [1.2 meters] of the desired
area of installation.
NOTE: For best performance and to minimize vibration
or movement, install washer on a solid, sturdy and lev-
el floor. Some floors may need to be reinforced, espe-
cially on a second floor or over a basement. Do not in-
stall the washer on carpeting, soft tile or other weakly
supported structures.
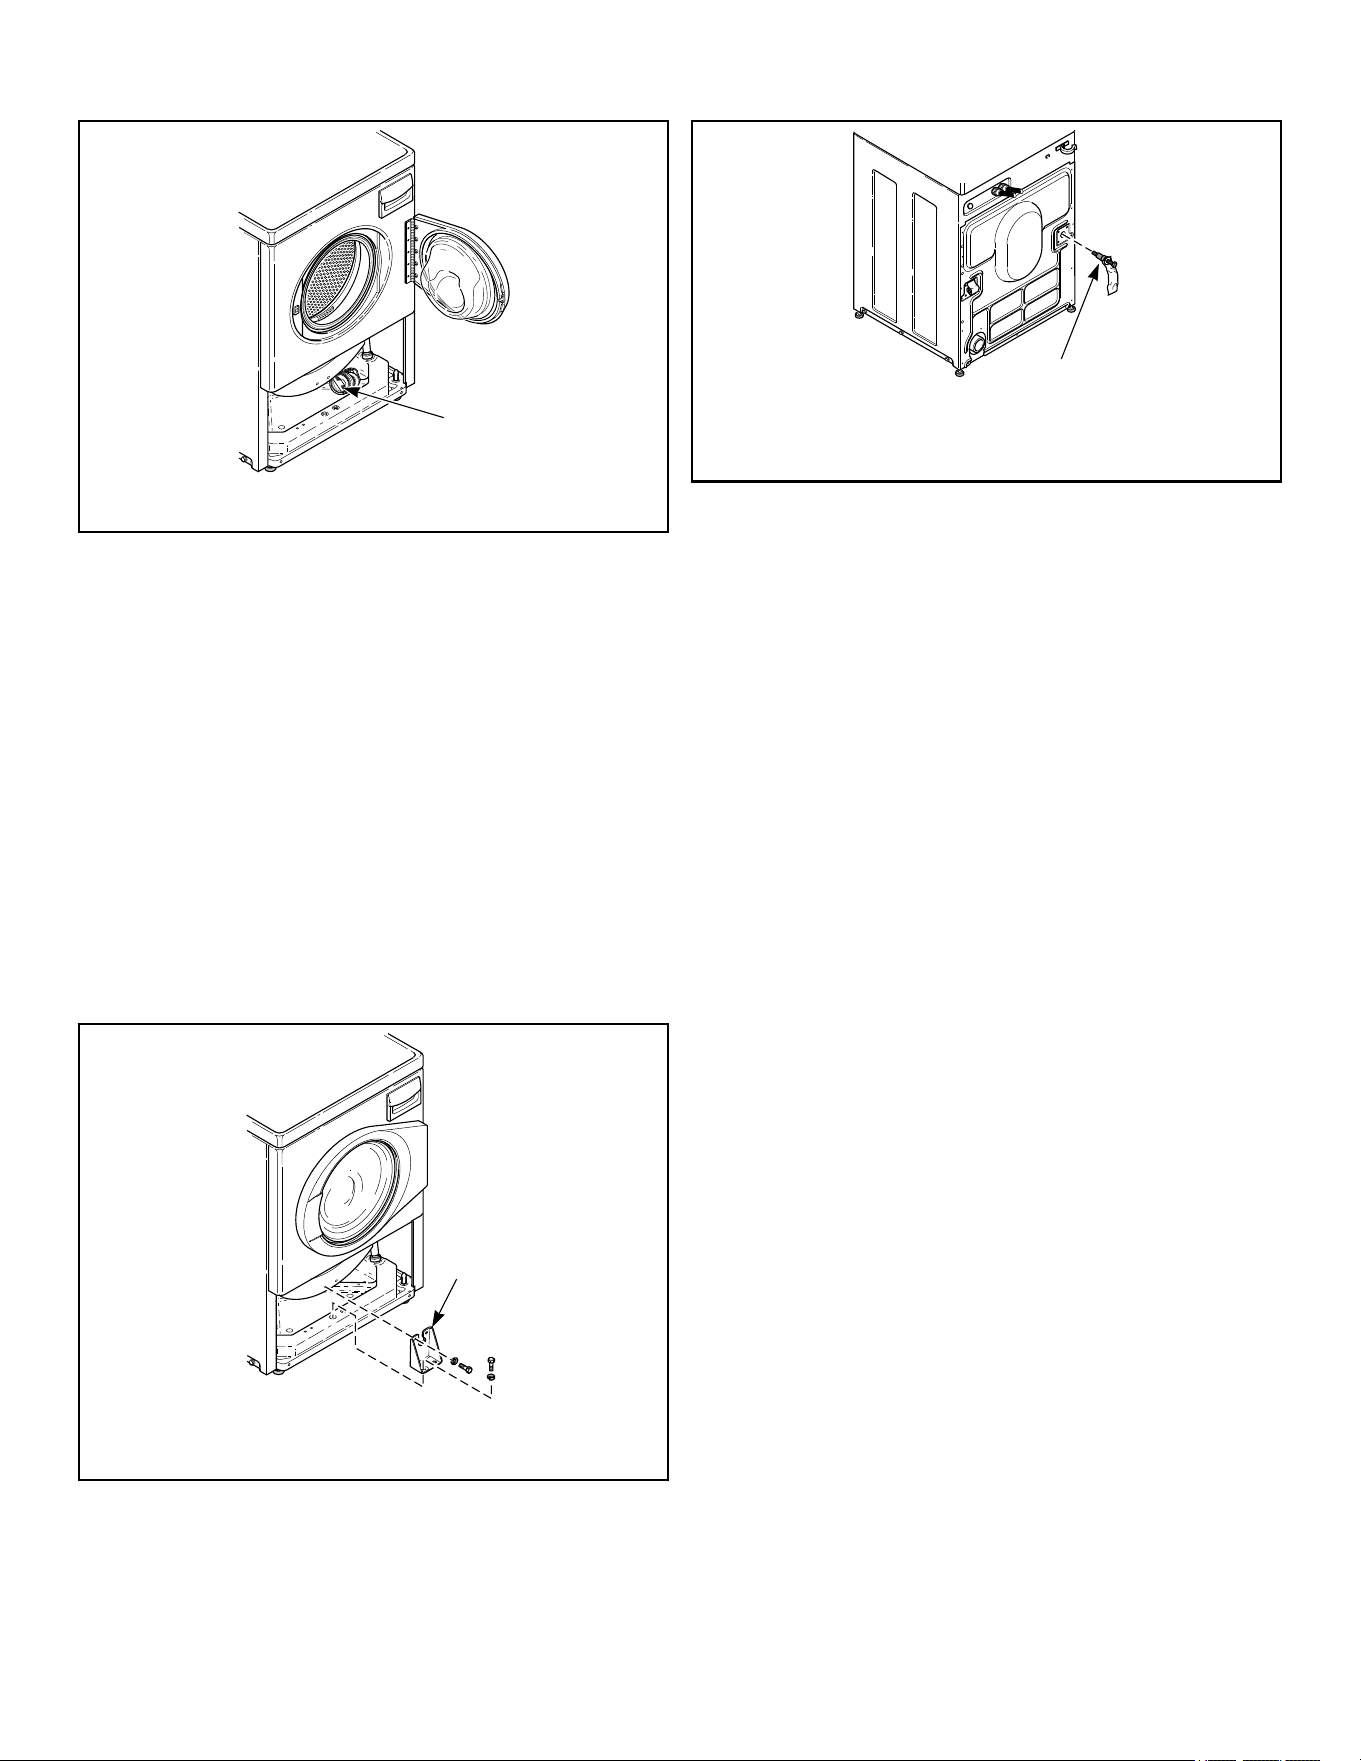
Remove Shipping Materials
1. Remove two screws at bottom of front access panel. Rotate
bottom of panel out and remove panel.
FLW2378N_SVG
Figure 3
2. Remove two 9/16 inch bolts and washers holding shipping
brace to weight.
Installation
©
Copyright, Alliance Laundry Systems LLC -
DO NOT COPY or TRANSMIT
11 Part No. 807871ENR3
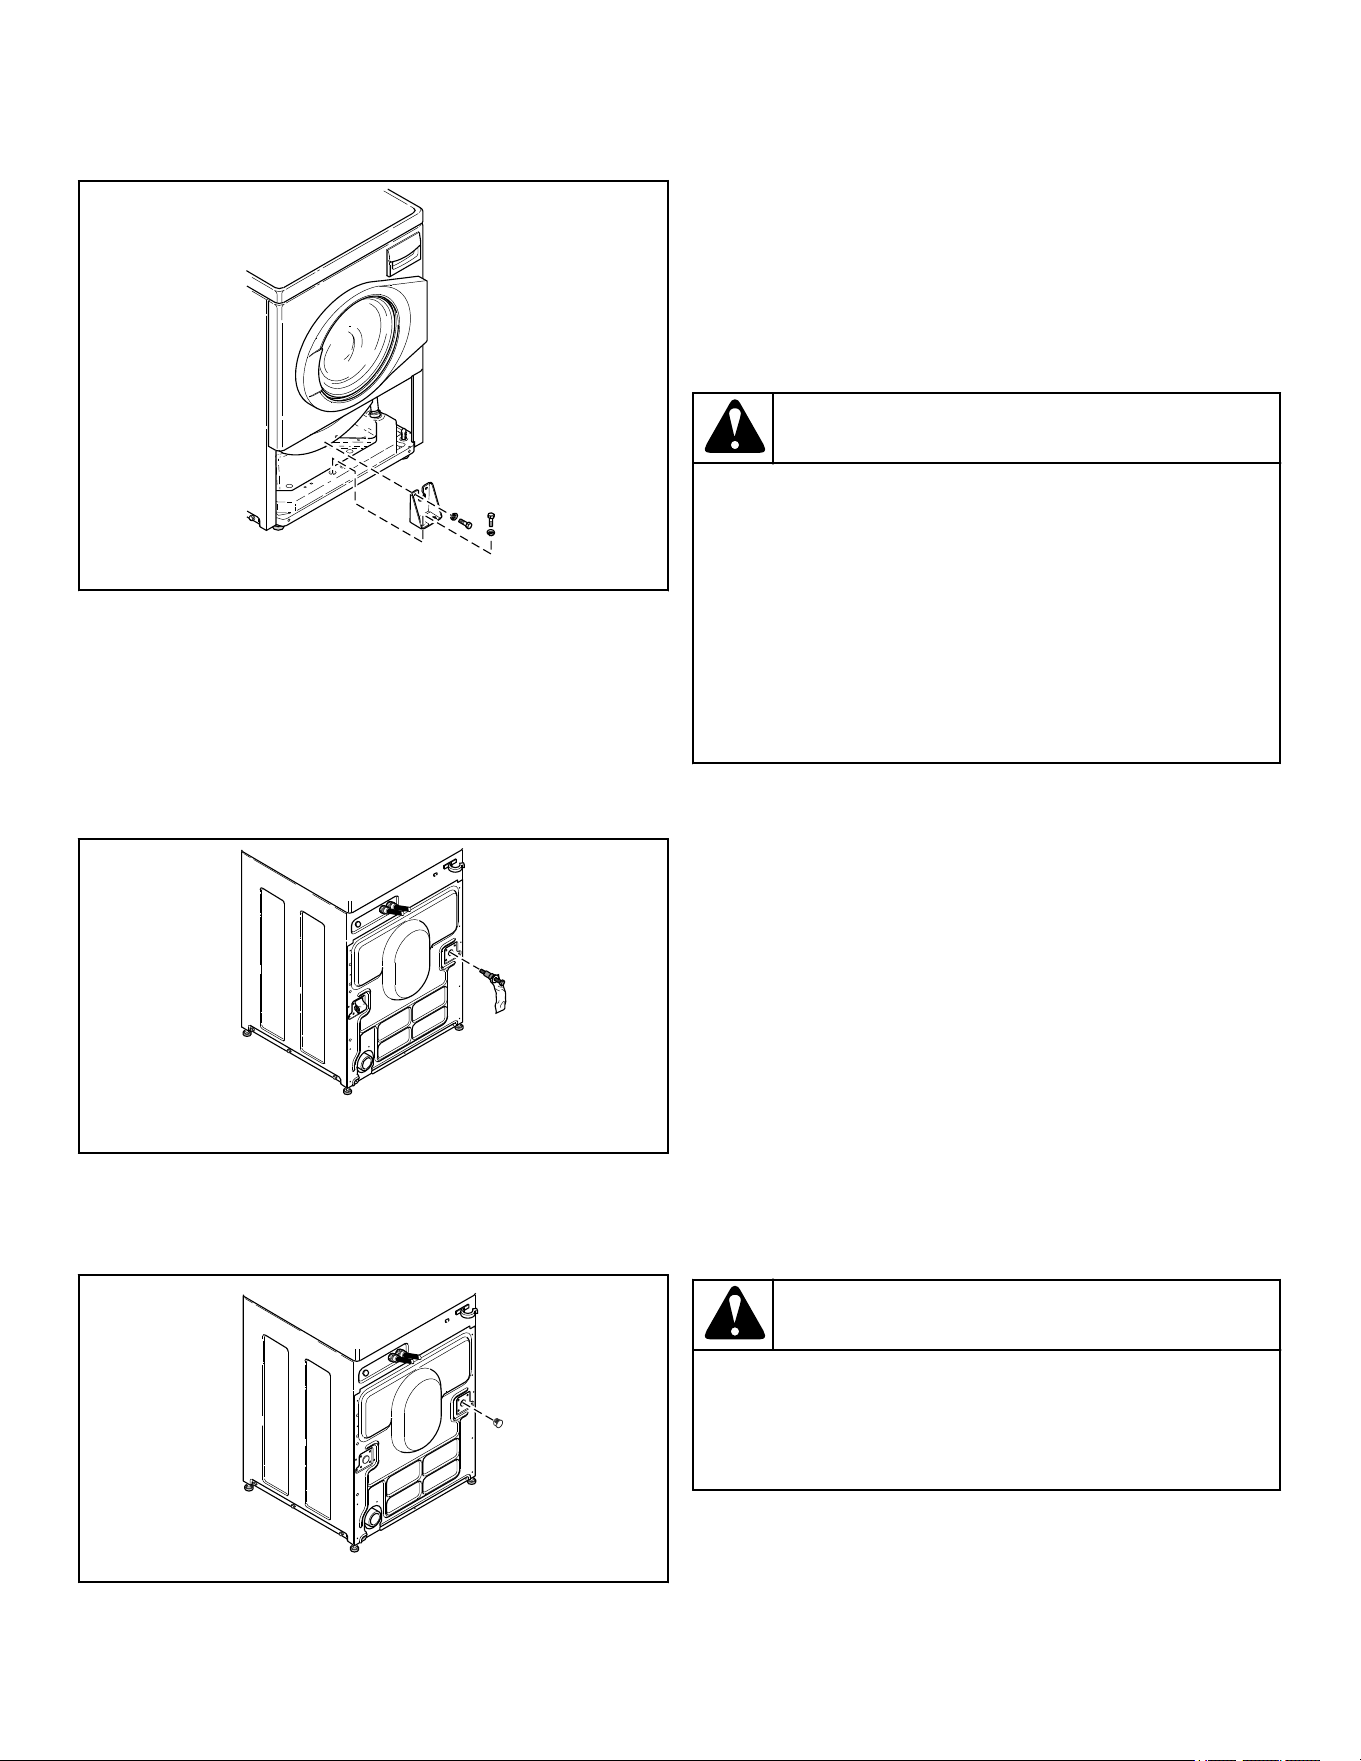
3. Remove two 9/16 inch bolts and washers holding shipping
brace to washer base and remove brace.
FLW2296N_SVG1
Figure 4
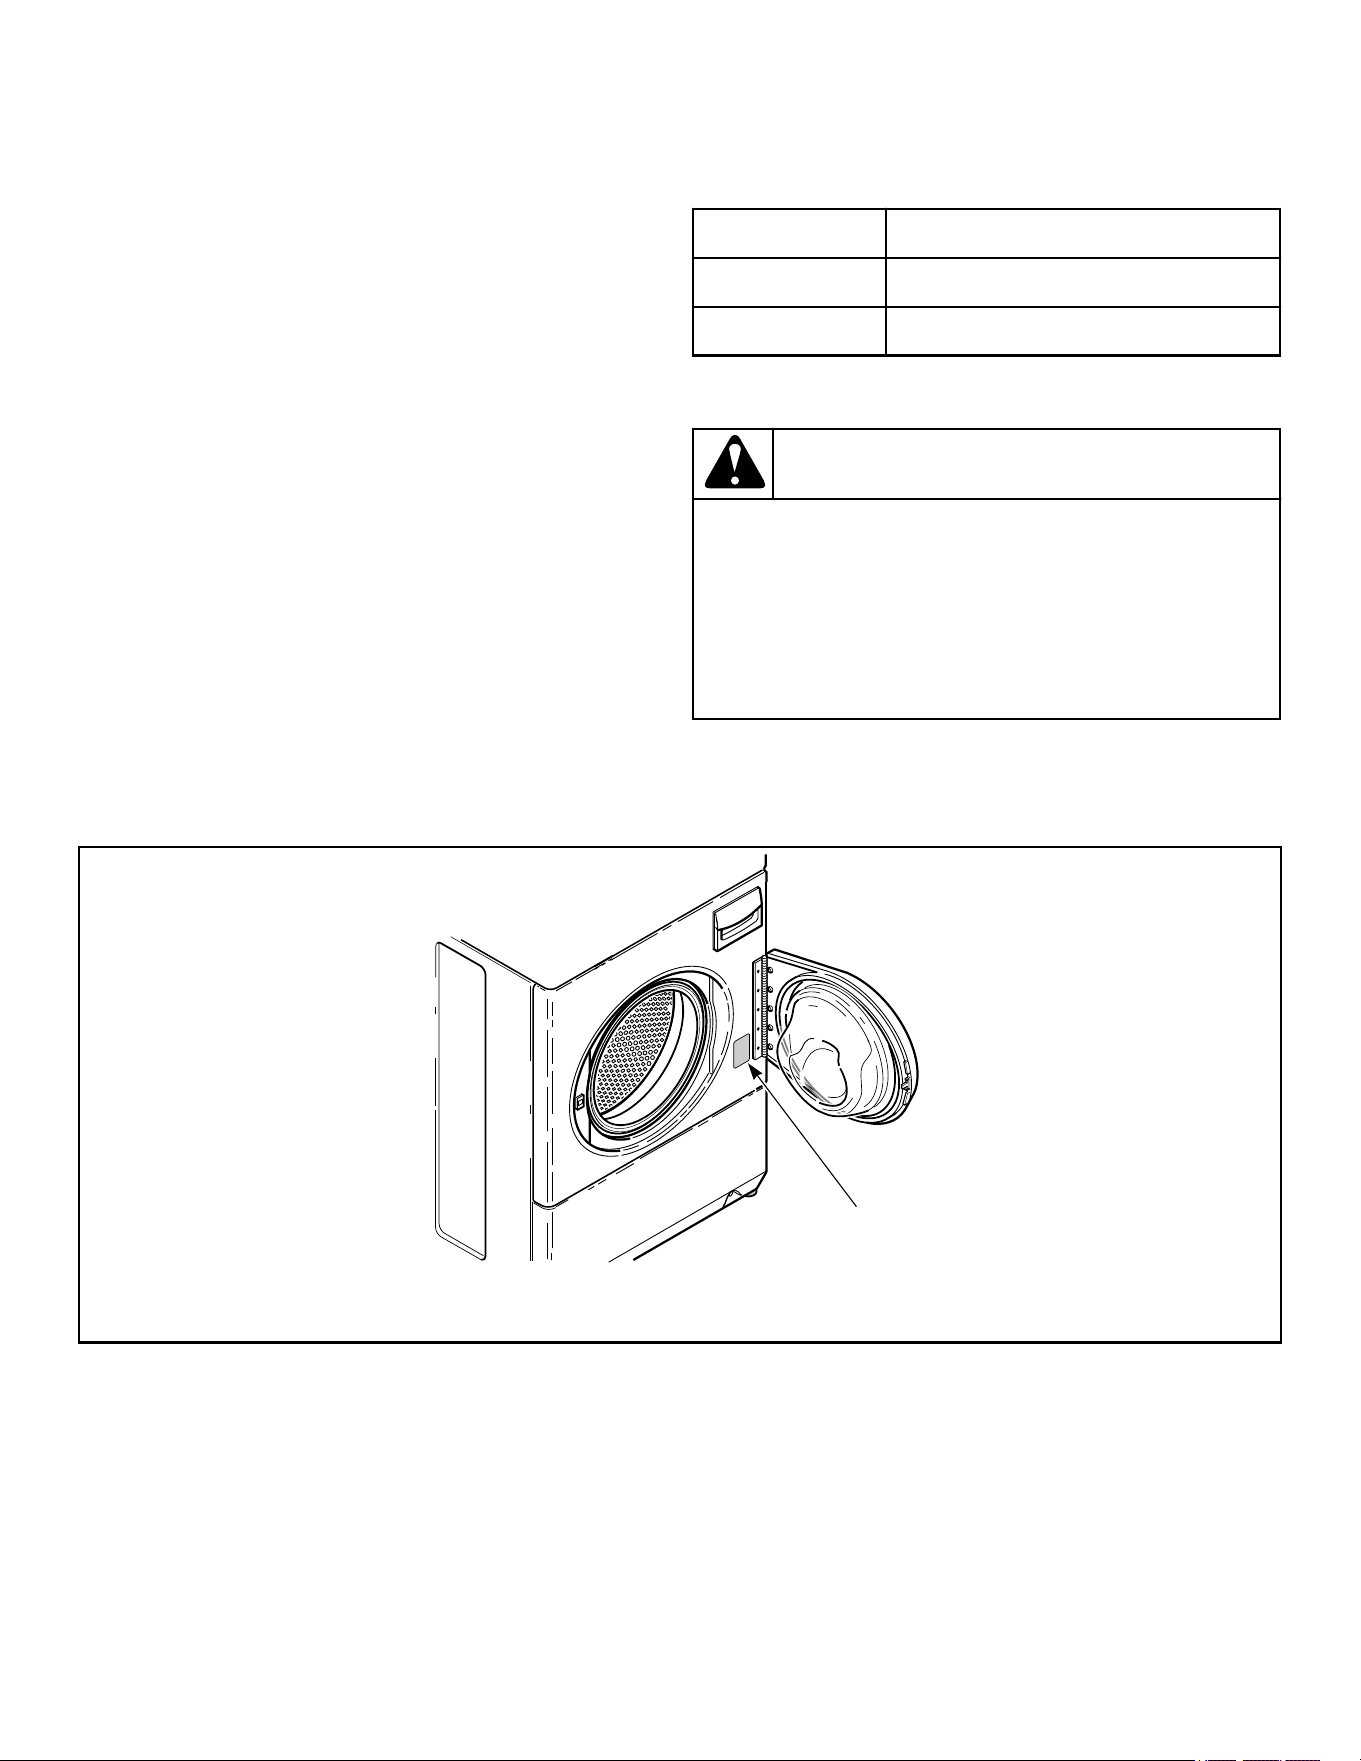
4. Go to rear of washer and pull label from rear shipping bolts.
5. Remove two 9/16 inch bolts. Unscrew each bolt while apply-
ing forward pressure just until bolt stops unthreading. Work
each bolt and spacer out by hand using a circular motion.
NOTE: Avoid backing bolts out completely or
spacers might fall into cabinet.
FLW2297N_SVG1
Figure 5
6. Insert two plugs included in accessories bag into rear shipping
bolt holes.
FLW2358N_SVG
Figure 6
7. Replace front access panel.
8. Save all shipping materials. They must be reinstalled any time
washer is moved more than four feet.
IMPORTANT: Do not lift or transport unit from front
or without shipping materials installed. Refer to the
Maintenace section for proper instructions on rein-
stalling the shipping materials.
Connect Fill Hoses
WARNING
Under certain conditions, hydrogen gas may be pro-
duced in a hot water system that has not been used
for two weeks or more. HYDROGEN GAS IS EXPLO-
SIVE. If the hot water system has not been used for
such a period and before using the washer, turn on
all hot water faucets and let the water flow from each
for several minutes. This will release any accumula-
ted hydrogen gas. The gas is flammable. Do not
smoke or use an open flame during this time.
W029
NOTE: If installing an accompanying steam dryer, a Y-
Connector may be needed. Check dryer installation
manual to confirm.
Water Supply Requirements
Water supply faucets must fit standard 3/4 inch [19 mm] female
garden hose couplings. DO NOT USE SLIP-ON OR CLAMP-
ON CONNECTIONS.
NOTE: Water supply faucets should be readily accessi-
ble to permit turning them off when washer is not being
used.
Recommended cold water temperature is 50° to 75° Fahrenheit
[10° to 24° Celsius] . Recommended maximum hot water temper-
ature is 125° Fahrenheit [51° Celsius] . Warm water is a mixture
of hot and cold water. Warm water temperature is dependent upon
the water temperature and the pressure of both the hot and cold
water supply lines.
WARNING
To prevent personal injury, avoid contact with inlet
water temperatures higher than 125° Fahrenheit [51°
Celsius] and hot surfaces.
W748
Maximum flow rate for all water temperatures is 2.5 gallons per
minute [9.46 liters per minute] ± 15%.
Installation
©
Copyright, Alliance Laundry Systems LLC -
DO NOT COPY or TRANSMIT
12 Part No. 807871ENR3

Water pressure must be a minimum of 20 to a maximum of 120
pounds per square inch [minimum of 138 to a maximum of 827
kPa] static pressure measured at the faucet.
NOTE: Water pressure under 20 pounds per square
inch [138 kPa] will cause an extended fill time in the
washer and may not properly flush out the detergent
dispenser.
Turn on the water supply faucets and flush the lines for approxi-
mately two minutes to remove any foreign materials that could
clog the screens in the water mixing valve. This is especially im-
portant when installing your washer in a newly constructed or
renovated building. Build-up may have occurred during construc-
tion.
Connecting Hoses
1. Insert rubber washers and filter screens (from accessories
bag) in water fill hose couplings (two hoses supplied with
washer). The filter screen must be facing outward.
2. Connect fill hose couplings with filter screens to water supply
faucets.
3. Connect the other hose couplings to the hot and cold valve
connections at the rear of the washer.
4. Thread hose couplings onto valve connections finger tight.
Then turn 1/4 turn with pliers.
IMPORTANT: DO NOT cross thread or overtighten
couplings. This will cause them to leak.
5. Turn water on and check for leaks.
6. If leaks are found, retighten the hose couplings.
7. Continue tightening and rechecking until no leaks are found.
FLW2304N_SVG1
COLD
HOT
1
4
5
6
7
8
2
3
1. Filter Screen (Screen must be facing outward)
2. Fill Hose
3. Plain Rubber Washer
4. Cold Water Connection
5. Hot Water Connection
6. Install this end of hose to valve connections at rear of
washer
7. Install this end of hose to water supply faucet
8. Faucet
Figure 7
IMPORTANT:
Hoses and other rubber parts deteriorate after exten-
ded use. Hoses may develop cracks, blisters or materi-
al wear from the temperature and constant high pres-
sure they are subjected to.
All hoses should be checked on a monthly basis for
any visible signs of deterioration. Any hose showing
the signs of deterioration listed above should be re-
placed immediately. All hoses should be replaced ev-
ery five years.
IMPORTANT: Turn off water supply faucets after check-
out and demonstration. Owner should turn off water
supply whenever there will be an extended period of
non-use.
NOTE: Longer fill hoses are available (as optional
equipment at extra cost) if the hoses (supplied with the
washer) are not long enough for the installation. Order
hoses as follows:
• No. 20617 Fill Hose: 8 feet [2.44 m]
• No. 20618 Fill Hose: 10 feet [3.05 m]
Risers
Risers (or air cushions) may have to be installed if the pipes
knock or pound when flow of water stops. The risers are more ef-
ficient when installed as close as possible to the water supply fau-
cets. Refer to Figure 8 .
Installation
©
Copyright, Alliance Laundry Systems LLC -
DO NOT COPY or TRANSMIT
13 Part No. 807871ENR3
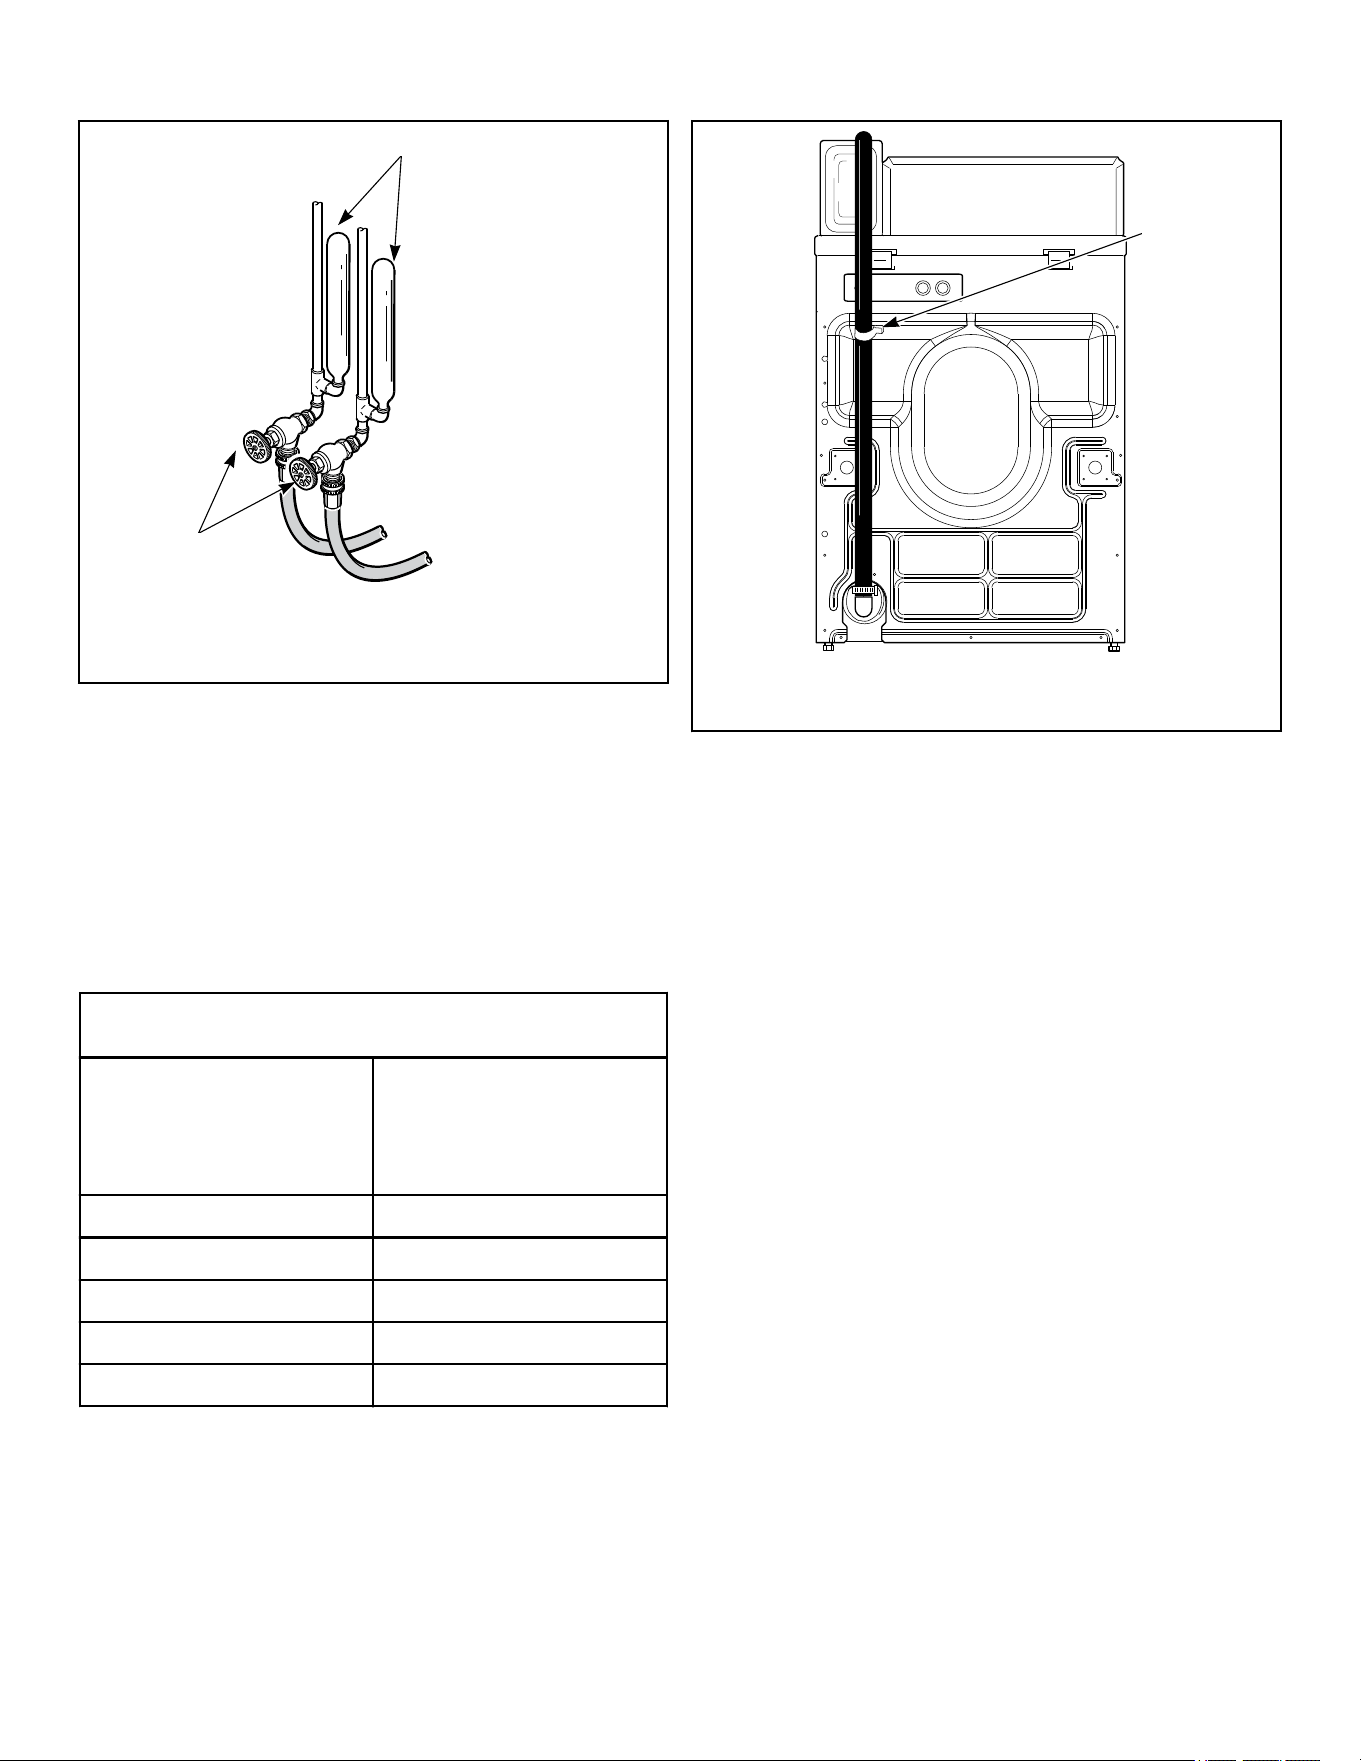
W005I_SVG
2
1
1. Risers (Air cushions)
2. Water Supply Faucets
Figure 8
Connect Drain Hose to Drain
Receptacle
Remove the drain hose from its shipping position on the rear of
the washer by removing the shipping tape.
IMPORTANT: Drain receptacle must be capable of han-
dling a minimum of 1-3/8 inch [35 mm] outside diame-
ter drain hose.
Drain Flow Rate
Drain Height
Flow Rate
gallons per minute [lit-
ers per minute]
3 ft. [0.9 m] 8.6 [32.7]
5 ft. [1.5 m] 6.8 [25.9]
6 ft. [1.8 m] 6.0 [22.7]
7 ft. [2.1 m] 5.1 [19.5]
8 ft. [2.4 m] 4.0 [15.2]
FLW2348_SVG
1
1. Shipping Tape
Figure 9
Standpipe Installation
1. Place the drain hose into the standpipe.
2. Remove the beaded tie-down strap from accessories bag and
place around standpipe and drain hose and tighten strap to
hold hose to standpipe. Refer to Figure 10 . This will prevent
the drain hose from dislodging from drain receptacle during
use.
3. If hose does not fit securely in standpipe because it is too
long:
a. Remove hose clamp attaching it to washer.
b. Cut hose to desired length.
c. Reattach hose and hose clamp.
Installation
©
Copyright, Alliance Laundry Systems LLC -
DO NOT COPY or TRANSMIT
14 Part No. 807871ENR3
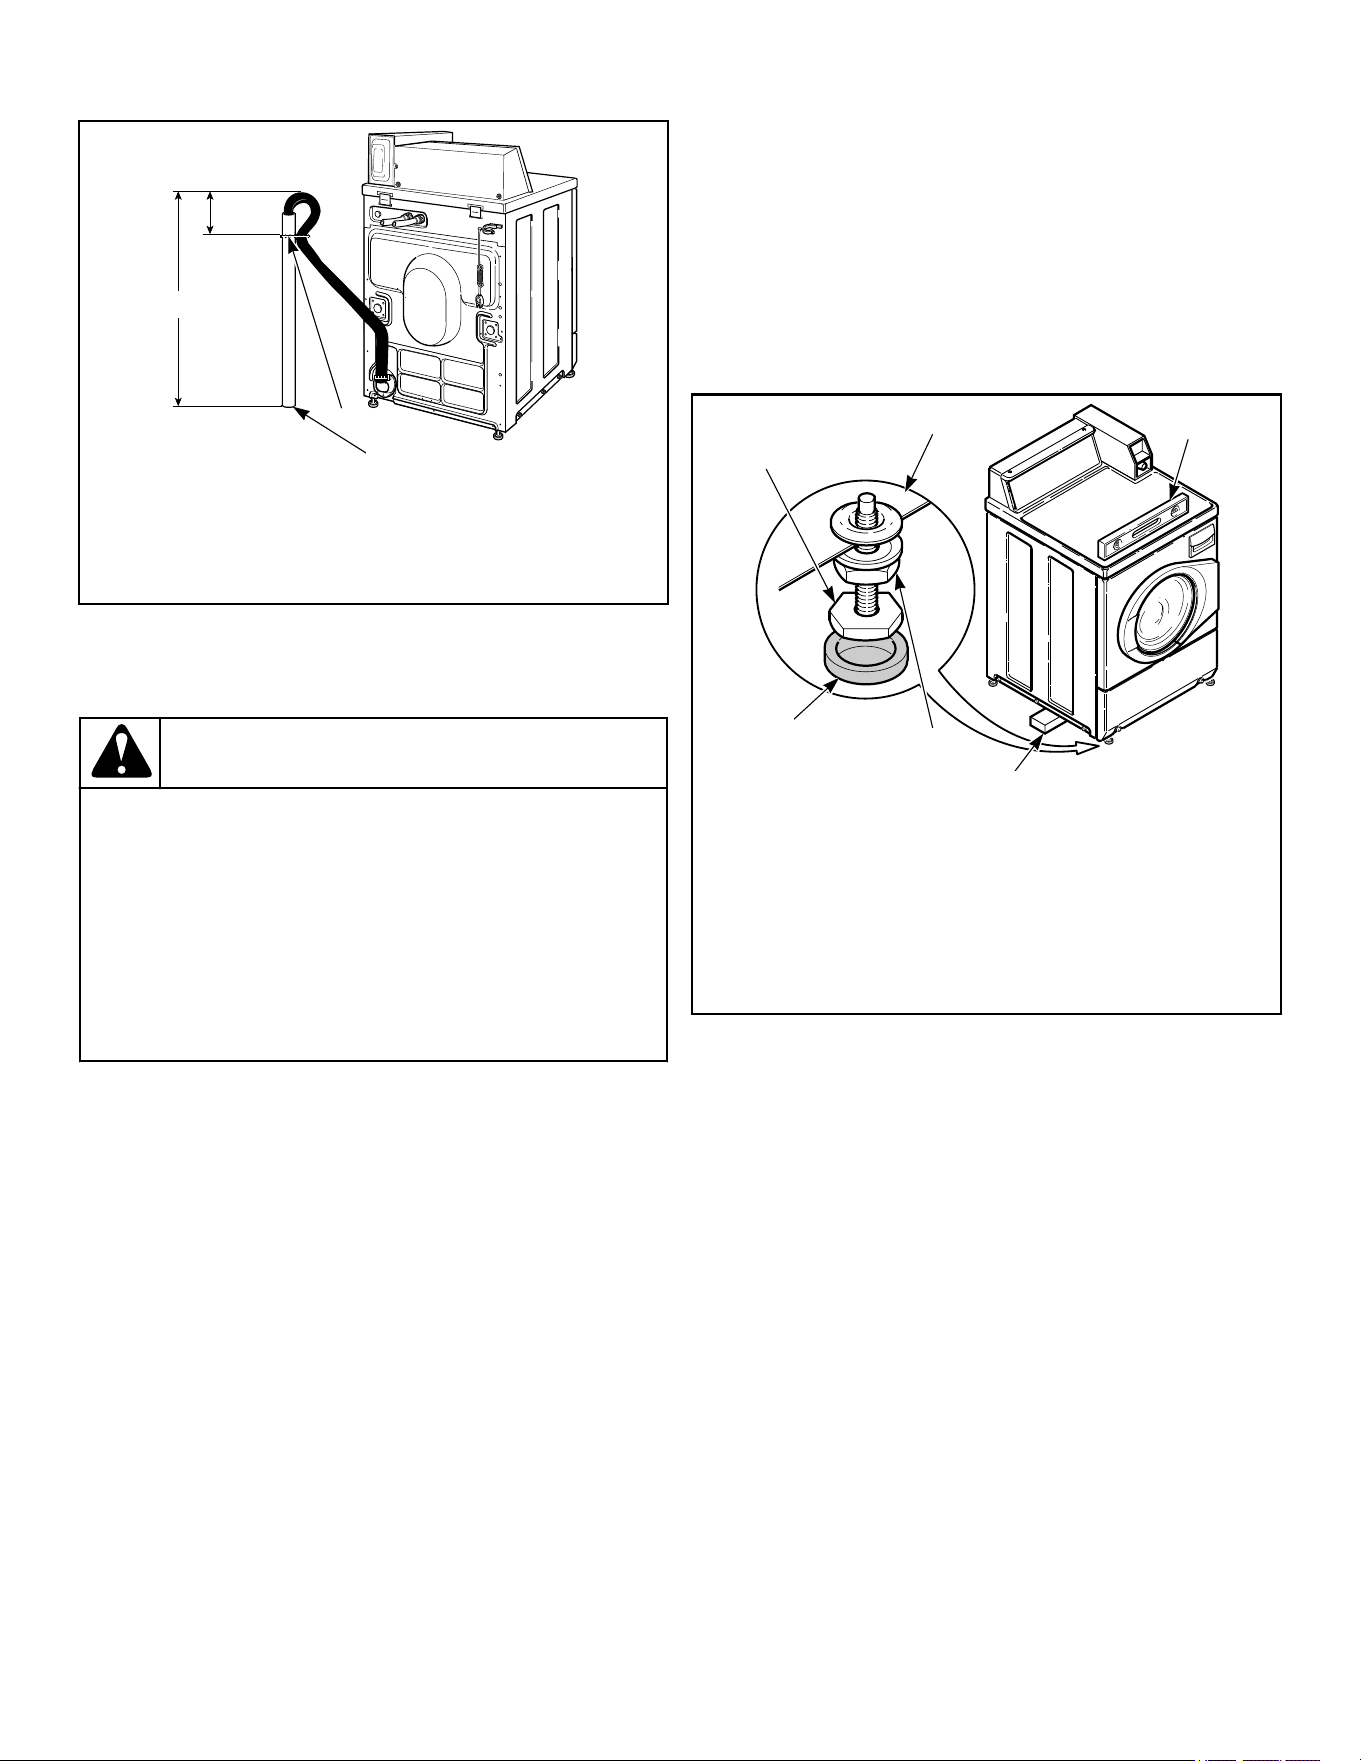
FLW2349N_SVG
2
3
1
1. 24 to 36 in. [610 to 914 mm] Recommended Height
2. Beaded strap from accessory bag
3. Standpipe 2 in. [51 mm] or 1-1/2 in. [40 mm]
Figure 10
Position and Level the Washer
WARNING
Washers elevated above floor level must be anch-
ored to that elevated surface, base or platform. The
material used to elevate the washer should also be
anchored to the floor to ensure that the washer will
not walk or that the washer can not be physically
pulled, tipped or slid from its installed position. Fail-
ure to do so may result in conditions which can pro-
duce serious injury, death and/or property damage.
W306
1. Position unit so it has sufficient clearance for installation and
servicing.
NOTE: Use of the dispenser drawer or washer door
as a handle in the transportation of the washer may
cause damage to the dispenser or door.
2. Place unit in position on a solid, sturdy and level floor. Instal-
ling the unit on any type of carpeting, soft tile or other weakly
supported structures is not recommended.
3. Place a level on the raised portion of cabinet top and check if
the unit is level from side to side and front to back.
4. If unit is not level, tilt unit to access the front and rear level-
ing legs. For easier access to leveling legs, prop up unit with a
wooden block.
5. Loosen 7/8 in. locknut and adjust legs by screwing into or out
of unit base until the unit is level from side to side and front
to back (using a level). Unit should not rock.
NOTE: Leveling legs can also be adjusted from in-
side the unit using an adjustable wrench.
6. Tighten the locknuts securely against the unit base. If the
locknuts are not tight, unit will move out of position during
operation.
NOTE: DO NOT slide unit across floor if the leveling
legs have been extended. Legs and base could be-
come damaged.
7. Remove rubber feet from accessories bag and place on all
four leveling legs.
8. Verify that unit doesn’t rock.
FLW2346N_SVG
6
5
4
3
2
1
1. Leveling Leg
2. Washer Base
3. Level
4. Wood Block
5. Locknut
6. Rubber Foot
Figure 11
Wipe Out Inside of Wash Drum
Prior to first wash, use an all purpose cleaner or a detergent
and water solution and a damp cloth to remove shipping dust
from inside of the washer.
Installation
©
Copyright, Alliance Laundry Systems LLC -
DO NOT COPY or TRANSMIT
15 Part No. 807871ENR3
FLW2350N_SVG
Figure 12
Plug In the Washer
Electrical Requirements
120 Volt, 60 Hertz with 3-Prong Earth/Ground Plug
NOTE: The wiring diagram is located in the control
hood.
WARNING
To reduce the risk of fire, electric shock, serious in-
jury or death, all wiring and protective earth/ground
connections MUST conform with the latest edition of
the National Electrical Code, ANSI/NFPA No. 70, and
such local regulations as might apply. It is the cus-
tomer’s responsibility to have the wiring, fuses and
circuit breakers installed by a qualified electrician to
make sure adequate electrical power is available to
the washer.
W824
When plugging in the washer:
• DO NOT overload circuits.
• DO NOT use an extension cord.
• DO NOT use an adapter.
• DO NOT operate other appliances on the same circuit. Use
separately fused 15 Amp circuits.
The washer is designed to be operated on a separate branch, po-
larized, three-wire, effective earth/ground, 120 Volt, 60 Hertz,
AC (alternating current), circuit protected by a 15 ampere fuse,
equivalent fusetron or circuit breaker.
The three-prong earth/ground plug on the power cord should be
plugged directly into a polarized three-slot effective earth/ground
receptacle rated 110/120 Volts AC (alternating current) 15 Amps.
Refer to Figure 13 to determine correct polarity of the wall recep-
tacle.
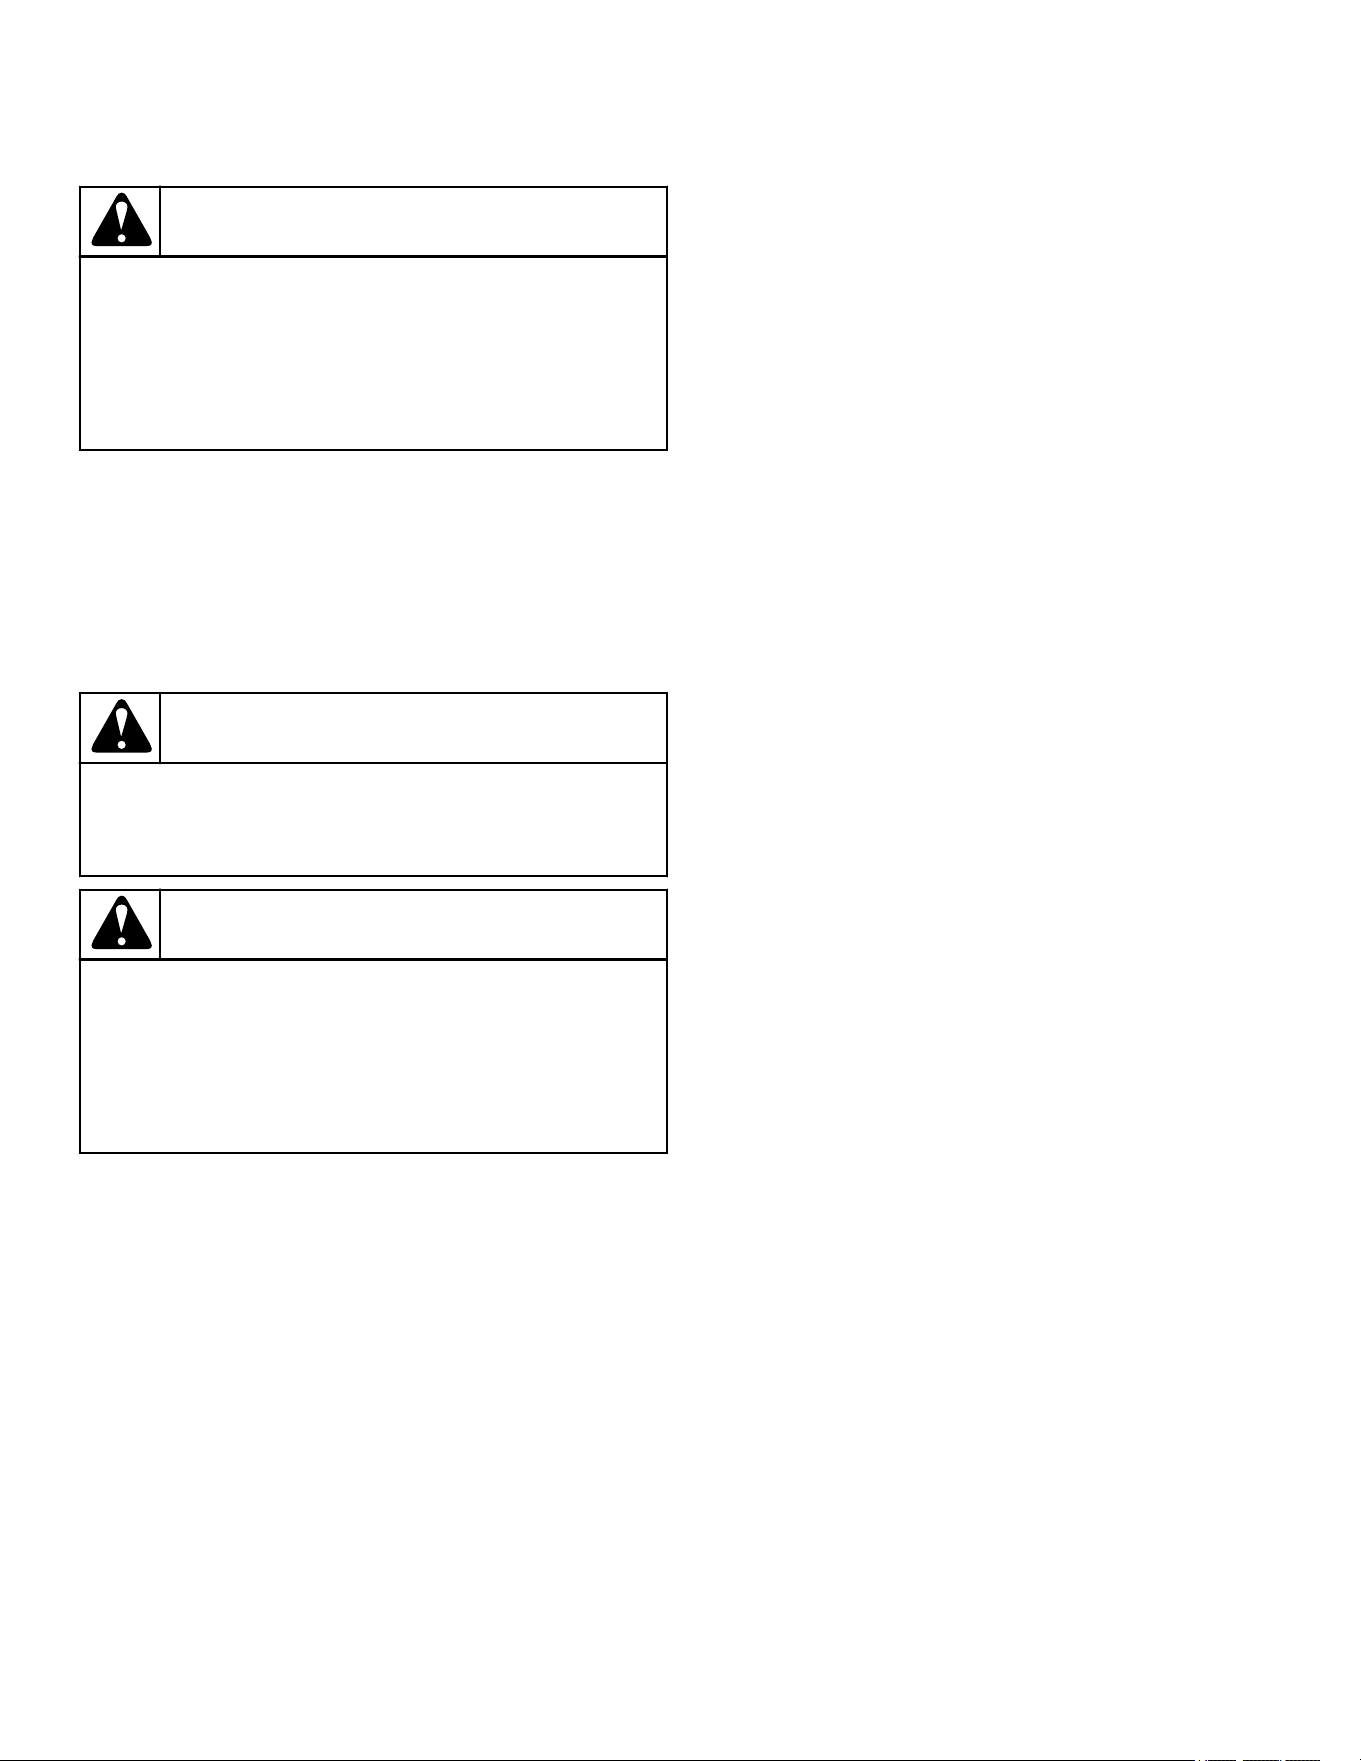
Standard 120 Volt, 60 Hertz 3-Wire Effective Earth/
Ground Circuit
TLW2287N_SVG
6
8
7
2
1 3
5
4
1. L1
2. Earth/Ground
3. Neutral Side
4. Round Earth/Ground Prong
5. Neutral
6. 0 V.A.C.
7. 120 ± 12 V.A.C.
8. 120 ± 12 V.A.C.
Figure 13
WARNING
To reduce the risk of an electric shock or fire, DO
NOT use an extension cord or an adapter to connect
the washer to the electric power source.
W082
Earth/Ground Instructions
This appliance must be properly connected to protective earth/
ground. In the event of malfunction or breakdown, the earth/
ground will reduce the risk of electric shock by providing a path
of least resistance for electric current.
The appliance is equipped with a cord having an equipment earth/
ground conductor and a three-prong earth/ground plug. The plug
must be plugged into an appropriate outlet that is properly instal-
Installation
©
Copyright, Alliance Laundry Systems LLC -
DO NOT COPY or TRANSMIT
16 Part No. 807871ENR3
led and connected to a protective earth/ground in accordance with
all local codes and ordinances.
WARNING
Improper connection of the equipment earth/ground
conductor can result in a risk of electric shock.
Check with a qualified electrician or service person if
you are in doubt as to whether the unit is properly
connected to a protective earth/ground.
W893
• DO NOT modify the plug provided with the unit – if it will
not fit the outlet, have a proper outlet installed by a qualified
electrician.
• If the laundry room’s electrical supply does not meet the
above specifications and/or if you are not sure the laundry
room has an effective earth/ground, have a qualified electri-
cian or your local electrical utility company check it and cor-
rect any problems.
WARNING
Any disassembly requiring the use of tools must be
performed by a suitably qualified service person.
W299
WARNING
This unit is equipped with a three-prong (earth/
ground) plug for your protection against shock haz-
ard and should be plugged directly into a protective
earth/ ground three-prong receptacle. Do not cut or
remove the earth/ground prong from this plug.
W823
Connect Laundry IQ to Gateway (Select
Models)
1. Connect machine to power source.
2. Power and connect gateway to internet source (ethernet pre-
ferred).
3. Call Software Support at +1-844-241-5519 to finalize connec-
tion.
NOTE: Ensure gateway is positioned in line of sight
to equipment. Do not install close to other electron-
ic devices.
Check Installation
1. Refer to Installer Checklist on the back cover of this manual
and make sure that unit is installed correctly.
2. Run washer with a test load to make sure it is operating prop-
erly and properly leveled.
a. Put about six pounds of laundry (four bath towels and
three jeans) into washer.
b. Close door.
c. Rapid advance to the final spin part of the cycle.
d. When washer spins at high speed, verify that it is stable.
e. If it is not, after cycle is complete, refer to Position and
Level the Washer to readjust leveling legs.
Vending
Meter Case
The factory mounted coin meter case does not include the service
door lock, coin slide (if applicable), coin drawer, coin drawer
lock or keys. These parts must be ordered (at extra cost) accord-
ing to the purchaser’s requirements direct from the manufacturer
of your choice.
NOTE: You have the option of using a screw type lock
or a 1/4 turn lock on the meter case service door. If you
choose to use a screw lock, then the special bracket
(located inside the meter case) must be used. DO NOT
use the special bracket if a 1/4 turn lock is used.
Coin Drawer Security - For additional security, drill out the two
pilot holes on each side of the front of the meter case to 1/4 or
5/16 inch [6.4 or 7.9 mm] holes and install a bicycle lock through
these holes.
NOTE: An 8 in. [203 mm] coin drawer is required for
coin operated electronic control models.
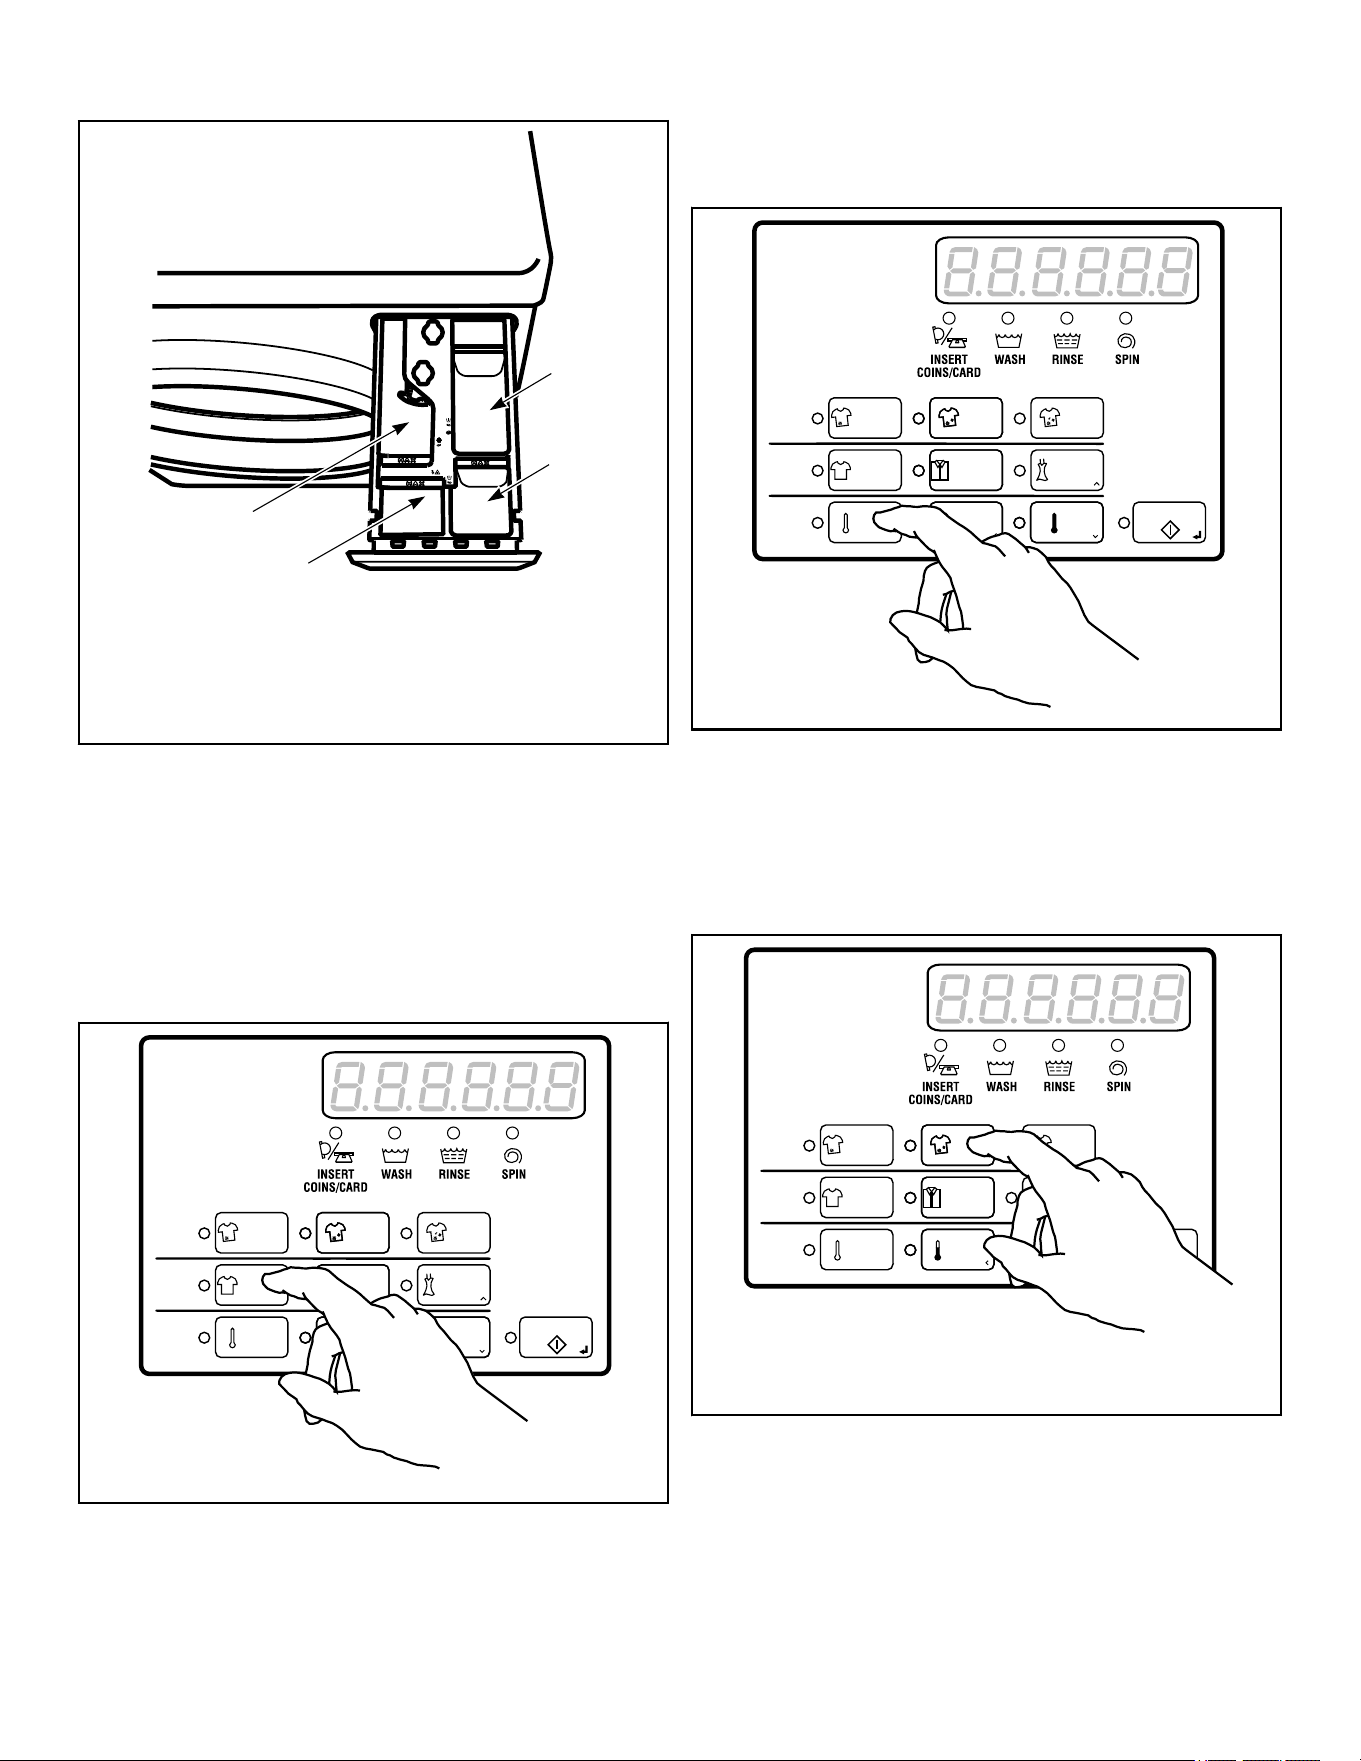
Models Prepped for Card Reader
The machine is shipped from the factory with the Electronic Con-
trol Diagnostic Harness Assembly unplugged. To avoid unauthor-
ized manual programming or vending, perform the following
steps.
1. Open control panel.
2. Locate diagnostic harness on electronic control.
3. Plug connectors for “white/black” wire and “blue/red” wire
together.
Installation
©
Copyright, Alliance Laundry Systems LLC -
DO NOT COPY or TRANSMIT
17 Part No. 807871ENR3
FLW6R_SVG
1
1. Control Panel
Figure 14
Installation
©
Copyright, Alliance Laundry Systems LLC -
DO NOT COPY or TRANSMIT
18 Part No. 807871ENR3
Operation
Operation Instructions
IMPORTANT: Prior to first wash, use an all-purpose
cleaner, or a detergent and water solution, and a damp
cloth to remove shipping dust from inside of washer.
IMPORTANT: Remove all sharp objects from laundry to
avoid tears and rips to items during normal machine
operation.
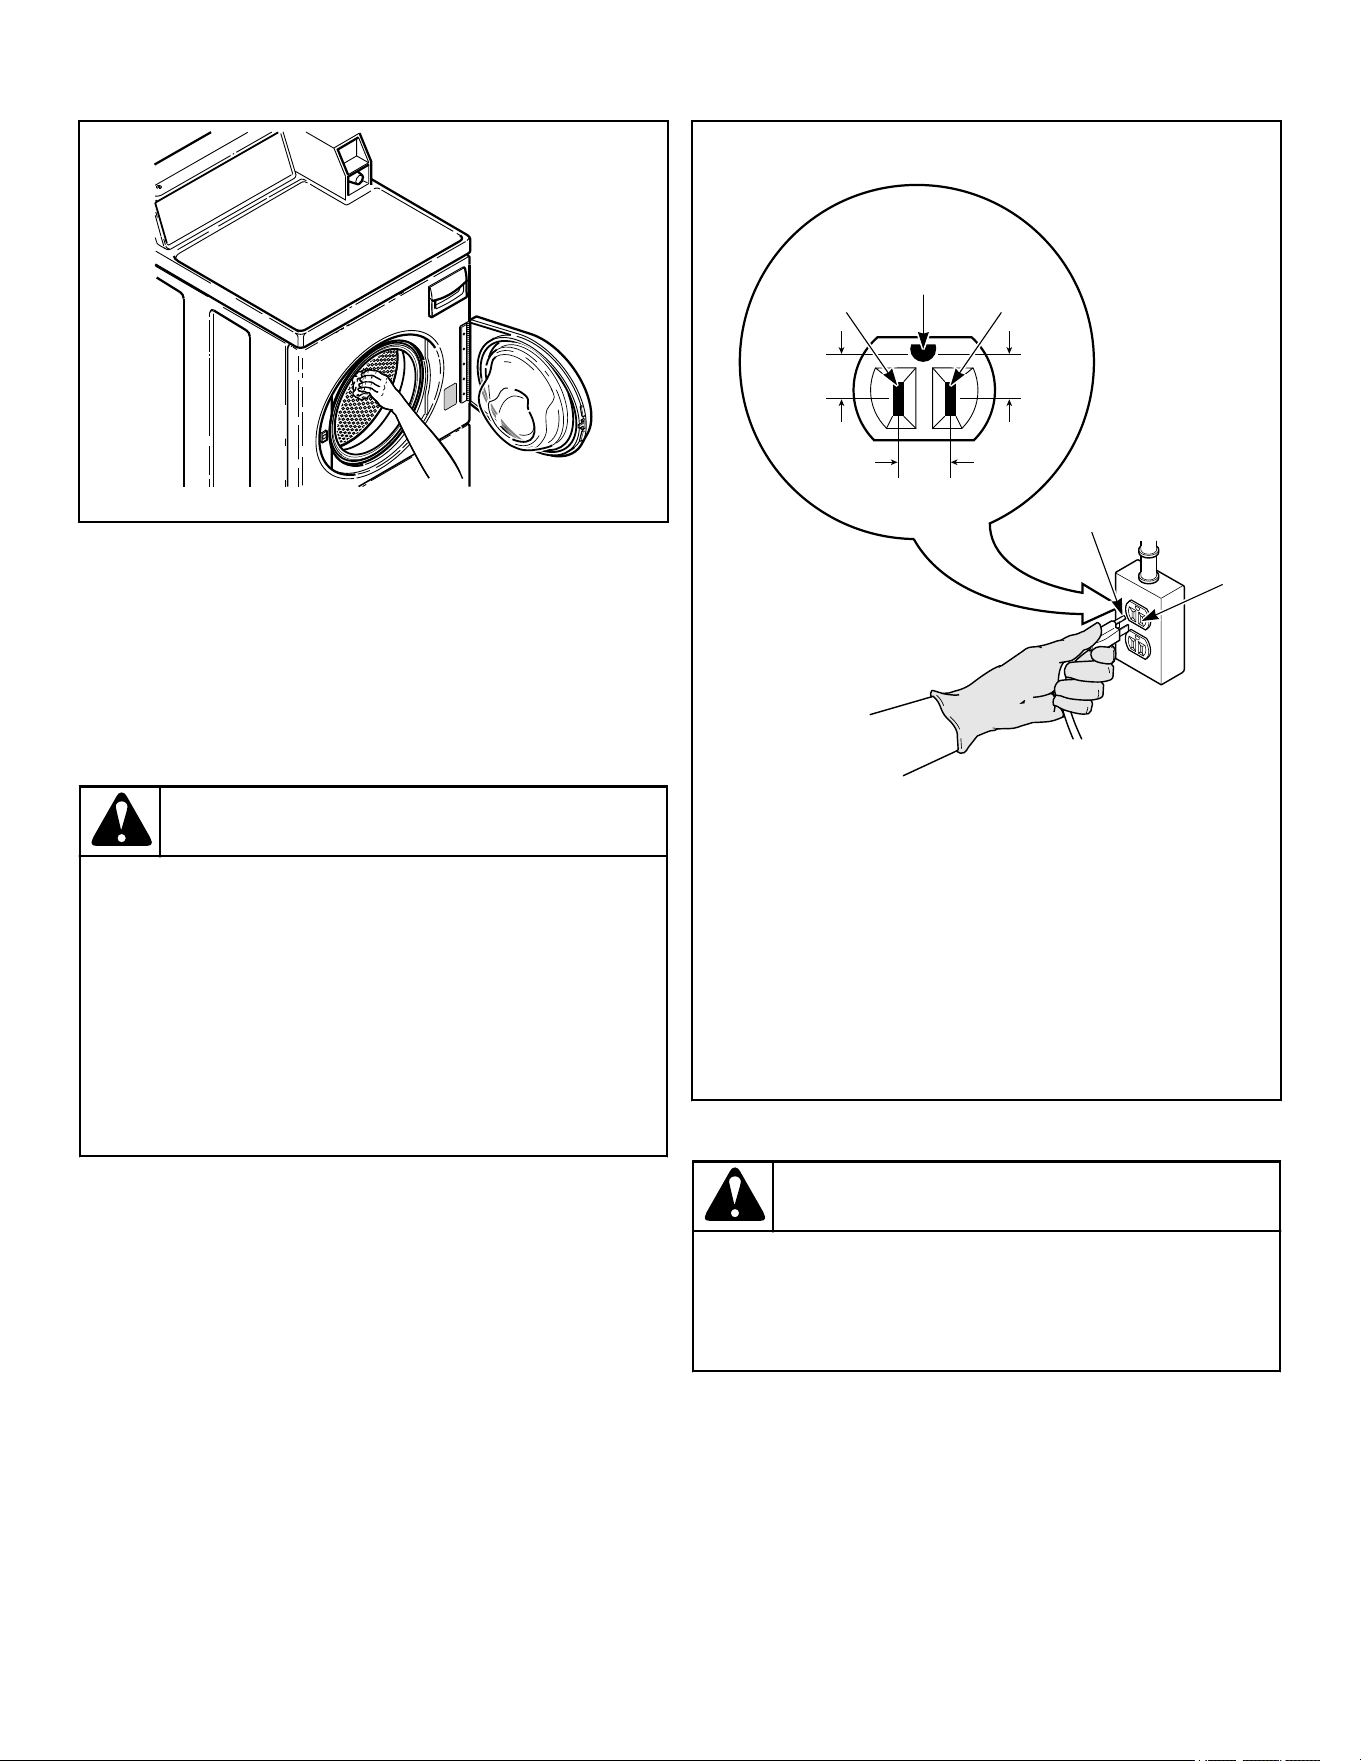
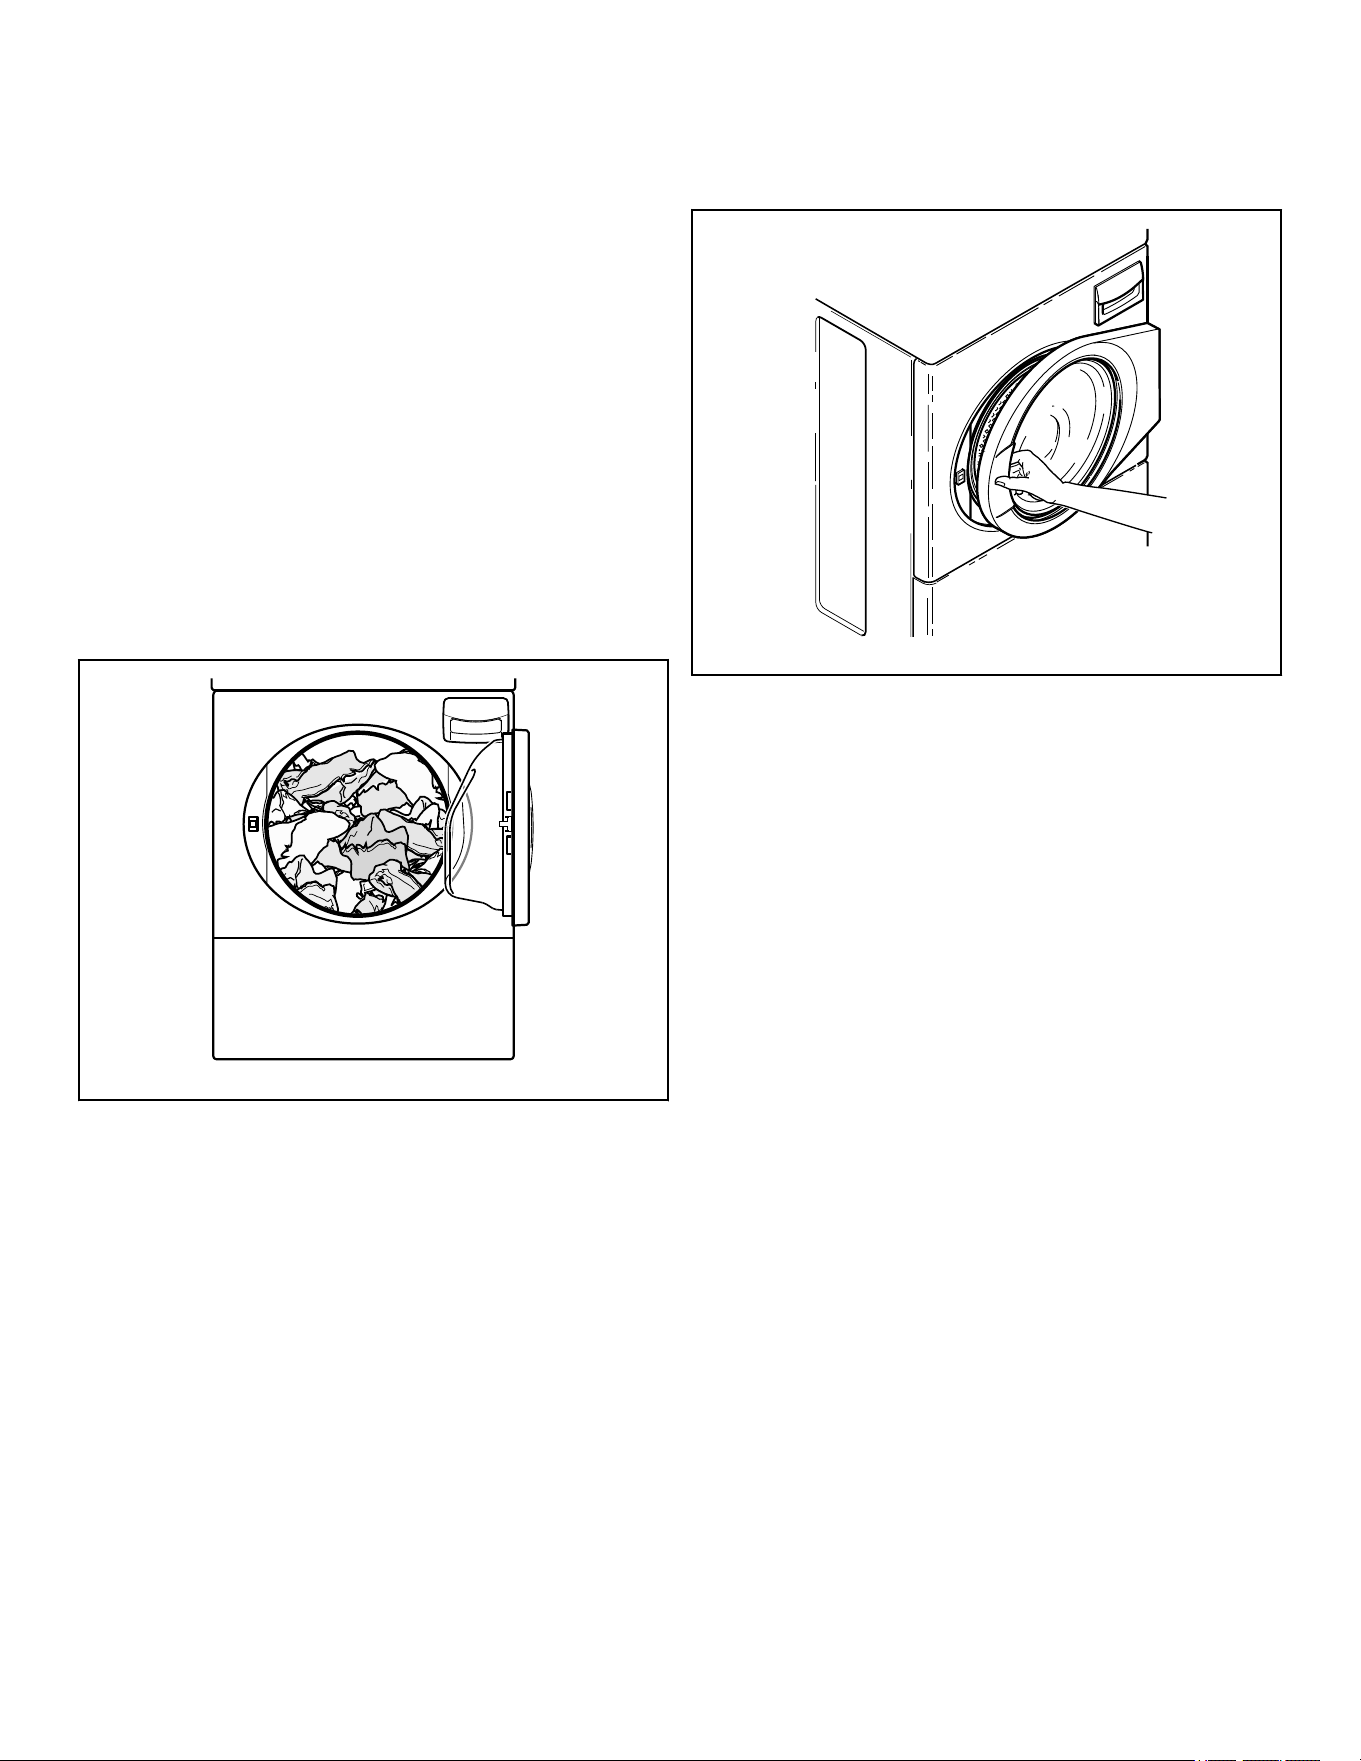
Load Laundry
1. Load items loosely into wash drum. (21 pounds [9.5 kg] max-
imum dry clothes load)
NOTE: Small items such as baby socks may get
caught around the door. Place these articles inside
a mesh garment bag.
FLW2309N_SVG
Figure 15
2. When washing bulky items such as blankets and comforters,
use the DELICATE cycle. The cycle includes agitation and fi-
nal spin speeds that maintain the load’s balance and minimize
wear to the articles.
NOTE: Different fabrics will have different densities
and loads must be adjusted accordingly to meet ma-
chine loading specifications shown.
Close Loading Door
Close loading door tightly. The washer will not operate with
the loading door open.
FLW2310N_SVG
Figure 16
Add Laundry Supplies
1. Open dispenser drawer.
2. Measure and add low sudsing, high efficiency (HE) main
wash detergent (1), bleach (2), fabric softener (3) and pre-
wash detergent (4) to the dispenser drawer.
IMPORTANT: If using single-load laundry detergent
packets or 3-in-1 laundry sheets, do not place them
in the dispenser drawer. Place them directly in the
washtub with clothes.
IMPORTANT: If using non-HE detergent, avoid over-
sudsing by using 1/2 of the detergent manufactur-
er’s recommended amount.
3. Close dispenser drawer.
Operation
©
Copyright, Alliance Laundry Systems LLC -
DO NOT COPY or TRANSMIT
19 Part No. 807871ENR3
FLW2389N_SVG
E
H
H
R
S
P
O
R
F
E
T
W
W
E
A
A
N
N
A
M
I
S
S
LIQUID BLEACH
3
2
1
4
1. Main Wash Detergent
2. Liquid Bleach
3. Fabric Softener
4. Pre-Wash Detergent
Figure 17
Set Cycle
1. Push touchpad for NORMAL, SYNTHETIC or DELICATE
cycle.
2. Light indicates selection.
NOTE: Changes can be made to Fabric Selector setting
up until the first fill is complete.
FLW2493N_SVG
Cycle
Wash
Temp
ULTRADELUXEREGULAR
DELICATESYNTHETICNORMAL
HOT
START
WARMCOLD
Figure 18
Set Wash Temperature
1. Push touchpad for COLD, WARM or HOT.
2. Light indicates selection.
NOTE: Always follow manufacturer's care labels.
FLW2494N_SVG
Cycle
Wash
Temp
ULTRADELUXEREGULAR
DELICATESYNTHETICNORMAL
HOT
START
WARMCOLD
Figure 19
Set Wash Level
1. Push Wash level touchpad to select REGULAR, DELUXE
OR ULTRA.
2. LED light indicates selection.
FLW2495N_SVG
Cycle
Wash
Temp
ULTRADELUXEREGULAR
DELICATESYNTHETICNORMAL
HOT
START
WARMCOLD
Figure 20
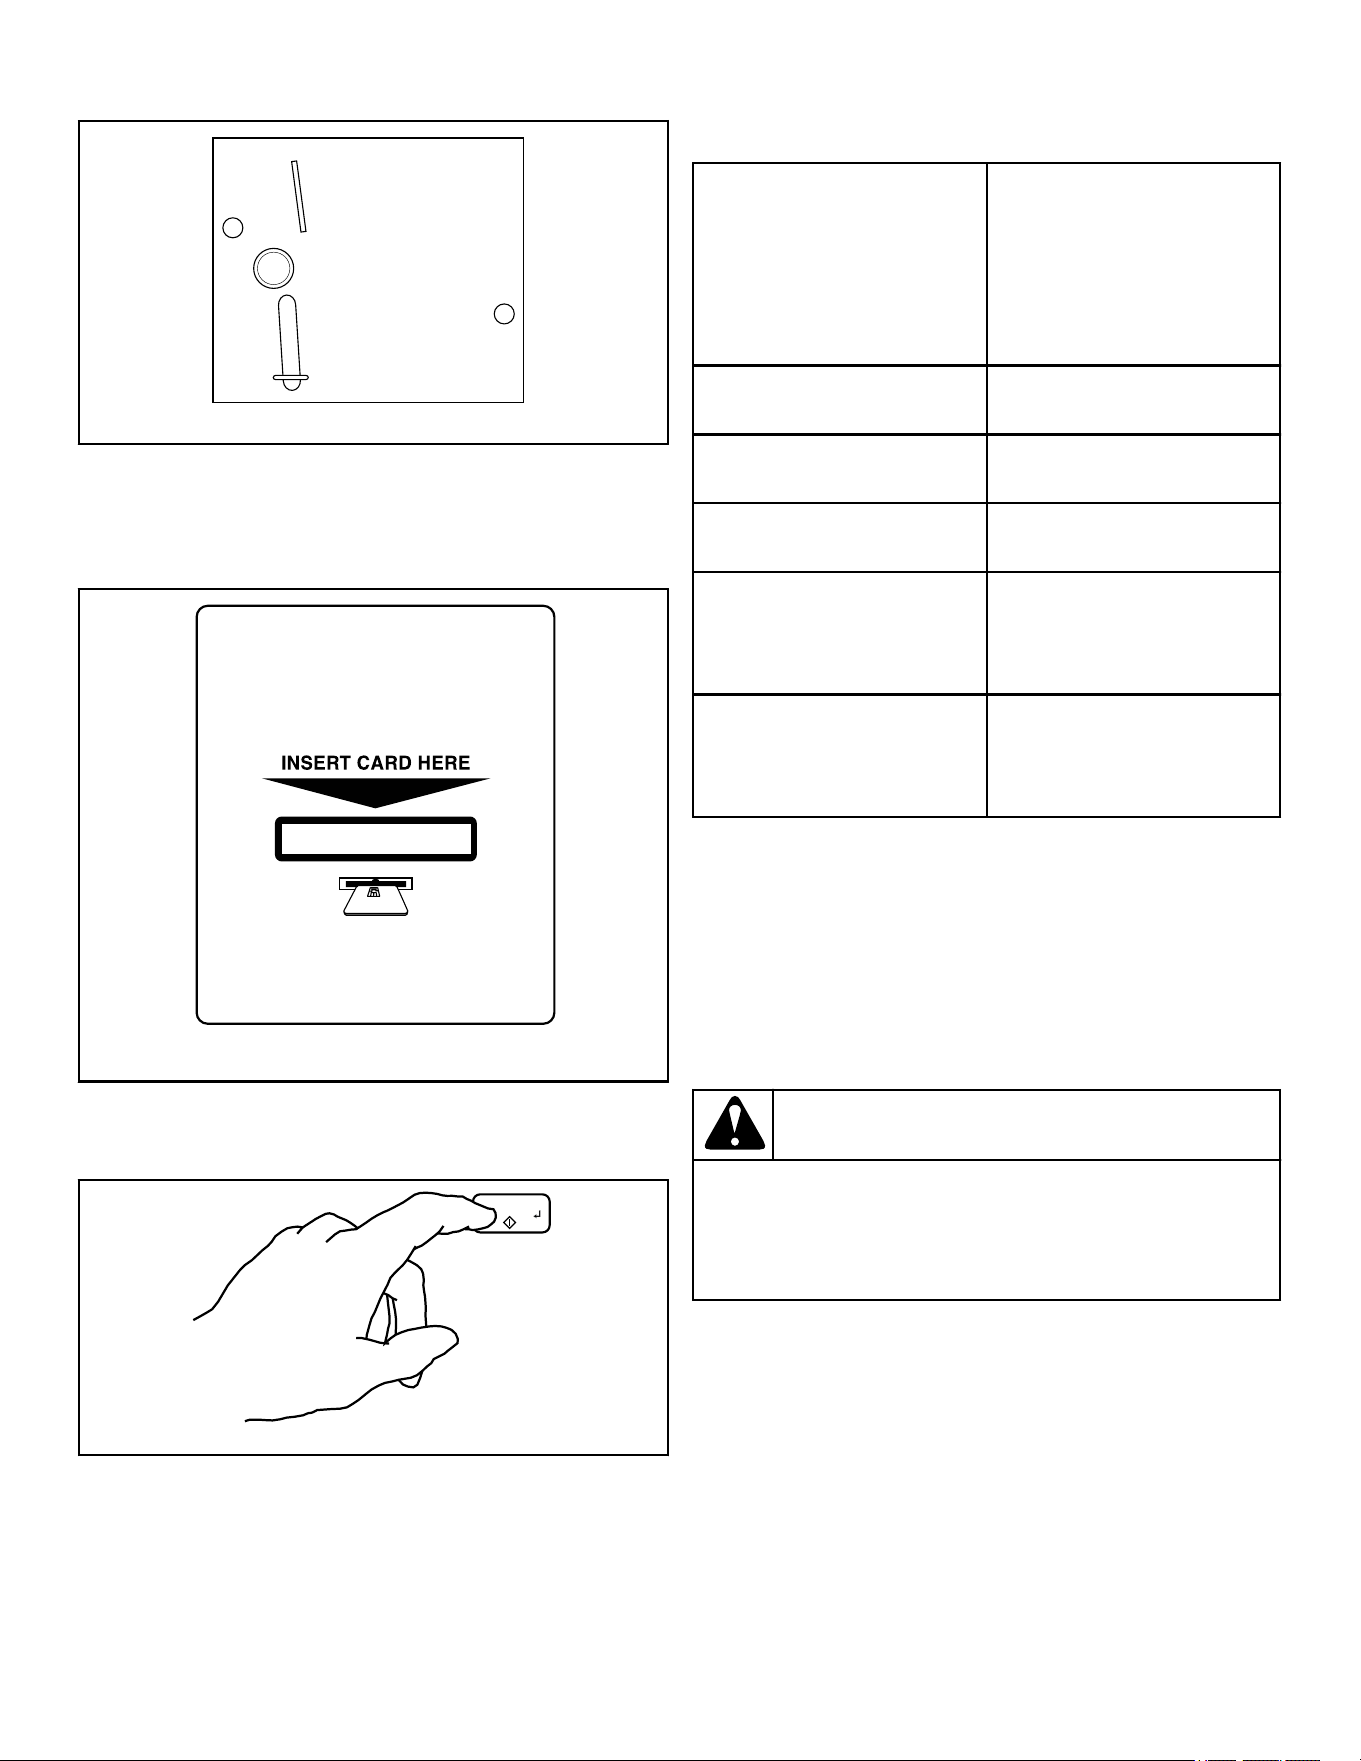
Insert Coins or Card
To Insert Coins
1. Insert coin(s) in coin slot.
2. Check pricing as seen on digital display.
Operation
©
Copyright, Alliance Laundry Systems LLC -
DO NOT COPY or TRANSMIT
20 Part No. 807871ENR3
W387I_SVG
Figure 21
To Insert Card
Insert card into opening.
DRY2633N_SVG
Figure 22
Start Washer
FLW2479N_SVG
COLD
START
Figure 23
Indicator Lights
INSERT COINS/CARD INSERT COINS/CARD is lit
to prompt the user to insert
payment to satisfy the vend
price. When INSERT COINS/
CARD is lit, the digits show
the vend price remaining to be
satisfied.
WASH WASH is lit during the WASH
portions of the cycle.
RINSE RINSE is lit during the RINSE
portions of the cycle.
SPIN SPIN is lit during the final spin
portion of the cycle.
DOOR DOOR is lit whenever the
door is locked. The door can-
not be opened when this light
is on.
START START flashes one second on
and one second off when the
full vend price has been satis-
fied.
IMPORTANT: If washer fails to operate properly after
installation, make sure electrical service and water
supply faucets are turned on. Are all the controls prop-
erly set? Have a qualified service person refer to the
wiring diagram (located inside of washer control cabi-
net) and check for broken, loose or incorrect wiring.
NOTE: Once a cycle has started, the door can only be
opened by first unplugging the power cord and waiting
one minute.
WARNING
To reduce the risk of bodily injury, do not remove
laundry from washer until all lights are out, and all
moving parts have stopped.
W092
Operation
©
Copyright, Alliance Laundry Systems LLC -
DO NOT COPY or TRANSMIT
21 Part No. 807871ENR3

Maintenance
User-Maintenance Instructions
Lubrication
All moving parts are sealed in a permanent supply of lubricant or
are equipped with oilless bearings. Additional lubrication will not
be necessary.
Do not lubricate the door hinge. If the hinge makes noise, replace
the hinge.
Cold Weather Care
If the unit is delivered on a cold day (below freezing), or is stored
in an unheated room or area during the cold months, do not at-
tempt to operate the washer until it has had a chance to warm up.
Water from the previous cycle may remain.
Care of Your Washer
Use only a damp or sudsy cloth for cleaning the control panel.
Some cleaning products may harm the finish on the control panel
or damage the interior. DO NOT use products that contain alco-
hol on the control panel. Wipe the panel dry after cleaning.
Wipe the washer cabinet as needed. If detergent, bleach or other
washing products are spilled on the cabinet, wipe immediately.
Some products will cause permanent damage if spilled on the
cabinet.
Do not use scouring pads or abrasive cleansers on control panel
or cabinet.
The outside of the door window can be cleaned with household
window cleaner.
Leave the door and dispenser drawer open slightly when not in
use. This will help keep them dry and prevent musty smells.
Use the Tub Clean cycle (select models) regularly to clean the
wash drum.
Cleaning Glass Sealing Area
In order to assure that the door properly seals against water leaks,
the following surfaces should be wiped off periodically:
• The outside perimeter of the door glass where the seal con-
tacts the glass
• The front surface of the door seal lip
Usually a mild soap solution will work. If there is an extreme
build-up of minerals from a hard water supply, the surfaces may
need to be cleaned with a lime removal chemical.
Replacing Hoses
Hoses and other rubber parts deteriorate after extended use. Ho-
ses may develop cracks, blisters or material wear from the tem-
perature and constant high pressure they are subjected to.
All hoses should be checked on a monthly basis for any visible
signs of deterioration. Any hose showing the signs of deteriora-
tion listed above should be replaced immediately. All hoses
should be replaced every five years.
Filter Screens
Check the filter screens in the fill hoses for debris or damage ev-
ery six months. Clean or replace them if necessary.
If the washer is filling with water slower than normal, check the
filter screens. Clean or replace them if necessary.
Order filter screen Part No. 803615 from the nearest authorized
parts distributor.
Extended Non-Use
IMPORTANT: To avoid possible property damage due
to flooding, turn off the water supply to the washer
whenever there will be an extended period of non-use.
Leave the loading door and dispenser drawer open during exten-
ded periods of non-use to allow the wash drum and drawer to dry
out and avoid a musty smell.
Laundry IQ (Select Models)
In the case that the Laundry IQ device detects a condition that re-
quires machine maintenance, the owner will receive a notification
on https://laundryIQ.alliancelaundry.com.
Cleaning Foreign Object Trap
The washer’s pump has a trap that may collect foreign objects.
The trap may need to be cleaned if water is draining slower than
usual. To clean:
1. Disconnect washer from electrical supply.
2. Remove two screws at bottom of the front access panel.
3. Rotate bottom of panel out and remove panel.
NOTE: The pump may have some water in it. Use a
rag or a container to catch water. If the wash drum
is full of water, use a wet/dry shop vacuum to catch
the water.
4. With rag or vacuum ready, unscrew the cap on the left side of
the pump and remove trap.
5. Clean the debris from the trap.
6. Reinstall the trap and access panel.
7. Reconnect washer to electrical supply.
Maintenance
©
Copyright, Alliance Laundry Systems LLC -
DO NOT COPY or TRANSMIT
22 Part No. 807871ENR3
FLW2444N_SVG2
1
1. Pump
Reinstallation of Shipping Materials
To prevent damage while moving the unit, the shipping materials
MUST be reinstalled.
1. Disconnect washer from electrical supply.
2. Remove two screws at bottom of front access panel.
3. Rotate bottom of panel out and remove panel.
4. Attach shipping brace to weight and base using four bolts and
washers. Refer to Figure 24 .
5. Reinstall front access panel.
6. Go to rear of washer to install rear shipping bolt, washer,
spacer assemblies.
7. Insert shipping bolt assemblies into each shipping bolt hole.
Refer to Figure 25 .
8. Tighten bolt while pressing washer against rear panel to en-
sure spacer is fully inserted.
FLW2296N_SVG
1
1. Shipping Brace
Figure 24
FLW2297N_SVG
1
1. Shipping Bolt Assembly
Figure 25
Maintenance
©
Copyright, Alliance Laundry Systems LLC -
DO NOT COPY or TRANSMIT
23 Part No. 807871ENR3

Troubleshooting
Try these troubleshooting tips before making a service call. They
may save you time and money.
Washer Symptom Possible Cause/Solution
Won’t Fill • Make sure power cord is plugged all the way into the electrical outlet.
• Check the laundry room fuse or circuit breaker.
• Make sure that the controls are properly set.
• Press START keypad.
• Make sure that the loading door is closed tightly.
• Make sure hot and cold water faucets are turned on.
• Make sure that the fill hoses are not kinked or twisted.
• Clean the screens in the water mixing valve and the filter screens located at the faucet
end of the fill hoses.
Won’t Start • Make sure power cord is plugged all the way into the electrical outlet.
• Check the laundry room fuse or circuit breaker.
• Make sure that the controls are properly set.
• Press START keypad.
• Make sure that the loading door is closed tightly.
• Insert coin(s) or card.
• Make sure door latch is properly adjusted relative to door lock.
Won’t Spin/Tumble • Make sure power cord is plugged all the way into the electrical outlet.
• Check the laundry room fuse or circuit breaker.
• Make sure that the controls are properly set.
• Press START keypad.
• Make sure that the loading door is closed tightly.
• Broken drive belt. Call the service person.
• Foreign object trap in pump may be clogged. Clean the trap. Refer to Maintenance
section.
Stops/Pauses During Cycle • Pauses are part of the washer’s normal operation.
• Check the laundry room fuse or circuit breaker.
• Wash load may be unbalanced. Washer will stop and then restart spin automatically.
Won’t Drain • Make sure drain hose is not kinked or twisted.
• Make sure drain hose is not clogged.
• Make sure drain receptacle is not clogged.
• Refer to the Installation instructions to make sure that the drain hose has been proper-
ly installed.
• Foreign object trap in pump may be clogged. Clean the trap. Refer to Maintenance
section.
Table continues...
Troubleshooting
©
Copyright, Alliance Laundry Systems LLC -
DO NOT COPY or TRANSMIT
24 Part No. 807871ENR3

Washer Symptom Possible Cause/Solution
Water Leaks • Check that fill hoses are properly installed on the faucets and the washer’s water mix-
ing valve.
• Check the condition of the fill hoses. Replace fill hoses every five years.
• Make sure drain receptacle is not clogged.
• Check laundry room plumbing.
• Check the condition of the rubber door gasket for tears or holes.
• Laundry load may be oversudsing. Make sure you are using low-sudsing, high effi-
ciency (HE) detergent.
• Laundry load may be overloaded. Make sure you are using proper load sizes.
• Make sure outside perimeter of the door glass where seal contacts glass is clean.
Too Many Soap Suds • Laundry load may be oversudsing. Make sure you are using low-sudsing, high effi-
ciency (HE) detergent.
• Make sure you are using the amount of detergent recommended on the detergent’s la-
bel. If using non-HE detergent, use only 1/2 of the detergent manufacturer's recom-
mended amount.
• Laundry load may be overloaded. Make sure you are using proper load sizes.
Vibrates/Moves Slightly • Make sure washer is level. Uneven leveling can cause vibration.
• Make sure washer is installed on a solid, sturdy and level floor. The washer should not
be installed on carpeting, soft tile, a platform or other weakly supported structures.
• Make sure rubber feet are installed on all four leveling legs. Refer to Position and
Level the washer.
Is Noisy • Make sure washer is level. Uneven leveling can cause vibration.
• Some sounds may be a part of normal operation for a frontload washer, such as click-
ing noise when door locks and clicking noise from balance ring during agitate part of
cycle.
Load is too Wet • Wash load may be unbalanced. The washer may have limited the spin speed to pre-
vent damage to the machine. Redistribute the load.
• Load is too small. Add items to make full load.
Wrong Water Temperature • Make sure that the controls are properly set.
• Check fill hoses. Make sure hot faucet hose is connected to hot mixing valve (indica-
ted with “H” on the valve bracket) and cold faucet is connected to cold mixing valve
(indicated with “C” on the valve bracket).
• Make sure laundry room water heater is adjusted properly.
Troubleshooting
©
Copyright, Alliance Laundry Systems LLC -
DO NOT COPY or TRANSMIT
25 Part No. 807871ENR3
Contact Information
If service is required, contact the nearest Factory Authorized
Service Center.
If you are unable to locate an authorized service center or are un-
satisfied with the service performed on your unit, contact:
Alliance Laundry Systems
Shepard Street
P.O. Box 990
Ripon, WI 54971-0990
www.alliancelaundry.com
Phone: +1 (920) 748-3121
If replacement parts are required, contact the source from where
you purchased your unit or call us at the number listed in this sec-
tion for the name and address of the nearest authorized parts dis-
tributor.
NOTE: For questions related to Laundry IQ, refer to
https://laundryIQ.alliancelaundry.com for service con-
tact information.
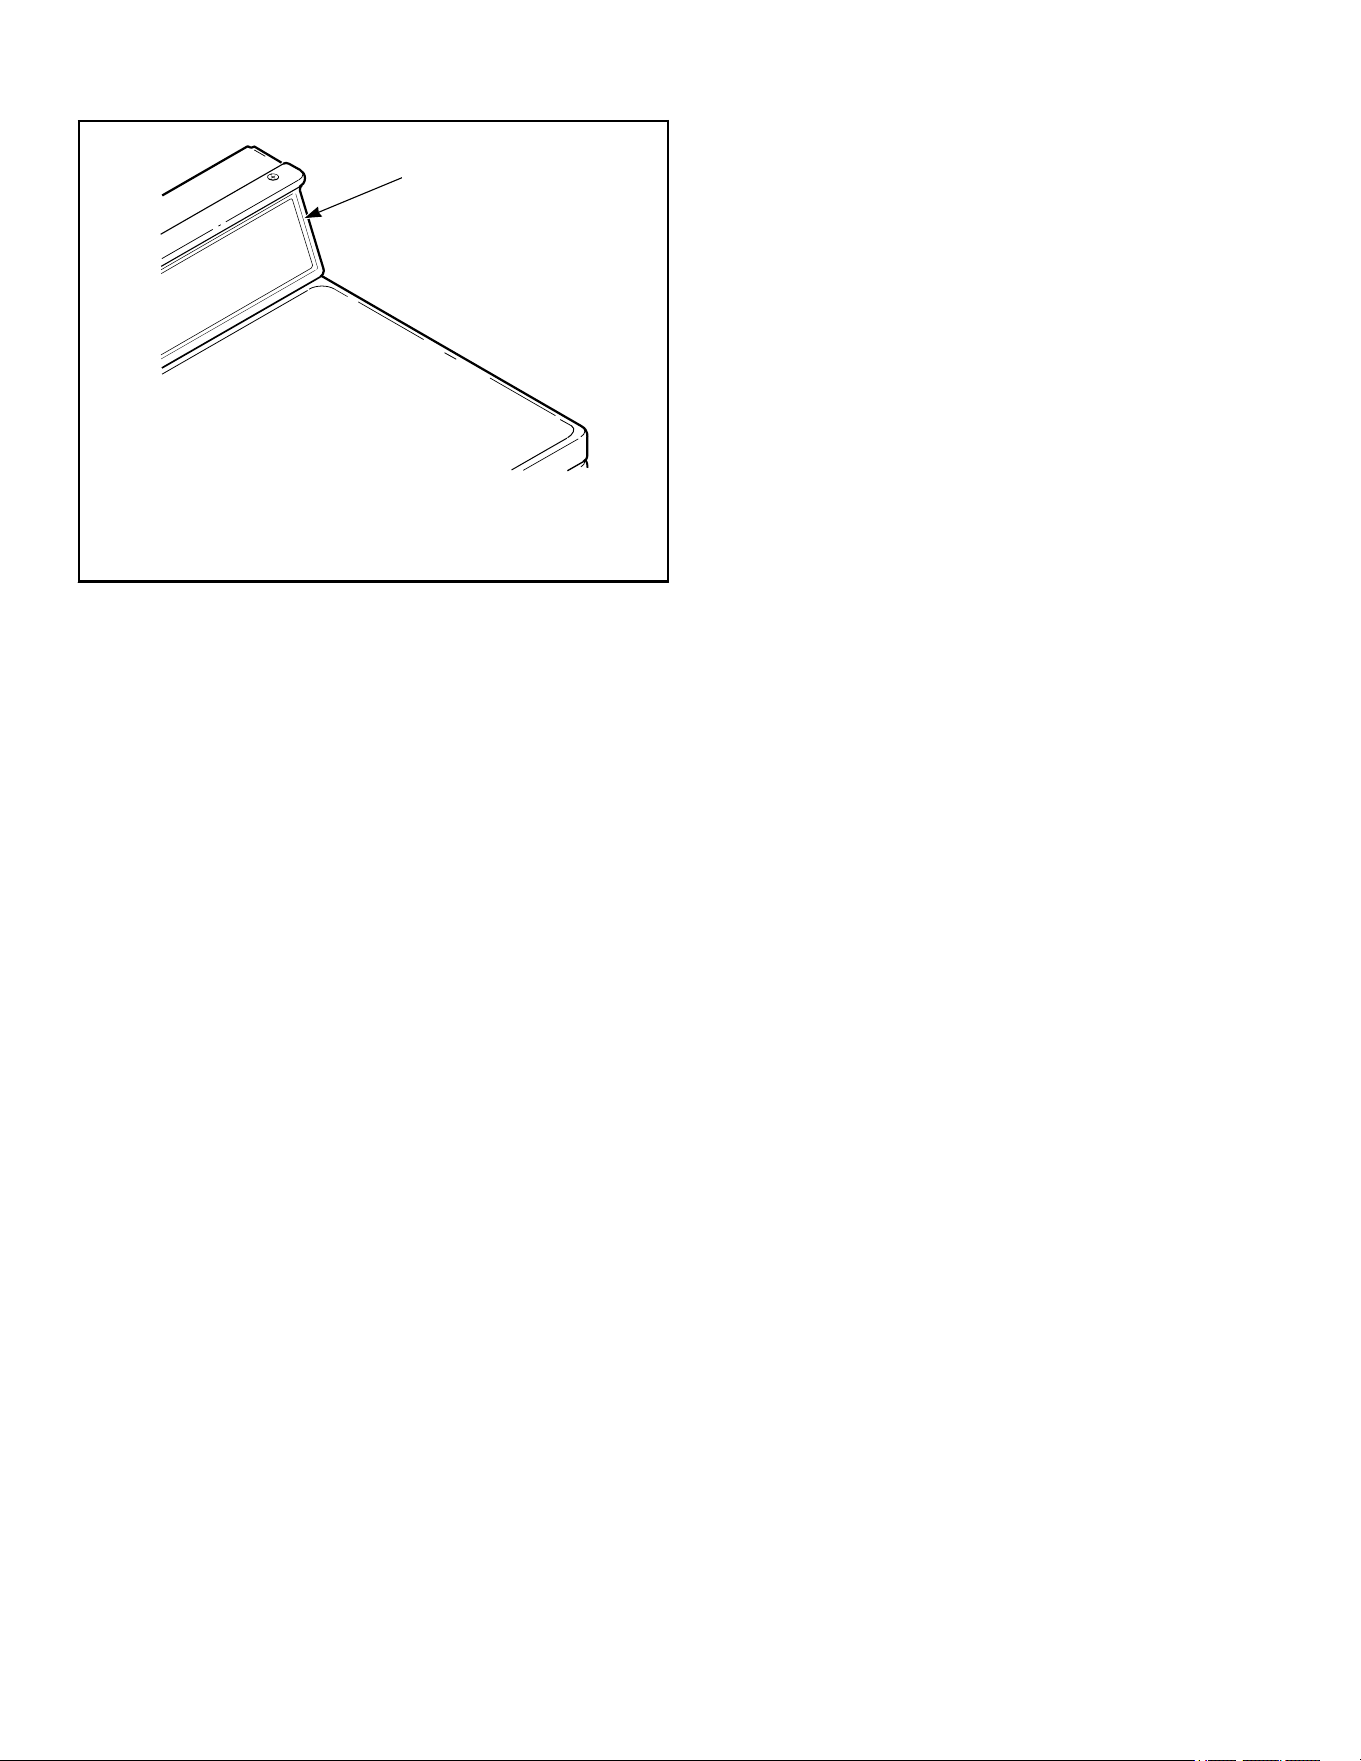
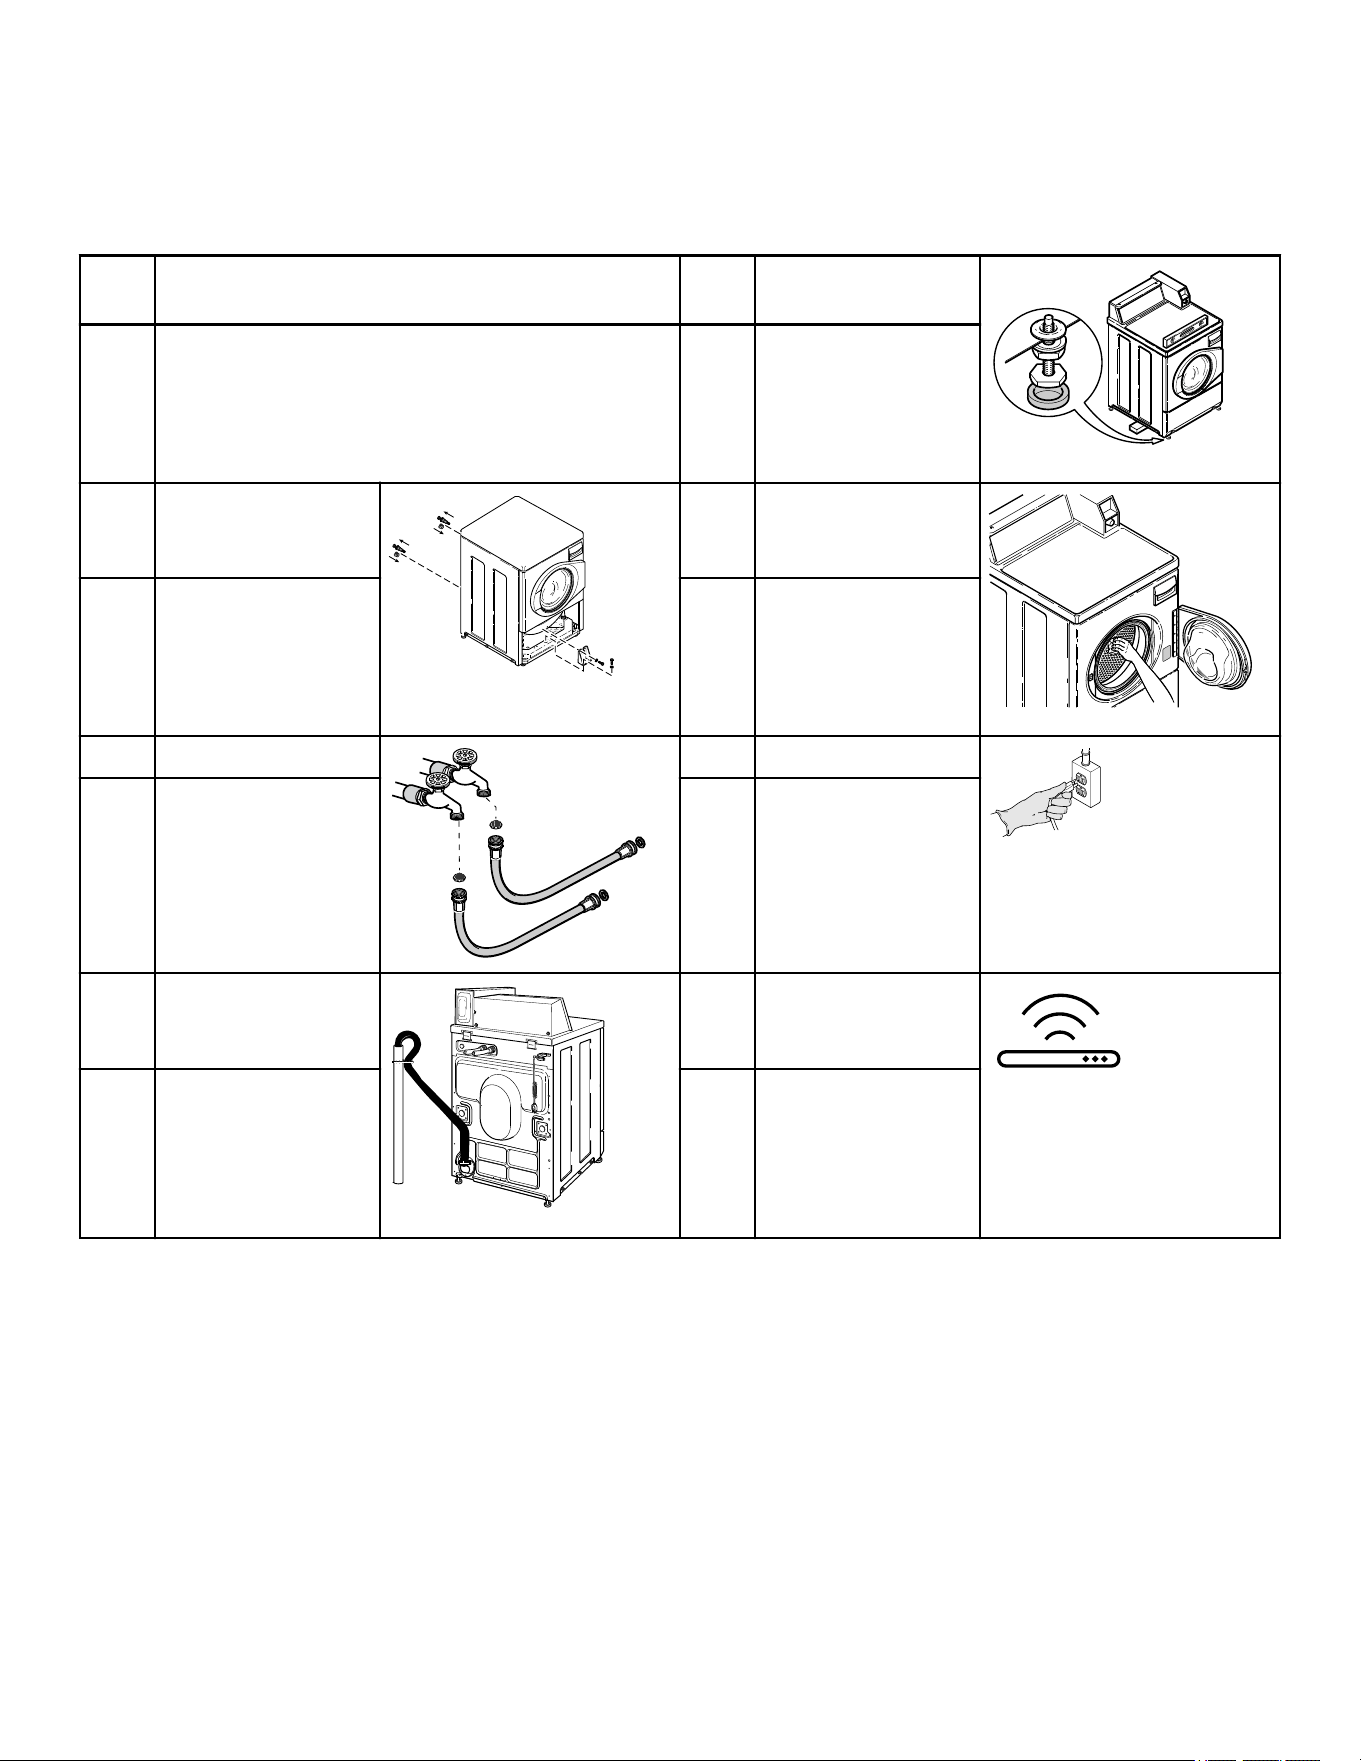
When calling or writing about your unit, PLEASE GIVE THE
MODEL AND SERIAL NUMBERS. The model and serial num-
bers are located on the serial plate. The serial plate will be in the
location shown in Figure 26 .
Date Purchased
Model Number
Serial Number
Please include a copy of your bill of sale and any service receipts
you have.
WARNING
To reduce the risk of serious injury or death, DO NOT
repair or replace any part of the unit or attempt any
servicing unless specifically recommended in the
user-maintenance instructions or in published user-
repair instructions that you understand and have the
skills to carry out.
W329
FLW2305N_SVG
1
1. Serial Plate
Figure 26
Contact Information
©
Copyright, Alliance Laundry Systems LLC -
DO NOT COPY or TRANSMIT
26 Part No. 807871ENR3
Installer Checklist
Fast Track for Installing the Washer
1 Position Washer Near Installation Area. 5 Position and Level
Washer.
FLW2346N_SVG1
CHECK CHECK
2 Remove Shipping Ma-
terials and Install
Plugs.
FLW2359N_SVG
6 Wipe Out Inside of
Washer.
FLW2350N_SVG
CHECK CHECK
3 Connect Fill Hoses.
TLW1976N_SVG1
HOT
COLD
7 Plug In Washer.
TLW2289N_SVG
CHECK CHECK
4 Connect Drain Hose to
Drain Receptacle.
FLW2349N_SVG1
8 Connect Laundry IQ to
Gateway (Select Mod-
els).
TLW2391N_SVG
CHECK CHECK
Refer to the manual for more detailed information.
Installer Checklist
©
Copyright, Alliance Laundry Systems LLC -
DO NOT COPY or TRANSMIT
27 Part No. 807871ENR3