WARNING
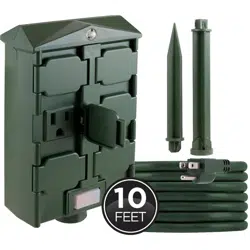
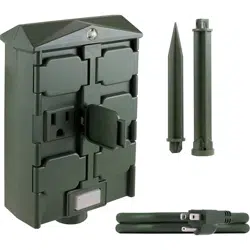
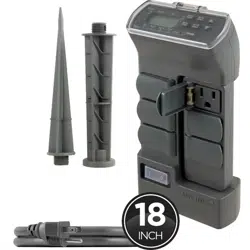
Setup
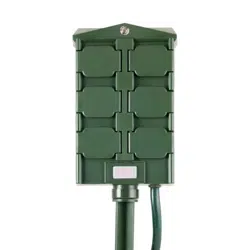
1. Connect the two segments of the stake, screw stake into the
bottom of the timer.
2. Select a sunny, outdoor location near a GFCI outlet.
– DO NOT PLACE TIMER IN A SHADED AREA.
To ensure proper operation of the atuomatic function,
ensure the light sensor is shielded from all night time
sources of light, such as floodlights. Also, ensure the
light sensor has direct access to sunlight.
3. Installation options:
Yard – Firmly push the stake into the ground.
Wall – Insert screws or nails into a solid surface leaving
approximately 1/8in. exposed and hang the timer from the
rear mounting holes — stake can be removed.
4. Plug the cord directly into a GFCI outlet.
5. Ensure master shuto switch is in the ON position.
— switch illuminates.
6. Open self-closing outlet cover.
7. Plug in device to be controlled.
8. If the device has a power switch, it must be in the ON position.
41295 v1 05/06/19
Outdoor Digital
6-Outlet
Evening Preset Timer
MADE IN CHINA
Distributed by Jasco Products Company LLC,
10 E. Memorial Rd., Oklahoma City, OK 73114.
This Jasco product comes with a 1-year limited
warranty.
Visit www.byjasco.com for warranty details.
Questions? Contact our U.S.-based Consumer Care
at 1-800-654-8483 between 7AM – 8PM CST.
125V~60Hz
Maximum load:
15A 1875W resistive
Suitable for indoor and
outdoor use.
Works with LED, CFL,
incandescent and halogen
bulbs.
WARNING
RISK OF ELECTRIC SHOCK
• PLUG DIRECTLY INTO A GFCI PROTECTED
ELECTRICAL OUTLET
• KEEP AWAY FROM CHILDREN
• SUITABLE FOR INDOOR AND OUTDOOR LOCATIONS,
STORE INDOORS WHILE NOT IN USE
RISK OF FIRE
• DO NOT USE TO CONTROL APPLIANCES THAT CONTAIN
HEATING ELEMENTS (COOKING APPLIANCES, HEATERS,
IRONS, ETC.)
• DO NOT EXCEED ELECTRICAL RATINGS
• USE ONLY WITH EQUIPMENT HAVING A 12A MAXIMUM
• IF USING DECORATIVE LIGHTING NOT MARKED WITH
AN AMPERE RATING, CONNECT NO MORE THAN 140
SCREW-BASED LAMPS (C7 OR C9) OR 12 STRINGS WITH
PUSH-IN LAMPS
• IF USED FOR MORE THAN 90 DAYS, CONTACT A
LICENSED ELECTRICIAN TO HARDWIRE A PERMANENT
OUTDOOR OUTLET RATED FOR YEAR-ROUND USE
• TIMER OUTLETS MUST REMAIN AT LEAST 6 INCHES
ABOVE GROUND
Master shuto
switch
Light sensor
9. Repeat steps 6-8 for additional devices.
– DO NOT EXCEED ELECTRICAL RATINGS.
10. Light sensor turns on timer at dusk — connected devices turn
o after six hours.
READ IT OR WATCH IT
Read instructions or watch easy-
to-follow video. Scan QR code
or visit https://goo.gl/ofEfsY
WARNING
Setup
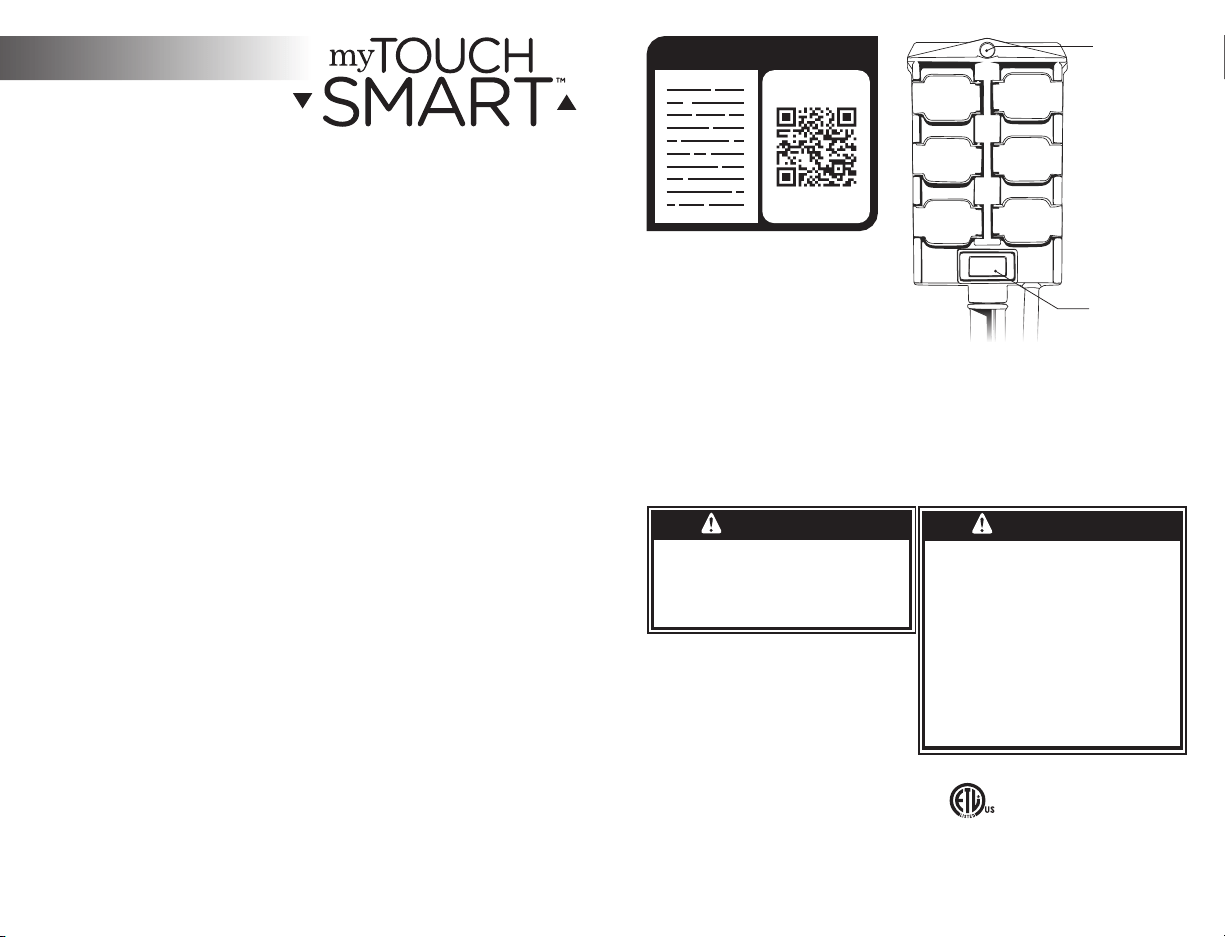
1. Connect the two segments of the stake, screw stake into the
bottom of the timer.
2. Select a sunny, outdoor location near a GFCI outlet.
– DO NOT PLACE TIMER IN A SHADED AREA.
To ensure proper operation of the atuomatic function,
ensure the light sensor is shielded from all night time
sources of light, such as floodlights. Also, ensure the
light sensor has direct access to sunlight.
3. Installation options:
Yard – Firmly push the stake into the ground.
Wall – Insert screws or nails into a solid surface leaving
approximately 1/8in. exposed and hang the timer from the
rear mounting holes — stake can be removed.
4. Plug the cord directly into a GFCI outlet.
5. Ensure master shuto switch is in the ON position.
— switch illuminates.
6. Open self-closing outlet cover.
7. Plug in device to be controlled.
8. If the device has a power switch, it must be in the ON position.
41295 v1 05/06/19
Outdoor Digital
6-Outlet
Evening Preset Timer
MADE IN CHINA
Distributed by Jasco Products Company LLC,
10 E. Memorial Rd., Oklahoma City, OK 73114.
This Jasco product comes with a 1-year limited
warranty.
Visit www.byjasco.com for warranty details.
Questions? Contact our U.S.-based Consumer Care
at 1-800-654-8483 between 7AM – 8PM CST.
125V~60Hz
Maximum load:
15A 1875W resistive
Suitable for indoor and
outdoor use.
Works with LED, CFL,
incandescent and halogen
bulbs.
WARNING
RISK OF ELECTRIC SHOCK
• PLUG DIRECTLY INTO A GFCI PROTECTED
ELECTRICAL OUTLET
• KEEP AWAY FROM CHILDREN
• SUITABLE FOR INDOOR AND OUTDOOR LOCATIONS,
STORE INDOORS WHILE NOT IN USE
RISK OF FIRE
• DO NOT USE TO CONTROL APPLIANCES THAT CONTAIN
HEATING ELEMENTS (COOKING APPLIANCES, HEATERS,
IRONS, ETC.)
• DO NOT EXCEED ELECTRICAL RATINGS
• USE ONLY WITH EQUIPMENT HAVING A 12A MAXIMUM
• IF USING DECORATIVE LIGHTING NOT MARKED WITH
AN AMPERE RATING, CONNECT NO MORE THAN 140
SCREW-BASED LAMPS (C7 OR C9) OR 12 STRINGS WITH
PUSH-IN LAMPS
• IF USED FOR MORE THAN 90 DAYS, CONTACT A
LICENSED ELECTRICIAN TO HARDWIRE A PERMANENT
OUTDOOR OUTLET RATED FOR YEAR-ROUND USE
• TIMER OUTLETS MUST REMAIN AT LEAST 6 INCHES
ABOVE GROUND
Master shuto
switch
Light sensor
9. Repeat steps 6-8 for additional devices.
– DO NOT EXCEED ELECTRICAL RATINGS.
10. Light sensor turns on timer at dusk — connected devices turn
o after six hours.
READ IT OR WATCH IT
Read instructions or watch easy-
to-follow video. Scan QR code
or visit https://goo.gl/ofEfsY

Configuración
41295 v1 05/06/19
Digital Al Aire Libre
6 Tomacorrientes
Temporizador Nocturno
Programable de
HECHO EN CHINA
Distribuido por Jasco Products Company LLC,
10 E Memorial Rd., Oklahoma City, Oklahoma
73114.
Este producto de Jasco tiene una garantía
limitada de 1 año. Visite www.byjasco.com para
obtener detalles de la garantía y registrar el
producto.
¿Preguntas? Comuníquese con nuestro Centro de
atención al cliente con sede en EE. UU. al
1-800-654-8483 de 7AM a 8PM CST
(hora central estándar).
125V~60Hz
Carga máxima:
15A 1875W resistiva
Adecuado para uso en
interiores y exteriores.
Funciona con bombillas
LED, CFL, incandescentes y
halógenas.
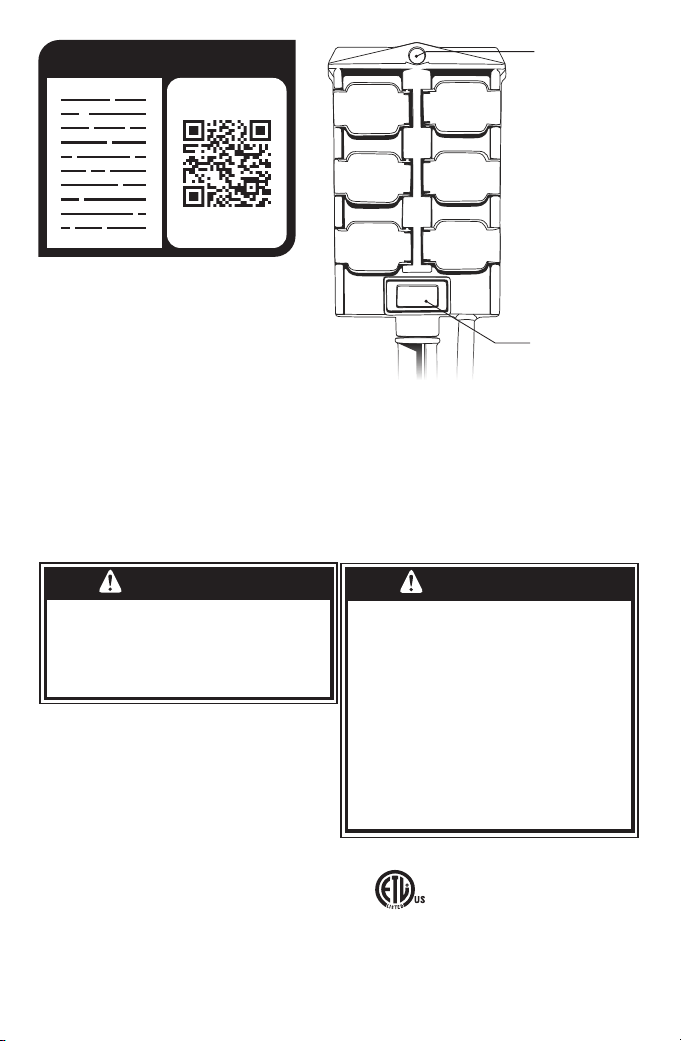
1. Conecte los dos segmentos de la estaca, atornille la estaca en la
parte inferior del temporizador.
2. Seleccione un lugar soleado, al aire libre cerca de una toma GFCI.
- NO COLOQUE EL TEMPORIZADOR EN UNA ZONA CON SOMBRA.
Para garantizar el funcionamiento correcto de la función automática
cuando utiliza la configuración de atardecer a amanecer, asegúrese
de que el sensor de luz esté protegido de todo tipo de fuentes de
luz nocturnas, como los proyectores. Además, asegúrese de que el
sensor de luz tenga acceso directo a la luz solar.
3. Opciones de instalación:
El patio - Empuje firmemente la estaca en el suelo.
La barrera- Inserte el tornillo o clavos en una superficie sólida dejando
un espacio de aproximadamente 1/8 in. (3,18 mm) exponga y cuelgue
el temporizador de los orificios de montaje traseros. En este punto se
puede retirar la estaca.
4. Enchufe el cable directamente en un tomacorriente GFCI.
5. Asegúrese de que el interruptor de apagado maestro esté en la
posición de ENCENDIDO.
— El interruptor se ilumina.
6. Abra la tapa del tomacorriente de cierre automático.
7. Enchufe el dispositivo a controlar.
8. Si el dispositivo tiene un interruptor de encendido, este debe estar en
la posición de ENCENDIDO.
9. Repita los pasos 6-8 para dispositivos adicionales
- NO EXCEDA LAS CALIFICACIONES ELÉCTRICAS.
10. El sensor de luz enciende el temporizador al anochecer. Los dispositivos
conectados se apagan después de seis horas.
Sensor de luz
Interruptor de
apagado maestro
RIESGO DE CHOQUE ELÉCTRICO
• ENCHUFE EL EQUIPO DIRECTAMENTE EN UN
TOMACORRIENTE ELÉCTRICO PROTEGIDO POR GFCI
• MANTÉNGALO ALEJADO DE LOS NIÑOS
• ADECUADO PARA UBICACIONES INTERIORES Y
EXTERIORES, ALMACENE EN INTERIORES MIENTRAS
NO ESTÉ EN USO
RIESGO DE INCENDIO
• NO UTILICE PARA CONTROLAR APARATOS QUE INCLUYAN
RESISTENCIAS ELÉCTRICAS (APARATOS DE COCCIÓN,
CALEFACTORES, PLANCHAS, ETC.)
• NO UTILICE PARA CONTROLAR APARATOS QUE INCLUYAN
RESISTENCIAS ELÉCTRICAS (APARATOS DE COCCIÓN,
CALEFACTORES, PLANCHAS, ETC.)
• ÚSELO SOLO CON EQUIPOS QUE TENGAN UN MÁXIMO DE 12A
• SI UTILIZA ILUMINACIÓN DECORATIVA QUE NO ESTÁ MARCADA
CON LA CLASIFICACIÓN DE AMPERIOS, NO CONECTE MÁS
DE 140 LÁMPARAS CON BASE ATORNILLADA (C7 O C9) O 12
CORDONES DE LUCES CON LÁMPARAS A PRESIÓN
• SI SE USA DURANTE MÁS DE 90 DÍAS, PÓNGASE EN CONTACTO
CON UN ELECTRICISTA CERTIFICADO PARA CONECTAR UN
TOMACORRIENTE DE EXTERIORES PERMANENTE CLASIFICADO
PARA USO TODO EL AÑO
• LOS TOMACORRIENTES DEL TEMPORIZADOR DEBEN
PERMANECER AL MENOS A 6 PULGADAS POR ENCIMA
DEL SUELO
ADVERTENCIA
ADVERTENCIA
Configuración
41295 v1 05/06/19
Digital Al Aire Libre
6 Tomacorrientes
Temporizador Nocturno
Programable de
HECHO EN CHINA
Distribuido por Jasco Products Company LLC,
10 E Memorial Rd., Oklahoma City, Oklahoma
73114.
Este producto de Jasco tiene una garantía
limitada de 1 año. Visite www.byjasco.com para
obtener detalles de la garantía y registrar el
producto.
¿Preguntas? Comuníquese con nuestro Centro de
atención al cliente con sede en EE. UU. al
1-800-654-8483 de 7AM a 8PM CST
(hora central estándar).
125V~60Hz
Carga máxima:
15A 1875W resistiva
Adecuado para uso en
interiores y exteriores.
Funciona con bombillas
LED, CFL, incandescentes y
halógenas.
1. Conecte los dos segmentos de la estaca, atornille la estaca en la
parte inferior del temporizador.
2. Seleccione un lugar soleado, al aire libre cerca de una toma GFCI.
- NO COLOQUE EL TEMPORIZADOR EN UNA ZONA CON SOMBRA.
Para garantizar el funcionamiento correcto de la función automática
cuando utiliza la configuración de atardecer a amanecer, asegúrese
de que el sensor de luz esté protegido de todo tipo de fuentes de
luz nocturnas, como los proyectores. Además, asegúrese de que el
sensor de luz tenga acceso directo a la luz solar.
3. Opciones de instalación:
El patio - Empuje firmemente la estaca en el suelo.
La barrera- Inserte el tornillo o clavos en una superficie sólida dejando
un espacio de aproximadamente 1/8 in. (3,18 mm) exponga y cuelgue
el temporizador de los orificios de montaje traseros. En este punto se
puede retirar la estaca.
4. Enchufe el cable directamente en un tomacorriente GFCI.
5. Asegúrese de que el interruptor de apagado maestro esté en la
posición de ENCENDIDO.
— El interruptor se ilumina.
6. Abra la tapa del tomacorriente de cierre automático.
7. Enchufe el dispositivo a controlar.
8. Si el dispositivo tiene un interruptor de encendido, este debe estar en
la posición de ENCENDIDO.
9. Repita los pasos 6-8 para dispositivos adicionales
- NO EXCEDA LAS CALIFICACIONES ELÉCTRICAS.
10. El sensor de luz enciende el temporizador al anochecer. Los dispositivos
conectados se apagan después de seis horas.
Sensor de luz
Interruptor de
apagado maestro
RIESGO DE CHOQUE ELÉCTRICO
• ENCHUFE EL EQUIPO DIRECTAMENTE EN UN
TOMACORRIENTE ELÉCTRICO PROTEGIDO POR GFCI
• MANTÉNGALO ALEJADO DE LOS NIÑOS
• ADECUADO PARA UBICACIONES INTERIORES Y
EXTERIORES, ALMACENE EN INTERIORES MIENTRAS
NO ESTÉ EN USO
RIESGO DE INCENDIO
• NO UTILICE PARA CONTROLAR APARATOS QUE INCLUYAN
RESISTENCIAS ELÉCTRICAS (APARATOS DE COCCIÓN,
CALEFACTORES, PLANCHAS, ETC.)
• NO UTILICE PARA CONTROLAR APARATOS QUE INCLUYAN
RESISTENCIAS ELÉCTRICAS (APARATOS DE COCCIÓN,
CALEFACTORES, PLANCHAS, ETC.)
• ÚSELO SOLO CON EQUIPOS QUE TENGAN UN MÁXIMO DE 12A
• SI UTILIZA ILUMINACIÓN DECORATIVA QUE NO ESTÁ MARCADA
CON LA CLASIFICACIÓN DE AMPERIOS, NO CONECTE MÁS
DE 140 LÁMPARAS CON BASE ATORNILLADA (C7 O C9) O 12
CORDONES DE LUCES CON LÁMPARAS A PRESIÓN
• SI SE USA DURANTE MÁS DE 90 DÍAS, PÓNGASE EN CONTACTO
CON UN ELECTRICISTA CERTIFICADO PARA CONECTAR UN
TOMACORRIENTE DE EXTERIORES PERMANENTE CLASIFICADO
PARA USO TODO EL AÑO
• LOS TOMACORRIENTES DEL TEMPORIZADOR DEBEN
PERMANECER AL MENOS A 6 PULGADAS POR ENCIMA
DEL SUELO
ADVERTENCIA
ADVERTENCIA