
FULL MANUAL
HW-Q930B / HW-Q800B / HW-Q700B
Imagine the possibilities
Thank you for purchasing this Samsung product.
To receive more complete service, please register your product at
www.samsung.com/register
Para evitar cualquier avería o daños, lea detalladamente este manual de instrucciones antes de conectar y utilizar este aparato.
Conserve el manual para referencia futura. (Sólo México)
ENG - 2
SAFETY INFORMATION
SAFETY WARNINGS
TO REDUCE THE RISK OF ELECTRIC SHOCK, DO NOT REMOVE THE
COVER (OR BACK).
NO USER-SERVICEABLE PARTS ARE INSIDE. REFER SERVICING TO
QUALIFIED SERVICE PERSONNEL.
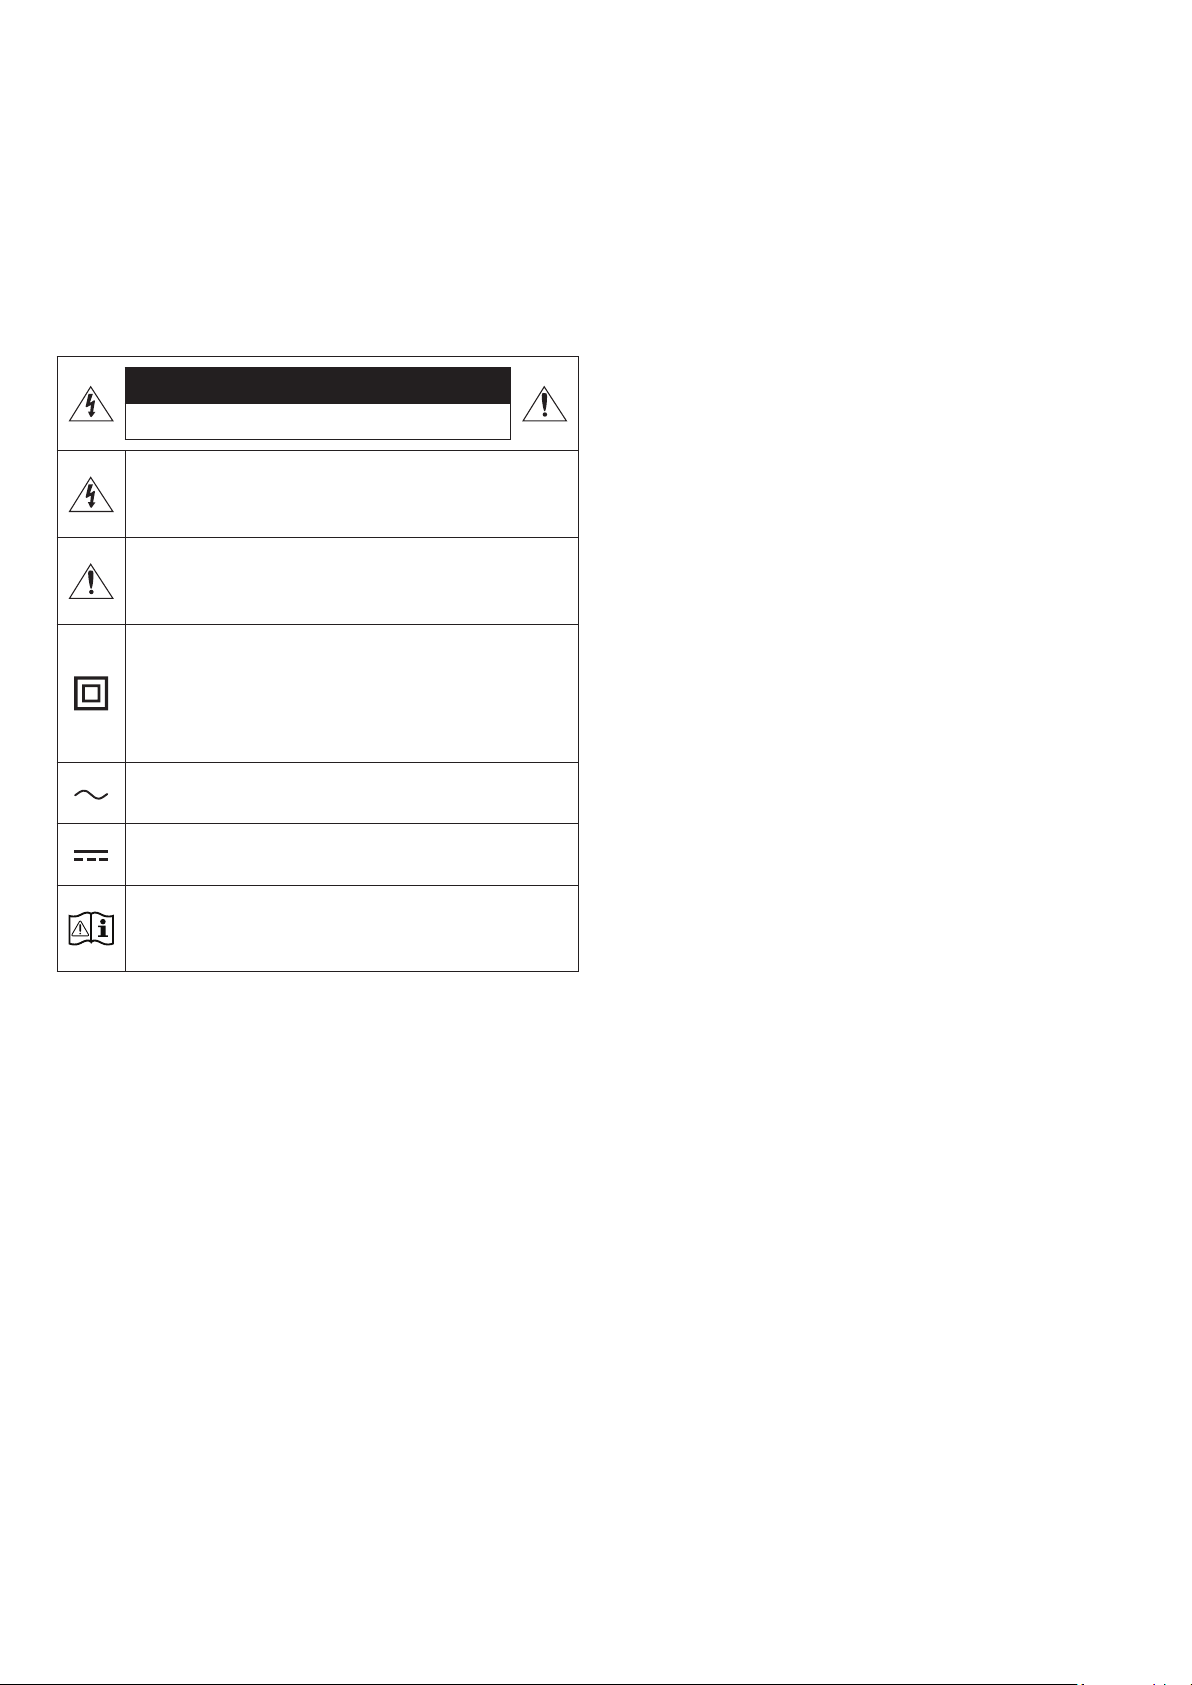
Refer to the table below for an explanation of symbols which may be
on your Samsung product.
CAUTION
RISK OF ELECTRIC SHOCK. DO NOT OPEN.
This symbol indicates that high voltage is present inside.
It is dangerous to make any kind of contact with any
internal part of this product.
This symbol indicates that this product has included
important literature concerning operation and
maintenance.
Class II product : This symbol indicates that a safety
connection to electrical earth (ground) is not required.
If this symbol is not present on a product with a power
cord, the product MUST have a reliable connection to
protective earth (ground).
AC voltage : Rated voltage marked with this symbol is AC
voltage.
DC voltage : Rated voltage marked with this symbol is DC
voltage.
Caution. Consult Instructions for use : This symbol
instructs the user to consult the user manual for further
safety related information.
WARNING
• To reduce the risk of re or electric shock, do not expose this
appliance to rain or moisture.
CAUTION
• TO PREVENT ELECTRIC SHOCK, MATCH WIDE BLADE OF PLUG TO
WIDE SLOT, FULLY INSERT.
• This apparatus shall always be connected to a AC outlet with a
protective grounding connection.
• To disconnect the apparatus from the mains, the plug must be
pulled out from the mains socket, therefore the mains plug shall
be readily operable.
• Do not expose this apparatus to dripping or splashing. Do not put
objects lled with liquids, such as vases, on the apparatus.
• To turn this apparatus off completely, you must pull the power
plug out of the wall socket. Consequently, the power plug must be
easily and readily accessible at all times.

ENG - 3
PRECAUTIONS
1. Ensure that the AC power supply in your house complies with the
power requirements listed on the identication sticker located
on the bottom of your product. Install your product horizontally,
on a suitable base (furniture), with enough space around it for
ventilation (7~10 cm). Make sure the ventilation slots are not
covered. Do not place the unit on ampliers or other equipment
which may become hot. This unit is designed for continuous use.
To fully turn off the unit, disconnect the AC plug from the wall
outlet. Unplug the unit if you intend to leave it unused for a long
period of time.
2. During thunderstorms, disconnect the AC plug from the wall
outlet. Voltage peaks due to lightning could damage the unit.
3. Do not expose the unit to direct sunlight or other heat sources.
This could lead to overheating and cause the unit to malfunction.
4. Protect the product from moisture (i.e. vases), and excess heat
(e.g. a replace) or equipment creating strong magnetic or electric
elds. Unplug the power cable from the AC wall socket if the unit
malfunctions. Your product is not intended for industrial use. It is
for personal use only. Condensation may occur if your product has
been stored in cold temperatures. If transporting the unit during
the winter, wait approximately 2 hours until the unit has reached
room temperature before using.
5. The battery used with this product contains chemicals that are
harmful to the environment. Do not dispose of the battery in the
general household trash. Do not expose the battery to excess
heat, direct sunlight, or re. Do not short circuit, disassemble, or
overheat the battery.
CAUTION : Danger of explosion if the battery is replaced
incorrectly. Replace only with the same or equivalent type.

ENG - 4
CONTENTS
01 Checking the Components 6
02 Product Overview 7
Top Panel of the Soundbar. . . . . . . . . . . . . . . . . . . . . . . . . . . . . . . . . . . . . . . . . . . . . . . . . . . . . . . . . . . . . . . . . . . . . . . . . . . . . . . . . . . . . . . . . . . . . . . . . . . . . .7
Bottom Panel of the Soundbar . . . . . . . . . . . . . . . . . . . . . . . . . . . . . . . . . . . . . . . . . . . . . . . . . . . . . . . . . . . . . . . . . . . . . . . . . . . . . . . . . . . . . . . . . . . . . . . . . 8
03 Using the Soundbar Remote Control 9
Inserting Batteries before using the Remote Control (AAA batteries X 2) . . . . . . . . . . . . . . . . . . . . . . . . . . . . . . . . . . . . . . . . . . . . . . . . . . . . . . . . . . 9
How to Use the Remote Control . . . . . . . . . . . . . . . . . . . . . . . . . . . . . . . . . . . . . . . . . . . . . . . . . . . . . . . . . . . . . . . . . . . . . . . . . . . . . . . . . . . . . . . . . . . . . . . . 9
Active Voice Amplier (AVA) . . . . . . . . . . . . . . . . . . . . . . . . . . . . . . . . . . . . . . . . . . . . . . . . . . . . . . . . . . . . . . . . . . . . . . . . . . . . . . . . . . . . . . . . . . . . . . . . . . .11
Using the Hidden Buttons (Buttons with more than one function). . . . . . . . . . . . . . . . . . . . . . . . . . . . . . . . . . . . . . . . . . . . . . . . . . . . . . . . . . . . . . . . .11
Output specications for the different sound effect modes . . . . . . . . . . . . . . . . . . . . . . . . . . . . . . . . . . . . . . . . . . . . . . . . . . . . . . . . . . . . . . . . . . . . . . .11
Adjusting the Soundbar volume with a TV remote control . . . . . . . . . . . . . . . . . . . . . . . . . . . . . . . . . . . . . . . . . . . . . . . . . . . . . . . . . . . . . . . . . . . . . . . 13
04 Connecting the Soundbar 14
Connecting the power and units. . . . . . . . . . . . . . . . . . . . . . . . . . . . . . . . . . . . . . . . . . . . . . . . . . . . . . . . . . . . . . . . . . . . . . . . . . . . . . . . . . . . . . . . . . . . . . . 14
‒ Recommended Speaker Layout . . . . . . . . . . . . . . . . . . . . . . . . . . . . . . . . . . . . . . . . . . . . . . . . . . . . . . . . . . . . . . . . . . . . . . . . . . . . . . . . . . . . . . . . . . . . 15
‒ Surround speaker mode (HW-Q930B only) . . . . . . . . . . . . . . . . . . . . . . . . . . . . . . . . . . . . . . . . . . . . . . . . . . . . . . . . . . . . . . . . . . . . . . . . . . . . . . . . . . 15
‒ Manually connecting the Subwoofer or Surround Speakers . . . . . . . . . . . . . . . . . . . . . . . . . . . . . . . . . . . . . . . . . . . . . . . . . . . . . . . . . . . . . . . . . . . 16
‒ LED Indicator Lights on the Rear of Subwoofer and Surround Speakers . . . . . . . . . . . . . . . . . . . . . . . . . . . . . . . . . . . . . . . . . . . . . . . . . . . . . . . . .17
05 Connecting to a TV 18
Connecting the TV that supports HDMI ARC (Audio Return Channel) . . . . . . . . . . . . . . . . . . . . . . . . . . . . . . . . . . . . . . . . . . . . . . . . . . . . . . . . . . . . . 18
Connecting using an Optical Cable . . . . . . . . . . . . . . . . . . . . . . . . . . . . . . . . . . . . . . . . . . . . . . . . . . . . . . . . . . . . . . . . . . . . . . . . . . . . . . . . . . . . . . . . . . . . 19
Connecting via Bluetooth. . . . . . . . . . . . . . . . . . . . . . . . . . . . . . . . . . . . . . . . . . . . . . . . . . . . . . . . . . . . . . . . . . . . . . . . . . . . . . . . . . . . . . . . . . . . . . . . . . . . . 20
Connecting via Wi-Fi . . . . . . . . . . . . . . . . . . . . . . . . . . . . . . . . . . . . . . . . . . . . . . . . . . . . . . . . . . . . . . . . . . . . . . . . . . . . . . . . . . . . . . . . . . . . . . . . . . . . . . . . . 22
Using the Q-Symphony Function . . . . . . . . . . . . . . . . . . . . . . . . . . . . . . . . . . . . . . . . . . . . . . . . . . . . . . . . . . . . . . . . . . . . . . . . . . . . . . . . . . . . . . . . . . . . . . 23
Using the Spacet sound . . . . . . . . . . . . . . . . . . . . . . . . . . . . . . . . . . . . . . . . . . . . . . . . . . . . . . . . . . . . . . . . . . . . . . . . . . . . . . . . . . . . . . . . . . . . . . . . . . . . . 24
06 Connecting an External Device 25
Method 1. Connecting using an HDMI Cable (Capable of Dolby Atmos / DTS:X decoding and playback) . . . . . . . . . . . . . . . . . . . . . . . . . . . . . . 25
Method 2. Connecting using an Optical Cable . . . . . . . . . . . . . . . . . . . . . . . . . . . . . . . . . . . . . . . . . . . . . . . . . . . . . . . . . . . . . . . . . . . . . . . . . . . . . . . . . . 26
07 Connecting a Mobile Device 27
Method 1. Connecting via Bluetooth . . . . . . . . . . . . . . . . . . . . . . . . . . . . . . . . . . . . . . . . . . . . . . . . . . . . . . . . . . . . . . . . . . . . . . . . . . . . . . . . . . . . . . . . . . . 27
Method 2. Connecting via Wi-Fi (Wireless Network). . . . . . . . . . . . . . . . . . . . . . . . . . . . . . . . . . . . . . . . . . . . . . . . . . . . . . . . . . . . . . . . . . . . . . . . . . . . . 29
Using the Tap Sound . . . . . . . . . . . . . . . . . . . . . . . . . . . . . . . . . . . . . . . . . . . . . . . . . . . . . . . . . . . . . . . . . . . . . . . . . . . . . . . . . . . . . . . . . . . . . . . . . . . . . . . . . 30
08 Connecting via Apple Airplay 2 31
09 Installing the Wall Mount 32
Installation Precautions . . . . . . . . . . . . . . . . . . . . . . . . . . . . . . . . . . . . . . . . . . . . . . . . . . . . . . . . . . . . . . . . . . . . . . . . . . . . . . . . . . . . . . . . . . . . . . . . . . . . . . 32
Wallmount Components. . . . . . . . . . . . . . . . . . . . . . . . . . . . . . . . . . . . . . . . . . . . . . . . . . . . . . . . . . . . . . . . . . . . . . . . . . . . . . . . . . . . . . . . . . . . . . . . . . . . . . 32
Installing the Surround Speakers on a Wall (applicable models only) . . . . . . . . . . . . . . . . . . . . . . . . . . . . . . . . . . . . . . . . . . . . . . . . . . . . . . . . . . . . . 33

ENG - 5
10 Installing the Soundbar in front of TV 33
Component . . . . . . . . . . . . . . . . . . . . . . . . . . . . . . . . . . . . . . . . . . . . . . . . . . . . . . . . . . . . . . . . . . . . . . . . . . . . . . . . . . . . . . . . . . . . . . . . . . . . . . . . . . . . . . . . . 33
11 Software Update 34
Auto Update. . . . . . . . . . . . . . . . . . . . . . . . . . . . . . . . . . . . . . . . . . . . . . . . . . . . . . . . . . . . . . . . . . . . . . . . . . . . . . . . . . . . . . . . . . . . . . . . . . . . . . . . . . . . . . . . . 34
USB Update . . . . . . . . . . . . . . . . . . . . . . . . . . . . . . . . . . . . . . . . . . . . . . . . . . . . . . . . . . . . . . . . . . . . . . . . . . . . . . . . . . . . . . . . . . . . . . . . . . . . . . . . . . . . . . . . . 34
Initialization. . . . . . . . . . . . . . . . . . . . . . . . . . . . . . . . . . . . . . . . . . . . . . . . . . . . . . . . . . . . . . . . . . . . . . . . . . . . . . . . . . . . . . . . . . . . . . . . . . . . . . . . . . . . . . . . . 35
12 Troubleshooting 35
13 License 37
14 Open Source License Notice 37
15 Important Notes About Service 37
16
Specications . . . . . . . . . . . . . . . . . . . . . . . . . . . . . . . . . . . . . . . . . . . . . . . . . . . . . . . . . . . . . . . . . . . . . . . . . . . . . . . . . . . . . . . . . . . . . . . . . . . . . . . . . . . . . . . 38

ENG - 6
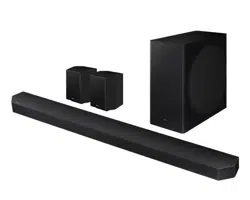
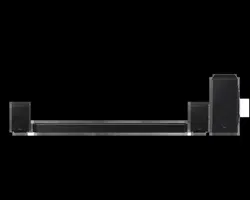
01 CHECKING THE COMPONENTS
SOUNDBAR
Soundbar Main Unit Samsung Smart Remote &
Batteries (Not available in some locations or
models)
Subwoofer
x 2
x 4 or 2
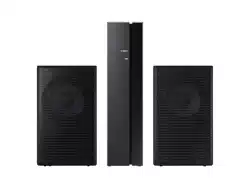
Surround Speaker (optional)
(Left / Right)
Power Cord
(Subwoofer, Surround Speaker, Soundbar)
(optional)
HDMI Cable
x 2
x 2
(M4 x L10)
Wall Mount Guide Holder-Screw Screw
x 2
x 4
Bracket-Wall Mount Rubber-Foot
• For more information about the power supply and power consumption, refer to the label attached to the product. (Label: Rear of the Soundbar
Main Unit)
• To purchase additional components or optional cables, contact a Samsung Service Center or Samsung Customer Care.
• For more information about the wallmount or rubber-foot, see pages 32~34.
• Design, specications, and App screen are subject to change without prior notice.
• The appearance of the accessories may differ slightly from the illustrations above.
ENG - 7
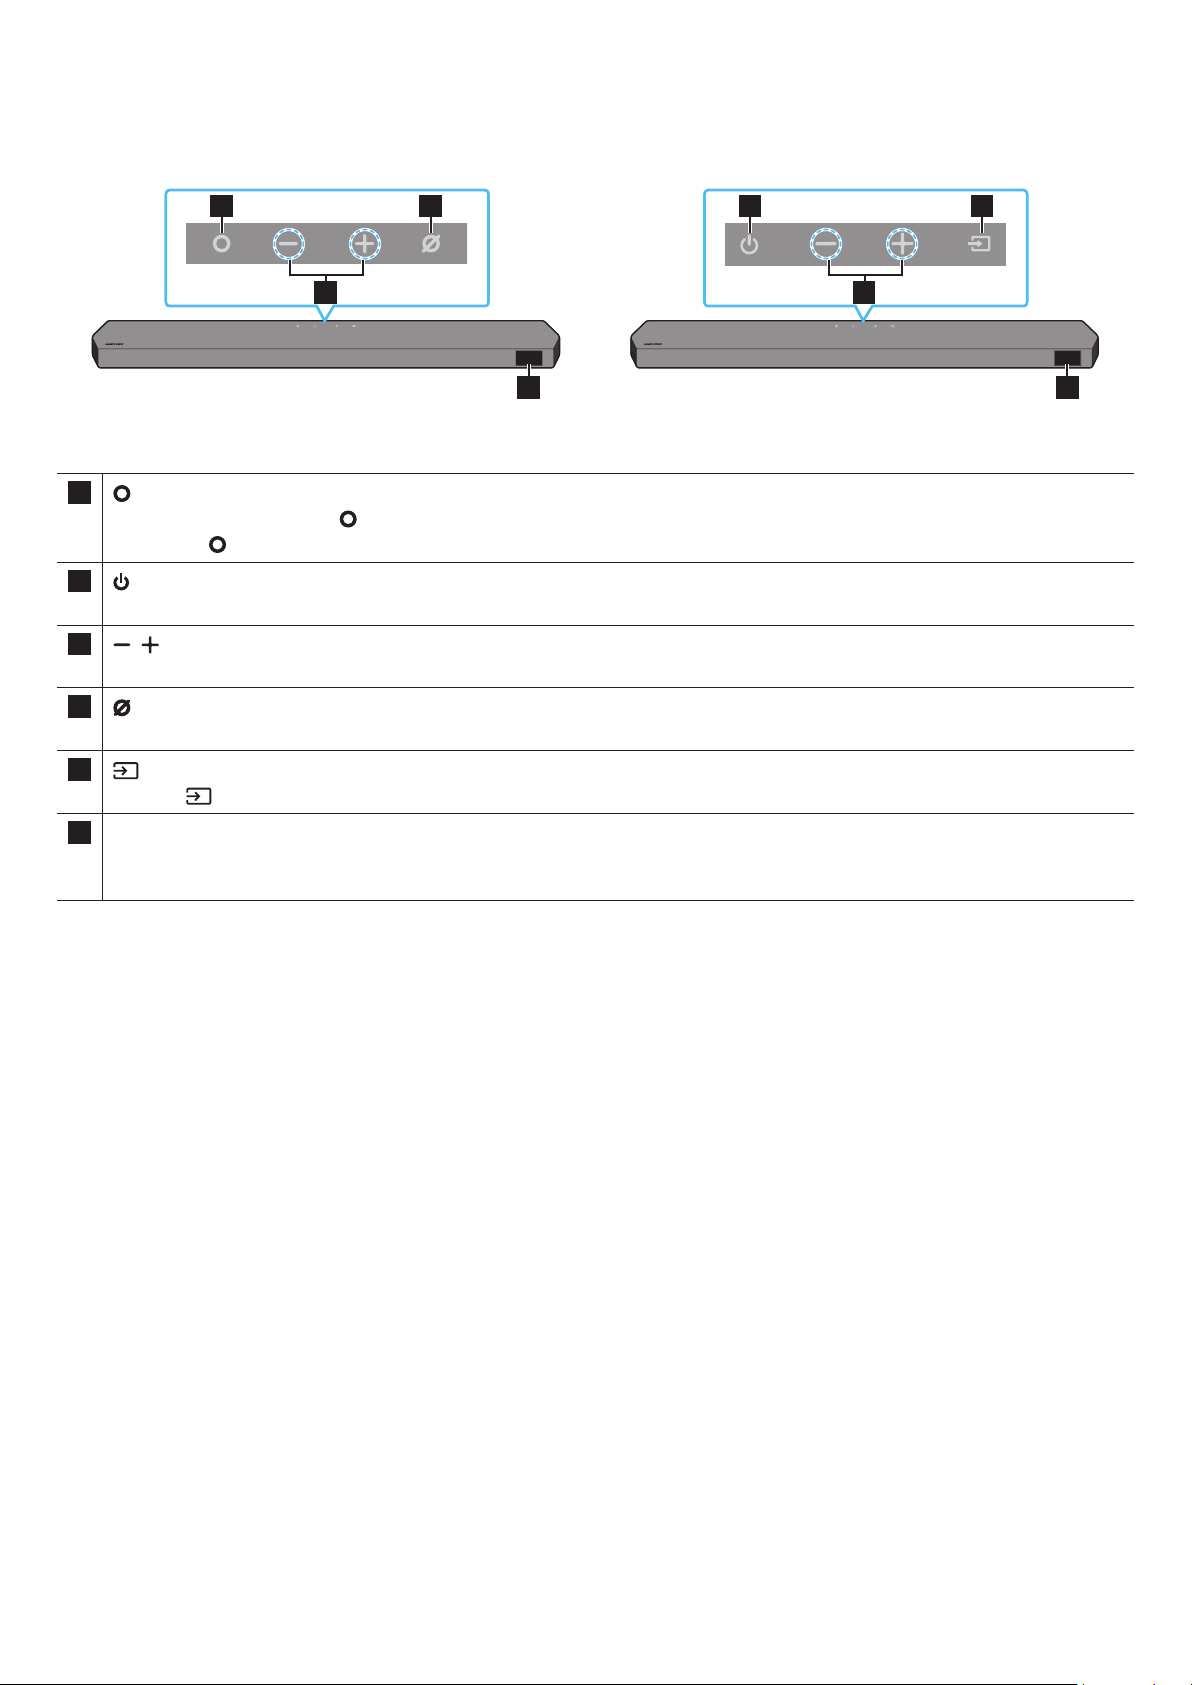
02 PRODUCT OVERVIEW
Top Panel of the Soundbar
2
1 3
4
2
1 3
4
HW-Q930B / HW-Q800B HW-Q700B
1
(Multi Function) Button (Q930B / Q800B models)
• In standby mode, press the (Multi Function) button to turn on the Soundbar.
• Press the (Multi Function) button to change the input source.
1
(Power) Button (Q700B model)
Turns the power on and off.
2
(Volume) Button
Adjusts the volume.
3
(Mic On/Off) Button (Q930B / Q800B models)
Press the button to turn the microphone on or off.
3
(Source) Button (Q700B model)
Press the (Source) button to change the input source.
4 Display
Displays the product’s status and current mode.
D.IN → HDMI → Wi-Fi → BT
• When you plug in the AC cord, the power button will begin working in 4 to 6 seconds.
• When you turn on this unit, there will be a 4 to 5 second delay before it produces sound.
• If you hear sounds from both the TV and Soundbar, go to the Settings menu for the TV audio and change the TV speaker to External Speaker.
ENG - 8
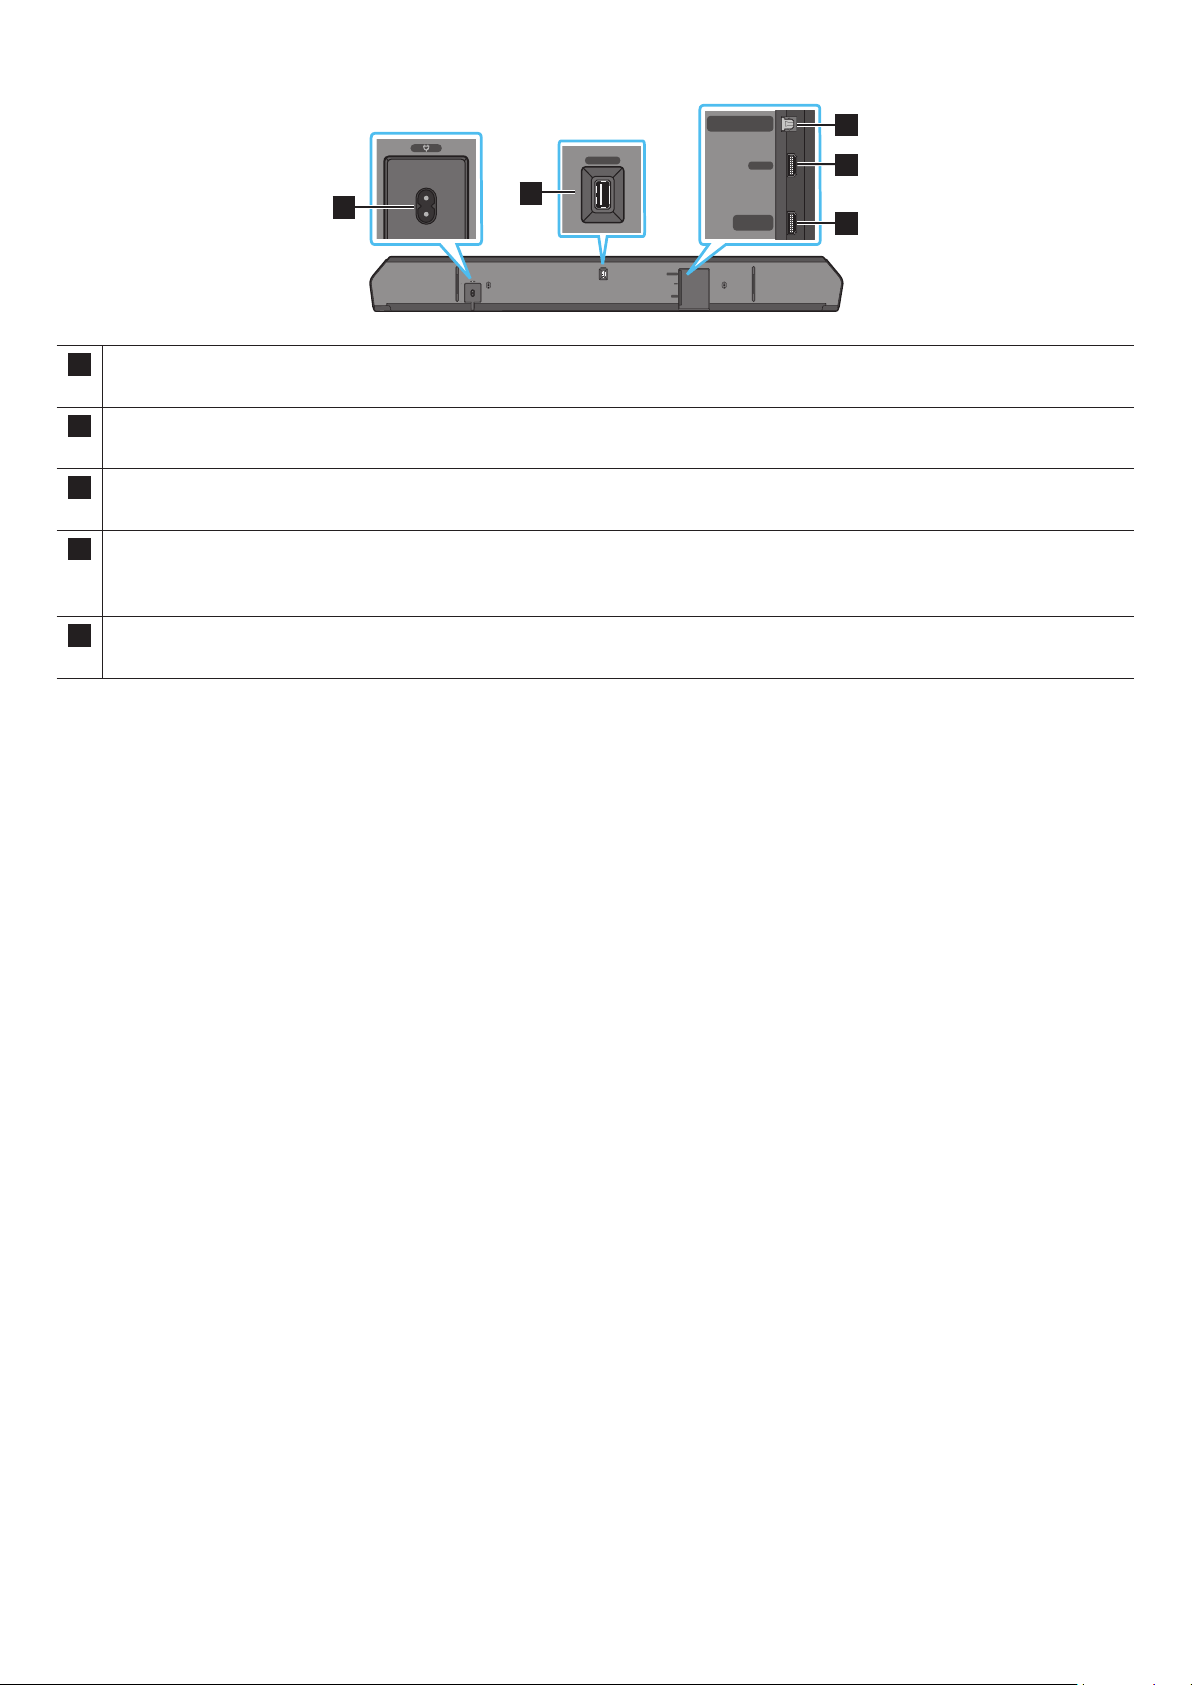
Bottom Panel of the Soundbar
HDMI IN 1
HDMI IN 2
SERVICE
DIGITAL AUDIO IN
(OPTICAL)
HDMI TO TV
(eARC/ARC)
HDMI
1
SERVICE
2
DIGITAL AUDIO IN
(OPTICAL)
HDMI TO TV
(eARC/ARC)
HDMI
3
5
4
1 POWER
Connect the Soundbar’s AC power cable. (See page 14)
2 SERVICE
Connect a USB storage device to upgrade the product’s software.
3 DIGITAL AUDIO IN (OPTICAL)
Connect to the digital (optical) output of an external device. (See page 26)
6 HDMI
Inputs digital video and audio signals simultaneously using an HDMI cable.
Connect to the HDMI output of an external device. (See page 25)
7 HDMI TO TV (eARC/ARC)
Connect to the HDMI jack on a TV. (See page 18)
• When disconnecting the power cord from a wall outlet, pull the plug. Do not pull the cable.
• Do not connect this unit or other components to an AC outlet until all connections between components are complete.
ENG - 9
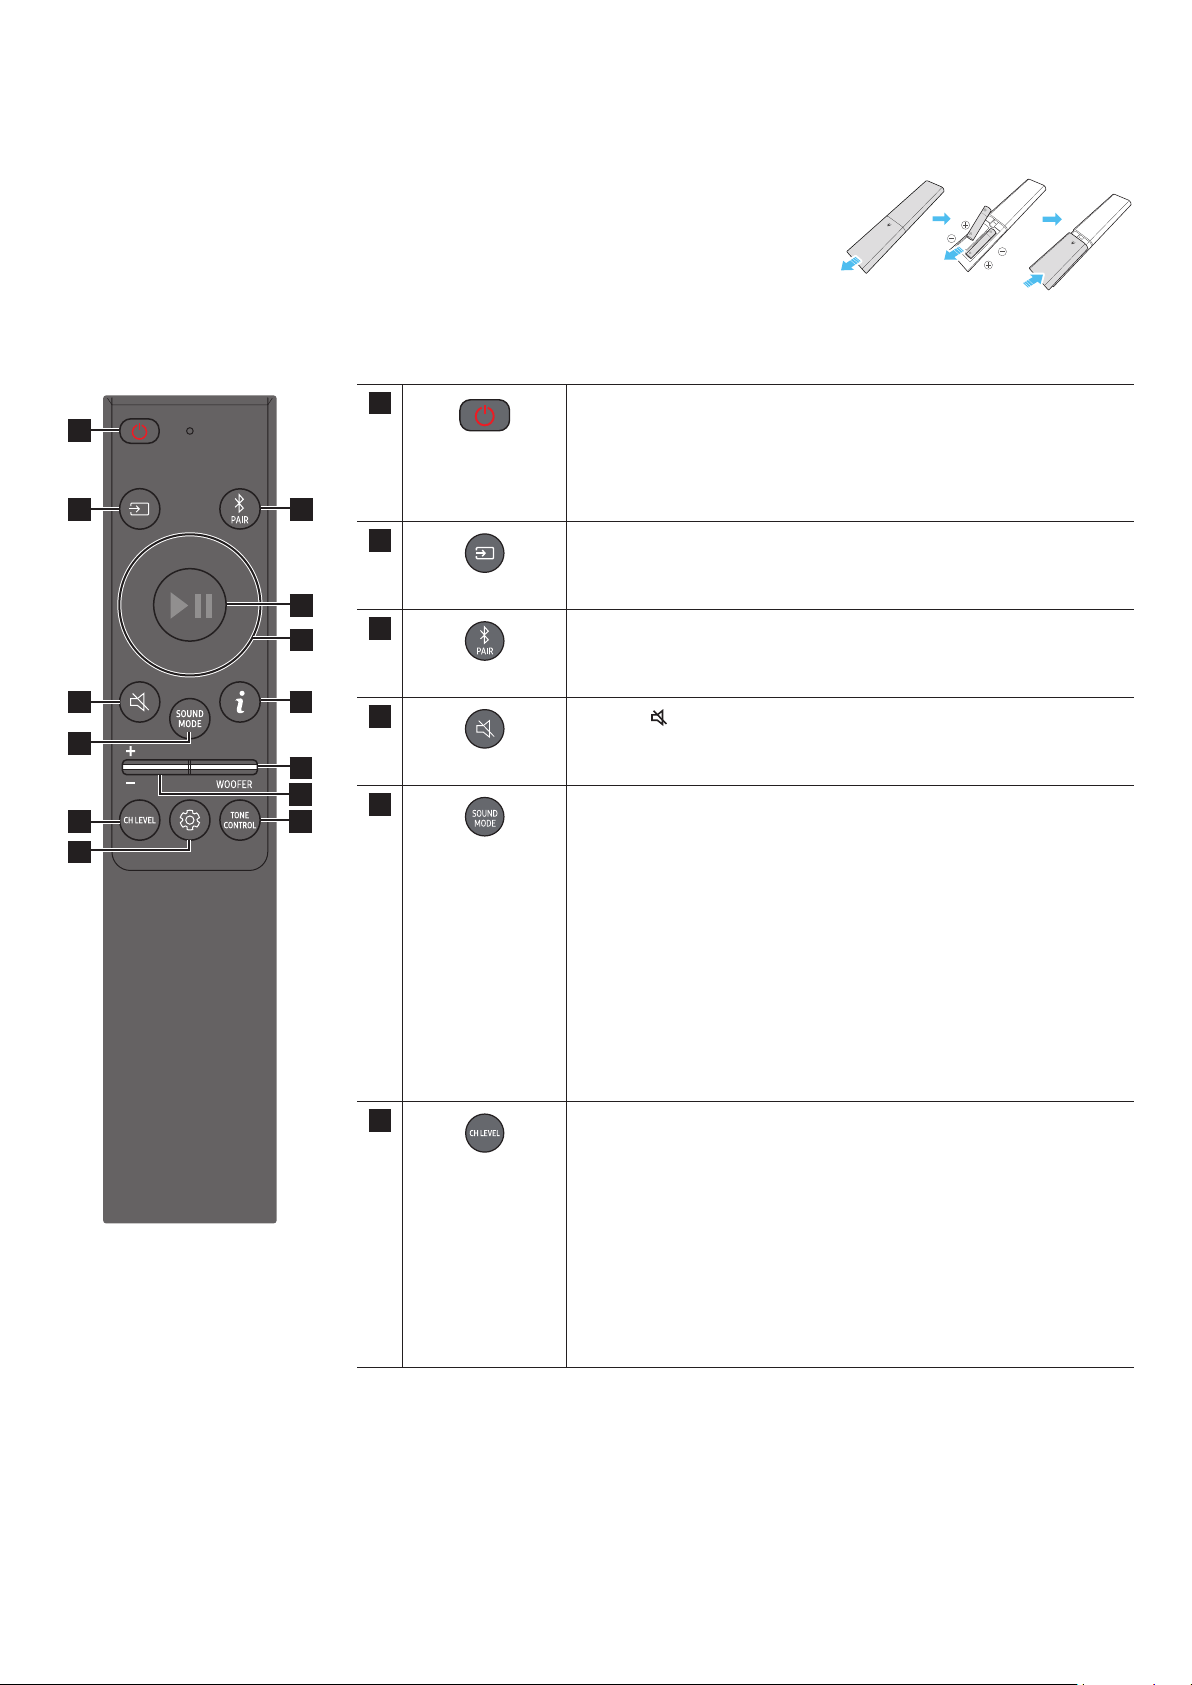
03 USING THE SOUNDBAR REMOTE CONTROL
Inserting Batteries before using the Remote Control (AAA batteries X 2)
Slide the back cover in the direction of the arrow until it is completely removed. Insert 2 AAA batteries
(1.5V) oriented so that their polarity is correct. Slide the battery cover back into position.
How to Use the Remote Control
SOUNDBAR
1
2
3
10
11
13
8
9
4
6
5
7
12
1
Power
Turns the Soundbar on and off.
• Auto Power Down Function
The unit turns off automatically in the following situations:
• In D.IN / HDMI / Wi-Fi / BT mode if there is no audio signal for
18 minutes.
2
Source
Press to select a source connected to the Soundbar.
3
Bluetooth PAIR
Switch the Soundbar to Bluetooth pairing mode. Press the button and
wait for the “BT PAIRING” screen to connect to a new Bluetooth device.
4
Mute
Press the
(Mute) button to mute the sound.
Press it again to unmute the sound.
5
SOUND MODE
By pressing the button, you can select the desired audio mode such as
Surround, Game, Standard, Adaptive sound.
• Standard
Outputs the original sound.
• Surround
Provides a wider sound eld than standard.
• Game
Provides stereoscopic sound to immerse you in the action while
gaming.
• Adaptive sound
Analyzes the content in real time and automatically provides the
optimal sound eld based on the characteristics of the content.
6
CH LEVEL
By pressing the button, you can adjust the volume of the each speaker
such as Center level, Side level, Wide level, Front Top level, Rear level,
and Rear top level.
• To control the volume of the each speaker select Center level, Side
level, Wide level, or Front Top level in Sound Settings, and then adjust
the volume between -6~+6 by using the Up/Down buttons.
• If Surround Speakers are connected, select Rear level or Rear top
level and then use the Up/Down buttons to adjust the volume within
a -6 to +6 range.
• CH LEVEL specications may differ with the respective model.
ENG - 10
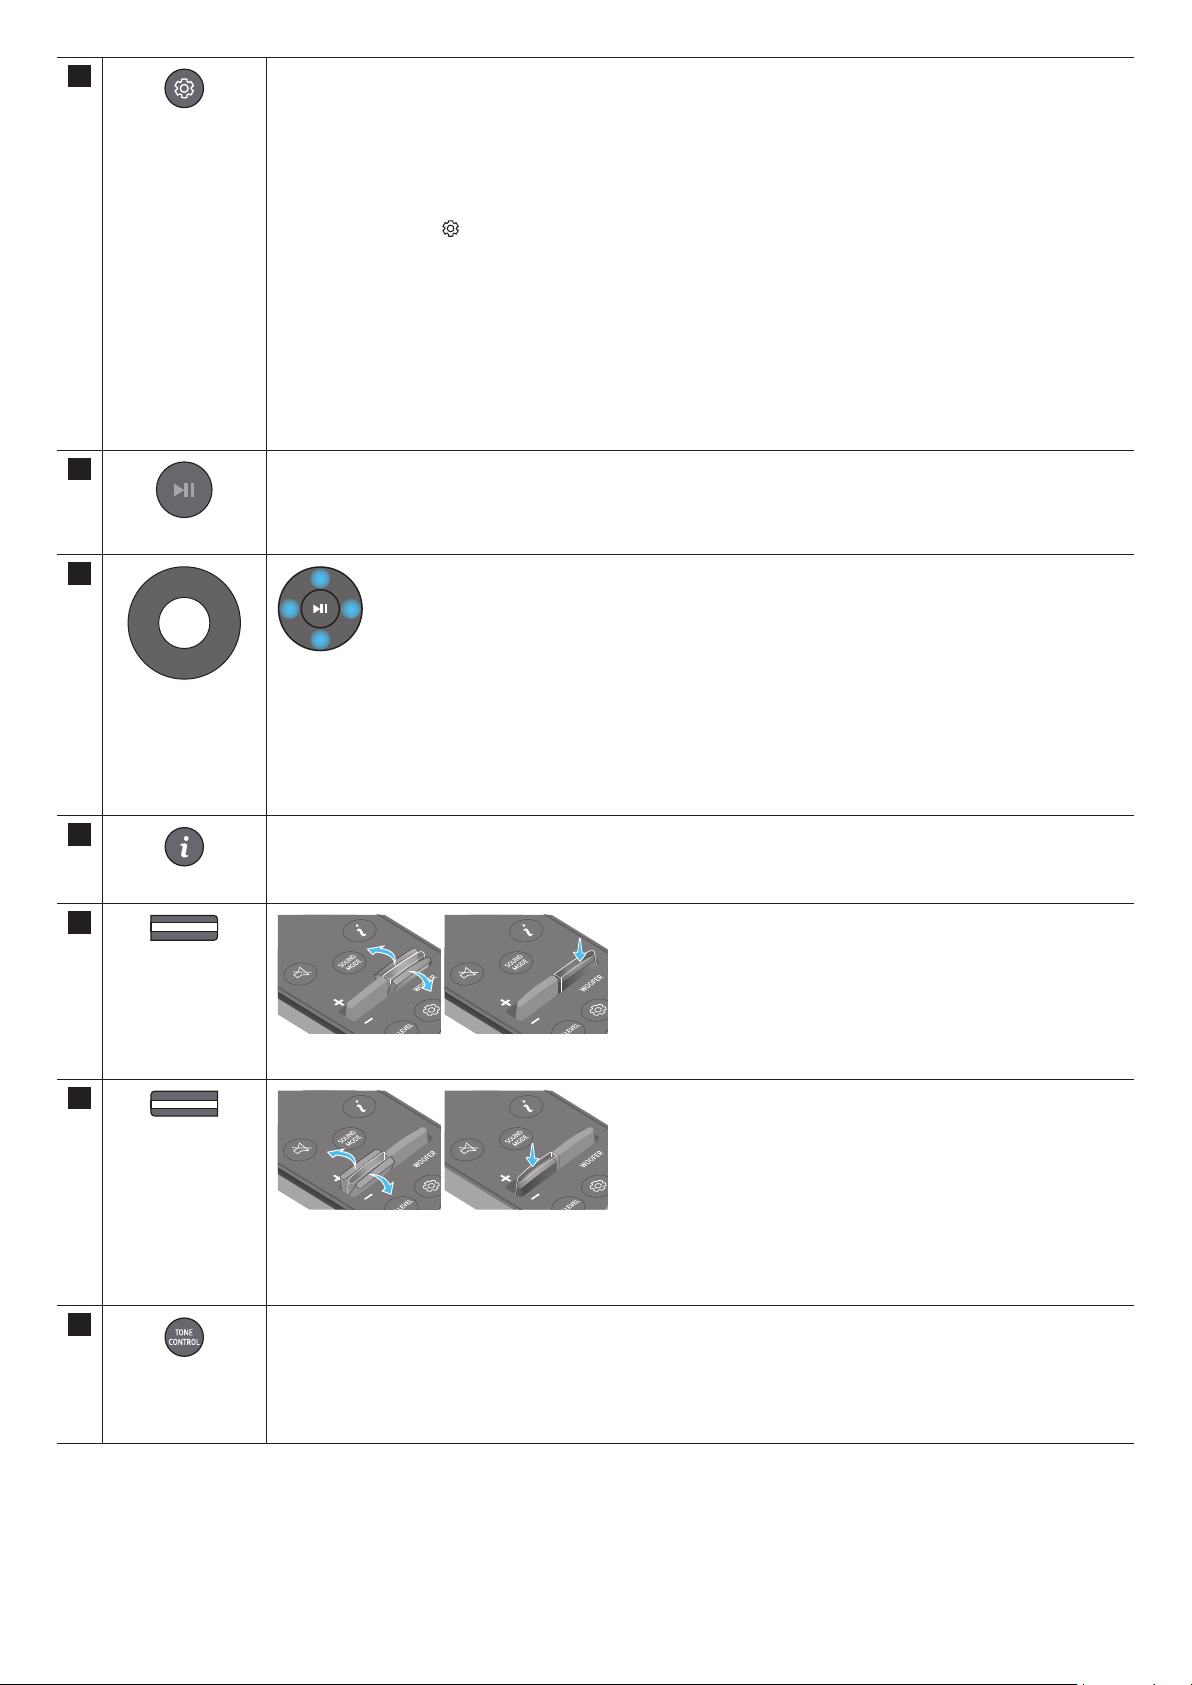
7
Sound Control
By pressing the button, you can set the audio function such as , AVA, Voice enhance mode, Night
mode, Sync, Surround speaker mode, Virtual. The desired item can be adjusted using the Up/Down buttons.
• The and AVA functions are not supported by Q700B model.
• Voice enhance mode enhances spoken dialog in movies and TV to make it easier to hear.
• Night mode is optimized for night time viewing with the settings adjusted to bring the volume down but keep
the dialog clear.
• Press and hold the
(Sound Control) button for about 5 seconds to adjust the sound for each frequency band.
150Hz, 300Hz, 600Hz, 1.2kHz, 2.5kHz, 5kHz, and 10kHz are selectable using the Left/Right buttons and each
can be adjusted to a setting between -6 to +6 using the Up/Down buttons.
(Make sure the Sound mode is set to “Standard”.)
• If the video on the TV and audio from the Soundbar are not synchronized, select Sync in Sound Control, and
then set the audio delay between 0~300 milliseconds by using the Up/Down buttons.
• Sync is only supported for some functions.
• Available Surround speaker mode settings are supported only by Q930B model.
• The Virtual Speaker function can be turned ON/OFF by using the Up/Down buttons.
8
Play / Pause
You can also play or pause music by pressing the button.
9
Up/Down/Left/
Right
Press the indicated areas to select Up/Down/Left/Right.
Press Up/Down/Left/Right on the button to select or set functions.
• Music Skip
Press the Right button to select the next music le. Press the Left button to select the previous music le.
• ID SET
Use this option when the Subwoofer or Surround Speakers are not connected or need reconnection.
While powered off, press and hold the Up button for 5 seconds to perform ID SET. (See page 16.)
10
Info
Press to display information about the active function or the codec available.
In BT mode, it displays the connected device (when pairing is complete) or “BT ready” (when pairing is required).
11
WOOFER LEVEL
Push the button up or down to adjust the level of the woofer (bass).
12
VOLUME
Push the button up or down to adjust the volume.
• Mute
Press the VOL button to mute the sound. Press it again to unmute the sound.
13
TONE CONTROL
By pressing the button, you can adjust the volume of the treble or bass sound. The dered item can be adjusted
using the Up/Down buttons. This function is enabled in Sound mode excluding in Standard mode.
• To control the volume of the treble or bass sound, select TREBLE or BASS in Sound Settings, and then adjust
the volume between -6~+6 by using the Up/Down buttons.
• Once the bass level is changed, the woofer level will be also adjusted accordingly.

ENG - 11
• Analyzes external noise in real time while soundbar is playing, so that voice audio can always be heard clearly.
• No data is saved during the analysis.
• This function is not supported by Q700B model.
Using the Hidden Buttons (Buttons with more than one function)
Hidden Button
Reference page
Remote Control Button Function
WOOFER (Up) TV remote control On/Off (Standby) page 13
Up ID SET page 16
(Sound Control)
7 Band EQ page 10
<HW-Q930B>
Effect Input
Output
With Subwoofer & Surround Speaker
Standard
2.0 ch 2.1 ch
5.1 ch 5.1 ch / 7.1 ch (DTS)
7.1 ch 7.1 ch
Dolby Atmos®, DTS:X 7.1.4 ch
Surround
2.0 ch 9.1.4 ch
5.1 ch 9.1.4 ch
7.1 ch 9.1.4 ch
Dolby Atmos®, DTS:X 9.1.4 ch
Game
2.0 ch 9.1.4 ch
5.1 ch 9.1.4 ch
7.1 ch 9.1.4 ch
Dolby Atmos®, DTS:X 9.1.4 ch
Adaptive sound
2.0 ch 9.1.4 ch
5.1 ch 9.1.4 ch
7.1 ch 9.1.4 ch
Dolby Atmos®, DTS:X 9.1.4 ch

ENG - 12
<HW-Q800B>
Effect Input
Output
With Subwoofer Only
With Subwoofer & Surround
Speaker
Standard
2.0 ch 2.1 ch 2.1 ch
5.1 ch 5.1 ch 5.1 ch / 7.1 ch (DTS)
7.1 ch 5.1 ch 7.1 ch
Dolby Atmos®, DTS:X 5.1.2 ch 7.1.4 ch
Surround
2.0 ch 5.1.2 ch 7.1.4 ch
5.1 ch 5.1.2 ch 7.1.4 ch
7.1 ch 5.1.2 ch 7.1.4 ch
Dolby Atmos®, DTS:X 5.1.2 ch 7.1.4 ch
Game
2.0 ch 5.1.2 ch 7.1.4 ch
5.1 ch 5.1.2 ch 7.1.4 ch
7.1 ch 5.1.2 ch 7.1.4 ch
Dolby Atmos®, DTS:X 5.1.2 ch 7.1.4 ch
Adaptive sound
2.0 ch 5.1.2 ch 7.1.4 ch
5.1 ch 5.1.2 ch 7.1.4 ch
7.1 ch 5.1.2 ch 7.1.4 ch
Dolby Atmos®, DTS:X 5.1.2 ch 7.1.4 ch
<HW-Q700B>
Effect Input
Output
With Subwoofer Only
With Subwoofer & Surround
Speaker
Standard
2.0 ch 2.1 ch 2.1 ch
5.1 ch 3.1 ch 5.1 ch
Dolby Atmos®, DTS:X 3.1.2 ch 5.1.4 ch
Surround
2.0 ch 3.1.2 ch 5.1.4 ch
5.1 ch 3.1.2 ch 5.1.4 ch
Dolby Atmos®, DTS:X 3.1.2 ch 5.1.4 ch
Game
2.0 ch 3.1.2 ch 5.1.4 ch
5.1 ch 3.1.2 ch 5.1.4 ch
Dolby Atmos®, DTS:X 3.1.2 ch 5.1.4 ch
Adaptive sound
2.0 ch 3.1.2 ch 5.1.4 ch
5.1 ch 3.1.2 ch 5.1.4 ch
Dolby Atmos®, DTS:X 3.1.2 ch 5.1.4 ch
The Surround Speakers will not produce sounds for 2 channel output while Standard mode is in use. To enable sound for the Surround
Speakers, change the effect mode to Surround.
ENG - 13
Adjusting the Soundbar volume with a TV remote control
Adjust the Soundbar volume using the TV’s remote control.
• This function can be used with IR remote controls only. Bluetooth remote controls (remote controls that require pairing) are not
supported.
• Set the TV speaker to External Speaker to use this function.
• Manufacturers supporting this function:
Samsung, VIZIO, LG, Sony, Sharp, PHILIPS, PANASONIC, TOSHIBA, Hisense, RCA
1. Turn Off the Soundbar.
2. Push up and hold the WOOFER button for 5 seconds.
Each time you push the WOOFER button up and hold it for 5 seconds, the mode switches in the following order: “OFF-TV REMOTE” (Default
mode), “SAMSUNG-TV REMOTE”, “ALL-TV REMOTE”.
Remote Control Button Display Status
(Default mode)
OFF-TV REMOTE
Disable the TV remote control.
SAMSUNG-TV REMOTE
Enable a Samsung TV’s IR remote control.
ALL-TV REMOTE
Enable a third-party TV’s IR remote control.
ENG - 14
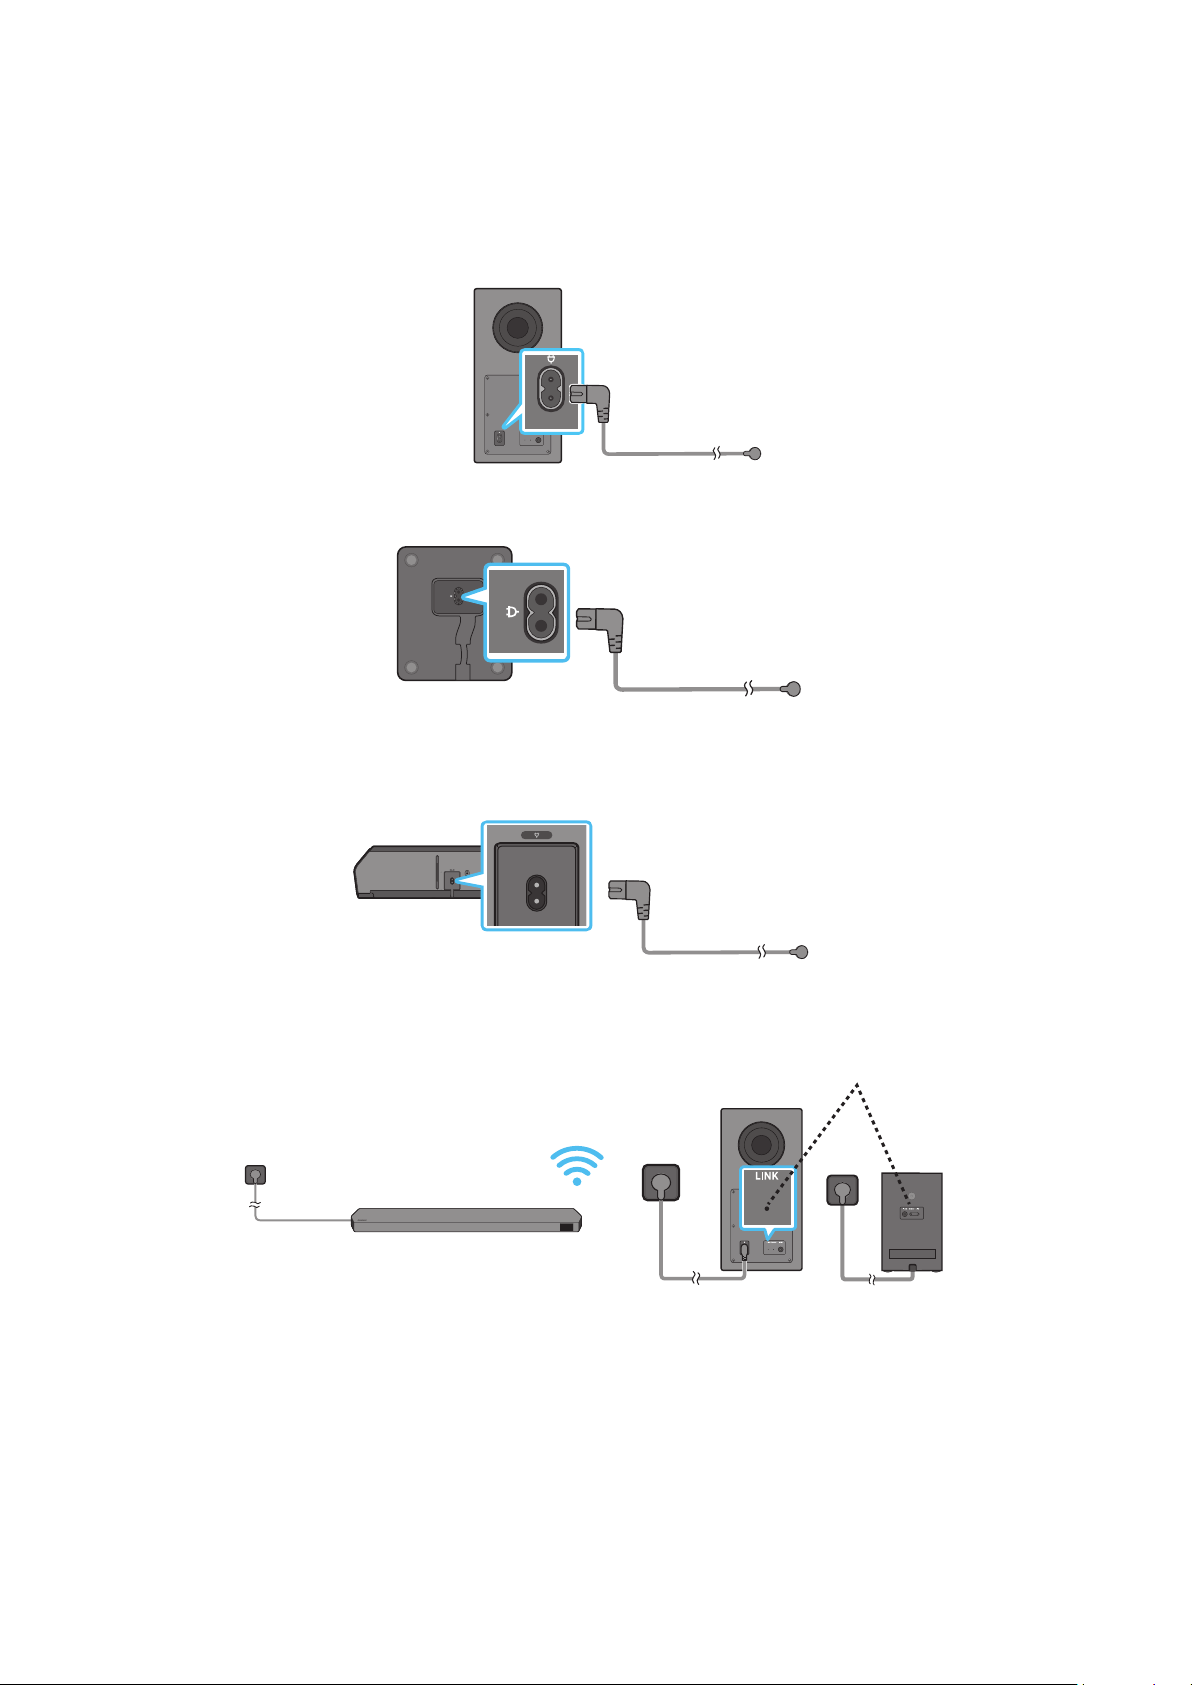
04 CONNECTING THE SOUNDBAR
Connecting the power and units
Use the Power cord to connect the Subwoofer, Surround Speakers, and Soundbar to an electrical outlet in the following order:
• For more information about the required electrical power and power consumption, refer to the label attached to the product. (Label: Rear of
the Soundbar Main Unit)
1. Connect the Power cord to the Subwoofer.
Rear of Subwoofer
Power Cord
2. Connect the power cord to the Left and Right Surround Speakers. (optional)
Bottoms of the Left and
Right Surround Speakers
(optional)
Power Cord
3. Connect the Power cord to the Soundbar.
POWER
Bottom of the Soundbar
Main Unit
Power Cord
4. Connect power to the Soundbar, Subwoofer and Surround Speakers. The Subwoofer and Surround Speakers are automatically connected when
the Soundbar is turned on.
LINK LED - Blue is On
(optional)
NOTE
• Connect the Subwoofer and Surround Speakers power before connecting to the Soundbar. The Subwoofer and Surround Speakers will be
automatically connected when turning on the Soundbar.
• If you unplug and reconnect the power cord when the product is turned on, the Soundbar turns on automatically.
• The surround speaker system is supported by applicable models only.

ENG - 15
Recommended Speaker Layout
150° 150°
135° 135°
0°
Subwoofer
Soundbar
Surround Speaker L Surround Speaker R
CAUTION
• Wireless receiving antennas are built into the wireless subwoofer and
surround speakers. Keep the units away from water and moisture.
• For optimal listening performance, make sure that the areas around the
wireless subwoofer and surround speakers locations are clear of any
obstructions.
Surround speaker mode (HW-Q930B only)
An optimal surround sound may be delivered depending on the position of the rear speaker. See the illustration below for speaker positioning.
To activate this mode, select the Surround Speaker mode using the remote control of the Soundbar.
(
(Sound Control) → Surround speaker → (Up) / (Down) → Front / Rear)
Soundbar
Surround Speaker L Surround Speaker R
Soundbar
Surround Speaker L
Surround Speaker R
Rear positioning Front positioning
NOTE
• This mode is available only with Soundbar models including a specic surround speaker.
• In Front speaker mode, position the front speakers toward you.
• The Rear Speaker mode is enabled by default.
ENG - 16
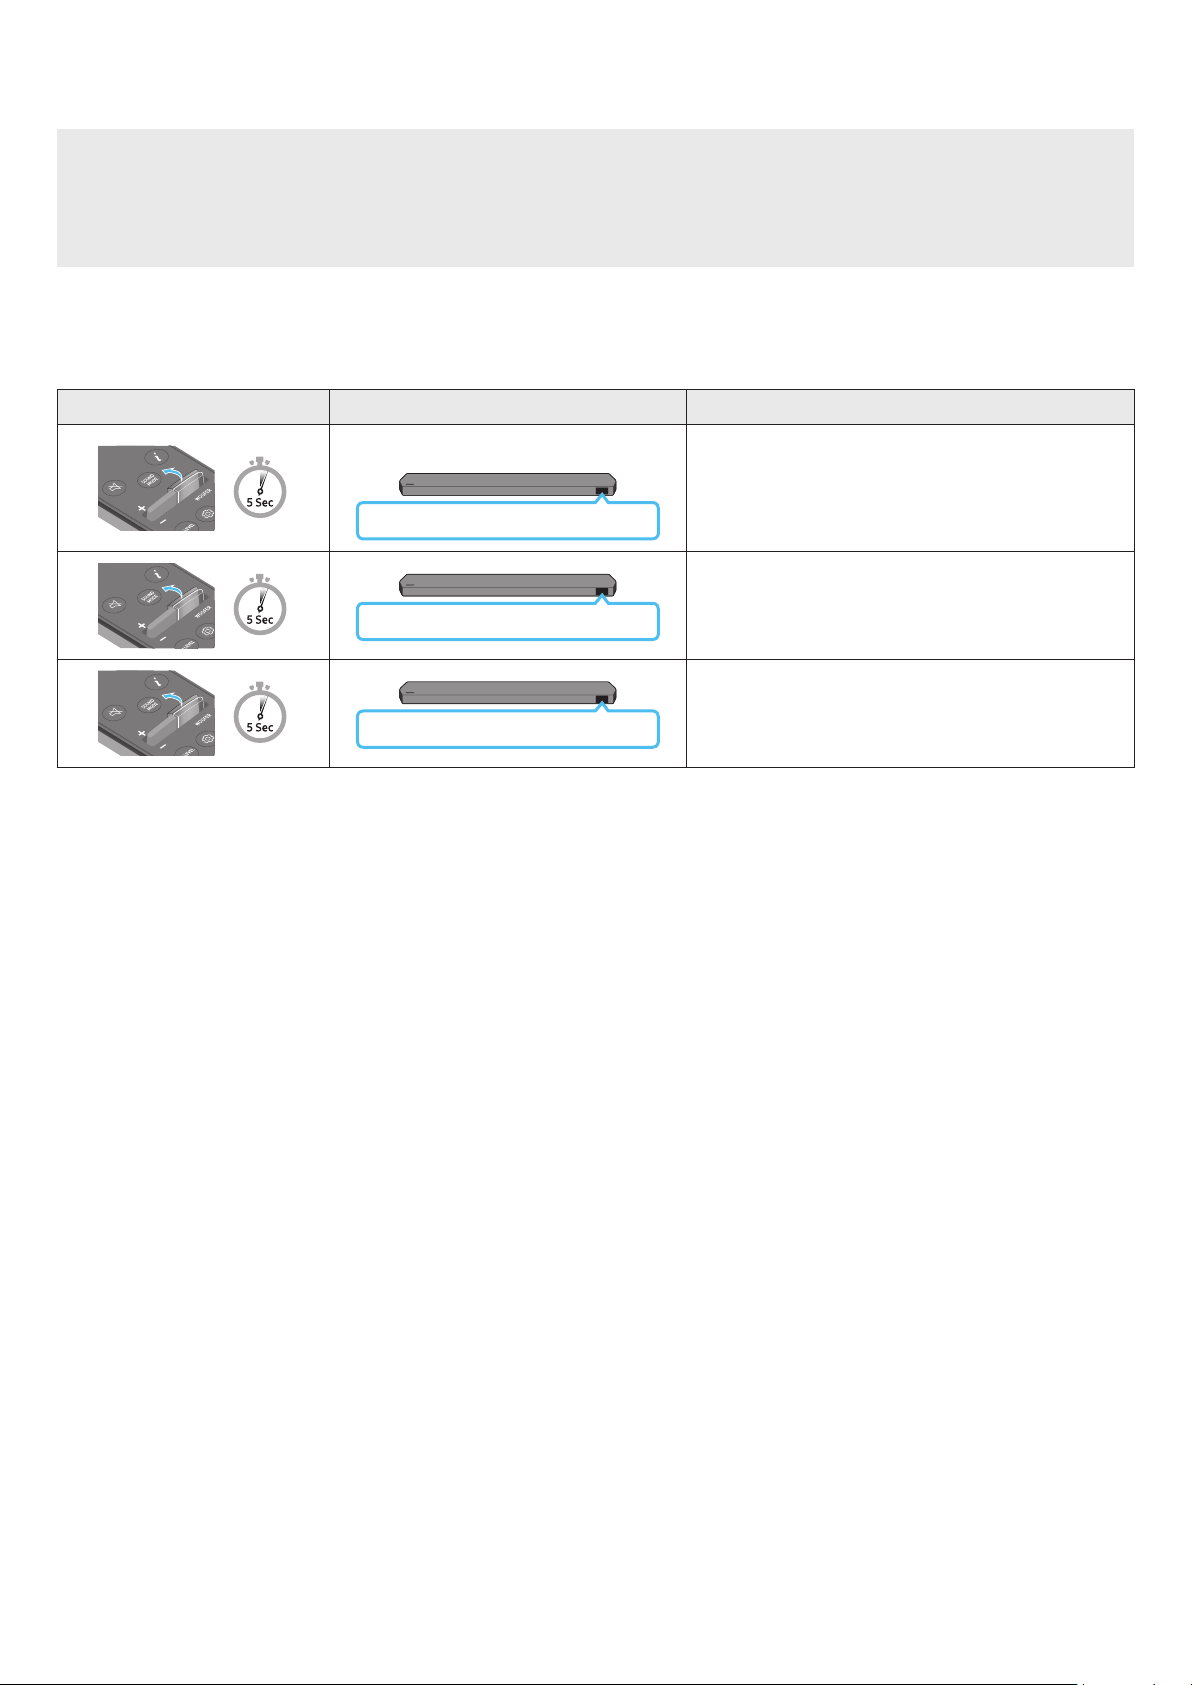
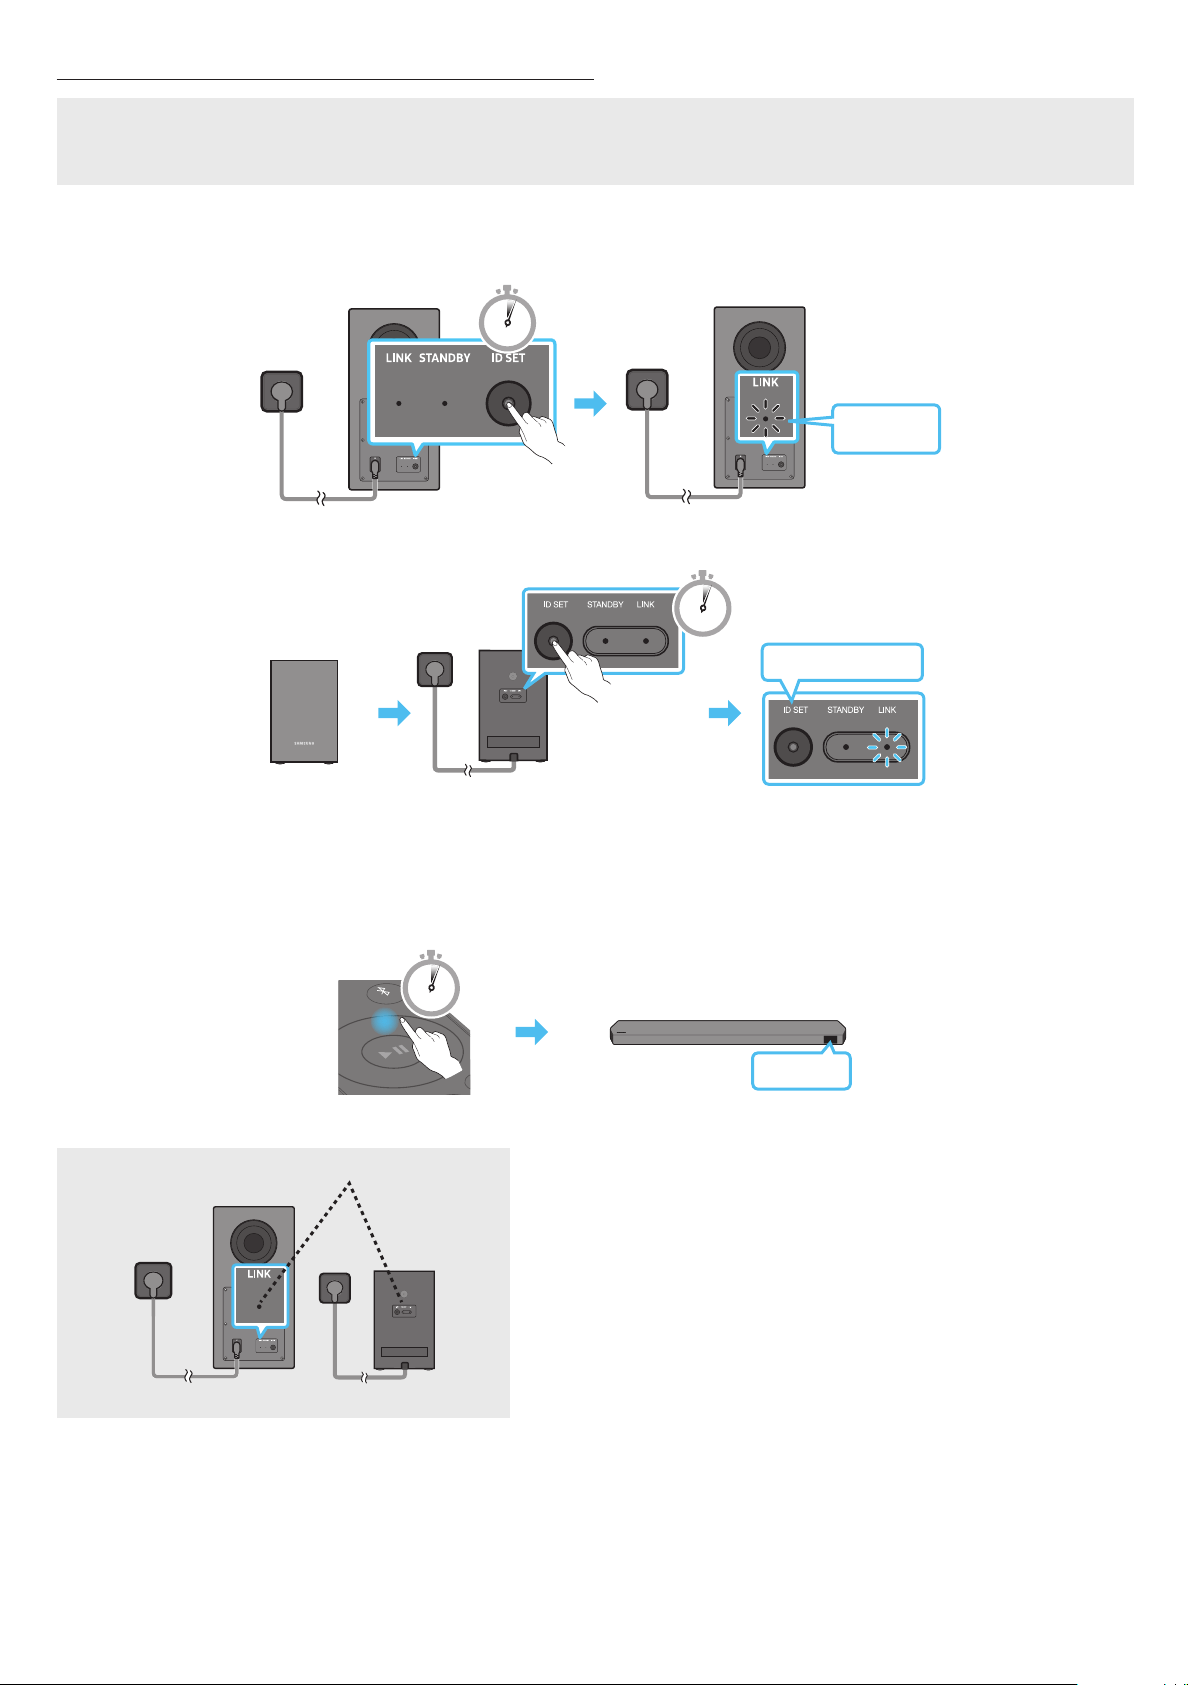
Manually connecting the Subwoofer or Surround Speakers
Before performing the manual connection procedure below:
• Check whether the power cables for the Soundbar and subwoofer or Surround Speakers are connected properly.
• Make sure that the Soundbar is turned off.
1. Turn off the Soundbar main.
2. Press and hold ID SET on the rear of the subwoofer and surround speakers for at least 5 seconds.
• The red indicator at the rear of each speaker turns off and the blue indicator blinks.
5 Sec
Blinking
blue fast
Rear of Subwoofer Rear of Subwoofer
Blinking blue fast
x 2
Rear of the Left and Right Surround Speakers
(optional)
5 Sec
3. Press the Up button on the remote control for 5 seconds.
• The ID SET message appears on the display of the Soundbar for a moment, and then it disappears.
• The Soundbar will automatically power on when ID SET is complete.
PAIR
5 Sec
ID SET
4. Check if the LINK LED is solid blue (connection complete).
LINK LED - Blue is On
(optional)
The LINK LED indicator stops blinking and glows a solid blue when a connection
is established between the Soundbar and the Wireless Subwoofer, surround
speakers.
ENG - 17
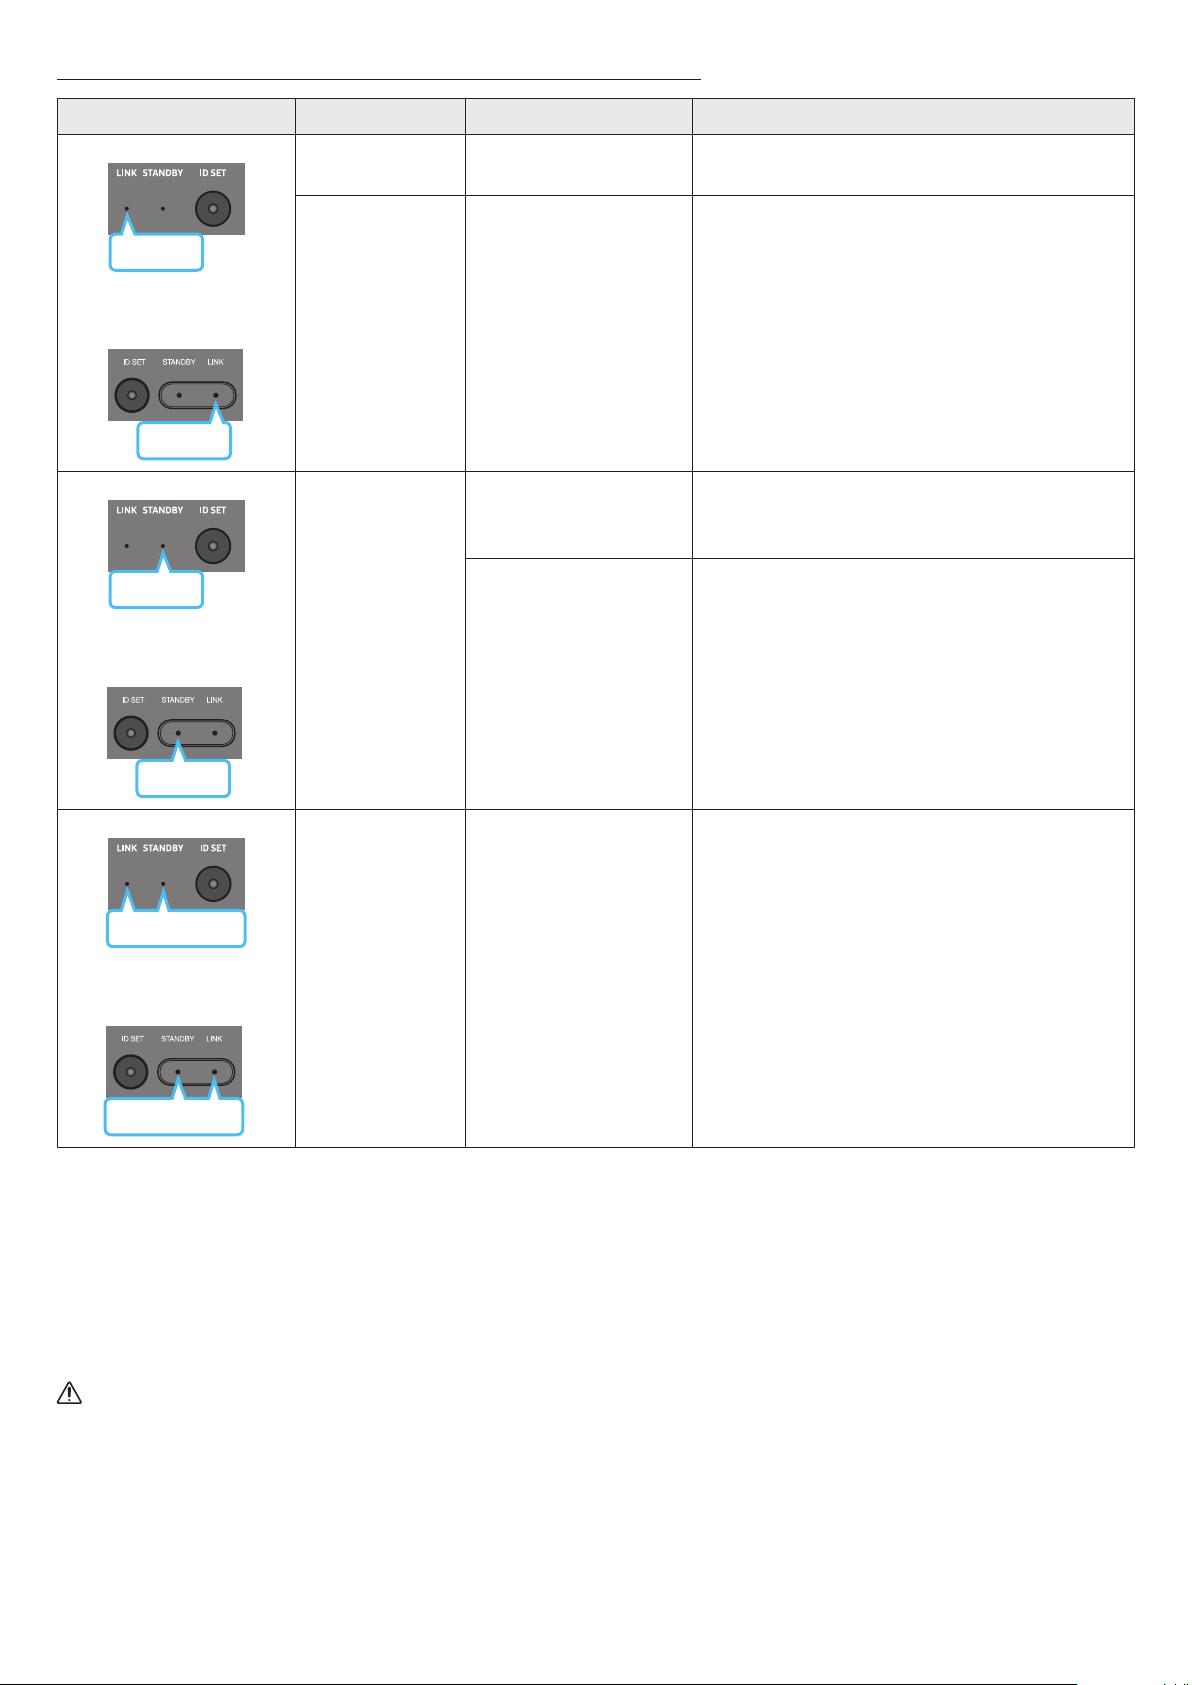
LED Indicator Lights on the Rear of Subwoofer and Surround Speakers
LED Status Description Resolution
Blue
Subwoofer
Surround Speakers
(applicable models only)
Blue
On
Successfully connected
(normal operation)
-
Blinking Recovering the connection
Check if the power cable attached to the main Soundbar
unit is connected properly or wait about 5 minutes.
If blinking persists, try manually connecting the
subwoofer and Surround Speakers. See page 16.
Red
Subwoofer
Red
Surround Speakers
(applicable models only)
On
Standby (with the
Soundbar main unit turned
off)
Check if the power cable attached to the main Soundbar
unit is connected properly.
Connection failed
Connect again. See the instructions for manual
connection on page 16.
Subwoofer
Red and blue
Red and blue
Surround Speakers
(applicable models only)
Blinking Malfunction
See the contact information for the Samsung Service
Center in this manual.
NOTE
• If the main unit is powered off, the wireless subwoofer will go into stand-by mode and the STANDBY LED on the rear of the sub-woofer will
turn red after blinking in blue several times.
• If you use a device that uses the same frequency as the Soundbar near the Soundbar, interference may cause some sound interruption.
• The maximum transmission distance of the main unit’s wireless signal is about 10 m, but may vary depending on your operating environment.
If a steel-concrete or metallic wall is between the main unit and the wireless subwoofer, the system may not operate at all because the
wireless signal cannot penetrate metal.
• The surround speaker system is supported by applicable models only.
CAUTION
• Wireless receiving antennas are built into the wireless subwoofer and Surround Speakers. Keep the unit away from water and moisture.
• For optimal listening performance, make sure that the area around the wireless subwoofer and the Surround Speakers are clear of any
obstructions.
ENG - 18
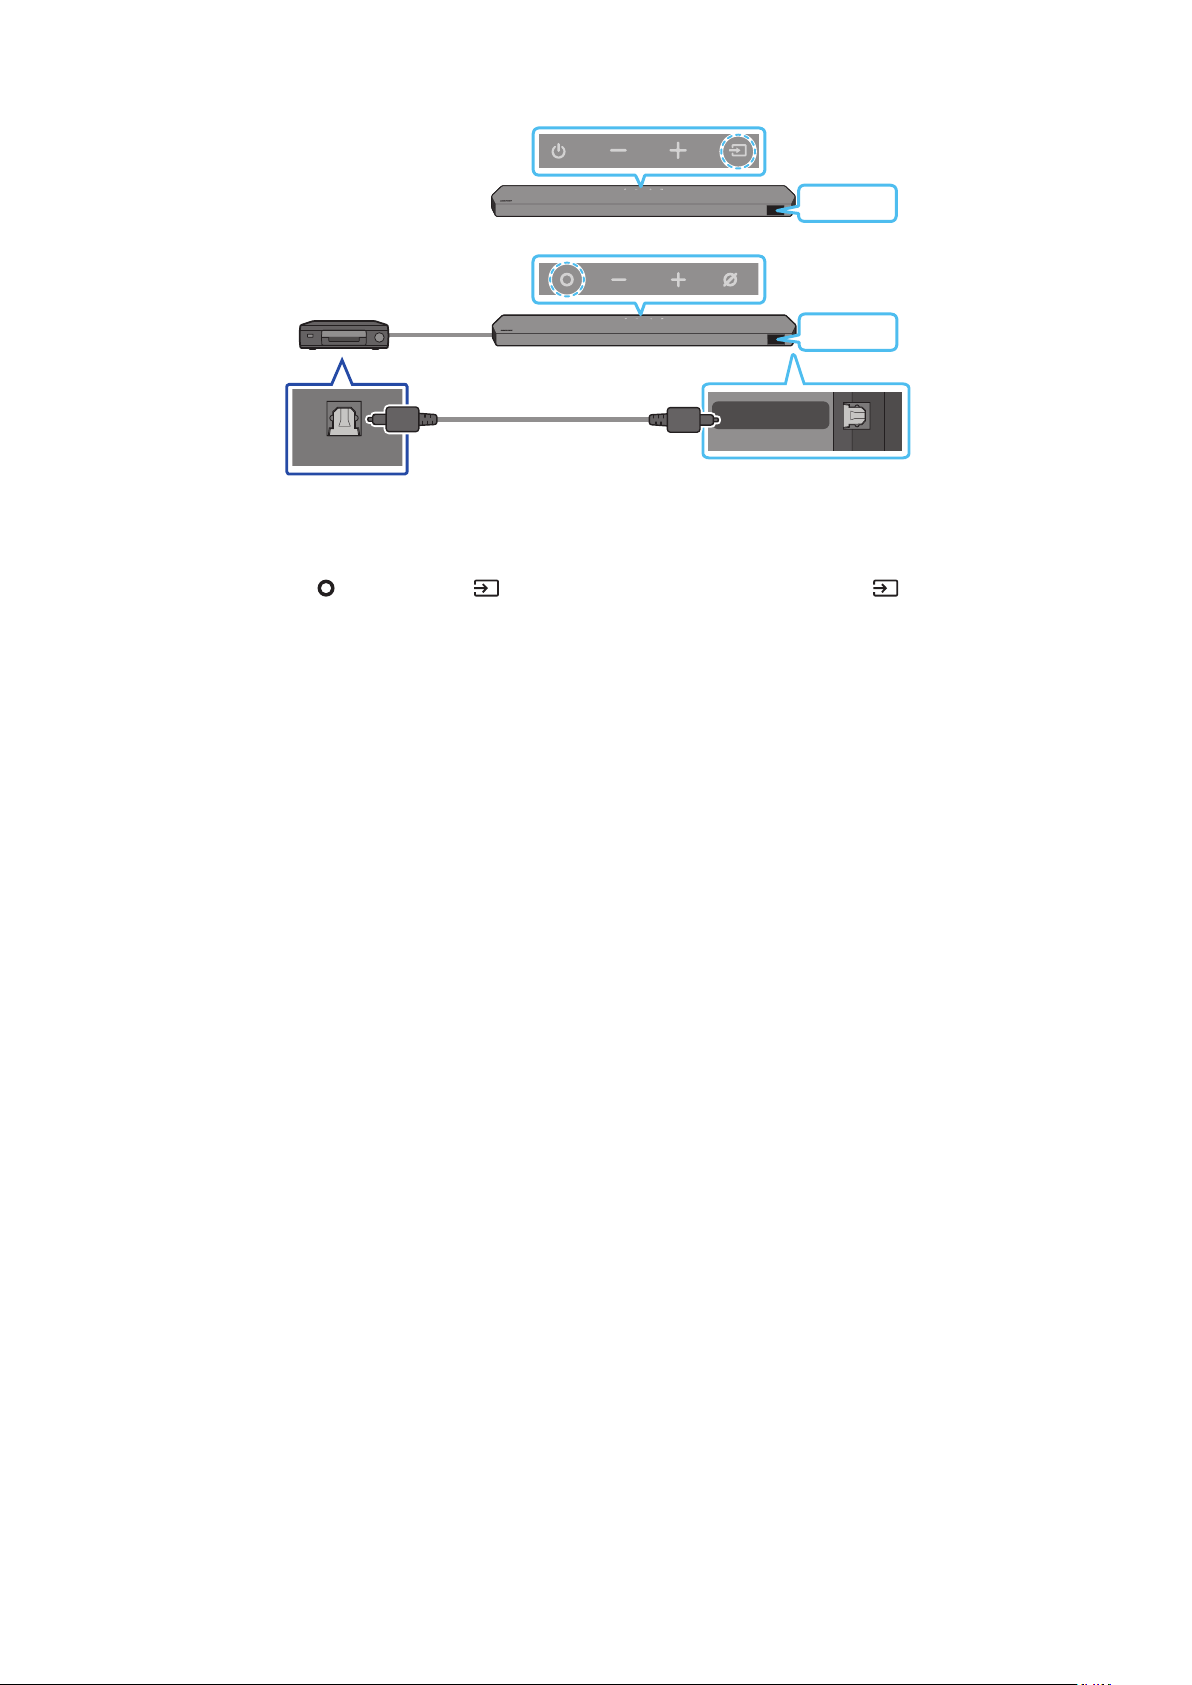
05 CONNECTING TO A TV
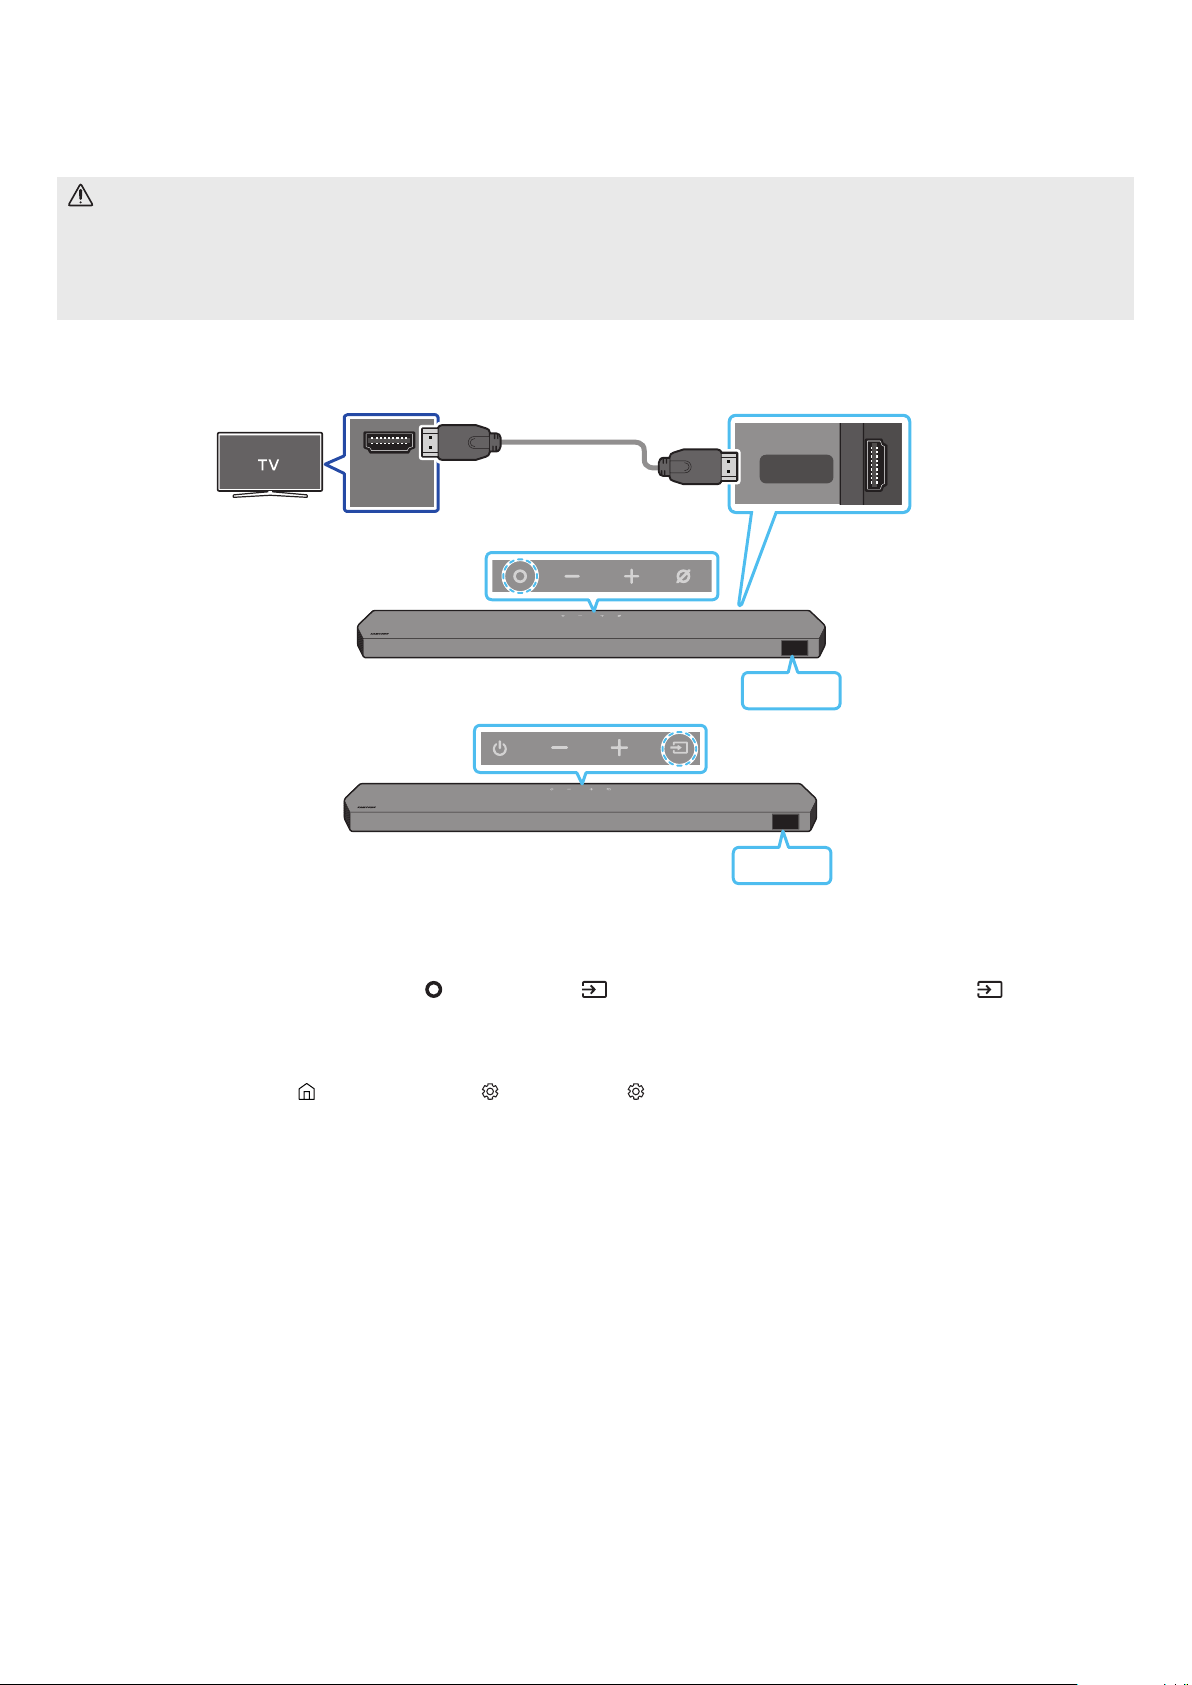
Connecting the TV that supports HDMI ARC (Audio Return Channel)
CAUTION
• When both the HDMI cable and optical cable are connected, the HDMI signal is received rst.
• To connect the HDMI cable between the TV and Soundbar, be sure to connect the terminals marked ARC. Otherwise, the TV sound may not
be output.
• The recommended cable is High Speed HDMI Cable with Ethernet.
HDMI IN
(ARC)
HDMI TO TV
(eARC/ARC)
Connect to the HDMI IN
(ARC/eARC) port of your TV.
Connect to the HDMI TO
TV (eARC/ARC) port of the
Soundbar main unit.
HDMI Cable
Top of the Soundbar
Bottom of the Soundbar
TV ARC
<Q930B / Q800B>
Top of the Soundbar
TV ARC
<Q700B>
1. With the Soundbar and TV turned off, connect the HDMI cable as shown in the gure.
2. Turn on the Soundbar and TV.
3. “TV ARC” appears in the display window of the Soundbar main unit and the Soundbar plays TV sound.
• When the TV sound is not output, press the
(Multi Function) / (Source) button at the top of the Soundbar or the (Source) button
on the remote control to select the “D.IN” mode. The screen displays “D.IN” and “TV ARC” in sequence, and TV sound is played.
• When connecting a TV that supports the eARC function, “eARC” appears on the display and the sound is heard.
• To connect with eARC, the eARC function in the TV menu should be set to On. Refer to the TV user manual for details on setting.
(e.g. Samsung TV : Home ( ) → Menu → Settings ( ) → All Settings ( ) → Sound → Expert Settings → HDMI-eARC Mode (Auto))
• If “TV ARC” does not appear in the display window of the Soundbar main unit, conrm that the HDMI cable is connected to the correct port.
• Use the volume buttons on the TV’s remote control to change the volume on the Soundbar.
NOTE
• When you connect the TV that supports the HDMI ARC (Audio Return Channel) to the Soundbar with an HDMI cable, you can transmit the
digital video and audio data without connecting a separate optical cable.
• We recommend you use a coreless HDMI cable if possible. If you use a cored HDMI cable, use one whose diameter is less than 14 mm.
• This function is not available if the HDMI cable does not support ARC.
• When the audio in a broadcast is encoded in Dolby Digital and the “Digital Output Audio Format” on your TV is set to PCM, we recommend that
you change the setting to Dolby Digital. When the setting on the TV is changed, you will experience better sound quality. (The TV menu may
use different words for Dolby Digital and PCM depending on the TV manufacturer.)
• The ARC/eARC protocols support Dolby Atmos.
• Make sure that the content supports Dolby Atmos®.
ENG - 19
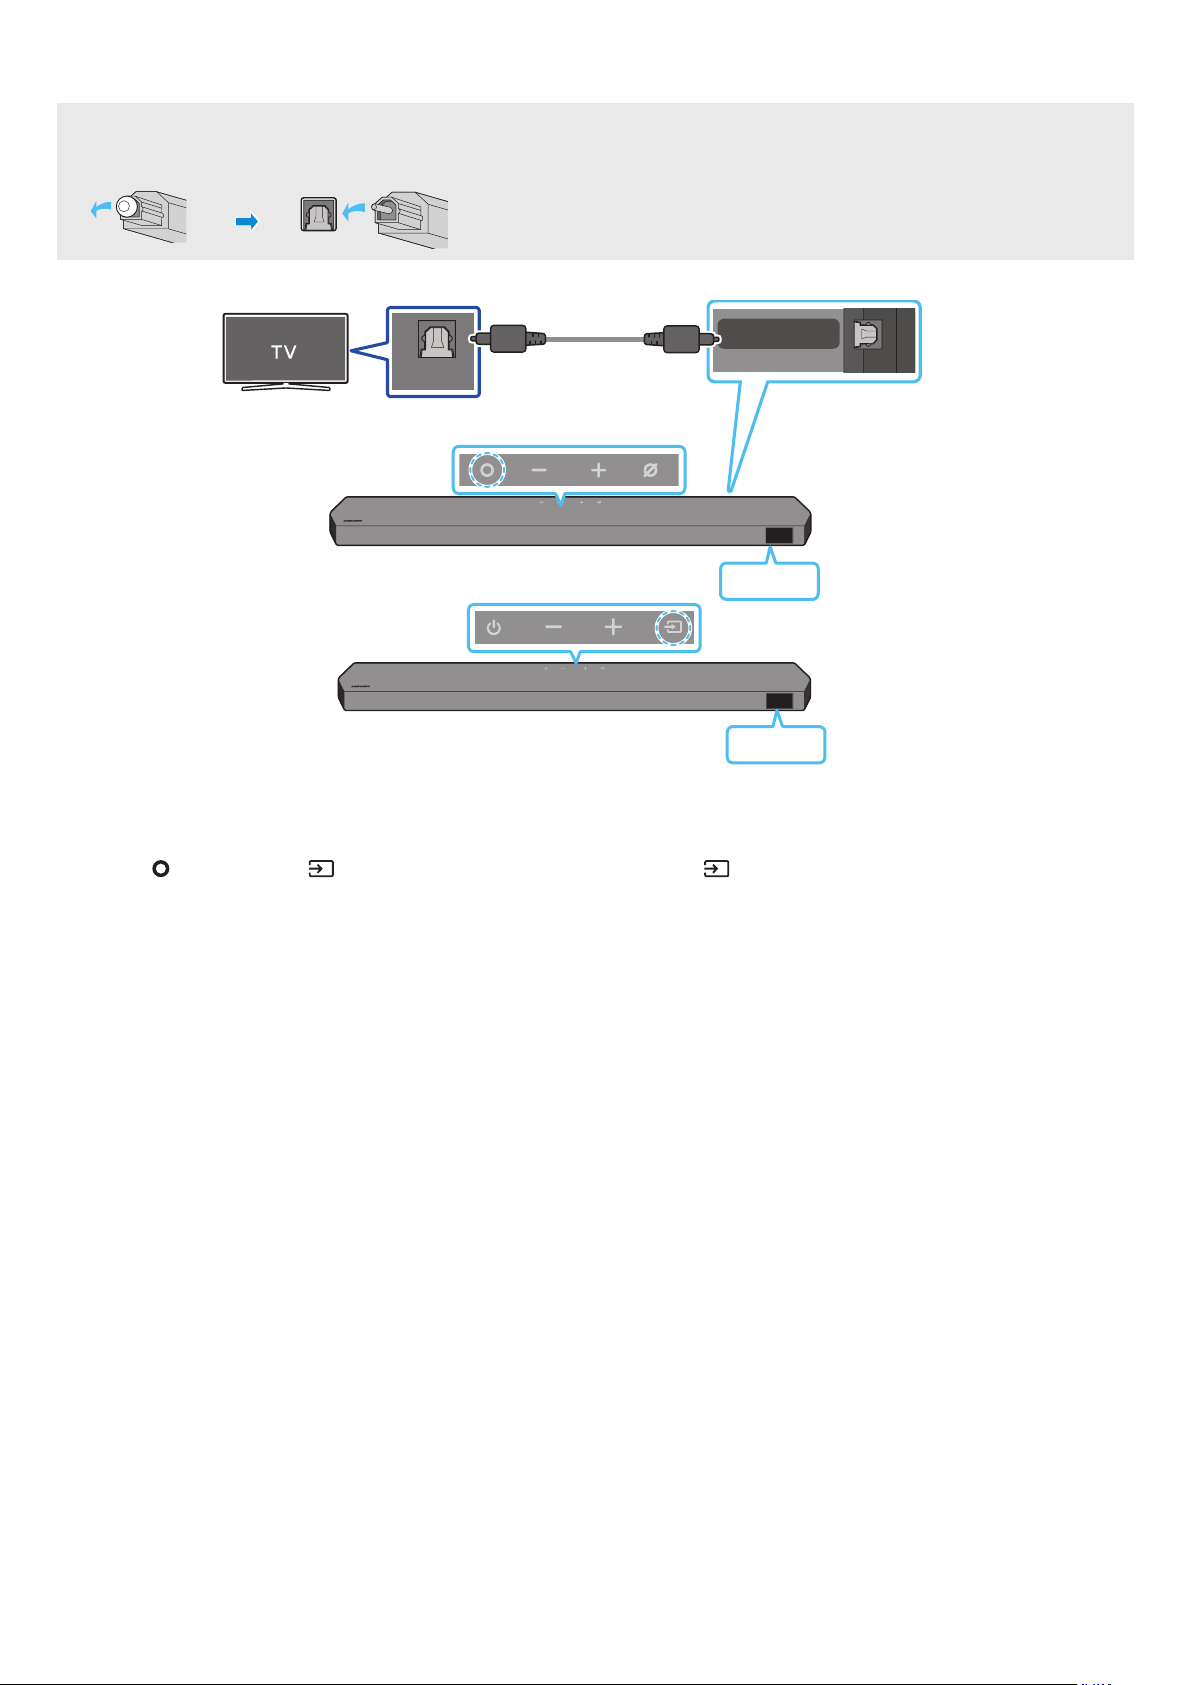
Connecting using an Optical Cable
Pre-connection Checklist
• When both the HDMI cable and optical cable are connected, the HDMI signal is received rst.
• When you use an optical cable and the terminals have covers, be sure to remove the covers.
OPTICAL OUT
DIGITAL AUDIO IN
(OPTICAL)
Optical Cable (not supplied)
Bottom of the Soundbar
D.IN
Top of the Soundbar
<Q930B / Q800B>
Top of the Soundbar
D.IN
<Q700B>
1. With the TV and Soundbar turned off, connect the DIGITAL AUDIO IN (OPTICAL) port on the Soundbar and the OPTICAL output port on the TV
with the optical cable (not supplied), as shown in the gure.
2. Turn on the Soundbar and TV.
3. Press the
(Multi Function) / (Source) button at the top of the Soundbar or the (Source) button on the remote control to select the
“D.IN” mode.
4. The TV sound is output from the Soundbar.

ENG - 20
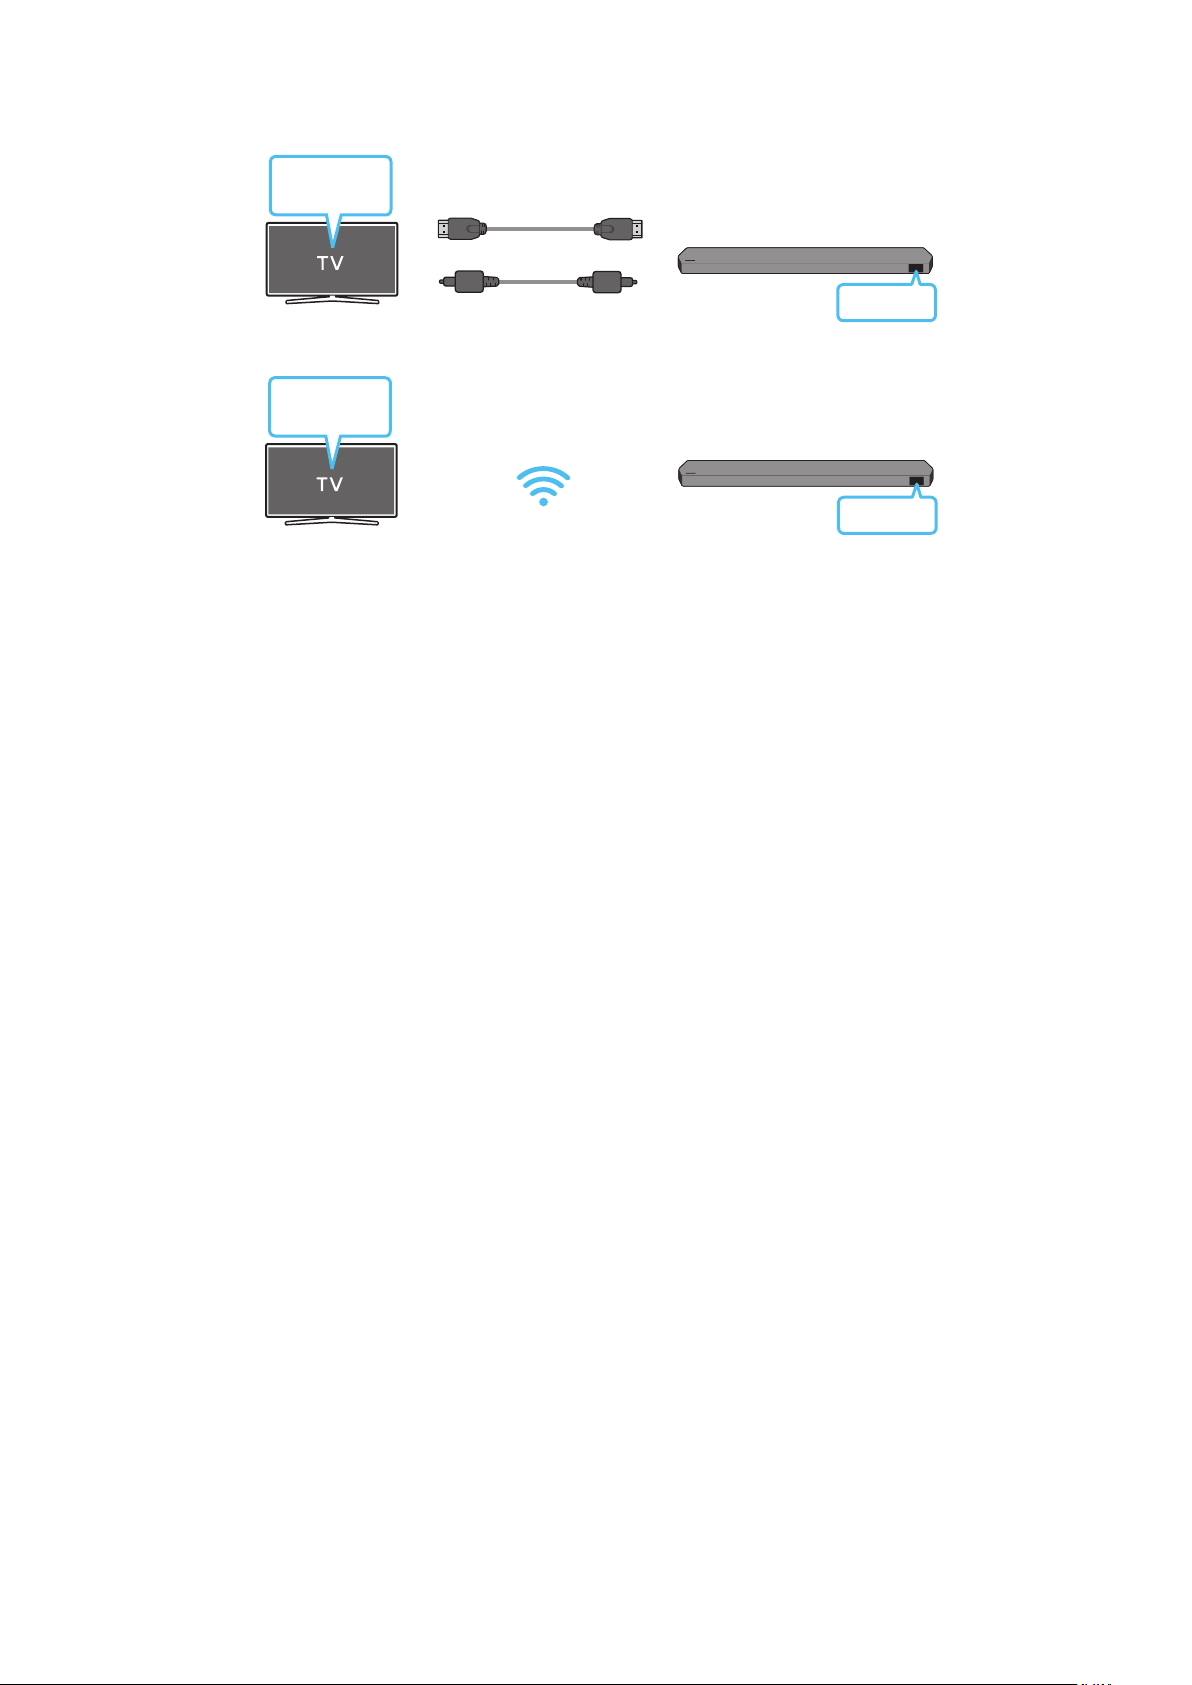
Connecting via Bluetooth
When a Samsung TV is connected using Bluetooth, you can hear stereo sound without the hassle of cabling.
• Only one Samsung TV can be connected at a time.
• Samsung TV that supports Bluetooth can be connected. Check the specications of your TV.
PAIR
5 Sec
5 Sec
OR
Top of the Soundbar
BT PAIRING
<Q930B / Q800B>
Top of the Soundbar
BT PAIRING
<Q700B>
The initial connection
1. Press the
PAIR button on the Soundbar remote control to enter the “BT PAIRING” mode.
(OR)
a. Press the
(Multi Function) / (Source) button on the top panel and then select “BT”.
“BT” changes to “BT PAIRING” in a few seconds automatically or changes to “BT READY” if there is a connect record.
b. When “BT READY” appears, press and hold the (Mic On/Off) / (Source) button on the top panel of the Soundbar for more than
5 seconds to display “BT PAIRING”.
2. Select Bluetooth mode on the Samsung TV.
(e.g. Home (
) → Menu → Settings ( ) → All Settings ( ) → Sound → Sound Output → Bluetooth Speaker List → Soundbar Q***B
(Bluetooth))
3. Select “Soundbar Q***B” from the list on TV’s screen.
An available Soundbar is indicated with “Need Pairing” or “Paired” on the TV’s Bluetooth device list. To connect the Samsung TV to the
Soundbar, select the message, and then establish a connection.
• When the Samsung TV is connected, [TV Name] → “BT” appears on the Soundbar’s front display.
4. You can now hear Samsung TV sound from the Soundbar.
• After you have connected the Soundbar to your Samsung TV the rst time, use the “BT READY” mode to reconnect.
If the device fails to connect
• If you have an existing Soundbar (e.g., Soundbar Q***B) on the list of speakers on the Samsung TV, delete it.
• Then repeat steps 1 through 3.
Disconnecting the Soundbar from the Samsung TV
Press the
(Multi Function) / (Source) button at the top of the Soundbar or the (Source) button on the remote control to select the
mode other than “BT”.
• Disconnecting takes time because the Samsung TV must receive a response from the Soundbar.
(The time required may differ, depending on the Samsung TV model.)

ENG - 21
What is the difference between BT READY and BT PAIRING?
• BT READY : In this mode, you can reconnect any Samsung TV or mobile device that was connected before.
• BT PAIRING : In this mode, you can connect a new device to the Soundbar.
(Press the PAIR button on the Soundbar remote control or press and hold the (Mic On/Off) / (Source) button on the top of the
Soundbar for more than 5 seconds while the Soundbar is in “BT” mode.)
Notes on Bluetooth connection
• Locate a new device within 1 m to connect via Bluetooth communication.
• If asked for a PIN code when connecting a Bluetooth device, enter <0000>.
• The Soundbar automatically turns off after 18 minutes in the Ready state.
• The Soundbar may not perform Bluetooth search or connection correctly under the following circumstances:
‒ If there is a strong electrical eld around the Soundbar.
‒ If several Bluetooth devices are simultaneously paired with the Soundbar.
‒ If the Bluetooth device is turned off, not in place, or malfunctions.
• Electronic devices may cause radio interference. Devices that generate electromagnetic waves must be kept away from the Soundbar main
unit - e.g., microwaves, wireless LAN devices, etc.

ENG - 22
Connecting via Wi-Fi
Pre-connection Checklist
• Wi-Fi connection is available only on Samsung TV.
• Check whether the wireless router (Wi-Fi) is turned on and the TV is connected to the router.
• The TV and Soundbar must be connected to the same wireless network (Wi-Fi).
• If your wireless router (Wi-Fi) uses a DFS channel, you will not be able to establish a Wi-Fi connection between the TV and Soundbar.
Contact your Internet service provider for details.
• Because the menus may differ depending on the year of manufacture, refer to your TV manual.
• To connect the TV to the Soundbar via Wi-Fi, connect the Soundbar to the wireless router rst. See page 29, for details on how to
establish a Wi-Fi connection.
1. For more information about Wi-Fi connection to the Soundbar, see page 29, “Method 2. Connecting via Wi-Fi (Wireless Network)”.
2. Change the input source of the TV by using the Audio menu to Soundbar.
• Samsung TVs released in 2017 or later
Home (
) → Menu → Settings ( ) → All Settings ( ) → Sound → Sound Output → Soundbar Q***B (Wi-Fi)
NOTE
The Wi-Fi Dolby Atmos connection is available in some Samsung TVs and some Soundbar models.
ENG - 23
Using the Q-Symphony Function
For Q-Symphony, the Soundbar syncs with a Samsung TV to output sound through two devices for optimum surround effect. When the Soundbar
is connected, the menu, “TV+Soundbar” appears under the Sound Output menu of the TV. Select the corresponding menu.
TV menu
HDMI Cable
OR
Optical Cable (not supplied)
D.IN
• TV menu example: TV + [AV] Soundbar series name (HDMI)
Wi-Fi
TV menu
Wi-Fi
• TV menu example: TV + [AV] Soundbar series name (Wi-Fi)
NOTE
• It can operate according to the Codec supported by TV.
• This function is supported only when the HDMI Cable or Optical Cable (not supplied) or Wi-Fi is connected.
• The message displayed may differ with the TV model.
• Ensure that your TV and Soundbar are connected to the same wireless router/frequency.
• This function is available in some Samsung TVs and some Soundbar models.

ENG - 24
Provides optimized sound quality by analyzing the listening spaces.
Method 1. Connecting via Soundbar
To enable this function, turn on the Spacet sound mode with the remote control of the Soundbar.
(
(Sound Control) → → ( Up ) → “”)
• This is available in all Sound modes.
Method 2. Connecting via TV
To enable this function, turn on the Adaptive Sound+ mode on your Samsung TV menu.
(Home (
) → Menu → Settings ( ) → All Settings ( ) → General → Intelligent Mode Settings → Adaptive Sound+)
• The sound mode on your Soundbar will automatically change to Adaptive Sound+ if you enable the Adaptive Sound+ mode on your TV.
NOTE
• This function works when the Soundbar connects to some of the Samsung TVs.
• Q700B models support only the method of “Connecting via TV”.
ENG - 25
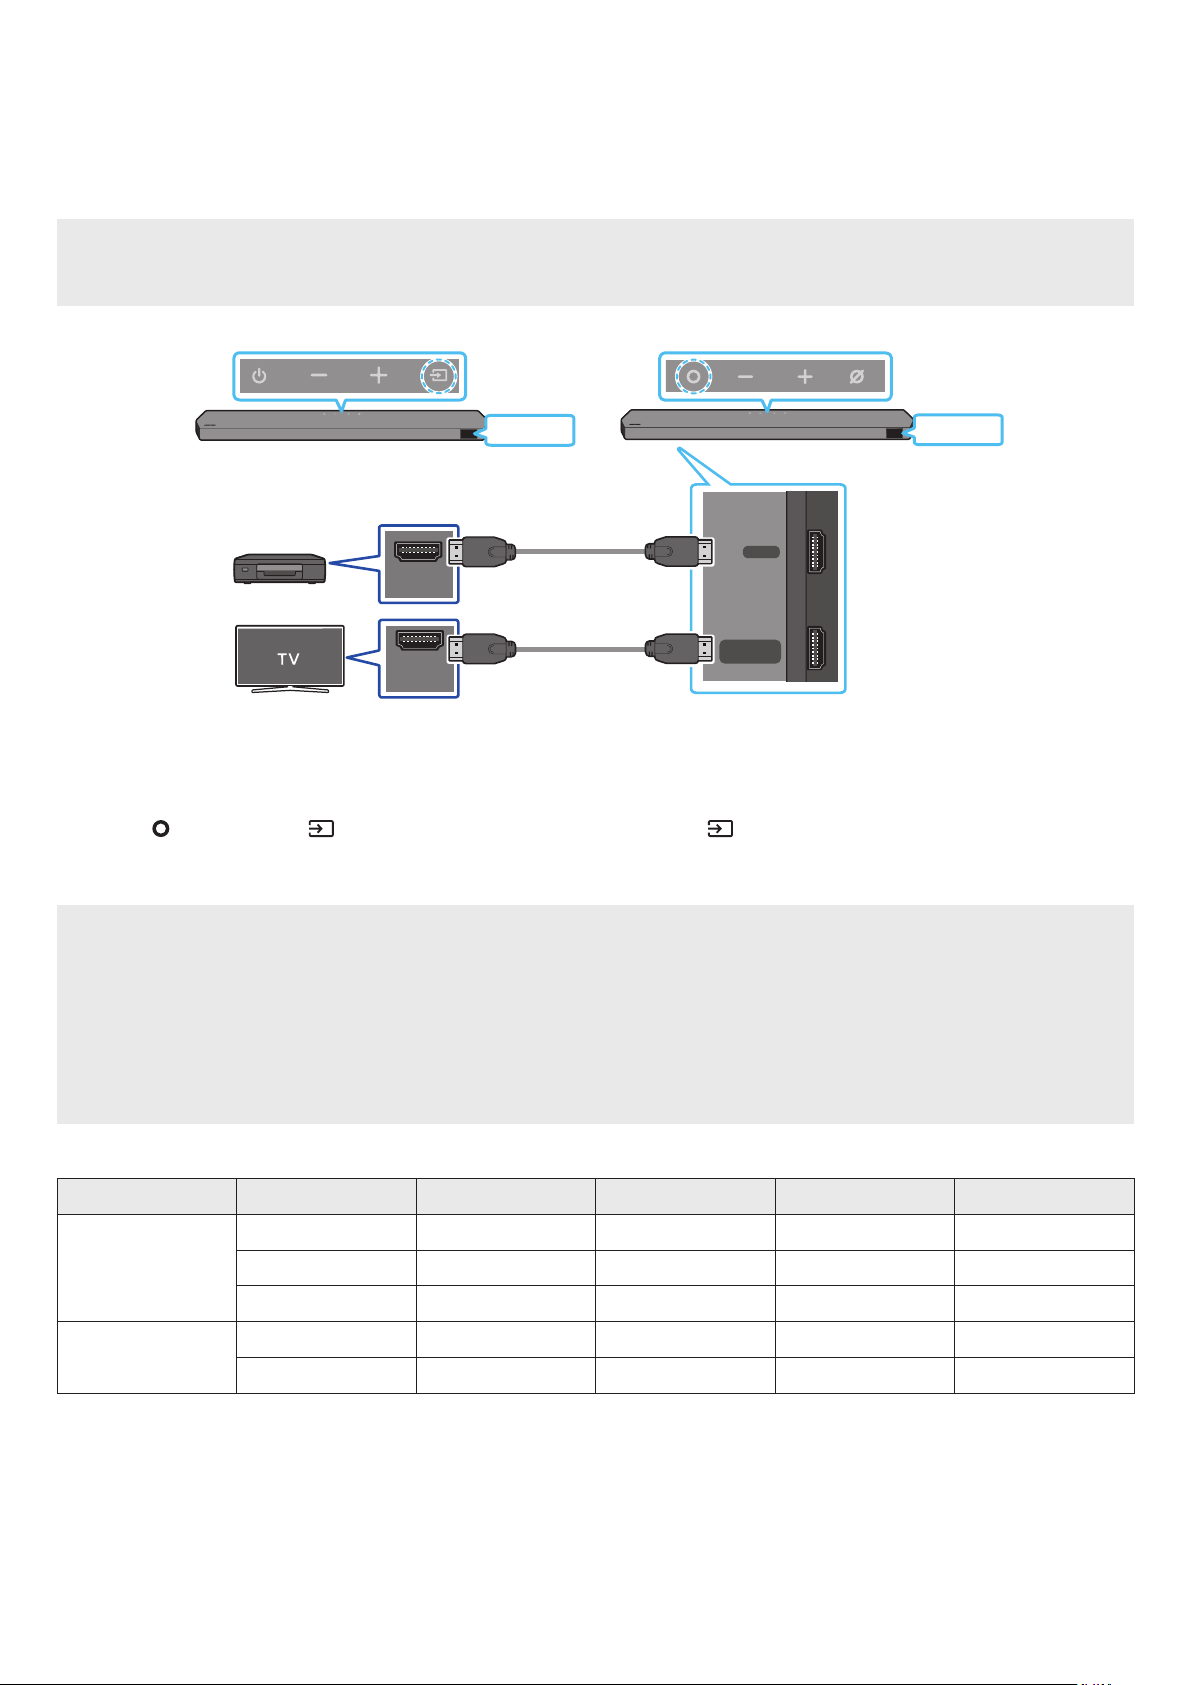
06 CONNECTING AN EXTERNAL DEVICE
Method 1. Connecting using an HDMI Cable (Capable of Dolby Atmos / DTS:X decoding
and playback)
Pre-connection Checklist
• If the Audio Output options include Secondary Audio, make sure Secondary Audio is set to Off.
• Make sure that the content supports Dolby Atmos® / DTS:X.
HDMI TO TV
(eARC/ARC)
HDMI
HDMI IN
(ARC)
HDMI OUT
Bottom of the Soundbar
HDMI
HDMI
External Device
HDMI Cable
HDMI Cable
Top of the Soundbar
Top of the Soundbar
<Q930B / Q800B><Q700B>
1. Use an HDMI cable to connect the HDMI OUT port on the external device and the HDMI port on the bottom of the Soundbar.
2. Use an HDMI cable to connect the HDMI IN port of the TV and the HDMI TO TV (eARC/ARC) port on the bottom of the Soundbar.
3. Turn on the Soundbar, TV, and the external device.
4. Press the
(Multi Function) / (Source) button on the top of the Soundbar or the (Source) button on the remote control to select
“HDMI” mode.
5. The Soundbar display indicates that “HDMI” mode is currently selected and the Soundbar will start playing sounds.
NOTE
• When you use Dolby Atmos® / DTS:X: If the input source is Dolby Atmos® / DTS:X, refer to “
effect modes” on page 11.
• When Dolby Atmos® is activated, “DOLBY ATMOS” appears in the front display.
• When DTS:X is activated, “DTS:X” appear in the front display.
•
Open the audio output options on the settings menu of your BD player or other device and make sure that “No Encoding” is selected for
Bitstream. For example, on a Samsung BD Player, go to Home Menu → Sound → Digital Output and then select Bitstream (unprocessed).
Frame rate (fps) Color depth
< 60
8 bit O O O O
10 bit - - O O
12 bit - - O O
120
8 bit - - - -
10 bit - - - -
• Supported specication may vary depending on the connected external device or usage conditions.
ENG - 26
Method 2. Connecting using an Optical Cable
DIGITAL AUDIO IN
(OPTICAL)
OPTICAL OUT
BD / DVD player / Set-
top box / Game console
Top of the Soundbar
D.IN
Optical Cable
(not supplied)
Bottom of the Soundbar
<Q930B / Q800B>
Top of the Soundbar
D.IN
<Q700B>
1. Use an optical cable (not supplied) to connect the DIGITAL AUDIO IN (OPTICAL) on the Soundbar main and the OPTICAL OUT port on the
external device.
2. Turn on the Soundbar and external device.
3. To select “D.IN” mode, press the
(Multi Function) / (Source) button on the top of the Soundbar or the (Source) button on the remote
control.
4. Your Soundbar will play sounds from the external device.
ENG - 27
07 CONNECTING A MOBILE DEVICE
Method 1. Connecting via Bluetooth
When a mobile device is connected using Bluetooth, you can hear stereo sound without the hassle of cabling.
• When you connect a paired Bluetooth device with the Soundbar off, the Soundbar automatically turns on.
PAIR
5 Sec
5 Sec
OR
Top of the Soundbar
BT PAIRING
<Q930B / Q800B>
Top of the Soundbar
BT PAIRING
<Q700B>
Mobile device
The initial connection
• When connecting to a new Bluetooth device, make sure the device is within 1 m distance.
1. Press the PAIR button on the Soundbar remote control to enter the “BT PAIRING” mode.
(OR)
a. Press the
(Multi Function) / (Source) button on the top panel and then select “BT”.
“BT” changes to “BT PAIRING” in a few seconds automatically or changes to “BT READY” if there is a connect record.
b. When “BT READY” appears, press and hold the (Mic On/Off) / (Source) button on the top panel of the Soundbar for more than 5
seconds to display “BT PAIRING”.
2. On your device, select “Soundbar Q***B” from the list that appears.
• When the Soundbar is connected to the Mobile device, [Mobile Device Name] → “BT” appears in the front display.
3. Play music les from the device connected via Bluetooth through the Soundbar.
• After you have connected the Soundbar to your mobile device the rst time, use the “BT READY” mode to reconnect.
If the device fails to connect
• If you have an existing Soundbar (e.g., “Soundbar Q***B”) in the list of speakers on the Mobile device, delete it.
• Repeat steps 1 and 2.
What is the difference between BT READY and BT PAIRING?
• BT READY : In this mode, you can reconnect any Samsung TV or mobile device that was connected before.
• BT PAIRING : In this mode, you can connect a new device to the Soundbar.
(Press the PAIR button on the Soundbar remote control or press and hold the (Mic On/Off) / (Source) button on the top of the
Soundbar for more than 5 seconds while the Soundbar is in “BT” mode.)

ENG - 28
Notes on Bluetooth connection
• Locate a new device within 1 m to connect via Bluetooth communication.
• If asked for a PIN code when connecting a Bluetooth device, enter <0000>.
• The Soundbar automatically turns off after 18 minutes in the Ready state.
• The Soundbar may not perform Bluetooth search or connection correctly under the following circumstances:
‒ If there is a strong electrical eld around the Soundbar.
‒ If several Bluetooth devices are simultaneously paired with the Soundbar.
‒ If the Bluetooth device is turned off, not in place, or malfunctions.
• Electronic devices may cause radio interference. Devices that generate electromagnetic waves must be kept away from the Soundbar main
unit - e.g., microwaves, wireless LAN devices, etc.
• The Soundbar supports SBC data (44.1kHz, 48kHz).
• Connect only to a Bluetooth device that supports the A2DP (AV) function.
• You cannot connect the Soundbar to a Bluetooth device that supports only the HF (Hands Free) function.
• When connecting the Soundbar to a Bluetooth device, place them as close to each other as possible.
• The farther the Soundbar and Bluetooth device are from each other, the lower the sound quality will become.
The Bluetooth connection may break when the devices are out of the effective range.
• The Bluetooth connection may not function as intended in areas with poor reception.
• A Bluetooth device may experience noise or malfunction under in the following conditions:
‒ When the body is in contact with the signal transceiver on the Bluetooth device or Soundbar
‒ In corners or when there is an obstacle in proximity, such as a wall or partition, where electrical changes may occur.
‒ When exposed to radio interferences by other products operating on the same frequency ranges, such as medical equipment, microwave
ovens, and wireless LAN devices.
‒ Obstacles such as doors and walls may still impact the sound quality even when the devices are within the effective range.
• Note that your Soundbar cannot be paired with other Bluetooth devices while using the Bluetooth option.
• This wireless device may cause electrical interference during operation.
Disconnecting the Bluetooth device from a Soundbar
You can disconnect a Bluetooth device from the Soundbar. For instructions, see the Bluetooth device’s user manual.
• The Soundbar will be disconnected.
• When the Soundbar is disconnected from the Bluetooth device, the Soundbar will display “BT DISCONNECTED” on the front display.
Disconnecting the Soundbar from the Bluetooth device
Press the (Multi Function) / (Source) button on the top of the Soundbar or the (Source) button on the remote control to switch the
mode from “BT”.
• Disconnecting takes time because the Bluetooth device must receive a response from the Soundbar. (Disconnection time may differ,
depending on the Bluetooth device)
• When the Soundbar is disconnected from the Bluetooth device, the Soundbar will display “BT DISCONNECTED” on the front display.
ENG - 29
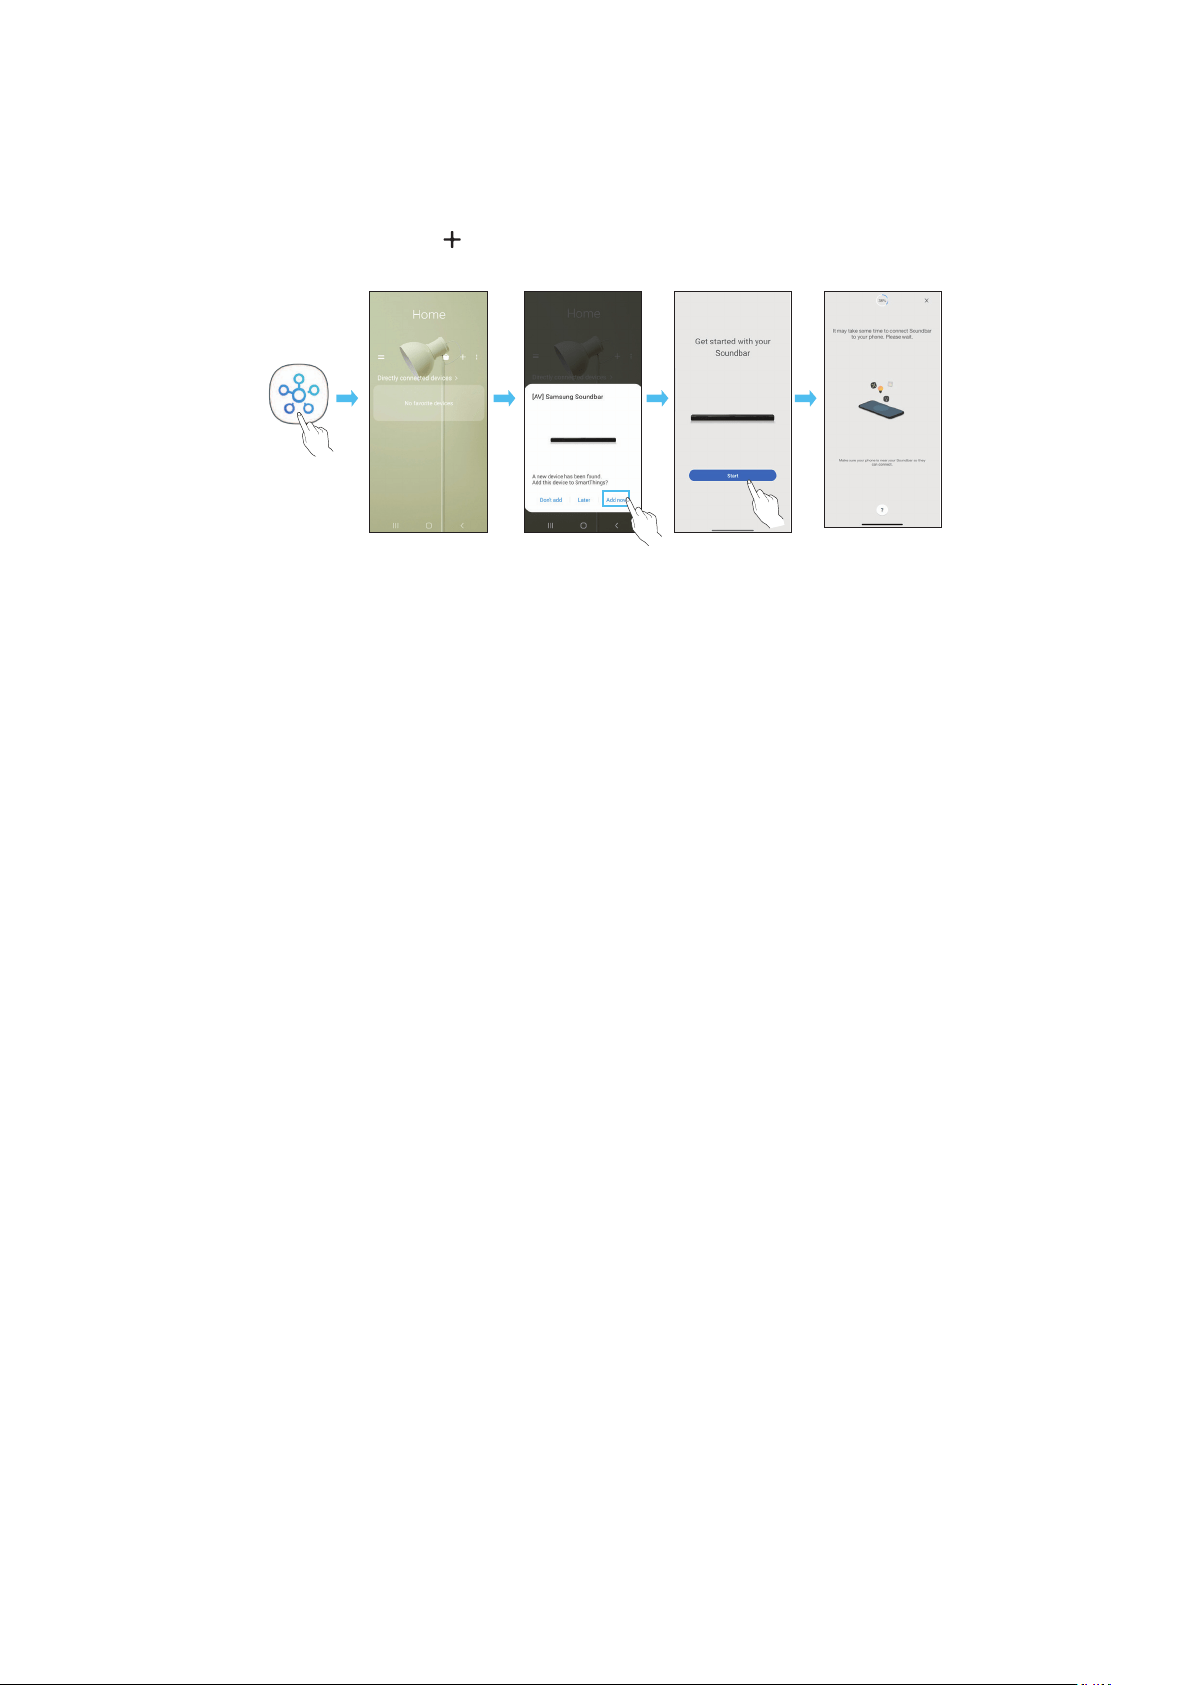
Method 2. Connecting via Wi-Fi (Wireless Network)
To connect a Soundbar to a mobile device via a wireless network (Wi-Fi), the SmartThings app is required.
The initial connection
1. Install and launch the SmartThings app from your mobile device (smartphone or tablet).
2. On the app, follow the screen instructions to add the Soundbar.
• The automatic pop-up (the second screenshot below) may not show on some devices.
If the pop-up window does not appear, press “
” on the Home screen. The Soundbar is added to the app.
• The illustration below may differ according to the app version.
Launch App Auto pop-up Add device
SmartThings
App
ENG - 30
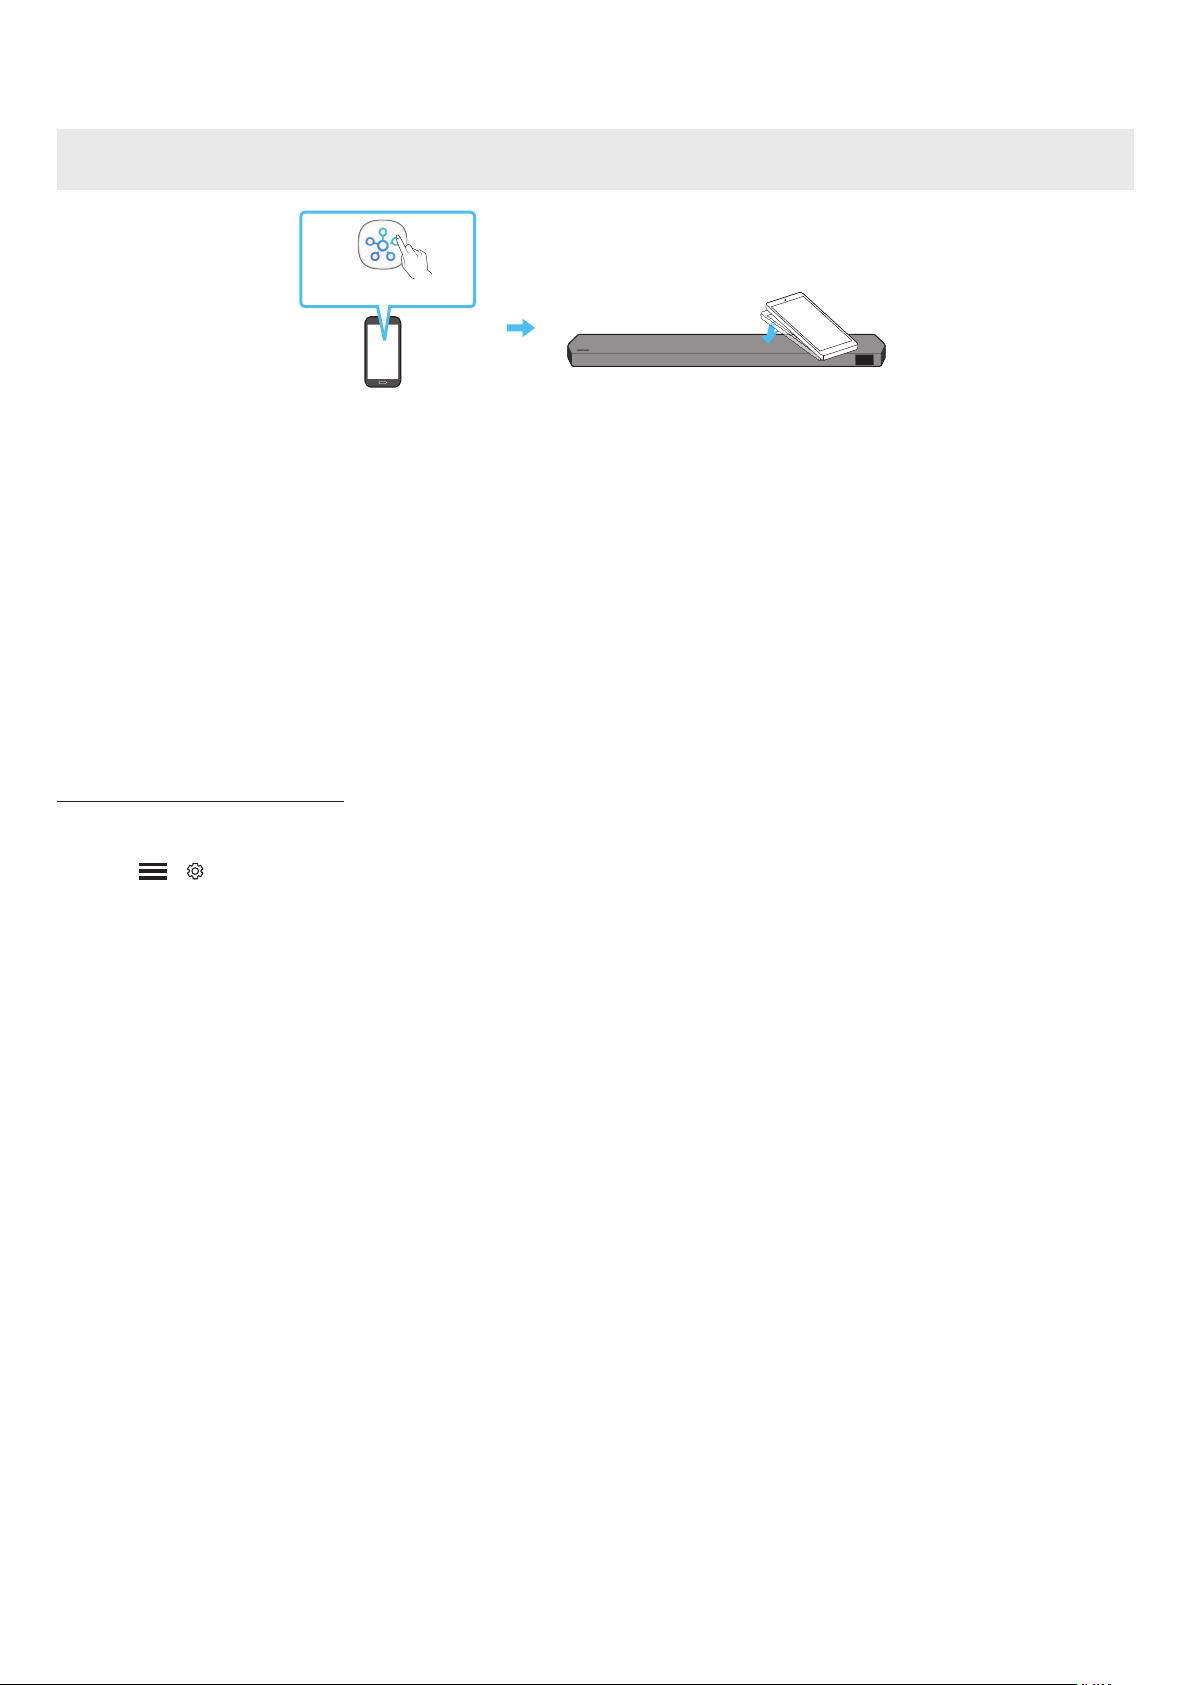
Using the Tap Sound
Tap the Soundbar with your mobile device to play the sound of content on the mobile device through the Soundbar.
• This function may not be supported, depending on the mobile device.
• This function is only compatible with Samsung mobile devices with Android 8.1 or later.
Top of the Soundbar
Mobile device
SmartThings App
1. Turn on the Tap Sound function on your mobile device.
• For details on how to turn on the function, refer to “Setting the Tap Sound function” below.
2. Tap the Soundbar with the mobile device. Select “Start now” in the displayed message window.
A connection is established between the mobile device and Soundbar via Bluetooth.
3. Play the sound of content on the mobile device through the Soundbar.
• This function connects a mobile device to the Soundbar via Bluetooth by detecting vibration that occurs when the device touches the
Soundbar.
• Make sure the mobile device does not tap a sharp corner of the Soundbar. The Soundbar or mobile device may become scratched or
damaged.
• It is recommended that the mobile device be covered with a case. Lightly tap the wide area in the upper portion of the Soundbar, without
using excessive force.
• To use this function, update the SmartThings app to the latest version.
The function may not be supported, depending on the app version.
Setting the Tap Sound function
Use the SmartThings app to turn on the Tap View, Tap Sound function.
1. On the mobile device, run the SmartThings app.
2. Select (
→ ) in the SmartThings app screen displayed on the mobile device.
3. Set “Tap View, Tap Sound” to On to allow the function to work when a mobile device moves close to the Soundbar. The function is turned on.
NOTE
• When the mobile device is in power-saving mode, the Tap Sound function does not work.
• The Tap Sound function may not work if there are devices near the Soundbar that cause radio interference such as electric devices. Make sure
devices that may cause radio interference are placed at a sufcient distance away from the Soundbar.

ENG - 31
08 CONNECTING VIA APPLE AIRPLAY 2
• This feature may not be available in some countries.
• This Samsung Soundbar supports AirPlay 2 and requires iOS 11.4 or later.
With AirPlay 2, you can stream music, podcasts, and other audio from your Apple devices to the Samsung Soundbar.
• Make sure the Soundbar is powered on and connected to the same Wi-Fi network as your Apple device.
• Select
from an AirPlay-supported app or Control Center on your iPhone, iPad, or Mac.
• Select the Soundbar from the list of available devices to play the current audio to.
ENG - 32
09 INSTALLING THE WALL
MOUNT
Installation Precautions
• Install on a vertical wall only.
• Do not install in a place with high temperature or humidity.
• Verify whether the wall is strong enough to support the product’s
weight. If not, reinforce the wall or choose another installation
point.
• Purchase and use the xing screws or anchors appropriate for
the kind of wall you have (plaster board, iron board, wood, etc.). If
possible, x the support screws into wall studs.
• Purchase wall mounting screws according to the type and
thickness of the wall you want to mount the Soundbar on.
‒ Diameter: M5
‒ Length: 35 mm or longer recommended.
• Connect cables from the unit to external devices before you install
the Soundbar on the wall.
• Make sure the unit is turned off and unplugged before you install
it. Otherwise, it may cause an electric shock.
Wallmount Components
Wall Mount Guide
x 2
x 2
(M4 x L10)
Holder-Screw Screw
x 2
Bracket-Wall Mount
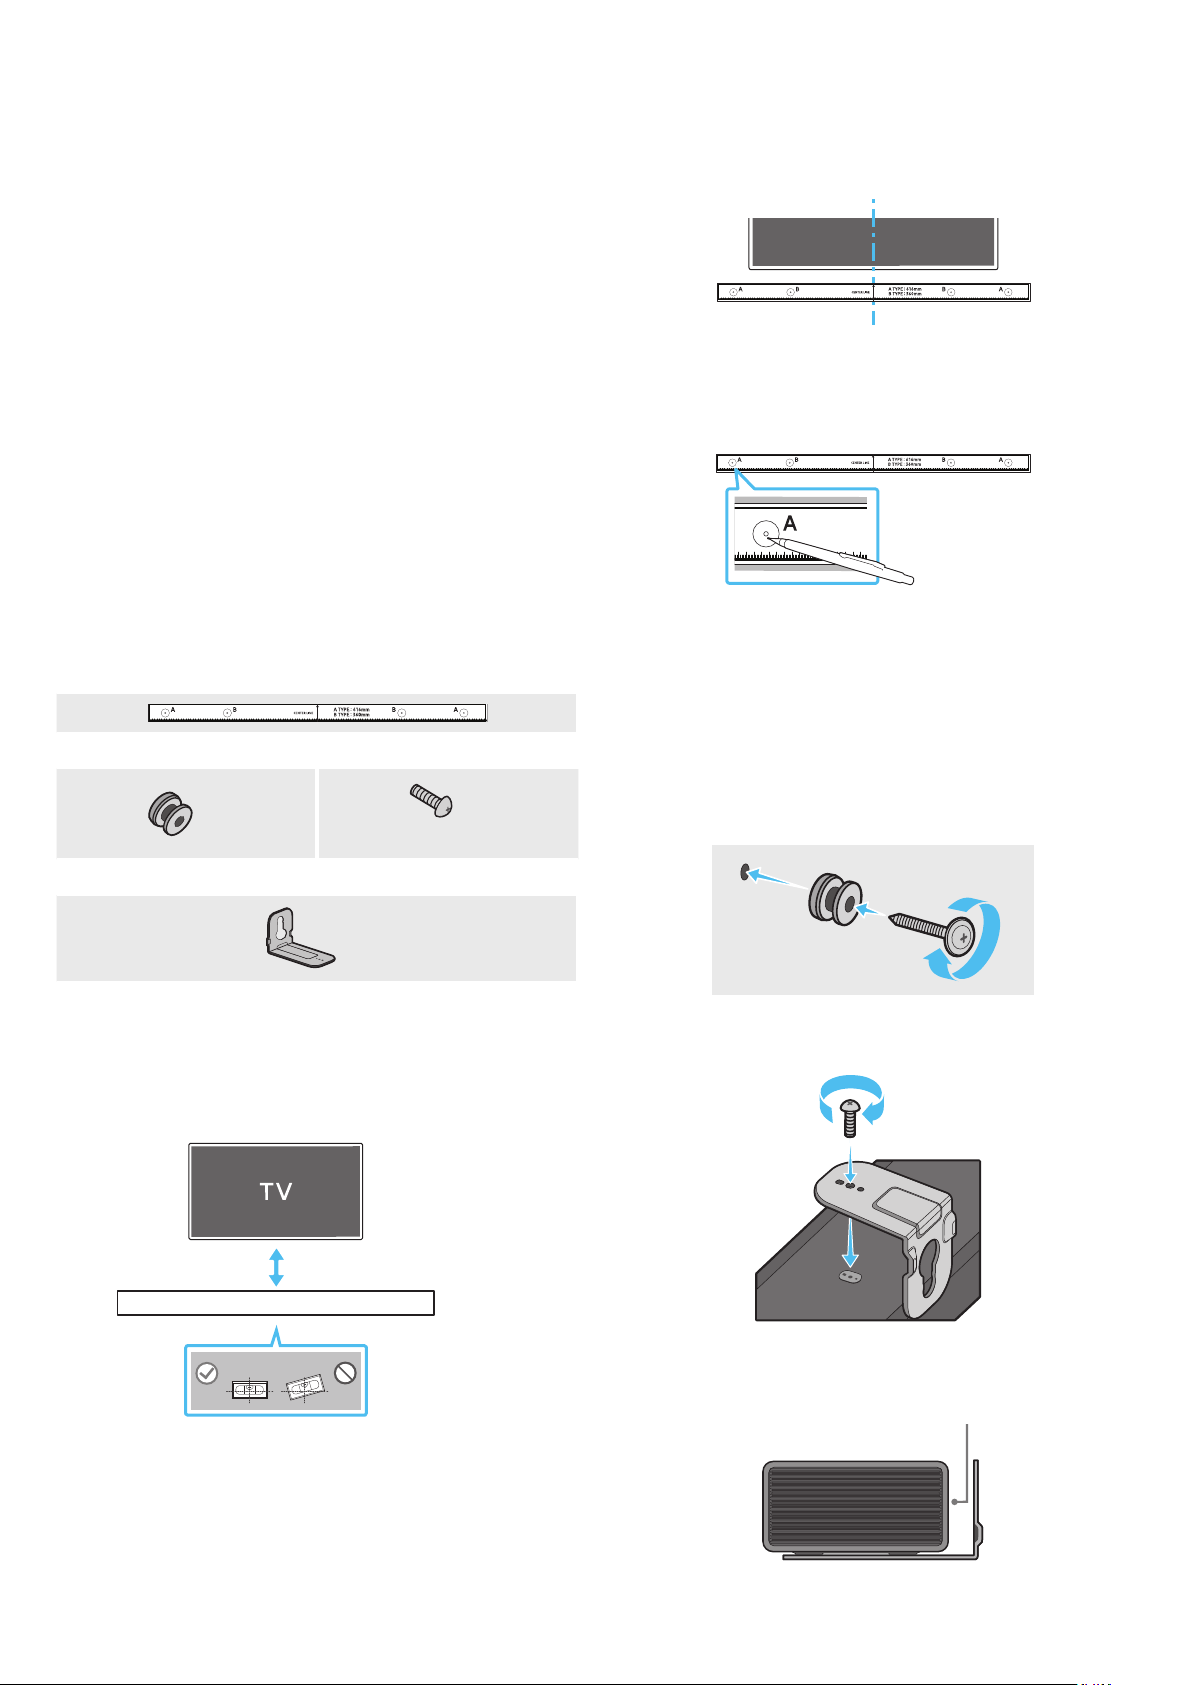
1. Place the Wall Mount Guide against the wall surface.
• The Wall Mount Guide must be level.
• If your TV is mounted on the wall, install the Soundbar at least
5 cm below the TV.
5 cm or more
2. Align the Wall Mount Guide’s Center Line with the center of your
TV (if you are mounting the Soundbar below your TV), and then x
the Wall Mount Guide to the wall using tape.
• If you are not mounting below a TV, place the Center Line in the
center of the installation area.
Center Line
3. Push a pen tip or sharpened pencil tip through the center of the
A-TYPE images on each end of the Guide to mark the holes for the
supporting screws, and then remove the Wall Mount Guide.
4. Using an appropriately sized drill bit, drill a hole in the wall at each
marking.
• If the markings do not correspond to the positions of studs,
make sure you insert appropriate anchors or mollies into the
holes before you insert the support screws. If you use anchors
or mollies, make sure the holes you drill are large enough for
the anchors or mollies you use.
5. Push a screw (not supplied) through each Holder-Screw, and then
screw each screw rmly into a support screw hole.
6. Install the 2 Bracket-Wall Mounts in the correct orientation on the
bottom of the Soundbar using 2 Screws.
• When assembling, make sure the hanger part of the Bracket-
Wall Mounts are located behind the rear of the Soundbar.
Rear of Soundbar
Right end of Soundbar
ENG - 33
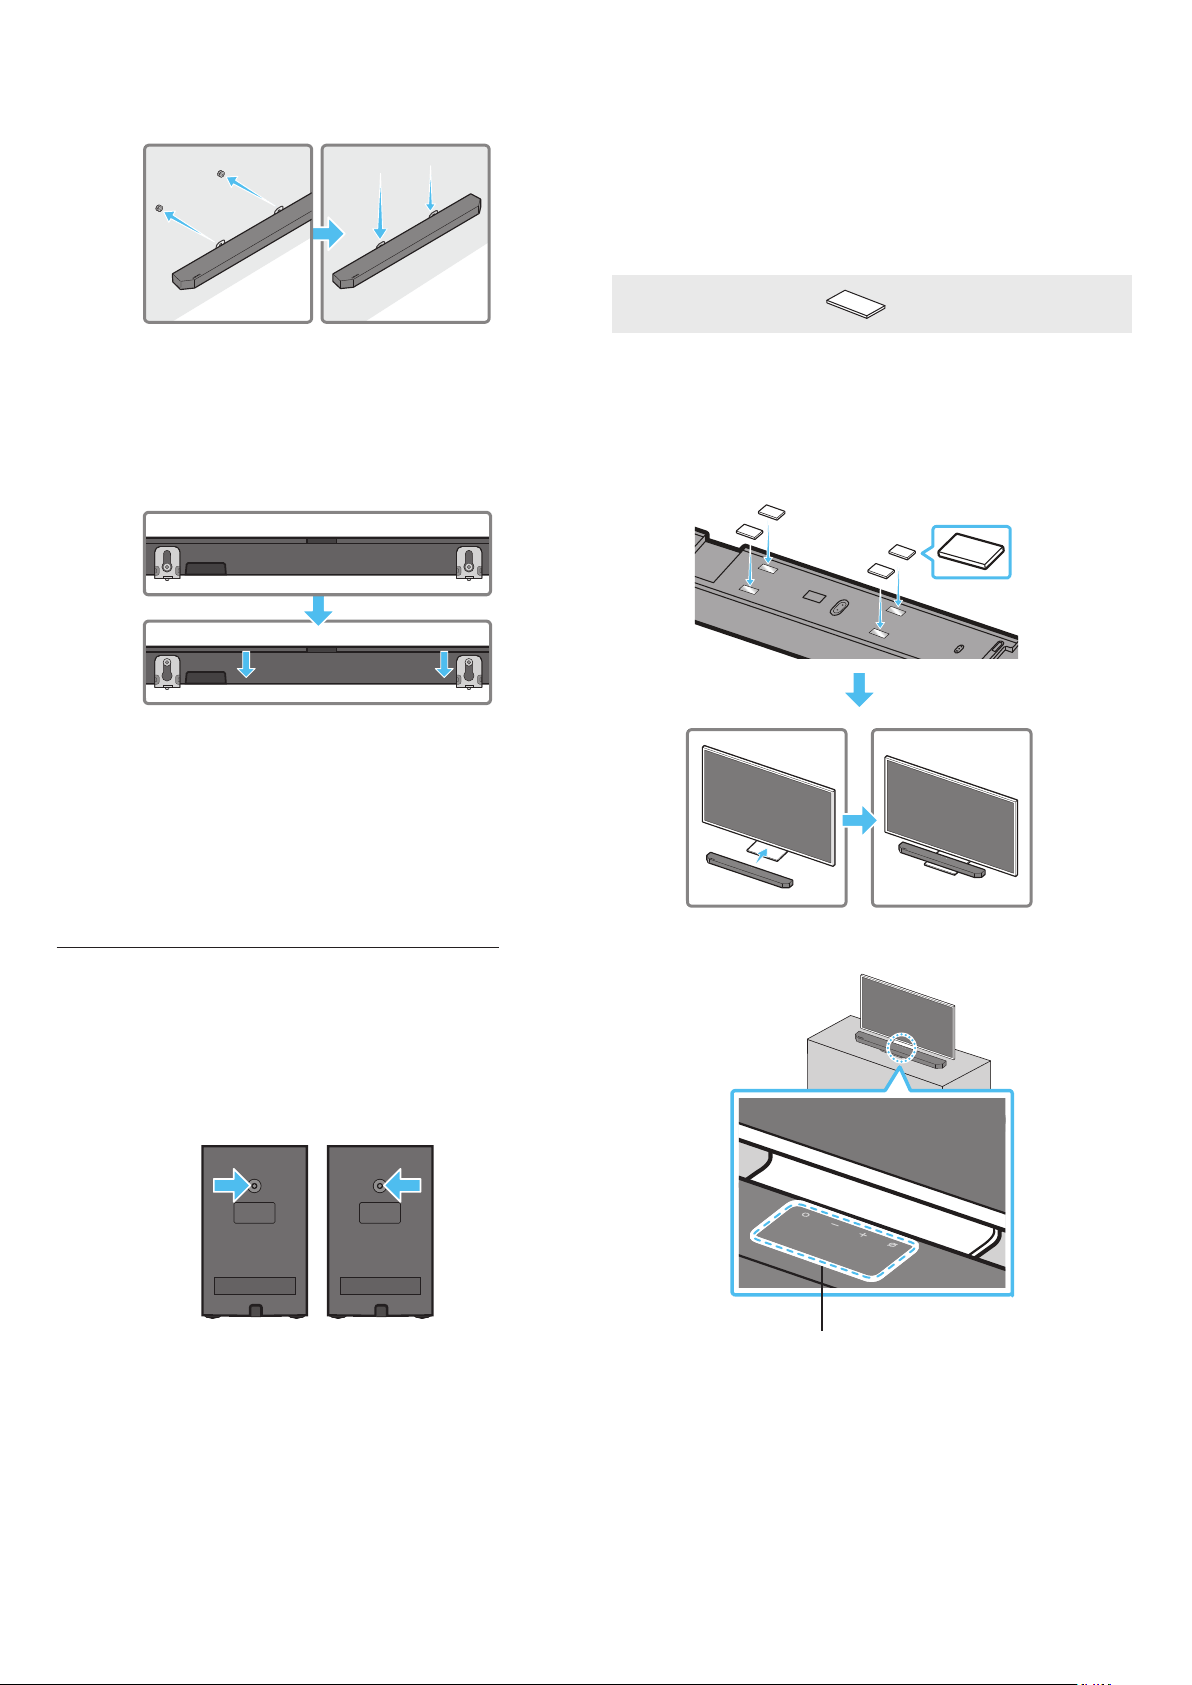
7. Install the Soundbar with the attached Bracket-Wall Mounts by
hanging the Bracket-Wall Mounts on the Holder-Screws on the
wall.
8. Slide the Soundbar down as shown below so that the Bracket-Wall
Mounts rest securely on the Holder-Screws.
• Insert the Holder-Screws into the wide (bottom) part of the
Bracket-Wall Mounts, and then slide the Bracket-Wall Mounts
down so that the Bracket-Wall Mounts rest securely on the
Holder-Screws.
Installing the Surround Speakers on a
Wall (applicable models only)
You can purchase wall mounts separately to install the surround
speakers on a wall.
Wall mounts aren’t sold by Samsung Electronics.
Notes for Wall Mounting the Surround Speakers
• Surround Speaker wall mounts must be able to support more than
8.0 kg.
• Hole size : 1/4 - 20 UNC threaded insert
‒ Standard Screw : 6.35 mm ø,
1.2 7mm Pitch
‒ Length : 18 mm long
‒ Quantity : Left 1 EA / Right 1 EA
L R
• Check the strength of the wall before you install the Wall Mount
Brackets. If the strength is insufcient, make sure to reinforce the
wall before installing the Wall Mount Brackets and the speakers
on the wall.
• Samsung Electronics is not liable for any damage to the product
due to the product being installed inappropriately.
• Take care not to install the speakers sideways or upside down.
10 INSTALLING THE
SOUNDBAR IN FRONT OF
TV
Component
x 4
Rubber-Foot
To install, attach the Rubber-Feet to the bottom of the Soundbar
before placing it in position above the TV stand. Make sure you attach
the Rubber-Feet so they do not lie outside the edges of the TV stand.
Refer to the gure below.
Rubber-Foot
Place the Soundbar on a TV stand.
Microphones (applicable models only)
ENG - 34
As illustrated in the image, align the center of the Soundbar with the
center of the TV, carefully place the Soundbar onto the TV stand.
At this time, place the microphones (applicable models only) at the
front of the stand not to interfere with voice recognition.
Right end of Soundbar
TV
NOTE
• Make sure the Soundbar is placed on a at and solid surface.
• Insufcient gap from the TV may cause voice recognition and
acoustic problems.
• The illustration above differs with the respective model.
• This function is not supported by Q700B model.
11 SOFTWARE UPDATE
Auto Update
When the Soundbar is connected to the Internet, software updates
automatically occur even when the Soundbar is turned off.
• To use the Auto Update function, the Soundbar must be connected
to the Internet.
The Wi-Fi connection to the Soundbar will be terminated if
the Soundbar’s power cord is disconnected or the power is cut
off. If the power is cut off, when the power comes back on or
you reconnect the power cord, turn on the Soundbar, and then
reconnect it to the Internet.
USB Update
Bottom of the Soundbar
HDMI IN 1
HDMI IN 2
ID SET
(WOOFER,
REAR)
POWER
NETWORK
SERVICE
DIGITAL AUDIO IN
(OPTICAL)
HDMI TO TV
(eARC/ARC)
HDMI 1
HDMI 2
ID SET
HDMI IN 1
HDMI IN 2
SERVICE
SERVICE
the future.
When an update is available, you can update the Soundbar by
connecting the USB drive that contains the update rmware to the
SERVICE port of the Soundbar.
1. Go to the Samsung website (www.samsung.com) → search for the
model name from the customer support menu option.
• For more information about update, refer to Upgrade Guide.
2. Download the upgrade le (USB type).
3. Unzip the le to create a folder with the le name.
4. Store the created folder in a USB and then connect it to the
Soundbar.
5. Turn on the Soundbar. Then the product is updated within 3
minutes with displaying the message, “UPDATE”.
• During update, do not turn it off or remove the USB.
• If “UPDATE” does not appear on the display window, remove the
power cord from the Soundbar and then reconnect it.
• When the latest version is installed, no update is performed.
• Depending on the USB type, update may not be supported.

ENG - 35
Initialization
Top of the Soundbar
INIT
With the Soundbar on, press the (Volume) buttons on the body
at the same time for at least 5 seconds. “INIT” appears on the display
and then the Soundbar is initialized.
CAUTION
• All the settings of the Soundbar are initialized. Be sure to
perform this only when initialization is required.
12 TROUBLESHOOTING
Before seeking assistance, check the following.
Soundbar does not turn on.
• Check whether the power cord of the Soundbar is correctly
inserted into the outlet.
Soundbar works erratically.
• After removing the power cord, insert it again.
• Power cycle the external device and try again.
• If there is no signal, the Soundbar automatically turns off after a
certain period of time. Turn on the power. (See page 9.)
Remote control does not work
• Point the remote directly at the soundbar.
• Replace the batteries with new ones.
The Soundbar indicator turns solid red.
• The microphone is turned off.
Turn on the microphone. (See page 7.)
Sound is not output from the soundbar.
• The volume of the Soundbar is too low or muted. Adjust the
volume.
• When any external device (STB, Bluetooth device, mobile device,
etc.) is connected, adjust the volume of the external device.
• For sound output of the TV, select Soundbar. (Samsung TV:
Home (
) → Menu → Settings ( ) → All Settings ( ) → Sound
→ Sound Output → Select Soundbar)
• The cable connection to the Soundbar may not be loose. Remove
the cable and connect again.
• Remove the power cord completely, reconnect, and turn the
power on.
• Initialize the product and try again. (See page 35.)
Sound is not output from the subwoofer or the rear speakers.
• Check whether the LED indicator on the rear of the Subwoofer
and Surround Speakers are on in blue. Reconnect the Soundbar
and Subwoofer and Surround Speakers if the indicator is blinking
in blue or turned red. (See page 16.)
• You may experience an issue if there is an obstacle between the
Soundbar and Subwoofer. Move devices to an area away from
obstacles.
• Other devices sending radio frequency signals in proximity may
interrupt the connection.
Keep your speaker away from such devices.
• Remove and reconnect the power plug.
ENG - 36
In case there is sound jitter, delays, or noise from the Subwoofer
and Surround Speaker
• If there are any objects between the Soundbar and Subwoofer
speaker, this could cause a problem. Please reposition these to a
place without such an object.
• There may be sound jitter or delays when the Subwoofer and
Surround Speaker are far from the Soundbar. Please place them
near the Soundbar.
• There may be sound jitter or delays when the Soundbar is near an
instrument or electrical device that can cause radio interference.
Place the Soundbar far from such devices that can cause radio
interference. (E.g., wireless router)
• Change the TV network connection status from wireless to wired.
The Subwoofer volume is too low
• The original volume of the content you are playing may be low.
Try adjusting the Subwoofer level. (See page 10.)
• Bring the Subwoofer speaker closer to you.
If the TV is not connected via HDMI TO TV (eARC/ARC)
• Check whether the HDMI cable is correctly connected to the ARC
terminal. (See page 18.)
• Connection may not be possible due to the connected external
device (set-top box, game machine, etc.). Directly connect the
Soundbar.
• HDMI-CEC may not be activated on the TV. Turn on the CEC on
the TV menu. (Samsung TV: Home (
) → Menu → Settings ( )
→ All Settings ( ) → Connection → External Device Manager →
Anynet+ (HDMI-CEC) ON)
• To connect with eARC, the eARC function in the TV menu should
be set to On. (Samsung TV: Home ( ) → Menu → Settings ( ) →
All Settings ( ) → Sound → Expert Settings → HDMI-eARC Mode
(Auto))
There is no sound in when connecting to the TV in HDMI TO TV
(eARC/ARC) mode
• Your device is unable to play the input signal. Change the TV’s
audio output to PCM or Dolby Digital. (For a Samsung TV:
Home (
) → Menu → Settings ( ) → All Settings ( ) → Sound
→ Expert Settings → Digital Output Audio Format)
Soundbar will not connect via Bluetooth.
• When connecting a new device, switch to “BT PAIRING” for
connection. (Press the
PAIR button on the remote control or
press the (Mic On/Off) / (Source) button on the body for at
least 5 seconds.)
• If the Soundbar is connected to another device, disconnect that
device rst to switch the device.
• Reconnect it after removing the Bluetooth speaker list on the
device to connect. (Samsung TV: Home ( ) → Menu →
Settings ( ) → All Settings ( ) → Sound → Sound Output →
Bluetooth Speaker List)
• The automatic TV connection may be disabled. While the
Soundbar is in “BT READY”, press and hold the Left button on
the Soundbar remote control for 5 seconds to select ON-TV
CONNECT. If you see OFF-TV CONNECT, press and hold Left
button again for 5 seconds to switch the selection.
• Remove and reconnect the power plug, then try again.
• Initialize the product and try again. (See page 35.)
Sound drops out when connected via Bluetooth.
• Some devices can cause radio interference if they are located too
close to the Soundbar. e. g. microwaves, wireless routers, etc.
• If your device that is connected via Bluetooth moves too far away
from the soundbar, it may cause the sound to drop out. Move the
device closer to the soundbar.
• If a part of your body is in contact with the Bluetooth transceiver
or the product is installed on metal furniture, the sound may drop
out. Check the installation environment and conditions for use.
Soundbar will not connect to Wi-Fi.
• Check whether your wireless router is on.
• Turn off the router, turn it back on, and then try again.
• The soundbar will not connect if the wireless signal is too weak.
Try moving the router closer to the soundbar, or eliminating
any obstacles that are between the soundbar and the router, if
possible.
• If your wireless router is new, you will need to recongure the
speaker’s network settings.
The soundbar does not turn on automatically with the TV.
• When you turn off the Soundbar while watching TV, power
synchronization with the TV is disabled. First turn off the TV.
The AVA function (applicable models only) is not available in the
following cases.
• The AVA function (applicable models only) will not be available
using Q-symphony function.
• The AVA function (applicable models only) will not be available
when the microphone is turned off.
After connecting the TV to the Soundbar, I switched the Soundbar
mode. Then no sound is output from the TV.
• If you connect your Soundbar to a mobile device while the
Soundbar is connected to the TV, the Soundbar outputs sound
from the mobile device while keeping the TV connection. So the
TV sound will not be delivered anywhere.
• Disconnect the mobile device, and the TV sound will be output
from the Soundbar again.

ENG - 37
13 LICENSE
Dolby, Dolby Atmos, and the double-D symbol are registered
trademarks of Dolby Laboratories Licensing Corporation.
Manufactured under license from Dolby Laboratories. Condential
unpublished works. Copyright © 2012-2021 Dolby Laboratories. All
rights reserved.
For DTS patents, see http://patents.dts.com. Manufactured under
license from DTS, Inc. (for companies headquartered in the U.S./
Japan/Taiwan) or under license from DTS Licensing Limited (for all
other companies). DTS, DTS:X, and the DTS:X logo are registered
trademarks or trademarks of DTS, Inc. in the United States and
other countries. © 2021 DTS, Inc. ALL RIGHTS RESERVED.
The terms HDMI and HDMI High-Denition Multimedia Interface,
and the HDMI Logo are trademarks or registered trademarks of
HDMI Licensing Administrator, Inc. in the United States and other
countries.
• Use your phone, tablet or computer as a remote control for
Spotify. Go to spotify.com/connect to learn how
• The Spotify Software is subject to third party licenses found
here: https://www.spotify.com/connect/third-party-licenses.
• Apple, Airplay, iPhone, iPad, and Mac are trademarks of Apple
Inc., registered in the U.S. and other countries.
• Use of the Works with Apple badge means that an accessory
has been designed to work specically with the technology
identied in the badge and has been certied by the developer
to meet Apple performance standards.
14 OPEN SOURCE LICENSE
NOTICE
To send inquiries and requests for questions regarding open sources,
contact Samsung Open Source (
http://opensource.samsung.com)
15 IMPORTANT NOTES
ABOUT SERVICE
Figures and illustrations in this User Manual are provided for
reference only and may differ from actual product appearance.

ENG - 38
16 SPECIFICATIONS AND GUIDE
Soundbar Main Unit
Model Name HW-Q930B
Weight 5.4 kg
Dimensions (W x H x D) 1110.7 x 60.4 x 120.0 mm
Operating Temperature Range +5°C to +35°C
Operating Humidity Range 10 % ~ 75 %
AMPLIFIER
Rated Output power (30 W x 3) + (20 W x 6) + (10 W x 3)
Supported play formats
Dolby 5.1ch / Dolby Digital Plus / Dolby TRUE HD / Dolby ATMOS /
DTS 5.1ch / DTS HD / DTS-HD Master Audio / DTS:X / LPCM 8Ch
Model Name HW-Q800B
Weight 5.1 kg
Dimensions (W x H x D) 1110.7 x 60.4 x 120.0 mm
Operating Temperature Range +5°C to +35°C
Operating Humidity Range 10 % ~ 75 %
AMPLIFIER
Rated Output power (30 W x 3) + (20 W x 4) + (10 W x 3)
Supported play formats
Dolby 5.1ch / Dolby Digital Plus / Dolby TRUE HD / Dolby ATMOS /
DTS 5.1ch / DTS HD / DTS-HD Master Audio / DTS:X / LPCM 8Ch
Model Name HW-Q700B
Weight 4.8 kg
Dimensions (W x H x D) 1110.7 x 60.4 x 120.0 mm
Operating Temperature Range +5°C to +35°C
Operating Humidity Range 10 % ~ 75 %
AMPLIFIER
Rated Output power (30 W x 3) + (20 W x 2) + (10 W x 3)
Supported play formats
Dolby 5.1ch / Dolby Digital Plus / Dolby TRUE HD / Dolby ATMOS /
DTS 5.1ch / DTS HD / DTS-HD Master Audio / DTS:X / LPCM 8Ch

ENG - 39
Subwoofer
Subwoofer Name PS-WB96B
Weight 9.8 kg
Dimensions (W x H x D) 210.0 x 403.0 x 403.0 mm
AMPLIFIER
Rated Output power 160 W
Subwoofer Name PS-WB75B
Weight 5.9 kg
Dimensions (W x H x D) 205.0 x 353.0 x 302.0 mm
AMPLIFIER
Rated Output power 160 W
Surround Speaker (applicable models only)
Wireless Surround Speaker SET Name PS-RB96B (LEFT/RIGHT)
Weight 3.1 kg
Dimensions (W x H x D) 129.5 x 201.3 x 140.4 mm
AMPLIFIER
Rated Output power 140 W
NOTE
• Samsung Electronics Co., Ltd reserves the right to change the specications without notice.
• Weight and dimensions are approximate.
Precaution : The Soundbar will restart automatically if you turn on/turn off Wi-Fi.
Wi-Fi
Port deactivation method
Press the CH LEVEL button on the remote control of the Soundbar for 30 seconds to turn
Wi-Fi On / Off.
Bluetooth
Port deactivation method
Press the TONE CONTROL button on the remote control of the Soundbar for 30 seconds
to turn Bluetooth On / Off.
SPA - 2
INFORMACIÓN DE SEGURIDAD
ADVERTENCIAS DE SEGURIDAD
PARA REDUCIR EL RIESGO DE DESCARGA ELÉCTRICA, NO QUITE LA TAPA (O LA
PARTE TRASERA).
NO CONTIENE PIEZAS QUE PUEDAN SER REPARADAS O REEMPLAZADAS
POR EL USUARIO. TODAS LAS REPARACIONES DEBEN SER REALIZADAS POR
PERSONAL CAPACITADO.
Consulte la tabla a continuación para obtener una explicación de los símbolos
que podrían aparecer en su producto Samsung.
PRECAUCIÓN
RIESGO DE DESCARGA ELÉCTRICA. NO ABRIR.
Este símbolo indica que hay alta tensión en el interior del
producto. Es peligroso hacer contacto con cualquier pieza interna
de este producto.
Este símbolo indica que, con este producto, se incluye
documentación importante correspondiente a su funcionamiento
y mantenimiento.
Producto de Clase II: Este símbolo indica que no se requiere una
conexión de seguridad de puesta a tierra (toma de tierra).
Si un producto con un cable de alimentación no tiene este
símbolo, el producto DEBE tener una conexión segura a una
puesta a tierra.
Tensión de CA: La tensión nominal marcada con este símbolo es
tensión de CA.
Tensión de CC: La tensión nominal marcada con este símbolo es
tensión de CC.
Precaución. Consulte las instrucciones antes de usar: Este
símbolo indica que se debe consultar el manual del usuario para
obtener más información relativa a la seguridad.
ADVERTENCIA
• Para reducir el riesgo de incendio o descarga eléctrica, no exponga este
dispositivo a la lluvia o la humedad.
PRECAUCIÓN
• A FIN DE EVITAR UNA DESCARGA ELÉCTRICA, HAGA COINCIDIR EL
CONTACTO MÁS ANCHO DEL ENCHUFE CON LA RANURA ANCHA E INSERTE
EL ENCHUFE POR COMPLETO.
• Este aparato debe conectarse siempre a un tomacorriente de CA que tenga
conexión a tierra por protección.
• Para desconectar el aparato de la red eléctrica, debe sacar el enchufe de la
toma de alimentación; por lo tanto, el enchufe de alimentación debe poder
accionarse fácilmente.
• No exponga este aparato a goteos o salpicaduras. No coloque objetos llenos
de líquidos, por ejemplo, un orero, sobre el aparato.
• Para apagar este aparato por completo, debe sacar el enchufe del
tomacorriente de la pared. Por lo tanto, el enchufe debe estar ubicado de
forma tal que siempre se pueda acceder a él fácil y rápidamente.

SPA - 3
PRECAUCIONES
1. Asegúrese de que el suministro eléctrico de CA en su hogar cumpla con
los requisitos de energía enumerados en la etiqueta de identicación
ubicada en la parte inferior de su producto. Instale su producto de manera
horizontal, sobre una base adecuada (mueble), con suciente espacio
alrededor para su ventilación (7 a 10 cm). Asegúrese de que las ranuras de
ventilación no estén cubiertas. No coloque la unidad sobre amplicadores
u otros equipos que puedan calentarse. Esta unidad está diseñada para uso
continuo.
Para apagar la unidad por completo, desconecte el enchufe de CA de la toma
de corriente. Desenchufe la unidad si tiene intenciones de no utilizarla por
un período largo de tiempo.
2. En caso de haber tormenta eléctrica, desconecte el enchufe de CA del
tomacorriente. Los cambios de voltaje que se producen a causa de la
actividad eléctrica de la tormenta pueden dañar la unidad.
3. No exponga la unidad a la luz solar directa ni a otras fuentes de calor. Esto
puede causar sobrecalentamiento y el mal funcionamiento de la unidad.
4. Proteja el producto contra la humedad (por ejemplo, los oreros) y el exceso
de temperatura (por ejemplo, una chimenea) o equipos que generen campos
eléctricos o magnéticos fuertes. Desconecte el cable de alimentación
de la toma de corriente de CA si la unidad no funciona correctamente.
Su producto no está diseñado para uso industrial. Es para uso personal
únicamente. Si el producto ha sido almacenado a bajas temperaturas, puede
producirse el fenómeno de la condensación. Si transporta la unidad durante
el invierno, espere 2 horas aproximadamente hasta que la unidad alcance la
temperatura ambiente antes de utilizarla.
5. La batería empleada en este producto contiene sustancias químicas que
son dañinas para el medioambiente. No deseche la batería junto con los
residuos generales del hogar. No exponga la batería a la luz solar directa,
al fuego ni a temperaturas altas extremas. No ocasione un cortocircuito, no
desensamble ni sobrecaliente la batería.
PRECAUCIÓN: Existe peligro de explosión si se cambia la batería por una de
tipo incorrecto. Reemplácelas solo con el mismo tipo o un tipo equivalente
de baterías.

SPA - 4
CONTENIDO
01
02
Panel superior de la Soundbar. . . . . . . . . . . . . . . . . . . . . . . . . . . . . . . . . . . . . . . . . . . . . . . . . . . . . . . . . . . . . . . . . . . . . . . . . . . . . . . . . . . . . . . . . . . . . . . . . . . . . . . . . . . . . . . . . . . . . 7
Panel inferior de la Soundbar. . . . . . . . . . . . . . . . . . . . . . . . . . . . . . . . . . . . . . . . . . . . . . . . . . . . . . . . . . . . . . . . . . . . . . . . . . . . . . . . . . . . . . . . . . . . . . . . . . . . . . . . . . . . . . . . . . . . . . 8
03
Colocación de las baterías antes de utilizar el control remoto (2 baterías AAA). . . . . . . . . . . . . . . . . . . . . . . . . . . . . . . . . . . . . . . . . . . . . . . . . . . . . . . . . . . . . . . . . . . . . . . . 9
Cómo usar el control remoto . . . . . . . . . . . . . . . . . . . . . . . . . . . . . . . . . . . . . . . . . . . . . . . . . . . . . . . . . . . . . . . . . . . . . . . . . . . . . . . . . . . . . . . . . . . . . . . . . . . . . . . . . . . . . . . . . . . . . . 9
Amplicador de voz activo (AVA) . . . . . . . . . . . . . . . . . . . . . . . . . . . . . . . . . . . . . . . . . . . . . . . . . . . . . . . . . . . . . . . . . . . . . . . . . . . . . . . . . . . . . . . . . . . . . . . . . . . . . . . . . . . . . . . . . 11
Uso de los botones ocultos (botones con más de una función) . . . . . . . . . . . . . . . . . . . . . . . . . . . . . . . . . . . . . . . . . . . . . . . . . . . . . . . . . . . . . . . . . . . . . . . . . . . . . . . . . . . . . . 11
Especicaciones de salida para los diferentes modos de efectos de sonido . . . . . . . . . . . . . . . . . . . . . . . . . . . . . . . . . . . . . . . . . . . . . . . . . . . . . . . . . . . . . . . . . . . . . . . . . . 11
Ajuste del volumen de la Soundbar con un control remoto de TV. . . . . . . . . . . . . . . . . . . . . . . . . . . . . . . . . . . . . . . . . . . . . . . . . . . . . . . . . . . . . . . . . . . . . . . . . . . . . . . . . . . . 13
04
Conexión de las unidades a la fuente de alimentación . . . . . . . . . . . . . . . . . . . . . . . . . . . . . . . . . . . . . . . . . . . . . . . . . . . . . . . . . . . . . . . . . . . . . . . . . . . . . . . . . . . . . . . . . . . . . 14
‒ Diseño recomendado para los altavoces . . . . . . . . . . . . . . . . . . . . . . . . . . . . . . . . . . . . . . . . . . . . . . . . . . . . . . . . . . . . . . . . . . . . . . . . . . . . . . . . . . . . . . . . . . . . . . . . . . . . . . . 15
‒ Modo de altavoces surround (solo los modelos HW-Q930B). . . . . . . . . . . . . . . . . . . . . . . . . . . . . . . . . . . . . . . . . . . . . . . . . . . . . . . . . . . . . . . . . . . . . . . . . . . . . . . . . . . . . 15
‒ Conexión manual del altavoz de graves o los altavoces surround . . . . . . . . . . . . . . . . . . . . . . . . . . . . . . . . . . . . . . . . . . . . . . . . . . . . . . . . . . . . . . . . . . . . . . . . . . . . . . . . 16
‒ Luces del indicador LED de la parte posterior del altavoz de graves y los altavoces surround . . . . . . . . . . . . . . . . . . . . . . . . . . . . . . . . . . . . . . . . . . . . . . . . . . . . . . 17
05
Conexión al TV que es compatible con HDMI ARC (Retorno del canal de audio). . . . . . . . . . . . . . . . . . . . . . . . . . . . . . . . . . . . . . . . . . . . . . . . . . . . . . . . . . . . . . . . . . . . . . . 18
Conexión con un cable óptico . . . . . . . . . . . . . . . . . . . . . . . . . . . . . . . . . . . . . . . . . . . . . . . . . . . . . . . . . . . . . . . . . . . . . . . . . . . . . . . . . . . . . . . . . . . . . . . . . . . . . . . . . . . . . . . . . . . . 19
Conexión a través de Bluetooth . . . . . . . . . . . . . . . . . . . . . . . . . . . . . . . . . . . . . . . . . . . . . . . . . . . . . . . . . . . . . . . . . . . . . . . . . . . . . . . . . . . . . . . . . . . . . . . . . . . . . . . . . . . . . . . . . .20
Conexión mediante Wi-Fi . . . . . . . . . . . . . . . . . . . . . . . . . . . . . . . . . . . . . . . . . . . . . . . . . . . . . . . . . . . . . . . . . . . . . . . . . . . . . . . . . . . . . . . . . . . . . . . . . . . . . . . . . . . . . . . . . . . . . . . . 22
Cómo utilizar la función Q-Symphony. . . . . . . . . . . . . . . . . . . . . . . . . . . . . . . . . . . . . . . . . . . . . . . . . . . . . . . . . . . . . . . . . . . . . . . . . . . . . . . . . . . . . . . . . . . . . . . . . . . . . . . . . . . . .23
Uso del sonido Spacet . . . . . . . . . . . . . . . . . . . . . . . . . . . . . . . . . . . . . . . . . . . . . . . . . . . . . . . . . . . . . . . . . . . . . . . . . . . . . . . . . . . . . . . . . . . . . . . . . . . . . . . . . . . . . . . . . . . . . . . . . .24
Método 1. Conexión con un cable HDMI (capaz de decodicar y reproducir Dolby Atmos/DTS:X) . . . . . . . . . . . . . . . . . . . . . . . . . . . . . . . . . . . . . . . . . . . . . . . . . . . . . . .25
Método 2. Conexión con un cable óptico . . . . . . . . . . . . . . . . . . . . . . . . . . . . . . . . . . . . . . . . . . . . . . . . . . . . . . . . . . . . . . . . . . . . . . . . . . . . . . . . . . . . . . . . . . . . . . . . . . . . . . . . . . 26
Método 1. Conexión a través de Bluetooth. . . . . . . . . . . . . . . . . . . . . . . . . . . . . . . . . . . . . . . . . . . . . . . . . . . . . . . . . . . . . . . . . . . . . . . . . . . . . . . . . . . . . . . . . . . . . . . . . . . . . . . . . 27
Método 2. Conexión a través de wi (Red inalámbrica) . . . . . . . . . . . . . . . . . . . . . . . . . . . . . . . . . . . . . . . . . . . . . . . . . . . . . . . . . . . . . . . . . . . . . . . . . . . . . . . . . . . . . . . . . . . . .29
Uso de Tap Sound . . . . . . . . . . . . . . . . . . . . . . . . . . . . . . . . . . . . . . . . . . . . . . . . . . . . . . . . . . . . . . . . . . . . . . . . . . . . . . . . . . . . . . . . . . . . . . . . . . . . . . . . . . . . . . . . . . . . . . . . . . . . . . .30
Precauciones durante la instalación . . . . . . . . . . . . . . . . . . . . . . . . . . . . . . . . . . . . . . . . . . . . . . . . . . . . . . . . . . . . . . . . . . . . . . . . . . . . . . . . . . . . . . . . . . . . . . . . . . . . . . . . . . . . . . 32
Componentes para montaje en la pared. . . . . . . . . . . . . . . . . . . . . . . . . . . . . . . . . . . . . . . . . . . . . . . . . . . . . . . . . . . . . . . . . . . . . . . . . . . . . . . . . . . . . . . . . . . . . . . . . . . . . . . . . . .32
Cómo montar los altavoces surround en una pared (solo para los modelos en los que se aplique) . . . . . . . . . . . . . . . . . . . . . . . . . . . . . . . . . . . . . . . . . . . . . . . . . . . . .33

SPA - 5
10
Componente. . . . . . . . . . . . . . . . . . . . . . . . . . . . . . . . . . . . . . . . . . . . . . . . . . . . . . . . . . . . . . . . . . . . . . . . . . . . . . . . . . . . . . . . . . . . . . . . . . . . . . . . . . . . . . . . . . . . . . . . . . . . . . . . . . . .33
11
Actualización automática. . . . . . . . . . . . . . . . . . . . . . . . . . . . . . . . . . . . . . . . . . . . . . . . . . . . . . . . . . . . . . . . . . . . . . . . . . . . . . . . . . . . . . . . . . . . . . . . . . . . . . . . . . . . . . . . . . . . . . . .34
Actualización mediante USB . . . . . . . . . . . . . . . . . . . . . . . . . . . . . . . . . . . . . . . . . . . . . . . . . . . . . . . . . . . . . . . . . . . . . . . . . . . . . . . . . . . . . . . . . . . . . . . . . . . . . . . . . . . . . . . . . . . . .34
Inicialización. . . . . . . . . . . . . . . . . . . . . . . . . . . . . . . . . . . . . . . . . . . . . . . . . . . . . . . . . . . . . . . . . . . . . . . . . . . . . . . . . . . . . . . . . . . . . . . . . . . . . . . . . . . . . . . . . . . . . . . . . . . . . . . . . . . .35
12
13
14
15
Especicaciones . . . . . . . . . . . . . . . . . . . . . . . . . . . . . . . . . . . . . . . . . . . . . . . . . . . . . . . . . . . . . . . . . . . . . . . . . . . . . . . . . . . . . . . . . . . . . . . . . . . . . . . . . . . . . . . . . . . . . . . . . . . . . . . .38
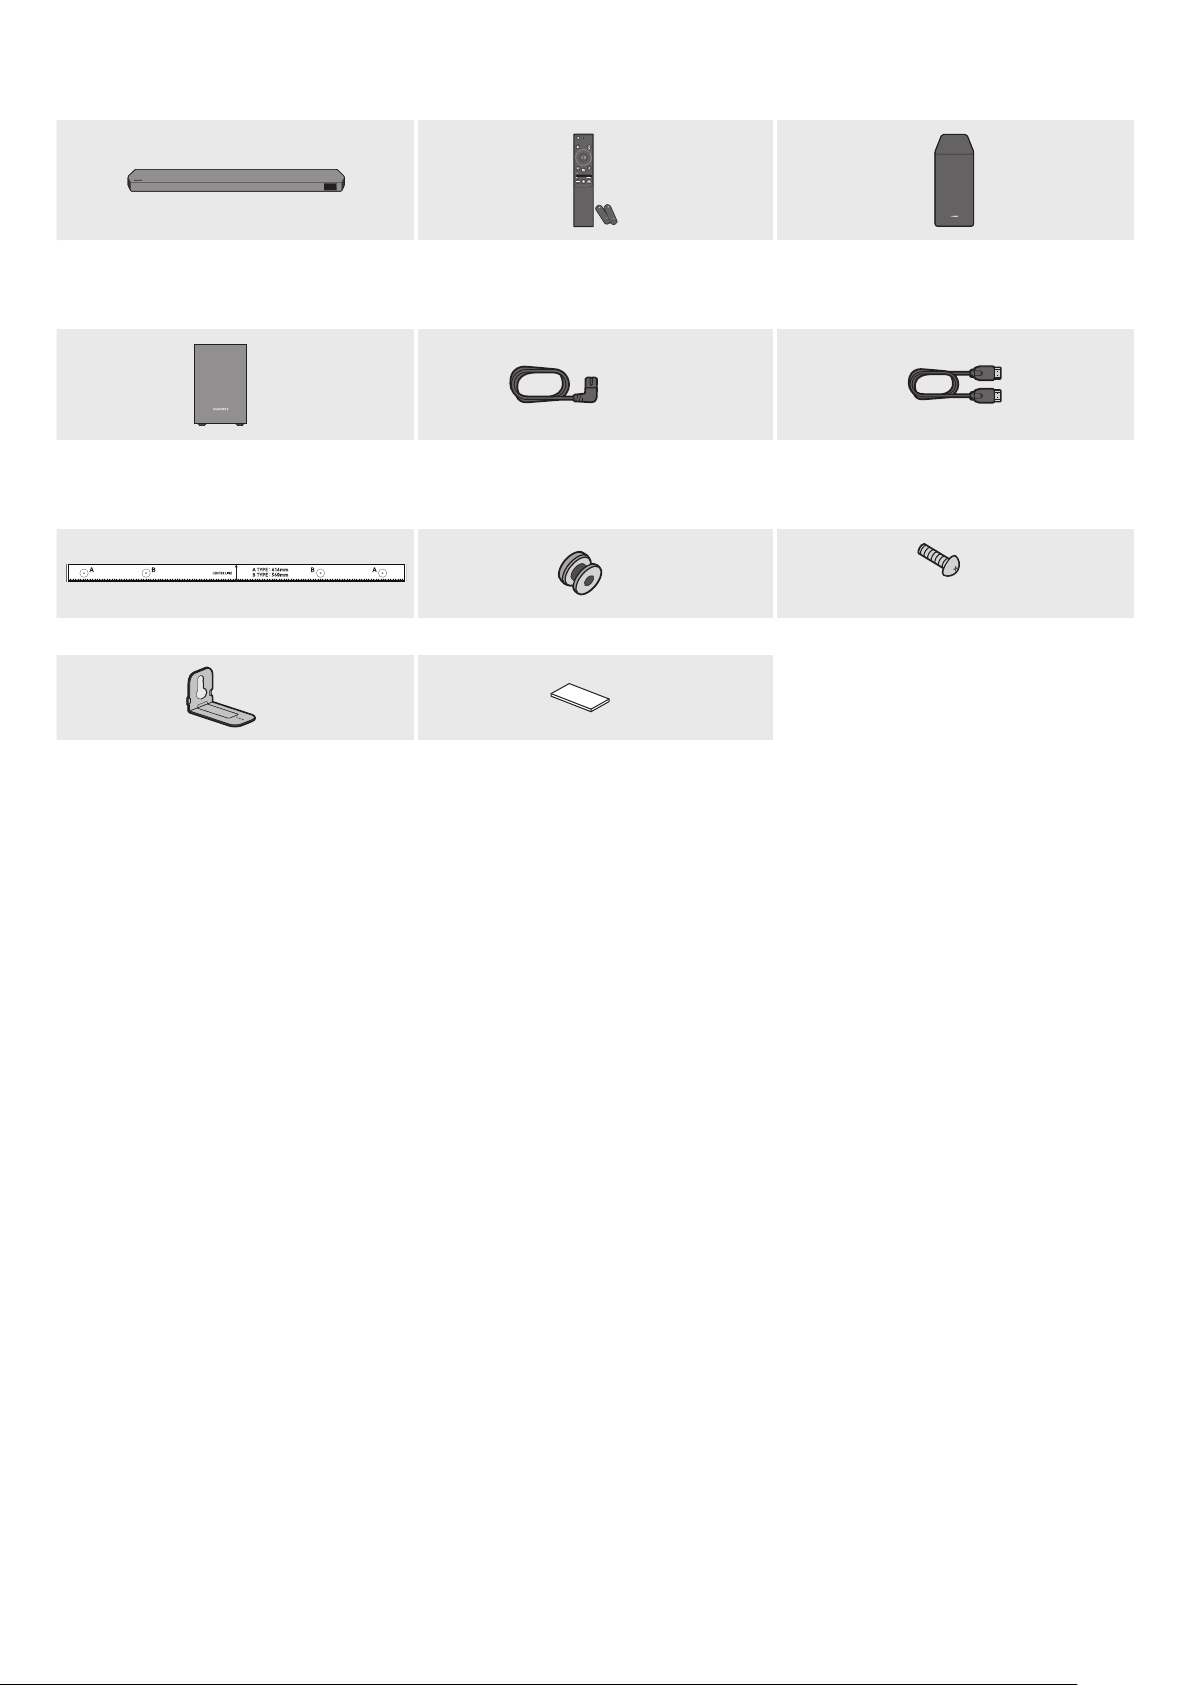
SPA - 6
01 VERIFICACIÓN DE LOS COMPONENTES
SOUNDBAR
(M4 x L10)
• Para obtener más información acerca del suministro eléctrico y el consumo de energía, consulte la etiqueta del producto. (Etiqueta: Parte posterior de la unidad
principal de la Soundbar).
• Para comprar componentes adicionales o cables opcionales, póngase en contacto con un Centro de soporte técnico de Samsung o con el Centro de atención al
cliente de Samsung.
• Para obtener más información sobre el montaje en la pared o el pie de goma, consulte las páginas 32~34.
• El diseño, las especicaciones y la pantalla de la aplicación están sujetos a cambios sin previo aviso.
• La apariencia de los accesorios puede diferir ligeramente de las ilustraciones de arriba.
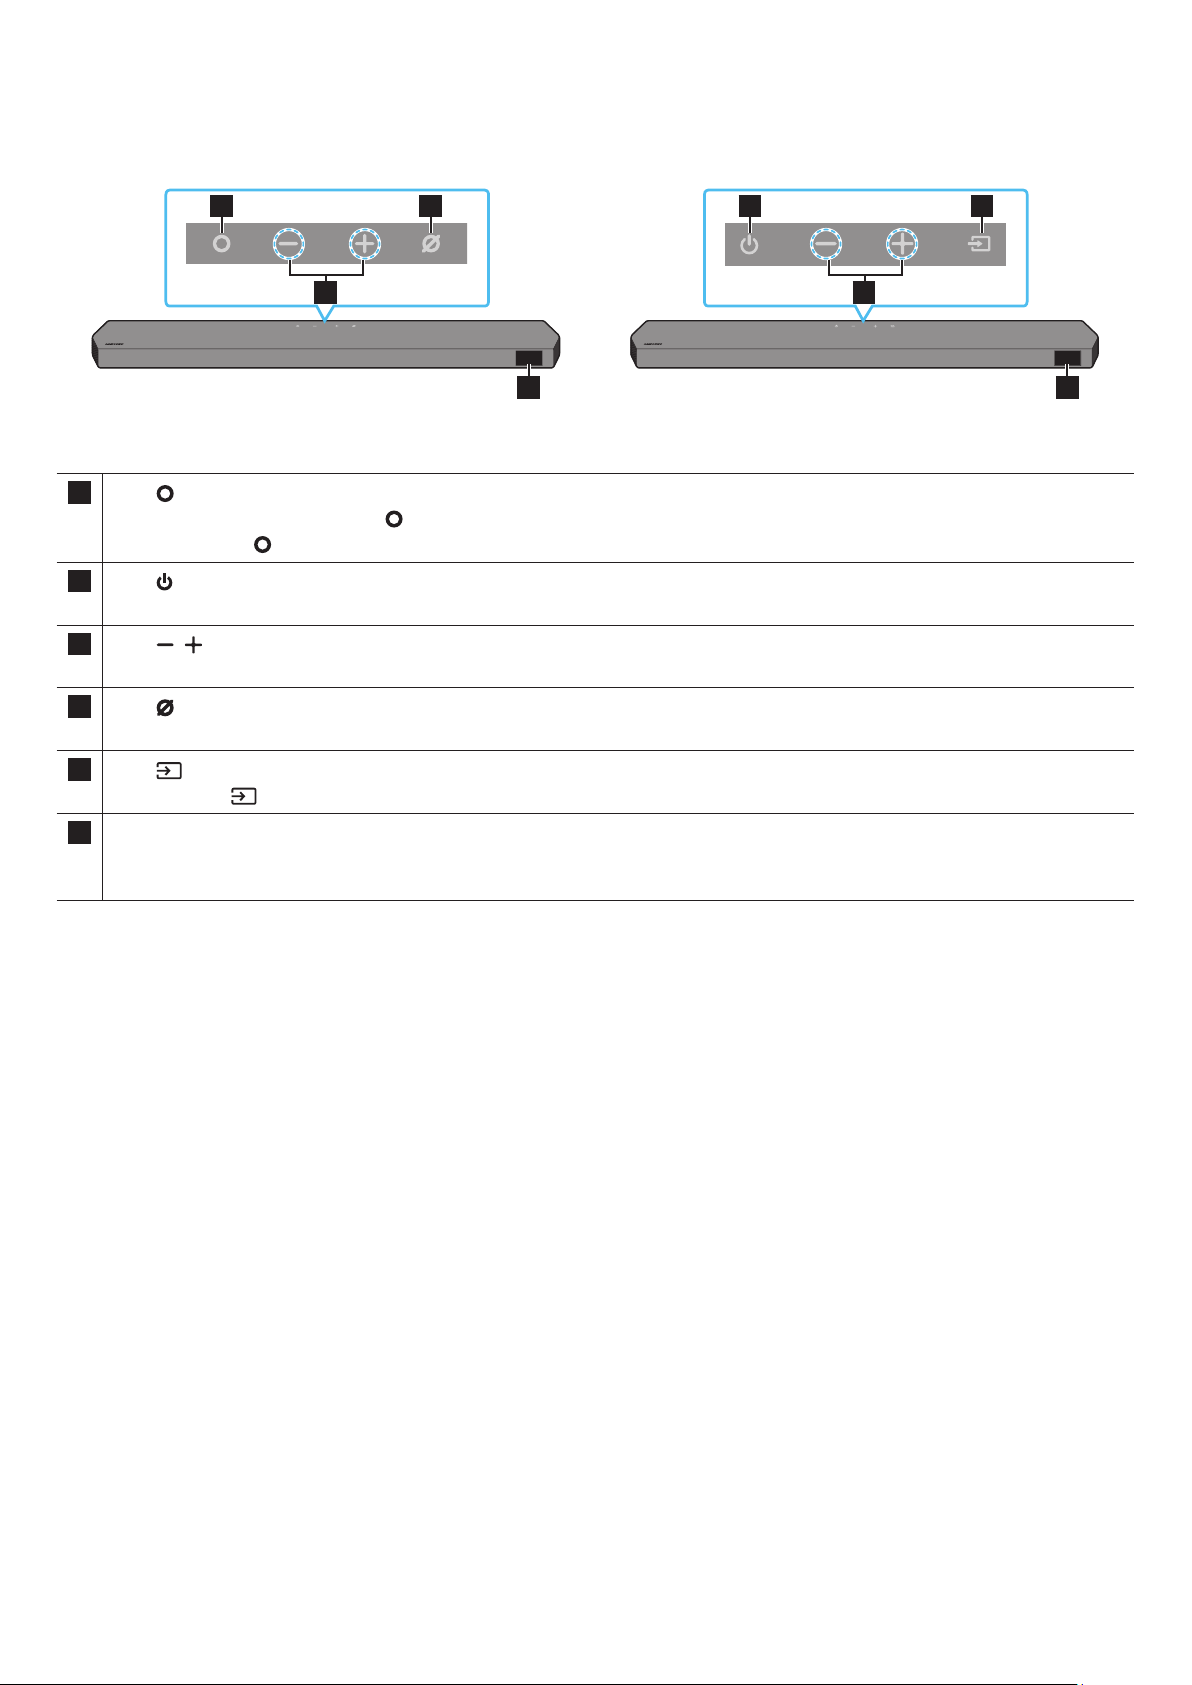
SPA - 7
02 INFORMACIÓN GENERAL DEL PRODUCTO
2
1 3
4
2
1 3
4
1
• En modo de espera, presione el botón para encender la Soundbar.
• Presione el botón para cambiar la fuente de entrada.
1
Enciende y apaga el equipo.
2
Permite ajustar el volumen.
3
Presione el botón para encender o apagar el micrófono.
3
Presione el botón para cambiar la fuente de entrada.
4
Muestra el estado del producto y el modo actual.
D.IN → → → BT
• Cuando conecte el cable de CA, el botón de encendido comenzará a funcionar luego de 4 a 6 segundos.
• Cuando encienda esta unidad, habrá un retraso de 4 a 5 segundos antes de que emita sonido.
• Si oye sonidos tanto del TV como de la Soundbar, vaya al menú , busque la opción de audio del TV y cambie el altavoz del TV a .

SPA - 8
HDMI IN 1
HDMI IN 2
SERVICE
DIGITAL AUDIO IN
(OPTICAL)
HDMI TO TV
(eARC/ARC)
HDMI
1
SERVICE
2
DIGITAL AUDIO IN
(OPTICAL)
HDMI TO TV
(eARC/ARC)
HDMI
3
5
4
1
Conecte el cable de suministro eléctrico de CA de la Soundbar. (Consulte la página 14).
2 SERVICE
Conecte un dispositivo de almacenamiento USB para actualizar el software del producto.
3
Conecte a la salida digital (óptica) de un dispositivo externo. (Consulte la página 26).
Entrada simultánea de señales digitales de audio y video a través de un cable HDMI.
Conecte a la salida HDMI de un dispositivo externo. (Consulte la página 25).
Conecte al conector HDMI de una TV. (Consulte la página 18).
• Cuando desconecte el cable de alimentación de una toma de la pared, jale el enchufe. No tire del cable.
• No conecte esta unidad ni otros componentes a un tomacorriente de CA antes de completar todas las conexiones entre los componentes.
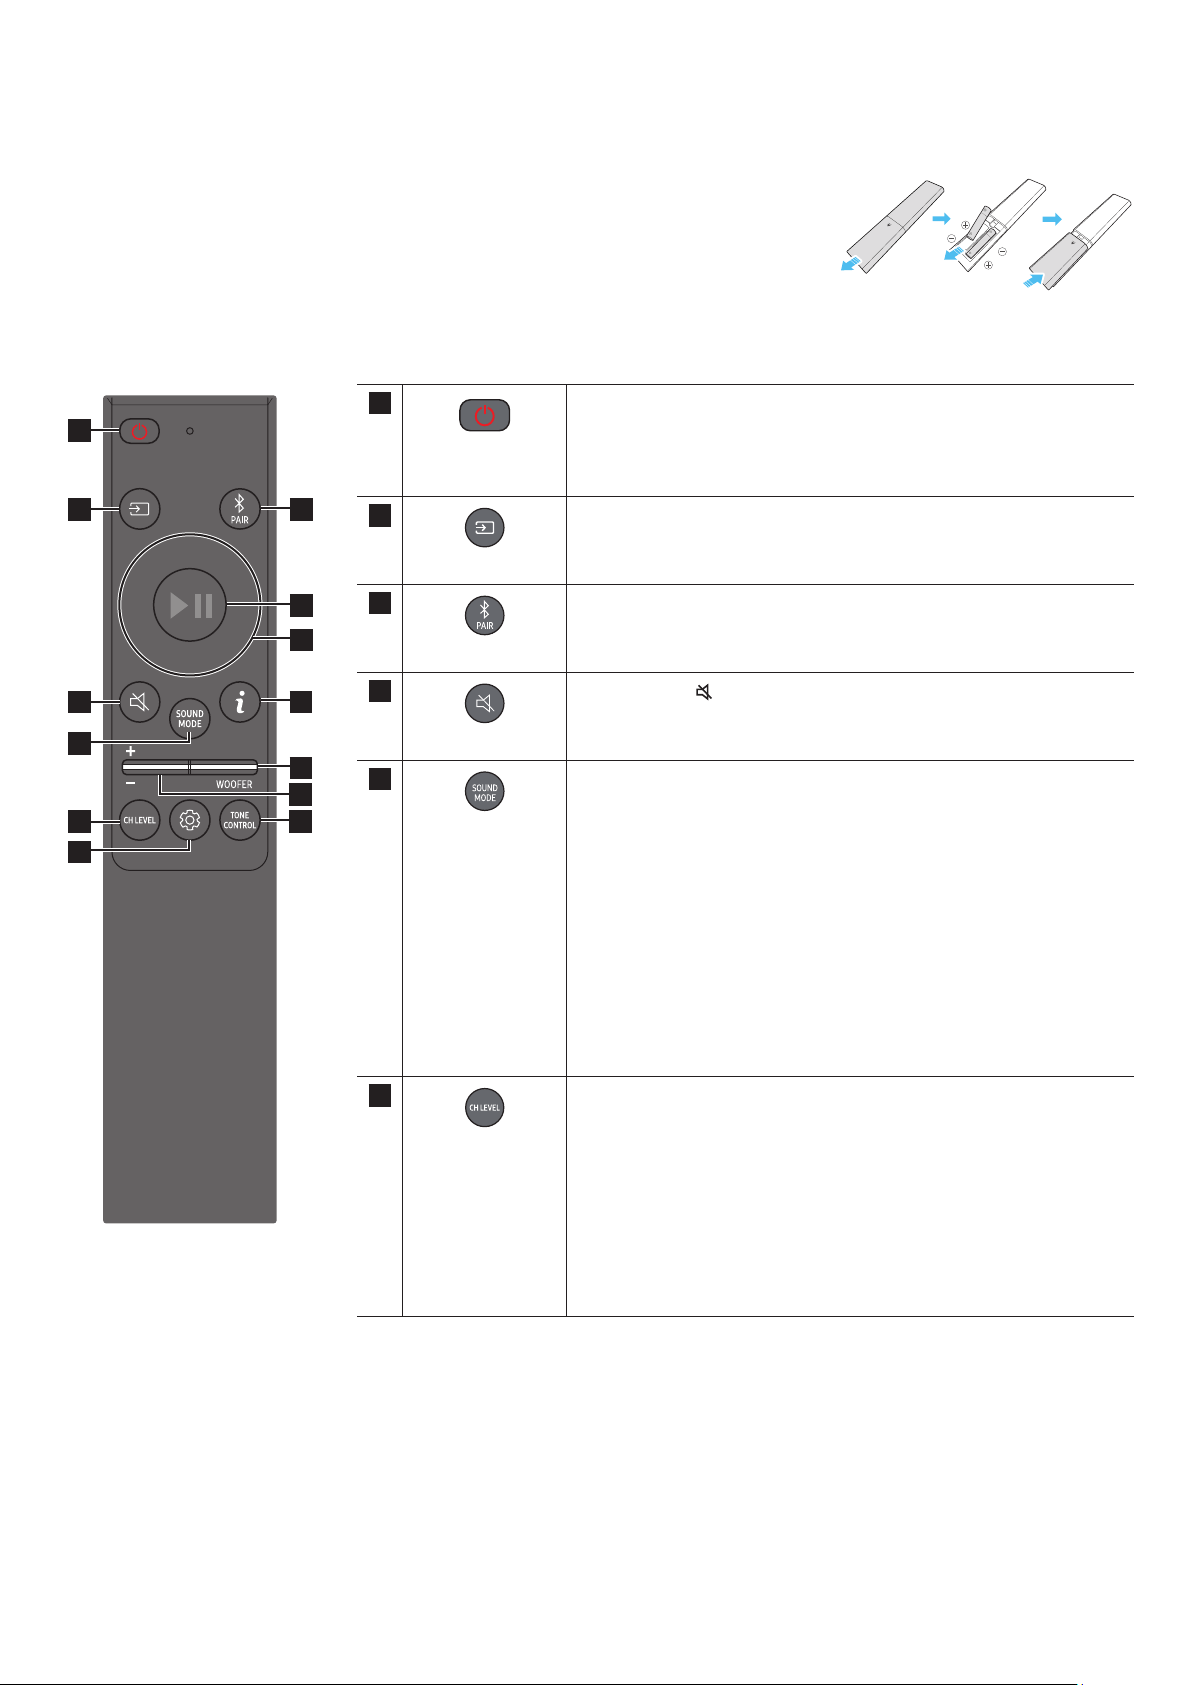
SPA - 9
03 USO DEL CONTROL REMOTO DE LA SOUNDBAR
Deslice la cubierta posterior en la dirección de la echa hasta retirarla completamente. Inserte 2 baterías AAA (1,5 V)
correctamente según su polaridad. Vuelva a deslizar la cubierta de las baterías a su posición inicial.
SOUNDBAR
1
2
3
10
11
13
4
5
12
1
Enciende y apaga la Soundbar.
•
La unidad se apaga automáticamente en las siguientes situaciones:
• En modo D.IN / / / BT si no hay señal de audio por 18 minutos.
2
Presione aquí para elegir una fuente conectada a la Soundbar.
3
Cambie la Soundbar a modo de conexión Bluetooth. Presione el botón y espere a
que aparezca la pantalla “BT PAIRING” para conectarse a un dispositivo Bluetooth
nuevo.
4
Presione el botón
para silenciar el sonido.
Vuelva a presionarlo para reanudar el sonido.
5
SOUND MODE
Puede presionar el botón para seleccionar el modo de sonido deseado, como
, , o .
•
Emite el sonido original.
•
Proporciona un campo sonoro más amplio que el estándar.
•
Proporciona sonido estereoscópico para sumergirlo en la acción mientras
juega.
•
Analiza el contenido en tiempo real y automáticamente proporciona el campo
sonoro óptimo según las características del sonido.
Puede presionar este botón para ajustar el volumen de cada altavoz, como
, , , , y .
• Para controlar el volumen de cada altavoz, seleccione , ,
o en Ajustes de sonido, y luego ajuste el volumen
entre -6~ y +6 mediante los botones /.
• Si los altavoces surround están conectados, seleccione o
y, luego, utilice los botones / para ajustar el volumen en el
rango -6 y +6.
• Las especicaciones de pueden diferir de las del modelo respectivo.
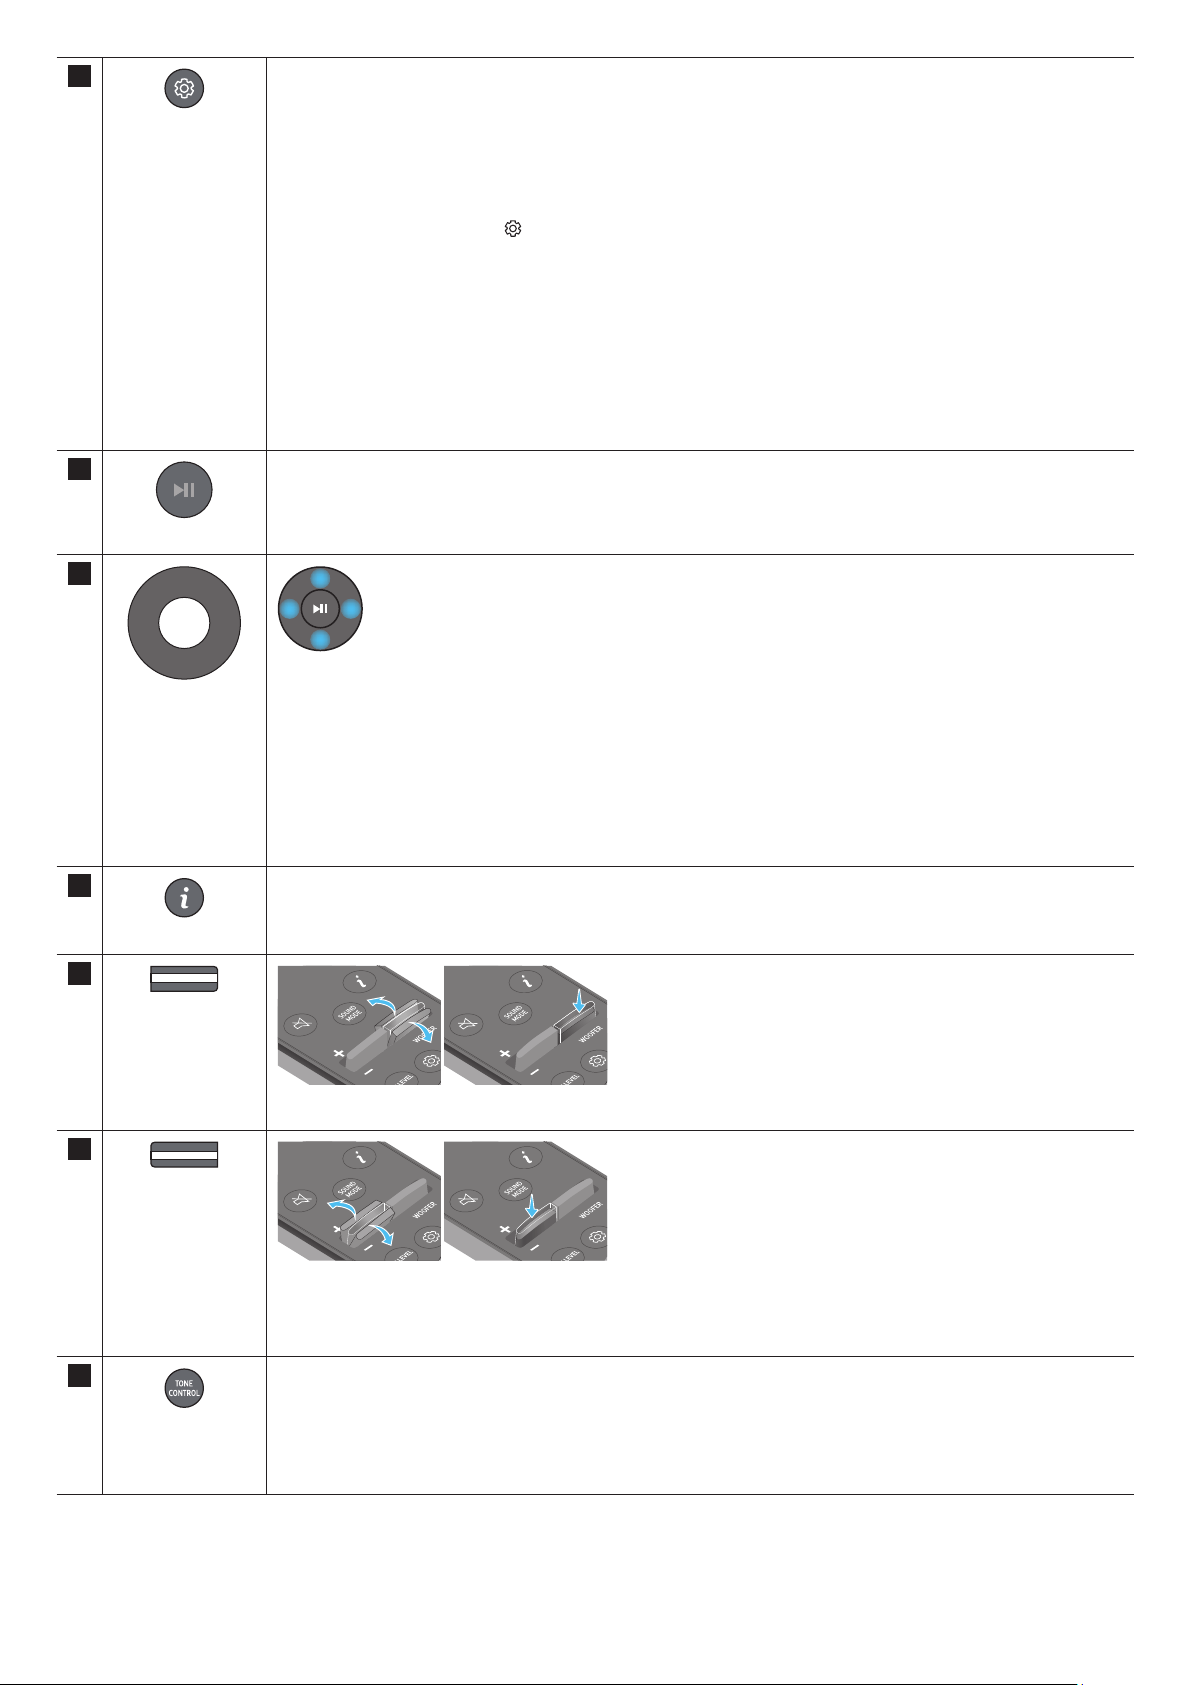
SPA - 10
Puede presionar este botón para establecer la función de audio, como , AVA , , ,
, , . Se puede ajustar el elemento deseado con los botones /.
• Las funciones y AVA no son compatibles con el modelo .
• hace que sea más fácil oír el diálogo hablado en las películas y contenido de TV.
• está optimizado para ver contenido por la noche, ya que la conguración se ajusta para bajar el volumen, pero
mantener la claridad del diálogo.
• Mantenga presionado el botón
durante aproximadamente 5 segundos para ajustar el sonido de cada
banda de frecuencia. Puede elegir 150 Hz, 300 Hz, 600 Hz, 1,2 kHz, 2,5 kHz, 5 kHz y 10 kHz usando los botones /
y puede congurar cada uno entre -6 y +6 con los botones /.
(Asegúrese de que el modo de Sonido se establezca como “”).
• Si el video del TV y el audio de la Soundbar no están sincronizados, seleccione en Control de sonido y, luego, dena la
demora de audio entre 0 y 300 milisegundos utilizando los botones /.
• La opción solo es compatible con algunas funciones.
• Los ajustes de disponibles solo son compatibles con el modelo .
• La función de altavoz se puede ACTIVAR/DESACTIVAR con los botones /.
También puede presionar este botón para reproducir o pausar música.
Presione arriba/abajo/izquierda/derecha en el botón para seleccionar o congurar las funciones.
•
Para seleccionar el siguiente archivo de música, presione el botón . Para seleccionar el archivo de música anterior,
presione el botón .
• ID SET
Use esta opción cuando los altavoces de graves o Surround no estén conectados o necesiten reconexión.
Mientras está apagado, mantenga presionado el botón durante 5 segundos para realizar la ID SET. (Consulte la
página 16).
10
Presione el botón para mostrar información detallada acerca de la función activa o el códec disponible.
En el modo BT, se muestra el dispositivo conectado (cuando el emparejamiento esté completo) o “” (cuando se requiere
emparejamiento).
11
Pulse este botón para subir o bajar el nivel de los graves (bajos).
12
VOLUMEN
Mueva el botón hacia arriba o hacia abajo para ajustar el volumen.
•
Presione el botón VOLUMEN para silenciar el sonido. Vuelva a presionarlo para reanudar el sonido.
13
TONE CONTROL
Presione este botón para ajustar el volumen de los sonidos graves o agudos. Se puede ajustar el elemento deseado con los
botones /. Esta función se activa en el modo de Sonido, excepto en el modo .
• Para controlar el volumen de los sonidos agudos o bajos, seleccione TREBLE o BASS en Ajustes de sonido, y luego ajuste el
volumen entre -6~ y +6 con los botones /.
• Una vez modicado el nivel de bajos, el nivel del graves se ajustará según corresponda.

SPA - 11
• Analiza el ruido externo en tiempo real mientras se está reproduciendo la Soundbar, para que el audio de voz siempre pueda oírse con claridad.
• No se guardan datos durante este análisis.
• Esta función no es compatible con el modelo .
WOOFER (Arriba)
Control remoto del televisor encendido/apagado
(modo de espera)
página 13
Arriba ID SET página 16
(Control de sonido)
Ecualización de 7 bandas página 10
<>
Standard
2.0 canales 2.1 canales
5.1 canales 5.1 canales / 7.1 canales (DTS)
7.1 canales 7.1 canales
Dolby Atmos®, DTS:X 7.1.4 canales
Surround
2.0 canales 9.1.4 canales
5.1 canales 9.1.4 canales
7.1 canales 9.1.4 canales
Dolby Atmos®, DTS:X 9.1.4 canales
Game
2.0 canales 9.1.4 canales
5.1 canales 9.1.4 canales
7.1 canales 9.1.4 canales
Dolby Atmos®, DTS:X 9.1.4 canales
Adaptive sound
2.0 canales 9.1.4 canales
5.1 canales 9.1.4 canales
7.1 canales 9.1.4 canales
Dolby Atmos®, DTS:X 9.1.4 canales
SPA - 12
<>
Standard
2.0 canales 2.1 canales 2.1 canales
5.1 canales 5.1 canales 5.1 canales / 7.1 canales (DTS)
7.1 canales 5.1 canales 7.1 canales
Dolby Atmos®, DTS:X 5.1.2 canales 7.1.4 canales
Surround
2.0 canales 5.1.2 canales 7.1.4 canales
5.1 canales 5.1.2 canales 7.1.4 canales
7.1 canales 5.1.2 canales 7.1.4 canales
Dolby Atmos®, DTS:X 5.1.2 canales 7.1.4 canales
Game
2.0 canales 5.1.2 canales 7.1.4 canales
5.1 canales 5.1.2 canales 7.1.4 canales
7.1 canales 5.1.2 canales 7.1.4 canales
Dolby Atmos®, DTS:X 5.1.2 canales 7.1.4 canales
Adaptive sound
2.0 canales 5.1.2 canales 7.1.4 canales
5.1 canales 5.1.2 canales 7.1.4 canales
7.1 canales 5.1.2 canales 7.1.4 canales
Dolby Atmos®, DTS:X 5.1.2 canales 7.1.4 canales
<>
Standard
2.0 canales 2.1 canales 2.1 canales
5.1 canales 3.1 canales 5.1 canales
Dolby Atmos®, DTS:X 3.1.2 canales 5.1.4 canales
Surround
2.0 canales 3.1.2 canales 5.1.4 canales
5.1 canales 3.1.2 canales 5.1.4 canales
Dolby Atmos®, DTS:X 3.1.2 canales 5.1.4 canales
Game
2.0 canales 3.1.2 canales 5.1.4 canales
5.1 canales 3.1.2 canales 5.1.4 canales
Dolby Atmos®, DTS:X 3.1.2 canales 5.1.4 canales
Adaptive sound
2.0 canales 3.1.2 canales 5.1.4 canales
5.1 canales 3.1.2 canales 5.1.4 canales
Dolby Atmos®, DTS:X 3.1.2 canales 5.1.4 canales
Los altavoces surround no emitirán sonido para la salida de 2 canales mientras el modo esté en uso. Para habilitar el sonido hacia los altavoces
surround, cambie el modo de efecto a .

SPA - 13
Ajuste el volumen de la Soundbar utilizando el control remoto del TV.
• Esta función solo se puede usar con controles remotos IR. Los controles remotos Bluetooth (controles remotos que requieren emparejamiento) no son
compatibles.
• Congure el altavoz del TV en para usar esta función.
• Fabricantes que admiten esta función:
Samsung, VIZIO, LG, Sony, Sharp, PHILIPS, PANASONIC, TOSHIBA, Hisense, RCA
1. Apague la Soundbar.
2. Mantenga presionado el botón durante 5 segundos.
Cada vez que mantiene presionado el botón durante 5 segundos, el modo cambia en el siguiente orden: “” (Modo predeterminado),
“”, “”.
(Modo predeterminado)
Deshabilita el control remoto del TV.
Habilita el control remoto IR de un TV Samsung.
Habilita el control remoto IR de un TV de otra marca.

SPA - 14
04 CONEXIÓN DE LA SOUNDBAR
Use el cable de alimentación para conectar el Altavoz de graves, los Altavoces surround y el Soundbar a un enchufe eléctrico en el siguiente orden:
• Para obtener más información acerca del suministro eléctrico necesario y el consumo de energía, consulte la etiqueta del producto. (Etiqueta: Parte posterior de
la unidad principal de la Soundbar).
1. Conecte el cable de alimentación al altavoz de graves.
2. Conecte el cable de alimentación al Altavoz surround izquierdo y derecho. (opcional)
3. Conecte el cable de alimentación al Soundbar.
POWER
4. Conecte el cable de alimentación al Soundbar, al Altavoz de graves y a los Altavoces surround. El Altavoz de graves y los Altavoces surround se conectan
automáticamente cuando se enciende el Soundbar.
NOTA
• Conecte el cable de alimentación del Altavoz de graves y los Altavoces surround antes de conectarlos al Soundbar. El Altavoz de graves y los Altavoces surround
se conectarán automáticamente cuando encienda el Soundbar.
• Si desenchufa el cable de alimentación y vuelve a conectarlo cuando el producto está encendido, la Soundbar se encenderá automáticamente.
• El sistema de altavoces surround es compatible solo con los modelos en los que se aplique.
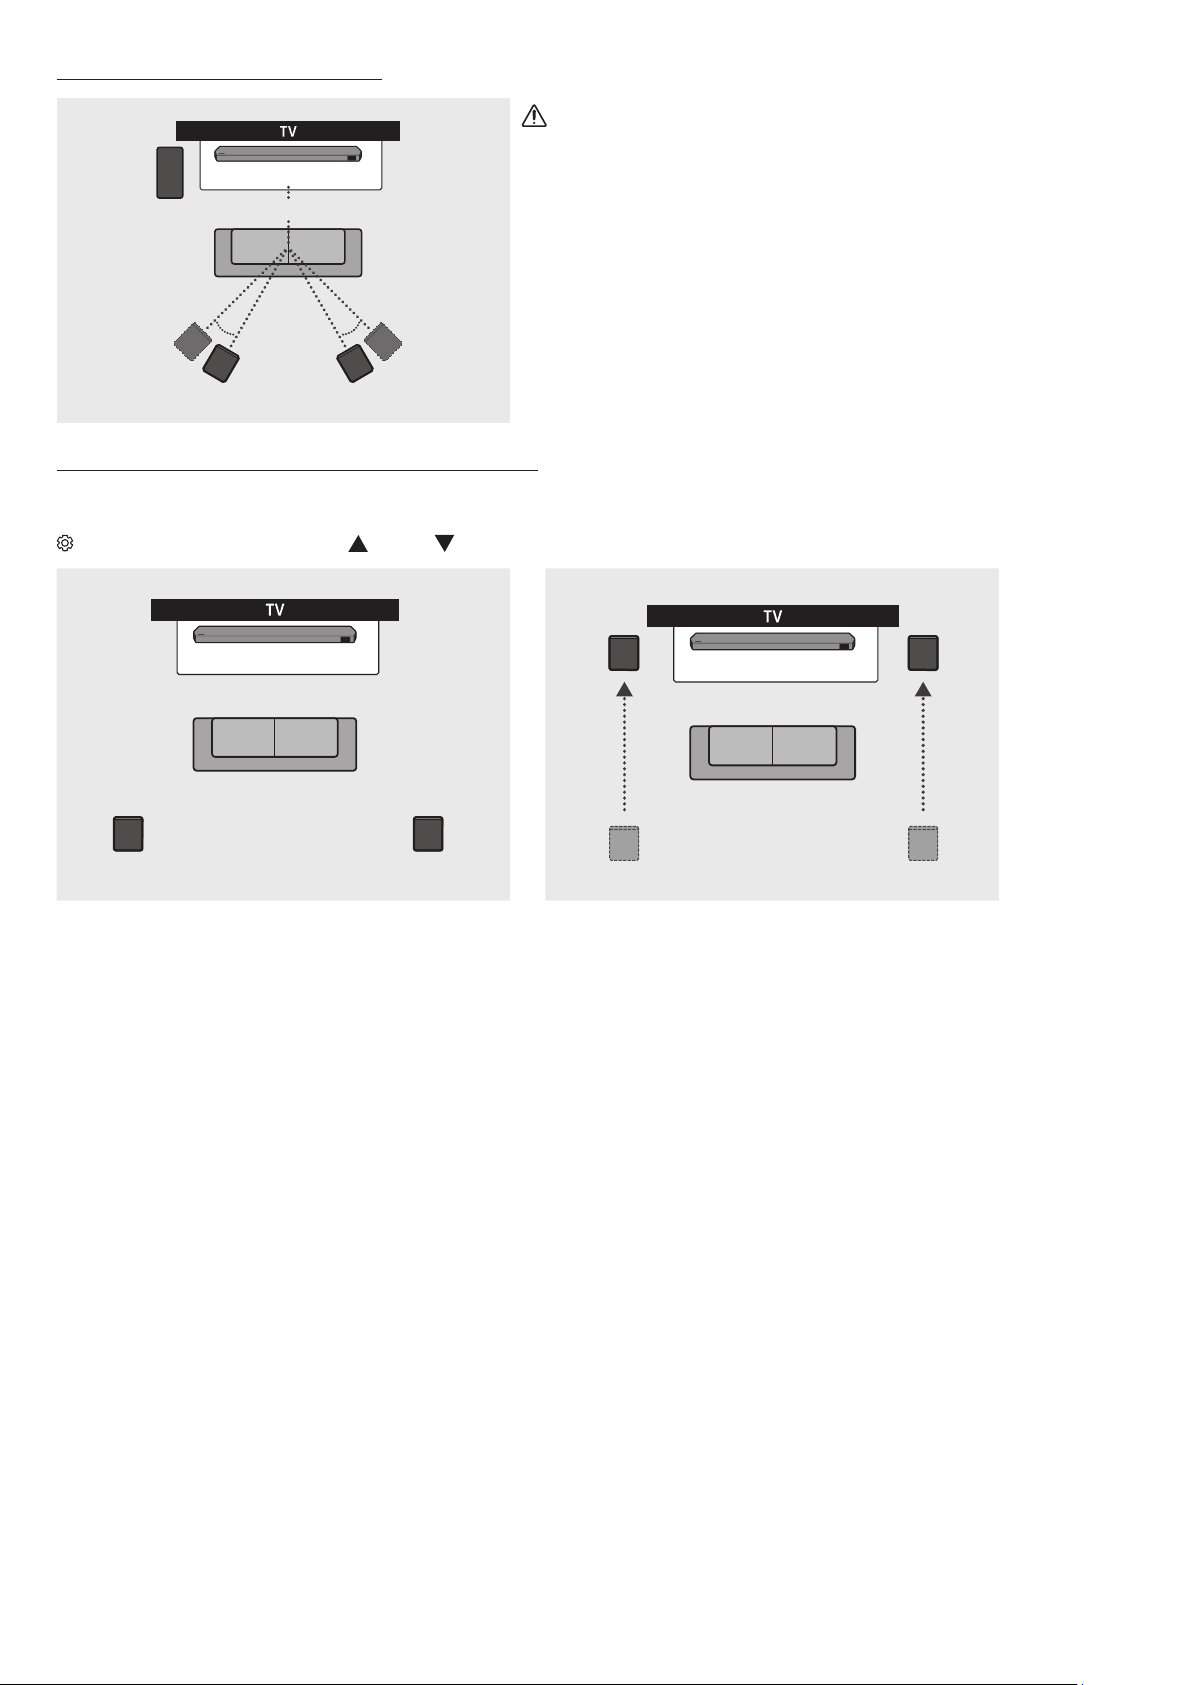
SPA - 15
150° 150°
135° 135°
0°
PRECAUCIÓN
• Las antenas receptoras inalámbricas están integradas en los altavoces surround y el
altavoz de graves inalámbrico. Mantenga las unidades lejos del agua y la humedad.
• Para obtener un rendimiento del sonido óptimo, asegúrese de que en las áreas
alrededor del lugar donde se encuentran los altavoces surround y el altavoz de graves
inalámbrico no haya obstáculos.
Se puede obtener un sonido surround óptimo según la posición del altavoz trasero. Consulte la imagen de abajo para ver la distribución de los altavoces.
Para activar este modo, seleccione el modo de altavoces surround con el control remoto de la Soundbar.
(Control de sonido) → Altavoz surround → (Arriba) / (Abajo) → Delantero / Trasero)
NOTA
• Este modo solo está disponible con los modelos de Soundbar que incluyen un altavoz surround especíco.
• En el modo de altavoces delanteros, colóquelos apuntando hacia usted.
• El modo de altavoces traseros está habilitado de forma predeterminada.
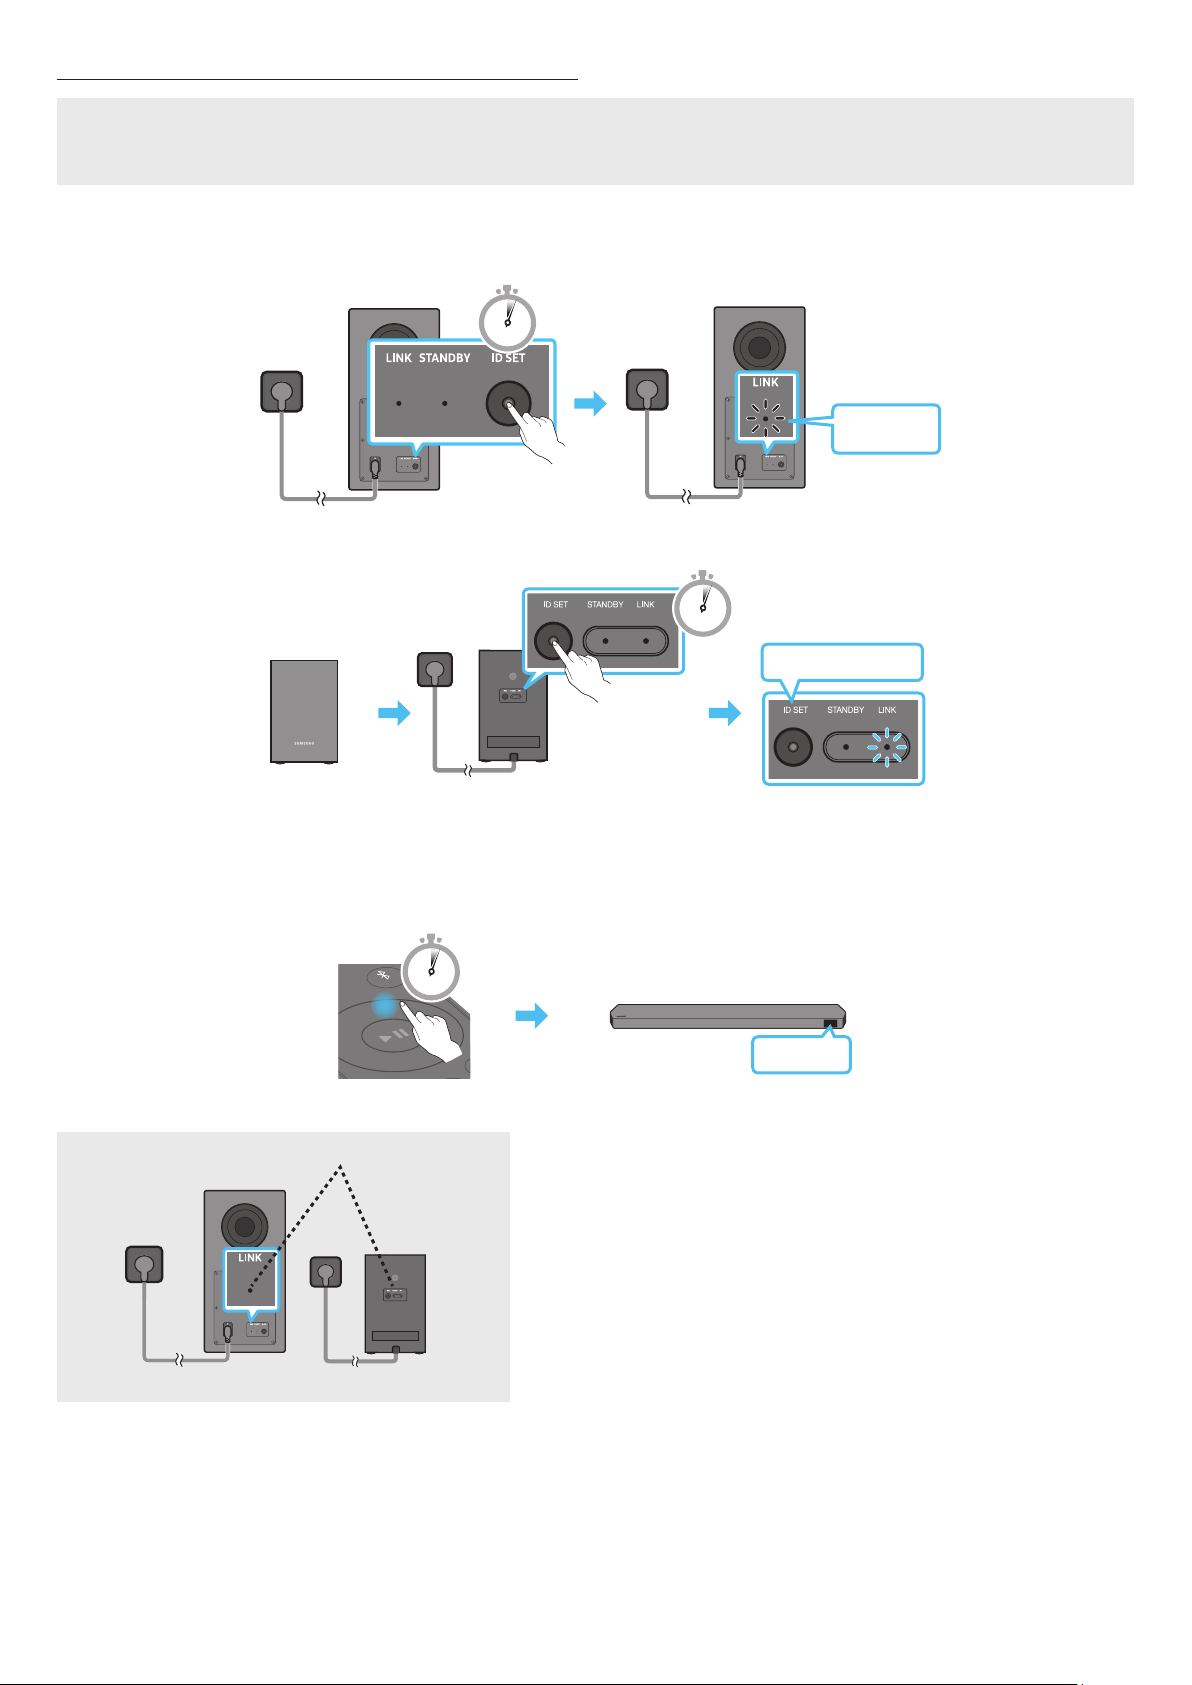
SPA - 16
• Verique que los cables de alimentación del Altavoz de graves y el Soundbar o los Altavoces surround estén conectados correctamente.
• Asegúrese de que la Soundbar esté apagada.
1. Apague la unidad principal de la Soundbar.
2. Mantenga presionado ID SET en la parte posterior del altavoz de graves y los altavoces surround durante, al menos, 5 segundos.
• El indicador rojo de la parte posterior de cada parlante se apaga y el indicador azul parpadea.
5 Sec
5 Sec
3. Presione el botón en el control remoto durante 5 segundos.
• El mensaje ID SET aparece en la pantalla de la Soundbar por un momento y luego desaparece.
• La Soundbar se enciende automáticamente cuando se completa la ID SET.
PAIR
5 Sec
ID SET
4. Compruebe si el LINK LED es azul (conexión completa).
El indicador LINK LED deja de parpadear y se ilumina de color azul cuando se establece una
conexión entre el Soundbar y el Altavoz de graves inalámbrico o los Altavoces surround.
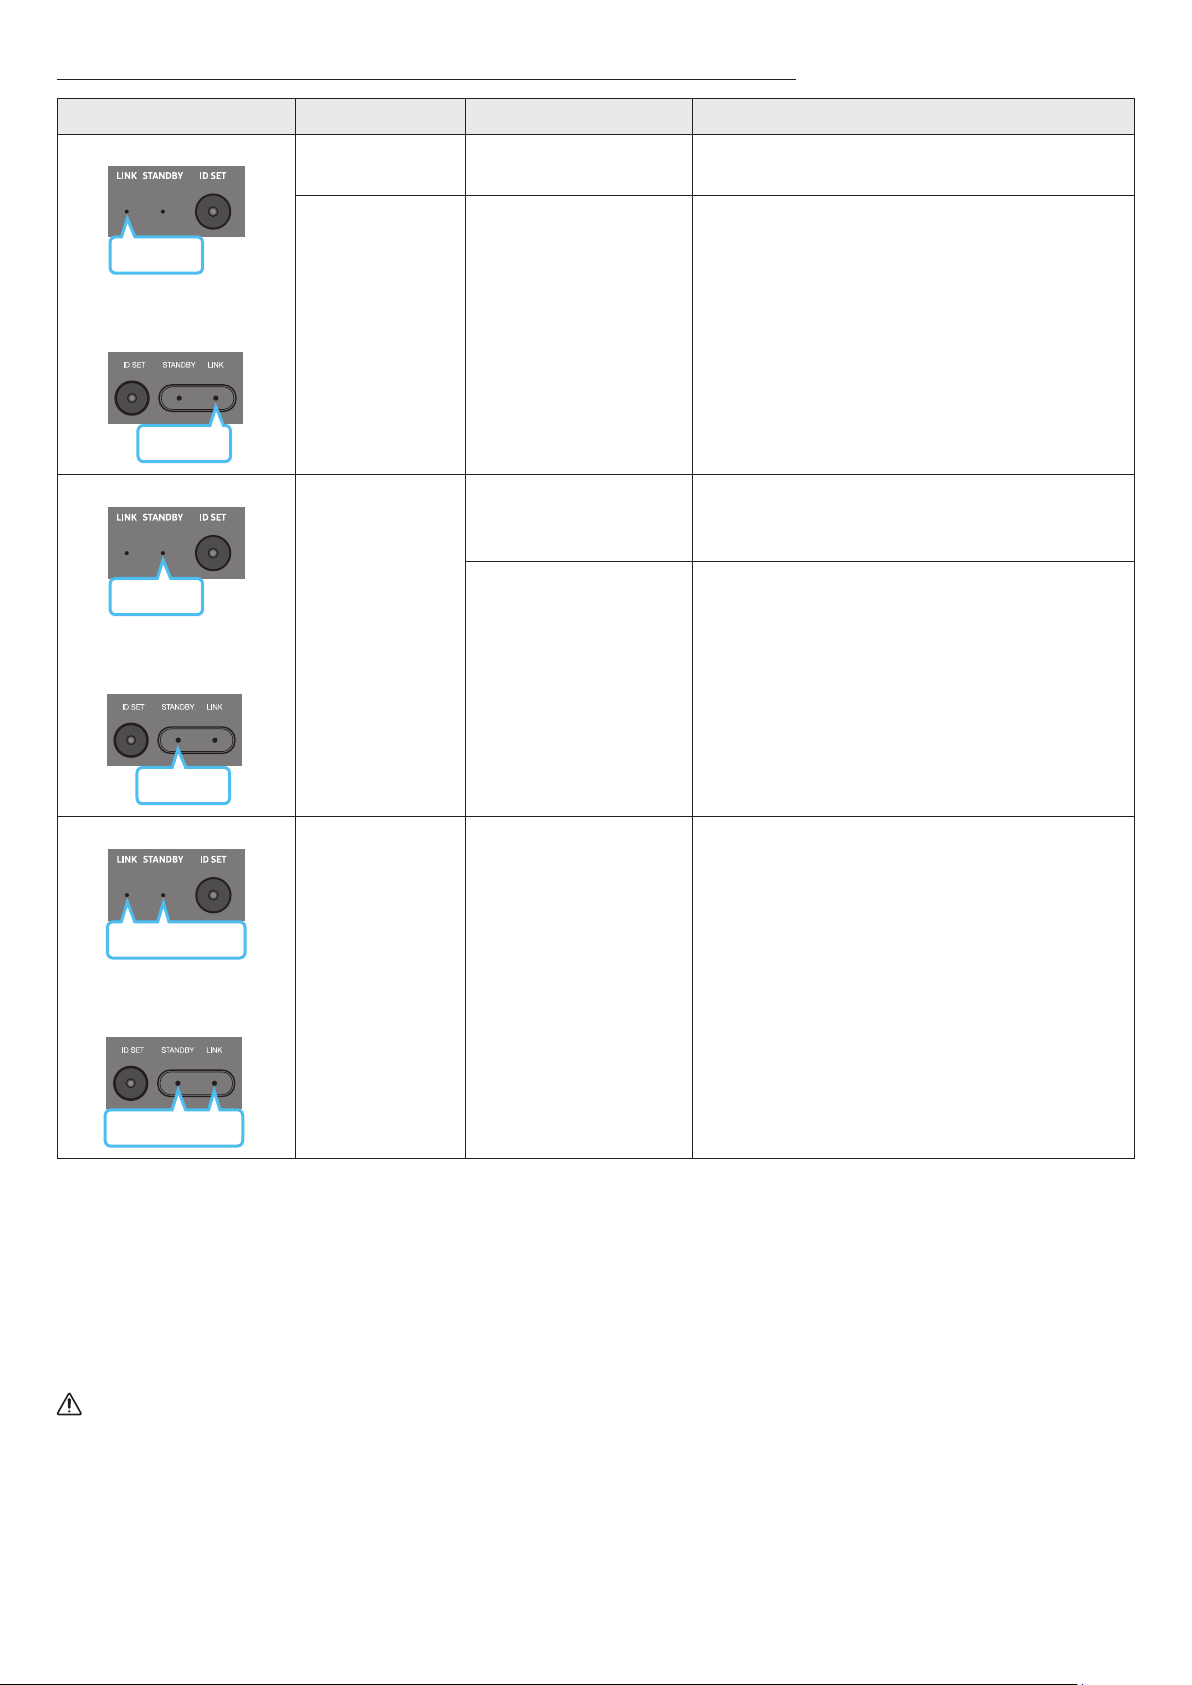
SPA - 17
LED
Encendido
Conectado correctamente
(operación normal)
-
Parpadeante Recuperando la conexión
Compruebe si el cable de alimentación conectado a la unidad
principal de la Soundbar está conectado correctamente o
espere unos 5 minutos. Si la luz continúa parpadeando, intente
conectar de forma manual el Altavoz de graves y los Altavoces
surround. Consulte la página 16.
Encendido
Modo Standby (con la unidad
principal de la Soundbar
apagada)
Compruebe si el cable de alimentación conectado a la unidad
principal de la Soundbar está conectado correctamente.
Se produjo un error en la
conexión
Conecte de nuevo. Consulte las instrucciones de conexión
manual en la página 16.
Parpadeante Problema de funcionamiento
Consulte la información de contacto del Centro de soporte
técnico de Samsung en este manual.
NOTA
• Si la unidad principal está apagada, el altavoz de graves inalámbrico se pondrá en modo de espera y el STANDBY LED que se encuentra en la parte posterior del
altavoz de graves se pondrá rojo luego de parpadear en azul varias veces.
• Si cerca de la Soundbar, utiliza algún dispositivo que usa la misma frecuencia que la Soundbar, las interferencias pueden interrumpir el sonido.
• La distancia de transmisión máxima de la señal inalámbrica de la unidad principal es de aproximadamente 10 metros, pero puede variar según el entorno
operativo. Si hay una pared metálica o de acero y hormigón entre la unidad principal y el altavoz de graves inalámbrico, es posible que el sistema no funcione
debido a que la señal inalámbrica no puede penetrar el metal.
• El sistema de altavoces surround es compatible solo con los modelos en los que se aplique.
PRECAUCIÓN
• Las antenas receptoras inalámbricas están integradas en los altavoces surround y el altavoz de graves inalámbrico. Mantenga la unidad lejos del agua y la
humedad.
• Para obtener un rendimiento del sonido óptimo, asegúrese de que en las áreas alrededor de los altavoces surround y el altavoz de graves inalámbrico no haya
obstáculos.
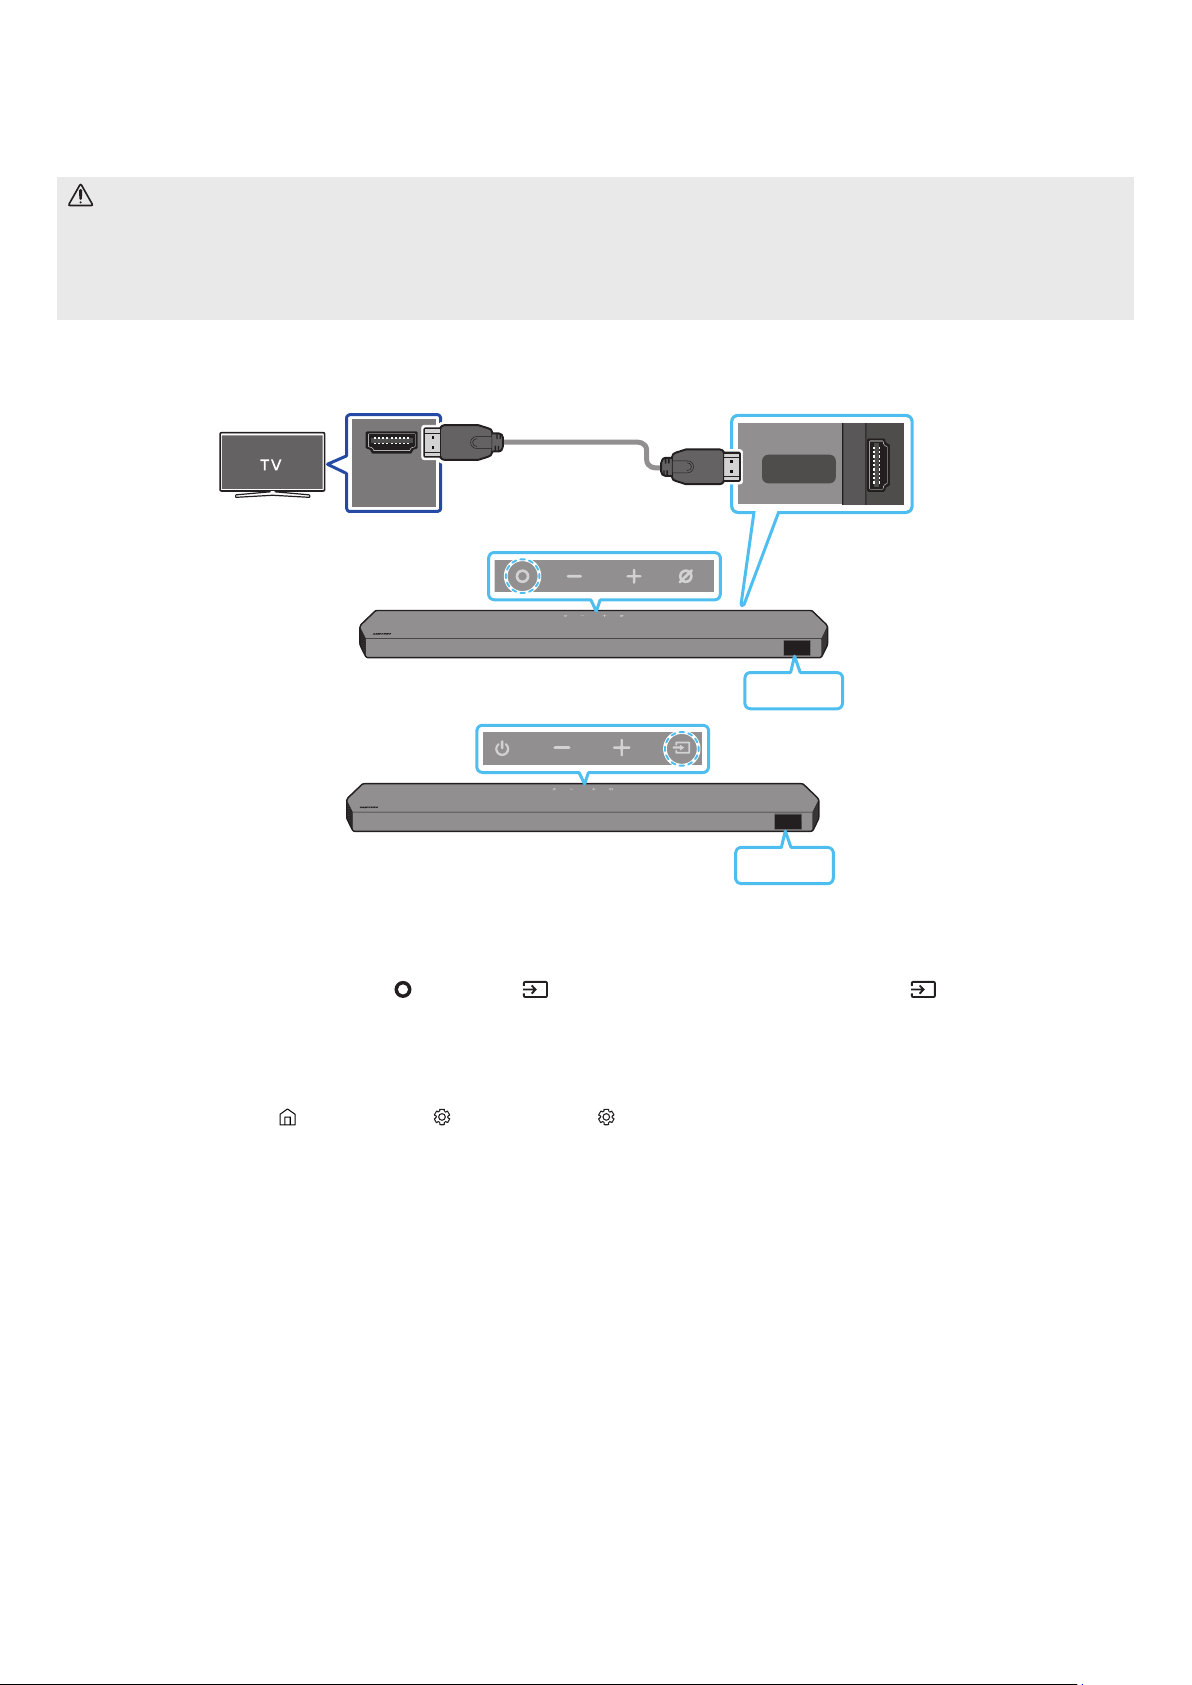
SPA - 18
05 CONEXIÓN A UN TV
PRECAUCIÓN
• Cuando el cable HDMI y el cable óptico estén conectados al mismo tiempo, la señal HDMI se recibe primero.
• Para conectar el cable HDMI entre el TV y la Soundbar, asegúrese de conectar las terminales marcadas como ARC. De lo contrario, es posible que el sonido del
TV no se escuche.
• El cable recomendado es .
HDMI IN
(ARC)
HDMI TO TV
(eARC/ARC)
TV ARC
<>
TV ARC
<>
1. Con la Soundbar y el TV apagados, conecte el cable HDMI como se indica en la imagen.
2. Encienda la Soundbar y el TV.
3. En la ventana de visualización de la unidad principal de la Soundbar aparece “TV ARC” y la Soundbar reproducirá el sonido del TV.
• Si no sale el sonido del TV, presione el botón
/ en la parte superior de la Soundbar o el botón del control remoto
para seleccionar el modo “D.IN”. En la pantalla aparece “D.IN” y “TV ARC” en secuencia, y se escucha el sonido del televisor.
• Cuando conecte un TV compatible con la función eARC, aparece “eARC” en la pantalla y se oye un sonido.
• Para establecer la conexión con eARC, la función eARC en el menú del TV debe estar encendida. Consulte el manual de usuario del televisor para ver más
detalles sobre la conguración.
(p. ej., TV Samsung: Inicio ( ) → Menú → Cong. ( ) → Todos los ajustes ( ) → Sonido → Expert Settings → HDMI-eARC Mode (Auto))
• Si no aparece “TV ARC” en la ventana de visualización de la unidad principal de la Soundbar, verique que el cable HDMI esté conectado en el puerto correcto.
• Use los botones de volumen en el control remoto del TV para cambiar el volumen de la Soundbar.
NOTA
• Cuando conecte el TV que es compatible con HDMI ARC a la Soundbar con un cable de HDMI, puede transmitir los datos de audio y video digitales sin conectar un
cable óptico aparte.
• Le recomendamos que use un cable HDMI sin núcleo, si es posible. Si usa un cable HDMI con núcleo, use uno cuyo diámetro sea menor de 14 mm.
• Esta función no está disponible si el cable HDMI no es compatible con ARC.
• Cuando el audio en una transmisión está codicado en Dolby Digital y el “Formato de audio de salida digital” de su TV está congurado como PCM, le
recomendamos que cambie la conguración a Dolby Digital. Cuando cambie la conguración en el TV, la calidad del sonido será mejor. (Es posible que en el
menú del TV se usen palabras distintas para Dolby Digital y PCM según el fabricante del TV.)
• Los protocolos ARC/eARC admiten Dolby Atmos.
• Asegúrese de que el contenido admita Dolby Atmos®.
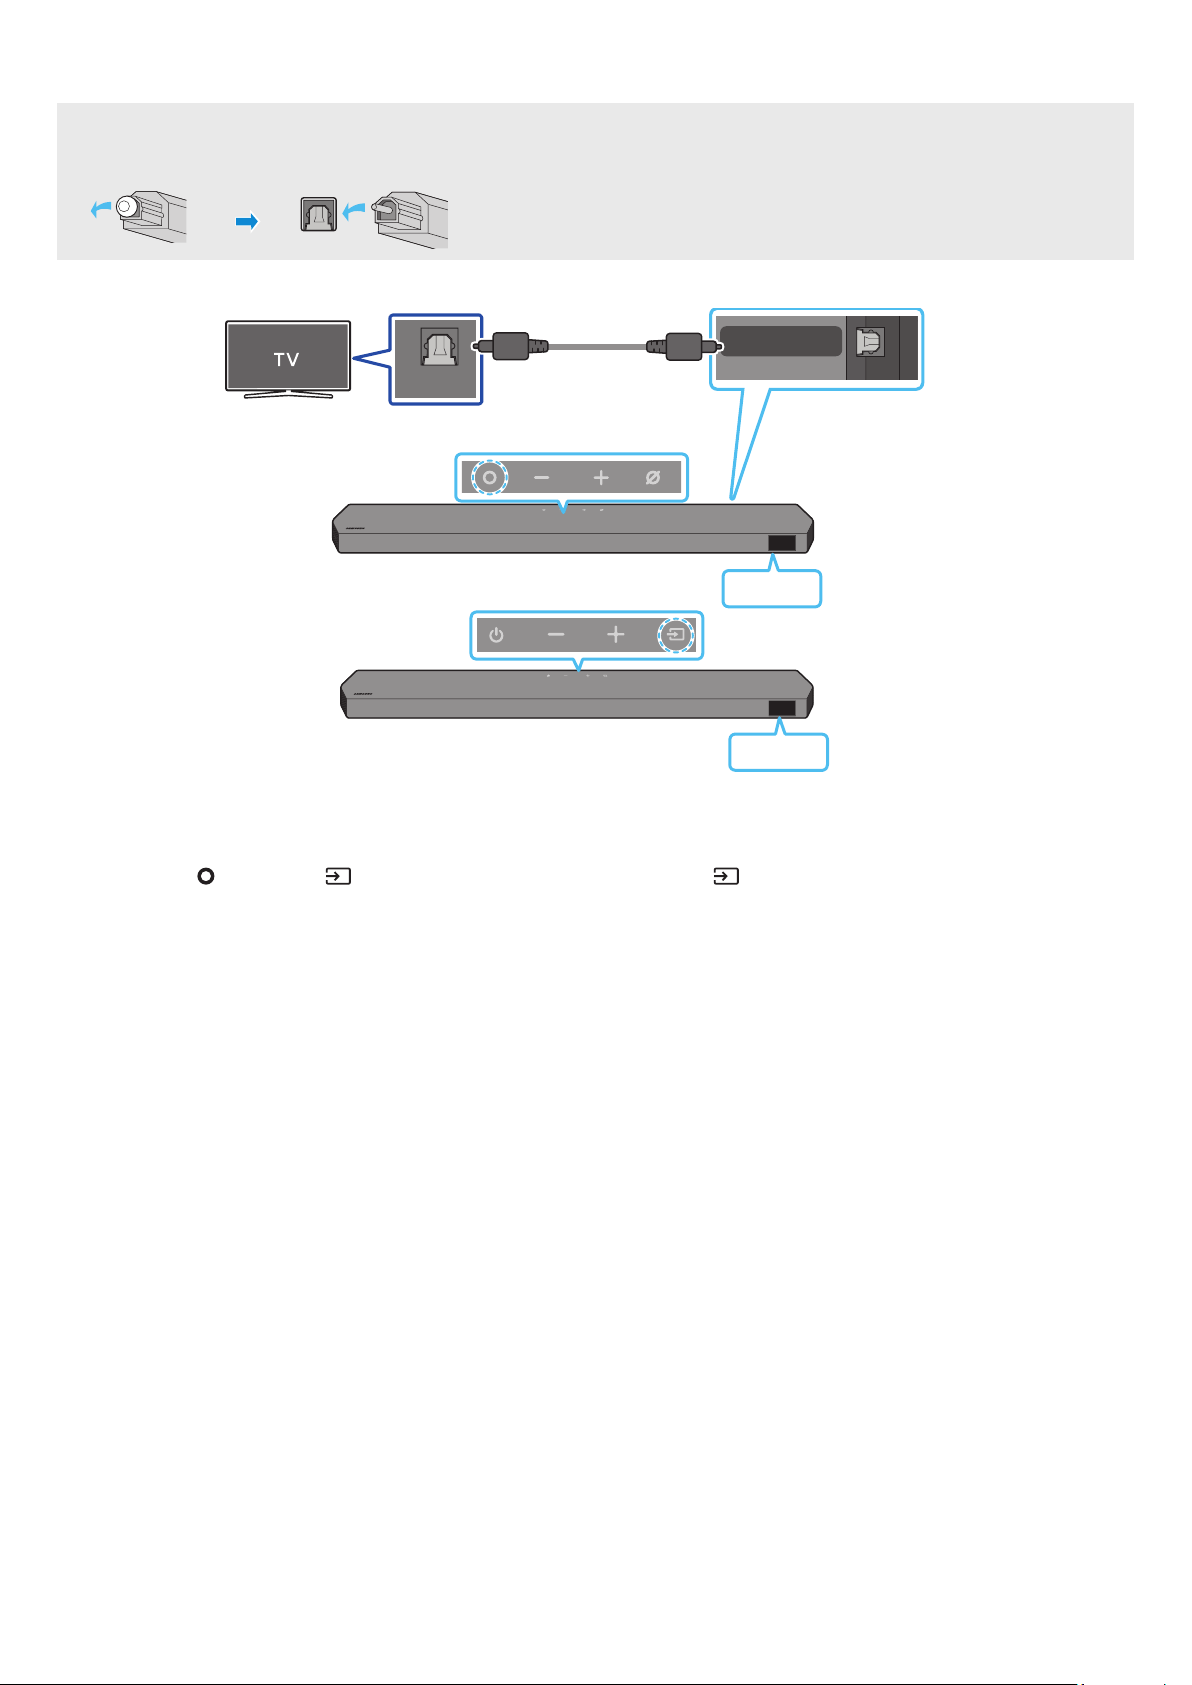
SPA - 19
• Cuando el cable HDMI y el cable óptico estén conectados al mismo tiempo, la señal HDMI se recibe primero.
• Si usa un cable óptico y las terminales tienen cubiertas, quítelas.
OPTICAL OUT
DIGITAL AUDIO IN
(OPTICAL)
D.IN
<>
D.IN
<>
1. Con la Soundbar y el TV apagados, conecte el puerto de la Soundbar y el puerto de salida OPTICAL del TV con el cable óptico (no
suministrado) como se muestra en la imagen.
2. Encienda la Soundbar y el TV.
3. Presione el botón
/ en la parte superior de la Soundbar o el botón en el control remoto para seleccionar el modo
“D.IN”.
4. El sonido del TV saldrá de la Soundbar.
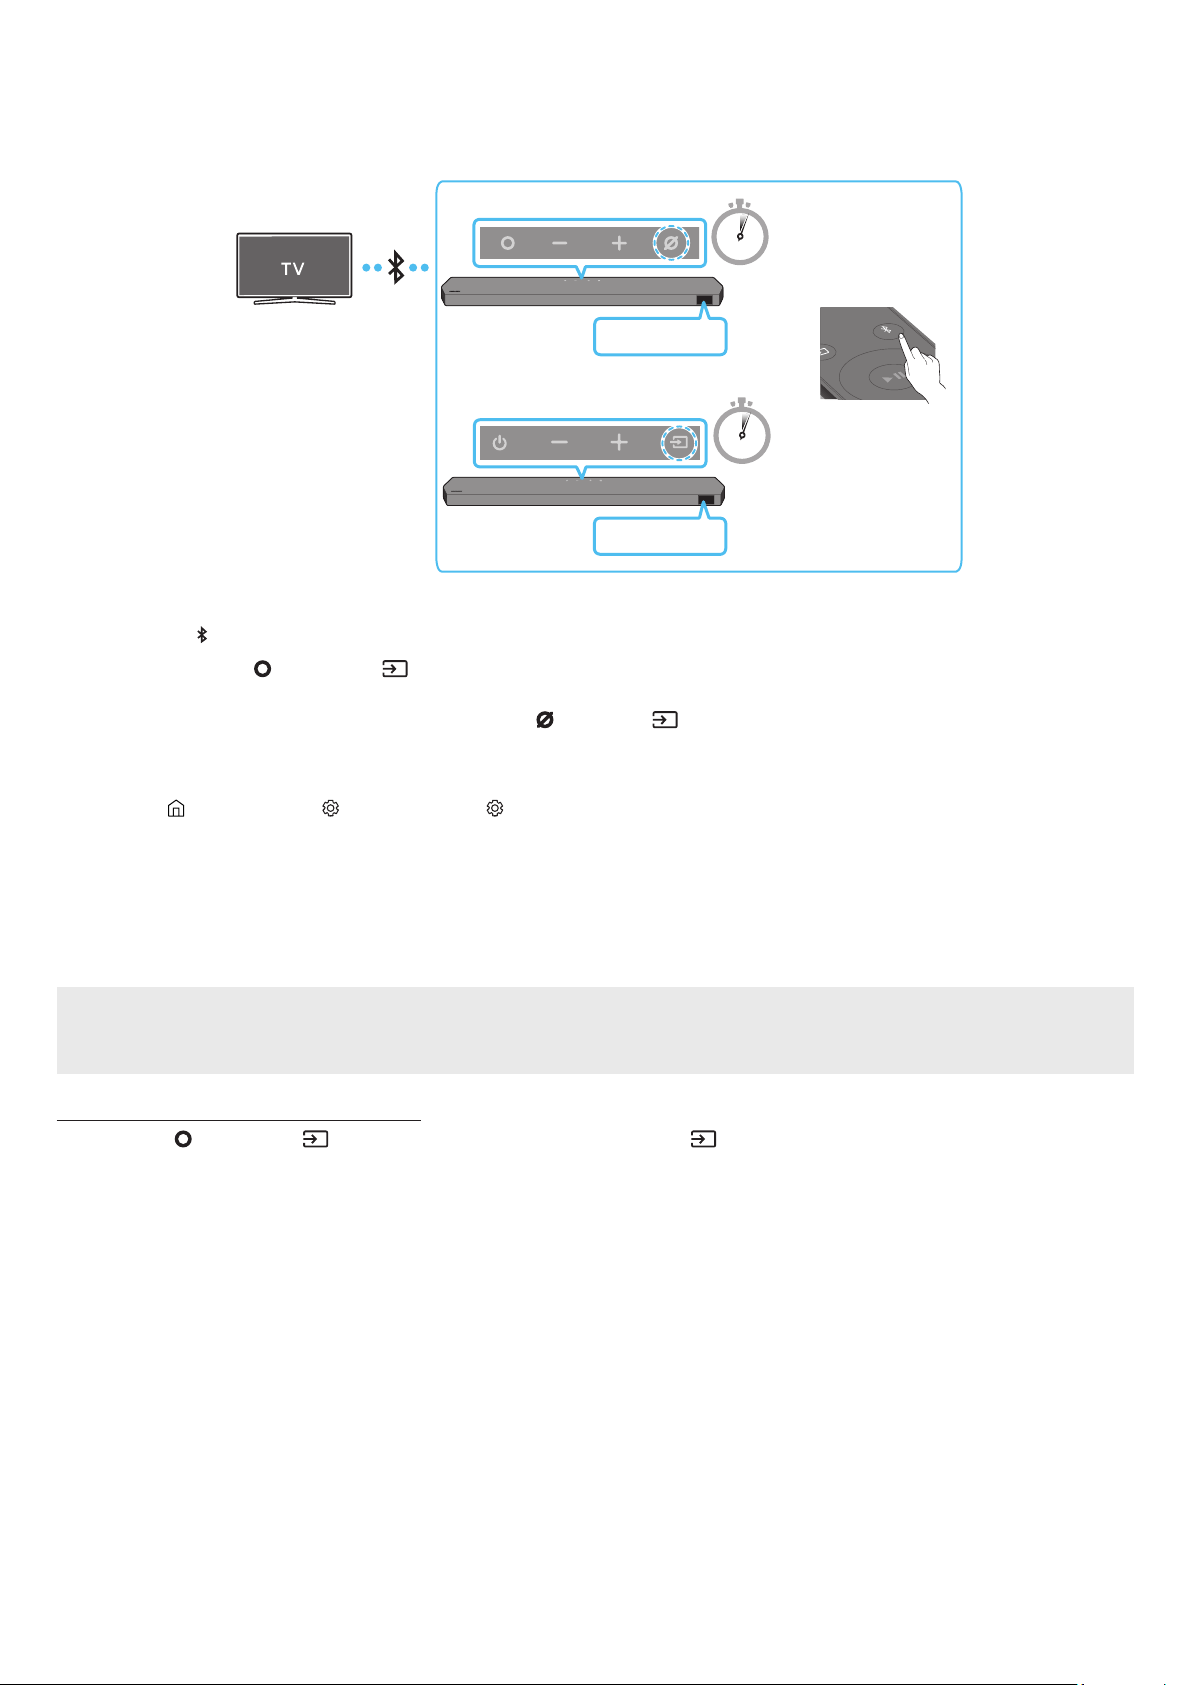
SPA - 20
Cuando se conecta un TV Samsung a través de Bluetooth, puede escuchar sonido en estéreo sin cables de por medio.
• Solo se puede conectar un TV Samsung por vez.
• Se puede conectar un TV Samsung que sea compatible con Bluetooth. Compruebe las especicaciones de su TV.
PAIR
5 Sec
5 Sec
O
BT PAIRING
<>
BT PAIRING
<>
1. Presione el botón
PAIR del control remoto de la Soundbar para entrar al modo “BT PAIRING”.
Presione el botón
/ en el panel superior y luego seleccione “BT”.
“BT” cambia automáticamente a “BT PAIRING” en pocos segundos o cambia a “BT READY” si existe un registro de conexión.
Cuando aparezca “BT READY”, mantenga presionado el botón / en el panel superior de la Soundbar durante más de
5 segundos hasta que aparezca “BT PAIRING”.
2. Seleccione el modo Bluetooth en el TV Samsung.
(p. ej., Inicio (
) → Menú → Cong. ( ) → Todos los ajustes ( ) → Sonido → Salida de sonido → Lista de altavoces Bluetooth → Soundbar Q***B (Bluetooth))
3. Seleccione “” de la lista que aparece en la pantalla del TV.
Se indicará la Soundbar disponible con “” o “” en la lista de dispositivos Bluetooth del TV. Para conectar el TV Samsung a la
Soundbar, seleccione el mensaje y establezca una conexión.
• Cuando el TV Samsung esté conectado, aparecerá [] → “BT” en la pantalla frontal de la Soundbar.
4. Podrá escuchar el sonido del TV Samsung en la Soundbar.
• Luego de haber conectado por primera vez la Soundbar a su TV Samsung, use el modo “BT READY” para volver a conectar.
• Si ya tiene una Soundbar existente (p. ej., ) en la lista de altavoces del TV Samsung, elimínela.
• Luego, repita los pasos 1 a 3.
Presione el botón
/ en la parte superior de la Soundbar o el botón en el control remoto para seleccionar otro modo que
no sea “BT”.
• La desconexión toma tiempo porque el TV Samsung debe recibir la respuesta de la Soundbar.
(El tiempo requerido puede variar según el modelo del TV Samsung).

SPA - 21
• BT READY: en este modo, puede reconectar cualquier dispositivo móvil o TV Samsung que se haya conectado antes.
• BT PAIRING: en este modo, puede conectar un dispositivo nuevo a la Soundbar.
(Presione el botón PAIR en el control remoto de la Soundbar o mantenga presionado el botón / en la parte superior de la
Soundbar durante más de 5 segundos mientras la Soundbar está en modo “BT”).
• Ubique un dispositivo nuevo en un radio de 1 m para conectarlo a través de Bluetooth.
• Si le pide un código PIN cuando conecta un dispositivo Bluetooth, ingrese <0000>.
• La Soundbar se apaga automáticamente después de estar 18 minutos en estado Listo.
• Es posible que la Soundbar no realice la conexión o la búsqueda de Bluetooth correctamente en los siguientes casos:
‒ Si hay un campo eléctrico fuerte cerca de la Soundbar.
‒ Si varios dispositivos Bluetooth se emparejan en simultáneo con la Soundbar.
‒ Si el dispositivo Bluetooth se apaga, no está en el lugar o no funciona correctamente.
• Los dispositivos electrónicos pueden ocasionar interferencias de radio. Los dispositivos que generan ondas electromagnéticas deberán mantenerse alejados de
la unidad principal de la Soundbar, p. ej., dispositivos con redes LAN inalámbricas, microondas, etc.

SPA - 22
• La conexión Wi-Fi solo está disponible en el TV Samsung.
• Compruebe si está encendido y si .
• El TV y la Soundbar deben estar conectados a la misma red inalámbrica (Wi-Fi).
• Si su enrutador inalámbrico (Wi-Fi) usa un canal de DFS, no podrá establecer una conexión Wi-Fi entre el TV y la Soundbar. Comuníquese con su proveedor de
servicio de Internet para obtener más detalles.
• Dado que los menús pueden ser diferentes según el año de fabricación, consulte el manual correspondiente a su TV.
• Para conectar el TV a la Soundbar mediante Wi-Fi, conecte primero la Soundbar al enrutador inalámbrico. Consulte la página 29 para ver detalles sobre cómo
establecer una conexión Wi-Fi.
1. Para obtener más información sobre cómo establecer una conexión Wi-Fi con la Soundbar, consulte la página 29, “
”.
2. Cambie la fuente de entrada del TV a la Soundbar mediante el menú de audio.
•
Inicio (
) → Menú → Cong. ( ) → Todos los ajustes ( ) → Sonido → Salida de sonido → Soundbar Q***B (Wi-Fi)
NOTA
La conexión Wi-Fi Dolby Atmos está disponible en algunos TV Samsung y en algunos modelos de Soundbar.

SPA - 23
En el caso de Q-Symphony, la Soundbar se sincroniza con un TV Samsung para emitir el sonido a través de dos dispositivos a n de brindar un efecto envolvente
óptimo. Cuando la Soundbar está conectada, aparece el menú “” debajo del menú del TV. Seleccione el menú correspondiente.
O
D.IN
• Ejemplo del menú del TV:
• Ejemplo del menú del TV:
NOTA
• Puede funcionar según el códec que admita el TV.
• Esta función solo se admite cuando se conecta el cable HDMI o el cable óptico (no suministrado), o si hay conexión a Wi-Fi.
• El mensaje que se muestra puede ser diferente según el modelo de TV.
• Asegúrese de que el TV y la Soundbar se encuentren conectados a la misma frecuencia o enrutador inalámbrico.
• Esta función está disponible en algunos TV Samsung y en algunos modelos de Soundbar.

SPA - 24
Brinda una calidad de sonido optimizada mediante el análisis de los espacios de escucha.
Para habilitar esta función, active el modo Spacet sound con el control remoto de la Soundbar.
(
() → → ( ) → “”)
• Este menú está disponible en todos los modos de Sonido.
Para habilitar esta función, active el modo Sonido adaptable+ en el menú de su TV Samsung.
(Inicio (
) → Menú → Cong. ( ) → Todos los ajustes ( ) → General → Conguración del Modo inteligente → Sonido adaptable+)
• El modo de sonido en su Soundbar automáticamente pasará a ser si habilita el modo en su TV.
NOTA
• Esta función solo está disponible cuando la Soundbar se conecta a un TV Samsung.
• Los modelos admiten solo el método de "Conexión mediante un TV".
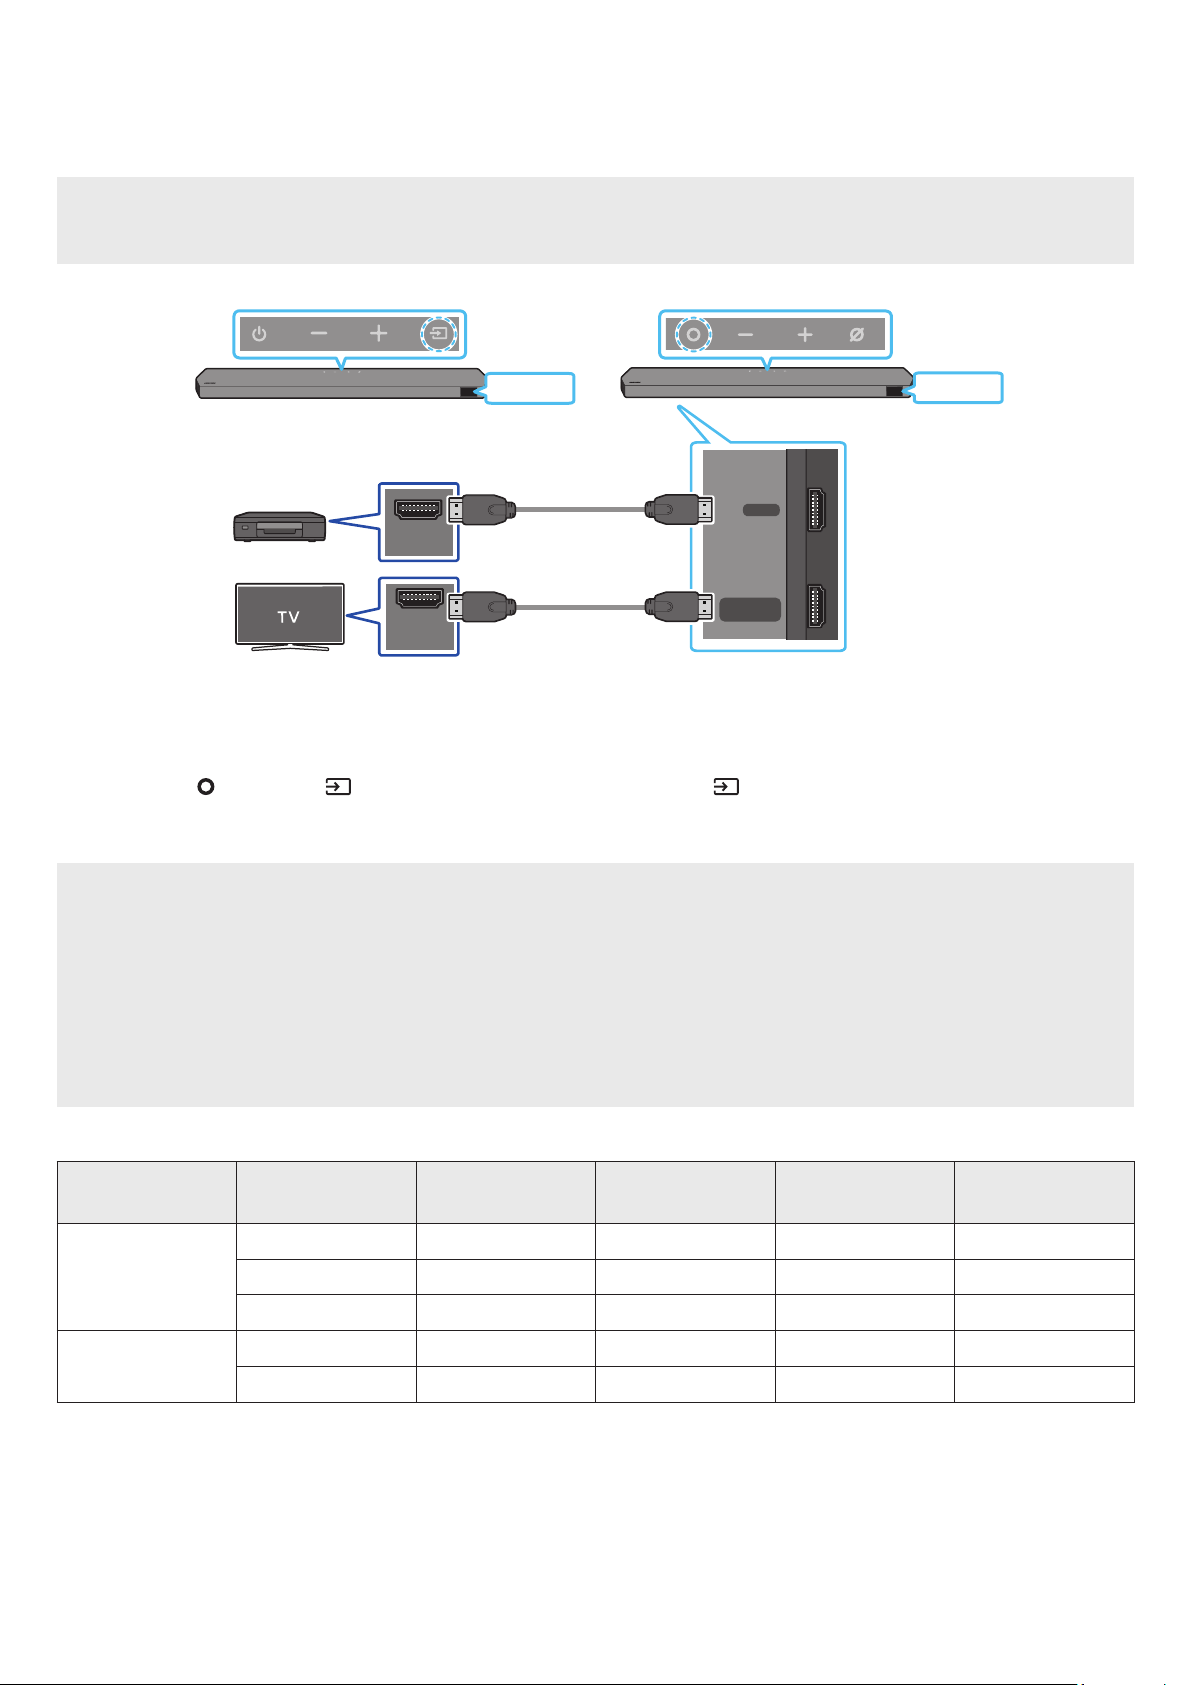
SPA - 25
CONEXIÓN A UN DISPOSITIVO EXTERNO
• Si las opciones de Salida de audio incluyen Audio secundario, asegúrese de que esté en la posición Apagado.
• Asegúrese de que el contenido admita Dolby Atmos®/DTS:X.
HDMI TO TV
(eARC/ARC)
HDMI
HDMI IN
(ARC)
HDMI OUT
<><>
1. Utilice un cable HDMI para conectar el puerto de HDMI OUT del dispositivo externo y el puerto ubicado en la base de la Soundbar.
2. Utilice un cable HDMI para conectar el puerto de HDMI IN del televisor y el puerto ubicado en la base de la Soundbar.
3. Encienda la Soundbar, el televisor y el dispositivo externo.
4. Presione el botón
/ en la parte superior de la Soundbar o el botón en el control remoto para seleccionar el modo
“”.
5. La pantalla de la Soundbar indica que el modo “” se encuentra actualmente seleccionado, y la Soundbar comenzará a reproducir sonidos.
NOTA
• : Si la fuente de entrada es Dolby Atmos®/DTS:X, consulte “
” en página 11.
• Cuando se activa Dolby Atmos®, aparece “DOLBY ATMOS” en la pantalla frontal.
• Cuando se activa DTS:X, aparece “DTS:X” en la pantalla delantera.
•
Abra las opciones de salida de audio en el menú de conguraciones de su reproductor de Blu-ray u otro dispositivo, y asegúrese de que esté seleccionada la
opción “Sin codicación” para el ujo de bit. Por ejemplo, en un reproductor de Blu-ray de Samsung, vaya a Menú de inicio → Sonido → Salida digital y luego
seleccione Flujo de bit (no procesado).
< 60
8 bits O O O O
10 bits - - O O
12 bits - - O O
120
8 bits - - - -
10 bits - - - -
• La especicación admitida puede variar en función del dispositivo externo conectado o las condiciones de uso.
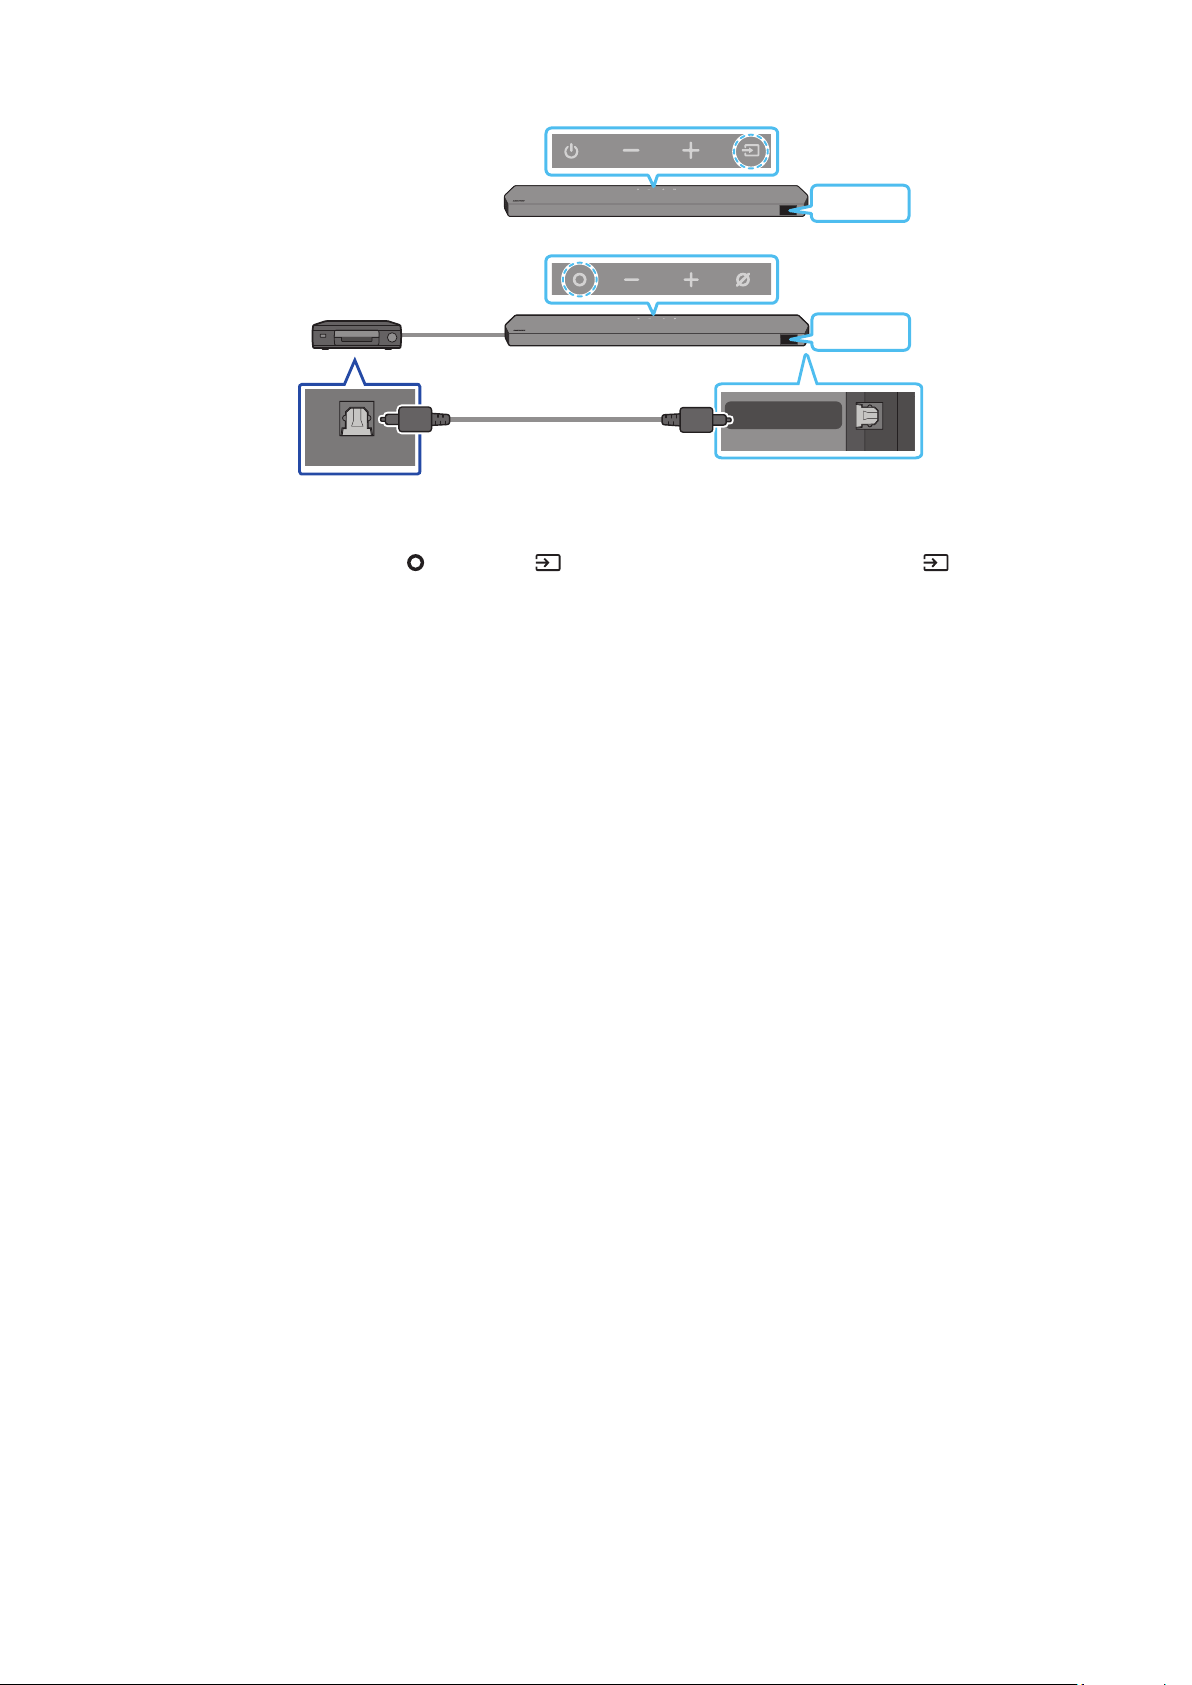
SPA - 26
DIGITAL AUDIO IN
(OPTICAL)
OPTICAL OUT
D.IN
<>
D.IN
<>
1. Use un cable óptico (no suministrado) para conectar en el puerto principal de la Soundbar y OPTICAL OUT en el dispositivo externo.
2. Encienda la Soundbar y el dispositivo externo.
3. Para seleccionar el modo “D.IN”, presione el botón
/ en la parte superior de la Soundbar o el botón en el control
remoto.
4. La Soundbar reproducirá sonidos del dispositivo externo.
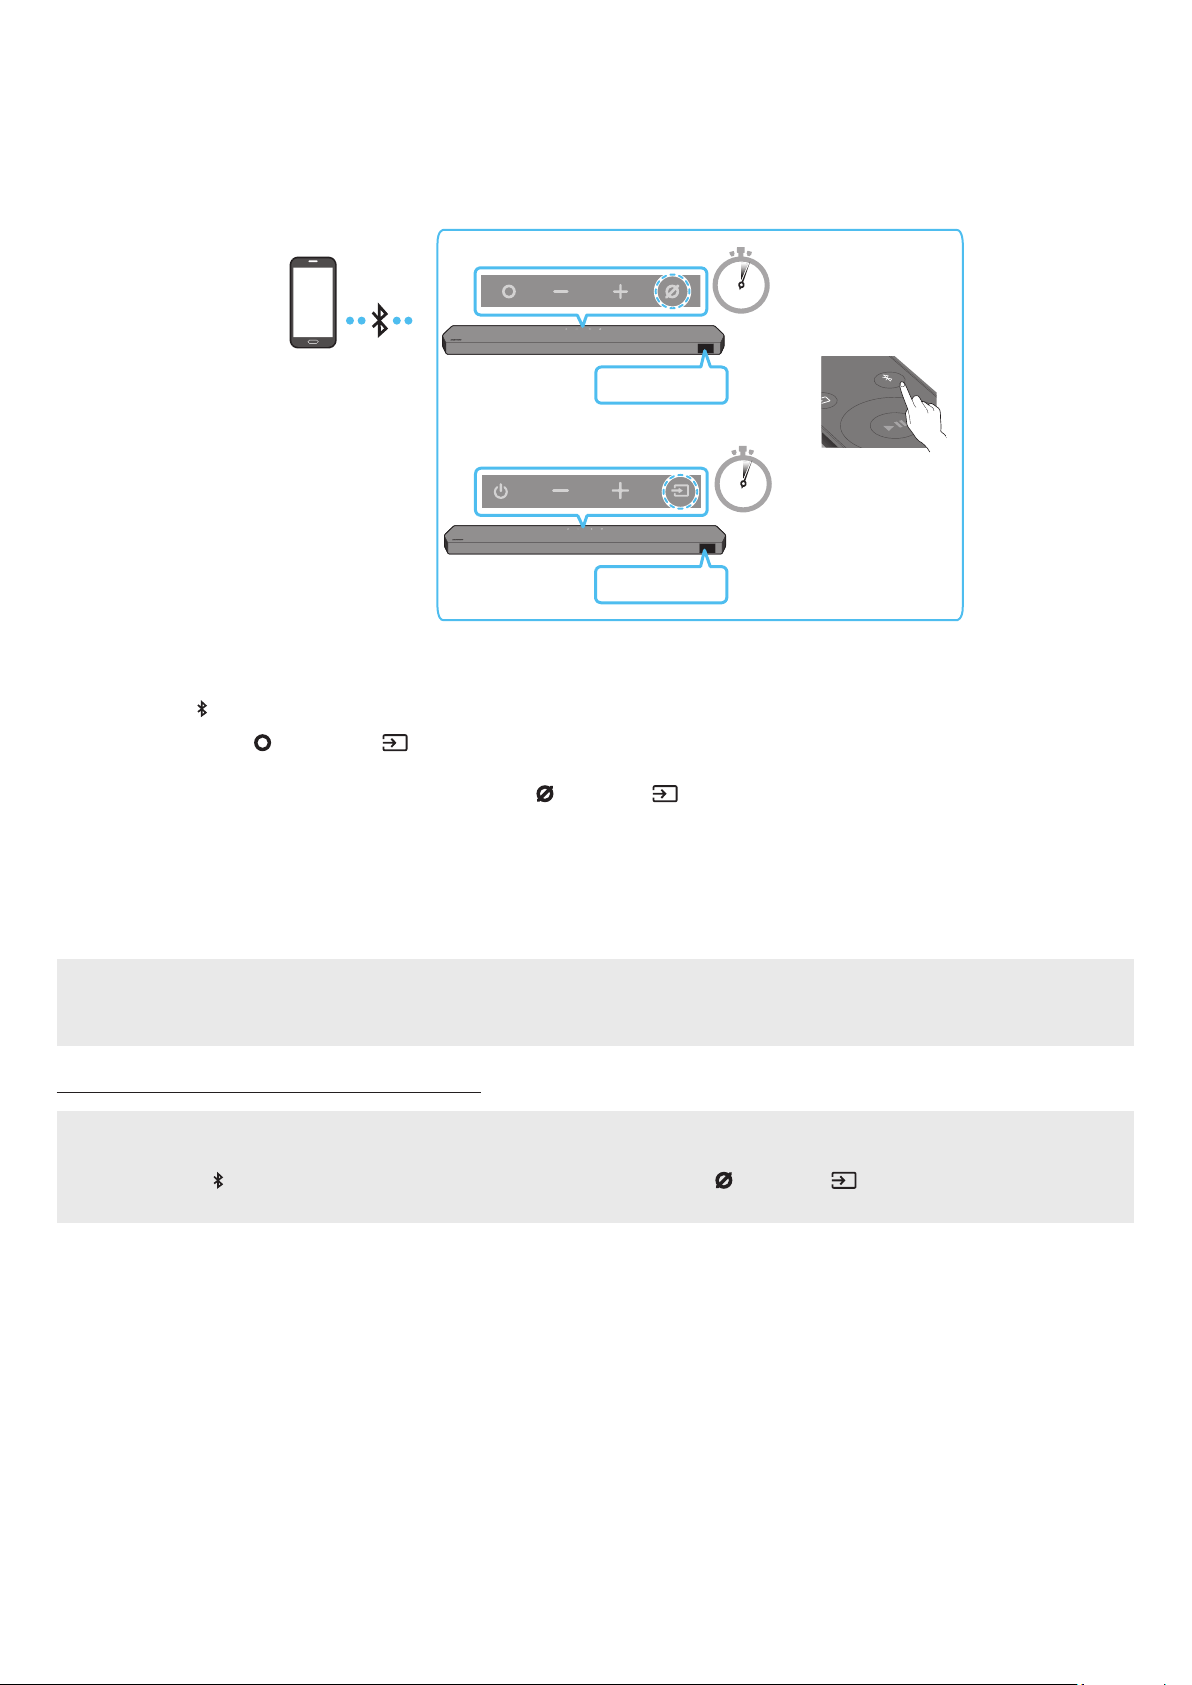
SPA - 27
CONEXIÓN A UN DISPOSITIVO MÓVIL
Cuando se conecta un dispositivo móvil a través de Bluetooth, puede escuchar sonido en estéreo sin cables de por medio.
• Cuando conecta un dispositivo Bluetooth emparejado y la Soundbar está apagada, la Soundbar se enciende automáticamente.
PAIR
5 Sec
5 Sec
O
BT PAIRING
<>
BT PAIRING
<>
• Cuando conecte un dispositivo Bluetooth nuevo, asegúrese de que el dispositivo esté en un radio de 1 m de distancia.
1. Presione el botón PAIR del control remoto de la Soundbar para entrar al modo “BT PAIRING”.
Presione el botón
/ en el panel superior y luego seleccione “BT”.
“BT” cambia automáticamente a “BT PAIRING” en pocos segundos o cambia a “BT READY” si existe un registro de conexión.
Cuando aparezca “BT READY”, mantenga presionado el botón / en el panel superior de la Soundbar durante más de
5 segundos hasta que aparezca “BT PAIRING”.
2. En su dispositivo, seleccione “” de la lista que aparece.
• Cuando la Soundbar se conecta al dispositivo móvil, aparece [] → “BT” en la pantalla frontal.
3. Reproduzca archivos de música desde el dispositivo conectado por Bluetooth a través de la Soundbar.
• Luego de haber conectado la Soundbar a su dispositivo móvil por primera vez, use el modo “BT READY” para volver a conectarla.
• Si ya tiene una Soundbar existente (p. ej., "") en la lista de altavoces del dispositivo móvil, elimínela.
• Repita los pasos 1 y 2.
• BT READY: en este modo, puede reconectar cualquier dispositivo móvil o TV Samsung que se haya conectado antes.
• BT PAIRING: en este modo, puede conectar un dispositivo nuevo a la Soundbar.
(Presione el botón PAIR en el control remoto de la Soundbar o mantenga presionado el botón / en la parte superior de la
Soundbar durante más de 5 segundos mientras la Soundbar está en modo “BT”).

SPA - 28
• Ubique un dispositivo nuevo en un radio de 1 m para conectarlo a través de Bluetooth.
• Si le pide un código PIN cuando conecta un dispositivo Bluetooth, ingrese <0000>.
• La Soundbar se apaga automáticamente después de estar 18 minutos en estado Listo.
• Es posible que la Soundbar no realice la conexión o la búsqueda de Bluetooth correctamente en los siguientes casos:
‒ Si hay un campo eléctrico fuerte cerca de la Soundbar.
‒ Si varios dispositivos Bluetooth se emparejan en simultáneo con la Soundbar.
‒ Si el dispositivo Bluetooth se apaga, no está en el lugar o no funciona correctamente.
• Los dispositivos electrónicos pueden ocasionar interferencias de radio. Los dispositivos que generan ondas electromagnéticas deberán mantenerse alejados de
la unidad principal de la Soundbar, p. ej., dispositivos con redes LAN inalámbricas, microondas, etc.
• La Soundbar admite datos SBC (44,1 kHz, 48 kHz).
• Conéctese solo a un dispositivo Bluetooth que admita la función A2DP (AV).
• No puede conectar la Soundbar a un dispositivo Bluetooth que solo admita la función HF (manos libres).
• Cuando conecte la Soundbar a un dispositivo Bluetooth, colóquelos lo más cerca posible entre sí.
• Cuanto más lejos estén la Soundbar y el dispositivo Bluetooth, menor será la calidad del sonido.
La conexión Bluetooth se puede interrumpir cuando los dispositivos están fuera del alcance efectivo.
• La conexión Bluetooth puede no funcionar según lo previsto en zonas con poca señal.
• Un dispositivo Bluetooth puede presentar ruido o puede no funcionar correctamente en las siguientes condiciones:
‒ Si una parte de su cuerpo está en contacto con el transceptor de señal del dispositivo Bluetooth o la Soundbar
‒ En esquinas o lugares donde hay un obstáculo cerca, como en las paredes o divisiones, donde puedan producirse cambios eléctricos.
‒ Cuando se expone a interferencias de radio de otros productos que operan en los mismos rangos de frecuencia, como equipos médicos, hornos microondas y
dispositivos de LAN inalámbrica.
‒ Los obstáculos como puertas y paredes pueden afectar la calidad del sonido incluso cuando los dispositivos están dentro del alcance efectivo.
• Tenga en cuenta que la Soundbar no se puede emparejar con otros dispositivos Bluetooth mientras usa la opción Bluetooth.
• Este dispositivo inalámbrico puede causar interferencia eléctrica durante el funcionamiento.
Puede desconectar un dispositivo Bluetooth de la Soundbar. Para obtener instrucciones, consulte el manual de usuario del dispositivo Bluetooth.
• La Soundbar se desconectará.
• Cuando la Soundbar se desconecta del dispositivo Bluetooth, la Soundbar mostrará “BT DISCONNECTED” en la pantalla delantera.
Presione el botón / en la parte superior de la Soundbar o el botón en el control remoto para salir del modo “BT”.
• La desconexión toma tiempo porque el dispositivo Bluetooth debe recibir la respuesta de la Soundbar. (El tiempo de desconexión puede variar según el modelo
de dispositivo Bluetooth).
• Cuando la Soundbar se desconecta del dispositivo Bluetooth, la Soundbar mostrará “BT DISCONNECTED” en la pantalla delantera.
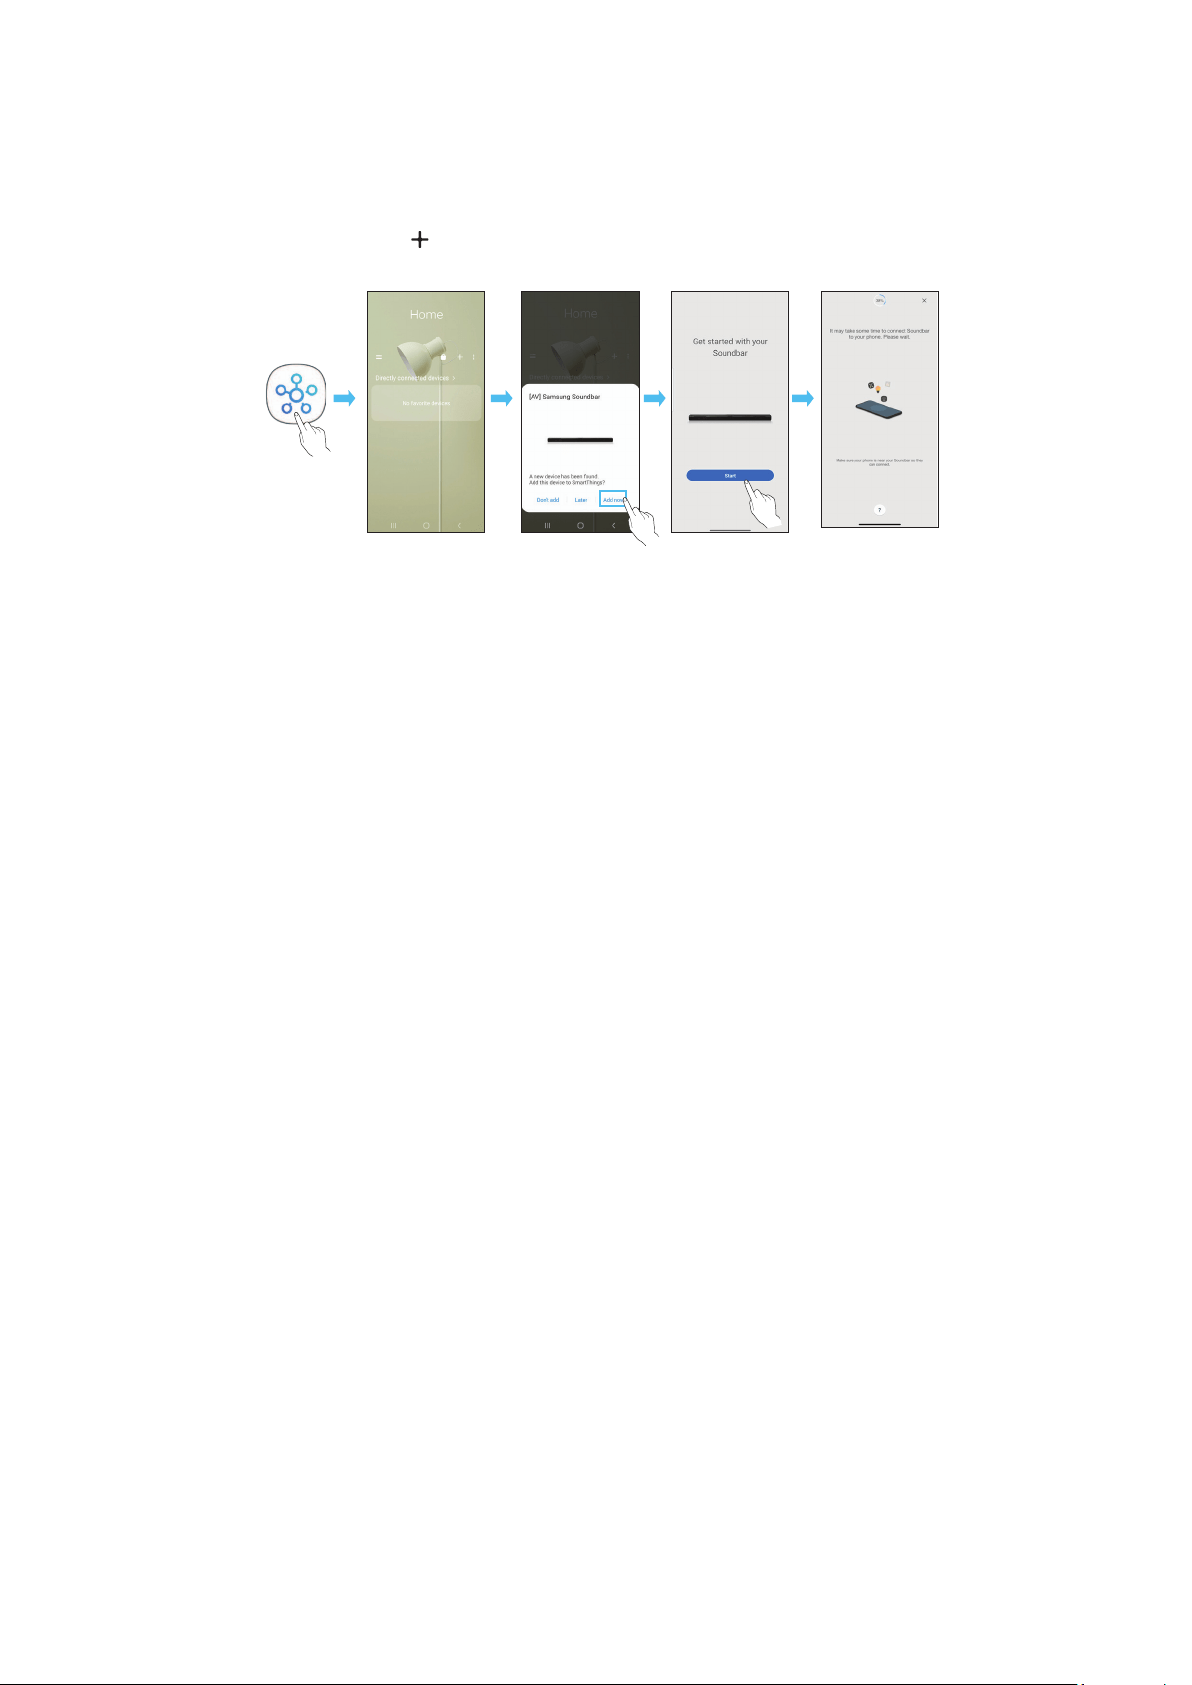
SPA - 29
Para conectar la Soundbar a un dispositivo móvil a través de una red inalámbrica (wi), se necesita la aplicación .
1. Instale e inicie la aplicación en su dispositivo móvil (teléfono inteligente o tableta).
2. En la aplicación, siga las instrucciones de la pantalla para agregar la Soundbar.
• Es posible que la ventana emergente automática (la segunda captura de pantalla a continuación) no se muestre en algunos dispositivos.
Si no aparece la ventana emergente, presione “
” en la pantalla . La Soundbar se agrega a la aplicación.
• La imagen que se muestra abajo puede ser diferente según la versión de la aplicación.

SPA - 30
Toque la Soundbar con su dispositivo móvil para reproducir el sonido del contenido del dispositivo móvil a través de la Soundbar.
• Es posible que esta función no sea compatible, según el dispositivo móvil.
• Esta función solo es compatible con dispositivos móviles Samsung con Android 8.1 o una versión posterior.
1. Active la función en su dispositivo móvil.
• Para obtener información detallada acerca de cómo activar la función, consulte “” a continuación.
2. Toque la Soundbar con el dispositivo móvil. Seleccione “” en la ventana de visualización.
Se establece una conexión entre el dispositivo móvil y la Soundbar a través de Bluetooth.
3. Reproduzca el sonido del contenido del dispositivo móvil a través de la Soundbar.
• Esta función conecta un dispositivo móvil a la Soundbar a través de Bluetooth detectando vibraciones que se producen cuando el dispositivo toca la
Soundbar.
• Asegúrese de que el dispositivo móvil no toque una esquina na de la Soundbar. La Soundbar o el dispositivo móvil podrían rayarse o dañarse.
• Se recomienda cubrir el dispositivo móvil con una funda. Toque ligeramente el área ancha en la parte superior de la Soundbar sin aplicar fuerza excesiva.
• Para utilizar esta función, actualice la aplicación a la última versión.
Es posible que la función no sea compatible, según la versión de la aplicación.
Utilice la aplicación para activar la función .
1. En el dispositivo móvil, ejecute la aplicación .
2. Seleccione (
→ ) en la pantalla de la aplicación que aparece en el dispositivo móvil.
3. Congure “” a Activado para permitir que la función pueda usarse cuando acerca un dispositivo móvil a la Soundbar. La función está activada.
NOTA
• Cuando el dispositivo móvil está en modo ahorro de energía, la función no funciona.
• Es posible que la función no funcione si hay dispositivos cerca de la Soundbar que generan interferencias de radio como dispositivos eléctricos.
Asegúrese de que los dispositivos que pueden generar interferencias de radio estén colocados a suciente distancia de la Soundbar.

SPA - 31
CONEXIÓN MEDIANTE APPLE AIRPLAY 2
• Es posible que esta función no esté disponible en algunos países.
• La Samsung Soundbar admite AirPlay 2 y requiere iOS 11.4 o posterior.
Con AirPlay 2, puede transmitir música, podcasts y otro tipo de audio desde sus dispositivos Apple a la Samsung Soundbar.
• Asegúrese de que la Soundbar esté encendida y conectada a la misma red Wi-Fi que su dispositivo Apple.
• Seleccione
en una aplicación compatible con AirPlay o en el Centro de control de su iPhone, iPad o Mac.
• Seleccione la Soundbar en la lista de dispositivos disponibles para reproducir el sonido actual en ella.
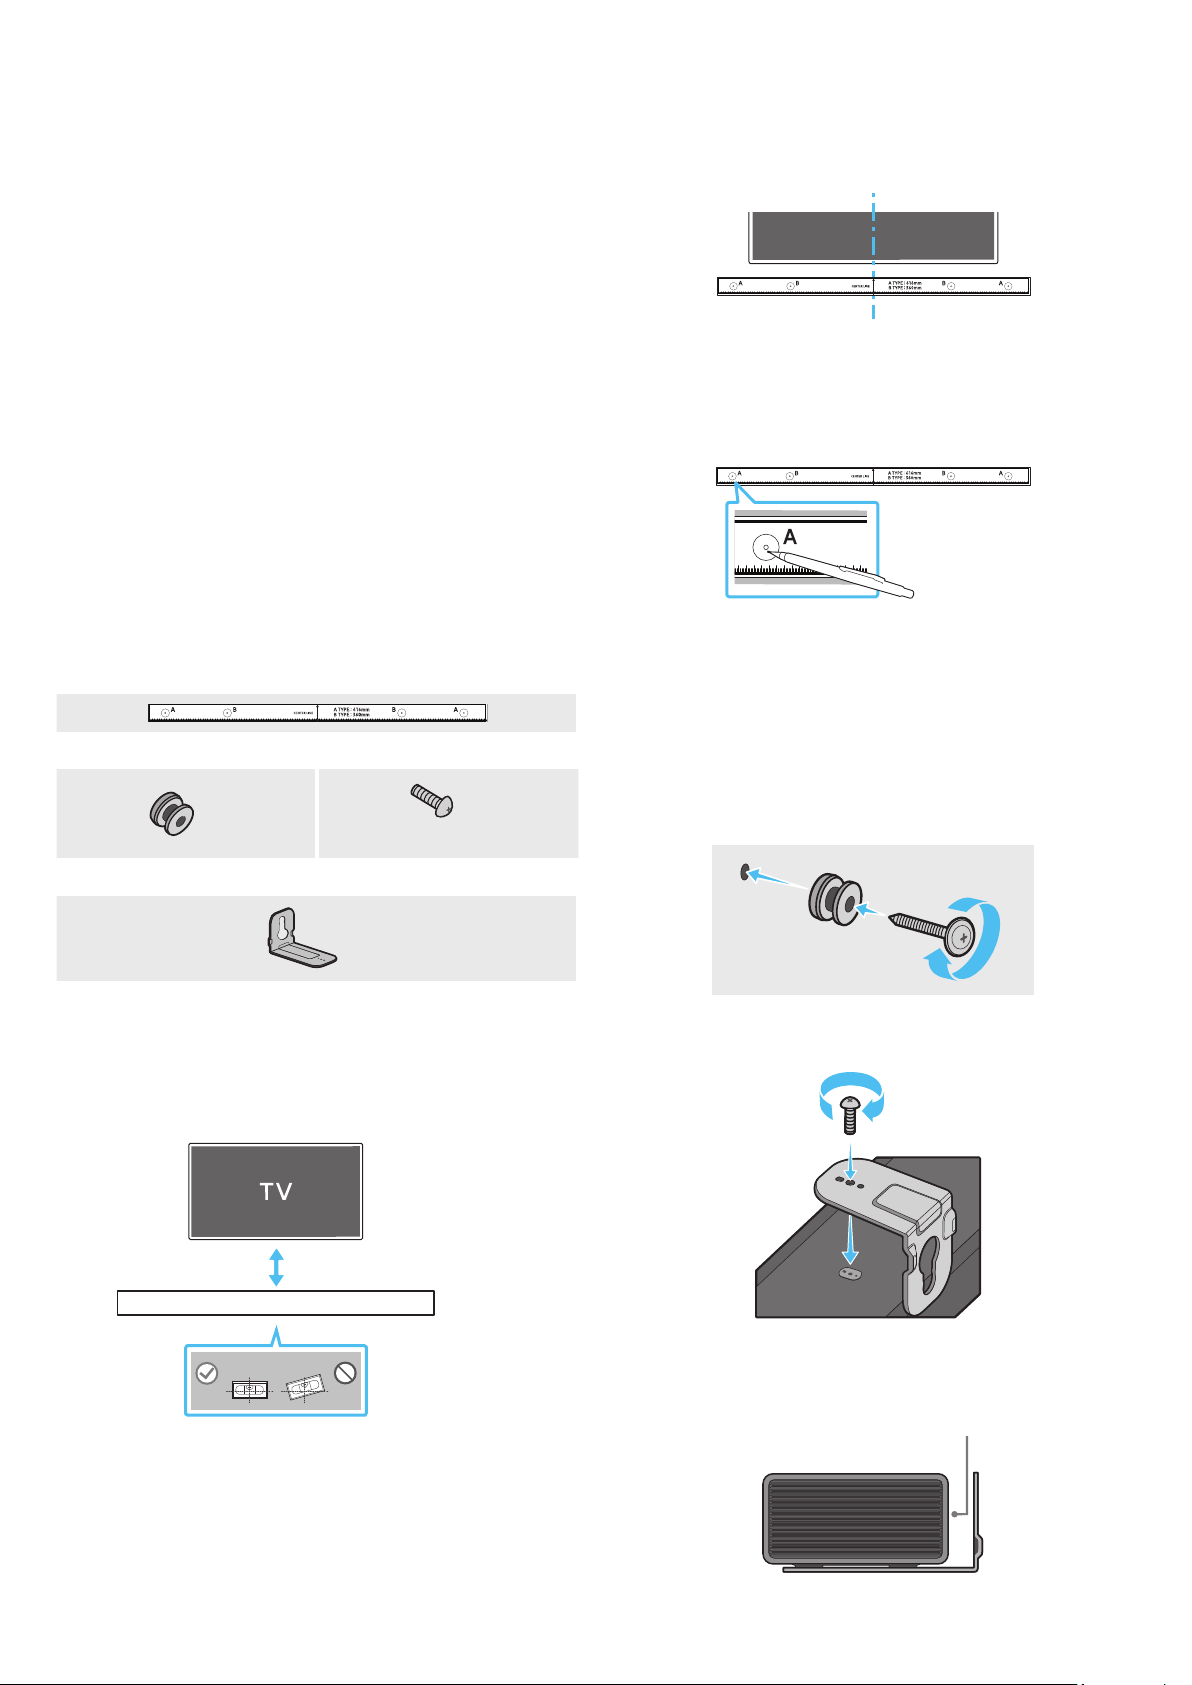
SPA - 32
INSTALACIÓN DEL SOPORTE
DE MONTAJE EN LA PARED
• Instálelo solo en una pared vertical.
• No lo instale en un lugar con altas temperaturas o humedad.
• Verique si la pared es lo sucientemente resistente como para soportar
el peso del producto. Si no lo es, refuerce la pared o elija otro lugar para
realizar la instalación.
• Compre y utilice tornillos de jación o pernos adecuados para el tipo de
pared que tiene (placa de sello, placa de hierro, madera, etc.). Si es posible,
je los tornillos de sujeción en los pernos de la pared.
• Compre tornillos para montaje en la pared según el tipo y el grosor de la
pared en la que desea montar la Soundbar.
‒ Diámetro: M5
‒ Longitud: se recomienda 35 mm o más.
• Conecte los cables de la unidad a los dispositivos externos antes de instalar
la Soundbar en la pared.
• Asegúrese de que la unidad esté apagada y desconéctela antes de
instalarla. De lo contrario, se puede producir una descarga eléctrica.
(M4 x L10)
1. Coloque la sobre la supercie de la pared.
• La debe estar nivelada.
• Si su TV está montado en la pared, instale la Soundbar al menos 5 cm
debajo del TV.
2. Haga coincidir la con el
centro del TV (si va a montar la Soundbar debajo del TV) y luego je la
a la pared con cinta adhesiva.
• Si no la va a montar debajo de un TV, coloque la en el
centro del área de instalación.
3. Pase la punta de una lapicera o la punta de un lápiz no por el centro de las
imágenes TIPO A en cada extremo de la Guía para marcar los oricios en
donde irán los tornillos de sujeción. Luego, quite la
.
4. Utilizando una broca del tamaño adecuado, taladre un oricio en la pared
en cada una de las marcas.
• Si las marcas no coinciden con la posición de los pernos, asegúrese de
colocar tacos o pernos de expansión tipo Molly adecuados dentro de los
oricios antes de colocar los tornillos de soporte. Si utiliza tacos o pernos
de expansión tipo Molly, asegúrese de que los oricios que taladre sean
lo sucientemente grandes para los tacos o pernos que va a utilizar.
5. Pase un tornillo (no suministrado) por cada y luego
atornille cada tornillo con rmeza en un oricio de soporte del tornillo.
Instale los en la orientación correcta en la parte inferior
de la Soundbar utilizando 2 .
• Al realizar el montaje, asegúrese de que la parte de los ganchos para
colgar queden ubicados detrás de la parte posterior
de la Soundbar.
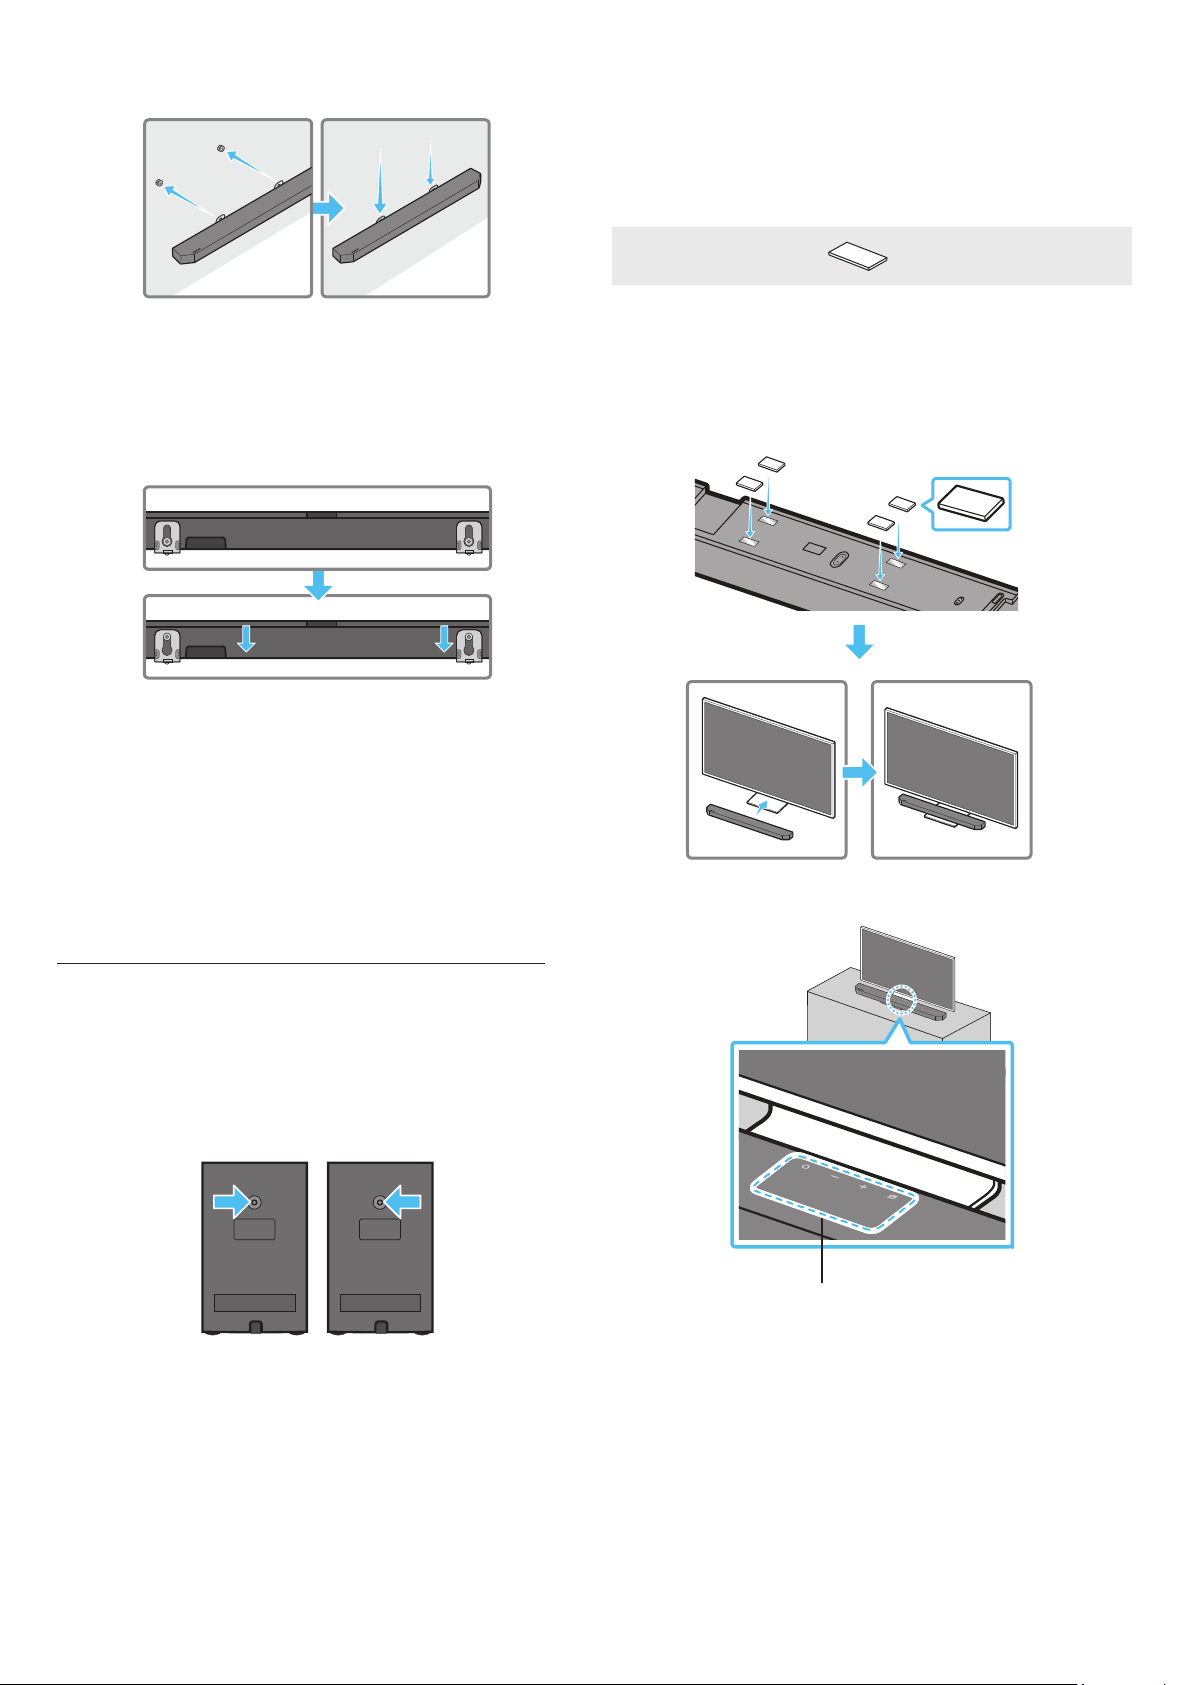
SPA - 33
Para instalar la Soundbar con los ya colocados,
cuélguelos en los que están en la pared.
Deslice la Soundbar hacia abajo como se muestra a continuación de manera
que los queden asentados de forma segura sobre los
.
• Inserte los en la parte ancha (inferior) de los
y luego deslícelos hacia abajo de manera que queden
asentados de manera segura sobre los .
Puede comprar montajes de pared por separado para instalar los altavoces
surround en la pared.
Samsung Electronics no vende montajes de pared.
• Los soportes de pared del altavoz surround deben tener capacidad para
soportar más de 8.0 kg.
• Tamaño del oricio: Inserto roscado de 1/4 - 20 UNC
‒ Tornillo estándar: 6.35 mm de diámetro,
1.27 mm de paso
‒ Longitud: 18 mm de largo
‒ Cantidad: Izquierda: 1 de c/u / Derecha: 1 de c/u
I D
• Verique la resistencia de la pared antes de instalar los soportes para el
montaje. Si la resistencia no es suciente, asegúrese de reforzar la pared
antes de instalar los soportes de pared y los parlantes en la pared.
• Samsung Electronics no se hace responsable por ningún daño del producto
debido a su instalación inadecuada.
• Tenga cuidado de no instalar los parlantes del lado incorrecto o al revés.
10 INSTALACIÓN DE LA
SOUNDBAR FRENTE AL TV
Para instalarla, adhiera los a la parte inferior de la Soundbar antes
de colocarla sobre el soporte para TV. Asegúrese de colocar los
de forma tal que no sobresalgan de los bordes del soporte del TV. Consulte la
imagen a continuación.
Coloque la Soundbar en un soporte para TV.
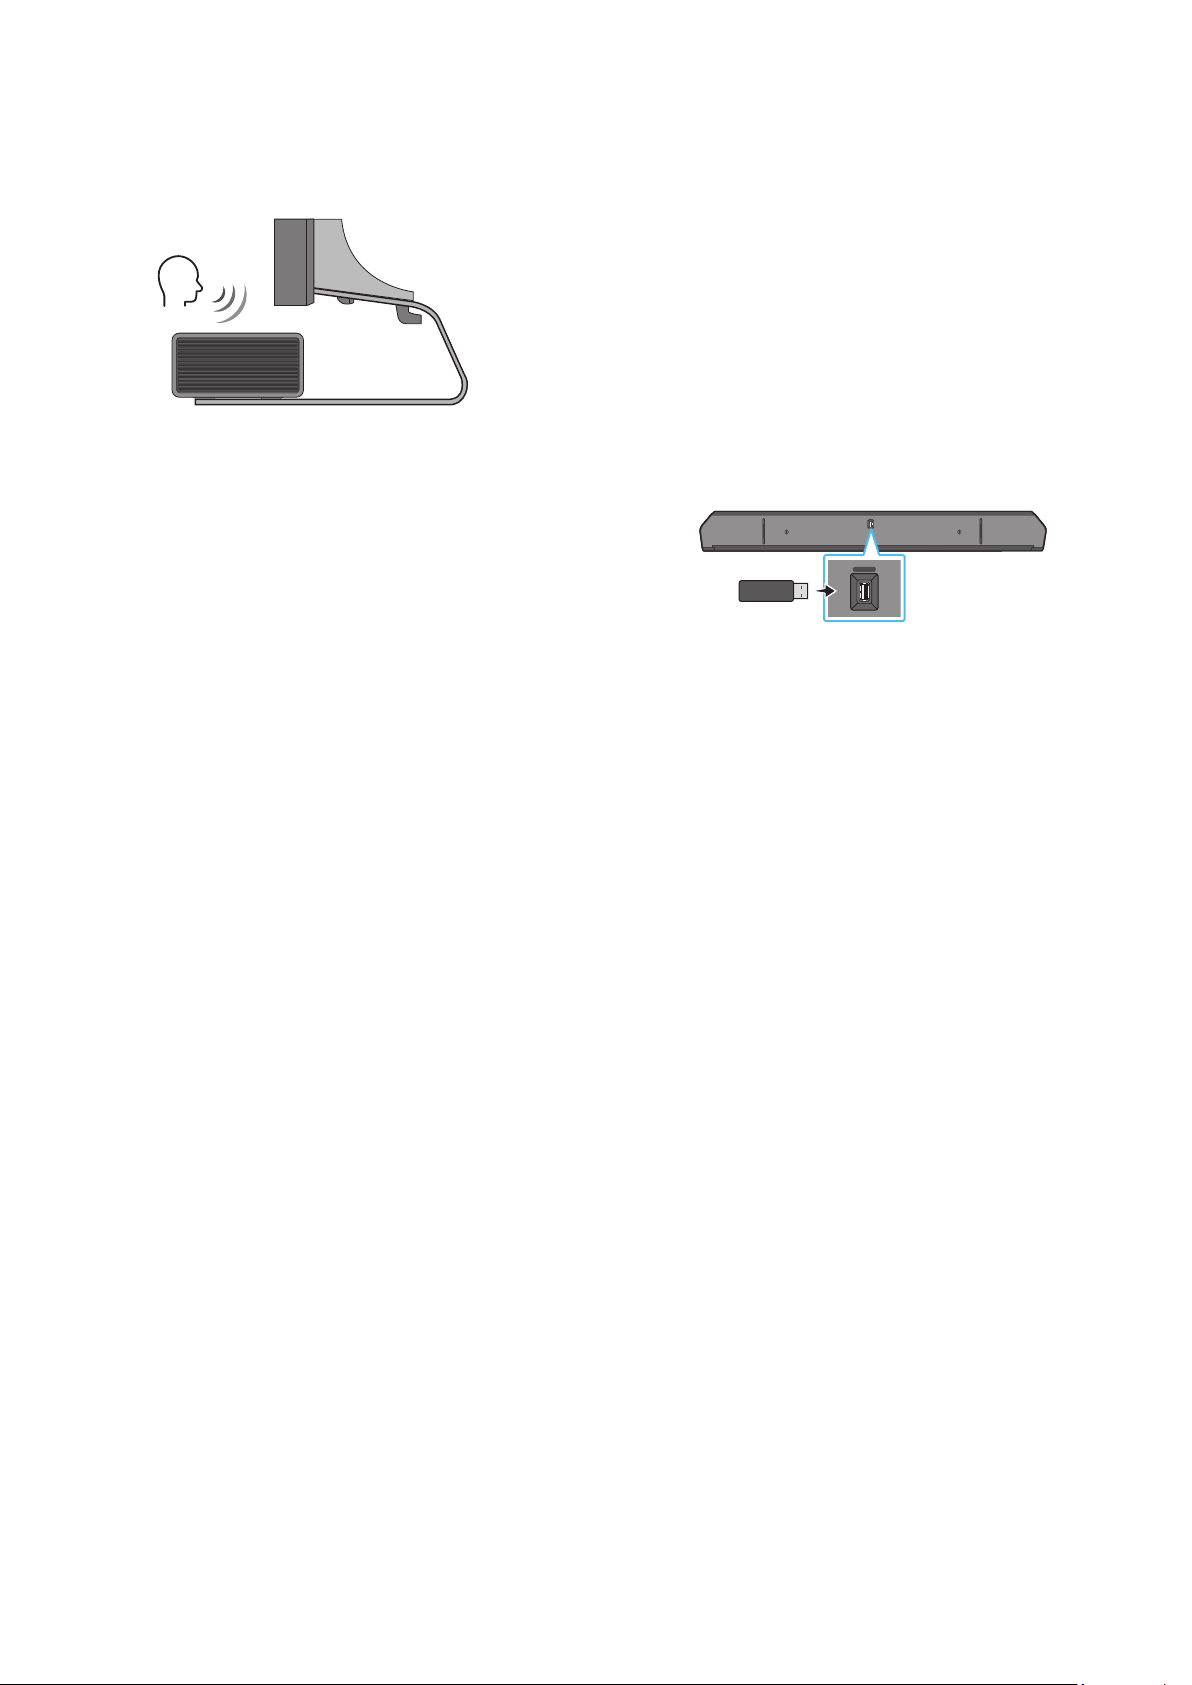
SPA - 34
Como se indica en la imagen, alinee el centro de la Soundbar con el centro del
TV, y coloque con cuidado la Soundbar en el soporte para TV.
En este momento, coloque los micrófonos (solo en los modelos en los que se
aplique) en la parte delantera del soporte a n de que no intereran con el
reconocimiento de voz.
TV
NOTA
• Asegúrese de que la Soundbar esté colocada sobre una supercie plana y
sólida.
• Si no hay espacio suciente desde el TV, puede haber problemas acústicos y
con el reconocimiento de voz.
• La ilustración de arriba diere del modelo de respectivo.
• Esta función no es compatible con el modelo .
11 ACTUALIZACIÓN DE
Cuando la Soundbar está conectada a Internet, las actualizaciones de software
se realizan de forma automática, incluso cuando la Soundbar está apagada.
• Para usar la función de actualización automática, la Soundbar debe estar
conectada a Internet.
La conexión wi de la Soundbar se anulará si se desconecta el cable de
alimentación o si se corta la corriente eléctrica. Si se corta la corriente
eléctrica, cuando se restaure, o si usted vuelve a conectar el cable de
alimentación, encienda la Soundbar y, luego, vuelva a conectarla a Internet.
HDMI IN 1
HDMI IN 2
ID SET
(WOOFER,
REAR)
POWER
NETWORK
SERVICE
DIGITAL AUDIO IN
(OPTICAL)
HDMI TO TV
(eARC/ARC)
HDMI 1
HDMI 2
ID SET
HDMI IN 1
HDMI IN 2
SERVICE
SERVICE
Cuando haya una actualización disponible, puede actualizar la Soundbar
conectando la unidad USB que contiene el rmware de actualización al puerto
SERVICE de la Soundbar.
1. Vaya al sitio web de Samsung (www.samsung.com) → busque el nombre del
modelo en la opción del menú de atención al cliente.
• Para obtener más información sobre la actualización, consulte la Guía de
Actualización.
2. Descargue el archivo de actualización (por ejemplo, en una memoria USB).
3. Descomprima el archivo para crear una carpeta con el nombre del archivo.
4. Guarde la carpeta creada en una memoria USB y luego conéctela a la
Soundbar.
5. Encienda la Soundbar. El producto se actualiza en 3 minutos, y se muestra el
mensaje “UPDATE”.
• Durante la actualización, no lo apague ni retire la memoria USB.
• Si no aparece la leyenda “UPDATE” en la ventana de visualización, retire
el cable de alimentación de la Soundbar y luego vuelva a conectarlo.
• Cuando está instalada la última versión, no se realiza ninguna
actualización.
• Según el tipo de memoria USB, es posible que no se admita la
actualización.
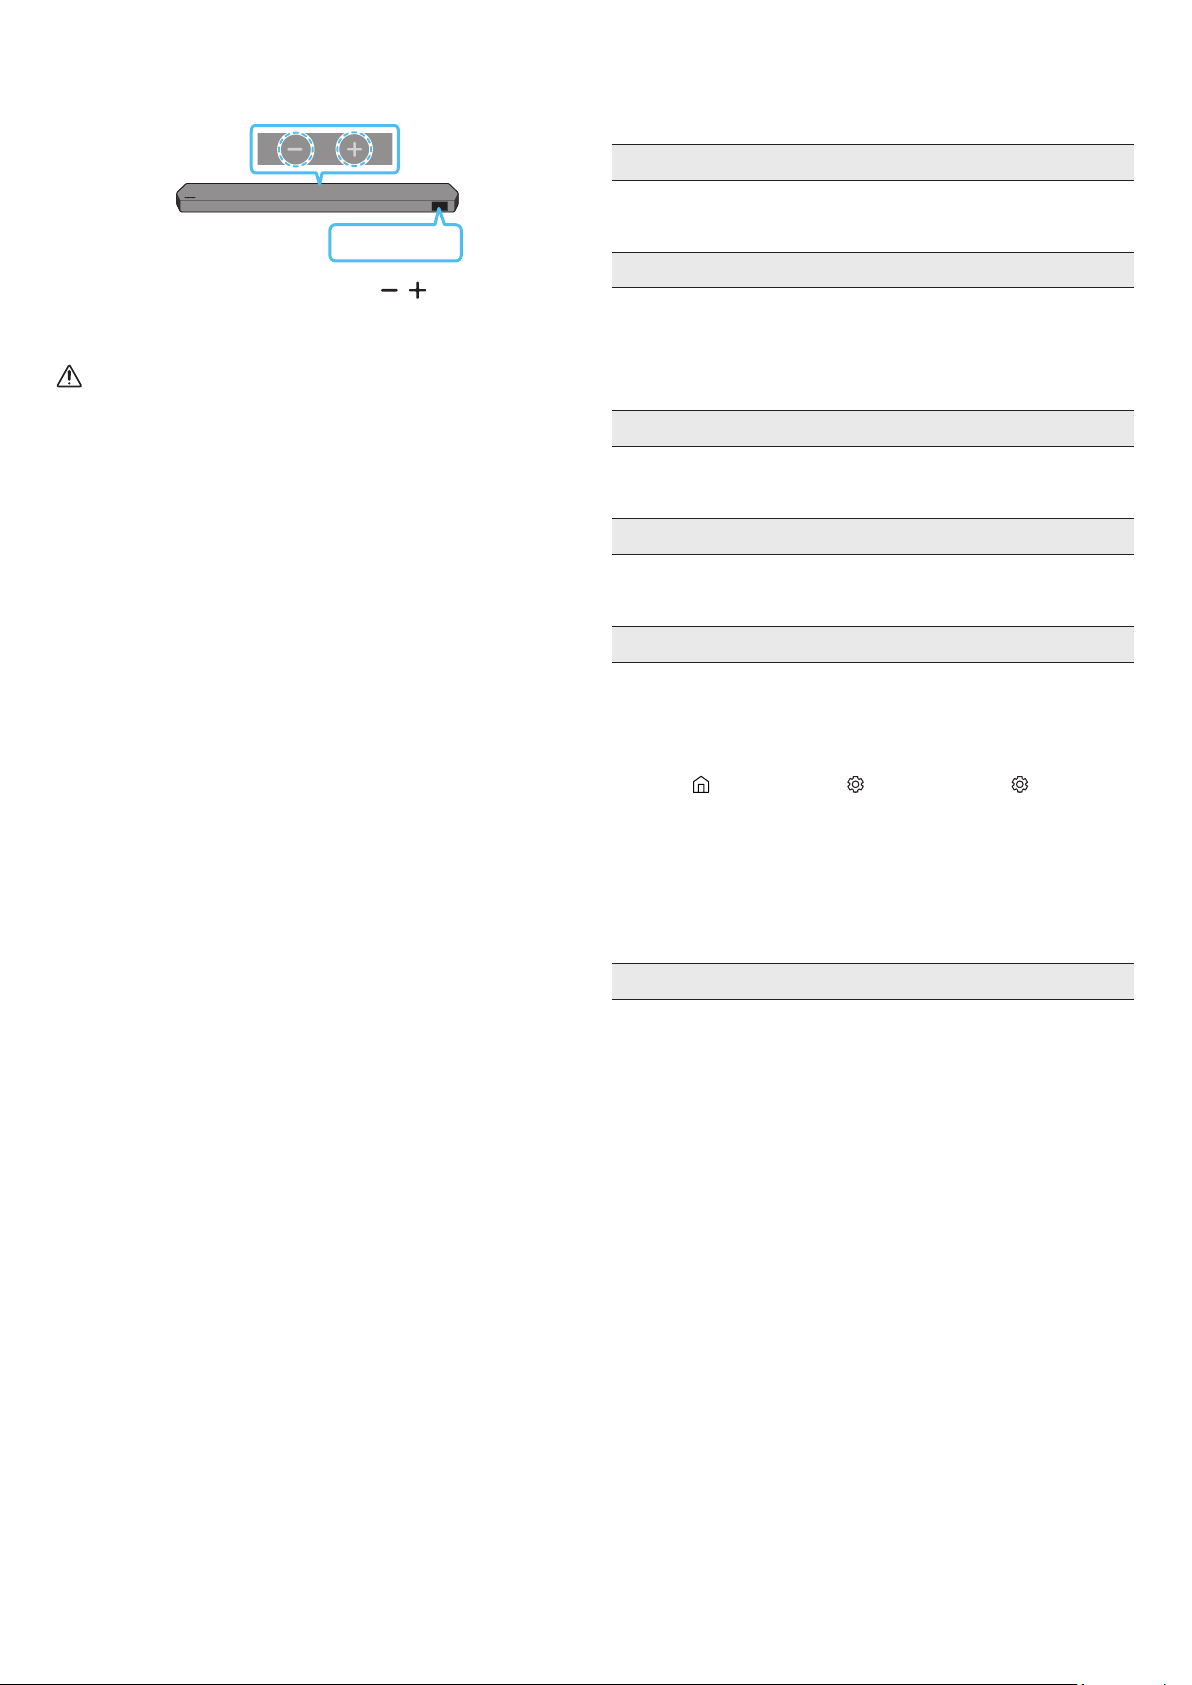
SPA - 35
INIT
Con la Soundbar encendida, presione los botones al mismo
tiempo durante un mínimo de 5 segundos. Aparece “INIT” en la pantalla y se
inicia la Soundbar.
PRECAUCIÓN
• Todas las conguraciones de la Soundbar están inicializadas. Asegúrese
de realizar esto solo cuando sea necesario inicializar.
12 RESOLUCIÓN DE PROBLEMAS
Antes de buscar ayuda, compruebe lo siguiente.
• Compruebe si el cable de alimentación de la Soundbar se insertó
correctamente en el enchufe.
• Después de quitar el cable de alimentación, vuelva a insertarlo.
• Reinicie el dispositivo externo e intente nuevamente.
• Si no hay señal, la Soundbar se apaga automáticamente después de un
período determinado. Encienda la Soundbar (Consulte la página 9).
• Apunte el control remoto directamente a la Soundbar.
• Cambie las pilas por unas nuevas.
• El micrófono está apagado.
Encienda el micrófono. (Consulte la página 7).
• El volumen de la Soundbar está muy bajo o en silencio. Ajuste el volumen.
• Cuando hay un dispositivo externo (STB, dispositivo Bluetooth, dispositivo
móvil, etc.) conectado, ajuste el volumen del dispositivo externo.
• Para la salida del sonido del TV, seleccione Soundbar. (TV Samsung:
Inicio (
) → Menú → Cong. ( ) → Todos los ajustes ( ) → Sonido →
Salida de sonido → Seleccione la Soundbar)
• La conexión del cable a la Soundbar no debe estar oja. Retire el cable y
vuelva a conectar.
• Retire el cable de alimentación por completo, vuelva a conectarlo y
enciéndalo.
• Inicie el producto e intente nuevamente. (Consulte la página 35).
• Verique que el indicador LED en la parte posterior del Altavoz de graves y
los Altavoces surround esté azul. Vuelva a conectar el Soundbar, el Altavoz
de graves y los Altavoces surround si el indicador parpadea en azul o se
enciende en rojo. (Consulte la página 16).
• Puede haber problemas de funcionamiento si hay un obstáculo entre la
Soundbar y el altavoz de graves. Mueva los dispositivos a un área alejada
de los obstáculos.
• Otros dispositivos que envían señales de radiofrecuencia en las
proximidades pueden interrumpir la conexión.
Mantenga su altavoz alejado de tales dispositivos.
• Retire y vuelva a conectar el enchufe de alimentación.
SPA - 36
• Si hay algún objeto entre la Soundbar y el Altavoz de graves, eso podría
causar un problema. Cambie los altavoces a otro lugar donde ese objeto no
se interponga.
• Puede haber interferencias o retrasos en el sonido si el altavoz de graves o
el altavoz surround están lejos de la Soundbar. Acérquelos a la Soundbar.
• Puede haber interferencias o retrasos en el sonido si la Soundbar está cerca
de un instrumento o dispositivo eléctrico que pueda causar interferencia
de radio. Aleje la Soundbar de tales dispositivos (por ejemplo, un router
inalámbrico).
• Cambie el estado de la conexión de red del TV de inalámbrico a cableado.
• El volumen original del contenido que está reproduciendo puede ser bajo.
Intente ajustar el nivel del altavoz de graves. (Consulte la página 10).
• Acerque el altavoz de graves hacia usted.
• Compruebe si el cable HDMI se conectó correctamente a la terminal ARC
(Consulte la página 18).
• Si hay un dispositivo externo conectado (decodicador, consola de juegos,
etc.), es posible que no se pueda realizar la conexión. Conecte la Soundbar
directamente.
• Es posible que HDMI-CEC no esté activado en el TV. Encienda el CEC en el
menú del TV. (TV Samsung: Inicio (
) → Menú → Cong. ( ) → Todos los
ajustes ( ) → Conexión → External Device Manager → Anynet+ (HDMI-
CEC) ON)
• Para establecer la conexión con eARC, la función eARC en el menú del TV
debe estar encendida. (TV Samsung: Inicio ( ) → Menú → Cong. ( )
→ Todos los ajustes ( ) → Sonido → Expert Settings → HDMI-eARC Mode
(Auto))
• Es posible que su dispositivo no pueda reproducir la señal de entrada.
Cambie la salida de audio del TV a PCM o Dolby Digital. (Si se trata de un
TV Samsung: Inicio (
) → Menú → Cong. ( ) → Todos los ajustes ( )
→ Sonido → Expert Settings → Digital Output Audio Format)
• Cuando conecte un dispositivo nuevo, cambie a “BT PAIRING” para
establecer la conexión. (Presione el botón
PAIR del control remoto
o presione el botón / en el cuerpo de la
Soundbar por al menos 5 segundos).
• Si la Soundbar está conectada a otro dispositivo, primero desconéctelo
para poder cambiarlo.
• Vuelva a conectarlo después de quitar la lista de parlantes Bluetooth del
dispositivo al que se quiere conectar. (TV Samsung: Inicio ( ) → Menú →
Cong. ( ) → Todos los ajustes ( ) → Sonido → Salida de sonido → Lista
de altavoces Bluetooth)
• La conexión de TV automática puede estar deshabilitada. Mientras la
Soundbar está en modo “BT READY”, mantenga presionado el botón
en el control remoto de la Soundbar durante 5 segundos
para seleccionar . Si ve la leyenda ,
mantenga presionado el botón nuevamente durante 5 segundos
para cambiar la selección.
• Retire y vuelva a conectar el enchufe de alimentación; luego, intente
nuevamente.
• Inicie el producto e intente nuevamente. (Consulte la página 35).
• Algunos dispositivos, p. ej., microondas, enrutador inalámbrico, etc.,
pueden generar interferencias de radio si están ubicados demasiado cerca
de la Soundbar.
• Si el dispositivo que está conectado mediante Bluetooth se aleja
demasiado de la Soundbar, eso puede hacer que no haya sonido. Acerque
el dispositivo a la Soundbar.
• Si parte de su cuerpo está en contacto con el transceptor Bluetooth o si
el producto está sobre un mueble de metal, eso puede hacer que no haya
sonido. Compruebe el entorno de instalación y las condiciones de uso.
• Compruebe si su enrutador inalámbrico está encendido.
• Apague el enrutador, vuelva a encenderlo e intente nuevamente.
• La Soundbar no se conecta si la señal inalámbrica es demasiado débil.
Intente acercar el enrutador a la Soundbar o eliminar los obstáculos que
pudiera haber entre la Soundbar y el enrutador de ser posible.
• Si su enrutador inalámbrico es nuevo, deberá volver a congurar la red del
altavoz.
• Cuando apaga la Soundbar mientras mira TV, se desactiva la
sincronización de encendido con el TV. Primero, apague el TV.
• La función AVA (solo para los modelos en los que se aplique) no está
disponible cuando se usa la función Q-symphony.
• La función AVA (solo para los modelos en los que se aplique) no está
disponible cuando el micrófono está apagado.
• Si conecta la Soundbar a un dispositivo móvil mientras esta está
conectada al TV, la Soundbar transmite el sonido del dispositivo móvil
mientras se mantenga la conexión con el TV. Por eso, dejará de salir el
sonido proveniente del TV.
• Desconecte el dispositivo móvil y el sonido del TV volverá a reproducirse
desde la Soundbar.

SPA - 37
13 LICENCIA
Dolby, Dolby Atmos, and the double-D symbol are registered trademarks of
Dolby Laboratories Licensing Corporation. Manufactured under license from
Dolby Laboratories. Condential unpublished works. Copyright © 2012-2021
Dolby Laboratories. All rights reserved.
For DTS patents, see http://patents.dts.com. Manufactured under license
from DTS, Inc. (for companies headquartered in the U.S./Japan/Taiwan) or
under license from DTS Licensing Limited (for all other companies). DTS,
DTS:X, and the DTS:X logo are registered trademarks or trademarks of DTS,
Inc. in the United States and other countries. © 2021 DTS, Inc. ALL RIGHTS
RESERVED.
The terms HDMI and HDMI High-Denition Multimedia Interface, and the
HDMI Logo are trademarks or registered trademarks of HDMI Licensing
Administrator, Inc. in the United States and other countries.
• Usa tu teléfono, tablet o computadora como control remoto de Spotify.
Para más información, entra a spotify.com/connect
• El software de Spotify está sujeto a licencias de terceros que puedes
encontrar aquí: https://www.spotify.com/connect/third-party-licenses.
• Apple, Airplay, iPhone, iPad, and Mac are trademarks of Apple Inc.,
registered in the U.S. and other countries.
• Use of the Works with Apple badge means that an accessory has been
designed to work specically with the technology identied in the badge
and has been certied by the developer to meet Apple performance
standards.
14 AVISO SOBRE LA LICENCIA
DE CÓDIGO ABIERTO
Para enviar consultas y solicitudes relacionadas con el código abierto,
comuníquese con Samsung Open Source (
http://opensource.samsung.com).
15 NOTAS IMPORTANTES SOBRE
EL SERVICIO
Las guras e ilustraciones se proporcionan en este manual de usuario solo a
modo de referencia y pueden ser diferentes del aspecto real del producto.

SPA - 38
ESPECIFICACIONES Y GUÍA
Nombre del modelo HW-Q930B
Requisitos de electricidad AC 100-240 V ~ 50/60 Hz (solo México)
Consumo de energía 42 W (solo México)
Peso 5.4 kg
Dimensiones (An. x Al. x Prof.) 1110.7 x 60.4 x 120.0 mm
Rango de temperatura de funcionamiento De +5°C a +35°C
Rango de humedad de funcionamiento 10 % ~ 75 %
AMPLIFICADOR
Potencia de salida nominal (30 W x 3) + (20 W x 6) + (10 W x 3)
Formatos de reproducción admitidos
Dolby 5.1ch / Dolby Digital Plus / Dolby TRUE HD / Dolby ATMOS /
DTS 5.1ch / DTS HD / DTS-HD Master Audio / DTS:X / LPCM 8Ch
Nombre del modelo HW-Q800B
Requisitos de electricidad AC 100-240 V ~ 50/60 Hz (solo México)
Consumo de energía 39 W (solo México)
Peso 5.1 kg
Dimensiones (An. x Al. x Prof.) 1110.7 x 60.4 x 120.0 mm
Rango de temperatura de funcionamiento De +5°C a +35°C
Rango de humedad de funcionamiento 10 % ~ 75 %
AMPLIFICADOR
Potencia de salida nominal (30 W x 3) + (20 W x 4) + (10 W x 3)
Formatos de reproducción admitidos
Dolby 5.1ch / Dolby Digital Plus / Dolby TRUE HD / Dolby ATMOS /
DTS 5.1ch / DTS HD / DTS-HD Master Audio / DTS:X / LPCM 8Ch
Nombre del modelo HW-Q700B
Requisitos de electricidad AC 100-240 V ~ 50/60 Hz (solo México)
Consumo de energía 37 W (solo México)
Peso 4.8 kg
Dimensiones (An. x Al. x Prof.) 1110.7 x 60.4 x 120.0 mm
Rango de temperatura de funcionamiento De +5°C a +35°C
Rango de humedad de funcionamiento 10 % ~ 75 %
AMPLIFICADOR
Potencia de salida nominal (30 W x 3) + (20 W x 2) + (10 W x 3)
Formatos de reproducción admitidos
Dolby 5.1ch / Dolby Digital Plus / Dolby TRUE HD / Dolby ATMOS /
DTS 5.1ch / DTS HD / DTS-HD Master Audio / DTS:X / LPCM 8Ch

SPA - 39
Nombre del altavoz de graves PS-WB96B
Requisitos de electricidad 110-127 V ~ 50/60 Hz (solo México)
Consumo de energía 28 W (solo México)
Peso 9.8 kg
Dimensiones (An. x Al. x Prof.) 210.0 x 403.0 x 403.0 mm
AMPLIFICADOR
Potencia de salida nominal 160 W
Nombre del altavoz de graves PS-WB75B
Requisitos de electricidad 110-127 V ~ 50/60 Hz (solo México)
Consumo de energía 28 W (solo México)
Peso 5.9 kg
Dimensiones (An. x Al. x Prof.) 205.0 x 353.0 x 302.0 mm
AMPLIFICADOR
Potencia de salida nominal 160 W
Nombre del CONJUNTO del altavoz surround
inalámbrico
PS-RB96B (IZQUIERDA/DERECHA)
Requisitos de electricidad AC 100-240 V ~ 50/60 Hz (solo México)
Consumo de energía 19 W (solo México)
Peso 3.1 kg
Dimensiones (An. x Al. x Prof.) 129.5 x 201.3 x 140.4 mm
AMPLIFICADOR
Potencia de salida nominal 140 W
NOTA
• Samsung Electronics Co., Ltd se reserva el derecho de cambiar las especicaciones sin previo aviso.
• El peso y las dimensiones son aproximados.
• La operación de este equipo está sujeta a las siguientes dos condiciones:
(1) es posible que este equipo o dispositivo no cause interferencia perjudicial y
(2) este equipo o dispositivo debe aceptar cualquier interferencia, incluyendo la que pueda causar su operación no deseada.
Wi-Fi
Método de desactivación del puerto
Presione el botón en el control remoto de la Soundbar durante 30 segundos para
encender o apagar Wi-Fi.
Bluetooth
Método de desactivación del puerto
Presione el botón TONE CONTROL en el control remoto de la Soundbar durante 30 segundos para
encender o apagar Bluetooth.

© 2022 Samsung Electronics Co., Ltd. All rights reserved.
Contact SAMSUNG WORLD WIDE
If you have any questions or comments relating to Samsung products, please contact the SAMSUNG customer care Center.
Country Samsung Service Center Web Site
MEXICO 800-SAMSUNG
www.samsung.com/mx/support
BRAZIL
0800 555 0000 (Demais cidades e regiões)
4004-0000 (Capitais e grandes centros)
www.samsung.com/br/support
COSTA RICA 00-800-1-SAMSUNG (726-7864)
www.samsung.com/latin/support (Spanish)
www.samsung.com/latin_en/support (English)
DOMINICAN REPUBLIC 1-800-751-2676
ECUADOR 1-800-SAMSUN (72-6786)
EL SALVADOR 8000-SAMSUNG (726-7864)
GUATEMALA 1-800-299-0033
HONDURAS 800-2791-9111
JAMAICA 1-800-SAMSUNG (726-7864)
www.samsung.com/latin_en/support (English)
NICARAGUA 001-800-5077267
www.samsung.com/latin/support (Spanish)
www.samsung.com/latin_en/support (English)
PANAMA 800-0101
PUERTO RICO 1-800-682-3180
TRINIDAD & TOBAGO 1-800-SAMSUNG(726-7864)
VENEZUELA 0-800-100-5303
COLOMBIA
Bogotá en el 600 12 72
Sin costo en todo el pais 01 8000 112 112
Y desde tu celular #726
www.samsung.com/co/support
CHILE 800 726 786
www.samsung.com/cl/support
BOLIVIA 800 107 260
PERU 080077708 Desde teléfonos jos, públicos o celulares
www.samsung.com/pe/support
ARGENTINA 0800-555-SAMS(7267)
www.samsung.com/ar
URUGUAY 0800-SAMS(7267)
www.samsung.com/uy
PARAGUAY 0800-11-SAMS(7267)
www.samsung.com/py
--------------SOLO MÉXICO---------------
IMPORTADO POR : SAMSUNG ELECTRONICS MÉXICO S.A. DE C.V.
GENERAL MARIANO ESCOBEDO 476 PISO 8
COL. ANZURES, DELEGACIÓN MIGUEL HIDALGO MÉXICO, CIUDAD DE MÉXICO C.P. 11590
TEL : 01 (55) 5747-5100 / 01 800 726 7864