Please keep this instruction manual. When passing the vacuum cleaner on toa third party. please also pass fon this instruction manual
Intended use
This appliance is intended for domestic use only. This appliance is intended for use up to a maximum height of 2000 metres above sea level. Only use this vacuum Cleaner in accordance with the instructions in this instruction manual.
In order to prevent injuries and damage, the vacuum Cleaner must not be used for:
Vacuum cleaning persons or animals
Vacuuming up.
Hazardous, sharp-edged, hot or glowing substances.
Damp or liquid substances, highly flammable or explosive substances and gases.
Ash, soot from tiled stoves and central heating
Toner dust from printers and copiers.
Spare parts, accessories, dust bags
Our original spare parts original (special) accessories and original dust bags are designed to work with the features and requirements of our vacuum cleaners. We therefore recommend that you only use our orginal spare parts. original (special) accessories and original dust bags. This will ensure that your vacuum cleaner has a long service life and that the quality of its cleaning per for remance will main consistently high throughout.
Please note Using unsuitable or inferior quality spare parts. (special) accessories and dust bags can damage your vacuum cleaner. Damage caused by the use of such products fs not covered by our guarantee.
Safety information
This vacuum cleaner complies with the recognised rules of technology and the relevant safety regulations.
The appliance may be used by children over the age of 8 years and by persons with reduced physical. sensory or mental capacity or by per sons with a lack of experience or knowledge if they are supervised or have been instructed on the safe use of the appliance and the have understood the potential dangers of using the appliance.
Children must never play with the appliance.
Cleaning and user maintenance must never be carried out by children without supervision.
Plastic bags and films must be kept out of the reach of children before disposal. => Risk of suffocation.
Proper use
Only connect and use the vacuum cleaner in ac cordance with the specifications on the rating plate
Never vacuum without the dust bag or dust container. ator protection or exhaust filter. => This may damage the vacuum cleaner
Always keep the vacuum cleaner away from your head when using nozzles and tubes. => This could cause injury!
When vacuuming stars. the appliance must always be positioned below the user
Do not use the power cord or the hose to carry or transport the vacuum cleaner.
For safety reasons. if this appliance's mains power cable becomes damaged. it must be replaced by the manufacturer. their aftersales service department or a similariyquaified person.
If using the appliance for longer than 20 minutes. pull ut the power cord completely.
When disconnecting the appliance from the mains. pull on the plug itslf to remove it;
Do not pull on the ito become trapped.
When the cable is being automaticaly rewound. en sure that the mains plug isnot thrown towards persons, body parts, animals or objects. => Use the mains plug to guide the power cord
Pull out the mains plug before carrying out any work fon the vacuum cleaner.
Do not operate the vacuum cleaner if itis damaged. Unplug the appliance from the mains if a fault is de tected.
For safety reasons. only authorised aftersales service personnel are permitted to carry out repairs and fit replacement parts to the vacuum cleaner.
Protect the vacuum cleaner from the weather. moistu reand sources of heat
Do not pour flammable substances or substances con taining alcohol onto the filers (dust bag, motor protection filter, exhaust fiter, et…)
The vacuum cleaner is not suitable for use on con => Vacuuming up building rubble could damage the appliance.
When not in use, switch off the appliance and pull out the mains plug
At the end of it life, the appliance should immediately be rendered unusable. then disposed of in an appropriate manner.
Please note
The mains socket must be protected by at least a 16 amp circuit breaker.
If a circuit breaker is tripped when you switch on the vacuum cleaner. this may be because other electrical appliances which have a high current draw are connected to the same power circuit.
To prevent the circuit breaker from tripping. select the lowest power setting before switching the appliance on. and increase the power only once it is. running.
Disposal information
Packaging The packaging is designed to protect the vacuum cleaner from being damaged during transportation.
It is made of environmentally friendly materials and can therefore be recycled. Dispose of packaging that is no longer required at an appropriate recycling point.
Old appliance Old sppliances still contain many valuable mate tials. Therefore. please take appliances that have reached the end of their service ife to your retailer or recycling centre 20 that they can be recycled. For current disposal methods. please enquire at a retailer or your local council.
Disposal of filters and dust bags
Filter and dust bags are manufactured from environmentally friendly materials. Provided they do not contain substances that are not permitted in household waste. you can dispose of them with your normal household waste.
Notes on the energy label
This vacuum cleaner is a general purpose vacuum cleaner with a primary hose.
These appliances can be operated with either a dust bag ora dust box in the dust compartment. The stated values refer to the appliance when used with 2 dust bag. To achieve the best possible energy efficiency on carpet and hard floor. please use the interchangeable universal nozele.
These calculations are based on the Commission Delegated Regulation (EU) No. 665/2043 of 3rd May 2013 Supplementing Directive 2010/30/EU.
Unless otherwise stated. red to in these instructions were carried out accordance with the EN 60312-4.2047" standard.
As the motor service fest is carried out with the dust collector empty, the stated motor service life must be increased by 10% for tests with the dust collector half filled.
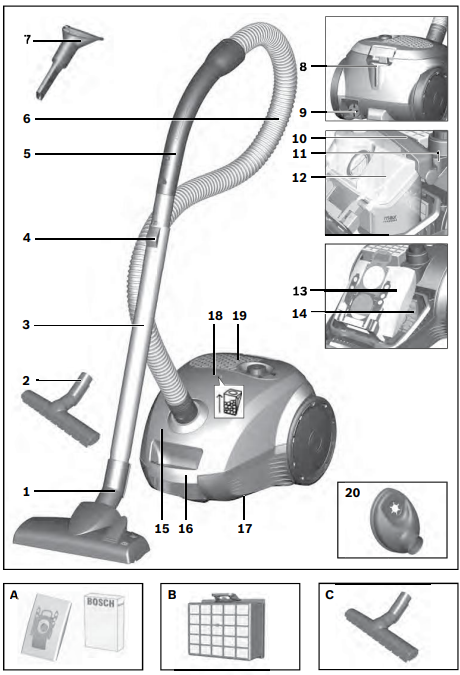
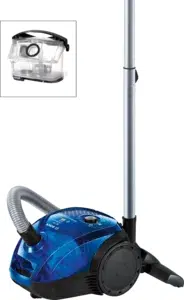
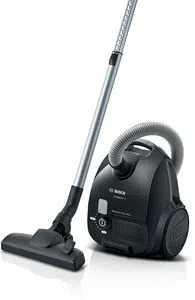
Your vacuum cleaner
Adjustable floor tool
Hard floor tool
Telescopic tube
Sliding switcht
Handle
Flexible hose
Muitipurpose nozzle
Parking aid
Power cord
Exhaust fter
On/Off button with electronic suction reguator*
Dust container for using the vacuum cleaner without dust bags or an alternative dust bag
Dust bag
Motor protection fiter, washable
Dust bag compartment lid
Carrying handles
Storage ad (on the underside of the appliance)
Dust bag change indicator
Exhaust grille
Drill dust nozzle
Replacement parts and special accessories
A Replacement filter package Type PowerProtect Dustbag No 00575069. Contents: 4 dust bags with fasteners 1 micro-hyglene fiter
PLEASE NOTE
We therefore recommend that you only use our original dust bags.
Your appliance is a highly efficient vacuum cleaner that achieves excellent cleaning results when used with high-quality dust bags. Only by using high quality dust bags (such as Bosch original dust bags) can you ensure that your vacuum cleaner is working at the energy efficiency class. dust pick-up rate and dust retention capacity listed on its EU energy label.
The use of inferior-quality dust bags (e.g. paper bags) can have a negative effect on the service life and performance of your appliance. Using unsuitable or inferior-quality dust bags can also damage your vacuum cleaner. Such damage is not covered by our guarantee.
You can find more information about this at www.bosch-home.com/dust-bag. You can order our original vacuum cleaner bags here.
B (H)EPA filter BBZ156HF Additional filter for cleaner exhaust air. Recommended for allergy sufferers. Replace once a year.
C Hard-floor tool BBZ123HD For vacuuming hard floors (parquet. tiles. terracotta. etc.)
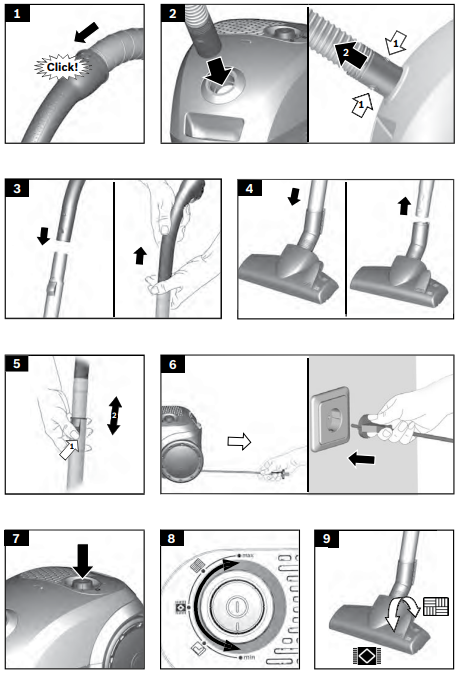
Before using for the first time
Figure 1 + Push the handle onto the flexible hose and lock it in place.
Initial use
Figure 2 a) Push the flexible hose connecting piece into the air intake opening in the lid until it locks in place. b) To remove the flexible hose. press the two locking catches together and pull out the hose.
Figure 3 + Push the handle into the suction/telescopic tube. + To remove it. turn the handle slightly and pull it out of the tube.
Figure 4 + Push the suction/telescopic tube into the connecting piece of the floor tool. + To release the connection. turn the tube slightly and pull it out of the floor tool.
Figure 5 + Unlock the telescopic tube by moving the sliding switch in the direction of the arrow and adjust it to the desired length.
Figure 6 + Holding the power cord by the plug. pull it out to the required length and insert the plug into the mains socket.
Figure 7 + To switch the vacuum cleaner on or off. press the On/Off button in the direction of the arrow.
Controlling the suction level
Figure 8 Set the suction level by turning the On/Off button in the direction of the arrow. The suction level can be infinitely adjusted to the level required by turning the control knob in the direction of the arrow min.
- For vacuuming curtains and delicate textiles
- For vacuuming upholstered furniture and cushions
- For vacuuming delicate rugs und for daily vacuuming of lightly soiled floors
- For vacuuming durable floor coverings
- For vacuuming hard floors and heavily soiled rugs and carpets
Vacuuming
Figure 9 Adjusting the floor tool - Rugs and carpets - Hard floors
Please note:
Floor tools are subject to a certain amount of wear. depending on the type of hard floors you have (e.g. rough. rustic tiles). You must therefore check the underside of the floor tool at regular intervals.
Worn undersides of floor tools may have sharp edges that can damage delicate hard floors. such as parquet or linoleum. The manufacturer does not accept any responsibility for damage caused by worn floor tools.
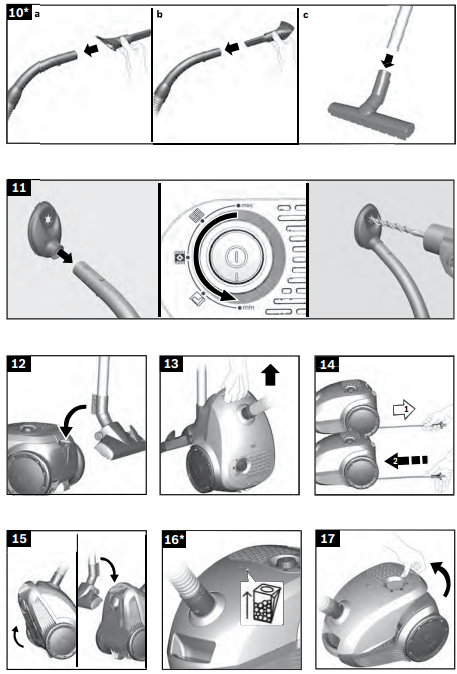
Figure 10 vacuuming with accessories Attach the nozzles to the suction pipe or handle as required: a) Crevice nozzle for vacuuming crevices and corners. etc. b) Upholstery nozzle for vacuuming upholstered furniture. curtains. etc. c) Hard-floor tool For vacuuming hard floor coverings (tiles. parquet. etc.)
Drill dust nozzle
Fig. 11 - Fasten the drill dust nozzle onto the handle and position it on the wall so that the drill hole opening on the nozzle is placed directly over where the hole is to be drilled.
- The drill dust nozzle is held in the required position by suction. Depending on the condition of the wall to be drilled. you may need to adjust to a higher power setting to ensure that the drill dust nozzle remains in place. During drilling. the fine dust is automatically vacu umed up.
Figure 12 You can use the parking aid on the side of the appli ance if you wish to stop vacuuming for a short time.
After switching off the appliance. slide the hook on the floor tool into the recess on the side of the appliance.
Figure 13 When vacuuming on stairs for example. the appliance can also be carried by the handle.
After using the appliance
Figure 14 + Pull out the mains plug. + Briefly pull on the power cord and then release it (the power cord retracts automatically).
Figure 15
To store/transport the appliance. you can use the storage aid on the underside of the appliance.
Stand the appliance up on its end. Slide the hook on the floor tool into the recess on the underside of the appliance.
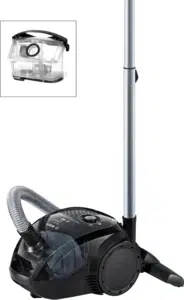
You have purchased a floor vacuum cleaner which can vacuum up any type of dry dirt using the dust contai ner or dust bag.
We recommend that you use: -The dust bag principally for everyday household cleaning. -The dust container for DlV-related cleaning in parti cular, e.g. to vacuum up wood shavings. etc.
Using dust bags
Replacing the dust bag
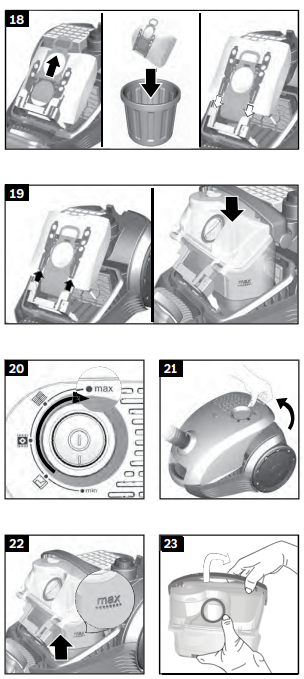
Figure 16 + Ifthe dust bag change indicator in the lid is filled completely when the floor tool is lifted from the floor with the highest suction level selected. the dust bag must be changed. even though it may not yet be full. Even if the dust bag is not full. it may still need changing. due to the type of dust which has been vacuumed.
First check that the nozzle. suction pipe and flexib le hose are not blocked. as this would also lead to the dust bag change indicator being triggered.
Figure 17 + Unlock the lid by releasing the locking lever in the direction of the arrow.
Figure 18
a) Close the dust bag by pulling on the locking tab and then remove it. b) Insert a new dust bag by pushing it fully into the holder.
Please note: The lid e has been inserted. only close if a dust bag
Using the dust container
If necessary. a dust container can be used in place of a dust bag.
Please note: The dust bag change indicator only works in conjunction with a dust bag.
Figure 19 + Open the dust bag compartment lid. e@ Remove the dust bag and insert the dust container. + Close the appliance lid.
Figure 20 Set the power setting to maximum for best results when vacuuming.
We recommend that you reduce the setting only when vacuuming very delicate materials.
Emptying the dust container
In order to achieve the best possible vacuuming results. the dust container should be emptied after every use or. at the latest. when dust at one point in the container has reached the max marking.
When emptying the dust container. always check the soiling level of the foam filter in the bottom of the container.
When it is visibly soiled. clean the filter as described from figure 25 on wards.
Figure 21 + Open the dust bag compartment lid by moving the locking lever in the direction of the arrow.
Figure 22 + Remove the dust container from the appliance.
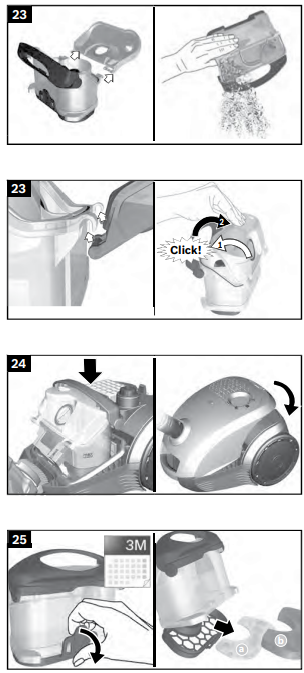
Figure 23 + Fold the carrying handle backwards. away from the air intake opening. + Remove the cover from the container and put it to one side. + Empty the container. + Hook the cover into the container and the close it. + Fold up the carrying handle and lock it in place on the cover.
Figure 24 + Reinsert the dust container into the appliance and close the dust bag compartment lid.
Please note: The inside of the dust container may become scratched with use and start to look opaque. This does not. however. affect the performance of the vacuum cleaner in any way. i.e. it will continue to function as normal.
Cleaning the filter fleece (a) and the foam filter (b) in the dust container
The filter must be cleaned: - After any malfunctions. i.e. after a blockage is cleared. - If there is visible dirt on the filter - At least every three months
Figure 25 + Unlock the locking tab on the rear side of the container and open the base plate on the bottom of the container. # Remove both filters (a + b) from the base plate.
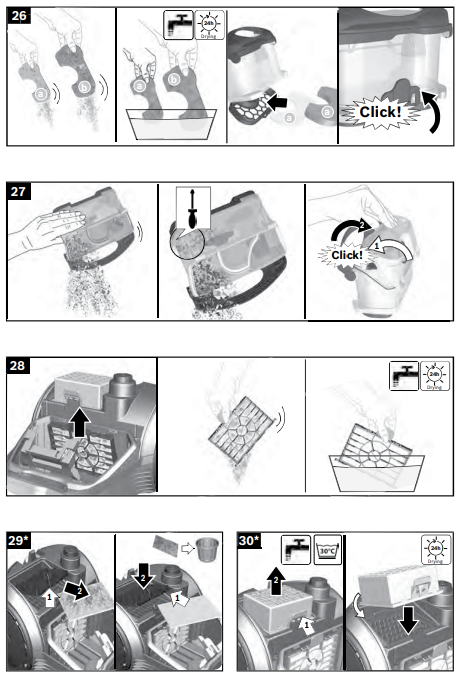
Figure 26 Wash out both filters (a+ b) and leave them to dry for at least 24 hours. + After cleaning them. insert both filters into the base plate. + Close the base plate and push in the locking tab until you hear it click into place.
Note: When inserting the filters. you must follow the correct sequence. The foam filter (b) must lie on top of the filter fleece (a).
Malfunctions
Removing a blockage in the dust container
Figure 27 + Empty the container. Figure 21 + Loosen the blockage. e.g. with a screwdriver. and tap or suck it out.
If sucking out. a dust bag must be inserted in the appliance. Figure 19. Fit the container cover. fold up the carrying handle and lock it in place on the cover.
Note: After any malfunctions. you must clean the filters on the dust container (figure 25 + figure 26).
Filter care
Cleaning the motor protection filter The motor protection filter should be cleaned regularly by tapping out the dirt and rinsing.
Figure 28 + Open the dust bag compartment lid. Figure Ell + Remove the motor protection filter in the direction of the arrow. + Clean the motor protection filter by tapping out the dirt. + If it is very dirty. the motor protection filter should be rinsed. Then allow the filter to dry for at least 24 hours. + After cleaning. insert the motor protection filter into the appliance and close the dust bag compartment lid.
Replacing the micro-hygiene filter
This should be replaced with every replacement filter pack
Figure 29 + Open the dust bag compartment lid. Figure 21 + Release the filter holder by moving the locking lever in the direction of the arrow. + Remove the micro-hygiene filter. Insert a new micro-hygiene filter into the appliance. + Insert the filter holder into the appliance and lock it in place.
Cleaning the (H)EPA* exhaust filter
The (H)EPA* filter is designed so that it does not need to be replaced. provided the appliance is used as intended in the household.
To ensure that the vacuum cleaner is working at its optimum power level. the (H)EPA* filter should be rinsed out after one year. The filtering action of the filter remains intact. even if the filter surface becomes discoloured.
Figure. 30
+ Open the rear flap. + Unlock the (H)EPA* filter by moving the locking tab in the direction of the arrow. and remove it from the appliance. + Tap out the filter unit and rinse it under running water.
Alternatively. the unit can be cleaned in a washing machine at max. 30 °C using a gentle programme and the lowest spin speed.
TIP: To protect other laundry items. put the filter unit into a laundry bag.
+ Once the (H)EPA* filter has dried completely (at least 24 hours). insert it back into the appliance and lock it in place. + Close the rear flap.
After vacuuming fine dust particles (e.g. gypsum. cement. etc.). clean the motor protection filter by tapping it out or. if necessary. replace the motor pro tection filter and exhaust filter.
Care
Always switch off the vacuum cleaner and disconnect the power cord from the mains before cleaning the vacuum cleaner.
The vacuum cleaner and plastic accessories can be cleaned with a commercial plastic cleaner.
Do not use a scourer. glass-cleaning agent or multi-purpose cleaning products. Never immerse the vacuum cleaner in water.
The dust compartment can. if necessary. be cleaned with a second vacuum cleaner or simply wiped with a dry cloth or dusting brush.