Use & Care Guide
Mode[ JMV8166BA
IMPORTANT SAFETY INSTRUCTIONS ........... 2
Precautions to Avoid Possible Exposure to Excessive
Microwave Energy ............................ 4
Getting The Best Cooking Results .............. 6
Features .................................... 7
Operating Instructions ........................ 9
Cooking Utensils ............................ 29
Care and Cleaning ........................... 30
Troubleshooting ............................. 32
Warranty ................................... 34
Guide d'utilisation et d'entretien ............... 35
Gufa de uso y cuidado ....................... 69
Keep instructions for future reference.
Be sure Use & Care Guide stays with oven.
Part No.8112P299-60
Form No. A/08/05 Code No. DE68-03143K
IMPORTANT SAFETY INSTRUCTIONS
What You Need to
Know About Safety
instructions
Warning and Important Safety Instructions appearing in
this Use & Care Guide are not meant to cover all possible
conditions and situations that may occur. Common sense,
caution, and care must be exercised when installing,
maintaining, or operating microwave.
Always contact your dealer, distributor, service agent, or
manufacturer about problems or conditions you do not
understand.
RecognizeSafety
Symbols, Words, Labels
SAVE THESE INSTRUC'rlO

IMPORTANT SAFETY INSTRUCTIONS
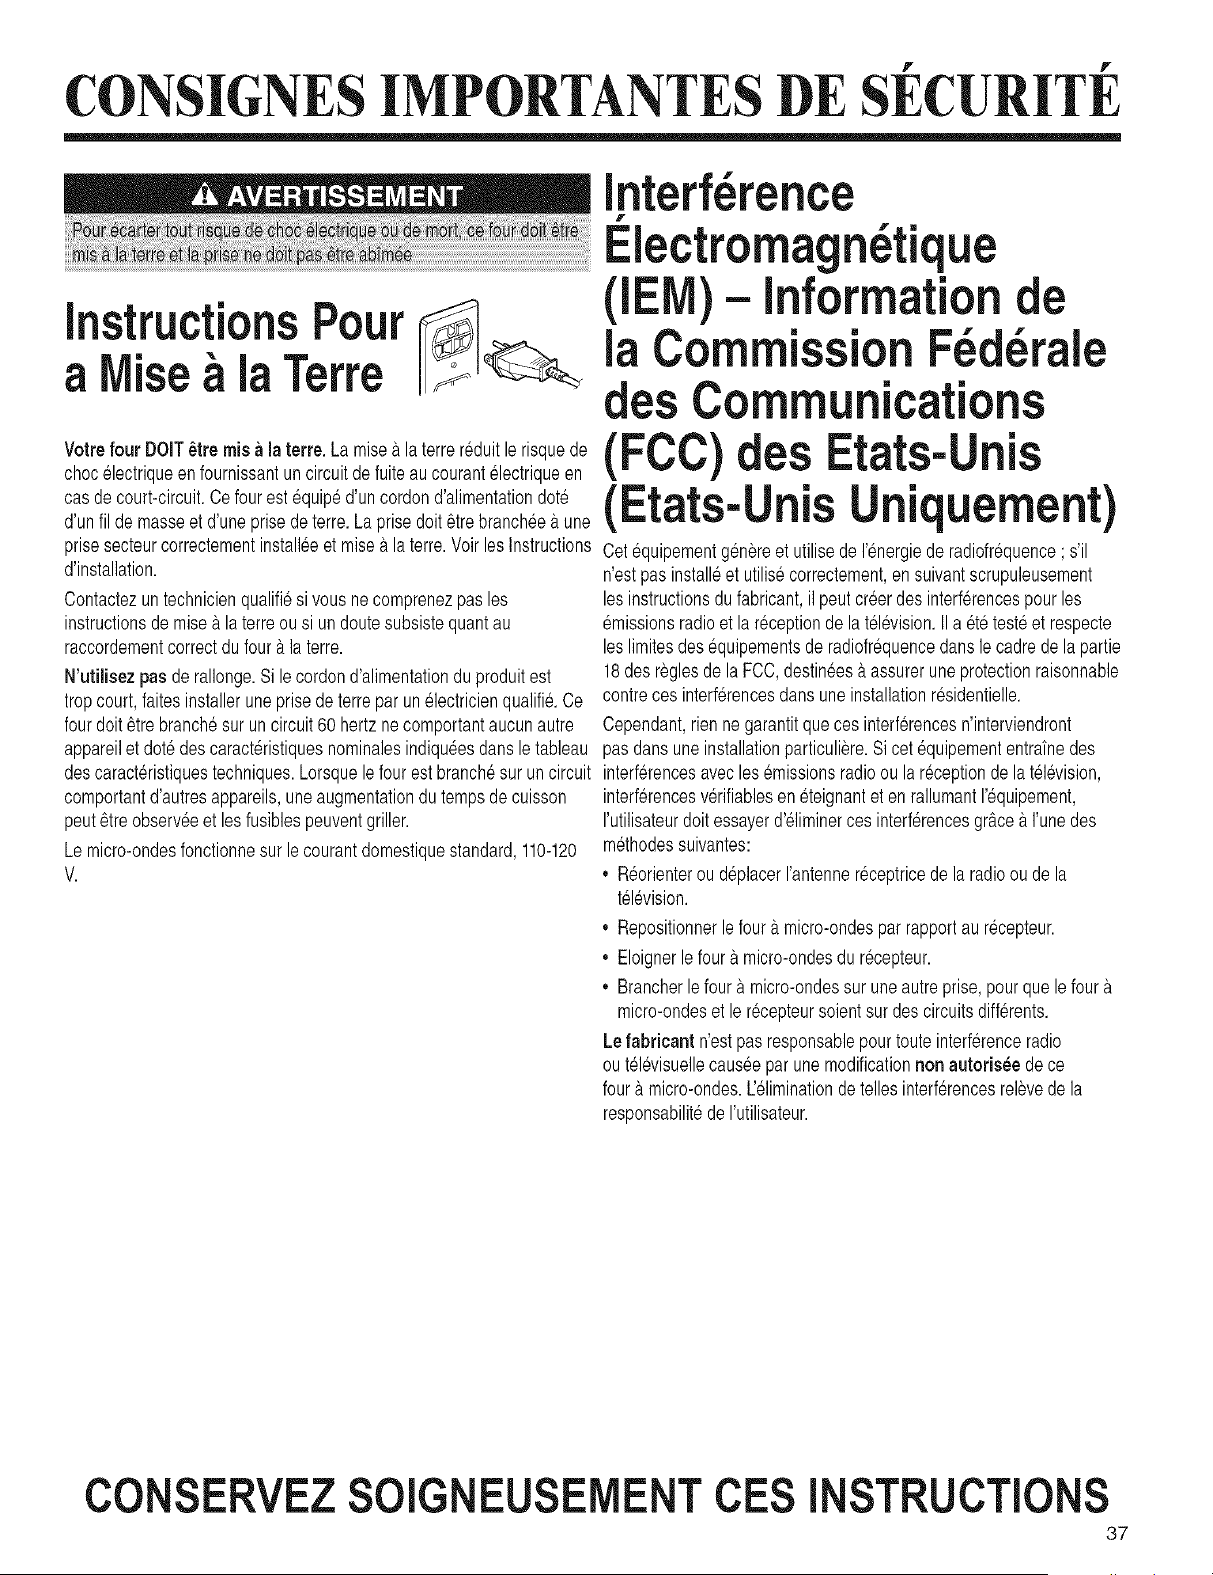
Grounding
instructions
Oven MUST be grounded. Grounding reduces risk of
electric shock by providing an escape wire for the electric
current if an electrical short occurs. This oven is equipped
with a cord having a grounding wire with a grounding plug.
The plug must be plugged into an outlet that is properly
installed and grounded. See Installation Instructions.
Consult a qualified electrician or servicer if grounding
instructions are not completely understood, or if doubt
exists as to whether the oven is properly grounded.
Do not use an extension cord. If the product power cord
is too short, have a qualified electrician install a three-slot
receptacle. This oven should be plugged into a separate
60 hertz circuit with the electrical rating as shown in
specifications table. When the oven is on a circuit with
other equipment, an increase in cooking times may be
required and fuses can be blown.
Microwave operates on standard household current, 110-
120V.
Federal
Communications
Commission Radio
Frequency interference
Statement (U.S.A. Only)
This equipment generates and uses ISM frequency energy
and if not installed and used properly, that is in strict
accordance with the manufacturer's instructions, may
cause interference to radio and television reception, it has
been type tested and found to comply with limits for ISM
Equipment pursuant to part 18 of FCC Rules, which are
designed to provide reasonable protection against such
interference in a residential installation.
However, there is no guarantee that interference will not
occur in a particular installation, if this equipment does
cause interference to radio or television reception, which
can be determined by turning the equipment off and on,
the user is encouraged to try to correct the interference by
one or more of the following:
* Reorient the receiving antenna of the radio or television.
* Relocate the microwave oven with respect to the receiver.
* Move the microwave oven away from the receiver.
* Plug the microwave oven into a different outlet so that the
microwave oven and the receiver are on different branch
circuits.
The manufacturer is not responsible for any radio
or television interference caused by unauthorized
modification to this microwave oven. it is the responsibility
of the user to correct such interference.
SAVE THESE INSTRUCTIONS

IMPORTANT SAFETY INSTRUCTIONS
Precautions to Avoid
Possible Exposure to
Excessive ;rowave
Energy
A. DO NOT attempt to operate this oven with the door
open since open door operation can result in harmful
exposure to microwave energy. It is important not to
defeat or tamper with the safety interlocks.
B. DO NOT place any object between the oven front
face and the door or allow soil or cleaner residue to
accumulate on sealing surfaces.
C. DO NOT operate the oven if it is damaged. It is
particularly important that oven door close properly and
that there is no damage to:
1. door (bent),
2. hinges and latches (broken or loosened),
3. door seals and sealing surfaces.
D. Oven should not be adjusted or repaired by anyone
except properly qualified service personnel.
SAVE THESE INSTRUCTIO
IMPORTANT SAFETY INSTRUCTIONS
SAVE THESE iNSTRUCTiONS
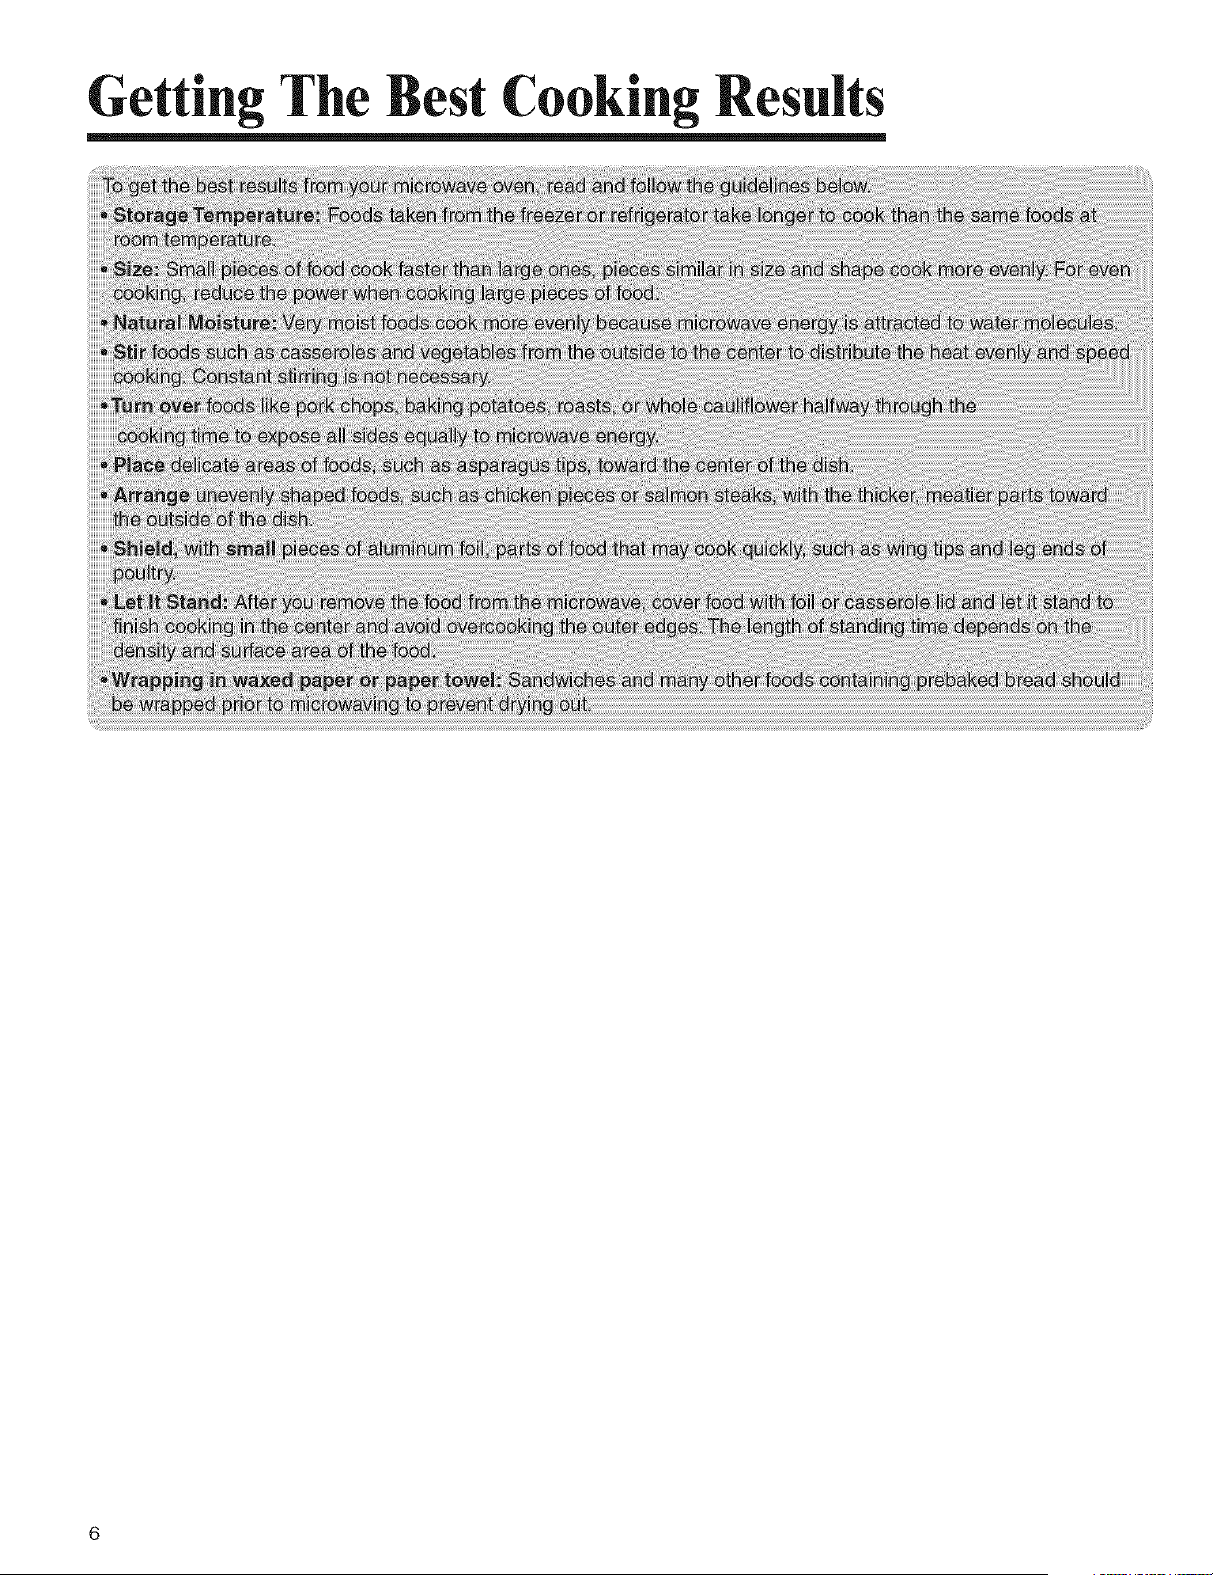
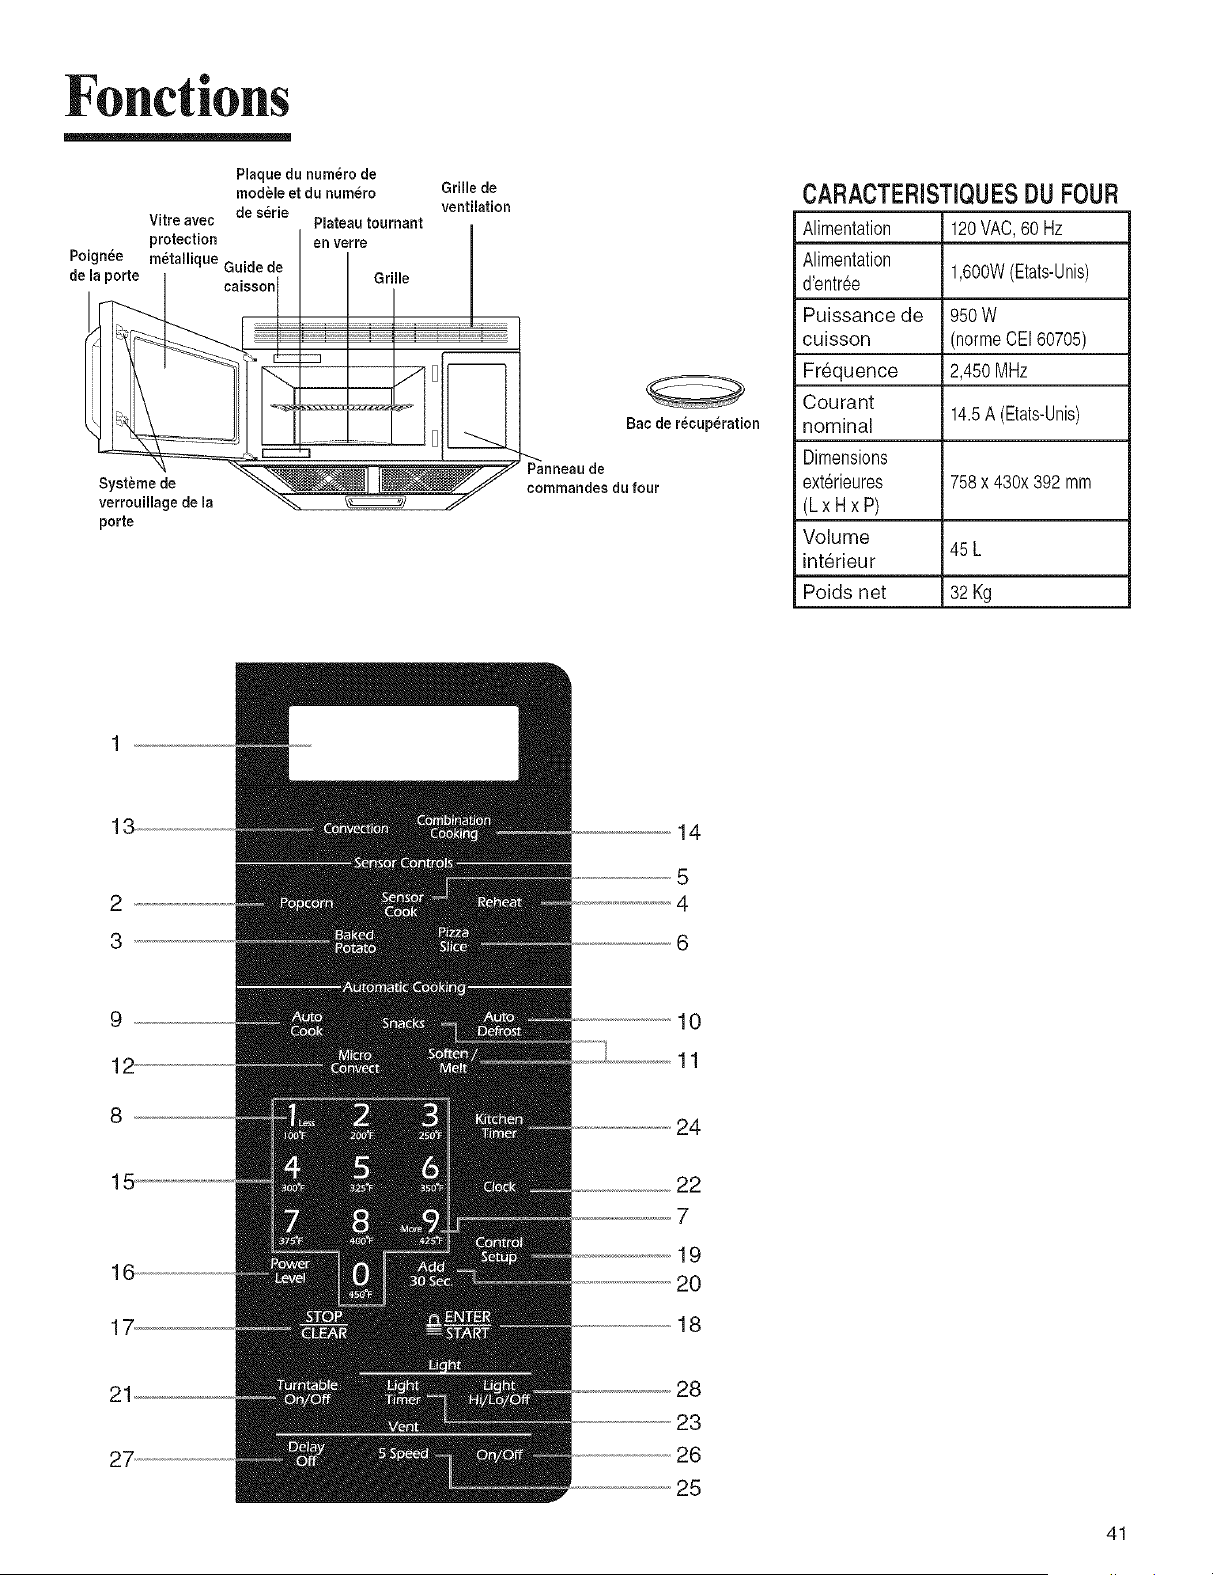
Getting The Best Cooking Results
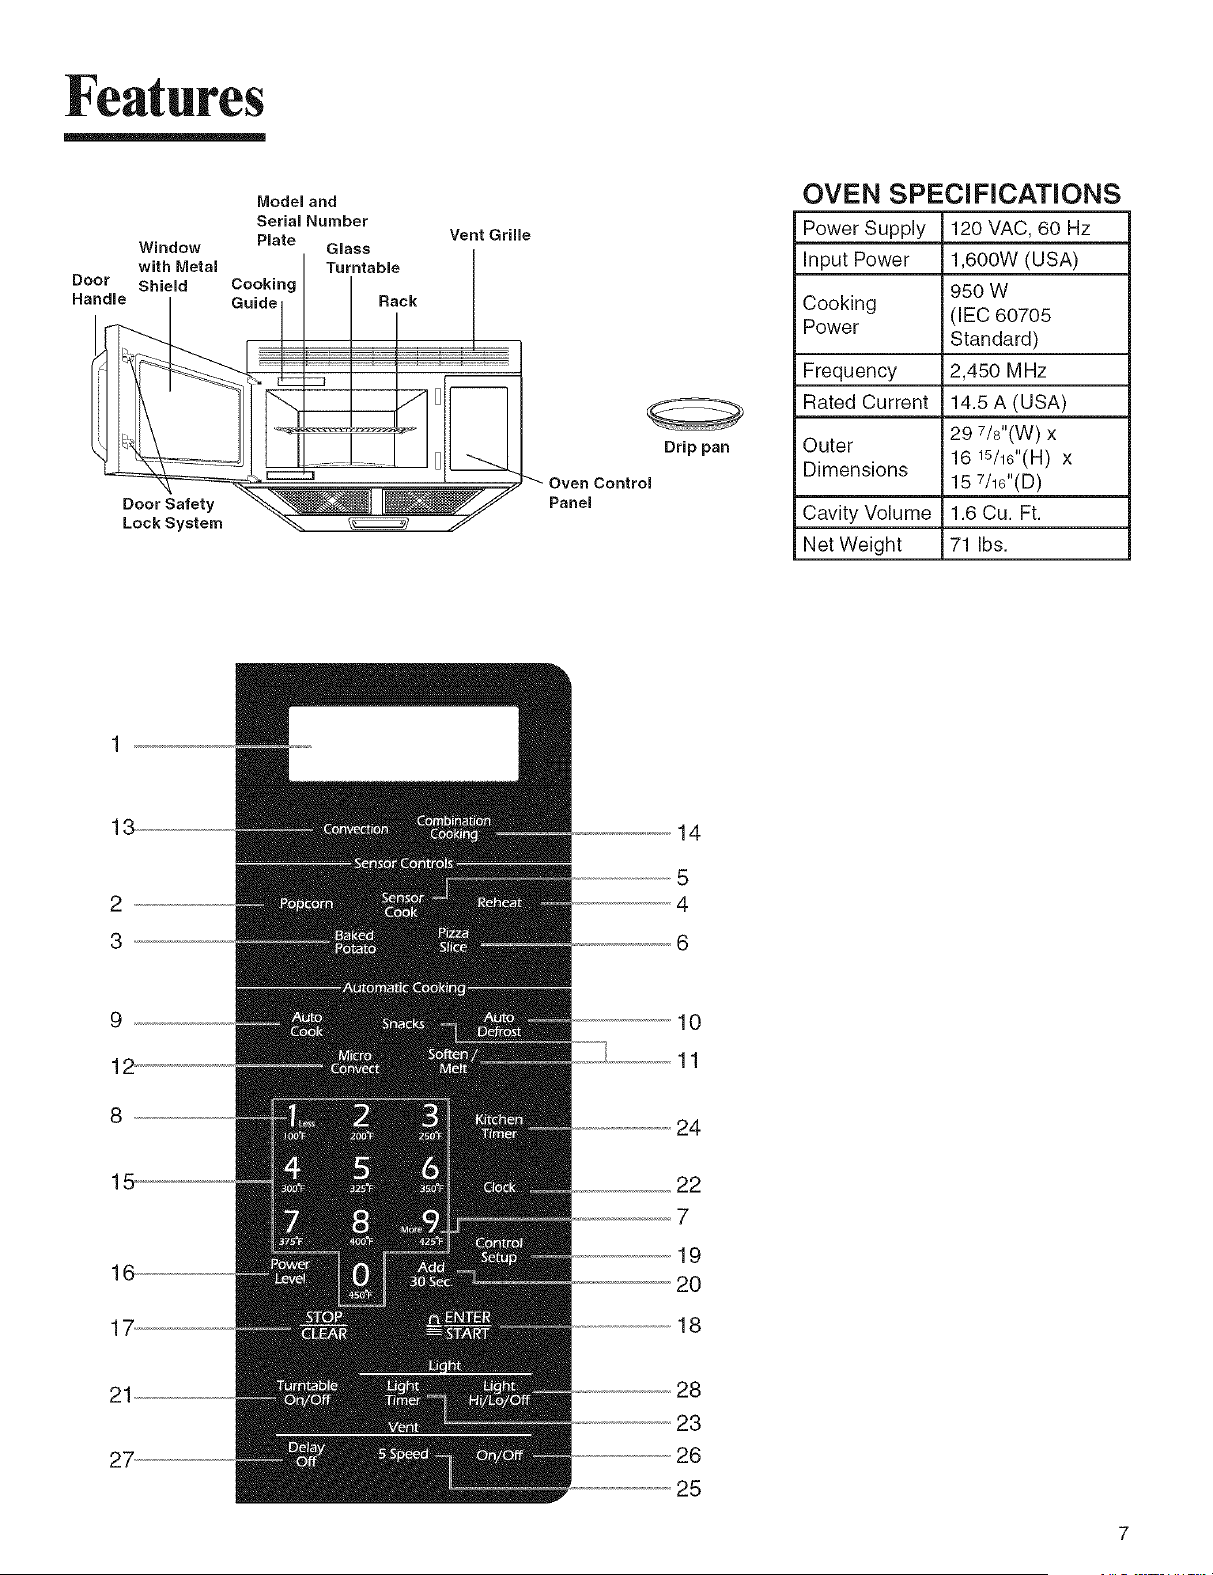
Features
Door
Handle
IVlodel and
Serial Number
Window Plate Glass
with Metal Turntable
Shield Cooking
Guide Rack
Door Safety
Lock System
Vent Grille
Oven Control
Panel
Drip pan
OVEN SPECIFICATIONS
Power Supply 120 VAC, 60 Hz
Input Power 1,600W (USA)
950 W
Cooking (IEC 60705
Power
Standard)
Frequency 2,450 MHz
Rated Current 14.5 A (USA)
29 7/8"(W) x
Outer
16 15/16"(H) x
Dimensions
15 7/16"(D)
Cavity Volume 1.6 Cu. Ft.
Net Weight 71 Ibs.
13
2
3
14
5
4
6
9
12
8
10
11
24
15
16
17
22
7
19
2O
18
21
27
28
23
26
25
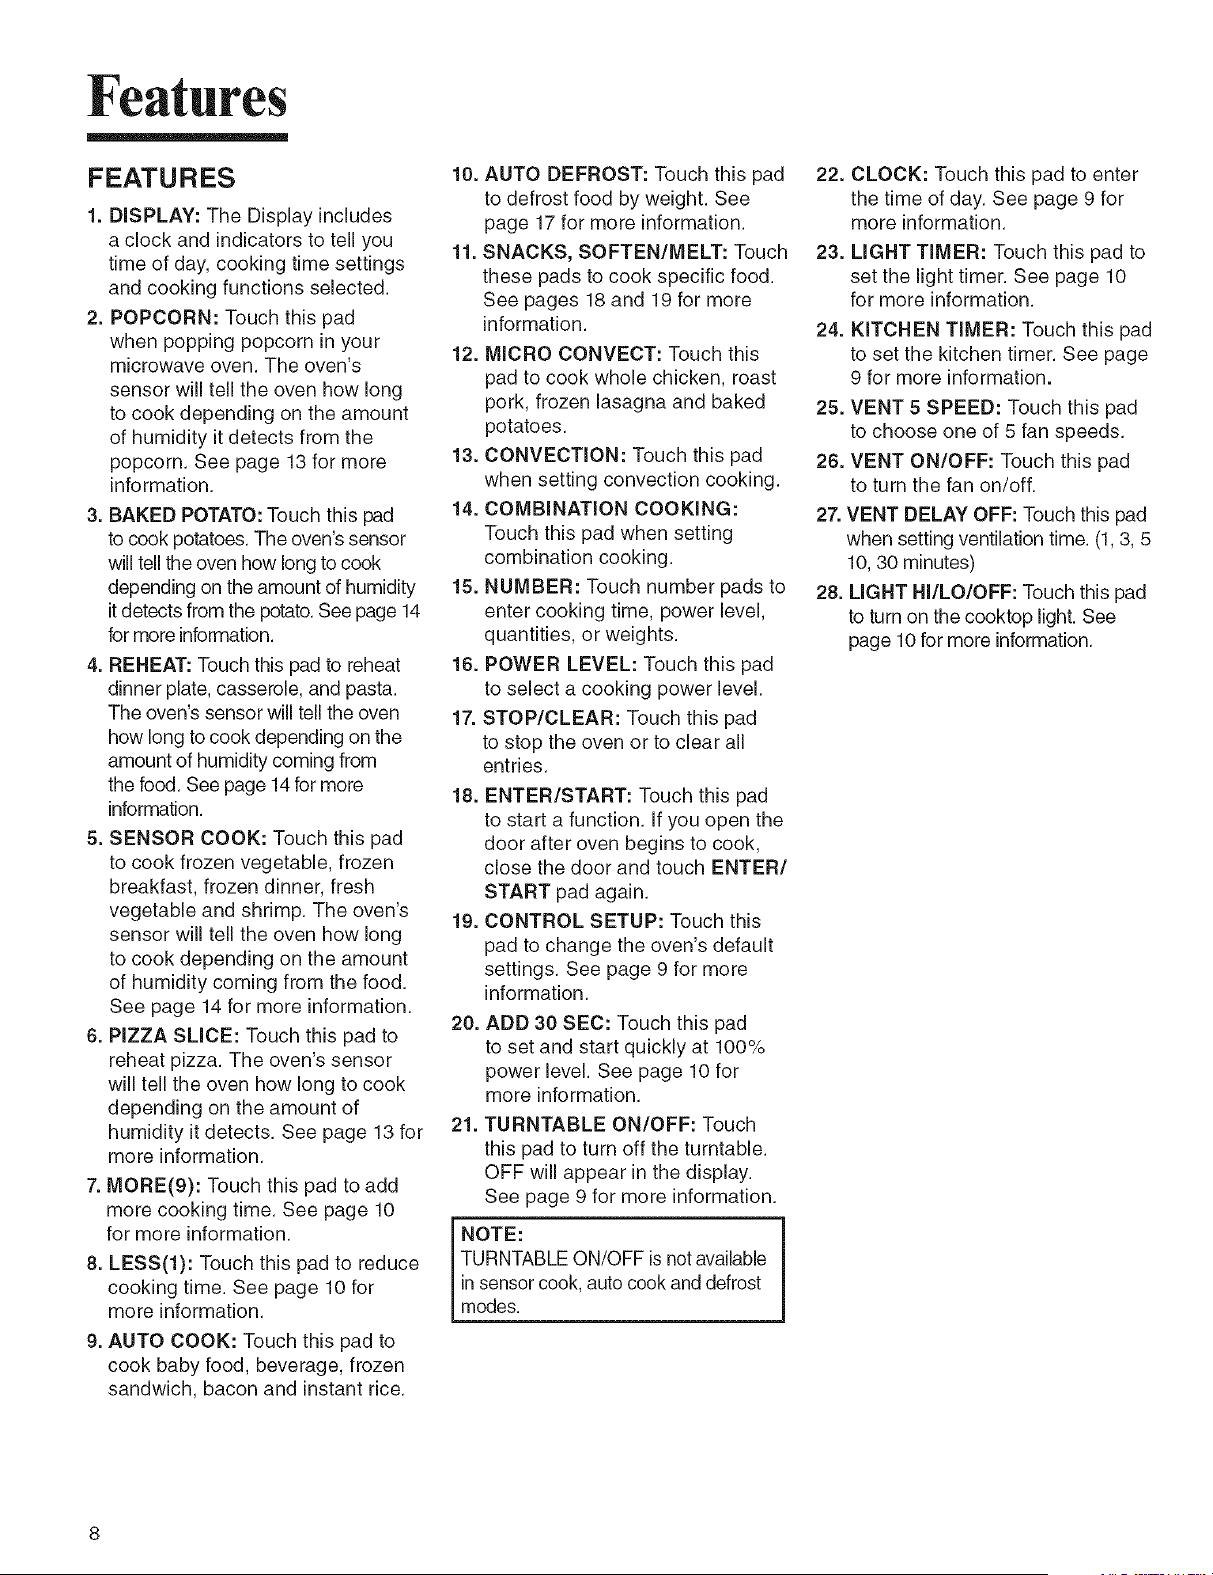
Features
FEATURES
1. DISPLAY: The Display includes
a clock and indicators to tell you
time of day, cooking time settings
and cooking functions selected.
2. POPCORN: Touch this pad
when popping popcorn in your
microwave oven. The oven's
sensor will tell the oven how long
to cook depending on the amount
of humidity it detects from the
popcorn. See page 13 for more
information.
3. BAKED POTATO: Touch this pad
to cook potatoes. The oven's sensor
will tell the oven how long to cook
depending on the amount of humidity
it detects from the potato. See page 14
for more information.
4. REHEAT: Touch this pad to reheat
dinner plate, casserole, and pasta.
The oven's sensor will tell the oven
how long to cook depending on the
amount of humidity coming from
the food. See page 14 for more
information.
5. SENSOR COOK: Touch this pad
to cook frozen vegetable, frozen
breakfast, frozen dinner, fresh
vegetable and shrimp. The oven's
sensor will tell the oven how long
to cook depending on the amount
of humidity coming from the food.
See page 14 for more information.
6. PIZZA SLICE: Touch this pad to
reheat pizza. The oven's sensor
will tell the oven how long to cook
depending on the amount of
humidity it detects. See page 13 for
more information.
7. MORE(9): Touch this pad to add
more cooking time. See page 10
for more information.
8. LESS(l): Touch this pad to reduce
cooking time. See page 10 for
more information.
9. AUTO COOK: Touch this pad to
cook baby food, beverage, frozen
sandwich, bacon and instant rice.
10. AUTO DEFROST: Touch this pad
to defrost food by weight. See
page 17 for more information.
11. SNACKS, SOFTEN/MELT: Touch
these pads to cook specific food.
See pages 18 and 19 for more
information.
12. MICRO CONVECT: Touch this
pad to cook whole chicken, roast
pork, frozen lasagna and baked
potatoes.
13. CONVECTION: Touch this pad
when setting convection cooking.
14. COMBiNATiON COOKING:
Touch this pad when setting
combination cooking.
15. NUMBER: Touch number pads to
enter cooking time, power level,
quantities, or weights.
16. POWER LEVEL: Touch this pad
to select a cooking power level.
17. STOP/CLEAR: Touch this pad
to stop the oven or to clear all
entries.
18. ENTER/START: Touch this pad
to start a function. If you open the
door after oven begins to cook,
close the door and touch ENTER/
START pad again.
19. CONTROL SETUP: Touch this
pad to change the oven's default
settings. See page 9 for more
information.
20. ADD 30 SEC: Touch this pad
to set and start quickly at 100%
power level. See page 10 for
more information.
21. TURNTABLE ON/OFF: Touch
this pad to turn off the turntable.
OFF will appear in the display.
See page 9 for more information.
NOTE:
TURNTABLE ON/OFF is not available
in sensor cook, auto cook and defrost
modes.
22. CLOCK: Touch this pad to enter
the time of day. See page 9 for
more information.
23. LIGHT TIMER: Touch this pad to
set the light timer. See page 10
for more information.
24. KITCHEN TIMER: Touch this pad
to set the kitchen timer. See page
9 for more information.
25. VENT 5 SPEED: Touch this pad
to choose one of 5 fan speeds.
26. VENT ON/OFF: Touch this pad
to turn the fan on/off.
27. VENT DELAY OFF: Touch this pad
when setting ventilation time. (1, 3, 5
10, 30 minutes)
28. LIGHT HI/LO/OFF: Touch this pad
to turn on the cooktop light. See
page 10 for more information.
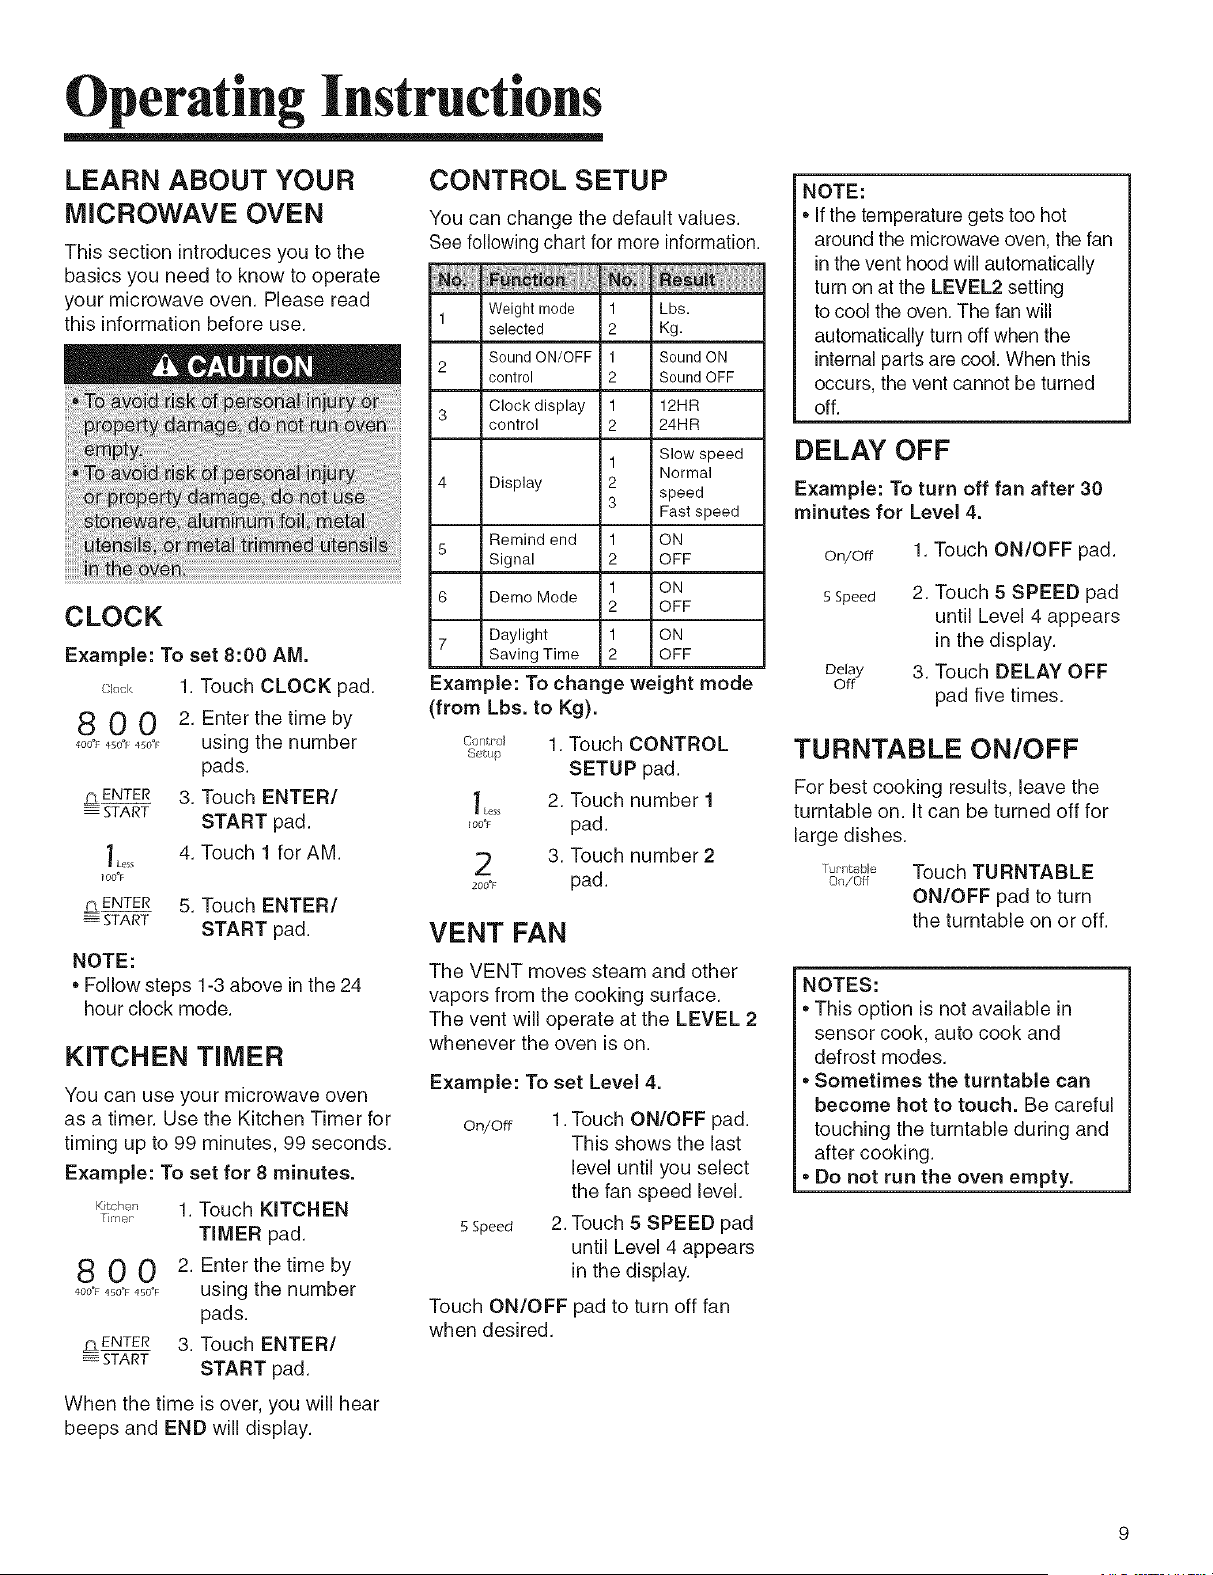
Operating Instructions
LEARN ABOUT YOUR
MICROWAVE OVEN
This section introduces you to the
basics you need to know to operate
your microwave oven. Please read
this information before use.
CLOCK
Example: To set 8:00 AM.
aod, 1. Touch CLOCK pad.
8 0 0 2. Enter the time by
4o0.,_o_,4_o., using the number
pads.
p_ ENTER 3. Touch ENTER/
START START pad.
'L,,_ 4. Touch 1 for AM.
oo°F
¢_,ENTER 5. Touch ENTER/
START START pad.
NOTE:
• Follow steps 1-3 above in the 24
hour clock mode.
KITCHEN TIMER
You can use your microwave oven
as a timer. Use the Kitchen Timer for
timing up to 99 minutes, 99 seconds.
Example: To set for 8 minutes.
K_to_,._._1 Touch KITCHEN
T me/"
TIMER pad.
8 0 0 2. Enter the time by
_oo.__o.__o._ using the number
pads.
j_t ENTER 3. Touch ENTER/
_---START START pad.
When the time is over, you will hear
beeps and END will display.
CONTROL SETUP
You can change the default values.
See following chart for more information.
Weight mode 1 Lbs.
selected 2 Kg.
Sound ON/OFF 1 Sound ON
control 2 Sound OFF
Clock display 1 12HR
control 2 24HR
Display
1
2
3
Slow speed
Normal
speed
Fastspeed
Remind end 1 ON
Signal 2 OFF
1 ON
Demo Mode
2 OFF
7 Daylight 1 ON
Saving Time 2 OFF
Example: To change weight mode
(from Lbs. to Kg).
con,.o_ 1. Touch CONTROL
8et.u
SETUP pad.
1_o,, 2. Touch number 1
,00._ pad.
2 3. Touch number 2
200._ pad.
VENT FAN
The VENT moves steam and other
vapors from the cooking surface.
The vent will operate at the LEVEL 2
whenever the oven is on.
Example: To set Level 4.
on/off 1. Touch ON/OFF pad.
This shows the last
level until you select
the fan speed level.
5Speed 2. Touch 5 SPEED pad
until Level 4 appears
in the display.
Touch ON/OFF pad to turn off fan
when desired.
NOTE:
• If the temperature gets too hot
around the microwave oven, the fan
in the vent hood will automatically
turn on at the LEVEL2 setting
to cool the oven. The fan will
automatically turn off when the
internal parts are cool. When this
occurs, the vent cannot be turned
off.
DELAY OFF
Example: To turn off fan after 30
minutes for Level 4.
On/Off
5 Speed
Delay
Off
1. Touch ON/OFF pad.
2. Touch 5 SPEED pad
until Level 4 appears
in the display.
3. Touch DELAY OFF
pad five times.
TURNTABLE ON/OFF
For best cooking results, leave the
turntable on. It can be turned off for
large dishes.
Tul'nt,ab_e
On/Oil
Touch TURNTABLE
ON/OFF pad to turn
the turntable on or off.
NOTES:
• This option is not available in
sensor cook, auto cook and
defrost modes.
• Sometimes the turntable can
become hot to touch. Be careful
touching the turntable during and
after cooking.
• Do not run the oven empty.
Operating Instructions
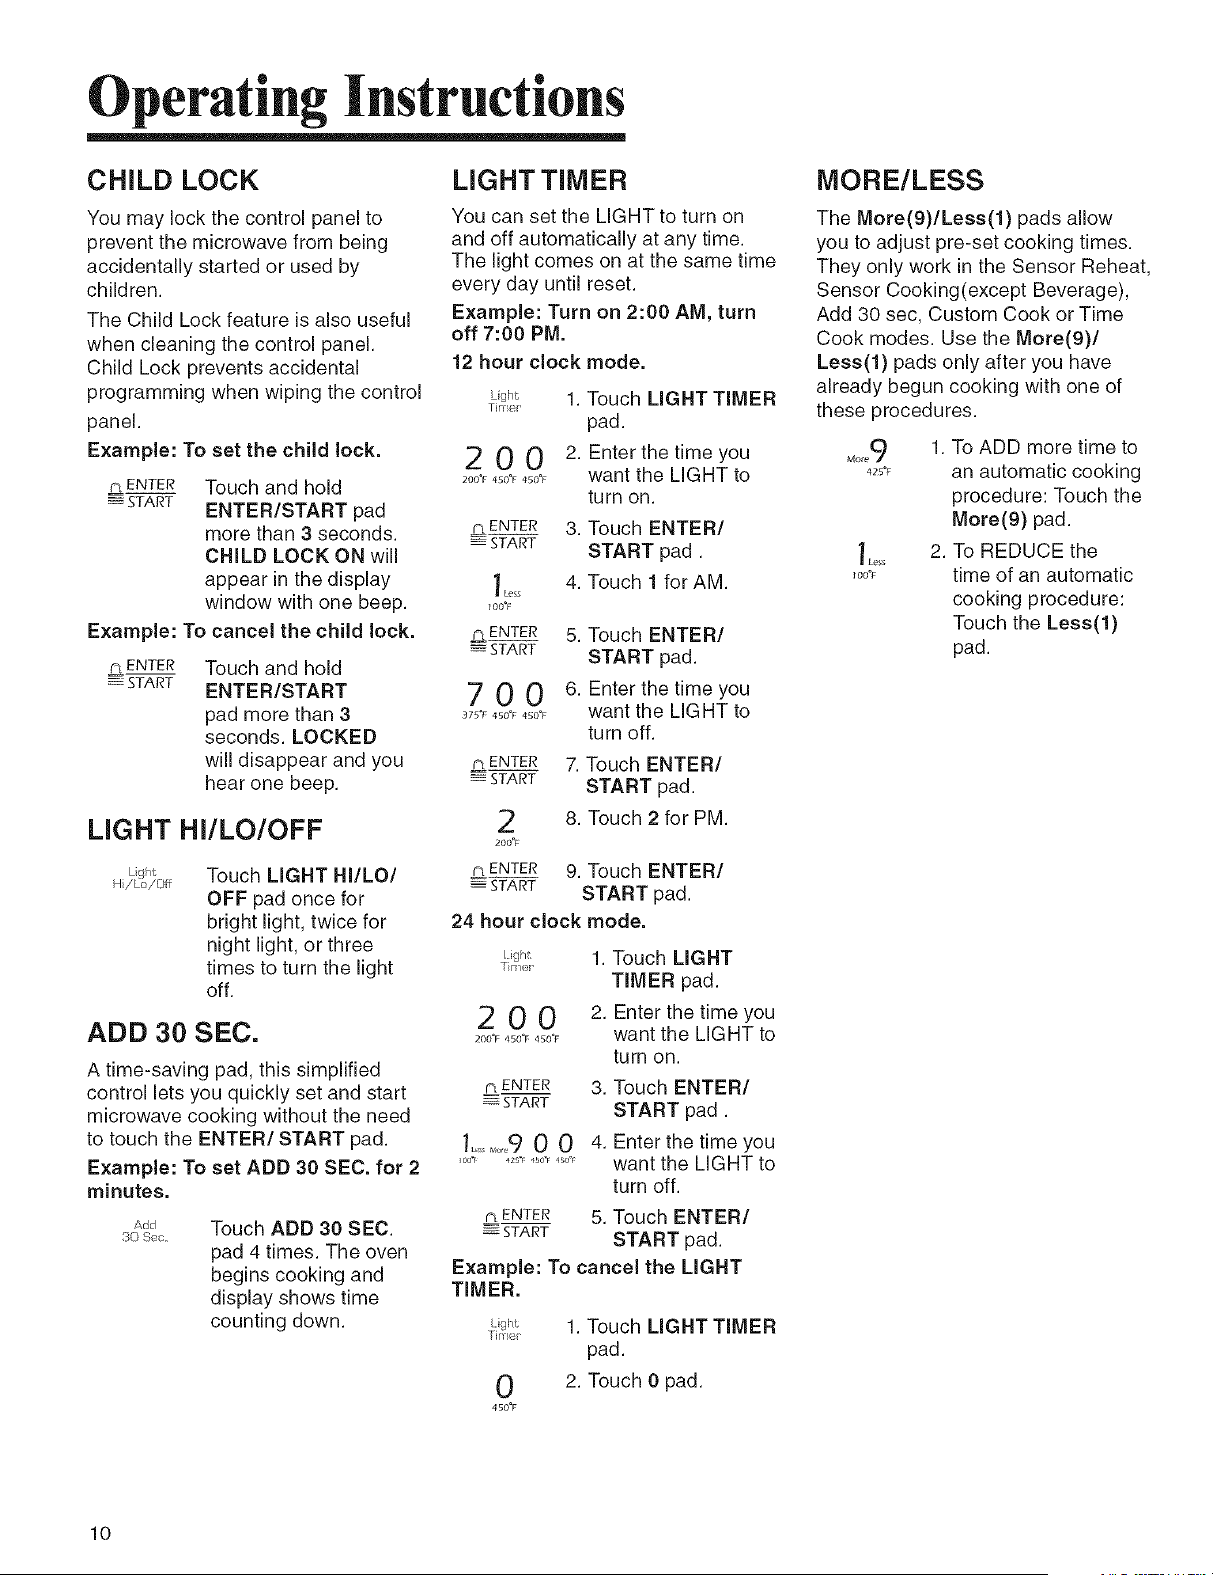
CHILD LOCK
You may lock the control panel to
prevent the microwave from being
accidentally started or used by
children.
The Child Lock feature is also useful
when cleaning the control panel.
Child Lock prevents accidental
programming when wiping the control
panel.
Example: To set the child lock.
GENTER Touch and hold
_ START ENTER/START pad
more than 3 seconds.
CHILD LOCK ON will
appear in the display
window with one beep.
Example: To cancel the child lock.
¢'_ENTER
_- START
Touch and hold
ENTER/START
pad more than 3
seconds. LOCKED
will disappear and you
hear one beep.
LIGHT HI/LO/OFF
Touch LIGHT HI/LO/
OFF pad once for
bright light, twice for
night light, or three
times to turn the light
off.
ADD 30 SEC.
A time-saving pad, this simplified
control lets you quickly set and start
microwave cooking without the need
to touch the ENTER/START pad.
Example: To set ADD 30 SEC. for 2
minutes.
Add
30 Sec.
Touch ADD 30 SEC.
pad 4 times. The oven
begins cooking and
display shows time
counting down.
LIGHT TIMER
You can set the LIGHT to turn on
and off automatically at any time.
The light comes on at the same time
every day until reset.
Example: Turn on 2:00 AM, turn
off 7:00 PM.
12 hour clock mode.
_ight 1. Touch LIGHT TIMER
FiP4eI*
pad.
2 0 0 2. Enter the time you
2oo'F_o'F_0"_ want the LIGHT to
turn on.
¢i ENTER 3. Touch ENTER/
START START pad.
1L_ 4. Touch 1 for AM.
100_
G ENTER 5. Touch ENTER/
START START pad.
6. Enter the time you
want the LIGHT to
turn off.
7. Touch ENTER/
START pad.
8. Touch 2 for PM.
700
375"F 450"1 450"
¢o_ENTER
START
2
200"F
A ENTER
START
24 hour clock
9. Touch ENTER/
START pad.
mode.
1. Touch LIGHT
TIMER pad.
2 0 0 2 Enter the time you
2OO'F450"F450"F want the LIGHT to
turn on.
r_ENTER 3. Touch ENTER/
_---START START pad.
1........9 0 0 4. Enter the time you
,0o., _ _°'__°_ want the LIGHT to
turn off.
G ENTER 5. Touch ENTER/
START START pad.
Example: To cancel the LIGHT
TIMER.
0
450"F
1. Touch LIGHT TIMER
pad.
2. Touch 0 pad.
MORE/LESS
The More(9)/Less(1) pads allow
you to adjust pre-set cooking times.
They only work in the Sensor Reheat,
Sensor Cooking(except Beverage),
Add 30 sec, Custom Cook or Time
Cook modes. Use the More(9)/
Less(l) pads only after you have
already begun cooking with one of
these procedures.
More9
425"F
'_ Less
100"F
1. To ADD more time to
an automatic cooking
procedure: Touch the
More(9) pad.
2. To REDUCE the
time of an automatic
cooking procedure:
Touch the Less(l)
pad.
10
Operating Instructions
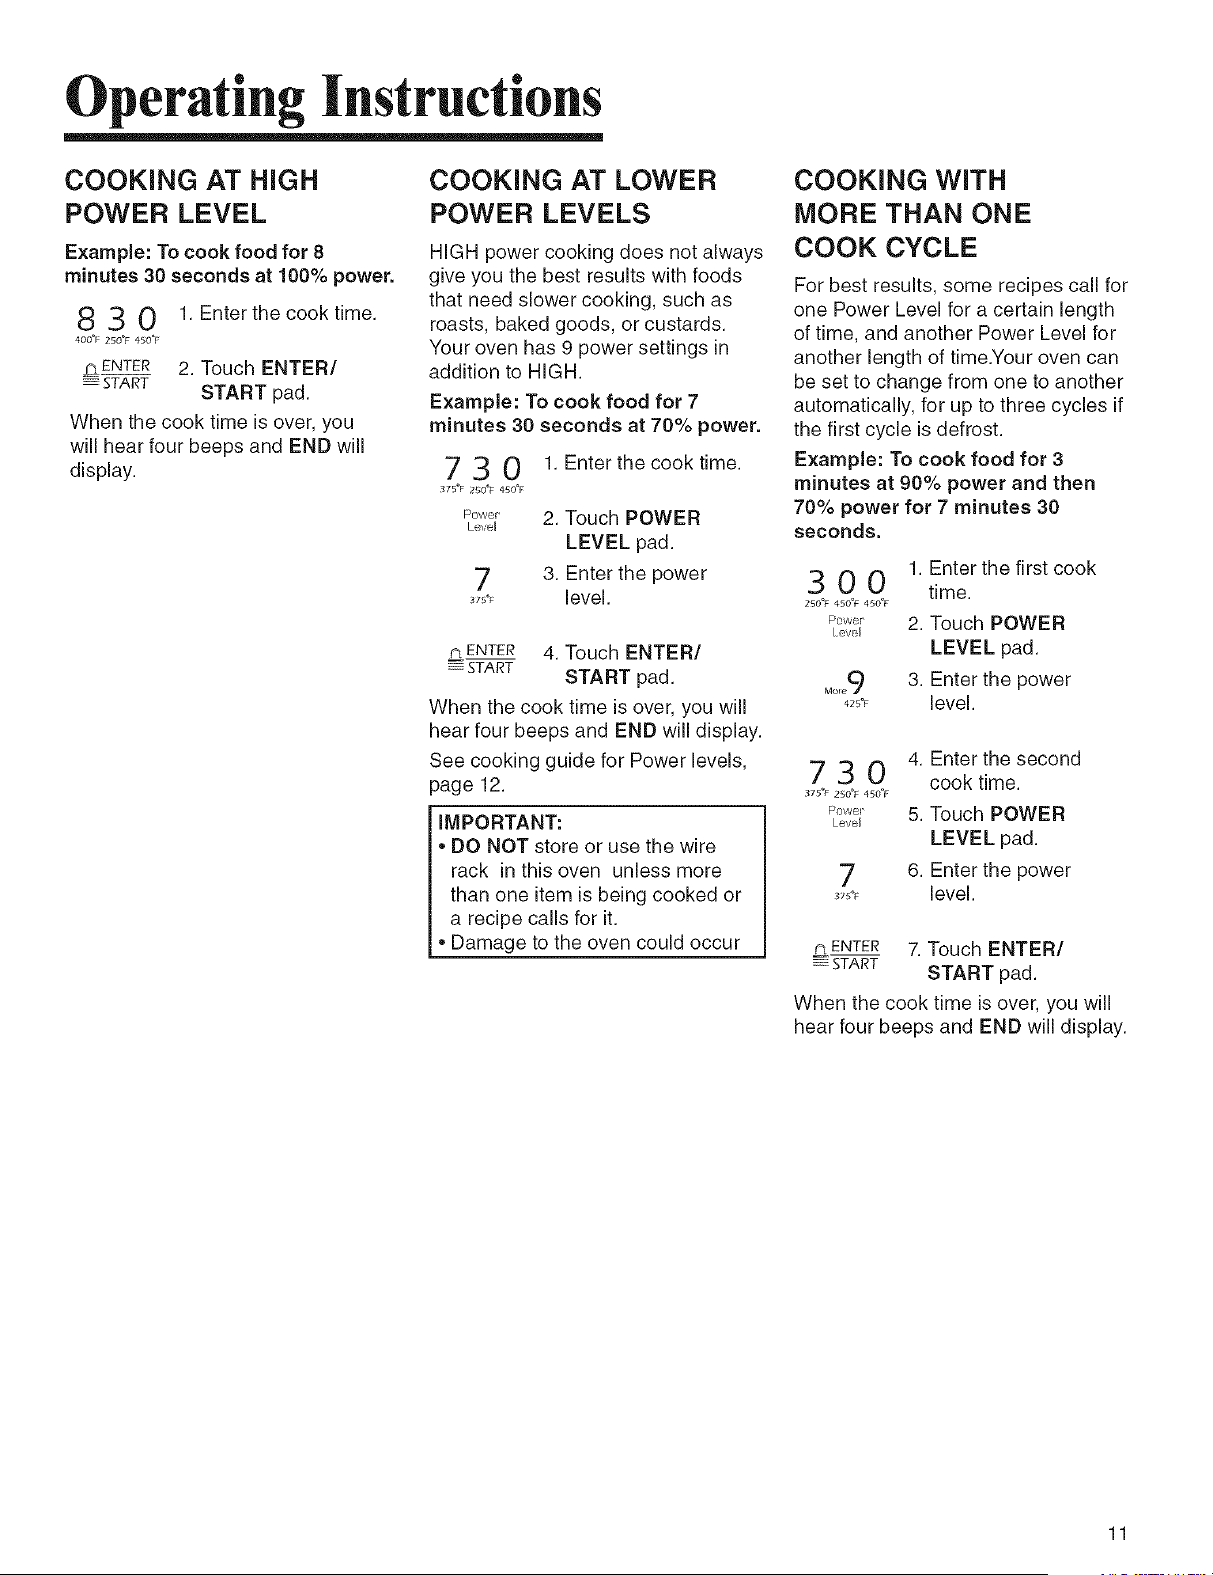
COOKING AT HIGH
POWER LEVEL
Example: To cook food for 8
minutes 30 seconds at 100% power.
8 3 0 1. Enter the cook time.
400"F 250"F 450"
=G ENTER 2. Touch ENTER/
_ START START pad.
When the cook time is over, you
will hear four beeps and END will
display.
COOKING AT LOWER
POWER LEVELS
HIGH power cooking does not always
give you the best results with foods
that need slower cooking, such as
roasts, baked goods, or custards.
Your oven has 9 power settings in
addition to HIGH.
Example: To cook food for 7
minutes 30 seconds at 70% power.
7 3 0 1. Enter the cook time.
375"F ZSO'F 450"F
r*owe,_ 2. Touch POWER
Level
LEVEL pad.
7 3 Enter the power
3_s'_ level.
N ENTER 4. Touch ENTER/
_- START START pad.
When the cook time is over, you will
hear four beeps and END will display.
See cooking guide for Power levels,
page 12.
IMPORTANT:
• DO NOT store or use the wire
rack in this oven unless more
than one item is being cooked or
a recipe calls for it.
• Damage to the oven could occur
COOKING WITH
MORE THAN ONE
COOK CYCLE
For best results, some recipes call for
one Power Level for a certain length
of time, and another Power Level for
another length of time.Your oven can
be set to change from one to another
automatically, for up to three cycles if
the first cycle is defrost.
Example: To cook food for 3
minutes at 90% power and then
70% power for 7 minutes 30
seconds.
3 0 0 1. Enter the first cook
time.
250"F 450"F 450_t
P_'_' 2. Touch POWER
levi
LEVEL pad.
Mo,o9 3. Enter the power
42°_ level.
7 3 0 4. Enter the second
cook time.
375"F 2SO_F 450_F
P_'_'÷" 5. Touch POWER
Level
LEVEL pad.
7 6. Enter the power
3_,s_ level.
L_ ENTER 7. Touch ENTER/
START START pad.
When the cook time is over, you will
hear four beeps and END will display.
11
Operating Instructions
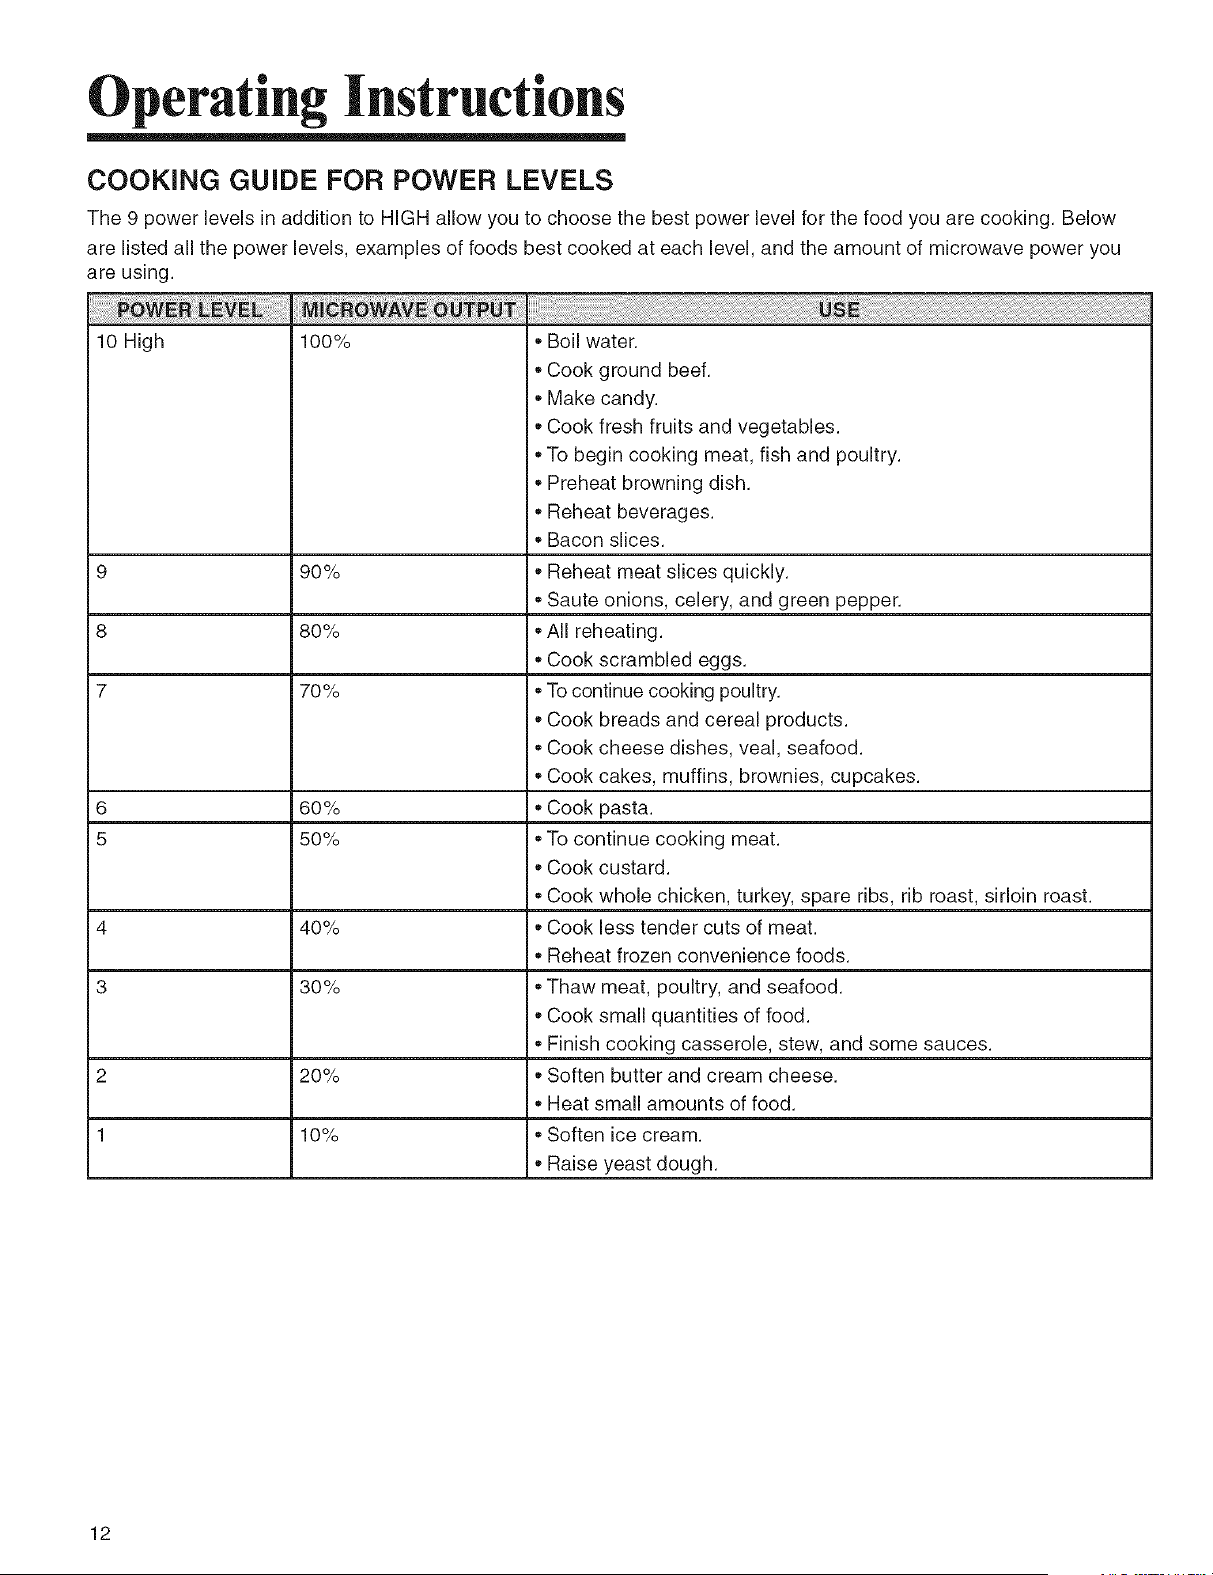
COOKING GUIDE FOR POWER LEVELS
The 9 power levels in addition to HIGH allow you to choose the best power level for the food you are cooking. Below
are listed all the power levels, examples of foods best cooked at each level, and the amount of microwave power you
are using.
10 High
9 9O%
8 80%
7 70%
6 60%
5 50%
4 40%
3 30%
2 20%
1 10%
100%
iii ! ! ! !!!! i iiiii i i ! i ! i ! ! ! ! ! ! !!i i i i i i iiiiiii i iii Ji i i i i i !! iii i i iiiiiiiiiiiiiiiiiiiiiiiiiiiiiiiiiiiiiiiiiiiiiiiiiiiiiiiiiiiiiiiiiiiiiiiiiiiiiiiiiiiiiiiiiiiiiiiiiiiiiiiiiiiiiiiiiiiiiiiiiiiiiiiiiiiiiiiiiiiiiiiiiiiiiiiiiiiiiiiiiiiiiiiiiiiiiiiiiiiiiiiiiiiiiiiiiiiiiiiiiiiiiiiiiiiiiiiiiiiiiiiiiiiiiiiiiiiiiiiiiiiiiiiiiii i ii i ! i ! !!!i!i!i!i!iiiiiiiiiiiiiiiiiiiiiiiiiiiiiiiiiiiiiiiiiiiiiiiiiiiiiiiiiiiiiiiiiiiiiiiiiiiiiiiiiiiiiiiiiiiiiiiiiiiiiiiiiiiiiiiiiiiiiiiiiiiiiiiiiiiiiiiiiiiiiiiiiiiiiiiiiiiiiiiiiiiiiiiiiiiiiiiiiiiiiiiiiiiiiiiiiiiiiiiiiiiiiiiiiiiiiiiiiiiiiii!i
• Boil water.
• Cook ground beef.
• Make candy.
Cook fresh fruits and vegetables.
To begin cooking meat, fish and poultry.
• Preheat browning dish.
Reheat beverages.
• Bacon slices.
Reheat meat slices quickly.
Saute onions, celery, and green pepper.
All reheating.
• Cook scrambled eggs.
To continue cooking poultry.
Cook breads and cereal products.
• Cook cheese dishes, veal, seafood.
• Cook cakes, muffins, brownies, cupcakes.
Cook pasta.
To continue cooking meat.
Cook custard.
Cook whole chicken, turkey, spare ribs, rib roast, sirloin roast.
Cook less tender cuts of meat.
Reheat frozen convenience foods.
Thaw meat, poultry, and seafood.
Cook small quantities of food.
Finish cooking casserole, stew, and some sauces.
Soften butter and cream cheese.
Heat small amounts of food.
Soften ice cream.
Raise yeast dough.
12
Operating Instructions
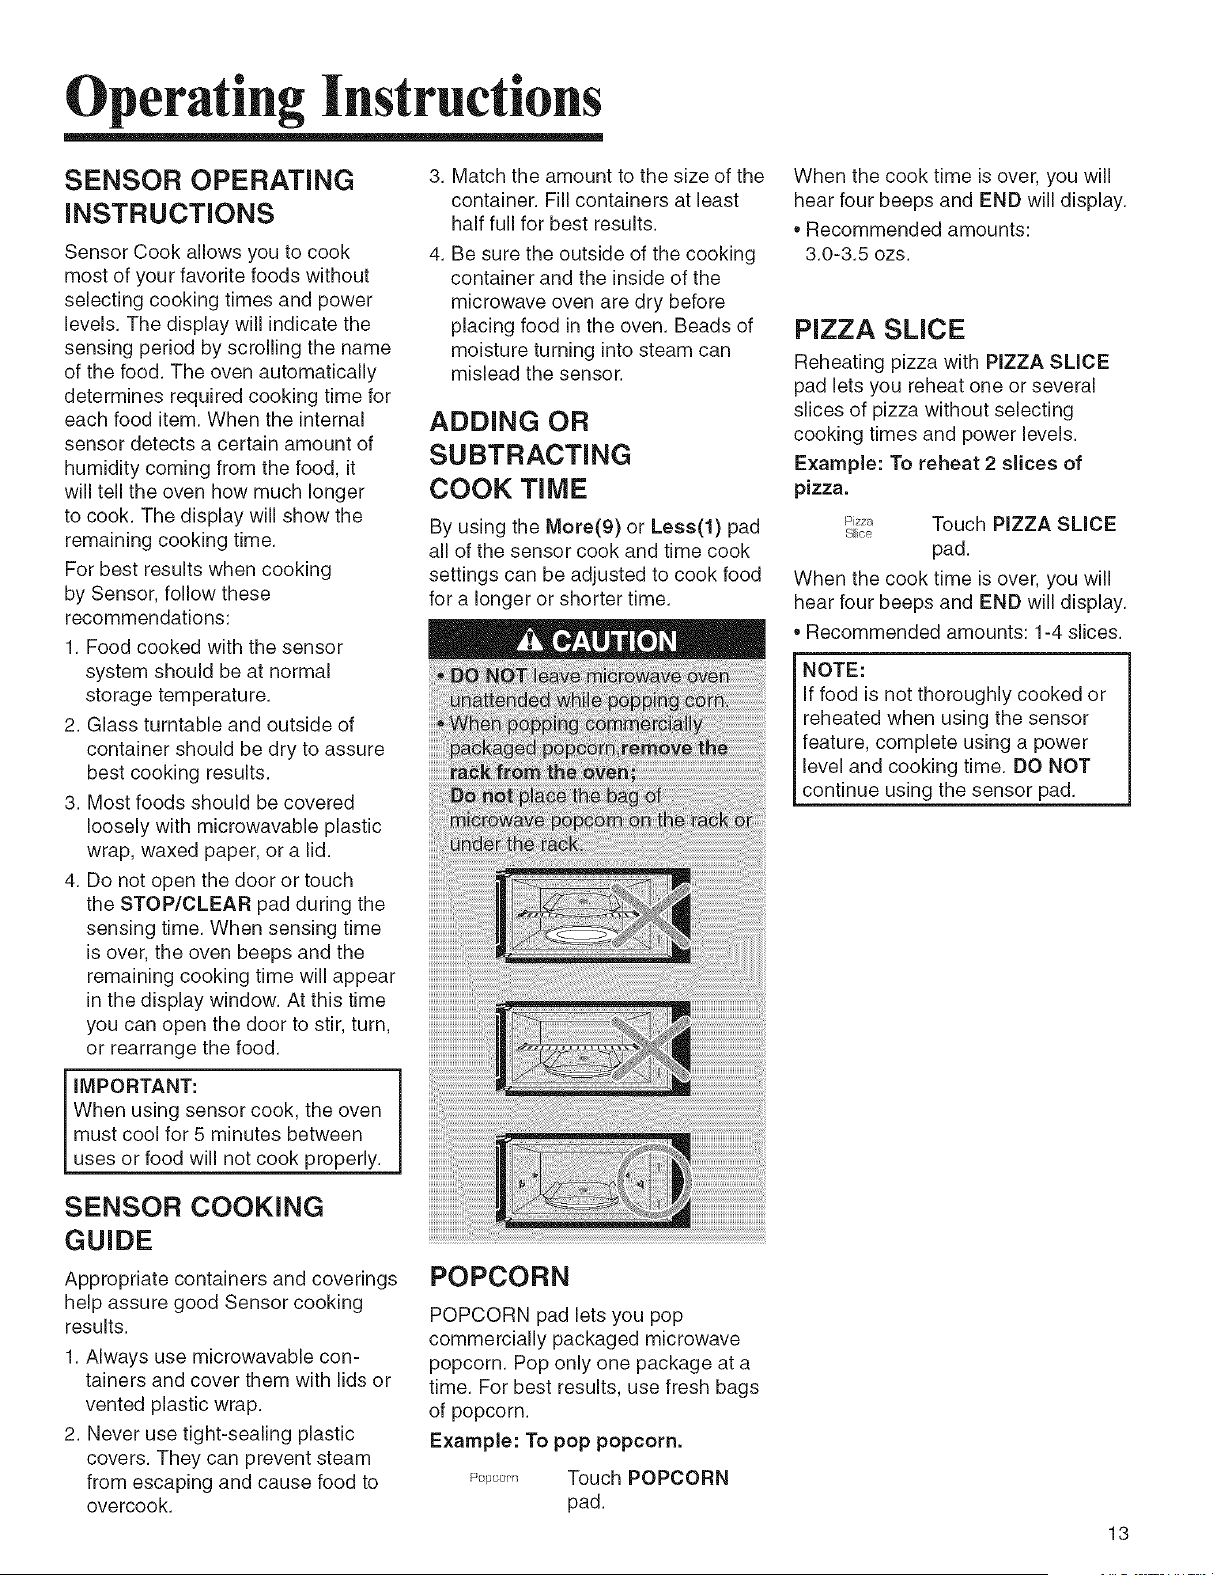
SENSOR OPERATING
INSTRUCTIONS
Sensor Cook allows you to cook
most of your favorite foods without
selecting cooking times and power
levels. The display will indicate the
sensing period by scrolling the name
of the food. The oven automatically
determines required cooking time for
each food item. When the internal
sensor detects a certain amount of
humidity coming from the food, it
will tell the oven how much longer
to cook. The display will show the
remaining cooking time.
For best results when cooking
by Sensor, follow these
recommendations:
1. Food cooked with the sensor
system should be at normal
storage temperature.
2. Glass turntable and outside of
container should be dry to assure
best cooking results.
3. Most foods should be covered
loosely with microwavable plastic
wrap, waxed paper, or a lid.
4. Do not open the door or touch
the STOP/CLEAR pad during the
sensing time. When sensing time
is over, the oven beeps and the
remaining cooking time will appear
in the display window. At this time
you can open the door to stir, turn,
or rearrange the food.
IMPORTANT:
When using sensor cook, the oven
must cool for 5 minutes between
uses or food will not cook properly.
3. Match the amount to the size of the
container. Fill containers at least
half full for best results.
4. Be sure the outside of the cooking
container and the inside of the
microwave oven are dry before
placing food in the oven. Beads of
moisture turning into steam can
mislead the sensor.
ADDING OR
SUBTRACTING
COOK TIME
By using the More(9) or Less(l) pad
all of the sensor cook and time cook
settings can be adjusted to cook food
for a longer or shorter time.
When the cook time is over, you will
hear four beeps and END will display.
,, Recommended amounts:
3.0-3.5 ozs.
PIZZA SLICE
Reheating pizza with PIZZA SLICE
pad lets you reheat one or several
sJices of pizza without selecting
cooking times and power levels,
Example: To reheat 2 slices of
pizza.
_J_" Touch PIZZA SLICE
S_ice
pad.
When the cook time is over, you will
hear four beeps and END will display.
,, Recommended amounts: 1-4 slices.
NOTE:
If food is not thoroughly cooked or
reheated when using the sensor
feature, complete using a power
level and cooking time. DO NOT
continue using the sensor pad.
SENSOR COOKING
GUIDE
Appropriate containers and coverings
help assure good Sensor cooking
results.
1. Always use mJcrowavable con-
tainers and cover them with lids or
vented plastic wrap.
2. Never use tight-sealing plastic
covers. They can prevent steam
from escaping and cause food to
overcook.
POPCORN
POPCORN pad lets you pop
commercially packaged microwave
popcorn. Pop only one package at a
time. For best results, use fresh bags
of popcorn.
Example: To pop popcorn.
[J{: poor'r Touch POPCORN
pad.
13
Operating Instructions
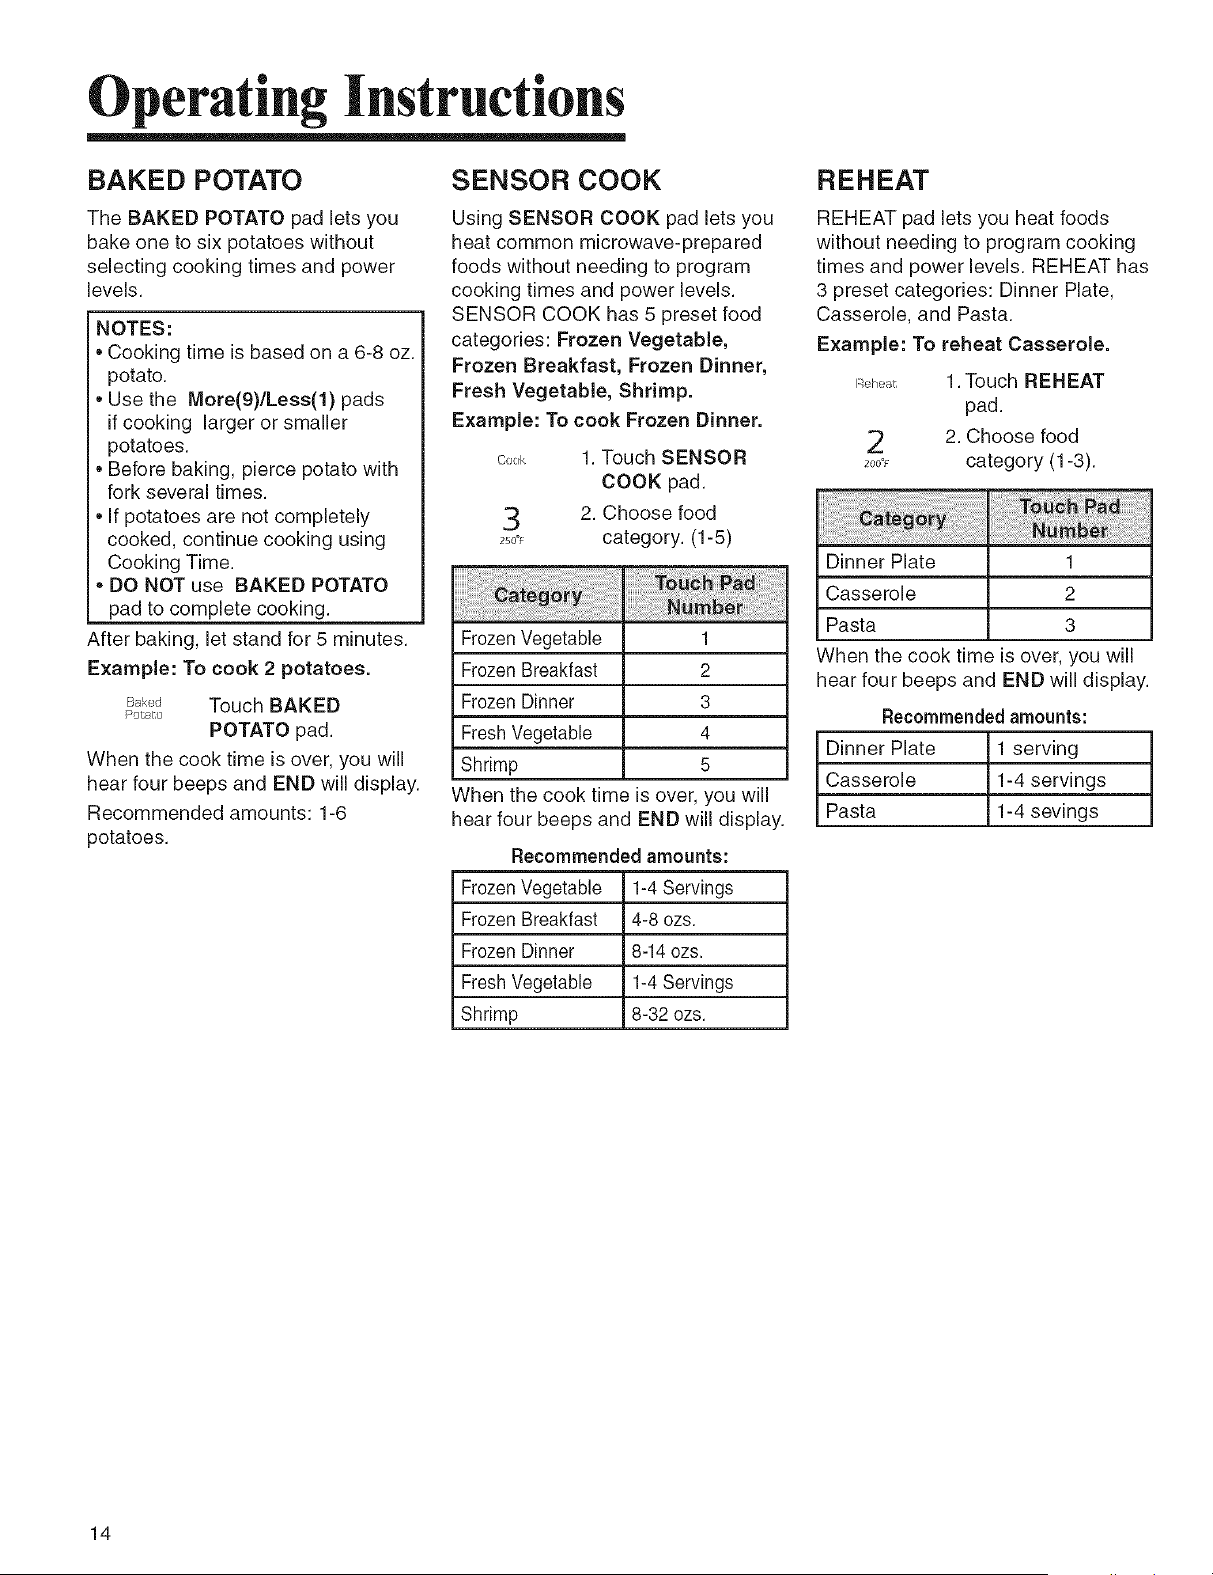
BAKED POTATO
The BAKED POTATO pad lets you
bake one to six potatoes without
selecting cooking times and power
levels.
NOTES:
• Cooking time is based on a 6-8 oz.
potato.
• Use the More(9)/Less(1) pads
if cooking larger or smaller
potatoes.
• Before baking, pierce potato with
fork several times.
• If potatoes are not completely
cooked, continue cooking using
Cooking Time.
• DO NOT use BAKED POTATO
pad to complete cooking.
After baking, let stand for 5 minutes.
Example: To cook 2 potatoes.
B_k_.,, Touch BAKED
POTATO pad.
When the cook time is over, you will
hear four beeps and END will display.
Recommended amounts: 1-6
potatoes.
SENSOR COOK
Using SENSOR COOK pad lets you
heat common microwave-prepared
foods without needing to program
cooking times and power levels.
SENSOR COOK has 5 preset food
categories: Frozen Vegetable,
Frozen Breakfast, Frozen Dinner,
Fresh Vegetable, Shrimp.
Example: To cook Frozen Dinner.
c,_,k 1. Touch SENSOR
COOK pad.
3 2. Choose food
2_0., category. (1-5)
Frozen Vegetable 1
Frozen Breakfast 2
Frozen Dinner 3
Fresh Vegetable 4
Shrimp 5
When the cook time is over, you will
hear four beeps and END will display.
Recommended amounts:
Frozen Vegetable 1-4 Servings
Frozen Breakfast 4-8 ozs.
Frozen Dinner 8-14 ozs.
Fresh Vegetable 1-4 Servings
Shrimp 8-32 ozs.
REHEAT
REHEAT pad lets you heat foods
without needing to program cooking
times and power levels. REHEAT has
3 preset categories: Dinner Plate,
Casserole, and Pasta.
Example: To reheat Casserole.
R !heat
2
Z00"F
Dinner Plate
Casserole
Pasta
1. Touch REHEAT
pad.
2. Choose food
category (1-3).
To_ _
1
2
3
When the cook time is over, you will
hear four beeps and END will display.
Recommendedamounts:
Dinner Plate 1 serving
Casserole 1-4 servings
Pasta 1-4 sevings
14
Operating Instructions
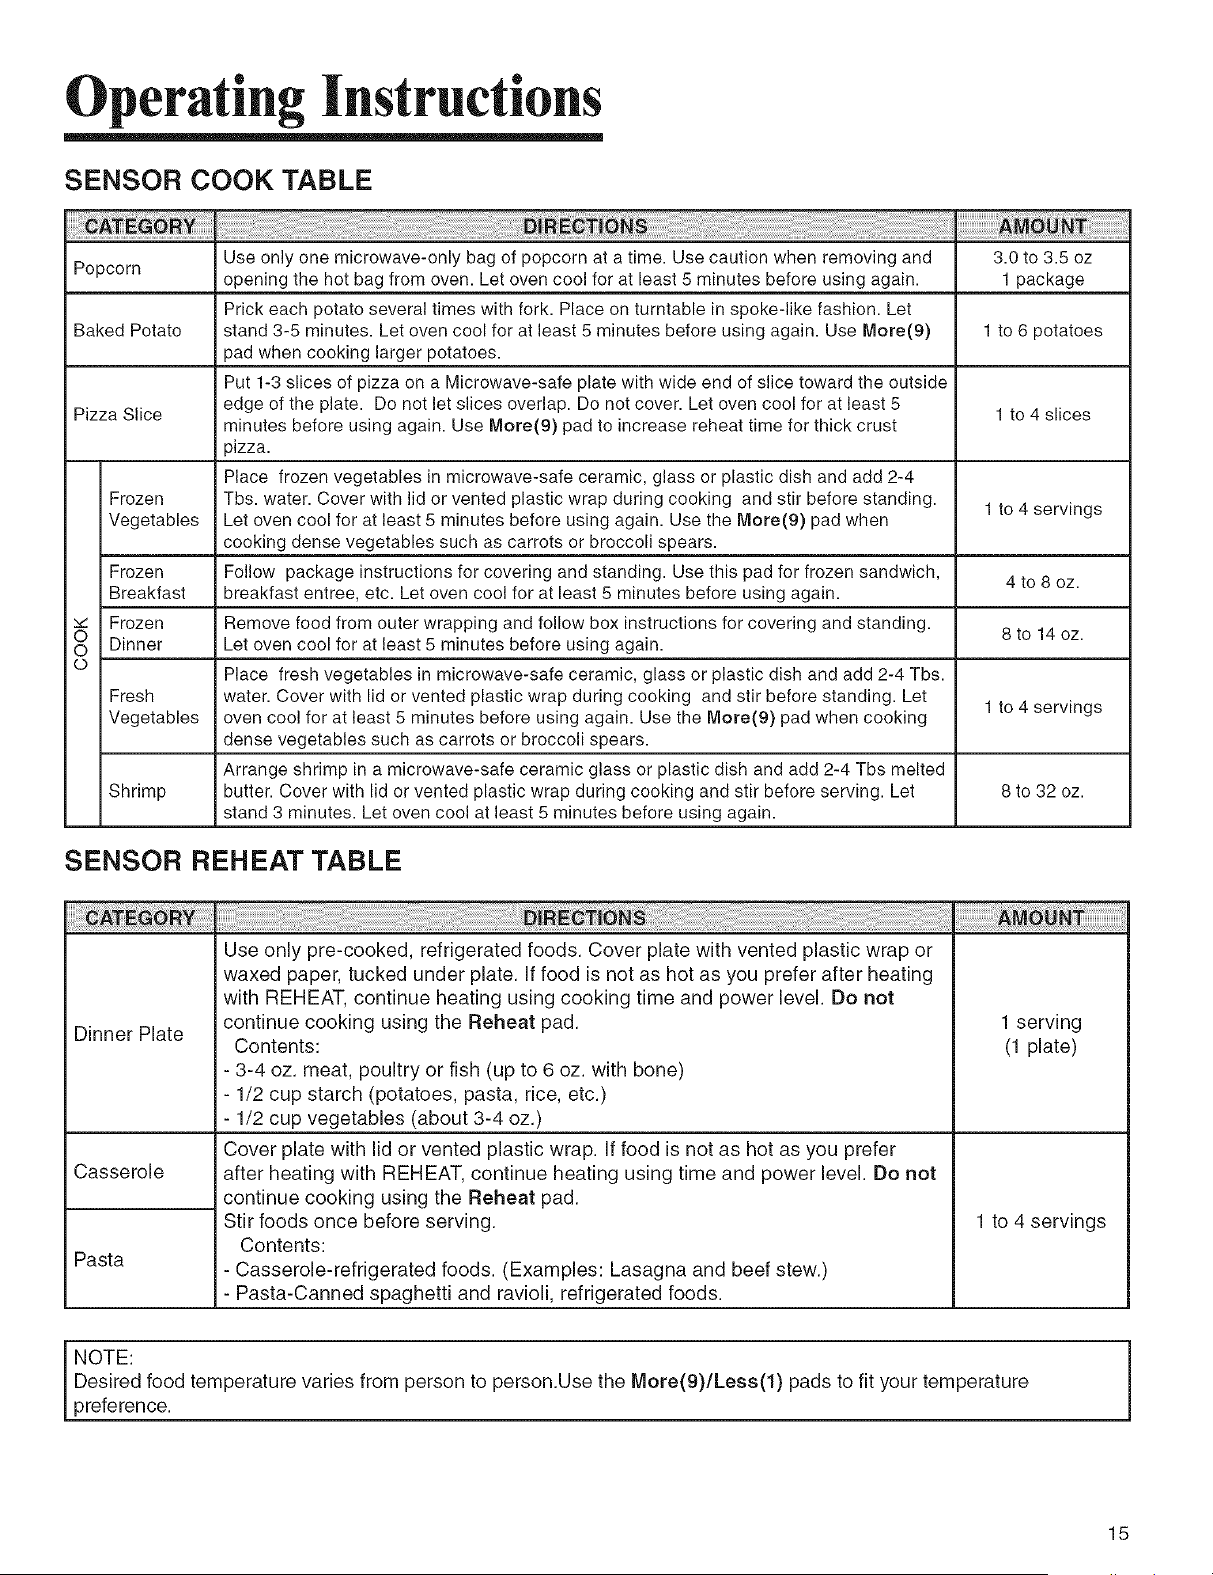
SENSOR COOK TABLE
.....
Use only one microwave-only bag of popcorn at a time. Use caution when removing and 3.0 to 3.5 oz
Popcorn opening the hot bag from oven. Let oven cool for at least 5 minutes before using again. 1 package
Prick each potato several times with fork. Place on turntable in spoke-like fashion. Let
Baked Potato stand 3-5 minutes. Let oven cool for at least 5 minutes before using again. Use More(9) 1 to 6 potatoes
pad when cooking larger potatoes.
Put 1-3 slices of pizza on a Microwave-safe plate with wide end of slice toward the outside
Pizza Slice edge of the plate. Do not let slices overlap. Do not cover. Let oven cool for at least 5 1 to 4 slices
minutes before using again. Use More(9) pad to increase reheat time for thick crust
pizza.
Place frozen vegetables in microwave-safe ceramic, glass or plastic dish and add 2-4
Frozen Tbs. water. Cover with lid or vented plastic wrap during cooking and stir before standing. 1 to 4 servings
Vegetables Let oven cool for at least 5 minutes before using again. Use the More(9) pad when
cooking dense vegetables such as carrots or broccoli spears.
Frozen Follow package instructions for covering and standing. Use this pad for frozen sandwich, 4 to 8 oz.
Breakfast breakfast entree, etc. Let oven cool for at least 5 minutes before using again.
,,¢ Frozen Remove food from outer wrapping and follow box instructions for covering and standing.
O Dinner Let oven cool for at least 5 minutes before using again.
8 to 14
oz.
o
Place fresh vegetables in microwave-safe ceramic, glass or plastic dish and add 2-4 Tbs.
Fresh water. Cover with lid or vented plastic wrap during cooking and stir before standing. Let
1 to 4 servings
Vegetables oven cool for at least 5 minutes before using again. Use the More(9) pad when cooking
dense vegetables such as carrots or broccoli spears.
Arrange shrimp in a microwave-safe ceramic glass or plastic dish and add 2-4 Tbs melted
Shrimp butter. Cover with lid or vented plastic wrap during cooking and stir before serving. Let 8 to 32 oz.
stand 3 minutes. Let oven cool at least 5 minutes before using again.
SENSOR REHEAT TABLE
Use only pre-cooked, refrigerated foods. Cover plate with vented plastic wrap or
waxed paper, tucked under plate. If food is not as hot as you prefer after heating
with REHEAT, continue heating using cooking time and power level. Do not
continue cooking using the Reheat pad.
Dinner Plate
Contents:
- 3-4 oz. meat, poultry or fish (up to 6 oz. with bone)
- 1/2 cup starch (potatoes, pasta, rice, etc.)
- 1/2 cup vegetables (about 3-4 oz.)
Cover plate with lid or vented plastic wrap. If food is not as hot as you prefer
Casserole after heating with REHEAT, continue heating using time and power level. Do not
continue cooking using the Reheat pad.
Stir foods once before serving.
Contents:
Pasta - Casserole-refrigerated foods. (Examples: Lasagna and beef stew.)
- Pasta-Canned spaghetti and ravioli, refrigerated foods.
1 serving
(1 plate)
1 to 4 servings
NOTE: ]
Desired food temperature varies from person to person.Use the More(9)/Less(1) pads to fit your temperature
preference.
15
Operating Instructions
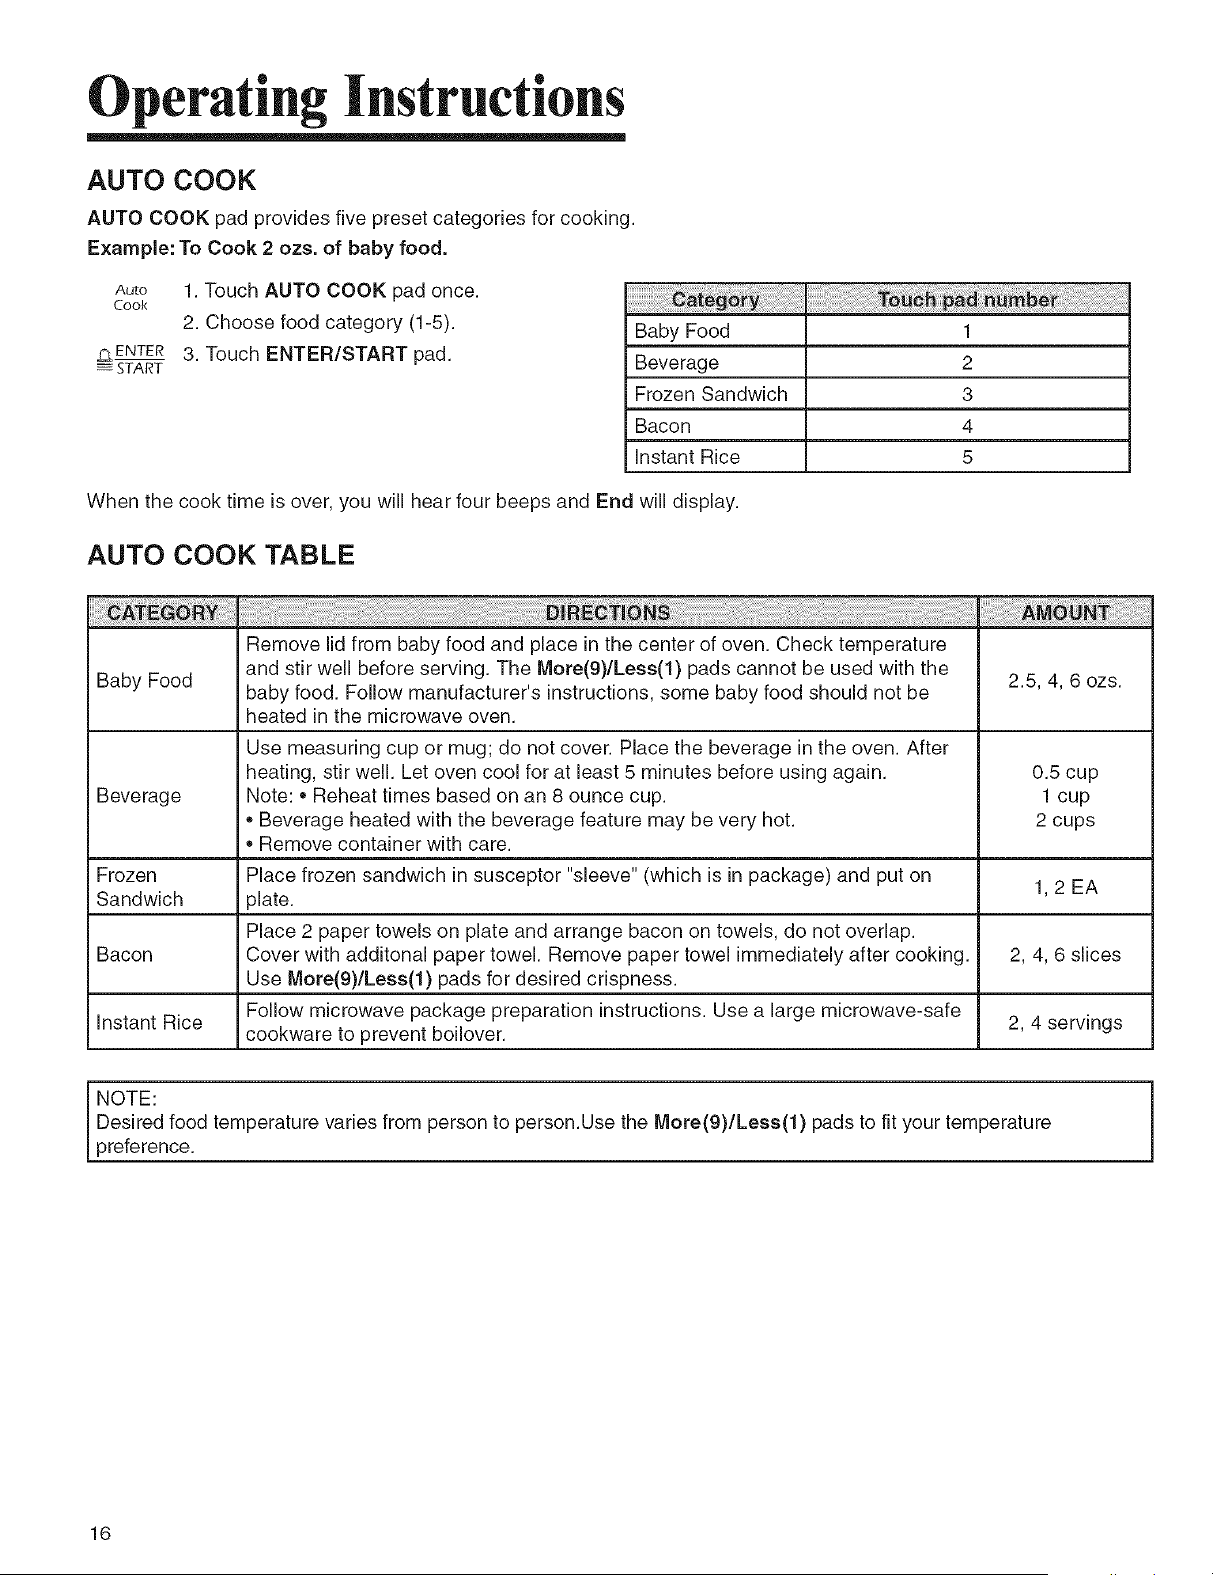
AUTO COOK
AUTO COOK pad provides five preset categories for cooking.
Example: To Cook 2 ozs. of baby food.
Auto
Cook
_=_ENTER
_ START
1. Touch AUTO COOK pad once.
2. Choose food category (1-5).
3. Touch ENTER/START pad.
Baby Food
Beverage
Frozen Sandwich
Bacon
Instant Rice
! i i ii! iiii !ii!i! ! ! ! i i i i i i ii ii iiiiiiiiiii i iiiiiiiiiiiiiiiii i iiiiiiiiiiiiiiiii i i i i !i !i!!i!!i!!i! ! ! ii ! ! ! ! i! i! i ! ! i i i i i i iii ii i ii i i i i ii iiiiiiiiii iiiiiiiii i ii ii i iiiiiiiiiiiiiiiii i iiiiiiiiiiiiiiiii !i
1
2
3
4
5
When the cook time is over, you will hear four beeps and End will display.
AUTO COOK TABLE
_______________________________________________________________________________________________________________________________________________________________________________________________________________________________________________________________________________________________________________________________________________________________________________________________________________________________________________________________________________________________________________________________________________________________________________________________________________________________________________________________________________________________________________________________________________________________________________________________________________________________________________________________________________________________________________________________________________________________________________
Remove lid from baby food and place in the center of oven. Check temperature
Baby Food and stir well before serving. The More(9)/Less(1) pads cannot be used with the
baby food. Follow manufacturer's instructions, some baby food should not be 2.5, 4, 6 ozs.
heated in the microwave oven.
Use measuring cup or mug; do not cover. Place the beverage in the oven. After
heating, stir well. Let oven cool for at least 5 minutes before using again. 0.5 cup
Beverage Note: * Reheat times based on an 8 ounce cup. 1 cup
Beverage heated with the beverage feature may be very hot. 2 cups
Remove container with care.
Frozen Place frozen sandwich in susceptor "sleeve" (which is in package) and put on
Sandwich plate. 1, 2 EA
Place 2 paper towels on plate and arrange bacon on towels, do not overlap.
Bacon Cover with additonal paper towel. Remove paper towel immediately after cooking. 2, 4, 6 slices
Use More(9)/Less(1) pads for desired crispness.
Follow microwave package preparation instructions. Use a large microwave-safe
Instant Rice cookware to prevent boilover. 2, 4 servings
Desired food temperature varies from person to person.Use the More(9)/kess(1) pads to fit your temperature
preference.
16
Operating Instructions
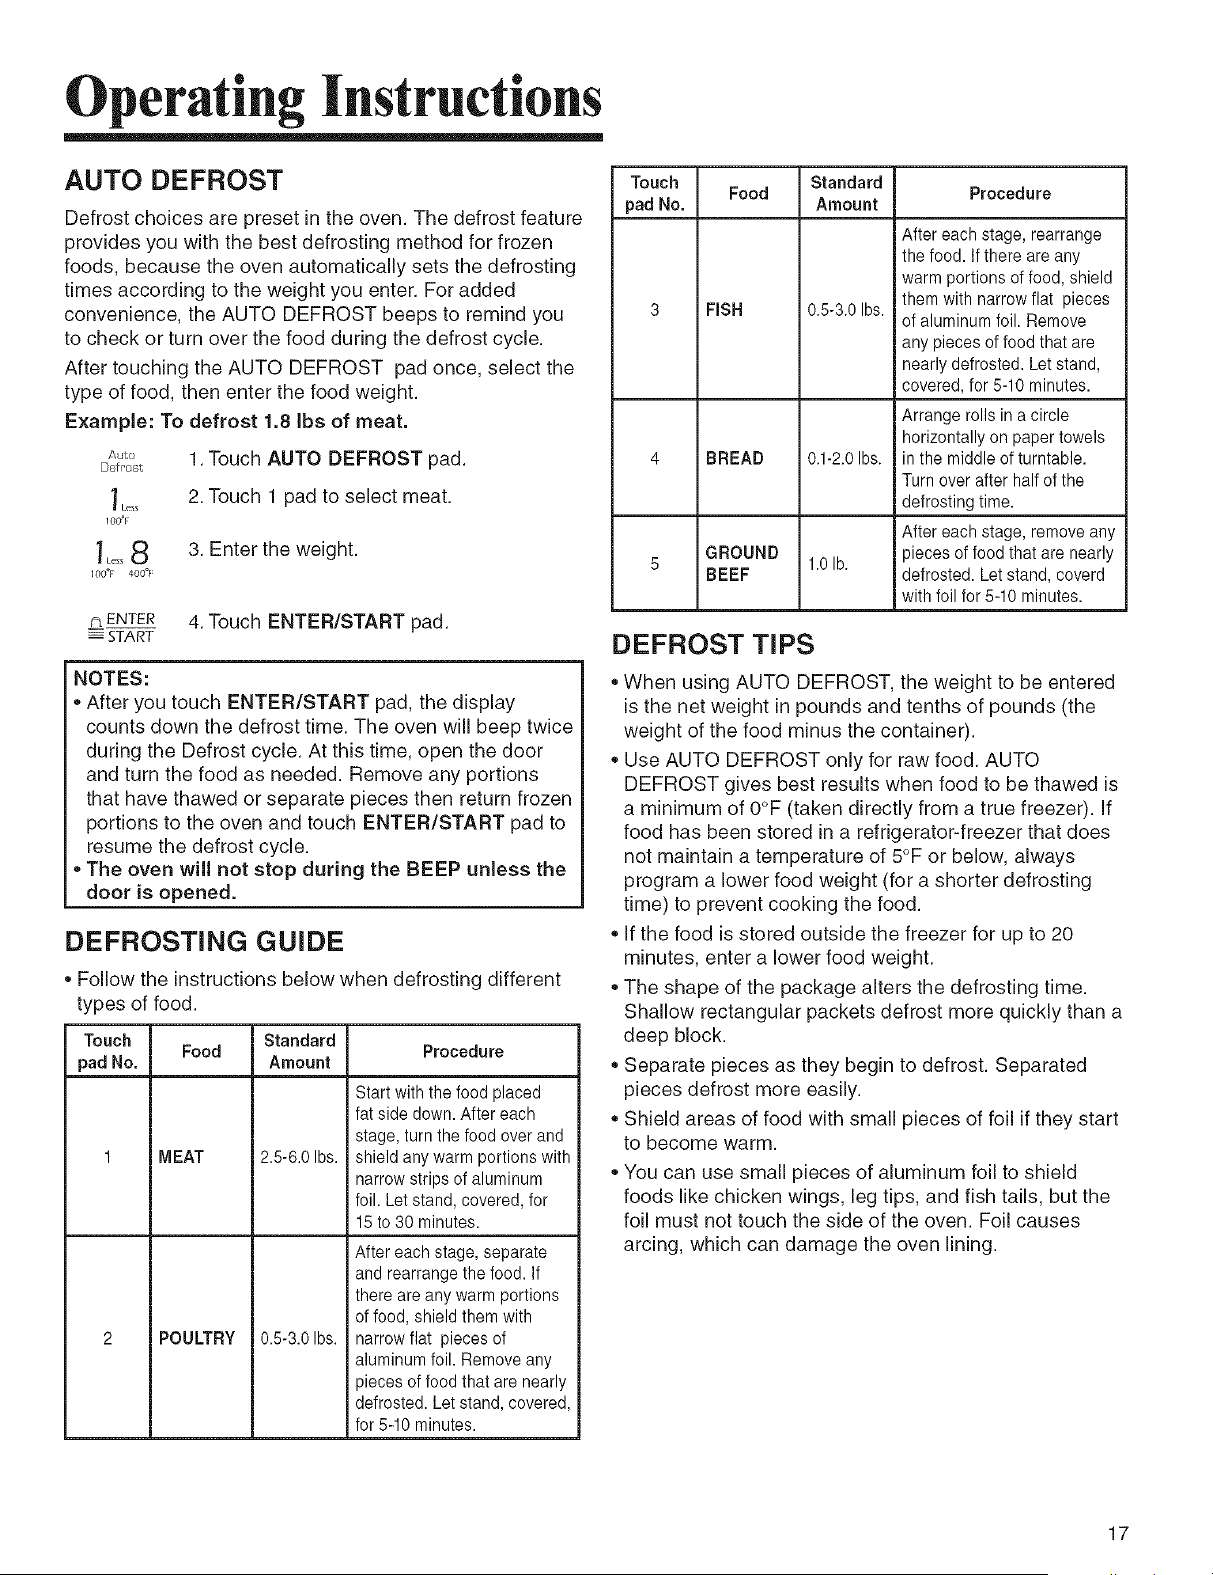
AUTO DEFROST
Defrost choices are preset in the oven. The defrost feature
provides you with the best defrosting method for frozen
foods, because the oven automatically sets the defrosting
times according to the weight you enter. For added
convenience, the AUTO DEFROST beeps to remind you
to check or turn over the food during the defrost cycle.
After touching the AUTO DEFROST pad once, select the
type of food, then enter the food weight.
Example: To defrost 1.8 Ibs of meat.
Auto
Defrost
Less
100_1 =
100_ _ 400"F
1. Touch AUTO DEFROST pad.
2. Touch 1 pad to select meat.
3. Enter the weight.
r_ENTER 4. Touch ENTER/START pad.
START
NOTES:
• After you touch ENTER/START pad, the display
counts down the defrost time. The oven will beep twice
during the Defrost cycle. At this time, open the door
and turn the food as needed. Remove any portions
that have thawed or separate pieces then return frozen
portions to the oven and touch ENTER/START pad to
resume the defrost cycle.
• The oven will not stop during the BEEP unless the
door is opened.
DEFROSTING GUIDE
• Follow the instructions below when defrosting different
types of food.
Touch Standard
Food Procedure
pad No. Amount
MEAT
POULTRY
2.5-6.0 Ibs.
0.5-3.0 Ibs.
Start with the food placed
fat side down. After each
stage, turn the food over and
shield any warm portions with
narrow strips of aluminum
foil. Let stand, covered, for
15 to 30 minutes.
After each stage, separate
and rearrange the food. If
there are any warm portions
of food, shield them with
narrow flat pieces of
aluminum foil. Remove any
pieces of food that are nearly
defrosted. Let stand, covered,
for 5-10 minutes.
Touch Standard
Food Procedure
pad No. Amount
FISH
BREAD
GROUND
BEEF
0.5-3.0 Ibs.
0.1-2.0 Ibs.
1.0lb.
After each stage, rearrange
the food. If there are any
warm portions of food, shield
them with narrow flat pieces
of aluminum foil. Remove
any pieces of food that are
nearly defrosted. Let stand,
covered, for 5-10 minutes.
Arrange rolls in a circle
horizontally on paper towels
in the middle of turntable.
Turn over after half of the
defrosting time.
After each stage, remove any
pieces of food that are nearly
defrosted. Let stand, coverd
with foil for 5-10 minutes.
DEFROST TIPS
• When using AUTO DEFROST, the weight to be entered
is the net weight in pounds and tenths of pounds (the
weight of the food minus the container).
• Use AUTO DEFROST only for raw food. AUTO
DEFROST gives best results when food to be thawed is
a minimum of O°F (taken directly from a true freezer). If
food has been stored in a refrigerator-freezer that does
not maintain a temperature of 5°F or below, always
program a lower food weight (for a shorter defrosting
time) to prevent cooking the food.
If the food is stored outside the freezer for up to 20
minutes, enter a lower food weight.
The shape of the package alters the defrosting time.
Shallow rectangular packets defrost more quickly than a
deep block.
Separate pieces as they begin to defrost. Separated
pieces defrost more easily.
Shield areas of food with small pieces of foil if they start
to become warm.
You can use small pieces of aluminum foil to shield
foods like chicken wings, leg tips, and fish tails, but the
foil must not touch the side of the oven. Foil causes
arcing, which can damage the oven lining.
17
Operating Instructions
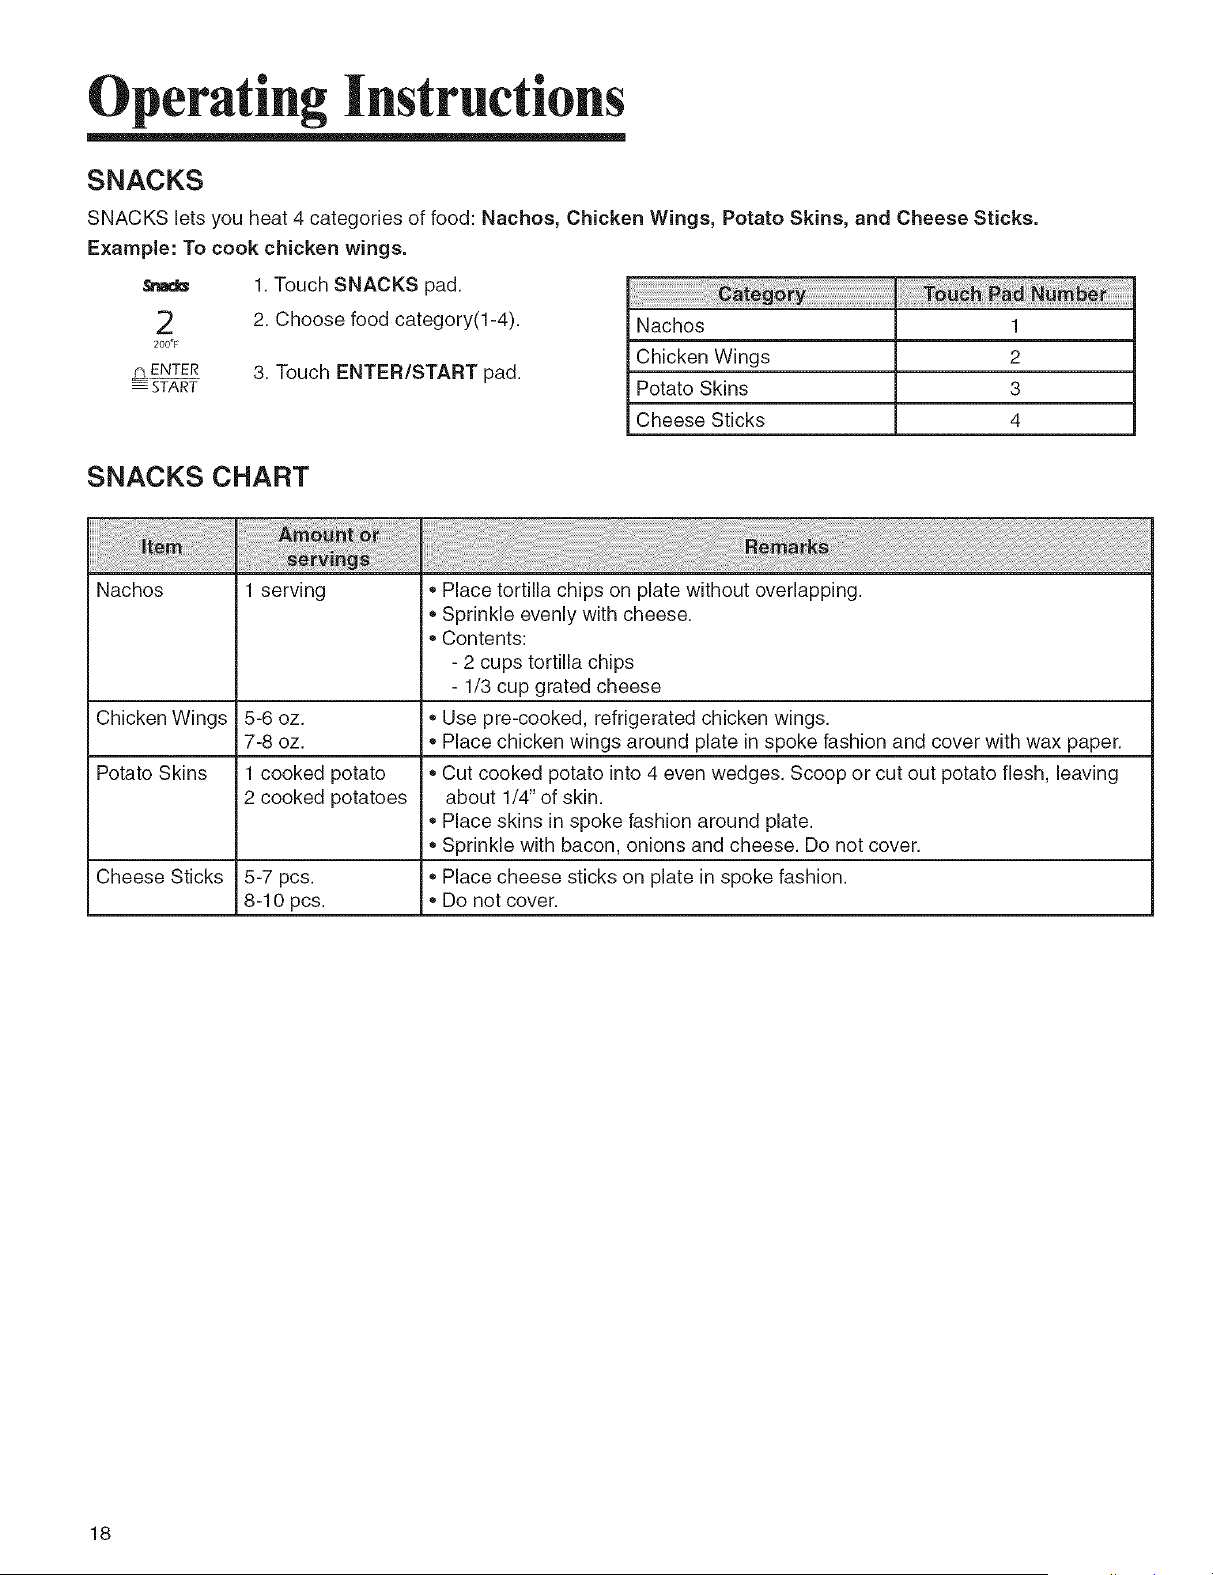
SNACKS
SNACKS lets you heat 4 categories of food: Nachos, Chicken Wings, Potato Skins, and Cheese Sticks.
ExampJe: To cook chicken wings.
2
200"F
#LENTER
START
1. Touch SNACKS pad.
2. Choose food category(I-4).
3. Touch ENTER/START pad.
Nachos 1
Chicken Wings 2
Potato Skins 3
Cheese Sticks 4
SNACKS CHART
Nachos 1 serving * Place tortilla chips on plate without overlapping.
• Sprinkle evenly with cheese.
• Contents:
- 2 cups tortilla chips
- 1/3 cup grated cheese
Chicken Wings 5-6 oz. * Use pre-cooked, refrigerated chicken wings.
7-8 oz. * Place chicken wings around plate in spoke fashion and cover with wax paper.
Potato Skins 1 cooked potato * Cut cooked potato into 4 even wedges. Scoop or cut out potato flesh, leaving
2 cooked potatoes about 1/4" of skin.
• Place skins in spoke fashion around plate.
• Sprinkle with bacon, onions and cheese. Do not cover.
Cheese Sticks 5-7 pcs. * Place cheese sticks on plate in spoke fashion.
8-10 pcs. * Do not cover.
18
Operating Instructions
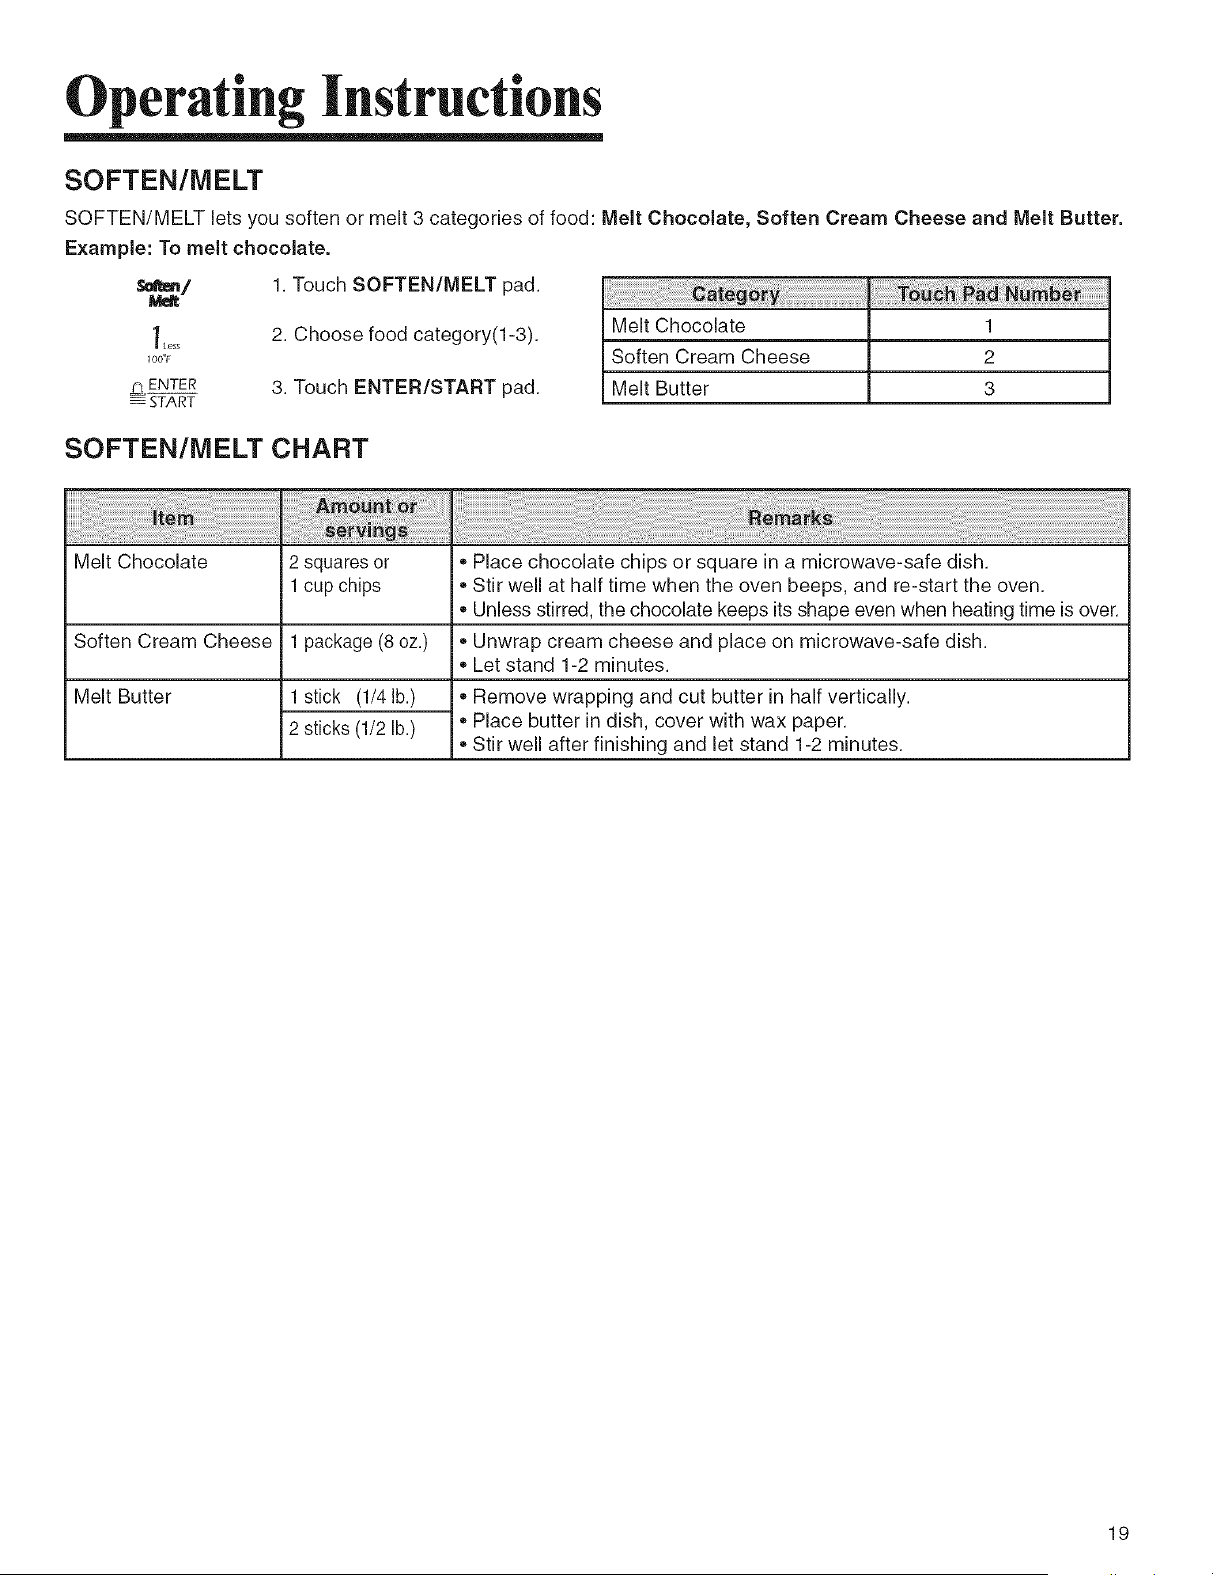
SOFTEN/MELT
SOFTEN/MELT lets you soften or melt 3 categories of food: Melt Chocolate, Soften Cream Cheese and Melt Butter.
Example: To melt chocolate.
_Ies5
100_F
E_ ENTER
_ START
1. Touch SOFTEN/MELT pad.
2. Choose food category(I-3).
3. Touch ENTER/START pad.
Melt Chocolate
Soften Cream Cheese
Melt Butter
1
2
3
SOFTEN/MELT CHART
Melt Chocolate
Soften Cream Cheese
Melt Butter
2 squares or
1 cup chips
1 package (8 oz.)
1 stick (1/4lb.)
2 sticks (1/2 lb.)
• Place chocolate chips or square in a microwave-safe dish.
• Stir well at half time when the oven beeps, and re-start the oven.
Unless stirred, the chocolate keeps its shape even when heating time is over.
• Unwrap cream cheese and place on microwave-safe dish.
Let stand 1-2 minutes.
Remove wrapping and cut butter in half vertically.
Place butter in dish, cover with wax paper.
Stir well after finishing and let stand 1-2 minutes.
19
Operating Instructions
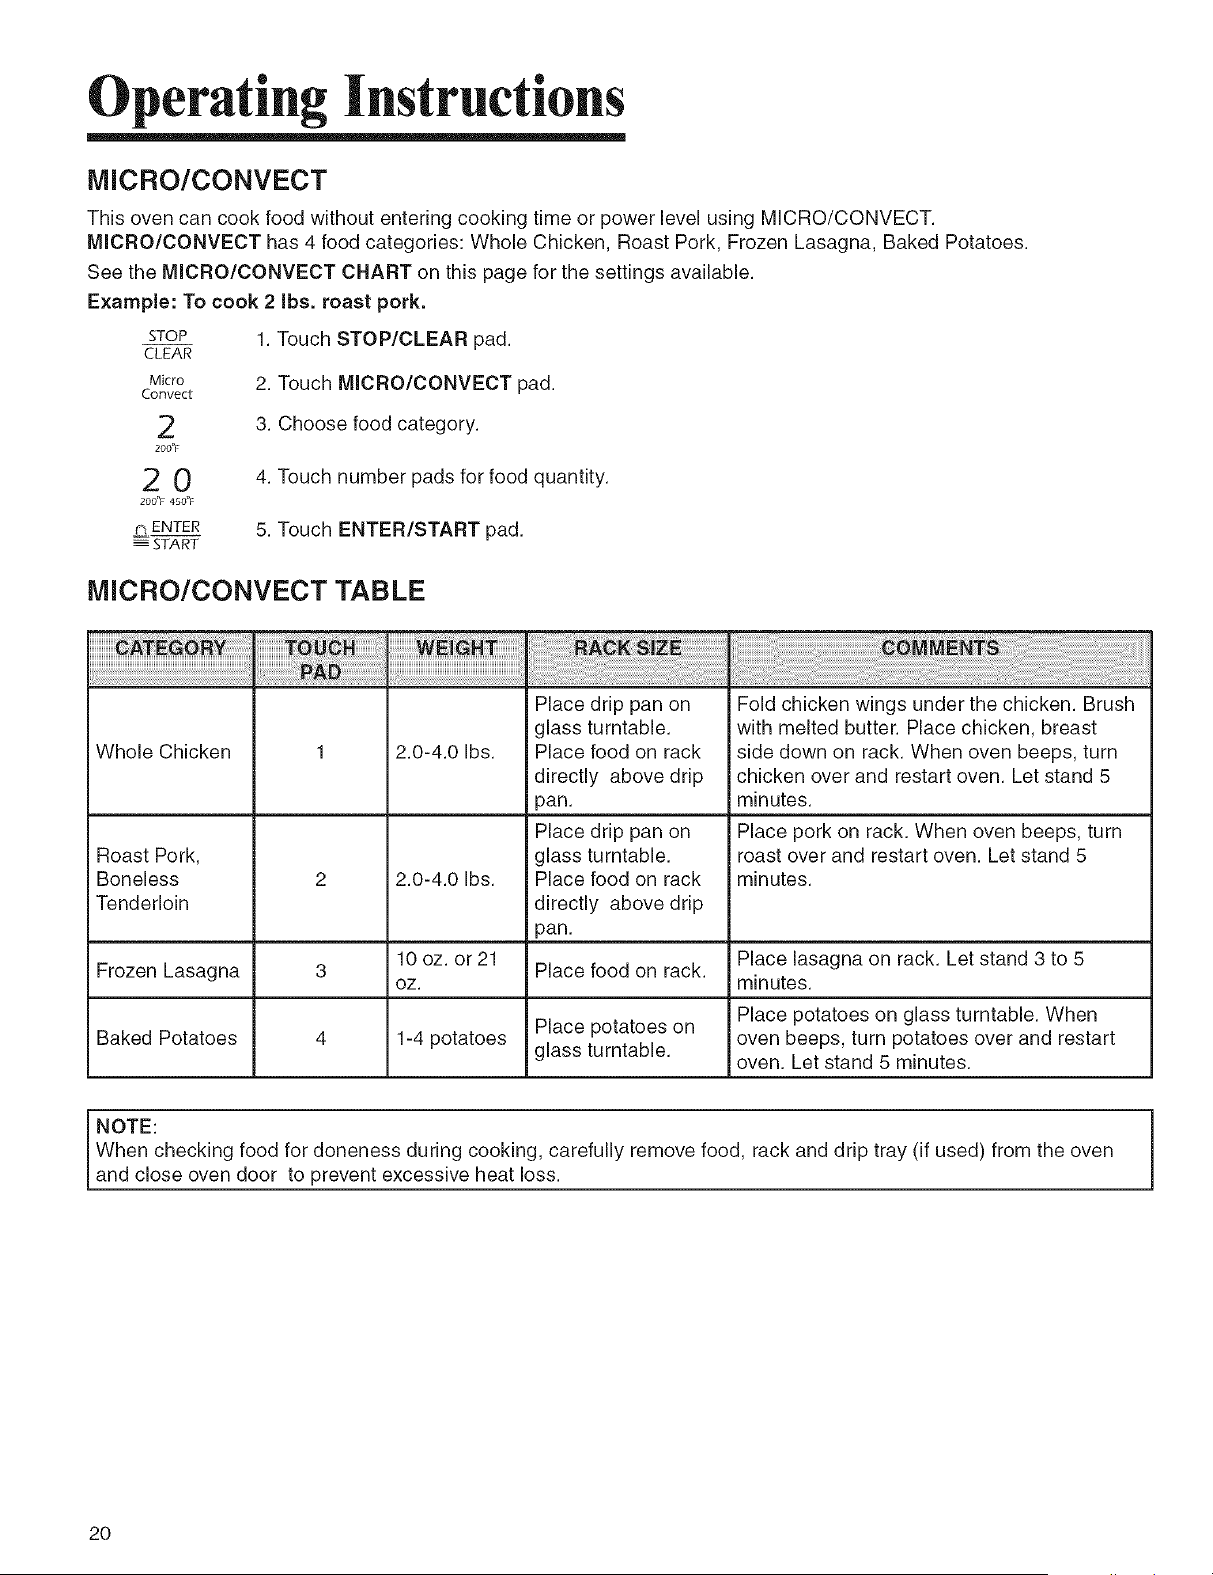
MICRO/CONVECT
This oven can cook food without entering cooking time or power level using MJCRO/CONVECT.
MICRO/CONVECT has 4 food categories: Whole Chicken, Roast Pork, Frozen Lasagna, Baked Potatoes.
See the MICRO/CONVECT CHART on this page for the settings available.
Example: To cook 2 Ibs. roast pork.
STOP
CLEAR
Micro
Convect
2
200"1
20
200"F 450_
p_ ENTER
START
t. Touch STOP/CLEAR pad.
2. Touch MJCRO/CONVECT pad.
3. Choose food category.
4. Touch number pads for food quantity.
5. Touch ENTER/START pad.
MICRO/CONVECT TABLE
Whole Chicken 2.0-4.0 Ibs.
Place drip pan on
glass turntable.
Place food on rack
directly above drip
pan.
Place drip pan on
glass turntable.
Place food on rack
directly above drip
pan.
iiiiiiiiiiiiiiiiii : iiiiiiiiiiiiiiiiiiiiiiiiiiiiiiiiiiiiiiii !i i i i i i i i i i i i i i i i i i i i i i i i i i i i i i i i i i i !! i i ii i i! i! ! i! ! i! ii¸iii'ii¸iii
i i i ! ii iiiiiiiiiiii ii ii!!ii!!iiiii i!i!iiii! !i! iiiiii!i!i!i!i!i!i!i!i!i!i!i!i!i!i!i!i!i!i!i!iii ! !! ! !!!!!!!i! !i! iiiiiiiiiii i !!i !!i i i i i i ! i ! i i i ! iiii iii iii iiiiiiiiiiiiiiiiii i ii!!ii!!iiiiiiiiiiii!! i! i!i i!i!i! !i! ! iiiiiiiiiiiiiiiiiiiiiiiiiiiiiiiiiiiii ii ii ii!!ii!!iiiiiiiiiii!i!iiiiii! ! ii !iiiiiiiiiiiiii!i! i! !iiii!!
Fold chicken wings under the chicken. Brush
with melted butter. Place chicken, breast
side down on rack. When oven beeps, turn
chicken over and restart oven. Let stand 5
minutes.
Place pork on rack. When oven beeps, turn
roast over and restart oven. Let stand 5
minutes.
Roast Pork,
Boneless 2 2.0-4.0 Ibs.
Tenderloin
10 oz. or 21 Place lasagna on rack. Let stand 3 to 5
Frozen Lasagna 3 Place food on rack.
oz. minutes.
Baked Potatoes 4 1-4 potatoes Place potatoes on Place potatoes on glass turntable. When
glass turntable, oven beeps, turn potatoes over and restart
oven. Let stand 5 minutes.
j,,OTE: j
When checking food for doneness during cooking, carefully remove food, rack and drip tray (if used) from the oven
land c ose oven door to prevent excess ve heat oss.
2O
Operating Instructions
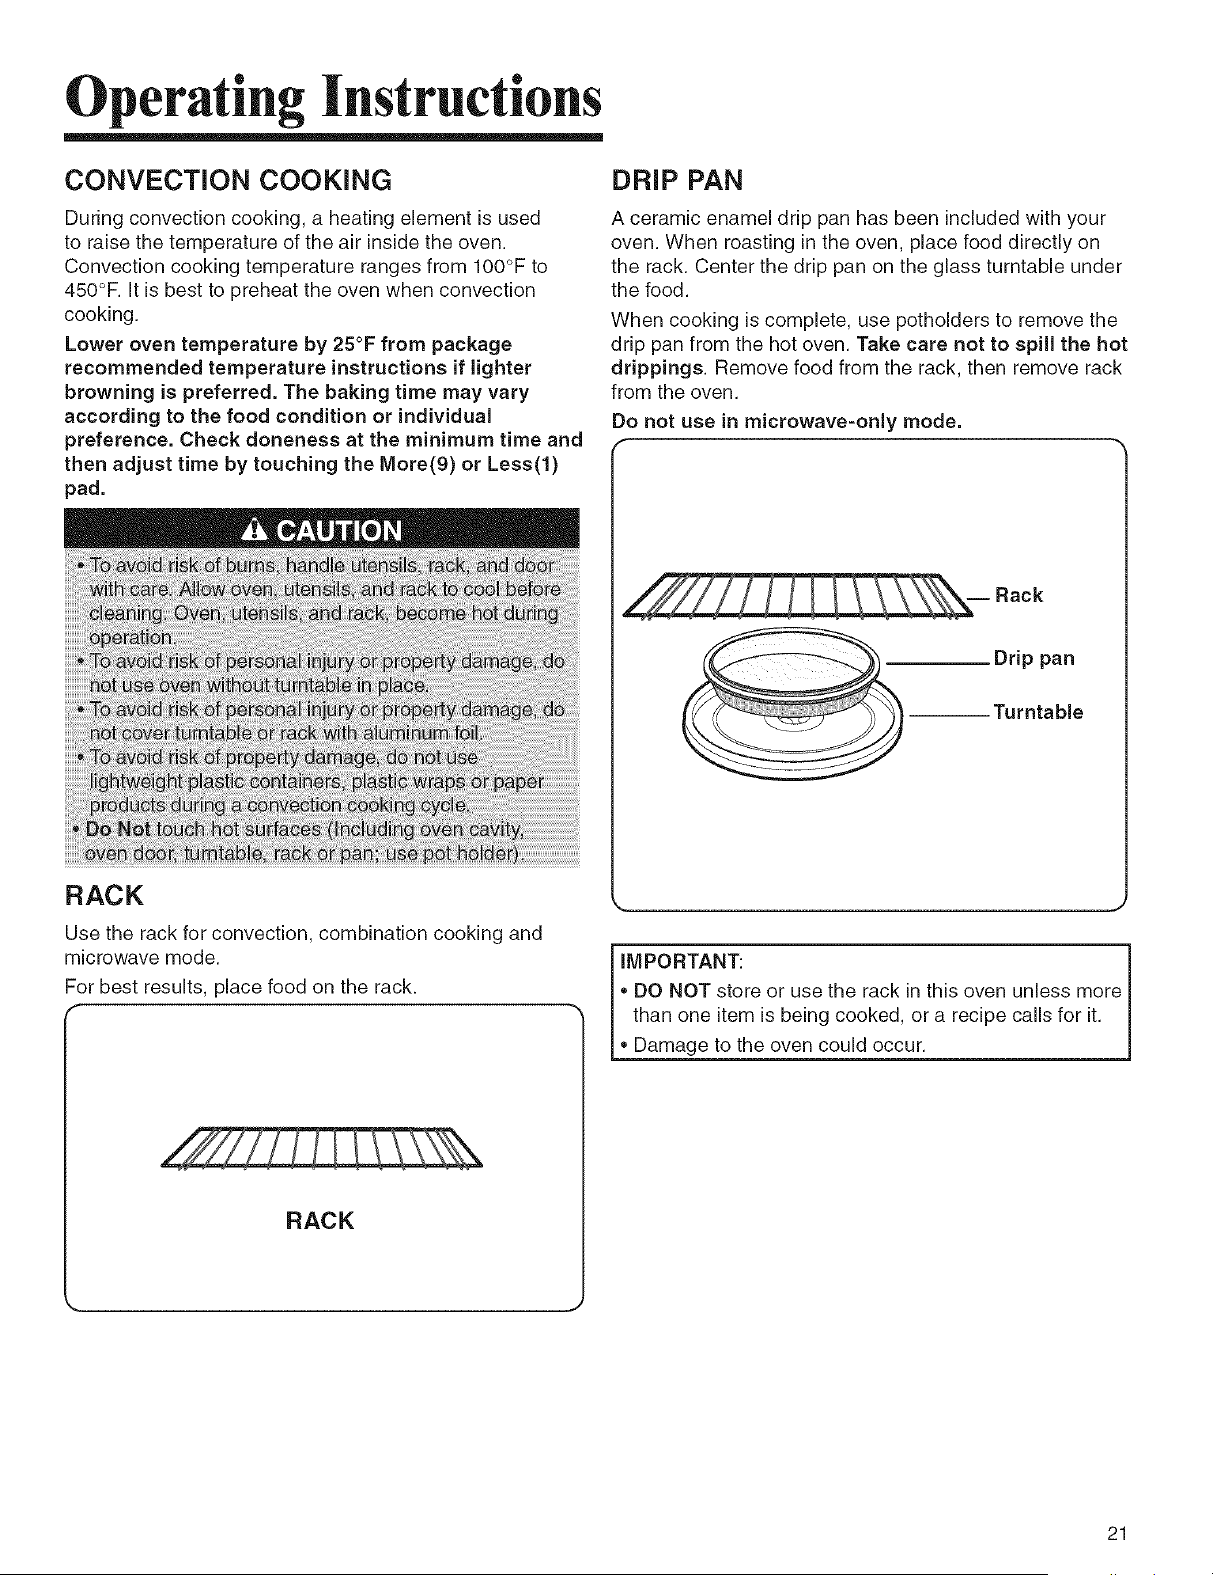
CONVECTION COOKING
During convection cooking, a heating element is used
to raise the temperature of the air inside the oven.
Convection cooking temperature ranges from 100°F to
450°F. It is best to preheat the oven when convection
cooking.
Lower oven temperature by 25°F from package
recommended temperature instructions if lighter
browning is preferred. The baking time may vary
according to the food condition or individual
preference. Check doneness at the minimum time and
then adjust time by touching the More(9) or Less(l)
pad.
RACK
Use the rack for convection, combination cooking and
microwave mode.
For best results, place food on the rack.
I ==
RACK ._
DRiP PAN
A ceramic enamel drip pan has been included with your
oven. When roasting in the oven, place food directly on
the rack. Center the drip pan on the glass turntable under
the food.
When cooking is complete, use potholders to remove the
drip pan from the hot oven. Take care not to spill the hot
drippings. Remove food from the rack, then remove rack
from the oven.
Do not use in microwave-only mode.
f
-- Rack
Drip pan
Turntable
_ J
I i
DO NOT store or use the rack in this oven unless more I
than one item is being cooked, or a recipe calls for it. I
• Damage to the oven could occur. J
21
Operating Instructions
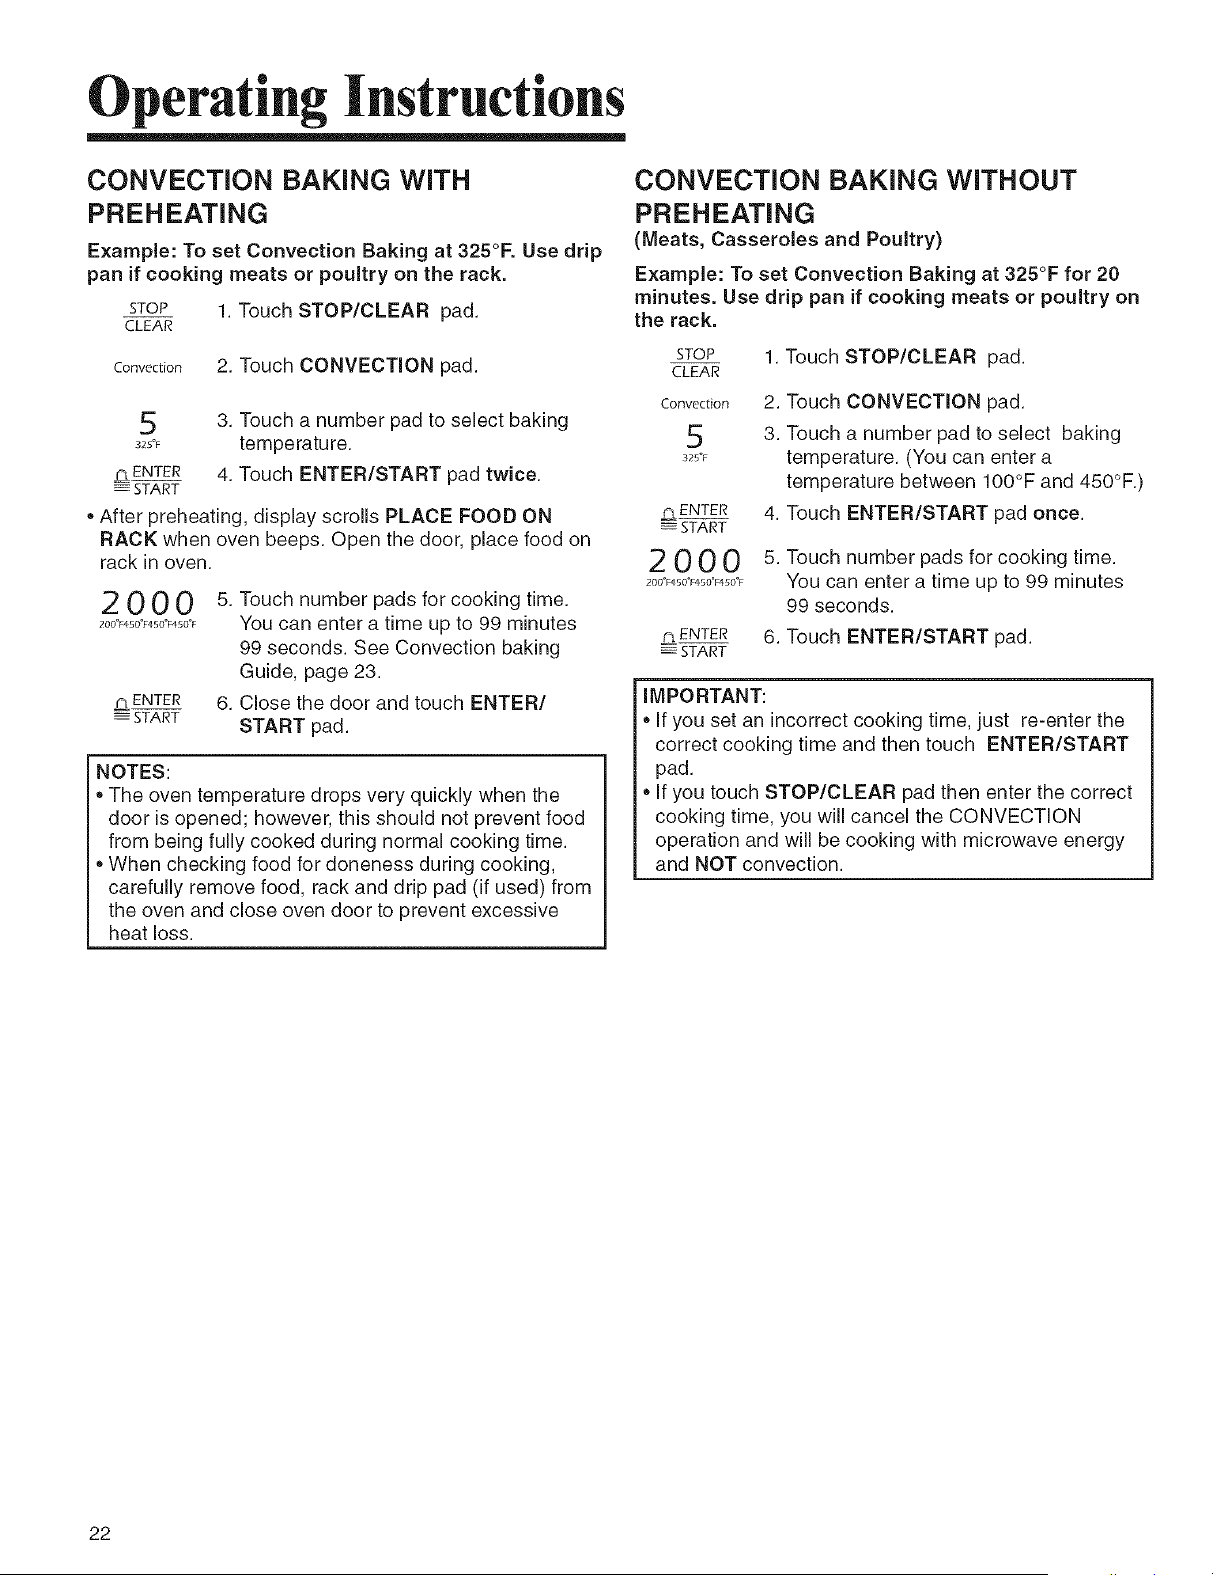
CONVECTION BAKING WITH
PREHEATING
Example: To set Convection Baking at 325°F. Use drip
pan if cooking meats or poultry on the rack.
STOP 1. Touch STOP/CLEAR pad.
CLEAR
Convection 2. Touch CONVECTION pad.
5
325°F
¢l ENTER
START
3. Touch a number pad to select baking
temperature.
4. Touch ENTER/START pad twice.
• After preheating, display scrolls PLACE FOOD ON
RACK when oven beeps. Open the door, place food on
rack in oven.
2000
2000F4500F450"Fq 50"F
r3 ENTER
START
5. Touch number pads for cooking time.
You can enter a time up to 99 minutes
99 seconds. See Convection baking
Guide, page 23.
6. Close the door and touch ENTER/
START pad.
NOTES:
• The oven temperature drops very quickly when the
door is opened; however, this should not prevent food
from being fully cooked during normal cooking time.
• When checking food for doneness during cooking,
carefully remove food, rack and drip pad (if used) from
the oven and close oven door to prevent excessive
heat loss.
CONVECTION BAKING WITHOUT
PREHEATING
(Meats, Casseroles and Poultry)
Example: To set Convection Baking at 325°F for 20
minutes. Use drip pan if cooking meats or poultry on
the rack.
STOP
CLEAR
Convection
5
325_F
1.
2.
3.
p_ENTER 4.
_- START
2000 s.
200"F'150"F450"F450"F
¢_ENTER 6.
START
Touch STOP/CLEAR pad.
Touch CONVECTION pad.
Touch a number pad to select baking
temperature. (You can enter a
temperature between 100°F and 450°F.)
Touch ENTER/START pad once.
Touch number pads for cooking time.
You can enter a time up to 99 minutes
99 seconds.
Touch ENTER/START pad.
IMPORTANT:
• If you set an incorrect cooking time, just re-enter the
correct cooking time and then touch ENTER/START
pad.
if you touch STOP/CLEAR pad then enter the correct
cooking time, you will cancel the CONVECTION
operation and will be cooking with microwave energy
and NOT convection.
22
Operating Instructions
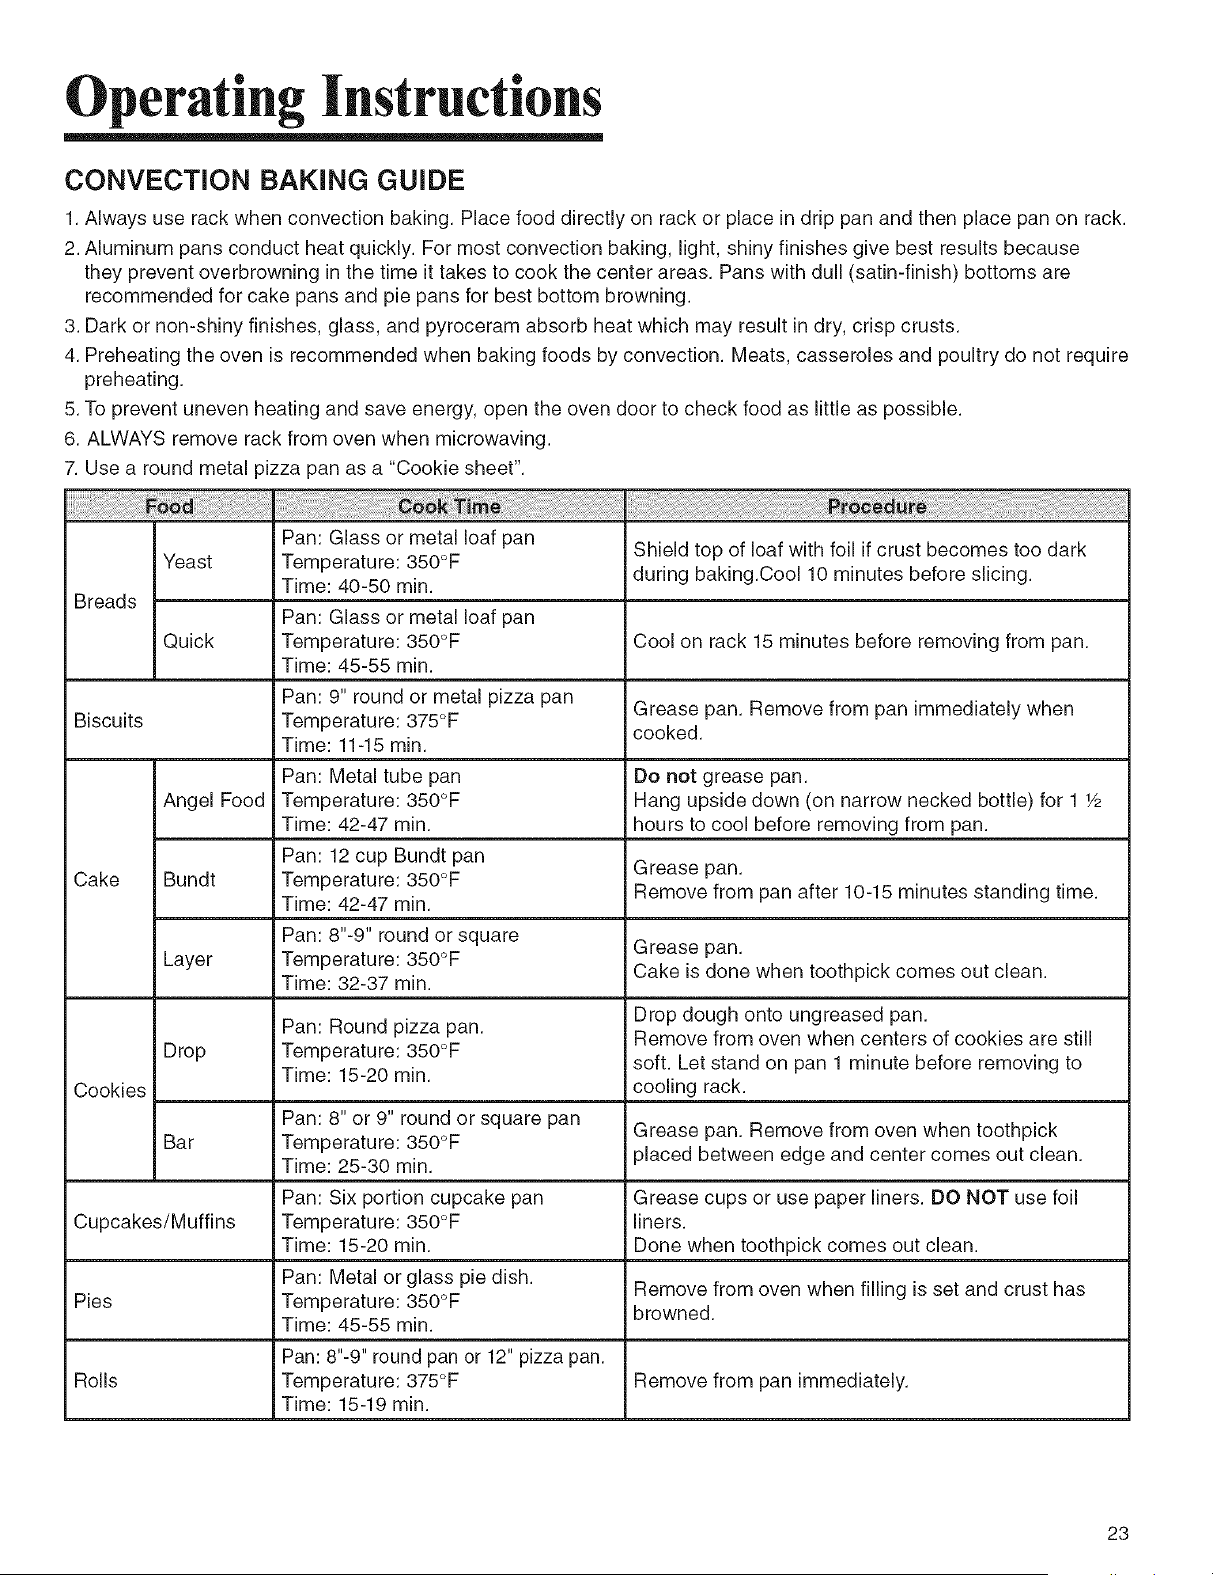
CONVECTION BAKING GUIDE
1. Always use rack when convection baking. Place food directly on rack or place in drip pan and then place pan on rack.
2. Aluminum pans conduct heat quickly. For most convection baking, light, shiny finishes give best results because
they prevent overbrowning in the time it takes to cook the center areas. Pans with dull (satin-finish) bottoms are
recommended for cake pans and pie pans for best bottom browning.
3. Dark or non-shiny finishes, glass, and pyroceram absorb heat which may result in dry, crisp crusts.
4. Preheating the oven is recommended when baking foods by convection. Meats, casseroles and poultry do not require
preheating.
5. To prevent uneven heating and save energy, open the oven door to check food as little as possible.
6. ALWAYS remove rack from oven when microwaving.
7. Use a round metal pizza pan as a "Cookie sheet".
Pan: Glass or metal loaf pan Shield top of loaf with foil if crust becomes too dark
Yeast Temperature: 350°F
Time: 40-50 min. during baking.Cool 10 minutes before slicing.
Breads
Pan: Glass or metal loaf pan
Quick Temperature: 350°F Cool on rack 15 minutes before removing from pan.
Time: 45-55 min.
Pan: 9" round or metal pizza pan Grease pan. Remove from pan immediately when
Biscuits Temperature: 375°F
cooked.
Time: 11-15 min.
Pan: Metal tube pan Do not grease pan.
Angel Food Temperature: 350°F Hang upside down (on narrow necked bottle) for 1 1/2
Time: 42-47 min. hours to cool before removing from pan.
Pan: 12 cup Bundt pan Grease pan.
Cake Bundt Temperature: 350°F
Time: 42-47 min. Remove from pan after 10-15 minutes standing time.
Pan: 8"-9" round or square Grease pan.
Layer Temperature: 350°F
Cake is done when toothpick comes out clean.
Time: 32-37 min.
Pan: Round pizza pan. Drop dough onto ungreased pan.
Remove from oven when centers of cookies are still
Drop Temperature: 350°F
soft. Let stand on pan 1 minute before removing to
Time: 15-20 min.
Cookies cooling rack.
Pan: 8" or 9" round or square pan Grease pan. Remove from oven when toothpick
Bar Temperature: 350°F
Time: 25-30 min. placed between edge and center comes out clean.
Pan: Six portion cupcake pan Grease cups or use paper liners. DO NOT use foil
Cupcakes/Muffins Temperature: 350°F liners.
Time: 15-20 min. Done when toothpick comes out clean.
Pan: Metal or glass pie dish. Remove from oven when filling is set and crust has
Pies Temperature: 350°F
browned.
Time: 45-55 min.
Pan: 8"-9" round pan or 12" pizza pan.
Rolls Temperature: 375°F Remove from pan immediately.
Time: 15-19 min.
23
Operating Instructions
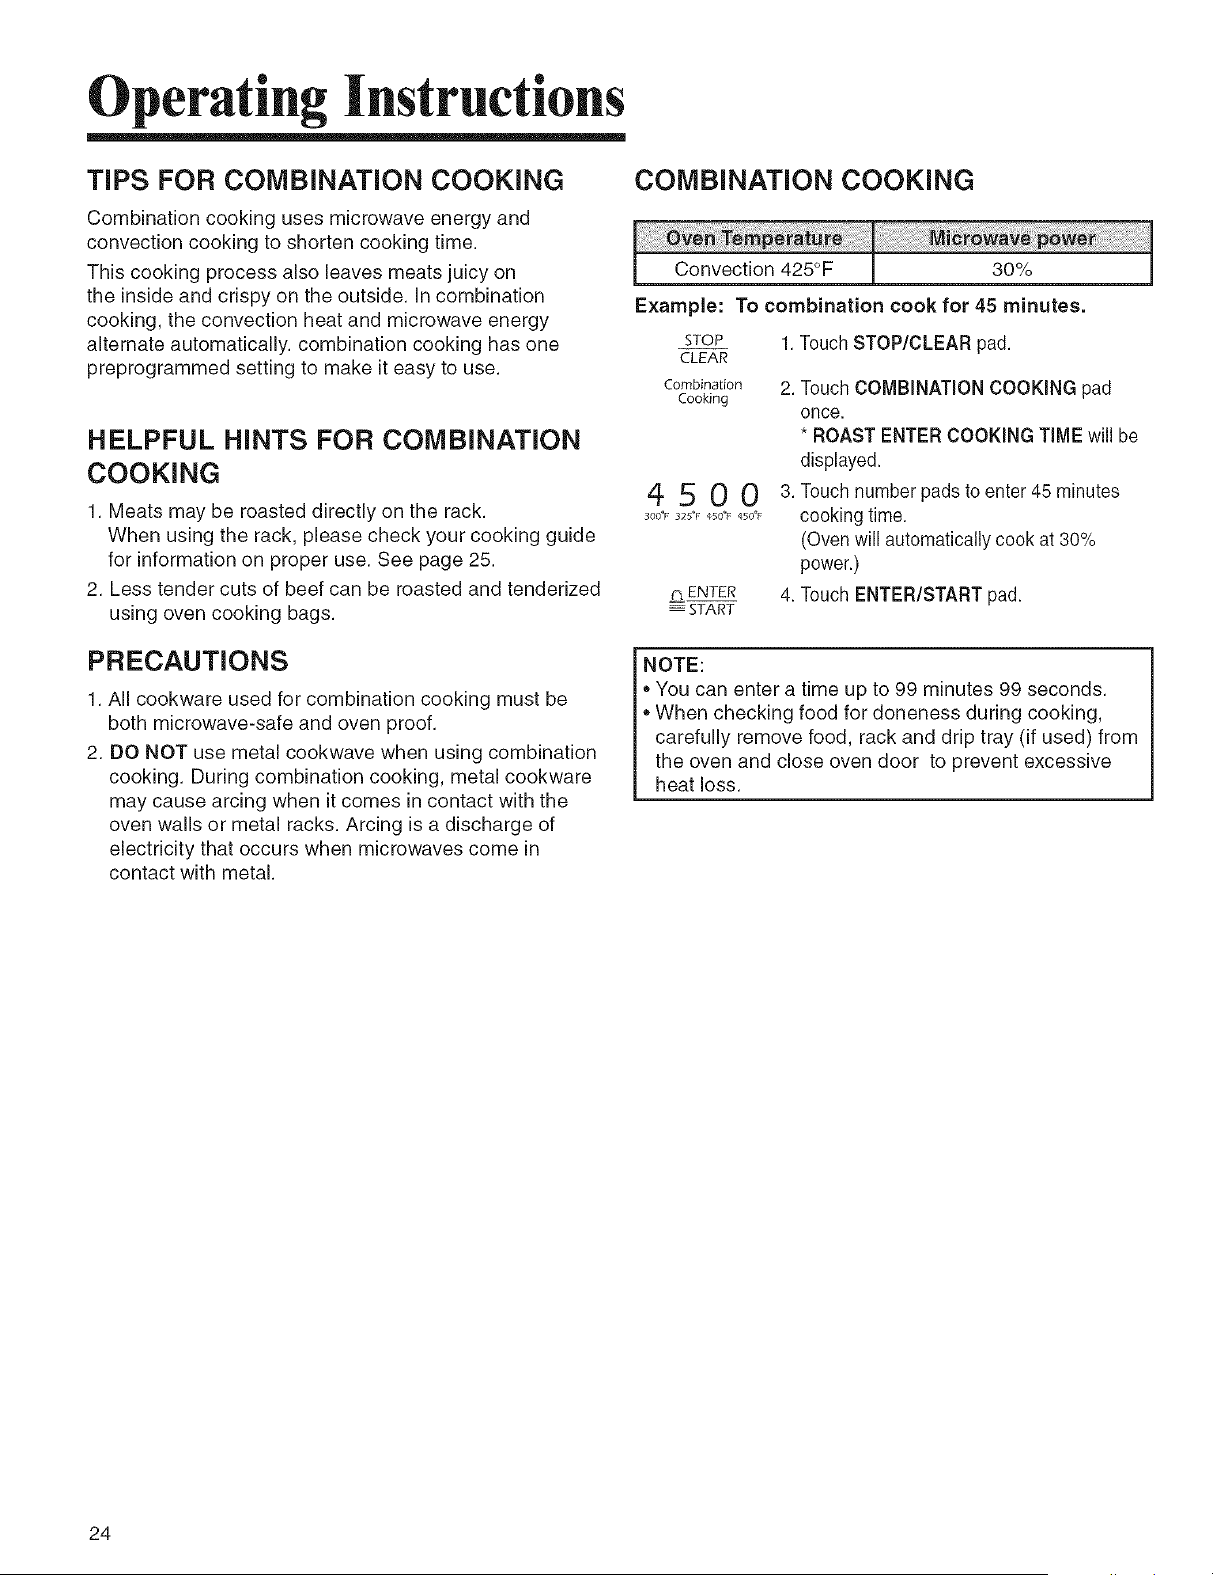
TIPS FOR COMBINATION COOKING
Combination cooking uses microwave energy and
convection cooking to shorten cooking time.
This cooking process also leaves meats juicy on
the inside and crispy on the outside. In combination
cooking, the convection heat and microwave energy
alternate automatically, combination cooking has one
preprogrammed setting to make it easy to use.
HELPFUL HINTS FOR COMBINATION
COOKING
1. Meats may be roasted directly on the rack.
When using the rack, please check your cooking guide
for information on proper use. See page 25.
2. Less tender cuts of beef can be roasted and tenderized
using oven cooking bags.
PRECAUTIONS
1. All cookware used for combination cooking must be
both microwave-safe and oven proof.
2. DO NOT use metal cookwave when using combination
cooking. During combination cooking, metal cookware
may cause arcing when it comes in contact with the
oven walls or metal racks. Arcing is a discharge of
electricity that occurs when microwaves come in
contact with metal.
COMBINATION COOKING
Convection 425°F 30%
Example: To combination cook for 45 minutes.
1. Touch STOP/CLEAR pad.
STOP
CLEAR
Combination
Cooking
4500
300"F 325"F 450"F 450"F
C'_ENTER
_ START
2. Touch COMBINATION COOKING pad
once.
* ROAST ENTER COOKING TIME will be
displayed.
3. Touch number pads to enter 45 minutes
cooking time.
(Oven will automatically cook at 30%
power.)
4. Touch ENTER/START pad.
NOTE:
• You can enter a time up to 99 minutes 99 seconds.
• When checking food for doneness during cooking,
carefully remove food, rack and drip tray (if used) from
the oven and close oven door to prevent excessive
heat loss.
24
Operating Instructions
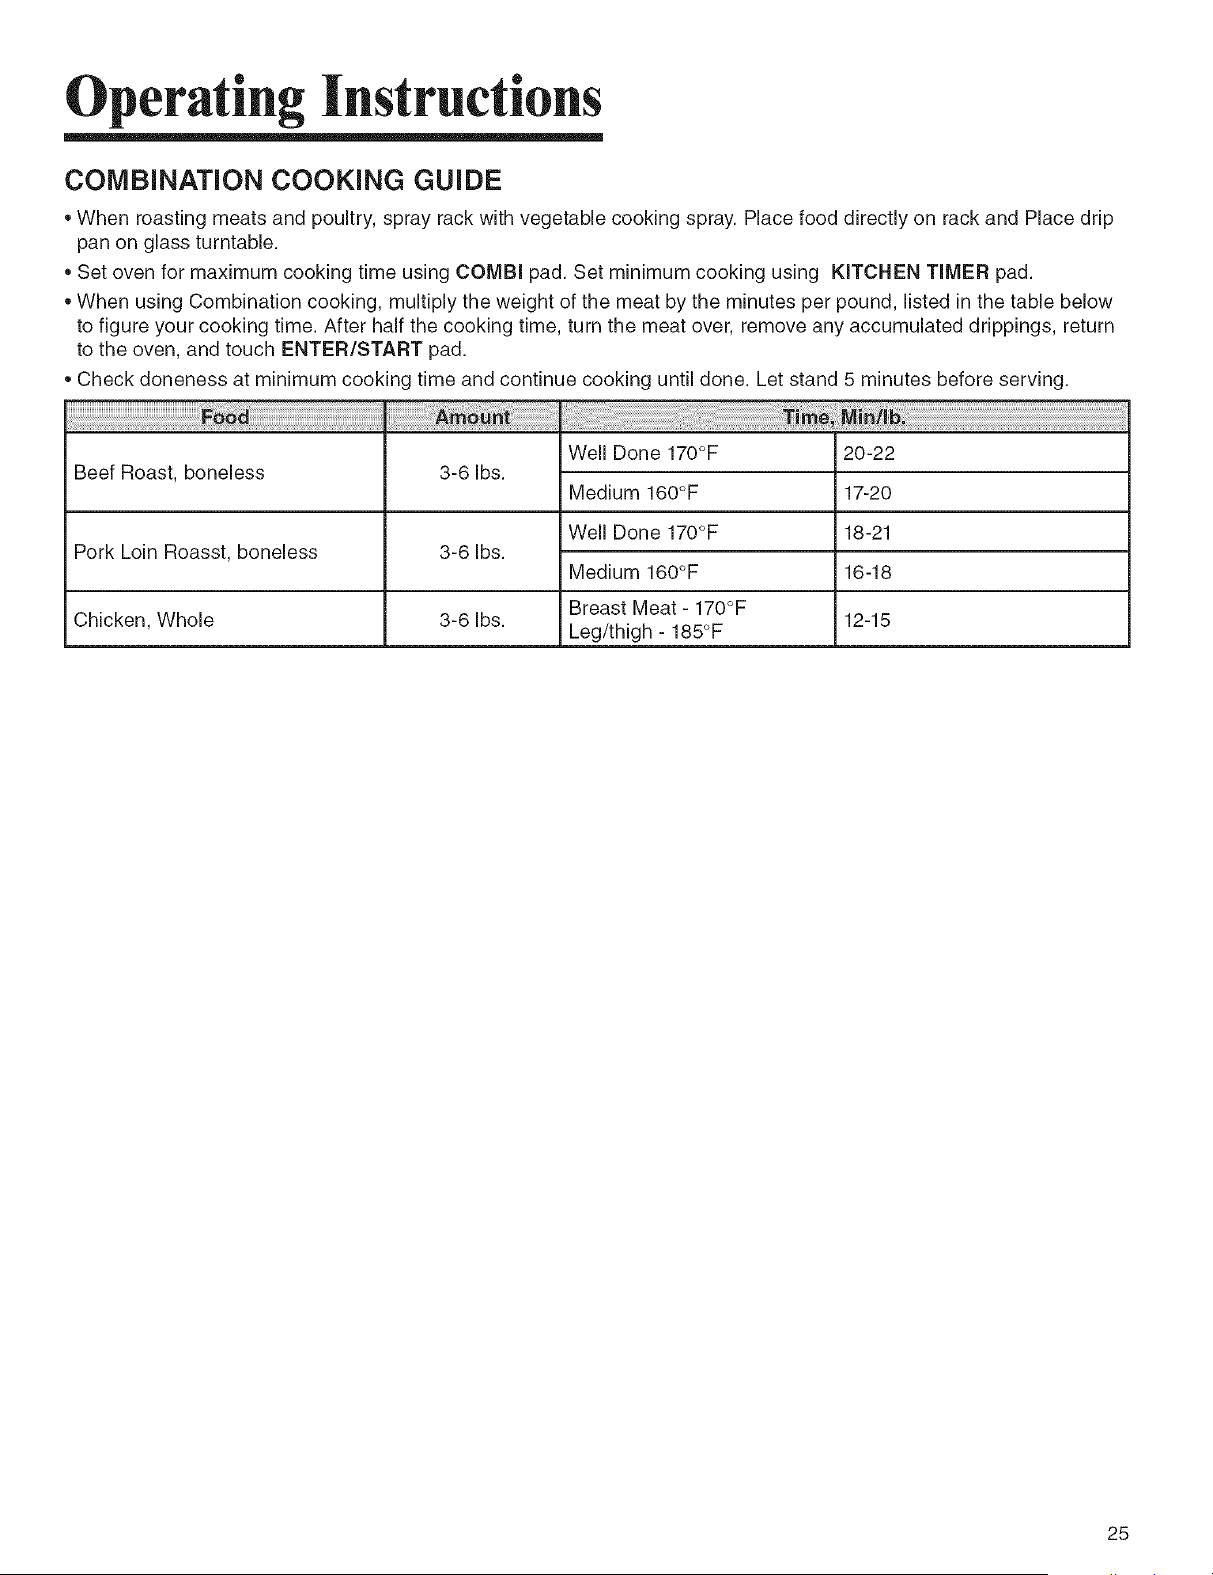
COMBINATION COOKING GUIDE
,,When roasting meats and poultry, spray rack with vegetable cooking spray. Place food directly on rack and Place drip
pan on glass turntable.
• Set oven for maximum cooking time using COMBI pad. Set minimum cooking using KITCHEN TIMER pad.
When using Combination cooking, multiply the weight of the meat by the minutes per pound, listed in the table below
to figure your cooking time. After half the cooking time, turn the meat over, remove any accumulated drippings, return
to the oven, and touch ENTER/START pad.
Check doneness at minimum cooking time and continue cooking until done. Let stand 5 minutes before serving.
Beef Roast, boneless
Pork Loin Roasst, boneless
3-6 Ibs.
3-6 Ibs.
Chicken, Whole 3-6 Ibs.
Well Done 170°F
Medium 160°F
Well Done 170°F
Medium 160°F
Breast Meat - 170°F
Leg/thigh - 185°F
20-22
17-20
18-21
16-18
12-15
25

Operating Instructions
RACK
The rack gives you extra space when cooking in more than one container at the same time.
To use rack:
1. Place rack securely in the four plastic supports.
* Rack MUST NOT touch metal walls or back of microwave oven.
2. Place equal amounts of food both ABOVE AND BELOW rack.
* Amount of food must be approximately the same to balance out cooking energy.
i'.MPORTANT:
DO NOT store or use the rack in this oven unless more than one item is being cooked or a recipe calls for it.
|* Damage to the oven cou d occur
26
Operating Instructions
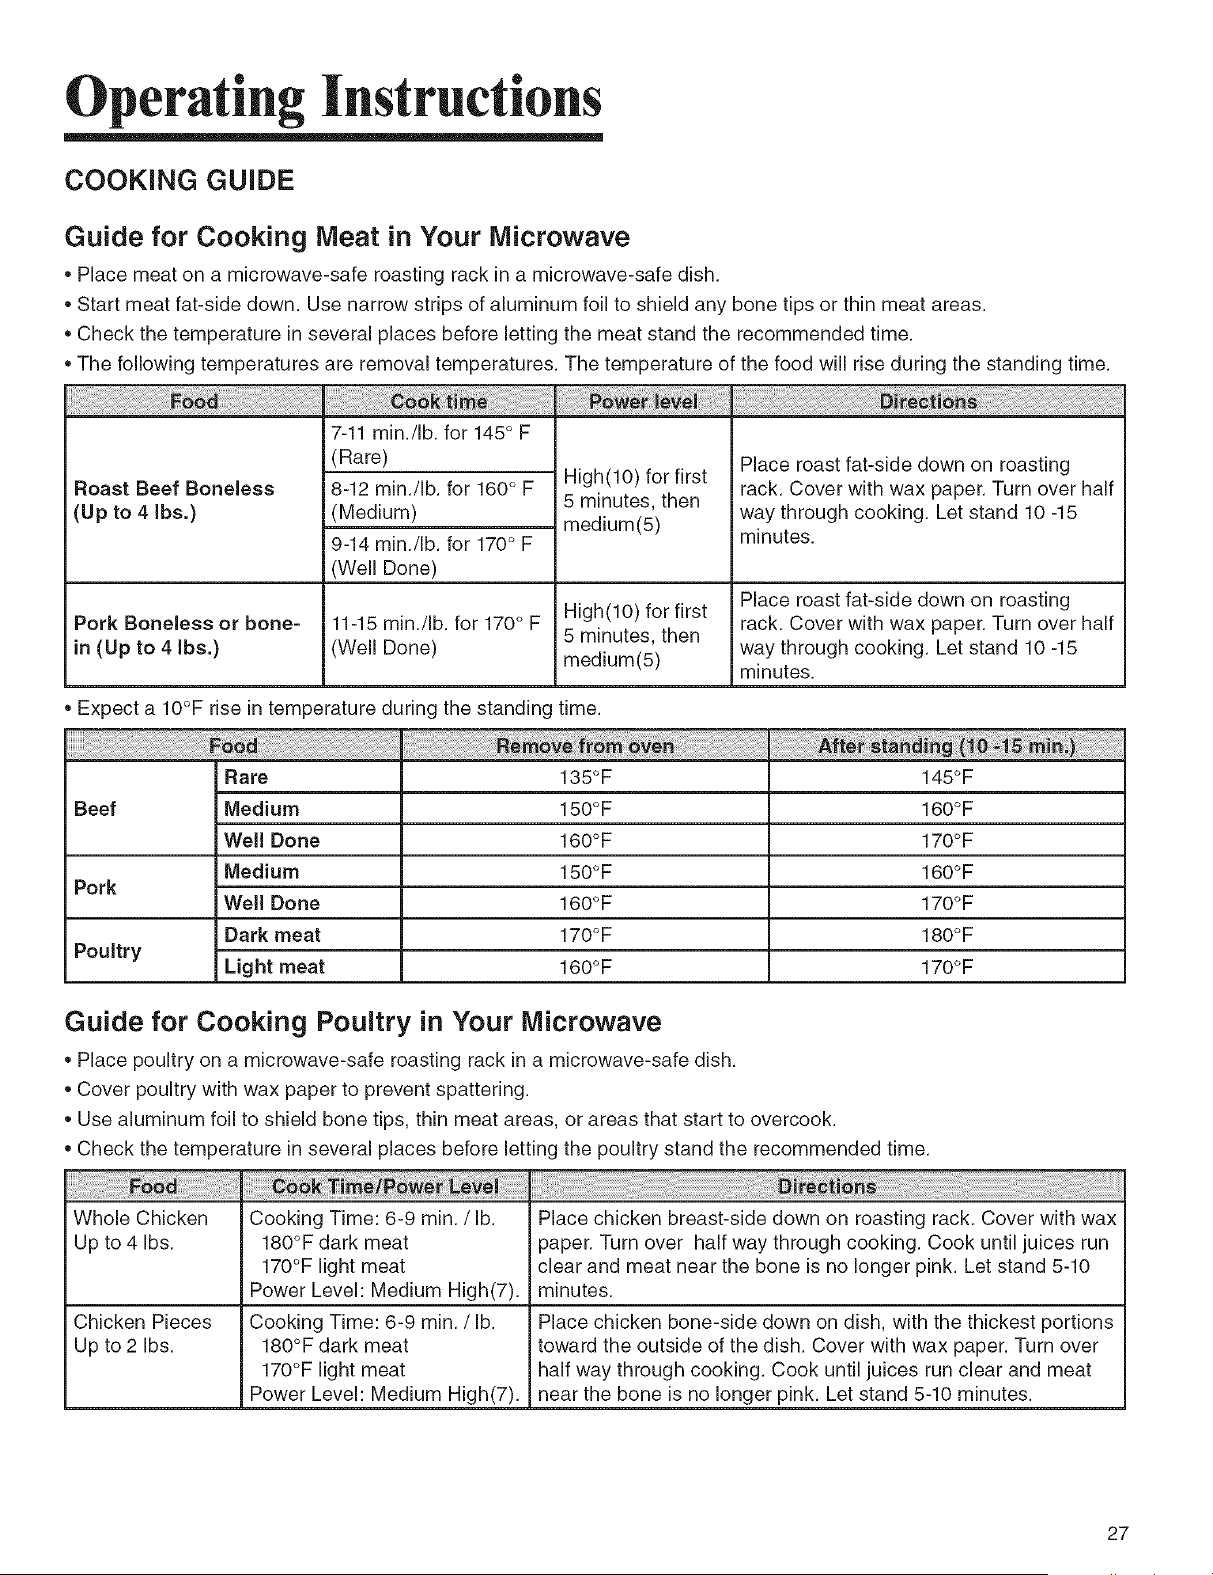
COOKING GUIDE
Guide for Cooking Meat in Your Microwave
* Place meat on a microwave-safe roasting rack in a microwave-safe dish.
* Start meat fat-side down. Use narrow strips of aluminum foil to shield any bone tips or thin meat areas.
* Check the temperature in several places before letting the meat stand the recommended time.
* The following temperatures are removal temperatures. The temperature of the food will rise during the standing time.
7-11 min./Ib, for 145° F
(Rare)
Roast Beef Boneless 8-12 min./Ib, for 160° F
(Up to 4 Ibs.) (Medium)
9-14 min./Ib, for 170 ° F
(Well Done)
High(lO) for first
5 minutes, then
medium(5)
Place roast fat-side down on roasting
rack. Cover with wax paper. Turn over half
way through cooking. Let stand 10 -15
minutes.
High(lO) for first Place roast fat-side down on roasting
Pork Boneless or bone= 11-15 min./Ib, for 170° F 5 minutes, then rack. Cover with wax paper. Turn over half
in (Up to 4 Ibs.) (Well Done) medium(5) way through cooking. Let stand 10 -15
minutes.
* Expect a IO°F rise in temperature during the standing time.
Rare 135°F 145°F
Beef Medium 150°F 160°F
l Well Done 160°F 170°F
Medium 150°F 160°F
Pork
Well Done 160°F 170°F
Dark meat 170°F 180°F
Poultry
Light meat 160°F 170°F
Guide for Cooking Poultry in Your Microwave
* Place poultry on a microwave-safe roasting rack in a microwave-safe dish.
* Cover poultry with wax paper to prevent spattering.
* Use aluminum foil to shield bone tips, thin meat areas, or areas that start to overcook.
* Check the temperature in several places before letting the poultry stand the recommended time.
Whole Chicken
Up to 4 Ibs.
Chicken Pieces
Up to 2 Ibs.
Cooking Time: 6-9 min. / lb.
180°F dark meat
170°F light meat
Power Level: Medium High(7).
Cooking Time: 6-9 min. / lb.
180°F dark meat
170°F light meat
Power Level: Medium High(7).
Place chicken breast-side down on roasting rack. Cover with wax
paper. Turn over half way through cooking. Cook until juices run
clear and meat near the bone is no longer pink. Let stand 5-10
minutes.
Place chicken bone-side down on dish, with the thickest portions
toward the outside of the dish. Cover with wax paper. Turn over
half way through cooking. Cook until juices run clear and meat
near the bone is no longer pink. Let stand 5-10 minutes.
27
Operating Instructions
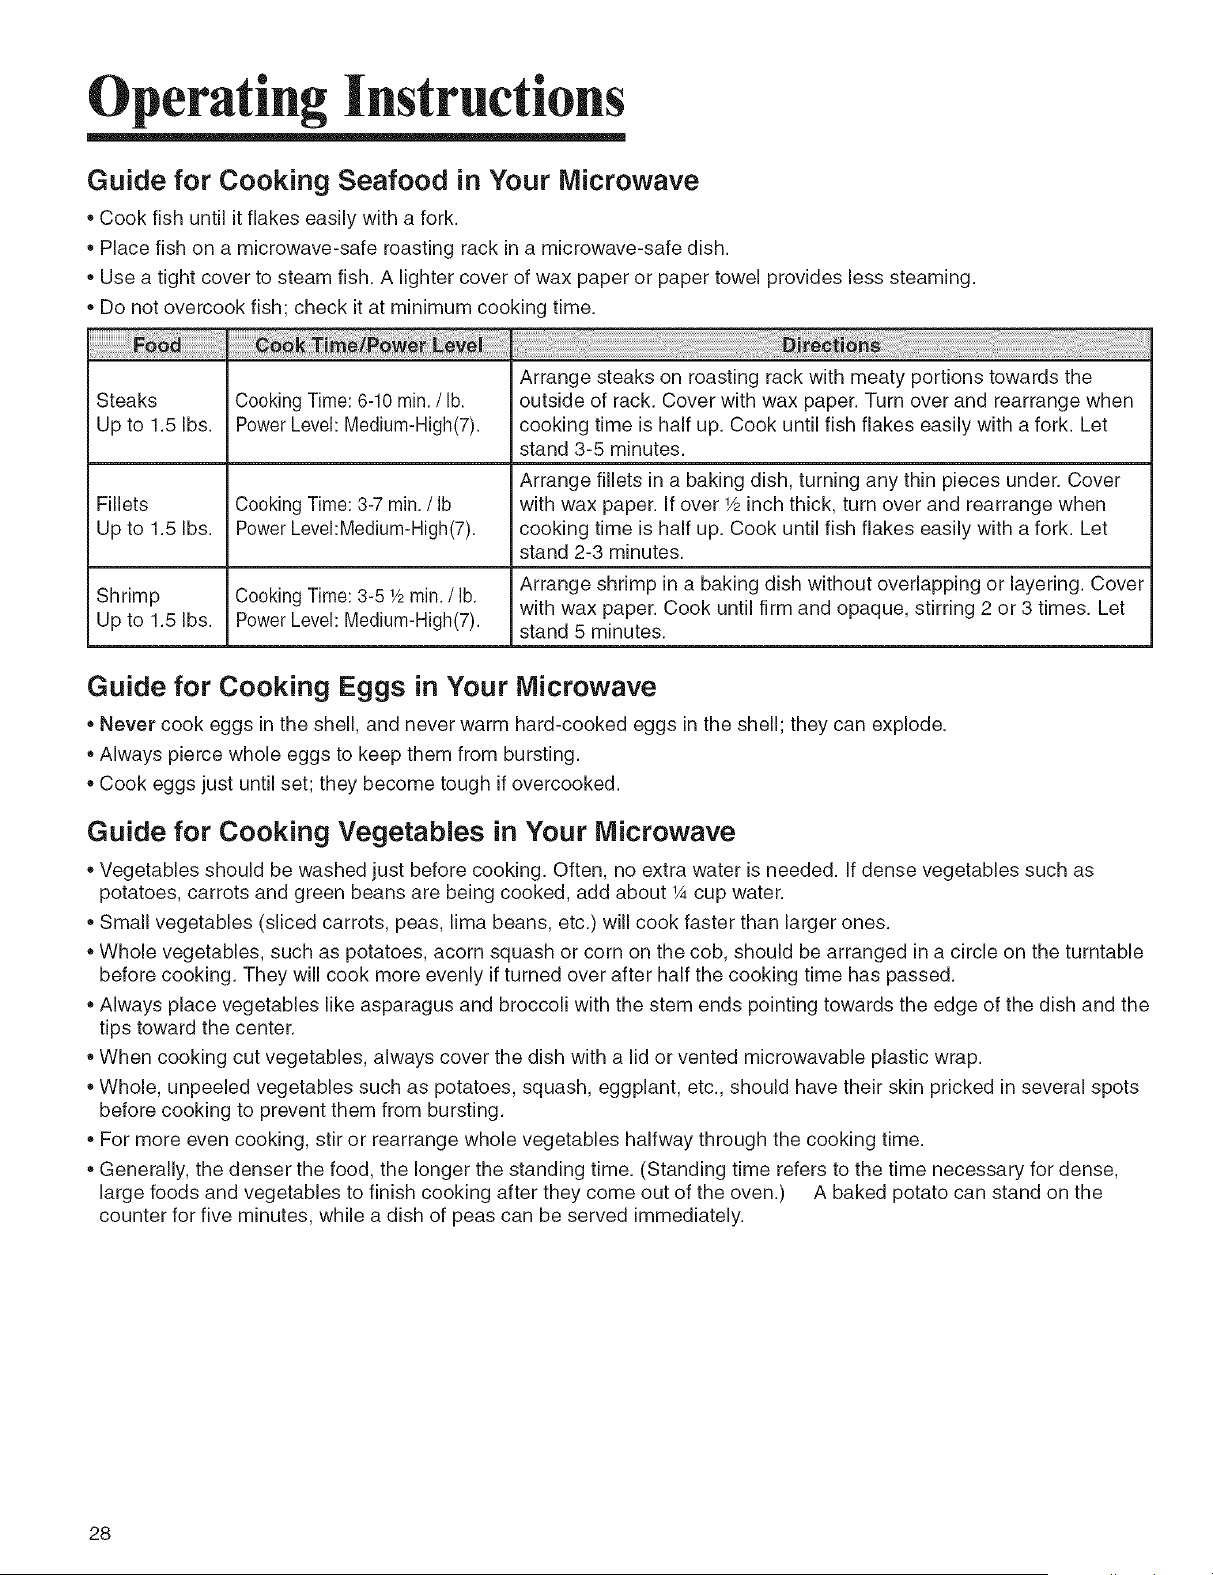
Guide for Cooking Seafood in Your Microwave
• Cook fish until it flakes easily with a fork.
• Place fish on a microwave-safe roasting rack in a microwave-safe dish.
Use a tight cover to steam fish. A lighter cover of wax paper or paper towel provides less steaming.
Do not overcook fish; check it at minimum cooking time.
Arrange steaks on roasting rack with meaty portions towards the
Steaks Cooking Time: 6-10 rain. / lb. outside of rack. Cover with wax paper. Turn over and rearrange when
Up to 1.5 Ibs. Power Level: Medium-High(7). cooking time is half up. Cook until fish flakes easily with a fork. Let
stand 3-5 minutes.
Arrange fillets in a baking dish, turning any thin pieces under. Cover
Fillets Cooking Time: 3-7 rain. / Ib with wax paper. If over 1/2inch thick, turn over and rearrange when
Up to 1.5 Ibs. Power Level:Medium-High(7). cooking time is half up. Cook until fish flakes easily with a fork. Let
stand 2-3 minutes.
Shrimp Cooking Time: 3-51/2 rain. / lb. Arrange shrimp in a baking dish without overlapping or layering. Cover
with wax paper. Cook until firm and opaque, stirring 2 or 3 times. Let
Up to 1.5 Ibs. Power Level: Medium-High(7). stand 5 minutes.
Guide for Cooking Eggs in Your Microwave
• Never cook eggs in the shell, and never warm hard-cooked eggs in the shell; they can explode.
Always pierce whole eggs to keep them from bursting.
Cook eggs just until set; they become tough if overcooked.
Guide for Cooking Vegetables in Your Microwave
• Vegetables should be washed just before cooking. Often, no extra water is needed, if dense vegetables such as
potatoes, carrots and green beans are being cooked, add about 1Acup water.
• Small vegetables (sliced carrots, peas, lima beans, etc.) will cook faster than larger ones.
Whole vegetables, such as potatoes, acorn squash or corn on the cob, should be arranged in a circle on the turntable
before cooking. They will cook more evenly if turned over after half the cooking time has passed.
Always place vegetables like asparagus and broccoli with the stem ends pointing towards the edge of the dish and the
tips toward the center.
When cooking cut vegetables, always cover the dish with a lid or vented microwavable plastic wrap.
Whole, unpeeled vegetables such as potatoes, squash, eggplant, etc., should have their skin pricked in several spots
before cooking to prevent them from bursting.
For more even cooking, stir or rearrange whole vegetables halfway through the cooking time.
Generally, the denser the food, the longer the standing time. (Standing time refers to the time necessary for dense,
large foods and vegetables to finish cooking after they come out of the oven.) A baked potato can stand on the
counter for five minutes, while a dish of peas can be served immediately.
28
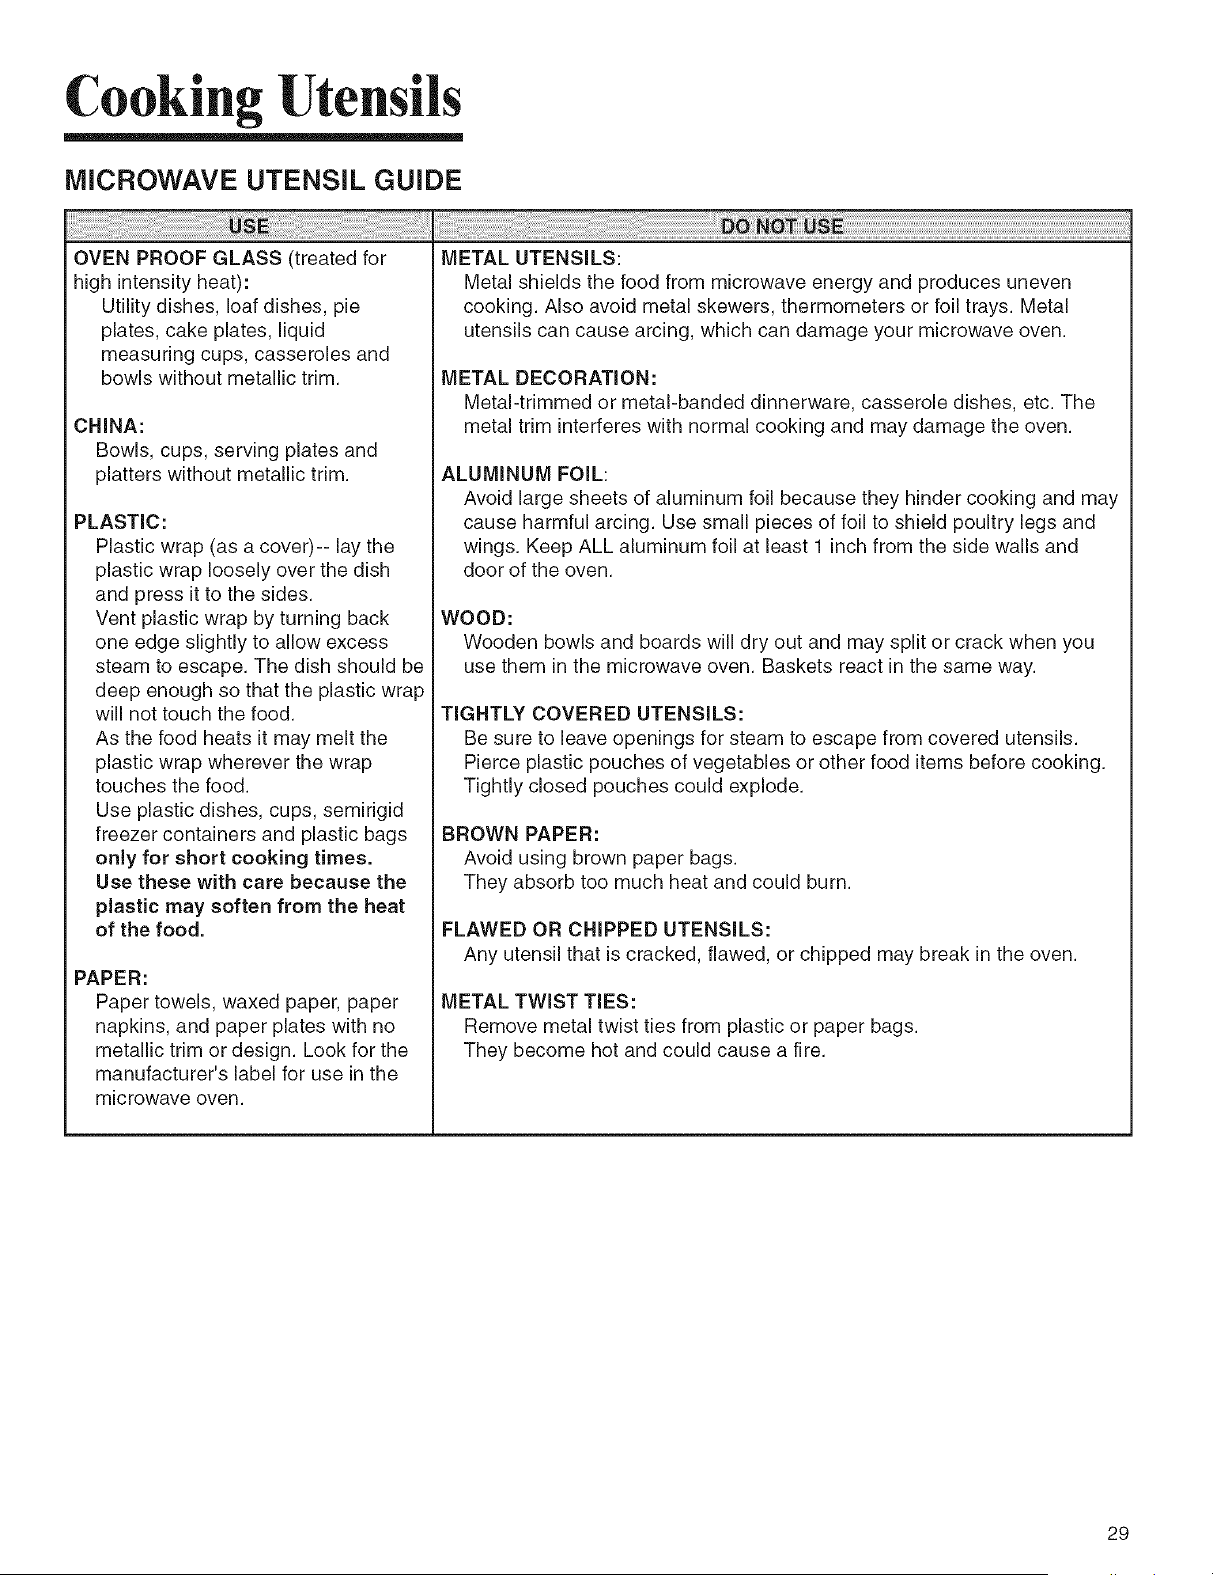
Cooking Utensils
MICROWAVE UTENSIL GUIDE
OVEN PROOF GLASS (treated for
high intensity heat):
Utility dishes, loaf dishes, pie
plates, cake plates, liquid
measuring cups, casseroles and
bowls without metallic trim.
CHINA:
Bowls, cups, serving plates and
platters without metallic trim.
PLASTIC:
Plastic wrap (as a cover)-- lay the
plastic wrap loosely over the dish
and press it to the sides.
Vent plastic wrap by turning back
one edge slightly to allow excess
steam to escape. The dish should be
deep enough so that the plastic wrap
will not touch the food.
As the food heats it may melt the
plastic wrap wherever the wrap
touches the food.
Use plastic dishes, cups, semirigid
freezer containers and plastic bags
only for short cooking times.
Use these with care because the
plastic may soften from the heat
of the food.
PAPER:
Paper towels, waxed paper, paper
napkins, and paper plates with no
metallic trim or design. Look for the
manufacturer's label for use in the
microwave oven.
METAL UTENSILS:
Metal shields the food from microwave energy and produces uneven
cooking. Also avoid metal skewers, thermometers or foil trays. Metal
utensils can cause arcing, which can damage your microwave oven.
METAL DECORATION:
Metal-trimmed or metal-banded dinnerware, casserole dishes, etc. The
metal trim interferes with normal cooking and may damage the oven.
ALUMINUM FOIL:
Avoid large sheets of aluminum foil because they hinder cooking and may
cause harmful arcing. Use small pieces of foil to shield poultry legs and
wings. Keep ALL aluminum foil at least 1 inch from the side walls and
door of the oven.
WOOD:
Wooden bowls and boards will dry out and may split or crack when you
use them in the microwave oven. Baskets react in the same way.
TIGHTLY COVERED UTENSILS:
Be sure to leave openings for steam to escape from covered utensils.
Pierce plastic pouches of vegetables or other food items before cooking.
Tightly closed pouches could explode.
BROWN PAPER:
Avoid using brown paper bags.
They absorb too much heat and could burn.
FLAWED OR CHIPPED UTENSILS:
Any utensil that is cracked, flawed, or chipped may break in the oven.
METAL TWIST TIES:
Remove metal twist ties from plastic or paper bags.
They become hot and could cause a fire.
29
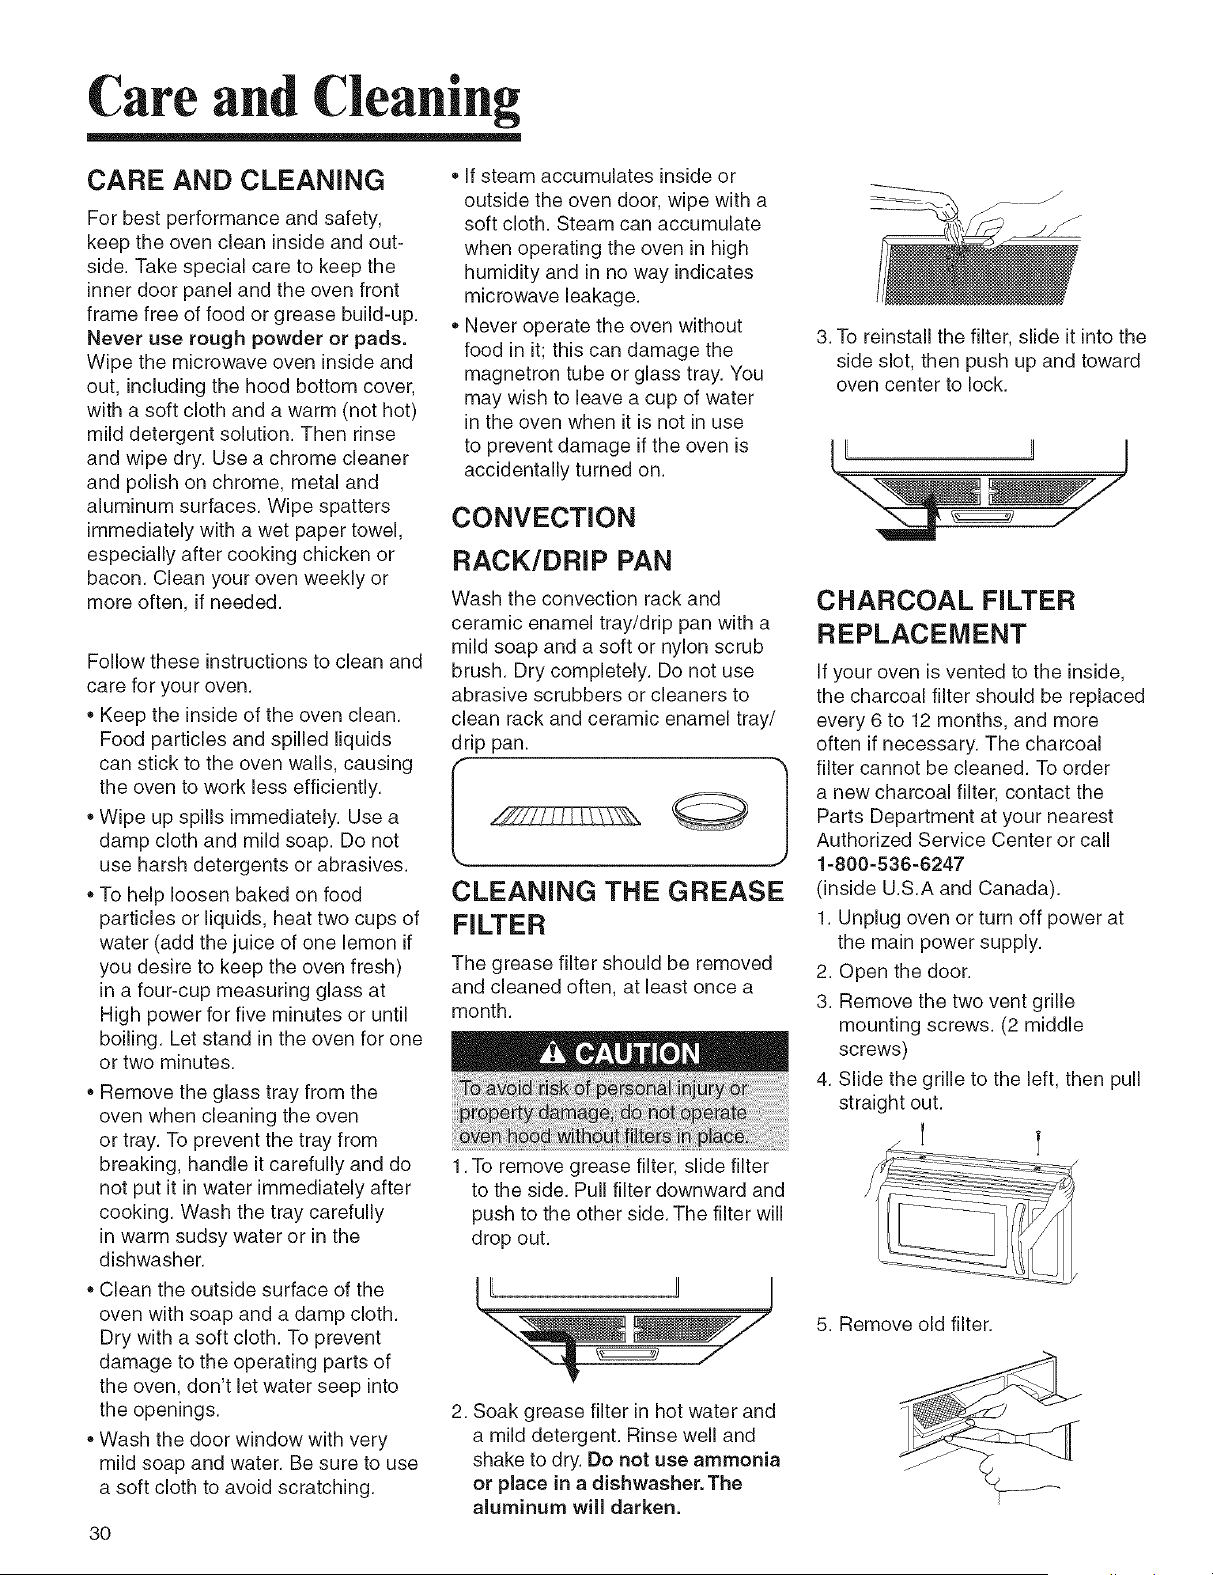
Care and Cleaning
CARE AND CLEANING
For best performance and safety,
keep the oven clean inside and out-
side. Take special care to keep the
inner door panel and the oven front
frame free of food or grease build-up.
Never use rough powder or pads.
Wipe the microwave oven inside and
out, including the hood bottom cover,
with a soft cloth and a warm (not hot)
mild detergent solution. Then rinse
and wipe dry. Use a chrome cleaner
and polish on chrome, metal and
aluminum surfaces. Wipe spatters
immediately with a wet paper towel,
especially after cooking chicken or
bacon. Clean your oven weekly or
more often, if needed.
Follow these instructions to clean and
care for your oven.
• Keep the inside of the oven clean.
Food particles and spilled liquids
can stick to the oven walls, causing
the oven to work less efficiently.
Wipe up spills immediately. Use a
damp cloth and mild soap. Do not
use harsh detergents or abrasives.
• To help loosen baked on food
particles or liquids, heat two cups of
water (add the juice of one lemon if
you desire to keep the oven fresh)
in a four-cup measuring glass at
High power for five minutes or until
boiling. Let stand in the oven for one
or two minutes.
Remove the glass tray from the
oven when cleaning the oven
or tray. To prevent the tray from
breaking, handle it carefully and do
not put it in water immediately after
cooking. Wash the tray carefully
in warm sudsy water or in the
dishwasher.
Clean the outside surface of the
oven with soap and a damp cloth.
Dry with a soft cloth. To prevent
damage to the operating parts of
the oven, don't let water seep into
the openings.
Wash the door window with very
mild soap and water. Be sure to use
a soft cloth to avoid scratching.
3O
If steam accumulates inside or
outside the oven door, wipe with a
soft cloth. Steam can accumulate
when operating the oven in high
humidity and in no way indicates
microwave leakage.
Never operate the oven without
food in it; this can damage the
magnetron tube or glass tray. You
may wish to leave a cup of water
in the oven when it is not in use
to prevent damage if the oven is
accidentally turned on.
CONVECTION
RACK/DRIP PAN
Wash the convection rack and
ceramic enamel tray/drip pan with a
mild soap and a soft or nylon scrub
brush. Dry completely. Do not use
abrasive scrubbers or cleaners to
clean rack and ceramic enamel tray/
drip pan.
CLEANING THE GREASE
FILTER
The grease filter should be removed
and cleaned often, at least once a
month.
1. To remove grease filter, slide filter
to the side. Pull filter downward and
push to the other side. The filter will
drop out.
I
2. Soak grease filter in hot water and
a mild detergent. Rinse well and
shake to dry. Do not use ammonia
or place in a dishwasher. The
aluminum will darken.
3. To reinstall the filter, slide it into the
side slot, then push up and toward
oven center to lock.
/
CHARCOAL FILTER
REPLACEMENT
If your oven is vented to the inside,
the charcoal filter should be replaced
every 6 to 12 months, and more
often if necessary. The charcoal
filter cannot be cleaned. To order
a new charcoal filter, contact the
Parts Department at your nearest
Authorized Service Center or call
1-800-536-6247
(inside U.S.A and Canada).
1. Unplug oven or turn off power at
the main power supply.
2. Open the door.
3. Remove the two vent grille
mounting screws. (2 middle
screws)
4. Slide the grille to the left, then pull
straight out.
5. Remove old filter.
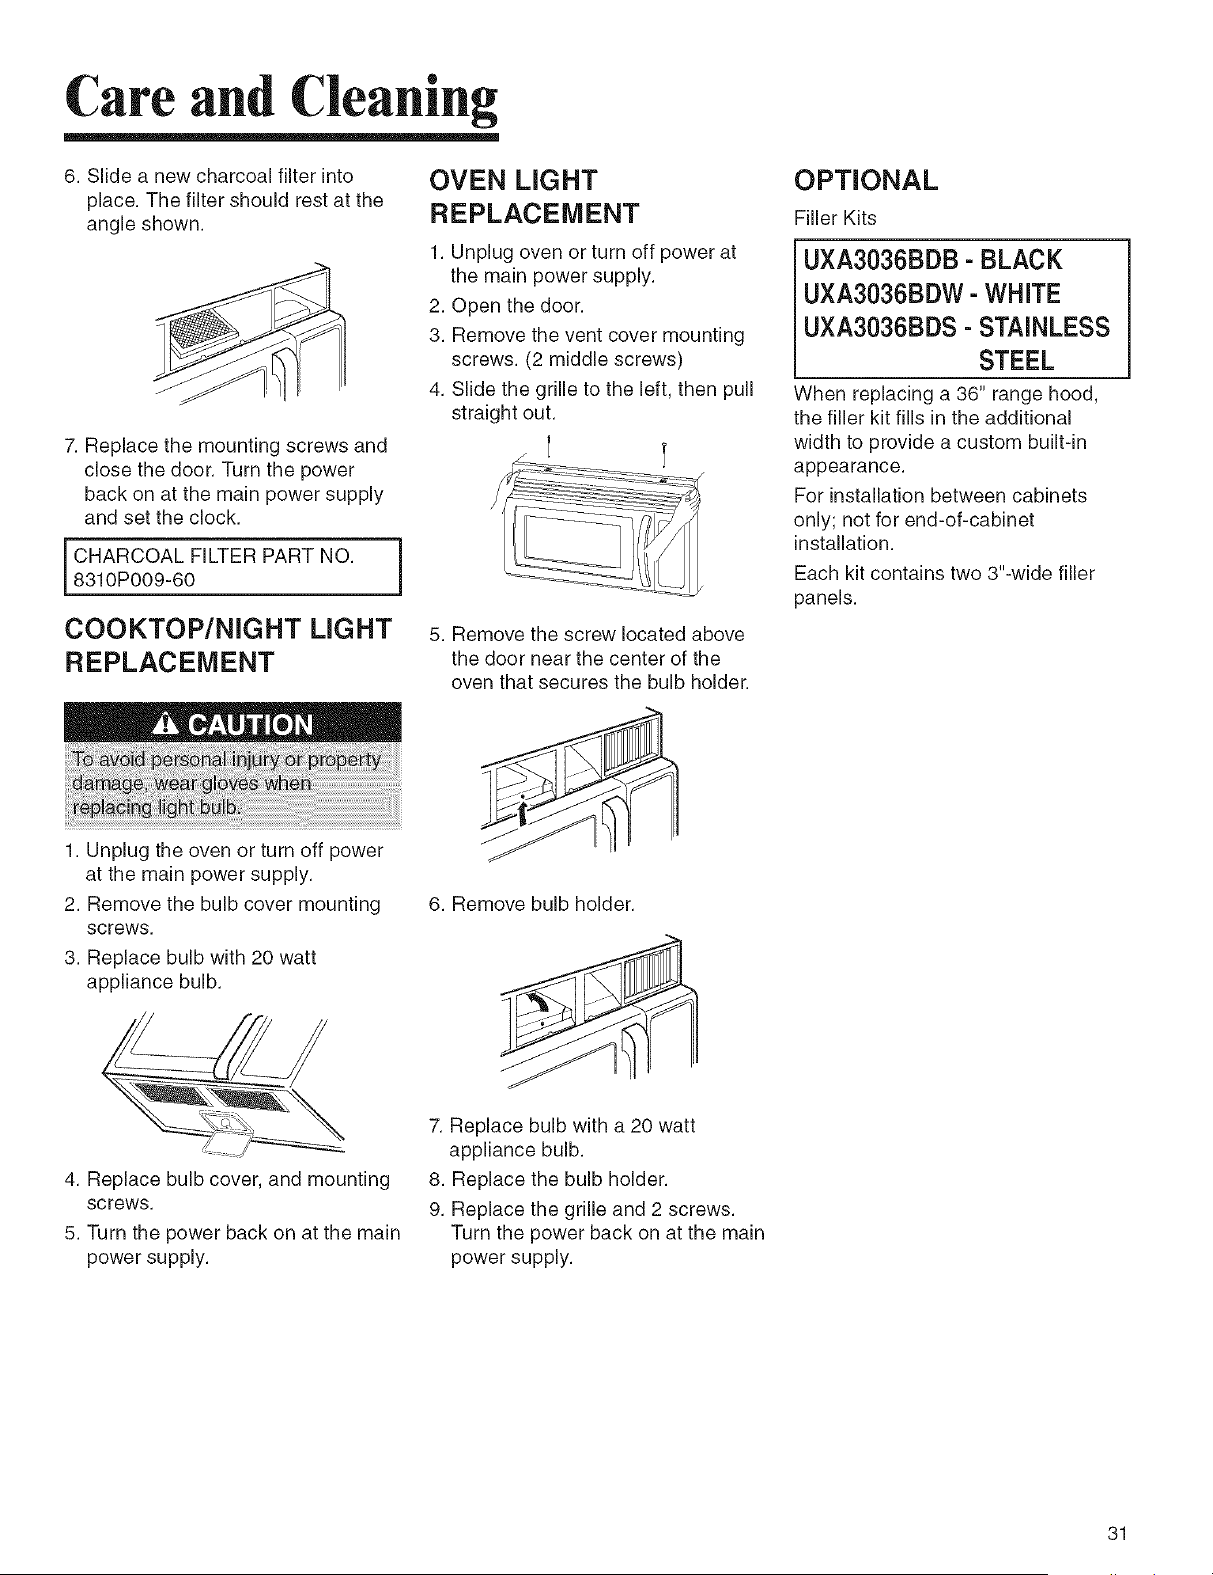
Care and Cleaning
6. Slide a new charcoal filter into
place. The filter should rest at the
angle shown.
7. Replace the mounting screws and
close the door. Turn the power
back on at the main power supply
and set the clock.
l CHARCOAL FILTER PART NO.
8310P009-60
COOKTOP/NIGHT LIGHT
REPLACEMENT
i
OVEN LIGHT
REPLACEMENT
1. Unplug oven or turn off power at
the main power supply.
2. Open the door.
3. Remove the vent cover mounting
screws. (2 middle screws)
Slide the grille to the left, then pull
straight out.
J ,
4.
5. Remove the screw located above
the door near the center of the
oven that secures the bulb holder.
OPTIONAL
Filler Kits
UXA3036BDB - BLACK
UXA3036BDW - WHITE
UXA3036BDS - STAINLESS
STEEL
When replacing a 36" range hood,
the filler kit fills in the additional
width to provide a custom built-in
appearance.
For installation between cabinets
only; not for end-of-cabinet
installation.
Each kit contains two 3"-wide filler
panels.
1. Unplug the oven or turn off power
at the main power supply.
2. Remove the bulb cover mounting
screws.
3. Replace bulb with 20 watt
appliance bulb.
6. Remove bulb holder.
4. Replace bulb cover, and mounting
sc rews.
5. Turn the power back on at the main
power supply.
7. Replace bulb with a 20 watt
appliance bulb.
8. Replace the bulb holder.
9. Replace the grille and 2 screws.
Turn the power back on at the main
power supply.
31
Troubleshooting
TROUBLESHOOTING GUIDE
Before you call a repair person for your oven, check
this list of possible problems and solutions.
Neither the oven's display nor the oven operate.
* Properly insert the plug into a grounded outlet.
* If the outlet is controlled by a wall switch, make sure the
wall switch is turned on.
* Remove the plug from the outlet, wait ten seconds, then
plug it in again.
* Reset the circuit breaker or replace any blown fuse.
* Plug another appliance into the outlet; if the other
appliance doesn't work, have a qualified electrician
repair the outlet.
* Plug the oven into a different outlet.
The oven's display works, but the power won't come
on.
* Make sure the door is closed securely.
* Check to see if packing material or other material is
stuck to the door seal.
* Check for door damage.
* Press STOP/CLEAR pad twice and re-enter all cooking
instructions.
Using your microwave causes TV or radio
interference.
* This is similar to the interference caused by other small
appliances, such as hair dryers. Move your microwave
further away from other appliances, like your TV or radio.
Note:
if the oven is set to cook for more than 25 minutes,
it will automatically adjust itself to 70 percent power
after 25 minutes to avoid overcooking.
if you have a problem you cannot solve,
please call our service line:
(1-800-536-6247)
The power goes off before the set time has elapsed.
* if there has not been a power outage, remove the plug
from the outlet, wait ten seconds, then plug it in again. If
there was a power outage, the time indicator will display:
PLEASE TOUCH CLOCK AND SET TiME OF BAY.
Reset the clock and any cooking instructions.
* Reset the circuit breaker or replace any blown fuse.
The food is cooking too slowly.
* Make sure the oven is on its own 20 amp circuit line.
Operating another appliance on the same circuit can
cause a voltage drop. If necessary, move the oven to its
own circuit.
You see sparks or arcing.
* Remove any metallic utensils, cookware, or metal ties. if
using foil, use only narrow strips and allow at least one
inch between the foil and interior oven walls.
The turntable makes noises or sticks.
* Clean the turntable, roller ring and oven floor.
* Make sure the turntable and roller ring are positioned
correctly.
32

Note
33
Warranty
What is not covered by these
warranties
• Replacement of household fuses, resetting of circuit
breakers, or correction to household wiring or plumbing.
Normal product maintenance and cleaning, including
light bulbs.
Products with original serial numbers removed, altered,
or not readily determined.
Products purchased for commercial, industrial, rental, or
leased use.
Products located outside of the United States or
Canada.
Premium service charges, if the servicer is requested to
perform service in addition to normal service or outside
normal service hours or area.
Adjustments after the first year.
Repairs resulting from the following:
- Improper installation, exhaust system, or maintenance.
- Any modification, alteration, or adjustment not
authorized by the manufacturer.
- Accident, misuse, abuse, fire, flood, or acts of nature.
- Connections to improper electrical current, voltage
supply, or gas supply.
- Use of improper pans, containers, or accessories that
cause damage to the product.
• Travel.
If you need service
Call the dealer from whom your appliance was pur-
chased or call Maytag Services LLC, Jenn-Air Customer
Assistance at 1-800-536-6247, USA and Canada to
locate an authorized servicer.
Be sure to retain proof of purchase to verify warranty
status. Refer to WARRANTY for further information on
owner's responsibilities for warranty service.
If the dealer or service company cannot resolve the
problem, write to Maytag Services LLC, Attn: CAIR ®
Center P.O. Box 2370, Cleveland, TN 37320-2370, or call
1-800-536-6247 U.S.A. and Canada.
NOTE:
When writing or calling about a service problem,
please include the following information:
a. Your name, address and telephone number;
b. Model number and serial number;
c. Name and address of your dealer or servicer;
d. A clear description of the problem you are having;
e. Proof of purchase (sales receipt).
User's guides, service manuals and parts information
are available from Maytag Services LLC, Jenn-Air
Customer Assistance.
iN NO EVENT SHALL MAYTAG BE LIABLE FOR iNCiDENTAL OR CONSEQUENTIAL DAMAGES.
This warranty gives you specific legal rights, and you may have others which vary from state to state. For example, some
states do not allow the exclusion or limitation of incidental or consequential damages, so this exclusion may not apply to you.
34
Guided'utilisatiouet d eutretieu
IVlodel JMV8166BA
CONSIGNES iMPORTANTES DE SE_CURiTE_.............. 36
Consignes de S_curit_ pour Eviter une Exposition Excessive
aux IVlicro-ondes .................................... 38
Obtenir Des Resuitats Optimaux Pour La Cuisson ........ 40
Fonctions .......................................... 41
IVlanuei d'expioitation ................................ 43
Ustensiies de cuisine ................................ 63
Entretien et nettoyage ................................ 64
D_pannage ......................................... 66
Garantie ........................................... 68
Gufa de uso y cuidado ............................... 69
Conservezces instructionspour r_f_renceult_rieure.
Assurez-vousquele Guided'utilisation et d'entretien rests avec le four.
N° de ref 8112P299-60
N° formulaire: A/08/05 Code N ° DE68-03143K
V V
CONSIGNES IMPORTANTES DE SECURITE
Ce queCousDevez
Savoirsurles Consignes
e S_curit_
Lesconsignesde s6curiteAvertissementet Importantde ce Guide
d'utilisationet d'entretiennesentpasreputeescouvrirI'ensembledes
conditionset dessituationspotentielles.II convientdefairepreuvede ben
sens,de prudenceet de discernementIorsderinstallation,de rentretien
oudufonctionnementdumicro-ondes.
Contacteztoujourslerevendeur,ledistributeur,le r6parateuragr_6ou le
fabricantpourtoutproblemeou_tat suscitantI'incompr_hension.
Apprenez/i Reconnaitre
I.esSymboles, avis et
Etiquettesde S_curit_
iiiiiiiiiiiiii
CONS
36
SOIGN ENT CES iNSTRUCTIONS
f V
CONSIGNESIMPORTANTESDE SECURITE
InstructionsPour
a _ea Terre
Votrefour DOlT_,tremis a la terre. Lamisea laterre r_duitlerisquede
choc61ectriqueenfournissantuncircuitdefuiteau courant_lectriqueen
casdecourt-circuit.Cefourestequip6d'un cordond'alimentationdote
d'unfil de masseet d'uneprisede terre.Laprisedolt_trebranchee&une
prisesecteurcorrectementinstall_eet mise&laterre.Voir lesInstructions
d'installation.
Contactezuntechnicienqualifi_si vousne comprenezpasles
instructionsderaise&la terreousi un doutesubsistequantau
raccordementcorrectdu four&la terre.
N'utilisez pas derallonge.Si le cordond'alimentationduproduitest
tropcourt,faitesinstallerune prisede terreparun electricienqualifi&Ce
fourdolt_trebranchesuruncircuit60 hertzne comportantaucunautre
appareilet dot_des caract@istiquesnominalesindiqu6esdansletableau
descaract@istiquestechniques.Lorsquele fourest branch_sur un circuit
comportantd'autresappareils,uneaugmentationdu tempsde cuisson
peut8treobserv_eet lesfusiblespeuventgriller.
Lemicro-ondesfonctionnesur lecourantdomestiquestandard,110-120
V.
Interfdrence
f
Electromagn_tique
(IEM)- informationde
la Commission F_d_rale
des Communications
(FCC) des Etats- his
(Etats-UnisUniquement)
Cet@uipementgenereet utilisede I'_nergiederadiofrequence;s'il
n'estpasinstalleet utilisecorrectement,en suivantscrupuleusement
les instructionsdufabricant,ilpeutcreerdesinterferencespourles
_missionsradioet la r_ceptionde la t_16vision.II a _t6testeet respecte
les limitesdes _quipementsde radiofrequencedansle cadredela partie
18desreglesde la FCC,destin6es& assureruneprotectionraisonnable
contrecesinterf@encesdartsune installationr_sidentielle.
Cependant,rien negarantitquecesinterferencesn'interviendront
pasdansuneinstallationparticuliere.Sicet _quipemententrafnedes
interferencesavecles_missionsradioou la r_ceptiondelatel@ision,
interferencesv@ifiablesen eteignantet en rallumant1'6quipement,
I'utilisateurdoltessayerd'61iminercesinterferencesgr&ce& I'unedes
m6thodessuivantes:
• R6orienterou d@lacerI'antenner@eptricedela radioou de la
t_l@ision.
• Repositionnerle fourµ-ondespar rapportau r6cepteur.
• Eloignerlefour& micro-ondesdu r_cepteur.
• Brancherle four µ-ondessur uneautreprise,pourquelefour&
micro-ondeset le r_cepteursoientsur descircuitsdiff@ents.
Lefabricant n'estpasresponsablepourtoute interferenceradio
outel@isuellecauseeparune modificationnon autoris_ede ce
four& micro-ondes.E61iminationdetellesinterf@encesrelevede la
responsabilit6de I'utilisateur.
CON SOIGN CES iNSTRUCTiONS
37
V V
CONSIGNES IMPORTANTES DE SECURITE
Consignesde S_curit_
pourEviterune
ExpositionExcessive
au×Micro-ondes
A. NE FAITESJAMAISfonctionnerle fouraveclaporteouverte,ce
quivousexposerait&une quantitedangereusede micro-ondes.II
estessentielde nejamaismanipulerouneutraliserlessystemesde
verrouillagedes_curit&
B. NE PLACEZJAMAISun objetentrela face avantet la portedufour et
nelaissezpass'accumulerdela salet_oudes r_sidusdeproduitde
nettoyageau niveaudesjoints.
C.NE METTEZPASlefouren marches'ilestendommag&IIest
particulierementimportantquelaportedufourse fermecorrectement
et quelesel6mentssuivantsne soientpasendommag_s:
1.la porte(tordue),
2. les charniereset les Ioquets(cass6soudesserres),
3. lesjoints de laporteet lessurfacesd'_tanch6it&
D.Toutemodificationour@arationdufourdoit _treeffectu@parun
technicienqualifi&
CONS
38
SOIGN ENT CES iNSTRUCTiONS
f V
CONSIGNESIMPORTANTESDE SECURITE
CON SOIGN CES iNSTRUCTiONS
39
Obtenir _sResultats Optimaux Pour La Cuisson
4O
Fonctions
Poign_e
de la porte
Plaque du num_ro de
modele et du numero
Vitre avec de s_rie Plateau tournant
protection en verre
m_tallique Guide de
caisson Grille
Grille de
ventilation
Syst_me de
verrouillage de la
porte
Bac de r_cup_ration
commandes du four
CARACTERISTIQUESDUFOUR
Alimentation 120VAC,60Hz
Alimentation
d'entr_e 1,600W(Etats-Unis)
Puissance de 950W
cuisson (normeCEI60705)
Frequence 2,450MHz
Courant
14.5A (Etats-Unis)
nominal
Dimensions
exterieures 758x 430x392mm
(LxHxP)
Volume
45 L
interieur
Poids net 32Kg
13
2
3
14
5
4
6
9
12
8
10
11
24
15
16
17
22
7
19
2O
18
21
27
28
23
26
25
41
FonctJons
FEATURES
(CARACTERISTIQUES)
1. DISPLAY(CADRAND'AFFICHAGE):Le
cadrand'affichagecomporteune horloge
et desindicateursde I'heure,des reglages
dutempsdecuissonet desfonctionsde
cuissons61ectionn6es.
2. POPCORN(POP-CORN):Appuyezsur
ce boutonIorsquevousfaitesdu pop-corn
dansvotrefoura micro-ondes.Le capteur
indiqueraaufourle tempsde cuissonselon
la quantited'humiditedegageepar lepop-
cornqu'ild6tectera.Voirpage47 pourplus
d'informations.
3. BAKEDPOTATO(POMMEDETERREAU
FOUR):Appuyezsur ce boutonpourcuire
despotatoesdeterre. Le capteurindiquera
aufour letempsdecuissonselonla quantit6
d'humidit_,d6gag6epar la pommedeterre
qu'il detectera.Voirpage48pourplus
d'informations.
4. REHEAT (RECHAUFFAGE):
Appuyez sur ce bouton pour
rechauffer un plat cuisin& un plat
en sauce et des p&tes. Le capteur
indiquera au four le temps de
cuisson selon la quantite d'humidite
degagee par les aliments. Voir page
48 pour plus d'informations.
5. SENSORCOOK(CUISSONPAR
CAPTEUR):permetdefairecuiredes
I_gumes,despetits-dejeunersoudesdfners
surgel_s,desI_gumesfraiset descrevettes.
Lecapteurintegrecalculeautomatiquement
le tempsdecuissonpourchaquealimenten
fonctionde sateneuren eau.Reportez-vous
&lapage48 pourplusd'informations.
6. PIZZASLICE(PARTDEPIZZA):Appuyez
surce boutonpourr@haufferdela pizza.
Lecapteurindiqueraaufour le temps
decuissonselonlaquantit6d'humidite
d6gag6equ'il d_tectera.Voirpage47pour
plusd'informations.
7. MORE(PLUS):Appuyezsurce bouton
pouraugmenterle tempsde cuisson.Voir
page44pourplusd'informations.
8. LESS(MOINS):Appuyezsur cebouton
pourdiminuerle tempsdecuisson.Voir
page44pourplusd'informations.
9. AUTOCOOK(CUISSONAUTO):permet
defairecuiredes petitspots pourb6b&des
boissons,dessandwichessurgel_s,du lard
et duriz instantan&
10.AUTODEFROST(DECONGELATION
AUTOMATIQUE):Appuyezsurce bouton
pourd@ongelerles alimentsenfonction
dupoidsentr& Voirpage51pourplus
d'informations.
11.SNACKS(EN-CAS),SOFTEN/MELT
(RAMOLLIR/FONDRE):permettentde
fairecuirecertainescategoriesd'aliments.
Reportez-vousenpages52et 53pourplus
d'informations.
12.MICROCONVECT(CUISSONPAR
CONVECTION):permetde fairecuire
des pouletsentiers,du r6tide porc,des
lasagnessurgel6eset despommesde
terreau four.
13.CONVECTION(CONVECTION):permet
deselectionnerlacuissonparconvection.
14.COMBINATIONCOOKING(CUISSON
COMBINEE):permetdeselectionnerla
cuissonpar convection.
15.NUMBER(CHIFFRE):Appuyezsurles
boutonsdu pav6num_,riquepourentrerun
tempsde cuisson,unniveaudepuissance,
desquantit_sou despoids.
16.POWERLEVEL(NIVEAUDE
PUISSANCE):Appuyezsur ce bouton
pourselectionnerun niveaude puissance
decuisson.
17.STOP/CLEAR(STOP/ANNULER):
Appuyezsurce boutonpourarr_terlefour
ouannulertoutesles entr_,es.
18.ENTER/START(ENTREE/DEPART):
Appuyezsurce boutonpour lancerune
fonction.Sivousouvrezla porteapr&,s
ledebutde lacuisson,fermezlaporteet
appuyeza nouveausurlatoucheENTER/
START(ENTREE/DEPART).
19.CONTROLSETUP(CONFiGURATiON
DESCOMMANDES):Appuyezsurce
boutonpourmodifierlesr_glagespar
d_,fautdu four. Voir page43 pourplus
d'informations.
20. ADD30 SEC(AJOUTER30S): Appuyez
surce boutonpourregleret lancer
rapidementla cuissonau niveaude
puissancemaximal.Voirpage44 pourplus
d'informations.
21.TURNTABLEON/OFF(MARCNE/ARRET
DUPLATEAUTOURNANT):Appuyez
surceboutonpourarr_terleplateau
tournant.OFF(ARRET)apparaitdansle
cadrand'affichage.Voirpage43pourplus
d'informations.
REMARQUE:
TURNTABLEON/OFF(MARCHE/ARRET
DUPLATEAUTOURNANT)n'estpas
disponiblepourles modescuissonpar
capteuret d6cong_lation.
22.CLOCK(HORLOGE):Appuyezsur ce
boutonpour entrerI'heure.Voirpage43
pourplusd'informations.
23.LLIGHTTIMER(MINUTEUR
D'ECLAIRAGE):Appuyezsur ce bouton
pourreglerleminuteurd'eclairage.Voir
page44 pourplusd'informations.
24. KITCHENTIMER(MINUTEURDE
CUISSON):Appuyezsurce boutonpour
reglerle minuteurdecuisson.Voirpage43
pourplusd'informations.
25.VENT5 SPEED(VENTILATEUR5
VITESSES):permetde choisirI'unedes5
vitessesduventilateur.
26.VENTON/OFF(MARCNE/ARRET
VENTILATEUR):permetd'activeroude
d6sactiverleventilateur.Reportez-vous_t
lapage43pourplusd'informations.
27.VENTDELAYOFF(ARRETRETARDE
DUVENTILATEUR):permetder_gler
ladureedeventilation(1,3, 5, 10ou 30
minutes).Reportez-vous&la page43 pour
plusd'informations.
28.LIGHTHI/LO/OFF(LUMIEREFORTE/
FAIBLE/ARRET):Appuyezsurce
boutonpourallumerI'_clairagedela
zonede cuisson.Voirpage44.pourplus
d'informations.
42
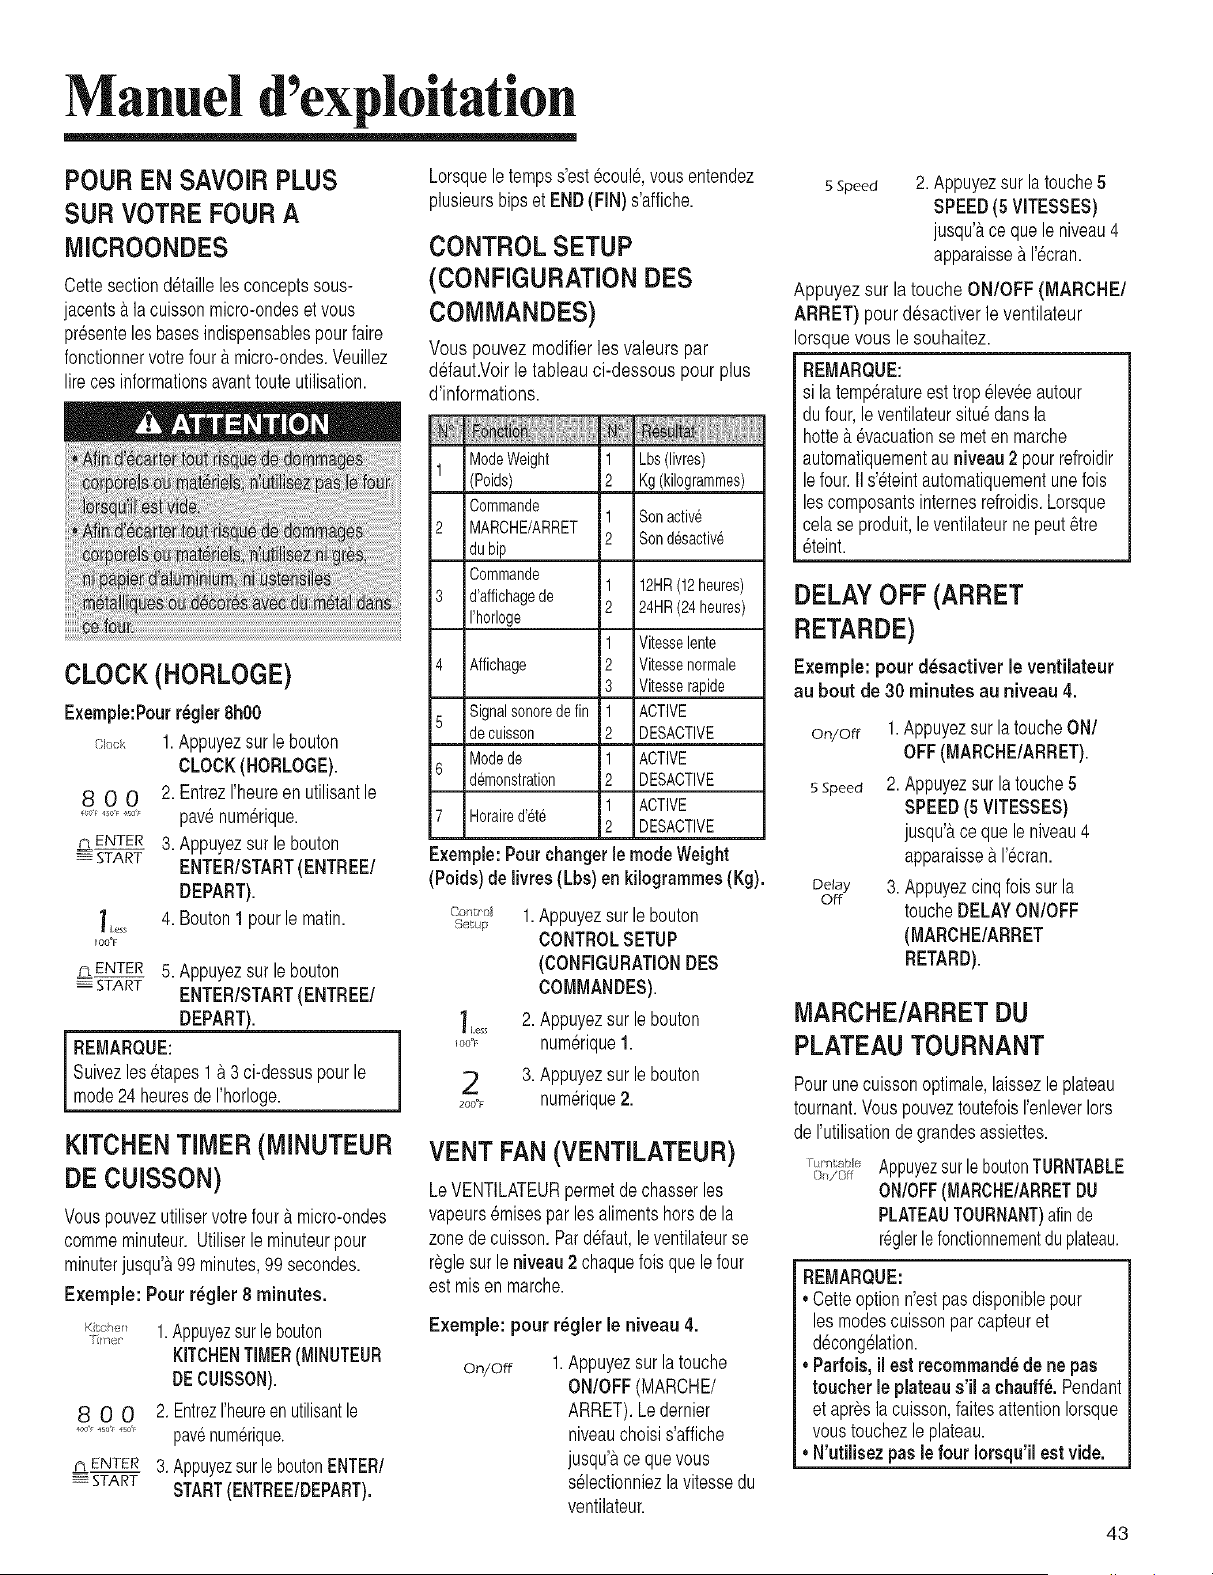
Manuel d exploitation
POUR EN SAVOIR PLUS
SUR VOTRE FOUR A
IVIICROONDES
Cettesectiondetaillelesconceptssous-
jacentsa la cuissonmicro-ondesetvous
presenteles basesindispensablespourfaire
fonctionnervotrefoura micro-ondes.Veuillez
lirecesinformationsavantrouteutilisation.
CLOCK (HORLOGE)
E×emple:Pourr_gier8hO0
Ok,ok 1.Appuyezsur lebouton
CLOCK(HORLOGE).
8 0 0 2. Entrezrheureenutilisantle
....,_,,o ,,o, pav6num@ique.
¢.tENTER 3. Appuyezsur le bouton
START ENTER/START(ENTREE/
DEPART).
] L_,_ 4. Bouton1 pourle matin.
100°F
r_LENTER 5. Appuyezsur lebouton
E START ENTER/START(ENTREE/
DEPART).
REMARQUE:
Suivezles6tapes1 & 3ci-dessuspourle
mode24 heuresde I'horloge.
KITCHEN TIMER (IVllNUTEUR
DE CUISSON)
Vouspouvezutiliservotrefourµ-ondes
commeminuteur.Utiliserleminuteurpour
minuterjusqu'&99 minutes,99secondes.
Exemple: Pour r_gler 8 minutes.
K_oh_,, 1.Appuyezsurle bouton
fi rx-r"
KITCHENTIMER(MINUTEUR
DECUISSON).
8 0 0 2. Entrezrheureenutilisantle
°°'"'°"'_°" pavenum6rique.
¢lENTER 3.AppuyezsurleboutonENTER/
START START(ENTREE/DEPART).
Lorsquele tempss'est@oul&vous entendez
plusieursbipset END(FIN)s'affiche.
CONTROL SETUP
(CONFIGURATION DES
COIVIlVIANDES)
Vous pouvezmodifierles valeurs par
ddaut.Voir le tableauci-dessous pour plus
d'informations.
ModeWeight 1 Lbs(livres)
1
(Poids) 2 Kg(kilogrammes)
Commande
1 Sonactive
2 MARCHE/ARRET
2 Sondesactive
dubip
Commande
3 d'affichagede 1 12HR(12heures)
I'horloge 2 24HR(24heures)
1 Vitesselente
4 Affichage 2 Vitessenormale
3 Vitesserapide
5 Signalsonorede fin 1 ACTIVE
de cuisson 2 DESACTIVE
Modede 1 ACTIVE
6
demonstration 2 DESACTIVE
1 ACTIVE
7 Horaired'ete
2 DESACTIVE
Exemple:Pour changerle modeWeight
(Poids)de livres (Lbs) en kilogrammes(Kg).
co_,_._,_1.Appuyezsur lebouton
Sebop
CONTROLSETUP
(CONFIGURATIONDES
COMMANDES).
1,..... 2. Appuyezsur le bouton
_oo_ numerique1.
2 3.Appuyezsur le bouton
_ooo_ num6rique2.
VENT FAN (VENTILATEUR)
LeVENTILATEURpermetdechasserles
vapeurs6raisesparlesalimentshorsdela
zonede cuisson.Pardefaut,leventilateurse
reglesur leniveau2 chaquefoisque lefour
estmisen marche.
Exemple: pour r_glerle niveau 4.
On/Off
1.Appuyezsur la touche
ON/OFF(MARCHE/
ARRET).Ledernier
niveauchoisis'affiche
jusqu'ace quevous
s_lectionniezlavitessedu
ventilateur.
5Speed 2. Appuyezsur latouche5
SPEED(5 VlTESSES)
jusqu'_tce quele niveau4
apparaisse& I'@ran.
Appuyezsur la toucheON/OFF (MARCHE/
ARRET) pourdesactiverle ventilateur
Iorsquevous le souhaitez.
REMARQUE:
si latemp@atureesttropeleveeautour
dufour,leventilateursitue dansla
hotte_t@acuationse meten marche
automatiquementau niveau 2 pourrefroidir
lefour.IIs'6teintautomatiquementunefois
lescomposantsinternesrefroidis.Lorsque
celase produit,le ventilateurne peut_tre
_teint.
DELAY OFF (ARRET
RETARDE)
Exemple: pour d_sactiver le ventilateur
au bout de 30 minutes au niveau 4.
on/oft 1.AppuyezsurlatoucheON/
OFF(MARCHE/ARRET).
sspeed 2. Appuyezsur la touche5
SPEED(5 VlTESSES)
jusqu'_,ce quele niveau4
apparaissea I'@ran.
Delay 3. Appuyezcinqfoissur la
oft
toucheDELAYON/OFF
(MARCHE/ARRET
RETARD).
MARCHE/ARRET DU
PLATEAUTOURNANT
Pourunecuissonoptimale,laissezleplateau
tournant.VouspouveztoutefoisI'enleverIors
de rutilisationde grandesassiettes.
r,,,n,,,{:,_,AppuyezsurleboutonTURNTABLE
(] I/Off
ON/OFF(MARCHE/ARRETDU
PLATEAUTOURNANT)afinde
r@lerlefonctionnementduplateau.
REMARQUE:
• Cetteoptionn'estpas disponiblepour
les modescuissonparcapteuret
d@ongelation.
• Parfois, ilest recommand_de ne pas
toucher le plateaus'ila chauff& Pendant
et apresla cuisson,faitesattentionIorsque
voustouchezle plateau.
• N'utilisez paslefour Iorsqu'il estvide.
43
Manuel d exploitation
CHILD LOCK (SECURITE
ENFANT)
Vouspouvezverrouillerle panneaude
commandespouremp_cherquelemicro-
ondesnesoit accidentellementactiv6ou utilis6
pardesenfants.
LafonctionChildLock(Securiteenfant)est
_galementutilepournettoyerlepanneaude
commandes.LafonctionChildLock(S_curit6
enfant)emp_chetouteprogrammation
accidentelleIorsquevous essuyezlepanneau
de commandes.
Exemple: Pour activer la s_curit_ enfant.
_ ENTER Appuyezsurlebouton
START ENTER/START(ENTREE/
DEPART)etmaintenez-le
enfoncependantplusde3
secondes.CHILDLOCK
ON(SECURITEENFANT
ACTIVEE)s'affichedansle
cadranet unbipsontemis.
Exemple:Pour d_sactiverla s_curit_
enfant.
p_ENTER
START
Appuyezsur le bouton
ENTER/START(ENTREE/
DEPART)et maintenez-
le enfoncependantplus
de3 secondes.LOCKED
(VERROUILLE)disparaftet
unbipsont _mis.
LIGHT HI/LO/OFF (LUMIERE
FORTE/FAIBLE/ARRET)
Appuyezsur le bouton
LIGHTHI/LO/OFF
(LUMIEREHI/LO/OFF)
unelois pouruneclairage
intense,deuxfois pour
reclairagede nuitoutrois
foispour6teindrer_clairage.
ADD 30 SEC (AJOUTER 30 S)
Gagnezdutempsgr&ce&cettecommande
simplifi6e,qui vouspermetder_gleret lancer
rapidementlacuissonmicro-ondessans
m_meappuyersur leboutonENTER/START
(ENTREE/DEPART).
Exemple: Pour r_gler ADD 30 SEC.
(AJOUTER30 S) sur 2 minutes.
Add
3Q Sec.
Appuyez4 fois surle bouton
ADD30 SEC.(AJOUTER
30S). Lefourdebutela
cuissonet le cadranaffiche
led_comptedutemps.
LIGHT TIMER (MINUTEUR
D'ECLAIRAGE)
Vouspouvezr_glerI'activation/ladesactivation
automatiquede LIGHT(ECLAIRAGE)a tout
moment.L'6clairageest activ6tousles jours_t
lam_meheurejusqu'ar_initialisation.
Exemple:Activation _.2h00, desactivation
b.7h00.
Mode12 heuresde I'horloge.
1.Appuyezsur le
boutonLIGHT
TIMER(MINUTEUR
D'ECLAIRAGE).
2. EntrezI'heure&laquelle
2 0 0 vous souhaitezque
2°°°"_°°_4"°°_ I'_clairages'active.
mENTER 3. Appuyezsurle bouton
START ENTER/START
(ENTREE/DEPART).
4. Bouton1 pourle matin,2
1.... pourrapres-midi.
}O0_F
¢_ENTER 5. Appuyezsurle bouton
START ENTER/START
(ENTREE/DEPART).
6. EntrezI'heure&laquelle
7 0 0 voussouhaitezque
37'_°__°°_4_°°_ r_clairagesed_sactive.
7.Appuyezsurle bouton
_ ENTER ENTER/START(ENTREE/
START
DEPART).
8. Bouton2 pourl'apres-midi.
2
mENTER 9. Appuyezsurle bouton
START ENTER/START(ENTREE/
DEPART).
Mode24 heures de rhorloge.
1.Appuyezsurle
boutonLIGHT
TIMER(MINUTEUR
D'ECLNRAGE).
2. EntrezI'heurea laquelle
2 0 0 voussouhaitezque
_°°°_'_°°_4s°°_ I'_clairages'active.
p_ENTER 3. Appuyezsur le bouton
START ENTER/START
(ENTREE/DEPART).
1........9 0 0 4. EntrezI'heure_tlaquelle
'°°_ _'_ _°"__°'_ voussouhaitezque
1'6clairagese d6sactive.
p_ENTER 5. Appuyezsur lebouton
START ENTER/START
(ENTREE/DEPART).
Exemple: Pourannulet le LIGHT TIMER
(MINUTEURD'ECLAIRAGE).
0
450°F
1.Appuyezsurle bouton
LIGHTTIMER(MINUTEUR
D'ECLAIRAGE).
2.Appuyezsurle boutonO.
MORE/LESS (PLUS/MOINS)
LesboutonsMore(9)/Less(1)(Plus/Moins)
vouspermettentd'ajusterlestempsdecuisson
pred6finis.IIsfonctionnentuniquementen
modeSensorReheat(R_chauffagepar
capteur),SensorCooking(Cuissonpar
capteur)sauf Beverage(Boissons),Add30
sec(Ajouter30s), CustomCook (Cuisson
personnalis_e)ouTimeCook(Cuissonavec
minuterie).Utilisezles boutonsMore(9)/
Less(l) (Plus/Moins)uniquementIorsque
vousavezd_jacommencelacuissonavec
runedesproc6duressuivantes.
1. PourAUGMENTERle
4_s°_ tempsde cuissond'une
proc_,duredecuisson
automatique:Appuyezsur
leboutonMORE(PLUS)
(9).
1,.... 2. PourDIMINUERle
,oo°_ tempsdecuissond'une
proc_,duredecuisson
Appuyezsurle bouton
LESS(MOINS)(1).
44
Manuel d exploitation
COOKING AT HiGH POWER
LEVEL (CUISSON AUX
NiVEAUX DE PUISSANCE
ELEVE)
Exemple:Pourcuire desalimentspendant
8 minutes et 30secondesa la puissance
maximum.
8 3 0 1.Entrezletempsde
400_F 250"£ 450°F caisson,
¢-IENTER 2. Appuyezsur lebouton
START ENTER/START
(ENTREE/DEPART).
Lorsquele tempsdecuissons'est_coul&vous
entendezquatrebipset END(FIN)s'affiche.
COOKING AT LOWER
POWER LEVELS (caIssoN
AUX NIVEAUX DE
PUISSANCE INFERIEURS)
Lacuisson&la puissanceMAXIMUMn'offre
pastoujoursdes resultatsoptimauxpourles
alimentsdemandantunecuissonpluslente,
commeles r6tis,les produitsde boulangerie
et p&tisserieoulescremes.Votrefourdispose
de9 reglagesdepuissanceenplusde HIGH
(MAXIMUM).
Exemple:Pourcuire des alimentspendant
7 minutes et 30 secondes _ une puissance
de 70 %.
7 3 0 1. Entrezletempsde
_7_°F_._0°__,_o°_ caisson.
r*o,_,,,, 2. Appuyezsurle bouton
Lev(d
POWERLEVEL(NIVEAU
DEPUISSANCE).
7 3. Entrezle niveaude
3_o_ puissance.
_mENTER 4. Appuyezsur le bouton
_-- START ENTER/START
(ENTREE/DEPART).
Lorsquele tempsde cuissons'est_coul&vous
entendezquatrebipset END(FIN) s'affiche.
Voir le Guide de cuisson pour les
Niveaux de puissance, page 46.
iMPORTANT:
,,NERANGEZPASet N'UTILISEZPASla
clayetteenm6taldansce four,saufsi vous
cuisezplusieursplatsen m_metempsou
si c'estindiquedansla recette.
,,Celapourraitendommagerle four.
COOKING WITH MORE
THAN ONE COOKING CYCLE
(CUISSON AVEC PLUS D'UN
CYCLE DE CUISSON)
Pourdes r6sultatsoptimaux,certainesrecettes
exigentuncertainniveaudepuissance
pendantunlapsde tempsd_fini,puisunautre
Niveaude puissancependantun autrelapsde
temps.Votrefourpeut_trer_glepourpasser
automatiquementde run a rautreet enchainer
ainsijusqu'_ttrois cycles,si le premiercyclede
cuissonest la d@ong_lation.
Exemple:Pourcuire des alimentspendant
3 minutes a une puissancede 90 %, puis
pendant7 minutes et 30 secondes _ une
puissancede 70%.
3 0 0 1.Entrezlepremiertemps
decuisson.
250°F 450"F 450_t
P'_'_'_" 2. Appuyezsurle bouton
Ir_vl
POWERLEVEL(NIVEAU
DEPUISSANCE).
3. Entrezleniveaude
,_2_°_ puissance.
7 3 0 4. Entrezledeuxiemetemps
decuisson.
_75°F 2'_O"F 450_F
P_'_'÷" 5. Appuyezsurle bouton
Level
POWERLEVEL(NIVEAU
DE PUISSANCE).
7 6 Entrezleniveaude
_7_°_: puissance.
L"t ENTER 7. Appuyezsurle bouton
START ENTER/START
(ENTREE/DEPART).
Lorsqueletempsde cuissons'est@oul&vous
entendezquatrebipset END(FIN) s'affiche.
45
Manuel d exploitation
GUIDE DE CUISSON POUR LES NIVEAUX DE PUISSANCE FAIBLES
Les9 niveauxdepuissancevous permettentdechoisirle niveauleplusadapt6auxalimentsquevous cuisinez.Voustrouverezci-dessousla liste de
tousles niveauxdepuissance,desexemplesd'alimentscuisin6spourchaqueniveauet la puissanceutilis6e.
ATJN
100%
9 90%
8 80%
7 70%
6 60%
5 50%
4 40%
3 30%
2 20%
1 10%
10Elev_
• Fairebouillirde I'eau.
• Cuiredu boeufhach&
• Fairedesbonbons.
• Cuiredesfruitsetdes legumesfrais.
• Pourcommencerlacuissondeviande,despoissonset desvolailles.
• Prechaufferunplatbrunisseur.
• R6chaufferdesboissons.
• Cuiredestranchesde bacon.
R@haufferrapidementdesfiletsdeviande.
Fairesauterdesoignons,duc61eriet despoivronsverts.
R@hauffertouttype d'aliments.
• Cuiredesoeufsbrouill6s.
• Pourpoursuivrela cuissondevolaille.
Cuiredu painet desproduitsc@ealiers.
Cuiredesplatsa basedefromageet duveau.
Cuiredesgateaux,desmuffins,desbrownies,des petitsgateaux.
Cuiredespates.
• Pourpoursuivrela cuissondeviande.
• Cuirelescremes.
Cuireun pouletentier,unedinde,desc6teslevees,desc6tesde boeuf,des
r6tisdesurlonge.
Cuiredesmorceauxdeviandemoinstendres.
Rechaufferdesplatspr@ar6ssurgeles.
Decongelerdelaviande,de la volailleet desfruitsdemer.
Cuiredesalimentsparpetitesquantites.
Finirla cuissondes platsmijot6s,des ragoOtset decertainessauces.
Ramollirle beurreet lefromagea lacreme.
Rechaufferdesalimentsparpetitesquantit6s.
• Ramollirlescremesglacees.
Fairemonterunepatea beignets.
46
Manuel d exploitation
iNSTRUCTiONS
D'EXPLOITATIONDU CAPTEUR
LafonctionSensorCook (Cuissonparcapteur)
vouspermetdefairecuirela plupartdevos
alimentsfavorissanss61ectionnerdestemps
decuissonetdes niveauxdepuissance.
Uecranindiquela p@iodededetectioninitiale
enanalysantlenomdeI'aliment.Le four
determineautomatiquementle tempsde
cuissonrequispourchaquealiment.Lorsque
lecapteurdetecteunecertainequantite
d'humidit6provenantde I'aliment,II indiqueau
fourle tempsde cuissonrestant.Le cadran
affichele tempsde cuissonrestant.Pour
desresultatsoptimauxIorsde la cuissonpar
capteur,suivezces recommandations:
1.Ealimentcuisineaveclesystemede
capteurdolt_tre &temperaturenormalede
stockage.
2. Laplupartdesalimentsdoiventtoujours_tre
recouvertsd'unfilm plastiqueutilisableen
foura micro-on@s,de papierparaffin_ou
d'uncouvercle.
3. Lesalimentsdoiventtoujours_trecouverts
I_.chementavecunfilmplastiqueutilisable
enfour_tmicro-on@s,du papierparaffin6
ouuncouvercle.
4. N'ouvrez pas la porte ou n'appuyez
pas sur le bouton STOP/CLEAR
(STOP/ANNULER) pendant la
d_,tection. Lorsque la detection est
terminee, le four _,met un bip et le
temps de cuisson restant apparaft
dans ie cadran d'affichage. Vous
pouvez alors ouvrJr la porte
pour melanger, retourner ou
repositionner les aliments.
IMPORTANT:
Lots de I'utilisation de la fonction
Sensor Cook (Cuisson par capteur),
le four dolt refroidir pendant 5 minutes
entre chaque cycle, sinon, la cuisson
ne s'effectuera pas correctement.
SENSOR COOKING GUIDE
(GUIDEDECUISSONPARCAPTEUR)
Desrecipientset couverclesadaptes
permettentd'assurerde bonsresultatspour la
cuissonparcapteur.
1. Utiliseztoujoursdes r_cipientspourfour
b.micro-ondeset couvrez-lesa I'aided'un
couvercleoud'unfilmplastiqueperc_.
2. N'utilisezjamaisde couverclesen plastique
herm_tiques.[Ispeuventemp_cherla
vapeurde s'@happer,faisantainsitropcuire
les aliments.
3. Adapterla quantit__tla tailledurecipient.
Pourdes resultatsoptimaux,remplissezle
r_cipientaumoins&moitie.
4. Assurez-vous que I'ext@ieur du
recipient de cuisson et I'int@ieur
du four b.micro-ondes sont secs
avant de placer des aliments dans
le four. Des gouttes d'humidite se
transformant en vapeur peuvent
induire le capteur en erreur.
ADDINGORSUBTRACTINGCOOK
TIME(AUGMENTEROUREDUIRE
LETEMPSDECUISSON)
En utilJsant les boutons MORE
(PLUS) ou LESS (MOINS), vous
pouvez modifier tous les reglages de
cuisson par capteur et de temps de
cuJsson, pour faire cuire les aliments
pendant plus ou moins Iongtemps.
POPCORN(POP-CORN)
LafonctionPOPCORN(POP-CORN)vous
permetde pr@arerdupop-cornpr_emball_
specialmicro-ondes.Nechauffezqu'unseul
paquetb.la fois.Pourdes resultatsoptimaux,
utilisezdessachetsde pop-cornfrais.
Exemple: Pour faire du pop-corn.
p,_pr_o_.,, Appuyezsur le bouton
POPCORN(POP-
CORN),
Lorsqueletempsde cuissons'est6coul6,vous
entendezquatrebipset END(FIN) s'affiche.
Quantit_srecommand_es:80 a 100g.
PIZZA SLICE (PART DE PIZZA)
LafonctionPIZZASLICE(PARTDEPIZZA)
vouspermetder@haufferuneouplusieurs
partsdepizzasansselectionnerdestempsde
cuissonet des niveauxdepuissance.
Exemple: TPour rechauffer 2 parts de
pizza.
Pizz_J Appuyez sur le bouton
_1 c_:
PIZZA SLICE(PART
DE PIZZA).
Lorsque le temps de cuisson s'est
ecoule, vous entendez quatre bips et
END (FIN) s'affiche.
,,Quantites recommandees: 1 a 4 parts.
REMARQUE:
Si les aliments ne sont pas entierement
cults ou rechauffesavec la fonction
SensorCook (Cuissonpar capteur),
achevezla cuissonb.I'aidedes fonctions
Powerlevel (Niveau de puissance)
et Cookingtime (Tempsde cuisson).
N'UTILISEZPLUSla toucheSensor
(Cuissonpar capteur).
47
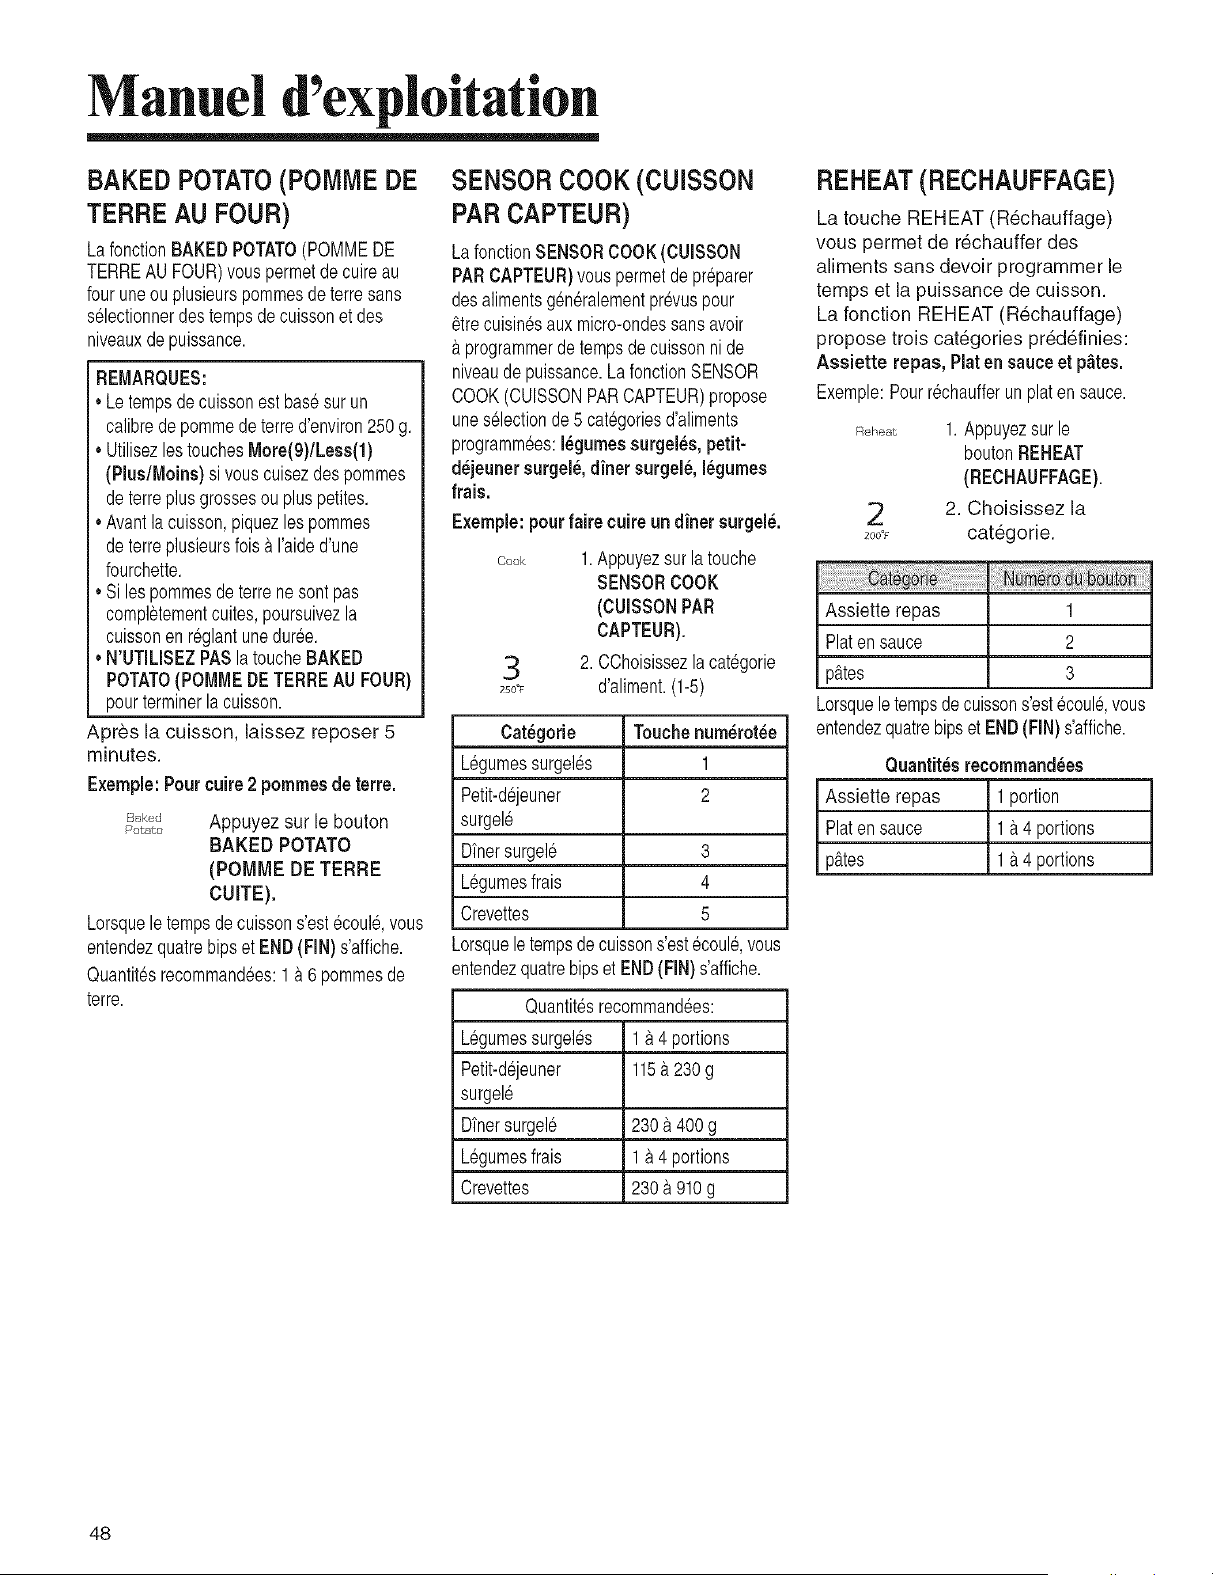
Manuel d exploitation
BAKED POTATO (POMME DE
TERRE AU FOUR)
LafonctionBAKEDPOTATO(POMMEDE
TERREAU FOUR)vouspermetdecuireau
fourune ou plusieurspotatoesdeterresans
selectionnerdestempsdecuissonet des
niveauxde puissance.
REMARQUES:
Letempsdecuissonestbas6sur un
calibrede pommedeterred'environ250 g.
UtilisezlestouchesMore(9)/Less(1)
(Plus/Moins) si vouscuisezdespotatoes
deterreplusgrossesou pluspetites.
Avantla cuisson,piquezles potatoes
deterreplusieursfois& I'aided'une
fourchette.
Siles potatoesdeterrenesontpas
completementcuites,poursuivezla
cuissonen r_glantuneduree.
N'UTILISEZPASlatoucheBAKED
POTATO(POMMEDETERREAU FOUR)
pourterminerlacuisson.
A )r&,sla cuisson, laissez reposer 5
minutes.
Exemple:Pourcuire 2 potatoesde terre.
B_k.d Appuyez sur [e bouton
Po'cabo
BAKED POTATO
(POMME DE TERRE
CUffE).
Lorsquele tempsde cuissons'est6coul&vous
entendezquatrebipset END(FIN) s'affiche.
Quantit_srecommandees:1 & 6pommesde
terre.
SENSOR COOK (CUISSON
PAR CAPTEUR)
LafonctionSENSORCOOK(CUISSON
PARCAPTEUR)vouspermetdepr@arer
desalimentsgen6ralementprevuspour
_trecuisinesauxmicro-ondessansavoir
_.programmerdetempsde cuissonnide
niveaudepuissance.LafonctionSENSOR
COOK(CUISSONPARCAPTEUR)propose
uneselectionde5 categoriesd'aliments
programmees:I_gumessurgel_s, petit-
d_jeunersurgel& dinersurgel&I_gumes
frais.
Exemple:pourfaire cuire un dinersurgel&
C,,ok 1.Appuyezsurlatouche
SENSORCOOK
(CUISSONPAR
CAPTEUR).
,3 2. CChoisissezlacategorie
_ooF d'aliment.(1-5)
Cat_gorie Touchenum_rot_e
L_gumessurgeles 1
Petit-dejeuner 2
surgele
Dinersurgel_ 3
L_gumesfrais 4
Crevettes 5
Lorsqueletempsdecuissons'estecoul&vous
entendezquatrehipset END(FIN)s'affiche.
Quantit6srecommand_es:
L_gumessurgeles 1&4 portions
Petit-dejeuner 115b.230g
surgele
Dinersurgel_ 230&400g
L_gumesfrais 1& 4 portions
Crevettes 230&910g
REHEAT (RECHAUFFAGE)
La touche REHEAT (Rechauffage)
vous permet de rechauffer des
aliments sans devoir programmer le
temps et la puissance de cuisson.
La fonction REHEAT (Rechauffage)
propose trois categories predefinies:
Assiette repas, Platen sauceet p_tes.
Exemple:Pourr6chaufferunplaten sauce.
F_u,_,at 1.Appuyezsur le
boutonREHEAT
(RECHAUFFAGE).
2 2. Choisissez la
,ooo_ categorie.
i i
Assiette repas 1
Platen sauce 2
p_ttes 3
Lorsqueletempsde cuissons'estecoul&vous
entendezquatrebipset END(FIN)s'affiche.
Ouantit_s recommand_es
Assiette repas 1 portion
Platen sauce 1_t4 portions
p&tes 1&4 portions
48
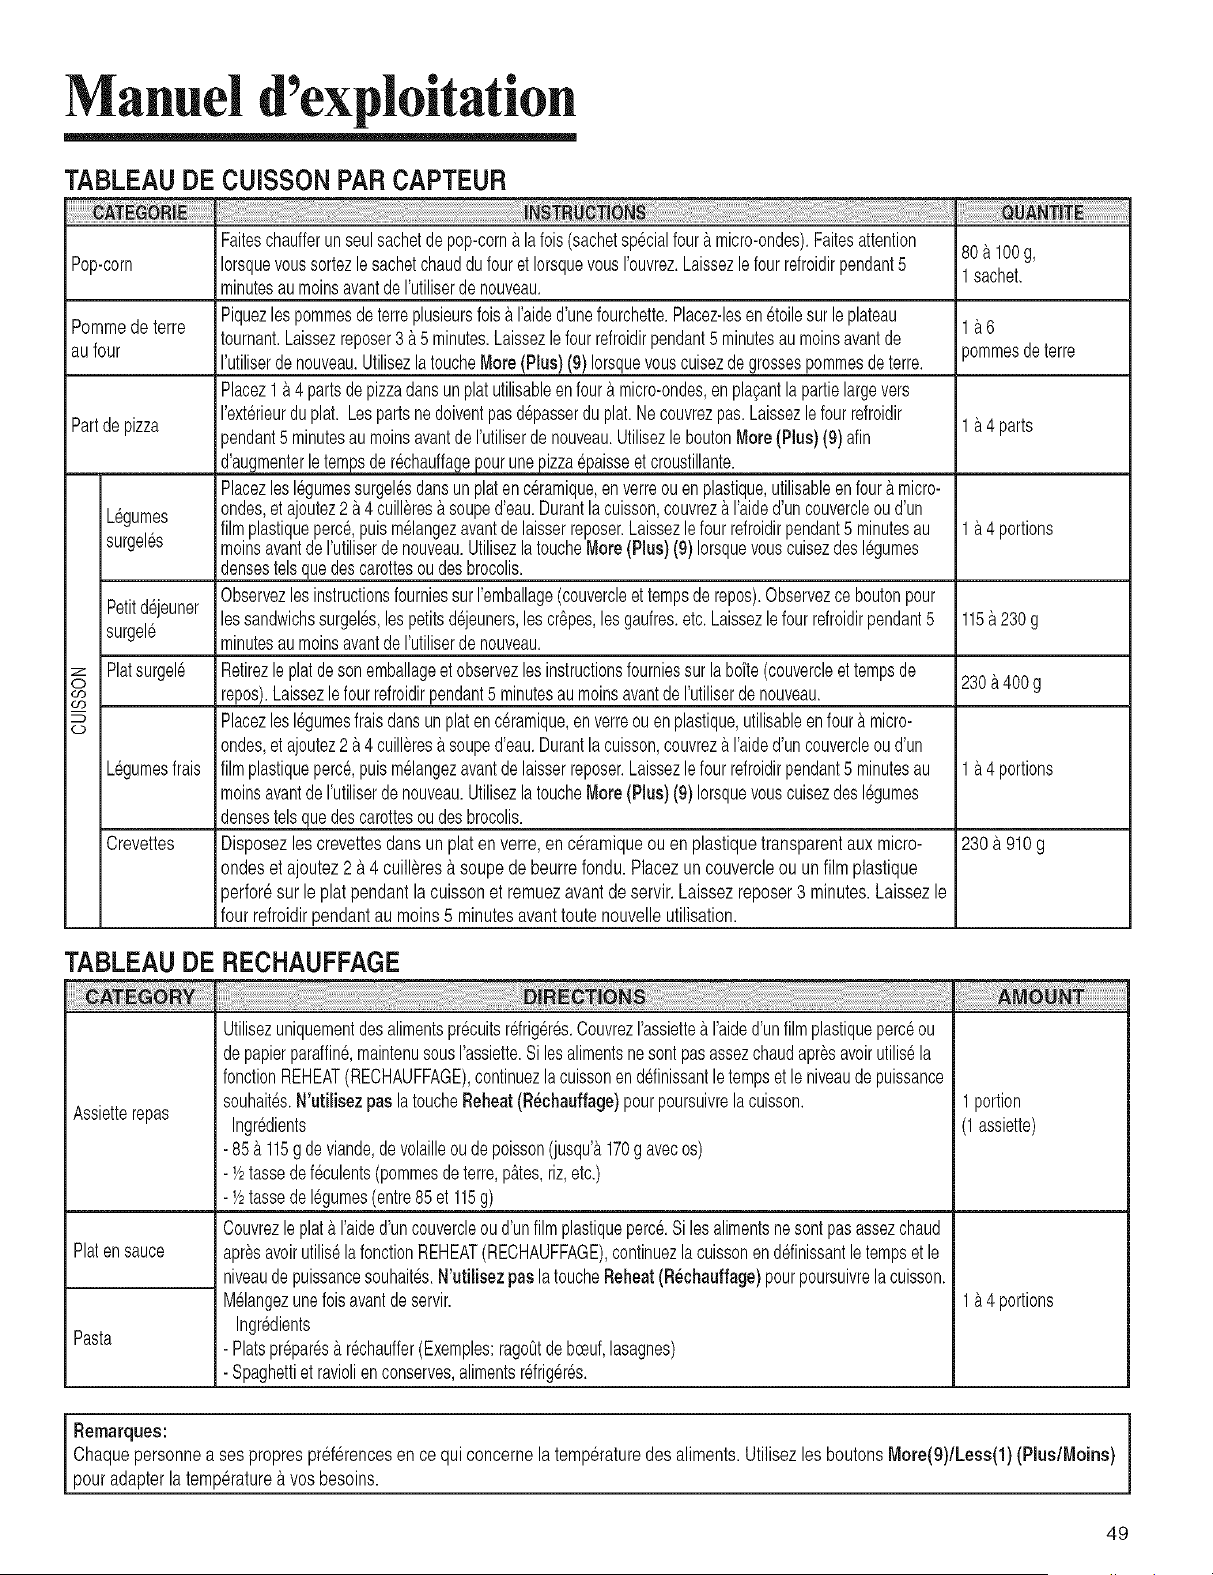
Manuel d'exploitation
TABLEAU DE CUISSON PAR CAPTEUB
Pop-corn
Pommede terre
aufour
Partdepizza
Legumes
surgeles
Petitdejeuner
surgele
z Platsurgel6
o
(,,3
(,o
0
Legumesfrais
Crevettes
Faiteschaufferunseulsachetdepop-corna lafois(sachetsp6cialfouramicro-ondes).Faitesattention
IorsquevoussortezlesachetchauddufouretIorsquevousI'ouvrez.Laissezlefourrefroidirpendant5
minutesaumoinsavantdeI'utiliserdenouveau.
Piquezlespommesdeterreplusieursfoisa I'aided'unefourchette.Placez-lesen 6toilesurleplateau
tournant.Laissezreposer3 a5minutes.Laissezlefourrefroidirpendant5 minutesaumoinsavantde
rutiliserde nouveau.UtilisezlatoucheMore(Plus)(9) Iorsquevouscuisezdegrossespommesdeterre.
Placez1 a4 partsdepizzadansunplatutilisableen foura micro-ondes,enpla£antlapartielargevers
I'exterieurduplat. Lespartsnedoiventpasd6passerdu plat.Necouvrezpas.Laissezlefourrefroidir
pendant5 minutesau moinsavantdeI'utiliserdenouveau.Utilisezle boutonMore(Plus)(9)afin
d'augmenterletempsderechauffagepourunepizzaepaisseetcroustillante.
Placezleslegumessurgelesdansunplatenc6ramique,en verreouen plastique,utilisableenfoura micro-
ondes,etajoutez2 a4cuilleresa souped'eau.Durantlacuisson,couvrezaI'aided'uncouvercleoud'un
filmplastiqueperce,puism61angezavantdelaisserreposer.Laissezlefourrefroidirpendant5 minutesau
moinsavantdeI'utiliserdenouveau.UtilisezlatoucheMore(Plus)(9) Iorsquevouscuisezdeslegumes
densestelsquedescarottesou desbrocolis.
ObservezlesinstructionsfoumiessurI'emballage(couvercleettempsde repos).Observezceboutonpour
lessandwichssurgel6s,lespetitsdejeuners,lescr6pes,lesgaufres,etc.Laissezlefourrefroidirpendant5
minutesaumoinsavantdeI'utiliserdenouveau.
Retirezleplatdesonemballageetobservezlesinstructionsfourniessurlabofte(couvercleettempsde
repos).Laissezlefourrefroidirpendant5 minutesau moinsavantdeI'utiliserdenouveau.
Placezleslegumesfraisdansunplatenc6ramique,en verreouenplastique,utilisableenfoura micro-
ondes,etajoutez2 a4cuilleresa souped'eau.Durantlacuisson,couvrezaI'aided'uncouvercleoud'un
filmplastiqueperce,puism61angezavantdelaisserreposer.Laissezlefourrefroidirpendant5 minutesau
moinsavantdeI'utiliserdenouveau.UtilisezlatoucheMore(Plus)(9) Iorsquevouscuisezdeslegumes
densestelsquedescarottesou desbrocolis.
Disposezlescrevettesdansunplatenverre,en ceramiqueou en plastiquetransparentauxmicro-
ondeset ajoutez2 a 4 cuilleres_.soupedebeurrefondu.Placezun couvercleou un filmplastique
perfor6sur le platpendantlacuissonet remuezavantde servir.Laissezreposer3 minutes.Laissezle
fourrefroidirpendantaumoins5 minutesavanttoutenouvelleutilisation.
!i i !i ii!ii!ii!ii!ii!ii!ii!ii!ii!ii!ii!ii!ii!ii!ii!i !!i i ! U i iEii!iii!iii!iii!iii!iii!iii!iii!iii!iii!iii! ili!
80alOOg,
1sachet.
la6
3ommesdeterre
1&4parts
1a4 portions
115a 230g
230&400g
1&4portions
230a 910g
M
TABLEAU DE BECHAUFFAGE
_ATE_
Utilisezuniquementdesalimentspr6cuitsrdrig6r6s.OouvrezI'assiettea I'aided'unfilmplastiqueperceou
depapierparaffin6,maintenusousI'assiette.Silesalimentsne sontpasassezchaudapr_savoirutilis6la
fonctionREHEAT(RECHAUFFAGE),continuezlacuissonen ddinissantle tempsetleniveaude puissance
souhaitSs.N'utilisezpasla toucheReheat(R6chauffage)pourpoursuivrelacuisson.
Assietterepas Ingredients
- 85& 115g deviande,devolailleoude poisson(jusqu'&170g avecos)
- _/2tassedefeculents(pommesdeterre,p&tes,riz,etc.)
- _/2tassede 16gumes(entre85 et 115g)
Couvrezle plat&I'aided'uncouvercleoud'unfilmplastiqueperce.Silesalimentsnesontpasassezchaud
Platensauce apr_savoirutiliselafonctionREHEAT(RECHAUFFAGE),continuezlacuissonenddinissantletempsetle
niveaude puissancesouhait6s.N'utilisezpaslatoucheReheat(Rechauffage)pourpoursuivrelacuisson.
Melangezunefoisavantdeservir.
Ingredients
Pasta - Platspr6par6s& rechauffer(Exemples:ragoGtdebceuf,lasagnes)
- Spaghettietraviolienconserves,alimentsr6frig6r6s.
1portion
(1assiette)
1&4portions
Rernarques: i
Chaquepersonnea sesproprespref6rencesence quiconcernela temperaturedes aliments.Utilisezles boutonsMore(9)/Less(1)(Plus/Moins)
pouradapterlatemperaturea vos besoins.
49
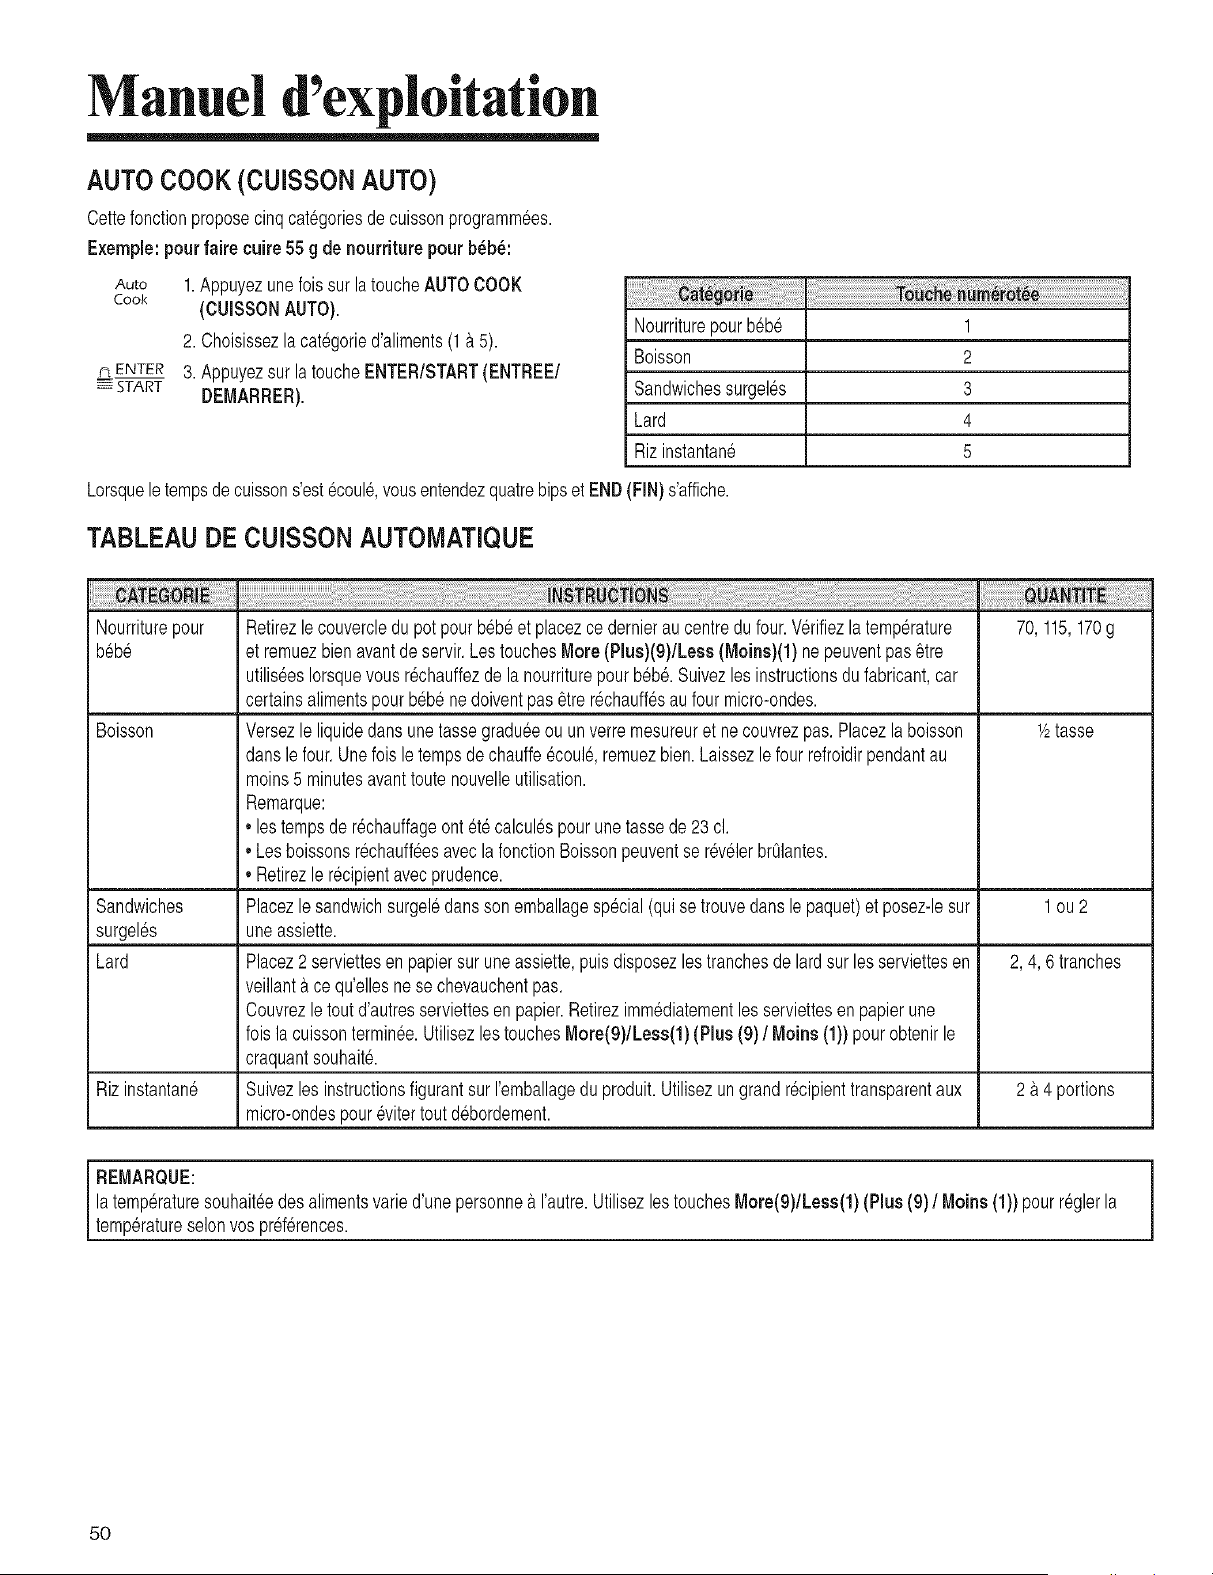
Manuel d exploitation
AUTO COOK (CUISSON AUTO)
Cettefonctionproposecinqcategoriesdecuissonprogramm_es.
E×emple:pourfaire cuire 55 g de nourriture pour b_b_:
Auto 1.Appuyezunefoissur la toucheAUTO COOK
Cook (CUISSONAUTO).
2. Choisissezla cat6goried'aliments(1& 5).
r_ENTER 3. Appuyezsur la toucheENTER/START(ENTREE/
START DEMARRER).
Nourriturepourb_b6
Boisson
Sandwichessurgel_s
Lard
Rizinstantane
1
2
3
4
5
Lorsqueletempsdecuissons'est_coul6,vousentendezquatrebipset END(FIN)s'affiche.
TABLEAU DE CUISSON AUTOMATIQUE
Nourriturepour Retirezlecouvercledu potpourbebeet placezcedernierau centredu four.V@ifiezlatemperature 70,115,170g
b_b6 et remuezbien avantde servir.LestouchesMore (Plus)(9)/Less (Moins)(1) nepeuventpas_tre
utilis6esIorsquevous r_chauffezde la nourriturepourbebe.Suivezlesinstructionsdufabricant,car
certainsalimentspourb6b6nedoiventpas _trer6chauff_sau four micro-ondes.
Boisson Versezle liquidedansune tassegradu_eou un verremesureuret necouvrezpas. Placezla boisson 1/2tasse
dansle four.Unelois le tempsde chauffeecoule,remuezbien.Laissezle four refroidirpendantau
moins5 minutesavanttoutenouvelleutilisation.
Remarque:
,,lestempsde Mchauffageont et6calculespourunetassede23cl.
,,Lesboissonsr6chauff_esavec lafonctionBoissonpeuventse r6v_lerbrOlantes.
,,Retirezle Mcipientavecprudence.
Sandwiches Placezle sandwichsurgel_dansson emballagespecial(quise trouvedansle paquet)et posez-lesur 1ou2
surgel_s uneassiette.
Lard Placez2 serviettesen papiersur uneassiette,puisdisposezles tranchesde lardsurles serviettesen 2, 4, 6 tranches
veillant&ce qu'ellesnese chevauchentpas.
Couvrezle toutd'autresserviettesen papier.Retirezimm6diatementlesserviettesenpapierune
foisla cuissontermin_e.UtilisezlestouchesMore(9)/Less(1)(Plus (9) / Moins(1)) pourobtenirle
craquantsouhait&
Rizinstantan_ Suivezles instructionsfigurantsurI'emballagedu produit.Utilisezungrandr_cipienttransparentaux 2 & 4 portions
micro-ondespour6vitertout debordement.
REMAROUE: i
latemperaturesouhait_edesalimentsvaried'unepersonne& I'autre.UtilisezlestouchesMore(9)/Less(1)(Plus (9) / Moins(1)) pourr_glerla
temperatureselonvospref@ences.
50
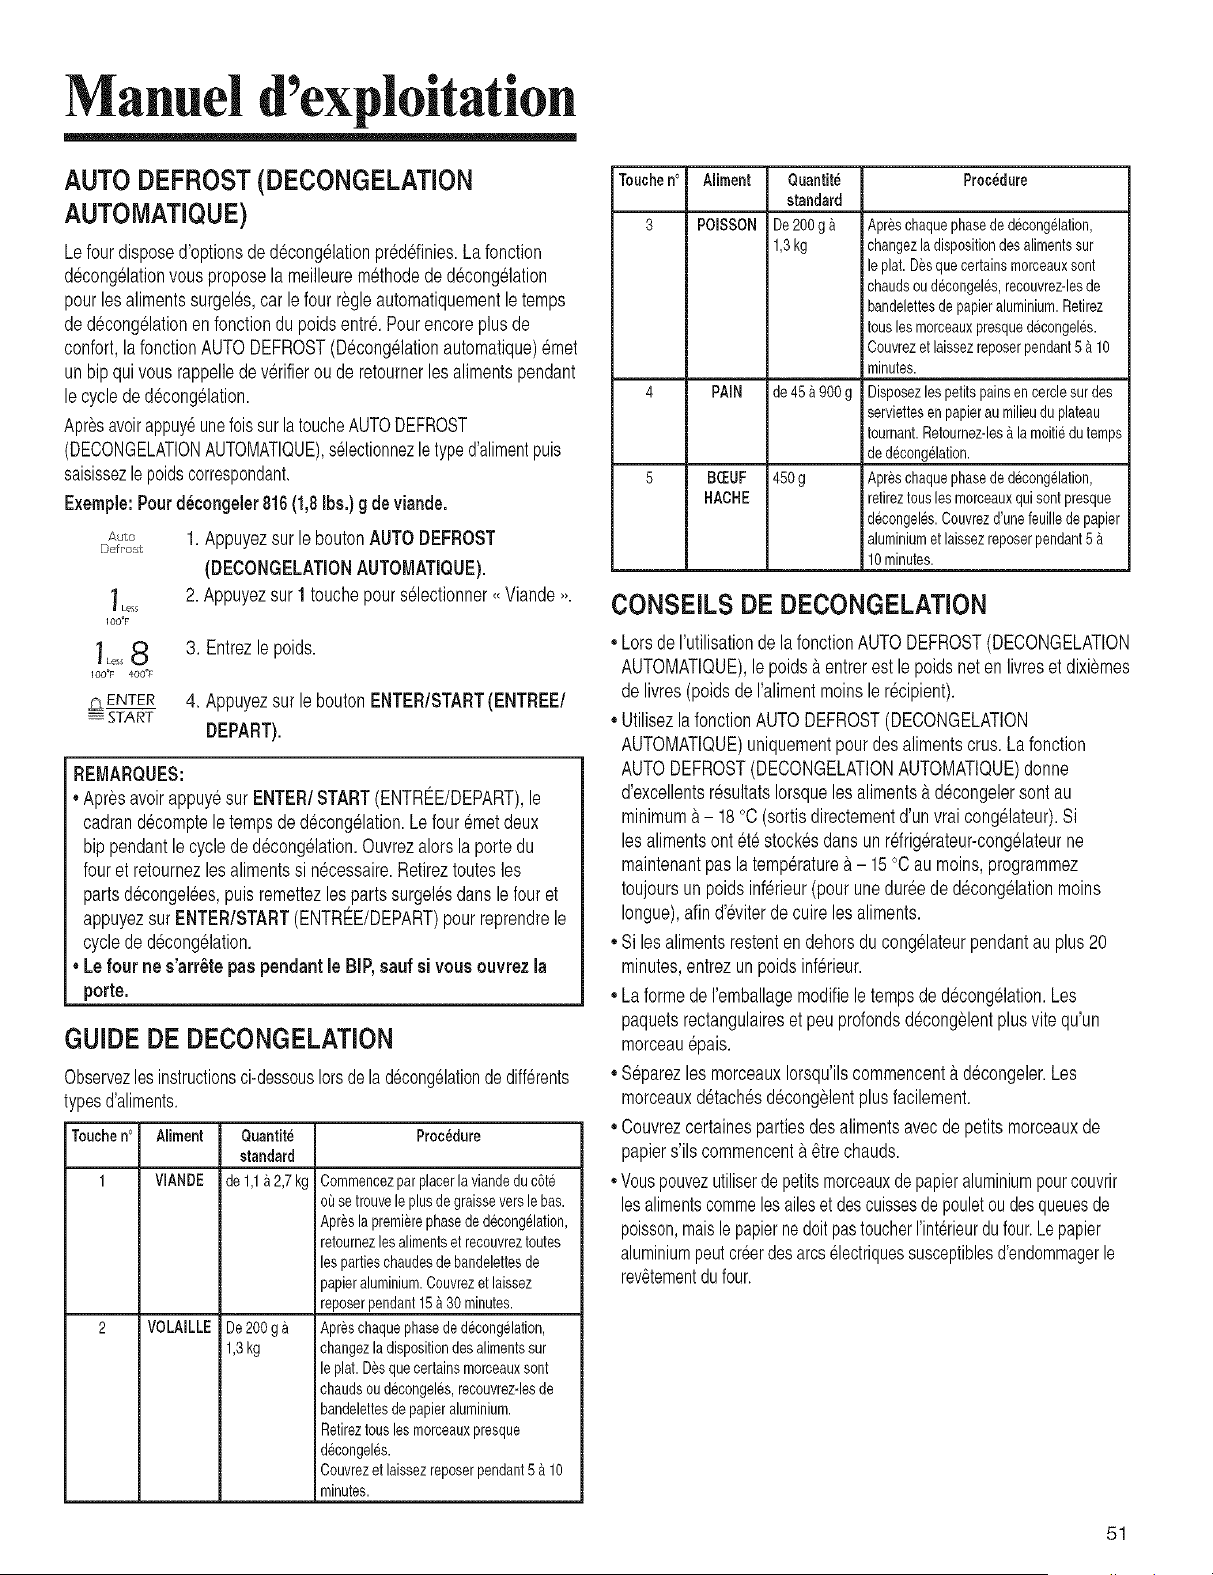
Manuel d exploitation
AUTO DEFROST (DECONGELATION
AUTOMATIQUE)
Lefourdisposed'optionsde deceng61ationpred6finies.Lafenction
d@ongelationvousproposela meilleurem6thodede decong61ation
pourles alimentssurgeles,car lefourregleautomatiquementle temps
ded@ong61ationen fonctiondu poidsentr& Pourencoreplusde
confort,la fonctionAUTODEFROST(D@ongelationautomatique)emet
unbipqui vousrappellede v@ifierou de retoumerlesalimentspendant
lecyclede decong61ation.
Apresavoirappuy6unefoissurlatoucheAUTODEFROST
(DECONGELATIONAUTOMATIQUE),selectionnezle typed'alimentpuis
saisissezle poidscorrespondant.
Exemple:Pourd_congeler816(1,8[bs.)g deviande.
Au/,o
Defro;;l_
Less
I OO_F
; OO_F 4OO°F
=O=NENTER
START
1. Appuyezsur le boutonAUTODEFROST
(DECONGELATIONAUTOMATIQUE).
2.Appuyezsur1 touchepours61ectionner,, Viande,,.
3. Entrezle poids.
4. Appuyezsur le boutonENTER/START(ENTREE/
DEPART).
REMARQUES:
Apresavoirappuyesur ENTER/START(ENTREE/DEPART),le
cadrandecomptele tempsde d6cong61ation.Lefour emetdeux
bippendantlecycleded6congelation.Ouvrezalorslaportedu
fouret retournezlesalimentssi n6cessaire.Retireztoutesles
partsd6congel6es,puisremettezlespartssurgel6sdansle fouret
appuyezsurENTER/START(ENTREE/DEPART)pourreprendrele
cyclede d6cong61ation.
Lefour nes'arr_tepaspendantle BIP,sauf si vous ouvrezla
porte.
GUIDE DE DECONGELATION
Observezlesinstructionsci-dessousIorsde lad@ong61ationde diff@ents
typesd'alirnents,
Touche no Aliment Quantite Proc6dure
standard
1 VlANDE de1,1 &2,7kg
VOLAILLE De200 g,_
1,3kg
Cemmencezpar placerla viandedu cSte
o_3setreuvele plus degraissevers le bas.
Apresla premierephasede d@engelation,
retoumezles alimentset recouvreztoutes
les partieschaudesde bandelettesde
papieraluminium.Couvrezet laissez
reposerpendant15 &30 minutes.
Apreschaque phasede decongelatien,
changezla dispositiondesalimentssur
le plat.Desquecertainsmorceauxsent
chaudsou d@ongeles,recouvrezdesde
bandelettesde papieraluminium.
Retireztousles morceauxpresque
d@engeles.
Ceuvrezet laissezreposerpendant5 &10
minutes.
Toucheno Ailment Procedure
3 POISSON
PAIN
B_VF
HACHE
Quantite
standard
De 200g &
1,3kg
de45&900g
45Og
Apreschaquephasede decongelation,
changezladispositiondesalimentssur
leplat. Desque certainsmorceauxsent
chaudsou decongeles,recouvrez-lesde
bandelettesde papieraluminium.Retirez
teusles morceauxpresqued@ongeles.
Couvrezet laissezrepeserpendant5 & 10
minutes.
Disposezles petitspainsen cerclesur des
serviettesen papierau milieudu plateau
toumant.Retoumez-les&la moitiedu temps
de decongelatien.
Apreschaquephasede decongelatien,
retireztousles merceauxquisent presque
decongeles.Ceuvrezd'unefeuillede papier
aluminiumet laissezreposerpendant5 &
10minutes.
CONSEILS DE DECONGELATION
,,LorsdeI'utilisationdelafonctionAUTODEFROST(DECONGELATION
AUTOMATIQUE),lepoids&entrerestle poidsnet en livreset dixiemes
de livres(poidsdeI'alimentmoinsle r6cipient).
,,UtilisezlafonctionAUTODEFROST(DECONGELATION
AUTOMATIQUE)uniquementpour desalimentscrus.La fonction
AUTODEFROST(DECONGELATIONAUTOMATIQUE)donne
d'excellentsresultatsIorsquelesalimentsa decongelersentau
minimum&- 18°C (sortisdirectementd'unvrai cong61ateur).Si
lesalimentsontet6 stock6sdansun r@ig@ateur-congelateurne
maintenantpas la temp@ature&- 15°C au moins,programmez
toujoursun poidsinf@ieur(pourunedureede d@ongelationmoins
Iongue),afind'@iterdecuirelesaliments.
,,Silesalimentsrestenten @hersducong61ateurpendantau plus20
minutes,entrezun poidsinf@ieur.
,,LaformedeI'emballagemodifiele tempsded6congelation.Les
paquetsrectangulaireset peuprofondsd6congelentplusvite qu'un
morceau@ais.
,,S@arezlesmorceauxIorsqu'ilscommencent_td@ongeler.Les
morceauxd6tach6sd@ongelentplusfacilement.
,,Couvrezcertainespartiesdesalimentsavecdepetitsmorceauxde
papiers'ilscommencent&6trechauds.
,,Vouspouvezutiliserdepetitsmorceauxdepapieraluminiumpourcouvrir
lesalimentscommelesaileset descuissesde pouletoudesqueuesde
poisson,maislepapiernedoitpastoucherI'int@ieurdufour.Lepapier
aluminiumpeutcr@rdesarcselectriquessusceptiblesd'endommagerle
rev6tementdufour.
51
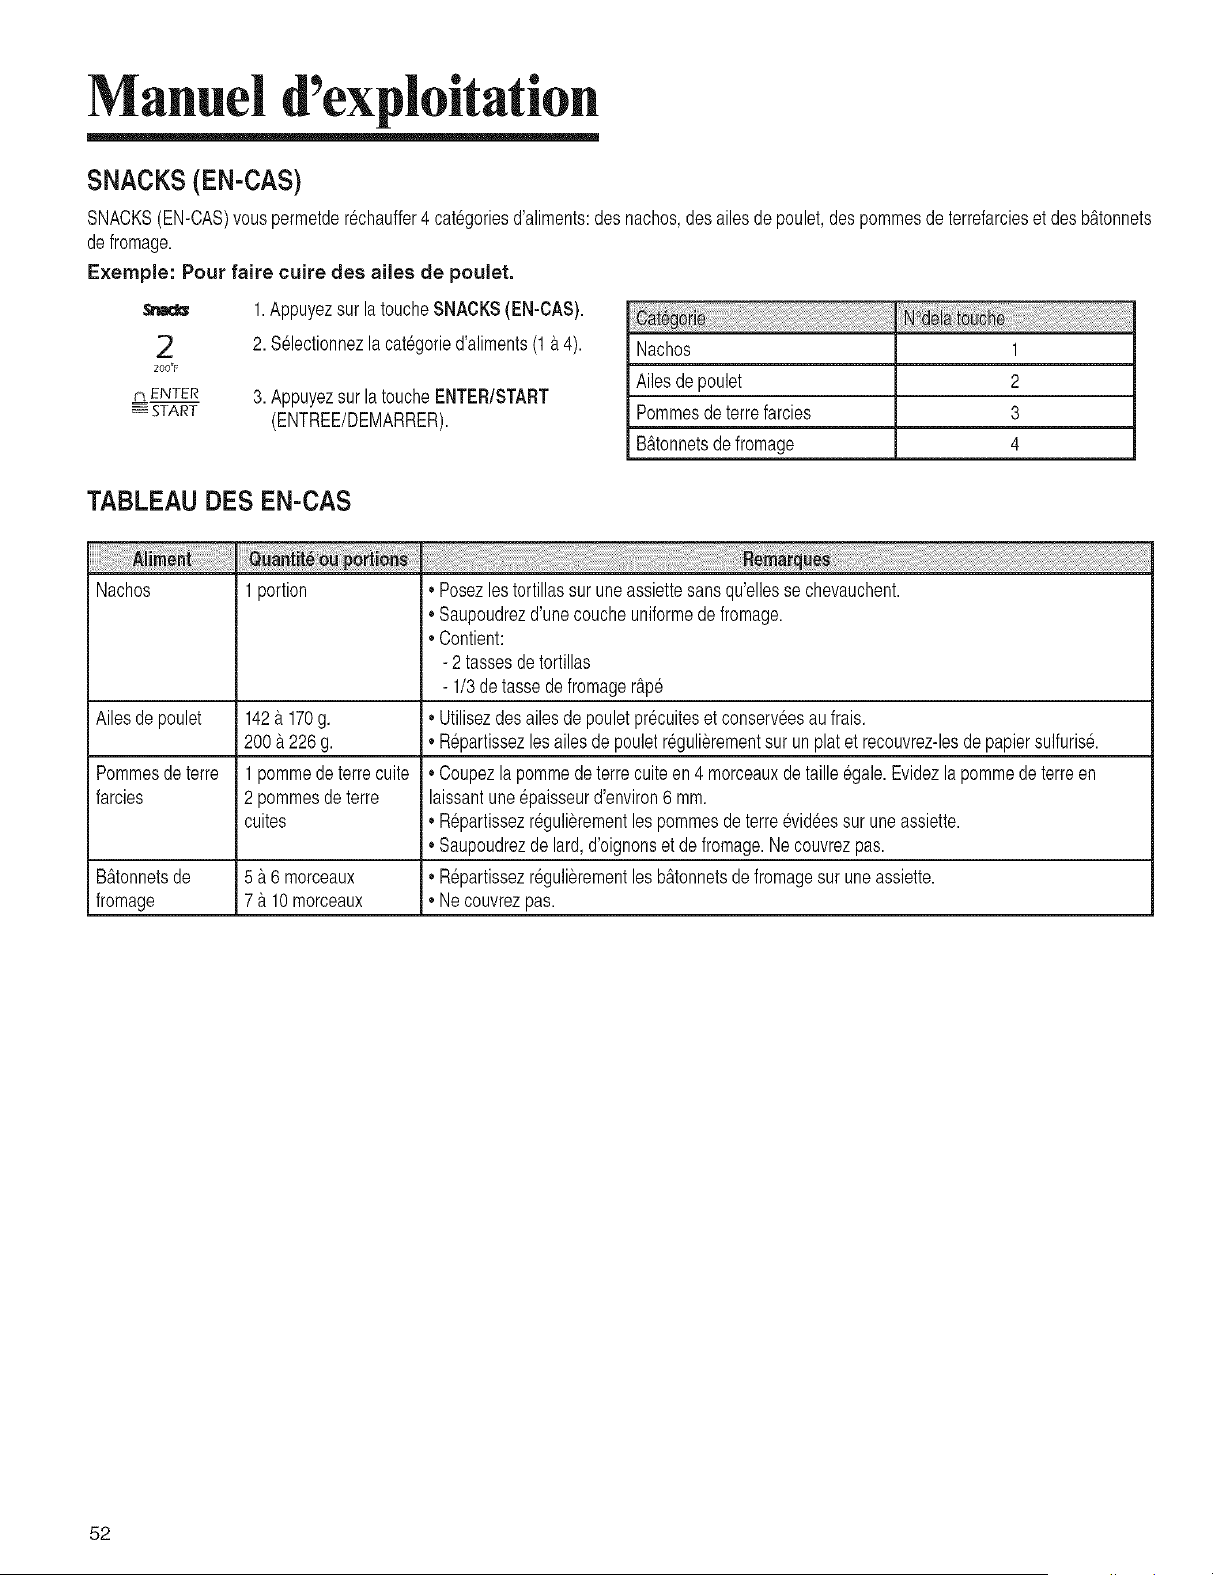
Manuel d exploitation
SNACKS (EN-CAS)
SNACKS(EN-CAS)vouspermetder_chauffer4 categoriesd'aliments:desnachos,desailesde poulet,despotatoesde terrefarcieset desb_tonnets
defromage.
Exemple: Pour faire cuire des ailes de poulet.
2
2oo°r
¢'_ENTER
_- START
1.Appuyezsur latoucheSNACKS(EN-CAS).
2. S_lectionnezla cat_goried'aliments(1_t4).
3. AppuyezsurlatoucheENTER/START
(ENTREE/DEMARRER).
Nachos
Ailesde poulet
Pommesdeterrefarcies
B&tonnetsde fromage
!; ! i i iiii i i ii i i iiii ii iiiiiiiiiii ii iiiiiiiiiii ii iiiiiiiiiii ii iiiiiiiiiii ii iiiiiiiiiii ii iiiiiiiiiii ii iiiiiiiiiii ii iiii
1
2
3
4
TABLEAU DES EN-CAS
Nachos 1 portion ,,Posezlestortillassur uneassiettesansqu'ellesse chevauchent.
,,Saupoudrezd'unecoucheuniformede fromage.
,,Contient:
- 2 tassesdetortillas
- 1/3detassedefromager&p6
Ailesde poulet 142_t170g. ,,Utilisezdesailesde pouletpr_cuiteset conserv_esaufrais.
200a 226 g. ,,R@artissezles ailesde pouletr6guli&,rementsur unplatet recouvrez-lesde papiersulfuris&
Pommesdeterre 1 pommede terrecuite ,,Coupezla pommedeterrecuiteen4 morceauxde taille_gale.Evidezlapommedeterreen
farcies 2 pommesde terre laissantune@aisseurd'environ6 ram.
cuites ,,R@artissezr6gulierementlespommesde terreevid6essuruneassiette.
,,Saupoudrezde lard,d'oignonset de fromage.Ne couvrezpas.
B&tonnetsde 5 a 6 morceaux ,, R@artissezregulierementlesb&tonnetsdefromagesur uneassiette.
fromage 7 _t10morceaux ,, Necouvrezpas.
52
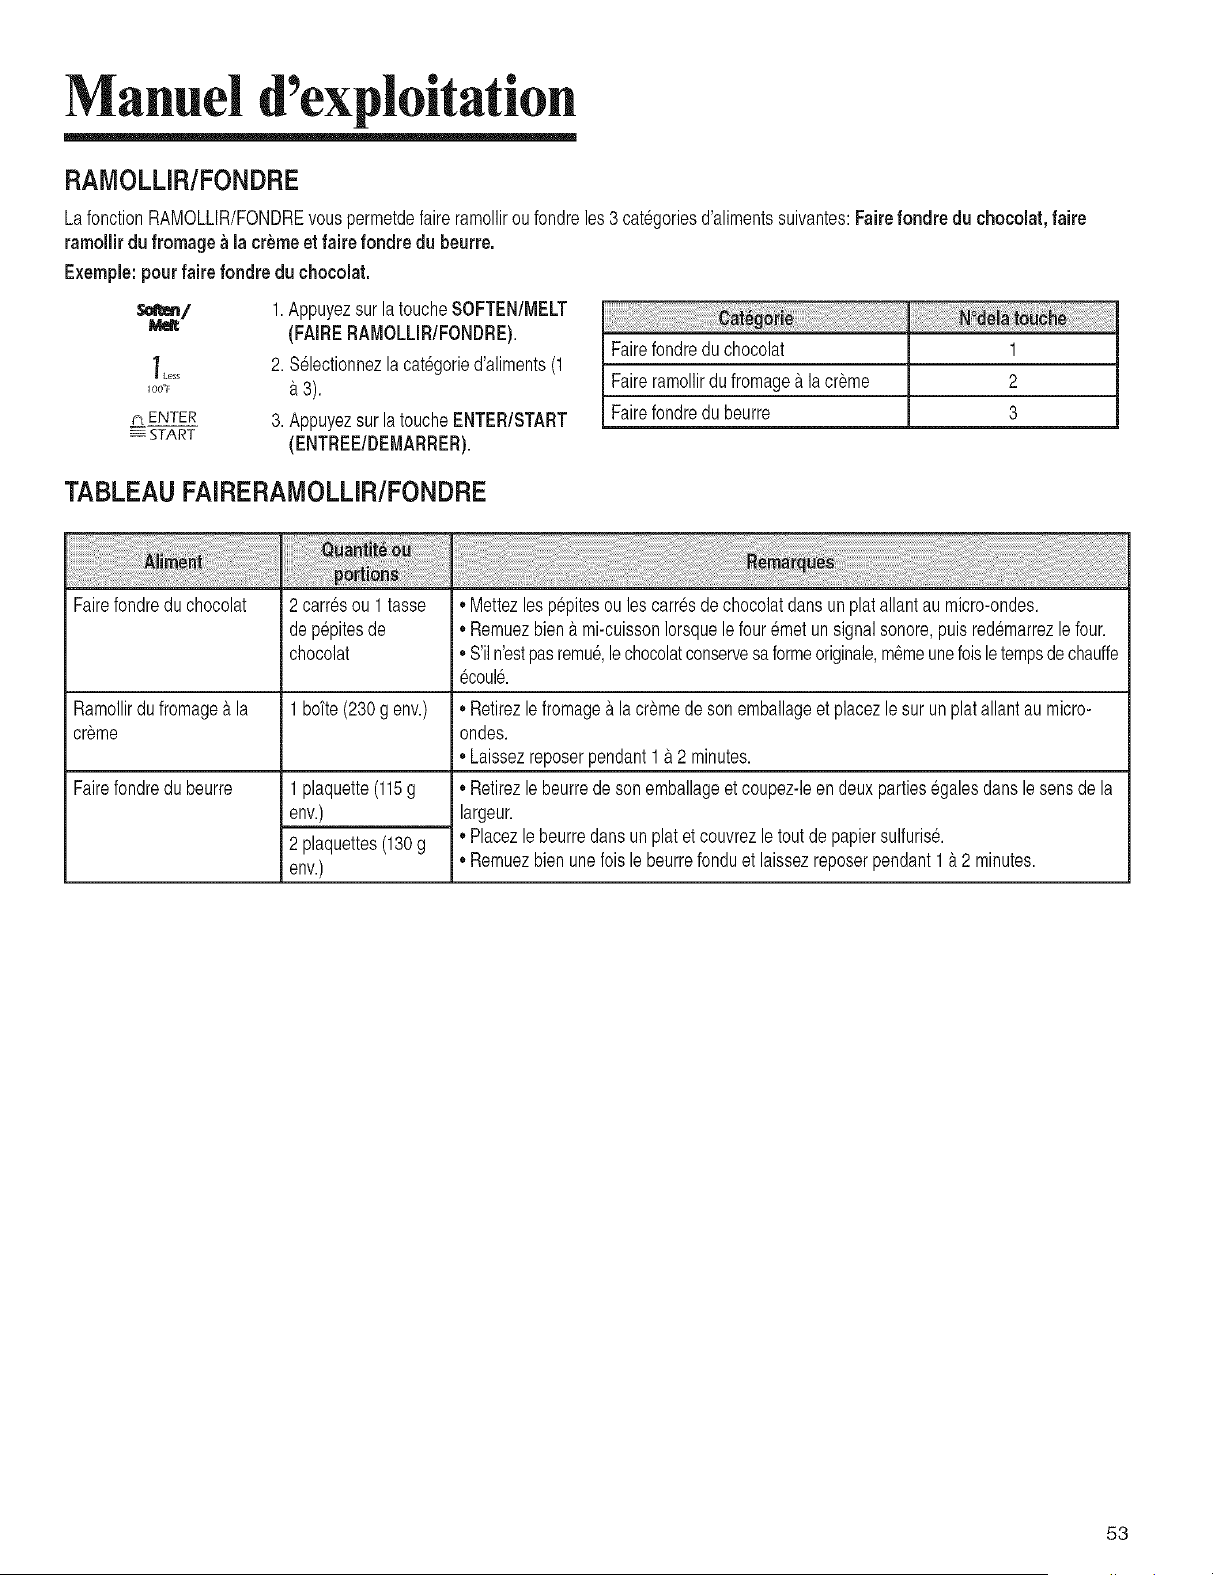
Manuel d exploitation
RAMOLLIR/FONDRE
LafonctionRAMOLLIR/FONDREvouspermetdefaireramolliroufondreles3 categoriesd'alimentssuivantes:Fairefondre du chocolat,faire
ramollir du fromage a la cremeet faire fondre du beurre.
Exemple:pour faire fondre du chocolat.
_Less
I00_:
C_ENTER
_ START
1.Appuyezsur latoucheSOFTEN/MELT
(FAIRERAMOLLIR/FONDRE).
2. Selectionnezla cat_goried'aliments(1
3. AppuyezsurlatoucheENTER/START
(ENTREE/DEMARRER).
Fairefondredu chocolat 1
Faireramollirdu fromageA lacreme 2
Fairefondredu beurre 3
TABLEAU FAIRERAIVIOLLIR/FONDRE
Fairefondreduchocolat
Ramollirdu fromageb.la
creme
Fairefondredubeurre
2 carresou 1 tasse
depepitesde
chocolat
1bofte(230g env.)
1plaquette(115g
env.)
2 plaquettes(130g
env.)
* Mettezles p@itesou lescarresdechocolatdansun platallantau micro-ondes.
, Remuezbien_.mi-cuissonIorsquele fouremetunsignalsonore,puisred_marrezlefour.
, S'iln'estpasremu&le chocolatconservesaformeoriginale,m_meuneloisletempsdechauffe
_coul&
* Retirezle fromagea lacremedesonemballageet placezle surunplatallantaumicro-
ondes.
* Laissezreposerpendant1a2 minutes.
* Retirezle beurrede sonemballageetcoupez-leen deuxpartiesegalesdanslesensde la
largeur.
* Placezle beurredansun platetcouvrezletoutde papiersulfuris&
* Remuezbienunefoisle beurrefonduet laissezreposerpendant1a2 minutes.
53
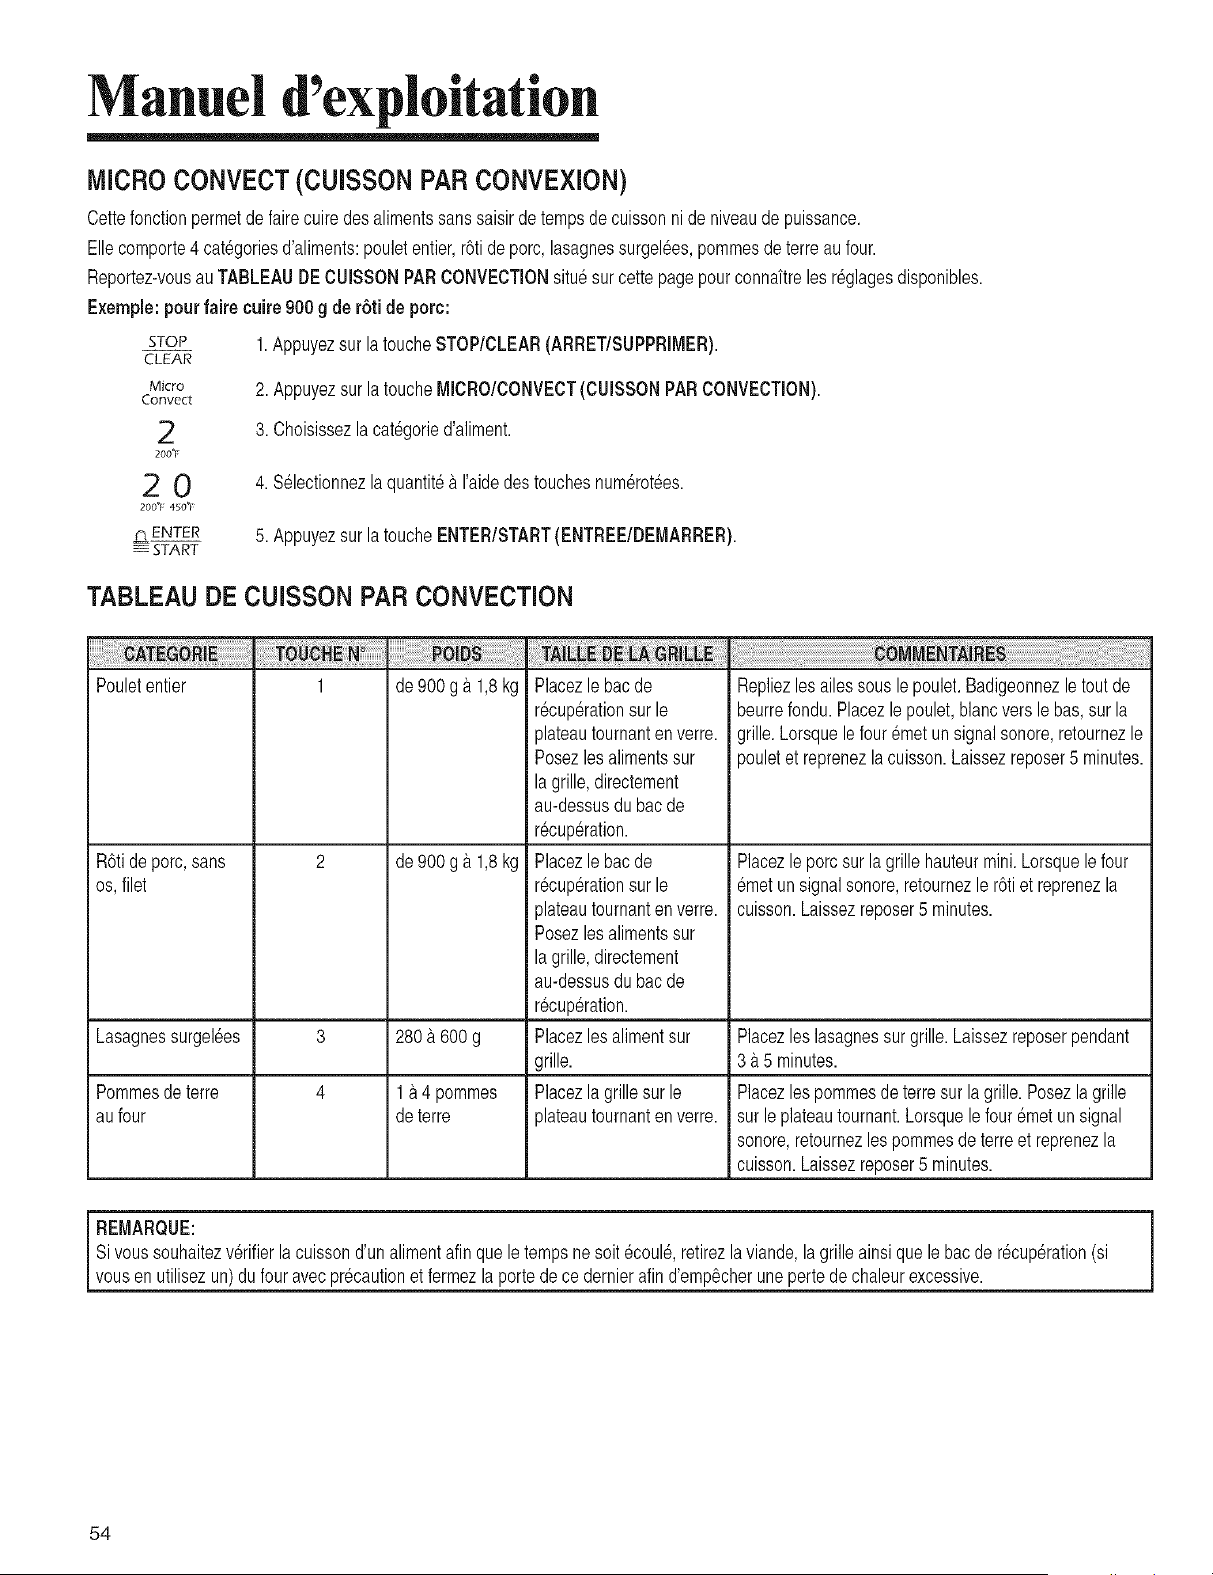
Manuel d exploitation
MICRO CONVECT (CUISSON PAR CONVEXION)
Cettefonctionpermetde fairecuiredesalimentssanssaisirdetempsde cuissonni de niveaude puissance.
Ellecomporte4cat6goriesd'aliments:pouletentier,r6tideporc, lasagnessurgel6es,potatoesdeterreau four.
Reportez-vousauTABLEAUDECUISSONPARCONVECTIONsituesurcettepagepourconnaftrelesr_glagesdisponibles.
Exemple:pourfaire cuire900g der6ti de porc:
STOP
CLEAR
Micro
Convect
2
2oo°r
2O
2OO'1 450_1
p_ ENTER
START
1.Appuyezsur latoucheSTOP/CLEAR(ARRET/SUPPRIMER).
2. AppuyezsurlatoucheMICRO/CONVECT(CUISSONPARCONVECTION).
3. Choisissezlacat_goried'aliment.
4. Selectionnezla quantit6a I'aidedestouchesnum@otees.
5. AppuyezsurlatoucheENTER/START(ENTREE/DEMARRER).
TABLEAU DE CUISSON PAR CONVECTION
1 de 900g _t1,8kg
Pouletentier
R6tideporc,sans
os,filet
de 900g _t1,8kg
Placezle bacde
recup@ationsur le
plateautournanten verre.
Posezles alimentssur
lagrille,directement
au-dessusdubacde
r_cup_ration.
Placezle bacde
r_cuperationsur le
plateautournanten verre.
Posezlesalimentssur
lagrille,directement
au-dessusdubacde
r_cup6ration.
Placezles alimentsur
grille.
Placezla grillesurle
plateautournanten verre.
Repliezles ailessous lepoulet.Badigeonnezletoutde
beurrefondu.Placezle poulet,blancversle bas,surla
grille.Lorsquelefour_metun signalsonore,retournezle
pouletet reprenezla cuisson.Laissezreposer5 minutes.
Placezle porcsurla grille hauteurmini.Lorsquele four
_metunsignalsonore,retoumezle r6tiet reprenezla
cuisson.Laissezreposer5 minutes.
Lasagnessurgel_es 3 280 & 600 g Placezles lasagnessur grille.Laissezreposerpendant
3 _t5 minutes.
Pommesdeterre 4 1 a 4 pommes Placezles pommesde terresurla grille.Posezla grille
aufour deterre sur leplateautournant.Lorsquelefouremetunsignal
sonore,retournezlespommesde terreet reprenezla
cuisson.Laissezreposer5 minutes.
i REMAROUE: i
Sivoussouhaitezv@ifierla cuissond'unalimentafin queletempsnesoit @oul&retirezlaviande,la grille ainsiquele bacde r_cup_ration(si
vousenutilisezun)du fouravecpr@autionetfermezlaportede cedernierafind'emp@herunepertedechaleurexcessive.
54
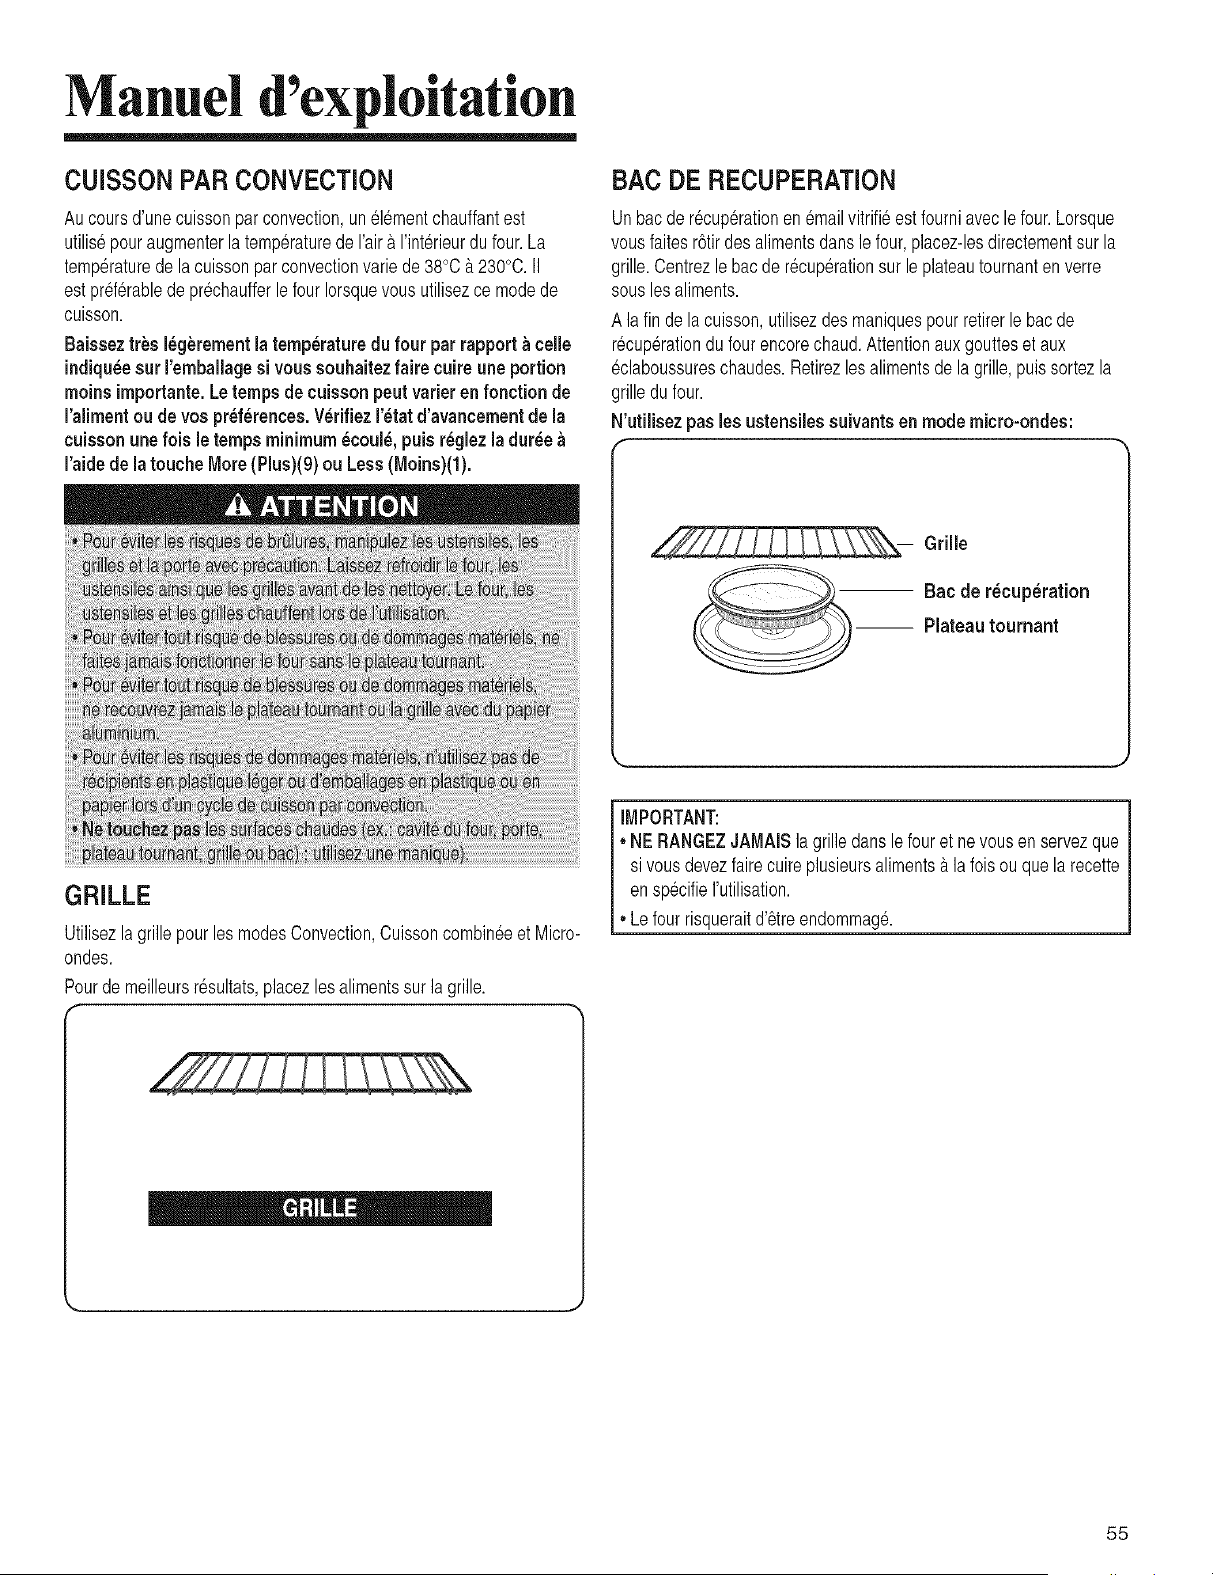
Manuel d exploitation
CUISSON PAR CONVECTION
Aucoursd'unecuissonparconvection,unel6mentchauffantest
utilis6pouraugmenterla temperaturede Fair&I'int_rieurdufour.La
temperaturede lacuissonparconvectionvariede38°C&230°C.11
estpreferablede prechaufferle fourIorsquevousutilisezcemodede
cuisson.
Baisseztr_s I_gerementla temperaturedufour parrapport h celle
indiqu_esur I'embailagesi voussouhaitezfaire cuire une portion
rnoins importante.Le temps decuisson peutvarlet enfonction de
I'aiimentou de vos preferences.V_rifiez I'_tatd'avancernentde la
cuisson unefois letemps minimum_coul_, puis r_glezla dur_e
I'aidede la touche More(Plus)(9) ou Less (Moins)(1).
GRILLE
BAC DE RECUPERATION
Unbacderecuperationenemailvitrifi_estfourniavecle four.Lorsque
vousfaitesr6tirdesalimentsdanslefour,placez-lesdirectementsurla
grille.Centrezle bacde r6cup6rationsur leplateautournantenverre
souslesaliments.
A la fin dela cuisson,utilisezdes maniquespourretirerle bacde
r_cup6rationdu fourencorechaud.Attentionauxgoutteset aux
_claboussureschaudes.Retirezlesalimentsdela grille,puissortezla
grilledufour.
N'utilisez pas lesustensilessuivantsen modernicro-ondes:
f
Grille
Bac de r_cup_ration
-- Plateau tournant
Utilisezlagrillepourles modesConvection,Cuissoncombin_eet Micro-
ondes.
Pourdemeilleursresultats,placezlesalimentssur la grille.
IMPORTANT:
• NERANGEZJAMAISlagrilledanslefouret ne vousen servezque
si vousdevezfairecuireplusieursaliments&lafois ouquela recette
enspecifierutilisation.
• Le fourrisqueraitd'etreendommag&
55
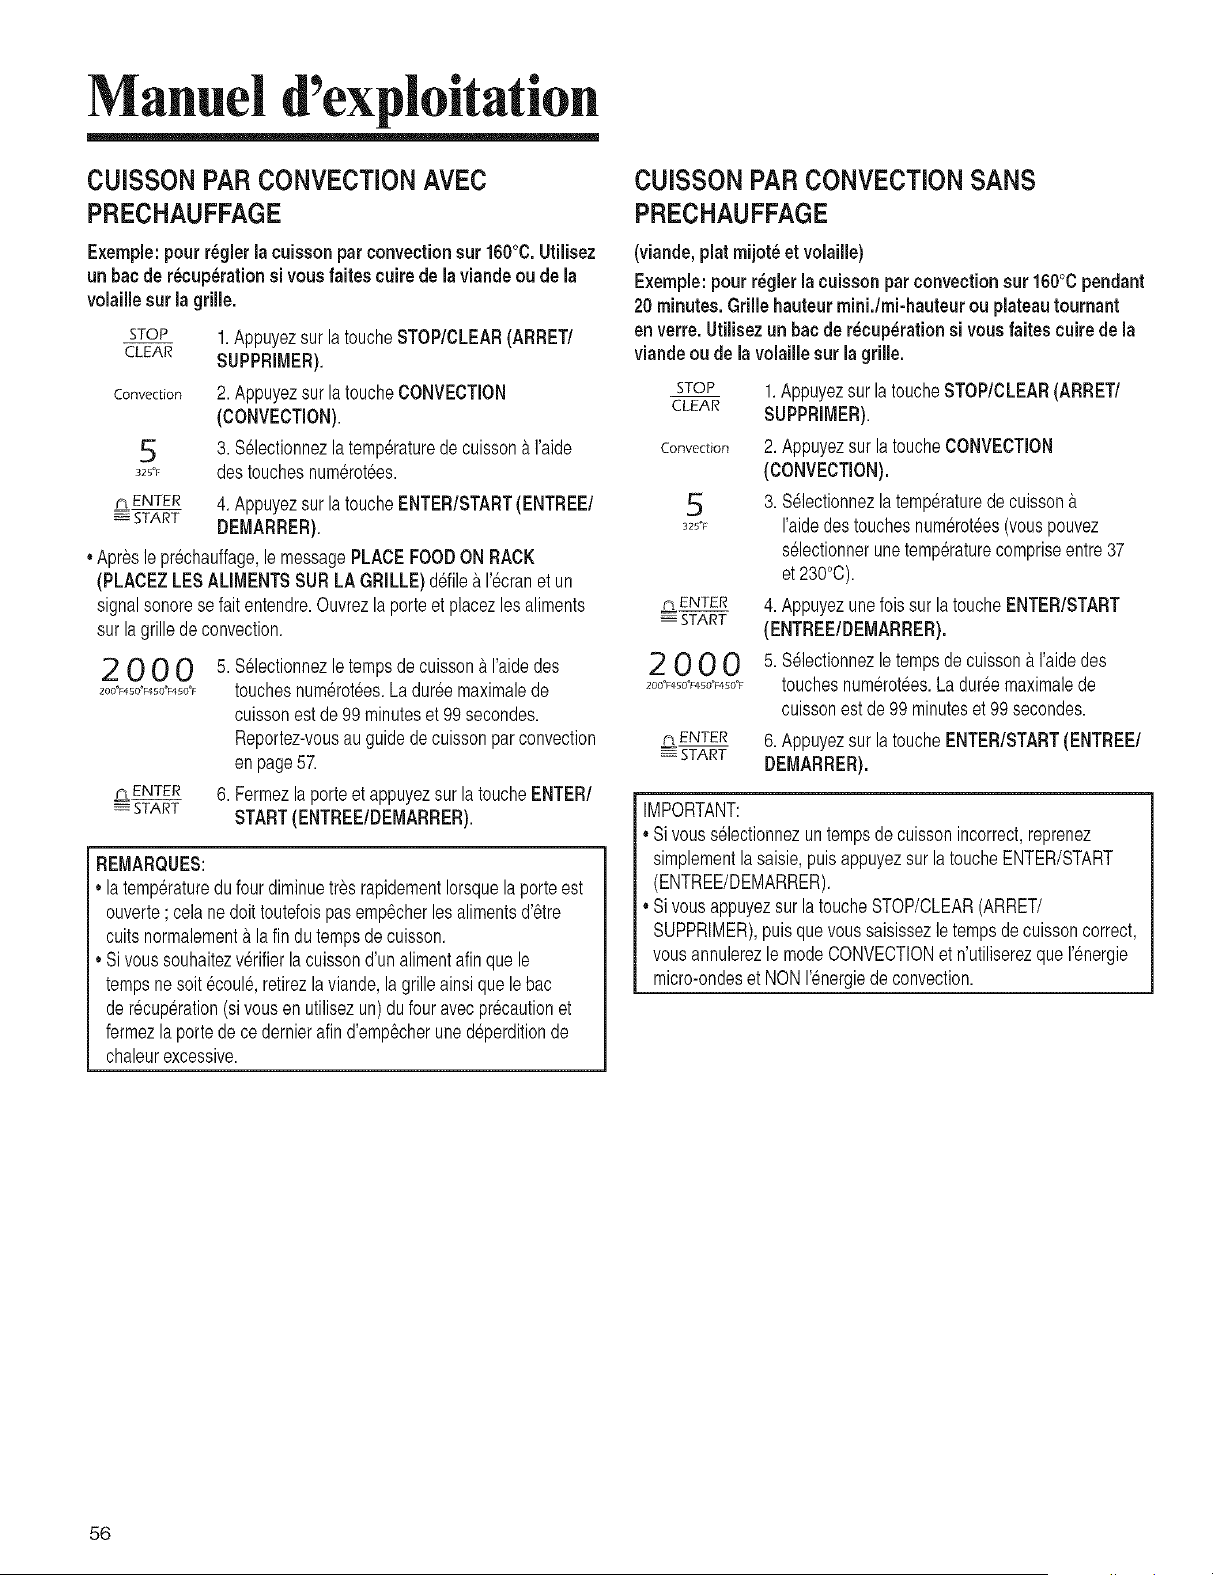
Manuel d exploitation
CUISSON PAR CONVECTION AVEC
PRECHAUFFAGE
Exempie:pourr_gler lacuissonpar convection sur 160°C.Utiiisez
un bac de r_cup_rationsi vousfaites cuire de la viandeou de la
voiaiiiesur la grille.
STOP 1.Appuyezsur la toucheSTOP/CLEAR(ARRET/
CLEAR SUPPRIMER).
convection 2. Appuyezsur latoucheCONVECTION
(CONVECTION).
.5 3. Selectionnezlatemp@aturedecuisson_traide
32_°F destouchesnum6rot6es.
p_ENTER 4. Appuyezsur latoucheENTER/START(ENTREE/
START DEMARRER).
, Apresle pr@hauffage,lemessagePLACEFOODONRACK
(PLACEZLESALIMENTSSUR LA GRILLE)defilea 1'6cranet un
signalsonorese fait entendre.Ouvrezla porteet placezlesaliments
sur lagrillede convection.
2000 s.
Z00°F450°F450°F'150_F
ENTER
START
Selectionnezletempsdecuisson&I'aidedes
touchesnum@ot@s.Ladur@maximalede
cuissonest de99minuteset 99 secondes.
Reportez-vousau guidedecuissonparconvection
enpage57.
Fermezla porteet appuyezsurla toucheENTER/
START(ENTREE/DEMARRER).
REMARQUES:
latemp@aturedufourdiminuetresrapidementIorsquela porteest
ouverte; celanedolt toutefoispasemp@herlesalimentsd'6tre
cuitsnormalementa lafin dutempsdecuisson.
Sivoussouhaitezv@ifierla cuissond'unalimentafinque le
tempsne soit 6coul6,retirezlaviande,la grilleainsiquelebac
der@up@ation(si vousen utilisezun) dufouravecprecautionet
fermezla portedece dernierafind'emp@herune d@erditionde
chaleurexcessive.
CUISSON PAR CONVECTION SANS
PRECHAUFFAGE
(viande,platmijot_ etvolaille)
Exempie:pourr_gier la cuisson parconvection sur 160°Cpendant
20minutes.Grille hauteur mini./mi-hauteur ou plateautournant
enverre. Utilisezunbac de r_cup_rationsi vous faites cuire de la
viandeou de la volaille sur la grille.
STOP
CLEAR
Convection
5
325°F
PLENTER
START
r_LENTER
_= START
1.Appuyezsur latoucheSTOP/CLEAR(ARRET/
SUPPRIMER).
2. Appuyezsur la toucheCONVECTION
(CONVECTION).
3. S61ectionnezlatemp@aturede cuisson_.
raidedestouchesnum@ot6es(vouspouvez
s61ectionnerunetemp@aturecompriseentre37
et230°C).
4. Appuyezunefois sur latoucheENTER/START
(ENTREE/DEMARRER).
5. S61ectionnezletempsdecuissona.raide des
touchesnum@otees.Ladur@max/malede
cuissonest de99 minuteset 99 secondes.
6.Appuyezsur la toucheENTER/START(ENTREE/
DEMARRER).
IMPORTANT:
,,Sivousselectionnezun tempsdecuissonincorrect,reprenez
simplementla saisie,puisappuyezsurla toucheENTER/START
(ENTREE/DEMARRER).
,,Sivousappuyezsur latoucheSTOP/CLEAR(ARRET/
SUPPRIMER),puisquevoussaisissezle tempsdecuissoncorrect,
vousannulerezlemodeCONVECTIONet n'utiliserezquer6nergie
micro-ondeset NONI'energiede convection.
56
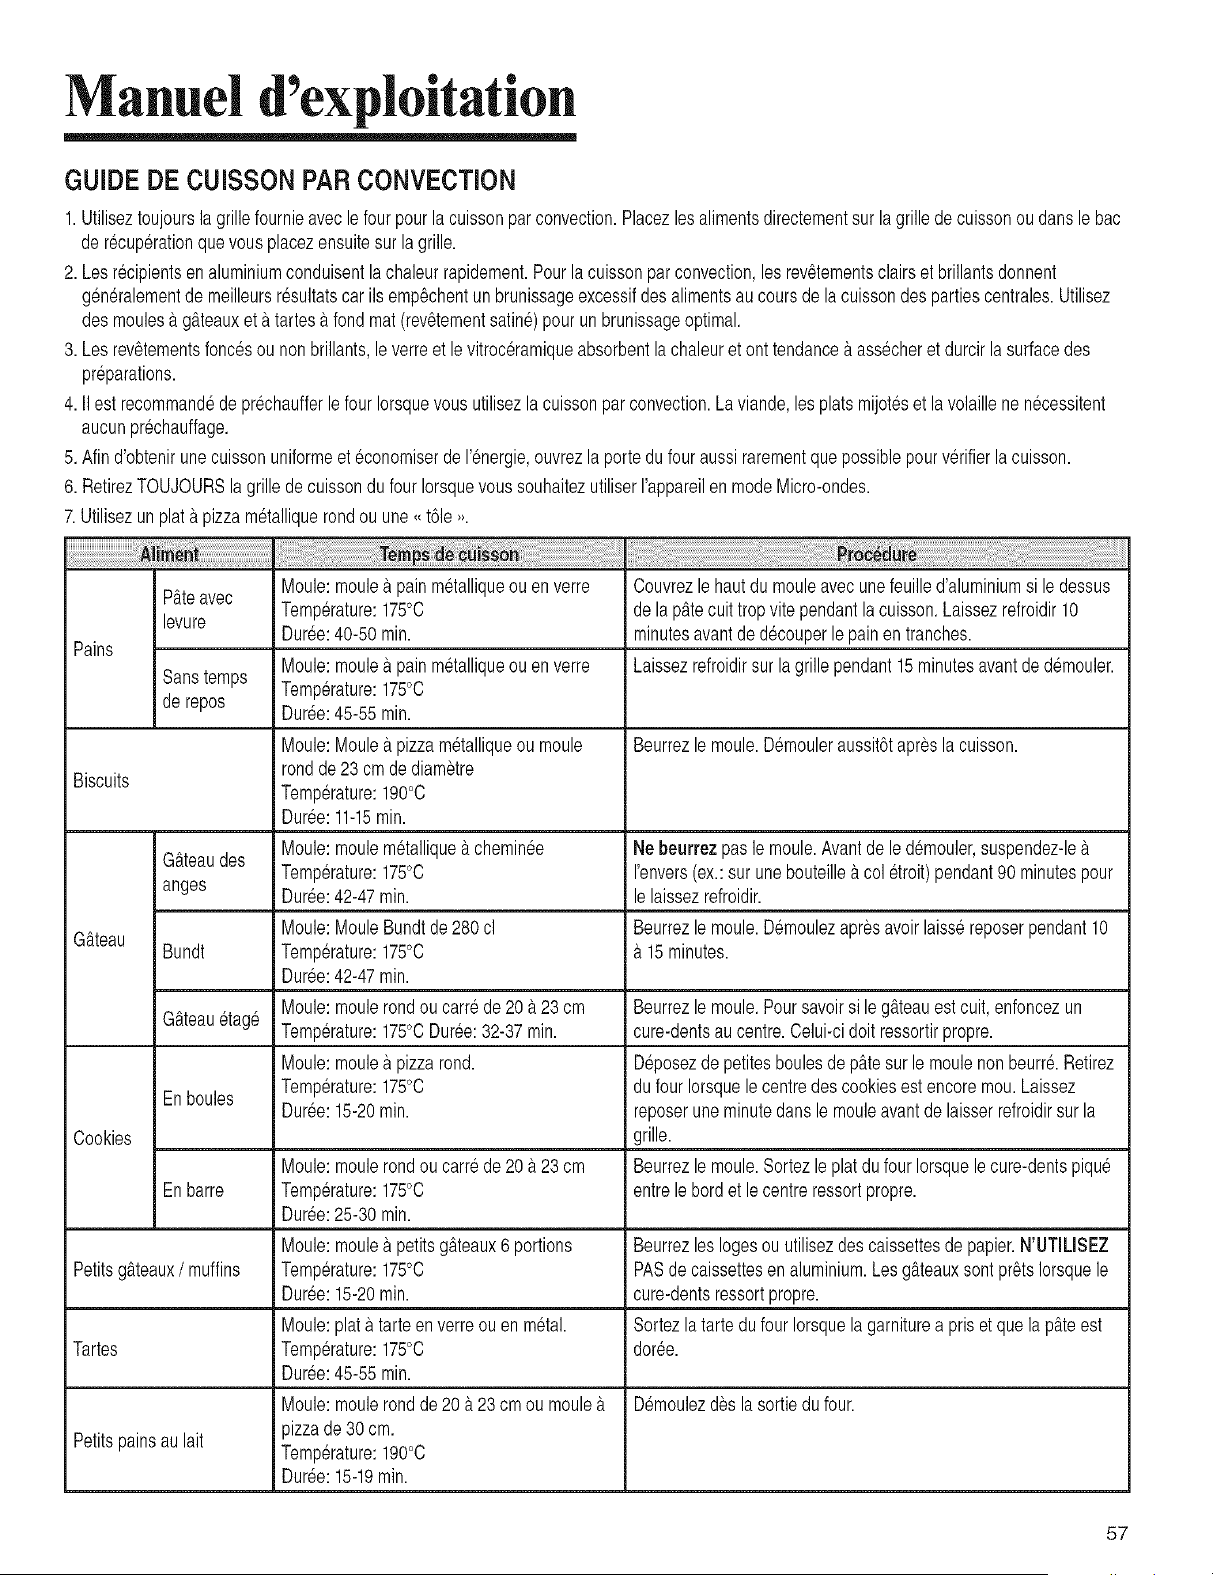
Manuel d exploitation
GUIDE DE CUISSON PAR CONVECTION
1. Utiliseztoujoursla grillefournieaveclefourpourla cuissonparconvection.Placezlesalimentsdirectementsur lagrille de cuissonoudansle bac
de r_cup@ationquevousplacezensuitesur lagrille.
2. Lesrecipientsen aluminiumconduisentlachaleurrapidement.Pourla cuissonparconvection,les revStementsclairset brillantsdonnent
gen6ralementde meilleursr_sultatscarils emp@hentunbrunissageexcessifdesalimentsau coursde la cuissondespartiescentrales.Utilisez
desmoules_.g&teauxeta tartes_tfondmat (revStementsatine)pour unbrunissageoptimal.
3. Lesrev_tementsfoncesou nonbrillants,leverreet le vitroceramiqueabsorbentlachaleuretont tendancea ass@heret durcirlasurfacedes
pr@arations.
4. IIestrecommandedepr@haufferle fourIorsquevousutilisezlacuissonpar convection.La viande,lesplatsmijoteset lavolaillene n_cessitent
aucunpr_chauffage.
5. Afind'obtenirunecuissonuniformeet @onomiserde I'_nergie,ouvrezla portedufouraussirarementquepossiblepourv@ifierlacuisson.
6. RetirezTOUJOURSlagrilledecuissondufour IorsquevoussouhaitezutiliserI'appareilen modeMicro-ondes.
7.Utilisezun plata pizzam_talliquerondou une,<t61e,,.
Moule:moulea painmetalliqueou en verre Couvrezlehautdu mouleavecunefeuilled'aluminiumsi le dessus
P_.teavec
levure Temp@ature:175°O de lap&tecult tropvitependantlacuisson.Laissezrefroidir10
Dur6e:40-50min. minutesavantde d@ouperle painentranches.
Pains
Moule:moulea painmetalliqueou en verre Laissezrefroidirsur lagrillependant15 minutesavantde demouler.
Sanstemps Temp@ature:175°O
de repos Dur6e:45-55min.
Moule:Moulea.pizzametalliqueoumoule Beurrezlemoule.D6mouleraussit6tapresla cuisson.
rondde23cm de diametre
Biscuits
Temp@ature:190°O
Duree:11-15rain.
Moule:moulem6tallique_tcheminee Ne beurrezpas le moule.Avantde le d_mouler,suspendez-le
G&teaudes
Temp@ature:175°O I'envers(ex.:surunebouteille_tcol _troit)pendant90 minutespour
anges Duree:42-47rain. lelaissezrefroidir.
Moule:MouleBundtde 280cl Beurrezlemoule.D6moulezapresavoirlaiss6reposerpendant10
G_tteau
Bundt Temp@ature:175°C _t15minutes.
Duree:42-47rain.
Moule:moulerondou carrede 20 _.23 cm Beurrezlemoule.Poursavoirsi le g&teauestcult,enfoncezun
G_tteau6tag_ Temp@ature:175°CDur_e:32-37min. cure-dentsau centre.Oelui-cidolt ressortirpropre.
Moule:moulea pizzarond. D@osezde petitesboulesdep_.tesur le moulenonbeurr_.Retirez
Enboules Temp@ature:175°O dufour Iorsquele centredescookiesestencoremou.Laissez
Duree:15-20min. reposeruneminutedansle mouleavantde laisserrefroidirsurla
Cookies grille.
Moule:moulerondou carrede 20 _t23 cm Beurrezlemoule.Sortezle platdu four Iorsquele cure-dentspiqu6
Enbarre Temp@ature:175°O entrelebord et le centreressortpropre.
Duree:25-30min.
Moule:moulea petitsg&teaux6 portions Beurrezleslogesouutilisezdescaissettesde papier.N'UTILISEZ
Petitsg&teaux/ muffins Temp@ature:175°O PASdecaissettesenaluminium.Lesg&teauxsont pr_tsIorsquele
Duree:15-20min. cure-dentsressortpropre.
Moule:plata tarteenverreou en m_tal. Sortezlatartedu fourIorsquelagarniturea priset que la p&teest
Tartes Temp@ature:175°O dor6e.
Duree:45-55min.
Moule:moulerondde20 _t23cmou moulea D_moulez@s la sortiedu four.
pizzade 30 cm.
Petitspainsaulait Temp@ature:190°O
Dur_e:15-19rain.
57
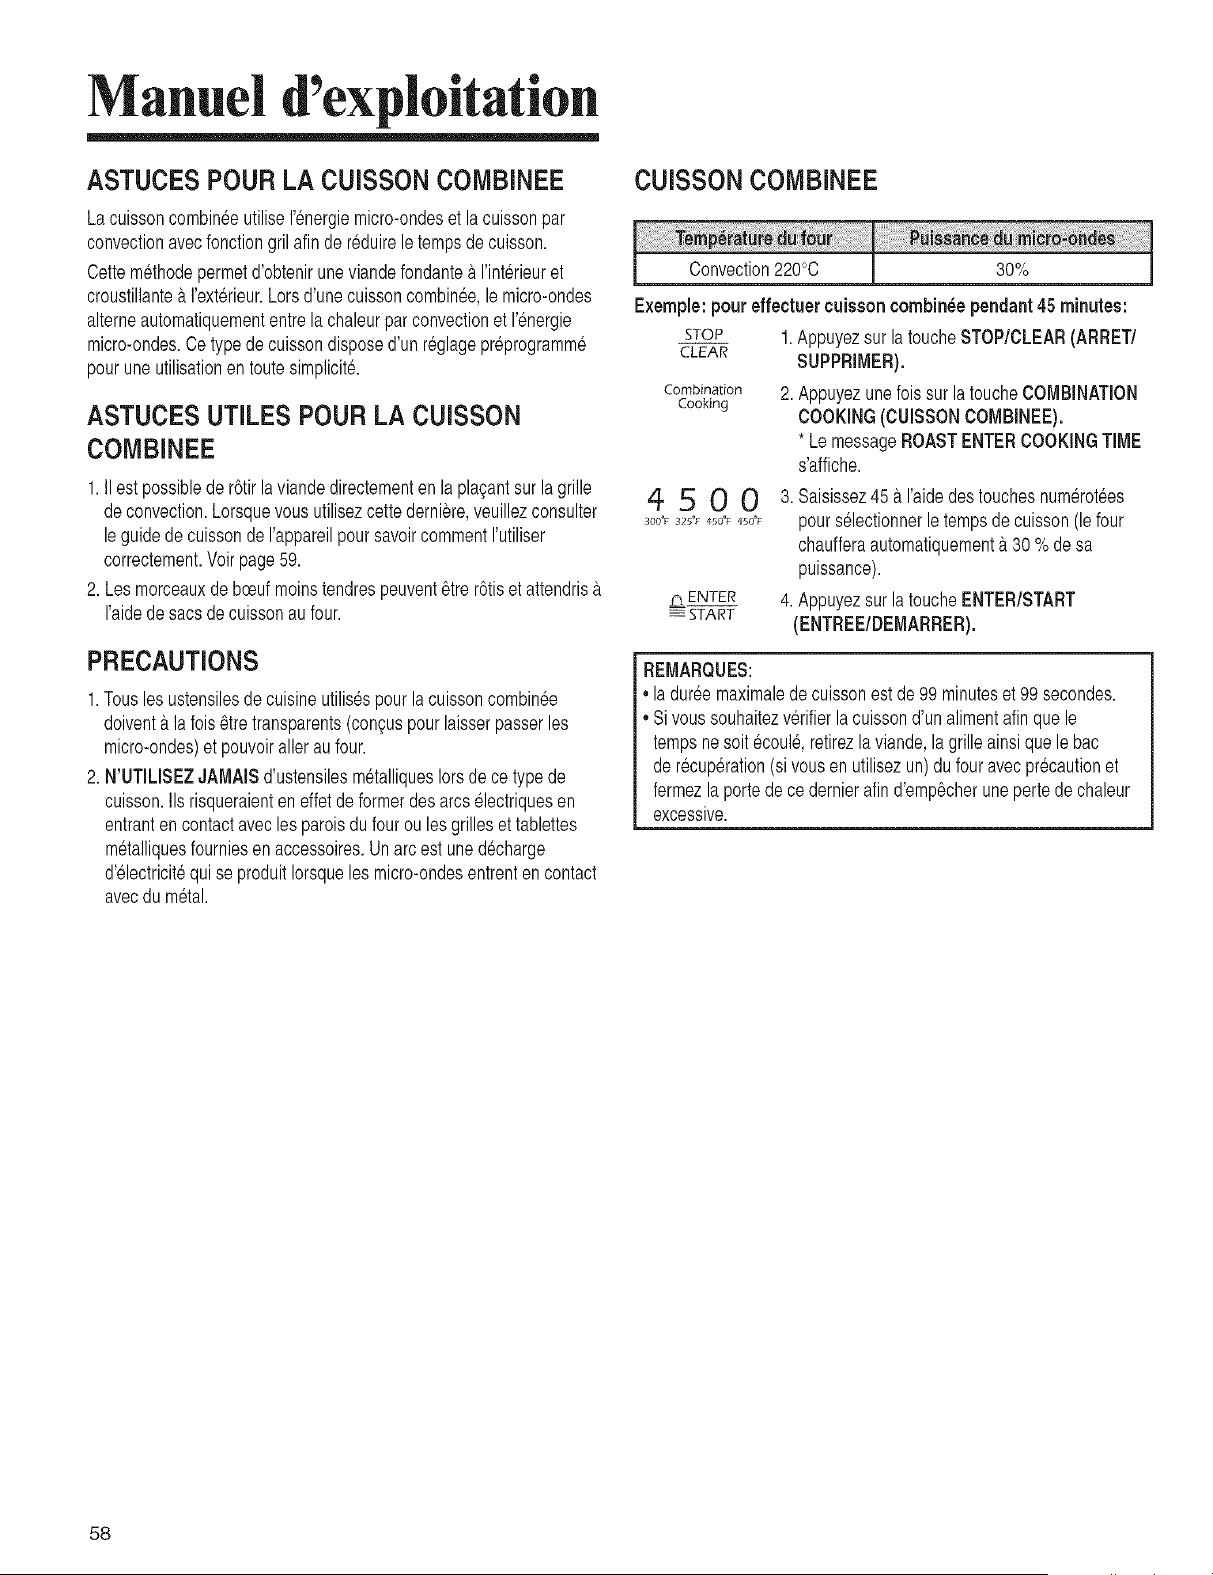
Manuel d exploitation
ASTUCES POUR LA CUiSSON COIVIBINEE
La cuissoncombin6eutiliseI'_nergiemicro-ondeset la cuissonpar
convectionavecfonctiongril afin der_duireletempsde cuisson.
Cettem6thodepermetd'obtenirune viandefondante& I'int@ieuret
croustillante&I'ext@ieur.Lorsd'unecuissoncombinee,le micro-ondes
alterneautomatiquemententrelachaleurparconvectionet I'energie
micro-ondes.Cetypede cuissondisposed'unr6glagepr@rogramm_
pouruneutilisationen toutesimplicit&
ASTUCES UTILES POUR LA CUISSON
COIVlBINEE
1.II est possiblede r6tirla viandedirectementen la pla_;antsurla grille
deconvection.Lorsquevousutilisezcettederniere,veuillezconsulter
leguidedecuissondeI'appareilpour savoircommentI'utiliser
correctement.Voirpage59.
2. Lesmorceauxde bceufmoinstendrespeuvent_tre r6tiset attendris&
I'aidedesacsdecuissonaufour.
PRECAUTIONS
1.Tousles ustensilesdecuisineutilisespourla cuissoncombin@
doiventa la lois 8tretransparents(con£uspourlaisserpasserles
micro-on@s)et pouvoiralleraufour.
2. N'UTILISEZJAMAISd'ustensilesm_talliquesIorsdece typede
cuisson.IIs risqueraienteneffetde formerdes arcselectriquesen
entranten contactaveclesparoisdu fourou lesgrillesettablettes
m_talliquesfourniesen accessoires.Unarc est unedecharge
d'electricit6quise produitIorsqueles micro-ondesentrentencontact
avecdum_tal.
CUISSON COMBINEE
Convection220°C 30%
Exemple:pour effectuercuisson combin_e pendant45 minutes:
STOP 1.Appuyezsur latoucheSTOP/CLEAR(ARRET/
CLEAR SUPPRIMER).
Combination 2. Appuyezuneloissur la toucheCOMBINATION
Cooking
COOKING(CUISSONCOMBINEE).
* LemessageROASTENTERCOOKINGTIME
s'affiche.
4 5 0 0 3. Saisissez45& I'aidedestouchesnum@ot_es
_oo°,:_;,_°,_,_o°__o°_ pourselectionnerle tempsde cuisson(lefour
chaufferaautomatiquement& 30%de sa
puissance).
¢,_ENTER 4.Appuyezsur la toucheENTER/START
START (ENTREE/DEMARRER).
REMARQUES:
,,la dur_emaximalede cuissonest de99 minuteset 99 secondes.
,,Sivoussouhaitezverifierla cuissond'un alimentafinquele
tempsnesoit @oul& retirezla viande,la grilleainsiquele bac
de recup@ation(sivousen utilisezun)dufouravecpr@autionet
fermezla portede ce dernierafind'emp_,cherunepertedechaleur
excessive.
58
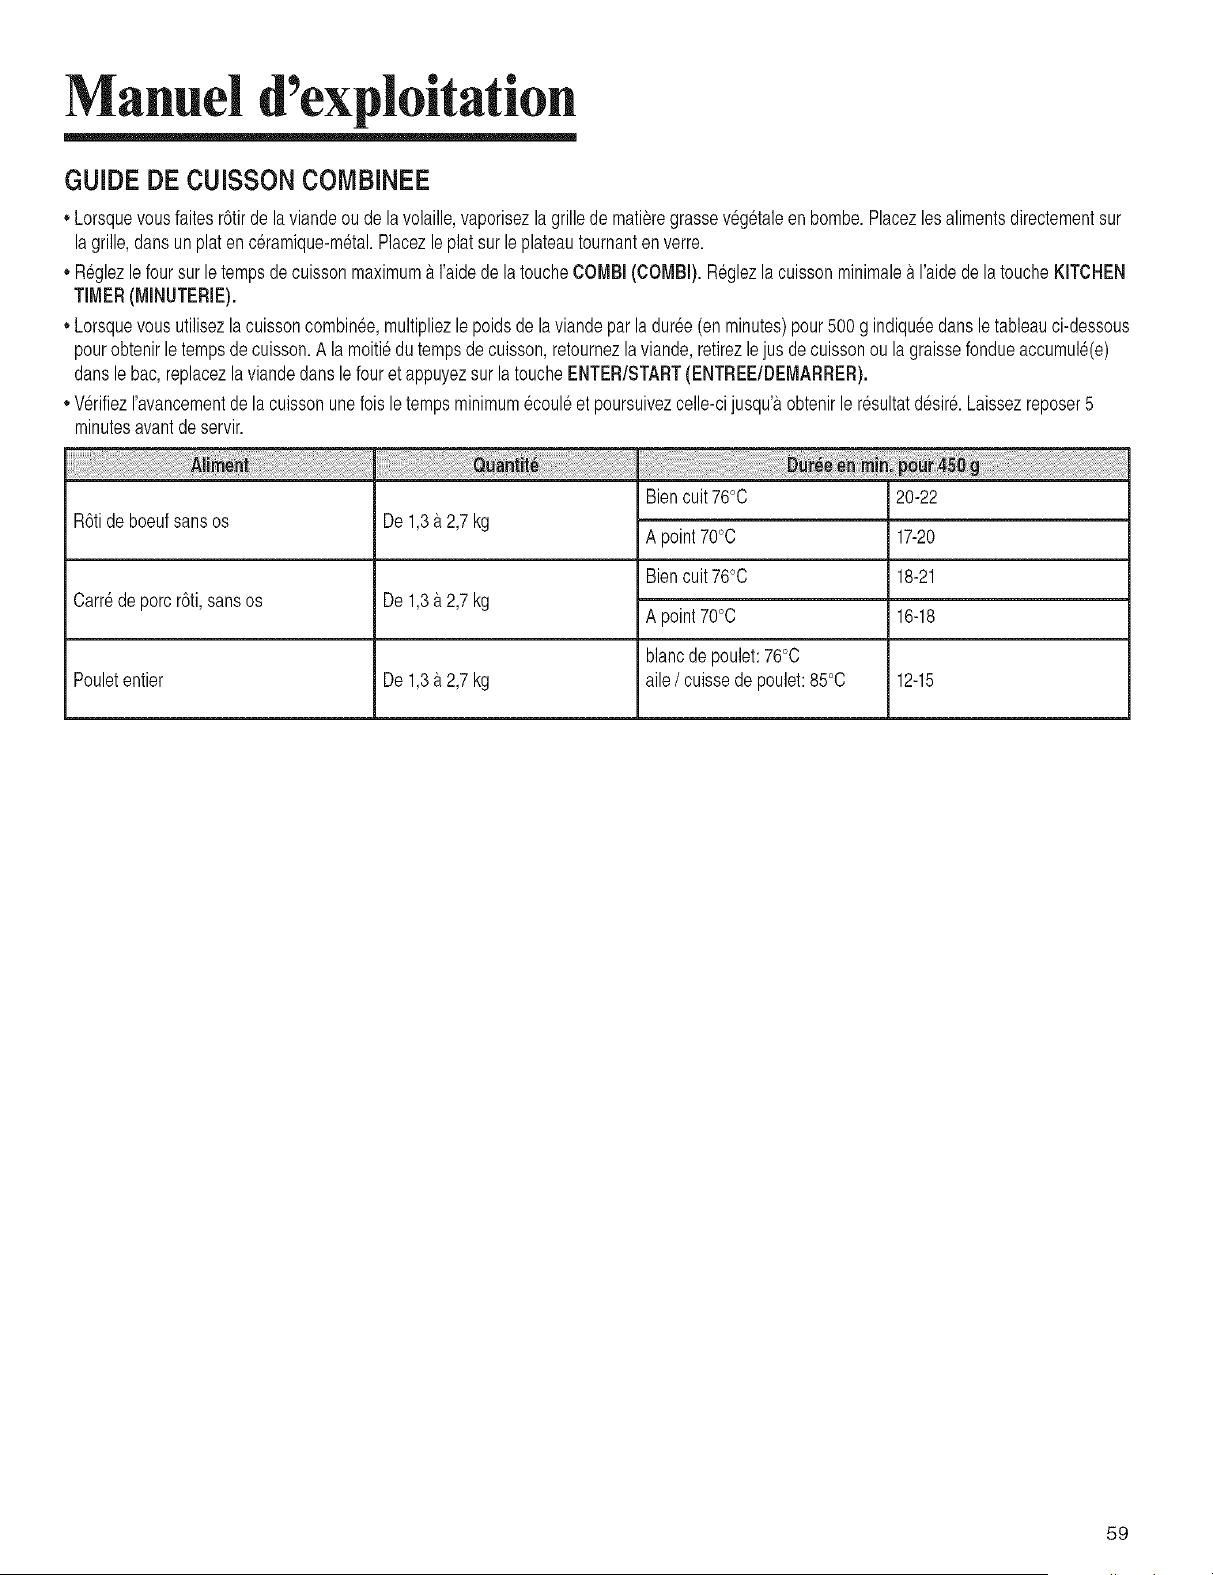
Manuel d exploitation
GUIDE DE CUiSSON COMBINEE
,,Lorsquevousfaitesr6tirdela viandeou de la volaille,vaporisezlagrillede ma%regrassev_g_taleen bombe.Placezlesalimentsdirectementsur
lagrille,dansunplatenc6ramique-m6tal.Placezle plat surleplateautournantenverre.
,,R_glezlefoursur le tempsde cuissonmaximuma I'aidedela toucheCOMBI(COMBI).Reglezla cuissonminimalearaide de la toucheKITCHEN
TIMER(MINUTERIE).
,,Lorsquevousutilisezlacuissoncombinee,multipliezlepoidsde la viandepar la dur_e(enminutes)pour500 g indiqu6edansletableauci-dessous
pourobtenirle tempsde cuisson.A la moiti_du tempsde cuisson,retournezlaviande,retirezlejus de cuissonou lagraissefondueaccumul6(e)
dansle bac, replacezla viandedanslefour et appuyezsur la toucheENTER/START(ENTREE/DEMARRER).
,,V_rifiezI'avancementde lacuissonunefoisle tempsminimum6coul_et poursuivezcelle-cijusqu'aobtenirler6sultatd_sir_.Laissezreposer5
minutesavantdeservir.
R6tideboeufsansos
iii ! ! ! ii ii ii i i i i i i ii i i ii ii ii ii i i ii i ! ii ii ii ii !i ii i i i ii ii ii ii i ii i iiiiiiiiiiiii iiiiiiiiiiiiiiiiiiiiii i i ! ! i ! !i ¸ ! !i !i !i !i !i ! ! ! i i i ! i iiiiiiiiiiiii i iiiiiiiiiiiiiiiiiiiiiiiiiiiiiiiiiiiiiiiiiiiiiiiiiiiiiiiiiiiiiiiiiiiiiiiiiiiiiiiii i i i!
De 1,3_t2,7kg
Carr_de porcr6ti,sansos De 1,3_t2,7kg
Pouletentier De 1,3_t2,7kg
Biencult76°C 20-22
A point70°C 17-20
Biencult76°C 18-21
A point70°C 16-18
blancde poulet:76°0
aile/ cuissedepoulet:85°C 12-15
59
Manuel d exploitation
GRILLE
La grillepermetun gaindeplacenonnegligeableIorsquevousutilisezplusieursr_cipients&la lois.
Pourutilieer lagrille:
1.Placez-lacorrectementsur lesquatresupportsen plastique.
,,Ellene DOlTPAStoucherlesparoism_talliquesou I'arri&,redufour_tmicro-ondes.
2. Placezdes quantitesde nourritureequivalentesAU-DESSUSETENDESSOUSde la grille.
,,Veillezace que lesquantit6sd'alimentssoienta peupres_galesafinder@artirau mieux1'6nergiede la cuisson.
IMPORTANT:
,,NERANGEZJAMAISlagrilledans lefouret NELUTILISEZQUESI vousdevezfairecuireplusieursaliments&la fois ouquela recetteen
I specifieI'utilisation.
[, Dansle cascontraire,lefourrisqueraitd _treendommag&
6O
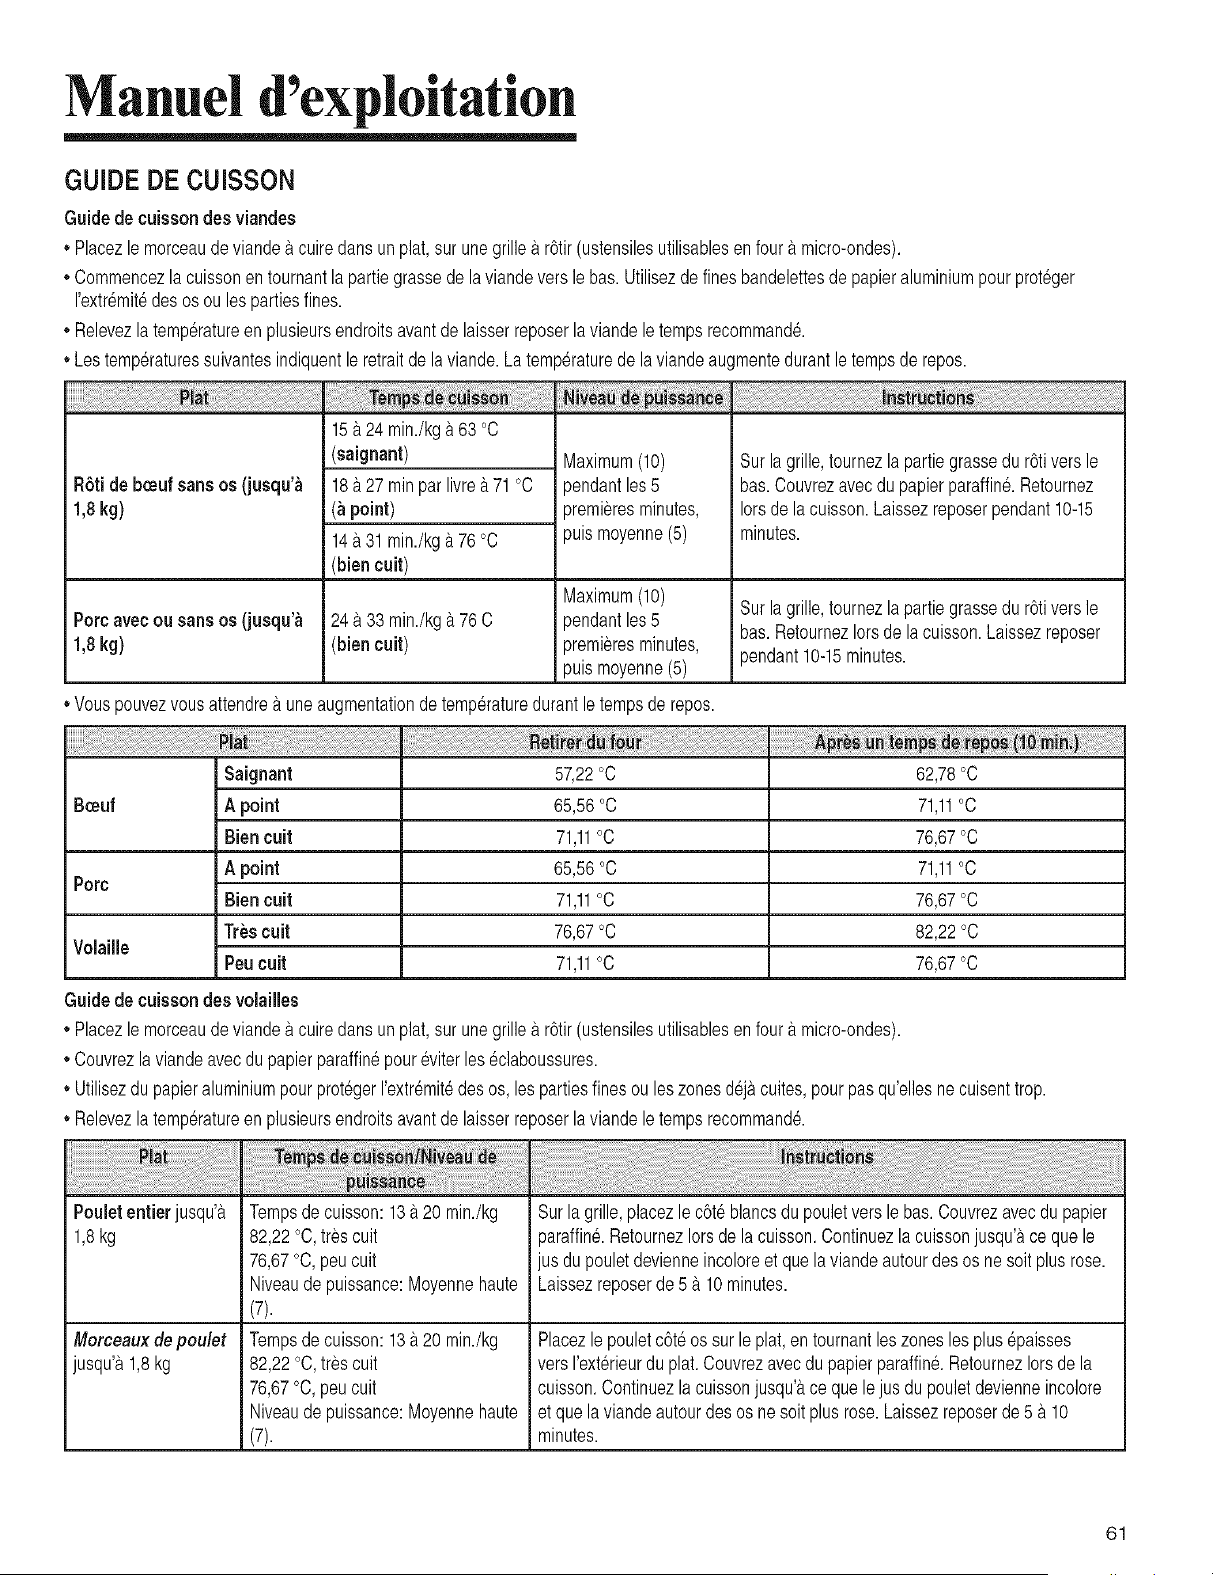
Manuel d exploitation
GUIDE DE CUISSON
Guidede cuissondes viandes
,,Placezle morceaude viandea cuiredansunplat, surunegrillea r6tir(ustensilesutilisablesenfoura micro-ondes).
,,Commencezla cuissonen tournantla partiegrassedela viandeversle bas. Utilisezde finesbandelettesde papieraluminiumpourprot_ger
I'extr_mit_desosou lespartiesfines.
,,Relevezlatemp@atureen plusieursendroitsavantdelaisserreposerla viandeletempsrecommand&
,,Lestemp@aturessuivantesindiquentleretraitde la viande.Latemp@aturede la viandeaugmentedurantletempsde repos.
R6tide b_eufsansos(jusqu'a
15A24 min./kg& 63°C
(saignant)
18_t27 minparlivre_t71°C
(h point)
14a31 min./kg_t76°C
(bien cult)
Maximum(10)
pendantles5
premieresminutes,
puismoyenne(5)
Surlagrille,tournezla partiegrassedu r6tiversle
bas.Couvrezavecdupapierparaffin&Retournez
Iorsdelacuisson.Laissezreposerpendant10-15
minutes.
Maximum(10) Sur la grille,tournezlapartiegrassedu r6tiversle
Porcavecou sansos (jusqu'a 24& 33 min./kg_t76 C pendantles5
bas.RetournezIorsde la cuisson.Laissezreposer
1,8 kg) (bien cult) premieresminutes, pendant10-15minutes.
puismoyenne(5)
,,Vouspouvezvousattendrea uneaugmentationde temp@aturedurantletempsde repos.
i Saignant 57,22°C 62,78°C
Bo_uf i A point 65,56°C 71,11°C
Biencult 71,11°C 76,67°C
j A point 65,56°C 71,11°C
Porc
Biencult 71,11°C 76,67°C
I . ,
i Trescu_t 76,67°C 82,22°C
Volaille
Peucult 71,11°C 76,67°C
Guidede cuisson desvolailles
,,Placezle morceaude viande&cuiredansunplat, surunegrille&r6tir(ustensilesutilisablesen four_tmicro-ondes).
,,Couvrezlaviandeavecdupapierparaffin_poureviterles@laboussures.
,,Utilisezdupapieraluminiumpourprot_gerI'extr_mit_des os, lespartiesfinesouleszonesdej&cuites,pour pasqu'ellesne cuisenttrop.
,,Relevezlatemp@atureen plusieursendroitsavantdelaisserr_
Pouletentierjusqu'&
1,8kg
Morceauxde poulet
jusqu'&1,8kg
Tempsde cuisson:13 &20 min./kg
82,22°C,tres cult
76,67°C, peucult
Niveaude puissance:Moyennehaute
(7).
Tempsde cuisson:13 a20 min./kg
82,22°C,tres cult
76,67°C, peucult
Niveaude puissance:Moyennehaute
(7).
3oserla viandele tempsrecommand&
Surla grille,placezlec6teblancsdu pouletverslebas. Couvrezavecdu papier
paraffin&RetournezIorsde la cuisson.Continuezla cuissonjusqu'ace que le
jus dupouletdevienneincoloreet quela viandeautourdes os ne soitplusrose.
Laissezreposerde 5a 10minutes.
Placezle pouletc6t_ ossur le plat, entournantleszoneslesplus@aisses
versI'ext@ieurdu plat.Couvrezavecdu papierparaffin&RetournezIorsde la
cuisson.Continuezla cuissonjusqu'_tce quele jus du pouletdevienneincolore
et quelaviandeautourdes os nesoit plus rose.Laissezreposerde 5 a 10
minutes.
61
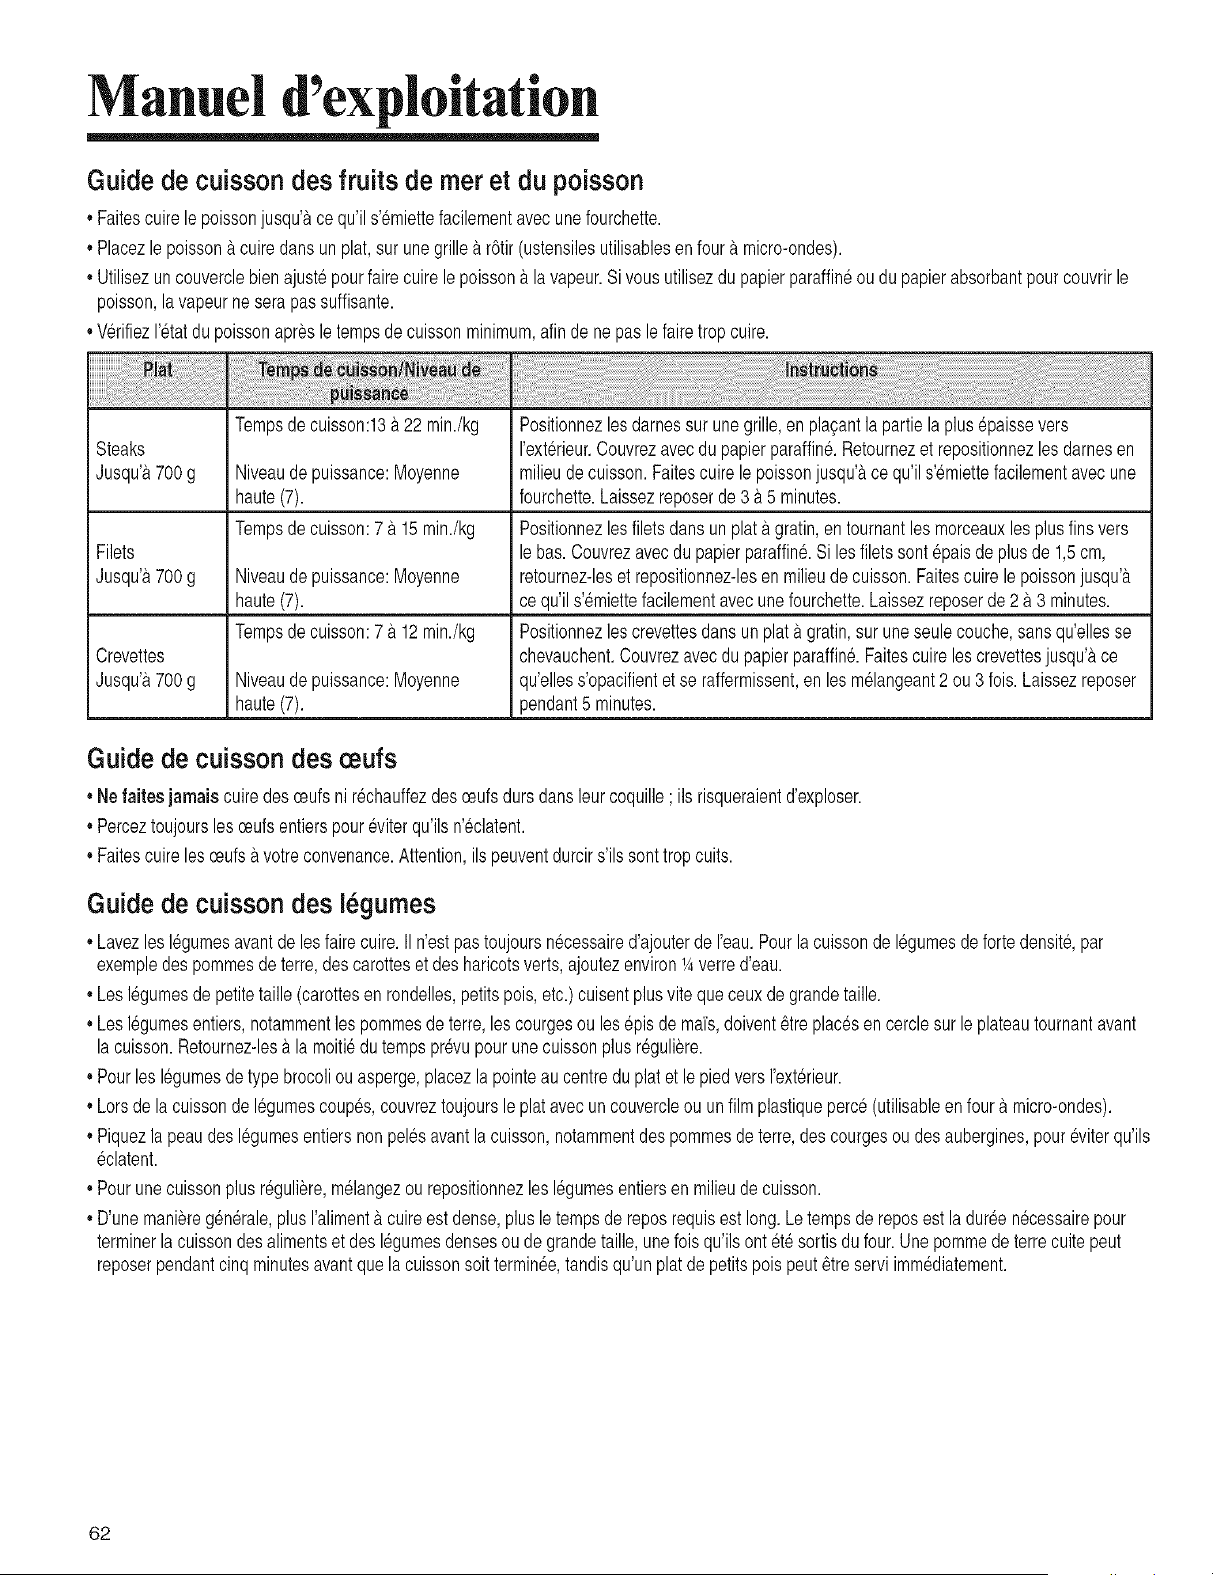
Manuel d exploitation
Guide de cuisson des fruits de met et du poisson
• Faitescuirelepoissonjusqu'ace qu'ils'emiettefacilementavecunefourchette.
• Placezlepoissona cuiredansunplat, surunegrillea r6tir(ustensilesutilisablesenfoura micro-ondes).
,,Utilisezuncouverclebienajustepourfairecuirele poisson_tla vapeur.Sivousutilisezdu papierparaffineou du papierabsorbantpourcouvrirle
poisson,la vapeurne serapassuffisante.
,,Wrifiez I'_tatdupoissonapresle tempsdecuissonminimum,afindene pas le fairetrop cuire.
Steaks
Jusqu'&700g
Filets
Jusqu'a700g
Crevettes
Jusqu'&700g
Tempsde cuisson:13b.22 min./kg
Niveaude puissance:Moyenne
haute(7).
Tempsde cuisson:7 & 15min./kg
Niveaude puissance:Moyenne
haute(7).
Tempsde cuisson:7 & 12min./kg
Niveaude puissance:Moyenne
haute(7).
Positionnezlesdamessur unegrille,en plagantla partiela plus@aissevers
I'ext@ieur.Couvrezavecdu papierparaffine.Retournezet repositionnezlesdarnesen
milieude cuisson.Faitescuirele poissonjusqu'&ce qu'ils'6miettefacilementavecune
fourchette.Laissezreposerde 3_t5 minutes.
Positionnezlesfiletsdansunplata gratin,entournantlesmorceauxlesplusfinsvers
lebas.Couvrezavecdupapierparaffin6.Si lesfiletssont @aisde plusde 1,5cm,
retournez-leset repositionnez-lesen milieude cuisson.Faitescuirele poissonjusqu'a
ce qu'ils'emiettefacilementavecunefourchette.Laissezreposerde 2 & 3 minutes.
Positionnezlescrevettesdansun plat&gratin,sur uneseulecouche,sansqu'ellesse
chevauchent.Couvrezavecdu papierparaffin6.Faitescuirelescrevettesjusqu'&ce
qu'elless'opacifientetse raffermissent,en lesm_langeant2 ou 3 fois.Laissezreposer
pendant5 minutes.
Guide de cuisson des eufs
,,Ne faites jamais cuiredesceufsni r@hauffezdesceufsdursdansleurcoquille; ils risqueraientd'exploser.
,,Perceztoujoursles ceufsentierspoureviterqu'ilsn'_clatent.
,,Faitescuirelesceufsavotreconvenance.Attention,ilspeuventdurcirs'ils sonttropcults.
Guide de cuisson des I gumes
,,Lavezles16gumesavantde lesfairecuire.IIn'estpastoujoursn6cessaired'ajouterde I'eau.Pourlacuissonde16gumesde fortedensite,par
exempledespommesdeterre,descarotteset desharicotsverts,ajoutezenviron1Averred'eau.
,,Leslegumesde petitetaille(carottesenrondelles,petitspois, etc.)cuisentplusvite queceuxdegrandetaille.
,,Les16gumesentiers,notammentles pommesde terre,lescourgesou les@is demais,doivent_treplac6sencerclesur leplateautournantavant
la cuisson.Retournez-les_tlamoiti_dutempspr@upourunecuissonplus r_guliere.
,,Pourles I_gumesde typebrocoliouasperge,placezla pointeaucentreduplatet le piedversI'ext@ieur.
,,Lorsde lacuissondeI_,gumescoup_s,couvreztoujoursle platavecuncouvercleou unfilmplastiqueperce(utilisableenfoura micro-ondes).
,,Piquezla peaudes I_gumesentiersnon pelesavantla cuisson,notammentdespommesdeterre,descourgesou desaubergines,pour @iterqu'ils
eclatent.
,,Pourunecuissonplus reguliere,m61angezourepositionnezles16gumesentiersen milieudecuisson.
,,D'unemanieregen6rale,plusI'aliment& cuireest dense,plusletempsde reposrequisestlong.Le tempsde reposestladureenecessairepour
terminerlacuissondesalimentset des 16gumesdensesou de grandetaille,unefois qu'ilsontet6sortisdu four.Unepommede terrecuitepeut
reposerpendantcinqminutesavantquelacuissonsoittermin_e,tandisqu'unplatdepetitspoispeut_tre serviimmediatement.
62
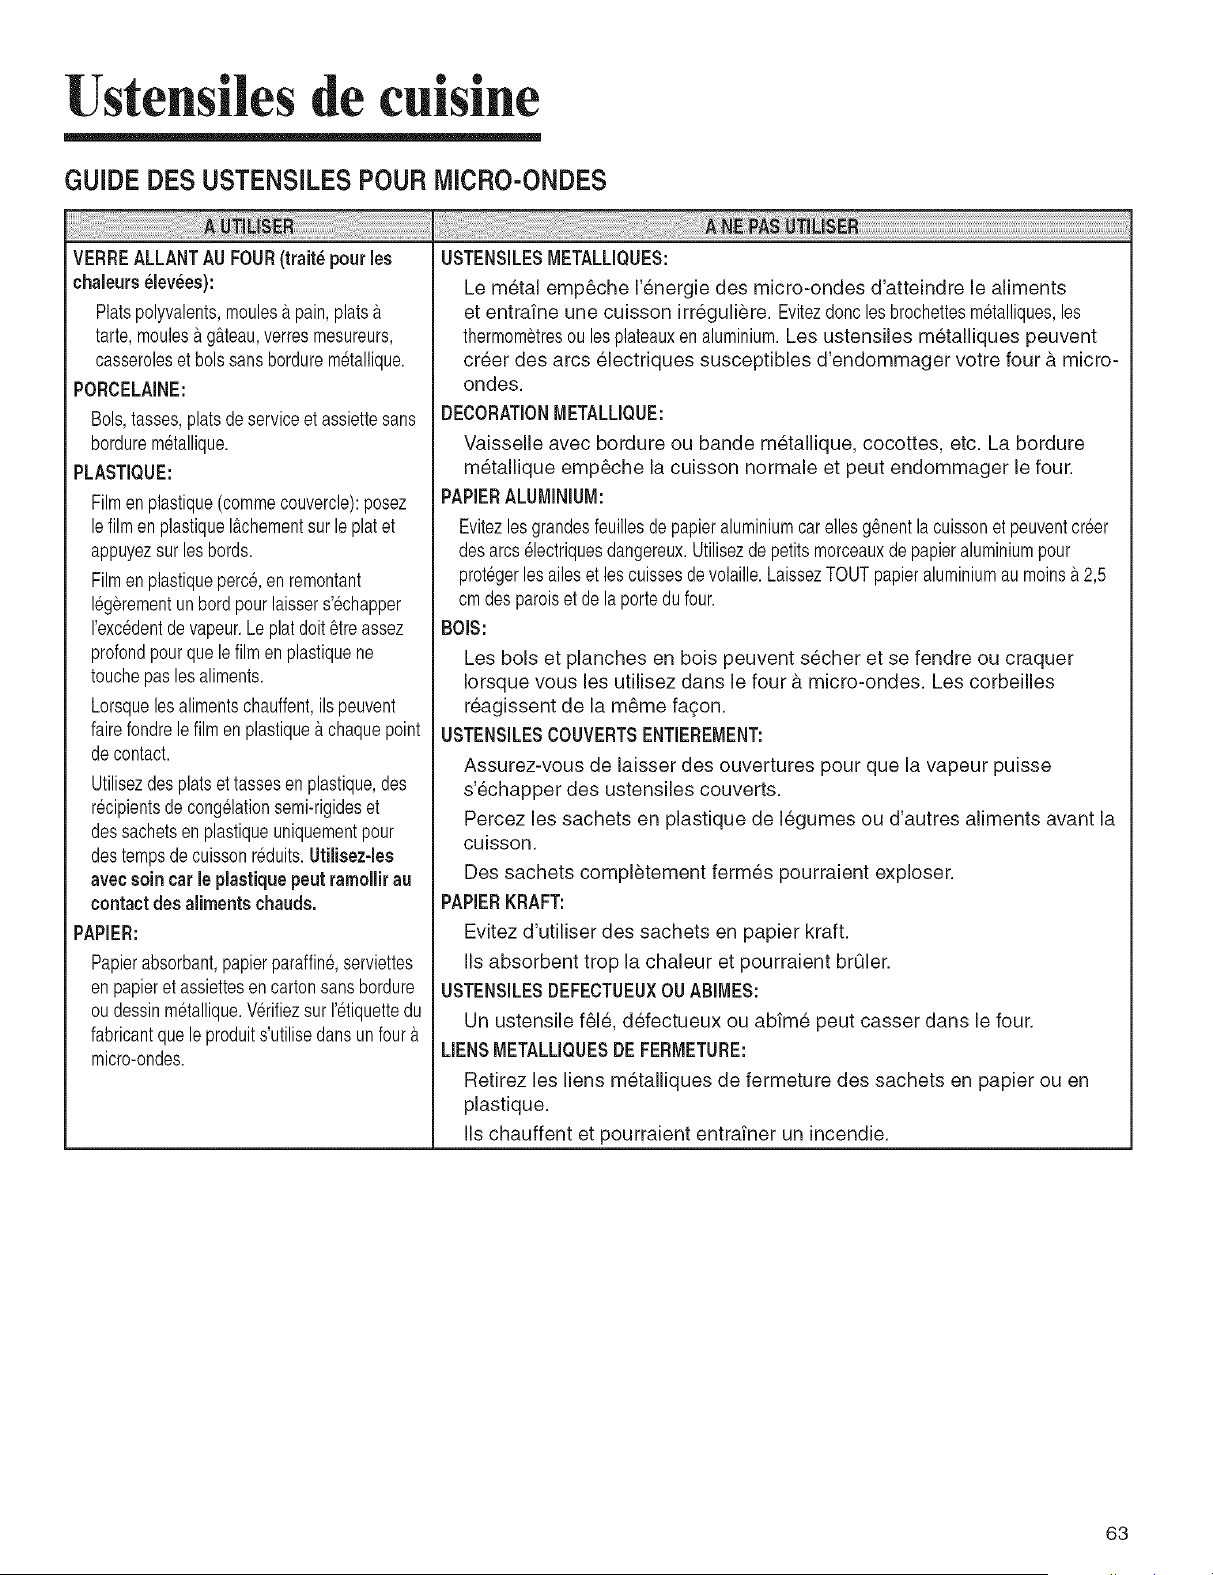
Ustensiles de cuisine
GUIDE DES USTENSILES POUR IVIICRO-ONDES
VERREALLANTAU FOUR(trait_ pour les
chaleurs _lev_es):
Platspolyvalents,moules_tpain,plats&
tarte,moulesa g_.teau,verresmesureurs,
casseroleset bolssans bordurem6tallique.
PORCELAINE:
Bols,tasses,platsde serviceetassiettesans
bordurem6tallique.
PLASTIQUE:
Filmenplastique(commecouvercle):posez
lefilmen plastiqueI&chementsurleplatet
appuyezsurlesbords.
Filmenplastiqueperce,enremontant
16gerementunbordpourlaissers'echapper
I'exc6dentdevapeur.Le platdolt _treassez
profondpourque lefilmen plastiquene
touchepaslesaliments.
Lorsquelesalimentschauffent,ils peuvent
fairefondrelefilmenplastiquea chaquepoint
de contact.
Utilisezdes platsettassesen plastique,des
recipientsdecongelationsemi-rigideset
des sachetsen plastiqueuniquementpour
destempsde cuissonr6duits.Utilisez-les
avecsoin car leplastiquepeut ramollir au
contact desalimentschauds.
PAPIER:
Papierabsorbant,papierparaffine,serviettes
en papieret assiettesen cartonsansbordure
ou dessinm6tallique.V@ifiezsurI'etiquettedu
fabricantquele pro@its'utilisedansunfour_.
micro-ondes.
USTENSILESMETALLIQUES:
Le metal emp6che 1'6nergie des micro-ondes d'atteindre le aliments
et entraine une cuisson irr6guliere. Evitezdonclesbrochettesm6talliques,les
thermometresou lesplateauxen aluminium.Les ustensiles metalliques peuvent
creer des arcs 61ectriques susceptibles d'endommager votre four & micro-
ondes.
DECORATIONMETALLIQUE:
Vaisselle avec bordure ou bande m6tallique, cocottes, etc. La bordure
m6tallique emp6che la cuisson normale et peut endommager le four.
PAPIERALUMINIUM:
Evitezlesgrandesfeuillesdepapieraluminiumcarellesg6nentla cuissonet peuventcr6er
desarcs electriquesdangereux.Utilisezdepetitsmorceauxde papieraluminiumpour
protegerles aileset les cuissesde volaille.LaissezTOUTpapieraluminiumaumoinsa 2,5
cmdes patoiset de laportedu four.
BOIS:
Les bols et planches en bois peuvent secher et se fendre ou craquer
Iorsque vous les utilisez dans le four b. micro-ondes. Les corbeilles
r6agissent de la m6me fa9on.
USTENSILESCOUVERTSENTIEREMENT:
Assurez-vous de laisser des ouvertures pour que la vapeur puisse
s'echapper des ustensiles couverts.
Percez les sachets en plastique de legumes ou d'autres aliments avant la
cuisson.
Des sachets completement fermes pourraient exploser.
PAPIERKRAFT:
Evitez d'utiliser des sachets en papier kraft.
IIs absorbent trop la chaleur et pourraient brOler.
USTENSILESDEFECTUEUXOUABIMES:
Un ustensile f616, defectueux ou ab'_m6 peut casser clans le four.
LIENSMETALLIQUESDE FERMETURE:
Retirez les liens metalliques de fermeture des sachets en papier ou en
plastique.
IIs chauffent et pourraient entrainer un incendie.
63
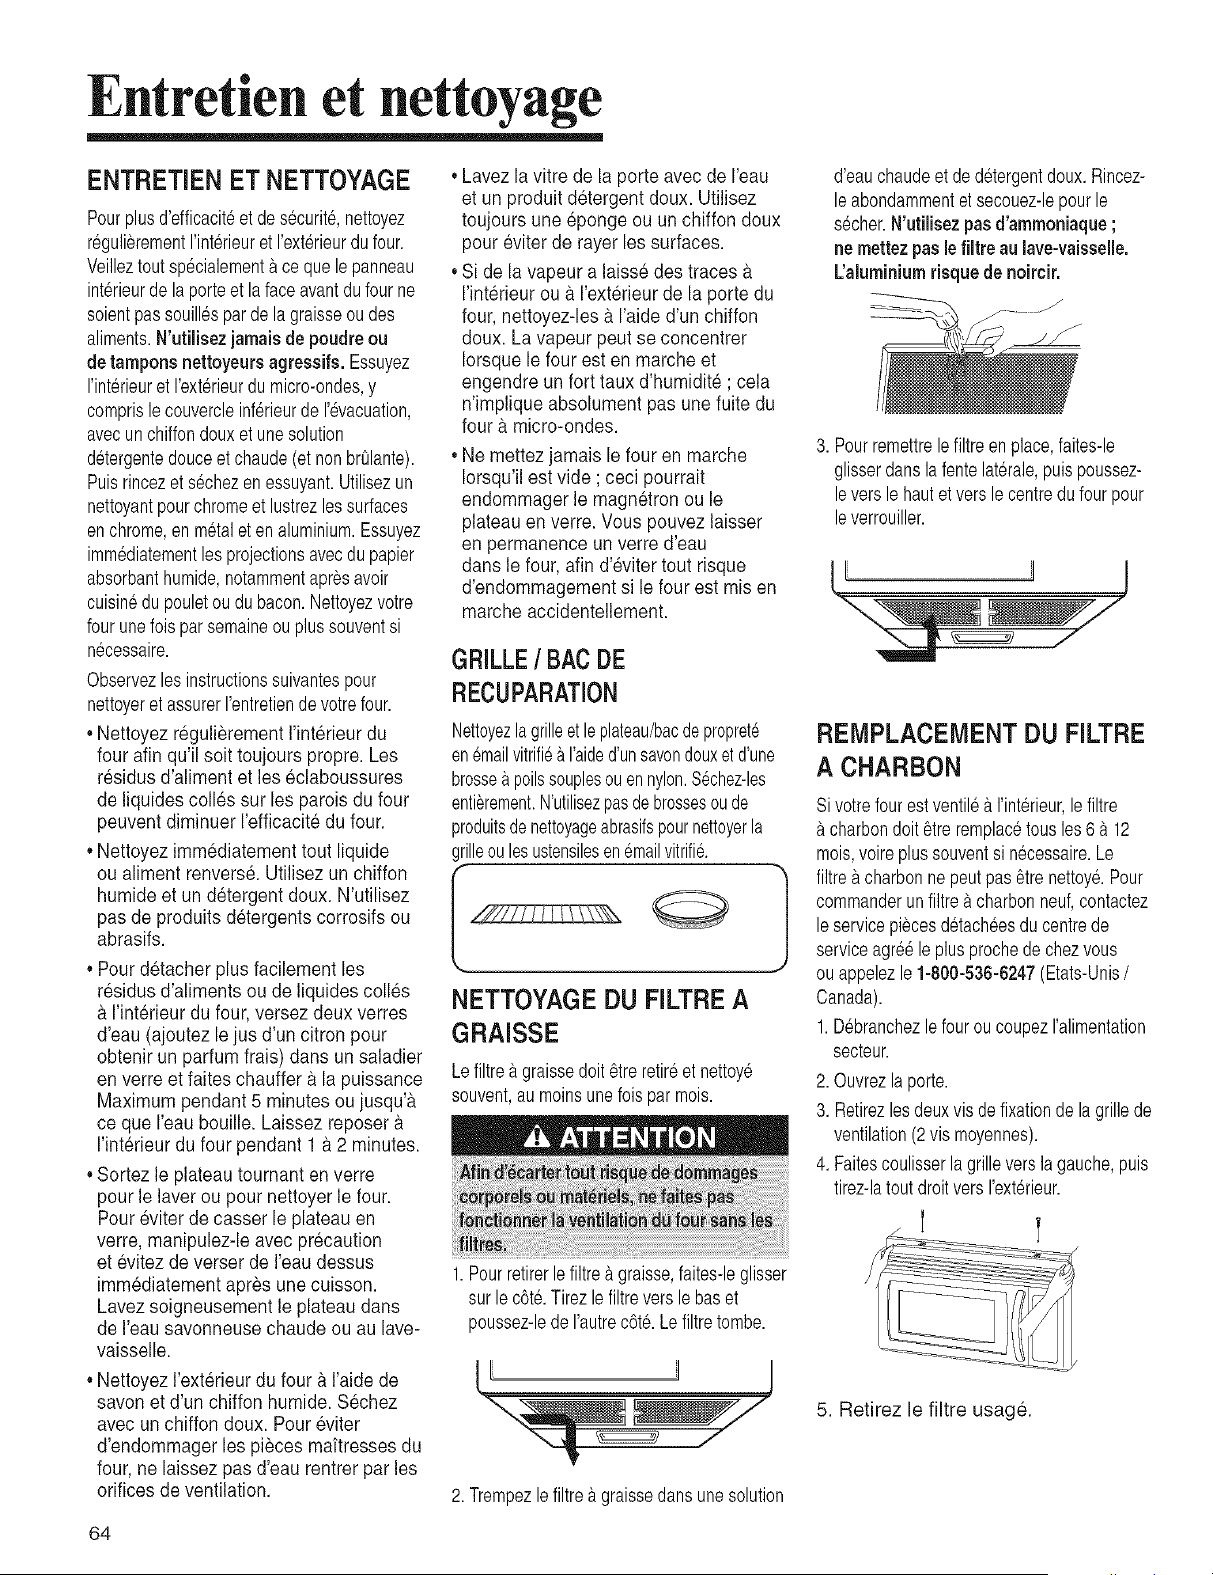
tretien et nettoyage
ENTRETIEN ET NETTOYAGE
Pourplusd'efficacit6et de s6curit_,nettoyez
r_gulierementI'int@ieuret I'ext6rieurdu four.
Veilleztoutspecialement&ce quele panneau
int@ieurde laporteet la face avantdu four ne
soientpassouill6spar de la graisseou des
aliments.N'utilisez jamaisde poudre ou
de tampons nettoyeurs agressifs. Essuyez
I'interieuret I'ext@ieurdumicro-on@s,y
comprisle couvercleinf@ieurde I'evacuation,
avecunchiffondouxet unesolution
detergentedouceet chaude(et nonbrGlante).
Puisrincezet s_chezen essuyant.Utilisezun
nettoyantpourchromeet lustrezlessurfaces
enchrome,enm_taleten aluminium.Essuyez
immediatementlesprojectionsavecdupapier
absorbanthumide,notammentapresavoir
cuisin6dupouletoudu bacon.Nettoyezvotre
fourune fois parsemaineou plussouventsi
necessaire.
Observezles instructionssuivantespour
nettoyeret assurerI'entretiende votrefour.
• Nettoyez reguli@ement I'int@ieur du
four afin qu'il soit toujours propre. Les
residus d'aliment et les eclaboussures
de liquides colles sur les parois du four
peuvent diminuer I'efficacite du four.
• Nettoyez immediatement tout liquide
ou aliment renverse. Utilisez un chiffon
humide et un detergent doux. N'utilisez
pas de produits detergents corrosifs ou
abrasifs.
• Pour detacher plus facilement les
residus d'aliments ou de liquides colles
& I'int@ieur du four, versez deux verres
d'eau (ajoutez le jus d'un citron pour
obtenir un parfum frais) darts un saladier
en verre et faites chauffer & la puissance
Maximum pendant 5 minutes ou jusqu'&
ce que I'eau bouille. Laissez reposer 9,
I'int@ieur du four pendant 1& 2 minutes.
• Sortez le plateau tournant en verre
pour le laver ou pour nettoyer le four.
Poureviter de casser le plateau en
verre, manipulez-le avec precaution
et evitez de verser de I'eau dessus
immediatement apres une cuisson.
Lavez soigneusement le plateau dans
de I'eau savonneuse chaude ou au lave-
vaisselle.
• Nettoyez I'ext@ieurdu four b,I'aide de
savon et d'un chiffon humide. Sechez
avec un chiffon doux. Pour eviter
d'endommager les pieces maftresses du
four, ne laissez pas d'eau rentrer par les
orifices de ventilation.
• Lavez la vitre de la porte avec de I'eau
et un produit detergent doux. Utilisez
toujours une @onge ou un chiffon doux
pour eviter de rayer les surfaces.
• Si de la vapeur a laisse des traces &
I'interieur ou & I'ext@ieurde la porte du
four, nettoyez-les & I'aide d'un chiffon
doux. La vapeur peut se concentrer
Iorsque le four est en marche et
engendre un fort taux d'humidite ; cela
n'implique absolument pas une fuite du
four & micro-ondes.
• Ne mettez jamais le four en marche
Iorsqu'il est vide ; ceci pourrait
endommager le magnetron ou le
plateau en verre. Vous pouvez laisser
en permanence un verre d'eau
darts le four, afin d'@iter tout risque
d'endommagement si le four est mis en
marche accidentellement.
GRILLE/ BACDE
RECUPARATION
Nettoyezla grilleet leplateau/bacdepropret6
enemailvitrifi6&I'aided'unsavondouxet d'une
brossea pollssouplesouennylon.S6chez-les
en%rement.N'utilisezpasdebrossesoude
_roduitsdenettoyageabrasifspournettoyerla
rilleoulesustensilesen _mailvitrifie.
NETTOYAGE DU FILTRE A
GRAISSE
Lefiltrea graissedolt6tre retireet nettoy6
souvent,au moinsunefoisparmois.
1.Pourretirerlefiltre&graisse,faites-leglisser
surle c6t_.Tirezle filtreverslebaset
poussez-ledeI'autrec6t_.Lefiltre tombe.
2. Trempezlefiltreb.graissedansunesolution
d'eauchaudeet de detergentdoux.Rincez-
leabondammentet secouez-lepourle
s6cher.N'utilisez pasd'ammoniaque;
nemettezpas lefiltre au lave-vaisselle.
L'aluminiumrisque de noircir.
Pourremettrelefiltreen place,faites-le
glisserdansla fente lat@ale,puispoussez-
levers le hautetverslecentredu fourpour
leverrouiller.
/
REMPLACEIVlENTDU FILTRE
A CHARBON
Sivotrefourest ventileb.I'int@ieur,lefiltre
&charbondolt_tre remplacetousles 6 a 12
mois,voireplussouventsi necessaire.Le
filtre&charbonne peutpas _trenettoye.Pour
commanderunfiltre&charbonneuf,contactez
leservicepiecesd_tacheesdu centrede
serviceagre_le plusprochedechezvous
ouappelezle1-800-536-6247(Etats-Unis/
Canada).
1. Debranchezle fouroucoupezI'alimentation
secteur.
2. Ouvrezla porte.
3. Retirezles deuxvis defixationde la grillede
ventilation(2vis moyennes).
4. Faitescoulisserla grilleverslagauche,puis
tirez-latout droitvers I'ext@ieur.
5. Retirez le filtre usage.
64

tretieu et uettoyage
/
6. Ins@ez un nouveau filtre
charbon. Le filtre doit reposer avec
I'angle indique.
REMPLACEMENT DE
L'ECLAIRAGE DU FOUR
1.Debranchezle fourou coupezI'alimentation
secteur.
2. Ouvrezla porte.
3. Retirezlesvis de fixationdu couvercledela
ventilation(2vismoyennes).
Faitescoulisserla grilleversla gauche,puis
tirez-latoutdroitversI'ext@ieur.
7. Fixez les vis de montage et fermez
la porte. Retablissez I'alimentation
secteur et reglez I'horloge.
[ FILTREA CHARBON'REFERENCE: i8310P009-60
5. Retirezensuitela vissitu6eau-dessusde
la portepresdu centredu four;cettevis
assurelafixationducaissond'@lairage.
FIEMPLACEMENT
DE L'ECLAIFIAGE DE
NUIT/DE LA ZONE DE
CUISSON
6. RetirezlesupportdeI'ampoule.
EN OPTION
Kitsdefinition
UXA3036BDB- NOIR
UXA3036BDW- BLANC
UXA3036BDS- INOXIDABLE
AClER
Lorsquevousremplacezunehottede36",le
kitdefinitionremplitla largeurrestantepour
donnerunfinid'apparenceint_gr_e.
Pouruneinstallationentrearmoires
uniquement; neconvientpaspourune
installationsur lec6t_d'unearmoire.
Chaquekit contientdeuxpanneauxdefinition
de 3"de large.
1.D6branchezlefourou coupezI'alimentation
secteur.
2. Retirezlesvisde fixationdela protectionde
I'ampoule.
3. Remplacez I'ampoule par un
modele identique de 20 watts.
7.RemplacezI'ampouleparun mo@le
identiquede20watts.
8. Replacezle supportde I'ampoule.
9. Replacezlagrilleet les2 vis. Replacezles
visdefixation.R_tablissezI'alimentation
secteur.
4. ReplacezlaprotectiondeI'ampouleet les
vis de fixation.
5. Retablissez I'alimentation secteur.
65
D pa age
GUIDE DE DEPANNAGE
Avantd'appelerun r@arateurpourvotrefour,v@ifiezles_16ments
indiquesdansla listedesproblemescourantset de leurssolutions.
Lefour et I'_crand'affichagene fonctionnent pas.
• Branchez correctement [e cordon d'alimentation sur une prise
secteur raise b,la terre.
• Si la prise est contr61eepar un interrupteur mural, assurez-vous
que celui-ci est allume.
• Debranchez la prise du secteur, attendez dix secondes, puis
rebranchez-la.
• Rearmez le disjoncteur ou remplacez tout fusible grille.
• Branchez un autre appareil sur cette prise ; s'il ne fonctionne
pas, contactez un electricien qualifie pour r@arer la prise.
• Branchez le four sur une prise differente.
L'_crand'affichagefonctionne, mais lefour nese metpasen
marche.
• Assurez-vous que la porte est correctement fermee.
• Verifiez qu'aucun morceau d'emballage ou d'un autre mat@iau
n'est coince dans le joint de la porte.
• Wrifiez que la porte n'est pas endommagee.
• Appuyez deux fois sur Cancel (Annuler) et entrez de nouveau
les instructions de cuisson.
Lefour s'arr_teavantqueletemps de cuissonsoitterming.
• Si aucune coupure de courant n'a eu lieu, debranchez la prise
du secteur, attendez dix secondes, puis rebranchez-la. Si une
coupure de courant a eu lieu, I'ecran affiche le message:
PLEASETOUCHCLOCKAND SETTIMEOFDAY.(TOUCHEZ
L'HORLOGE ET REGLEZ L'HEURE.)
• Reinitialisez I'horloge et entrez vos instructions de cuisson.
• Rearmez le disjoncteur ou remplacez tout fusible grille.
Lesailmentscuisent trop lentement.
• Assurez-vous que le four est branche sur une ligne de 20
amperes.
L'utilisation d'un autre appareil sur le m_me circuit peut
entra'iner une chute de potentiel. Si necessaire, utilisez un
circuit dedie pour le four.
Des_tincelies ou des arcs_lectriques apparaissent.
• Retirez du four tout ustensile, plat ou toute attache metallique.
Si vous utilisez du papier aluminium, servez-vous uniquement
de fines bandelettes et laissez un espace d'au moins 3 cm
entre le papier et les parois int@ieures du four.
Leplateautournantfait dubruit ou estcoil_.
• Nettoyez [e plateau, I'anneau du guidage et la paroi inf@ieure
du four.
• Assurez-vous que le plateau tournant et I'anneau de guidage
sont correctement mis en place.
L'utiiisation devotrefour a micro-ondes entrainedes interferences
avecunt_l_viseur ou uneradio.
• II s'agit du m_me type d'interf@ences que celles produites par
d'autres petits appareils menagers, tels qu'un s_che-cheveux.
D@lacez votre four & micro-ondes afin de I'eloigner des autres
appareils electriques (televiseur ou radio).
Remarque:
Si le four est r_gi_ pour un temps de cuisson sup_rieura 25
minutes, il se regiera de lui-m_mesur une puissancea 70 pour
cent apres 25 minutes afin dene pastrop cuire lesaliments.
Si vous n'arrivez pash r_soudre un probleme,contactez notre
service d'assistance:
(1-800-536-6247)
66
Remarque
67
Garantie
Elements non couverts par ies pr sentes
garanties
• Le remplacementdesfusiblesdomestiques,le r6armementdes
disjoncteursou lamodificationduc_tblageelectriqueoude la
plomberie.
,,La maintenancenormaleet le nettoyagede I'appareil,y comprisdes
ampoules61ectriques.
,,Lesproduitsdont le numerode s_rieoriginala _t_ retir&alt_r6oun'est
pasclairementdetermin&
,,Lesproduitsachet6s&desfinscommerciales,industriellesou
locatives.
,,Lesproduitssitu_sendehorsdesEtats-Unisou duCanada.
,,Lesservicessuppl6mentairesdemandesparI'utilisateuren plusdes
servicesnormauxou endehorsdeshorairesou de lazonede service.
,,Les r6glagesapresla premiereannee.
,,Les r@arationsd_coulantdes616mentssuivants:
- Uneinstallationincorrecte,unmauvaisfonctionnementdu systeme
deventilationou uneoperationdemaintenance.
- Toutemodification,alt@ationou toutajustementnonautoris6parle
fabricant.
- Tout(e)accident,utilisationimpropreou abusive,incendie,inondation
oucatastrophenaturelle.
- Toutraccordement& unealimentationen _lectricit6ouengaz.
- Touteutilisationde plats,de contenantsou d'accessoires
inappropri_spouvantendommagerle produit.
,,Tout transport.
Si vous avez besoin de faire appel a un
technicien qualifi
,,Contactez le revendeur aupres duquel vous avez fait
I'acquisition de I'appareil ou appelez Maytag Servicesu-c,
Assistance clientele Jenn-Air au 1-800-536-6247, aux Etats-
Unis et au Canada pour trouver un technicien agre&
,,Conservezbienvotre preuved'achatpourv@ifierle statutde votre
garantie.Consultezla section,<Garantie,, pourplusd'informations
sur les responsabilit_sdeI'utilisateurdansle cadredesservicesde
garantie.
,,Si le revendeur ou la societe de maintenance ne peut resoudre
votre probl_me, envoyez un courrier & Jenn-Air ServicesLLc,_.
I'attention de: CAIR®Center, P.O. Box 2370, Cleveland, TN
37320-2370, Etats-Unis, ou appelez le 1-800-536-6247 aux
Etats-Unis et au Canada.
REMARQUE:
Lorsquevoussignalezunproblemepartel@honeou par courrier,
veuillezindiquerlesinformationssuivantes:
a. Votre nom, votre adresse et votre num@o de tel@hone ;
b. Le num@o de modele et le num@o de s@ie de I'appareil ;
c. Le nora et I'adresse de votre revendeur ou r@arateur ;
d. Une description claire du probleme rencontre ;
e. Une preuve d'achat (ticket de caisse).
Les guides utilisateur, manuels d'instructions et fiches
techniques des pi_ces sont disponibles aupres de Maytag
ServicesLLc,Assistance clientele Jenn-Air.
MAYTAGN'ESTENAUCUNCASRESPONSABLEDESDOMMAGESACClDENTELSOU INDIRECTSSUBISOUCAUSESPARL'APPAREIL.
LapresentegarantievousoctroiedesdroitsspecifiquesreconnusparlaIoi, ainsiqued'autresvariantd'unetat&un autre.Parexemple,certainsetats
n'autorisentpasI'exclusionou la limitationdesdommagesaccidentelsouindirects; dansuntel cas,cetteclausenes'appliquepas.
68
Guia de uso y cuidado
iVlode[o JMV8166BA
CONSIGNES IMPORTANTES DE SECURiTE .............. 70
Precauciones Para Evitar la Posible Exposici6n a Energia de
Microondas Excesiva ................................... 72
Obtener los mejores resuitados de cocci6 ............... 74
Caracteristicas ...................................... 75
Manual de instrucciones.............................. 77
Utensiiios para cocinar ............................... 96
Cuidado y iimpieza .................................. 97
Soluci6n de probiemas ............................... 99
Garantia .......................................... 100
Conservelasinstruccionesparaconsuitas futuras.
Aseg_resede que estaGuiade uso y cuidado se conserve con el homo.
Parte Nro. 8112P299-60
Form No. A/08/05 Nro. de c6digo: DE68-03143K
V V
CONSIGNES IMPORTANTES DE SECURITE
Lo _ueNecesitaSaber
SobreLasinstrucciones
De Seguridad
Las advertenciase instruccionesimportantessobreseguridadque
aparecenenestaGuiade usoy cuidadono estAndestinadasa cubrir
todaslas posiblescondicionesy situacionesque puedenocurrir.Debe
actuarconsentidocomtJn,precauci6ny cuidadocuandoinstale,realice
el mantenimientoo pongaenfuncionamientoel microondas.
Comunfquesesiempreconsu vendedor,distribuidor,agentedeservicioo
fabricantesi surgenproblemasosituacionesqueustednocomprende.
.=conozcaLosSirnbolos,
AdvertenciasY Etiquetas
.=Seguridad
70
CONSERVE ESTAS I STRUCCIO
INSTRUCCIONESSEGURIDADIMPORTANTES
lnstruccionesde
Conexi6na Tierra
El homo DEBEestar conectado a tierra. Laconexi6na tierrareduce
el riesgodedescargael_ctricayaqueofreceuncablede escapeparala
corrienteel_ctricaencasodeque hayauncortocircuito.Estehomoesta
equipadocon un cablequetieneun conductora tierraconun enchufe
conconexi6na tierra. Elenchufedebeconectarsea untomacorriente
queest_correctamenteinstaladoy conectadoatierra.Consultelas
instruccionesde instalaci6n.
Consultea un electricistao centrode serviciocalificadosi no comprende
bienlasinstruccionesde conexi6na tierra,o si tienealgunaduda
respectodesi el homoesterconectadoa tierracorrectamente
No utiliceuncable prolongador.Si elcablede alimentaci6ndel
productoes demasiadocorto,hagaque unelectricistacalificado
instaleuntomacorrientedetresranuras.Estehomodebeenchufarse
enuncircuitode60 Hzseparadocon losvaloresel@tricosnominales
mostradosen latablade especificaciones.Cuandoelhornocomparte
elcircuitoconotrosequipos,quiz_.sseanecesariounaumentoenlos
tiemposde cocci6ny puedensaltarlosfusibles.
El microondasfuncionaconla corrientenormaldom_stica,110-120V.
Declaraci6nde
lnterferenciade
Radiofrecuencia de la
Comisi.6nFederalde
Comunlcaclones
(EE. U. Solamente)
Esteequipogeneray utilizaenergfade frecuenciaISM,y si no se instala
y se utilizacorrectamente,esdecir,en estrictocumplimientoconlas
instruccionesdelfabricante,puedecausarinterferenciaconla recepci6n
de radioy televisi6n.Se hacomprobadoy confirmadoquecumpleconlos
IfmitesestipuladosparaEquiposISM(Industriales,CientMcos,M_dicos)
envirtudde lasecci6n18de los reglamentosdelaFCC,que hansido
dise_adosparaproveerprotecci6nrazonablecontratal interferenciaen
unainstalaci6nresidencial.
Sinembargo,nose garantizaque no habr_,interferenciaenalguna
instalaci6ndeterminada.Si esteequipocausainterferenciacon la
recepci6nde radioo televisi6n,Ioquepuededeterminarseapagandoy
encendiendoel equipo,se recomiendaqueel usuariointentecorregirla
interferenciadeunade lassiguientesmaneras:
* Cambiela orientaci6nde laantenaderecepci6nde radioo televisi6n.
* Ubiqueen otrolugarel hornode microondascon respectoal receptor.
* Alejeel hornode microondasdel receptor.
* Enchufeel homode microondasen untomacorrientedistintoparaque
el hornode microondasy el receptorestenencircuitosdiferentes.
El fabricante no es responsabledeningunainterferenciade radioo
televisi6ncausadapor la modificaci6nno autorizada de este hornode
microondas.Es responsabilidaddelusuariocorregirtal interferencia.
CONSERVE ESTAS I STRUCC
71
INSTRUCCIONESSEGURIDADIMPORTANTES
PrecaucionesPara
EvitarlaPosible
Exposici6na Energ[ade
IVlicroondasExcesiva
A. NO intentehacerfuncionarestehomoconlapuertaabiertapuesse
puedeproducirunaexposici6nperjudiciala la energfade microondas.
Es importantenoalterarni modificarlastrabasde seguridad.
B. NOcoloqueningQnobjetoentrelapartedelanteradel homoy la
puertani dejeque se acumulesuciedado residuosde limpiadoresen
lassuperficiesde sellado.
C.NO pongaenfuncionamientoel homosi est,.da_ado.Es
particularmenteimportantequelapuertadelhomocierrebieny que
nose ocasionendares a:
1.la puerta(doblada),
2. las bisagrasy pestillos(roteso sueltos),
3. lasjuntas de lapuertay lassuperficiesde sellado.
D.El homonodebeserreguladoo reparadoporningunapersona
exceptoel personalde serviciodebidamentecalificado.
72
CONSERVE ESTAS I STRUCCIO
INSTRUCCIONESSEGURIDADIMPORTANTES
CONSERVE ESTAS I STRUCC
73
o • f
Obtener los mejores resu|tados de cocclon
74
Caracteristicas
Placa de modelo y
n_mero de serie
Ventana Plato giratorio
con escudo Guia de devidrio
Manija de met&lico cocci6n
la puerta Estante
Istema de cierre de
seguridad la puerta
Rekillade
ventilaci6n
Bandeja
recogegotas
Panel de control
del horno
ESPECIFICACIONESOELHORNO
Alimentaci6n
el_ctrica 120VAC,60 Hz
Potenciade
entrada 1,600W(EE.UU.)
Potenciade 950W
cocci6n (Norma60705lEO)
Frecuencia 2,450MHz
Potencianominal 14.5A(EE.UU.)
Dimensiones
exteriores
758x 430x392 mm
(Anchox Altox
Profundidad)
Capacidadinterior 1,6piescQbicos
Pesoneto 71 Ibs.
13
2
3
14
5
4
6
9
12
8
10
11
24
15
16
17
22
7
19
20
18
21
27
28
23
26
25
75
Caracteristicas
FEATURES
(CARACTERISTIQUES)
1. DISPLAY(PANTALLA):Lapantallaincluye
unreloje indicadoresquele muestran
lahoradeldfa, los ajustesde tiempo
decocci6ny lasfuncionesde cocci6n
seleccionadas.
2. POPCORN(PALOMITASDEMAJZ):
Optimaestateclacuandopreparepalomitas
de maizen su hornode microondas.El
sensorleindicar_,al homocuantotiempo
cocinardependiendode la cantidadde
humedadquedetecteen laspalomitasde
maiz.Consultela p_tgina81 paraobtener
masinformaci6n.
3. BAKEDPOTATO(PAPAAL HORNO):
Oprimaestatecla paracocinarpapas.El
sensorleindicar_,alhomocuantotiempo
cocinardependiendode la cantidadde
humedadquedetecteen laspapas.
Consultela p_tgina82 paraobtenermas
informaciGn.
4. REHEAT(RECALENTAMIENTO):Optima
estateclapararecalentarunplatode
comida,guisosy pastas. Elsensorle
indicar_,alhomocuantotiempococinar
dependiendode la cantidadde humedad
provenientedela comida.Consultela
pAgina82 paraobtenerm_tsinformaciGn.
5. SENSORCOOK(COOOl0NCON
SENSOR):Oprimaestateclapara
cocinarverdurascongeladas,desayunos
congelados,comidascongeladas,verduras
frescasy camarones.El sensorleindicar_.
al homoel tiempode coccbn dependiendo
dela cantidadde humedadproveniente
dela comida.Consultela pAgina82 para
obtenerm_.sinformacbn.
6. PIZZASLICE(REBANADADE PIZZA):
Oprimaestateclapararecalentarla pizza.
Elsensorleindicar_,al homocuantotiempo
cocinardependiendode la cantidadde
humedadquedetecte.Consultelap_tgina
81paraobtenermasinformaciGn.
7. MORE(MAS):Oprimaestateclapara
agregarm_tstiempode cocci6n.Consultela
p_tgina78 paraobtenerm_.sinformaciGn.
8. LESS(MENOS):Optimaesta teclapara
restartiempode cocci6n.Consultela p&gina
78paraobtenerm_tsinformaci6n.
9. AUTO COOK (COCClGN
AUTOM/_TICA): Oprima esta tecla
para cocinar alimento para beb&
76
bebidas, emparedados congelados,
tocino y arroz instanta.neo.
10.AUTODEFROST
(DESCONGELAMIENTOAUTOMATICO):
Optimaestateclaparadescongelar
alimentossegQnel peso.Consultela
p&gina85 paraobtenermasinformacbn.
11.SSNACKS,SOFTEN/MELT(ABLANDAR/
DERRETiR):Oprimaestasteclaspara
cocinarcomidasespedficas.Consulte
lasp_.ginas86 y 87 paraobtenermas
informaciGn.
12.MICROCONVECT:Optimaestateclapara
cocinarunpolioentero,carnede cerdo,
lasagnacongeladay papasal horno.
13.CONVECTION(CONVECCION):Optima
estateclacuandoprogramela cocci6npor
convecci6n.
14.COMBiNATiONCOOKING(COCCl0N
COMBINADA):Oprimaestateclacuando
programela cocciGncombinada.
15.NOMERO:OptimalasteclasnumGricas
paraingresareltiempodecocci6n,el nivel
depotencia,lascantidadeso los pesos.
16.POWERLEVEL(NIVELDEPOTENCIA):
Optimaestateclaparaseleccionarunnivel
depotenciadecocciGn.
17.STOP/CLEAR(APAGAR/ANULAR):
Oprimaestateclaparaapagarelhornoo
anulartodas lasentradas.
18.ENTER/START(INGRESAR/
COMENZAR):Oprimaestateclapara
iniciarunafunciGn.Si abrelapuerta
despu_sde queel homocomienzaa
cocinar,cierrela puertay optimala
tecla ENTER/START(INGRESAR/
COMENZAR)nuevamente.
19.CONTROLSETUP(CONFIGURACl0N
DECONTROLES):Optimaestatecla
paramodificarlasconfiguraciones
predeterminadasdelhorno. Consultela
pAgina77 paraobtenermasinformacbn.
20. ADD30 SEC(AGREGAR30 SEG):
Oprimaestateclapara ajustary comenzar
r_tpidamenteenel nivelde potenciadel
100%. Consultela pAgina78 paraobtener
mdtsinformaciGn.
21.TURNTABLEON/OFF(PLATO
GIRATORIOACTiVADO/
DESACTIVADO):Oprimaestateclapara
desactivarel platogiratorio.Aparecer_.la
palabra"OFF"(desactivado)en la pantalla.
Consultelap_tgina77 paraobtenermas
informaciGn.
NOTA:
TURNTABLEON/OFF(PLATO
GIRATORIOACTIVADO/DESACTiVADO)
noestAdisponibleenlosmodoscocciGn
consensory descongelamiento.
22.CLOCK(RELOJ):Oprimaesta teclapara
ingresarlaheradel dia.Consultelapagina
77 paraobtenerm_tsinformaciGn.
23.LIGHTTIMER(TEMPOREADORDELA
LUZ):Oprimaestateclaparaconfigurarel
temporizadorde laluz. Consultela pagina
78paraobtenerm_tsinformacbn.
24. KITCHENTIMER(TEMPORIZADOR
DE LA COCINA):Optimaestatecla para
configurarel temporizadordela cocina.
Consultela pAgina77para obtenerm_ts
informaci6n.
25.VENT5 SPEED(VentilaciGncon 5
veiocidades):Optimaestateclapara
elegirunadelas5 velocidadesdel
ventilador.
26.VENTON/OFF(VentilaciGnactivada/
desactivada):Oprimaestateclapara
encendero apagarel ventilador.Consulte
lapagina77paraobtenermAsinformaciGn.
27.VENTDELAYON/OFF(VentilaciGn
retrasadaactivada/desactivada):Oprima
estateclacuandoconfigureel tiempo
deventilaciGn(1,3, 5, 10,30minutos).
Consultelap_tgina77 paraobtenermas
informaciGn.
28. LIGHTHI/LO/OFF(LUZ ALTA/BAJA/
APAGADA):Oprimaestateclapara
encenderla luzde lacubierta.Consultela
pAgina78 paraobtenermasinformaci6n.
Manual de instrucciones
CONOZCASUHORNO DE
MICROONDAS
Estasecci6nlos conocimientosbasicosque
debeconocerparamanejarsu homode
microondas.Porfavorleaestainformaci6n
antesdeutilizarlo.
CLOCK (RELOJ)
Ejemplo: Paraponerel reloj a las8:00 AM.
q_o< 1.OptimalateclaCLOCK.
800 2. Ingresela horautilizandoel
4oo__,,,Fo_,,_ tecladonum_rico.
¢1ENTER 3. Optimala teclaENTER/
START
START.
4. Optima1 paraAM.l less
1000F
pt ENTER
Z START
5. OptimalateclaENTER/
START.
j NOTA:
,,Sigalospasos1-3anterioresenel modode
L reo de24horas.
KITCHEN TIMER
(TEIVlPORIZADORDE LA
COClNA)
Puedeutilizarsu homode microondascorno
temporizador.Utiliceel Temporizadorpara
programarhasta99 minutos,99segundos.
Ejemplo: Para programar 8 minutos.
K:._,_, 1.Oprimala tecla KITCHEN
i_er
TIMER.
800 2. Ingresela horautilizandoel
.........__'°_ tecladonum6rico.
,.OAENTER 3. Optimala tecla ENTER/
START START.
Cuandohayatranscurridoel tiempo,
escucharase_alessonorasy aparecerdtla
palabraEND(FIN).
CONTROL SETUP
(CONFIGURACl0NDECONTROLES)
Puedemodificarlosvalorespredeterminados.
Consultela siguientetablaparaobtenerm_ts
informaci6n.
1 i Modode peso 1 Lbs.
seleccionado 2 i Kg.
2 Controlde serial 1 SonidoON
sonoraON/OFF (activado)
i (activada/ 2 SonidoOFF
I
desachvada) i (desactivado)
3 i Controlde pantalla 1 12HR
i de reloj 2 124HR
4 Pantalla 1 Velocidadlenta
2 Velocidadnormal
3 Velocidadr@ida
5 Serialde 1 i ON (activada)
recordatoriode 2 i OFF (desactivada)
final
6 ModoDemo 1 i ON (activada)
I
2 OFF (desachvada)
7 Horade verano 1 ON (activada)
2 OFF (desactivada)
Ejemplo: Paracarnbiarel rnodo de peso(de
Lbs.a Kg.).
Corl_Pol
Sel,u }
Les
100"F
1.Optimala tecla CONTROL
SETUP.
2. Oprimala teclanum@ica1.
2
200_f:
3.Optima la teclanum6rica2.
VENT FAN (VENTILACl0N)
Laventilaci6nquitael vapordeaguay otros
vaporesde lasuperficiedecocci@.La
ventilaci6nfuncionaraen LEVEL2(Nivel 2)
siemprequeelhomoest6encendido.
Ejernplo: Paraseleccionar Level 4 (Nivel 4).
on/off 1.Oprimala teclaON/OFF
(encendido/apagado).
Estomuestrael Oltimo
nivelhastaque usted
seleccioneel nivelde
velocidaddel ventilador.
SSpeed 2. Optimala tecla5 SPEED
(5 velocidades)hasta
queen la pantalla
aparezcaLevel4 (Nivel
4).
OprimalateclaON/OFF(encendido/apagado)
paraapagarelventiladorcuandoIodesee.
NOTA:
Sila temperaturasubedemasiadoalrededor
delhomode microondas,elventiladorde
lacampanadeventilacidnse encender_.
automaticamenteenLEVEL2(Nivel2) para
enfriarel homo.El ventiladorseapagara
automaticamentecuandolaspartesinternas
est@frias.Cuandoestosucede,nose
puedeapagarla ventilaci6n.
DELAYOFF(RETRAS0APAGAD0)
Ejernplo:Paraapagarel ventiladordespu_s
de 30 minutos parael Nivel 4.
On/Off
5 Speed
Delay
Off
1.Optimala teclaON/OFF
(encendido/apagado).
2. Oprimala tecla5 SPEED(5
velocidades)hastaqueen
lapantallaaparezcaLevel4
(Nivel4).
3. Oprimala teclaDELAY
ON/OFF(Retrasoactivado/
desactivado)cincoveces.
Enlapantallasedesplazala
frase"AFTER30 MINUTES"
(Despu_sde30 minutos).
TURNTABLE ON/OFF (PLATO
GIRATORIO ACTIVADO/
DESACTIVADO)
Paraobtenermejoresresultadosde cocci@,
dejeelplatogiratorioactivado.Puede
desactivarseparaplatosgrandes.
r,,,,_,_ PresioneTURNTABLEON/OFF
Orb/Off
paraactivaro desactivarel plato
giratorio.
NOTAS:
,,Estaopci6nnoesterdisponibleen
los modoscocci@consensory
descongelamiento.
• A vecesel platogiratorio puedeestar
dernasiadocaliente. Tengacuidado
cuandotoqueel platogiratoriodurantey
despu6sde lacocci6n.
• No pongaen funcionamientoel homo
vacio,
77
Manual de instrucciones
CHILD LOCK (BLOQUEO
PARA NINOS)
Puedebloquearel paneldecontrolparaevitar
queelmicroondasse inicieaccidentalmenteo
sea utilizadoper niros.
Lafunci6nChildLocktambi6nes t_tilcuando
se limpiael panelde control.ChildLockevita
laprogramaci6naccidentalcuandose limpiael
paneldecontrol.
Ejemplo: Para configurar el bloqueo para
nifios.
p_ENTER Oprimay mantengaoprimida
START lateclaENTER/START
durantemasde3 segundos.
Enlapantallaseleer&
CHILDLOCKON(Bloqueo
paranirosactivado)y se
escuchar_.nunoserialsonora.
Ejemplo: Para cancelar el bloqueo para
nifios.
¢'t ENTER
START
Optimay mantengaoprimida
lateclaENTER/START
durantem_.sde 3 segundos.
Desaparecerala palabra
LOCKED(Bloqueado)y
se escucharAnunoserial
sonora.
LIGHT HI/LO/OFF (LUZ ALTA/
BAJA/APAGADA)
Oprimala teclaLIGHT
HI&O/OFFunavez paraluz
brillante,dosvecesparaluz
nocturna,otresvecespara
apagarla luz.
ADD 30 SEC (AGREGAR 30
SEG.)
Estatecla ahorratiempoy le permite
configurarrapidamentey comenzarla cocci6n
enel microondassin la necesidadde oprimirla
teclaENTER/START.
Ejemplo:Paraprogramar AGREGAR30
SEGparaafiadir2 minutos.
Ad,J OptimalateclaADD30
30 S_.c.
SEC.4veces.Elhorno
comienzalacocci6ny la
pantallamuestrala cuenta
regresivadel tiempo.
LIGHT TIMER
(TEMPORIZADOR DE LA LUZ)
Puedeprogramarla LUZparaque se encienda
y se@agueautomaticamenteencualquier
memento.La hz se enciendea la mismahora
cadadia hastaquese reinicia.
Ejemplo:Seenciendea las 2:00 AM, se
apagaalas 7:00 AM.
Modode reloj de 12horas.
1.Optimala tecla LIGHT
TIMER.
2. Ingresela horaa la que
2 0 0 deseaque se enciendala
_°°°F4_°°F_°°_ LUZ.
n ENTER 3. Optimala teclaENTER/
START START.
1.... 4. Oprima1 paraAM.
100_F
G ENTER 5. Optimala teclaENTER/
START START.
6. Ingresela horaa la que
7 0 0 deseaque se apaguela
"_°_*_°°4_°°_ LUZ.
7.Optimala teclaENTER/
j2kj_NTER
-" START START.
2 8. Oprima2 paraPM.
200°F
¢1ENTER 9. Oprimala teclaENTER/
=-START START.
Modode reloj de 24 horas.
1.Optimala tecla LIGHT
TIMER.
2. Ingresela horaa la que
2 0 0 deseaqueseenoienda
_°°°__s°°__°°" la LUZ.
n ENTER 3. Optimala tecla
START ENTER/START.
1.........9 0 0 4. Ingreselaheraa la que
,oo_.... .,_O_F_,'_ deseaque seapague
laLUZ.
5.Oprimalatecla
¢*LENTER
= START ENTER/START.
Ejemplo: Pour annuler le LIGHT TIMER
(MINUTEUR D'ECLAIRAGE).
1.Optimala teclaLIGHT
TIMER.
0 2. Oprimala teclaO.
450°F
MORE/LESS (M/ S/MENOS)
Los botones More/Less le permiten
ajustar los tiempos de cocci6n
preconfigurados. S61ofuncionan en los
modes Sensor Reheat (recalentamiento
con sensor), Sensor cooking (cocci6n
con sensor) (excepto para Bebidas),
Add 30 sec. (agregar 30 seg), Custom
Cook (cocci6n personalizada) o Time
Cook (cocci6n per tiempo). Utilice el
bot6n More/Less s61odespues de haber
comenzado a cocinar con uno de estos
procedimientos.
Morn9
425°F
'_ Less
100°F
1. ParaAGREGAR
mas tiempo a un
procedimiento de
cocci6n automatico:
Optima el bot6n MORE
(9) (M,_s).
2. Para REDUCIR
mas tiempo de un
procedimiento de
cocci6n automAtico:
Optima el bot6n LESS
(1) (Menos).
78
Manual de instrucciones
COCINAR CON NiVELE DE
POTENCIA ALTOS
Ejemplo: Para cocinar aiimentos
durante 8 minutos 30 segundos a una
potencia de1100%.
8 3 0 1.1ngrese el tiempo de
4OO°F2'_o°_,_5o'_ cocci6n.
A ENTER 2. Optima la tecla
START ENTER/START.
Cuando haya transcurrido el tiempo
de cocci6n, escuchara cuatro sefiales
sonoras y aparecer& la palabra END.
COClNAR CON NIVELES
DE POTENClA MAS BAJOS
Lacocci6ncon el niveldepotenciaHIGH
nosiemprelebrinda losmejoresresultados
con losalimentosquenecesitanuna cocci6n
maslenta,talescomelascarnesasadas,los
alimentoshorneadoso losflanes.Su homo
tiene 9 ajustes de potencia adem_.s
de HIGH.
Ejemplo: Paracocinar alimentosdurante
7 minutos 30 segundos a unapotenciadel
70%.
7 3 0 1Ingreseeltiempode
37_°F2so°_,,_o°F cocci6n.
r,,,_,,_,,, 2. Oprimalatecla POWER
I{vel
LEVEL.
7 3. Ingreseen nivelde
37s°_ potencia.
r_ENTER 4. OptimalateclaENTER/
START START.
Cuandohayatranscurridoeltiempode
cocci6n,escucharacuatroseflalessonorasy
aparecer_tlapalabra END.
Para conocer los niveles de potencia
consulte la guia de cocci6n en la
p_.gina 80.
IMPORTANTE:
* NOalmaceneniutiliceel estantede
alambreen estehomoa menosquese
vayaa cocinarmas deunalimentoo una
recetaIo requiera.
, Podrfacausardafios en el homo.
COClNARCONMAS DE UN
ClCLO DE COCClON
Paraobtenermejoresresultados,algunas
recetasrequierenun niveldepotenciadurante
untiempoy otto niveldepotenciaduranteotro
tiempo.Su homopuedeconfigurarsepara
pasarde unoaotroautom_.ticamente,durante
trescicloscomemaximosi el primerciclode
calentamientoesel dedescongelamiento.
Ejemplo: Para cocinar alimentos
durante 3 minutos a una potencia del
90% y luego a una potencia del 70%
durante 7 minutos 30 segundos.
3 0 0 1. Ingreseelprimertiempo
decocci6n.
250"F 450°F 450°F
r-,o_,v_, 2. Oprimala teclaPOWER
LEVEL.
3. Ingreseen nivelde
_°_ potencia.
7 3 0 4. [ngreseelsegundotiempo
decocci6n.
375°F 250_F 450_F
P'_" 5. Optimalatecla POWER
Lewel
LEVEL.
7 6. Ingreseen nivelde
3_ potencia.
n ENTER 7. Optimala tecla ENTER/
START START.
Cuandohayatranscurridoeltiempode
cocci6n,escucharacuatrosefialessonorasy
apareceralapalabraEND.
79
Manual de instrucciones
GU[A DE COCCION PARA NiVELES DE POTENCiA iVIASBAJOS
Los9 nivelesde potenciaadem_.sdel HIGHle permitenelegirel niveldepotenciamasadecuadoparalosalimentosque cocina.A continuaci6nse
enumeranlosnivelesde potencia,ejemplosde alimentosquese cocinanmejora carlanively lapotenciadel microondasque utiliza.
10High(alto)
100%
9 90%
8 80%
7 70%
6 60%
5 50%
4 40%
3 30%
2 20%
1 10%
,,Herviragua.
,,Cocinarcarnemolida.
,'Hacerdulces.
,,Cocinarfrutasy verdurasfrescas.
,,Paracomenzaracocinarcame,pescadoy carnedeave.
,,Precalentarunabandejadoradora.
,,Recalentarbebidas.
,,Rebanadasdetocino.
,,Recalentarrebanadasdecame r_.pidamente.
,,Saltearcebollas,apioy pimientoverde.
,,Todotipo de recalentamiento.
,, Cocinarhuevosrevueltos.
,,Paraseguircocinandocarnedeave.
,,Cocinarpanesy productosa basedecereales.
,,Cocinarplatosconqueso,ternera.
,,Cocinartortas,muffins,brownies,magdalenas.
,,Cocinarpasta.
,,Paraseguircocinandocarne.
,,Cocinarbudines.
,,Cocinarpollosenteros,pavo,costillas,costillasasadas,solomilloasado.
,,Cocinarcortesdecarnemenostiernos.
,,Recalentarcomidasr_tpidascongeladas.
,,Descongelarcarnede res,de avey mariscos.
,,Cocinarpeque_ascantidadesde alimentos.
,, Terminarde cocinarguiso,estofadoy algunassalsas.
,,Ablandarmantequillay quesocrema.
,,Calentarpequeflascantidadesde alimentos.
,,Ablandarhelado.
,,Leudarmasaconlevadura.
8O
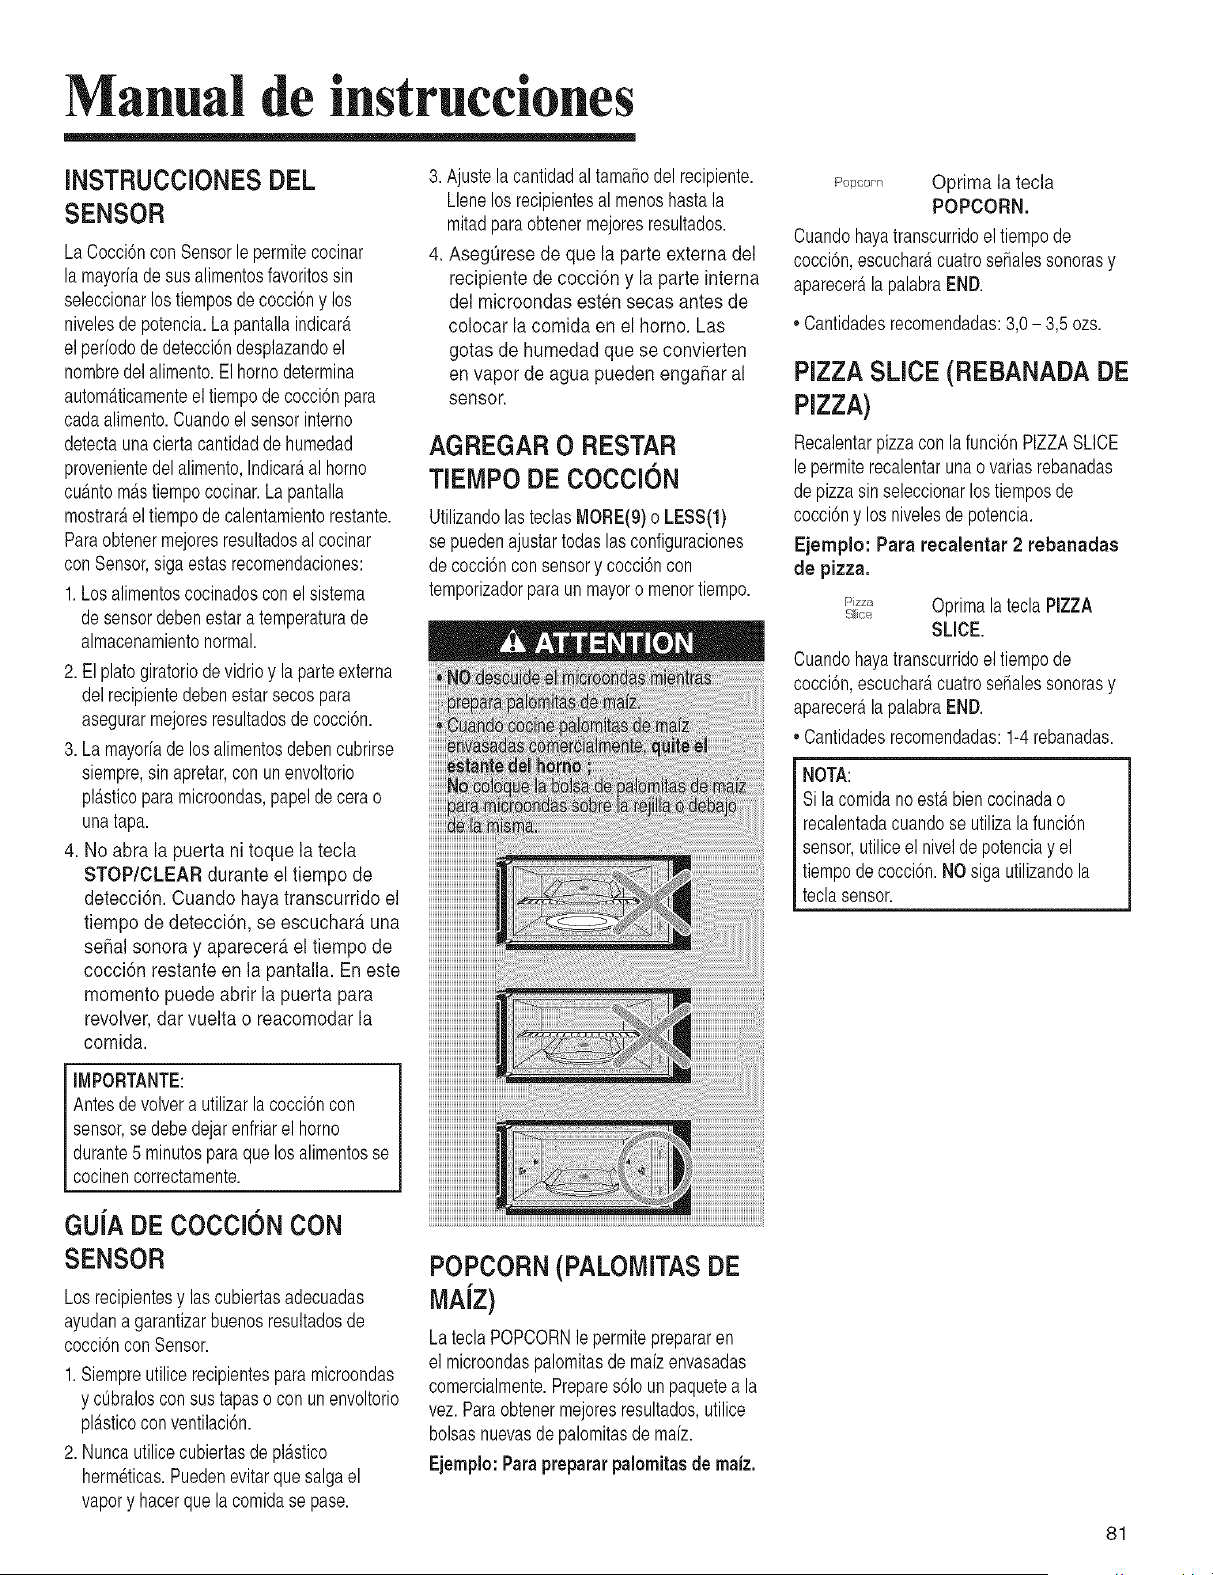
Manual de instrucciones
INSTRUCCIONES DEL
SENSOR
LaCocci6nconSensorle permitecocinar
lamayoriadesus alimentosfavoritossin
seleccionarlostiemposdecocci6ny los
nivelesdepotencia.Lapantallaindicar_.
elpeffododedetecci6ndesplazandoel
nombredelalimento.Elhomodetermina
autom_.ticamenteel tiempode cocci6npara
cadaalimento.Cuandoelsensorinterne
detectaunacierta cantidadde humedad
provenientedelalimento,Indicaraal horno
cuantomastiempococinar.La pantalla
mostraraeltiempodecalentamientorestante.
Paraobtenermejoresresultadosal cocinar
conSensor,sigaestasrecomendaciones:
1.Losalimentoscocinadosconel sistema
de sensordebenestara temperaturade
almacenamientonormal.
2. Elplatogiratoriode vidrioy la parteexterna
delrecipientedebenestarsecospara
asegurarmejoresresultadosdecocci@.
3. Lamayofiadelos alimentosdebencubrirse
siempre,sinapretar,conunenvoltorio
plasticoparamicroondas,papelde cerao
unatapa.
4. No abra la puerta ni toque la tecla
STOP/CLEAR durante el tiempo de
detecci6n. Cuando haya transcurrido el
tiempo de detecci6n, se escuchara una
sehal sonora y aparecerb,el tiempo de
cocci6n restante en la pantalla. En este
memento puede abrir la puerta para
revolver, dar vuelta o reacomodar la
comida.
IMPORTANTE:
Antesdevolvera utilizarla cocci6ncon
sensor,sedebedejarenfriarel homo
durante5 minutosparaque losalimentosse
cocinencorrectamente.
GUIA DE COCClON CON
SENSOR
Losrecipientesy lascubiertasadecuadas
ayudana garantizarbuenosresultadosde
cocci6nconSensor.
1.Siempreutilicerecipientesparamicroondas
y cQbraloscon sustapaso con unenvoltorio
pldtsticoconventilaci6n.
2. Nuncautilicecubiertasde pl&stico
herm6ticas.Puedenevitarque salgael
vapory hacerquela comidase pase.
Ajustelacantidadaltamafiodel recipiente.
Llenelos recipientesal menoshastala
mitadparaobtenermejoresresultados.
Asegurese de que la parte externa del
recipiente de cocci6n y la parte interna
del microondas est@ secas antes de
colocar la comida en el horno. Las
gotas de humedad que se convierten
en vapor de agua pueden engahar al
sensor.
AGREGAR O RESTAR
TIEMPO DE COCCI()N
UtilizandolasteclasMORE(9)o LESS(l)
se puedenajustartodaslas configuraciones
decocci6ncon sensory cocci@con
temporizadorpara un mayoro menortiempo.
POPCORN(PALOMITAS DE
MAJZ)
LateclaPOPCORNle permiteprepararen
el microondaspalomitasde maizenvasadas
comercialmente.Prepares61oun paquetea la
vez.Paraobtenermejoresresultados,utilice
bolsasnuevasde palomitasde maz.
Ejemplo: Paraprepararpalomitasde maiz.
r_op..... Oprima la tecla
POPCORN.
Cuandohayatranscurridoeltiempode
cocci6n,escucharacuatroseSalessonorasy
aparecerala palabraEND.
"Cantidadesrecomendadas:3,0- 3,5 ozs.
PIZZA SLICE (REBANADA DE
PIZZA)
Recalentarpizzaconla funci6nPIZZASLICE
lepermiterecalentarunao variasrebanadas
de pizzasinseleccionarlos tiemposde
cocci6ny losnivelesdepotencia.
Ejemplo: Para recalentar 2 rebanadas
de pizza.
P_zz,_ Optimalatecla PIZZA
Slice
SLICE.
Cuandohayatranscurridoeltiempode
cocci6n,escucharacuatrosefialessonorasy
apareceralapalabraEND.
* Cantidadesrecomendadas:1-4rebanadas.
NOTA:
Sila comidano estabiencocinadao
recalentadacuandose utilizala funci6n
sensor,utiliceel nivelde potenciay el
tiempode cocci6n.NOsigautilizandola
teclasensor.
81
Manual de instrucciones
BAKED POTATO (PAPA AL
HORNO)
La teclaBAKED POTATO lepermite
hornear una o varias papas sin
seleccionar los tiempos de cocci6n y los
niveles de potencia.
NOTAS:
Eltiempode cocci6nesterbasadoen una
papade6-8oz.
Utilicela teclaMore(M&s)(9)/Less
(Menos)(1)cuandococinepapasmas
grandeso maspeque_as.
Antesdehornear,perforela papaconun
tenedorvariasveces.
Silas papasnoest_.ncocinadas
completamente,sigacocinandolas
utilizandoel Tiempodecocci6n.
NOutilicela tecla BAKEDPOTATOpara
completarlacocci6n.
Despuesde hornear,deje reposardurante5
minutos.
Ejemplo: Para cocinar 2 papas.
_k_J Oprima [atecla BAKED
IJo/, _tx/
POTATO.
Cuandohayatranscurridoeltiempode
cocci6n,escuchar_tcuatroseSalessonorasy
apareceralapalabraEND.
Cantidades recomendadas: 1-6 papas.
SENSORCOOK(COCCKSN
CON SENSOR)
UsarlateclaSENSORCOOKle permite
calentarcomidascomunespreparadaspara
microondassin necesidaddeprogramar
tiemposde cocci6nni nivelesde potencia.
SENSORCOOKtiene5 categoriasde
alimentospredeterminadas.Verduras
congeladas,Desayunoscongelados,Comidas
congeladas,Verdurasfrescas.
Ejemplo:Paracocinar comidas
congeiadas.
c,,k 1.OptimalateclaSENSOR
COOK.
.3 2. Elijala categofiade
2_o._ aliment&(1-5)
Categoda Oprirnirtecla
n_Jrnero
Verdurascongeladas 1
Desayunos 2
congelados
Comidascongeladas 3
Verdurasfrescas 4
Camarones 5
Cuandohayatranscurridoel tiempode
cocci6n,escuchar_tcuatrose_alessonorasy
aparecer_tla palabraEND.
Cantidadesrecornendadas:
Verdurascongeladas 1-4porciones
Desayunos 4-8 ozs.
congelados
Comidascongeladas 8-14ozs.
Verdurasfrescas 1-4porciones
Camarones 8-32ozs.
REHEAT
(RECALENTAMIENTO)
LateclaREHEAT(RECALENTAMIENTO)le
permitecalentaralimentossin necesidadde
programartiemposde cocci6nni nivelesde
potencia.REHEAT(RECALENTAMENTO)
tiene3 categorfaspredeterminadas:Platode
cornida,guiso y pasta.
Ejemplo: Para recaientarun guiso.
F__h,,_t 1.Oprimala tecla
REHEAT.
2 2. Elija la categorfa
_oo._ de alimento.
! ! !!i!ii!ii!ii!ii!ii!ii!ii!ii!ii!ii!ii!ii!ii!iii il
Platode comida 1
Guiso 2
pasta 3
Cuandohayatranscurridoel tiempode
cocci6n,escuchar&cuatroseSalessonorasy
aparecer_tla palabraEND.
Cantidades recomendadas
Platode comida 1 portion
Guiso 1b.4 portions
Recalentamientode 1 b.4 portions
pasta
82
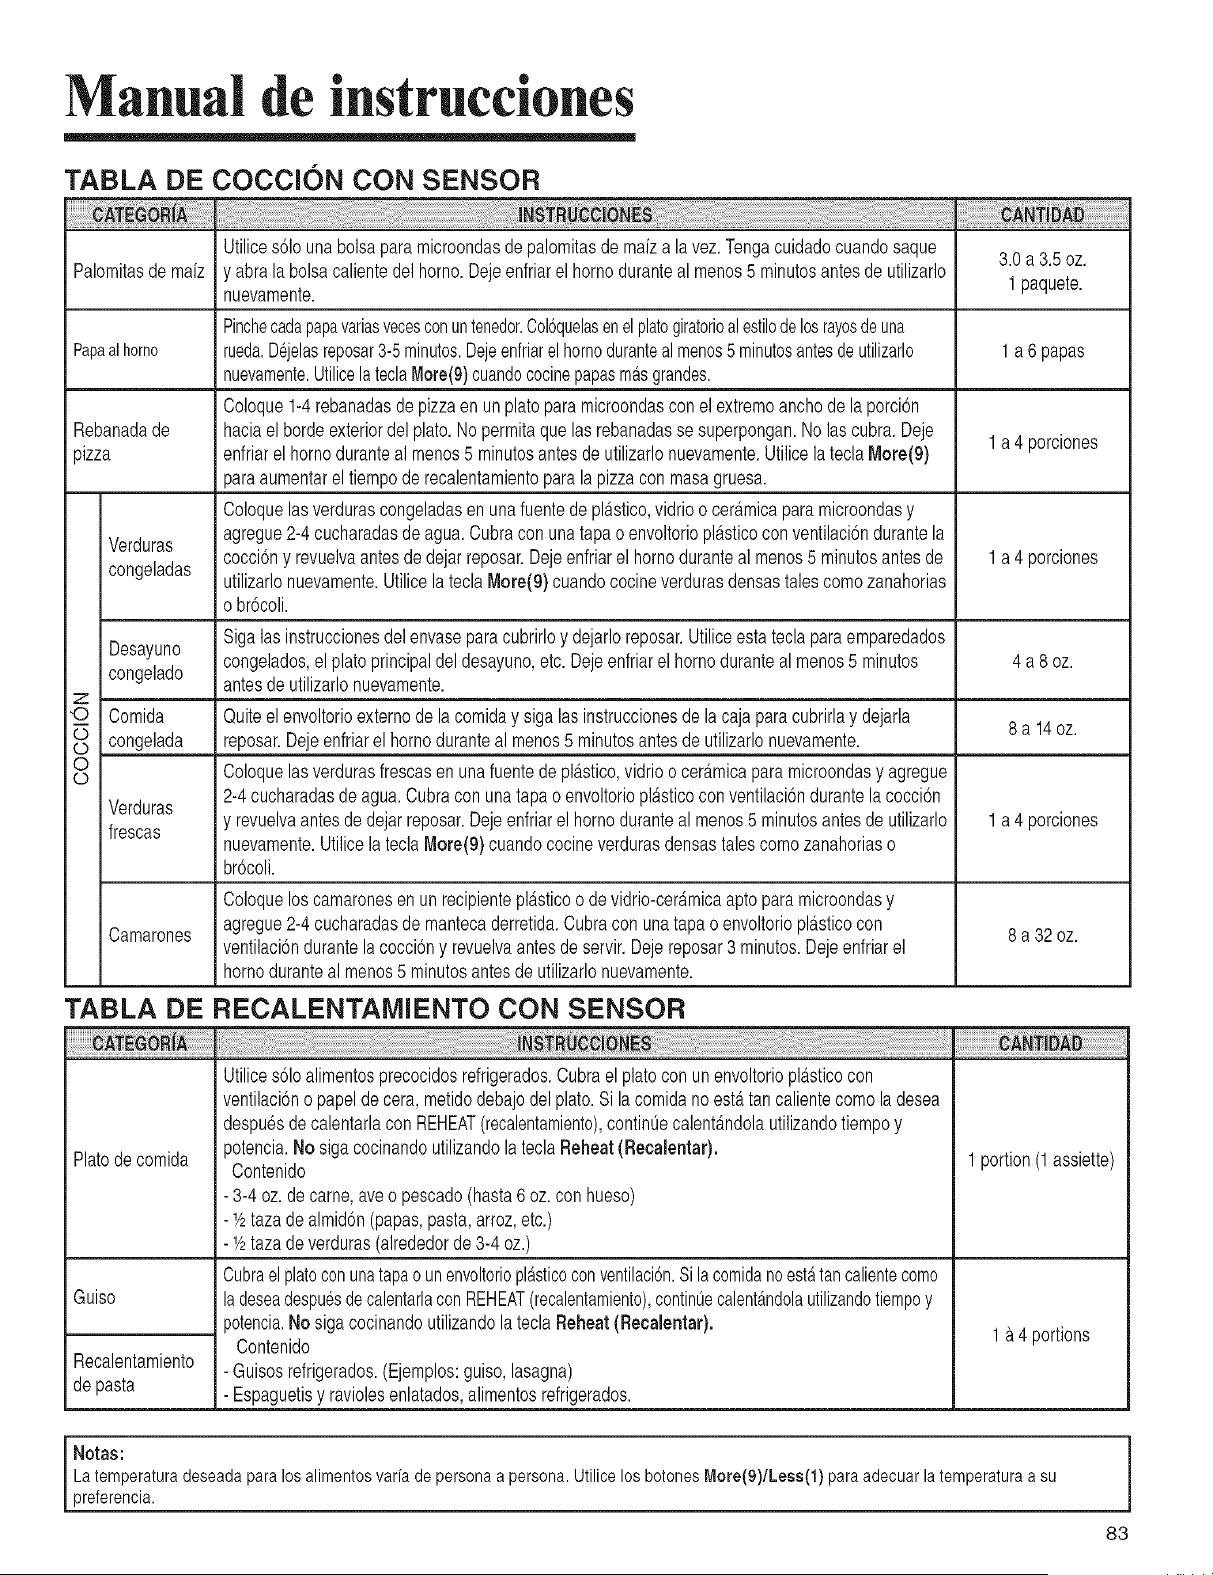
Manual de instrucciones
TABLA DE COCClON CON SENSOR
Utilices61ounabolsaparamicroondasde palomitasde mafza la vez.Tengacuidadocuandosaque 3.0a 3.5oz.
Palomitasdemaiz y abralabolsacalientedel homo.Dejeenfriarel homoduranteal menos5 minutosantesde utilizarlo
nuevamente. 1paquete.
Pinchecadapapavariasvecesconuntenedor,Cobquelasenel platogiratorioalestilodelosrayosdeuna
Papaalhomo rued&Dejelasreposar3-5minutos.Dejeenfriarelhornoduranteal menos5 minutosantesde utilizarlo 1a6 papas
nuevamente.Utilicela teclaMore(9)cuandococinepapasmasgrandes,
Coloque1-4rebanadasde pizzaenunplatoparamicroondasconel extremoanchode laporci6n
Rebanadade haciael bordeexteriordelplato.Nopermitaquelas rebanadasse superpongan.No lascubra.Deje
pizza enfriarel homoduranteal menos5 minutosantesdeutilizarlonuevamente.UtilicelateclaMore(9) 1 a 4 porciones
paraaumentarel tiempoderecalentamientoparala pizzaconmasagruesa.
Coloquelasverdurascongeladasenuna fuentede plastico,vidriooceramicaparamicroondasy
Verduras agregue2-4 cucharadasde agua.Cubracon unatapao envoltorioplasticoconventilaci6ndurantela
congeladas cocci6ny revuelvaantesde dejarreposar.Dejeenfriarel homoduranteal menos5 minutosantesde 1a 4 porciones
utilizarlonuevamente.UtilicelateclaMore(9) cuandococineverdurasdensastalescomozanahorias
o br6coli.
Desayuno Sigalasinstruccionesdelenvaseparacubrirloy dejarloreposar.Utiliceestatecla paraemparedados
congelados,el platoprincipaldeldesayuno,etc.Dejeenfriarel homoduranteal menos5 minutos 4a 8 oz.
congelado antesdeutilizarlonuevamente.
z
,0 Comida Quiteelenvoltorioexternode la comiday sigalasinstruccionesde la cajaparacubrirlay dejarla 8a 14oz.
0 congelada reposar.Dejeenfriarel homoduranteal menos5 minutosantesde utilizarlonuevamente.
0 Coloquelasverdurasfrescasenunafuentede plastico,vidrioocer_tmicaparamicroondasy agregue
(.3
Verduras 2-4 cucharadasde agua.Cubraconunatapao envoltorioplasticoconventilaciOndurantela cocci6n
y revuelvaantesde dejarreposar.Dejeenfriarel homoduranteal menos5 minutosantesde utilizarlo 1 a 4 porciones
frescas
nuevamente.Utilicela teclaMore(9)cuandococineverdurasdensastalescomozanahoriaso
br6coli.
Coloqueloscamaronesenun recipienteplasticoo de vidrio-ceramicaaptoparamicroondasy
Camarones agregue2-4 cucharadasde mantecaderretida.Cubracon unatapao envoltorioplasticocon 8 a 32 oz.
ventilaci6ndurantelacocci6ny revuelvaantesdeservir.Dejereposar3 minutos.Dejeenfriarel
homoduranteal menos5 minutosantesdeutilizarlonuevamente.
TABLA DE RECALENTAIVUENTO CON SENSOR
Utilices61oalimentosprecocidosrefrigerados.Cubrael platocon unenvoltorioplasticocon
ventilaci6nopapeldecera, metidodebajodel plato.Si la comidano estertancalientecomo ladesea
despuesde calentarlacon REHEAT(recalentamiento),contint_ecalent_mdolautilizandotiempoy
Platode comida potencia.No sigacocinandoutilizandola teclaReheat(Recalentar).
Contenido
- 3-4 oz.de came,aveo pescado(hasta6oz. con hueso)
- _/2taza dealmid6n(papas,pasta,arroz,etc.)
- 1/2taza de verduras(alrededorde 3-4 oz.)
Cubraelplatoconunatapaounenvoltorioplasticoconventilaci6n.Si lacomidanoestatancalientecomo
Guiso ladeseadespuesdecalentarlaconREHEAT(recalentamiento),contintJecalent_.ndolautilizandotiempoy
potencia.No sigacocinandoutilizandola teclaReheat(Recalentar).
Contenido
Recalentamiento - Guisosrefrigerados.(Ejemplos:guiso,lasagna)
de pasta - Espaguetisy raviolesenlatados,alimentosrefrigerados.
1portion(1assiette)
1a 4 portions
Notas: ]
Latemperaturadeseadaparalosalimentosvariade personaapersona.UtilicelosbotonesMore(9)/Less(1)paraadecuarla temperaturaasu
preferencia.
83
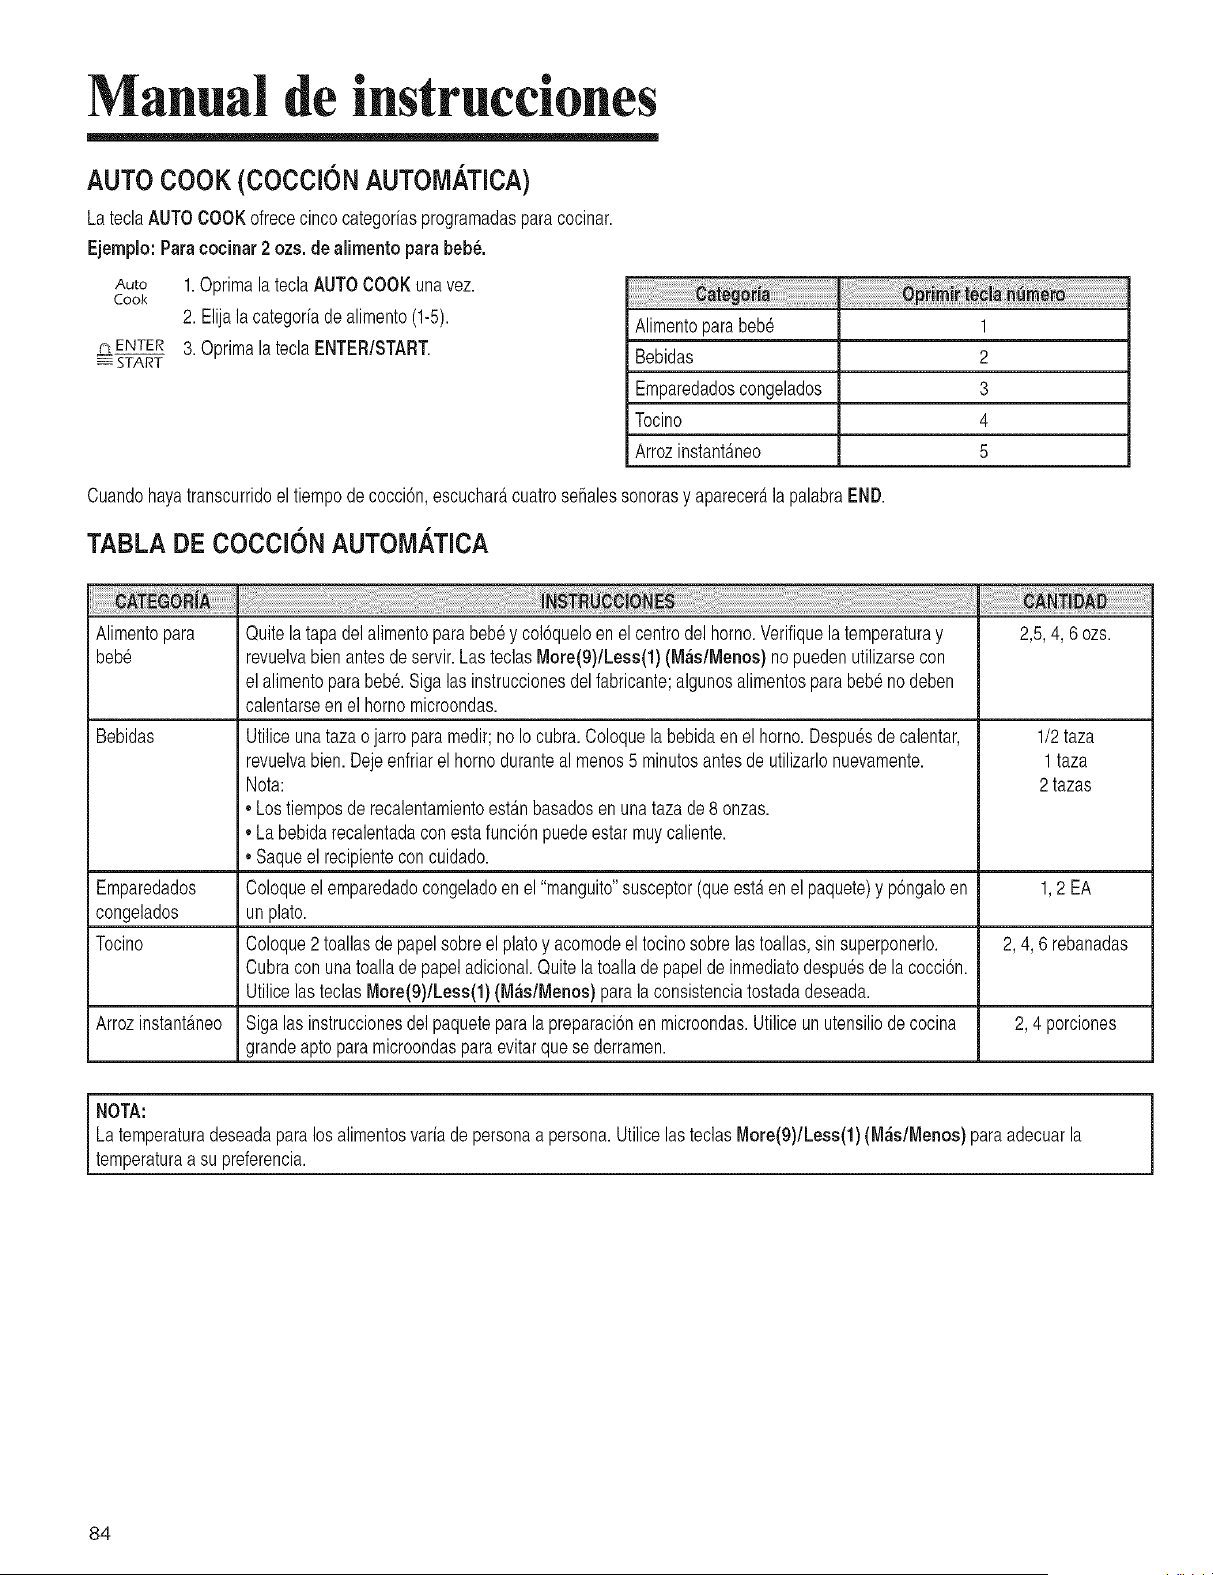
Manual de instrucciones
AUTO COOK (COCCl0N AUTOMATICA)
LateclaAUTOCOOKofrececincocategoriasprogramadasparacocinar.
Ejemplo:Paracocinar 2 ozs. de alimentopara beb&
Auto 1.Optimala teclaAUTOCOOKunavez.
Cook
2. Elijalaoategoriadealimento(1-5).
N=.O=ENTER 3. OprimalateclaENTER/START.
START
Alimentoparabeb_ 1
Bebidas 2
Emparedadoscongelados 3
Tocino 4
Arrozinstantaneo 5
Cuandohayatranscurridoeltiempodecocci6n,escucharacuatrosefialessonorasy aparecer_,la palabraEND.
TABLA DE COCClON AUTOM ,TICA
Alimentopara 2,5,4, 6 ozs.
bebe
Bebidas 1/2taza
l taza
2tazas
Quitela tapa del alimentopara beb_y col6queloen elcentredelhomo.Verifiquela temperaturay
revuelvabien antesde servir.Las teclasMore(9)/Less(1)(M&s/Menos)no puedenutilizarsecon
el alimentoparabeb& Sigalasinstruccionesdel fabricante;algunosalimentosparabeb_no deben
calentarseenel hornomicroondas.
Utiliceunataza ojarroparamedir;no Io cubra.Coloquelabebidaenelhomo.Despu_sde calentar,
revuelvabien.Dejeenfriarel homoduranteal menos5 minutosantesde utilizarlonuevamente.
Nota:
,,Lostiemposde recalentamientoestanbasadosenunataza de 8 onzas.
,,Labebidarecalentadaconestafunci6npuedeestarmuycaliente.
,,Saqueel recipienteconcuidado.
Coloqueel emparedadocongeladoen el "manguito"susceptor(queesta enel paquete)y p6ngaloen
unplato.
Coloque2 toallasdepapelsobreel platoy acomodeel tocinosobrelastoallas,sin superponerlo.
Cubraconunatoallade papeladicional.Quitela toalladepapelde inmediatodespu_sdela cocci6n.
UtilicelasteclasMore(9)/Less(1)(M&s/Menos)paralaconsistenciatostadadeseada.
Sigalas instruccionesdel paquetepara la preparaciSnen microondas.Utiliceun utensiliode cocina
grandeaptoparamicroondasparaevitarque sederramen.
Emparedados 1,2 EA
congelados
Tocino 2, 4, 6 rebanadas
Arrozinstantaneo 2, 4 porciones
i.o. i
La temperatura deseada para los alimentos varia de persona a persona. Utilicelas teclas More(9)/Less(1) (M_s/Menos) para adecuar la
temperatura a su preferencia.
84
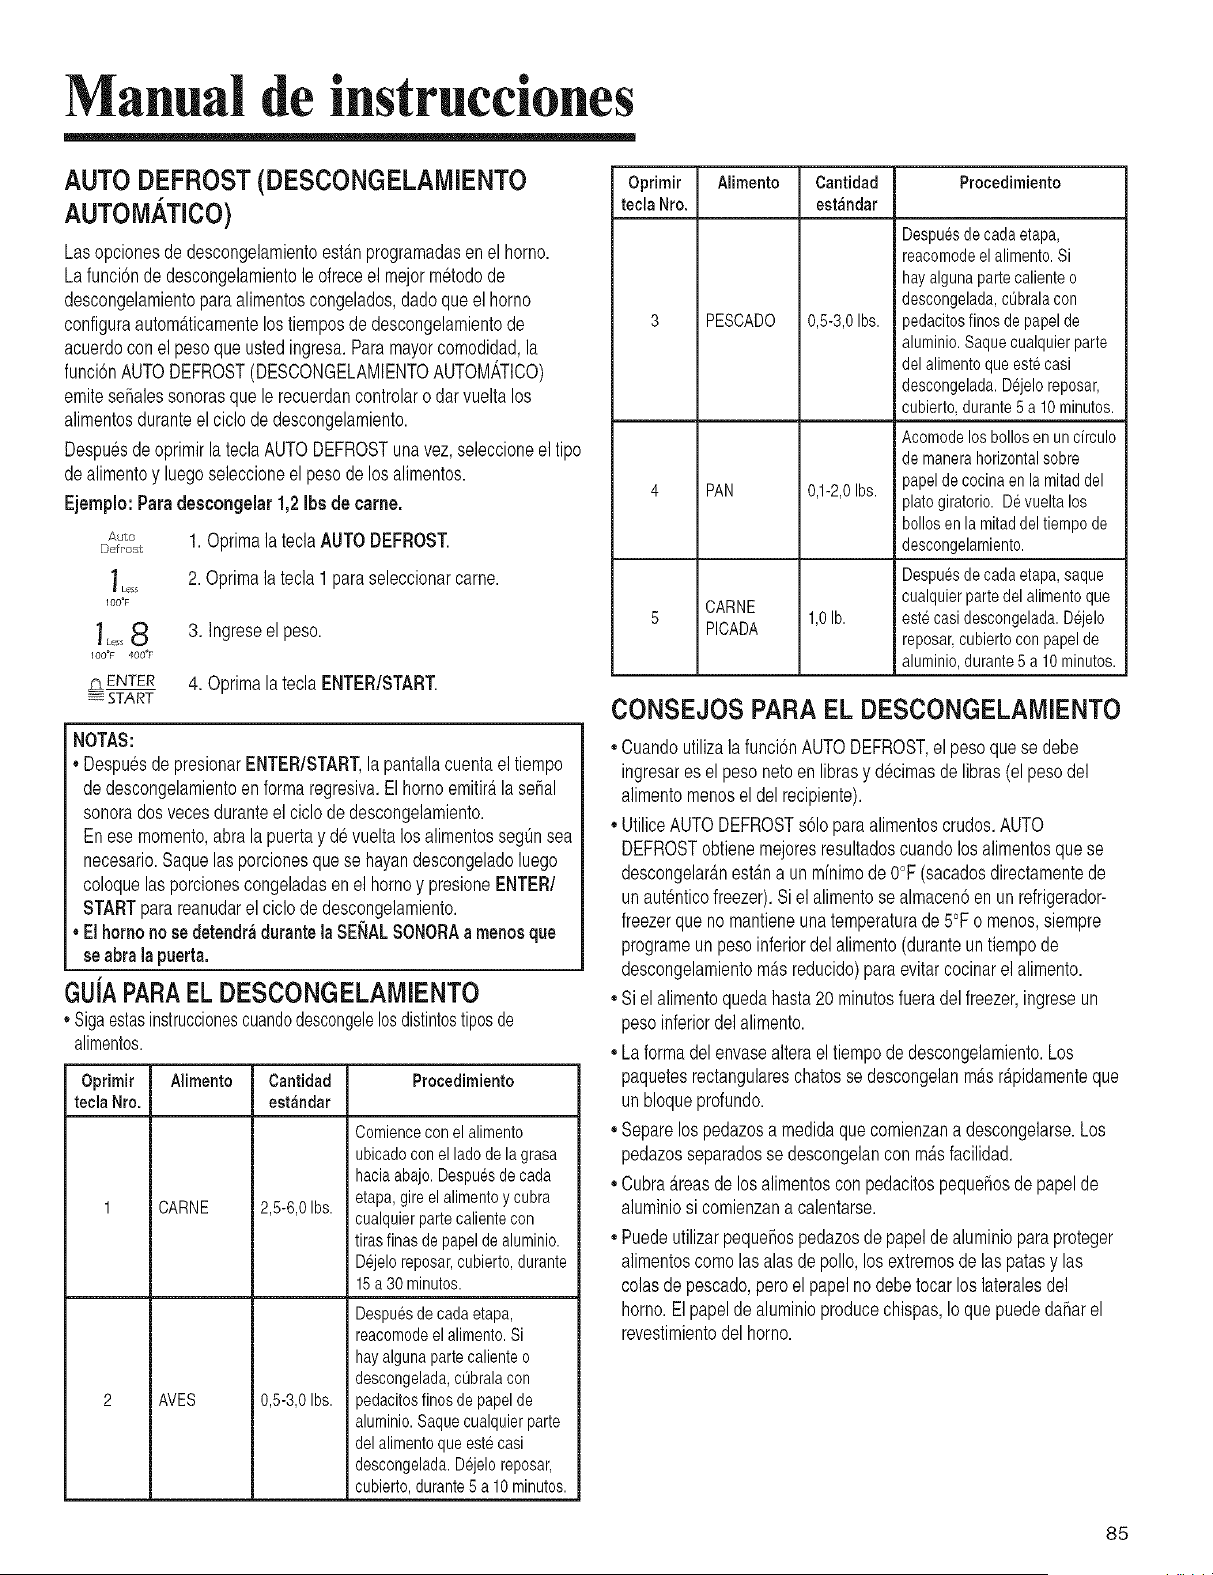
Manual de instrucciones
AUTO DEFROST (DESCONGELAMIENTO
AUTOMATICO)
Lasopcionesde descongelamientoest&nprogramadasen el homo.
Lafunci6ndedescongelamientole ofreceel mejormetodode
descongelamientoparaalimentoscongelados,dadoqueel homo
configuraautom_.ticamentelos tiemposde descongelamientode
acuerdoconel pesoqueustedingresa.Paramayorcomodidad,la
funci6nAUTODEFROST(DESCONGELAMIENTOAUTOMATICO)
emiteseralessonorasque le recuerdancontrolaro darvueltalos
alimentosduranteel ciclodedescongelamiento.
Despu6sdeoprimirlatecla AUTODEFROSTunavez,seleccioneel tipo
dealimentoy luegoseleccioneel pesode losalimentos.
Ejemplo: Paradescongelar 1,2 Ibs de came.
Auflo
Defro;:/_
Less
I O0_F
IO0°F 400_F
3t ENTER
_---START
1. OptimalateclaAUTODEFROST.
2. Optimala tecla 1 paraseleccionarcarne.
3. Ingreseel peso.
4. OptimalateclaENTER/START.
NOTAS:
DespuesdepresionarENTER/START,la pantallacuentael tiempo
dedescongelamientoenformaregresiva.El hornoemitirAla serial
sonoradosvecesduranteel ciclode descongelamiento.
Enese momento,abralapuertay devueltalosalimentossegflnsea
necesario.Saquelas porcionesquese hayandescongeladoluego
coloquelasporcionescongeladasenel homoy presioneENTER/
STARTparareanudarel ciclodedescongelamiento.
Elhomono se detendradurantelaSENALSONORAa mendsque
se abralapuerta.
GUIAPARAEL DESCONGELAMIENTO
• Sigaestasinstruccionescuandodescongelelosdistintostiposde
alimentos,
OprimJr Alimento Cantidad Procedimiento
tecla Nro. estandar
CARNE
AVES
2,5-6,0Ibs.
0,5-3,0Ibs.
Comiencecon el alimento
ubicadocon elladode la grasa
haciaabajo.Despuesde cada
etapa,gireelalimentoycubra
cualquierpartecalientecon
tirasfinas de papelde aluminio.
Dejeloreposar,cubierto,durante
15a 30 minutos.
Despu6sde cadaetapa,
reacomodeel alimento.Si
hay algunapartecalienteo
descongelada,cubralacon
pedacitosfinos de papelde
aluminio.Saquecualquierparte
del alimentoque estecasi
descongelada.Dejeloreposar,
cubierto,durante5 a 10 minutos.
Oprimir Alimento Cantidad Procedirniento
tecla Nro. estandar
PESCADO
PAN
CARNE
PICADA
0,5-3,0Ibs.
0,1-2,0Ibs.
1,0lb.
Despuesde cadaetapa,
reacomodeel alimento.Si
hayalgunapartecalienteo
descongelada,cubralacon
pedacitosfinosde papelde
aluminio.Saquecualquierparte
delalimentoqueestecasi
descongelada.Dejeloreposar,
cubierto,durante5a 10minutos.
Acomodelos bollosen un cffculo
de manerahorizontalsobre
papelde cocinaen la mitaddel
platogiratorio. Devueltalos
bollosen la mitaddel tiempode
descongelamiento.
Despuesde cadaetapa,saque
cualquierpartedel alimentoque
estecasidescongelada.Dejelo
reposar,cubiertocon papelde
aluminio,durante5 a 10minutos.
CONSEJOS PARA EL DESCONGELAMIENTO
• Cuandoutilizalafunci6nAUTODEFROST,el pesoque se debe
ingresaresel pesonetoen librasy d6cimasde libras(el pesodel
alimentomenosel del recipiente).
• UtiliceAUTODEFROSTs61oparaalimentoscrudos.AUTO
DEFROSTobtienemejoresresultadoscuandolos alimentosque se
descongelaranestana un mfnimodeO°F(sacadosdirectamentede
unautenticofreezer).Si el alimentosealmacen6enun refrigerador-
freezerquenomantieneunatemperaturade 5°Fo menos,siempre
programeunpesoinferiordel alimento(duranteun tiempode
descongelamientomasreducido)paraevitarcocinarel alimento.
Sielalimentoquedahasta20 minutosfueradel freezer,ingreseun
pesoinferiordelalimento.
Laformadelenvasealterael tiempode descongelamiento.Los
paquetesrectangulareschatossedescongelanm_tsr@idamenteque
unbloqueprofundo.
• Separelospedazosa medidaque comienzanadescongelarse.Los
pedazosseparadossedescongelanconmasfacilidad.
Cubra_.reasdelosalimentosconpedacitospequerosdepapelde
aluminiosi comienzana calentarse.
Puedeutilizarpequerospedazosde papelde aluminioparaproteger
alimentoscomolasalasde polio,los extremosde las parasy las
colasde pescado,pero elpapelnodebetocarloslateralesdel
horno.El papelde aluminioproducechispas,Io quepuededarar el
revestimientodel homo.
85
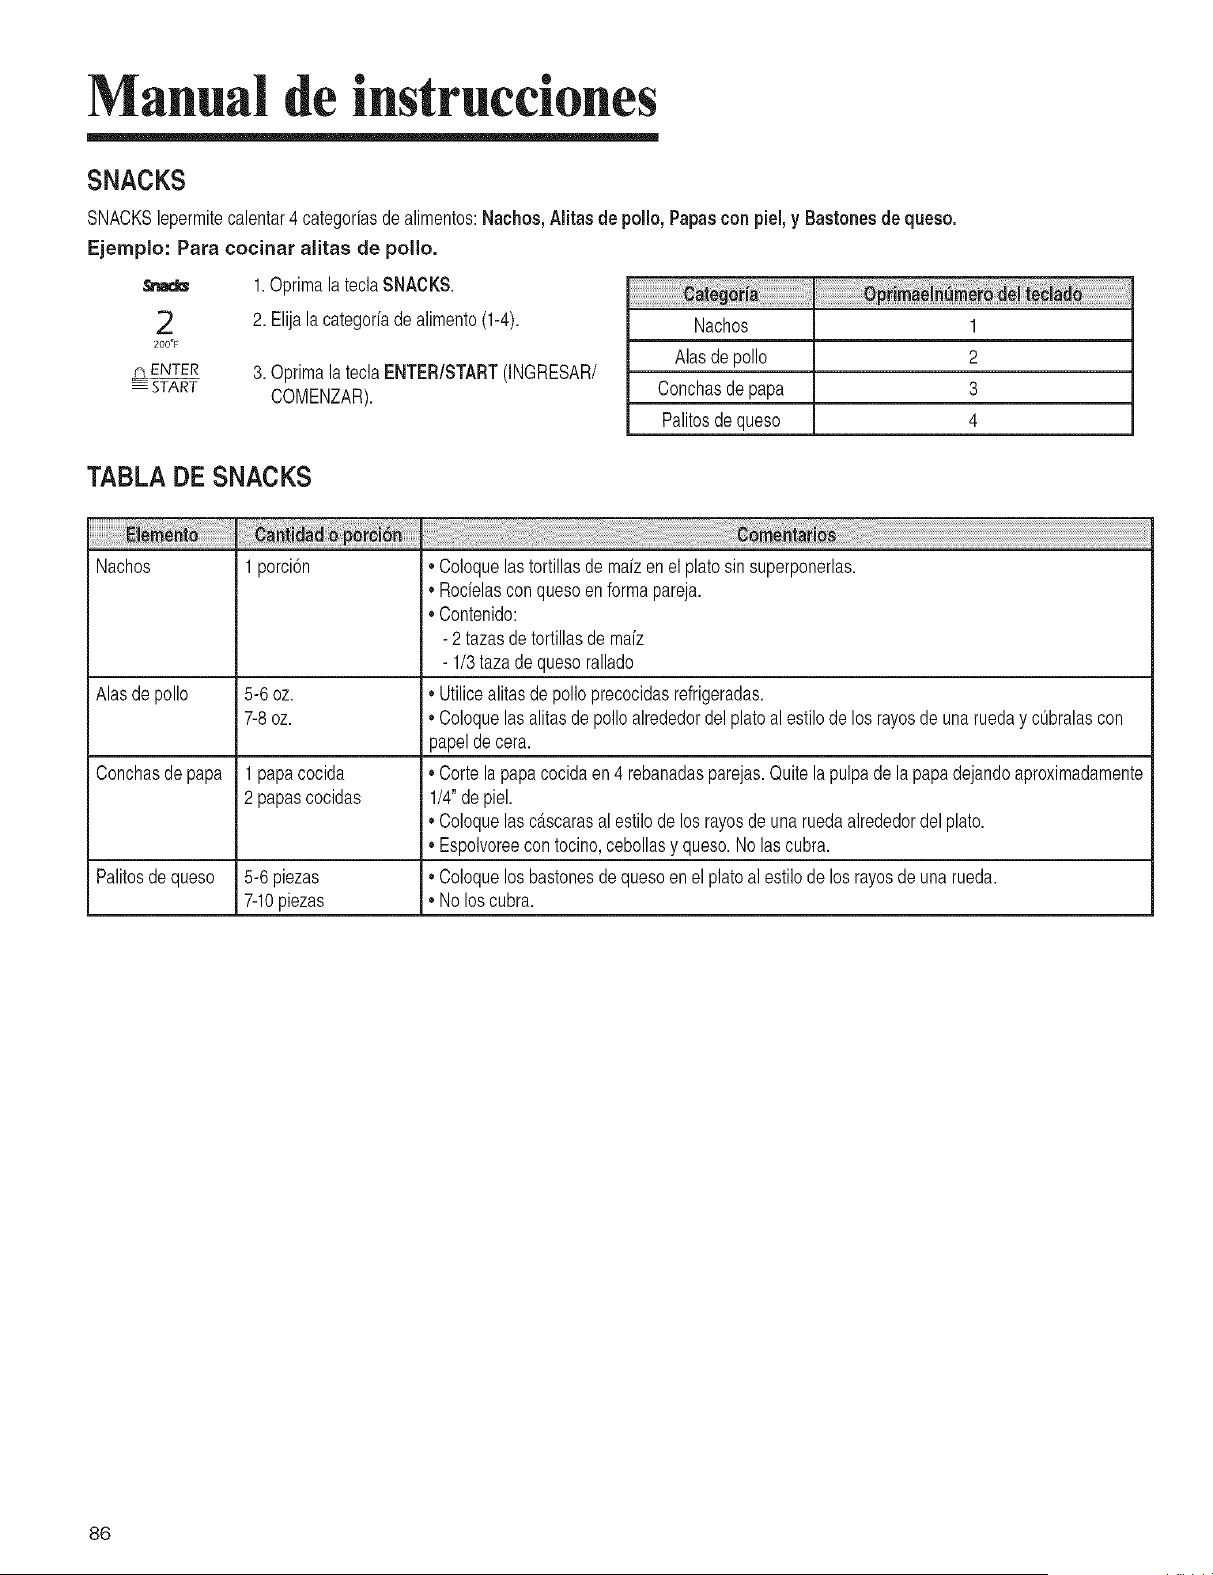
Manual de instrucciones
SNACKS
SNACKSlepermitecalentar4 categoriasdealimentos:Nachos,Alitas de polio,Papascon piel,y Bastonesde queso.
Ejemplo: Para cocinar alitas de polio.
2
200"F
#t ENTER
START
1.Optimala teclaSNACKS.
2. Elijalacategoffade alimento(1-4).
3. OptimalateclaENTER/START(INGRESAR/
COMENZAR).
¸
Nachos
Alasde polio
Conchasde papa
Palitosde queso
ii!iiii!i
1
2
3
4
TABLA DE SNACKS
Nachos 1 porcidn • Coloquelastortillasde mafzenelplatosinsuperponerlas.
• Rod@asconquesoenformapareja.
Contenido:
- 2 tazasde tortillasde mafz
- 1/3tazade quesorallado
Alasde polio 5-6 oz. * Utilicealitasde polioprecocidasrefrigeradas.
7-8oz. * Coloquelasalitasde polio alrededordel platoalestilode los rayosde unarueday ctJbralascon
papeldecera.
Conchasdepapa 1 papacocida * Cortelapapacocidaen 4 rebanadasparejas.Quitela pulpade la papadejandoaproximadamente
2 papascocidas 1/4"depiel.
Coloquelasc_.scarasal estilode losrayosdeunaruedaalrededordel plato.
Espolvoreecontocino,cebollasy queso.No lascubra.
Palitosde queso 5-6piezas * Coloquelosbastonesde quesoenel platoal estilode losrayosde unarueda.
7-10piezas * Noloscubra.
86
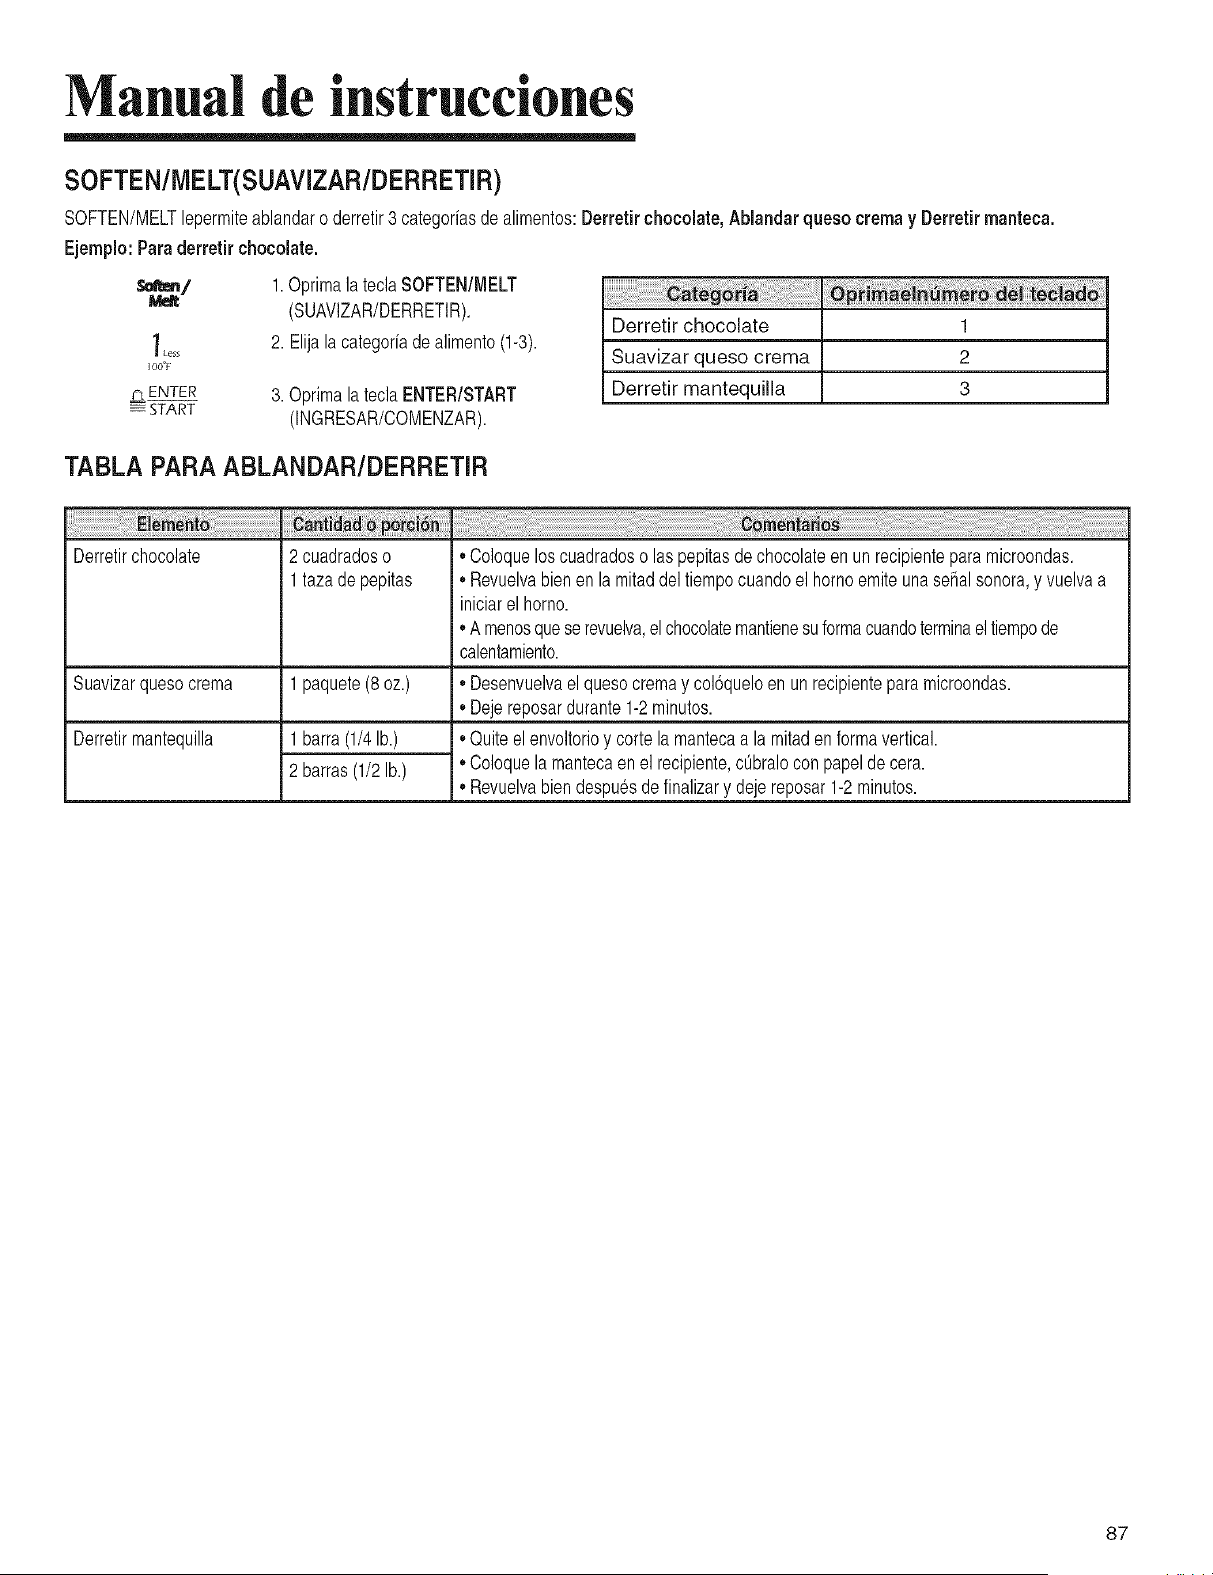
Manual de instrucciones
SOFTEN/MELT(SUAVIZAR/DERRETIR)
SOFTEN/MELTlepermiteablandaro derretir3 categoriasdealimentos:Derretirchocolate, Ablandarqueso crema y Derretir manteca.
Ejemplo: Paraderretir chocolate.
s_zn/
Less
100°P
ENTER
START
1.Optimala teclaSOFTEN/MELT
(SUAVIZAR/DERRETIR).
2. Elijalacategofiadealimento(1-3).
3. Oprimala teclaENTER/START
(INGRESAR/COMENZAR).
Derretir chocolate 1
Suavizar queso crema 2
Derretir mantequilla 3
TABLA PARA ABLANDAR/DERRETIR
Derretirchocolate
Suavizarquesocrema
Derretirmantequilla
2 cuadradoso
1tazade pepitas
1paquete(8 oz.)
1barra(1/4lb.)
2 barras(1/2lb.)
• Coloqueloscuadradoso laspepitasdechocolateen unrecipienteparamicroondas.
• Revuelvabien en lamitaddeltiempocuandoel homoemiteunaserialsonora,y vuelvaa
iniciarel homo.
• A menosqueserevuelva,el chocolatemantienesuformacuandoterminaeltiempode
calentamiento.
• Desenvuelvael quesocremay col6queloen unrecipienteparamicroondas.
• Dejereposardurante1-2minutos.
• Quiteelenvoltorioy cortela mantecaa la mitadenformavertical.
• Coloquela mantecaen el recipiente,cQbraloconpapeldecera.
• Revuelvabien despuesde finalizary dejereposar1-2minutos.
87
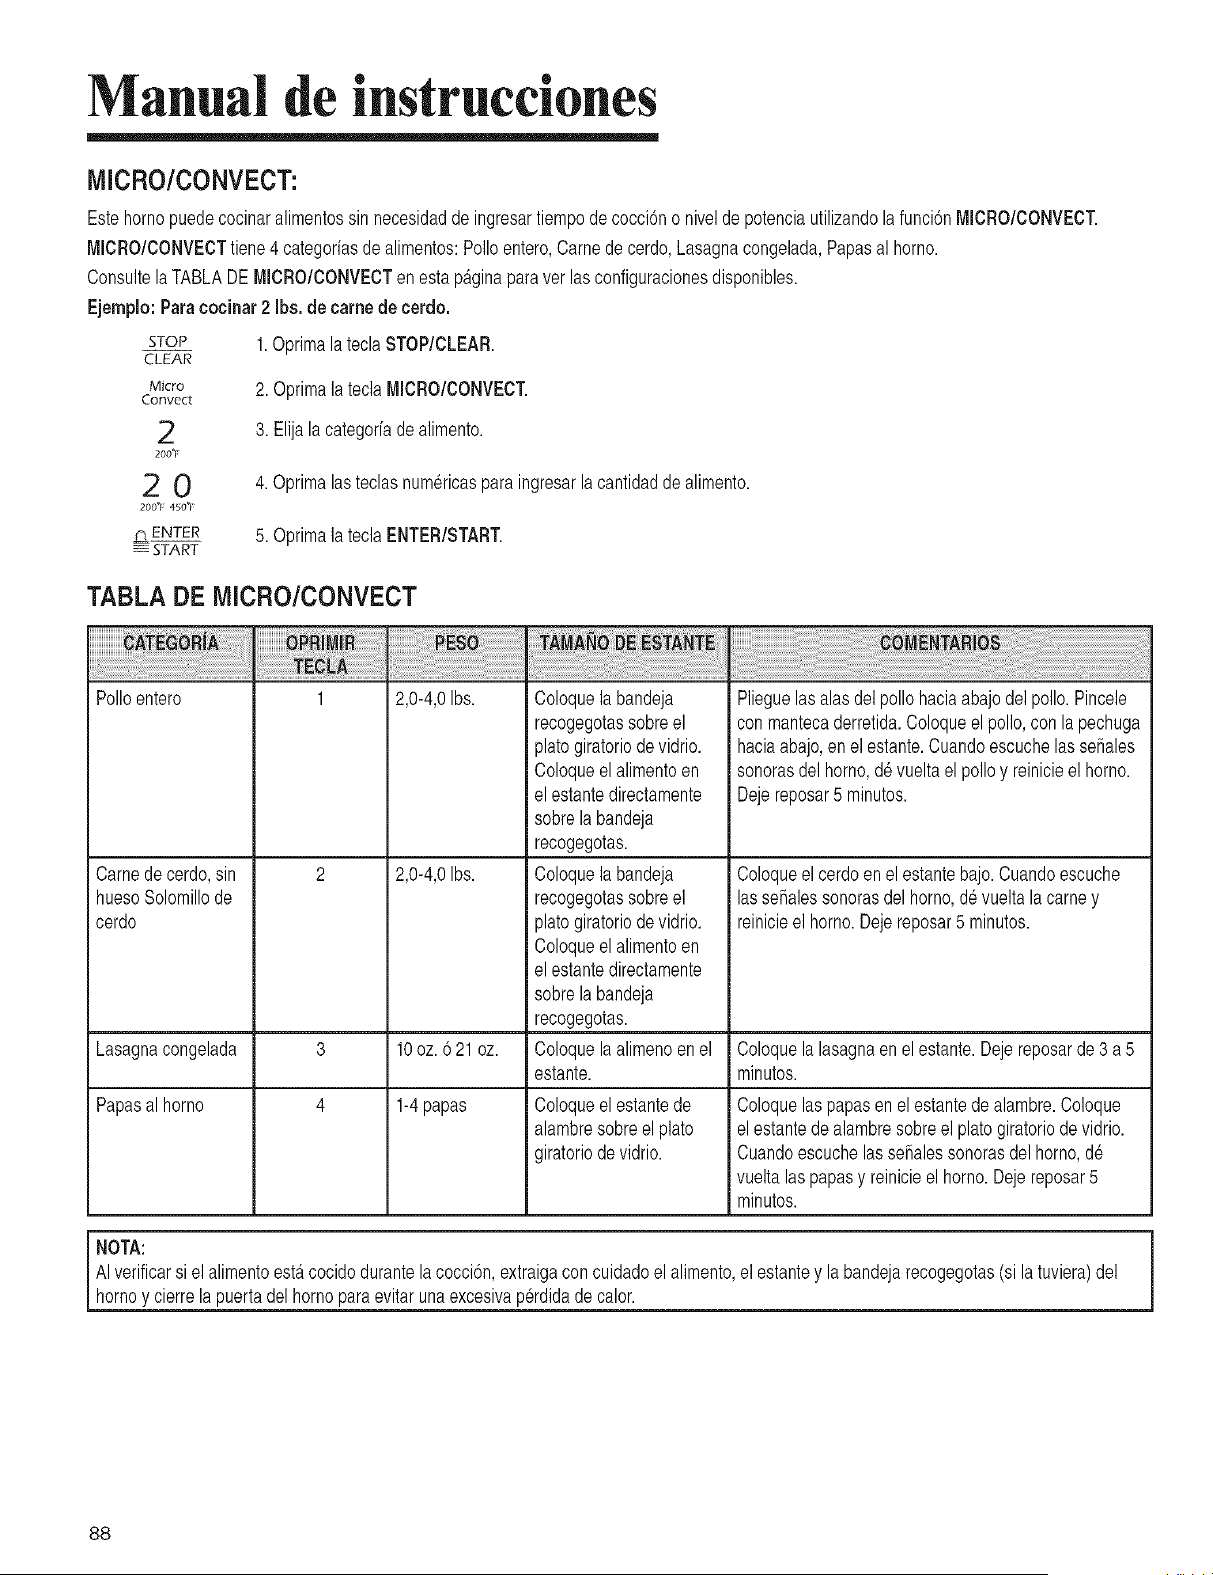
Manual de instrucciones
MICRO/CONVECT:
Estehomopuedecocinaralimentossinnecesidadde ingresartiempode cocci6no niveldepotenciautilizandolafunci6nMICRO/CONVECT.
MICRO/CONVECTtiene4categoriasde alimentos:Polioentero,Camedecerdo,Lasagnacongelada,Papasalhomo.
ConsultelaTABLADE MICRO/CONVECTenestapAginaparaver lasconfiguracionesdisponibles.
Ejemplo:Paracocinar 2 Ibs. de camede cerdo.
STOP
CLEAR
Micro
Convect
2
2oo°r
2O
200"1 450_1
p_ ENTER
START
1.Optimala teclaSTOP/CLEAR.
2. OptimalateclaMICRO/CONVECT.
3. Elijalacategoriadealimento.
4. Optimalasteclasnumericaspara ingresarlacantidaddealimento.
5. OptimalateclaENTER/START.
TABLA DE MICRO/CONVECT
Polioentero
Carnede cerdo,sin
huesoSolomillode
cerdo
1 2,0-4,0Ibs.
2 2,0-4,0Ibs.
3 10oz. 621 oz.
4 1-4papas
Coloquela bandeja
recogegotassobreel
platogiratoriode vidrio.
Coloqueel alimentoen
elestantedirectamente
sobrela bandeja
recogegotas.
Coloquela bandeja
recogegotassobreel
platogiratoriode vidrio.
Coloqueel alimentoen
elestantedirectamente
sobrela bandeja
recogegotas.
Coloquela alimenoenel
estante.
Coloqueel estantede
alambresobreel plato
giratoriodevidrio.
Plieguelas alasdelpoliohaciaabajodelpolio.Pincele
conmantecaderretida.Coloqueel polio,conla pechuga
haciaabajo,en el estante.CuandoescuchelasseSales
sonorasdel homo,d_vueltaelpolioy reinicieel homo.
Dejereposar5 minutos.
Coloqueel cerdoenel estantebajo.Cuandoescuche
las se5alessonorasdel homo,de vueltala camey
reinicieel horno.Dejereposar5 minutos.
Lasagnacongelada Coloquela lasagnaen el estante.Dejereposarde3 a5
minutos.
Papasal homo Coloquelaspapasenel estantedealambre.Coloque
elestantedealambresobreel platogiratoriodevidrio.
Cuandoescuchelasse_alessonorasdelhomo,d6
vueltalaspapasy reinicieel homo.Dejereposar5
minutos.
i.o,A: i
AIverificarsi el alimonto ostfi cocido duranto la coccidn, oxtraiga con cuidado el alimento, el ostante y la bandoja rocogegotas (si la tuviora)del
[ homo y o orro a puerta do homo para ov tar una oxcesiva perdida do calor.
88
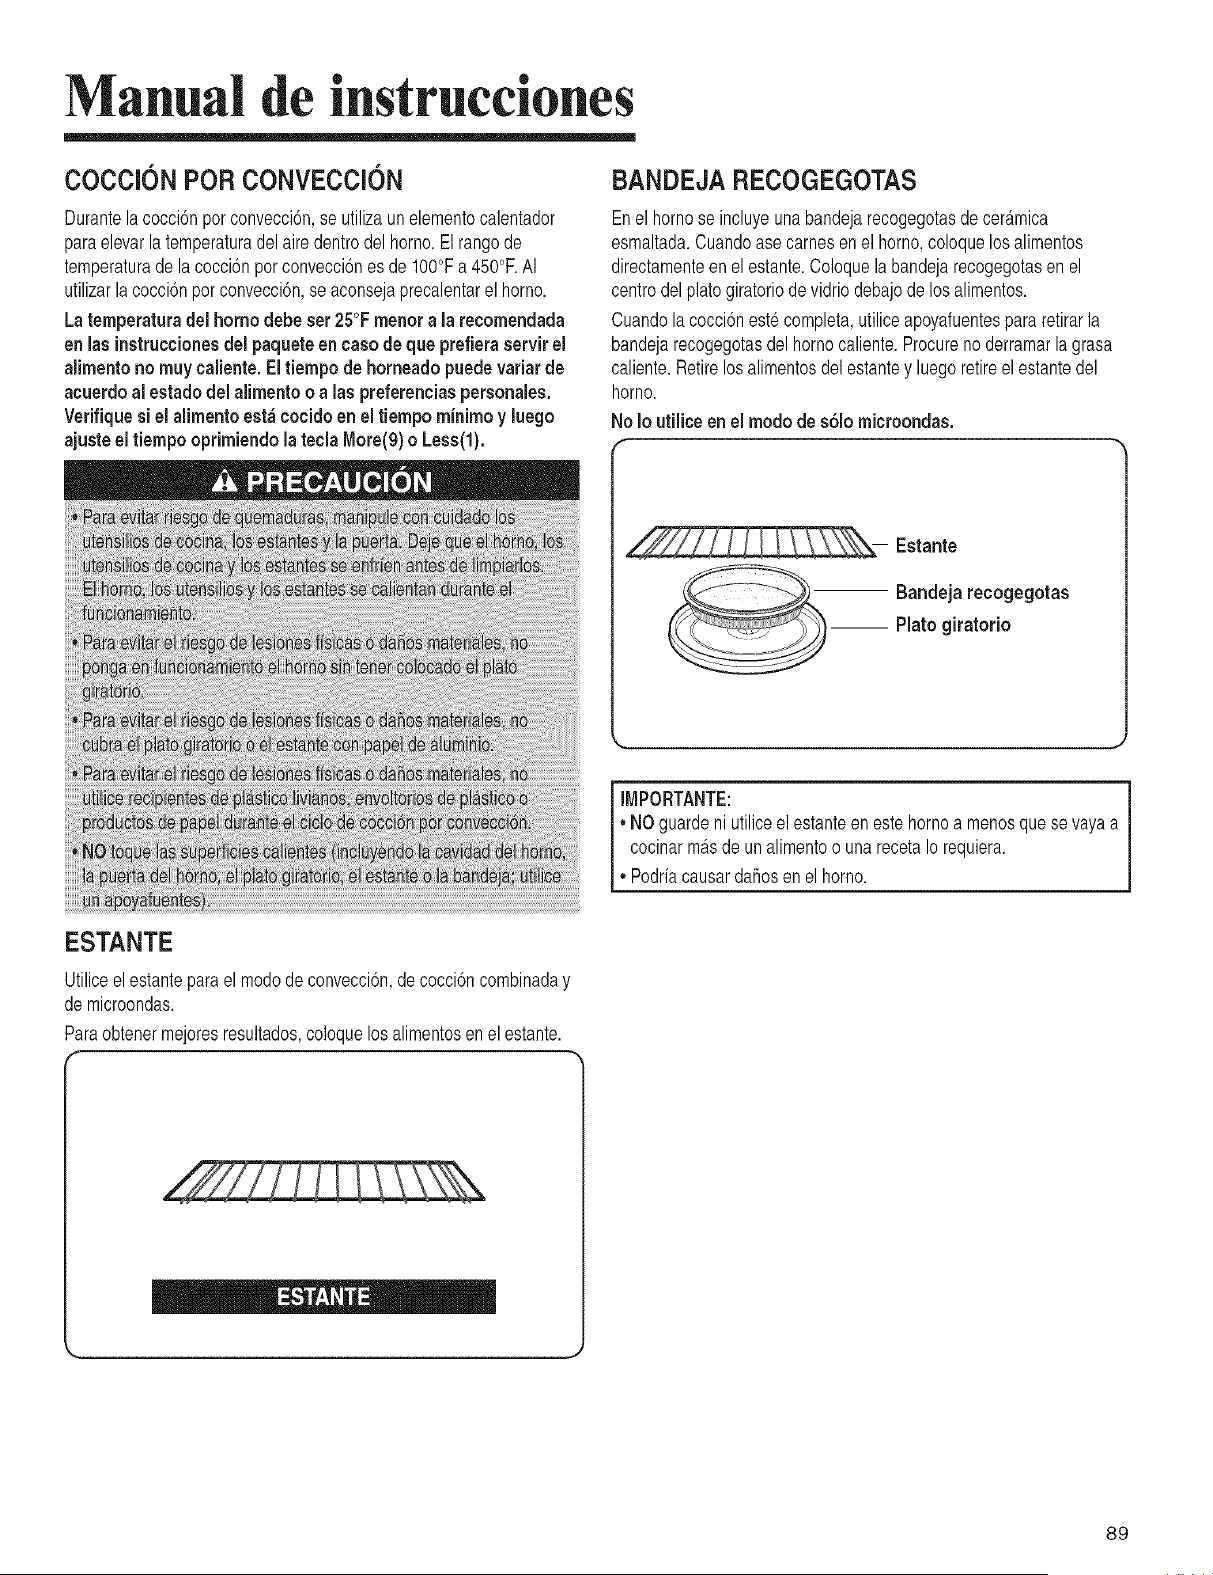
Manual de instrucciones
COCClON POR CONVECClON
Durantela cocci6npor convecci6n,se utilizaunelementocalentador
paraelevarla temperaturadelairedentrodel horno.El rangode
temperaturade lacocci6nporconvecci6nes de 100°Fa450°F.AI
utilizarlacocci6nporconvecci6n,se aconsejaprecalentarel homo.
Laternperaturadel homo debe set 25°Fmenora la recomendada
en lasinstruccionesdel paqueteencaso de que prefieraservir el
aiimentono muy caiiente. EItiempo de horneadopuedevatiarde
acuerdoal estadodel aiimentoo alas preferenciaspersonaies.
Verifiquesi el alimentoest_ cocidoen el tiempo minimoy luego
ajusteel tiernpo oprimiendola tecla More(9)o Less(l).
ESTANTE
BANDEJA RECOGEGOTAS
Enel homose incluyeunabandejarecogegotasde ceramica
esmaltada.Cuandoase camesenel homo,coloquelos alimentos
directamenteenel estante.Coloquelabandejarecogegotasenel
centrodelplatogiratoriodevidriodebajode los alimentos.
Cuandola cocci6nest6completa,utiliceapoyafuentespararetirarla
bandejarecogegotasdel homocaliente.Procureno derramarla grasa
caliente.Retirelosalimentosdelestantey luegoretireel estantedel
horno.
No Io utiliceen el modo de s6io rnicroondas.
Estante
Bandeja recogegotas
-- Plato giratotio
J
IMPORTANTE:
,,NOguardeni utiliceelestanteeneste homoa menosque sevayaa
cocinarmasde un alimentoo una recetaIorequiera.
,,PodriacausardaSosenel homo.
Utiliceel estantepara el modode convecci6n,de cocci6ncombinaday
demicroondas.
Paraobtenermejoresresultados,coloquelosalimentosenel estante.
89

Manual de instrucciones
HORNEADO POR CONVECCION CON
PRECALENTAIVllENTO
HORNEADO POR CONVECCION SiN
PRECALENTAIVllENTO
Ejemplo:Paraprogramarel horneadopot convecci6n a325°F.
Utilieela bandejarecogegotasal cocinar carneso ayesen el
estante.
STOP
CLEAR
1.Optima lateclaSTOP/CLEAR
convection 2. OprimalateclaCONVECTION.
5 3. Oprimaunateclanumericaparaseleccionarla
_2_°F temperaturade horneado.
mENTER 4. Optimala tecla ENTER/STARTdosveces.
START
,,Unavez precalentado,enla pantallasedesplazaralafrasePLACE
FOODONRACK(COLOQUEELALIMENTOEN ELESTANTE)y se
escucharaunasepalsonora.Abrala puertay coloquelosalimentos
sobreel estantede convecci6n.
2000
200°F450°F4GO°F4GO°F
f_ ENTER
START
5. Optimalasteclasnumericaspara ingresarel
tiempodecocci6n.Puedeingresaruntiempode
hasta99minutosy 99segundos.ConsultelaGufa
parahornadade la convecci6nen la p_tgina91.
6. Cierrela puertay optimala tecla ENTER/START.
NOTAS:
LatemperaturadelhomodisminuyemuyMpidocuandola puerta
delhomose abre;sin embargo,estonodeberiaimpedirqueel
alimentose cocineporcompletoduranteeltiemponormalde
cocci6n.
AI verificarsi el alimentoest,. cocidodurantela cocci6n,extraiga
concuidadoelalimento,elestantey labandejarecogegotas(si
latuviera)del hornoy cierrelapuertadel hornopara evitaruna
excesivap6rdidade calor.
(Carries,Guisos y Aves)
Ejemplo:Para programarel horneadoporeonvecci6na 325°F
durante20 rninutos. Utilice la bandeja recogegotasal cocinar
carneso ayesenel estante.
STOP
CLEAI_
ConvectioR
5
32_°F
p_ ENTER
START
2000
200°F4 _O°_, _O_ 50°F
PLENTER
START
1.Optimala teclaSTOP/CLEAR.
2. Oprimala teclaCONVECTION.
3.Oprimaunateclanum6ricaparaseleccionarla
temperaturadehorneado.(Puedeingresaruna
temperaturadeentre100°Fy 450°R)
4. OptimalateclaENTER/STARTunavez.
5.Optimalasteclasnum6ricasparaingresarel
tiempodecocci6n.Puedeingresaruntiempode
hasta99 minutosy 99 segundos.
6.Optimala tecla ENTER/START.
NOTA:
• Puedeingresaruntiempode hasta99 minutosy 99 segundos.
• AIverificarsi elalimentoestacocidodurantelacocci6n,extraiga
concuidadoel alimento,el estantey labandejarecogegotas(si
latuviera)delhomoy cierrela puertadelhomoparaevitaruna
excesivaperdidade calor.
9O
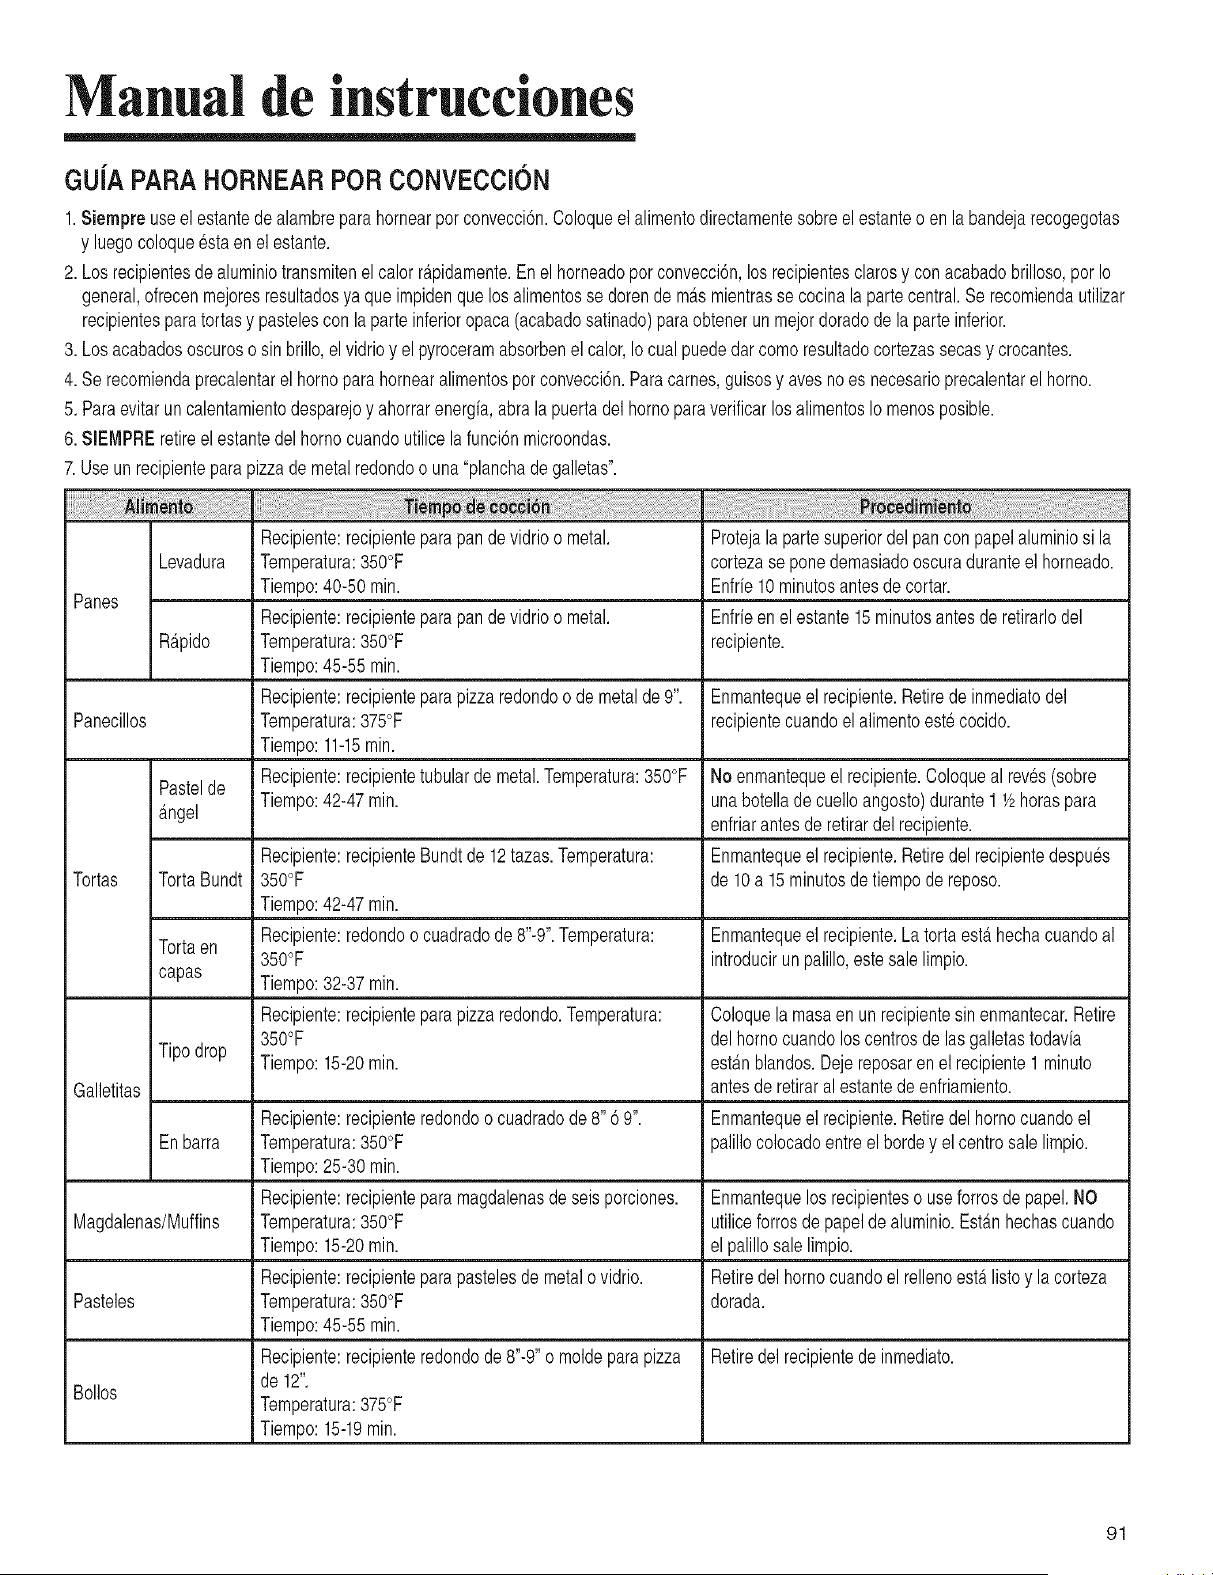
Manual de instrucciones
GU[A PARA HORNEAR POR CONVECCl6N
1.Siempreuseel estantedealambreparahornearperconvecci6n.Coloqueel alimentodirectamentesobreelestanteo en la bandejarecogegotas
y luegocoloque_staen el estante.
2. Losrecipientesde aluminiotransmitenel calorrapidamente.Enelhorneadoporconvecci6n,los recipientesclarosy conacabadobrilloso,por Io
general,ofrecenmejoresresultadosya que impidenquelosalimentosse dorende mAsmientrasse cocinala partecentral.Se recomiendautilizar
recipientesparatortasy pastelescon la parteinferioropaca(acabadosatinado)paraobtenerunmejordoradode laparteinferior.
3. Losacabadososcuroso sin brillo,el vidrioy el pyroceramabsorbenel calor,Io cualpuededarcomoresultadocortezassecasy crocantes.
4. Serecomiendaprecalentarelhomoparahornearalimentosper convecci6n.Paracarnes,guisesy avesno es necesarioprecalentarel homo.
5. Paraevitaruncalentamientodesparejoy ahorrarenergfa,abralapuertadel hornoparaverificarlos alimentosIo menosposible.
6. SlEMPREretireelestantedelhornocuandoutilicelafunci6nmicroondas.
7.Use un recipienteparapizzade metalredondoo una"planchade galletas".
Recipiente:recipienteparapandevidrioo metal.
Levadura Temperatura:350°F
Tiempo:40-50rain.
Panes
Recipiente:recipienteparapandevidrioo metal.
Rapido Temperatura:350°F
Tiempo:45-55rain.
Recipiente:recipienteparapizzaredondoo demetalde9".
Panecillos Temperatura:375°F
Tiempo:11-15rain.
Recipiente:recipientetubulardemetal.Temperatura:350°F
Tiempo:42-47min.
i!i!i!i!i!i7 i i!:!! i!i!i ii ii ii ii iiiiiiiiiiiiiiiiiiiiiiiii!ii!i!i i i i i i i i i i i i i:i:i:i:ii i i i!i!i
Protejala partesuperiordelpancon papelaluminiosi la
cortezaseponedemasiadooscuraduranteel horneado.
Enfrfe10minutesantesdecortar.
Enfrieen el estante15minutesantesde retirarlodel
recipiente.
Enmantequeel recipiente.Retirede inmediatodel
recipientecuandoelalimentoestecocido.
Pastelde No enmantequeelrecipiente.Coloquealrev_s(sobre
unabotellade cuelloangosto)durante1 1/2horaspara
Angel enfriarantesderetirardelrecipiente.
Recipiente:recipienteBundtde 12tazas.Temperatura: Enmantequeel recipiente.Retiredel recipientedespu_s
Tortas TortaBundt 350°F de 10a 15minutosdetiempode reposo.
Tiempo:42-47min.
Tortaen Recipiente:redondoo cuadradode 8"-9".Temperatura: Enmantequeel recipiente.Latorta estahechacuandoal
350°F introducirun palillo,este salelimpio.
capas Tiempo:32-37rain.
Recipiente:recipienteparapizzaredondo.Temperatura: Coloquela masaen unrecipientesinenmantecar.Retire
350°F delhornocuandoloscentrosdelasgalletastodavfa
Tipodrop Tiempo:15-20min. estanblandos.Dejereposarenel recipiente1 minuto
Galletitas antesde retiraralestantede enfriamiento.
Recipiente:recipienteredondoocuadradode 8" 6 9". Enmantequeel recipiente.Retiredel homocuandoel
Enbarra Temperatura:350°F palillocolocadoentreelbordey el centrosale limpio.
Tiempo:25-30min.
Recipiente:recipienteparamagdalenasdeseis porciones. Enmantequelosrecipienteso useforrosdepapel.NO
Magdalenas/Muffins Temperatura:350°F utiliceforrosde papelde aluminio.EstAnhechascuando
Tiempo:15-20min. elpalillosalelimpio.
Recipiente:recipienteparapastelesde metalo vidrio. Retiredel hornocuandoel rellenoestalisto y la corteza
Pasteles Temperatura:350°F dorada.
Tiempo:45-55rain.
Recipiente:recipienteredondode8"-9"o moldeparapizza Retiredelrecipientedeinmediato.
de12".
Belles
Temperatura:375°F
Tiempo:15-19min.
91
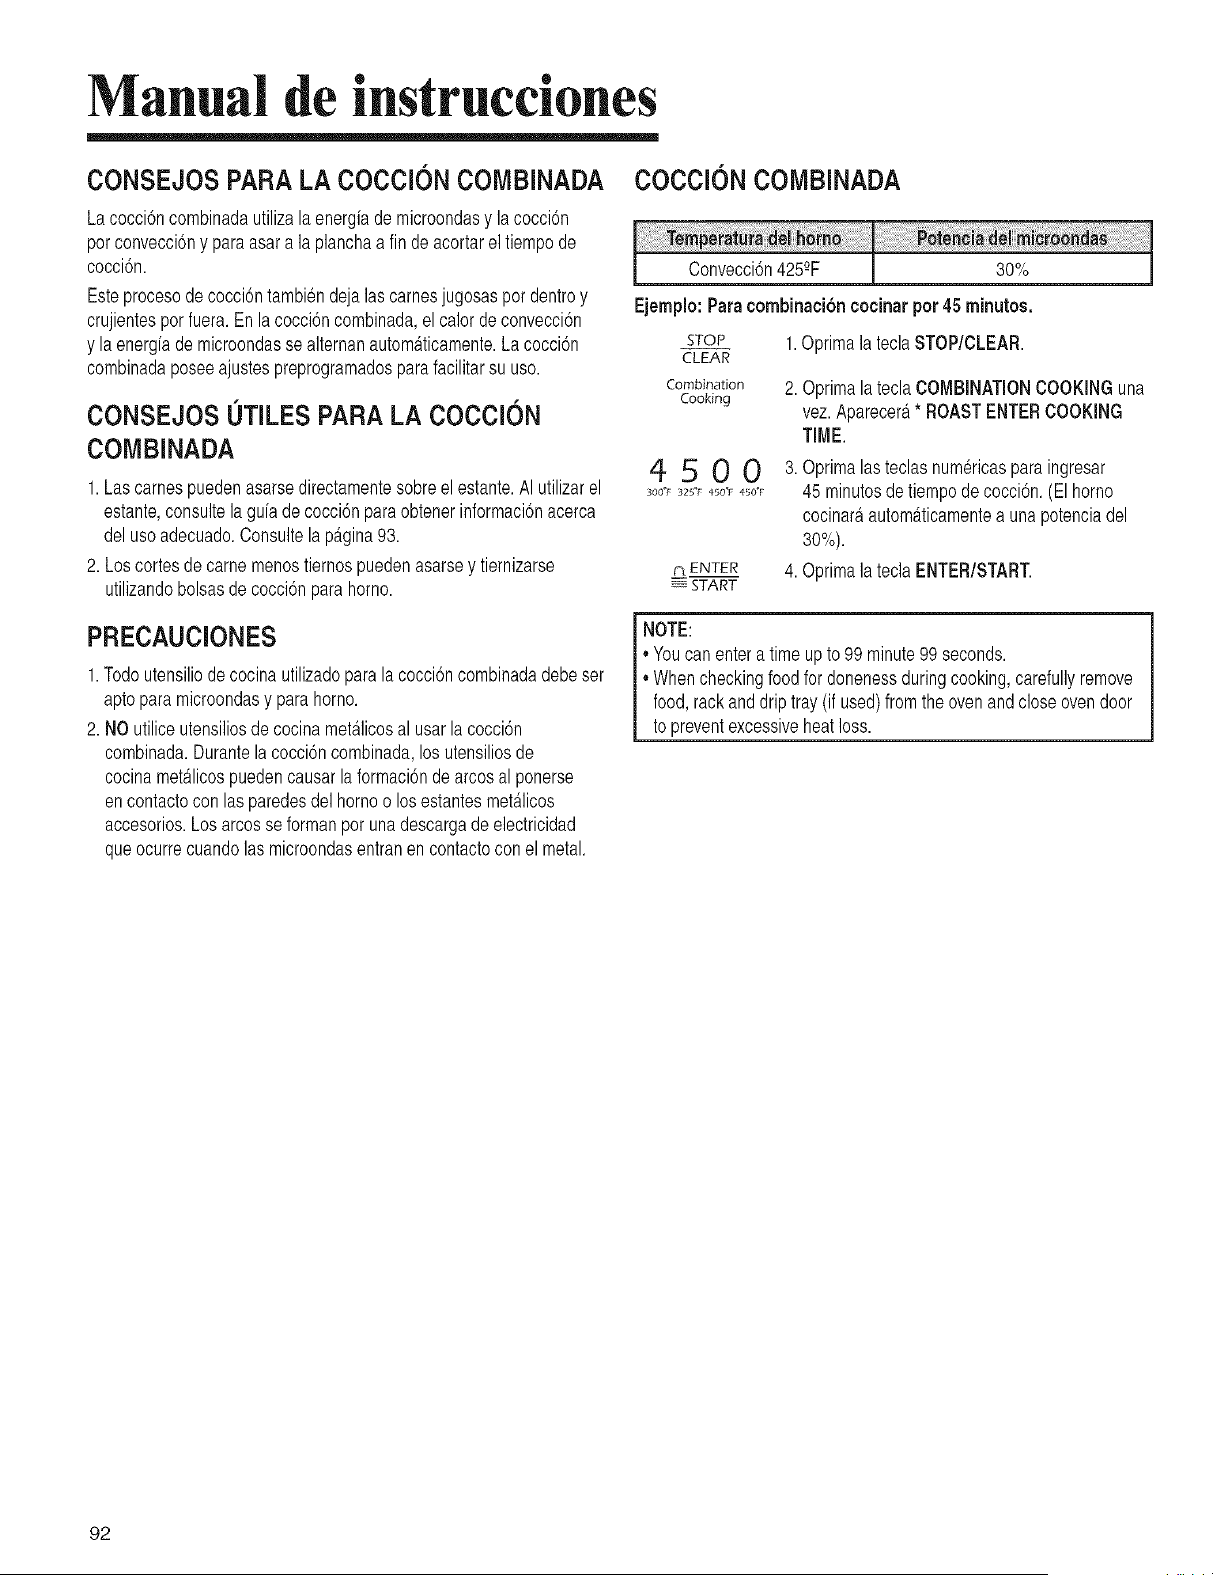
Manual de instrucciones
CONSEJOS PARA LA COCCION COMBINADA COCCION COMBINADA
La cocci6ncombinadautilizalaenergiade microondasy lacocci6n
porconvecci6ny paraasara la planchaafin deacortareltiempode
cocci6n.
Esteprocesode cocci6ntambiendeja lascarnesjugosaspor dentroy
crujientesporfuera.Enla cocci6ncombinada,el calorde convecci6n
y laenergfade microondasse alternanautomaticamente.La cocci6n
combinadaposeeajustespreprogramadosparafacilitarsu uso.
CONSEJOS 0TILES PARA LA COCCl0N
COMBINADA
1.Lascarnespuedenasarsedirectamentesobreelestante.AI utilizarel
estante,consultelagufade cocci6nparaobtenerinformaci6nacerca
delusoadecuado.Consultelap_tgina93.
2. Loscortesdecamemenostiernospuedenasarsey tiernizarse
utilizandobolsasde cocci6npara homo.
Convecci6n425_°F 30%
Ejemplo:Paracombinaci6n cocinar pot 45minutos.
STOP
CLEAR
Combination
Cooking
45OO
300°F 325°_ 450"1 450°f:
pt ENTER
_- START
1.Optimala teclaSTOP/CLEAR.
2. Oprimala teclaCOMBINATIONCOOKINGuna
vez.Aparecera* ROASTENTERCOOKING
TIME.
3. Oprimalasteclasnumericasparaingresar
45minutosdetiempode cocci6n.(El homo
cocinaMautom_tticamentea una potenciadel
30%).
4. Optimala teclaENTER/START.
PRECAUClONES
1.Todoutensiliodecocina utilizadoparala cocci6ncombinadadebeser
aptopara microondasy parahorno.
2. NO utiliceutensiliosde cocinametalicosalusarla cocci6n
combinada.Durantela cocci6ncombinada,los utensiliosde
cocinametalicospuedencausarla formaci6nde arcosalponerse
encontactocon lasparedesdel hornoo losestantesmetalicos
accesorios.Losarcosse formanpor una descargade electricidad
queocurrecuandolasmicroondasentranencontactoconel metal.
NOTE:
,,Youcanenteratimeupto 99 minute99 seconds.
* Whencheckingfoodfor donenessduringcooking,carefullyremove
food,rackanddriptray (if used)fromthe ovenandcloseovendoor
to preventexcessiveheatloss.
92
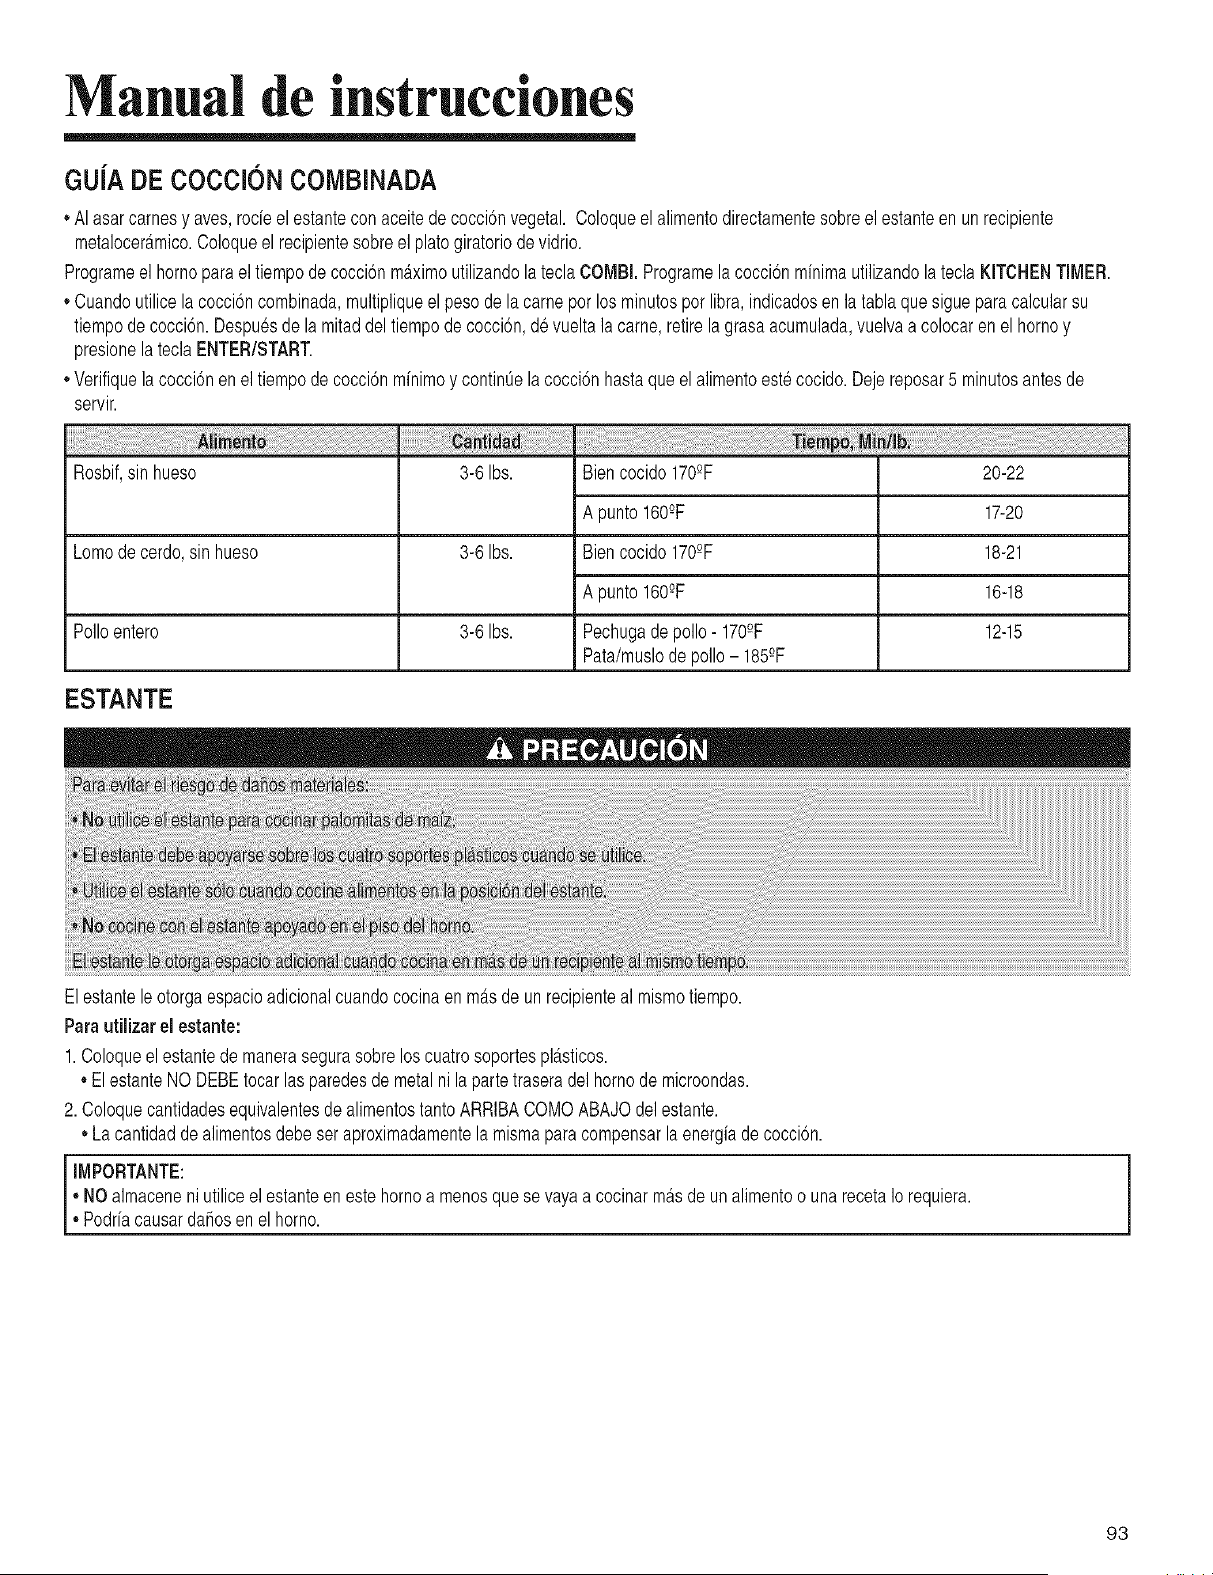
Manual de instrucciones
GU[A DE COCClON COIVIBINADA
* AIasarcarnesy aves,rocieel estanteconaceitede cocci6nvegetal. Coloqueelalimentodirectamentesobreelestanteenunrecipiente
metalocerimico.Coloqueelrecipientesobreelplatogiratoriode vidrio.
Programeel homoparaeltiempode cocci6nmiximo utilizandola tecla COMBI.Programelacocci6nminimautilizandola tecla KITCHENTIMER.
* Cuandoutilicelacocci6ncombinada,multipliqueel pesode lacameper losminutesper libra,indicadosen la tablaquesigueparacalcularsu
tiempode cocci6n.Despuesde la mitaddeltiempodecocci6n,devueltala came,retirela grasaacumulada,vuelvaa colocaren elhomoy
presionelateclaENTER/START.
Verifiquelacocci6nenel tiempode cocci6nminimoy contintJela cocci6nhastaqueel alimentoest6cocido.Dejereposar5 minutesantesde
servir.
Rosbif,sin hueso 3-6Ibs. Biencocido170_°F
3-6 Ibs.
Lomode cerdo,sin hueso
Apunto160_°F
Biencocido170_°F
Apunto160_°F
Polioentero 3-6Ibs. Pechugadepolio- 170-°F
Pata/muslode polio- 185-°F
ESTANTE
20-22
17-20
18-21
16-18
12-15
Elestanteleotorgaespacioadicionalcuandococinaenmis de unrecipienteal mismotiempo.
Parautiiizar el estante:
1.Coloqueelestantede manerasegurasobreloscuatrosoportesplisticos.
• El estanteNO DEBEtocarlasparedesde metalni la partetraseradel homode microondas.
2. Coloquecantidadesequivalentesde alimentostantoARRIBACOMOABAJOdel estante.
Lacantidaddealimentosdebe seraproximadamentelamismaparacompensarla energiade cocci6n.
NOalmacene ni utiliceel estante en este homo a menos que se vaya a cocinar mils de un alimentoo una receta Io requiera.
Podria causar dafios on el homo.
i
93
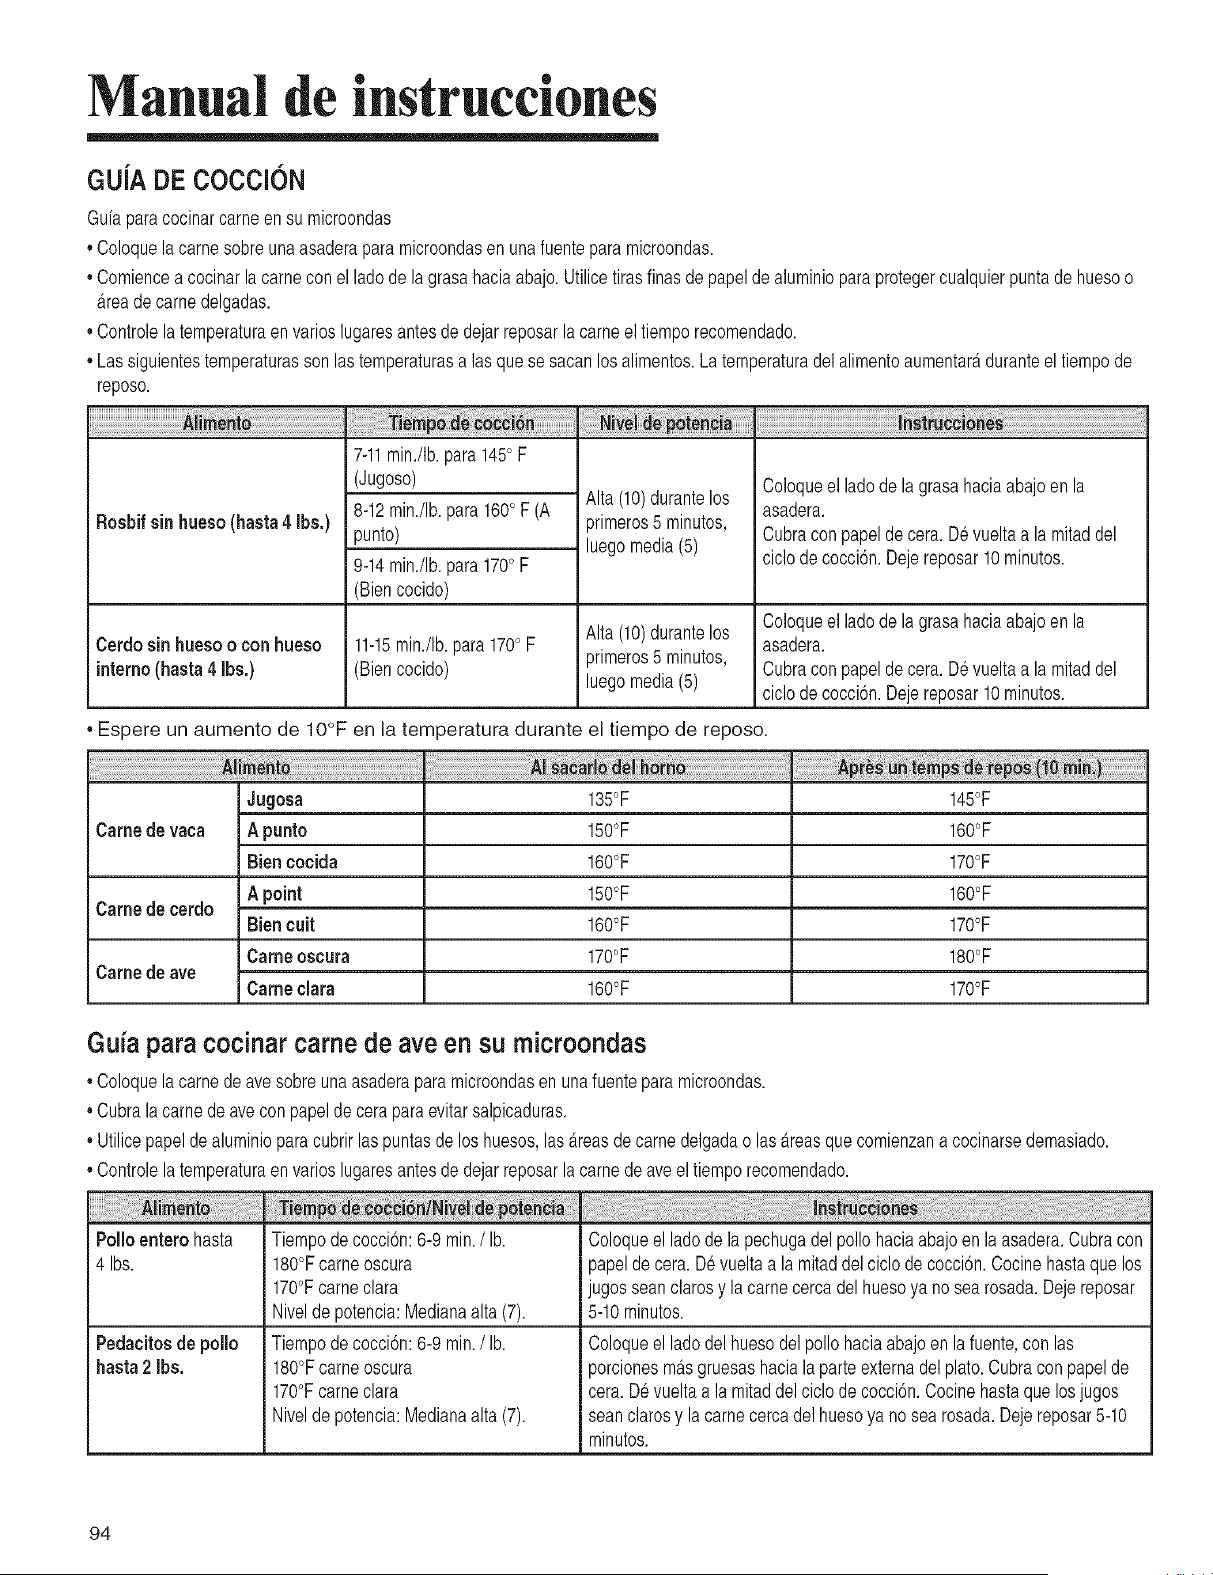
Manual de instrucciones
GU[A DE COCCiON
Gufaparacocinarcame en su microondas
• Coloquelacarnesobreunaasaderaparamicroondasenunafuentepara microondas.
• Comienceacocinarla carneconel ladodela grasahaciaabajo.Utilicetirasfinasde papelde aluminioparaprotegercualquierpuntade huesoo
Areade carnedelgadas.
• Controlelatemperaturaen varioslugaresantesde dejarreposarlacarneel tiemporecomendado.
• Lassiguientestemperaturassonlastemperaturasa las quesesacanlos alimentos.La temperaturadelalimentoaumentar_tduranteeltiempode
reposo.
::::::::::::::::::::::::::::::::::::::::::::::::::::::::::
7-11min./Ib,para1450F
(Jugoso) Coloqueel ladode la grasahaciaabajoen la
Rosbif sin hueso (hasta4 Ibs,) 8-12min./Ib,para1600F (A Alta (10)durantelos asadera.
punto) primeros5 minutos,
luegomedia(5) Cubraconpapelde cera. Devueltaa lamitaddel
9-14min./Ib,para170° F ciclode cocci6n.Dejereposar10 minutos.
(Biencocido)
Alta (10)durantelos Coloqueel ladode la grasahaciaabajoen la
Cerdosin hueso o con hueso 11-15min./Ib,para 170° F asadera.
interno (hasta4 Ibs.) (Biencocido) primeros5 minutos, Cubraconpapeldecera.Devueltaa la mitaddel
luegomedia(5) ciclode cocci6n.Dejereposar10minutos.
• Espere un aumento de IO°F en la temperatura durante el tiempo de reposo.
Came de vaca
Camedecerdo
Camedeave
Jugosa
A punto
Bien cocida
A point
Bien cult
Cameoscura
Cameclara
135°F
150°F
160°F
150°F
160°F
170°F
160°F
145°F
160°F
170°F
160°F
170°F
180°F
170°F
Guia para cocinar came de ave ell SU microondas
• Coloquelacame deavesobreunaasaderaparamicroondasen unafuenteparamicroondas.
• Cubrala camedeavecon papelde ceraparaevitarsalpicaduras.
• Utilicepapeldealuminioparacubrirlaspuntasdeloshuesos,las&reasde came delgadao las_,reasquecomienzana cocinarsedemasiado.
• Controlelatemperaturaen varioslugaresantesde dejarreposarlacamede aveeltiemporecomendado.
Polioentero hasta
4 Ibs.
Pedacitosde polio
hasta2 Ibs.
Tiempodecocci6n:6-9 min./lb.
180°Fcame oscura
170°Fcameclara
Niveldepotencia:Medianaalta (7).
Tiempodecocci6n:6-9 min./lb.
180°Fcame oscura
170°Fcameclara
Niveldepotencia:Medianaalta (7).
i Coloqueel ladode la pechugadelpoliohaciaabajoen laasadera.Cubracon
papeldecera.D_vueltaa la mitaddelciclo de cocci6n.Cocinehastaque los
jugosseanclarosy la carnecercadel huesoyano sea rosada.Dejereposar
l 5-10minutos.
i Coloqueel ladodel huesodelpoliohaciaabajoenla fuente,con las
l porcionesmasgruesashaciala parteexternadel plato.Cubraconpapelde
cera.Devueltaa la mitaddelciclo de cocci6n.Cocinehastaque losjugos
seanclarosy la carnecercadel huesoya no searosada.Dejereposar5-10
minutos.
94
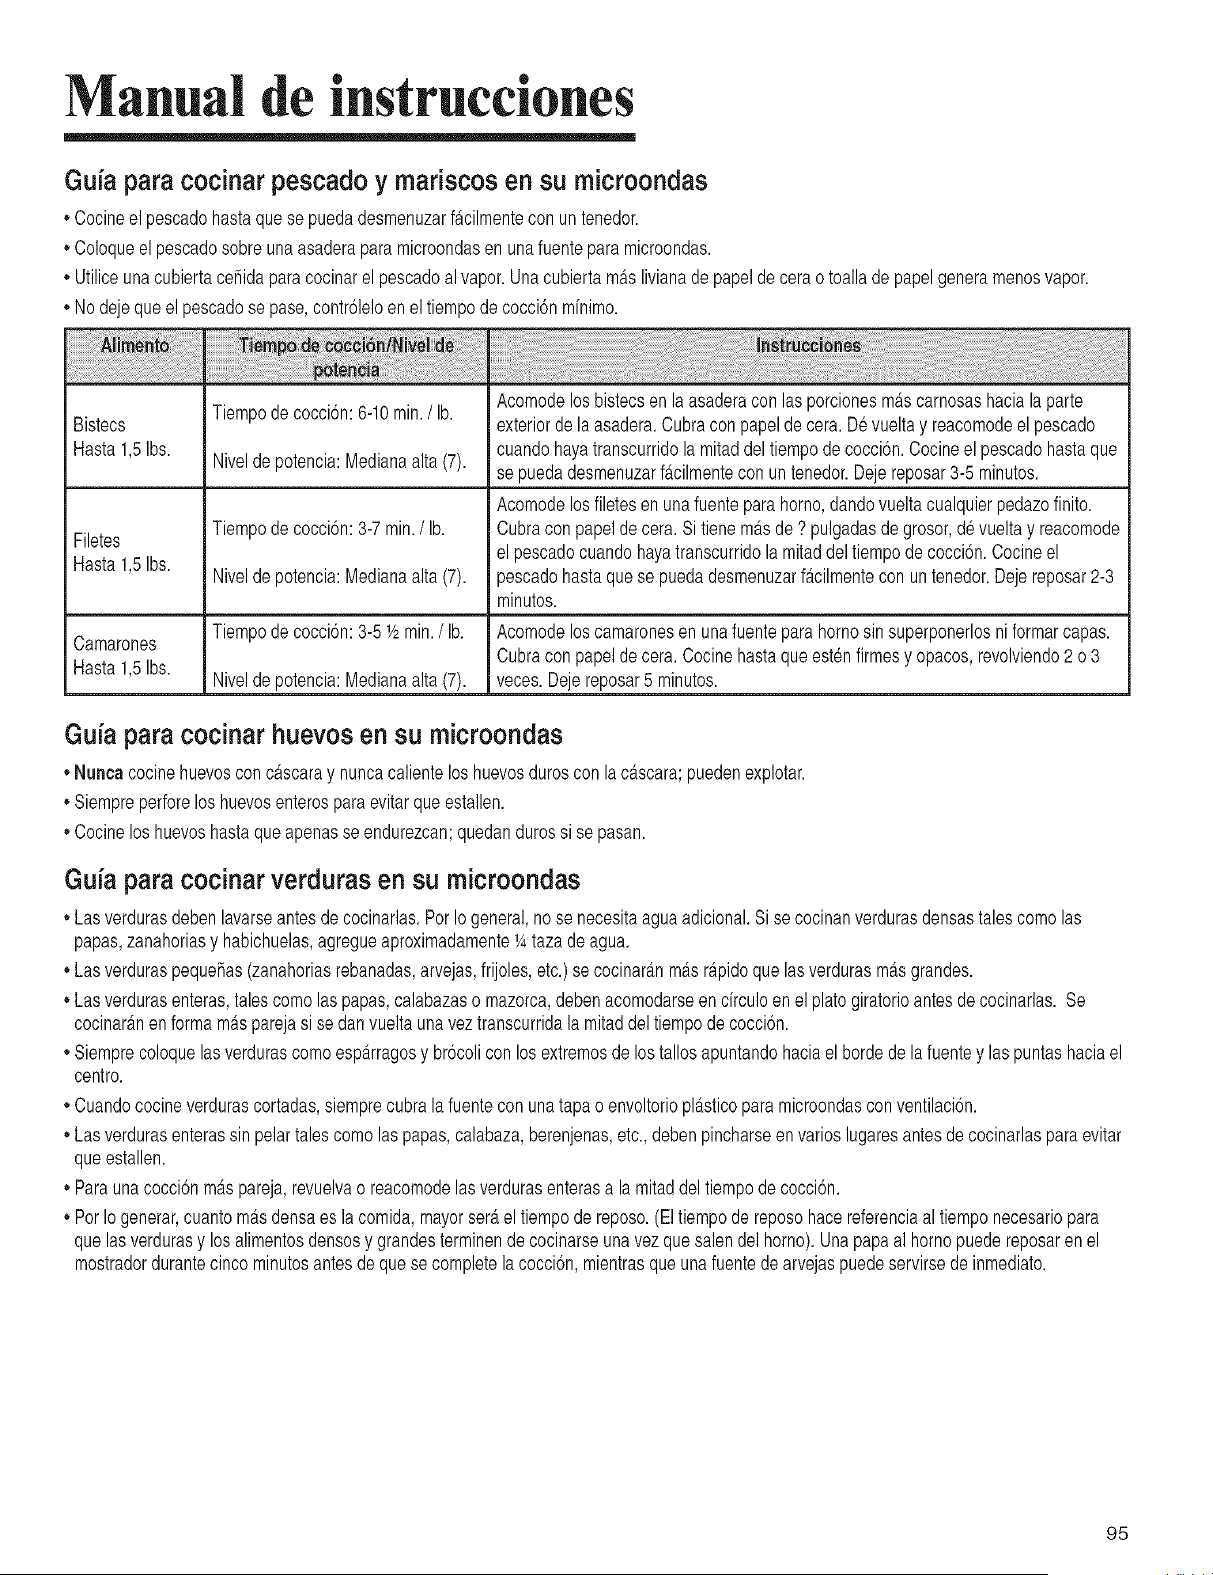
Manual de instrucciones
Gu{aparacocinarpescadoy mariscos en su microondas
,,Cocineel pescadohastaque se pueOadesmenuzarfacilmenteconunteneOor.
• Coloqueel pescadosobreunaasaderaparamicroondasen unafuentepara microondas.
• Utiliceunacubiertace_idaparacocinarel pescadoalvapor.Unacubiertamaslivianadepapelde cerao toallade papelgeneramenosvapor.
• Nodejequeel pescadose pase,contr61eloen eltiempode cocci6nmfnimo.
Bistecs
Hasta1,5Ibs.
Filetes
Hasta1,5Ibs.
Camarones
Hasta1,5Ibs.
Tiempodecocci6n:6-10min./lb.
Niveldepotencia:Medianaalta (7).
Tiempodecocci6n:3-7min./lb.
Niveldepotencia:Medianaalta (7).
Tiempodecocci6n:3-51/2min./lb.
Niveldepotencia:Medianaalta (7).
Acomodelosbistecsen laasaderacon lasporcionesmascarnosashaciala parte
exteriordela asadera.Cubracon papelde cera.D6vueltay reacomodeelpescado
cuandohayatranscurridola mitaddel tiempodecocci6n.Cocineel pescadohastaque
se puedadesmenuzarfacilmentecon un tenedor.Dejereposar3-5 minutos.
Acomodelosfiletesenuna fuentepara homo,dandovueltacualquierpedazofinito.
Cubraconpapeldecera. Si tienemAsde? pulgadasdegrosor,d_vueltay reacomode
elpescadocuandohayatranscurridolamitaddel tiempode cocci6n.Cocineel
pescadohastaquese puedadesmenuzarfAcilmentecon untenedor.Dejereposar2-3
minutos.
Acomodeloscamaronesenuna fuentepara homosin superponerlosni formarcapas.
Cubraconpapeldecera. Cocinehastaque est6nfirmesy opacos,revolviendo2 o 3
veces.Dejereposar5 minutos.
Guia para cocinar huevos en su microondas
=Nuncacocinehuevoscon cascaray nuncacalienteloshuevosduroscon lacascara;puedenexplotar.
• Siempreperforelos huevosenterosparaevitarque estallen.
• Cocineloshuevoshastaqueapenasse endurezcan;quedandurossi sepasan.
Guia para cocinar verduras en su microondas
• Lasverdurasdebenlavarseantesde cocinarlas.Por Iogeneral,no se necesitaaguaadicional.Si se cocinanverdurasdensastalescomolas
papas,zanahoriasy habichuelas,agregueaproximadamente1Ataza deagua.
• LasverduraspequeRas(zanahoriasrebanadas,arvejas,frijoles,etc.)secocinarAnmAsrapidoque lasverdurasmAsgrandes.
• Lasverdurasenteras,talescomolas papas,calabazaso mazorca,debenacomodarseendrculo enel platogiratorioantesde cocinarlas.Se
cocinarAnenformamasparejasi se danvueltaunaveztranscurridala mitaddel tiempodecocci6n.
• SiemprecoloquelasverdurascomoespArragosy br6colicon losextremosde lostallosapuntandohaciael bordedela fuentey laspuntashaciael
centro.
• Cuandococineverdurascortadas,siemprecubrala fuentecon unatapao envoltorioplAsticoparamicroondasconventilaci6n.
• Lasverdurasenterassin pelartales comolaspapas,calabaza,berenjenas,etc., debenpincharseenvarioslugaresantesdecocinarlasparaevitar
queestallen.
• Parauna cocci6nmAspareja,revuelvao reacomodelasverdurasenterasa la mitaddel tiempode cocci6n.
• Por Iogenerar,cuantomAsdensaesla comida,mayorserAel tiempode reposo.(Eltiempode reposohacereferenciaal tiemponecesariopara
quelasverdurasy losalimentosdensosy grandesterminende cocinarseunavezquesalendel homo).Unapapaal homopuedereposarenel
mostradordurantecincominutosantesde quesecompletelacocci6n,mientrasqueunafuentedearvejaspuedeservirsedeinmediato.
95
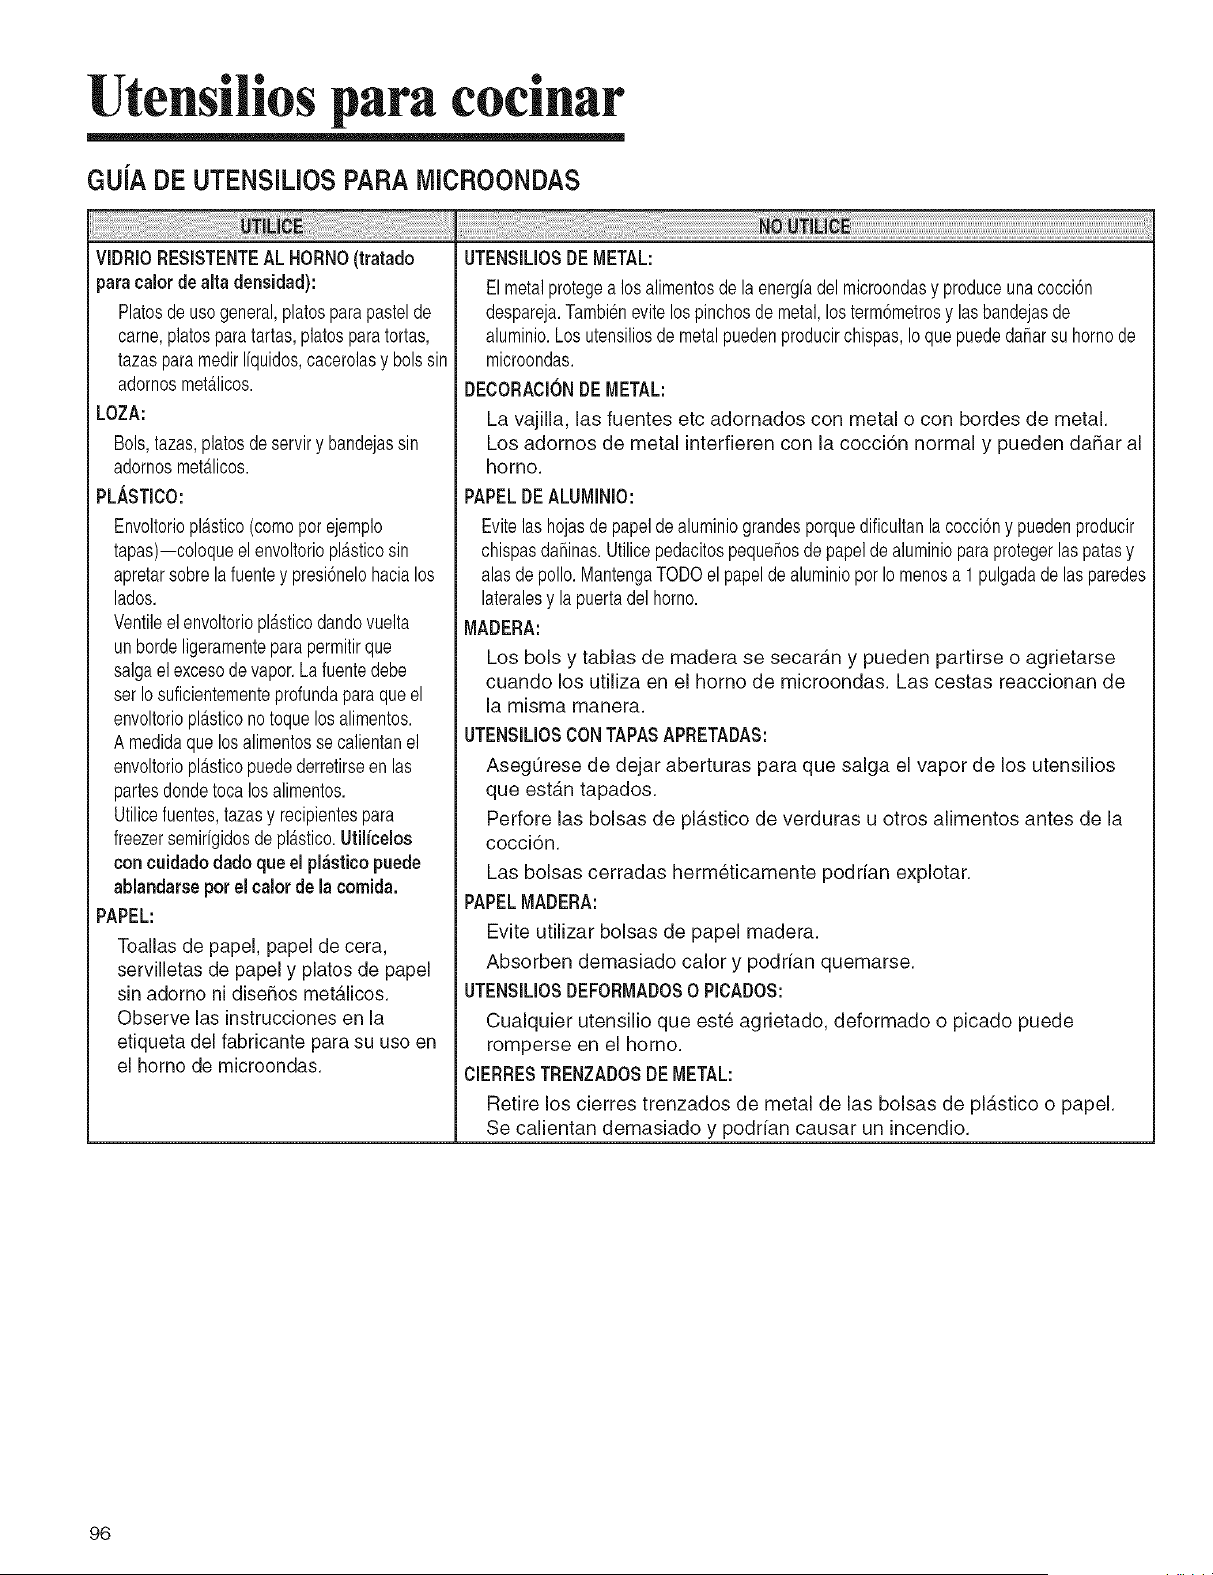
UtensHios para cocinar
GU[A DE UTENSILIOS PARA MICROONDAS
VIDRIORESISTENTEAL HORNO(tratado
paracalorde altadensidad):
Platesde usegeneral,platosparapastelde
came,platosparatartas,platosparatortas,
tazasparamedirIfquidos,cacerolasy bolssin
adornosmetalicos.
LOZA:
Bols,tazas,platosde serviry bandejassin
adornosmet_tlicos.
PLASTICO:
Envoltorioplastico(comeper ejemplo
tapas)--coloqueel envoltorioplasticosin
apretarsobrela fuentey presi6nelohacialos
lados.
Ventileelenvoltoriopl_tsticodandovuelta
unbordeligeramenteparapermitirque
salgael excesode vapor.Lafuentedebe
serIosuficientementeprofundaparaqueel
envoltoriopl_tsticonotoquelosalimentos.
Amedidaquelosalimentossecalientanel
envoltoriopl_.sticopuedederretirseen las
partesdondetoca losalimentos.
Utilicefuentes,tazasy recipientespara
freezersemirfgidosdepl_tstico.Utilicelos
con cuidado dadoque el pl_sticopuede
abiandarseper el calor de la comida.
PAPEL:
Toallas de papel, papel de cera,
servilletas de papel y plates de papel
sin adorno ni disefios metalicos.
Observe las instrucciones en la
etiqueta del fabricante para su use en
el homo de microondas.
UTENSILIOSDEMETAL:
Elmetalprotegea losalimentosde la energfadelmicroondasy produceunacocci6n
despareja.Tambienevite lospinchosde metal,los term6metrosy lasbandejasde
aluminio.Losutensiliosdemetalpuedenproducirchispas,Ioque puededaSarsu homode
microondas.
DECORAClONDEMETAL:
La vajilla, las fuentes etc adornados con metal o con bordes de metal.
Los adornos de metal interfieren con la cocci6n normal y pueden daSar al
horno.
PAPELDEALUMINIO:
Evitelas hojasde papelde aluminiograndesporquedificultanlacocci6ny puedenproducir
chispasdaSinas.UtilicepedacitospequeSosde papelde aluminioparaprotegerlasparasy
alasde polio.MantengaTODOel papelde aluminioporIomenosa 1 pulgadade las paredes
lateralesy la puertadelhorno.
MADERA:
Los bols y tablas de madera se secaran y pueden partirse o agrietarse
cuando los utiliza en el homo de microondas. Las cestas reaccionan de
la misma manera.
UTENSILIOSCONTAPASAPRETADAS:
AsegQrese de dejar aberturas para que salga el vapor de los utensilios
que est_.n tapados.
Perfore las bolsas de plastico de verduras u otros alimentos antes de la
cocci6n.
Las bolsas cerradas hermeticamente podrian explotar.
PAPELMADERA:
Evite utilizar bolsas de papel madera.
Absorben demasiado calory podrian quemarse.
UTENSILIOSDEFORMADOS0 PICADOS:
Cualquier utensilio que este agrietado, deformado o picado puede
romperse en el horno.
ClERRESTRENZADOSDEMETAL:
Retire los cierres trenzados de metal de las bolsas de pl_tstico o papel.
Se calientan demasiado y podrfan causar un incendio.
96
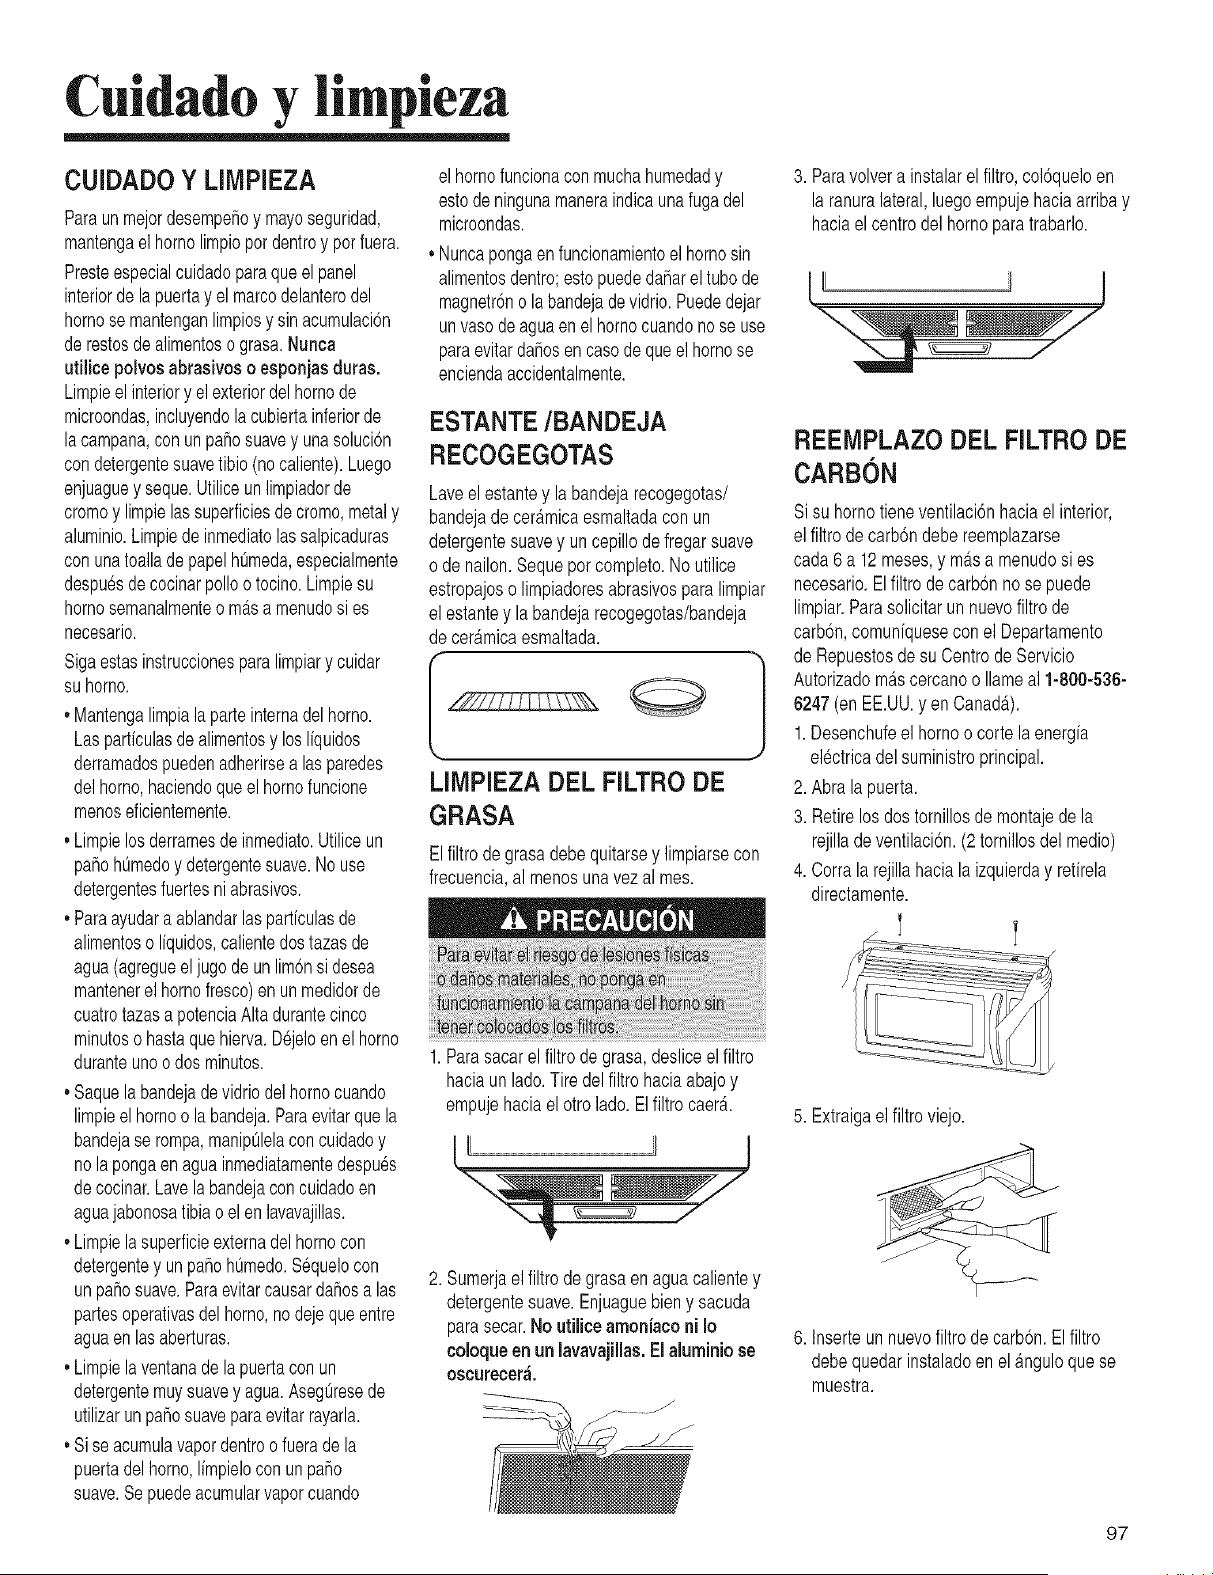
Cuidado y I pieza
CUIDADO Y LIMPIEZA
Paraunmejordesempei_oy mayoseguridad,
mantengaelhornolimpiopordentroy por fuera.
Presteespecialcuidadoparaqueel panel
interiordelapuertay el marcodelanterodel
hornose mantenganlimpiosy sinacumulaci6n
derestosdealimentoso grasa.Nunca
utilice polvos abrasivoso esponjasduras.
Limpieelinteriory elexteriordelhornode
microondas,incluyendolacubiertainferiorde
lacampana,conun pasosuavey unasoluci6n
condetergentesuavetibio(nocaliente).Luego
enjuaguey seque.Utiliceunlimpiadorde
cromoy limpielassuperficiesdecromo,metaly
aluminio.Limpiede inmediatolassalpicaduras
conunatoalladepapelh_meda,especialmente
despu_sde cocinarpolioo tocino.Limpiesu
homosemanalmenteo m_tsa menudosi es
necesario.
Sigaestasinstruccionesparalimpiary cuidar
suhorno.
,,Mantengalimpiala parteinternadel homo.
Lasparticulasde alimentosy losliquidos
derramadospuedenadherirsealas paredes
delhomo,haciendoqueelhornofuncione
menoseficientemente.
,,Limpielosderramesdeinmediato.Utiliceun
pahohtJmedoy detergentesuave.Nouse
detergentesfuertesniabrasivos.
,,Paraayudara ablandarlasparticulasde
alimentoso liquidos,calientedostazasde
agua(agregueeljugode unlim6nsi desea
mantenerelhornofresco)enunmedidorde
cuatrotazasapotenciaAltadurantecinco
minuteso hastaque hierva.D_jeloen elhorno
duranteunoodosminutes.
,,Saquela bandejadevidriodelhornocuando
limpieel hornoo la bandeja.Paraevitarquela
bandejase romp&manipulelaconcuidadoy
nolapongaen aguainmediatamentedespu_s
decocinar.Lavelabandejaconcuidadoen
aguajabonosatibiao elenlavavajillas.
,,Limpielasuperficieexternadelhornocon
detergentey unpahohtJmedo.S_quelocon
unpai_osuave.Paraevitarcausardai_osalas
partesoperativasdel homo,no dejequeentre
aguaen lasaberturas.
,,Limpielaventanade la puertaconun
detergentemuysuavey agua.AsegQresede
utilizarunpahosuaveparaevitarrayarla.
,,Siseacumulavapordentroo fueradela
puertadelhomo,limpieloconun paho
suave.Sepuedeacumularvaporcuando
elhornofuncionaconmuchahumedady
estodeningunamaneraindicaunafugadel
microondas.
,,Nuncapongaen funcionamientoel hornosin
alimentosdentro;estopuededaharel tubode
magnetr6nolabandejadevidrio.Puededejar
unvasodeaguaenel hornocuandono se use
paraevitardai_osen casodequeel hornose
enciendaaccidentalmente.
ESTANTE/BANDEJA
RECOGEGOTAS
Laveel estantey la bandejarecogegotas/
bandejade ceramicaesmaltadaconun
detergentesuavey un cepillodefregarsuave
o de nailon.Sequepor completo.No utilice
estropajosolimpiadoresabrasivospara limpiar
el estantey la bandejarecogegotas/bandeja
deceramicaesmaltada.
LIMPIEZA DEL FILTRO DE
GRASA
Elfiltrode grasadebequitarsey limpiarsecon
frecuencia,al menosunavez al mes.
1.Parasacarel filtro degrasa,desliceelfiltro
haciaun lado.Tiredelfiltrohaciaabajoy
empujehaciael otrolado.El filtrocaer_t.
Sumerjael filtrode grasaen aguacalientey
detergentesuave.Enjuaguebieny sacuda
parasecar.No utilice amoniaconi Io
coloque enun lavavajillas.Elaluminiose
oscurecer&
3. Paravolvera instalarel filtro,col6queloen
laranuralateral,luegoempujehaciaarribay
haciael centrodelhornoparatrabarlo.
REEMPLAZO DEL FILTRO DE
CARBON
Sisu homotieneventilaci6nhaciael interior,
el filtrode carb6ndebereemplazarse
cada6 a 12meses,y m_.sa menudosi es
necesario.Elfiltrode carb6nnose puede
limpiar.Parasolicitarunnuevofiltrode
carb6n,comuniqueseconel Departamento
de Repuestosde su CentrodeServicio
Autorizadomascercanoo Ilameal 1-800-536-
6247(enEE.UU.yen Canada).
1.Desenchufeel hornoo cortela energia
electricadelsuministroprincipal.
2. Abralapuerta.
3. Retirelos dostornillosdemontajede la
rejilladeventilaci6n.(2tornillosdel medio)
4. Corrala rejillahacialaizquierday retirela
directamente.
y_ .........
5. Extraigael filtroviejo.
6. Inserteun nuevofiltrodecarb6n.El filtro
debequedarinstaladoen elanguloque se
muestra.
97
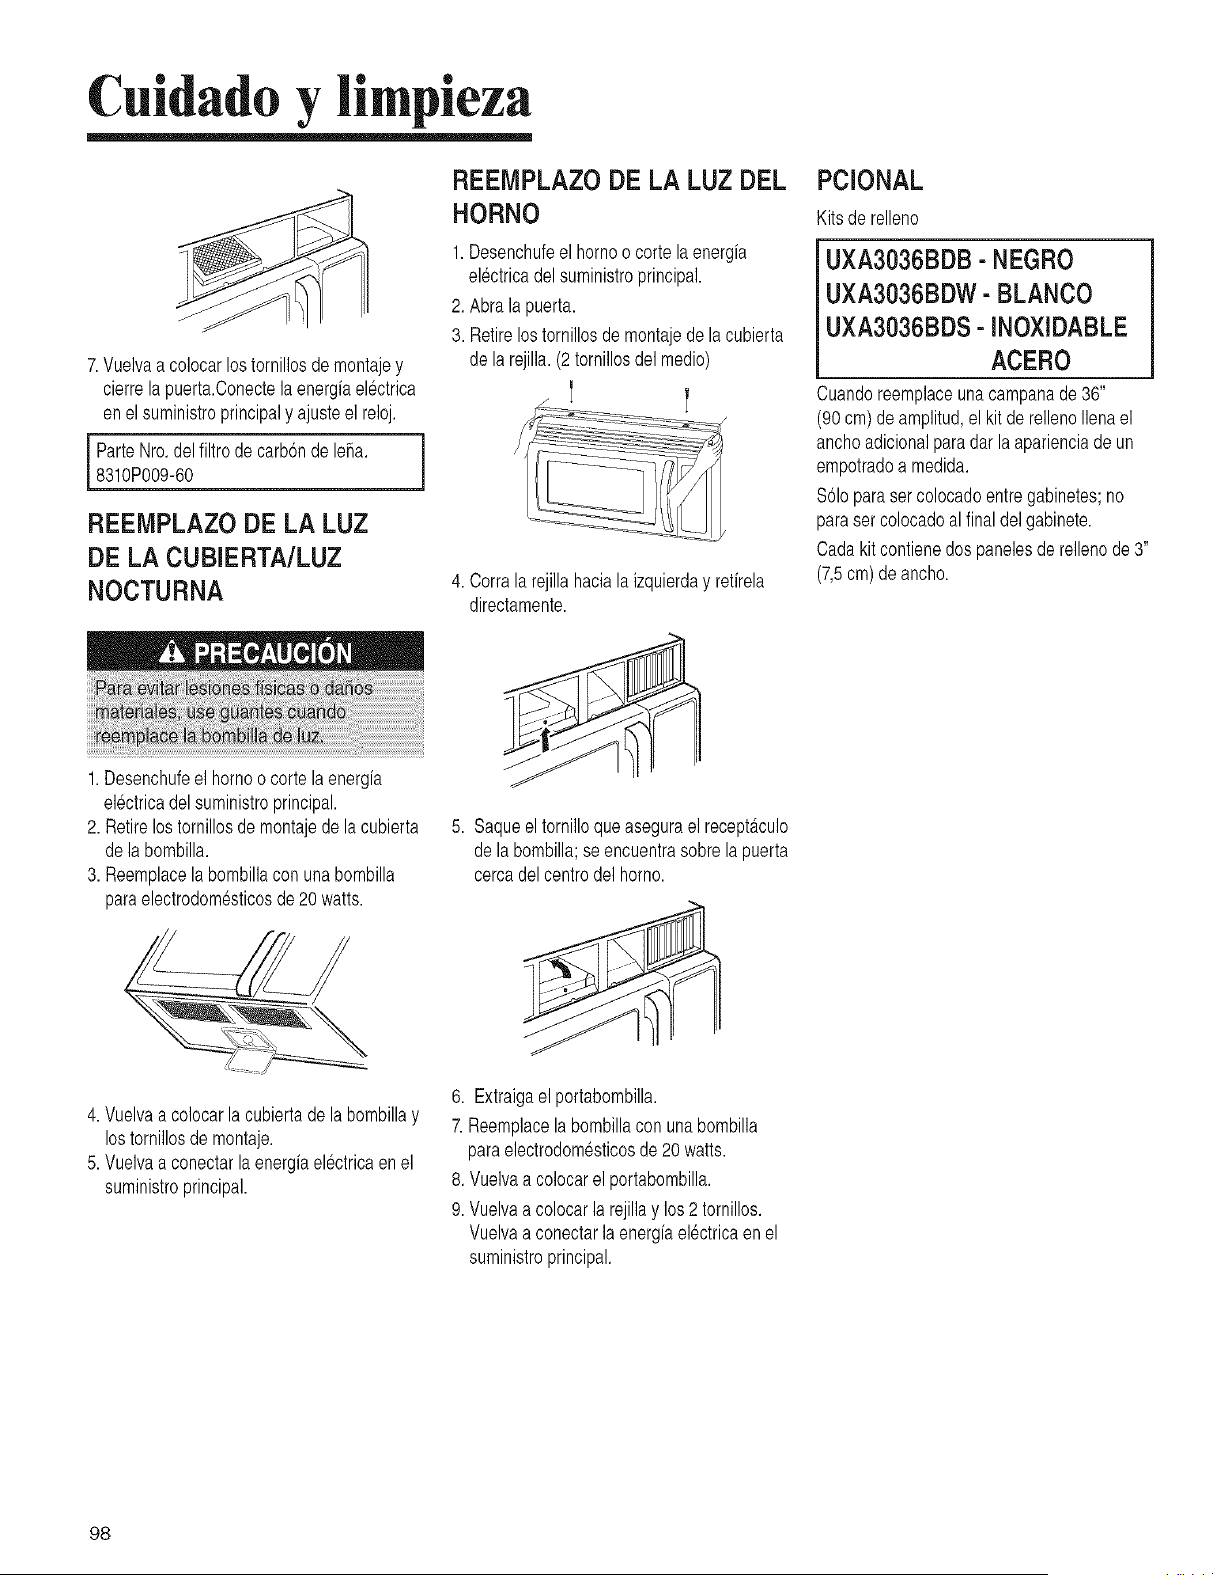
Cuidado y limpieza
7.Vuelvaacolocarlostornillosde montajey
cierrela puerta.Conectela energiaelectrica
en el suministroprincipaly ajusteel reloj.
ParteNro.del filtrodecarb6nde leSa.
8310P009-60
REEIMIPLAZODE LA LUZ
DE LA CUBIERTA/LUZ
NOCTURNA
REEIVIPLAZODE LA LUZ DEL
HORNO
1.Desenchufeel homoo cortelaenergfa
el6ctricadelsuministroprincipal.
2. Abralapuerta.
3. Retirelos tornillosde montajedelacubierta
delarejilla.(2tornillosdelmedio)
4. Corrala rejillahacialaizquierday retfrela
directamente.
PCIONAL
Kitsde relleno
UXA3036BDB- NEGRO
UXA3036BDW-BLANCO
UXA3036BDS- INOXIDABLE
ACERO
Cuandoreemplaceuna campanade 36"
(90cm)de amplitud,el kit de rellenoIlenael
anchoadicionalparadar la aparienciade un
empotradoa medida.
S61oparaser colocadoentregabinetes;no
paraset colocadoalfinaldelgabinete.
Cadakit contienedos panelesderellenode3"
(7,5cm) deancho.
1.Desenchufeel hornoo cortelaenergia
electricadelsuministroprincipal.
2. Retirelostornillosde montajede la cubierta
dela bombilla.
3. Reemplacela bombillacon unabombilla
paraelectrodom_sticosde 20watts.
5. Saqueel tornilloqueasegurael recept_.culo
delabombilla;se encuentrasobrela puerta
cercadelcentredel homo.
4. Vuelvaa colocarlacubiertade labombillay
los tornillosde montaje.
5. Vuelvaa conectarla energiael_ctricaenel
suministroprincipal.
6. Extraigael portabombilla.
7.Reemplacela bombillacon unabombilla
paraelectrodomesticosde 20 watts.
8.Vuelvaa colocarel portabombilla.
9.Vuelvaacolocarlarejillay los2 tornillos.
Vuelvaa conectarla energfael_ctricaen el
suministroprincipal.
98
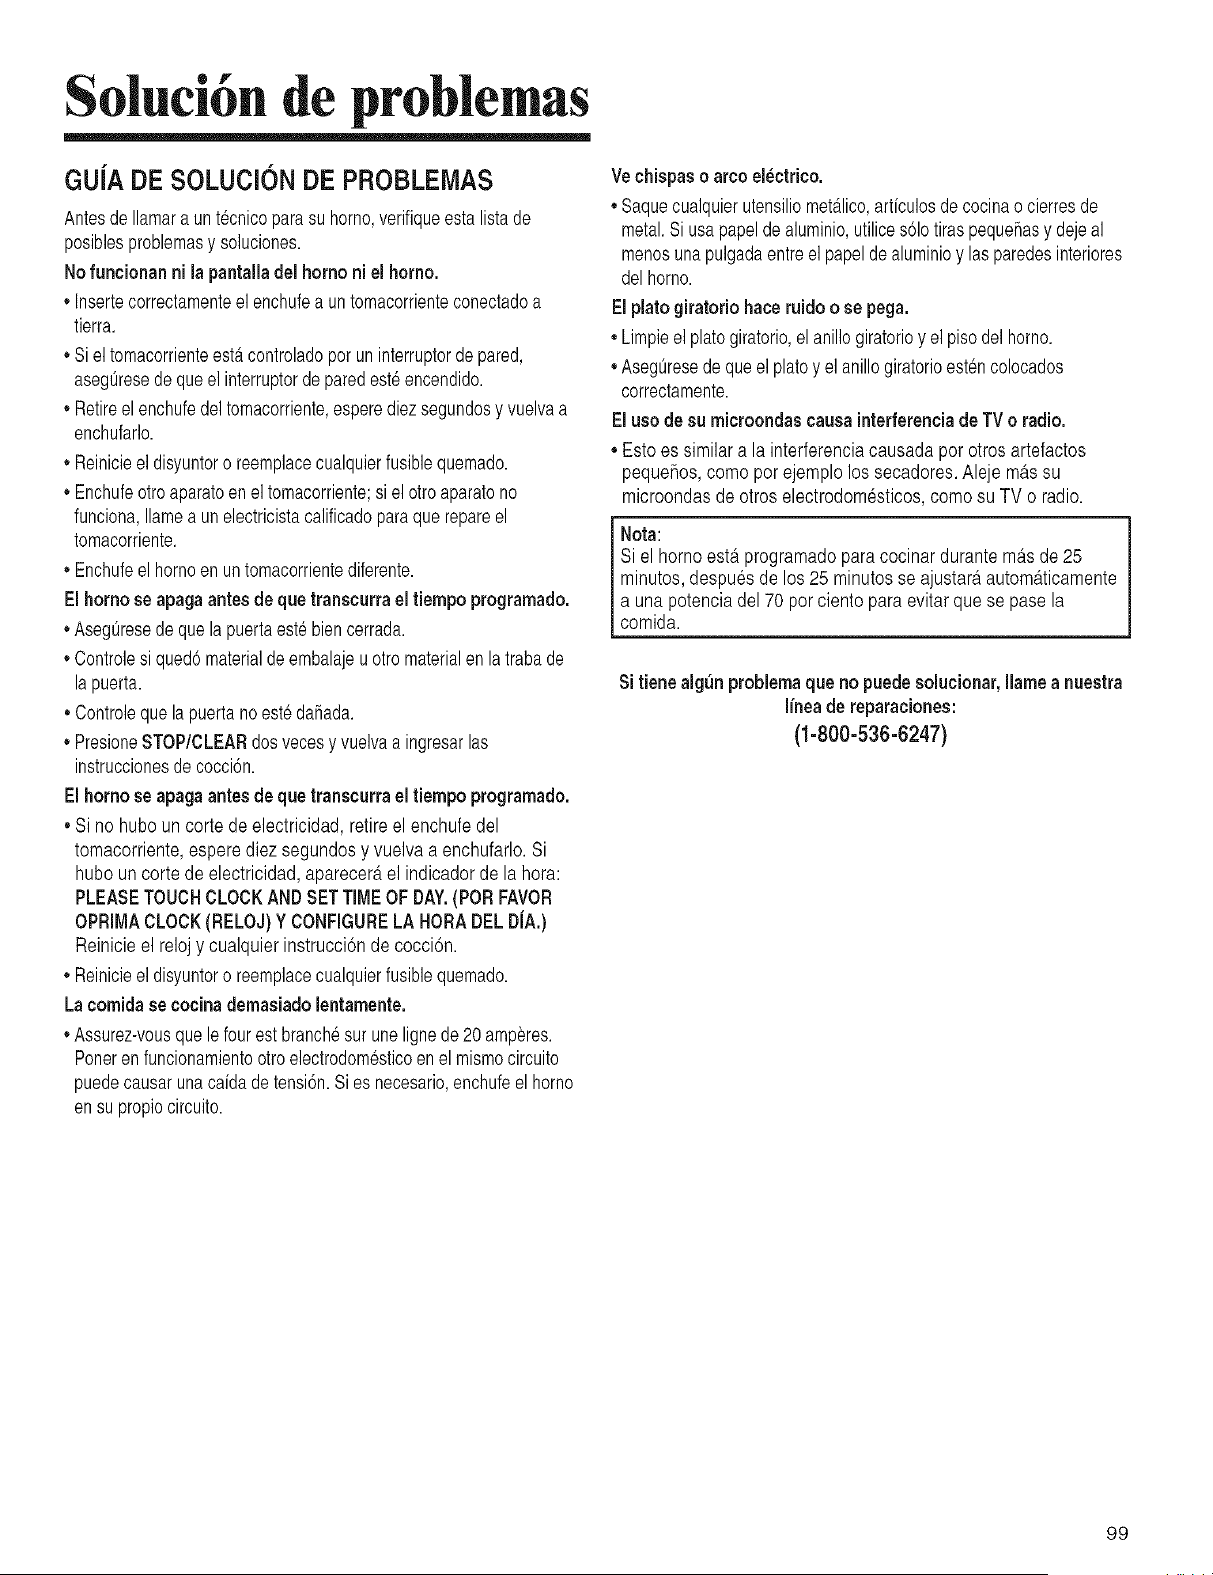
Soluci6n de problemas
GUJADE SOLUCION DE PROBLEMAS
AntesdeIlamara unt6cnicopara su homo,verifiqueesta listade
posiblespreblemasy sohciones.
Nofuncionan ni la pantailadel homo niel homo.
* Insertecorrectamenteel enchufea untomacorrienteconectadoa
tierra.
* Siel tomacorrienteestercontroladoperun interruptorde pared,
asegOresedequeel interrupterde paredesteencendido.
Retireelenchufedeltomacorriente,esperediezsegundosy vuelvaa
enchufarlo.
* Reinicieeldisyuntoro reemplacecualquierfusiblequemado.
* Enchufeotroaparatoen eltomacorriente;si el otroaparatono
funciona,Ilamea un electricistacalificadoparaque repareel
tomacorriente.
Enchufeel hornoenuntomacorrientediferente.
El homo se apagaantesdeque transcurra el tiempo programado.
* AsegOresedequela puertaestebiencerrada.
* Controlesi qued6materialdeembalajeuotromaterialen la trabade
la puerta.
, Controleque lapuertano est_da_ada.
* PresioneSTOP/CLEARdosvecesy vuelvaa ingresarlas
instruccionesde cocci6n.
E[ homo seapagaantesde que transcurra el tiempo programado.
. Si no hubo un corte de electricidad, retireel enchufedel
tomacorriente,esperediez segundosy vuelva a enchufarlo.Si
hubouncorte de electricidad,aparecer_,el indicadorde la hera:
PLEASETOUCHCLOCKANDSETTiMEOF DAY.(PORFAVOR
OPRIMACLOCK(RELOJ)Y CONFIGURELA HORADEL DJA.)
Reinicieel relojy cualquierinstruccion de cocci6n.
* Reinicieeldisyuntoro reemplacecualquierfusiblequemado.
Lacomida se cocina demasiadolentamente.
=Assurez-vousquelefourest branchesur unelignede 20 amperes.
Poneren funcionamientootroelectrodom6sticoenel mismocircuito
puedecausarunacaidadetensi6n.Sies necesario,enchufeel homo
ensu propiocircuito.
Vechispas o arcoel_ctrico.
• Saquecualquierutensiliomet_.lico,articulosdecocinao cierresde
metal.Si usapapeldealuminio,utilices61otiras peque_asy dejeal
menosunapulgadaentreelpapelde aluminioy lasparedesinteriores
del homo.
EIplatogiratoriohaceruido o se pega.
• Limpieel platogiratorio,el anillogiratorioy el pisodel horno.
• AsegOresedeque el platoy el anillogiratorioest_ncolocados
oorrectamente.
Eluse desu microondas causa interferenciade TVo radio.
• Esto es similar a la interferenciacausada pot otros artefactos
pequefios,como per ejemplolos secadores.Aleje mb.ssu
microondasde otros electrodomesticos,come su TV o radio.
Nota:
Si el homo estb.programadopara cocinar durantemb.sde 25
minutos,despuesde los 25 minutesse ajustarb,automb.ticamente
a una potenciadel 70 per ciento para evitarque se pase la
comida.
Si tiene algOnprobiemaque no puedesolucionar, liarnea nuestra
[ineade reparaciones:
(1=800=536=6247)
99
Garan6a
no cubren estas garantias
• El reemplazode losfusiblesdelacasa,el reajustede disyuntoreso el
arreglodelcableadoo las caherfasde la casa.
,,El mantenimientoy limpiezanormaldelproducto,incluyendolas
bombillasde luz.
,,Losproductosa losque se leshayanquitadoo alteradolosntJmeros
deserieoriginales,o enlosque nose puedandeterminarf_.cilmente.
,,Losproductoscompradosparausecomercial,industrial,paraalquiler
o leasing.
,,Losproductosque seencuentranfuerade losEstadosUnidoso
CanadA.
,,Loscargosper serviciopremium,si se lesolicitaal t_cnicoque realice
unareparaci6nadicionalal servicionormalo fuerade las horaso el
Areade servicionormal.
,,Losajustesdespu6sdel primerabe.
,,Las reparacionesqueresultandeIo siguiente:
- Instalaci6n,sistemade escapeomantenimientoinadecuados.
- Cualquiermodificaci6n,alteraci6no ajusteno autorizadoporel
fabricante.
- Accidente,usoincorrecto,abuse,incendio,inundaci6n,o case
fortuito.
- Conexionesa corrienteel_ctrica,suministrode tensi6n,o suministro
degas inadecuados.
- Usede fuentes,recipienteso accesoriosinadecuadosque ocasionan
da_osal producto.
,,Viaje.
Si necesita reparaciones
• Llamealdistribuidoralque le compr6el electrodomesticooa Maytag
ServicesLLC,ParaIocalizarunserviciot_,cnicoautorizadoen EE.UU.
y CANADA,Ilameal ServiciodeAsistenciaalClientede Jenn-Airal
1-800-538-6247.
• Aseg_resedeconservarunapruebadecompraparaverificarel estado
de la garanfia Remftaseala secci6nGARANTiAparaobtenerm_s
informaci6nacercadelas responsabilidadesdelpropietarioen cuanto
al serviciodegarantfa
,,Si el distribuidor o la compafiia de servicio no puede resolver
el problema, escriba a Maytag Services LLC,Attn: CAIR®
Center PO Box 2370, Cleveland, TN 37320-2370, o Ilame al
1-800-536-6247 en EEUU y CANADa,
NOTA:
Cuandoescribao Ilameparaconsultarsobreunproblemadeservicio,
incluyalasiguienteinformaci6n:
a. Sunombre,direcci6ny ntJmerotelefTnico;
b. ElntJmerode modeloy el nt_merodeserie;
c.El nombrey la direcci6ndesu distribuidoro centrede servicio
d. UnadescripciTnprecisadelproblemaquetiene ;
e. Pruebade compra(recibodeventas).
Maytag ServicesLLC,el Servicio de Atenci6n al Cliente de
Jenn-air, tiene a disposici6n las gufas de usuario, los manuales
de servicio y la informaci6n sobre las piezas.
MAYTAGNO SERARESPONSABLEBAJO NINGUNAClRCUNSTANClAPORLOSDANOSIMPREVISTOS0 DERIVADOS.
Estagarantfaleotorgaderechoslegalesespedficos,y adernaspuedetenerotrosquevarfansegunelEstadoenel quese encuentrePorejemplo,algunos
EstadosnopermitenlaexclusiTno limitaci6nde dai_osimprevistosoderivados,porIotantoestaexclusiTnpuedeno aplicarseensu caso.
1OO