RUMBLEX 4D VIBRATION PLATE
READY,
SET, PRO
USER MANUAL
HELLO THERE.
Joel and I are athletes who suffered from
severe ACL injuries a few months apart.
We purchased multiple pieces of exercise
equipment for our in-home rehab but were
left disappointed and frustrated by fitness
gear that made big promises but gave no
support, no well-thought-out plan to follow,
and no results. And that’s how Lifepro came
about, and why the Recovery + Fitness active
recovery collection was created — we’ve
set out to change all of that. It’s why every
piece of equipment bearing our name not only
undergoes rigorous scrutiny to make sure it
delivers on power and efficacy, but also comes
with built-in support from our ‘guiding angels’
and a built-in lifetime warranty so that
you’re never left hanging.
Welcome to Lifepro.
We’re in this together now.
Not everyone can afford to hire a personal trainer or a team of professionals
to help them feel and look their best. But the good news is: you don’t have
to. Lifepro brings the gym to you.
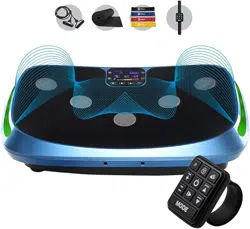
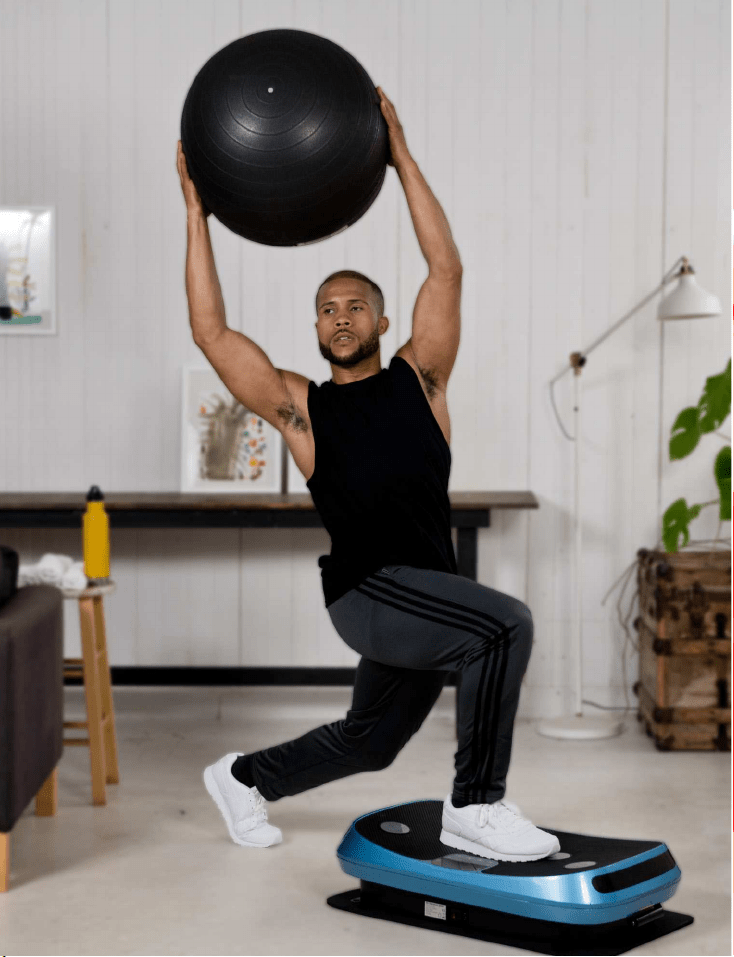
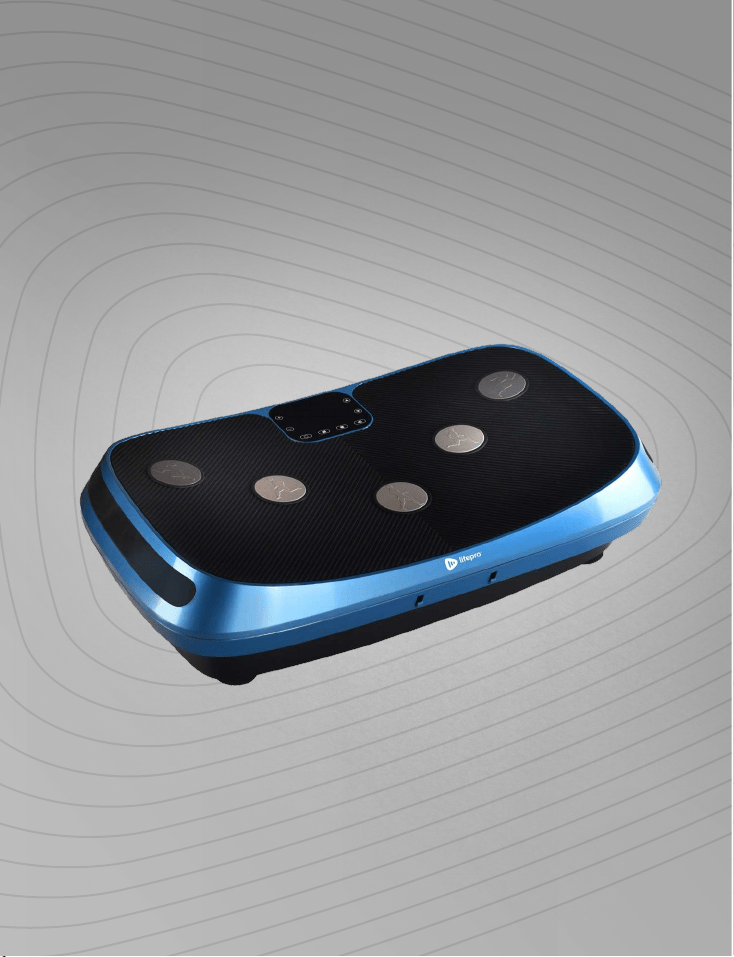
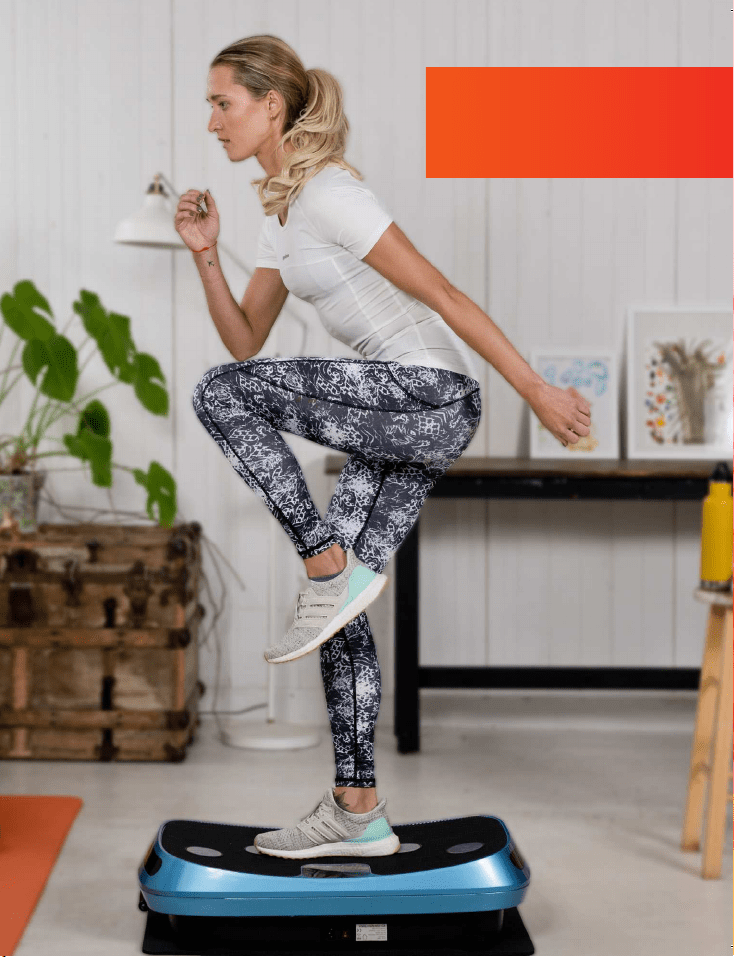
The Lifepro Rumblex boosts your metabolism and increases circulation,
which forces your body to burn more fat and reduces the appearance of
cellulite. The Rumblex has three powerful, ultra-quiet motors: lateral,
horizontal/oscillating, and pulsating. Each motor can be used separately
or in combination, giving you an abundance of workout options. When used
together, the three motors create a unique 4D motion which means you can
work all of your muscles in far less time than a typical workout. 10 minutes
is all it takes to complete a full workout with your Rumblex.
If you have suffered an injury or you experience joint or back pain,
find relief and help prevent future injuries by adding the vibration plate
to your rehab routine. Vibration plates are used by professional athletes,
physical therapists, and rehabilitation centers everywhere.
Redefine your workouts and experience the
transformative power of the Lifepro Rumblex:
Experience joint- and back-pain relief: improves core strength
& circulation
Boost your metabolism: encourages your body to burn fat faster
Decrease your stress: increases serotonin and decreases cortisol
Improve circulation: decreases blood pressure
Increase strength & flexibility: improves stability
Develop stronger bones: increases bone density
Check out the exercises in this manual for ways to get started using your
Rumblex. Next, be sure to visit our website rumblex.lifeprofitness.com for
access to our
FREE library of workout videos which demonstrate how to
easily incorporate the Rumblex into your fitness routine.
4 Rumblex™ User Manual Lifepro Recovery + Fitness Collection 5
Not everyone can afford to hire a personal trainer or a team of professionals
to help them feel and look their best. But the good news is: you don’t have
to. Lifepro brings the gym to you.
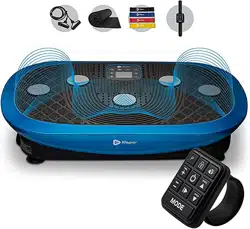
The Lifepro Rumblex boosts your metabolism and increases circulation,
which forces your body to burn more fat and reduces the appearance of
cellulite. The Rumblex has three powerful, ultra-quiet motors: lateral,
horizontal/oscillating, and pulsating. Each motor can be used separately
or in combination, giving you an abundance of workout options. When used
together, the three motors create a unique 4D motion which means you can
work all of your muscles in far less time than a typical workout. 10 minutes
is all it takes to complete a full workout with your Rumblex.
If you have suffered an injury or you experience joint or back pain,
find relief and help prevent future injuries by adding the vibration plate
to your rehab routine. Vibration plates are used by professional athletes,
physical therapists, and rehabilitation centers everywhere.
Redefine your workouts and experience the
transformative power of the Lifepro Rumblex:
Experience joint- and back-pain relief: improves core strength
& circulation
Boost your metabolism: encourages your body to burn fat faster
Decrease your stress: increases serotonin and decreases cortisol
Improve circulation: decreases blood pressure
Increase strength & flexibility: improves stability
Develop stronger bones: increases bone density
Check out the exercises in this manual for ways to get started using your
Rumblex. Next, be sure to visit our website rumblex.lifeprofitness.com for
access to our
FREE library of workout videos which demonstrate how to
easily incorporate the Rumblex into your fitness routine.
4 Rumblex™ User Manual Lifepro Recovery + Fitness Collection 5
Recovery + Fitness Collection 7 6 Rumblex User Manual Lifepro
GET STARTED
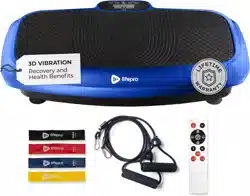
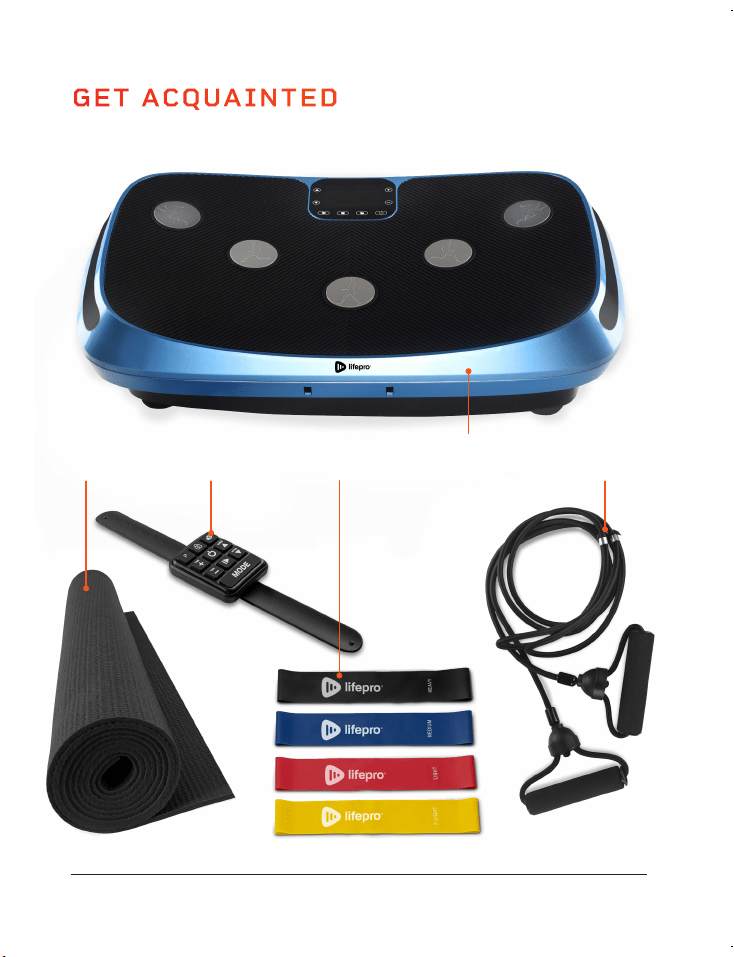
WHAT’S IN THE BOX
• Lifepro Rumblex 4D Vibration Plate
• Power Cord
• Hands-Free Remote Control
• Resistance Bands (2)
• Lifepro Mini Bands (4)
• Exercise Mat
• User Guide
FIRST STEPS
1. Remove your Rumblex from the shipping box and remove all packaging
from the unit and accessories.
2. Read carefully through this user manual and all safety instructions
before using the Rumblex.
3. Go to rumblex.lifeprofitness.com and register your product within
14 days of purchase to activate your lifetime warranty.
4. Complete the steps in the EASY-START SETUP GUIDE on page 8
to begin using your Rumblex.
CUSTOMER SUPPORT
If you have any questions about setting up your Rumblex, we’re
here to help. Call or email us and an experienced customer support
representative will be happy to assist you: (732) 456-6063 or
support@lifeprofitness.com.
GET ACQUAINTED
Rumblex 4D
Vibration Plate
4 Mini
Bands
Exercise
Mat
Remote
Control
2 Resistance
Bands
RUMBLEX
4D VIBRATION PLATE
RECOVERY + FITNESS
Recovery + Fitness Collection 7 6 Rumblex User Manual Lifepro
GET STARTED
WHAT’S IN THE BOX
• Lifepro Rumblex 4D Vibration Plate
• Power Cord
• Hands-Free Remote Control
• Resistance Bands (2)
• Lifepro Mini Bands (4)
• Exercise Mat
• User Guide
FIRST STEPS
1. Remove your Rumblex from the shipping box and remove all packaging
from the unit and accessories.
2. Read carefully through this user manual and all safety instructions
before using the Rumblex.
3. Go to rumblex.lifeprofitness.com and register your product within
14 days of purchase to activate your lifetime warranty.
4. Complete the steps in the EASY-START SETUP GUIDE on page 8
to begin using your Rumblex.
CUSTOMER SUPPORT
If you have any questions about setting up your Rumblex, we’re
here to help. Call or email us and an experienced customer support
representative will be happy to assist you: (732) 456-6063 or
support@lifeprofitness.com.
GET ACQUAINTED
Rumblex 4D
Vibration Plate
4 Mini
Bands
Exercise
Mat
Remote
Control
2 Resistance
Bands
RUMBLEX
4D VIBRATION PLATE
RECOVERY + FITNESS
Recovery + Fitness Collection 9 8 Rumblex User Manual Lifepro
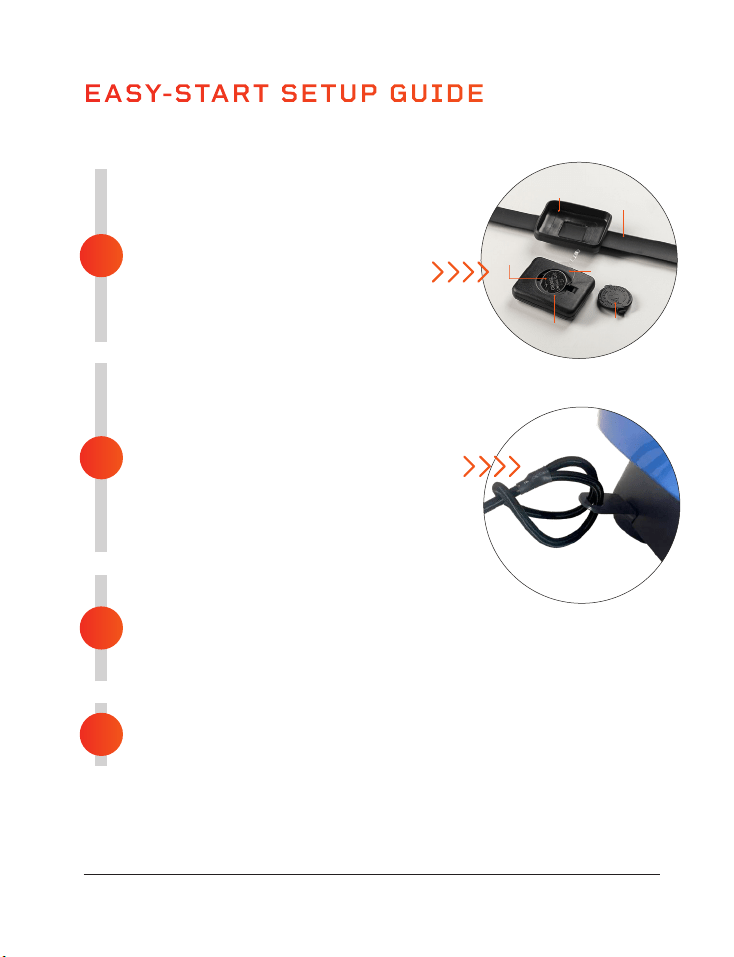
ACTIVATE THE REMOTE
• Remove the remote from the silicone shell
holding it to the wristband.
• Remove the back of the remote.
• Remove the round plastic insert under
the CR2032 3V battery.
• Replace the battery and the back of the remote.
• Re-insert the remote into the silicone shell.
ATTACH THE TWO RESISTANCE BANDS
The resistance bands let you incorporate strength training into your workout.
• Loop the end of a resistance band through one
of the metal rings under the front edge of
the Rumblex.
• Thread the resistance band handle through
the loop and pull tight.
• Attach the second resistance band to the metal
ring on the opposite side.
CONNECT TO POWER
• Insert the power cord firmly into the front of the unit.
NOTE: Press forcefully until you feel a click, which indicates that the cord is
securely connected. The power cord fits tightly so it will not loosen during use.
• Plug the power cord into an AC outlet.
POWER ON THE RUMBLEX
• Flip the breaker switch on the front of the Rumblex to the ON position.
• Press the power button on the Rumblex’s display or the remote control.
EASY-START SETUP GUIDE
Setup your Lifepro Rumblex in just 4 easy steps:
4
3
1
2
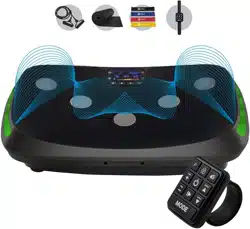
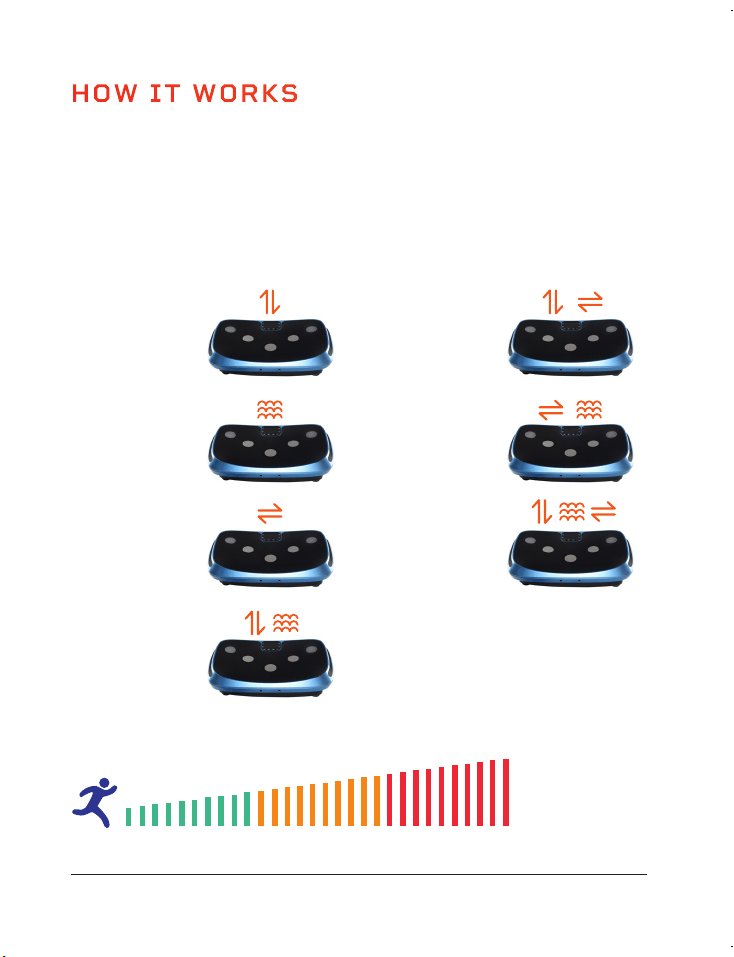
HOW IT WORKS
The Rumblex has three powerful, ultra-quiet motors: a lateral motor, a
horizontal/oscillating motor, and a pulsating motor. The three motors combine
to create a unique 4D motion which activates all of your muscle fibers more
efficiently than other exercise products. Create unlimited workout combination
with 7 training modes, 3 workout intensities, and 60 speed levels.
TRAINING MODES
Low
Medium High
Lateral
• Side-to-Side
WORKOUT INTENSITIES AND SPEED LEVELS
Pulsation
• Pulsating
Oscillation
• Up-Down
3D/Spiral
• Up-Down
• Side-to-Side
4D
• Up-Down
• Pulsating
• Side-to-Side
Oscillating Pulsation
• Up-Down
• Pulsating
Lateral Pulsation
• Side-to-Side
• Pulsating
SPEED
INTENSITY
Remote
Shell
Remote
Remote
Back
Plastic insert
Battery
Wristband
That’s it. Your Lifepro Rumblex is now ready to use. See OPERATING INSTRUCTIONS
and CHOOSING A PROGRAM on the next pages for details about how to use your
Rumblex.
Recovery + Fitness Collection 9 8 Rumblex User Manual Lifepro
ACTIVATE THE REMOTE
• Remove the remote from the silicone shell
holding it to the wristband.
• Remove the back of the remote.
• Remove the round plastic insert under
the CR2032 3V battery.
• Replace the battery and the back of the remote.
• Re-insert the remote into the silicone shell.
ATTACH THE TWO RESISTANCE BANDS
The resistance bands let you incorporate strength training into your workout.
• Loop the end of a resistance band through one
of the metal rings under the front edge of
the Rumblex.
• Thread the resistance band handle through
the loop and pull tight.
• Attach the second resistance band to the metal
ring on the opposite side.
CONNECT TO POWER
• Insert the power cord firmly into the front of the unit.
NOTE: Press forcefully until you feel a click, which indicates that the cord is
securely connected. The power cord fits tightly so it will not loosen during use.
• Plug the power cord into an AC outlet.
POWER ON THE RUMBLEX
• Flip the breaker switch on the front of the Rumblex to the ON position.
• Press the power button on the Rumblex’s display or the remote control.
EASY-START SETUP GUIDE
Setup your Lifepro Rumblex in just 4 easy steps:
4
3
1
2
HOW IT WORKS
The Rumblex has three powerful, ultra-quiet motors: a lateral motor, a
horizontal/oscillating motor, and a pulsating motor. The three motors combine
to create a unique 4D motion which activates all of your muscle fibers more
efficiently than other exercise products. Create unlimited workout combination
with 7 training modes, 3 workout intensities, and 60 speed levels.
TRAINING MODES
Low
Medium High
Lateral
• Side-to-Side
WORKOUT INTENSITIES AND SPEED LEVELS
Pulsation
• Pulsating
Oscillation
• Up-Down
3D/Spiral
• Up-Down
• Side-to-Side
4D
• Up-Down
• Pulsating
• Side-to-Side
Oscillating Pulsation
• Up-Down
• Pulsating
Lateral Pulsation
• Side-to-Side
• Pulsating
SPEED
INTENSITY
Remote
Shell
Remote
Remote
Back
Plastic insert
Battery
Wristband
That’s it. Your Lifepro Rumblex is now ready to use. See OPERATING INSTRUCTIONS
and CHOOSING A PROGRAM on the next pages for details about how to use your
Rumblex.
10 Rumblex User Manual Lifepro Recovery + Fitness Collection 11
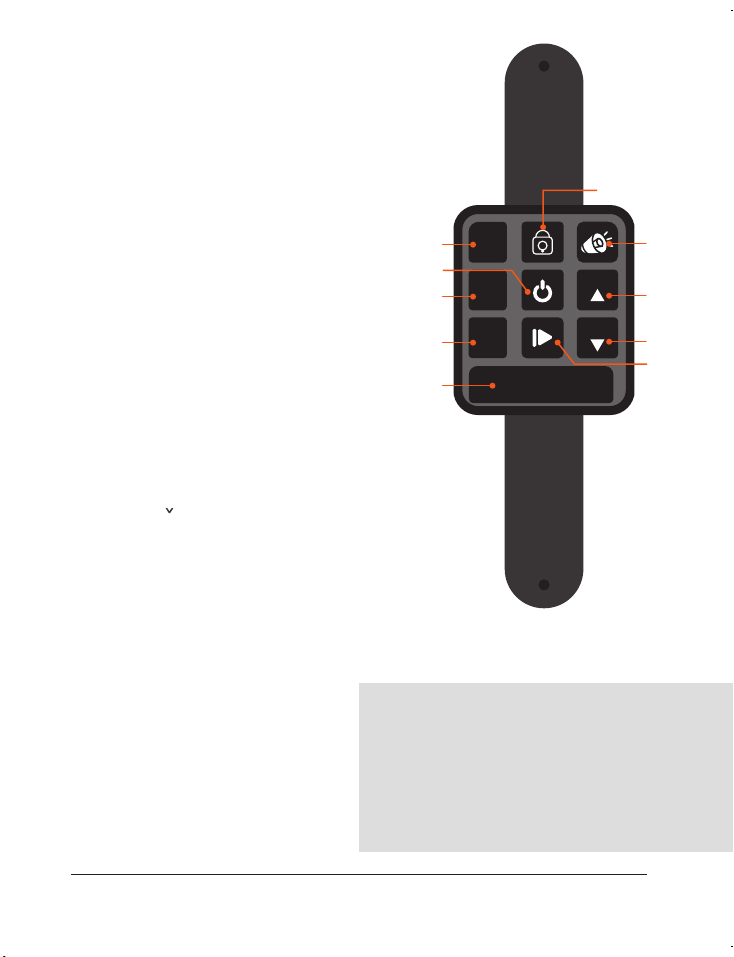
USING THE REMOTE TO OPERATE THE
RUMBLEX
1. Program Mode Button: Toggle through the
preset programs: P1, P2, P3.
2. Power Button: Power the Rumblex on
and off.
3. Time +/- Buttons*: In standby, with
Manual Mode selected: use the buttons
to set a time duration for your custom
workout.
4. Manual Mode Button: Toggle through the
7 training modes to create a custom
workout.
5. Lock Button: Lock/unlock the display buttons.
6. Sound Button: Turn system sounds on/off.
7. Speed ^/
Buttons*: Once the custom workout
has begun, press the Speed +/- buttons to
adjust the speed.
8. Start/Stop Button: Start/stop the selected preset
program in program mode or a custom workout in
manual mode.
*Speed and time cannot be adjusted for preset programs.
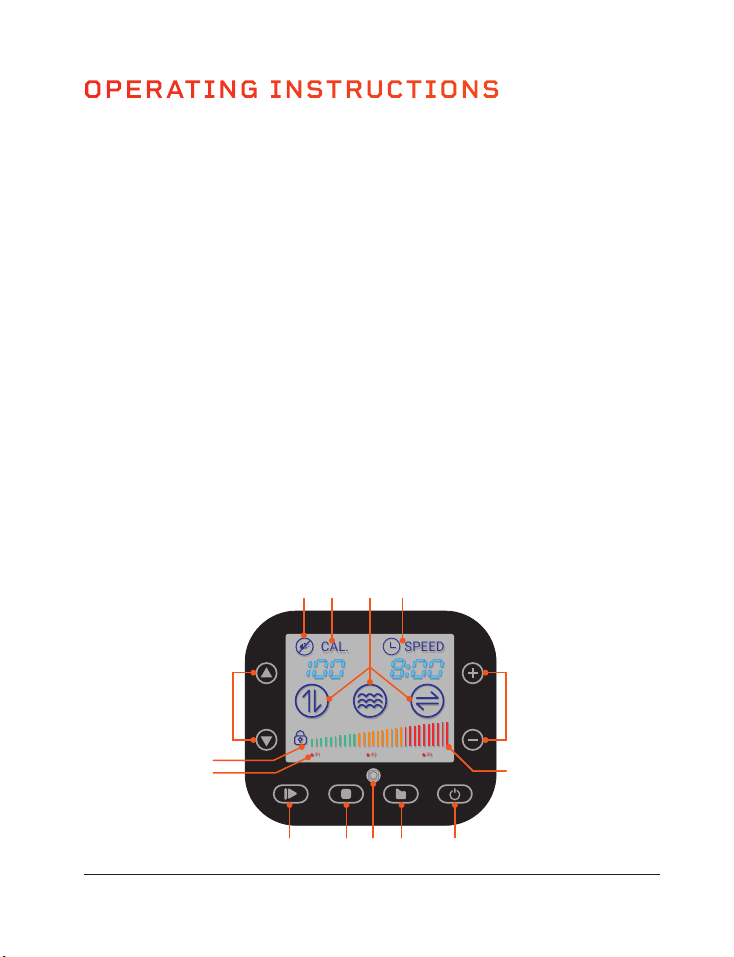
OPERATING INSTRUCTIONS
USING THE DISPLAY PANEL TO OPERATE THE RUMBLEX
1. Power Button: Power the Rumblex on and off. NOTE: Unit will auto power-off after
3 minutes of inactivity.
2. Program Mode Button: Toggle through preset programs: P1, P2, P3.
3. Remote: Infrared receiver window for the remote.
4. Manual Mode Button: Toggle through the 7 training modes to create a custom
workout.
5. Start/Stop Button: Start/stop the selected preset program or manual mode
workout.
6. Program Indicator: Shows which preset program is selected.
7. Lock Indicator: When icon is lit, it indicates that the display panel buttons have
been locked via the remote control.
8. Set Speed Buttons*: Adjust workout speed after manual mode workout begins.
Speed automatically starts at 1.
9. Sound Indicator: When icon is lit, it indicates that the system sounds have been
muted via the remote control. When icon is not lit, the sound is on.
10. Calorie Indicator: Shows number of calories burned in current workout.
11. Training Mode Indicator: Shows which training mode is selected.
12. Time/Speed Indicator: Alternates between showing time remaining and current
speed.
13. Set Time Buttons*: Set time duration for manual mode workout.
14. Workout Intensity Graph: Shows current workout intensity.
*Speed and time cannot be
adjusted for preset programs.
MODES
Standby Mode: The Rumblex is
powered on, but no program is selected.
Program Mode: Choose from preset
programs: P1-P3.
Manual Mode: Create your own custom
workout: choose from 7 training modes,
then set a workout time duration and
speed.
USE THE BUILT-IN SPEAKERS
1. Turn ON Bluetooth on your smartphone
or other Bluetooth device.
2. Select the device called “lifepro”.
3. Enter the password “8888” to connect
to the Rumblex’s integrated Bluetooth
speakers.
P1 P2 P3
SPEED
CAL.
MODE
TIME
-
TIME
+
P
SPEED
SPEED
1
2
4
7
6
5
7
8
3
3
8 13
14
1245 3
129 10 11
7
6
10 Rumblex User Manual Lifepro Recovery + Fitness Collection 11
USING THE REMOTE TO OPERATE THE
RUMBLEX
1. Program Mode Button: Toggle through the
preset programs: P1, P2, P3.
2. Power Button: Power the Rumblex on
and off.
3. Time +/- Buttons*: In standby, with
Manual Mode selected: use the buttons
to set a time duration for your custom
workout.
4. Manual Mode Button: Toggle through the
7 training modes to create a custom
workout.
5. Lock Button: Lock/unlock the display buttons.
6. Sound Button: Turn system sounds on/off.
7. Speed ^/
Buttons*: Once the custom workout
has begun, press the Speed +/- buttons to
adjust the speed.
8. Start/Stop Button: Start/stop the selected preset
program in program mode or a custom workout in
manual mode.
*Speed and time cannot be adjusted for preset programs.
OPERATING INSTRUCTIONS
USING THE DISPLAY PANEL TO OPERATE THE RUMBLEX
1. Power Button: Power the Rumblex on and off. NOTE: Unit will auto power-off after
3 minutes of inactivity.
2. Program Mode Button: Toggle through preset programs: P1, P2, P3.
3. Remote: Infrared receiver window for the remote.
4. Manual Mode Button: Toggle through the 7 training modes to create a custom
workout.
5. Start/Stop Button: Start/stop the selected preset program or manual mode
workout.
6. Program Indicator: Shows which preset program is selected.
7. Lock Indicator: When icon is lit, it indicates that the display panel buttons have
been locked via the remote control.
8. Set Speed Buttons*: Adjust workout speed after manual mode workout begins.
Speed automatically starts at 1.
9. Sound Indicator: When icon is lit, it indicates that the system sounds have been
muted via the remote control. When icon is not lit, the sound is on.
10. Calorie Indicator: Shows number of calories burned in current workout.
11. Training Mode Indicator: Shows which training mode is selected.
12. Time/Speed Indicator: Alternates between showing time remaining and current
speed.
13. Set Time Buttons*: Set time duration for manual mode workout.
14. Workout Intensity Graph: Shows current workout intensity.
*Speed and time cannot be
adjusted for preset programs.
MODES
Standby Mode: The Rumblex is
powered on, but no program is selected.
Program Mode: Choose from preset
programs: P1-P3.
Manual Mode: Create your own custom
workout: choose from 7 training modes,
then set a workout time duration and
speed.
USE THE BUILT-IN SPEAKERS
1. Turn ON Bluetooth on your smartphone
or other Bluetooth device.
2. Select the device called “lifepro”.
3. Enter the password “8888” to connect
to the Rumblex’s integrated Bluetooth
speakers.
P1 P2 P3
SPEED
CAL.
MODE
TIME
-
TIME
+
P
SPEED
SPEED
1
2
4
7
6
5
7
8
3
3
8 13
14
1245 3
129 10 11
7
6

CHOOSING A PROGRAM
12 Rumblex User Manual Lifepro Recovery + Fitness Collection 13
CHOOSING A TRAINING MODE
*Each training mode is listed in the order that they are toggled through when you press the
Mode button (e.g., press the Mode button once to select the Oscillation training mode. press
twice to select Pulsation, press three times to select Lateral, etc..
SETTING A WORKOUT TIME AND SPEED
The default time for manual workouts is 10 minutes. You can set a custom
workout duration of 1 to 10 minutes (in 1-minute increments), while in standby
mode. Once you start the manual workout, you cannot adjust the workout time.
You may adjust the speed of your manual workout after your workout has
started. The speed for your manual workout will begin automatically at level 1.
Once your workout has begun, you can change your speed, at any time, from
1-60.
WORKOUT INTENSITY AND SPEED
During your workout, you can quickly see your
current workout intensity by checking the
LED lights on the sides of the Rumblex or the
Workout Intensity Graph on the LCD touch
display. Workout intensities correspond to
the following speeds and colors.
You can use the Rumblex in program or manual mode. To get the best results,
alternate between the preset programs and custom workouts created in manual
mode to keep your body guessing. Your body tends to adapt to a workout routine
over time, so you want to change up your workouts to keep improving your fitness.
PROGRAM MODE
In program mode, you can select from three preset programs: P1, P2, P3. Each
preset program is 10 minutes long and uses a different training mode to challenge
your body. All three preset programs vary speed and intensity throughout to help
keep you on your toes.
CHOOSING A PROGRAM IN PROGRAM MODE
1. Press the Power button to turn the system ON.
2. Press the P Mode button to toggle between the 3 programs: P1, P2, P3.
3. Press the Start/Stop button to activate the selected program.
NOTE: You cannot adjust the workout time or speed for preset programs.
MANUAL MODE
In manual mode, you can create your own custom workout by choosing from
7 training modes and then setting a workout time and speed.
CREATING A CUSTOM WORKOUT IN MANUAL MODE
1. Press the Power button to turn the system ON.
2. Choose a training mode by pressing the Mode button to toggle between the
7 training modes.
3. Set a time duration for your workout:
a. Use the - / + buttons on the LCD touch display, OR
b. Use the Time +/- buttons on the hands-free remote control.
3. Press the Start/Stop button to begin the manual workout.
4. The speed will automatically begin at 1. To adjust the speed:
a. Use the Up/Down Arrow buttons on the LCD touch display, OR
b. Use the Speed
^
/
buttons on the hands-free remote control.
TRAINING MODES*
MOTOR MOVEMENT ACTIVE MOTOR
Oscillation
Up-Down Oscillating Motor
Pulsation
Pulsating Pulsating Motor
Lateral
Side-to-Side Lateral Motor
Oscillating Pulsation
Up-Down + Pulsating
Oscillating Motor + Pulsating
Motor
3D/Spiral
Up-Down + Side-to-Side
Oscillating Motor + Lateral
Motor
Lateral Pulsation
Pulsating + Side-to-Side
Pulsating Motor + Lateral
Motor
4D
Up-Down + Pulsating +
Side-to-Side
Oscillating Motor + Pulsating
Motor + Lateral Motor
INTENSITY SPEED COLOR
Low 1-20 Green
Medium 21-40 Orange
High 41-60 Red
LIFEPRO MINI BANDS
MINI BANDS HAVE REVOLUTIONIZED THE FITNESS INDUSTRY
Mini bands have become the new go-to for sculpting a stronger, leaner
physique. You’ve definitely seen your favorite fitness Instagrammers and
Youtubers using these versatile, colored resistance bands in conjunction with
their workout routines. They add resistance to cardio workouts and power
to strength training sessions, allowing you to train both simultaneously.
The number of creative workout possibilities are endless. Unlike the
inconvenience of a full gym, these mini bands are well-known for their ability
to train all aspects of fitness and performance at any intensity—anywhere,
anytime. No more excuses.
The Lifepro mini bands are made from 100% latex. Each band has a different
resistance strength, which allows you to level-up your resistance training
effortlessly. Use the mini bands in conjunction with your Lifepro Rumblex to
exponentially improve your fitness results.
AMPLIFY YOUR WORKOUTS
Experience the unique benefits of the Lifepro mini bands:
• Versatile: add resistance to cardio workouts and power
to strength training
• Joint-friendly: reduce joint compression; high-intensity,
low-impact training
• Portable: carry the mini bands in your pocket to work out on the go
14 Rumblex User Manual Lifepro
Recovery + Fitness Collection 15
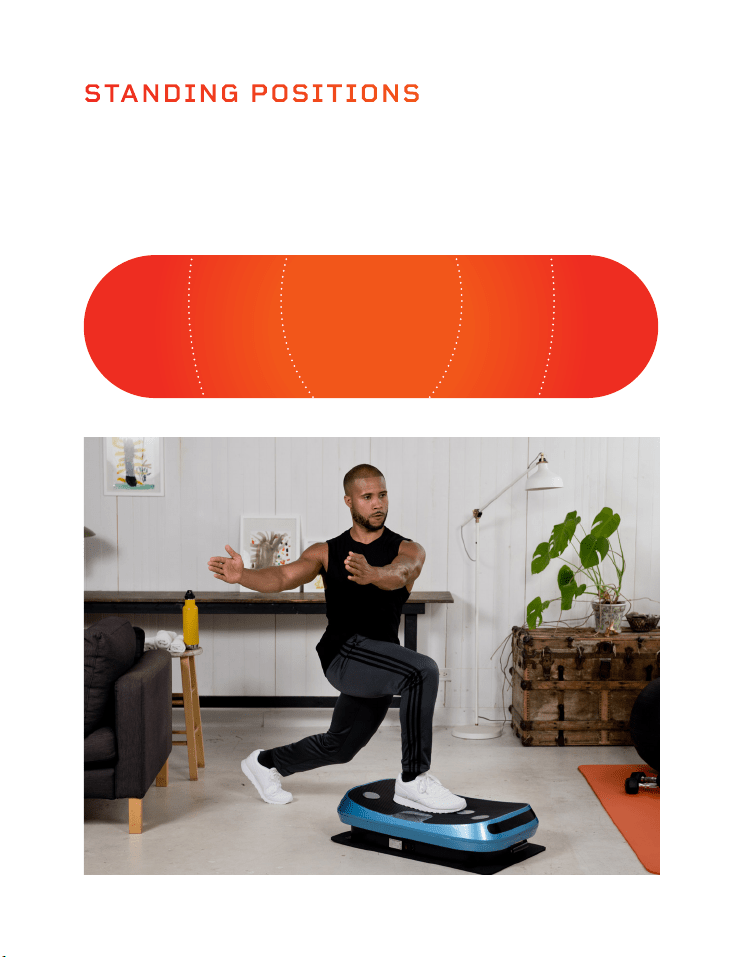
INTENSE INTENSE MEDIUM MEDIUMEASY
Where you stand on the Lifepro Rumblex will impact how challenging the
vibrations are for your body. Stand with your feet close together for an
“easy” workout and stand with your feet further apart for “medium” and
“intense” workouts.
STANDING POSITIONS
BONUS EXERCISE MAT
The included exercise mat can be used as a sound dampener (place it under
your Rumblex) or a cushion (place it on top of the Rumblex when doing an
exercise that involves sitting or lying on the unit).

LIFEPRO MINI BANDS
MINI BANDS HAVE REVOLUTIONIZED THE FITNESS INDUSTRY
Mini bands have become the new go-to for sculpting a stronger, leaner
physique. You’ve definitely seen your favorite fitness Instagrammers and
Youtubers using these versatile, colored resistance bands in conjunction with
their workout routines. They add resistance to cardio workouts and power
to strength training sessions, allowing you to train both simultaneously.
The number of creative workout possibilities are endless. Unlike the
inconvenience of a full gym, these mini bands are well-known for their ability
to train all aspects of fitness and performance at any intensity—anywhere,
anytime. No more excuses.
The Lifepro mini bands are made from 100% latex. Each band has a different
resistance strength, which allows you to level-up your resistance training
effortlessly. Use the mini bands in conjunction with your Lifepro Rumblex to
exponentially improve your fitness results.
AMPLIFY YOUR WORKOUTS
Experience the unique benefits of the Lifepro mini bands:
• Versatile: add resistance to cardio workouts and power
to strength training
• Joint-friendly: reduce joint compression; high-intensity,
low-impact training
• Portable: carry the mini bands in your pocket to work out on the go
14 Rumblex User Manual Lifepro
Recovery + Fitness Collection 15
INTENSE INTENSE MEDIUM MEDIUMEASY
Where you stand on the Lifepro Rumblex will impact how challenging the
vibrations are for your body. Stand with your feet close together for an
“easy” workout and stand with your feet further apart for “medium” and
“intense” workouts.
STANDING POSITIONS
BONUS EXERCISE MAT
The included exercise mat can be used as a sound dampener (place it under
your Rumblex) or a cushion (place it on top of the Rumblex when doing an
exercise that involves sitting or lying on the unit).
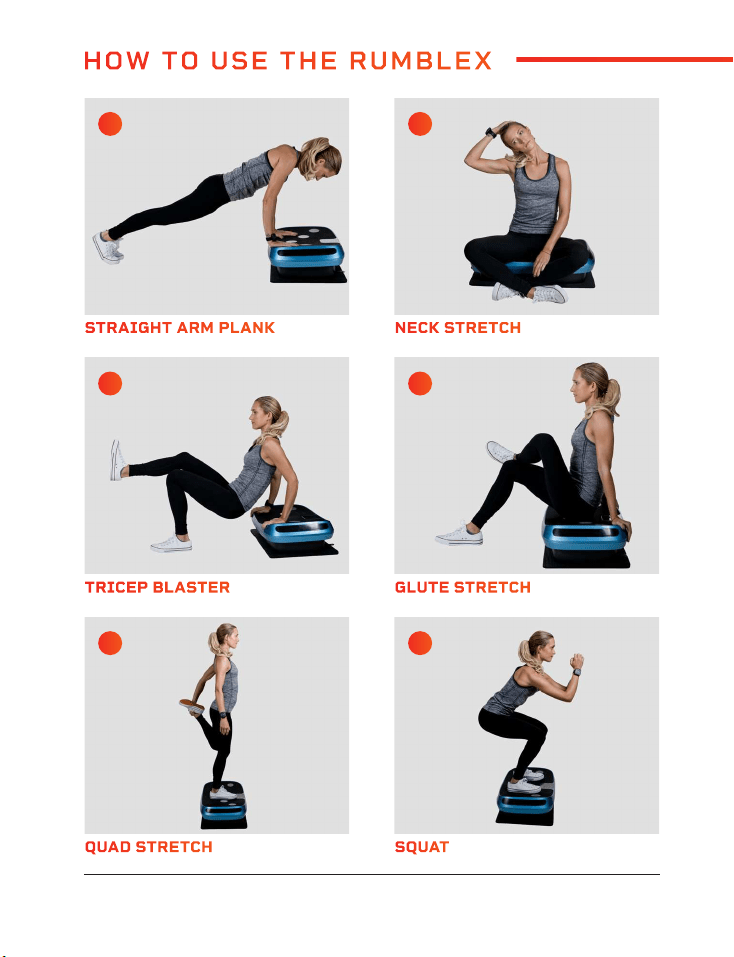
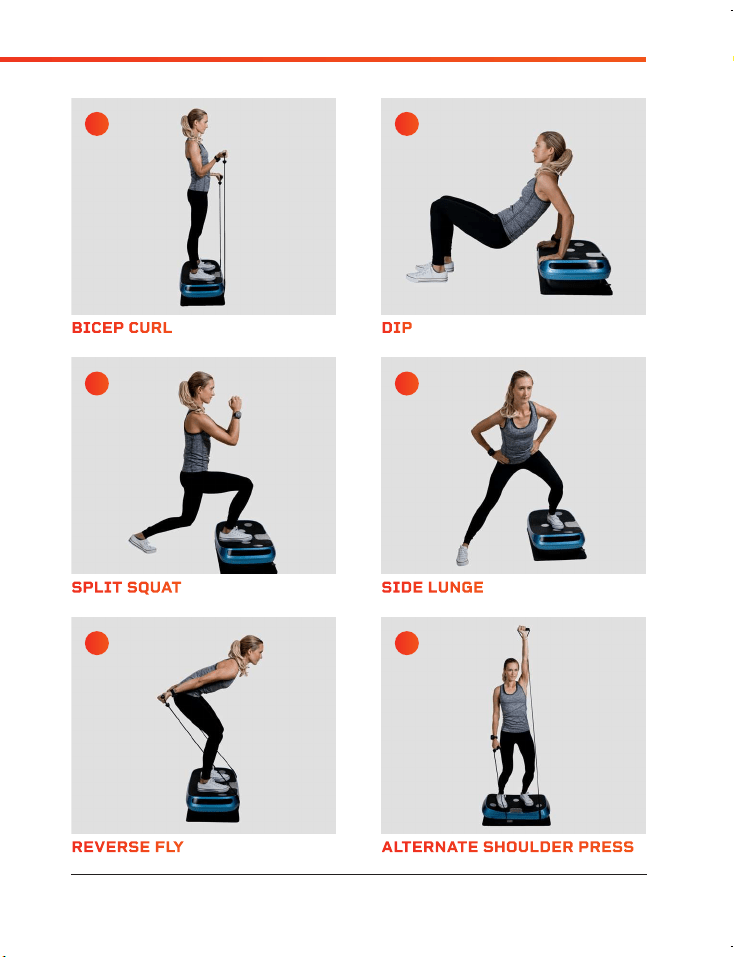
QUAD STRETCH REVERSE FLY
TRICEP BLASTER SPLIT SQUAT
STRAIGHT ARM PLANK BICEP CURL
SQUAT ALTERNATE SHOULDER PRESS
GLUTE STRETCH SIDE LUNGE
NECK STRETCH DIP
A C
E G
I K
B D
F H
J L
16 Rumblex User Manual Lifepro
Recovery + Fitness Collection 17
HOW TO USE THE RUMBLEX
QUAD STRETCH REVERSE FLY
TRICEP BLASTER SPLIT SQUAT
STRAIGHT ARM PLANK BICEP CURL
SQUAT ALTERNATE SHOULDER PRESS
GLUTE STRETCH SIDE LUNGE
NECK STRETCH DIP
A C
E G
I K
B D
F H
J L
16 Rumblex User Manual Lifepro
Recovery + Fitness Collection 17
HOW TO USE THE RUMBLEX
Visit our FREE library of
personal training videos at
rumblex.lifeprofitness.com
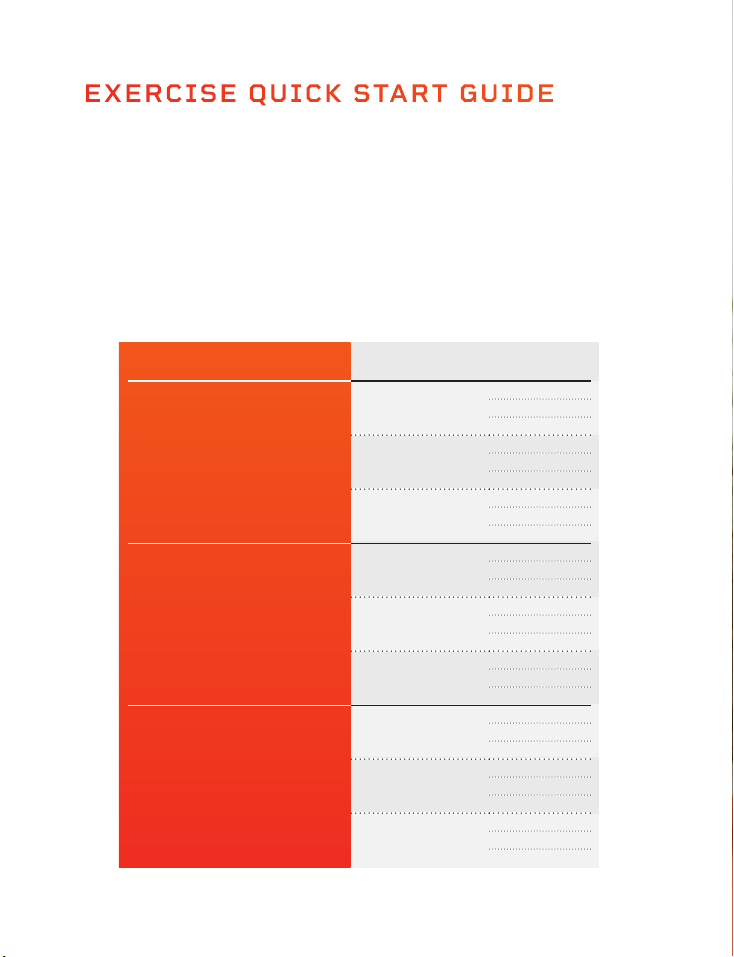
EXERCISE QUICK START GUIDE
HOW TO BEGIN
It’s a good idea to start off slow and easy with your Rumblex as it can take
time to get use to how vibration plates move and feel. We recommend you
follow the workout guide below--building from beginner to advanced over a
period of several weeks.
EXERCISE GUIDE
Hold the stretches and exercises on pages 16-17 for the number of seconds
shown in the chart below. You will build strength and stamina as you progress
through the levels.
LEVEL SPEED SECONDS
Beginner
Speed 1
15
30
45
Speed 10
15
30
45
Speed 20
15
30
45
Intermediate
Speed 21
60
75
90
Speed 30
60
75
90
Speed 40
60
75
90
Advanced
Speed 41
105
120
135
Speed 50
105
120
135
Speed 60
105
120
135
18 Rumblex User Manual Lifepro
Visit our FREE library of
personal training videos at
rumblex.lifeprofitness.com
EXERCISE QUICK START GUIDE
HOW TO BEGIN
It’s a good idea to start off slow and easy with your Rumblex as it can take
time to get use to how vibration plates move and feel. We recommend you
follow the workout guide below--building from beginner to advanced over a
period of several weeks.
EXERCISE GUIDE
Hold the stretches and exercises on pages 16-17 for the number of seconds
shown in the chart below. You will build strength and stamina as you progress
through the levels.
LEVEL SPEED SECONDS
Beginner
Speed 1
15
30
45
Speed 10
15
30
45
Speed 20
15
30
45
Intermediate
Speed 21
60
75
90
Speed 30
60
75
90
Speed 40
60
75
90
Advanced
Speed 41
105
120
135
Speed 50
105
120
135
Speed 60
105
120
135
18 Rumblex User Manual Lifepro

SAFETY
PLEASE KEEP THIS MANUAL IN A SAFE PLACE FOR REFERENCE.
WARNING: To reduce the risk of burns, fire, electric shock, or injury to
persons, read the following important precautions and information before
operating the Lifepro Rumblex.
DISCLAIMER
1. The health benefits suggested or implied in this user manual, our other
product literature, and website are not certified or endorsed by any
regulatory authority or medical institute.
2. The use of this vibration machine is entirely at the user’s discretion.
Please read all instructions and safety information carefully before using
this product. We assume no responsibility for personal injury or property
damage sustained by or through using this product.
RESPONSIBILITIES
3. It is the responsibility of the owner to ensure that all users of the
Rumblex are adequately informed of all warnings and precautions.
4. Use the Rumblex only as instructed in this manual.
5. Place the Rumblex on a level surface, with at least eight feet of clearance
behind it. Do not place the Rumblex on any surface that blocks air
openings. To protect the floor or carpet from damage, place a mat under
the Rumblex.
6. Keep the Rumblex indoors, away from moisture and dust. Do not put the
Rumblex in a garage or covered patio, or near water.
DOS AND DON’TS
7. Do not operate the Rumblex where aerosol products are used or
where oxygen is being administered.
8. Keep children under the age of 12 and pets away from the Rumblex
at all times.
9. The Rumblex should not be used by persons weighing more than 330 lbs.
10. Never allow more than one person on the Rumblex at a time.
11. Keep the power cord and the surge suppressor away from all heat
sources.
12. Never leave the Rumblex unattended while it is running.
13. Always unplug the power cord when the Rumblex is not in use.
EXERCISING
14. Consult with a medical professional before beginning a new exercise
program.
15. Get into position before powering on the Rumblex.
16. Always wear appropriate clothing and athletic shoes when using the
Rumblex.
17. The Rumblex is intended for in-home use only. Do not use the Rumblex in
any commercial, rental, or institutional setting.
MAINTENANCE
18. DANGER: Always unplug the power cord immediately after use, before
cleaning the Rumblex, and before performing the maintenance and
adjustment procedures described in this manual.
19. Inspect and tighten all external screws periodically (do not remove the
motor hood).
20. Never remove the motor hood unless instructed to do so by an authorized
service representative. Servicing other than the procedures in this manual
should be performed by an authorized service representative only.
21. Never insert or drop any object into any opening.
20 Rumblex User Manual Lifepro
Recovery + Fitness Collection 21
Recovery + Fitness Collection 23
Lifepro Fitness creates quality, durable
exercise products and we stand by
that quality with a lifetime warranty
on all of our products. If your Rumblex
ever breaks (and we doubt it will), we’ll
send you replacement parts and show
you how to repair it. If your Rumblex
cannot be repaired, we’ll replace
it—free of charge. Register your
Rumblex at rumblex.lifeprofitness.com
to activate your warranty within 14 days
of purchase.
Recovery + Fitness Collection 23
MADE IN CHINA
UNIT SPEC S
Size: 33”l x 20”w x 9.67”h
Net Weight: 42 lbs
Power: 200W + 40W + 200W
Voltage: 110V
Amplitude: 0-12mm / 1.5mm / 8mm
Max User Weight: 330 lbs.
TROUBLESHOOTING GUIDE
Quickly troubleshoot simple issues you might experience using the table below. Please contact
a customer support representative for additional assistance at: support@lifeprofitness.com,
(732) 456-6063.
ISSUE MACHINE DOES NOT TURN ON
CAUSE Power cable is not plugged into a wall outlet.
SOLUTION Connect power cable to an outlet.
CAUSE Power cable is not securely plugged into the front of the unit.
SOLUTION Remove the power cable and reinsert forcefully until you hear a click indicating it is
securely connected.
CAUSE Breaker switch is not flipped on.
SOLUTION Flip breaker switch on the front of machine to the ON position.
ISSUE REMOTE CONTROL DOES NOT WORK
CAUSE Remote is too far away from the infrared sensor on the display.
SOLUTION Point remote directly at infrared sensor when in use (effective distance is
approximately 6 feet).
CAUSE Battery is dead.
SOLUTION Insert new 3V 2032 battery.
CAUSE Battery is not contacting battery terminals.
SOLUTION Insert a piece of tissue or thin foam on top of battery to press it down.
ISSUE UNIT STOPPED WORKING SUDDENLY
CAUSE Program or manual workout ended.
SOLUTION Begin a new exercise program.
Frequency: 4-40 Hz
Speed Levels: 60
Preset Programs: P1-P3
Batteries Required:
3V CR2032 lithium battery (included)
RUMBLEX
4D V IBRA TION P L A T E
Recovery + Fitness Collection 23
Lifepro Fitness creates quality, durable
exercise products and we stand by
that quality with a lifetime warranty
on all of our products. If your Rumblex
ever breaks (and we doubt it will), we’ll
send you replacement parts and show
you how to repair it. If your Rumblex
cannot be repaired, we’ll replace
it—free of charge. Register your
Rumblex at rumblex.lifeprofitness.com
to activate your warranty within 14 days
of purchase.
Recovery + Fitness Collection 23
MADE IN CHINA
UNIT SPEC S
Size: 33”l x 20”w x 9.67”h
Net Weight: 42 lbs
Power: 200W + 40W + 200W
Voltage: 110V
Amplitude: 0-12mm / 1.5mm / 8mm
Max User Weight: 330 lbs.
TROUBLESHOOTING GUIDE
Quickly troubleshoot simple issues you might experience using the table below. Please contact
a customer support representative for additional assistance at: support@lifeprofitness.com,
(732) 456-6063.
ISSUE MACHINE DOES NOT TURN ON
CAUSE Power cable is not plugged into a wall outlet.
SOLUTION Connect power cable to an outlet.
CAUSE Power cable is not securely plugged into the front of the unit.
SOLUTION Remove the power cable and reinsert forcefully until you hear a click indicating it is
securely connected.
CAUSE Breaker switch is not flipped on.
SOLUTION Flip breaker switch on the front of machine to the ON position.
ISSUE REMOTE CONTROL DOES NOT WORK
CAUSE Remote is too far away from the infrared sensor on the display.
SOLUTION Point remote directly at infrared sensor when in use (effective distance is
approximately 6 feet).
CAUSE Battery is dead.
SOLUTION Insert new 3V 2032 battery.
CAUSE Battery is not contacting battery terminals.
SOLUTION Insert a piece of tissue or thin foam on top of battery to press it down.
ISSUE UNIT STOPPED WORKING SUDDENLY
CAUSE Program or manual workout ended.
SOLUTION Begin a new exercise program.
Frequency: 4-40 Hz
Speed Levels: 60
Preset Programs: P1-P3
Batteries Required:
3V CR2032 lithium battery (included)
RUMBLEX
4D V IBRA TION P L A T E

Enjoy all of the benefits of foam
rolling and vibration technology
together with the Surger Vibrating
Foam Roller. Use the Surger before
or after your workout as part of
your warm-up or recovery routine
to gain more flexibility and to help
prevent soreness and injuries.
Deep compression of muscle
fibers and tissues (self-myofascial
release) combined with the
Surger’s vibration technology
breaks up muscle knots and relaxes
tight muscles and fascia. Choose
from 4 vibration speed levels
to apply the perfect amount of
intensity every time.
SURGER
VIBRATING FOAM ROLLER
SURGER BENEFITS
• Increase workout
effectiveness
• Reduce soreness
• Speed up recovery
• Prevent injury
• Boost circulation
• Improve muscle flexibility
and performance
• Decrease pain and
inflammation
• Loosen knots, trigger
points, and tightness in your
muscles and fascia.
FROM OUR SOAR FX
™
COLLECTION
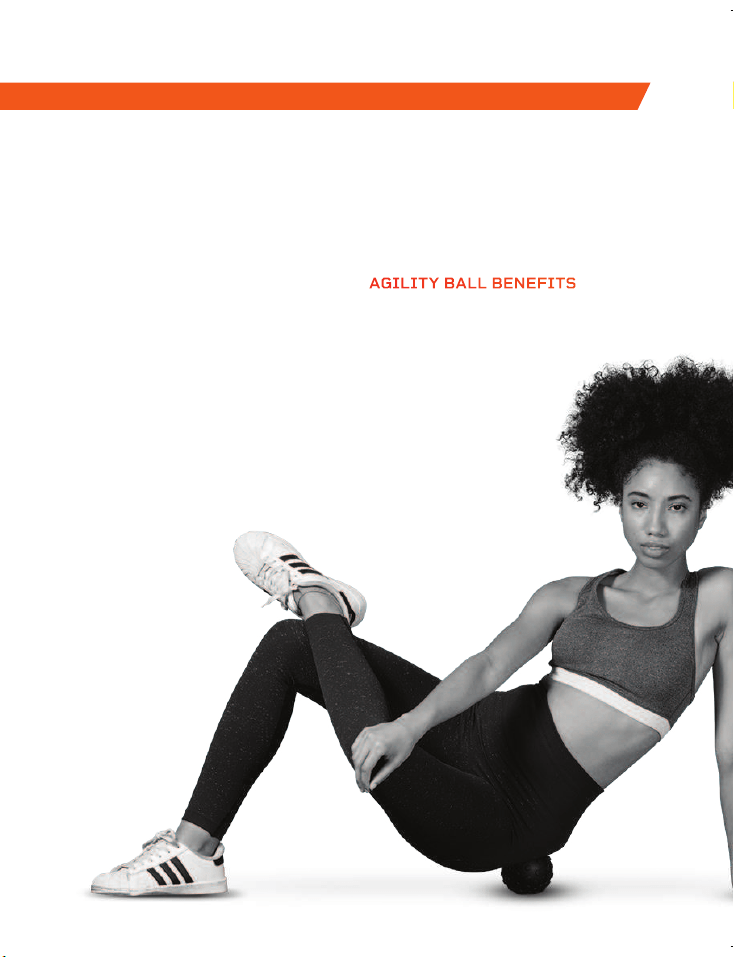
The Agility vibrating massage
ball is designed to target small
muscle groups. The Agility Ball is
small enough to fit in the palm of
your hand and gives you a wide
range of massage motions: circular,
up-and-down, and side-to-side.
The Agility Ball’s silicone exterior
is durable and easy-to-grip, but
soft enough to use on sensitive
areas like your neck, hands,
and feet.
AGILITY
VIBRATING MASSAGE BALL
AGILITY BALL BENEFITS
• Increase circulation
• Improve muscle flexibility
and performance
• Relax tight muscles
and fascia
• Reduce muscle
pain and
inflammation
• Boost blood flow
Enjoy all of the benefits of foam
rolling and vibration technology
together with the Surger Vibrating
Foam Roller. Use the Surger before
or after your workout as part of
your warm-up or recovery routine
to gain more flexibility and to help
prevent soreness and injuries.
Deep compression of muscle
fibers and tissues (self-myofascial
release) combined with the
Surger’s vibration technology
breaks up muscle knots and relaxes
tight muscles and fascia. Choose
from 4 vibration speed levels
to apply the perfect amount of
intensity every time.
SURGER
VIBRATING FOAM ROLLER
SURGER BENEFITS
• Increase workout
effectiveness
• Reduce soreness
• Speed up recovery
• Prevent injury
• Boost circulation
• Improve muscle flexibility
and performance
• Decrease pain and
inflammation
• Loosen knots, trigger
points, and tightness in your
muscles and fascia.
FROM OUR SOAR FX
™
COLLECTION
The Agility vibrating massage
ball is designed to target small
muscle groups. The Agility Ball is
small enough to fit in the palm of
your hand and gives you a wide
range of massage motions: circular,
up-and-down, and side-to-side.
The Agility Ball’s silicone exterior
is durable and easy-to-grip, but
soft enough to use on sensitive
areas like your neck, hands,
and feet.
AGILITY
VIBRATING MASSAGE BALL
AGILITY BALL BENEFITS
• Increase circulation
• Improve muscle flexibility
and performance
• Relax tight muscles
and fascia
• Reduce muscle
pain and
inflammation
• Boost blood flow
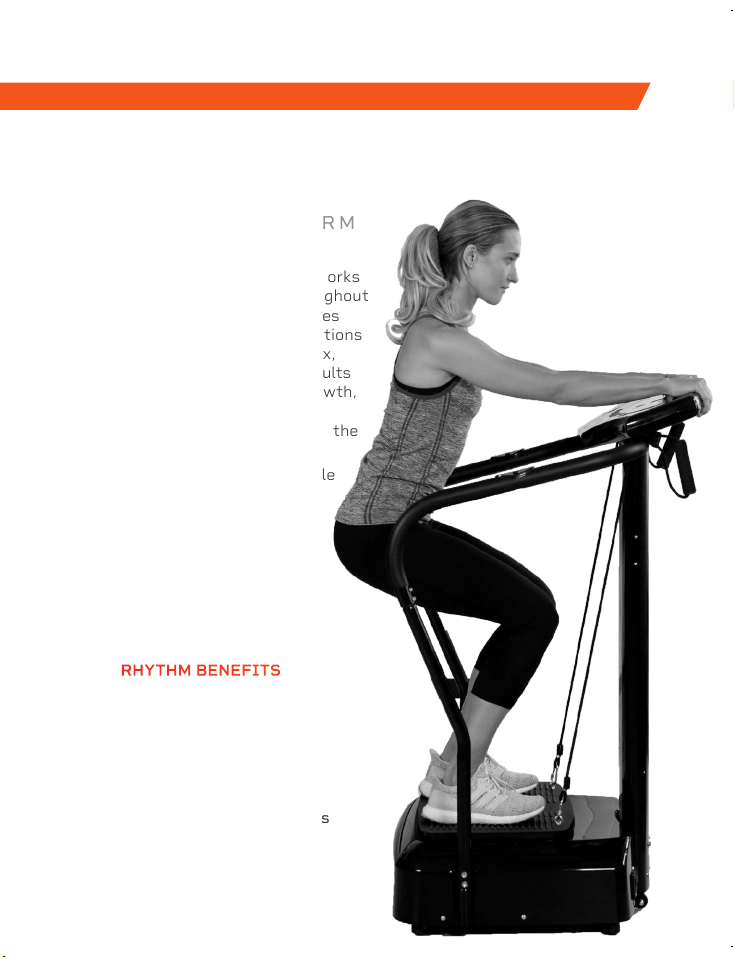
The Rhythm Vibration Platform works
by creating rapid vibrations throughout
the body, especially on the muscles
specifically targeted. These vibrations
cause the muscles to stretch, flex,
and relax at a rapid rate. This results
in increased muscle and bone growth,
improved flexibility, and boosted
metabolism—all of which increase the
number of calories you burn.
The Rhythm can be used by people
from every fitness level. If you
have suffered an injury or you
experience joint or back pain,
find relief and help prevent
future injuries by adding the
Rhythm to your rehab routine.
RHYTHM
VIBRATION PLATFORM
FROM OUR SOAR FX
™
COLLECTION FROM OUR RECOVERY + FITNESS COLLECTION
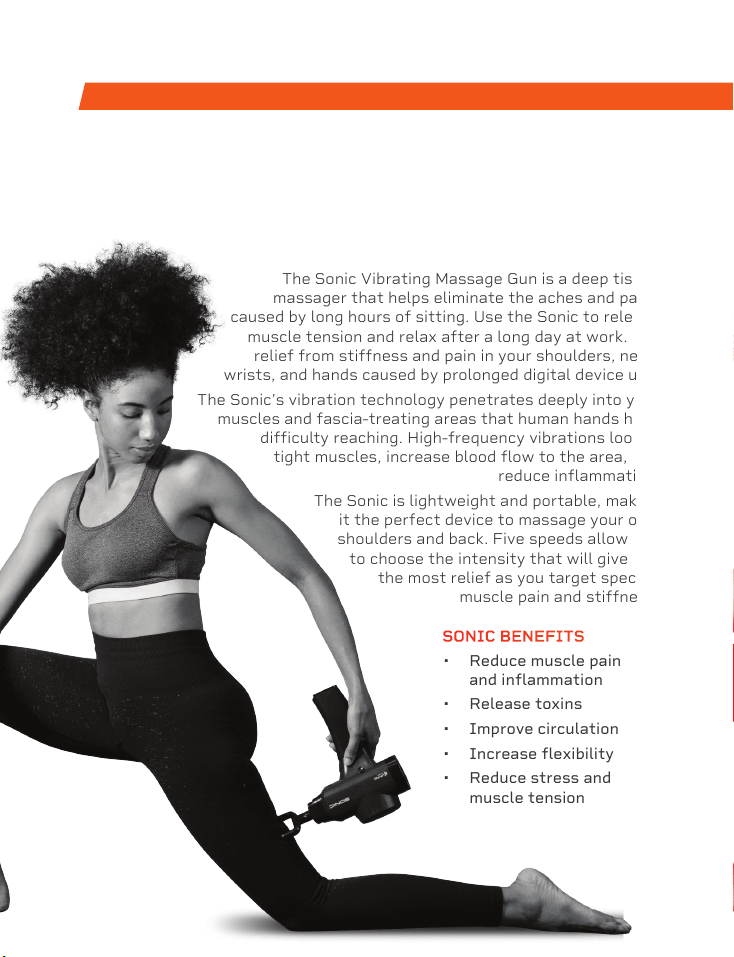
The Sonic Vibrating Massage Gun is a deep tissue
massager that helps eliminate the aches and pains
caused by long hours of sitting. Use the Sonic to release
muscle tension and relax after a long day at work. Get
relief from stiffness and pain in your shoulders, neck,
wrists, and hands caused by prolonged digital device use.
The Sonic’s vibration technology penetrates deeply into your
muscles and fascia-treating areas that human hands have
difficulty reaching. High-frequency vibrations loosen
tight muscles, increase blood flow to the area, and
reduce inflammation.
The Sonic is lightweight and portable, making
it the perfect device to massage your own
shoulders and back. Five speeds allow you
to choose the intensity that will give you
the most relief as you target specific
muscle pain and stiffness.
SONIC
VIBRATING MASSAGE GUN
SONIC BENEFITS
• Reduce muscle pain
and inflammation
• Release toxins
• Improve circulation
• Increase flexibility
• Reduce stress and
muscle tension
RHYTHM BENEFITS
• Improve mobility
• Prevent injury
• Increase strength
• Boost metabolism
• Improve sleep
• Develop stronger bones
• Increase circulation
The Rhythm Vibration Platform works
by creating rapid vibrations throughout
the body, especially on the muscles
specifically targeted. These vibrations
cause the muscles to stretch, flex,
and relax at a rapid rate. This results
in increased muscle and bone growth,
improved flexibility, and boosted
metabolism—all of which increase the
number of calories you burn.
The Rhythm can be used by people
from every fitness level. If you
have suffered an injury or you
experience joint or back pain,
find relief and help prevent
future injuries by adding the
Rhythm to your rehab routine.
RHYTHM
VIBRATION PLATFORM
FROM OUR SOAR FX
™
COLLECTION FROM OUR RECOVERY + FITNESS COLLECTION
The Sonic Vibrating Massage Gun is a deep tissue
massager that helps eliminate the aches and pains
caused by long hours of sitting. Use the Sonic to release
muscle tension and relax after a long day at work. Get
relief from stiffness and pain in your shoulders, neck,
wrists, and hands caused by prolonged digital device use.
The Sonic’s vibration technology penetrates deeply into your
muscles and fascia-treating areas that human hands have
difficulty reaching. High-frequency vibrations loosen
tight muscles, increase blood flow to the area, and
reduce inflammation.
The Sonic is lightweight and portable, making
it the perfect device to massage your own
shoulders and back. Five speeds allow you
to choose the intensity that will give you
the most relief as you target specific
muscle pain and stiffness.
SONIC
VIBRATING MASSAGE GUN
SONIC BENEFITS
• Reduce muscle pain
and inflammation
• Release toxins
• Improve circulation
• Increase flexibility
• Reduce stress and
muscle tension
RHYTHM BENEFITS
• Improve mobility
• Prevent injury
• Increase strength
• Boost metabolism
• Improve sleep
• Develop stronger bones
• Increase circulation
Access Lifepro TV, our library of
free personal training videos on the
web at rumblex.lifeprofitness.com
to learn how to get the most out of
your Lifepro
®
Rumblex and achieve
the results you want.
Lifeprousa Lifeprousa support@lifeprofitness.com
YOU'VE
GOT
THIS