®
Self-Cleaning Gas Range
Use & Care Guide
Estufa de gas con autolimpieza
Models/Modelos 665.72002/72004/72012/72014/72022/72023/72024/72029
665.75002/75004/75012/75014/75022/75023/75024/75029
665.75032/75033/75034/75039/75842/75843/75844/75849
To the installer: please leave this instruction book with the unit,
To the consumer: please read and keep this book for future reference.
Para el instalador: favor de Dejar este manual de instrucciones con la unidad.
Para el consumidor: favor de Leer y guardar este manual para futuras referencias
Super Capacity with ULTRABAKE _M System
Capacidad extra con el Sistema ULTRABAKE TM
8274077B Sears Roebuck and Co., Hoffman Estates, IL 60179 U.S.A. www.sears.corn
TABLE OF CONTENTS
|NDICE
WE SERVICE WHAT WE SELL ...................................................... 3
WARRANTY ..................................................................................... 3
RANGE SAFETY .............................................................................. 4
The Anti-Tip Bracket 5
PARTS AND FEATURES ................................................................ 6
COOKTOP USE ........... 7
Control Knobs .7
Cooktop Lockout .7
Sealed Surface Burners ............................................................... 8
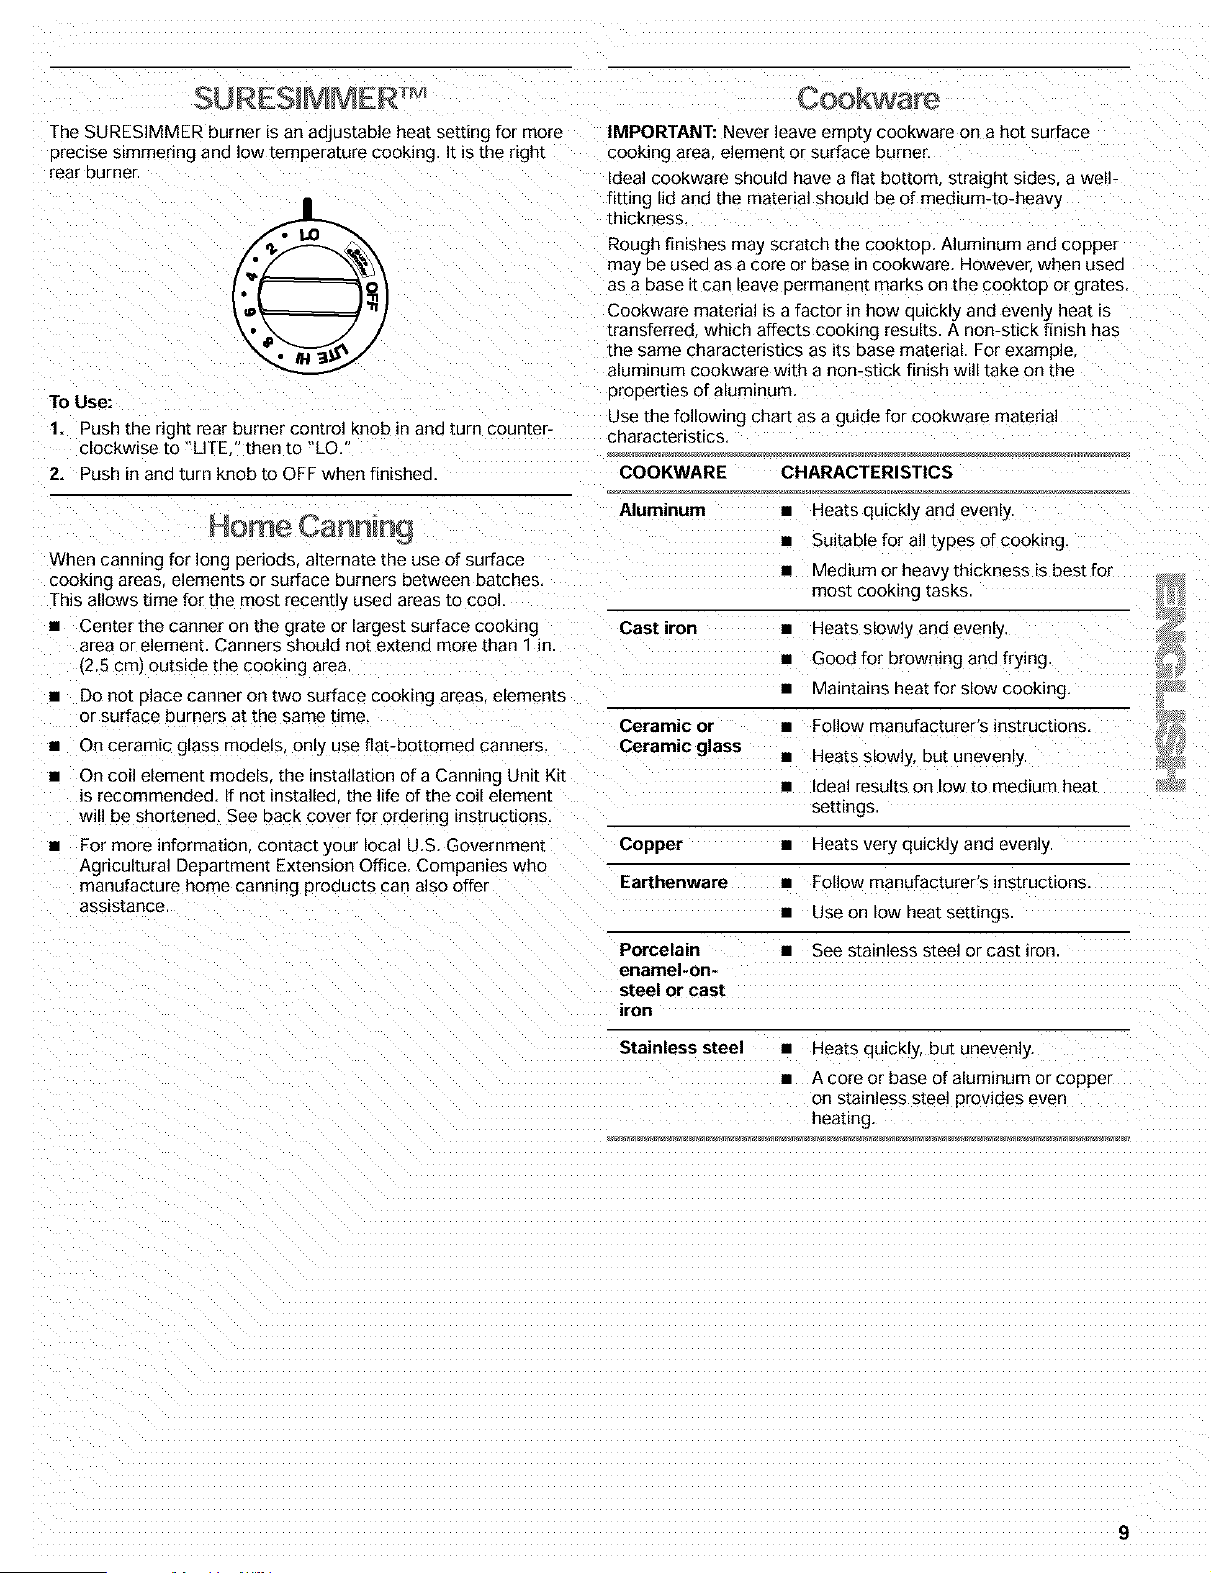
SURESIMMER TM .9
Home Cannin_ ........................................................................... 9
REPARAMOS LO QUE VENDEMOS .......................................... 27
GARANT|A .................................................................................... 27
SEGURIDAD DE LA ESTUFA ...................................................... 28
El Soeorte anzivuelco ................................................................. 29
PIEZAS Y CARACTER|STICAS ................................................... 30
USO DE LA SUPERFICIE DE COCCION ................................... 31
Perillas de control 31
Bloqueo de la superficie de coccion 3!
Quemadores extenores sellados ............................................... 32
SURESIMMER TM 33
Enlatado casero 33
Cookware ..................................................................................... 9 Utensilios de cocina .................................................................. 33
ELECTRONIC OVEN CONTROL ................................................ 10 CONTROL ELECTRONICO DEL HORNO .................................. 34
Display I 0 Pantalla 34
Start/Enter ............................................................................. 10 Start/Enter (Inicio/Ingreso] 34
Off/Cancel 10 Off/Cancel (Apagado/Anuladol 34
Clock ..................................................................................... 10 Reloj .......................................................................................... 34
Tones .................................................................................... 10 Sehales audibles ........................................................................ 34
Fahrenheit and Celsius 11
Timer ......................................................................................... 11
Oven LOCkOUt 11
Oven Temoerature Control 11
OVEN USE ....................................................................... 12
Aluminum Foil 12
Fahrenheit y Centigrados 35
TemporizadoF .......................................................................... 35
BIoqueo del homo ................................................................... 35
Control de temperatura de[ home 35
USO DEL HORNO ........................................................................ 35
Paoel de aluminio 36
Positioning Racks and Bakeware 12 PosiciOn de Ins Darrillas ylos utensilios 3ara hornear 36
STURDIGLIDE TM Oven Racks 12 Parrillas del homo STURDIGLIDE TM 36
Bakeware ............................................................................... 13 Utensilios Darn homear .............................................................. 37
Meat Thermome[er 13 Termometro para carries ...... 37
Oven Vent "3
Baking and Roasting ............................................................. 13
Broiling 14
RECIPE RECALLTM ............................................................... 15
Serve Warm ........................................................................... 15
Timed Oven Control 16
Using Warm & Ready Drawer ............................................... 17
12-Hour Shut-Off 18
Ducto de ventilacion del hornc 37
Como homear y asar ................................................................. 37
Como asar 38
RECIPE RECALLTM {Repeticion de recetasl 39
Caractedstica "Servir caliente". ................................................. 39
Control temDorizado del homo 40
Como usar la gaveta Warm & Ready (Caliente y listo, ............ 41
Interruptor de 12 horas 42
RANGE CARE .............................................................................. 18 CUIDADO DE LA ESTUFA .......................................................... 43
Self-Cleaning Cycle 18 Ciclo de autolimpleza ...................................................... 43
General Cleaning 20 Limu_eza general .................................... 45
Oven Light 21 Luz del home 47
Console Night Light.. 21 La luz noctuma de la consola 47
Oven Door ............................................................................. 22 Puerta del homo ........................................................................ 48
Storage Drawer. 23 Gaveta de almacenamiento. 49
Warming Drawer 23 Gaveta calentadora 49
TROUBLESHOOTING ................................................................... 24 SOLUCION DE PROBLEMAS ..................................................... 50
2

WE SERVICE WARRANTY
WHAT WE SELL ,U'LONE-YEARWARRANTVONA'LPARTS
For one year from the date of purchase when this range is
Your aurchase has added value because you can deoena on installed and oDerated according to instructions Drovided in the
Sears HomeCeetraF for service. With over 12.000 trained repair Installation Instructions and Use & Care Guide Sears will repair
specialists and access to over 4,2 million parts and accessories
we have the tools Darts, knowledge and skills to ensure our
31edge: We Service What We Sell,
Sears Maintenance Agreements
Your Kenmore _ appliance is designed _nanufactured and tested
[o Drow(]e years of dependable operation, Yet any major
appliance may require service from time to time, The Sears
Maintenance Agreement offers you an outstanding serwce
3rogram affordably priced
The Sears Maintenance Agreement
• Is your way [o BUytomorrow's service at today's Dnce
• Eliminates repair bills resulting tram normal wear and teac
• Provides for non-technical and instructional assistance
• Even if you don't need repairs, provides an annual Preventive
Maintenance Check, a[ your request to ensure that your
appliance is in proper runnmg condition,
Some limitations apply, For more information, call
1-800-827-6655,
For information concerning Sears Canada Maintenance
Agreements, call 1-800-361-6665.
th_s ranae [ree of charge, if defective in material or workmanship,
WARRANTY RESTRICTION
If the range is subject [o other than private family use, the above
warran[y coverage is effective for only 90 days
WARRANTY SERVICE
WARRANTY SERVICE IS AVAILABLE BY CONTACTING THE
NEAREST SEARS SERVICE CENTER IN THE UNITED STATES
This warranty appl=es only while the product is in use in the
United States. This warranty gives you specific legal rights and
you may also have other rights which vary from stare [o stare.
For Sears warranty nformation in the United States, please
reference the service numbers located on the back page of this
manual
Sears, Roebuck and Co.
D/817WA, Hoffman Estates, IL 60179
PRODUCT RECORD
In Lhespace below, record your complete model number aerial
number and ourchase date. You can find this information on the
modelandserialnumberlabel ocatedasshowninthePartsand
Fea[ures secDon of this book, Have this information available to
held yOU quickly obtain assistance or service when you con[ac[
Sears concerning your appliance.
Model number 665
Serial number
Purchase date
Save these instructions and your sales receipt for future reference.
3
RANGE SAFETY
Your safety and the safety of others are very important.
We have provided many important safety messages in this manual and on your appliance. Always read and obey all
safety messages.
This is the safety alert symbol.
This symbol alerts you to potential hazards that can kill or hurt you and others.
All safety messages will follow the safety alert symbol and either the word "DANGER" or
"WARNING." These words mean:
You can be killed or seriously injured if you don't
immediately follow instructions.
You can be killed or seriously injured if you don't
follow instructions.
All safety messages will tell you what the potential hazard is. tell you how to reduce the chance of injury, and tell you
what can happen if the instructions are not followed.
I ARNING: If the information in this manual is not followed exactly, a fire or explosion
may result causing property damage, personal injury or death.
- Do not store or use gasoline or other flammable vapors and liquids in the vicinity of this
or any other appliance.
- WHAT TO DO IF YOU SMELL GAS:
• Do not try to light any appliance.
• Do not touch any electrical switch.
° Do not use any phone in your building.
° Immediately call your gas supplier from a neighbor's phone. Follow the gas supplier's
instructions.
° If you cannot reach your gas supplier, call the fire department.
- Installation and service must be performed by a qualified installer, service agency or
the gas supplier.
The California Safe Drinking Water and Toxic Enforcement Act requires the Governor of California to publish a list
of substances known to the State of California to cause cancer, birth defects, or other reproductive harm. and
requires businesses to warn of potential exposure to such substances.
WARNING: This product contains a chemical known to the State of California to cause cancer, birth defects, or
other reproductive harm.
This appliance can cause low-level exposure to some of the substances listed, including benzene, formaldehyde,
carbon monoxide, toluene, and soot.
4
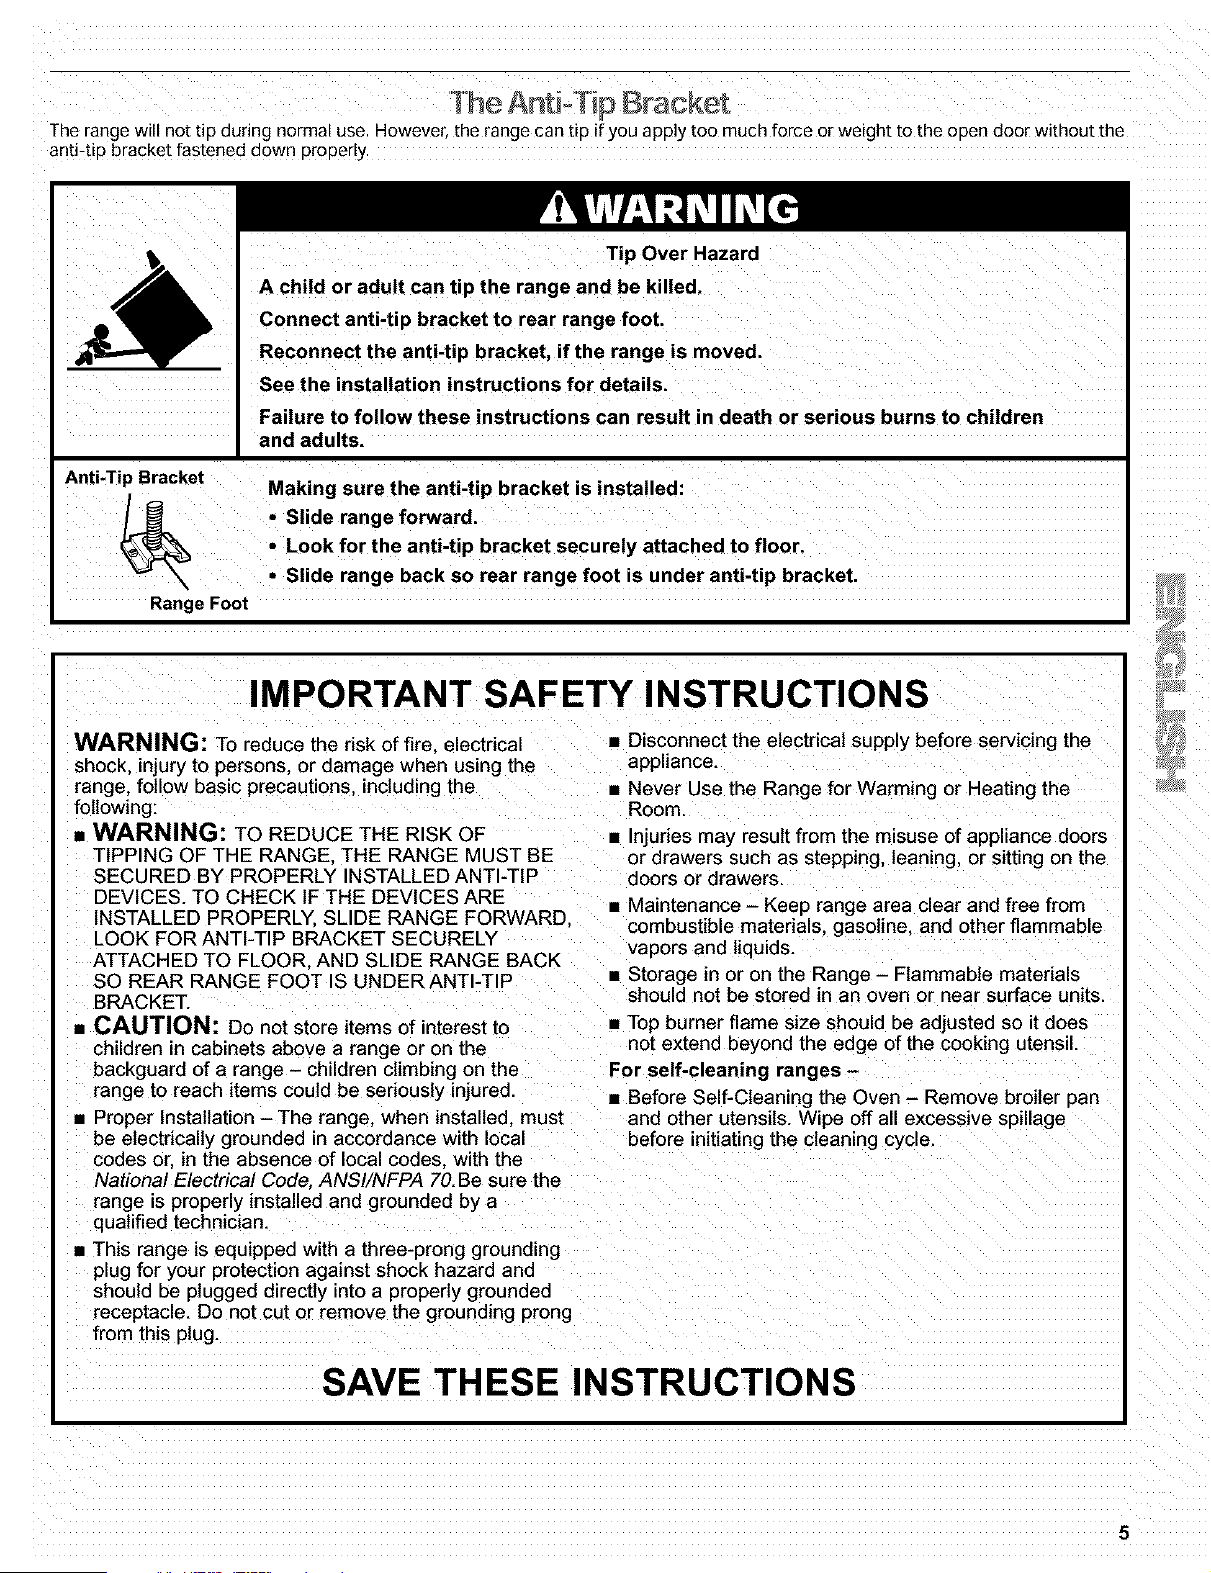
[h AntioTiD Bracket
The range wellnot tip during normal use. However, the range can tiD if yOUapply too much force or weight to the ooen door without the
anti-tip bracket fastened down DroDer[)"
Anti-Tip Bracket
Range Foot
Tip Over Hazard
A child or adult can tip the range and be killed.
Connect anti-tip bracket to rear range foot.
Reconnect the anti-tip bracket, if the range is moved.
See the installation instructions for details.
Failure to follow these instructions can result in death or serious burns to children
and adults.
Making sure the anti-tip bracket is installed:
• Slide range forward,
• Look for the anti-tip bracket securely attached to floor,
• Slide range back so rear range foot is under anti-tip bracket,
IMPORTANT SAFETY INSTRUCTIONS
WARNING: To reduce the risk of fire. electrical
shock, injury to persons, or damage when using the
range, follow basic precautions, including the
following:
• WARNING: To REDUCE THE RISK OF
TIPPING OF THE RANGE. THE RANGE MUST BE
SECURED BY PROPERLY INSTALLED ANTI-TIP
DEVICES. TO CHECK IF THE DEVICES ARE
INSTALLED PROPERLY. SLIDE RANGE FORWARD.
LOOK FOR ANTI-TIP BRACKET SECURELY
ATTACHED TO FLOOR. AND SLIDE RANGE BACK
• Disconnect the electrical supply before servicing the
appliance.
• Never Use the Range for Warming or Heating the
Room.
• Injunes may result from the misuse of appliance doors
or drawers such as stepping, leaning, or sitting on the
doors or drawers.
• Maintenance - Keep range area clear and free from
combustible materials, gasoline, and other flammable
vapors and liquids.
SO REAR RANGE FOOT IS UNDER ANTI-TIP • Storage in or on the Range - Flammable materials
BRACKET.
• CAUTION: Do not store items of interest to
children in cabinets above a range or on the
backguard of a range - children climbing on the
range to reach items could be seriously injured
• Proper Installation - The range, when installed, must
be electdcalty grounded in accordance with local
codes or. in the absence of local codes, with the
National Electrical Code. ANSI/NFPA 70. Be sure the
range is properly installed and grounded by a
qualified technician.
• This range is equipped with a three-prong grounding
plug for your protection against shock hazard and
should be plugged directly into a properly grounded
receptacle. Do not cut or remove the grounding prong
from this #lug.
should not be stored in an oven or near surface units.
• Top burner flame size should be adjusted so it does
not extend beyond the edge of the cooking utensil.
For self-cleaning ranges -
• Before Self-Cleaning the Oven - Remove broiler pan
and other utensils. Wipe off all excessive spillage
before initiating the cleaning cycle.
SAVE THESE INSTRUCTIONS
5
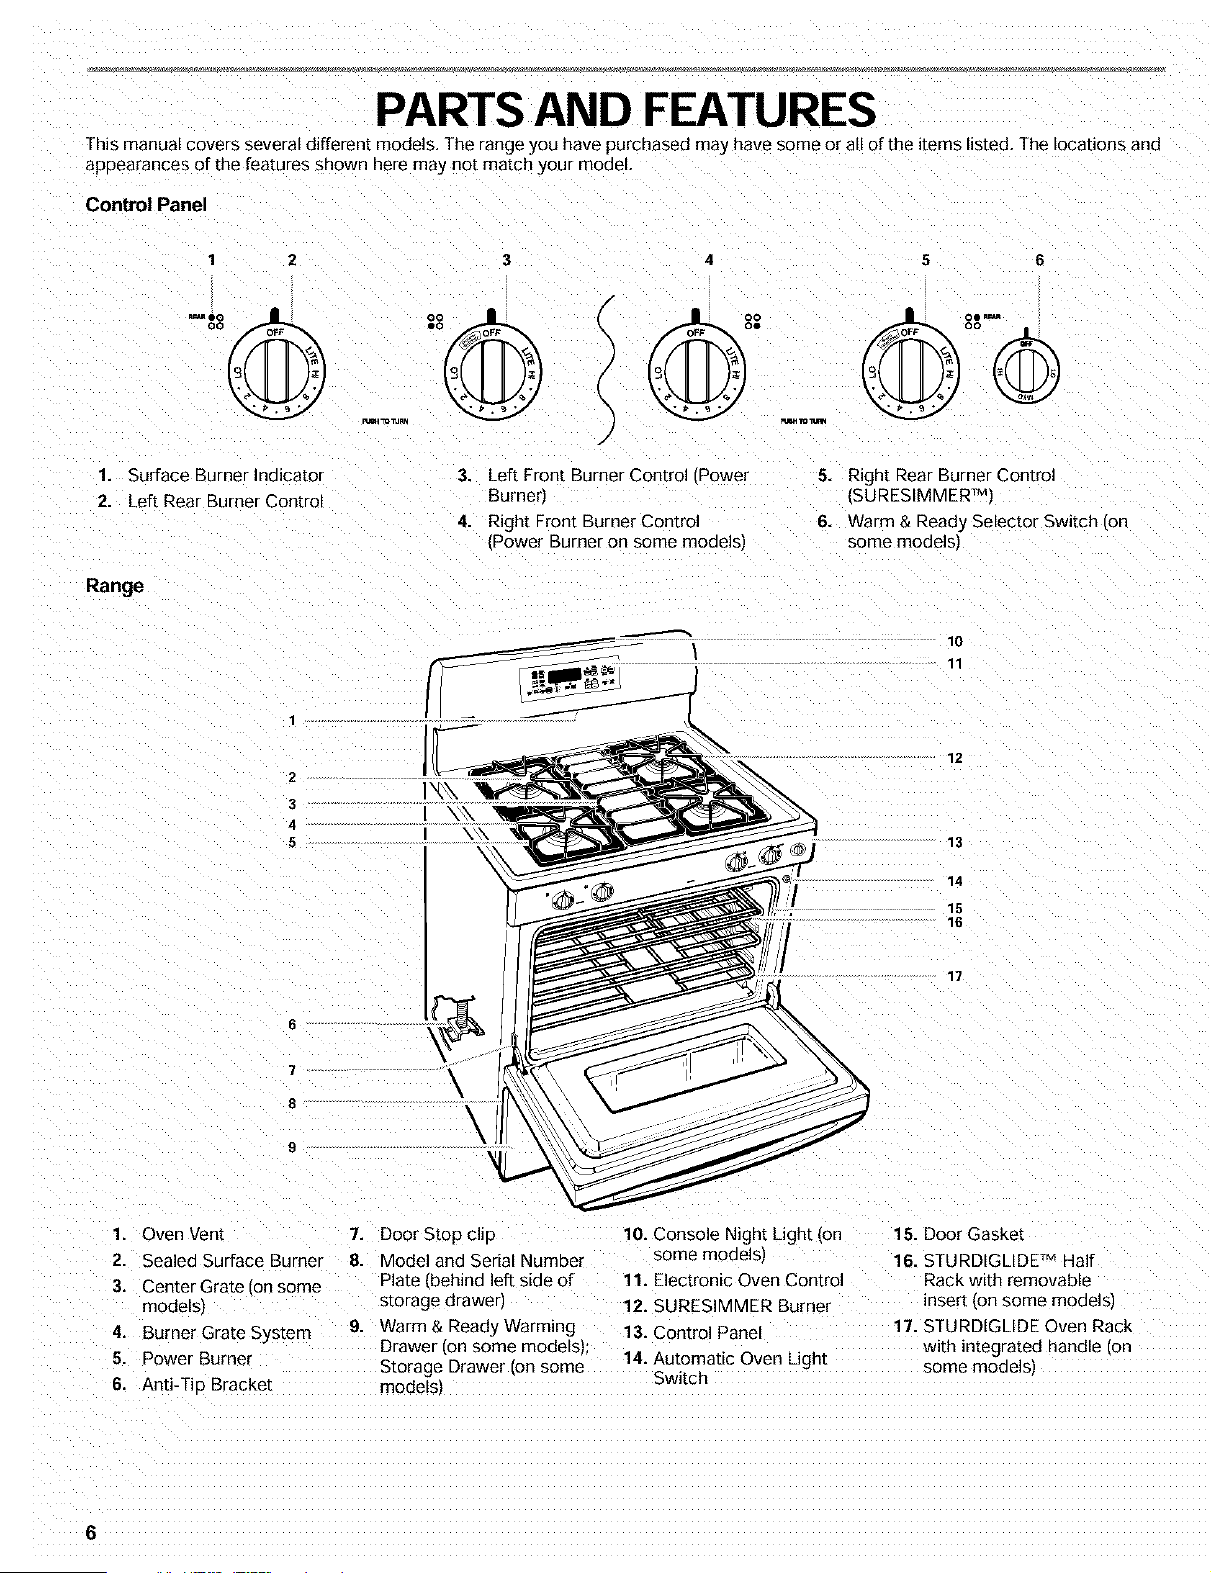
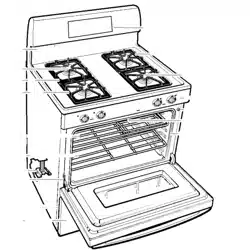
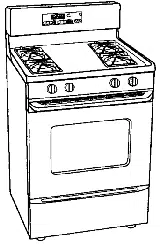
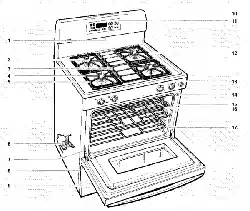
PARTS AND FEATURES
This manual covers several different models, The range you have purchased may have some or all of the items listed, The locations and
appearances of the features shown here may not match your model,
Control Panel
3
1 Surface Burner Indicator
2. Left Rear Burner Control
Range
2
3
4
5
oo
eo
3. Left Front Burner Contro [Power
Burner)
4. Right Front Burner Contro
[Power Burner on some models'
\
(
I_\\
\\\
N\\
5. Right Rear Burner Control
ISURESIMMER T_'
6. Warm & Ready Selector Switch [on
some modelsl
10
11
13
14
15
16
6
7
8
9
\
\
\
\ Jl
17
1. Oven Vent 7.
2. Sealed Surface Burner 8.
3. Center Grate {on some
models,
4. Burner Grate System 9.
5. Power Burner
6. Anti-Tie Bracket
Door Stop clip 10. Console Night Light (on
Model and Serial Numbe{ some modelsJ
Plate aehind left side of 11. Electronic Oven Contro
s[orage drawer) 12. SURESIMMER Burner
Warm & Ready Warming 13. Control Panel
Drawer [on some models_:
Storage Drawer on some 14. Automatic Oven Light
Switch
models_
15. Door Gasket
16. STURDIGLIDE TM Half
Rack with removable
inser[ ion some modelsJ
17. STURDIGLIDE Oven Rack
with integrated handle {o_
some modelsl
6
COOKTOP USE
I
REMEMBER: When range is in use or i on some
models) during the Self-Cleaning cycle, the entire
cooktop area may become hot.
Fire Hazard
Do not let the burner flame extend beyond the
edge of the pan.
Turn off all controls when not cooking.
Failure to follow these instructions can result in
death or fire.
Electric ignitors automatically light the surface Burners when
control knobs are turned to LITE
3efore setting a control knob alace filled cookware on the grate.
30 not ooerate a burner using empty cookware or while the grate
is vacant
To Set:
1. Push in and turn knob counterclockwise te LITE
All four surface burners will click, Only the Burner with the
control knob turned to LITE will oroduee a flame,
2. Turn knob anywhere between HI and LB. Use the following
chart as a guide when setting heat levels.
SETTING RECOMMENDEDUSE
LITE •
HI •
Mid-range •
Between HI and LOI
Light the burner.
Start food cooking.
Bring liau[a [o a boil
Hold a rapid boil.
Quickly brown or sear food.
To fry chicken.
Maintain a slow boil.
Power failure
In case of prolongea power failure the surface burners can be lit
manually Hold a lit match near a burner and turn knob
counterclockwise to LITE. After burner lights turn knob to
setting
Power Burner
The left front burner is designee to give ultra-high power when it
is turned to HI. It can be used to rapidly bring liquid to a boil and
to cook large quantities of food. On some models both front
Burners are Power Burners.
;ooKtoo) Lockout
(ON SOL_T_ m_5
The Cooktop Lockout prevents unintended use of the surface
burners. When the cooktoe is locked out the surface burners
cannot De turneo on BY the control knobs
Whe_ power is first supplied to the range, or if the range loses
cower the surface burners will be in the Cooktou Lockout
oosleon. The surface burners cannot be activated untiJ power is
restored to the range and/or the Cooktop Lockout is disengagee.
To Lock/Unlock Cooktop:
Before using turn all control knobs to OFF. Press and hold the
TOP keypad for 5 seconds until a single tone aria "Loc on" will
appear on the diSDlay. After 5 seconds Loc On" will disappear
from the display, and a picture of the cooktoD will appear,
Repeat to unlock cooktop. "Loc OFF" will appear on the displa:y
for 5 seconds and the picture of the cooktop will disappear from
the disDlay.
• Fry or saute foods.
• Cook souos sauces and grawes.
LO • Keep food warm.
• TO simmer.
Power Burner • Provide highest neat setting
',left front burnerJ
SURESIMMER TM
(right rear burnen
• Provide lowest simmer/heat
setting.
• Melt chocolate or butter.
7
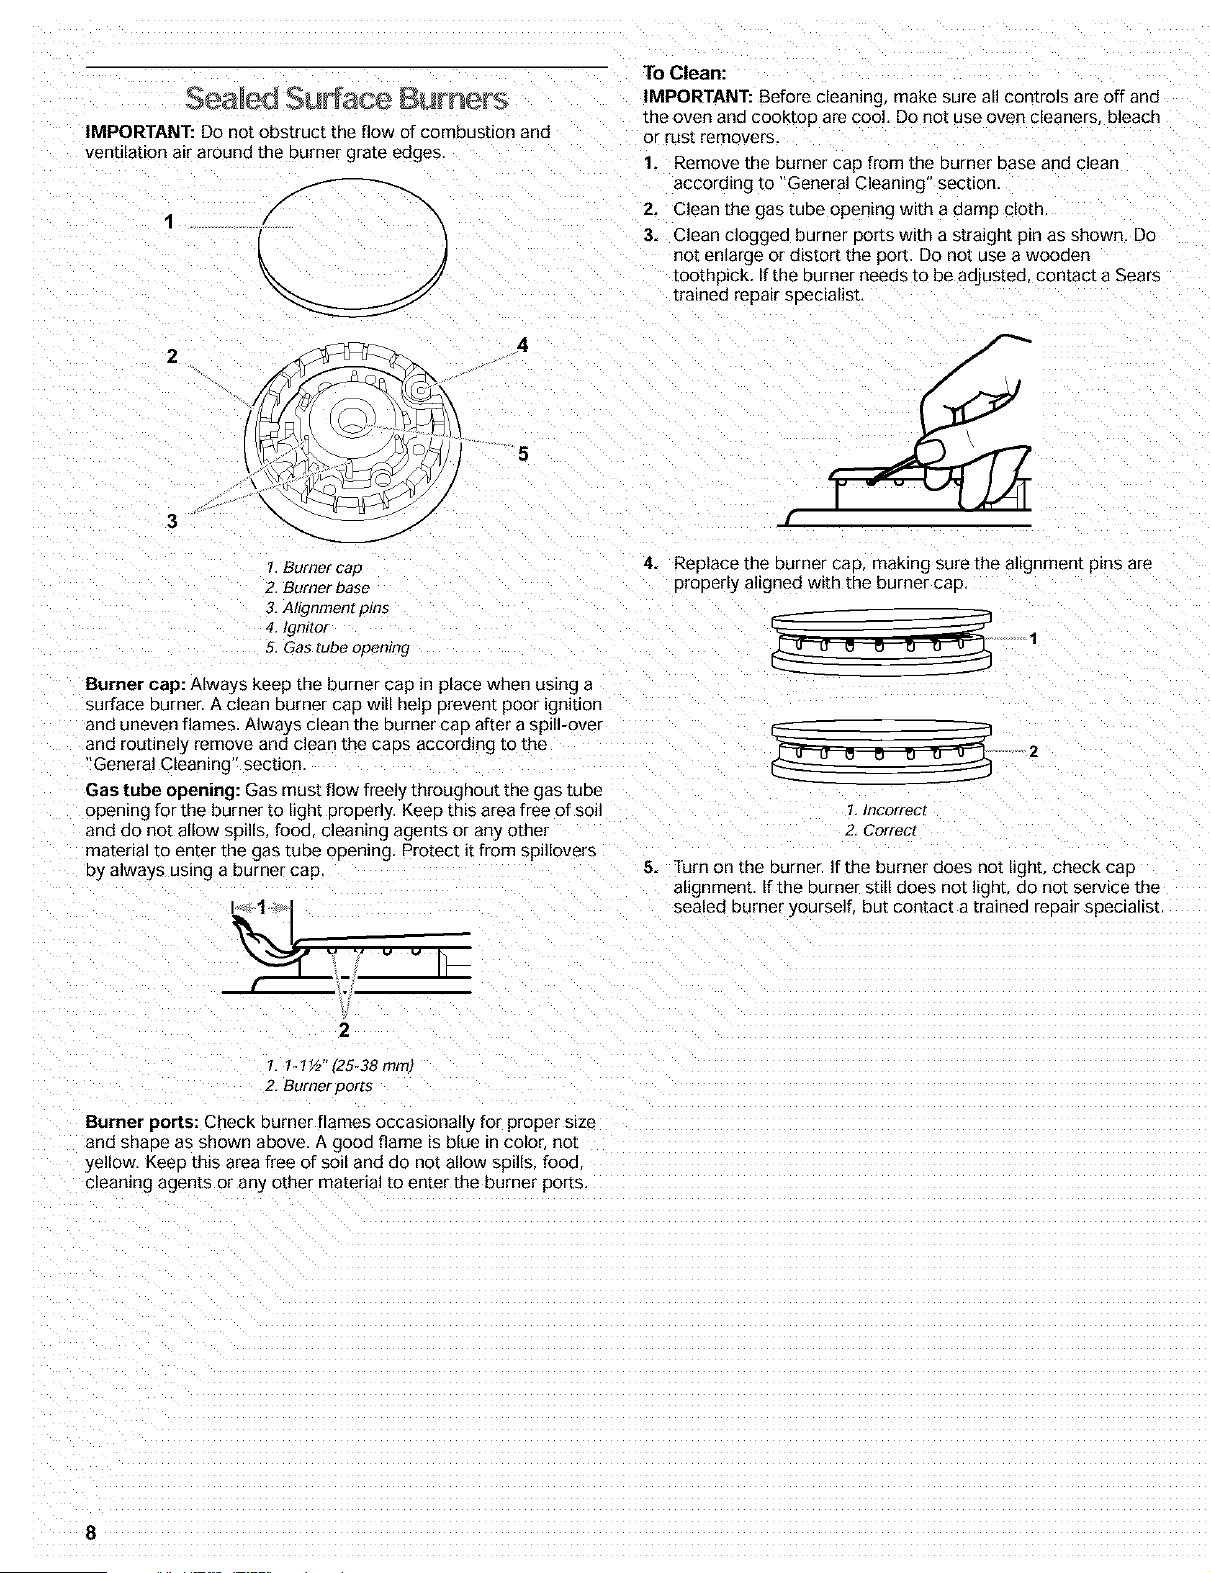
Sea ed Su ace Burners
IMPORTANT: Do not obstruct the flow of combustion and
venblahon air around the burner grate edges
To Clean:
IMPORTANT: Before cleaning, make sure all controls are off and
the oven and cooktop are cool. Do not use oven cleaners bleach
or rust removers.
1. Remove me Burner cap from the burner base and clean
accor@ng to "General Cleaning section,
2. Clean the gas tube opening w_th a aamp cloth
3. Clean cloggea burner Botts w_th a straight pin as shown, Do
not enlarge or distort the port. Do not use a wooaen
toothpick, If the burner needs to be adjusted contact a Sears
trmned repair specialist,
\
\
4
[
1. Burner cap
2. Burner base
3. Alignment pins
4. tgnl_or
5. Gas tube opening
4=
Replace the burner caB. making sure the alignment pros are
Brooerly aligned with the burner caB.
Burner cap: Always keep the burner cap Jn place when using a
surface burner. A clean burner cap w=ll he]p Brevent poor ignition
and uneven flames. Always clean the burner cap after a sp_ll-over
and routinely remove and clean the CaDSaccording 1othe
General Cleaning" section,
Gas tube opening: Gas must flow freely throughout the gas tube
opening for the burner to light properly. Keep this area free of soil
and do not allow spills, food, cleaning agents or any other
matenal to enter the gas tube oBening. Protect Jtfrom spillovers
By always using a burner cap
- 2
7, Incorrect
2. Correct
5. Turn on the burner. If the burner does not light, check cab
alignment, If the burner still does not light, do not service the
sealed Burner yourself aut contact a trained repair specialist
1. 1-1½ (25-38mm)
2. Burner ports
Burner ports: Check burner flames occasionally for proper s=ze
and shade as shown above. A good flame is blue in coloi no[
yellow. Keen this area free of soil and do not allow sp=lls, fooc
cleaning agents or any other material to enter the burner ports.
8
]RESIMMER
The SURESIMMER burner is an adjustable heat setting for more
3recBe s_mmenng ana low temperature cooking It is the right
rear Burner
To Use:
1. Push the right rear burner control knob in ana [urn counter-
clockwise to "UTE," then to "LO."
2. Push in ana turn knob to OFF when finished.
When canning for long eeriods, alternate the use of surface
cooking areas elements or surface burners between batches
This allows time for the most recently usea areas to cool.
• Center the canner on the grate or largest surface cooking
area or element. Canners should not extend more than 1 in
(2,5 cm) outside the cooking area
• Do not Dlace canner on two surface cooking areas elements
or surface burners at the same ume.
On ceramic glass models only use flat-bottomed canners.
On coil element models the installation of a Canning Unit Kit
is recommended. If not installed the life of the coil element
will be shortened. See back cover for ordering instructions.
IMPORTANT: Never leave empty cookware on a hot surface
cookin£ area element or surface Burner.
Ideal cookware should have a flat bottom straight sides, a well-
fimng lid and the material should be of medium-to-hear)
thickness
Rough finishes may scratch the CooktoD. Aluminum and copper
may Be usea as a core or base in cookware. Howeve" when usea
as a ease it can leave eermanent marks on the cooktoe or grates.
Cookware material is a factor in how auickly and evenly heat is
transferred, which affects cooking results. A non-stick finish has
the same characteristics as its base material For example,
aluminum cookware with a non-stick finish will take on the
eroBerties of aluminum.
Use the following chart as a guide for cookware material
characteristics.
COOKWARE CHARACTERISTICS
Aluminum
Cast iron
Ceramic or
Ceramic glass
For more information contact your local U.S. Government Copper
Agricultural Department Extension Office. Companies who
manufacture home canning proauc[s can also offer Earthenware
assistance
Porcelain
enamel-on-
steel or cast
iron
Stainless steel •
• Heats quickly and evenly
• Suitable for all types of cooking.
• Medium or heavy thickness is best for
most cooking tasks
• Heats slowly and evenl_
• Good for browning and frying
• Maintains heat for slow cooking.
• Follow manufacturer's instructions
• Heats slowly, BUt uneventy.
• Ideal results on low to medium heat
settings
• Heats very quickly and evenly.
• Follow manufacturer's instructions
• Use on low heat settings.
• See stainless steel or cast iron
Heats auickly, but unevenly.
A gore or base of aluminum or coppe-
on stainless steel provides even
heatmg.
9
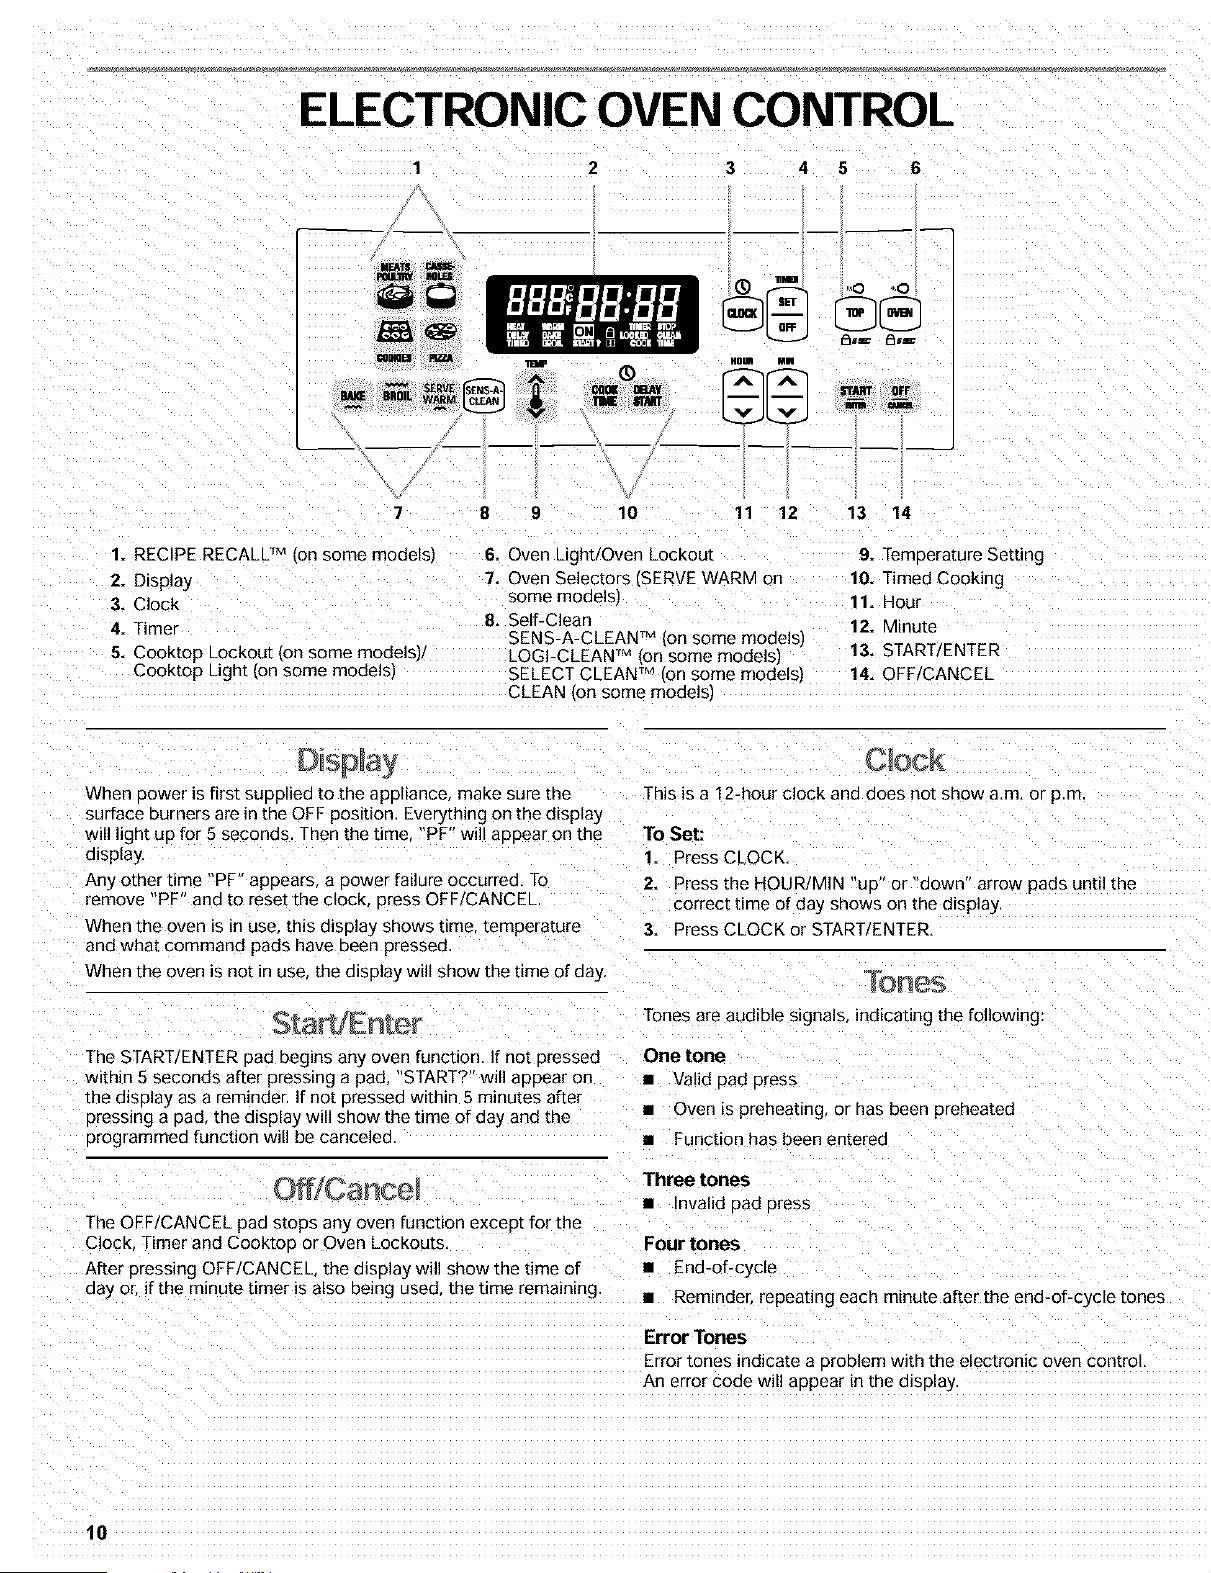
ELECTRONIC OVEN CONTROL
3 4 5 6
19
loll Mm
7 8 9 10 11 12 13 14
1. RECIPE RECALL TM _on some models]
2. Display
3. Clock
4. Time-
5. Cooktop Lockout ,on some models)
Cooktop Light ion some modelsJ
6. Oven Light/Oven Lockout
7. Oven Selectors (SERVE WARM on
some modelsi
8. Self-Clean
SENS-A-CLEAN TM _oesome models]
LOGI-CLEAN TM Ion some models)
SELECT CLEAN TM [on some modelsl
CLEAN _on some models]
9. TemDerature Setting
10. Timed Cooking
11. Hour
12. Minute
13. STARTJENTER
14. OFF/CANCEL
Di
When Dower is first SUDDIied tO the appliance make sure tee
surface burners are in the OFF pos[uon Everything on the dEsplay
will light up for 5 seconds Then the time "PF" will aDDear on the
a_sp[ay.
Any omer ume "PF" appears, a Dower failure occurred, To
remove "PF" and to reset the clock. Dress OFF/CANCEL
When the oven is in use. this display shows time. temperature
and what command pads have been aressed
When the oven is not in use. the disDlay Will show the time of day.
The START/ENTER Dad begins any oven function If not Dressed
within 5 seconds after pressing a pad. "START?" will aDDear on
the diSDlay as a reminder. If not Dressed within 5 minutes after
Dressing a DaG the display, will show the time of day and the
programmed function will be canceled
The OFF/CANCEL pad stops any oven function except for the
Clock Timer and CooktOD or Oven Lockouts.
AfTer pressing OFF/CANCEL the display will show the time of
Day or, if the minute timer is also Deng used the time remaining.
This is a 12-hour clock and does not show a,m, or p.m
To Set:
1. Press CLOCK.
2. Press the HOUR/MIN "UD" or "down" arrow pads until the
correct time of day snows on tee display.
3. Press CLOCK or START/ENTER,
[O_@S
]-ones are audible signals, indicating Lhe following:
One tone
• Valid Dad Dress
• Oven is preheating or has been preheated
• Function has been entered
Three tones
• Invalid Dad Dress
Four tones
• End-of-cycle
• Rem[nden repeaung each minute after the end-of-cycle tones
Error Tones
Error [ones indicate a oroblem with the electronic oven control.
An error code will appear in the display.
10
Tone Volume
The volume can be adJusted between high and low.
To Change: Press and hold DELAY START for 5 seconds. A short
tone will sound ana either "Snd HI" or "Snd Lo" will appear on the
display. Press and hold DELAY START again for 5 seconds to
cnange to desired setting,
To remove "Snd on " "Snd OFE" "rEP on," "rEP off." "Snd HI" or
"Snd Lo" Dress any paa and the keyed function will appear on
the disDlay.
Reminder Tones
Reminder tones are four 1-second tones which indicate that the
set time has exDired for a timer or a timed oven control function,
Timer
To Turn Tones Off/On: Press and hold SET for 5 seconds, A
short tone will sound and "rEP OFF" will appear on the dlspla 9
Repeat to turn back on
Timed Cooking
To Turn Tones Off/On: Press ana hold COOK TIME. A short tone
will sounc and "Snd OFF" will appear on the dlSDlaV. ReDea[ to
[urn back on,
Fahrenheit and Celsius
The temDerature is areset at Fahrenheit but can be changed to
Celsius
Oven Lockout
The Oven Lockout prevents unintended use of the control aanel
command keypads. The oven can only be locked out when the
oven is not in use or the oven control has not been set.
The oven will remanD locked out after a Dower failure if it was
locked before the Dower failure
To Enable/Disable Oven Lockout:
Press and hold OVEN for 5 seconds. A single tone wdl sound
and "Loc on" and a lock icon will appear on the display. After 5
seconds "Loc on" will disappear from the display and "Loc" will
appear,
Three tones will sound when the oven is locked ana any
commanc pad other than CLOCK TIMER. START/ENTER OFF/
CANCEL or OVEN has bee_ pressec
To unlock oven press and hold OVEN for 5 seconds Loc OFF"
will appear on the d[splay and lock icon will disappear from the
display.
OvenTempe atureContro,
IMPORTANT: Do not use a thermometer to measure oven
temperature because opening the oven door and element o"
burner cycling may g_ve incorrect reaamgs.
The oven provides accura[e temperatures: however, it may cook
faster or slower than your Drevlous oven SOthe temDera[ure
calibration can be adjus[ea. It can be changed in Fahrenheit or
To Change: Press and hold BROIL for 5 seconds. A short tone Celsius
will sound and the temperatures @splayed will switch to "°C",
Repeat to change back to Fahrenheit
[imer
The Timer can be set in minutes ana seconds or hours ant
minu[es ana counts down the set time, The Timer does not start
or s_co the oven,
A minus sign means the oven will cook cooler by the adjus[men[
amount. No sign means the oven will cook warmer by the
adjus[mem amount Use the following chart as a guide.
ADJUSTMENT °F
(ADJUSTMENT °C)
COOKS FOOD
10°F [5°CI ...a little more
To Set:
1. Press TIMER SET.
2. Press the NOUR/MIN "up" or "down" arrow pads until the
correct length of time shows on the d_SDlay.
3. Press START/ENTER orTIMER SE]
The Timer will beg_n counDng down after the Timer is startec
The display will count down in hours and minutes if remaining
time is one hour or more and in minutes and seconds il
remaning time is less than one hour
When the set ttme ends four 1-second tones if enabled will
sounG then reminder tones will sound ever9 minute
4. Press TIMER OFF anytime to cancel the Timer ana/or S[OD
remlnaer tones
20°F [10°C1 ,_moderatelj more
30"F [15°C1 ,,,much more
-10°F (-5°C) ,,,a little less
-20°F (N0°C} ,_moderatel) less
-30°F (-15°C) .,,much less
To Adjust Oven Temperature Calibration:
1. Press and hold BAKE for 5 seconds until the oven alsplay
shows the current calibration [or example "0 ° CAL.
2. Press the TEUP "up or Down arrow pad to increase or to
decrease the temperature in 10°F (5°C) amounts. The
adjustmem can be set between 30"F [15°C and -30°F
[-15°Ci
3. Press START, ENTER.
11
OVEN USE
Odors are normal when the range is new. This happens the first
time the oven is used or when the oven is heavily soiled.
IMPORTANT: The health of some birds is extremely sensltwe to
the fumes given off Exposure to the fumes may result in death to
certain birds. Always move birds to another closed and well
ventilated room,
BAKEWARE
To cook food evenly, hot air must be able to circulate. Allow 2 in.
[5 cml of space around bakeware and oven walls. Use the
following chart as a guide.
NUMBEROF POSITION ON RACK
PAN(S)
Center of rack.
2 Side by side or slightly staggered
3 or 4 ODDOSEecorners on each rack. Make sure
that no bakeware piece is directly over
another.IMPORTANT: Do not line the oven bottom with any type of foil,
I_nersor cookware because Dermanent carnage will occur to the
oven bottom finish
• Do not block or cover the oven bottom vents.
Do not cover entire rack with foil because air must be able to
move freely for best cooking results
To catch spills, place foil on rack below dish. Make sure foil is
at least I in. 12.5 cm) larger than the dish and that it is turnec
UD at the edges
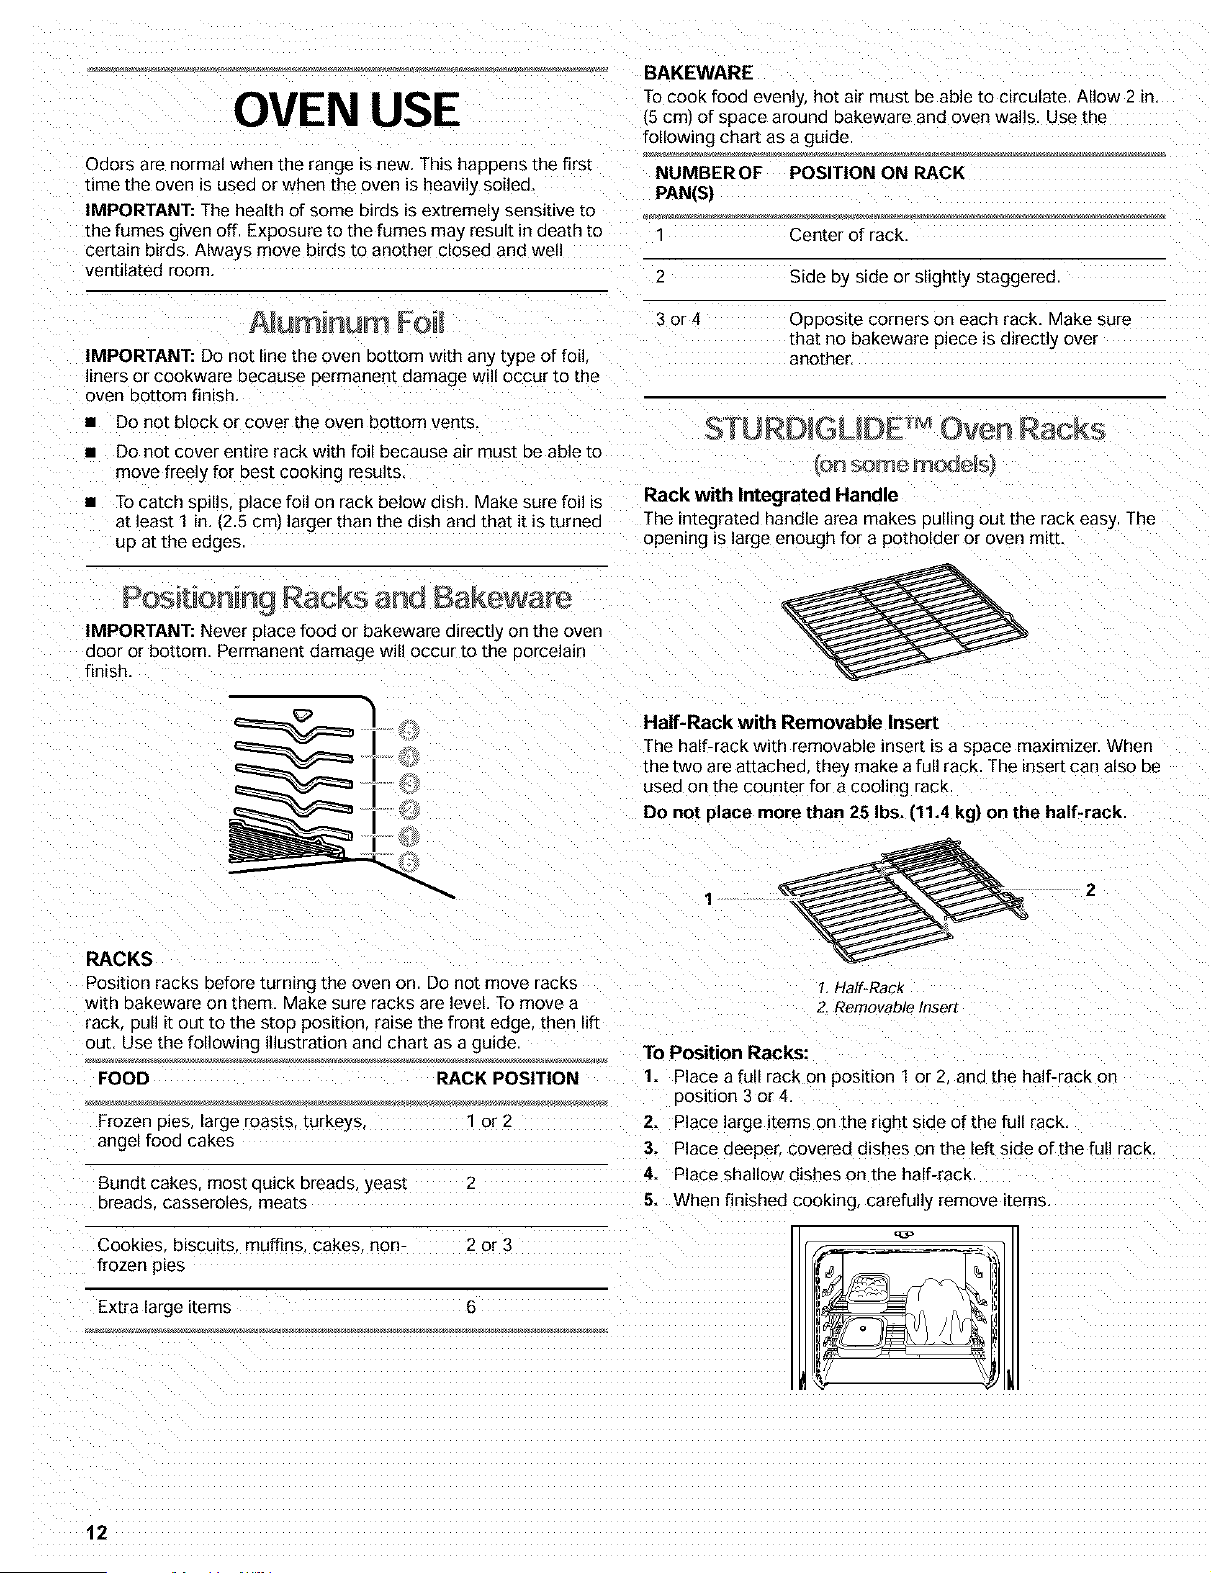
Positioning Racks and Bakeware
IMPORTANT: Never place food or bakeware directly on the oven
door or bottom. Permanent damage will occur to the Dorcelain
finish.
3N SO[T_ m_@_S_
Rack with Integrated Handle
The integrated handle area makes pulling out the rack easy The
opening is large enough for a potholder or oven m_tt.
Half-Rack with Removable Insert
The half-rack with removable insert is a space max_mtzer. When
the two are attached they make a full rack. The insert can also be
ased on the counter for a cooling rack
Do not place mere than 25 Ibs. (11.4 kg) on the half-rack
RACKS
Pos_uon racks before turning the oven on Do not move racks
with bakeware on them. Make sure racks are level. To move a
rack 3ull it out to the stop position raise the front edge then lift
our. Use the following illustration and chart as a guide
FOOD RACK POSITION
Frozen DieS. large roasts, turkeys " or 2
angel food cakes
Bundt cakes most ouick breads yeas[ 2
Dreaas. casseroles meats
Cookies biscuits, muffins, cakes, non- 2 or 3
frozen pies
Extra large items 6
2
1. Half-RacK
2. Removable Insert
To Position Racks:
1. Place a full rack on position 1 or 2 and the half-rack on
DOSition 3 or 4.
2. Place large items on the right side of the full rack.
3. Place aeeper covered dishes on the left side of the full rack.
4. Place shallow dishes on the half-rack
5. When finished cooking, carefully remove Etems
12
The bakeware matena] affects cooking results Follow
manufacturer's recommendations and Jse the bakeware size
recommended in the recioe. Use the following chart as a guide
BAKEWARE/ RECOMMENDATIONS
RESULTS
Light colored
aluminum
• Light golden
crusts
• Use temoerature and time
recommended in recede
1
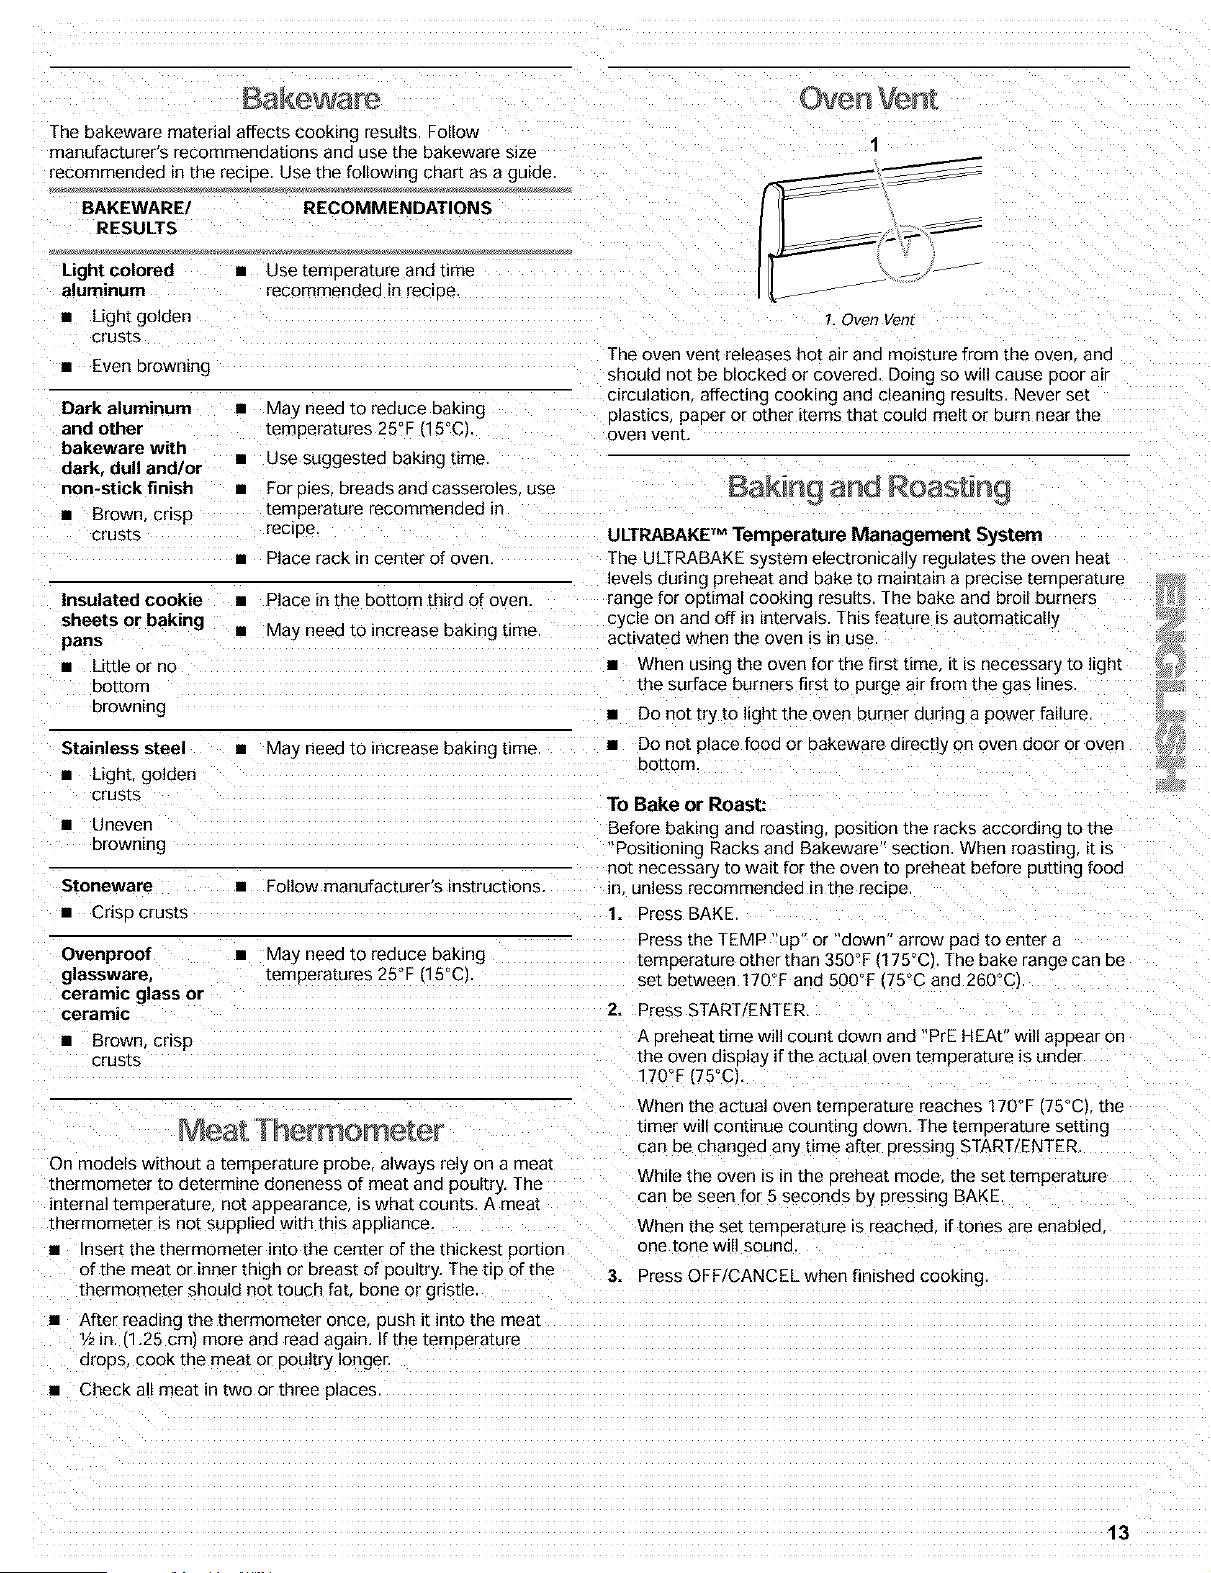
1. Oven Vent
• Even browning
Dark aluminum
and other
bakeware with
dark, dull and/or
• May need to reduce baking
temperatures 25°F (15°Ci
• Use sugges[ea baking eme
The oven vent releases hot air and moisture from the oven ana
should not be blocked or covered. Doing so will cause Door air
circulation affecting cooking and cleaning results. Never set
DlaStiCS paper or other items that could melt or burn near the
oven vent.
non-stick finish •
• Brown cesp
crusts
Insulated cookie
sheets or baking
pans
• L_ttle or no
DO[tOm
browning
For oies. breads and casseroles use Baking and Roas ng
temperature recommended in
recede ULTRABAKE TM Temperature Management System
• Place rack in center of oven. The ULTRABAKE system electronically regulates the oven heat
levels during preheat and bake to maintain a DrecBe temperature
• Place in the bottom third of oven range for optimal cooking results The bake and broil burners
cycle on aria off in intervals. This feature is automatically
• May need to increase baking ume. activated when the oven is in use
• When using the oven for the first time t is necessary to light
the surface burners first to purge air from the gas lines
• Do no[ try to light the oven burner during a power failure.
Stainless steel
• Light, golden
crusts
• Uneven
browning
• May need to increase baking time
Stoneware • Follow manufacturer's instructions.
• Criso crusts
• Do not place food or bakeware directly on oven door or oven
DoEom
To Bake or Roast:
Before baking ana roasting DOS[nonme racks according to the
"Positioning Racks and Bakeware" section. When roasting, it is
not necessary [o wait for the oven to oreheat before putting food
in Jnless recommended in the recipe.
1. Press BAKE
Ovenproof
glassware,
ceramic glass or
ceramic
• Brown. crisp
crusts
• May neea to reauce baking
temperatures 25°F (15°CI
Press the TEMP "up" or "down" arrow pad to enter a
[emoerature other than 350°F (175°C1. The bake range can De
set between 170°F and 500°F (75°C and 260°C]
2. Press START/ENTER,
A oreheat time will count down and PrE HEAt" will appear on
the oven display if the actual oven temperature is unaer
170°F .75°C1.
When the actual oven [emDerature reaches 170°F (75°C) the
timer will conenue couneng down. The temperature setting
can be changea any time after Dressing START/ENTER
On models without a temperature probe, always rely on a meat
thermometer to determine doneness of meat and poultry, The While the oven is in the preheat mode the set tempera[ure
can De seen for 5 seconds by pressing 3AKE
internal temoerature, not aDDearance, is what counts A meat
thermometer B not supplied with this appliance When the set temoerature is reached if tones are enabled
• Insert the thermometer into the center of the thickest por[_on one tone will senna
of the meat or inner thigh or breast of poultry. The tie of the 3. Press OFF/CANCEL when finished cooking
thermometer should not touch fat. Done or gristle.
• After reading the thermometer once. oush it into the meat
V2in (1.25 cmJ more and read again, If the temoerature
aroos, cook the meat or ooultry longer.
• Check all meat in two or three places
13
• Use only the broiler pan and grid provided with the range. It is
aes_gned to drain juices and help prevent spatter and smoke,
• For 3roDer draining, ao not cover the grid with foil. The
BOttom of the Dan may be Pined with aluminum foil for easier
cleaning
• Trim excess fat to reduce spattering Slit the remaining fat on
the edges to prevent curling.
• Pull out oven rack to StOD OOSltlOnbefore turning or removing
food. Use tongs to turn food to avoid the loss of juices. Very
thin cuts of fish, poultr 3, ar meat may not need to be turned
• After broiling, remove the Dan from the oven when removing
the food. Drippings will bake on the Dan if left in the heated
oven. making cleaning more difficult
Broiling uses direct radiant heat to cook food. Before broiling,
Position rack according to Broiling chart. It is no£ necessary [o
preheat the oven before euthng food in unless recommended in
the recipe. Position food on grid in the broiler nan, then place it in
the center of the oven rack. Close oven door
To Broil:
1. Press BROIL
2. Press START ENTER.
The temoera_ure setung can De cnanged any time before or
after pressing STAR] 'ENTER.
3. Press OFF/CANCEL when finished
Precision Broiling
Precision Broiling allows more precise _emperature control while
cooking. The lower the temperature, the slower the cooking.
Thicker cuts and unevenly ShaDed pieces of meat fish and
Poultry may cook better at lower broiling temperatures.
To Precision Broil:
1. Press BROIL
2. Press the TEMP "down" arrow cad to lower the temperature
in 5°F amounts. The broil range is 300°F to 525°F :150°C to
275°C).
3, Press START ENTER.
4. Press OFF/CANCEL when finished
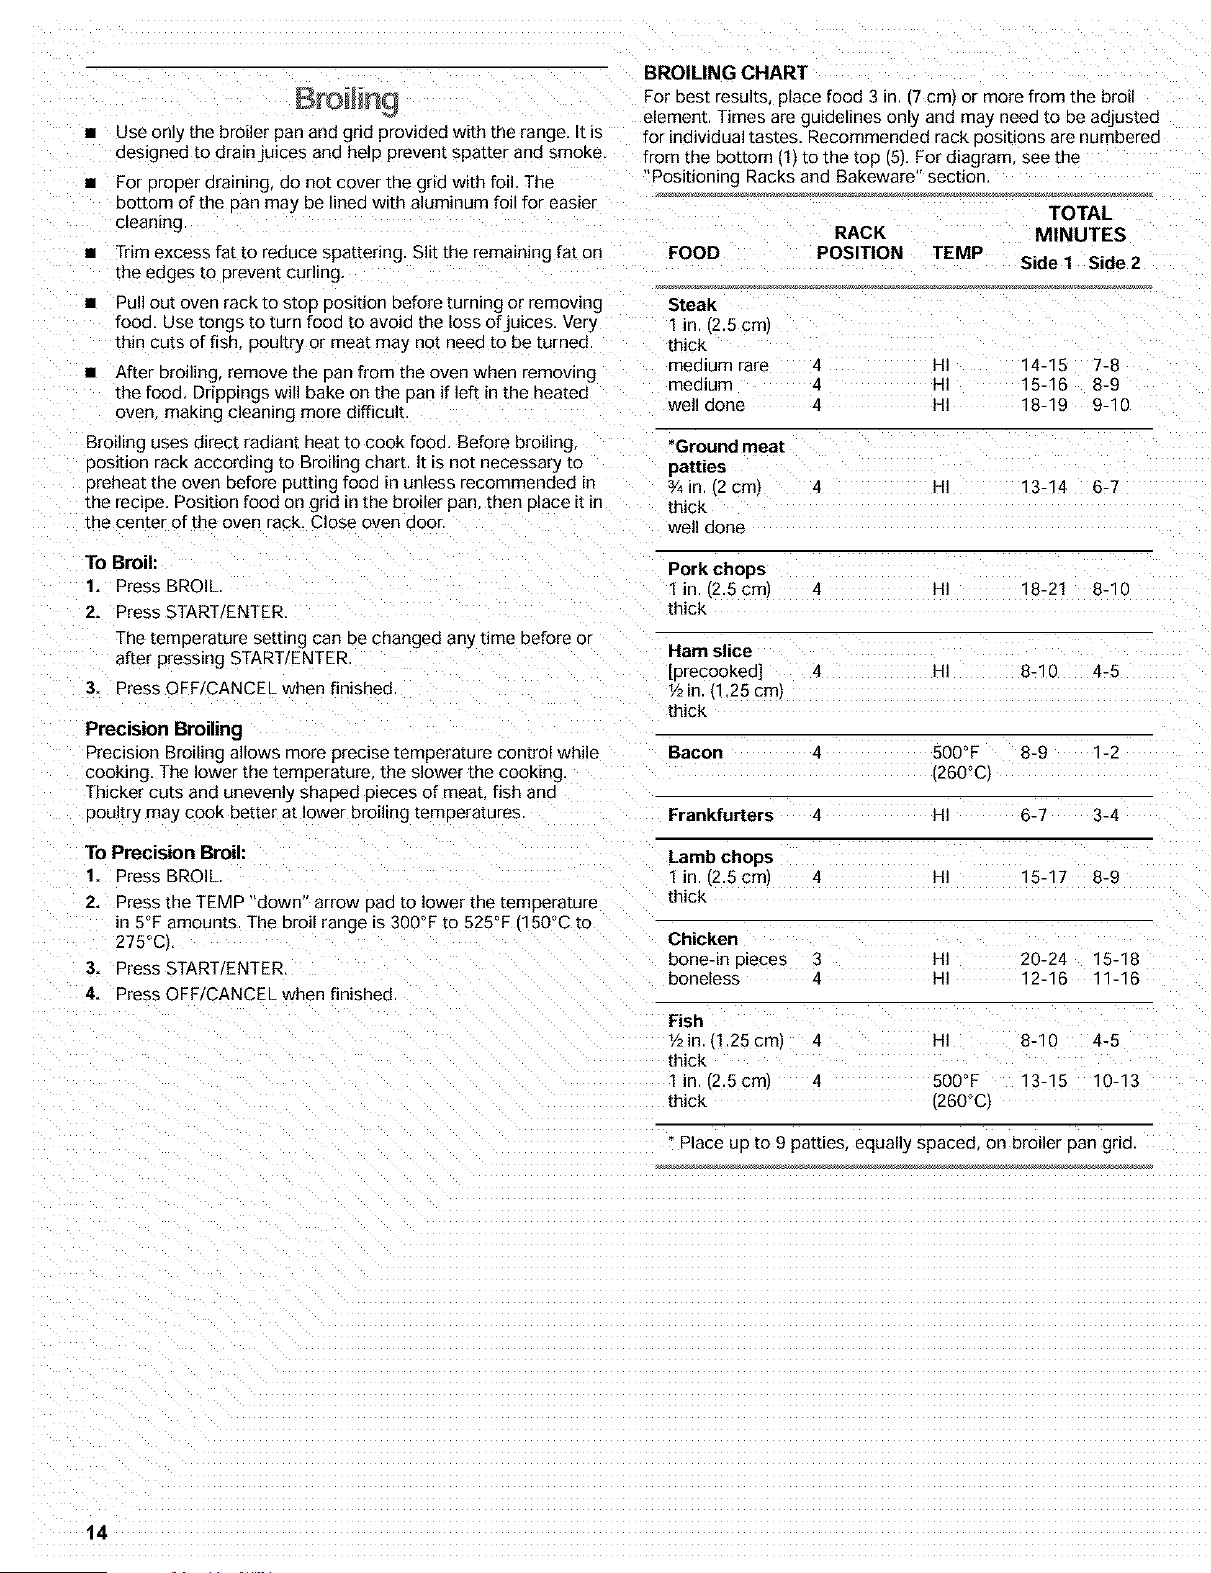
BROILING CHART
For best results, place food 3 in (7 cm, or more from the broil
element. Times are guidelines only and may neea to De adjusted
for individual tastes. Recommended rack POSitions are numberec
from the bottom (1) to the top (5). For diagram, see the
Positioning Racks and Bakeware" section.
TOTAL
RACK MINUTES
FOOD POSITION TEMP
Side 1 Side 2
Steak
1 in [2.5cm)
thick
mealum rare 4 HI 14-15 7-8
mea_um 4 HI "5-16 8-9
well done 4 HI "8-19 9-10
*Ground meat
patties
3/4in r,2cml 4 HI 13-14 6-7
thick
well done
Pork chops
1 in ,2.5cml 4 HI "8-2! 8-10
thick
Ham slice
[precooked] 4 HI 8-10 4-5
1/2in (1.25 cml
thick
Bacon 4 500°F 8-9 1-2
(260°C)
Frankfurters 4 HI 6-7 3-4
Lamb chops
1 in ,2.5 cml 4 HI "5-17 8-9
thick
Chicken
bone-in 3[eces 3 HI 20-24 15-18
boneless 4 HI 12-15 11 - 16
Fish
I/2in (1.25 cm) 4 HI 8-10 4-5
thick
1 in [2.5cm) 4 500°F 13-15 10-13
thick (260°C,
* Place up to 9 patties, equally spaceG on broiler pan gno
14
RE(; IPE JALL
i_n Some m_s_
RECIPE RECALL makes cooking favorite foods faster and easier.
The temperatures and times have been chosen to cover a variety
of choices in each food category. Cooking times are adJustable
for individual recipes and can be saved. Temperatures can De
changed but not saved, When changed, the display will not show
"PrEHEAt" while the oven is preheating.
f recipe recommenas no preheat is needed put food in oven
Use the following chart as a guide when using :_ECIPE RECALL:
Keypad Set Preset Time
Temperature
MEATS/POULTRY* 325°F !165°CI 1 hour
3 Ib [6.6 kg]
CASSEROLES* 350°F (175°C) 45 minutes
2 at. (500 mL)
COOKIES 375°F t190°C1 10 minutes
2.
PIZZA 400°F (205°C/ 20 minutes
*The MEATS/POULTRY and CASSEROLES functions ao not have
a programmea ore-heat. If your recipe suggests you ore-heat
3efore cooking meats, poultry or casseroles, pre-heat using the
3AKE function. Once the pre-heat temperature has been 3.
reached cancel BAKE and select MEATS/POULTRY or 4.
CASSEROLES function
To Use RECIPE RECALL:
1. Press one of the four keypads MEATS POULTRY
CASSEROLES COOKIES or PIZZA
2. Press START ENTER.
The cook time can be changed after pressing START/ENTER.
By pressing the HOUR/MIN pads. The oven will finish cooking
with the new hme.
When cook time ends the oven will automatically shut off.
End" and COOK TIME will appear on the display :our tones
will souno then four 1-second reminder tones will souna
ever} minute after.
COOKIES and PIZZA keypads include a preheat. When the
preheat ends a single tone will sound and the cooking eme
will appear couneng down on the display.
Food Poisoning Hazard
Do not let food sit in oven more than one hour
before or after cooking.
Doing so can result in food poisoning or
sickness.
IMPORTANT: Food must be at serving temperature before
placing it in the warmed oven. Food may be held up to one hour.
Serve Warm allows hot cooked foods to slay warm before
serving. It can also be used at the end of a timed cook
To Use:
1. Press SERVEWARM
Set the temperature Ioptionall
Press the TEMP "up or aown arrow pad to raise or lower
the temperature in 5°F r5°cl amounts 1o set a temperature
other than 150"F (65°C] The warm range is 100°F-200°F
(35°C-90°C).
Press START, ENTER,
Press OFF/CANCEL when finished
To Add to the End of a Set Cook Time:
1. Press BAKE
2. Set the temperature Ioptlonal]
Press the TEMP "up" or "down" arrow pad to set a
temuerature other than 350°F (175°CI.
3. Press COOK TIME
4. Press the HOUR/MIN "up" or "down'" arrow oaas to set cook
ume
5. Press SERVE WARM
A one hour warm time will automatically be set
6. Set the warm temperature ioptloeal)
Press the TEMP "up or "down" arrow pad to raise or lower
the temperature in 5°F '5°C_ amounts [o set a temoera[ure
other than 150°F (65°Ci The warm range is 100°F-200°F
3.
Loeesand remove "End" from display. The time of day will
appear on the display.
,35°C-90°CL
Press OFF/CANCEL or open the oven door to stop remmae/
7. Press START/ENTER.
To Change Preset Cook Time:
The length of cooking time for each of the 4 keyDaas can De
changed and the range will store the new information for the
next use.
The display will show the cook time counting down. When
cook time ends Lhedisplay will show a warming ume
When warming time ends the oven will automatically shut off
and "End" and COOK TIME will show on the display. Four
tones will sound and then four 1-second reminder tones will
1. Press one of the four keypads MEATS POULTRY. sound every "ninute thereafter
CASSEROLES COOKIES or PIZZA 8. Press OFF/CANCEL or open me oven door to stop remnaer
2. Press the HOUR/MIN "up" or "down" arrow pads until the tones and remove "End" from display. The time of day will
length of cooking lime shows on the display. "eturn to the diSDlay.
3. Press same Daa selected in SteD 1 tO save the change for the
next use
A single tone will souna
4. Press OFF/CANCEL if only changing the stored 3reset cook
time. Press START/ENTER if 3roceeang to cook with new set
cook time.
15

To Add to the End of a Delay Start/Set Cook Time:
1. Press BAKE
2. Bet the temperature _opt_onal
Press the TEMP "up" or "down arrow pad to set a
temperature other than 350°F (175°CL
3. Press COOK TIME.
Press the HOUR/MIN "ue" or "down" arrow oads to set cook
time.
4. Press DELAY START.
Press the HOUR/MIN "UP" or "down" arrow paos ro set the
rime of day to start cooking.
5. Press SERVE WARM
A one hour warm time will automatically be set
6. Set the warm temoera(ure (optional)
Press the TEMP "up" or "down" arrow pad to raise or lower
the temperature in 5°F (5°C) amounts to set a [empera[ure
other than 150°F ,65°C1 The warm range is 100°F-200°F
(35°C-90°C,.
7. Press START ENTER.
When the start time is reached the display will show the cook
rime countmg down. When cook time ends. the d_splay will
show a warming time.
When warmmg t_me ends the oven will automaticall_ shut off
and "End" and COOK TIME will show on the display. Four
lores will sound and then four 1-second remnder tones will
sound every minute thereafter,
8. Press OFF/CANCEL or open the oven ooor [o slop remmaer
tones ana remove "End" from display, The time of day will
return to the display.
T med Oven Con o
Food Poisoning Hazard
Do not let food sit in oven more than one hour
before or after cooking.
Doing so can result in food poisoning or
sickness.
The Timed Oven Control allows the oven to be se[ [o [urn on a[ a
cer[a[n ume of day. cook for a set length of time. and/or shut off
automatically. Delay start should not be used for foods such as
breads and cakes because they may not bake properly.
To Set a Cook Time:
Before setting make sure the clock is set to the correc[ ume of
any See "Clock" section.
1. Press BAKE
Press the TEMP "up" or "down" arrow pad to set a
temperature other than 350°F (175°C).
2. Press COOK TIME.
3. Press the HOUR/MIN "up" or "down" arrow pads to enter the
length of time to cook.
4. Press START ENTER.
5.
The cook time will appear on the oven display. The display
will count down the baking/roasung time in hours anc
minutes (ff cook time is more than ! hour) or in minutes anG
seconds [if cook time is less than 1 houri
The time settings can be changed any time after pressing
START/ENTER by repeating step 3
When the countdown is complete the oven will shut off
automatically and "End and COOK TIME will appear on the
oven o]selay. Four tones will souno then four 1-second
reminder tones will sound every minute thereafter.
Press OFF/CANCEL or oDen the oven door to remove "End'
from display, The time of day will appear on the disulay.
To Set a Cook Time and Stop Time [Delay Start]:
1. Press BAKE
Press the TEMP "up or "down" arrow pan to se[ a
[emDerature other than 350°F (175°C).
2. Press COOK TIME.
3. Press tPe HOUR/MIN "UP" or "down" arrow pads to enter the
length of time to cook.
4. Press DELAY START.
5. Press the HOUR/MIN "UP" or "down" arrow pads to enter the
time of day ros[ar[
6. Press START ENTER.
"DELAY and the time of day will aDDear on the oven diSPlay.
When the start time is reachee the oven will automatically
[urn on display the cook time and _mmed_ately star[
counting aown
When cook time ends four tones w_ll sound then four 1-
second reminder tones will sound ever)_ mEnu[e
7. Press OFF/CANCEL or open the oven door Lo remove "End'
from display. The time of day will appear on the display.
To Recall Programmed Timed Settings (displayed for 5
seconds):
To Recall Set Press
Cook Time COOK TIME_
Delay Start DELAY START
Temoerature BAKE
*If cook time has begun wren DELAY START is Dressea the
display will show the time it starteG When COOK TIME is
Dressed. the display will remove the seconds from the remaining
countdown time
16

ToChangeProgrammedTimedSettings:
ToChangeSet Press SettingDisplayed
Cook Time COOK TIME Press HOUR MIN
up/down" arrow
Press STAR]
ENTER
4. Place container with food into the warming araweR
5. Turn selector switch to OFF when finished warming
WARM & READY TEMPERATURE CHART
Different foods require different settings in order to maintain the
ideal serving temperature, Use the following chart as a guide.
FOOD SETTING
Delay Start* DELAY START Press HOURtMIN
up/down" arrow
Press STAR]"
ENTER
Temoera[ure 3AKE Press TEMP "uo
down arrow
Press START/
ENTER
*Cannot :hange the set delay start time once it has been
reached.
Using Warm & Ready Urawe
" 3n some m_e_5.
Food Poisoning Hazard
3acon- HI
3eef medium and well done HI
3read hard rolls LO
3read soft rolls LO
Casseroles HI
Coffee cake oas[ries LO
Cooked cereal MED
Eggs MED
:ish Seafood 'No breading) V1ED
:ish Seafood :Breaded)" V1ED
:ried foods HI
Gravy, Cream Sauces HI
Ham V1ED
qors d'oeuvres :soft Hi
Do not let food sit for more than one hour before
or after cooking.
Doing so can result in food poisoning or
sickness.
The Warm & Ready warming drawer is ideal for keeping hot
cooked foods at serving temperature. It may also be used for
warming breads and pasmes
The warming arawer comes with a rack that may be used in two
3osleons or not at all
qors a oeuvres Lcnsp_ HI
_amb V1ED
_ancakes waffles" V1ED
Dies. cus[ara V1ED
_ies single crust LO
_ies. double crust LO
_izza HI
V1ED
HI
V1ED
HI
MED
V1ED
Different types of food may be placed in the warming drawer at 3ork
the same time. For best results do not hold foods longer than
one hour, For smaller quantities or heat-sensitive foods isuch as 3otatoes baked
eggsl do not hold longer than 30 minutes
:ood must De a[ serving temperature before being placed in the Potatoes mashed
warming drawer. (Breads pastries, and fruit Dies may De heated
from room temeera[ure on the HI setting.I 3oultr}
Remove food from plastic bags aria place in oven-safe container Quiche
Do not cover with plasbc wrap. Cover foods with a lid or
aluminum foil Empty serving dishes and dinner plates can be
heated while the warming drawer is preheating. Vegetables
To Use:
1. Position rack if needed in the warming drawer
2. Turn the WARM & READY selector switch to choose HI MED.
or LO temperature setting.
All foods should De covered exceDt those marked with an
asterisk Iq
3. Allow warming arawer [o preheat for 10 minutes
17
The oven comro] B set to automatica]l)! shut the oven off 12
hours after the oven turns on. This will not interfere with any
t_med or delayed cook function
The oven light will come on when the oven door is ooened. To
keep the light on continuously, turn the light on by pressing
OVEN
To Override:
For longer cooking periods that require oven usage longer tha_
12 hours 3ress ana hold CLOCK for 5 seconds. A single tone will
sound and "12H OFF" will appear on the dBplay. The oven w_ll
remam on until turned off
To Reset:
Press and hold CLOCK for 5 seconds. A sinole tone will sound
and "12H on" will aeDear on the d[splay.
Prepare Oven:
• Removethe broiler Dan gRC cookware and bakeware anc
on some models [he temDeraTure probe from the oveR.
Remove an)/foil from the oven because itma)! burn or melt
aamagmg the oven
Remove oven racks to keeD them shmy and easy to slide.
See "General Cleaning section for more information
Hand clean inside door eage ana the 1Y_in. '3.8 cm) area
around the inside oven cavRy frame, being careful no[ [o
move or Dena the gasket. This area does not get hot enough
aunng self-cleaning [o remove soil. Do not let wateE c]eanen
etc. enter slots on door frame. Use a dame cloth to clean this
area,
WiDe OUTany loose soil to reduce smoke and avoid damage.
At high temeeraTures foods react with porcelain. Staining
etchmg, pitting or faint white spots can result. This will not
affect cooking performance.
Prepare Cooktop and Storage Drawer:
RANGE PARE . Remove olasticitemsfromthecooktopnecausetheymay
_ melt.
• Remove all items from the storage (]rawer
IMPORTANT: The heating and cooling of porcelain on steel in the
oven may result in discoloring loss of gloss, hairline cracks and
popping sounas.
Burn Hazard
Do not touch the oven during the
Self-Cleaning cycle.
Keep children away from oven during
Self-Cleaning cycle.
Failure to follow these instructions can result
in burns.
IMPORTANT: The health of some birds is extremely sensitive te
the fumes given off during the Self-Cleaning cycle ExDosure [o
the fumes may result in death to certain birds. Always move birds
to another closed and well ventilated room
SELECT CLEAN TM Self-Cleaning Cycle
(on some models)
How the Cycle Works
The SELECT CLEAN Self-Cleaning cycle uses very high
[emperaTures and dissolves soil to a powdery ash
SELECT CLEAN will set the clean time automatically, once the
sou level is set.
The soil level can be manually set to light, average or heav)! soil
eveis by repeatedly pressmg SELECT CLEAN
The oven will automatically shut off once it is clean. The door will
not unlock until the oven cools
Once the oven has completely cooled, remove ash with a damp
cloth. Do not w 3e down ae)! of the inside surfaces until the ove_
has completely cooled down. Applymg a cool. dared cloth to the
nner door class before it has cooled completely could result in
the glass b_eaking
The oven light will not work during the Self-Cleaning cycle.
To Set SELECT CLEAN:
• Press once For light soils and "SoilL" will appear on the
oBplay.
• Press two times for average soils and "SoilA" will appear on
the diSDlay
Self-clean the oven before it becomes heavily soiled Heavy sou
results in longer cleaning and more smoke
Keep the kitchen well-ventilated during the Self-Cleaning cycle to
helD get rid of heat oaors, and smoke
Do not block the oven vent(s) during the Self-Cleaning cycle. Air •
must be able to move freely. See "Oven Ventlsl" section
Do not clea_ rub. damage or move the oven eoor gasket. The •
ooor gasket is essential for a good seal
• Press three times for heavy so)ls and "SoilH" will appear on
the dBDlay
To Set CLEAN:
Press CLEAN. This will automatically set a 3 hour 30 minute
Self-Cleaning cycle
Press the HOUR/MIN "UD" or "down" arrow paes Toset a
Self-Cleaning cycle longer or shorter than the 3 hour 30
minute cycle.
18
To Start Self-Clean:
3efore self-cleaning, make sure the door is closed completely or
it will not lock and the cycle will not begin.
1. Set SELECT CLEAN ion some models, or C _EAN.
2. Press START ENTER.
The oven door will lock in 6 seconds and "LOCKED "the start
time and stop time will appear on the dlsdlay. The door will
not unlock until the oven cools. The cycle time includes a 30
minute cool down time
When the cycle is complete and the oven cools "End will
appear on the dlselay and "LOCKED" will disappear.
3. Press OFF/CANCEL or open the door to remove "End" from
the dBelay.
4. Close door.
To Self-Clean:
Before self-cleaning, make sure the door is closed completely or
it will not lock and the cycle will not begin
1. Press LOGICLEAN.
2. Press START, ENTER,
]-he oven moor w_[[lock in 6 seconds and "CLN SENS
HEAT," "ON. "LOCKED and "CLEAN"will aDdear on the
display, The door will not unlock until the oven cools, The
cycle time includes a 30 minute cool down time
When the cycle is complete an(] the oven cools. End" will
appear on the diselay and LOCKED" will disappear,
3. Press OFF/CANCEL or oeen the door to remove "End" from
the dBdlay,
4. Close door
The time of day will aeeear on the disdlay.The time of day will appear on the display,
To Delay Start Self-Clean: To Delay Start Self-Clean:
3efore delay starting Self-Clean make sure the clock is set to the Before delay starting Self-Clean make sure the clock is set to the
correct time of day, See "Clock" section. Also make sure the correct time of day. See "Clock" section. Also make sure the
odor is closed comeletely or _twill not lock and the cycle will not door is closed completely or it will not lock and the cycle will not
Begin. Begin.
1. Set SELECT CLEAN [on some models, or C _EAN. 1. Press LOGICLEAN.
2. Press DELAY START. 2. Press DELAY START.
Press the HOUR/MIN "ue" or "down" arrow pad to set time of
nay Lo start the Self-Cleaning cycle
Press the HOUR/MIN "UD" or "down" arrow pad to set time of
nay to start the Self-Cleaning cycle,
3. Press START ENTER. 3. Press START/ENTER.
The start time is automatically calculated and displayed. The
odor will automatically lock, and "LOCKED. DELAY" and
the time of day will appear on the dlselay.
The door will automatically lock. and "LOCKED, 'DELAY
and the time of day will appear on the display,
When the start time is reached the oven will automatically
When the start time is reached the oven will automatically [urn on
[urn on
When the cycle is complete and the oven cools "End will
appear on the display and "LOCKED" will disappear.
4. Press OFF/CANCEL or open the door to remove End"from
the d_selay.
5. Close door,
The time of day will appear on the disdlay,
To Stop Self-Clean any time:
3ress OFF/CANCEL and "cln," "ON." "cool an(] "LOCKED" will
appear on the display Jntil the oven cools, Then "End" will
appear and the door will unlock.
TM
LOGICLEAN Self-Cleaning Cycle
(on some models)
How the Cycle Works
The LOGICLEAN Self-Cleaning cycle is a "one-touch" step that
uses very high temperatures and dissolves soil to a powdery ash.
"SEnS" setting wdl automatically determine the length of cleaning
time needed based on the number of times the oven has been
used since the last self-dean cycle. Maximum clean time is 4
hours 30 minutes and minimum is 2 hours.
The oven will automatically shut off once it is clean, The door will
no_ unlock until the oven cools.
Once the oven has completely cooled, remove ash with a damp
cloth. Do not wide down any of the inside surfaces until the oven
has completely cooled down Applying a cool. dame cloth to the
inner door glass before it has cooled completely could result in
the glass breaking
The soil level can be manually set to light, average or heavy soil
levels by repeatedly pressing LOGICLEAN
When the CyCle is complete an(] the oven coors. "End" will
appear on the dBOlay and LOCKED" will dBappear.
4. Press OFF/CANCEL or ooen the door to remove "End" from
the display,
5. Close doo[
]he time of day will appear on the dLsd[ay.
To Manually Set Soil Level:
• Press twice for light soils, and "SoilL" will appear on the
display,
• Press three times for average soils ann "SoilA" will appear
on the disdlay
• Press four times for heavy soils and "SoilH" will appear o_
the dBplay
The oven light will not work during the Self-Cleaning cycle.
To Stop Self-Clean any time:
Press OFFICANCEL and "cln." "ON." "cool and "LOCKED" will
appear on the diselay unhl the oven cools. Then "End" will
appear and the door will unlock
SENS-A-CLEAN TM Self-Cleaning Cycle
(on some models)
How the Cycle Works
The SENS-A-CLEAN Self-Cleaning cycle uses very high
[emperatures and dissolves soil to a powdery ash.
The sophBtJcated electronic sensor contlnuousl_ monitors by-
oroducts of the burning off of the baked-on foods, and adjus[s
the cleaning time accordingly ]-he maximum clean time is 4
hours 30 minutes and the minimum is 2 hours
19
The oven will automatically shut off once it senses it is clean. The
door will not unlock unbl the oven cools.
Once the oven has completely cooled remove ash w_th a damp
cloth, Do not wipe down any of the inside surfaces until the oven
has completely cooled down. Applying a cool. damp cloth to the
inner door glass before it has cooled completely could result in
the glass breaking
The soil level can be manually set to light, average or heavy soil
levels by repeatedly pressing SENS-A-CLEAN
To Start Self-Clean:
Before self-cleaning, make sure the door is closed completely or
it will not lock and the cycle will not begin.
1. Press SENS-A-CLEAh
The SEnS setting will automatically determine the length of
cleaning time
2. Press START ENTER.
The oven door will lock in 6 seconds and "CLN SENS.
HEAT." "ON " "LOCKED." and CLEAN" will aePear on the
alsplay The door will not unlock until the oven cools. The
cycle time includes a 30 minute cool down time
When the cycle is complete and the oven cools "End" will
appear on the display and "LOCKED" will d_sappear.
3. Press OFF/CANCEL or open tne aoor [o remove "End" frorr
the display
4. Close aoor.
The time of day will appear on the display.
To Delay Start Self-Clean:
Before delay s[amng Self-Clean make sure the clock is set to the
correct time of day, See "Clock" section Also make sure the
door is closed completely or it will not lock and the cycle will no[
Begin,
1, Press SENS-A-CLEAN
The SEnS setting will automatically determine the length of
cleaning time
If desired set the aDeroriate soil level by repeatedly pressing
the SENS-A-CLEAN Dan,
To Step Self-Clean any time:
Press OFF!CANCEL, and "cln." "ON," "cool," ano "LOCKED" wil
appear on the display until the oven cools. Then "End" will
appear and the door will unlock
IMPORTANT: Before cleaning, make sure all controls are off and
the oven and cooktop are cool. Always follow label instructions
on cleaning products.
Soap water and a soft cloth or sponge are suggested first unless
otherwise noted
EXTERIOR PORCELAIN ENAMEL SURFACES
Ion some models)
Fooa soills containing acids, such as vinegar ana tomato shoulc
be cleaned as soon as [he entire appliance is cool, These SPillS
may affect the finish
• Glass cleanen mild liquid cleaner or non-abrasive scrubbing
Dad:
Gently clean around the model and serial number elate
Decause scrUDDIng may remove numbers
PORCELAIN-COATED GRATES AND CAPS
Fooa soills containing ac=as, such as vinegar and tomato shoulc
be cleaned as soon as the cooktop, grates and caos are cool
these SDilIS may affect the finish,
To avoid chiDeing, do not bang grates ano caps against each
other or hard surfaces such as cast iron cookware.
Do no[ reassemble caos on burners while wet,
Do not clean in the Self-Cleaning cycle
• Non-abrasive plastic scrubbing pad and mildly abrasive
cleanser:
Clean as soon as cooktoD, grates and caps are coo
• Dishwasher (grates only, not capsf
Use the most aggresswe cycle.
2. Press DELAY START,
Press HOUR/MIN "up" or "down" arrow pads to set the ume
of clay to start the Self-Cleaning cycle.
3. Press START ENTER.
The door will automatically lock and "LOCKED "DELAY"
and the time of day will appear on the display.
When the start time is reached the oven will automatically
[urn on
SURFACE BURNERS
Sealed Burner models
See "Sealed Surface Burners" section
COOKTOP CONTROLS
Do not use steel wool abrasive cleansers or oven cleaner.
When the cycle _scomplete and the oven cools "End" will Do not Soak knobs
appear on the diSDlay and "LOCKED" will disappear. When replacing knobs make sure knobs are in the OFF position.
4. Press OFF/CANCEL or open the aoor [o remove "End" from On some models do not remove seals under knobs.
the d_selay • Soao and water or dishwasher:
5. Close ooor. Pull knobs straight away from control aanel [o remove.
The time of day will appear on the display.
To Manually Set Soil Level:
• Press twice for light soils and "SoilL" will appear on the
o_splay.
• Press three times for average soils and "SoilA" will appear
on the display
• Press four times for heavy soils, and "SoilH" will appear on
the display
CONTROLPANEL
Do not use abrasive cleaners steel-wOOl 3ads. gritty wash cloths
or some paper towels. Damage may occur
• Glass cleaner and soft cloth or sponge:
ADDly glass cleaner to soft cloth or sponge, not directly on
panel
The oven light will not work during the Self-Cleaning cycle.
2O
OVEN DOOR EXTERIOR
Glass cleaner and paper towels or non-abrasive plastic
scrubbing aad
Apply glass cleaner to soft cloth or sponge, not directly on
panel
For models with stainless steel oven doors see "Stainless
Steel" section in "General Cleaning.
Drawer Liner (on some models)
Remove all stored items from drawer and lift out drawer liner.
• Clean with mild detergent.
WARMING DRAWER
( on some models]
Make sure drawer is cool.
• Mila ae[ergent
STAINLESS STEEL (on some models)
3o not use soap-filled scouring paes abrasive cleaners Cooktop
3olishing Creme. steel-wool BaGs. gritty wash cloths or some
aaDer towels. Damage may occur.
:_ub in direction of grain to avoid damaging.
• Stainless Steel Cleaner & Polish mot includedJ
See back cover for ordering information
• Liquid detergent or alI-DUreose cleaner:
Rinse with clean water and cry w=th soft. lint-free cloth.
• Vinegar for hard water scots
OVEN CAVITY
1)o not use oven cleaners
Food spills should be cleaned when oven cools. At high
[emperatures foods react with eorcelain and staining, etching,
aitting or faint white spots can result
• Self-Cleaning cycle:
See "Self-Cleaning Cycle" first.
OVEN AND ROASTING RACKS
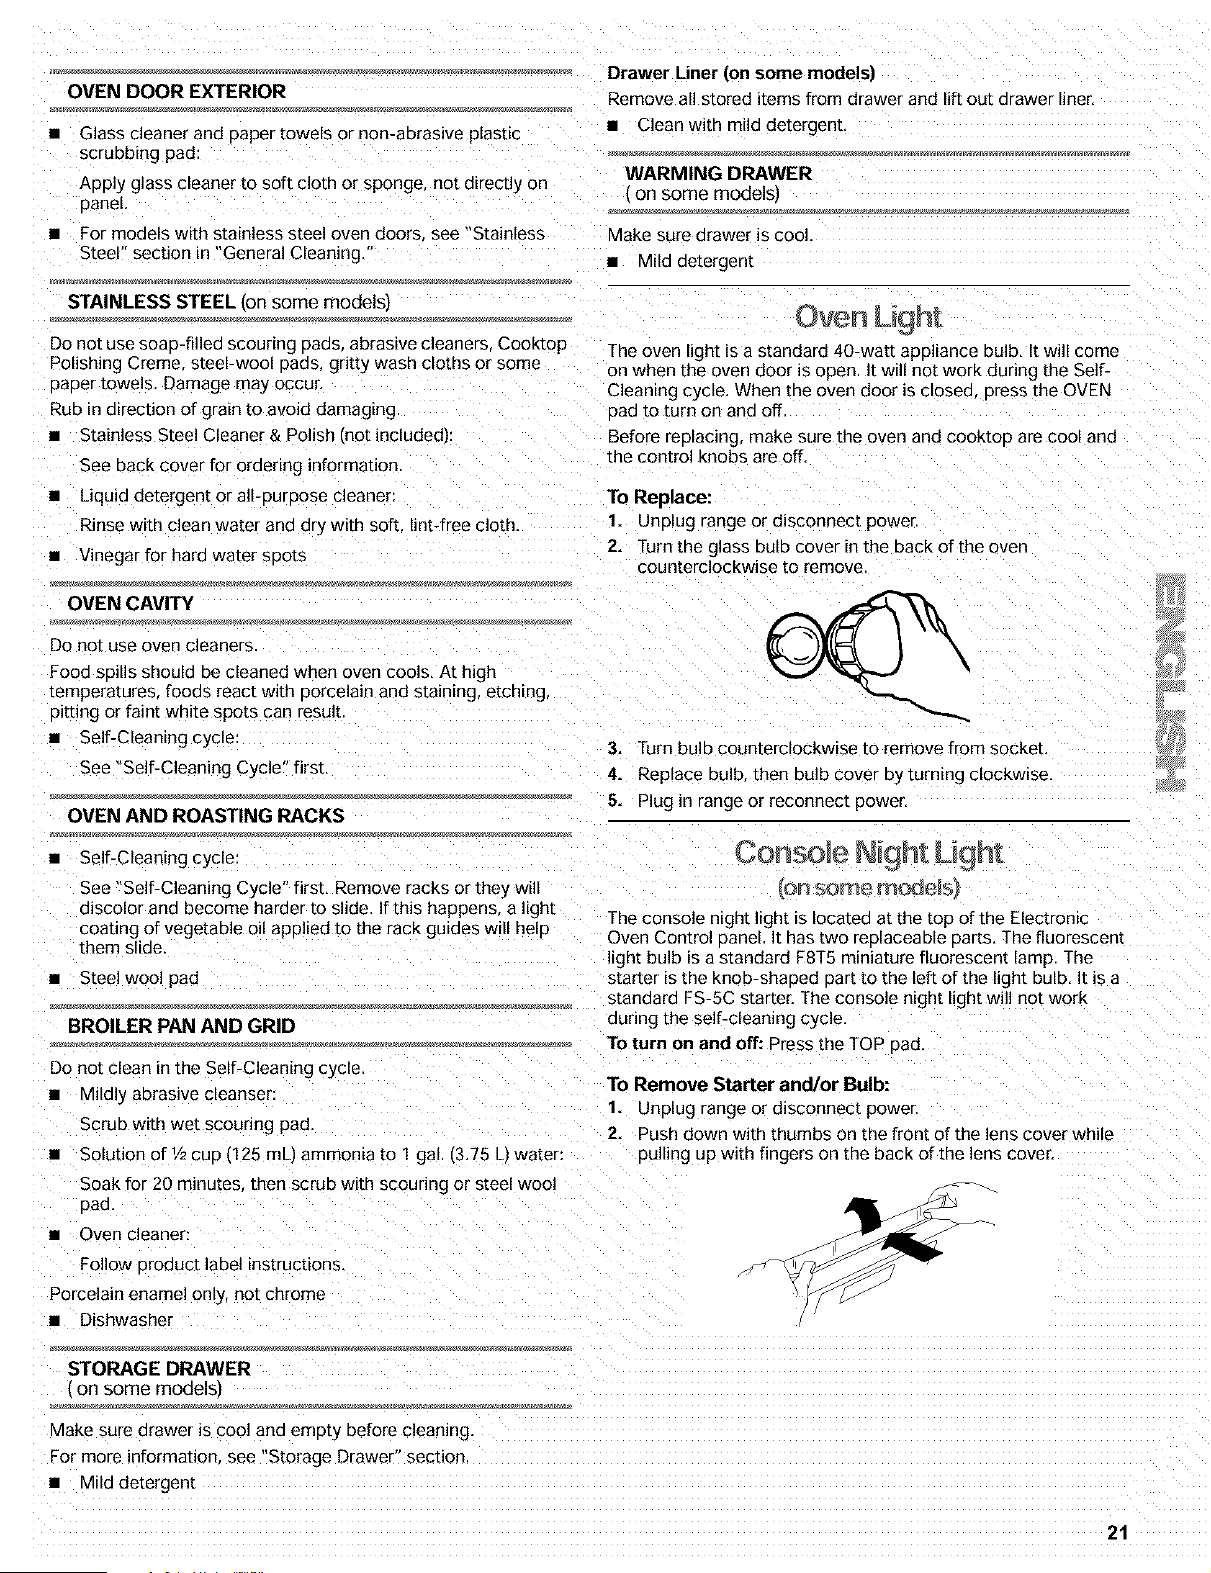
The oven light is a standard 40-watt appliance bulb. It will come
on when the oven door is open. It will not work during the Self-
Cleaning cycle. When the oven door is closed Dress the OVEN
oae to turn OFtane Off
Before replacing make sure the oven and COOktODare cool and
the control knobs are off.
To Replace:
1. UnPlug range or dBconnect power
2. Turn the glass DUIDcover In the back of the ave_
counterclockwise to remove
3. Turn bulb counterclockwise to remove from socket.
4. Replace bulb then bulb cover by turning clockwBe.
5. Plug In range or reconnect power,
Self-Cleaning cycle:
See "Self-Cleaning Cycle" first. Remove racks or they will
discolor and become harder to slide. If this happens, a light
coaung of vegetable oil applied to the rack guides will held
them slide.
• Steel wool pad
BROILER PAN AND GRID
3o not clean in the Self-Cleaning cycle
• Mildly abrasive cleanser:
Scrub with wet scouring pad.
• Solution of 1/2CUD1125 mL] ammonia to 1 gal. (3.75 L) water:
Soak for 20 minutes then scrub with scouring or steel wool
one.
• Oven cleaner:
Console Night Lig n[
( )R Some Rl_e_5
The console night light is Iocatee at the top of the Electronic
Oven Control 3anel It has two reolaceable Darts, The fluorescent
lignt bulb is a standard F8T5 miniature fluorescent lamp, The
starter is the knob-shaDed Dart to the left of the light DUID,It is a
standard FS-5C starter. The console n_ght light will not work
during the self-cleaning cycle,
To turn on and off: Press the TOP oad
To Remove Starter and/or Bulb:
1. Unelug range or dBconnect power
2. Push down with thumbs on the fronl of the lens cover while
pulling up with fingers on the back of the lens cover,
Follow eroduct label instructions.
Porcelain enamel only not chrome
• Dishwasher
STORAGE DRAWER
( on some models)
Make sure drawer is coo] and empty before cleanino.
=or more information see "Storage Drawer" section
• Mild detergent
21

3. Push release lever toward bulb, The left end of the light
assembly will raise up.
1 2 3 For normal range use, it is not suggested to remove the oven
door. However. if necessary, follow these instructions. The oven
_-_ _- door is heavy -
/" _ Before Removing:
__J/ 1. Use knife screwdriver and insert it at the bottom
a
putty
or
corner of the door Stop clip
I. Starter
2. Release lever
3. Bulb
4. To remove starter turn it counterclockwise and lift out of its
mounting Base.
5. To remove bull roll it forward or backward 90 ° until it clicks
then lift out
To Install Starter and/or Bulb:
1. Fit starter prongs into starter mounting base and turn
clockwise,
2,
I
1
(I
I. Door Stop Clip
Pry door stop clip free and remove from front frame hinge
slot. Take care not to scratch finish.
3. Repeat procedure for other door Stop CIiD
To Remove:
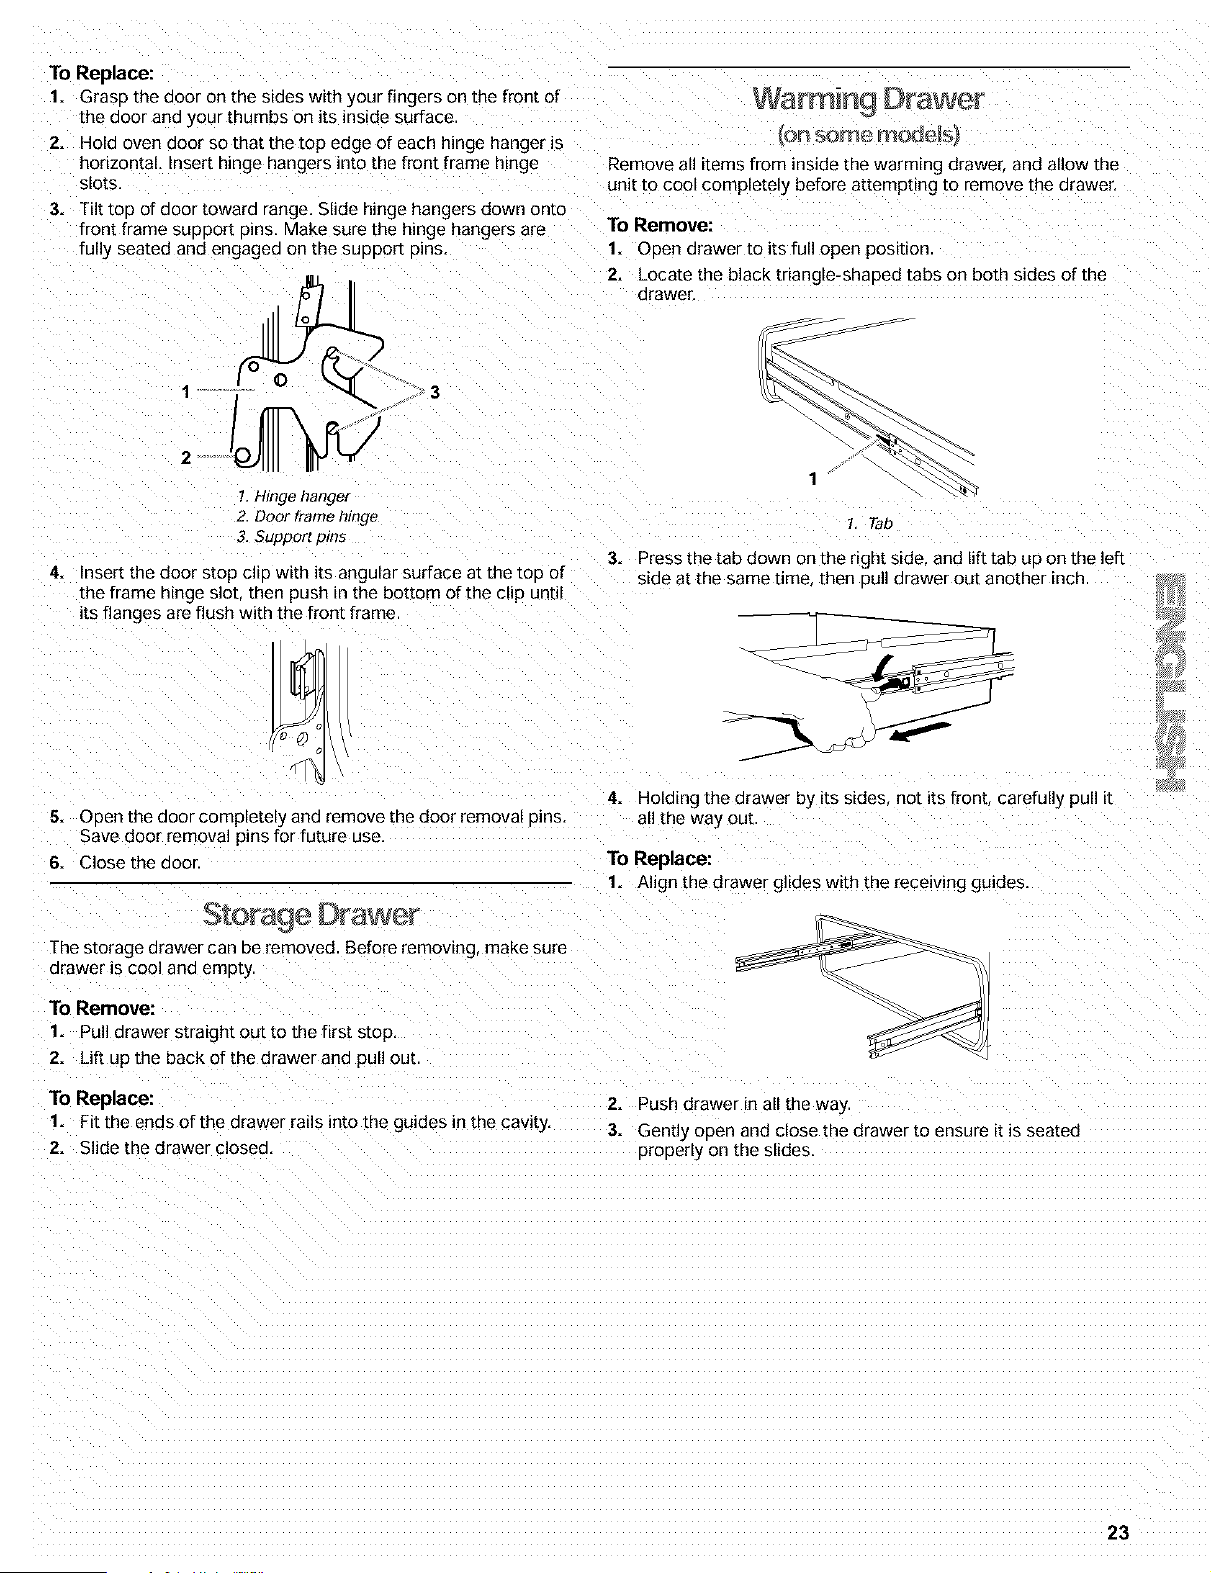
1. OPen the oven door, Insert door removal Dins _ncluded with
your range nto both hinge hangers. Do not remove the Dins
while the door is removed from the range.
Slide bulb 3rongs into bulb mounting 3ase ends. Roll the bulb
forward or backward 90 ° until it clicks.
1
2
\
\
\
\ i ""
\
3. Push down on the left end of the bulb mounting base. When
the assembly latches, it will CI_CK
4. Replace lens cover, Position the two rear lens cover tabs in
front of the two metal spnng cl_ps {located d_rectly behind the
bulb) Push back and down on the lens cover to lock into
DOSIDOn,
5. Plug in range or reconnect power.
1, Removal pins
2. Hinge hanger
2, Carefully close the door until it rests against the door remora
DINS,
3. Graso the door on the sides w_th your fingers on the front of
the door and your thumbs on the inside surface.
4. Pull door straight up then toward you. Hinge hangers will
slide out of front frame hinge slot. Do not remove aoo_
removal pins until the door is replaced on the range.
22
To Replace:
1. Grasp the door on the sides with your fingers on the front of
[he door and your thumbs on its inside surface
2. Hold oven door so that the top edge of each hinge hanger is
horizontal mser[ hinge hangers into the front frame nmge
Slots.
3. Tilt tc a of door toward range. Slide hinge hangers down omo
_'Dnt frame suPPort 3ins, Make sure the hinge hangers are
fully seated and engaged on the SUDDO[[Dins,
1
2
3
7. Hinge hanger
2. Door frame hinge
3. Support pros
4. Insert the door stop clip with its angular surface at the tc a of
[he frame hinge slot, then push in the bottom of the clip until
its flanges are flush with the front frame
5. ODen the door completely and remove the door removal Dins,
Save door removal pins for future use.
6. Close the aoor.
Storage D['awer
Thestoragearawercan beremoved Before removing, makesure
drawer ts cool and emD[y,
To Remove:
1. Pull drawer straight out to the first stop
2. Lift up the back of the drawer and pull out
To Replace:
1. Fit the ends of the drawer ra_ls into the guides in the cavity.
2. Slide the drawer closed
Warm n9 D awer
Remove all items from inside the warming drawer and allow the
unit to cool completely before attempting to remove the drawer.
To Remove:
1. Open drawer to its full open posE=on
2. Locate the black triangle-shaped tabs on both sides of the
arawer.
3.
1 Tab
Press the tab down on the right s_de. and lift tab UD on the left
side at the same time, then Dull drawer out another inch
4. Holding the drawer by =tss=des, not its front carefully pull it
all the way out
To Replace:
1. Align the drawer glides with the receiving guides.
2. Push drawer in all the way
3. Gently open and close the drawer to ensure it is seated
properly on the slides
23
TROUBLESHOOTING Surface burner makes popping noises
Try the solutions suggested here first in order to avoid the
cost of an unnecessar_ service call.
Nothing will operate
• Is the power outlet properny wired and polarized?
Try another outlet to check for proper wiring and polarity
• Is the power supply cord unplugged?
Plug into a erooerly grounded 3 prong outlet
Is the burner wet?
Let it dry
Excessive heat around cookware on cooktop
Is the cookware the proper size?
Use cookware about the same size as the surface cooking
area element or surface burner. Cookware should not extenc
more than 1 in. r2.5 cm) outside the cooking area
breaker been tripped?
Replace the fuse or reset the circuit.
Oven will not operate
Has a household fuse been blown or has the circuit
• Is the power outlet properly wired and polarized?
Try another outlet to check for proper wiring and polarity.
Is the main or regulator gas shutoff valve in the off
position?
See installation instructions.
• Is the range properly connected to the gas supply?
Contact a Sears trained repair specialist or see Installation
Instructions.
Surface burners will not operate
• Is this the first time the surface burners have been used?
Turn on any one of the surface burner knobs to release air
"-am the gas lines.
• On some models, is the Cooktop Lockout set?
See "Cooktop Lockout" section
• Is the control knob set correctly?
Push in knob before turning to a se[eng.
• Are the burner ports clogged?
See "Sealed Surface Burners" secuon
• Is this the first time the oven has been used?
Turn any one of the surface burner knobs on to release a_r
ffom the gas lines
• Is the electronic oven control set correctly?
See "Electronic Oven Control" section.
• On some models, is the Oven Lockout set?
See "Oven Lockout" section
Oven burner fails to light
• A household fuse has blown or a circuit breaker has been
mppea
• The ignition system is broken. Contact a Sears trained repair
technician See back cover,
Oven makes muffled ticking noise when in use
• This is normal and occurs when the oven burner cycles on
and off to hold the set oven [emoera[ure
Surface burner flames are uneven, yellow and/or noisy
• Are the burner ports clogged?
See "Sealed Surface Burners" section
• Are the burner caps positioned properly?
See "Sealed Surface Burners" section
• Is the burner damaged?
On models with caps, look for a warped cap. If cap will spin
Oven burner lights, then goes out after 1 minute
• Press OFF/CANCEL then wait 1 minute before trying again.
• Is the power outlet properly wired and polarized?
Try another outlet to check for aroper winng and polarity,
Oven burner flames are yellow or noisy
freely on a flat surface painted side down, the cad is waroee,
Switch CaD with a different surface burner to check for further
warping. Contact a Sears trained repair specialist. See back
cover.
Is propane gas being used?
The appliance may nave been converted improperly
Contact a Sears trained repair specialist. See back cover
• Is propane gas being used?
The appliance may have been converted improperly. Contact
a Sears trained repa=r specialist. See back cover.
Oven temperature too high or too low
Does the oven temperature calibration need adjustment?
See "Oven Temperature Control" section.
24
Displayshowsmessages Slowbakingorroasting
• Is the display showing "PF"? • Was the oven preheated?
There has been a power failure, Press OFF/CANCEL to clear Wait for oven to 3reheat before placing load in oven
the diselay Reset the clock if needed. See "Clock" section
• Is there proper air circulation around bakeware?
• On some models, is the display showing a "PF" and a See "Positioning _acks and Bakeware" section.
cooktop icon?
The Cooktop Lockout feature is engaged. See "Cooktop • Is the proper length of time being used?
Lockout" section, (ncrease baking or roasting time.
• Is the display showing "F" followed by a number? • Is the proper temperature set?
Press OFF/CANCEL to clear the display. If an "F" code (ncrease [emoerature 25°F (15°C)
reappears contact a Sears trained repair specialist • Has the oven door been opened while cooking?
See back cover. Peeking rata the oven while cooking "eleases oven heat and
• Is the display showing a "EO F5"? can result in longer cooking times.
The Self-Cleaning latch is interferring with the oven door
closing Press OFF/CANCEL to clear disolay, Deeress and
hold door switch plunger (located on the oven front frame_
Latch mechanism will unlock after 6 seconds.
Self-Cleaning Cycle will not operate
• Is the oven door open?
Close the oven door all the way.
• Has START/ENTER been pressed?
Press START. ENTER,
• Has a delay start been set?
See "Timed Oven Control" section
Cooktop cooking results not what expected
• Is the proper cookware being used?
See "Cookware" section
• Is the control knob set to the proper heat level?
See "Control Knobs" section.
• Is the appliance level?
Level the aeoliance. See the Installation Instructions
Baking results not what expected
• Was the oven preheated?
Wait for oven to areheat before placing food in oven.
• Are the racks positioned properly?
See "Positioning Racks and Bakeware" section,
• Is there proper air circulation around bakeware?
See "Positioning Racks and Bakeware" section.
• Is the batter evenly distributed in the pan?
Check to make sure batter is level in the pan
• Is the appliance level?
Level the aoeliance. See the Installation Instructions
• Are baked items too brown on the bottom?
Decrease oven temperature !5°F to 25°F 5°C to 15°CI
• Are crust edges browning early?
Use aluminum foil to cover the edoe of the crust,
25

26
REPARAMOS LO QUE GARANTIA
VI-NUI- IVlU '"-- "---" -"- GARANT= COMPLETA DE UN A_O PARA TODAS LAS
PIEZAS
Su compra adqu{ere un nuevo valor ya aue usted puede confiar Durar}te un aho a Dartir de la fecha ae compra, siempre y cuando
en Sears HomeCentra] oara oD[er}er serwc{o ae reparacJor}, la estufa sea instalada y operada de acuerdo con las
Con m_s de 12,000 esDecialistas capacitados en reDaracior}es
y acceso a m_s de 4.2 millones de aiezas de reDues[o y
accesonos contamos con las herramientas Dlezas,
conoclmien[o y ]a destreza uara asegurarnos oe cumpllr nuestra
3romesa de aue: ReDaramos Io aue vendemos.
Contratos de mantenimiento Sears
ins[rucciones proporcionadas en el Manual de uso y cuidado y
las instrucciones de instalacion Sears reoarara esta estufa s_r}
cos[o a_guno, si tuviese defectos de materiales o de mano de
obra.
RESTRICCION DE LA GARANTJA
Si se some[e a la estufa a un uso ajer}o al domestlco arivado, la
Su electrodomestico Kenmore" est_ disehado fabricado y cobertura de las 9arantias arriba citadas aueda restring_aa a solo
someuao a prueba para proporcionarle ahos de funcior}amier}to
confiable. No obstante cualcaier electrodomestico moderno
auede r}ecesitar servicio tecnico de vez en cuar}do. El contrato
ae mar}ter}imiento Sears le ofrece ur} programa de servicio
exceocior}aL a ur} orecio accesible
El contrato de mantenimiento Sears
• Es la manera de adcairir el servicio tecnico del mahar}a a
urecios de hoy.
• Elimina las facturas de reparacion producidas por el uso
normal y el desgas[e
• Proporcior}a asister}cia no tecr}ica _ eaucauva,
90 dias.
SERVIClO DE REPARACION DE LA GARANT|A
EL SERVICIO DE REPARACION DE LA GARANT[A ESTA A SU
DISPOSICION AL CONTACTARSE CON EL CENTRO DE
SERVICIO SEARS DE SU LOCALIDAD EN LOS ESTADOS
UNIDOS. Esta garant_a corresDonde solo mier}tras se use el
oroauc[o en los Estados Unidos Esta garantia le otorga
derechos legales especificos yes Doslble que usted tenga
tambien otros derechos que pueder} variar de un estado a otro
Para recibir informaciOn acerca de la garantia de Sears en los
Estados Un_dos sirvase tomar como referencia los numeros de
serv_cJo tecr}ico ubicados en la contraoortada del manual,
At]r} cuando no r}ecesite reparaciones le DroDorclona una
revision ar}ual de mantenimier}to Drever}tivo a solicitud suya
para asegurarse de que su electrodomestico esta en
cond_c_ones apropiadas de fur}cionamiento.
Se aplican ciertas restricciones. Para obtener mbs
informacibn, Ilame al 1-888-784-6427.
Para obtener informaci6n referente a los contratos de
mantenimiento de Sears Canad& Ilame al 1-800-361-6665.
Sears. Roebuck and Co.
D/817WA, Hoffman Estates, IL 60179
REGISTRO DEL PRODUCTO
En el esoacto a contmuac_on anote el r}L]mero completo del
modelo y de la serie asi como la fecha de comDra. Usted podra
encor}trar esta informaci0n en la etiaueta con el nt]mero de1
modelo _/ ae la sene Iocalizada tal como se ilustra en la seccior}
de Piezas _ caracteristicas de este manual. Siempre que se
Dor}ga er} contacto con Sears respec[o a su electrodomesticc
[enga esta informacion a mano para facilitar la obtencior} de
asls[er}cla o servlclo,
N_mero de modelo 665.
Ndmero de serie
Fecha de compra
Guarde estas instrucciones )' su comprobante de ventas para
consulta futura.
27
SEGURIDAD DE LA ESTUFA
Su seguridad y la seguridad de los demos es muy importante.
Hemos incluido muchos mensajes nmportantes de seguridad en este manual y en su electrodomestico.
Lea y obedezca siempre todos los mensajes de seguridad
Este es el simbolo de advertencia de seguridad
Este simbolo le llama ta atenci6n sobre peligros potenciates que pueden ocasionar la muerte o una
lesion a usted y a los demas.
Todos los mensajes de seguddad iran a continuaci6n del simbolo de advertencia de seguridad
y de la palabra "PELIGRO" o "ADVERTENCIA". Estas palabras significan:
Si no sigue las instrucciones de inmediato, usted
puede morir o sufrir una lesion grave,
Si no sigue las instrucciones, usted puede morir
o sufrir una lesion grave,
Todos los mensajes de seguddad te diran el peligro potencial, le diran como reducir las posibilidades de sufrir
una tesi6n y Io que puede suceder si no se siguen las instrucciones.
I
ADVERTENCIA: Para su seguridad, la informacibn en este manual debe ser observada
para minimizar el riesgo de incendio o explosibn, o para prevenir daSos a propiedades,
I
heridas o la muerte.
- No almacene o use gasolina u otros liquidos y vapores inflamables cerca de este u otro
aparato electrodom_stico.
- PASOS QUE USTED DEBE SEGUIR SI HUELE A GAS:
° No trate encender ningun aparato electrodom_stico.
° No toque ningt3n enchufe el_ctrico.
• No use ningt3n tel_fono en su casa o edificio.
• Llame inmediatamente a su proveedor de gas desde el tel_fono de un vecino.
Siga las instrucciones de su proveedor de gas.
° Si usted no puede comunicarse con su proveedor de gas, Ilame al departamento
de bomberos.
- La instalacibn y el servicio deben ser efectuados por un instalador calificado, una
agencia de servicio o por el proveedor de gas.
La California Safe Drinking Water and Toxic Enforcement Act (La tey de la protecci6n del agua potable y
la etiminacion de sustancias t6xicas de California) exige que el gobernador de California publique una lista de
aquellas sustancias identificadas pot et estado de California como causantes de cancer, defectos congenitos
o algQn otto tipo de daSos en la funci6n reproductora y exige a los comerciantes que adviertan de los posibles
riesgos de exposici6n a tales sustancias.
ADVERTENCIA: Este producto contiene una sustancia quimlca identificada pot el estado de California como
causante de cancer, defectos congenitos o atgQn otto tipo de dahos en la funci6n reproductora.
Este electrodomestico puede producir una exposici6n de bajo nivel a atguna de tas sustancias enumeradas,
incluyendo et benceno, formaldehido, mon6xido de carbone tolueno y hollin.
28

La estufa no se v01teara durante el uso normal. Sin embargo, si usted aP!ica mucha fuerza 0 peso a la puerta abierta s ir] haber fijad0
adecuadamente el soporte antivuelco, la estufa puede voltearse.
El soporte anti-vuelco
La pata trasera
Peligro de Vueleo
Un nifio o un adulto puede vo!car accidenta!mente la estufa y resultar muerto.
Conecte el Soporte anti-vuelco a !a pata trasera de la estufa.
Si traslada de lugar la estufa, vuelva a conectar el soporte anti,vuelco.
Consulte las instrucciones de instalacibn para m&s detalles.
No seguir estas instrucciones puede ocasionar la muerte o quemaduras graves en nifios
y adultos.
Aseg_rese de que el soporte anti-vuelco haya sido instalado:
• Deslice la estufa hacia adelante.
• Verifique que el soporte anti-vuelco est_ bien asegurado al piso.
- Deslice la estufa para colocarla de nuevo en su lugar asegur_ndose de que la pata
trasera quede debajo del soporte anti-vuelco.
INSTRUCClONES IMPORTANTES DE SEGURIDAD
ADVERTENCIA: Para reducir el riesgo de
incendio, etectrocuci6n, lesiones a personas o daSos at
usar la cocina de gas, siga precauciones basicas.
incluyendo tas siguientes:
• ADVERTENC IA: PAPA REDUCIR EL RIESGO DE
VOLTEO DE LA COCINA DE GAS. ESTA DEBE ASE-
GURARSE EN EL PISO MEDIANTE LA INSTALACION
DE DISPOSITIVOS DE ANTI-VUELCO. PARA VERI-
FICAR SI LOS DISPOSlTIVOS ESTAN INSTALADOS
ADECUADAMENTE, DESLICE LA COCINA DE GAS
HACIA ADELANTE. CERCI6RESE QUE EL SOPORTE
ANTI-VUELCO EST¢: BIEN FIJO EN EL PISO Y DE-
SLICE LA COCINA DE GAS HACIA ATRAS DE MA-
NERA QUE LA PATA TRASERA DE LA COClNA DE
GAS QUEDE FIJA DE BAJO DEL SOPORTE DE ANTI-
VUELCO.
• AVl SO: No almacene articutos que interesen a los
niSos en los armarios que est_ln encima de una COclna
de gas o en el respaldo de proteccion de una cocina
de gas - al trepar los nii_os encima de la cocina para
alcanzar alg_ln objeto, podrian lastimarse sedamente,
• Instataci6n Apropiada - Instalar ta cocina de gas
debe hacer ta conexion electrica a tierra de acuerdo
con las normas locales o. en ausencia de normas
locales, con el C6digo Electrico Nacional (National
Electrical CodeL ANSI/NFPA 70. En Canad& la
cocina de gas debe tener su conexion electrica a
tierra de conformidad con et C6digo Electrico
Canadiense. Cerci6rese que la instalaci6n y puesta a
tierra de ta cocina de gas sean efectuadas
adecuadamente pot un tecnico competente
Esta coclna de gas esta equipada con un enchufe de
tres puntas con contacto a tierra para su proteccion
contra riesgo de etectrocuci6n y deberia enchufarse
directamente a un tomacorriente que tiene conexi6n
a tierra. No corte ni quite ta punta para conexi6n a
tierra de este enchufe.
• Desconecte la energia electdca antes de hacer
una revisi6n al aparato electrodom6stico.
• Nunca use la cocina de gas como calefaccion del
cuarto.
• El mal uso de las puertas o gavetas del aparato
etectrodomestico, tales como pisar, recostarse o
sentarse en las puertas o gavetas, puede ocasionar
heridas
• Mantenimiento - Mantenga el _rea de la cocina de
gas despejada y libre de materiales combustibles.
gasolina y otros vapores y liquidos inflamables
• Almacenaje dentro o encima de ta cocina de gas -
No se debe almacenar materiales inflamables en
el homo o cerca de las unidades que estan en la
superficie. I
• El tamaSo de ta llama det quemador superior debe
ajustarse de manera que no se extienda mas alia
de los bordes det utensilio de cocina.
Para cocinas de gas de limpieza autom&tica -
• Antes de efectuar la limpleza automatica del homo -
quite ta charola para asar y otros utensilios. Limpie
con un trapo hQmedo todo derrame excesivo antes
de iniciar el ciclo de autolimpieza.
GUARDE ESTAS INSTRUCClONES
29

PIEZAS Y CARACTER|STICAS
Este manual abarca varios modelos dJstintos. La estufa que usted ha adquirJdo puede tener algunos o todos los articulos que se
enumeran. Las ubicaciones y asoecto ae las caractensucas que aqu_ se ilustran auiz_s no coincidan con su modelo.
Tablero de control
2 6
1. Indicador del quemaaor ex[enor
2. Control del auemaaor [rasero
izauierao
Estufa
%0
/
3. Control del quemador delantero 5. Control del auemador trasero derecho
zauierdo (Quemador de potencia) _SURESIMMER T_
4. Control del quemador delantero 6. Interruptor selector de Warm & Ready
derecho (Quemador de oo[encia en (en algunos modelos)
algunos modelos,
1
2
3
4
IX_
I \\\
I \\\
10
11
12
13
14
15
16
17
1. Conducto de ventilacion 7. Gancho de tope de la
de] hornQ Duer[a
2. Quemador exterior sellado
3. Parilla central [en algunos
modelosl
4. Sistema de oarrilla del
auemador
5. Quemador de oo[encla
6. Sooorl:e an[ivuelco
8. Placa del nL]mero de
modelo y ae sene {detr_s
del lado tzauierdo de la
gaveta de
almacenamiento/
9. Gaveta calentadora Warm
& Ready (en algunos
modelos/ Gaveta de
almacenam_ento [en
algunos modelos_
lO. Luz nocturna de ]a consola
_enalgunos modelost
11. Control electr6nico de
homo
12. Quemaaor a fuego lento
SURESIMMER
13. Tablero de control
14. Enterruetor autom_tico de
luz del horno
15. Junta de ]a ouer[a
16. Media parnlla
STURDIGLIDE TM con
inserto desmontable [en
algunos moaelosl
17. Parrilla ael homo
STURDIGLIDE con
agarradera integraaa (en
algunos moaelos]
30
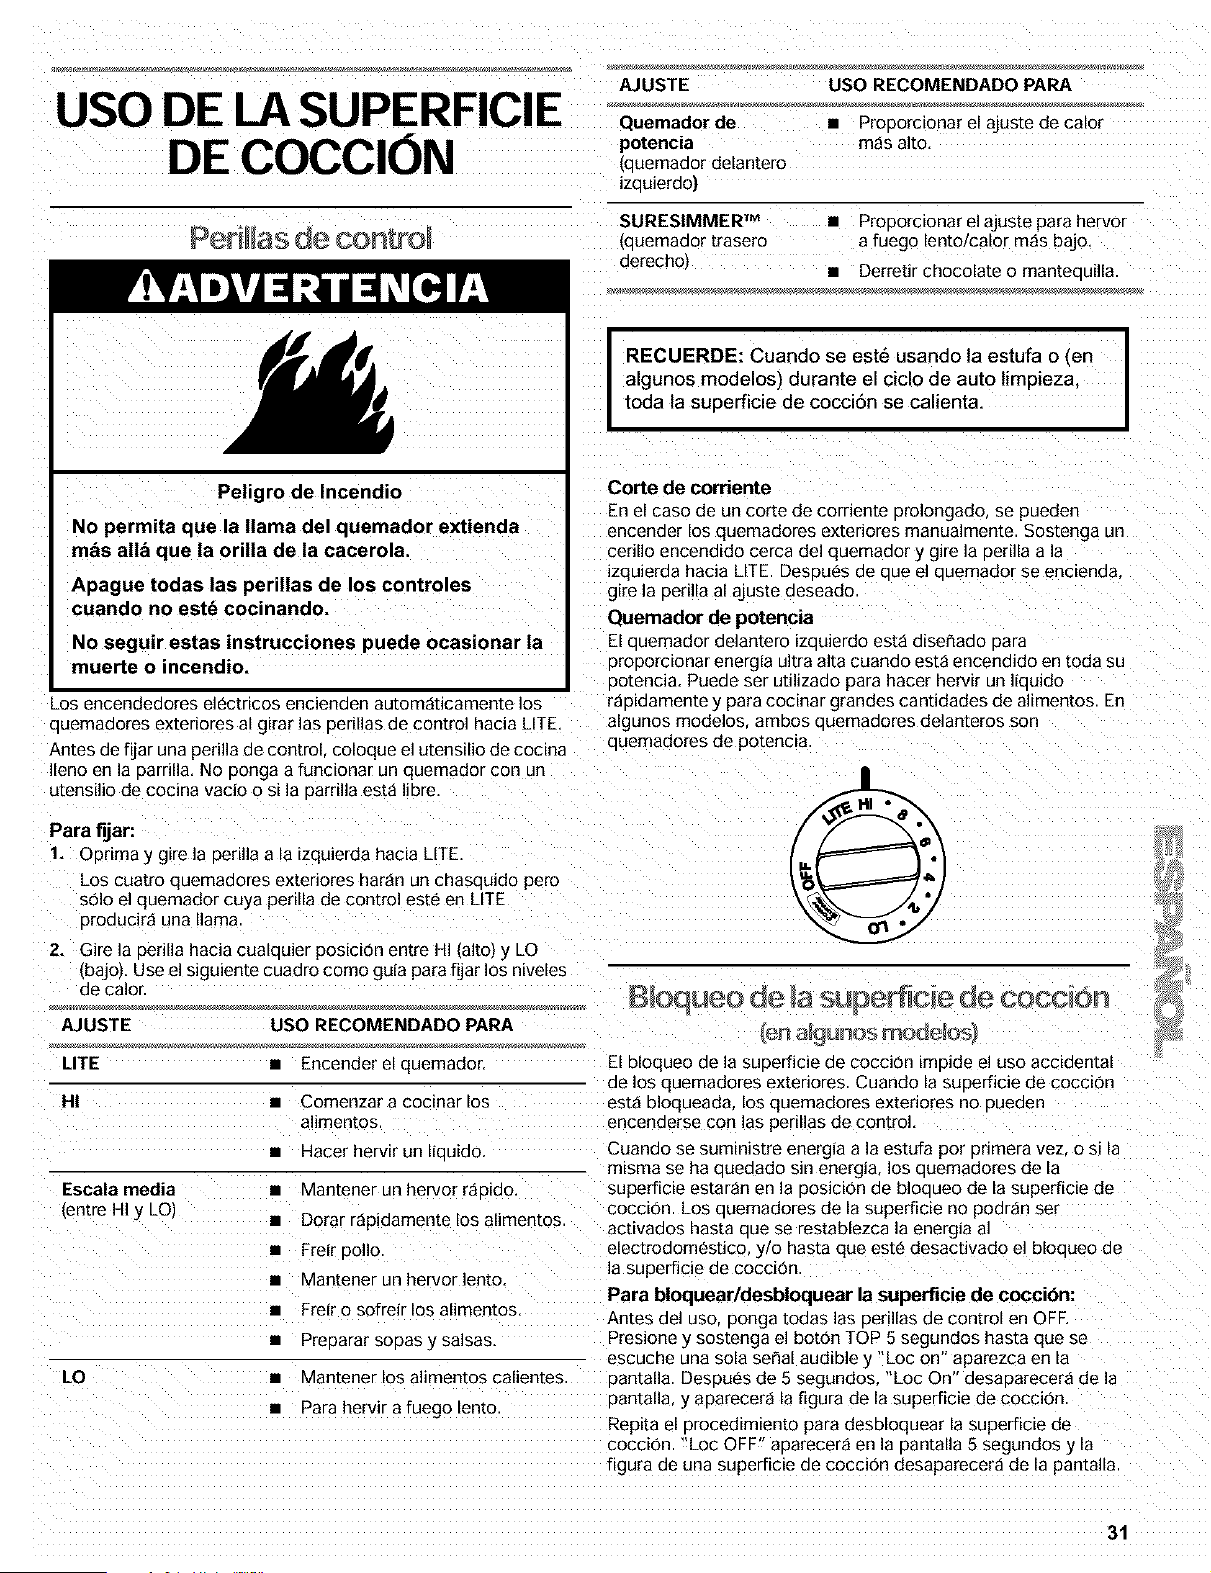
USO DE LA SUPERFIClE
DE COCClON
AJUSTE
Quemador de
potencia
_auemador delantero
izauierdo)
USO RECOMENDADO PAPA
• ProDorclonar el ajuste de calol
m_s alto,
Peligro de Incendio
No permita que la llama del quemador extienda
m_s alia que la orina de la cacerola.
Apague todas las perinas de los controles
cuando no este cocinando.
No seguir estas instrucciones puede ocasionar la
muerte o incendio.
SURESIMMER TM • ProDorclonar el ajuste para hervor
,auemaaor [rasero a fuego lento/calor m_s bajo,
derecho,
• Derretir chocolate o manteeui]la
I
RECUERDE: Cuando se este usando ta estufa o (en
algunos modelos) durante el ciclo de auto timpieza.
toda la superficie de cocci6n se calienta.
Corte de corriente
En el caso de un corte de corriente orolongado, se pueden
encender los quemadores exteriores manualmente. Sostenga un
cerillo encendido cerca del quemaaor y gire la 3erilla a la
izquierda hacia LITE DeSDUeSde aue el auemador se enc_enda
gire la perilla al ajuste deseado.
Quemador de potencia
El auemador delantero izauierdo est_ dise_ado oara
orooorc_onar energ_a ultra alta cuando est,1 encendido en toda su
ootencia. Puede ser utilizado para hacer hervir un liou]do
_os encendedores electricos encienden autom_ticamente IDa raD_aamen[e y para cocinar grandes cantidades de alimentos En
auemadores extenores al airar las 3erillas de control hacia LITE. algunos modelos amoos auemadores delanteros son
auemadores de po[encta
Antes de fijar una perilia de control coloque el utensilio de cocina
Ileno en la 3arrilla. No 3onga a funcionar un quemador con un
utensilio de cocina vacio o si la Darrilla est_ libre
Para fijar:
1. Oorima y glre la Derilla a la izquierda hacia LITE
LOS cuatro quemadores exteriores har_n un cnasauido pero
s01o el quemador cuya perilla de control este en LITE
uroducira una llama
2. Gire la Derilia hacia cualquier posici0n entre Hi lairD) y LO
[baJo). Use el siguiente cuadro como guia para fijar los niveles
de calor B_OCoHeO de so, erficie de coccion
AJUSTE USO RECOMENDADO PARA
LITE •
HI •
Escala media
[entre HI y LOI
LO
Encender el quemador.
Comenzar a cocinar los
allmentos
Hacer hervir un licJido,
• Mantener un hervor r_Diao.
• Dorar r_p_damente los alimentos.
• Frei[ polio
• Mantener un hervor lento,
• Fre# o sofreir los alimen[os.
• Preoarar SODASy salsas.
• Mantener los alimentos calientes
• Para hervir a fue9o lento
El bloqueo de la suoerficie de cocci0n impede el uso accidental
de IDa quemadores exteriores. Cuando la suoerficie de cocci0r
est_ bioqueada, los quemadores extenores no Dueae_
encenderse con ]as perilias de control.
Cuando se suministre energia a la estufa por pnmera vez o s_la
misma se ha auedado sin energia los auemadores de la
superficie estar_n en ]a aosici0n de blooueo de la superficie de
cocci0n. Los auemadores de la superficie no podran ser
activados hasta aue se restablezca ]a energia a]
electrodomestlco y/o nasta que es[e desactivado el bloaueo ae
la superficie de coccion.
Para bloquear/desbloquear la superficie de coccibn:
Antes del uso Donga todas ]as oenllas de control en OFF.
PresJone y sos[enga el boton TOP 5 segundos hasta que se
escucne una sola serlal au@ble } "Loc on" aparezca en la
oantal]a DesDues de 5 segundos. "Loc On" desaoarecer_ de ]a
Dantalla y aDarecer_ la figura de la superficie de cocci0n
Rep_ta el aroced_m_ento para desbloquear la superficie de
cocci0_ "Loc OFF" aoarecer_ en ]a uantalla 5 segundos y la
figura ae una superficie de coccJOn desaparecera de la pantalla
31
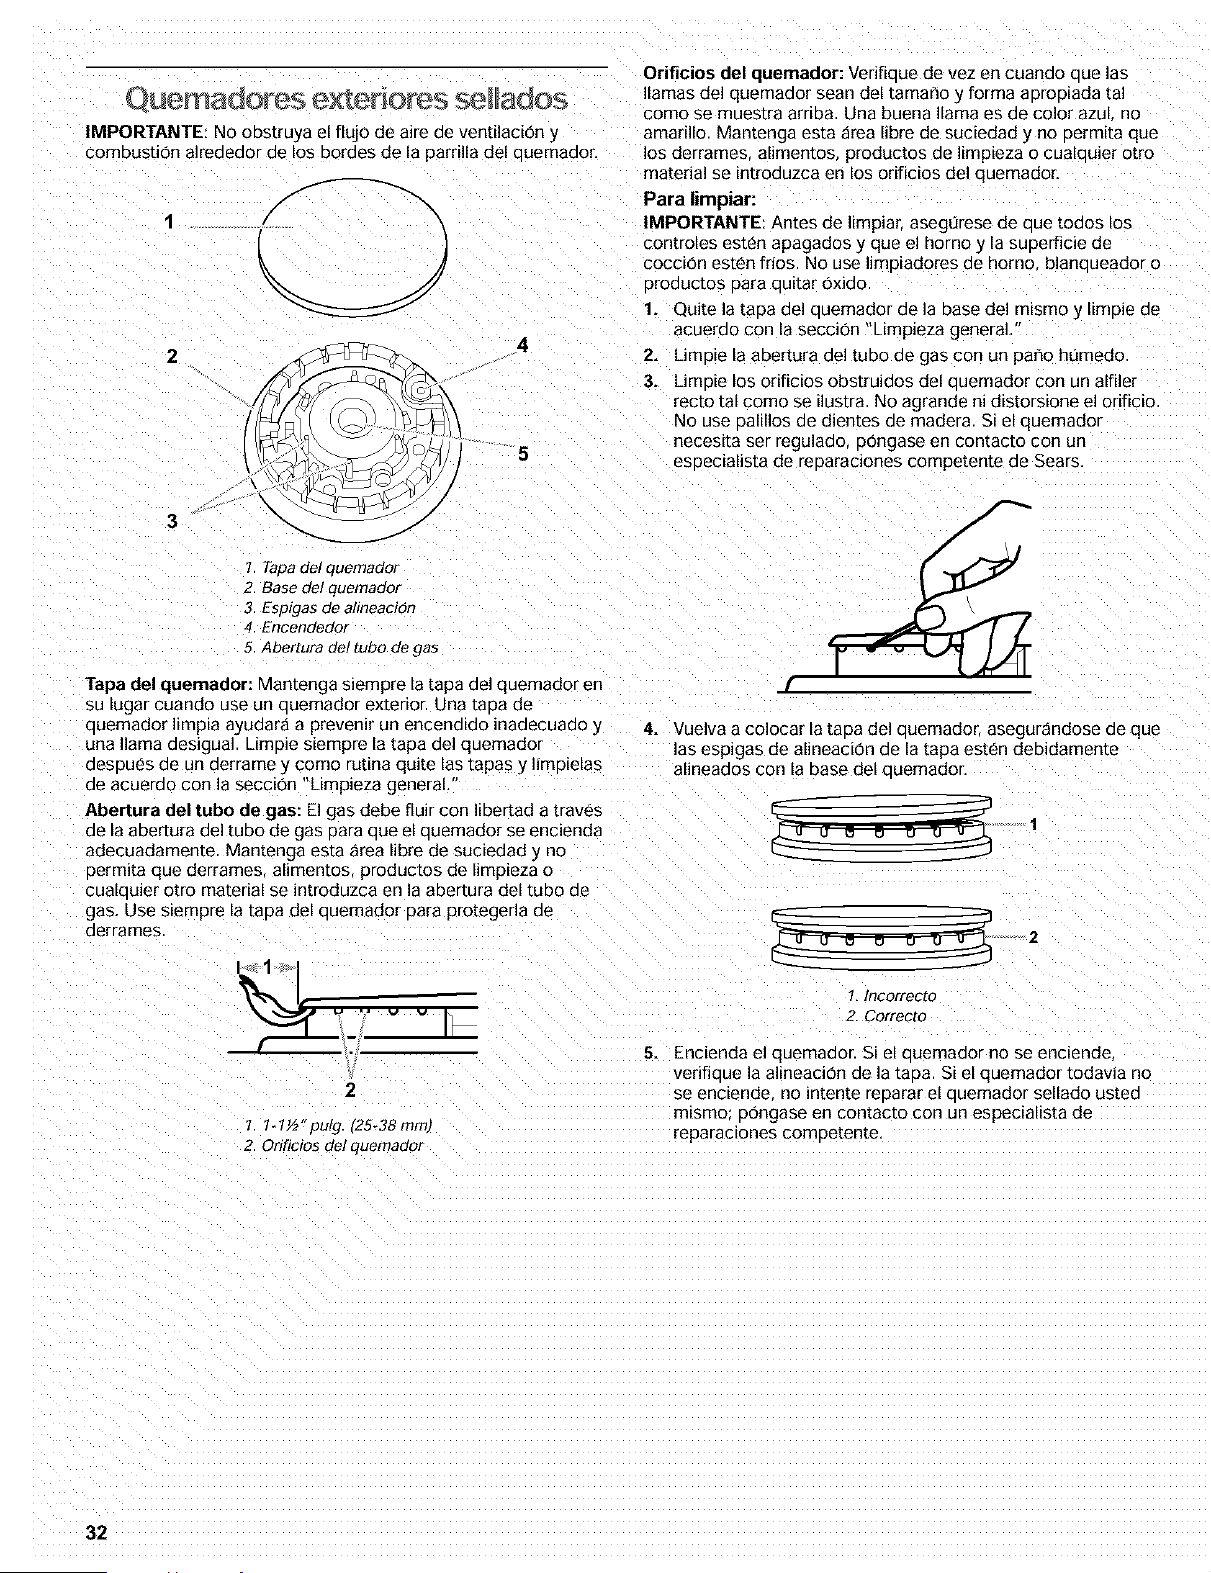
emado es e×tenor÷s se ados
IMPORTANTE: No oes[ruya el flujo de aire de ventilaci0n y
combustion alrededor de los bordes de la pamlla del euemaaor,
/ \
( I
3 _. j
5
I Tapadel quemaaor
2. Base de/quemaaor
3, Esp_gasae almeaclon
4. ERcepoeEior
5. Abertura clef tube de gas
Orificios del quemador: Verifieue de vez en cuando aue las
lamas del quemador sean del tamaho y forma aeroDiada tal
=omo se muestra arriba. Una buena llama es de color azuL no
amarillo. Mantenga es[a area libre de suciedad y no permita que
os derrames alimentos productos de limp_eza o cualouier otro
material se introduzca en los orificios del quemador.
Para limpiar:
IMPORTANTE: Antes de limpiar, aseg0rese de que tones los
controles esten apagacios y que el homo y la suDerficie de
cocci0n esten fries. No use limBiadores de homo, blanaueacior o
Droauczos Dara auitar oxide.
1, Quite lataea del auemador de la base del mEsmo y limDie ae
acuerdo con la secci0n "Limp_eza general
2. LimD{e la abertura del tube de gas con un paho hi]merle.
3. LimDie los orificios obstruidos del auemador con un niftier
recto tal come se ilustra. No agrande ni distorsione el orificio
No use eal_lIos de d_entes de madera. Si e_quemador
necesE[a ser regulado, eongase en contacto con un
esoecialista de reDaraciones competente de Sears.
Tapa del quemador: Mantenga siempre la tapa del quemador en /"
su lugar cuando use un auemador extenor. Una taea de
auemador limp=a ayuaara a prevenir un encendido inadecuado y
una llama desigual. Limpie siempre la tapa del quemacio"
aesDues de un derrame y come ruuna quite las tapas y limDielas
de acuerdo con la seccion "LimpJeza general.
Abertura del tube de gas: El gas debe fluir con libertad a traves _'__
de la abertura de] tube de gas eara aue el auemaaor se encienda _ 1
adecuadamente. Mantenga esta _rea libre de suciedac v no
permita que derrames alimentos productos de limp[eza o
cualau_er o[ro matenal se introduzca en ]a abertura ciel tube de
gas. Use siempre la tape de[ quemador para protegerla de -:=J
aerrames
4. Vuelva a colocar la taDa del auemador, asegur_ndose ae que
las esplgas de alineacion de la tapa esten debidamente
alineados con la base del auemador.
:/. v v
2
I 1-1½ pul 9 f25_38mml
2. Orificios del auemador
1, Incorrecto
Z Correcto
5. Encienda el quemador. Si el auemaaor no se enciende
verifiaue la alineaci0n de lataDa. Si el quemador todawa no
se enc_ende, no intente reDarar el auemador sellado usted
mtsme pongase en contacto con un especialista de
reparaclones comDetente.
32
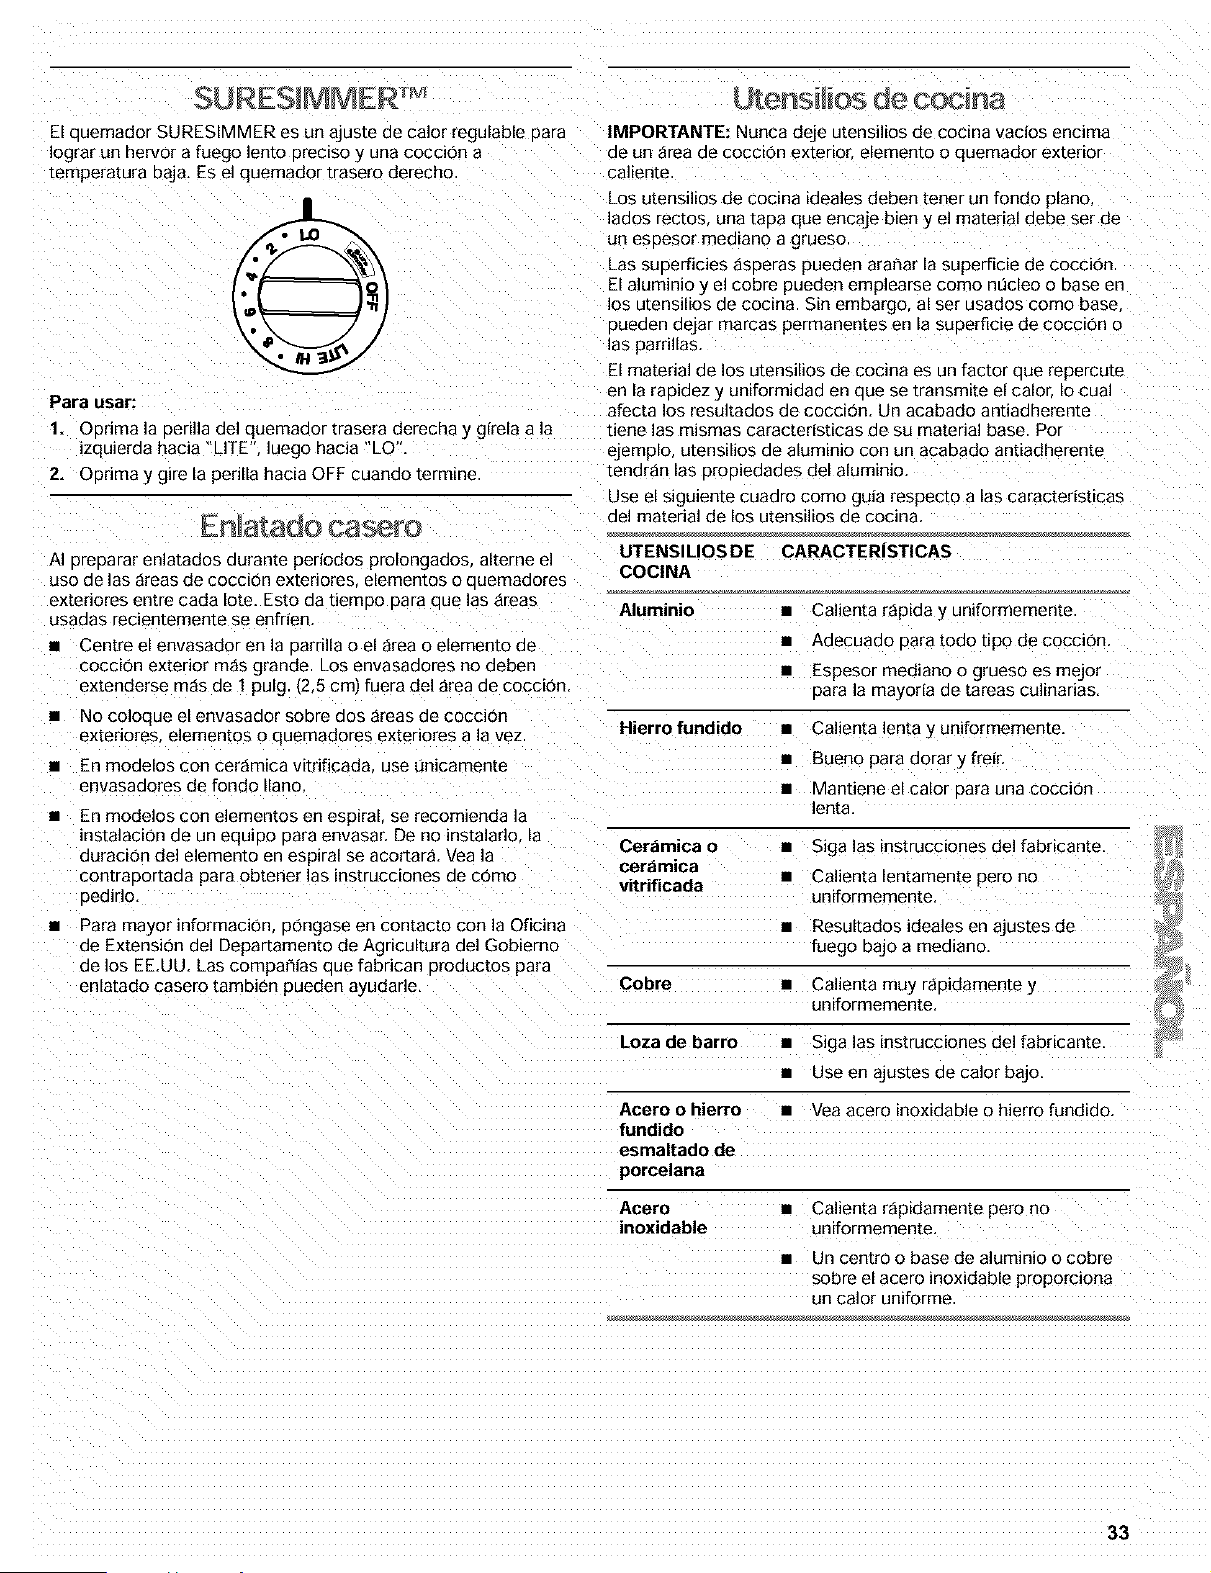
El auemador SURESIMMER es un ajuste de calor regulable Dara
Iograr un hervor a fuego lento oreciso y una cogcion a
[empera[ura oaja. Es el quemador trasero deregho
Para usar:
1. ODrima la Derilla del quemaaor trasera derecha y girela a la
izquierda hacia "LITE luego hacia"LO .
2. ODrima y gire la perilla hacia OFF cuanao termme
AI DreDarar enlatacios durante periodos prolongaaos, alterne el
uso de las _reas de cocci0n exteriores elementos o ouemaaores
exteriores entre carla lore. Esto da tiemDo Dara aue las 8reas
usadas recientemente se enfrien.
• Centre el envasacior en la oarrilla o el _rea o elemento de
COCCiOnexterior m_s grande. Los envasadores no deben
extenderse m_s de 1 pulg 12,5 cm fuera del 8rea de coccion.
• No coloque el envasador sobre dos _reas de coccion
extenores elementos o quemadores exteriores a la vez
• En modelos con cer_mica vitrificada use unicamente
envasadores de rondo llano.
• En modelos con elementos en esplral, se recomienda la
instalaci0n de un equipo oara envasar. De no instalarlo a
duraci0n del elemento en esp_ral se acortar& Vea la
con[rapor[aaa para obtener las instrucciones de como
eedirlo.
• Para mayor informacion pongase en contacto con la Oficina
de Extension del Departamento de Agncultura del Gobierno
de los EE.UU. Las compar_ias aue fabrican oroauc[os para
enlatado casero tambien pueden ayudarle,
IMPORTANTE: Nunca deje utensilios de cocina vacios encima
ae un _rea de cocclo_ ex[erlor elemento o quemador exterior
caliente
LOS utenslllos de coclna ideales deben tener un fondo piano.
lados rectos, una _apa que encaje bien y el material debe ser de
un eseesor mealano a grueso
Las superficies _speras pueden ara_ar la superficie de cocci0n
El aluminio y el cobre pueden emplearse como nucleo o base en
los utensilios de cocina. Sin embargo, al ser usados como base
oueaen aejar marcas permanentes en la suoerficie de coccion o
las parrillas.
El material de los utensilios de cocina es un factor aue repercu_e
en la raDidez y uniformidad en aue se _ransm_[e el calot Io cua]
afecta los resultados de coccion, Un acabado antiadherente
tiene las mismas caracteristicas de su material base. Po/
ejemplo, utensilios de aluminio con un acabado antiadherente
[enaran las orooiedades del aluminio,
Use el sigulen[e cuaaro como guia respecto alas caracteristicas
del material de los utensilios de cocina.
UTENSILIOS DE CARACTERISTICAS
COCINA
Aluminio •
Calienta r_pida y uniformemente
Adecuado Data [oao upo de cocci0n.
Espesor mediano o grueso es mejor
Data la mayoria de tareas culinarias.
Hierro fundido • Calienta lenta y uniformemente.
• Bueno para aora[ y freer
• Mantiene el calor Data una coccion
lenta
Cerzimica o • Siga las instrucciones del fabrican[e.
cer_mica
vitrificada • Calienta lentamente pero no
uniformemente.
• Resultados ideales en ajustes de
fuego DaJo a mea_ano.
Cobre • Calienta muy raeidamentey
uniformemente.
Loza de barro • Siga las instrucciones del fabricante.
• Use en ajustes de calor bajo.
Acero o hierro • Yea acero inoxidable o hierro fundido
fundido
esmaltado de
porcelana
Acero • Calienta r_pidamente pero no
inoxidable uniformemente.
• Un centro o base de aluminio o cobre
sobre el acero inoxidable proporciona
un calor uniforme
33
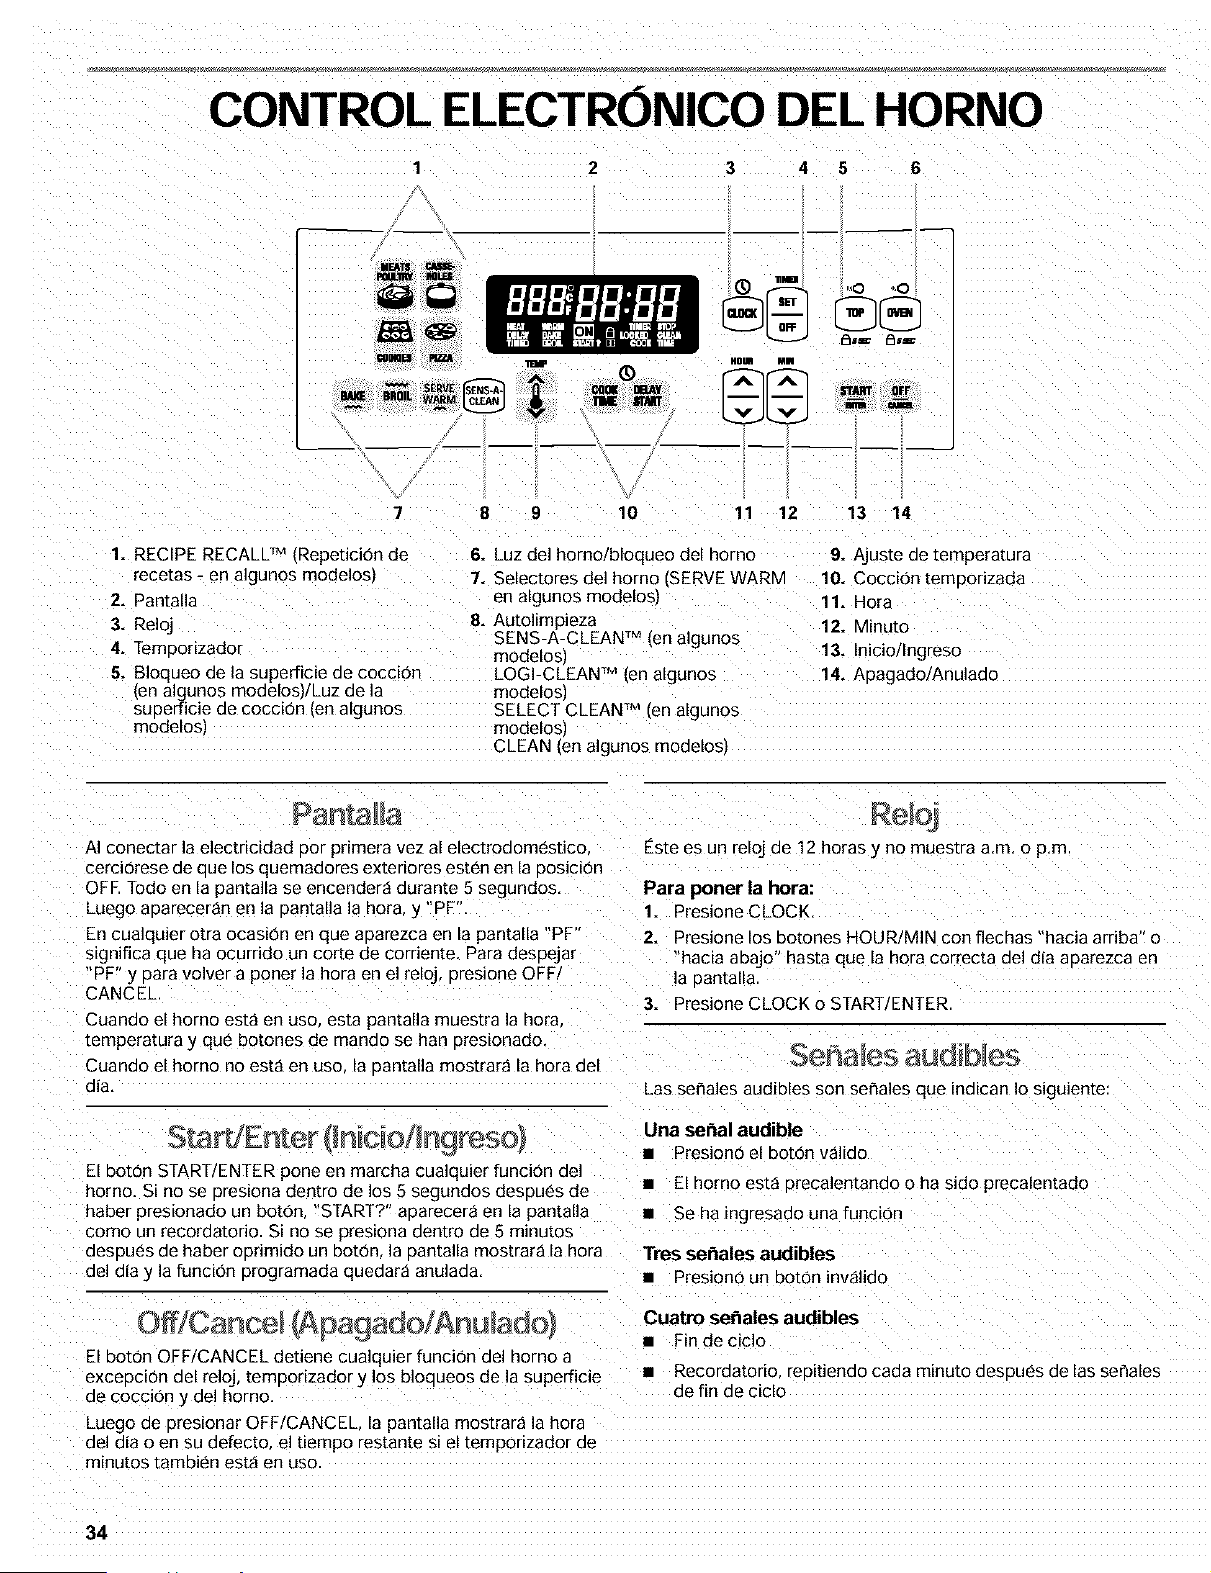
CONTROL ELECTRONICO DEL HORNO
3 4 5 6
(D _r_ ,_0 ,,,0
IIOUl Mm
1. RECIPE RECALL TM {RepeticiOn de
[ecetas - en algunos modelos
2. Pantalla
3. Reloj
4. TemDorizador
5. Bloqueo ae la superficie de coccion
(en algunos modelos, Luz de la
suuerficie de coccion len a_gunos
modelos/
8 9 10 11 12 13 14
6. Luz del horno/bloqueo del norno
7. Selectores del homo (SERVE WARIV
an algunos modelos_
B. Autolimpieza
SENS-A-CLEAN TM ten algunos
modelos'
LOGI-CLEAN TM {en algunos
modelos:
SELECT CLEAN TM (en algunos
modelos'
CLEAN 'en algunos moueEos]
9. Ajus[e ae [emperatura
10. Coccion temDorizada
11. Hora
12. Minuto
13. Inicio/Ingreso
14. Auagado/Anulado
AI conectar la electricidad por prJmera vez al electrodomestico Este es un reloj de 12 horas y no mues_ra a.m. o p.m
cerci0rese de que los quemaaores exterlores es[en en la DOSlClOn
OFE Todo en la pantalla se encender_ durante 5 segundos
Luego apareceran en la oantalla la hora, y "PF".
En cualquier otra ocasi6n en que aparezca en _a 3antalla "PF"
s_gnifica que ha ocurrido un corte de corriente. Para despejar
PF" y 3ara volver a poner la hora en el reloj Dresione OFF/
CANCEL
Cuando el homo est8 en uso. es[a aantalla muestra la hora
[empera[ura y que botones de mando se hart 3res_onado.
Para poner la hora:
1. Presione CLOCK
2, Presione los botones HOUR/MIN con flechas "hacia arriba" o
hacia abajo" hasta que la hora correcta del dia auarezca en
la oaetalla
3. Presione CLOCK o START/ENTER
Cuando el homo no est_ en use la Dantalla mostrar_ la hora del
dia. Las sehales audibles son sehales que indican Io siguiente
S Enter Jnicio/ ngreso Una serial audible
• Presiono el boron valido
El botOn START/ENTER 3one en marcha cualquier funcion de]
horno. Si no se uresiona dentro de los 5 segunaos desoues de • El homo est_ orecalentando o ha sJdo precalentado
haber aresionado un boton 'START?" auarecer_ en la pantalla • Se ha ingresado una funci0n
como un recordatorio. Si no se presiona dentro de 5 minutos
aesgues de haber oorimido un boton, la 3antalla mostrar_t la hora Tres seffales audibles
del aEay la funci0n programada queaara anulada. • Presion0 un boron inv_lido
El boton OFF/CANCEL detiene cualquier funci0n del homo a
exceocion del reloj, temporizador y los bloaueos de la superficie
ae coccIon y de] horno,
Luego ae presionar OFF/CANCEL la pantalla mostrar_ la hora
del dia o en su defecto, el tiemoo restante s[ el temporizador de
minu[os [ambien esta en uso
Cuatro se_ales audibles
• Fin deciclo
• Recordatorio "eoitJendo cada minuto desoues de las senales
de fin de cEclo
34
Ser_alesaudibles de error
=as set, ales audibles de error indican un problema del control
electronico del homo. Un codioo de error aparecera en la
3antalla.
Volumen de la sepal audible
El volumen puede regularse entre alto y bajo.
Para cambiar: Presione y sosmnga DELAY START 5 segunaos.
Se escuchara una serial audible corta y "Snd HI" o Snd Lo
aparecera en la pantalla. Presione y sosmnga DELAY START
nuevamente 5 seguneos para cambiar al ajuste deseado.
B OQUeO Gel OFnO
El bloqueo del homo _mpide el uso accidental de los bomnes ae
manao de] tablero de control. El homo solo Dueae ser bloqueaao
cuando no esta en uso o el control del mismo no ha sido fijaao.
El homo permanecera bloqueado luego ae un apagon si rue
bloaueado antes del apagon.
Para bloquearldesbloquear el hereo:
Presione y sosmnga OVEN 5 segundos Se escuchar_ una sola
sepal audible y "Loc on" (bloqueado] y la figura de un candado
3ara despejar "Snd on" "Snd OFF 'rEP on". "rEP off' 'Snd HI" apareceran en la pantalla Luego de 5 segunaos. _oc on
o "Snd LO presione cualquier botOn y la funciOn ores_onaaa aesaoarecer_ de la Dantalla _ aoarecer_n "Loc"
aparecer_ en ]a pantalla Se escucharan tres se_ales audibles cuando el homo este
bloqueaao y cualauier otro boton de mando excepmanao
Senales audibles recordatorias CLOCK (Reloj), TIMER (Temoorizadorl START/ENTER (In[cmr/
_as se_ales audibles recordatorias son cuatro seriales audibles Ingresar OFF/CANCEL (Apagado/Anuladol. u OVEN (Hornc ha
ae" segunao de aurae[on, las cuales indican que el tiempo fijaao s[ao ores_onaao.
aara una funcion del temporizador odel Control temeonzado del
horno ha terminado.
Temporizador
Para encender o apagar las senales audibles (Off/On):
_resione y sosmnga SET 5 segunaos. Se escuchara una seria
audible corta y "rEP OFF" aearecera en la oantalla. Repita el
3rocealmlen[o para volver a encenderlas.
Cocci6n temporizada
Para encender o apagar las senales audibles: Presione y
sosmnga COOK TIME. Se escuchara una serial audible corta y
"Snd OFF" aoarecera en la oantalla. Repita el procedimiento para
volver a encenderlas
Fahrenheit y CeH 9raaos
La temperatura esta prefijada en Fahrenheit pero puede
cambiarse a Centigraaos.
Para cambiar: Presione y sosmnga BROIL 5 segundos. Una
se_al audible corta sonar_ y las temperaturas aue est_n en la
3antalla cambiar_n a "°C". Ree_ta el orocedimiento 3ara volver a
:ahmnheit
Para desbloauear el home opnma y sosmnga OVEN por 5
segunaos. Loc OFF" (desbloaueado} aoarecera en la pantalla y
la figura de un candado desaparecera de la pantalla
Cont de tern peratura homo
IMPORTANTE: No use un termometro oara medir la temperarura
del homo 3oraue el abrir la Duerta del homo _ el cambio de
ciclos del elemento o quemador puede dar lecturas mcorrectas.
El homo proporc_ona mmoeramras precisas. Sin embargo
euiz_s cocine mas r_oK]o O m_s lento (lee SU homo anterior de
modo que se puede regular la calibracion de la temperatura Se
ouede cambiar a Fahrenheit o Centigraaos
Un signo de menos significa que el homo estara m_s fdo en la
proportion indicada oor Jacifra aue aparece en la 3antalla. La
ausencia de] signo sJgnifica Gee el homo estar_ m_s caliente en
la proporcion indicada oor la cifra que aparece en la pantalla. Use
el siguiente cuadro a manera (]e guia.
AJUSTE °F
(AJUSTE °C)
COCINA LOS
ALIMENTOS
10°F [5°C) un ooco m_s
ariz do
El temporizador puede ser fijado en mmums y segundos u horas
y mmums y hace la cuenm regreswa del bempo fijado. El
mmponzaaor no pone el homo en marcha ni Io detiene.
20°F {10°C] ...moderadamente mas
30°F 115°C1 ...mucho mas
-10°F (-5°C) un ooco menos
Para fijar:
1. Presione TIMER SET _ajuste Clel temponzaoor).
2. Presione los botones HOUR/MIN con las fiechas "hacia
arriba" o "hacia abajo" hasta que la duracion correcta del
tiemeo aoarezca en Iz oantalla
3. Presione START/ENTER o TIMER SET.
-20°F 1-10°C} ...moderadamente menos
-30°F (-15°C) ...mucho menos
Para regular la calibracibn de temperatura del homo:
1. Presione y sosmnga BAKE 5 segundos hasta aue la Dantalla
El mmporizador comenzara a hacer la cuenta regreswa del homo muestre la calibracion actual por ejemplo. 0° CAL
aesoues (]e que se ponga a funcionar. La Dantalla har_ la
cuen[a regreswa en noras y mmums si el tiempo restante es
una hora o mas yen mmums y segundos si el tiemoo
resmnm es menos de una hora
Cuando se termine el tiempo fijaao, si est_ activado se
escuchar_n cuatro se_ales audibles de 1 segundo, luego las
se_ales audibles recordatorias sonar_n cada minuto.
2. Presione el Domn TEMP con la flecha "hacia arriba" o "hacia
abajo' 3ara aumentar o disminuir la temperatura en
orooorciones de 10°F (5°C} El ajuste puede fijarse entre 30°F
(15°C) y -30°F (- 15°CI.
3. Presione START/ENTER.
4. Presione TIMER OFF ITemoonzador aDagado) en cualau_e_
momenta para anular el temoodzador y/o detener las
se_ales audibles recordatorias
35

USO DEL HORNO
Los olores son normales cuando la estufa es nueva, Esto sucede
la orimera vez aue se usa el homo o cuando este tiene suciedad
Desaaa
IMPORTANTE: La salud de algunas aves es sumamente sensible
a los gases emanaeos. La eXDOSiCi0na lOSgases 3ueae
ocasionar la muerte de ciertas aves, Nude siempre [as aves a
Dire cuar[o cerraao y bier ventilado.
de a uminio
IMPORTANTE: No forte el rondo del homo con ningun upo de
Babel de aluminic revestimiento o utensilio de cocina ya que
dahana Dermanentemente el acabado del rondo del homo
• No ODS[ruya ni tape los conductos de ventilaci0n inferiores
del norno,
• No cubra toda la parrilla con papel de aluminio ya aue Dara
Iograr optimos resultados de coccion el aim debe circular con
IlbeEac
Parr recoger los derrames coloque papel de aluminJo en la
parrilla que esta debaJO del recipiente de hornear. Asegt]rese
ae aue el forro sea eor Io menDs 1 pulg. 12,5 cml m_s granae
que el recip_en[e de hornear y Rue los bordes ester doblados
hacia arriba
PosItiOn de pamHas y utensi I os
IMPORTANTE: Nunca coloaue alimentos o utensilios Data
hornear directamente en la ouerta oen el rondo del horno ya que
dar_ara Dermanen[emente el acabado ae oorcelana,
PARRILLAS
Ubique las 3arri]las antes de encender el homo. No retire las
oarrillas con los utensilios 3ara hornear sobre elias, Cerci0rese
ae que las parrillas ester niveladas. Para mover una parrilla.
j_lela hasta la posici0n ae [ODe. levante el horde delantero luegc
saeuela, Use come guia la ilustraci0n siguten[e y el cuadro.
ALIMENTO POSICION DE LA
PARRILLA
Pays congelados, asados grandes " 0 2
BarDs, Dasteles de Engel
Roscas Bundt. la mayoria de Danes 2
rap_oos, panes ae levadura gutsaaos
carRes
Galletas Dastelillos aanecJllos 2 0 3
Dasteles y pays no congelaaos
Articulos extragranees 6
UTENSILIOS PARA HORNEAR
Parr la Cocci0R uniforme el a[re cal[ente debe Doder circular
Deje 2 pulg. 15cml de esDacio alrededor de] utensilio oara
hornear y las aareaes ael norno,
Use el sigu_en[e cuaaro come guia,
NO. DE
CACEROLA(S)
UBICACION EN LA PARRILLA
I Centre de la parnlla
2 Lade a lade o ligerameme en z_gzag.
30 4 En esquinas opues[as en caaa 3arrilla,
Cerciorese ae que n[ngun utens[l_o oara
hornear este dlrectamente enclma del otro
Parri las homo STURDIGUDE
Parrilla con agarradera integrada
El _rea de la agarradera integrada hace que sejale la Darrilla con
facilidad, La abertura es Io suficientemente grancle parr un
agarrador de elias ounos guames Dara hornear
Media pardna con inserto desmontable
La meala oarrilla con inserto desmontable ahorra espacio al
m_ximo, Cuando los dos estdn un[aos se conweEen en una
Darrilla completa, El accesorio auede set usado tamb[en en el
mos[raoor come parrilla Dara enffiar
No ponga m_is de 25 libras (11,4 kg) en la media parrilla.
1 _ 2
1. Media Dardlla
2. Inse#o desmontable
Para ubicar las parrillas:
1, Coloque una parrilla completa en la guia 1 0 2 y la media
Darrilla en la guia 3 0 4,
2. Coloque los articulos grandes en el lade derecho de la parrillz
comDleta,
& Coloque los rec_p_emes mas orofundos y con [aDa en el lade
Jzquierdo de la oamlla comDleta,
4. Coloque los rec[pientes llanos en la media parrilla
5. AI terminar de cocina_ retire cuidadosamente los articulos
36
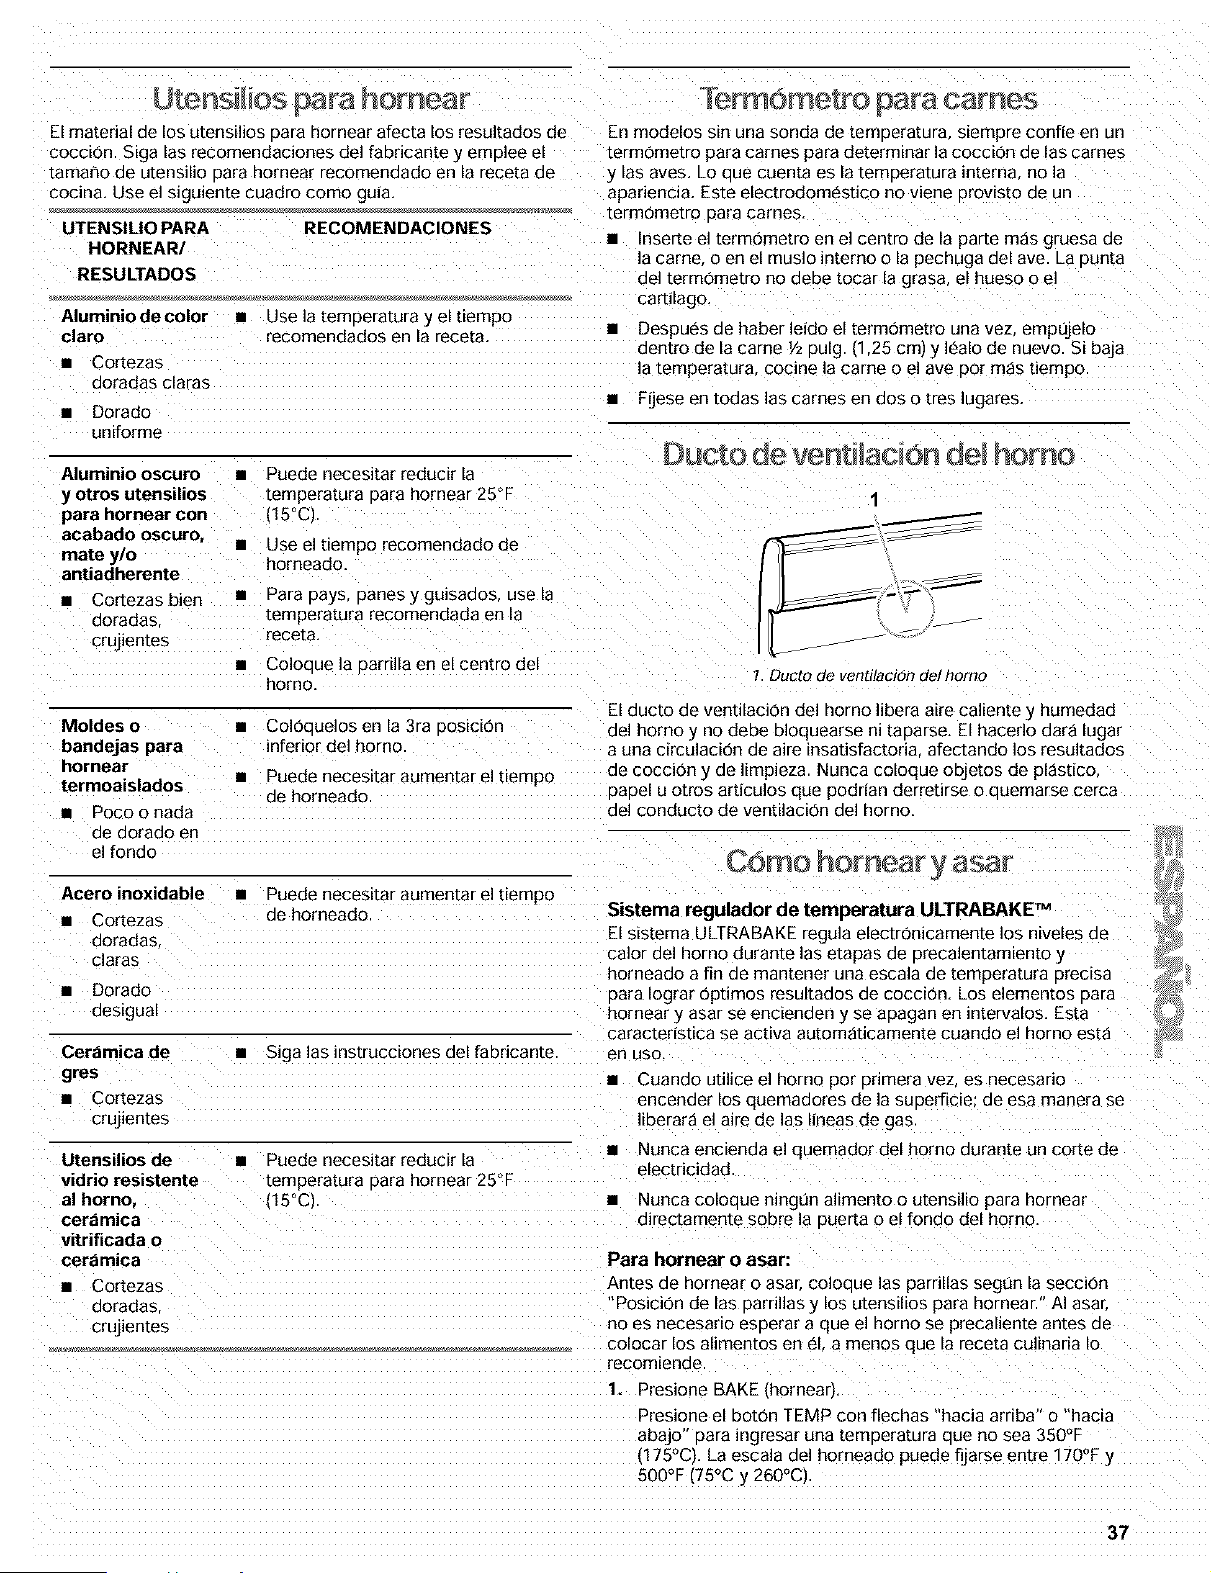
Utemsdios para homea
El material de los utensilios Data hornear afecta los resultados de
cocoton. Siga [as recomendaciones de] fabdcante y emolee el
tama_o de utensilio oara hornear recomendado en _a rece[a oe
cocina, Use el sJgu_ente cuadro coma guia,
UTENSILIO PARA RECOMENDACIONES
HORNEAR/
RESULTADOS
Aluminio decolor • Use la temoera[ura y el [lempo
clara recomendados en la receta.
• Cortezas
doradas claras
• Dorado
uniforme
Aluminio oscuro •
y otros utensilios
para hornear con
acabado oscuro,
mate y/o
antiadherente
• Cortezas bien •
doradas
crujien[es
Puede necesitar reducir la
[empera[ura Dara hornear 25°F
(15°C).
Use el tiempo recomendado de
homeado.
Para Days panes y guisados, use la
[emperatura recomendada en la
rece[a,
Coloeue la oarrilla en el centro del
homo.
Yerm6me o 3ara comes
En modelos sin una sonda de temDeratura siempre confie en un
termometro para cames para determinar la coccion de las carnes
y las ayes. LO oue cuenta es la temoeratura interne no la
apariencia. Este electrodomestico no viene Drows[o me un
termometro 3ara carries.
Enserte el termometro en el centro de la parle mas gruesa oe
a carne, o en el muslo Jnterno o la pechuga del ave. La oun[a
del termometro no deDe [ocar la grasa el hueso o el
car[_lago.
• Despues de haber leido el termometro una vez. empt_je[o
oen[ro de la came Y2pulg (1,25 co) y I_alo de nuevo. Si baja
a tempera[ura cocine la came o el ave oar m_s tiempo.
• Fijese en todas las carnes en dos o ires lugares.
Ducto de venti acion homo
1
!. Ducto de vorltl/z_ClOIl deJ _OFrlO
Moldes o •
bandejas para
hornear
termoaislados •
• Poco o nada
Coloodelos en la 3ra oosicio_
inferior del homo
Puede necesltar aumentar el tlempo
de horneado
El ducto de ventilacion del homo libera aire caliente y humedad
del homo y no debe bloquearse nl [aDarse, El haceflo dar_ lugar
a una circulaciOn de aire insatisfactoria afectando los resultados
de coccion y de limpieza. Nunca coloque oDJe[os de pl_stico.
babel U arras articulos que podrian derretirse o ouemarse cerca
del conducto de ventdacEOn del horno.
ae aoraao en
el fondo
Acero inoxidable
• Cortezas
doradas
claras
• Dorado
oes_gual
• Puede necesitar aumentar el tiempo
de horneado
Cer_imica de
gres
• Cortezas
crujien[es
• Siga las instrucciones del fabricante
Coma homear y asar
Sistema regulador de temperatura ULTRABAKE TM
El sistema ULTRABAKE regula electronicamente los niveles oe
calor del homo durante las etapas oe orecalentam_ento y
horneado a fin de mantener una escala de temperatura orecisa
Data Iograr opt;mos resuEados de coccion. Los elementos oara
hornear y asar se encienden y se apagan en ntervalos. Esta
carac_ensuca se activa autom_ticamente cuando el homo es[a
en usa,
• Cuando utilice el homo par pnmera vez es necesario
encender los quemadores de la suoerficie: de esa manera se
iberara el alre de los lineas de gas.
Utensilios de • Puede necesJtar reducer la
vidrio resistente [empera[ura oara hornear 25°F
al homo, 115°C_
cerzimica
vitrificada o
cerzimica
• Nunca encienda el quemador del homo durante un carte de
electricidad
• Nunca coloaue nmgun alimento o utensilio para hornear
directamente sabre la ouerta o el fondo del homo
Para hornear o asar:
Cortezas
doradas
crujien[es
Antes de homear o asan co]oque los parrillas segue la seccJOfl
Posicion de las uarrillas y los utensilios para hornear." AI asar
no es necesano esperar a que el homo se precaliente an[es oe
colocar los alimentos ee el. a menos que la receta culinaria Io
recomiende
1. Presione BAKE [hornearL
Presione el baton TEMP con flechas "hacia arriba" o "hacia
abajo" para ingresar una [emoeratura oue no sea 350°F
175°Cl. La escala del horneado puede fijarse en[re 170°F
500°F [75°C y 260°C)
37

2, Presione STAR] ENTER.
Un tiemDo ae erecalentamiento hard la cuenta regreswa
PrE HEAT aDarecera en la oantalla del homo si la
[emperatura real del homo est_ debajo de 170°F (75°C).
Cuando la temaeratura real del homo alcanza 170°F [75°C),
e_[emporizador continuar_ haciendo la cuenta regresiva. El
ajuste de la tempera[ura puede camblarse en cualauier
momento (uego ae presionar STAR] £NTER.
Mien[ras el norno esta en el modo de precalentamiento _a
[emperatura fijada se pueae vet por 5 segundos a[ eres_onar
BAKE.
Una vez alcanzada la temperatura fijaaa si se han activado
las seflales audibles se escuchar_ una sola sehal audible
& Presione OFF/CANCEL al terminar ae coclnar.
Use t]nicamente la charola _/la rejilla para asar. provis[as con
la estufa. Estas est_n disehadas Dara drenar Iosjugos 1"
ayuaar a Drevenir salDicaduras y humo
Para Iograr un drenado aDroD_ado no forre la rejilla con pape]
de aluminio El fondo de la cnarola Duede forrarse con papel
de aluminio para facilitar su limpieza
Quite el exceso de grasa uara reducir las saioicaduras. Corte
la grasa restante de los bordes Data ew[ar que se ondulen.
Jale la earrilla del homo a su posicion de LoDe antes de da(
vuelta o sacar los alimentos. Use tenazas 3ara dar vuelta la
came a fin de evitar la Derdida dejugos. Qulz_s no tenga que
dar vuelta los cortes muy finos de pescaao ayes o came
Luego de asa£ saode la charola del homo al retirar los
alimentos. LOS goteos se hornearan si se deja la charola en el
homo caliente dificultando mas la limeJeza
El ciclo de asado usa el calor radiante directo para cocinar los
alimentos. Antes de asar. coloque la parrilla segun el cuaaro oara
asar. No es necesario 3recalentar el homo antes de colocar los
alimentos a menos que la receta culinaria Io recomiende
Coloaue los al_mentos en la charola oara asar sobre la rejilla
luego ubiquelos en el centro de la Darrilla del homo. Cierre la
euerta del homo
Para asar:
1. Presione BROIL
2. Presione STAR] ENTER.
El ajuste de temuera[ura puede camb[arse en cualauJer
momen[o an[es o aespues ae 3resionar START ENTER
& Presione OFF/CANCEL al terminar ae asar
Asado con precisi6n
El cambiar la temperatura aI asar con 3recisi0n perm_[e un
control mas exacto de la coccion. Cuanto mas baja la
[emperatura m_s lenta sera la cocc(on Los cortes mas gruesos
trozos no uniformes de came, pescaao y ayes se pueaen
cocinar mejor a temperaturas para asar mas bajas.
Para el asado con precision:
1. Presione BROIL
2. Presione el boton TEMP con la flecha "hacia abajo para
Dajar la [emDeratura en proporciones de 5°R La escala Dara
asar es de 300°F a 525°F 1150°0 a 275°C
3, PresioneSTAR] ENTER.
4, Presione OFF/CANCEL al terminar.
CUADRO PARA ASAR
Para Iograr optimos resultados coloque los alimentos a 3 pulg. (7
cm, de distancia o m_s del elemento para asar. LOSuemDos
ndicados sirven unicamente de pautas y quizas tengan que
regularse al gusto del individuo. Las ubicaciones recomendadas
de las parnllas estan enumeradas comenzando pot el fondo (1)
hasta la earle suuerior (5). Para obtener el a_agrama yea la
seccion "Posicion de las uarrillas y los utensilios uara hornear.
ALIMENTO
POSICION TEM- TOTAL DE
DE LA PERA- MINUTOS
PARRILLA TURA Lado 1 Lade 2
_s_c
1 3ulg (2,5
cm) de groso[
mea_o cruao 4 HI 14-15 7-8
t_rmino medio 4 HI "5-16 8-9
bien cocido 4 HI 18-19 9-10
*Hamburgue-
sas de came
molida
3/4eulg.
12cm) de
grosor bien
coclaas
HI " 3-14 6-7
Chuletas de
cerdo 4 HI 18-21 8-10
1 Dulg. [2 5
cm, de grosof
Trozo de
jambn 4 HI 8-10 4-5
[precocido]
Y2Dulg.
[1.25 cm)
de grosor
Tocino 4 500°F 8-9 1-2
(260°C)
Salchichas 4 HI 6-7 3-4
alemanas
Chuletas de
cordero 4 HI - 5-17 8-9
1 aulg [2 5
cm) de groso[
Polio
Trozos con 3 HI 20-24 15-18
hueso
Deshuesados 4 HI 12-15 11-16
Pescado
I/2 pulg. L1,25 4 HI 8-10 4-5
cm/ae grosor
1 aulg (2,5
cm) de grosor 4 500°F 13-15 10-13
1260°C)
" Coloaue hasta 9 hamburguesas, seDaraaas a igual
d_stancJa en la rejilla para asar.
38
RECIPE RE :ALL
fR÷oe c on de m tas
RECIPE RECALL agiliza y facilita la tarea de cocinar sus
alimentos favoritos. Las temeeraturas y duraciones ban sido
seleccionadas a fin de incluir una variedad de opciones encada
camgoda de alimentos. Las duraciones de coccion son
regulables eara las recetas individuales y se pueaen guardar. Las
mmpera[uras se Dueden cambiar oero no guardar. AI cambiarlas
la pantalla no mostrara "PrEHEAt" ,precalentam_entoi mientras el
homo est_ orecalentando.
Sila receta indica que no es necesano precalentar, ponga los
alimentos en el horno.
Use el cuadro siguJente como guJa cuando emolee RECIPE
RECALL
BOTON TEMPERATURA TIEMPO
FUADA PREFBADO
*MEATS/POULTRY
(CARNES/AVES)
325°F (165°C1 I nora
3 Ib (6,6 kg)
*CASSEROLES 350°F /175°C) 45 minutos
(*GUISADOS)
2 cuaEos [500 mLI
COOKIES (GALLETAS) 375°F (190°CI 10 minums
PIZZA 400°F (205°C) 20 mJnutos
"Las funciones MEATS/POULTRY icarnes/aves) y CASSEROLES
[gu_saaost no uenen un orecalentamiento orogamado. Si su
recem sugiere aue se Drecaliente el homo antes de cocinar
carnes, aves o gu_sados, precalientelo usando la funciOn BAKE
Una vez alcanzada la temperamra ae orecalentamientG anule
3AKE y seleccione la funcion MEATS/POULTRY o
CASSEROLES.
Para usar RECIPE RECALL (Repeticibn de recetas):
1. Presione uno de los cuatro botones: MEATS/POULTRY
CASSEROLES COOKIES G PIZZA,
2. Presione START/ENTER.
El uempo de coceion puede cambiarse luego ae Dresionar
START/ENTER presionando los botones HOUR/MIN _hora
mmumJ El homo terminara de cocinar con el nuevo tiemDo.
AI terminar el tiempo de cocclon el homo se apagara
automaticamente. "End" (Fin) y COOK TIME mempo de
cocc_om aoarecer_n en la 3antalla. Se escucharan cuatro
sehales audibles uego cuatro senales audibles repetidas de
segundo de duracion se escuchar4n cada minuto de alli en
adelante,
3.
Los Domnes COOKIES [galletas) y PIZZA. incluyen un
erecalentamiento. AI cabo del precalentamientc se
escuchara una sole sepal audible y el tiemuo de coccion
aparecera en la pantalla haciendo la cuenta regresiva
Presione OFF/CANCEL o abra la puer[a del homo Dara
detener las seCiales audibles de reDeticion y despejar "End'
de la oantalla Lahora de] die aparecer4 en la pantalla
Para cambiar el Tiempo de coccibn prefijado:
La duraciOn del tiempo de cocciOn uara carla uno de los 4
Butanes ouede cambiarse y la estufa guardara en la memona la
nueva informacion para un uso posmnor.
1. Presione uno de los cuatro botones MEATS POULTRY
CASSEROLES COOKIES o PIZZA.
2. Presione los botones HOUR/MIN con los flechas "hacia
arriba" o "hacia abajo hasta aue la duracion del eemDo de
coccion auarezca en la oantalla
3. Presione el mismo botOn seleccionado en el paso 1 uara
guardar el cambio eara un uso oosmrioK
Se escuchar4 un solo sonido
4.
Presione OFF/CANCEL solo si esta cambiando el nempo oe
coccion arefijado que tJene en la memorla. Presione START
ENTER siva a continuar cocinando con el nuevo tiemoo ae
coccion fijaao
racte[' shca "Serif caHente"
ler_ g-_lg!INOS mOd@tO 1 f
Peligro de Intoxicacion Alimentaria
No deje sus alimentos en el homo por m_s de
una hora antes o despues de su coccibn.
No seguir esta instruccion puede ocasionar
intoxicacibn alimentaria o enfermedad.
IMPORTANTE: Los alimentos deben estar ya calientes antes de
colocarlos en el homo caliente Los alimentos oueaen
conservarse haste una hora
La funcion Serve Warm lServir caliente} permite que los
alimentos cocidos calientes permanezcan calientes antes de
servirlos. Tambien se puede user al final de un ciclo de coccion
[emoonzaaa.
Para usar:
1• Presione SERVE WARM.
2• Fije la temperatura (opcionall
Presione el boton TEMP con la flecha "hacia arriba" o "hacia
abajo" para aumentar o bajar la temperatura en proporaones
de 5°F '5°C1 para fijar una temperatura que no sea 150°F
[65°C) La escala de calor es de 100°F-200°F _35°0-90°CI
3• Presione START ENTER.
4. Presione OFF/CANC EL cuando termine
Para agregar al final de un tiempo de cocci6n fijado:
1• Presione BAKE
2• Fije la tempera[ura iopcional)
Presione el boton TEMP con la flecha "hacia arriba" o "hacia
abajo" pare fijar una mmperamra que no sea 350°F 1175°CL
3• Presione COOK TIME
4• Presione los botones HOUR/MIN con flechas hacia arriba" o
ilacia abajo" para fijar el tiempo de coccion.
5• Presione SERVE WARM [Servir caliente)
Una hora de calentamiento se fijar4 automaticamente.
39

6. Fije ]a [emoeratura de calentamiento [opcionali
Presione el botOn TEMP con las flechas "hacia arriba" o
hacla abajo" para aumen[ar o Dajar la tempera[era en
Droeorciones de 5°F 15°C) para fijar una temperatura que no
sea 150°F (65°C). La escala de calor es de 100°F-200°F
f35oc-90oCI
ContR) tem.o orizado homo
7. Presione START ENTER.
La oantalia mostrar_ la cueeta regreswa del t_empo de
cocc[on Una vez terminado el tiemeo ae cocc]on. ]a Dantalla
mostrar_ ue tiemuo de ca]entam[ento.
Una vez que termme el t_emDo ae calentamientc el homo se
apagara automabcamente y "End" y COOK TIME apareceran
en la oantalla. Se escucharaq cua[ro se_ales audibles y luego
las cuatro set, ales audibles repebt]vas de un segunao
sonaran carla minuto de alli en adelante
8. Presione OFF/CANCEL o aora la puerta del homo oara
detener las seflales audibles reuetitivas y despejar End" de
la oantalla. La hora del dia aparecera nuevamente en la
oantalla.
Para agregar al final de un tiempo de cocci6n fijado/inicio
diferido:
1. Presione BAKE.
2. Fije ]a [emDera[ura [opcional]
Presione el boton TEMP con la fiecha "hacia arriba" o "hacia
abajo" para fiJar una [emperatura que no sea 3500F 11750C).
3. Presioee COOK TIME
Presloee los botones HOUR/MIN con las fiechas "hacia
arriba" o "hacia abajo" para fijar un tiemoo de coccion
4. Presione DELAY/STARE 4.
Presione los botones HOUR/MIN con las flechas "hacia
arr 3a o "hacia abajo" para ingresar ]a hora del a_a uara
ooner en marcha
5. Presione SERVE WARM.
Una hora de calentamiento se fijara automatJcamente.
6, FiJe la [emaeratura de calentamiento lopcionaiL
Peligro de Intoxicacion Alimentaria
No deje sus alimentos en el horno por mas de
una hera antes o despu6s de su coccibn.
No seguir esta instruccion puede ocasionar
intoxicacibn alimentaria o enfermedad.
El Control temaorizado del homo permite fijar el homo aara
encenaerlo a cierta hora del dia cocinar durante un laeso de
uemeo determinado y/o apagarlo autom_ticamente. El inicio
diferido no debe usarse para alimentos como Danes y pasteles
Doraue no se hornearan adecuadamente.
Para fijar un tiempo de cocci6n:
Antes de hacer el ajuste cerciorese de que el reloj tenga la hora
correc[a del dia. Vea la secciOn "Reloj.
1. Presione BAKE
Presione el boton TEMP con la flecha "hacia arriba" o "hacia
abajo" para fijar una temperatura que no sea 350°F (175°C}.
2. Presione COOK TIME
3. Presione los botones HOUR/MIN con los flechas "hacia
arriba" o "hacia abajo" para ingresar la duracion del tiemeo
ae cocclon
Presione START 'ENTER.
El tiempo de cocc_on auarecera en ]a 3anta]la del homo. La
oantalla har_ la cuen[a regresiva del tiemoo de horneado
asado en horas y mmutos (S_el bemoo ae coccEon exceae
una hora/ o en minutos y segundos (si el tiempo de cocc_on
es inferior a una hora]
Los ajus[es ae eemoo 3ueaen cambiarse en cualqule"
momento luego ae presionar START/ENTER a] reoeur
el Paso 3
Presioee el botOn TEMP con las flechas "hacia arriba" o
"hac_a aoajo" para aumentar o Dajar la tempera[ura en Una vez ]a cuenta regresiva el homo se aDagara
orooorciones de 5°F (5°C) para fijar una [empera[ura que no automaticamente y "End" y COOK TIME aearecer_n en la
sea 150°F (65°Cl. La escala de calor es de 100°F-200 °F oantalla del homo. Se escucharae cuatro seaales audibles
,35°0-90°0] luego las cuatro se_ales audibles reDetitivas de 1 segundo
Presioee STARTJENTER. sonaran cada minuto de alli en adelante.
Cuando alcance el tiempo de [nJcio la Dantalla mostrara la
cuenta regresiva del tierr, ao de coccion. Una vez terminado el
uemuo ae cocc_on la pantalla mostrar_ un uempo de
calentamiento
Una vez que termme el t_emoo de calentamiente el homo se
apagara automat_camente y "End" y COOK TIME apareceran
en la oantalla. Se escucharan cuatro set, ales audibles y _uego
las cuatro set, ales audibles repet]twas de un segunao
sonaran coda minuto de a]li en adelante
5. Presione OFF/CANCEL o aora la puerto del homo oara
despejar "End" de la pantalia. La hora del dia aparecer_ en la
uantalia.
Para fijar el tiempo de cocci6n y el tiempo de parada
[inicio diferido]:
1. Presione BAKE
Presione el botOn TEMP con la flecha "hacia arriba" o "hacia
abajo" para fijar una [empera[ura que no sea 3500F (!75°C).
8,
Presione OFF/CANCEL o aora la puerta del homo oara
detener ]as sehales audibles reoetitivas y despejar "End" de
]a oantalla La hora del dia aparecer_ nuevamente en la
oantalla.
2. Presione COOK TIME
3. Preslone los botones HOUR/MIN con las fiechas "hacia
arriba" o "hacia abajo" para ingresar ]a duracion del tiemuo
de coccion
4. Presione DELAY START [inicio diferidol
5. Presione los botones HOUR/MIN con los flechas "hacia
arriba" o "hacia abajo" para ingresar la hora del dia oara
Boner en marcba.
4O
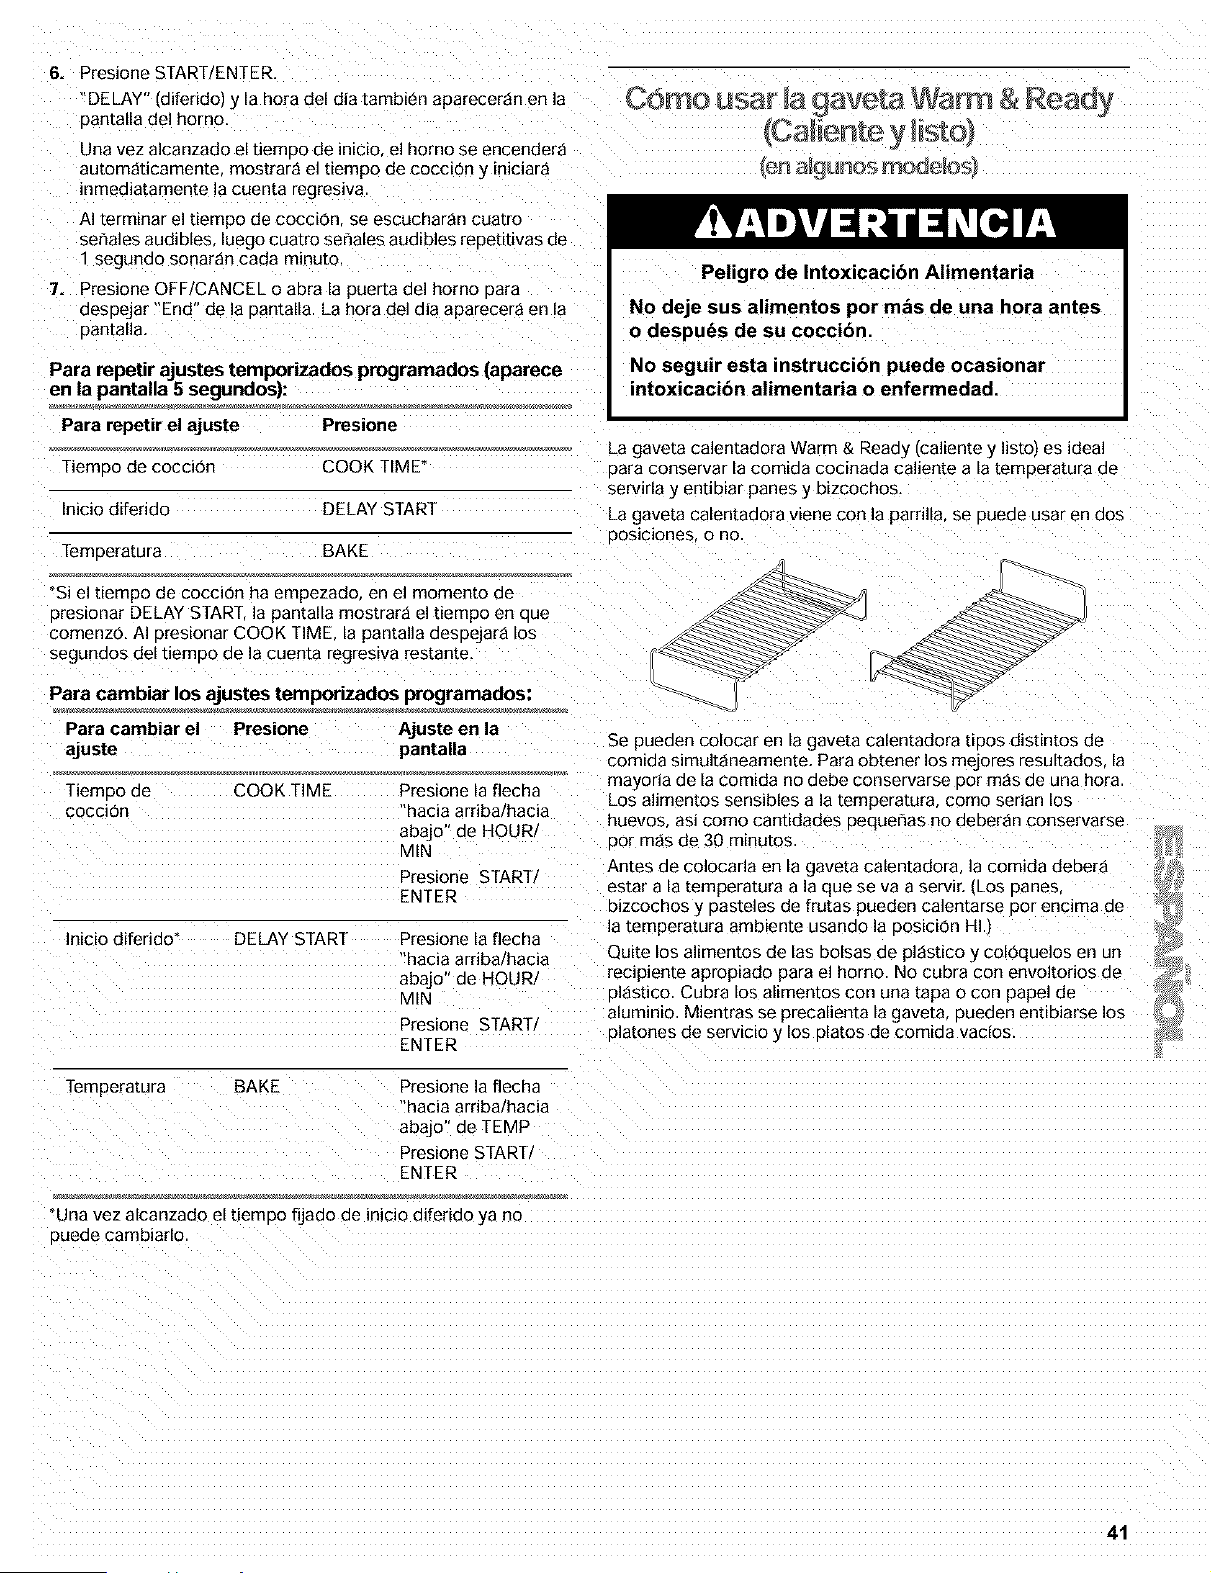
6.
7.
Presione START ENTER.
DELAY" (diferido) y la hora del dia tambi_n aparecer_n en la
Dantalla del homo.
Una vez alcanzado el tiemDo de inicio el homo se encender_
automat]camente mostrar_ el t_empo de cocctOn y niciar_
_nmediatamente la cuenta regresiva
AI terminar el tiempo de coccion se escucharan cuatro
se_ales audibles luegocuatrose_alesaudiblesreDetitivasde
" segdndo sonar_n cada minuto
Presione OFF/CANCEL o abra la puer[a del horno Dara
aespejar "End" de la Dantalla. La hora del dia aparecer_ en la
Dantalla
Para repetir ajustes temporizados programados (aparece
en la pantalla 5 segundos):
Para repetir el ajuste Presmne
TiemDo de cocci0n COOKTIME _
Lnicio diferido DELAY START
Temoera[ura BAKE
*Si el tiempo de coccion ha empezado, en el momento ae
3resionar DELAY START la pantalla mostrar_ el tiempo en que
comenzo, AI Dresionar COOK TIME. la pantalla despejara los
segundos del t]emoo de la cuenta regres_va restante,
Para cambiar los ajustes temporizados programados:
Para cambiar el Presione Ajuste en la
ajuste pantalla
Tiemoo ae
Cocci011
COOK TIME Presione la flecha
aacJa arriba/hacia
abajo" de HOUR_
MIN
Pres[one START/
ENTER
Inicio diferido* DELAY START Presione la flecha
"hacia arriba/hacia
abajo" de HOUR_
MIN
Presione START/
ENTER
Temperatura BAKE
Presione la flecha
"hacia arribalhacia
abajo ae TEMP
Presione START,
ENTER
"Una vez alcanzado el tiempo fijado de inicio diferido ya no
3uede cambiarlo
Como usar 9aveta Warm & Read}-
ICa#ente
Peligro de Intoxicacion Alimentaria
No deje sus alimentos por mas de una hora antes
o despu_s de su coccion
No seguir esta instruccibn puede ocasionar
intoxicacibn alimentaria o enfermedad.
La gave[a calentadora Warm & Ready (calLente y listol es ideal
oara conservar la comida cocinada caliente a la temueratura ae
serv_rla y enuu_ar panes y b_zcochos.
La gaveta calentadora viene con la parrilla, se oueae usar en aos
OOSlcJones o no.
Se pueden colocar en la gaveta calentadora ttoos distintos de
comida simultaneamente. Para obtener los mejores resultados la
mayoria de la comida no debe conservarse Dor mas de una hora
Los aIimentos sensibles a la tempera[ura como senan los
huevos asi como canuaades peque_as no aeDeran conservarse
oor m_s de 30 minutos
Antes de colocarla en la gave[a calentadora la comida deber_
estar a la [emperatura a la que se va a servir. _LOSoanes
o]zcocnos y Dasteles de frutas aueden calentarse oor encima de
la temperatura ambiente usando la Dosici0n H ,
Quite los alimentos de las bolsas de alast_co y colOquelos en un
recJp_en[e apropiado para el homo. No cubra con envoitonos de
ol_stico. Cubra los alimentos con una tapa o con papel de
aluminio. Mientras se precalienta la gave[& Dueaen entibiarse los
olatones de servicio y los alatos de comida vacios
41
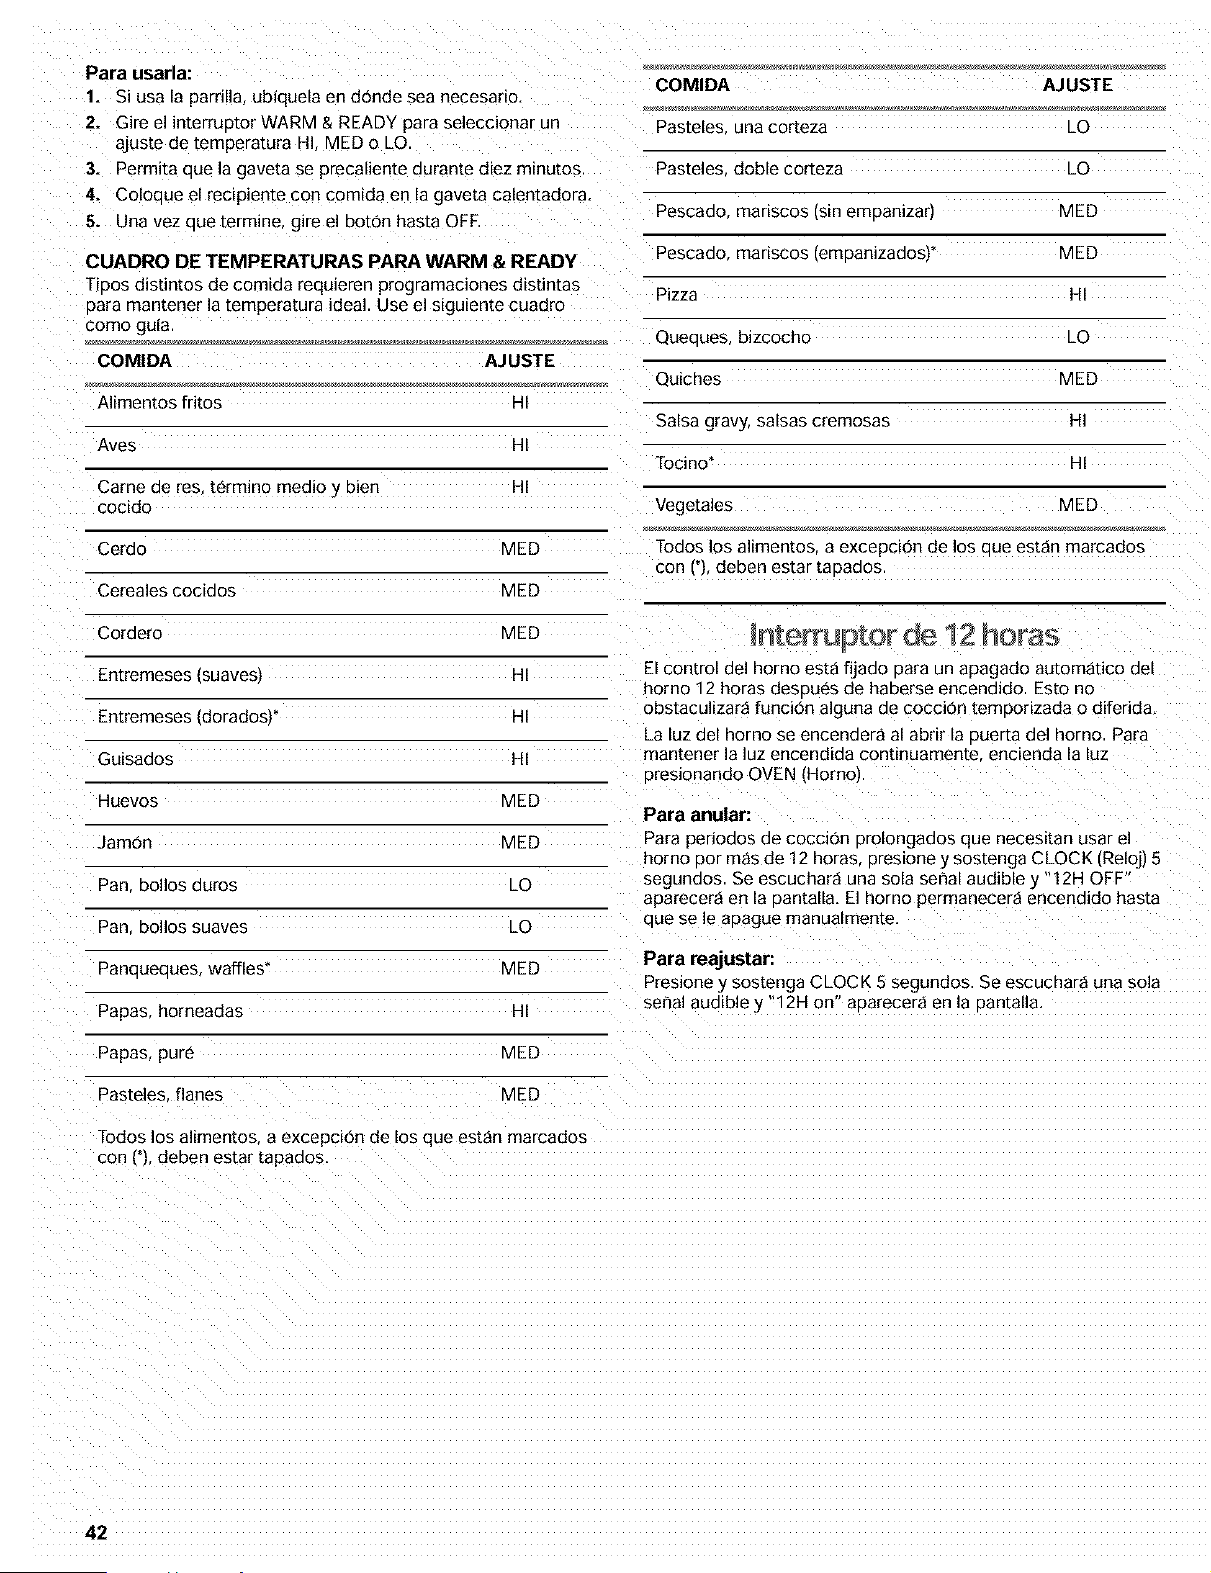
Para usarla:
1. Si usa la parrlla, ubiquela en dOnde sea necesano.
2, Gire el interruDtor WARM & READY para seleccionar un
ajuste de temperatura H MED o LO
3. Permita aue la gave[a se precaliente durante diez minutos
4, Coloque el rec[piente con comida en la gaveta caleetadora,
5. Una vaz aue [errnne, gire el bot0n hasta OFF
CUADRO DE TEMPEI_tTUI_aLS PAPA WARM & READY
TiDos distintos de com_aa requ_eren programacJones distintas
Dara mantener la tampera[ura ideal. Use el siguiente cuadro
como guia.
COMIDA AJUSTE
A]imentos fritos HI
Ayes HI
Came de res termno mea_o y bien HI
cocido
Cerdo MED
Cereales cocidos MED
Cordero MED
Entremeses isuaves_ HI
Entremeses (doradosF HI
Guisados HI
Huevos MED
JamOn MED
Pan bollos duros LO
Pan bollos suaves LO
COMIDA AJUSTE
Pasteles una corteza LO
Pasteles doble corteza LO
Pescaao mariscos [s_n emDanizar) MED
Pescaao manscos temoanizadosY MED
Pizza HI
Queaues. b_zcocho LO
Qu_cnes MED
Salsa gravy, salsas cremosas HI
Tocino _ HI
Vegetales MED
Todos los alimentos a excepc_on de los aue est_n marcados
con ffl deben estar taoaaos
El control del horno est_ fiJado para un apagado autom_tico del
homo 12 horas deseues de haberse encendido. Esto no
obstacu]izar_ funci0n alguna de cocci0n temDorizada o diferida.
La IUZ de[ homo se encender_ al abrir la ouer[a del homo. Pare
mantener ]a ]uz encendida continuamente enctenda la luz
Dresionando OVEN (Homo
Para anular:
Pare periodos de cocc_on prolongaoos que necesitan usar el
homo 3or m_s de 12 horas 3res_one y sos[enga CLOCK IReloj) 5
segunaos. Se escuchar_ una sole serial audible _ 12H OFF
aparecera en la Dantalla, El norno permanecer_ encendido haste
que se le apague manua_meme,
Panaueaues, waffles"
Papas horneadas
M ED Para reajustar:
Presione y sostenga CLOCK 5 segundos. Se escuchar_ una sold
sepal audible y "12H on" aearecer_ en la Dantalla.
HI
Papas, pure MED
Pasteles flanes MED
Todos los al_mentos, a excepc_on de los que est_n marcados
con 1_ deben estar [apaaos.
42

CUIDADO DE LA
ESTUFA
de auto m, } eza
Peligro de Quemadura
No toque el homo durante el ciclo de
autolimpieza,
Mantenga a los nihos lejos del homo durante el
ciclo de autolimpieza.
No seguir estas instrucciones puede ocasionar
quemaduras o enfermedades por inhalacibn de
gases peligrosos.
IMPORTANTE: La salud de algunas aves es sumamen[e sensible
a los gases emanados durante el ciclo de autol[moieza. La
exposicion a los gases puede ocaslonar la muerte de ciertas
aves. Mude siemore las ayes a otto cuarto cerrado y bien
vent[lade
Haga la autolimpieza del horno antes de que es[e mu} suc_o. La
suciedad orofunda da lugar a una limpleza mas prolongada y
mas humo
Vlantenga la cocina bien ventilada durante el ciclo de
autolimD_eza Data facilitar la eliminacion del calor, olores y numo
_1obloauee el (los) ductois) de ventilaci0n del homo durante el
ciclo de autolimBieza. El aire debe poaer moverse con libertad.
Vea la secci0n "DuctolsJ de ventilacion del homo.
_1o]impie. frote dar_e o mueva ]ajunta de la puer[a del norno. La
junta de la puerta es esencJal Dara un buen cierre
Prepare el horno:
• Retire la charola Dara asar. la rejilla los utensilios de cocina y
de hornear y, en algunos moaelos el me@dor de temDeratura
del homo
• Retire todo forro de aluminio del homo ya que podria
auemarse o aerre£1rse dal=lando eJ horno
Retire las 9arrillas del horno para mantenerlas lustrosas y
faciles de desiizarse. Para mayor informacion yea "LimpJeza
general
Limp_e manualmente el borde interior de la puer_a y el area ae
2 pulg. ,3.8 cml alrededor del marco de la cavidad in_erna
del homo asegurandose de no mover ni doblar lajunta. Esta
_rea no se calienta Io suficiente como oara el[m[nar la
suciedad durante la autolimoieza. No deje que el agua,
Droducto de limp_eza, etc penetre en las ranuras del marco
de la ouer[a Use un ua¢_ohLJmedo para limpiar este area
Limp_e cualquier suciedad suelta oara reducir el humo )
evitar da_os. A altas temoera[uras los alimentos reaccionan
con la porcelana pudiendo ocasionar manchas, p[caduras
corrosiones o manchas blancas tenues. Esto no afectar_ el
"endimiento de la coccion
Prepare la superficie de coccibn y la gaveta de
almacenamiento:
• Quite los articulos de Ol_stico de la superficie de coccion ya
aue Dueaen aerreurse.
• Qu_[e [oaos los articulos de la gaveta de aimacenam[ento
IMPORTANTE: El calentamiento y enfriamiento de la porcelana
sobre el acero en el homo auede dar lugar a decolorac[on
oerdida del lustre, agrietamientos finos y estall[dos
Ciclo de autolimpieza SELECT CLEAN TM
(en algunos modelos}
Cbmo funciona el ciclo
El ciclo de autolimpieza SELECT CLEAN usa temperaturas muy
altas y disuelve la suciedad hasta convertirla en cenizas
SELECT CLEAN fijara automaticamente el tiempo de limp_eza
una vez aue se naya fijado el nivel de suciedad
El nivel de suciedad puede fijarse manualmente en niveles de
suciedad ligera, media o profunda al ures[onar continuamente
SELECT CLEAN
El homo se apagara automat_camente una vez que este limp_o.
La puerta no se desbloaueara hasta que el homo se enfrie
Una vez aue el homo este completamente frio. quite la ceniza
con un paho hL]medo No limD_e suoerficie interna alguna hasta
aue el homo se naya enfriado Dot comDleto. El Dasar un 3a_o
hL]medo frio en el vidrio interior de la puer[a antes de que se naya
enfriado pot completo podria ocasionar la ruotura del vidrio.
La luz del horno no [uncionara durante el ciclo de
autolimpieza.
Para fijar SELECT CLEAN:
• Presione una vez para suciedad ligera, y "SoilL" aDarecera
an la Dantalla.
Presione dos veces Dara suciedad media, y "SoilA"
aparecer_ en la pantalla.
Presione tres veces oara suciedad profunda y "SoilH
aparecer_ en la pantalla
Para fijar la LIMPIEZA:
• Presione CLEAN. Esto fijara automaticamente un ciclo de
autolimDieza de 3 horas } 30 minutos.
• Presione los botones HOUR/MIN con las flechas "hacia
arriba" o "hacia abajo" para fijar un ciclo de autolimp[eza mas
prolongado o m_s corto que el ciclo de 3 horas y 30 minutos.
Para iniciar la autolimpieza:
Antes de la autolimD[eza, aseg0rese de que la puerta este
comoletamente cerraaa, ae Io contrario no se b]oaueara )/el
clclo no comenzara
1. Fue SELECT CLEAN len algunos moaelosl o C =EAN.
2. Presione START/ENTER.
La puerta del homo se bloauear_ en 6 segundos y
apareceran en la pantalla "LOCKED' 'bloqueaaol la hora de
n[cio _ la hora de parada. La puer[a no se desbloqueara
hasta aue el homo se enfrie. La duracion del ciclo incluye un
uemDo de enfriamiento de 30 minutos
Una vez aue el cicIo este completo y e[ homo se enfrie "End
aparecer_ en la pama,a y "LOCKED" desaparecera
43
3. Presione OFFICANCEL para aespejar "End" o abra la puerta
de] homo
4. Cierre la puer[a.
La hora del dia aoarecera en la oantalla
Para hacer la autolimpieza:
Antes ae la autolimoleza, asegurese de que la puerta este
comuletamente cerrada de Io contrario no se bloqueara y el
CIClO £O comenzara.
1. Presione LOGIC =EAN.
Para diferir el inicio de la autolimpieza:
Antes ae diferir el inicio de la autolimoieza, cerclorese de que el
reloj tenga la hora correcta del dia Vea la secciOn Reloj.
ASlmlsmc asegurese ae aue la Duer[a este cerrada por
comDleto, de Io contrario no se bloquear8 y el ciclo no
comenzar8
1. Presione SELECT CLEAN len algunos modelos, o CLEAN.
2. Presione DELAY START Hnicio diferido,
Presione el boron HOUR/MIN con las flechas "hacia arriba" o
"hac_a aoajo" para poner la hora del diay comenzar el c_clo
de autolimu_eza.
3. Presione STARTIENTER.
La hora de inicio se calcula automaticameme y aoarece en la
Dantalla. La Duer[a se bloquear_ autom_ticamente } tambien
aparecer_n en Eapantalla "LOCKED" (bloaueadoL DELAY
(diferido) y la hora del do,
A] alcanzar ]a hora de inicio el homo se encendera
autom_tlcamente.
Cuando el ciclo este completo y el homo se enfrie "End'
2. Presione START'ENTER.
La puer[a del horno se bloaueara en 6 segundos y
aparecer_n en la pantalla CLN SENS." "HEAT." "ON
LOCKED _ 'CLEAN". La puer[a no se desbioquear_ hasta
aue el homo se enfrie. La duraciOn del ciclo incluye un
uemuo de enffiamiento de 30 minutos
Una vez oue el ciclo este completo :y el homo se enfrie End"
aparecera en la pantalla y "LOCKED" desaparecera
3. Presione OFF/CANCEL para despejar "End" o abra la puerta
del homo,
4. Cierre la puerta.
La hora del dla aoarecera en la Dantalla.
Para diferir el inicio de la autolimpieza:
Ames ae diferir el inicio de la autolimD_eza cerciorese de que el
-eloj tenga la hora correcta del dia, Vea la seccion "Reloj.
As_mBmo asegurese de que la puer[a este cerrada DOrcomDleto
a de Io contrario no se bloquear8 y el ciclo no comenzara
1. Preslone LOGICLEAN.
aparecer_ ee ]a pantalla 3' "LOCKED" desaparecer_ 2.
4. Presione OFFICANCEL para despejar "End" o abra la puer[a
del norno.
5. Cierre la puer[a,
La hora del dia aparecera en la uantalla
Para detener la autolimpieza en cualquier momento:
Presione OFF/CANCEL y aDarecer_n en la 3antalla "cln "ON."
cool y "LOCKED" hasta aue el homo se enfrie. Des3ues
aparecer_ "End" y la puer[a se desbloqueara
Presione DELAY START [inicio diferidoJ
Presione el boron HOUR/MIN con las flechas "hacia arriba" o
"hac_a auajo" para poner la hora del dia y comenzar el c_clo
de autol_moieza.
3. Presione START'ENTER.
La puerta se bloquear_ automat_camente y aslmlsmo
aparecer_n en la pantalla "LOCKED" (blooueadoL "DELAY
(diferido) y la hora del dia.
AI Ilegar la hora de inicio el homo se encenaera
automaticamente
Ciclo de autolimpieza LOGICLEAN TM
(en algunos modelosl
C6mo funciona el ciclo
El ciclo de autolimoieza LOGICLEAN es un Paso "de un solo
[oaue aue usa £emDera£uras muy altas y disuelve la suciedad
hasta convertlrla en cenlzas oolvonentas.
Cuando el ciclo este completo y el homo se enfrie End
aparecera en la pantalla y "LOCKED" desaparecera
4. Preslone OFF/CANCEL para despejar "End" o aDra la puer£a
del horno.
5. Cierre la puerta.
La hora del dia aoarecera en la oantalla.
El ajuste "SEns" determinar_ automaticamente el t_emoo ae
limpJeza necesario basado en la cantidad de veces oue se ha
usado el homo desde el t]ltimo ciclo de autolimDieza. El tiemDo •
de limpleza m_xlmo es de 4 horas 30 minutos yun minimo de 2
horas •
El homo autom_ticamente se apagara una vez que est(_ limpJo
La Duer[a no se desblooueara hasta que el homo se enfrie. •
Una vez aue el homo este completamente frio quite la ceniza
con un paso hLimedo. No limp_e superficie interna alguna hasta
aue el homo se haya enffiado Dor comoleto. El Dasar un Daflo
humedo frio en el vidrio interior de la Duer[a ames de aue se haya
enfriado por completo podria ogasionar la ruo[ura del vidrio
Para fijar manualmente el ajuste de nivel de suciedad:
Presione dos veces para suciedad ligera, y "SoiiL" aparecera
en la oantalla.
Presioee tres veces Dara suciedad media, y "SoilA"
aparecer_ en la pantalla
Presione cuatro veces oara Sucledad profunda, y "SoiIH
aparecera en la pantalla
La luz del homo no funcionar_l durante el ciclo de
autolimpmza.
Para detener la autolimpieza en cualquier momento:
El nivel de suciedad puede fijarse manualmente desde niveles de Pr ion FF AN EL r r n n I n II In " "ON
suciedad ligera, media o profunda al eresionar continuamente es e O /C C y apa ece 8 e a pa ta a"c ,
cool y LOCKED hasta aue el homo se enfrie DeSDUeS
LOGICLEAN. aparecer_ "End" y la ouer[a del homo quedar_ sin bloqueo
44
Ciclo de autolimpieza SENS-A-CLEAN TM
(en algunos modelos)
C6mo funciona el ciclo
El ciclo de autolimDieza SENS-A-CLEAN usa [emoera[uras muy
aEas y disuelve la suciedad hasta conver[irla en cenlzas
El sensor electr6nico sofisticado controla continuamente los
reslduos emanados DOr la calcinacion de los alimentos cocidos
en el homo y regula el tiemDo de limD_eza como corresponde. El
tiemoo m_ximo de limpieza es de 4Y2horas y el minlmo es de 2
horas.
:_ncuanto slenta que est_ completamente limoio el homo se
apagar& La Duerta no se desblooueara hasta que el homo se
enfrie.
Una vez ode el homo este completamente frio quite la ceniza
con un pano hL_medo. No limp_e superficie interna alguna hasta
aue el horno se haya enfriado Dor comDleto. El Dasar un DaflO
humedo ffio en el vidrio interior de la puerta antes de que se laaya
enfriado pot completo podria ocasionar la ruDtura del vidrio.
El nivel de suciedad puede fiJarse manualmente desde niveles de
suciedad ligera, media o profunda al Dresionar continuamente
SENS-A-CLEAN,
Para iniciar la autolimpieza:
Antes de la autollmpieza, asegL_rese de que la puerta este
comDletamente cerrada ae Io contrario no se bloaueara y el
ciclo no comenzara,
1. Presione SENS-A-CLEAN
El Drograma SenS determinar_ autom_ticamente el tiempo
de limpteza necesano.
2. Presione START ENTER.
La Buerta de] homo se bloaueara en 6 segundos y
apareceran en la pantalla "CLN SENS HEAT." "ON.
"LOCKED '" y 'CLEAN". La Duer[a no se desbloqueara hasta
aue el homo se enfrie. La duracion del ciclo incluye un
tiemDo de enfriamiento de 30 minutos
Una vez Due el ciclo este completo y el homo se enfrie. End
aparecera en la pantalla y "LOCKED" desaparecer_
3. Presione OFFICANCEL para aespejar "End o abra la puer[a
del homo
4. Cierre la puer[a,
La hora del dia aparecera en la Dantalla
Para diferir el inicio de la autolimpieza:
Antes de diferir el inicio de la autollmDleza cerclorese de que el
reloj tenga la hora correcta del dia. Vea la seccion "Reloj
Asimismo asegurese de que la puer[a es[e cerraaa Dor comDleto
o de Io contrario no se bloaueara 2/el ciclo no comenzar_
1. Presione SENS-A-CLEAN
El Drograma SEnS determinar_ autom_ticamente el tiempo
de limp[eza necesario.
Si Io desea, fBe el nivel de suciedad aproptado presionando
repet_damente el boron SENS-A-CLEAN
2. Presione DELAY START micio diferido.
Presione el DO[On HOUR/MIN con las flechas "hacia arnba" o
hagia abajo" para poner la hora del alia y comenzar el clcIo
de autolimD_eza,
3. Presione START/ENTER,
La puer[a se bloquear_ autom_ticamente _ asim_smo
apareceran en la pantalla "LOCKED' 'blooueado) DELAY
(diferido) y la hora del dia,
AI llegar la hora de inicio el homo se encender__
automatlcameete
Cuando el ciclo este completo y el homo se enfrie End"
aparecer_ en la pantalla y "LOCKED" desaparecera
4. Presione OFF/CANCEL para despejar "End" o abra la puer[a
del homo.
5. Cierre la puer[a,
La hora del dia aBarecera en ]a 3antalla.
Para fijar manualmente el ajuste de nivel de suciedad:
• Presione dos veces para sucJedad ligera, y"SoiiL" aparecera
en Eaoantalla,
• Presione tres veces oara suciedad media, _ "SoilA"
aparecer_ en la pantaHa
• Presione cuatro veces oara suciedad profunda, y "SoiiH"
aparecer_ en la pantalla.
La luz del homo no funcionar_t durante el ciclo de
autolimpieza,
Para detener la autolimpieza en cualquier momento:
Presione OFF/CANCEL y apareceran en la Dantalla "cln." "ON
cool _ "LOCKED" has[a Due el homo se enfrie DesDues
aparecer_ "End" 2/la Duerta del homo quedar_ sin bloqueo.
leza 9enera
IMPORTANTE: Antes ae limplar, asegurese de aue todos los
controles esten apagados y que el homo y la suDerficie de
cocci0n est@nfrios, Siga slempre las instrucgiones que wenen en
las etiaue[as de los productos de limp_eza
A menDs que se ma_que Io con[rane se sugiere pnmero eljabon
agua y un Dafio Suave o una esponja
SUPERFICIES EXTERIORES DE ESMALTE DE
PORCELANA (en algunos modelos)
Los derrames de alimentos que contienen _cidos tales como
vinagre y [oma[e deber_n limpiarse tan pronto se enfrie el
electrodomestico. Estos derrames Dueden afectar el acabado.
• Producto para IJmpiar vJdrios 3roducto de limDieza liauJdo
suave o estropajo no abrasivo:
Limpie cuidadosamente alrededor de la Dlaca con el nL_mero
de modelo y de serie porque el refregar puede borrar los
m]meros.
Los derrames de allmentos que contlenen acldos tales como
wnagre y tomate se deben limp_ar [an pronto la superficie de
cocc_o_ las parrillas :y _astaDas se nayan enfriado. Estos
aerrames pueden afectar el acabado.
Para evitar aue se p_quen, no golDee las Darrilias _,las [aDas entre
s_o con suDerficies duras como utensilios de estufa de hierro
fundido.
No vuelva a montar las tapas en los quemadores mlentras esten
mojaaos.
No las limoie en el ciclo de autolimD_eza.
45
Estropajoae3l_sticonoabrasivoyproductodeItmpJeza
CAVIDAD DEL HORNO
hgeramente abrasivo:
Limp_e [an pronto la superficie de coccion, las parriilas y las
[apas se nayan enfriado.
Lavavajdlas Isolo las parrillas, no las tapas}:
Use el ciclo m_s fuerte
QUEMADORES EXTERIORES
Modelos con quemadores sellados
Yea la seccion "Qaemadores ex[enores sellados.
CONTROLES DE LA SUPERFICIE DE COCCION
No use oroauctos de limpieza abrasivos de fibra met_lica o oara
limpiar hornos
No remoje las perillas
AI vo_ver a montar las Deri]las. asegurese de que las mismas
esten en la DOSiCiOnOFF (ApagadoL
En algunos modelos no auite los obturadores que est_n debajo
de las perillas
• Agua yjabon o lavavajillas:
Jale las oerillas en sentido recto para quitarlas del tablero de
control
TABLERO DE CONTROL
No use 3roductos de limpieza abrasivos, es[ropajos de fibra de
acero, panos asperos o cJertas toaHas de DaDel ya que poanan
da_ar el tablero.
• Producto Dara limDiar vidrios yun patio suave o esponja:
Aplique el producto para limpiar vidrios al Daffo suave o
esponja, no Io haga directamente sobre el tablero.
EXTERIOR DE LA PUERTA DEL HORNO
Producto Dara limpiar vidrios y toallas de papel o estropajo
ae olastico no abrasivo:
Aplique el producto para limpiar vidrios al Dar_osuave c
esponja, no Io haga directamente sobre el tablero.
En los modelos de norno con oueEa de acero inoxidable vea
la secciOn "Acero inoxidable" en "Limpieza general
ACERO INOXIDABLE (en algunos modelos)
No use estropajos que wenen con jabon, productos de limp_eza
abrasivos crema para pulir la superficie de coccion, es[ropajos
de metal, pa_os asperos o c_ertos tipos de papel. Dahos pueden
ocurrir,
Frote en la direccion del hilo Data evEar aue se da_e
• Producto de limuieza y para pulir acero inoxidable {no
incluidor
No use oroductos comerciales de limp_eza para hornos
Los derrames de alimentos deber_n limDiarse cuando el horno se
enfrie. A altas temaera[uras la reaccion quim_ca de los alimentos
con la porcelana puede dar lugar a manchas corrosion.
Dlcaauras o [enues ountos blancos
• Ciclo de autolimpleza:
Vea orimero la secciOn "Ciclo de autolimoieza
PARRILLAS DEL HORNO Y PARA ASAR
• Ciclo de autollmpleza:
Vea orimero la seccion "Ciclo de autolimoieza". Quite las
oarrillas o se decoloraran y sera mas dificil deslizadas Luego
de la limpieza, una ligera capa ae aceEe vegetal aDlicado a
las guias de las parrillas las ayuaara a deslizarse.
• Estropajo de fibra met_lica
CHAROLA Y REJILLA PARA ASAR
No las ]imoie en el ciclo de autolimu[eza.
• Producto de [impieza ligeramente abrasivo:
Refriegue con un es[ropajo h[_medo.
• Soluci0n de Yztaza 112_ mL} de amoniaco pot un galon
,3.75 LI de agua
Remoje 20 minutos uego refriegue con un estropajo o una
esponja de fibra met_lica
• Producto Dara limDiar hornos:
Siga las instrucciones de la etiaue[a del Droauc[o
S01o esmalte de Dorcelana. no cromo
• Lavavaji]ias
GAVETA DE ALMACENAMIENTO
(enalgunos modelos)
AsegL_rese de que la gave£a es[e fria y vacia antes de I_mDiarla.
Para mayor informaci0n vea la seccion "Gaveta de
almacenamiento."
• De[ergente suave
Revestimiento (en algunos modelosl
DesocuDe la gave[a y saque el revestimiento
• Limp_e con ae[ergente suave
GAVETA CALENTADORA
(on algunos modelos)
AsegL_rese de que ]a gave[a es[e fria.
• Detergen[e suave
Vea la contraDortada Dara informacion sobre pea[aos.
Detergente en liauido o oroducto de ]impieza general:
Enjuague con agua limpia y seque con un paso suave y sin
Delusas.
• Vinagre para manchas ae agua aura
46

4. Para quitar el arrancaaor g[relo en sentido contrario a ]as
manecillas del reloj y lev_ntelo de su base de instalacion
5. Para quitar el foco gEreel foco 90 ° hacia delante o hacJa
_a luz del homo es una bombilia est_ndar Dara atr_s hasta que se escuche un clic. Luego lev_ntelo hacia
electrodomesticos de 40 vatios. Se encender_ 2uando se abra la afuera.
3uerta del homo. No funcionar_ durante el ciclo de Autolimpieza.
Cuando la Duerta de] horno este cerrada, presione el boton Para iastalar el arrancador y/o el foco:
OVEN para encender y apagar 1. Ajuste las oatas del arrancador en la base de instalaci0n del
Antes de cambiarla asegurese de que el homo _ la superficie de arrancaaor y gire en sentido de las manecillas del reloj.
coccion esten frios y que las perillas de control esten apagadas
Para reemplazar:
1. Desenchufe la estufa o desconecte la electricidad
2. Para quitafla, gire a la izquierda la pantalla de vidrio de la
bombilla aue est_ en la parle posterior del homo
2. Deslice las 3atas del foco en los extremos de base de
o
instalaci0n del foco. Gire el foco 90 hacia adelante o atras
hasta aue se escuche un clic
3. Gire la bombilla a la izqu[eroa para sacarla del caseuillo
4. Reemolace la bombilia luego la pantaila de la bombil]a
g[r_ndolas hacia la derecha.
5. Enchufe la estufa o vuelva a conectar la electricidad
La IHZ noct[ ma de la conso a 3. Presione hacia aDajo en el lado izquierdo de la base de
nstalacion del foco. Usted oir_t un chasquido para indicar
_eR a_JNOS [T_OQe_OSJ oue el mon[aje ha aueaaao asegurado.
_a luz nocturna de la consola est_ ubicada en la DaRe superior
del tablero de control electronico del homo. Cuenta con dos
3aries reemolazables. La luz fluorescente es un foco miniatura
fluorescente estandar modelo F8T5 El arrancador es la aar[e en
forma de boton a la izouierda del foco. Es un arrancaaor
est_ndar FS-5C. La luz noctuma de la consola no funcionar_
durante el cicio de auto limp_eza
Para encender y apagar: Presione el boton TOP
Para quitar el arrancador y/o el foco:
1. Desenchufe la estufa o desconecte la energ_a electrica
2. Presione hacia abajo con los pulgares en el frente de[
Drotector del lente mientrasjala hacia arriba con los dedos
en la DaRe Dos[enor del protector del lente.
4. Reponga la tapa del lente. Ubique las dos lengue[as
Dosteriores del protector del lente frente a los dos
sujetadores de resorte met_llcos (Iocalizados jus[o detras
focoL Empuje el lente hacia atr_s y hacia abajo para
asegdrarlo en su sitio.
3. Ourima la palanca de liberacion en direccion del foco. El lado
izquierdo del ensamblaje del foco se levantar_
1 2 3
I. AF,_allcador
2. Palanca de #berac_on
3. FOCO
5. Enchufe la estufa o reconecte la energia electnca.
47
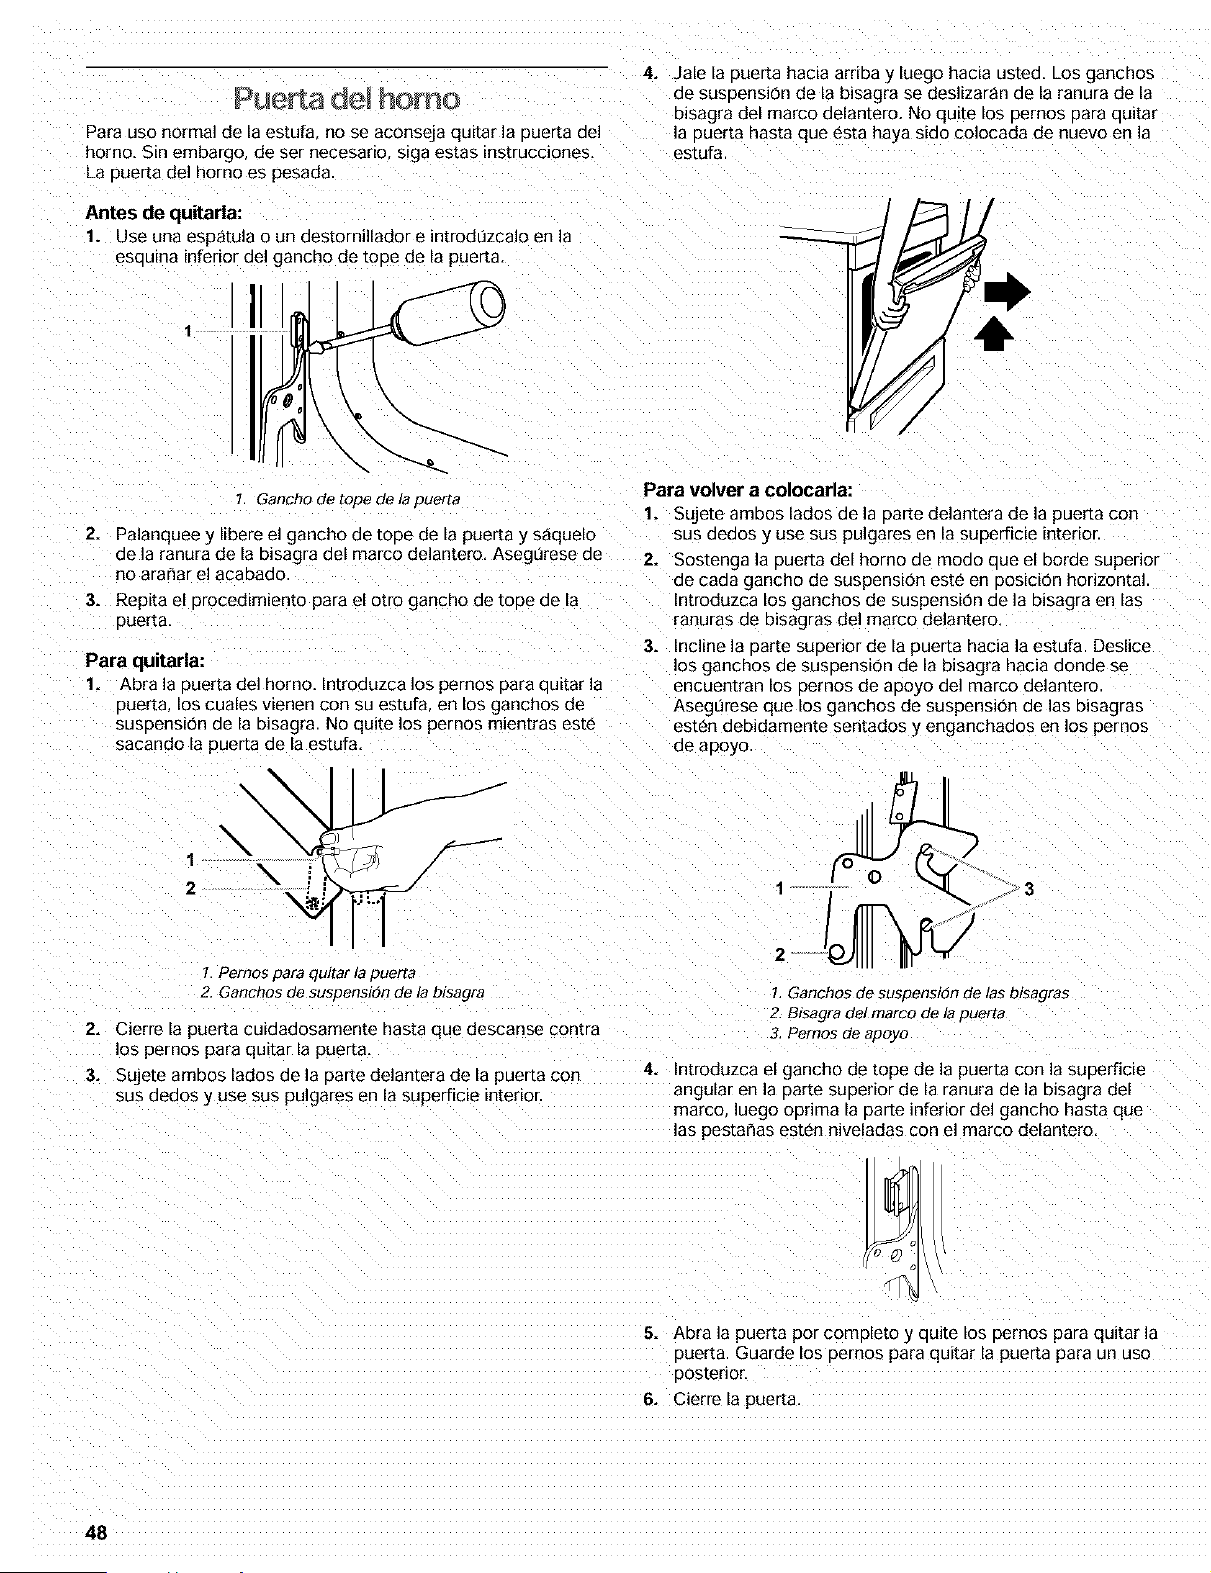
Para uso normal de la estufa no se aconseja quitar la puerta del
homo. Sin embargo, de ser necesano s_ga es[as instrucciones.
La ouerta del homo es pesada
Antes de quitarla:
1. Use una esp_tula o un destornillador e introdLJzcalo en la
esauma inferior del gancho de tooe de la puerta.
I
1 Gancho de tope ae ta puerta
2, Palanquee y libere el gancho de tODe de la puerta y saquelo
de la ranura de la bisagra del marco delantero. Aseaurese ae
no ara_ar el acabado
3. Repita el orocedimiento para el otro gancho de tooe de la
ouerta.
Para quitarla:
1. Abra la ouer[a del horno. Introduzca los pernos para quitar la
Duer[a. los cuales vienen con su estufa en los ganchos de
SUsDensiOn de la bisagra. No quite los pernos m_entras este
sacando la pueEa de la estufa.
\
f
1 /
2.............\ i /
1. Pernos para qultar ta puen'a
2. Ganchos de suspenston ae la o/sagra
2. Cierre la puerta culaaaosamente nasta que descanse contra
los pernos para quitar la puer[a
3. Sujete ambos lados de la oarte delantera de la pueEa con
sus aeaos y use SUSpulgares en la superficie interior.
4=
Jale la Duerta hacia arriba y luego hacia us[ea. LOSganchos
ae susoensi0n de la bisagra se deslizar_n de la ranura de la
bisagra del marco delantero. No qutte los pernos oara auitar
la ouerta hasta que esta haya sido colocada de nuevo en la
estufa
Para volver a colocarla:
1. Suje[e amDos lados de la Darte delantera de la auer[a con
sus aeaos y use SUSpulgares en _asuoerficie interior.
2. Sostenga la ouer[a del homo de modo aue el oorae supenor
ae caaa gancho de suspension este en 3osicion horizontal
Introduzca los ganchos de suspension de la o_sagra en las
ranuras de bisagras del marco delantero.
3. Incline la oarte suoerior de la pueEa hacia la estufa. Deslice
los ganchos de Suspension de la bBagra hacia aonae se
encuenl:ran los oernos de aooyo del marco delantero
Asegurese que Eosganchos de suspension de las bisagras
esten debidamente sentados y enganchados en los pernos
ae aooyo
1
2
3
1 Ganchos de suspension de las blsagras
2. Bis_3gra Qel marco Qe i_ puer[8
3, Pernos de apovo
4. Introduzca el gancho de tope de la puer[a con la suoerficie
angular en la oarte superior de la ranura de la oBagra del
marco, luego oorima la parle inferior del gancho hasta que
las pesta_as esten niveladas con el marco delantero.
5. Abra la auerta por completo y quite los pernos para quitar la
Duerta. Guarde los pernos para quitar la puerta para un uso
oosterior.
6, Cierre la puerta
48
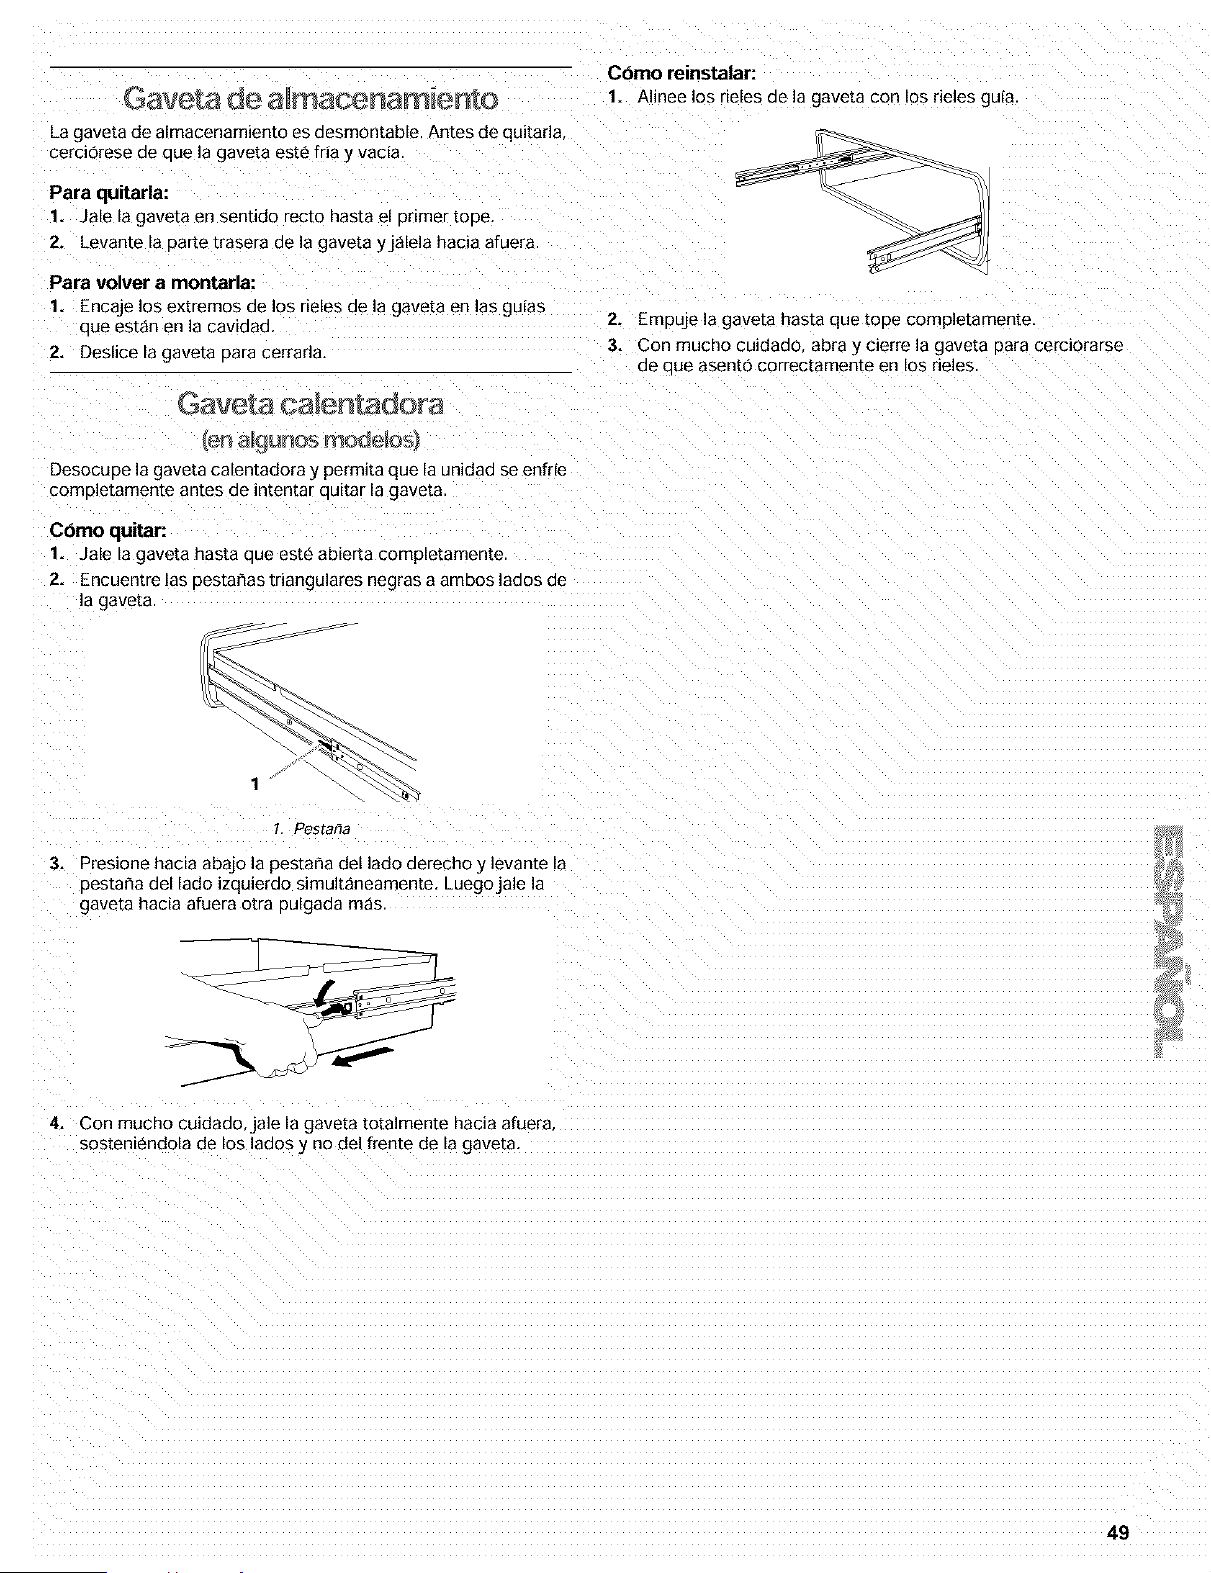
Gaveta de a macenamiento
La gaveta de almacenamiento es desmontable. Antes de quitarla.
cerciorese de aue la gaveta est_ fria y vacia
Para quitarla:
1. Jale la gaveta en sent_do recto hasta el Dnmer rode.
2. Levante la BaKe [rasera ae la gavem yjalela hacia afuera
Para volver a montarla:
1. Encaje los extremos de los deles de la gaveta en las gu_as
aue estan en la cavlaaa,
2. Deslice la gavem para cerrarla.
Gaveta ca entadora
3esocuoe la gaveta calentadora _ perm_ta que la unidad se enfrie
comeletamente antes de mtentar quitar la gaveta
Cbmo quitar:
1. Jale la gaveta hasta aue este abierta completamente.
2. Encuentre las oesta_as triangulares negras a ambos lados ae
la gaveta
1, PestaBo
3. Presione hacia abajo la pestaffa del lado derecho _ levante la
eestar_a del lado izqulerao simultaneamente. Luegojale la
gavem hacia afuera otra oulgaaa mas.
Cbmo reinstalar:
1. Alinee los deles de la gaveta con los deles guia
2. Empuje la gaveta hasta que tope completamente.
3. Con mucho cuidado abra y cierre la gaveta para cerciorarse
oe oue asento correctamente en los deles
4. Con mucho cuidado jale la gavem totalmente hacla afuera
sosten[endola de los lados _ no del frente de la gave[a
49
SOLUCION DE
PROBLEMAS
Pruebe primero las soluciones aqui sugeridas para evitar el
costo de una visita de servicio t_cnico innecesaria.
Nada funciona
&Se ha cableado y polarizado debidamente el contacto
de suministro el_ctrico?
Pruebe otro contacto oara verificar el cableado y la 3olandad
adecuados.
• LEst_ desenchufado el cable el_ctrico?
EnchLifelo en un contacto de tres terminales con debida
conexion a tierra
• ESe ha quemado un fusible en casa o se ha disparado el
disyuntor?
Cambie el fusible o vuelva a conectar el circuito.
• &Estzt la vztlvula principal o la valvula reguladora de cierre
del gas en la posicibn "off" (apagado)?
Vea las instrucciones de instalacion.
• &Estzt la estufa debidamente conectada al suministro de
gas?
Pongase en con[ac[o con un especialista comoetente en
reoaracEones de Sears o vea las instrucciones de instalacion
Los quemadores exteriores no funcionan
&Es _sta la primera vez que se usan los quemadores
exteriores?
Encienda cualcaiera de ]as oerillas de los ouemaoores
ex[eriores sara liberar el aire proveniente de la tuberia del
gas.
En algunos modelos, Lse ha fijado el Bloqueo de la
Superficie de coccibn?
Yea la seccion "BIoqueo de la Suoerficie de coccion
LSe ha fijado correctamente la perilla de control?
ODrima la Derilla antes de g(rar a un ajus[e
LEst_n obstruidos los orificios del quemador?
Yea la secci0n "Quemadores exteriores sellados,
Las llamas del quemador exterior est_n desiguales,
amarillas y/o ruidosas
LEst_n obstruidos los orificios del quemador?
Vea la secci0n "Quemadores exteriores sellados,
&Estzin las tapas del quemador colocadas
adecuadamente?
Yea la secci0n "Quemadores exteriores sellados,
LEst_ daflado el quemador?
En modelos con taDas revise sl la taDa est_ torcida. Si la
[apa gira libremente en una superficie plane, con la parle
ointada hacia abajo la tape est_ torcida. Cambie la tapa con
un ouemador exterior diferente Dare verificar el n_vel de
torcimiento. Pongase en con[ac[o con un esaecialista
comeetente en reoarac_on de Sears, Vea la contraDortada.
• LSe estzi usando gas propano?
El electrodomestico oueoe haber s_do converttdo
incorrectamente. Pongase en contac[o con un esaecialista
comoetente en reoarac_on de Sears, Vea la contraDortada.
El quemador exterior hace estallidos
• LEst_ mojado el quemador?
Dejelo secar
Calor excesivo alrededor del utensilio de cocina en la
superficie de coccibn
• LEs el utensilio de cocina del tamaNo apropiado?
Use el utensilio de cocina de tama[io similar al _rea elemento
de cocci6n exterior o quemador exterior. El utensilio de
cocina no debe extenderse m_s de 1 pulg. (2,5 cm] fuera del
area de cocc_On
El homo no funciona
• &Se ha cableado y polarizado debidamente el contacto
de suministro electrico?
Pruebe otto contacto para verificar si el cableado y la
eolaridad son lOSadecuados,
zEs (_sta la primera vez que usa el homo?
Encienda cualou(era de los oerillas del quemador exterior
Dare liberar el aire Drovenlen[e de la tuberia oe gas.
&Se ha fijado debidamente el control electr6nico del
horno?
Yea la secciOn "Control electronico del homo
• En algunos modelos, &se ha fijado el Bloqueo del homo?
Yea la seccion "BIoqueo del homo."
El quemador del horno no se enciende
• Se ha ouemado el fusible de la casa o se ha disparado un
alsyunToF
• Est_ averiado el sistema de encendido, P0ngase en con[ac[o
con un [ecn]co oe reparac(on capacitado de Sears. Vea la
conrraDorTaoa
El homo hace un ruido sordo acompasado cuando estb
erl uso
• Esto es normal y ocurre cuando el quemador del homo se
enciende y apaga para man[ener Eatemperatura fijada del
horno,
5O
EI.quemador del homo se enciende y despu_s de un Los resultados de coccibn de la superficie de coccibn
minute se apaga no son los que se esperaba
• Presione OFF/CANCEL luego espere un minute antes de
intentarlo de nuevo.
&Se ha cableado y polarizado debidamente el contacto
de suministro el_ctrico?
Pruebe otto contacto para verificar si el cableado y ]a
Dolaridad son los adecuados,
Las llamas del quemador del homo son amarillas o
ruidosas
LSe est_ usando gas propane?
El electrodomestico oueae haber side convertido
incorrec[amen[e. P6ngase en con[ac[o con un esoecialista
comDe[en[e en reDaracion de Sears. Vea la contraDortada
La temperatura del homo es demasiado alta o
demasiado baja
• LLa calibraci6n de temperatura del homo necesita un
ajuste?
Vea la seccion "Control de temDeratura del homo
La pantalla muestra mensajes
&Est_t la pantalla mostrando "PF"?
Ha ocurrido un corte de electricidad Presione OFF/CANC EL
para despejar la pantaila. Vuelva a ooner el reloj a la nora de
ser necesano. Vea la seccion "Reloj
LEn algunos modelos, estzi la pantalla mostrando "PF" 3/
un icono de la superficie de coccidn?
Se est_ usando el bloaueo de la superficie de coccion, Yea la
secci6n "Bloaueo de la superficie de coccion '+.
LEst_ la pantalla mostrando "F" seguida de un ntimero?
Presione OFF/CANCEL Dara despejar la pantaila Si vuelve a
aparecer el codigo "F". o6ngase en contacto COn un
esDecialista compe[en[e en reparationes de Sears. Vea la
CO£[_eoEaa2
LMuestra la pantalla "EO FS"?
El oesti]lo de autolimDieza est_ tmpidiendo que la puerta de
homo se cierre. Presione OFF/CANCEL para aespejar la
DantaUa, Baje y sos[enga el desatascador del m[erruptor de
la Duerta lubicado en el marco delantero de] homo,. El
mecanismo del pestillo se desbloquear_ deSDU_S de 6
segunaos.
El ciclo de autolimpieza no funciona
LEst_ la puerta del homo abierta?
Cierre bien )a Duerta del norno
LSe ha presionado START/ENTER?
Presione START/ENTER,
LSe ha fijado un inicio diferido?
Yea la seccion "Control temDorizado del homo
• LSe est_l usando el utensilio de estufa apropiado?
Vea la seccion "Utensilios de estufa,
• &Se ha fijado la perilla de control en el nivel apropiado de
calor?
Vea la seccion "PeriIlas de control
• LEst_ nivelade el electrodomestico?
Nivele el electrodomestico. Vea las instrucciones de
nstalaci0n
Los resultados del horneado no son los que se esperaba
• LSe ha precalentado el horno?
EsDere aue el homo se Drecaliente antes de colocar los
al(mentos en el
• zSe han ubicado las parrillas adecuadamente?
Vea la seccion "Posicbn de las Darrillas y los utensllios para
hornear,
&Hay circulaciOn de aire apropiada alrededor del utensilio
para hornear?
Yea la seccion "Posici0n de las parrillas y los utensilios para
hornear,
i Se ha distribuido la masa en forma pareja en el molde
para hornear?
Revise para asegurarse de eJe la masa este nivelada en el
molde para hornear.
• zEst_l nivelado el electrodomestico?
NJvele el electrodomestico. Yea las instrucciones de
nstalacion
LEst_n los articulos horneados demasiado dorados en el
fondo?
Disminuyala temperatura dR horno de 15°F a 25°F [5°C a
15°CL
• i.Se est_n dorando los berries de las cortezas antes de
tiempo?
Use DaDel de alumlnlo aara cubrir el horde de la corteza,
Horneado o asado lento
LSe ha precalentado el horno?
EsDere aue el homo se caliente antes de colocar los
alimentos en el
&Hay circulaciOn de aire apropiada alrededor del utensilio
para hornear?
Yea la seccion "Posicion de las parrillas y los utensilios para
hornea£
&Se estE usando un lapse de tiempo apropiado?
Aumente el tiemDo Dara hornear o asar
&Se ha fijado la temperatura apropiada?
Aumente la temperatura 25°F (15°C).
&Se ha abierto la puerta del homo durante la cocciOn?
Abrir el homo oara mirar los alimentos disminuye el calor del
homo y pueae Drolongar los tJemDos de cocci0n.
51

Get it fixed, at your home or ours!
For repairof majorbrand appliancesin your own home...
no matterwho made it,no matter who soldit!
1-800-4-MY-HOM E® Anytime,day or night
(1-800-469-4663) (U.S.A.and Canada)
www.sears.com www.sears.ca
For repairof carry-inproducts like vacuums, lawn equipment,
and electronics,call forthe locationof your nearest
Sears Parts and Repair Center.
1-800-488-1222 Anytime, day or night (U.S.A. only)
www.sears.com
For the replacementparts,accessories and owner'smanuals
thatyou need to do-it-yourself,cell Sears ParteDirects"!
1-800-366-PART 6a.m.- 11 p.m.CST, 7 daysa week
(1-800-366-7278) (U.S.A. only)
www.sears.com/partsdirect
To purchase or inquireabouta Sears ServiceAgreement
or Sears Maintenance Agreement:
1-800-827-6655 (U.S.A.) 1-800-361-6665 (Canada)
7 a.m. - 5 p.m. CST, Mon.- Sat. 9 a.m. - 8 p.m. EST, M- F, 4 p.m. Sat.
Para pedirserviciode reparaci6na
demicilio, y para ordenarpiezas:
1-888-SU-HOGAR su
(1-888-784-6427)
Au Canada pourserviceen franr._ais:
1-800-LE-FOYER Mc
(1-800-533-6937)
www.sears.ca
SEARS
HomeCentral ®
4_02
8274077B _H s
_' Registered Trademark / Trademark ! Service Mark of Sears Roebuck and Co Printed LnU S A
C, Sears RoebuckandCo e. MarcaRegLstradal MarcadeFabrica _ Marca de Servtc_o de Sears Roebuck and Co [mpresoenEE UU