Loading ...
Loading ...
Loading ...
9 English
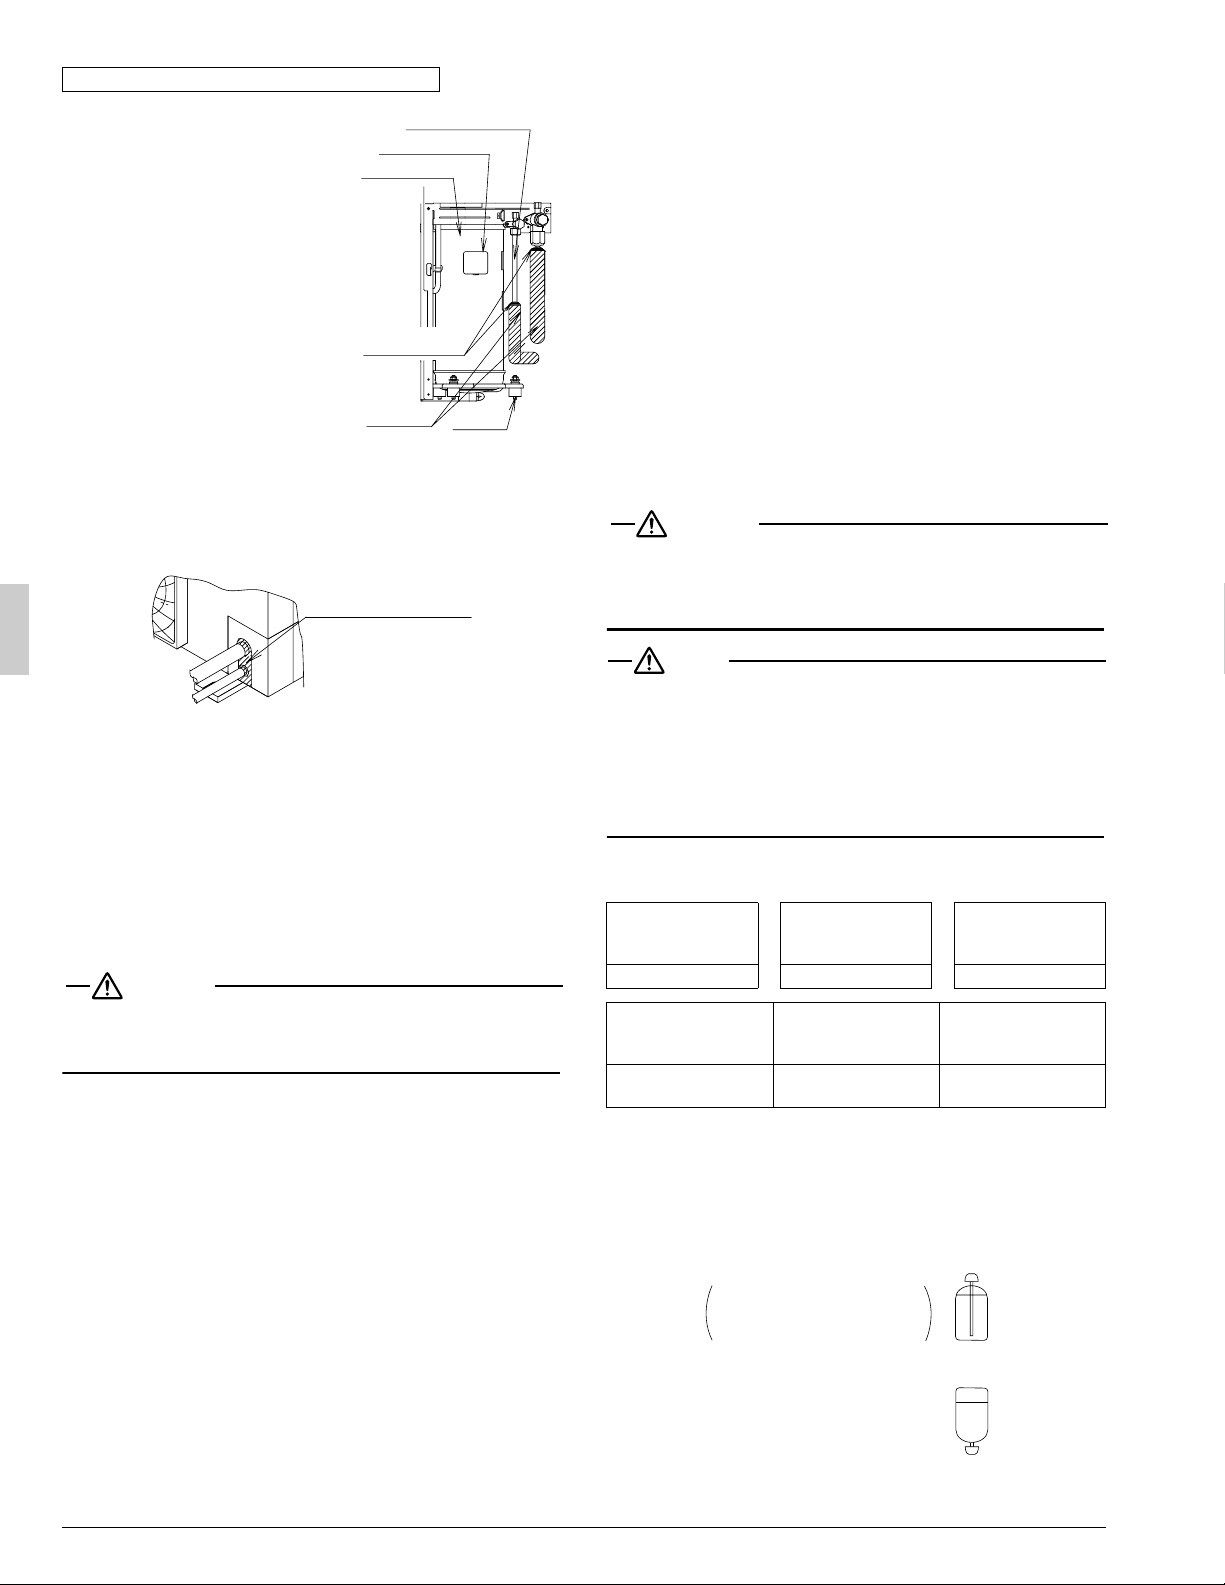
• Be careful not to let the field piping
come into contact with the compres-
sor terminal cover.
Adjust the height of the insulation
material on liquid pipe when it has
the possibility of getting in contact
with the terminal. Also make sure
that the field piping does not touch
the mounting bolt of the compressor.
• When it is expected that water con-
densed in the stop valve will reach
the indoor unit through the gap
between the heat insulating material
and the piping (for example, when
the outdoor unit is installed in a
higher position than the indoor unit),
take proper action such as caulking
the connection area.
[Measures to prevent invasion of small creatures and litter]
• Block all gaps in the piping penetration areas with putty or heat insu-
lating material (arranged in the local field) as shown in the figure
below.
(If small creatures such as insects or litter enter the outdoor unit, a
short-circuit may be caused inside the control box.)
6-5 Heat insulation of piping
• Make sure to insulate the field piping (on both the liquid line and gas
line) and refrigerant branching kit.
(If they are not insulated, water leakage may be caused.)
(The maximum temperature of the piping on the gas line is about
248 °F during heating operation. Use an insulation sufficiently resis-
tant to this temperature.)
• Reinforce the refrigerant piping according to the installation environ-
ment. If it is not reinforced, condensate may form on the surface of
the insulation.
WARNING
• Make sure to insulate the field piping up to the piping connection
area inside the unit. If the piping is exposed, dew condensation and
burn by contact may be caused.
6-6 Airtight test and vacuum drying
The unit has been checked for leaks by the manufacturer.
Confirm that the valves are firmly closed before airtight test or vacuum-
drying.
To prevent entry of any impurities and insure sufficient pressure resis-
tance, always use the special tools dedicated for R410A.
Perform the following inspections securely after the piping work.
•
Airtight test
- Make sure to use nitrogen gas. (For the service port
position, refer to the figure in
“Stop valve operation method”
.)
[Procedure] Pressurize the air conditioner from the liquid pipe and
gas pipe up to 478 psi (Make sure not to exceed 478 psi). When the
pressure does not drop for 24 hours, the piping work shall be
accepted.
If the pressure drops, check for leakage positions. (Confirm that
there is no leakage, then release nitrogen.)
• Vacuum drying - Use a vacuum pump which can evacuate up to
–14.6 psi or less.
[Procedure] Operate the vacuum pump for evacuation for 2 hours or
more using both liquid pipe and gas pipe until the vacuum pressure
reaches –14.6 psi or less. Leave the air conditioner at –14.6 psi or
less for 1 hour or more, and confirm that the vacuum pressure indi-
cated by the vacuum gage does not increase.
(If the vacuum pressure increases, the system may contain moisture
or have leakage.)
If there is a possibility of moisture remaining in the piping (for example,
when there is a possibility of dew condensation inside the piping because
the piping work was performed in the rainy season or over a long period of
time, or when rainwater may have entered the piping during the work)
Perform evacuation described above for 2 hours (vacuum drying), pres-
surize the air conditioner up to 7 psi (vacuum break) with nitrogen gas,
then evacuate the air conditioner using the vacuum pump for 1 hour to
achieve –14.6 psi or less (vacuum drying).
(If the vacuum pressure does not reach –14.6 psi or less even after evacu-
ation for 2 hours or more, repeat vacuum break and vacuum drying.) Leave
the air conditioner in the vacuum status for 1 hour or more, and confirm that
the vacuum pressure indicated by the vacuum gauge does not increase.
6-7 Additional refrigerant charge
WARNING
• To avoid injury always use protective gloves and eye protection when
charging refrigerant.
• To avoid injury do not charge with unsuitable substances. Use only
the appropriate refrigerant.
NOTE
• Refrigerant cannot be charged until field wiring has been completed.
Refrigerant may only be charged after performing the airtight test
and the vacuum drying (see above).
When charging refrigerant into the system, take care that its maximum
allowable charge is never exceeded, in view of the danger of liquid hammer.
Refrigerant containers shall be opened slowly.
To avoid compressor breakdown, do not charge the refrigerant more
than the specified amount to raise the condensing pressure.
• This outdoor unit is factory charged with refrigerant.
• Charge the additional refrigerant calculated by the formula below.
Record the additional amount to the label stuck on the back of front
panel.
•
Charge the refrigerant to the liquid pipe in its liquid state. Since R410A
is a mixed refrigerant, its composition changes if charged in a state of
gas and normal system operation would no longer be assured.
•
Before filling, check whether the tank has a siphon attached or not.
How to fill a tank with a siphon attached.
Other ways of filling the tank
Cautions on connecting the connection piping
Terminal cover
Insulation
Bolt
Caulking, etc.
Compressor
Liquid piping
Putty or heat
insulating material
(arranged in local field)
Additional charging
amount
=
Liquid piping length
× 0.036
+
Additional charging
depended on type
of indoor unit
(lb.) (ft.)×0.036 A (lb.)
Indoor unit
FBQ
FCQ
FHQ
FTQ
Additional charging
A (lb.)
00.22
There is a siphon tube
inside, so there is no need
to turn the tank upside-down.
Fill with the tank upright.
Fill with the tank upside-down.
01_EN_3PN07193-7L.fm Page 9 Thursday, February 16, 2012 8:22 PM
Loading ...
Loading ...
Loading ...