Loading ...
Loading ...
Loading ...

7
ENGLISH
Repairs
The charger and battery pack are notserviceable.
WARNING: To assure product SAFETY and RELIABILITY,
repairs, maintenance and adjustment (including brush
inspection and replacement) should be performed by a
DeWALT factory service center or a DeWALT authorized
service center. Always use identical replacementparts
Accessories
WARNING: Since accessories, other than those offered
by DeWALT, have not been tested with this product, use
of such accessories with this tool could be hazardous.
To reduce the risk of injury, only DeWALT recommended
accessories should be used with thisproduct.
Recommended accessories for use with your tool are
available at extra cost from your local dealer or authorized
servicecenter.
Cleaning
WARNING: Blow dirt and dust out of all air vents with
clean, dry air at least once a week. To minimize the
risk of eye injury, always wear approved eye protection
when performingthisprocedure.
WARNING: Never use solvents or other harsh
chemicals for cleaning the non‑metallic parts of the
tool. These chemicals may weaken the plastic materials
used in these parts. Use a cloth dampened only with
water and mild soap. Never let any liquid get inside the
tool; never immerse any part of the tool into aliquid.
MAINTENANCE
WARNING: To reduce the risk of serious personal
injury, turn unit off and remove the battery pack
before making any adjustments or removing/
installing attachments or accessories. An
accidental start‑up can causeinjury.
Your D
eWALT power tool has been designed to operate
over a long period of time with a minimum of maintenance.
Continuous satisfactory operation depends upon proper tool
care and regularcleaning.
Adjusting the Orientation of the Light(Fig.F)
Once attached to the automobile hood, the light can be
rotated to the desired position. The rotating mechanisms are
located in the base of each hook
1
.
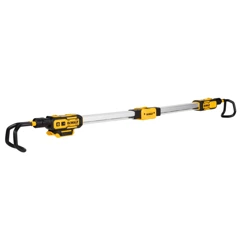
Attaching Hood Light to Auto Hood
(Fig.A, E, F)
CAUTION: Ensure area between extended hook and
hood light is clear before releasing hook. Keep your
fingers out of the area between the hook and the light
when itretracts.
CAUTION: User must confirm that the hood can
support the weight of this light, 9lbs (4kg).
1. Unfold the hoodlight.
2. Attach the hook
1
on one side of the light to the hood
of the automobile, then carefully pull on the other hook
so that it extends out from thehousing.
3. Once the hooks extends past the edge of the hood,
slowly allow the hook to slide back into the housing (do
not release the hook) until it securely attaches to the
hood of theautomobile.
NOTE: Before installing onto the hood, make sure
the hood is properly secured in the open position via
manufacturer’srecommendation.
Light Selector Button (Fig.A)
The hood light can operate using one or both LED lenses.
1. With the light on, press the light selector button
3
to
cycle between left, right or both LEDlenses
6
.
Low Battery Indicator (Fig.A)
As the battery
7
nears a fully discharged state, the light will
blink twice and then dim, dropping the brightness of the
light below the normal level. The light will continue to blink
twice every 45seconds until the battery is fully discharged
at which time the light will turn off. Indication time will vary
based on battery packcapacity.
Power ON/OFF Button (Fig.A)
1. To turn the light on, press the power button
2
, this initial
setting is highmode.
2. Press the button again and the light will convert to
lowmode.
3. Press again to turn the lightoff.
Installing and Removing the Battery Pack
(Fig.D)
DO NOT USE THIS HOOD LIGHT WITH A BATTERY
GREATER THAN 12AHCAPACITY.
NOTE: For best results, make sure your battery pack is
fullycharged.
1. To install the battery pack
7
into the tool handle, align
the battery pack with the rails inside the tool’s handle
and slide it into the handle until the battery pack is firmly
seated in the tool and ensure that it does notdisengage.
2. To remove the battery pack from the tool, press the
release button
8
and firmly pull the battery pack out of
the tool handle. Insert it into the charger as described in
the charger section of thismanual.
Hood Light Storage (Fig.E, G)
CAUTION: Keep fingers clear of center hinge when
opening or closing hoodlight.
The hood light folds down for easy, compact storage.
1. Ensure center joint is clear of obstruction beforefolding.
2. To secure folded hood light, align tab
4
to receiver
5
until they snap together.
Loading ...
Loading ...
Loading ...