User Manual
Register your product and get support at
www.philips.com/support
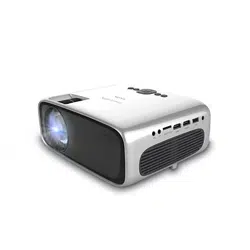
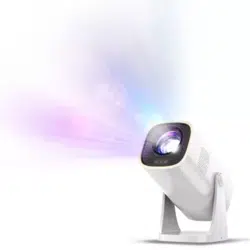
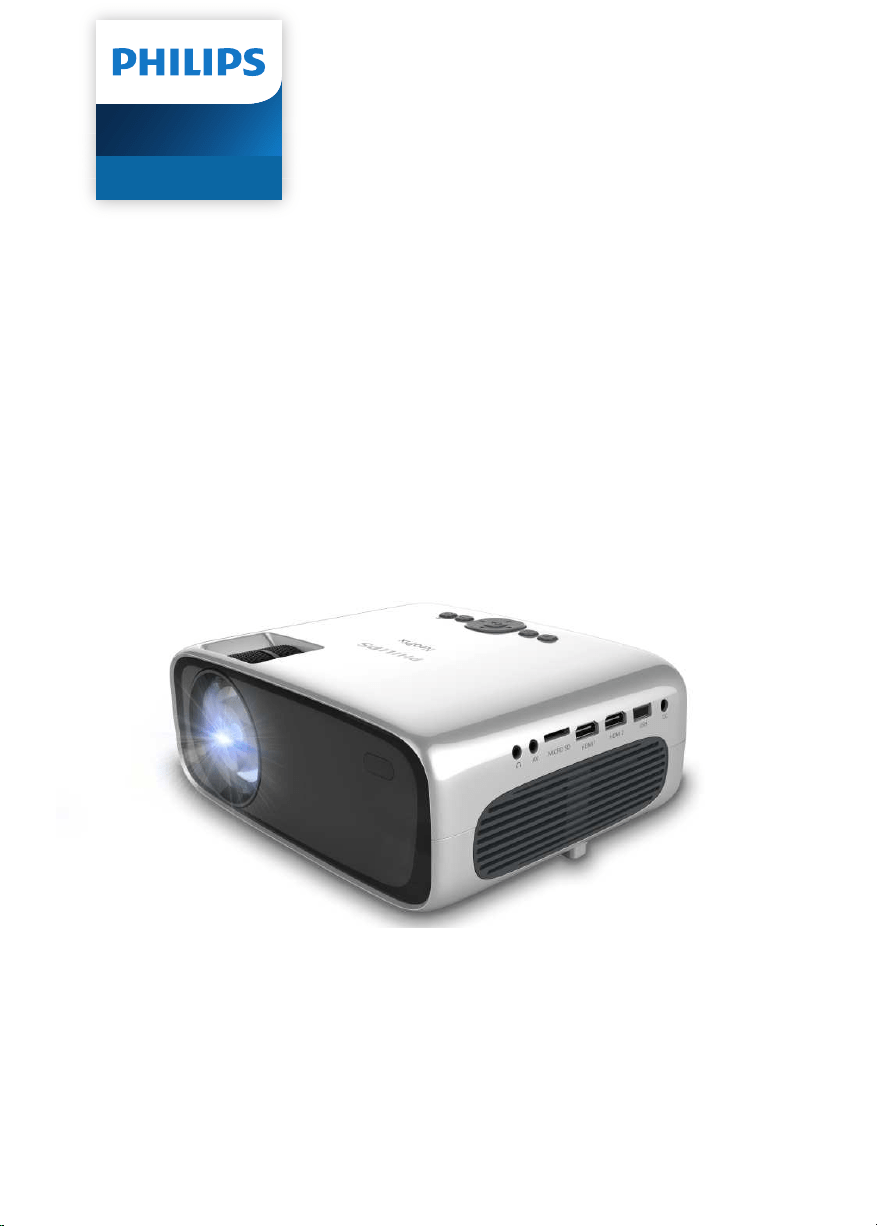
NeoPix Ultra One
Home Projector

Introduction .................................................3
Dear customer ...............................................................3
About this user manual ..............................................3
What’s in the box ..........................................................3
Customer service centre ............................................3
1 General safety information ............... 4
Setting up the product .............................................. 4
Repairs ............................................................................ 4
Power supply .................................................................5
2 Overview ................................................5
Top view ...........................................................................5
Front view ....................................................................... 6
Side view ......................................................................... 6
Rear view ........................................................................ 6
Remote control............................................................. 6
3 Initial setup ............................................ 7
Place the projector.......................................................7
Connect to power supply ..........................................7
Prepare the remote control ..................................... 8
Power on and set up the projector ....................... 8
4 Connect to playback devices ............ 9
Connect to devices through HDMI ........................ 9
Connect to devices through AV .............................10
Connect to a computer through VGA ..................10
Connect to external speakers or headphones .11
5 Play videos from storage devices ....11
6 Change settings .................................. 13
7 Maintenance........................................ 15
Cleaning ......................................................................... 15
Update software .........................................................15
8 Troubleshooting .................................16
9 Appendixes ..........................................18
Technical data .............................................................18
CE statement ...............................................................19
FCC statement .............................................................19
Canada regulatory compliance .............................19
Other notice .................................................................20
Table of contents
Introduction 3
Introduction
Dear customer
Thank you for purchasing this projector.
We hope you enjoy this product and the many
functions it offers!
About this user manual
The quick start guide supplied with this product
allows you to start using this product quickly
and easily. Detailed descriptions can be found
in the following sections of this user manual.
Read the entire user manual carefully. Follow
all safety instructions in order to ensure proper
operation of this product (see General safety
information, page 4). The manufacturer
accepts no liability if these instructions are not
followed.
Symbols used
Notice
This symbol indicates tips that will help
you use this product more effectively
and easily.
DANGER!
Danger of personal injury!
This symbol gives warning of danger
of personal injury. Physical injury or
damage can result from improper
handling.
CAUTION!
Damage to the product or loss of data!
This symbol gives warning of damage
to the product and possible loss of
data. Damage can result from improper
handling.
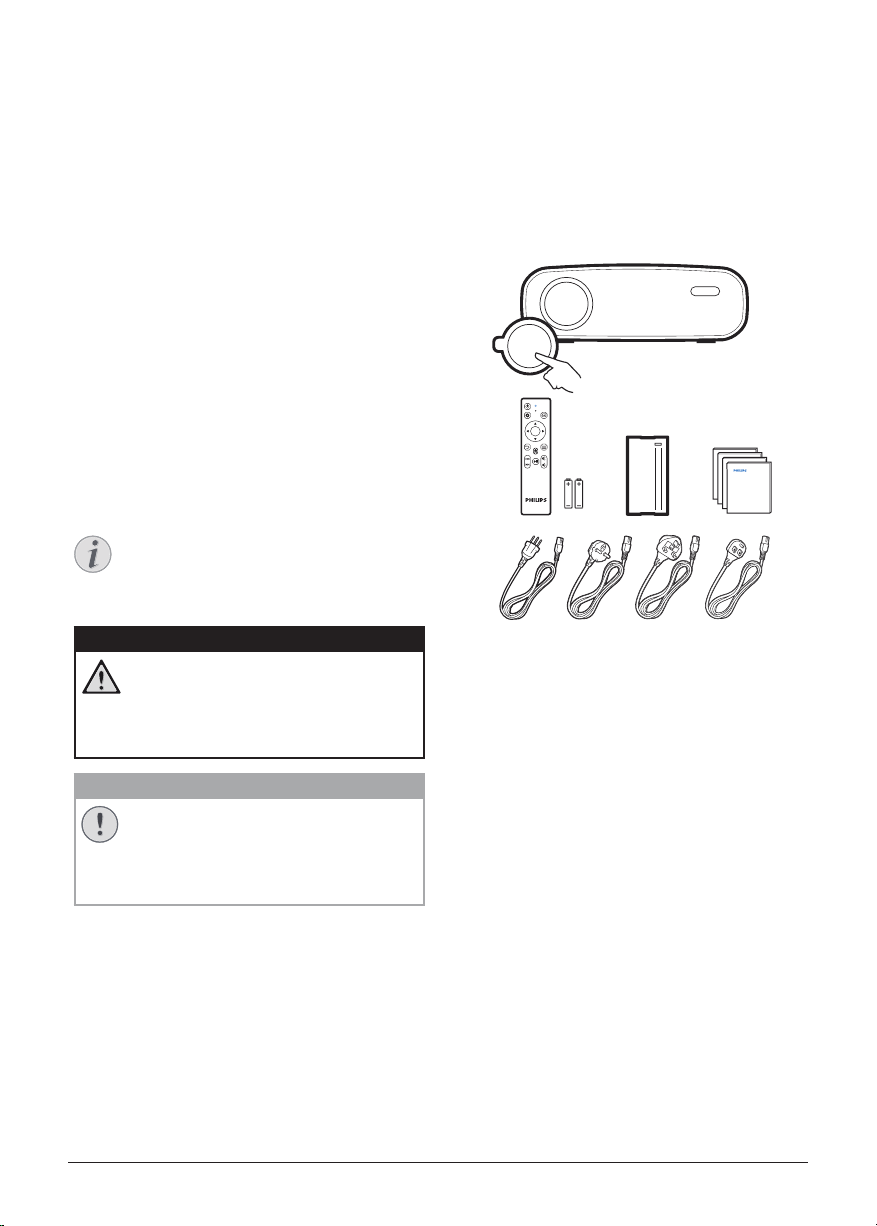
What’s in the box
a
NeoPix Ultra One projector (NPX641/INT)
b
Lens cover
c
Remote control with 2 AAA batteries
d
AC adapter
e
Quick Start Guide
f
AC power cable with plug x 4
OK
Quick Start
Guide
Quick Start
Guide
Quick Start
Guide
Quick Start
Guide
a
b
c
d
e
f
Customer service centre
The Support page, warranty card, and user
manuals can be found here:
Web: www.philips.com/support
Support Contacts:
International Phone: +41 215 391 665
Please ask your provider for international call
costs!
Mail: philips.projector.eu@screeneo.com
Access our FAQ websites:
https://support.philipsprojection.com
https://community.philipsprojection.com

4 Philips · NeoPix Ultra One
1 General safety
information
Take note of all warning and safety notes
indicated. Do not make any changes or settings
that are not described in this user manual.
Incorrect operation, and improper handling can
lead to physical injury, damage to the product
or loss of data.
Setting up the product
This product is for indoor use only. Place the
product securely on a stable, flat surface.
To help avoid possible injuries to persons or
damage to the product itself, position all cables
in such a way that no one will trip over them.
Do not operate the product in damp rooms.
Never touch the mains cable or the mains
connection with wet hands.
Never operate the product immediately after
moving it from a cold location to a hot location.
When the product is exposed to such a change
in temperature, moisture may condense on the
crucial internal parts.
The product must have sufficient ventilation
and must not be covered. Do not put the
product in closed cabinets, boxes, or other
enclosures when in use.
Protect the product from direct sunlight,
heat, intense temperature fluctuations and
moisture. Do not place the product in the
vicinity of heaters or air conditioners. Observe
the information on temperature listed in the
technical data (see Technical data, page 18).
Prolonged operation of the product causes the
surface to become hot. In case of overheating,
the product automatically switches to standby
mode.
Do not allow liquids to leak into the product.
Turn off the product and disconnect it from the
mains supply if liquids or foreign substances
leaked into the product. Have the product
inspected by an authorised service centre.
Always handle the product with care. Avoid
touching the lens. Never place heavy or sharp
objects on the product or on the power cable.
If the product gets too hot or emits smoke,
shut it down immediately and unplug the
power cable. Have your product checked by
an authorised service centre. Keep the product
away from open flames (e.g. candles).
DANGER!
Risk of explosion with incorrect type
of batteries!
There is a risk of explosion if the wrong
battery type is used.
Do not expose the batteries (battery pack or
embedded batteries) to excessive heat such as
sunshine, or open fire.
Under the following conditions, a layer of
moisture can appear inside the product which
can lead to malfunctions:
• if the product is moved from a cold to a
warm area;
• after a cold room is heated;
• when the product is placed in a damp
room.
Proceed as follows to avoid any moisture
buildup:
1 Seal the product in a plastic bag before
moving it to another room, in order for it to
adapt to room conditions.
2 Wait one to two hours before you take the
product out of the plastic bag.
The product should not be used in a very dusty
environment. Dust particles and other foreign
objects may damage the product.
Do not expose the product to extreme
vibrations. This may damage the internal
components.
Do not allow children to handle the product
without supervision. The packing materials
should be kept out of the hands of children.
For your own safety, do not use the product
during thunderstorms with lightning.
Repairs
Do not repair the product yourself. Improper
maintenance can result in injuries or damage to
the product. The product must be repaired by
an authorised service centre.
Please find the details of authorised service
centres on the warranty card supplied with this
product.
Do not remove the type label from this product,
as this will void the warranty.
Overview 5
Power supply
Use only a power adapter which is certified for
this product (see Technical data, page 18).
Check whether the mains voltage of the power
supply matches the mains voltage available at
the setup location. This product complies with
the voltage type specified on the product.
The power outlet shall be installed near the
product and shall be easily accessible.
CAUTION!
Always use the button to turn the
projector off.
Turn off the product and unplug from the
power outlet before cleaning the surface
(see Cleaning, page 15). Use a soft, lint-
free cloth. Never use liquid, gaseous or easily
flammable cleaners (sprays, abrasives, polishes,
alcohol). Do not allow any moisture to reach
the interior of the product.
DANGER!
Risk of eye irritation!
This product is equipped with a high
power LED (Light Emitting Diode),
which emits very bright light. Do not
look directly into the projector lens
during operation. This could cause eye
irritation or damage.
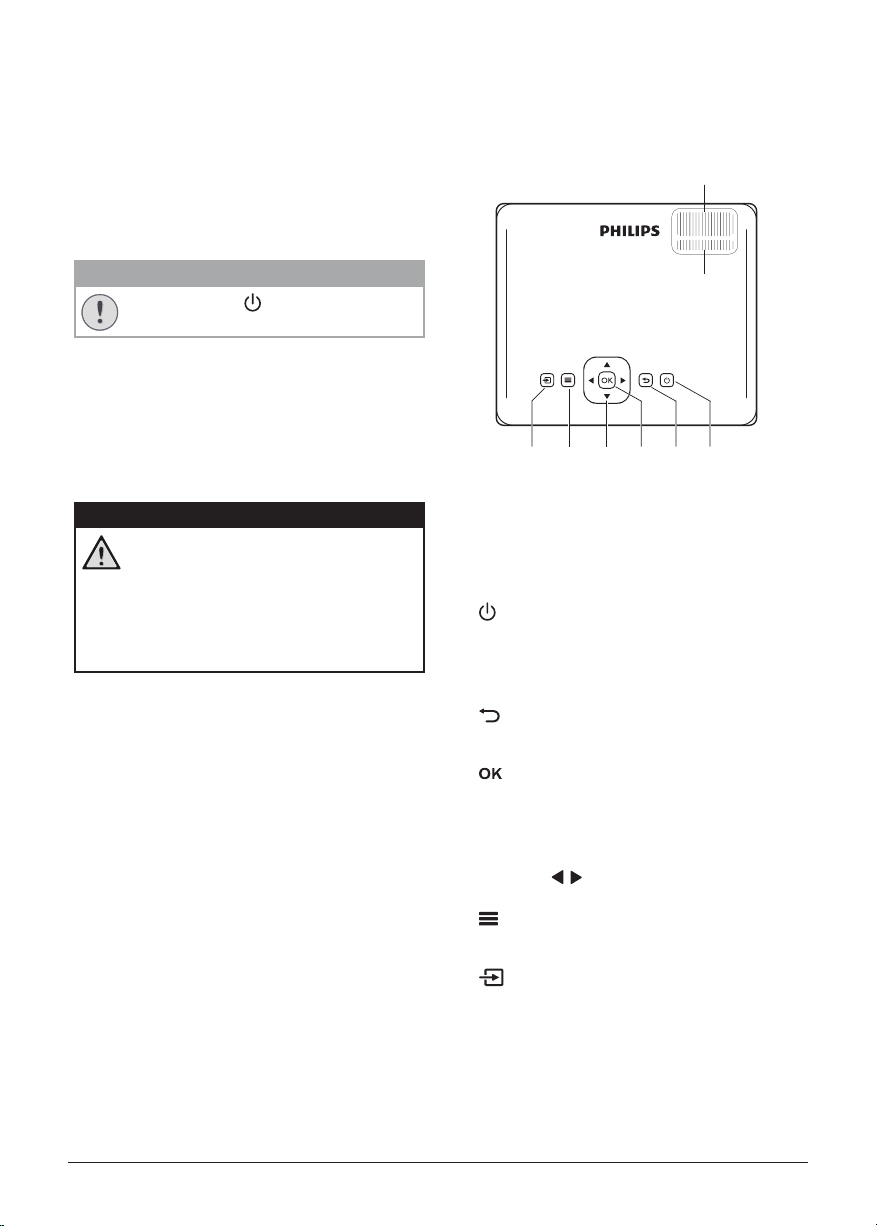
2 Overview
Top view
NeoPix
heg f d c
a
b
a
Focus adjustment knob
Adjust image sharpness.
b
Keystone adjustment knob
Adjust image shape.
c
• Switch the projector on or to standby.
• When the projector is on, the LED lights
up in green. When the projector is on
standby, the LED lights up in red.
d
Return to the previous screen or exit the
current screen.
e
Confirm a selection or change the current
value on the screen.
f
Navigation buttons (Up, Down, Left, Right)
• Navigate items on the screen.
• Press / to change the value for the
current setting
.
g
Quick access to the setup options (e.g.
picture and sound options).
h
Display all the input sources and allow you
to switch to a different input source.
6 Philips · NeoPix Ultra One
Front view
a
b
a
Projection lens
b
Front IR sensor
Side view
MICRO SDAV HDMI 1 HDMI 2USB DC
ab c d e f g
a
3.5 mm audio output; connect to external
speakers or headphones.
b
3.5 mm audio/video input; connect to the
analogue audio jacks and/or composite
video jack on a playback device.
c
MicroSD card slot
Connect to a microSD card for media
playback.
d
1
Connect to an HDMI output on a playback
device.
e
2
Connect to an HDMI output on a playback
device.
f
USB port
Connect to a USB storage device for media
playback.
g
Connect to the AC adapter.
Rear view
a b
a
VGA port
Connect to the VGA port on a computer.
b
Rear IR sensor
Remote control
OK
a
b
c
d
e
f
g
h
j
i
k
a
Display all the input sources and allow you
to switch to a different input source.
b
Confirm a selection or change the current
value on the screen.
c
View or change the picture mode.
d
Access the home screen.
e
/
Increase or decrease the volume.
Initial setup 7
f
Start, pause or resume media playback
.
g
/
Skip to the previous or next video file.
h
Return to the previous screen or exit the
current screen.
i
Navigation buttons (Up, Down, Left, Right)
• Navigate items on the screen.
• Press / to change the value for the
current setting
.
j
Quick access to the setup options (e.g.
picture and sound options).
k
Switch the projector on or to standby.
3 Initial setup
Notice
Make sure all devices are disconnected
from their power supplies before
establishing or changing any
connections.
Place the projector
Place the projector on a flat surface such as a
table in front of the projection surface.
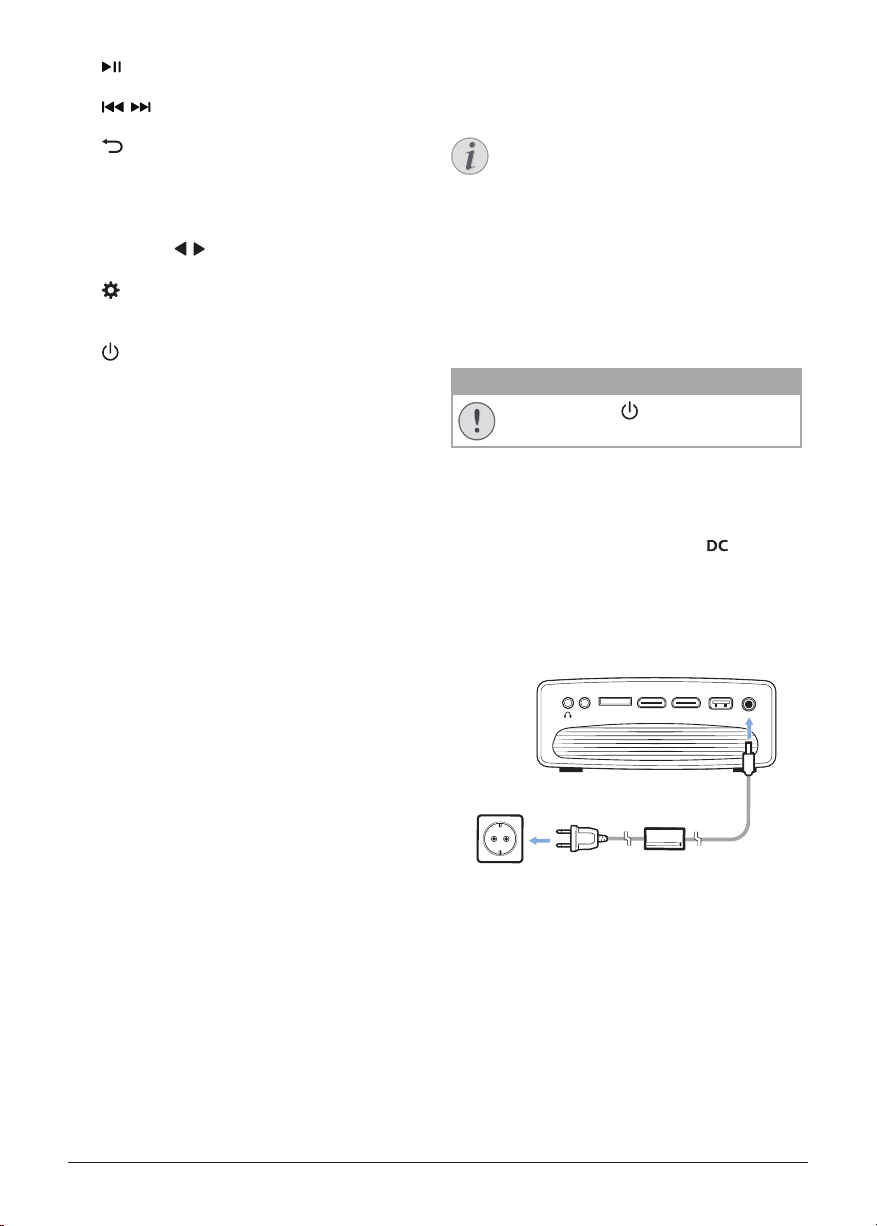
Connect to power supply
CAUTION!
Always use the button to turn the
projector on and off.
1 Select a supplied power cable with the
correct plug (EU/UK/US/CH).
2 Connect the power cable to the AC adapter.
3 Connect the AC adapter to the
socket
on the projector.
4 Connect the power cable to an electrical
socket.
• The LED on the projector lights up in
red.
a
c
d
MICRO SDAV HDMI 1HDMI 2USB DC
b
8 Philips · NeoPix Ultra One
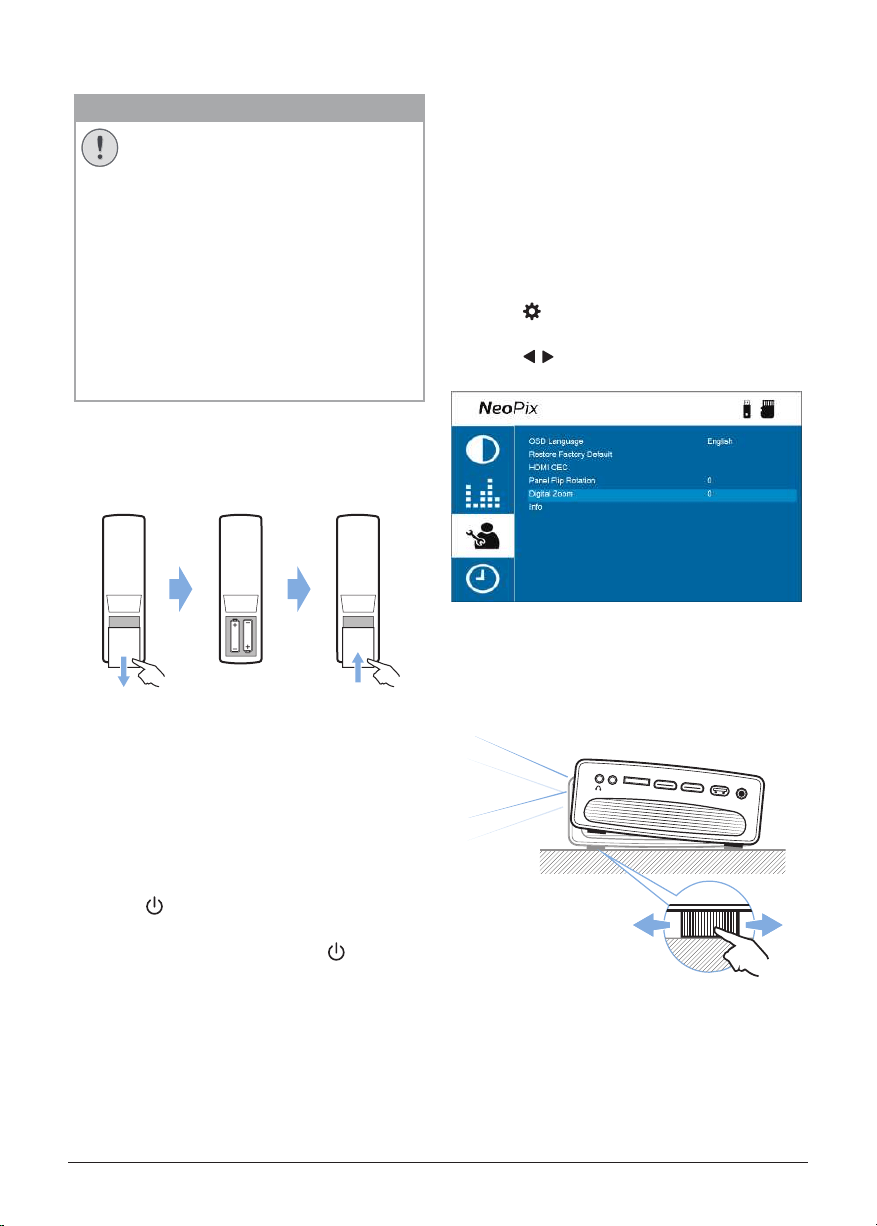
Prepare the remote control
CAUTION!
The improper use of batteries can
lead to overheating, explosion, risk of
fire and injury. Leaking batteries can
possibly damage the remote control.
Never expose the remote control to
direct sunlight.
Avoid deforming, dismantling or
charging the batteries.
Avoid exposure to open fire and water.
Replace empty batteries immediately.
Remove the batteries from the remote
control if not in use for long periods of
time.
1 Open the battery compartment.
2 Insert the supplied batteries (type AAA)
with correct polarity (+/-) indicated.
3 Close the battery compartment.
• When using a remote control with infrared
signals, point the remote control at the IR
sensor on the projector, and make sure
there is no obstacle between the remote
control and the IR sensor.
Power on and set up the
projector
1 Press
to turn on the projector. The LED
on the projector turns from red to green.
• To turn off the projector, press
twice. The
projector enters standby mode and its LED
turns from green to red. To fully shut down
the projector, disconnect the power cable
from the electrical socket.
• The distance between the projector and the
projection surface determines the actual
screen size.
Screen size adjustment
The projection screen size (or size of images) is
determined by the distance between the lens
of the projector and the projection surface.
This projector has a projection distance of 80
cm to 200 cm, and thus creates a screen size of
20" to 65".
Digital zooming
You can use the digital zooming to reduce the
screen size.
1 Press
on the remote control to access
the setup options and go to Digital Zoom.
2 Press
/ or the OK button to adjust the
screen size.
Screen height adjustment
To adjust the screen height when placing
the projector on a flat surface, turn the angle
adjustment knob located at the bottom of the
projector.
MI
C
R
O
S
DA
UX
H
DMI
1
HDMI 2
USB
D
C
MICRO SDAV HDMI 1 HDMI 2 USB DC
Connect to playback devices 9
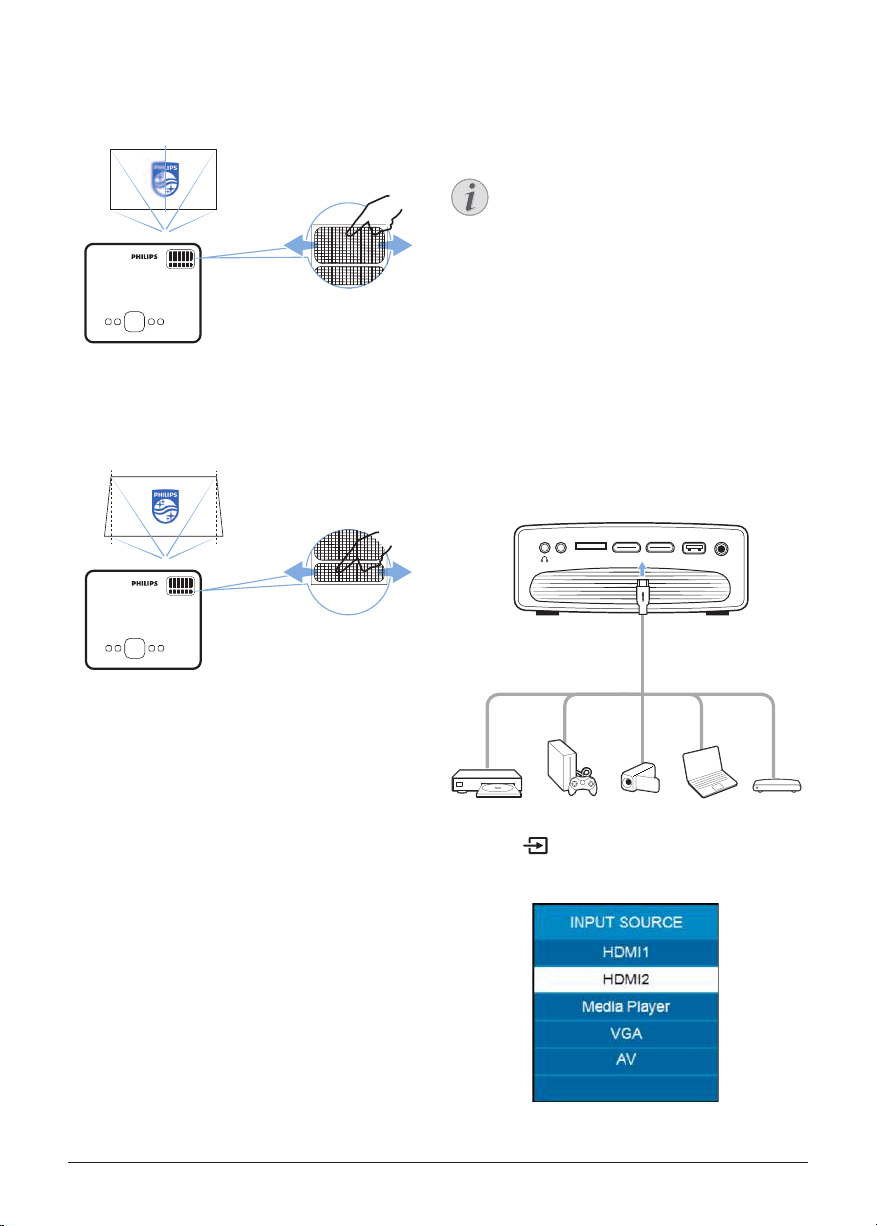
Image focus adjustment
To adjust image focus, turn the focus
adjustment knob at the top of the projector.
NeoPix
Image shape adjustment
To adjust image shape, turn the keystone
adjustment knob at the top of the projector.
NeoPix
4 Connect to
playback devices
Notice
Make sure all devices are disconnected
from their power supplies before
establishing or changing any
connections.
Connect to devices through
HDMI
You can connect a playback device (e.g. a Blu-
ray player, gaming console, camcorder, digital
camera or PC) to the projector through HDMI
connection. With this connection, images are
shown on the projection screen, and audio is
played on the projector.
1 Using an HDMI cable, connect the HDMI
1 or HDMI 2 port on the projector to the
HDMI output port on the playback device.
MICRO SDAV HDMI 1 HDMI 2 USB DC
2 Press on the remote control to bring up
the input source list, and then select HDMI1
or HDMI2.
10 Philips · NeoPix Ultra One
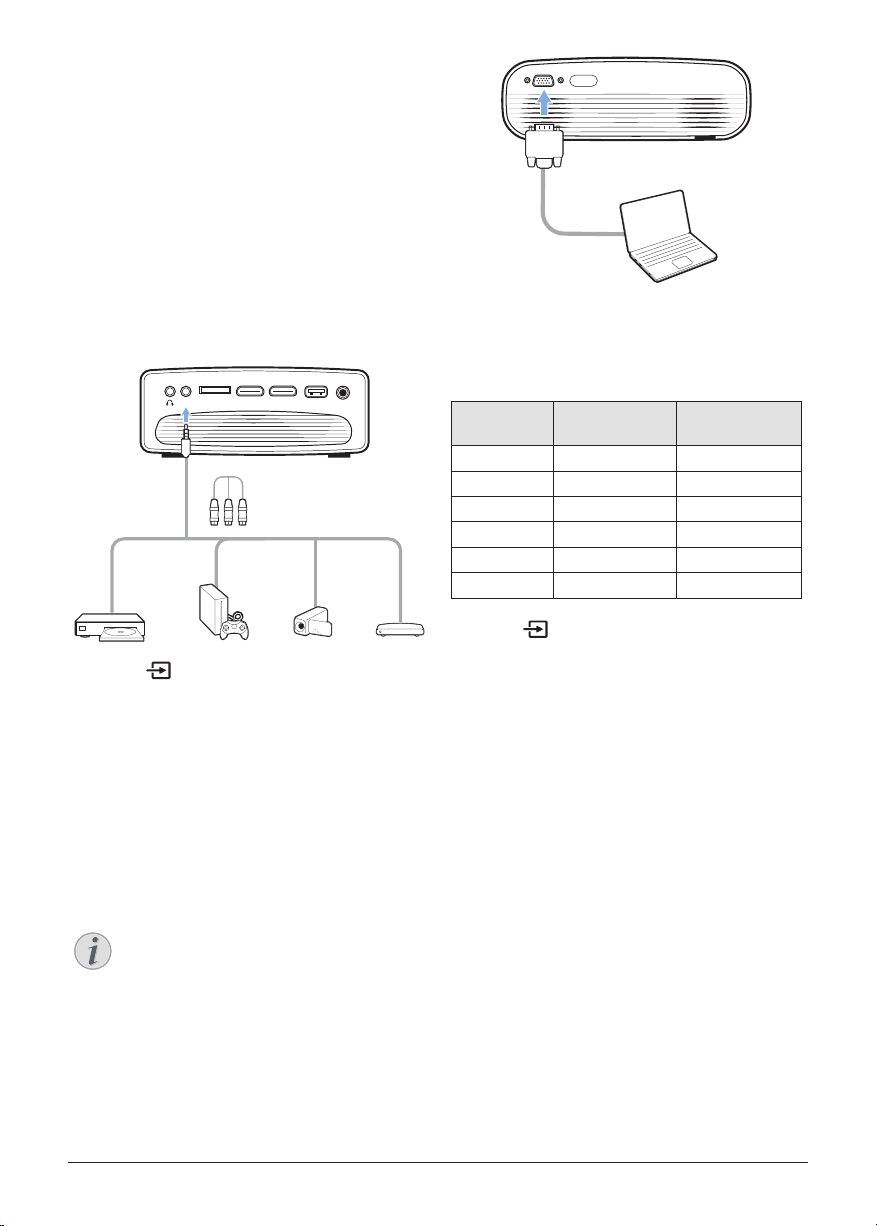
Connect to devices through
AV
You can connect a playback device (e.g. a DVD
player, gaming console, camcorder or digital
camera) to the projector through AV connection.
With this connection, images are shown on the
projection screen, and audio is played on the
projector.
1 Using an RCA cable with 3.5 mm plug (not
included in the box), connect the AV jack
(3.5 mm) on the projector to the analogue
audio output jacks (red and white) and/or
composite video output jack on a playback
device.
MICRO SDAV HDMI 1 HDMI 2USB DC
2 Press on the remote control to display
the input source list, and then select AV.
Connect to a computer
through VGA
You can connect a computer (e.g. a desktop
or laptop) to the projector through VGA
connection. With this connection, images are
shown on the projection screen.
Notice
Many laptops do not activate the
external video output automatically
when you connect a second display such
as a projector. Check your laptop user
manual to find out how to activate the
external video output.
1 Using a VGA cable (not included in the box),
connect the VGA port on the projector to
the VGA output port on a computer.
VGA
2 Adjust your computer's screen resolution
to the correct setting and switch the VGA
signal to an external monitor. The following
resolutions are supported:
Resolution Image refresh
rate
VGA 640 x 480 60 Hz
SVGA 800 x 600 60 Hz
XGA 1024 x 768 60 Hz
WXGA 1280 x 768 60 Hz
HD 1280 x 720 60 Hz
FULL HD 1920 x 1080 60 Hz
3 Press
on the remote control to display
the input source list, and then select VGA.
Play videos from storage devices 11
Connect to external
speakers or headphones
You can connect external speakers or
headphones to the projector. With this
connection, audio from the projector is played
through the external speakers or headphones.
DANGER!
Danger of hearing damage!
Before connecting the headphones,
turn down the volume on the projector.
Do not use the projector over a longer
time at high volume – especially when
using headphones. This could lead to
hearing damage.
1 Using a 3.5 mm audio cable, connect the
jack on the projector to the analogue audio
input (3.5 mm jack, or red and white jacks)
on external speakers. Or connect the
jack
on the projector to headphones.
• The internal speakers of the projector
are deactivated automatically when
external speakers or headphones are
connected to the projector.
MICRO SDAV HDMI 1 HDMI 2USB DC
2 After connecting the speakers or
headphones, press the volume control
buttons on a remote control to adjust the
volume to the desired level.
5 Play videos from
storage devices
Using the projector, you can access and play
video files stored on a local storage device.
Notice
The projector supports a USB storage
device that is formatted for FAT16 or
FAT32 file system.
Supported file formats
The following file formats are supported:
.dat/.mpg/.mpeg/.ts/.trp/.tp/.vob/.mp4/.mkv/.
avi/.flv/.3gp
1 Connect a USB storage device to the USB
port on the projector.
• Or insert a MicroSD card into the
MicroSD slot on the projector.
MICRO SDAV HDMI 1HDMI 2 USB DC
microSD
2 Go to the projector home screen by
pressing
on the remote control and then
select MOVIE.
3 Select USB to open the USB storage device
or TF to open the MicroSD card. Note: Only
supported video files are displayed on the
screen. All folders and files are ordered
alphabetically by name.
4 Press the navigation buttons on the remote
control to select a video file or a folder.

12 Philips · NeoPix Ultra One
To open a selected folder, press the OK
button. To return to the parent folder, select
Up Folder on the screen. To exit the current
folder and storage device, press
on the
remote control or select RETURN on the
screen. If you select a video file and wait
more than 3 seconds, the projector will
begin playing a preview of the video from
the beginning.
5 Press the OK button or
on the remote
control to start playing a selected video file.
6 During video playback, press
on the
remote control to start, pause or resume
playback. Press
/ on the remote
control to skip to the previous/next video
file in the current folder.
While a video file is playing, you can press
the OK button on the remote control to
bring up the control bar at the bottom of
the screen. To instantly hide the control bar,
press
or .
While the control bar is visible, press /
on the remote control to select an option
and then press OK to confirm the action or
change the value. To close the dialog box of
an option, press
.
The following options are available on the
control bar:
• Play/Pause: Plays or pauses the video.
• FB: Rewinds the video quickly. The
rewinding speeds range from 2X to 32X.
When you move to the point you want,
press
to start playing at normal
speed.
• FF: Fast-forwards the video. The
forward speeds range from 2X to 32X.
When you move to the point you want,
press
to start playing at normal
speed.
• Prev.: Skips to the previous video in the
current folder.
• Next: Skips to the next video in the
current folder.
• Stop: Stops playing the video and
returns to the list of video files in the
current folder.
• Repeat: Toggles between the repeat
options. If Repeat None is selected, the
projector will stop playing videos after
the last video file in the current folder
has been played. If Repeat 1 is selected,
the projector will play the current video
continuously. If Repeat ALL is selected,
the projector will cycle through all
the video files in the current folder
continuously.
• Set A/Set B/None: Use this option to
loop a segment of the video. To set the
start point for the loop, press the OK
button when you see Set A. Then Set
B appears and you can press the OK
button again to set the end point of the
loop. After these 2 steps, the video will
start playing in this loop. To deactivate
the loop, press the OK button when you
see None.
• Playlist: Select this option to pull up the
list of all video files in the current folder
in order to switch to another video or
view the list without having to stop the
playback.
• Info: Displays the information about the
current video including resolution and
size.
• Slow Forward: Plays the video in slow
motion with a speed between 2X and
16X. Press
to return to the normal
playing speed.
• Step Forward: Freezes the video and
allows you to play it frame by frame by
pressing the OK button.
• Aspect Ratio: Toggles between the
available aspect ratios (16:9, 4:3 and
Auto).
7 To stop playing a video file and return to
the list of files in the current folder, press
on the remote control.
Change settings 13
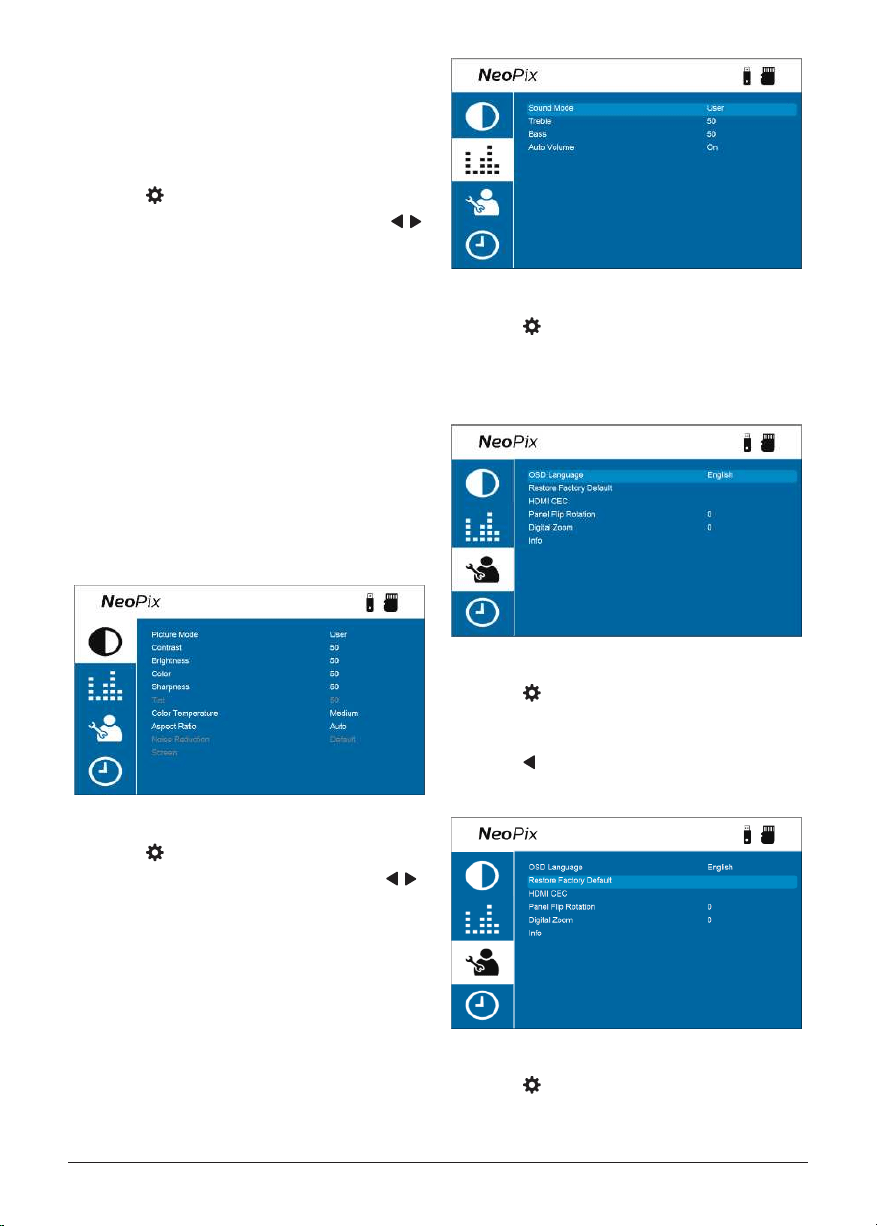
6 Change settings
This section helps you change the settings of
the projector.
Picture settings
1 Press
on the remote control.
2 Select a picture option, and then press
/
or the OK button to change the value.
• Picture Mode: Select predefined color
settings for picture or video display.
Select User to customize the following
settings:
• Contrast: Set color contrast.
• Brightness: Set color brightness.
• Color: Set color saturation.
• Sharpness
: Se
t image sharpness.
• Color Temperature: Set the color
temperature.
• Aspect Ratio: Set the screen aspect
ratio.
• Noise Reduction: Set the noise
reduction level. This option is enabled
only when you play a video.
Sound settings
1 Press
on the remote control.
2 Select a sound option, and then press
/
or the OK button to change the value.
• Sound Mode: Select predefined sound
settings for your video or music. Select
User to customize the following settings:
• Treble: Set the treble level.
• Bass: Set the bass level.
• Auto Volume: Turn this on to reduce
sudden changes in volume.
Language settings
1 Press
on the remote control.
2 Select OSD Language, and then press the
navigation buttons on the remote control to
select your desired language for on-screen
menu.
Restore default settings
1 Press
on the remote control.
2 Select Restore Factory Default, and then
press
the OK button
.
3
Press
to start restoring the projector to its
factory default settings. The projector will
turn off after the restoration.
Rotate/flip projection screen
1 Press
on the remote control.
2 Select Panel Flip Rotation, and then press
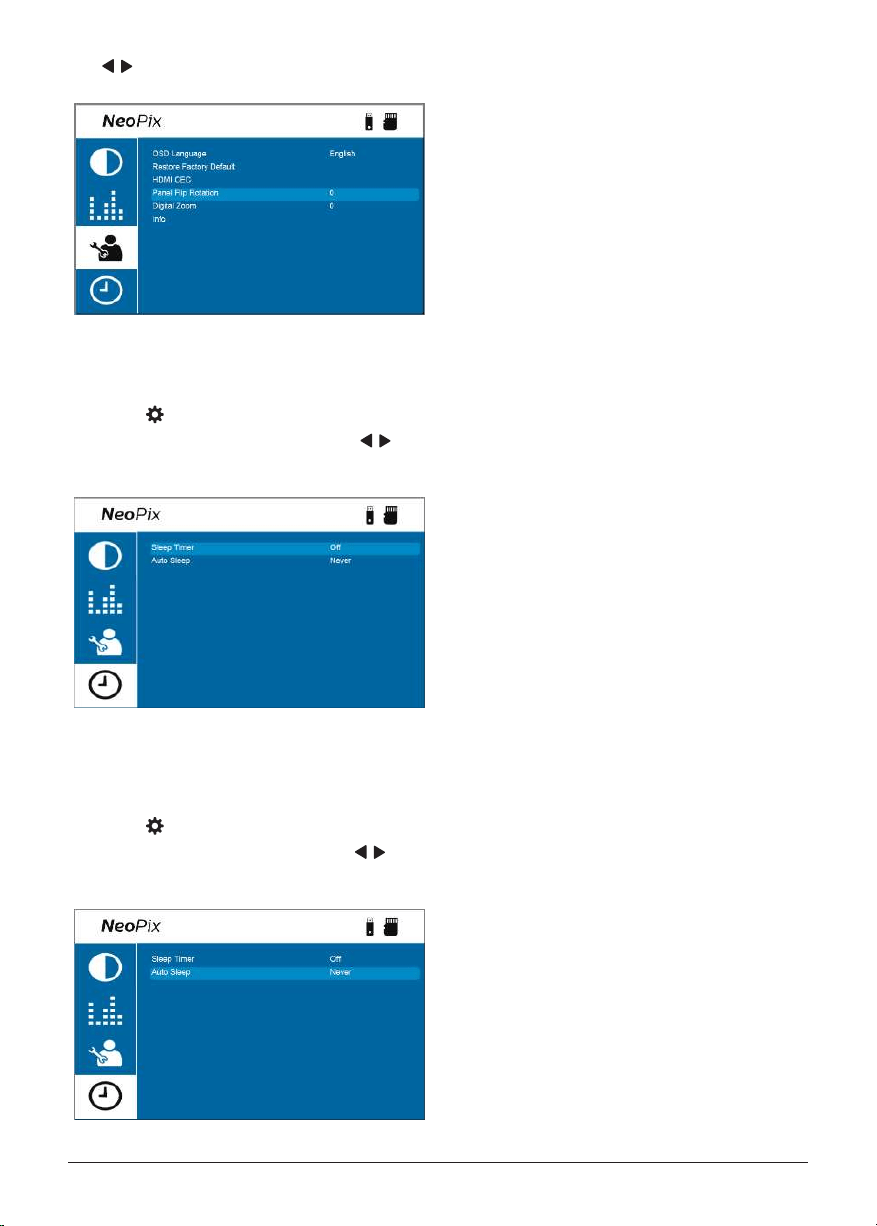
14 Philips · NeoPix Ultra One
/ or the OK button to rotate or flip the
projection screen.
Set sleep timer
Select a period of time after which the projector
turns off automatically. The default value is Off.
1 Press
on the remote control.
2 Select Sleep Timer, and then press
/ or
the OK button to select a period of time (in
minutes).
Set auto sleep
Select a period of time so that the projector
turns off automatically after the selected period
of inactivity. The default value is Never.
1 Press
on the remote control.
2 Select Auto Sleep, and then press
/ or
the OK button to select a period of time (in
hours).
Maintenance 15
7 Maintenance
Cleaning
DANGER!
Follow the following instructions when
cleaning the projector:
Use a soft, lint-free cloth. Never use
liquid or easily flammable cleansers
(sprays, abrasives, polishes, alcohol,
etc.). Do not allow any moisture to
reach the interior of the projector.
Do not spray the projector with any
cleaning fluids.
Wipe over the surfaces gently. Be
careful that you do not scratch the
surfaces.
Cleaning the lens
Use a soft brush or lens cleaning paper for
cleaning the lens of the projector.
DANGER!
Do not use any liquid cleaning agents!
Do not use any liquid cleaning
agents for cleaning the lens, to avoid
damaging the coating film on the lens.
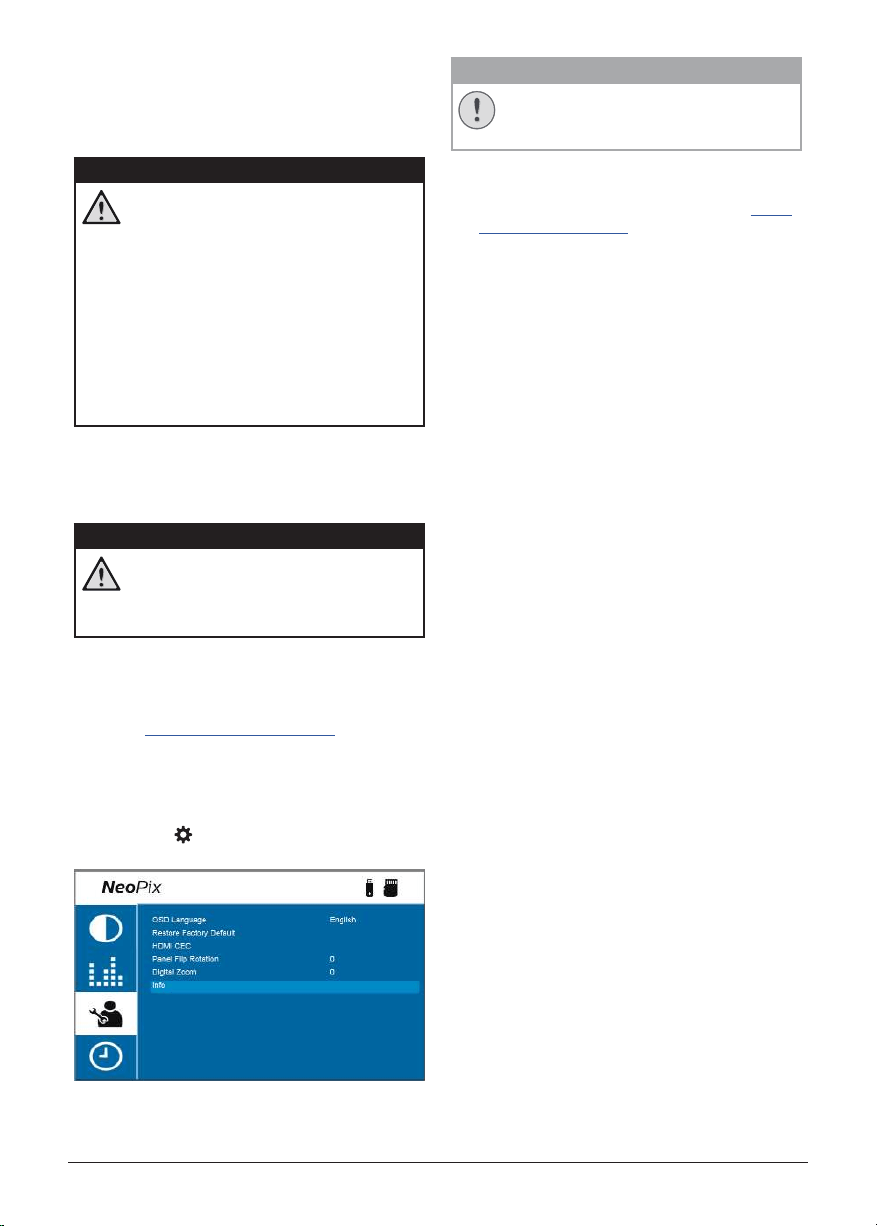
Update software
The latest software for the projector can be
found on
www.philips.com/support for you
to get the best features and support from the
projector.
Before you update the software of the
projector, check the current software version:
• Press
on the remote control and
then select Info
.
CAUTION!
Do not turn off the projector or remove
the USB flash drive during a software
update.
Update software through USB
1 Check the latest software version on
www.
philips.com/support
. Find your product
(model number: NPX641), and locate
‘Software and drivers’.
2 Download the software installation file to
a USB flash drive. Unzip the downloaded
file and save the resulting file in the root
directory of the USB flash drive.
3 Turn off the projector and then connect the
USB flash drive to the projector.
4 Turn on the projector and the software
update will start automatically. The LED on
the projector blinks during the update.
5 Wait about 15 seconds for the update to
complete. The projector will turn off by itself
after the update.
6 Disconnect the USB flash drive from the
projector.
16 Philips · NeoPix Ultra One
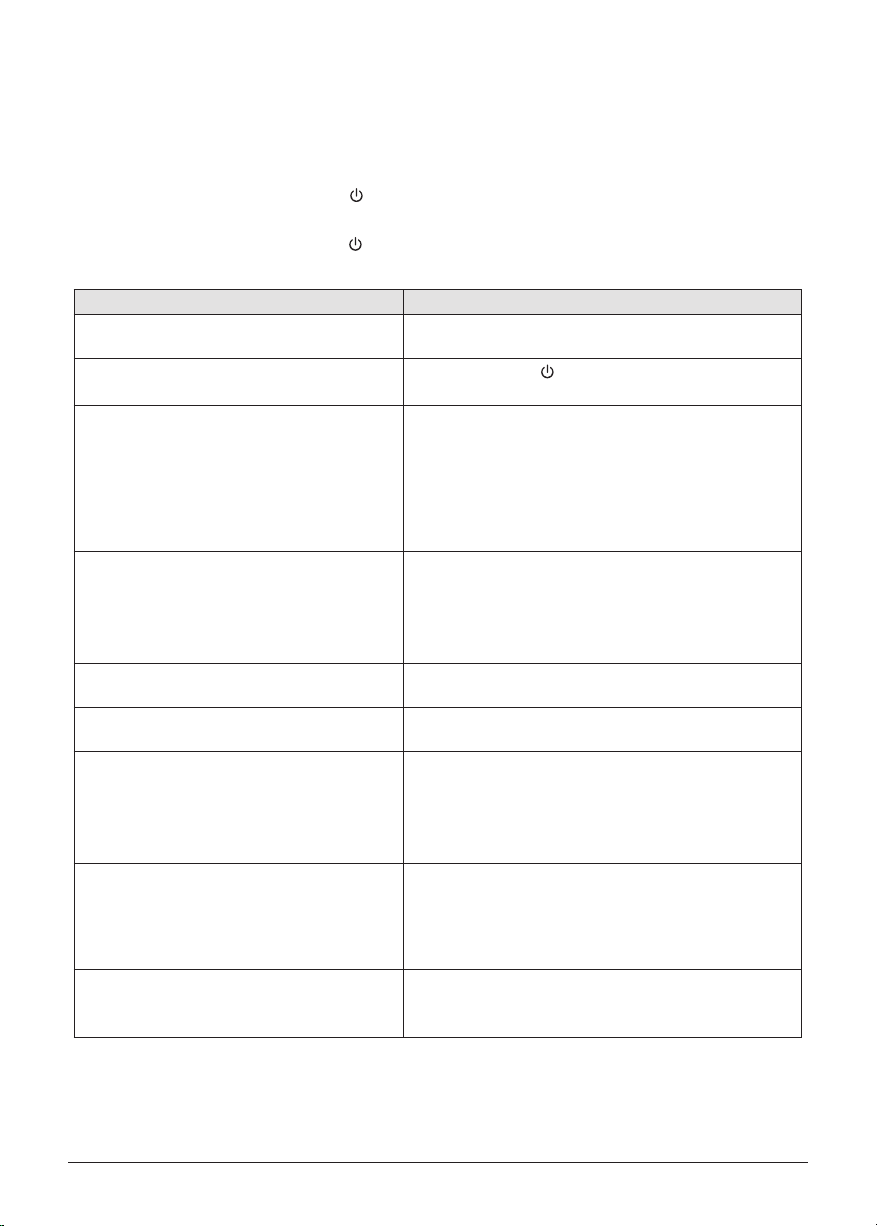
8 Troubleshooting
Power cycling
If a problem occurs and you cannot resolve it using the instructions in this user manual, try the
following steps to resolve the problem.
1 Turn the projector off by pressing
twice.
2 Wait at least ten seconds.
3 Turn the projector on by pressing
once.
4 If the problem persists, contact our technical service center or your dealer.
Problem Solution
The projector cannot be turned on. • Disconnect and reconnect the power cable, and
try to turn the projector on again.
The projector cannot be turned off.
• Press and hold
longer than ten seconds. If this
does not work, disconnect the power cable.
No image from the external HDMI device. • Check if the correct HDMI input is selected (HDMI
1 or HDMI 2).
• Disconnect the HDMI cable or switch off the
HDMI device.
• Wait three seconds.
• Reconnect the HDMI cable or switch on the HDMI
device again.
No sound from the external connected
device.
• Check the cables to the external device.
• Check that the sound is activated on the external
device.
• Only the original cables from the device
manufacturer may function.
No sound from external HDMI output
device.
• On the HDMI output device, set the audio setting
to Multichannel (Raw data) & Stereo (PCM).
No sound when you connect your
computer via HDMI cable.
• Check that the sound is activated on the
computer.
Only the home menu appears and not the
image from the external device.
• Check if the cables are connected to the correct
sockets.
• Check that the external device is turned on.
• Check if the video output of the external device is
turned on.
Only the home menu appears and not the
image from the connected computer.
• Check that the VGA output of the computer is
turned on.
• Check if the resolution of the computer is set to
1920*1080 (for VGA connection) or 1080P (for
HDMI connection).
The projector turns itself off. • When the projector is running for a long period of
time, the surface becomes hot.
• Check that the power cable is connected correctly.

Troubleshooting 17
Problem Solution
The projector cannot read the USB storage
device.
• The projector does not support the exFAT file
system.
• Format the USB storage device in FAT32 or NTFS
format, then use it.
The projector does not react to remote
control commands.
• Check the batteries of the remote control.
The temperature of the projector’s surface
is warm.
• For this projector it is normal to generate
moderate heat during operation.
The projector does not work after I connect
it to a laptop.
• Check that the HDMI cable is plugged in correctly.
• Make sure that the laptop has been switched to
projector display.

18 Philips · NeoPix Ultra One
9 Appendixes
Technical data
Technology/optical
Display technology ...............................................LC D
Light source .............................................................LED
Resolution ..................................... 1920 × 1080 pixel
LED lifetime ................................over 30,000 hours
Contrast ratio .................................................... 3000:1
Aspect ratio .............................................................16:9
Throw ratio ............................................................... 1.4:1
Screen size (diagonal)..............................20" to 65"
Screen distance ...............................................................
........................................ 80 cm - 200 cm / 24”- 60”
Keystone correction ...................................... manual
Projection modes ...........................................................
....................................................................................4
Focus adjustment ...........................................manual
Digital zoom .......................................yes (60-100%)
Integrated media player ....................................... yes
Sound
Built-in speakers ............................................... 2 x 5W
Surround mode ....................................................... yes
Equalization .............................................................. yes
Connection
USB (mass storage for multimedia player) ....... x1
MicroSD..........................................................................x1
HDMI in .........................................................................x2
VGA in .............................................................................x1
AV in ................................................................................x1
3.5 mm audio out .......................................................x1
Power source
Power consumption ....................operating: 100 W
......................................................... Standby: 0.3 W
Power adapter ................................................................
............Input: AC 100-240V, 50/60Hz, 1.4A (Max)
................................. Output: DC 24.0V, 3.0A, 72.0W
Integrated Media Player
Thousands of codecs supported via VLC built-
in players
Dimensions and weight
Unpacked (WxDxH) .......................................................
................ 220 x 170 x 90 mm / 8.6 x 6.6 x3.5 inch
Packed (W x D x H) .................267 x 216 x 148 mm
Weight....................................................1.2kg / 2.69lbs
Temperature requirements
Operating temperature.......................... 5 °C - 35 °C
Storage temperature ...................................... < 60 °C
Package contents
1. NeoPix Ultra One projector
2. Remote control
3. AC adapter
4. Power cables (EU, UK, US, CH)
5. Lens cover
6. AAA batteries for remote control
7. Quick Start Guide
8. Warranty card
Model
NPX641/INT
EAN: 7640186961691
UPC: 667619992784
Appendixes 19
CE statement
• The product shall only be connected to a
USB interface of version USB 2.0 or higher.
• Adapter shall be installed near the
equipment and shall be easily accessible.
• The operating temperature of the EUT can’t
exceed 35°C and shouldn’t be lower than
5°C.
• The plug is considered as disconnect device
of adapter.
• The UNII Band 5150-5250 MHz is for indoor
use only.
• The device complies with RF specifications
when the device is used at 20 cm from your
body.
Hereby, Screeneo Innovation SA declares that
this product is in compliance with essential
requirements and other relevant provisions of
Directive 2014/53/EU.
The Declaration of Compliance can be
consulted on the site www.philips.com.
Frequency bands Maximum output
power
BT EDR (EIRP) 9.09 dBm
BT BLE (EIRP) 4.85 dBm
Wi-Fi 2.4GHz (EIRP) 17.88 dBm
Wi-Fi 5GHZ (EIRP) 17.89 dBm
FCC statement
15.19 Labeling requirements.
This device complies with part 15 of the FCC
Rules. Operation is subject to the following
two conditions: (1) This device may not cause
harmful interference, and (2) this device must
accept any interference received, including
interference that may cause undesired
operation.
15.21 Information to the user.
Any changes or modifications not expressly
approved by the party responsible for
compliance could void the user’s authority to
operate the equipment.
15.105 Information to user.
This equipment has been tested and found
to comply with the limits for a Class B digital
device, pursuant to Part 15 of the FCC Rules.
These limits are designed to provide reasonable
protection against harmful interference in
a residential installation. This equipment
generates, uses and can radiate radio
frequency energy and, if not installed and used
in accordance with the instructions, may cause
harmful interference to radio communications.
However, there is no guarantee that interference
will not occur in a particular installation. If this
equipment does cause harmful interference
to radio or television reception, which can be
determined by turning the equipment off and
on, the user is encouraged to try to correct the
interference by one or more of the following
measures:
• Reorient or relocate the receiving antenna.
• Increase the separation between the
equipment and receiver.
• Connect the equipment into an outlet on
a circuit different from that to which the
receiver is connected.
• Consult the dealer or an experienced radio/
TV technician for help.
During operation, the separation distance
between the user and the antenna shall be
at least 20 cm. This separation distance will
ensure that there is sufficient distance from a
properly installed externally-mounted antenna
to satisfy the RF exposure requirements.
FCC ID: 2ASRT-NPX641/INT
Canada regulatory
compliance
This device complies with Industry Canada CAN
ICES-3 (B)/NMB-3(B)
RSS-Gen & RSS-247 statement: This device
complies with Industry Canada RSS standard(s).
Operation is subject to the following two
conditions:
1 This device may not cause interference, and
2 This device must accept any interference,
including interference that may cause
undesired operation of the device.
RF Radiation Exposure statement: The
device meets the exemption from the routine
evaluation limits in section 2.5 of RSS102 and
users can obtain Canadian information on RF

20 Philips · NeoPix Ultra One
exposure and compliance.
This device should be installed and operated
with a minimum distance of 7.8 inches
(20 centimetres) between the device and your
body.
Other notice
Preservation of the environment as part
of a sustainable development plan is an
essential concern of Screeneo Innovation SA.
The desire of Screeneo Innovation SA is to
operate systems respecting the environment
and consequently it has decided to integrate
environmental performances in the life cycle
of these products, from manufacturing to
commissioning use and elimination.
Batteries: If your product contains batteries,
they must be disposed of at an appropriate
collection point.
Product: The crossed-out waste bin symbol on
the product means that the product belongs
to the family of electrical and electronic
equipment. In this respect, the European
regulations ask you to dispose of it selectively:
• At sales points in the event of the
purchase of similar equipment.
• At the collection points made available
to you locally (drop-off centre, selective
collection, etc.).
In this way you can participate in the reuse
and upgrading of Electrical and Electronic
Equipment Waste, which can have an effect on
the environment and human health.
The paper and cardboard packaging used can
be disposed of as recyclable paper. Have the
plastic wrapping recycled or dispose of it in
the non-recyclable waste, depending on the
requirements in your country.
Trademarks: The mentioned references in
this manual are trademarks of the respective
companies. The lack of the trademarks ®
and ™ does not justify the assumption that
these dedicated terminologies are free
trademarks. Other product names used herein
are for identification purposes only and may
be trademarks of their respective owners.
Screeneo Innovation SA disclaims any and all
rights in those marks.
Neither Screeneo Innovation SA nor its affiliates
shall be liable to the purchaser of this product
or third parties for damages, losses, costs, or
expense s incurred by the purchaser or third
parties as a result of accident, misuse, or abuse
of this product or unauthorised modifications,
repairs, or alterations to this product, or failure
to strictly comply with Screeneo Innovation SA
operating and maintenance instructions.
Screeneo Innovation SA shall not be liable for
any damages or problems arising from the use
of any options or any consumable materials
other than those designated as original
Screeneo Innovation SA/PHILIPS products or
Screeneo Innovation SA/PHILIPS approved
products.
Screeneo Innovation SA shall not be held liable
for any damage resulting from electromagnetic
interference that occurs from the use of any
interface cables other than those designated as
Screeneo Innovation SA/PHILIPS products.
All rights reserved. No part of this publication
may be reproduced, stored in a retrieval
system or transmitted in any form or by any
means, electronic, mechanical, photocopying,
recording, or otherwise, without the prior
written permission of Screeneo Innovation SA.
The information contained herein is designed
only for use with this product. Screeneo
Innovation SA. is not responsible for any use of
this information as applied to other devices.
This user manual is a document that does not
represent a contract.
Errors, printing errors and changes are reserved.
Copyright © 2022 Screeneo Innovation SA.
The terms HDMI, HDMI High-Definition
Multimedia Interface, HDMI trade dress and
the HDMI Logos are trademarks or registered
trademarks of HDMI Licensing Administrator, Inc.

Screeneo Innovation SA
Route de Lully 5c - 1131 Tolochenaz - Switzerland
Philips and the Philips Shield Emblem are registered trademarks of Koninklijke Philips N.V. used
under license. Screeneo Innovation SA is the warrantor in relation to the product with which this
booklet was packaged.
2022 © Screeneo Innovation SA. All rights reserved.
NeoPix Ultra One
EN