Loading ...
Loading ...
Loading ...

8
Assembly
Read and understand all
assembly instructions before attempting
assembly! Failure to comply may cause serious
injury!
Unpacking and Cleanup
1. Finish removing all contents from the shipping
carton. Do not discard the carton or packing
material until the band saw is assembled and
is running satisfactorily.
2. Inspect the contents for shipping damage.
Report damage, if any, to your distributor.
3. Compare the contents of the shipping carton
with the contents list in this manual. Report
shortages, if any, to your distributor.
Stand
Attach stand supports to back of cabinet BEFORE
placing saw body on top of cabinet.
1. Using four M6x16 carriage bolts (C, Fig. 1) and
four M6 nuts (B, Fig. 1) attach the stand
supports (A, Fig. 1) through the saw cabinet.
The bolt must be attached from the inside
bottom of the saw cabinet (fig 1). To do this it
is easiest if you tilt the saw cabinet on its front
and then install the hardware.
2. Place cabinet stand upright on a level surface.
If the surface is uneven then you should level
the stand supports by loosening the nut (B, Fig
1) and moving the support up or down to
prevent the stand from rocking, then tighten
the nuts.
Saw body is heavy! Use caution
when lifting and stabilize until firmly attached to the
stand! Failure to comply may cause serious injury!
3. With the aid of a second person, lift the saw
body out of the shipping container and place
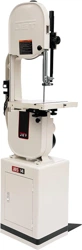
onto stand top. Be sure front of saw (with JET
logo) faces stand front (Door Side).
4. Line up holes in saw body with holes in the top
of the stand. Fasten saw body to the stand
with four M8 x 40 hex cap screws, eight M8
washers, four M8 lock washers, and four M8
hex nuts.
Figure 1
Loading ...
Loading ...
Loading ...