Loading ...
INTRODUCTION & WARRANTY
Thank you for selecting and buying V-TAC product. V-TAC will serve you the best. Please read
these instructions carefully before starting the installation and keep this manual handy for
future reference. If you have any another query, please contact our dealer or local vendor from
whom you have purchased the product. They are trained and ready to serve you at the best.
The warranty is valid for 5 years from the date of purchase. The warranty does not apply to
damage caused by incorrect installation or abnormal wear and tear. The company gives no
warranty against damage to any surface due to incorrect removal and installation of the
product. The products are suitable for 10-12 Hours Daily operation. Usage of product for 24
Hours a day would void the warranty. This product is warranted for manufacturing defects only.
WARNING
1. Please make sure to turn off the power
before starting the installation.
2. Installation should only be done by a
certified electrician.
INSTALLATION REQUIREMENTS
• Installation only by certified electrician
• Operation environment temperature:
from -20°C to +45°C
• Do NOT use DC electricity
EN
T5 INTERGRATED FITTING
EN
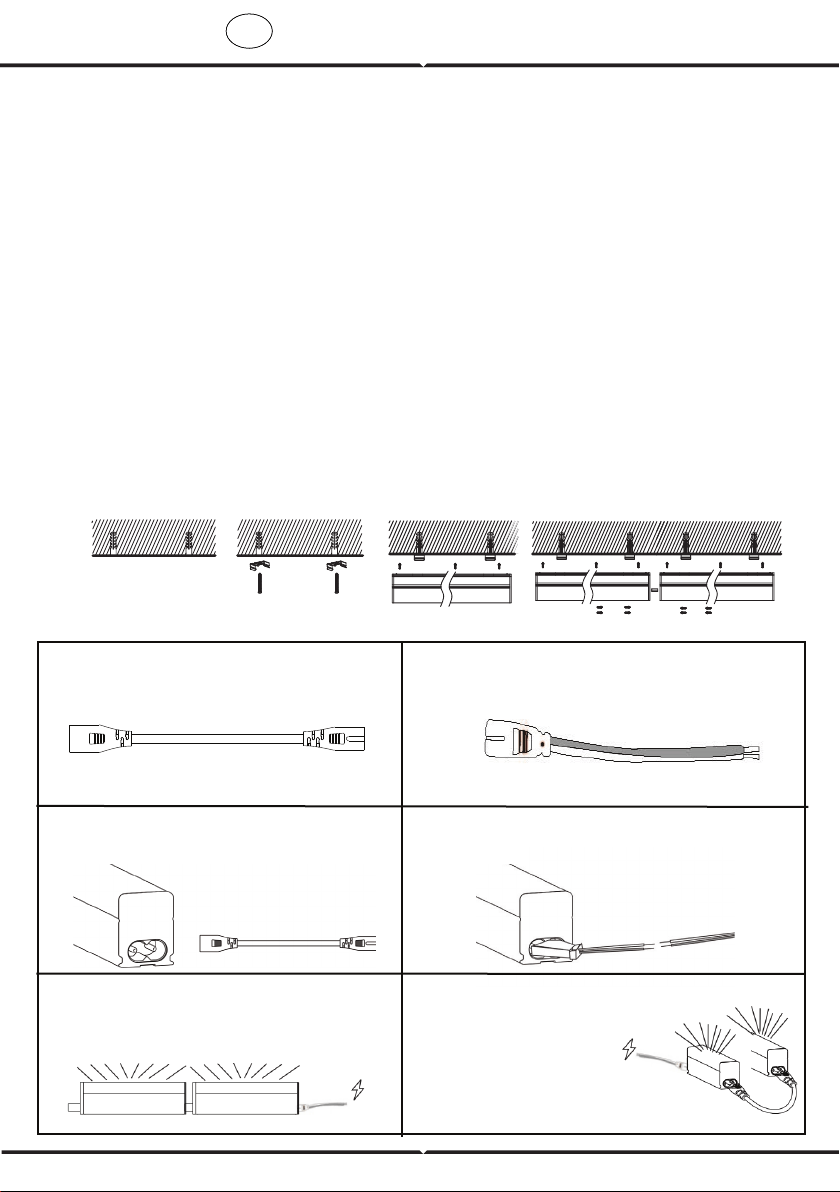
WIRING DIAGRAM
MOUNTING INSTALLATION DIAGRAM
Fig 1
Fig 2
Fig 3
Fig 4
1. Quick Connecting wire with double
head.
2. Using wire clipper cut off one end of the
connecting wire. Ensure to strip the wire
upto 5mm
3. Plug the connecting wire into the
fixture as shown below
4. Power the end of connecting wire which
was cut to input power source.
5 .Linkable T5 tube allows you to
connect two lights together.
6. Easy Connecting wire
allows flexibility of
installing the T5 fixture
for corner installation as
well as linear installa-
tion.
PACKING
• T5 Intergrated Fixture (1PC)
• Mounting Clips (2PCS)
• Quick connecting double head wire
(1PC)
• Screws (2PCS)
INSTALLATION INSTRUCTIONS
A. Turn OFF electricity before
starting!
B. Follow diagram below:
Loading ...
Loading ...
Loading ...