
MX-ST50B
FULL MANUAL
Imagine the possibilities
Thank you for purchasing this Samsung product.
To receive more complete service, please register
your product at www.samsung.com/register
ENG - ii
SAFETY INFORMATION
SAFETY WARNINGS
TO REDUCE THE RISK OF ELECTRIC SHOCK, DO
NOT REMOVE THE COVER (OR BACK).
NO USER-SERVICEABLE PARTS ARE INSIDE.
REFER SERVICING TO QUALIFIED SERVICE
PERSONNEL.
Refer to the table below for an explanation of
symbols which may be on your Samsung product.
CAUTION
RISK OF ELECTRIC SHOCK.
DO NOT OPEN.
This symbol indicates that high voltage
is present inside. It is dangerous to
make any kind of contact with any
internal part of this product.
This symbol indicates that this product
comes with important literature
concerning operation and maintenance.
Class II product : This symbol indicates
that a safety connection to electrical
earth (ground) is not required.
If this symbol is not present on a
product with a power cord, the product
MUST have a reliable connection to
protective earth (ground).
AC voltage : Rated voltage marked
with this symbol is AC voltage.
DC voltage : Rated voltage marked
with this symbol is DC voltage.
Caution. Consult Instructions for use :
This symbol instructs the user to
consult the user manual for further
safety related information.
WARNING
• To reduce the risk of re or electric shock, do
not expose this appliance to rain or moisture.
• This product contains chemicals known to the
State of California to cause cancer and birth
defects or other reproductive harm.
• The battery (battery or batteries or battery
pack) shall not be exposed to excessive heat
such as sunshine, re or the like.
CAUTION
• Do not expose this apparatus to dripping or
splashing. Do not put objects lled with
liquids, such as vases, on the apparatus.
• To turn this apparatus off completely, you
must pull the power plug out of the wall
socket. Consequently, the power plug must
be easily and readily accessible at all times.
FCC NOTE (for U.S.A):
FCC Supplier’s Declaration of Conformity
Responsible Party - U.S. Contact Information:
Samsung Electronics America, Inc.
85 Challenger Road.
Ridgeeld Park, NJ 07660
Phone: 1-800-SAMSUNG (726-7864)
FCC Compliance Statement :
This device complies with Part 15 of the FCC Rules.
Operation is subject to the following two
conditions:
(1) This device may not cause harmful
interference, and (2) this device must accept any
interference received, including interference that
may cause undesired operation.

ENG - iii
FCC Caution :
• Any changes or modications not expressly
approved by the party responsible for
compliance could void the user’s authority to
operate this equipment.
• This product satises FCC regulations when
shielded cables and connectors are used to
connect the unit to other equipment.
To prevent electromagnetic interference with
electric appliances, such as radios and
televisions, use shielded cables and
connectors for connections.
Class B FCC Statement
This equipment has been tested and found to
comply with the limits for a Class B digital device,
pursuant to Part 15 of the FCC Rules. These limits
are designed to provide reasonable protection
against harmful interference in a residential
installation. This equipment generates, uses and
can radiate radio frequency energy and, if not
installed and used in accordance with the
instructions, may cause harmful interference to
radio communications. However, there is no
guarantee that interference will not occur in a
particular installation. If this equipment does
cause harmful interference to radio or television
reception, which can be determined by turning
the equipment off and on, the user is encouraged
to try to correct the interference by one of the
following measures:
• Reorienting or relocating the receiving
antenna.
• Increasing the separation between the
equipment and receiver.
• Connecting the equipment to an outlet that is
on a different circuit than the radio or TV.
• Consulting the dealer or an experienced
radio/TV technician for help.
FCC Radiation Exposure Statement :
This equipment complies with FCC radiation
exposure limits set forth for an uncontrolled
environment. This equipment should be installed
and operated so there is at least 8 inches (20 cm)
between the radiator and your body. This device
and its antenna(s) must not be co-located or
operated in conjunction with any other antenna or
transmitter.
CALIFORNIA USA ONLY (Applicable for
networking models only.)
This Perchlorate warning applies only to primary
CR(Manganese Dioxide) Lithium coin cells in the
product sold or distributed ONLY in California
USA “Perchloate Material - special handling may
apply, See www.dtsc.ca.gov/hazardouswaste/
perchlorate.”
Dispose unwanted electronics through an
approved recycler. To nd the nearest recycling
location, go to our website:www.samsung.com/
recycling Or call, 1‐800‐SAMSUNG
WARNING: Cancer and Reproductive Harm
- www.P65Warnings.ca.gov.
Important Safety Instructions
Read these operating instructions carefully
before using the unit. Follow all the safety
instructions listed below. Keep these operating
instructions handy for future reference.
1. Read these instructions.
2. Keep these Instructions.
3. Heed all warnings.
4. Follow all instructions.
5. Clean only with dry cloth.
6. Do not block any ventilation openings.
Install in accordance with the manufacturer’s
instructions.
ENG - iv
7. Do not install near any heat sources such as
radiators, heat registers, stoves, or other
apparatus (including ampliers) that produce
heat.
8. Do not defeat the safety purpose of the
polarized or grounding-type plug.
A polarized plug has two blades with one
wider than the other. A grounding type plug
has two blades and a third grounding prong.
The wide blade or the third prong are
provided for your safety. If the provided plug
does not t into your outlet, consult an
electrician for replacement of the obsolete
outlet.
9. Protect the power cord from being walked
on or pinched particularly at plugs,
convenience receptacles, and the point
where they exit from the apparatus.
10. Only use attachments/accessories specied
by the manufacturer.
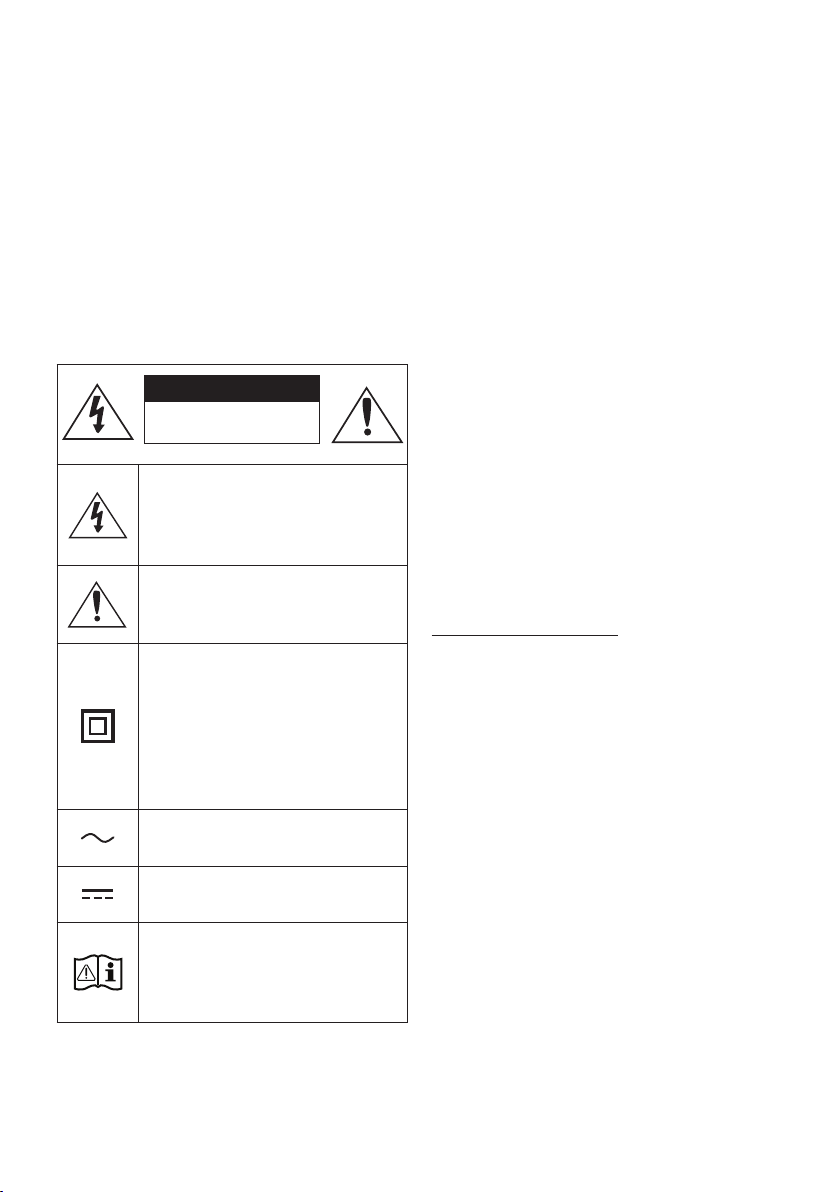
11. Use only with the cart, stand,
tripod, bracket, or table
specied by the manufacturer,
or sold with the apparatus.
When a cart is used, use caution when
moving the cart/apparatus combination to
avoid injury from tip-over.
12. Unplug this apparatus during lightning
storms or when unused for long periods of
time.
13. Refer all servicing to qualied service
personnel. Servicing is required when the
apparatus has been damaged in any way,
such as power-supply cord or plug is
damaged, liquid has been spilled or objects
have fallen into the apparatus, the apparatus
has been exposed to rain or moisture, does
not operate normally, or has been dropped.
To avoid deterioration of water resistant
Check the following and use the unit correctly.
• Deformation or damage from dropping the
unit or subjecting it to mechanical shock may
cause deterioration of the water resistant.
• This unit does not have a design that is
resistant to water pressure. Use of the unit in
a location where high water pressure is
applied, such as in the shower, may cause a
malfunction.
• Do not pour high-temperature water or blow
hot air from a hair dryer or any other
applicance on the unit directly. Also never use
the unit in a place subject to high
temperatures, such as in a sauna or near a
heat source.
• Handle the cap with care. Port cover and AC
plug cover plays a very important role in
maintenance of the water resistant. When
using the unit, make sure that the cap is
closed completely. When closing the cap, be
careful not to allow foreign objects inside. If
the cap is not closed completely the water
resistant may deteriorate and may cause a
malfunction of the unit as a result of water
entering the unit.
• IPX5 cannot be met when any JACK or AC
power is plugged in.
• The product cannot be dumped to ensure it is
water resistant.
POWER
ECHOVOL
USB
(5V 2.1A)
AUX 1
MIC
ENG - v
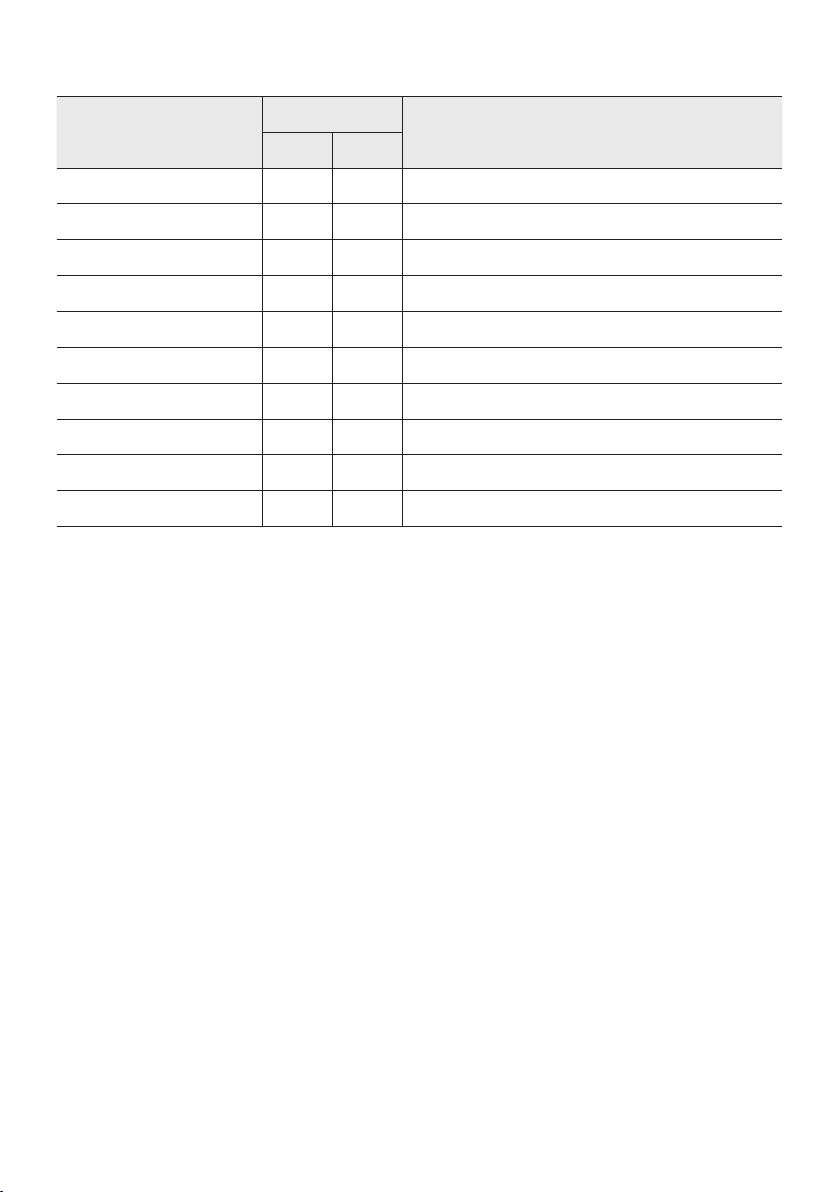
• The Sound Tower provides durability by IPX5.
Protection against solids
IP
Protection against water
0 5
No requirements X X No requirements
No protection 0 0 No protection
Solids> 50 mm 1 1 Vertically falling water
Solids> 12 mm 2 2 Vertically water-enclosure tilted 15°
Solids> 2.5 mm 3 3 Sprayed water 60° from vertical
Solids> 1.0 mm 4 4 Splashed water from all directions
Dust Protected 5 5 Hosing jets from all directions
Dust tight 6 6 Strong hosing jets from all directions
- 7 Temporary Immersion: 1m for 30 minutes
- 8 Immersion: manufacture dened depth and time

ENG - vi
PRECAUTIONS
1. Ensure that the AC power supply in your
house complies with the power
requirements listed on the identication
sticker located on the rear of your product.
Install your product horizontally, on a
suitable base (furniture), with enough space
around it for ventilation (3~4 inches). Make
sure the ventilation slots are not covered. Do
not place the unit on ampliers or other
equipment which may become hot. This unit
is designed for continuous use.
To fully turn off the unit, disconnect the AC
plug from the wall outlet. Unplug the unit if
you intend to leave it unused for a long
period of time.
2. During thunderstorms, disconnect the AC
plug from the wall outlet. Voltage peaks due
to lightning could damage the unit.
3. Do not expose the unit to direct sunlight or
other heat sources. This could lead to
overheating and cause the unit to
malfunction.
4. Protect the product from moisture (i.e.
vases), and excess heat (e.g. a replace) or
equipment creating strong magnetic or
electric elds. Unplug the power cable from
the AC wall socket if the unit malfunctions.
Your product is not intended for industrial
use. It is for personal use only. Condensation
may occur if your product has been stored in
cold temperatures. If transporting the unit
during the winter, wait approximately
2 hours until the unit has reached room
temperature before using.
5. The battery used with this product contains
chemicals that are harmful to the
environment. Do not dispose of the battery
in the general household trash. Do not
expose the battery to excess heat, direct
sunlight, or re. Do not short circuit,
disassemble, or overheat the battery.
Danger of explosion if the battery is replaced
incorrectly. Replace only with the same or
equivalent type.
Others
• As the battery is manufactured only for this
product, do not use the battery for other
electronic appliances or other purposes.
• When discarding a dead battery, put it into a
battery collection box for recycling.
• Do not disassemble the battery.
• To protect the battery, the battery cannot be
charged when the temperature is lower than
3 °C or higher than 42 °C.
• When the battery level is low, recharge it. If
the level of the battery remains low for a long
period of time, it can cause the performance
of the battery to degrade.
• Do not apply heat to the battery and do not
put the battery in a re.
• Do not disassemble the battery.
• To protect the battery, the Sound Tower may
not operate when the temperature is lower
than -17 °C or higher than 57 °C.
ENG - vii
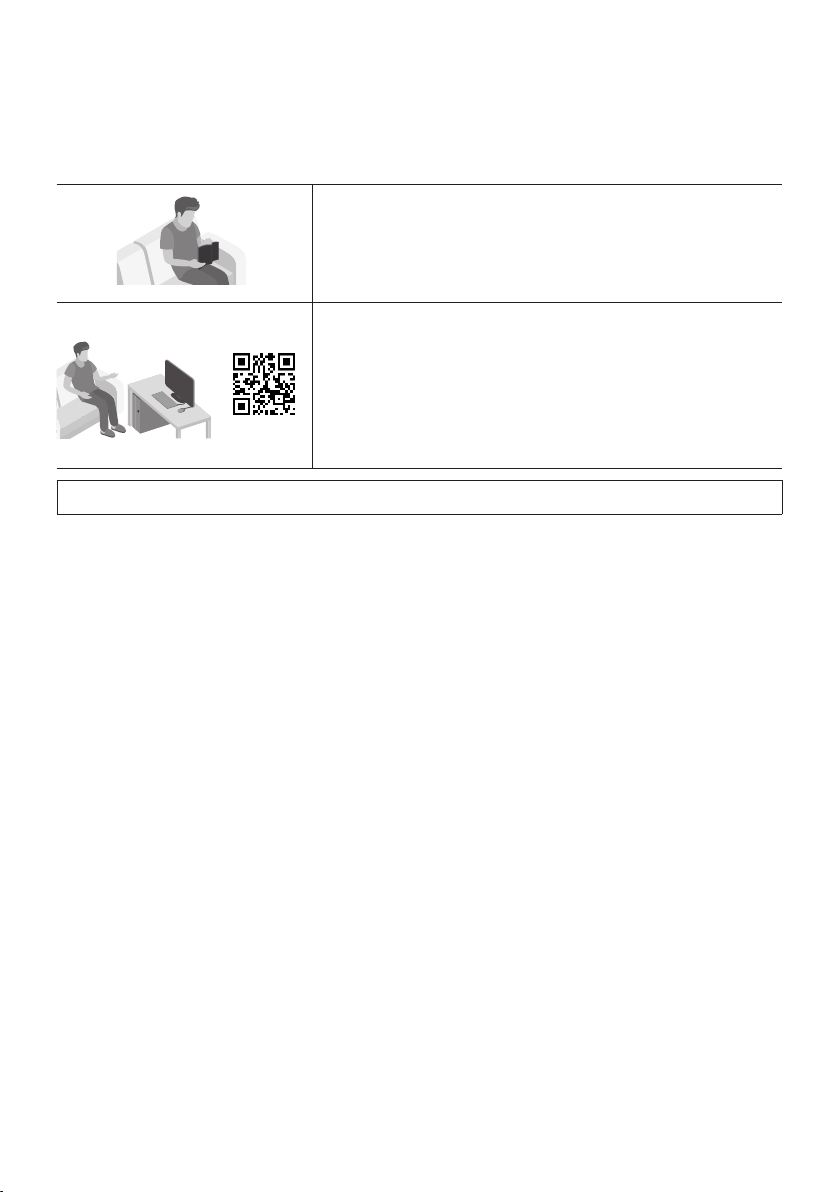
ABOUT THIS MANUAL
The user manual has two parts: this simple paper USER MANUAL and a detailed FULL MANUAL you can
download.
USER MANUAL
See this manual for safety instructions, product installation,
components, connections, and product specications.
FULL MANUAL
You can access the FULL MANUAL on Samsung’s on-line
customer support center by scanning the QR code on the left.
To see the manual on your PC or mobile device, download the
manual in document format from Samsung’s website.
(https://www.samsung.com/us/support/downloads/)
Design and specications are subject to change without prior notice.

ENG - viii
CONTENTS
01 Checking the Components 1
Inserting Batteries before using the Remote Control
(AAA batteries X 2) ------------------------- 1
02 Product Overview 2
Top Panel of the Sound Tower ------------------------- 2
Rear Panel of the Sound Tower ------------------------- 3
03 Connecting the Sound Tower 5
Connecting Electrical Power
-------------------------
5
How to use Audio Group
-------------------------
6
04 Connecting an External Device 12
Connecting using an Analog Audio (AUX) Cable
-------------------------
12
Connecting a mobile device via Bluetooth
-------------------------
13
Connecting the Samsung TV via Bluetooth
-------------------------
16
05 Connecting a USB Storage Device 17
Software Update
-------------------------
18
Connecting an External Microphone
-------------------------
19
06 Using the Remote Control 20
How to Use the Remote Control
-------------------------
20
How to use Sound Mode
-------------------------
23
How to use the DJ Effect
-------------------------
24

ENG - ix
07 Using the Samsung Sound Tower App 25
Install Samsung Sound Tower App
-------------------------
25
Launching the Samsung Sound Tower App
-------------------------
25
08 Troubleshooting 26
09 License 27
10 Open Source License Notice 28
11 Important Notes About Service 28
12 SpecicationsandGuide 29
Specications
-------------------------
29

ENG - 1
01 CHECKING THE COMPONENTS
Sound Tower Main Unit Remote Control (AH81-15581A) /
Batteries
Power Cord
(AH81-15587A)
• For more information about the power supply and power consumption, refer to the label attached
to the product. (Label: Rear of the Sound Tower Main Unit)
• To purchase additional components or optional cables, contact a Samsung Service Center or
Samsung Customer Care.
• When moving the product, do not drag or pull the product from the ground. Lift the product when
moving the product.
Inserting Batteries before using the Remote Control
(AAA batteries X 2)
Slide the battery cover in the direction of the arrow
until it is completely removed. Insert 2 AAA
batteries (1.5V) oriented so that their polarity is
correct. Slide the battery cover back into position.
ENG - 2
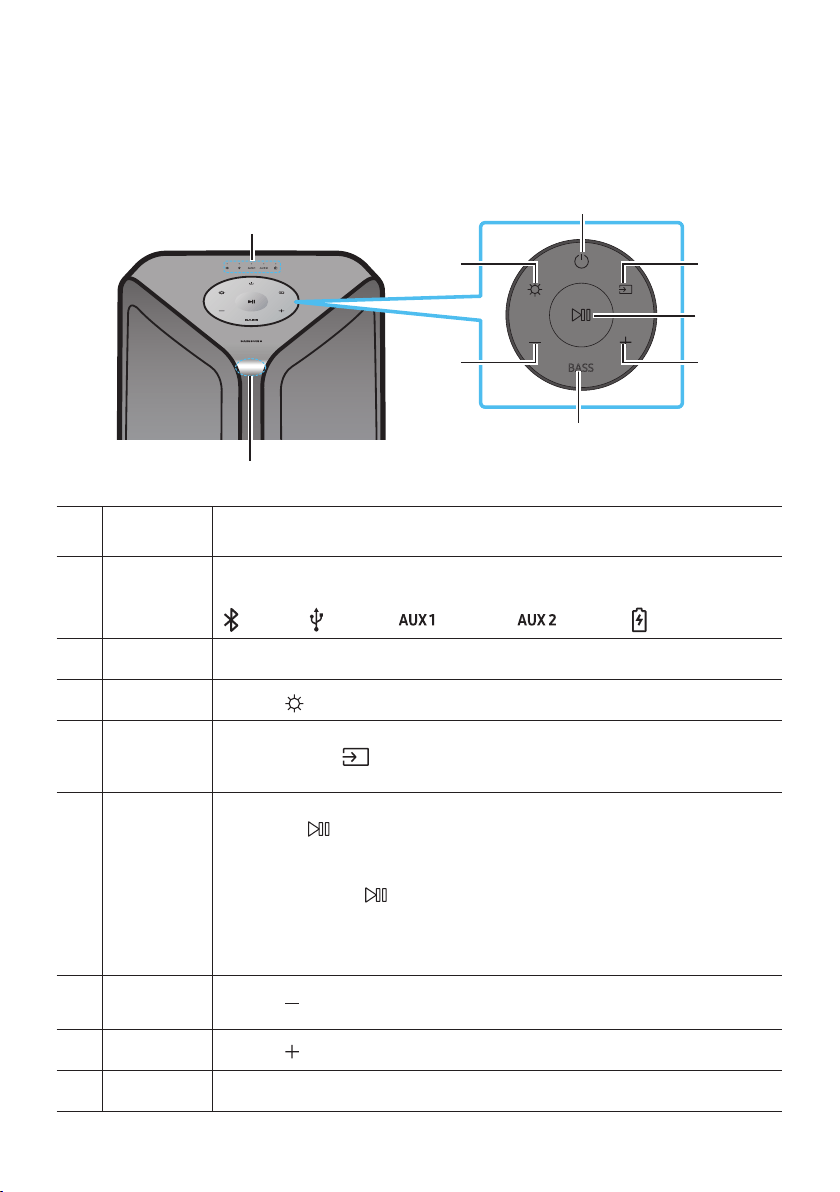
02 PRODUCT OVERVIEW
Top Panel of the Sound Tower
BASS
Remote
Sensor
When operating the Sound Tower system, please aim the front of the remote control at
the remote sensor.
LED Indicator
Displays operating messages or current source of the Sound Tower system.
The information sources represented by each LED are as follows:
(BT) (USB) (AUX1) (AUX2) (Power/Battery)
Power Turns the Sound Tower on and off.
Light
Press the
(Light) button to turn the Lighting Mode on.
Source
Press to select a source connected to the Sound Tower.
Press and hold the (Source)
button for more than 5 seconds
to enter the
“SEARCHING TV” mode.
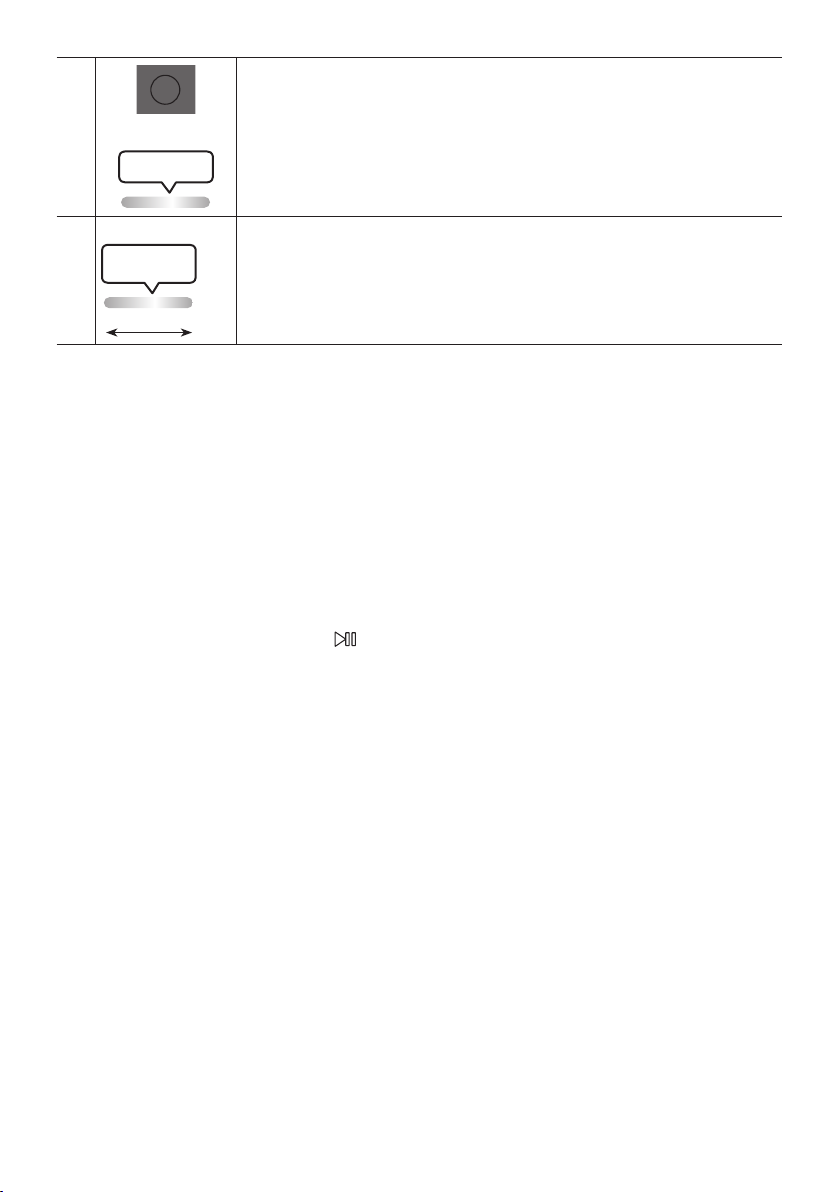
Play/Pause
• Play/Pause
Press the button to pause a music le temporarily.
When you press the button again, the music le plays.
• Demo play
Press and hold the
button for more than 5 seconds to start the Demo play while
the system is turned on. 5 LEDS ashing simultaneously and it plays demo music for
90 seconds.
– Please be careful as it may play louder than the set volume.
Volume down Press the (Volume down) button to lower the volume.
Volume up
Press the (Volume up) button to raise the volume.
BASS Press the BASS button to use the powerful bass sound.
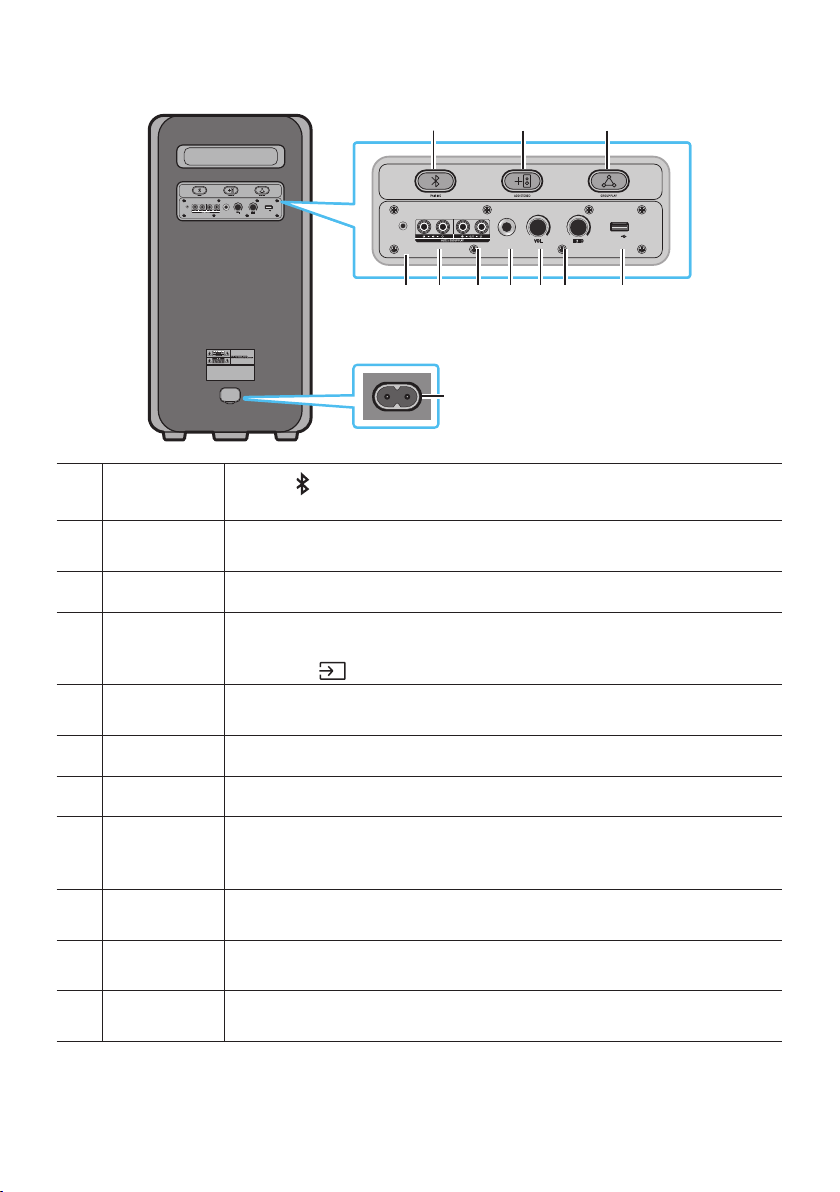
ENG - 3
Rear Panel of the Sound Tower
POWER
ECHOVOL
USB
(5V 2.1A)
AUX 1
MIC
ECHOVOL
USB
(5V 2.1A)
AUX 1
MIC
Bluetooth
PAIRING
Press the PAIRING button to enter pairing mode, "PAIRING" LED on the rear plane
will be fast blink.
ADD STEREO
Press the ADD STEREO button to connect to another same model Sound Tower
wirelessly.
GROUP PLAY Press the GROUP PLAY button to connect up to ten Sound Tower systems wirelessly.
USB
Connect a USB device to the USB ports on the main unit.
If you connect your cell phone to the USB port, you can charge it.
• Press the (Source) button to select USB.
ECHO
You can give an echo effect to the sound from a connected microphone (MIC) by
adjusting the ECHO knob.
VOL Use the VOL knob to adjust the volume of a connected microphone (MIC).
MIC Connect your microphone to the MIC jack.
GROUP PLAY
OUT
Terminals
Use an Audio Cable (not supplied) to connect GROUP PLAY (OUT) terminals on the
main unit to Audio In on an external analog output device.
GROUP PLAY
IN Terminals
Use an Audio Cable (not supplied) to connect AUX2(IN) terminals on the main unit to
Audio Out on an external analog output device.
AUX1
Use an Audio (AUX) Cable (not supplied) to connect AUX1 jack on the main unit to
Audio Out on an external device.
Power
Connect the power cord to the Power jack and connect the other end of the power
cord to a wall socket to supply electrical power to the Sound Tower.
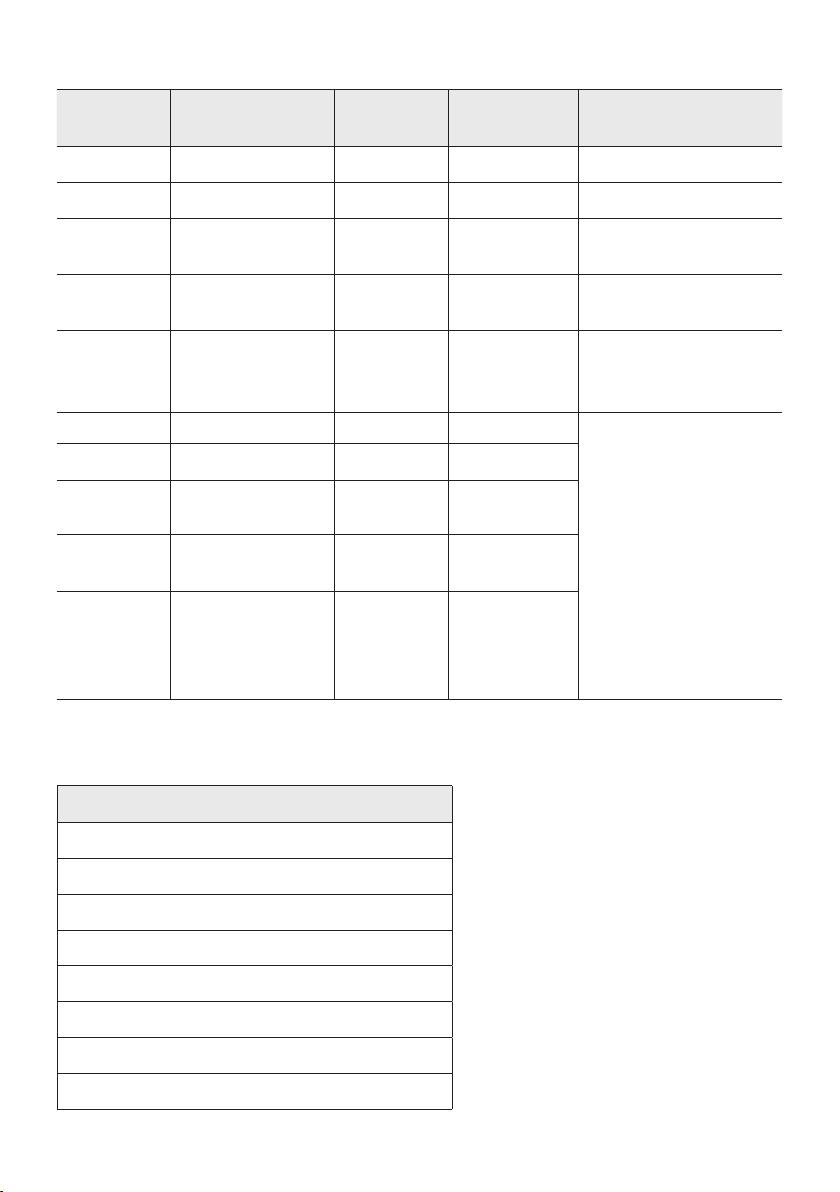
ENG - 4
Charge LED State of the Sound Tower:
Sound
Tower state
Charging state
Charge LED
(AC Mode)
Charge LED
(DC Mode)
Remark
Off Fully charged Off(black) Off (black)
Off Charging Green blinks N/A
Off Not in charging Off (black) Off (black)
The AC cable is not
inserted.
Stand by Fully charged Blue on N/A
There is no standby mode
in DC mode.
Stand by Charging Green blinks N/A
The charging LED is the
same as when Sound
Tower is shut down.
On Fully charged Blue on Blue on
When turned on, Sound
Tower mainly reects the
current battery state.
On Charging Green blinks N/A
On
Not in charging and
30%~98%power
Green on Green on
On
Not in charging and
5% ~ 29% power
Red on Red on
On
Not in charging and
below 5% power
Red on
Power off after
Light bar
orange blink
once
In DC mode shutdown, the entire system power will be turned off. So in the off state, compared with AC
mode, the following functions are not supported.
Feature
Wake up via bluetooth
Shop mode
Power Off Setting
Customer Reset
Power on via IR
Battery Charge
AUI on/off
UI feedback of LED lighting bar(front) on/off
ENG - 5
03 CONNECTING THE SOUND TOWER
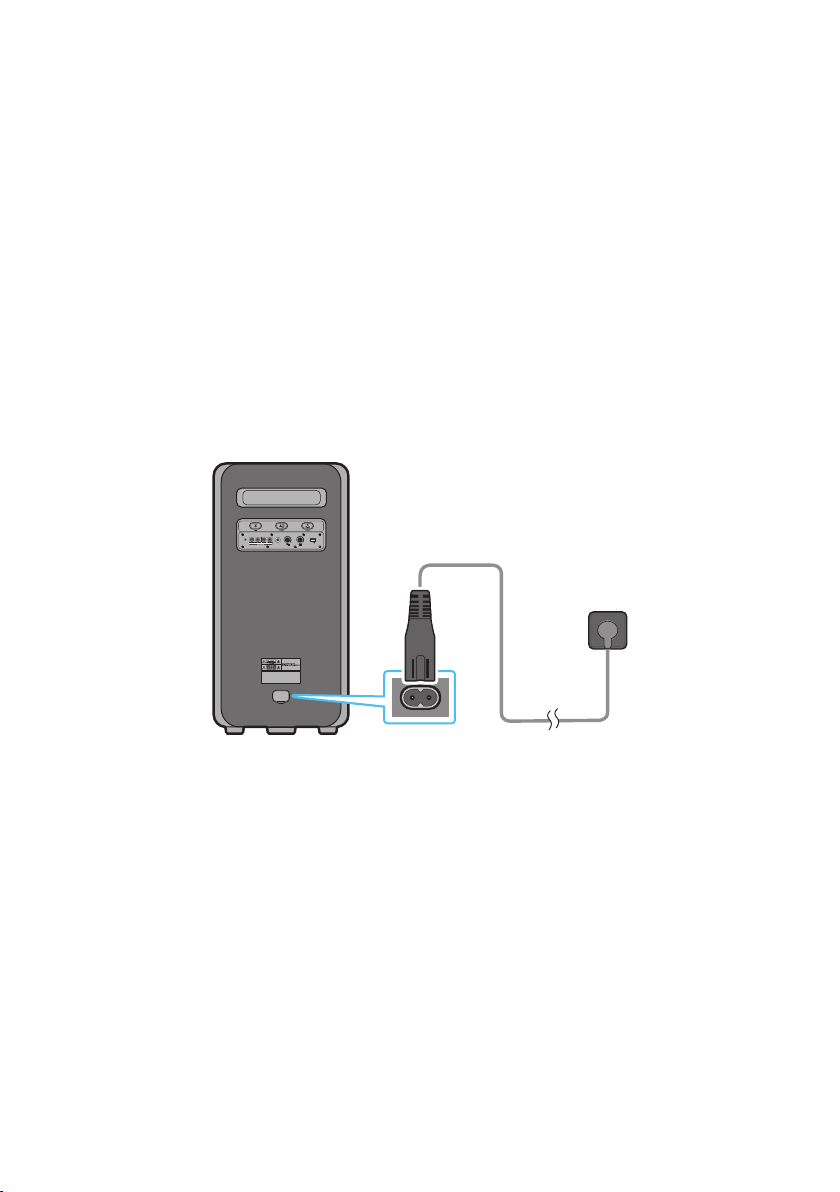
Connecting Electrical Power
Use the power cord to connect the Sound Tower to an electrical outlet in the following order:
Connect the power cord to the Sound Tower and then to a wall socket.
See the illustrations below.
• When the AC cord is pressed in, the built-in battery will be charged automatically until the battery
is fully charged. The LED indicator on the top panel will show the current charging state (refer to
page ENG - 4)
• When you unplug the set to run on battery, the volume level drops dramatically.
• For more information about the required electrical power and power consumption, refer to the
label attached to the product. (Label: Rear of the Sound Tower)
Rear of Sound Tower
POWER
ECHOVOL
USB
(5V 2.1A)
AUX 1
MIC
Connecting
Electrical Power
ENG - 6
How to use Audio Group
You can connect multiple audio systems in a group to create a party environment and produce higher
sound output. Set one Sound Tower as the HOST and any music played on it will be shared among any
other Sound Tower systems in the Audio group.
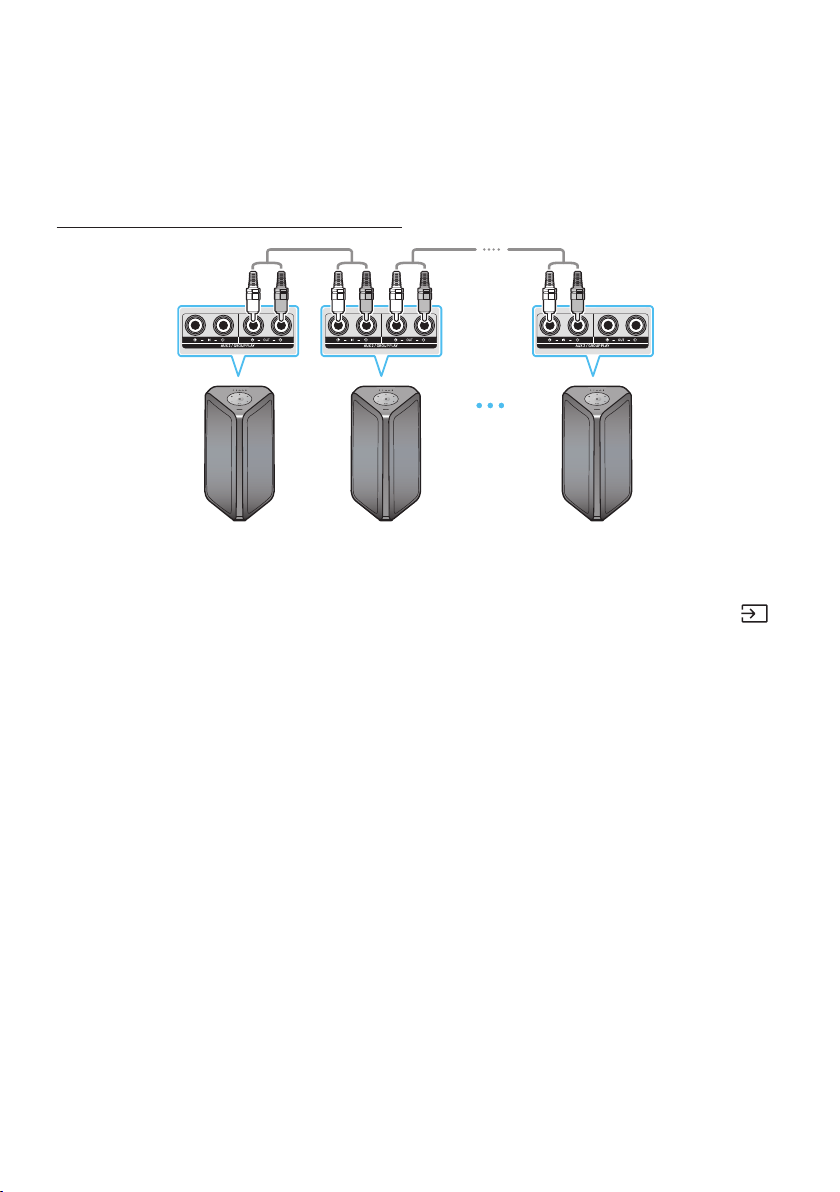
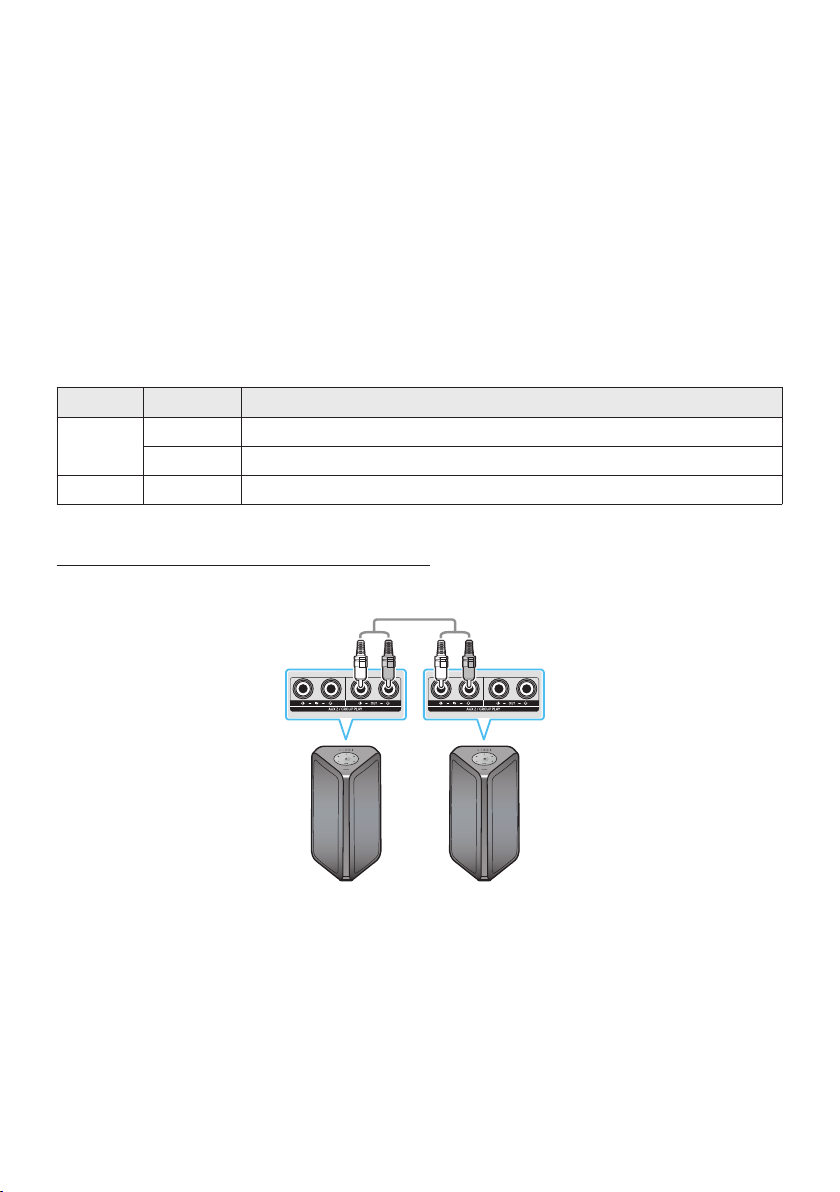
Connecting the wired Group Play mode
1st
Sound Tower HOST
2nd
Sound Tower
Last
Sound Tower
Continue the
connection until
the last Sound
Tower
Set up Group Play by connecting all the systems using audio cables (not supplied). Use the AUX or
(Source) button to change the source to AUX2 for every Sound Tower system except the 1st (or HOST)
Sound Tower system.
NOTES
• The 1st Sound Tower HOST can play music from any source.
• Depending on the length or characteristics of the cable, there may be a difference in operating
distance.
ENG - 7
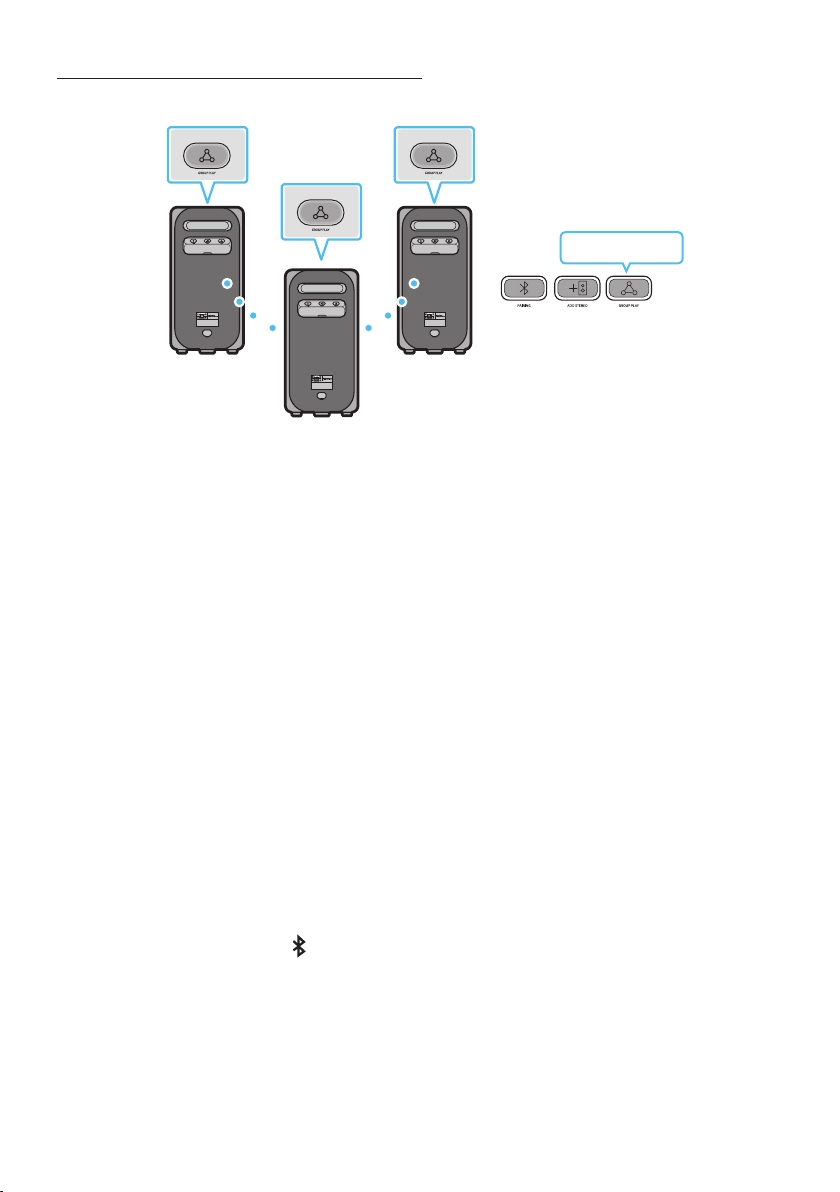
Connecting the wireless Group Play mode
You can connect up to ten Sound Tower systems with the wireless Group Play function.
HOST
SUB 1
SUB 2
POWERPOWER
POWER
Greenashing
1. Press the GROUP PLAY button on the HOST Sound Tower system, After “GROUP LED” solw blinks
10 seconds, ”GROUP PLAY”LED will be fast blink (30s).
2. Press the GROUP PLAY button on the 2nd Sound Tower system (SUB 1).”GROUP PLAY”LED will be
blink.And then SUB1 will be connected with HOST,”GROUP PLAY”LED of SUB1 and HOST will stop
blinking and turn on.
3. Press the GROUP PLAY button on the 3rd Sound Tower system (SUB 2). Tone prompt instead the
GROUP PLAY button on the system stops blinking.
4. If you want to add more Sound Tower systems, repeat step 3.
5. Play music on the HOST Sound Tower. Sound outputs from all the connected systems.
NOTES
• In Group play mode, “HOST” Sound Tower (Figure 1) can connect to the Samsung TV. After the
connection is successful, the Group play mode automatically exits.
• The wireless Group Play connection is available for MX-ST90B/MX-ST50B/MX-ST40B.
• Environmental conditions or other factors with connected devices may have effect on playback
quality.
• If the red LED is on the GROUP PLAY button, an error has occurred in the wireless Group Play
connection. Try step 1 to step 5 again.
• The ADD STEREO button and PAIRING button on the SUB Sound Tower systems are not available
while in wireless Group Play mode.
• The ADD STEREO button on the HOST Sound Tower system is not available while in wireless Group
Play mode.
• Long press “GROUP PLAY” in BT Source state to enter Group mode as “HOST”.

ENG - 8
• All SUB units must be connected one by one. For example, after HOST is connected, press GROUP
PLAY button on SUB 1 to connect, and after SUB 1 is connected, you should connect SUB 2 and SUB
3 one by one sequentially.
• While using Group Play, currently connected Bluetooth devices are disconnected and Bluetooth
connection is disabled.
• Bluetooth devices can search and connect with the HOST Sound Tower only.
• When in Group Play mode, the SUB cannot connect to a Bluetooth device.
• If you power off and then power on the Sound Tower or select any source other than BT on a SUB
unit, in Group Play mode, the Group Play mode is disconnected.
• This product does not support aptX audio stream with Wireless Group Play mode.
Disconnecting the wireless Group Play mode
1. Press and hold the GROUP PLAY button over 5 seconds (HOST or SUB) after Group Play is
connected or press the GROUP PLAY button (HOST or SUB) before Group Play is connected.
• Tone prompt instead and the LED above the GROUP PLAY button is off.
2. If you select any source other than BT on the SUB units or turn off the HOST Sound Tower, the
Group Play mode is disconnected.
• If the disconnection is made from the HOST Sound Tower, Group Play is disconnected.
LED Indications
LED STATE Description
Green
Blink Waiting for a wireless Group Play connection.
Solid The wireless Group Play connection was successful.
Red Solid There is an error with the wireless Group Play connection.
NOTE
• In wireless connection, Playback quality can be unstable depending on Bluetooth environment.
For better play, please keep the device in wired Group Play mode.
• The rst bluetooth connection should be within 1m.
ENG - 9
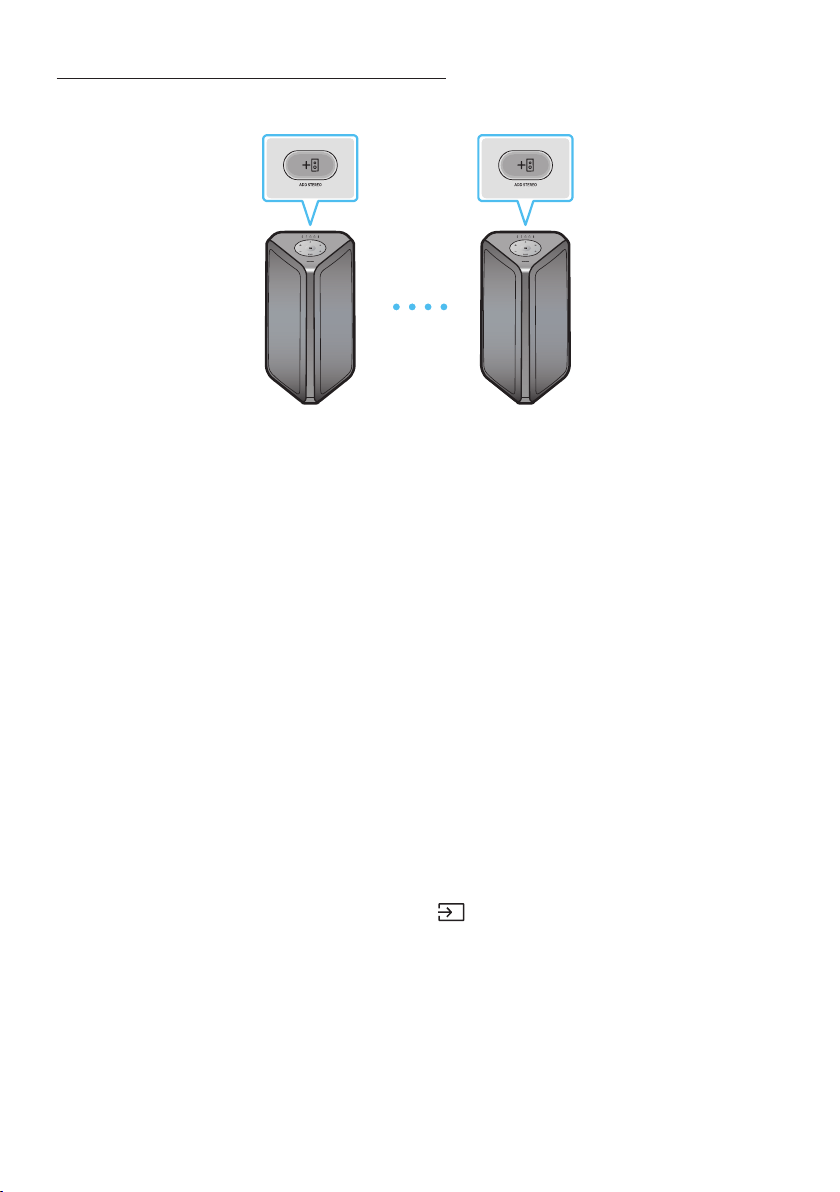
Using a Smartphone and Stereo Group mode
Connect two Sound Tower and use them with your smartphone to enjoy stereo sound.
Left Sound Tower
(MAIN)
Right Sound Tower
(SUB)
1. Press the ADD STEREO button on the left Sound Tower system. The LED blinks on the ADD
STEREO button.
2. Press the ADD STEREO button on the right Sound Tower system. The LED blinks on the ADD
STEREO button.
3. When the connection is made, tone prompt. Back plane ADD LED Green Indicator Steady on.
• The MAIN Sound Tower system outputs left channel sound and the SUB Sound Tower system
outputs right channel sound. Press the ADD STEREO button on the MAIN or SUB Sound Tower
to change the sound channel of the Sound Tower.
4. Play music by connecting your smartphone to the MAIN Sound Tower and Bluetooth.
Sound is output from both Sound Tower.
NOTES
• To use the Stereo Group mode, both Sound Tower systems must be the same model.
• Environmental conditions or other factors with connected devices may have effect on playback
quality.
• If the red LED is on the ADD STEREO, an error has occured in the Stereo Group connection. Try step
1 and step 3 again.
• Remote Controller, BT PAIRING, GROUP PLAY and (Source) buttons on the SUB Sound Tower
systems are disabled while in Stereo Group mode.
• The GROUP PLAY button on the MAIN Sound Tower system is not available while in Stereo Group
mode.
ENG - 10
• In mode other than “BT” (ex. USB, AUX mode), music is played only in MAIN Sound Tower and music
is not played in SUB Sound Tower.
• The lighting colors between MAIN Sound Tower and SUB Sound Tower may vary.
• This product does not support aptX audio stream with Stereo Group mode.
• If you try to connect a Bluetooth device while Stereo Group is connecting, the Stereo Group mode
may fail.
Terminate the Stereo Group mode
Press the ADD STEREO button (MAIN or SUB) for at least 5 seconds while the Stereo Group is
connected.
• Tone prompt and the LED above the ADD STEREO button is off.
LED Indications
LED STATE Description
Green
Blink Waiting for a Stereo Group connection.
Solid The Stereo Group connection is successful.
Red Solid There is an error with the Stereo Group connection.
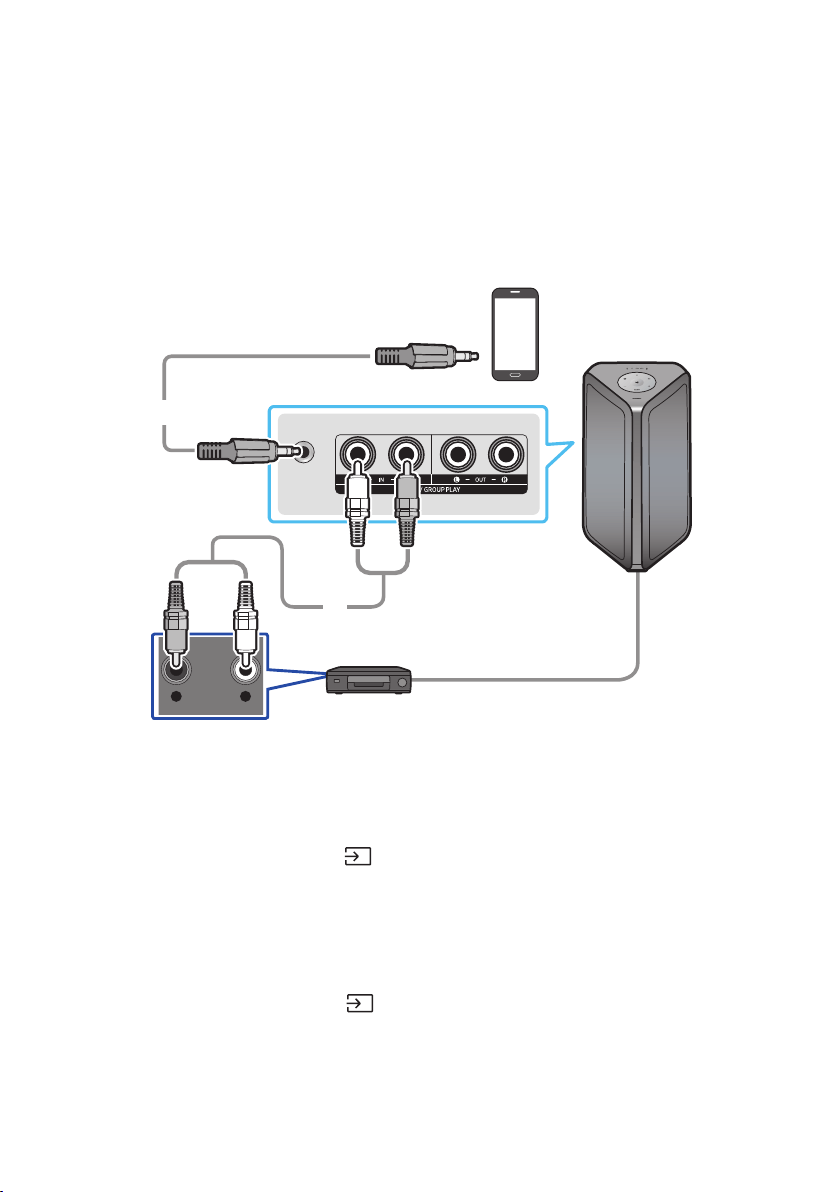
Using Samsung TV and Stereo Group mode
Connect two Sound Tower by wire and use them with Samsung TV to enjoy stereo sound.
Left Sound Tower
(MAIN)
Right Sound Tower
(SUB)
1. Connect two sound towers via stereo mode by press the ADD STEREO button on the two Sound
Tower.
2. Connect the RCA cable to the AUX2 OUT on the MAIN and AUX2 IN on the SUB as shown by using
the RCA cable (not supplied).
3. In “BT” mode, press the “AUX” button on the MAIN Sound Tower remote control for at least 5
seconds. The LED blinks on the ADD STEREO button.

ENG - 11
4. When the connection is complete, the “ADD STEREO” LED turn on and then the current output.
Tone prompt instead.
5. When the connection is complete, the SUB top panel “AUX2” LED turn on.
• The MAIN Sound Tower outputs the left channel sound and the SUB Sound Tower outputs the
right channel sound. Press the ADD STEREO button on the MAIN or SUB Sound Tower to
change the sound channel of the Sound Tower.
6. Connect a TV and MAIN Sound Tower via Bluetooth to play music. Sound is output from both
Sound Tower.
NOTES
• To use Stereo Group mode, both Sound Tower must be the same model.
• A red light on the LED on the ADD STEREO button indicates an error in the Stereo Group
connection. Try Step 1 to 5 again.
• In Stereo Group mode, the remote control, BT PAIRING, GROUP PLAY, and (Source) buttons on
the SUB Sound Tower are disabled.
• The GROUP PLAY button on the MAIN Sound Tower is not available in Stereo Group mode.
• If Samsung TV supports a simple connection, the connection pop-up is automatically displayed on
the TV, and if you select “Yes”, it connects to the TV. If there is a previous connection history
between Samsung TV and Sound Tower, it will be connected to Samsung TV without pop-up. For a
simple connection to Samsung TV, refer to page 16.
• The lighting colors may vary between the MAIN Sound Tower and the SUB Sound Tower.
Terminating the Stereo Group mode connection
Press the ADD STEREO button (MAIN or SUB) for at least 5 seconds after the Stereo Group is
connected.
• “OFF-STEREO MODE” tone prompt and the LED on the ADD STEREO button turns off.
ENG - 12
04 CONNECTING AN EXTERNAL DEVICE
Connect to an external device via a wired or wireless network to play the external device’s sound
through the Sound Tower.
Connecting using an Analog Audio (AUX) Cable
AUX 1
- AUDIO -
R L
Mobile device / MP3 / PMP
BD / DVD player / Set-top box / Game console
0.14 inches (3.5 mm)
stereo cable (not supplied)
Audio (AUX) Cable (not supplied)
Rear of the Sound Tower
0.14 inches (3.5 mm) stereo Cable (AUX1)
1. Connect AUX1 jack on the main unit to the AUDIO OUT jack of the Source Device using an
0.14inches (3.5 mm) stereo cable.
2. Select “AUX1” mode by pressing the (Source) button on the top panel or on the remote control.
• You can also select a source using AUX button on the remote control.
Audio Cable (AUX2)
1. Connect AUX2 (IN) terminals on the main unit to the AUDIO OUT terminals of the Source Device
using an audio cable.
2. Select “AUX2” mode by pressing the (Source) button on the top panel or on the remote
control.
• You can also select a source using AUX button on the remote control.
ENG - 13
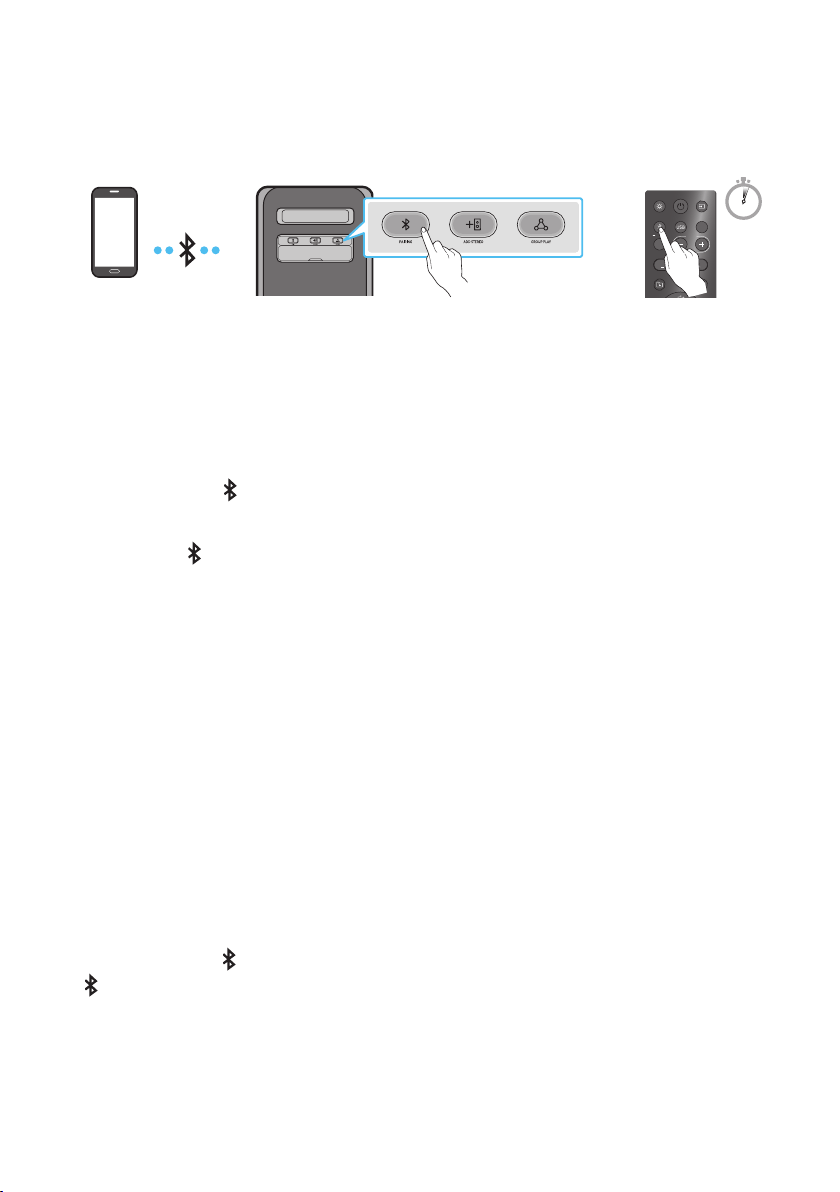
Connecting a mobile device via Bluetooth
When a mobile device is connected using Bluetooth, you can hear stereo sound without the hassle of
cabling.
LIGHT
PAIRING
TEMPO
USB
AUX
EFFECT
DOWN
UP
EFFECT
DJ
SOUND
MODE
Bluetooth
device
OR
5 Sec
* In battery mode, when the Sound Tower is power off, Bluetooth connection and the party audio app are
not available.
The initial connection
1. Press and hold the PAIRING button on the remote control for more than 5 seconds to enter the
“BT PAIRING” mode.
(OR)
Press the PAIRING button on the rear panel.
2. On your device, select “[AV] MX-ST5B Series” from the list that appears.
• After the device is connected. The third light on the top panel blinks three times cyan, and the
bluetooth light on the rear panel is steady on.
3. Play music les from the device connected via Bluetooth through the Sound Tower.
If the device fails to connect
• Sound tower will play voice prompt via bluetooth disconnected.
• If a previously connected Sound Tower listing (e.g. “[AV] MX-ST5B Series”) appears in the list, delete
it.
• Then repeat steps 1 and 2.
What is the difference between BT READY and BT PAIRING?
• BT READY : In this mode, you can use the previously connected TV or mobile device to connect to
Sound Tower.
• BT PAIRING : In this mode, you can connect a new device to the Sound Tower.
(Press and hold the PAIRING button on the remote control for more than 5 seconds or press the
PAIRING button on the rear of the Sound Tower to enter the “BT PAIRING” mode.)

ENG - 14
Bluetooth Multi connection
Sound Tower supports up-to two simultaneous Bluetooth device connections. Sound Tower can play
music through one of the connected Bluetooth devices without disconnecting the second device.
Bluetooth device 1 Bluetooth device 2
1. Connect Sound Tower to the rst device and the second device respectively for the rst time.
(See page 13)
2. Music can be played on only one of the two connected devices, and when the music is played on
the other device, the music on the playing device is paused.
NOTES
• If you want to connect Sound Tower to a third device, you can disconnect Sound Tower from one of
the two currently connected devices and then connect Sound Tower to the third device.
(Device include Samsung TV)
• With the Sound Tower and two devices currently connected, when pairing to a new Bluetooth
device, the devices currently connected maybe disconnected.
• You can connect to two Bluetooth devices at the same time.
• Environmental conditions or other factors with connected devices may have effect on playback
quality.
• The Sound Tower automatically turns off after 18 minutes with no command input in the ready
state.
• The Sound Tower may not perform Bluetooth search or connection correctly under the following
circumstances:
– If there is a strong electrical eld around the Sound Tower.
– If several Bluetooth devices are simultaneously paired with the Sound Tower.
– If the Bluetooth device is turned off, not in place, or malfunctions.
• Electronic devices may cause radio interference. Devices that generate electromagnetic waves
must be kept away from the Sound Tower main unit - e.g., microwaves, wireless LAN devices, etc.

ENG - 15
• Bluetooth Multi connection may not be supported depending on the connected device’s
specications.
• Removable/detachable Bluetooth devices (Ex:Dongle etc..) ,windows phone, laptops, TV, etc. do not
support Bluetooth Multi connection.
• After Bluetooth Multi connection pairing, there may be a slight delay before music starts playing
depending on the Bluetooth devices.
• If you move too far out of range from the Sound Tower without rst disconnecting your Bluetooth
device, it may take a few minutes to connect other Bluetooth devices. If you turn the Sound Tower
off and back on, you can connect other Bluetooth devices without waiting.
LED Indications
LED STATE Description
Blue
Fast Blink BT PAIRING mode
Blink BT READY mode
Solid A Bluetooth device is connected.
Using Bluetooth Power On
When the Sound Tower is turned off, you can connect your smart device via a Bluetooth connection to
turn it on. Battery status cannot use Bluetooth power on.
1. Press and hold the BASS button on the remote control or on the top panel to set the Bluetooth
Power On function on. Lighting bar will be blink white once.
2. When the Sound Tower is off, connect your smart device via Bluetooth. (For information on
Bluetooth connections, refer to your smart device’s manual.)
3. When the connection is complete, the Sound Tower turns itself on automatically in Bluetooth
mode.
• Select the desired music to play from your smart device.
NOTE
• Each time you press and hold the BASS button for 5 seconds. LED lighting bar will be blink white once
and status switched:
BLUETOOTHPOWER-ON→BLUETOOTHPOWER-OFF
ENG - 16
Connecting the Samsung TV via Bluetooth
If Sound Tower connected with Samsung TV via Bluetooth, Sound Tower can be controlled by TV UI.
(Volume +/-, Mute On/Off and Power On/Off)
LIGHT
PAIRING
TEMPO
USB
AUX
EFFECT EFFECT
DJ
SOUND
MODE
OR
Top Panel of the Sound Tower
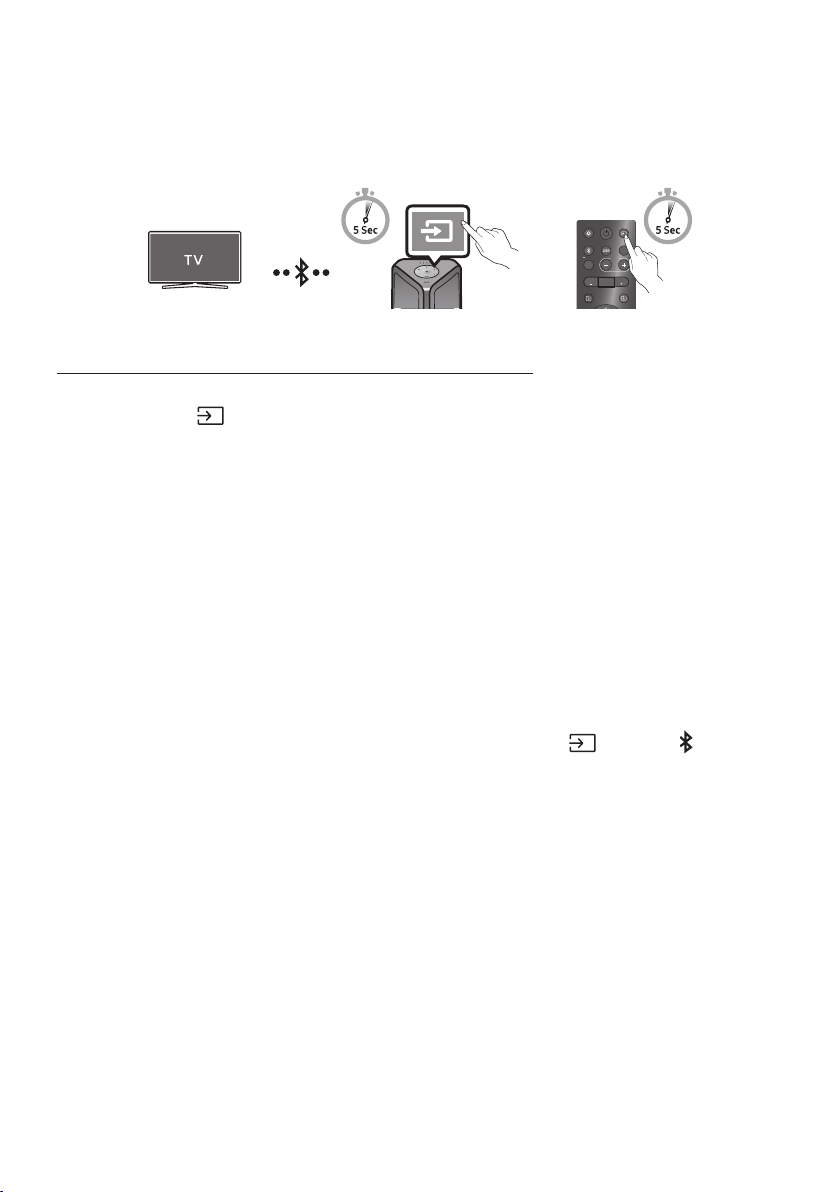
Easy connect with Samsung TV (SEARCHING TV mode)
Sound Tower has “SEARCHING TV” mode for easy connect with Samsung TV.
1. Press and hold (Source) bottom for more than 5 seconds on remote control or top panel then
Sound Tower will start to search Samsung TV. Lighting bar will blink white once and then blink
cyan, The back plane “PAIRING” LED will be slow blink. (Or, when the wired Stereo Group mode
connection is complete, the “SEARCHING TV” mode is automatically activated.)
2. If Samsung TV support easy connection, connection popup will be displayed on TV.
If Samsung TV has connected with Sound Tower before, Samsung TV will be connected without
popup.
3. If Sound Tower can not nd any Samsung TV within 5 minutes, Sound Tower will terminate
“SEARCHING TV” mode and turn to “BT PAIRING” mode. If nd any Samsung TV, Sound Tower will
request connection to those TV.
NOTES
• While in wireless Group Play mode, searching TV is not available.
• To stop searching Samsung TV, turn off the Sound Tower or press the (Source) or PAIRING
button.
• Sound Tower does not support multi connection if Samsung TV is connected.
• While Samsung TV is connected, Sound mode is PARTY and SOUND MODE button is not available.
• While Samsung TV is connected, Sound Tower APP can not connect with Sound Tower.
• Connection popup may not be displayed according to TV spec.
• You can select and connect directly from the Bluetooth speaker list on your TV when the
connection pop-up does not appear on your TV.
• When the Sound Tower is connected to your TV by Bluetooth connection, the video on the TV and
audio from the Sound Tower may not be synchronized because the distance between the Sound
Tower and the TV is too far. It is recommended to move the Sound Tower closer to your TV within 3.3 ft
(1 meter).
ENG - 17
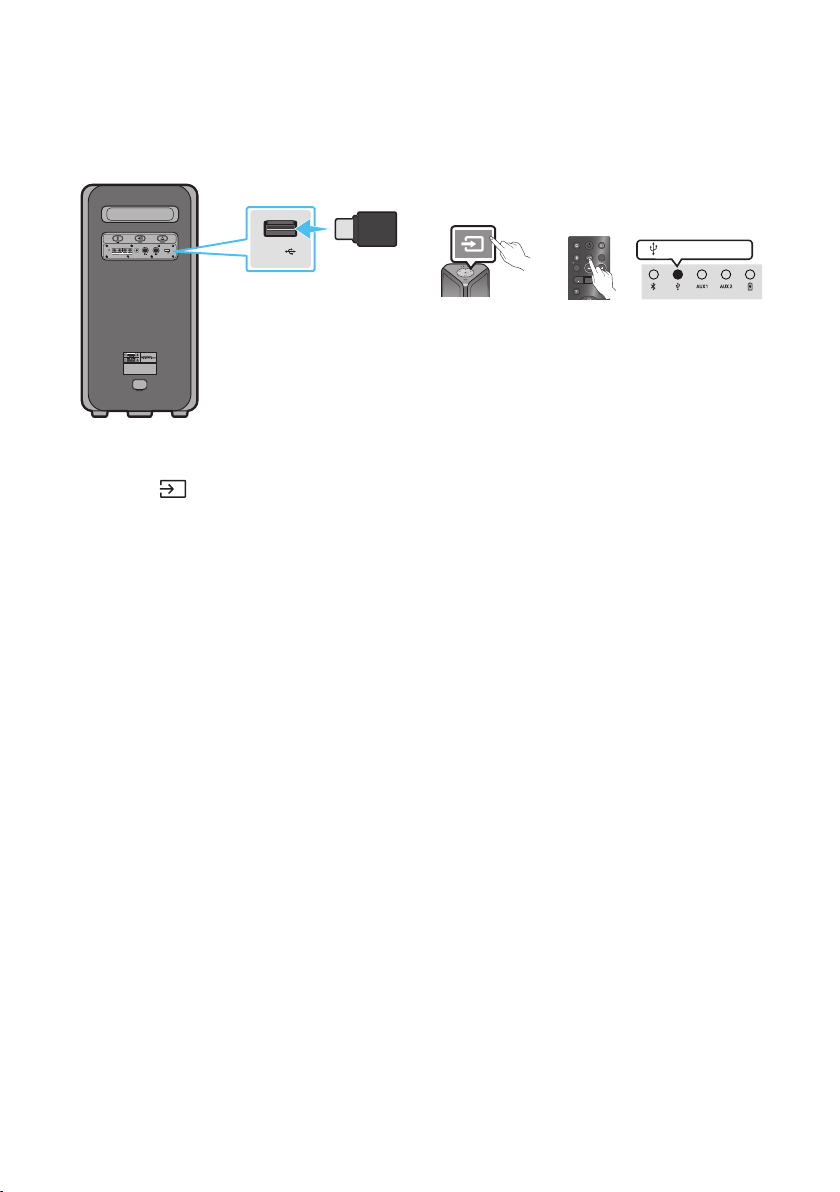
05 CONNECTING A USB STORAGE DEVICE
You can play music les located on USB storage devices through the Sound Tower.
POWER
ECHOVOL
USB
(5V 2.1A)
AUX 1
MIC
USB
(5V 2.1A)
LIGHT
PAIRING
TEMPO
USB
AUX
EFFECT EFFECT
DJ
SOUND
MODE
USB storage
device
(not supplied)
Rear of the Sound Tower
OR
white LED on
1. Connect a USB storage device to the USB jacks on your Sound Tower.
2. Press the (Source) button on the top panel or on the remote control, and then select “USB”.
• You can also select a source using USB button on the remote control.
3. The second USB indicator on the top panel is steady on.
4. Play music les from the USB storage device through the Sound Tower.
• The Sound Tower automatically turns off (Auto Power Down) if USB device is not connected,
playback stopped, or there is no input for more than 18 minutes.
NOTES
• This product only supports USB storage devices that are formatted in the FAT and FAT32 le
system.
• This product does not support HDD storage or storage on mobile devices.
• A maximum of 999 les can be played per USB storage device.
• A maximum of 256 folders can be read per USB storage device.

ENG - 18
Supported Audio Formats
File Extension Audio Codec Sampling Rate Bit Rate
*.mp3
MPEG 1 Layer3 32 kHz ~ 48 kHz 32 kbps ~ 320 kbps
MPEG 2 Layer3 16 kHz ~ 24 kHz 8 kbps ~ 160 kbps
MPEG 2.5 Layer3 8 kHz ~ 12 kHz 8 kbps ~ 160 kbps
*.wma WMA7/8/9 8 kHz ~ 48 kHz 32 kbps ~ 320 kbps
*.aac
AAC 8 kHz ~ 96 kHz < 1728 kbps
A AC- L C 8 kHz ~ 96 kHz < 1728 kbps
HE-AAC 8 kHz ~ 96 kHz < 1728 kbps
*.wav
PCM/LPCM/
IMA_ADPCM
8 kHz ~ 192 kHz < 5 Mbps
*ac - 8 kHz ~ 192 kHz < 5 Mbps
NOTES
• This product does not support WMA Professional codec.
• The above table shows supported sampling rates and bit rates. Files in formats that are not
supported will not play.
• A AC les only support the ADTS native format.
Software Update
SamsungmayofferupdatesfortheSoundTower’ssystemrmwareinthefuture.
If an update is offered, you can update the rmware by connecting a USB device with the rmware
update stored on it to the USB port on your Sound Tower. For more information about how to download
update les, go to the Samsung Electronics website at www.samsung.com/us/support/.
Then, enter or select the model number of your Sound Tower, select the Software & Apps option, and
then Downloads. Note that the option names can vary.
ENG - 19
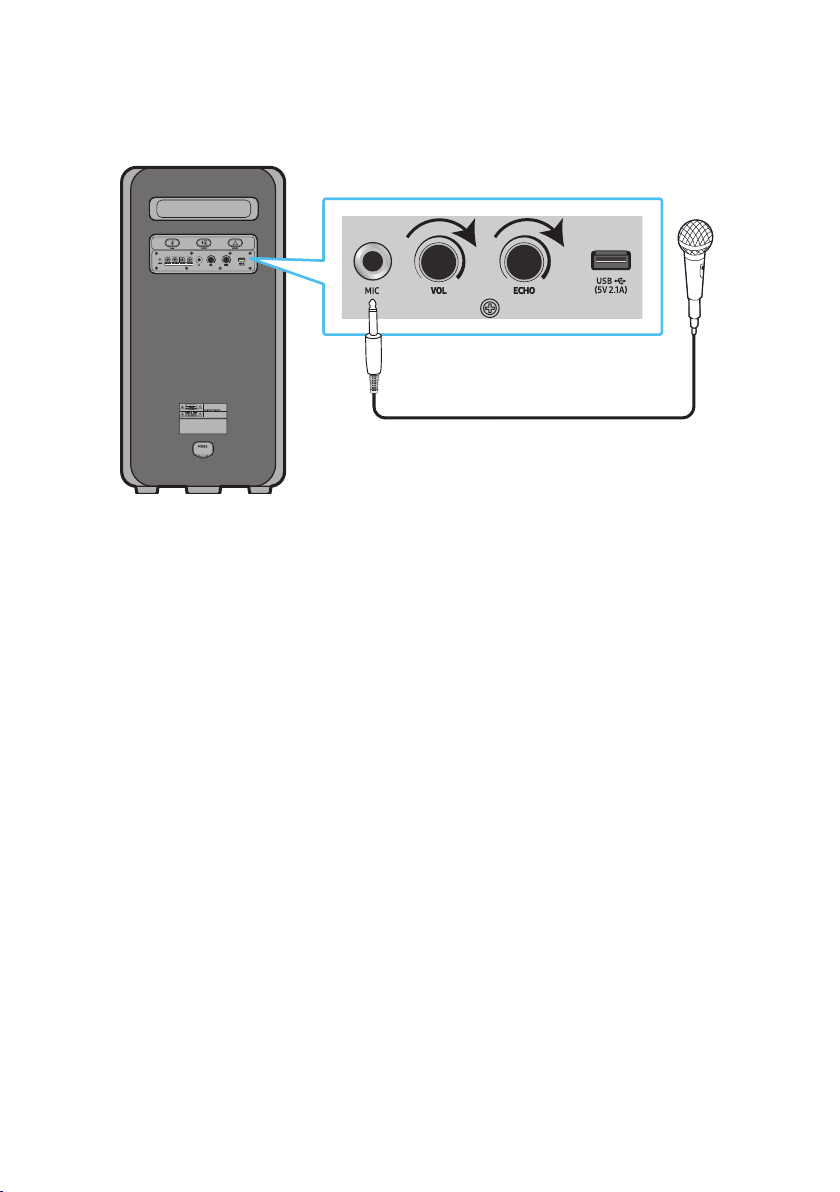
Connecting an External Microphone
You can output your voice from the system by connecting a dynamic microphone with a normal plug
(not supplied).
MAXMIN MAXMIN
1. Turn the MIC LEVEL knob to MIN to reduce the microphone volume level.
2. Connect an optional microphone to the MIC jack on the unit.
3. Adjust the volume using the MIC “VOL” knob.
4. Adjust the Effect of the echo using the MIC “ECHO” knob.
5. Speak or sing into the connected microphone.
NOTES
• When using the wireless Group mode or stereo mode function, sound from the microphone is only
output from the system to which the microphone is connected.
• When Sound Tower is in battery mode, the MIC sound level will be lower.

ENG - 20
06 USING THE REMOTE CONTROL
How to Use the Remote Control
LIGHT
PAIRING
TEMPO
USB
AUX
EFFECT
DOWN
UP
BASS
EFFECT
DJ
SOUND
MODE
* To reduce battery drain, the product
does not turn on when press the power
button of remote control while the
battery is in use.
Power
DOWN
UP
BASS
EFFECT
EFFECT
DJ
LIGHT
PAIRING
TEMPO
USB
AUX
SOUND
MODE
Turn the Sound Tower on and off.
LIGHT
DOWN
UP
BASS
EFFECT
EFFECT
DJ
LIGHT
PAIRING
TEMPO
USB
AUX
SOUND
MODE
Press the (LIGHT) button to turn the
Lighting Mode on.
(Only during music playback is effective)
Press the button repeatedly to cycle through
the available light modes: AMBIENT, PARTY,
DANCE, THUNDERBOLT, STAR or OFF.
Lighting LED
white blink x1
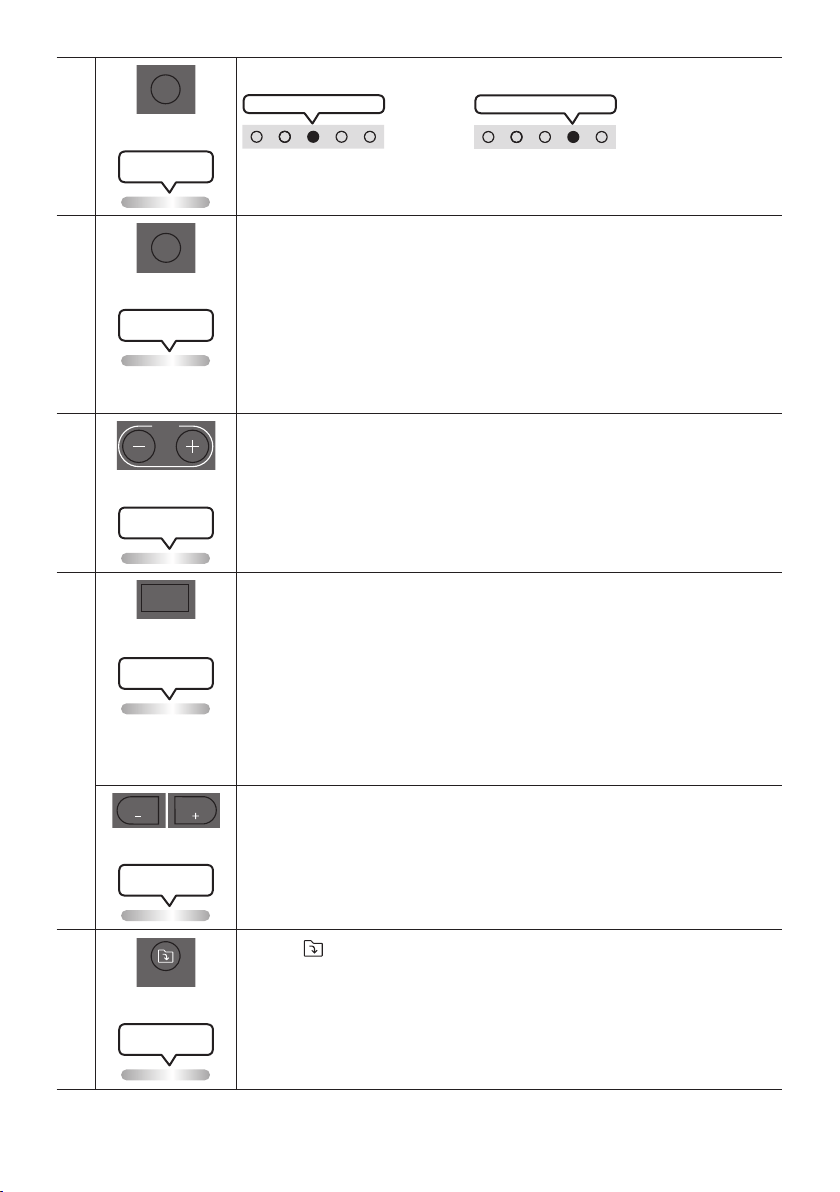
Source
DOWN
UP
BASS
EFFECT
EFFECT
DJ
LIGHT
PAIRING
TEMPO
USB
AUX
SOUND
MODE
Press to select a source connected to the
Sound Tower.
Press the button repeatedly to cycle through
the available sources: BT, USB, AUX1 or AUX2 .
Lighting LED
white blink x1
White LED moves to right on
LED indicator on the top of the product.
Bluetooth
PAIRING
DOWN
UP
BASS
EFFECT
EFFECT
DJ
LIGHT
PAIRING
TEMPO
USB
AUX
SOUND
MODE
Press to select a source connected directly to
"BT" mode.
Press and hold the button for more than
5 seconds to enter the "BT PAIRING" mode.
You can connect the Sound Tower to a new
Bluetooth device in this mode by selecting the
Sound Tower from the Bluetooth device's
search list.
Lighting LED
Cyanashes
white LED on
LED indicator on the top of the product.
USB
DOWN
UP
BASS
EFFECT
EFFECT
DJ
LIGHT
PAIRING
TEMPO
USB
AUX
SOUND
MODE
Press to select the USB source connected to
the Sound Tower.
white LED on
LED indicator on the top of the product.
Lighting LED
white blink x1
ENG - 21
AUX
DOWN
UP
BASS
EFFECT
EFFECT
DJ
LIGHT
PAIRING
TEMPO
USB
AUX
SOUND
MODE
Press to select the AUX1 or AUX2 sources connected to the Sound Tower.
AUX2 white LED on
OR
AUX1 white LED on
LED indicator on the top of the product.
Lighting LED
white blink x1
SOUND MODE
DOWN
UP
BASS
EFFECT
EFFECT
DJ
LIGHT
PAIRING
TEMPO
USB
AUX
SOUND
MODE
Press the button repeatedly to cycle through the available sound effects: PARTY,
STANDARD, HIPHOP, EDM, ROCK, LATIN, HOUSE or REGGAE.
• PARTY: Term for more upbeat music effect ,like a party
• Standard: Term for raw musical effects, like no EQ.
• HIPHOP: term for Dynamic dance and music.
• EDM: A more “generalized concept” genre than electronic music.
• ROCK: Band music.
• LATIN: Term for the music of many South American countries.
• HOUSE: Fast beat dance music played on electronic instruments.
Lighting LED
white blink x1
TEMPO +, -
DOWN
UP
BASS
EFFECT
EFFECT
DJ
LIGHT
PAIRING
TEMPO
USB
AUX
SOUND
MODE
Press the TEMPO + or TEMPO - buttons to change the tempo of the music up or down.
• This function only works in the USB mode.
Lighting LED
white blink x1
DJ
DOWN
UP
BASS
EFFECT
EFFECT
DJ
LIGHT
PAIRING
TEMPO
USB
AUX
SOUND
MODE
This function lets you turn on the DJ effect function.
Press the button repeatedly to cycle through the available DJ sound effects:
NOISE, FILTER, CRUSH, CHORUS, WAHWAH or OFF.
• NOISE: Mixing white noise into the original sound.
• FILTER: Filter out the sound of some frequencies.
• CRUSH: Make the original sound sharp.
• CHORUS: Separate the original sound into several track and delay them
separately,then mix again. Create a chorus effect.
• WAHWAH: WAHWAH effect created by enhancing some specic frequencies of
original sound.
Lighting LED
white blink x1
EFFECT +, -
DOWN
UP
BASS
EFFECT
EFFECT
DJ
LIGHT
PAIRING
TEMPO
USB
AUX
SOUND
MODE
DOWN
UP
BASS
EFFECT
EFFECT
DJ
LIGHT
PAIRING
TEMPO
USB
AUX
SOUND
MODE
Press the EFFECT + or EFFECT - buttons to change the level of the each DJ sound
effect up or down.
Effect value default is 5, can be changed to – 15 ~ 0 ~ +15.
Lighting LED
white blink x1
Folder DOWN
DOWN
UP
BASS
EFFECT
EFFECT
DJ
LIGHT
PAIRING
TEMPO
USB
AUX
SOUND
MODE
Press the (DOWN) button to move to the next folder in the USB device.
Lighting LED
white blink x1
ENG - 22
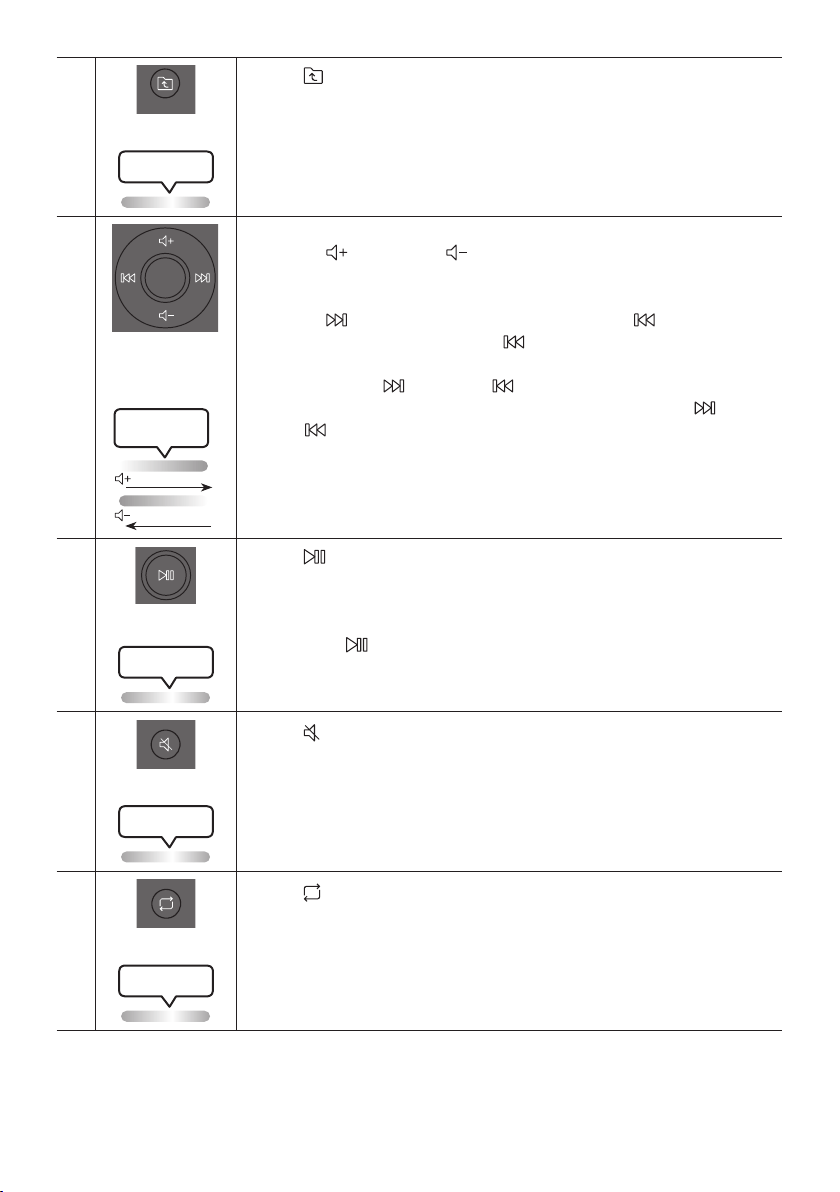
Folder UP
DOWN
UP
BASS
EFFECT
EFFECT
DJ
LIGHT
PAIRING
TEMPO
USB
AUX
SOUND
MODE
Press the (UP) button to move to the previous folder in the USB device.
Lighting LED
white blink x1
Volume up,
Volume down /
Skip
• Volume up, Volume down
Press the (Volume up) or (Volume down) to adjust the volume level up or
down.
• Music Skip
Press the button to select the next music le. Press the button once to
play the current music again. Pass the button twice to select the previous
music le.
Press and hold the button or the button for more than 3 seconds in USB
play mode to search forward or search backward. Press and hold the button
or the button for more than 3 seconds again to get back to normal play.
Lighting LED
White Flashes
From down to up
From top to bottom
Play / Pause
Press the button to pause a music le temporarily.
When you press the button again, the music le plays.
• Auto Power Down Function
To turn off Auto Power Down function while the unit is in AUX1, AUX2 mode, press
and hold the button for more than 5 seconds. Lighting bar will be blink white
once.
Lighting LED
white blink x1
Mute
DOWN
UP
BASS
EFFECT
EFFECT
DJ
LIGHT
PAIRING
TEMPO
USB
AUX
SOUND
MODE
Press the (Mute) button to mute the sound.
Press it again to unmute the sound.
Lighting LED
white blink x1
Repeat
DOWN
UP
BASS
EFFECT
EFFECT
DJ
LIGHT
PAIRING
TEMPO
USB
AUX
SOUND
MODE
Press the (Repeat) button to use the Repeat function in “USB” mode.
Press the button repeatedly to cycle through the available repeat functions:
ONE, FOLDER, ALL, RANDOM or OFF.
Lighting LED
white blink x1
ENG - 23
BASS
DOWN
UP
BASS
EFFECT
EFFECT
DJ
LIGHT
PAIRING
TEMPO
USB
AUX
SOUND
MODE
Press the BASS button to use the powerful bass sound.
Press it again to return to the normal sound.
Press and hold the BASS button for more than 5 seconds to turn on or off the
BLUETOOTH POWER function.
Lighting LED
white blink x1
※
Not available
Lighting LED
Pink Flashes
From middle to end
The remote control button function is not available in the current source.
How to use Sound Mode
Your Sound Tower provides predened equalizer settings that are optimized for particular music
genres.
1. Press the SOUND MODE button on the Remote control.
2. Each time you press the SOUND MODE button, the Sound Tower cycles through the available
sound effects: PARTY, STANDARD, HIPHOP, EDM, ROCK, LATIN, HOUSE or REGGAE.
NOTES
• Default sound mode is PARTY.
• When turned off, press and hold the button on product or remote control for more than 5 seconds
to turn on in the default Sound Mode setting.

ENG - 24
How to use the DJ Effect
The DJ Effect function lets you add DJ sound effects to your music. The level of each effect is
adjustable.
1. Press the DJ button on the Remote control.
2. Each time you press the DJ button, the Sound Tower cycles through the available DJ Effects:
• NOISE: Create white noise and mixed with the original sound through the lter and output.
• FILTER : Creates an effect similar to the sound of only treble or bass.
• CRUSH: Creates an effect that makes the original sound sharper.
• CHORUS : Creates an effect similar to a singing chorus.
• WAHWAH : Creates a ‘Wah~ Wah~’ effect.
• DJ EFFECT OFF : Turns off the DJ Effect.
3. Press the EFFECT + or EFFECT - buttons to raise or lower the level of each of the DJ sound effects
from -15 to +15.
NOTE
• When turned off, press and hold the button on product or remote control for more than 5
seconds to turn on in the default DJ Effect setting.
ENG - 25
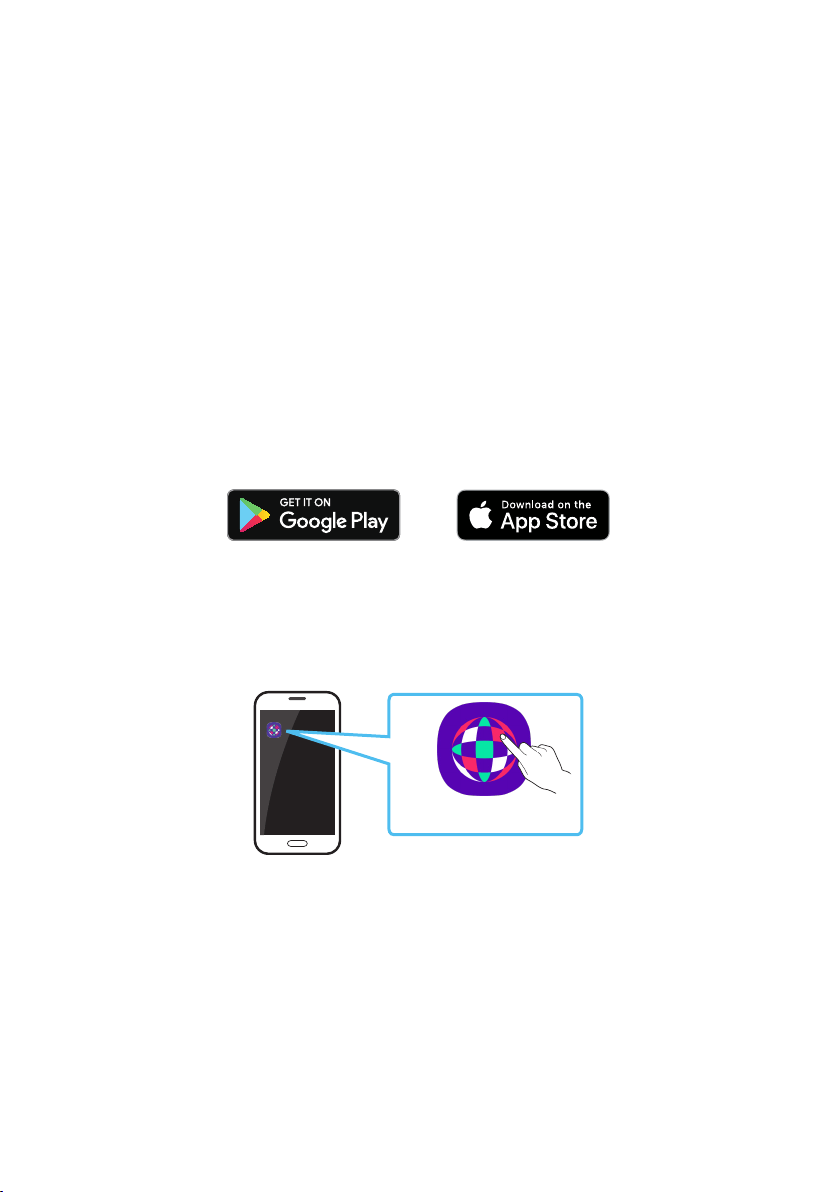
07 USING THE SAMSUNG SOUND TOWER
APP
Install Samsung Sound Tower App
To control this product with your Smart Device and the Samsung Sound Tower app, download the
Samsung Sound Tower App from the Google Play Store or Apple App Store, and install it on your Smart
Device.
NOTES
• The Samsung Sound Tower app is compatible with Android mobile phone devices running Android
OS 8.0 or later.
• The Samsung Sound Tower app is compatible with Apple mobile devices running iOS 11.0 or later.
Market search : Samsung Sound Tower
Launching the Samsung Sound Tower App
To launch and use the Samsung Sound Tower app, touch the Samsung Sound Tower icon on your smart
device, and then follow the directions on the screen.
Samsung
Multiroom
Samsung Sound Tower
Samsung Sound Tower
ENG - 26
08 TROUBLESHOOTING
Refer to the table below if this product does not function properly. If the problem you are experiencing
is not listed below or if the instructions below do not help, turn off the product, disconnect the power
cord, and contact Samsung Electronics at 1-800-SAMSUNG (1-800-726-7864).
The unit will not turn on.
; The battery may be fully discharged.
Please connect the power plug and try to
turn it on.
A function does not work when the button is
pressed.
; After removing the power plug, turn off the
Sound Tower. And insert power plug again,
turn on the Sound Tower.
; Power cycle the external device and try
again.
; If there is no signal, the Sound Tower
automatically turns off after a certain
period of time. Turn on the power.
Sound dropouts occur in BT mode.
; See the Bluetooth connection sections on
page 13.
Sound is not produced.
Is the Mute function on?
; Press the (Mute) button to cancel the
mute function.
Is the volume set to minimum?
; Adjust the Volume.
The remote control does not work.
Are the batteries drained?
; Replace them with new batteries.
Is the distance between the remote control
and Sound Tower main unit too far?
; Move the remote control closer to the
Sound Tower main unit.
Stereo Group connection is not working.
Is the system in wireless Group Play mode?
; Disconnect the wireless Group Play mode
and try Stereo Group connection again.
It cannot make a Bluetooth connection.
Is the system connected to another system in
wireless Group Play mode or Stereo Group
mode?
; Try Bluetooth connection again after
disconnecting the wireless Group Play or
Stereo Group connection.
Are the two Bluetooth devices already
connected?
; Try Bluetooth connection again after
disconnecting other Bluetooth connections.
The PAIRING button is not working.
Is the system in wireless Group Play mode or
Stereo Group mode?
; Try again after disconnecting the wireless
Group Play or Stereo Group connection.
I want to switch the HOST (MAIN) system to
the other in wireless Group Play or Stereo
Group connection.
; Disconnect Group Play mode, press the
Speaker which you want make to HOST
rst, and after it use Group LED to judge
instead connect the others one by one.
; With Stereo Group mode, MAIN is xed.
You can not change others as MAIN.
ENG - 27
I want to play AUX1 or AUX2 more than 8 hours
without control input.
; Press and hold the remote control
button for more than 5 seconds in AUX1 or
AUX2 mode to disable Auto Power Down
Function. Change from ON-AUTO POWER
DOWN to OFF-AUTO POWER DOWN.
I can’t connect a SUB to Group play.
; After 1 hour, the HOST will block any
additional SUB from being added.
Press the GROUP PLAY button on HOST,
the SUB can be reconnected.
It cannot make a “Wireless/Wired Group/Add
Stereo/Bluetooth” connection.
Is the distance between systems too far?
; It is recommended to make a “Wireless/
Wired Group/Add Stereo/Bluetooth” pairing
within 3.3 ft (1 meter) from the system.
; The recommended operating distance
between Sound Tower systems is closer than
32.8 ft (10 meters).
09 LICENSE
The Bluetooth® word mark and logos are
registered trademarks owned by the Bluetooth
SIG, Inc. and any use of such marks by Samsung
Electronics Co., Ltd. is under license. Other
trademarks and trade names are those of their
respective owners.
Qualcomm aptX is a product of
Qualcomm
Technologies, Inc. and/or its subsidiaries.
Qualcomm is a trademark of Qualcomm
Incorporated, registered in the United States
and other countries. aptX is a trademark of
Qualcomm Technologies International, Ltd.,
regi
stered in the United States and other
countries.

ENG - 28
[ENERGY STAR]
ENERGYSTARqualiedmodelonly
– Your Samsung product is ENERGY STAR
qualied in its factory default setting.
Change to certain features, settings and
functionality in this product can change the
power consumption, possibly beyond the
limits required for ENERGY STAR
qualication.
– Environmental Protection Agency and
Department of Energy. ENERGY STAR is a
joint program of the Government agencies,
designed to promote energy efcient
products and practices.
Refer to www.energystar.gov for more
information of the ENERGY STAR Program.
ENERGYSTARqualiedmodelonly
(Applicable to Thin Client models only)
As an ENERGY STAR® Partner, SAMSUNG has
determined that this product meets the
ENERGY STAR® guidelines for energy
efciency.
– The ENERGY STAR Program has been to
reduced greenhouse gas emissions and
save energy through voluntary labeling.
– Power management setting of this product
have been enabled by default, and have
various timing setting from 1 minutes to 5
hours.
– The product can wake with a button press
on the chassis from sleep mode.
ENERGYSTARqualiedmodelonly(Theother
models)
– As an ENERGY STAR Partner, Samsung has
determined that this product or product
models meets the ENERGY STAR guideline
for energy efciency.
To send inquiries and requests for questions
regarding open sources, contact Samsung
Open Source (http://opensource.samsung.com)
10 OPEN SOURCE
LICENSE NOTICE
To send inquiries and requests for questions
regarding open sources, contact Samsung Open
Source (http://opensource.samsung.com)
11 IMPORTANT
NOTES ABOUT
SERVICE
• Figures and illustrations in this User Manual
are provided for reference only and may differ
from actual product appearance.
• An administration fee may be charged if either:
a. An engineer is called out to your home at
your request and there is no defect in the
product.
b. You bring the unit to a repair center and
there is no defect in the product.
• You will be advised of the amount of the
administration fee before any work is done or
a home visit is made.
• If you have a problem with this product, we
strongly recommend you read the
appropriate section of this manual, visit the
Support page for your product at
www.samsung.com, or call Samsung Product
Support (1-800-726-7864) to nd an answer
before you contact a service center for a
repair.
ENG - 29
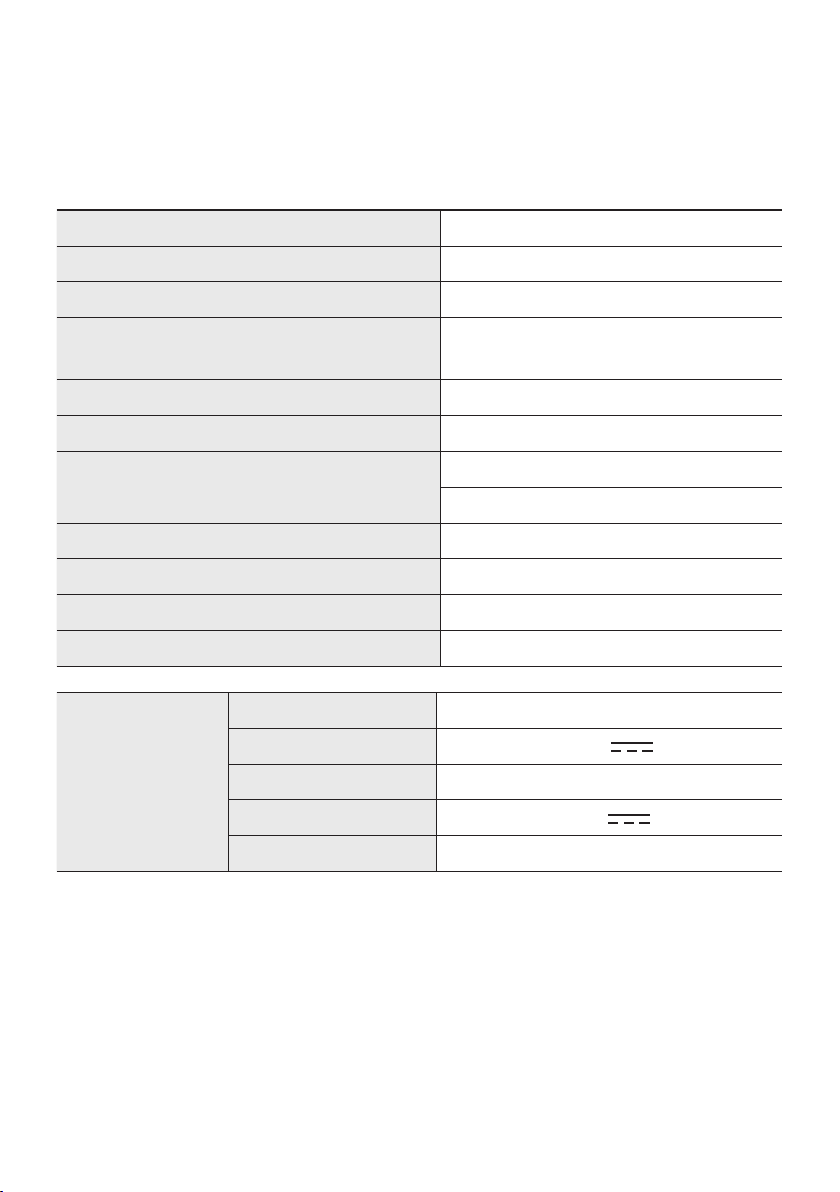
12 SPECIFICATIONS AND GUIDE
Specications
Model Name MX-ST50B
USB 5V/2.1A
Weight 26.32lbs (11.94kg)
Dimensions (W x H x D)
12.9×26.2×11.9 inches
(329×665×301mm)
Operating Temperature Range +41°F to +95°F (+5°C to +35°C)
Operating Humidity Range 10 % ~ 75 %
AMPLIFIER Rated Output power
Power cord plug-in 240W
Battery 90W
Overall Power Consumption 65W
Battery Type Lithium-ion 72Wh
Battery play time up to 18hrs
Battery charge time <3.5hrs
Li-ion Rechargeable
Battery
Battery Model EB-T24C-00, 2INR19/65-4
Nominal Voltage 7.34 V
Rate Capacity 9800 mAh, 71.93 Wh
Limited Charge Voltage 8.4 V
Typical Capacity 10000 mAh, 73.40 Wh
NOTES
• Samsung Electronics Co., Ltd reserves the right to change the specications without notice.
• Weight and dimensions are approximate.
• Battery Play time and Battery charge time vary with use conditions.
• In an extremely cold or hot environment, charging stops for safety. To resolve these issues,
disconnect the AC power cord and connect it again in an operating temperature between 5°C and
35°C (41°F and 95°F).

LIMITED WARRANTY TO ORIGINAL PURCHASER
This SAMSUNG brand product, as supplied and distributed by SAMSUNG and delivered new, in the original carton to the original
consumer purchaser, is warranted by SAMSUNG against manufacturing defects in materials and workmanship for a limited
warranty period of:
One (1) Year Parts and Labor*
(*90 Days Parts and Labor for Commercial Use)
This limited warranty begins on the original date of purchase, and is valid only on products purchased and used in the
United States. To receive warranty service, the purchaser must contact SAMSUNG for problem determination and
service procedures. Warranty service can only be performed by a SAMSUNG authorized service center. The original
dated bill of sale must be presented upon request as proof of purchase to SAMSUNG or SAMSUNG’s authorized service
center. Transportation of the product to and from the service center is the responsibility of the purchaser.
SAMSUNG will repair or replace this product, at our option and at no charge as stipulated herein, with new or
reconditioned parts or products if found to be defective during the limited warranty period specied above.
All replaced parts and products become the property of SAMSUNG and must be returned to SAMSUNG.
Replacement parts and products assume the remaining original warranty, or ninety (90) days, whichever is longer.
SAMSUNG’s obligations with respect to software products distributed by SAMSUNG under the SAMSUNG brand
name are set forth in the applicable end user license agreement. Non-SAMSUNG hardware and software products,
if provided, are on an “AS IS” basis.
Non-SAMSUNG manufacturers, suppliers, publishers, and service providers may provide their own warranties.
This limited warranty covers manufacturing defects in materials and workmanship encountered in normal, and
except to the extent otherwise expressly provided for in this statement, noncommercial use of this product, and
shall not apply to the following, including, but not limited to: damage which occurs in shipment; delivery and
installation; applications and uses for which this product was not intended; altered product or serial numbers;
cosmetic damage or exterior nish; accidents, abuse, neglect, re, water, lightning or other acts of nature; use of
products, equipment, systems, utilities, services, parts, supplies, accessories, applications, installations, repairs,
external wiring or connectors not supplied and authorized by SAMSUNG, or which damage this product or result in
service problems; incorrect electrical line voltage, uctuations and surges; customer adjustments and failure to
follow operating instructions, cleaning, maintenance and environmental instructions that are covered and
prescribed in the instruction book; product removal or reinstallation; reception problems and distortion related to
noise, echo, interference or other signal transmission and delivery problems. SAMSUNG does not warrant
uninterrupted or error-free operation of the product.
THERE ARE NO EXPRESS WARRANTIES OTHER THAN THOSE LISTED AND DESCRIBED ABOVE, AND NO
WARRANTIES WHETHER EXPRESS OR IMPLIED, INCLUDING, BUT NOT LIMITED TO, ANY IMPLIED WARRANTIES OF
MERCHANTABILITY OR FITNESS FOR A PARTICULAR PURPOSE, SHALL APPLY AFTER THE EXPRESS WARRANTY
PERIODS STATED ABOVE, AND NO OTHER EXPRESS WARRANTY OR GUARANTY GIVEN BY ANY PERSON, FIRM OR
CORPORATION WITH RESPECT TO THIS PRODUCT SHALL BE BINDING ON SAMSUNG. SAMSUNG SHALL NOT BE
LIABLE FOR LOSS OF REVENUE OR PROFITS, FAILURE TO REALIZE SAVINGS OR OTHER BENEFITS, OR ANY OTHER
SPECIAL, INCIDENTAL OR CONSEQUENTIAL DAMAGES CAUSED BY THE USE, MISUSE OR INABILITY TO USE THIS
PRODUCT, REGARDLESS OF THE LEGAL THEORY ON WHICH THE CLAIM IS BASED, AND EVEN IF SAMSUNG HAS
BEEN ADVISED OF THE POSSIBILITY OF SUCH DAMAGES. NOR SHALL RECOVERY OF ANY KIND AGAINST
SAMSUNG BE GREATER IN AMOUNT THAN THE PURCHASE PRICE OF THE PRODUCT SOLD BY SAMSUNG AND
CAUSING THE ALLEGED DAMAGE. WITHOUT LIMITING THE FOREGOING, PURCHASER ASSUMES ALL RISK AND
LIABILITY FOR LOSS, DAMAGE OR INJURY TO PURCHASER AND PURCHASER’S PROPERTY AND TO OTHERS AND
THEIR PROPERTY ARISING OUT OF THE USE, MISUSE OR INABILITY TO USE THIS PRODUCT SOLD BY SAMSUNG
NOT CAUSED DIRECTLY BY THE NEGLIGENCE OF SAMSUNG. THIS LIMITED WARRANTY SHALL NOT EXTEND TO
ANYONE OTHER THAN THE ORIGINAL PURCHASER OF THIS PRODUCT, IS NONTRANSFERABLE AND STATES YOUR
EXCLUSIVE REMEDY.
Some states do not allow limitations on how long an implied warranty lasts, or the exclusion or limitation of incidental or
consequential damages, so the above limitations or exclusions may not apply to you. This warranty gives you specic legal rights, and
you may also have other rights which vary from state to state.
To obtain warranty service, please contact SAMSUNG customer care center.
The benets of this Limited Warranty extend only to the original purchaser of Samsung products from an authorized
Samsung reseller. THIS LIMITED WARRANTY SHALL NOT APPLY TO ANY SAMSUNG PRODUCTS PURCHASED
FROM UNAUTHORIZED RESELLERS OR RETAILERS, EXCEPT IN STATES WHERE SUCH RESTRICTION MAY BE
PROHIBITED. For a list of Samsung authorized retailers, please go to:
http://www.samsung.com/us/peaceofmind/authorized_resellers.html.
© 2022 Samsung Electronics Co., Ltd. All rights reserved.
QUESTIONS OR COMMENTS?
Country
IN THE US 1-800-SAMSUNG (726-7864)
www.samsung.com/us/support
Samsung Electronics America, Inc.
85 Challenger Road
Ridgeeld Park, NJ 07660
Samsung Service Center
Web Site Address