Loading ...
Loading ...
Loading ...
24
POUR TOUTES LES INSTALLATIONS, ENLEVEZ TOUS LES REVÊTEMENTS DE PROTECTION
EN PLASTIQUE BLANC DE LA HOTTE, DES RAILS LATÉRAUX, DES GARNITURES, DES RAILS
À GRAISSE ET DES FILTRES À GRAISSE.
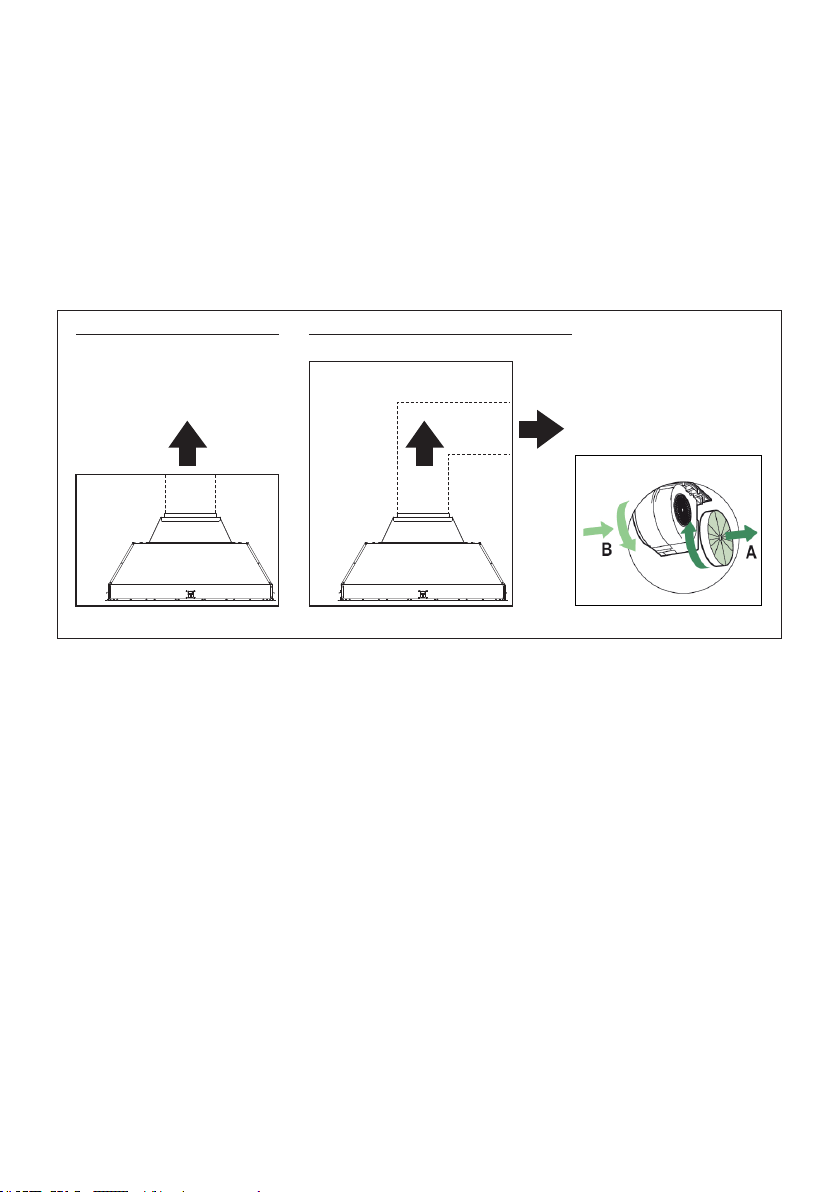
INSTALLATIONS A RECIRCULATION
IL EST VIVEMENT RECOMMANDE QUE LA CUISINE DE STYLE PROFESSIONNEL SOIT TOU-
JOURS VENTILÉE À L'EXTÉRIEUR. Pour les installations à recirculation (Figure 1), des ltres à char-
bon sont indispensables. Retirez tous les ltres à graisse et mettez-les de côté. Fixez un ltre à charbon
à chacune des extrémités du ventilateur. Chaque ltre à charbon se xe à la grille sur le côté du ventila-
teur. Faites tourner le ltre dans le sens des aiguilles d'une montre pour l'installer et dans le sens inverse
pour le retirer (Figure 1A). Remplacez tous les ltres à graisse. Les installations à recirculation exigent
également des conduits permettant de détourner l'air du haut ou de la face ou du côté de l'armoire ou de
la hotte personnalisée ou du côté / de la face du plafond et de retour dans la cuisine. Installez au moins
un conduit de 15" de longueur verticale métallique (Figure 1) à la sortie d'air. Faites passer le conduit
verticalement et xez-le à l'ouverture correspondante préalablement découpée en haut ou sur le côté de
l'armoire ou du plafond. Une grille cache-conduit métallique est également recommandée. Les conduits
ne doivent pas se terminer à l'intérieur de l'armoire ou de la hotte personnalisée.
FIGURE 1
Armoire
ou hotte
personnalisée
Plafond
Travaux
des
conduits
Armoire ou hotte
personnalisée
Plafond
Travaux
des
conduits
Version 07/11 - Page 7
PLAN YOUR DUCTWORK
To ensure that the blower performs to its highest
possible capacity, ductwork should be as short
and straight as possilbe.
The ductrun should not exceed 35 equivalent
feet if ducted using the required minimum of 6"
round duct. For 10" round ducting with the 1200
cfm internal motor or 900 / 1200 remote blower,
use 55 equivalent feet. Calculate the length of
the ductwork by adding the equivalent feet in
FIGURE 5 for each piece of duct in the system
An example is given in FIGURE 6.
For best results, use no more than three 90°
elbows. Make sure that there is a minimum of
24" of straight duct between elbows if more
than one is used. Do not install two elbows
together. If you must elbow right away, do it
as far away from the hood's exhaust opening
as possible.
9 Feet Straight Duct
2 - 90˚ Elbows
Wall Cap
Total System
9.0 feet
10.0 feet
0.0 feet
19.0 feet
FIGURE 6
3.0 feet
5.0 feet
12.0 feet
0.0 feet
45˚ Elbow
90˚ Elbow
90˚ Flat Elbow
Wall Cap
FIGURE 5
FIGURE 4
RECIRCULATING INSTALLATIONS
IT IS HIGHLY RECOMMENDED THAT PROFESSIONAL STYLE COOKING ALWAYS BE VENTED TO THE OUTSIDE. For recirculating
installations (FIGURE 4), Charcoal Filters are necessary. Remove all grease filters and set aside. Attach one charcoal filter to each end
of the blower. Each charcoal filter attaches to the grid on the side of the blower. Rotate the filter clockwise to install and counterclockwise
to remove (FIGURE 4A). Replace all grease filters. Recirculating installations also require some duct work to divert the air out of the top or
face or side of the cabinet or custom hood or out of the side / face of the soffit and back into the kitchen. Install at least 15" of vertical run of
metal duct (FIGURE 4) at the air outlet. Run the duct vertically and secure it at the relevant opening previously cut out at the top or side of
the cabinet or soffit. A metal duct cover grille is also recommended. The duct work must not terminate inside the cabinet or custom hood.
cabinet
or
custom
hood
ceiling
duct
work
duct
work
ceiling
inca pro plus
cabinet
or
custom
hood
MAKE YOUR CUT-OUTS
1. Disconnect and move freestanding range from cabinet opening to provide easier access
to upper cabinet or custom hood. Put a thick, protective covering over cooktop, set-in range
or countertop to protect from damage or dirt.
2. Determine and make all necessary cuts in the wall and/or ceiling for the ductwork. Install
the ductwork before the rangehood.
3. Determine the proper location for the Power Supply Cable. Use a 1
1/4" Drill Bit to make
this hole. Install the cable. Use caulking to seal around the hole. DO NOT turn on the
power until installation is complete.
4. Choose the knock out hole to remove for installing the power cable. Use a screwdriver
to snap off the knock out covering. (FIGURE 7 shows inside the wiring box and outside)
FIGURE 4A
inca pro plus
FIGURE 7
FOR ALL INSTALLATIONS
REMOVE ALL WHITE PLASTIC PROTECTIVE COVERING FROM HOOD, SIDE RAILS,
TRIM, GREASE RAILS AND GREASE FILTERS
FIGURE 1A
Loading ...
Loading ...
Loading ...