INSTALLER:
Leave this manual with
the appliance.
CONSUMER:
Retain this manual for
future reference.
!
If any parts are missing
or defective contact us at
or call
423-415-1682
DANGER
FIRE OR EXPLOSION HAZARD
If you smell gas:
· Shut off gas to the appliance. · Extinguish
any open flame. · If odor continues, leave
the area immediately. · After leaving
the area, call your gas supplier or fire
department.
Failure to follow these instructions could
result in fire or explosion, which could cause
property damage, personal injury, or death.
WARNING
Do not store or use gasoline or other
flammable vapors and liquids in the vicinity
of this or any other appliance. An LP-
cylinder not connected for use shall not be
stored in the vicinity of this or any other
appliance.
WARNING
For outdoor use only. Installation and
service must be performed by a qualified
installer, service agency, or the gas supplier.
WARNING
If the information in this manual is not
followed exactly, a fire or explosion may
result causing property damage,personal
injury,or loss of life.
Improper installation, adjustment,
alteration, service or maintenance can
cause injury or property damage. Refer to
the owner's information manual provided
with this appliance. For assistance or
additional information consult a qualified
installer, services agency or the gas
supplier.
DANGER
CARBON MONOXIDE HAZARD
This appliance can produce
carbon monoxide which has no
odor.
Using it in an enclosed space can
kill you.
Never use this appliance in an
enclosed space such as a camper,
tent, car or home.
IN221100405V01_US
842-291V00

2
Table of contents
Parts list ....................................................................... 3
....................................................... 4
................................................... 7
..........................................................1
Cleaning and maintenance ..........................................1
.............................................1
TABLE OF CONTENTS
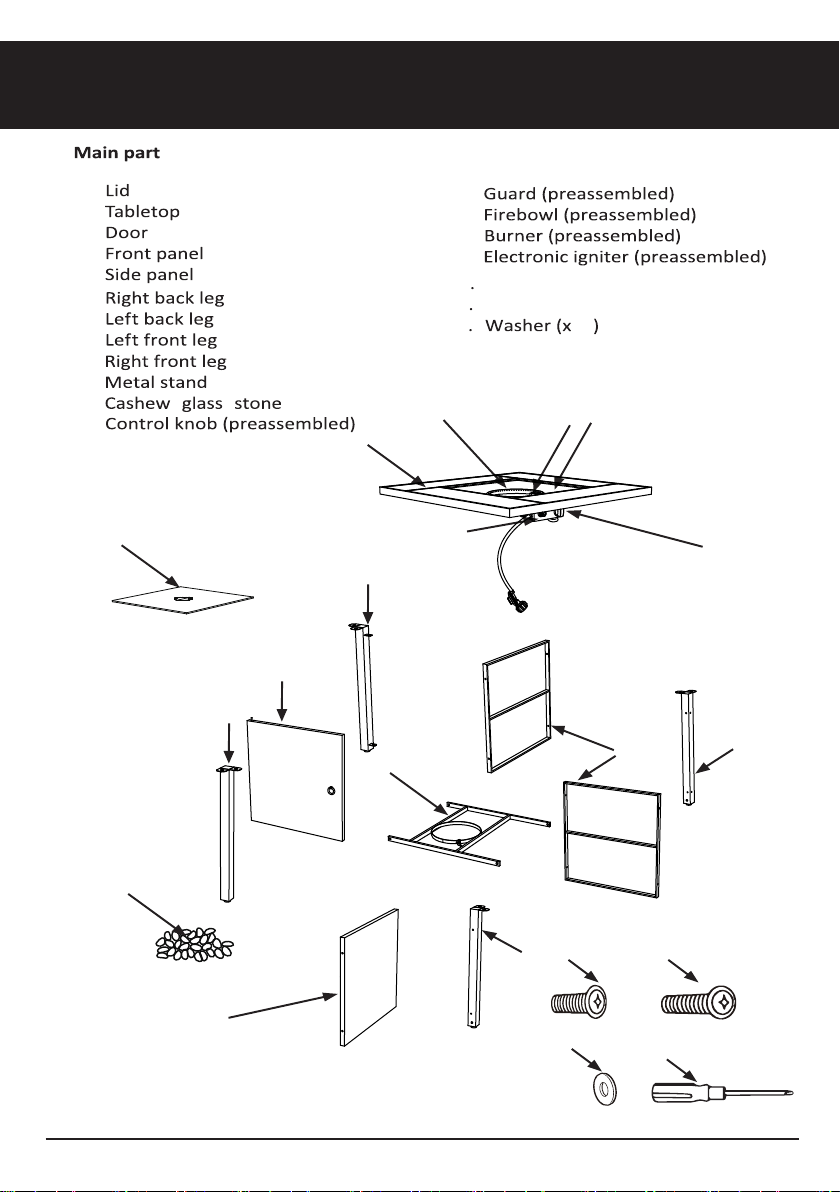
Parts list
3
AA
BB
CC
AA BB
CC
M6x16 screw(x9)
M6x40 screw(x16)
(x2)
25
A
B
C
D
E
F
G
H
I
J
K
L
M
N
O
P
B
A
C
D
F
E
G
H
I
J
K
P
DD. Screwdriver
DD
PARTS LISTS
O
Safety instrucons
4
General informa
WARNING
1.
Handling Code, CSA B149.2
2. THIS UNIT IS INTENDED FOR OUTDOOR USE ONLY! This product shall be used
3. This unit is to be used with propane gas only! (sold separately)
4.
5. Only use propane gas for this unit.
6. This unit is not intended for natural gas.
7.
conversion of this unit will void the manufacturer warranty.
8. Do not use any solid fuel or charcoal for this unit.
9.
10. LP GAS WARNING: Do not use any more than 1/4in depth lava rocks/pumice
11. If the propane gas tank is leaking gas, you may hear, see, or smell a hiss. Do the
following:
12. Applying too much propane may result in gas pooling and will not burn. Allow
fresh air into the unit so that the remaining gas may escape.
13.
14. Manifold pressure: 11 inch w.c. (2.74kPa).
15. Use LP propane tanks with the following dimensions: diameter 12 in, height 18
in.
16. You must use a propane tank that has a collar to protect the gas valve.
17.
18. The tank system must be set up for vapor withdrawal.
19.
be hazardous and should be inspected by a gas supplier.
20.
21.
22. Always ensure that lava rocks/pumice stones/LavaGlass™ are completely dry
before use. Failure to do so will cause them to crack or pop.
23.
24.
25.
26.
27. This unit is not intended for cooking.
28.
this unit.
29. Keep a safe distance to avoid burning skin or clothing.
30.
31.
32. Keep all electrical cords and fuel supply hose away from heated surfaces.
33.
SAFETY INSTRUCTIONS
Safety instrucons
5
34.
35.
down the control knob for 1 minute.
36. Do not add water into the unit.
37. Do not operate unit if any part has been under water. Call a service technician to
replace any damaged parts should this occur.
38. Do not disconnect any part while unit is in use.
39. Do not store a spare propane tank on or near this unit.
40.
41.
outdoors ONLY.
42.
43.
cooled down.
44.
45. Children should never operate this unit. Children must be supervised while near
this unit.
46. Keep gas tank at least 5 feet away from unit when lit. (if external tank)
47. Maximum gas supply: 250 psi; Min. gas supply: 10 psi.
48.
should be inspected annually and cleaned regularly.
49.
burner must be replaced.
50. Keep the hose out from any pathways to eliminate any accidental damage. (if
external tank)
51. Be aware of the hazards of high temperatures and stay away from the unit to
52.
Standard of Canada CAN/CSA-B339, LP gas tanks, spheres and tubes for
53.
54.
55. Children and adults should be alerted to the hazards of high surface
56. Young children should be carefully supervised when they are in the area of the
appliance.
57.
or placed on or near the appliance.
58.
59.
the appliance are kept clean.
IF APPLICABLE:
60.
61.
Safety instrucons
SAFETY INSTRUCTIONS
Safety instrucons
6
Only use the regulator and hose assembly provided with this unit.
Inspect the burner before use of this unit. If the burner shows any kind
of damage, do not operate the appliance.
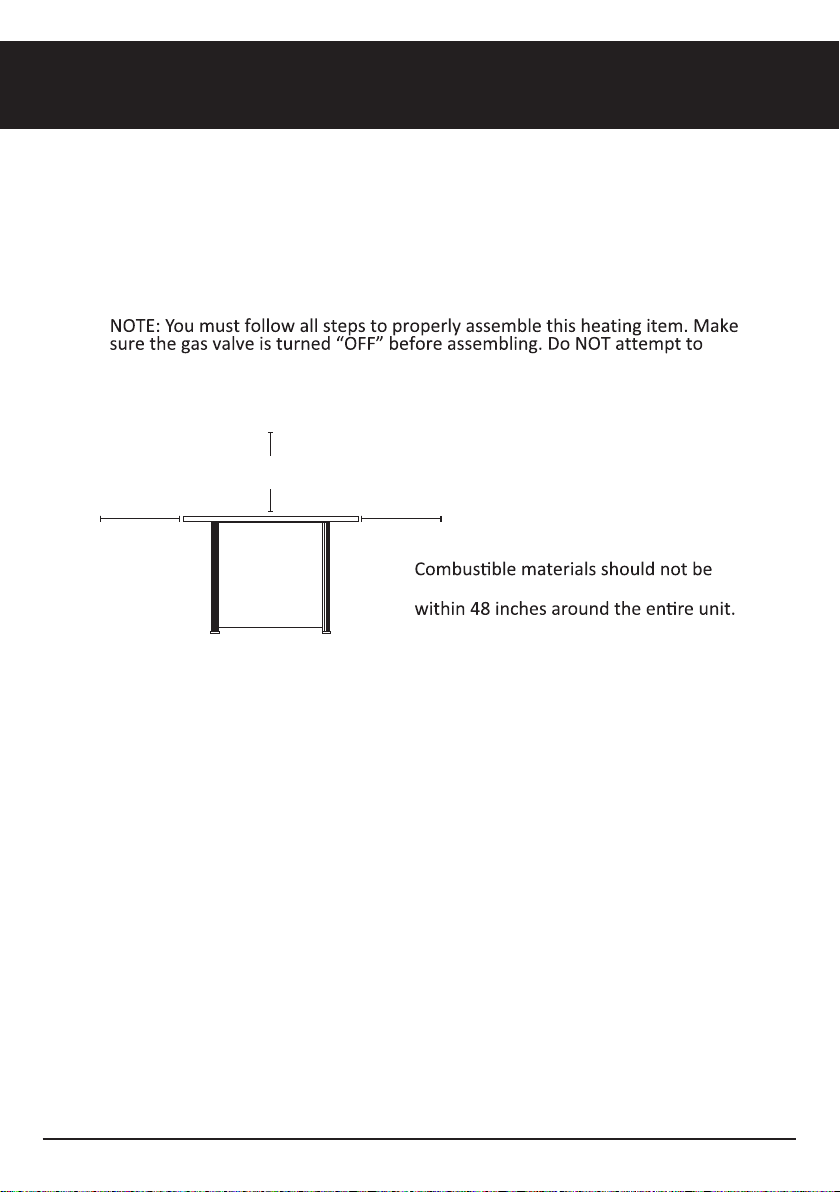
assemble without proper tools.
within 60 inches of the top of the unit, or
SAVE ALL INSTRUCTIONS FOR FURTHER USE
Min. Clearance
60 in. (152.4 cm)
Min. Clearance
48 in. (121.9 cm)
Min. Clearance
48 in. (121.9 cm)
Safety instruconsSafety instrucons
SAFETY INSTRUCTIONS
7
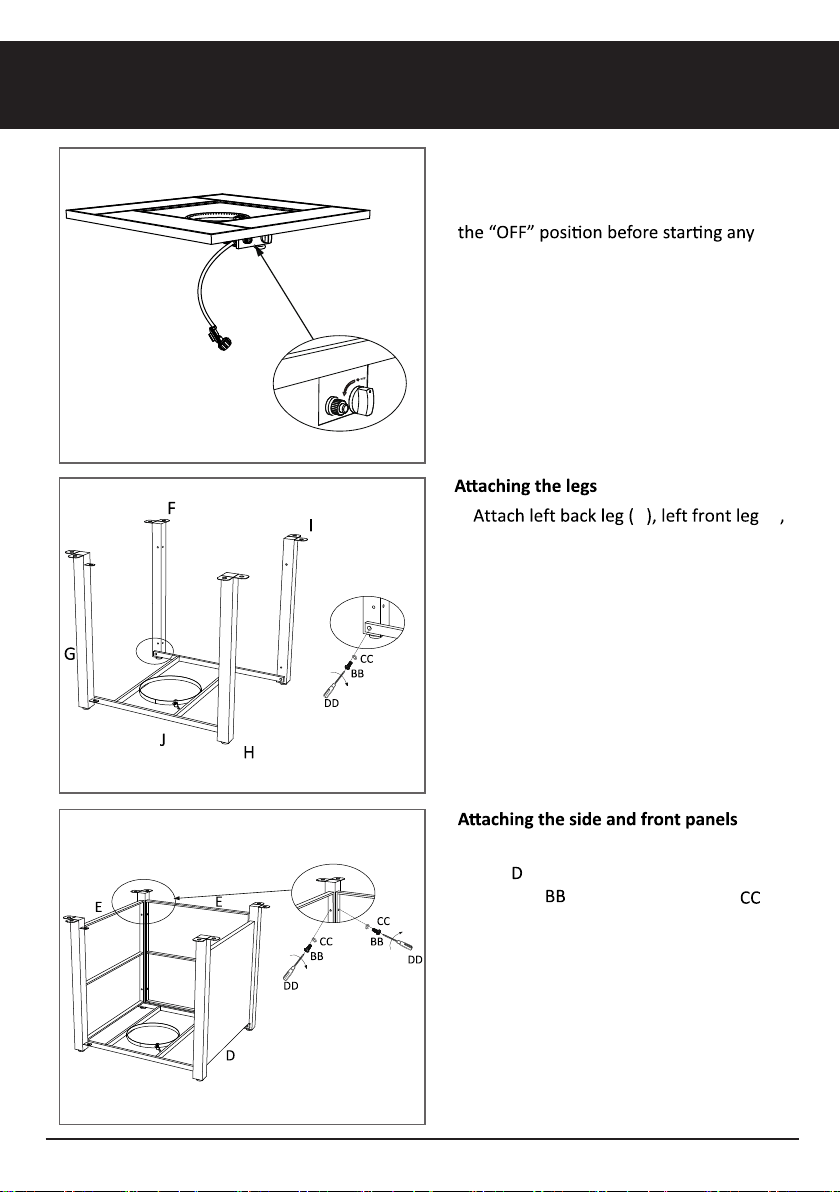
Checking the gas control
1. Check that the control knob (
)for
the gas supply system is turned to
assembly.
(A
PAGADO)
Safety instruconsSafety instruconsSafety instrucons
ASSEMBLY INSTRUCTIONS
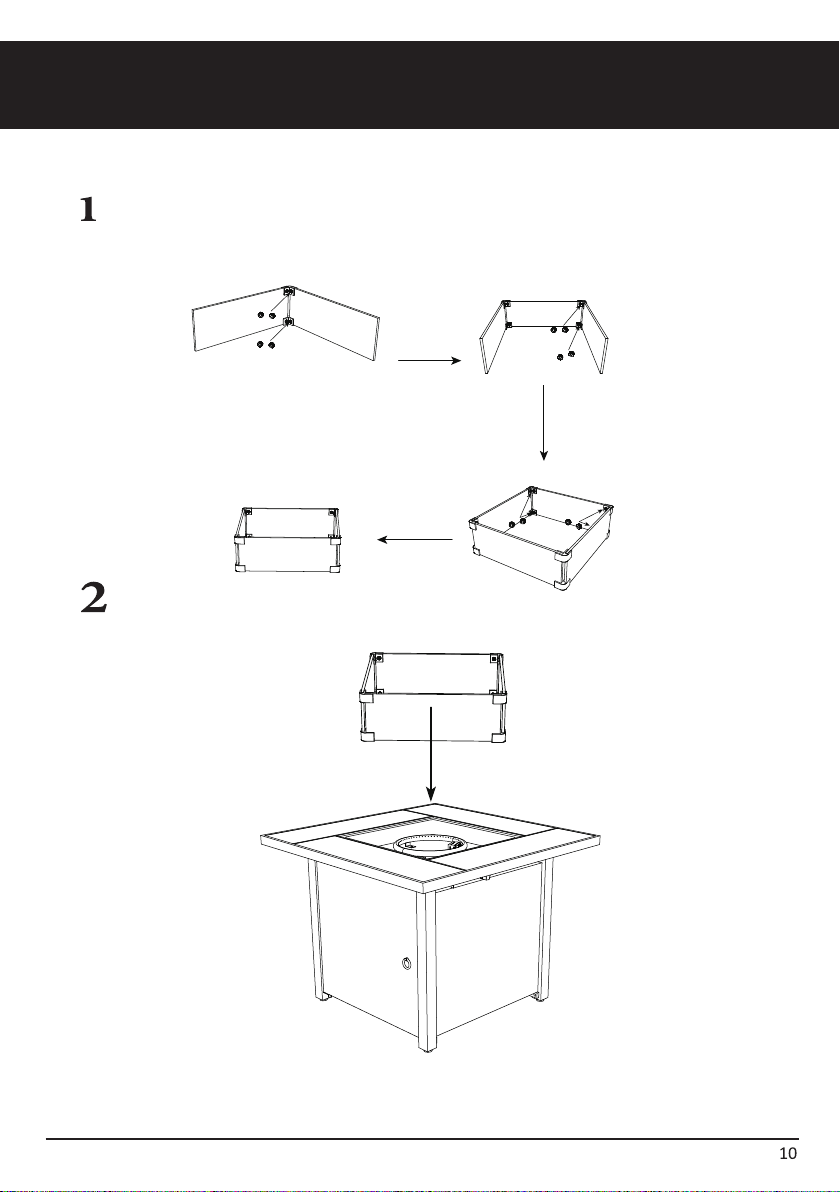
3. Attach the 2 side panels (E) and front
panel ( ) to the legs using 12 pcs M6 x
40 screws ( ) and 12 pcs washers ( ).
2.
G
) and right front leg (I) to
the metal stand (
) using
4 pcs M6 x 40
screws (BB) and 4 pcs washers (CC).
right back leg (
F
(H)
J
G
Assembly instru ons
8
6. r g t
into the met st e sure the
g
t et st
completely. Turn the pr
screw on the out et st
) to secure
J
J
J
the pr
g
ASSEMBLY INSTRUCTIONS
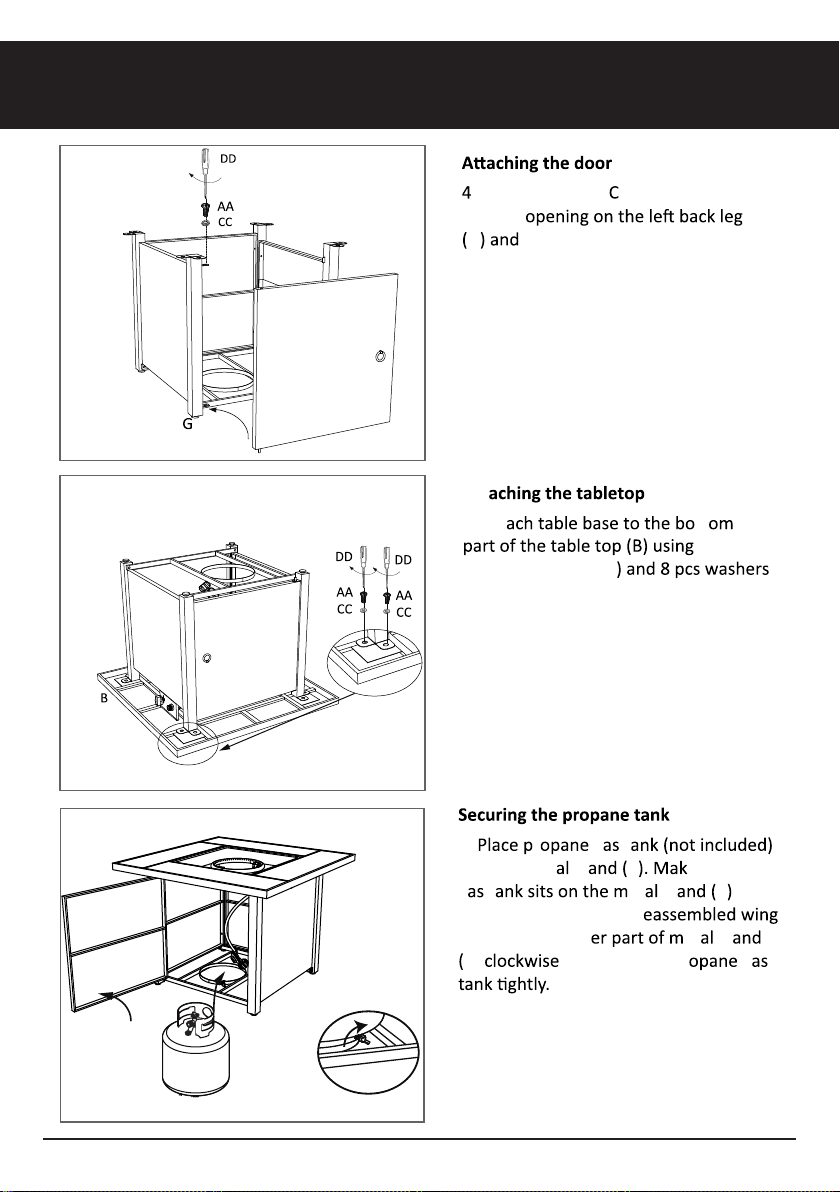
5
) into the . Insert the door (
bottom
secure
Att
.
. Att
tt
8 pcs
screws (AA
(CC).
1 pc M6 x 16 screw (AA) and 1 pc
washer (CC).
M6 x 16
G
C
Assembly instructions
9
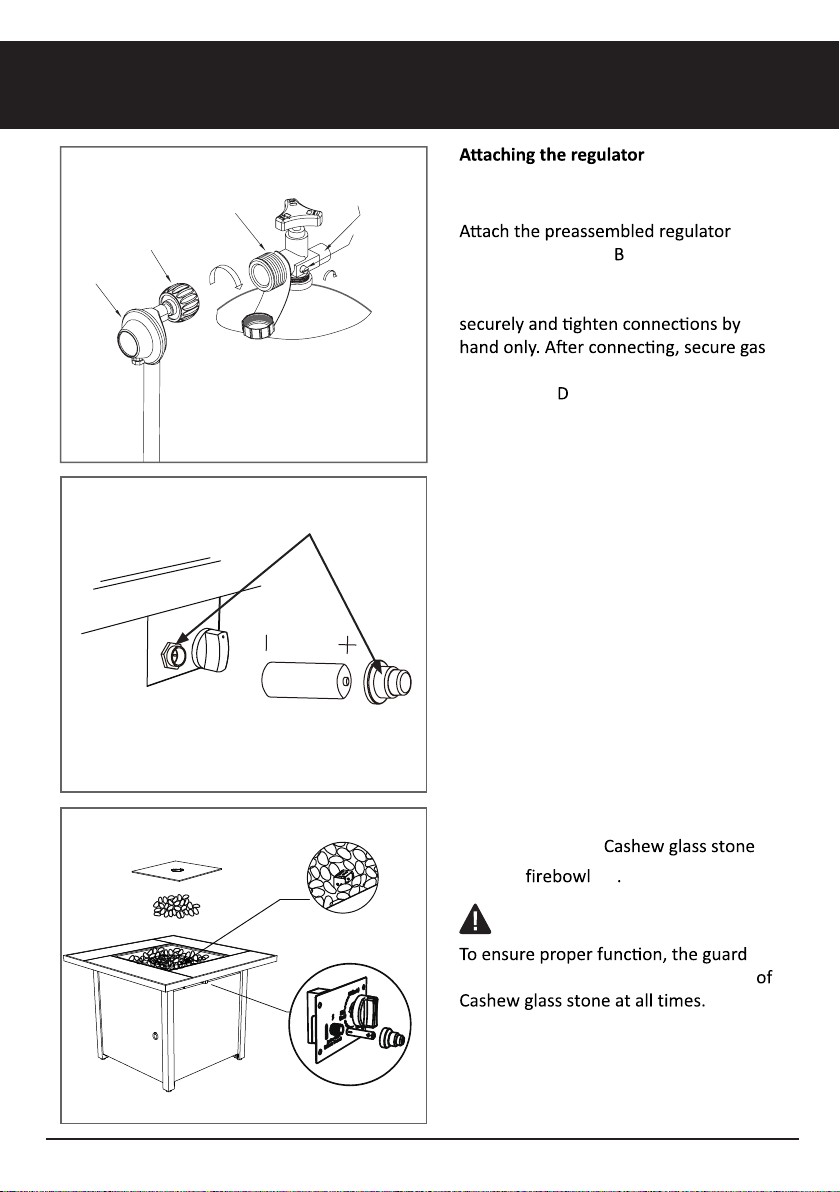
7. Turn the cylinder valve on the tank
clockwise to close the propane tank.
from the table top (
) to the cylinder
valve by turning the regulator coupling
nut clockwise. Make sure it is fastened
hose to the bracket on the inside of the
front panel ( ).
Pouring the lava rocks
9. Pour the box of
( )
into the
CYLINDER VALVE
PRESSURE
RELIEF VALVE
BLEED-OFF
VALVE
REGULATOR
BLACK COUPLING NUT
turn clockwise to connect
turn clockwise
to reseal
CAUTION
Assembly instru ons
ASSEMBLY INSTRUCTIONS
(K)
()
(())on this burner (() should be free
Assembly
Assembly instructiAssembly instru
ASSEMBLY INSTRUCTIONS
Assembling the glass
Unscrew all preassembled screws on the glass clamps.
Then, assemble one glass panel to the other glass panel . Repeat for the rest two glass panels.
Inserting the glass
Insert the glass assembly made in step 1 into the ridge on the top of the fire table body .
User instrucons
1
Before performing a leak test, be sure that no sparks can occur and you are in a
spacious outdoor area. Connect the propane gas tank to the regulator and turn
be a leak.
wear or abrasion you must replace the hose (if applicable). Pumice stones/lava rocks/
should be a yellow/blue color between 10 - 25 inches in height.
Open the door (
the knob counterclockwise.
Close the door ( ) on the body.
Push and hold in the electronic igniter to create sparks within the electrode,
To light
USER INSTRUCTIONS
()
) and slowly open the valve on the propane gas tank by turning
()
()
()
()
()
()
Close the cylinder valve on the propane gas tank if you don’t intend to use it for a
(
)
)

1
Cleaning and maintenance
1. Before performing any maintenance always disconnect propane gas tank.
2.
3.
from debris.
4.
and pumice stones/lava rocks/LavaGlass are completely cooled down. Wipe
5.
6. Permanent damage may occur if powder or solvent comes in contact with
7.
8. If storing this unit inside, disconnect the propane gas tank from the gas valve.
9. Not using manufacturer approved or supplied parts/accessories may result in a
10.
use.
11. Store your product indoors during winter months. Avoiding extreme cold
temperatures will prevent from exposure damage.
•
•
in possible damage.
Cleaning and maintenance
Storing
Environmental protecn
Please be sure that all packaging material is disposed of in an
environmentally friendly way.
CLEANING AND MAINTENANCE
Cleaning and maintenance
OTHER USEFUL INFORMATION
®
