KitchenAid _
PRO LI N E TM SERIES
GUIDE TO
PROF SS|ONA_
RESULTS
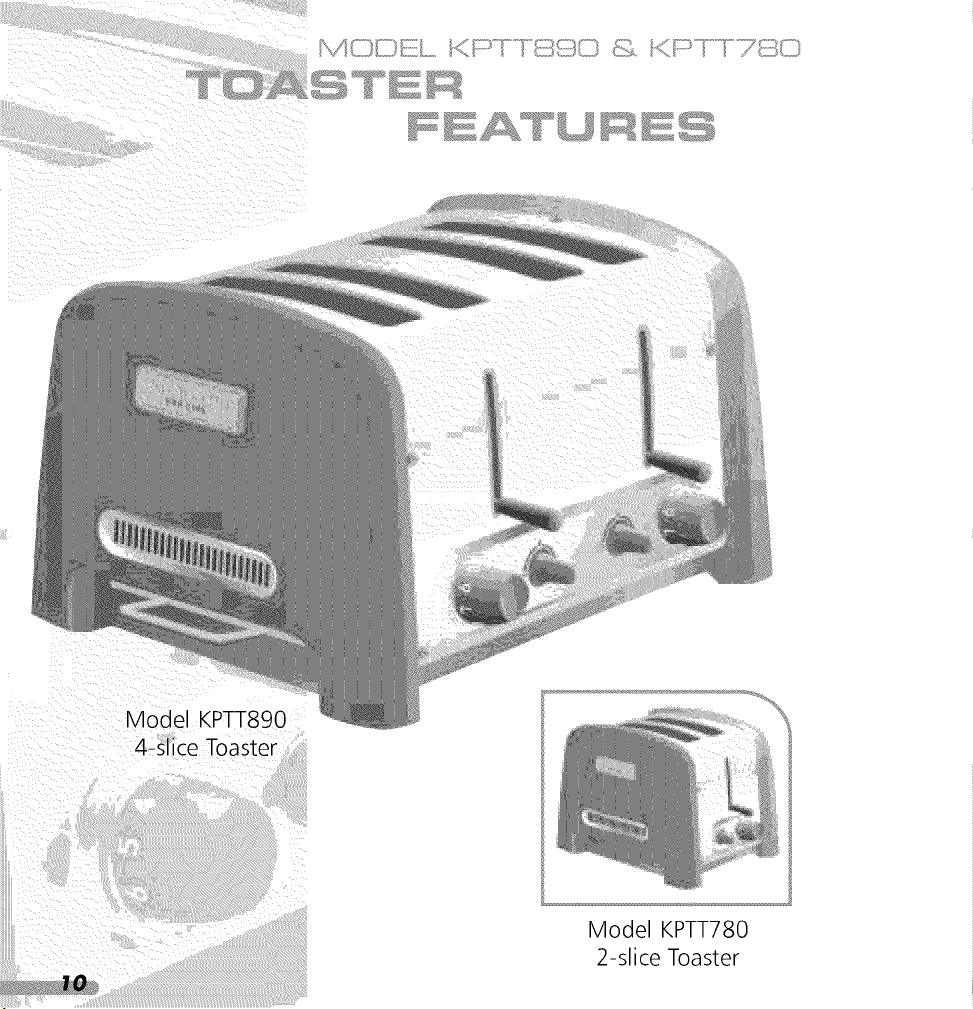
Model KPTT890 & KPTT780 Toasters


KitchenAid ® PRO LINE
are encineered to oe a n_
commercial aurability, cla._
contemporary performance
_ylooking at the es__
simplicity, depenc
by t _a_
ose essential qualit
aefound ar
Series Toasters
d of
the home. VVe
ing in the commercial
ftsmanship
)int, our goal became
offered a
Series 2 and 4 slice toasters
_stmetal construction will wil
_okterrific doing so. A tot
I remain within the
_eshade levels provide toast for eve@
beautifully con_,stent resu ts
•
Ice Toaster speeds preparation when
_stfor part cular tastes.
_nd the toughest
sli
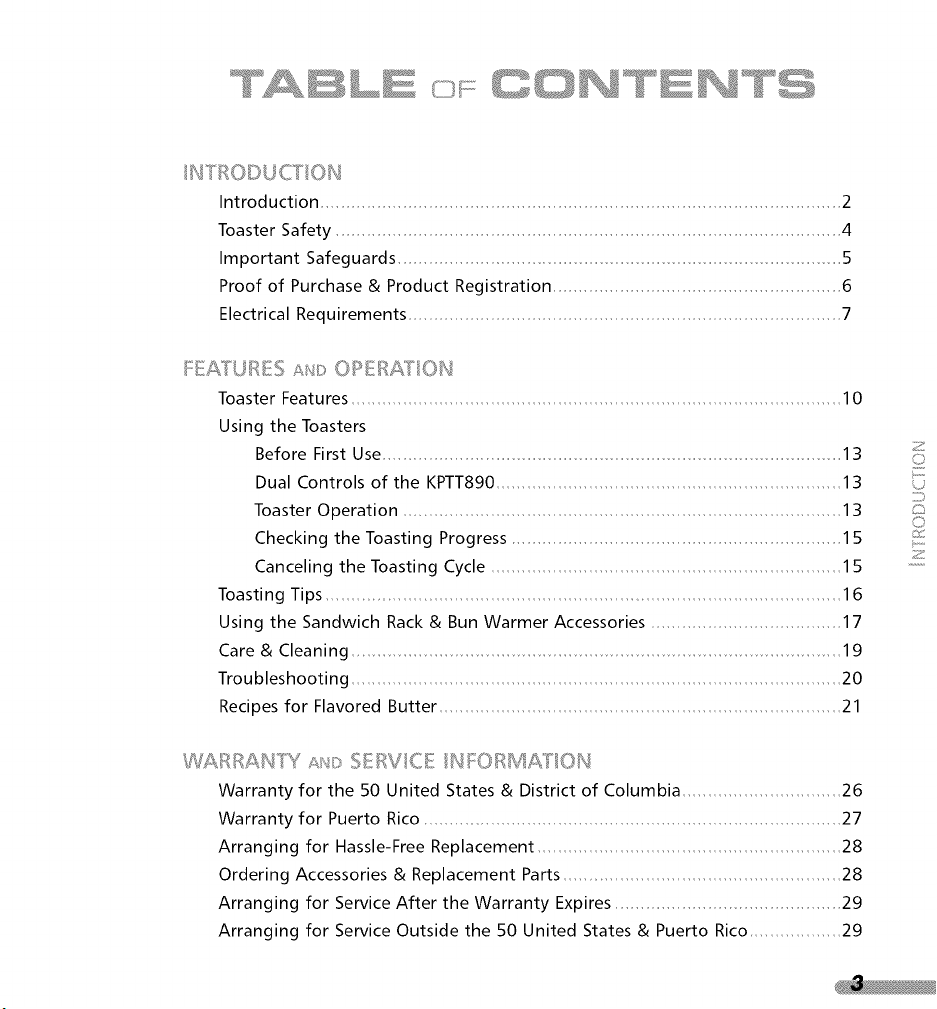
IHTRO©UCTIOH
Introduction ..................................................................................................... 2
Toaster Safety 4
Important Safeguards .... 5
Proof of Purchase & Product Registration 6
Electrical Requirements 7
FEAi[URES Slit: OPERA/Y/OH
Toaster Features 10
Using the Toasters
Before First Use .... 13
Dual Controls of the KPTT890 13
Toaster Operation 13
Checking the Toasting Progress 15
Canceling the Toasting Cycle 15
Toasting Tips 16
Using the Sandwich Rack & Bun Warmer Accessories 17
Care & Cleaning 19
Troubleshooting 20
Recipes for Flavored Butter 21
RRAHPl s/_/_:>SERVICE /HFORMAIr/OH
Warranty for the 50 United States & District of Columbia 26
Warranty for Puerto Rico 27
Arranging for Hassle-Free Replacement 28
Ordering Accessories & Replacement Parts 28
Arranging for Service After the Warranty Expires 29
Arranging for Service Outside the 50 United States & Puerto Rico 29
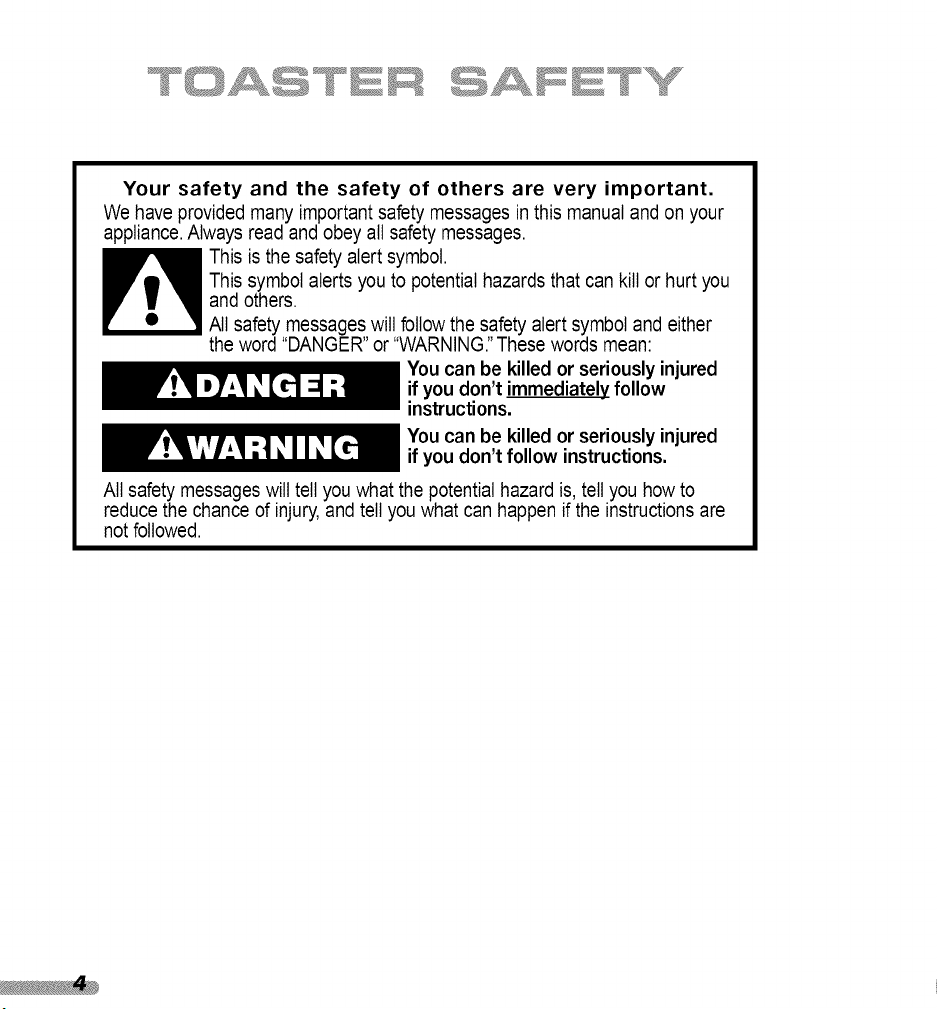
Your safety and the safety of others are very important.
We have provided many important safety messages inthis manual and on your
appliance.Always read and obey all safety messages.
This is the safety alert symbol.
This symbol alerts you to potential hazards that can kill or hurt you
and others.
All safety messages will follow the safety alert symbol and either
the word "DANGER" or "WARNING."These words mean:
You can be killed or seriously injured
if you don't immediatelyfollow
instructions.
You can be killed or seriously injured
if you don't follow instructions.
All safety messages will tell you what the potential hazard is, tell you how to
reduce the chance d injury,and tell you what can happen if the instructions are
not followed.
Whenusingelectricalappliances,basicsafetyprecautionsshouldalwaysbe
followed,includingthefollowing
" Read all instructions.
? Do not touch hot surfaces. Use handles or knobs.
To protect against electrical shock, do not immerse cord, plugs, or
Toaster in water or other liquids.
4. Closesupervision is necessarywhen any appliance is used by or near children.
;i Unplug Toaster from outlet when not in use and before cleaning.
Allow to cool before putting on or taking off parts.
Do not operate any appliance with a damaged cord or plug, or after the
appliance malfunctions or has been damaged in any manner. Return appliance
to the nearest authorized servicefacility for examination, repair, or adjustment.
? The use of accessory attachments not recommended by the appliance
manufacturer may cause injuries.
_!:' Do not use outdoors.
? Do not let cord hang over edge of table or counter, or touch hot surfaces.
" Do not place on or near a hot gas or electric burner, or in a heated oven.
" To disconnect, turn any control to "Off", then remove plug from outlet.
_ Do not use appliance for other than intended use.
" ' Oversize foods, metal foil packages, or utensils must not be inserted in
Toaster as they may involve a risk of fire or electric shock.
4 A fire may occur if Toaster is covered or touching flammable material,
including curtains, draperies, walls and the like, when in operation.
;; Do not attempt to dislodge food when Toaster is plugged in.
" This product has been UL Listed for household and commercial use.
Alwayskeepacopyofthesalesreceiptshowingthe dateof purchaseofyour
Toaster.Proofof purchasewillassureyouof in-warrantyservice.
BeforeyouuseyourToaster,pleasefill outandmailyourproductregistration
cardpackedwith theunit.Thiscardwillenableusto contactyouin the
unlikelyeventof a productsafetynotificationandassistusin complyingwith
theprovisionsof theConsumerProductSafetyAct.Thiscarddoesnotverify
yourwarranty.
Pleasecompletethefollowingforyourpersonalrecords:
ModelNumber:2-SliceToaster- KPTT780
4-SliceToaster- KPTT890
SerialNumber
DatePurchased
StoreName
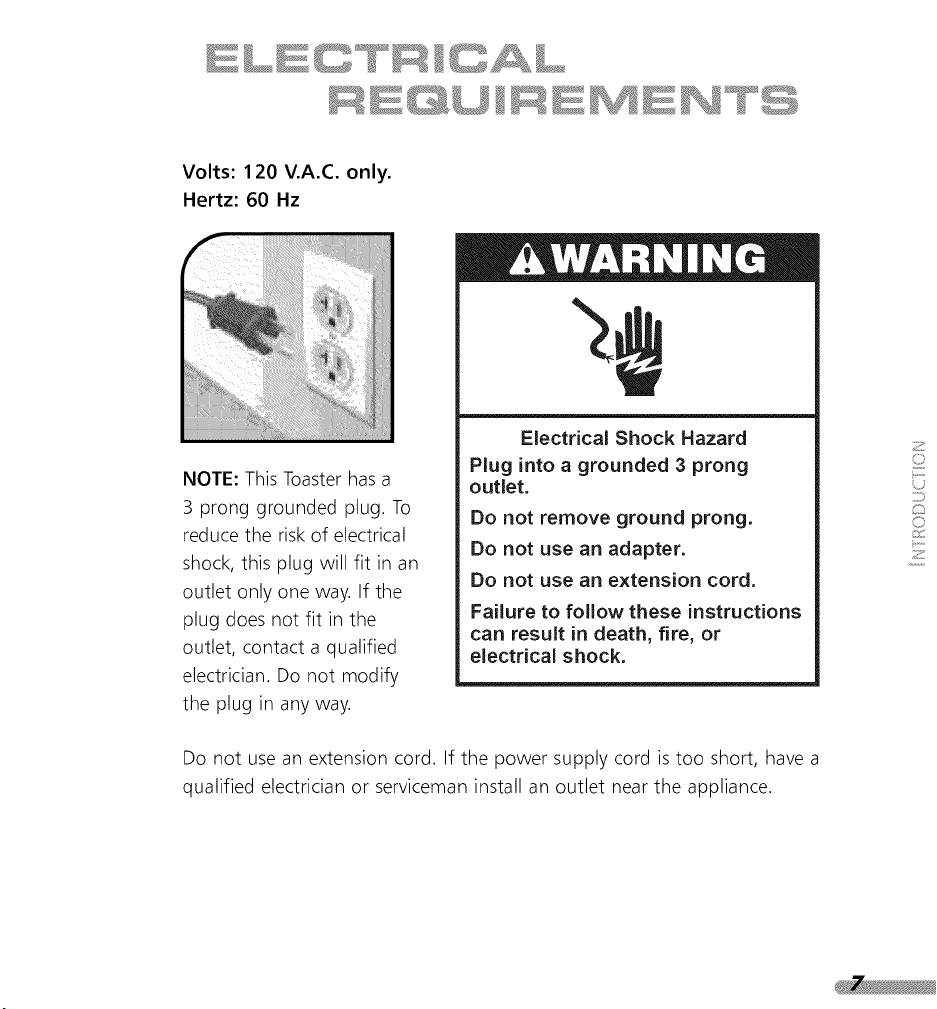
Volts:120V.A.C.only.
Hertz:60 Hz
NOTE:ThisToasterhasa
3 pronggroundedplug.To
reducetheriskof electrical
shock,thisplugwillfit inan
outletonlyoneway.If the
plugdoesnotfit inthe
outlet,contactaqualified
electrician.Donot modify
theplugin anyway.
ElectricalShockHazard
Pluginto agrounded3 prong
outlet.
Donot removegroundprong.
Donot usean adapter.
Donot usean extension cord.
Failure to follow these instructions
can result in death, fire, or
electrical shock.
Do not use an extension cord. If the power supply cord is too short, have a
qualified electrician or serviceman install an outlet near the appliance.

LINE TM SERIES
UR S
ON
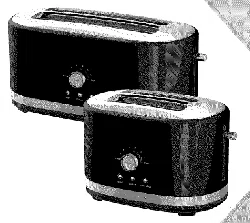
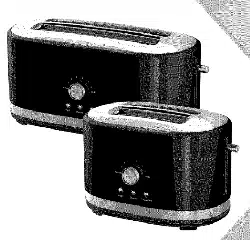
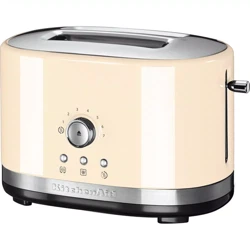
Model KPTT780
2-slice Toaster
Stainless Steel and Die-Cast
Metal Construction
Designed to withstand the commercial
environment, the rugged metal
construction will last for years.
Outstanding Performance
Heavy gauge heating elements held flat
on extra-thick mica boards ensure even
browning. A heat sensor and
microprocessor yield consistent toasting
slice after slice, without pre-heating.
Flexible Operation
On the 4-slice KPTT890, each pair of
slots features its own shade dial, lift
lever, and on/off switch. Speeds
preparation when making toast for
different tastes.
Wide, Deep Slots
1" wide slots handle
bagels, English muffins,
thick breads, and
toaster pastries easily.
Extra-deep toasting cavity enhances
even browning.
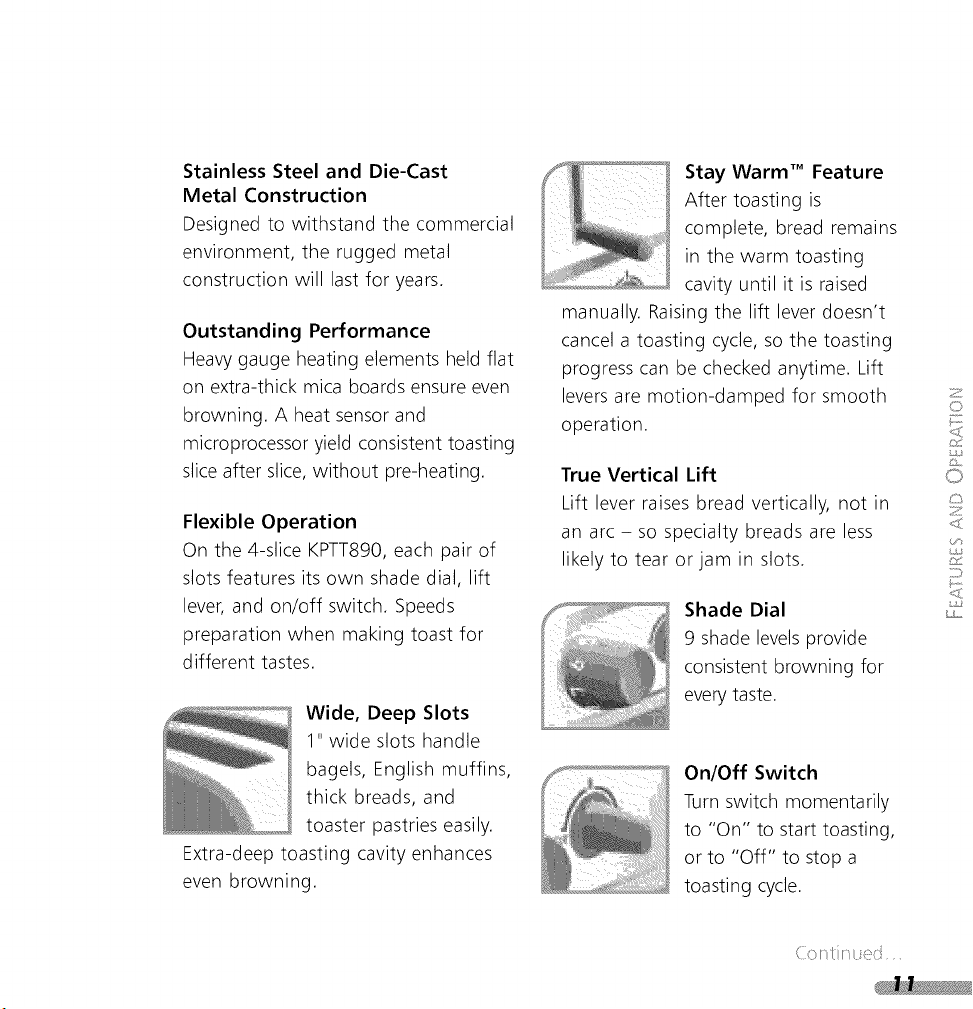
Stay Warm TM Feature
After toasting is
complete, bread remains
in the warm toasting
cavity until it is raised
manually. Raising the lift lever doesn't
cancel a toasting cycle, so the toasting
progress can be checked anytime. Lift
leversare motion-damped for smooth
operation.
True Vertical Lift
Lift lever raises bread vertically, not in
an arc - so specialty breads are less
likely to tear or jam in slots.
Shade Dial
9 shade levelsprovide
consistent browning for
everytaste.
On/Off Switch
Turn switch momentarily
to "On" to start toasting,
or to "Off" to stop a
toasting cycle.
Z
O
O
Z
j,
(: } .:

Function Light
Indicates when toaster is operating.
Toasting Finished Tone
Tone sounds when a toasting cycle
is complete.
Removable
Crumb Tray
Full-width, polished
stainless steel tray is
dishwasher-safe. Model
KPTT890 has two trays, one for each
pair of slots.
Under Base
Cord Wrap
Keeps extra cord out of
sight and out of the way.
Overtemp Protection
Toasting cycle is electronically
controlled. Toaster will not remain on
and overheat due to a mechanical jam
or failure.

I I ! !
I
LIN ......
@_;_W _w_I I ,.=.,, i"" _ ]]Z) I k,,,, =" ....,,J
Before First Use:
Before using your toaster, check the
slots and remove any packing or
printed material that may have fallen
inside during shipping or handling.
The toaster may emit a pungent
odor or light smoke the first time
you use it. This is a normal result of
the manufacturing process. The odor
or smoke is harmless and will
dissipate quickly.
Dual Controls of the KPTT890:
The 4-slice KPTT890 toaster has
separate controls for each pair of
toasting slots, so you can prepare toast
for different tastes - or toast different
breads - simultaneously. Follow the
same operating steps regardless of
which slot pair you are using.
Toaster Operation:
" Shorten the cord, if necessary, by
wrapping it under the base.
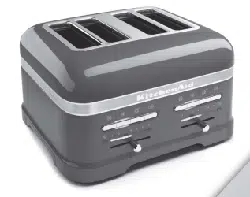
Model KPTT890
4-slice Toaster
Model KPTT780
2-slice Toaster
Z
I')
C)
c)
Z
;y,}
_J
z)
(: ! .:
Electrical Shock Hazard
Plug into a grounded 3 prong
outlet.
Do not remove ground prong.
Do not use an adapter.
Do not use an extension cord.
Failure to follow these instructions
can result in death, fire, or
electrical shock.
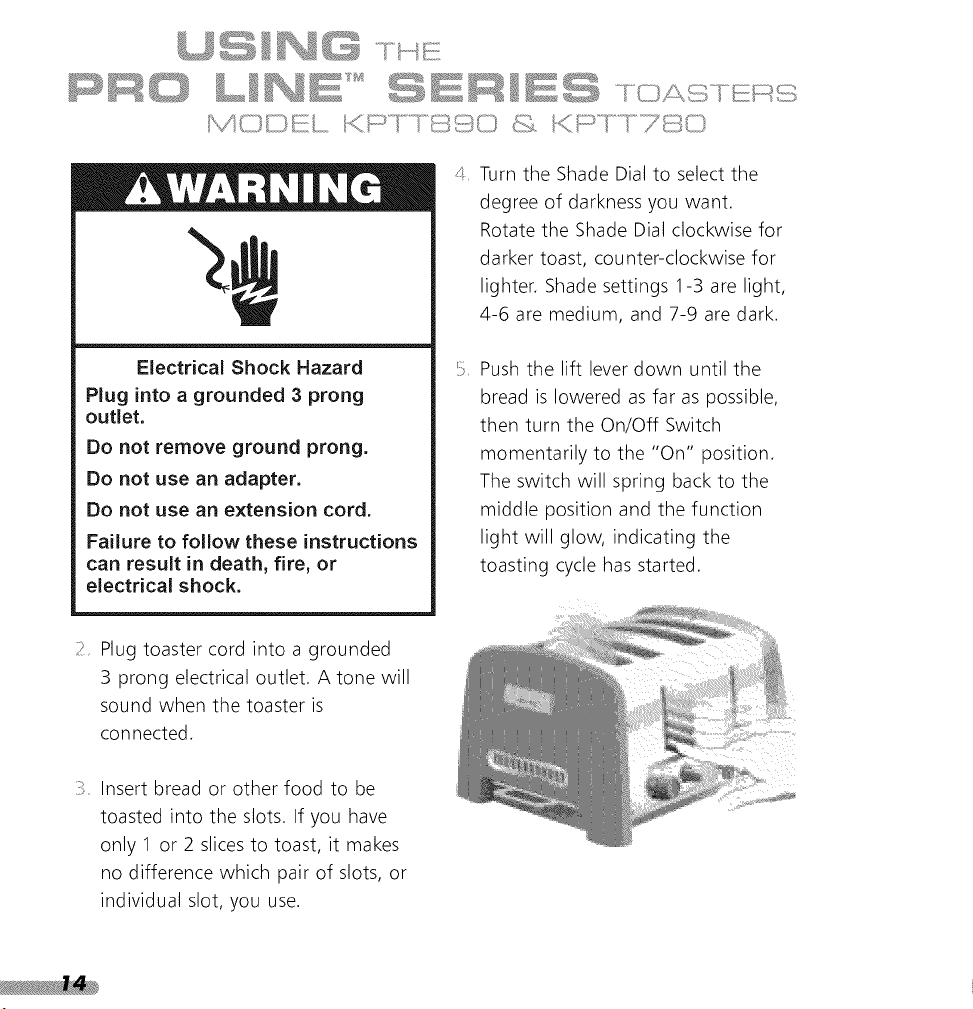
4_ Turn the Shade Dial to select the
degree of darkness you want.
Rotate the Shade Dial clockwise for
darker toast, counter-clockwise for
lighter. Shade settings 1-3 are light,
4-6 are medium, and 7-9 are dark.
Push the lift lever down until the
bread is lowered as far as possible,
then turn the On/Off Switch
momentarily to the "On" position.
The switch will spring back to the
middle position and the function
light will glow, indicating the
toasting cycle has started.
2 Plug toaster cord into a grounded
3 prong electrical outlet. A tone will
sound when the toaster is
connected.
Insert bread or other food to be
toasted into the slots. If you have
only 1 or 2 slices to toast, it makes
no difference which pair of slots, or
individual slot, you use.
NOTE: Toaster will automatically shut
off if the On/Off Switch is held in the
"On" position more than 15 seconds.
When the toasting cycle is complete,
a tone will sound and the function
light will stop glowing. The toast will
remain in the warm toasting cavity
until the lift lever is raised.
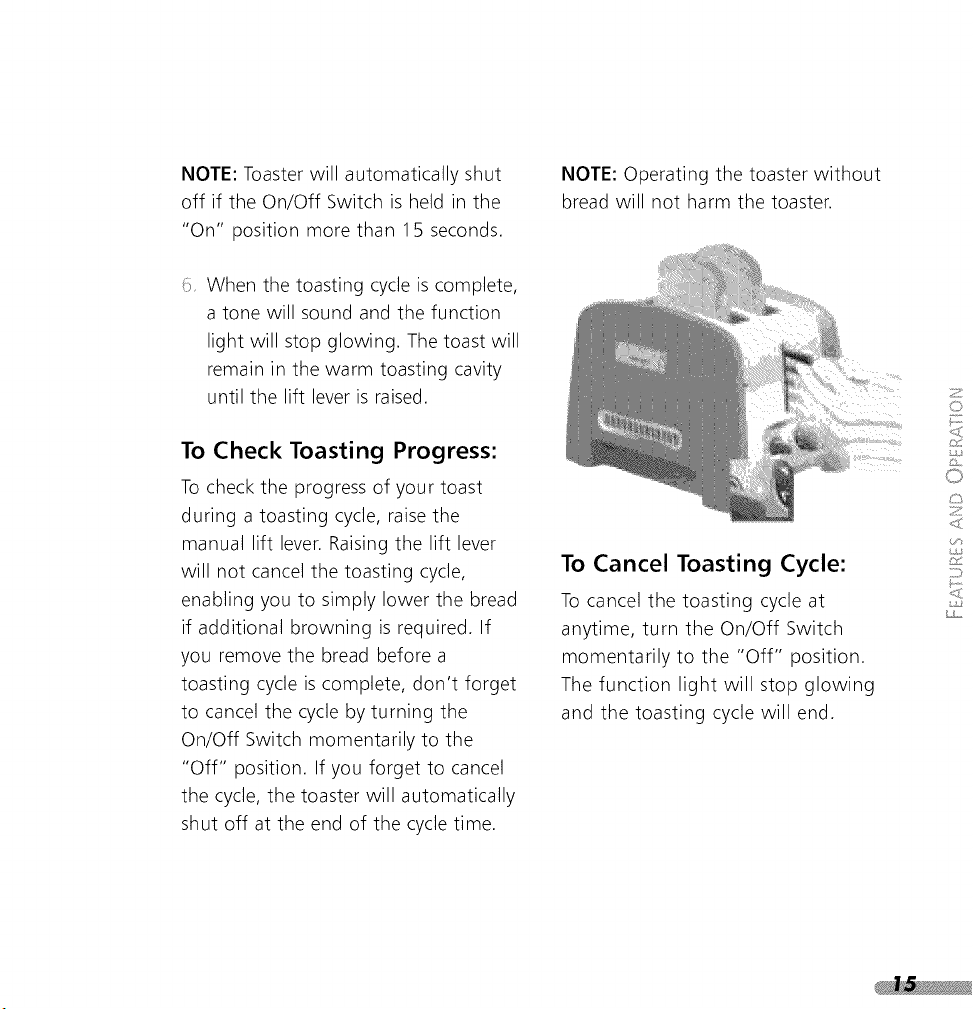
To Check Toasting Progress:
To check the progress of your toast
during a toasting cycle, raise the
manual lift lever. Raising the lift lever
will not cancel the toasting cycle,
enabling you to simply lower the bread
if additional browning is required. If
you remove the bread before a
toasting cycle is complete, don't forget
to cancel the cycle by turning the
On/Off Switch momentarily to the
"Off" position. If you forget to cancel
the cycle, the toaster will automatically
shut off at the end of the cycle time.
NOTE: Operating the toaster without
bread will not harm the toaster.
To Cancel Toasting Cycle:
To cancel the toasting cycle at
anytime, turn the On/Off Switch
momentarily to the "Off" position.
The function light will stop glowing
and the toasting cycle will end.
0
0
Z
j,
CkC

_"_ _'_ s_'_ C _'__Z2;:_°_ _ C_
_.-_.-_I _ _ I_ tE __
rapidly than moist bread and will require a lighter setting. Bagels
and English muffins usually require higher shade settings due to
their firm texture and high density.
For best results, toast only one
bread type and thickness at a time
in a given pair of toasting slots.
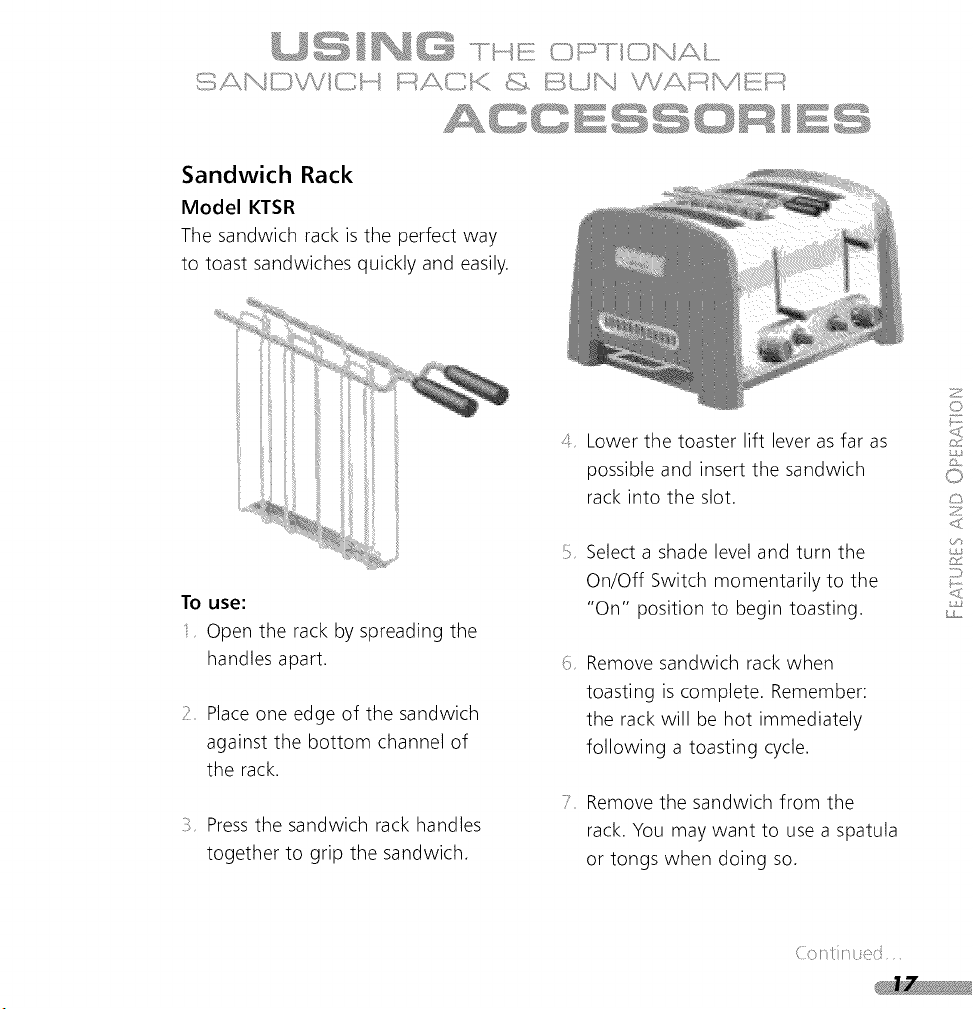
Sandwich Rack
Model KTSR
The sandwich rack is the perfect way
to toast sandwiches quickly and easily.
To use:
Open the rack by spreading the
handles apart.
7 Place one edge of the sandwich
against the bottom channel of
the rack.
Pressthe sandwich rack handles
together to grip the sandwich.
4 Lower the toaster lift lever as far as
possible and insert the sandwich
rack into the slot.
Select a shade level and turn the
On/Off Switch momentarily to the
"On" position to begin toasting.
Remove sandwich rack when
toasting is complete. Remember:
the rack will be hot immediately
following a toasting cycle.
Remove the sandwich from the
rack. You may want to use a spatula
or tongs when doing so.
Z
¢,)
0
c:,
Z
;J}
(: }
Sandwich Toasting Tips
Do not overfill the sandwich. Thinly
sliced ingredients- like ham, turkey,
and cheese- work best.
Lightly butter the outside of the
sandwich bread - do not butter the
side which faces the filling. Buttering
the outside of the bread slows
browning and helps warm the filling.
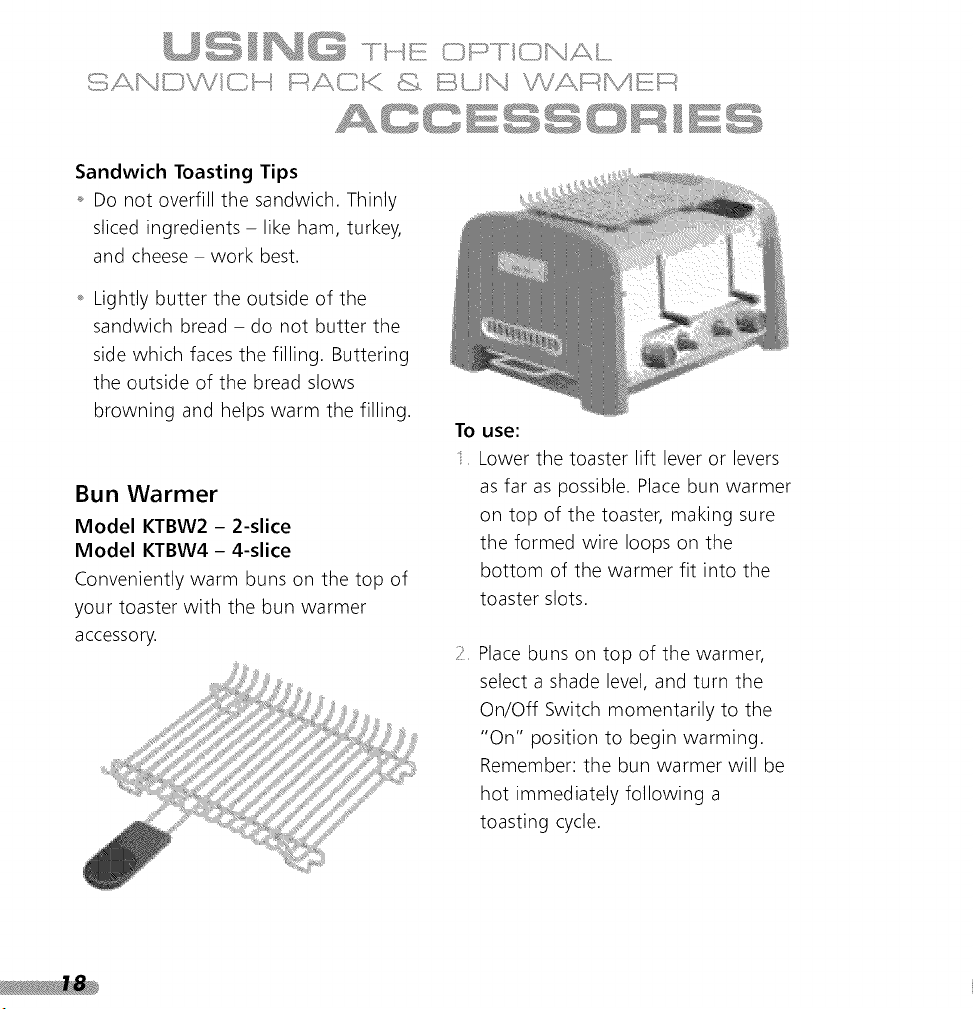
Bun Warmer
Model KTBW2 - 2-slice
Model KTBW4 - 4-slice
Conveniently warm buns on the top of
your toaster with the bun warmer
accessory.
To use:
Lower the toaster lift lever or levers
as far as possible. Place bun warmer
on top of the toaster, making sure
the formed wire loops on the
bottom of the warmer fit into the
toaster slots.
Place buns on top of the warmer,
select a shade level, and turn the
On/Off Switch momentarily to the
"On" position to begin warming.
Remember: the bun warmer will be
hot immediately following a
toasting cycle.
Alwaysunplugthetoasterand
letit coolbeforecleaning.
Slideoutthecrumbtray(the
KPTT890hastwotrays,onefor
eachpairof slots)andshakethe
crumbsintoa wastecontainer.It is
recommendedthatthecrumbtraybe
emptiedaftereachuse.Remember:the
traywillbehotimmediatelyfollowing
atoastingcycle.
NOTE:Liftingthecrumbtrayhandle
locksthecrumbtrayinsidethetoaster,
preventingremoval.Alwayspullthe
crumbtraystraightfromthetoaster
withoutliftingthehandle.
Thecrumbtraycanbewashedinthe
toprackof a dishwasher,orbyhandin
warmsoapywater.If handwashing,
besureto rinsethetrayanddryit
thoroughlywitha softcloth.
Besureto insertthe crumbtrayinto
thetoasterasfaraspossible.Forbest
toastingresults,do notusethe
toasterwithoutthecrumbtrayin its
properposition.
Theoptionalsandwichrackand
bunwarmeraccessoriescanbe
washedinthetop rackof a
dishwasher,orbyhandinwarmsoapy
water.Ifhandwashing,besureto
rinsetheaccessoryanddryit
thoroughlywitha softcloth.
: _! Wipethetoasterwitha soft,
dampcottoncloth.Donot use
abrasivecleansers,scrubbers,orliquid
cleaningproducts.Donotimmersethe
toasterinwater.
KitchenAiddoesnotrecommend
theuseofa toastercover.
Z
C,
0
c:,
Z
j,}
z;>
The toaster may emit a pungent odor or light smoke the first time you use it.
This is a normal result of the manufacturing process. The odor or smoke is
harmless and will dissipate quickly.
If the function light remains dark and the toaster fails to heat when
the On/Off Switch is turned to "On":
Check to see if the toaster is plugged in; if it is, unplug the toaster, then plug
it back in again. A tone will sound when the toaster is plugged into a live
electrical outlet. If no tone sounds, check the electrical circuit the toaster is
connected to - is a fuse blown or a circuit-breaker tripped in your home?
If the problem cannot be corrected, see the KitchenAid Warranty and Service
section on page 25 for service information.*
If you have difficulty removing the crumb tray:
Lifting the crumb tray handle locks the crumb tray inside the toaster,
preventing removal. Always pull the crumb tray straight from the toaster
without lifting the handle.
If the function light next to the On/Off Switch flashes:
A flashing function light signals a fault in the toaster electronics. Unplug the toaster
and refer to the KitchenAid Warranty and Servicesection on page 25 for service
information.*
* Do not return the Toaster to the retailer - they do not provide service.
HONEY-ORANGE BUTTER
Add all ingredients to food processor. Process until
thoroughly mixed, about 30 seconds.
_Acup (16_A-tablespoon servings).
About 56 cal, 0 g pro, 1 g carb,
6 g fat, 16 mg chol, 38 mg sod.
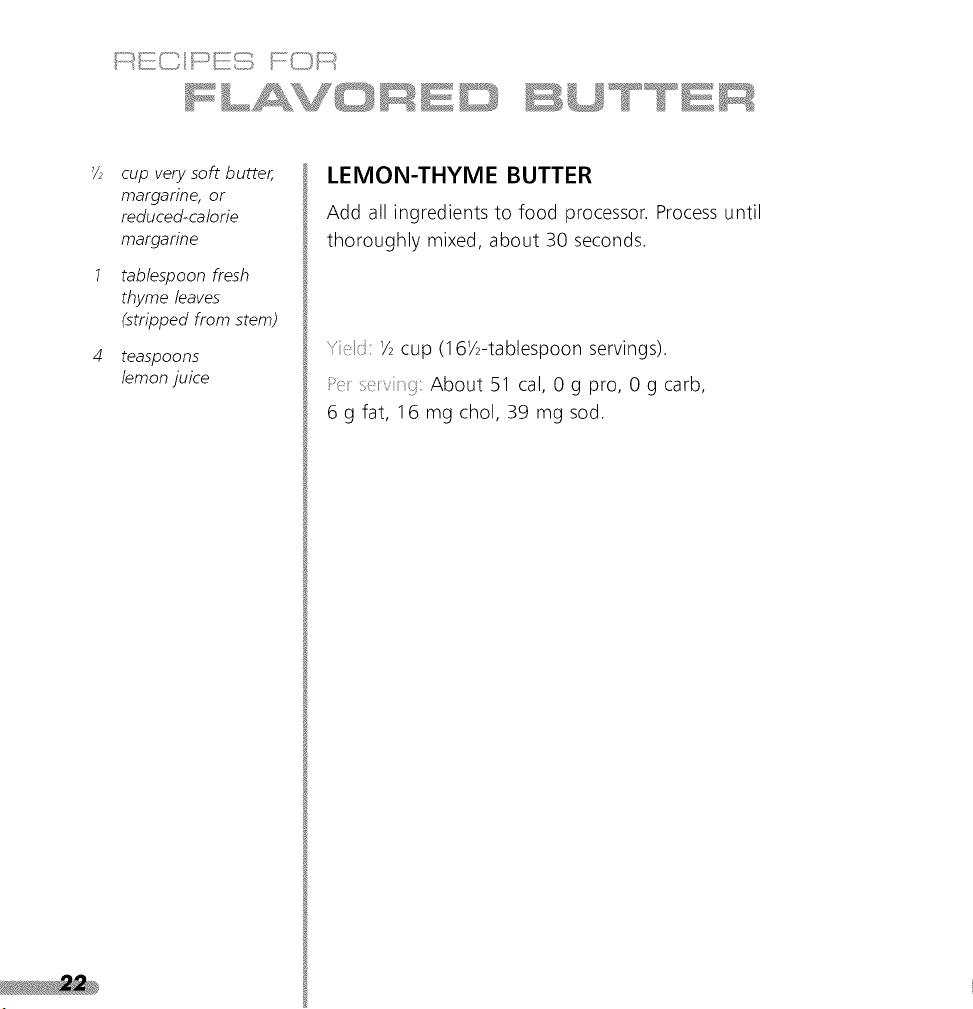
7± cup very soft butter,
margarine, or
reduced-calorie
margarine
2 tablespoons orange
juice concentrate,
thawed
1 tablespoon honey
7_ teaspoon cinnamon
Z
C_
0
Z
:o
½
cup very soft butter,
margarine, or
reduced-calorie
margarine
tablespoon fresh
thyme leaves
(stripped from stem)
teaspoons
lemon juice
LEMON-THYME BUTTER
Add all ingredients to food processor. Process until
thoroughly mixed, about 30 seconds.
Y,:i: Y_cup (1 @A-tablespoon servings).
;_ev _::About51 cal, 0g pro, 0gcarb,
6 g fat, 16 mg chol, 39 mg sod.
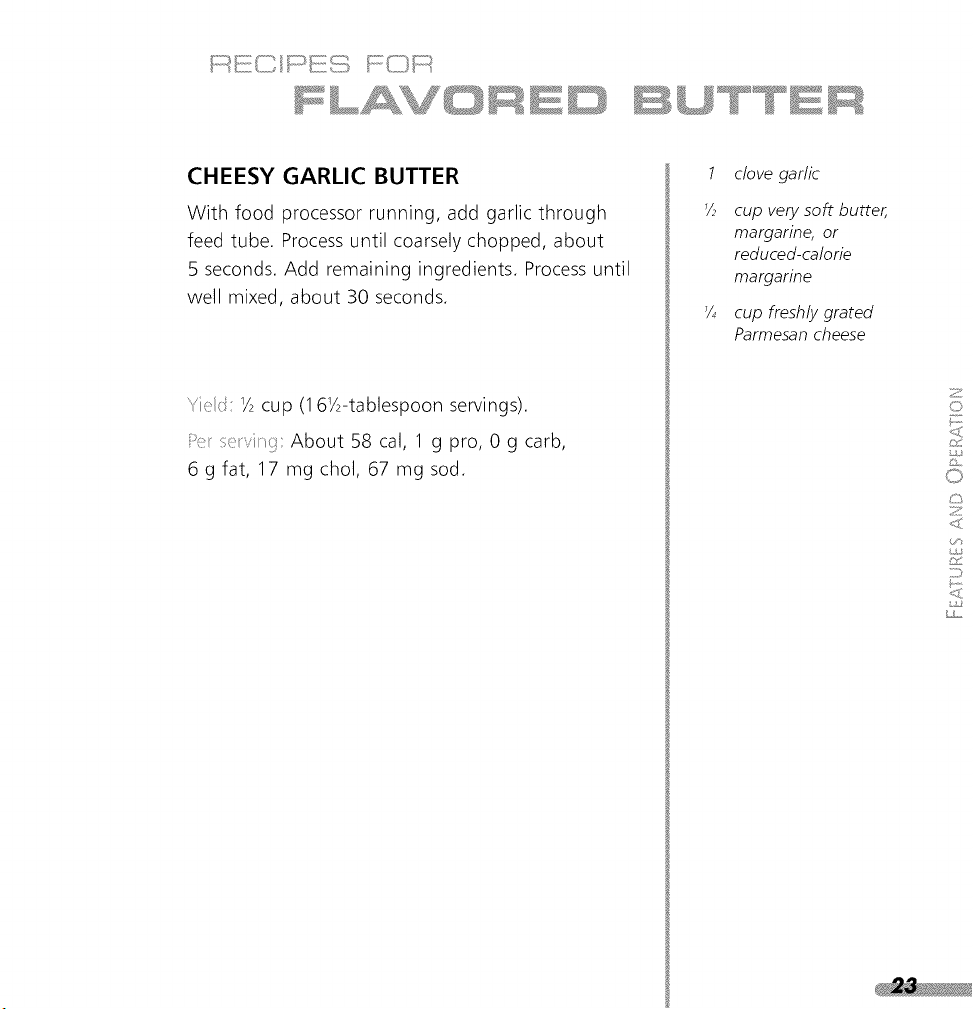
CHEESY GARLIC BUTTER
With food processor running, add garlic through
feed tube. Process until coarsely chopped, about
5 seconds. Add remaining ingredients. Process until
well mixed, about 30 seconds.
72cup (1 6V2-tablespoon servings).
About 58 cal, 1 g pro, 0 g carb,
6 g fat, 17 mg chol, 67 mg sod.
1 clove garlic
1/± cup very soft butter,
margarine, or
reduced-calorie
margarine
1A cup freshly grated
Parmesan cheese
Z
{,3
ks
o
c:>
Z
j,}
;])

EINE TM SERIES
A
SE
INF
VICE
25
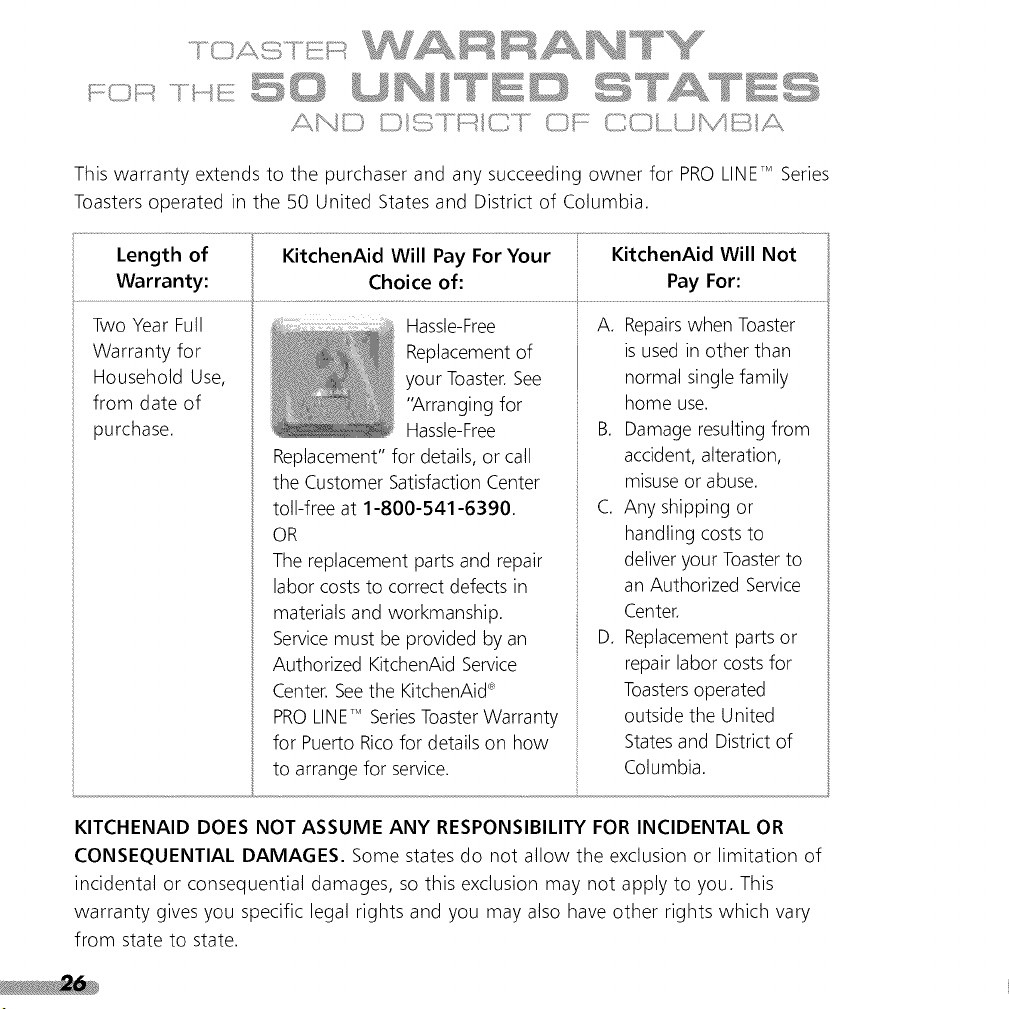
This warranty extends to the purchaser and any succeeding owner for PROLINETM Series
Toasters operated in the 50 United States and District of Columbia.
Length of KitchenAid Will Pay For Your KitchenAid Will Not
Warranty: Choice of: Pay For:
Two Year Full
Warranty for
Household Use,
from date of
purchase.
Hassle-Free
Replacement of
your Toaster.See
"Arranging for
Hassle-Free
Replacement" for details, or call
the Customer Satisfaction Center
toll-free at 1-800-541-6390.
OR
The replacement parts and repair
labor coststo correct defects in
materials and workmanship.
Servicemust be provided by an
Authorized KitchenAid Service
Center. See the KitchenAid®
PROLINETM SeriesToasterWarranty
for Puerto Rico for details on how
to arrange for service.
A. Repairswhen Toaster
is used in other than
normal single family
home use.
B. Damage resulting from
accident, alteration,
misuse or abuse.
C. Any shipping or
handling costs to
deliver your Toasterto
an Authorized Service
Center.
D. Replacement parts or
repair labor costs for
Toastersoperated
outside the United
Statesand District of
Columbia.
KITCHENAID DOES NOT ASSUME ANY RESPONSIBILITY FOR INCIDENTAL OR
CONSEQUENTIAL DAMAGES. Some states do not allow the exclusion or limitation of
incidental or consequential damages, so this exclusion may not apply to you. This
warranty gives you specific legal rights and you may also have other rights which vary
from state to state.

A limitedtwo yearwarrantyextendsto thepurchaserandanysucceedingownerfor
PROLINETM Series Toasters operated in Puerto Rico. During the warranty period, all
service must be handled by an Authorized KitchenAid Service Center.
Please bring the Toaster, or ship it prepaid and insured, to the nearest Authorized
Service Center. Simply call toll-free 1-800-541-6390 Monday through Friday, 8 a.m. to
8 p.m. (Eastern Time), or Saturday, 10 a.m. to 5 p.m. to learn the location of a Service
Center near you. Your repaired Toaster will be returned to you prepaid and insured.
IF YOU RESIDE IN THE 50 UNITED STATESand your KitchenAid _R'PRO LINET" Series
Toaster should fail within two years of ownership, simply call our toll-free Customer
Satisfaction Center at 1-800-541-6390 Monday through Friday, 8 a.m. to 8 p.m.
(Eastern Time), or Saturday, 10 a.m. to 5 p.m. Give the consultant your complete
shipping address. (No RO. Box Numbers, please.)
KitchenAid will arrange to deliver an identical or comparable replacement to your door
free of charge and arrange to have your "failed" Toaster returned to us. Your
replacement unit will also be covered by our two year full warranty.
When you receive your replacement PRO LINETM Series Toaster, use the carton and
packing materials to pack-up your "failed" Toaster. In the carton, include your name
and address on a sheet of paper along with a copy of the proof of purchase
(register receipt, credit card charge slip, etc.).
To order accessories or replacement parts for your Toaster, call toll-free 1-800-541-6390
Monday through Friday, 8 a.m. to 8 p.m. (Eastern Time), or Saturday, 10 a.m. to 5 p.m.
or write to: Customer Satisfaction Center, KitchenAid Portable Appliances, RO. Box 218,
St. Joseph, MI 49085-0218.
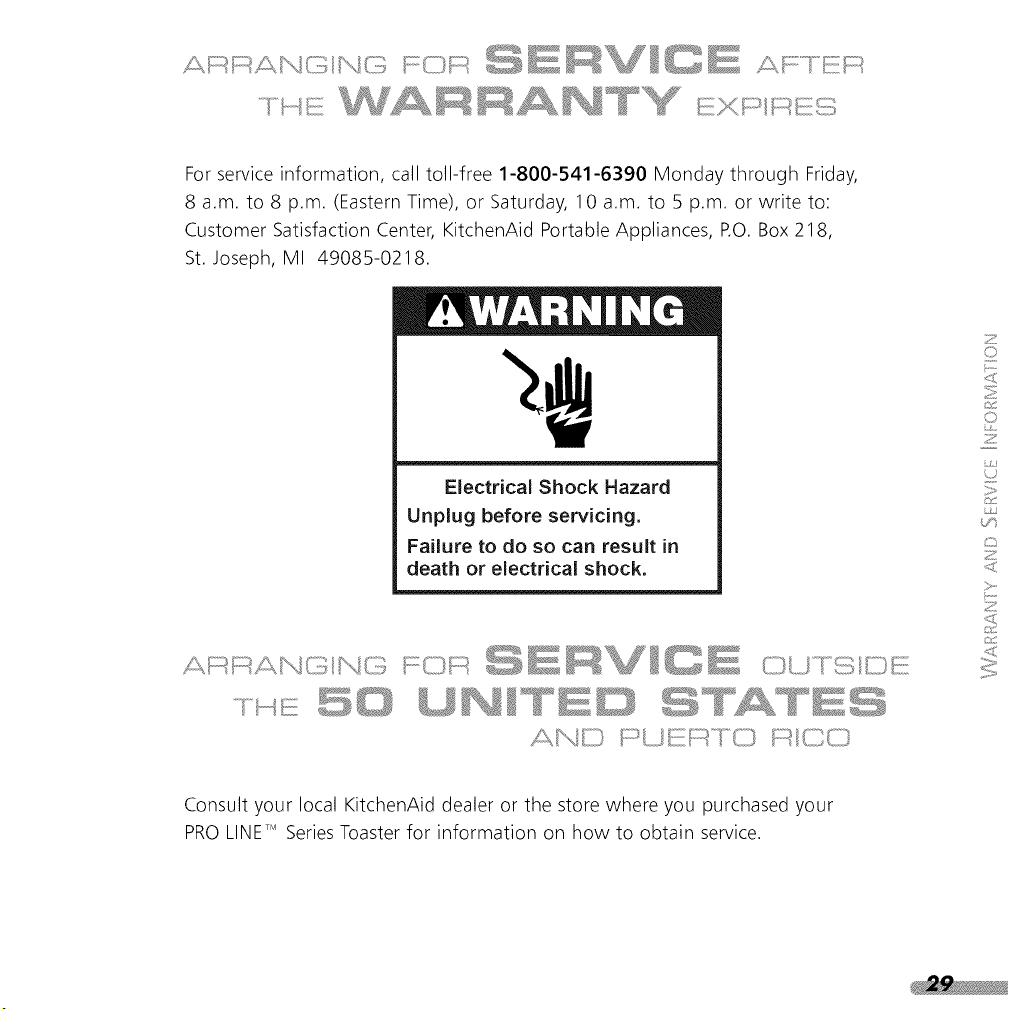
For service information, call toll-free 1-800-541-6390 Monday through Friday,
8 a.m. to 8 p.m. (Eastern Time), or Saturday, 10 a.m. to 5 p.m. or write to:
Customer Satisfaction Center, KitchenAid Portable Appliances, RO. Box 218,
St. Joseph, MI 49085-0218.
Electrical Shock Hazard
Unplug before servicing.
Failure to do so can result in
death or electrical shock.
I]" " 'o"_"s'"_i FD _°" _".......
..... L.=J [Z, I'==i .=J I ..J .=J
Consult your local KitchenAid dealer or the store where you purchased your
PRO LINETM SeriesToaster for information on how to obtain service.