Loading ...
Loading ...
Loading ...

7
ENGLISH
Repairs
The charger and battery pack are notserviceable. There are
no serviceable parts inside the charger or batterypack.
WARNING: To assure product SAFETY and RELIABILITY,
repairs, maintenance and adjustment (including brush
inspection and replacement, when applicable) should
be performed by a DeWALT factory service center or a
DeWALT authorized service center. Always use identical
replacementparts.
Accessories
WARNING: Since accessories, other than those offered
by DeWALT, have not been tested with this product, use
of such accessories with this tool could be hazardous.
To reduce the risk of injury, only DeWALT recommended
accessories should be used with thisproduct.
Recommended accessories for use with your tool are available
at extra cost from your local dealer or authorized service
center. If you need assistance in locating any accessory, please
contact DeWALT call 1‑800‑4‑DeWALT (1-800-433-9258) or
visit our website: www.dewalt.com.
Cleaning
WARNING: Blow dirt and dust out of all air vents with
clean, dry air at least once a week. To minimize the risk
of eye injury, always wear ANSI Z87.1approved eye
protection when performingthisprocedure.
WARNING: Never use solvents or other harsh
chemicals for cleaning the non‑metallic parts of the
tool. These chemicals may weaken the plastic materials
used in these parts. Use a cloth dampened only with
water and mild soap. Never let any liquid get inside the
tool; never immerse any part of the tool into aliquid.
MAINTENANCE
WARNING: To reduce the risk of serious personal
injury, turn unit off and remove the battery pack
before making any adjustments or removing/
installing attachments or accessories. An
accidental start‑up can causeinjury.
Your DeWALT power tool has been designed to operate
over a long period of time with a minimum of maintenance.
Continuous satisfactory operation depends upon proper tool
care and regularcleaning.
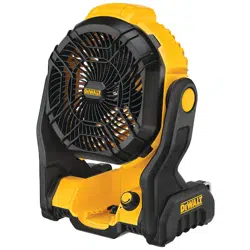
Turning the Fan On and Off (Fig. A)
To turn the fan ON, rotate the control knob
1
clockwise.
To turn the fan OFF, rotate the control knob
1
counterclockwise until itclicks.
Fan speeds are variable and can be adjusted by the
controlknob.
it in until the battery pack is firmly seated and ensure that it
does notdisengage.
To remove the battery pack from the fan, press the release
button
6
and firmly pull the battery pack out of the fan's
battery nook. Insert it into the charger as described in the
charger section of thismanual.
OPERATION
WARNING: To reduce the risk of serious personal
injury, turn unit off and remove the battery pack
before making any adjustments or removing/
installing attachments or accessories. An
accidental start‑up can causeinjury.
Adjusting the Fan Angle (Fig. A)
WARNING: Keep fingers away from the front and rear
grill of thefan.
This fan has soft detents to maintain multiple angles. To
adjust, gently push or pull the fan handle
3
.
Carrying the Fan (Fig. A)
Carry the fan using the top handle
3
.
Suspending/Mounting the Fan (Fig A, E)
CAUTION: When the fan hangs by the hang hooks, do
not shake the fan or the object from which it hangs. Do
not hang the fan from any electrical wires or anything
that is not secure. Personal injury or property damage
mayoccur.
CAUTION: Only use the hang hooks for hanging
the fan as shown in Fig. A. The hang hooks are not
intended to support additional weight. Do not attach
or hang anything additional to the fan or risk of
breakage may occur.
CAUTION: Do not use the hang hooks to reach with or
to support your weight in anysituation.
CAUTION: Do not stand underneath the fan when it is
mounted overhead. Serious personal injury or damage
to the fan may result if the fanfalls.
CAUTION: Do not mount the fan to theceiling.
NOTE: Locate the fan away from a corner or other
obstructions which may impede airflow.
Your jobsite fan has multiple options formounting.
Hang Hooks
The built‑in hang hooks
4
telescope out of the back legs and
can be used to suspend the fan from 2X lumber as shown.
Be sure to fully extend the hooks before using, then rotate
asneeded.
Keyhole Slots (Fig. E)
If using the keyhole slots
7
, use at least 2screws, one on
each side, secured into a sturdy surface.
1. Place the wide portion of the keyhole slot over the head
of thescrew.
2. Slide the jobsite fan down until the screw is inside the
narrow portion of the keyhole and check to be sure the
fan issecure.
Installing and Removing the Battery Pack
(Fig. A, D)
NOTE: For best results, make sure your battery pack is
fullycharged.
To install the battery pack
5
into the fan, align the battery
pack with the rails inside the fan's battery nook
2
and slide
Loading ...
Loading ...
Loading ...