
JBL RALLYBAR S/RALLYBAR/
RALLYBAR XL
EN
OWNER'S MANUAL
RALLYBAR S RALLYBAR RALLYBAR XL

11
TABLE OF CONTENTS
1. INTRODUCTION........................................................................................................................................................................................ 2
2. WHAT’S IN THE BOX ................................................................................................................................................................................ 2
3. PRODUCT INSTALLATION ...................................................................................................................................................................... 2
3.1 Product Dimensions ......................................................................................................................................................................... 2
3.2 Product Mounting ............................................................................................................................................................................ 2
4. WIRING AND POWER ON ........................................................................................................................................................................ 3
4.1. WIRING ........................................................................................................................................................................................... 3
4.2. Power on ......................................................................................................................................................................................... 4
5. PRODUCT OVERVIEW ............................................................................................................................................................................. 4
5.1 Side panel ......................................................................................................................................................................................... 4
5.2 Bottom Panel .................................................................................................................................................................................... 4
6. USING YOUR RALLAYBAR ...................................................................................................................................................................... 5
6.1 Bluetooth connection ....................................................................................................................................................................... 5
6.2 USB Connection ............................................................................................................................................................................... 5
6.3 AUX connection ................................................................................................................................................................................ 5
6.4 Source Priority ................................................................................................................................................................................. 6
7. ADVANCED USAGE .................................................................................................................................................................................. 6
7.1 MAP Lights Effect ............................................................................................................................................................................. 6
7.2 RGB Lights Effect.............................................................................................................................................................................. 6
7.3 RGB Lights Brightness Setting .......................................................................................................................................................... 7
7.4 RGB Lights DIY Setting ..................................................................................................................................................................... 7
7.5 Broadcast mode ............................................................................................................................................................................... 8
7.6 Party Mode ....................................................................................................................................................................................... 8
7.7 DEMO Mode ..................................................................................................................................................................................... 8
7.8 DEEP STANDBY MODE .................................................................................................................................................................... 8
7.9 FACTORY RESET ............................................................................................................................................................................. 9
7.10 Firmware Upgrade Service ............................................................................................................................................................. 9
8. SPECIFIATION .......................................................................................................................................................................................... 9
9. TROUBLESHOOTINGS .......................................................................................................................................................................... 10
22
1. INTRODUCTION
Congratulations on your purchase! This manual includes
information about “RALLYBAR S”, “RALLYBAR” and “RALLYBAR
XL” speakers. We encourage you to take a few minutes to read
this manual, which describes general installation guidelines and
operation instructions. Please note that proper installation of
mobile audio and video components require qualified experience
with mechanical and electrical procedures. If you do not have the
knowledge and tools to successfully perform this installation, we
strongly recommend consulting an authorized JBL dealer about
your installation options.
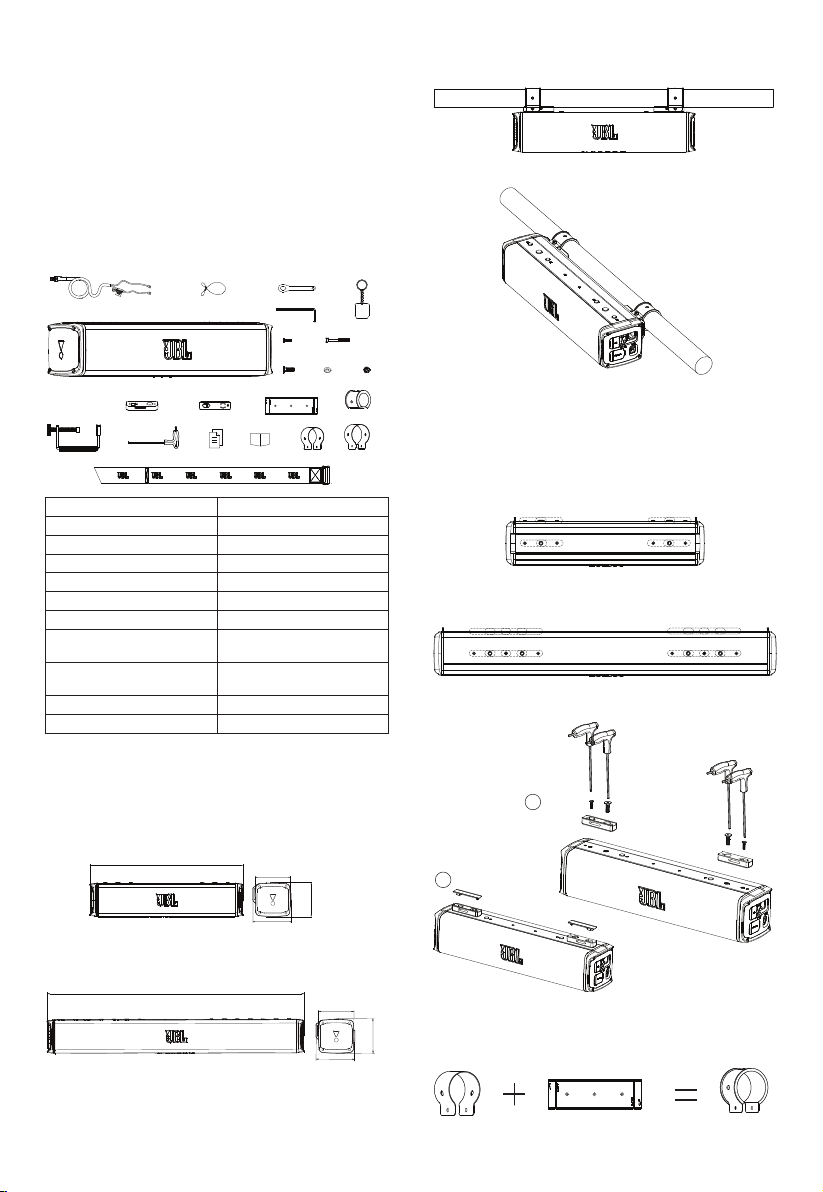
2. WHAT’S IN THE BOX
×1
×2
×2
×2
×2
×2
×2
×2
×2
×2
×2
×2
×2
×4
×1
×1
×1×1
×1×1
×1
1x Soundbar 2x Short M8 screws
2x Security cables 2x Short M5 screws
1xSmall Wrench 2x Long M5 screws
1 x L- Small Allen wrench 2x M5 screw nuts
1xT-handle hex wrench 4X Flat washers
2x Straps with Velcro 2X C -Clamps (2")
1X G -Clamp 2X C -Clamps (1.75")
1x Keychain 2X Thick rubber strips
(for 1.5" pole)
1x 12ft (3.66m) power/
ground wire harness
2x Thin rubber strips
(for 2" &1.75" pole)
2x Rubber top covers 1x Quick start guide
2x Mount cleats 1x Safety sheet &warranty card
3. PRODUCT INSTALLATION
3.1 Product Dimensions
RALLYBAR&RALLYBAR S
JBL RALLYBAR S
21-5/32"
(537.5mm)
4-5/8"
(118mm)
5-5/16"
(135.2mm)
5"
(126.7mm)
RALLYBAR XL
JBL RALLYBAR XL
35-11/32"
(897.5mm)
4-5/8"
(118mm)
5-5/16"
(135.2mm)
5"
(126.7mm)
3.2 Product Mounting
1) Top mount view
TOP&BACK MOUNT INSTRUCTIONS
2) Back mount view
TOP&BACK MOUNT INSTRUCTIONS
3) Mounting Steps
Step 1 -Choose cleat mounting positions on soundbar.
Note: There are 4 (RALLYBAR /RALLYBAR S), or 8 (RALLYBAR
XL) mounting positions for left cleat and right cleat;
RALLYBAR&RALLYBAR S
1 12
4
3
2
3 4
RALLYBAR XL
1 2 3 4
5 6 7 8
1 2 3 4
5 6 7 8
Step 2-put cleat on soundbar
MOUNT-1-CLEAT
1
2
Step 3 -Choose C-Clamps and rubbers based on your
pole size.
Option1:
MOUNT2-CLAMP&RUBBER
2" 2"
33
Option2:
MOUNT2-CLAMP&RUBBER
1.75"
1.75"
Option3:
MOUNT2-CLAMP&RUBBER
1.75"
1.5"
Step4 -Mount soundbar on the pole.
MOUNT –CLAMP &POLE
1
MOUNT –CLAMP &POLE
2
MOUNT –CLAMP &POLE
3
MOUNT –CLAMP &POLE
4
0°
270°
180°
90°
Remarks: JBL logo badge is rotatable.
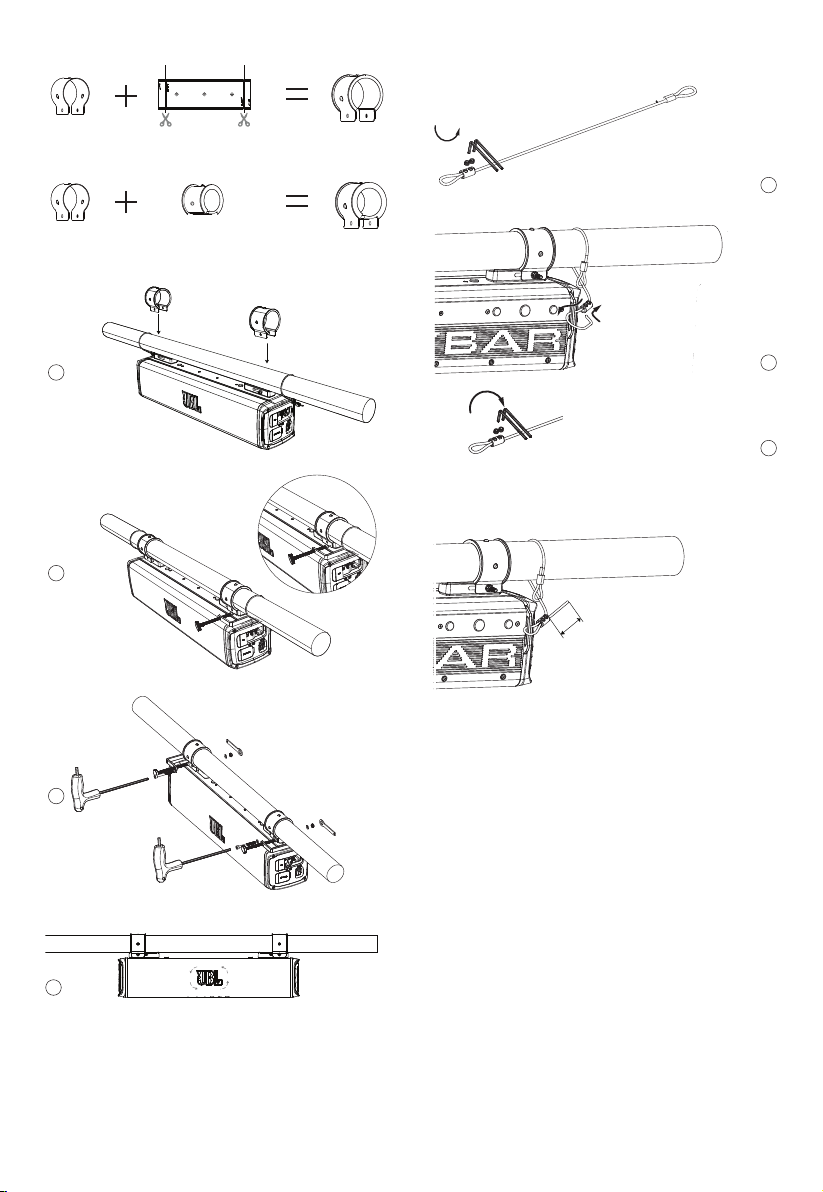
Step 5-Safety Cable
Loose the safety cable screws
SAFETY CABLE
1
Tight the safety cable screws
SAFETY CABLE
2
SAFETY CABLE
3
Note: Before using the L-hex wrench to tighten the cable,
please make sure the distance is over 2"(50mm) from the cable
end.
SAFETY CABLE
>2"(50mm)
4. WIRING AND POWER ON
4.1. WIRING
Power: Connect the red +12V power wire in the wire harness
to the positive terminal of the vehicle battery. The wire harness
includes an inline 25A ATC fuse (RALLYBAR&RALLYABR S) or
40A ATC fuse (RALLYBAR XL), and 5/16" ring terminals. The ring
terminals can be cut off if they’re not needed, but the fuse should
always be kept within 18"(457mm) of the battery
Ground: Connect the black GND wire in the wire harness to bare
metal of the vehicle’s chassis, such as at a seat belt bolt.
NOTE: 1. Use the provided power wire harness only 2. If
possible, remove any paint from the chassis for best contact. It
is recommended to use a star washer below the ring connector
for a secure connection; 2. Disconnect the vehicle’s battery to
avoid an electrical short.
Plug-in: Plug the power connector into the “Power” port on side
of the speaker.
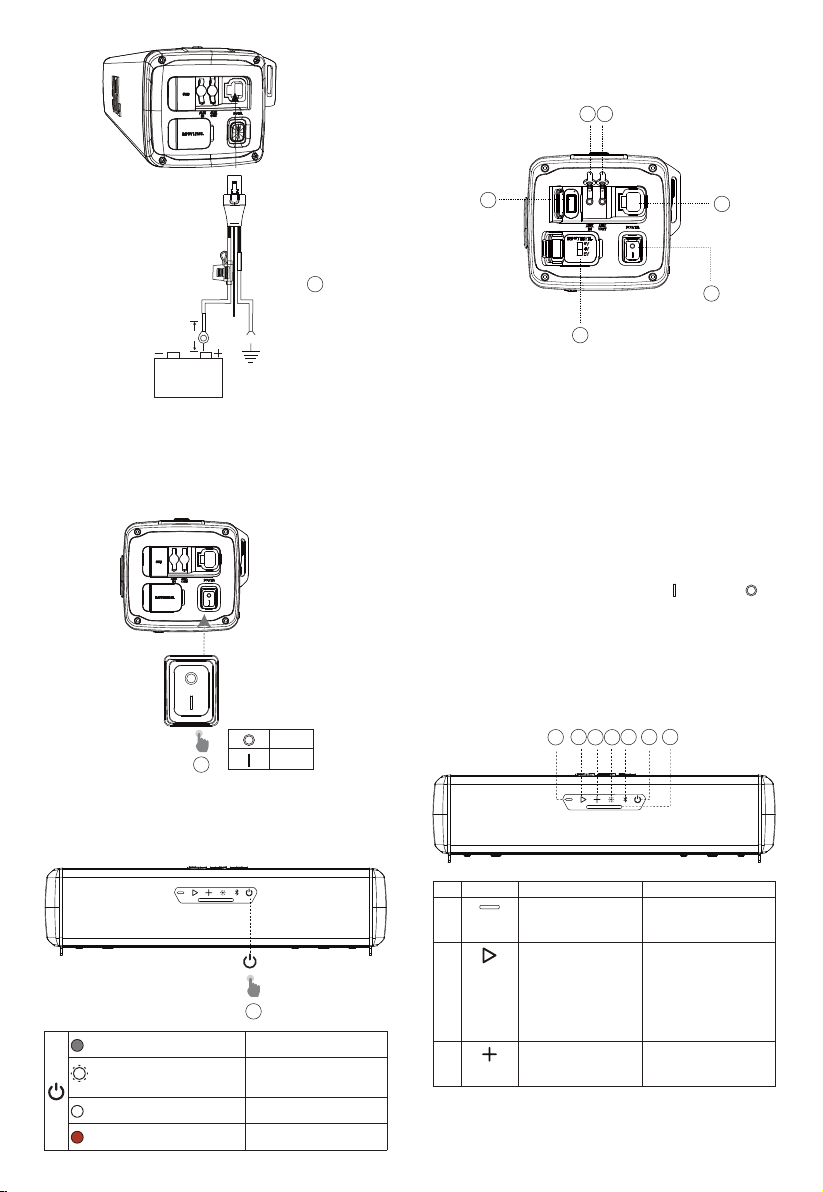
4
WIRING
Battery
Chassis ground (–)
1
RALLYBAR / RALLYBAR S-25A
RALLYBAR XL-40A
Fuse holder
18"(46cm)
4.2. Power on
Main Power Switch: Press the main power switch on the side
panel to turn on and turn off the speaker.
Once turn on the main power, the Power button(on the bottom
backlight will be white color and start to get slow flash, which
shows the speaker is on Deep standby mode.
POWER ON
Off
On
2
Note: on the Deep standby mode, only the MAP Light can be
turned on/off by short pressing light button.
Press Power button: Press the power button, the backlight of
the power button will become constant white, which shows that
the speaker is on operation mode.
POWER ON
3
×1
Off
Main power switch is off
White (Flashing)
Main power switch is on-
(Deep standby mode)
White (Constant)
Operation mode on
Red (Constant) (15 seconds)
Protection: OVP/UVP/OTP
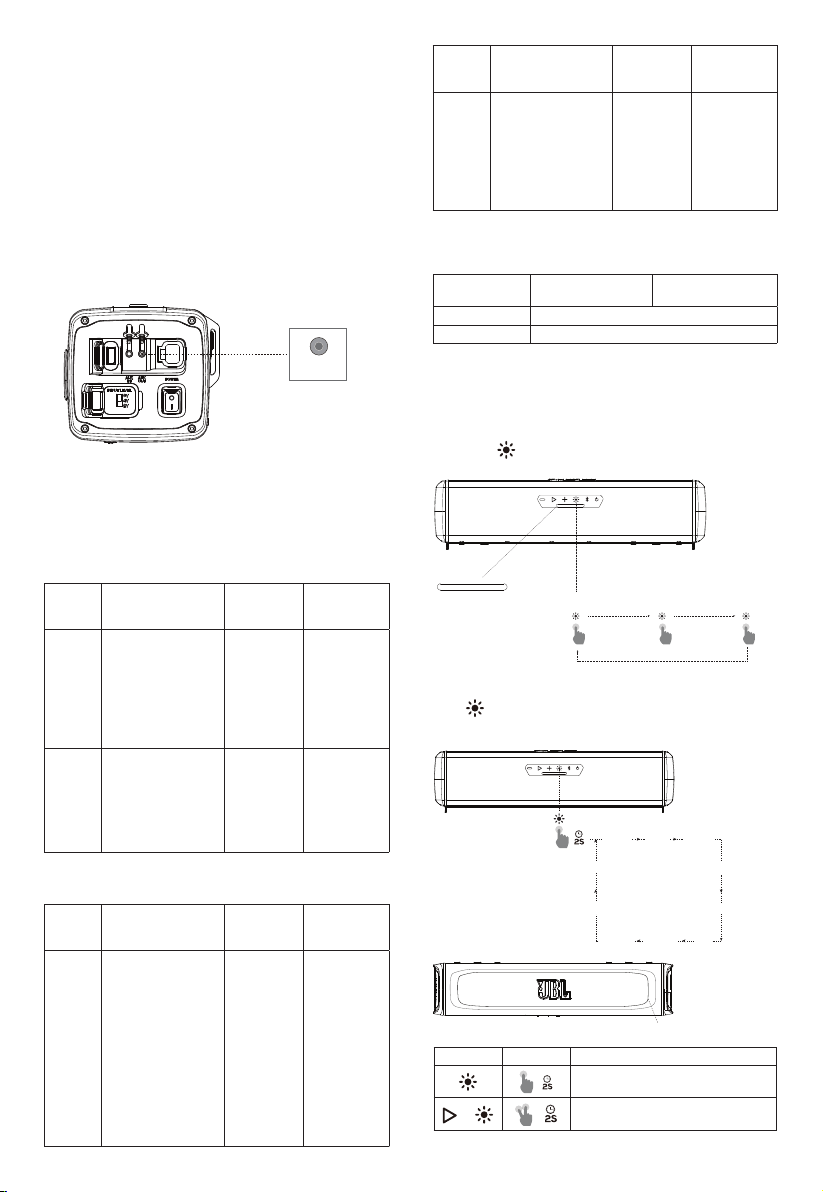
5. PRODUCT OVERVIEW
5.1 Side panel
1
2 3
4
5
6
1. USB
• Connect to a USB storage device.
2. Aux-in
• Connect to an external audio device through a 3.5mm audio
cable (not supplied).
3. Aux-out
• Connect to a secondary soundbar, amplified Subwoofer
through a 3.5mm audio cable (not supplied)
4. Power
• Connect to vehicle battery.
5. Main Power Switch
• Press to switch power on and power off.
is power on, is
power off.
6. Input Level
• Provides 3 different Gain settings when use AUX-IN to
connect with head unit: 2V, 4V, and 6V. (2Vrms: 0.35Vrms -
2Vrms; 4Vrms: 0.7Vrms - 4Vrms; 6Vrms: 1.05Vrms - 6Vrms)
5.2 Bottom Panel
1
2
3 4
5 6 7
NO. BUTTON Short Press Long press
1
Press to decrease
the volume level one
by one
decreasing volume
continually (Press and
hold 1 second)
2
Press to play or pause
the music.;
Press twice to play the
next track.;
Press three times to
play the previous track.
3
Press to increase
the volume level one
by one
Increasing volume
continually (Press and
hold 1 second)

5
NO. BUTTON Short Press Long press
4
Press to switch
MAP lights based
on sequence:
100% brightness ->
50%brightness -> OFF
Press and hold for
2 seconds to switch
light show patterns
based on sequence:
Rock -> Flow -> Cross
-> Ripple -> Flash ->
Static1 -> Static2 -> Mix
-> DIY -> OFF
5
Press to enter
Bluetooth pairing
mode.
Press and hold for
5seconds to disconnect
all Bluetooth devices
and enter Bluetooth
pairing mode
6
Press to switch
between Operation
mode and Deep
standby mode
7 MAP Lights
6. USING YOUR RALLAYBAR
6.1 Bluetooth connection
You can use your RALLYBAR as an external speaker for your
Bluetooth enabled smartphone or tablet.
1) Press
to enter Bluetooth pairing mode.
2) Select “JBL RALLYBAR”, “JBL RALLYBAR S” or “JBL
RALLYBARXL” to connect.
3) Once successfully connected, audio will stream from your
Bluetooth device to this speaker.
BT COONECTION
DEVICES
JBL RALLYBAR
JBL RALLYBAR S
JBL RALLYBAR XL
Bluetooth
Bluetooth
< 10 m (33 ft)
1
2
Off
Power off
White (Constant)
In operation mode But no
Bluetooth connection
Blue (Constant)
Bluetooth connected
Blue (Flashing)
Bluetooth pairing
Notes:
– This speaker can memorize a maximum of 8 paired devices. The
ninth paired device will replace the first one.
– Bluetooth performance can be affected by the distance between
this product and your Bluetooth device and the environment of
operation.
To terminate the Bluetooth-enabled device:
• Turn off this speaker.
• Disable Bluetooth on your device; or Move this speaker
beyond the Bluetooth operational range.
To reconnect the Bluetooth-enabled device:
• When you turn on this speaker next time, it tries to reconnect
the last connected device automatically;
• If not, manually select “JBL RALLYBAR”, ”JBL RALLYBAR S”
or “JBL RALLYBAR XL” on your Bluetooth device to start a
connection
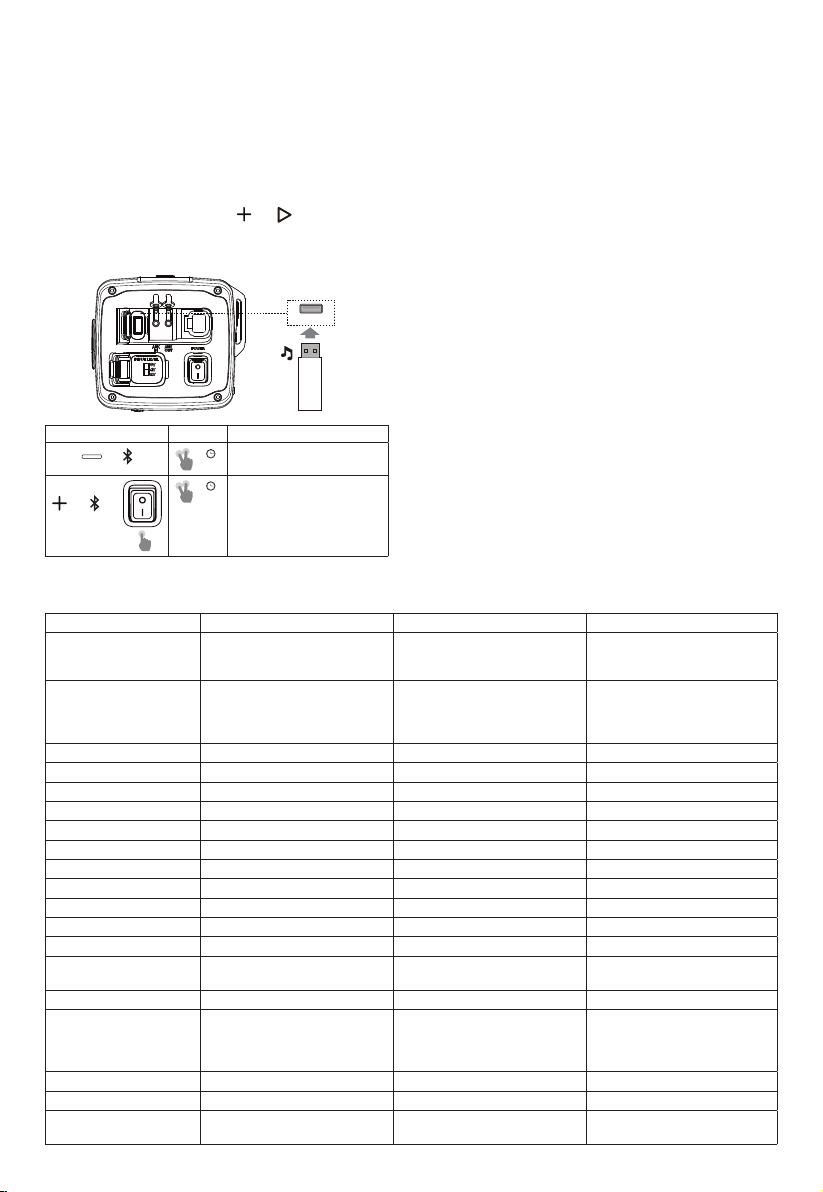
6.2 USB Connection
With your RALLYBAR, you can enjoy music that is stored on
a USB storage device such as an MP3 player. Plug your USB
storage device into the USB port of your RALLYBAR. The music
will play automatically. If not, please check if the USB device
contains playable audio contents.
USB CONNECTION
Supported Audio Format
Extension Codec Sample rate Bitrate
WAV PCM 44.1KHz ~
192KHz
< 5Mbps
LPCM 44.1KHz ~
192KHz
< 5Mbps
MP3 MPEG1 layer1/2/3 32KHz ~
48KHz
32Kbps ~
320Kbps
MPEG2 layer1/2/3 16KHz ~
24KHz
8Kbps ~
160Kbps
MPEG2.5 layer3 8KHz ~
12KHz
8Kbps ~
160Kbps
Tip:
1. The speaker plays audio files on the USB storage device from
the root folder to the last level of subfolders in alphabetical
sequence. Up to 8 levels of subfolders are supported.
2. Supported USB Drive File System: FAT16, FAT32
6.3 AUX connection
6.3.1 Aux-In connection
1. Connect a 3.5mm audio cable (not supplied) to:
• the Aux-out port of your portable audio device or headunit in
the car.
• the AUX-in port of this speaker
2. Turn on your portable audio device or head unit and it starts playing.
AUX-IN CONNECTION
1
Aux-in
2
66
Notes:
- if use Aux-in to connect the head unit and this speaker, you may
need a RCA to 3.5mm cable or adapter (not supplied).
- there are 3 different INPUT LEVEL options to choose from when
use AUX-IN to connect with head unit to avoid noise: 2Vrms
(0.35Vrms - 2Vrms); 4Vrms (0.7Vrms - 4Vrms); 6Vrms (1.05Vrms -
6Vrms).
6.3.2 Aux-out connection
There is Aux-out available for you to connect with external speaker
or subwoofer (for example, JBL BASSPRO GO, which is sold
separately on www.jbl.com).
1. Connect a 3.5mm audio cable (not supplied) to:
• the Aux-out port of RALLYBAR
• the AUX-in port of external speaker or subwoofer
AUX OUT CONNECTION
Aux-out
6.4 Source Priority
1. 1st priority - USB disk >2nd Priority -Bluetooth >3rd Priority
Aux-in, only one source will play at one time.
2. Higher priority can break in lower priority source; Starting a source
with higher priority will always interrupt a source with lower priority.
Source Situation 1: when USB disk is on soundbar.
USB disk source
is playing
USB disk
source is
not playing
Remarks
Bluetooth
Source
if Bluetooth source
want to play, user
need press play/
pause button on the
RALLYBAR to stop the
music from USB disk,
then play the music
from Bluetooth source
Bluetooth
source can
break-in
directly
Control buttons
(PLAY /PAUSE,
VOLME +;
VOLUME -)
on soundbar
will control
the USB disk
source
AUX-in
Source
Need press play/
pause button on
RALLYBAR to stop
the music from USB
Disk and play the
music from Aux-in
source directly
Aux-in source
can break-in
and play
directly.
Source Situation 2: when there is Bluetooth connection
on soundbar.
Bluetooth source is
playing
Bluetooth
source is
not playing
Remarks
USB disk
Source
1. plug in the USB
disk, the music from
USB disk will start
playing directly
2. if USB disk already
on RALLYBAR and
Bluetooth source is
playing, Pressing play/
pause button on the
RALLYBAR will stop
the Bluetooth music
and play the music
from USB disk
USB disk
source can
break-in
directly
Control buttons
(PLAY /PAUSE,
VOLME +;
VOLUME -)
on soundbar
will control
the USB disk
source
Bluetooth source is
playing
Bluetooth
source is
not playing
Remarks
AUX-in
Source
Need press play/
pause button on
RALLYBAR to stop
the music from
Bluetooth source and
play the music from
Aux-in source directly
Aux-in source
can break-in
and play
directly.
Control buttons
(PLAY /PAUSE,
VOLME +;
VOLUME -)
on soundbar
will control
the Bluetooth
source
Source Situation 3: When there is AUX-IN connection
on soundbar.
AUX-IN source is
playing
AUX-IN source is
not playing
USB Disk Source USB disk can break in and play directly
Bluetooth Source Bluetooth source can break-in and play directly.
7. ADVANCED USAGE
7.1 MAP Lights Effect
Short Press
to switch MAP lights effect: Map Lights on at
100% brightness, Map Lights on at 50%brightness, Off
MAP LIGHTS
×1
×1
×1
100% brightness
map light
50% brightness
MAP light off
7.2 RGB Lights Effect
Press
button and hold for 2 seconds to select your preferred
lights patterns: Rock -> Flow -> Cross -> Ripple -> Flash ->
Static1 -> Static2 -> Mix -> DIY -> OFF
RGB LIGHTS OPTIONS
off
Flow
DIY
Cross
Static2
Ripple
Static1
Flash
Mix
Rock
RGB Light
Button Press Behaviors
RGB Light pattern change
Turn off RGB light
7
Notes:
- Press and hold the
and buttons simultaneously
2 seconds to quickly turn off the RGB lights on front.
- the DIY pattern will be your latest saved Pattern based on your
RGB Light DIY setting
7.3 RGB Lights Brightness Setting
RGB LIGHTS OPTIONS
RGB Light
Button Press Behaviors
RGB Light Brightness Setting Mode
Button Backlights Status
Off
Power off
White (Constant)
In operation mode
White (Flashing)
1. In RGB Light DIY menu
mode
2. In RGB Brightness menu
mode
RGB Light Brightness Adjustment Level
Level 1: Minimal
Level 2: 50% Brightness
Level 3: 70% Brightness
Level 4: Max Brightness
1. Press and hold and buttons simultaneously 2 seconds
to enter or exit from RGB lights brightness menu mode
2. Short press
to increase the brightness level; press to
decrease from current brightness level
3. press
to save the Brightness selection and exit from the
Brightness menu mode
Notes:
- when in RGB lights brightness menu mode, the backlights of the
, and buttons will be white flashing status.
- There are 4 levels brightness selection: Minimal, 50%, 70%, Max
- the brightness level selection is for all RGB lights patterns.
- if there is no action in the brightness menu mode over 2 minutes,
RGB lights brightness menu mode will automatically exit but
brightness adjustment will not be saved.
- Press
and buttons simultaneously 2 seconds to exist,
brightness adjustment will not be saved.
- Only press
button to confirm, then the brightness adjustment
could be finally saved.
- if press the main power switch to shut down the speaker directly,
the brightness adjustment will not be saved properly for next
time usage, only user press the power button to enter the deep
standby mode first then press the main power switch to shut
down power, then DIY setting will be finally saved.
7.4 RGB Lights DIY Setting
RGB LIGHTS OPTIONS
RGB Light
Button Press Behaviors
RGB Light DIY Setting Mode
Button Backlights Status
Off
Power off
White (Constant)
In operation mode
White (Flashing)
3. In RGB Light DIY menu mode
4. In RGB Brightness menu mode
Off
Power off
White (Constant)
In operation mode
Blue (Constant)
In RGB Light DIY menu mode
Light Pattern
1. Rock
2. Flow
3. Cross
4. Ripple
5. Static
6. Mix
Primary Color Zone
1. Aquamarine
2. Blue
3. Green
4. Orange
5. Purple
6. Red
7. White
8. Yellow
9. Off
Secondary Color Zone
1. Aquamarine
2. Blue
3. Green
4. Orange
5. Purple
6. Red
7. White
8. Yellow
9. Off
1. Press and buttons simultaneously 2 seconds to enter or
exit RGB Lights DIY menu.
2. Press
or buttons to choose from 6 Light pattern: Rock,
Flow, Cross, Ripple, Static and Mix.
3. Press
button to confirm the pattern selection and enter the
Primary Color Zone menu at the same time
4. Press
or buttons to choose from 9 Light colors:
Aquamarine, Blue, Green, Orang, Purple, Red, White, Yellow
and Off.
5. Press
button to confirm the Primary color selection and
enter the Secondary Color Zone menu at the same time.
6. Press
or buttons to choose from 9 Light colors:
Aquamarine, Blue, Green, Orang, Purple, Red, White, Yellow
and Off.
7. Press
button to confirm the secondary color selection and
exit RGB Lights DIY menu.
Notes:
- when in RGB lights DIY menu mode, the backlights of the ,
and buttons will be white flashing status, the backlight of
button will be constant Blue at the same time.
- if there is no action in the RGB lights DIY menu mode over
2 minutes, RGB lights DIY menu mode will automatically exit but
DIY setting will not be saved.
8
- Press
and buttons simultaneously 2 seconds to exit,
brightness adjustment will not be saved.
- Only press
button to confirm, then the DIY setting will be
finally saved and exit.
- latest saved DIY setting will cover the previous DIY setting. there
is only one latest pattern to be saved under DIY pattern.
- if press the main power switch to shut down the speaker directly,
the DIY adjustment will not be saved properly, only user press
the power button to enter the deep standby mode first then
press the main power switch. The DIY setting will be finally saved
for next time.
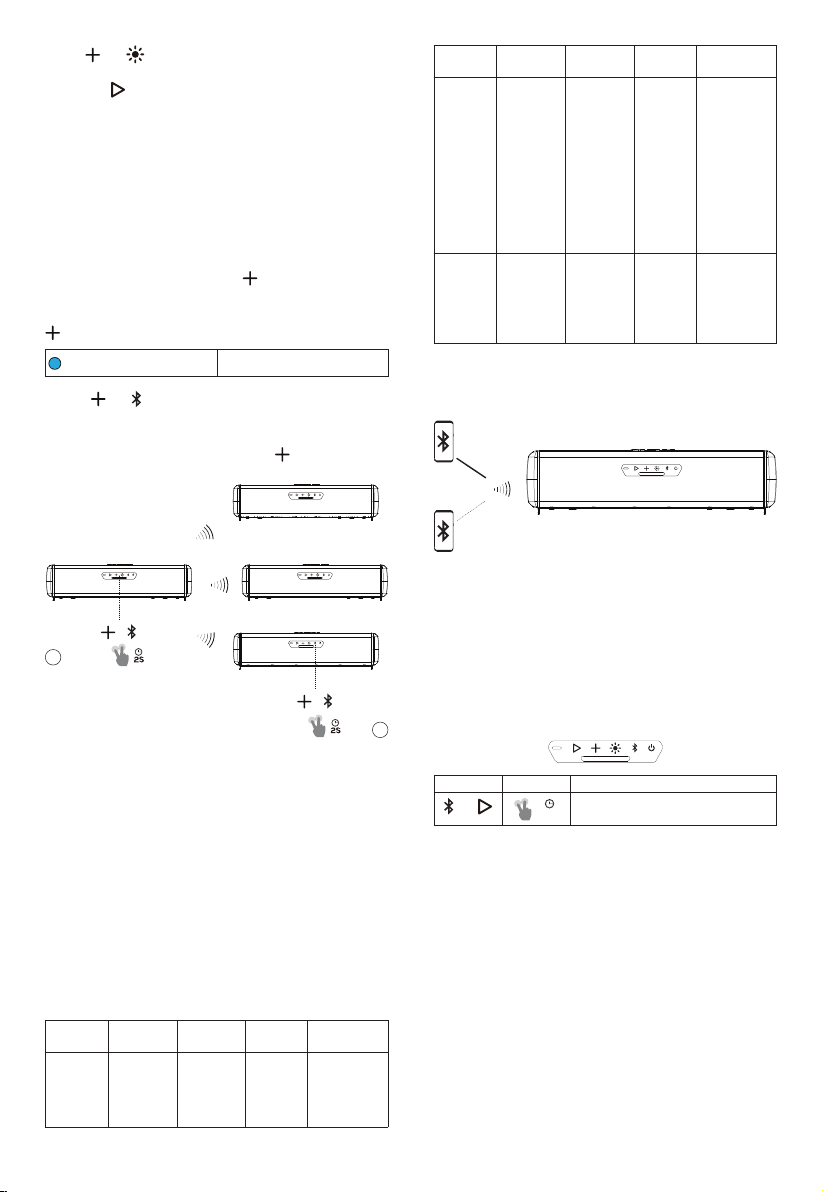
7.5 Broadcast mode
Broadcast Mode allows you to play your audio through multiple
soundbar speakers. The backlights of
button will be constant
blue when soundbar on Broadcast Mode
Button Backlights Status
Blue (Constant)
Broadcast mode on
1. Press
and buttons simultaneously 2 seconds to enter or
exit Broadcast mode.
2. Repeat Step 1 for all additional soundbars.
3. When in broadcast mode the backlight of
button will be
constant blue status.
BROADCASTING
1
2
Notes:
- Broadcast Mode is compatible with AUX-IN, USB-Disk and
Bluetooth input sources.
- Both audio and the RGB light will synchronize on broadcast mode
- Local source (Bluetooth/AUX-IN&USB) can break-in
broadcasting mode: Secondary soundbar receives music from
other soundbar only when local source not playing on Secondary
soundbar
- In Broadcast mode, only the Primary soundbar will synchronize
the volume or RGB light change to other soundbar, while the
Secondary/third /forth…. soundbar will not synchronize the
volume change to other soundbar.
- RALLYBAR can connect with RALLYBAR, RALLYBAR S and
RALLYBAR XL in Broadcast mode
- Multiple soundbars Broadcast mode connect scenarios example
below:
A
soundbar
B
soundbar
C
soundbar
Result
Scenario 1 playing
music
when enter
broadcast
mode
Not playing
music
when enter
broadcast
mode
/ A is primary, B
is Secondary
A
soundbar
B
soundbar
C
soundbar
Result
Scenario 2 playing
music
when enter
broadcast
mode
playing
music
when enter
broadcast
mode
/ Both A and B
are primary,
cannot
connect to
each other;
need one
of the 2
soundbars
stopping
music to
become
secondary.
Scenario 3 playing
music
when enter
broadcast
mode
playing
music
when enter
broadcast
mode
Not
playing
music
when enter
broadcast
mode
Both A and B
are primary, C
will connect A
or B randomly
to become
the secondary
7.6 Party Mode
One soundbar have simultaneous connection of up to two
Bluetooth
®
devices.
PARTY MODE
Notes:
- When turn off the soundbar speaker, it will only connect the
device with the latest action automatically, user need manually
connect the second device.
- Maximum 2 devices connect at same time, Last action on one of
the devices will always take the control.
- Third device cannot find soundbar speaker’s name when there
are 2 phones are connected.
7.7 DEMO Mode
Button Press Behaviors
5S
To enter or exit DEMO mode
To enter or exit form DEMO MODE, press and hold
“Bluetooth”&“play/pause” button at same time 5 seconds
NOTES:
- Only AUX audio can work, USB & Bluetooth is disabled
- Long Press light button will switch to next pattern. short press
for MAP lights turn on/off/50%
Every 30 seconds, auto switch to next light pattern in following
sequences:
Rock -> Flow -> Cross -> Ripple -> Flash -> Static1 -> Static2 -> Mix
if no action for 1 hours, device will auto switch to default pattern Rock
7.8 DEEP STANDBY MODE
The product will enter into Deep standby mode
• If there is no Bluetooth connection and there is no any action
over 15 minutes.
• If there is Bluetooth connection and there is no any action over
1 hour.
9
Note:
- Power button’s backlight is on white and slow flash status and rest
buttons’ backlights are off, if product is on Deep standby mode
- The MAP light can be turned on or off in Deep standby mode,
while if there is no any button press action over 15 minutes, MAP
lights will shut-off automatically.
- Press the power button, the product will exist from deep standby
mode
7.9 FACTORY RESET
To restore the factory settings, Press
and buttons
simultaneously 10 seconds.
7.10 Firmware Upgrade Service
USB CONNECTION
Button Press Behaviors
10S
Firmware version check
1S
firmware upgrade
1. Firmware Version Check:
When main power switch is on and soundbar in operation
mode, Press and hold “volume down” & “BT” button at same
time over 10 seconds, the machine voice out the firmware
version number
2. Firmware Upgrade by U Disk (Flash drive)
1) Download the latest firmware to a USB stick (the USB Disk
file system need to be FAT32or FAT16)and plug the USB
Stick into USB port.
2) Make sure the main power switch is off. Press and hold the
“volume up” & “BT” button at same time then turning on the
main power switch, after 1 second, release hand from the
“volume up” & “BT” buttons to trigger the firmware upgrade.
Note:
- You can download the latest firmware on JBL Website(www.JBL.
com) If there is new firmware release
8. SPECIFIATION
RALLYBAR RALLYBAR S RALLYBAR XL
Product Description
21" Bluetooth
®
Universal Outdoor
Vehicle Soundbar with LED lights
and 150Wrms amplifier
21" Bluetooth
®
Universal Outdoor
Vehicle Soundbar with 150Wrms
amplifier
35" Bluetooth
®
Universal Outdoor
Vehicle Soundbar with LED lights
and 300Wrms amplifier
Transducers:
4 x 2.75" (70mm) woofers;
2 x 1" (25mm) Tweeters;
2 x 7.2" (182.8mm) x 3" (76.2mm)
Racetrack Passive Radiators
4 x 2.75" (70mm) woofers;
2 x 1" (25mm) Tweeters;
2 x 7.2" (182.8mm) x 3" (76.2mm)
Racetrack Passive Radiators
8 x 2.75" (70mm) woofers;
2 x 1" (25mm) Tweeters;
4 x 7.2" (182.8mm) x 3" (76.2mm)
Racetrack Passive Radiators
Output Power: 150WRMS; 300W PEAK (IEC60268) 150WRMS; 300W PEAK (IEC60268) 300WRMS; 600W PEAK (IEC60268)
THD at Rated RMS Power: <1% <1% <1%
Voltage Range: 9.6 - 16VDC 9.6 - 16VDC 9.6 - 16VDC
Quiescent Current Draw: <0.9A <0.9A <0.9A
Maximum Current Draw: 25A 25A 40A
Frequency response: 45Hz-40kHz 45Hz-40kHz 45Hz-40kHz
Signal-to-noise Ratio: > 80 dB > 80 dB > 80 dB
Cable type 12AWG. 12AWG. 10 AWG.
Cable length 12 Feet (3.66m) 12 Feet (3.66m) 12 Feet (3.66m)
Bluetooth
®
Version 5.3 5.3 5.3
Bluetooth
®
Profile A2DP V1.3, AVRCP V1.6 A2DP V1.3, AVRCP V1.6 A2DP V1.3, AVRCP V1.6
Bluetooth
®
transmitter
frequency range
2400 MHz – 2483.5 MHz 2400 MHz – 2483.5 MHz 2400 MHz – 2483.5 MHz
Bluetooth
®
transmitter power ≤ 15 dBm (EIRP) ≤ 15 dBm (EIRP) ≤ 15 dBm (EIRP)
Aux-In
2Vrms (0.35Vrms - 2Vrms);
4Vrms (0.7Vrms - 4Vrms);
6Vrms (1.05Vrms - 6Vrms):
(3.5 mm connector)
2Vrms (0.35Vrms - 2Vrms);
4Vrms (0.7Vrms - 4Vrms);
6Vrms (1.05Vrms - 6Vrms):
(3.5 mm connector)
2Vrms (0.35Vrms - 2Vrms);
4Vrms (0.7Vrms - 4Vrms);
6Vrms (1.05Vrms - 6Vrms):
(3.5 mm connector)
Aux-Out 2 Vrms (3.5 mm connector) 2 Vrms (3.5 mm connector) 2 Vrms (3.5 mm connector)
USB Drive File System FAT16, FAT32 FAT16, FAT32 FAT16, FAT32
USB Drive Maximum
Capacity
64GB 64GB 64GB
10
RALLYBAR RALLYBAR S RALLYBAR XL
Soundbar Housing Dimension
(L x W x H)
21-5/32" x 5" x 4-5/8"
(537.5 x 126.7 x 118mm)
21-5/32" x 5" x 4-5/8"
(537.5 x 126.7 x 118mm)
35-11/32" x 5" x 4-5/8"
(897.5 x 126.7 x 118mm)
Soundbar Dimension
(L x W x H)
21-5/32" x 5-5/16" x 4-5/8"
(537.5 x 135.2 x 118mm)
21-5/32" x 5-5/16" x 4-5/8"
(537.5 x 135.2 x 118mm)
35-11/32" x 5-5/16" x 4-5/8"
(897.5 x 135.2 x 118mm)
Soundbar Weight 11.57 lbs (5.25 kg) 11.46 lbs (5.2 kg) 20.83 lbs (9.45 kg)
Packaging dimensions
(W x H x D)
24" x 9" x 7.6"
(611 x 229 x 193mm)
24" x 9" x 7.6"
(611 x 229 x 193mm)
38.2" x 9" x 7.6"
(971 x 229 x 193mm)
Gross weight 17.14 lbs (7.79 kg) 17 lbs (7.74 kg) 27.5 lbs (12.52 kg)
Maximum Operation
Temperature:
45 °C 45 °C 45 °C
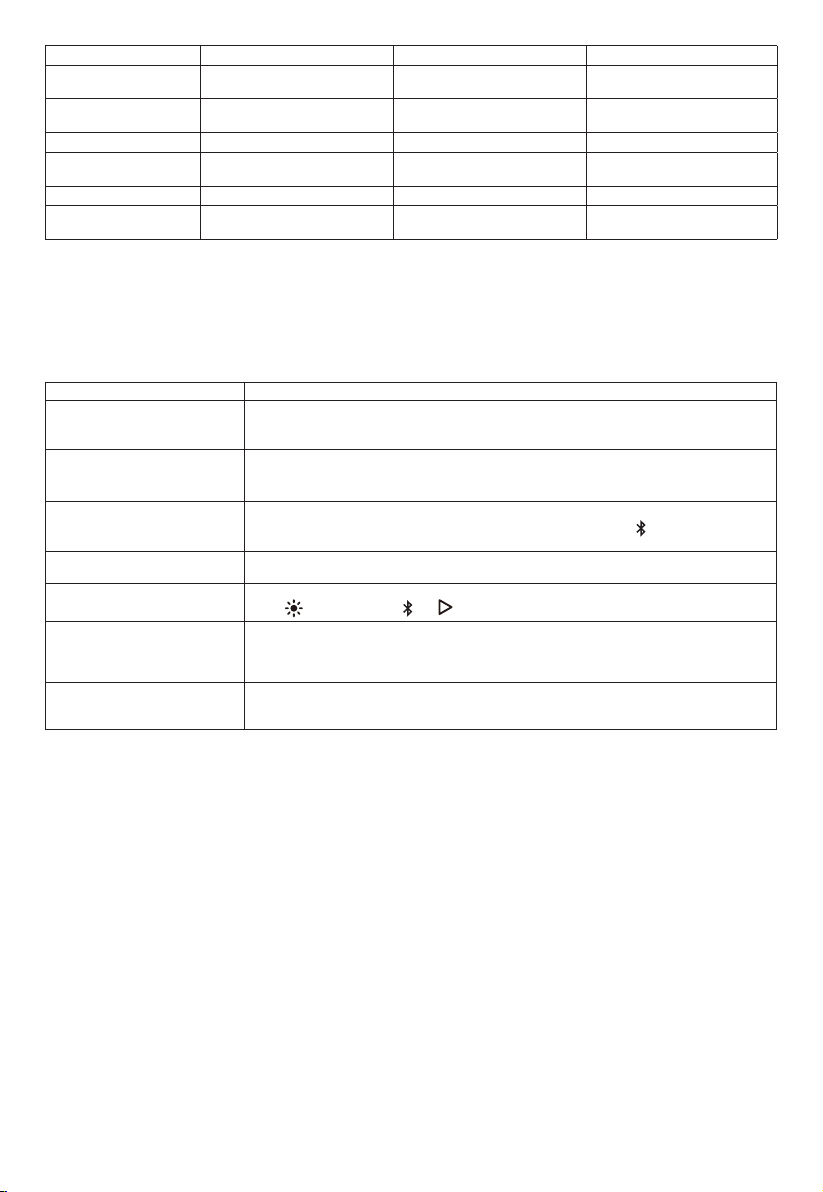
9. TROUBLESHOOTINGS
Caution:
– Never try to repair the product by yourself. If you have any problems while using this product, check the following points before you request
service.
Problem Causes and Solutions
No sound (Standby indicator is off) • Check that the soundbar’s +12V and GND connections have been properly made.
• Check if the fuse on the +12V wire located near the battery is blown; if so, replace it with an
identical fuse.
No sound from the speaker • Ensure that the soundbar is powered on and operation mode is on
• Adjust volume.
• Ensure that a sound source is active and not muted.
Bluetooth device cannot connect
with the soundbar
• Ensure that the Bluetooth function of the device is enabled.
• The soundbar is already connected with another Bluetooth device. Hold
button on the soundbar
for more than 5 seconds to disconnect and pair with a new device.
Poor audio quality from a connected
Bluetooth device.
The Bluetooth reception is poor. Move the device closer to the soundbar, or remove any obstacle
between the device and the soundbar.
No response from some buttons The product may be in demo mode. In demo mode, all the USB&Bluetooth input sources and buttons
except
are disabled. Hold and simultaneously for more than 5 seconds to exit.
USB DISK FIRMWARE Upgrade
failed and soundbar get brick or
Soundbar hang up after unplugging
U-disk during upgrading process
In this case, please re-do the firmware upgrade process again to make the soundbar work: make
main power switch off. Press and hold the “volume up” & “BT” button at same time then turning on
the main power switch, after 1 second, release hand from the “volume up” & “BT” buttons to trigger
the firmware upgrade.
Cannot auto resume USB music
after deep stand by or main power
on/off
Press play/pause button to resume soundtrack play from USB disk
Harman International Industries,
Incorporated 8500 Balboa Blvd,
Northridge, CA 91329, UNITED STATES.
www.jbl.com
© 2023 HARMAN International Industries, Incorporated. All rights reserved.
JBL is a trademark of HARMAN International Industries, Incorporated,
registered in the United States and/or other countries. Features, specifications
and appearance are subject to change without notice.
The Bluetooth® word mark and logos are registered trademarks owned by Bluetooth SIG, Inc. and any use of such marks by HARMAN International
Industries, Incorporated is under license. Other trademarks and trade names are those of their respective owners.
*
**
* Rally bar S/Rally bar/Rally bar XL
** Rally bar XL
CA_JBL Rally Bar_OM_Global_SOP_V2_online

