21
Porsche Classic
Communication Management Plus
Operating manual
21
Part number:
99764259000
95564259000
Operating manual Version 1.0
Porsche, the Porsche crest, and other marks are
registered trademarks of Dr. Ing. h.c. F. Porsche
AG. Printed in Germany.
Reprinting, even of excerpts, or duplication of any
type is only permissible with the written authori-
sation of Dr. Ing. h.c. F. Porsche AG.
© 2022 Dr. Ing. h.c. F. Porsche AG
Porscheplatz 1
70435 Stuttgart
Germany
Equipment and owner's manual
Porsche reserves the right to alter the equipment
and technology vis-à-vis the illustrations and de-
scriptions in this manual to keep abreast of ongoing
developments of the Porsche Classic Communi-
cation Management Plus. The equipment variants
donot always reect the standard scope of delivery
and may depend on country-specic options. For
information on how to install the Porsche Classic
Communication Management Plus, please contact
a Porsche Classic Partner or an Authorised Porsche
Dealership. The equipment of your Porsche Classic
Communication Management Plus may dier
from the description due to the diering statutory
provisions from country to country. If your Porsche
Classic Communication Management Plus features
equipment items not described here, your Porsche
Classic Partner or an Authorised Porsche Dealership
will tell you how to operate and maintain them
properly.
Please direct any questions, suggestions or ideas
concerning your Porsche Classic Communication
Management Plus to:
Dr. Ing. h.c. F. Porsche AG
Vertrieb Customer Relations
Porscheplatz 1
70435 Stuttgart, Germany
Germany
Warning notices and symbols
WARNING
Risk of severe or fatal
injury
Failure to observe warning notices in the "Warning"
category may lead to severe or fatal injury.
Be sure to observe warning notices.
INFORMATION
Failure to observe warning notices in the "Notice"
category may lead to material damage on the
vehicle or the Porsche Classic Communication
Management Plus.
Be sure to observe warning notices.
Information
Additional information is identied as "Information".
Prerequisites that have to be fullled to be able
to use a function.
Instruction to be followed.
1. Instruction to be followed with several succes-
sive steps.
Note on further information.
Information
The Auto-congure PCCM Plus function must
be run when the Porsche Classic Communication
Management Plus is used for the rst time in order
to guarantee the full range of functions.
911 (Type 997) / Boxster (Type 987) / Cayman
(Type 987):
To run the function, press the
CAR
Set
System Congure PCCM Plus
Auto-congure
PCCM Plus button or the
HOME
Car
Set
System
Congure PCCM Plus
Auto-congure
PCCM Plus button.
Cayenne (Type 9PA):
To run the function, press the
CAR
Set
Congure PCCM Plus button or the
HOME
Car
Set
Congure PCCM Plus button.

43
Layout of the manual
Contents
See an overview to nd the topics
you're looking for.
From page 5.
Safety notices
Find out what you can do to ensure
safe operation.
From page 7.
Overviews
Familiarise yourself with the control
elements and functions.
From page 8.
Operation
Find out how to operate the device
ingeneral.
From page 21.
Sound
Find out here how to change
thesound settings.
From page 24.
Car
Find out here how to use the Trip
function or the Individual Memory and
how to make general system settings.
From page 27.
Tuner
Find out here how to use the radio
function.
From page 35.
Media
Find out here how to use the media
function.
From page 39.
43
Phone
Find out here how to use the phone
function.
From page 45.
Technical data
Search specically for values.
From page 52.
Glossary, Index
Skip to the information you're
looking for.
From page 54.

5
Contents
Safety notices ...............................................7
Overviews ......................................................8
Control elements and their functions ...........................9
HOME screen ....................................................................13
Radio function control elements .................................15
Audio player control elements ......................................17
Bluetooth® function control elements ....................... 19
Using the PCCM Plus................................21
Basic functions ................................................................. 22
Switching the PCCM Plus on and o .........................22
On/o via ignition ............................................................22
On/o via the le-hand knob........................................22
Adjusting the volume ...................................................... 22
Muting .................................................................................22
Unmuting ...........................................................................22
Selecting a mode .............................................................22
Menu types and control options .................................. 22
Which menus are available? .......................................... 22
The HOME menu .............................................................. 22
Returning to the HOME menu ......................................22
Options menus .................................................................22
Opening and using menu types ...................................22
Opening a main menu .....................................................22
Opening the Options menus ......................................... 22
Using menus via the touchscreen ............................... 22
Using menus via the right-hand knob ........................ 22
Exiting menus ...................................................................23
Returning to the higher-level menu ............................ 23
Returning to the top level of a main menu ................ 23
Using lists...........................................................................23
Using input menus...........................................................23
Checkboxes .......................................................................23
Option elds ......................................................................23
Sound ...........................................................24
Sound settings .................................................................25
Standard Equalizer settings .......................................... 25
Custom Equalizer settings ............................................25
Loudness ............................................................................25
Adjusting the fader .......................................................... 25
Adjusting the balance ..................................................... 25
Speed dependent volume adjustment (with
basic speakers) .................................................................25
AudioPilot (with Bose® Sound System) ....................26
Surround (with Bose® Sound System) ....................... 26
Listening position (with Bose® Sound System) ......26
Car ................................................................27
Brief overview ...................................................................28
Trip information display .................................................. 29
Displaying trip information ............................................ 29
Displaying personal trip information ..........................29
Resetting Trip information display ..............................29
Individual Memory and System (Set) ......................... 30
Daytime running lights .................................................. 30
Fade-out time ...................................................................30
Orientation lights .............................................................30
Rain sensor.........................................................................30
Rear wiper ..........................................................................31
Climate memory ...............................................................31
Saving climate settings ..................................................31
Door opener .......................................................................31
Autolock..............................................................................31
Screen button ...................................................................31
Setting the time ...............................................................32
Setting the date ...............................................................32
Setting the time format .................................................32
Synchronising the time ..................................................32
Setting the Standby time ..............................................32
Enabling automatic day/night mode ..........................32
Customising day/night mode .......................................32
Setting the menu language...........................................33
Specifying the unit for speed .......................................33
Specifying the unit for temperature ...........................33
Specifying the unit for consumption ..........................33
Adjusting the individual volumes of audio
sources ................................................................................33
Conguring PCCM Plus ..................................................34
Version info ........................................................................34
Factory reset .....................................................................34
Tuner ............................................................35
Brief overview ...................................................................36
Setting the reception range ..........................................37
Setting/selecting a station ...........................................37
Displaying and selecting saved stations
(presets) .............................................................................37
Setting a station using the Skip buttons ..................37
Setting a station manually ............................................37
Selecting a station from the station list ....................37
Saving the station ............................................................ 37
Saving the set station ..................................................... 37
Storing a station from the station list ........................38
Setting Trac announcements ....................................38
Switching Trac announcements on/o ..................38
Setting Trac announcements volume .....................38
Changing settings ...........................................................38
Media ...........................................................39
Brief overview ...................................................................40
Selecting media source ..................................................41
Media player control elements ..................................... 41
Playing music .................................................................... 41
Skipping forward/back...................................................41
Fast forward/back ...........................................................41
Shue on/o .....................................................................41
Repeating music track ....................................................41
Browsing media ................................................................42
Notes on drives and externally-connected
devices ............................................................................... 42

6
Contents
Connecting and playing from a USB stick ................42
Inserting a MicroSDHC card (MAP) ............................ 42
Removing the MicroSDHC card ...................................42
Opening Apple CarPlay®.................................................42
Operating Apple CarPlay® with the PCCM Plus ......43
Operating Apple CarPlay® via Siri® voice
recognition .........................................................................43
Opening Android Auto™ ..................................................43
Operating Android Auto™ with the PCCM Plus ........ 43
Operating Android Auto™ via Google Assistant™
voice recognition ..............................................................43
Phone ...........................................................44
Brief overview ...................................................................45
Connecting a mobile phone via Bluetooth® ..............46
Connecting a new mobile phone ................................. 46
Bluetooth® function on/o ............................................ 46
Connecting to a known mobile phone .......................47
Displaying the connection status ................................ 47
Opening Phone Manager ...............................................47
Deleting a Bluetooth® device from the Phone
Manager .............................................................................. 47
Entering a telephone number (keypad) .....................47
Calling last number ..........................................................48
Dialling number from call list ........................................ 48
Dialling number from contacts ....................................48
Accepting a call ................................................................ 48
Rejecting a call ..................................................................48
Ending a call .....................................................................48
Functions during a call ...................................................48
Private mode .....................................................................48
Activating external microphone ...................................48
Switching between two calls (toggling) ...................49
Displaying call list ............................................................ 49
Use contacts .....................................................................49
Transfer contacts .............................................................49
Search contact .................................................................49
Calling contact ..................................................................49
Deleting contact list ........................................................49
Sorting contact list ..........................................................50
Change settings ...............................................................50
Auto connect mobile phone ..........................................50
Changing Bluetooth® name ..........................................50
Playing from external audio sources via
Bluetooth® ..........................................................................50
Technical data ............................................51
System ................................................................................ 52
Tuner/digital radio ............................................................52
Bluetooth® ..........................................................................52
Navigation ..........................................................................52
File formats ........................................................................ 52
Dimensions/weight ......................................................... 52
Glossary, Index ...........................................54

87
Safety notices
Perfect technology: Prerequisite for your safety.
Premium materials and outstanding workmanship
ensure a long life for the Porsche Classic Commu-
nication Management Plus. Your care and attention
are required to ensure that the Porsche Classic Com-
munication Management Plus can keep its promise.
You will then be able to rely on your Porsche Classic
Communication Management Plus even incritical
situations.
The Porsche Classic Communication Management
Plus is the central control unit for the radio, media
functions, external audio sources, sound settings,
navigation system, Bluetooth® telephony, trip
computer and Individual Memory. You must observe
the following to ensure that neither you nor others
are placed at risk or come to harm when using the
Porsche Classic Communication Management Plus:
WARNING
Risk of accident
Distracted driving can cause you to lose control over
the vehicle.
Only operate the Porsche Classic Communication
Management Plus when you can operate your
vehicle safely and the trac situation permits.
If indoubt, stop the vehicle and operate the
Porsche Classic Communication Management
Plus when at a full stop.
Rear view camera:
The objects captured by the camera are shown
distorted. The image from the rear view camera
does not show the complete area behind the
vehicle.
Keep watching the vehicle's complete surround-
ings.
Make sure that there are no people, animals, ob-
stacles or vehicles around the rear view camera
image.
WARNING
Risk of accident
The navigation system is only intended as support
for the driver and gives suggestions for the route.
It does not relieve you from your full responsibility
toobserve the proper rules of the road and other
applicable regulations governing conduct on public
roads. You as the driver must judge the trac situa-
tion at the time.
You are solely responsible for driving your vehicle
safely.
Continue to pay attention to the trac situation.
WARNING
Risk of injury
Risk of injury. Use of the telephone in the proximity
of explosives (e.g. at fuelling stations) or in the prox-
imity of blasting operations is prohibited.
Mobile phones must be turned o in certain hazard
zones, such as in the proximity of fuelling stations,
fuel depots, chemical plants, and blasting zones.
They could interfere with technical equipment.
Observe the relevant notices.
Observe legal regulations and local restrictions
when using the telephone.
INFORMATION
Risk of damage
The Porsche Classic Communication Management Plus
contains high-end electronic components, the care
andmaintenance of which require special attention.
You should note the following:
– The screen is susceptible to scratches.
– Do not spray liquids onto the unit. Penetrating
liquids can destroy the unit.
Carefully clean your Porsche Classic Communi-
cation Management Plus from time to time with
a dry, clean, and so tissue (microbre tissue)
ora cleaning brush.
Do not apply excessive pressure to the surface
when cleaning.
Never use solvents such as denatured alcohol,
thinner, benzine, acetone, or alcohol (ethanol,
methanol, or isopropyl alcohol), or abrasives.
Remove nger prints with a slightly damp cloth
ora mild cleaning agent.
Never spray cleaning agents or other liquids
directly onto the screen. Instead, moisten a cloth
and carefully wipe down the screen.
Never attempt to correct malfunctions
byopening the Porsche Classic Communication
Management Plus yourself! Have the defective
device repaired professionally.
We recommend that you have this work performed
by a Porsche Classic Partner or an Authorized
Porsche Dealership, since these are staed with
trained technicians and have the required parts and
tools.
7

87
Overviews
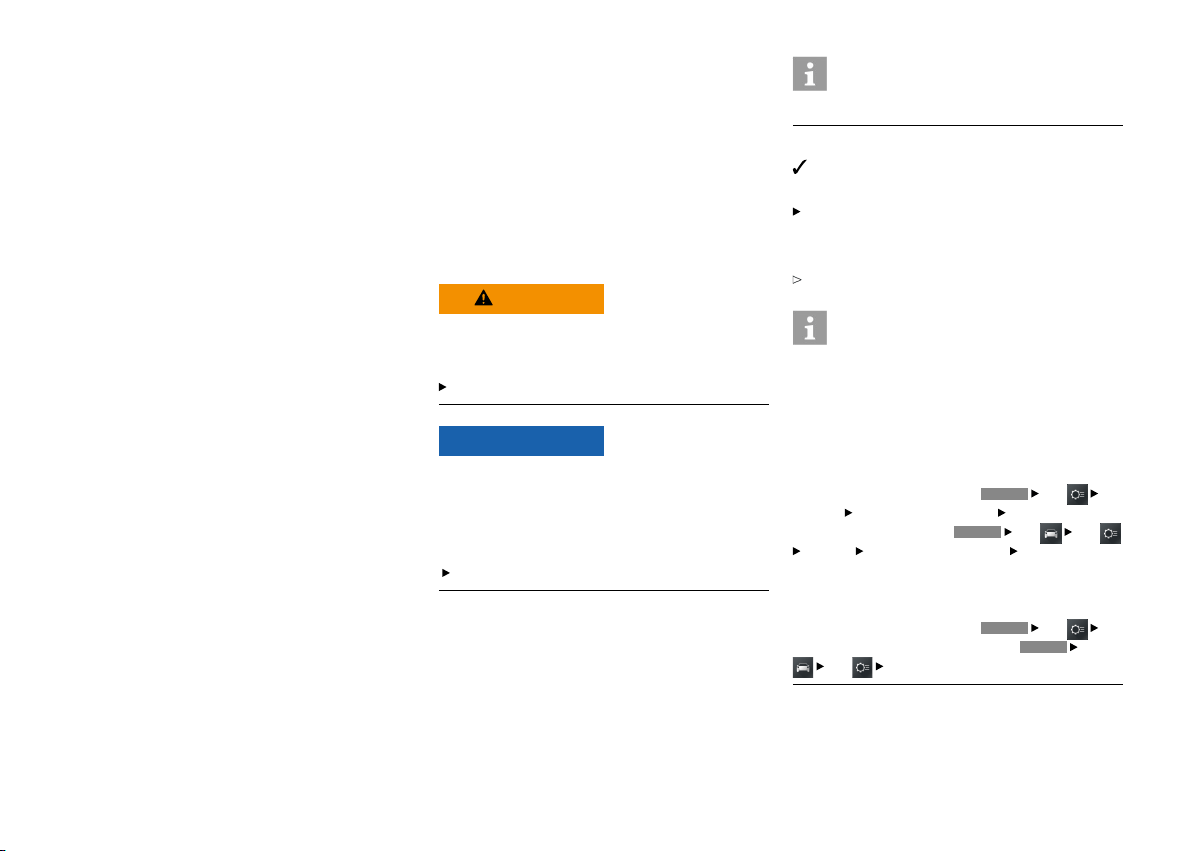
The pages below contain overviews of the most
important control elements and functions of the
Porsche Classic Communication Management Plus
along with a brief explanation.
8
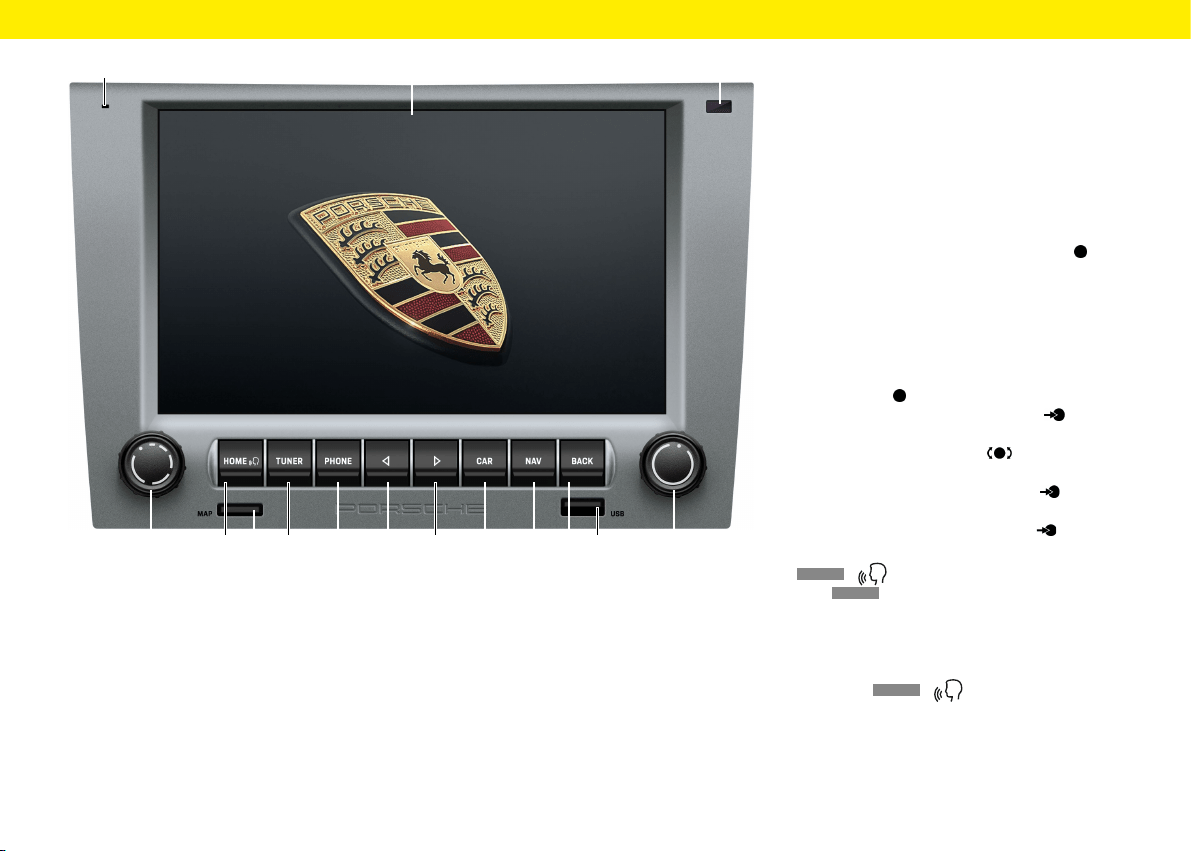
Control elements and their
functions
A Microphone
The built-in microphone is designed for making
calls using the Bluetooth® hands-free system.
B
Touchscreen
The touchscreen serves as a central control ele-
ment supplementary to the right-hand knob .
You can use the touchscreen to select any menu
option directly on the screen.
C Sensor for day/night mode
The day/night mode sensor allows the device
todetect the current lighting situation andtoad-
just the display brightness accordingly.
D Le-hand knob
– Keeping the le-hand knob pressed for
alonger time turns the device on or o.
– Turning the le-hand knob changes the
volume of the active audio source.
– Briey pressing the le-hand knob mutes
or unmutes playback.
– Briey pressing the le-hand knob can-
cels a Trac Announcement (TA).
E
HOME
/ button
Press
HOME
to open the main menu and access
the following functions:
– Tuner – Nav – Car
– Media – Map – App
– Phone – Sound
Keeping the
HOME
/ pressed:
Activate Siri®/Google Assistant™.
E F GD
A C
H
I J K
B
O
L M N
9
Overviews
F MAP
MicroSDHC card slot navigation soware. The
MicroSDHC card slot for the navigation soware
accepts the MicroSDHC card containing the
navigation soware and the map data.
G
TUNER
button
Press
TUNER
to activate radio mode and toggle
between FM/AM and DAB+.
H
PHONE
button
Press
PHONE
to activate Bluetooth® hands-free
mode.
I Skip le
Press the Skip button
to select the previous
station or track.
J Skip right
Press the Skip button
to select the next
station or track.
K
CAR
button
Press
CAR
to activate the following functions:
– Trip
– Set (Individual Memory and/or system)
L
NAV
button
Press
NAV
to activate GPS navigation mode.
For further information about the navigation
functions of the device, please refer to the sepa-
rate navigation manual.
M
BACK
button
Press
BACK
to return to the previous step
ofthe current menu.
N USB/Apple CarPlay®/Android Auto™
The USB port accepts a USB storage device
forplaying audio les and also acts as a port
fora mobile device for operating Apple CarPlay®/
Android Auto™.
O The touchscreen serves as a central control
element supplementary to the right-hand knob :
– Turn the knob to highlight a menu option.
– Press to select a highlighted menu
option.
– Turn to change settings (e.g. fader).
– Turn to change the zoom factor in Map
view.
Information
In some cases, the illustrations in this manual may
dier slightly between the Porsche Classic Commu-
nication Management Plus for Porsche 911 (Type
997) / Boxster (Type 987) / Cayman (Type 987)
and Porsche Cayenne (Type 9PA).
Information
The Individual Memory function is available only
forthe Porsche 911 (Type 997) / Boxster (Type
987) / Cayman (Type 987) vehicle models.
10
Overviews

Control elements and their
functions
A
HOME
/ button
Press
HOME
to open the main menu and access
the following functions:
– Tuner – Nav – Car
– Media – Map – App
– Phone – Sound
Keeping the
HOME
/ pressed:
Activate Siri®/Google Assistant™.
B
TUNER
button
Press
TUNER
to activate radio mode and toggle
between FM/AM/DAB+.
C Microphone
The built-in microphone is designed for making
calls using the Bluetooth® hands-free system.
D Skip right
Press the Skip button
to select the next
station or track.
E Skip le
Press the Skip button
to select the previous
station or track.
F
NAV
button
Press
NAV
to activate GPS navigation mode.
For further information about the navigation
functions of the device, please refer to the sepa-
rate navigation manual.
LK
I JGF HDEBA C
ON
M
11
Overviews
G
PHONE
button
Press
PHONE
to activate Bluetooth® hands-free
mode.
H Sensor for day/night mode
The day/night mode sensor allows the device
todetect the current lighting situation and toad-
just the display brightness accordingly.
I
CAR
button
Press
CAR
to activate the following functions:
– Trip
– Set
J
BACK
button: Press
BACK
to return to the
previous step of the current menu.
K MAP
MicroSDHC card slot navigation soware. The
MicroSDHC card slot for the navigation soware
accepts the MicroSDHC card containing the
navigation soware and the map data.
L Le-hand knob
– Keeping the le-hand knob pressed for
alonger time turns the device on or o.
– Turning the le-hand knob changes
thevolume of the active audio source.
– Briey pressing the le-hand knob mutes
or unmutes playback.
– Briey pressing the le-hand knob can-
cels a trac announcement (TA).
M Touchscreen
The touchscreen serves as a central control ele-
ment supplementary to the right-hand knob .
You can use the touchscreen to select any menu
option directly on the screen.
N USB/Apple CarPlay®/Android Auto™
The USB port accepts a USB storage device
forplaying audio les and also acts as a port
fora mobile device for operating Apple CarPlay®/
Android Auto™.
O The touchscreen serves as a central control
element supplementary to the right-hand knob :
– Turn the knob to highlight a menu option.
– Press to select a highlighted menu option.
– Turn to change settings (e.g. fader).
– Turn to change the zoom factor in Map
view.
12
Overviews
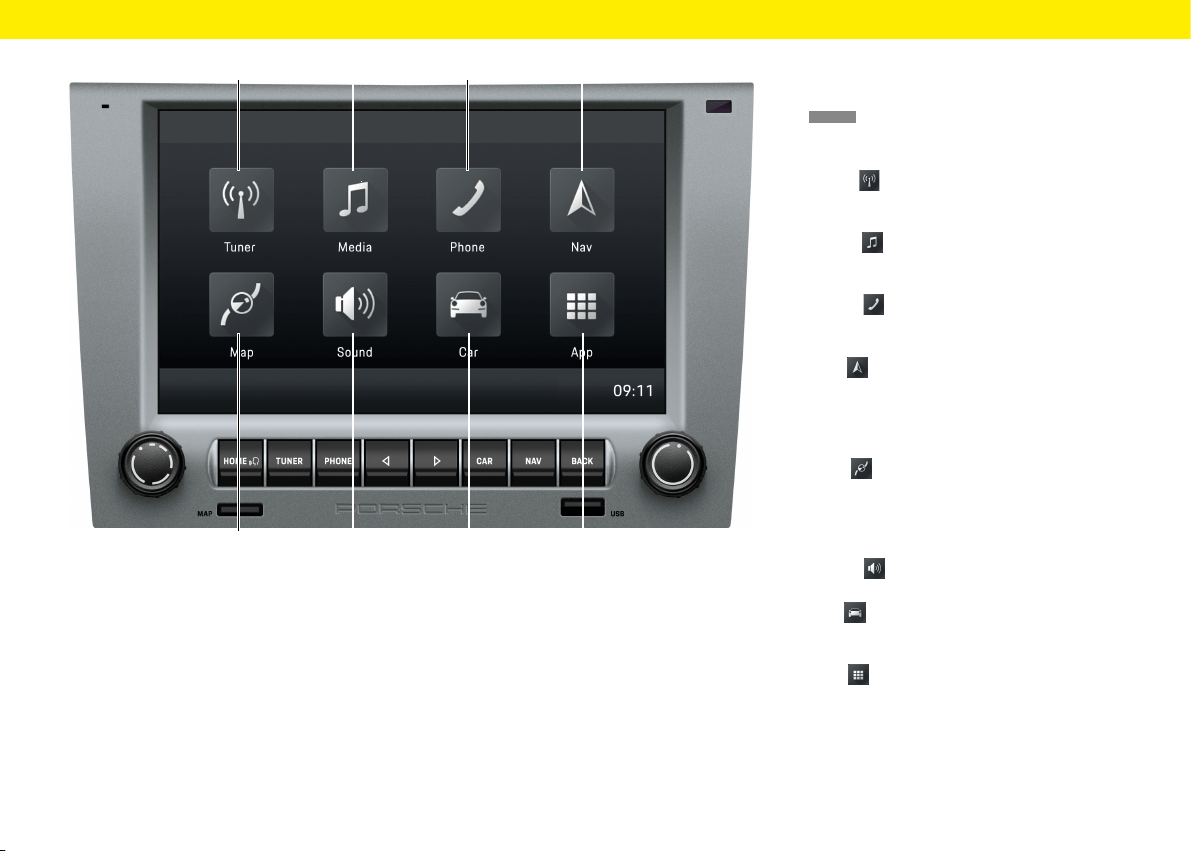
HOME screen
Press
HOME
to open the main menu and access the
following functions:
A Tuner
Tap Tuner to activate radio mode and toggle
between the FM/AM/DAB+ reception ranges.
B Media
Tap Media to activate the mode for playing
from the USB stick/ext. Bluetooth® audio source.
C Phone
Tap Phone to activate Bluetooth® hands-free
mode.
D Nav
Tap Nav to activate GPS navigation mode.
Forfurther information about the navigation
functions of the device, please refer to the sepa-
rate navigation manual.
E Map
Tap Map to activate Map view in the nav.
Forfurther information about the navigation
functions of the device, please refer to the sepa-
rate navigation manual.
F Sound
Tap Sound to activate sound settings mode.
G Car
Tap Car to activate Trip display and Individual
Memory mode and the general system settings.
H App
Tap App to activate Apple CarPlay®/Android
Auto™ mode.
Overviews
E F G H
A B C D
13
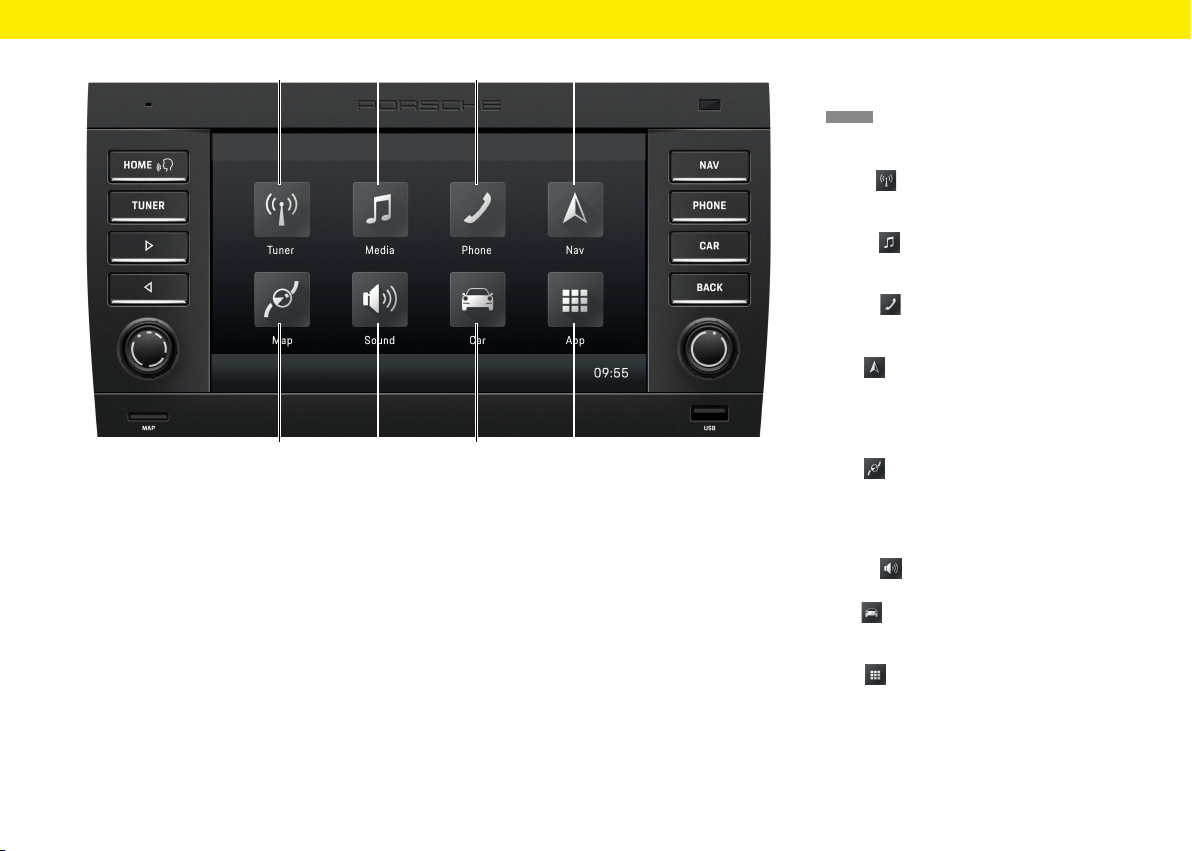
Overviews
E F G H
A B C D
HOME screen
Press
HOME
to open the main menu and access the
following functions:
A Tuner
Tap Tuner to activate radio mode and toggle
between the FM/AM/DAB+ reception ranges.
B Media
Tap Media to activate the mode for playing
from the USB stick/ext. Bluetooth® audio source.
C Phone
Tap Phone to activate Bluetooth® hands-free
mode.
D Nav
Tap Nav to activate GPS navigation mode.
Forfurther information about the navigation
functions of the device, please refer to the sepa-
rate navigation manual.
E Map
Tap Nav to activate navigation Map view.
Forfurther information about the navigation
functions of the device, please refer to the sepa-
rate navigation manual.
F Sound
Tap Sound to activate sound settings mode.
G Car
Tap Car to activate Trip display mode and the
general system settings.
H App
Tap App to activate Apple CarPlay®/Android
Auto™ mode.
14
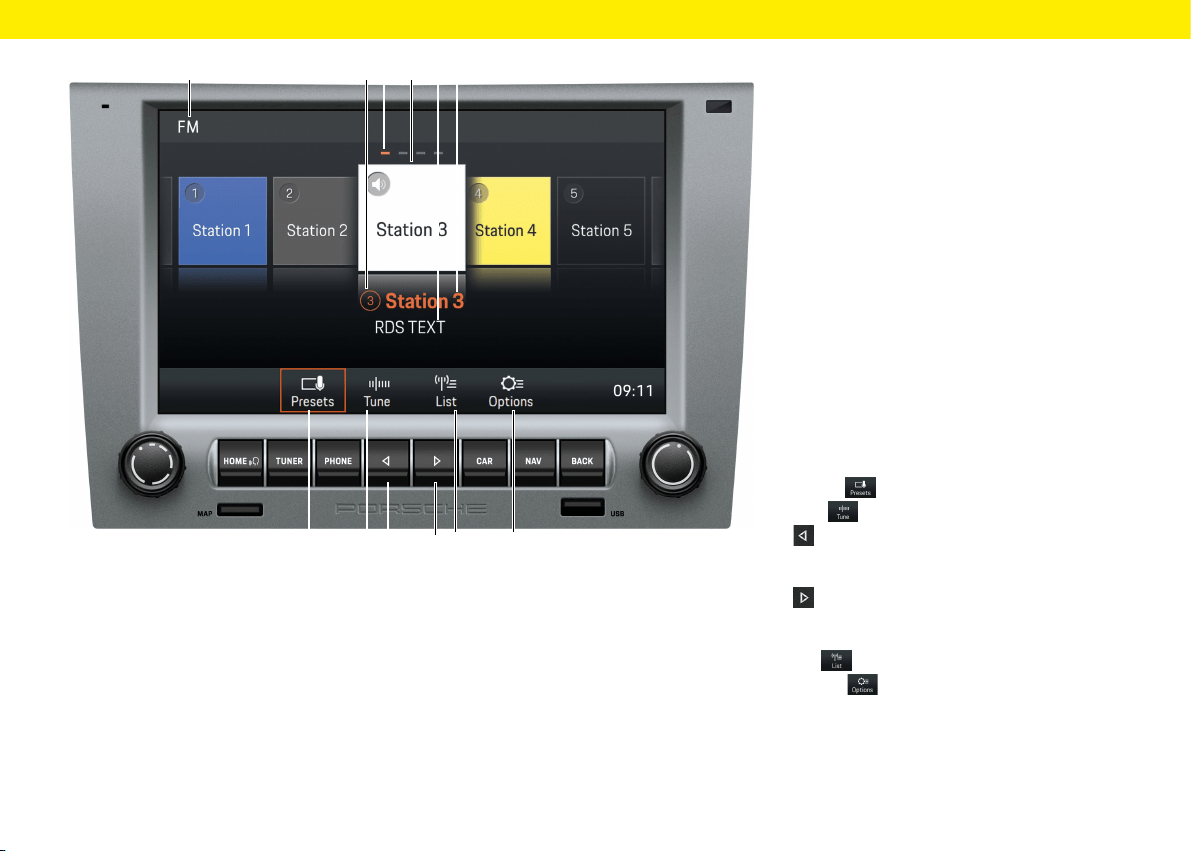
Radio function control
elements
A FM/AM/DAB+ reception range
B Station button/program storage location
Indicates the program storage location
ofthestation currently selected
C Page indicator
D Selected station
E RDS TEXT
This display shows the radio text currently being
broadcast. This information is the additional
data being broadcast by the station that appears
inthe display. Such information may be the track
and artist of the song being played or the latest
news.
F Station name or frequency display
Displays the name or the transmission frequency
of the station currently selected.
G Presets Main view of the tuner
H Tune Frequency band display
I
The Skip le button allows you to skip tothe
previous station in the program storage loca-
tions.
J
The Skip right button allows you to skip
tothe next station in the program storage loca-
tions.
K List Channel list display
L Options Radio settings
– Switch on/o AM
– Save station
– Switch on/o Trac Announcements (TA)
– Filter/sort station lists by RDS name
– Sort DAB+ station lists
– Select frequency range (by region)
Overviews
G H L
A CB FD E
I
J
K
15
K
I
J
I
A BC DEF
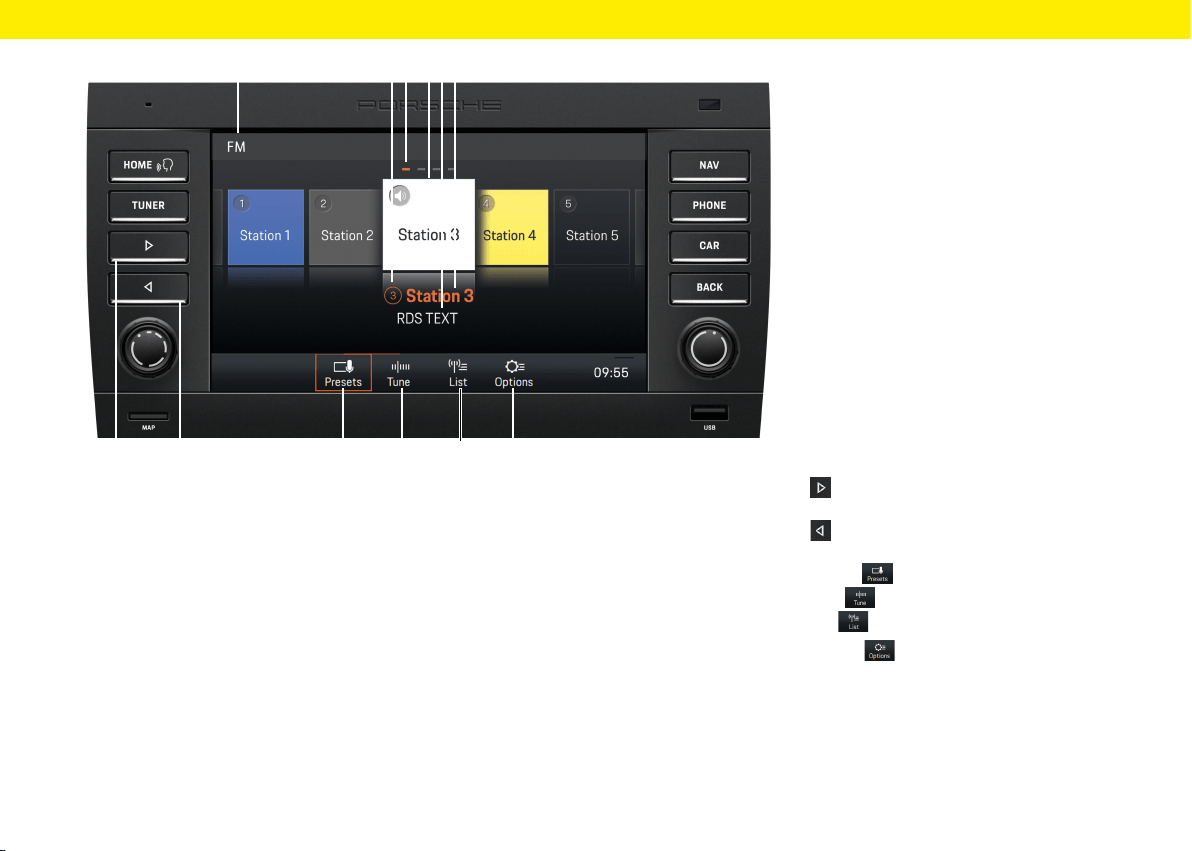
Overviews
LH
Radio function control
elements
A FM/AM/DAB+ reception range
B Station button/program storage location
Indicates the program storage location
ofthestation currently selected
C Page indicator
D Selected station
E RDS TEXT
This display shows the radio text currently being
broadcast. This information is the additional
data being broadcast by the station that appears
inthe display. Such information may be the track
and artist of the song being played or the latest
news.
F Station name or frequency display
Displays the name or the transmission frequency
of the station currently selected.
G
The Skip right button allows you to skip tothe
next station in the program storage locations.
H
The Skip le button allows you to skip tothe
previous station in the program storage locations.
I Presets Main view of the tuner
J Tune Frequency band display
K List Station list display
L Options Radio settings
– Switch on/o AM
– Save station
– Switch on/o Trac Announcements (TA)
– Filter/sort station lists by RDS name
– Sort DAB+ station lists
– Select frequency range (by region)
G
16
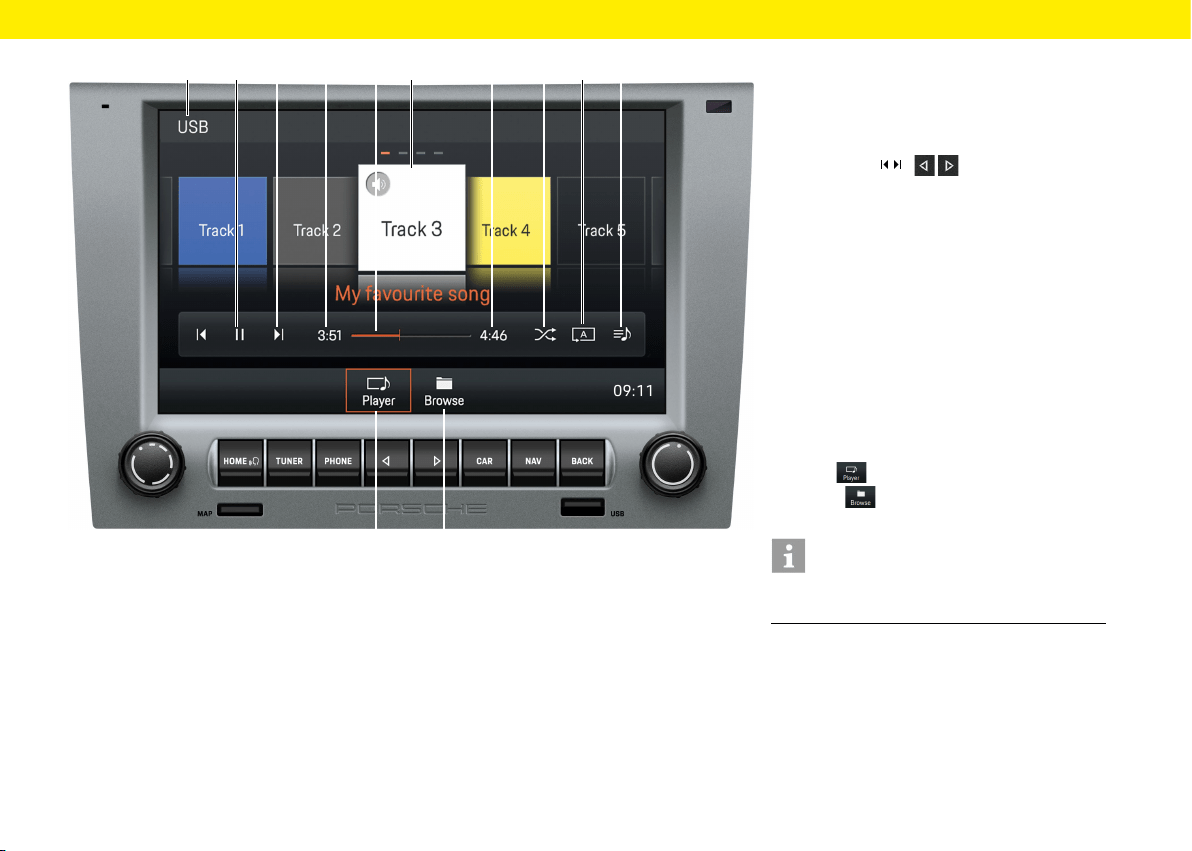
Audio player control elements
A Selected medium: USB/Bluetooth®
B Pause/Play
C Skip buttons /
The Skip buttons allow you to skip to the previ-
ous/next track
D Elapsed play time
E Fast forward/back/progress bar
F Song track/artist currently playing
G Total track time
H Shue
Enable/disable shue play
I Repeat
– Repeat all
– Repeat track
– Repeat folder
J All album tracks within the selected playlist
K Player
Main view of the audio player
L
Browse
Folder structure of the current
medium
Information
The folder structure is displayed only when playing
from USB media.
Overviews
A F
K L
CB ED HG I J
17
L
A C FB ED H
Overviews
G I J
K
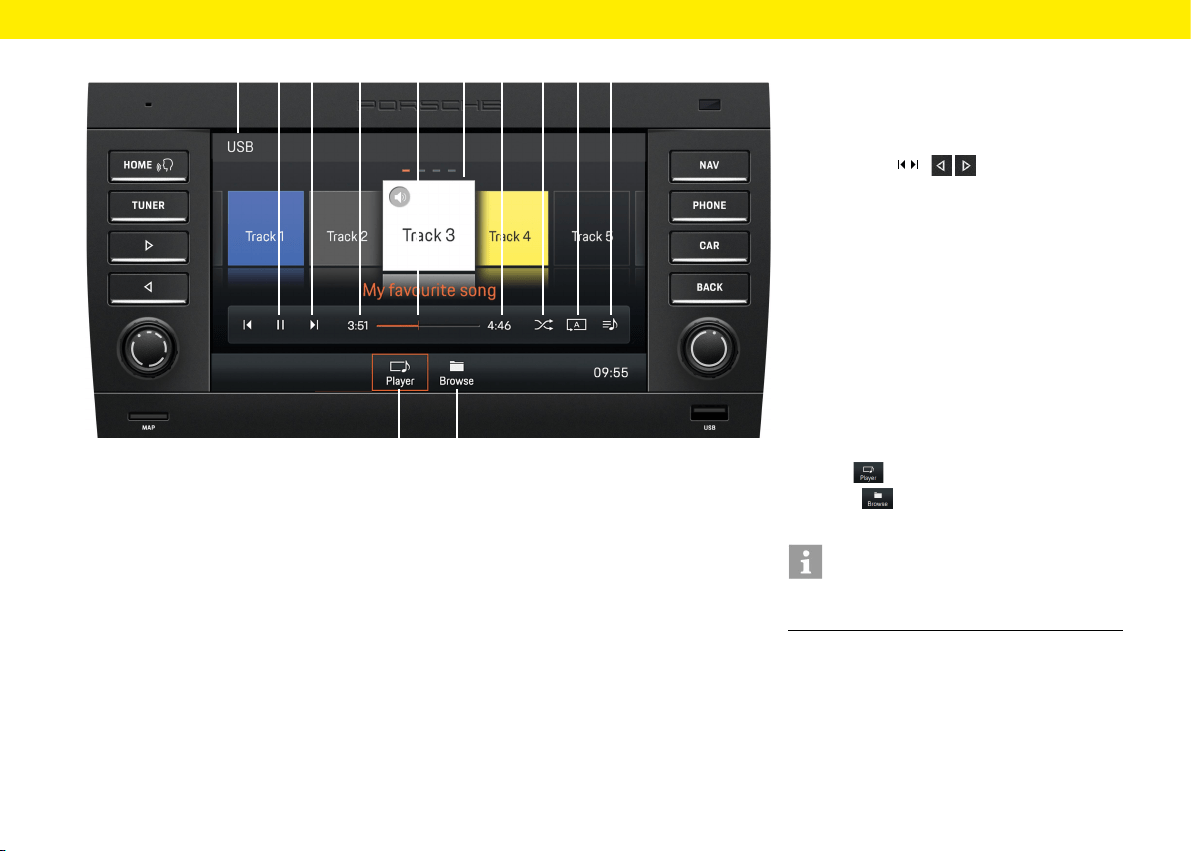
Audio player control elements
A Selected medium: USB/Bluetooth®
B Pause/Play
C Skip buttons /
The Skip buttons allow you to skip to the previ-
ous/next track
D Elapsed play time
E Fast forward/reverse/progress bar
F Song track/artist currently playing
G Total track time
H Shue
Enable/disable shue play
I Repeat
– Repeat all
– Repeat track
– Repeat folder
J All album tracks within the selected playlist
K Player
Main view of the audio player
L Browse
Folder structure of the current
medium
Information
The folder structure is displayed only when playing
from USB media.
18
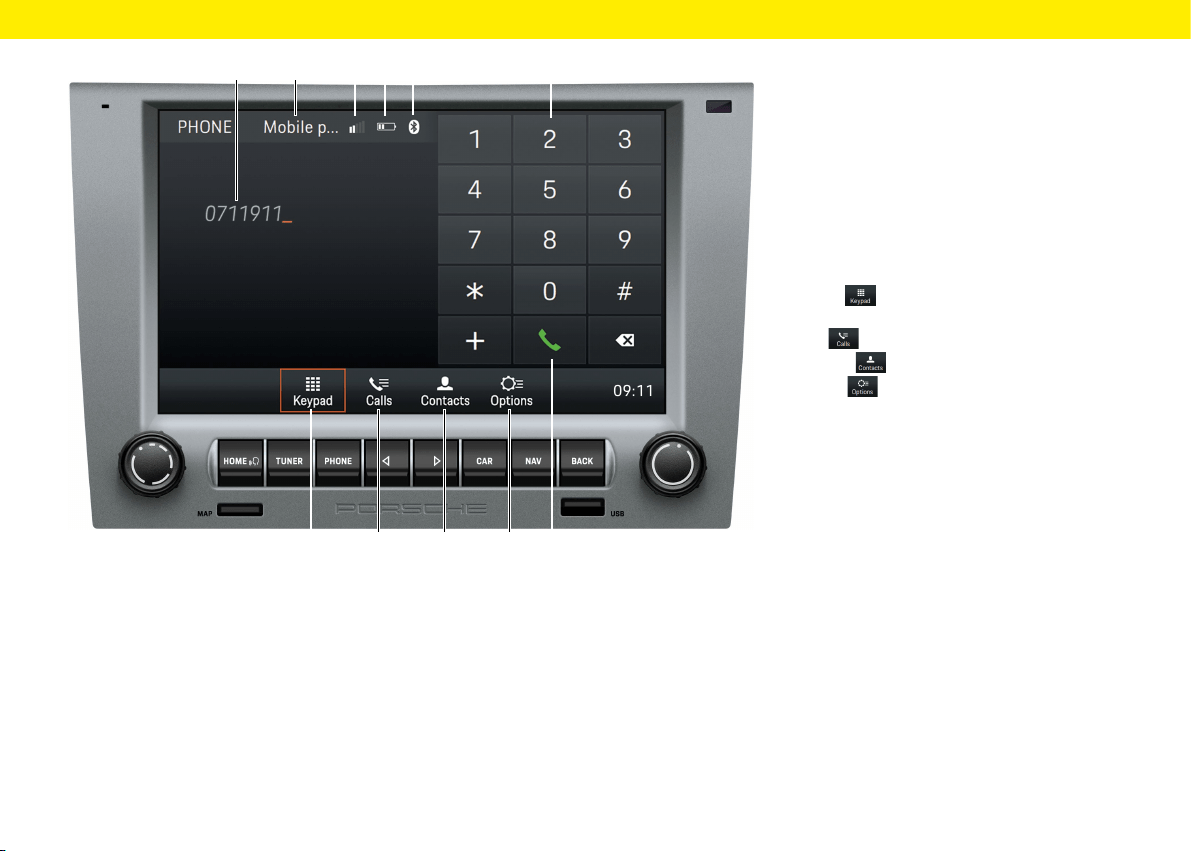
Bluetooth® function control
elements
A Display of the number entered
B Selected mobile phone
C Signal strength
D Phone charge indicator
E Bluetooth® function activated
F Number/character pad
G Keypad Main view of the Bluetooth®
function
H Calls Call list
I Contacts
Contacts
J Options
Options
– Phone Manager
– Set Bluetooth®
– Set contacts
– Activate/deactivate external microphone
– Switch between calls
K Dial/Hang up
Overviews
B C D E FA
KHG J
I
19
JIHG
EDCB F
Overviews
K
A
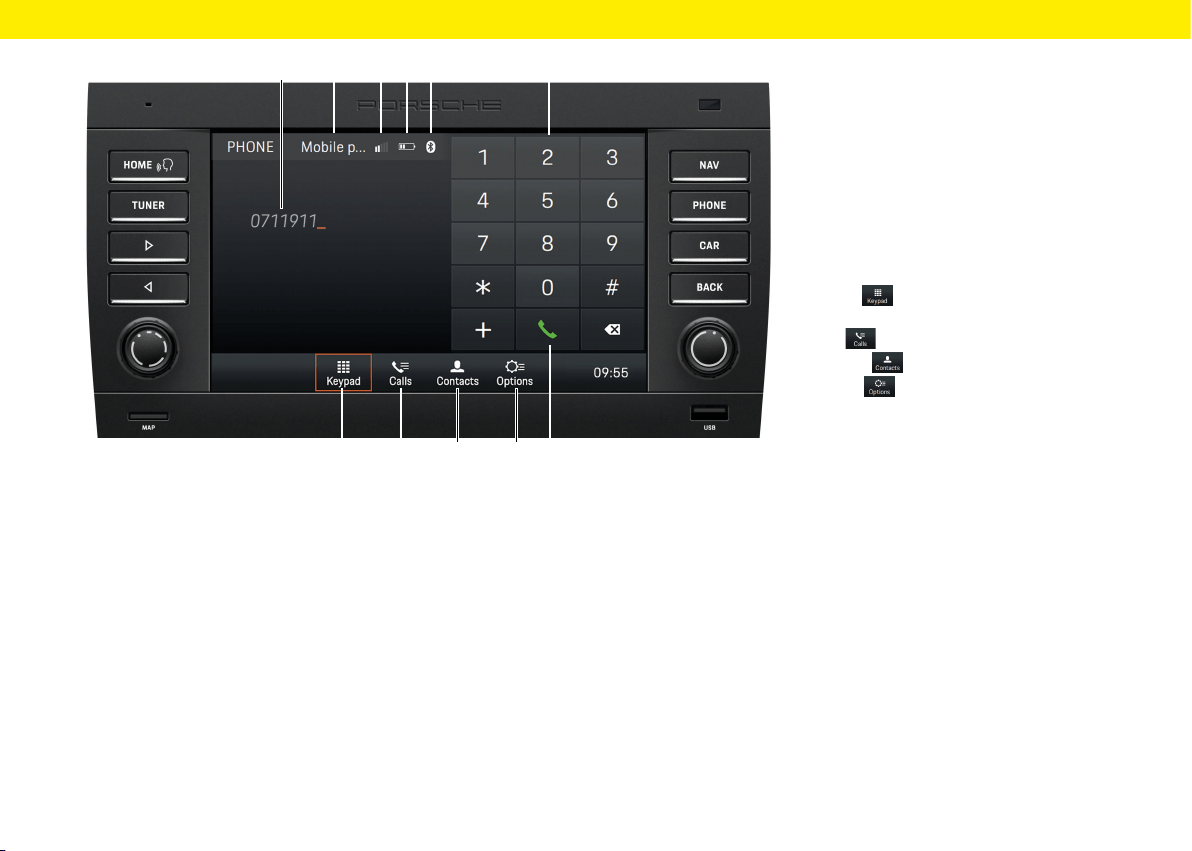
Bluetooth® function control
elements
A Display of the number entered
B Selected mobile phone
C Signal strength
D Phone charge indicator
E Bluetooth® function activated
F Number/character pad
G Keypad Main view of the Bluetooth®
function
H Calls Call list
I Contacts
Contacts
J Options
Options
– Phone Manager
– Set Bluetooth®
– Set contacts
– Activate/deactivate external microphone
– Switch between calls
K Dial/Hang up
20

Using the PCCM Plus
The pages below contain a description of the basic
operation on the Porsche Classic Communication
Management Plus, such as access to the various
modes, menu types or control elements.
21

Basic functions
Switching the PCCM Plus on and o
On/o via ignition
Switch on the ignition. The Porsche Classic
Communication Management Plus is active.
On/o via the le-hand knob
If you do not want the Porsche Classic Communica-
tion Management Plus to be active all the time, you
can switch it on and o using the le-hand knob.
Press the le-hand knob for at least one
second.
Adjusting the volume
Turn the le-hand knob . Depending
onthesituation, this changes the volume of
– the active audio source,
– a trac announcement,
– a navigation announcement,
– the phone ring tone during an incoming call,
- the hands-free feature during a call.
Muting
Muting the audio source:
Press the le-hand knob briey. Playback
ofthe audio source is muted.
Unmuting
To unmute and resume playback, press
orturn the le-hand knob again.
Information
The mute function can also be used to cancel trac
announcements (TA).
Selecting a mode
Press the HOME, TUNER, PHONE, CAR or NAV
button to access the modes of the Porsche Classic
Communication Management Plus.
Menu types and control options
The Porsche Classic Communication Management
Plus screen is a colour touchscreen. All menu
functions, list entries and input menus, as well asthe
arrow symbols and scroll bar, are easy to use bytap-
ping the screen at the relevant point.
Which menus are available?
The HOME menu
The range of functions of the Porsche Classic
Communication Management Plus is divided into the
following main menus via the HOME menu:
– Tuner (icon in the HOME menu or button):
Radio main menu
– Media (icon in the HOME menu):
Media main menu
– Phone (icon in the HOME menu or button):
Telephone main menu
– Nav (icon in the HOME menu or button):
Navigation main menu
– Map (icon in the HOME menu): Map display
– Sound (icon in the HOME menu): Sound settings
– Car (icon in the HOME menu or button): Trip
function, Individual Memory and general system
settings
– App (icon in the HOME menu): Apple CarPlay®/
Android Auto™
Many of these main menus contain submenus
forspecic features.
Returning to the HOME menu
Press the
HOME
button to return to the HOME
menu.
Options menus
Some of the main menus contain an Options
menu that oer settings and other functions for
these main menus.
Opening and using menu types
Opening a main menu
To open a main menu, press the corresponding
button on the Porsche Classic Communication
Management Plus or select the associated icon
via the
HOME
menu using the touchscreen. You
can toggle between the main menus at any time.
To return to the highest level of a main menu,
press
BACK
until the highest level appears.
Opening the Options menus
To open an Options menu, select the Options
icon in the main menu on the touchscreen.
Using menus via the touchscreen
Tap the individual menu options or buttons
directly on the screen.
Using menus via the right-hand knob
As an alternative to using the menu options on
the touchscreen you can also turn the right-hand
knob .
Turn the right-hand knob to highlight a menu
option.
Press the right-hand knob to select the
highlighted menu option.
Using the PCCM Plus
22
Using the PCCM Plus
Exiting menus
Returning to the higher-level menu
Press
BACK
to cancel an operation and return
to the higher level menu.
Returning to the top level of a main menu
Press
BACK
repeatedly to return to the main
menu's top level. Alternatively, press the correspond-
ing button on the Porsche Classic Communication
Management Plus or select the associated button
inthe
HOME
menu using the touchscreen.
Using lists
There are several ways to highlight a menu option:
Turn the right-hand knob . Menu options
arehighlighted by an orange-coloured frame.
Press the right-hand knob
– or –
select a menu option via the touchscreen: Con-
rm the selection.
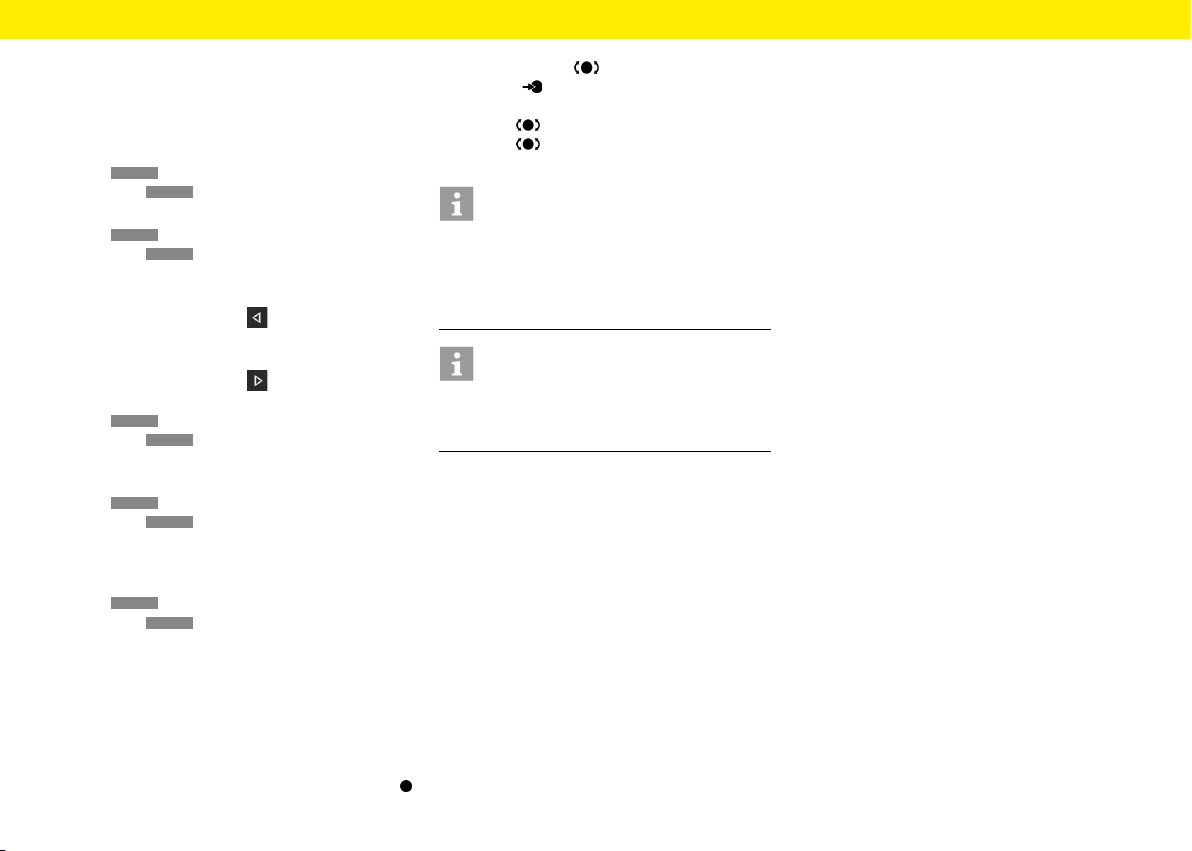
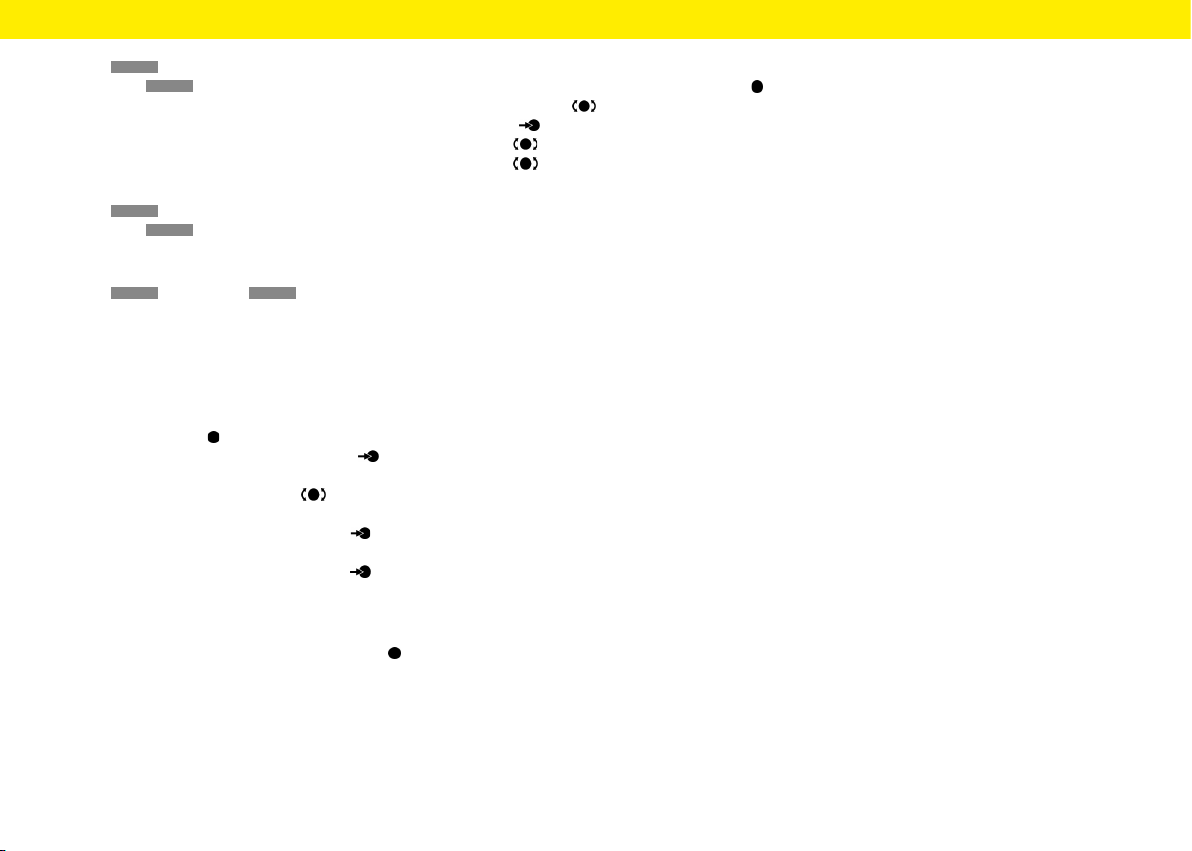
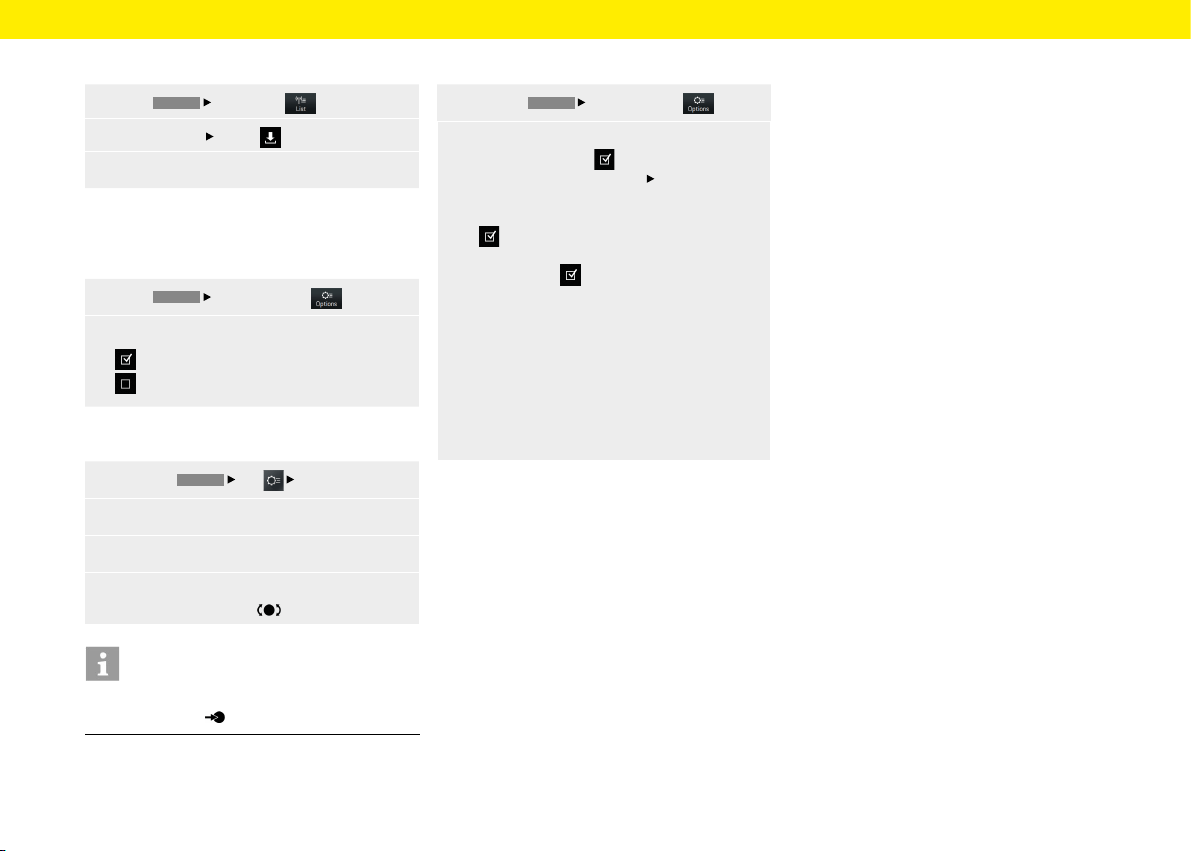
Using input menus
You can enter certain data into the Porsche Classic Com-
munication Management Plus. e.g. a phone number.
To enter data in an input menu, tap the charac-
ters on the screen.
– or –
Turn the right-hand knob to highlight
a character and press the right knob
toselect it.
To conrm and apply the data entered up to this
point, tap the corresponding button, e.g.
inthe menu.
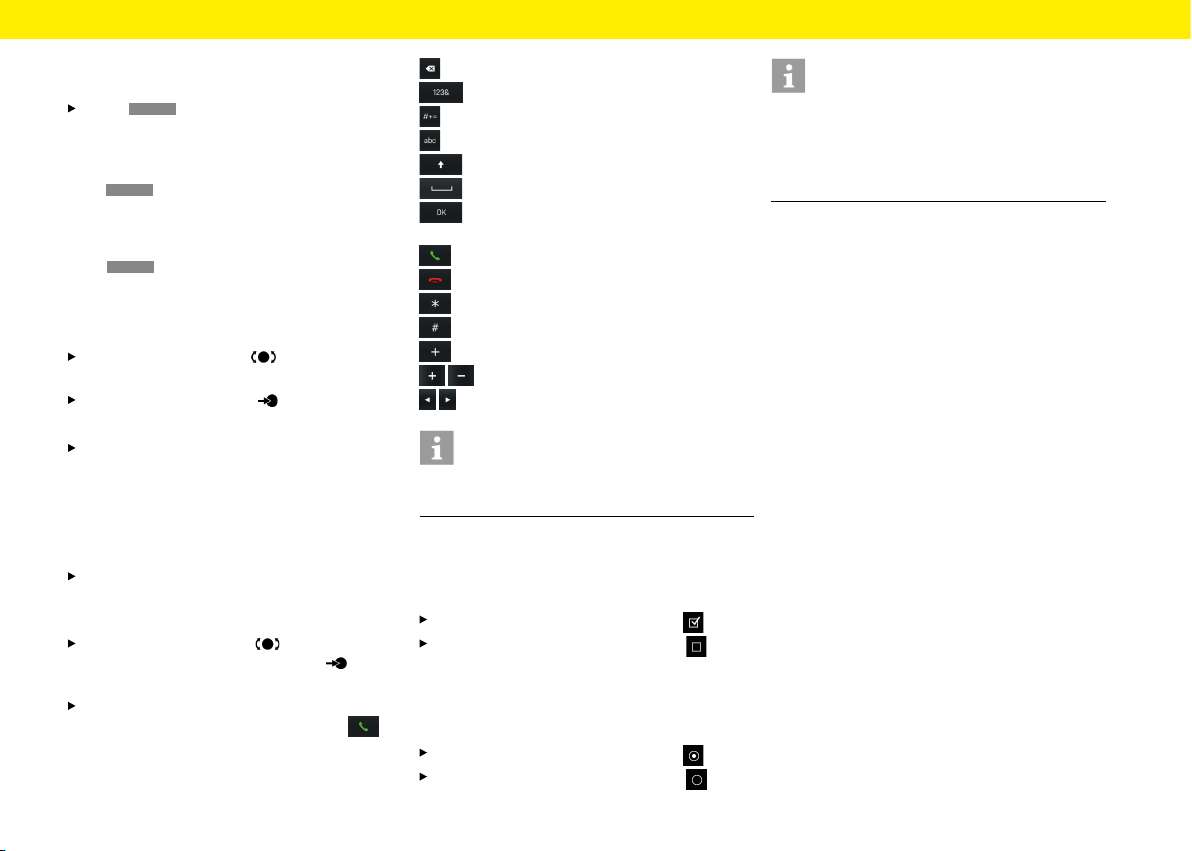
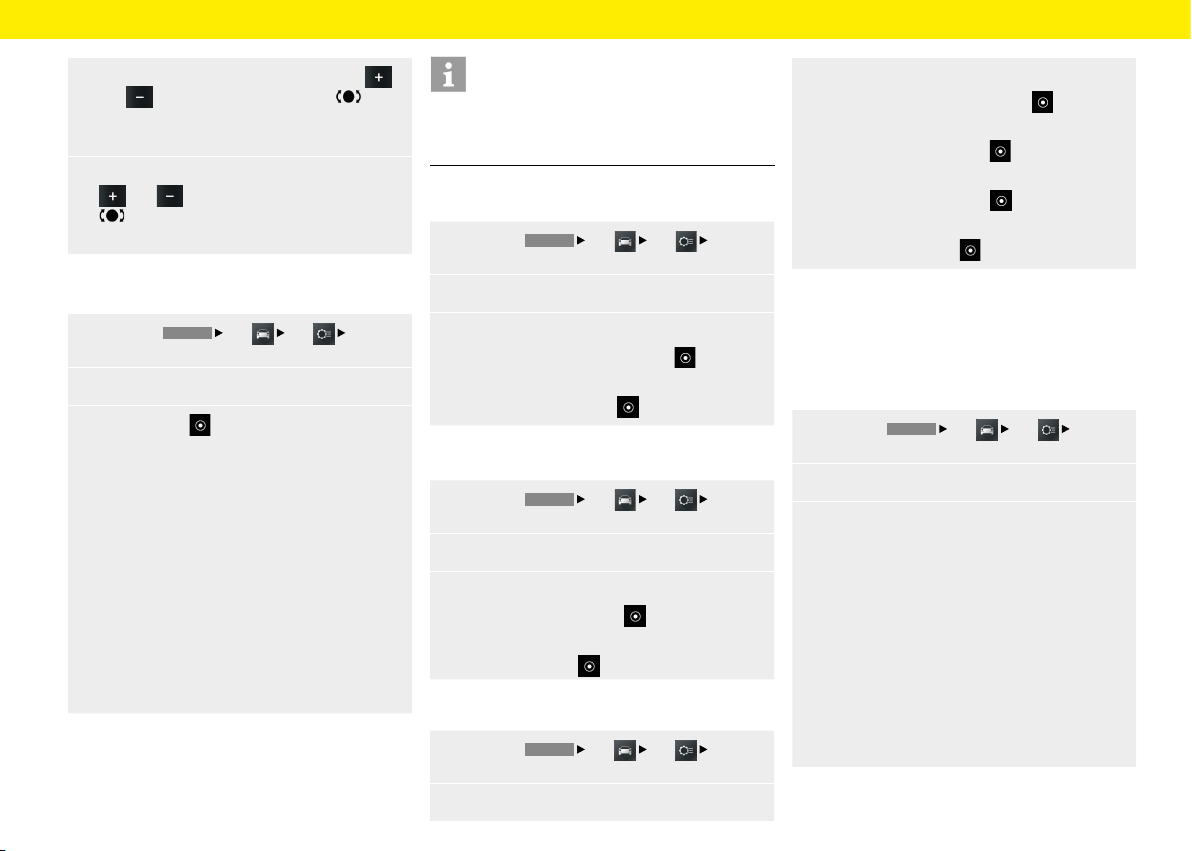
In addition to characters, the menus also provide
some buttons.
deletes the last entry from the input eld
switches to numbers and special characters
switches to extended special characters
switches to letters
toggles between upper and lower case
adds a space
conrms the entry and searches for entries
in the phonebook
dials the number entered
ends the current call
is required to enter GSM service codes
is required to enter GSM service codes
is required to enter country codes
is required to change values
is required to change values
Information
Other special letters can be reached by pressing
theletter required for longer.
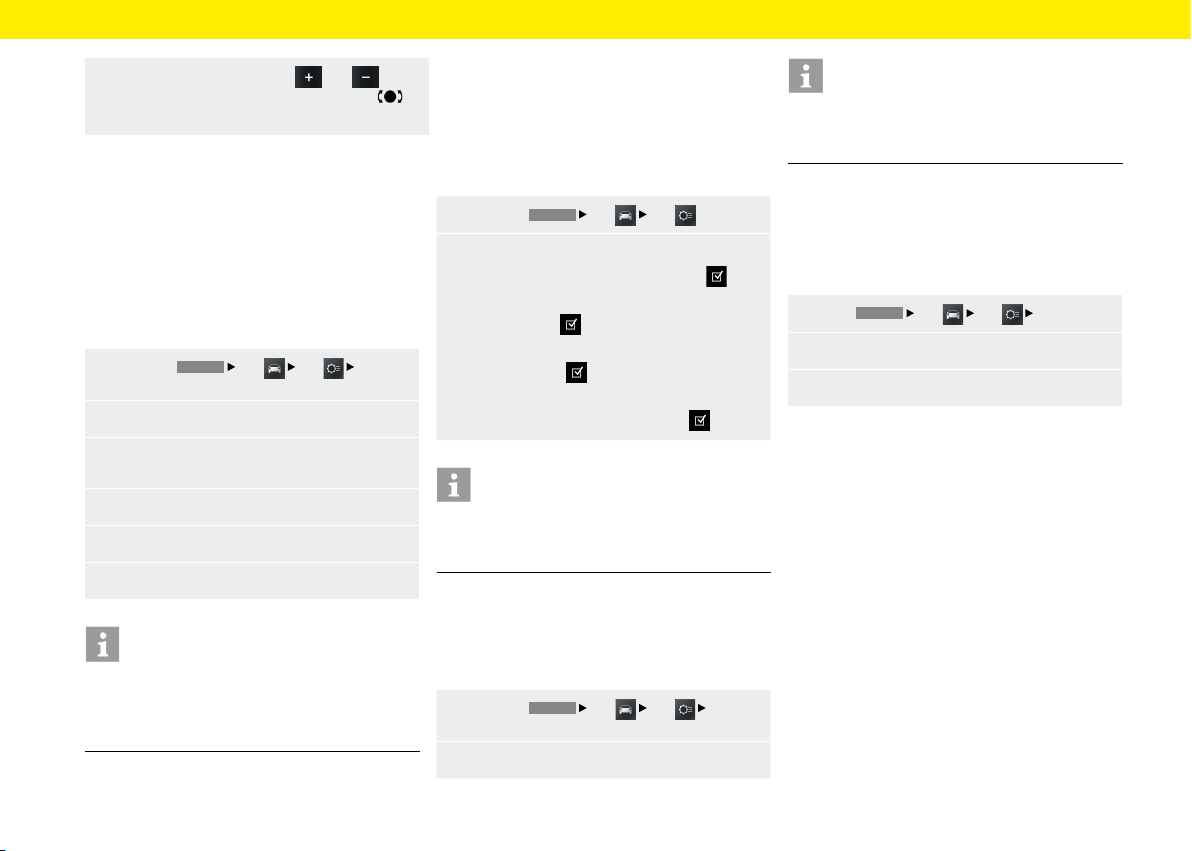
Checkboxes
Certain menu options oer checkboxes that allow
you to enable or disable functions.
Selecting and enabling a menu option .
Selecting and disabling a menu option .
Option elds
Certain menu options oer option elds that allow
you to choose between options.
Selecting and enabling a menu option .
Selecting and disabling a menu option .
Information
In some cases, the illustrations in this manual may
dier slightly between the Porsche Classic Commu-
nication Management Plus for Porsche 911 (Type
997) / Boxster (Type 987) / Cayman (Type 987)
and Porsche Cayenne (Type 9PA).
23

24
Sound
The pages below provide all the information you
need on the "Sound" settings in the Porsche Classic
Communication Management Plus, including
theequaliser or the speed-dependent volume
adjustment.
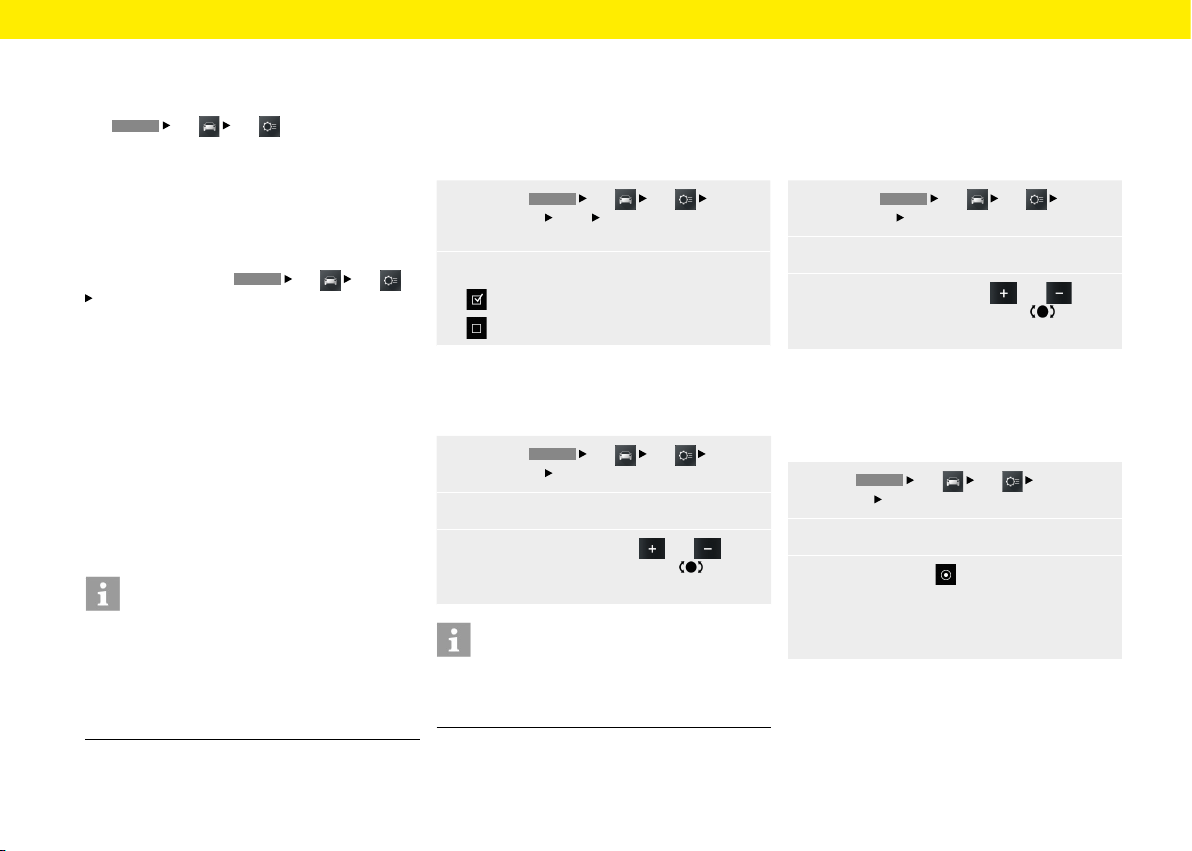
Sound settings
The sound settings in the
HOME
Sound menu
allow you to adjust the sound of the audio sources
played back by your Porsche Classic Communication
Management Plus. To make adjustments, proceed
as follows:
Standard Equalizer settings
1. Press the
HOME
Sound button.
2.
Select the Equalizer menu option.
3.
Select the option eld you want :
– Pop,
– or –
– Rock,
– or –
– Classic,
– or –
– Jazz,
– or –
– Custom settings.
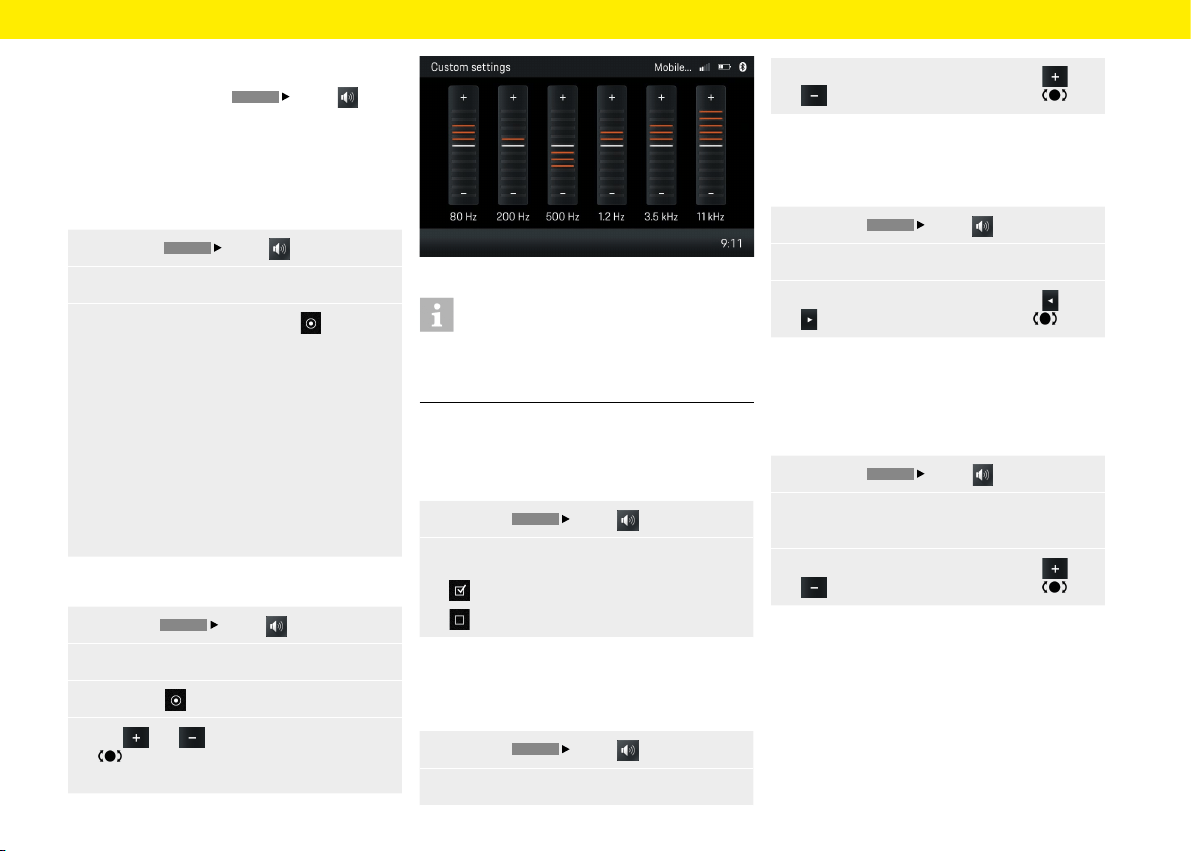
Custom Equalizer settings
1.
Press the
HOME
Sound button.
2.
Select the Equalizer menu option.
3.
Select the Custom settings option eld.
4.
Tap and or turn the right-hand knob
to make the required setting (6 bands
orbass and treble).
Fig.: Equalizer
Information
Under Custom settings, either a 6-band equaliser or
the settings for bass and treble appear, depending
onthe vehicle's technical requirements.
Loudness
The Loudness function increases the audibility of low
frequencies at lower volumes.
1.
Press the
HOME
Sound button.
2.
Loudness
Loudness is switched on.
Loudness is switched o.
Adjusting the fader
The fader controls the distribution of the volume
between rear and front speakers.
1.
Press the
HOME
Sound button.
2.
Select the Fader menu option.
3. Make the setting you want by tapping and
or by turning the right-hand knob .
Adjusting the balance
The balance controls the distribution of the volume
between le and right speakers.
1.
Press the
HOME
Sound button.
2.
Select the Balance menu option.
3.
Make the setting you want by tapping and
or by turning the right-hand knob .
Speed dependent volume adjustment
(with
basic speakers)
You can set the volume increase in line with speed
using the speed-dependent volume adjustment.
1.
Press the
HOME
Sound button.
2. Select the Speed dependent volume menu
option.
3.
Make the setting you want by tapping and
or by turning the right-hand knob .
Sound
25
AudioPilot (with Bose® Sound System)
This patented technology from Bose® is setting
standards in noise compensation for in-car audio
systems. A microphone inside the vehicle contin-
uously monitors the noise level - both music and
all unwanted noises, whether from inside orout-
side, speed-dependent or not. Background noise
isanalysed by a lter and the playback of the music
ispermanently and automatically adjusted in real
time by a compensation algorithm, not only in vol-
ume but also in the dynamics of the entire frequency
spectrum. The music is no longer masked by noise
and the listener enjoys a pure listening experience.
To activate AudioPilot, proceed as follows:
1.
Press the
HOME
Sound button.
2. AudioPilot
AudioPilot is switched-on.
AudioPilot is switched o.
Surround (with Bose® Sound System)
Additional independent audio channels in the front
and rear of the vehicle create a multi-channel sur-
round sound experience. Also for conventional stereo
recordings. That's because Bose® Centerpoint™
signal processing technology converts virtually
any sound source into ve separate audio channels
foratuned and balanced surround sound experience.
Centerpoint™ surround sound technology isopti-
mised for digital media. Therefore, in conjunction
with FM transmitters in poorly served areas, there
may be limitations to the surround functionality due
to inadequate reception.
It is not possible to receive/listen to AM stations
insurround sound. To set Surround, proceed as
follows:
1.
Press the
HOME
Sound button.
2. Switch on Surround.
3.
Select the Set Surround menu option.
4.
Make the setting you want by tapping and
or by turning the right-hand knob .
Listening position (with Bose® Sound System)
To achieve optimum sound, the listening position can
be adjusted to the current sitting position. To adjust
the listening position, proceed as follows (Porsche
911 (Type 997) / Boxster (Type 987) / Cayman
(Type 987)):
1.
Press the
HOME
Sound button.
2. Select the Listening position menu option.
3.
Select option eld
– Le,
– or –
– Symmetric,
– or –
– Right.
To adjust the listening position, proceed as follows
(Porsche Cayenne (Type 9PA)):
1.
Press the
HOME
Sound button.
2. Select the Listening position menu option.
3. Select option eld
– Rear,
– or –
– Symmetric,
– or –
– Right.
Information
AudioPilot, Surround and Listening position settings
are available only in vehicles with Bose® Sound
System.
Information
To adjust the volume of dierent audio sources
separately (navigation or radio for example), select
the Volume menu option in the Set menu.
Sound
26

Car
The pages below provide a description of the Car
function. Car includes Trip and Set functions. The
Trip menu provides the trip information, such as
average speed or fuel consumption. Set includes
the Individual Memory function (Porsche 911 (Type
997) / Boxster (Type 987) / Cayman (Type 987))
andthe general system settings.
27
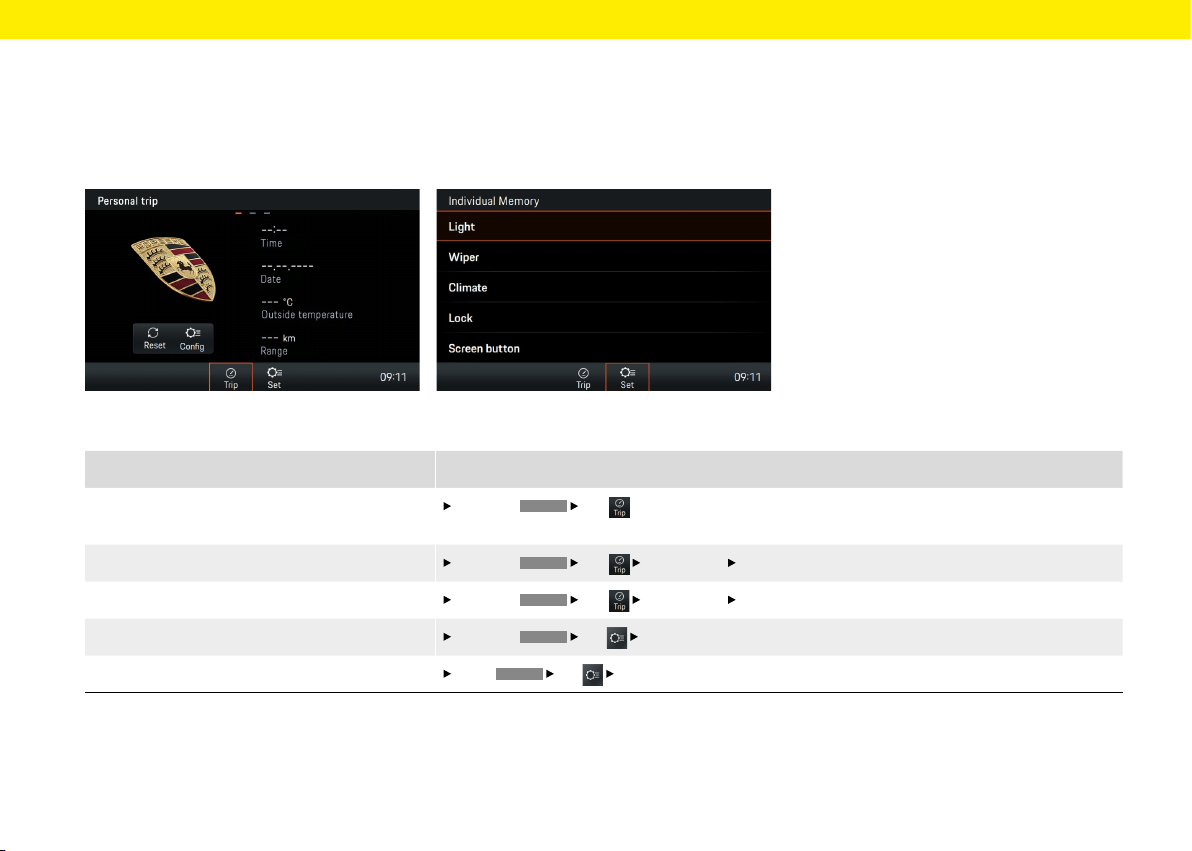
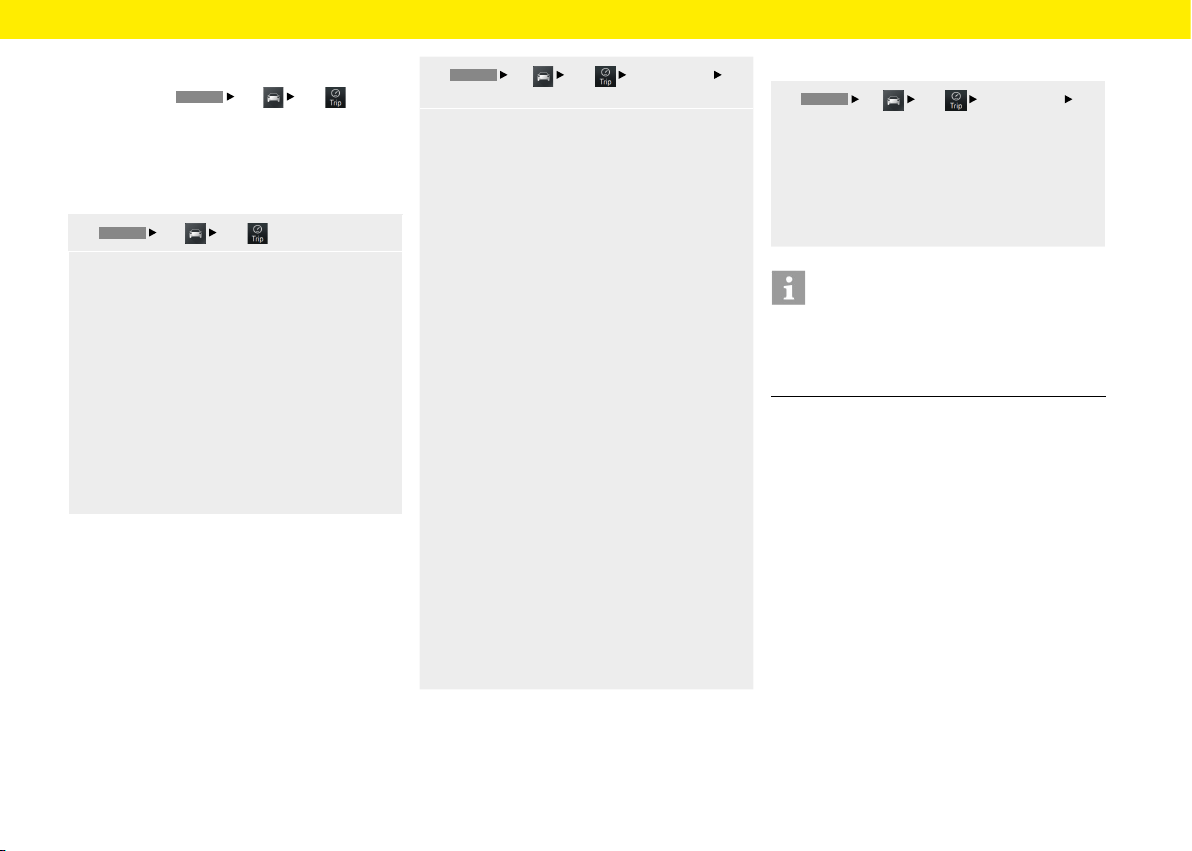
Fig.: Trip information display
What do I want to do? What do I have to do?
Access the trip information display
Press the
CAR
Trip
button
.
To toggle between the Personal trip, Trip since or Total trip buttons,
swipe the touchscreen.
Set Personal Trip information
Press the
CAR
Trip
Personal trip
Cong button.
Select the required data elds.
Reset the Trip information
Press the
CAR
Trip
Personal trip
Reset button.
Delete the required data.
Access the Individual Memory
Press the
CAR
Set
Individual Memory button.
Make the required setting.
Access the System settings
Press
CAR
Set
System.
Make the required setting.
Fig.: Individual Memory Porsche 911 (Type 997) /
Boxster (Type 987) / Cayman (Type 987)
Car
Brief overview
This brief overview is no substitute for the complete
descriptions in the "Car" chapter. In particular,
safety and warning notices are not replaced by this
brief overview.
28
Car
Trip information display
In the Trip menu,
HOME
Car
Trip button,
avariety of trip information can be displayed, such
as the distance travelled, the trip time, the average
speed or
the average consumption.
Displaying trip information
1.
HOME
Car
Trip button.
2. Scroll (swipe) to the view level you want:
– Personal trip: The trip information can
beindividually compiled in four data elds.
– Trip since: Trip information since the last
vehicle start. The trip information is auto-
matically reset aer the vehicle has been
stationary for 2 hours (with the ignition key
removed).
– Total trip: The trip information is accu-
mulated continuously until the function is
reset. The trip information isretained even
if the vehicle is stationary for a prolonged
period (ignition switched o).
Displaying personal trip information
In the Personal Trip menu, you can compile the
content of the individual data elds yourself. You can
choose between general information such as date,
time or ambient temperature, as well as various data
elds such as average speeds or consumption data
and certain vehicle parameters.
1.
HOME
Car
Trip
Personal trip
Cong button.
2.
Select the data eld to be changed:
– Drive time since,
– or –
– Total drive time,
– or –
– Distance since,
– or –
– Total distance,
– or –
– Range,
– or –
– Avg. consumption since,
– or –
– Cont. avg. consumption,
– or –
– Avg. speed since,
– or –
– Continuous avg. speed,
– or –
– Date,
– or –
– Time,
– or –
– Outside temperature.
Resetting Trip information display
1.
HOME
Car
Trip
Personal trip
Reset button.
2.
Select entry from list:
– All: Reset the Personal trip, Trip since
andTotal trip information.
– Since
– Total
Information
Average fuel consumption and average speed
Due to a dierent calculation logic, the values shown
in the trip computer may deviate from the values
shown in the instrument cluster.
29
Car
Individual Memory and System
(Set)
The
HOME
Car
Set
menu oers the
settings for Individual Memory and System.
The memory function allows you to store dierent
settings for your vehicle for up to 3 ignition keys.
When the ignition is switched on, the settings
assigned to the key used to unlock the vehicle take
eect. The selection elements Light, Wiper, Climate
Lock and Screen button are available for saving your
custom settings. In the
HOME
Car
Set
System menu, you can adjust the various basic
settings of the Porsche Classic Communication
Management Plus for the following:
– Date/time
– Time synchronising
– Standby time
– Day/night mode
– Language
– Units
– Volume
– Congure PCCM Plus
– Version info
– Factory reset
Information
The "Individual Memory" function is available only
with Porsche Classic Communication Management
Plus for Porsche 911 (Type 997) / Boxster (Type
987) / Cayman (Type 987), but not for the Porsche
Classic Communication Management Plus for the
Porsche Cayenne (Type 9PA).
Daytime running lights
If this function is active, the low beam is always on
when the engine is running. This is the case regard-
less of the light switch setting. The lights forthe in-
struments and switches will continue tobeswitched
on or o by the light switch regardless of this setting.
1.
Press the
HOME
Car
Set
Individ-
ual Memory
Light
Daytime running lights
button.
2.
Daytime running lights
Daytime running lights switched on.
Daytime running lights switched o.
Fade-out time
You can set a fade-out time for your vehicle's marker
light and fog lights.
1.
Press the
HOME
Car
Set
Individ-
ual Memory
Light button.
2. Select the Fade-out time menu option.
3.
Set the required value with and
orbyturning the right-hand knob or via
the touchscreen.
Information
The setting also changes the light time when un-
locking the vehicle. Please also refer to the relevant
chapters in the owner's manual.
Orientation lights
The orientation lights illuminate the vehicle interior
decentrally in the dark. For this purpose, small
lamps are installed near the interior mirror and in the
recesses of the door handles. You can set the desired
illumination intensity here.
1.
Press the
HOME
Car
Set
Individ-
ual Memory
Light button.
2. Select the Orientation lights menu option.
3.
Set the required value with and
orbyturning the right-hand knob or via
the touchscreen.
Rain sensor
The rain sensor can be activated permanently
byswitching on the ignition as soon as the wiper
switch is set to interval operation.
1.
Press
HOME
Car
Set
Individual
Memory
Wiper.
2. Select the Rain sensor menu option.
3.
Select option eld
– Manual,
– or –
– Active with ignition.
30
Car
Rear wiper
The rear wiper can be activated automatically
assoon as reverse gear is engaged as long as the
front windscreen wiper was active within the last
40seconds.
1.
Press the
HOME
Car
Set
Individ-
ual Memory
Wiper button.
2. Select the Rear wiper menu option.
3.
Select option eld
– Manual,
– or –
– Automatic.
Climate memory
If this function is activated, your personal settings
for the climate system will be restored every time
you start the vehicle. This happens regardless of the
current settings.
1.
Press the
HOME
Car
Set
Indi-
vidual Memory
Climate
Climate control
memory button.
2.
Climate control memory
Climate control memory is switched on.
Climate control memory is switched o.
Saving climate settings
Selecting this function saves the current climate
settings as your personal settings.
1.
Press the
HOME
Car
Set
Individ-
ual Memory
Climate button.
2.
Select the Store menu option.
Door opener
Select which doors are to be unlocked aer the radio
remote control is pressed.
1.
Press the
HOME
Car
Set
Individ-
ual Memory
Lock button.
2. Select the Door opener menu option.
– Select option eld Both doors ,
– or –
– option eld Driver's door .
Autolock
Set whether the doors should be locked automatical-
ly aer the ignition is switched on or aer driving o.
1.
Press the
HOME
Car
Set
Individ-
ual Memory
Lock button.
2.
Select the Auto lock menu option
– Select option eld O ,
– or –
– option eld When ignition on ,
– or –
– option eld Aer starting .
Screen button
You can assign a function of your choice to the
screen button on the multifunction steering wheel.
1.
Press the
HOME
Car
Set
Individ-
ual Memory button.
2.
Select the Screen button menu option.
– Option eld HOME ,
– or –
– option eld TUNER ,
– or –
– option eld MEDIA ,
– or –
– option eld PHONE ,
– or –
– option eld CAR ,
– or –
– option eld NAV ,
– or –
– option eld MAP ,
– or –
– option eld Next track/station ,
– or –
– option eld Previous track/station .
Information
MEDIA includes gating all active media sources
(e.g.also FM or USB), provided they are activated
(AM) or connected. The scope of the Individual
Memory function may vary, depending on equipment
and vehicle type.
31
Car
Setting the time
1.
Press the
HOME
Car
Set
System
button.
2.
Select the Date/time menu option.
3.
Select the Setting time menu option.
4.
Set the required time using the screen keypad
or
.
5.
Select OK.
Information
The time settings can also be reached directly
bypressing the time.
Setting the date
1.
Press the
HOME
Car
Set
System
button.
2.
Select the Date/time menu option.
3.
Select the Setting date menu option.
4.
Set the required date using the screen keypad
or
.
5.
Select OK.
Setting the time format
1.
Press the
HOME
Car
Set
System
button.
2.
Select the Date/time menu option.
3.
Select the Time format menu option.
4.
Set the required time format, 12h or 24h.
Synchronising the time
The Time synhronising menu option allows you to
set the signal that determines the time.
1.
Press the
HOME
Car
Set
System
button.
2.
Select the Time synhronising menu option
andchoose between the options :
– RDS,
– or –
– GPS,
– or –
– Manually.
Setting the Standby time
The Standby time menu option allows you to keep
the device in active mode for a set period aer you
have le the vehicle, thereby avoiding a restart of the
system when you return to the vehicle.
1.
Press the
HOME
Car
Set
System
button.
2. Select the Standby time menu option and
choose between the options :
– 5 minutes,
– or –
– 15 minutes,
– or –
– 30 minutes,
– or –
– O.
Enabling automatic day/night mode
Select menu option Day/night mode to adjust the
display brightness in day and night mode. The light
sensor in the front face of the device adjusts the
brightness automatically if the automatic switch-
over is enabled.
1.
Press
HOME
Car
Set
System.
2.
Select the Day/night mode menu option.
3.
Enable option eld Auto .
Customising day/night mode
Select the Custom menu option to adjust the display
brightness for day and night mode.
1.
Press the
HOME
Car
Set
System
button.
2.
Select the Day/night mode menu option.
3.
Select option eld Custom
option.
32
Car
4.
Select the Day mode menu option. Press
and
or turn the right-hand knob or use
the touchscreen to set the display brightness
forday mode.
5. Select the Night mode menu option. Press
and or turn the right-hand knob
or use the touchscreen to set the display
brightness for night mode.
Setting the menu language
1.
Press the
HOME
Car
Set
System
button.
2.
Select the Language menu option.
3.
Select option
– Deutsch,
– oder –
– English,
– oder –
– Español,
– oder –
– Français,
– oder –
– Italiano,
– oder –
– Русский.
Information
The change applies only to the user interface
ofthedevice and to the navigation soware
(menulanguage).
Specifying the unit for speed
1.
Press the
HOME
Car
Set
System
button.
2.
Select the Units menu option.
3.
Select the Speed menu option.
– Select option eld km, km/h ,
– or –
– option eld mi, mph .
Specifying the unit for temperature
1.
Press the
HOME
Car
Set
System
button.
2.
Select the Units menu option.
3.
Select the Temperature
menu option.
– Select option eld °C
,
– or –
– option eld °F .
Specifying the unit for consumption
1.
Press the
HOME
Car
Set
System
button.
2.
Select the Units menu option.
3. Select the Consumption menu option.
– Select option eld l/100km ,
– or –
– option eld mpg (US) ,
– or –
– option eld mpg (UK) ,
– or –
– option eld km/l .
Adjusting the individual volumes of audio
sources
Select the Volume menu option if you wish to set
separate volume levels for the individual audio
sources.
1.
Press the
HOME
Car
Set
System
button.
2.
Select the Volume menu option.
3.
Select menu option
– Bluetooth,
– or –
– TA,
– or –
– Tuner,
– or –
– Navigation,
– or –
– USB.
33
Car
4. Set the volume by pressing and
orbyturning the right-hand rotary knob
orvia the touchscreen.
Conguring PCCM Plus
For certain equipment features, such as the rear
view camera, vehicle type or antenna type, the
Porsche Classic Communication Management Plus
must perform a sequence in which the vehicle's
peripherals are checked and the Porsche Classic
Communication Management Plus is customised.
The sequence isnished when the antenna type has
been detected.
1.
Press the
HOME
Car
Set
System
button.
2.
Select the Congure PCCM Plus menu option.
3.
Select the Auto-congure PCCM Plus menu
option.
4.
Select Start.
5.
Engage reverse gear.
6. Select OK.
Information
The teach-in function must be run when the Porsche
Classic Communication Management Plus is used
for the rst time so that the full range of functions
can be guaranteed.
To use the settings for Climate control memory,
Rain sensor, Rear wiper and Screen button in the
Individual Memory function, you must activate the
vehicle's equipment features manually. If your vehicle
has the equipment features automatic climate, rear
wiper, rain sensor or multi-function steering wheel,
proceed as follows to activate them:
1.
Press the
HOME
Car
Set
button.
2.
Select the Congure PCCM Plus menu option.
– Select Automatic air conditioning ,
– or –
– Rear wiper ,
– or –
– Rain sensor ,
– or –
– Multifunctional steering wheel .
Information
The Individual Memory function is available only
forthe Porsche 911 (Type 997) / Boxster (Type
987) / Cayman (Type 987) vehicle models.
Version info
Select this menu option if you want to check the
current soware status of your Porsche Classic
Communication Management Plus,
1.
Press the
HOME
Car
Set
System
button.
2.
Select the Version info menu option.
Information
To call up the version info of the navigation soware,
open the navigation menu provided separately
for
this purpose.
Factory reset
This function allows you to reset the Porsche Classic
Communication Management Plus to its status
ondelivery. All settings made aer this time will
bedeleted.
1.
Press
HOME
Car
Set
System.
2.
Select the Factory reset menu option.
3.
Tap Reset.
34

Tuner
The pages below provide a description for using the
radio function for receiving analogue and digital radio
with the Porsche Classic Communication Manage-
ment Plus.
35
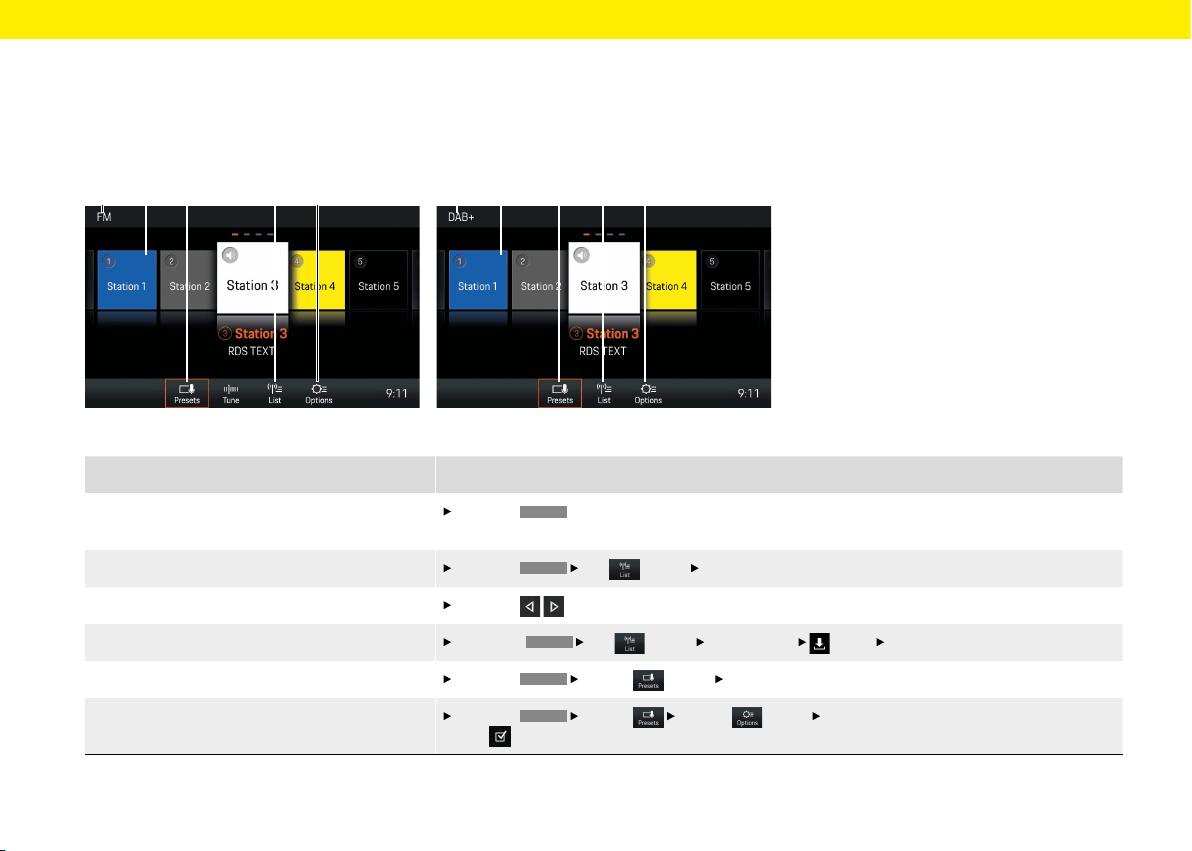
Tuner
Fig.: FM reception range Fig.: DAB+ reception range
A C D EB A C D EB
What do I want to do? What do I have to do?
Set the reception range
Press the
TUNER
button repeatedly until the desired reception range (AM, FM or DAB+) is displayed
inthe header (see A).
Select a station from the list
Press the
TUNER
List
(see D)
Select station button.
Select station using the Skip button
Press the
the buttons repeatedly until the desired station is played.
Store a station from the station list
Select the
TUNER
List
(see D)
Select station
Select
Select station button.
Select a saved station
Press the
TUNER
Presets (see C)
Select desired station button (e.g. B).
Switch on/o Trac Announcements
Press the
TUNER
Presets
Options (see E)
Activate or deactivate Trac announcements
(TA) checkbox button.
Brief overview
This brief overview is no substitute for the complete
descriptions in the "Tuner" chapter. In particular,
safety and warning notices are not replaced by this
brief overview.
36
Tuner
Setting the reception range
1. Press
HOME
Press
TUNER
.
2.
Select AM, FM or DAB+.
– or –
Press the
TUNER
button repeatedly until the de-
sired reception range (AM, FM or DAB+) isset).
The radio supports the FM, AM and DAB+ (digitalra-
dio) reception range.
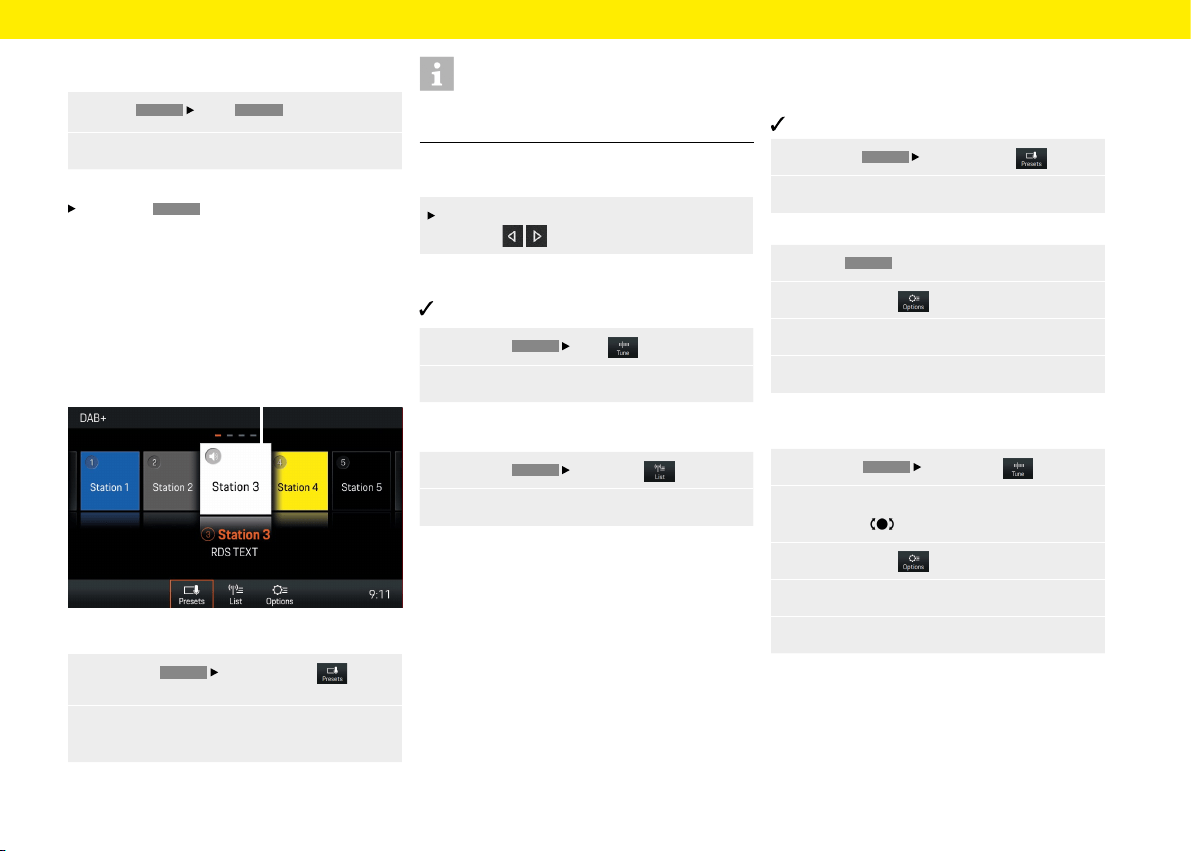
Setting/selecting a station
Displaying and selecting saved stations
(presets)
Fig.: Station buttons (presets)
1. Press the
TUNER
Select Presets but-
ton.
2.
Select station. The selected station (e.g. A)
ishighlighted.
Information
A total of 20 stations buttons (presets) are available
for assigning to stations.
Setting a station using the Skip buttons
A stored station can be set using the skip
buttons .
Setting a station manually
FM or AM reception range is activated.
1. Press the
TUNER
Tune button.
2. Select frequency using the frequency bar.
Selecting a station from the station list
1. Press the
TUNER
Select
List button.
2.
Select station.
All receivable stations are displayed in the station list
(maximum 100 entries).
Saving the station
Saving the set station
Station is selected.
1. Press the
TUNER
Select
Presets button.
2.
Press the desired station button for 2 seconds.
– or –
1. Select
TUNER
.
2.
Select Options .
3.
Select the Store menu option.
4.
Press the desired station button.
Saving the station using "Tune"
1. Press the
TUNER
Select
Tune button.
2.
Set the desired station by turning the right-
hand knob or via the touchscreen.
3. Select Options .
4.
Select the Store menu option.
5.
Press the desired station button.
A
37
Tuner
Storing a station from the station list
1. Press
TUNER
Select
List
.
2.
Select station
Select
.
3.
Select desired station button.
Setting Trac announcements
Switching Trac announcements on/o
1. Press
TUNER
Select
Options .
2.
Trac announcements (TA)
Trac announcements are switched on.
Trac announcements are switched o.
Setting Trac announcements volume
1.
Press the
CAR
Set
System button.
2.
Select the Volume menu option.
3.
Select the TA menu option.
4.
Set the desired volume via the touchscreen
or
by turning the knob .
Information
To interrupt a running trac announcement, press
the le-hand knob .
Changing settings
1. Press the
TUNER
Select
Options button.
2.
Select desired setting:
– Switch on/o AM .
– Save station: Select Store
Select station
button
.
– Switch on/o Trac announcements (TA)
.
– Sort station list: Switch on/o Filter/sort by
RDS names . If this function is deactivat-
ed, sorting is by frequency.
– Sort DAB+ station lists: Select Ensemble
orService.
– Frequency range: Select the region (Europe,
North America, South America, Australia,
Asia, South Africa, Japan), in which the
Porsche Classic Communication Manage-
ment Plus is operated and the frequency
range ofthe tuner is adjusted.
38

Media
The pages below provide a description on how to use
the media functions for playing music les with the
Porsche Classic Communication Management Plus,
such as USB, Apple CarPlay® or Android Auto™.
39
Media
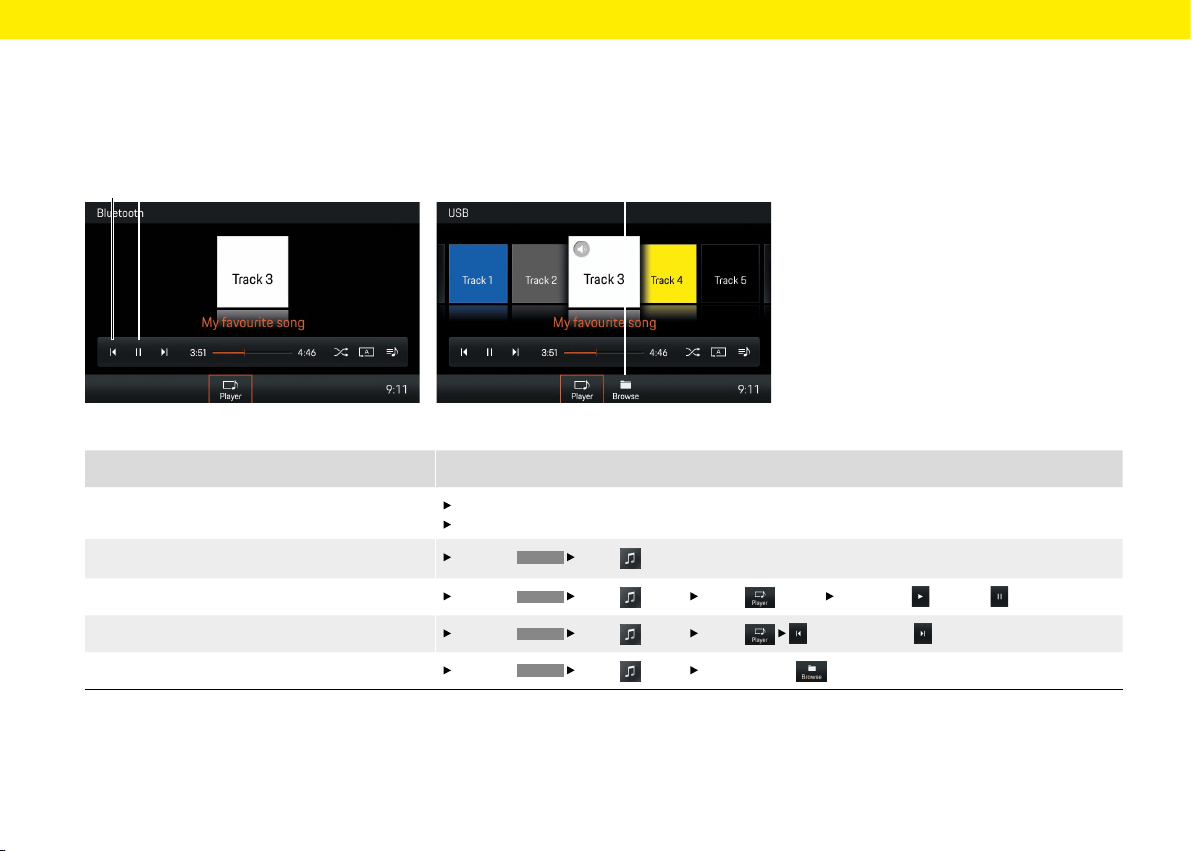
Fig.: Bluetooth® media source
Fig.: USB media source
What do I want to do?
What do I have to do?
Play music les from media sources
Connect USB stick.
Connect external device via Bluetooth®.
Select media source
Press the
HOME
Media
button and select the desired media source.
Play/pause music
Press the
HOME
Media
button Player
(see B) Select Play or Pause button (see B).
Skip forward or back in playback
Press the
HOME
Media
button Player
button or select
(see A).
Browse media library (USB media only)
Press the
HOME
Media button Select Browse
button (see C).
A B
C
Brief overview
This brief overview is no substitute for the complete
descriptions in the "Media" chapter. In particular,
safety and warning notices are not replaced by this
brief overview.
40
Media
Selecting media source
Select USB and Bluetooth® from the media
asfollows:
Press the
HOME
Media button andse-
lect the desired media source.
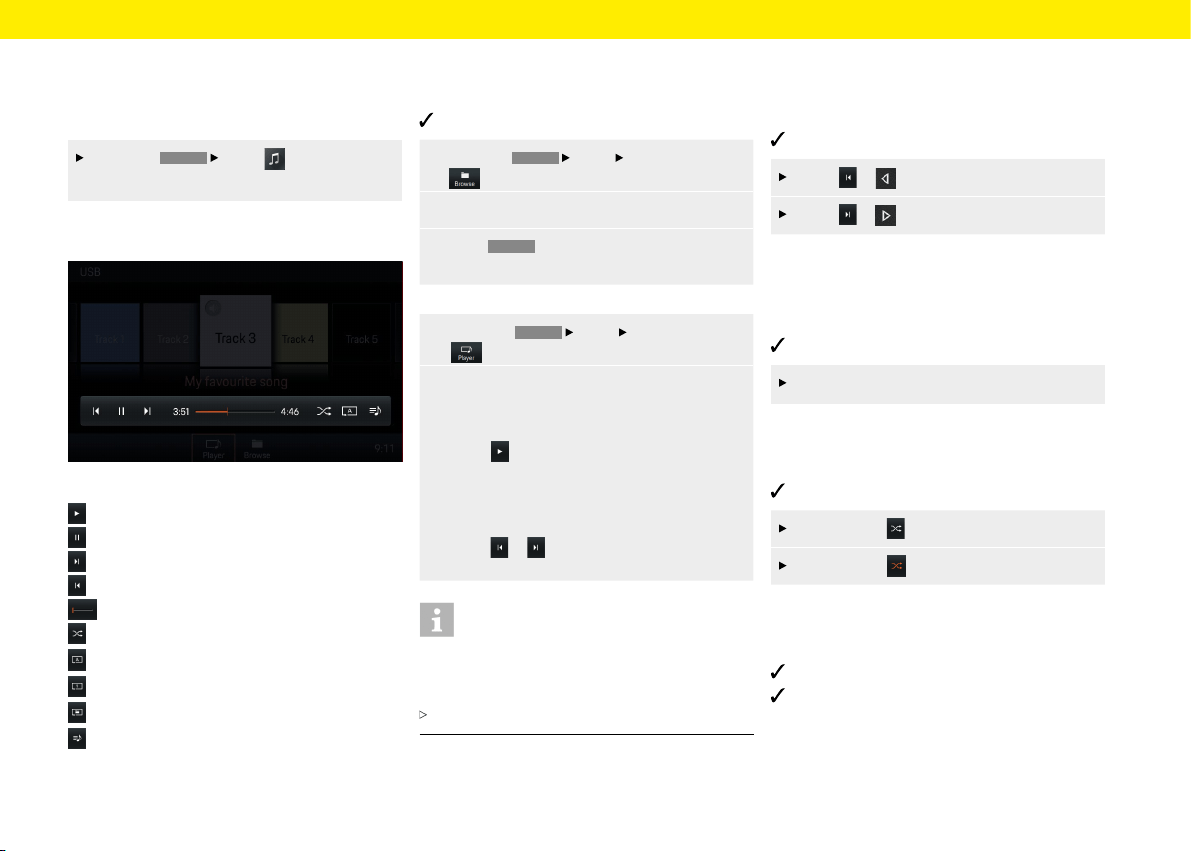
Media player control elements
Fig.: PCCM Plus media player
Play media
Pause media
Skip forward to media track
Skip back to media track
Fast forward/back
Shue music
Repeat all
Repeat track
Repeat folder
Display album list
Playing music
To play media tracks, proceed as follows:
Audio source is selected.
1. Press the
HOME
Media
Select Browse
button.
2.
Select desired folder or media track.
3. Press
BACK
to navigate back in the folder
structure.
– or –
1. Press the
HOME
Media
Select Player
button.
2.
In Coverow view, swipe le or right until the
desired album is displayed larger in the centre.
– or –
select to play an album
– or –
press the right-hand knob
– or –
press or .
Information
Audio formats must have certain properties so that
they can be played via the media function. For infor-
mation on the audio formats supported:
Refer to the Technical Data chapter.
Skipping forward/back
To skip forward and back (while media tracks
areplaying), proceed as follows:
Media source is selected.
Press or to skip back.
Press or to skip forward.
Fast forward/back
To fast forward and back (while media tracks are
playing), proceed as follows:
Media source is selected.
Slide the time bar to the desired position.
Shue on/o
To activate/deactivate shue, proceed as follows:
Media source is selected.
Press Shue . Shue is activated.
Press Shue again to deactivate shue.
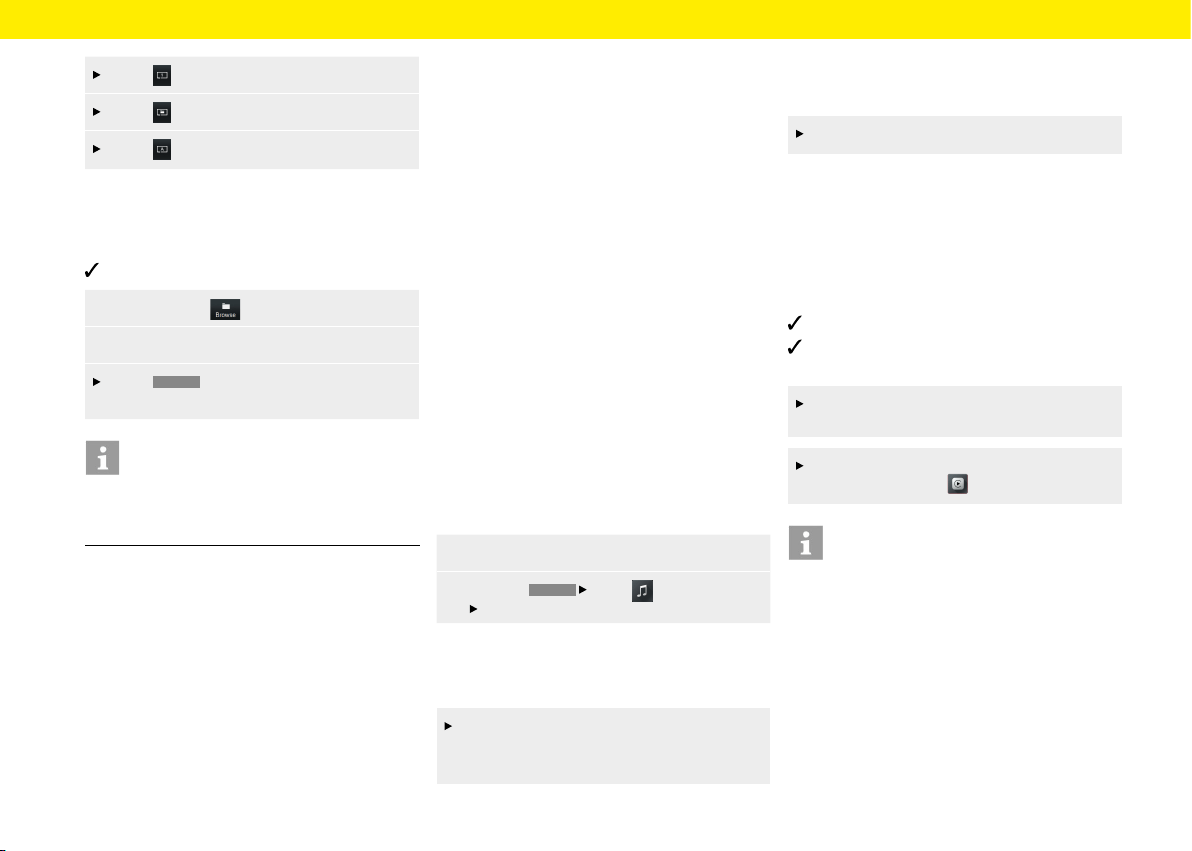
Repeating music track
To activate/deactivate repeat, proceed as follows:
Media source is selected.
Music tracks are selected.
41
Media
Press . Current track is repeated.
Press . All tracks in the folder are repeated.
Press . All tracks are repeated.
Browsing media
To play browse media, proceed as follows:
Media source is selected.
1. Select Browse .
2. Select desired folder and media track
Press
BACK
to navigate in the folder
structure.
Information
The folder structure is displayed only when playing
from USB media. The repeat shue and repeat track
functions are possible only with USB media.
Notes on drives and externally-
connected devices
Information on the media and le formats supported:
– If there are many les, folders or playlists
onastorage medium, the media titles may take
longer to load the rst time.
– Audio les are automatically displayed with
stored additional information during playback
(ifavailable, e.g. artist, title, album cover).
– Do not use a USB extension cable or adapter.
They impair functionality.
– USB hubs are not supported.
– Porsche AG accepts no liability for damaged
orlost les and media. Never save important data
on the data carriers or portable players.
– Music tracks that have been created for MP3
operation and can be played back in MP3
operation are generally subject to copyright
protection inaccordance with the applicable
international and national provisions. In many
countries, nocopies, even for private use, may
be made without the prior consent of the rights
holders. Please observe the applicable provisions
of copyright law. Insofar as you yourself hold
these rights, e.g. in the case of original compo-
sitions and original recordings, or these have
been granted to you by the rights holder, these
restrictions do not apply.
The current legal situation applies in all cases.
Connecting and playing from a
USB stick
To connect and play from a USB stick, proceed
asfollows:
1. Insert the USB stick in the device front (USB).
2. Press the
HOME
Media button
Select USB button.
Inserting a MicroSDHC card (MAP)
To insert a MicroSDHC card, proceed as follows:
Push the MicroSDHC card with the contacts
facing upwards into the MicroSDHC card slot
(MAP), until it engages.
Removing the MicroSDHC card
To remove a MicroSDHC card, proceed as follows:
Press on the inserted card and remove it.
Opening Apple CarPlay®
With Apple CarPlay®, iPhone® apps are available
inthe Porsche Communication Management Plus.
Siri® voice recognition can be used to send and reply
totext messages, and process voice commands.
Toopen Apple CarPlay®,proceed as follows:
iPhone® 5 or later, iOS® 7.1 or higher.
Siri® and Apple CarPlay® are activated in the
settings of the iPhone® used.
Insert the iPhone® in the device front (USB).
Apple CarPlay® starts immediately.
To open Apple CarPlay® from another function,
select Apple CarPlay .
Information
– It is advisable to install the latest iOS® version.
– Only apps of the iPhone® used that are supported
by Apple CarPlay® can be displayed. For infor-
mation on supported apps: www.apple.com/ios/
carplay.
– The displayed content and functions within the
Apple CarPlay® function are provided exclusively
by the connected iPhone®.
– When Apple CarPlay® is used, active Bluetooth®
connections (e.g. for telephony or media play-
back) are automatically disconnected.
42
Media
– Certain apps require an active data connection.
Additional costs may be incurred, depending
on the mobile phone tari and especially when
operating abroad. The use of a data at rate
isrecommended.
Operating Apple CarPlay®
with the PCCM Plus
To open the main menu within the Apple
CarPlay function, press .
To open the main function of the Porsche
Classic Communication Management Plus,
press the
HOME
button.
– or –
select any function (e.g.
CAR
).
Operating Apple CarPlay® via Siri®
voice recognition
Siri®/iPhone® are activated in the settings of the
iPhone® used.
Ignition and Porsche Classic Communication
Management Plus are switched on.
There is no active telephone call.
1. Press
HOME
/Keep pressed.
2. Say the desired voice command.
Opening Android Auto™
With Android Auto™, apps from the Android™ device
are available in the Porsche Communication Man-
agement Plus. Voice recognition can be
used to send
and answer text messages and
process voice com-
mands. To open Android Auto™, proceed as follows:
Android device from Android™ version 5.0.
Android Auto™ App is installed on the Android™
device.
Google Assistant™ is activated for Android™ in the
settings of the device used.
Insert the Android™ device in the device front
(USB). Android Auto™ starts immediately.
To switch to Android Auto™ from another
function, select Android Auto .
Information
– Android™ is a trademark of Google LLC.
– It is advisable to install the latest Android™
version.
– Only apps of the Android™ device used that
aresupported by Android Auto™ can bedis-
played. For information on supported apps: www.
android.com/auto/.
– The displayed content and functions within the
Android Auto™ function are provided exclusively
by the connected Android™ device.
– When Android Auto™ is used, active Blue-
tooth® connections (e.g. for telephony ormedia
playback) are automatically disconnected. An
inserted SIM card cannot be used to make calls
during this time.
– Certain apps require an active data connection.
Additional costs may be incurred, depending
on the mobile phone tari and especially when
operating abroad. The use of a data at rate
isrecommended.
Operating Android Auto™ with the
PCCM Plus
To open the main menu within the Android
Auto function, press the home icon .
To open the main function of the Porsche
Classic Communication Management Plus,
press the
HOME
button.
– or –
Select any function (e.g.
CAR
).
Operating Android Auto™ via
Google Assistant™ voice recogni-
tion
Google Assistant™ is activated in the settings
ofthe Android™ device used.
Ignition and Porsche Classic Communication
Management Plus are switched on.
There is no active telephone call.
1. Press
HOME
/ Keep pressed.
2. Say the desired voice command.
43

Phone
The pages below provide descriptions on how
touse the Bluetooth®/telephone functions of the
Porsche Classic Communication Management Plus,
such astelephony or accessing the mobile phone's
contacts.
44
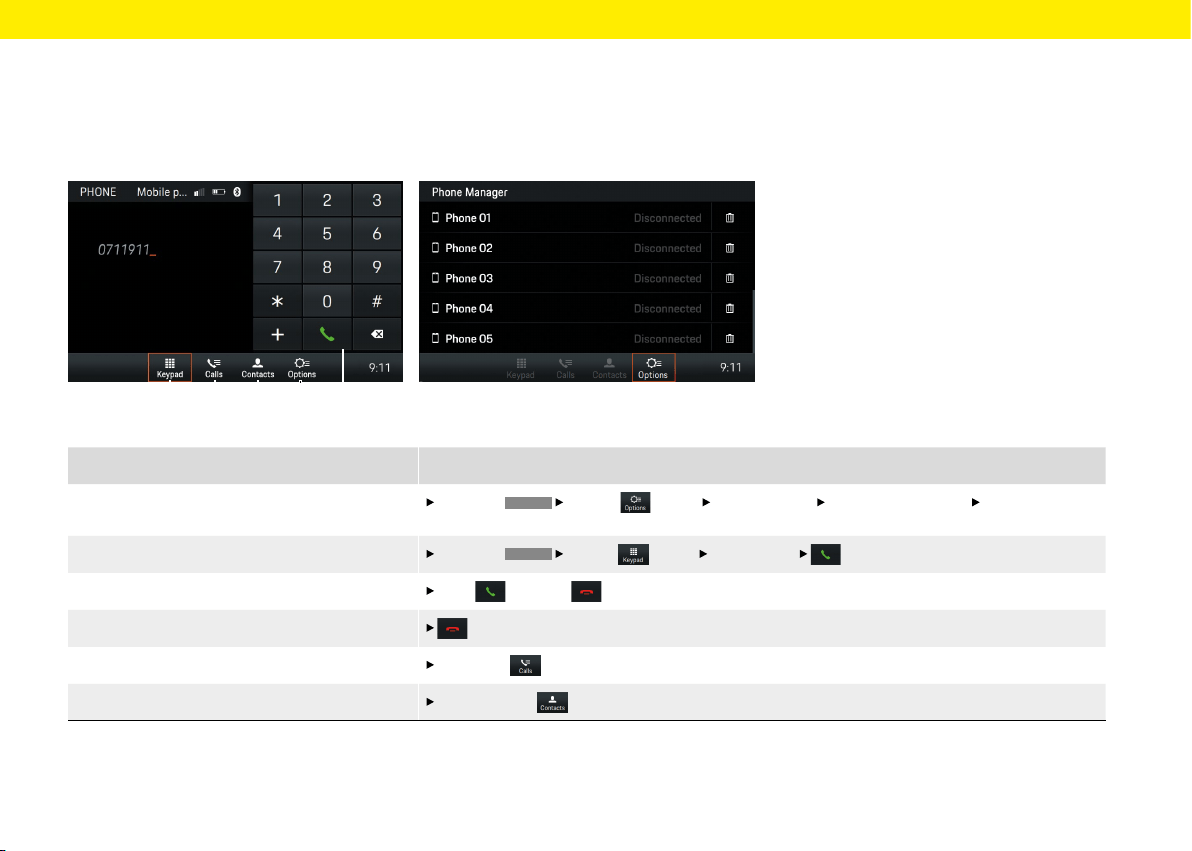
Phone
Fig.: Keypad
What do I want to do?
What do I have to do?
Connect a phone via Bluetooth®
Select the
PHONE
Options (see D) Phone Manager Search for new device Select device
button.
Dial number
Select the
PHONE
Keypad (see A) Enter number button (see E).
Accept/reject call
Press accept or reject.
End call in the footer or in the telephone menu.
Display call list Press Calls (see B).
Display contacts
Press Contacts (see C).
Fig.: Phone Manager
A B C D E
Brief overview
This brief overview is no substitute for the complete
descriptions in the "Phone" chapter. In particular,
safety and warning notices are not replaced by this
brief overview.
45
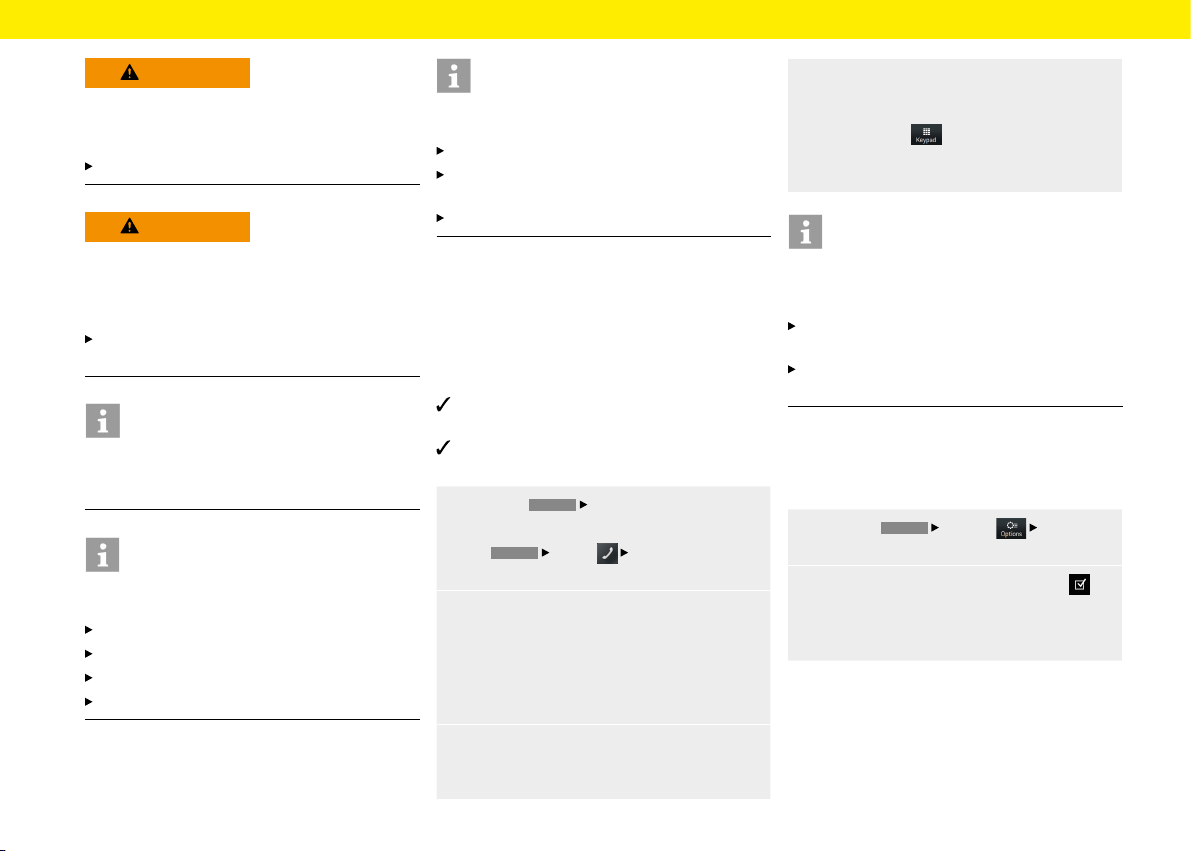
Phone
WARNING
Risk of accident
The use of mobile phones while driving distracts the
driver from the trac situation. Control of the vehicle
can be lost.
Only make calls with hands-free equipment.
WARNING
Risk of injury
Mobile phones must be turned o in certain hazard
zones, such as in the proximity of fuelling stations,
fuel depots, chemical plants, and blasting zones.
They could interfere with technical equipment.
Observe instructions as well as legal regulations
and local restrictions.
Information
The Bluetooth® word mark and logos are the proper-
ty of Bluetooth SIG, Inc. and any use of such marks
by Porsche AG is under licence.
Information
Hands-free sound quality. The quality of the hands-
free feature may be aected by:
Fans, open windows or folded-down sotop,
wind or road noise,
poor connection to the cellular network,
high road speeds.
Information
Dropped calls Calls may drop-out while driving. The
reasons for this are:
GSM network coverage is not sucient.
All channels are occupied in the GSM cell
towhich the vehicle switches.
The SIM card used is not network compatible.
Connecting a mobile phone via
Bluetooth®
Connecting a new mobile phone
To connect a mobile phone for the rst time, proceed
as follows:
The Bluetooth® function of the mobile phone
isactivated and visible to other devices.
The Bluetooth® function of the Porsche Classic
Communication Management Plus is activated.
1. Press the
PHONE
Phone Manager button.
– or –
the
HOME
Phone
Phone Manager
button.
2. Select the Search for new device menu option
and select the mobile phone from the device
list. A 6-digit Bluetooth® code is generated
and displayed in the Porsche Classic Commu-
nication Management Plus and in the mobile
phone.
3. Compare Bluetooth® code in the Porsche
Classic Communication Management Plus and
mobile phone.
4. Conrm the Bluetooth® code in the mobile
phone if it matches. If the mobile phone has
been successfully connected, the number
entry (Keypad menu) is displayed in the
Porsche Classic Communication Management
Plus.
Information
For mobile phones with a Windows® and iOS® oper-
ating system, it is advisable to start the connection
from the mobile phone:
Search for available devices in the Bluetooth®
menu of the mobile phone.
Select the Porsche Classic Communication Man-
agement Plus from the list of available devices.
Bluetooth® function on/o
To activate/deactivate the Bluetooth® function (the
function is activated by default), proceed as follows:
1. Press the
PHONE
Options
Bluetooth
settings button.
2. Activate or deactivate the Bluetooth on
checkbox to switch the Bluetooth® function
ofthe Porsche Classic Communication Man-
agement Plus on or o.
46
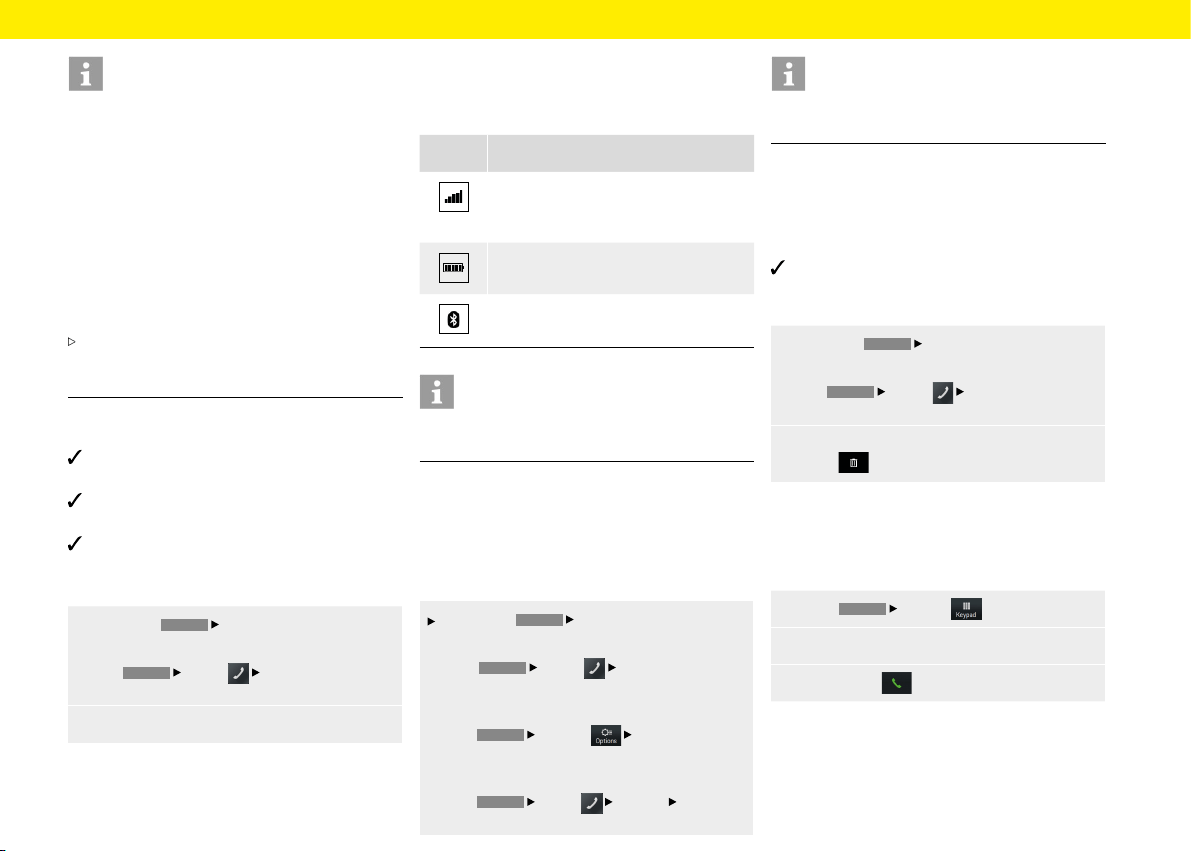
Phone
Information
When connecting the mobile phone to the Porsche
Classic Communication Management Plus via
Bluetooth®, the Handsfree Prole (HFP) is used. With
the Handsfree Prole, the Porsche Classic Com-
munication Management Plus acts as a Bluetooth®
hands-free device for the connected mobile phone
and, depending on the mobile phone, can access the
contents of the phone book and call lists. Even aer
the vehicle has been parked, it is possible to transfer
an ongoing call to the mobile phone and continue the
call outside the vehicle when the Bluetooth® connec-
tion is disconnected.
For more information on Bluetooth® proles,
please refer to the operating instructions of the
mobile phone.
Connecting to a known mobile phone
Bluetooth® function of the mobile phone is acti-
vated and visible to other devices.
Bluetooth® function of the Porsche Classic Com-
munication Management Plus is activated.
Mobile phone has already been connected to the
Porsche Classic Communication Management
Plus once.
1. Press the
PHONE
Phone Manager button.
– or –
the
HOME
Phone
Phone Manager
button.
2.
Select mobile phone from list.
Displaying the connection status
Depending on the connection status, the following
displays are possible in the header:
Symbol Meaning
Telephone connected/reception signal
strength of the mobile network for the
telephone function.
Phone connected/mobile phone charge
indicator.
Bluetooth® function of the Porsche Classic
Communication Management Plus active.
Information
If a mobile phone is already connected, the name
ofthe mobile phone also appears in the header.
Opening Phone Manager
The Phone Manager is used to manage mobile
phones for use with the Porsche Classic Communi-
cation Management Plus. To open Phone Manager,
proceed as follows:
Press the
PHONE
Phone Manager button.
– or –
the
HOME
Phone Phone Manager
button.
– or –
the
PHONE
Options Phone Manager
button.
– or –
the
HOME
Phone Options Phone
Manager button.
Information
If a mobile phone is already connected, the Phone
Manager must be opened via the Options menu.
Deleting a Bluetooth® device from the Phone
Manager
To delete a phone from the Phone Manager, proceed
as follows:
Mobile phone has already been connected to the
Porsche Classic Communication Management
Plus once.
1.
Press the
PHONE
Phone Manager button.
– or –
the
HOME
Phone
Phone Manager
button.
2.
Select the mobile phone from the list and
press
.
Dialling a telephone number
Entering a telephone number (keypad)
To call a number, proceed as follows:
1.
Press
PHONE
Keypad .
2.
Enter the number using the keypad.
3. To call press .
47
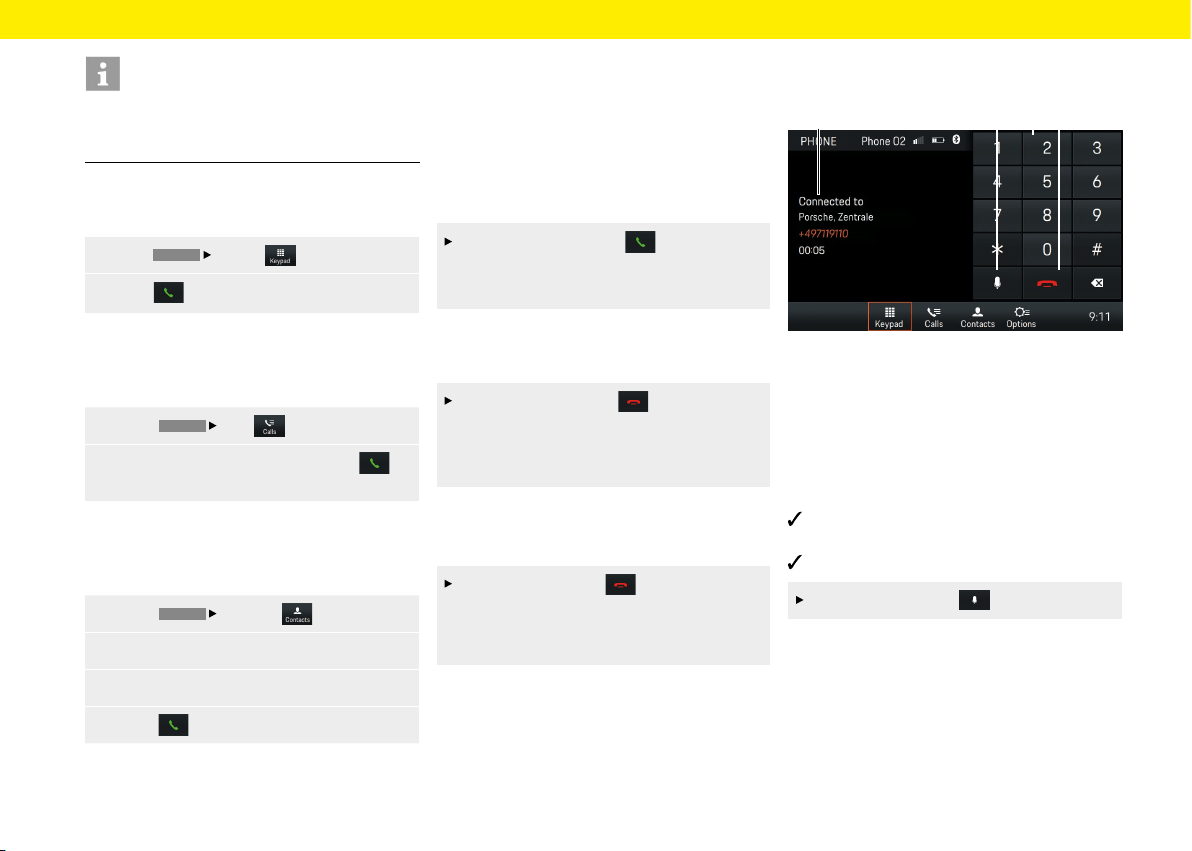
Phone
Information
DTMF (Dual Tone Multi Frequency) tones and Sup-
plementary Services (services that can be accessed
via star and hash codes) are supported.
Calling last number
To call the last number, proceed as follows:
1. Press
PHONE
Keypad .
2.
Press . The last number is selected.
Dialling number from call list
To call a number from the call list, proceed
asfollows:
1. Select
PHONE
Calls .
2.
Select the button behind the list entry
you want. The number is selected.
Dialling number from contacts
To call a number from a contact, proceed
as follows:
1. Select
PHONE
Contacts .
2. Search and select the contact you want.
3. Dial the number you want.
4. Select .
Accepting a call
An incoming call is signalled by a ring tone through
the vehicle's speakers. Audio sources that were pre-
viously active are muted by an incoming call. If the
caller is stored in the phonebook, both their name
and number are displayed. If the caller is unknown,
only their number is displayed, provided this caller
has not been blocked.
To accept the call, select .
– or –
Press the Accept button on your mobile phone.
Rejecting a call
To reject a call, proceed as follows:
To reject the call, select .
– or –
Press the Hang up button on your mobile
phone.
Ending a call
To end a call, proceed as follows:
To end the call, select .
– or –
Press the Hang up button on your mobile
phone.
Functions during a call
Fig.: Active call
A Active call
B Microphone on/o
C Enter number
D End call
Private mode
Mobile phone is connected to the Handsfree
Prole (HFP) via Bluetooth®.
Call established.
Activate or deactivate .
Activating external microphone
Located on the front of the Porsche Classic Commu-
nication Management Plus is an internal microphone
for making calls in hands-free mode. If an external
microphone is connected in addition, it is possible
to toggle between the two microphones. Toggle
asfollows:
DCA B
48
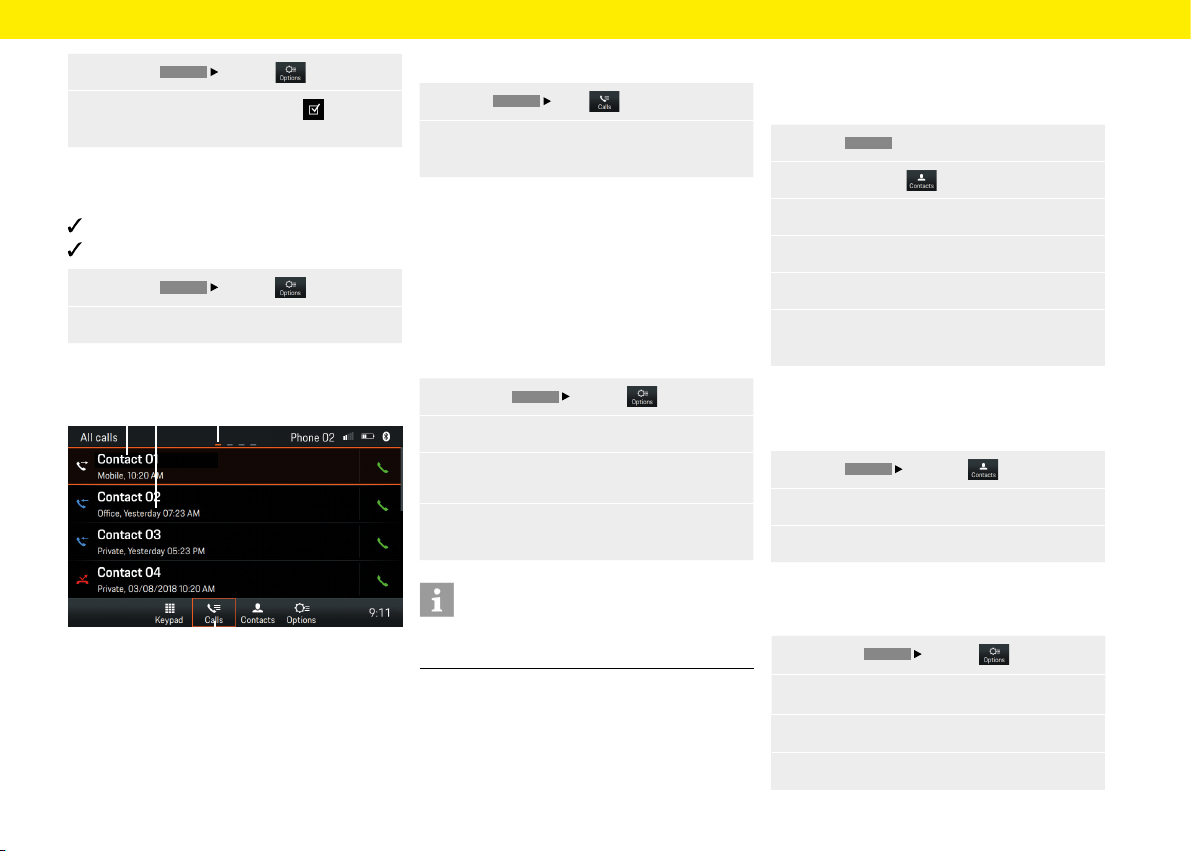
Phone
1.
Press the
PHONE
Options button.
2. Activate or deactivate checkbox External
microphone.
Switching between two calls (toggling)
To toggle between two live calls, proceed as follows:
Call is active.
Call in on-hold.
1.
Press the
PHONE
Options button.
2.
Select the Switch phone calls menu option.
Displaying call list
Fig.: Call history
A Contact/caller
B Date/time/contact type
C Page
D Call history
To display the call lists, proceed as follows:
1.
Select
PHONE
Calls .
2.
Swipe le or right to display All calls, Missed
calls, Outgoing calls or Incoming calls.
Use contacts
Transfer contacts
Once a Bluetooth® connection has been established,
the Porsche Classic Communication Management
Plus will try to transfer the device's phonebook. If the
phonebook is not transferred automatically, it can
be started manually. To transfer manually, proceed
as follows:
1.
Press the
PHONE
Options button.
2. Select the Set contacts menu option.
3.
Select the Contact synchronisation menu
option.
4.
Allow access to your phonebook via the mobile
device.
Information
A maximum of 5000 phonebook entries can
be
transferred per mobile device.
Search contact
To search for a contact from the contact list, proceed
as follows:
1. Select
PHONE
.
2.
Select Contacts .
3. Select Search for contact.
4.
Enter contact via the keypad.
5. Select the contact you want.
6. If other numbers are saved for the contact,
select the one you want.
Calling contact
To call a contact from the contact list, proceed
as follows:
1.
Select
PHONE
Contacts .
2. Select the contact you want.
3. Dial the number you want.
Deleting contact list
To delete the contact list, proceed as follows:
1.
Press the
PHONE
Options button.
2. Select the Set contacts menu option.
3.
Select the Delete contacts menu option.
4.
Select Delete.
C
D
A B
49
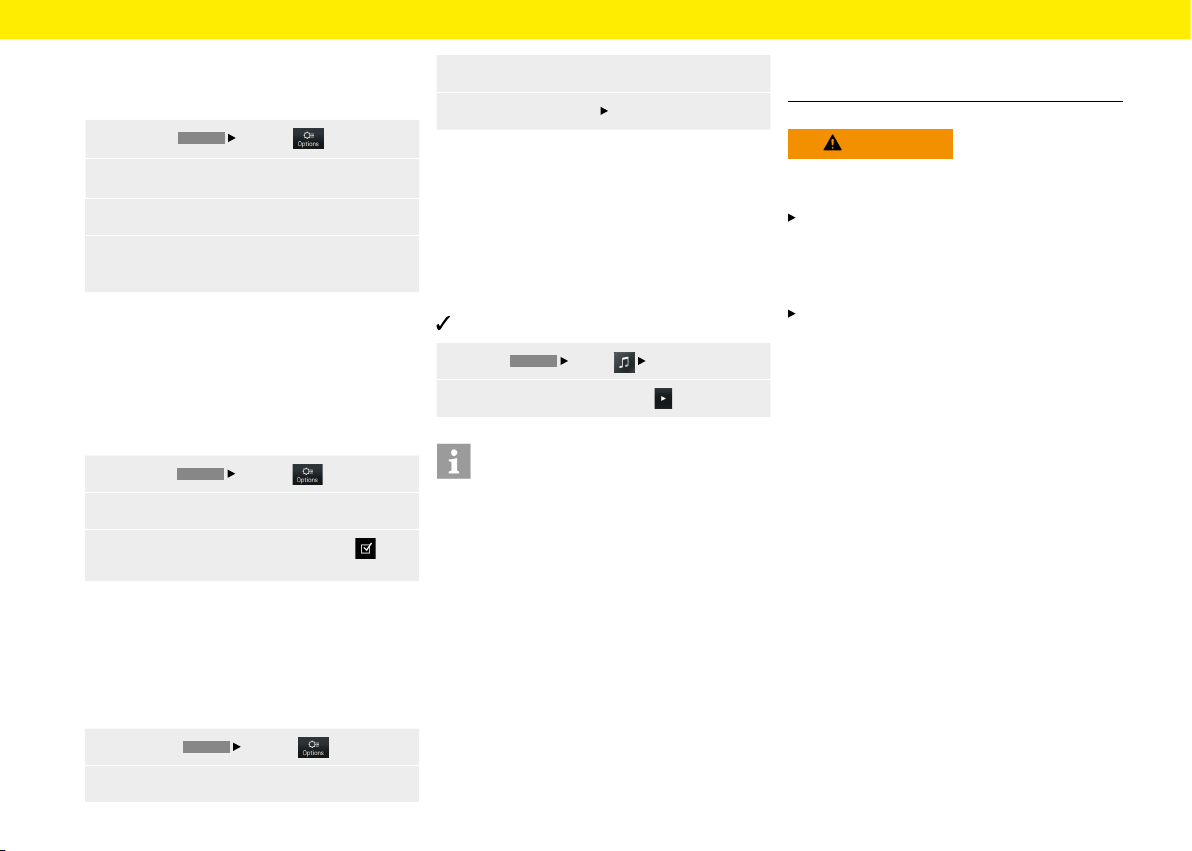
Phone
Sorting contact list
To sort the contact list by rst and last name, pro-
ceed as follows:
1.
Press the
PHONE
Options button.
2.
Select the Set contacts menu option.
3.
Select the Sort contacts menu option.
4.
Select Sort contacts by First name, Surname
or Surname, First name.
Change settings
Auto connect mobile phone
This function allows the mobile device to connect
automatically as soon as it is within range of the Por-
sche Classic Communication Management Plus. To
activate/deactivate this function, proceed as follows:
1.
Press the
PHONE
Options button.
2. Select the Set Bluetooth menu option.
3.
Activate/deactivate the Auto connect
checkbox.
Changing Bluetooth® name
This function allows you to change the name of the
Porsche Classic Communication Management Plus
that is transmitted by the Bluetooth® signal. The
default setting is "PCCM+". To change the name,
proceed as follows:
1.
Select the
PHONE
Options button.
2.
Select the Set Bluetooth menu option.
3. Select the Change Bluetooth name menu option.
4.
Select Change name
OK.
Playing from external audio
sources via Bluetooth®
An external audio source, which is sometimes
operated at the source itself rather than on the
Porsche Classic Communication Management Plus,
can beconnected via Bluetooth®. To play from the
external media source, proceed as follows:
Mobile phone is connected via Bluetooth®.
1.
Select
HOME
Media
Bluetooth.
2.
To play back the media, press .
Information
To connect and operate the external Bluetooth®
audio source, the Porsche Classic Communication
Management Plus supports the A2DP prole. Toex-
tent to which the external Bluetooth® audio source
can be operated on the Porsche Classic Communi-
cation Management Plus depends on the functions
that are supported by the audio source. In certain
cases, therefore, operation of the external Bluetooth®
audio source on Porsche Communication Manage-
ment Plus is limited. In other cases, operation of the
Porsche Classic Communication Management Plus
is not possible at all. In such cases, operation is from
the connected device directly. Please observe the
operating instructions of the device concerned.
To connect the external device via Bluetooth®, please
read "Connecting the mobile device via Bluetooth®".
WARNING
Risk of accident
Distracted driving can cause you to lose control over
the vehicle.
Only operate the external Bluetooth® audio
source when you can operate your vehicle safely
and the trac situation permits. If in doubt, stop
the vehicle and operate the external Bluetooth®
audio source when at a full stop.
Certain apps used for playing from external media
require an active data connection. Additional
costs may be incurred, depending on the mobile
phone tari and especially when operating abroad.
Theuse of a data at rate is recommended.
50

Technical data
Technical data for the Porsche Classic Communi-
cation Management Plus is provided on the pages
below.
51
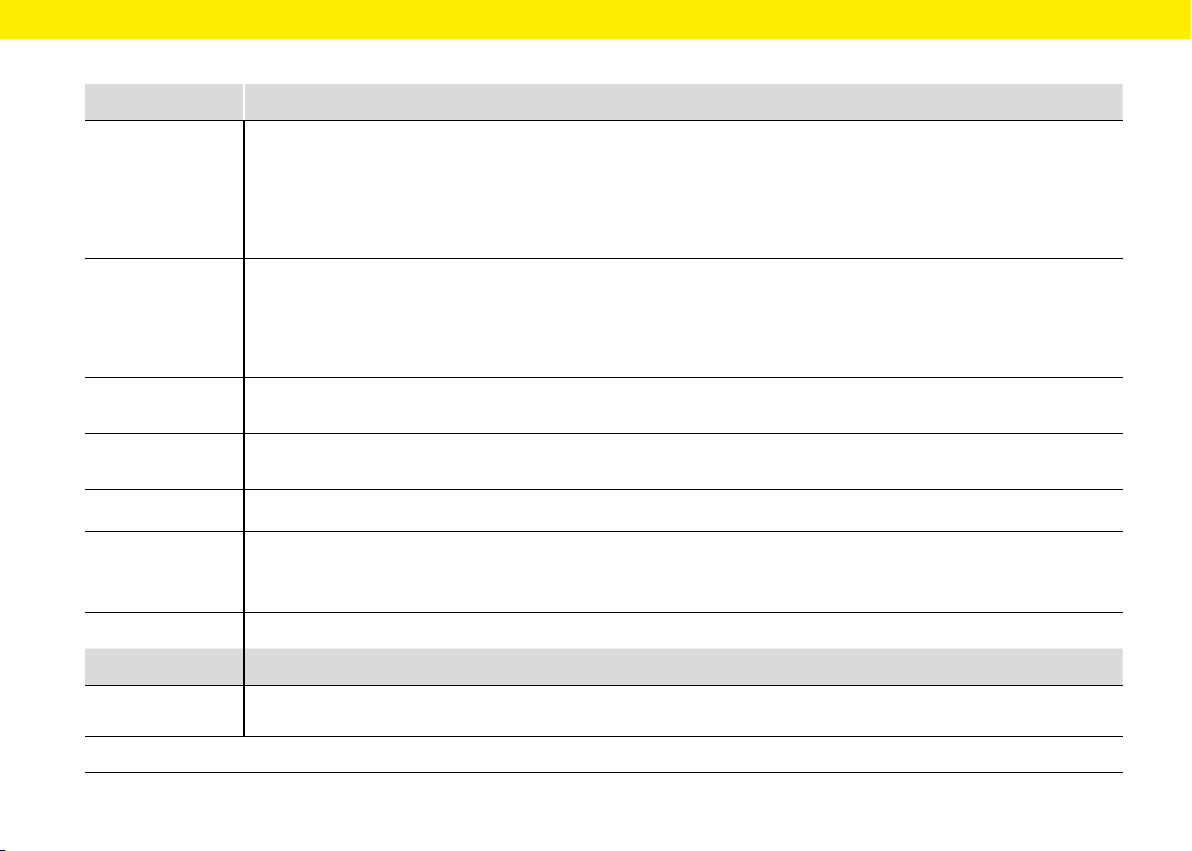
Technical data
Porsche Classic Communication Management Plus
Technical data
System
2-DIN Porsche Classic Communication Management Plus, processor: ARM® Cortex®-A9 (840 MHz),
Operating system: Linux 3.4.5, 512 MB RAM, Digital Touchscreen 7",
Resolution: 800 x 480, light sensor for display brightness, 1 x MicroSDHC card slot for navigation,
GPS port, USB port for USB media and Apple CarPlay®/Android Auto™,
amplier: 4 x 45 W, Volume/Balance/Fader/Treble/Bass/Loudness, Mute, MP3-Player, MP3 with ID3-Tag,
Connection for sound systems: Bose®, GPS receiver UBlox® NEO-M8L, TMC (Europe only)
Tuner/digital radio
Tuner/digital radio , FM-/AM-Dual-Tuner, DAB+-Tuner (Europe only),
FM: 87.5-108.0 MHz, AM: 531-1602 kHz, DAB+: VHF-Band III 174-230 MHz (Europe),
FM: 87.5-107.9 MHz, AM: 531-1602 kHz (Australia/New Zealand),
Radio text, program storage locations: FM/AM/DAB+: 20,
Automatic station list, manual station search, manual station save
Bluetooth®
Onboard Bluetooth® module (SPHE8368), Bluetooth® hands-free, max. 5000 contacts, transmission
phonebook and call log, A2DP function, internal and external microphone, microphone input
Navigation
The map data is not included in the Porsche Classic Communication Management Plus supply scope and is provided on a separate
MicroSDHC card, which can also be ordered from an Authorized Porsche Dealership.
File formats
.mp2, .mp3, .wav, .wma, .ogg, .ac, .ape
Dimensions/weight
Porsche Classic Communication Management Plus (Porsche Cayenne (Type 9PA)): 255 x 123 x 170 mm (WxHxD), 1.6 kg
Porsche Classic Communication Management Plus (Porsche 911 (Type 997) / Boxster (Type 987) / Cayman (Type 987)):
205 x 133 x 170 mm (WxHxD), 1.5 kg
Technical changes reserved.
Scope of supply
Porsche Classic Communication Management Plus, GPS antenna, microphone for hands-free function, installation accessories
and
cables, antenna signal distributor for DAB+ (EU version only), MOST Box, Quick Start Guide
Changes to scope of supply reserved.
52

53
Glossary, Index
A
Accepting a call ............................................................... 48
Activating external microphone ..................................48
Adjusting the balance .................................................... 25
Adjusting the fader ......................................................... 25
Adjusting the individual volumes of audio
sources...............................................................................33
Adjusting the volume ..................................................... 22
AudioPilot (with Bose® Sound System) ...................26
Auto connect mobile phone .........................................50
Autolock.............................................................................31
B
Basic functions ................................................................ 22
Bluetooth®.........................................................................52
Bluetooth® function on/o ........................................... 46
Browsing media ...............................................................42
C
Calling contact.................................................................49
Calling last number.........................................................48
Car ....................................................................................... 27
Change settings ..............................................................50
Changing Bluetooth® name .........................................50
Changing settings ..........................................................38
Checkboxes ......................................................................23
Climate memory ..............................................................31
Conguring PCCM Plus .................................................34
Connecting a mobile phone via Bluetooth® .............46
Connecting and playing from a USB stick ...............42
Connecting a new mobile phone ................................ 46
Connecting to a known mobile phone ......................47
Custom Equalizer settings ...........................................25
Customising day/night mode ...................................... 32
D
Daytime running lights ................................................. 30
Deleting a Bluetooth® device from the Phone
Manager ............................................................................. 47
Deleting contact list .......................................................49
Dialling number from call list ....................................... 48
Dialling number from contacts ...................................48
Dimensions/weight
........................................................ 52
Displaying and selecting saved stations
(presets)
............................................................................37
Displaying call list ........................................................... 49
Displaying personal trip information .........................29
Displaying the connection status
...............................47
Displaying trip information
...........................................29
Door opener ......................................................................31
E
Enabling automatic day/night mode .........................32
Ending a call ....................................................................48
Entering a telephone number (keypad) ....................47
Exiting menus ..................................................................23
F
Factory reset ....................................................................34
Fade-out time .................................................................. 30
Fast forward/back .......................................................... 41
File formats
....................................................................... 52
Functions during a call
..................................................48
I
Individual Memory and System (Set) ........................ 30
Inserting a MicroSDHC card (MAP) ........................... 42
L
Listening position (with Bose® Sound System) .....26
Loudness
...........................................................................25
M
Media ..................................................................................39
Media player control elements ....................................41
Menu types and control options ................................. 22
Muting ................................................................................22
N
Navigation ......................................................................... 52
Notes on drives and externally-connected
devices
.............................................................................. 42
O
On/o via ignition ...........................................................22
On/o via the le-hand knob ......................................22
Opening a main menu ....................................................22
Opening Android Auto™ ................................................. 43
Opening and using menu types .................................. 22
Opening Apple CarPlay® ...............................................42
Opening Phone Manager ..............................................47
Opening the Options menus ........................................22
Operating Android Auto™ via Google Assistant™
voice recognition.............................................................43
Operating Android Auto™ with the PCCM Plus .......43
Operating Apple CarPlay® via Siri® voice
recognition
........................................................................43
Operating Apple CarPlay® with the PCCM Plus .....43
Option elds .....................................................................23
Options menus ................................................................22
Orientation lights ............................................................30
Overviews.............................................................................8

Glossary, Index
54
P
Phone .................................................................................44
Playing from external audio sources via
Bluetooth®.........................................................................50
Playing music ................................................................... 41
Private mode ....................................................................48
R
Rain sensor........................................................................30
Rear wiper
.........................................................................31
Rejecting a call.................................................................48
Removing the MicroSDHC card
..................................42
Repeating music track ...................................................41
Resetting Trip information display .............................29
Returning to the higher-level menu ........................... 23
Returning to the HOME menu .....................................22
Returning to the top level of a main menu ...............23
S
Safety notices .....................................................................7
Saving climate settings .................................................31
Saving the set station .................................................... 37
Saving the station ........................................................... 37
Screen button ..................................................................31
Search contact ................................................................49
Selecting a mode ............................................................22
Selecting a station from the station list
...................37
Selecting media source
.................................................41
Setting a station manually ...........................................37
Setting a station using the Skip buttons .................37
Setting/selecting a station ..........................................37
Setting the date
..............................................................32
Setting the menu language
.........................................33
Setting the reception range .........................................37
Setting the Standby time .............................................32
Setting the time ..............................................................32
Setting the time format
................................................32
Setting Trac announcements ...................................38
Setting Trac announcements volume .................... 38
Shue on/o....................................................................41
Skipping forward/back .................................................41
Sorting contact list .........................................................50
Sound .................................................................................24
Sound settings ................................................................25
Specifying the unit for consumption .........................33
Specifying the unit for speed ......................................33
Specifying the unit for temperature ..........................33
Speed dependent volume adjustment (with
basic speakers) ................................................................25
Standard Equalizer settings ......................................... 25
Storing a station from the station list .......................38
Surround (with Bose® Sound System) ...................... 26
Switching between two calls (toggling) ..................49
Switching the PCCM Plus on and o ........................22
Switching Trac announcements on/o ................. 38
Synchronising the time .................................................32
System ............................................................................... 52
T
Technical data .................................................................. 51
The HOME menu ............................................................. 22
Transfer contacts ............................................................49
Trip information display ................................................. 29
Tuner ................................................................................... 35
Tuner/digital radio ...........................................................52
U
Unmuting ..........................................................................22
Use contacts ....................................................................49
Using input menus .........................................................23
Using lists..........................................................................23
Using menus via the right-hand knob ....................... 22
Using menus via the touchscreen .............................. 22
Using the PCCM Plus .....................................................21
V
Version info ....................................................................... 34
W
Which menus are available? .........................................22