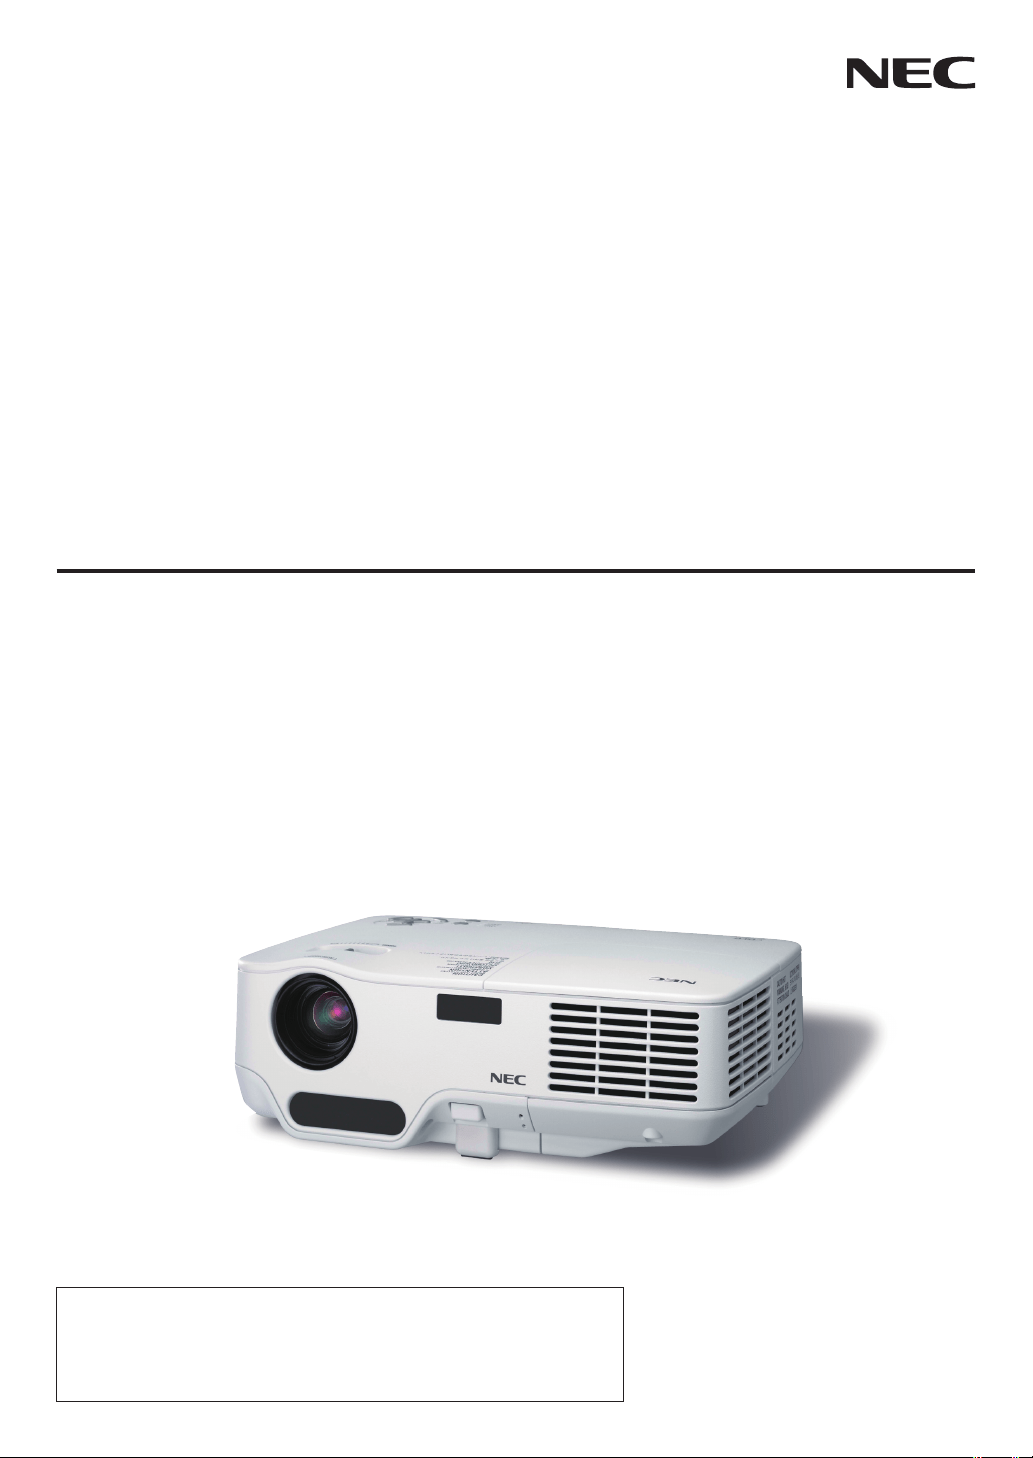
Portable Projector
NP62/NP61/NP52/NP41
User’s Manual
•Theprojector'smodelnameindicatedontheprojector'slabelisNP62,
NP61,NP41,NP62G,NP61G,NP52G,andNP41Grespectively.
AllthemodelsarereferredtoasNP62,NP61,NP52,andNP41throughout
theuser'smanualexceptsomeofthespecicationpages.
•TheNP52isnotdistributedinNorthAmerica.

2ndeditionAugust2008
•DLPandBrilliantColoraretrademarksofTexasInstruments.
•IBMisatrademarkorregisteredtrademarkofInternationalBusinessMachinesCorporation.
•Macintosh,MacOSXandPowerBookaretrademarksofAppleInc.,registeredintheU.S.andothercountries.
•Microsoft,Windows,WindowsVista,andPowerPointareeitheraregisteredtrademarkortrademarkofMicro-
softCorporationintheUnitedStatesand/orothercountries.
•VESAisaregisteredtrademarkofVideoElectronicsStandardsAssociation.
•MicroSaverisaregisteredtrademarkofKensingtonComputerProductsGroup,adivisionofACCOBrands.
•Otherproductandcompanynamesmentionedinthisuser’smanualmaybethetrademarksorregisteredtrade
-
marksoftheirrespectiveholders.
•The
Bluetooth®registeredtrademarkisownedbyBluetoothSIG,Inc.
•Containsthesoftware(UBQ-BlueBluetoothprotocolstack2.0+EDR(QDID:B010586))fromCanoni-tech,Inc
&CanonInformationTechnologiesPhilippines,Inc.
NOTES
(1)Thecontentsofthisuser’smanualmaynotbereprintedinpartorwholewithoutpermission.
(2)Thecontentsofthisuser’smanualaresubjecttochangewithoutnotice.
(3)Greatcarehasbeentakeninthepreparationofthisuser’smanual;however,shouldyounoticeanyquestion
-
ablepoints,errorsoromissions,pleasecontactus.
(4)Notwithstandingarticle(3),NECwillnotberesponsibleforanyclaimsonlossofprofitorothermatters
deemedtoresultfromusingtheProjector.
Important Information
Safety Cautions
Precautons
PleasereadthismanualcarefullybeforeusingyourNECNP62/NP61/NP52/NP41projectorandkeepthemanual
handyforfuturereference.Yourserialnumberislocatedonthebottomofyourprojector.Recordithere:
CAUTION
Toturnoffmainpower,besuretoremovetheplugfrompoweroutlet.
Thepoweroutletsocketshouldbeinstalledasneartotheequipmentaspossible,andshouldbeeas-
ilyaccessible.
CAUTION
TOPREVENTSHOCK,DONOTOPENTHECABINET.
THEREAREHIGH-VOLTAGECOMPONENTSINSIDE.
REFERSERVICINGTOQUALIFIEDSERVICEPERSONNEL.
Thissymbolwarnstheuserthatuninsulatedvoltagewithintheunitmaybesufcienttocauseelectrical
shock.Therefore,itisdangeroustomakeanykindofcontactwithanypartinsideoftheunit.
Thissymbolalertstheuserthatimportantinformationconcerningtheoperationandmaintenanceof
thisunithasbeenprovided.
Theinformationshouldbereadcarefullytoavoidproblems.
WARNING: TOPREVENTFIREORSHOCK,DONOTEXPOSETHISUNITTORAINORMOISTURE.
DONOTUSETHISUNIT’SPLUGWITHANEXTENSIONCORDORINANOUTLETUNLESSALLTHE
PRONGSCANBEFULLYINSERTED.
DOC Complance Notce (for Canada only)
ThisClassBdigitalapparatusmeetsallrequirementsoftheCanadianInterference-CausingEquipmentRegula-
tions.
Machne Nose Informaton Regulaton - 3. GPSGV,
Thehighestsoundpressurelevelislessthan70dB(A)inaccordancewithENISO7779.
Dsposng of your used product
WARNING TO CALIFORNIA RESIDENTS:
Handlingthecablessuppliedwiththisproductwillexposeyoutolead,achemicalknowntotheStateofCalifor-
niatocausebirthdefectsorotherreproductiveharm.
EU-widelegislationasimplementedineachMemberStaterequiresthatusedelectricalandelectronic
productscarryingthemark(left)mustbedisposedofseparatelyfromnormalhouseholdwaste.This
includesprojectorsandtheirelectricalaccessoriesorlamps.Whenyoudisposeofsuchproducts,
pleasefollowtheguidanceofyourlocalauthorityand/orasktheshopwhereyoupurchasedtheprod-
uct.
Aftercollectingtheusedproducts,theyarereusedandrecycledinaproperway.Thiseffortwillhelp
usreducethewastesaswellasthenegativeimpactsuchasmercurycontainedinalamptothehu-
manhealthandtheenvironmentattheminimumlevel.
ThemarkontheelectricalandelectronicproductsonlyappliestothecurrentEuropeanUnionMem-
berStates.
Important Informaton
RF Interference (for USA only)
WARNING
TheFederalCommunicationsCommissiondoesnotallowanymodicationsorchangestotheunitEXCEPT
thosespeciedbyNECDisplaySolutionsofAmerica,Inc.inthismanual.Failuretocomplywiththisgovern-
mentregulationcouldvoidyourrighttooperatethisequipment.Thisequipmenthasbeentestedandfound
tocomplywiththelimitsforaClassBdigitaldevice,pursuanttoPart15oftheFCCRules.Theselimitsare
designedtoprovidereasonableprotectionagainstharmfulinterferenceinaresidentialinstallation.Thisequip-
mentgenerates,uses,andcanradiateradiofrequencyenergyand,ifnotinstalledandusedinaccordancewith
theinstructions,maycauseharmfulinterferencetoradiocommunications.However,thereisnoguaranteethat
interferencewillnotoccurinaparticularinstallation.
Ifthisequipmentdoescauseharmfulinterferencetoradioortelevisionreception,whichcanbedeterminedby
turningtheequipmentoffandon,theuserisencouragedtotrytocorrecttheinterferencebyoneormoreofthe
followingmeasures:
•Reorientorrelocatethereceivingantenna.
•Increasetheseparationbetweentheequipmentandreceiver.
•Connecttheequipmentintoanoutletonacircuitdifferentfromthattowhichthereceiverisconnected.
•Consultthedealeroranexperiencedradio/TVtechnicianforhelp.
ForUKonly:InUK,aBSapprovedpowercablewithmouldedplughasaBlack(veAmps)fuseinstalledforuse
withthisequipment.Ifapowercableisnotsuppliedwiththisequipmentpleasecontactyoursupplier.
Important Safeguards
Thesesafetyinstructionsaretoensurethelonglifeofyourprojectorandtopreventreandshock.Pleaseread
themcarefullyandheedallwarnings.
Installaton
•Donotplacetheprojectorinthefollowingconditions:
-onanunstablecart,stand,ortable.
-nearwater,baths,ordamprooms.
-indirectsunlight,nearheaters,orheatradiatingappliances.
-inadusty,smokyorsteamyenvironment.
-onasheetofpaperorcloth,rugsorcarpets.
•Ifyouwishtohavetheprojectorinstalledontheceiling:
-Donotattempttoinstalltheprojectoryourself.
-Theprojectormustbeinstalledbyqualiedtechniciansinordertoensureproperoperationandreducethe
riskofbodilyinjury.
-Inaddition,theceilingmustbestrongenoughtosupporttheprojectorandtheinstallationmustbeinaccor
-
dancewithanylocalbuildingcodes.
-Pleaseconsultyourdealerformoreinformation.
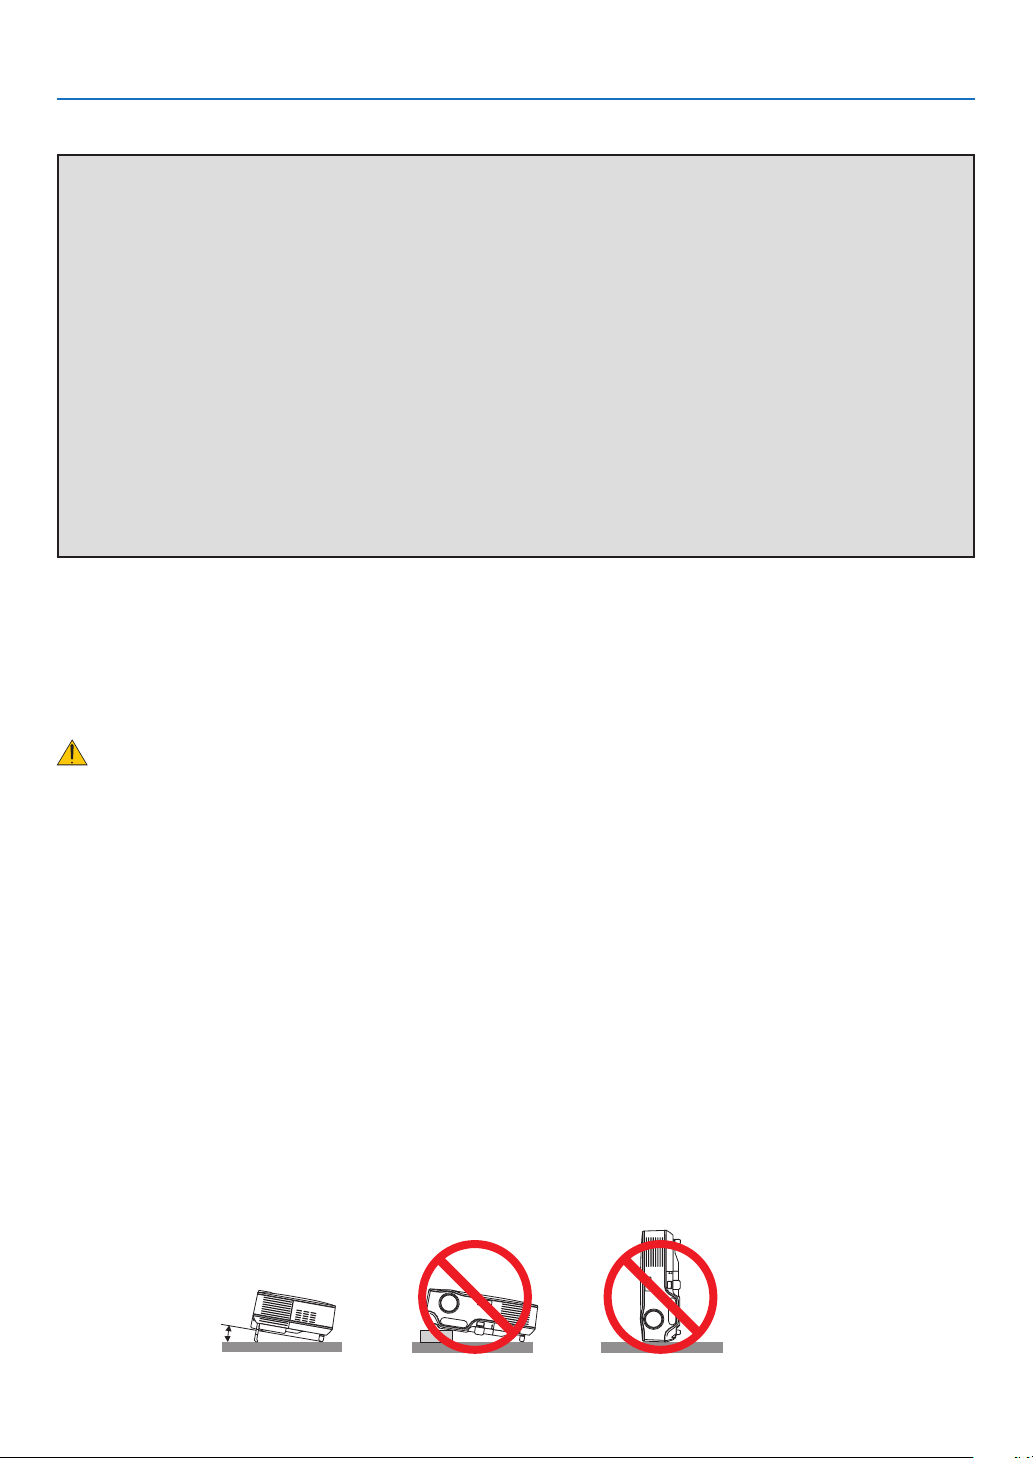
10˚
Place the projector n a horzontal poston
Thetiltangleoftheprojectorshouldnotexceed10degrees,norshouldtheprojectorbeinstalledinanywayother
thanthedesktopandceilingmount,otherwiselamplifecoulddecreasedramatically.

Important Informaton
Fre and Shock Precautons
•Ensurethatthereissufcientventilationandthatventsareunobstructedtopreventthebuild-upofheatinside
yourprojector.Allowatleast4inches(10cm)ofspacebetweenyourprojectorandawall.
•Donottrytotouchtheventilationoutletontherightfront(whenseenfromthefront)asitcanbecomeheated
whiletheprojectoristurnedonandimmediatelyaftertheprojectoristurnedoff.
•Preventforeignobjectssuchaspaperclipsandbitsofpaperfromfallingintoyourprojector.Donotattemptto
retrieveanyobjectsthatmightfallintoyourprojector.Donotinsertanymetalobjectssuchasawireorscrew
-
driverintoyourprojector.Ifsomethingshouldfallintoyourprojector,disconnectitimmediatelyandhavethe
objectremovedbyaqualiedservicepersonnel.
•Donotplaceanyobjectsontopoftheprojector.
•Donottouchthepowerplugduringathunderstorm.Doingsocancauseelectricalshockorre.
•Theprojectorisdesignedtooperateonapowersupplyof100-240VAC50/60Hz(NP62/NP61/NP41)or
200-240VAC50/60Hz(NP62G/NP61G/NP52G/NP41G).Ensurethatyourpowersupplytsthisrequirement
beforeattemptingtouseyourprojector.
•Donotlookintothelenswhiletheprojectorison.Seriousdamagetoyoureyescouldresult.
•Keepanyitemssuchasmagnifyingglassoutofthelightpathoftheprojector.Thelightbeingprojectedfrom
thelensisextensive,thereforeanykindofabnormalobjectsthatcanredirectlightcomingoutofthelens,can
causeunpredictableoutcomesuchasreorinjurytotheeyes.
•Donotcoverthelenswiththeblacklenscaporequivalentwhiletheprojectorison.Doingsocanleadtomelt
-
ingofthecapandpossiblyburningyourhandsduetotheheatemittedfromthelightoutput.
•Donotplaceanyobjects,whichareeasilyaffectedbyheat,infrontoftheprojectorlensoraprojectorexhaust
vent.
Doingsocouldleadtotheobjectmeltingorgettingyourhandsburnedfromtheheatthatisemittedfromthe
lightoutputandexhaust.
•Handlethepowercablecarefully.Adamagedorfrayedpowercablecancauseelectricshockorre.
-Donotuseanypowercablesthanthesuppliedone.
-Donotbendortugthepowercableexcessively.
-Donotplacethepowercableundertheprojector,oranyheavyobject.
-Donotcoverthepowercablewithothersoftmaterialssuchasrugs.
-Donotheatthepowercable.
-Donothandlethepowerplugwithwethands.
•Turnofftheprojector,unplugthepowercableandhavetheprojectorservicedbyaqualiedservicepersonnel
underthefollowingconditions:
-Whenthepowercableorplugisdamagedorfrayed.
-Ifliquidhasbeenspilledintotheprojector,orifithasbeenexposedtorainorwater.
-Iftheprojectordoesnotoperatenormallywhenyoufollowtheinstructionsdescribedinthisuser'smanual.
-Iftheprojectorhasbeendroppedorthecabinethasbeendamaged.
-Iftheprojectorexhibitsadistinctchangeinperformance,indicatinganeedforservice.
•Disconnectthepowercableandanyothercablesbeforecarryingtheprojector.
•Turnofftheprojectorandunplugthepowercablebeforecleaningthecabinetorreplacingthelamp.
•Turnofftheprojectorandunplugthepowercableiftheprojectorisnottobeusedforanextendedperiodof
time.

v
Important Informaton
CAUTION
•Donotusethetilt-footforpurposesotherthanoriginallyintended.Misusessuchasusingthetiltfoottocarry
orhang(fromthewallorceiling)theprojectorcancausedamagetotheprojector.
•Donotsendtheprojectorinthesoftcasebyparceldeliveryserviceorcargoshipment.Theprojectorinside
thesoftcasecouldbedamaged.
•Select[HIGH]inFanmodeifyoucontinuetousetheprojectorforconsecutivedays.(Fromthemenu,select
[SETUP]
→[OPTIONS(1)]→[FANMODE]→[HIGH].)
•Donottrytotouchtheventilationoutletontheleftfront(whenseenfromthefront)asitcanbecomeheated
whiletheprojectoristurnedonandimmediatelyaftertheprojectoristurnedoff.
•DonotturnofftheACpowerfor60secondsafterthelampisturnedonandwhilethePOWERindicatoris
blinkinggreen.
Doingsocouldcauseprematurelampfailure.
Remote Control Precautons
•Handletheremotecontrolcarefully.
•Iftheremotecontrolgetswet,wipeitdryimmediately.
•Avoidexcessiveheatandhumidity.
•Donotheat,takeapart,orthrowbatteriesintore.
•Ifyouwillnotbeusingtheremotecontrolforalongtime,removethebatteries.
•Ensurethatyouhavethebatteries'polarity(+/–)alignedcorrectly.
•Donotusenewandoldbatteriestogether,orusedifferenttypesofbatteriestogether.
•Disposeofusedbatteriesaccordingtoyourlocalregulations.
Lamp Replacement
•Toreplacethelamp,followallinstructionsprovidedonpage
72.
•Besuretoreplacethelampwhenthemessage[THE LAMP HAS REACHED THE END OF ITS USABLE
LIFE. PLEASE REPLACE THE LAMP.]appears.Ifyoucontinuetousethelampafterthelamphasreached
theendofitsusablelife,thelampbulbmayshatter,andpiecesofglassmaybescatteredinthelampcase.Do
nottouchthemasthepiecesofglassmaycauseinjury.
Ifthishappens,contactyourdealerforlampreplacement.
A Lamp Characterstc
Theprojectorhasahigh-pressuremercurylampasalightsource.
Alamphasacharacteristicthatitsbrightnessgraduallydecreaseswithage.Alsorepeatedlyturningthelamp
onandoffwillincreasethepossibilityofitslowerbrightness.
CAUTION:
•DONOTTOUCHTHELAMPimmediatelyafterithasbeenused.Itwillbeextremelyhot.Turntheprojector
offandthendisconnectthepowercable.Allowatleastonehourforthelamptocoolbeforehandling.
•Whenremovingthelampfromaceiling-mountedprojector,makesurethatnooneisundertheprojector.
Glassfragmentscouldfallifthelamphasbeenburnedout.
Note for US Resdents
Thelampinthisproductcontainsmercury.PreasedisposeaccordingtoLocal,Stateor
FederalLaws.

v
Important Informaton
About Hgh Alttude mode
•Set[FANMODE]to[HIGHALTITUDE]whenusingtheprojectorataltitudesapproximately5000feet/1500me-
tersorhigher.
•Usingtheprojectorataltitudesapproximately5000feet/1500metersorhigherwithoutsettingto[HIGHALTI
-
TUDE]cancausetheprojectortooverheatandtheprotectorcouldshutdown.Ifthishappens,waitacouple
minutesandturnontheprojector.
•Usingtheprojectorataltitudeslessthanapproximately5000feet/1500metersandsettingto[HIGHALTI
-
TUDE]cancausethelamptoovercool,causingtheimagetoicker.Switch[FANMODE]to[AUTO].
•Usingtheprojectorataltitudesapproximately5000feet/1500metersorhighercanshortenthelifeofoptical
componentssuchasthelamp.
About Copyrght of orgnal projected pctures:
Pleasenotethatusingthisprojectorforthepurposeofcommercialgainortheattractionofpublicattentionina
venuesuchasacoffeeshoporhotelandemployingcompressionorexpansionofthescreenimagewiththefol-
lowingfunctionsmayraiseconcernabouttheinfringementofcopyrightswhichareprotectedbycopyrightlaw.
[ASPECTRATIO],[KEYSTONE],Magnifyingfeatureandothersimilarfeatures.

v
Table of Contents
Important Information
........................................................................................i
1. Introduction
........................................................................................................1
➊What'sintheBox?........................................................................................................1
➋IntroductiontotheProjector.........................................................................................2
➌PartNamesoftheProjector.........................................................................................4
TopFeatures...........................................................................................................6
TerminalPanelFeatures.........................................................................................6
➍PartNamesoftheRemoteControl...............................................................................7
BatteryInstallation.............................................................................................8
RemoteControlPrecautions..............................................................................8
OperatingRangeforWirelessRemoteControl.................................................8
2. Installation and Connections
..................................................................9
➊SettingUptheScreenandtheProjector......................................................................9
SelectingaLocation................................................................................................9
ThrowDistanceandScreenSize..........................................................................10
➋MakingConnections...................................................................................................12
ConnectingYourPCorMacintoshComputer.......................................................12
ConnectingYourDVDPlayerwithComponentOutput.........................................13
ConnectingYourVCR...........................................................................................14
ConnectingtheSuppliedPowerCable.................................................................15
3. Projecting an Image (Basic Operation)
............................................16
➊TurningontheProjector.............................................................................................16
NoteonStartupScreen(MenuLanguageSelectscreen).....................................17
➋SelectingaSource.....................................................................................................18
➌AdjustingthePictureSizeandPosition......................................................................20
➍AdjustingFocusManually...........................................................................................24
➎CorrectingKeystoneDistortionManually...................................................................25
➏OptimizingRGBPictureAutomatically.......................................................................26
➐AdjustingVolumeUp&Down.....................................................................................27
❽TurningofftheProjector.............................................................................................27
❾AfterUse.....................................................................................................................28
4. Convenient Features
...................................................................................29
➊TurningOfftheImage.................................................................................................29
➋FreezingaPicture.......................................................................................................29
➌EnlargingandMovingaPicture..................................................................................29
➍ChangingLampMode...............................................................................................30
➎PreventingtheUnauthorizedUseoftheProjector.....................................................30
➏UsingtheOptionalRemoteMouseReceiver(NP01MR)............................................33

v
Table of Contents
5. Using the Viewer (NP62/NP52)
.............................................................35
➊WhatyoucandowiththeViewer...............................................................................35
➋ProjectingimagesstoredinaUSBmemorydevice(Basicoperation).......................37
➌Operatingtheslidescreen..........................................................................................40
➍Operatingthethumbnailscreen.................................................................................40
➎UsingtheBluetooth®wirelesstechnologytotransmitimages...................................45
6. Using On-Screen Menu
.............................................................................48
➊UsingtheMenus.........................................................................................................48
➋MenuElements...........................................................................................................49
➌ListofMenuItems......................................................................................................50
➍MenuDescriptions&Functions[SOURCE]...............................................................52
[COMPUTER]........................................................................................................52
[VIDEO].................................................................................................................52
[S-VIDEO]..............................................................................................................52
➎MenuDescriptions&Functions[ADJUST].................................................................53
[BASIC]..................................................................................................................53
[IMAGEOPTIONS]................................................................................................56
➏MenuDescriptions&Functions[SETUP]...................................................................60
[GENERAL]...........................................................................................................60
[INSTALLATION]...................................................................................................62
[OPTIONS(1)]........................................................................................................65
[OPTIONS(2)]........................................................................................................66
➐MenuDescriptions&Functions[INFO.]......................................................................68
[USAGETIME]......................................................................................................68
[SOURCE].............................................................................................................69
[VERSION]............................................................................................................69
➑MenuDescriptions&Functions[RESET]...................................................................70
7. Maintenance
.....................................................................................................71
➊CleaningtheLensandtheFocusSensor.................................................................71
➋CleaningtheCabinet.................................................................................................71
➌ReplacingtheLampandtheCoolingPump..............................................................72
8. Appendix
.............................................................................................................76
➊Troubleshooting.........................................................................................................76
➋Specications............................................................................................................79
➌CabinetDimensions...................................................................................................81
➍PinAssignmentsofD-SubCOMPUTERInputConnector........................................82
➎CompatibleInputSignalList......................................................................................83
➏PCControlCodesandCableConnection.................................................................84
➐TroubleshootingCheckList.......................................................................................85
➑TravelCareGuide.......................................................................................................87
LA
M
P
ST
A
T
US
P
OWE
R
F
O
C
US
ON/STAND BY
S
O
U
R
CE
AU
T
O
A
D
J
.
SELECT
➊
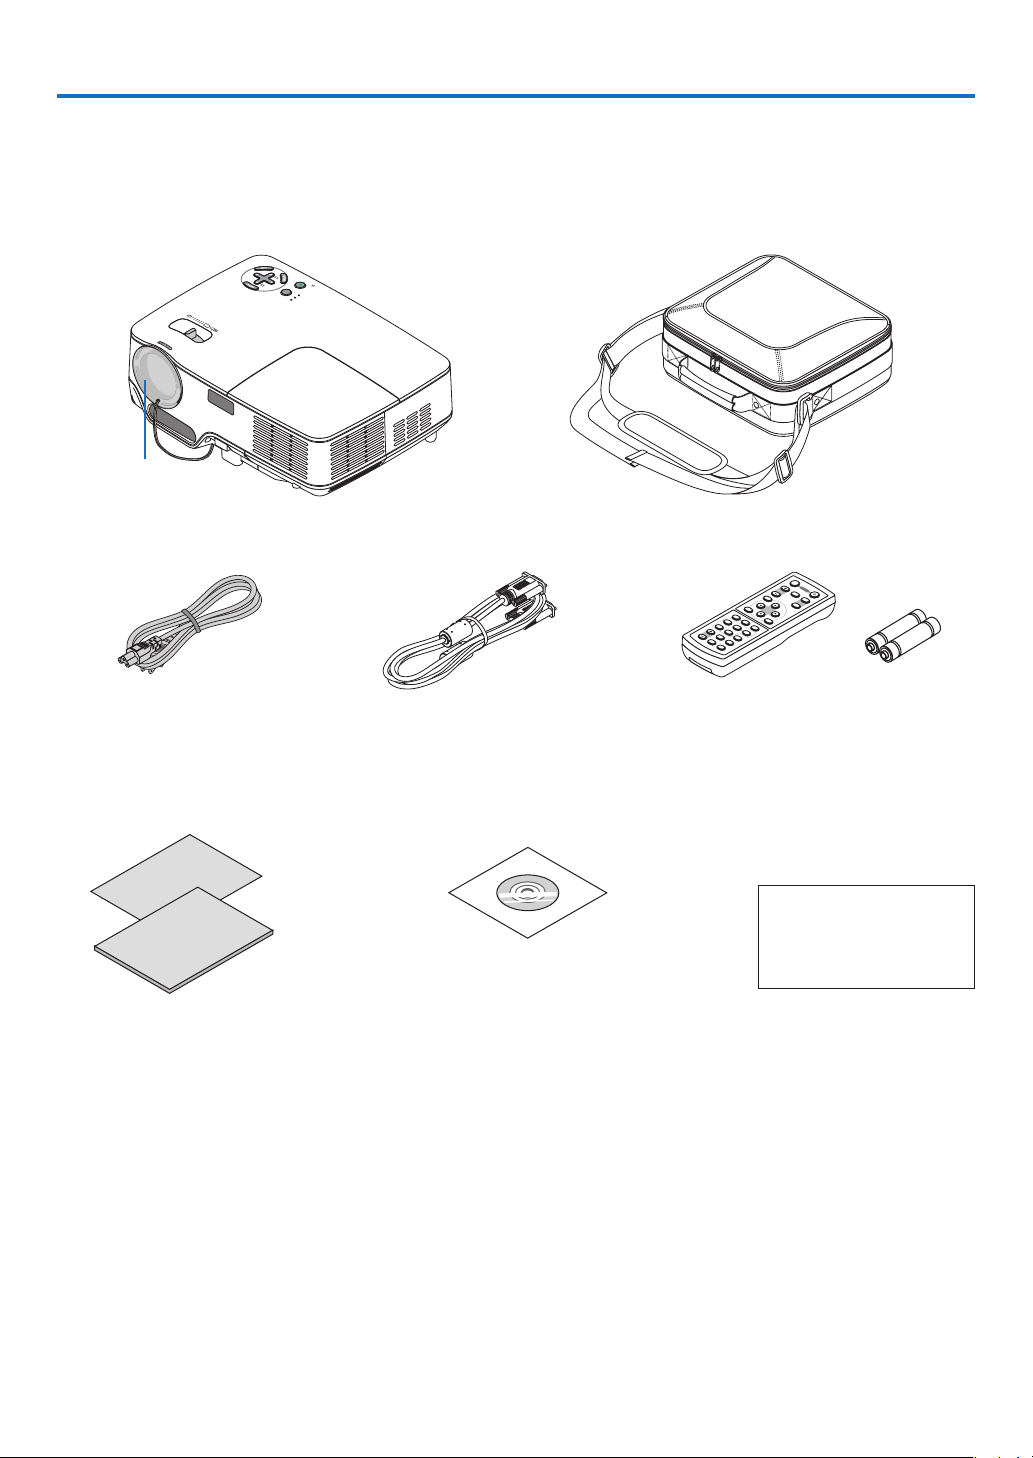
What's in the Box?
Makesureyourboxcontainseverythinglisted.Ifanypiecesaremissing,contactyourdealer.
Pleasesavetheoriginalboxandpackingmaterialsifyoueverneedtoshipyourprojector.
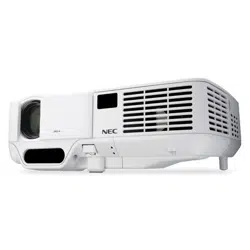
Projector
Lens cap
(24FT9983)
Power cable
(US: 7N080228)
(EU: 7N080017)
VGA signal cable
(7N520052)
CD-ROM
User’s manual
(7N951221)
For North Amerca only
Registrationcard
Limitedwarranty
For Europe only
Guaranteepolicy
Quick Setup Guide
(7N8P8881)
Important Information
(7N8P8891)
1. Introduction
V
O
L
U
M
E
S
-V
ID
E
O
V
ID
E
O
ENT
ER
E
X
IT
M
E
N
U
U
P
PA
G
E
O
F
F
P
O
W
E
R
O
N
DO
W
N
AU
TO A
D
J.
C
OM
PU
TE
R
A
S
P
E
C
T
H
E
LP
F
R
E
E
Z
E
P
IC
T
U
R
E
LAMP MODE
M
AGNIFY A
V-
MUTE
F
OCUS
L
-
M
OU
SE
-
R
V
IEW
E
R
Remote control
(7N900841)
Batteries (AAA•2)
Soft case
(24BS7901)

. Introducton
➋
Introduction to the Projector
Thissectionintroducesyoutoyournewprojectoranddescribesthefeaturesandcontrols.
Congratulatons on Your Purchase of the Projector
ThisDLP™projectorisoneoftheverybestprojectorsavailabletoday.Theprojectorenablesyoutoprojectpre-
ciseimagesupto300inches(measureddiagonally)fromyourPCorMacintoshcomputer(desktopornotebook),
VCR,DVDplayerordocumentcamera.
Youcanusetheprojectoronatabletoporcart,youcanusetheprojectortoprojectimagesfrombehindthe
screen,andtheprojectorcanbepermanentlymountedonaceiling*
1
.Theremotecontrolcanbeusedwirelessly.
*
1
Donotattempttomounttheprojectoronaceilingyourself.
Theprojectormustbeinstalledbyqualiedtechniciansinordertoensureproperoperationandreducethe
riskofbodilyinjury.
Inaddition,theceilingmustbestrongenoughtosupporttheprojectorandtheinstallationmustbeinaccor-
dancewithanylocalbuildingcodes.Pleaseconsultyourdealerformoreinformation.
Features you'll enjoy:
•AUTOFOCUSfunction
Whenyouturnonthepower,changethezoomorrepositiontheprojector,theAUTOFOCUSfunctionwillwork
instantly.
Thefocussensorontheprojectordetectsthedistancetothescreenandautomaticallyadjuststhefocusofan
imageaswellasreducingtherequiredset-uptime.
•Autoverticalkeystonecorrection
•Built-inWALLCOLORCorrectionpresetsprovideforadaptivecolorcorrectionwhenprojectingontonon-white
screenmaterial
•DirectPowerOff,AUTOPOWERON(AC),andAUTOPOWERON(COMP.)
Theprojectorhasafeaturecalled“DirectPowerOff”.Thisfeatureallowstheprojectortobeturnedoff(even
whenprojectinganimage)usingapowerstripequippedwithaswitchandabreaker.
TheAUTOPOWERON(AC)andAUTOPOWERON(COMP.)featureseliminatestheneedtoalwaysusethe
POWERbuttonontheremotecontrolorprojectorcabinet.
•HDTV(1080i,720p)andSDTV(576p,480p)compatibility
•Integratedde-interlacevideoprocessingtechnology
•Displaypopularwidescreenandfullscreenaspectratios–16:9and4:3
•Highresolutiondisplay-uptoUXGAcompatible,XGAnativeresolution.
•Multiplevideomodeselections(dependingonyoursource)
•SafetyprotectbySecurityfunction
Securityfeaturepreventsunauthorizedindividualsfromdisplayingimages.
•YoucancontroltheprojectorwithaPCorcontrolsystemusingthePCControlport.
•Easysetupandoperation
•Thecontemporarycabinetdesignislight,compactandcomplementsanyofce,boardroomorAuditorium.
•ViewersupportsUSBmemoryorthe
Bluetooth®wirelesstechnology(NP62/NP52only)
TheNP62andNP52projectorshavetheViewer.
TheViewerallowsyoutoviewtheimagelesstoredinacommerciallyavailableUSBmemoryinsertedintothe
USBportoftheprojector.
Connectingtheoptional
Bluetooth®USBadaptor(NP01BA)totheprojectorwillallowyoutotransmitimages
wirelesslyfromyourcomputersormobilephoneswith
Bluetoothwirelesstechnologytotheprojector.
SeethelistofcountriesandareassupportedbytheoptionalBluetoothUSBadaptor(NP01BA)onpage
35.

3
. Introducton
About ths user's manual
Thefastestwaytogetstartedistotakeyourtimeanddoeverythingrightthersttime.Takeafewminutesnowto
reviewtheuser'smanual.Thismaysaveyoutimelateron.Atthebeginningofeachsectionofthemanualyou'll
ndanoverview.Ifthesectiondoesn'tapply,youcanskipit.
Inthisuser'smanualthedrawingsoftheprojectorshowanexampleofNP61.
. Introducton
LAMP
STATUS
POWER
SOUR
C
E
AUTO
AD
J
.
SEL
E
C
T
ON/S
TAND BY
F
OCUS
V
ID
EO
IN
COMPUTER IN
PC
C
ON
TRO
L
AUDI
O
IN
S
-V
ID
E
O IN
LAMP
STAT
US
POWER
ON/
ST
AND BY
SOUR
C
E
AUTO
ADJ.
SEL
E
CT
FOCUS
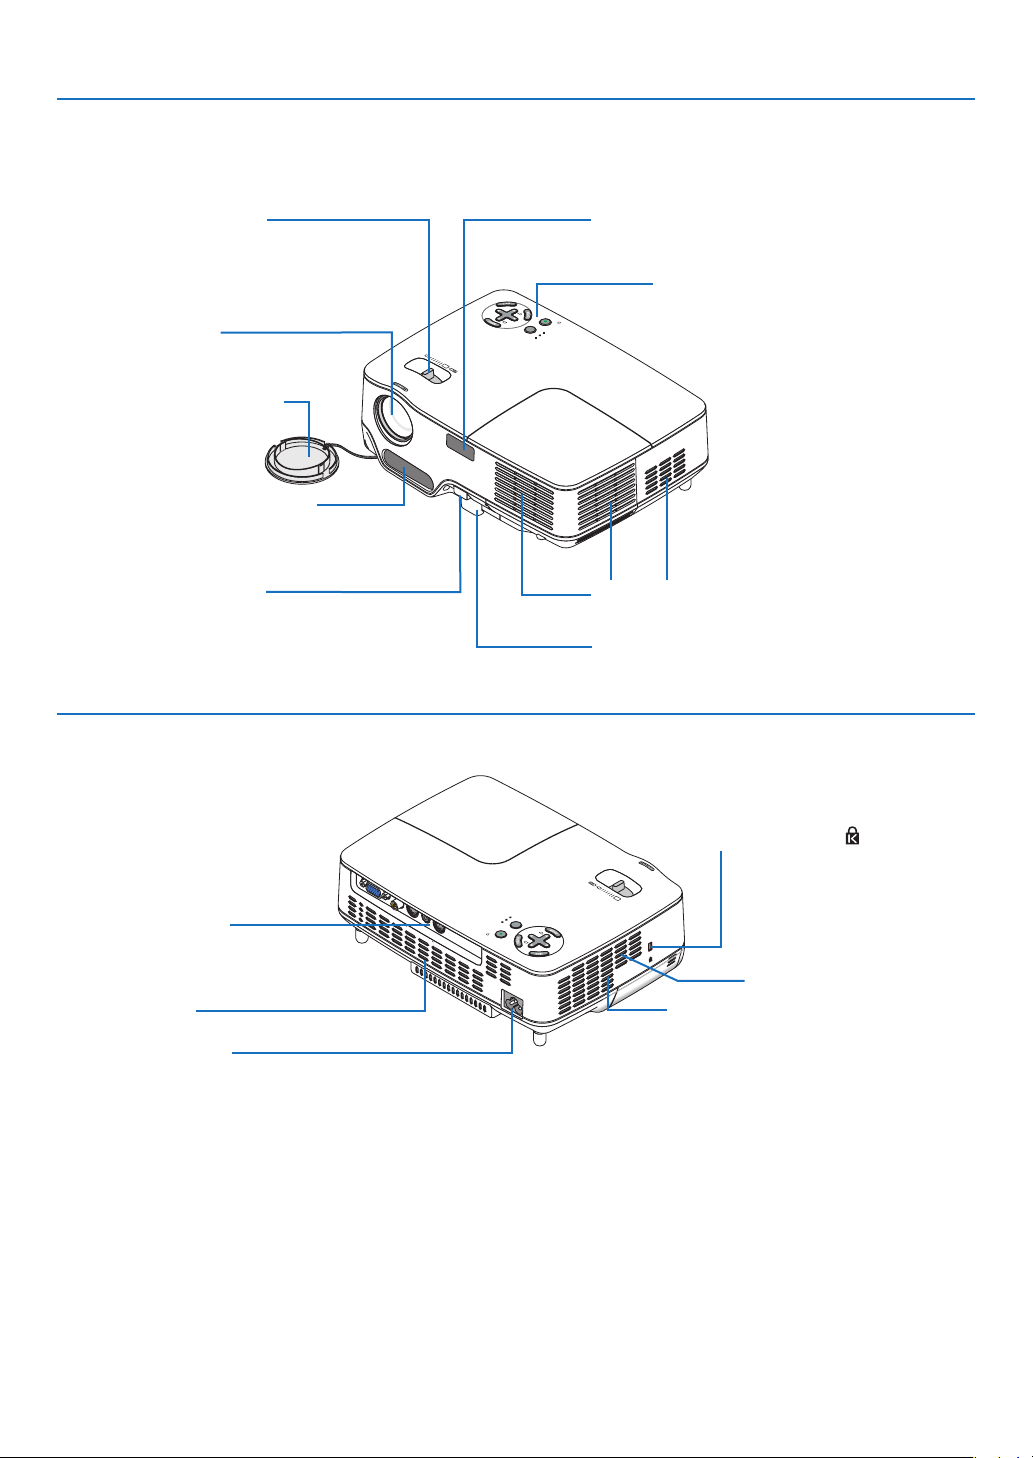
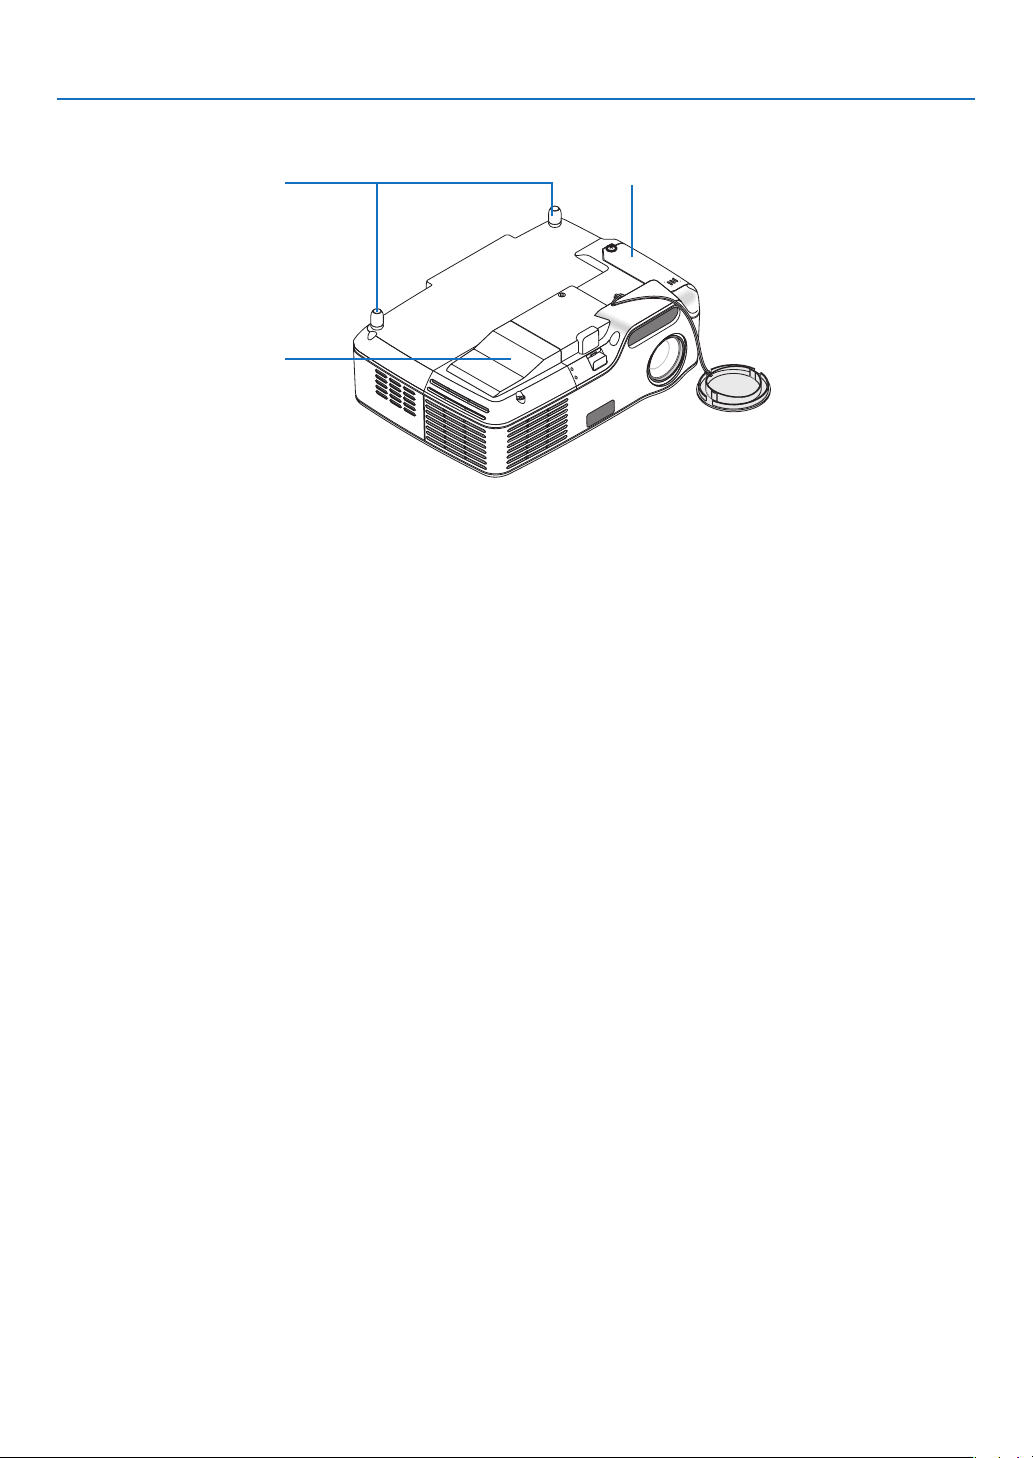
➌
Part Names of the Projector
Zoom Lever
(→ page
22)
Controls
(→ page
6)
Lens
Lens Cap
Built-in Security Slot (
)*
Adjustable Tilt Foot Button
(→ page
21)
Adjustable Tilt Foot
(→ page
21)
Remote Sensor
(→ page 8)
Front/Top
AC Input
Connect the supplied power cable's three-pin plug here, and plug
the other end into an active wall outlet. (→ page
15)
Terminal Panel
(→ page
6)
Rear
*ThissecurityslotsupportstheMicroSaver®SecuritySystem.
Ventilation (outlet)
Heated air is exhausted from here.
Focus Sensor
(→ page
22)
Ventilation (inlet)
Ventilation (inlet)
Speaker

. Introducton
Top Features
. POWER Button (ON / STAND BY) (
) (→page
16,27)
. POWER Indcator
(→page
15,16,27,76)
3. STATUS Indcator
(→page
76)
. LAMP Indcator
(→page
72,76)
. FOCUS Button
(→page
24)
. MENU Button
(→page
48)
7. SELECT
▲▼◀▶ / SOURCE ▶ / AUTO ADJ ◀ /
Keystone ▲▼ Buttons (→page
18,25,26)
8. ENTER Button
9. EXIT Button
Termnal Panel Features
. COMPUTER IN/ Component Input Connector
(Mn D-Sub Pn)
(→page
12,13)
. VIDEO IN Connector (RCA)
(→page
14)
3. S-VIDEO IN Connector (Mn DIN Pn)
(→page14)
. AUDIO IN Mn Jack (Stereo Mn)
(→page12,13,14)
. PC CONTROL Port (Mn DIN 8 Pn)
(→page
84)
UsethisporttoconnectaPCorcontrolsystem.
Thisenablesyoutocontroltheprojectorusingse
-
rialcommunicationprotocol.Ifyouarewritingyour
ownprogram,typicalPCcontrolcodesareonpage
84.
. USB Port (Type A)
InsertingacommerciallyavailableUSBmemoryal
-
lowsyoutoviewimagesstoredintheUSBmemory
(→page
37)
Insertingtheoptional
Bluetooth®USBadaptor
(NP01BA)allowsyoutotransmitimagesfromyour
computerormobilephonewith
Bluetoothwireless
technologytotheprojector.(
→page
46)
NOTE: The NP61 and NP41 do not have the USB port.
SOURCE
AUTO
ADJ.
ON/STAND BY
FOCUS
LAMP
STATUS
POWER
SELECT
8
12
4
5
6
7
3
9
VIDEO IN
COMPUTER IN
PC CONTROL
AUDIO IN
S-VIDEO IN
VIDEO IN
COMPUTER IN
PC CONTROL
AUDIO IN
S-VIDEO IN
U S B
1 5
6
NP61/NP41
NP62/NP52
2 3 4
7
. Introducton
❹
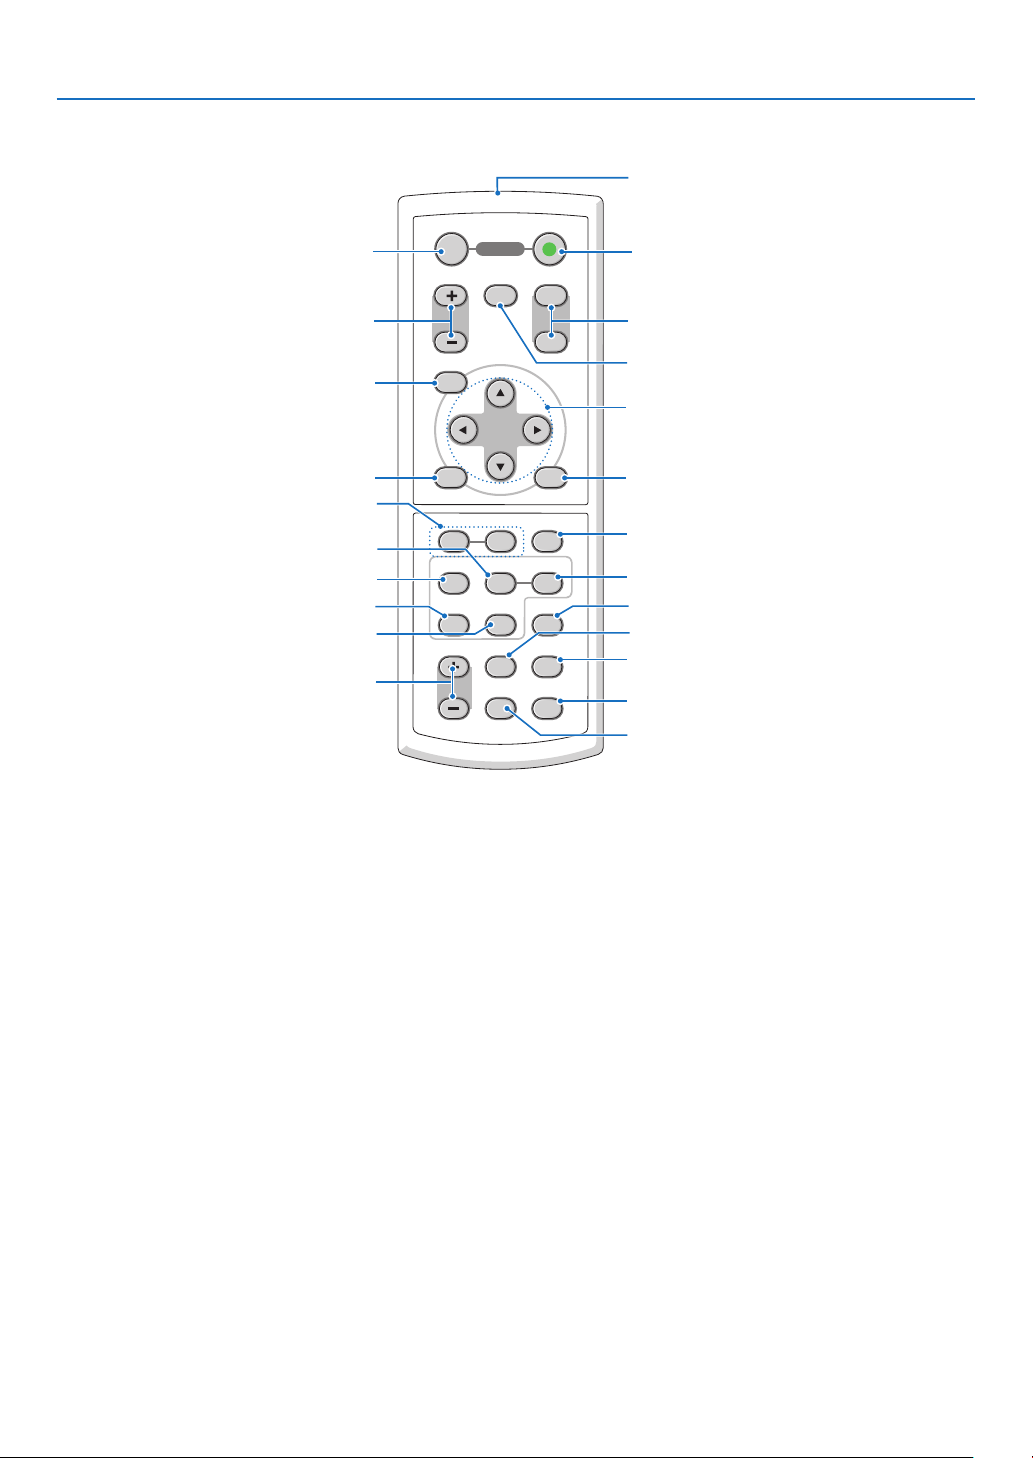
Part Names of the Remote Control
. Infrared Transmtter (→page
8)
. POWER ON Button
(→page
16)
3. POWER OFF Button
(→page
27)
. MAGNIFY (+) (–) Buttons
(→page
29)
. AV-MUTE Button
(→page
29)
. PAGE (UP) / (DOWN) Buttons*
(→page
34)
7. MENU Button
(→page
48)
8. SELECT
▲
,
▼
,
◀
,
▶ Buttons
9. ENTER Button
0. EXIT Button
. L-MOUSE-R Buttons*
(→page
34)
VOLUME
ENTER
EXIT
MENU
UP
MAGNIFY
FOCUS
PAGE
OFF
POWER
ON
AV-MUTE
DOWN
L
-
MOUSE
-
R
ASPECT HELP
FREEZE
PICTURE
S-VIDEO VIEWER
LAMP MODE
VIDEO
AUTO ADJ.COMPUTER
1
3
4
7
6
9
2
8
10
5
11
13
14
15
16
12
20
23
22
17
18
19
21
. FOCUS Button (→page24)
3. COMPUTER Button
(→page
18)
. VIDEO Button
(→page
18)
. S-VIDEO Button
(→page
18)
. VIEWER Button
(→page
37) (Notavailableon
NP61andNP41)
7. AUTO ADJ. Button
(→page
26)
8. LAMP MODE Button
(→page
30)
9. ASPECT Button
(→page
58)
0. HELP Button
(→page
68)
. VOLUME (+) (–) Buttons
(→page
27)
. PICTURE Button
(→page
53,55)
3. FREEZE Button
(→page
29)
*Availableonlywhentheoptionalremotemousereceiverisconnectedwithyourcomputer.
8
. Introducton
30°
30°
30°
30°
Remote Control Precautons
•Handletheremotecontrolcarefully.
•Iftheremotecontrolgetswet,wipeitdryimmediately.
•Avoidexcessiveheatandhumidity.
•Donotheat,takeapart,orthrowbatteriesintore.
•Ifyouwillnotbeusingtheremotecontrolforalongtime,removethebatteries.
•Ensurethatyouhavethebatteries'polarity(+/–)alignedcorrectly.
•Donotusenewandoldbatteriestogether,orusedifferenttypesofbatteriestogether.
•Disposeofusedbatteriesaccordingtoyourlocalregulations.
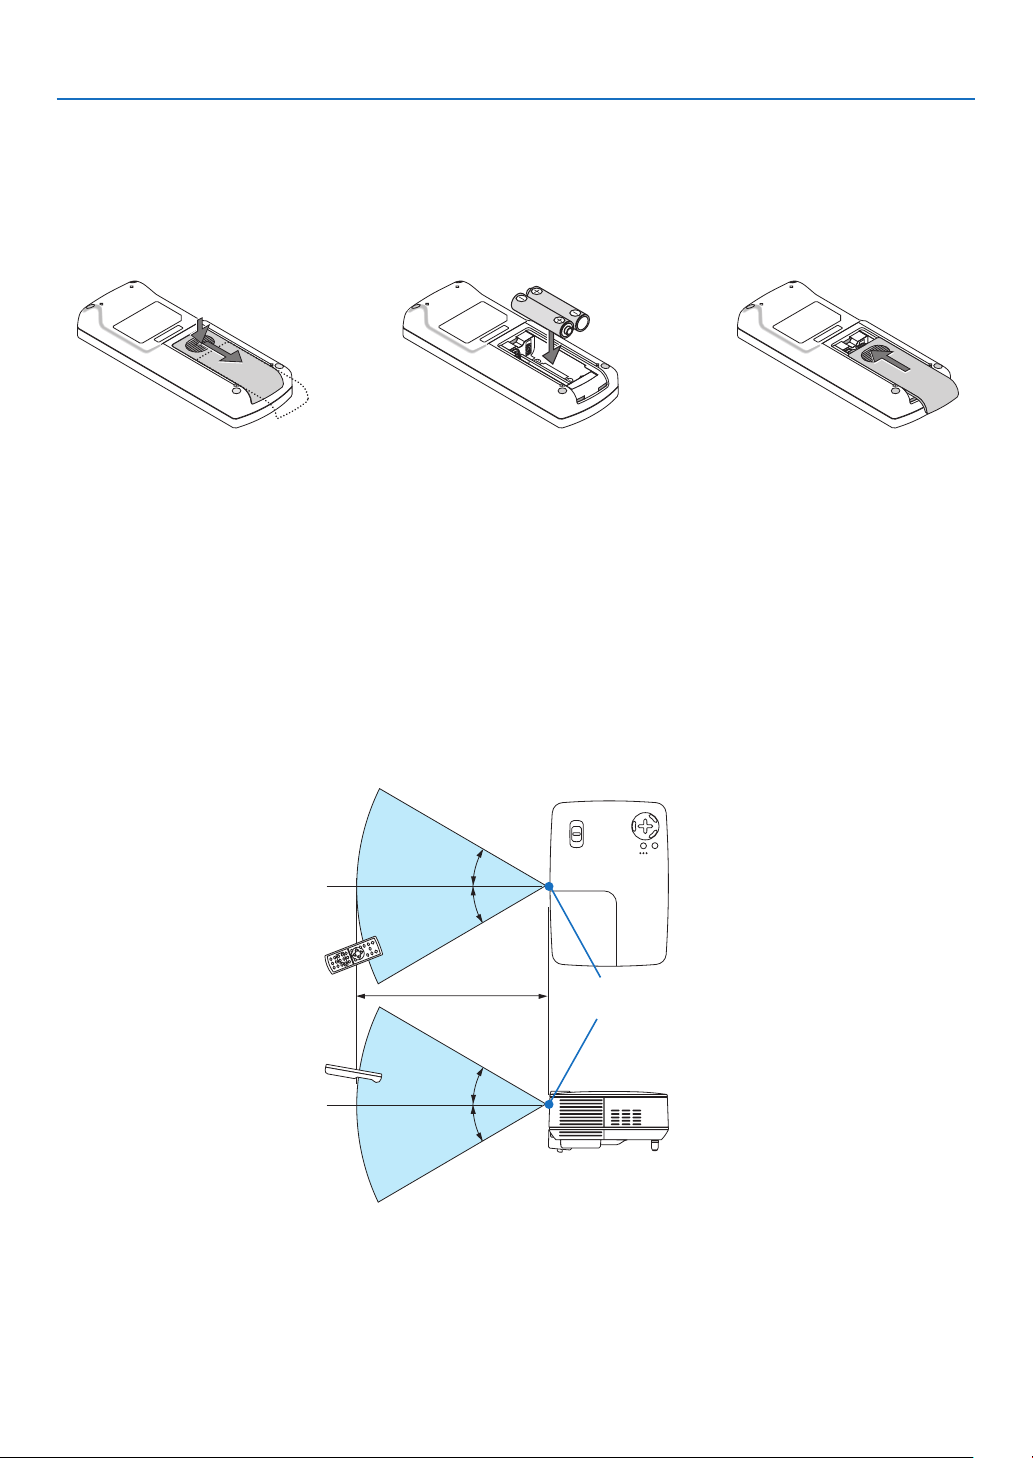
Operatng Range for Wreless Remote Control
Battery Installaton
Pressrmlyandslidethe
batterycoveroff.
Installnewbatteries(AAA).En-
surethatyouhavethebatteries'
polarity(+/–)alignedcorrectly.
3
Slipthecoverbackoverthebat-
teriesuntilitsnapsintoplace.Do
notmixdifferenttypesofbatteries
ornewandoldbatteries.
Remote sensor on
projector cabinet
Remote control
22 feet / 7 m
•Theinfraredsignaloperatesbyline-of-sightuptoadistanceofabout22feet/7mandwithina60-degreeangle
oftheremotesensorontheprojectorcabinet.
•Theprojectorwillnotrespondifthereareobjectsbetweentheremotecontrolandthesensor,orifstronglight
fallsonthesensor.Weakbatterieswillalsopreventtheremotecontrolfromproperlyoperatingtheprojector.
Remote control
9
Thissectiondescribeshowtosetupyourprojectorandhowtoconnectvideoandaudiosources.
2. Installation and Connections
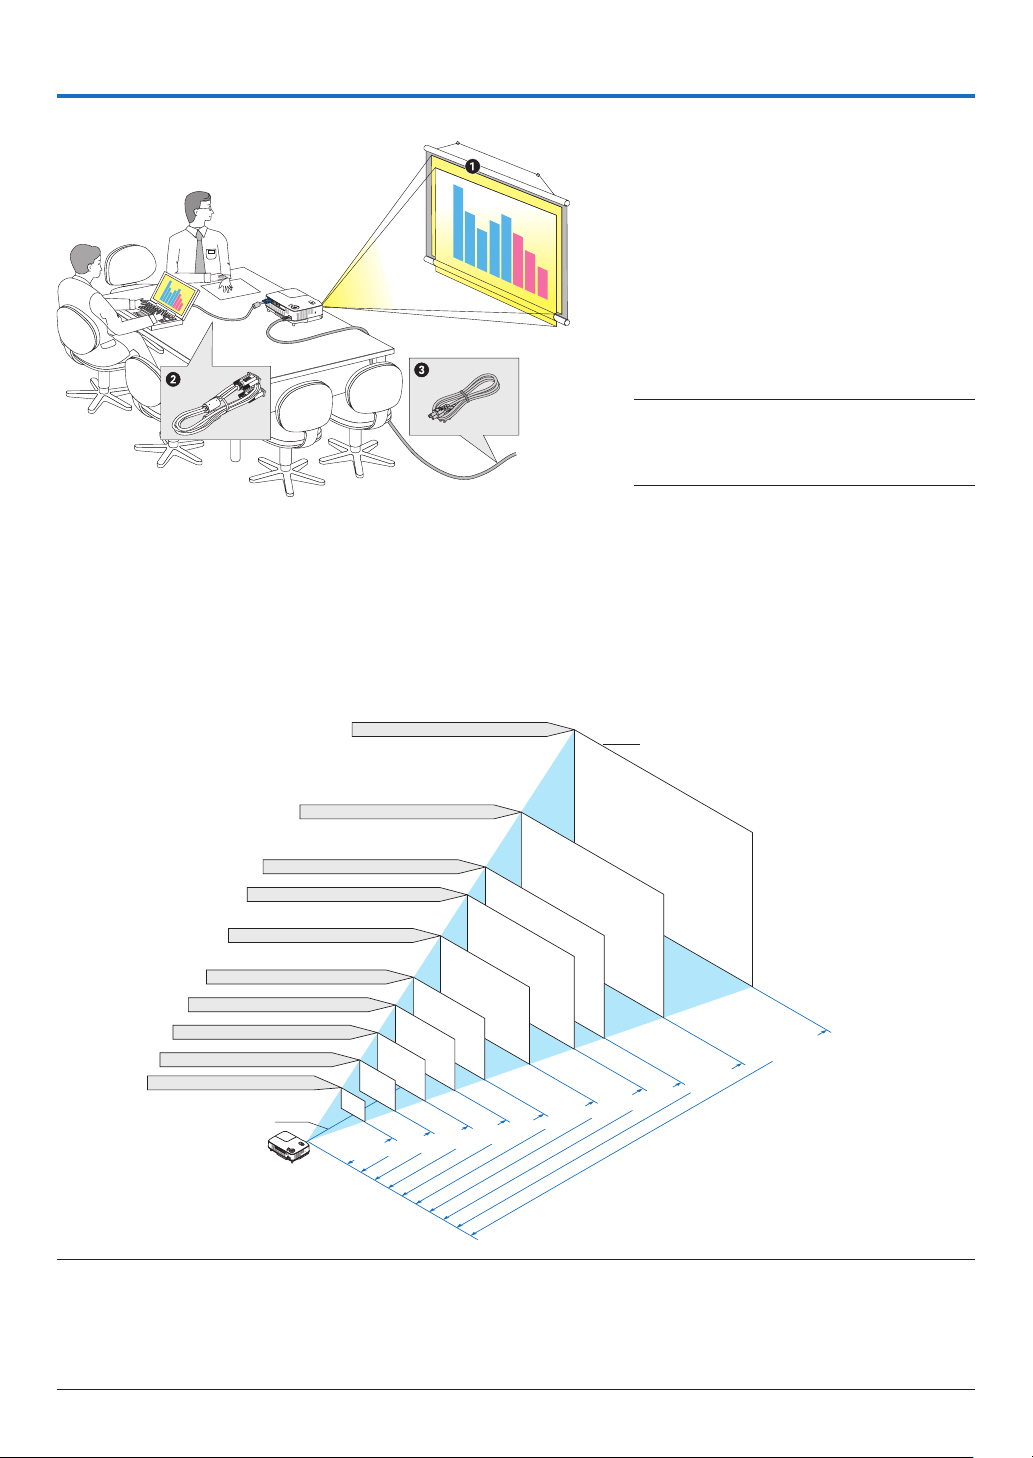
➊
Setting Up the Screen and the Projector
Selectng a Locaton
Thefurtheryourprojectorisfromthescreenorwall,thelargertheimage.Theminimumsizetheimagecanbeis
33"(0.84m)measureddiagonallywhentheprojectorisroughly57inches(1.44m)fromthewallorscreen.The
largesttheimagecanbeis300"(7.6m)whentheprojectorisabout484inches(12.3m)fromthewallorscreen.
Usethechartbelowasaroughguide.
Yourprojectorissimpletosetupanduse.
Butbeforeyougetstarted,youmustrst:
➊
Setupascreenandtheprojector.
➋
Connectyourcomputerorvideo
equipmenttotheprojector.Seepages
12,13,14.
➌
Connectthesuppliedpowercable.
Seepage
15.
NOTE: Ensure that the power cable and any oth-
er cables are disconnected before moving the
projector. When moving the projector or when
it is not in use, cover the lens with the lens cap.
D
istance (U
nit:
m
/inch)
Lens center
Screen Size (diagonal: inch)
Screen Size (Unit: cm/inch)
609.6(W)×457.2(H) / 240(W)×180(H)
487.7(W)×365.8(H) / 192(W)×144(H)
406.4(W)×304.8(H) / 160(W)×120(H)
365.8(W)×274.3(H) / 144(W)×108(H)
304.8(W)×228.6(H) / 120(W)×90(H)
243.8(W)×182.9(H) / 96(W)×72(H)
203.2(W)×152.4(H) / 80(W)×60(H)
162.6(W)×121.9(H) / 64(W)×48(H)
121.9(W)×91.4(H) / 48(W)×36(H)
81.3(W)×61.0(H) / 32(W)×24(H)
300"
240"
200"
180"
150"
120"
100"
60"
40"
80"
12.3/484.3
9.8/385.8
8.2/322.8
7.4/291.3
6.1/240.2
4.9/192.9
4.1/161.4
3.3/129.9
2.4/94.5
1.6/63.0
NOTE:
• The distances are indicated by intermediate values between tele and wide. Use as a rule of thumb.
• The Zoom lever adjusts the image size up to +/-10%
• For more details on throw distance, see next page.
• Changing the image size starts the AUTO FOCUS to adjust the focus; changing the throw angle starts the Auto Keystone to
correct the vertical keystone distortion.
To the wall outlet.
0
. Installaton and Connectons
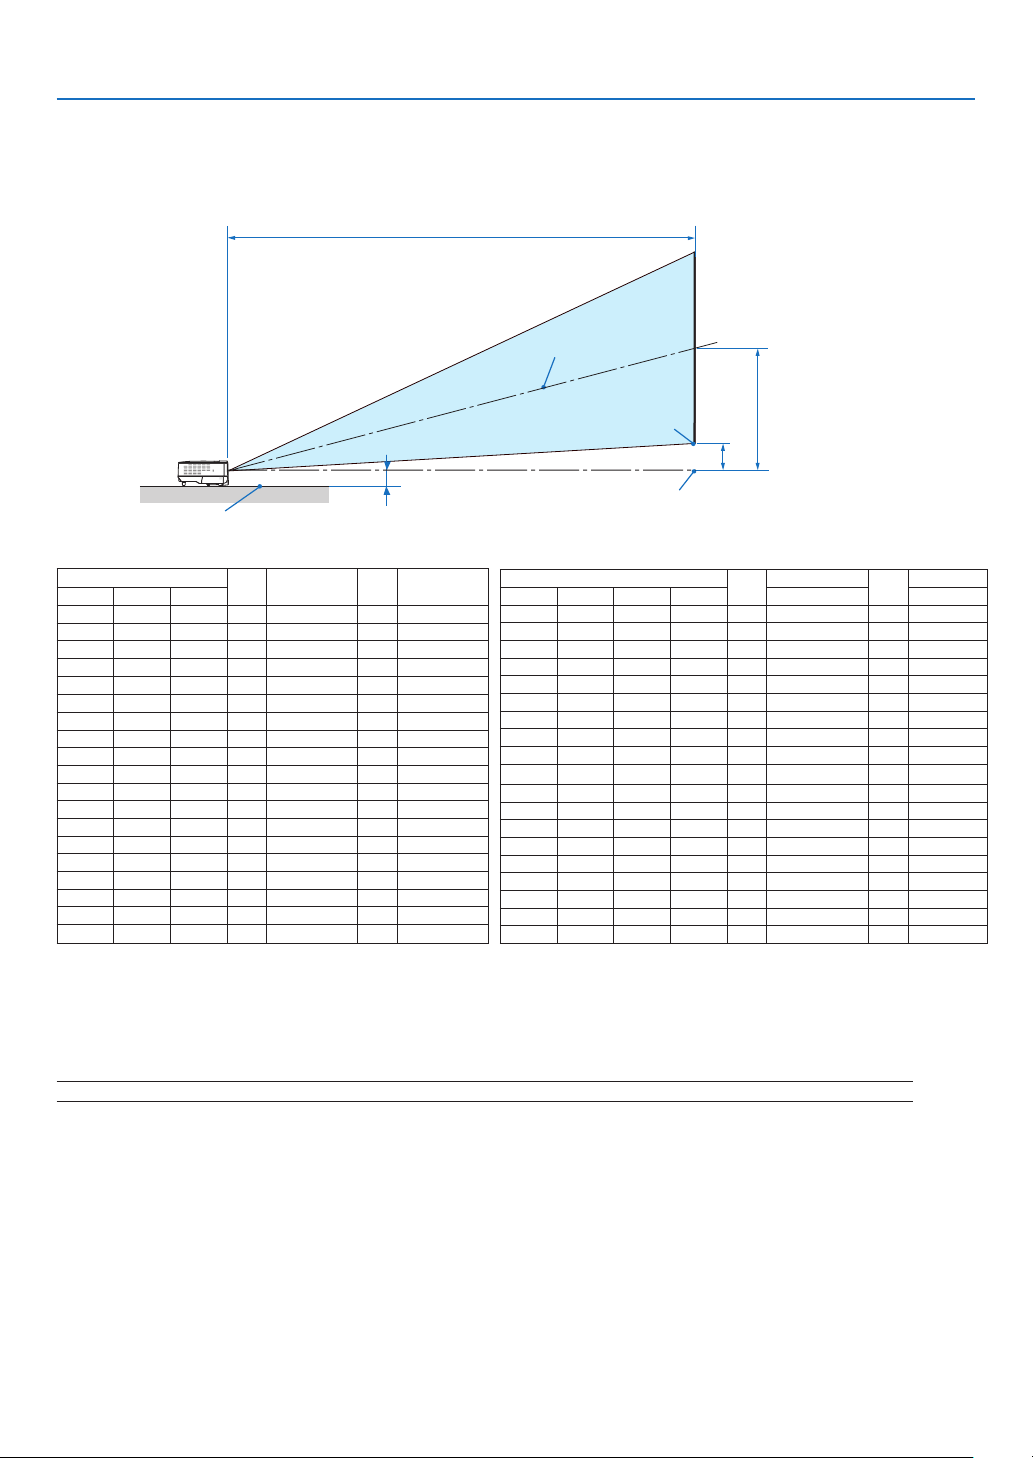
Throw Dstance and Screen Sze
Thefollowingshowstheproperrelativepositionsoftheprojectorandscreen.Refertothetabletodeterminethe
positionofinstallation.
Dstance Chart
C
D
B
Screen center
Lens center
Screen bottom
2.28"/58 mm
Projector bottom
ScreenSize
B
C
D
α
DiagonalWidthHeightwide-telewide-tele
inchinchinchinchinchinchdegree
33262013
-573-12.6
4032241557
-69315.0-12.5
6048362387
-105514.9-12.4
6754402697-117614.9-12.4
72584328104
-126614.9-12.4
80644831116
-140714.8-12.3
84675032122
-147714.8-12.3
90725435130
-158814.8-12.3
100806038145
-176814.8-12.3
120967246174
-2111014.8-12.3
1501209058219
-2641314.7-12.3
18014410869263
-3171514.7-12.3
20016012077292
-3531714.7-12.3
22017613284321
-3881814.7-12.3
24019214492351
-4232014.7-12.3
260208156100380
-4592214.7-12.3
280224168107409
-4942314.7-12.3
300240180115439
-5302514.7-12.3
ScreenSize
B
C
D
α
DiagonalDiagonalWidthHeightwide-telewide-tele
inchmmmmmmmmmmmmdegree
33838671503321
-144070-12.6
4010168136103901450
-17608515.0-12.5
60152412199145842200
-266012714.9-12.4
671702136110216532460
-297014214.9-12.4
721829146310977012640
-320015314.9-12.4
802032162612197792940
-356016914.8-12.3
842134170712808183090
-374017814.8-12.3
902286182913728773310
-401019114.8-12.3
1002540203215249743690-446021214.8-12.3
12030482438182911694430-536025414.8-12.3
15038103048228614615550
-671031814.7-12.3
18045723658274317536670
-806038114.7-12.3
20050804064304819487420
-896042414.7-12.3
22055884470335321438160
-985046614.7-12.3
24060964877365823378910
-1075050814.7-12.3
26066045283396225329650
-1165055114.7-12.3
280711256904267272710400
-1255059314.7-12.3
300762060964572292211140
-1345063614.7-12.3
B=Verticaldistancebetweenlenscenterandscreencenter
C=Throwdistance
D=Verticaldistancebetweenlenscenterandbottomofscreen(topofscreenforceilingapplication)
α=Throwangle
NOTE: The values in the tables are design values and may vary.

. Installaton and Connectons
WARNING
*Installingyourprojectorontheceilingmustbedone
byaqualiedtechnician.ContactyourNECdealer
formoreinformation.
*Donotattempttoinstalltheprojectoryourself.
•Onlyuseyourprojectoronasolid,levelsurface.If
theprojectorfallstotheground,youcanbeinjured
andtheprojectorseverelydamaged.
•Donotusetheprojectorwheretemperaturesvary
greatly.Theprojectormustbeusedattemperatures
between41˚F(5˚C)and104˚F(40˚C).([ECO]mode
selectedautomaticallyat95°Fto104°F/35°Cto40°C.
Notethat[ECO]modewillbeselectedautomatically
at86°Fto104°F/30°Cto40°Cwhenusedin[HIGH
ALTITUDE].)
•Donotexposetheprojectortomoisture,dust,or
smoke.Thiswillharmthescreenimage.
•Ensurethatyouhaveadequateventilationaround
yourprojectorsoheatcandissipate.Donotcover
theventsonthesideorthefrontoftheprojector.
Reectng the Image
Usingamirrortoreflectyourprojector'simageen-
ablesyoutoenjoyamuchlargerimagewhena
smallerspaceisrequired.ContactyourNECdealerif
youneedamirrorsystem.Ifyou'reusingamirrorsys-
temandyourimageisinverted,usetheMENUand
SELECTbuttonsonyourprojectorcabinetoryour
remotecontroltocorrecttheorientation.(→page
62)
. Installaton and Connectons
VIDEO IN
COMPUTER IN
PC CONTROL
AC IN
AUDIO IN
S-VIDEO IN
COMPUTER IN
PHONE
PHONE
AUDIO IN
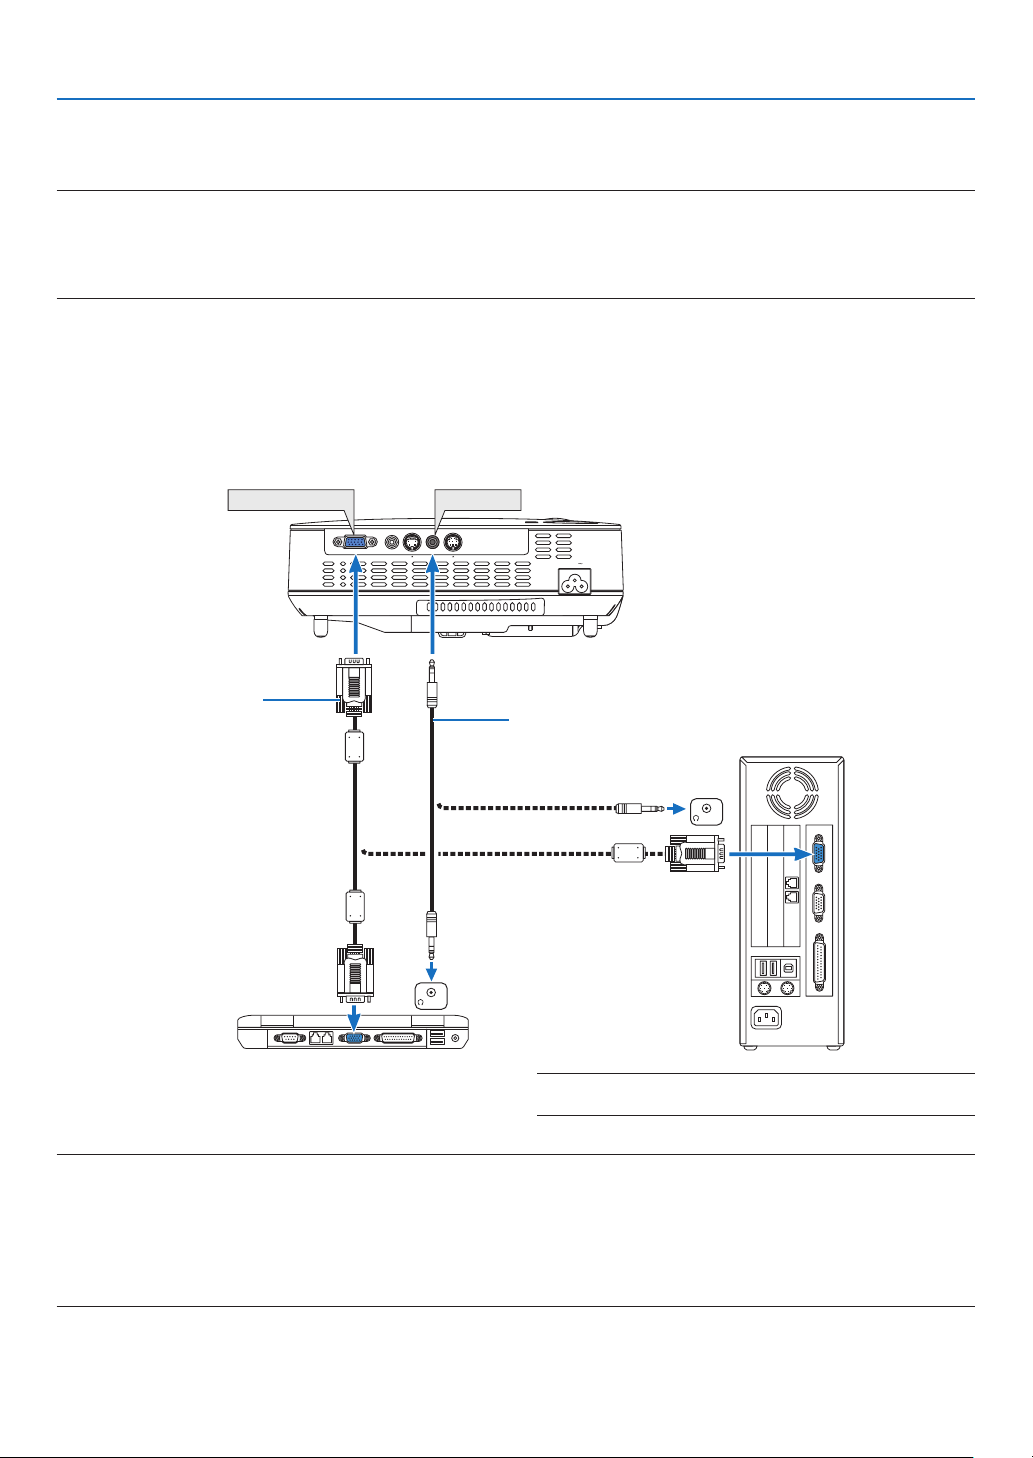
➋
Making Connections
Connectng Your PC or Macntosh Computer
NOTE: When using with a notebook PC, be sure to connect the projector and notebook PC while the projector is in standby mode and
before turning on the power to the notebook PC.
In most cases the output signal from the notebook PC is not turned on unless connected to the projector before being powered up.
* If the screen goes blank while using your remote control, it may be the result of the computer's screen-saver or power man
-
agement software.
Enablng the computer’s external dsplay
DisplayinganimageonthenotebookPC’sscreendoesnotnecessarilymeanitoutputsasignaltotheprojector.
WhenusingaPCcompatiblelaptop,acombinationoffunctionkeyswillenable/disabletheexternaldisplay.
Usually,thecombinationofthe‘Fn”keyalongwithoneofthe12functionkeysgetstheexternaldisplaytocome
onoroff.Forexample,NEClaptopsuseFn+F3,whileDelllaptopsuseFn+F8keycombinationstotoggle
throughexternaldisplayselections.
VGA signal cable (supplied)
To mini D-Sub 15-pin connector on
the projector. It is recommended
that you use a commercially avail-
able distribution amplifier if con-
necting a signal cable longer than
the cable supplied.
IBM VGA or Compatibles (Notebook
type) or Macintosh (Notebook type)
NOTE: An image may not be displayed correctly when a Video or S-Video source is played back via a commercially available
scan converter.
This is because the projector will process a video signal as a computer signal at the default setting. In that case, do the follow-
ing.
• When an image is displayed with the lower and upper black portion of the screen or a dark image is not displayed correctly:
Project an image to fill the screen and then press the AUTO ADJ. button on the remote control or the projector cabinet.
• The COMPUTER IN connector supports Plug & Play (DDC2B).
NOTE: For older Macintosh, use a commercially available pin
adapter (not supplied) to connect to your Mac's video port.
Stereo mini-plug audio cable (not supplied)
3
. Installaton and Connectons
AUDIO IN
L R
AUDIO OUT
L R
Component
Y Cb Cr
VIDEO IN
COMPUTER IN
PC CONTROL
AC IN
AUDIO IN
S-VIDEO IN
COMPUTER IN AUDIO IN
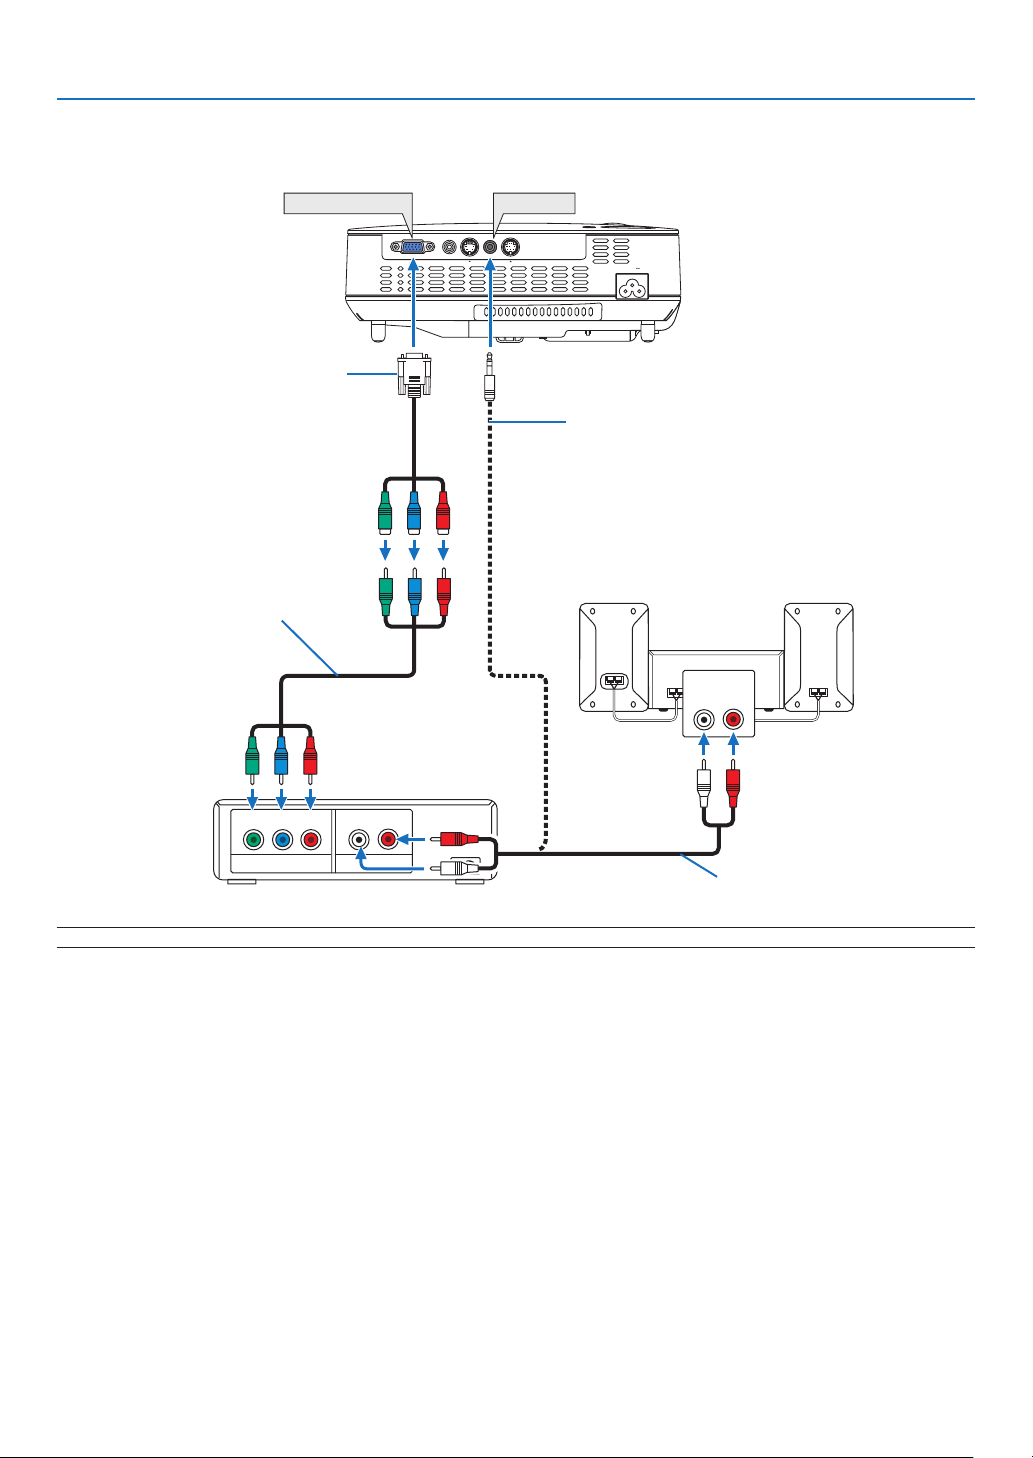
NOTE: Refer to your DVD player's owner's manual for more information about your DVD player's video output requirements.
Connectng Your DVD Player wth Component Output
DVD player
Audio Equipment
Optional 15-pin - to - RCA (female)
×3 cable (ADP-CV1E)
Component video RCA×3 cable
(not supplied)
Audio cable (not supplied)
Stereo mini plug - to - RCA audio cable
(not supplied)
. Installaton and Connectons
AUDIO IN
L R
AUDIO OUT
L R
VIDEO OUT
S-VIDEOVIDEO
VIDEO IN
COMPUTER IN
PC CONTROL
AC IN
AUDIO IN
S-VIDEO IN
VIDEO IN
S-VIDEO IN
AUDIO IN
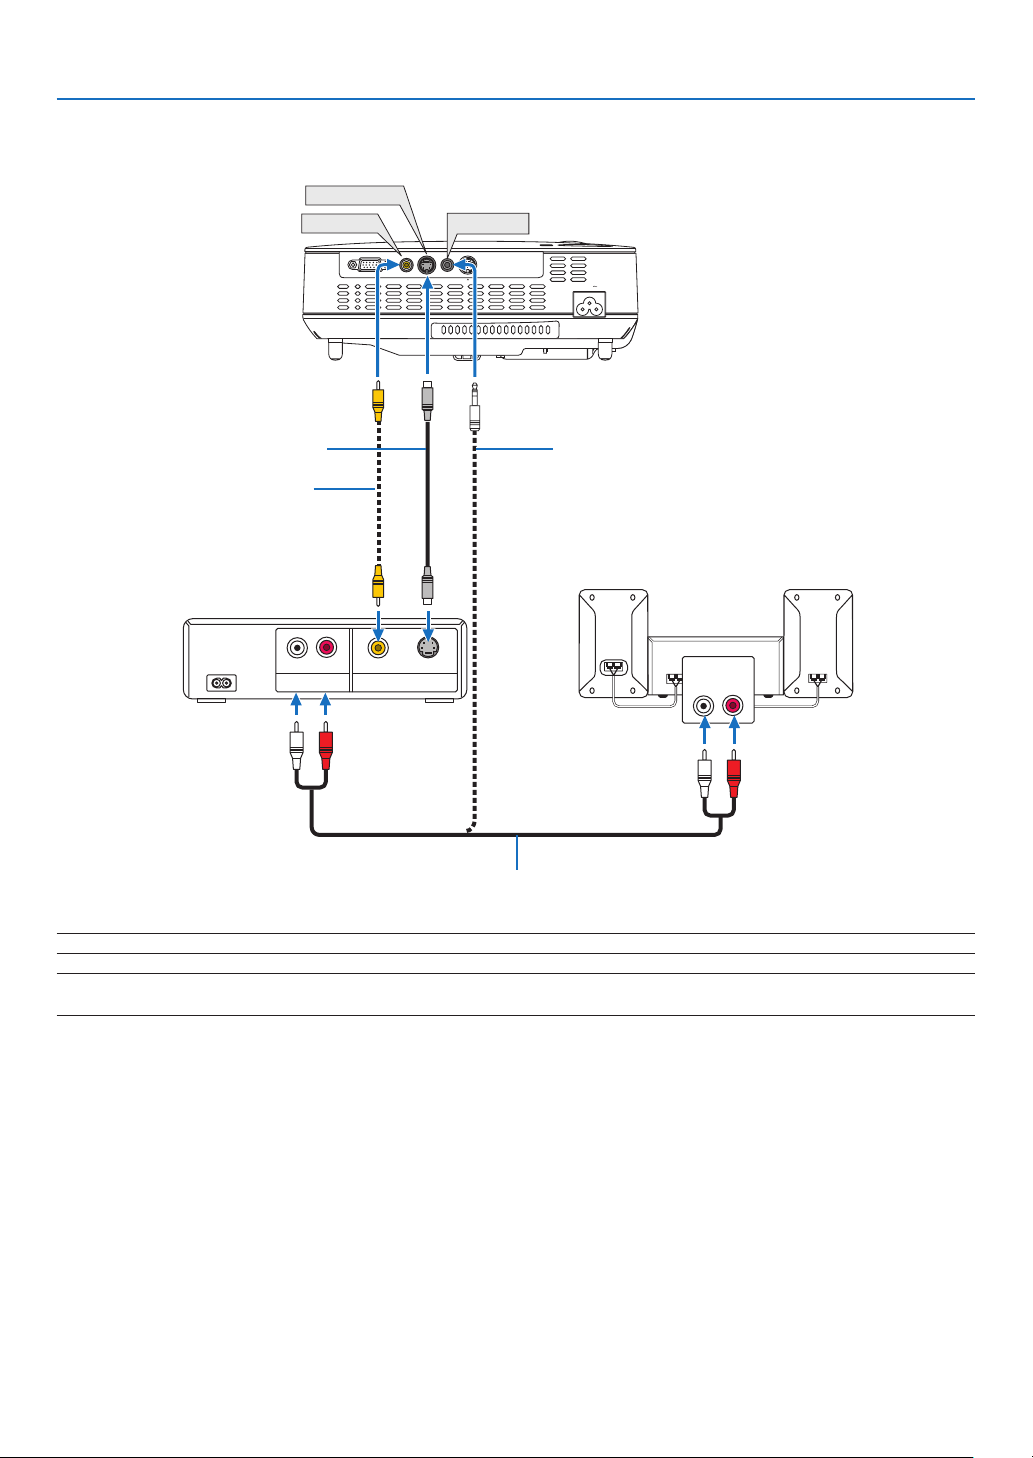
Connectng Your VCR
S-Video cable (not supplied)
Video cable (not supplied)
VCR
Audio equipment
Audio cable (not supplied)
NOTE: Refer to your VCR owner's manual for more information about your equipment's video output requirements.
NOTE: An image may not be displayed correctly when a Video or S-Video source is played back in fast-forward or fast-rewind via
a scan converter.
Stereo mini plug - to - RCA audio cable
(not supplied)
. Installaton and Connectons
LAMP
STATUS
POWER
SOURCE
AUTO
ADJ.
SELE
C
T
O
N
/S
TA
ND
B
Y
F
O
C
U
S
VIDEO IN
C
O
M
P
U
TE
R
IN
PC
C
ON
TRO
L
AUDIO IN
S-VIDEO IN
ON/STAND BY
FOCUS
LAMP
STATUS
POWER
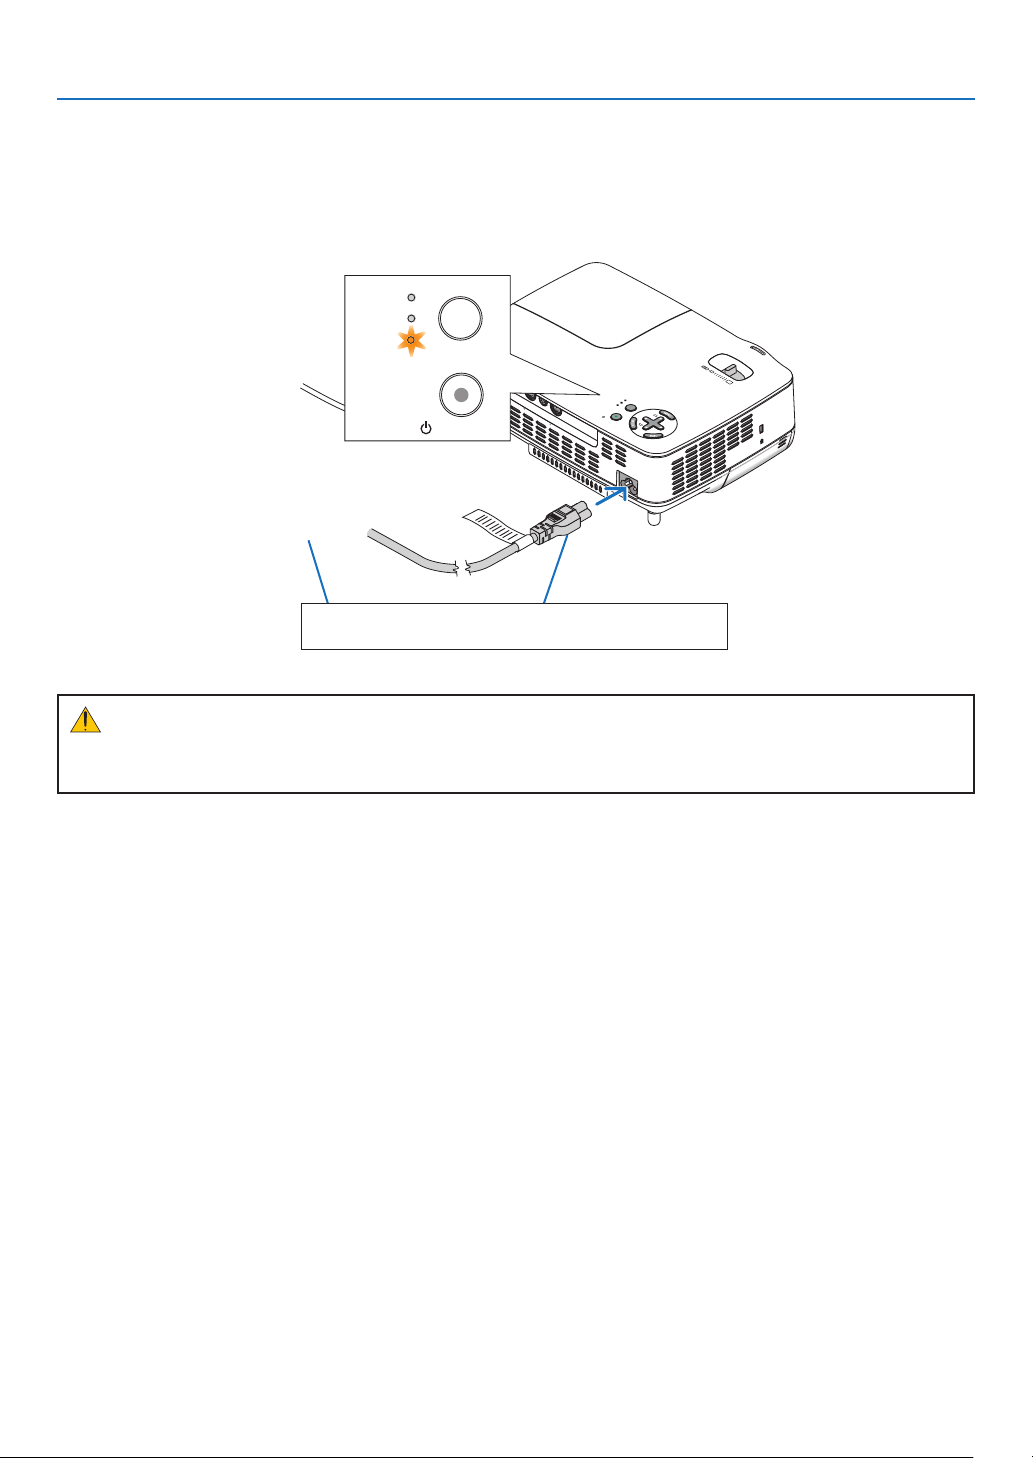
Connectng the Suppled Power Cable
Connectthesuppliedpowercabletotheprojector.
Firstconnectthesuppliedpowercable'sthree-pinplugtotheACINoftheprojector,andthenconnecttheother
plugofthesuppliedpowercableinthewalloutlet.
To wall outlet
Theprojectorwillgointoitsstand-
bymodeandthePOWERindica-
torwillgloworange.
CAUTION:
Donottrytotouchtheventilationoutletontherightfront(whenseenfromthefront)asitcanbecomeheated
whiletheprojectoristurnedonandimmediatelyaftertheprojectoristurnedoff.
Make sure that the prongs are fully inserted into both
the power plug and the wall outlet.
AUTO
ADJ.
ON/STAND BY
FOCUS
LAMP
STATUS
POWER
SELECT
3. Projecting an Image (Basic Operation)
Thissectiondescribeshowtoturnontheprojectorandtoprojectapictureontothescreen.
➊
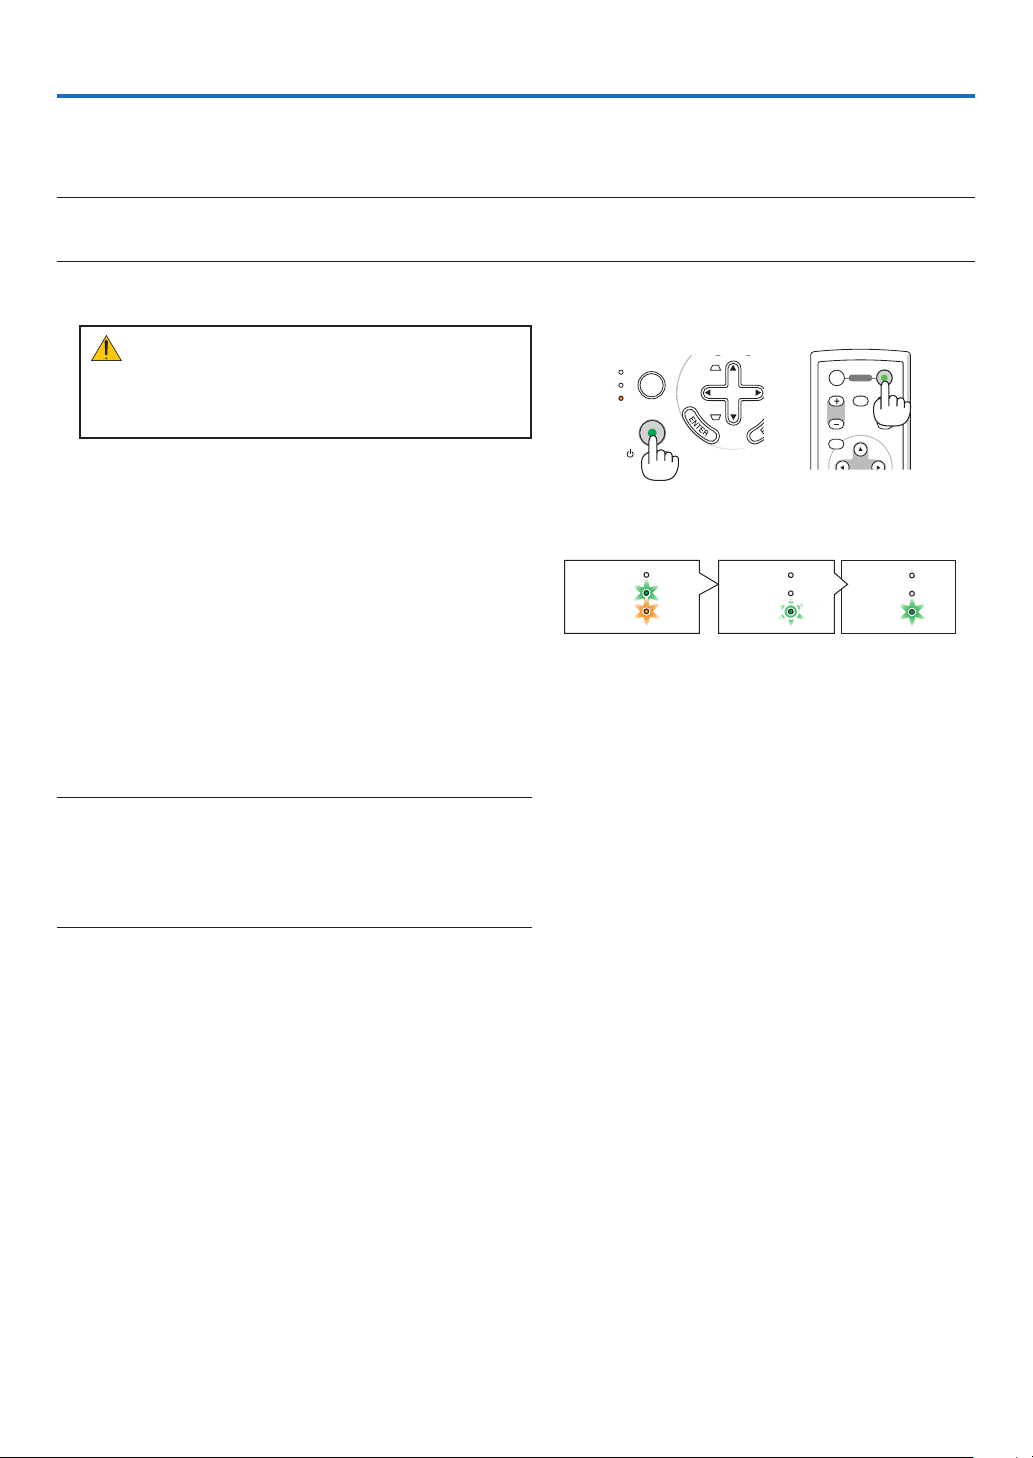
Turning on the Projector
NOTE: Before turning on the projector, first connect the supplied power cable's three-pin plug to the AC IN of the projector, and
then connect the other plug of the supplied power cable in the wall outlet. Make sure that the projector is in its standby mode
and the power indicator is glowing orange.
STATUS
LAMP
POWER
STATUS
LAMP
POWER
STATUS
LAMP
POWER
StandbyBlinkingPower On
Steady green/
orange light
Blinking green
light
Steady green
light
Seepage
76formoredetails.
MENU
UP
PAGE
OFF
POWER
ON
DOWN
MAGNIFY AV-MUTE
CAUTION:
Donotremovethelenscapbypullingonthestring.
Doingsocancausemechanicaldamagetothepart
aroundthelens.
The POWER indicator will turn to green and the projec
-
tor will become ready to use.
TIP:
* Turning on the projector will instantly cause the
AUTO FOCUS function to operate. (→ page
22)
* When the message "CONTROL PANEL LOCK IS TURNED
ON" is displayed, it means that the [CONTROL PANEL LOCK]
is turned on. (→ page
62)
After you turn on your projector, ensure that the com
-
puter or video source is turned on and that your lens
cap is removed.
NOTE: When no signal is available, the NEC logo (default), blue,
or black screen will be displayed. When the projector displays the
NEC logo, a blue or black screen, the projector will automatically
switch to the [ECO] mode.
The projector will return to the [NORMAL] mode once a signal
connected.
7
3. Projectng an Image (Basc Operaton)
SOURCE
AUTO
ADJ.
ON/STAND BY
FOCUS
LAMP
STATUS
POWER
SELECT
SOURCE
AUTO
ADJ.
ON/STAND BY
FOCUS
LAMP
STATUS
POWER
SELECT
EXIT
MENU
UP
PAGE
OFF
POWER
ON
DOWN
ENTER
MAGNIFY AV-MUTE
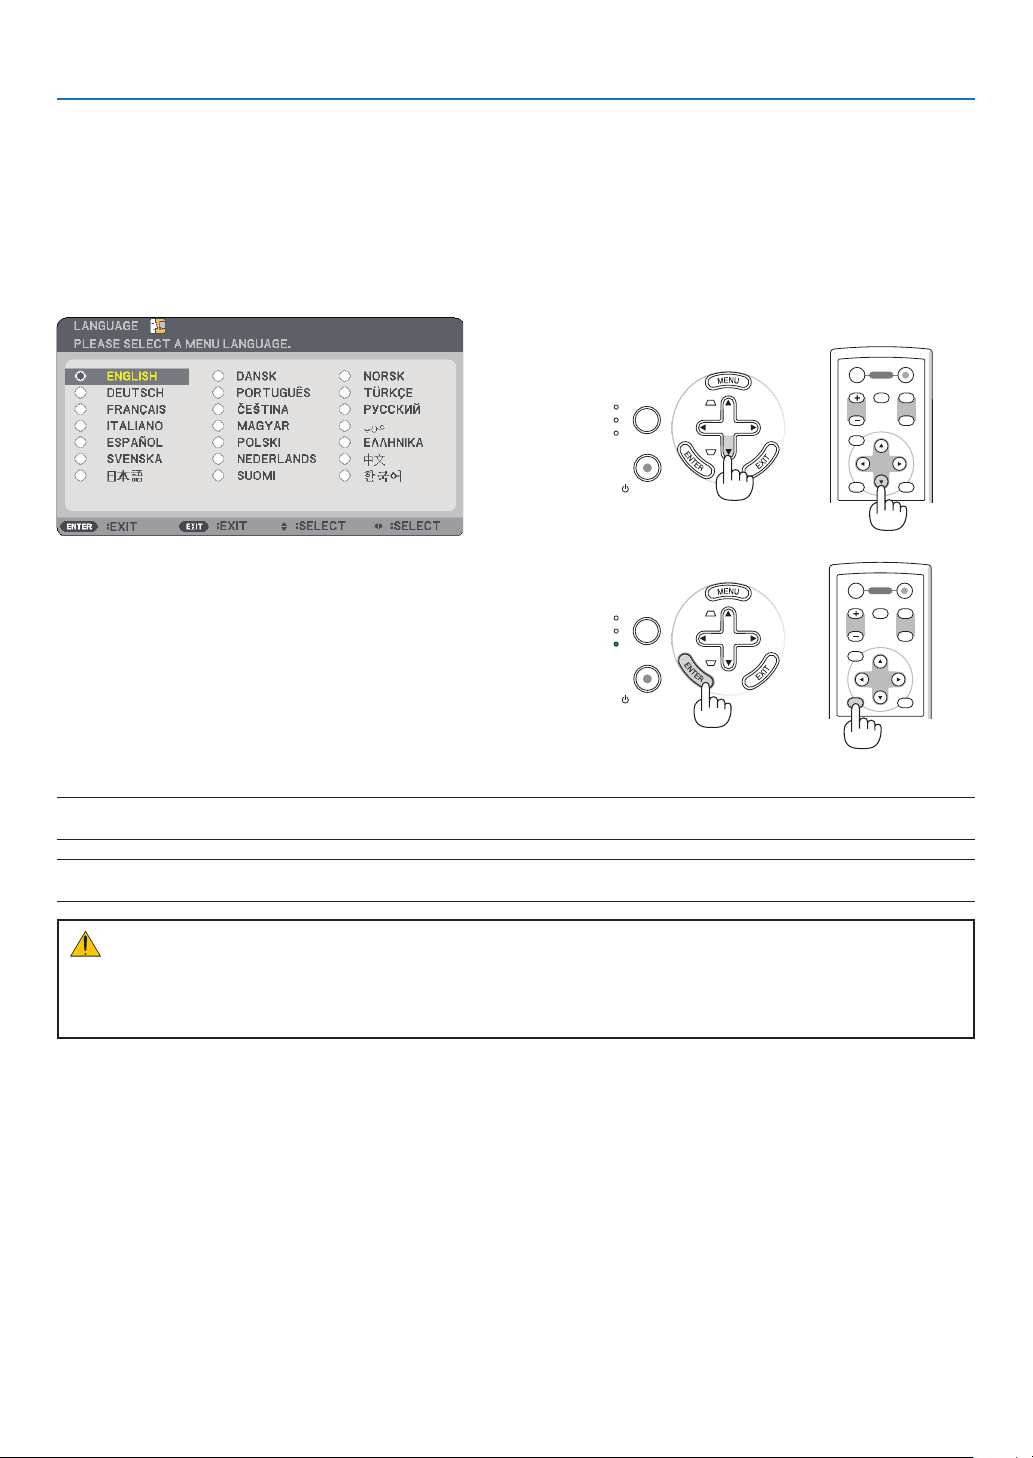
Note on Startup screen (Menu Language Select screen)
Whenyourstturnontheprojector,youwillgettheStartupmenu.Themenugivesyoutheopportunitytoselect
themenuinoneofthe21languages.
To select a menu language, follow these steps:
▲
,
▼
,
◀▶
Afterthishasbeendone,youcanproceedtothemenuop
-
eration.
Ifyouwant,youcanselectthemenulanguagelater.(→[LAN-
GUAGE]onpage
61)
NOTE: Immediately after turning on the projector, screen flicker may occur. This is normal. Wait 3 to 5 minutes until the lamp
lighting is stabilized.
NOTE: If you turn on the projector immediately after the lamp is turned off or when the temperature is high, the fans run without
displaying an image for some time and then the projector will display the image.
CAUTION:
TheprojectorcannotbeturnedoffwhilethePOWERindicatorisblinkinggreen.
•DonotturnofftheACpowerduringthisperiod.
Doingsocouldcauseprematurelampfailure.
Whenthe[LAMPMODE]issetto[ECO],theLAMPindicatorwilllightgreen.
Ifoneofthefollowingthingshappens,theprojectorwillnotturnon.
•Iftheinternaltemperatureoftheprojectoristoohigh,theprojectordetectsabnormalhightemperature.Inthis
conditiontheprojectorwillnotturnontoprotecttheinternalsystem.Ifthishappens,waitfortheprojector'sin
-
ternalcomponentstocooldown.
•Whenthelampreachesitsendofusablelife,theprojectorwillnotturnon.Ifthishappens,replacethelamp.
•Ifthelampfailstolight,andiftheSTATUSindicatorashesonandoffinacycleofsixtimes,waitafullminute
andthenturnonthepower.
ENTER
EXIT
MENU
UP
PAGE
OFF
POWER
ON
DOWN
MAGNIFY AV-MUTE
8
3. Projectng an Image (Basc Operaton)
SELECT
SOURCE
AUTO
ADJ.
ON/STAND BY
FOCUS
LAMP
STATUS
POWER
➋
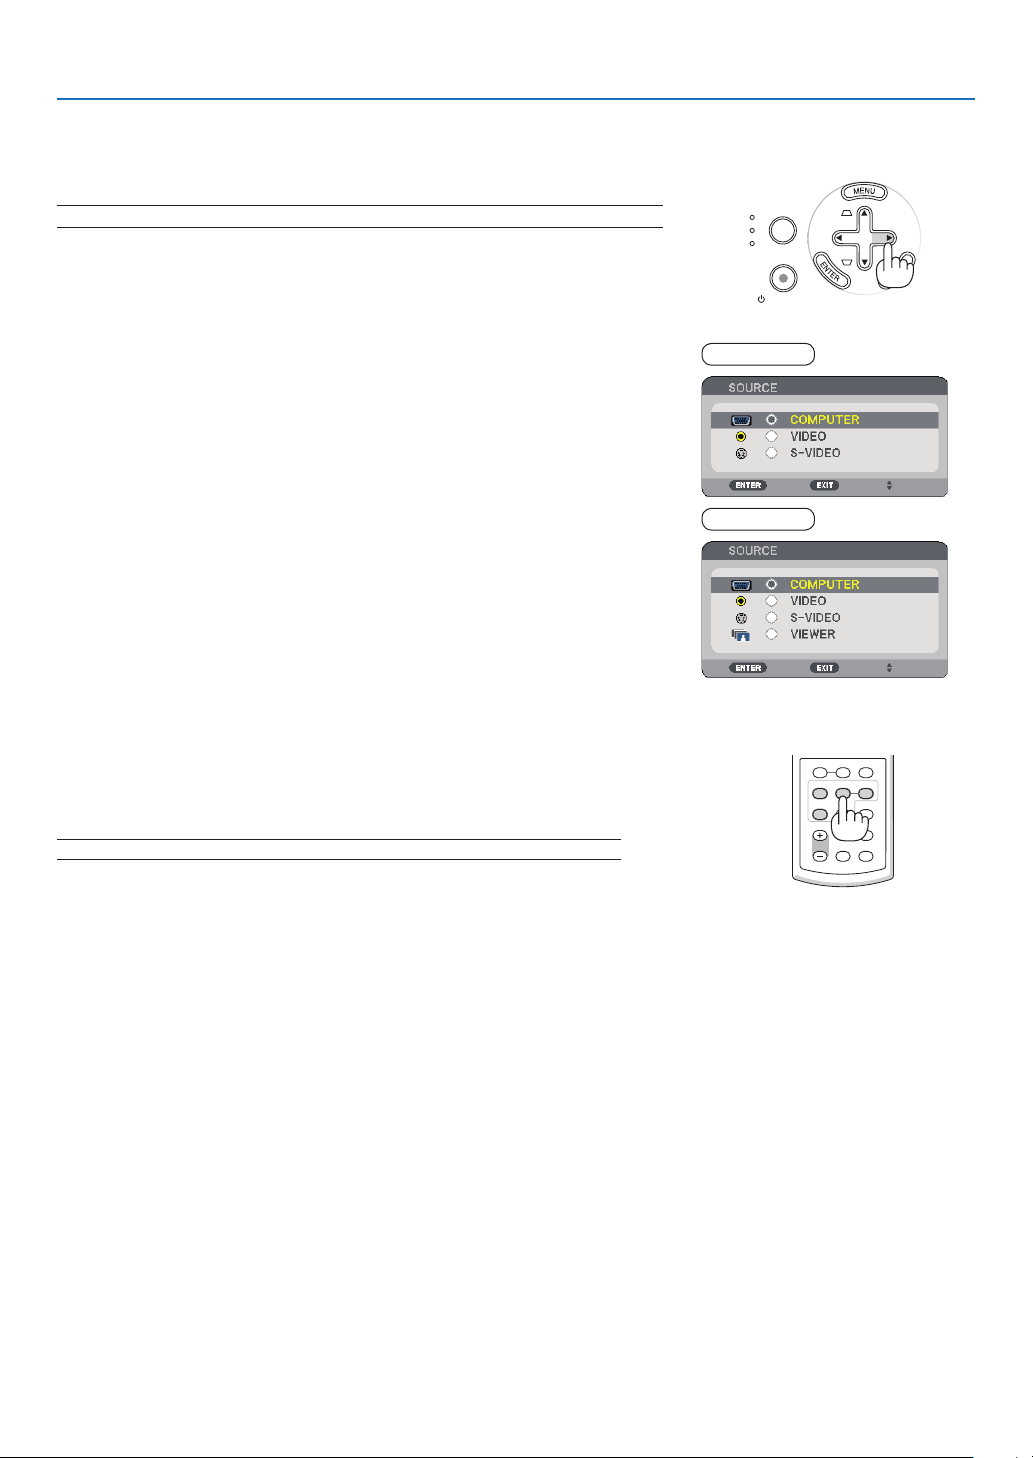
Selecting a Source
Selectng the computer or vdeo source
VOLUME ASPECT HELP
FOCUS
L
-
MOUSE
-
R
FREEZE
PICTURE
LAMP MODE
VIDEO
AUTO ADJ.COMPUTER
S-VIDEO VIEWER
NOTE: Turn on the computer or video source equipment connected to the projector.
Adjustng wth buttons on the cabnet
▶
The Source list will be displayed.
- When the menu is displayed, press the EXIT button to close the menu
and start the operation.
▶
Each time the SELECT
▶ button is pressed, each source name will be
highlighted in sequence.
- The selected signal will be displayed.
TIP: Detecting the Signal Automatically
Press and hold the SELECT ▶ button for a minimum of 2 seconds, the projector
will search for the next available input source.
Detecting the signal automatically is not available for the Viewer source on the
NP62 and NP52.
Usng the Remote Control
PressanyoneoftheVIDEO,S-VIDEO,COMPUTER,andVIEWER
buttons.
NOTE: The VIEWER button is not available on the NP61 and NP41.
NP61/NP41
NP62/NP52
9
3. Projectng an Image (Basc Operaton)
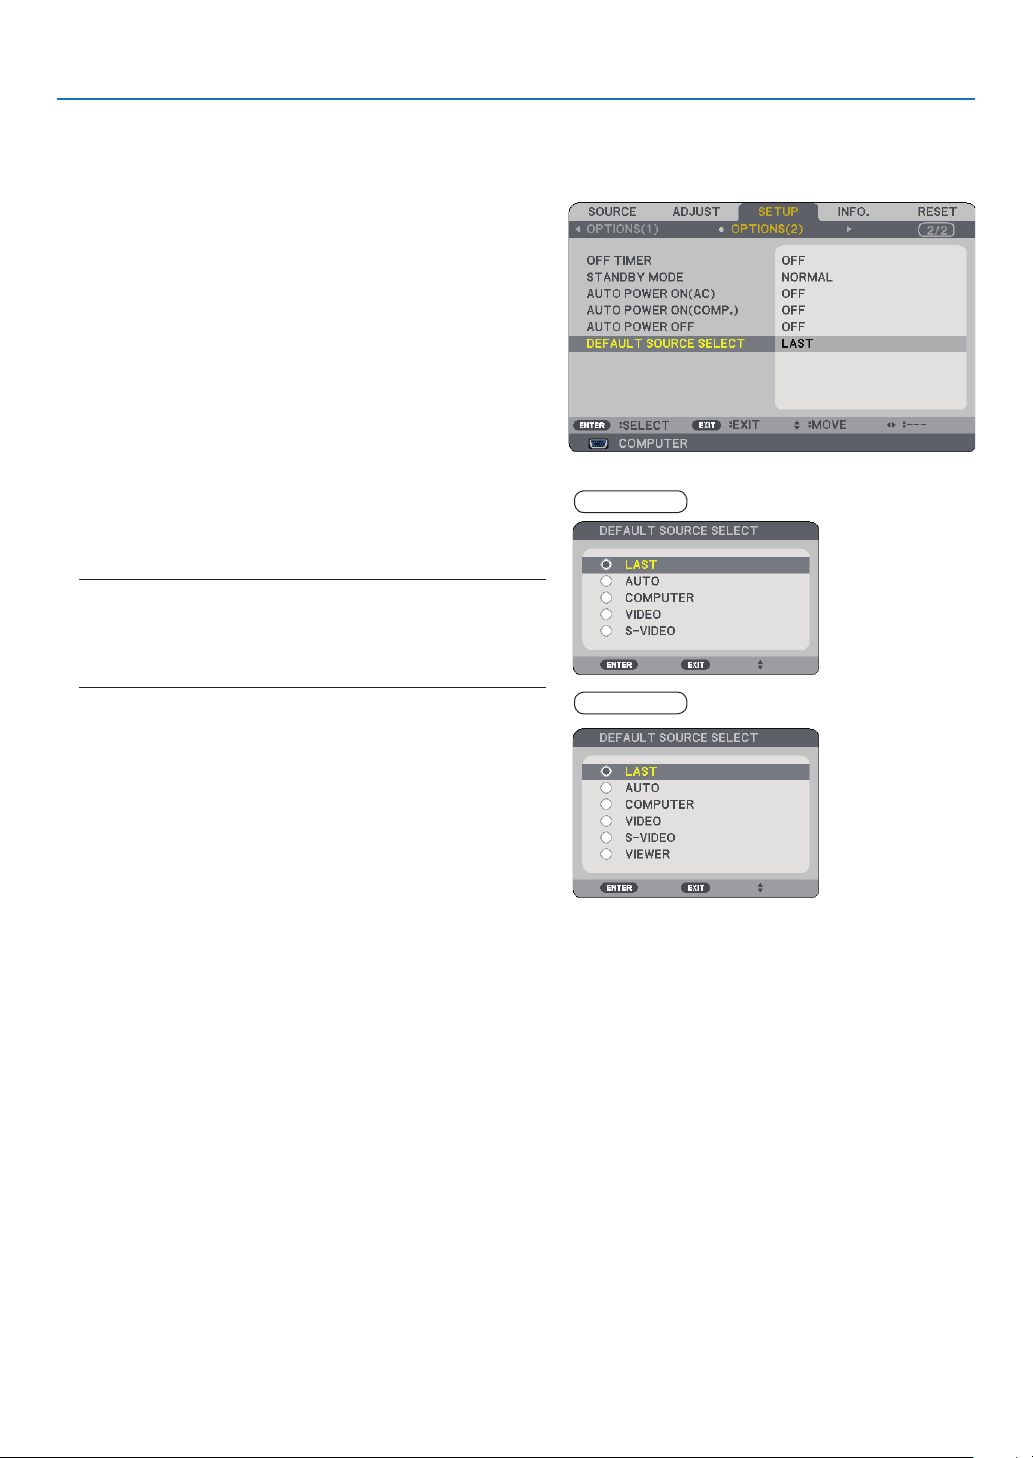
Selectng Default Source
Youcansetasourceasthedefaultsourcesothatthedefaultsourcewillbedisplayedeachtimetheprojectoris
turnedon.
The menu will be displayed.
▶
▼
▶
▼
The [DEFAULT SOURCE SELECT] screen will be dis
-
played.
(
→ page
67)
NOTE: To specify [VIEWER] as the default source on the NP62
or NP52, select [VIEWER] from the [DEFAULT SOURCE SELECT]
screen, and press the ENTER button because detecting the signal
automatically is not available for the Viewer source on the NP62
and NP52.
The source you selected in step 5 will be displayed.
TIP: When the projector is in Standby mode, applying an RGB signal
from a computer connected to the COMPUTER IN input will power
on the projector and simultaneously project the computer's image.
([AUTO POWER ON(COMP.)] → page
67)
NP61/NP41
NP62/NP52
0
3. Projectng an Image (Basc Operaton)
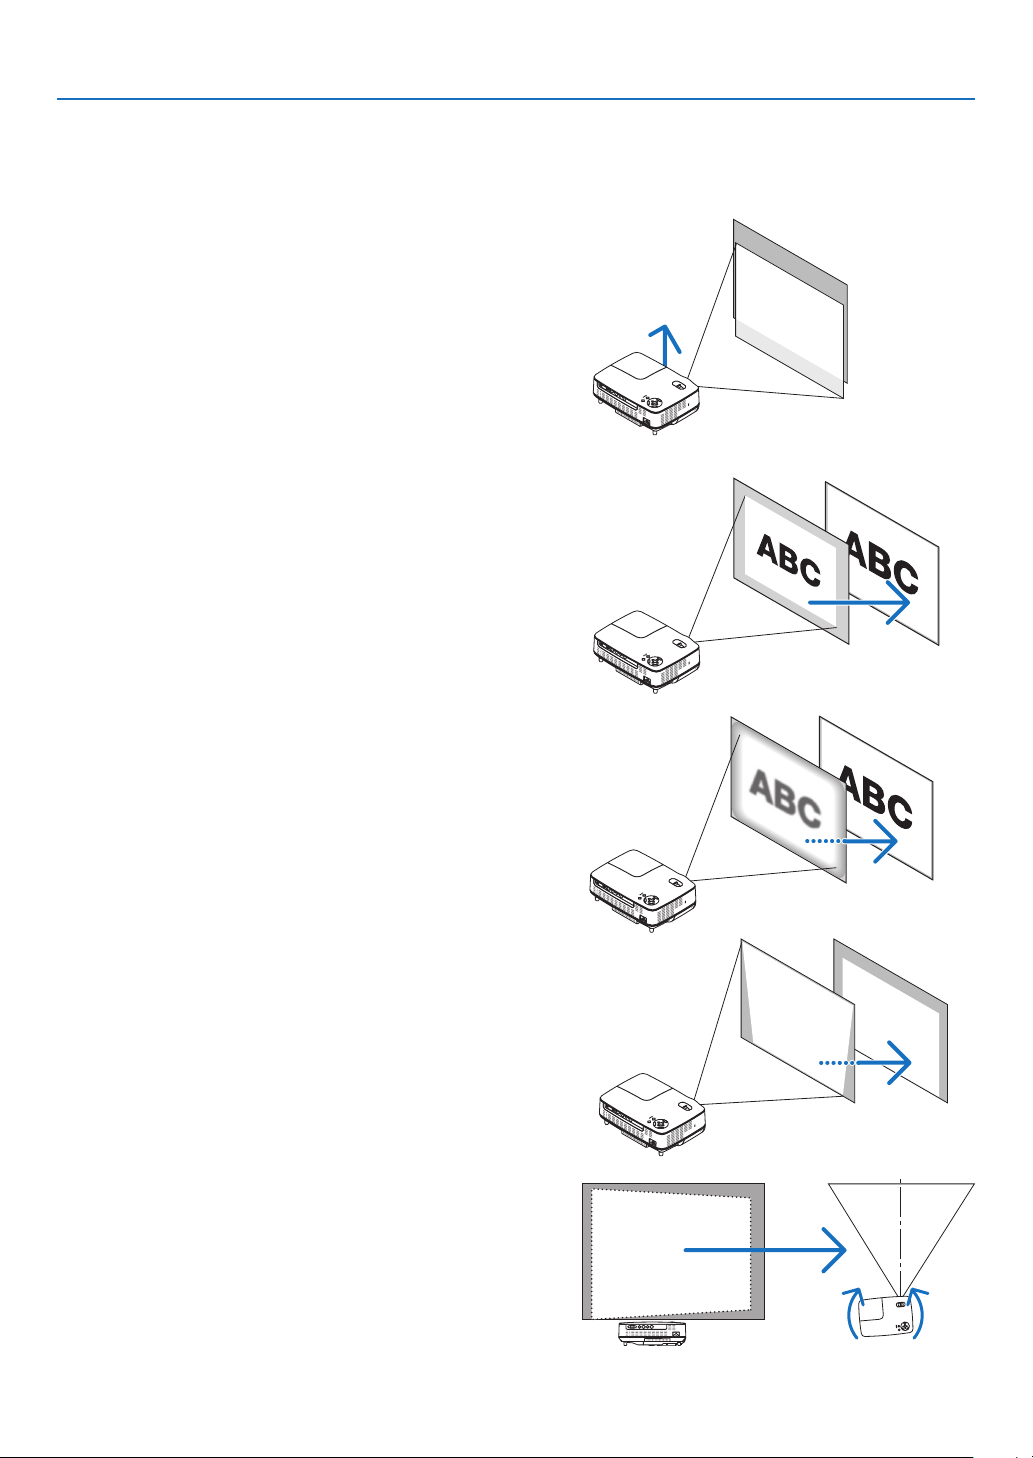
Manual Operaton
Placeyourprojectoronaatlevelsurfaceandensurethatthe
projectorissquaretothescreen.
[AdjusttheTiltFoot]
Liftthefrontedgeoftheprojectortocentertheimageverti-
cally.(→page
21)
[Zoom]
UsetheZOOMlevertoadjusttheimagesizeonthescreen.
➌
Adjusting the Picture Size and Position
Automatc Operaton
[AUTO FOCUS]
Justplacingtheprojectoronaatlevelsurfacemakesafo-
cusedimage.(→page
22)
TIP: If the projected image is distorted horizontally, move the projec-
tor left or right to center the image horizontally on the screen.
[AUTO KEYSTONE Correcton]
Adjustingtheheightofaprojectedimageorchangingthe
projectionanglewillresultintheAUTOKEYSTONEfunction
quicklycorrectingtheverticaldistortion.(
→page
23)
3. Projectng an Image (Basc Operaton)
LAMP
STATUS
POWER
O
N/STAND
BY
SOURCE
AUTO
ADJ.
SELECT
FOCUS
2
1
LAMP
STATUS
POWER
SOURCE
AU
TO
A
D
J.
SELECT
ON/STAND BY
FO
CUS
VI
DE
O
I
N
COMPUTER IN
PC CO
NTRO
L
A
U
D
IO
IN
S
-V
ID
E
O
IN
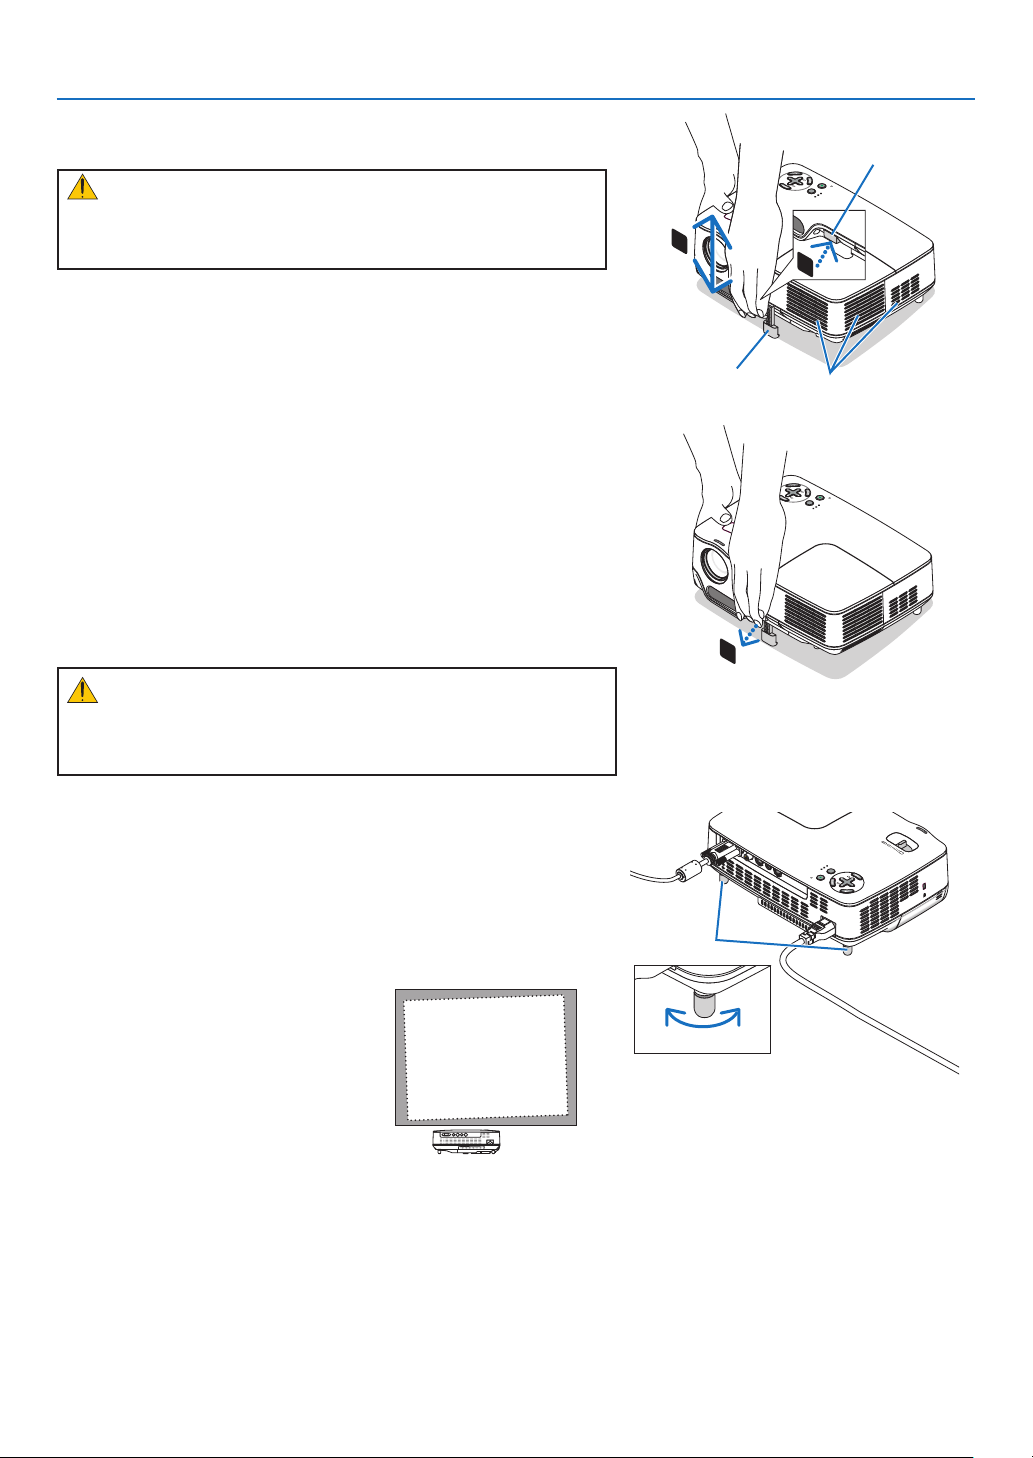
Adjust the Tlt Foot
CAUTION:
DonottrytotouchtheventilationoutletduringTiltFootadjust-
mentasitcanbecomeheatedwhiletheprojectoristurnedonand
duringitscooldownperiodafteritisturnedoff.
Adjusting the height of a projected image or changing the pro-
jection angle will result in the AUTO KEYSTONE function quickly
correcting the vertical distortion. (→ page
23)
The tilt foot can be extended up to 0.98 inch/25 mm.
There is approximately 10 degrees (up) of adjustment for the front
of the projector.
Adjustable Tilt Foot
Adjustable Tilt
Foot Button
Ventilation (outlet)
CAUTION:
Donotusethetilt-footforpurposesotherthanoriginallyintended.
Misusessuchasusingthetiltfoottocarryorhang(fromthewallor
ceiling)theprojectorcancausedamagetotheprojector.
The rear foot height can be adjusted up to 0.16 inch/4 mm (1 de
-
gree of angle).
Do not extend the rear foot over 0.16" (4 mm). Doing so will cause
the rear foot to come free off the bottom.
Rear foot
UpDown
LAMP
STATUS
POWER
O
N/S
TA
ND BY
SOURCE
AUTO
ADJ.
SELE
CT
FOCUS
3
3. Projectng an Image (Basc Operaton)
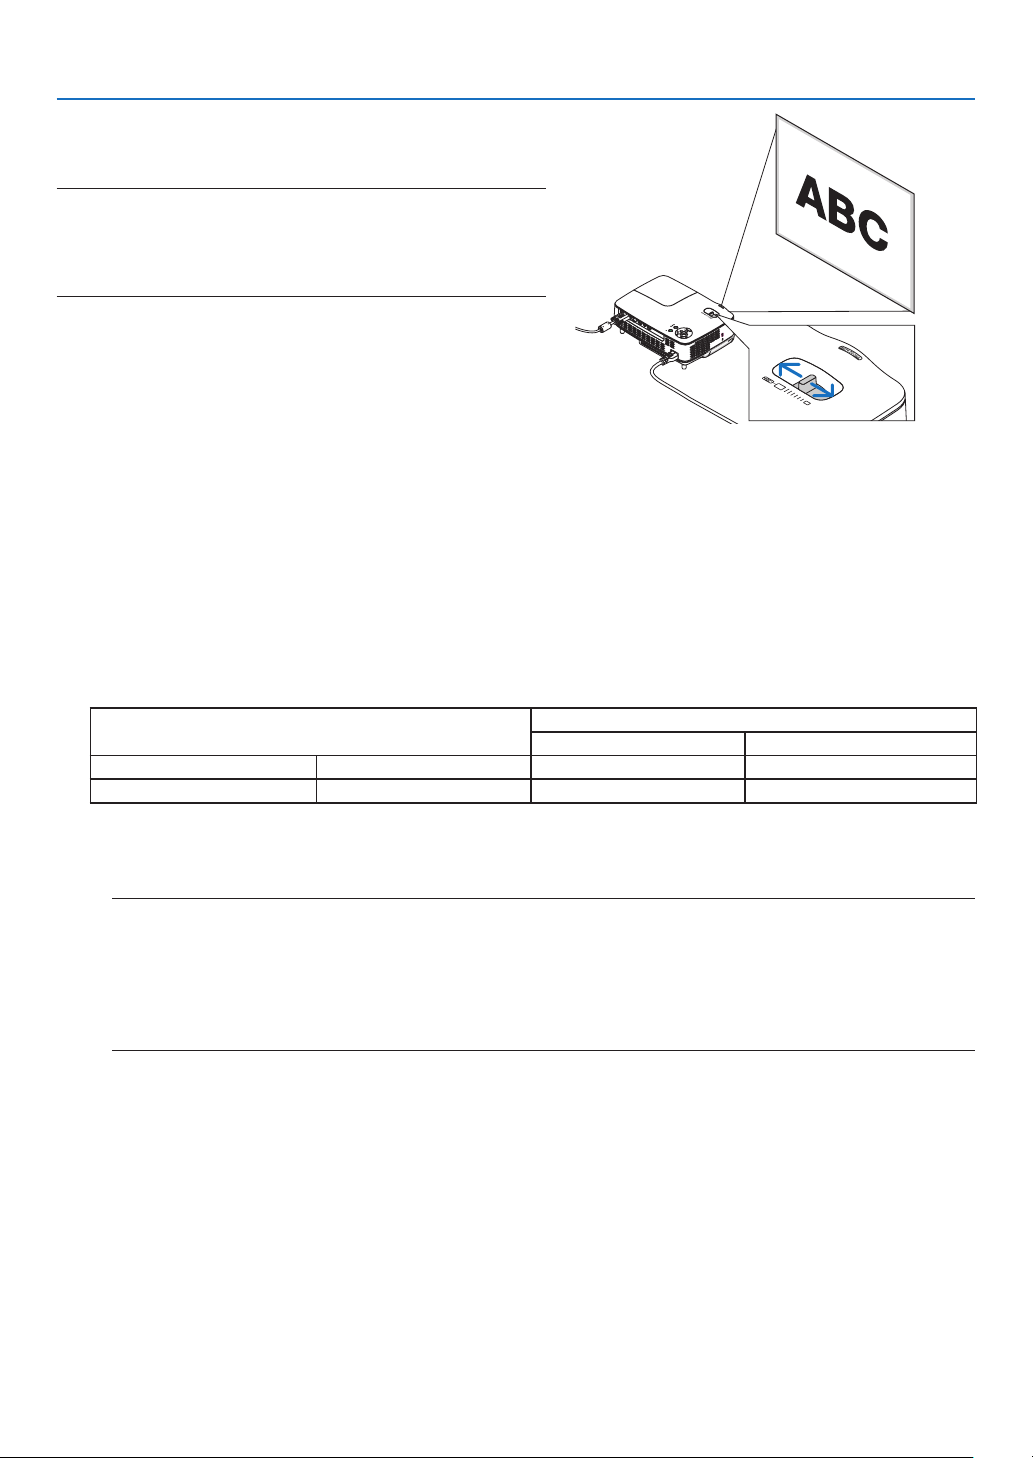
ZOOM
UsetheZOOMlevertoadjusttheimagesizeonthescreen.
NOTE: Rotating the ZOOM lever will cause the focus to be adjusted
automatically. For more detail, see "AUTO FOCUS" below.
• Moving the projector back and forth can change the image size
on the screen.
• Adjust the tilt foot if the image is distorted vertically.
AUTO FOCUS
Thefocussensorontheprojectordetectsthedistancetothescreenandautomaticallyadjuststhefocusofan
image.
•TheAUTOFOCUSfunctionwillworkwhenthefollowingtasksaredone:
-Turningonthepower
-Changingthezoomlever
-Repositioningtheprojector
-Changingtheprojectionangle
Effectve auto focus range for screen :3
ThrowdistanceImagesize(inch)
Tele(Zoomatmin.)Wide(Zoomatmax.)
Minimumdistance57.1"/1.5m
33"40"
Maximumdistance216.5"/5.5m123"149"
Whenthethrowdistanceisbeyond5.5m/216.5",itmeansthatthefocussensorwillnotworkcorrectlyand
thatyouneedtousetheFOCUSbuttontoadjustthefocusmanually.
NOTE: In some cases, the AUTO FOCUS may not work correctly or the AUTO FOCUS range can be made narrower, de-
pending on the environmental conditions.
The AUTO FOCUS function will not work under the following circumstances
• When using a transparent screen.
• When there are objects between the focus sensor of the projector and the screen.
• When moving the projector so slowly that the focus sensor cannot detect the distance to the screen.
• When moving the screen, not the projector, because the focus sensor cannot detect the distance to the screen
TIP: To turn off the AUTO FOCUS function, from the menu select [SETUP] → [OPTIONS(1)] → [AUTO FOCUS] and select [OFF].
LAMP
STATUS
POWE
R
SOURCE
AUTO
ADJ.
SELECT
O
N
/STA
N
D
BY
FO
C
US
VID
EO IN
COMPUTER IN
PC
C
O
NTRO
L
AUD
IO IN
S-VIDEO
IN

3
3. Projectng an Image (Basc Operaton)
AUTO KEYSTONE Correcton
TheAUTOKEYSTONEcorrectionfeaturewillcorrecttheverticaldistortionofaprojectedimageonthescreen.
Nospecialoperationrequired.Justplacetheprojectoronaatsurface.
NOTE: When using the AUTO KEYSTONE function, heed the following:
• The AUTO KEYSTONE correction will take effect in 2 seconds after changing the projection angle during projection.
• The left and right, or horizontal keystone distortion is not available.
Place the projector so that the lens surface is parallel to the screen.
Also, adjust the height to keep the projector level by rotating the rear feet.
TIP: To turn off the AUTO KEYSTONE function, from the menu select [SETUP] → [GENERAL] → [AUTO KEYSTONE] and select [OFF].
(→ page
60) Even when the menu setting for [AUTO KEYSTONE] is turned on, [KEYSTONE] can be adjusted manually.
NOTE: The AUTO KEYSTONE Correction feature can cause an image to be slightly blurred because the correction is made elec-
tronically.

3. Projectng an Image (Basc Operaton)
SELECT
SOURCE
AUTO
ADJ.
ON/STAND BY
FOCUS
LAMP
STATUS
POWER
SOURCE
AUTO
ADJ.
ON/STAND BY
FOCUS
LAMP
STATUS
POWER
SELECT
➍
Adjusting Focus Manually
Adjustthefocusmanuallyinthefollowingcases:
•Whenadjustingthefocusoutoftheeffectiverangeoftheauto
-
maticfocus
•Whennelyadjustingthefocus
•Whenthemenusettingfor[AUTOFOCUS]isturnedoff
Adjustng wth buttons on the cabnet or the remote control
The focus adjustment screen will be displayed.
The focus adjustment screen will be closed if no button operation is
made for 5 seconds.
TIP: If the projector is placed within the effective focus range, pressing and
holding the FOCUS for a minimum of 2 seconds starts the AUTO FOCUS func-
tion.
◀▶
The focus adjustment screen will be closed.
VOLUME ASPECT HELP
FOCUS
L
-
MOUSE
-
R
FREEZE
PICTURE
LAMP MODE
VIDEO
AUTO ADJ.COMPUTER
S-VIDEO VIEWER
ENTER
EXIT
MENU
UP
PAGE
OFF
POWER
ON
DOWN
MAGNIFY AV-MUTE
3. Projectng an Image (Basc Operaton)
SELECT
SOURCE
AUTO
ADJ.
ON/STAND BY
FOCUS
LAMP
STATUS
POWER
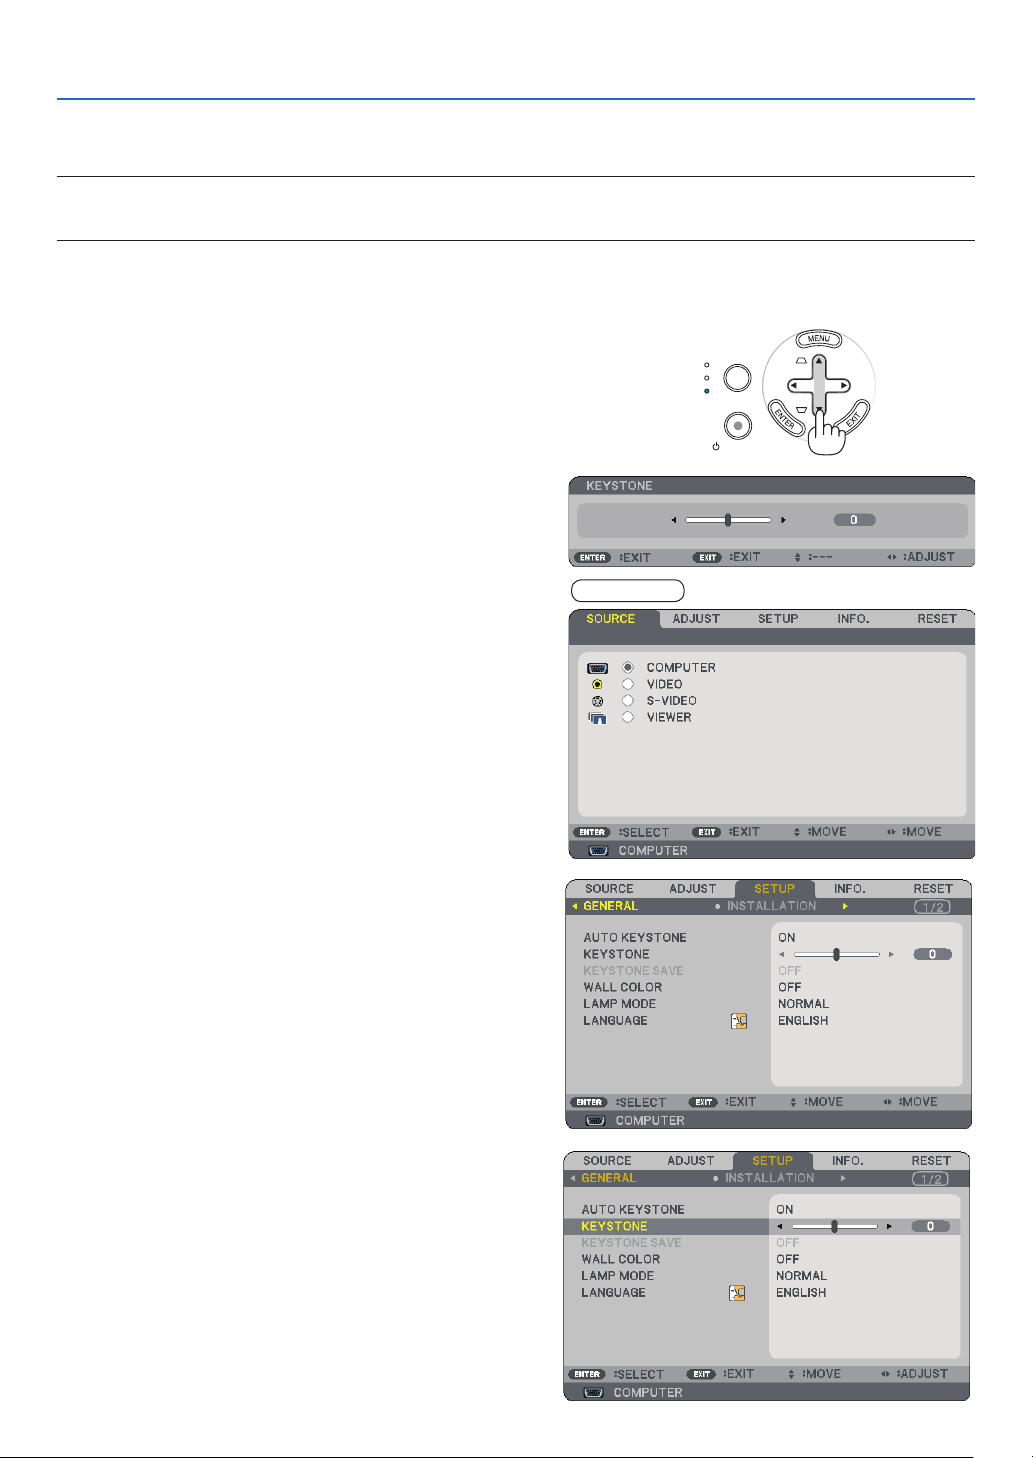
➎
Correcting Keystone Distortion Manually
Youcanalsocorrecttheverticalkeystonedistortionmanually.
NOTE:
• Keystone correction by using the SELECT
▲/▼ button is not possible when [VIEWER] is selected for the source.
• The vertical keystone angle can be corrected between 40 degrees upward and 40 degrees downward from level.
Adjustthekeystonedistortionmanuallyinthefollowingcases:
•TonetuneKeystonecorrectionevenafterperformingthe[AUTOKEYSTONE]adjustment
•Whenthemenusettingfor[AUTOKEYSTONE]isturnedoff
Adjustng wth buttons on the cabnet
▲▼
The slide bar will be displayed for your adjustment.
The slide bar will be closed.
Adjustng wth the remote control
The menu will be displayed.
▶
The [GENERAL] screen will be displayed.
▼
NP62/NP52
3. Projectng an Image (Basc Operaton)
SELECT
AUTO
ADJ.
ON/STAND BY
FOCUS
LAMP
STATUS
POWER
SOURCE
[Poor picture]
[Normal picture]
➏
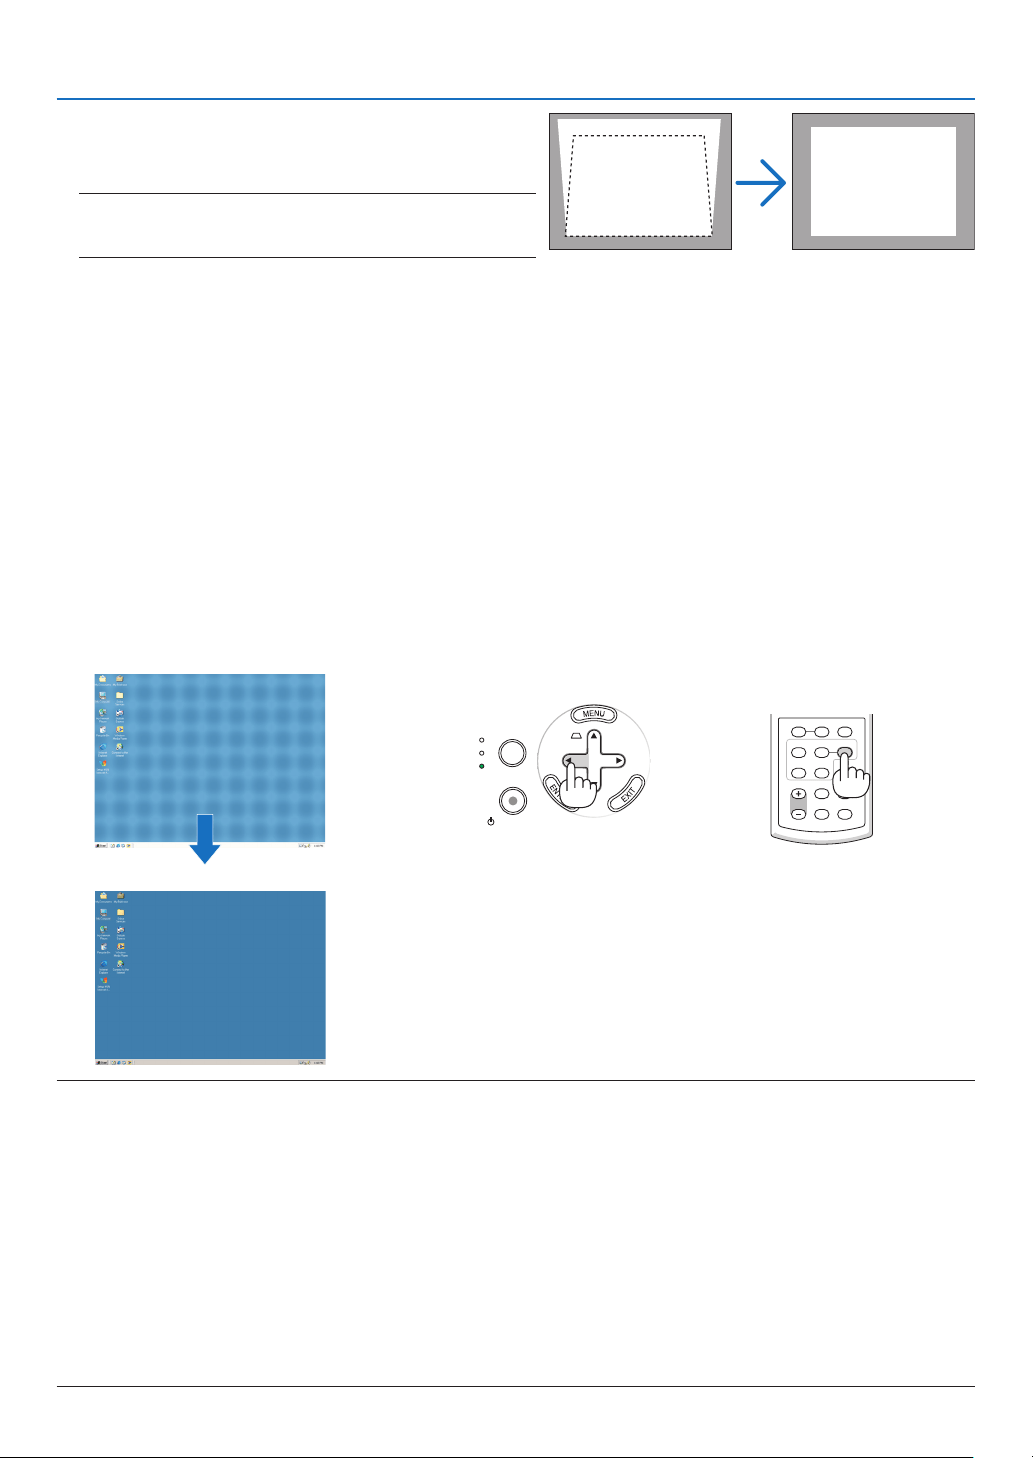
Optimizing RGB Picture Automatically
Adjustng the Image Usng Auto Adjust
Thisadjustmentmaybenecessarywhenyouconnectyourcomputerforthersttime.
Adjustng wth buttons on the cabnet
•PresstheSELECT◀buttonwithnomenusdisplayed.
AnRGBimagewillbeoptimizedautomaticallyafterafewseconds.
Adjustng wth the remote control
•PresstheAUTOADJ.buttontooptimizeanRGBimageautomatically.
NOTE:
Some signals may take time to display or may not be displayed correctly.
NP61/NP41: The Auto Adjust function does not work for component and video signals.
NP62/NP52: The Auto Adjust function does not work for component/video signals, and the Viewer source.
If the Auto Adjust operation cannot optimize the RGB signal, try to adjust HORIZONTAL/VERTICAL, CLOCK and PHASE manu-
ally. (→ page 56, 57)
If performing the Auto Adjust function does not correct image positioning, vertical stripes (banding) or horizontal noise, per-
form the [HORIZONTAL], [VERTICAL], [CLOCK] or [PHASE] function from the menu to optimize the image. (→ page 56, 57)
Performing the [HORIZONTAL], [VERTICAL], [CLOCK] or [PHASE] function will store the adjustment values of the currently
projected source into the projector’s memory.
The next time the same source (same resolution, horizontal and vertical frequencies) is projected; the projector will call up
from memory the stored values for the source.
To clear the stored adjustment values, select the [RESET] → [CURRENT SIGNAL] or [ALL DATA] from the menu to reset the
adjustment values.
•
•
•
•
•
•
•
VOLUME ASPECT HELP
FOCUS
L
-
MOUSE
-
R
FREEZE
PICTURE
LAMP MODE
VIDEO
AUTO ADJ.COMPUTER
S-VIDEO VIEWER
Use the SELECT
◀ or ▶ button to correct the vertical
keystone distortion.
NOTE: The KEYSTONE Correction feature can cause an image
to be slightly blurred because the correction is made electroni-
cally.
TIP: You can save the changes using the KEYSTONE SAVE fea-
ture when you turn off the projector. (→ page
60)
7
3. Projectng an Image (Basc Operaton)
➐
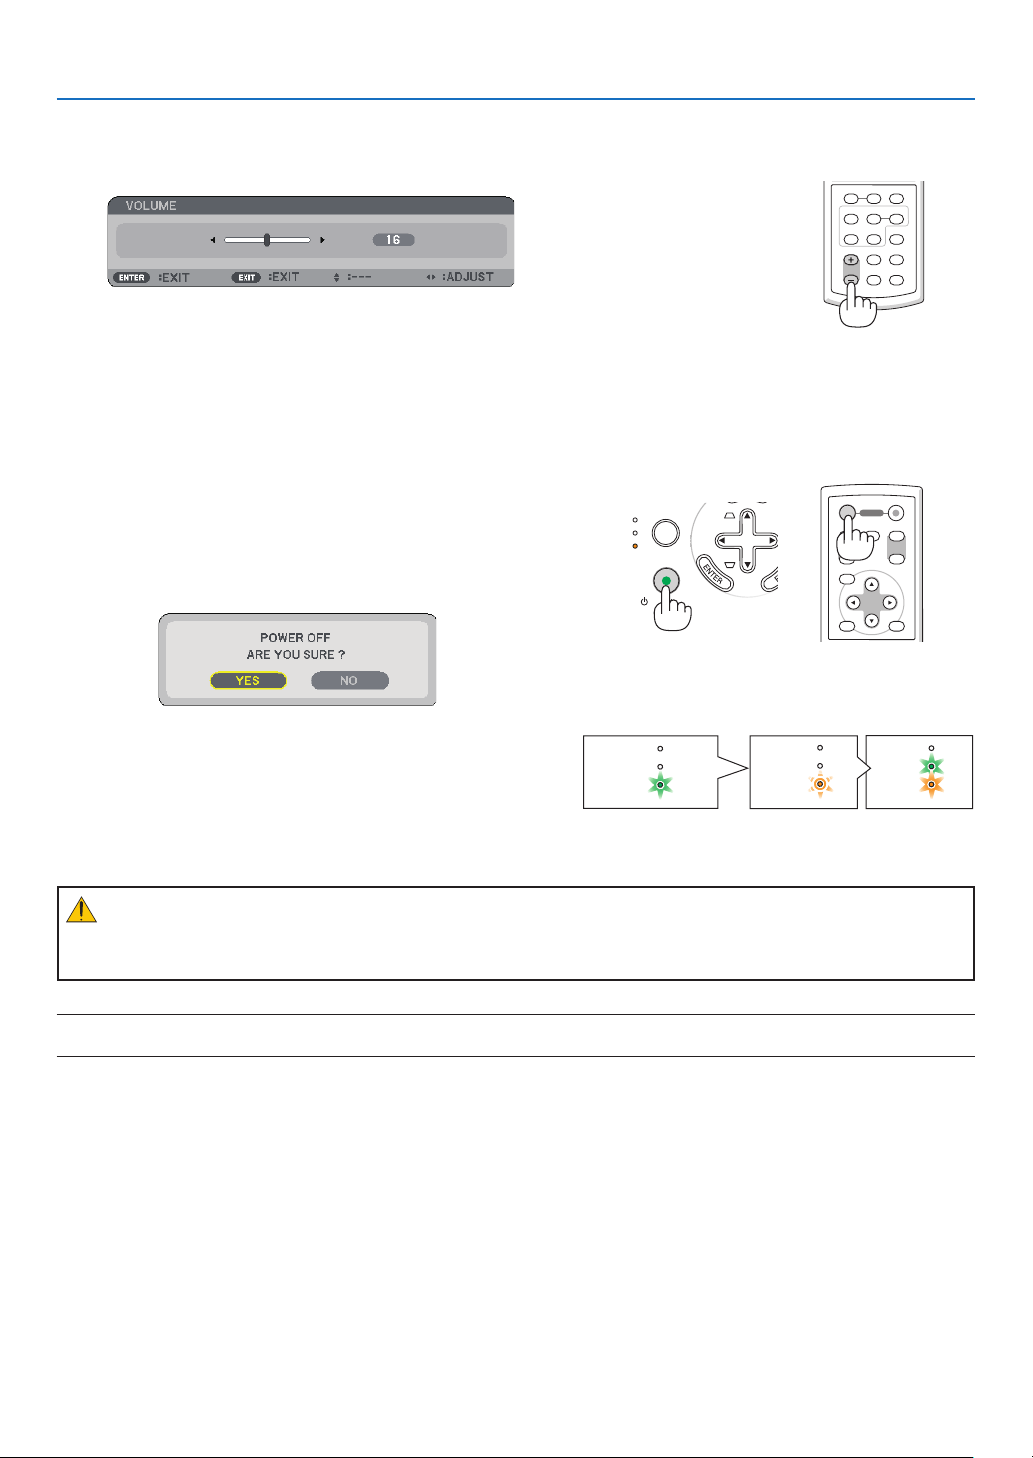
Adjusting Volume Up & Down
Soundlevelfromthespeakerontheprojectorcanbeadjusted.
Anotherwaytoadjustvolumeistousethemenu.
Select[ADJUST]
→[BASIC]→[VOLUME]fromthemenu.
AUTO
ADJ.
ON/STAND BY
FOCUS
LAMP
STATUS
POWER
SELECT
❽
Turning off the Projector
To turn off the projector:
ENTER
EXIT
MENU
UP
PAGE
OFF
POWER
ON
DOWN
MAGNIFY AV-MUTE
Frst, press the POWER (ON/STAND BY) button on the
projector cabnet or the POWER OFF button on the re-
mote control. The “POWER OFF / ARE YOU SURE ?”
message wll appear.
Secondly, press the ENTER button or press the POW-
ER (ON/STAND BY) or the POWER OFF button agan.
The power ndcator wll glow orange.
Immedately after turnng on the projector and dsplay-
ng an mage, you cannot turn off the projector for 0
seconds.
POWER
STATUS
LAMP
POWER
STATUS
LAMP
STATUS
LAMP
POWER
Power OnFan runningStandby
Steady green lightBlinking
orange light
Steady green/
orange light
CAUTION:
Partsoftheprojectorwillbecomeheatedduringoperation.Usecautionwhenpickinguptheprojectorimmedi-
atelyafterithasbeenoperating.
NOTE: Do not turn off the projector using the "Direct Power Off" function within 10 seconds of making adjustment or setting
changes and closing the menu. Doing so can cause loss of adjustments and settings.
VOLUME ASPECT HELP
FOCUS
L
-
MOUSE
-
R
FREEZE
PICTURE
LAMP MODE
VIDEO
AUTO ADJ.COMPUTER
S-VIDEO VIEWER
8
3. Projectng an Image (Basc Operaton)
❾
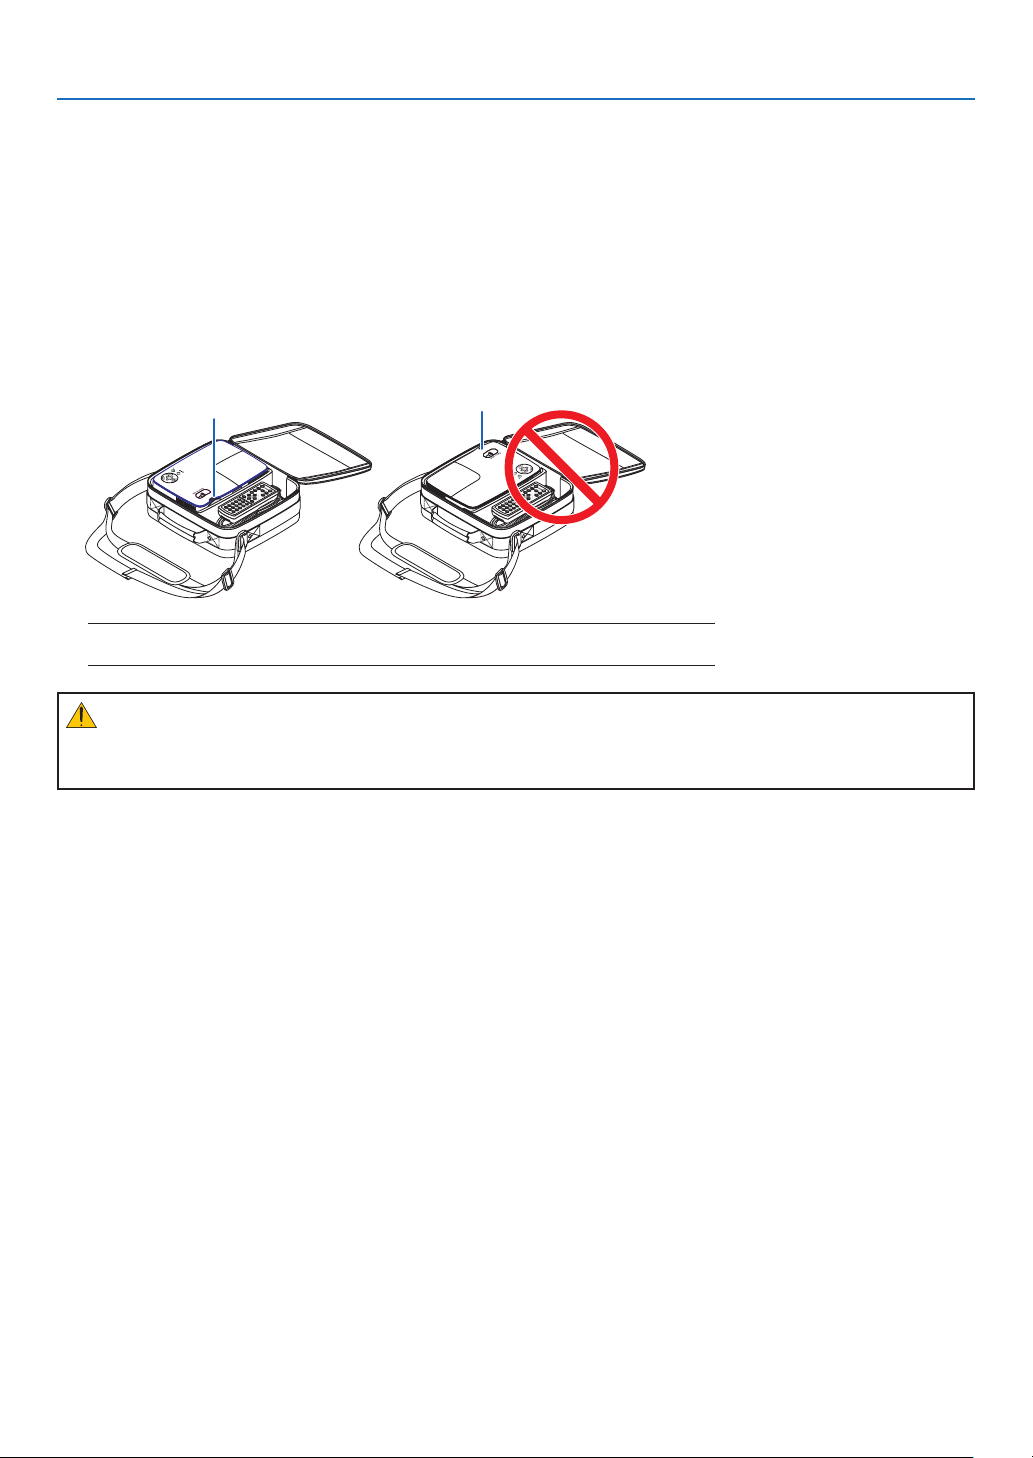
After Use
Preparaton: Make sure that the projector s turned off.
Place the projector in the soft case as shown below. This is to prevent the lens from damage.
CAUTION:
Usecautionwhenputtingtheprojectorinthesoftcaseimmediatelyaftertheprojectorhasbeenoperating.
Theprojectorcabinetishot.
NOTE: When placing the projector in the soft case, retract the tilt foot and the rear feet.
Failure to do so may case damage to the projector.
SOURCE
AUTO
ADJ.
ON/STAND BY
L
A
M
P
S
T
A
T
U
S
P
O
W
E
R
S
EL
ECT
VOLUME
S-VIDEO
VID
EO
EN
TE
R
EXIT
MENU
UP
PAGE
OFF
POWER
ON
D
OW
N
AU
TO
AD
J
.
C
OM
PU
TER
ASPECT
HELP
FREEZEPICTURE
LAMP MODE
MAGNIFY
A
V-M
UT
E
FOC
US
L
-
M
OUS
E
-
R
V
IE
WE
R
S
O
U
RC
E
AUTO
ADJ.
ON/STAN
D B
Y
LAMP
STATUS
POWER
SELECT
VOLUME
S-VIDEO
VIDEO
EN
T
E
R
EXIT
MENU
UP
PAGE
OFF
POWER
ON
DOWN
A
U
TO
AD
J
.
C
OM
PU
TE
R
ASPECT
HELP
FREEZE
PICTURE
LAMP MODE
M
AGNIFY AV
-M
UT
E
FO
CU
S
L
-
MOUSE
-
R
V
IE
WE
R
LensLens
9
4. Convenient Features
➊
Turning Off the Image and Sound
PresstheAV-MUTEbuttontoturnofftheimageandsoundforashort
periodoftime.
Pressagaintorestoretheimageandsoundfromthespeaker.
NOTE: Even though the image is turned off, the menu still remains on the
screen.
MENU
UP
PAGE
OFF
POWER
ON
DOWN
AV-MUTEMAGNIFY
➋
Freezing a Picture
PresstheFREEZEbuttontofreezeapicture.Pressagaintoresume
motion.
NOTE:
• The image is frozen but the original video is still playing back.
• This function is not available for the Viewer source.
VOLUME ASPECT HELP
FREEZE
PICTURE
LAMP MODE
S-VIDEO VIEWER
❸
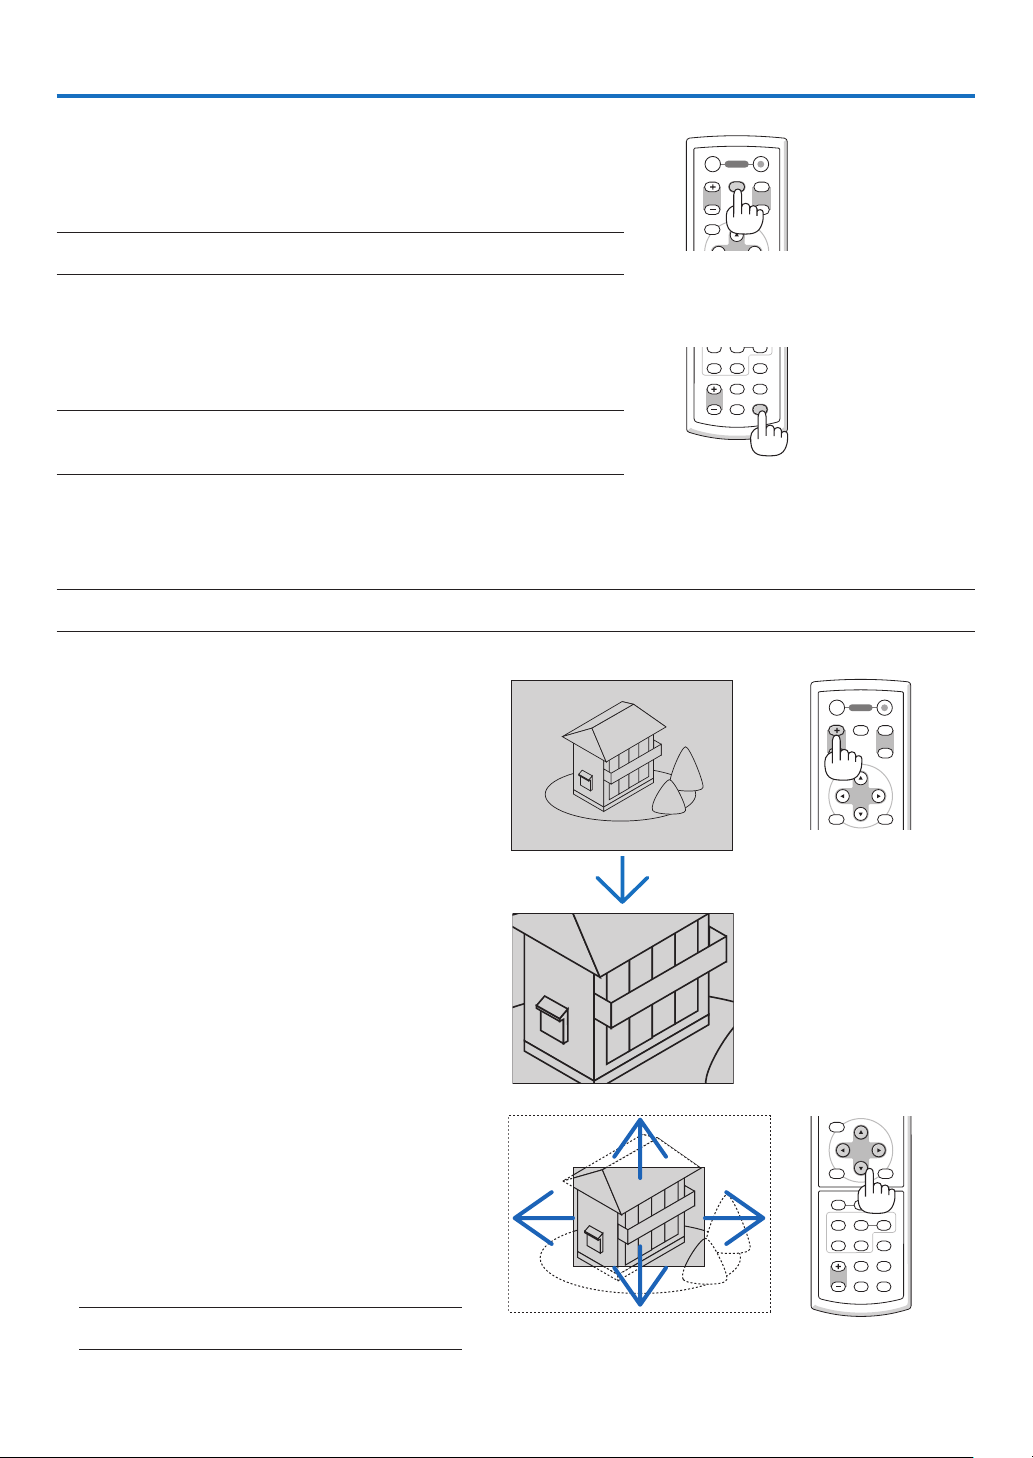
Enlarging and Moving a Picture
Youcanenlargetheareayouwantupto400percent.
NOTE: The maximum magnification may be less than four times depending on the following; the signal and when [WIDE ZOOM]
is selected for [ASPECT RATIO].
To do so:
Each time the MAGNIFY (+) button is pressed,
the image is magnified.
* Image can be magnified up to 400%
▲▼◀▶
The area of the magnified image will be moved
Each time the MAGNIFY (-) button is pressed,
the image is reduced.
NOTE: The image will be enlarged or reduced at the
center of the screen.
ENTER
EXIT
MENU
UP
PAGE
OFF
POWER
ON
DOWN
MAGNIFY AV-MUTE
VOLUME
ENTER
EXIT
MENU
ASPECT HELP
FOCUS
L
-
MOUSE
-
R
FREEZE
PICTURE
LAMP MODE
VIDEO
AUTO ADJ.COMPUTER
S-VIDEO VIEWER
30
. Convenent Features
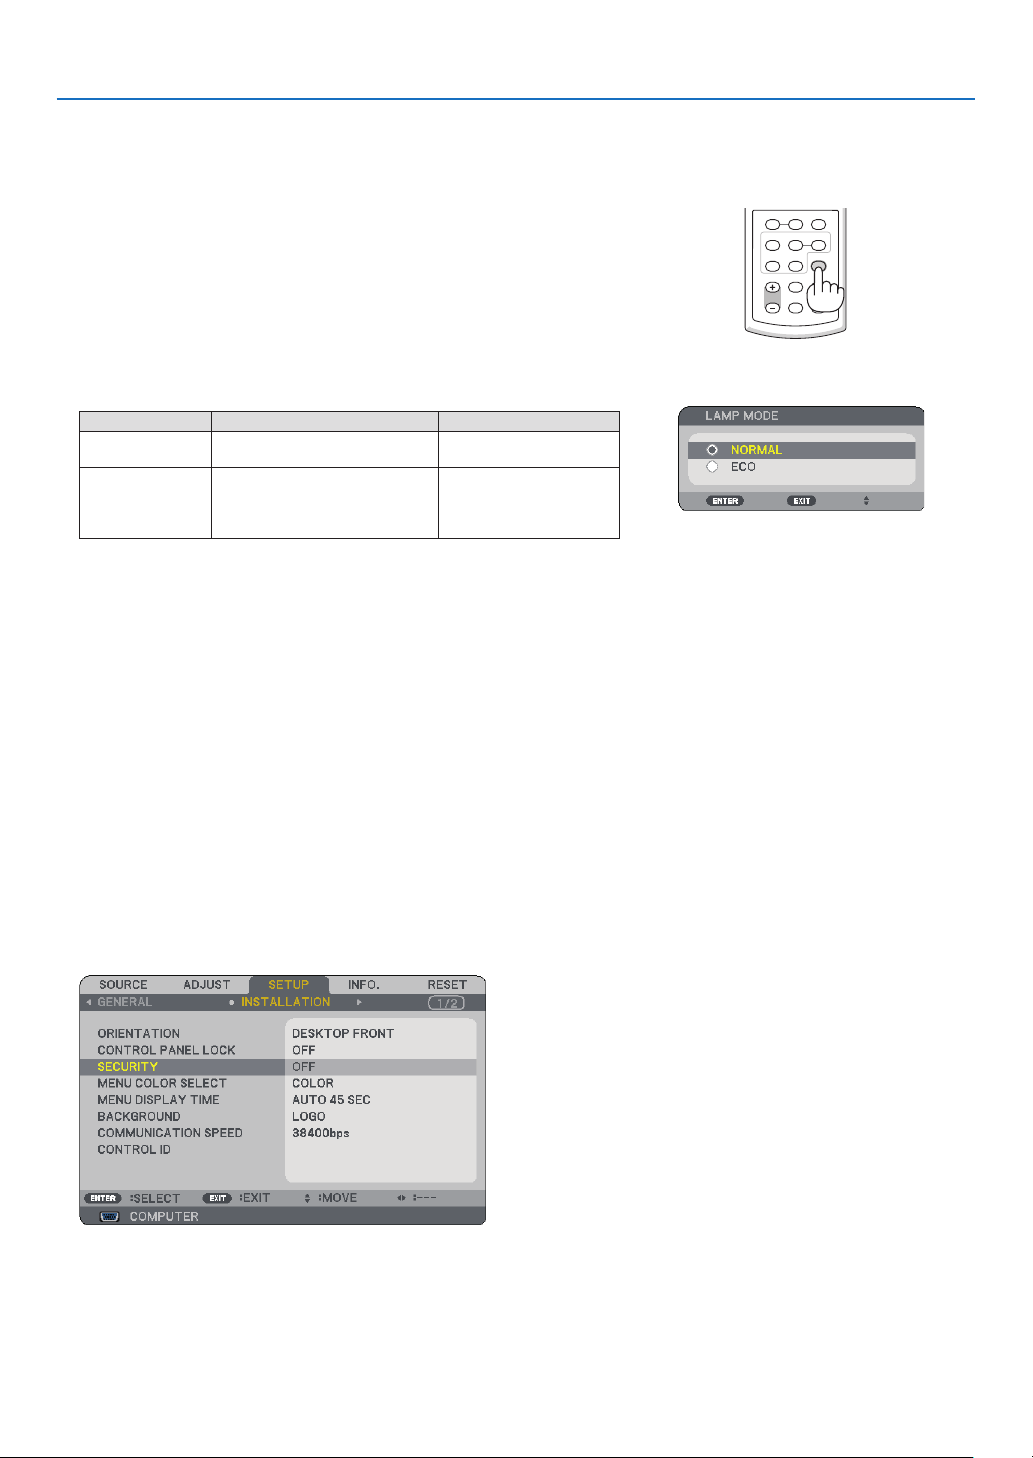
➍
Changing Lamp Mode
VOLUME ASPECT HELP
FOCUS
L
-
MOUSE
-
R
FREEZE
PICTURE
LAMP MODE
VIDEO
AUTO ADJ.COMPUTER
S-VIDEO VIEWER
ThelamplifecanbeextendedbyusingtheECOmode.
Tochangetothe“ECO”mode,dothefollowing:
▲▼
▶
To change from [ECO] to [NORMAL], Go back to Step 2 and select
[NORMAL]. Repeat Step 3.
LampModeDescriptionStatusofLAMPindicator
NormalMode
Thisisthedefaultsetting(100%
Brightness).
Off
EcoMode
Selectthismodetoincreasethe
lamplife(NP62/NP61:approx.75%
Brightness,NP52NP41:approx.
85%Brightness).
SteadyGreenlight
• The [LAMP MODE] can be changed by using the menu.
Select [SETUP]
→ [GENERAL] → [LAMP MODE]
(
→ page
61)
➎
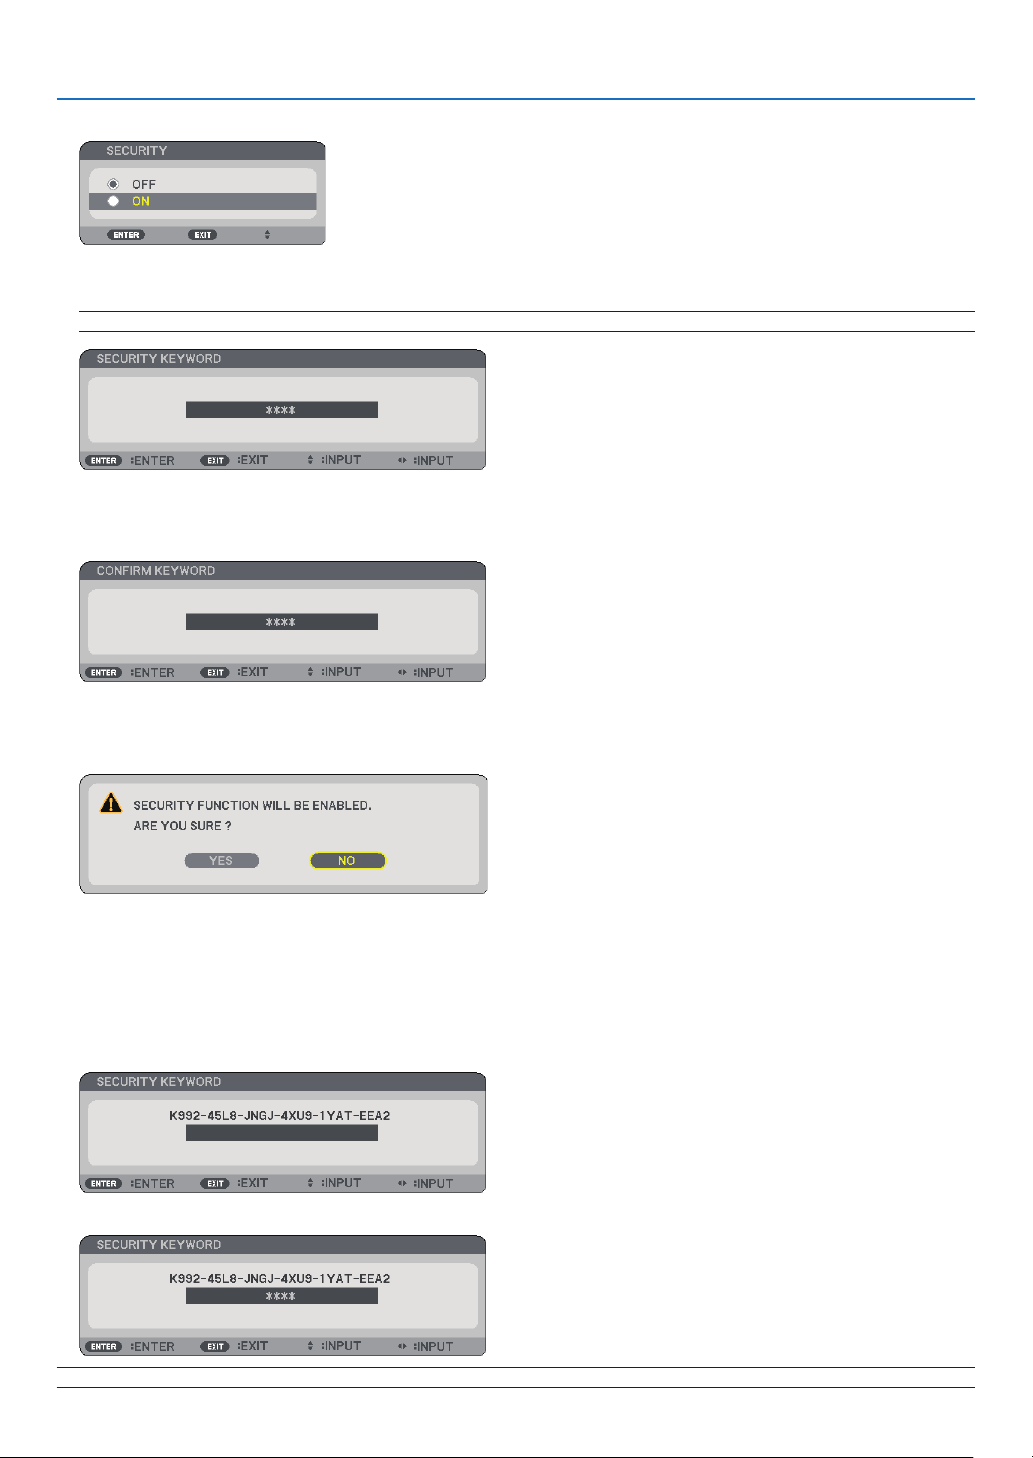
Preventing the Unauthorized Use of the Projector
AkeywordcanbesetforyourprojectorusingtheMenutoavoidoperationbyanunauthorizeduser.Whenakey-
wordisset,turningontheprojectorwilldisplaytheKeywordinputscreen.Unlessthecorrectkeywordisentered,
theprojectorcannotprojectanimage.
To enable the Securty functon:
The menu will be displayed.
▶▼
▶
▼
The OFF/ON menu will be displayed.
3
. Convenent Features
▼
The [SECURITY KEYWORD] screen will be displayed.
▲▼◀▶
NOTE: A keyword must be 4 to 10 digits in length.
The [CONFIRM KEYWORD] screen will be displayed.
▲▼◀▶
The confirmation screen will be displayed.
The SECURITY function has been enabled.
To turn on the projector when [SECURITY] s enabled:
When the SECURITY function is enabled and the projector is turned on, the projector will display a blue back
-
ground.
To display an image at this time, press the MENU button to display the Keyword input screen.
Type in the correct keyword and press the ENTER button. The projector will display an image.
NOTE: The security disable mode is maintained until the main power is turned off or unplugging the power cable.

3
. Convenent Features
To dsable the SECURITY functon:
The menu will be displayed.
→→
The OFF/ON menu will be displayed.
The KEYWORD CONFIRMATION screen will be displayed.
When the correct keyword is entered, the SECURITY function will be disabled.
NOTE: If you forget your keyword, contact your dealer. Your dealer will provide you with your keyword in exchange for your re-
quest code. Your request code is displayed in the Keyword Confirmation screen. In this example [K992-45L8-JNGJ-4XU9-
1YAT-EEA2] is a request code.
33
. Convenent Features
30°
30°
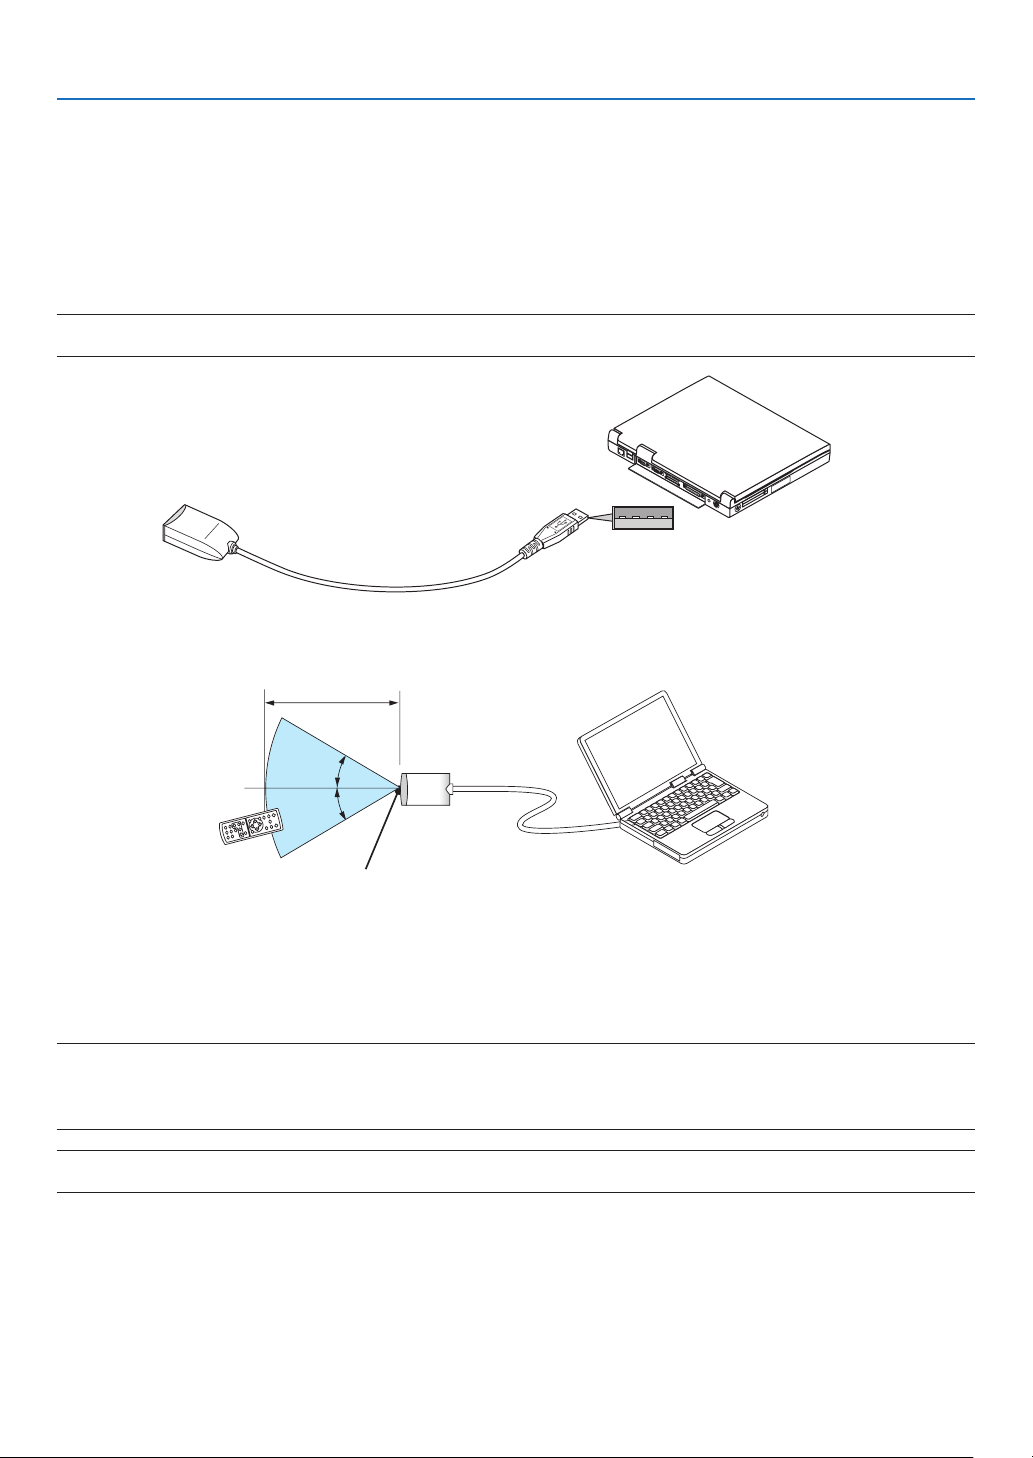
➏
Using the Optional Remote Mouse Receiver (NP01MR)
Theoptionalremotemousereceiverenablesyoutooperateyourcomputer’smousefunctionsfromtheremote
control.Itisagreatconvenienceforclickingthroughyourcomputer-generatedpresentations.
Connectng the remote mouse recever to your computer
Ifyouwishtousetheremotemousefunction,connectthemousereceiverandcomputer.
Themousereceivercanbeconnecteddirectlytothecomputer’sUSBport(typeA).
NOTE: Depending on the type of connection or OS installed on your computer, you may have to restart your computer or change
your computer settings.
Remote mouse receiver
Computer
To USB port of PC or Macintosh
When operatng a computer va the remote mouse recever
Remote sensor on the remote mouse receiver
7m/22 feet
When connectng usng the USB termnal
ForPC,themousereceivercanonlybeusedwithaWindows98/Me/XP*,Windows2000,WindowsVista,or
MacOSX10.0.0orlateroperatingsystem.
* NOTE: In SP1 or older version of Windows XP, if the mouse cursor will not move correctly, do the following:
Clear the Enhance pointer precision check box underneath the mouse speed slider in the Mouse Properties dialog box [Pointer
Options tab].
• The PAGE UP and DOWN buttons do not work with PowerPoint for Macintosh.
NOTE: Wait at least 5 seconds after disconnecting the mouse receiver before reconnecting it and vice versa. The computer may
not identify the mouse receiver if it is repeatedly connected and disconnected in rapid intervals.

3
. Convenent Features
About Drag Mode
BypressingtheMOUSE-LorMOUSE-Rbuttonfor2or3secondsthenreleasing,thedragmodeissetandthe
dragoperationcanbeperformedsimplybypressingtheSELECT▼▲◀▶button.Todroptheitem,pressthe
MOUSE-L(orMOUSE-R)button.Tocancelit,presstheMOUSE-R(orMOUSE-L)button.
TIP: You can change the Pointer speed on the Mouse Properties dialog box on the Windows. For more information, see the user
documentation or online help supplied with your computer.
Operatng your computer’s mouse from the remote control
Youcanoperateyourcomputer'smousefromtheremotecontrol.
PAGE UP/DOWN Button .....scrolls the viewing area of the window or to move to the previous or next slide in PowerPoint
on your computer.
SELECT ▲▼◀▶ Buttons ....moves the mouse cursor on your computer.
MOUSE-L Button ...............works as the mouse left button.
MOUSE-R Button ...............works as the mouse right button.
NOTE:
• When you operate the computer using the SELECT
▲▼◀ or ▶ button with the menu displayed, both the menu and the mouse
pointer will be affected. Close the menu and perform the mouse operation.
• The PAGE UP and DOWN buttons do not work with PowerPoint for Macintosh.
3
5. Using the Viewer (NP62/NP52)
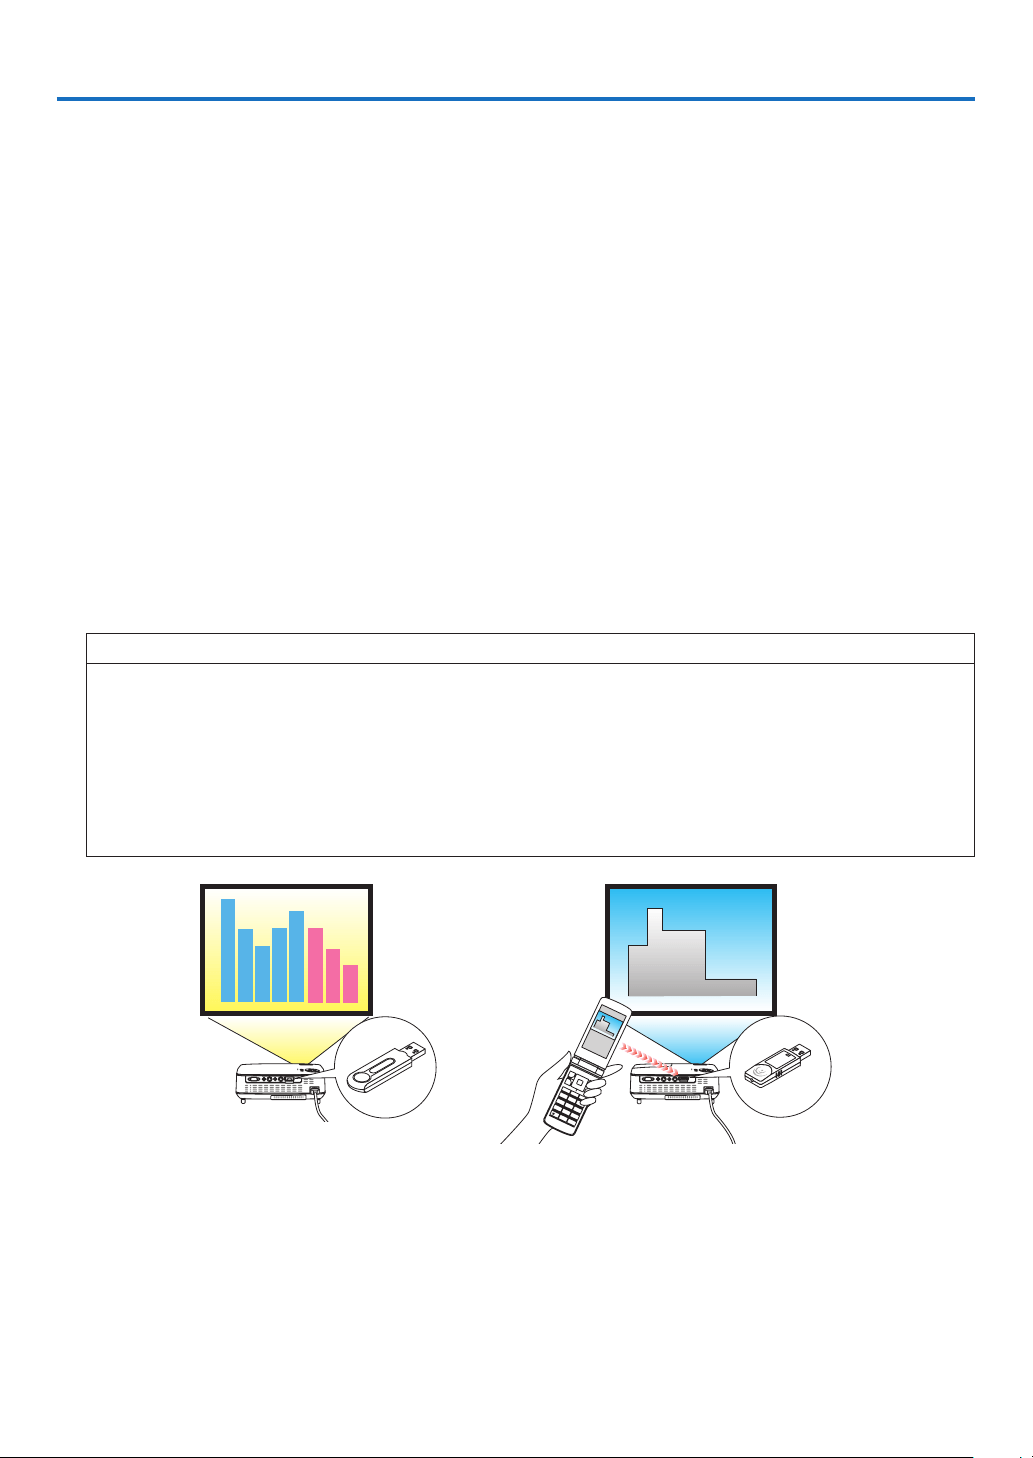
❶
What you can do with the Viewer
TheNP62andNP52havetheViewer.
TheViewerhasthefollowingfeatures.
•WhenacommerciallyavailableUSBmemorythatstoresimagelesisinsertedintotheUSBport(TypeA)of
theprojector,theViewerallowsyoutoviewtheimagelesontheUSBmemory.
Evenifnocomputerisavailable,presentationscanbeconductedsimplywiththeprojector.
•ImageformatssuchasGIF,JPEG,PNG,andBMPcanbeprojected.
•TheViewerdisplaysthethumbnailscreenonwhichyoucanjumptoanyspecicimageyouwishtoproject.
•Therearetwowaysofplaybackforslideshow:manualplaybackandautoplayback.Theintervaltimecanbe
changedinautoplayback.
•Theorderofdisplayingimagescanbesetbyname,extension,dateorsize.Ascendingordescendingorder
canbeselected.
•Imagescanberotatedby90degreesduringplayback.
•Connectingtheoptional
Bluetooth
®
USBadaptor(NP01BA)totheUSBport(TypeA)oftheprojectorwillallow
youtotransmitimageswirelesslyfromyourcomputersormobilephoneswith
Bluetoothwirelesstechnologyto
theprojector.
Operationoftheoptional
Bluetooth®USBadaptor(NP01BA)issubjectedtotheregulationsofthecountries
listedbelow,andmaybeprohibitedtouseoutsidethecountrywhereyoupurchased.
Supportedcountriesandareas:
Japan
USA
Canada
Europe:Austria/Belgium/Bulgaria/Cyprus/Czech/Denmark/Estonia/Finland/France/Germany
/Greece/Hungary/Iceland/Ireland/Italy/Latvia/Liechtenstein/Lithuania/Luxembourg/
Malta/Norway/Poland/Portugal/Romania/Slovak/Slovenia/Spain/Sweden/Switzer
-
land/TheNetherlands/UnitedKingdom
1
2
3
4 5 6
7
8 9
0 #
USBmemoryBluetooth®USBadaptor

3
. Usng the Vewer (NP/NP)
NOTE
• The NP61 and NP41 do not have the Viewer.
• The USB port of the NP62 and the NP52 does not support USB hub. Both a USB memory and the Bluetooth
®
USB adaptor
cannot be used at the same time.
• The following operations by using the buttons on the projector are not possible when the VIEWER screen such as the slide
screen and the thumbnail screen is displayed.
- Keystone correction by using the SELECT
▲/▼ button
- Auto Adjustment by using the SELECT
◀ or AUTO ADJ button
- Source selection by using the SELECT
▶ (SOURCE) button
To perform Keystone correction or Source selection during display of the Viewer, press the MENU button twice to display
the menu and operate Viewer from the menu.
• Freezing picture by using the FREEZE button on the remote control is not possible when the VIEWER screen such as the slide
screen and the thumbnail screen is displayed.
• Executing [RESET]
→ [ALL DATA] from the menu will return the settings for the Viewer [OPTIONS] menu to the factory de-
fault.
• USB memory
- Be sure to use a USB memory device formatted with the FAT32, FAT16 or FAT12 file system.
The projector does not support NTFS formatted USB memory.
If the projector does not recognize your USB memory, check if the format is supported.
To format your USB memory in your computer, refer to the document or help file that comes with your Windows.
- We do not warrant that the USB port of the projector will support all USB memories in the market.
• Supported images
- Supported file format for Viewer are as follows.
We do not warrant all the images are supported for Viewer.
Images other than mentioned in the table may not be supported.
ImagetypeExtensionRestrictions
GIFGIFInterlacedGIF,transparentGIF,andanimatedGIFarenot
supported.
JPEGJPG/JPE/JPEGCMYKJPEGandprogressiveJPEGarenotsupported.
PNGPNGInterlacedPNGandalphachannelPNGarenotsupported.
WindowsBitmap
BMP-
- Images with up to 4000 x 4000 pixels can be supported.
• More than 300 files in a single folder cannot be displayed with the Viewer.
• If a single folder contains too many files, switching images will take time. To shorten switching time, reduce the number of
images contained in a single folder.
37
. Usng the Vewer (NP/NP)
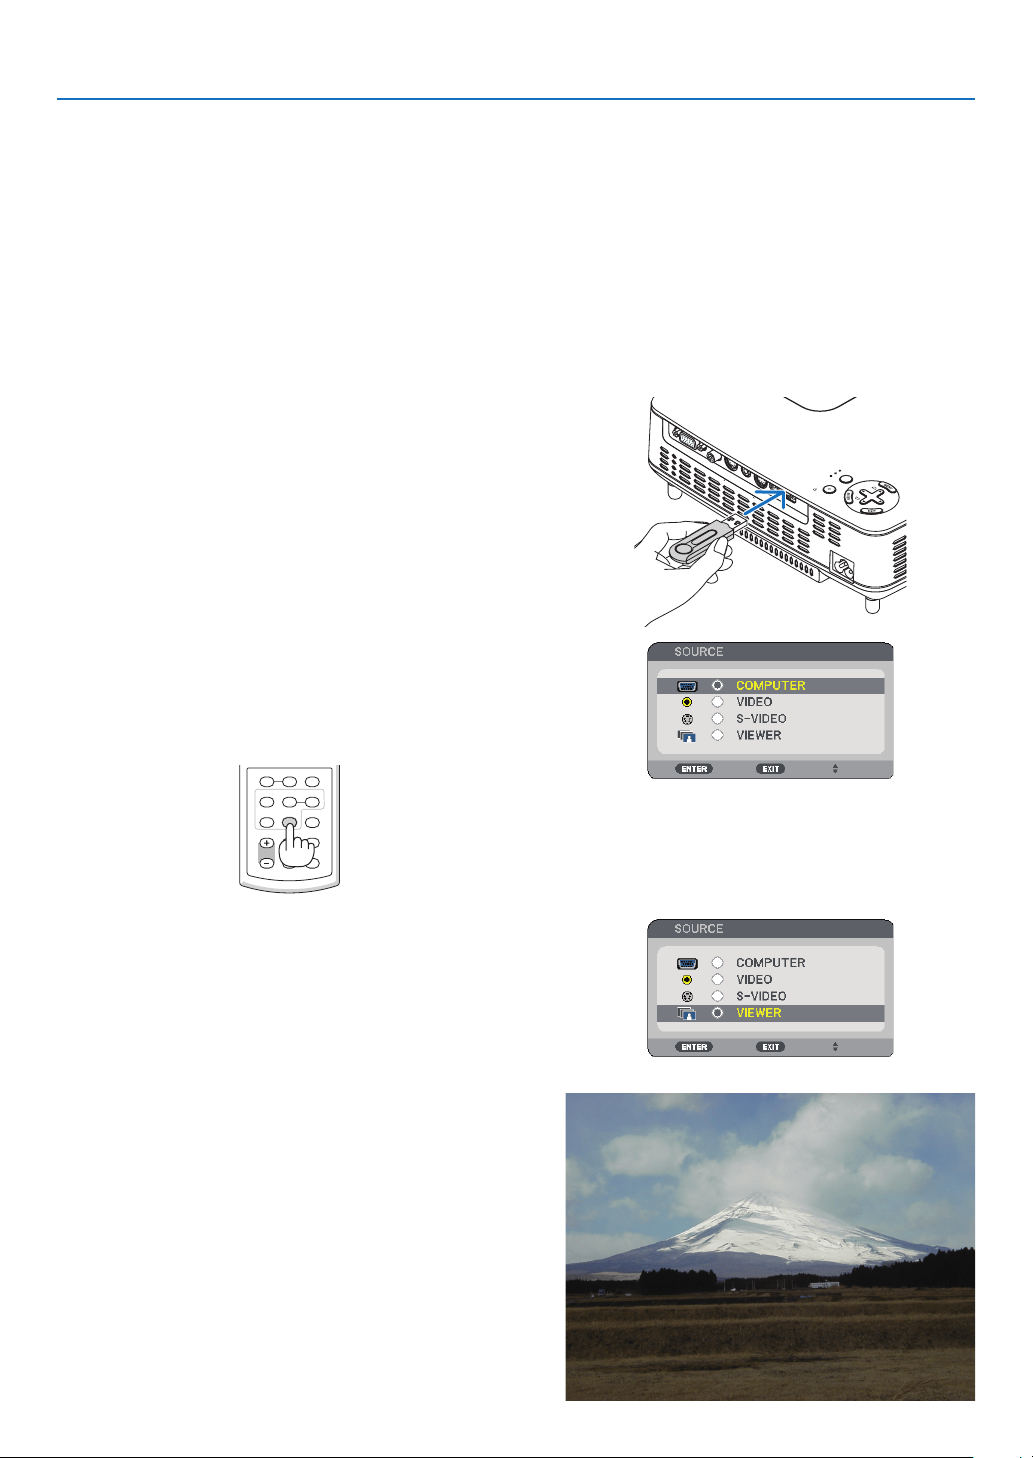
❷
Projecting images stored in a USB memory device (Basic operation)
ThissectionexplainsthebasicoperationoftheViewer.
TheexplanationprovidestheoperationalprocedurewhentheViewer[OPTIONS]menu(→page41)issettothe
factorydefault.
-StartingtheViewer......................................................................below
-RemovingtheUSBmemoryfromtheprojector......................page
38
-ExitingtheViewer....................................................................page39
Preparation:BeforestartingtheViewer,storeimagestotheUSBmemoryusingyourcomputer.
L
A
M
P
S
T
A
T
U
S
P
O
W
E
R
S
O
U
RC
E
AUTO
AD
J.
SE
LECT
ON/STAND BY
FOCUS
VID
EO IN
C
OM
PUTER IN
PC CONTROL
A
UD
IO
I
N
S-VIDEO IN
US B
Startng the Vewer
→
- To remove the USB memory from the projector, select
"REMOVE USB DEVICE" from the OPTIONS menu. (→
Step 5 on page
39)
▶
The SOURCE list will be displayed.
• Another way to display the SOURCE list is to press the
VIEWER button on the remote control. Go on to Step [5].
▶
Each time the SELECT
▶ button is pressed quickly, the
next source will be highlighted.
• During this time, do not press and hold the SELECT
▶
button for 2 seconds or longer. Doing so will start the
projector to detect the signal automatically.
Highlighting [VIEWER] for a while will start the Viewer to
project images stored in the USB memory (slide screen).
VOLUME ASPECT HELP
FOCUS
L
-
MOUSE
-
R
FREEZE
PICTURE
LAMP MODE
VIDEO
AUTO ADJ.COMPUTER
S-VIDEO VIEWER

38
. Usng the Vewer (NP/NP)
▶
The next image will be displayed.
◀
The previous image will be displayed.
The control bar will be displayed.
• Pressing the MENU button during display of the control
bar will display the SOURCE SELECT screen. Press
the MENU button again to close the SOURCE SELECT
screen.
• Pressing the EXIT button during display of the control
bar will close the control bar.
▶
• From this state, each time the ENTER button is pressed,
the image will be rotated by 90 degrees clockwise.
▶
The control bar will be closed.
• Another way to display the thumbnail screen is to go
back to Step 7 and select [
] of the control bar and
press the ENTER button.
• To return the slide screen from the thumbnail screen,
select the image you wish to display in slide and press
the ENTER button.
Removng the USB memory from the projector
The pop-up menu will be displayed at the bottom left of
the screen.
• Pressing the MENU button during display of the pop-up
menu will display the on-screen menu. Press the MENU
button again to close the on-screen menu.
• The confirmation message will be displayed at the cen
-
ter.
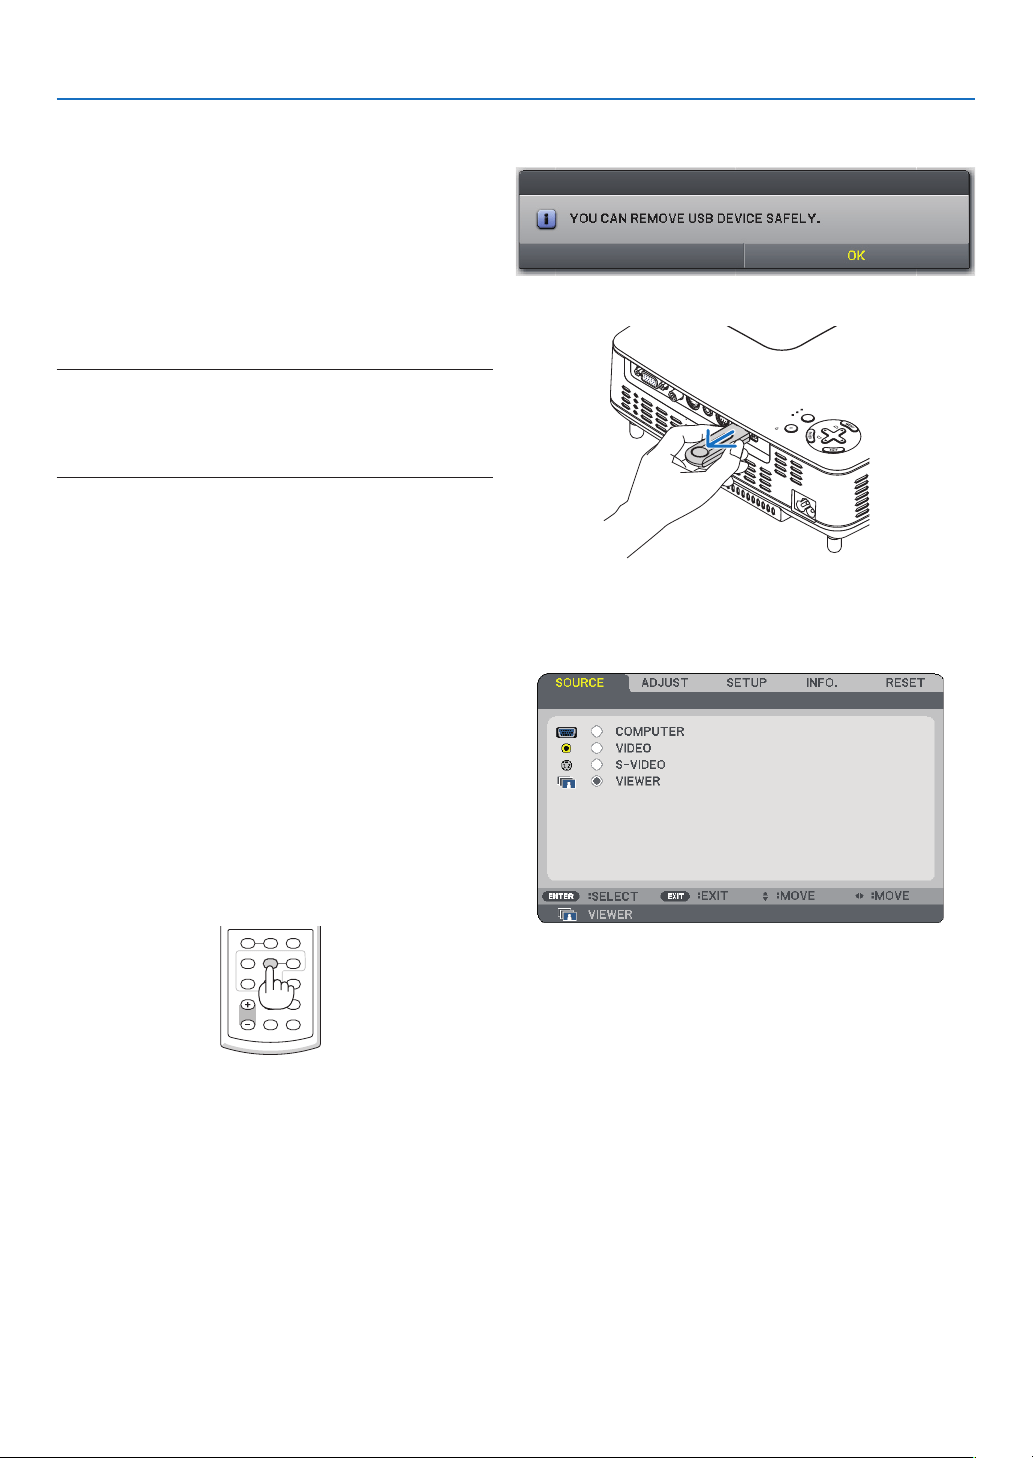
39
. Usng the Vewer (NP/NP)
◀
The confirmation message will be displayed at the
center of the screen.
The confirmation message will be changed.
NOTE: If you remove the USB memory from the projector
without using [REMOVE USB DEVICE] from the menu, the
projector may not operate correctly. If this happens, turn off
the projector and unplug the power cable. Wait 3 minutes,
then connect the power cable, and turn on the projector.
Extng the Vewer
The control bar or the pop-up menu will be dis
-
played.
The on-screen menu will be displayed.
The Viewer will be exited.
TIP: To exit the Viewer using the remote control, select a
source other than [VIEWER].
L
A
M
P
S
T
A
T
U
S
P
O
W
E
R
SOURC
E
A
UTO
A
DJ.
S
E
L
ECT
ON/STAND BY
FOCUS
VID
EO IN
C
OMP
UTER IN
PC CONTROL
AUDIO
IN
S-VIDEO IN
US B
VOLUME ASPECT HELP
FOCUS
L
-
MOUSE
-
R
FREEZE
PICTURE
LAMP MODE
VIDEO
AUTO ADJ.COMPUTER
S-VIDEO VIEWER
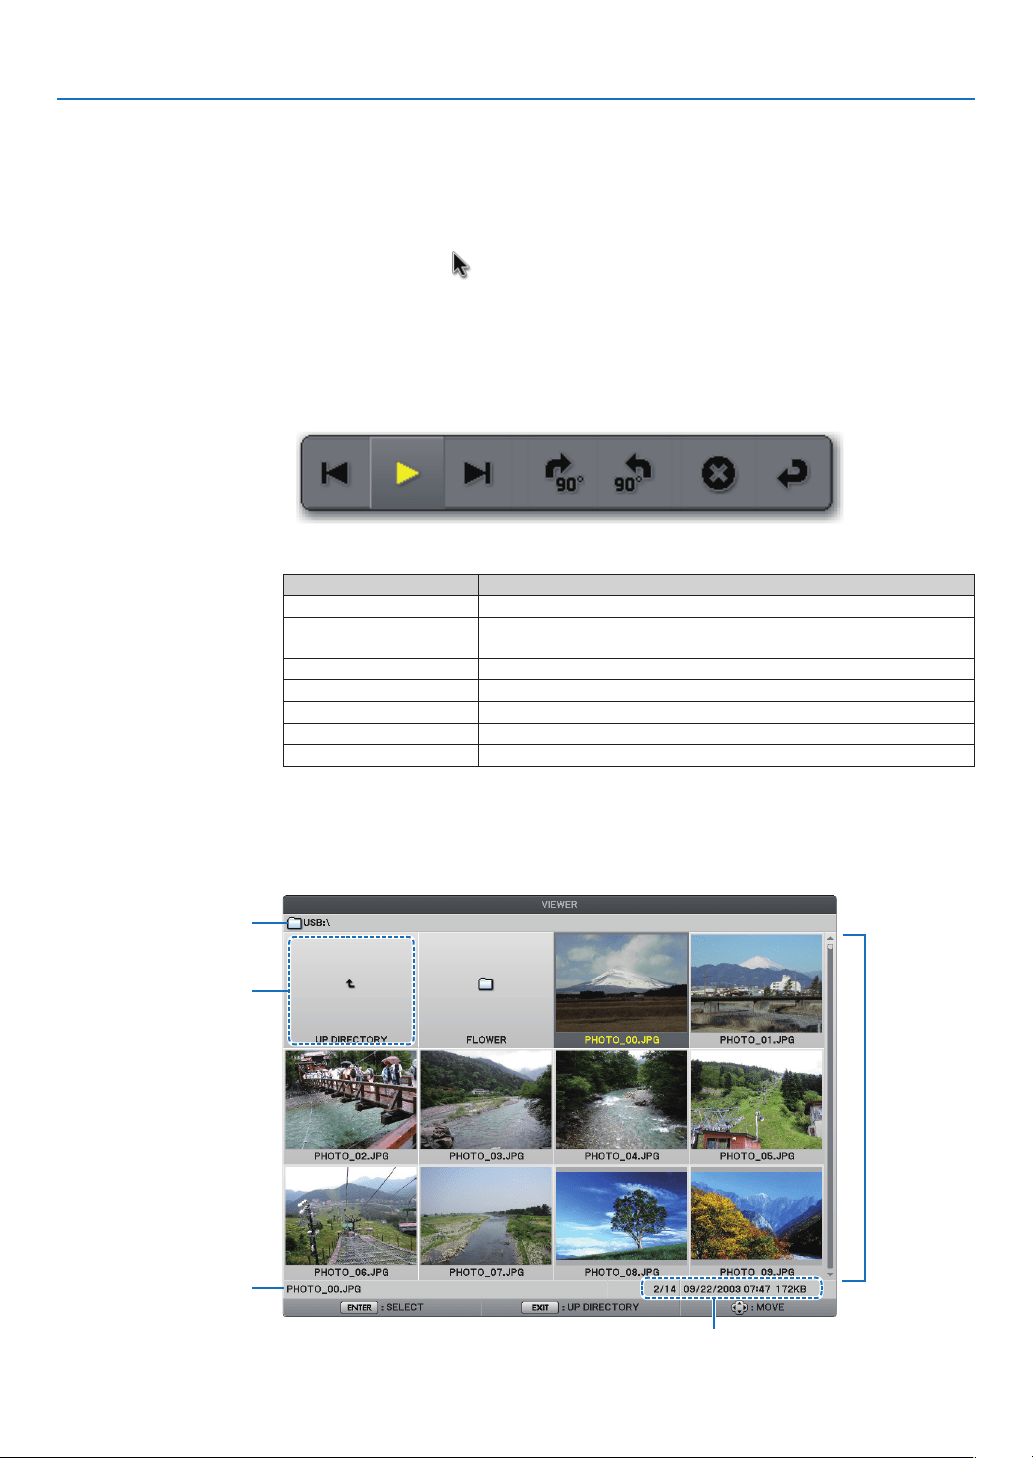
0
. Usng the Vewer (NP/NP)
❸
Operating the slide screen
Theslidescreenallowsyoutoperformthefollowingoperations.
SELECT ▶ button...............Displays the next image.
SELECT ◀ button...............Displays the previous image.
ENTER button ....................Displays the pointer (
). The pointer can be moved by using the SELECT ▲▼◀▶ button.
Press the ENTER button again to close the pointer.
EXIT button ........................ Switches to the thumbnail screen.
MENU button .....................Displays the control bar.
Use the SELECT ◀ or ▶ button to move the yellow cursor to the item and press the ENTER
button. Each function is shown below.
①②③④⑤⑥⑦
ButtonNameDescription
①
BackDisplaysthepreviousimage.
②
Play/Pause
Startsorstopsautoplaybackofslideshow.Orstartsorstopsslide-
show.
③
ForwardDisplaysthenextimage.
④
90°clockwiseRotatestheimage90degreesclockwise.
⑤
90°counterclockwiseRotatestheimage90degreescounterclockwise.
⑥
ExitClosesthecontrolbar.
⑦
ReturnSwitchestothethumbnailscreen.
❹
Operating the thumbnail screen
Parts of thumbnal screen
①
②
④
⑤
③
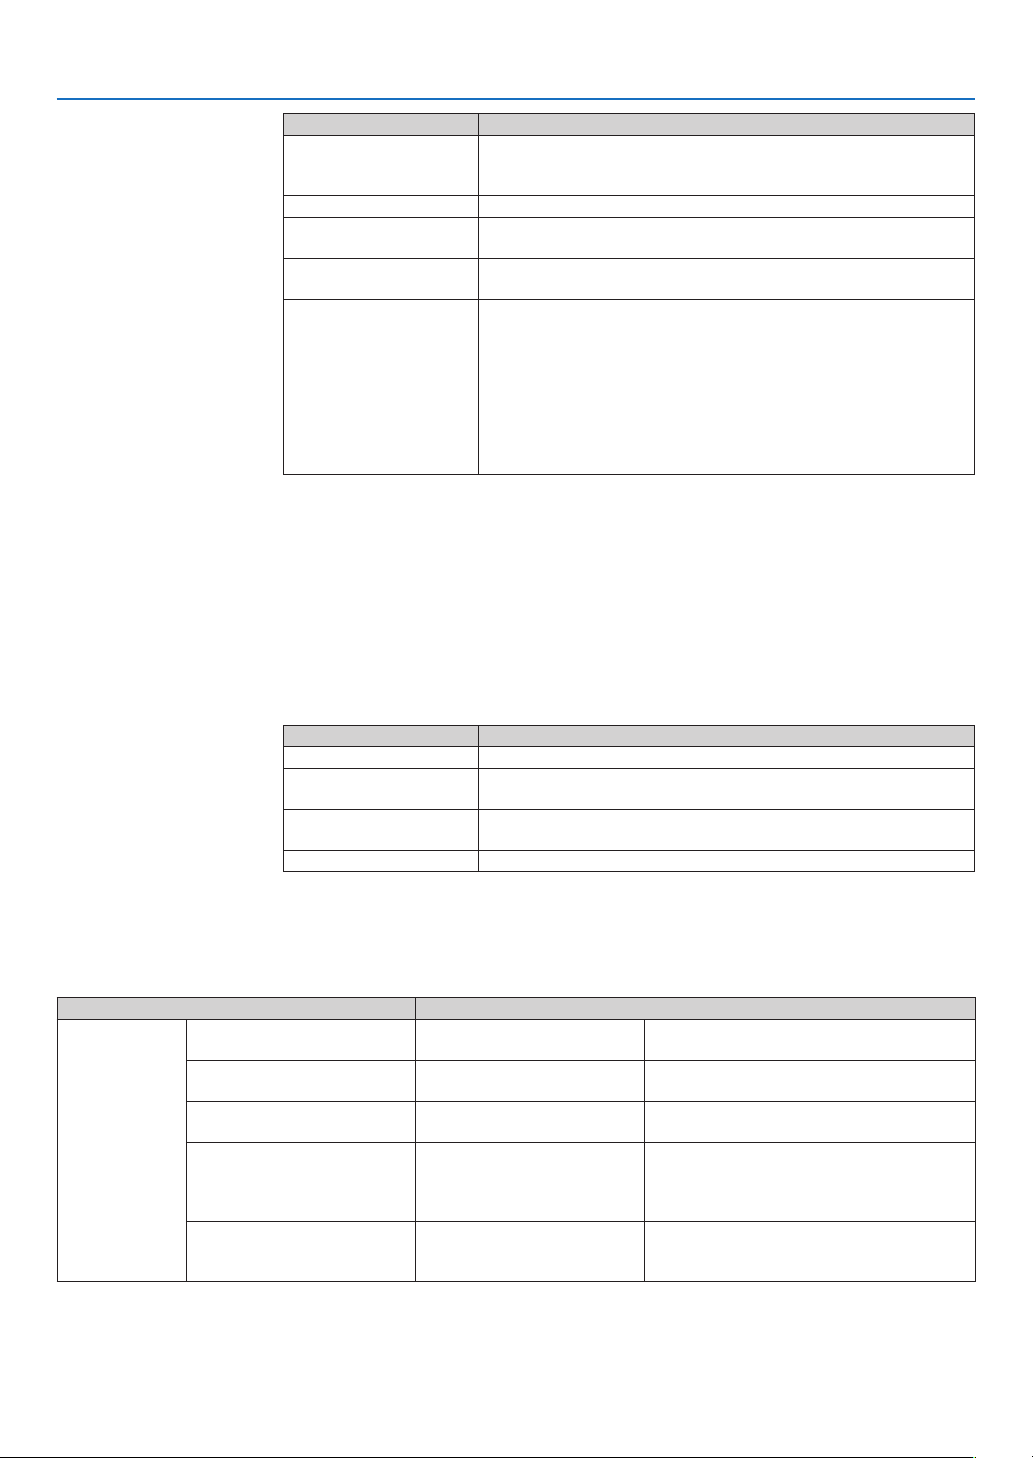
. Usng the Vewer (NP/NP)
NameDescription
①
Path
Displaysthepathofthedisplayedimage.WhenaUSBmemoryis
inserted,thedrivenameisdisplayedas[USB].WhentheBluetooth
USBadaptorisinserted,thedrivenameisdisplayedas[Bluetooth].
②
UpdirectoryReturnstotheupper(parent)folder.
③
Imagesorfolder(in
thumbnailoriconform)
Displaystheimageinthethumbnail(reduceddisplay)oriconform.
④
Filenameofselected
image
Displaysthelenameoftheimageyoumovethecursorto.
⑤
Information
•Whentheimageishighlighted:
Displaysthegivennumberintheorderofdisplay,thelastdate
andtimeoftheimagechanging,andthelesize.Thedateand
timeoftheimagereceivedusingtheBluetoothwirelesstechnol-
ogywillnotbeshown.
•Whenthefolderishighlighted:
Displaysthelastdateandtimeofthefolder.
•Whenthedriveishighlighted:
Displaysthefreespaceofthedrive.
Operatng the thumbnal screen
SELECT ▲▼◀▶ buttons ....Moves the cursor.
ENTER button ....................Switches to the slide screen when the image is highlighted.
The files in a folder are displayed when the folder is highlighted.
It returns to the upper (parent) folder when the "Up directory" is highlighted.
EXIT button ........................ Returns to the upper (parent) folder.
MENU button .....................Displays the following pop-up menu.
MenuitemDescription
PLAYSelectstostartslideshow.
DELETE
(Note)
DeletestheimagesreceivedwithBluetoothwirelesstechnology.
Thesubmenuof[DELETE]or[DELETEALLFILES]isdisplayed.
REMOVEUSBDEVICE
StopstheUSBmemoryinsertedintotheprojector.Executethis
menuitembeforeremovingtheUSBmemoryfromtheprojector.
OPTIONSDisplays[OPTIONS]menu.(→thispage)
Note: This option will be displayed when the optional Bluetooth
®
USB adaptor (NP01BA) is in-
serted into the projector. (→ page
45)
[OPTIONS] menu
Factorysettingsareindicatedinsquarebracket[].
MenuitemDescription
VIEWER
PLAYMODE
[MANUAL]
AUTO
Selectsautoplayormanualplay(buttonop-
eration)ofslideshow.
INTERVAL
[5SECONDS]-
300SECONDS
Specifiesintervaltimewhen[AUTO]isse-
lectedforPLAYMODE.
START
[SLIDE]
THUMBNAILS
Selectstheslidescreenorthethumbnail
screenwhentheViewerstarts
REPEAT
OFF
[ON]
Turnsonorofftherepeatfunctionwhen
[AUTO]isselectedfor[PLAYMODE]and
turnsonorofftherotationwhen[MANUAL]
isselectedfor[PLAYMODE].
SHOWTHUMBNAILS
OFF
[ON]
Selects[ON]todisplaythumbnailsinthe
thumbnailscreen.Select[OFF]todisplay
iconsrepresentingimage.

. Usng the Vewer (NP/NP)
VIEWERSORT
[NAME(ABC..)]
(Note1)
NAME(ZYX..)
TYPE(ABC..)
TYPE(ZYX..)
DATE(NEW)
DATE(OLD)
SIZE(LARGE)
SIZE(SMALL)
Selectsthesortingorderoftheslidesor
thumbnailsforslideshow.
USB
REMOVEUSBDEVICE
EXECUTE
StopstheUSBmemoryinsertedintothepro-
jector.Executethismenuitembeforeremov-
ingtheUSBmemoryfromtheprojector.
Bluetoothsetting
(Note2)
SEARCHRESPONSE
(Note2)
OFF
[ON]
Selectswhethertoanswerwhenasearch
commandisreceivedfromtheBluetoothde-
vice.
DEVICENAME
(Note2)
-
Returnsadevicenamespecifiedwiththis
optiontoadevicewithBluetoothwireless
technology.TheBDaddress(12digitsnot
including“colon”)ofBluetooth®USBadaptor
isusedasthedefaultnameofthedevice.
PASSKEY
(Note2)
OFF
[ON(0000)]
CHANGE
Selectswhethertodoauthenticationanden-
cryptionwhenadevicewithBluetoothwire-
lesstechnologyisconnected.Theauthen-
ticationcharacterstring(1to8characters)
canbechangedifnecessary.
BDADDRESS
(Note2)
–
DisplaystheBDaddressofBluetooth®USB
adaptorthatisinsertedintotheprojector.
VERSION
FIRMWARE
DisplaysthermwareversionoftheViewer.
DATA
FONT
Note 1: The [SORT] setting will be returned to [NAME(ABC..)] when the projector is turned off and then back on.
Note 2: These items will be displayed when the optional Bluetooth
®
USB adaptor (NP01BA) is inserted into the projector. (→
page
45)
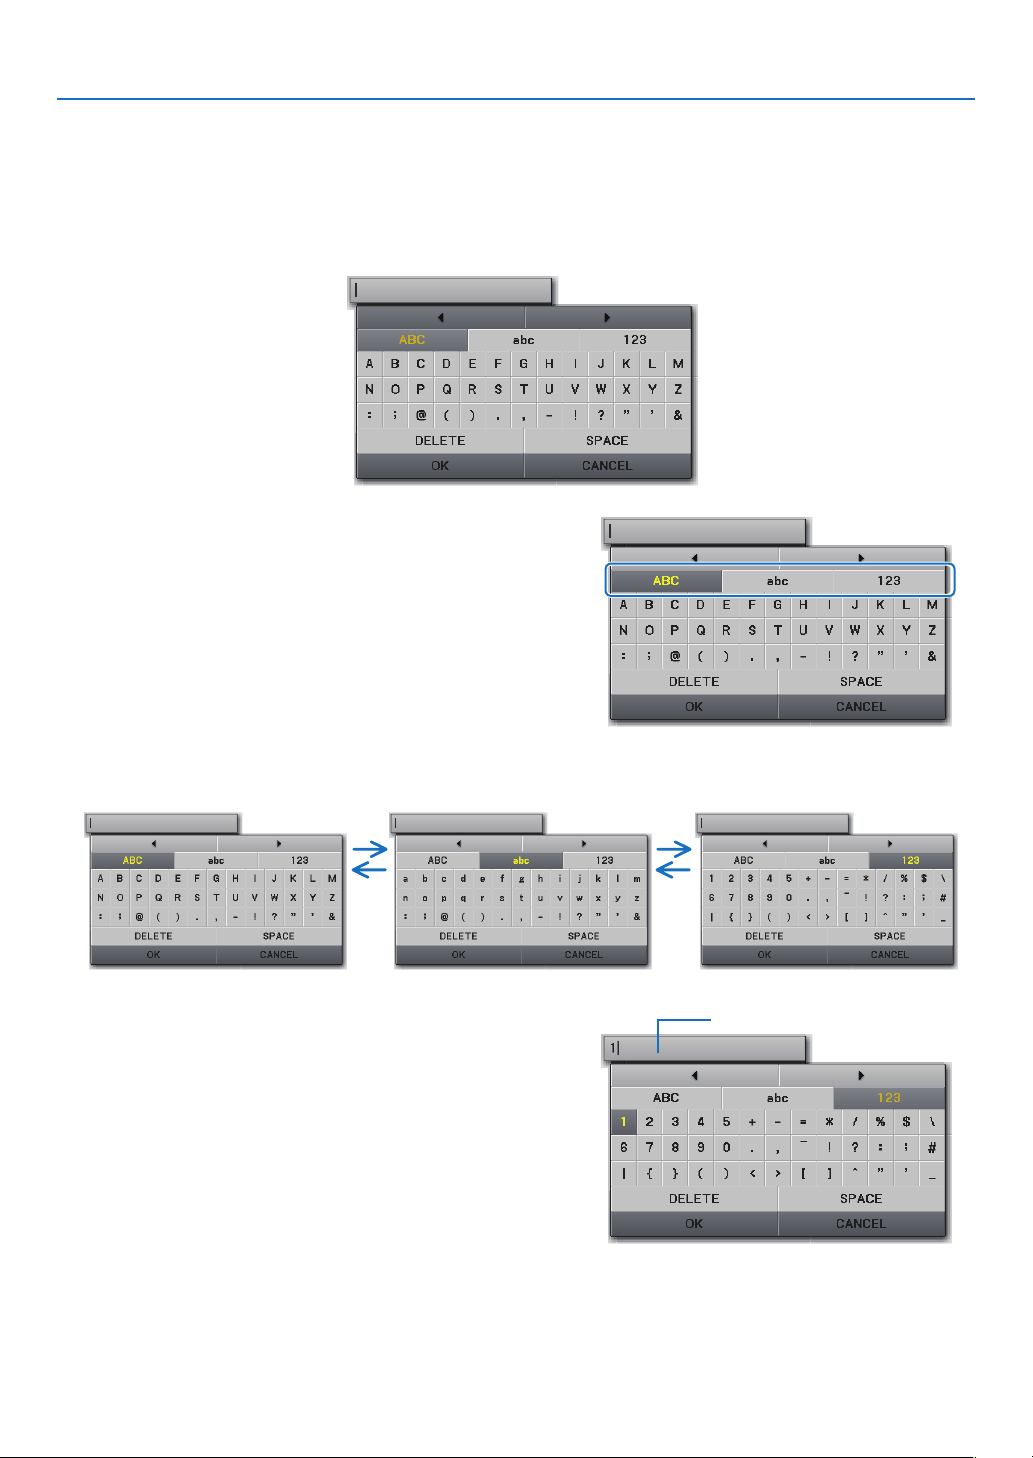
3
. Usng the Vewer (NP/NP)
Enterng Characters
Toenterorchange[DEVICENAME]and[PASSKEY]attheuseofBluetooth®USBadaptor,usethecharacteren-
tryscreen(softwarekeyboard).
Thissectionusesanexampleofenteringapasskeytodescribehowtoentercharacters.
Whenyouselect[CHANGE]of[PASSKEY]fromthe[OPTIONS]menu,thecharacterentryscreenwillbedis-
played.
Enterng characters
▼
The cursor will move to the character type section.
◀▶
The character type will be changed in the order of [ABC], [abc],
and [123].
▼
The cursor will move to the character field.
The character will be displayed in the entry field.
▼
The entry will take effect.
• To cancel, move the cursor to select [CANCEL] and press
the ENTER button.
Entry field
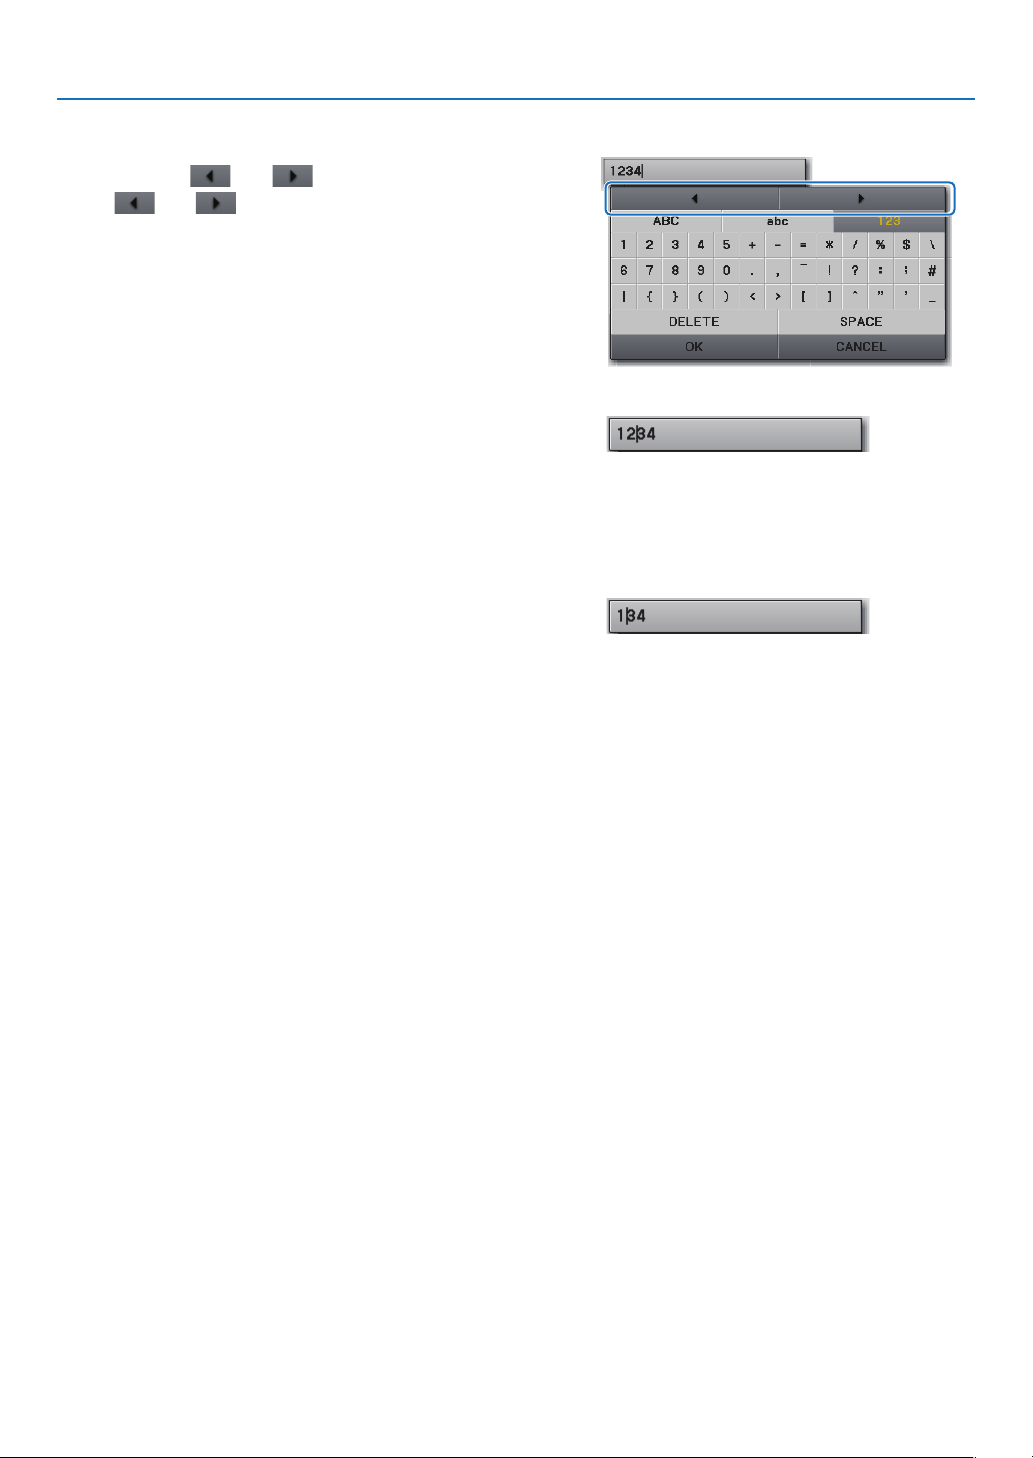
. Usng the Vewer (NP/NP)
Changng characters n the entry eld
▲▼
The
and will be changed to dark gray.
◀▶
The cursor (I) in the entry field will be moved from
side to side.
▼
The character in the entry field will be deleted.
• To insert a space, move the cursor to select [SPACE]
and press the ENTER button.

. Usng the Vewer (NP/NP)
❺
Using the Bluetooth
®
wireless technology to transmit images
Overvew
ConnectingtheoptionalBluetooth®USBadaptor(NP01BA)totheUSBport(TypeA)oftheprojectorwillallowyou
totransmitimageswirelesslyfromyourcomputersormobilephoneswithBluetoothwirelesstechnologytothe
projector.
[Important]
•IfyouremovetheBluetooth®USBadaptorfromtheprojector,alltheimagesthattheprojectorreceived
willbedeleted.
•WhentheprojectorgoesintothestandbymodeorwhentheACpowersupplyisturnedoff,allthere
-
ceivedimageswillbedeleted.
•Receivedimagescannotbestoredtotheprojector.
•Themaximumavailablespaceforreceivedimagesinallis6MB.Oneimagemustnotexceed2.5MBin
size.
•Iftheprojectorisreceivingimagesbeyondthespacelimitduringthetransmission,theoldestimagewill
bedeletedandwillreceiveanewimage.Whentheimageisreceived,aconrmationmessagewillnotbe
displayed.
Typcal Speccatons of USB Adaptor
ModelnameNP01BA
StandardBluetoothVer.2.0+EDR
TransmissionmethodFH-SS(Frequency-HoppingSpreadSpectrum)
Frequencyrange2.4GHzband(2402-2480MHz)
Transmissionoutput2.5mW,Class2
Supportedproles
BIP(BasicImagingProle)
OPP(ObjectPushProle)
Communicationdistance
Approx.10m/33feet(*Thecommunicationdistancemayvarydependingontheenviron
-
ment.)
Dimensions17.6mm/0.69”(Width)x9.0mm/0.35”(Height)x56.3mm/2.22”(Depth)
Weight6g/0.2oz
Useenvironment
Temperature:0°Cto40°C/32°Fto104°F
Humidity:20to80%(non-condensing)
Storageenvironment
Temperature:-10°Cto60°C/14°Fto140°F
Humidity:20to80%(non-condensing)
•MakesurebeforehandthatyourtransmissiondevicesupportstheBIPorOPPproleaccordingtotheuser’s
manualsuppliedwithyourtransmissiondevice.
•Bluetooth®USBadaptor(NP01BA)isfortheexclusiveuseofourprojectors.
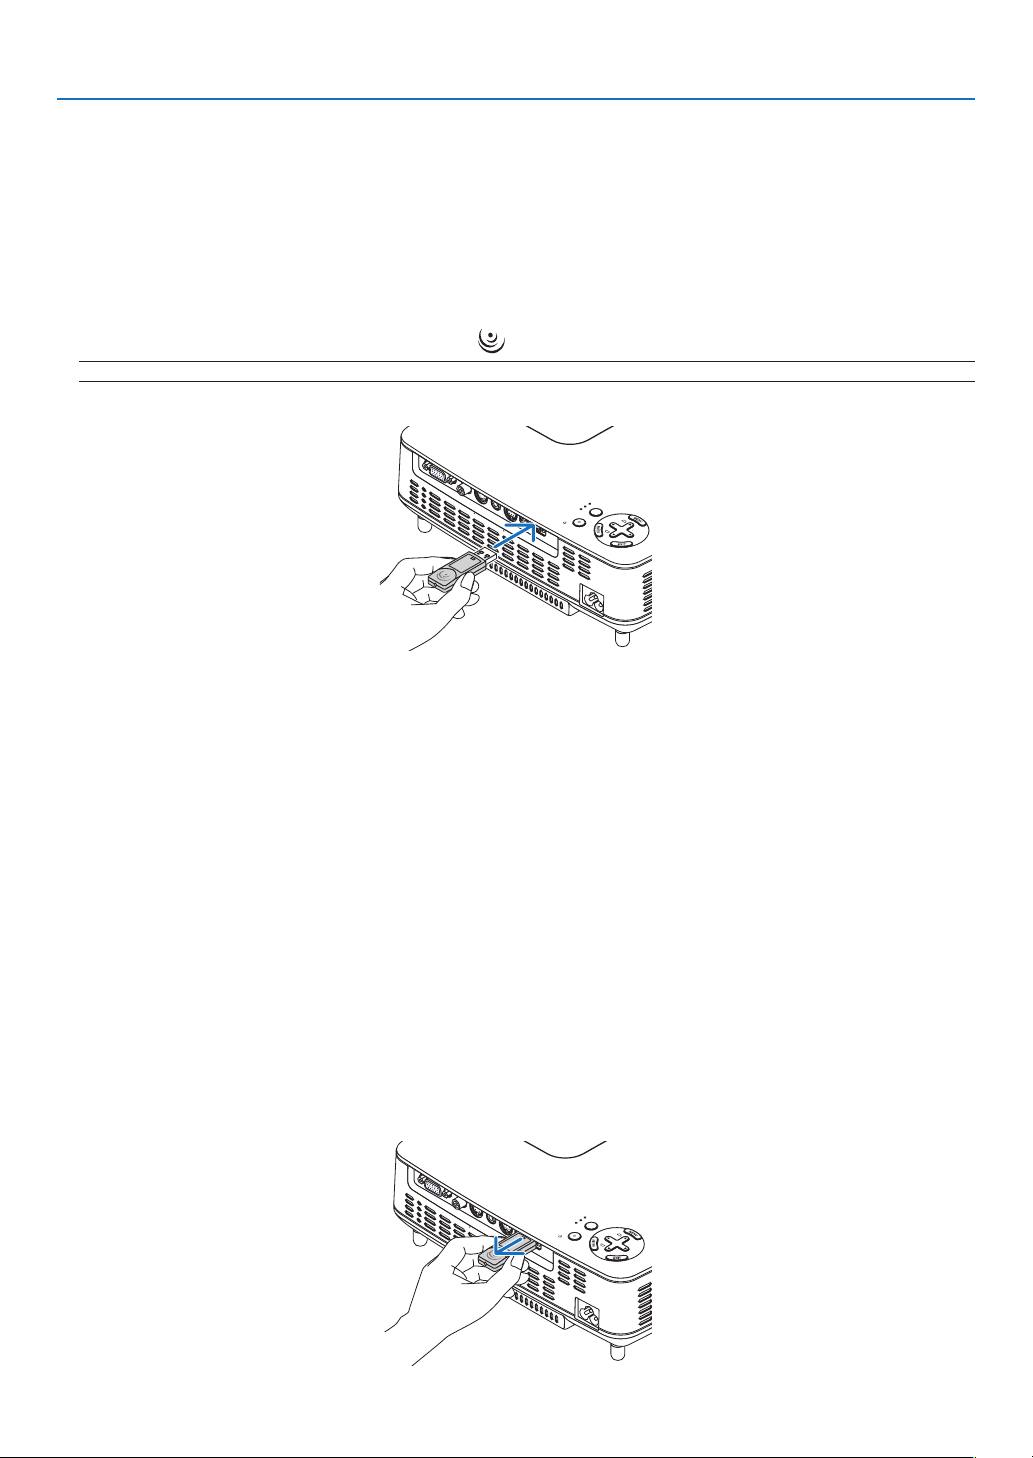
. Usng the Vewer (NP/NP)
Operatng Procedures
• Another way to select the [VIEWER] source is to press the VIEWER button on the remote control.
• When the slide screen is displayed from the Viewer, press the EXIT button to change it to the thumbnail
screen.
• Make sure that the drive display shows“Bluetooth”on the top left of the thumbnail screen.
• Insert the Bluetooth® USB adaptor with the [
] side facing upward.
NOTE: Do not remove the Bluetooth
®
USB adaptor while the message [INITIALIZING Bluetooth DEVICE] is being displayed.
L
A
M
P
S
T
A
T
U
S
P
O
W
E
R
S
OU
R
C
E
AU
T
O
A
DJ
.
SEL
ECT
ON/STAND BY
FOCUS
VIDEO
IN
C
OM
P
UT
E
R IN
PC CONTROL
AUDIO IN
S-VIDEO IN
US B
• Select the device name of the projector and enter your passkey on your transmission device.
The default device name of the projector is “BD address of inserted Bluetooth® USB adaptor”. The default
passkey is “0000”.
• When the projector receives images, those images will be shown on the thumbnail screen.
• If the projector receives unsupported images, the message [FILE FORMAT IS INCORRECT.] will be dis
-
played.
• After receiving images, operate the Viewer in the same way as the one for USB memory.
(
→ ”3. Operating the slide screen” on page
40), (→ “4. Operating the thumbnail screen” on page 40)
• To delete the received images, press the MENU button in the thumbnail screen to select [DELETE…] from
the pop-up menu.
• Remove the Bluetooth® USB adaptor from the projector.
L
A
M
P
S
T
A
T
U
S
P
O
W
E
R
SOURC
E
AUTO
ADJ.
SEL
EC
T
ON/STAND BY
FOCUS
VIDEO
IN
COMPUTER IN
PC CONTROL
A
UDIO
IN
S-VIDEO IN
US B

7
. Usng the Vewer (NP/NP)
Troubleshootng on Usng the wreless technology to transmt mages
ProblemCheck These Items
Cannot the projector, or
transmission rate is too
slow
• Check if the Bluetooth
®
USB adaptor is fully inserted into the USB port of the projector, and make sure that
the Bluetooth
®
USB adaptor is displayed in the thumbnail screen. (→ page
46)
• Check if the communication distance is too far or if there is any obstacle between the Bluetooth
®
USB adap-
tor and your transmission device. The maximum line-of-sight distance is 10 m/33 feet. (*The communica-
tion distance may vary depending on the environment.) (→ page 45)
• Check if the projector is used near a device generating electric wave such as a wireless LAN device or mi-
crowave oven. These devices may cause interference to the radio communications.
• Check if [SEARCH RESPONSE] is turned [ON]. If [SEARCH RESPONSE] is turned [OFF], the search screen
cannot be displayed. Should this happen, turn [SEARCH RESPONSE] to [ON] or specify the BD address in [BD
ADDRESS]. (→ page 42)
• Check if the Bluetooth wireless technology function is turned off with your transmission device. If so, turn it
on.
Cannot connect to the
projector
• Check if two or more transmission devices is sending data to the projector. The projector does not have the
capability of receiving data from multiple devices. Wait until data transmission from another transmission
device is completed.
• Check if a passkey is set on the projector. If so, the passkey is also required to be correctly set on your
transmission device. (→ page
42)
• Check if your transmission device supports the BIP or OPP profile. (→ page 45)
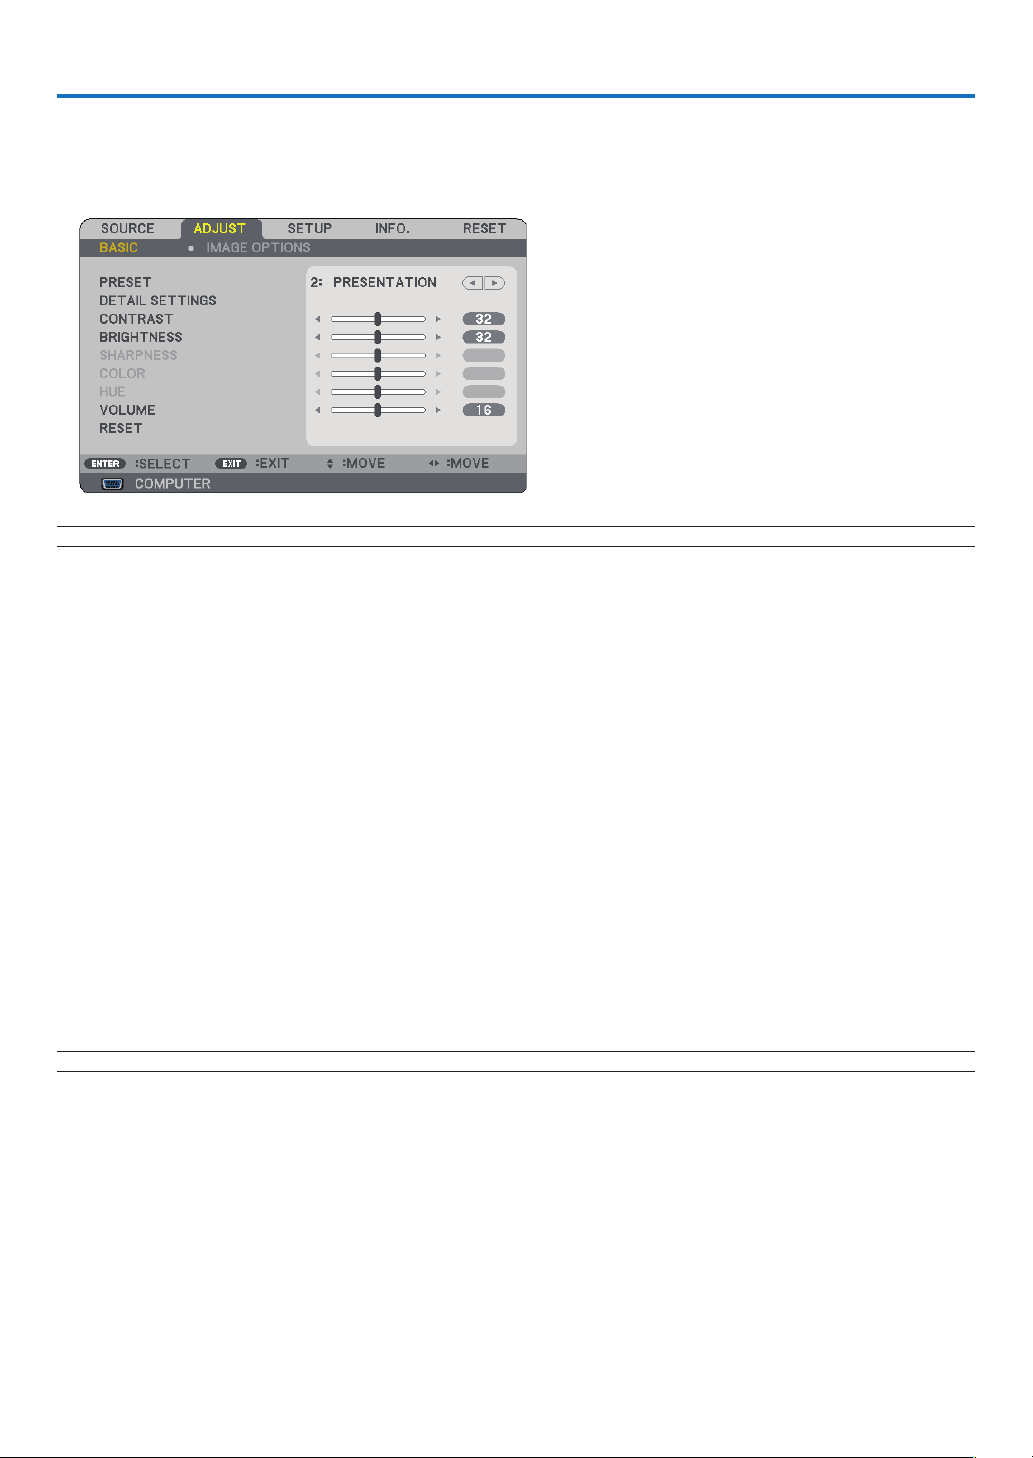
8
6. Using On-Screen Menu
❶
Using the Menus
NOTE: The commands such as
ENTER, EXIT, ▲▼, ◀▶ in the bottom show available buttons for your operation.
◀▶
▲▼
◀▶
▲▼◀▶
Changesarestoreduntilyouadjustitagain.
NOTE: When a menu or message is displayed, several lines of information may be lost, depending on the signal or settings.
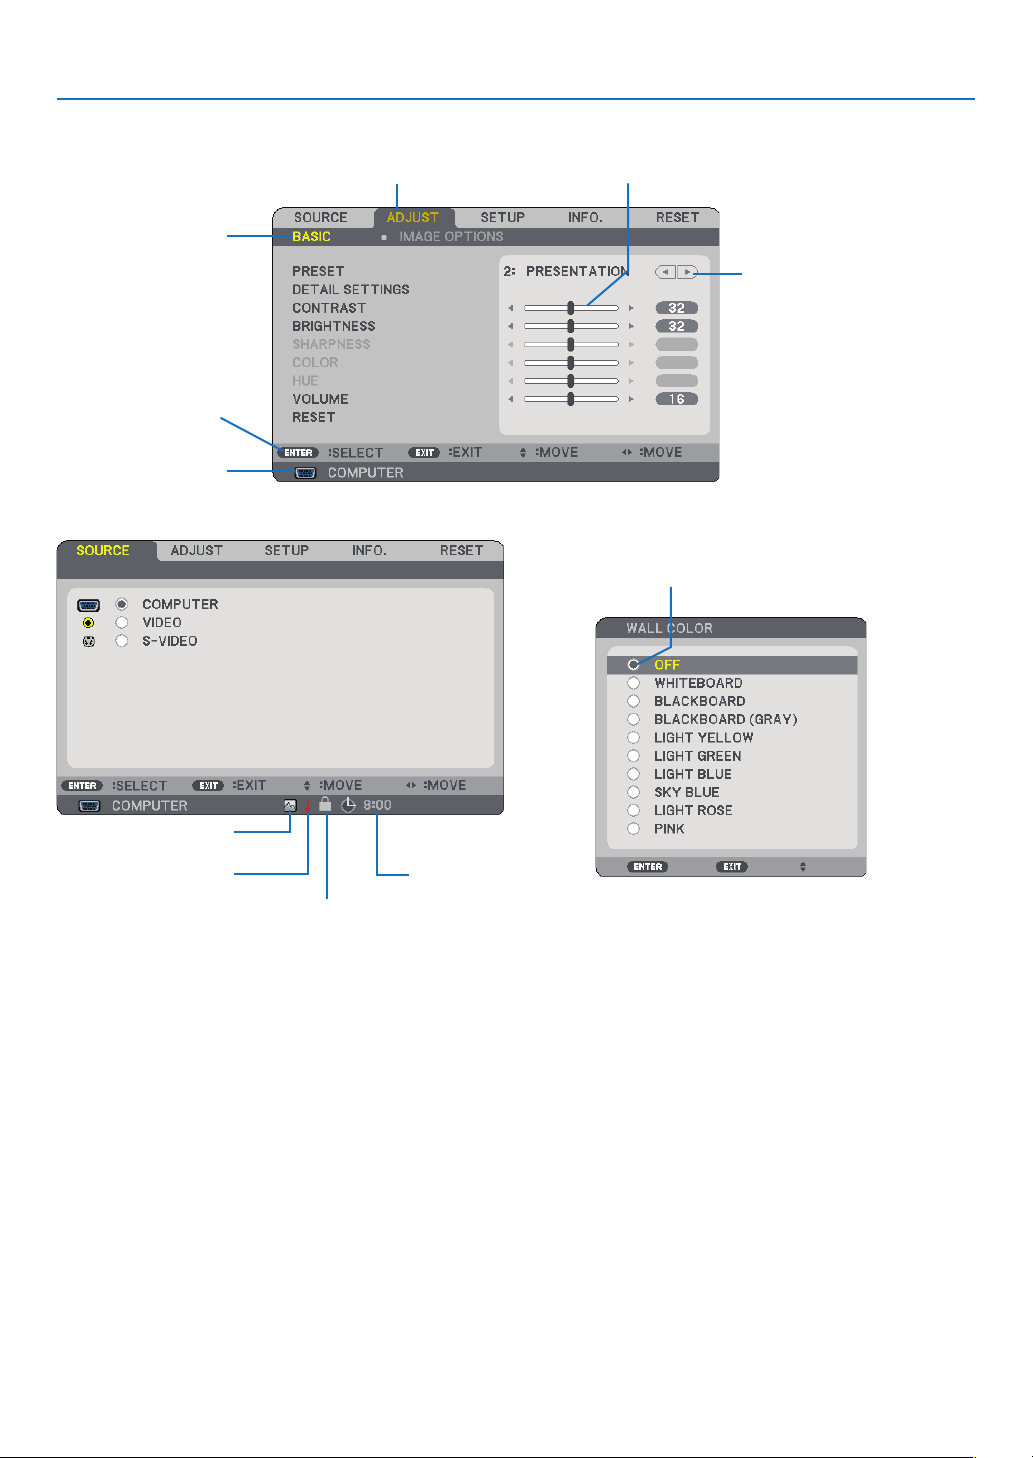
9
. Usng On-Screen Menu
➋
Menu Elements
Slide bar
Solid triangle
Highlight
Tab
Radio button
High Altitude symbol
Menu wndows or dalog boxes typcally have the followng elements:
Highlight .............................Indicates the selected menu or item.
Solid triangle ......................Indicates further choices are available. A highlighted triangle indicates the item is active.
Tab ......................................Indicates a group of features in a dialog box. Selecting on any tab brings its page to the front.
Radio button ......................Use this round button to select an option in a dialog box.
Source ................................Indicates the currently selected source.
Off Timer remaining time ... Indicates the remaining countdown time when the [OFF TIMER] is preset.
Slide bar .............................Indicates settings or the direction of adjustment.
Key Lock symbol ................Indicates the [CONTROL PANEL LOCK] is enabled.
Thermometer symbol.........Indicates the lamp mode is forcibly set to [ECO] mode because the internal temperature is too
high.
High Altitude symbol .........Indicates the [FAN MODE] is set to [HIGH ALTITUDE] mode.
Source
Available buttons
Thermometer symbol
Key Lock symbol
Off Timer remaining
time
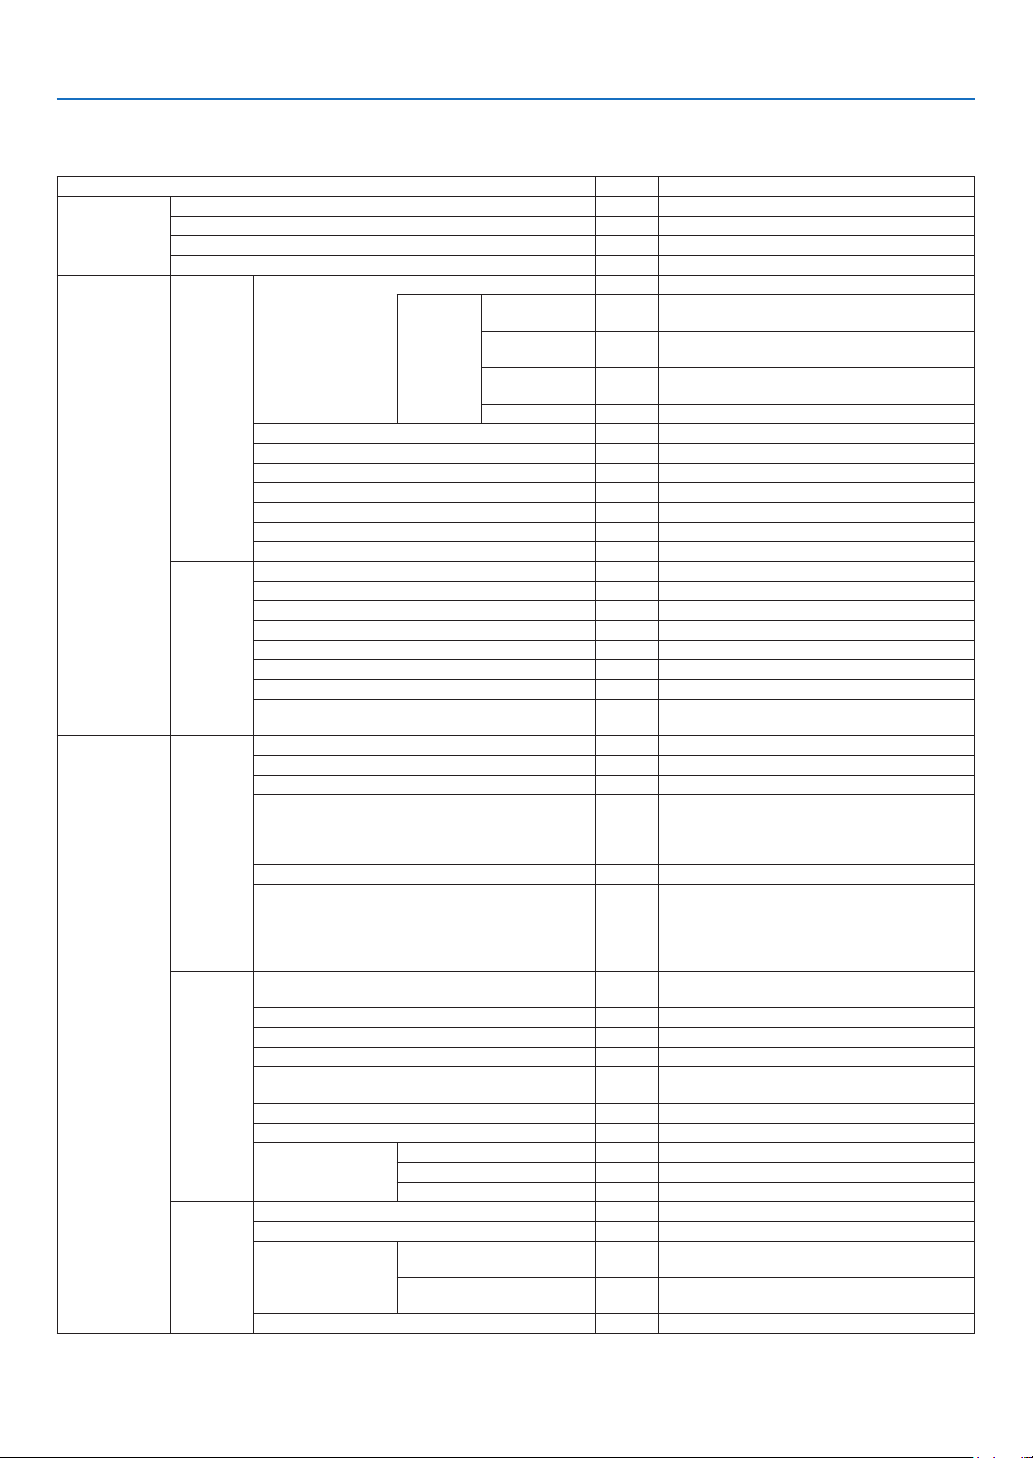
0
. Usng On-Screen Menu
➌
List of Menu Items
Somemenuitemsarenotavailabledependingontheinputsource.
MenuItemDefaultOptions
SOURCE
COMPUTER
VIDEO
S-VIDEO
VIEWER(NP62/NP52)
ADJUST
BASIC
PRESET
1-6
DETAIL
SETTINGS
REFERENCE*
HIGH-BRIGHT,PRESENTATION,
VIDEO,MOVIE,GRAPHIC,sRGB
GAMMA
CORRECTION
*DYNAMIC,NATURAL,BLACKDETAIL
COLOR
TEMPERATURE
*5000/6500/7800/8500/9300/10500
BrilliantColor*OFF,MEDIUM,HIGH
CONTRAST
BRIGHTNESS
SHARPNESS
COLOR
HUE
VOLUME
RESET
IMAGE
OPTIONS
CLOCK*
PHASE*
HORIZONTAL*
VERTICAL*
ASPECTRATIO*NORMAL,WIDEZOOM,CINEMA,NATIVE
CINEMAPOSITION
NOISEREDUCTIONOFFOFF,LOW,MEDIUM,HIGH
TELECINE
2-2/2-3
AUTO
OFF,2-2/2-3AUTO,2-2ON,2-3ON
SETUP
GENERAL
AUTOKEYSTONE
ONOFF,ON
KEYSTONE
KEYSTONESAVEOFFOFF,ON
WALLCOLOROFF
OFF,WHITEBOARD,BLACKBOARD,
BLACKBOARD(GRAY),LIGHTYELLOW,LIGHT
GREEN,LIGHTBLUE,SKYBLUE,LIGHT
ROSE,PINK
LAMPMODE
NORMAL
NORMAL,ECO
LANGUAGE
ENGLISH, DEUTSCH, FRANÇAIS, ITALIANO,
ESPAÑOL, SVENSKA, 日本語 , DANSK,
PORTUGUÊS, ČEŠTINA, MAGYAR, POLSKI,
NEDERLANDS, SUOMI, NORSK, TÜRKÇE,
РУССКИЙ , عربي, ΕΛΛΗΝΙΚΑ , 中文 , 한국어
INSTALLA-
TION
ORIENTATION
DESKTOP
FRONT
DESKTOPFRONT,CEILINGREAR,DESKTOP
REAR,CEILINGFRONT
CONTROLPANELLOCKOFFOFF,ON
SECURITYOFFOFF,ON
MENUCOLORSELECTCOLORCOLOR,MONOCHROME
MENUDISPLAYTIME
AUTO
45SEC
MANUAL/AUTO5SEC/AUTO15SEC/AUTO45
SEC
BACKGROUNDLOGOBLUE,BLACK,LOGO
COMMUNICATIONSPEED
38400bps
4800bps/9600bps/19200bps/38400bps
CONTROLID
CONTROLIDNUMBER11-254
CONTROLIDOFFOFF,ON
IDDISPLAYONOFF,ON
OPTIONS
(1)
AUTOFOCUS
ONOFF,ON
FANMODEAUTOAUTO,HIGH,HIGHALTITUDE
COLORSYSTEM
VIDEOAUTO
AUTO,NTSC3.58,NTSC4.43,PAL,PAL-M,
PAL-N,PAL60,SECAM
S-VIDEOAUTO
AUTO,NTSC3.58,NTSC4.43,PAL,PAL-M,
PAL-N,PAL60,SECAM
BEEPONOFF,ON
*Theasterisk(*)indicatesthatthedefaultsettingvariesdependingonthesignal.
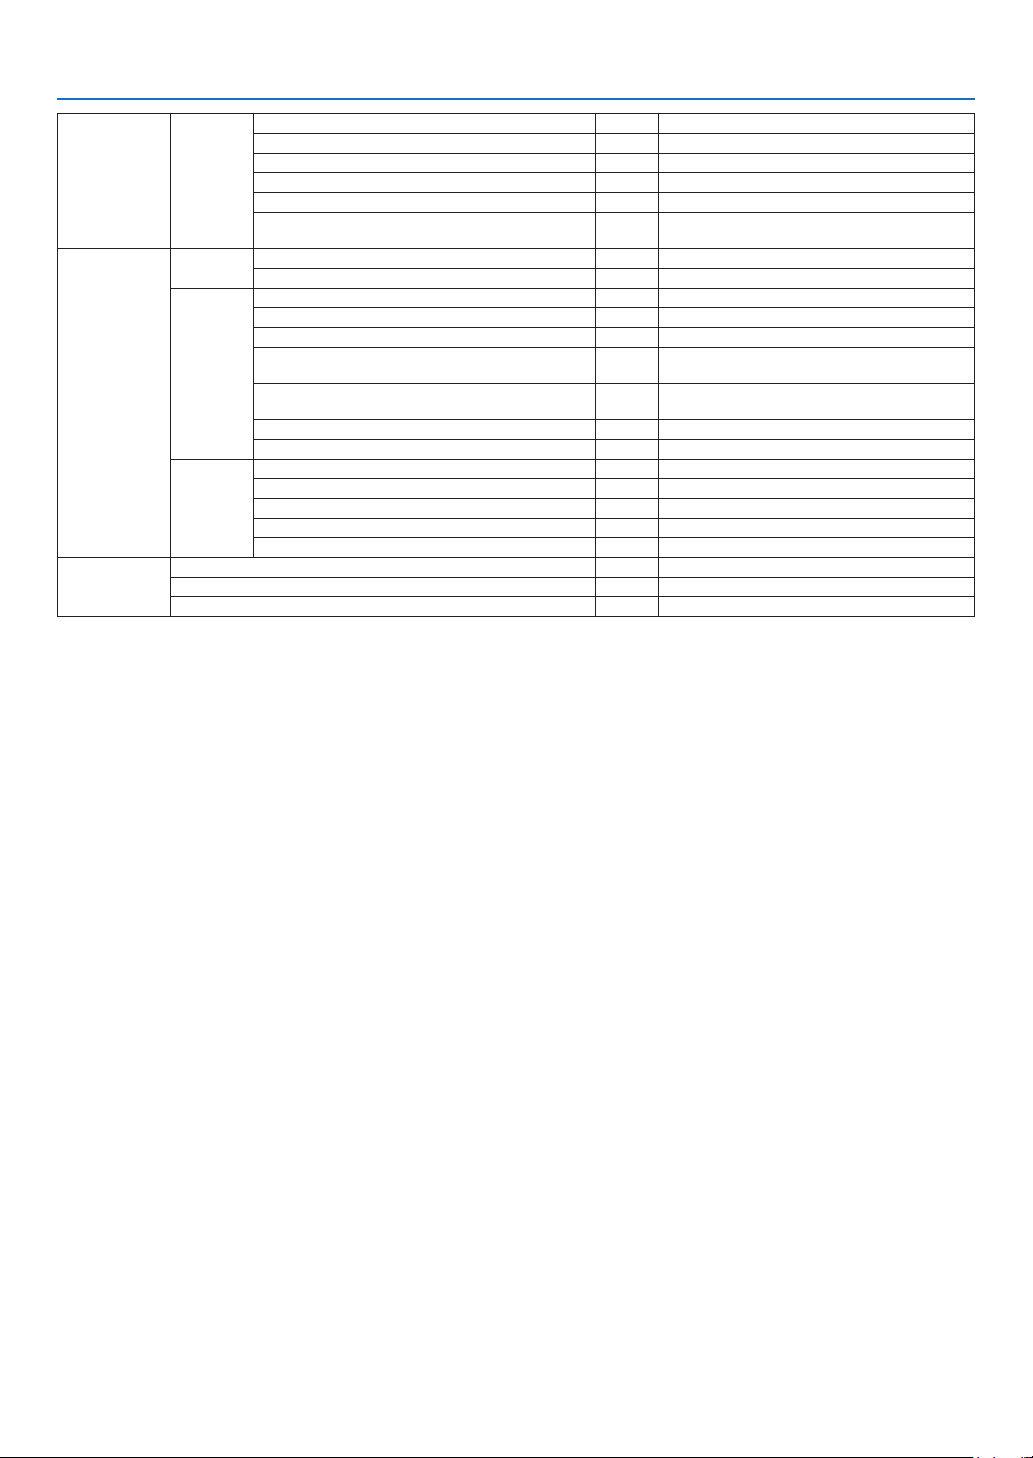
. Usng On-Screen Menu
SETUP
OPTIONS
(2)
OFFTIMER
OFFOFF/0:30/1:00/2:00/4:00/8:00/12:00/16:00
STANDBYMODE
NORMAL
NORMAL,POWER-SAVING
AUTOPOWERON(AC)OFFOFF,ON
AUTOPOWERON(COMP.)OFFOFF,ON
AUTOPOWEROFFOFFOFF/0:05/0:10/0:20/0:30
DEFAULTSOURCESELECTLAST
LAST,AUTO,COMPUTER,VIDEO,S-VIDEO,
VIEWER(NP62/NP52)
INFO.
USAGE
TIME
LAMPLIFEREMAINING
LAMPHOURSUSED
SOURCE
HORIZONTALFREQUENCY
VERTICALFREQUENCY
SIGNALTYPERGB,COMPONENT,VIDEO,S-VIDEO,HDTV
VIDEOTYPE
NTSC,NTSC3.58,NTSC4.43,PAL,PAL-M,
PAL-N,PAL60,SECAM
SYNCTYPE
SEPARATESYNC,COMPOSITESYNC,SYNC
ONGREEN,SYNCONVIDEO
SYNCPOLARITY
SCANTYPEINTERLACE,NON-INTERLACE
VERSION
PRODUCT
SERIALNUMBER
FIRMWARE
DATA
CONTROLID
RESET
CURRENTSIGNAL
ALLDATA
CLEARLAMPHOURS
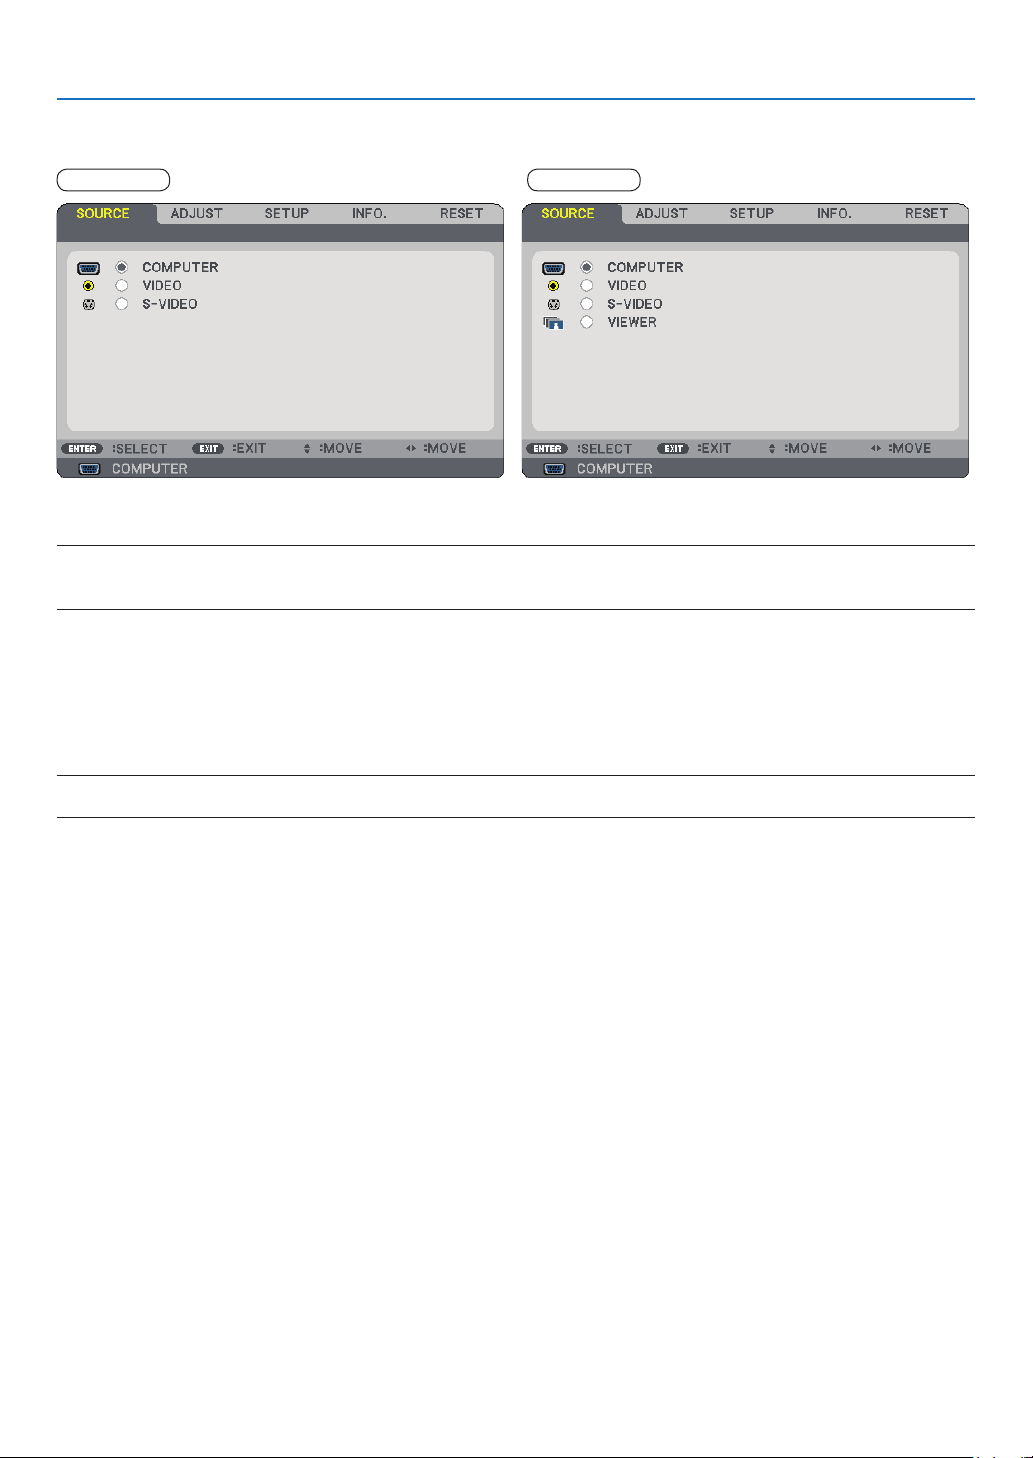
. Usng On-Screen Menu
➍
Menu Descriptions & Functions [SOURCE]
COMPUTER
SelectsthecomputerconnectedtoyourCOMPUTERinputconnector.
NOTE:
• When the component input signal is connected to the COMPUTER IN connector, select [COMPUTER].
• The projector will determine if the input signal is RGB or component signal.
VIDEO
SelectswhatisconnectedtoyourVIDEOinput-VCR,DVDplayerordocumentcamera.
S-VIDEO
SelectswhatisconnectedtoyourS-VIDEOinput-VCRorDVDplayer.
NOTE: A frame may freeze for a brief period of time when a video is played back in fast-forward or fast-rewind with a Video or
S-Video source.
VIEWER (NP/NP)
ProjectsimagesstoredinacommerciallyavailableUSBmemoryinsertedintotheUSBportoftheprojector.
InsertingtheoptionalBluetooth®USBadaptor(NP01BA)allowsyoutotransmitimagesfromyourcomputerormo-
bilephonewithBluetoothwirelesstechnologytotheprojector.
(→“5.UsingtheViewer”onpage
35)
NP61/NP41NP62/NP52
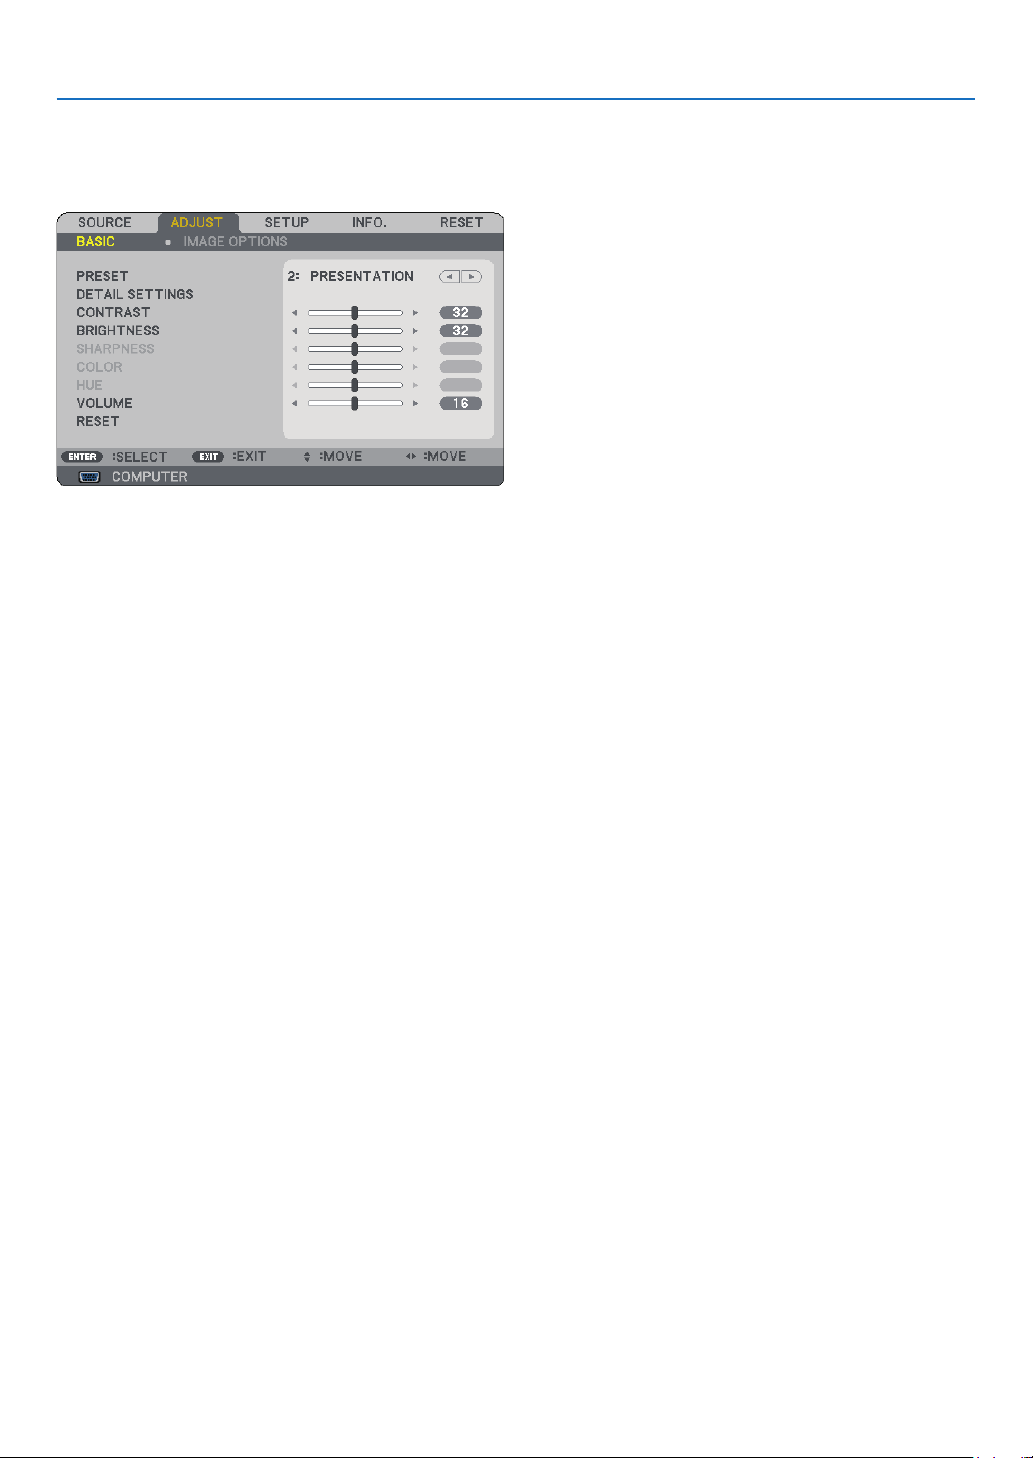
3
. Usng On-Screen Menu
➎
Menu Descriptions & Functions [ADJUST]
[BASIC]
[PRESET]
Thisfunctionallowsyoutoselectoptimizedsettingsforyourprojectedimage.
Youcanadjustneutraltintforyellow,cyanormagenta.
Therearesixfactorypresetsoptimizedforvarioustypesofimages.Youcanalsouse[DETAILSETTINGS]toset
useradjustablesettingstocustomizeeachgammaorcolor.
Yoursettingscanbestoredin[PRESET1]to[PRESET6].
HIGH-BRIGHT ....... Recommended for use in a brightly lit room.
PRESENTATION .... Recommended for making a presentation using a PowerPoint file.
VIDEO .................... Recommended for typical TV program viewing.
MOVIE ................... Recommended for movies.
GRAPHIC ............... Recommended for graphics.
sRGB ..................... Standard color values

. Usng On-Screen Menu
[DETAIL SETTINGS]
Storng Your Customzed Settngs [REFERENCE]
Thisfunctionallowsyoutostoreyourcustomizedsettingsin[PRESET1]to[PRESET6].
First,selectabasepresetmodefrom[REFERENCE],thenset[GAMMACORRECTION],[COLORTEMPERA-
TURE],and[BrilliantColor].
HIGH-BRIGHT ....... Recommended for use in a brightly lit room.
PRESENTATION .... Recommended for making a presentation using a PowerPoint file.
VIDEO .................... Recommended for typical TV program viewing.
MOVIE ................... Recommended for movies.
GRAPHIC ............... Recommended for graphics.
sRGB ..................... Standard color values.
Selectng Gamma Correcton Mode [GAMMA CORRECTION]
Eachmodeisrecommendedfor:
DYNAMIC .............. Creates a high-contrast picture.
NATURAL .............. Natural reproduction of the picture.
BLACK DETAIL ...... Emphasizes detail in dark areas of the picture.
Adjustng Color Temperature [COLOR TEMPERATURE]
Thisoptionallowsyoutoselectthecolortemperatureofyourchoice.
NOTE:
• When [PRESENTATION] or [HIGH-BRIGHT] is selected in [REFERENCE], this function is not available.
• Other options than [OFF] is selected in [WALL COLOR], the function is not available.
Adjustng Brghtness of Whte Areas [BrllantColor]
Thisfunctionallowsyoutoadjustthebrightnessofthewhiteareas.Asthepicturebecomesdim,itlooksmore
natural.
OFF ........................ Turns off the BrilliantColor feature.
MEDIUM ................ Increases brightness of the white areas.
HIGH ...................... Increases more brightness of the white areas.
NOTE: [BrilliantColor] is not available when [HIGH-BRIGHT] and [PRESENTATION] are selected for [REFERENCE].

. Usng On-Screen Menu
[CONTRAST]
Adjuststheintensityoftheimageaccordingtotheincomingsignal.
[BRIGHTNESS]
Adjuststhebrightnesslevelorthebackrasterintensity.
[SHARPNESS]
ControlsthedetailoftheimageforVideo.
[COLOR]
Increasesordecreasesthecolorsaturationlevel.
[HUE]
Variesthecolorlevelfrom+/-greento+/-blue.Theredlevelisusedasreference.
InputsignalCONTRASTBRIGHTNESSSHARPNESSCOLORHUE
Computer(RGB)
YesYesNoNoNo
ComponentYesYesYesYes*Yes*
Video,S-Video
YesYesYesYesYes
Viewer(NP62/NP52)
YesYesNoNoNo
Yes=Adjustable,No=Notadjustable,Yes*=dependingonthesignal
[VOLUME]
Adjuststhevolumeoftheprojectorspeaker.
NOTE:
• The volume level is set to "16" at the factory.
• Volume can be also adjusted by using the VOLUME (+/-) button on the remote control.
[RESET]
Theadjustmentsfor[CONTRAST],[BRIGHTNESS],[SHARPNESS],[COLOR],[HUE],and[VOLUME]willbere-
turnedtothefactorysettingvalues.
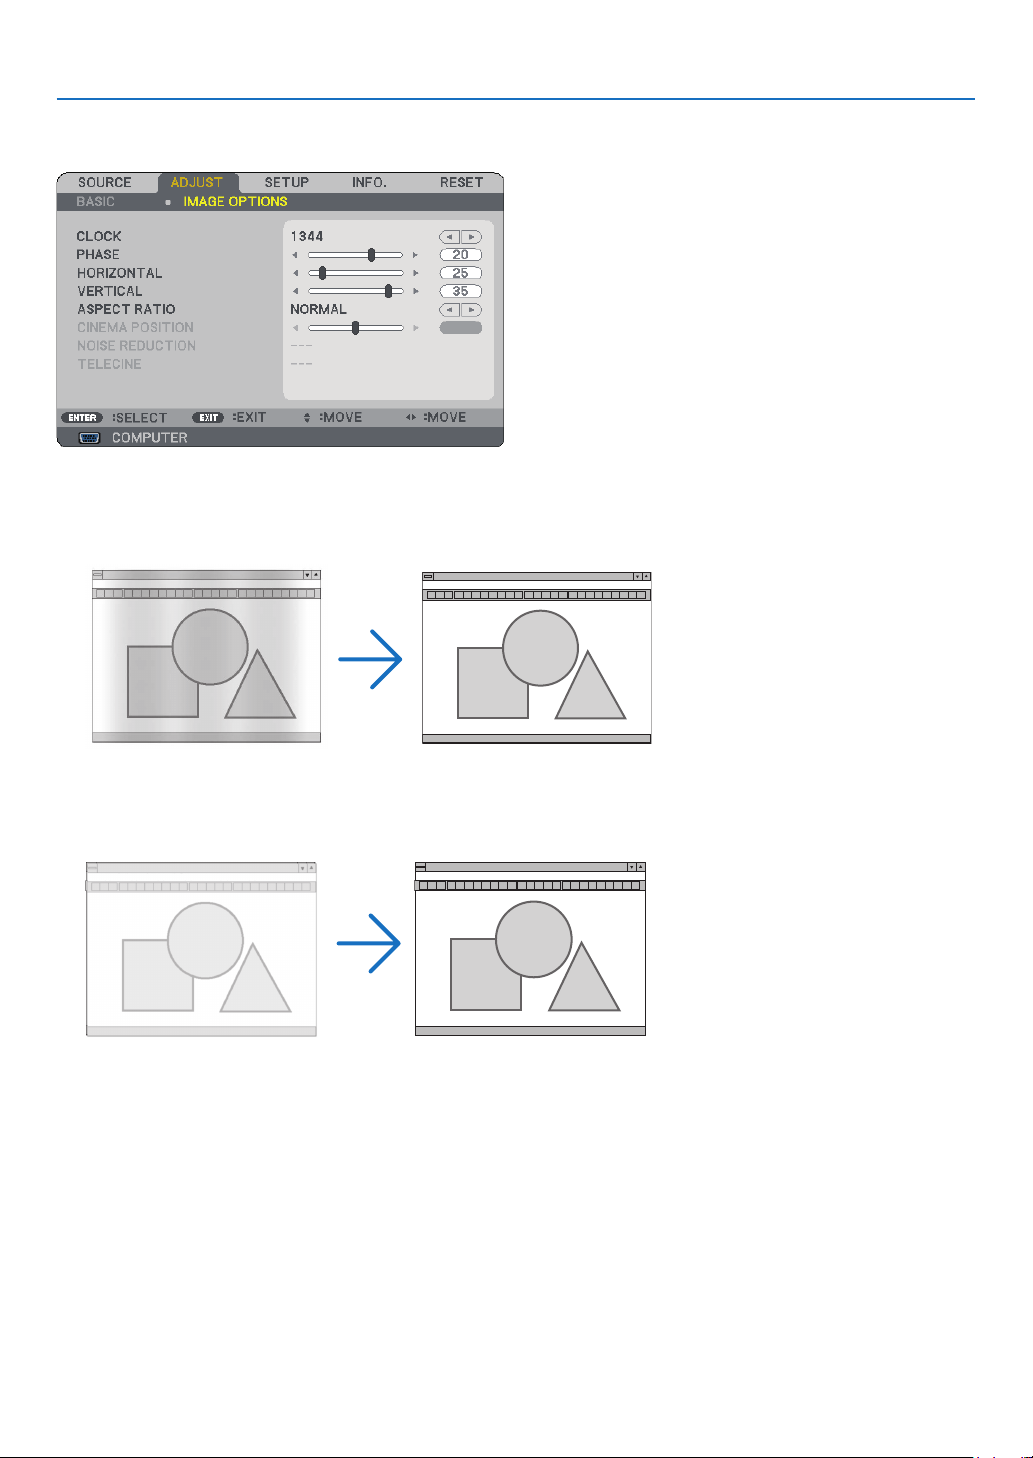
. Usng On-Screen Menu
[IMAGE OPTIONS]
Adjustng Clock and Phase [CLOCK/PHASE]
ThisallowsyoutomanuallyadjustCLOCKandPHASE.
CLOCK ................... Use this item to fine tune the computer image or to remove any vertical banding that might appear.
This function adjusts the clock frequencies that eliminate the horizontal banding in the image.
This adjustment may be necessary when you connect your computer for the first time.
PHASE ................... Use this item to adjust the clock phase or to reduce video noise, dot interference or cross talk. (This is
evident when part of your image appears to be shimmering.)
Use [PHASE] only after the [CLOCK] is complete.
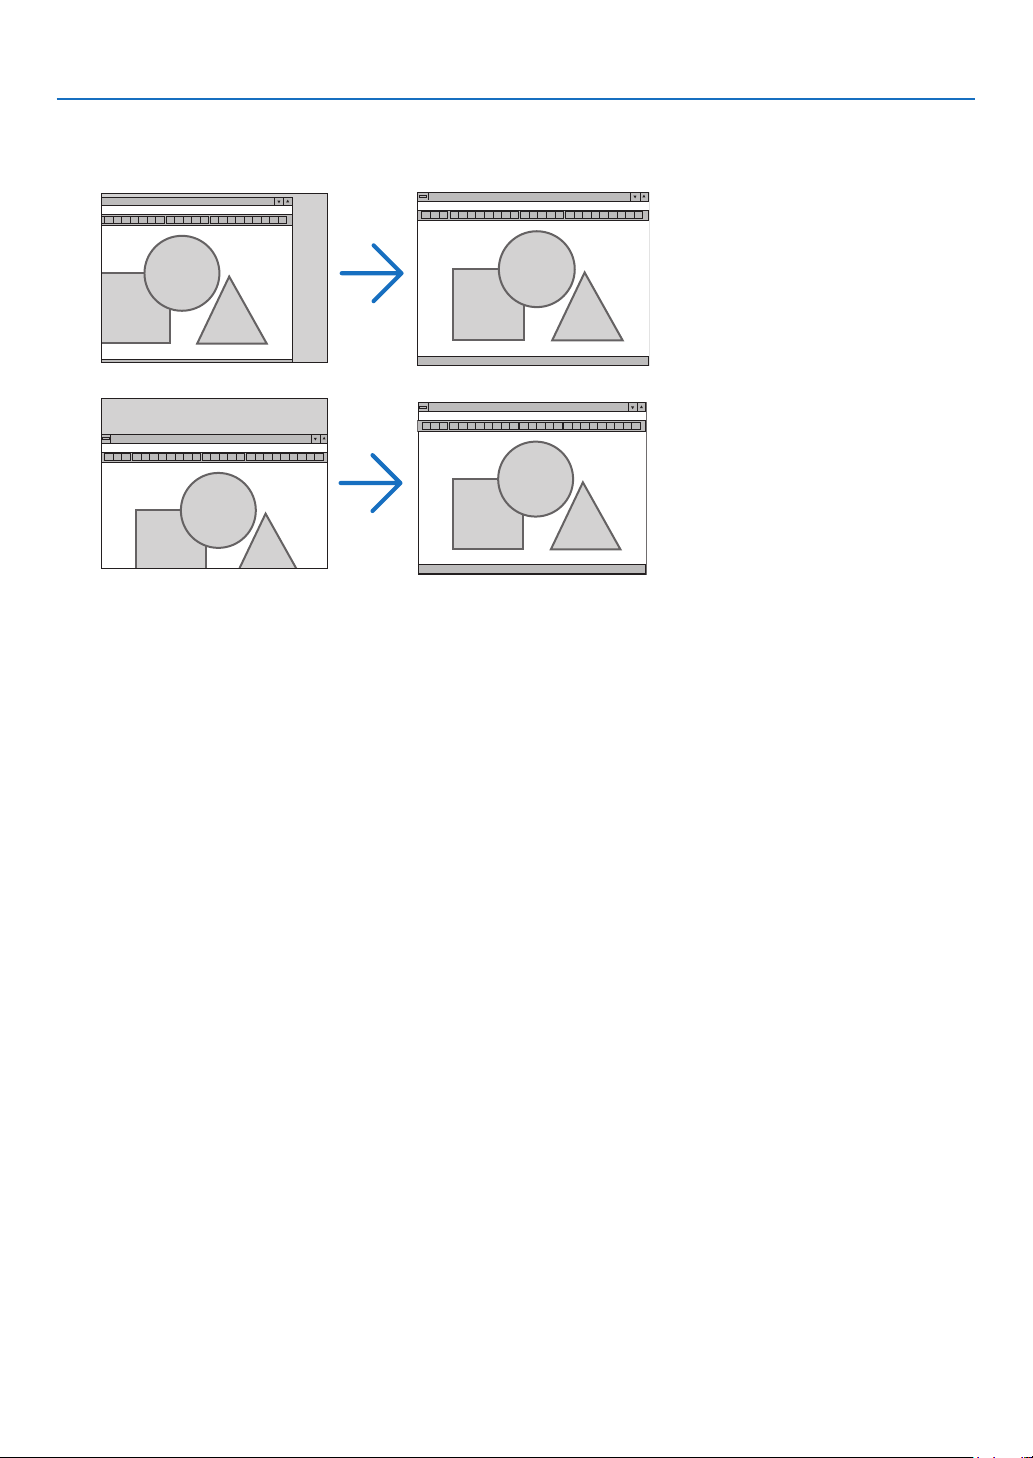
7
. Usng On-Screen Menu
Adjustng Horzontal/Vertcal Poston [HORIZONTAL/VERTICAL]
Adjuststheimagelocationhorizontallyandvertically.
-Animagecanbedistortedduringtheadjustmentof[CLOCK]and[PHASE].Thisisnotmalfunction.
-Theadjustmentsfor[CLOCK],[PHASE],[HORIZONTAL],and[VERTICAL]willbestoredinmemoryforthe
currentsignal.Thenexttimeyouprojectthesignalwiththesameresolution,horizontalandverticalfrequen
-
cy,itsadjustmentswillbecalledupandapplied.
Todeleteadjustmentsstoredinmemory,fromthemenu,youselect[RESET]
→[CURRENTSIGNAL]or[ALL
DATA]andresettheadjustments.(
→page
70)
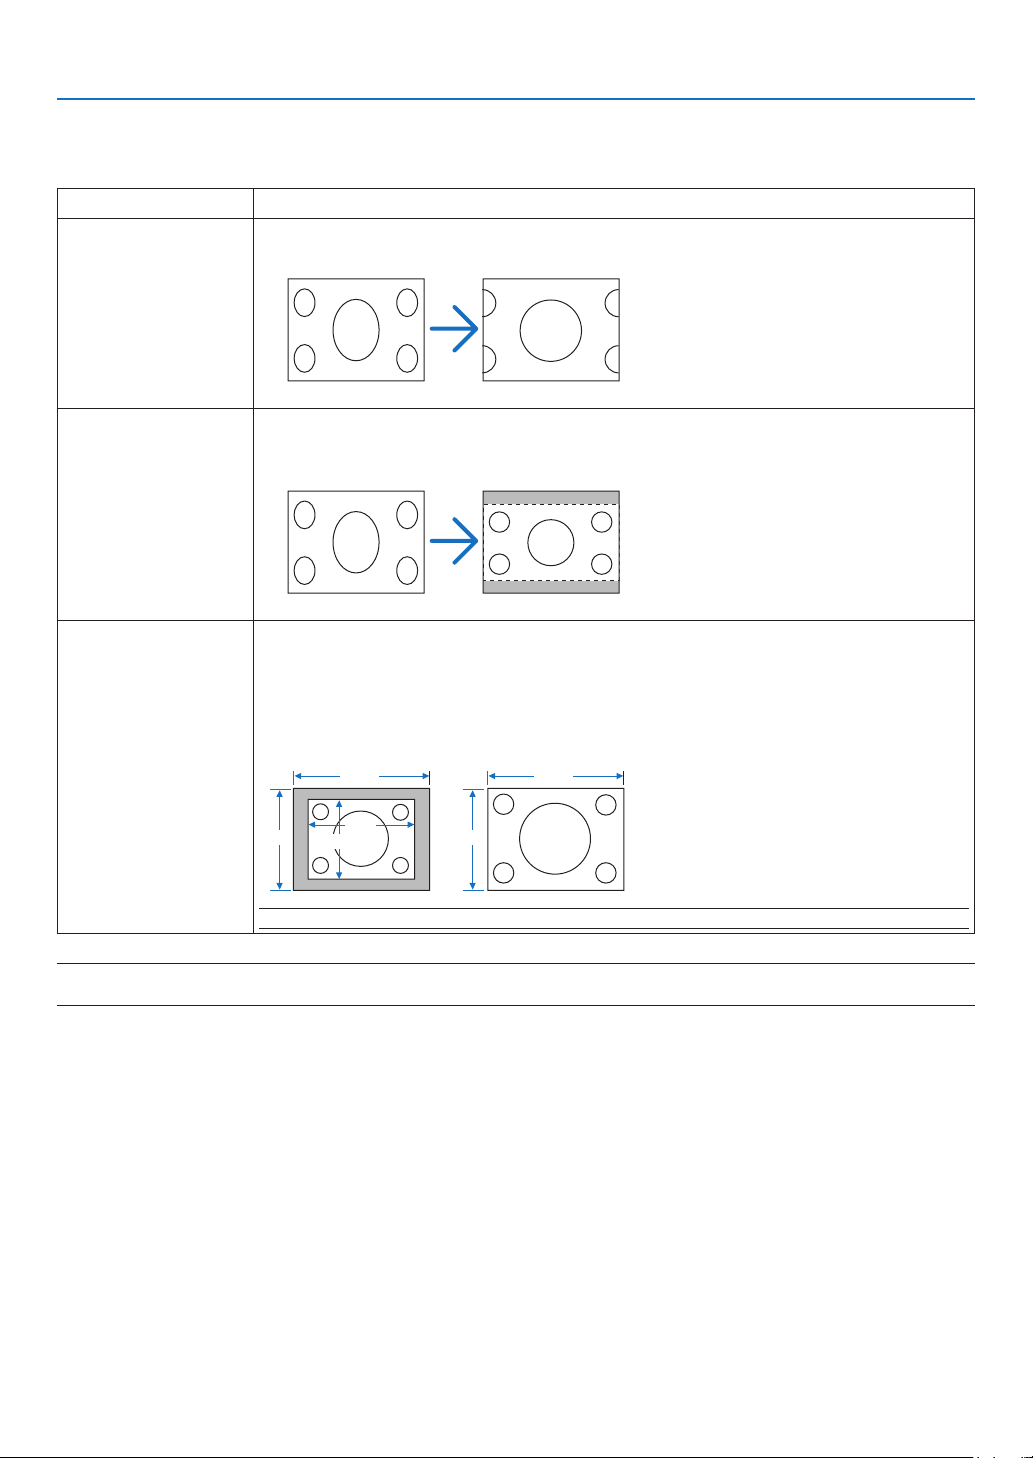
8
. Usng On-Screen Menu
Selectng Aspect Rato [ASPECT RATIO]
AspectRatioallowsyoutoselectthebestAspectmodetodisplayyoursourceimage.
YoucanalsodisplaytheAspectRatiowindowbypressingtheASPECTbuttonontheremotecontrol.(→page
7)
NORMALStandard4:3aspect
WIDE ZOOM
The16:9imageisstretchedleftandrighttot4:3screen.Someleftandrightedgesof
theimagearecutout.
16:9signal
CINEMA
The16:9imageiscompressedtopandbottomoftheimagetot16:9screen.Youcan
adjusttheimagepositionfor[CINEMA]aspect.See[CINEAMAPOSITION]forsetting
theimageposition.(
→page
59)
16:9signal
NATIVE
(RGB only)
Theprojectordisplaysthecurrentimageinitstrueresolution.Selectingotheroptions
than[NATIVE]willexpandorreducetheimagetottheprojector’snativeresolution(1024
x768pixels).
Example:Whenasourcewith800x600pixelsisselected:
1024
768
800
600
768
1024
NOTE: When a non- RGB is selected, you cannot select [NATIVE].
NOTE: When you are displaying an RGB image with a higher resolution than the projector's native resolution such as SXGA, the
image will be displayed in the projector’s native resolution (XGA) even if [NATIVE] is selected.
[NATIVE]
Opton other than
[NATIVE]
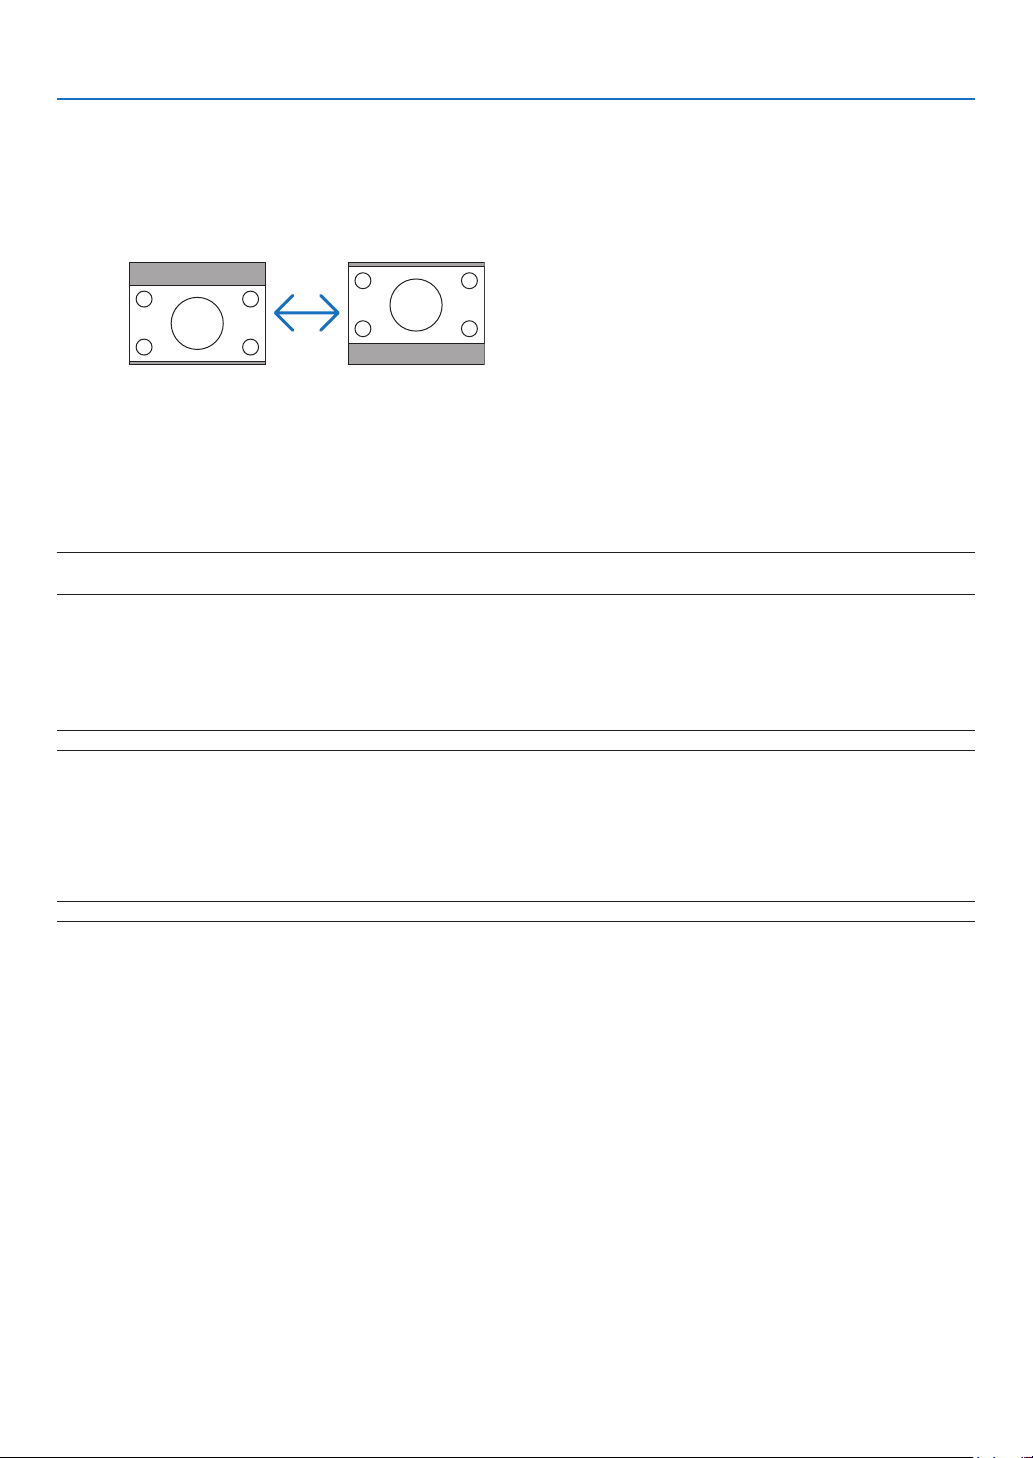
9
. Usng On-Screen Menu
Adjustng the Vertcal Poston of Image [CINEMA POSITION]
(onlywhen[CINEMA]isselectedfor[ASPECTRATIO])
ThisfeatureadjuststheverticalpositionoftheimagewhenviewingvideowithCinemaaspectratioselected.
When[CINEMA]isselectedin[ASPECTRATIO],theimageisdisplayedwithblackbordersonthetopandbottom.
Youcanadjusttheverticalpositionfromthetoptothebottomoftheblackarea.
Turnng on Nose Reducton [NOISE REDUCTION]
Thisfunctionallowsyoutoselectthelevelofnoisereduction.
Theprojectorissettotheoptimizedlevelforeachsignalatthefactory.
Selectyourpreferenceitemforyoursignalwhenvideonoiseisnoticeable.
Theoptionsare[OFF],[LOW],[MEDIUM],and[HIGH].
NOTE: This feature is not available for the RGB signal. Noise reduction set to off gives best image quality by way of higher band-
width. Noise reduction set to on softens the image.
Settng Telecne Mode [TELECINE]
Thisfunctionallowsyoutoconvertmotionpicturelmimagesintovideo.Theprocessaddsadditionalframesto
thepictureinordertoincreasetheframerate.
NOTE: This feature is available only when an SDTV signal is selected.
OFF ........................ Turns off the TELECINE mode.
2-2/2-3 AUTO ........ Detects pull-down correction method.
2-2 ON ................... Uses 2-2 pull-down correction method
2-3 ON ................... Uses 2-3 pull-down correction method
NOTE: This feature is not available for 480p, 576p, 720p, 1080i and RGB signals
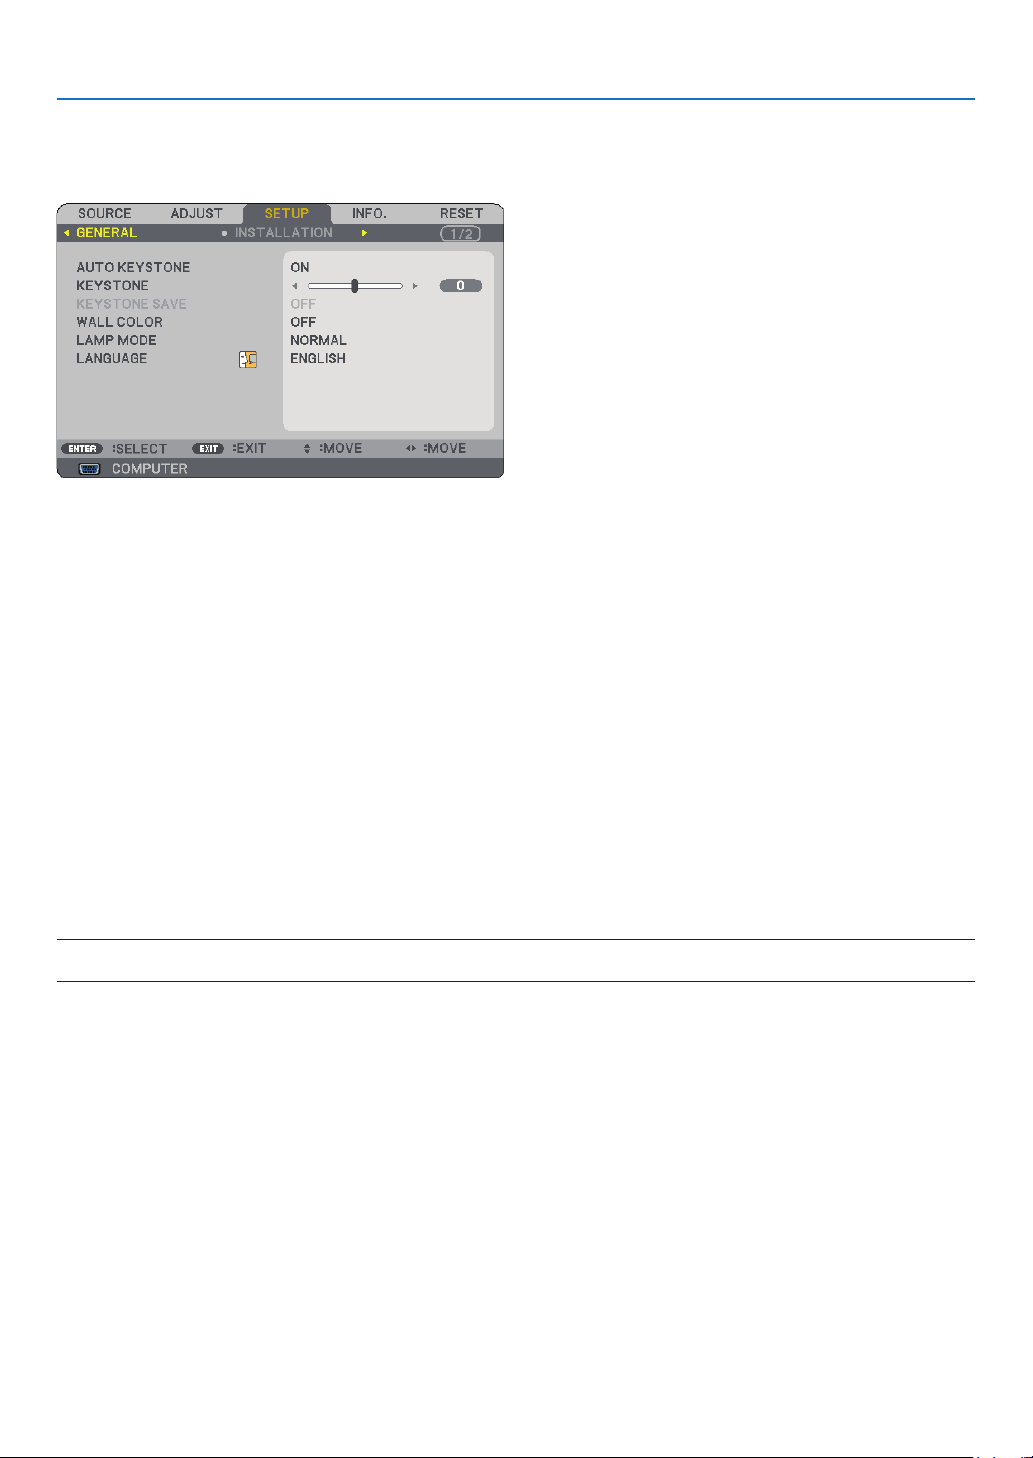
0
. Usng On-Screen Menu
➏
Menu Descriptions & Functions [SETUP]
[GENERAL]
Enablng Auto Keystone [AUTO KEYSTONE]
Thisfeatureallowstheprojectortodetectitstiltandcorrectverticaldistortionautomatically.
ToturnontheAUTOKEYSTONEfeature,select[ON].ToadjusttheKEYSTONEfeaturemanually,select[OFF].
Correctng Vertcal Keystone Dstorton Manually [KEYSTONE]
Youcancorrectverticaldistortionmanually.(→page
25)
TIP: When this option is highlighted, pressing the ENTER button will display its slide bar for adjustment.
Savng Vertcal Keystone Correcton [KEYSTONE SAVE]
Thisoptionenablesyoutosaveyourcurrentkeystonesettings.
OFF ........................ Does not save current keystone correction settings. It will return your keystone correction settings to
“zero”.
ON ......................... Saves current keystone correction settings
Savingyourchangeonceaffectsallsources.Thechangesaresavedwhentheprojectoristurnedoff.
NOTE: When [AUTO KEYSTONE] is set to [ON], [KEYSTONE SAVE] is not available. Next time you turn on the power, the AUTO
KEYSTONE function will work and the data stored with [KEYSTONE SAVE] will be invalid.
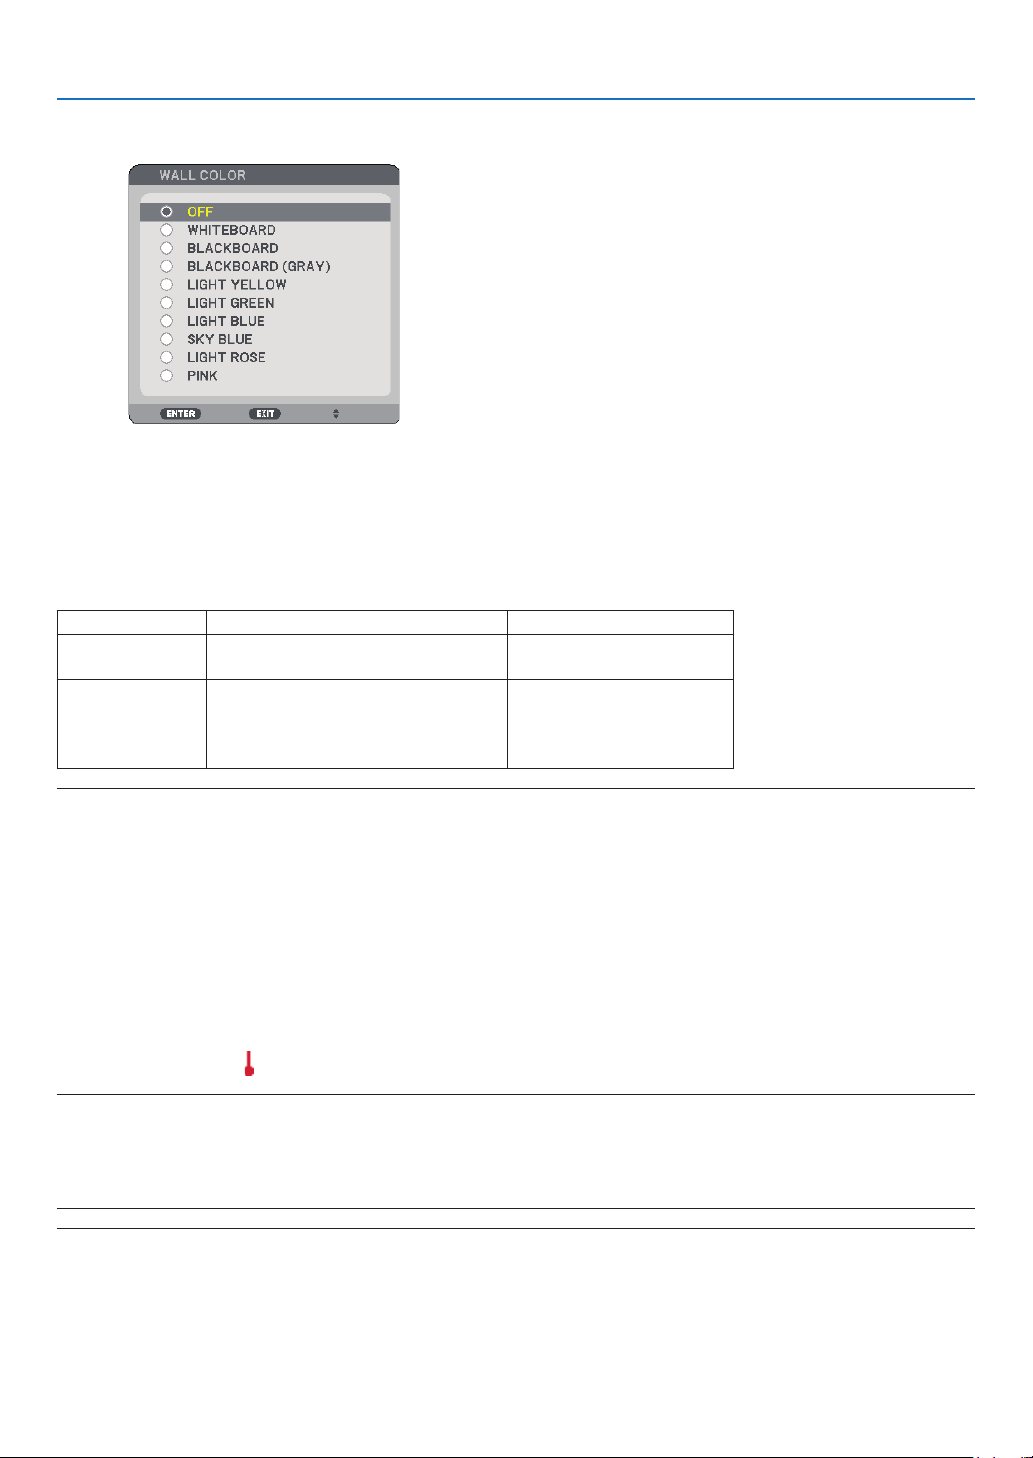
. Usng On-Screen Menu
Usng the Wall Color Correcton [WALL COLOR]
Thisfunctionallowsforquickadaptivecolorcorrectioninapplicationswherethescreenmaterialisnotwhite.
Settng Lamp Mode to Normal or Eco [LAMP MODE]
Thisfeatureenablesyoutoselecttwobrightnessmodesofthelamp:NORMALandECOmodes.Thelamplife
canbeextendedbyusingtheECOmode.SelectingECOmodedecreasesfannoisewhencomparedtoNORMAL
mode.
LampModeDescriptionStatusofLAMPindicator
NORMALMODE
ThisistheDefaultsetting
(100%Brightness).
Off
ECOMODE
Selectthismodetoincreasethe
lamplife(NP62/NP61:approx.75%
Brightness/NP52/NP41:approx.85%
Brightness)
SteadyGreenlight
NOTE:
• The [LAMP LIFE REMAINING] and [LAMP HOURS USED] can be checked in [USAGE TIME]. Select [INFO.]
→ [USAGE TIME]. (→
page
68)
• The projector is always in [NORMAL] for one minute after the lamp is turned on and while the POWER indicator is blinking
green. The lamp condition will not be affected even when [LAMP MODE] is changed.
• If there is no signal for about one minute, the projector will display a blue, black or logo background (depending on setting)
and go into [ECO].
The projector will return to the [NORMAL] once a signal is accepted.
• If the projector is overheated in [NORMAL] mode because of use in a high-temperature room , there may be a case where the
[LAMP MODE] automatically changes to [ECO] mode to protect the projector. This mode is called "forced ECO mode". When
the projector is in [ECO] mode, the picture brightness decreases. The LAMP indicator's steady light indicates the projector is
in [ECO] mode. When the projector comes back to normal temperature, the [LAMP MODE] returns to [NORMAL] mode.
Thermometer symbol [
] indicates the [LAMP MODE] is automatically set to [ECO] mode because the internal temperature
is too high.
Selectng Menu Language [LANGUAGE]
Youcanchooseoneof21languagesforon-screeninstructions.
NOTE: Your setting will not be affected even when [RESET] is done from the menu.
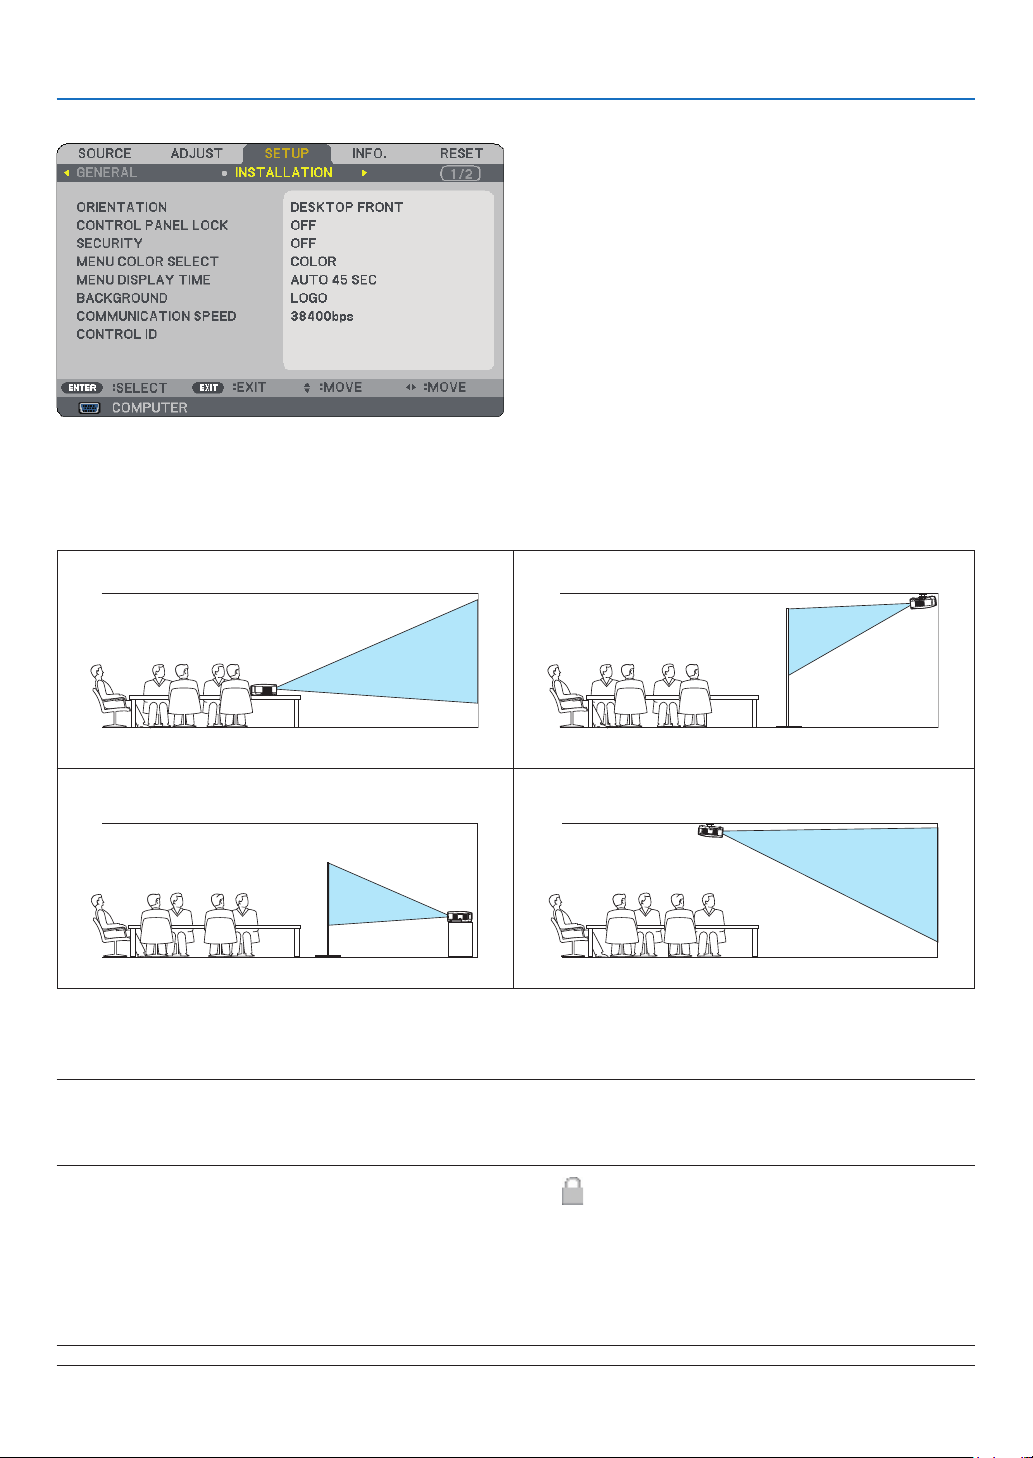
. Usng On-Screen Menu
[INSTALLATION]
Selectng Projector Orentaton [ORIENTATION]
Thisreorientsyourimageforyourtypeofprojection.Theoptionsare:desktopfrontprojection,ceilingrearprojec-
tion,desktoprearprojection,andceilingfrontprojection.
DESKTOPFRONT
CEILINGREAR
DESKTOPREAR
CEILINGFRONT
Dsablng the Cabnet Buttons [CONTROL PANEL LOCK]
ThisoptionturnsonorofftheCONTROLPANELLOCKfunction.
NOTE:
• This CONTROL PANEL LOCK does not affect the remote control functions.
• When the control panel is locked, pressing and holding the EXIT button on the projector cabinet for about 10 seconds will
change the setting to [OFF].
TIP: When the [CONTROL PANEL LOCK] is turned on, a key lock icon [
] will be displayed at the bottom right of the menu.
Enablng Securty [SECURITY]
ThisfeatureturnsonorofftheSECURITYfunction.
Unlessthecorrectkeywordisentered,theprojectorcannotprojectanimage.(→page
30)
NOTE: Your setting will not be affected even when [RESET] is done from the menu.

3
. Usng On-Screen Menu
Selectng Menu Color [MENU COLOR SELECT]
Youcanchoosebetweentwooptionsformenucolor:COLORandMONOCHROME.
Selectng Menu Dsplay Tme [MENU DISPLAY TIME]
Thisoptionallowsyoutoselecthowlongtheprojectorwaitsafterthelasttouchofabuttontoturnoffthemenu.
Thepresetchoicesare[MANUAL],[AUTO5SEC],[AUTO15SEC],and[AUTO45SEC].The[AUTO45SEC]is
thefactorypreset.
Selectng a Color or Logo for Background [BACKGROUND]
Usethisfeaturetodisplayablue/blackscreenorlogowhennosignalisavailable.Thedefaultbackgroundis
[LOGO].
NOTE: Your setting will not be affected even when [RESET] is done from the menu.
Selectng Communcaton Speed [COMMUNICATION SPEED]
ThisfeaturesetsthebaudrateofthePCControlport(MiniDIN8Pin).Itsupportsdataratesfrom4800to38400
bps.Thedefaultis38400bps.Selecttheappropriatebaudrateforyourequipmenttobeconnected(depending
ontheequipment,alowerbaudratemayberecommendedforlongcableruns).
NOTE: Your selected communication speed will not be affected even when [RESET] is done from the menu.
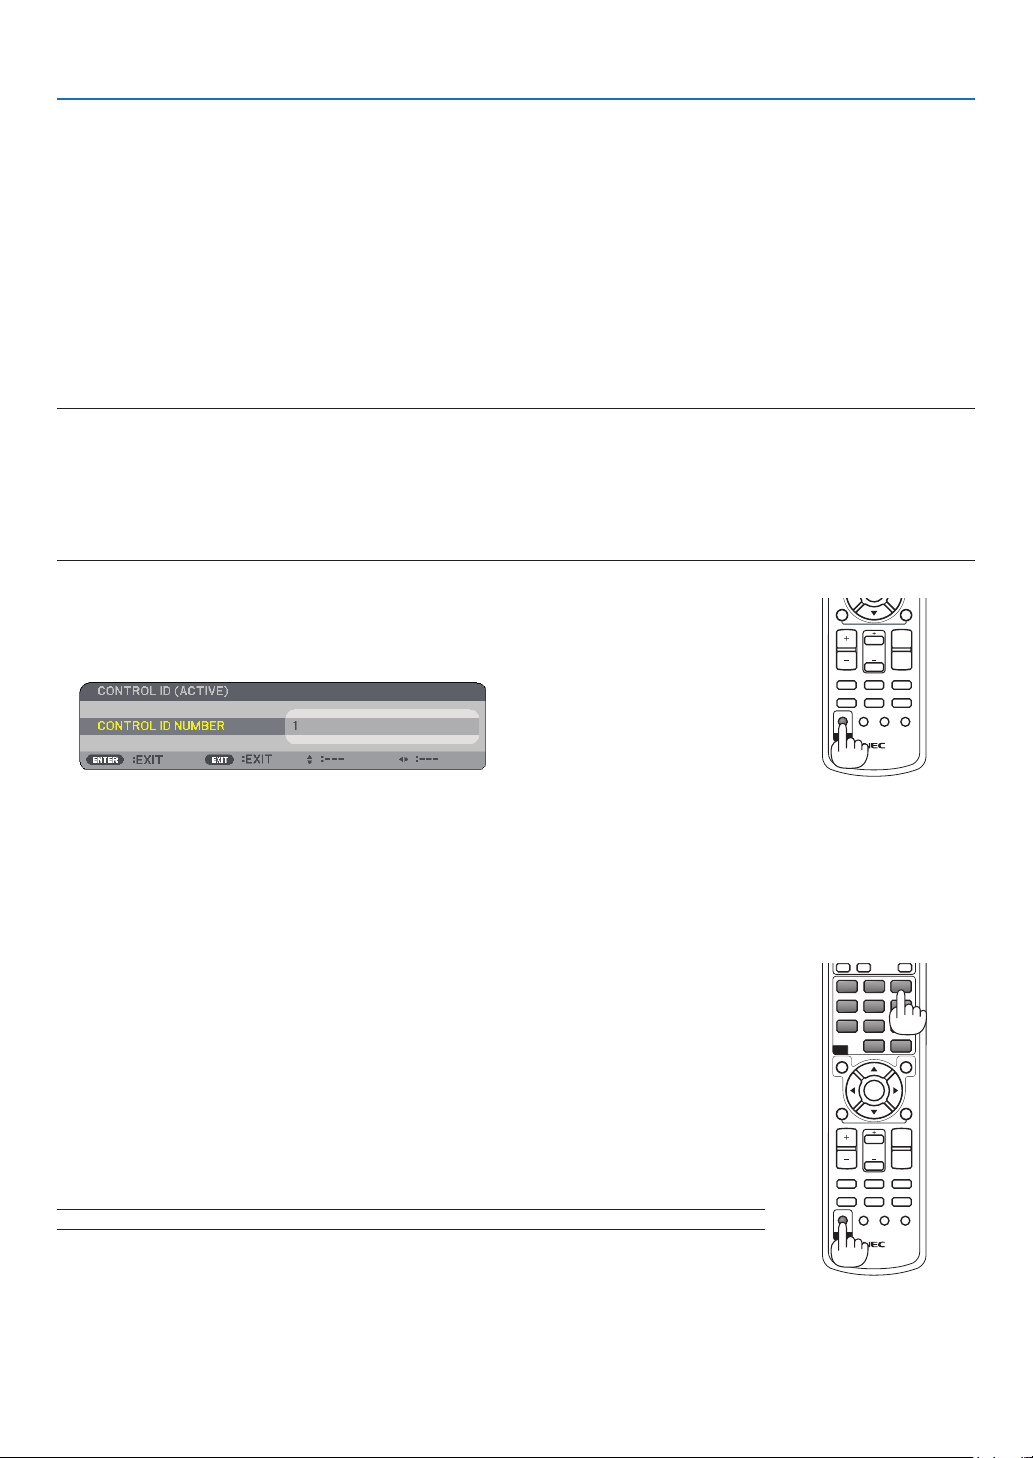
. Usng On-Screen Menu
Settng ID to the Projector [CONTROL ID]
(Avalable only when the optonal remote control NP0RC s used)
YoucanoperatemultipleprojectorsseparatelyandindependentlywithasingleremotecontrolthathastheCON-
TROLIDfunction.IfyouassignthesameIDtoalltheprojectors,youcanconvenientlyoperatealltheprojectors
togetherusingthesingleremotecontrol.Todoso,youhavetoassignanIDnumbertoeachprojector.
CONTROL ID NUMBER ......Select a number from 1 to 254 you wish to assign to your projector.
CONTROL ID ......................Select [OFF] to turn off the CONTROL ID setting and select [ON] to turn on the CONTROL ID
setting.
ID DISPLAY ........................ This option turns on or off the ID number which is displayed when the ID SET button on the
remote control is pressed.
NOTE:
• Selecting [ON] for [CONTROL ID] will make the remote control supplied with the projector inoperable. The buttons on the
projector cabinet can be used. Optional remote control NP01RC does not have the CONTROL ID function and therefore cannot
operate the projector once a Control ID is set.
• Pressing and holding the ENTER button on the projector cabinet for 10 seconds will display the menu for canceling the Con
-
trol ID.
• Your setting will not be affected even when [RESET] is done from the menu.
Assgnng or Changng the Control ID
The CONTROL ID screen will be displayed.
If the projector can be operated with the current remote control ID, the [ACTIVE] will be displayed. If the pro-
jector cannot be operated with the current remote control ID, the [INACTIVE] will be displayed. To operate the
inactive projector, assign the control ID used for the projector by using the following procedure (Step 3).
MAGNIFY
VOLUME
PICTURE
LAMP MODE
ASPECT
AV-MUTE
3D REFORM
FREEZE
ID SET
LENS SHIFT
FOCUS
/ZOOM
HELP
PAGE
L-CLICK
R-CLICK
UP
DOWN
ID
MAGNIFY
VOLUME
PICTURE
LAMP MODE
ASPECT
AV-MUTE
3D REFORM
FREEZE
ID SET
LENS SHIFT
FOCUS
/ZOOM
HELP
PAGE
MENU
L-CLICK
R-CLICK
EXIT
ENTER
UP
DOWN
ID
ID
1 32
4 65
7 98
0
CLEAR
To assign "3", press the "3" button on the remote control.
No ID means that all the projectors can be operated together with a single remote
control. To set "No ID", enter "000" or press the CLEAR button.
TIP: The range of IDs is from 1 to 254.
The updated CONTROL ID screen will be displayed.
NOTE: The IDs can be cleared in a few days after the batteries are run down or removed.

. Usng On-Screen Menu
[OPTIONS()]
Enablng or Dsablng Auto Focus [AUTO FOCUS]
ThisoptionturnsonorofftheAUTOFOCUSfeature.(→page
22)
NOTE:
When the “AUTO FOCUS” is on, the AUTO FOCUS function works instantly under the following conditions:
When you turn on the power.
When you change the zoom.
When you reposition the projector.
When you change the projection angle.
Selectng Fan Mode [FAN MODE]
Thisoptionallowsyoutoselectthreemodesforfanspeed:Automode,Highspeedmode,andHighAltitude
mode.
AUTO ..................... The built-in fans automatically run at a variable speed according to the internal temperature.
HIGH ...................... The built-in fans run at high speed.
HIGH ALTITUDE .... The built-in fans run at a high speed. Select this option when using the projector at altitudes approxi-
mately 5000 feet/1500 meters or higher.
Whenyouwishtocooldownthetemperatureinsidetheprojectorquickly,select[HIGH].
NOTE:
• It is recommended that you select High speed mode if you use the projector non-stop for consecutive days.
• Set [FAN MODE] to [HIGH ALTITUDE] when using the projector at altitudes approximately 5000 feet/1500 meters or higher.
• Using the projector at altitudes approximately 5000 feet/1500 meters or higher without setting to [HIGH ALTITUDE] can cause
the projector to overheat and the protector could shut down. If this happens, wait a couple minutes and turn on the projector.
• Using the projector at altitudes less than approximately 5000 feet/1500 meters and setting to [HIGH ALTITUDE] can cause the
lamp to overcool, causing the image to flicker. Switch [FAN MODE] to [AUTO].
• Using the projector at altitudes approximately 5000 feet/1500 meters or higher can shorten the life of optical components
such as the lamp.
• Your setting will not be affected even when [RESET] is done from the menu.
Selectng [COLOR SYSTEM]
Thisfeatureenablesyoutoselectvideostandardsmanually.
Normallyselect[AUTO].Selectthevideostandardfromthepulldownmenu.ThismustbedoneforVIDEOand
S-VIDEOConnectorsseparately.
TIP: The projector automatically detects a component signal.
•
•
•
•
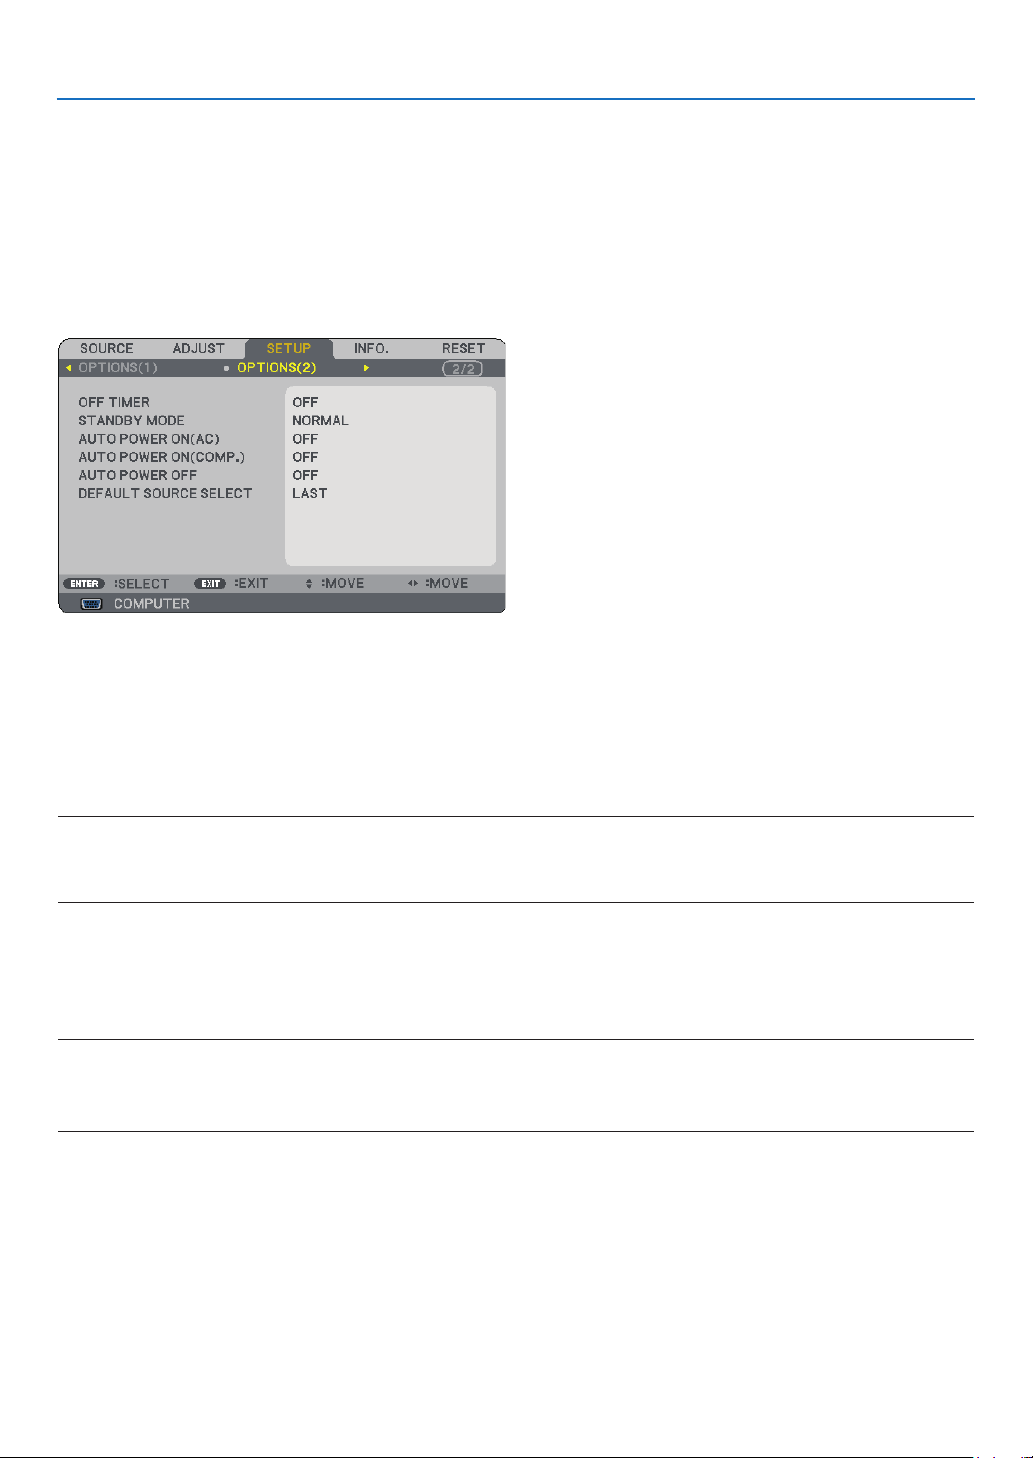
. Usng On-Screen Menu
Enablng Key Sound and Error Sound [BEEP]
Thisfeatureturnsonoroffthebuttonsoundoralarmwhenthefollowingoperationsareperformed.
-displayingthemainmenu
-switchingsources
-Resettingdatabyusing[RESET]
-PressingPOWERONorPOWEROFFbutton
[OPTIONS()]
Usng Off Tmer [OFF TIMER]
NOTE:
• To cancel the preset time, set [OFF] for the preset time or turn off the power.
• When the remaining time reaches 3 minutes before the projector is turned off, the [THE PROJECTOR WILL TURN OFF WITHIN
3 MINUTES] message will be displayed on the bottom of the screen.
Selectng Power-savng n [STANDBY MODE]
Theprojectorhastwostandbymodes:[NORMAL]and[POWER-SAVING].
Power-savingmodeisthemodethatallowsyoutoputtheprojectorinthepower-savingconditionwhichcon-
sumeslesspowerthantheNORMALmode.TheprojectorispresetforNORMALmodeatthefactory.
NOTE:
• Control through the PC Control connector is not available during POWER-SAVING mode. For PC control of the projector it is
recommended to leave the projector in the Normal mode.
• Your setting will not be affected even when [RESET] is done from the menu.
NORMAL ....................... Power indicator: Orange light/STATUS indicator: Green light
POWER-SAVING ........... Power indicator: Orange light/STATUS indicator: Off

7
. Usng On-Screen Menu
Enablng Auto Power On [AUTO POWER ON(AC)]
Turnstheprojectoronautomaticallywhenthepowercableisinsertedintoanactivepoweroutlet.Thiseliminates
theneedtoalwaysusethePOWERbuttonontheremotecontrolorprojectorcabinet.
Turnng On the Projector By Applyng RGB Sgnal [AUTO POWER ON(COMP.)]
WhentheprojectorisinStandbymode,applyinganRGBsignalfromacomputerconnectedtotheCOMPUTER
INinputwillpowerontheprojectorandsimultaneouslyprojectthecomputer'simage.
ThisfunctionalityeliminatestheneedtoalwaysusethePOWERbuttonontheremotecontrolortheprojector
cabinettopowerontheprojector.
Tousethisfunction,rstconnectacomputertotheprojectorandtheprojectortoanactiveACinput.
NOTE:
• Disconnecting an RGB signal from the computer will not power off the projector. We recommend using this function in com
-
bination of the AUTO POWER OFF function.
• This function will not be available under the following conditions:
- when a component signal is applied to the COMPUTER IN connector
- when a Sync on Green RGB signal or composite sync signal is applied
- when [POWER-SAVING] is selected for [STANDBY MODE]
Enablng Power Management [AUTO POWER OFF]
Whenthisoptionisselectedyoucanenabletheprojectortoautomaticallyturnoff(attheselectedtime:5min.,
10min.,20min.,30min.)ifthereisnosignalreceivedbytheCOMPUTER,VIDEO,orS-VIDEOinput.
Selectng Default Source [DEFAULT SOURCE SELECT]
Youcansettheprojectortodefaulttoanyoneofitsinputseachtimetheprojectoristurnedon.
LAST ..................................Sets the projector to default to the previous or last active input each time the projector is
turned on.
AUTO ..................................Searches for an active source in order of COMPUTER → VIDEO → S-VIDEO → COMPUTER
and displays the first found source. ([AUTO] is not available for the Viewer source on the NP62
and NP52.)
COMPUTER ........................Displays the RGB source from the COMPUTER IN connector every time the projector is turned on.
VIDEO .................................Displays the Video source from the VIDEO IN connector every time the projector is turned on.
S-VIDEO .............................Displays the Video source from the S-VIDEO IN connector every time the projector is turned on.
VIEWER (NP62/NP52) .......Displays images stored in a USB memory or images transmitted wirelessly from your com-
puter or mobile phone with Bluetooth wireless technology.
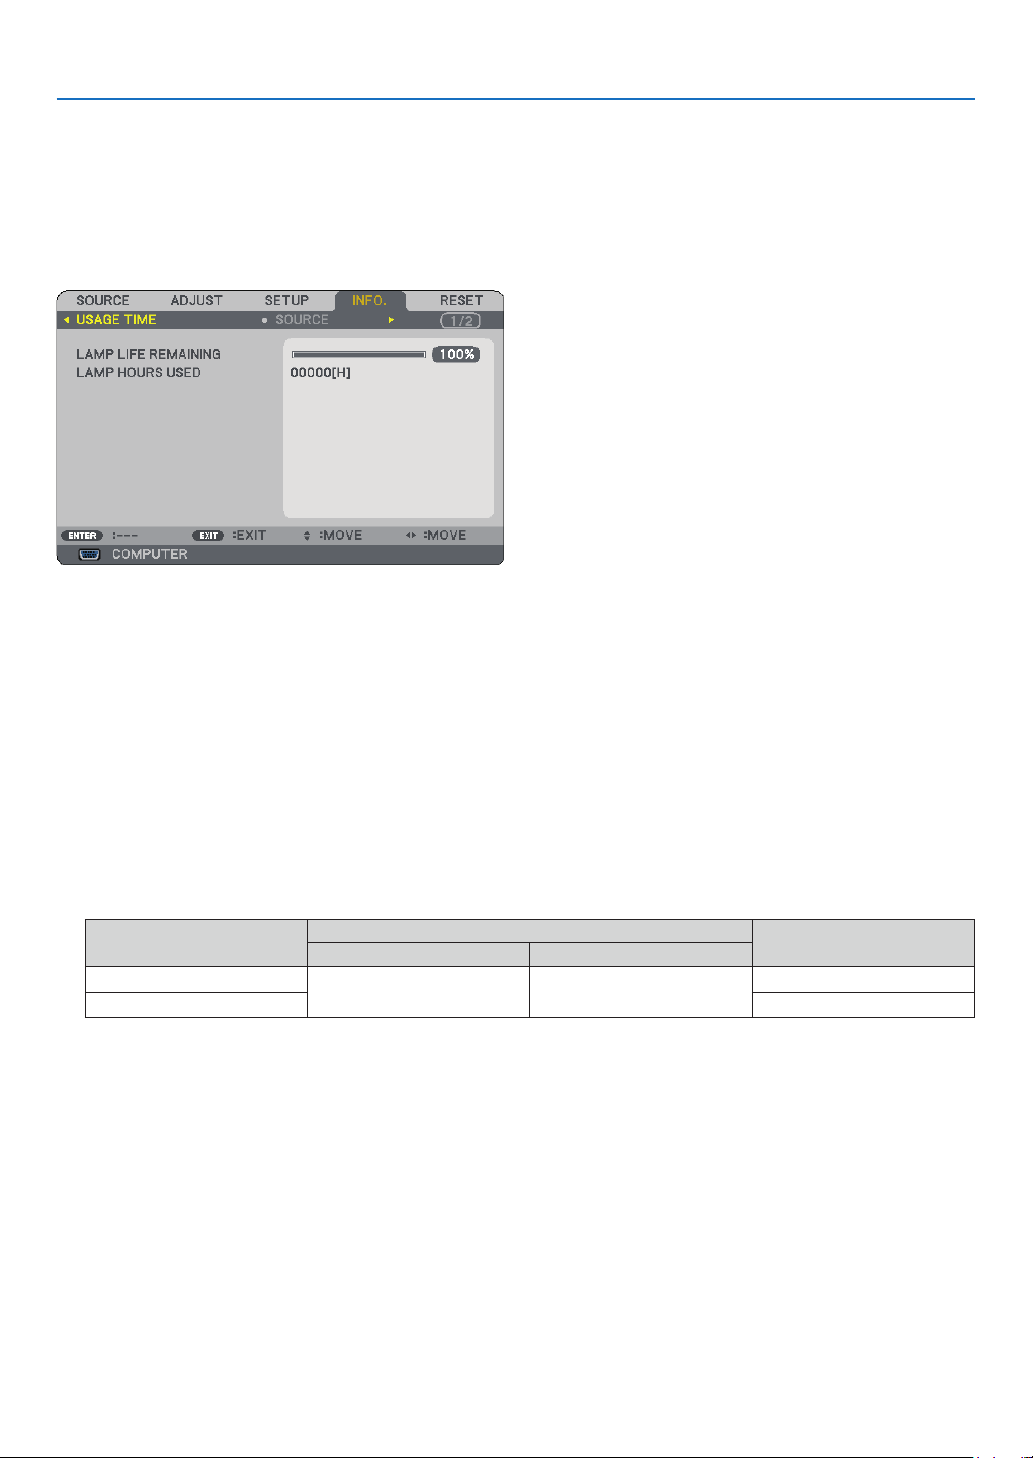
8
. Usng On-Screen Menu
❼
Menu Descriptions & Functions [INFO.]
Displaysthestatusofthecurrentsignalandlampusage.Thisitemhasthreepages.Theinformationincludedis
asfollows:
TIP: Pressing the HELP button on the remote control will show the INFORMATION menu items.
[USAGE TIME]
[LAMPLIFEREMAINING](%)*
[LAMPHOURSUSED](H)
*Theprogressindicatorshowsthepercentageofremainingbulblife.
Thevalueinformsyouoftheamountoflampusage.Whentheremaininglamptimereaches0,theLAMPLIFE
REMAININGbarindicatorchangesfrom0%to100Hoursandstartscountingdown.
Iftheremaininglamptimereaches0hours,theprojectorwillnotturnonregardlessofwhethertheLAMP
MODEissettoNORMALorECO.
•Themessagetotheeffectthatthelampshouldbereplacedwillbedisplayedforoneminutewhentheprojec
-
toristurnedonandwhenthePOWERbuttonontheprojectorortheremotecontrolispressed.
Todismissthismessage,pressanybuttonontheprojectorortheremotecontrol.
Product
Lamp lfe(H)
Replacement lamp
NORMALECO
NP62/NP61
25003500
NP09LP
NP52/NP41
NP08LP
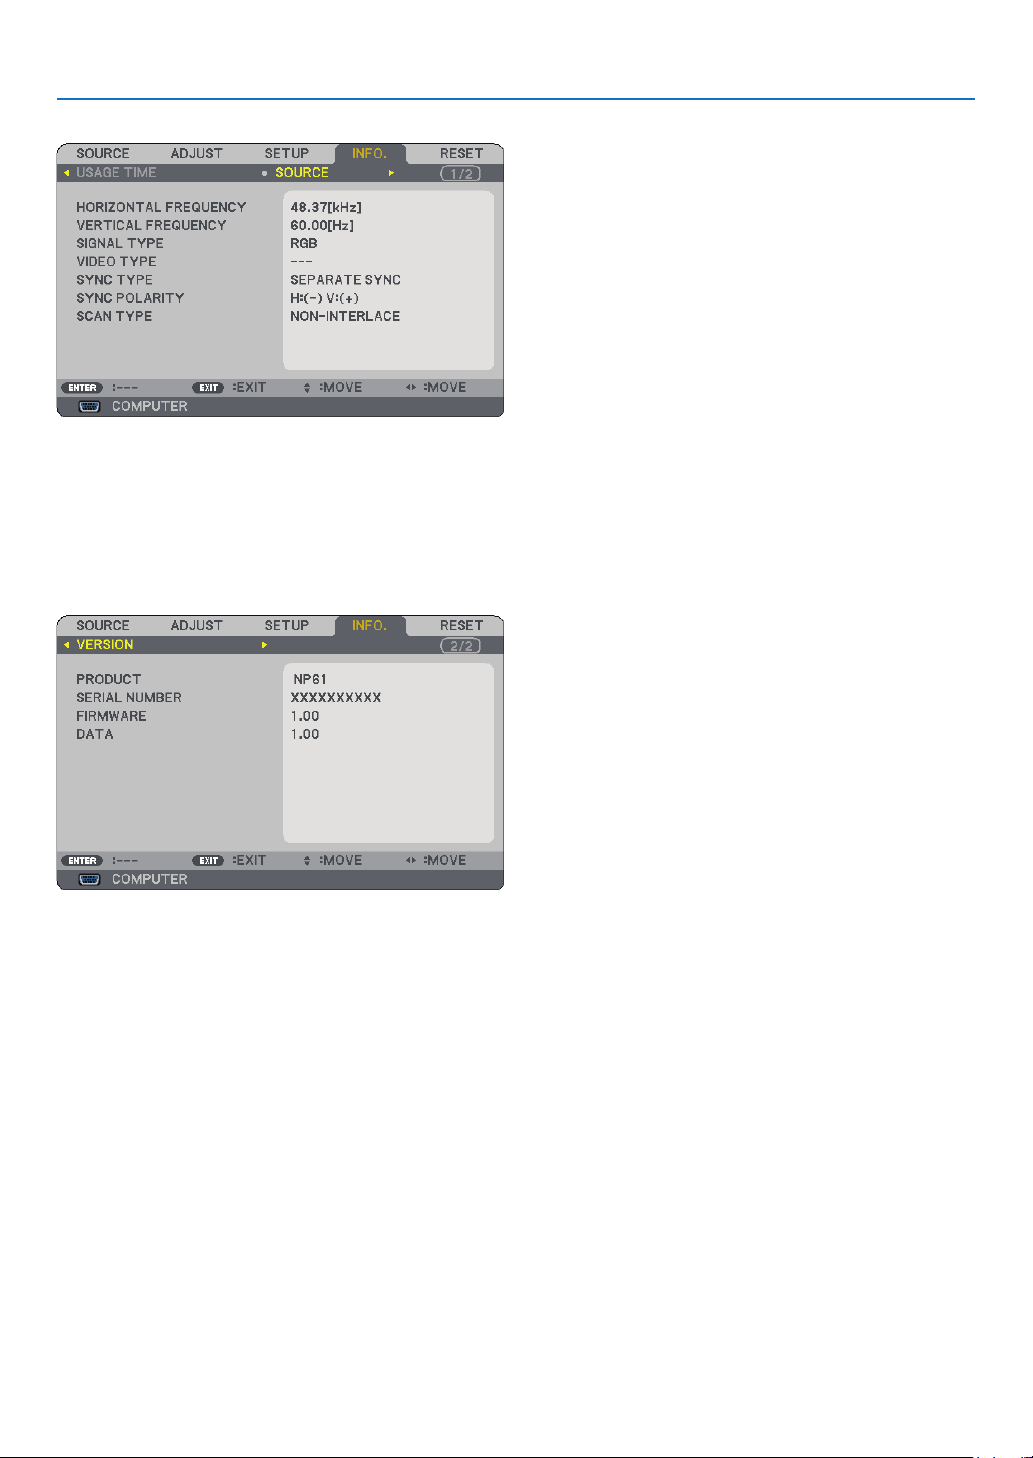
9
. Usng On-Screen Menu
[SOURCE]
[HORIZONTALFREQUENCY][VERTICALFREQUENCY]
[SIGNALTYPE] [VIDEOTYPE]
[SYNCTYPE][SYNCPOLARITY]
[SCANTYPE]
[VERSION]
[PRODUCT]
[SERIALNUMBER]
[FIRMWARE]Version
[DATA]Version
[CONTROLID](optional)

70
. Usng On-Screen Menu
➑
Menu Descriptions & Functions [RESET]
Returnng to Factory Default [RESET]
TheRESETfeatureallowsyoutochangeadjustmentsandsettingstothefactorypresetfora(all)source(s)ex-
ceptthefollowing:
[CURRENTSIGNAL]
Resetstheadjustmentsforthecurrentsignaltothefactorypresetlevels.
Theitemsthatcanberesetare:[PRESET],[CONTRAST],[BRIGHTNESS],[COLOR],[HUE],[SHARPNESS],
[ASPECTRATIO],[HORIZONTAL],[VERTICAL],[CLOCK],[PHASE],[NOISEREDUCTION],and[TELECINE].
[ALLDATA]
Resetalltheadjustmentsandsettingsforallthesignalstothefactorypreset.
AllitemscanberesetEXCEPT[LANGUAGE],[BACKGROUND],[COMMUNICATIONSPEED],[SECURITY],
[CONTROLIDNUMBER],[CONTROLID],[FANMODE],[STANDBYMODE],[LAMPLIFEREMAINING],and
[LAMPHOURSUSED].
Toresetthelampusagetime,see“ClearingLampHourMeter[CLEARLAMPHOURS]”below.
Clearng Lamp Hour Meter [CLEAR LAMP HOURS]
Resetsthelampclockbacktozero.Selectingthisoptiondisplayssubmenuforaconrmation.
NOTE: Elapsed time of the lamp use will not be affected even when [RESET] is done from the menu.
NOTE: The projector will turn off and go into standby mode when you continue to use the projector for another 100 hours after
the lamp has reached the end of its life. In this condition you cannot clear the lamp hour meter on the menu. If this happens,
press the HELP button on the remote control for 10 seconds to reset the lamp clock back to zero. Do this only after replacing the
lamp.
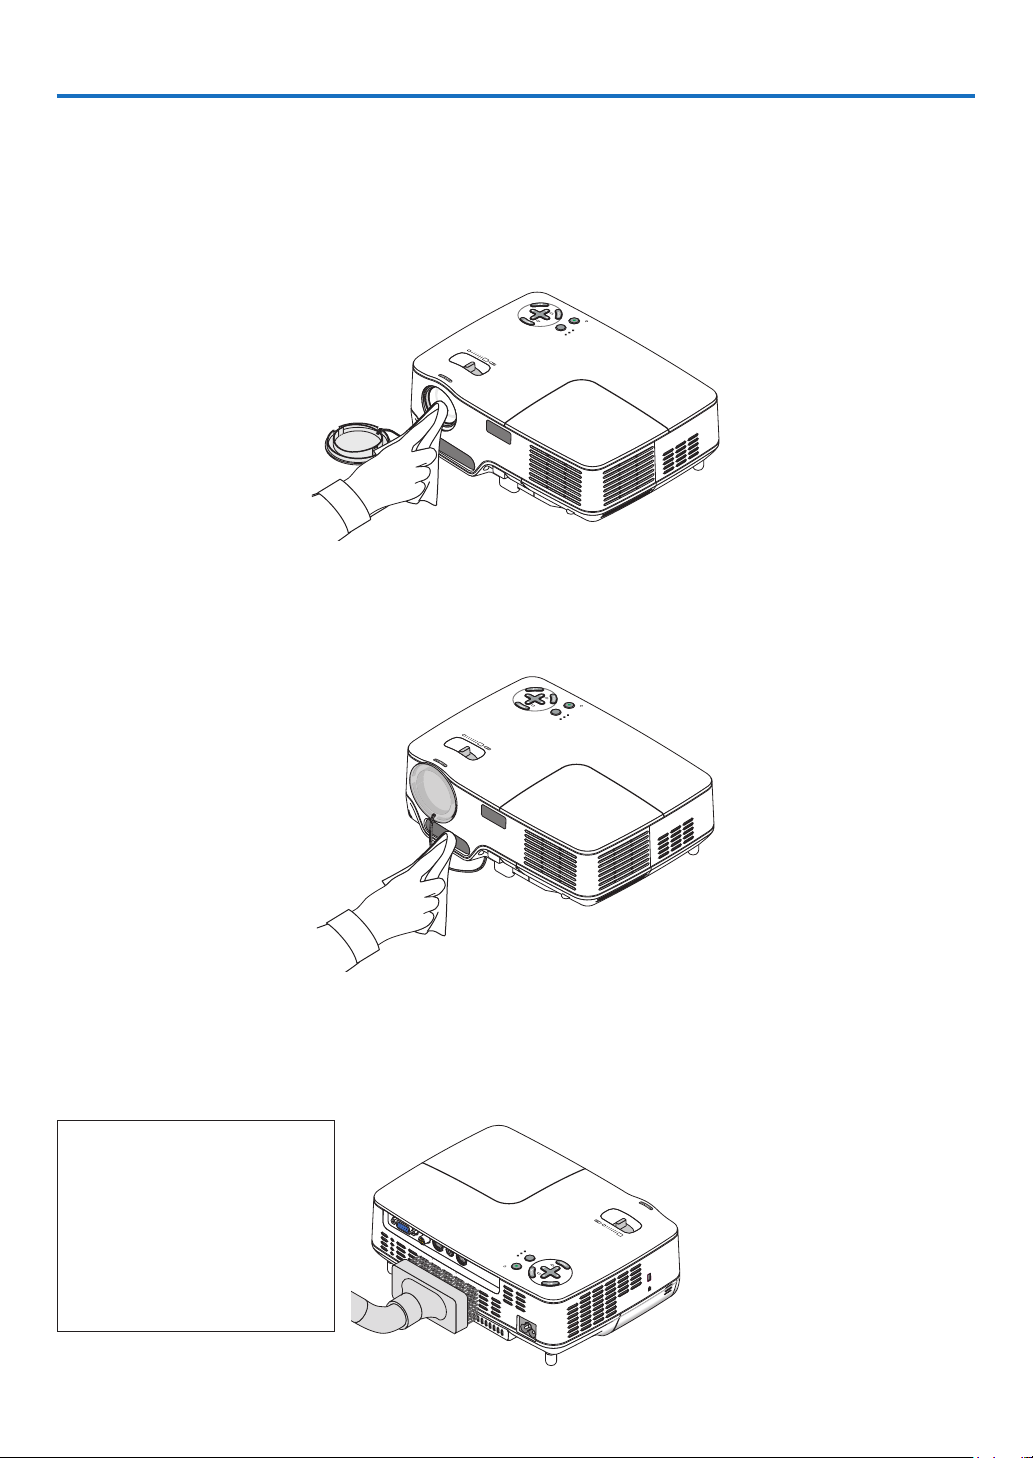
7
7. Maintenance
Thissectiondescribesthesimplemaintenanceproceduresyoushouldfollowtocleanthefocussensor,lensand
replacethelampandthecoolingpump.
➊
Cleaning the Lens and Focus Sensor
Cleanng the lens
Useablowerorlenspapertocleanthelens,andbecarefulnottoscratchormarthelens.
Cleanng the focus sensor
Useablowerorlenspapertocleanthefocussensor.
Keepngerprintsoffthefocussensor.Leavingngerprintsinthefocussensormightcausepoorfocusorshort
autofocusrange.
➋
Cleaning the Cabinet
LAMP
STATU
S
POWER
ON/STAND
BY
SOU
RC
E
AUTO
ADJ.
S
E
LE
C
T
F
OC
US
LAMP
STATUS
POWER
ON/STAND BY
S
OUR
C
E
AUTO
ADJ.
S
E
LEC
T
F
OCUS
LAMP
S
TATU
S
POWER
SOURCE
AUTO
ADJ.
SE
LEC
T
ON
/STAND BY
FOCUS
V
IDEO IN
COMPUTER IN
PC
C
ON
TR
O
L
AUDIO IN
S-VID
EO IN
CAUTION:
Whencleaningthespeakerus-
ingavacuumcleaner,donot
forcethebrushofthevacuum
cleanerintotheslitsofthecabi-
net.
Applyingstrongpressureorpos-
siblyimpactingthespeakermay
causeamalfunction.
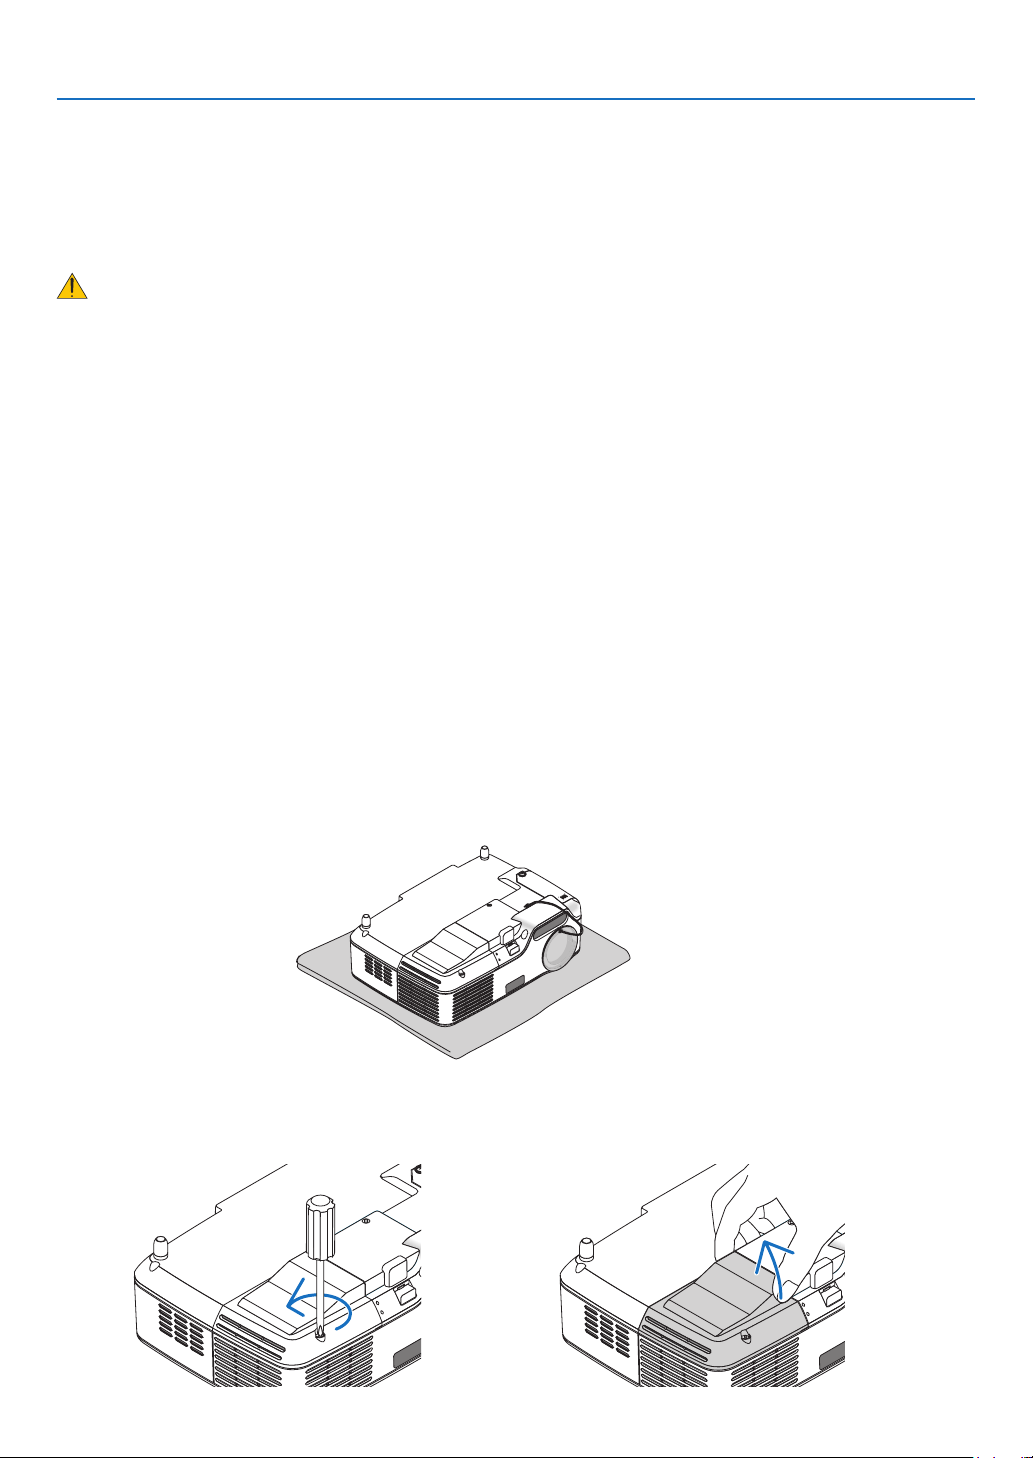
7
7. Mantenance
➌
Replacing the Lamp and the Cooling Pump
Afteryourlamphasbeenoperatingfor2500hours(upto3500hoursinECOmode)orlonger,theLAMPindica-
torinthecabinetwillblinkredandthemessage [THE LAMP HAS REACHED THE END OF ITS USABLE LIFE.
PLEASE REPLACE THE LAMP.]willappear.Eventhoughthelampmaystillbeworking,replaceitat2500(upto
3500hoursinECOmode)hourstomaintainoptimalprojectorperformance.Afterreplacingthelamp,besureto
clearthelamphourmeter.(→page
70)
CAUTION
•Theoptionallampcomeswiththecoolingpump.
Afterreplacingthelamp,besuretoreplacethecoolingpump,too.
•DONOTTOUCHTHELAMPimmediatelyafterithasbeenused.Itwillbeextremelyhot.Turntheprojectoroff
andthendisconnectthepowercable.Allowatleastonehourforthelamptocoolbeforehandling.
•DONOTREMOVEANYSCREWSexceptonelampcoverscrewandtwolamphousingscrews.Youcouldre
-
ceiveanelectricshock.
•Donotbreaktheglassonthelamphousing.
Keepngerprintsofftheglasssurfaceonthelamphousing.Leavingngerprintsintheglasssurfacemight
causeanunwantedshadowandpoorpicturequality.
•Theprojectorwillturnoffandgointostandbymodeafter2600(upto3600hoursinECOmode)hoursofser
-
vice.Ifthishappens,besuretoreplacethelamp.Ifyoucontinuetousethelampafter2500hours(upto3500
hoursinECOmode)ofuse,thelampbulbmayshatter,andpiecesofglassmaybescatteredinthelampcase.
Donottouchthemasthepiecesofglassmaycauseinjury.Ifthishappens,contactyourNECdealerforlamp
replacement.
To replace the lamp:
Optionallamp,coolingpumpandtoolsneededforreplacement:
•Replacementlampwithcoolingpump:NP09LP(NP62/NP61)orNP08LP(NP52/NP41)
•Phillipsscrewdriverorequivalent
The lamp cover screw is not removable.
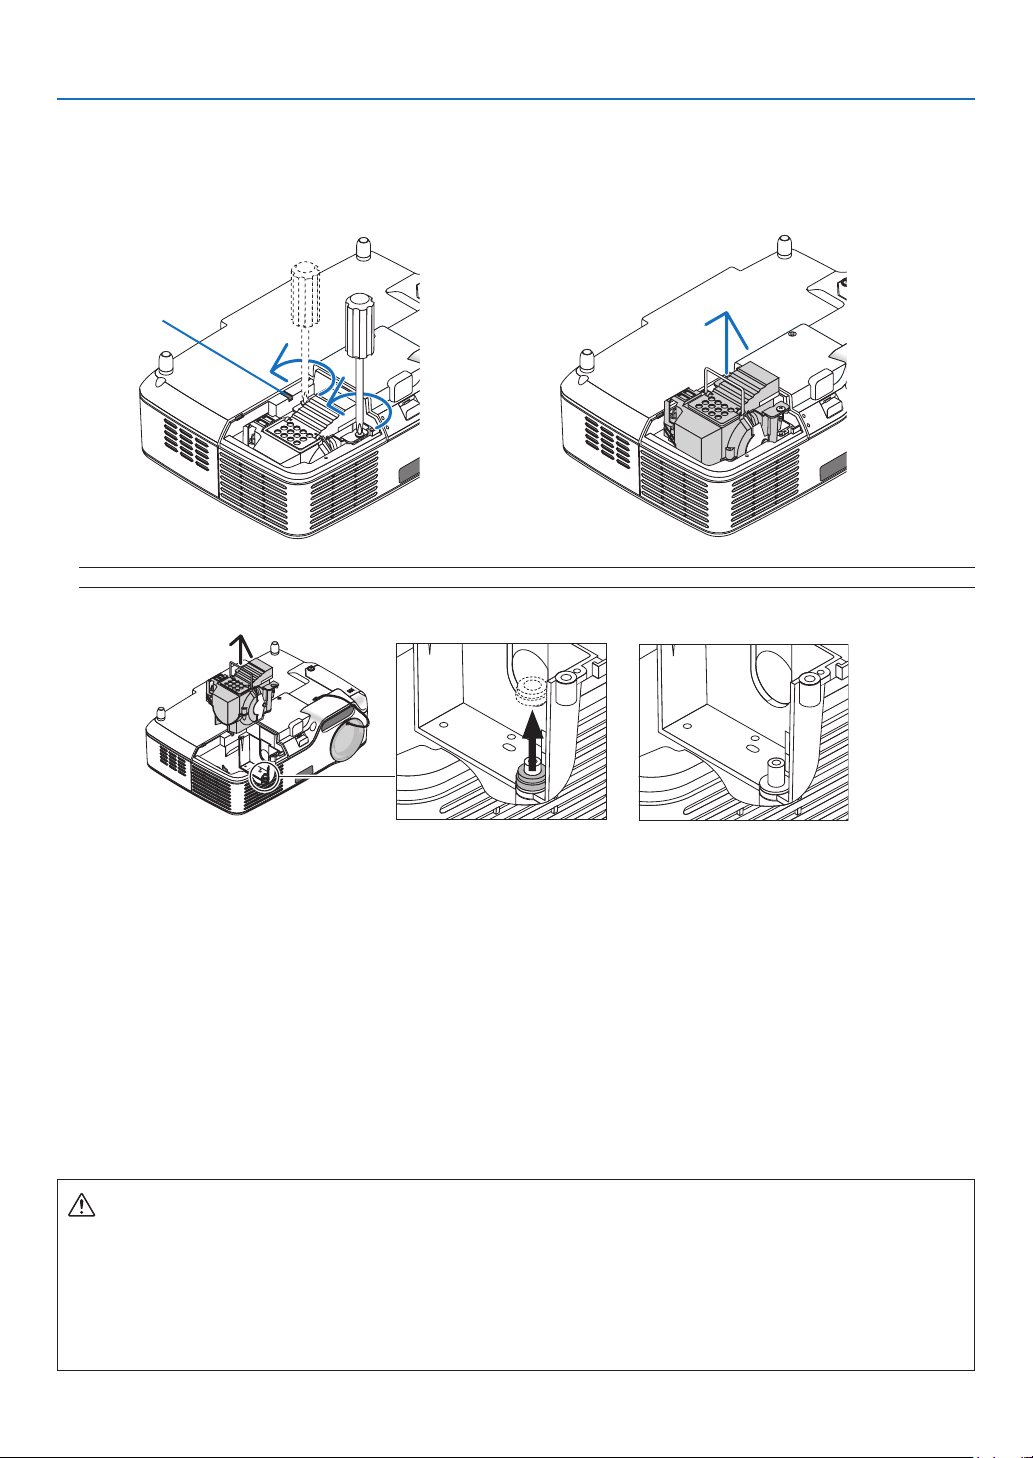
73
7. Mantenance
The two screws are not removable.
Remove the lamp housing by holding the handle.
Interlock
NOTE: There is an interlock on this case to prevent the risk of electrical shock. Do not attempt to circumvent this interlock.
Fig. A Fig. B Fig. C
Note: Removng or Insertng the Lamp (Stckng of Packng Rng)
Afterlampreplacement,ablackpackingringmaybestuckinsidetheprojector(Fig.AandFig.B).
Ifthishappens,dothefollowing:
•Iftheusedpackingringdoesnotremaininsidetheprojector(Fig.C),proceedwiththenewlamphousingin-
stallation.
•Iftheusedpackingringisstuckinsidetheprojector(Fig.B),removeitfrominsidetheprojectorbeforeinstall-
ingthenewlamphousing.Toremovethepackingring,simplypullitoffofthestud.
*Inothercaseswherethelampisremoved(otherthanlampreplacement),pullingoutthelamphousingmay
alsocausethepackingringtostaystuckinsidetheprojector.Ifthishappens,makesuretoinsertthelamp
housingbackinitsoriginalposition.
CAUTION
•Beforeremovingtheusedpackingring,besuretoturnofftheprojector,waitforthecoolingfantostop,dis-
connectthepowercable,andallowatleastonehourforthelamptocool.
Theprojectorcanbecomeveryhotwhenitisturnedonandstayhotimmediatelyafteritisturnedoff.
•Donotinstallanewlampwiththeusedpackingringstuckinsidetheprojectorasitrequiresexcessive
forcetoinstallthenewlampwhichthenmaycausedamagetotheprojector.
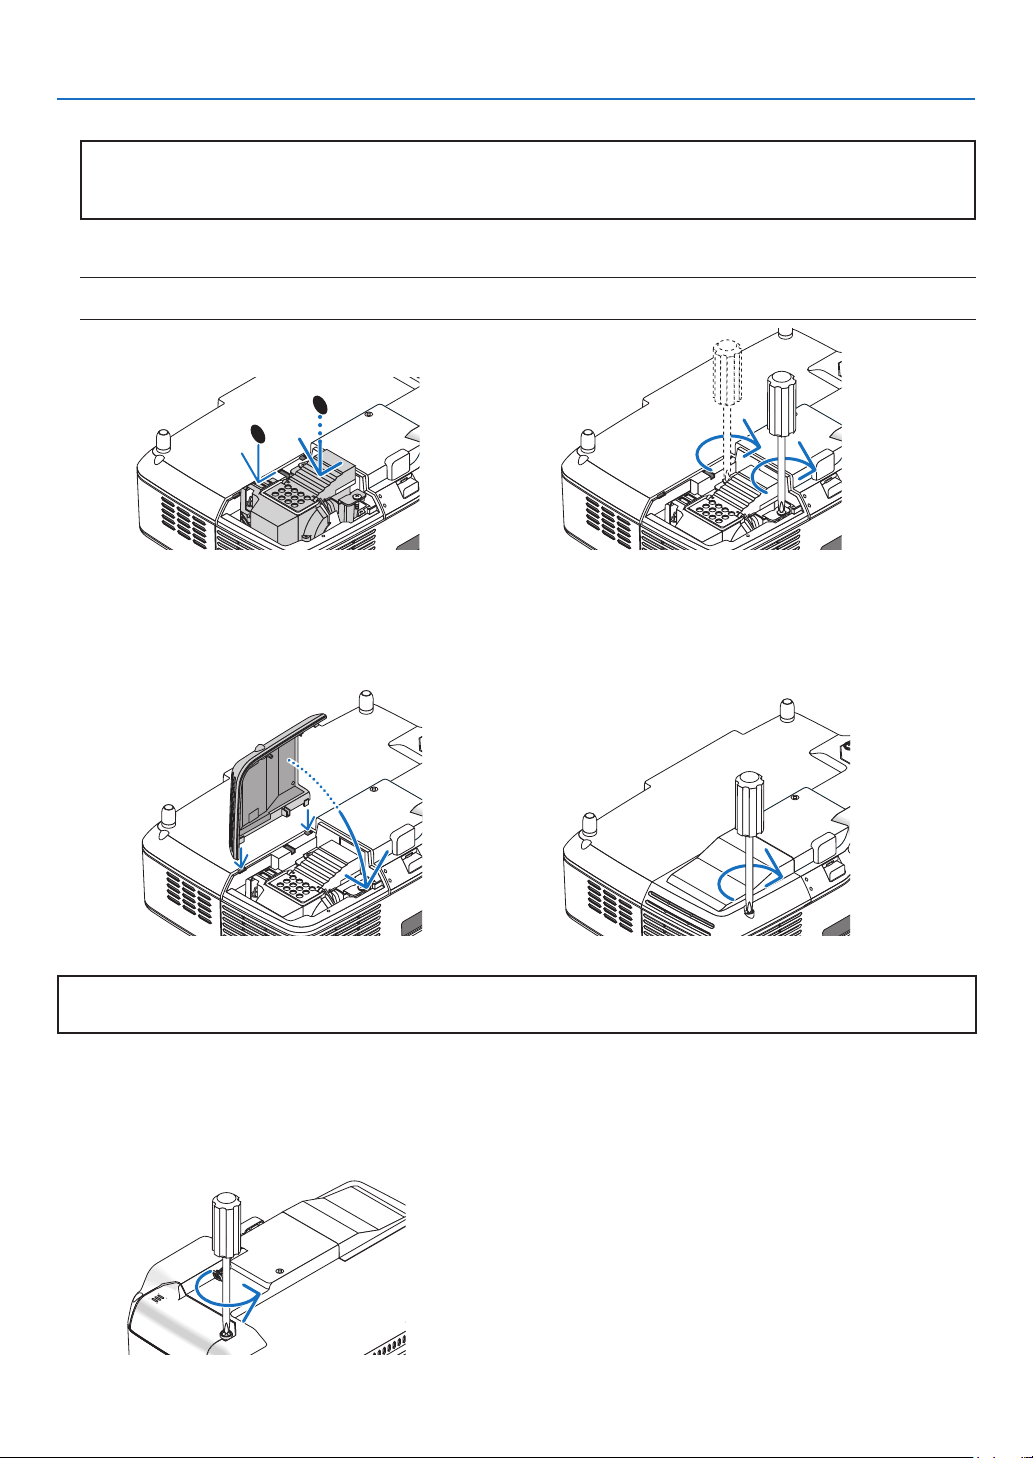
7
7. Mantenance
Ths completes the lamp replacement.
Go on to the coolng pump replacement.
Toreplacethecoolingpump:
(1) Loosen the cooling pump cover screw until the screwdriver goes into a freewheeling condition.
- The cooling pump cover screw is not removable.
Tighten the lamp cover screw.
Be sure to tighten the screw.
CAUTION
DonotusealampotherthantheNECreplacementlampNP09LP(NP62/NP61)orNP08LP(NP52/NP41).
OrderthisfromyourNECdealer.
NOTE: Tighten the two screws alternately until both screws are completely tightened. Failure to do this can result in air leak
from the cooling pump, causing the pump error. (→ page 76)
1
2
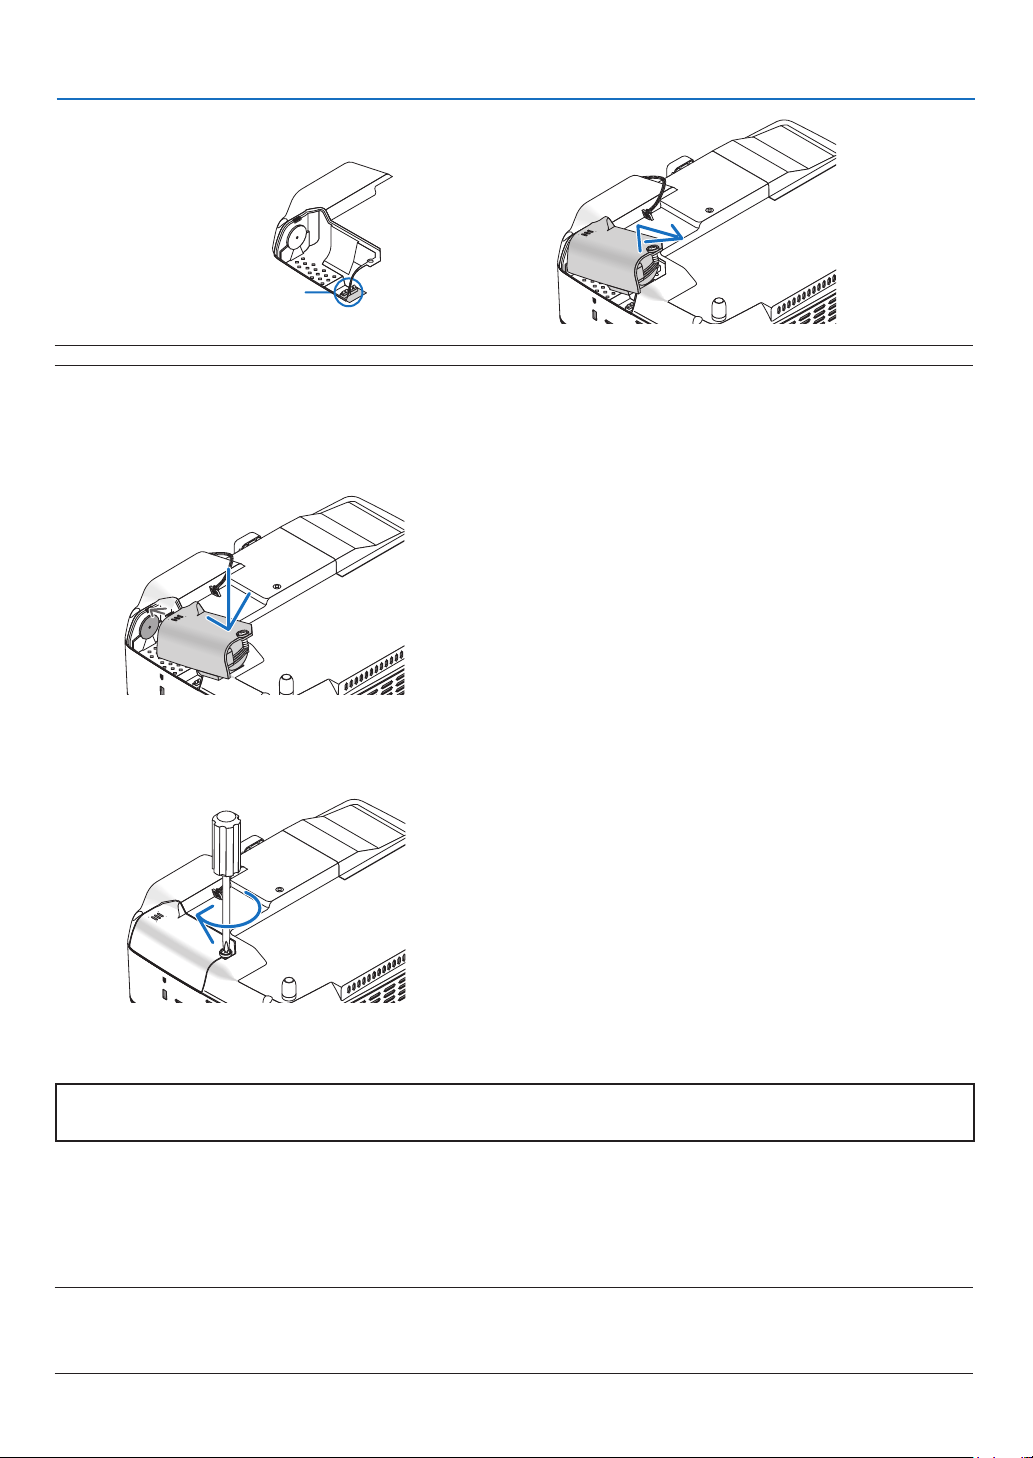
7
7. Mantenance
→→
NOTE: When the lamp exceeds 2600 hours (up to 3600 hours in ECO mode) of service, the projector cannot turn on and the
menu is not displayed.
If this happens, press the HELP button on the remote control for 10 seconds to reset the lamp clock back to zero.
When the lamp time clock is reset to zero, the LAMP indicator goes out.
N
(2) Tighten the cooling pump cover screw.
- Be sure to tighten the cooling pump cover screw.
Ths completes the coolng pump replacement.
Go on to the next step.
(1) Align the tabs on the cooling pump cover with the guide on the cabinet and slide the cooling pump cover.
IN
(2) Remove the cooling pump cover.
N
Contact area of the connector
NOTE: Keep the contact area of the connector clean. If there are dust and dirt in the contact area of the connector, remove them.
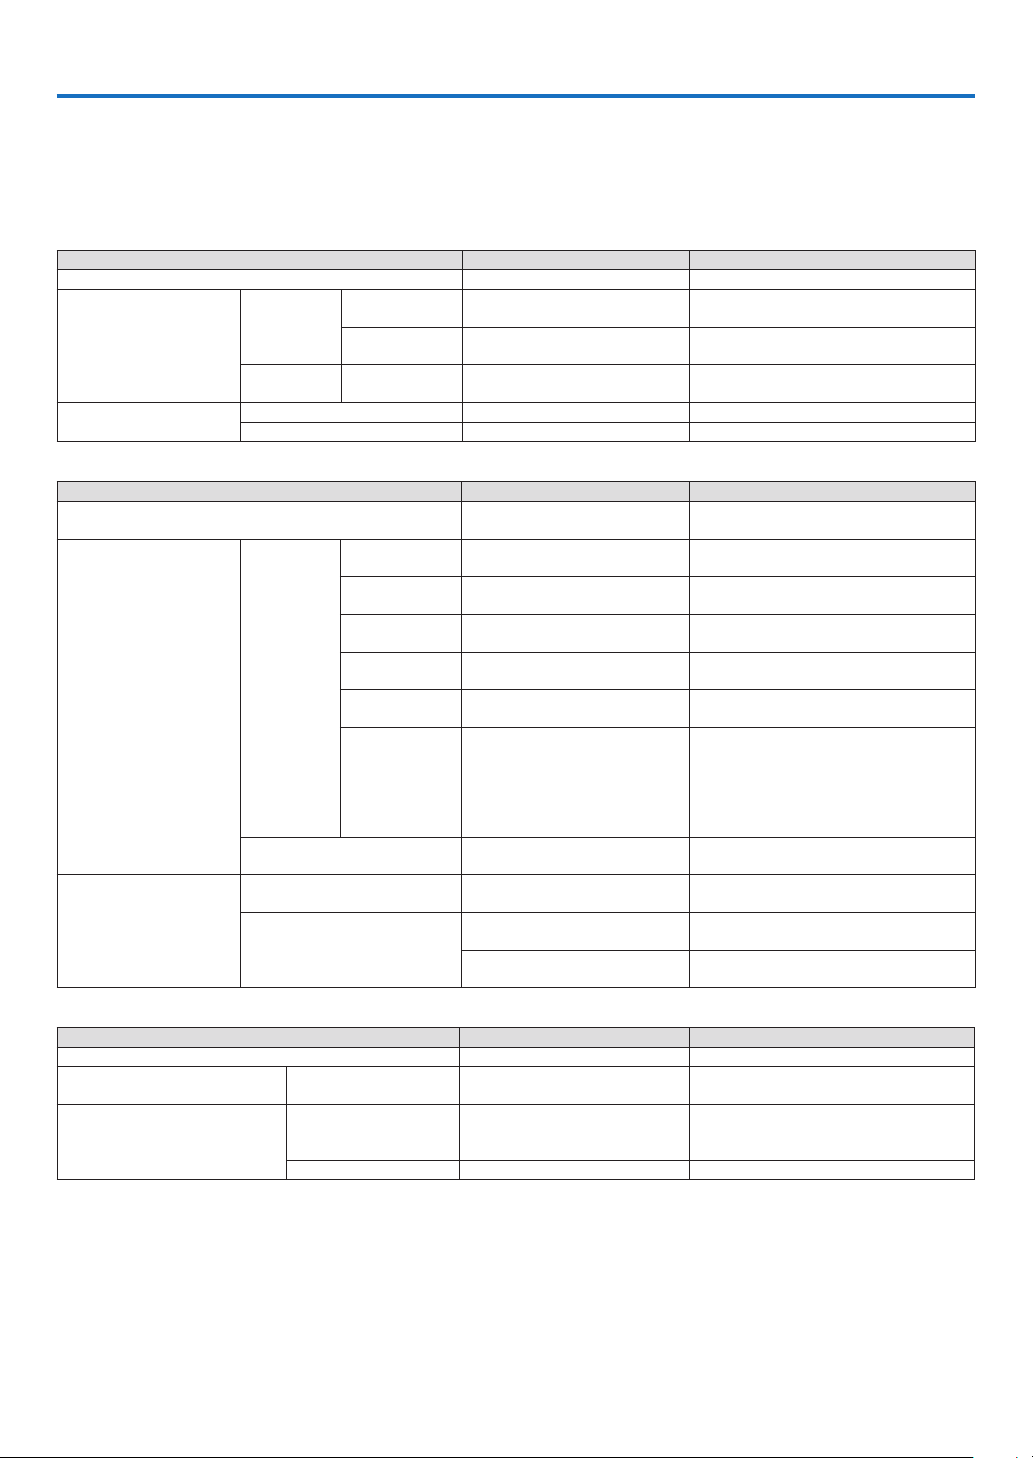
7
8. Appendix
➊
Troubleshooting
Thissectionhelpsyouresolveproblemsyoumayencounterwhilesettinguporusingtheprojector.
Indcator Messages
Power Indcator
Indicator Condition Projector Condition Note
Off The main power is off –
Blinking light
Green
0.5 sec On,
0.5 sec Off
The projector is getting ready to turn
on.
Wait for a moment.
2.5 sec On,
0.5 sec Off
Off Timer is enabled.
–
Orange
0.5 sec On,
0.5 sec Off
The projector is cooling down. Wait for a moment.
Steady light
Green The projector is turned on. –
Orange The projector is in Standby. –
Status Indcator
Indicator Condition Projector Condition Note
Off
Normal or Standby ([POWER-SAVING]
for [STANDBY MODE])
–
Blinking light
Red
1 cycle (0.5 sec On,
2.5 sec Off)
Lamp cover error or lamp housing er-
ror
Replace the lamp cover or lamp housing cor-
rectly.
2 cycle (0.5 sec On,
0.5 sec Off)
Temperature error
The projector is overheated. Move the projector to
a cooler location.
3 cycle (0.5 sec On,
0.5 sec Off)
Power error
Power unit is not working properly. Contact your
dealer.
4 cycle (0.5 sec On,
0.5 sec Off)
Fan error Fans will not work correctly.
6 cycle (0.5 sec On,
0.5 sec Off)
Lamp error
Lamp fails to light. Wait a full minute and then
turn on again.
8 cycle (0.5 sec On,
0.5 sec Off)
Cooling pump error
• The two screws on the lamp housing are not
completely tightened. Tighten the two screws
alternately until both screws are completely
tightened.
• The cooling pump is not working properly.
Contact your dealer.
Green
Re-firing the lamp (The projector is
cooling down.)
The projector is re-firing.
Wait for a moment.
Steady light
Green
Standby ([NORMAL] for [STANDBY
MODE])
–
Orange
CONTROL PANEL LOCK is on.
You have pressed cabinet button when Control
Panel Lock is on.
CONTROL ID error
Remote control ID and pr ojector ID are not
matched.
Lamp Indcator
Indicator Condition Projector Condition Note
Off Normal –
Blinking light Red
Lamp has reached its end of life. Lamp
replacement message will be displayed.
Replace the lamp.
Steady light
Red
Lamp has been used beyond its limit.
The projector will not turn on until the
lamp is replaced.
Replace the lamp.
Green Lamp mode is set to ECO mode. –
Over-Temperature Protecton
Ifthetemperatureinsidetheprojectorrisestoohigh,theover-temperatureprotectorwillautomaticallyturnoffthe
lampwiththeSTATUSindicatorblinking(2-cycleOnandOff.)
Shouldthishappen,dothefollowing:
-Unplugthepowercableafterthecoolingfansstop.
-Movetheprojectortoacoolerlocationiftheroomwhereyouarepresentingisparticularlytoowarm.
-Cleantheventilationholesiftheyarecloggedwithdust.
-Waitabout60minutesuntiltheinsideoftheprojectorbecomescoolenough.

77
8. Appendx
Common Problems & Solutons (→"Power/Status/LampIndicator"onpage
76.)
ProblemCheck These Items
Does not turn on • Check that the power cable is plugged in and that the power button on the projector cabinet or the remote control
is on. (→ page
15, 16)
• Ensure that the lamp cover is installed correctly. (
→ page
74)
• Ensure that the two screws on the lamp housing are completely tightened.(
→ page
74)
• Ensure that the cooling pump is installed correctly. (
→ page
75)
• Check to see if the projector has overheated. If there is insufficient ventilation around the projector or if the room
where you are presenting is particularly warm, move the projector to a cooler location.
• Check to see if you continue to use the projector for another 100 hours after the lamp has reached the end of its
life. If so, replace the lamp.
After replacing the lamp, reset the lamp hours used. (
→ page
70)
• The lamp may fail to light. Wait a full minute and then turn on the power again.
• Set [FAN MODE] to [HIGH ALTITUDE] when using the projector at altitudes approximately 5000 feet/1500 meters
or higher. Using the projector at altitudes approximately 5000 feet/1500 meters or higher without setting to [HIGH
ALTITUDE] can cause the projector to overheat and the projector could shut down. If this happens, wait a couple
minutes and turn on the projector. (→ page
65)
Also when the lamp is turned off, the projector internal temperature is hot. If the power is turned on before the
projector has cooled down, the fan will run a short time before the lamp will turn on.
Will turn off • Ensure that the [OFF TIMER] or [AUTO POWER OFF] is off. (→ page
66, 67)
No picture • Use the appropriate source button on the remote control to select your source. (→ page
18) If there is still no pic-
ture, press the button again.
• Ensure your cables are connected properly.
• Use menus to adjust the contrast and brightness. (
→ page
55)
• Check to see if the image is muted. (
→ page
29)
• Remove the lens cap.
• Reset the settings or adjustments to factory preset levels using the [RESET] in the Menu. (
→ page
70)
• Enter your registered keyword if the SECURITY function is enabled. (
→ page
30)
• Be sure to connect the projector and notebook PC while the projector is in standby mode and before turning on the
power to the notebook PC.
In most cases the output signal from the notebook PC is not turned on unless connected to the projector before
being powered up.
* If the screen goes blank while using your remote control, it may be the result of the computer's screen-saver or
power management software.
• See also the next page.
Picture suddenly becomes
dark
• When one of the following happens, the [LAMP MODE] automatically changes from [NORMAL] to [ECO].
* When there are no signals (blue or black screen) → To return to the NORMAL mode, select another available
source.
* When the room where you' re presenting is particularly warm
→ Move the projector to a cooler location.
Color tone or hue is unusu-
al
• Check if an appropriate color is selected in [WALL COLOR]. If not, select an appropriate option. (
→ page
61)
• Adjust [HUE] in [ADJUST]
→ [BASIC]. (→ page
55)
Image isn’t square to the
screen
• Reposition the projector to improve its angle to the screen. (
→ page
20, 21)
• Use the KEYSTONE correction function to correct the trapezoid distortion. (
→ page
25)
Picture is blurred • Make sure that focus is appropriate.
• Reposition the projector to improve its angle to the screen. (
→ page
20, 21)
• Ensure that the distance between the projector and screen is within the adjustment range of the lens. (
→ page
10)
• Make sure that the distance between the focus sensor and the screen is within the effective range of the AUTO
FOCUS. (→ page 22)
• Make sure that the requirements for the AUTO FOCUS are met. (
→ page
22)
• Condensation may form on the lens if the projector is cold, brought into a warm place and is then turned on.
Should this happen, let the projector stand until there is no condensation on the lens.
Flicker appears on screen • Set [FAN MODE] to other than [HIGH ALTITUDE] mode when using the projector at altitudes approximately 5000
feet/1500 meters or lower. Using the projector at altitudes less than approximately 5000 feet/1500 meters and setting
to [HIGH ALTITUDE] can cause the lamp to overcool, causing the image to flicker. Switch [FAN MODE] to [AUTO].
(
→
page
65)
Image is scrolling verti-
cally, horizontally or both
• Use the appropriate source button on the remote control to select your source. (
→ page
18)
• Adjust the computer image manually with the [HORIZONTAL] and [VERTICAL] in [ADJUST]
→ [IMAGE OPTIONS]
in the menu. (→ page
57)
Remote control does not
work
• Install new batteries. (
→ page
8)
• Make sure there are no obstacles between you and the projector.
• Stand within 22 feet (7 m) of the projector. (
→ page
8)
Indicator is lit or blinking • See the POWER/STATUS/LAMP Indicator. (→ page
76)
Cross color in RGB mode • Press the AUTO ADJ. button on the remote control (SELECT ◀ button on the projector cabinet). (→ page 26)
• Adjust the computer image manually with [CLOCK] and [PHASE] in [ADJUST]
→ [IMAGE OPTIONS] in the menu. (→
page
56)
Formoreinformationcontactyourdealer.

78
8. Appendx
If there s no pcture, or the pcture s not dsplayed correctly.
•PoweronprocessfortheprojectorandthePC.
BesuretoconnecttheprojectorandnotebookPCwhiletheprojectorisinstandbymodeandbeforeturning
onthepowertothenotebookPC.
InmostcasestheoutputsignalfromthenotebookPCisnotturnedonunlessconnectedtotheprojectorbe
-
forebeingpoweredup.
NOTE: You can check the horizontal frequency of the current signal in the projector’s menu under Information. If it reads “0kHz”,
this means there is no signal being output from the computer. See page
69 or go to next step.
•Enablingthecomputer’sexternaldisplay.
DisplayinganimageonthenotebookPC’sscreendoesnotnecessarilymeanitoutputsasignaltotheprojec
-
tor.WhenusingaPCcompatiblelaptop,acombinationoffunctionkeyswillenable/disabletheexternaldis
-
play.Usually,thecombinationofthe‘Fn”keyalongwithoneofthe12functionkeysgetstheexternaldisplay
tocomeonoroff.Forexample,NEClaptopsuseFn+F3,whileDelllaptopsuseFn+F8keycombinationsto
togglethroughexternaldisplayselections.
•Non-standardsignaloutputfromthecomputer
IftheoutputsignalfromanotebookPCisnotanindustrystandard,theprojectedimagemaynotbedisplayed
correctly.Shouldthishappen,deactivatethenotebookPC’sLCDscreenwhentheprojectordisplayisinuse.
EachnotebookPChasadifferentwayofdeactivate/reactivatethelocalLCDscreensasdescribedinthepre
-
viousstep.Refertoyourcomputer’sdocumentationfordetailedinformation.
•ImagedisplayedisincorrectwhenusingaMacintosh
WhenusingaMacintoshwiththeprojector,settheDIPswitchoftheMacadapter(notsuppliedwiththeprojec
-
tor)accordingtoyourresolution.Aftersetting,restartyourMacintoshforthechangestotakeaffect.
ForsettingdisplaymodesotherthanthosesupportedbyyourMacintoshandtheprojector,changingtheDIP
switchonaMacadaptermaybounceanimageslightlyormaydisplaynothing.Shouldthishappen,setthe
DIPswitchtothe13”xedmodeandthenrestartyourMacintosh.Afterthat,restoretheDIPswitchestoadis
-
playablemodeandthenrestarttheMacintoshagain.
NOTE: A Video Adapter cable manufactured by Apple Computer is needed for a PowerBook which does not have a mini
D-Sub 15-pin connector.
•MirroringonaPowerBook
*WhenusingtheprojectorwithaMacintoshPowerBook,outputmaynotbesetto1024x768unless“mirroring”
isoffonyourPowerBook.Refertoowner’smanualsuppliedwithyourMacintoshcomputerformirroring.
•FoldersoriconsarehiddenontheMacintoshscreen
Foldersoriconsmaynotbeseenonthescreen.Shouldthishappen,select[View]
→[Arrange]fromtheApple
menuandarrangeicons.

79
8. Appendx
➋
Specifications
ThissectionprovidestechnicalinformationabouttheNP62/NP61/NP52/NP41projector'sperformance.
Model Number NP/NP/NP/NP
Optcal
ProjectionSystemSingleDLP™chip(0.55",aspect4:3)
Resolution1024x768pixels*
1
Lens
Manualzoomandautofocus/manualpoweredfocus
(effectiverange:57.1"/1.5m-216.5"/5.5m)/manualfocus
F2.2-2.34,f=20.4mm-24.5mm
Lamp
NP62/NP61:220WAC(170WECOmode)
NP52/NP41:200WAC(170WECOmode)
LightOutput*
2
,*
3
NP62/NP61:3000lumens(approx.75%inECOmode)
NP52:2600lumens(approx.85%inECOmode)
NP41:2300lumens(approx.85%inECOmode)
ContrastRatio*
3
(fullwhite:fullblack)
1600:1
ImageSize(Diagonal)
33"-300"diagonal(4:3)
(imagesizeswithlessthan40"areavailableonlyintelemode)
ProjectionDistance
57"-439"(wide)/57"-530"(tele)
1.45-11.14m(wide)/1.44-13.45m(tele)
ProjectionAngle14.7°-15.0°(wide)/12.3°-12.6°(tele)
*
1
Effectivepixelsaremorethan99.99%.
*
2
Thisisthelightoutputvalue(lumens)whenthe[PRESET]modeissetto[HIGH-BRIGHT].Ifanyothermode
isselectedasthe[PRESET]mode,thelightoutputvaluemaydrop.
*
3
CompliancewithISO21118-2005
Electrcal
Inputs
1AnalogRGBsharedwithcomponentvideo(MiniD-Sub15Pin),1S-Video(MiniDIN
4Pin),1Video(RCA),1StereoMiniAudiosharedwithanalogRGBinput
PCControl1PCControl(MiniDIN8Pin)
USBPort1AType
ExternalControlRS232,IR,USB(NP62/NP52)
ColorReproduction16.7millioncolorssimultaneously,Fullcolor
CompatibleSignals*
4
VGA/SVGA/XGA/WXGA/WXGA+/SXGA/SXGA+/UXGA
480i/480p/576i/576p/720p/1080i
VideoBandwidthRGB:100MHz(max.)
ScanRate
Horizontal:15kHzto100kHz(RGB:24kHzorover)
Vertical:50kHzto120Hz(Signalswithhigherthanrefreshrate85Hzsupportresolu
-
tionsof1024x768orlower.)
SyncCompatibilitySeparateSync/CompositeSync/SynconG/SynconVideo
HorizontalResolution
540TVlines:NTSC/NTSC4.43/PAL/PAL-M/PAL-N/PAL60
300TVlines:SECAM
PowerRequirement/InputCurrent
NP62/NP61:100-240VAC,50/60Hz,3.5-1.4A
NP41:100-240VAC,50/60Hz,3.1-1.2A
NP62G/NP61G:200-240VAC,50/60Hz,1.6A
NP52G/NP41G:200-240VAC,50/60Hz,1.5A
PowerConsumption
NP62/NP62G:300WinLampNORMALmode,235WinLampECOmode,5Win
STANDBYMODE(POWER-SAVING)
NP61/NP61G:285WinLampNORMALmode,225WinLampECOmode,5Win
STANDBYMODE(POWER-SAVING)
NP52G:275WinLampNORMALmode,235WinLampECOmode,5WinSTANDBY
MODE(POWER-SAVING)
NP41/NP41G:265WinLampNORMALmode,225WinLampECOmode,5Win
STANDBYMODE(POWER-SAVING)
*
4
Animagewithhigherorlowerresolutionthantheprojector’snativeresolution(1024x768)willbedisplayed
withscalingtechnology.

80
8. Appendx
Mechancal
InstallationOrientation:Desktop/Front,Desktop/Rear,Ceiling/Front,Ceiling/Rear
Dimensions
9.7"(W)x2.8"(H)x7.0"(D)
246mm(W)x72mm(H)x177mm(D)(notincludingprotrusions)
NetWeight
NP62/NP52:3.75lbs/1.7kg
NP61/NP41:3.5lbs/1.6kg
EnvironmentalConsiderations
OperationalTemperatures:41°Fto104°F/5°Cto40°C
(ECOmodeselectedautomaticallyat95°Fto104°F/35°Cto40°C/ECOmodeselect
-
edautomaticallyat86°Fto104°F/30°Cto40°CwhenusedinHIGHALTITUDE)
20%to80%humidity(non-condensing)
StorageTemperatures:14°Fto122°F(-10°Cto50°C),20%to80%humidity(non-
condensing)
Regulatons
For Unted States:
ULApproved(UL60950-1)
MeetsFCCClassBrequirements
For Canada:
ULApproved(CSA60950-1)
MeetsDOCCanadaClassBrequirements
For Australa/New Zealand:
MeetsAS/NZSCISPR.22ClassB
For Europe:
MeetsEMCDirective(EN55022,EN55024,EN61000-3-2,EN61000-3-3)
MeetsLowVoltageDirective(EN60950-1,TÜVGSApproved)
Foradditionalinformationvisit:
US:http://www.necdisplay.com
Europe:http://www.nec-display-solutions.com
Global:http://www.nec-pj.com/
Forinformationonouroptionalaccessories,visitourwebsiteorseeourbrochure.
Thespecicationsaresubjecttochangewithoutnotice.
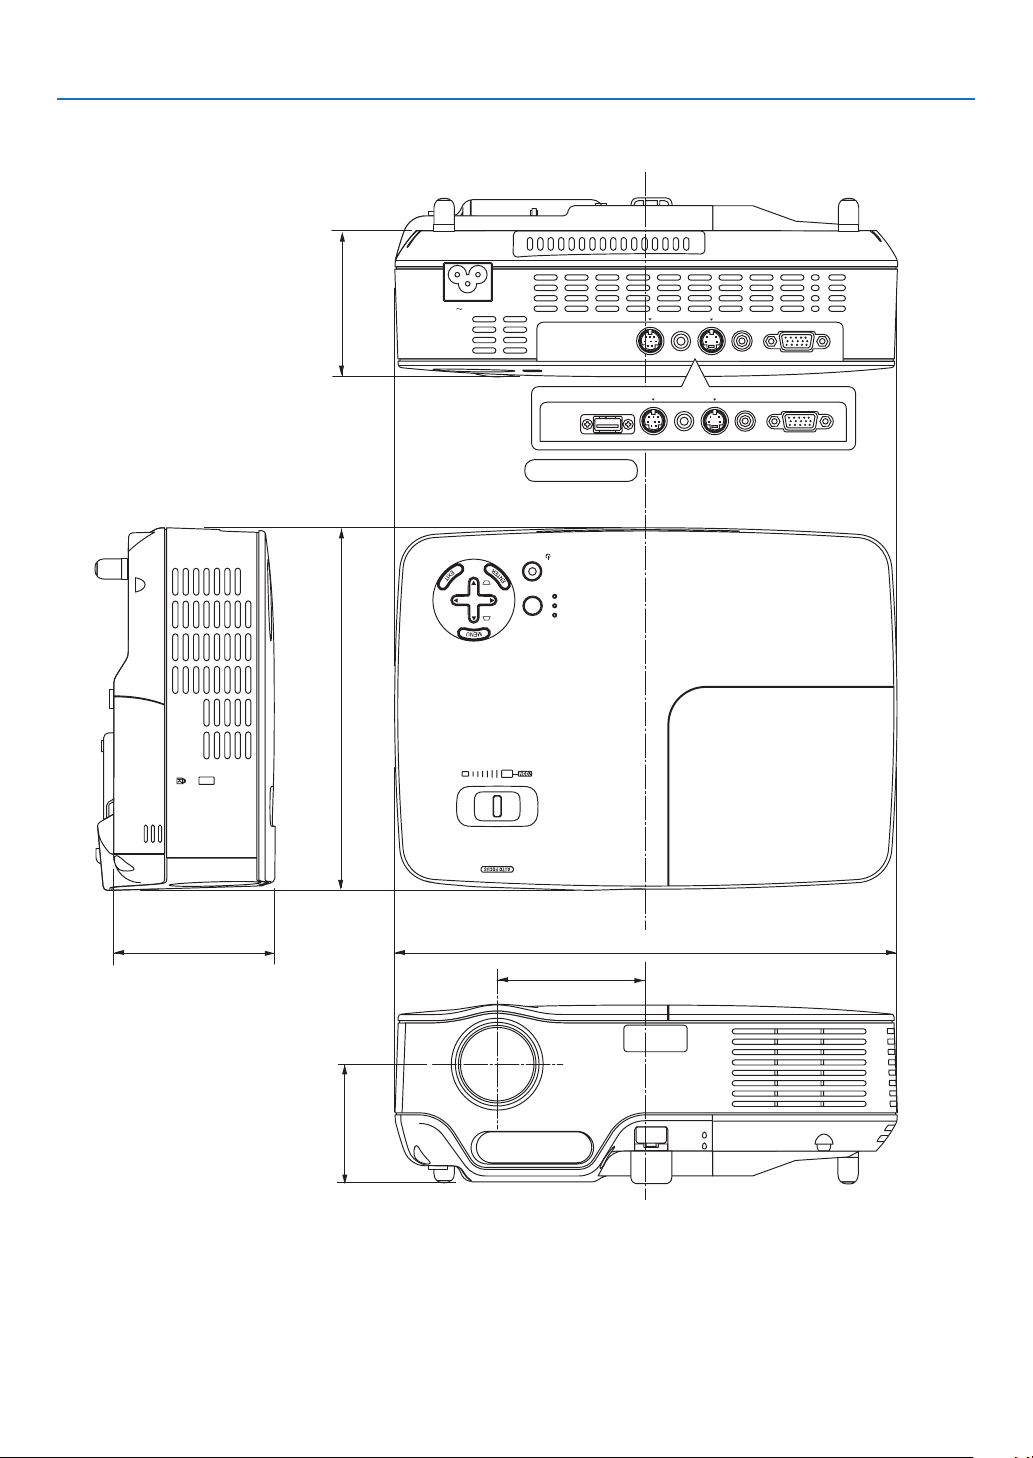
8
8. Appendx
VIDEO IN
COMPUTER IN
PC CONTROL
AC IN
AUDIO IN
S-VIDEO IN
SOURCE
AUTO
ADJ.
ON/STAND BY
FOCUS
LAMP
STATUS
POWER
SELECT
➌
Cabinet Dimensions
Lens center
Unit:mm(inch)
246 (9.7")
177 (7.0")
73 (2.9")
59 (2.3")
79 (3.1")
Lens center
72 (2.8")
VIDEO IN
COMPUTER IN
PC CONTROL
AUDIO IN
U SB
S-VIDEO IN
NP62/NP52
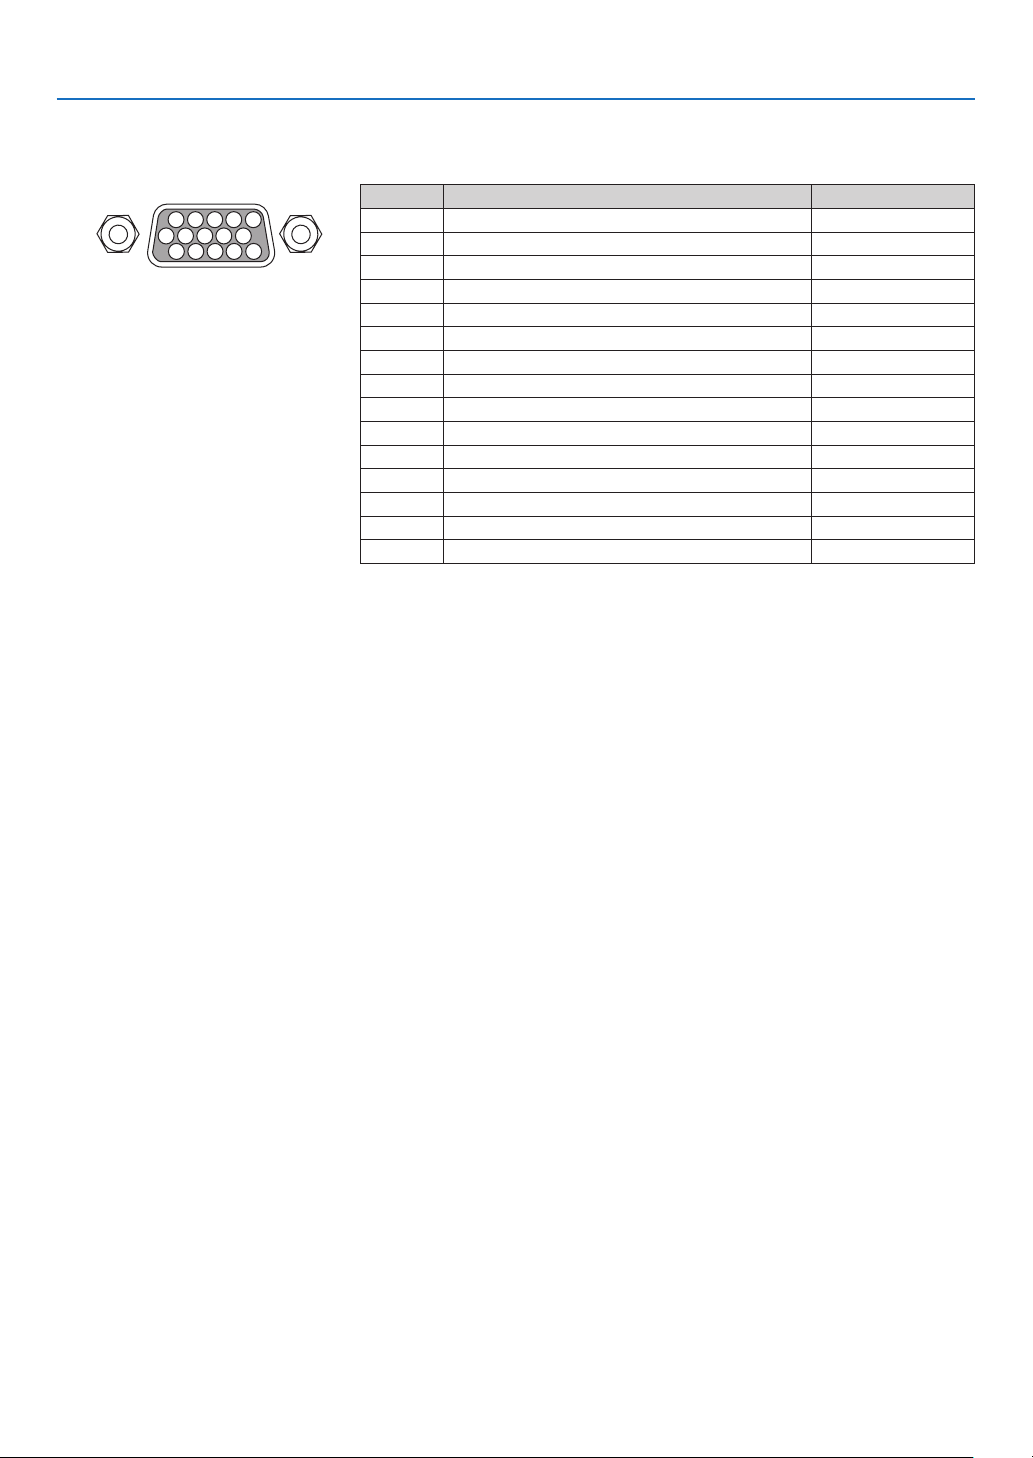
8
8. Appendx
Mn D-Sub Pn Connector
➍
Pin Assignments of D-Sub COMPUTER Input Connector
SignalLevel
Videosignal:0.7Vp-p(Analog)
Syncsignal:TTLlevel
11 1512 1413
6
54321
107 98
PinNo.RGBSignal(Analog)YCbCrSignal
1RedCr
2GreenorSynconGreenY
3BlueCb
4Ground
5Ground
6RedGroundCrGround
7GreenGroundYGround
8BlueGroundCbGround
9NoConnection
10SyncSignalGround
11NoConnection
12Bi-directionalDATA(SDA)
13HorizontalSyncorCompositeSync
14VerticalSync
15DataClock

83
8. Appendx
➎
Compatible Input Signal List
SignalResolutionFrequencyH.RefreshRate
(Dots)(kHz)(Hz)
NTSC–15.7360.00
PAL–15.6350.00
PAL60–15.7360.00
SECAM–15.6350.00
VESA640×48031.4759.94
IBM640×48031.4859.95
MAC640×48035.0066.67
VESA640×48037.8672.81
VESA640×48037.5075.00
VESA640×48043.2785.01
VESA800×60035.1656.25
VESA800×60037.8860.32
VESA800×60048.0872.19
VESA800×60046.8875.00
VESA800×60053.6785.06
MAC832×62449.7274.55
VESA1024×76848.3660.00
VESA1024×76856.4870.07
MAC1024×76860.2474.93
VESA1024×76860.0275.03
VESA1024×76868.6885.00
#SUN1152×90061.8065.95
#VESA1280×96060.0060.00
#VESA1280×102463.9860.02
#MAC1280×102469.8765.18
#SXGA+1400×1050–60.00
#VESA1600×120075.0060.02
#
HDTV
(1080i)
1920×108033.7560.00Interlace
#
HDTV
(1080i)
1920×108028.1350.00Interlace
#
HDTV(720p)
1280×72045.0060.00Progressive
#
HDTV(720p)
1280×72037.5050.00Progressive
SDTV(576p)
–31.2550.00Progressive
SDTV(480p)
–31.4759.94Progressive
DVDYCbCr–15.7359.94Interlaced
DVDYCbCr–15.6350.00Interlaced
#:Signalsaboveaggedwith#arecompressedwithscalingtechnology.
NOTE:
• Signals other than those specified in the table above may not be displayed correctly. If this should happen, change the re
-
fresh rate or resolution on your PC. Refer to Display Properties help section of your PC for procedures.
• UXGA (1600 x 1200) is supported for separate sync signal only.
• Composite sync signals or Sync on Green signals may not be displayed correctly.
Horizontal:15kHzto100kHz(RGB:24kHzorover)
Vertical:50Hzto85Hz
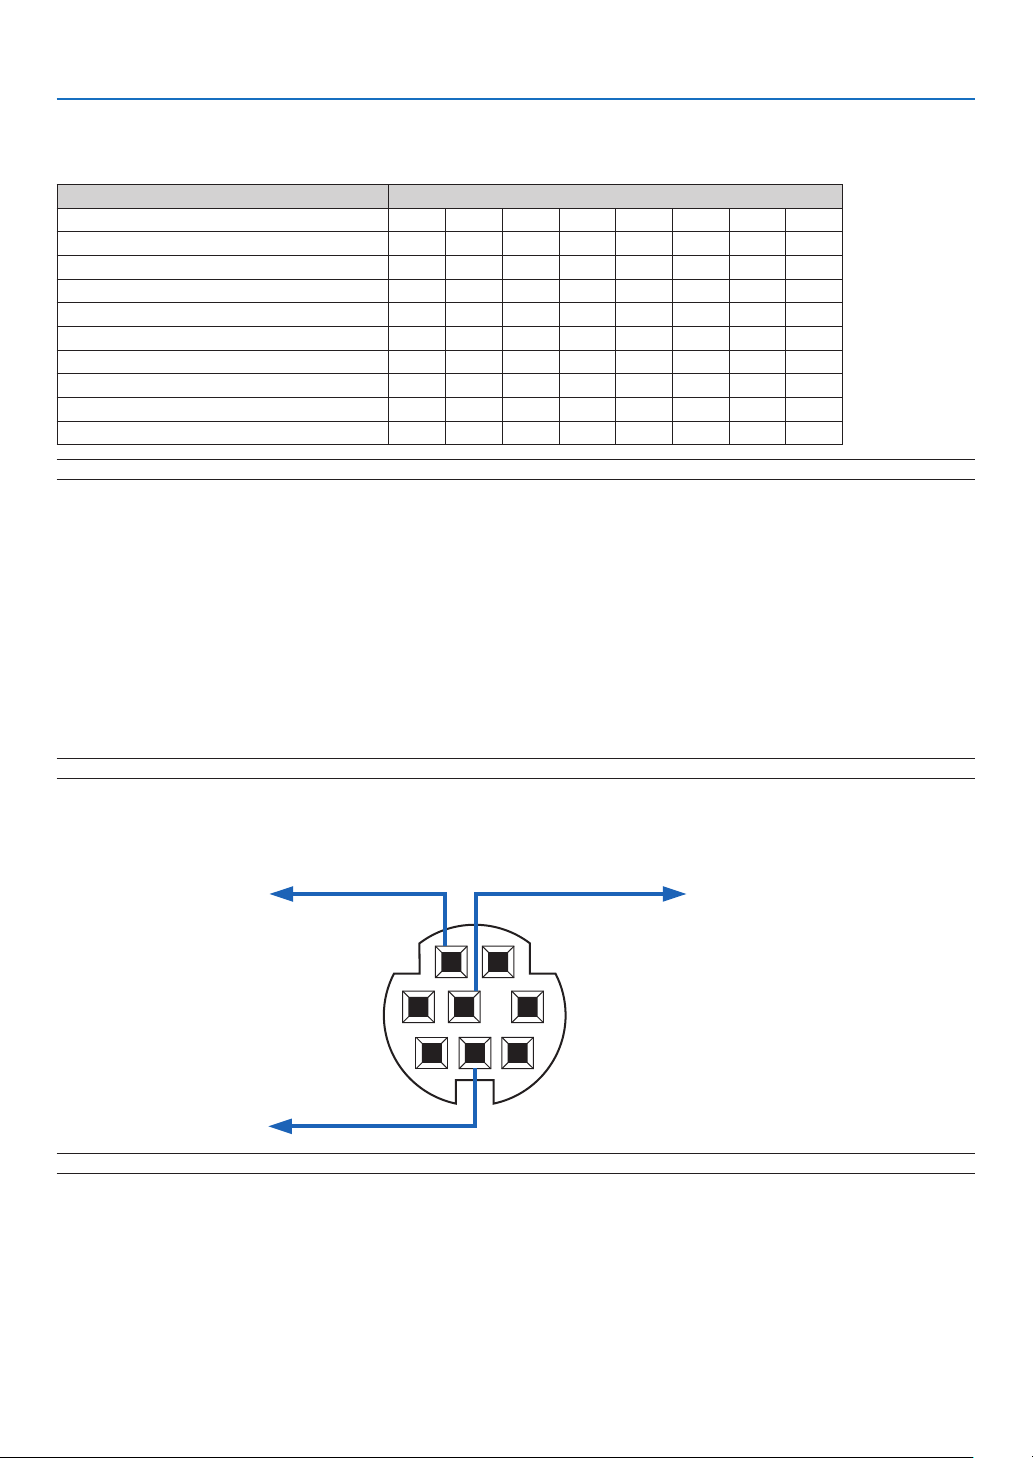
8
8. Appendx
➏
PC Control Codes and Cable Connection
PC Control Codes
FunctionCodeData
POWERON02H00H00H00H00H02H
POWEROFF02H01H00H00H00H03H
INPUTSELECTCOMPUTER02H03H00H00H02H01H01H09H
INPUTSELECTVIDEO02H03H00H00H02H01H06H0EH
INPUTSELECTS-VIDEO02H03H00H00H02H01H0BH13H
INPUTSELECTVIEWER(NP62/NP52)02H03H00H00H02H01H1FH27H
PICTUREMUTEON02H10H00H00H00H12H
PICTUREMUTEOFF02H11H00H00H00H13H
SOUNDMUTEON02H12H00H00H00H14H
SOUNDMUTEOFF02H13H00H00H00H15H
NOTE: Contact your local dealer for a full list of the PC Contorol Codes if needed.
Cable Connecton
CommunicationProtocol
Baud rate .........................................38400 bps
Data length ......................................8 bits
Parity ...............................................No parity
Stop bit ............................................One bit
X on/off ...........................................None
Communications procedure ...........Full duplex
NOTE: Depending on the equipment, a lower baud rate may be recommended for long cable runs.
PC Control Connector (DIN-8P)
1 2
3 4 5
6
7 8
To RxD of PC
To TxD of PC
To GND of PC
NOTE : Pins 2, 3, 5, 6 and 8 are used inside the projector.

8
8. Appendx
No image is displayed from your PC or video equipment to the
projector.
Still no image even though you connect the projector to the
PC first, then start the PC.
Enabling your notebook PC’s signal output to the projector.
• A combination of function keys will enable/disable the
external display. Usually, the combination of the “Fn” key
along with one of the 12 function keys turns the external
display on or off.
No image (blue background, logo, no display).
Still no image even though you press the AUTO ADJ. but-
ton.
Still no image even though you carry out [RESET] in the
projector’s menu.
Signal cable’s plug is fully inserted into the input connector
A message appears on the screen.
(
)
The source connected to the projector is active and available.
Still no image even though you adjust the [BRIGHTNESS]
and/or the [CONTRAST].
Input source’s resolution and frequency are supported by
the projector.
Image is too dark.
Remains unchanged even though you adjust the [BRIGHT-
NESS] and/or the [CONTRAST].
Image is distorted.
Image appears to be trapezoidal (unchanged even though
you carry out the [KEYSTONE] adjustment).
➐
Troubleshooting Check List
Beforecontactingyourdealerorservicepersonnel,checkthefollowinglisttobesurerepairsareneededalsoby
referringtothe“Troubleshooting”sectioninyouruser’smanual.Thischecklistbelowwillhelpussolveyourprob-
lemmoreefciently.
*Printthefollowingpages.
Frequency of occurrence
always
sometimes (How often?
)
other ( )
Power
No power (POWER indicator does not light green) See also
“Status Indicator (STATUS)”.
Power cable’s plug is fully inserted into the wall outlet.
Lamp cover is installed correctly .
The two screws on the lamp housing are completely tight-
ened.
The cooling pump is installed correctly.
[LAMP HOURS USED] (lamp operation hours) was cleared
after lamp replacement.
No power even though you press and hold the POWER but-
ton for a minimum of 1 second.
Shut down during operation.
Power cable’s plug is fully inserted into the wall outlet.
Lamp cover is installed correctly .
[AUTO POWER OFF] is turned off (only models with the
[AUTO POWER OFF] function).
[OFF TIMER] is turned off (only models with the [OFF
TIMER] function ).
Video and Audio
Parts of the image are lost.
Still unchanged even though you press the AUTO ADJ. but-
ton.
Still unchanged even though you carry out [RESET] in the
projector’s menu.
Image is shifted in the vertical or horizontal direction.
Horizontal and vertical positions are correctly adjusted on
a computer signal.
Input source’s resolution and frequency are supported by
the projector.
Some pixels are lost.
Image is flickering.
Still unchanged even though you press the AUTO ADJ. but-
ton.
Still unchanged even though you carry out [RESET] in the
projector’s menu.
Image shows flickering or color drift on a computer signal.
Still unchanged even though you change [FAN MODE] from
[HIGH ALTITUDE] to [AUTO].
Image appears blurry or out of focus.
[AUTO FOCUS] is turned on.
There are no objections between the focus sensor and the screen.
The throw distance is within 1.5 to 5.5 m/57.1” to 216.5”.
Image is projected onto the screen.
Still unchanged even though you adjusted the focus manually
No sound.
Audio cable is correctly connected to the audio input of the
projector.
Still unchanged even though you adjusted the volume level.
Other
Remote control does not work.
No obstacles between the sensor of the projector and the
remote control.
Projector is placed near a fluorescent light that can disturb
the infrared remote controls.
Batteries are new and are not reversed in installation.
Buttons on the projector cabinet do not work ( only models
with the [CONTROL PANEL LOCK] function).
[CONTROL PANEL LOCK]
is not turned on or is disabled in
the menu.
Still unchanged even though you press and hold the EXIT
button for a minimum of 10 seconds.
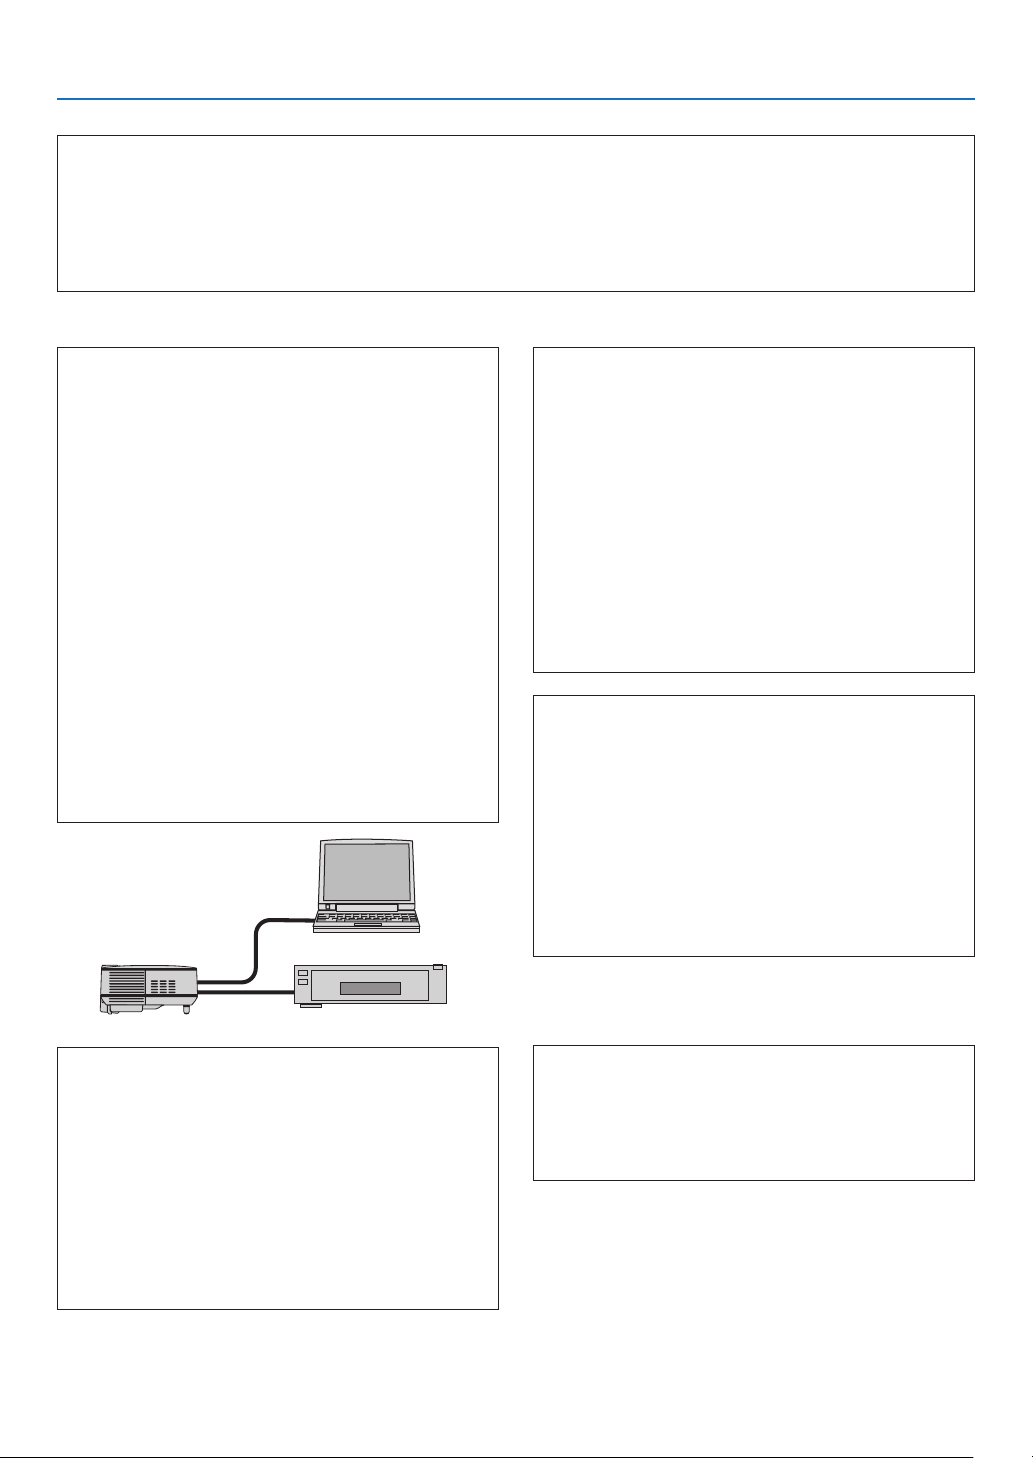
8
8. Appendx
In the space below please describe your problem in detail.
Information on application and environment where your projector is used
Projector
Model number:
Serial No.:
Date of purchase:
Lamp operating time (hours):
Lamp Mode:
Normal
Eco
Information on input signal:
Horizontal synch frequency [ ] kHz
Vertical synch frequency [ ] Hz
Synch polarity H
(+)
(–)
V
(+)
(–)
Synch type
Separate
Composite
Sync on Green
STATUS Indicator:
Steady light
Orange
Green
Flashing light [ ] cycles
Remote control model number:
Sgnal cable
NEC standard or other manufacturer’s cable?
Model number: Length: inch/m
Distribution amplifier
Model number:
Switcher
Model number:
Adapter
Model number:
Projector
PC
DVD player
Installaton envronment
Screen size: inch
Screen type:
White matte
Beads
Polarization
Wide angle
High contrast
Throw distance: feet/inch/m
Orientation:
Ceiling mount
Desktop
Power outlet connection:
Connected directly to wall outlet
Connected to power cord extender or other (the
number of connected equipment______________)
Connected to a power cord reel or other (the num-
ber of connected equipment______________)
Computer
Manufacturer:
Model number:
Notebook PC
/ Desktop
Native resolution:
Refresh rate:
Video adapter:
Other:
Vdeo equpment
VCR, DVD player, Video camera, Video game or other
Manufacturer:
Model number:

87
8. Appendx
➑
TravelCare Guide
TravelCare - a service for international travelers
This product is eligible for “TravelCare”, NEC’s unique international
warranty.
Please note that TravelCare coverage differs in part from coverage
under the warranty included with the product.
Services offered with TravelCare
This warranty allows customers to receive service on their product at
the NEC and NEC-designated service stations in the countries listed
herein when temporarily traveling internationally for business or plea-
sure.
For details on services offered by the different service stations, please
refer to the “List of TravelCare Outlets” below.
1 Repair services
The product will be repaired and delivered within 10 business days,
not including shipping time.
During the term of warranty, the cost of maintenance parts, labor
costs for repairs and shipping costs within the service station’s cov-
erage area are covered by the warranty.
2 Replacement product rental service
If the customer desires, he or she can rent a replacement product
while the original product is being repaired.
Fee: US$200 for 12 days
This fee must be paid at the local service station in cash or credit
card.
The US$200 rental fee is non-refundable even if the customer rents
it less than 12 days before returning.
The replacement product will be delivered within 3 business days.
If the customer did not return the replacement product within 12
days, the customer will be charged the price of the unit.
If the customer returned the replacement product in a faulty or
damaged condition, the repair cost will be charged to the customer.
Note that this service is not offered in all countries and regions.
Please refer to the “List of TravelCare Outlets”.
In addition, this replacement product rental service is not offered
after the product’s warranty has expired.
Term of warranty
1
a. Upon presentation of the warranty or receipt received upon
purchase:
Valid for the term indicated on the warranty or the normal term
of warranty for the country of purchase.
b. When only the product is brought in:
Valid for a period of within 14 months of the date of manufac
-
ture indicated by the serial number attached to the product.
2 When a product whose term of warranty is expired is brought in:
Repairs will be offered for a fee. In this case the customer is not
eligible for the replacement product rental service.
3 In the following cases, repairs may be charged, even if the product’
s warranty is still in effect:
1) If the term of warranty, model name, serial number and name
of the store of purchase are not indicated on the warranty or
have been altered.
2) Problems or damage caused by dropping or shocks during
shipment or movement by the customer or by improper han
-
dling by the customers.
3) Problems or damage caused by improper usage or unwarrant-
able alterations or repairs by the customer.
4) Problems or damage caused by fire, salt damage, gas dam-
age, earthquakes, lightning damage, storm or flood damage or
other natural disasters or such external factors as dust, ciga-
rette smoke, abnormal voltage, etc.
5) Problems or damage caused by use in hot or humid places, in
vehicles, boats or ships, etc.
6) Problems or damage caused by expendable supplies or de-
vices connected to the product other than those designated by
NEC.
7) Problems caused by natural consumption, wear or deteriora-
tion of parts under normal usage conditions.
8) Problems or damage to lamps and other expendable supplies,
included parts or optional parts.
9) Other conditions stipulated in the warranty included with the
product also apply.
NOTE: The product can be used overseas with voltages of 100 to 120V and
200 to 240V by using a power cable suited for the standards and power source
voltage of the country in which the product is being used.
List of TravelCare Outlets
This list applies as of July 1, 2008.
For the most up-to-date information, please refer to the websites of
the service stations in the various countries on the List of TravelCare
Outlets or to the NEC website at
http://www.nec-pj.com.
In Europe
NEC Europe, Ltd. / European Technical Centre
Address: Unit G, Stafford Park 12, Telford TF3 3BJ, U.K.
Telephone: +44 1952 237000
Fax Line: +44 1952 237006
Email Address: [email protected]
WEB Address:
http://www.neceur.com
(Regions Covered)
EU:
Austria*, Belgium*, Denmark*, Finland*, France*, Germany*,
Greece*, Ireland*, Italy*, Luxembourg*, The Netherlands*,
Portugal*, Spain*, Sweden* and the United Kingdom*
EEA: Norway*, Iceland and Liechtenstein
In North America
NEC Display Solutions of America, Inc.
Address: 500 Park Boulevard, Suite 1100
Itasca, Illinois 60143, U.S.A.
Telephone: +1 800 836 0655
Fax Line: +1 800 356 2415
Email Address: [email protected]
WEB Address:
http://www.necdisplay.com/
(Regions Covered)
U.S.A. *, Canada*
In Oceania
NEC Australia Pty., Ltd.
Address:
New South Wales;
Sydney
184 Milperra Road, Reversby NSW 2212
Telephone: 131 632
Newcastle
120 Parry Street Newcastle West NSW 2302
Telephone: 131 632
Victoria;
Melbourne
Unit 1/6 Garden Road, Clayton VIC 3168
Telephone: 131 632
Queensland;
Brisbane
Unit 4/305 Montague Road West End QLD 4101
Telephone: 131 632
Southport
Shop1 48 Ferry Road Southport QLD 4215
Telephone: 131 632
South Australia;
Adelaide
84A Richmond Road, Keswick SA 5035
Telephone: 131 632
Western Australia;
Perth
45 Sarich Court Osborne Park WA 6017
Telephone: 131 632
WEB Address:
http://www.nec.com.au
(Regions Covered)
Australia*, New Zealand

88
8. Appendx
Hyosung ITX Co., Ltd.
Address: 1st Fl., Ire B/D. #2, 4Ga, Yangpyeng-Dong,
Youngdeungpo-Gu, Seoul, Korea 150-967
Telephone: +82 2 2163 4193
Fax Line: +82 2 2163 4196
Email Address: [email protected]
(Regions Covered)
South Korea
Lenso Communication Co., Ltd.
Address:
292 Lenso House 4, 1st Floor, Srinakarin Road,
Huamark, Bangkapi, Bangkok 10240, Thailand
Telephone: +66 2 375 2425
Fax Line: +66 2 375 2434
Email Address: [email protected]
WEB Address:
http://www.lensocom.com/
(Regions Covered)
Thailand
ABBA Electronics L.L.C.
Address: Tariq Bin Ziyad Road, P.O.Box 327, Dubai,
United Arab Emirates
Telephone: +971 4 371800
Fax Line: +971 4 364283
Email Address: [email protected]
(Regions Covered)
United Arab Emirates
Samir Photographic Supplies
Address: P.O.Box 599, Jeddah 21421, Saudi Arabia
Telephone: +966 2 6828219
Fax Line: +966 2 6830820
Email Address: [email protected]
Riyadh
Address: P.O.Box 5519, Riyadh 11432, Saudi Arabia
Telephone: +966 1 4645064
Fax Line: +966 1 4657912
Email Address: [email protected]
Alkhobar
Address: P.O.Box 238, Alkhobar 31952, Saudi Arabia
Telephone: +966 3 8942674
Fax Line: +966 3 8948162
Email Address: [email protected]
(Regions Covered)
Saudi Arabia
NOTE: In countries designated with an asterisk(*), replacement product rental
service are offered.
In Asia and Middle East
NEC Display Solutions, Ltd.
Address: 686-1, Nishioi, Oi-Machi, Ashigarakami-Gun,
Kanagawa 258-0017, Japan
Telephone: +81 465 85 2369
Fax Line: +81 465 85 2393
Email Address: [email protected]
WEB Address: http://www.nec-pj.com
(Regions Covered)
Japan*
NEC Solutions (China) Co.,Ltd.
Address: Rm 1903, Shining Building, 35 Xueyuan Rd,
Haidian District Beijing 100083, P.R.C.
Telephone: +8610 82317788
Fax Line: +8610 82331722
Email Address: [email protected]
WEB Address:
http://www.necsl.com.cn
(Regions Covered)
China
NEC Hong Kong Ltd.
Address:
25/F.,The Metropolis Tower, 10 Metropolis
Drive,
Hunghom, Kowloon, Hong Kong
Telephone: +852 2369 0335
Fax Line: +852 2795 6618
Email Address: [email protected]
WEB Address:
http://www.nec.com.hk
(Regions Covered)
Hong Kong
NEC Taiwan Ltd.
Address:
7F, No.167, SEC.2, Nan King East Road, Tai-
pei,
Taiwan, R.O.C.
Telephone: +886 2 8500 1700
Fax Line: +886 2 8500 1420
Email Address: [email protected]
WEB Address: http://www.nec.com.tw
(Regions Covered)
Taiwan
NEC Asia Pte.Ltd.
Address: 401 Commonwealth Drive, #07-02, Haw Par
Technocentre, Singapore 149598
Telephone: +65 6 273 8333
Fax Line: +65 6 274 2226
Email Address: [email protected]
WEB Address: http://www.nec.com.sg/ap
(Regions Covered)
Singapore
NEC Corporation of Malaysia Sdn. Bhd.
Address:
33rd Floor, Menara TA One, 22, Jalan P. Ramlee,
50250 Kuala Lumpur, Malaysia
Telephone: +6 03 2178 3600 (ISDN)
Fax Line: +6 03 2178 3789
Email Address: [email protected]
WEB Address: http://www.necarecenter.com
(Regions Covered)
Malaysia

89
8. Appendx
TO: NEC or NEC’s Authorized Service Station:
FM:
(Company & Name with signature)
Dear Sir (s),
I would like to apply your TravelCare Service Program based on attached registration and qualification sheet and agree with
your following conditions, and also the Service fee will be charged to my credit card account, if I don’t return the Loan units
within the specified period. I also confirm following information is correct. Regards.
Application Sheet for TravelCare Service Program
P-1/ ,
Country,
product purchased :
User’s Company Name :
User’s Company Address :
Phone No., Fax No. :
User’s Name :
User’s Address :
Phone No., Fax No. :
Local Contact office :
Local Contact office Address :
Phone No., Fax No. :
User’s Model Name :
Date of Purchase :
Serial No. on cabinet :
Problem of units per User :
Required Service : (1) Repair and Return (2) Loan unit
Requested period of Loan unit :
Payment method : (1) Credit Card (2) Travelers Cheque (3) Cash
In Case of Credit Card :
Card No. w/Valid Date :
Date: / / ,

90
8. Appendx
5. Loan Service Charges and Conditions:
Upon acceptance of this NEC Projector, Customer agrees to assume
liability for this loan unit.
The current cost of use of this loan unit is $200.00 USD for 12 calen-
dar days.
If Customer does not return the unit within the 12 calendar days, Cus-
tomer will be charged the next highest cost up to and including the full
list price to Credit Cards, which price will be informed by NEC Autho-
rized Service Stations. Please see the attached listing of contacts for
each country to arrange for pickup of the loan unit.
If you return to their country of origin with the loan unit, you will be
charged additional freight to return the unit to the loaning country.
Thank you for your understanding of this program.
Condition of your TravelCare Service Program
Enduser is requested to understand following condition of TravelCare
Service Program and complete the necessary information on the ap-
plication sheet.
1. Service Options:
There are 3 types of “Service” available. Enduser has to understand
following condition and is required to fill in the Application Sheet.
1) Repair and Return:
The ’Faulty unit’ is sent or collected from the customer. It is re
-
paired and returned within 10 days to the customer, excluding
transport time.
There may have a case, repair and return can’t be done by NEC
Authorized Service Station, because of shortage of spare parts due
to same model is not sold in the territory.
2) Repair and Return with Loan: (This service is limited to some Ser
-
vice Stations)
This service is offered to the Enduser, who cannot wait until their
unit is repaired.
The customer can borrow a unit for $200 up to 12 days. Customer
then sends in inoperable unit to nearest NEC Authorized Service
Station for service. In order to prevent collection problem, Enduser
is required to fill in Application Sheet.
Enduser needs to confirm the availability of the Service to NEC Au
-
thorized Service Stations.
3) Loan Only:
For this service, NEC Authorized Service Station supplies the cus
-
tomer with a loan unit for US$200 up to 12 days. Customer keeps
the inoperable unit and when customer returns home, customer
arranges to have the projector serviced in the home country.
2. Warranty Exclusions:
This program does not apply if the Projector’s serial number has been
defaced, modified or removed.
If, in the judgement of NEC Authorized Service Station or its agent the
defects or failures result from any cause other than fair wear and tear
or NEC neglect, or fault including the following without limitation:
1) Accidents, transportation, neglect, misuse, abuse, water, dust,
smoke or default of or by the Customer its employees or agents or
any third party;
2) Failure or fluctuation of electrical power, electrical circuitry, air con
-
ditioning, humidity control or other environmental conditions such
as use it in smoking area;
3) Any fault in the attachments or associated products or components
(whether or not supplied by NEC or its agents which do not form
part of the Product covered by this warranty);
4) Any act of God, fire, flood, war, act of violence or any similar occur
-
rence;
5) Any attempt by any person other than any person authorized by
NEC to adjust, modify, repair, install or service the product.
6) Any Cross-border charges such as, duty, insurance, tax etc.
3. Charges for Warranty Exclusions and Out of Warranty Case:
In case faulty unit is under warranty exclusions case or under Out of
Warranty period, NEC Authorized Service Station will Inform estima-
tion of actual service cost to the Enduser with reason.
4. Dead on Arrival (DOA):
Enduser must take this issue up with their original supplier in the
country of purchase.
NEC Authorized Service Station will repair the DOA unit as a War-
ranty repair, but will not exchange DOA unit with new units.

©NECDisplaySolutions,Ltd.20087N951221