INSTRUCTION MANUAL
Models #22150, 22151, 22152
ENGLISH
2 | ENGLISH
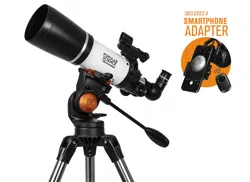
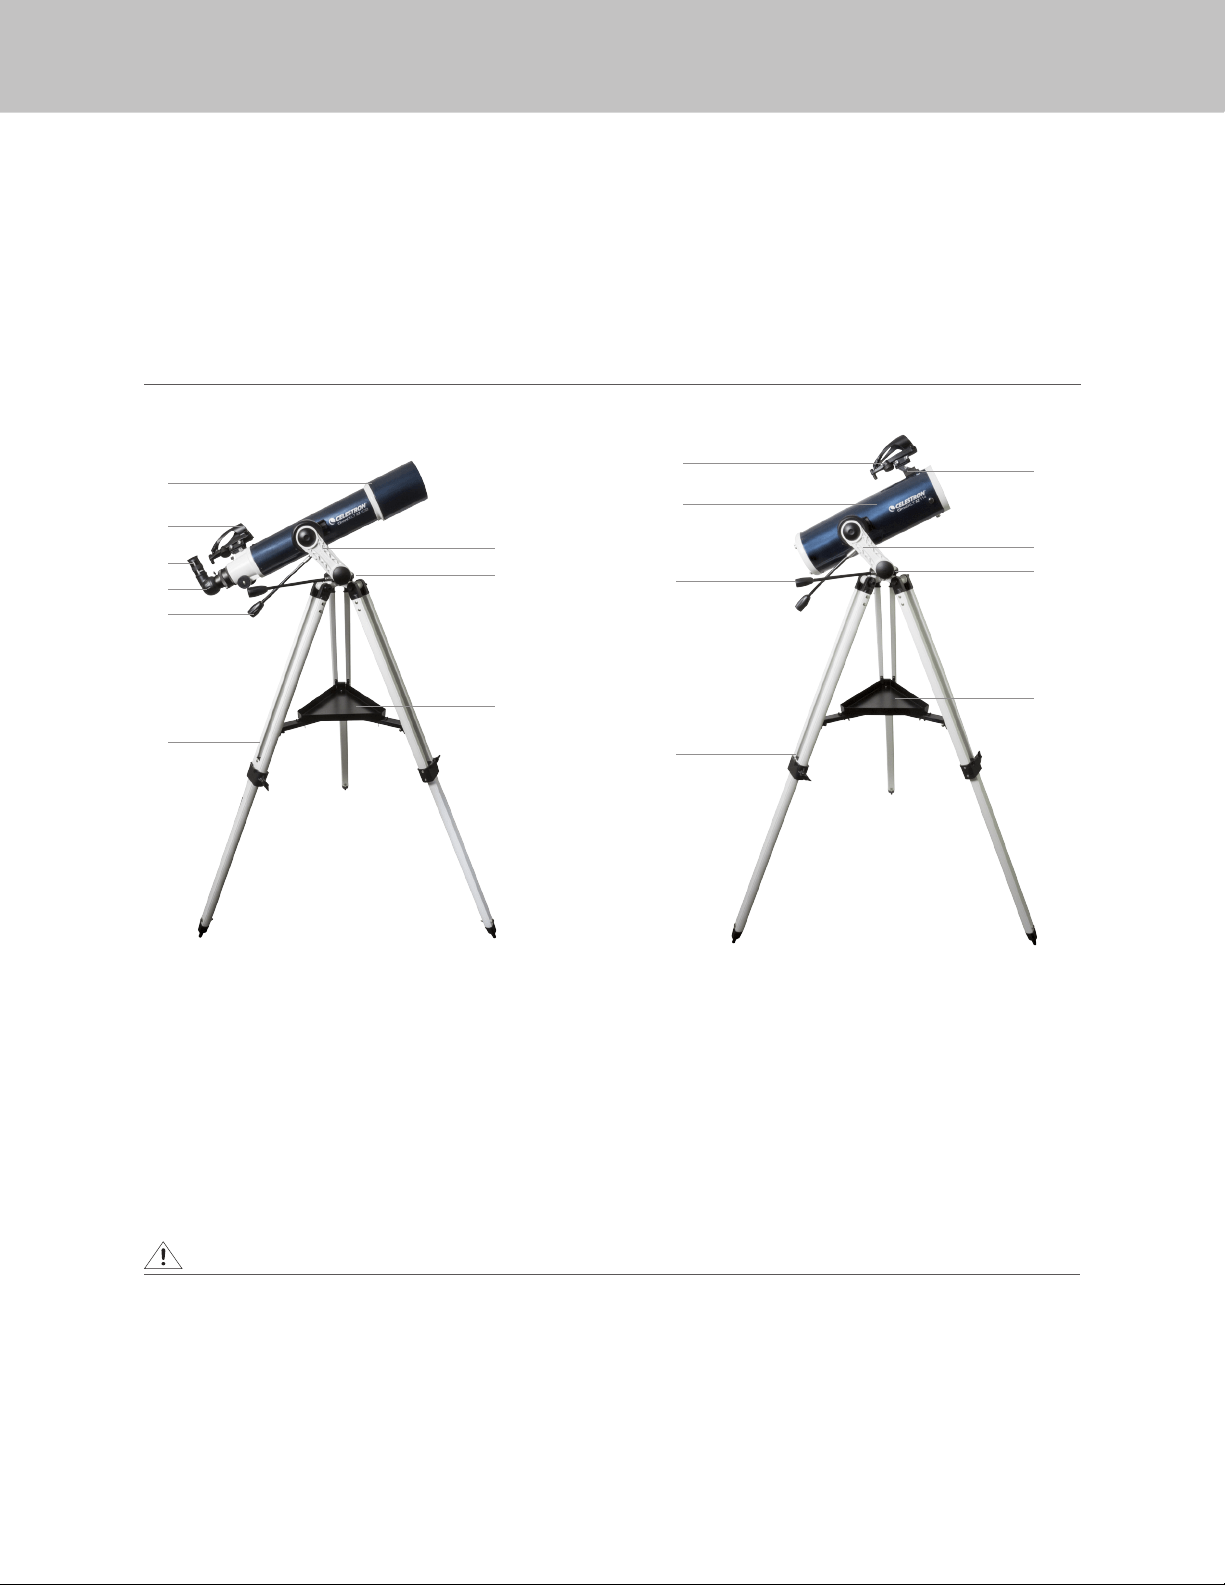
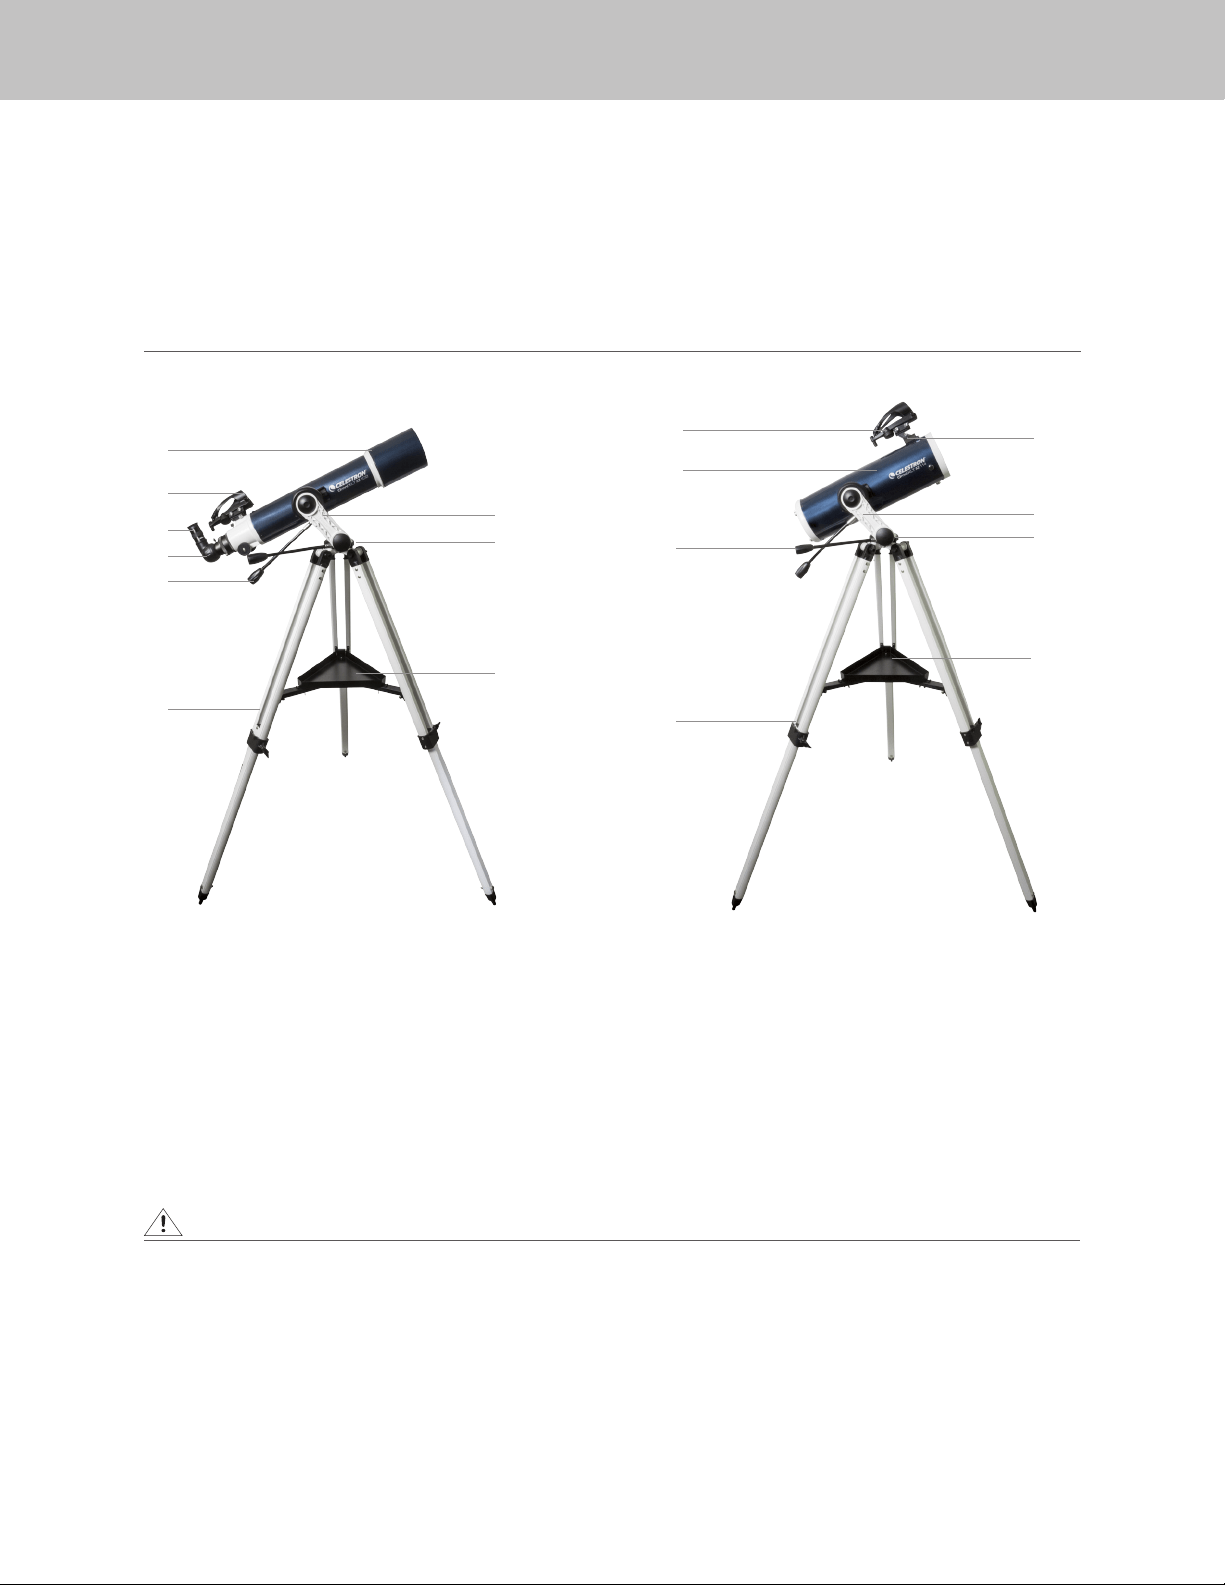
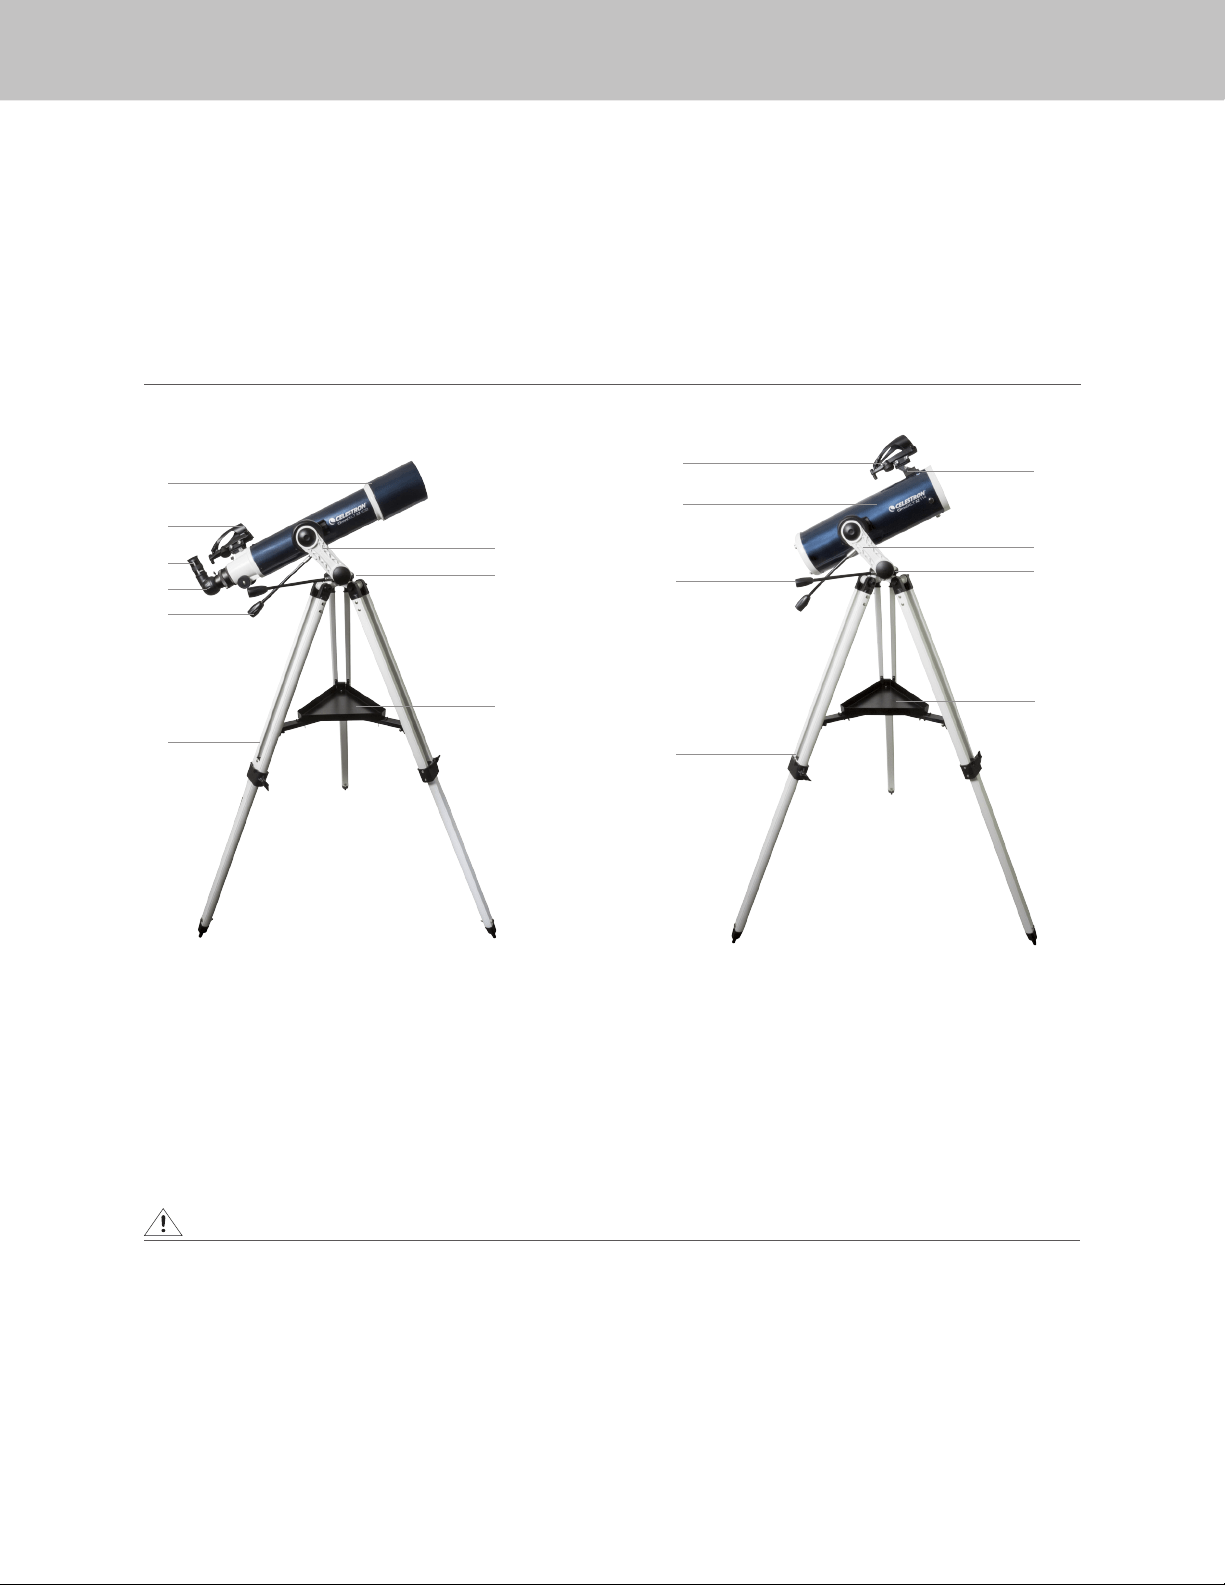
1. Telescope Tube
2. Finderscope
3. Eyepiece
4. Erect Image Diagonal
5. Slow Motion Knobs
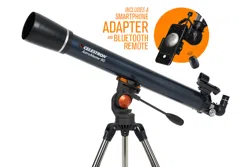
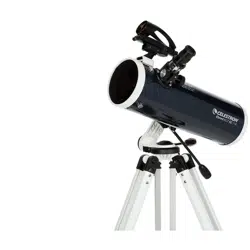
OMNI XLT AZ 102 OMNI XLT AZ 114 and OMNI XLT AZ 130
1. Finderscope
2. Telescope Tube
3. Slow Motion Knobs
4. Tripod
5. Focuser and Eyepiece
SOLAR WARNING
Never look directly at the Sun with the naked eye or with a telescope unless you have the proper solar filter. Permanent and irreversible eye damage may result.
Never use your telescope to project an image of the Sun onto any surface. Internal heat build-up can damage the telescope and any accessories attached to it.
Never use an eyepiece solar filter or a Herschel wedge. Internal heat build-up inside the telescope can cause these devices to crack or break, allowing unfiltered
sunlight to pass through to the eye.
Do not leave the telescope unsupervised, especially when children or adults unfamiliar with the correct operating procedures of your telescope are present.
We recommend saving your telescope box so it can be used to store the telescope when it is not in use. Unpack the
box carefully as some parts are small. Use the parts list below to verify that all parts and accessories are present.
PARTS LIST
WHAT’S IN THE BOX
6. Tripod
7. Omni XLT AZ Mount
8. Hex-key Wrench
(Inside Mount)
9. Accesory Tray
6. Omni XLT AZ Mount
7. Hex-key Wrench
(Inside Mount)
8. Accesory Tray
2
3
4
5
6
1
1
2
3
4
7
6
5
8
7
8
9

ENGLISH | 3
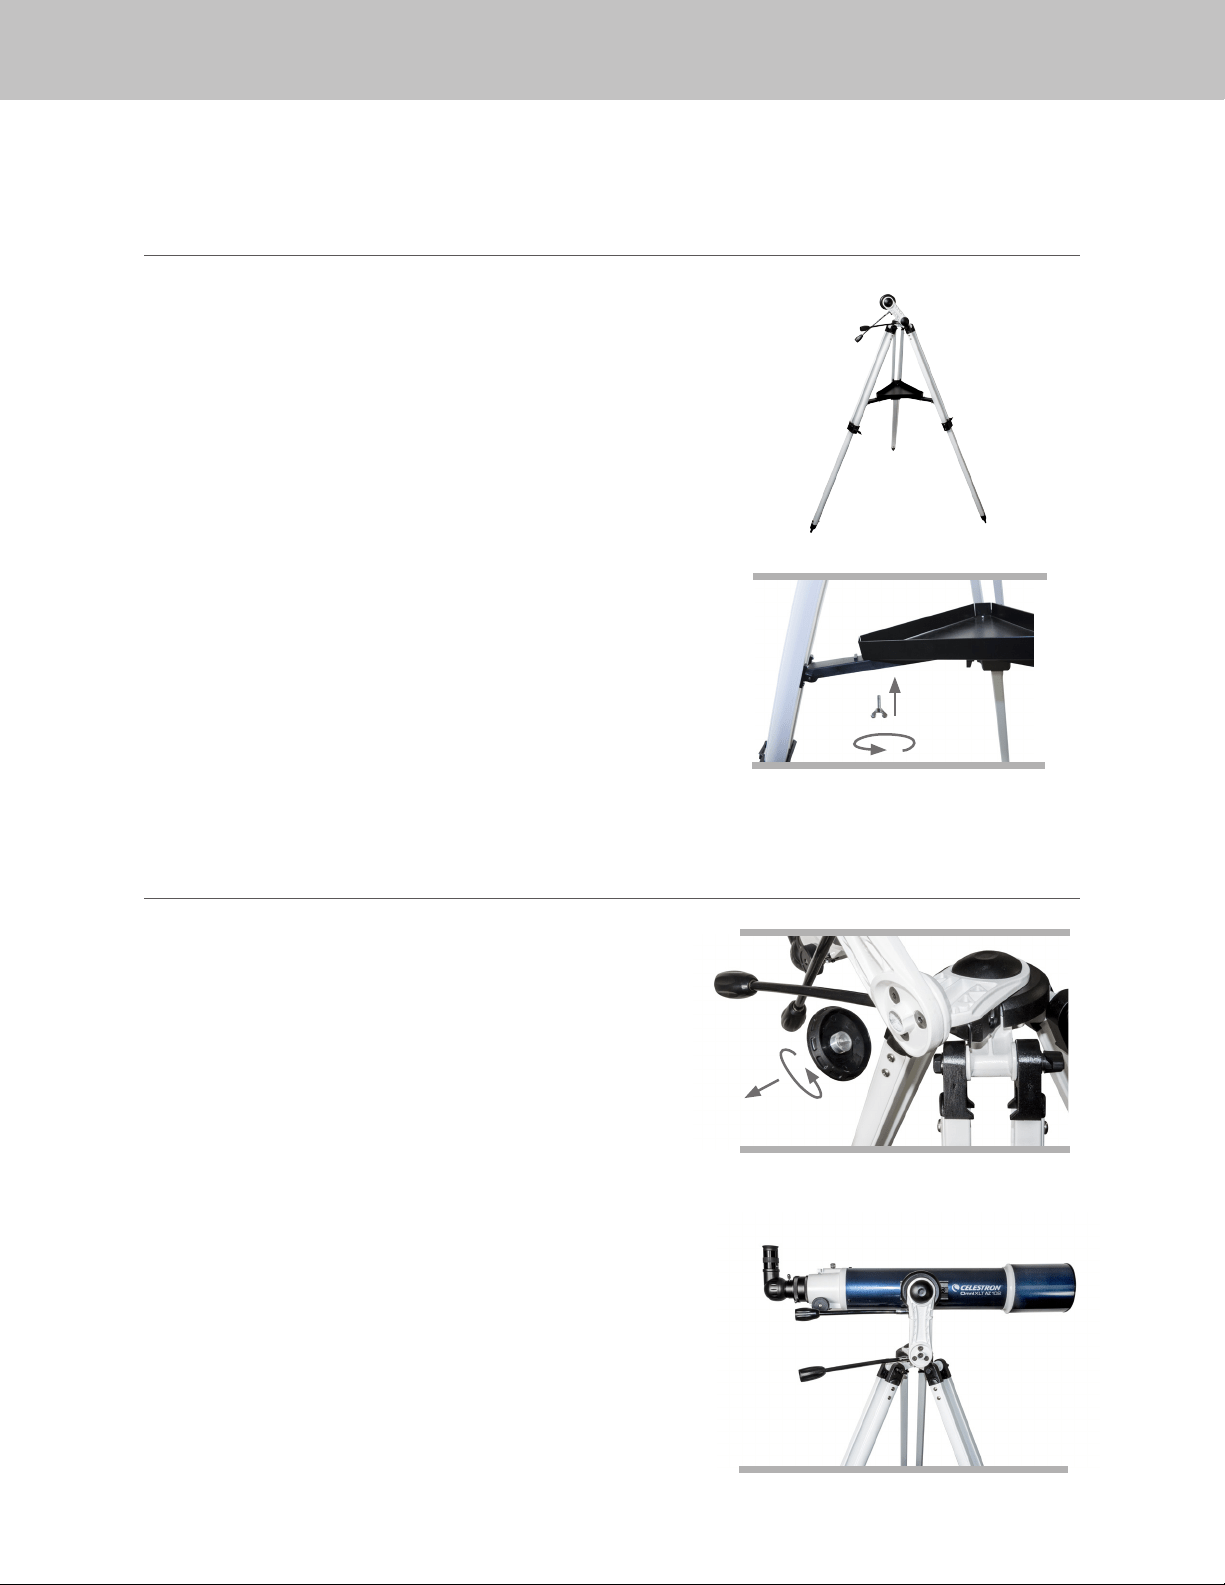
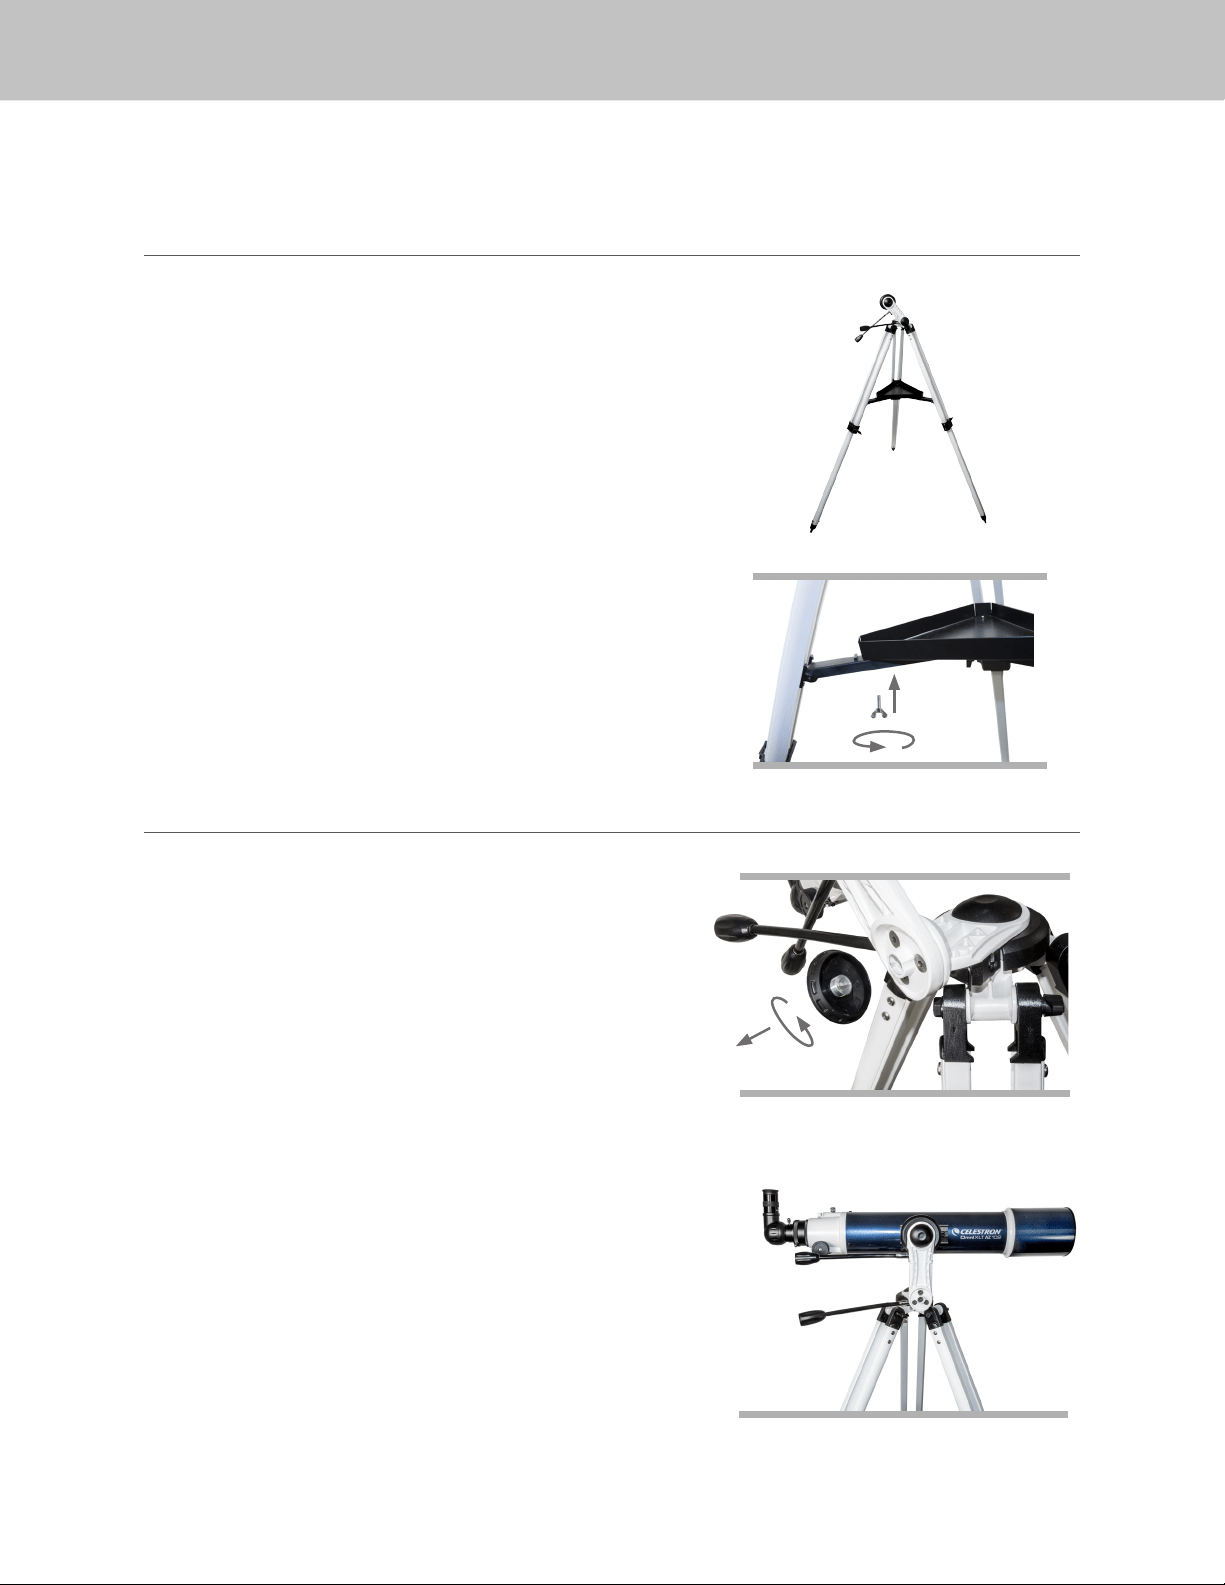
The Omni XLT AZ mount and tripod come fully assembled,
so setting it up is easy.
1. Remove the tripod and mount from the box.
2. Loosen the hand knobs at the bottom of each leg and
extend the inner section of the leg to the desired length.
Tighten the knobs to secure the legs, being careful not
to over tighten.
3. Stand the tripod upright and pull the tripod legs apart
until the center brace snaps into place.
4. Place the accessory tray on top of the center brace and
line up the holes. Insert the three thumb screws through
the bottom of the leg brace and thread them into the
tray.
5. Make sure the leg hinge bolts are secure by snugging
down the black thumbnuts at the top of each leg.
Depending on your specific use of the telescope, you may
wish to change the angle of the mount arm to give you
additional range of motion. The mount comes set up for
the astronomical use; it can move upward but is limited
in its downward motion. If you are using the mount for
terrestrial observation from an elevated location (cliff top,
balcony, etc.) and you want to point the scope well below
the horizon, you will need to change the angle of the mount
arm to accommodate this.
To make this adjustment:
1. Unthread the round cover on the bottom of the vertical
arm of the mount.
2. Using a 4 mm hex-key wrench (user supplied), remove
the three screws under the cover.
3. Rotate the mount arm so that it is pointed straight up and
thread the three screws back in.
4. Tighten the screws and replace the round cover.
ASSEMBLING YOUR TELESCOPE
ADJUSTING THE ANGLE OF THE MOUNT ARM
THE MOUNT
4 | ENGLISH
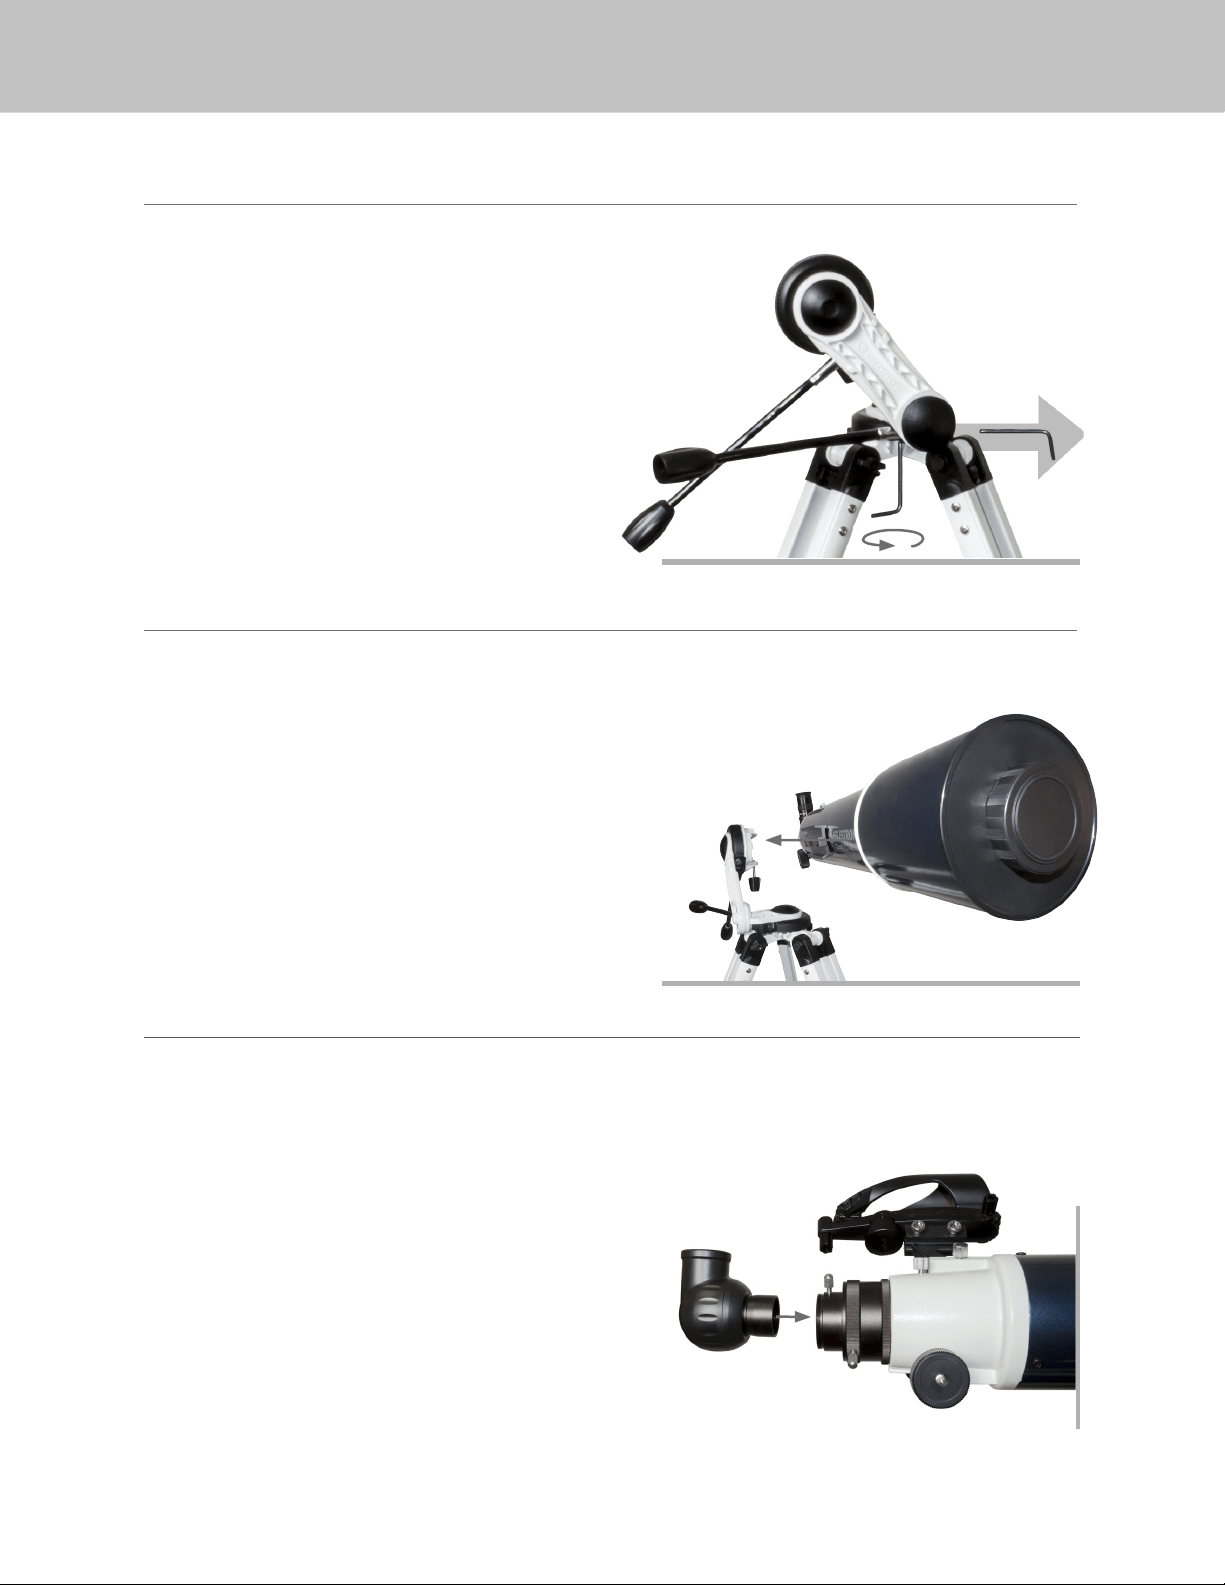
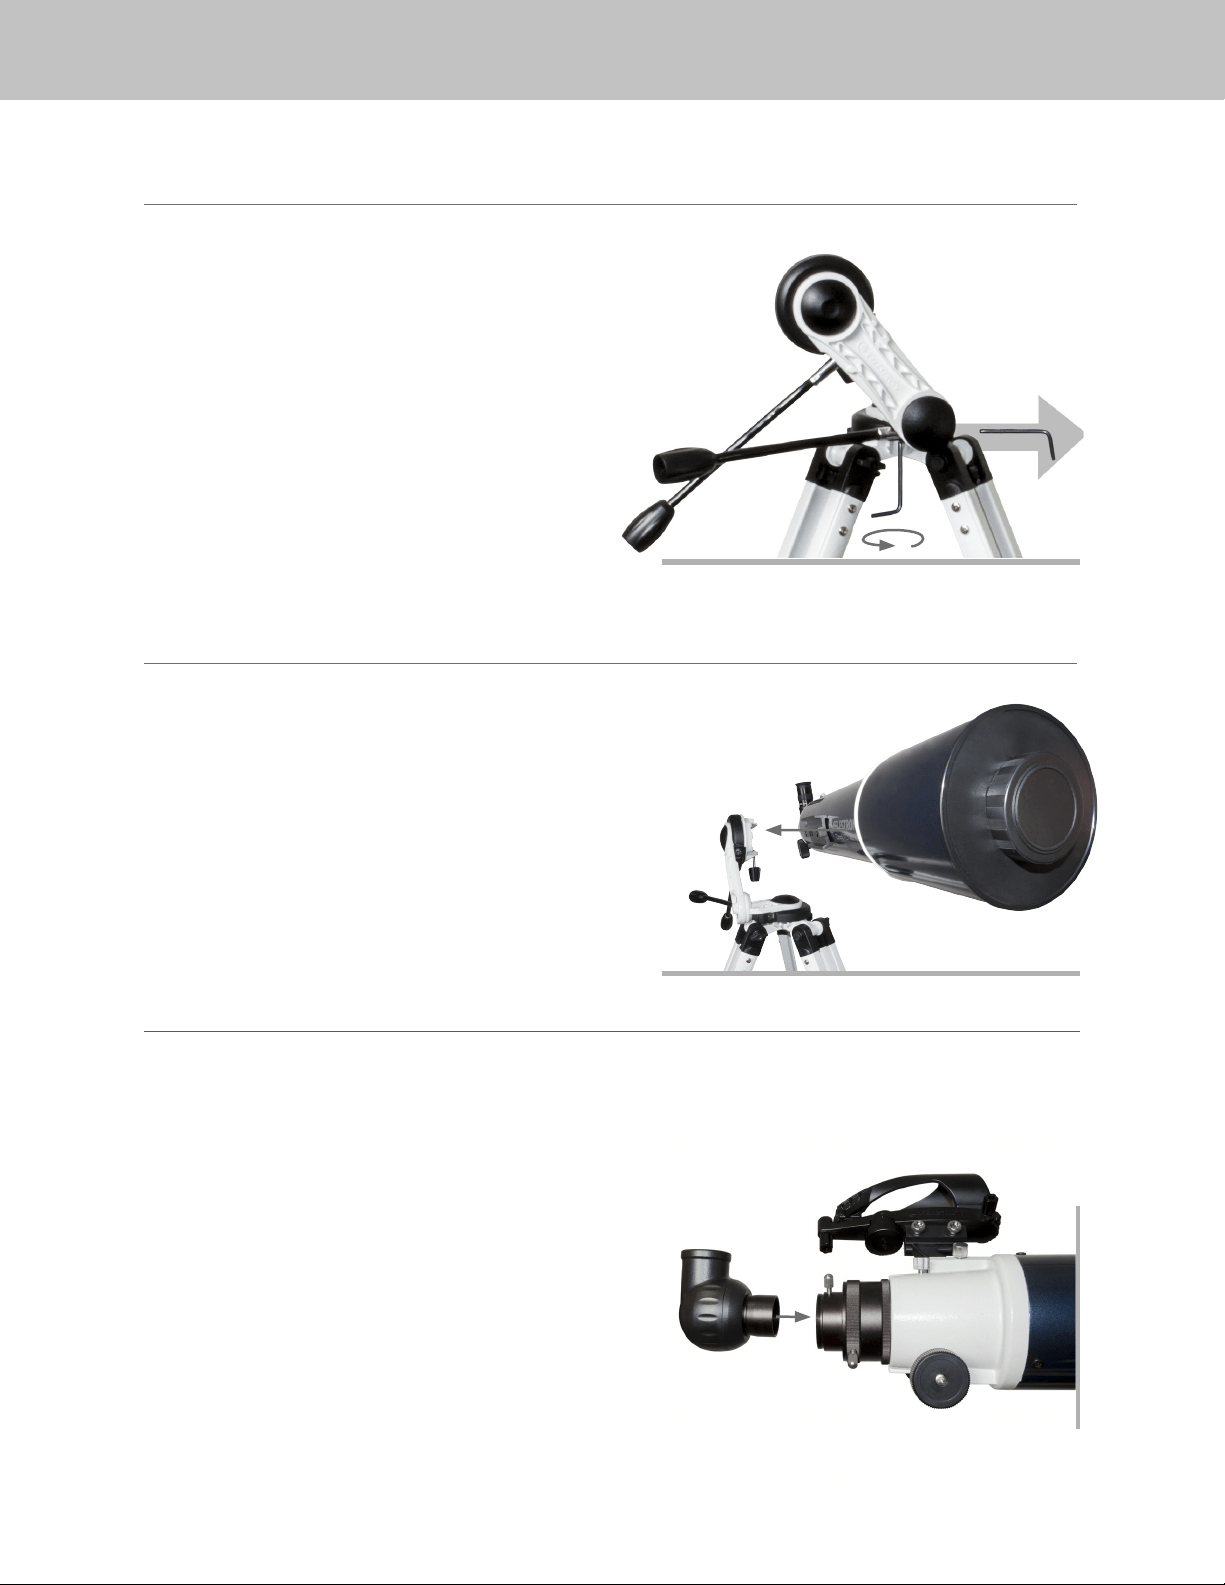
THE SLOW MOTION KNOBS
To attach the slow motion knobs to your mount:
1. Locate the supplied hex key hidden inside the slot in the
front of your mount.
2. Place the slow motion control knob over the D-shaped
gear shaft and push inward to make sure it is fully seated.
3. Use the hex key to tighten the setscrews onto the gear
shaft.
4. Return the hex key to its storage position in the front of
the mount.
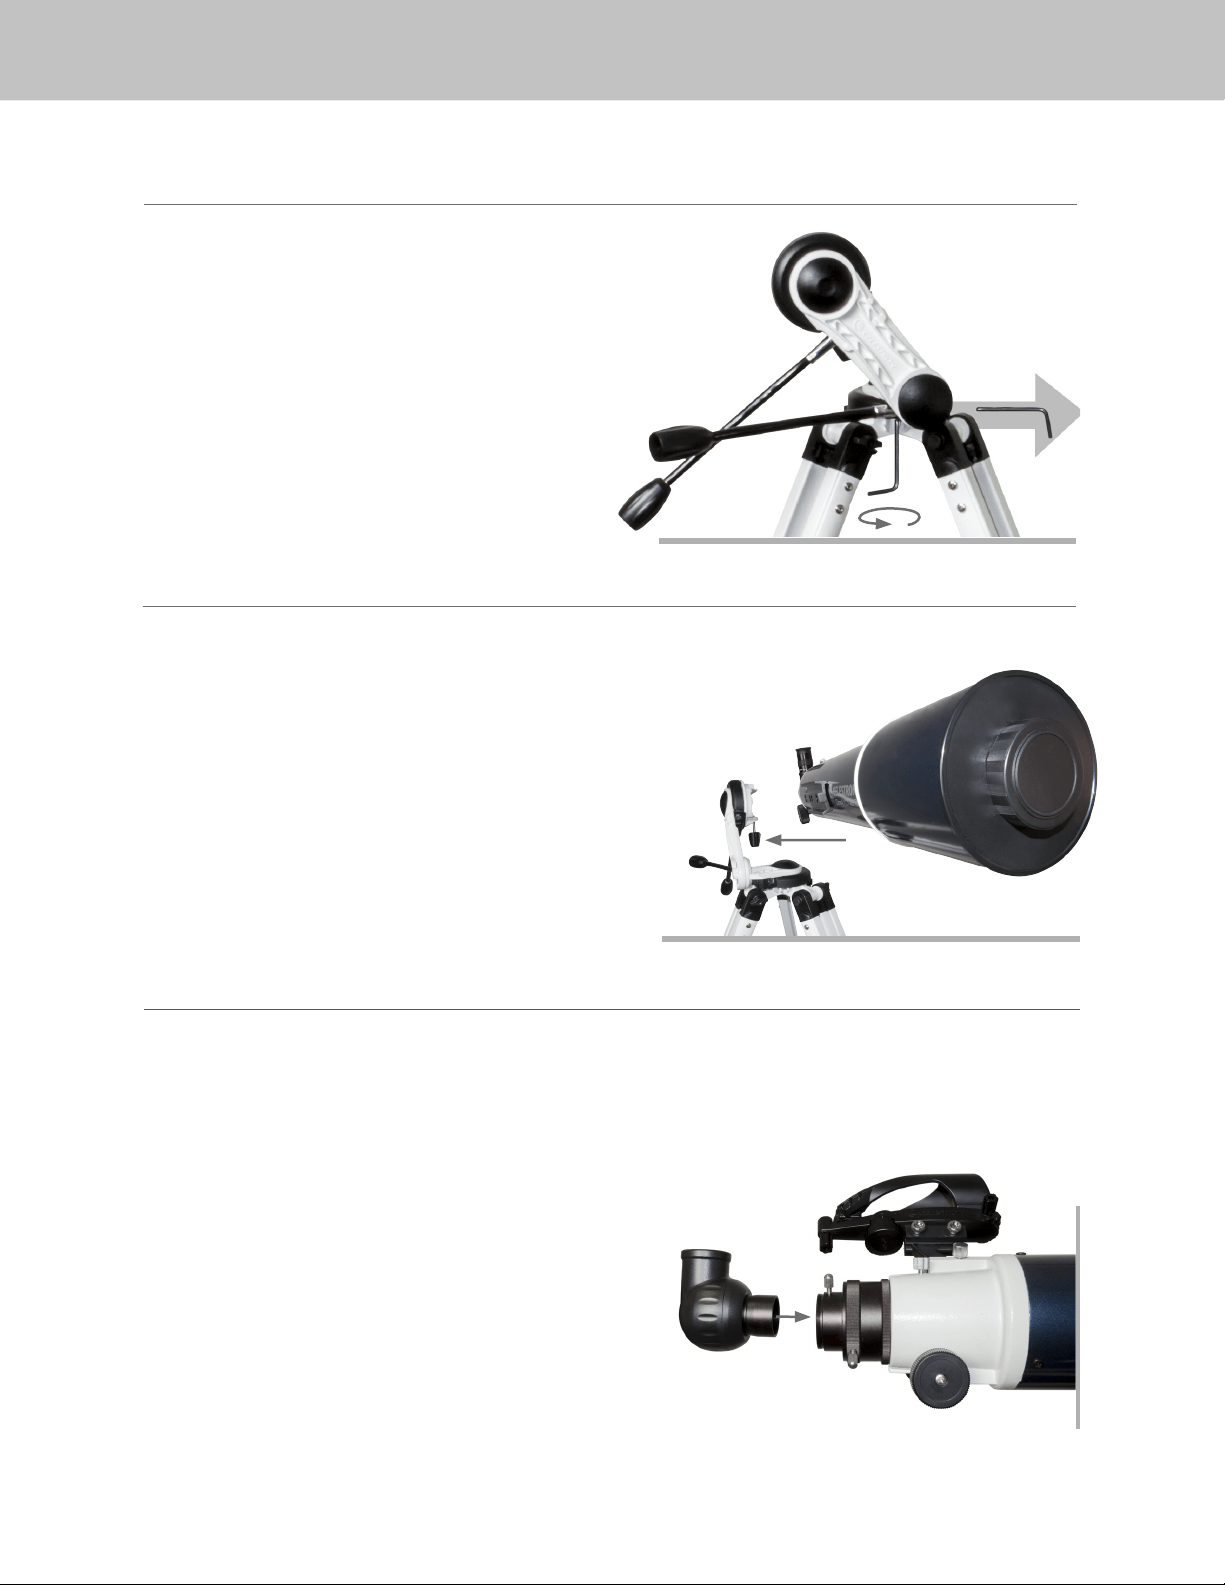
THE TELESCOPE TUBE
To attach the telescope tube to your tripod and mount:
1. Locate the dovetail bar mounted on the side of the
telescope tube.
2. Holding the telescope tube next to the mount, slide the
dovetail bar into the clamp at the top of the mount.
3. Tighten the hand knob on the bottom of the clamp to
secure the telescope in place.
NOTE: The 102 mm refractor is shown, but the 114 mm and 130 mm Newtonian telescopes
attach to the mount in the same way.
The star diagonal attaches to the back of a refracting
telescope and contains a small prism that reflects light
at a 90° angle, providing a more comfortable viewing
position. Because a star diagonal gives you a 100%
correctly oriented image, you can easily use the telescope
for daytime terrestrial observing.
To insert the diagonal:
1. Remove the caps from both sides of the diagonal.
2. Loosen the setscrews on the back of the focuser and
pull out the small dust cap.
3. Insert the smaller tube on the diagonal into the back of
the focuser and secure it by tightening the setscrews.
You can rotate the diagonal to any position by loosening
the setscrews.
THE STAR DIAGONAL (FOR 102 MM REFRACTOR ONLY)

ENGLISH | 5
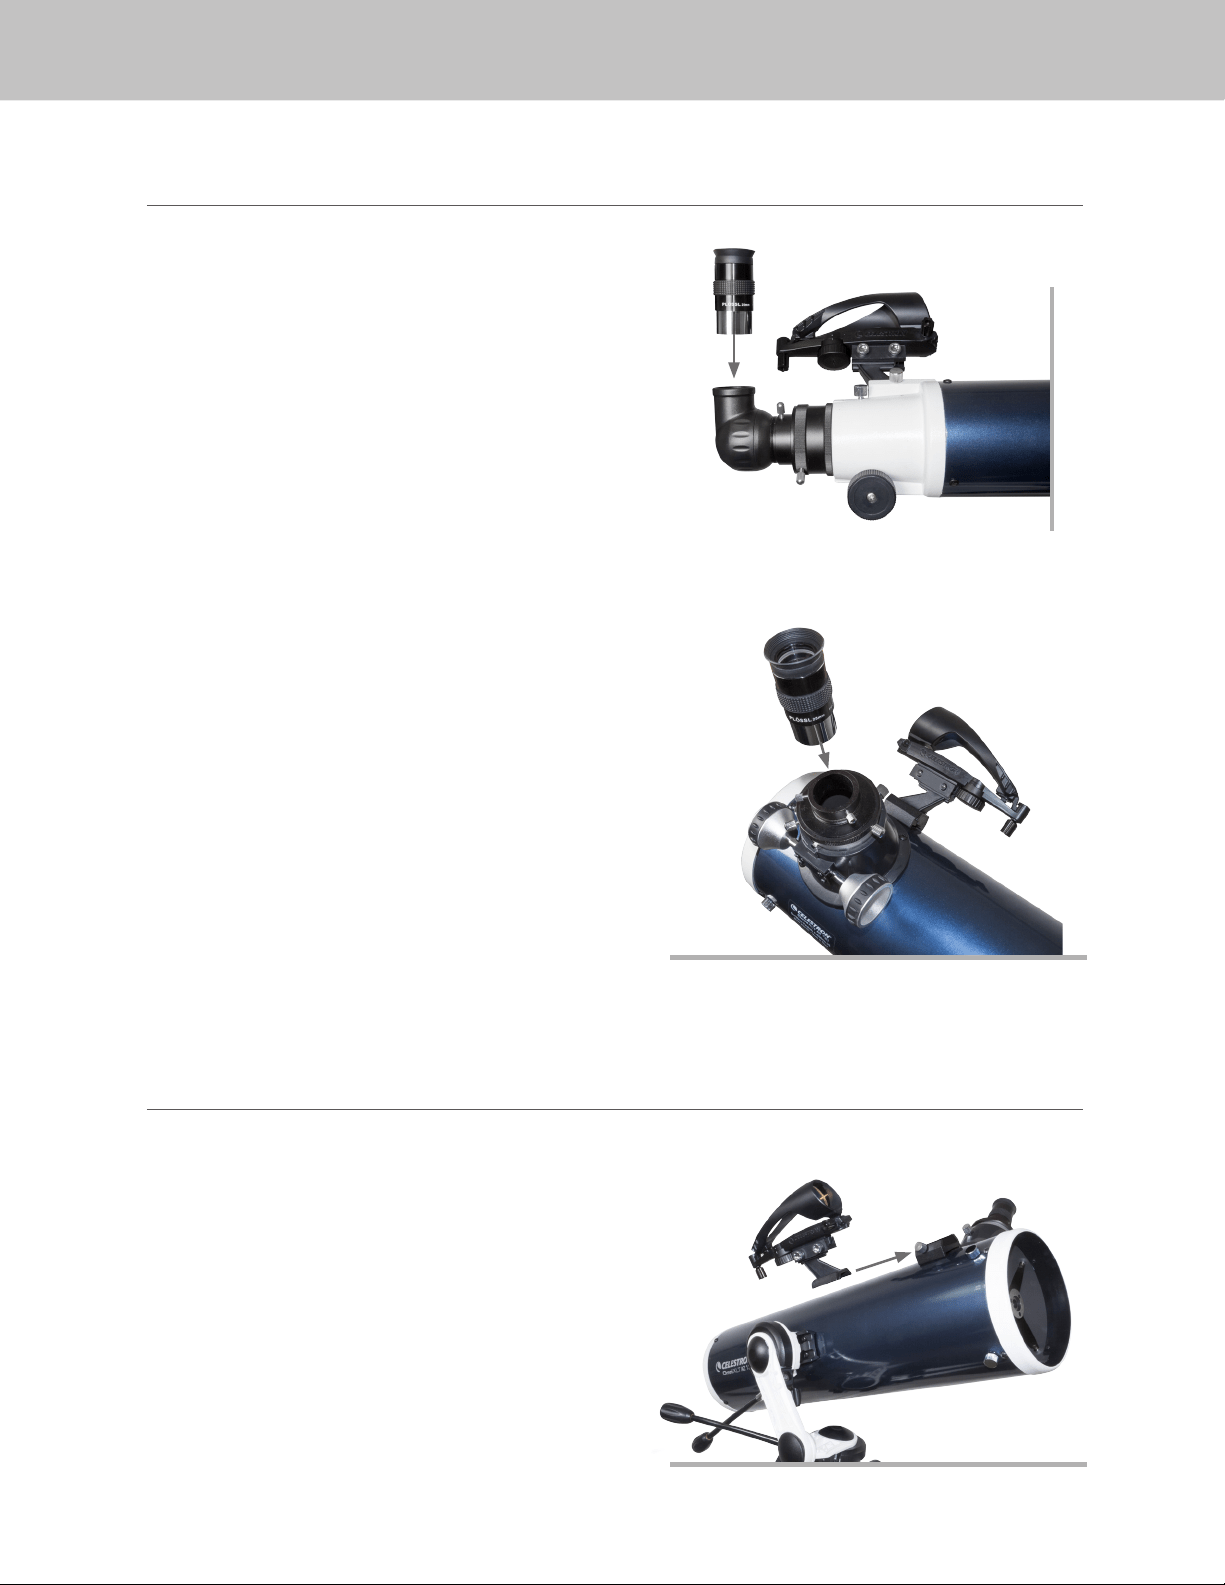
Your telescope comes with a 25 mm Plössl eyepiece,
which will give a moderately wide field of view. Additional
eyepieces can be purchased to increase or decrease the
magnification to your desired level.
To install an eyepiece on the 102 mm refractor:
1. Loosen the setscrews on the open end of the star
diagonal.
2. Insert the silver barrel of the 25 mm eyepiece into the
star diagonal.
3. Tighten the setscrews to secure the eyepiece
4. To see the sharpest image possible, focus by looking
through the eyepiece and slowly turning the focusing
knobs until the image comes into sharp focus.
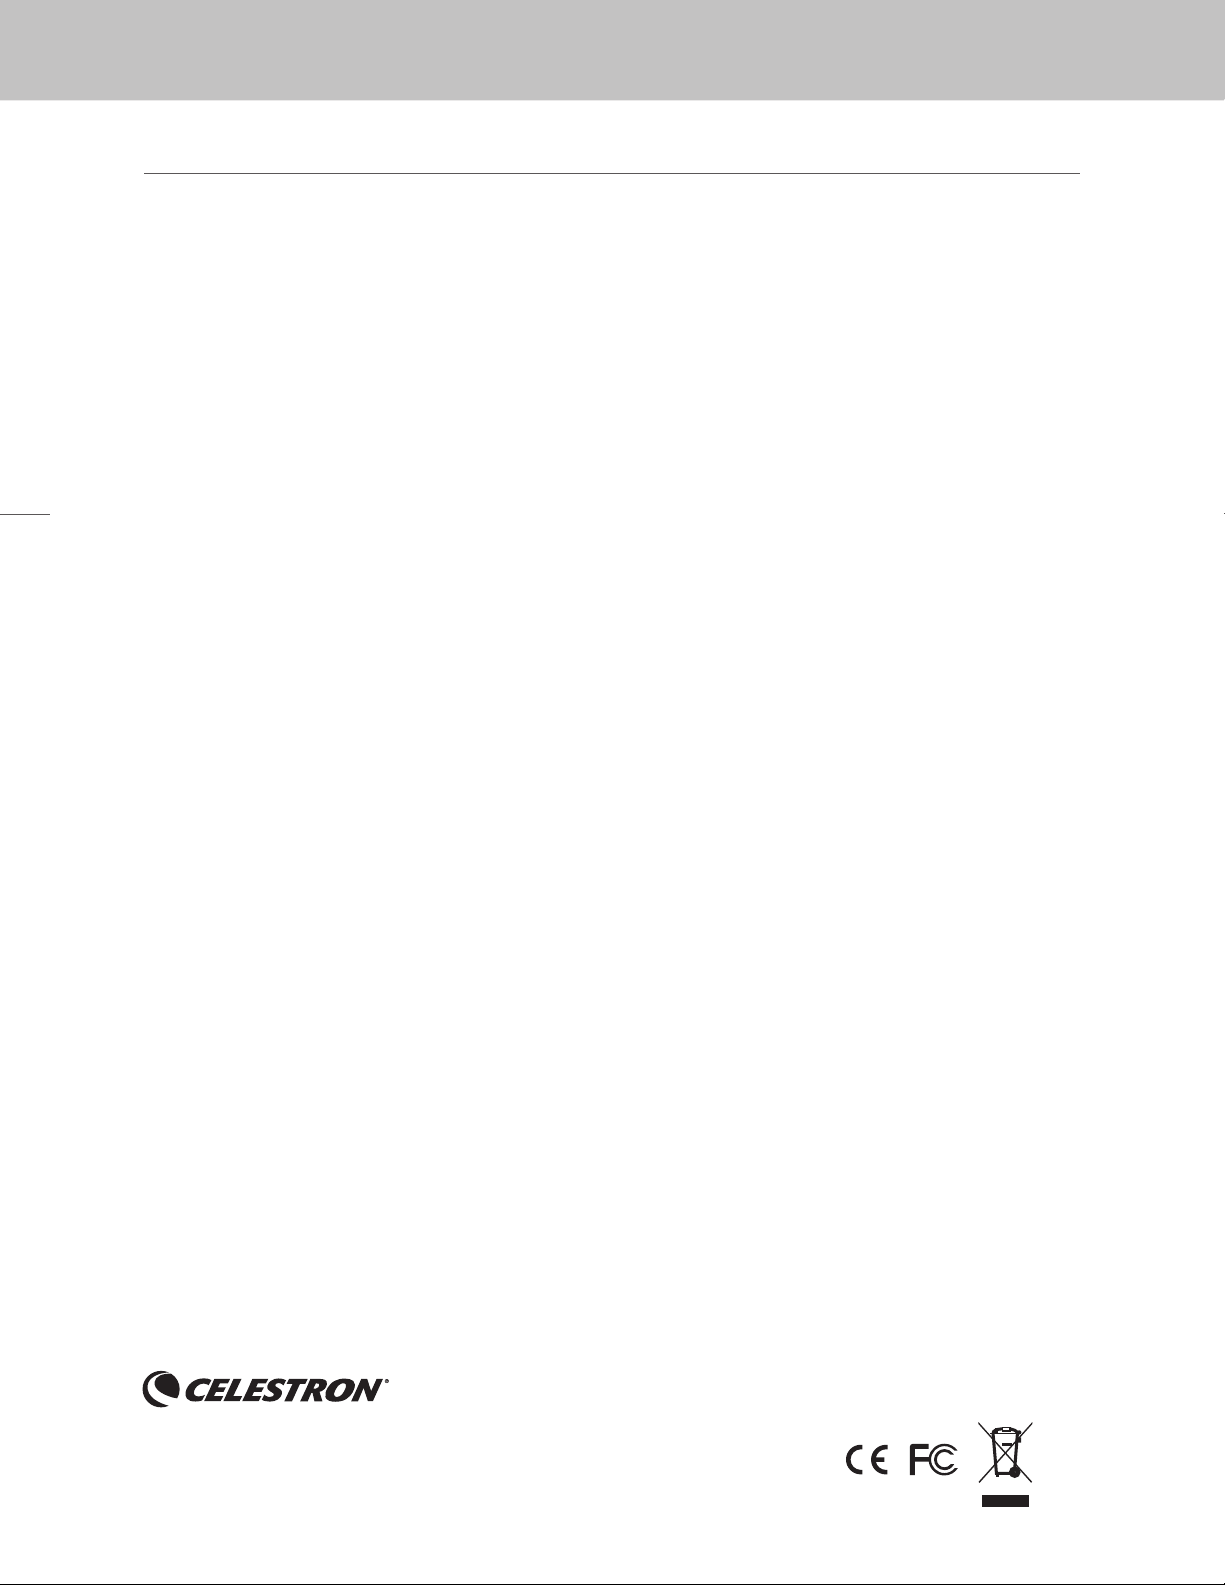
To install an eyepiece on the
114 mm and 130 mm Newtonian:
1. Loosen the setscrews on the open end of the star
diagonal.
2. Insert the silver barrel of the 25 mm eyepiece into the
star diagonal.
3. Tighten the setscrews to secure the eyepiece
4. To see the sharpest image possible, focus by looking
through the eyepiece and slowly turning the focusing
knobs until the image comes into sharp focus.
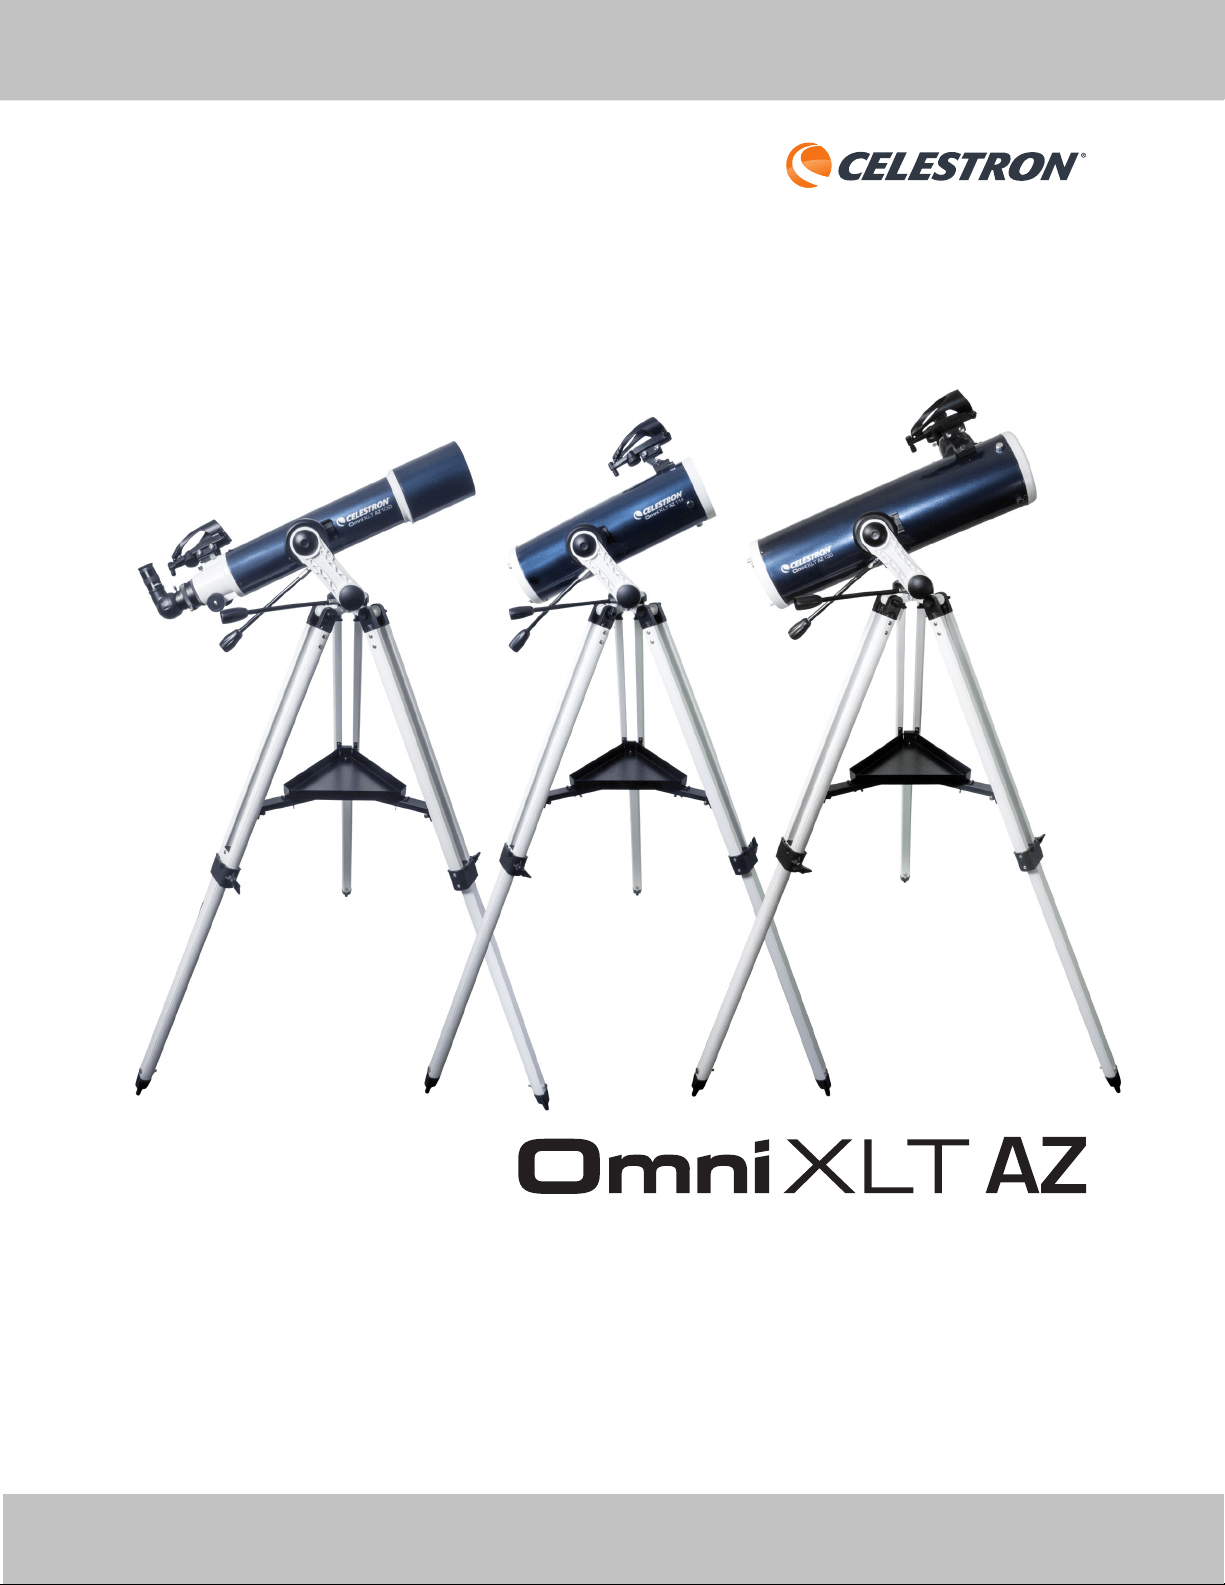
Your telescope comes with a Starpointer Pro Finderscope
that you will use as a sighting tool when aiming the telescope
at a target.
To install the finderscope:
1. Slide the finderscope bracket into the dovetail slot on
the telescope tube near the focuser. The large window
on the finder should be facing the front of the telescope.
2. Secure the bracket by tightening the setscrew on the
dovetail slot.
THE EYEPIECE
THE STARPOINTER PRO FINDERSCOPE

6 | ENGLISH
MOVING THE TELESCOPE
The Omni AZ mount has slip clutches in both axes. To make large movements with the telescope, simply hold the optical
tube and push it in the desired direction. To make fine adjustments or to track celestial objects, turn both slow motion
knobs.
ALIGNING THE STARPOINTER PRO FINDERSCOPE
The Starpointer Pro Finderscope helps you aim your telescope by looking through its round glass window and covering
your target with the red recticle projected in the window.
The first time you assemble your telescope, you’ll need to align the finderscope with the main optics of the telescope.
Although this step can be done at night, it is significantly easier during the day. Once you have completed the finderscope
alignment, you should not have to repeat this step unless the finderscope is bumped or dropped.
1. Take the telescope outside during the day. Using your naked eye, find an easily recognizable object, such as a streetlight,
car license plate, or tall tree. The object should be as far away as possible, but at least a quarter mile away.
2. Remove the main dust cover from the telescope and make sure your 25 mm eyepiece is installed.
3. Move the telescope left and right or up and down so that it is roughly pointing toward the object you chose in step 1.
4. Look through the telescope’s eyepiece and manually move the telescope until the object you chose lies in the center of
the view. If the image is blurry, gently turn the focus knobs until it comes into sharp focus.
NOTE: The image in the telescope eyepiece will appear upside-down. This is perfectly normal in an astronomical telescope.
5. Once the object is centered in your 25 mm eyepiece, turn on the finderscope by turning the power/brightness switch
knob on the bottom of the unit as far as it will go.
6. With your head positioned about a foot behind the finder, look through the round window and locate the red reticle. It will
probably be close to, but not on top of, the object you see when you are looking through the 25 mm eyepiece.
7. Without moving the telescope, use the two adjustment knobs on the side and underneath the finderscope. One controls
the left-right motion of the reticle, while the other controls the up-down motion. Adjust both until the reticle appears over
the same object you are observing in the 25 mm eyepiece.
Now choose some other distant targets to practice aiming your telescope. Look through the Starpointer Pro Finderscope
window and place the red dot on the target you are trying to view and verify that it is the 25 mm eyepiece of the scope.
With your finderscope aligned, your telescope is fully assembled and you are ready to observe!
NOTE: Be sure to turn off the Starpointer Pro Finderscope when not in use to conserve battery power.

ENGLISH | 7
YOUR FIRST ASTRONOMICAL OBSERVING SESSION
THE MOON
Now you are ready to take your telescope out at night and do some real observing!
Let’s start with the Moon. The Moon takes about one month go through a complete phase cycle, from New Moon to Full
Moon and back again. Try observing it at different points during this cycle.
While you can observe the Moon any time it is visible in the night sky, the best time to view it is from two days after a New
Moon up to a few days before a Full Moon. During this period, you will be able to see the most detail in craters and lunar
mountain ranges. Consult a calendar to find out when the next New Moon will be.
1. With a clear view of the Moon, set up your telescope with the 25 mm eyepiece.
2. Turn on the finderscope and look through it to find the red reticle.
3. Move the telescope until you can see the Moon through the finderscope’s window and the reticle is centered on the Moon.
4. Look through the 25 mm eyepiece. Gently turn the focus knobs to adjust the sharpness of the image.
CONGRATULATIONS! YOU HAVE NOW OBSERVED YOUR FIRST CELESTIAL OBJECT!
To get a closer view of the Moon, replace the 20 mm eyepiece with the 4 mm eyepiece. It will give you more magnification,
making the Moon appear much larger. You may need to adjust the focus knobs when you change eyepieces to ensure you are
getting the sharpest image.
You can view many other celestial objects, such as planets, star clusters and nebulae using this same basic technique.
For more tips for astronomical observing, please visit: ExploreTheSky.com
There you will find comprehensive tips to help you get the most from your new telescope including:
• How to observe the planets
• How to locate and observe stars, double stars, star clusters
• How to observe deep-sky objects such as nebulae and galaxies
• How to choose a good location for astronomical observing
• How to evaluate sky conditions

8 | ENGLISH
CELESTRON TWO YEAR LIMITED WARRANTY
A. Celestron warrants your telescope to be free from defects in materials and workmanship for two years. Celestron will repair or replace
such product or part thereof which, upon inspection by Celestron, is found to be defective in materials or workmanship. As a condition to
the obligation of Celestron to repair or replace such product, the product must be returned to Celestron together with proof-of-purchase
satisfactory to Celestron.
B. The Proper Return Authorization Number must be obtained from Celestron in advance of return. Call Celestron at (310) 328-9560 to
receive the number to be displayed on the outside of your shipping container.
All returns must be accompanied by a written statement setting forth the name, address, and daytime telephone number of the owner,
together with a brief description of any claimed defects. Parts or product for which replacement is made shall become the property of
Celestron.
The customer shall be responsible for all costs of transportation and insurance, both to and from the factory of Celestron, and shall be
required to prepay such costs.
Celestron shall use reasonable efforts to repair or replace any telescope covered by this warranty within thirty days of receipt. In the event
repair or replacement shall require more than thirty days, Celestron shall notify the customer accordingly. Celestron reserves the right to
replace any product which has been discontinued from its product line with a new product of comparable value and function.
This warranty shall be void and of no force of effect in the event a covered product has been modified in design or function, or subjected to
abuse, misuse, mishandling or unauthorized repair. Further, product malfunction or deterioration due to normal wear is not covered by this
warranty.
CELESTRON DISCLAIMS ANY WARRANTIES, EXPRESS OR IMPLIED, WHETHER OF MERCHANTABILITY OF FITNESS FOR A PARTICULAR USE, EXCEPT AS EXPRESSLY SET FORTH HEREIN. THE SOLE OBLIGATION
OF CELESTRON UNDER THIS LIMITED WARRANTY SHALL BE TO REPAIR OR REPLACE THE COVERED PRODUCT, IN ACCORDANCE WITH THE TERMS SET FORTH HEREIN. CELESTRON EXPRESSLY DISCLAIMS ANY
LOST PROFITS, GENERAL, SPECIAL, INDIRECT OR CONSEQUENTIAL DAMAGES WHICH MAY RESULT FROM BREACH OF ANY WARRANTY, OR ARISING OUT OF THE USE OR INABILITY TO USE ANY CELESTRON
PRODUCT. ANY WARRANTIES WHICH ARE IMPLIED AND WHICH CANNOT BE DISCLAIMED SHALL BE LIMITED IN DURATION TO A TERM OF TWO YEARS FROM THE DATE OF ORIGINAL RETAIL PURCHASE.
Some states do not allow the exclusion or limitation of incidental or consequential damages or limitation on how long an implied warranty
lasts, so the above limitations and exclusions may not apply to you.
This warranty gives you specific legal rights, and you may also have other rights which vary from state to state.
Celestron reserves the right to modify or discontinue, without prior notice to you, any model or style telescope.
If warranty problems arise, or if you need assistance in using your telescope contact: Celestron - 800.421.9649
NOTE: This warranty is valid to U.S.A. and Canadian customers who have purchased this product from an authorized Celestron dealer in the U.S.A. or Canada. Warranty outside the U.S.A. and Canada is valid only to
customers who purchased from a Celestron’s International Distributor or Authorized Celestron Dealer in the specific country. Please contact them for any warranty service.
03-15
Printed in China
FCC NOTE: This equipment has been tested and found to comply with the limits for a Class B digital device, pursuant to part 15 of
the FCC Rules. These limits are designed to provide reasonable protection against harmful interference in a residential installation. This
equipment generates, uses, and can radiate radio frequency energy and, if not installed and used in accordance with the instructions,
may cause harmful interference to radio communications. However, there is no guarantee that interference will not occur in a particular
installation. If this equipment does cause harmful interference to radio or television reception, which can be determined by turning the
equipment off and on, the user is encouraged to try to correct the interference by one or more of the following measures:
• Reorient or relocate the receiving antenna.
• Increase the separation between the equipment and receiver.
• Connect the equipment into an outlet on a circuit different from that to which the receiver is connected.
• Consult the dealer or an experienced radio/TV technician for help.
Product design and specifications are subject to change without prior notification.
This product is designed and intended for use by those 14 years of age and older.
© 2015 Celestron • All rights reserved
celestron.com
2835 Columbia Street • Torrance, CA 90503 U.S.A.
Telephone: 800.421.9649
GUIDE DE L’UTILISATEUR
Modèles no 22150, 22151 et 22152
FRANÇAIS
10 | FRANÇAIS
1. Tube de télescope
2. Chercheur (viseur)
3. Oculaire
4. Renvoi coudé
5. Molettes de mouvement lent
OMNI XLT AZ 102 OMNI XLT AZ 114 and OMNI XLT AZ 130
1. Chercheur (viseur)
2. Tube de télescope
3. Molettes de mouvement lent
4. Trépied
5. Porte-oculaire et oculaire
AVERTISSEMENT AU SUJET DES RAYONS DU SOLEIL :
Ne regardez jamais directement le soleil à l’œil nu ou avec un télescope sans l’utilisation d’un filtre adéquat. Cela pourrait entraîner des lésions oculaires permanentes et
irréversibles.
N’utilisez jamais votre télescope pour projeter une image du soleil sur une surface quelconque. Une accumulation de chaleur interne pourrait endommager le télescope et
tout accessoire qui s’y rattache.
N’utilisez jamais un filtre solaire oculaire ou un prisme (hélioscope) de Herschel. Une accumulation de chaleur à l’intérieur du télescope peut endommager ces dispositifs,
laissant alors la lumière non filtrée du soleil atteindre les yeux.
Ne laissez pas le télescope sans surveillance, particulièrement en présence d’enfants ou d’adultes qui ne sont pas familiarisés avec le mode d’emploi.
Nous vous recommandons de conserver votre boîte de télescope afin de pouvoir l’utiliser pour son rangement
lorsqu’il n’est pas utilisé. Déballez le contenu de la boîte avec soin, car certaines pièces sont petites. Utilisez la liste
des pièces ci-dessous pour vous assurer que toutes les pièces et tous les accessoires sont inclus dans la boîte.
LISTE DES PIÈCES
CONTENU DE LA BOÎTE :
6. Trépied
7. Monture Omni XLT AZ
8. Clé hexagonale (à l’intérieur
de la monture)
9. Plateau pour accessoires
6. Monture Omni XLT AZ
7. Clé hexagonale (à
l’intérieur de la monture)
8. Plateau pour
accessoires
2
3
4
5
6
1
1
2
3
4
7
6
5
8
7
9
8
FRANÇAIS | 11
La monture et le trépied de l’Omni XLT AZ sont
entièrement assemblés, facilitant ainsi son installation.
1. Retirez le trépied et la monture de la boîte.
2. Desserrez les molettes au bas de chaque pied et
étendez la section intérieure du pied à la longueur
souhaitée. Afin de fixer les pieds, serrez sans excès les
molettes.
3. Mettez le trépied en position verticale et écartez l’un de
l’autre ses pieds jusqu’à ce qu’un déclic confirme que
l’entretoise centrale soit bien en place.
4. Placez le plateau pour accessoires sur le dessus de
l’entretoise et alignez les trous. Insérez les trois vis à
serrage à main par le dessous de l’entretoise et vissez-
les dans le plateau.
5. Assurez-vous que les boulons de charnière des pieds
sont fermement fixés en serrant bien les écrous à
serrage à main noirs situés en haut de chaque pied.
En fonction de l’utilisation que vous ferez du télescope,
vous pouvez changer l’angle du bras de monture
pour vous donner plus d’amplitude des mouvements.
La monture fournie est réglée pour l’observation
astronomique. Vous pouvez la déplacer vers le haut, mais
son mouvement vers le bas est limité. Si vous utilisez la
monture pour l’observation terrestre depuis un endroit
surélevé (falaise, balcon, etc.) et que vous souhaitez
pointer le télescope bien au-dessous de l’horizon, vous
devrez modifier l’angle du bras de monture pour l’adapter.
Pour effectuer ce réglage :
1. Dévissez le couvercle rond situé au bas du bras vertical
de la monture.
2. À l’aide d’une clé hexagonale de 4 mm (fournie par
l’utilisateur), retirez les trois vis qui se trouvaient sous le
couvercle.
3. Faites pivoter le bras de monture afin qu’il soit pointé
tout droit vers le haut et revissez les trois vis.
4. Serrez les vis et remettez en place le couvercle rond.
ASSEMBLAGE DE VOTRE TÉLESCOPE
RÉGLAGE DE L’ANGLE DU BRAS DE MONTURE
LA MONTURE
12 | FRANÇAIS
LES MOLETTES DE MOUVEMENT LENT
Pour fixer les molettes de mouvement lent sur votre
monture :
1. Prenez la clé hexagonale fournie, laquelle est cachée à
l’intérieur de la fente à l’avant de votre monture.
2. Placez la molette de réglage du mouvement lent sur
l’arbre en forme de D de l’engrenage et poussez vers
l’intérieur pour vous assurer qu’il est bien en place.
3. Utilisez la clé hexagonale pour serrer les vis de réglage
sur l’arbre de l’engrenage.
4. Remettez la clé hexagonale dans son espace de
rangement situé à l’avant de la monture.
LE TUBE DU TÉLESCOPE
Pour fixer le tube du télescope sur votre trépied et votre
monture :
1. Localisez la barre queue d’aronde fixée le long du tube
du télescope.
2. Tenez le tube du télescope près de la monture, puis
faites glisser la barre queue d’aronde dans la pince
située sur la partie supérieure de la monture.
3. Serrez la molette située au bas de la pince pour fixer en
place le télescope.
REMARQUES: Le réfracteur de 102 mm est illustré. Les télescopes de Newton de 114 mm et
130 mm se fixent cependant sur la monture de la même façon.
Le renvoi coudé fixé à l’arrière d’une lunette astronomique
contient un petit prisme qui réfléchit la lumière à un angle
de 90°, permettant ainsi d’adopter une position plus
confortable pour l’observation. Puisque le renvoi coudé
vous donne également une image correctement orientée à
100 %, vous pouvez utiliser facilement ce télescope pour
l’observation terrestre pendant la journée.
To insert the diagonal:
1. Retirez les capuchons des deux extrémités du renvoi
coudé.
2. Desserrez les vis de réglage à l’arrière du porte-oculaire
et retirez le petit capuchon antipoussière.
3. Insérez le plus petit tube du renvoi coudé à l’arrière du
porte-oculaire et fixez-le en serrant les vis de réglage.
Vous pouvez faire pivoter le renvoi coudé dans n’importe
quelle direction en desserrant les vis de réglage.
LE RENVOI COUDÉ (POUR LE RÉFRACTEUR102 MM UNIQUEMENT)

FRANÇAIS | 13
Votre télescope est livré avec un oculaire Plössl 25 mm, lequel
vous donnera un champ de vision relativement large. D’autres
oculaires peuvent être achetés pour augmenter ou diminuer le
grossissement à votre gré.
Pour installer un oculaire sur le réfracteur 102 mm:
1. Desserrez les vis de réglage situées à l’extrémité ouverte du
renvoi coudé.
2. Insérez le barillet argenté de l’oculaire 25 mm dans le renvoi
coudé.
3. Serrez les vis de réglage pour fixer bien en place l’oculaire.
4. Pour obtenir l’image la plus nette qui soit, effectuez la
mise au point en regardant dans l’oculaire et en tournant
lentement les molettes de mise au point jusqu’à ce que
vous obteniez l’image la plus nette.
Pour installer un oculaire sur les réfracteurs de
Newton 114 mm et 130 mm :
1. Desserrez les vis de réglage argentées du porte-oculaire et
retirez le petit capuchon antipoussière.
2. Insérez le barillet argenté au bas de l’oculaire 25 mm dans
le porte-oculaire.
3. Serrez les vis de réglage pour fixer bien en place l’oculaire.
4. Pour obtenir l’image la plus nette qui soit, effectuez la
mise au point en regardant dans l’oculaire et en tournant
lentement les molettes de mise au point jusqu’à ce que vous
obteniez l’image la plus nette.
Votre télescope est livré avec un chercheur reflex à DEL rouge
que vous utiliserez comme outil d’observation lorsque vous
pointerez le télescope en direction d’une cible.
Pour installer le chercheur :
1. Faites glisser le support du chercheur dans la rainure de
fixation en queue d’aronde située sur le télescope près du
porte-oculaire. La grande fenêtre du chercheur doit être
orientée vers l’avant du télescope.
2. Fixez le support en serrant la vis de réglage située sur la
rainure de fixation en queue d’aronde.
L’OCULAIRE
LE CHERCHEUR

14 | FRANÇAIS
MOUVEMENTS DU TÉLESCOPE
La monture AZ Omni st dotée d’un système de débrayage sur les deux axes. Pour que le télescope effectue de grands
mouvements, il suffit de tenir le tube optique et de le pousser dans la direction désirée. Pour effectuer des réglages fins ou
pour suivre des objets célestes, tournez les deux molettes de mouvement lent.
ALIGNEMENT DU CHERCHEUR
Le chercheur à DEL rouge vous aide à pointer votre télescope lorsque vous regardez par sa fenêtre ronde en couvrant
votre cible avec le réticule rouge projeté sur la fenêtre.
La première fois que vous assemblez votre télescope, vous devrez aligner le chercheur avec l’élément optique principal du
télescope. Bien que cette étape puisse être effectuée pendant la nuit, il est beaucoup plus facile de l’effectuer en plein jour.
Une fois que vous avez terminé l’alignement du chercheur, vous ne devriez pas avoir à répéter cette étape à moins que le
chercheur ait été déplacé ou retiré.
Pour aligner le chercheur reflex à DEL rouge :
1. Apportez votre télescope à l’extérieur alors qu’il fait jour. À l’œil nu, trouvez un objet facilement reconnaissable, comme
un lampadaire, une plaque d’immatriculation de voiture ou un grand arbre. L’objet doit être le plus loin possible, à au
moins un quart de mille (400 m ou plus).
2. Retirez la housse de protection principale du télescope et assurez-vous que votre oculaire 25mm a été installé.
3. Déplacez le télescope horizontalement et verticalement afin qu’il pointe vers l’objet que vous avez choisi à l’étape 1.
4. Regardez à travers l’oculaire du télescope et déplacez manuellement le télescope jusqu’à ce que l’objet que vous avez
choisi se trouve dans le centre de vision. Si l’image est floue, tournez tout doucement les molettes de mise au point
jusqu’à ce que l’image soit nette.
REMARQUE: L’image dans l’oculaire du télescope s’affichera à l’envers. Ceci est tout à fait normal pour une lunette astronomique.
5. Une fois que l’objet est centré dans votre oculaire 25 mm, allumez le chercheur en tournant jusqu’à la fin de sa course la
molette de réglage d’intensité lumineuse avec interrupteur d’alimentation. Cette molette est située au bas de l’appareil.
6. Avec votre tête située à environ 30 cm (1 pied) derrière le chercheur, regardez par la fenêtre ronde et localisez le réticule
rouge. Il ne couvrira probablement pas l’objet que vous observez, mais sera à proximité lorsque vous regarderez à travers
l’oculaire 25 mm.
7. Sans déplacer le télescope, utilisez les deux molettes de réglage situées sur le côté et en dessous du chercheur. L’une
contrôle le mouvement gauche-droite du réticule, tandis que l’autre contrôle le mouvement haut-bas. Ajustez les deux
molettes jusqu’à ce que le réticule couvre l’objet que vous observez dans l’oculaire 25 mm.
Choisissez maintenant d’autres cibles lointaines pour vous exercer à pointer votre télescope vers une cible. Regardez par
la fenêtre du chercheur reflex à DEL rouge et placez le point rouge sur la cible que vous tentez d’observer et vérifiez qu’elle
est dans l’oculaire 25 mm du télescope.
Votre chercheur étant maintenant aligné, l’installation de votre télescope est terminée et vous êtes prêt pour l’observation!
REMARQUES: Assurez-vous d’éteindre le chercheur reflex à DEL rouge lorsqu’il n’est pas utilisé afin d’économiser les piles.

FRANÇAIS | 15
VOTRE PREMIÈRE SESSION D’OBSERVATION
ASTRONOMIQUE
LA LUNE
Vous êtes maintenant prêt à installer votre télescope à l’extérieur et faire de véritables observations pendant la nuit!
Commençons par la lune. Les phases de la lune s’étendent sur un cycle complet d’environ un mois, de la nouvelle lune à la
pleine lune et vice versa. Essayez de l’observer à différents moments au cours de ce cycle.
Alors que vous pouvez observer la lune à n’importe quel moment lorsqu’elle est visible dans le ciel nocturne, le meilleur
moment pour la voir est deux jours après une nouvelle lune jusqu’à quelques jours avant une pleine lune. Durant cette
période, vous pourrez voir plus de détails relatifs aux cratères et aux chaînes de montagnes lunaires. Consultez un calendrier
pour connaître la prochaine apparition de la nouvelle lune.
1. Lorsque la lune se voit clairement, installez votre télescope avec l’oculaire 25 mm.
2. Allumez le chercheur et regardez à travers celui-ci pour trouver le réticule rouge.
3. Déplacez le télescope de façon à voir la lune par la fenêtre du chercheur et le réticule centré sur la lune.
4. Regardez dans l’oculaire 25 mm. Tournez tout doucement les molettes de mise au point pour régler la netteté de l’image.
FÉLICITATIONS! VOUS OBSERVEZ MAINTENANT VOTRE PREMIER OBJET CÉLESTE!
Vous pouvez voir de nombreux autres objets célestes, tels que des planètes, des amas stellaires et des nébuleuses en
utilisant cette même technique de base.
Pour obtenir plus de conseils pratiques sur l’observation astronomique, veuillez consulter : ExploreTheSky.com
Vous y trouverez tous les conseils pratiques pour vous aider à profiter au maximum de votre nouveau télescope, y compris :
• Comment observer les planètes
• Comment localiser et observer les étoiles, les étoiles doubles et les amas d’étoiles
• Comment observer les objets du ciel profond tels que les nébuleuses et les galaxies
• Comment choisir un bon site pour l’observation astronomique
• Comment évaluer la condition du ciel
16 | FRANÇAIS
GARANTIE LIMITÉE DE 2 ANS DE CELESTRON
A. Celestron garantit que votre monture de télescope sera exempte de tout défaut de matériaux ou de fabrication pour une période de
deux (2) ans. Celestron réparera ou remplacera ce produit ou une partie de celui-ci lorsqu’il a été déterminé, lors d’une inspection par
Celestron, que le produit est défectueux en raison d’un défaut de matériaux ou de fabrication. Comme condition à l’obligation de Celestron
de réparer ou remplacer un tel produit, le produit doit être retourné à Celestron avec la preuve d’achat satisfaisante pour Celestron.
B. Un numéro d’autorisation de retour valide doit être obtenu de Celestron avant le renvoi. Appelez Celestron au (310) 328-9560 pour
recevoir le numéro à afficher à l’extérieur de votre colis d’expédition.
Tous les retours doivent être accompagnés d’une déclaration écrite indiquant le nom, l’adresse et le numéro de téléphone de jour du
propriétaire, ainsi qu’une brève description des prétendus défauts. Les pièces ou le produit ayant été l’objet d’un remplacement deviendront
la propriété de Celestron.
Le client sera responsable de tous les frais de transport et d’assurance, à la fois vers et depuis l’usine de Celestron, et devra payer à l’avance
ces coûts.
Celestron fera des efforts raisonnables pour réparer ou remplacer tout télescope couvert par cette garantie dans les trente jours suivant
sa réception. Dans le cas où une réparation ou un remplacement nécessitera plus de trente jours, Celestron en avisera le client en
conséquence. Celestron se réserve le droit de remplacer tout produit qui a été retiré de sa gamme de produits disponibles avec un nouveau
produit ayant une valeur et des fonctions équivalentes.
Cette garantie sera nulle et sans effet dans le cas où la conception ou la fonction d’un produit couvert a été modifiée, ou lorsque le produit a
été soumis à un usage abusif, à de mauvaises manipulations ou à une réparation non autorisée. En outre, une défaillance ou une détérioration
du produit due à l’usure normale n’est pas couverte par cette garantie.
CELESTRON DÉCLINE TOUTE GARANTIE, EXPRESSE OU IMPLICITE, DE QUALITÉ MARCHANDE OU D’ADAPTATION À UN USAGE PARTICULIER, À MOINS DE DISPOSITIONS EXPRESSES DANS CE DOCUMENT.
LA SEULE OBLIGATION DE CELESTRON EN VERTU DE CETTE GARANTIE LIMITÉE SERA DE RÉPARER OU REMPLACER LE PRODUIT COUVERT, EN CONFORMISTE AVEC LES DISPOSITIONS DE CE DOCUMENT.
CELESTRON DÉCLINE TOUTE RESPONSABILITÉ POUR TOUTE PERTE DE PROFITS, TOUT DOMMAGE GÉNÉRAL, PARTICULIER OU INDIRECT POUVANT RÉSULTER DE LA VIOLATION DE TOUTE GARANTIE, OU EN
RAISON DE L’UTILISATION DE, OU DE L’INCAPACITÉ À UTILISER, UN PRODUIT CELESTRON. TOUTE GARANTIE IMPLICITE QUI EST ET QUI NE PEUT ÊTRE DÉCLINÉE SERA LIMITÉE À UNE DURÉE DE DEUX ANS À
PARTIR DE LA DATE D’ACHAT INITIALE.
Certains états ou certaines provinces ne permettent pas l’exclusion ou la limitation des dommages accessoires ou indirects ou une limitation
sur la durée d’une garantie implicite, alors dans ces cas les limitations et exclusions susmentionnées pourraient ne pas s’appliquer à vous.
Cette garantie vous donne des droits légaux spécifiques, et vous pouvez également avoir d’autres droits qui varient d’un état ou d’une
province à l’autre.
Celestron se réserve le droit de modifier ou de cesser la production de tout modèle ou style de télescope, et cela sans préavis.
Si des problèmes liés à la garantie surviennent, ou si vous avez besoin d’assistance pour utiliser votre télescope, contactez:
Celestron, Service à la clientèle. Tél. (310) 328-9560
Du lundi au vendredi, de 8 h à 16 h HNP
REMARQUE: Cette garantie est valable pour les clients américains et canadiens qui ont acheté ce produit auprès d’un revendeur autorisé Celestron aux États-Unis ou au Canada. La garantie en dehors des É.-U. et
du Canada n’est valable que pour les clients ayant acheté le produit d’un distributeur international de Celestron ou d’un distributeur agréé dans le pays en question. Veuillez communiquer avec eux pour
toute réparation sous garantie.
03-15
Printed in China
REMARQUE RELATIVE À LA FCC : Cet équipement a été testé et jugé conforme aux limites établies pour un dispositif numérique
de classe B, conformément à la partie 15 de la réglementation de la FCC. Ces limites ont été mises en place pour offrir une protection
raisonnable contre les interférences dans un complexe résidentiel. Cet équipement génère et peut émettre des fréquences radio et,
s’il n’est pas installé et utilisé conformément aux instructions du manuel, peut causer des interférences nuisibles aux communications
radio. Mais il n’existe aucune garantie que des interférences ne seront pas produites dans une installation particulière. Si cet équipement
crée des interférences pour la réception radio ou télévisuelle, ce qui peut être constaté en l’allumant et en l’éteignant, alors il vous est
conseillé d’y remédier d’une des manières suivantes :
• Réorientez ou déplacez l’antenne de réception.
• Augmentez la distance séparant l’équipement et le récepteur.
• Branchez l’équipement dans une prise de courant faisant partie d’un circuit différent de celui sur lequel le récepteur est branché.
• Consultez le distributeur ou un technicien radio ou TV d’expérience pour de l’assistance.
La conception et les caractéristiques du produit sont indiquées sous réserve de modifications sans préavis.
Ce produit a été conçu à l’intention des utilisateurs de 14 ans et plus.
© 2015 Celestron • All rights reserved
celestron.com
2835 Columbia Street • Torrance, CA 90503 U.S.A.
Telephone: 800.421.9649
BEDIENUNGSANLEITUNG
Modellnr. 22150, 22151, 22152
DEUTSCH
18 | DEUTSCH
1. Teleskoptubus
2. Sucherfernrohr
3. Okular
4. Aufricht-DiagonalspiegeL
5. Slowmotion-Knöpfe
OMNI XLT AZ 102 OMNI XLT AZ 114 and OMNI XLT AZ 130
1. Sucherfernrohr
2. Teleskoptubus
3. Slowmotion-Knöpfe
4. Stativ
5. Porte-oculaire et oculaire
SONNENSTRAHLEN-WARNHINWEIS
Schauen Sie weder mit bloßem Auge noch durch ein Teleskop direkt in die Sonne, es sei denn, Sie verfügen über einen geeigneten Sonnenfilter. Permanente und
irreversible Augenschäden können daraus resultieren.
Das Teleskop keinesfalls zur Projektion eines Bildes der Sonne auf eine Oberfläche verwenden. Durch die interne Wärmeakkumulation können das Teleskop und etwaiges
daran angeschlossenes Zubehör beschädigt werden.
Niemals einen Okularsonnenfilter oder einen Herschelkeil verwenden. Die interne Wärmeakkumulation im Teleskop kann zu Rissen oder Brüchen dieser Instrumente führen.
Dadurch könnte ungefiltertes Sonnenlicht ins Auge gelangen.
Lassen Sie das Teleskop nicht unbeaufsichtigt, vor allem wenn sich Kinder oder Erwachsene, die mit der korrekten Bedienung Ihres Teleskops nicht vertraut sind, in der
Nähe befinden.
Wir empfehlen Ihnen, die Verpackung Ihres Teleskops aufzubewahren, um das Teleskop bei Nichtverwendung darin
zu verstauen. Gehen Sie beim Auspacken vorsichtig vor, da Kleinteile enthalten sind. Überprüfen Sie anhand der
untenstehenden Teileliste die Vollständigkeit aller Teile und Zubehörteile.
TEILELISTE
LIEFERUMFANG:
6. Stativ
7. Omni XLT AZ-Montierung
8. Innensechskant-Schlüssel (im
Inneren der Montierung)
9. Zubehörablageay
6. Omni XLT AZ-Montierung
7. Innensechskant-
Schlüssel (im Inneren der
Montierung)
8. Zubehörablage
2
3
4
5
6
1
1
2
3
4
7
6
5
8
7
9
8
DEUTSCH | 19
Der Aufbau gestaltet sich einfach, da Stativ und Montierung
des Omni XLT AZ vollständig montiert geliefert werden:
1. Nehmen Sie Stativ und Montierung aus der Schachtel.
2. Lösen Sie die Knöpfe an jedem Beinunterteil und ziehen
Sie den Innenteil jedes Beins auf die gewünschte Länge
aus. Ziehen Sie die Knöpfe zum Feststellen der Beine
wieder an, wenden Sie jedoch dabei nicht zu viel Kraft
auf.
3. Stellen Sie das Stativ auf und ziehen Sie die Stativbeine
auseinander, bis die Halterung einrastet.
4. Platzieren Sie die Zubehörablage oben auf die
Mittelstange und richten Sie die Bohrungen aus. Führen
Sie die drei Flügelschrauben durch die Unterseite der
Beinhaltung und drehen Sie sie in die Ablage.
5. Stellen Sie sicher, dass die Gelenkbolzen sicher an den
schwarzen Flügelmuttern oben an jedem Bein sitzen.
Je nach Verwendungsweise Ihres Teleskops können Sie den
Winkel des Montierungsarms für mehr Bewegungsfreiheit
anpassen. Die Montierung ist für das astronomische
Beobachten vormontiert; es kann weit nach oben bewegt
werden, ist jedoch nur begrenzt nach unten schwerkbar.
Wenn Sie die Montierung für Bodenbeobachtungen von
einer erhöhten Position (Klippe, Balkon etc.) aus verwenden
und das Teleskop weit unter den Horizont schwenken
möchten, muss der Winkel des Montierungsarms hierfür
angepasst werden.
Den Winkel einstellen:
1. Drehen Sie die runde Abdeckung unten am vertikalen
Montierungsarm ab.
2. Nehmen Sie die drei Schrauben unter der Abdeckung
mithilfe eines 4-mm-Innensechskant-Schraubendrehers
(nicht enthalten) ab.
3. Drehen Sie den Montierungsarm senkrecht nach oben
und drehen Sie die drei Schrauben wieder hinein.
4. Ziehen Sie die Schrauben fest und bringen Sie die runde
Abdeckung wieder an.
DAS TELESKOP AUFBAUEN
DEN WINKEL DES MONTIERUNGSARMS EINSTELLEN
DIE MONTIERUNG
20 | DEUTSCH
DIE SLOWMOTION-KNÖPFE
So bringen Sie die Slowmotion-Knöpfe an Ihre Montierung
an:
1. Vorne an der Montierung befindet sich verborgen in einer
Spalte ein mitgelieferter Innensechskantschlüssel.
2. Platzieren Sie den Slowmotion-Knopf über dem
D-förmigen Schaft und drücken Sie ihn fest nach innen.
3. Ziehen Sie die Befestigungsschrauben mithilfe des
Innensechskantschlüssels fest.
4. Legen Sie den Innensechskantschlüssel wieder in die
Aufbewahrung der Montierung.
DER TELESKOPTUBUS
So bringen Sie den Teleskoptubus an Ihrem Stativ mit
Montierung an:
1. Die Schwalbenschwanzführung befindet sich seitlich am
Teleskoptubus.
2. Halten Sie den Teleskoptubus neben die Montierung
und schieben Sie die Schwalbenschwanzführung in die
Klammer oben an der Montierung.
3. Ziehen Sie den Knopf unten an der Klammer fest, um das
Teleskop zu arretieren.
ANMERKUNG: Hier ist der 102-mm-Refraktor abgebildet, doch für die 114-mm- und 130-mm-
Newton-Teleskope erfolgt die Fixierung an der Montierung auf dieselbe Weise.
Der Zenitspiegel auf der Rückseite des Refraktorteleskops
reflektiert das Licht über einen kleinen Spiegel in einem
Winkel von 90 ° und ermöglicht so eine bequemere
Betrachtungsposition. Da ein Zenitspiegel ein
hundertprozentig korrekt ausgerichtets Bild liefert, können
Sie das Teleskop leicht für terrestrische Beobachtungen
bei Tageslicht einsetzen.
Den Zenitspiegel anbringen:
1. Nehmen Sie beide Kappen vom Zenitspiegel ab.
2. Lösen Sie die Feststellschrauben auf der Rückseite des
Fokussierers und ziehen Sie die kleine Staubschutzkappe ab.
3. Setzen Sie den kleineren Tubus des Zenitspiegels in die
Rückseite des Fokussierers ein und sichern Sie diesen
durch Anziehen der Feststellschrauben.
Wenn Sie die Feststellschrauben wieder lösen, können
Sie den Zenitspiegel in jede beliebige Richtung drehen.
DER ZENITSPIEGEL (NUR FÜR DEN 102-MM-REFRAKTOR)
DEUTSCH | 21
Ihres Teleskops verfügt über ein 25-mm-Plössl-Okular für
ein moderat breites Gesichtsfeld. Zusätzliche Okulare für
eine geringere oder höhere Vergrößerungsstufe sind separat
erhältlich.
So installieren Sie ein Okular am 102-mm-Refraktor:
1. Lösen Sie die Feststellschrauben am offenen Ende des
Zenitspiegels.
2. Schieben Sie den Chromabschnitt des 25-mm-Okulars in
den Zenitspiegel.
3. Ziehen Sie die zwei Feststellschrauben wieder an, um das
Okular zu fixieren.
4. Für ein gestochen scharfes Bild müssen Sie fokussieren,
indem Sie durch das Okular sehen und die Fokussierknöpfe
solange langsam drehen, bis Sie das schärfste Bild erhalten.
So installieren Sie ein Okular am 114-mm- und 130-mm-
Newton-Teleskop:
1. Lösen Sie die beiden silbernen Feststellschrauben
am Fokussierer und ziehen Sie die kleine Kunststoff-
Schutzkappe ab.
2. Stecken Sie den Silberzylinder an der Unterseite des
25-mm-Okulars in den Fokussierer.
3. Ziehen Sie die zwei Feststellschrauben wieder an, um das
Okular zu fixieren.
4. Für ein gestochen scharfes Bild müssen Sie fokussieren,
indem Sie durch das Okular sehen und die Fokussierknöpfe
solange langsam drehen, bis Sie das schärfste Bild
erhalten.
Ihr Teleskop ist mit einem Reflex-Sucherfernrohr mit roter LED
ausgestattet, mit dessen Hilfe Sie ein fernes Zielobjekt im
Teleskop anvisieren können.
Installation des Suchfernrohrs:
1. Schieben Sie die Sucherfernrohr-Halterung in die Spalte
des Schwalbenschwanzes am Teleskop in der Nähe des
Fokussierers. Das große Fenster des Sucherfernrohrs muss
in Richtung der Vorderseite des Teleskops weisen.
2. Fixieren Sie die Halterung, indem Sie die Flügelschrauben
der Spalte am Schwalbenschwanz festziehen.
OKULAR
DAS SUCHERFERNROHR

22 | DEUTSCH
DAS TELESKOP SCHWENKEN
Die Omni AZ-Montierung verfügt über Rutschkupplungen an beiden Achsen. Für ausladende Teleskopschwenks wird
einfach der optische Tubus in die gewünschte Richtung gedrückt. Für Feineinstellungen oder das Nachführen von
Himmelsobjekten werden die beiden Slowmotion-Knöpfe gedreht.
JUSTIEREN DES SUCHFERNROHRS
Das Reflex-Sucherfernrohr mit roter LED unterstützt Sie beim Ausrichten Ihres Teleskops, indem Sie beim Blick durch das
runde Glasfenster Ihr Zielobjekt mit einem roten Fadenkreuz, der auf das Fenster projiziert wird, abdecken können.
Nach dem ersten Aufbau Ihres Teleskops müssen Sie das Sucherfernrohr an der Hauptoptik Ihres Teleskops ausrichten.
Obwohl dies auch bei Nacht vorgenommen werden kann, ist es bei Tag bedeutend einfacher. Einmal ausgerichtet muss Ihr
Sucherfernrohr nicht erneut ausgerichtet werden, es sei denn, es wird einem Stoß ausgesetzt oder fällt um.
So wird das Reflex-Sucherfernrohr mit roter LED justiert:
1. Nehmen Sie Ihr Teleskop bei Tag nach draußen. Suchen Sie mit dem bloßen Auge ein leicht erkennbares Objekt, wie
eine Straßenlaterne, ein Autokennzeichen oder einen hohen Baum. Das Objekt sollte 400 Meter oder weiter entfernt
sein.
2. Nehmen Sie die große Schutzabdeckung vom Teleskop ab und vergewissern Sie sich, dass das 25-mm-Okular
angebracht ist.
3. Schwenken Sie das Teleskop nach links und rechts bzw. auf und ab, um das in Schritt 1 gewählte Objekt grob
anzuvisieren.
4. Schauen Sie durch das Teleskopokular und schwenken Sie dieses manuell, bis das ausgewählte Objekt im Zentrum des
Gesichtfelds liegt. Ist das Bild unscharf, drehen Sie langsam am Fokussierknopf, bis das Bild scharf gestellt ist.
HINWEIS: Das Bild im Teleskop-Okular steht dabei auf dem Kopf. Das ist für ein Astronomie-Teleskop völlig normal.
5. Sobald das Objekt im 25-mm-Okular zentriert ist, können Sie das Sucherfernrohr einschalten, indem Sie den Netz-/
Helligkeitsschalter bis zum Anschlag im Uhrzeigersinn drehen.
6. Bringen Sie Ihren Kopf etwa 30 cm hinter den Sucher, schauen Sie durch das runde Fenster und suchen Sie das rote
Fadenkreuz. Dieser befindet sich höchstwahrscheinlich nahe, jedoch nicht direkt auf dem Objekt, das Sie durch das
25-mm-Okular betrachten.
7. Drehen Sie nun, ohne das Teleskop zu bewegen, an den beiden Einstellknöpfen seitlich und unterhalb des
Sucherfernrohrs. Der eine steuert die Links-Rechts-Bewegung und der andere die Auf- und Abbewegung des
Fadenkreuzes. Stellen Sie beide so ein, dass das Fadenkreuz direkt über dem Objekt erscheint, dass Sie im 25-mm-
Okular betrachten.
Visieren Sie nun einige andere entfernte Zielobjekte an, um das Ausrichten Ihres Teleskops zu üben. Schauen Sie durch
das Fenster des Reflex-Sucherfernrohrs mit roter LED und führen Sie den roten Punkt über das Zielobjekt; vergewissern
Sie sich dabei, dass Sie durch das 25-mm-Okular schauen.
Nach dem Ausrichten des Sucherfernrohrs ist Ihr Teleskop vollständig montiert und bereit für die erste Beobachtung!
ANMERKUNG: Achten Sie darauf, das Reflex-Sucherfernrohr mit roter LED bei Nichtverwendung auszuschalten, um die Batterie zu schonen.

DEUTSCH | 23
IHRE ERSTE ASTRONOMISCHE BEOBACHTUNG
DER MOND
Jetzt können Sie Ihr Teleskop bei Nacht nach draußen nehmen und ans Beobachten gehen!
Fangen wir mit dem Mond an. Der Mond benötigt für einen vollständigen Phasenzyklus vom Neumond über den Vollmond
zurück zum Neumond ungefähr einen Monat. Versuchen Sie, ihn zu verschiedenen Stadien dieses Zyklus zu beobachten.
Obwohl sich der Mond immer als Beobachtungsobjekt eignet, wenn er sichtbar am Nachthimmel steht, ist die beste Zeit
zwei Tage nach dem Neumond bis ein paar Tage vor dem Vollmond. Innerhalb dieses Zeitfensters zeigen sich Krater und
Mondgebirge am detailreichsten. Schauen Sie in einem Kalender nach, wann Neumond ist.
1. Bauen Sie Ihr Teleskop mit dem 25-mm-Okular auf, sobald Sie eine freie Sicht auf den Mond haben.
2. Schalten Sie das Sucherfernrohr ein und schauen Sie hindurch, um das rote Fadenkreuz auszumachen.
3. Schwenken Sie Ihr Teleskop, bis Sie den Mond durch das Sucherfernrohr-Fenster sehen können und sich das rote
Fadenkreuz mittig auf dem Mond befindet.
4. Schauen Sie durch das 25-mm-Okular. Drehen Sie vorsichtig an den Fokussierknöpfen, um das Bild scharfzustellen.
HERZLICHEN GLÜCKWUNSCH! SIE HABEN GERADE IHR ERSTES HIMMELSOBJEKT BEOBACHTET!
Sie können mithilfe dieser grundlegenden Technik viele weiter Himmelsobjekte, wie Planeten, Sternhaufen und Nebel,
beobachten.
Besuchen Sie für weitere Tipps über astronomische Beobachtungen: ExploreTheSky.com
There you will find comprehensive tips to help you get the most from your new telescope including:
• Wie man Planeten beobachtet
• Wie man Sterne, Doppelsterne und Sternhaufen lokalisiert und beobachtet
• Wie man Deep-Sky-Objekte wie Nebel und Galaxien beobachtet
• Wie man einen guten Standort für astronomische Beobachtungen auswählt
• Wie man die Bedingungen am Himmel bewertet
24 | DEUTSCH
ZWEIJÄHRIGE EINGESCHRÄNKTE GARANTIE VON CELESTRON
A. Celestron garantiert, dass Ihre Teleskop-Montierung für zwei Jahre frei von Material- und Verarbeitungsfehlern ist. Celestron
wird ein solches Produkt oder Teile davon, wenn nach Inspektion durch Celestron ein Defekt an Material oder Verarbeitung
gefunden wurde, reparieren oder austauschen. Die Verpflichtung von Celestron, ein solches Produkt zu reparieren oder
auszutauschen, unterliegt der Bedingungen, dass das Produkt zusammen mit einem für Celestron zufriedenstellenden
Kaufbeleg an Celestron zurückgesendet wird.
B. Die korrekte Rücksende-Autorisationsnummer muss zuvor von Celestron angefordert werden. Rufen Sie Celestron unter
(310) 328-9560 an, um die Nummer, die auf der Außenseite Ihres Versandcontainers aufgebracht ist, zu erhalten.
Alle Rücksendungen müssen eine schriftliche Erklärung enthalten, aus der der Name, die Adresse und die Telefonnummer
des Eigentümers, zu der er tagsüber erreichbar ist, zusammen mit einer kurzen Beschreibung aller beanstandeten Defekte,
hervorgeht. Ausgetauschte Teile oder Produkte werden Eigentum von Celestron.
Der Kunde ist für alle Kosten für Versand und Versicherung zu und vom Celestron-Werk verantwortlich und muss diese
Kosten im Voraus begleichen.
Celestron muss vernünftige Maßnahmen ergreifen, um jede Teleskopmontierung unter dieser Garantie innerhalb von 30
Tagen nach Erhalt zu reparieren oder auszutauschen. Für den Fall, dass Reparatur oder Austausch mehr als dreißig Tage
in Anspruch nimmt, muss Celestron den Kunden entsprechen in Kenntnis setzen. Celestron behält sich das Recht vor, ein
Produkt, das aus der Produktlinie ausgeschieden ist, durch ein neues oder in Wert und Funktion vergleichbares Produkt zu
ersetzen.
Diese Garantie erlischt und wird außer Kraft gesetzt, für den Fall, dass ein Produkt unter der Garantie in Design oder Funktion
modifiziert wurde oder Missbrauch, unsachgemäße Handhabung oder unautorisierter Reparatur unterzogen wurde. Des
Weiteren sind Produktfehlfunktionen oder Wertminderung aufgrund von normalem Verschleiß von dieser Garantie nicht
abgedeckt.
CELESTRON LEHNT JEGLICHE GEWÄHRLEISTUNG, OB AUSDRÜCKLICH ODER STILLSCHWEIGEND, OB DER MARKTGÄNGIGKEIT ODER DER EIGNUNG
FÜR EINEN BESTIMMTEN ZWECK, AUSSER DEM HIERIN GENANNTEN, AB. DIE ALLEINIGE VERPFLICHTUNG VON CELESTRON UNTER DIESER
EINGESCHRÄNKTEN GARANTIE BESTEHT DARIN, DAS DURCH DIE GARANTIE ABGEDECKTE PRODUKT IN ÜBEREINSTIMMUNG MIT DEN HIERIN
FESTGEHALTENEN BEDINGUNGEN ZU REPARIEREN ODER AUSZUTAUSCHEN. CELESTRON LEHNT AUSDRÜCKLICH JEGLICHE HAFTUNG FÜR ENTGANGENE
PROFITE, ALLGEMEINE, SPEZIELLE, INDIREKTE ODER FOLGESCHÄDEN AB, DIE SICH AUS EINER GARANTIEVERLETZUNG ERGEBEN KÖNNTEN ODER
DIE DURCH NUTZUNG BZW. UNFÄHIGKEIT ZUR NUTZUNG JEGLICHEN CELESTRON-PRODUKTS ERGEBEN. JEGLICHE STILLSCHWEIGENDE ODER NICHT
BEANSPRUCHBARE GEWÄHRLEISTUNGEN IST ZEITLICH AUF ZWEI JAHRE AB DATUM DES URSPRÜNGLICHEN KAUFS BESCHRÄNKT.
Einige Staaten erlauben keinen Ausschluss oder keine Beschränkung von zufälligen oder Folgeschäden sowie keine zeitliche
Begrenzung einer stillschweigenden Garantie; daher könnten die oben genannten Beschränkungen und Ausschlüsse auf Sie
nicht zutreffen.
Diese Garantie gibt Ihnen bestimmte Rechte und darüber hinaus könnten Sie auch weitere Rechte haben, die von Land zu
Land variieren.
Celestron behält sich das Recht vor, jegliches Modell und jeglichen Teleskoptyp zu modifizieren oder aus der Produktlinie
auszuschließen, ohne Ihnen dies vorher anzukündigen.
Wenn ein Garantiefall eintritt oder wenn Sie Hilfestellung bei der Verwendung Ihrer Teleskopmontierung benötigen, wenden
Sie sich bitte an: Celestron, Kundendienstabteilung, Tel. (310) 328-9560Tel. (310) 328-95
03-15
Printed in China
FCC-ERKLÄRUNG: Dieses Gerät wurde getestet und entspricht den Grenzwerten für digitale Geräte der Klasse B in Übereinstim-
mung mit Artikel 15 der FCC-Bestimmungen. Diese Grenzwerte bieten einen angemessenen Schutz vor Störungen in Wohnanlagen.
Dieses Gerät erzeugt, verwendet und strahlt Hochfrequenzenergie aus und kann den Funkverkehr stören, wenn es nicht gemäß den An-
weisungen installiert und verwendet wird. Es kann jedoch nicht garantiert werden, dass in einer bestimmten Einrichtung keine Störungen
auftreten. Falls dieses Gerät Störungen des Radio- oder Fernsehempfangs verursacht, was durch ein vorübergehendes Ausschalten
des Geräts festgestellt werden kann, wird der Benutzer dazu angehalten, die Störung durch eine oder mehrere der nachstehenden
Maßnahmen zu beheben:
• Neuausrichtung oder Positionsveränderung der Empfangsantenne.
• Den Abstand zwischen dem Gerät und dem Empfänger vergrößern.
• Anschluss des Geräts an eine Steckdose, die nicht am selben Stromkreis angeschlossen ist, wie die des Empfängers.
• Den Händler oder einen erfahrenen Radio- und Fernsehtechniker um Hilfe bitten.
Produktdesign und technische Daten können ohne Vorankündigung geändert werden.
Dieses Produkt wurde für die Verwendung durch Personen von 14 Jahren und darüber entworfen und vorgesehen.
© 2015 Celestron • All rights reserved
celestron.com
2835 Columbia Street • Torrance, CA 90503 U.S.A.
Telephone: 800.421.9649
UCHFERNR
MANUAL DE INSTRUCCIONES
Modelos #22150, 22151, 22152
ESPAÑOL

26 | ESPAÑOL
1. Telescope Tube
2. Finderscope
3. Eyepiece
4. Erect Image Diagonal
5. Slow Motion Knobs
OMNI XLT AZ 102 OMNI XLT AZ 114 and OMNI XLT AZ 130
1. Finderscope
2. Telescope Tube
3. Slow Motion Knobs
4. Tripod
5. Focuser and Eyepiece
AVISO SOLAR
No mire nunca directamente al Sol con los ojos descubiertos o un telescopio, a menos que tenga un filtro solar adecuado. Puede producir daños oculares permanentes e
irreversibles.
No use nunca su telescopio para proyectar una imagen del Sol sobre ninguna superficie. La acumulación interna de calor puede dañar el telescopio y cualquier accesorio
que tenga instalado.
No use nunca un filtro solar de ocular ni una cuña Herschel. La acumulación interna de calor en el telescopio puede hacer que los dispositivos se agrieten o rompan,
permitiendo pasar la luz solar sin filtrar hasta el ojo.
No deje el telescopio sin supervisión, especialmente cuando estén presentes niños o adultos no familiarizados con los procedimientos operativos correctos del telescopio.
Recomendamos guardar la caja de su telescopio para poder usarla para guardarlo cuando no lo use. Desembale
cuidadosamente la caja, algunas piezas son pequeñas. Use la lista de piezas siguiente para comprobar que dispone
de todas las piezas y accesorios.
PARTS LIST
CONTENIDO DE LA CAJA:
6. Tripod
7. Omni XLT AZ Mount
8. Hex-key Wrench
(Inside Mount)
9. Accesory Tray
6. Omni XLT AZ Mount
7. Hex-key Wrench
(Inside Mount)
8. Accesory Tray
2
3
4
5
6
1
1
2
3
4
7
6
5
8
7
9
8

ESPAÑOL | 27
El trípode y el soporte del Omni XLT AZ se entregan
totalmente montados, por lo que la instalación es sencilla.
1. Saque el trípode y el soporte de la caja.
2. Afloje los tornillos manuales de la parte inferior de cada
pata y extienda la sección interna de la pata hasta la
longitud deseada. Apriete los tornillos para asegurar las
patas, con cuidado de no apretarlos en exceso.
3. Ponga el trípode de pie y separe las patas hasta que la
abrazadera central encaje en posición.
4. Coloque la bandeja de accesorios sobre el soporte
central y alinee los agujeros. Introduzca los tres tornillos
por la parte inferior del soporte de la pata y enrósquelos
en la bandeja.
5. Asegúrese de que los pernos de la bisagra de la pata
estén fijos apretando hacia abajo las roscas de la parte
superior de cada pata.
Según el uso que vaya a hacer del telescopio, puede querer
cambiar el ángulo del brazo del soporte para que le ofrezca
una mayor capacidad de movimiento. El soporte se incluye
preparado para uso astronómico; puede moverse hacia
arriba pero está limitado en su movimiento descendente.
Si usa el soporte para observación terrestre desde un
lugar elevado (cima de una montaña, balcón, etc.) y desea
apuntar el telescopio por debajo del horizonte, deberá
cambiar el ángulo del brazo del soporte para permitirlo.
Para realizar este ajuste:
1. Desenrosque la cubierta redonda la de parte inferior del
brazo vertical del soporte.
2. Con una llave hexagonal de 4mm (proporcionada por el
usuario), saque los tres tornillos bajo la cubierta.
3. Gire el brazo del soporte de forma que apunte
directamente hacia arriba y vuelva a enroscar los tres
tornillos.
4. Apriete los tornillos y vuelva a colocar la cubierta
redonda.
MONTAJE DEL TELESCOPIO
AJUSTE DEL ÁNGULO DEL BRAZO DEL SOPORTE
SOPORTE

28 | ESPAÑOL
MANDOS DE MOVIMIENTO LENTO
Para fijar los mandos de movimiento lento al soporte:
1. Encuentre la llave hexagonal incluida en la ranura de la
parte delantera del soporte.
2. Coloque el mando de control de movimiento lento
sobre el eje del engranaje en forma de D y presiónelo
hacia adentro para asegurarse de que esté totalmente
introducido.
3. Use la llave hexagonal para apretar los tornillos en el eje
del engranaje.
4. Vuelva a colocar la llave hexagonal en su posición de
guardado en la parte anterior del soporte.
TUBO DEL TELESCOPIO
Para fijar el tubo del telescopio al trípode y el soporte:
1. Localice el tornillo de mariposa en el lateral del tubo del
telescopio.
2. Aguantando del tubo del telescopio al lado del soporte,
ponga el tornillo de mariposa en la abrazadera de la
parte superior del soporte.
3. Apriete el tornillo manual de la parte inferior de la
abrazadera para asegurar el telescopio en posición.
NOTA: Se muestra el refractor de 102mm, pero los telescopios newtonianos de 114mm y
130mm se fijan al soporte del mismo modo.
La diagonal estelar se fija a la parte posterior de un telescopio
refractor y contiene un pequeño prisma que refleja la luz
en un ángulo de 90º, proporcionando una posición de
visionado más cómoda. Como la diagonal estelar le ofrece
una imagen con orientación 100% correcta, puede usar
fácilmente el telescopio para observación terrestre diurna..
Para introducir la diagonal:
1. Saque las tapas de ambos extremos de la diagonal.
2. Afloje los tornillos de la parte posterior del enfoque y
saque la tapa pequeña.
3. Introduzca el tubo más pequeño de la diagonal en la
parte posterior del enfoque y asegúrelo apretando los
tornillos.
Puede girar la diagonal a cualquier posición aflojando los
tornillos.
DIAGONAL ESTELAR (SOLO PARA EL REFRACTOR DE 102MM)

ESPAÑOL | 29
Su telescopio incluye un ocular Plössl de 25mm, que le
ofrece un campo de visión moderadamente amplio. Puede
obtener oculares adicionales para aumentar o reducir el
aumento al nivel deseado.
Para instalar un ocular en el refractor de 102mm
1. Afloje los tornillos del extremo abierto de la diagonal
estelar.
2. Introduzca el cañón cromado del ocular de 25 mm en la
diagonal estelar.
3. Apriete los tornillos para asegurar el ocular.
4. Para ver la imagen lo más definida posible, enfoque
mirando por el ocular y girando lentamente los mandos
de enfoque hasta mostrar la imagen lo más definida
posible.
Para instalar un ocular en los newtonianos de
114mm y 130mm:
1. Afloje los tornillos plateados del enfoque y saque la
pequeña tapa de plástico para polvo.
2. Introduzca el cañón plateado en la parte inferior del
ocular de 25mm, en el enfoque.
3. Apriete los tornillos para asegurar el ocular.
4. Para ver la imagen lo más definida posible, enfoque
mirando por el ocular y girando lentamente los mandos
de enfoque hasta mostrar la imagen lo más definida
posible.
Su telescopio incluye un localizador réflex de LED rojo que
se utiliza como herramienta de mira al apuntar el telescopio
a un objetivo.
Para instalar el localizador:
1. Deslice el soporte del localizador en la ranura del tubo
del telescopio, cerca del enfoque. La apertura grande
del localizador debe estar orientada a la parte anterior
del telescopio.
2. Asegure el soporte apretando el tornillo de la ranura.
EL OCULAR
LOCALIZADOR

30 | ESPAÑOL
MOVIMIENTO DEL TELESCOPIO
El soporte Omni AZ tiene fijaciones deslizantes en ambos ejes. Para realizar movimientos amplios con el telescopio,
aguante el tubo óptico y presiónelo en la dirección deseada. Para realizar ajustes precisos o seguir objetos celestes, gire
ambos mandos de movimiento lento.
ALINEAR EL LOCALIZADOR
El localizador réflex de LED rojo le ayuda a apuntar el telescopio mirando por la ventana redonda y cubriendo el objetivo
con el punto de mira rojo proyectado en la ventana.
La primera vez que monte el telescopio, deberá alinear el localizador con la óptica principal del telescopio. Aunque puede
realizar este paso de noche, es notablemente más sencillo de día. Cuando haya finalizado la alineación del localizador, no
deberá repetir este paso a menos que se golpee o caiga el localizador.
1. Saque su telescopio al exterior durante el día. Con el ojo desnudo, localice un objeto fácilmente reconocible, como una
farola, una matrícula de coche o un árbol alto. El objeto debe estar lo más lejos posible, al menos a 400 m.
2. Saque la cubierta contra el polvo principal del telescopio y asegúrese de que el ocular de 25mm esté instalado.
3. Mueva el telescopio a izquierda y derecha o arriba y debajo de forma que apunte aproximadamente al objeto elegido en
el paso 1.
4. Mire por el ocular del telescopio y muévalo manualmente hasta que el objeto elegido quede en el centro del campo de
visión. Si la imagen está borrosa, gire suavemente los mandos de enfoque hasta que quede enfocada.
NOTA: La imagen se verá boca abajo en el ocular del telescopio. Es normal en un telescopio astronómico.
5. Cuando el objeto esté centrado en el ocular de 25 mm, active el localizador girando el mando de encendido/brillo de la
parte inferior de la unidad al máximo.
6. Con la cabeza a aproximadamente 30cm tras el localizador, mire por la ventana redonda del localizador y localice la
retícula roja. Probablemente esté cercana, pero no encima, del objeto que observe por el ocular de 25mm.
7. Sin mover el telescopio, use los dos mandos de ajuste del lateral y bajo el localizador. Uno controla el movimiento a
izquierda-derecha de la retícula, y el otro controla el movimiento arriba-abajo. Ajuste ambos hasta que la retícula roja
aparezca sobre el mismo objeto que esté observando con el ocular de 25 mm.
Ahora elija otro objetivo distante para practicar el apuntado con el telescopio. Mire por la ventana del localizador réflex de
LED rojo y coloque el punto rojo en el objetivo que esté intentando ver, y compruebe que esté en el ocular de 25mm del
telescopio.
Con el localizador alineado, el telescopio está totalmente montado y está a punto para observar.
NOTA: Asegúrese de apagar el localizador réflex de LED rojo cuando no esté en uso para conservar batería.

ESPAÑOL | 31
PRIMERA SESIÓN DE OBSERVACIÓN ASTRONÓMICA
LA LUNA
Ahora está a punto para sacar su telescopio de noche y realizar observaciones reales.
Comencemos con la Luna. La Luna tarda aproximadamente un mes en realizar un ciclo de fases completo, de Luna nueva a
Luna llena y vuelta a empezar. Pruebe a observarla en distintos momentos de este ciclo.
Aunque puede observar la Luna siempre que esté visible en el firmamento nocturno, el mejor momento para observarla es a
partir de dos días después de Luna nueva hasta algunos días antes de Luna llena. Durante este periodo podrá ver el máximo
detalle de los cráteres y riscos lunares. Consulte un calendario para saber cuándo será la siguiente Luna nueva.
1. Con una vista clara de la Luna, instale el telescopio con el ocular de 25 mm.
2. Encienda el localizador y mire por él para localizar la retícula roja.
3. Mueva el telescopio hasta que pueda ver la Luna por la ventana del localizador y la retícula esté centrada en la Luna.
4. Mire por el ocular de 25 mm. Gire suavemente los mandos de enfoque para ajustar la definición de la imagen.
FELICIDADES. HA OBSERVADO SU PRIMER OBJETO CELESTE.
Puede observar muchos otros objetos celestes, como planetas, clústeres estelares y nebulosas usando esta misma técnica
elemental.
Para más recomendaciones sobre observación astronómica, visite: ExploreTheSky.com
Encontrará recomendaciones exhaustivas para ayudarle a obtener el máximo de su nuevo telescopio, incluyendo:
• Observación de planetas
• Localización y observación de estrellas, estrellas binarias y clústeres estelares
• Observación de objetos del espacio profundo como nebulosas y galaxias
• Elección de una buena ubicación para la observación astronómica
• Estimación de condiciones del firmamento

32 | ESPAÑOL
GARANZIA LIMITATA DI DUE ANNI CELESTRON
A. Celestron garantisce che il cannocchiale è privo di difetti nei materiali e nella fabbricazione per due anni. Celestron si
riserva di riparare o sostituire prodotti o parti di prodotti che, dopo un’ispezione da parte di Celestron, risultino essere
difettosi nei materiali o nella fabbricazione. Come condizione per l’obbligo di Celestron di riparare o sostituire il prodotto, il
prodotto deve essere presentato a Celestron insieme a una prova d’acquisto valida.
B. Prima dell’invio del prodotto per la restituzione è necessario ottenere da Celestron un codice di autorizzazione alla
restituzione. Contattare Celestron al (310) 328-9560 per ricevere il codice da applicare all’esterno del pacco di invio.
Tutte le restituzioni devono essere accompagnate da una dichiarazione scritta indicante il nome, l’indirizzo e un numero
di telefono del proprietario, assieme a una breve descrizione di qualsiasi difetto reclamato. Le parti del prodotto per cui si
effettua la sostituzione devono diventare proprietà di Celestron.
I costi di trasporto e assicurazione alla e dalla fabbrica Celestron sono a carico dell’utente, che è tenuto a pagare in anticipo.
Celestron si impegna a riparare o sostituire ogni telescopio coperto da garanzia entro 30 giorni dalla ricezione. Se la
riparazione o la sostituzione dovessero richiedere più di 30 giorni, Celestron si impegnar a notificare il cliente di conseguenza.
Celestron si riserva il diritto di sostituire qualsiasi prodotto di cui sia stata sospesa la produzione con un nuovo prodotto di
valore e con funzioni similari.
La presenta garanzia è resa nulla o priva d’effetto nel caso in cui il prodotto venga alterato nel design o nelle funzioni, o sia
soggetto ad abusi, usi impropri o riparazioni non autorizzate. Inoltre, il malfunzionamento o il deterioramento del prodotto
dovuti alla normale usura del prodotto non sono coperti dalla garanzia.
CELESTRON DECLINA QUALSIASI GARANZIA, ESPRESSA O IMPLICITA, SIA DI COMMERCIABILITÀ SIA DI ADEGUATEZZA PER UNA DETERMINATA FINALITÀ,
ECCETTO NEI CASI ESPRESSAMENTE QUI INDICATI. IL SOLO OBBLIGO DI CELESTRON RELATIVO A QUESTA GARANZIA LIMITATA È QUELLO DI RIPARARE
O SOSTITUIRE IL PRODOTTO COPERTO DALLA GARANZIA SECONDO I TERMINI QUI INDICATI. CELESTRON DECLINA QUALSIASI GARANZIA PER PERDITE
DI PROFITTI O DANNI GENERALI, SPECIALI, INDIRETTI O CONSEGUENTI DERIVATI DALLA VIOLAZIONE DELLA GARANZIA, O DALL’USO O L’INCAPACITÀ DI
UTILIZZO DI QUALSIVOGLIA PRODOTTO CELESTRON. LE GARANZIE IMPLICITE E CHE NON POSSONO ESSERE DECLINATE SONO LIMITATE NELLA DURATA
A UN TERMINE DI DUE ANNI DALLA DATA D’ACQUISTO.
Alcuni Stati non consentono l’esclusione o la limitazione di danni accidentali o conseguenti, o limitazioni sulla durata di
una garanzia implicita, per cui le limitazioni ed esclusioni sopra indicate potrebbero non essere applicabili.
La presente garanzia dà all’utente specifici diritti legali, oltre ad altri diritti che possono variare da Stato a Stato.
Celestron si riserva il diritto di modificare o sospendere la produzione, senza previa notifica, di qualsivoglia modello o stile di
telescopio.
Nel caso in cui sorgano problemi di garanzia, o se si necessita di assistenza per l’uso del telescopio, contattare:
Celestron, Centro di assistenza clienti, Tel. (310) 328-9560 Dal lunedì al venerdì, dalle 8:00 alle 16:00 (fuso orario
convenzionale del Pacifico)
NOTA: La presente garanzia è valida per i clienti di Stati Uniti e Canada che hanno acquistato il proprio binocolo da un rivenditore Celestron autorizzato negli
Stati Uniti o in Canada. La garanzia al di fuori degli Stati Uniti e il Canada è valida solo per i clienti che hanno acquistato da un distributore Celestron
internazionale o un distributore Celestron autorizzato nel specifico Paese. Per l’assistenza in garanzia contattare il rivenditore.
03-15
Printed in China
NOTA FCC: Este equipo ha sido probado y cumple con los límites de un dispositivo digital de Clase B, según el apartado 15 de las nor-
mas FCC. Estos límites están diseñados para proporcionar una protección razonable contra interferencias dañinas en una instalación
doméstica. Este equipo genera, usa e irradia energía de radiofrecuencia y, si no se instala y utiliza de acuerdo con las instrucciones,
puede provocar interferencias dañinas en comunicaciones por radio. Sin embargo, no se garantiza que no existan interferencias en
una instalación en particular. Si este equipo causa interferencias dañinas en la recepción de radio o televisión, lo que puede determi-
narse apagando y encendiendo el equipo, se recomienda al usuario intentar corregir las interferencias con una o varias de las medidas
siguientes:
• Reorientar o recolocar la antena receptora.
• Aumentar la separación entre el equipo y el receptor.
• Conectar el equipo a una toma de un circuito distinto al que esté conectado el receptor.
• Consultar al vendedor o aun técnico experimentado de radio/TV para obtener ayuda.
El diseño y las especificaciones del producto están sujetos a cambios sin notificación previa.
Este producto ha sido diseñado y está pensado para ser usado por personas de 14 años o más de edad.
© 2015 Celestron • All rights reserved
celestron.com
2835 Columbia Street • Torrance, CA 90503 U.S.A.
Telephone: 800.421.9649

MANUALE DI ISTRUZIONI
Modelli 22150, 22151, 22152
ITALIANO

34 | ITALIANO
1. Tubo del telescopio
2. Mirino
3. Oculare
4. Diagonale raddrizzatore
d’immagine
5. Manopole movimento lento
OMNI XLT AZ 102 OMNI XLT AZ 114 and OMNI XLT AZ 130
1. Mirino
2. Tubo del telescopio
3. Manopole movimento lento
4. Treppiede
5. Focheggiatore e oculare
AVVERTENZA SOLARE
Mai guardare direttamente il Sole a occhio nudo o con un telescopio, a meno che non si disponga di un filtro solare adeguato. Ciò potrebbe causare danni irreversibili agli
occhi.
Mai utilizzare il telescopio per proiettare un’immagine del Sole su una qualsiasi superficie. L’accumulo interno di calore può danneggiare il telescopio e i relativi accessori
ad esso fissati.
Mai utilizzare un filtro solare per oculare o un prisma di Herschel. L’accumulo di calore all’interno del telescopio può causare l’incrinatura o la rottura di tali dispositivi,
lasciando che la luce solare non filtrata passi attraverso l’occhio.
Mai lasciare il telescopio incustodito, sia in presenza di bambini sia di adulti che potrebbero non avere familiarità con le corrette procedure di funzionamento del telescopio
Si consiglia di conservare la confezione del telescopio per riporre il telescopio quando non è in uso. Disimballare
con attenzione la confezione poiché alcuni componenti sono di piccole dimensioni. Utilizzare l’elenco dei componenti
fornito di seguito per verificare che siano presenti tutti i componenti e gli accessori.
ELENCO PARTI
CONTENUTO DELLA CONFEZIONE
6. Treppiede
7. Montatura Omni XLT AZ
8. Chiave esagonale (all’interno
della montatura)
9. Vassoio porta oggetti
6. Montatura Omni XLT AZ
7. Chiave esagonale
(all’interno della
montatura)
8. Vassoio porta oggetti
2
3
4
5
6
1
1
2
3
4
7
6
5
8
7
8
9

ITALIANO | 35
La montatura e il treppiede Omni XLT AZ sono forniti
completamente assemblati, quindi la preparazione è
semplificata.
1. Estrarre il treppiede e la montatura dalla confezione.
2. Allentare le manopole sulla parte inferiore di ciascuna
gamba ed estendere la sezione interna alla lunghezza
desiderata. Serrare le manopole per fissare le gambe,
prestando attenzione a non serrare eccessivamente.
3. Mettere il treppiede in posizione verticale e tirare le
gambe dello stesso verso l’esterno fino a quando il
supporto centrale non scatta in posizione.
4. Sistemare il vassoio porta accessori sul supporto
centrale e allineare i fori. Inserire le tre viti zigrinate nella
parte inferiore del supporto per le gambe e avvitarle al
vassoio.
5. Assicurarsi che i bulloni delle cerniere delle gambe
siano bloccati facendoli aderire nella parte superiore di
ciascuna gamba.
A secondo del tipo di utilizzo del telescopio, è possibile
modificare l’angolazione del braccio della montatura per
ottenere maggiore spazio di manovra. Il telescopio viene
fornito pronto per l’uso astronomico; può essere spostato
verso l’alto mentre il movimento verso il basso è limitato.
Se si utilizza il telescopio per l’osservazione terrestre
da posizione elevata (cima di una collina, balcone, ecc.)
e si desidera puntare il telescopio al di sotto della linea
dell’orizzonte, è necessario modificare l’angolazione del
braccio della montatura.
Per operare la regolazione procedere come segue.
1. Svitare il coperchio rotondo sulla parte inferiore del
braccio verticale della montatura.
2. Utilizzando una chiave esagonale da 4 mm (non fornita),
rimuovere le tre viti sotto il coperchio.
3. Ruotare il braccio in modo da puntare verso l’alto e
avvitare nuovamente le tre viti.
4. Serrare le viti e posizionare nuovamente in sede il
coperchio rotondo.
MONTAGGIO DEL TELESCOPIO
REGOLAZIONE DELL’ANGOLAZIONE DEL BRACCIO DELLA MONTATURA
MONTATURA

36 | ITALIANO
MANOPOLE MOVIMENTO LENTO
Per fissare le manopole per movimento lento alla montatura
procedere come segue.
1. Localizzare la chiave esagonale in dotazione nascosta
all’interno della fessura nella parte anteriore della
montatura.
2. Sistemare la manopola di comando del movimento lento
sull’albero a D e spingere verso l’interno per assicurarsi
che sia completamente in sede.
3. Utilizzare la chiave esagonale per serrare le viti all’albero.
4. Riporre la chiave esagonale nella sua posizione di
stoccaggio nella parte anteriore della montatura.
TUBO DEL TELESCOPIO
Per fissare il tubo al treppiede e alla montatura procedere
come segue.
1. Localizzare la barra a coda di rondine sul lato del tubo
del telescopio.
2. Tenendo il tubo vicino alla montatura, fa scorrere la
barra a coda di rondine nel morsetto sulla sommità della
montatura.
3. Serrare la manopola in fondo al morsetto per fissare il
telescopio in posizione.
NOTA: Tè mostrato il refrattore da 102 mm, ma i telescopi newtoniani da 114 mm e 130 mm si
fissano alla montatura nello stesso modo
Il diagonale si fissa sul retro del telescopio e contiene
un piccolo prisma che riflette la luce a un angolo di 90°,
consentendo una posizione di osservazione più comoda.
Poiché il diagonale fornisce un immagine orientata
correttamente, è possibile utilizzare facilmente il telescopio
per l’osservazione terrestre.
To insert the diagonal:
1. Rimuovere i coperchi da entrambi i lati del diagonale.
2. Allentare le viti sul retro del focheggiatore ed estrarre il
piccolo coperchio antipolvere.
3. Inserire il tubo più piccolo del diagonale sul retro del
focheggiatore e fissarlo serrando le viti.
È possibile ruotare il diagonale in qualsiasi posizione
allentando le viti.
DIAGONALE PER STELLE (SOLO PER REFRATTORE DA 102 MM)

ITALIANO | 37
Il telescopio è dotato di un oculare Plössl da 25 mm
che fornisce un campo visivo moderatamente ampio. È
possibile acquistare altri oculari per aumentare o diminuire
l’ingrandimento al livello desiderato.
Per installare l’oculare sul rifrattore da 102 mm
procedere come segue.
1. Allentare le viti sull’estremità aperta del diagonale.
2. Inserire il barilotto color argento dell’oculare da 25 mm
nel diagonale.
3. Serrare le viti per fissare l’oculare.
4. Per vedere l’immagine il più nitido possibile, mettere
a fuoco guardando attraverso l’oculare e ruotando
lentamente le manopole di messa a fuoco fino a quando
l’immagine non è completamente nitida.
Per installare l’oculare sui telescopi newtoniani da
114 mm e 130 mm procedere come segue.
1. Allentare le viti argentate sul focheggiatore ed estrarre il
piccolo coperchio antipolvere in plastica.
2. Inserire il barilotto color argento sulla base dell’oculare
da 25 mm nel focheggiatore.
3. Serrare le viti per fissare l’oculare.
4. Per vedere l’immagine il più nitido possibile, mettere
a fuoco guardando attraverso l’oculare e ruotando
lentamente le manopole di messa a fuoco fino a quando
l’immagine non è completamente nitida.
Il telescopio è dotato di un mirino reflex con LED rosso
che viene impiegato per puntare il telescopio verso un
determinato oggetto.
To install the finderscope:
1. Far scorrere la staffa del mirino nella scanalatura a coda
di rondine sul tubo del telescopio vicino al focheggiatore.
L’ampia finestrella del mirino dovrebbe essere rivolta
verso la parte anteriore del telescopio.
2. Fissare la staffa serrando la vite sulla scanalatura a coda
di rondine.
L’OCULARE
IL MIRINO

38 | ITALIANO
SPOSTAMENTO DEL TELESCOPIO
La montatura Omni AZ è dotata di innesti di sicurezza su entrambi gli assi. Per effettuare ampi movimenti con il telescopio,
è sufficiente tenere il tubo del telescopio e spingerlo nella direzione desiderata. Per regolazioni più precise o per individuare
corpi celesti, ruotare entrambe le manopole di movimento lento.
ALLINEAMENTO DEL MIRINO
Il mirino reflex con LED rosso aiuta a puntare il telescopio guardando attraverso la finestrella in vetro rotonda e coprendo
l’oggetto da visualizzare con la croce rossa proiettata nella finestrella.
La prima volta che si monta il telescopio è necessario allineare il mirino con le ottiche principali del telescopio. Anche se
questo passaggio può essere effettuato di notte, è molto più semplice compierlo durante il giorno. Una volta completato
l’allineamento del telescopio, non è necessario ripetere questo passaggio salvo che il telescopio riceva un colpo o cada.
Per allineare il mirino reflex con LED rosso procedere come segue.
1. Portare fuori il telescopio durante il giorno. A occhio nudo, identificare un oggetto riconoscibile, come un lampione, una
targa o un albero alto. L’oggetto deve trovarsi il più lontano possibile, ma almeno a 400 metri.
2. Rimuovere dal telescopio il coperchio antipolvere e assicurarsi che l’oculare da 25 mm sia installato.
3. Spostare il telescopio a destra e a sinistra, oppure su e giù, in modo che punti all’incirca verso l’oggetto scelto in
precedenza.
4. Guardare attraverso l’oculare del telescopio e muovere manualmente il telescopio fino a quando l’oggetto non si trova al
centro. Se l’immagine è sfuocata, ruotare le manopole di messa a fuoco fino a raggiungere una buona messa a fuoco.
NOTA: l’immagine nell’oculare del telescopio appare capovolta. Ciò è perfettamente normale in un telescopio astronomico.
5. Una volta centrato l’oggetto nell’oculare da 25 mm, accendere il telescopio ruotando completamente la manopola
dell’interruttore di accensione/luminosità posto sulla parte inferiore dell’unità.
6. Con la testa circa 30 cm (1 piede) dietro il mirino, guardare attraverso la finestrella rotonda e trovare il reticolo rosso.
Sarà probabilmente vicino, non al di sopra dell’oggetto visto attraverso l’oculare da 25 mm.
7. Senza muovere il telescopio, utilizzare le due manopole di regolazione sul lato e sotto il telescopio. Una controlla il
movimento sinistra-destra del reticolo rosso, mentre l’altra controlla il movimento su-giù. Regolare entrambe fino a quando
il reticolo appare sopra l’oggetto che si sta osservando attraverso l’oculare da 25 mm.
Ora scegliere altri oggetti lontani per fare pratica nel puntare il telescopio. Guardare attraverso la finestrella del mirino reflex
con LED rosso e puntare il puntino rosso sull’oggetto che si vuole visualizzare, verificando che sia all’interno dell’oculare da
25 mm del telescopio.
Dopo l’allineamento, il telescopio è montato e tutto è pronto per l’osservazione.
NOTA: assicurarsi di spegnere il mirino reflex con LED rosso quando non in uso per risparmiare batteria.

ITALIANO | 39
PRIMA SESSIONE DI OSSERVAZIONE ASTRONOMICA
LA LUNA
Ora è tutto pronto per utilizzare il telescopio di notte e iniziare l’osservazione.
Iniziamo con la Luna. La Luna impiega circa un mese per completare un ciclo completo, dalla Luna nuova alla Luna piena e
così via. Provare ad osservarla nelle diverse fasi.
Sebbene la Luna sia sempre visibile di notte, il momento migliore per osservarla è a partire dai due giorni successivi alla Luna
nuova fino a qualche giorno prima della Luna piena. Durante questo periodo sono visibili numerosi dettagli come i crateri e le
montagne lunari. Consultare un calendario per sapere la data della prossima Luna nuova.
1. Con una visione chiara della Luna, impostare il telescopio con l’oculare da 25 mm.
2. Accendere il mirino e osservare attraverso per trovare il reticolo rosso.
3. Muovere il telescopio fino a vedere la Luna attraverso la finestrella del mirino e centrare la Luna nel reticolo.
4. Osservare attraverso l’oculare da 25 mm. Ruotare delicatamente le manopole di messa a fuoco per regolare la nitidezza
dell’immagine.
CONGRATULAZIONI! AVETE OSSERVATO IL VOSTRO PRIMO CORPO CELESTE!
Utilizzando la stessa tecnica di base, è possibile osservare molti altri corpi celesti, come pianeti, ammassi stellari e nebulose.
Per ulteriori suggerimenti sull’osservazione astronomica, visitare: ExploreTheSky.com
Sono qui disponibili suggerimenti dettagliati su come ottenere il massimo dal nuovo telescopio, compreso:
• Come osservare i pianeti
• Come localizzare e osservare stelle, stelle doppie e ammassi stellari
• Come osservare oggetti del profondo cielo come nebulose e galassie
• Come scegliere una buona posizione per l’osservazione astronomica
• Come valutare le condizioni del cielo

40 | ITALIANO
GARANZIA LIMITATA DI DUE ANNI CELESTRON
A. Celestron garantisce che il cannocchiale è privo di difetti nei materiali e nella fabbricazione per due anni. Celestron si
riserva di riparare o sostituire prodotti o parti di prodotti che, dopo un’ispezione da parte di Celestron, risultino essere
difettosi nei materiali o nella fabbricazione. Come condizione per l’obbligo di Celestron di riparare o sostituire il prodotto, il
prodotto deve essere presentato a Celestron insieme a una prova d’acquisto valida.
B. Prima dell’invio del prodotto per la restituzione è necessario ottenere da Celestron un codice di autorizzazione alla
restituzione. Contattare Celestron al (310) 328-9560 per ricevere il codice da applicare all’esterno del pacco di invio.
Tutte le restituzioni devono essere accompagnate da una dichiarazione scritta indicante il nome, l’indirizzo e un numero
di telefono del proprietario, assieme a una breve descrizione di qualsiasi difetto reclamato. Le parti del prodotto per cui si
effettua la sostituzione devono diventare proprietà di Celestron.
I costi di trasporto e assicurazione alla e dalla fabbrica Celestron sono a carico dell’utente, che è tenuto a pagare in anticipo.
Celestron si impegna a riparare o sostituire ogni telescopio coperto da garanzia entro 30 giorni dalla ricezione. Se la
riparazione o la sostituzione dovessero richiedere più di 30 giorni, Celestron si impegnar a notificare il cliente di conseguenza.
Celestron si riserva il diritto di sostituire qualsiasi prodotto di cui sia stata sospesa la produzione con un nuovo prodotto di
valore e con funzioni similari.
La presenta garanzia è resa nulla o priva d’effetto nel caso in cui il prodotto venga alterato nel design o nelle funzioni, o sia
soggetto ad abusi, usi impropri o riparazioni non autorizzate. Inoltre, il malfunzionamento o il deterioramento del prodotto
dovuti alla normale usura del prodotto non sono coperti dalla garanzia.
CELESTRON DECLINA QUALSIASI GARANZIA, ESPRESSA O IMPLICITA, SIA DI COMMERCIABILITÀ SIA DI ADEGUATEZZA PER UNA DETERMINATA FINALITÀ,
ECCETTO NEI CASI ESPRESSAMENTE QUI INDICATI. IL SOLO OBBLIGO DI CELESTRON RELATIVO A QUESTA GARANZIA LIMITATA È QUELLO DI RIPARARE
O SOSTITUIRE IL PRODOTTO COPERTO DALLA GARANZIA SECONDO I TERMINI QUI INDICATI. CELESTRON DECLINA QUALSIASI GARANZIA PER PERDITE
DI PROFITTI O DANNI GENERALI, SPECIALI, INDIRETTI O CONSEGUENTI DERIVATI DALLA VIOLAZIONE DELLA GARANZIA, O DALL’USO O L’INCAPACITÀ DI
UTILIZZO DI QUALSIVOGLIA PRODOTTO CELESTRON. LE GARANZIE IMPLICITE E CHE NON POSSONO ESSERE DECLINATE SONO LIMITATE NELLA DURATA
A UN TERMINE DI DUE ANNI DALLA DATA D’ACQUISTO.
Alcuni Stati non consentono l’esclusione o la limitazione di danni accidentali o conseguenti, o limitazioni sulla durata di una
garanzia implicita, per cui le limitazioni ed esclusioni sopra indicate potrebbero non essere applicabili.
La presente garanzia dà all’utente specifici diritti legali, oltre ad altri diritti che possono variare da Stato a Stato.
Celestron si riserva il diritto di modificare o sospendere la produzione, senza previa notifica, di qualsivoglia modello o stile di
telescopio.
Nel caso in cui sorgano problemi di garanzia, o se si necessita di assistenza per l’uso del telescopio, contattare:
NOTA: La presente garanzia è valida per i clienti di Stati Uniti e Canada che hanno acquistato il proprio binocolo da un rivenditore Celestron autorizzato negli Stati Uniti
o in Canada. La garanzia al di fuori degli Stati Uniti e il Canada è valida solo per i clienti che hanno acquistato da un distributore Celestron internazionale o un
distributore Celestron autorizzato nel specifico Paese. Per l’assistenza in garanzia contattare il rivenditore.
03-15
Printed in China
NOTA FCC: La presente apparecchiatura è stata testata ed è risultata conforme ai limiti imposti per i dispositivi digitali di Classe B, ai
sensi della Parte 15 delle Norme FCC. Tali limiti sono stati ideati per fornire un’adeguata protezione nei confronti di interferenze dannose
in installazioni residenziali. La presente apparecchiatura genera, utilizza e può irradiare energia in radio frequenza e, se non installata e
utilizzata conformemente alle istruzioni, può causare interferenze dannose alle radiocomunicazioni. Tuttavia, non vi è alcuna garanzia che
l’interferenza non si verifichi in una particolare installazione. Nel caso in cui la presente apparecchiatura causi interferenze dannose alla
ricezione radio o televisiva, il che potrebbe essere determinato dall’accensione e spegnimento dell’apparecchiatura, l’utente è incorag-
giato a tentare di correggere l’interferenza mediante una o più delle misure seguenti:
• Riorientare o riposizionare l’antenna di ricezione.
• Aumentare la distanza tra l’apparecchiatura e il ricevitore.
• Collegare l’apparecchiatura a una presa su un circuito diverso da quello a cui è collegato il ricevitore.
• Consultare il rivenditore o un tecnico specializzato per ricevere assistenza.
Il design del prodotto e le specifiche sono soggetti a modifiche senza previa notifica.
Questo prodotto è progettato per essere utilizzato da persone di età pari o superiore ai 14 anni.
© 2015 Celestron • All rights reserved
celestron.com
Celestron • 2835 Columbia Street • Torrance, CA 90503
Tel. (310) 328-9560