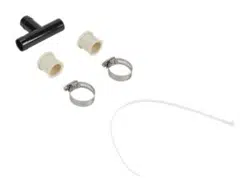
1
3. A. Rubber drain hose –
1a. Measure and cut drain hose to fit bottom port of
siphon break.
2a. Install drain hose, using clamp supplied, to
bottom port of siphon break. See Figure 1.
B. Plastic drain hose –
1b. Measure and cut drain hose to fit bottom port
of siphon break.
2b.Install drain hose sleeve in plastic drain hose.
See Figure 2.
3b. Install plastic drain hose with sleeve installed,
using clamp supplied, to bottom port of siphon
break. See Figure 1.
4. Install remaining length of drain hose to side port of
siphon break with clamp supplied.
NOTE: If using plastic drain hose, install drain hose
sleeve in plastic drain hose. See Figure 2. Cut to fit
the particular drain installation.
Plastic drain hose
Figure 2
Drain hose sleeve
© Whirlpool Corporation 1997
(All Rights Reserved)
INSTALLATION INSTRUCTIONS
for Siphon Break Kit
wWARNING
Electrical Shock Hazard
Disconnect power before servicing.
Replace all panels before operating.
Failure to do so can result in death or electrical shock.
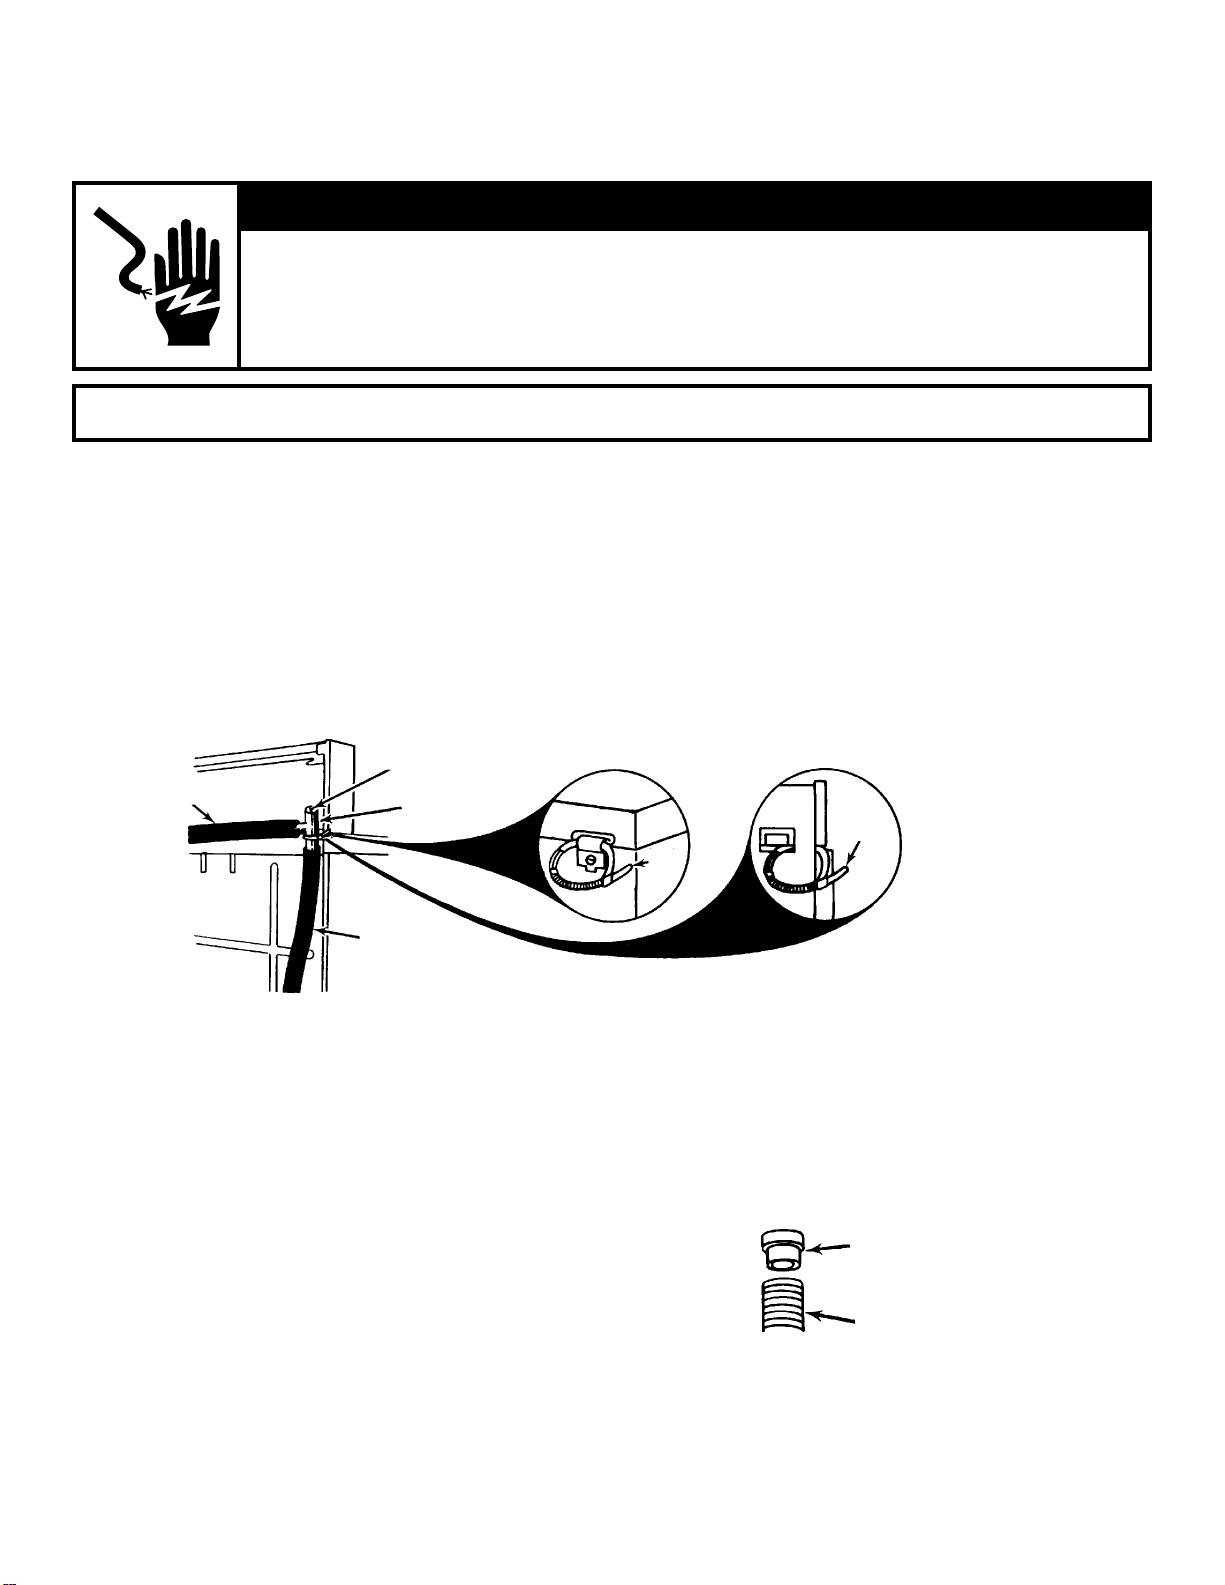
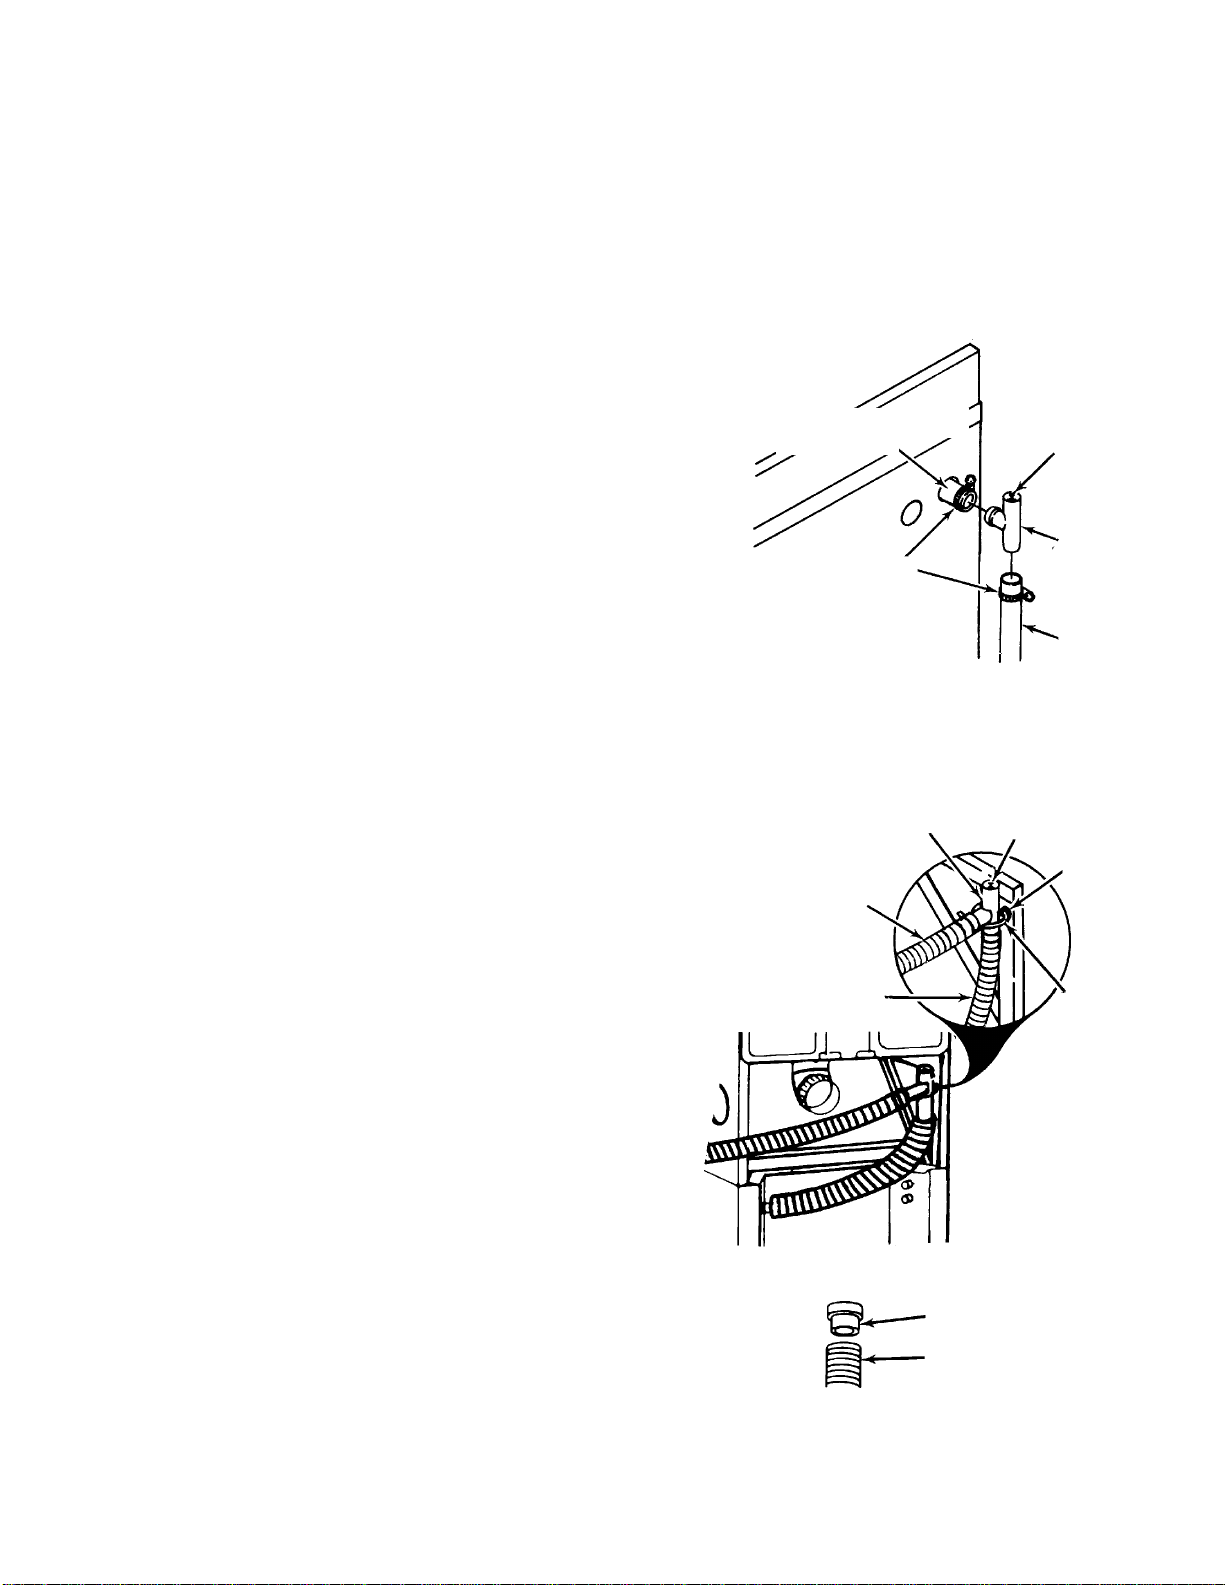
Drain hose to
drain
Air bleed vent
Siphon break
Drain hose from
bottom drain
connector
Top hinge
version
or Rear panel
version
Figure 1
Wire
tie
Wire
tie
Instruction Sheet 285319 Rev. B 8/97
(continued)
1
REFER TO FIGURES 1, 3, AND 4 TO IDENTIFY YOUR TYPE OF MACHINE.
Unplug washer or disconnect power.
For machines with bottom
drain hose connector:
INSTALLATION PROCEDURE
1. Install rubber or plastic drain hose to drain connector
at bottom of machine.
2. Install siphon break, using wire tie to hold siphon
break in place.
See Figure 1.
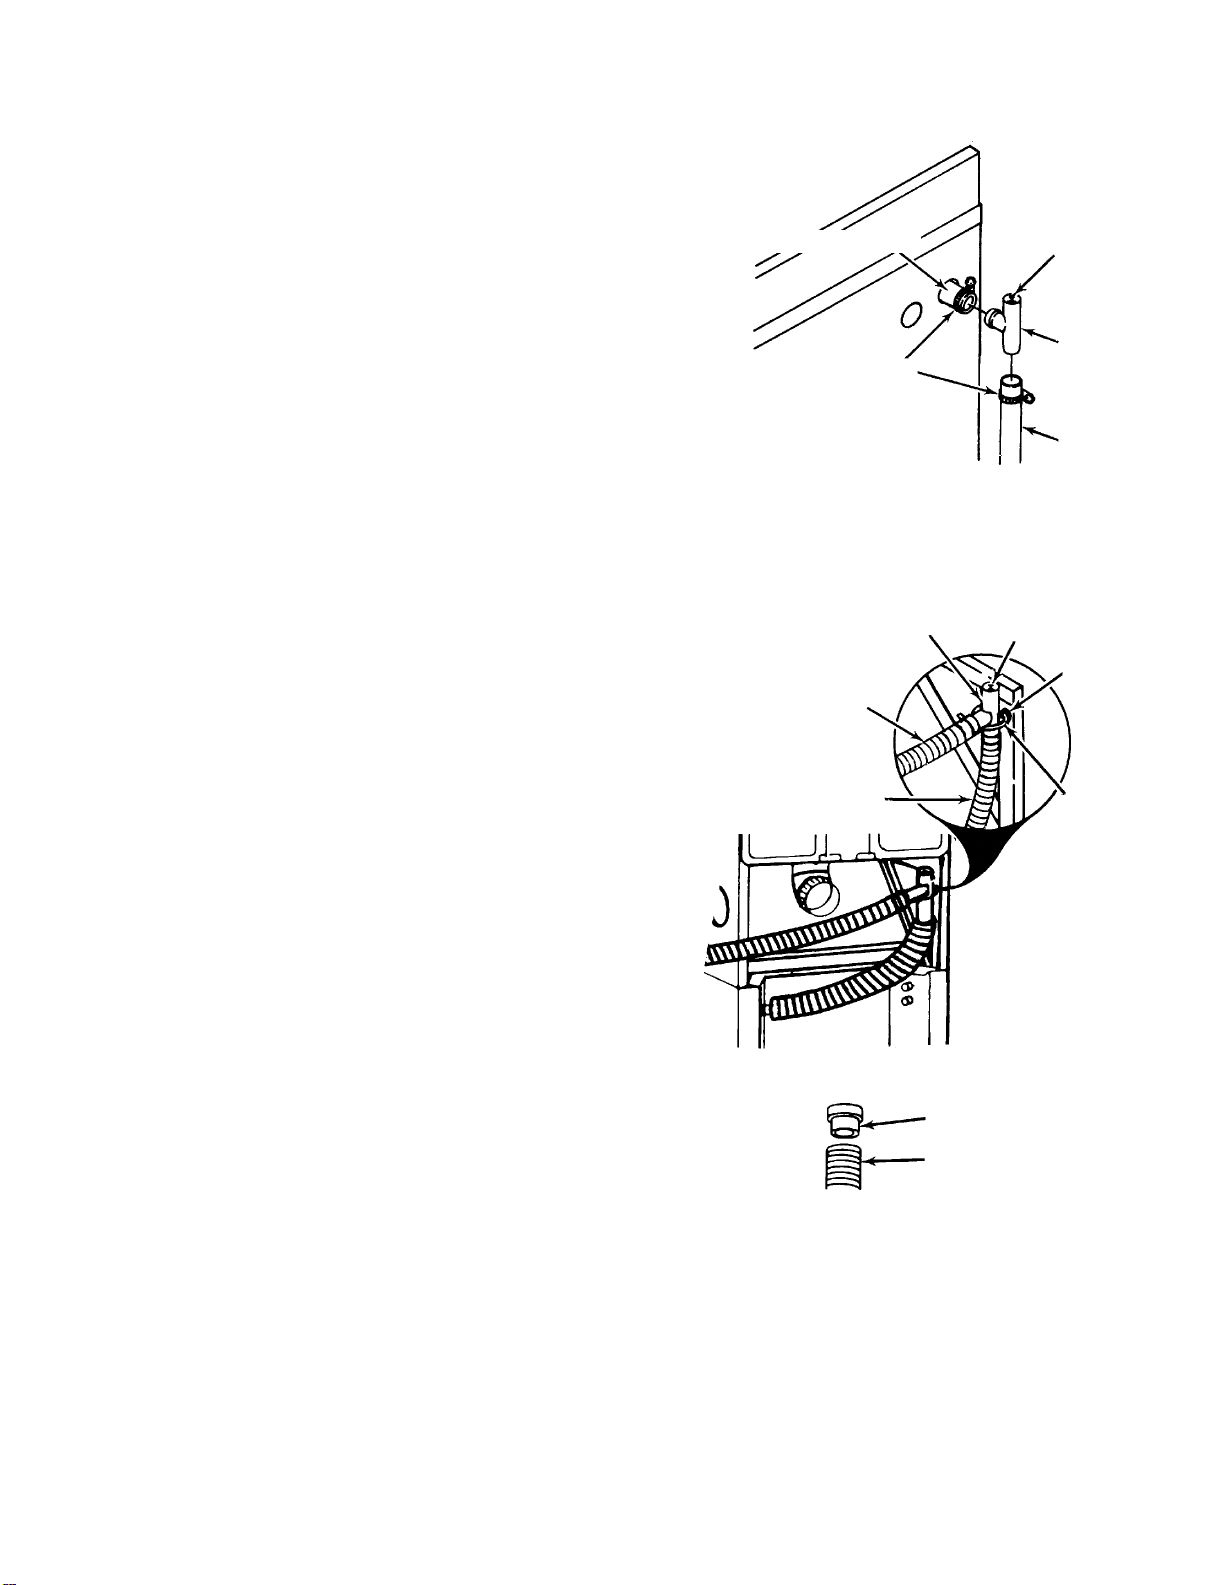
2
Drain hose
to drain
Drain hose to
bottom port
Siphon
break
Air bleed vent
Wire tie
Hole in
support
Figure 4
Drain hose sleeve
Plastic drain hose
Figure 3
285319-B
Figure 5
For machines with top drain hose
connector located in upper right:
INSTALLATION PROCEDURE
1. Remove hose connector from machine discharge hose.
2. Install siphon break to machine discharge hose, using
clamp supplied.
See Figure 3.
3. Install drain hose to siphon break as shown in Figure
3,
using clamp supplied. Cut to fit the particular drain
installation.
For machines with top drain hose
connector located in upper left:
INSTALLATION PROCEDURE
1. Install plastic drain hose to drain connector.
2. Install siphon break using wire tie. See Figure 4.
3. Measure and cut plastic drain hose to fit bottom port
of siphon break. See Figure 4.
4. Install drain hose sleeve in plastic drain hose. See
Figure 5.
5. Install plastic drain hose with sleeve installed, using
clamp supplied, to bottom port of siphon break.
See
Figure 4.
6. Install remaining length of plastic drain hose with
sleeve installed (see Figures 4 and 5) to side port of
siphon break, using clamp supplied. Cut to fit the
particular drain installation.
Clamp
Machine discharge hose
Siphon
break
Air
bleed
vent
Drain
hose

1
3. A. Tuyau d’évacuation en caoutchouc –
1a. Mesurer le tuyau d’évacuation et le couper à la
longueur voulue pour pouvoir le brancher sur
l’orifice inférieur de l’antisiphon.
2a. À l’aide du collier fourni, brancher le tuyau
d’évacuation sur l’orifice inférieur de l’antisiphon.
Voir la Figure 1.
B. Tuyau d’évacuation en plastique –
1b.Mesurer le tuyau d’évacuation et le couper à la
longueur voulue pour pouvoir le brancher sur
l’orifice inférieur de l’antisiphon.
2b.Poser le manchon dans le tuyau d’évacuation
en plastique. Voir la Figure 2.
3b.À l’aide du collier fourni, brancher le tuyau
d’évacuation en plastique sur lequel le manchon
a été posé sur l’orifice inférieur de l’antisiphon.
Voir la Figure 1.
Tuyau d’évacuation en
plastique
Figure 2
Manchon du tuyau
d’évacuation
© Whirlpool Corporation, 1997
(Tous droits réservés)
INSTRUCTIONS D’INSTALLATION
du nécessaire antisiphon
wAVERTISSEMENT
Risque de secousses électriques
Couper le courant avant toute intervention.
Reposer les panneaux avant la remise en service.
Ne pas respecter ces recommandations risque de causer la mort, voire des
secousses électriques.
Tuyau d’évacuation
vers l’égout
Purge d’air
Antisiphon
Avec le collier, attacher
le tuyau d’évacuation
venant du raccord
d’évacuation du fond
Version
à charnière
en haut
ou Version à
panneau
arrière
Figure 1
Collier
Collier
(suite)
Feuille d’instructions 285319 Rév. B 8/97
SE REPORTER AUX FIGURES 1, 3 ET 4 POUR IDENTIFIER LE TYPE DE LAVEUSE.
Débrancher la laveuse ou couper le courant.
Laveuses sur lesquelles le raccord
de tuyau d’évacuation se trouve
au fond :
INSTALLATION
1. Brancher le tuyau d’évacuation en caoutchouc ou en
plastique sur le raccord d’évacuation au fond de la
laveuse.
2. Poser l’antisiphon en se servant d’un collier pour le
faire tenir en place. Voir la Figure 1.
2
Tuyau
d’évacuation
vers l’égout
Tuyau
d’évacuation
vers l’orifice
inférieur
Antisiphon
Purge d’air
Collier
Trou dans
le support
Figure 4
Manchon du tuyau
d’évacuation
Tuyau d’évacuation
en plastique
Figure 3
285319-B
Figure 5
4. Avec le collier fourni, brancher la longueur restante du
tuyau d’évacuation sur l’orifice latéral de l’antisiphon.
NOTA : Si on utilise un tuyau d’évacuation en plas-
tique, poser le manchon dans le tuyau d’évacuation
en plastique. Voir la Figure 2. Le couper à la longueur
voulue pour qu’il s’adapte à l’installation d’évacuation.
Laveuses sur lesquelles le raccord
du tuyau d’évacuation supérieur se
trouve en haut, à droite :
INSTALLATION
1. Débrancher le raccord du tuyau de refoulement de la
laveuse.
2. À l’aide du collier fourni, brancher l’antisiphon sur le
tuyau de refoulement de la laveuse.
Voir la Figure 3.
3. À l’aide du collier fourni, brancher le tuyau
d’évacuation sur l’antisiphon, comme il est illustré à
la Figure
3. Le couper à la longueur voulue pour qu’il
s’adapte à l’installation d’évacuation.
Laveuses sur lesquelles le raccord
du tuyau d’évacuation supérieur se
trouve en haut, à gauche :
INSTALLATION
1. Brancher le tuyau d’évacuation en plastique sur le
raccord d’évacuation.
2. Poser l’antisiphon à l’aide du collier. Voir la Figure 4.
3. Mesurer le tuyau d’évacuation en plastique et le
couper à la longueur voulue pour pouvoir le brancher
sur l’orifice inférieur de l’antisiphon. Voir la Figure 4.
4. Poser le manchon dans le tuyau d’évacuation en
plastique. Voir la Figure 5.
5. À l’aide du collier fourni, brancher le tuyau
d’évacuation en plastique sur lequel le manchon a
été posé sur l’orifice inférieur de l’antisiphon. Voir la
Figure 4.
6. Brancher la longueur restante du tuyau d’évacuation
en plastique sur lequel le manchon a été posé (voir
les Figures 4 et 5) sur l’orifice latéral de l’antisiphon
avec le collier fourni. Le couper à la longueur voulue
pour qu’il s’adapte à l’installation d’évacuation.
Collier
Tuyau de refoulement
de la laveuse
Antisiphon
Purge d’air
Tuyau
d’évacuation
